wire design basics - jewelry making with beads ... -...
TRANSCRIPT

So You Want to Make Jewelry.Now What Do You Need to Know!
Wire Design Basics
© 2001 Gary Helwig & WigJIg (www.wigjig.com)
By Gary L. HelwigInventor of
WigJig Transparent Jigs

Foreword
I am taking the time to write this book because I have found that there really isn’t any single book or information resource that tells beginners to wire-working how to get started. I believe that the skills involved in making jewelry are actually simple to learn, but there just isn’t any single source that teaches all of the requisite skills. I have also found that the existing publications tend to be either project oriented, defining the steps to complete a project, but assuming that the reader already knows the skills necessary to complete the project; or skills oriented, discussing the skills necessary to make jewelry, but leaving it to the student to find jewelry projects. I have contributed projects to books that suffered from this situation and was unfulfilled. In this book, I will attempt to correct these prob-lems.
I have also found that several of the “beginner’s skills” taught in the existing literature are actually more difficult to perform than some of the “intermediate skills”. In fact, I believe that the skills presented in this book will allow the reader to begin making professional quality jewelry with just a few hours of practice.
Another reason for tackling this project is that I have been teaching beginners to make jew-elry in several courses offered at local craft shops. I have found in these classes that people need a combination of verbal instructions, demonstrations, and pictures that they can keep, in order to properly learn these skills. The words that I say in class and the demonstrations that I provide need to be reinforced with a hard copy document providing pictures of all the steps involved.
In summary, my goal in this book is to make as many people as possible into successful jewelry crafters. The skills involved are as simple as learning to ride a bike. Just like riding a bike, a student won’t be perfect in their first attempt. Furthermore, everyone will get better at these skills with practice. But, the bottom line is that if you can learn to ride a bike, you can learn to make professional quality jewelry.
I hope to see as many of you as possible selling jewelry using these designs.
Sincerely,Gary Helwig
© 2001 Gary Helwig & WigJIg (www.wigjig.com)

Wire Design Basics
© 2001 Gary Helwig & WigJig (www.wigjig.com)
Table of Contents PageForeward IIntroduction 1History of Jewelry 2Basic Tools 4Findings 8Where to Buy Supplies 9Wire Hardness and Hardening Wire 10How to Cut Wire with the Flush Cutter 12How to Straighten Wire 13How to Make a “P” Loop 14How to Make an Eye Loop 15Opening and Closing Loops 16Making a Bead Dangle 17Making a Figure 8 Connector 23Project 1 -- Making a Simple Earring 25How to Make a Diamond 26Project 2 -- How to Make a Complex Earring 30Making a Chain Using the Wrapped Bead Link 31Project 3 -- Make a Beaded Chain Bracelet 36How to Make a Spiral 38Project 4 -- Earrings with a Spiral 44

Wire Design Basicsby Gary Helwig
© 2001 Gary Helwig & WigJig (www.wigjig.com)
Organization:This document will be organized into sections starting with one or more pages teaching specific skills and followed by a project that uses those skills. The projects walk the reader through every step in making a piece of jewelry. When completed the reader should have several pairs of earrings, some bracelets or necklaces, and one set of matching earring, bracelet and necklace.
Introduction:The purpose of this document is to provide Wire Designers, both beginner and experienced, with the basic skills necessary to make wire projects including jewelry. Anyone who can master the skills discussed in this document will be fully capable of making professional quality jewelry by hand. The techniques taught herein involve manipulating wire by hand and with tools, but do not involve any soldering or heat treatment of the wire. The tech-niques taught emphasize using tools properly to be able to make consistent, repeatable wire designs and finished jewelry projects. This book attempts to teach skills and provides projects that use those skills.
A very small number of beginner’s techniques have been intentionally left out of this docu-ment because I have found that they are very difficult to perform in a consistent, repeatable manner, and, therefore, I never use them and recommend to others that they be avoided. Some additional skills have been left out as they may be too advanced to cover in a begin-ner’s book.
Wherever possible, I have used pictures rather than text. I have attempted to err on the side of too many pictures rather than too few.
Supplies & Tools:The following supplies and tools are used in this document: 18 gauge wire, 20 gauge wire, 24 gauge wire, several head pin find-ings, several beads, and the following tools:o flush cuttero round nose pliers or round-flat plierso chain nose pliers (2)o Nylon Jaw Plierso WigJig Olympus or similar jig.
I strongly recommend that the reader begin the projects shown in this book using inexpensive copper practice wire. After making three of the pieces shown in copper, the reader should then graduate to more expensive wire for making the final, finished piece.

The History of Jewelry:Before we begin teaching the concepts of making jewelry, let’s discuss some of the history of making jewelry so that we can put this approach to making jewelry into a historical context. The history of jewelry goes back at least 20,000 years and perhaps much farther. To quote from the Encyclopedia Britannica, the definition of jewelry is “objects designed for the adorn-ment of the body, usually made of gold, silver, or platinum, often with precious or semiprecious stones. Jewelry evolved from shells, animal teeth and other objects used as adornment in pre-historic times.” It is probably correct to state that the first jewelry was a simple leather strip, worn around the neck or wrist, and adorned with shells, teeth, pieces of bone and later, even pieces of stone. This simple jewelry style is still in vogue today, with shark’s teeth, bear claws, shells and other beads and adornments worn on the leather thong.
Archeologists have problems studying ancient jewelry. In every culture gold and silver are valuable. Quite often, ancient jewelry is cannibalized by later cultures for its gold and silver content. For this reason, archeologists often specialize in looking at shards of pottery, which tends to remain untouched through the ages. Jewelry is the first thing to be removed from an archeological site.
Metal objects were added to jewelry in early civilizations that pre-date the Egyptians (800 BC and earlier). Archeologists have found manufactured gold spirals, worn on leather strips in the remains of an ancient Iraqi civilization. The use of gold in jewelry was rather natural because gold does not easily react with other elements, and can be found in its relatively pure state as gold nuggets. These pieces of gold can be worked mechanically by hammering to form sheets of metal. In the ancient civilizations up to and including the Roman civilization (about 100 to 200 BC) hammered and flattened sheets of gold were cut into narrow strips and twisted into rounded shapes similar to wire. These rounded tubes were used to make jewelry similar to the wire jewelry we see today. In Roman times, these tubes of gold were filled with melted, liquid sulfur to add strength to the piece. A later enhancement to this early approach to making wire was to roll the tubes of gold between two wooden blocks to make solid “wire”. The character-istic of wire made with this ancient approach are the spiral markings on the sides of the wire which are the remains of the edge of the cut strip. The wire technique for making the wrapped bead link, that we demonstrate in later sections of this book, is seen in Etruscan jewelry that dates from about 700 BC using wire made with these rolling techniques.
Early jewelry was based upon natural materials. First shells, teeth and bone, then gold which was available naturally. With the advent of the Bronze Age, brass was added as a jewelry component. Silver was not a significant component of ancient jewelry until much later for two reasons. First, silver combines with other elements in nature, and is almost never found in its natural state. Silver must be extracted from silver ore through a refining process that did not exist in the early Bronze Age. The other reason that silver was not used very much in ancient jewelry is the fact that silver conducts heat so well that it is much more difficult to solder or work thermally than either gold or brass.
© 2001 Gary Helwig & WigJIg (www.wigjig.com)
Wire Design Basics

© 2001 Gary Helwig & WigJIg (www.wigjig.com)
Wire Design BasicsThe History of Jewelry (Continued):
I would like to emphasize that early jewelry was made using mechanical processes, like ham-mering, drilling, rolling, bending and cutting. Making jewelry using thermal based processes like casting and soldering was developed later during the Bronze Age.
The one significant advance that was necessary to make wire jewelry using the techniques discussed in this book was the discovery of the technique for making wire by drawing the wire through a narrow hole in a “draw plate”. Using this technique which seems to have been per-fected during Roman times, ancient jewelers were able to make solid wire, without the spiral marks, in a wide variety of gauges.
The Romans also worked extensively with Bronze Age thermal processing techniques for cast-ing and soldering. Their casting approach is similar to the wet sand, or wax replacement cast-ing techniques that are in common use today. In this approach, a mold is made of the object to be cast and this mold is used to make an impression in wet sand. The wax replacement tech-nique uses a wax mold surrounded by wet sand. In both cases, the molten, hot metal is poured into the cavity created in the wet sand, or onto the wax, which vaporizes and leaves behind the cavity in the sand.
The cast object may be cooled slowly through a process called “annealing”, to improve the malleability and ductility of the metal, making the finished piece easier to work mechanically. As another alternative, the cast object may be “tempered” by cooling it rapidly by quenching it in oil or water. Tempering metals makes them tougher and harder to bend.
The history of jewelry continued with the development of techniques for soldering metals. Sol-dering allows the permanent connection of two similar pieces of metal by melting a metal alloy with a lower melting point into the space between the two original pieces.
Modern jewelry, is made by a combination of the mechanical techniques of hammering, drill-ing, bending and polishing used by early civilizations combined with the thermal techniques of casting, soldering, annealing, and tempering that were developed following the Bronze Age.
This book will address only those jewelry techniques that do not require heat. Most modern jewelers rely extensively on soldering and other thermal techniques. I do not intend to dispar-age these techniques, they are very important. I have limited this book to techniques that do not require heat, for the simple reason that everyone can perform these techniques in total safety, and with very professional results. My belief is that jewelry doesn’t have to be difficult to make, in order to be beautiful. The ancient artisans proved this and I hope that the projects included in this book will also demonstrate that jewelry doesn’t have to be hard to make to be attractive.

Wire Design Basics
© 2001 Gary Helwig & WigJIg (www.wigjig.com)
Figure 1A & B Round Nose Pliers
Figure 2 A & B Chain Nose Pliers
Figure 3 A, B & C Flush Cutter
Round nose pliers are used for making loops of various diameters in wire.
Chain nose pliers are used for grasping wire without making marks and for bending wire. Please note that the jaws of these pliers are smooth and flat.
The flush cutter is used for cutting wire. One side is flat and the opposite side is beveled. The tapered tips allow cutting wire in the tight spaces often found in a wire jewelry component.
Flat Side Beveled Side
Basic Tools:The following tools are frequently used for working with wire and making jewelry. It is certainly not a complete list of all possible wire working tools, but focuses on those tools that each beginner should be familiar with. Many of these tools are optional. It is impor-tant to understand the function of each of these tools.

© 2001 Gary Helwig & WigJIg (www.wigjig.com)
Wire Design Basics
Figure 4 A & B Nylon Jaw Pliers
Nylon jaw pliers are used for grasp-ing wire without making marks. Also used for straightening wire. Many nylon jaw pliers have replace-able jaws.
Figure 6 Wire Bending Jig (WigJig Olympus)
A jig is used for making patterns in wire by placing pegs into a matrix of holes and wrapping the wire around the pegs. For this beginner’s book, the WigJig Olympus, Olympus Lite, or the Wild Wire Jig may be used to make the compo-nents shown. The hole patterns and spacing for these jigs are identical. I have also included patterns for the smaller WigJig Delphi and for the WigJig Cyclops with a round hole pattern. When placing pegs in a jig, please count the holes in the pictures shown, as many of these pictures are shown larger than actual scale for clarity and ease of viewing.
Basic Tools (Continued):
Figure 5 A & B Master Coiler Pliers
The Master Coiler is used for making loops with consistent diameters without marking the wire. Especially valuable when making several of the same piece.

© 2001 Gary Helwig & WigJIg (www.wigjig.com)
Figure 7 A & B Round-Flat Pliers
The Chasing Hammer is used with a jeweler’s anvil or bench block to harden the wire. The Chasing Hammer will slightly deform the shape of the wire that is hardened (as opposed to a nylon hammer which will not deform the wire). The rounded side of this chasing hammer may be used to dimple or pattern the wire.
Wire Design BasicsBasic Tools (Continued):
Round-Flat pliers are used to make loops in wire without marking the outside of the wire loop.
Figure 8 A & B Bur Cup
The Bur Cup is used for filing burs off the cut end of wire. Especially important with Ear Wires.
Figure 9 Chasing Hammer

© 2001 Gary Helwig & WigJIg (www.wigjig.com)
A Jeweler’s Anvil is used with a hammer to harden wire. This is especially important when making ear wires to ensure that the rounded shape of the portion of the wire that goes through the ear remains fixed and rounded.
Loop Closing Pliers are used to close loops includ-ing jump rings, and figure 8 connectors. They help to make sure that the loop is closed tightly. Please note the groove in the jaws of the pliers used to grasp the loop.
Wire Design Basics
Basic Tools (Continued):
Figure 10 Jeweler’s Anvil
Figure 11 Loop Closing Pliers

© 2001 Gary Helwig & WigJIg (www.wigjig.com)
Ear Wires come in many sizes and shapes. They are decorative components used to attach beads or jewels to the wearer’s ear.
Wire Design Basics
Findings:Findings are wire and cast metal components that are often pre-made by machines and not custom made by hand for each piece of jewelry. The findings shown below are commonly used. In many cases, pre-cast findings add a finishing touch to hand made jewelry. Some findings, like ear-wires, figure 8 connectors, jump rings, or eye pins, can be made by hand.
Figure 12 Head Pin Figure 13 Eye Pin
A head pin is often used to hang a bead or other orna-ment to a chain or ear wire. The head pin terminates that link. An eye pin is used to make a link or chain compo-nent.
Figure 14 Jump Ring Figure 15 Figure 8 Connector
Jump Rings are round wire components. They may be either open (with an open gap in the circle) or closed with the gap soldered permanently closed.
Figure 8 connectors are used to link two components like a bead dangle and an ear wire. They may be hand made, or pre-made by machine.
Figure 16 Ear Wires
Figure 17 A, B & C Three styles of clasp -- Filigree, round & Lobster Claw
Clasps come in a wide variety of sizes and shapes and are used to finish a bracelet or necklace by adding a detachable link, attaching one end of the piece to the other for wearing.

© 2001 Gary Helwig & WigJIg (www.wigjig.com)
Wire Design Basics
Where to Buy Supplies:There are essentially two different types of “stores” that sell wire working supplies. The first type is the brick and mortar store where they have a physical store that you can visit and buy off the shelf. The second is a mail-order, or Internet “store” where you shop by browsing a catalog, or viewing pictures of items over the Internet. In this second category of store, the products purchased must be shipped to the customer so there is an attendant delay in between completing the purchase and using the product.
To find a brick and mortar store near you, look in the yellow pages for a bead shop or craft store near your location. As an alternative, you can search for a bead shop near your loca-tion by going to the Helby Industries web site. This site, www.helby.com has a link on their home page to allow visitors to “Locate a Store Near You”. You can also jump directly to this search function by typing:
www.helby.com/html/locator.html
My personal favorite location to buy jewelry supplies is the WigJig web site. It is my favor-ite because my family runs it. I also believe that it has one of the most complete inventories of wire, tools, beads and other wire-working supplies. You can get to the WigJig store by going to the wigjig home page, www.wigjig.com and selecting “Store” in the header, or go to the store directly by entering http://www.wigjig.net/store/ . The WigJig web site has over 1,000 pages of free information on how to use wire and beads for making jewelry, and other household items.
A third way to find a store for purchasing wire working supplies is to visit an Internet search engine and search on the words -- +beads, +jewelry, +tools. I strongly recommend including the “+” sign in the search so that you limit your search to sites that include beads, jewelry AND tools. This eliminates the thousands of stores that only sell finished jewelry. I personally recommend the Yahoo search engine for performing this search because it is one of the biggest. Yahoo can be found at http://www.yahoo.com.

© 2001 Gary Helwig & WigJIg (www.wigjig.com)
Wire Design BasicsWire Hardness & Hardening Wire:Wire during manufacturing can be made in one of several different hardnesses from dead soft through half-hard to fully hardened with variations in between. The hardness is a measure of how stiff the wire is. Soft wire bends more easily than harder wire.
The perfect wire is one which is easy to bend while the artist is making a piece, but unable to be bent once the piece is finished. This perfect wire does not exist so we have developed several work-arounds or compromises that allow us to work with the imperfect wire that is actually available.
One compromise is to use soft wire to manufacture a jewelry component and then harden the wire after the component is finished. This is possible through one of several tech-niques. Some professional metal-smiths accomplish this process through heating the wire to “anneal” it to become hard and inflexible. While this process works very well if you have the oven to perform the annealing, it is impractical for craft jewelers or small jewelry manufacturers. Another alternative to thermal annealing is to harden the wire component by hammering the wire with a chasing hammer or nylon hammer. In this case, the force of the hammer blows is converted to heat within the wire and at a microscopic level thermal annealing occurs. In effect, this is an inexpensive replacement for an oven. The obvious drawback to hammering the wire is that using a chasing hammer can distort the shape of the wire. In fact, pounded wire will appear flattened instead of round. Sometimes this effect enhances the beauty of the finished piece. Where the flattening effect is not desired, one can use a nylon hammer to minimize the physical changes in the hammered wire. One particular caution when hammering wire is to avoid hammering wire where one wire seg-ment crosses another segment. In this case, when one wire is stacked on top of another wire, hammering can cause the wire to break at the point where the wires cross. Where this problem exists, there is another alternative -- to use pre-hardened wire.
As noted above, wire can be manufactured to be hardened during the manufacturing process. At first blush, it might seem that the perfect solution would be to always use hard wire, then you would not need to worry about hardening the finished piece. This solution works well for simple, angular pieces, where the wire can be bent around a peg, or pliers to a position beyond the desired final angle, and allowed to relax back when the bending force is removed to the final angle. Unfortunately, it doesn’t work well for round shapes, or for complex shapes. In some cases, using half-hard wire is the compromise that will satisfy the competing requirements for hardness. In other cases, using soft wire and a hammer and anvil is the best solution for hardening wire to become a finished piece.
One concept that merits discussion is the difference between “hardness” and “hardening”. Hardness is the property of all metals to resist surface deformation

© 2001 Gary Helwig & WigJIg (www.wigjig.com)
Wire Design BasicsWire Hardness & Hardening Wire (Continued):
or scratching. Almost everyone knows that a diamond has a hardness of 10 and is much harder than either steel or gold. Most people know that quartz (sand) is harder than gold, because sand can scratch the surface of gold jewelry. This resistance to scratching is the geological concept of hardness and is expressed in a numeric form as a number from one to ten. Hardening is not the resistance to surface scratches, but rather is the internal resis-tance to bending. While hardness is a property of the surface of the material, hardening is a property of the interior cross-section of the material. Hardness is not an important concept in making jewelry but is extremely important in defining gemstones. Hardening is important in selecting wire for a jewelry project.
In the projects that follow, we will discuss the hardening approach that is recommended for that project.

© 2001 Gary Helwig & WigJIg (www.wigjig.com)
How to Cut Wire Using the Flush Cutter
When cutting wire there are two concerns that must be considered. First, is a safety concern, in that the loose end of the cut wire can fly through the air when cut. Please be careful so that no one is injured by the loose end. Often, it is a good idea to wear safety goggles or glasses when cutting wire.
Second is both a safety and an aesthetic concern. Always cut the wire so that the dull side of the cut is on the finished piece. This reduces the amount of filing required and eliminates the possibility that a sharp wire segment could injure someone or that clothing could snag on the end of the wire.
When wire is cut with the flush cutter, one side of the wire after the cut will be sharp and the other side will be blunt or dull. See Figures 18 and 19 for pictures of the orientation of the flush cutter and the resulting blunt and sharp cut wire segments.
I suggest learning the skill of holding both sides of the wire in one hand while using the other hand to cut the wire with the flush cutter. This approach will minimize the possibility of the wire flying away and causing injury. I also hold my index finger from the hand holding the flush cutter on short wire seg-ments that I cut (too short to hold) so that they don’t fly away. Finally, I recommend cutting wire over a waste basket to catch the cut segment.
Figure 18 Cutting Wire
Figure 19 The Cut Wire
Wire Design Basics
Caution!!
The small ends of wire that are cut may fly off after cutting. This can create an eye hazard. Please make sure to control both ends of the wire that is cut.
Beveled Side
Flat Side
Flat Side of Flush Cutter
Beveled Side
SharpBlunt

How to Straighten Wire:
Introduction:Almost all wire is delivered in spools or coils. This means that before the wire is used, one must remove the natural curl in the wire that results from being coiled. Removing the natural curves in the wire is necessary to make consistent finished pieces. Almost every project covered in this book assumes that the reader has already removed the curl from the wire being used.
Removing the curl from wire is accomplished in one of two ways. Either the wire is repeat-edly pulled between your thumb and forefinger, with increasing pressure on the wire. Or the wire is pulled through the jaws of Nylon Jaw Pliers. While Nylon Jaw Pliers are not absolutely essential for a wire-worker, they are the next thing to essential. I strongly rec-ommend that everyone have a pair for this reason and more. Use the jaws of the Nylon Jaw Pliers to straighten wire, including wire that has been kinked. It saves wear and tear on your fingers. Remember to grip the wire firmly, but not so firmly that you can not pull the wire through the jaws.
In some cases you may find that the wire is slippery and therefore it is hard to pull through the jaws of the pliers. In these cases, go ahead and make a loop in the wire (skill shown in succeeding pages) and grip the wire at this loop to allow pulling it through the pliers.
Pulling the wire through the jaws of Nylon Jaw Pliers has the added benefit that it hardens the wire very slightly each time you do this. One way to partially harden wire is to pull it through the jaws of nylon jaw pliers thirty or forty times.
In summary, after you have cut any wire segment, the next step is always to straighten the wire.
It is assumed in all the projects in this book that the student will perform this step and is not explicitly mentioned otherwise!
© 2001 Gary Helwig & WigJIg (www.wigjig.com)
Wire Design Basics

© 2001 Gary Helwig & WigJIg (www.wigjig.com)
How to Make a “P” Loop
Step One:Grasp the wire with round nose pliers, as shown in Figure 20. Bring the end of the wire to a position flush with the edge of the round nose pliers as shown in this figure.
Figure 20 Grasp the Wire
Figure 21A- Wrap the Wire Around the Pliers
Figure 21B- Wrap the Wire View 2
Figure 22 The Finished Loop
Step Two:Push the wire with your thumb up and over the round nose pliers until it rests against the opposite side of the pliers. Push with your thumb as close to the pliers as possible. You may need to open the pliers, move the wire and re-grasp the wire, then twist the pliers to fully close the loop.
Step Three:Remove from the pliers and inspect. The size of the loop is determined by how far down the pliers the loop is made. Closer to the tip makes a smaller loop, and further from the tip makes a larger loop.
The great majority of wire projects start with just this type of loop. A few start with another type of loop, called an eye loop. The following pages show how to make an eye loop.
Wire Design Basics
Introduction:The basic loop shown at the bottom of this page is, while very simple, also very impor-tant. Most wire components begin and/or end with a simple loop. These instructions show how to make a simple loop that I call a “P” loop because of its shape.

© 2001 Gary Helwig & WigJIg (www.wigjig.com)
Making an Eye Loop
Figure 23 Grasp the Loop
Figure 24 The Completed Eye Loop
Step Two:Grasp the loop with the tip of the round nose pliers as shown in Figure 23. While holding the wire in your non-dominant hand, and the round nose pliers in your dominant hand, twist the round nose pliers very slightly up or counter-clockwise. Figure 24 shows how the finished loop should look.
Twist pliers
Wire Design Basics
Hold wire
Introduction:The eye loop is a modification to the simple “P” loop shown above. Aesthetically, the eye loop is more appealing because the loop is centered on the wire tail. The eye loop is also an important element to the finding called an “eye pin”.
Step One:Make a “P” loop using the instructions on the pre-vious page.

© 2001 Gary Helwig & WigJIg
Opening & Closing a Loop
Wire Design Basics
Figure 25 Open Loop
Figure 26 3/4 View Figure 27 Top View
Figure 28 Close Loop
Twist pliers
Introduction:Opening and closing loops without distorting the shape of the loop are important skills that enable connecting one loop to another.
Step One:This is accomplished rather simply by grasping the loop as shown in Figure 25 with chain nose pliers and twisting the chain nose pliers, moving the tip up and the base down. Figure 26 and 27 show two views of opening a loop. In these views you can see how the loop is opened while retaining the round shape of the loop. You can also see that the loop is ready to have another loop, such as a bead dangle, or ear wire finding, connected.
Step Two:Closing the loop is accomplished by grasping the loop with the chain nose pliers as shown in Figure 26 and 27 and twisting in the opposite direction used to open the loop. In this case, the tip of the chain nose pliers is twisted down, while the base is twisted up. Figure 28 shows the closed loop, grasped in the chain nose pliers.
to opento open
In the next section, I will introduce another skill, making a bead dangle. After this skill is mastered, I will combine the skills to that point into a simple project -- making a simple pair of ear-rings.

Figure 29 Bead Dangle
Figure 30 Sample Head Pin
Figure 31 Head Pin with Beads
Step One:Make a bead dangle following the instructions below. Each bead dangle requires one or more beads, and a head pin. The tools required to make the bead dangle are a flush cutter, chain nose pliers, and round nose pliers.
Step Two:Begin by threading the beads onto the head pin. An example of a head pin is shown in Figure 30. Figure 31 shows the same head pin with two beads.
© 2001 Gary Helwig & WigJIg (www.wigjig.com)
Making a Bead Dangle
Wire Design Basics
Introduction:A bead dangle is one or more beads hanging from a loop of wire. Figure 29 shows a picture of a bead dangle (Shown larger than actual scale.) For a beginner, a bead dangle is an important component of many jewelry projects. In fact, a pair of earrings can be made from a pair of ear wire findings and a bead dangle hanging from each ear wire. Making a bead dangle is also a technique that can be used to hang beads from a chain or other jewelry component. I frequently combine a bead dangle with a Diamond to make a necklace or brace-let component. (Directions for making a Diamond are provided in following pages.)
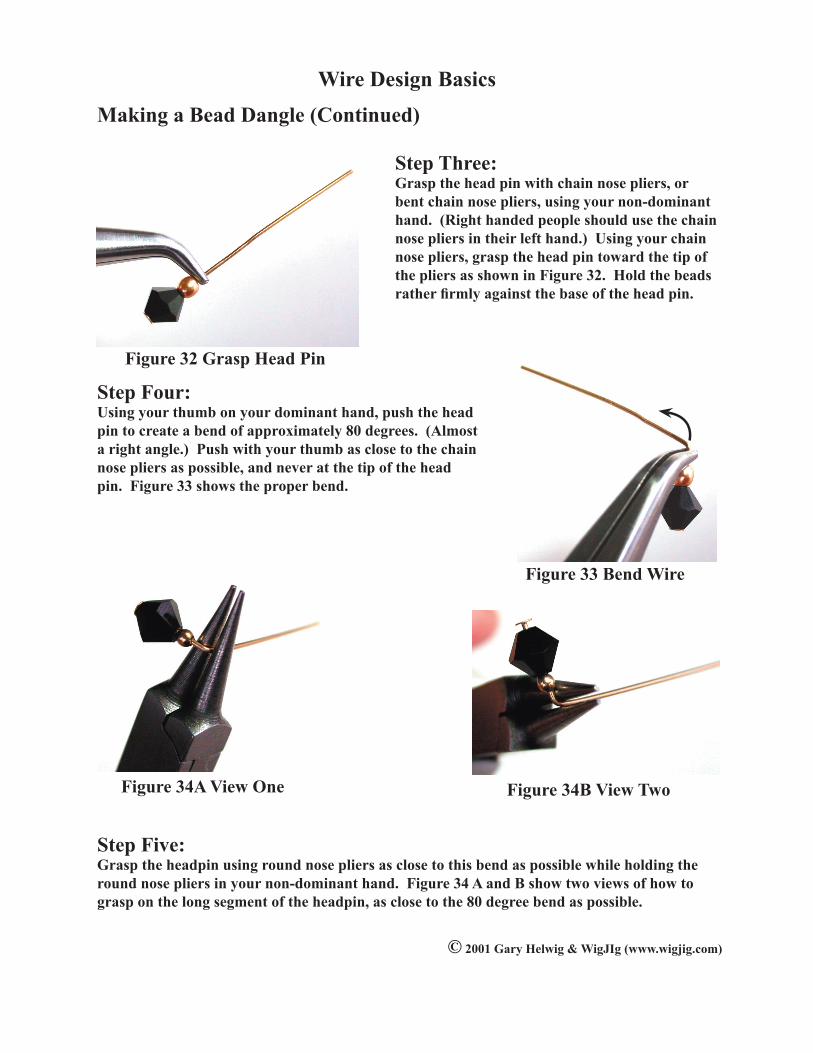
Figure 32 Grasp Head Pin
Figure 33 Bend Wire
Figure 34A View One Figure 34B View Two
Step Three:Grasp the head pin with chain nose pliers, or bent chain nose pliers, using your non-dominant hand. (Right handed people should use the chain nose pliers in their left hand.) Using your chain nose pliers, grasp the head pin toward the tip of the pliers as shown in Figure 32. Hold the beads rather firmly against the base of the head pin.
Step Four:Using your thumb on your dominant hand, push the head pin to create a bend of approximately 80 degrees. (Almost a right angle.) Push with your thumb as close to the chain nose pliers as possible, and never at the tip of the head pin. Figure 33 shows the proper bend.
Step Five:Grasp the headpin using round nose pliers as close to this bend as possible while holding the round nose pliers in your non-dominant hand. Figure 34 A and B show two views of how to grasp on the long segment of the headpin, as close to the 80 degree bend as possible.
© 2001 Gary Helwig & WigJIg (www.wigjig.com)
Wire Design BasicsMaking a Bead Dangle (Continued)

Figure 35 Bend to Form Loop, Two Views
Figure 36 Reposition Wire
Figure 37 Closed Loop
Step Six:Pressing the wire with your thumb as close to the pliers as possible, bend the wire around the round nose pliers as shown in Figure 35.
Step Seven:Reposition the wire, as shown in Figure 36, to continue bending the wire into a closed loop.
Step Eight:Continue to push the wire with your thumb to complete the loop as shown in Figure 37. When completed, the wire tail should be perpendicular to the wire segment between the beads and the loop you have just completed. Adjust the loop so that the loop is centered above the segment holding the beads. This can be done by slightly twisting the round nose pliers (if necessary).
Push
© 2001 Gary Helwig & WigJIg
Wire Design Basics
Making a Bead Dangle (Continued)

Figure 38 Begin Wrap
Figure 39 Continue Wrap
Figure 40 Continue Wrap
Step Nine:Reposition the loop to a comfortable location on the round nose pliers, keeping the loop pressed down on the round nose pliers so that all parts of the loop touch the pliers. Continue to hold the round nose pliers in your non-dominant hand. Squeeze the pliers firmly, but use only the amount of pressure required to hold the wire without letting it move or slip. Now push down on the wire tail of the head-pin as shown in Figure 38, to begin wrapping the wire tail around the short wire segment above the beads. Again, push with your thumb close to the pliers. Keep the wire tail perpendicular to the rest of the head-pin.
Step Ten:Continue wrapping the wire, as shown in Figure 39. Keep the wire tail perpendicular to the wire segment between the beads and the loop while you push. Keep the wraps tightly together. If necessary, use bent chain nose pliers to assist in wrapping the wire around the neck.
Step Eleven:Continue wrapping the wire for roughly two to three full loops. When the wire tail becomes very short, you might need to use chain nose pliers to push the wire tail.
PushDown
© 2001 Gary Helwig & WigJIg (www.wigjig.com)
Wire Design Basics
Making a Bead Dangle (Continued)

Figure 41 Final Wrap
Figure 42 Cut the Wire Tail
Figure 43 Wire Tail
Step Twelve:Continue wrap until wire is almost snug against the beads, as shown in Figure 41.
Step Thirteen:Cut the wire tail off using the flush cutter. Keep the flat side of the flush cutter toward the finished bead dangle so that the cut is smooth.
Step Fourteen:After the cut is completed there will be a very short wire tail, as shown in Figure 43.
Cut
© 2001 Gary Helwig & WigJIg (www.wigjig.com)
Wire Design BasicsMaking a Bead Dangle (Continued)

Figure 44 Tuck in Wire
Figure 45 Inspect Piece
Figure 46 Bead Dangle
Step Fifteen:Tuck in the wire tail using the bent chain nose pliers as shown in Figure 44. This is done by squeezing the wire tail with the bent chain nose pliers and slightly twisting the chain nose pliers. Hold the bead dangle in round nose pliers while squeezing and twisting. In order to keep the loop in the dangle as round as possible, push the loop down the round nose pliers as far as possible so that all of the loop is in complete contact with one jaw of the pliers.
Step Sixteen:Inspect the finished piece.
Step Seventeen:Done.
© 2001 Gary Helwig & WigJIg (www.wigjig.com)
Wire Design Basics
Making a Bead Dangle (Continued)
In the next section of this document, I will show how to make a figure 8 connector. This is another skill that is very important as it allows us to connect one closed loop component to another closed loop component. The figure 8 connector also adds new ways to move for the connected components. This motion may make a pair of earrings more interest-ing.

© 2001 Gary Helwig & WigJIg (www.wigjig.com)
Wire Design BasicsHow to Make a Figure 8 Connector
Figure 47 Figure 8 Connector
Step One:Begin by making a “P” loop in a 1.5” piece of wire as shown in Figure 48 A, B & C.
Figure 48 A, B, & C Making a P Loop Using Round Nose Pliers.
Step Two:Remove the loop from the pliers and grip the wire just below the loop as shown in Figure 49, at left. Try to grasp the piece in about the same place on the round nose pliers as you used for the ini-tial loop (the same distance from the tip of the pliers). This will ensure that both loops of the figure 8 connector will be the same size.
Figure 49 Grip the Wire Below the loop
Step Three:Push the wire with your thumb up and over the round nose pliers as shown in Figure 50. Push with your thumb as close to the pliers as possible.
PushWire
Figure 50 Push the Wire
Introduction:A figure 8 connector is an important component for connect-ing one closed loop component to another.

© 2001 Gary Helwig & WigJIg (www.wigjig.com)
Wire Design Basics
How to Make a Figure 8 Connector (Continued)
PushStep Four:Continue to push the wire until it stops against the jaws of the round nose pliers as shown in Figure 51.
Figure 51
Figure 52
Figure 53
Figure 54
Figure 55 Cut
Push
Figure 56 Figure 8
Step Five:Remove the wire from the pliers and reposition so that you can complete the second loop. The new position is shown in Figure 52.
Step Six:Grip the wire in the jaws of the pliers so that it doesn’t slip, and push the wire tail up to complete the second loop of the figure 8, as shown in Figure 53.
Step Seven:Remove the wire from the jaws of the pliers. It should look like the piece in Figure 54.
Step Eight:Cut the wire tail off the figure 8, as shown in Figure 55. Be sure to cut with the flat side of the Flush Cutter toward the finished figure 8. Close the finished figure 8 using chain nose pliers.
Step Nine:The finished figure 8 should appear as shown in Figure 56
In the next section, we will combine all the skills introduced to this point into a project making a simple pair of earrings.

© 2001 Gary Helwig & WigJIg (www.wigjig.com)
Wire Design Basics
How to Make a Simple Earring -- Beginner’s Project 1
Materials:The materials required for this project are one pair of ear wire findings, about 6 inches of 20 gauge wire, two head pins, and two or more beads. 18 gauge wire may be substituted for the 20 gauge wire.
Tools:The tools required for this project are round nose pliers, chain nose pliers, and a flush cutter. Round-flat pliers may be used instead of round nose pliers for making the figure 8. Nylon jaw pliers or a hammer and anvil are also optional tools for hardening wire.
Overview:At this point, I have discussed all the skills necessary to make a simple pair of earrings. One thing I would like to emphasize is that simple earrings can also be very elegant. Quite often, in making jewelry, less is more. I think that you will find that the earrings made in this project will be quite stylish and attractive.
I can not over-emphasize that one must practice these skills before making finished jew-elry projects. Please plan on making several practice pieces to be cut up and discarded before making the final, finished piece. These practice pieces should be made with inex-pensive practice wire like copper. My personal philosophy is that if a task is worth doing, it is worth doing well. In spite of the fact that I have made hundreds of pieces of jewelry for display on our web site, for gifts, and for sale, I find that I frequently end up cutting up a piece of my work to correct an error, or re-size the finished piece. As a beginner, you should expect that you will need to re-do a portion of any jewelry project to get it right. This is natural and should be expected.
Step One:Using the instructions provided in the previous pages, make two figure 8 connectors out of 20 gauge wire. If you have a hammer and anvil or bench block, harden the figure 8 by gently tapping the piece several times with the hammer.
Step Two:Make two bead dangles, using head pins, beads and the techniques described in previous sections. Choose an attractive combination of beads to thread onto your head pins for the bead dangle.
Step Three:Open the figure 8 connector and connect one side to the ear wire finding, and the other side to the bead dangle that you have just made. Close the figure 8 connector and inspect the finished earring. The finished product should look like Figure 57. Figure 57
© 2001 Gary Helwig & WigJIg (www.wigjig.com)
How to make a Diamond on the WigJig Olympus or Wild Wire
Wire Design Basics
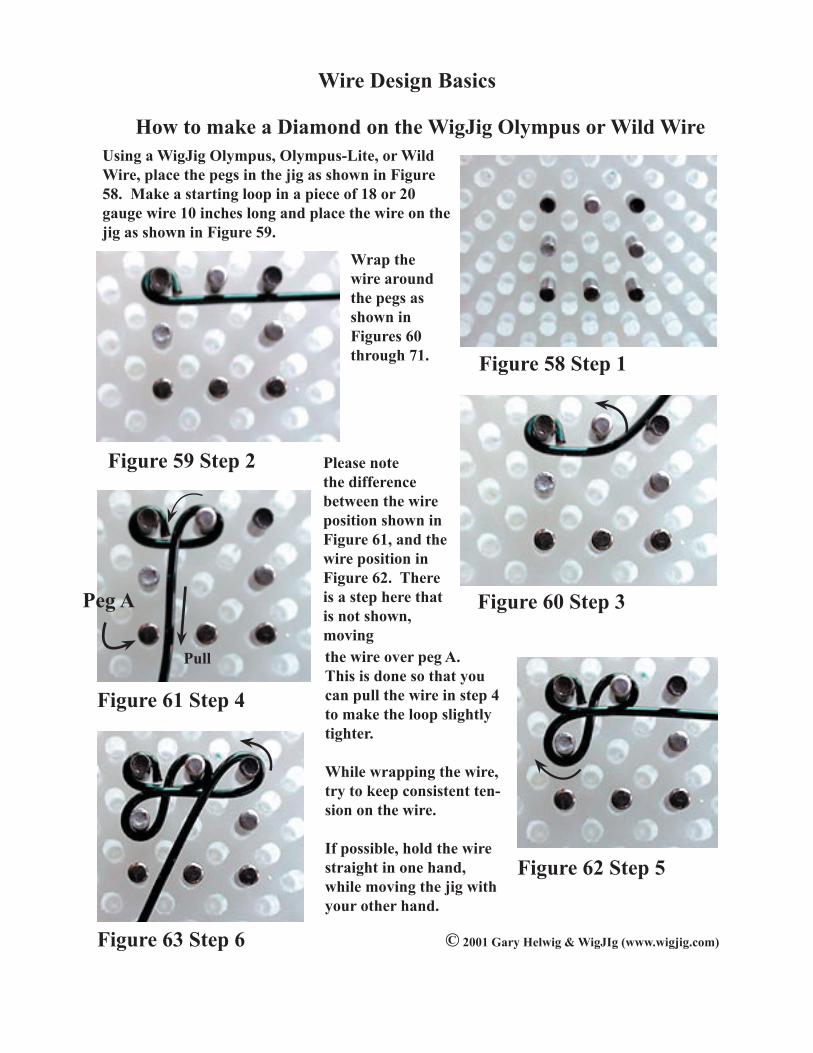
Figure 58 Step 1
Figure 59 Step 2
Figure 60 Step 3
Figure 61 Step 4
Figure 62 Step 5
Figure 63 Step 6
Using a WigJig Olympus, Olympus-Lite, or Wild Wire, place the pegs in the jig as shown in Figure 58. Make a starting loop in a piece of 18 or 20 gauge wire 10 inches long and place the wire on the jig as shown in Figure 59.
Wrap the wire around the pegs as shown in Figures 60 through 71.
Please note the difference between the wire position shown in Figure 61, and the wire position in Figure 62. There is a step here that is not shown, moving the wire over peg A. This is done so that you can pull the wire in step 4 to make the loop slightly tighter.
While wrapping the wire, try to keep consistent ten-sion on the wire.
If possible, hold the wire straight in one hand, while moving the jig with your other hand.
Pull
Peg A

© 2001 Gary Helwig & WigJIg
Wire Design Basics
How to make a Diamond on the WigJig Olympus or Wild Wire(Continued)
Figure 64 Step 7 Figure 65 Step 8
Figure 66 Step 9 Figure 67 Step 10
Figure 68 Step 11 Figure 69 Step 12
Please note that this is a skill that must be learned. You will find that the first few wire components that you make will not be as nice as you would like. This is normal. Plan on making several practice pieces that you discard before you are ready to make the final, finished piece.
Proceed to wrap the wire around each peg until you get to Step 10 (Figure 67). At this point you are ready to remove the wire from the Jig.
Once the wire is removed from the jig, cut the wire tail aS shown in Figure 68. Then close the loop at that cut, using chain nose pliers (Figure 69).
Cut

© 2001 Gary Helwig & WigJIg (www.wigjig.com)
Wire Design Basics
How to make a Diamond on the WigJig Olympus or Wild Wire(Continued)
Figure 70 Step 13
Figure 71 Step 14
Figure 72 Step 15
At this point, the wire piece will be slightly 3 dimensional as shown in Figure 70. To flatten the piece, gently squeeze the wire in nylon jaw pliers. Squeeze in several different orientations of the nylon jaw pliers so that the entire piece goes through the squeezing.
After being thoroughly squeezed in the nylon jaw pliers, the final wire piece should look like Figure 72. To finish the piece, you will need to manipulate the wire by hand to make the spacing of all the loops as consistent as possible.
Figure 73 -- Strong & Weak Axis of Diamond
Please note that the finished product has a strong axis and a weak axis. Pulling the piece on the strong axis will not result in deformation of the piece. Pulling on the piece along the weak axis of the piece will result in a “springy” deformation of the piece, which should return to the original piece after stopping the tension on the piece.
Strong Axis
Strong Axis
WeakAxis
WeakAxis
© 2001 Gary Helwig & WigJIg (www.wigjig.com)
Wire Design Basics
How to make a Diamond on the WigJig Olympus or Wild Wire(Continued)
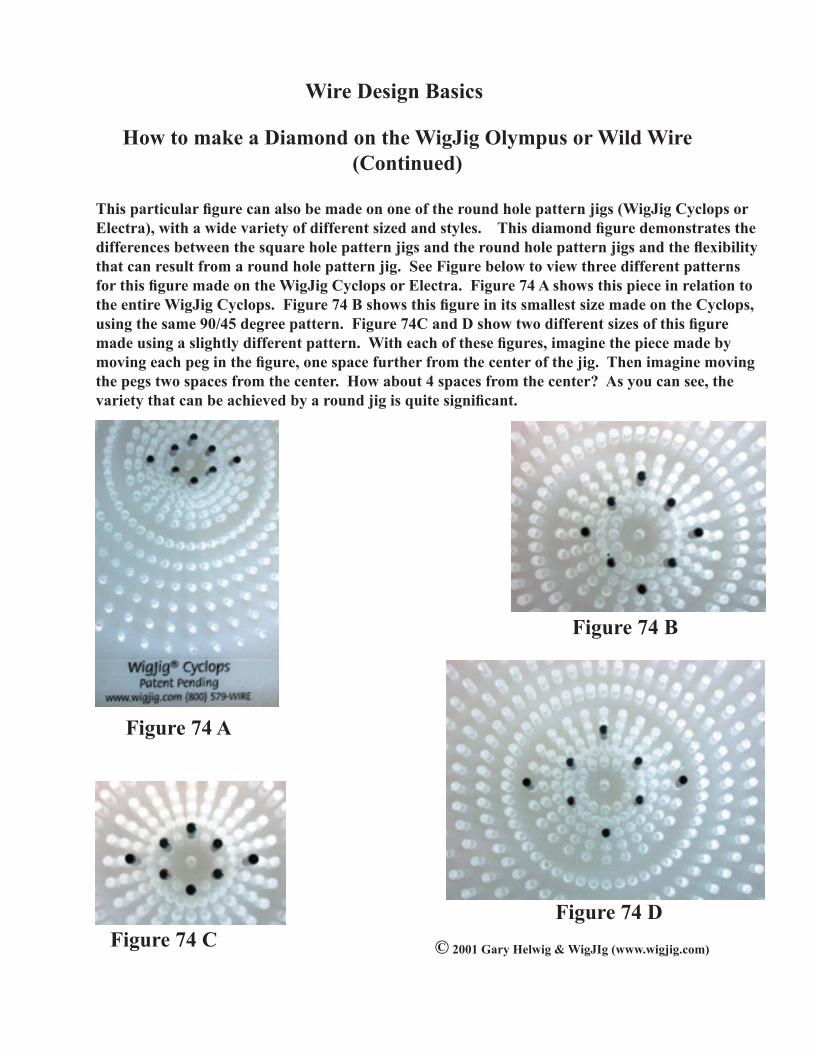
This particular figure can also be made on one of the round hole pattern jigs (WigJig Cyclops or Electra), with a wide variety of different sized and styles. This diamond figure demonstrates the differences between the square hole pattern jigs and the round hole pattern jigs and the flexibility that can result from a round hole pattern jig. See Figure below to view three different patterns for this figure made on the WigJig Cyclops or Electra. Figure 74 A shows this piece in relation to the entire WigJig Cyclops. Figure 74 B shows this figure in its smallest size made on the Cyclops, using the same 90/45 degree pattern. Figure 74C and D show two different sizes of this figure made using a slightly different pattern. With each of these figures, imagine the piece made by moving each peg in the figure, one space further from the center of the jig. Then imagine moving the pegs two spaces from the center. How about 4 spaces from the center? As you can see, the variety that can be achieved by a round jig is quite significant.
Figure 74 A
Figure 74 B
Figure 74 CFigure 74 D
In the next section, we will discuss another skill to master, how to make a wrapped bead link. This is a very impor-tant skill in making beaded chains for bracelets and necklaces.
© 2001 Gary Helwig & WigJIg (www.wigjig.com)
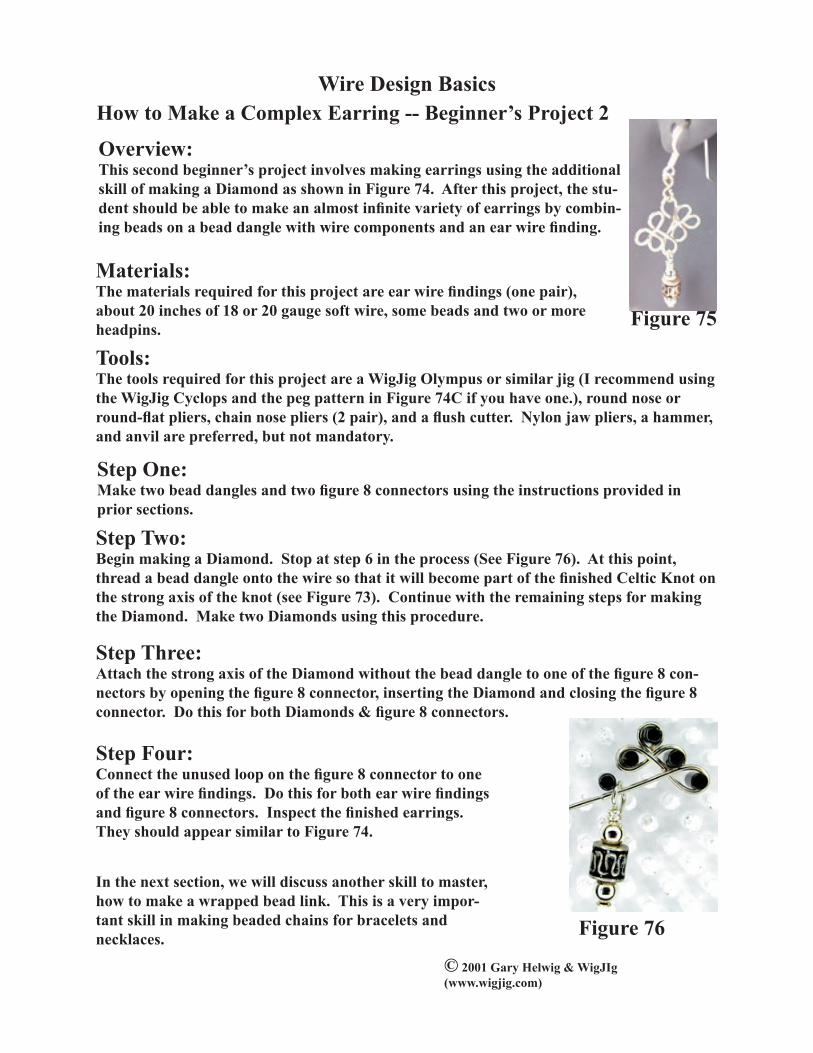
Wire Design BasicsHow to Make a Complex Earring -- Beginner’s Project 2
Materials:The materials required for this project are ear wire findings (one pair), about 20 inches of 18 or 20 gauge soft wire, some beads and two or more headpins.
Tools:The tools required for this project are a WigJig Olympus or similar jig (I recommend using the WigJig Cyclops and the peg pattern in Figure 74C if you have one.), round nose or round-flat pliers, chain nose pliers (2 pair), and a flush cutter. Nylon jaw pliers, a hammer, and anvil are preferred, but not mandatory.
Overview:This second beginner’s project involves making earrings using the additional skill of making a Diamond as shown in Figure 74. After this project, the stu-dent should be able to make an almost infinite variety of earrings by combin-ing beads on a bead dangle with wire components and an ear wire finding.
Step One:Make two bead dangles and two figure 8 connectors using the instructions provided in prior sections.
Step Two:Begin making a Diamond. Stop at step 6 in the process (See Figure 76). At this point, thread a bead dangle onto the wire so that it will become part of the finished Celtic Knot on the strong axis of the knot (see Figure 73). Continue with the remaining steps for making the Diamond. Make two Diamonds using this procedure.
Step Three:Attach the strong axis of the Diamond without the bead dangle to one of the figure 8 con-nectors by opening the figure 8 connector, inserting the Diamond and closing the figure 8 connector. Do this for both Diamonds & figure 8 connectors.
Step Four:Connect the unused loop on the figure 8 connector to one of the ear wire findings. Do this for both ear wire findings and figure 8 connectors. Inspect the finished earrings. They should appear similar to Figure 74.
Figure 75
Figure 76

© 2001 Gary Helwig & WigJIg (www.wigjig.com)
Wire Design Basics
Make a Chain using the Wrapped Bead Link
Figure 77
Figure 78
Figure 79
Figure 80A
Supplies/Tools Required:The following supplies and tools are required:
o 22 or 24 gauge wire (about 3’),o Flush cutter (1),o Round Nose or Round-Flat Pliers (1), ando Chain Nose Pliers (quantity 2)
Desired Result:Figure 78 shows the “Wrapped Bead Link” that these instructions will teach.
Step One:In a piece of 22 or 24 gauge wire at least 3.5 inches long, make an 80 degree bend using chain nose pliers, about 3/4 inch from one end of the wire. See Figure 79.
Step Two:Grasp the wire next to the bend with round nose pliers or with round-flat pliers, as shown in Figure 80 A & B.
80 Degrees
Push
Grasp at bend on short segment
Figure 80B
ShortSegment
Bend
Introduction:This skill is one of the most important skills that a beginning wire-worker can learn. In fact, mastery of this skill is probably the defini-tion of an intermediate wire-worker.

© 2001 Gary Helwig & WigJIg (www.wigjig.com)
Wire Design Basics
Make a Chain using the Wrapped Bead Link (Continued)
Figure 81
Figure 82
Figure 83
Figure 85 A & B View 1 & 2
Figure 84
Step Three:Using your thumb, push the short wire segment around the round nose pliers. When done, the wire should appear as shown in Figure 81.
Step Four:Reposition your grip on the wire to the position shown in Figure 82.
Step Five:Continue pushing the short segment around the round nose pliers until it is in the position shown in Figure 83. The short wire segment should be perpendicular to the longer wire tail (as shown).
Step Six:Remove the wire from the pliers. It should appear as shown in Figure 84
Step Seven:Thread this wire segment through the clasp, bead dangle, or other loop, as required. See Figure 84 A & B.

© 2001 Gary Helwig & WigJIg
Wire Design BasicsMake a Chain using the Wrapped Bead Link (Continued)
Figure 86
Figure 87
Figure 88
Figure 89
Step Eight:Grasp the loop that you are making with chain nose pliers as shown in Figure 86. Grasp the wire firmly, but not so tight that you mark the wire.
Step Nine:While holding the wire with the chain nose pliers, push the short segment around the longer segment, as shown in Figure 87. Please note that the short segment goes on top of the long wire segment then is pushed down, to go under.
Step Ten:Continue wrapping the short wire segment around the longer wire segment as shown in Figures 88 and 89. Try to keep the short wire segment perpendicular to the long wire segment as you wrap. Try to make the wrap as tight and close together as possible.
Short WireSegment
Long WireSegment
As with all jewelry skills, this technique requires prac-tice. As always with new skills, practice this technique several times with inexpensive wire.
Wire connections made with this technique are very strong. With necklaces, I like to include a weak link in the chain to break in case the necklace gets caught on something solid. I always want the chain to break instead of the neck of the wearer.

© 2001 Gary Helwig & WigJIg (www.wigjig.com)
Wire Design BasicsMake a Chain using the Wrapped Bead Link (Continued)
Figure 90
Figure 91
Figure 92
Figure 93
Figure 94
Step Eleven:Continue wrapping for about 2 and 1/2 loops. You may choose how many times to wrap the wire, I like 2 1/2 loops because I am able to do 2 1/2 loops on both sides of the beads and hold the beads snug.
Step Twelve:Cut the end of the wire off as shown in Figure 90. Keep flat side of flush cutters toward the finished piece.
Cut
Figure 91 shows a distant view of the piece after the cut. While it doesn’t show in this figure, see a close up in Figure 92. This figure shows the very short wire tail left after the cut performed in Step Twelve.
Step Thirteen:Continue to grasp the wire as shown in Figure 93. Now, with a second chain nose pliers, squeeze and twist the wire to gently tuck in the short wire tail.
The finished wrap should look as shown in Figure 94. There shouldn’t be any loose wire. The round loop should be centered like an eye loop on the long wire segment. If the loop is not precisely centered, you can adjust the position of the loop by grasping the loop with one set of chain nose pliers and by grasping the wrapped segment with the other pair of chain nose pliers and twisting slightly. Squeeze & twist
At this point, one end of a wrapped bead link is completed. To com-plete the entire link, you need to add beads to the long wire segment, and complete the wrapped loop on the other end of the link. The fol-lowing instructions show how this is done.

© 2001 Gary Helwig & WigJIg (www.wigjig.com)
Wire Design BasicsMake a Chain using the Wrapped Bead Link (Continued)
Figure 95
Figure 96
Figure 97
Figure 98
Step Fourteen:Thread beads on the long wire segment as shown in Figure 95.
Step Fifteen:Grasp the long wire segment with chain nose pliers just above the beads. Keep the beads snug against the initial wrapped loop. Use the tip of the chain nose pliers, as this is the thinnest point on the pliers. The goal is that the initial wrap and this final wrap be the same size. See Figure 96 for how to grasp the piece.
Step Sixteen:As shown in Figure 97, bend the long wire segment to an angle of about 80 degrees. At this point, go back to step two and follow the instructions used to make the initial wrapped loop. Follow steps 2 through 14 as you continue to make links in a chain. Figure 98 shows the wrapped bead link, ready for connection to the next link in the chain.
80 degrees
Bend
Continue making links until the chain is com-pleted. For bracelets, I like to use 7 1/4 inches as my target length, although some people will require smaller bracelets and some will require larger. For necklaces I like lengths of 16, 18 and 24 inches long. Consider the length of the clasp that you have selected when planning your design.
In the next few pages, we will use the skill of making the wrapped bead link along with a clasp finding to make a beaded chain bracelet.
Pliers shown in background
Connect the next link

Step One:Begin by making a Diamond using the previous instructions.
Step Two:Using the wrapped bead chain technique, begin making chain links and connect the chain links to both of the strong axes of the Diamond. See Fig-ures 83 and 84 for starting the chain and linking it to the Diamond.
Step Three:Add beads to both chain links and make the second side of the link. See Figure 96.
Step Four:At this point you have several options. You can add another Diamond and make a chain of Diamond, wrapped bead link, Diamond; or you can add a short segment of manufactured chain and continue with one Diamond in the center, with wrapped bead link, chain, wrapped bead link, chain, clasp on either side, or the third option is to have the Diamond in the center, with a series of wrapped bead links connected on either side.
Step Six:Measure the length of the chain as you add links symmetrically to either side of the Diamond. As a rule, a finished bracelet, including the clasp should be about seven and 1/4 inches long and a necklace should be
© 2001 Gary Helwig & WigJIg
Wire Design BasicsHow to Make a Beaded Chain Bracelet -- Beginner’s Project 3
Materials:About 2 feet of 24 gauge wire (preferably half-hard if possible), 10 inches of 18 gauge wire, a clasp finding, and 20 to 30 beads.
Tools:Chain nose pliers (2), round nose or round-flat pliers, flush cutter, nylon jaw pliers and WigJig Olympus or equivalent jig are required. A hammer and anvil are optional.
Overview:With the skills described in the previous sections, and an eye for style and color, even a beginner to wire work can make bracelets and necklaces that sell. There are numerous variations on the wrapped bead chain. In this project, we will make a simple wrapped bead chain and incorporate a Dia-mond into the chain. We will also discuss how this technique can be modi-fied to incorporate manufactured chain into elegant bracelet and necklace designs.
Figure 99

© 2001 Gary Helwig & WigJIg (www.wigjig.com)
Wire Design Basics
How to Make a Beaded Chain Bracelet -- Beginner’s Project 3 (Continued)
16, 18, 24 or 30 inches long. The easy way to measure how long to make a bracelet or necklace is to use a piece of string. Wrap the string around your wrist or neck and hold it in the length that you like best. Remove the string and measure the length. This becomes your target length. As the length of your project approaches your target length, you will find that you need to adjust your pattern to finish the piece at the right length. (This is far more important for a bracelet than for a necklace.) If necessary, reduce the number of beads in a wrapped bead link and/or cut out a few segments of chain to finish the piece, including the clasp, at the proper length.
Step Seven:Add the clasp. You can add the clasp either by using an open (unsoldered) jump ring or figure 8 connector to connect the clasp to the chain, or you can use a wrapped bead link to connect the chain to the clasp. For the end of the bracelet or necklace opposite the clasp you also have several options. You can use a finding like a soldered jump ring, a figure 8 connector, or you can just make a larger loop in the end of the wrapped bead link (see Figure 100) and finish by wrapping this loop closed.
Step Eight:Inspect the finished piece. See Figures 100 A and 100B for examples of finished bracelets.
Figure 100 B Bracelet with
Figure 100 A Wrapped bead Chain Bracelet

How to Make a Spiral:
© 2001 Gary Helwig & WigJIg (www.wigjig.com)
Wire Design Basics
Introduction:A spiral is a relatively common decorative accessory to a jewelry piece. In fact, spirals were used in ancient jewelry made at least 3,000 years ago. Figure 101A and 101B show several spirals. The spirals shown in Figure 101B are based upon samples of spirals in Mesopotamian and Egyptian ancient jewelry, made about 2,000 BC. Spirals are attrac-tive wire accessories and can be made both by hand, or with assistance from Jig accessories discussed later in this section.
Figure 101A Spirals
How to Make a Spiral Step One:The first step in making a spiral by hand is to use round nose pliers to make as small a loop as you can in a piece of wire about 3 inches long. The wire can be almost any gauge, but for beginners it is better to start with 18 or 20 gauge wire. If you have both, use the 20 gauge wire for making your first spiral. The one mandatory requirement is that the wire be soft instead of half-hard or hard. For this reason, Artistic Wire, copper, brass and soft silver or gold wire will work well. See Figures 20 through 22 for instructions on how to make the starting loop.
Step Two:Grasp the loop with chain nose pliers as shown in Figure 102. While holding the wire with the chain nose pliers, push the wire a very small amount in the direction shown. Figure 103 shows the wire position after completing the small push.
Figure 101B Spirals
Figure 102 Step 2
Figure 103 Step 3
Grasp
Push
After
Before

How to Make a Spiral (Continued):
© 2001 Gary Helwig & WigJIg (www.wigjig.com)
Wire Design Basics
Step Three:Grasp the wire, as shown in Figure 104 and continue pushing the wire in small increments (about 30 degrees of motion per grasp of the pliers). Continue moving the wire in the grasp of the chain nose pliers and moving the wire in small increments. The one secret in making a spiral is to move the wire in small increments. The wire should move only about 30 to 45 degrees at a time. Continue this process until the spiral is the size that you want and inspect the finished spiral.
Figure 104 Step 4
Figure 105 Step 4 Contd.
Step Four:Leave enough of a tail to complete the connector required by this use of the spiral. As seen above, Figure 101A and B show several different ways to finish a spiral for incorporation into jewelry.
The following section will describe how to make a spiral using the WigJig Spiral Maker tool. This tool helps beginners to make consistent spirals with mini-mum tool marks on the wire.
Making a Spiral Using the WigJig Spiral Maker:
Introduction:Making a spiral with the WigJig Spiral Maker is relatively simple, but like all wire-working techniques, it does require some practice. The tools required are a Spiral Maker, the associated WigJig Olympus, Electra, Delphi or Cyclops and a flush cutter. Like a spiral made by hand, the wire for making a spiral with the Spiral Maker is preferably 18 or 20 gauge soft wire. Figure 106 shows a pic-ture of the Spiral Maker with the asso-ciated WigJig. In this case, we have a Spiral Maker for the Delphi/Cyclops and a WigJig Cyclops.
Figure 106 WigJig Cyclops & Spiral Maker

Figure 107 Step 1 Figure 108 Step 1
Figure 110 Step 3
Figure 109 Step 2
Step One:Begin by inserting a piece of straightened soft wire about 4 to 6 inches long into one of the holes in the bottom of the Spiral Maker as shown in Figure 107. As shown in Figure 108, use your thumb to keep the wire from falling through the Spiral Maker.
Step Two:Push the wire as shown in Figure 108 so that it rests flat against the Spiral Maker as shown in Figure 109.
Step Three:Insert the peg in the spiral maker into one of the holes on the outside of your WigJig as shown in Figure 110. In this case the Spiral Maker is inserted into a WigJig Cyclops.
Step Four:Hold the Spiral Maker and wire tightly against the WigJig. Look through the WigJig to watch the wire as you wrap the spiral. This process works the same for any clear jig, the Olympus, Olympus-Lite, the WigJig Delphi, the WigJig Electra, or as shown here the WigJig Cyclops.
How to Make a Spiral (Continued):
© 2001 Gary Helwig & WigJIg (www.wigjig.com)
Wire Design Basics

Figure 111 Step 5 Figure 112 Step 6
Figure 113 Step 7
Figure 114Step 7
How to Make a Spiral (Continued):
© 2001 Gary Helwig & WigJIg (www.wigjig.com)
Wire Design Basics
Step Five:Begin wrapping the wire around the center peg in the Spiral Maker. During this phase of making the Spiral you can pull the wire very firmly to make the wire wrap as tightly around the center peg as possible. You can do this by holding the wire and moving the Spiral Maker, or by holding the Spiral Maker and moving the wire. Figure 111 shows this initial phase.
Step Six:Once you have completed the first full wrap around the center peg (See Figure 112) you must change the way you pull on the wire. During this second phase you must be very careful to pull firmly but not so firmly that the wire begins to overlap the prior loop of wire. This is best accomplished by moving the wire in small increments of about 30 degrees at a time while watching the spiral grow. Watch carefully to make sure the spiral remains flat. Hold the Spiral Maker firmly against the WigJig.
Step Seven:Continue wrapping in small increments while watching the spiral grow. See Figures 113, 114, 115, and 116. Continue to hold the Spiral Maker firmly against the WigJig. In these figures you can notice in the background of the photograph that the index finger and longest finger were used to hold the Spiral Maker against the WigJig.

Figure 116Step 7
Figure 115Step 7
Figure 117Step 8
Figure 118Step 9
Figure 119Step 10
How to Make a Spiral (Continued):
© 2001 Gary Helwig & WigJIg (www.wigjig.com)
Wire Design Basics
Step Eight:Once the spiral has reached the proper size, stop wrapping and remove the Spiral Maker from the WigJig.
Step Nine:When removed from the WigJig, the wire and Spiral Maker will appear as shown in Figure 117. Remove the wire from the Spiral Maker and the spiral should appear as shown in Figure 118.
Step Ten:As shown in Figure 119, cut the perpendicu-lar wire segment that went through the Spiral Maker to leave a flat spiral. See Figure 120. This is what the spiral should look like after cutting off the perpendicular wire segment.
Figure 120Done

Figure 121Add Loop
How to Make a Spiral (Continued):
© 2001 Gary Helwig & WigJIg (www.wigjig.com)
Wire Design Basics
Step Eleven:Finish the spiral by making a loop in the wire tail on the spiral. The fin-ished spiral should look like Figure 121.
As discussed previously, this is just one sample of how a spiral can be incorporated into a jewelry component. In the following pages, we will do a project that incorporates a spiral into a simple earring design.

How to Make Earrings with a Spiral -- Beginners Project 4:
© 2001 Gary Helwig & WigJIg (www.wigjig.com)
Wire Design Basics
Figure 123 Step 2
Introduction:This project incorporates a spiral into a figure made on a WigJig. The shape made will be 1/2 of a Diamond, or as it is alternatively called, a tree. The design shown in these figures was made on the WigJig Cyclops. A very similar figure could be made on the WigJig Delphi, Olympus, Olympus-Lite or Electra. For the Delphi, Olympus, or Olympus-Lite the tree should be made using pegs on the 45 degree angle. For the Cyclops or Electra, I have chosen to make this figure with a 30 degree angle. See Figure 122 for two alternatives for making these earrings.
Tools and Materials:The tools required for this project are a WigJig Cyclops, Electra, Delphi, Olympus, or Olympus-Lite, round nose pliers, chain nose or bent chain nose pliers (2), a flush cutter, and nylon jaw pliers. The supplies required are one pair of ear wire findings, two 4 mm beads, and 20 inches of 20 gauge wire (preferably brightly colored wire like Niobium or Artistic Wire silver- plated copper wire.) The pictures shown below use the WigJig Cyclops. Figure 128 shows how to adapt this design to a WigJig Olympus, Olympus-Lite, WigJig Delphi, or Wild Wire jig.
Figure 122 Project 4
Step One:Cut and straighten two pieces of wire 8 inches long.
Step Two:Using the procedures for the wrapped bead link. Make a wrapped loop in one end of the wire. See Figure 77. I made this loop with only one wrap around the long wire segment. See Figure 123 for this beginning loop.
Step 3:Insert 9 pegs in the WigJig as shown in Figure 124
Figure 124 Step 3
Center Peg on Cyclops
Outside Row on Cyclops

How to Make Earrings with a Spiral -- Beginners Project 4 (Contin-ued):
© 2001 Gary Helwig & WigJIg (www.wigjig.com)
Wire Design Basics
Step 4:Using the same approach that you employed to make the Dia-mond in Figures 60 through 64, place the loop on the initial peg, and wrap the wire around the pegs as shown in Figure 125.
Figure 125 Step 4
12
34
65
7 8
9Step 5:Remove the wire from the WigJig and gently flatten the piece using the nylon jaw pliers. (See Figure 70 and 71).
Step Six:Make a loop in the end of the wire tail and make a spiral around this loop. See Figures 102, 103, 104 and 105. When completed the piece should appear as shown in Figure 126.
Step Seven:Using the procedures shown in Figures 48 through 56, make a Figure 8 connector and connect the wire piece to the ear wire finding using this figure 8 connector. The finished earring should appear as shown in Figure 127.
Figure 126 Step 6
Figure 127 Step 7

© 2001 Gary Helwig & WigJIg (www.wigjig.com)
Wire Design Basics
A Question of Style -- or How to Chose a Jig that’s Right for You
In Beginner’s Project 4, we introduced a new earring design that can be made on any of several different jigs. The pictures in the prior section show this pattern made on the WigJig Cyclops. The pattern can be modified slightly to be made on the WigJig Olympus, Olympus-Lite, Delphi, or Electra. At this point, let’s discuss the differences in this wire component when made on each of the five potential jigs so that you can chose the jig, or jigs that are right for you.
First, the Wild Wire Jig, the WigJig Olympus and the WigJig Olympus-Lite, all have exactly the same hole pattern and would make this component exactly the same. These jigs also all use pegs that are 3/32 inch in diameter. All three of these jigs have holes based upon a square, spaced at 90 degrees and 45 degrees and separated from center to center by 1⁄4” in each row, with every other row off-set. The basic rows provide the angles of 0, 90, 180, and 270 degrees. The offset rows allow you to add the angles of 45, 135, 225, and 315 degrees. These jigs are not capable of making other angles easily. The one difference between these three jigs is that the Wild Wire uses plastic pegs and the WigJig Olympus-Lite is smaller than the WigJig Olympus. Figure 128 shows how the earrings in Beginner’s Project 4 can be adapted to the WigJig Olympus’s square peg pattern, using the 45 degree angle inherent in that jig. (The spiral in this figure was added after removing the wire from the jig.)
Next, we add to these jigs the WigJig Delphi, which is a smaller jig, uses the same pattern of rows and offset rows to make the angles of 0, 45, 90, 135, 180, 225, 270, and 315 degrees just like the Olympus family. The Delphi has metal pegs that are 1/16” in diameter, or 1/32” smaller than the Olympus pins. The significant difference in the Delphi is that the holes are spaced 1/5 of an inch apart or 0.2 inches from center to center. This means that any design modified from the Olympus to be made on the Delphi would be 80% of the size of the same design made on the Olympus. Stated another way, Delphi designs are 20% smaller than Olympus designs. In jewelry terms, the Olympus makes larger, bolder designs, while the Delphi makes the same designs but smaller and more delicate.
It is not merely a choice of which one Delphi or Olympus to select, there is a significant virtue in having both the Olympus and the Delphi. When making necklace/bracelet, bracelet/earring, or necklace/earring jewelry sets, it is almost always a good idea to make a wire component for the necklace or bracelet on the Olympus matched with the same component made on the Delphi to be incorporated into the earrings. This adds style to handmade jewelry and makes it look more sophisticated.
Figure 128 Pattern for Square Jig
1
2345
67
How to Make Earrings with a Spiral -- Beginners Project 4 (Contin-ued):

How to Make Earrings with a Spiral -- Beginners Project 4 (Continued):
© 2001 Gary Helwig & WigJIg (www.wigjig.com)
Wire Design Basics
A Question of Style (Continued)
There are three significant advantages to a round jig over a square jig. First, the additional angles that are available, second, when you use a round jig, you can obviously make round figures in several different radius, and third, when using a round jig you can scale pieces, using an inner radius for a smaller pattern and a outer radius to make the same pattern but larger. Perhaps, given all the advantages to the round jigs, the question for a beginner should be why should anyone buy a square jig? The answer to this question is that, for a beginner, the square jigs are a more appropriate purchase at this time for the simple reason that they have been around longer and there are more books and patterns available for these jigs.
So, given all this background information, the final question is can one jig make all the shapes. Fortunately for the jig manufacturers, the answer is no. Square jigs make components that are what I would call laterally symmetrical – they are symmetrical in either side of a line. Round jigs make components that are radially symmetrical – they are spaced on a radius from a common center and symmetrical around another radius. This is a complex way of saying parallel linear patterns with two rows of three or more pegs in a row can not be made on a round jig. By contrast, angles of 30 and 60 degrees can not be made on a square jig. As in all things, each jig has it’s role.
At this point we have addressed the advantages and disadvantages of square jigs. There are also two relatively new jigs that are based upon a round pattern instead of square. The WigJig Cyclops and the WigJig Electra use this round pattern because it allows incorporation of many additional angles. In fact, both of these jigs incorporate angles in 7.5 degree increments for a full 360 degrees. This allows designers to make objects that use the very common angles of 15 degrees, 30 degrees 45 degrees and 60 degrees as well as all of the other increments of 7.5 degrees. The WigJig Electra is the same size as the WigJig Olympus and uses the same 3/32” pegs. The WigJig Cyclops is smaller than the Olympus, but larger than the Delphi and uses the same 1/16” pegs as the WigJig Delphi. Similar to the Olympus versus the Delphi, the Electra makes larger, bolder wire components, while the Cyclops makes smaller and more delicate components.

Gauge Inches (“) Millimeters (mm)10 0.1019 2.5911 0.0907 2.3012 0.0808 2.0513 0.072 1.8314 0.0641 1.6315 0.0571 1.4516 0.0508 1.2917 0.0453 1.1518 0.0403 1.0219 0.0359 0.91220 0.032 0.81321 0.0285 0.72422 0.0253 0.64323 0.0226 0.57424 0.0201 0.51125 0.0179 0.45526 0.0159 0.40427 0.0142 0.36128 0.0126 0.32129 0.0113 0.28730 0.01 0.25431 0.0089 0.22632 0.008 0.20333 0.0071 0.17934 0.0063 0.16035 0.0056 0.14236 0.005 0.12737 0.0045 0.11438 0.004 0.10239 0.0035 0.08940 0.0031 0.079
Wire Gauges
Appendix
1 inch = 25.4 millimeters 1 millimeter = .03937 inches

Appendix II
Feet Per Ounce by Gauge
Gauge 14K Gold-Filled Round Sterling Silver Round10 2.16 1.8312 3.48 3.0014 5.48 4.6616 8.75 7.5018 13.80 1220 21.68 1921 29.60 2422 35.50 3124 55.50 48