white paper · web viewconfiguring accounting segments in fusion financials to leverage otbi for...
TRANSCRIPT
Configuring Accounting segments in Fusion Financials to leverage OTBI for ad-hoc analysesO R A C L E W H I T E P A P E R | M A Y 2 0 2 3

Purpose
Oracle Fusion Financials users who want to create ad-hoc reports and leverage chart of account
segments for real time ad-hoc reporting will need to configure and enable the chart of account
segments in Fusion Financials for it to be available in Oracle Transactional Business Intelligence
(OTBI)
This document will provide a walkthrough of the different configuration steps in Fusion Financials that are necessary to support Chart of Accounts segments that you want to leverage for ad-hoc reporting using OTBI. It also provides troubleshooting tips and addresses some frequently asked questions.
IntroductionOracle Fusion Transactional Business Intelligence (OTBI) is a real time, self service reporting solution
for Oracle Fusion application users to create ad hoc reports and analyze them for daily decision-
making.
Fusion Financials customers leverage OTBI for ad-hoc and real-time reporting, which includes content
areas like General Ledger, Payables and Receivables. To include chart of accounts segments as part
of OTBI reporting for these content areas, customers need to complete a few configuration steps in
Fusion Financials before these chart of account segments are available in the corresponding OTBI
subject areas.
In the example below, the General Ledger – Transactional Balances Real Time subject area only has
the three GL segments pre-configured as dimensions. These segments are mapped to the following
accounting segments
» GL_BALANCING - Balancing Segment» FA_COST_CTR - Cost Center Segment» GL_ACCOUNT - Natural Account Segment
1

To include additional chart of accounts segments as dimensions in OTBI, there is a mapping process
to map each of these segments as a dimension for OTBI analysis. In addition to the mapping exercise, there are additional configuration steps that are required.
SolutionFollow the sequence of steps below to configure and enable the accounting segments for reporting in OTBI
Step 1: Designate the Chart of Accounts segments as BI enabledCheck the ‘BI Enabled’ check box on all accounting segments that you want to leverage in OTBI for reporting:
» From your implementation project or the Setup and Maintenance page, query for Manage Key Flexfields and
select the Go to Task.» Enter GL# in the Key Flexfield Code field.» Click Search button.
» Click on Manage Structure Instances button.
» Click the Search button.
2

» Click on the desired chart of accounts and Edit icon.
» Click on the desired segment and the Edit icon.
» Edit each of the segments by checking the BI enabled check box
» Click on save button. This should be done for all segments in every Chart of Accounts Structure Instance that you
plan to leverage in OTBI
Step 2: Map the accounting segments to the corresponding BI Object NamePopulate the BI Object Name for each of the Segment Labels that you plan to leverage with OTBI for reporting and analysis. The BI metadata has 10 pre-defined BI Objects for the different GL segments. These BI Objects will be used as dimensions in OTBI for the selected GL segments. To map the different chart of account segments to the pre-defined BI objects, perform the following steps:
» From your implementation project or the Setup and Maintenance page, query for Manage Key Flexfields and
select the Go to Task.
» Enter GL# in the Key Flexfield Code field.
» Query for GL# as Key Flexfield Code in Manage Key Flexfields page.
» Click Search button.
» Chose Actions menu and click on Manage Segment Labels
3

» Populate the BI Object Name for all the segment labels that are need to be mapped in the RPD
» For the following three GL segments, the BI Object names are already mapped and should not be altered
Segment Label Code BI Object Name
FA_COST_CTR Dim - Cost Center
GL_BALANCING Dim - Balancing Segment
GL_ACCOUNT Dim - Natural Account Segment
» For all other non qualified segment labels that you want to leverage within OTBI, the BI Object name should be
populated with one of the following» Dim - GL Segment1» Dim - GL Segment2» Dim - GL Segment3» Dim - GL Segment4» Dim - GL Segment5» Dim - GL Segment6» Dim - GL Segment7» Dim - GL Segment8» Dim - GL Segment9» Dim - GL Segment10
4

Note: It is critical to ensure that the BI object names Dim – GL SegmentX is entered correctly
Step 3: Assign Segment Labels to Key Flexfield Segments
» Assign a Segment Label for Each Segment.
Step 4: Managing Trees and Tree Versions
» Ensure each value set for an accounting segment that you plan to leverage for OTBI reporting is configured with a
data hierarchy using tree structures.
5

» Execute the column flattening process for the tree version to ensure the values are populated in the individual
segments.
» Ensure that the tree structure is assigned to the GL segment
» If there is more than one chart of account instance with the same segments that you want to bring into OTBI, we recommend creating a tree structure and assigning it to the GL segment so that the
6

value sets for that accounting segment are consolidated under the same BI Object Name (OTBI dimension)Note: If you have value set values which do not participate in a tree and those values are associated
with transactions, then you have to create a dummy tree to include those nodes; otherwise these
particular value set values will not appear in BI.
Step 5: Deploy Flexfields
» Deploy the flexfield using the Deploy Flexfield button from Manage Key Flexfields page
Step 6: Publish the accounting segment hierarchies into Essbase cube
» From your implementation project or the Setup and Maintenance page, query for Publish Account Hierarchies and
select the Go to Task.» Search account hierarchies and select or deselect the Publish check box. This is indicator of what to include in
balances cube by selecting the check box.
» Select the Publish button to update the balances cubes.
» Navigator > Tools > Scheduled Processes to monitor the process.
Step 7: Run the following scheduled processes by navigating to Tools/Schedule Processes
» Create Rules XML File for BI Extender Automation
» Import Oracle Fusion Data Extensions for Transactional Business Intelligence
ConclusionOnce all the steps outlined above have been performed, the accounting segments that are BI enabled will be available in the OTBI subject areas for ad-hoc analyses, as shown below
7
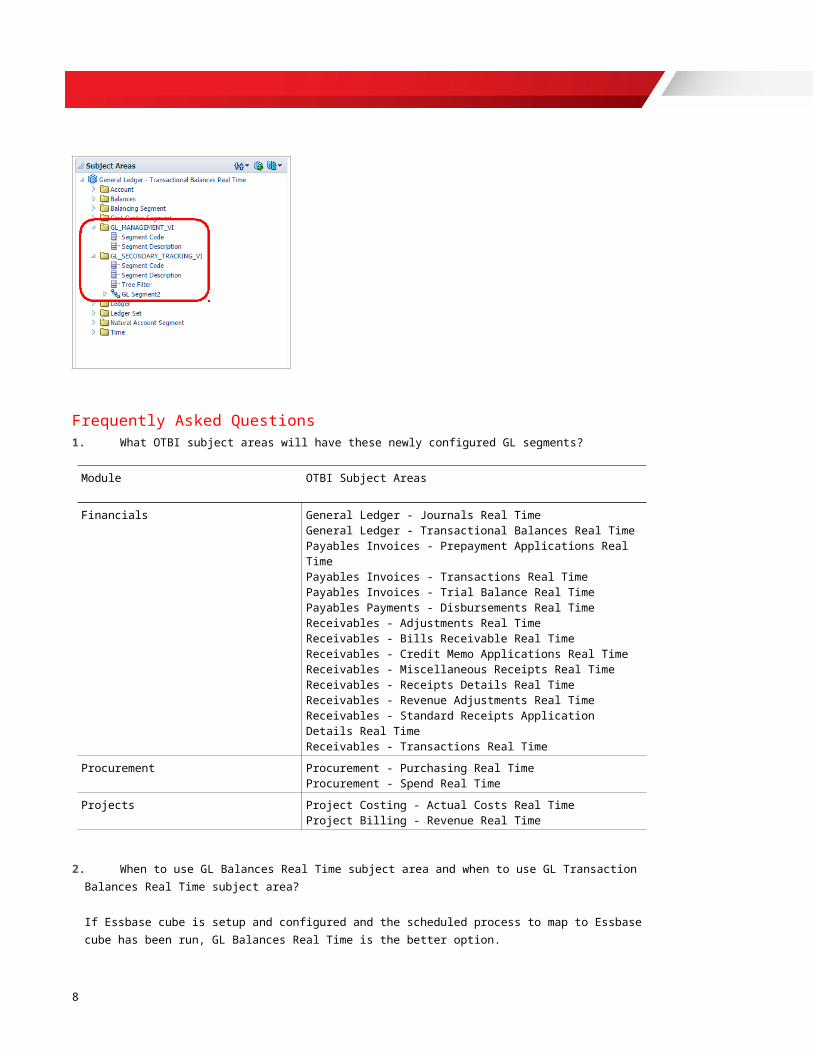
Frequently Asked Questions1. What OTBI subject areas will have these newly configured GL segments?
Module OTBI Subject Areas
Financials General Ledger - Journals Real Time General Ledger - Transactional Balances Real TimePayables Invoices - Prepayment Applications Real TimePayables Invoices - Transactions Real TimePayables Invoices - Trial Balance Real TimePayables Payments - Disbursements Real TimeReceivables - Adjustments Real TimeReceivables - Bills Receivable Real TimeReceivables - Credit Memo Applications Real TimeReceivables - Miscellaneous Receipts Real TimeReceivables - Receipts Details Real TimeReceivables - Revenue Adjustments Real TimeReceivables - Standard Receipts Application Details Real TimeReceivables - Transactions Real Time
Procurement Procurement - Purchasing Real TimeProcurement - Spend Real Time
Projects Project Costing - Actual Costs Real TimeProject Billing - Revenue Real Time
2. When to use GL Balances Real Time subject area and when to use GL Transaction Balances Real Time subject area?
If Essbase cube is setup and configured and the scheduled process to map to Essbase cube has been run, GL Balances Real Time is the better option.
» GL Balances Real Time subject area is mapped to Essbase cube, which contains the GL balance leaf level + pre-aggregated rollup of balances along all the segment hierarchies. If Essbase is setup and the necessary configuration steps are complete, this subject area is preferable for GL balances because of better aggregate performance and support for hierarchical drilldown.
» GL Balances Transactions Real Time subject area is based on relational tables showing leaf level balance. So it will show data even if the configuration and mapping to Essbase cube is not done. Also, the when
8

trying to create some cross subject area report between GL Balance and GL Journals, this subject area might be better suited since it is based on RDBMS tables
3. How does OTBI support single COA structure and multiple structure instances? i.e. Consider a scenario where you have two or more ledgers with separate chart of account segments. What to do if a segment from COA1 and another segment from COA2 needs to be mapped to the same BI Object name?
» The mapping is always between a segment label and BI object. One BI Object (Dim - GL SegmentX) can be mapped to one and only one segment label
» The solution for the above scenario is to ensure the same segment label is assigned to both COA1 and COA2 segments
» Next, assign the BI Object name to this single segment label
Troubleshooting Tips
1. How do I know if the configuration of GL segments for OTBI was successful?
Navigate to Reports and Analytics and create a new ad-hoc report using one of the subject areas mentioned in the Frequently Asked Questions
Ensure the desired GL segments are available. Select the desired dimension attributes and generate a report. If the report query returns the desired values, then the configuration of accounting segments was successful.
2. I see the desired accounting segments when I create a new OTBI subject area in Answers. However, I get an error message while generating an Answers query
» If there is only a single chart of account structure instance, check to ensure the tree structure is assigned to the GL segment as outlined above
» If there is more than one chart of account instance, ensure that there is at least one data hierarchy set up using the tree structure. In addition, ensure that the segment label is assigned to the different COA segments, as outlined above in the FAQ. Next, deploy the flex field and run the scheduled processes outlined in Steps 5 and 6
3. I see an error message when I run the schedule processes. What could be the reason?
» Create Rules XML File for BI Extender Automation» Import Oracle Fusion Data Extensions for Transactional Business Intelligence
9

Ensure that you run the schedule process ‘Publish Account Hierarchies’. This needs to be run before running the two processes ‘Create Rules XML File for BI Extender Automation’ and ‘Import Oracle Fusion Data Extensions for Transactional Business Intelligence’
4. I added a new value to a value set associated with a GL segment. However, I don’t see this value in the ad-hoc reports generated with OTBI. What could be the problem?
The problem could be because this node is not tied to the tree structure. Re-run the hierarchy flattening process » Go to Navigator-> Setup and maintenance » Search for "Manage%Account%Hierarchies%» Pick the desired hierarchy and then click on Action -> Flattening -> Column Flattening» Re-run the report after completing the above steps
Reference Documents» Oracle® Fusion Applications Financials Implementation Guideo http://docs.oracle.com/cd/E38454_01/fusionapps.1117/e20375.pdf
» Oracle® Fusion Transactional Business Intelligence - Administrator’s Guide Release 11.1.8 (E49138-02)o http://docs.oracle.com/cd/E39540_01/fusionapps.1111/e49138.pdf
» Reporting Tools in Oracle Fusion Financialso http://www.oracle.com/us/products/applications/fusion/financials/oracle-fusion-financials-1939055.pdf
Oracle Corporation, World Headquarters Worldwide Inquiries500 Oracle Parkway Phone: +1.650.506.7000Redwood Shores, CA 94065, USA Fax: +1.650.506.7200
10

Copyright © 2014, Oracle and/or its affiliates. All rights reserved. This document is provided for information purposes only, and the contents hereof are subject to change without notice. This document is not warranted to be error-free, nor subject to any other warranties or conditions, whether expressed orally or implied in law, including implied warranties and conditions of merchantability or fitness for a particular purpose. We specifically disclaim any liability with respect to this document, and no contractual obligations are formed either directly or indirectly by this document. This document may not be reproduced or transmitted in any form or by any means, electronic or mechanical, for any purpose, without our prior written permission.
Oracle and Java are registered trademarks of Oracle and/or its affiliates. Other names may be trademarks of their respective owners.
Intel and Intel Xeon are trademarks or registered trademarks of Intel Corporation. All SPARC trademarks are used under license and are trademarks or registered trademarks of SPARC International, Inc. AMD, Opteron, the AMD logo, and the AMD Opteron logo are trademarks or registered trademarks of Advanced Micro Devices. UNIX is a registered trademark of The Open Group. 0615
11
C O N N E C T W I T H U S
blogs.oracle.com/oracle
facebook.com/oracle
twitter.com/oracle
oracle.com
C O N N E C T W I T H U S
blogs.oracle.com/oracle
facebook.com/oracle
twitter.com/oracle
oracle.com
C O N N E C T W I T H U S
blogs.oracle.com/oracle
facebook.com/oracle
twitter.com/oracle
oracle.com