what is mahara? · 2019-07-17 · with mahara, you control which items and what information within...
TRANSCRIPT

What is Mahara?
© West College Scotland 1 May 2019
At the simplest level, Mahara is two things: an ePortfolio and a social networking
system combined. An ePortfolio is a system in which students can record ''evidence
of lifelong learning'' -- such as essays, artwork or other such things they produce that
can be stored digitally. Such things are known as artefacts in Mahara.
But Mahara is much more than just a place to store files. Mahara also includes
blogging, a résumé builder, and Moodle integration.
With Mahara, you control which items and what information within your portfolio
other users see. Such items and information are termed artefacts. To facilitate this
access control, all artefacts you wish to show to other users need to be arranged into
one area. In Mahara this compilation of selected artefacts is called a ‘page'. You can
have as many pages as you like, each with a different number of artefacts (images,
test, video, links or files), intended purpose and audience. Your audience, or the
people you wish to give access to your page, can be added as individuals or as a
member of a group.
For example, you could create:
• A page for your tutor, which includes assessments and your reflective journal
• A page to showcase your best work and résumé for potential employers
A single page or a collection of pages can make up your portfolio. Unless artefacts
are placed in a page, they are not visible to anybody but you. You can use files that
you uploaded or journal entries you wrote in as many pages as you wish. You only
need one copy of your artefact.

© West College Scotland 2 May 2019
Imagine you collected all your artefacts in a shoe box. Whenever you have a new
artefact, you add it to the shoe box. When you are ready to create your portfolio, you
take a look at the artefacts in your shoe box and choose those that you want to make
available on a portfolio page. You can arrange the artefacts on to your liking.
Overview of the Dashboard
You can change certain aspects of your dashboard, namely the user-specific
information, but a lot of what you see is static to allow you to quickly access other
parts of Mahara.
Your homepage is your dashboard from which you can access a number of areas in
Mahara conveniently.
1. General navigation Area: Move from one area of Mahara to the next.
2. Username: The username is displayed to indicate who is logged.

© West College Scotland 3 May 2019
3. Settings: This link gives you access to account settings and notifications.
4. Inbox: Go to your Mahara inbox to check for new messages. When you have
unread messages, the counter displays the number of unread messages.
5. User search: Search for users who have an account to view their profile page
and check which pages they have made accessible to you.
6. Personal information: In this box a number of constant and dynamic information
is displayed:
a) Your name is linked to your profile page.
b) Your profile picture and editable about me section.
c) Your friends.
d) Your Portfolios and Groups
e) If you tagged artefacts or pages with the tag a link to them is placed here.
f) Create post on your own personal walls for other members to view
7. User-specific information: You can customise this area on your dashboard to
put blocks there that you want to see every time you log in. Just click edit
Dashboard.
Quick Links
When you log in to Mahara for the first time, you see three boxes with quick links:
• Create: Develop your portfolio
• Share: Control your privacy
• Engage: Find people and join groups
With the help of these quick links you can reach the different parts of your portfolio
directly from your dashboard.
© West College Scotland 4 May 2019
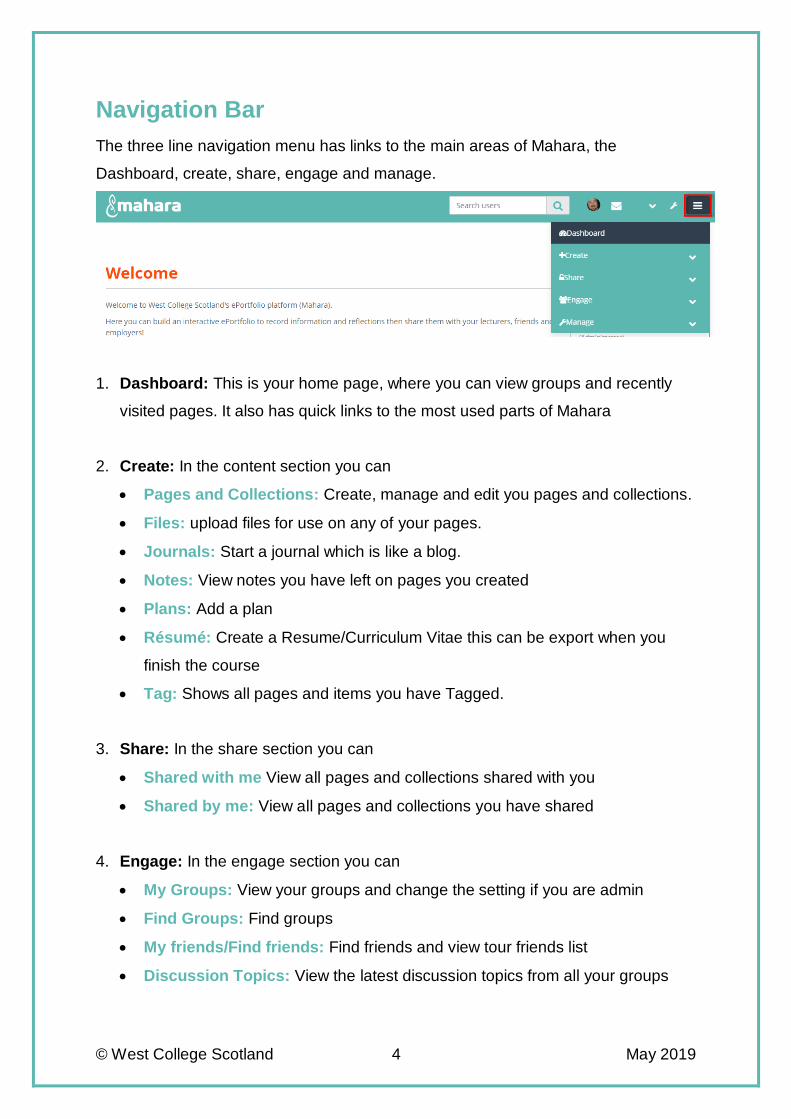
Navigation Bar
The three line navigation menu has links to the main areas of Mahara, the
Dashboard, create, share, engage and manage.
1. Dashboard: This is your home page, where you can view groups and recently
visited pages. It also has quick links to the most used parts of Mahara
2. Create: In the content section you can
• Pages and Collections: Create, manage and edit you pages and collections.
• Files: upload files for use on any of your pages.
• Journals: Start a journal which is like a blog.
• Notes: View notes you have left on pages you created
• Plans: Add a plan
• Résumé: Create a Resume/Curriculum Vitae this can be export when you
finish the course
• Tag: Shows all pages and items you have Tagged.
3. Share: In the share section you can
• Shared with me View all pages and collections shared with you
• Shared by me: View all pages and collections you have shared
4. Engage: In the engage section you can
• My Groups: View your groups and change the setting if you are admin
• Find Groups: Find groups
• My friends/Find friends: Find friends and view tour friends list
• Discussion Topics: View the latest discussion topics from all your groups

© West College Scotland 5 May 2019
5. Manage: In the manage section you can
• Import: Import a portfolio you already created
• Export: Export you whole portfolio to take to another institute
Create a Page in Mahara
1. Select the Create section
2. Click on Add and select page

© West College Scotland 6 May 2019
3. Fill in the Page Title and a small description below and click Save you can
also change the layout here.
Once you save will go automatically to the edit content screen where you can start to
add content to your page.

© West College Scotland 7 May 2019
Create a Page in Mahara
1. Select one of your Pages or Create a new page in the Create area
2. Select the Edit this Page button this happens automatically when you create
a new page.
3. Select the Content type on the left menu that you want to display or put on
your page, you can drag and drop the selection in any of the highlighted
blocks in the middle area. (These blocks can be arranged by clicking edit
layout.

© West College Scotland 8 May 2019
4. If you selected media that needs to be uploaded you will see the following
screen.
5. Click on Choose Files to find the file and upload it (If you already uploaded
this file to another page it will be listed under Home).
6. Save once you have uploaded the file
Create a Page in Mahara
1. Select the page you want to share in the Create section
2. Select Edit

© West College Scotland 9 May 2019
3. Select the Share Page link
4. In the Edit Access area:
1. Select who you want to share with i.e group, user
2. Search for their name and select
3. You can set a time frame to allow access
4. You can set multiple people/groups to share the page with by selecting
a new Share with drop down.
5. You can view what pages you have shared in the Share Section on the
dashboard under Pages.

© West College Scotland 10 May 2019
Groups
A group is an area where students and lecturers can share pages and collaborate.
Whoever creates the group will be the administrator, but more administrators can be
added. The group also contains a forum area for the members. Groups can be setup
either private or public. You will find your My Groups in the information block on the
dashboard.
1. There are seven sections to in each Group for you to navigate
2.

© West College Scotland 11 May 2019
3. Section descriptions
• About: This is the home page of your group, it will show any updates
or recent activity, this can be customized by the group administrators. It
also list the pages shared or create win the group.
• Members: You can see what members are in the group and add new
members if you have administration rights within the group.
• Forums: You participate in forum discussion for you group
• Pages: Shows all the pages shared and created within your group
• Collections: Shows and collections your group has(a group of pages)
• Journals: Start a journal in your group for other members to view, this
is a personal blog
• Share: Shows what pages you have shared with the group
• Files: You can upload files directly for other members to access, this
area also gives you access to any files other members have uploaded
Creating a Group
Anyone can create a group, it could be set up by your Lecturer or you could create
one to share ideas and information with you classmates.
1. To create a group click on My Groups in the information block

© West College Scotland 12 May 2019
2. Click on Create Group
3. Give the group a name and a description and change the settings if needed,
these settings can be modified at any time.
• Open: If yes user can join without approval from administrators
• Controlled: If Yes administrators can add members and they
cannot leave
• Request: Users can send membership requests to group
administrators.
• Roles: You can choose which roles will be available in your
group.
• Create and edit: set to who you want to edit or create pages in
your group
• Allow submissions: default setting No
• Visibility settings: Change on who you want to see this group
• General: No changes unless you want to turn off notifications
4. You can edit a group and at members, pages and collections at any time.