welding tips start at one end of pattern. lay darkest pieces onto pattern
DESCRIPTION
ozfeathers.com.au. WELDING TIPS Start at one end of pattern. Lay darkest pieces onto pattern. Line up with black lines, then lightly hot-tack into place at corners. Leave on pattern. Select next colour (leave LIGHTEST till last), line up into correct position on the pattern. - PowerPoint PPT PresentationTRANSCRIPT

WELDING TIPSStart at one end of pattern.Lay darkest pieces onto pattern.Line up with black lines, then lightly hot-tack into place at corners.
Leave on pattern.
Select next colour (leave LIGHTEST till last), line up into correct position on the pattern.
Hot tack* together - one dot weld per 2 cm is fine.
*dot with iron and “press” the weld with opposite hand to fix.
ozfeathers.com.au
ozfe
athe
rs.c
om
.au

WELDING TIPS
Hot tack* together - one dot weld per 2 cm is fine.
*dot with iron and “press” the weld with opposite hand to fix.
Continue until all pieces are in place, dotted, and still attached to pattern.
Check all welds are firm, no gaps.
Start at one end, GENTLY peel & roll fabric off paper, taking care not to pop any welds. ROLL UP, with seam side (lighter colours) visible.
READY TO SEW!
ozfeathers.com
.au

SEWING SEAMSZig zag stitch width OUGHT to match width of welded seam if possible.Sew from the lighter colour side for ease of work.At end of each piece, sew over starting point and back tack for few stitches.
ozfeathers.com.au ozfeathers.com.au

SEWING TIPSKeep work rolled either side of thesewing area. Hold with pin or bulldog clip.
12 stitches to 1 inch seems “ideal” - but, personal choice.
ozfeathers.com.au
ozfeathers.com.au
ozfeathers.com.au

SEWING CIRCLES OR CURVES - correctAim the sewing foot GAP to be over the seam width.Sewing from LIGHT side means underneath fabric is visible.Steer the sewing foot carefully so that the needle COVERS the cut edge of the topmost fabric.
ozfeathers.com.au

ozfeathers.com.au
ozfeathers.com.au
SEWING CIRCLES OR CURVES – OOPS!If the sewing foot points AWAY from the line of the seam… STOP!Leave needle DOWN in fabric, lift presser foot, realign.Continue.

EDGING TAPE 1Using zig zag stitch, sew 3cms. of folded tape first before introducing the trailing edge of the banner.Keep stitches ON edging tape only.
ozfeathers.com.auozfeathers.com.au

EDGING TAPE 2Lay trailing edge up to the fold of the edging tape.Sew the full length, including any excess tape at the end.
ozfeathers.com.au
ozfeathers.com.au

SEWING SLEEVEFold up 2cms (make sure fold is 90˚) and sew.Fold piece of loop tape in half and lay OFF CENTRE on same side as hem,Overhang by 1 cm.Stitch into place. (You can add bungee or cord later.)
ozfeathers.com.au ozfeathers.com.au

FOLDING SLEEVEFold sleeve in half, WRONG sides together. (Loop is on INSIDE.)If needed, pin edges together at intervals.
ozfeathers.com.au
ozfeathers.com.au
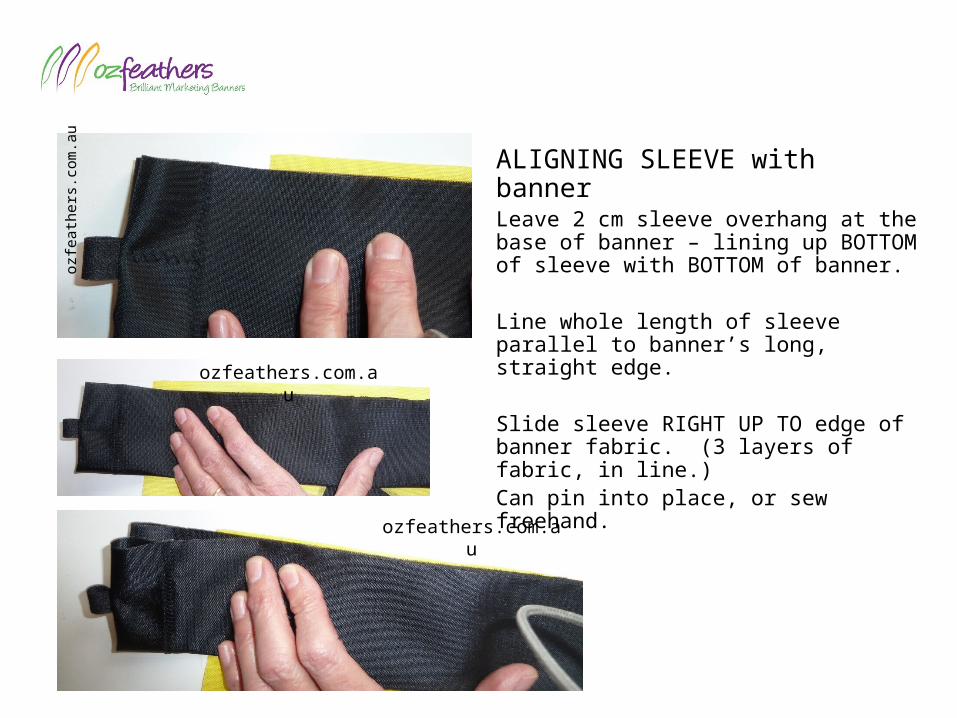
ALIGNING SLEEVE with bannerLeave 2 cm sleeve overhang at the base of banner – lining up BOTTOM of sleeve with BOTTOM of banner.
Line whole length of sleeve parallel to banner’s long, straight edge.
Slide sleeve RIGHT UP TO edge of banner fabric. (3 layers of fabric, in line.)Can pin into place, or sew freehand.
ozfeathers.com.au
ozfeathers.com.au
ozfe
athe
rs.c
om.a
u
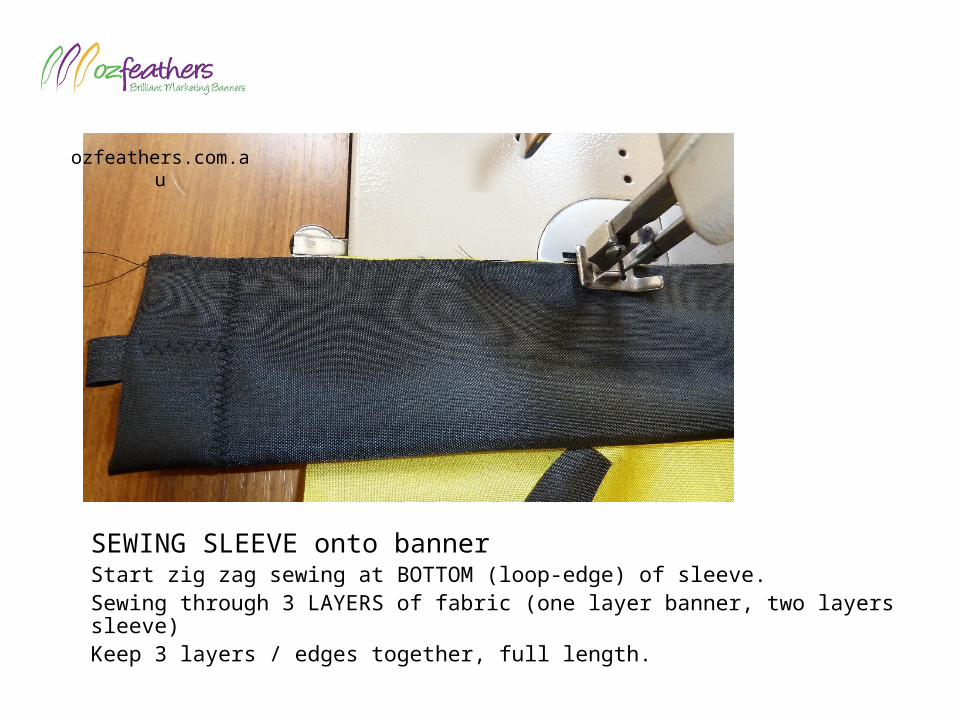
SEWING SLEEVE onto bannerStart zig zag sewing at BOTTOM (loop-edge) of sleeve.Sewing through 3 LAYERS of fabric (one layer banner, two layers sleeve)Keep 3 layers / edges together, full length.
ozfeathers.com.au

FINISHING SLEEVETrim edging tape (ONLY) to be flush with TOP edge of banner.Continue sewing to the end of the sleeve
ozfeathers.com.au
SLEEVE NOW LOOKS like… ozfeathers.com.au
ozfeathers.com.au
2
1
3
top
bottom

ozfeathers.com
.au
FINAL SEAM - SLEEVEHave banner fabric on top, bottom of the banner closest to you.Open black sleeve out to the right hand side.Fold / lay seam flat, black fabric on top.Sew full length top to bottom. Any stitch.

ozfeathers.com.au
TRIMMED
FOLD
SEW
CUT EXCESS
ozfeathers.com.au
ozfeathers.com.au
ozfeathers.com.au
ozfeathers.com.au
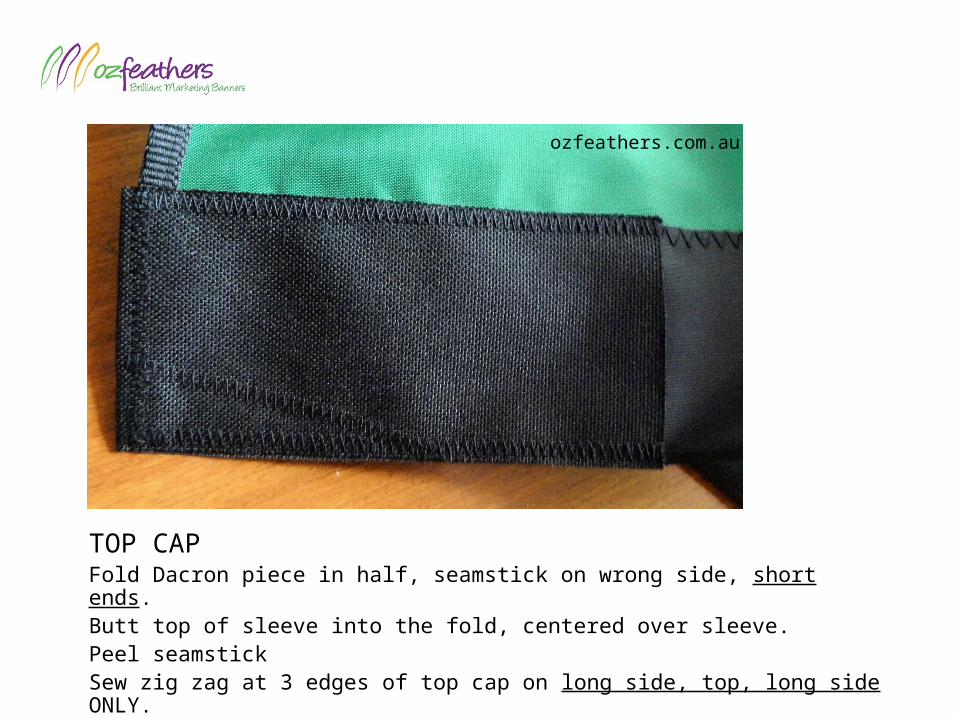
TOP CAPFold Dacron piece in half, seamstick on wrong side, short ends.Butt top of sleeve into the fold, centered over sleeve.Peel seamstickSew zig zag at 3 edges of top cap on long side, top, long side ONLY.