web viewmatches records with title fields containing the word "the" appearing twice in...
TRANSCRIPT

Create ListsSierra
Rev. 02-07-15 - lau

Copyright ©2015 by Innovative Interfaces, Inc.This publication is supplied for the exclusive use of customers of Innovative Interfaces with the understanding that it shall not be shown or distributed to anyone outside of the customer's organization without the prior written permission of Innovative Interfaces. This publication may be copied only if the copies are for the exclusive use of staff members of libraries that have purchased the Innovative system.

TABLE OF CONTENTSOverview........................................................................................................... 6
Create Lists Screen...............................................................................................................................6
Toolbar................................................................................................................................................6
Button Menu.......................................................................................................................................7
Tab Menu............................................................................................................................................7
Sorting Headers...................................................................................................................................7
Create Lists Settings.............................................................................................................................8
Record Links.......................................................................................................8Review Files....................................................................................................... 9
Creating a New Review File.....................................................................................................................9
Creating a Review File Off of another Review File...................................................................................9
Search Parameters.................................................................................................................................10
Store Record Type.............................................................................................................................10
Range of records................................................................................................................................11
Other Components............................................................................................................................11
Operator........................................................................................................................................11
Type...............................................................................................................................................12
Field...............................................................................................................................................12
Condition.......................................................................................................................................12
Value A & Value B..........................................................................................................................13
Other Options................................................................................................................................13
Regular Expressions...........................................................................................................................14
Advanced Keyword Searches.................................................................................................................15
Advance Word Search Syntax........................................................................................................15
Fixed-length fields.........................................................................................................................15
Case Sensitivity..............................................................................................................................16
Adjacency......................................................................................................................................16
Special Characters..........................................................................................................................17
Diacritics........................................................................................................................................17
Wildcards.......................................................................................................................................17
Boolean Operators.........................................................................................................................17
Specifying Data by the Marc Tag...........................................................................................................18
iii

Use Existing Search................................................................................................................................18
Reuse a Review File...............................................................................................................................19
Saving a Search......................................................................................................................................20
Retrieve Saved Query............................................................................................................................20
Managing Review Files.....................................................................................21Button Menu.........................................................................................................................................21
Sort Records......................................................................................................................................21
List Records........................................................................................................................................21
Show Records....................................................................................................................................21
Add................................................................................................................................................22
Edit.................................................................................................................................................22
Dedupe..........................................................................................................................................22
Show Info...........................................................................................................................................22
Export Records...................................................................................................................................23
Delimiters..............................................................................................................................................25
Field delimiter....................................................................................................................................25
Text qualifier......................................................................................................................................25
Repeated field delimiter....................................................................................................................25
Maximum field length........................................................................................................................25
Toolbar Menu........................................................................................................................................25
Dedupe - Removing Duplicate Records..............................................................................................25
Append - Add a new search to an existing list...................................................................................26
Copy - copy an existing search into another review file....................................................................26
Rename..............................................................................................................................................27
Own - Claim or un-claim ownership of a review file..........................................................................27
Manipulating an exported list...........................................................................27Excel…................................................................................................................................................27
List Examples....................................................................................................30Item.......................................................................................................................................................30
Status – i.e. Missing, Billed, Lost, Paid, etc........................................................................................30
Location Count...................................................................................................................................31
Not Circulating...................................................................................................................................32
Withdrawn.........................................................................................................................................33
Billed..................................................................................................................................................35
iv

Billed ILL.............................................................................................................................................36
Weeding by Location code.................................................................................................................38
Weeding by Dewey Call # or LC #.......................................................................................................40
Patron....................................................................................................................................................42
Non-Resident Patron Expirations.......................................................................................................42
Pcodes are in a run (133, 134, 135, etc.)........................................................................................42
Pcodes are not in a run (586, 590, etc.).........................................................................................43
New Patrons......................................................................................................................................45
Patrons who should have received an Overdue notice......................................................................46
Patrons who should have received bills.............................................................................................48
v

OverviewCreate Lists is a program that brings records together, using Boolean logic, into a review file based on common denominators. At the time of the search, the records in the list met the criteria listed in the search. Create Lists provides you with the ability to view records live or to export a snapshot of the data.
What beneficial uses do Create Lists have? It allows you to…
gather records for updating or deletion.
work your way through a list of records that need individual maintenance.
compile lists to produce paper copies, email to yourself, or export to a spreadsheet or database.
view the review file in the Statistics function in order to provide a statistical overview.
Create Lists Screen
ToolbarAppend - Add records to a review file.Dedupe - Remove duplicate records from a review file.Copy - Copy an existing review file to an empty review file.Empty - Clear or empty a selected review file.Rename - Rename the selected review file.Own - Claim ownership of a review file.Release - Release ownership of a review file.Cancel - Ends the current process for the selected review file.
6

Button Menu
View Drop-Down Menu - Filters the view between All review files or those that are Complete, In Progress, Empty or Limited.
All - Default selection. Shows all available review files. Complete - Shows all completed lists. In Progress - Shows lists that are currently in progress. Empty - Shows all empty review files. Limited - Shows all empty review files and completed lists for the current user.
Search Records - Opens the Boolean Search screen for the selected review file.Sort Records - Sorts the selected list based on the parameters selected.List Records - Prints the selected list based on the parameters selected.Export Records - Exports the selected list based on the parameters selected.Show Records - Shows the records retrieved for the selected list.Show Info - Shows the parameters entered for the selected list.
Tab MenuReview Files - Shows the Review Files.Saved Searches - Shows the Saved Searches.Saved Sorts - Shows the Saved Sorts.Saved Lists - Shows the Saved Lists.Saved Exports - Shows the Saved Exports.
Sorting HeadersTo sort the Review Files by the following fields, select the header once for Ascending and twice for descending order.
Name - Name assigned to review file. Current Records - Number of records the search compiled. Max Records - Maximum number of records the review file can hold. Type - Type of records stored in the list. Status - Status of the review file: complete, in progress, or empty Login - The login or username used to create the list. Created [date/time] - Date and time the list was completed.
7

Create Lists SettingsSettings for Create Lists can be adjusted by going to Admin>Settings>Create Lists tab.
Record LinksHow do records link?
The below diagram helps show how different records are connected. It also details why some search parameters aren’t available to use depending on the Store Record Type.
8
Figure 1
LINKLINKLINK
LINKLINK
Checkin Record
Order Record
Patron Record
ItemRecord
Bibliographic Record
Course Record
ASSOCIATED

Review Files
Creating a New Review File
1. Select an empty review file.2. Click the Search Records button.3. The Boolean Search window will appear.4. Name the Review File.
Figure 2
5. Enter the search parameters.6. When ready, click the Search button to run the list.
Creating a Review File Off of another Review File
1. Select an empty review file.2. Click the Search Records button.3. The Boolean Search window will appear.
9

Figure 3
4. Name the Review File.5. Select the Store Record Type. Remember this is dependent on the record links (refer to Record
Links), so the file you wish to create a review on has to be either the exact record type or a linked record type.
6. Change the Range to Review.7. In the Review file drop-down menu, scroll until you find the review file you want to create a list off
of.8. Enter the search parameters.9. When ready, click the Search button to run the list.
Search Parameters
Store Record TypeDepending on your search, it is best to create the store type as the type of records you primarily want to pull. Associated or linked data will be available to view or export based on your search, but indicates here what record type you want for results.
10
Figure 4

Figure 5
Range of recordsIndicate which range of records the system should search by choosing a specific range, a review file as a range, or an advanced range. A narrower range usually results in a speedier search, but keep in mind the parameters will affect this process, as well.Using the system default will search through all the records, where looking at just your barcode range will narrow down the search and speed it up.
Figure 7
Range - Search a range of records, such as the system default beginning and ending records or record #s of your choosing.Review - Create a search off of another existing list (refer to Creating a Review File off of another Review File).Index - Search the database by author, title, call no., barcode, patron name, etc. The options for index fields will change depending on the Store Record Type that was chosen.Advanced - Use advanced keyword syntax to search fields (i.e. a: author, t: title, s: subject, etc.). Refer to Advanced Keyword Searches for more information.
Other ComponentsWhen setting up your parameters, it is best if you place your parameters in a hierarchical manner in order to grab the best possible results. Putting the parameters that encompass the largest part of the search at the top then adding any additional below, helps to give the search structure and clear direction. To create the parameters, key components are identified in order for the system to know what information is needed (TRUE) or not needed (FALSE). This is where Boolean Logic comes into play. The components entail the operator, type, field, condition and the values.
Operator
This field allows you to connect or limit data by using AND and OR. When using AND, this limits the system to look for data that meets all the requirements that have been set in the search. When using OR, the system knows to look for any data that meets the requirements.
Type
11
Figure 6

Choose the record type that the parameter is to begin with. This option will change according to the Store Record Type, so be aware that with certain record types you won’t be able to search by other record types in your parameters because they aren’t linked data. For example, if the Store Record Type is set to Bibliographic, the parameter Type will only offer Bibliographic, Order, Checkin and Item for you to search by. Refer to the Record Links 1 image for a visual guide as to how the records are connected.
Figure 8
Field
Depending on the record type you chose in the Type, you will have a varying degree of options to choose from (Figure 8).
Condition
Set the condition to how you want the search to match. If you want the parameters to match exactly, then choose Equal to and so on and so forth.
Condition options (Figure 9):> greater than< less than>= greater than or equal toN not withinH hasO At Least one Field doesn’t have^ starts with= equal to
!= not equal to<= less than or equal toW BetweenA All Fields don’t haveR matches$ ends withe exist (available with certain fields)n not exist (available with certain fields)
12
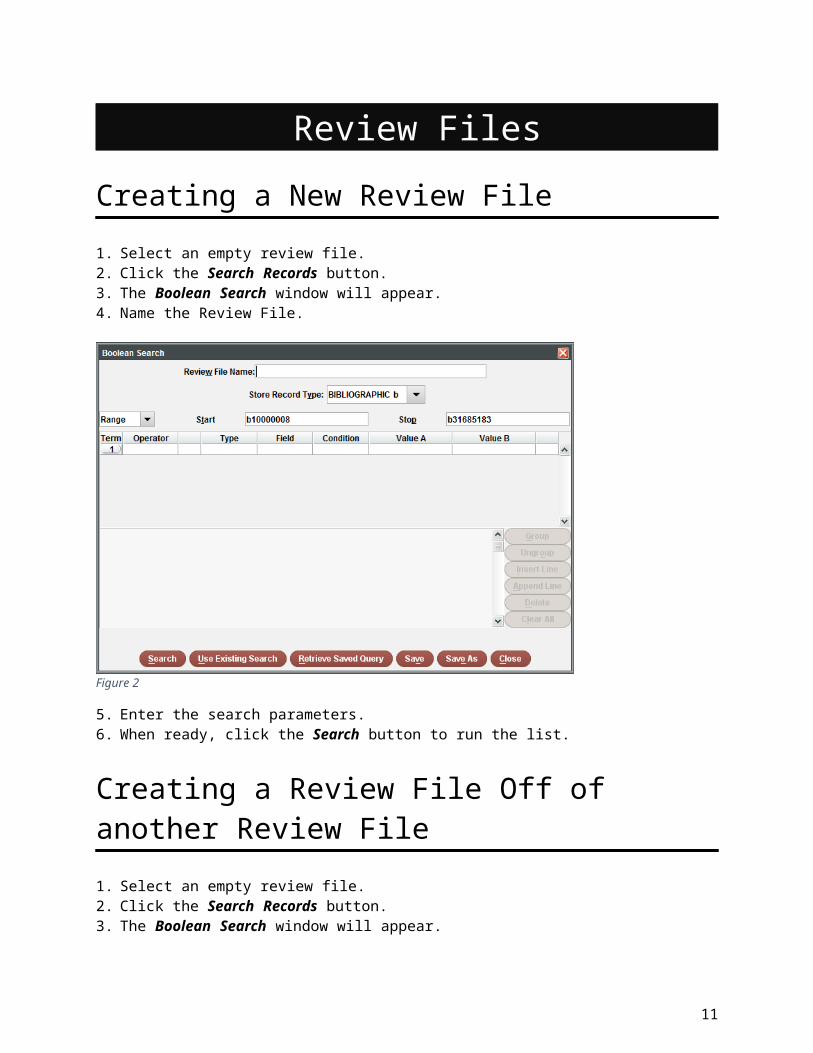
Figure 9
Value A & Value B
In Values A & B, you will enter in the data of your search based on the Type and Field you chose at the beginning of the parameter string. For example, if you chose Type: Patron, Field: Exp. Date, Condition: W between; then you would enter a beginning date into Value A and an ending date into Value B. Again, this will fluctuate depending on your choices in the previous parameter data.
Figure 10
Other Options
Group – If you need to group data, you can group parameters by selecting them and choosing Group.
Ungroup – To remove a group, select the grouped data and then click Ungroup.
Insert Line – Inserting a line between two rows can be done by selecting the row which you want the line to appear above.
Append Line – Appending a line will add a line to the end of the rows of parameters.
Delete – Deletes the selected row.
Clear All – Deletes all data entered in the Boolean Search screen.
13
Figure 11

Regular ExpressionsUsing the Condition R – Matches, enables the search to capture variances.
+ The plus sign is a special regular expression symbol that allows you to match one or more of the preceding characters. For example, a search for:
PHYSICAL DESCRIPTION matches x+i+
matches records with PHYSICAL DESCRIPTION fields containing "xi, 318 p. ;|c18 cm.," "xii, 610, [29] p.," "xix, 374 p.," and "xxii, 314 p."
* The asterisk allows you to match zero or more of the preceding characters. For example, a search for:
TITLE matches dea*f
matches records with TITLE fields containing "Eating defensively" and "Deafness in infancy and early childhood."
. The period is a special symbol that matches any single character, including letters, numbers, spaces, and punctuation marks. For example, a search for:
AUTHOR matches j.n
matches records with AUTHOR fields containing "Jones, Aubrey B," "Heise, Jon O.," and "Janaro, Richard Paul."
You can combine the period with the plus sign or asterisk to search for more than a single character. For example,
AUTHOR matches j.*n
matches all of the records of the previous search as well as records containing "Couger, J. Daniel," "Diebold, John," and "Rosenberg, Jerry Martin."
[ ] Square brackets are special regular expression symbols that enable you to define patterns that match one of a group of alternatives (a character class). For example, a search for:
AUTHOR matches jo[ah]n
matches records with AUTHOR fields containing "Johnson, Stephen M.," "Narciso, John,|d1924-," and "Fromer, Margot Joan,|d1939-."
You can use a hyphen within square brackets to specify a range of characters, for example, "[0-9]" matches any digit and "[a-z]" matches any letter. You can also combine the square brackets with the plus sign (or the asterisk) to search for a string of characters of any length:
AUTHOR matches [a-z] man
matches records with AUTHOR fields containing "Maurer, Hermann A.," "Rothman, Stanley," and "Enger, Norman L."
If the first character in the square brackets is a caret '^', then the search matches all characters that are not in the character class. See About Subfield Tags for an example of this.
14

{ } Curly braces allow you to specify that a character or pattern must occur a specific number of times. For example:
TITLE matches l{3}
matches records with TITLE fields containing the letter 'l' appearing three times in succession, such as "illlustrated". This can be useful in catching data entry errors in the database.
( ) Parentheses create groups that can be followed by modifiers. For example:
TITLE matches (the ){2}
matches records with TITLE fields containing the word "the" appearing twice in succession, such as "The the book of lists". This can be useful in catching data entry errors in the database.
Advanced Keyword Searches
Advance Word Search Syntax
The Advanced Word Search (AWS) index is a form of the keyword phrase index. It takes specified strings of text from variable-length fields and indexes each word separately.
The AWS index is made up of segments (also called slices). When the system indexes a variable-length field, it places the indexed data into a segment of the database reserved for the field's type. The default segments are:
Segment Name Index Tag SynonymTitle t, ti, titleAuthor a, au, authorSubject d, s, su, subjectNote n, no, note
For example, to search for the book "The importance of being Ernest" by Oscar Wilde, you could limit the results to records with the name "Wilde" in the Author field and the word "Ernest" in the Title field by entering:
a:wilde and t:ernest
Figure 12
Fixed-length fields
15

Certain fixed-length fields can be used to limit the advanced keyword search.
Fixed-field Index Tag SynonymMaterial Type mattype:mattype5Language lang:langengLocation branch:branchoplvi
NOTE: The underlined portion of the Index Tag Synonym is indicative of the variable part of the string. Change this part to whichever mattype, language or branch you are searching for.
For example, to search for the DVD "Hobbit" by Oscar Wilde, you could limit the results to records with the name "Tolkien" in the Author field and the word "hobbit" in the Title field and then “mattype5” in the Material type field by entering:
a:tolkien and t:hobbit and mattype:mattype5
Figure 13
Case Sensitivity
All alphabetic characters in the search expression are converted to lowercase before the search is performed. Therefore, there is no difference between searching for Jean Baudrillard and jean baudrillard.
Adjacency
Words that are adjacent to each other are considered to be one search string, except for the Boolean operators AND, OR, and NOT. Only records that contain those words in any order will appear in the search results.
Figure 14
16

Special Characters
The following punctuation characters are converted to the SPACE character in the search expression:
Character Name Character Name Character Name\ Backslash . Period / Forward slash
@ "at" sign = Equals sign ^ Caret; Semicolon % Percent sign # Pound sign` Backtick , Comma$ Dollar sign _ Underscore
Diacritics
Sierra indexes words containing diacritics both with and without the diacritics.
If you enter a search string containing diacritics, Sierra retrieves only records with words containing those diacritics. For example, the search string caña retrieves only records with a tilde over the n.
If you enter a search string without any diacritics, the system retrieves both records with words containing diacritics and records with words not containing diacritics. For example, the search string cana retrieves records containing caña as well as cana.
Combining diacritics are treated as two characters.
Wildcards
Search expressions can include the following wildcards:? - Matches any single character in the specified position in the word. For example, anders?n matches both anderson and andersen. The '?' wildcard functions only after at least two characters have been entered. For example, a?derson produces no results, but an?erson matches anderson.
* - Matches any number of non-space characters, starting at the specified position in the word. For example, "inter*" will match all words that begin with "inter" (e.g., "internal", "internet", "international", etc.). There is no requirement for a minimum number of characters before the wildcard symbol ('*'). Note, however, that if too many matches are made against the wildcarded term, no results are returned.
Boolean Operators
AND, OR and NOTWhen using AND, this limits the system to look for the specified keywords. When using OR, the system knows to look for any of the keywords entered. NOT indicates to the system that the following keyword(s) are not to be included in the search.
Boolean Operator SynonymAND &OR |NOT !
17

Specifying Data by the Marc Tag
It is possible to add marc tags, indicators and up to four subfields as components of your search string. Choose ! Marc Tag Field in the Boolean Search window Field.
Figure 15
Figure 16
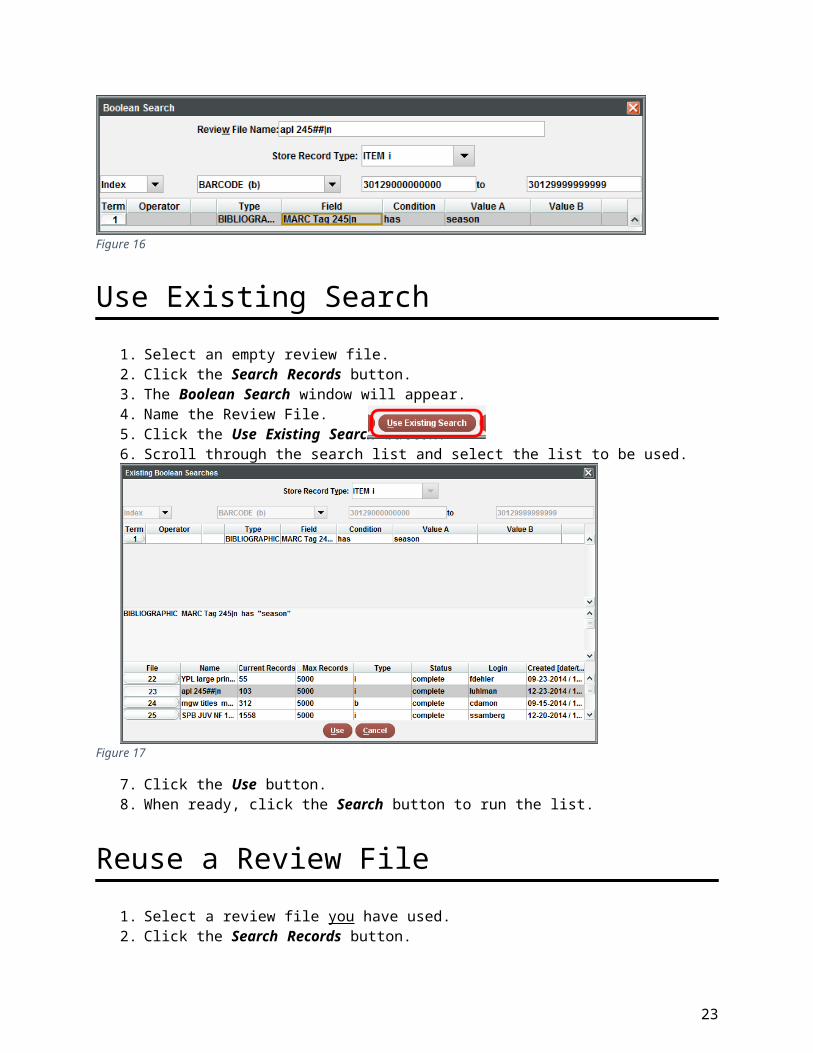
Use Existing Search
1. Select an empty review file.2. Click the Search Records button.3. The Boolean Search window will appear.4. Name the Review File.5. Click the Use Existing Search button. 6. Scroll through the search list and select the list to be used.
18

Figure 17
7. Click the Use button.8. When ready, click the Search button to run the list.
Reuse a Review File
1. Select a review file you have used.2. Click the Search Records button.
Figure 18
3. A dialog box appears, stating:
Warning: You are about to over-write the contents of this review file. Would you like to continue?
4. Select Yes.5. Continue on creating a review file (refer to Creating a
New Review File) or use an existing search (refer to Use Existing Search).
19
Figure 19

Saving a Search
Once you have set all the parameters for a search, you can retain it for future use by the following:
1. In the Boolean Search window, select the Save As button at the bottom of the screen.
2. Name the query in the Save Query As box.
3. Select the checkbox next to Include Record Information. This retains the Store Record Type and the Range information.
4. Click the Save button.
Retrieve Saved Query
1. Select an empty review file.2. Click the Search Records button. 3. The Boolean Search window will
appear.4. Name the Review File.5. Click the Retrieve Saved Query
button.
6. Scroll through the search list and select the list to be used.
7. Click the Select button.8. When ready, click the Search
button to run the list.
20
Figure 20
Figure 21

Managing Review Files
Button Menu
Sort RecordsThe ability to sort records in a review file is available in Create Lists. The option to sort allows up to 32 sort criterion and performs the sort in an alphanumeric/chronological order depending on the type of data. Records that do not contain the specified sort field will appear at the top of the sorted list.
Records can be sorted by data from linked records (refer to Figure 1). For example, a sort can be performed on bibliographic records based on the item record call #.
1. Select the Sort Records button
2. Enter the fields that you would like sorted. Use Append to add lines to the end of the list and use
Insert to add a line in between fields.
List RecordsList Records allows you to print a list of selected fields.
1. Select the List Records button
2. Enter the fields that you would like in the list. Use Append to add lines to the end of the list and use
Insert to add a line in between fields.
3. Choose the formatting for your list: Page Heading Starting Record Ending Record Number of blank lines between records Number the records in the list Display meanings of fixed-length fields
instead of codes
Display each variable-length field on a new line
Print labels for variable length fields If listing bibliographic title, print it in
uppercase List box information (if present)
4. Click OK.
Show Records1. In Create Lists, select the review file you wish to view.
2. Select the Show Records button.
21

3. View the records in the list by double-clicking on a row, or select the checkbox next to the record
and click on the Edit button.
Add
1. Select the Add button.
2. In the dialog box, search for the item to be added.
3. Open the item record and choose Use Item Record. The item will be added to the end of the review
file.
Figure 22
Edit
1. Click the Edit button.
2. View or make any changes to the record.
3. Select Save and Close.
Dedupe
By clicking the Dedupe button, any duplicate records that have the same record # as another will be removed from the review file.
Show InfoThis displays the parameters used to define the search of a selected review file.
1. Select a review file.
2. Click the Show Info button.
3. A screen similar to the following will appear:
22

Figure 23
4. Click OK when done viewing.
Export RecordsThe Export Records button allows the user to export a review files select data in .txt format. This enables the user to bring the data into another program and manipulate the data for some other purpose, i.e. a spreadsheet or report.
1. Select the Review File to be exported.
2. Click the Export Records button.
3. Enter the fields that you would like
exported. Use Append to add lines to the
end of the list and use Insert to add a line
in between parameters.
4. Select the Field delimiter button.
5. Click the radio button next to Control
character (1-127). Enter 9 in the text box.
Figure 24
23
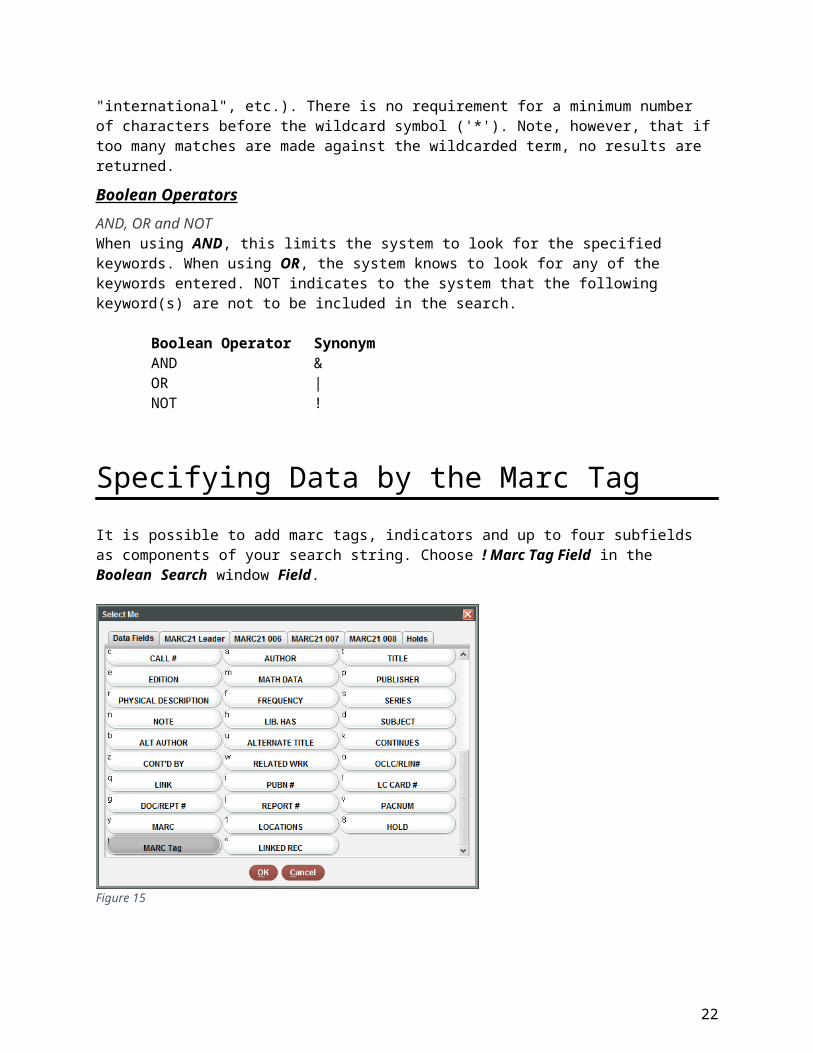
Figure 25
6. Click OK.
7. Select the Browse button.
8. Enter a name and Save the file in an easy to find location.
9. Once done, your Export parameters should look similar to this:
Figure 26
10. If everything looks good, click OK.
24
Delimiters
The following delimiters appear in Export Records. Delimiters enable the system to export large amounts of data, but maintain it in a format that another program can convert it into a legible document. The default delimiters can be changed in order to compensate for different types of data that may contain the default character or for programs that use specific characters as delimiters.
Field delimiterThis is the delimiter between fields in the exported file. The default is a comma. If you need to use the <TAB> character as the field delimiter, enter it by choosing the Control character option and typing 9 (this is the ASCII value for the <TAB> character).
Text qualifierThe delimiter for text fields in the exported file. The default is the quote character. This character precedes and follows each text field.
Repeated field delimiterThis is the delimiter between repeated fields of the same type. The default is a semicolon.
Maximum field lengthThe maximum number of characters exported from each field. By default there is no limit. Setting a limit to this helps streamline lists where the field length is quite long and not all the information is pertinent to the list.
Toolbar Menu
Dedupe - Removing Duplicate RecordsDue to various circumstances, there can be duplicate records in a review file. To remove any instance of records that have the same record number, perform the following actions:
1. Go to Create Lists.
2. Select the Review File.
3. Click the Dedupe icon – OR - Go to Tools in the File Menu and select Remove Duplicates.
25

Append - Add a new search to an existing list1. Go to Create Lists.
2. Select the Review File.
3. Click the Append icon – OR - Go to Tools in the File Menu and select Append.
4. The Boolean Search window will appear. Enter in the parameters of the new search.
5. When finished, select Search. The records from the new search will be added to the existing list.
Copy - copy an existing search into another review file1. Go to Create Lists.
2. Select an empty Review File. Verify that it is a large enough review file to contain the copy.
3. Click the Copy icon – OR - Go to Tools in the File Menu and select Copy.
4. Scroll through the list of files and select the one you wish to copy.
Figure 27
5. Click OK.
26

Rename 1. Go to Create Lists.
2. Select the Review File.
3. Click the Rename icon.
Figure 28
4. Enter in the new name.5. Click OK.
Own - Claim or un-claim ownership of a review fileTo claim a review file for your use:
1. Select the review file.
2. Click the Own icon.
To un-claim ownership of a review file:
1. Select the review file.
2. Click the Own icon.
Manipulating an exported listAn exported list can be manipulated in other programs that support the exported file type. Our system uses *.txt or a text file to export data. Depending on how the list was exported it may be comma separated or use other delimiters to separate the data. The delimiters assist the program in parsing the data into the appropriate fields to make it legible. To manipulate your list into a view-friendly list, report, etc., refer to the following:
Excel…1. Open Excel.
2. Select Open.
3. Browse for the exported review file and open it.
27

Figure 29
4. If you receive this message, select Yes. Otherwise, move on to #5.
Figure 30
5. In the Text Import Wizard, make sure the Delimited radio button is selected and click Next.
Figure 31
28

6. Click the checkbox next to Other and insert the character |(pipe).
Figure 32
7. Click Finish.
8. The list should now be in an easily viewed format and editable.
Figure 33
9. Adjust the cell format and width as necessary.
29

List Examples
Item
Status – i.e. Missing, Billed, Lost, Paid, etc.1. Go to Create Lists.
2. Find an empty review file by selecting the drop down menu arrow and choose Empty.
3. Double-click on an empty review file that has a Max Records capacity to suit your needs.
4. The Boolean Search screen should appear.
5. Enter in a Review File Name.
6. Change the Store Record Type to Item i.
7. In the row of drop-down menus, change the first one to Index, the second to Barcode, the third to
your beginning barcode range 3xxxx000000000, and the fourth to your ending barcode range
3xxxx999999999.
Example:
Figure 34
8. In the paramaters, change:
(Double click the parameter boxes to see the available options.)
a. Type to Item - i
b. Field to Status - 88
c. Condition to Equal to - =
d. Value A to Missing – m…or change this to any status that you are looking for.
Figure 35
30

9. Once your screen looks like the above, click on the Search button.
10. Next, change the Review File view to All or Limited.
Figure 36
11. Find your review file and check the Status column. If it is complete, you can now work with the list.
Figure 37
Location Count1. Go to Create Lists.
2. Find an empty review file by selecting the drop down menu arrow and choose Empty.
3. Double-click on an empty review file that has a Max Records capacity to suit your needs.
4. The Boolean Search screen should appear.
5. Enter in a Review File Name.
6. Change the Store Record Type to Item i.
7. In the drop-down menus, change the first one to Index and the second to Barcode. Next, enter your
beginning barcode range 3xxxx000000000 and your ending barcode range 3xxxx999999999 in the
text boxes.
Example:
Figure 38
8. Leave the parameters blank.
Figure 39
31

9. Once your screen looks like the above, click on the Search button.
10. Next, change the Review File view to All or Limited.
Figure 40
11. Find your review file and check the Status column. If it is complete, you can now work with the list.
Figure 41
Not Circulating1. Go to Create Lists.
2. Find an empty review file by selecting the drop down menu arrow and choose Empty.
3. Double-click on an empty review file that has a Max Records capacity to suit your needs.
4. The Boolean Search screen should appear.
5. Enter in a Review File Name.
6. Change the Store Record Type to Item i.
7. In the drop-down menus, change the first one to Index and the second to Barcode. Next, enter your
beginning barcode range 3xxxx000000000 and your ending barcode range 3xxxx999999999 in the
text boxes.
Example:
Figure 42
8. In line 1 of the parameters:
(Double click the parameter boxes to see the available options.)
a. Type to Item - i
b. Field to TOT CHKOUT - 76
c. Condition to Equal to - =
d. Value A to 0
9. Click the Append Line button.
10. In line 2 of the parameters:
32

a. Type to Item - i
b. Field to CREATED - 83
c. Condition to less than or equal to - <=
d. Value A to mmddyy (If you don’t want anything more recent than January 1, 2013 then
enter 12-31-2012)
Figure 43
11. Once your screen looks like the above, click on the Search button.
12. Next, change the Review File view to All or Limited.
Figure 44
13. Find your review file and check the Status column. If it is complete, you can now work with the list.
Figure 45
Withdrawn1. Go to Create Lists.
2. Find an empty review file by selecting the drop down menu arrow and choose Empty.
3. Double-click on an empty review file that has a Max Records capacity to suit your needs.
4. The Boolean Search screen should appear.
5. Enter in a Review File Name.
6. Change the Store Record Type to Item i.
33

7. In the drop-down menus, change the first one to Index and the second to Barcode. Next, enter your
beginning barcode range 3xxxx000000000 and your ending barcode range 3xxxx999999999 in the
text boxes.
Example:
Figure 46
8. In line 1 of the parameters:
(Double click the parameter boxes to see the available options.)
a. Type to Item - i
b. Field to STATUS - 88
c. Condition to Equal to - =
d. Value A to Withdrawn - w
9. Click the Append Line button.
10. In line 2 of the parameters:
a. Type to Item - i
b. Field to ICODE2 - 60
c. Condition to Equal to - =
d. Value A to Withdrawn - w
Figure 47
11. Once your screen looks like the above, click on the Search button.
12. Next, change the Review File view to All or Limited.
34

Figure 48
13. Find your review file and check the Status column. If it is complete, you can now work with the list.
BilledSearching for billed items is fairly straight forward and can be done in a multitude of ways. To capture all of the items with a status of billed and checked out to your library’s patrons, please follow the steps below.
1. Go to Create Lists.
2. Find an empty review file by selecting the drop down menu arrow and choose Empty.
3. Double-click on an empty review file that has a Max Records capacity to suit your needs.
4. The Boolean Search screen should appear.
5. Enter in a Review File Name.
6. Change the Store Record Type to Item i.
7. In the drop-down menus, change the first one to Index and the second to Barcode. Next, enter your
beginning barcode range 3xxxx000000000 and your ending barcode range 3xxxx999999999 in the
text boxes.
Example:
Figure 49
8. In line 1 of the parameters:
(Double click the parameter boxes to see the available options.)
a. Type to Item - i
b. Field to STATUS - 88
c. Condition to Equal to - =
d. Value A to Billed - n
e. Click the Append Line button.
9. In line 2 of the parameters:
a. Type to Patron - p
35

b. Field to HOME LIBR - 53
c. Condition to equal to - =
d. Value A to tml … or whatever your 3-digit library code is
Figure 50
10. Once your screen looks similar to the above, click on the Search button.
11. Next, change the Review File view to All or Limited.
Figure 51
Find your review file and check the Status column. If it is complete, you can now work with the list.
Billed ILLThere are several ways you can grab your Billed ILLs, but one tried and true method is to just grab them all without any other delimiting factors.
1. Go to Create Lists.
2. Find an empty review file by selecting the drop down menu arrow and choose Empty.
3. Double-click on an empty review file that has a Max Records capacity to suit your needs.
4. The Boolean Search screen should appear.
5. Enter in a Review File Name.
6. Change the Store Record Type to Item i.
7. In the drop-down menus, change the first one to Index and the second to Barcode. Next, enter your
beginning barcode range 3xxxx000000000 and your ending barcode range 3xxxx999999999 in the
text boxes.
36

Example:
Figure 52
8. In line 1 of the parameters:
(Double click the parameter boxes to see the available options.)
a. Type to Item - i
b. Field to STATUS - 88
c. Condition to Equal to - =
d. Value A to Billed - n
9. Click the Append Line button.
10. In line 2 of the parameters:
a. Type to Patron - p
b. Field to HOME LIBR - 53
c. Condition to not equal to - !=
d. Value A to otp … or whatever your 3-digit library code is.
Figure 53
11. Once your screen looks similar to the above, click on the Search button.
12. Next, change the Review File view to All or Limited.
Figure 54
Find your review file and check the Status column. If it is complete, you can now work with the list.
37

WeedingThere are several ways to compile a weeding list. Below you will find ways to do it purely by location code or by call #. Both types of lists can also be combined, so as to narrow down the list. Note: the parameter fields can be added or removed depending on your specific needs.
Weeding by Location code1. Go to Create Lists.
2. Find an empty review file by selecting the drop down menu arrow and choose Empty.
3. Double-click on an empty review file that has a Max Records capacity to suit your needs.
4. The Boolean Search screen should appear.
5. Enter in a Review File Name.
6. Change the Store Record Type to Item i.
7. In the drop-down menus, change the first one to Index and the second to Barcode. Next, enter your
beginning barcode range 3xxxx000000000 and your ending barcode range 3xxxx999999999 in the
text boxes.
Example:
Figure 55
8. In line 1 of the parameters:
(Double click the parameter boxes to see the available options.)
e. Type to Item - i
f. Field to LOCATION - 79
g. Condition to Equal to - =
h. Value A to [xxxxx – the location code]
9. Click the Append Line button.
10. In line 2 of the parameters:
e. Type to Item - i
f. Field to CREATED - 83
g. Condition to less than - <
h. Value A to [mm-dd-yyyy]
11. Click the Append Line button.
12. In line 3 of the parameters:
(Double click the parameter boxes to see the available options.)
38

i. Type to Item - i
j. Field to LCHKIN - 68
k. Condition to less than - <
l. Value A to [mm-dd-yyyy]
13. Click the Append Line button.
14. In line 4 of the parameters:
(Double click the parameter boxes to see the available options.)
m. Type to Item - i
n. Field to STATUS - 88
o. Condition to Equal to - =
p. Value A to Available - -
Figure 56
15. Once your screen looks similar to the above, click on the Search button.
16. Next, change the Review File view to All or Limited.
Find your review file and check the Status column. If it is complete, you can now work with the list.
Weeding by Dewey Call # or LC #1. Go to Create Lists.
2. Find an empty review file by selecting the drop down menu arrow and choose Empty.
3. Double-click on an empty review file that has a Max Records
capacity to suit your needs.
4. The Boolean Search screen should appear.
5. Enter in a Review File Name.
6. Change the Store Record Type to Item i.
39
Figure 57

7. In the drop-down menus, change the first one to Index and the second to Barcode. Next, enter your
beginning barcode range 3xxxx000000000 and your ending barcode range 3xxxx999999999 in the
text boxes.
Example:
Figure 58
8. In line 1 of the parameters:
(Double click the parameter boxes to see the available options.)
a. Type to Item - i
b. Field to CALL # - c
c. Condition to Between - W
d. Value A to [beginning call #]
e. Value B to [ending call #]
9. Click the Append Line button.
10. In line 2 of the parameters:
a. Type to Item - i
b. Field to CREATED - 83
c. Condition to less than - <
d. Value A to [mm-dd-yyyy]
11. Click the Append Line button.
12. In line 3 of the parameters:
(Double click the parameter boxes to see the available options.)
a. Type to Item - i
b. Field to LCHKIN - 68
c. Condition to less than - <
d. Value A to [mm-dd-yyyy]
13. Click the Append Line button.
14. In line 4 of the parameters:
(Double click the parameter boxes to see the available options.)
a. Type to Item - i
b. Field to STATUS - 88
c. Condition to Equal to - =
40

d. Value A to Available - -
Figure 59
Figure 60
15. Once your screen looks similar to one of the above, click on the Search button.
16. Next, change the Review File view to All or Limited.
Figure 61
Find your review file and check the Status column. If it is complete, you can now work with the list.
Patron
Non-Resident Patron Expirations
41

Pulling a list together of non-resident patrons whose cards are about to expire can be done in several ways and depends on how your pcodes are set up. If you have a pcode range with your non-resident codes next to each other then it is fairly easy to compile a list, but if you don’t then a little tweaking will need to be done. Two example lists have been provided to demonstrate the different options.
Pcodes are in a run (133, 134, 135, etc.)
1. Go to Create Lists.
2. Find an empty review file by selecting the drop down menu arrow and choose Empty.
3. Double-click on an empty review file that has a Max Records capacity to suit your needs.
4. The Boolean Search screen should appear.
5. Enter in a Review File Name.
6. Change the Store Record Type to Patron p.
7. In the drop-down menus, change the first one to Index and the second to Barcode. Next, enter your
beginning barcode range 2xxxx000000000 and your ending barcode range 2xxxx999999999 in the
text boxes.
Example:
Figure 62
8. In line 1 of the parameters:
(Double click the parameter boxes to see the available options.)
a. Type to Patron - p
b. Field to PCODE3 – 46 or whichever PCode you use to classify your non-resident patrons.
c. Condition to between - W
d. Value A to the beginning of the non-resident pcode range
e. Value B to the ending of the non-resident pcode range
9. Click the Append Line button.
10. In line 2 of the parameters:
a. Type to Patron - p
b. Field to EXP DATE - 43
c. Condition to between - W
d. Value A to the beginning date
e. Value B to the ending date
42

Figure 63
11. Once your screen looks similar to the above, click on the Search button.
12. Next, change the Review File view to All or Limited.
Figure 64
Find your review file and check the Status column. If it is complete, you can now work with the list.
Pcodes are not in a run (586, 590, etc.)
1. Go to Create Lists.
2. Find an empty review file by selecting the drop down menu arrow and choose Empty.
3. Double-click on an empty review file that has a Max Records capacity to suit your needs.
4. The Boolean Search screen should appear.
5. Enter in a Review File Name.
6. Change the Store Record Type to Patron p.
7. In the drop-down menus, change the first one to Index and the second to Barcode. Next, enter your
beginning barcode range 2xxxx000000000 and your ending barcode range 2xxxx999999999 in the
text boxes.
Example:
Figure 65
8. In line 1 of the parameters:
43

(Double click the parameter boxes to see the available options.)
a. Type to Patron - p
b. Field to PCODE4 – 126 or whichever PCode you use to classify your non-resident patrons.
c. Condition to equal to - =
d. Value A to your first pcode
9. Click the Append Line button.
10. In line 2 of the parameters:
a. Change the Operator to OR.
b. Type to Patron - p
c. Field to PCODE4 – 126 or whichever PCode you use to classify your non-resident patrons.
d. Condition to equal to - =
e. Value A to your second pcode
11. Click the Append Line button.
12. In line 3 of the parameters:
a. Change the Operator to AND.
b. Type to Patron - p
c. Field to EXP DATE – 43 or whichever PCode you use to classify your non-resident patrons.
d. Condition to between - W
e. Value A to the beginning date
f. Value B to the ending date
13. Select the first and second parameter row by holding down the CTRL button on the keyboard and
clicking on each row with the mouse.
14. Next click the Group button.
Figure 66
15. Once your screen looks similar to the above, click on the Search button.
44

16. Next, change the Review File view to All or Limited.
Figure 67
Find your review file and check the Status column. If it is complete, you can now work with the list.
New Patrons1. Go to Create Lists.
2. Find an empty review file by selecting the drop down menu arrow and choose Empty.
3. Double-click on an empty review file that has a Max Records capacity to suit your needs.
4. The Boolean Search screen should appear.
5. Enter in a Review File Name.
6. Change the Store Record Type to Patron p.
7. In the drop-down menus, change the first one to Index and the second to Barcode. Next, enter your
beginning barcode range 2xxxx000000000 and your ending barcode range 2xxxx999999999 in the
text boxes.
Example:
Figure 68
8. In line 1 of the parameters:
(Double click the parameter boxes to see the available options.)
a. Type to Patron - p
b. Field to CREATED – 83 or whichever PCode you use to classify your non-resident patrons.
c. Condition to between - W
d. Value A to the beginning date
e. Value B to the ending of date
45

Figure 69
9. Once your screen looks similar to the above, click on the Search button.
10. Next, change the Review File view to All or Limited.
Figure 70
Find your review file and check the Status column. If it is complete, you can now work with the list.
Patrons who should have received an Overdue notice1. Go to Create Lists.
2. Find an empty review file by selecting the drop down menu arrow and choose Empty.
3. Double-click on an empty review file that has a Max Records capacity to suit your needs.
4. The Boolean Search screen should appear.
5. Enter in a Review File Name.
6. Change the Store Record Type to Item i.
7. In the drop-down menus, change the first one to Index and the second to Barcode. Next, enter your
beginning barcode range 3xxxx000000000 and your ending barcode range 3xxxx999999999 in the
text boxes.
Example:
Figure 71
8. In line 1 of the parameters:
(Double click the parameter boxes to see the available options.)
46

f. Type to Item - i
g. Field to ODUE DATE – 73 or whichever PCode you use to classify your non-resident patrons.
h. Condition to equal to - =
i. Value A to today’s date
9. In line 2 of the parameters:
(Double click the parameter boxes to see the available options.)
j. Type to Item - i
k. Field to # OVERDUE – 72 or whichever PCode you use to classify your non-resident patrons.
l. Condition to greater than or equal to - >=
m. Value A to 1
10. In line 3 of the parameters:
(Double click the parameter boxes to see the available options.)
n. Type to Item - i
o. Field to STATUS – 88 or whichever PCode you use to classify your non-resident patrons.
p. Condition to not equal to - !=
q. Value A to n
Figure 72
11. Once your screen looks similar to the above, click on the Search button.
12. Next, change the Review File view to All or Limited.
Figure 73
47

Find your review file and check the Status column. If it is complete, you can now work with the list.
Patrons who should have received bills
1. Go to Create Lists.
2. Find an empty review file by selecting the drop down menu arrow and choose Empty.
3. Double-click on an empty review file that has a Max Records capacity to suit your needs.
4. The Boolean Search screen should appear.
5. Enter in a Review File Name.
6. Change the Store Record Type to Item i.
7. In the drop-down menus, change the first one to Index and the second to Barcode. Next, enter your
beginning barcode range 3xxxx000000000 and your ending barcode range 3xxxx999999999 in the
text boxes.
Example:
Figure 74
8. In line 1 of the parameters:
(Double click the parameter boxes to see the available options.)
r. Type to Item - i
s. Field to ODUE DATE – 73 or whichever PCode you use to classify your non-resident patrons.
t. Condition to equal to - =
u. Value A to today’s date
9. Once your screen looks similar to the above, click on the Search button.
10. Next, change the Review File view to All or Limited.
Figure 75
11. Find your review file and check the Status column. If it is complete, you can now work with the list.
12. Change the Function to Notices
48

13. Create a Notices job for Statement of Charges.
14. Setup the parameters to look similar to the following:
Figure 76
a. If you don’t want any other charges or fees to appear on the statement, change the Charges
Incurred After date to the previous day.
15. Make sure to set the options drop-down menus to:
a. Review in the first drop-down.
b. Select your review file in the second drop-down.
16. Select Prepare.
17. The bottom half of the screen should look similar to below:
Figure 77
49

18. Click Send Notices. ** You can send the print notices to the local printer or select the email notices
to go to the patron’s email --OR-- you can switch the view to the email notices and select the Move
All to Print Queue button. This allows you to print all notices to the local printer.
19. Once they have been sent, the following pop-up will appear:
Figure 78
20. Select Yes or No. This really doesn’t matter in this instance since the data was grabbed from a
system table, but from the review file you created.
21. The printouts should look similar to the following:
Figure 79
50

NOTES