w3.leica-geosystems.com · 2004-04-01 · the type and the serial number of your instrument...
TRANSCRIPT

����������������
������������ �����
�������������� ���������

� ���������������
The type and the serial number of your instrumentindicated on the label in the battery compartment.Write the type and serial number of your instrument in thespace provided below, and always quote this informationwhen you need to contact your agency or serviceworkshop.
Type: Serial no.:
The symbols used in this User Manual have the followingmeanings:
DANGER:Indicates an imminently hazardous situationwhich, if not avoided, will result in death orserious injury.
WARNING:
Indicates a potentially hazardous situation or anunintended use which, if not avoided, could resultin death or serious injury.
CAUTION:
Indicates a potentially hazardous situation or anunintended use which, if not avoided, may resultin minor or moderate injury and / or appreciablematerial, financial and environmental damage.
Important paragraphs which must be adhered toin practice as they enable the product to be usedin a technically correct and efficient manner.
������������ �������� ��
Congratulations on your purchase of a new LeicaGeosystems Theodolite.
This manual contains important safety directions(refer to section "Safety directions") as well asinstructions for setting up the instrument andoperating it.Please read this User Manual carefully to achievemaximum efficiency from yourInstrument.
������ �����������
������������� ���

����������������
Introduction
Operating the Instrument
Simple measurements
Configuration
Safety Directions
Care and Storage
Accessories
Messages and Warnings
Technical Data
Index
��������������
�������� ����
6
10
12
30
39
50
56
57
59
61

� ����������������������
Measuring V-angle .................................................... 23Extending straight lines .............................................. 24Staking out vertical lines ............................................ 25Distance measuring with stadia lines .......................... 26Instrument errors ....................................................... 27
Line-of-sight error (Hz-collimation) .................................. 27V-Index (Vertical index error) ........................................... 27Determining the line-of-sight error (c) .............................. 28Determining V-index ....................................................... 29
Configuration ............................................... 30Setting the beep ........................................................ 31Setting V-angle .......................................................... 32Setting display contrast .............................................. 33Setting the angle units ............................................... 34
V - % .............................................................................. 35Displayed angle format .............................................. 36Switching on/off compensator .................................... 37Switching on/off line-of-sight error correction .............. 38
Introduction ................................................... 6Special features ........................................................... 6Important parts ............................................................ 7Technical terms and abbreviations ............................... 8
Operating the Instrument ........................... 10Keyboard .................................................................. 10Buttons ...................................................................... 11AutoOff ...................................................................... 11
Simple measurements ................................ 12Unpacking ................................................................. 12Batteries .................................................................... 13Inserting / Replacing Battery ...................................... 14Setting up the tripod ................................................... 16Centring with Laser Plummet, Coarse Level-Up ......... 17Laser intensity ........................................................... 18Centring with shiftable tribrach ................................... 18Hints for positioning ................................................... 19Accurate levelling-up with electronic level ................... 19Measuring ................................................................. 20
Setting Hz-direction ........................................................ 21Setting Hz-circle ............................................................. 21V-angle display ............................................................... 21
Measuring Hz-angle .................................................. 22
��������

����������������
Safety Directions ......................................... 39Intended use of instrument ........................................ 39
Permitted uses ............................................................... 39Adverse uses .................................................................. 39
Limits of use .............................................................. 40Responsibilities ......................................................... 40Hazards of use .......................................................... 41
Main hazards of use ....................................................... 41Laser classification .................................................... 45
Laser plummet ................................................................ 45Electromagnetic acceptability (EMV) .......................... 48FCC statement (applicable in U.S.) ............................ 49
Care and Storage......................................... 50Transport .................................................................. 50
In the field ....................................................................... 50Inside vehicle .................................................................. 51Shipping ......................................................................... 51
Storage ..................................................................... 51Cleaning ......................................................................... 52
Checking and adjusting ............................................. 53Tripod ............................................................................. 53Circular level ................................................................... 53Circular level on the tribrach ........................................... 53Laser plummet ................................................................ 54Reticle ............................................................................ 55
��������������
�������
Accessories ................................................. 56
Messages and Warnings ............................ 57
Technical Data ............................................. 59
Index ............................................................. 61

� ��������������������������
��� ������The Leica T105/T110 is a high-qualityelectronic theodolite designed for theconstruction site.Its innovative technology makes thedaily surveying jobs easier.
The instrument is ideally suited forsimple construction surveys andsetting out tasks.
The easy operation of the instrumentfunctions can be quickly learned evenby inexperienced surveyors.
������������
• Easy and quickly to learn !
• Logically designed keyboard; withlarge and clear LCD.
• Attractive design; low weight.
• User setting remain active evenafter switching off.
• Continuous drives for horizontaland vertical angles.
• AutoOFF function to preventunneccary power consumption.
• Equipped with laser plummet asstandard.
T10
0z01
T105

���������������� �����������
������� �������
1 Optical sight
2 Telescope
3 Vertical drive
4 Battery GEB111 (optional)
5 Battery spacer for GEB111
6 Battery holder for GEB111/GEB121/GAD39
7 Focussing graticule
8 Focussing telescope image
9 Detachable carrying handle withmounting screws
10 Foot screw
11 Objective
12 Battery adapter GAD39 for 6single cells (optional)
13 Battery GEB121 (optional)
14 Display
15 Keyboard
16 Circular level
17 Horizontal drive
1 3 8 9
10 161514
2 4
T10
0Z02
7
11
5 6
171312

������������ ���������������
��� ����������� ������������ �
ZA = Line of sight / collimationaxisLine in space containing all objectpoints imaged into the graticulecentre at different distance settingsfrom � to very near.
SA = Standing axisVertical rotation axis of the telescopeenables measuring of Hz-angles.
KA = Tilting axisHorizontal rotation axis of thetelescope enables measuring of V-angles.
V = Vertical angle / zenith angle
VK = Vertical circleWith coded circular division forreading the V-angle.
Hz = Horizontal angle
HK = Horizontal circleWith coded circular division forreading the Hz-angle.
Hz0 = Horizontal circle reading 0°
(0 gon)
ZA
ZA
KA
KAKA
SA
SA
SA
HK
VK
Hz
V
T10
0Z24
SA
Hz0

���������������� �����������
��� ����������� ������������ ����� ���
c i
Line-of-sighterror (Hz-collimation)The line-of-sighterror is thedeviation fromthe perpendicularbetween tiltingaxis and line-of-sight. This iseleminated bymeasuring in twotelescopepositions.
Zenith
Point on theplumb line abovethe observer.
Standing axisinclination
Angle betweenplumb line andstanding axis.
V-index (Verticalindex error)With horizontalline-of-sight theV-curcle readingshould be exactly90°(100gon). Thedeviation fromthis values istermed V-index(i).
Graticule
Glass platewithin thetelescope withevaporatedreticle anddistance marks.
Plumb line /Compensator
Direction ofgravity. Thecompensatordefines theplumb line withinthe instrument.
T10
0Z37
T10
0Z40
T10
0Z38
T10
0Z39
T10
0Z13
T10
0Z16

����������� ���������������
��� �������������� �����
��� ����������������
Angle keys
Setting the horizontal angleand Hz0.
Setting the Hz-angle right orleft.
Switching the vertical angle Von/off; selecting the displayunit (% or V).
Key combinations
Access to the second keyassignment of the angle keys isenabled.
Determining line-of-sight error.
Determining verticalindex error.
Activating configurationmenu.
Combi key
Calling quick setting forcompensator, beep anddisplay contrast.
Function keys
Switching on/off laserplummet; setting laserintensity
Switching on/off displayillumination and heating
(active under -5°C; is
displayed)
Switching on/off electroniclevel. The laser plummet isactivted simultaneously
+
+
+
�������
ON/OFF keys
Switches instrument ON
Switches instrument OFFby pressing both keyssimultaneously.
T10
0Z26

��������������� �����������
Important buttons:
Confirms settings; back intomeasuring mode.
Paging through menu (e.g.within the configuration).
Selection of a setting.The active selection is alwaysindicated in the left part of thedisplay.
���� �
A button is a symbol in the displaywhich is always assigned to afunction key directly below it. Buttonscan be found mainly in theconfiguration menu.
Find more and detailledinformation about buttons inthe relevant sections.
��� ��
The instrument is equipped with anautomatic switching off function.
Is activated when:• battery low,• no action is carried out with the
instrument for 1/3 hour (= no keypressed; V and Hz angle deviation� ±3' / ±600cc).
The function AutoOff cannotbe deactivated.
��� ����������������

������������ ���������������
������������ ������
1 Allen key (2x)
2 Adjusting pins (2x)
3 Removable tribrach GDF101 /Shiftable tribrach GUS75 (optio-nal)
4 Battery charger and accessories(optional)
5 Battery GEB111 (optional)
6 GHT196 Spacing Bracket (optio-nal)
7 GHM007 Instrument HeightMeter (optional)
8 Theodolite
9 User Manual
10 Protective cover / Lens hood
! ���"� #
Remove T105/T110 from transport case and check for completeness:
������ �������
T10
0Z31
3
1/2
4
8
9
10
5
7
6

���������������� ������ �������
8
12
GEB111GEB121 Individual cells in thebattery adapter GAD39
T10
0z79
�������
Your Leica Geosystems instrument isoperated with rechargable plug-inbatteries. The Basic battery(GEB111) or the Pro battery(GEB121) is recommended for T105/T110 instruments. As an option, sixindividual cells can be used with theappropriate battery adapter GAD39.
Six individual cells (1.5 V each)produce a voltage of 9 Volts. Thebattery indicator in the display isdesigned for a voltage of 6 Volts(GEB111/GEB121). For this reasonthe charge state of individual cells isnot indicated correctly. The batteryadapter with individual cells shouldtherefore be used as a backup. Theadvantage of individual cells is thelow self-discharge rate - even overlonger periods of time.
Use the Leica Geosystemsbatteries, chargers andaccessories or accessoriesrecommended by LeicaGeosystems to ensure thecorrect functionality of theinstrument.

������� ������� ���������������
8
12
� ���� #�$�%����� #�������
1. Remove battery holder. 2. Remove battery and replace. 3. Insert battery into battery holder.T
100Z
03
T10
0Z05
T10
0Z04

���������������� ������ �������
8
12
T10
0Z06
4. Insert battery holder intoinstrument.
� ���� #�$�%����� #����������� �� �
Insert battery correctly (notepole markings on the inside
of the battery cover). Check andinsert battery holder true to side intothe housing.
• For type of battery see section"Technical Data".
If the battery GEB121 or thebattery adapter GAD39 for
six individual cells is used, the spacerfor the GEB111 must be removedfrom the battery holder prior toinserting the battery.

������� ������� ���������������
8
12
T10
0Z32
When setting up the tripodpay attention to a horizontalposition of the tripod plate.
Heavy inclinations of the tripod mustbe corrected with the footscrews ofthe tribrach.
T10
0Z33
���� #������������
1. Loosen screws of tripod legs, pullout to required length and tightenscrews.
2. In order to guarantee a firmfoothold sufficiently press thetripod legs into the ground.When pressing the legs into theground note that the force must beapplied along the legs.
Careful handling of tripod
• Check all screws and bolts forcorrect fit.
• During transport always use thecover supplied.Scratches and other damages canresult in poor fit and measuringinaccuracies.
• Use the tripod only for surveyingjobs.
T10
0Z57
T10
0Z19
1. 1.
1.
2.
2.
2.
T10
0Z58

���������������� ������ �������
8
12
T10
0Z07
& ��� #������'����(������&�����'��)!�
1. Place the instrument onto thetripod head.Tighten central fixing screw oftripod slightly.
2. Turn footscrews of tribrach into itscentre position.
3. Switch on the instrument with .
4. Switch on laser plummet with . The electronic level
appears in the display.5. Position tripod legs so that the
laser beam is aimed to the groundpoint.
6. Firmly press in tripod legs.
7. Turn the footscrews of the tribrachto centre the laser beam exactlyover the ground point.
8. Move the tripod legs to centre thecircular level. The instrument isnow roughly levelled-up.
T10
0Z08
T10
0Z09
1.1.
3.
6.
4.
6.
6.
5.
5. 5.
5. 8.
8.7.
8.
8.
7.

������� ������� ���������������
8
12
Changing the laser intensity.
Possible adjustments:Intensity min.Intensity 25%Intensity 50%Intensity 75%Intensity max.
Switch off laser plummet with .
'����� � ����
External influences may require theadjustment of the intensity of thelaser plummet.
Adjusting the laser intensity.
If the instrument is equipped with ashiftable tribrach it can be aligned tothe station point by slight shifting.
1. Loosen screw.2. Shift instrument.3. Fix instrument by turning screw.
& ��� #�����������������������
T10
0Z23

���������������� ������ �������
8
12
20"
20"
������������ #)������������ ������
1. Switch on electronic level with In case of insuffient
levelling-up a inclined level symbolappears.
3. Check centring with laser plummetand re-centring if necessary.
4. Switch off electronic level with.
20"
20"
2. By turning the footscrews centrethe electronic level.
If the electronic level is centered theinstrument is levelled-up.
Positioning over pipes ordepressionsIn some cases the laser plummetcannot be positioned because thelaser spot is not visible. In suchcases, place a transparent plate ontothe pipe. As a result, the pipeperimeter remains visible and thelaser spot is reflected by the plate.
T10
0Z35
*� �������������� � #
T10
0Z10

������� ������� ���������������
8
12
+���� #
After switching on and setting upcorrectly, the instrument isimmediately ready for measuring.
Depending on setting the following display appears:
• Hz-angle in the unit selected• V-angle in the unit selected and
the setting concerning zenith V or
horizon V (see chapter"Configuration / Setting V-angle")
• battery condition
is indicated.
H: 123°12'50" H: 123°12'50"V: 90°00'30"
• Hz-angle in the unit selected (seechapter "Configuration / Angleunits")
• battery condition
is indicated.
Display 1 Display 2

���������������� ������ �������
8
12
Setting of Hz-circle.
Back to measuring menuwithout modification.
Setting of Hz-orientation.
Back to measuring menuwithout modification.
�� ������������ ���
Set Hz to 0°00'00"• Aim on orientation point.
• Set Hz-angle with .
Back to measuring menuautomatically.
Set any Hz-angle• Turn telescope to the desired Hz-
angle.• Hold indicated Hz-angle with
.• Aim on orientation point.
• Set Hz-angle with .
�� �������������
Set Hz to "Clockwise anglemeasurement".
Set Hz to "Counterclockwiseangle measurement".
Setting is acceptedimmediately.
���������������
The indication of the V-angle can bedirectly switched on/off with .
Switch off V-angle display.
Switch on V-angle display.Display of angle according toconfiguration setting.
Switch on V-angle dispaly.Indication of angle in "+/-%inclination" (valid range -300.00% to + 300.00 %).
H:123°12'50"H: 0°00'00"
H:123°12'50" V: 90°00'30"

�������� ������� ���������������
8
12
+���� #�*,)� #�
Wanted:Hz-angle � between BAC.
Procedure:Set up instrument above point A andlevel-up.
Two methods are possible:1st method:
• Aim on point B and read Hz(e.g.: 23°38');• Aim on point C and read Hz(e.g.: 94°40').
(e.g.: 94°40' - 23°38' = 71°02' )
Result:� = Hz (C) - Hz (B)
Result:Read � directly.
2nd method:• Aim on point B and set Hz-angleto "0".• Aim on point C.
T10
0Z41
�
B
AC

����������������� ������ �������
8
12
+���� #��)� #�
Wanted:V-angle (zenith angle)
Procedure:1. Set up instrument above point Aand level-up.
2. Aim on the target plate.
Depending on setting eitherthe zenith or the vertical ang-le is indicated (see chapter"V-angle setting").
Result:Read V directly.
T10
0Z42
270°
0°
90°
180°
V
A
B

�������� ������� ���������������
8
12
�-� �� #������#����� �
Procedure:Carry out steps 1 to 3 (see SIMPLE method).
4. Turn instrument around the standing axis and aim onpoint B again.
5. Turn telescope around the tilt axis and stake-out anauxiliary point C2 in the same distance as C1.
Wanted: The straight line from A to B should be extended. A new point C is created.
SIMPLE method ACCURATE method
Result:Point C is in the middle of line C1 to C2.
Procedure:1. Set up instrument above point A and level up.
2. Aim on point B in face one.
3. Turn telescope around the tilt axis and stake-out pointC1 in the desired distance.To ensure accuracy:distance A-C � distance A-B
T10
0Z14
T10
0Z15B
A
C
2.
3.
B
A
C1
4.
5. C2C
4.
5.

����������������� ������ �������
8
12
���"� #�������������� �
Wanted: Point C should be staked out vertically over B.
SIMPLE method ACCURATE method
Procedure:Carry out steps 1 to 3 (see SIMPLE method).
4. Change to face two and aim on point B again.
5. Swivel telescope upwards and mark centre oftelescope (C2) again in the desired height.
Procedure:1. Set up instrument at any point A. It must be possible to
aim on B and C1 easily.
2. Level up instrument and aim on point B.
3. Swivel telescope upwards and mark centre oftelescope (C1) in the desired height.
Result: Point C is in the middle of the twomarkings C1 and C2.
T10
0Z47
T10
0Z48
B
C1
2.3.
3.
B
C1
4.
4.
4.
5.
5.C
C2
AA
C

�������� ������� ���������������
8
12
.���� ������� #��������������� �
Wanted: Horizontal distance between station and target point.
Procedure:1. Set up instrument above point A
and level up.
2. Erect levelling staff exactly verticalon point B.
3. Aim on staff (z=i) and read staffsection L.
SIMPLE method ACCURATE method
Procedure:Carry out steps 1 and 2 (see SIMPLEmethod).
3. Aim on staff (z=i) and read staffsection L. Simultaneously, takedown zenith angle V.
Reading:Upper distance line: 166.2Lower distance line: 150.0
Difference L: 16.2
Difference L in [cm] equals distanceD in [m]
Result:D = 100 x L
Result:D = 100 x L x sin²V
��
����
T10
0Z12
a
T10
0Z12
c
T10
0Z12
bA B
3.
V � 90°/ 100 gon
1.
2.
zi
14
15
16
17
L
��
���
��A
B
3.V
z
i
D D

����������������� ������ �������
8
12
� ���� ������� ������������ ������������������ ����
The instruments are adjusted in thefactory prior to shipping.
Index-errors and line-of-sight errorscan change with time andtemperature.
These errors should bedetermined before theinstrument is used for the firsttime, before precisionsurveys, after long periods oftransport, before and afterlong periods of work, and ifthe temperature changes bymore than 10°C (18°F).
T10
0Z16
C
The line-of-sight error or collimationerror (C) is the deviation from theperpendicular between the tilting axisand the line of sight.
The effect of the line-of-sight error tothe Hz-angle increases with thevertical angle.For horizontal aimings the error of Hzequals the line-of-sight error.
The vertical circle should readexactly 90° (100 gon) when the lineof sight is horizontal. Any deviationfrom this figure is termed verticalindex error (i).
������������ �����������������
T10
0Z13
i

�������� ������� ���������������
8
12
3. Start calibration by pressing and simultaneously.
4. Measure Hz-angle with .orback to measuring menu with
without modification.
5. Change telescope position andaim at the point again.
6. Again measure Hz-angle with
line-of-sight error is computed.
� ��������� ��������������� ����������
1. Level up instrument exactly usingthe electronic level.
2. Aim at a point approximately 100mfrom the instrument wich is lessthan 5° from the horizontal. Checkby activating the V-angle display.
T10
0Z18
180°
180°
Keep actual value.
Accept new computed value(arrow).
H: 123°12'50"V: 90°04'14"c: 0°00'08"
c: -0°00'08"c: -0°00'12"
T10
0Z17
ca. 100 m
± 5°

����������������� ������ �������
8
12
By determining the verticalindex error the electroniclevel is adjustedautomatically.
� ����������������
1. Level up instrument exactly usingthe electronic level.
2. Aim at a point approximtely 100mfrom the instrument which is lessthan 5° from the horizontal. Checkby activating the V-angle display.
3. Start calibration by pressing and simultaneously.
4. Measure V-angle with .or
back to measuring menu with
without modification.
5. Change telescope position andaim on point again.
6. Again measure V-angle with vertical index error is computed.
Keep actual value.
Accept new computed value(arrow).
H: 123°12'50"V: 90°04'14"i: 0°00'15"
i: -0°00'15"i: -0°00'10"
T10
0Z18
180°
180°
T10
0Z17
ca. 100 m
± 5°

������� ������� ���������������
8
12
������� ���
Quick setting
Immediate access to functions:- compensator (on/off)- beep (on/off/90°)- display contrast
+ Configuration menu
After pressing the keys simultaneously the following parameters can beselected:
beep
setting V-angle
display contrast
angle units
indicated angle format
compensator
line-of-sight error correction
Select parameter Selecting the configuration parameters
Change setting Selected setting is displayed in the left display half
Quit Quit and set the setting
������� �����
All settings remain active even after switching off. The quick setting is an extract from the completeconfiguration.
360s
C
8
12
15

���������������� ������� ���
8
12
15
1
1
The setting of the beep can bechanged via the configuration menuor directly via the quick setting.
Possible settings:
Beep is switched ON.
Beep is switched OFF.
Beep is switched ON andsounds at right angles.
Switch on beep:1. Scroll to symbol
/ /
2. Select "Beep ON" with .
3. Confirm selection with .
Switch off beep:
Same procedure but select .
Switch on 90° beep for right anglestake-outs:
Same procedure but select .The beep sounds at right angles (0°,90°, 180°, 270° or 0, 100, 200, 300gon).
The beep is an acoustic signal aftereach key stroke or at right angles.
���� #������
Example:
From 95.0 to 99.5 gon (or from 105.0to 100.5 gon) a "Fast beep" and from99.5 to 99.995 gon (or from 100.5 to100.005 gon) a "Permanent beep"sounds.
T10
0Z27
1 No beep2 Fast beep3 Permanent beep
1 1
1
223 3

��������� ��� ���������������
8
12
15
3. Confirm selection with .
The setting is valid for allangle units and can only bechanged via the configurationmenu.
T10
0Z29
T10
0Z28
���� #��)� #�
The "0"- orientation of the verticalcircle can be either selected for thezenith or the horizontal plane.
1. Scroll to symbol /
2. Select desired option with
V-angle "0" for the zenith :
The V-anlge increases from 0° - 360°(0 - 400 gon).
V-angle "0" for the horizontal
plane :
V-angles above the horizontal planeare indicated as positive values andbelow the horizontal plane as negati-ve values. Up to the maximum valueof 180° (200 gon) the V-angledecreases/increases.

����������������� ������� ���
8
12
15
1
1
T10
0Z30
Setting of the contrast in five steps:
Minimum
Contrast 1/4
Contrast 1/2
Contrast 3/4
Maximum
The display contrast isimmediately adjusted duringthe setting.
���� #����������� �����
1. Scroll to symbol
The contrast setting can be changedvia the configuration menu or directlyvia the quick setting.
2. Select setting with
3. Confirm selection with
The actual setting is indicated andthe desired display contrast is set.
The readability of LCDs is influencedby external conditions (temperature,lighting) and by the reading angle.The display contrast can be adaptedstep by step until a perfect readabilityis reached.

��������� ��� ���������������
8
12
15
���� #����� #�� ���
Possible settings:
• 360s (degree sexagesimal)possible angle values:0° to 359°59'59''
• 360d (degree decimal)possible angle values:0° to 359.999°
• gonpossible angle values:0g to 399.999 gon
• milpossible angle values:0 to 6399.99mil
The setting of the angle units can bechanged at any time.The actual values are convertedaccording to the selected unit.Setting of the angle units can only bechanged via the configuration menu.
1. Scroll to symbol360s / 360d / gon / mil.
360s 360d milgon
360s
2. Select desired option with
3. Confirm selection with .
H: 123.209° H: 2190.06 mil
H: 123°12'53" H: 154.209 gon

����������������� ������� ���
8
12
15
1
1
�����
100% correspond to an angle of 45°(50 gon, 1600 mil).
The % value increases rapidly as theline of sight moves away from the ho-rizontal.That´s why "--.--%" appears on thedisplay at approx. 70° (80 gon).
T10
0Z46
--.--%
--.--%
+ 300%
+ 100%
- 100%
0°
+ 18%
- 300%
45°
20°71
°34'
-79.5 gon
-50 gon
gon
360s
± V

��������� ��� ���������������
8
12
15
.��������� #��������
For gon:1 => 0.001 gon5 => 0.005 gon10 => 0.010 gon
Always three decimals are indicated.
For mil:1 => 0.01 mil5 => 0.05 mil10 => 0.10 mil
Always two decimals are indicated.
In the following examplesalways the option indicated inItalics is shown.
11 5 10
The displayed angle format can beselected in three steps (1, 5 or 10)and only changed via theconfiguration menu.
1. Scroll to symbol
Possible settings:
For 360°'":1 => 0° 00' 01"5 => 0° 00' 05"10 => 0° 00' 10"
Always " are indicated.
For 360°:1 => 0.001°5 => 0.005°10 => 0.010°
Always three decimals are indicated.2. Select desired option with
3. Confirm selection with
H: 123.209° H: 2190.06 mil
H: 123°12'53" H: 154.209 gon

����������������� ������� ���
8
12
15
1
1
The compensator normaly remainsswitched on.
If the instrument is used on anunstable base (e.g. shaking platform,ship, etc.) the compensator mustbe switched off.This avoids the compensator driftingout of it's measuring range andinterupting the measuring process byindicating an error.
The working range of thecompensator is at 5'24" (±0.1gon).This horizontal accuracy can is easilyobtained with the electronic level.
������� #�� $�������� �����
1. Scroll to symbol / Possible settings:
The compensator is switchedON. V-angles relate to theplumb line.
The compensator is switchedOFF. V-angles relate to thestanding axis.
The compensator settingremains active even after theinstrument is switched off.
2. Select desired option with
3. Confirm setting with .

��������� ��� ���������������
8
12
15
2. Select desired option with
3. Confirm setting with
Possible settings:
The line-of-sight errorcorrection is switched ON.
The line-of-sight errorcorrection is switched OFF.
������� #�� $������ )��)��#����������������
By measuring in both facesthe line-of-sight error iseliminated.
Find more information aboutthe Hz-collimation in chapter"Determining instrumenterrors".
The T105/T110 can correct the line-of-sight error (Hz-collimation)automatically. This setting can onlybe changed via the configurationmenu.
If option "Line-of-sight errorcorrection ON" is active, eachmeasured Hz-angle is corrected(depending on V-angle).
For normal operation the line-of-sighterror correction remains switched on.
1. Scroll to symbol C / C
C
C C
C
C

����������������� � �����������
8
12
15
31
��������� ������The following directions shouldenable the person responsible for theT105/T110, and the person whoactually uses the instrument, toanticipate and avoid operationalhazards.
The person responsible for theinstrument must ensure that all usersunderstand these directions andadhere to them.
!���� ���"���
The electronic total stations areintended to the following applications:
• Measuring horizontal and verticalangles
• Visualising the standing axis (withlaser plummet)
� � ��������� ���� �
#�$�����"���
• Use of the total station withoutprevious instruction
• Use outside of the intended limits
• Disabling safety systems
• Removal of hazard notices
• Opening the instrument using tools(screwdriver, etc.), unless this isspecifically permitted for certainfunctions
• Modification or conversion of theinstrument
• Use after misappropriation
• Use with accessories from othermanufacturers without the prior ex-press approval of Leica Geosys-tems
• Aiming directly into the sun
• Inadequate safeguards at thesurreying site (e.g. whenmeasuring on roads, etc.)

�� ����������� ���������������
8
12
15
31
'����������
Environment:Suitable for use in an atmosphereappropriate for permanent humanhabitation: not suitable for use in ag-gressive or explosive environments.Use in rain is permissible for limitedperiods.
Refer to section "Technical Data".
%��� ���������
Area of responsibility for themanufacturer of the originalequipment Leica Geosystems AG,CH-9435 Heerbrugg (hereinafterreferred to as Leica Geosystems):Leica Geosystems is responsible forsupplying the product, including theuser manual and originalaccessories, in a completely safecondition.
Responsibilities of themanufacturers of non-Leicaaccessories:
The manufacturers of non-Leica accessories for the
T105/T110 electronic total stationsare responsible for developing,implementing and communicatingsafety concepts for their products,and are also responsible for theeffectiveness of those safetyconcepts in combination with the Lei-ca Geosystems product.
WARNING:Adverse use can lead toinjury, malfunction, and mate-
rial damage.It is the task of the personresponsible for the instrument toinform the user about hazards andhow to counteract them. Theelectronic total stations are not to beused until the user has been properlyinstructed how to use them.
#�$�����"���%����� �

���������������� � �����������
8
12
15
31
Responsibilities of the person incharge of the instrument:
WARNING:The person responsible forthe instrument must ensure
that it is used in accordance with theinstructions. This person is alsoaccountable for the training anddeployment of personnel who use theinstrument and for the safety of theequipment when in use.
The person in charge of theinstrument has the following duties:
• To understand the safetyinstructions on the product and theinstructions in the User Manual.
• To be familiar with local regulationsrelating to accident prevention.
• To inform Leica Geosystemsimmediately if the equipmentbecomes unsafe.
*�,���������
WARNING:The absence of instruction,or the inadequate imparting
of instruction, can lead to incorrect oradverse use, and can give rise toaccidents with far-reaching human,material, financial and environmentalconsequences.Precautions:All users must follow the safetydirections given by the manufacturerand the directions of the personresponsible for the instrument.
WARNING:Using a battery charger notrecommended by Leica
Geosystems can destroy thebatteries. This can cause fire orexplosions.Precautions:Only use chargers recommended byLeica Geosystems to charge thebatteries.
&���������������"��

��� ����������� ���������������
8
12
15
31
CAUTION:Watch out for erroneousmeasurements if the
instrument is defective or if it hasbeen dropped or has been misusedor modified.Precautions:Periodically carry out testmeasurements and perform the fieldadjustments indicated in the UserManual particularly after theinstrument has been subjected to ab-normal use and before and afterimportant measurements.
DANGER:Because of the risk ofelectrocution, it is very
dangerous to use reflector poles andextensions in the vicinity of electricalinstallations such as power cables orelectrical railways.Precautions:Keep at a safe distance fromelectrical installations. If it is essentialto work in this environment, firstcontact the safety authoritiesresponsible for the electricalinstallations and follow theirinstructions.
&���������������"��%���� �
WARNING:By surveying during athunderstorm you are at risk
from lightening.Precautions:Do not carry out field surveys duringthunderstorms.
CAUTION:
Be careful not to point theinstrument directly towards
the sun, because the telescopefunctions as a magnifying lens andcan injure your eyes.Precautions:When viewing into the sun or againstbright objects only use suitableaccessories for this purpose.

����������������� � �����������
8
12
15
31
&���������������"��%���� �
WARNING:During target recognition orstakeout procedures there is
a danger of accidents occurring if theuser does not pay attention to the en-vironmental conditions around orbetween the instrument and thetarget (e.g. obstacles, excavations ortraffic).Precautions:The person responsible for theinstrument must make all users fullyaware of the existing dangers.
WARNING:
Inadequate securing of thesurveying site can lead to
dangerous situations, for example intraffic, on building sites and atindustrial installations.Precautions:Always ensure that the surreying siteis adequately secured. Adhere to thelocal regulations governing accidentprevention and road traffic.
CAUTION:If a target lamp accessory isused with the instrument the
lamp's surface temperature may beextreme after a long working period.It may cause pain if touched.Replacing the halogen bulb beforethe lamp has been allowed to cooldown may cause burning to the skinor fingers.Precautions:Use appropriate heat protection suchas gloves or woollen cloth beforetouching the lamp, or allow the lampto cool down first.
CAUTION:If the accessories used withthe instrument are not
properly secured, and the equipmentis subjected to mechanical shock(e.g. blows, falling etc.), theequipment may be damaged safetydevices may be ineffective or peoplemay sustain injury.Precautions:When setting-up the instrument,make sure that the accessories (e.g.tripod, tribrach, etc.) are correctlyadapted, fitted, secured and locked inposition.Avoid subjecting the equipment tomechanical shock.Never position the instrument on thetripod baseplate without securelytightening the central fixing screw. Ifthe screw is loosened always removethe instrument immediately from thetripod.

��� ����������� ���������������
8
12
15
31
&���������������"��%���� �
WARNING:If the equipment isimproperly disposed of, the
following can happen:• If polymer parts are burnt,
poisonous gases are producedwhich may impair health.
• If batteries are damaged or areheated strongly, they can explodeand cause poisoning, burning,corrosion or environmentalcontamination.
• By disposing of the equipmentirresponsibly you may enableunauthorized persons to use it incontravention of the regulations,exposing themselves and thirdparties to the risk of severe injuryand rendering the environmentliable to contamination.
• Leakage of silicone oil from thecompensator can damage theoptical and electronic subassem-blies.
Precautions:Dispose of the equipmentappropriately in accordance with theregulations in force in your country.Always prevent access to theequipment by unauthorizedpersonnel.
CAUTION:During the transport ordisposal of charged batteries
it is possible for inappropriatemechanical influences to constitute afire hazard.Precautions:Before transporting or disposing ofequipment, discharge the battery(e.g. by running the instrument intracking mode until the batteries areexhausted.

����������������� � �����������
8
12
15
31
'�����������������
The integrated laser plummetproduces a visible laser beam whichemerges from the base of theinstrument.
The product is a Class 2 laserproduct in accordance with:• IEC 60825-1:1993 "Radiation
safety of laser products".• EN 60825-1:1994 + A11:1996
"Radiation safety of laserproducts".
The product is a Class II laserproduct in accordance with:• FDA 21CFR Ch.I §1040: 1988 (US
Department of Health and HumanService, Code of Federal Regulati-ons)
CAUTION:Allow only authorized LeicaGeosystems service
workshops to service the instrument.
��������"���
Class 2/II laser products:Do not stare into the beam or direct itunnecessarily at other persons. Eyeprotection is normally afforded byaversion responses including theblink reflex.

��� ����������� ���������������
8
12
15
31
Labelling
��������"��� %���� �
������������
� ����� �� ���� ������ ���������������������� �������
T10
0Z78
1/4s2
�������������������
� �������������������
���������������������
�������������
Laser RadiationDo not stare into beam
Class 2 Laser Productaccording to IEC 60825-1:1993
P0 � 0.95 mW� = 620 - 690 nm

����������������� � �����������
8
12
15
31
��������"��� %���� �
Laser beam(visible)
Laser beam (visible)exit
Beam divergence 0.16 x 0.6 mrad
Impulse duration c.w.
Maximum power output 0.95 mW
Measurement uncertainty ±5%
T10
0Z56
���������� ��������������������� ���������������������������������������� !�����"�#$$%�&#'���#��(����)%�(���&�*��+��,�&(�����*������������This laser product complies with 21CFR 1040as applicable.This device complies with part 15 of the FCCRules. Operation is subject to the following twoconditions: (1) This device may not cause harm-ful interference, and (2) this device must acceptany interference received, including inter-ference that may cause undesired operation.
T10
0Z54

��� ����������� ���������������
8
12
15
31
��������# �����������������/�+�0
The term "electromagneticacceptability" is taken to mean thecapability of the instrument tofunction correctly in an environmentwhere electromagnetic radiation andelectrostatic discharges are present,and without causing electromagneticdisturbances in other equipment.
CAUTION:Disturbances caused byelectromagnetic radiation can
result in the tolerance limits formeasurements being exceeded.
Although the teodolites meet thestrict regulations and standardswhich are in force in this connection,Leica Geosystems cannot completelyexclude the possibility that theteodolite may be disturbed by veryintense electromagnetic radiation,e.g. near radio transmitters, walkie-talkies, diesel generators, powercables.Check the plausibility of resultsobtained under these conditions.
WARNING:
Electromagnetic radiationcan cause disturbances in
other equipment.
Although electronic teodolites meetthe strict regulations and standardswhich are in force in this respect, Lei-ca cannot completely exclude thepossibility that other equipment maybe disturbed.
CAUTION:There is a risk thatdisturbances may be caused
in other equipment if the teodolite isused in conjunction with accessoriesfrom other manufacturers (e.g. per-sonal computers, walkie-talkies, ...).Precautions:Use only the equipment andaccessories recommended by LeicaGeosystems. When combined withteodolites, they meet the strictrequirements stipulated by theguidelines and standards. Whenusing computers and walkie-talkies,pay attention to the information aboutelectromagnetic compatibilityprovided by the manufacturer.

����������������� � �����������
8
12
15
31
1&&������ ��/����������� �!���0
WARNING:This equipment has been tested and found tocomply with the limits for a Class B digital device,
pursuant to part 15 of the FCC Rules.These limits are designed to provide reasonableprotection against harmful interference in a residentialinstallation.This equipment generates, uses and can radiatefrequency energy and, if not installed and used inaccordance with the instructions, may cause harmfulinterference to radio communications.However, there is no guarantee that interference will notoccur in a particular installation.
If this equipment does cause harmful interference to ra-dio or television reception, which can be determined byturning the equipment off and on, the user is encouragedto try to correct the interference by one or more of thefollowing measures:• Reorient or relocate the receiving antenna.• Increase the separation between the equipment and
receiver.• Connect the equipment into an outlet on a circuit
different from that to which the receiver is connected.• Consult the dealer or an experienced radio/TV
technician for help.
This device complies with part 15 of the FCC Rules.Operation is subject to the following two conditions:(1) This device may not cause harmful interference, and(2) this device must accept any interference received,including interference that may cause undesired operation.
WARNING:Changes or modifications not expressly approvedby Leica Geosystems for compliance could void
the user's authority to operate the equipment.
Product labelling:
������������� ���������������������������� ������������������������������ ���������������� �!��������������"��������������� �����������#����� $!�����������������������"��������������������#�� �������������������������"�����������������������
1000
Z77

�� �� ������� � ���������������
8
12
15
31
41
When transporting or shipping theequipment always use the originalLeica Geosystems packaging(transport case and shippingcardboard).
After a longer period ofstorage or transport of yourinstrument always check thefield ajustment parametersindicated in this manualbefore using the instrument.
�� �������� ���
��� ����� ��� ��������
• carry the tripod with its legssplayed across your shoulder,keeping the attached instrumentupright.
When transporting the equipment inthe field, always make sure to
• either carry the instrument in itsoriginal transport case or,
T10
0Z21
T10
0Z36

���������������� � �� ������� �
8
12
15
31
41
Never transport the instrument looseinside the vehicle.The instrument can be damaged byblows and vibrations. It must alwaysbe transported in it's case and beproperly secured.
�����#
When storing the equipment,particularly in summer and
inside a vehicle, take thetemperature limits into account.
When storing the intrument inside abuilding also use the transport case(if possible, in a safe place).
�������$������ ��������
T10
0Z70
T10
0Z71
For shipping the instrument by rail,aircraft or ship use the LeicaGeosystems original packaging(transport case or shippingcardboard) or another suitablepackaging securing the instrumentagainst blows and vibrations.
T10
0Z61
+70°
-40°
+158°
-40°
0°0°
°F °C

��� �� ������� � ���������������
8
12
15
31
41
'�������
If the instrument becomeswet, leave it unpacked.
Wipe down, clean, and dry theinstrument (at not more than 40 °C/108°F), transport case, foam inserts,and accessories. Pack up theequipment only when it is perfectlydry.
When using the instrument in thefield always close the transport case.
Objective, eyepiece andprisms:
• Blow dust off lenses and prisms
• Never touch the glass with fingers
• Use only a clean, soft and lint-freecloth for cleaning. If necessary,moisten the cloth with purealcohol.
Use no other liquids; these mayattack polymer components.
T10
0Z66
T10
0Z67

����������������� � �� ������� �
8
12
15
31
41
1 2
&��"� #�� ����2��� #
Level-up the instrument in advancewith the electronic level. The bubblemust be centered. If it extendsbeyond the circle, use the Allen keysupplied to center it by turning theadjustment screws.
After adjustment no screw must beloose.
T10
0z44
'���"������$��
Level the instrument and thenremove it from the tribrach. If thebubble is not centred, adjust it usingthe adjusting pin.Turning the adjustment screws:• to the left: the bubble approaches
the screw• to the right: the bubble goes away
from the screw.
After adjustment no screw must beloose.
'���"������$������ ��� ��(����
The connections between metal andtimber components must always befirm and tight.• Tighten the Allen screws (2)
moderately.• Tighten the articulated joints on the
tripod head (1) just enough to keepthe tripod legs open when you lift itoff the ground.
)�����
T10
0z43
T10
0z45

��� �� ������� � ���������������
8
12
15
31
41
��������"���
The laser plummet is integrated intothe vertical axis of the instrument.Under normal circumstances settingof the laser plummet is notnecessary. If an adjustment isnecessary due to external influencesthe instrument has to be returned toany Leica Geosystems servicedepartment.
Checking by turning theinstrument by 360°:1. Install the instrument on the tripod
approx. 1.5 m above ground andlevel up.
2. Switch on laser plummet and markthe centre of the red spot.
3. Turn instrument slowly by 360°and observe the red laser spot.
Inspecting the laser plummet shouldbe carried out on a bright, smoothand horizonal surface (e.g. a sheet ofpaper).
If the centre of the laser spot makesa clearly circular movement or if thecentre of the point is moving awaymore than 3 mm from the firstmarked point an adjustment ispossibly necessary. Call your nearestLeica Geosystems servicedepartment.
Depending on brightness and surfacethe size of the laser spot can vary. Ata distance of 1.5 m an average valueof 2.5 mm diameter must beestimated.
The max. diameter of the circularmovement of the centre of the laserspot should not exceed 3 mm at adistance of 1.5 m.
2
360°
� 3 mm / 1.5 m
1
T10
0z20
Laser spot:Ø 2.5 mm / 1.5 m

����������������� � �� ������� �
8
12
15
31
41
*� ����
Checking by turning the graticule
1. Aim on any point A in the centre ofthe graticule.
2. With the vertical drive move theinstrument upwards to the edge ofthe range of vision (point A1).
3. If point A moves along the verticalline no more adjustment isnecessary.
Adjusting
1. If point A does not move along thevertical line remove cover ofadjusting screws on the eyepiece.
2. With the help of the supplied toolloosen all four adjusting screwssymmetrically. Then turn thegraticule around the centre untilthe vertical line covers point A1.
3. Subsequently, tighten adjustingscrews symmetrically and repeatchecking until adustment iscorrect.
T10
0Z50
T10
0Z51
T10
0Z52A1

�� ���������������
8
12
15
41
53
61
����� ���
��������
1) Battery charger (EU, US, UK,AU, JP)
2) Battery GEB111(Art.No. 667318)
3) Battery GEB121(Art.No. 667123)
4) Battery adapter GAD39(Art.No. 712156)
5) Removable tribrach GDF101(Art.No. 714793)
6) Diagonal eyepiece GFZ2(Art.No. 721966)
7) Booklet:Surveying made easy(available in English (Art. No.722510) and German (Art. No.722383))
8) GHM007 Instrument HeightMeter(Art.No. 667718)GHT196 Spacing Bracket(Art.No. 722045)
T10
0Z49

�����������������
8
12
15
31
53
61
��� ��� ���� �����
�������������� �����Compensator out of measuringrange
This warning appears as soon as thecompensator is outside themeasuring range.
The display is removed if the user:• is levelling the instrument,• is switching off the compensator.
During this display only and areactive.
Battery empty
This warning appears as soon as thebattery is empty and is indicated for aperiod of about 10 seconds.
Replace battery and continuewith measurings.
System error
This error message appears if asystem error occurs requiring aservice.The real error no. is also indicated.
Rectifying this error by yourlocal Leica Geosystems Ser-vice Station.
20"
20"

�� ���������������
8
12
15
41
53
61
Hz-collimation (c)
This error message appears if thenew error value exceeds the limit(± 0.1 gon) during the Hz collimationdetermination.
The function is terminatedand the old value for "c"remains active; back tomeasuring menu.
During this display only and areactive.
V-index (i)
This error message appears if thenew error value exceeds the limit(± 0.1 gon) during the V-indexdetermination.
The function is terminatedand the old value for "i"remains active; back tomeasuring menu.
During this display only and areactive.
Temperature
This error message appear if theambient temperature is outside thespecifications (-20°C to +50°C;-4°F bis +122°F).
The instrument is switched offautomatically (saftey function!)
�������������� �����������
c: -0°00'08"c: -0° --' --"
i: -0°00'15"i: -0° --' --" +50°C +122°F
-20°C -4°F
��� ��� ���� �����
�����������������
8
12
15
31
53
61
����� ��� �
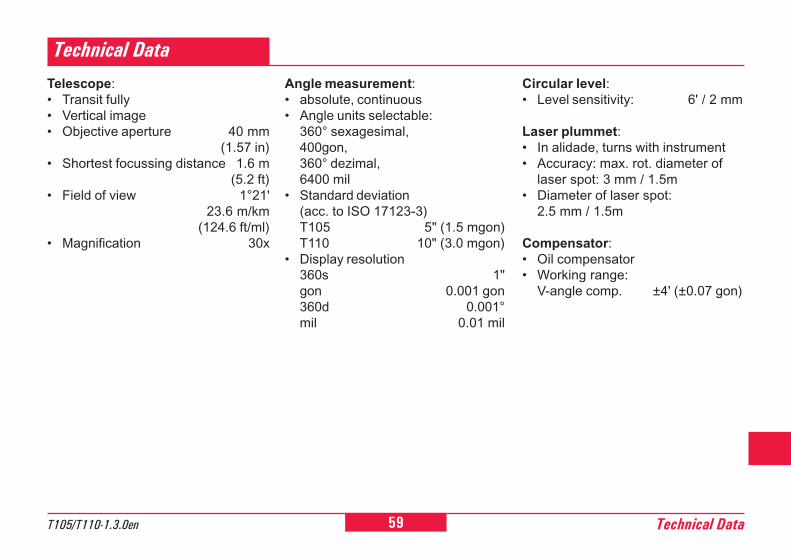
������������Angle measurement:• absolute, continuous• Angle units selectable:
360° sexagesimal,400gon,360° dezimal,6400 mil
• Standard deviation(acc. to ISO 17123-3)T105 5" (1.5 mgon)T110 10" (3.0 mgon)
• Display resolution360s 1"gon 0.001 gon360d 0.001°mil 0.01 mil
Telescope:• Transit fully• Vertical image• Objective aperture 40 mm
(1.57 in)• Shortest focussing distance 1.6 m
(5.2 ft)• Field of view 1°21'
23.6 m/km(124.6 ft/ml)
• Magnification 30x
Circular level:• Level sensitivity: 6' / 2 mm
Laser plummet:• In alidade, turns with instrument• Accuracy: max. rot. diameter of
laser spot: 3 mm / 1.5m• Diameter of laser spot:
2.5 mm / 1.5m
Compensator:• Oil compensator• Working range:
V-angle comp. ±4' (±0.07 gon)

� ���������������
8
12
15
41
53
61
Automatic corrections:• Line-of-sight error• Vertical index
Dimensions:• Instrument:
Height (including tribrach andcarrying handle):- with tribrach GDF111
360 mm ± 5 mm- with tribrach, shiftable
357 mm ± 5 mmWidth: 151 mmLength: 203 mm
• Weightincluding battery GEB111 andtribrach:- with tribrach GDF111
4.46 kg- with tribrach, shiftable
4.68 kgwithout battery and tribrach:
3.69 kg• Case: 468x254x355mm
(LxBxH)
������������������Keyboard:• Tilt angle 70°• Base area: 110x75 mm• No. of buttons: 7
Display:• Backlit• LCD: 144x64 Pixel• Heatable (Temp. < -5°C)
Type of tribrach:• Tribrach removable GDF101
Thread diam.: 5/8"(DIN 18720 / BS 84)
• Tribrach shiftable GUS75Thread diam.: M35x2
(DIN 13)with adapter 5/8"
Tilting axis height:• without tribrach 195.7 mm• with tribrach GDF111
240 mm ± 5 mm• with tribrach, shiftable
237 mm ± 5 mm
Power supply:• Battery GEB111 NiMH
(0% Cadmium)Voltage: 6V, 1800 mAhOperating life: 10h
• Battery GEB121 NiMH(0% Cadmium)
Voltage: 6V, 3600 mAhOperating life: 20h
• Battery adapter GAD39:6 x LR6/AA/AM3, 1.5V,
only alkaline batteries
Temperature range:• Storage: -40°C to +70°C
-40°F to +158°F• Operating: -20°C to +50°C
-4°F to +122°F
����� ��� �

����������������
8
12
15
31
53
61
����
���
� Accessories .......................................................... 56Adjusting ............................................................... 53Adjusting pins ....................................................... 12Allen key ............................................................... 12Angle format ......................................................... 36Angle keys ............................................................ 10Angle measurement ............................................. 59
� Batteries ............................................................... 13Battery adapter GAD39 ..................................13, 56Battery GEB111 ................................................7, 56Battery GEB121 .................................................... 56Bubble .................................................................. 53Button ....................................................................11
Care ...................................................................... 50Centring ................................................................ 17Checking ............................................................... 53Circular level ......................................................... 53Clockwise ............................................................. 21Coarse Level-Up ................................................... 17Collimation axis ...................................................... 8Combi key ............................................................. 10Compensator ....................................................9, 37Contrast setting .................................................... 33Counterclockwise ................................................. 21
� Decimals ............................................................... 36Diagonal eyepiece GFZ2 ...................................... 56Display contrast .................................................... 33Display heating ..................................................... 10Display illumination ............................................... 10Distance line ......................................................... 26
� Electronic level......................................... 10, 19, 53
� Faces .................................................................... 38Function key ................................................... 10, 11
� GEB111 ................................................................. 13GEB121 ................................................................ 13Graticule ................................................................. 9
� Hazards of use ..................................................... 41Horizontal angle ...................................................... 8Horizontal circle ...................................................... 8Hz-circle ................................................................ 21Hz-collimation ...................................................9, 27Hz-direction .......................................................... 21Hz0 ......................................................................... 8
� Inserting battery .................................................... 14Instrument errors ............................................27, 38

�� ���������������
8
12
15
41
53
61
����������
���
� Key assignment .................................................... 10Key combinations ................................................. 10Keyboard .............................................................. 10
� Laser intensity ....................................................... 18Laser plummet ......................................... 10, 17, 54Level ..................................................................... 19Limits of use ......................................................... 40Line of sight ............................................................ 8Line-of-sight error ...................................... 9, 27, 38
� Main hazards of use ......................... 41, 42, 43, 44Measuring range ................................................... 57Messages ............................................................. 57
� ON/OFF keys ........................................................ 10
� Plumb line ............................................................... 9Positioning ............................................................ 19
� Quick setting ......................................................... 10
� Replacing battery .................................................. 14
� Safety directions .............................................39, 41Second key assignment ........................................ 10Set Hz ................................................................... 21Standing axis .......................................................... 8Standing axis inclination ......................................... 9Storage ................................................................. 50System error ......................................................... 57
� Technical data ....................................................... 59Telescope ............................................................. 59Temperature ......................................................... 58Temperature limits ................................................ 51Tilting axis ............................................................... 8Tribrach ................................................................ 53Tripod ................................................................... 53Tripod legs ............................................................ 53
� V-angle ................................................................. 21V-angle display ..................................................... 21V-index ..............................................................9, 27Vertical angle .......................................................... 8Vertical circle .......................................................... 8
� Warnings .............................................................. 57
� Zenith ...................................................................... 9Zenith angle ............................................................ 8

�����������������
8
12
15
31
53
61
���� ��������� ������������������������������������������������������������������������������������ �������������������������!�������"������������!�������������# �$����������%&&'(�������)���������"���������������# �$���������'*&&'(+
,�����!�������"��������$��������������������������������������
�� ������������������������������������������������������������� �������
�!�
� �

������������� ������������������
������������ !"����#�$�%$�%&%��$��$'�(�#�$�%$�%&%��)�%�
���*������������*���
Printed in Switzerland - Copyright LeicaGeosystems AG, Heerbrugg, Switzerland 2004Translation of original text (710404-1.3.0de)
710405-1.3.0en