voluntary safety recall campaign 2016-2019 …
TRANSCRIPT

1/10
Classification: Reference: Date:
EL21-007 NTB21-026 March 29, 2021
VOLUNTARY SAFETY RECALL CAMPAIGN 2016-2019 SENTRA; STOP LAMP SWITCH REPLACEMENT
CAMPAIGN ID #: PM971 APPLIED VEHICLES: 2016-2019 Sentra (B17)
Check Service COMM or Dealer Business Systems (DBS) National Service History to confirm campaign eligibility.
INTRODUCTION Nissan is conducting this voluntary safety recall campaign, on certain specific model year 2016-2019 Sentra vehicles, to replace the stop lamp switch. This service will be performed at no charge to the customer for parts or labor. IDENTIFICATION NUMBER Nissan has assigned identification number PM971 to this campaign. This number must appear on all communication and documentation of any nature dealing with this campaign. DEALER RESPONSIBILITY It is the dealer’s responsibility to check Service COMM or Dealer Business Systems (DBS) National Service History for the campaign status on each vehicle falling within the range of this voluntary safety recall which for any reason enters the service department. This includes vehicles purchased from private parties or presented by transient (tourist) owners and vehicles in a dealer’s inventory. Federal law requires that new vehicles in dealer inventory which are the subject of a safety recall must be corrected prior to sale. Failure to do so can result in civil penalties by the National Highway Traffic Safety Administration. While federal law applies only to new vehicles, Nissan strongly encourages dealers to correct any used vehicles in their inventory before they are retailed. Nissan Bulletins are intended for use by qualified technicians, not 'do-it-yourselfers'. Qualified technicians are properly trained individuals who have the equipment, tools, safety instruction, and know-how to do a job properly and safely. NOTE: If you believe that a described condition may apply to a particular vehicle, DO NOT assume that it does. See your Nissan dealer to determine if this applies to your vehicle.

2/10 NTB21-026
REPAIR OVERVIEW
Does the customer have a concern of an intermittent or current:
No-start condition
Inoperative brake lights
Does the vehicle display a concern of an intermittent or current:
No-start condition
Inoperative brake lights
Yes
No
Yes No
Complete the FQA form on ASIST and submit for review. See steps 2 - 5.
Do NOT submit a claim at this time. Order the replacement part. Release the vehicle to the customer.
o The vehicle may continue to be driven until the above conditions occur or the campaign parts arrive.
NOTE: Parts may not arrive until fall 2021.
FQA will review the completed form and approve/release parts shipment in DBS
within 1-2 business days.
After the authorization and the requested parts have been received,
replace the stop lamp switch. See step 6.
When the parts are received, set up an appointment with the customer to
perform the vehicle repair. Skip to step 6.

3/10 NTB21-026
SERVICE PROCEDURE 1. Is there a customer concern or does the vehicle display a current or intermittent:
No-start condition
Inoperative brake lights
YES:
Provide the customer with a rental.
Inform the customer that a limited number of parts are available.
Perform steps 2 - 5 to complete the FQA form in ASIST.
NO:
Do NOT submit a claim.
Release the vehicle. The vehicle can continue to be driven until the above conditions occur or the campaign parts arrive.
NOTE: Parts may not arrive until fall 2021.
Order a replacement part.
When the parts are received, set up an appointment with the customer to perform the vehicle repair and skip to step 6.
Complete and Submit the FQA Form 2. Open ASIST.
4/10 NTB21-026
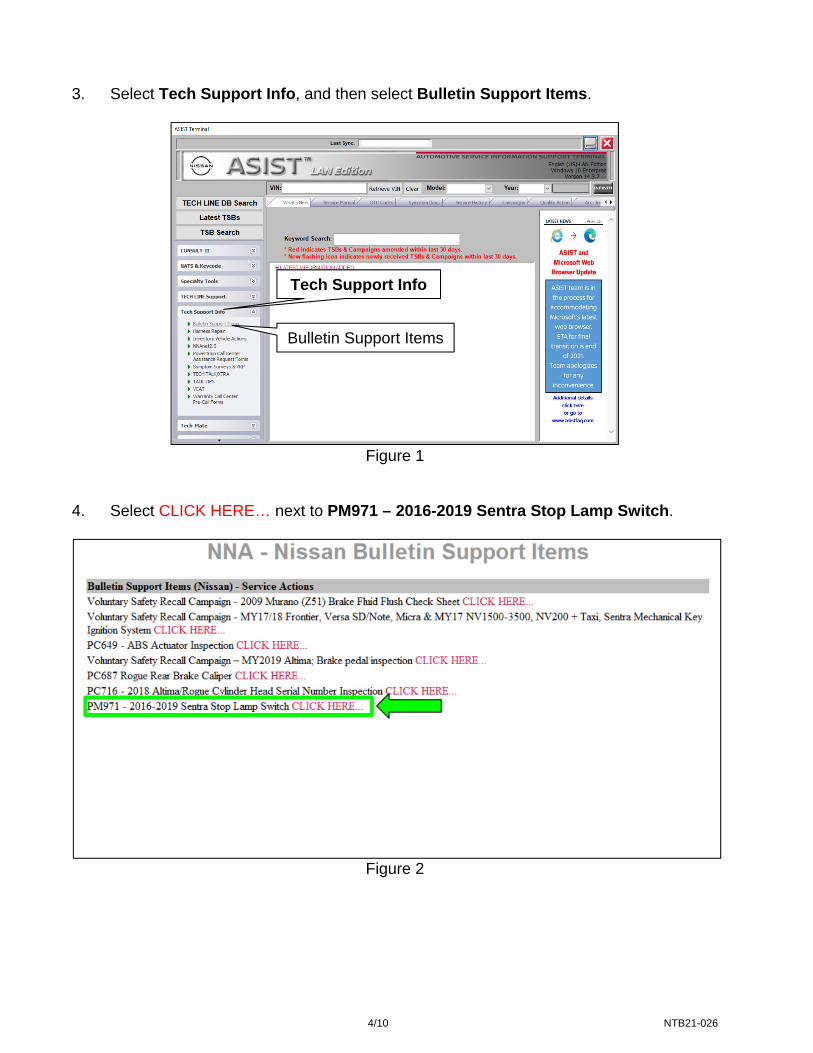
3. Select Tech Support Info, and then select Bulletin Support Items.
Figure 1
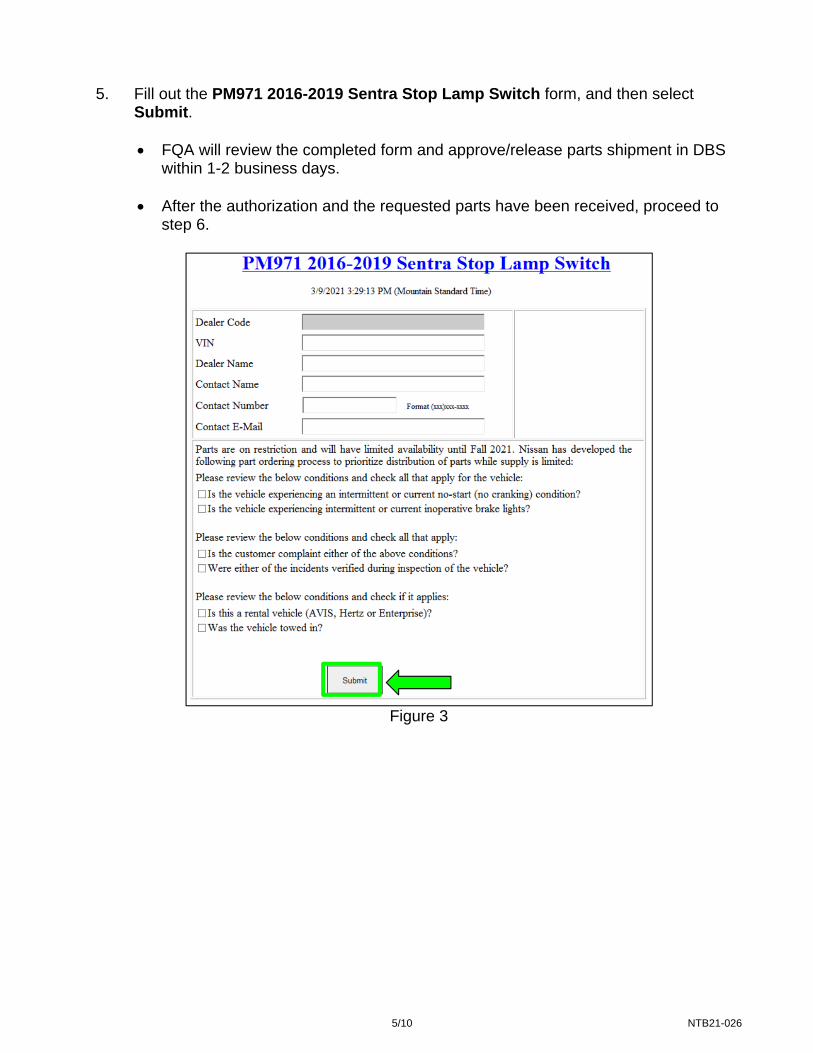
4. Select CLICK HERE… next to PM971 – 2016-2019 Sentra Stop Lamp Switch.
Figure 2
Tech Support Info
Bulletin Support Items
5/10 NTB21-026
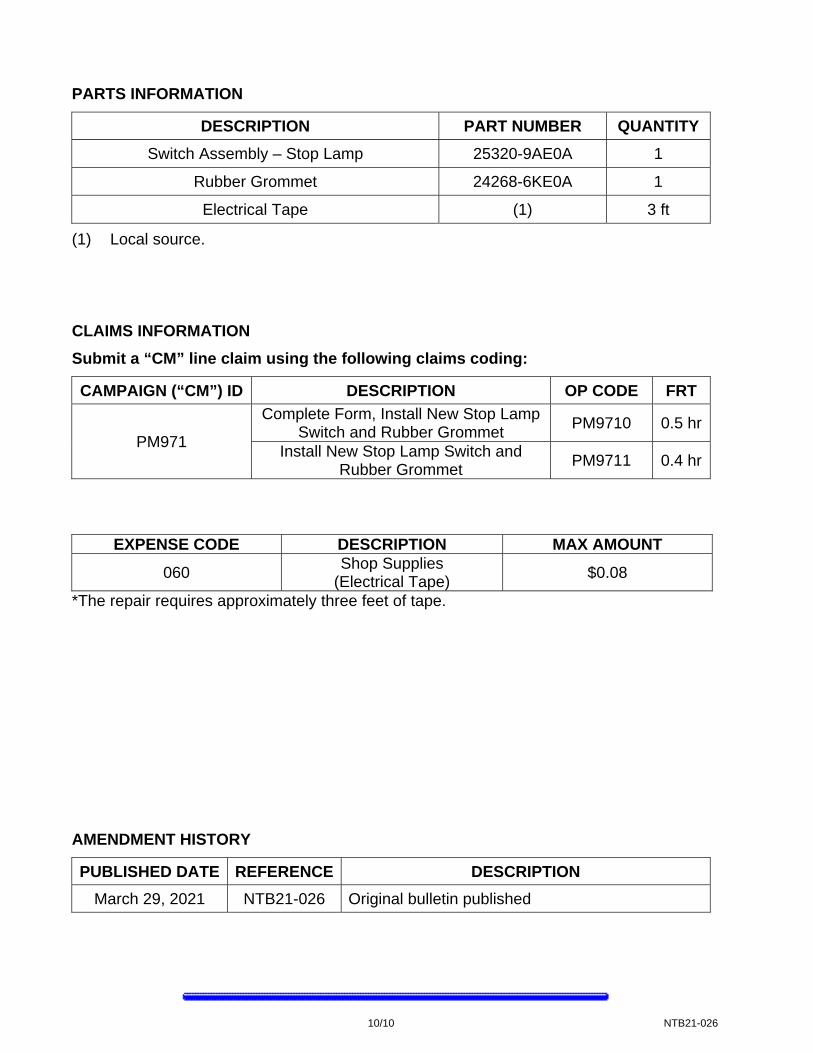
5. Fill out the PM971 2016-2019 Sentra Stop Lamp Switch form, and then select
Submit.
FQA will review the completed form and approve/release parts shipment in DBS within 1-2 business days.
After the authorization and the requested parts have been received, proceed to
step 6.
Figure 3

6/10 NTB21-026
Replace the Stop Lamp Switch 6. Remove the instrument lower panel LH.
For instrument lower panel LH removal, refer to the ESM section below. BODY INTERIOR > INSTRUMENT PANEL > REMOVAL AND
INSTALLATION > INSTRUMENT LOWER PANEL LH.
Figure 4
Figure 5
7. Disconnect the harness connector from the stop lamp switch.
8. Rotate the stop lamp switch
counterclockwise to remove.
HINT: The stop lamp switch is the upper of the 2 switches, as shown in Figure 4.
9. Connect the new stop lamp switch, from the PARTS INFORMATION table on page 10, to the harness connector (Figure 5).
Stop lamp switch
New stop lamp switch connected
to harness connector

7/10 NTB21-026
Figure 6
Figure 7
Figure 8
10. Insert the stop lamp switch, plunger first, into the large opening of the rubber grommet until the plunger is visible at the small end of the rubber grommet as shown in Figure 6
11. Pull the large opening of the rubber grommet to completely cover the stop lamp switch and harness connector.
NOTE: When the rubber grommet is
fully installed, the threads of the stop lamp switch will be exposed (Figure 7).
12. Fold the large opening of the grommet back around the stop lamp switch.
Rubber grommet
Stop lamp switch
plunger
Stop lamp switch
threads
Rubber grommet
fully installed
Fold or twist the open end of the rubber grommet

8/10 NTB21-026
Figure 9
Figure 10
13. Tape off the large opening of the rubber grommet as shown in Figure 9.
Ensure the large opening of the
rubber grommet is completely sealed off with tape.
The tape should be applied to the
stop lamp switch harness at least 1 inch beyond the end of the rubber grommet.
NOTE: Make sure the stop lamp switch threads are exposed.
14. Install the stop lamp switch.
Taped end of rubber grommet
Stop lamp switch
threads
New stop lamp switch and grommet installed in the upper position

9/10 NTB21-026
15. Adjust the stop lamp switch.
For stop lamp switch adjustment, refer to the ESM section, BRAKES > BRAKE SYSTEM > PERIODIC MAINTENANCE > BRAKE PEDAL > ADJUSTMENT > STOP LAMP SWITCH AND BRAKE PEDAL POSITION SWITCH.
IMPORTANT: Make sure that the clearance (A) between the brake pedal (3) and the brake pedal position switch (1) and the stop lamp switch (2) are within specification. The brake lights must turn OFF when the brake pedal is released.
Clearance (A): 0.74 – 1.96 mm (0.03 – 0.08 in.)
Figure 11
16. Reinstall the instrument lower panel LH.
For instrument lower panel LH installation, refer to the ESM section below. BODY INTERIOR > INSTRUMENT PANEL > REMOVAL AND
INSTALLATION > INSTRUMENT LOWER PANEL LH. 17. Verify the brake lights operate correctly when the brake pedal is depressed and
released.
10/10 NTB21-026
PARTS INFORMATION
DESCRIPTION PART NUMBER QUANTITY
Switch Assembly – Stop Lamp 25320-9AE0A 1
Rubber Grommet 24268-6KE0A 1
Electrical Tape (1) 3 ft
(1) Local source. CLAIMS INFORMATION
Submit a “CM” line claim using the following claims coding:
CAMPAIGN (“CM”) ID DESCRIPTION OP CODE FRT
PM971
Complete Form, Install New Stop Lamp Switch and Rubber Grommet
PM9710 0.5 hr
Install New Stop Lamp Switch and Rubber Grommet
PM9711 0.4 hr
EXPENSE CODE DESCRIPTION MAX AMOUNT
060 Shop Supplies
(Electrical Tape) $0.08
*The repair requires approximately three feet of tape. AMENDMENT HISTORY
PUBLISHED DATE REFERENCE DESCRIPTION
March 29, 2021 NTB21-026 Original bulletin published