· web view- consult the dealer or an experienced radio/tv technician for help. important...
TRANSCRIPT
Braille EDGE 40User Manual
ENGLISH MANUALFor Software Version 1.1
(June, 2013)
When there are any manual updates, the readme files or appendices will be added to the manual CD
and website.
HIMS International
139-9, Gajung-dong, Yuseong-gu,Daejeon, Korea 305-350Phone: +82-42-864-4601
Fax: +82-42-864-4462Email: [email protected]: www.himsintl.com

Safety Precautions
For your own safety and to protect the Braille EDGE 40 from accidental damage, please read and abide by the following safety precautions.
1. The input voltage of the AC adapter is 100V - 240V, and the output is DC 5V / 2A.
2. When you use the Braille EDGE 40 with the battery for the first time, the battery status may not be displayed accurately. To ensure the accuracy of the battery gauge, power on the Braille EDGE 40 and charge the unit via the AC adapter for more than four and a half hours, or leave the Braille EDGE 40 connected to the USB cable for more than ten and a half hours.
3. Your Braille EDGE 40 needs to be handled with care. The Braille EDGE 40 is a very delicate machine. Make sure to handle the unit in a proper manner. Also, the Braille EDGE 40 is very sensitive to dust. Make sure to keep the Braille EDGE 40 away from dusty environments.
4. The Braille cells are particularly sensitive, intricate parts. If any of the Braille cells are not working properly due to the presence of dust or any other reason, please contact our repair center, or the dealer from whom you purchased the Braille EDGE 40 for support.
5. If you let your Braille EDGE 40 remain for a long time in a closed, high temperature environment such as inside a car on a hot summer day, the battery attached to the Braille EDGE may malfunction or catch fire. Please keep your Braille EDGE 40away from such environments.
6. Do not disassemble the Braille EDGE 40 yourself. Do not have anyone else who is not authorized by HIMS take apart the Braille EDGE 40. If an unqualified person disassembles the unit, serious damage may occur to the Braille EDGE 40. If an unauthorized person disassembles the Braille
EDGE 40, the warranty is voided, and the unit will be excluded from any free maintenance. If any liquid or external force damages the unit, it may also be excluded from free maintenance, even if the damage occurs during the warranty period.
7. We thank you for using the Braille EDGE 40, and we value any comments or suggestions you have for our product. If you have any complaints or suggestions, please place your comments on our website. We will improve our product based on your comments and suggestions.
8. This equipment has been tested and found to comply with the limits for a Class B digital device, pursuant to part 15 of the FCC Rules. These limits are designed to provide reasonable protection against harmful interference in a residential installation.
Operation is subject to the following two conditions.1) This device may not cause harmful interference, and2) This device must accept any interference received, including
interference that may cause undesired operation.
This equipment can generate, use and radiate radio frequency energy and, if not installed and used in accordance with the instructions, may cause harmful interference to radio communications. However, there is no guarantee that interference will not occur in a particular installation.
If this equipment does cause harmful interference to radio or television reception, which can be determined by turning the equipment off and on, the user is encouraged to try to correct the interference by one or more of the following measures:- Reorient or relocate the receiving antenna.- Increase the separation between the equipment and receiver.- Connect the equipment into an outlet on a circuit different from that to which the receiver is connected.- Consult the dealer or an experienced radio/TV technician for help.
IMPORTANT NOTE:FCC RF Radiation Exposure Statement:This equipment complies with FCC RF radiation exposure limits set forth for an uncontrolled environment. This equipment should be installed and operated with a minimum distance of 20 cm between the radiator and your body. This transmitter must not be co-located or operating in conjunction with any other antenna or transmitter.

Notice
This user manual and products are protected by copyright law Microsoft Windows, and the Windows Logo are registered trademarks or
trademarks of Microsoft Corporation United States other countries.
Copyright 2013. All RIGHTS reserved, HIMS I nternational. This User Manual is protected by copyright belonging to HIMS, with all rights reserved. Information in this document is subject to change without

notice. The User Manual may not be copied in whole or part, without consent from HIMS.

Table of contents
Table of contents....................................................................................................................................6
1. Getting Started....................................................................................................................................9
1.1 What is the Braille EDGE 40?....................................................................................................................9
1.2 Package..........................................................................................................................................................9
1.3 Hardware Specifications.............................................................................................................................9
1.4 Physical Orientation..................................................................................................................................10
1.4.1 Top panel...............................................................................................................................................10
1.4.2 Left Panel..............................................................................................................................................12
1.4.3 Right Panel............................................................................................................................................12
1.4.4 Front Panel............................................................................................................................................13
1.4.5 Rear Panel.............................................................................................................................................13
2. Basic Functions................................................................................................................................14
2.1 Power on/off.................................................................................................................................................14
2.2 How to navigate..........................................................................................................................................14
2.3 Function keys..............................................................................................................................................15
2.4 Using Menus................................................................................................................................................15
2.5 Charging and using battery.....................................................................................................................17
2.6 Reset and Hard reset.................................................................................................................................18
2.7 Set date and time........................................................................................................................................18
2.8 Using the help menu..................................................................................................................................19
2.9 Using a USB mouse with the Braille EDGE 40.....................................................................................19
2.10 Global Hot Keys........................................................................................................................................20
3. Notepad..............................................................................................................................................22
3.1 What is the Notepad?................................................................................................................................22
3.2 Execute and Exit.........................................................................................................................................22
3.3 Structure of Notepad.................................................................................................................................23
3.4 Opening documents...................................................................................................................................24
3.4.1 Creating a New document.................................................................................................................24
3.4.2 Open document...................................................................................................................................24
3.4.3 Open recent document.......................................................................................................................24
3.4.4 Open document in ‘read only’ mode......................................................................................25
3.5 Save Document...........................................................................................................................................25
3.6 Document Navigation................................................................................................................................25
3.7 Editing a Document....................................................................................................................................26
3.7.1 Selecting Text.......................................................................................................................................26

3.7.2 Copy and paste....................................................................................................................................27
3.7.3 Cut...........................................................................................................................................................27
3.7.4 Delete.....................................................................................................................................................27
3.7.5 Undo.......................................................................................................................................................28
3.7.6 Insert date and time............................................................................................................................28
3.7.7 Insert calculation and result.............................................................................................................29
3.8 Find and Replace........................................................................................................................................29
3.8.1 Find.........................................................................................................................................................29
3.8.2 Replace..................................................................................................................................................30
3.9 Mark...............................................................................................................................................................31
3.9.1 Set Mark.................................................................................................................................................31
3.9.2 Go to Mark.............................................................................................................................................31
3.10 File information.........................................................................................................................................32
3.11 Auto scroll..................................................................................................................................................32
3.12 Settings.......................................................................................................................................................32
3.13 Managing files/folders.............................................................................................................................33
3.13.1 Copy and paste files and folders...................................................................................................34
3.13.2 Cut and move files and folders......................................................................................................34
3.13.3 Delete files and folders....................................................................................................................35
3.13.4 Selecting files/folders.......................................................................................................................35
3.13.5 Create new folder..............................................................................................................................36
3.13.6 Rename files and folders.................................................................................................................36
3.13.7 Find file or folder...............................................................................................................................36
3.14 Information.................................................................................................................................................37
4. Terminal for Screen Reader...........................................................................................................38
4.1 Supported Screen Readers......................................................................................................................38
4.2 Switching USB/Bluetooth mode..............................................................................................................38
4.3 Execute and Close......................................................................................................................................38
4.4 Connecting to a Screen reader................................................................................................................39
4.4.1 Connecting to PC via USB................................................................................................................39
4.4.2 Connecting to PC via Bluetooth serial port..................................................................................40
4.4.3 Using the Braille EDGE with Window-Eyes...................................................................................42
4.4.4 Using the Braille EDGE with JAWS for Windows........................................................................44
4.4.5 Using Braille EDGE as a Braille display with NVDA....................................................................47
4.4.7 Using Braille EDGE with System Access......................................................................................49
4.4.7 Using Braille EDGE with VoiceOver on the Mac..........................................................................51
4.4.8 Using the Braille EDGE with IOS devices......................................................................................53

4.4.9 Using the Braille EDGE with BrailleBack for Android................................................................56
4.5 Terminal Clipboard.....................................................................................................................................57
5. Applications.......................................................................................................................................59
5.1 Calculator.....................................................................................................................................................59
5.1.1. General functions...............................................................................................................................59
5.1.2 Clear All.................................................................................................................................................60
5.1.3 Save file.................................................................................................................................................60
5.1.4 Copy and paste....................................................................................................................................61
5.2 Alarm.............................................................................................................................................................61
5.2.1 Set Time.................................................................................................................................................62
5.2.2 Term........................................................................................................................................................62
5.2.3 Duration.................................................................................................................................................62
5.2.4 Wake-up call times..............................................................................................................................63
5.2.5 Repeat Interval.....................................................................................................................................63
5.2.6 Stop Alarm Sound...............................................................................................................................63
5.3 Date and Time..............................................................................................................................................64
5.3.1 Set the date and time..........................................................................................................................64
5.3.2 Time and Date Options.......................................................................................................................65
5.4 Stop Watch...................................................................................................................................................65
5.5 Countdown Timer.......................................................................................................................................66
5.6 Scheduler.....................................................................................................................................................67
5.6.1 View Calendar......................................................................................................................................67
5.6.2 New appointment.................................................................................................................................67
5.6.3 Modify appointment............................................................................................................................69
5.6.4. View All appointment........................................................................................................................69
5.6.5 Search appointment............................................................................................................................69
5.6.6 Delete appointment.............................................................................................................................70
5.6.7 Copy and paste appointment...........................................................................................................70
5.6.8 Backup appointment..........................................................................................................................70
5.6.9 Restore appointment..........................................................................................................................71
6. Options...............................................................................................................................................72
7. Information.........................................................................................................................................76
8. Command Summary........................................................................................................................77

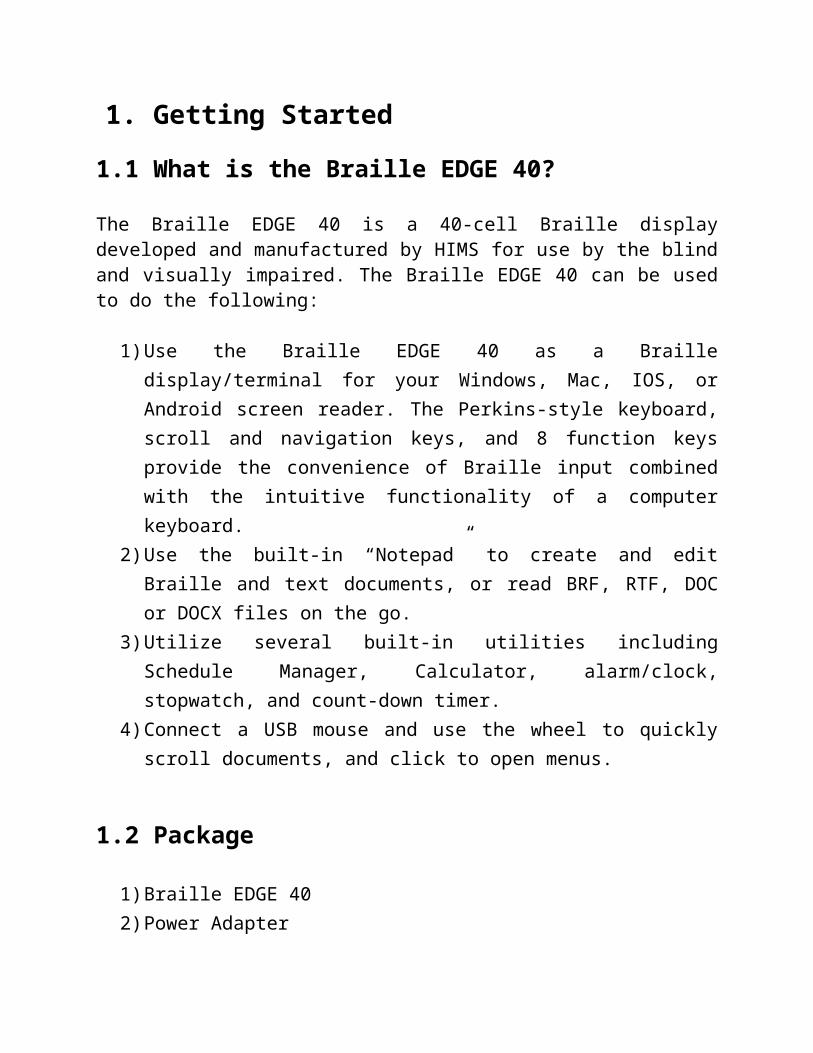
1. Getting Started1.1 What is the Braille EDGE 40?
The Braille EDGE 40 is a 40-cell Braille display developed and manufactured by HIMS for use by the blind and visually impaired. The Braille EDGE 40 can be used to do the following:
1) Use the Braille EDGE 40 as a Braille display/terminal for your Windows, Mac, IOS, or Android screen reader. The Perkins-style keyboard, scroll and navigation keys, and 8 function keys provide the convenience of Braille input combined with the intuitive functionality of a computer keyboard.
2) Use the built-in “Notepad” to create and edit Braille and text documents, or read BRF, RTF, DOC or DOCX files on the go.
3) Utilize several built-in utilities including Schedule Manager, Calculator, alarm/clock, stopwatch, and count-down timer.
4) Connect a USB mouse and use the wheel to quickly scroll documents, and click to open menus.
1.2 Package
1) Braille EDGE 40 2) Power Adapter3) USB Cable4) USB Gender adapter5) SD Card (2GB)6) Carrying case7) Documentation/driver CD8) Braille Quick Reference Guide
1.3 Hardware Specifications
1) Operating System: Windows CE 5.0
2) RAM: 128 MB3) CPU: Samsung S3C2443X4) Battery: Lithium polymer.5) Running Time: About 20 hours6) Keyboard: 9 key Perkins-style Braille keyboard, 8 Function keys, 8 Navigation buttons, 4 Scroll buttons, 40 cursor routing keys7) Additional Buttons: Power button, Bluetooth on/off switch, Reset button, hard reset button8) Braille display: 40 refreshable Braille cells9) Bluetooth: 2.0+EDR10) Interface: 1 USB OTG port (ver.2.0), 1 SD slot11) Sound: Mono speaker12) Size: 31cm x 10.2 cm x 2.2 cm
1.4 Physical Orientation
To get the most from your Braille EDGE 40, it is important to become oriented to the buttons on your Braille EDGE 40 as well as learning their functions. This section explains the physical configuration of the Braille EDGE 40. The Braille EDGE 40 is 12.2 inches long by 4 inches wide by 0.86 inches high. Place the Braille EDGE 40 on a desk or table top with the Braille display nearest you. Its shape resembles a long, thin rectangular box. This section of the manual describes each side of the Braille EDGE 40 and the basic function(s) of each button. We will discuss the panels in the following order: top panel, left panel, right panel, front panel, and rear panel.
1.4.1 Top panel
The top face of the unit contains the keyboard and Braille display. Along the front edge of the top panel are 40 refreshable Braille cells. Just above the Braille display. There are 40 small, oval-shaped buttons corresponding to each of the 40 Braille cells. These buttons are called cursor routing keys.

When you are editing documents, you can use these keys to route your cursor to the character of the corresponding Braille cell.
On each side of the Braille display are two capsule shaped keys. These are the "UP" and "DOWN" scroll keys. The scroll keys are used to scroll the Braille display through menus, fields, lists or text. You can use the scroll keys to scroll by display length or line.
Above the Braille display are the Perkins keyboard and the function and navigation keys. Near the center of the unit is a 9 key Perkins-style keyboard, consisting of Braille dots 1:6, "SPACE", "BACKSPACE", and "ENTER". When you are typing, you should place your fingers on these 9 keys in the following manner:
Place the index finger, middle finger, ring finger, and pinky finger of your left hand on the left four buttons. Then, place the index finger, middle finger, ring finger, and pinky finger of your right hand on the right four buttons. Finally, place both of your thumbs on the spacebar. The button where you placed your left index finger corresponds with dot one in Braille. The button that your left middle finger is on corresponds to dot two, and the button under your left ring finger corresponds to dot three. The button on which your left pinky finger is placed is the Backspace key.The button under your right index finger corresponds with dot four in Braille. The button under your right middle finger is dot five, and the button on which your ring finger is placed corresponds with dot six in Braille. The button on which your right pinky is placed is the Enter key. And, the long bar shaped button under your thumbs is the spacebar.
On the same row as the Space bar are 8 rectangular function keys: four to the left of the spacebar, and four to the right. Moving from left to right, these keys are numbered f1-f8 and are programmed with the following functions: Esc, Tab, Ctrl, Alt, Shift, Insert, Windows, and Applications.
On each of the upper left and right corners of the top face of the Braille EDGE 40 are 4 buttons in a circular pattern. These are the navigation
buttons and correspond to UP, DOWN, LEFT, and RIGHT arrows respective to the direction the buttons are pointed. These keys are also used in conjunction with other keys to create hot key commands.
Along the far edge of the top face of the unit, are located a speaker and 2 LED lights. The speaker is located between dot 1 and dot 4 and is used to output system sounds and audio alerts.
The LED lights are located above the navigation buttons on the right side of the top face. The left LED light shows Bluetooth status; when Bluetooth is activated, this LED light turns blue. The right LED indicates the status of the power; when you are charging the unit, the LED turns red. When the Braille EDGE 40 is powered on, the LED turns yellow. These LED lights help a sighted person easily determine the status of the unit when working with students. This helps them quickly evaluate whether options need to be changed for accomplishing current tasks, or if options are activated unnecessarily, and can be turned off to save power, etc.
1.4.2 Left Panel
The left panel contains 2 items. About halfway between front and rear of the unit is the Bluetooth on/off switch. Slide the switch toward the rear of the unit to turn Bluetooth on. There is a Braille letter “b” behind the Bluetooth switch to indicate the correct direction. Slide the switch toward the front of the unit to turn Bluetooth off, in which case, you can save power while using the internal applications on the unit or while the unit is used as a Braille terminal via USB.
Near the rear of the unit on the left panel is the SD card slot. The Braille EDGE 40 can accommodate high capacity SD cards up to 32GB.
1.4.3 Right Panel
The Right panel of the Braille EDGE 40 contains the USB OTG port and the AC adapter jack. Nearer the front of the unit on the right panel is a small port for connecting a USB cable. Use this cable to connect the Braille EDGE 40 to a computer for use as a USB Braille display or to charge the unit. To charge the unit via AC power, please connect the small round end of the AC adapter cable to the round jack near the rear of the right panel. Plug the larger, box-like end of the AC adapter in to a standard electrical outlet.
1.4.4 Front Panel
The front panel contains only one button near the right end of the front panel is a large, rectangular button used to turn the Braille EDGE 40 on/off.
Press the power button on the right side of the front panel for about 1 second to power the unit on/off. When the unit is powered on, again, hold the Power button for about 1 second to power the unit off.
1.4.5 Rear Panel
The rear panel of the Braille EDGE 40 contains 2 very small buttons. Near the right end of the rear panel is a small pin hole containing the “Hard reset” button. The “Hard reset” button is used when the “Reset” button has no affect or when the battery is completely depleted and connecting the AC adapter doesn’t reboot the unit. You can use a toothpick or the end of a paperclip to press the “Hard reset” button. Be careful when pressing the “Hard reset” button as, if you are not careful, pressing too hard or using an end too small may damage the device.
If you press the “Hard reset” button on the rear panel then press the power button on the front panel, the Braille EDGE 40 reboots, initializing all the settings on the unit to their factory defaults.

Toward the left end of the rear panel is a small, round recess with a dot-like button inside it. This is the “Reset” button. If your unit is not responding properly, press this button to perform a soft reboot of the Braille EDGE 40.NOTE: do NOT press the "Reset" button for more than 5 seconds. It takes about fifteen seconds for your unit to complete the reboot process.
2. Basic Functions
2.1 Power on/off
Press the power button on the right side of the front panel for about 1 second to power the unit on/off.
When the unit is powered on, again, hold the Power button for about 1 second to power the unit off.
2.2 How to navigate
Use the following keystrokes to navigate menus, lists, and programs on the Braille EDGE 40:1. Move to the next item in a menu or list: Down navigation button or Space-42. Move to the previous item in a menu or list: Up navigation button or Space-13. Move to the first item in a menu or list: Up navigation button-left navigation button or Space-1-34. Move to the last item in a menu or list: Down navigation button-right navigation button or Space-4-65. Move to the next 40 items: Ctrl-up navigation button or Space-1-2-66. Move to the previous 40 items: Ctrl-down navigation button or Space-3-4-57. Execute program: Enter, or right navigation button, or cursor routing key twice8. Enter sub folder: Enter, or right navigation button, or cursor routing key twice9. Cancel: Esc key or left navigation button
2.3 Function keys
On the same row as the spacebar there are 8 rectangular function keys, 4 to the left of the spacebar, and 4 to the right. These keys help you more intuitively interface with your PC as they are mapped to common PC keyboard functions. They can also be used to more easily perform functions in the internal applications.
NOTE: The key mappings listed below reflect the functionality we feel to be of most intuitive use for these keys. However, supported screen readers’ use of these function keys may vary, thus, you should consult each screen reader’s documentation on use with the Braille EDGE to discover the functions of these keys.Also Note: some function keys also have Braille keyboard equivalents as listed below.
From left to right, the function keys are as follows:
1. Esc: Cancels the current menu/program Space-E (dots 1-5)2. Tab: Advances the cursor to the next tab stop Space -dots 4-53. Ctrl4. Alt: Opens the menu Space-M (dots 1-3-4)5. Shift6. Insert7. Windows 8. Applications
Note: You cannot multi-task on the Braille EDGE 40, thus there is no hot key for bringing up the main menu, as you must exit the current program and return to the main menu before opening another application.
2.4 Using Menus
The main menu on the Braille EDGE 40 consists of the following 5 items:1. Notepad2. Terminal for Screen Reader3. Applications4. Options5. Information
You can navigate the main menu, or any menu on the unit, using the navigation commands listed in the previous section. You can also press the menu's shortcut key, usually the first letter of the menu name, to quickly jump to and execute that menu item. Often menu items can also be executed instantly with a hotkey, enabling you to perform the desired action without accessing the menus.When viewing menu items, several things are displayed including the item name, its shortcut key, a hot key if one is available, and whether the item has a sub menu or opens a dialog.
1) Shortcut keys: Shortcut keys are displayed in parentheses following the menu names for example, Open (o). If you press the shortcut key, you can execute the menu or item directly from anywhere in the menu.
2) Sub menus: When a menu contains a sub menu, the word "Pulldown" is displayed after the item to indicate that pressing "Enter" will "pull down" another menu.
3) Dialogs: When the menu item opens a dialog, the word "Dialog" is displayed after the item to indicate that pressing "Enter' on this item will bring up a dialog.
4) Hot keys:Hotkeys generally consist of a modifier such as "Enter," "Space," or "Backspace", pressed simultaneously with a letter or dot combination. These are displayed following the shortcut keys.
For example, if you are in the Notepad, and press "Space-m (dots 1-3-4)" or "F2," then press "Enter" on "File," you see "New (n) pull down Ctrl-n". The word "New" is the menu option. YOU would press the letter "n (dots 1-3-4-5)" to jump to "New" from within the "File" menu. Press "Ctrl-n" to access the "New" document command from anywhere in Notepad. The “n” is the shortcut key and "Ctrl-n" is the hotkey. It is important to note that some hotkey commands are global, thus will work from anywhere on the unit, and some are program specific.
Note: if you are in a sub menu or dialog box, and the Braille EDGE 40is powered off, when the unit is powered back on, the sub menu or dialog is closed and you are returned to the location at which you entered the menus.
2.5 Charging and using battery
Though the Braille EDGE 40 alerts you when the battery is low, it is important to keep track of the battery status so as not to lose unsaved data or unexpectedly disconnect a Bluetooth Braille display connection.To check the battery power status, press "Space-P (dots 1-2-3-4)". The unit displays the following 2 items:1. Battery power level2. Power source (battery, AC power or USB power)
The battery power level represents the percentage of the remaining battery power. The power source indicates whether the unit is being operated using the battery, the AC power or USB power supply.To close the battery power status dialog, press F1 button (Esc).
When the battery level falls below 15%, the Braille EDGE displays the message, “battery low” and suggests you connect the AC adapter. When the battery level falls below 5%, the Braille EDGE displays a warning that
the unit will automatically hard reset in 3 minutes time if the AC adapter is not connected. Note: if you are concerned about losing Bluetooth connection settings, you may wish to activate the “Auto disconnect Bluetooth at 10%” setting in the “Global options”. If this item is set to “On”, the Braille EDGE 40 alerts you and disconnects from a Bluetooth device when the battery level drops to 10%.
2.6 Reset and Hard reset
1. If the Braille EDGE 40 does not respond to keystrokes or commands, it may be necessary to reset the unit. To perform a soft reset of the Braille EDGE 40, press the “Reset” button on the rear panel. Do NOT hold the “Reset” button for more than 5 seconds. Note: it takes about 15 seconds for the unit to reboot.
2. If pressing the "Reset" button does not revive the Braille EDGE 40 or the battery is completely depleted, you may need to perform a ‘Hard reset’. You can use a toothpick or the end of a paperclip to press the ‘Hard reset’ button. Be careful when pressing the ‘Hard reset’ button as pressing too hard or using an end too small may damage the device. If you press the “Hard reset” button on the rear panel then press the “power” button on the front panel, Braille EDGE 40 reboots, initializing all settings to their factory defaults.
2.7 Set date and time
It is important for use with the Schedule Manager and alarm functions, that the date and time is set correctly. To set the date and time, follow the instructions below:1) From the Main menu, press “a (dot-1)” to open the Applications Menu. Press “t (dots-2-3-4-5)” to open “Date and Time”. Press “Control-s (dots-2-3-4)”, or press “alt” to open the Menu and press “enter” on “set”.
2) Type the time as hhmm using normal text editing commands. You may also use the following navigation keys to modify the time.Up/down button: change timeLeft/right button: modify hour or minute
3) Press ‘Enter’ or right navigation button to move to the Date Edit box.
4) Type month, day and year as mmddyyyy. Ex) 01252012 (25th January, 2012) or you can modify the date using the following commands: Up/down button: change valueLeft/right button: modify month, day, year
5) Press ENTER to save your settings.
2.8 Using the help menu
You can access context specific help anywhere on the unit by pressing “Space-h (dots-1-2-5)”. If you press the “Help” command, it brings up a list of hot keys pertaining to the currently open program.
Move among the items using Space-dot 1/space-dot4. You can select an item or function by pressing ‘Enter’. However, if you select a function which cannot be performed in your current context, an alert sound is heard and no action is executed.
2.9 Using a USB mouse with the Braille EDGE 40
You can use a USB mouse with the Braille EDGE 40 for additional navigation options in Braille EDGE’s built in applications. To connect a mouse to the Braille EDGE 40, follow below instructions:1) Connect your USB mouse to the included USB OTG gender adapter.
2) Connect the USB OTG gender adapter cable to the USB OTG port on the Braille EDGE 40.
You can use the mouse to perform the following functions on the Braille EDGE 40: 1) Click the right mouse button: Open menu/ Alt2) Double click the right mouse button: Open the “Global Options”
menu/Space-O (dots1-3-5)3) Click the left mouse button: Select or deselect current item (Only in the
file browser) 4) Double click the left mouse button: Execute the selected function5) Click both right and left mouse buttons: Exit function/ Space-Z(dots 1-2-
5-6)6) Scroll wheel down one click: Move to the next item, Space-dot 4 7) Scroll wheel up one click: Move to the previous item, Space-dot 1 8) Click mouse wheel in file browser: Move back a level in the folder
structure.9) Click mouse wheel in notepad: cycle scrolling unit between line,
sentence, paragraph, and page.10) Double click mouse wheel in Notepad: toggle auto scroll on/off.11) Click left mouse button in Notepad: Start block or exit
You can also use the mouse wheel to quickly scroll through documents or file or menu lists.
2.10 Global Hot Keys
Use the following hot keys to query information about your Braille EDGE 40 from most places on the unit.
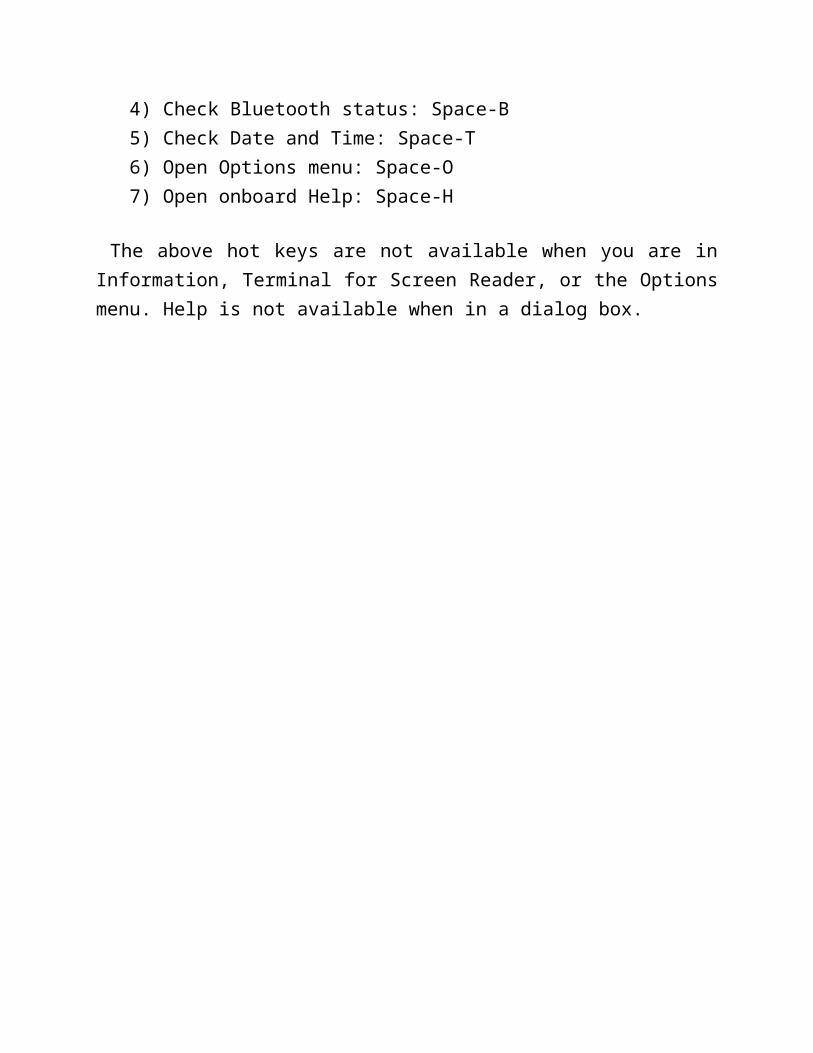
1) Check capacity of SD card: Space-S (Not available when in Information, Braille Terminal, or Global Options) 2) Check battery status: Space-P 3) Check firmware version: Space-F

4) Check Bluetooth status: Space-B 5) Check Date and Time: Space-T 6) Open Options menu: Space-O 7) Open onboard Help: Space-H
The above hot keys are not available when you are in Information, Terminal for Screen Reader, or the Options menu. Help is not available when in a dialog box.

3. Notepad3.1 What is the Notepad?
The Notepad on the Braille EDGE 40 can be used to manage, read, create, and edit documents without connecting to a PC or cell phone. The Notepad supports basic editing functions such as selecting and manipulating text, find, replace, mark functions, and inserting date, time, or calculator results.
Note: You cannot use the Notepad program on the Braille EDGE if an SD card is not inserted. If you attempt to open the program without an SD card inserted, the message, “SD card does not exist” is displayed and the Notepad program is closed.
The "notepad" supports creation and editing of TXT and Braille files. Read Only support is also available for RTF, DOC, and DOCX files.
3.2 Execute and Exit
“Notepad” is the first item in the Braille EDGE 40’s main menu. To execute the program: navigate to it and press the right arrow button or press a cursor routing key twice. Or you can press the hot key, N (dots 1-3-4-5).
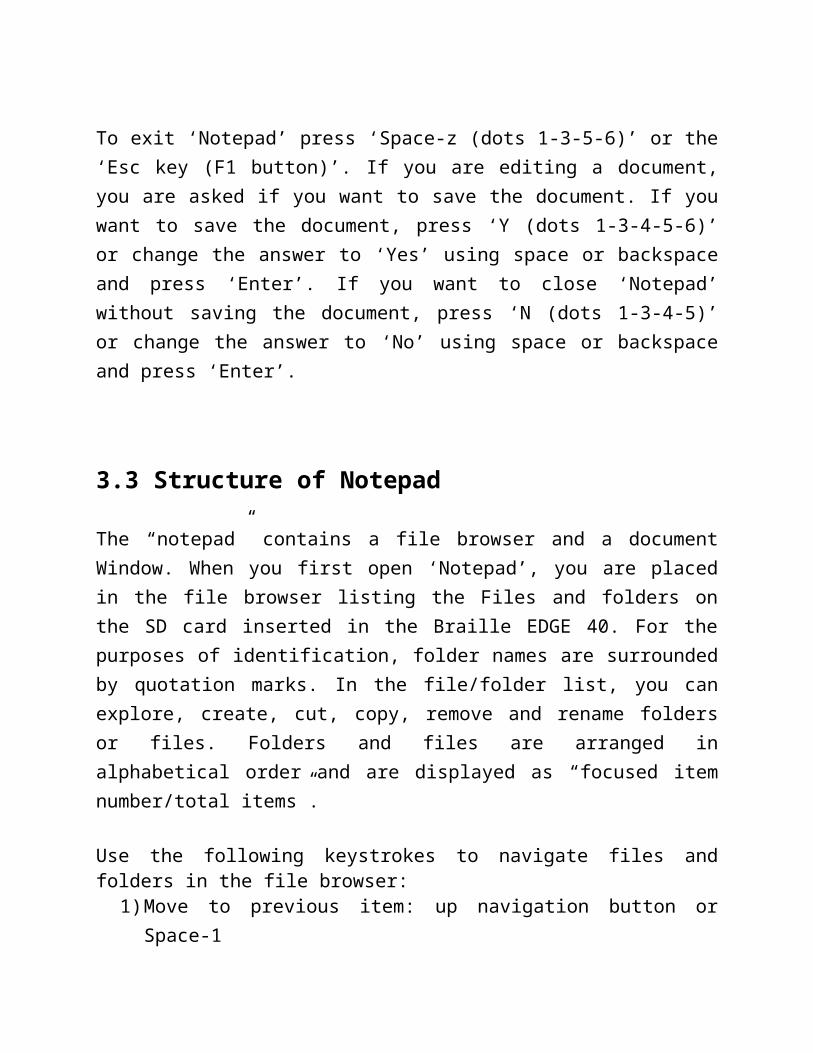
To exit ‘Notepad’ press ‘Space-z (dots 1-3-5-6)’ or the ‘Esc key (F1 button)’. If you are editing a document, you are asked if you want to save the document. If you want to save the document, press ‘Y (dots 1-3-4-5-6)’ or change the answer to ‘Yes’ using space or backspace and press ‘Enter’. If you want to close ‘Notepad’ without saving the document, press ‘N (dots 1-3-4-5)’ or change the answer to ‘No’ using space or backspace and press ‘Enter’.
3.3 Structure of Notepad
The “notepad” contains a file browser and a document Window. When you first open ‘Notepad’, you are placed in the file browser listing the Files and folders on the SD card inserted in the Braille EDGE 40. For the purposes of identification, folder names are surrounded by quotation marks. In the file/folder list, you can explore, create, cut, copy, remove and rename folders or files. Folders and files are arranged in alphabetical order and are displayed as “focused item number/total items”.
Use the following keystrokes to navigate files and folders in the file browser:
1) Move to previous item: up navigation button or Space-12) Move to next item: down navigation button or Space-43) Move to the first item in the current list: up navigation button-left
navigation button or Space-1-34) Move to the last item in the current list: down navigation button-right
navigation button.5) Enter folder or open file: right navigation button or Enter6) Move back a level in the folder structure: left navigation button or
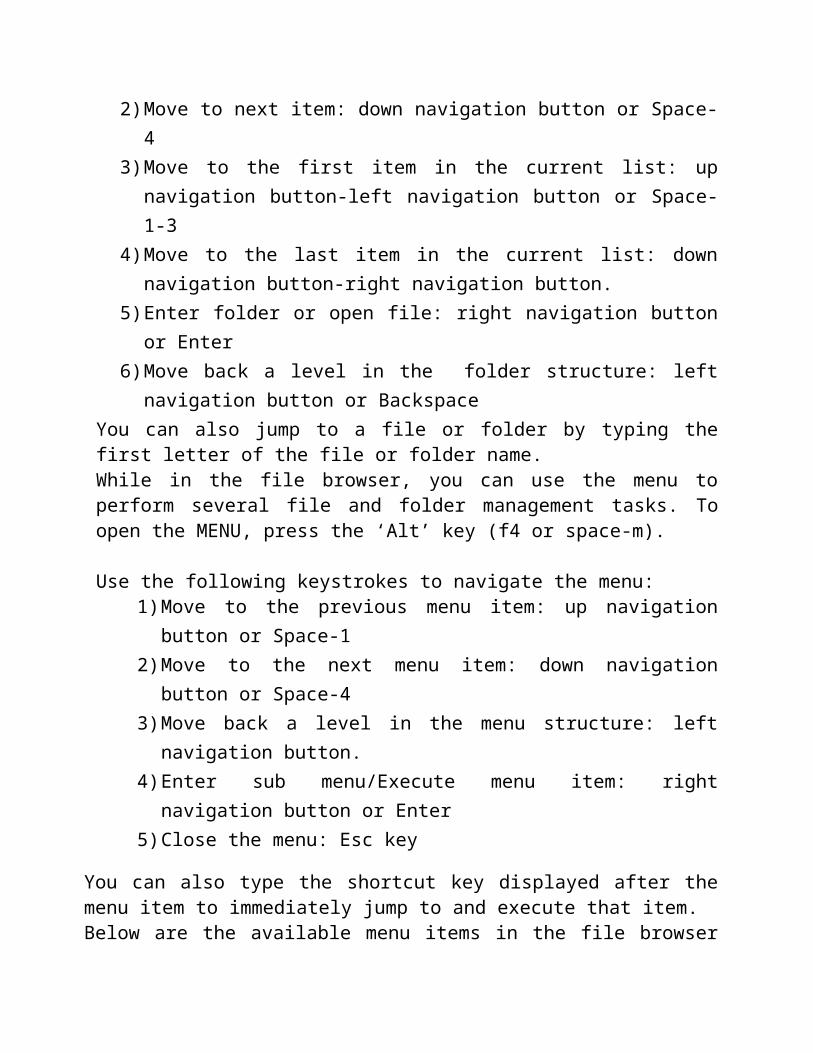
BackspaceYou can also jump to a file or folder by typing the first letter of the file or folder name. While in the file browser, you can use the menu to perform several file and folder management tasks. To open the MENU, press the ‘Alt’ key (f4 or space-m).
Use the following keystrokes to navigate the menu:1) Move to the previous menu item: up navigation button or Space-12) Move to the next menu item: down navigation button or Space-43) Move back a level in the menu structure: left navigation button. 4) Enter sub menu/Execute menu item: right navigation button or
Enter5) Close the menu: Esc key
You can also type the shortcut key displayed after the menu item to
immediately jump to and execute that item.Below are the available menu items in the file browser and document window:
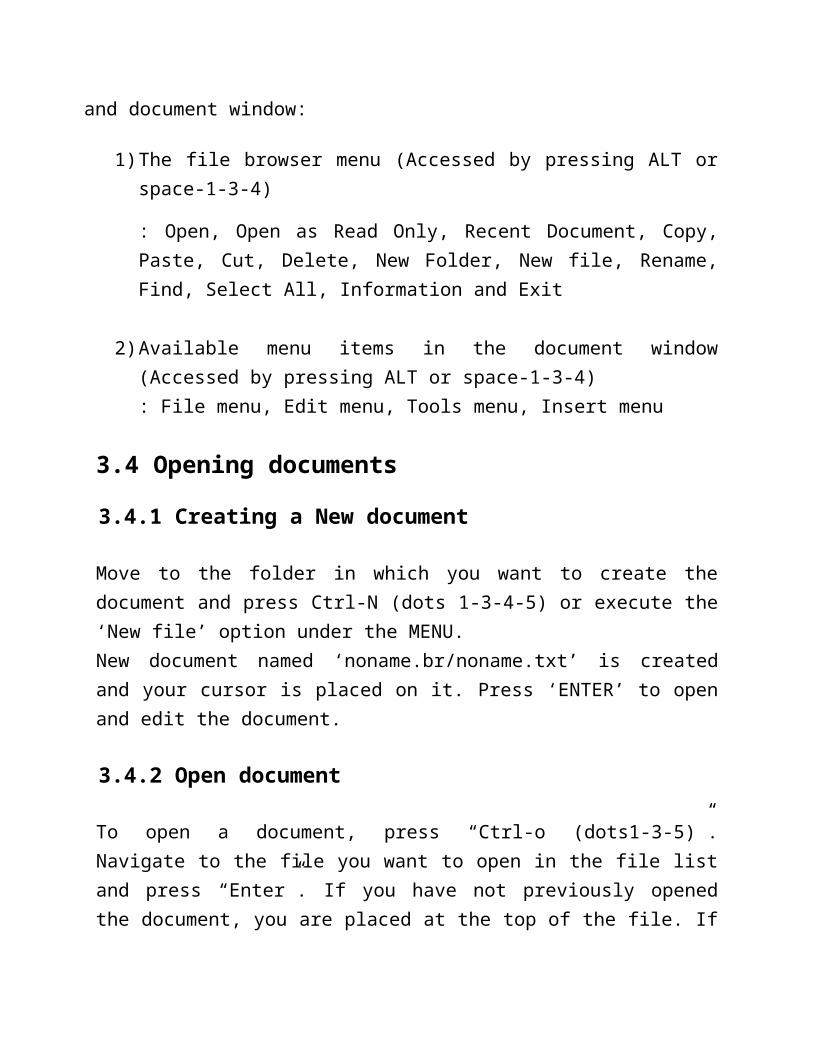
1) The file browser menu (Accessed by pressing ALT or space-1-3-4)
: Open, Open as Read Only, Recent Document, Copy, Paste, Cut, Delete, New Folder, New file, Rename, Find, Select All, Information and Exit
2) Available menu items in the document window (Accessed by pressing ALT or space-1-3-4): File menu, Edit menu, Tools menu, Insert menu
3.4 Opening documents
3.4.1 Creating a New document
Move to the folder in which you want to create the document and press Ctrl-N (dots 1-3-4-5) or execute the ‘New file’ option under the MENU. New document named ‘noname.br/noname.txt’ is created and your cursor is placed on it. Press ‘ENTER’ to open and edit the document.
3.4.2 Open document
To open a document, press “Ctrl-o (dots1-3-5)”. Navigate to the file you want to open in the file list and press “Enter”. If you have not previously opened the document, you are placed at the top of the file. If you have previously opened the document on the Braille EDGE 40, you are placed at the cursor position at which you last closed the document.
3.4.3 Open recent document
This function allows you to directly open the last document you read or edited on the unit. To open a recent document, press Ctrl-P (dots 1-2-3-4) from the file browser. Or open the MENU with ‘Alt’ key or ‘Space-1-3-4’ and

move to ‘recent document/’ using the ‘Up/down/ navigation buttons and press “enter”. The document you opened most recently is loaded automatically.
3.4.4 Open document in ‘read only’ mode
This function allows you to open a document without concern of accidental edits or insertion of data into the document, as this mode only allows you to read the document. To open a document in Read Only mode, press Ctrl-R (dots1-2-3-5) from the file browser. The focused file is opened in “read only’ mode and you can read the file without concern of undesired editing.
3.5 Save Document
1. SaveIf you wish to save the currently open document without changing the file type or renaming the document, press Ctrl-S (dots 2-3-4) or execute ‘save’ under the ‘File’ menu in the document window.
2. Save AsIf you want to save the document under a different file name, press Alt-S (dots 2-3-4) or execute ‘Save As’ under the ‘File’ menu in the document window. You can change only the file name; you cannot change the file type. Type the new file name using computer Braille and press ‘ENTER’.
Note: if you save an RTF, DOC, or DOCX file, it is automatically saved as a TXT file as Braille EDGE does not support saving Microsoft Word or RTF files.
3.6 Document Navigation
While reading/editing a document, you can navigate using the cursor routing keys, the Braille keyboard, and the navigation buttons.Use the following keystrokes to navigate a document:

1) Scroll up one display length: up scroll button 2) Scroll down one display length: down scroll button 3) Move to previous line: Space-1 or up navigation button. 4) Move to next line: Space-4 or down navigation button. 5) Move to first line: Space-1-36) Move to last line: Space-4-67) Move to previous paragraph: Space-3 or Ctrl-up navigation button. 8) Move to next paragraph: Space-6 or Ctrl-down navigation button. 9) Move to previous page: Space-2-3 or Alt-up navigation button (a page
is defined as 25 lines)10) Move to next page: Space-5-6 or Alt-down navigation button (moves
down 25 lines)11) Move to the top of the document: Space-1-2-3 or Ctrl-Alt-up
navigation button12) Move to the end of the document: Space-4-5-6 or Ctrl-Alt-down
navigation button
You can also navigate the document using only the navigation buttons. Choose the movement element; line, sentence, paragraph and page using the left/right navigation buttons. (The default is ‘line’). After selecting the element by which you want to move, press up/down navigation button. You will move through the document according to the element you selected.Note: Movement by sentence is available only in ‘txt’ documents.
3.7 Editing a Document3.7.1 Selecting Text
The "Start Selection" command allows you to select a certain portion of text that you would like to edit. When you use the "Start Selection" command, the cursor appears as blinking "dots 1-2-3-4-5-6-7-8" to indicate what text is being selected.To select text in a document, place your cursor on the location at which you want to start selecting text. Press "Space-m (dots 1-3-4)" or "Alt" to open the "Edit" menu, and press "Enter" on "Start Selection". While editing a

document, pressing "Ctrl-b (dots 1-2)" activates this command. The end of your selection is the position at which you place your cursor after activating the “Start Selection” command.
The "Select All" command selects all text in a document. To activate this command, press "Space-m (dots 1-3-4)" or "Alt", and press "Enter" on "Edit". Move to "Select All" by pressing "Space-4" repeatedly, and press "Enter". While editing a document, press "Ctrl-a (dot 1)" to activate this function.
3.7.2 Copy and paste
To copy the selected text to the clipboard, press "Space-m (dots 1-3-4)" or "Alt" to open the menu, and move to "Edit" by pressing "Space-4". Press "Enter" to open the "Edit" menu. Press "Space-4" to move to "Copy" and press "Enter". While editing a document, pressing "Ctrl-c (dots 1-4)" activates this command.To paste selected text from the clipboard, press "Space-m (dots 1-3-4)" or "Alt", and press "Enter" on "Edit". Move to "Paste" by pressing "Space-4" repeatedly and press "Enter". While editing a document, press "Ctrl-v (dots 1-2-3-6)" to paste the text from the clipboard to your current cursor location.
3.7.3 Cut
To cut a selection of text, press "Space-m (dots 1-3-4)" or "Alt", and press "Enter" on "Edit". Move to "Cut" by pressing "Space-4" repeatedly, and press "Enter". While editing a document, pressing "Ctrl-x (dots 1-3-4-6)" activates the "Cut" command.The difference between "Cut" and "Copy" is that if you execute the "Cut" command, the selected text is moved to the clipboard and the selection is removed from the document. The "Copy" command simply copies the selection to the clipboard, and the selected text remains in the document.
3.7.4 Delete
To delete a character, word, line or block, please use the hotkeys below: 1) Delete previous character: Backspace2) Delete current character: Alt-C (dots 1-3)3) Delete current word: Alt-W (dots 2-4-5-6)4) Delete current line: Alt-L (dots 1-2-3)5) Delete block: Space-D (dots 1-4-5)
The ‘Delete block’ command is only available when there is a block of text selected. You can also access this command via the “Edit” Menu.
To delete the selected block, press "Space-m (dots 1-3-4)" or "Alt", and press "Enter" on "Edit". Move to "delete" by pressing "Space-4" repeatedly, and press "Enter".
3.7.5 Undo
You can undo the last action performed such as ‘copy’, ‘cut’, ‘paste’ or ‘delete’. To undo your last command, press "Space-m (dots 1-3-4)" or "Alt", and press "Enter" on "Edit". Move to "Undo" by pressing "Space-4" repeatedly, and press "Enter". While editing a document, pressing "Ctrl-z (dots 1-3-5-6)" activates the "undo" command.
3.7.6 Insert date and time
You can insert today’s date and current time separately in your document. To insert the current date, press "space-m (dots 1-3-4)" or "Alt", and press "enter" on "insert". Move to "date" by pressing "space-4" repeatedly and press "enter". While editing a document, pressing "Insert-D (dots 1-4-5)" activates this command. To insert the current time, press "space-m (dots 1-3-4)" or "Alt", and press "enter" on "insert". Move to "time" by pressing "space-4" repeatedly and press "enter". While editing a document, pressing "Insert-T (dots 2-3-4-5)" activates this command.
When you activate one of these functions, today’s date or the current time is inserted into your document at your cursor location.
3.7.7 Insert calculation and result
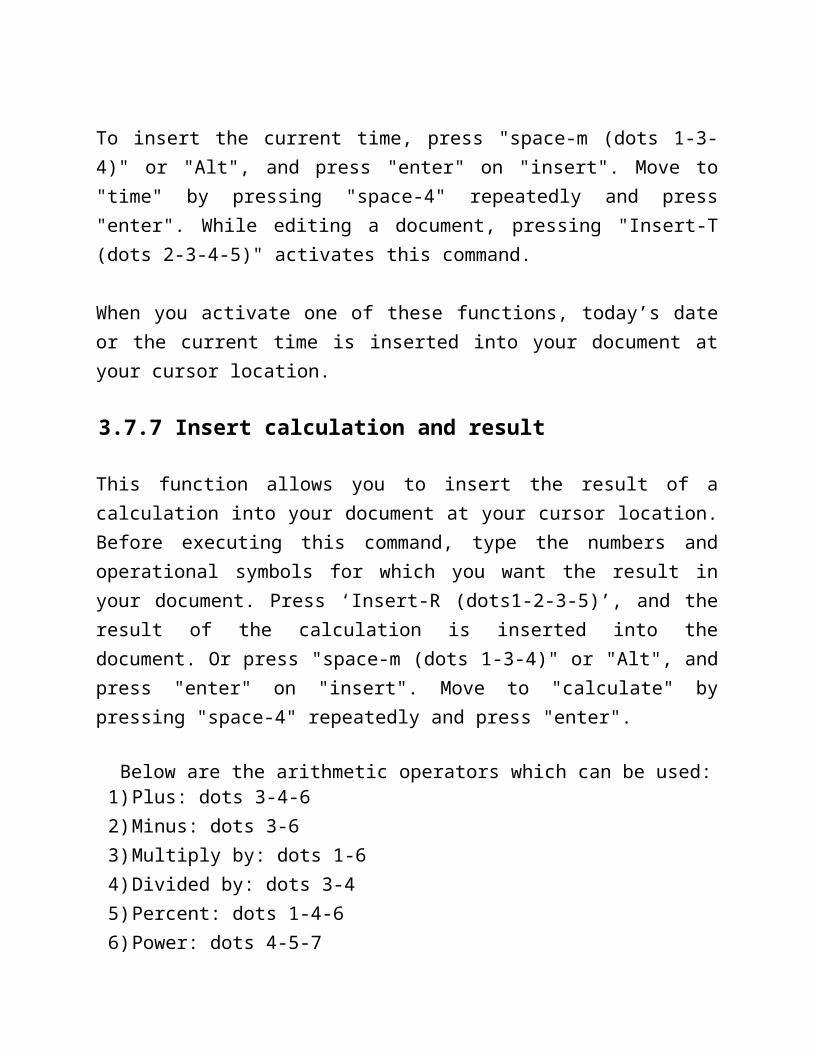
This function allows you to insert the result of a calculation into your document at your cursor location. Before executing this command, type the numbers and operational symbols for which you want the result in your document. Press ‘Insert-R (dots1-2-3-5)’, and the result of the calculation is inserted into the document. Or press "space-m (dots 1-3-4)" or "Alt", and press "enter" on "insert". Move to "calculate" by pressing "space-4" repeatedly and press "enter".
Below are the arithmetic operators which can be used:1) Plus: dots 3-4-62) Minus: dots 3-63) Multiply by: dots 1-64) Divided by: dots 3-45) Percent: dots 1-4-66) Power: dots 4-5-77) Decimal point: dots 4-68) Left parenthesis: dots 1-2-3-5-69) Right parenthesis: dots 2-3-4-5-610) Note: you must use Nemeth numbers when entering mathematical
expressions.
3.8 Find and Replace3.8.1 Find
The find function allows you to search for text in a document. Once the text is found you are taken to that position in your document. To execute this command, press "Space-m (dots 1-3-4)" or "Alt", and move to "tools" by pressing "Space-4" and press "Enter". Move to "Find" by pressing "Space-

1" or "Space-4". While editing a document, pressing "Ctrl-f (dots 1-2-4)" activates the "Find" command.
When "Find” is executed, the “Find” dialog is displayed. This dialog consists of “Text to find” and “Search direction”.
1. Text to findThe first field in the “Find” dialog is “Text to find”. In this edit box, you can type the text that you want to find. To search for the text, press “Enter”.
2. Search directionThe next field is “Search direction? F/B”. The default direction is “F (Forward)”. If you want to search the document from your current cursor to the end, press ‘F (dots 1-2-4)’. If you want to search the document from your current cursor to the top, press ‘B (dots 1-2)’. Or you can press the routing cursor button above the F or B on the Braille display.
If there are no search results, ‘not found’ is displayed and you are returned to your previous position in the document.
If you want to search for the same text again, press ‘Ctrl-shift-F (dots 1-2-4)’, “Find again”.
3.8.2 Replace
To execute this command, press “Space-m (dots 1-3-4)” or “Alt”, and navigate to “tools” by pressing “Space-4”, and press “Enter”. Move to “Replace” using “Space-4” and press “Enter”. While editing a document, pressing “Ctrl-r (dots 1-2-3-5)” activates this function.“Replace” opens a dialog that consists of the following fields: “Text to find”, and “Replace with”.
1. Text to findType the text that you want to replace in this field and press ‘Enter’.
2. Replace withType the replacement text in this edit box and press ‘Enter’.
If there are search results, you are prompted, “Replace? Once or all”. If you want to replace once, press O (dots 1-3-5). If you want to replace all instances of the found text, press A (dot 1), or you can press a cursor routing key above your desired option.Note: the ‘Replace’ function is available only in the forward direction.
3.9 Mark
3.9.1 Set Mark
The “Set mark” command marks a position in the document that you want to return to later. You can set up to 26 marks in a document on the Braille EDGE 40, defined by the letters a-z. To execute this command, move the cursor to the location at which you want to set a mark, and press “Space-m (dots 1-3-4)” or “Alt”, and move to “tools” by pressing “Space-4” and press “Enter”. Move to “Set mark” by pressing “Space-4”, and press “Enter. While editing a document, press “Ctrl-m (dots 1-3-4)” to activate this command.
When the mark is inserted successfully, “successfully set mark a-z” is displayed. Marks are automatically name from “a” to “z” according to the order in which they are set.
3.9.2 Go to Mark
The “Go to Mark” command jumps to a mark that has previously been set. To execute this command, press “Space-m (dots 1-3-4)”, or “Alt”, and move to “tools” by pressing “Space-4” and press “Enter”. Move to “Go to Mark” by pressing “Space-4”, and press “Enter”. While editing a document, go to marked text by pressing “Ctrl-j (dots 2-4-5)”.The Braille EDGE 40 prompts, “Mark”. Type the letter of the mark name that you want to locate, and the Braille EDGE 40 moves the cursor to the
marked position. You can also go to the mark directly by typing the letter of the mark with “f8”.
3.10 File information
If you wish to display the status of the Notepad, or rather, the information for the currently open file, you can do this by pressing “Space-dots3-4”. After reading the file information on the Braille display, press any key to return to document editing.
3.11 Auto scroll
The “Auto Scroll” command scrolls the Braille display automatically by line through the document. You can turn the auto scroll feature on and off by pressing the up and down scroll buttons simultaneously. You can also cancel auto scrolling by pressing the ‘Esc’ key.
3.12 Settings
Use the “Settings” dialog to change available “notepad” related options. To open the ‘settings’ menu press “Ctrl-E (dots 1-5)”. Or press “Space-m (dots 1-3-4)”, or “Alt”, and move to “tools” by pressing “Space-4” and press “Enter”. Move to “settings” by pressing “Space-4”, and press “Enter”.
Move among the available settings using ‘Space-4’ or ‘Space-1’. Use ‘Space’ or ‘Backspace’ to change the value of the focused setting.
1) View format character: On/offThis option allows you to choose whether format characters such as tab and form feed are displayed. Formatted characters are marked as "carriage return ($p)", and the "mark indicator ($pl)". While editing a document, press
‘Insert-C (dots 1-4)’ repeatedly to change the value of the ‘view format character’ setting directly.
2) Reading Unit: line/sentence/paragraph/pageThis option defines the unit of movement when pressing the "up arrow" or "down arrow" while reading a document. The available settings are “line”, “sentence”, “paragraph” and “page”. Default is set to “line”. While editing a document, press left navigation button and right navigation button to change the value of the ‘Change level of up/down arrow’ setting.
3) Set Read only: On/offIf this option is set to "On", the document cannot be modified. This setting is used to protect the document from any unintentional modifications. While editing a document, press ‘Alt-R (dots 1-2-3-5)’ to change the value of the ‘”Read only” setting directly.
4) Auto scroll speed: 1~36This option sets the duration one Braille display length is shown while you are auto scrolling in a document. Thirty-six is the fastest scrolling speed. Pressing "Space" increases the scroll speed and "Backspace" decreases it. While auto scrolling a document press ‘Shift-left navigation button’ or ‘Shift-right navigation button’ to change the value of the ‘Auto scroll speed’ setting directly.
5) Set default Document type for new documents: Braille/TextThis option defines the default document type when creating a new document. You can choose between Braille and text. The default is Braille.
6) Blink the blocked section: On/off This function defines whether the cursor blinks or not when navigating/selecting blocked text.
3.13 Managing files/folders

To open the File Browser, Press Ctrl-O (dots 1-3-5) or “Alt” and then move to “file” by pressing “Space-4” and press “Enter”. Move to “file browser” by pressing “Space-4”, and press “Enter”. From the file browser, you can create, open, and manage files and folders.
3.13.1 Copy and paste files and folders
"Copy" leaves the selected files and folders in their original locations, and creates copies of them in your chosen destinations. Use the ‘Copy’ function as follows:1. Select the files and folders you wish to copy by pressing “space” on each of them. 2. Open the menu, and choose "Copy" from the list to copy the selected files and folders. You can execute the "Copy" command directly from the file list by pressing "Ctrl-C (dots 1-4)". “Copy completed” message is displayed. 3. Navigate to the destination folder.4. Open the menu, and choose "Paste". Press "Enter" on "Paste," and your selected files and folders are copied. You can press "Ctrl-v" to execute the "paste" command directly from the file list. When the paste is complete, “Paste completed” is displayed.
3.13.2 Cut and move files and folders
"Cut" removes the selected files and folders from their original locations, and moves them to the new locations you have chosen. Use the ‘Cut’ function as follows:1. Select the files and folders you wish to cut. 2. Open the menu, and choose "cut" from the menu list. Use "Ctrl-x" to execute the "Cut" command directly from the file list. “Cut completed” message is displayed.3. Navigate to the destination folder.4. Open the menu, and choose "Paste". Press "Enter" on "Paste," and your selected files and folders are moved. You can press "Ctrl-v" to execute the
"paste" command directly from the file list. When the paste is complete, “Paste completed” is displayed.
3.13.3 Delete files and folders
To delete files or folders, navigate to the folders or files that you want to delete, and select them using “Space”. Open the menu by pressing "Space-m (dots 1-3-4)" or “Alt’ and choose the "Delete" option. Press "Enter" on "Delete" to complete the deletion of the selected files and folders. You can also delete selected files or folders by using hot keys; "Ctrl-d (dots 1-4-5)" and "space-d (dots 1-4-5)" can both be used to execute the "Delete" function. “Delete xxx? y/n” prompt message is displayed and an audio alert sounds. If you want to delete the selected folders/files, press ‘Y (dots 1-3-4-5-6)’. “Delete completed” message is displayed and the selected files/folders are deleted successfully. If you don’t want to delete the selected files/folders, press ‘N (dots 1-3-4-5)’.
3.13.4 Selecting files/folders
1. Select individual items "Space": *(dots 1-6) is displayed in front of the item to denote its selection. Pressing "Space" again on the selected folder or file cancels the selection.
2. Select all ("Ctrl-a (dot 1)")This feature selects all the files and folders in the current list. You can access this feature from the menu, or by using a shortcut key; Ctrl-a (dot1) to select all the files and folders in the current list without entering the menu. To select all via the menu, press "Space-m (dots 1-3-4)" to open the menu. Press the down arrow ("Space-4") to navigate to "Select All". Press "Enter" to execute the "Select All" function. When "Select All" is activated, the Braille EDGE 40 says, "Select all completed". An * appears in front of each file name you have selected. You can cancel the selection of a file or folder by pressing "Space". This feature is a convenient method for selecting multiple files for copying, cutting, or deleting.
3.13.5 Create new folder
Use this option to create a new sub-folder under the current folder. Press "Space-m (dots 1-3-4)" or “Alt” and move to the "New Folder" option using “Space-4”, and press “Enter” on "New Folder" to activate this function. Use the hot key "Ctrl-f (dots 1-2-4)" to access this feature directly from the file list.
Braille EDGE 40 prompts, "folder name?". Enter your preferred new folder name in computer Braille, and press "Enter". Your new folder is created and “new folder completed” is displayed. When creating a new folder name, you cannot use the following characters: "|, \, <, >, ?, :, *”
3.13.6 Rename files and folders
You can change the name of a file or folder by using this function. To change the name of a file or folder, move to the file or folder you wish to rename. Open the menu by using "Space-m (dots 1-3-4)" and choose "Rename" from the menu list and press "Enter". You can also use the hot key "Ctrl-E (dots 1-5)” to activate the "Rename" function directly from the file list. Braille EDGE 40 asks for a new name. On the Braille display, "New file (or folder) name: noname.brl" appears. You must type the new file/folder name in ASCII characters. Press "Enter" after entering a new file name to complete the renaming process. Braille EDGE displays, “rename completed”. You cannot use the following characters in a file name or folder: “|, \, <, >, ?, :, *”
3.13.7 Find file or folder
Use the "Find" function to locate a file or folder for which you know all or part of the name. You can press "Space-m (dots 1-3-4) to open the menu and move to "Find" and press "Enter". You can press "Ctrl-S (dot 2-3-4)" to activate this function directly from the file list. When you activate the file search, the unit prompts "File for find:" you are placed on the edit box for entering the file name to search". Type all or part
of the file name and press "Enter". Braille EDGE 40 searches for all files containing the text you entered. When the file search is complete, you are placed in the results list. If you press "Enter" on a file, you are placed on the path where the file is stored. You can open the file by pressing "Enter" on the file name again. If there is no search result, “no items” is displayed and you are returned to the file list. If you want to cancel this function, press “Esc” key and you are returned to the file list.
3.14 Information
This function allows you to check information about a folder or file. To open “information”, press “Ctrl-I (dots 2-4)”. Or pres “Space-m (dots 1-3-4)”, or “Alt”, and move to “Information” by pressing “Space-4” and press “Enter”.You can view size, date, time, and protection status (write/read). To cancel and return to the previous status, press ‘Esc’ key.

4. Terminal for Screen Reader4.1 Supported Screen Readers
1) Jaws (Freedom scientific)2) Window eyes (GW micro)3) Supernova (Dolphin)4) System Access (Serotek)5) NVDA (NV Access)6) Voice over for Mac and iOS (Apple)7) BrailleBack for Android (Google)8) Mobile Speak and Mobile Accessibility (Code factory)9) Talks and Zooms(Nuance)
4.2 Switching USB/Bluetooth mode
You can choose to use Braille EDGE 40 as a Terminal for Screen Reader via USB mode or Bluetooth mode. If you wish to connect the Braille EDGE 40 with a screen reader via Bluetooth, activate ‘Bluetooth mode’ by moving the ‘Bluetooth switch’ to the rear position. If you want to connect the Braille EDGE 40 with a screen reader via USB, activate ‘USB mode’ by moving ‘Bluetooth switch’ to the front position.
4.3 Execute and Close
You can execute the terminal for Screen Reader in a couple of ways: you can activate it manually, or you can start it automatically by connecting a USB cable to the Braille EDGE 40.
To manually open “Terminal for Screen Reader”, From the main menu, press the shortcut, T (dots 2-3-4-5) to open “Terminal for Screen Reader” directly from the main menu. When “Terminal for Screen Reader” is executed, The Braille EDGE 40 activates the ‘Bluetooth port’ or ‘USB port’ according to the position of the Bluetooth switch, and displays “the message, Terminal mode” while waiting for the device to connect.
To execute “Terminal for Screen Reader” automatically when connecting a “USB Cable”, the “Bluetooth switch” should be moved to the front position. When you connect a USB cable to the USB OTG port on the Braille EDGE 40, “Terminal for Screen Reader” is launched automatically. Even when Braille EDGE 40 is in power saving mode, when a USB cable is connected to the Braille EDGE 40, the unit awakens and “Terminal for Screen Reader” is launched automatically.
While you are editing a document, if the USB cable is connected to Braille EDGE 40, the unit prompts you to save the document. Once you have saved the document or chosen not to, “Terminal for Screen Reader” is executed. Press “Space-z (dots 1-3-5-6) to close “Terminal for Screen Reader”,.
4.4 Connecting to a Screen reader
4.4.1 Connecting to PC via USB
To connect the Braille EDGE 40 to a screen reader such as Jaws or Window-Eyes via USB, you must install the proper USB driver on your PC. Below are steps for installing the USB driver.
Note: for JAWS for Windows, you must download and install 2 drivers: the generic HIMS USB driver, and the JAWS specific driver.
1) Download the USB driver for Braille EDGE 40 from the HIMS Inc website (www.hims-inc.com).2) Unzip the compressed file and execute “Braille_SENSE_USB_Driver.exe.3) When the “Braille Sense USB Driver Setup wizard” appears, press the “Install” button. 4) When the installation wizard appears, select the “Next” button. 5) When the drivers are successfully installed, press the “Finish” button.
6) Connect the Braille EDGE 40 to the PC via the USB cable, and ‘terminal mode’ is displayed on the Braille EDGE. 7) A. if using windows 7/8, Windows will locate and automatically install the drivers. If running XP, please use step B, and the subsequent numbered steps.B. When the “Found New Hardware Wizard” appears, select “Install from a specific location” using the “Down arrow”, and then press the “Next” button. 8) When the “Please choose your search and install option” message appears, select “Don’t search. I will choose the driver to install”, and press the “Next” button. 9) You are prompted to “Select the device driver you want to install for this hardware”, select “HIMS USB DRIVER” and press the “Next” button. 10) “Completing the Found New Hardware Wizard” should appear and press the “Finish” button.
When you have finished installation of the USB driver on the PC, please follow the instructions for connecting the display with your screen reader via USB.
4.4.2 Connecting to PC via Bluetooth serial port
The following steps will walk you through setting up the Braille EDGE 40 to be used as a Bluetooth Terminal for Screen Reader. These instructions assume that you already have Bluetooth installed on your computer. The following instructions also assume that you are running at least Windows XP, Service Pack 2.
Before you begin, make sure that your Braille EDGE 40 is turned on and be aware of your Braille EDGE’s designated Bluetooth name.
1. Instructions for windows XP
1) Navigate to the Bluetooth icon in the System Tray. You may open the system tray by pressing "windows key-b", then press the Right or Left Arrow Key until you reach the Bluetooth icon. Then, press the "Applications” key". Note: If the Bluetooth icon does not appear in the System Tray, you may have to change the settings for the Bluetooth icon to appear. Go to the Windows Control Panel, Bluetooth Devices, Options, and check the check box that says "Show the Bluetooth Icon in the Notification Area".
2) Press the "up or down arrow" key until you get to "Open Bluetooth settings", and press "Enter".
3) Fromt the tabs list, use “Control-Tab” to select the Device tab.
4) Tab to the Add button, and press "Enter".
5) Press "Space" to check the checkbox for "My device is setup and ready to be found", and then press enter".
6) The XP machine should find the Braille EDGE 40 under the name "”BrailleEDGE---“where --- represents a numeric value. Remember that the Braille EDGE 40 must be turned on and the Bluetooth/USB switch in the “Bluetooth” position in order for the braille EDGE 40 to be discoverable. If you have forgotten to do these things, prepare the Braille EDGE as described, exit the Bluetooth settings, and start at step number 1 above.
7) Press the "down arrow" key to focus “BrailleEDGE----“.
8) Tab to the Next button, and press "Enter".
9) The PC should ask for the PIN code. Type 0000 and press "Enter" on the PC. (The generic pin code is assigned as 0000)
10) The computer should display the message, "Found new hardware" and the finish dialog should appear.

If the connection is successful, the dialog should display that the Bluetooth device was successfully set up. Please note the numbers for the incoming and outgoing com ports. For example, the outgoing COM port may be COM 5, and the incoming COM port may be COM 6. Do not be surprised if your COM ports are not set to COM 5 and COM 6. The COM ports used can vary from computer to computer.
11) Press "tab" to get to the Finish button, and press "Enter" to activate it.
12) You are returned to the Bluetooth device settings dialog. From the tabs list, press Ctrl-Tab twice to focus the COM ports tab control.
13) Press "tab" to get to the list of COM ports, and press the Down Arrow to move through the list of COM ports to verify the com port numbers.
14) Tab to the OK button, and press Enter.
2. Connecting via Bluetooth to a Windows 7/Windows 8 computer.
1) Open the Control Panel.2) Open Devices and Printers3) Tab to “Add a Device” and press “Enter”.4) Windows searches for devices and displays them in a list.5) Use the Up or Down arrow to navigate to the Braille EDGE and press
“Enter”.6) You are asked to enter the pass code for the device; enter 0000, and
press “Enter”.7) The computer should display the message, "Found new hardware"
and the final dialog should appear on the computer. The dialog should display that the Bluetooth device was successfully set up. It is very important to note the Bluetooth COM port as you will need this when setting up your screen reader.
4.4.3 Using the Braille EDGE with Window-Eyes
Use the following steps to connect your Braille EDGE as a terminal for Screen Reader with Window-Eyes from GW Micro.1) Make sure your Braille EDGE is powered on, in Terminal mode, and that
the Bluetooth/USB switch is set to your desired connection type.2) Press Control-Backslash to open the Window-Eyes control Panel.3) Arrow down to devices and press “Enter”.4) Arrow down to “Braille displays” and press “Tab” to open the available
displays list.5) Arrow down to Braille EDGE and press “Tab” to get to the ports list.6) If you are using Bluetooth, please choose the Com Port number that
matches your Bluetooth connection. If using USB, choose “USB” from the ports list.
7) Tab to “Activate” and press “Enter”.8) If activation is successful, you have 15 seconds to choose whether or not
to “keep settings” or “Revert” the settings to the way they were before you activated the Braille EDGE.
9) Tab to “Keep settings” and press “Enter”.10) Tab to “Save Settings” and press “Enter”.11) Tab to “Minimize” and press “Enter” to minimize the Window-Eyes
Control Panel.
Note: You may need to restart Window-Eyes for Braille to begin displaying.
Use the following keystrokes when using Braille EDGE with Window-Eyes:Enter: Dot 8.Backspace: Dot-7End: Space-4-6, Right navigation-Down navigation.Escape: Space-1-5, or F1.Tab: Space-4-5, F2.Page Up: Space-1-2-6.Page Down: Space-3-4-5.Windows-M: f-7-dots-1-3-4.Applications: Space-1-2-3-4, F8.Delete: Space-1-4-5.

Menu: Space-2-4-5-6.Left arrow: Space-3, or Left Navigation key.Ctrl-Escape: Space-2-3-4.Right arrow: Space-6 or Right Navigation Key.Alt-F 4: Space-1-2-3-4-5-6.Up arrow: Space-1 or Up Navigation key.Alt: Space-1-3-4, or F 4.Down arrow: Space-4 or Down Navigation key.Alt-Tab: Space-1-4-5-7 or F2-F 4.Ctrl-Left arrow: Space-3-8 or F3-Left Navigation.Shift-Tab: Space-1-2 or F2-F5.Ctrl-Right arrow: Space-6-8, or F3-Right Navigation key.Ctrl-Tab: Space-4-5-8 or F2-F3.Ctrl-Home: Space-1-2-3.Insert-Tab: Space-2-3-4-6 or F2-F6.Ctrl-End: Space-4-5-6.Caps Lock: Space-1-3-6.Ctrl-C: Dots-1-4-8, or F3-1-4.Grade 2 Braille Toggle: Up Scroll-Down Scroll.Select All: Dots 1-8, or Dot-1-F3. 6 / 8 Dot Toggle: F1-Down Scroll.Paste selection: Dots-1-2-3-6-8, or Dots-1-2-3-6-F3.Scroll Braille Left: Up scroll.Cut to Clipboard: Dots-1-3-4-6-8 or Dots-1-3-4-6-F3.Scroll Braille Right: Down scroll.Home: Space-1-3 or Up Nav-Left Nav.Continue Mouse Search: Dots-1-2-4-8.Mouse Search: Space-1-2-4.MSAA Application Mode: Space-1-8. Alt-Left arrow: Dots 1-2-3-4-7. Alt-Right arrow: Dots-1-3-4-5-7.Alt-Left arrow: Space-1-7.Alt-Right arrow: Space-4-7.Cell Left: Dot 8-Up scroll.Cell Right: Dot 8-Down scroll.
Cell Up: Dot 8-F1.Cell Down: Dot 8-F 4.Enter Table Mode: Dots-3-4-6-8.Exit Table Mode: Dots 3-6-8.To First Cell of Column: Space-F1-dot-8.To Last Cell of Column: Space-F 4-Dot-8.To First Cell of Row: Dot-8-Space-Up scroll.To Last Cell of Row: Dot-8-Space-Down Scroll.
4.4.4 Using the Braille EDGE with JAWS for Windows
Use the following instructions to set up the Braille EDGE 40 as a Braille display with the JAWS screen reader from Freedom Scientific:1) Make sure Braille EDGE 40 is powered on, in Terminal Mode, and the Bluetooth/USB switch is set to your desired connection type. If you are using USB, please connect the Braille EDGE to your computer via the included USB cable.2) Navigate to the JAWS Window and press “Alt” to open the menu. 3) Press “Enter” on the “Options” menu.4) Use the Up or Down arrow to navigate to “Braille” and press “Enter”.5) Choose HIMS Braille EDGE as your Braille device.6) Tab to “Advanced” and press “Enter”.7) Choose USB as the port if connecting via USB, or the correct Com Port if using Bluetooth.8) Tab to “OK” and press “Enter”.9) You are prompted that you must restart JAWS for the settings to take effect. Restart JAWS for Windows, and Braille should begin displaying.
Use the Following keystrokes when using the Braille EDGE as a Braille display with Jaws for Windows:Movement Commands:Top of file: Space-1-2-3.Bottom of file: Space-4-5-6.Say Line: Space-1-4.
Say Next Character: Space-6, Right Navigation key. Say Next Line: Space-4, Down Navigation key. Say Next Word: Space-5.Say Prior Character: Space-3, Left Navigation key.Say Prior Line: Space-1, Up Navigation key.Say Prior Word: Space-2.Say Current Word: Space-2-5.Say current Character: Space-3-6.Select All (CTRL + A): Dots 1-8, F3-dot 1. Braille Pan Left: F1-F2, Braille Pan Right: F3-f 4. JAWS Home: Left up scroll + Right Up Scroll. JAWS End: Left down scroll + Right Down Scroll. Application and Window Functions Toggle active cursor and Braille Cursor: Dots-3-6.Cut selected text to clipboard: Dots-1-3-4-6.Minimize all applications: Dots-1-2-3-4-5-6-7-8, f-7-dots-1-3-4.Copy selected text to clipboard: dots-1-4. Start Menu: Space-2-3-4.Menu bar: Space-1-3-4, or F 4.Adjust Braille options: Space-1-2-3-7.Escape: Space-1-5 or F1.Expand current word: Dots-2-4-5-6.Toggle grade 2 Braille On/Off: All 4 scroll keys.Keyboard Help: Dots-1-3.Run Jaws Manager: Dots-2-4.Delete: Space-1-4-5.Jaws Window: Dots-2-4-5.Toggle Typing Mode On/Off: Space-2-3-4-5-7.QWERTY Keyboard Simulation Commands:Tab: Space-4-5, or F2.Shift-Tab: Space-1-2, or Space-F2.Alt-Tab: Space-4-5-7, or F2-F 4.Enter: Dot 8.
Toggle 8 pixels per space: Dots-2-3-5-6.Move to next non-linked text: Dots 4-5-6.
Toggle and Cycle Commands:Toggle PC and JAWS Cursor: Dot-3.Toggle whether Active follows Braille: Dot 4.Cycle marking (Bold, italic, underline, strike-throughall, off, highlight): Dot-2.Toggle 6 or 8 dot Braille: F1-Down Scroll.Cycle Speech Mode: Dot-1.
Navigational Commands:Back 1 display length: Up scroll.Forward 1 display length: Down Scroll.Move display down one line: F 4-Down Scroll.Move display up one line: F1-Up Scroll.
Internet Explorer Commands:Select a frame: Dots-1-2-4.Select a link: Dots-2-4-7.Go to Next Webpage: Dots 1-3-4-5, or Space-6-7.Go to Previous Webpage: Dots-1-2-3-4, or Space-3-7.
Outlook Commands:Go to Attachments List: Dots-1-2-4.Go to Previous Message: Space-1.Go to Next Message: Space-4.Delete Message: Space-1-4-5.
4.4.5 Using Braille EDGE as a Braille display with NVDA
Use the following instructions to set up the Braille EDGE for use as a Braille display with the free NVDA screen reader from NV Access.1) Make sure Braille EDGE 40 is powered on, in Terminal Mode, and the
Bluetooth/USB switch is set to your desired connection type. If you are
using USB, please connect the Braille EDGE to your computer via the included USB cable.
2) Press “NVDA key-N” to open the NVDA menu.3) Arrow down to “Preferences” and press “Enter”.4) Arrow down to “Braille Settings” and press “Enter”.5) Choose “HIMS Braille Sense/Braille EDGE” from the Braille Display
combo box.6) Tab to the “Port” combo box and ensure that it is set correctly. (NVDA
employs automatic port detection, so you should not need to chane this setting)
7) Tab among the various combo boxes to choose options such as output and Input tables, cursor options, etc. Use the Up and Down arrows to navigate among the choices in each combo box.
8) When you have finished choosing your settings, Tab to “OK” and press “Enter”.
Note: Make sure the “Save configuration on Exit” box is checked in the NVDA menu in order to ensure your settings for the Braille EDGE are saved, thus the braille EDGE will automatically connect each time you use NVDA in the future.
Use the following keystrokes when using Braille EDGE with NVDA:Scroll Braille Display Back: Left Scroll Down. Scroll Braille Display Forward: Right Scroll Down. Move Braille Display to Previous Line: Left Scroll Up. Move Braille Display to Next Line: Right Scroll Up. Route to braille cell: Cursor routing key.Shift-Tab: Space-1-2.Alt Key: Space-1-3-4.Escape Key: Space-1-5.Tab Key: Space-4-5.Enter Key: Dot-8.Backspace Key: Dot-7.Up Arrow Key: Space-1.
Down Arrow Key: Space-4.CapsLock: Space-1-3-6.ShiftAlt-Tab Key: F1-F2-F3.Alt-Tab Key: F2-F3.End Key: Space-4-6.Control-End Key: Space-4-5-6.Home Key: Space-1-3.Control-Home Key: Space-1-2-3.Left Arrow Key: Space-3.Control-Shift-Left Arrow Key: Space-2-8-F1.Control-Left Arrow Key: Space-2.Shift-Alt-Left Arrow key: Dot-2-7-F1.Alt-Left Arrow Key: Dots-2-7.Right Arrow Key: Space-6.Control-Shift-Right Arrow Key: Space-5-8-F1.Control-Right Arrow Key: Space-5.Shift-AltRight Arrow Key: Dots-5-7-F1.Alt-Right Arrow Key: Dots-5-7.Page-Up Key: Space-1-2-6.Control-PageUp Key: Space-1-2-6-8. Control-Shift-Up Arrow Key: Space-2-3-8-F1. Control-Up Arrow Key: Space-2-3.Shift-Alt-Up Arrow Key: Dots-2-3-7-F1.Alt-Up Arrow Key: Dots-2-3-7.Shift-Up Arrow Key: Left scroll Down-Space. Page-Down Key: Space-3-4-5.Control-PageDown Key: Space-3-4-5-8. Control-Shift-Down Arrow Key: Space-5-6-8-F1. Control-Down Arrow Key: Space-5-6.Shift-Alt-Down Arrow Key: Dots-5-7-8-F1.alt-Down Arrow Key: Dots-5-6-7.Shift-Down Arrow Key: Right Scroll Down-Space. Delete Key: Space-1-3-5.F1 key: Space-1-2-5.F3 Key: Dots-1-2-4-8.
F4 Key: Dot-7-F3.Windows-B Key: Dots-1-2-F1.Windows-D Key: Dots-1-4-5-F1.
4.4.7 Using Braille EDGE with System Access.
Currently, The Braille EDGE works with System Access using only a Bluetooth connection. To use your Braille EDGE as a Braille display with System Access, ensure the Braille EDGE is powered on, in Terminal Mode, and that the Bluetooth/USB switch is set to “Bluetooth”. When System Access is started, the EDGE is automatically detected, and Braille begins displaying.
Use the following keystrokes when using the braille EDGE as a Braille display with System Access:F1: Tab.F2: Escape.F3: Control.F 4: Alt.F5: Shift.F6: Insert.F7: Windows.F8: Applications.Up Arrow: Up Nav key.Down Arrow, Down Nav key. Left Arrow, Left Nav key.Right Arrow: Right Nav key.Home, UP-Left Nav key.End: Down-Right Nav key.Space-1-3-4: Menu Bar.Space-3-4: Start Menu.Space-1-2-5-6: Recent. Applications Menu or Alt+Tab.Space-2-3-4-5: Read Title.Space-2-3-4: Read Status.Dot-8 or Space-1-5: Enter.Dot-7 or Space-2-3: Backspace.
Space-4-5: Tab.Space-1-2: Shift+Tab.Space-1-2-3-4-5-6: Say All.Space-1: Read Previous Line.Space-1-4: Read Current Line.Space-4: Read Next Line.Space-2: Read Previous Word.Space-2-5: Read Current Word.Space-5: Read Next Word.Space-3: Read Previous Character.Space-3-6: Read Current Character.Space-6: Read Next Character.Space-1-2-3: (Top Of Document.Space-4-5-6: Bottom Of Document.Space-1-3: HOME or Beginning Of Line.Space-4-6: END or End Of Line.Control Key: Stop Speech.Space-1-3-5-6: Close or Escape.
4.4.7 Using Braille EDGE with VoiceOver on the Mac.
To use the Braille EDGE as a USB braille display with a Mac running VoiceOver, you can simply power on the Braille EDGe and connect it to the Mac via USB. The unit is immediately recognized and VoiceOver output is shown on the Braille display.
Use the following steps to connect the Braille EDGE as a Bluetooth Braille display with a Mac running VoiceOver:
1. Ensure that the switch on the left side of the Braille EDGE is set to “Bluetooth”.2. From the Braille EDGE main menu, navigate to “Terminal for Screen reader” and press “Enter”.3. Press Vo-F8 to open voiceOver Utility.4. Navigate to “Categories” and press Vo-Shift-Down to begin interacting with it.5. Press B for Braille.

6. Press Vo-Shift-Up to stop interacting with the Categories group.7. Press Vo-Right to “Display”, and press Vo-Space to activate it.8. Navigate to “Add”, and press VoSpace to activate.9. VoiceOver announces “Searching for Bluetooth devices”.10. Navigate to the “Bluetooth devices” list and press Vo-Shift-Down to interact with the table.11. Navigate to “Braille EDGE” and press Vo-Shift-Up to stop interacting with the table.12. Navigate to “Remember this device” and press Vo-Space to check the box.13. Navigate to “select” and press Vo-Space” toactivate it.14. VoiceOver asks for the pairing code and places you in the edit box.15. Type 0000 and press “Enter”.You should hear a chime indicating VoiceOver has connected to your Braille EDGE 40 and you should begin seeing VoiceOver output on the Braille display.
Use the following commands when using your Braille EDGE 40 as a Braille display on a Mac running VoiceOver:Scroll left: Pan Left.Scroll right: Pan Right.F1: Escape.F2: Go to Desktop.F3: Go to Menu bar.F4: Go to Spotlight Menu.F5: Go to Linked item.F6: Go to Pop-Up item.F7: Go to Beginning.F8: Go to End.F1+F2: Move to are before splitter.F3+F4: Move to area after splitter.Cursor Router: Perform default action.Status Router: Toggle expanded status description On/Off.Space-1: Move Left.Space-4: Move Right.Space-3: Move Up.Space-6: Move Down.

Space-2-3: Select Previous roater item.Space-5-6: Select Next Roater Item.Space-1-2-3: Go to beginning.Space-4-5-6: Go to End.Space-1-2-3-5: Read content under VoiceOver Cursor.Space-2-4-5-6: Read from beginning to cursor.Space-3-6: Perform default action.Space-2-3-4: Go to menu bar.Space-3-4-5: increase Volume.Space-1-2-6: Decrease volume.Space-1-2: Escape.Space-1-4-5: Delete key.Space-1-5: Return key.Space-2-3-4-5: Tab key.Space-1-2-3-4-5-6: Toggle Screen Curtain on/off.Space-1-2-3-4: Pause/resume speech.Space-1-3-4: Toggle Speech on/off.Space-1-3: Keyboard Help.Space-1-2-3-4-6: Label item.Space-2-5-6: Go to Dock.Space-1-2-4: Find.Space-1-3-6: Open Voice Over Utility.Space-2-4: Item Chooser.Space-2-5: Open Shortcut Menu.Space-1-2-5: Open VoiceOver Help Menu.Space-2-4-6: Page Left.Space-1-3-5: Pate Right.Space-3-4-5-6: Page up.Space-1-4-5-6: Page Down.Space-3-4: Speak Current page in scroll area.Space-2-3-6: Star interacting with Item.Space-3-5-6: Stop interacting with Item.Space-2: Pan Left.Space-5: Pan Right.Space-1-3-4-5: Display announcement history.
Space-1-2-4-5: Toggle Contracted Braille On/Off.Space-1-7: Move Up.Space-4-7: Move Down.Space-2-5-6-7: Go to Desktop.
4.4.8 Using the Braille EDGE with IOS devices
Use the following instructions to connect the Braille EDGE as a Bluetooth Braille display with your iPhone, iPad, or iPod.
Note: You must be running IOS 4.2 or higher on your i-device in order to use the Braille EDGE as a Bluetooth Braille display with VoiceOver. These instructions refer to the iPhone, however, they apply to all compatible i-devices: iPhone 3Gs and higher, iPad, and iPod Touch 3G and later.
On the Braille EDGE:1) Turn Bluetooth on by moving Bluetooth switch to the rear position. 2) Press B(dots 1-2) or move to the “Terminal for Screen Reader” item in the menu and press “Enter”. 3) Braille EDGE displays “Terminal mode”.
On the I-Phone:1) Navigate to Settings/General/Accessibility/VoiceOver/Braille.2) If Bluetooth is not activated on the I-Phone, it will prompt you to do this. WHEN Bluetooth is activated, the I-Phone searches for devices.3) The Braille EDGE should appear in the list of available Braille devices.4) Double tap the "Braille EDGE" in the Braille devices list.5) You are asked for a pin code. Enter 0000, as this is the default code for the Braille EDGE 40.6) Double tap the "Pair" button. You should hear a chime on the iPhone, and the text displayed on the iPhone should appear on the Terminal for Screen Reader of your Braille EDGE.
Use the following keystrokes when using Braille EDGE as a Braille display with an iPhone, iPod, or iPad.F1: select previous Roater Setting.F2: Select Next Roater Setting.F3: Toggle Contracted and Uncontracted Braille.F4: Toggle 8-dot and 6-dot Braille.F5: Page Left.F6: Page Right.F7: Page Up.F8: Page Down.Left Navigation key: Move to previous item.Right Navigation key: Move to Next Item.Up Navigation key: Move to previous Roater Setting.Down Navigation key: move to Next Roater Setting.Cursor Router: Opens App/Selects item.Space-1: Move to Previous item.Space-4:: Move to next item.Space-3: Move to previous item using rotor setting.Space-6: Move to next item using rotor setting.Space-2-3: Select Previous roater Setting.Space-5-6: Select Next Roater Setting.Space-1-2-3: Go to beginning of current area.Space-4-5-6: Go to End of current area.Space-3-4-5: increase Volume.Space-1-2-6: Decrease volume.Space-1-2: Back Button.Space-1-2-5: Activates the Home button.Space-2-3-4: Goes to the status bar: Space-1-2-3-5: Read from Cursor to End.Space-2-4-5-6: Read from beginning to cursor.Space-3-4: Speak page number or rows being displayed.Space-2-3-5: Deselect text.Space-2-5-6: Select text.Space-2-3-5-6: Select all.Space-1-3-4-6: Cut.

Space-1-4: Copy.Space-1-2-3-6: Paste.Space-1-3-5-6: Undo typing.Space-2-3-4-6: Redo typing.Space-1-4-5: Delete key.Space-1-5: Return key.Space-2-3-4-5: Tab key.Space-1-2-3-4-5-6: Toggle Screen Curtain on/off.Space-1-2-3-4: Pause/resume speech.Space-1-3-4: Toggle Speech on/off.Space-2-4-6: Page Left.Space-1-3-5: Pate Right.Space-3-4-5-6: Page up.Space-1-4-5-6: Page Down.Space-2: Pan Left.Space-5: Pan Right.Space-1-3-4-5: Display announcement history.Space-1-2-4-5: Toggle Contracted Braille On/Off.Space-1-7: Move to Previous Container (iPad only).Space-4-7: Move to Next container (iPad only).Space-1-4-6: Show/Hide Onscreen keyboard.Space-1-3: Start VoiceOver Help.
4.4.9 Using the Braille EDGE with BrailleBack for Android.
In order to use BrailleBack, you must first download and install it to your Android device from the Google Play store.Use the following steps to use your Braille EDGE as a Braille display with BrailleBack.
1. Ensure that the Bluetooth/USB switch on the Braille EDGE is set to “Bluetooth”.2. From the Braille EDGE Main Menu, navigate to “Terminal for Screen Reader” and press “Enter”.3. On your Android device: go to “Settings”.
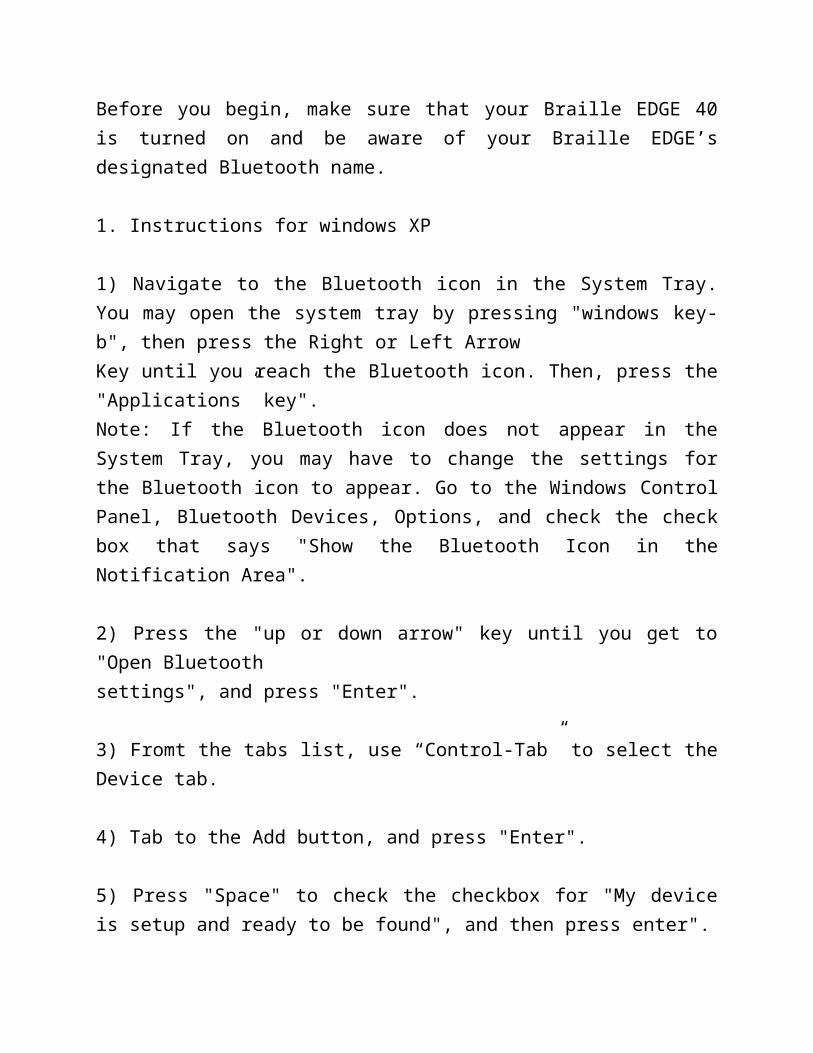
4. Select Bluetooth.5. Select “Search for devices”.6. Select the Braille EDGE from the device list.7. When requested, enter the pairing code 0000.8. When the Braille EDGE is successfully paired, return to “Settings” and select “Accessibility”.9. Select BrailleBack and enable the checkbox to turn it on.
Use the following keystrokes to navigate your Android device using the Braille EDGE with BrailleBack:Pan Right: Right Down Scroll key.Pan Left, left Down Scroll key.Move to next item, Space-4.Navigate to Previous item: Space-1.Navigate to Next Line: F3.Navigate to Previous Line: F2.Scroll Forward: Space-F3.Scroll Backward: Space-F2.Activate item: Press cursor routing key above item.Long Press Item: Long press of cursor router above item.Activate Back Button: Space-1-2.Activate Home Button: Space-1-2-5.Open notifications Window: Space-1-3-4-5.Open Recent Apps Window: Space-1-2-3-5.Activate “Enter” while typing Text: Space-dot-8.Backspace when entering Text: Space-dot-7.Delete when entering text: Space-2-5-6.Open BrailleBack keyboard help: Space=1=2=3.
4.5 Terminal Clipboard
Terminal Clipboard allows you to create and edit text on the Braille EDGE before sending it via the Terminal for Screen Reader to the connected device. This can be useful in instances like when using VoiceOver on an i-device, in which characters are translated as they are sent to the IPhone or
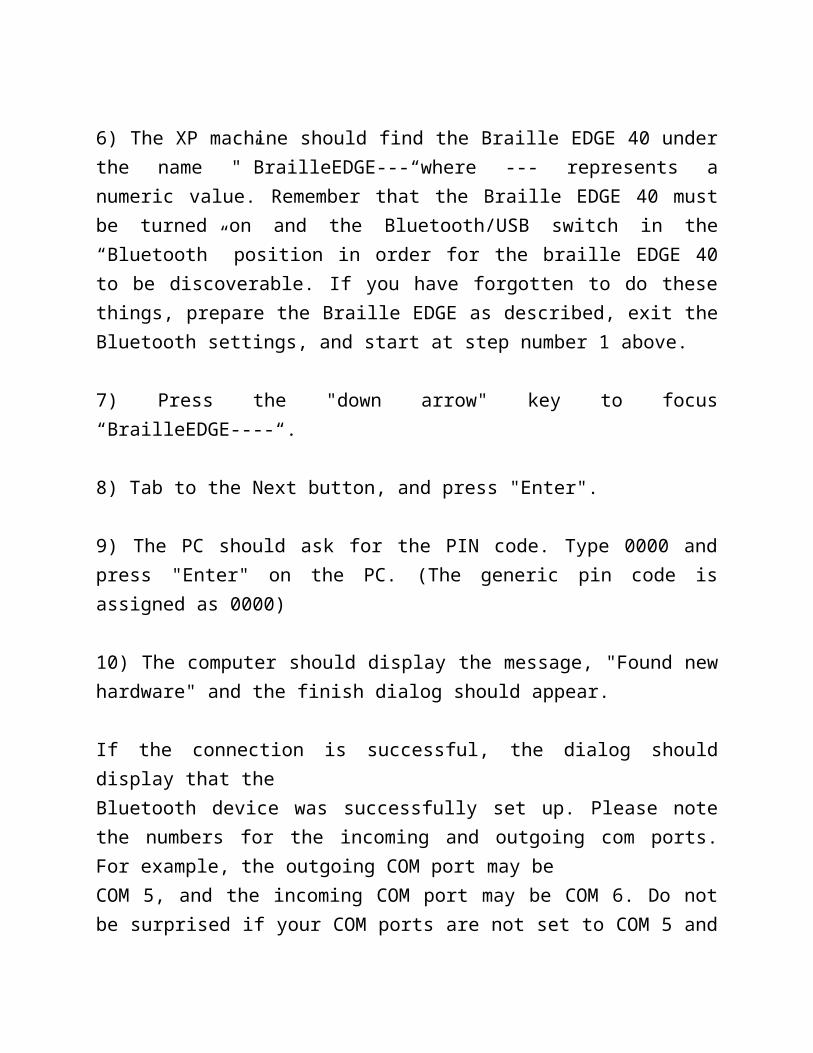
iPad. In this case, if you do not type quickly, characters may be mistranslated. For example: if you type "t e l l" and do not type quickly enough, VoiceOver could potentially translate this as "thateverylikelike" as, if there are pauses in typing, each Braille character can potentially be translated to its whole word equivalent. In the same way, editing text is also difficult as, any letter or single character Braille contraction, when typed by itself is translated as that contraction. So, if you are attempting to type the word "talk", and accidentally type "tall", when you delete the l and type the k the k is translated as "knowledge". Thus, the text you get is "talknowledge". To truly fix the word, you must erase the entire word and type it again.Thus, creating/editing text when using a Braille display is sometimes a very exact and tedious business. As explained above, the Terminal Clipboard allows you to create and edit text on the Braille EDGE and send the completed text to the connected computer or SmartPhone via the Terminal for Screen reader.To enter "Terminal Clipboard", press "Space-enter-I(dote 2-4)". The Braille EDGE displays "Terminal Clipboard", and places you in an edit box. Type and edit your text using normal text entry and edit commands. In "Terminal Clipboard", the Braille display and keyboard are temporarily disabled from sending/receiving information to/from your connected computer or i-device, so that you may use them for creating/editing your text. For more information on text entry and editing, please see section 3 of this manual on the Notepad. When you are finished typing the text you wish to send to your computer or smartphone, press "enter" and the text is quickly inputted to the device via the Terminal for Screen reader, and your Braille EDGE returns to sending/receiving information to and from the connected device.
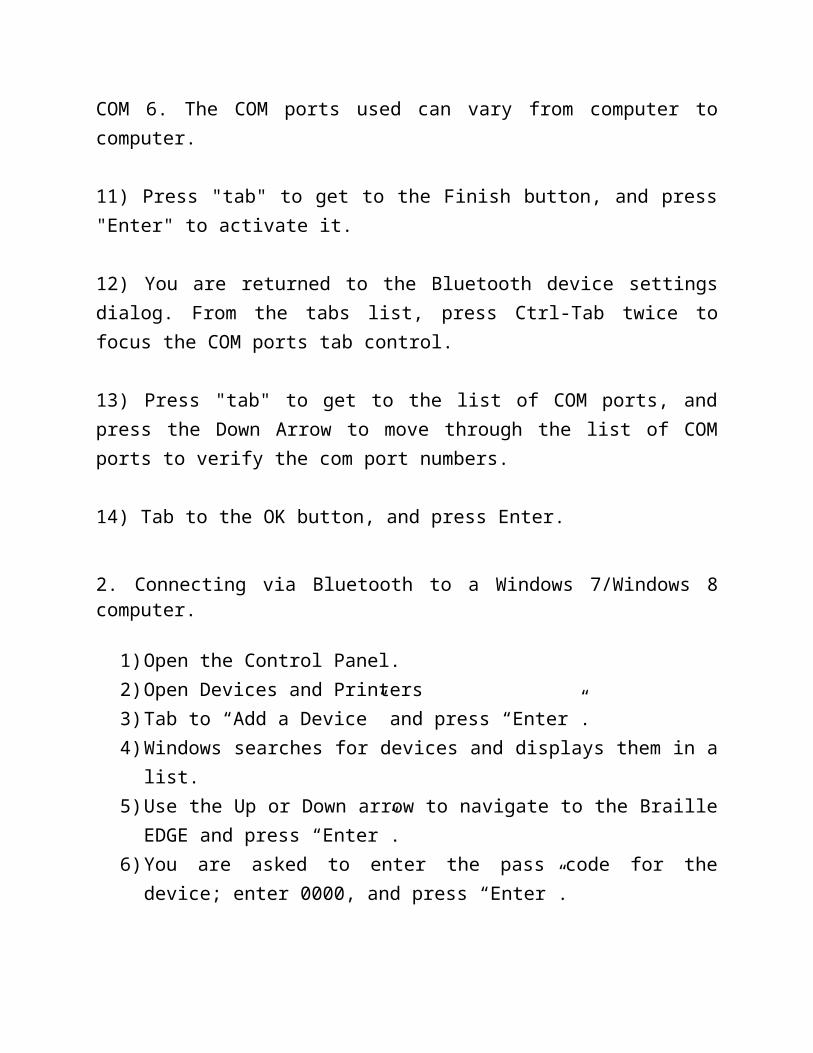
5. Applications
To open “Applications”, navigate to “Applications” using “Space-1” or “Space-4” and press “Enter”. You can also execute “Applications” from the main menu by pressing “A (dot1)”. Applications includes 6 utility programs: calculator, Alarm, Date and time, Stop watch, count down and scheduler. You can move among the items in the applications list by pressing “Space-1” or “Space-4”
5.1 Calculator
The Calculator can perform the four fundamental arithmetic operations, save calculations as a file, and copy and paste calculations.To open the calculator, from within “Applications”, move to the “Application” using the “Up” or “Down arrow”, and press “Enter”. Note: when using the Calculator, you must use computer Braille.
5.1.1. General functions
When you launch the “Calculator”, number 0 is displayed. Use computer Braille to input numbers. Press “Enter” to emulate the Equal sign”. To input a new calculation, press “Enter”. If you want to review previous calculations and results, press the ‘up arrow’. While reviewing previous calculations, if you want to use this calculation to perform another calculation, move your cursor to the desired location and change the number, and press “Enter”.
Use the following keystrokes in the Calculator:1) View calculation result (=): Enter2) Type new calculation: Enter3) Plus: dots 3-4-64) Minus: dots 3-65) Multiply by: dots 1-66) Divided by: dots 3-47) Percent: dots 1-4-68) Power: dots 4-5-79) Decimal point: dots 4-6

10) Left parenthesis: dots 1-2-3-5-611) Right parenthesis: dots 2-3-4-5-6
Note: To input a negative number, surround the negative number with parentheses. For example, when you type -2, press dots 1-2-3-5-6, dots 3-6, dots 1-2 and dots 2-3-4-5-6.
Immediately after you input percent (%) sign in the calculator, the result is displayed according to the percent value by dividing the original number by the number before the percent(%) sign.
For example, If you want to calculate 90+20%, as soon as the percent (%) sign is entered, the percent value is immediately calculated, and 18, is displayed as twenty percent of 90 is 18. Finally, the result of the calculation is 108.
However, when you place a multiplication sign before percent sign, for example, 20*40%, as soon as you enter the percent (%) sign, 0.4 is immediately displayed, as 40% equals 0.4. The final result of the entire calculation is 9 multiplying 20 by 0.4.
5.1.2 Clear All
If you wish, you can delete all previously saved calculations and initialize the calculator. To do this, open the menu by pressing "Space-m (dots 1-3-4)" or press "Alt". Then, use "Space-1" or "Space-4" to move to "Clear all", and press "Enter". Or you can activate this function by pressing “Ctrl-E (dots 1-5) directly from within in the calculation line.
5.1.3 Save file
The “Save file” function allows you to save the current calculations and results to a file for future use. This may be useful if you are balancing your
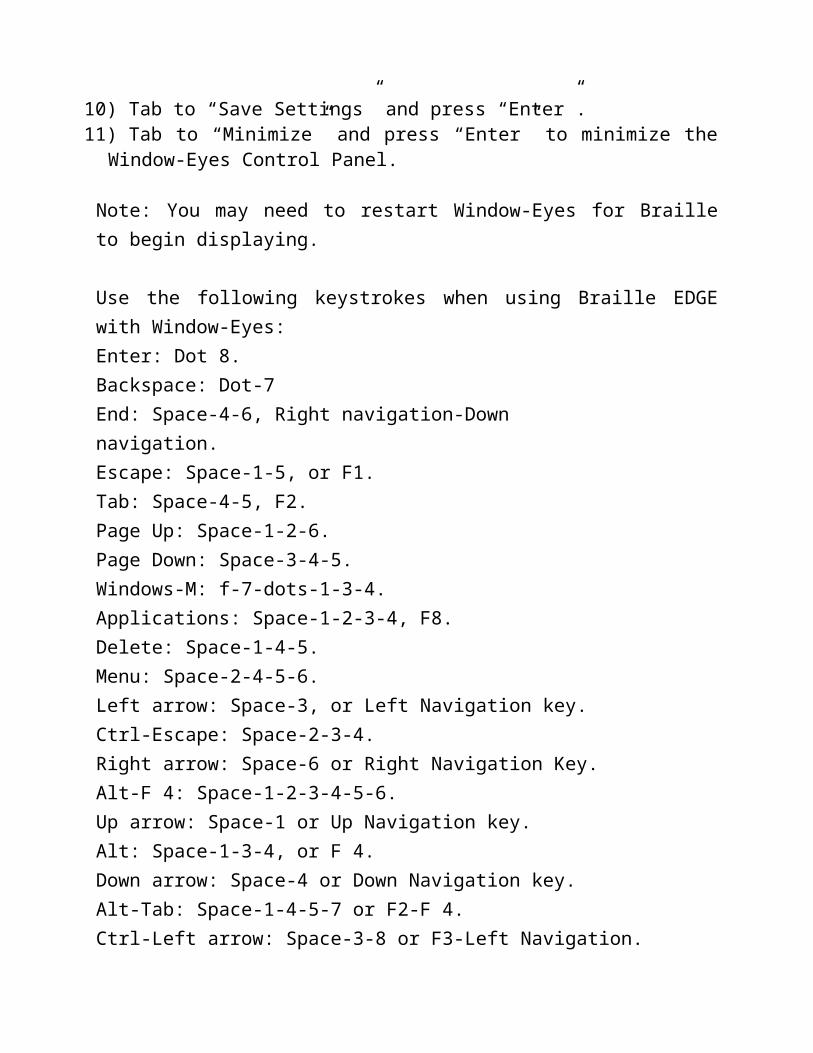
checkbook and wish to keep a record of all of the entries, calculations, and results.
To activate this function, press “Space-m (dots 1-3-4) or “Alt”. Then, use “Space-1” or “Space-4” to move to “Save file”, and pres “Enter”. Or you can activate this function by pressing “Ctrl-S (dots 2-3-4) directly while in the calculation line. When the dialog is opened, "Result.brl" is automatically displayed in the file name edit box. You can keep the default file name or type another of your choosing in to the edit box. When you have finished typing your file name. press “Enter”, and the file is saved to the root of your SD card.If you want to cancel the “Save file” function, press “Esc”.
5.1.4 Copy and paste
To copy the calculation on the current line to the clipboard, press “Ctrl-C(dots 1-4)”You can then paste the calculation to another place in the Calculator, or you may paste it to a document in the Notepad.You can paste the calculation by pressing “Ctrl-V (dots 1-2-3-6)”. You can also copy just the most recent result to the clipboard by pressing “Ctrl-R (dots 1-2-3-5). This function is different from the “Copy calculation” function, as this function saves only the last result.
5.2 Alarm
You can set an "Alarm" so that it sounds on the Braille EDGE 40 at a specified time for a single occurrence, once a week, or every day.To open "Alarm" from the Main menu, use "Space-1" or "Space-4" to navigate to "Applications", and press "Enter". Move to the “Alarm” by using “Space-4” or “Space-1”, and press “Enter”.
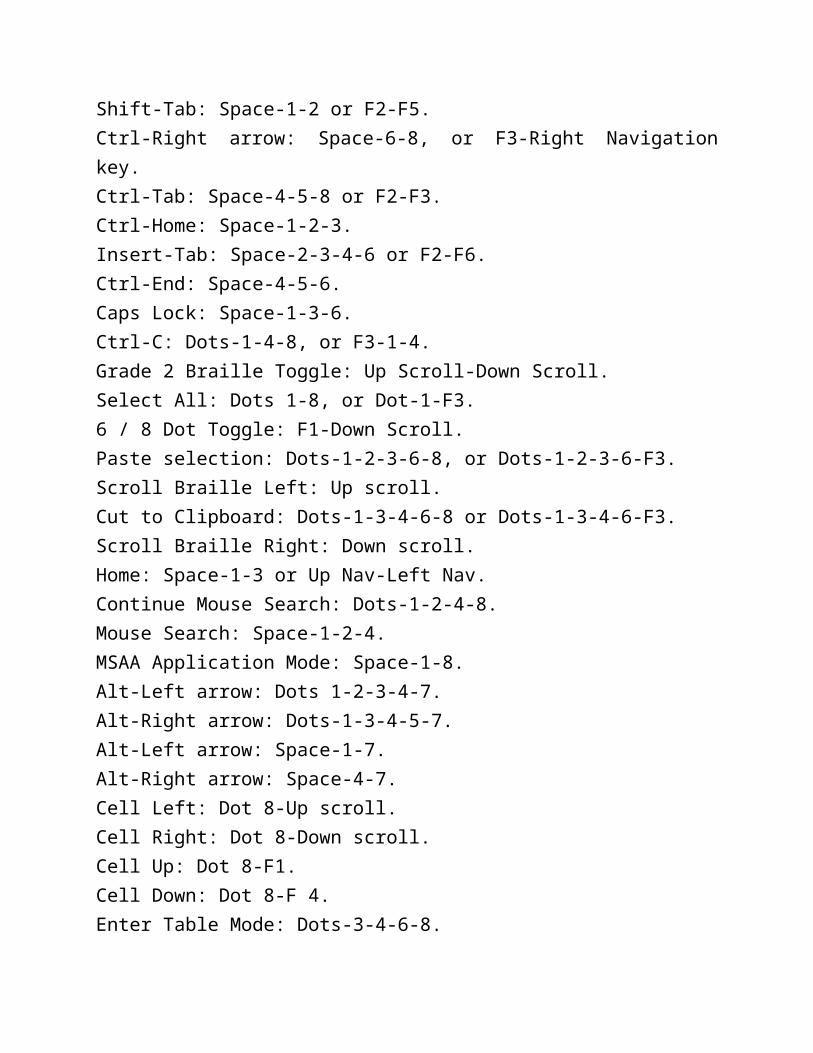
If this is the first time you have opened "Alarm", and you have not yet set the time or date in the Braille EDGE 40, the unit prompts, "Set time:(00:00)".
5.2.1 Set Time
When you execute “Alarm”, you are placed on the “hour”. You can type the time directly or use “Up/down navigation button” and “Left/right navigation buttons” to input time. then, press “Enter” or “Right navigation button” to save the “Time” and move to the “Term” setting.
Use the keystrokes below to adjust the time:Left/Right navigation button: move the cursor to hour or minuteUp/Down navigation button: change the time value
5.2.2 Term
Use the “Term” setting to define just when the alarm sounds. There are four options: "Off", "Once", "Week days", and "Every day". Move among these options by pressing "Space-1" or "Space-4". If the "Term" is set to "Off", the alarm does not sound at the specified time no matter how the other options in the dialog are set. If the "Term" is set to "Once", the alarm sounds only once. If the "Term" is set to "Week day", the alarm sounds at the same time every weekday, Monday through Friday. If the "Term" is set to "Everyday", the alarm sounds at the specified time 7 days a week. When you have selected your preference, press "Enter" or “Right navigation button” to move to the next field.
5.2.3 Duration
This option sets the amount of time that the alarm sounds. You can choose duration time from 1 minute to 9 minutes the default is 5 minutes. You can type the duration in minutes directly. Or you can move among these options by pressing “Backspace"/“Space” or “Up navigation button”/ “Down
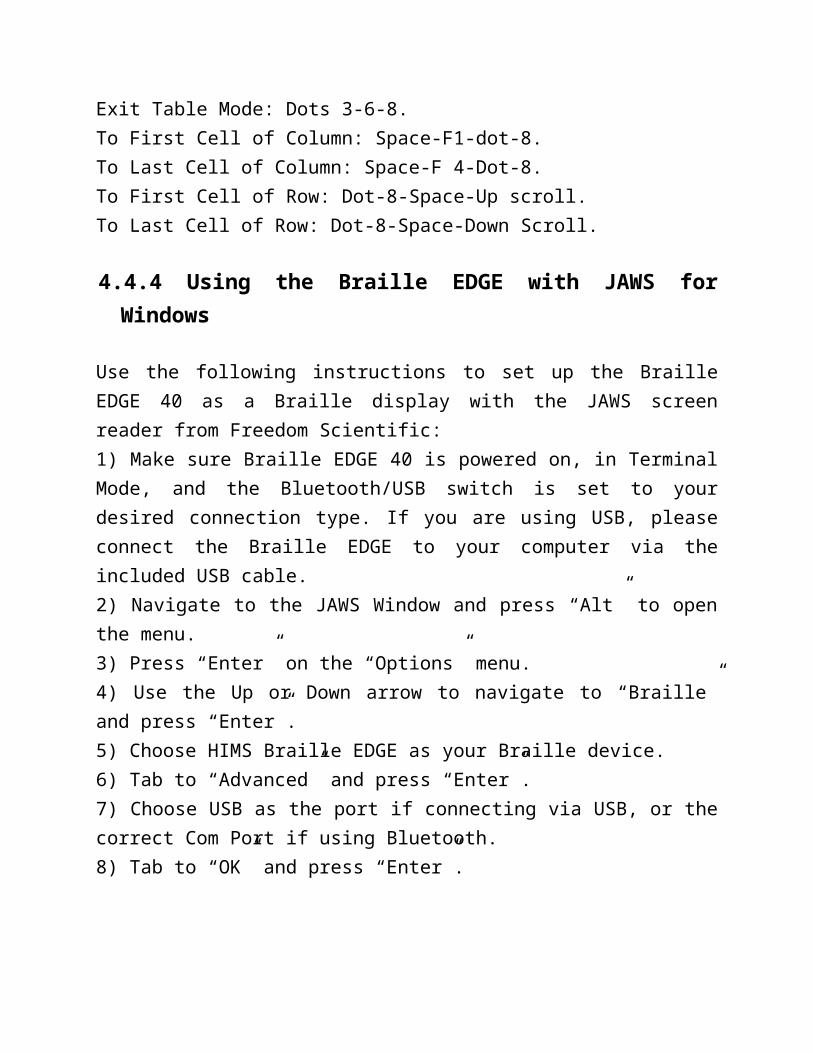
navigation button”. If you set the ringing duration to "1 minute", the alarm sounds for one minute, then the unit is silent. When you have selected your preference, press "Enter" or “Right navigation button” to move to the next field.
5.2.4 Wake-up call times
This option allows you to decide how many times the alarm sounds. If the alarm is not turned off by pressing "BackSpace-enter", it repeats according to the number of times you set for this option. The available settings are 1 to 5 and default is 3 times. Move among these options by pressing “Backspace"/“Space” or “Up navigation button”/“Down navigation button”. When you have selected your preference, press "Enter" or “Right navigation button” to move to the next field.
5.2.5 Repeat Interval
This option sets the amount of time between the times that the alarm sounds. For example, if you set the repeat interval to three minutes, after the alarm has stopped sounding, it rings again in 3 minutes. The available settings are from 1 minute to 9 minutes and default is 5 minutes. Move among these options by pressing “Backspace"/“Space” or “Up navigation button”/“Down navigation button”. As this is the final setting, pressing “Enter” completes the setting of the alarm and exits the “Alarm” dialog., if you want to cancel setting the “Alarm”, press “Esc”.
5.2.6 Stop Alarm Sound
When the alarm sounds, the Braille display also displays the message "Alarm stop? Stop or Yes to all". If you want to stop 1 occurrence of alarm, press “ENTER”. (the Current cursor is located on the “stop” option.)

If you want to stop the alarm completely so that it does not repeat at the specified time for the specified number of wake up calls, move the cursor to the “Yes to all” option and press “ENTER” or press the cursor routing button twice.Press “Space”/”Backspace” or “Space-1”/“Space-4” to change the cursor location to the different options and then press “ENTER”.
5.3 Date and Time
You can check and set date and time in the “Date and Time” application. To open “Date and Time”, move to “Applications” by using “Space-4” or “Space-1”, and press “Enter”. Move to the “Date and Time” by using “Space-4” or “Space-1”, and press “Enter”. When “Date and Time” is executed, time, day, month, date and year are displayed. To close “Date and Time”, press “Esc”.
5.3.1 Set the date and time
To set or change date and time, press Ctrl-S (dots 2-3-4). Or press “Space-m (1-3-4) or “Alt”, and move to “Set(s)” using “Space-4”, and press “Enter”. You can type the time directly or use the “Up/down navigation buttons” to select time values., Press “Enter” or “Right navigation button” to save the “Time” and move to the “Date” setting.
To set the date, type the correct year, month and day as mmddyyyy. For example, if you want to set the date as January 1st 2012, type 01022012. To edit the date, route your cursor to the place you want to correct and type the date value.
Use the following keystrokes to navigate and set Time and date values:- Left/Right navigation button: Move the cursor among
hour/minute/date- Up/Down navigation button: change the time or date value

When you have set all the values correctly, press “Enter” to save the time and date.
5.3.2 Time and Date Options
You can open the options menu with “ALT” key or “Space-m (dots 1-3-4)” and move to ‘Options’ by using “Space-4” or “Space-1”, and press “Enter”. You can also use “Ctrl-o (dots1-3-5)” to activate this function directly. In this dialog, you can choose “Time zone”, “Use daylight savings” and “Time format”.
When you open "Options" for the first time, you are placed on "Time zone”. You can review the "time zone" list by pressing "Space" or by typing the first letter of time zones or represented cities. Select your time zone, and move to the next item by pressing “Down navigation button”.
The "Use Daylight Saving" check box is displayed. You can check and uncheck this item using "Space". When you have selected your preference, press the “Down navigation button”.
The next item is "Time format", the options for which are 12 hour and 24 hour time. You can toggle between the two using "Space". When you have set all options, press “Enter” to save your settings.
5.4 Stop Watch
To open the “Stop watch”, move to “Applications” by using “Space-4” or “Space-1” from the main menu, and press “Enter”. Move to the “Stop Watch” by using “Space-4” or “Space-1”. When you press "Enter" on the "Stopwatch", "00:00:00" is displayed.
Press "Enter", to start the stopwatch running. Press "Enter" again, to stop.
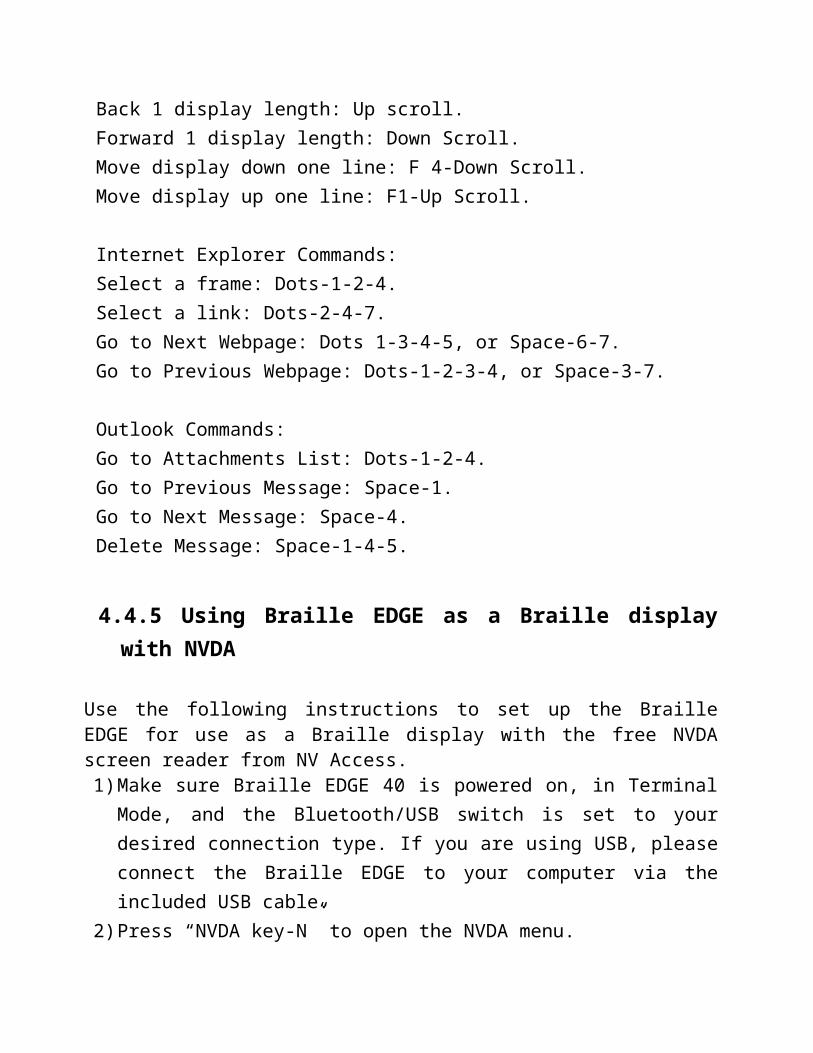
While the stopwatch is running, press "Space", to pause, and the Braille EDGE 40 displays the elapsed time in Braille. Pressing "Space" again restarts the stopwatch running.
If you press "Backspace" while the stopwatch is paused or running, the Braille EDGE 40 clears to "00:00:00".
5.5 Countdown Timer
To open the “Countdown Timer”, move to “Applications” using “Space-4” or “Space-1” from the main menu, and press “Enter”. Move to the “Countdown Timer” by using “Space-4” or “Space-1”. When you press “Enter” on the “Countdown Timer”, "00:00:00" is displayed and you are placed on the hour. You are asked to type hours, minutes, and seconds. You can type the time directly or change the time values using the “Up navigation button” or “Down navigation button”.
When typing the hours, minutes, and seconds, type a two-digit number for the hour, 2 digits for the minute, and 2 digits for the second using Computer Braille. You do not need to use a number sign. If you press "Enter" without typing a specified value, the "Countdown timer" starts counting down from the default time of one minute. When started, the "Countdown timer" displays "countdown xx minute", and continues displaying the remaining time as it counts down.
Press "Enter" on the "Countdown timer", and the Braille EDGE displays the remaining time, and stops the countdown. Press “Enter” once more to restart the countdown. Pressing "Backspace" clears the "Countdown timer". If the timer reaches zero, a 10-second alarm sounds, and the "Countdown timer" clears. If you press one of the keys or buttons while the alarm is sounding, the alarm stops and your timer clears, and is ready to accept a new time.

5.6 Scheduler
5.6.1 View Calendar
When you execute ‘Scheduler’, the calendar is displayed in a table which includes month, year, week and date.When you open the “Scheduler” for the first time, you are placed on the current week.
The week starts on Sunday and ends with Saturday and today’s date is displayed in brackets.To navigate the calendar by weeks, route the cursor to the Week field and press the “Up navigation button” or “Down navigation button”. If you want to move by months or years, route the cursor to the month or year field, and press the “Up navigation button” or “Down navigation button”
If a date has appointments scheduled, an asterisk is displayed in front of the date.To checkthe appointment details for a given day, press “ENTER” on the date. Appointments are arranged in chronological order and are displayed with time, alarm and subject.
The Scheduler menu contains 8 items. Open the menu by pressing “Alt” or “Space-m (dots 1-3-4)”. The Scheduler menu contains the following options: “New Appointment”, “Modify Appointment”, “View All Appoitnments”, “Search appointments”, “Delete appointment”, “Copy Appointment”, “Backup appointments” and “Restore appointments”. You can move among the menu items using the “Up navigation button”/“Down navigation button” or “Space-4”/“Space-1”. To execute a menu item, press “Enter” or “Cursor routing key” twice.
5.6.2 New appointment
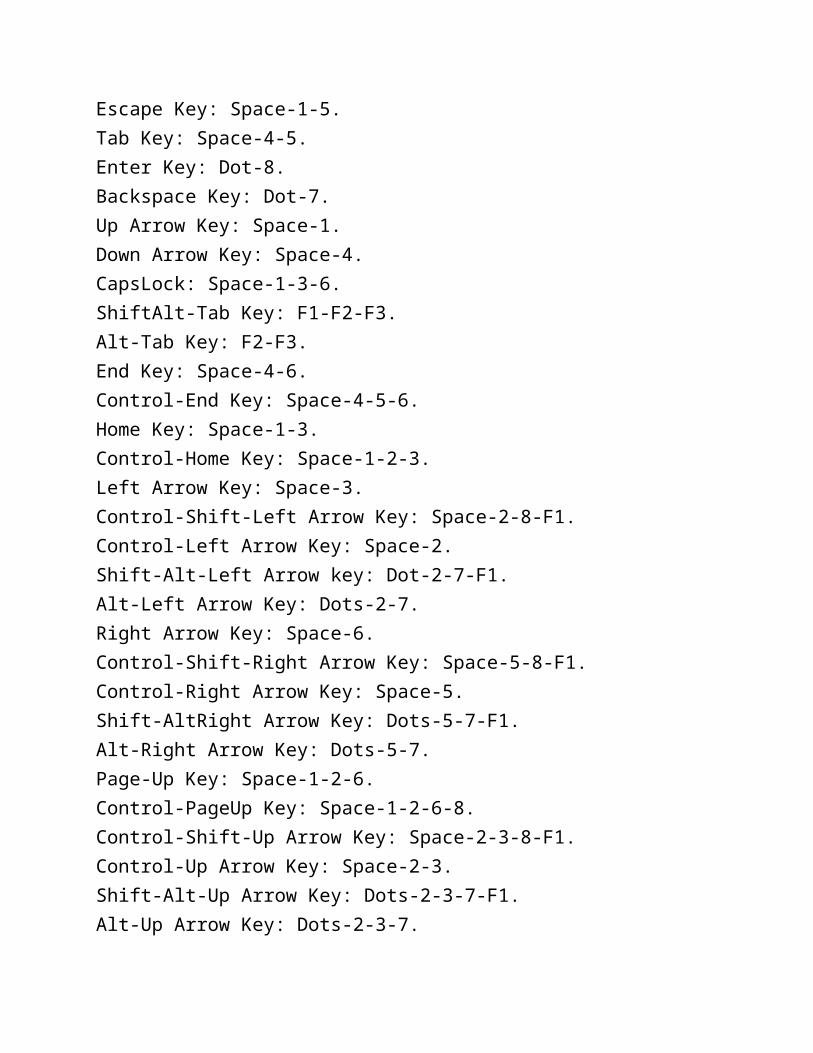
To add a new appointment, move the cursor to the desired date and press Ctrl-N (dots 1-3-4-5)” or “ENTER”. Or, press "Space-m (dots 1-3-4)" or "Alt" to open the menu. Select "New appointment", and press "Enter". The "New appointment" dialog contains the following fields: “Date”, “Time”, “Alarm time” and “Subject”.
1) DateInput the date as mmddyyyy, month, day and year. Press “Up navigation button” or “Down navigation button” to change the date values, or type the number directly. You can also route your cursor to what you want to edit. once the desired date is displayed, press “ENTER” to move to the next item.
Use the following keystrokes to navigate and change the date values.- Left/Right navigation button: move the cursor among date, month and
year- Up/Down navigation button: change the date value
2) TimePress “Up navigation button” or “Down navigation button” to change the time. Or, type the time directly as hhmm. You can also route your cursor to what you want to edit. After setting the time of the appointment, press “ENTER” to move to the next item.
3) Alarm TimeYou can set the alarm time using the “Up navigation button” or “Down navigation button”. Or, type the value directly (the maximum alarm time is 47:59, or 47 hours and 59 minutes before the appointment). The default alarm value is “off”. If you want the alarm to sound at the time of the appointment choose “Time of appointment”.Once you have set your desired alarm time, press “Enter” to move to the next item.
4) Subject
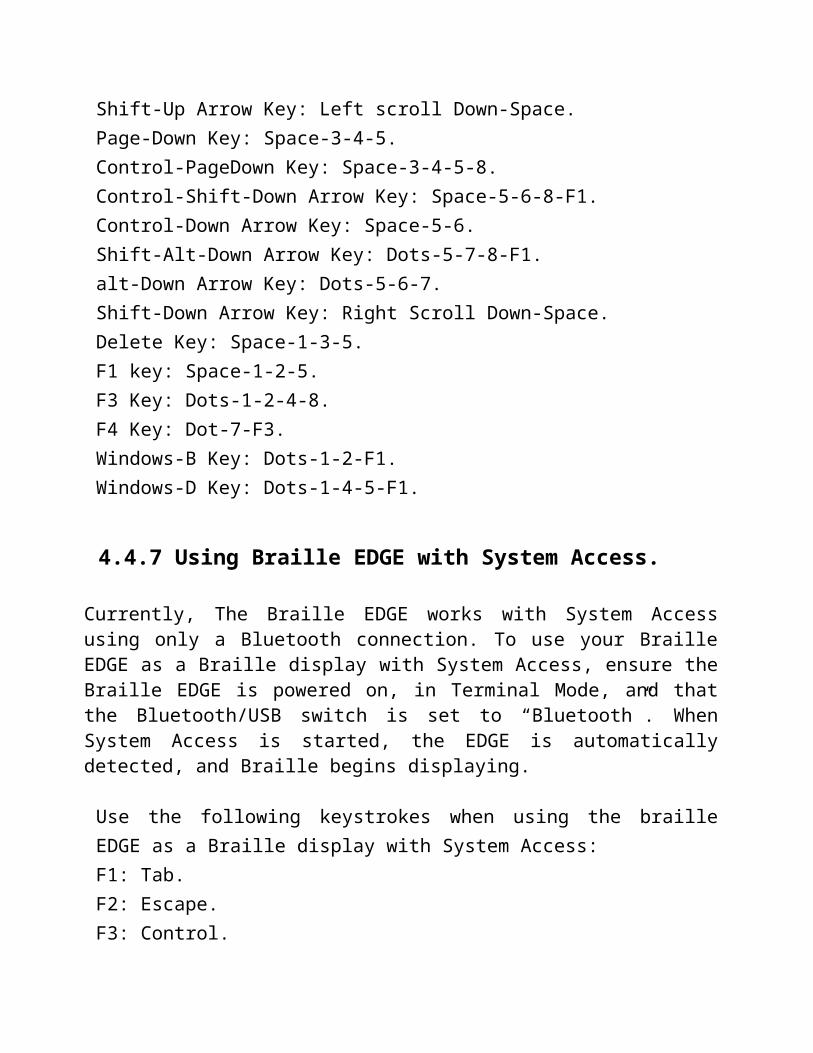
Type the subject of your appointment, or rather, a description of the nature of your appointment. When you have entered or set all the information for your appointment, press “ENTER” to save the appointment.
5.6.3 Modify appointment
You can modify an appointment that you have previously added. To do this, move to the appointment you want to modify. then press Ctrl-m (dots 1-3-4)”. Or, open the menu by pressing "Space-m (dots 1-3-4)" or "Alt" and press "Enter" on "Modify Appointment". This dialog contains the same fields as in the "N appointment" dialog. The only difference is that each field has the value you entered when creating the appointment. Edit the values using the same commands as when creating the appointment. If you have made changes you wish to save, press "Enter".
5.6.4. View All appointment
You can view all the appointments you have previously scheduled. When you are in the calendar view, press “Ctrl-A (dot 1)”. Or, open the menu by pressing "Space-m (dots 1-3-4)" or "Alt" and press "Enter" on "View All Appointment".When all appointments are displayed, you are placed on the newest appointment. You can move through appointments using the “Up navigation button” or “Down navigation button”. Appointments are displayed as “Date: mm-dd-yyyy, Time:hh:mm, Alarm time:hh:mm”.
To move to the first appointment in the list, press “Space-1-3” or “Up navigation button-Left navigation button”. To move to the last appointment in the list, press “Space-4-6” or “Down navigation button-Right navigation button”.You can access all the functions of the Scheduler while viewing appointments.
5.6.5 Search appointment
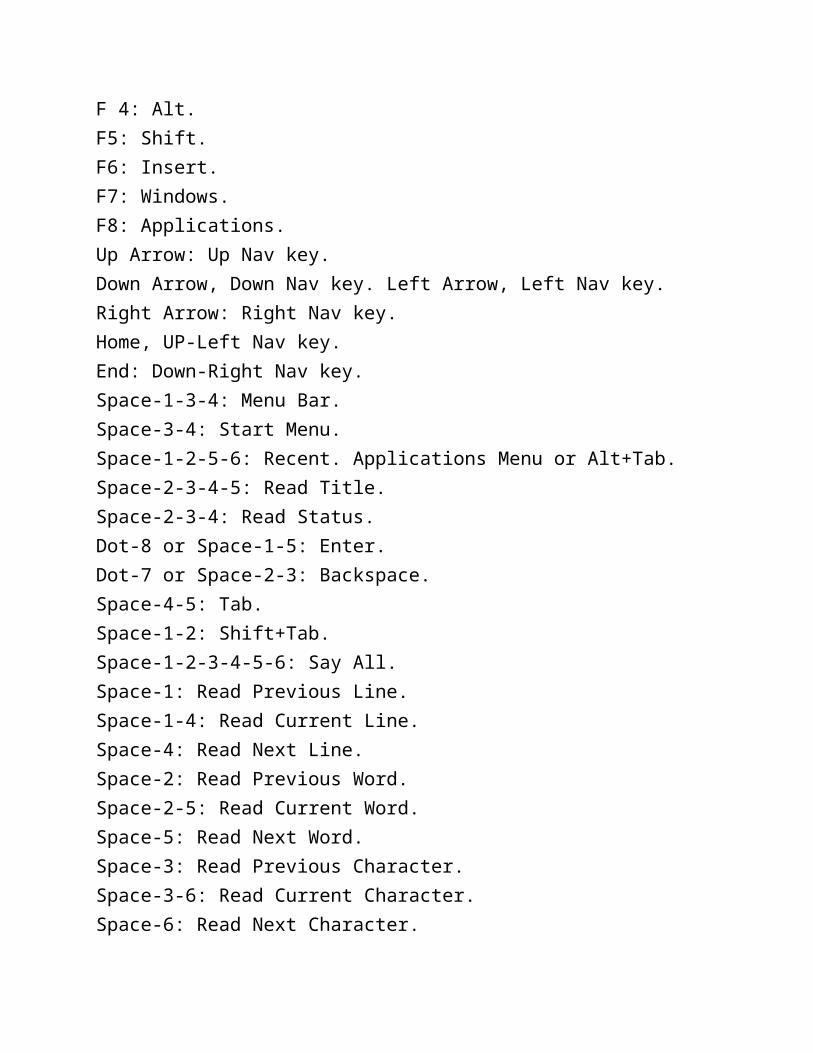
You can activate “Search appointment” by pressing "Ctrl-F (dots 1-2-4)". Or you can open the menu by pressing "Space-m (dots 1-3-4)" or “Alt”, and press "Enter" on "Search appointment". You can search for appointments using keywords in the subject field. When you press "Ctrl-f (dots 1-2-4)", the Braille EDGE 40 prompts, , "Find?”. Type the keyword you wish to find in the subject of an appointment and press “Enter”. Appointments in the results list are displayed in the same way as the “View All appointment” list.
5.6.6 Delete appointment
To delete an appointment, move the cursor to the date which contains an appointment you want to delete. Press "Space-m (dots 1-3-4)" to open the menu, and press "Enter" on "Delete Appointment". Or you can press its hot key, "Ctrl-d (dots 1-4-5)" from the appointment list. You are asked if you’re sure you want to delete the selected appointment. To confirm deletion of the selected appointment, press “Y (dots 1-2-3-6)” or, when your cursor is placed on “Yes”, press “Enter”. If you don’t want to delete the selected appointment, press “N(dots 1-3-4-5)” or, move your cursor to “No”, and press “Enter”.
5.6.7 Copy and paste appointment
You can copy appointments stored in the "Scheduler" to a document in notepad. Navigate the cursor to the specific appointment you want to copy from the Calendar view, “View all appointment” or “Search appointment” list. Open the menu by pressing "Space-m (dots 1-3-4)" or "Alt, and select "Copy appointment", and press "Enter". Or, press "Ctrl-c (dots 1-4)" to activate this function directly. You can then paste the appointment to a document in the Notepad by pressing “Ctrl-V (dots 1-2-3-6)”.
5.6.8 Backup appointment
The “Backup” function creates a backup of all appointments and saves the backup on the unit. To backup your appointments, open the menu by
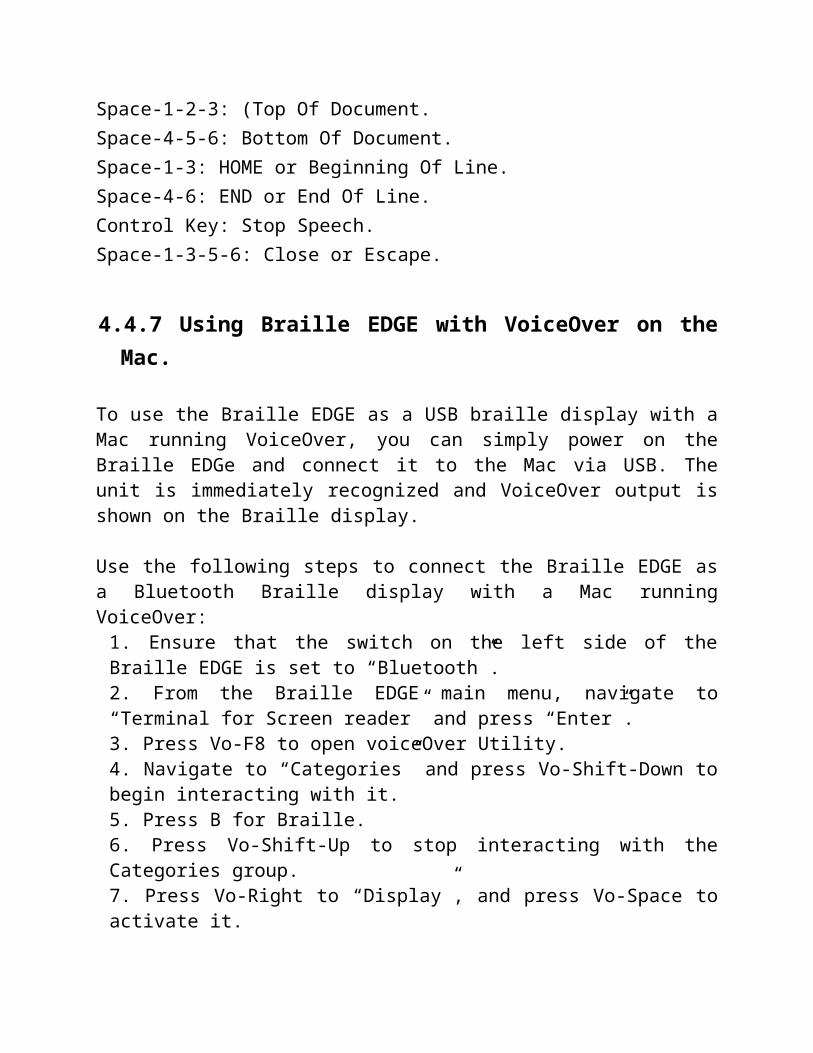
pressing "Space-m (dots 1-3-4)" or "Alt". Then, use the up and down arrows ("Space-1" or "Space-4"), to navigate to "Backup appointment". Or, you can press "Ctrl-b (dots 1-2)" to activate the “Backup” function directly.
5.6.9 Restore appointment
To restore your appointments from a previous backup, press "Space-m (dots 1-3-4)" or "Alt" to open the menu, and use the up and down scroll buttons to locate "Restore Appointment". Then, press "Enter". You can also press "Ctrl-r (dots 1-2-3-5)" to activate this function directly.Note: If you activate the "Restore Appointment" function, and the backup file contains appointments that also exist in your current file, you will have redundant appointments.

6. Options
To change your Braille EDGE 40 preferences/options, move to “Options” by pressing “Space-4” repeatedly, and press “Enter” or just press “O (dots 1-3-5)” from the main menu. You can move among the items in the settings list by pressing “Space-1” or “Space-4”. You can change the value of a setting using Space or Backspace. If you want to save the options, press ‘ENTER’ If you want to exit the “Options” without saving changes, press ‘Esc’.
The following are the settings that can be changed:
1. Eight dot mode: On/Off
This option allows you to set your Braille mode to 6 dot mode or 8 dot mode. The default is ‘Off’. If this option is set to “On”, all of the upper case characters are displayed with dot 7 on the Braille display. Use “Space” to toggle this option. If you want to cancel the option setting, press ‘Esc’ key and you are returned to the main menu.
2. View Shortcut keys: On/Off
This option defines whether shortcut keys are displayed after menu items. The default is on. If you change this option to off, shortcut keys are not displayed with each menu option.
Use “Space” to toggle this item on/off. Press “Enter” to save the setting. To cancel without saving, press “esc”, and you are returned to the main menu.
3. View File information: On/Off
This option allows you to choose whether or not file/folder attributes are shown in the file browser. The default is “Off”. If this option is set to “Off”, only the file name and item number are displayed. Ex) ‘noname.brl 1/1’
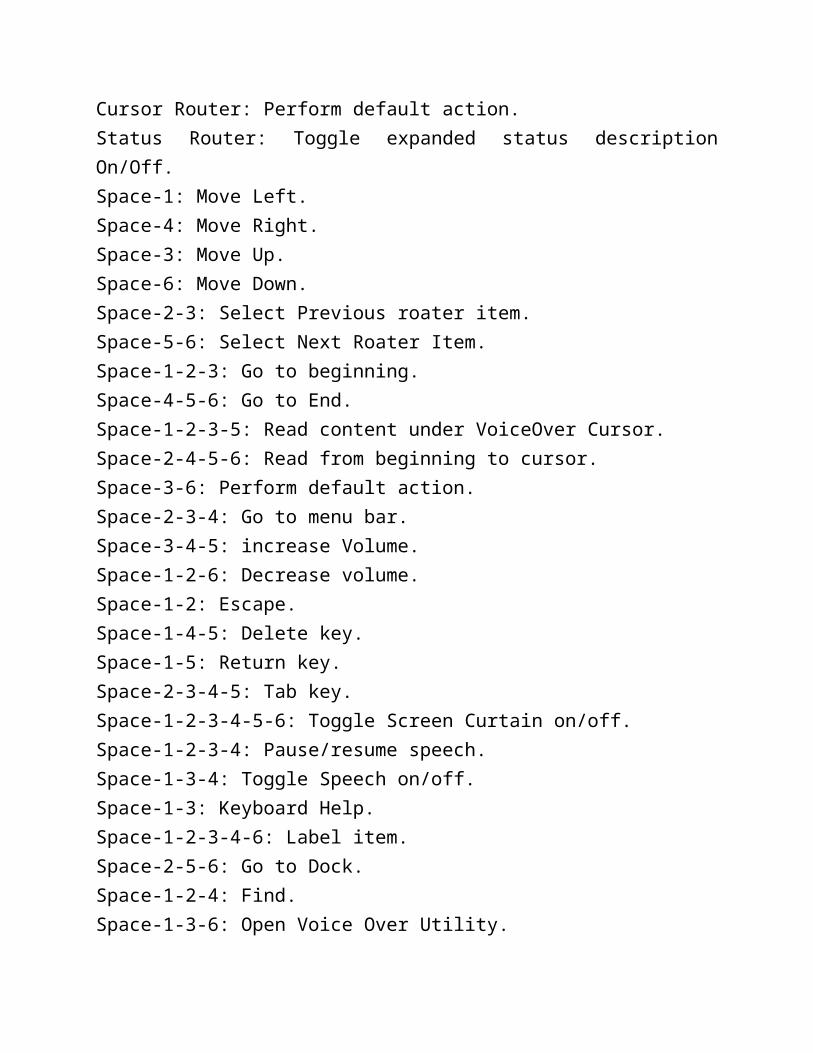
If this option is set to “On”, ‘file name’, ‘size’, ‘build date’ and ‘item number’ are displayed. Ex) ‘noname.brl ob 01:01:2009 1/1’Use “Space” to toggle this option. Press “Enter” to save the setting. If you want to cancel the option setting, press ‘Esc’ key and you are returned to the main menu.
4. Startup Mode: Main menu/New document/Recent document/ Terminal for Screen Reader/Calculator
This option allows you to choose the program to be executed when Braille EDGE 40 boots up. For example, if this option is set to “New document”, Braille EDGE 40 launches “New document” as soon as the unit is turned on and you can type data into the document. Default is “Main Menu”. Use “Space” to toggle this option. If you want to cancel the option setting, press ‘Esc’ key and you are returned to the main menu.
Note: This option applies when the Braille EDGE 40 boots from a soft or hard reset. It does not apply when using the Power button to power off/on the unit, as this operation returns you to the position at which you powered the unit off.
5. Play Sound: On/Off
This option allows you to choose whether the Braille EDGE 40 provides audio alerts.. If this option is set to “Off”, alert sounds and signal sounds are not heard. The default is “On”. Use “Space” to toggle this option. If you want to cancel the option setting, press ‘Esc’ key and you are returned to the main menu.
6. Braille grade for messages: Contracted/Uncontracted/Computer Braille
This option lets you choose what grade of Braille you want to use when viewing messages. The available settings are Uncontracted Braille, Contracted Braille, and Computer Braille. You can cycle among the settings by pressing “Space”. If you want to cancel the option setting, press ‘Esc’ key and you are returned to the main menu.

7. Braille Table: Spanish/French/Germany/Italian/English/UK/Polish/Denmark/Turkey/Hebrew
This option allows you to choose which Braille table is used when opening .brl files in the Notepad. Available settings are “Spanish”/ “French”/ “German”/ “Italian”/ “English”, “UK”, “Polish”, “Denmark”, “Turkey” and “Hebrew”. The default is “English”. Use “Space” to cycle through the available options. If you want to cancel the option setting, press ‘Esc’ key and you are returned to the main menu.
8. Message Display Time: Ignore/1sec/2sec/3sec/4sec/5sec/Stand by
This option defines how the Braille EDGE 40 deals with system messages. You can set the unit to ignore system messages, to stand by until you press a key, or, you can define how long the message remains on the display before automatically disappearing.
The available settings are “Ignore”, “1sec”, “2sec”, “3sec”, “4sec”, “5sec”, and “Stand by”. The default setting is “3 seconds”. Use “Space” to increase the message display time by one second. If this option is set to “standby”, the message remains indefinitely until you press a key. If you choose “Ignore,” messages are ignored and do not appear on the display.
9. Power Saving Mode: On/Off
This option allows you to choose whether Braille EDGE 40 automatically enters power saving mode after 10 minutes of inactivity. If this option is set to “On”, Braille EDGE 40 automatically goes into power saving mode, when the unit is not used for 10 minutes. The default is set to “On”. Use “Space” to toggle this option. If you want to cancel the option setting, press ‘Esc’ key and you are returned to the main menu.
10. Auto Disconnect from Bluetooth at 10%
This option allows you to choose to have the Braille EDGE automatically disconnect from a Bluetooth device at 10% of battery power. You may wish to do this in order to preserve Bluetooth settings as these are lost when the battery is completely depleted. Automatically disconnecting at 10% allows you time to locate a charging source without continuing to drain your battery. The available options are “On” or “Off. By default, this option is set to “Off”. Use “Space” to toggle this option. If you want to cancel the option setting, press ‘Esc’ key and you are returned to the main menu
11. Restore: Automatically/initialize
This option lets you set Braille EDGE 40 to Restore settings automatically on reset or initialize all settings. The default is set to “Restore automatically”. Use “Space” to cycle through the options. If you want to cancel the option setting, press ‘Esc’ key and you are returned to the main menu.

7. Information
Information is the last item in the Braille EDGE 40’s main MENU. To get to information, press ‘Space-dot1 or Space-dot4’ and press ‘ENTER’ on Information. Or you can press the hot key ‘I(dots 2-4) to open Information, regardless of your menu location.
The “information” dialog displays 4 items:1) SD card memory: total space, remaining space2) Power status: battery level, power source (adapter/battery) 3) Firmware version: Version number, build date4) Bluetooth: Bluetooth name (Braille EDGE 000000), pin code (0000)
You can navigate among the “Information” items using the up/down Navigation buttons or Space-1/Space-4.
You can use the following hot keys to check the information items from anywhere on the unit:SD card memory: Space-s (dots-2-3-4)Power status: Space-p (dots-1-2-3-4)Firmware version: Space-v (dots-1-2-3-6)Bluetooth status: Space-b (dots1-2)

8. Command SummaryGeneral shortcuts
Move to the next item in a menu or list: down navigation button or Space-4Move to the previous item in a menu or list: up navigation button or Space-1Move to the first item in a menu or list: up navigation button-left navigation button or Space-1-3Move to the last item in a menu or list: down navigation button-right navigation button or Space-4-6Move to the next 40 items: Ctrl-up navigation button or Space-1-2-6Move to the previous 40 items: Ctrl-down navigation button or Space-3-4-5Execute program: Enter, or right navigation button, or cursor routing key twiceEnter sub folder: Enter, or right navigation button, or cursor routing key twiceCancel: Esc key or left navigation button Exit: Space-z (dots 1-3-5-6) or Esc key.Enter folder or open file: right navigation button or EnterMove back a level in the folder structure: left navigation button or BackspaceOpen the menu: Space-1-2-4 or Alt
Notepad
Open new document: Ctrl-N (dots 1-3-4-5)Open recent document: Ctrl-P (dots 1-2-3-4)Open document in ‘read only’ mode: Ctrl-R (dots1-2-3-5)Move to previous line: Space-1 or up navigation button. Move to next line: Space-4 or down navigation button. Move to beginning of line: Space-1-3Move to end of line: Space-4-6
Move to previous paragraph: space-3 or Ctrl-up navigation button. Move to next paragraph: Space-6 or Ctrl-down navigation button. Move to previous page: Space-2-3 or Alt-up navigation buttonMove to next page: Space-5-6 or Alt-down navigation buttonMove to the top of the document: Space-1-2-3 or Ctrl-Alt-up navigation buttonMove to the end of the document: Space-4-5-6 or Ctrl-Alt-down navigation buttonStart block: Ctrl-B (dots 1-2)Select all: Ctrl-ACut block: Ctrl-X (dots 1-3-4-6)Copy: Ctrl-C (dots 1-3)Paste: Ctrl-V (dots 1-2-3-6)Delete current character: Alt-C (dots 1-3)Delete current word: Alt-W (dots 2-4-5-6)Delete current line: Alt-L (dots 1-2-3)Delete block: Space-D (dots 1-4-5)Undo: Ctrl-Z (dots 1-3-5-6)Insert today’s date: Insert-d (dots1-4-5)Insert current time: Insert-t (dots2-3-4-5) Insert calculation and result: Insert-R (dots1-2-3-5), Find: Ctrl-F (dots 1-2-4),Find again: Ctrl-Shift-F (dots 1-2-4)Replace: Ctrl-R (dots 1-2-3-5)Set Mark: Ctrl-M (dots 1-3-4).Move to Mark: Ctrl-J (dots 2-4-5)Auto scroll: up scroll button-down scroll buttonView format character: Insert-C (dots 1-4)Set Read only: Alt-R (dots 1-2-3-5)Auto scroll speed: Shift-left navigation button or Shift-right navigation buttonCopy file/folder: Ctrl-C (dots 1-3)Cut file/folder: Ctrl-X (dots 1-3-4-6)Paste file/folder: Ctrl-V (dots 1-2-3-6)Delete file/folder: Ctrl-D (dots 1-4-5)Select all file/folders: Ctrl-A
Create new folder: Ctrl-F (dots 1-2-4)Rename file/folder: Ctrl-E (dots 1-5)Find file/folder: Ctrl-S (dots-2-3-4)Information: Ctrl-I (dots 2-4)
Terminal for Screen Reader
Note: These commands are most commonly used and suggested byus to screen reader manufacturers. However, keystrokes may vary by screen reader. Please consult your screen reader’s documentation for a list of keystrokes specific to that screen reader, or see the section in this manual specific to the screen reader you are using.
Backspace: Backspace or space-1-2Delete: Space-1-4-5Insert: F6Alt: F4Alt-[Character]: F4-[Character]Enter: Enter or Space-1-5Ctrl: F3Ctrl-[Character]: F3-[Character]Tab: F2Shift-Tab: F2-F5Ctrl-Tab: F2-F3Ctrl-Shift-Tab: F2-F3-F5Esc: F1Shift-Esc: F1-F5Ctrl-Shift-Esc: F1-F3-F5Shift+[Character]: F5-[Character]Caps Lock: Space-U(dots 1-3-6)Up arrow: Up Navigation button or Space-1Down arrow: Down Navigation button or Space-4Left arrow: Left navigation button or Space-3

Right arrow: Right navigation button or Space-6Ctrl-left arrow: Space-2Ctrl-right arrow: Space-5Page up: Space-2-3Page down: Space-5-6Ctrl-page up: Space-1-2-6Ctrl-page down: Space-3-4-5Home: Space-1-3End: Space-4-6Ctrl-Home: Space-1-2-3Ctrl-End: Space-4-5-6F1 ~ F12: Space-1~12th cursor routing key. Windows: F7Applications: F8Win+[Character]: F7-[Character]Pause key: Space-p(1-2-3-4)Space: SpaceAlt-F4: Space-1-3-4-6
Applications
1) Calculator
View calculation result (=): EnterType new calculation: EnterPlus: dots 3-4-6Minus: dots 3-6Multiply by: dots 1-6Divided by: dots 3-4Percent: dots 1-4-6Power: dots 4-5-7Decimal point: dots 4-6Left parenthesis: dots 1-2-3-5-6Right parenthesis: dots 2-3-4-5-6Clear all: Ctrl-A

Save to file: Ctrl-SCopy calculation line: Ctrl-CPaste: Ctrl-VCopy Result: Ctrl-RReview previous calculation and result: Up navigation button
2) Stop Watch
Start/Stop: EnterPause: SpaceReset: Backspace
3) Countdown Timer
Start/Stop: EnterPause: SpaceReset: BackspaceClose: ESC key