version 13, user's guide
TRANSCRIPT

1
Version 13, User's Guide

Limited Use License Agreement
Limited Use License AgreementThe software described in this document is owned by Computer Keyes and is furnished under a license agreement. The software may be used or copied only in accordance with the terms of this agreement. It is against the law to copy the software on any medium except as specifically allowed in this license agreement. This license agreement constitutes the entire understanding between us and becomes effective upon the use of the software.
License
You may use the software on a single partition on a single machine and copy the software into any machine readable or printed form for backup purposes in support of your use of the software on that single machine.
You may not copy, modify, reverse engineer, sublicense, assign, or transfer the software in whole or in part to another party.
Term
This license is effective until terminated. You agree upon such termination to destroy the software together with all copies.
Warranty
The software is provided with a one year no bug guarantee: If you find that KeyesFax does not perform a function as it is described in the user's guide, during the first year after purchase, Computer Keyes will correct the problem at no charge. After the first year annual maintenance can be purchased that will cover bug corrections, enhancements, and transfers of the license from one computer partition to another.
Computer Keyes warrants that to the best of its knowledge use of this software is not an infringement of any third party's intellectual property rights. Computer Keyes does not warrant that the functions contained in the software will meet your requirements or that the software is fit for a particular purpose. This limited warranty replaces all other express or implied warranties.
Limitation of Remedies
Computer Keyes's entire liability and your exclusive remedy shall be the replacement of defective materials or workmanship, during the first year.
In no event will Computer Keyes be liable to you for any damages, including any lost profits, lost savings, or other consequential or incidental damages arising out of the use or inability to use the software.
© Copyright 2020, Computer Keyes. All rights reserved.
IBM is a registered trademark of International Business Machines Corporation.
KeyesFax, KeyesFile and KeyesMail are trademarks of Computer Keyes.
All other company and product names are trademarks or registered trademarks of their respective holders.
2

Limited Use License Agreement
Table of ContentsTable of Contents
Read Me 13
Applications for Image & Fax...........................................................13Image Viewers.................................................................................13Faxing from your PC........................................................................13DID Routing of Inbound Faxes.........................................................13
How to Implement Our Programs............................................14Starting and Stopping the Fax System.............................................14Using the FAXCOM output queue....................................................14Fax Spool File (KFAXSPLF).............................................................14Send Fax (KSNDFAX).....................................................................14
E-Mailing your Fax Documents................................................15Manually E-mailing from the Fax Queue or the Receive Queue.......15Automating the E-mail Process........................................................15
"How to" Faxing Instructions...................................................16Backing up the KeyesFax library......................................................16Use a Fax number found on each page...........................................16Extract a Fax number from another file............................................16Code Fax commands on each page................................................16Manually prepare a Coversheet for a spooled file............................17Send a Fax with a Forms Overlay....................................................17Use Fax machine as an Image Scanner..........................................17Display, edit, or print received Fax images.......................................17Send a quick Fax message..............................................................17Schedule a Fax for later...................................................................17Resend a Failed Fax........................................................................18Reduce the number of messages received......................................18Use Fax job accounting....................................................................18Set Fax job priorities........................................................................18Send a personalized broadcast Fax.................................................18Preview an outbound Fax.................................................................19Fax in Landscape mode...................................................................19Assign a Fax operator......................................................................19Track your outgoing Fax messages.................................................19Find information about an old Fax....................................................19Track your inbound Fax messages..................................................19Send Faxes without Coversheets.....................................................19Send a Fax from your PC.................................................................20Fax PCL with graphics.....................................................................20Automatically Route your inbound Fax messages............................20
Introduction 21
KeyesFile.........................................................................................21Image...............................................................................................21Fax...................................................................................................22
Faxing from PC's.......................................................................22
3

Limited Use License Agreement
Message Editor..........................................................................22Installing KeyesFax...................................................................23
Sign on as a Security Officer............................................................23New Installation................................................................................23Updating or Moving an Existing System...........................................23Copying KeyesFax Programs to a New Library................................24Ending the Fax System....................................................................25Backing up Existing KeyesFax Library.............................................25Alter your own Applications..............................................................25Running the KeyesFax Update Program..........................................26Adding KeyesFax Library to your Library List...................................26Entering your KeyesFax License Number........................................27Creating Fax Subsystem and Communication Objects....................28Connecting Fax Modems to your iSeries..........................................29Running the Fax Communication Setup Program............................30KeyesFax Custom User Options......................................................32Activating the Custom User Options................................................32
Where KeyesFax Documents are Stored.................................33Backing up KeyesFax Files..............................................................37
Running KeyesFax Programs...................................................38KeyesFax Command Summary.......................................................38
CPYFRMIFS (Copy PFM from IFS)...........................................38CPYPG (Copy Pages)...............................................................38CPYSPLPFM (Copy Spooled File to Physical File Member)......38CPYTOIFS (Copy PFM to IFS)..................................................38CRTFAXCOM (Create Fax Communication Objects)................38CRTFAXSBS (Create Fax Subsystem).....................................38CRTPBX (Create PBX member from a Text File)......................39CRTPBXMBR (Create a PBX member from KeyesFile)............39CSDSPLF (Consolidate Spool File to NIGHTFILE)....................39CVTIMG (Convert Image Type).................................................39KCVTSPLF (Convert Spool File)................................................39EDITIMG (Edit Image)...............................................................39ENDFAXCOM (End Fax Communication).................................39ENDHTTPSRV (End HTTP Server)...........................................39FAXAFPDS (Fax Spool File (*AFPDS)).....................................40FAXASCII (Fax Spool File (*USERASCII))................................40FAXEBCPCL (Fax Spool File with EBCDIC PCL Data).............40FAXLOG (Print Fax History Log)...............................................40FAXLOGP (Purge Fax History Log)...........................................40FAXMSG (Fax a Message Member)..........................................40FAXSETUP (Fax Communication Setup)..................................40FAXSPLNE (Fax Spool File with ¬E Esc Sequence).................40FCJOBQ (FAXCOM Job Queue)...............................................40FCSBS (FAXCOM Subsystem).................................................40KF (KeyesFile)...........................................................................41KEXPFAX (Export Fax).............................................................41KFAXSPLF (Fax Spool File)......................................................41KFAXSPLFS (Fax Spool Files)..................................................41KFEXPORT (KeyesFile Export).................................................41KFIMPORT (KeyesFile Import)..................................................41KFLICENSE (KeyesFax License)..............................................41KFSAVLIB (KeyesFax Save Library)..........................................41KFSPOOL (KeyesFax Spooled File Setup)................................41KFUPDATE (KeyesFax Update)................................................41KFVERSION (KeyesFax Version)..............................................42KSNDFAX (Send Fax)...............................................................42
4

Limited Use License Agreement
KWRKFAXL (Work with Fax Lines)...........................................42KWRKFAXQ (Work with Fax Queue)........................................42KWRKOUTQF (Work with Output Queue plus Fax)..................42KWRKRCVQ (Work with Receive Queue).................................42KWRKSPLFF (Work with Spooled Files plus Fax)....................42PRTIMG (Print Image)...............................................................42PURGEFAXQ (Purge Fax Queue).............................................43PURGELOGS (Purge Fax Logs)...............................................43PURGERCVQ (Purge Receive Queue).....................................43RMVFAXCOM (Remove Fax Communication Objects).............43RMVMBD (Remove Members by Date).....................................43RNMIMG (Rename Image)........................................................43RSTDOC (Restore a Saved Document)....................................43SLTDOC (Select Document).....................................................43STRFAXCOM (Start Fax Communication)................................43STRHTTPSRV (Start KeyesFax HTTP Server).........................44STSIMG (Status of an Image)...................................................44UPDRCVQ (Update Receive Queue)........................................44VRYFAX (Vary Fax)...................................................................44WRKFAXS (Work with Fax Security).........................................44WRKFCJOBQ (Work with FAXCOM Job Queues)....................44WRKIMGF (Work with Image Files)..........................................44WRKLACS (Work with Local Area Codes)................................44
Tutorial 45
Starting Fax Communication....................................................45Faxing a Spool File....................................................................46
End of the Spool File Exercise.........................................................46Faxing a Spool File with a Coversheet....................................47
The Message Editor Screen.............................................................48Tracking your Faxes.........................................................................48
Using the HTTP Server..............................................................49Starting the HTTP Server.................................................................49Connecting to the HTTP Server.......................................................49Controlling your Fax documents.......................................................50Working with a specific Fax..............................................................50Selecting your default Fax Viewer....................................................50Using the KeyesFax ImageMaker Print Driver..................................51Faxing the PC document..................................................................51
KeyesFile Information Manager...............................................53Managing Information......................................................................53Changing the Index..........................................................................55Editing a Card..................................................................................56
Faxing from the Information Manager.....................................58Keeping Track of your Fax Messages..............................................58Sending a Fax using the Message Editor.........................................60End of Faxing Exercise....................................................................61
Message Editor Advanced Features........................................62Using the Phonebook.......................................................................62Creating a new Message..................................................................62Spell Checking.................................................................................63Copying Lines..................................................................................65
5

Limited Use License Agreement
End of the Message Editor Exercise................................................65
Information Manager 67
Starting and Stopping KeyesFile Information Manager....................67KeyesFile's Screen....................................................................68Getting Help...............................................................................69Adding and Filling In Cards......................................................70
Adding Lines to a Card.....................................................................70Moving Through Your Cards....................................................71
Scrolling through Your Cards...........................................................71Displaying a Subsetted List of Cards................................................72Cancelling a Subsetted List..............................................................72Searching for Text in Cards.............................................................73
Editing Text on Cards...............................................................74Scrolling Through a Card.................................................................74Inserting a Line in a Card.................................................................74Deleting a Line from a Card.............................................................74Copying Text to Another Line or Card..............................................75Undoing Changes............................................................................75
Using Card Headings................................................................76Editing Card Headings.....................................................................76
Deleting a Card..........................................................................77Duplicating a Card.....................................................................78Printing Lines from Cards........................................................79
Printing a Card Image......................................................................79Selecting Lines to be Printed............................................................79Printing Individual Cards..................................................................80Printing a Series of Cards................................................................80
Managing KeyesFile Members.................................................81Opening a KeyesFile Member..........................................................81Determining Document Member Names and Sizes.........................81Copying and Merging Members.......................................................82Deleting a KeyesFile Member..........................................................82Securing a KeyesFile Member.........................................................83
Importing and Exporting Data..................................................84Importing Data to KeyesFile.............................................................84Exporting Data from KeyesFile.........................................................85
Using KeyesFile as a Phonebook............................................86Creating a PBX Member............................................................87
PC Tools 89
An Introduction to Imaging.......................................................89Image Tools.....................................................................................89Image File Types..............................................................................90Where Images are Stored................................................................90
Activating and Using the HTTP Server....................................91Configuring the HTTP Server...........................................................91
6
Limited Use License Agreement
Starting the HTTP Server.................................................................92Installing the KeyesFax ImageMaker Print Driver.............................92Using the HTTP Server....................................................................93
Displaying Images.....................................................................94Faxing PC Images & Documents.............................................95Creating Attachments or Forms Overlays...............................96
Annotating Images...........................................................................96Monitoring an IFS Folder for Faxing.................................................96Using your Fax Machine as a Scanner.............................................97Exporting a Fax to the IFS................................................................97
Working with Images on the iSeries........................................98Using WRKIMGF (Work with Image Files) Command.....................98
Editing Images...........................................................................99
Fax 101
The Benefits of Automated Fax......................................................101Using KeyesFax to Print with an Overlay........................................101Using KeyesFax to send E-mail Messages....................................101
Fax Communication................................................................102Working with Fax Lines..................................................................102Starting Fax Communication..........................................................103Ending Fax Communication...........................................................103Fax Communication Setup.............................................................103Faxing Image or Text Documents..................................................104Faxing Spooled Files......................................................................104Faxing from PC Applications..........................................................105
Using the HTTP Server:...........................................................105Using Virtual Printer support:...................................................105
Faxing at Night...............................................................................105How to Build Fax Messages...................................................106
Fax Commands..............................................................................106Spooled File example:.............................................................107¬Attn attention-to-name...........................................................108¬Cx coversheet-parameter......................................................108¬Desc description....................................................................108¬Email address........................................................................109¬End........................................................................................110¬Fax List distribution-list-id/qualifier.........................................110¬Fax PBX pbxfile-member.......................................................110¬Fax # phone-number.............................................................111¬Font font-name,point-size,text-tightness................................112¬From address........................................................................114¬Image image-file/image-member...........................................114¬Margin left-margin..................................................................115¬MBox mailbox........................................................................115¬Merge image-file/image-member...........................................116¬Page page-number................................................................117¬Px printer-name.....................................................................118¬Space space-amount.............................................................118¬Subj email-subject.................................................................118¬S1 - ¬S10 substitution-value..................................................118¬Template member.................................................................118
7

Limited Use License Agreement
¬Time transmit-time,transmit-date...........................................119¬Width text-characters,font-size..............................................120
Faxing in Landscape Mode............................................................121¬Landscape lpi,cpi,paper-length,merge-file/merge-member....121
Text Attributes................................................................................123Broadcast Faxing & Substitution Fields..........................................124
Faxing Forms Design or PCL5 Printer Data..........................125To prepare a forms overlay:.....................................................125To merge the forms overlay with your fax:...............................126
How to Create PCL5 Printer Data..................................................126Fax Communication Queues and Devices............................127
Message Queues...........................................................................127Job Queues....................................................................................127Holding or Releasing the Job Queues............................................127Ending the Fax Communication Subsystem...................................127Output Queue.................................................................................128The Fax Queue..............................................................................129The Receive Queue.......................................................................129The Fax Schedule File...................................................................129Varying the Fax Line, Ctl, and Device............................................129
The Fax History Log................................................................130Printing a Fax History Log..............................................................130Purging the Fax History Log...........................................................131
Ongoing Fax System Maintenance........................................132Purging Fax Logs...........................................................................132Purging the Fax Queue..................................................................133Purging the Receive Queue...........................................................134
Automatic Printing of Inbound Faxes....................................135Setting up for Auto Printing............................................................135
Automatic Routing of Received Faxes..................................136How the Routing Entries Work.......................................................136Maintaining the ROUTEFAX Member............................................136
Other Topics............................................................................138Previewing a FAX Image................................................................138Using Fax Accounting Codes.........................................................138Fax Job Priorities...........................................................................138Tracking Your Faxes......................................................................138Fax Security...................................................................................139Local Area Codes...........................................................................140Exporting Fax Images....................................................................141
Message Editor 143
Using a Coversheet........................................................................143Faxing Messages from KeyesFile..................................................143Message File..................................................................................143
The Message Editor Screen....................................................144Getting Help...................................................................................144Faxing the Message.......................................................................144Function keys.................................................................................145Accessing the Phonebook..............................................................145
The Fax Header / Footer Images............................................146Creating the Header / Footer Images.............................................146
8

Limited Use License Agreement
The Message Editor Fields.....................................................147To/From/Company/Fax/Phone/E-mail.....................................147Override KFaxSplF Cmd (Y/N):...............................................147Date.........................................................................................147Pages......................................................................................147Message..................................................................................147Attachments.............................................................................147
Editing the Message Text.......................................................148To delete a line from the text:..................................................148To insert text in a paragraph:...................................................148To adjust paragraph line endings:............................................148
Undoing Changes..........................................................................148Copying Lines of Text.....................................................................149Fax Commands..............................................................................149Text Attributes................................................................................150Spell Checking...............................................................................150
Managing Message Members.................................................152Opening a Message Member.........................................................152Deleting a Message member.........................................................152
Output Queue 153
Specifying Fax Parameters............................................................153Spooled File Attributes...........................................................154
Accounting Code............................................................................154Form Type......................................................................................154Front Side Overlay.........................................................................154Output Priority................................................................................154Page Range to Print.......................................................................154Record Length................................................................................154Save File........................................................................................154User Data.......................................................................................155User Defined Data..........................................................................155
Work with Fax Spooled Files..................................................156Spooled File Setup Screens...........................................................157Setup Screen Fields.......................................................................158
Phone number:........................................................................158Description:..............................................................................158Attention to:..............................................................................158Cover member:........................................................................158Cover file:................................................................................158Print fax:..................................................................................158Exit Program:...........................................................................159Scan Field Locations:...............................................................159
Coversheet Fields..........................................................................159To Name:.................................................................................159To Company:...........................................................................159From Name:.............................................................................159From Company:.......................................................................159From Fax #:.............................................................................160From Phone #:.........................................................................160From E-mail Addr:...................................................................160Cover Notes:............................................................................160
9

Limited Use License Agreement
Fax Commands within Spooled Files....................................161
Fax Queue 163
User Field.......................................................................................163Position to......................................................................................163Status column................................................................................164Function keys.................................................................................164Purging the Fax Queue..................................................................164Options...........................................................................................165User Defined Options.....................................................................168Fax Security...................................................................................168
Receive Queue 169
User Field.......................................................................................169Position to......................................................................................170Function keys.................................................................................170Purging the Receive Queue...........................................................170Options...........................................................................................171User Defined Options.....................................................................174Updating the Receive Queue.........................................................174Fax Security...................................................................................174
Commands 175
CRTPBX (Create PBX member) Command............................176CRTPBXMBR (Create PBX member from KeyesFile) Cmd. .177CSDSPLF (Consolidate Spool File to NIGHTFILE) Cmd.......179CVTIMG (Convert Image Type) Command.............................182KCVTSPLF (Convert Spool File) Command..........................184EDITIMG (Edit Image) Command...........................................187FAXAFPDS (Fax an AFPDS Spooled File) Command...........189FAXASCII (Fax a USERASCII Spooled File) Command........190FAXMSG (Fax a Message) Command....................................191FAXSETUP (Fax Communication Setup) Command.............193KEXPFAX (Export Fax to IFS) Command..............................200KFAXSPLF (Fax Spool File) Command..................................201
Adding KFAXSPLF to your Applications.........................................207KSNDFAX (Send Fax) Command............................................208PRTIMG (Print Image) Command...........................................213
Printing Images from your Applications..........................................214PURGEFAXQ (Purge Fax Queue) Command.........................215PURGELOGS (Purge Fax Logs) Command...........................216PURGERCVQ (Purge Receive Queue) Command.................217
10

Limited Use License Agreement
WRKIMGF (Work with Image Files) Command.....................218
Appendix 219
Trouble Shooting.....................................................................219Summary of Fax Commands..................................................221
Text Attributes................................................................................221Substitution Fields..........................................................................221Scalable Font Names.....................................................................221
Line Drawing............................................................................222International Character Set.....................................................223Scalable Fonts.........................................................................224Granting Authority to Start Fax Communication..................225Running a Communications Trace........................................226
Debugging an Exit Program...........................................................226Creating an Ethernet Device Server for Faxing....................227
11

Limited Use License Agreement
- - - - blank page - - - -
12

Read Me
Read MeRead Me
Applications for Image & FaxKeyesFax provides an image processor, an inbound fax system, and an outbound fax system. The image and receive fax programs are particularly useful as support to the outbound fax system. For instance, they allow a fax machine to be used as an image scanner. Letterheads, signatures, logos, brochures, and price sheets can be easily faxed to your iSeries. You may then view, convert, merge, cut and paste these images so they can be ultimately faxed to your customers.
Image ViewersYou may use any Image Viewer available on your PC to view images from the KeyesFax system. The optional HTTP Server will convert each image to a TIFF image and send it to your PC for viewing, printing, saving, etc. To help you control which viewer will be used, the images will have a filename extension of CK-TIF (Computer Keyes - TIFF). You can set your PC to use any viewer for these file types, that you want. The Windows Picture and Fax Viewer available on most PC's works well.
Faxing from your PCThe optional HTTP Server is used with any PC browser software. It will allow you to create and send fax images from any PC application. The PC application will print to a file, using our KeyesFax ImageMaker Print Driver. The HTTP Server will pick these files up and send them to KeyesFax for faxing or saving as images or overlays.
You can also activate the monitoring of an IFS folder for faxing. When you print any PC document, using our KeyesFax ImageMaker Print Driver to this IFS folder, KeyesFax will automatically convert and fax the TIFF image. You can code the Fax #, User-id, & Attention-to values in the file name, if desired.
Example: ^Fax 555-1212 ^User my-id ^Attn Joe Somebody ^ anything.TIFF
DID Routing of Inbound FaxesKeyesFax can work with a special DID (Direct Inward Dial) phone line from the phone company. DID allows a block of telephone numbers, larger than the number of fax lines, to be used for direct dialing to extensions. In order for this to work, you must have a DID capable modem, such as the Multi Modem DIDTM
from Multi-Tech. With this combination, KeyesFax will allow you to automatically route inbound faxes to the appropriate person or printer or e-mail address, based on the original phone number extension that had been dialed.
13

Read Me
How to Implement Our Programs
Starting and Stopping the Fax SystemFrom the Fax Communication Menu (FCMENU), you can manually start and stop the fax system using option 1 (Work with Fax Lines).
You can automatically start or end the fax system using the commands STRFAXCOM or ENDFAXCOM, respectively. You may wish to place STRFAXCOM in your normal QSTRUP routine, so that it automatically starts after an IPL. It is also recommended that you use ENDFAXCOM before doing a backup of the KeyesFax library, and restart it when the backup has finished.
Using the FAXCOM output queueThe simplest and most common method of faxing a document is to route or move a spooled file into the FAXCOM output queue. Our programs are monitoring this output queue and will automatically convert the printer output to a fax image and fax it. You can supply a phone number in a number of different methods. The destination phone number may be included in the printer data, or something that will lead us to the phone number (like a customer or vendor number). An Exit program can be used to retrieve the phone number from any master file. You can also code a phone number outside the printer data in the User Data or the User Defined Data parameters of the spooled file attributes.
Fax Spool File (KFAXSPLF)This command and its counterparts (FAXASCII & FAXAFPDS) are used to pull spool files and attach an optional coversheet and merge an optional forms overlay with the fax. You can run these commands from our Work with Output Queue (plus fax) program, or you can call them from an application program as it generates a document to be faxed. They can be called directly from programs as they generate documents to be faxed, so that a user can manually prepare a custom coversheet.
Send Fax (KSNDFAX)This command can be used to fax any existing image or text document that you have on your system. You can run this command from the KeyesFile Information Manager, from the command line, run it as a PDM option (SF), start it from a menu, or call it from any of your application programs. It can send a fax immediately, schedule it for later, send the fax to multiple numbers, or send each page to a different number.
14

Read Me
E-Mailing your Fax DocumentsWhen KeyesFax is combined with KeyesMail, you have a choice of either faxing or e-mailing your documents, from the same applications or spooled files.
Manually E-mailing from the Fax Queue or the Receive QueueYou may code an "E" option on any document in either the Fax Queue or the Receive Queue to manually e-mail any of the documents that are in the queues. After entering the "E" option, you will be able to manually alter the message that will go with the e-mail and select addresses for the recipients. The selected document will be converted to either a TIFF image or a PDF document and added to the message, as an attachment.
Automating the E-mail ProcessYour applications can supply up to 3 e-mail addresses in addition to a Fax number on any spooled file page, to automate the e-mailing process. The Fax Queue will track both types of documents that were either faxed or e-mailed. The e-mail addresses can be provided using any of 3 different methods, just like its Fax # counter part.
You can enter an e-mail address;• As a parameter when you call one of the Fax API's.• Using ¬Email commands in the spooled file pages.• In the User Defined Data field of the spooled file attributes.
E-mail address in the Fax API's
To specify an address you must first code the value *EMAIL in the Phone number parameter. After pressing the Enter key, the new parameter E-mail address will be available.
E-mail commands in Spooled File pages
You can embed up to 3 e-mail addresses for each of your spooled file pages, in addition to a fax number. This is done using ¬Email commands just like the usual ¬Fax # command, on any spooled file page. Those pages with e-mail addresses will be e-mailed, the ones with fax numbers will be faxed.
E-mail address in the User Defined Data
You can code an e-mail address in the User Defined Data field of any spooled file that you wish to e-mail, instead of fax. To specify an address in the field, code the letters ¬EMAIL followed by the address. The User Defined Data field is one of the attributes of a spooled file that can be set with an OVRPRTF command.
15

Read Me
"How to" Faxing Instructions
Backing up the KeyesFax libraryThe fax system must be stopped before you can backup the KeyesFax library. Otherwise, the backup will lock up all the objects in the library causing the fax system to fail. You can prevent this by running the ENDFAXCOM (End Fax Communication) command before you start the backup. If there are any fax conversions running, you may also want to hold the IMGCONV job queue. When the backup has completed you can run STRFAXCOM (Start Fax Communication) and release the IMGCONV job queue.
Use a Fax number found on each pageIf a fax number is already printed somewhere on each page of your spooled files you can use this method: Define the location of the phone number as a scan field, using item 35 (Work with Spooled Files). Then code the same substitution field (¬1 for example) as the phone number on the Spooled File Setup Screen. The system will automatically fax each page of the spool file to the fax number that it finds on each page at the specified location. Any pages that do not have a fax number at that location will not be faxed.
Extract a Fax number from another fileIf another value like a customer number is all that is available on the report, you can use this method: Define the location for that value as a scan field, using item 35 (Work with Spooled Files). An Exit Program is then used to look up that value in the appropriate external file. The scan field values will be sent to the Exit Program for each page. The Exit Program looks up the value in the master file and sends back the fax number for each page.
Code Fax commands on each pageYou can include the fax number for each page of a spool file using a ¬Fax # command anywhere on the page. This allows KeyesFax to burst the spooled file for each recipient. Place the spool file in the FaxCom OutQ, using an OVRPRTF command. KeyesFax will strip out the fax commands and fax each page of the spool file to the number it finds in the command. Pages without a ¬Fax # command will be faxed with the previous page. If you include a ¬Fax # command without a fax number on a page, that page will not be faxed. You may also want to include a ¬Desc command to help you identify each page of the fax in the Fax Queue. Custom coversheets can also be included using the appropriate fax commands, embedded on each page.
16

Read Me
Manually prepare a Coversheet for a spooled fileIf you wish to manually prepare a coversheet with each fax you may use this method: Print the spool file for a single recipient into any OutQ with a Hold status. Close the spool file either by ending the program or by using the CLOSE instruction in the program. Call the FAXSPLF API (described in the chapter titled Commands) directly from your program. It will start the Message Editor for the coversheet and then fax the spool file along with the coversheet. Be sure to pass the fax number, the contact name, and the company name to the FAXSPLF program so that this information will be automatically pasted onto the coversheet.
Send a Fax with a Forms OverlayYou may code a ¬Merge command in your document to name the overlay and to cause it to be merged with the document's text. For spool files, you may code the Front side overlay parameter using an OVRPRTF command. Or, you may code the Merge image member name parameter of the KFAXSPLF command to name the overlay.
Use Fax machine as an Image ScannerYour fax machine may be used as an image scanner for letterheads, logos, signatures, drawings, photos, forms overlays, etc. You can cut and paste the images to be used in your outbound fax messages, using the EDITIMG (Edit Image) program. Detailed instructions on how to create a forms overlay using a fax machine is included in the chapter titled Image.
Display, edit, or print received Fax imagesReceived Fax images are placed in RCVFILE and are recorded in the Receive Queue. Using the Receive Queue, you can display, route, copy pages, print, or download them to a PC. If desired, you can convert, combine, split up, cut, paste, flip over, or reverse the images using WRKIMGF (Work with Image Files).
Send a quick Fax messageThe Message Editor can create and fax quick messages with one or more pages. Item 9 on FCMENU will start FAXMSG for you. You can access a Phonebook from the editor, using F17, to fill out the recipient information. You can copy any existing Message member into your new ones to retrieve similar messages to reduce typing. You can also spell check your messages using F23.
Schedule a Fax for laterYou can schedule a fax to be sent at night, on a weekend, or any other convenient time using a ¬Time command in the document or using the Transmit time and date command parameters with any of the faxing commands (KSNDFAX, KFAXSPLF, FAXASCII, FAXAFPDS). You may also place spool files in the FAXNGT output queue for night faxing.
17

Read Me
Resend a Failed FaxIf an outbound fax page is transmitted with too many errors, the system will automatically resend the bad page. If the program loses connection, the system will immediately try to reestablish the connection. If it can, it will restart the fax at the page that failed. If it cannot, the remaining fax pages will be rescheduled for a later time. The default number of retries and the time interval between retries are set using the FAXSETUP (Fax Setup) command.
If all the retries have failed, the system will send you a message letting you know the job has been cancelled. Using the WRKFAXQ (Work with Fax Queue) program you can review all your faxes and their statuses. The reason for the last failure is shown in the status field. You should check the fax number of the failures. After correcting the number, if necessary, you can retry the fax again using option 9 (Restart).
Reduce the number of messages receivedThe FAXSETUP (Fax Setup) command has a parameter that can be set to reduce the number of messages that are sent to the users. Normally a completion message is sent to a user each time the system attempts to send their fax. If you change the Send Completion Messages parameter to N, the system will only send a message to a user if a fax fails after all retries have been exhausted. You can also code *NONE in the Route completion message parameter of the KFAXSPLF or KSNDFAX commands.
Use Fax job accountingAccounting codes can be assigned to each outbound fax. If it is not specifically assigned, the system will use the Job's Accounting Code. The Accounting Code in spool files routed to FAXCOM will be used as the Fax Accounting Code. The Fax History Log will be able to list and summarize the jobs by Accounting Code.
Set Fax job prioritiesYou can set different priorities to each outbound fax job using the Job Priority parameter in any of the faxing commands (KSNDFAX, KFAXSPLF, FAXAFPDS, & FAXASCII). This will allow the system to schedule more important jobs to be faxed prior to other jobs already on the system. The parameter Output priority for spool files routed to FAXCOM can be used to set the Job Priority for the faxes.
Send a personalized broadcast FaxYou can send a Personalized Fax to as many different destinations as you want. Up to 10 different text lines may have up to 10 different substitution fields defined in your fax documents. The personalization data is located in a PBXFILE member along with the phone number where each fax is to be sent. This can also be done using Distribution Lists. Instructions on how to create the PBXFILE members are located in this manual.
18

Read Me
Preview an outbound FaxYou can preview a fax image before it is sent by preparing the fax without a phone number or with a scheduled date some time in the future. When the fax is ready, you can display the image using Work with Fax Queue and supply the phone number or change the scheduled date, when you are ready to fax it.
Fax in Landscape modeYou can turn any text sideways to fax your documents in landscape mode. This is typically used when a document is too wide to fit on the 8 1/2" standard fax paper. Landscape mode can be established by coding LANDSCAPE in the Forms Type field of a spool file when it is placed in the FAXCOM output queue, or by coding a ¬Landscape command in the document. You can also code *YES in the Landscape mode parameter of the KFAXSPLF command.
Assign a Fax operatorYou may assign a Fax Operator who will receive messages that may need immediate attention by coding their user-id in the FAXSETUP (Fax Setup) command. These messages would include, the receipt of an inbound fax, or the loss of communication to a fax line.
Track your outgoing Fax messagesEvery fax that is you send is logged into a Fax Queue. Using the queue you can track, change, hold, restart, view, print, or delete old entries.
Find information about an old FaxThe system logs a copy of all messages in a FAXCOM message queue that the Fax Operator can use to track how the system is running. Successful and failed messages are also logged in SENTFILE and FAILFILE to be used as proof of delivery or for resending. The messages in these files are separated into individual members by User.
Track your inbound Fax messagesEvery fax that is received is logged into a Receive Queue. Using the queue you can assign a description, change the name, key some notes, route, print, fax, combine pages, delete, display, edit, or save the fax images.
Send Faxes without CoversheetsYou can provide an attention to name that will print at the top of the fax to identify who the fax is going to. This can eliminate the need to send a coversheet in many cases. This can be done by coding the Attention to name parameter of the faxing commands KFAXSPLF, KSNDFAX, FAXASCII, OR FAXAFPDS. You may also code a ¬Attn command in the document or spool file to provide the attention to name.
19

Read Me
Send a Fax from your PCThe HTTP Server allows any browser to create and control faxes. Any Windows application can print to file. The HTTP Server will retrieve and send the print file as a fax through the KeyesFax system. From the application, simply select and print to a KeyesFax ImageMaker Print Driver. This will print to a file on your C: drive. The HTTP Server can pick this file up, allow you to add an optional coversheet, add a fax number, then upload the whole document to the iSeries for faxing.
Fax PCL with graphicsA regular PCL file from a PC application can be uploaded to the iSeries and faxed using the FAXASCII command. You can also fax PCL graphics in a standard EBCDIC SCS printer file using an RPG or COBOL program using the FAXEBCPCL command. To do this, you code the ASCII Esc character using the EBCDIC Negate character. Additional information about these commands can be found under Faxing forms design or PCL5 printer data later in this manual.
Automatically Route your inbound Fax messagesInbound fax messages can be automatically routed to different printers, different user's Receive Queues, or to different e-mail addresses based on one of three different methods:
1) Using DID routing. (This requires a special DID modem & phone line.)
2) Using the sender's phone number.
3) Using the Fax line number. (The phone number dialed.)
To automate the routing process you will create routing entries using the command: KF ROUTEFAX
You can find instructions for this process in the Fax section of this manual.
20

1 Introduction
1 1 IntroductionIntroduction
KeyesFax is actually 3 systems in one. It marries a powerful information manager (KeyesFile) with an image system and a complete multi-line send and receive fax system.
KeyesFileKeyesFile is an information manager that is like a set of index cards that automatically sorts itself. You can use it to keep track of a wide variety of information, such as: names and addresses, phone numbers, sales information, customer follow-up, call-back or contact information, or anything else that you need to have quick access to. It can be used as a quick phonebook or to index, store, display, or fax documents using single keystrokes.
The true power of KeyesFile is its instant accessibility of the data using any piece of information that you have entered on the cards. For example, assume you recorded information about your customers with company name, address, contact and phone number keyed on the cards. You could access the cards by company name one moment, then by contact, phone number, or address the next, or by any other information that you have placed on any of the available 999 lines of the cards.
ImageImages may be displayed on any PC running a browser. An HTTP Server will send control information and images to your browser.
iSeries image documents can be one of four different types of files; PCX, TIFF, FAX, or CKX. PCX and TIFF (class B or class F) image documents are a common type of file that PC graphics applications, scanners, and fax programs use. You can transfer any of these files to the iSeries in their original ASCII format, and display them using your browser. FAX and CKX image documents are created by the fax system. FAX images are used for sending and receiving faxes. CKX images are used for creating forms overlays.
Multiple page CKX images can be converted to or from the other image types. Our editing commands can be used to cut and paste, merge, or flip any CKX image.
21

1 Introduction
FaxThe fax system uses Class 1, Class 2.0 or Class 2.1 fax modems attached to one or more of your communication ports (V.24 ports) or any of the Integrated modems (Comm ports) to send and receive Fax documents. Documents can be faxed from any iSeries terminal or any PC application through the iSeries to any fax machine.
Fax documents may be spooled files, messages created by the Message Editor included with the system, or any combination of text and images in iSeries source files. The system will automatically convert, include, and/or merge together the desired text and images into a multiple page Fax document. The fax can be scheduled for off hours or broadcast to multiple telephone numbers using easily maintained phone lists or distribution lists.
Your fax machine becomes a handy image scanner for letterhead, logos, signatures, drawings, invoices, photos, etc. Indexing and retrieving is a breeze with the KeyesFile Information Manager.
Faxing from PC's
An optional HTTP Server can be activated which works to control your existing faxes and create new ones with an Internet browser. You can define a KeyesFax ImageMaker Print Driver on your PC, that will print your PC documents to file. The browser can pick up the print files and send them to KeyesFax for faxing.
Message Editor
A powerful Message Editor is included that can be used to create standalone fax messages or coversheets for your other fax messages. Your company logo and page footers can be included with the cover pages. One touch of a function key will pop you into the KeyesFile Information Manager used as a phonebook to retrieve recipient information. The Message Editor will automatically adjust paragraphs while you type and has a built in spell checker.
22

1 Introduction
Installing KeyesFax
Sign on as a Security OfficerThe following installation procedure will require that you have enough authority to be able to create subsystems, communication controllers and devices, and to be able to change some system values.
New InstallationIf this is the first installation of the KeyesFax system it will take several steps to complete. Please follow the instructions on the following pages to complete the installation outlined below.
Steps for a new installation:• Restore KeyesFax programs to a new KFLIB library.• Add KeyesFax library to your library list.• Enter your KeyesFax License number.• Create Fax Subsystem and Communication objects.• Connect the fax modem(s).• Run Fax Communication Setup.• Activate KeyesFax custom user options.• Use the tutorial to learn the system.
Updating or Moving an Existing SystemAn update to an existing KeyesFax system will only take a few steps to complete. During the update, the programs in your original KeyesFax library will be replaced with a new ones from the CD or Save File. Please use the Update Instructions found on our website for best results.
Steps for an update:• Restore KeyesFax programs to a new KFUPD library.• End the Fax system (ENDFAXCOM, FCSBS *END).• Backup Existing KeyesFax library.• Alter your own Applications.• Run the KeyesFax Update program (KFUPDATE).
Perform the following steps if this is a new version number:• Update KeyesFax License number.• Recreate Fax Subsystem and Communication objects.
Moving the software to a new machine:• Restore your KeyesFax library on the new machine.• Update the KeyesFax License number.• Recreate Fax Subsystem and Communication objects.
23
1 Introduction
Copying KeyesFax Programs to a New LibraryThe library that you restore the programs in must not already exist. It can be given any name, however, we suggest that you restore the programs into a new library called KFLIB. If this is an update, restore the programs into a temporary update library called KFUPD.
Restoring Instructions:
1. Follow the instructions found in the Readme.txt file that you download from our website (www.ckeyes.com). It will use FTP to transfer Save File data to your IBM i.
2. If this is a New Installation:Enter: RSTLIB SAVLIB(KF13LIB) DEV(*SAVF)
SAVF(QGPL/KF13SVF) MBROPT(*ALL) RSTLIB(KFLIB)
If you are Updating an Existing System:Enter: DLTLIB LIB(KFUPD)Ignore any "Library not found" message.Enter: RSTLIB SAVLIB(KF13LIB) DEV(*SAVF)
SAVF(QGPL/KF13SVF) MBROPT(*ALL) RSTLIB(KFUPD)
24

1 Introduction
Ending the Fax SystemIf this was an update for an existing KeyesFax library, you must end fax communications and end the FAXCOM subsystem before you can update the library. The following procedure will do this for you.
Ending instructions:
1. Change your current library to the KeyesFax library.Enter: CHGCURLIB librarylibrary is the name of your KeyesFax library (usually KFLIB).
2. Display the FCMENU.Enter: GO FCMENU
3. End Fax Communication.Enter: ENDFAXCOM
4. Wait 20 to 30 seconds for Fax Communication to be ended on all lines. You can use item 1 (Work with Fax Lines) to determine when all lines have ended.
5. End the FaxCom Subsystem.Enter: FCSBS *END
Backing up Existing KeyesFax LibraryIf this is an update to an existing KeyesFax system, we highly recommend that you backup the KeyesFax library, before updating it.
Backup Instructions:
1. Load a tape to receive the backed up library.
2. The following command will backup the library.Enter: SAVLIB LIB(KFLIB) DEV(device)
Alter your own ApplicationsIf this is an update to an existing KeyesFax system prior to version 9, and you have used the FAXSPLF API, you will need to alter the call to this program. Two of the coversheet fields have been expanded from 23 characters to 30 characters long. Your programs should be altered to specify the new sizes.
If you have altered the CVTSPLTXT program in KFLIB to extract fax numbers from your data base files, we recommend that you change the way this is done. The new menu item 35 (Work with Spooled Files) will allow a better method of extracting spooled file data and passing this to an Exit program to extract fax numbers from external files.
25

1 Introduction
Running the KeyesFax Update ProgramIf you are installing KeyesFax for the first time, skip this step. Run this only for an update to an existing KeyesFax library. You should have two KeyesFax libraries on your system, the original library (KFLIB), and the Update library just restored (KFUPD).
1. Change your current library to the update library.Enter: CHGCURLIB kfupd
2. If you have the KeyesMail system, make sure that the KeyesMail Data library, usually called KMDATA, is on your library list.
Enter: ADDLIBLE kmdata
3. Prompt the KeyesFax Update program and fill in the appropriate library names in the parameters:
Type: KFUPDATE then press F4 (Prompt)KeyesFax Program library . . . kflib KeyesFax Update library . . . . kfupd
4. Press the Enter key to start the update.
5. Change your current library back to whatever you wish.Enter: CHGCURLIB *crtdft
6. If all of the update library objects were successfully copied to your program library, you may delete the update library.
Enter: DLTLIB kfupd
Adding KeyesFax Library to your Library ListYour KeyesFax library (KFLIB) must be on your library list in order for you to run the KeyesFax programs. You can permanently add the library to the list or temporarily add it whenever you want to use the system.
Sharing files with KeyesMail:
The KeyesFax system shares some of the files with the KeyesMail system. If you have already installed the KeyesMail system, you must include KMLIB and KMDATA libraries above KFLIB on your library list whenever you are running the KeyesFax system. They must appear in the following order:
• KMLIB (If KeyesMail is installed it is always on top)• KMDATA (If KeyesMail was installed prior to KeyesFax)• KFLIB
Note: If KeyesMail is installed after KeyesFax, then KMDATA must appear on the library list below KFLIB, as shown below:
• KMLIB (If KeyesMail is installed it is always on top)• KFLIB• KMDATA (If KeyesMail is installed after KeyesFax)
26

1 Introduction
To Permanently add libraries to your library list:
1. Go to the iSeries Main Menu.Enter: GO MAIN
2. Select item 7 Define or change the system.
3. Select item 8 Work with system values.
4. Roll down or position to QUSRLIBL and select option 2.
5. You will be placed on the Change System Value screen for changing QUSRLIBL.
6. Add the KeyesFax library (KFLIB) and the KeyesMail libraries to the list in the specified order.
To Temporarily add a library to your library list:Enter: ADDLIBLE kflib
Entering your KeyesFax License NumberThe KeyesFax programs will not function until the system is activated with a license number. The license number tells the system the number of fax lines that you will be using. The license number is based on the iSeries' serial number and the logical partition that you are running in.
You may contact Computer Keyes to get your license number. Before you call, get the serial number of your iSeries. It is a 7 or 8 digit number written on the front panel of the central processing unit. If you cannot locate your iSeries serial number, the KFLICENSE command described below will tell you what the serial number is and the logical partition.
Recording Your KeyesFax License Number:
1. Switch your current library to your KeyesFax library (KFLIB).Enter: CHGCURLIB KFLIB
2. Start up the program that will record your KF License.Enter: KFLICENSE
3. Key your KF License number in the field provided, then press Enter.
KeyesFax License Number:Permanent: S# - LPar ___Temporary:
Note: New i5's start with LPar 1, whereas original AS/400's and iSeries computers all started with LPar 0.
27

1 Introduction
Creating Fax Subsystem and Communication ObjectsRun these steps for new installations and when you are updating from an existing KeyesFax system. You can skip these steps if you are already using version 13 that was installed or updated since August of 2014.
Before the system can use the fax modems, a number of objects must be created including a communication subsystem, lines, controllers, device descriptions, job queues, message queues, data queues, an output queue, and an ICF file for fax communications. All of these will be created automatically for you in the KeyesFax library when you run the CRTFAXSBS and CRTFAXCOM commands described below. But first you must determine the system resource names assigned to the communication ports that will be used by the fax modems. The resource names can be determined using the WRKHDWRSC command.
Note: You must create the Fax Subsystem first, then create the Fax Communication objects for each of the fax lines. You may go back and rerun CRTFAXCOM for any of the lines at a later time to change the resource names. However, if you ever run CRTFAXSBS, you must go back and rerun CRTFAXCOM for each fax line again.
Creating the Fax Subsystem:
1. Change your current library to your KeyesFax library (KFLIB). This is important because the objects being created in the next step will be placed in your current library.
Enter: CHGCURLIB library
2. Create the Fax Subsystem.Enter: CRTFAXSBS
Creating the Fax Com Objects for each fax line:
1. Determine the resource name and type of the communications port.Enter: WRKHDWRSC *CMN
2. Note the resource name listed for the V.24 Port or Comm Port that you will be using. Also note the type of I/O port (2745, 2771, 576C etc.)
3. Change your current library to your KeyesFax library (KFLIB). This is important because the objects being created in the next step will be placed in your current library.
Enter: CHGCURLIB library
4. Create the Fax Communication Objects for each fax line.Type: CRTFAXCOM and press F4 to prompt it
Fill out the fax-line, resource-name, integrated-modem, line-speed, and flow control parameters. Use the Help key for assistance with the line-speed and flow control parameters. The correct values will depend on the type of I/O port you are using.
5. Repeat step 4 for each fax line. Be sure to use a different resource name for each line.
28

1 Introduction
Connecting Fax Modems to your iSeriesYou may connect any Class 1 or Class 2.0 Fax modem directly to the EIA-232 cable that comes with each V.24 Port on your iSeries. We recommend any PC style modem, such as the popular US Robotics modems. An IBM 7858 modem is a Class 1 Fax modem and can be used, but it must be configured properly before using.
Any of the IBM Integrated modems, such as 2771, 2772, 2793, 2805 and 576C, can also be used. Simply connect the modems to a telephone line using the original IBM telephone cord that was supplied with your hardware.
You may double use the port that you have been using for Electronic Customer Support, if no other port is available. To do this, simply unplug the cable from the ECS modem and plug it into your fax modem, as described below:
1. Plug the 25 pin cable from the V.24 port directly into the Class 1 or Class 2.0 Fax modems.
2. Connect a telephone cable into each of the fax modems.
3. Leave any external modem switches at the factory default settings. Set US Robotics modems with switches 3, 5 & 8 Down and all the other switches Up.
4. Using the modem's manual, determine any command strings that you may need to override the default modem values. Typically you should not code 'ATZ' or 'AT&F' commands, as this will remove the preset KeyesFax modem settings.• US Robotics modems can use 'ATX2' to eliminate false busy signals
from double rings.• Practical Peripherals & other Hayes compatible modems can be left
blank.• IBM Integrated modems should use 'AT&S0'.• Leave this blank for IBM 7858 modems.
5. Key the desired command string into the Modem initialization string parameter of the Fax Communication Setup program (Item 2 on the Fax Communication Menu) for each line.
6. If you are using an IBM 7858 modem, you will need to configure it using the Front Panel buttons. You must create and use one of the User Configurations, with the following attributes:• Mode Select Asynchronous• Flow DTE > DCE XON/XOFF• Flow DCE > DTE XON/XOFF• DTR (C108) 108/2• CTS (C106) Forced On• DSR/CD DSR On/ CD Ctr.• DSR (C107) Normal• Line Select Switched• Mode AT Mode
Store this into one of the User Configurations, then select this User Configuration as the power on default.
29

1 Introduction
Running the Fax Communication Setup ProgramThe Fax Communication Setup program is used to define data areas (KFDATAx), one for each fax line. You can change the these data areas at anytime, and the changes will take effect immediately. You may run the FAXSETUP program for each line, or use *ALL in the line number parameter to change some of the parameters for all the lines at one time.
Detailed information regarding the parameters for this command may be found by pressing the Help key for each parameter.
30

1 Introduction
Fax Communication Setup parameters:
31
Fax Communication Setup (FAXSETUP)
Type choices, press Enter.
Fax Com line number . . . . . . . . . . . . . . > 1 01-24, *ALLModem speaker . . . . . . . . . . . . . . . . . . > AUTO ON, OFF, AUTOModem initialization string . . . . . . . . . . . > 'ATX2' Dialing prefix . . . . . . . . . . . . . . . . . . . . > 'ATDT9,' Dialing suffix . . . . . . . . . . . . . . . . . . . . > '1234' Transmitting terminal ident . . . . . . . . . > 'Your Company Name' Calling/sending identification . . . . . . . . > 'Your Fax Number' Override Modem Class . . . . . . . . . . . . > A A, 1, 2Number rings before answering . . . . . . > '0' 1-9, 0=no answerOutbound fax line . . . . . . . . . . . . . . . . . > Y Y, NFax operator. . . . . . . . . . . . . . . . . . . . . > QSYSOPR Name, QSYSOPRAllow high resolution Fax recv . . . . . . . > YES YES, NOMaximum connect speed . . . . . . . . . . . > 33600 2400, 4800, 7200, 9600... Failed Send Fax retry count . . . . . . . . . > 2 0-9Number minutes between retries . . . . . > 05 01-15Route to Printer Device . . . . . . . . . . . . > PRT01 Leave blank for no printAuto Fax FAXCOM Output Queue . . . . > Y Y, NAuto Fax PC Documents . . . . . . . . . . . > Y Y, NDID Configuration (blank=None) . . . . . > ' ' DSx,DNx,DTxx,DDx or blankNight Fax Start Time . . . . . . . . . . . . . . > 0000 0000-2400Night Fax End Time . . . . . . . . . . . . . . . > 0000 0000-2400Monitor IFS Folder for faxing . . . . . . . . . > ' ' Auto Purge Sent Faxes . . . . . . . . . . . . . > N Y, NAuto Purge Failed Faxes . . . . . . . . . . . > N Y, NSend Completion Messages . . . . . . . . . > Y Y, NConversion Run Priority . . . . . . . . . . . . > 50 30-70Burst PCL before conversion . . . . . . . . > Y Y, NNumber of HTTP clients . . . . . . . . . . . . > 005 001-999Default IFS Path for Exports . . . . . . . > '/Home' KF PC Server Setup (Obsoleted):
Server IP address . . . . . . . . . . . . . . > '192.168.xx.xxx' Server Port (usually 18472) . . . . . . > 18472 Character valueRun Priority . . . . . . . . . . . . . . . . . . . > 15 10-70Client backlog. . . . . . . . . . . . . . . . . . > 003 000-099Communication timeout . . . . . . . . . . > 015 005-120 seconds
Default Fax resolution . . . . . . . . . . . . . . > *HIGH *NORMAL, *HIGHDefault Paper length . . . . . . . . . . . . . . > S (S)tandard 11", (A)4 sizeDefault Consolidation . . . . . . . . . . . . . . > Y N, YDefault Consolidation delay . . . . . . . . . > ' ' 00-99, 00 or Blank=no delayResend No Confirmations . . . . . . . . . . > N N, YDefault Phonebook name . . . . . . . . . . . > SAMPLE
Phonebook Fax # Heading . . . . . > FAX Phonebook Contact Heading . . . . . > CONTACT Phonebook Company Heading . . . . > COMPANY
Default System Language . . . . . . . . . . > AMERICAN American, British, Danish, French, German, Italian, Spanish

1 Introduction
KeyesFax Custom User OptionsWhile Working with Image Files or running IBM's PDM, you can use any of the IBM options to copy, rename, delete, display, or edit documents. You can also use any of the following custom options, that we provide, on the members. Enter this: To do this:CI Convert ImageCP Copy PagesDI Display Image (obsoleted)DN Display Notes (obsoleted)EI Edit ImageFM Fax MessageKF KeyesFile Information ManagerPI Print ImageRI Rename ImageSF Send FaxSI Status ImageX or SD Select Document
Activating the Custom User OptionsIn order to activate the KeyesFax custom user options for IBM's PDM, you can either copy them to your QGPL library or make a temporary change to the PDM defaults.
Permanent Activation:
1. Copy the user options from the KeyesFax library to the QGPL library as follows:
Enter: CPYF FROMFILE(KFLIB/QAUOOPT) TOFILE(QGPL/QAUOOPT) MBROPT(*ADD)
2. You may review and remove any duplicate or undesired options using F16 (User Options) while using PDM.
Temporary Activation:
1. Run the Work with Image Files command.Enter: WRKIMGF
2. Press F18 (Change Defaults).
3. On the Change Defaults screen, make sure that the following three parameters are set as follows:
Option file . . . . . . . . QAUOOPT Library . . . . . . . . . . KFLIBMember . . . . . . . . . . QAUOOPT
4. Press Enter.
32

1 Introduction
Where KeyesFax Documents are StoredThere are a number of different kinds of files that you may work with in this system.● Card files● Data Queues● Dictionary files● Distribution lists● Image files (PC fax files, CKX, FAX, PCL, PCX, & TIFF)● Fax & Receive Queues● Local Area Code file● Log & History files● Message files● Output queue for faxing spool files● Telephone number & substitution lists● Text documents (Spool files & Source files)
The document members that you create using KeyesFax are all placed in the KeyesFax library. Your documents will actually be members of the different files described below.
CKXFILE
You can use this image file to store any of your CKX images. CKX images are used as forms overlays to be merged with your faxes, and for our image editing programs. Images can be merged with your text or spool files using our ¬Merge fax command.
COVERFILE
This is a message file used to hold cover pages that are optionally added to the front of your faxes. They are used by the KFAXSPLF and the KSNDFAX programs.
FAILFILE
This is a source file that is used to log each failed fax transmission after all automatic retries have been exhausted. Although each user is notified of all failed transmissions, this file may be used as a history of failures. There will be a member for each user in the file and one for each broadcast fax that was sent. The broadcast fax members are named after the PBXFILE member that was used and can be used to resend the failures.
FAXCOM
This is an output queue that can be used to fax spool files. Any spool file that is placed in this output queue will be automatically converted and transmitted as a fax. You can supply the fax phone number in the document or in the User Data field of the spool file.
33

1 Introduction
The Forms Type field can be used to increase the text width or fax the file in landscape mode. The Accounting code is picked up from the spool file attributes. The Output Priority field will be used to set the Job Priority. The Save file after printing field will determine whether the spool file is removed after conversion or not, and the Front side overlay field can be used to merge a form with the spool file. More information may be found in the Chapter titled Fax.
FAXFILE
You can use this image file to store any of your FAX images. FAX images can be included with your text documents or spool files using our ¬Image fax command.
FAXNGT
This is an output queue that works exactly the same as the FAXCOM output queue, described above, except that spool files placed here will only be processed during night hours. You can set the desired night faxing hours using the FAXSETUP program.
FAXSCHED
This file is used by the system to keep track of any fax that is scheduled to be transmitted at a later time. More information is available in the Chapter titled Fax.
FAXQUEUE
Every fax that is initiated in the system is entered into this data base file so that it can be tracked or changed by the user that started it. All users can monitor their faxes using the WRKFAXQ command. See the Chapter titled Fax Queue for more information.
IMGFILE
This file can contain any image document that you wish to place in it. You can build additional image files, if you wish, to separate different kinds of images. For example, you can have different files to hold inbound faxes for each user. Or, you might have different files each with different security restrictions.
To build a new image file, you can copy or convert an image member into a new file name. We suggest that any new files that you create be named with FILE as the last four characters. We use these four characters to find your files.
KEYFILE
This is where your card file members are stored that are created with the KeyesFile Information Manager.
KFLAC
This is a file that will contain a list of all the area codes and prefixes that are in your local calling area. See Working with Local Area Codes in the Appendix for more information.
34

1 Introduction
LEXICON
This file contains a dictionary used for spell checking your messages or coversheets keyed using the Message Editor.
LEXSOUND
This file contains an alternate view of the dictionary words used for making spelling suggestions.
LEXUSER
This file contains the words that each user has added to the dictionary. There will be one member for each user in the file.
LOGFILE
This file contains the Fax History log of all activity on each fax line. It can be used to produce reports for job accounting. More information is available in the Chapter titled Fax.
NIGHTFILE
This file is used for faxing during night hours. Any FAX images placed in this file are automatically faxed during night hours that you set using the FAXSETUP program. The CSDSPLF command is typically used to convert spool files into FAX images for night faxing. It can be used to consolidate multiple FAX documents to the same recipient into a single call (Call Consolidation).
OUTFILE
This file is used each time you send a fax. The document that you send is first converted into a FAX image (if necessary) and placed in this file. The system uses this file to resend a failed fax without having to convert the document into a FAX image again. Entries are removed from this file whenever a user deletes the last fax that refers to it out of the Fax Queue. More information can be found in the Chapter titled Fax Queue.
PBXFILE
This is a source file that contains phone number and substitution lists that you can use with the Fax programs. Each list can contain one or more phone numbers that you wish to send a fax. You may also place substitution fields on the same lines with the phone numbers. Each substitution field must start with a negate (¬) symbol. You can add or change a list using IBM's SEU program. You do this by selecting option 2 while using IBM's PDM program.
PCLFILE
This file is intended to be used for uploading HP PCL image files. PCL files can be produced by any graphical based software on a PC.
35

1 Introduction
PCXFILE
This file is intended to be used for uploading PCX image files. PCX files are one of the most common types of image files used on a PC.
RCVFILE
This file contains each received FAX image. The fax operator will be notified each time a fax is received. To turn a received fax into a forms overlay, you can use the CI (Convert Image) user option to convert the FAX into a CKX image and place it in IMGFILE. You would do this after faxing in a form then running the WRKIMGF command to access this file. More information can be found in the Chapter titled Image.
RCVQUEUE
Every fax that is received in the system is entered into this data base file so that it can be viewed, copied, routed, printed, etc. by the intended users. See the Chapter titled Receive Queue for more information.
SENTFILE
This is a source file that is used to log each fax that was successfully transmitted. Although each user is notified of all transmissions, this file may be used as a history of transmission. There will be a member for each user in the file, one for each broadcast fax that was sent, and one for NIGHTFILE. The broadcast fax members are named after the PBXFILE member that was used.
SPLFILE
This is a source file that is used to hold spool file entries while they are being converted to FAX images. The KFAXSPLF command will allow you to use IBM's SEU to modify the text before faxing it.
TEMPFILE
This source file contains a temporary copy of OfficeVision and spool file documents as they are being converted into Fax images to be transmitted. If you find old members stuck in this file you may delete them.
TMPFILE
This file contains a temporary copy of PC images and *USERASCII spool files as they are being uploaded into the iSeries or being converted into Fax images to be transmitted. If you find old members stuck in this file you may delete them.
TIFFILE
This file is intended to be used for uploading TIFF image files. TIFF images are one of the most common types of images used in PC scanners and fax programs.
36

1 Introduction
TXTFILE
This is a source file that you can type fax messages in if you do not wish to use OfficeVision, the Message Editor or another word processor. Each fax consists of text and/or image members that you wish to add or merge together with the text. You can add or change the text members using IBM's SEU command (option 2 while using PDM).
You can create additional source files of any length from 80 to 228 bytes long (be sure to add 12 bytes to the length for the date and sequence number). The additional source files can be created using IBM's CRTSRCPF command or by copying a member from TXTFILE to a new file using our CPYPG command. We suggest that any new source files that you create be named with FILE as the last four characters. We use these four characters to find your files.
Backing up KeyesFax FilesYou may back up your KeyesFax files using IBM's SAVOBJ or SAVLIB commands, or use Backup KeyesFax Library on the KeyesFile Menu to back up the entire library. We recommend that the entire library be backed up on a regular basis to alternating tapes. Other items on the menu can be used to restore selected members from your backup.
Note: Before backing up the KeyesFax Library, you should end all the fax lines using the ENDFAXCOM command and end the HTTP server using ENDHTTPSRV command. You may restart the fax system using the STRFAXCOM command and STRHTTPSRV command.
37

1 Introduction
Running KeyesFax ProgramsMost of the KeyesFax programs can be run using any one of four different methods:● Selecting an item from one of the menus FCMENU or KFMENU.● Directly from any command line with commands.● Using custom user options while using PDM.● Calling the programs from your applications.
The specific method you choose to use is simply a matter of preference. You may mix the different methods at any time.
KeyesFax Command SummaryThe following commands can be used to run KeyesFax programs. A detailed listing of many of these commands can be found in the section titled Commands in this manual.
CPYFRMIFS (Copy PFM from IFS)
Copies a PC File from an IFS directory to a Physical file member.
CPYPG (Copy Pages)
Copies selected pages from one or more images and will optionally add those pages to an existing image of the same type. It can be used to either separate pages from a document or combine pages from different documents into one multi-page document.
CPYSPLPFM (Copy Spooled File to Physical File Member)
Copies a *USERASCII spooled file to a Physical file member.
CPYTOIFS (Copy PFM to IFS)
Copies a Physical file member to an IFS directory.
CRTFAXCOM (Create Fax Communication Objects)
This program creates all of the necessary objects in the KeyesFax library for each fax line. You must change your current library to the KeyesFax library before running this program.
CRTFAXSBS (Create Fax Subsystem)
This program creates the FAXCOM subsystem and all of the necessary objects in the KeyesFax library for fax communication. You must change your current library to the KeyesFax library before running this program. It also creates two objects outside of the KeyesFax library. These are a printer file and an output queue both called FAXCOM. These objects may be removed using our program called RMVFAXCOM (Remove Fax Communication Objects).
38

1 Introduction
CRTPBX (Create PBX member from a Text File)
Creates a PBX member out of a text file, converting it into the appropriate layout for PBXFILE. It is intended to be used in combination with one of your applications that can create a fax phone number list with substitution fields.
CRTPBXMBR (Create a PBX member from KeyesFile)
Creates a PBX member list from entries that you select out of a KeyesFile member. After opening a KeyesFile member you can select individual or groups of entries using F20 on the cards.
CSDSPLF (Consolidate Spool File to NIGHTFILE)
(Obsoleted) Converts and consolidates spool files to NIGHTFILE in preparation for night faxing. Multiple spool file pages generated at different times can be consolidated into a single member. This program gives you an alternative method to consolidate calls.
CVTIMG (Convert Image Type)
Converts any image or text document into a different image type. The following conversions are supported:
• CKX to FAX or PCX• FAX to CKX• PC Fax files to FAX• PCL to FAX• PCX to CKX or FAX• TIFF to CKX or FAX• Text to FAX• Text to Text (with a different record length)
KCVTSPLF (Convert Spool File)
Converts a spool file entry into a text document in preparation for faxing the spool file. This program was intended to be called by other programs to automate your system, but can be called manually if desired. The spool file will be converted into text up to 228 characters per line and placed in SPLFILE. You will then be able to edit the text using IBM's SEU, adding or merging images as desired, and use the Send Fax program to fax it. You can use F11 while Working with Output Queues to find the Spooled File Name, the Job Name, the Job Number, and the Spooled File Number needed for this command.
EDITIMG (Edit Image)
This command edits CKX images. It can cut any size rectangle out of an image, paste an image into another, flip an image over, or reverse the image colors.
ENDFAXCOM (End Fax Communication)
This command is used to stop fax communication on one or more lines. It holds the FAXCOMx job queues, ends the AUTORCVx programs and will try to vary OFF the Fax Communication line.
ENDHTTPSRV (End HTTP Server)
39

1 Introduction
Ends the HTTP Server jobs.
FAXAFPDS (Fax Spool File (*AFPDS))
Converts AFPDS spool files into a FAX image and will transmit them. This program is automatically run when you place an *AFPDS printer file into the FAXCOM output queue.
FAXASCII (Fax Spool File (*USERASCII))
Converts PCL or ASCII spool files in *USERASCII format into a FAX image and will transmit them. This program is automatically run when you place a *USERASCII printer file into the FAXCOM output queue.
FAXEBCPCL (Fax Spool File with EBCDIC PCL Data)
Translates, converts, and faxes spool files that are actually PCL written in EBCDIC code. Standard EBCDIC printer data is pulled out of the spool file and translated into ASCII PCL. The EBCDIC negate character (¬) is translated into the ASCII ESC character which is needed for PCL escape sequences. This allows regular iSeries applications to easily fax the full graphical printing of PCL data.
FAXLOG (Print Fax History Log)
Prints a Fax History Log by user, by date, or by account code.
FAXLOGP (Purge Fax History Log)
Purges old entries from the Fax History Log.
FAXMSG (Fax a Message Member)
Starts the Message Editor program to prepare and fax a quick message or a coversheet with attachments.
FAXSETUP (Fax Communication Setup)
Changes the fax communication parameters used in sending and receiving fax documents. These changes can be made at any time and will have an immediate affect on further fax communication.
FAXSPLNE (Fax Spool File with ¬E Esc Sequence)
Translates, converts, and faxes spool files that are actually PCL written in EBCDIC code. Standard EBCDIC printer data is pulled out of the spool file and translated into ASCII PCL. The EBCDIC negate E sequence (¬E) is translated into the ASCII ESC character which is needed for PCL escape sequences. This allows regular iSeries applications to easily fax the full graphical printing of PCL data.
FCJOBQ (FAXCOM Job Queue)
This can be used to hold or release any of the FAXCOM job queues.
FCSBS (FAXCOM Subsystem)
40

1 Introduction
This can be used to start or end the FAXCOM subsystem. You should ensure that fax communication has ended before running this program.
KF (KeyesFile)
Starts the KeyesFile Information Manager, where you will be able to maintain card files, display image and text files, and send faxes, as desired.
KEXPFAX (Export Fax)
Converts a Fax into either a PDF document or a TIFF image and will export the result to the IFS.
KFAXSPLF (Fax Spool File)
Converts a spool file into text, adds an optional cover page, and allows you to edit the text. It then converts the resulting text into a FAX image and will transmit it. This program was intended to be called by application programs, but can be manually run if desired. Alternatively, you can simply move a spool file into the output queue FAXCOM and the spool file will be automatically converted and faxed.
KFAXSPLFS (Fax Spool Files)
This command is used to fax multiple spooled files consolidated together to a single recipient with an optional cover page. The command is called multiple times, once for each spooled file that is to be included. You can run this program from a command line, but it is intended to be called from an application program as it generates spooled files to be faxed.
KFEXPORT (KeyesFile Export)
Exports data from a KeyesFile member. The data that is exported can then be sorted, printed, or processed by your applications.
KFIMPORT (KeyesFile Import)
Imports data into a KeyesFile member. This can be used to do an initial load of one of your existing data base files into a new KeyesFile member.
KFLICENSE (KeyesFax License)
Enters or changes the license number needed to use the KeyesFax system. Be sure to change your current library to the KeyesFax library before running this program.
KFSAVLIB (KeyesFax Save Library)
Backs up the KeyesFax library onto diskette or tape. We recommend that you regularly backup the library onto alternating tapes.
KFSPOOL (KeyesFax Spooled File Setup)
Runs a program to allow you to define how you want your spooled files faxed from the FAXCOM output queue.
KFUPDATE (KeyesFax Update)
41

1 Introduction
Updates the KeyesFax library to a new release. It copies all of the programs in an Update library (KFUPD) to your existing KeyesFax library (KFLIB).
KFVERSION (KeyesFax Version)
This command will tell you what version number you are running.
KSNDFAX (Send Fax)
Converts any image or text document into a FAX image, if necessary, and transmits it to a fax machine. The converted image is placed in OUTFILE for transmission. If an image with the same name already exists in OUTFILE, you will have the choice of resending the old image or deleting it and creating a new FAX image to be sent. The Send Fax program can be called manually, from the KeyesFile Information Manager, or a programmer can add a call to the program from any of your applications. You may also use the SF user option while Working with Image Files.
KWRKFAXL (Work with Fax Lines)
Allows you to control and track all fax communication activities. The current status of each fax line is displayed, with options and function keys available for you to control the system.
KWRKFAXQ (Work with Fax Queue)
Allows you to control and track all faxes that you have initiated on the system. You may also control faxes for other users that you have been authorized to access. Security administrators have access to all faxes.
KWRKOUTQF (Work with Output Queue plus Fax)
Allows you to control the entries in an Output Queue. This program works like the IBM command WRKOUTQ but includes the ability to fax a spool file with an optional coversheet.
KWRKRCVQ (Work with Receive Queue)
Allows you to control and track all received faxes that have been routed to your Receive Queue. You may also control faxes for other users that you have been authorized to access.
KWRKSPLFF (Work with Spooled Files plus Fax)
Allows you to control the the Spooled Files for a User. This program works like the IBM command WRKSPLF but includes the ability to fax a spool file with an optional coversheet.
PRTIMG (Print Image)
Prints a FAX image to any HP compatible laser printer available to the iSeries. It can be run manually, called from any of your applications, or you may run this program using the PI user option while Working with Image Files. It is automatically run for each inbound fax, if you name a printer in the Route to Printer Device parameter in the FAXSETUP program.
42

1 Introduction
PURGEFAXQ (Purge Fax Queue)
Purges the Fax Queue through a specified period ending date. You may specify which user and what type of faxes to be purged.
PURGELOGS (Purge Fax Logs)
Purges the Logs (SENTFILE and FAILFILE) from the KeyesFax system. You may specify how many records to leave in the files.
PURGERCVQ (Purge Receive Queue)
Purges the Receive Queue through a specified period ending date. You may specify which user, status, and file to be purged.
RMVFAXCOM (Remove Fax Communication Objects)
Removes the objects that the KeyesFax system has created outside of the KeyesFax library. This is to be run only if you are attempting to remove all traces of the software from your system after it has been installed.
RMVMBD (Remove Members by Date)
Deletes any member from a file that had not been used since a date designated by the operator.
RNMIMG (Rename Image)
Renames any image or text document member.
RSTDOC (Restore a Saved Document)
Restores a saved document from diskette or tape.
SLTDOC (Select Document)
Selects a phone list or a document member for some of the other KeyesFax programs. It is normally called using the X or SD user options while in IBM's PDM. If you use the *SEARCH parameter to find a document member in another program, that program will automatically run the WRKIMGF (Work with Image Files) command which uses IBM's PDM to help you locate a document member. When you find the document member desired you can simply place an X in the option column to select it. You then press F12 and the program that you had originally started will continue, using the selected document.
STRFAXCOM (Start Fax Communication)
This command is used to start fax communication on one or more fax lines. It starts the FAXCOM subsystem, several job queues, varies on the Fax Communication line(s), and starts the AUTORCVx programs running on the FAXCOMx job queues.
The AUTORCVx programs must continue to run even if you do not intend to receive any faxes. These programs are used to monitor the telephone lines and schedule outgoing faxes. They check for members that have been placed in the
43
1 Introduction
FAXCOM output queue, in DOCFILE, and in NIGHTFILE that are ready to fax. They also check a Data Queue called FAXCOMPC to see if any PC documents are ready to fax. If you do not wish to receive any faxes, change the Number rings before answering parameter to 0 using the FAXSETUP command.
STRHTTPSRV (Start KeyesFax HTTP Server)
This command is used to start the KeyesFax HTTP Server program. The HTTP Server is accessed from an Internet Browser to control the Fax Queue, Receive Queue, view Fax images, and create new faxes from your PC.
STSIMG (Status of an Image)
Displays the status of an image or text document. It will report the image type, the number of pages, the resolution, and how much disk space an image uses. It is typically called using the SI user option while Working with Image Files.
UPDRCVQ (Update Receive Queue)
Adds all image members found in an image file to the Receive Queue for the specified user. This is intended to be used when the system is initially installed to preload Faxes that already exist.
VRYFAX (Vary Fax)
Varies the FAXCOM communication lines, controllers, and devices ON or OFF. When a communication failure occurs, sometimes it may be necessary to vary OFF the line and vary it back ON again before communication can continue. Our system will do this automatically during its normal recovery process. You may have to run ENDFAXCOM, wait 15-20 seconds, Vary OFF the line, then run STRFAXCOM to correct an unusual problem.
WRKFAXS (Work with Fax Security)
Allows you to temporarily authorize other users to access and control your inbound or outbound faxes.
WRKFCJOBQ (Work with FAXCOM Job Queues)
Allows you to work with the job queues that are used by the Fax Communications system. You can use this to end jobs that you do not want to run.
WRKIMGF (Work with Image Files)
Uses IBM's PDM to work with image and text documents. While using this program you will be able to perform any of the IBM options, plus any of the KeyesFax commands to display, edit, copy, fax, print, etc. the document members. Many of the KeyesFax commands have simple user options that can be used on the document members instead of having to type the commands out. See KeyesFax Custom User Options in this chapter for more information.
WRKLACS (Work with Local Area Codes)
Allows you to maintain a list of all telephone area codes and prefixes that are within your local calling area.
44

2 Tutorial
2 2 TutorialTutorial
This chapter contains some exercises that can be used to familiarize yourself with the KeyesFax system. Each exercise is short and easy to complete in just a few minutes. Be sure that the system has been completely installed before starting the exercises.
We recommend that you spend a little time going through the tutorial. This will be the easiest and fastest method of finding out what the system can do. After that, you can refer to the other chapters for detailed instructions on how everything works.
A sample KeyesFile member, sample text files, and sample images are included with the system for these exercises.
✔ Note: Detailed instructions are given to you with a check-mark so that you will not miss any steps. Explanations for what you see or what the program is doing may either precede or follow each instruction.
Starting Fax CommunicationBefore you can actually send a fax, the Fax system must be started. This can be done using STRFAXCOM (Start Fax Communication) or using KWRKFAXL (Work with Fax Lines) from the menu FCMENU. Either of these programs will start the FAXCOM subsystem, release the FAXCOMx job queues, and vary ON the fax lines among other things. If you try to send a fax before fax communication has been started, your document will simply wait until the system is started.
✔ Display the Fax Communication menu, using GO FCMENU.
✔ Choose item 1 on the menu (Work with Fax Lines).
✔ Select option 1 (Start) for fax line 1 and press the Enter key.
If the system has been installed correctly, the modem's TR LED (Terminal Ready) will light up and in about 15 - 30 seconds the Status for line 1 will change from Str to Rdy. If it does not, please refer to the trouble shooting section in the Appendix.
✔ Press the Enter key periodically to allow the Work with Fax Lines screen to display the current status.
This program allows you to control and track all fax activities on the system. The options listed at the top of the screen make changes to individual fax lines. The function keys listed on the bottom will allow you to display or work with all of the different queues and files that the fax system uses.
✔ When the status changes to Rdy you are finished. Press F3 (Exit) to leave the Work with Fax Lines program.
45

2 Tutorial
Faxing a Spool FileThere are several different methods of faxing spooled files. The method you choose will depend on how and when you fax them. For example, if you have an application that will be faxing spooled files, it will either route the spooled files to the FAXCOM output queue or it will call the KFAXSPLF command to fax it. This exercise will show you what happens when you move a spooled file entry into the FAXCOM output queue.
This exercise assumes that the fax communication system has been started. If you try to send a fax before it has been started, the spooled file will simply wait on the output queue until someone properly starts the system.
✔ The first step is to create a simple 1 or 2 page spooled file in one of your output queues that you want to try faxing. If you have no other method, just press the print key to create an entry. Be sure that the output queue that it goes into is stopped or held so that it does not automatically print before you get a chance to work with it.
✔ Display the selected entry in your output queue. You may use IBM's WRKOUTQ (queue-name) command to display the spooled file that you wish to fax.
✔ Type a 2 (Change) in the option column of the desired spool file entry, and press Enter.
✔ Type FAXCOM for the Printer parameter.
✔ If your spool file entry is wider than 80 columns, you may want to print it in landscape mode. You can do this by typing LANDSCAPE in the Form type parameter. Otherwise, if this is print key output, type WIDTH 80 in the Form type to tell the system how wide the printed text is.
✔ Press F10 (Additional parameters).
✔ Press Page Down or Roll Up to get to the additional parameters.
✔ Type your fax machine's phone number (not your iSeries' phone number) in the User data parameter.
✔ Press Enter to make these changes and that is all there is to it.
End of the Spool File ExerciseAny spool file entry that is sent to the FAXCOM output queue will be automatically converted to a FAX image and faxed to the phone number that you can supply in the User Data field.
It may take the system 30 to 60 seconds to recognize that you have placed an entry in the output queue, then it will start converting and faxing the document. You can track the progress of the spooled file using item 3 (Work with Fax Queue) from FCMENU.
46

2 Tutorial
Faxing a Spool File with a CoversheetA text editor that can be used to fax quick messages with attachments or to add coversheets to your faxes is included with your system. This exercise will have you fax a spool file with a coversheet using the Message Editor.
✔ As before, prepare a sample spooled file to be faxed, or simply press the print key to create a spooled file entry. Be sure that the output queue that it goes into is stopped or held.
✔ Display the Fax Communication menu (FCMENU), using GO FCMENU.
✔ Choose item 6 on the menu (Fax a Spooled File).
✔ If you created the spooled file, you may simply press the Enter key. Otherwise, key the proper parameters and press the Enter key to find the sample spooled file.
This will start the KWRKOUTQF (Work with Output Queue plus Fax) program. This works very similarly to the IBM WRKOUTQ program except that option 1 allows you to fax one or more of the spooled file.
✔ Type a 1 (Fax) in the option column of the selected spooled file, and press Enter. This starts up the KFAXSPLF (Fax Spool File) program.
✔ Type *FAX in the Phone number parameter, and xxxSAMPLE with xxx as your initials for the Cover page member name parameter. You can change any of the other parameters if you like, then press Enter.
The Message Editor will start and it should notice that xxxSAMPLE does not already exist. At the bottom of the screen it will display the message:
Member does not exist! Press Enter to create a new member, or F12 to Cancel.
✔ Press Enter to instruct the program to create the new member.
Whenever you create a new message member, you are given a chance to copy another member into the new one to help you prepare the message faster.
✔ Type a description of Sample fax message, and type SAMPLE in the Copy from member parameter, leaving the other parameters with their default values, then press Enter.
Message member name . . . . xxxSAMPLE File . . . . . . . . . . . . . . . . . . COVERFILEDescription of new member . Sample fax messageCopy from member . . . . . . . SAMPLE File . . . . . . . . . . . . . . . . . . COVERFILE
The program will make a copy of SAMPLE in your new message member xxxSAMPLE in COVERFILE then return you to the Message Editor screen.
47

2 Tutorial
The Message Editor ScreenBy copying other documents into your new messages, you will not have to retype the transmitters information and any common messages. In this demonstration, all you will have to supply is the recipient information, most importantly the recipient's fax number.
✔ Move the cursor down to the fax number field (the third line of the To: box) and key your fax machine's number in the field, to send yourself a fax.
This message is actually longer than what you see on the first screen. You can use the Page keys to roll down to the second screen to see the rest of the message.
✔ To fax this coversheet along with the spooled file, press F2 (Fax Message).
The system will prepare the spooled file and the coversheet and submit it to an image conversion job queue. Within a minute or two it should start the fax transmission, if the system is running properly.
✔ Press F3 (Exit) to end the Work with Output Queue (Plus Fax) program.
Tracking your FaxesEvery time you send a fax, the system will notify you of its progress by sending you messages.
All your faxes are also logged into your Fax Queue. You may watch the activities on the queue using the Work with Fax Queue program. You do this by entering KWRKFAXQ or using item 3 on the Fax Com menu (FCMENU). From this program you can watch a fax's progress, change some of the fax parameters, hold a fax, or restart one.
48
Msg file: CVRFILE Member: xxxSAMPLE Cover Header: SAMPLEFAX/FAXHDR Footer: . -- To: ---------------------------------. . -- From: ----------------------------------. | Recipient's Name | Name | Your Name | | Recipient's Company | Comp | Your Company | | Recipient's Fax # | Fax# | Your Fax Number | | | Ph# | Your Phone Number | | | Mail | Your E-mail Address | ------------------------------------------ -----------------------------------------------
Date: 02/10/02 Pages: 2Message:
This is just a test fax. The following page is a spool file that I amfaxing to see how the KeyesFax¬STM¬S Message Editor works.
I can have our company logo appear at the top of the page and a footer atthe bottom. I can attach other documents to this fax by simply fillingout the names of each document desired in the Attachments field.
The message editor can be used to send quick messages, or to create fax Attachments: OvrTyp More . .1 2 34 5 6F2=Fax Msg F3=Exit F4=Adjust F6=Insert/OvrTyp F24=More Keys

2 Tutorial
Using the HTTP ServerIf you have a PC connected to a TCP/IP network and you have purchased the optional PC Fax Tools package, you can access your Fax & Receive Queues from a browser. You will be able to control & view the sample faxes that you sent in the previous exercises. If you do not have a PC, or it is not using TCP/IP to connect to the iSeries, you will have to skip over this exercise. If you have already deleted the faxes from your Fax Queue, you will have to go back and send another fax if you want to view it.
Before you can use the HTTP Server, it has to be running. It can be started as follows:
Starting the HTTP Server✔ Display the Fax Communication menu, using GO FCMENU.
✔ Choose item 1 on the menu (Work with Fax Lines).
✔ Press F9 to start the HTTP Server.
If the system has been installed correctly, the HTTP Server status should change to Rdy, in just a few seconds. You can see the status at the top of the screen.
Connecting to the HTTP Server✔ Start your PC browser and fill out the address field, as follows:
http://your-iSeries:18620/your-iSeries is the name or IP address of your iSeries. You may use the internal address from inside your network, or the external address from outside your network.
✔ This will ask you to Sign On, using your normal iSeries User-Id and Password.
Your Fax Queue will be shown to you.
49

2 Tutorial
✔ Use the “Add to Favorites” function of the browser (the first time), to save the address for easier connection in the future.
Controlling your Fax documentsThe HTTP Server gives you complete control over your Fax documents. To do this, you check one or more of the boxes to the left of the desired documents, then click one of the command buttons at the top (or bottom) of the screen. This will allow you to Delete, E-mail, Export, Hold, Print, Restart, or Save any of the Fax documents.
The View Inbound button is used to show you the inbound Fax documents in your Receive Queue. The New button is used to create a new Fax. You can attach documents created from any application on your PC, when creating a new Fax.
Working with a specific Fax✔ Click on the name of the document that you would like to Open.
From this screen you can change any of the Fax attributes, view the Fax image or view the original spooled file that created the Fax. The Cancel button leaves this screen without making any changes to the attributes, or you can use the browser's Back button to go back to the previous screen.
Selecting your default Fax ViewerThe following steps only have to be run once, for each PC. It is used to set the default viewer that will be used to display Fax images.
Your PC probably contains multiple programs that can view the Fax images. You will need to select one, the first time you view one of the images.
✔ Click the View Image button.
50

2 Tutorial
The Fax image will be sent to your PC as a file with a CK-TIF filename extension. This will not be a known File Type. Windows will ask you if you would like to Save the file.
✔ Click the Save button, on the File Download screen.
✔ Click the Save button, on the Save As screen.
✔ Click the Open button, on the Download complete screen.
Windows will tell you that it cannot open the file, because of the unknown filename extension.
✔ Check the Select the program from a list radio button then click the OK button.
The Open With screen will show you multiple programs that you can select from. We recommend that you select the “Windows Picture and Fax Viewer” program, but you are welcome to try others.
✔ Select the desired program, type “Computer Keyes – TIFF” in the description field, remove the “Always use the selected program to open this type of file” option (if you want to try other programs), and press the OK button.
You will be able to repeat the previous steps. When you find the viewer program that you like, select the “Always use the selected program to open this type of file” option.
✔ View another or the same Fax image. This time, on the File Download screen, uncheck the “Always ask before opening this type of file” option. This will tell your system to open the CK-TIF images with your selected viewer, without asking you to Save them first.
Using the KeyesFax ImageMaker Print DriverThese instructions assume that you have installed the “KeyesFax ImageMaker Print Driver” on your PC. If not, you will need to go to the PC Tools section and follow the instructions to do this.
✔ Open up any application on your PC that you would like to create a Fax from.
✔ Select the “KeyesFax ImageMaker Print Driver” for this document. This is typically done using the File/Printer setup... menu item.
✔ Print the document to the “KeyesFax ImageMaker Print Driver” which will print a .TIF file to your default directory.
It does not matter where the file is located. However, we recommend that the first time you use the print function, that you change the "Output File" location to your "My Documents" directory. This is the default browse directory that your HTTP server will be using.
Faxing the PC documentFrom your Fax Queue, using the HTTP Server, you can create new Fax documents and attach any file that you print with KeyesFax ImageMaker. From the browser session, press the New command button at the top of the Fax Queue screen.
The Send a fax screen will be shown to you.
51
2 Tutorial
A coversheet will be automatically created for you, named after your User-id. You can switch to a different coversheet by pressing the button to the right of Coversheet: and typing in a different file or member name. Type any information that you want, for your coversheet, or you can choose to not send a coversheet by clearing the Coversheet checkbox at the top of the screen. The last coversheet saved under each name is always given back to you, for each new Fax.
✔ You can add your PC document to this Fax by pressing the PC button to the right of Attachments:
✔ Press the Browse button on the Attach PC file screen and select the PRN file that you printed earlier.
✔ Press the OK button on the Attach PC file screen. The PC file will be uploaded to the iSeries, converted to a Fax image, and attached to your Fax.
✔ You can browse for the To Name, To Company, and To Fax # fields by pressing the Phonebook button to the right of To Fax #:
✔ Press the Send button to send the Fax.
52
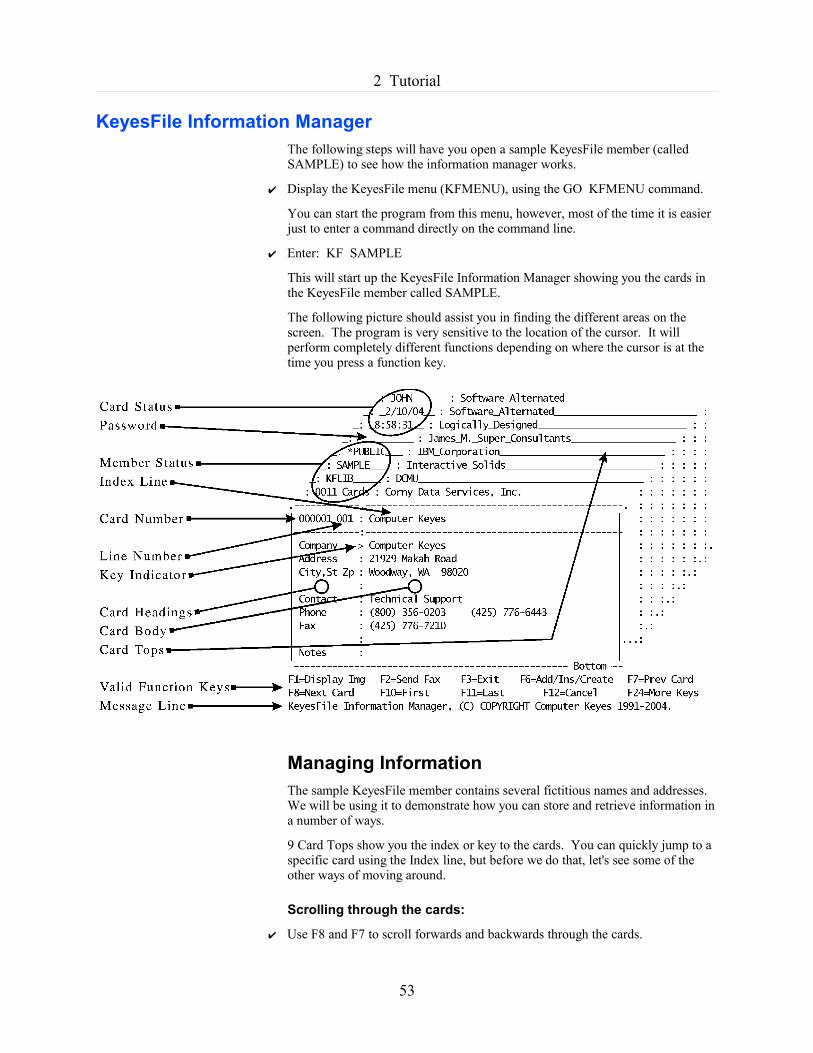
2 Tutorial
KeyesFile Information ManagerThe following steps will have you open a sample KeyesFile member (called SAMPLE) to see how the information manager works.
✔ Display the KeyesFile menu (KFMENU), using the GO KFMENU command.
You can start the program from this menu, however, most of the time it is easier just to enter a command directly on the command line.
✔ Enter: KF SAMPLE
This will start up the KeyesFile Information Manager showing you the cards in the KeyesFile member called SAMPLE.
The following picture should assist you in finding the different areas on the screen. The program is very sensitive to the location of the cursor. It will perform completely different functions depending on where the cursor is at the time you press a function key.
Managing InformationThe sample KeyesFile member contains several fictitious names and addresses. We will be using it to demonstrate how you can store and retrieve information in a number of ways.
9 Card Tops show you the index or key to the cards. You can quickly jump to a specific card using the Index line, but before we do that, let's see some of the other ways of moving around.
Scrolling through the cards:
✔ Use F8 and F7 to scroll forwards and backwards through the cards.
53
2 Tutorial
This is one of the ways of moving around, and is normally used when the card that you seek is only a few cards away, or you want to look at each card in a group. For a faster scroll you can use the Page or Roll keys.
✔ Be sure that the cursor is on the Index line, then use Page Up (or Roll Down) to scroll 8 cards at a time through the file.
There were only 11 cards in this file when we first gave it to you. As you scroll through the file, notice that the program shows you where the bottom of the file is, then starts the list over at the beginning of the file again.
Displaying a particular card:
If you see the top of a card that you want to display, here is another method you can use to get to it.
✔ Move the cursor to one of the Card Tops. Be sure that you have moved the cursor over to the right of the Card and Member Status areas.
✔ Press the Enter key.
The card top that you were on instantly moves to the front.
Jumping to a specific card:
The computer can find a card for you if you give it one or more characters of the key to search for.
✔ Move the cursor to the first character of the Index line.
✔ Type a capital S followed by the Field Exit key.
The computer will move the first card with a Company Name that starts with the letter S to the front.
Jumping to the first card:
Before we go on to the next step, lets jump to the first card in the file again.
✔ Be sure that the cursor is either on one of the Card Tops or on the Index line of the top card.
✔ Press F10 to jump to the first card.
You now should be on the Computer Keyes card. If not, use F8 or any other method to position yourself there.
54

2 Tutorial
Changing the IndexYou have been able to move around in the cards freely looking for different companies. But, what if you were looking for a person instead of a company. KeyesFile allows you to easily switch the key to any of the 999 card lines.
✔ Move the cursor to the Key Indicator column on the Contact line. The cursor should be on the colon in front of the words Technical Support.
✔ Press the Enter key.
The Card Top area is now split, showing you both the newly selected key and the primary key to the cards. The cards are instantly shown to you in a new order based on the newly selected key.
Searching by the new key:
Searching for cards using a different key is no different than for the primary key except that not all of the cards will necessarily be shown to you. Any card that does not have anything keyed for the selected key is not shown.
For example, there is a card in the file for IBM Corporation. Notice however, that if you scroll through the file, the IBM card is not shown to you. That is because the IBM card does not have anything keyed in the Contact column.
✔ Move the cursor to the first character of the Index line, type a capital Y, then press the Field Exit key.
This time the computer moves the first card with a Contact name that starts with the letter Y to the front. We are looking for a card with Your Name and Your Company Name on it.
55

2 Tutorial
Editing a CardWe are going to duplicate the Your Name card, so that you can change it. This will allow everyone to use the tutorial without things getting confusing.
✔ Put the cursor on the Index line of the Your Company Name card.
✔ Press F22 to duplicate the card.
Notice that the message, at the bottom of the screen, tells you that you are looking at the original (not the copy) of the card. The copy should be just behind the original in the file. The original had card number 11. The copy will have a higher card number.
✔ Press F8 to move to the copied card.
Making the copy your own:
The card that you just duplicated is for you, and you alone. You get to make any changes to this card that you want.
✔ Move the cursor down to the Company Name line (not the Index line).
✔ Key in your own company name over the top of Your Company Name.
✔ You may move the cursor down to the next line, using the Field Exit key.
✔ Fill in the address, your name, and phone numbers as each line is labeled.
✔ Press the Enter key to update the card and the Index line.
Undoing Changes
Before you press the Enter key, a function key, or a Roll key, any changes to a card are not permanently recorded. You will be able to undo those changes using the Home key (Alt+Home on some terminals). Lets make a change to your card and get the original back to see how it works.
✔ Use the down arrow key to move the cursor down to lets say the Address line.
✔ Type some garbage over the top of the good address line, but do not press the Enter key.
Remember, as long as you do not press the Enter key, a function key, or a Roll key, you can undo the changes that you make to the card.
✔ Press the Home key twice to undo the changes.
On some terminals, you must hold down the Alt key to activate the Home key. You will be able to tell when this is necessary, when the word Home is written on the front of the key in green.
Scrolling to additional card lines:
There are up to 999 lines of data for each card, but we have only seen 9 lines of the cards so far. Let's move down to the other lines in the cards.
56

2 Tutorial
✔ Move the cursor down to any line on the front card, not the Index line.
✔ Press the Page Down or Roll Up key to scroll down to the next 8 card lines.
You should see the Card Heading column change to Notes at the top of the column, and the number 009 appear in the Line Number field. If not, you may have pressed the Roll Down instead of the Roll Up key. You should see the following screen.
We have successfully explored the KeyesFile Information Manager to the point where you should be able to get around in any card file. For additional information please refer to the Information Manager chapter. It will show you how to make subsetted lists, use the search function, add or delete lines, update card headings, use the printing features, etc.
If you wish to end the tutorial now, just press the F3 (Exit) key. But if you stick around a little longer, the following exercises will show you how to use the Fax and Image features of the information manager.
57

2 Tutorial
Faxing from the Information ManagerFax messages can be sent directly from the KeyesFile Information Manager just as they can from one of your own applications (if your programmer adds a call statement to the program). The information manager is an ideal place to send a fax from, because it gives you an easy method of keeping track of all your fax messages, the people you send them to, and their phone numbers.
In this exercise we use IBM's PDM and SEU programs to copy, browse, and edit text files to be faxed. The information manager can do the same tasks with OfficeVision documents or with the Message Editor, but this exercise will show you how to send faxes using a third method. If you are not interested in learning how to send faxes using IBM's PDM and SEU programs, you may want to skip this exercise.
We will start from where you left off from the previous exercise, on your card. If you need to get back to your card, you may do so as follows:
✔ To start the program, enter KF SAMPLE.
✔ Change the key to the Contact name, by moving the cursor to the Key Indicator column at the Contact line and pressing the Enter key.
✔ Find your card, by typing the first few characters of your name on the Index line and pressing the Field Exit key.
✔ Scroll down to the Notes lines, by moving the cursor to the Card Body and pressing Page Down or Roll Up.
Your screen should look similar to the previous picture, listing sample text and sample image documents.
Keeping Track of your Fax MessagesYou can type document names, dates, and explanations on the cards. This gives you an easy method of keeping track of your correspondence. Document names are placed anywhere on a card line in the following format:
file/member-nameor
folder/document-name
Viewing a previously sent fax message:
You can view any text, message, or image document that is named on the cards using the F1 key (Display Image).
✔ Move the cursor to the SampleTxt/Fax0001 line. The cursor can be anywhere on the file or member name.
✔ Press the F1 key to display the document.
After a few seconds the program should place you in IBM's SEU program in Browse mode.
✔ Use the Roll keys to read the text document.
58

2 Tutorial
Like most documents that you will create, this one has several command lines in it. The command lines start with the negate symbol (¬) and direct the fax program to do various things. The text document that you are looking at produced the fax shown to you below.
✔ When you are finished looking at it, press F12 (Cancel).
59

2 Tutorial
Sending a Fax using the Message EditorYou can send any text, message, or image document as a fax using the F2 key (Send Fax). You can also select a fax phone number, or create a new fax using the same key.
Selecting a fax phone number:
Before you go off to create a new fax, normally you would want to select the phone number of the destination fax machine. Make sure that your fax machine's number is on your card.
Whenever you fax a message, the system will automatically pick up the phone number that it finds in any line that has the title Fax.
If there is more than one fax number to choose from you can select one manually by moving the cursor to the first few digits of the desired number and pressing F2. If you have only one fax number on the card, this will not be necessary.
Creating a new fax message:
If you know what you want to call the next fax that you will be creating, you simply key the file and new member name anywhere on a card line. We will be faxing a message from MSGFILE so:
✔ Move the cursor to an empty line on your card and type MsgFile/xxxSample where xxx is your initials.
✔ Put the cursor anywhere on the file or member name and Press F2 (Send Fax).
The Message Editor will start and it should notice that xxxSAMPLE does not already exist in MSGFILE. At the bottom of the screen it will display the message:
Member does not exist! Press Enter to create a new member, or F12 to Cancel.
✔ Press Enter to instruct the program to create the new member.
Whenever you create a new message member, you are given a chance to copy another member into the new one to help you prepare the message faster.
Notice that the company name field from your card was already copied to the description parameter for you. Type SAMPLE in the Copy from member parameter, leaving the other parameters with their default values, then press Enter.
Message member name . . . . xxxSAMPLE File . . . . . . . . . . . . . . . . . . MSGFILEDescription of new member . Company nameCopy from member . . . . . . . SAMPLE File . . . . . . . . . . . . . . . . . . MSGFILE
The program will make a copy of SAMPLE in your new message member xxxSAMPLE in MSGFILE then return you to the Message Editor screen.
60

2 Tutorial
Editing the message:
Notice that the company name, the contact, and the fax number fields from your card are automatically copied to this new message member for you. Also a standard message that you define is copied from the member that you specify (from SAMPLE in this case), so that you will not have to retype the transmitters information and any common messages.
You may change any part of the message at this time, if desired. Here are a few pointers on how this is done.
• Use the Page keys to roll down and view the entire message.• Type over text to change it.• Use the Delete key to remove unwanted text.• Use F6 to toggle between insert and overtype modes.• Use F4 to adjust lines of a paragraph after inserting or deleting text.• Use F13 to remove unwanted lines from the message, moving the
following lines up.• Use F17 to search a Phonebook for a new recipient.
Note: If you started the Message Editor from the KeyesFile Information Manager you cannot use the Phonebook feature, as this would cause the program to call itself recursively.
• Use F22 to copy lines of text.• Use F23 to start the Spell Checker.
✔ To fax the message, press F2 (Fax Message). Press Enter to confirm that you want it faxed.
The system will prepare the fax and submit it to an image conversion job queue. In a minute or two, it should fax the message.
✔ Press F3 (Exit) to end the Message Editor. You will be returned to the KeyesFile Information Manager right where you left off.
End of Faxing ExerciseYou have used the KeyesFile Information Manager to display, edit, and send a fax message. For additional information please refer to the Message Editor chapter. It will show you how to set up your own company logo as a fax header, how to attach other images to your messages, and how to include text commands or attributes in your messages.
If you wish to end the tutorial now, just press the F3 (Exit) key. However, if you have a graphics capable PC, the following exercise will show you how to use the Image features of the information manager.
61

2 Tutorial
Message Editor Advanced FeaturesThis exercise will show you some of the advanced features of the Message Editor, such as how to use a Phonebook, copy lines of text, insert text, and how to spell check your messages.
✔ Display the Fax Communication menu, using GO FCMENU.
You can start the Message Editor program by typing in the FAXMSG command or from this menu.
✔ Choose item 9 on the menu (Fax a Message).
✔ Type xxxSAMPLE, with xxx as your initials, in the Message member name parameter then press Enter.
Message member name . . . . xxxSAMPLE File . . . . . . . . . . . . . . . . . . MSGFILE
This member should already exist from a previous exercise. If not, go ahead and create a new member and copy from a member called SAMPLE when the system asks.
Using the PhonebookWe are going to make a new message to a new recipient in this exercise. The first step will be to get new information in the recipient box.
✔ Press F17 (Phonebook) to start up the Phonebook feature.
The KeyesFile Information Manager program will start up showing you one of your card files. The FAXSETUP program can be used to set the default Phonebook member name. If your default Phonebook has been left blank, the system will show you the member called SAMPLE. Also, you can change to any KeyesFile member that you desire by moving the cursor to the member name, activating it, and changing it to a different member. But for this exercise, it does not matter which member you are in.
✔ Select any one of the cards that you want to using the Roll keys, F7 or F8, or you can search for an entry in any of the normal methods.
✔ When you have chosen a recipient make sure that the card has a company name, a contact, and a fax number. If not add this information to the card.
✔ Move the cursor into the card body (not on the Index line) and press F20 (Select) to select the information in that card.
✔ Press F3 (Exit) and you will be returned to the Message Editor screen. The information that you selected should be pasted into the recipient box.
You can go back, using the F17 (Phonebook) key, at any time to change the selected recipient information for a message member.
Creating a new MessageBecause this is going to be new, you will want to clear the existing message from the screen.
62
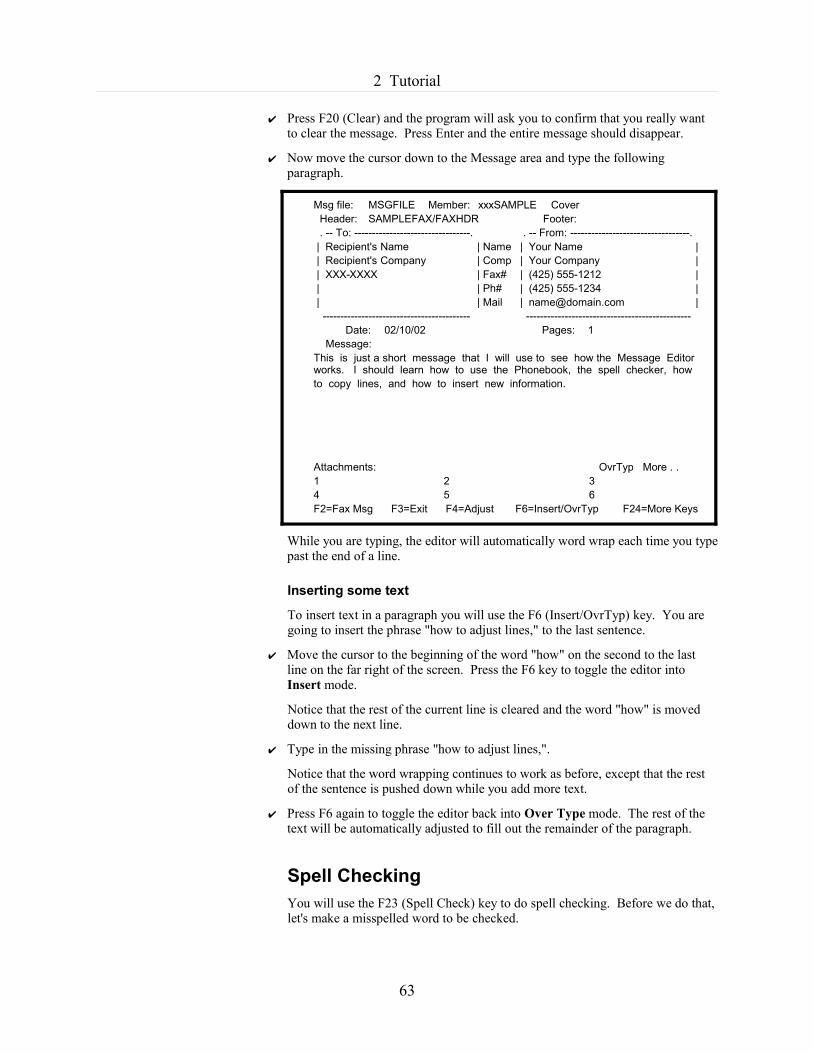
2 Tutorial
✔ Press F20 (Clear) and the program will ask you to confirm that you really want to clear the message. Press Enter and the entire message should disappear.
✔ Now move the cursor down to the Message area and type the following paragraph.
While you are typing, the editor will automatically word wrap each time you type past the end of a line.
Inserting some text
To insert text in a paragraph you will use the F6 (Insert/OvrTyp) key. You are going to insert the phrase "how to adjust lines," to the last sentence.
✔ Move the cursor to the beginning of the word "how" on the second to the last line on the far right of the screen. Press the F6 key to toggle the editor into Insert mode.
Notice that the rest of the current line is cleared and the word "how" is moved down to the next line.
✔ Type in the missing phrase "how to adjust lines,".
Notice that the word wrapping continues to work as before, except that the rest of the sentence is pushed down while you add more text.
✔ Press F6 again to toggle the editor back into Over Type mode. The rest of the text will be automatically adjusted to fill out the remainder of the paragraph.
Spell CheckingYou will use the F23 (Spell Check) key to do spell checking. Before we do that, let's make a misspelled word to be checked.
63
Msg file: MSGFILE Member: xxxSAMPLE Cover Header: SAMPLEFAX/FAXHDR Footer: . -- To: ---------------------------------. . -- From: ----------------------------------. | Recipient's Name | Name | Your Name | | Recipient's Company | Comp | Your Company | | XXX-XXXX | Fax# | (425) 555-1212 | | | Ph# | (425) 555-1234 | | | Mail | [email protected] | ------------------------------------------ -----------------------------------------------
Date: 02/10/02 Pages: 1Message:
This is just a short message that I will use to see how the Message Editor works. I should learn how to use the Phonebook, the spell checker, howto copy lines, and how to insert new information.
Attachments: OvrTyp More . .1 2 34 5 6F2=Fax Msg F3=Exit F4=Adjust F6=Insert/OvrTyp F24=More Keys

2 Tutorial
✔ Move the cursor up to the top message line and change the word "message" to read "mesage" by removing an "s".
The spell checker starts checking for spelling errors, capitalization errors, and for duplicate words from the cursor on. So before we get started, you must move the cursor to the beginning of the message.
✔ Press the F10 (First) key. This moves the cursor to the top of the message. Now press F23 to start the spell checker.
The following window should pop onto the screen:
It is showing you that the word "mesage" is misspelled. Notice that the second suggestion does have the correct spelling of the word.
✔ To select the suggested word "message" move the cursor down four lines, then press the Enter key.
The selected suggestion will appear in the replacement field and a 3 (Replace) will appear in the action field.
✔ To replace the misspelled word you may now press the Enter key.
The spell checker will then try to kick out the word "Phonebook".
✔ You may skip the word, leaving it as is, by pressing the Enter key or by typing the number 1.
When the spell checker has finished the window will disappear, returning you to the normal Message Editor screen.
64
Msg file: MSGFILE Member: xxxSAMPLE Edit Header: SAMPLEFAX/FAXHDR Footer: . -- To: ---------------------------------. . -- From: ----------------------------------. | Recipient's Name | Name | Your Name | | Recipient's Company | Comp | Your Company | | XXX-XXXX | Fax# | (425) 555-1212 | | | Ph# | (425) 555-1234 | | | Mail | [email protected] | ------------------------------------------ -----------------------------------------------
Date: 02/10/02 Pages: 1Message:
This is just a short message that I will use to see how the Message Editor works. I should learn how to use the Phonebook, the spell checker, howto copy lines, and how to insert new information.
Attachments: OvrTyp More . .1 2 34 5 6F2=Fax Msg F3=Exit F4=Adjust F6=Insert/OvrTyp F24=More Keys
Spell Checker
This is a short mesage that I will use to see how the Message- - - - - -
mesage Spelling ErrorReplace with Language: American SuggestionsMASSAGE 1 1. SkipMESSAGE 2. Skip AllMESSAUGE 3. Replace
5. Add to Main Dictionary6. Add to User Dictionary
Bottom 7. Exit Spell Checker
Move cursor to a suggestion & press Enter to select it

2 Tutorial
Copying LinesYou may copy individual lines of text or whole paragraphs from any message member to the same member or to a different member using the F22 (Copy lines) key. Let's copy the entire paragraph to see how this works.
✔ First move the cursor to the first line of the paragraph. It does not matter what column the cursor is in, just the line matters.
✔ Press F22 and the line that you were on is highlighted and the cursor moves down a line.
✔ Press F22 two more times to highlight the rest of the paragraph.
You now must move the cursor to a blank area that is big enough to hold all the lines that you have selected.
✔ Move the cursor down an extra line, so that there will be a blank line below the selected paragraph, and press Enter.
A copy of the selected lines will appear at the cursor location.
End of the Message Editor ExerciseYou have seen how the Message Editor can interface with a Phonebook of your choice. How it automatically word wraps and adjusts text as you type. You have inserted text, copied a paragraph, and spell checked your message. For additional information about these and other features, please refer to the Message Editor chapter.
✔ When you are finished using the Message Editor press F3 (Exit).
65

2 Tutorial
- - - - blank page - - - -
66

3 Information Manager
3 3 Information ManagerInformation Manager
Starting and Stopping KeyesFile Information ManagerYou may start the program using any one of three different methods. It can be started from the KeyesFile menu, from the command line, or from IBM's PDM while working with image files.
To start the KeyesFile Information Manager:● Select item 1 from the KeyesFile menu. You will be asked to enter the name
of a document member. You may enter a document name, a generic name, *NEW, or *SEARCH.
document-member is the name of the KeyesFile document member to be accessed.*NEW will allow the program to start without opening a document member.*SEARCH or a generic name will cause the program to use IBM's PDM to assist you in selecting the desired member.
OR● Type the following command to start KeyesFile. You may optionally follow
the command with the name of a document member, a generic name, *NEW, or *SEARCH.
Enter: KF document-memberOR
● While using IBM's PDM or our Work with Image Files (WRKIMGF) command, you may key the KF user option on any member in KEYFILE.
Note: If you name a member that is private or locked, and you are not the owner, the program will ask you to type the appropriate password. For a locked member, if you only wish to work with the unlocked lines, you do not need to supply the password.
To stop the KeyesFile Information Manager:● Press F3 (Exit).
KeyesFile will end and the display will return to the previous program or menu.
67
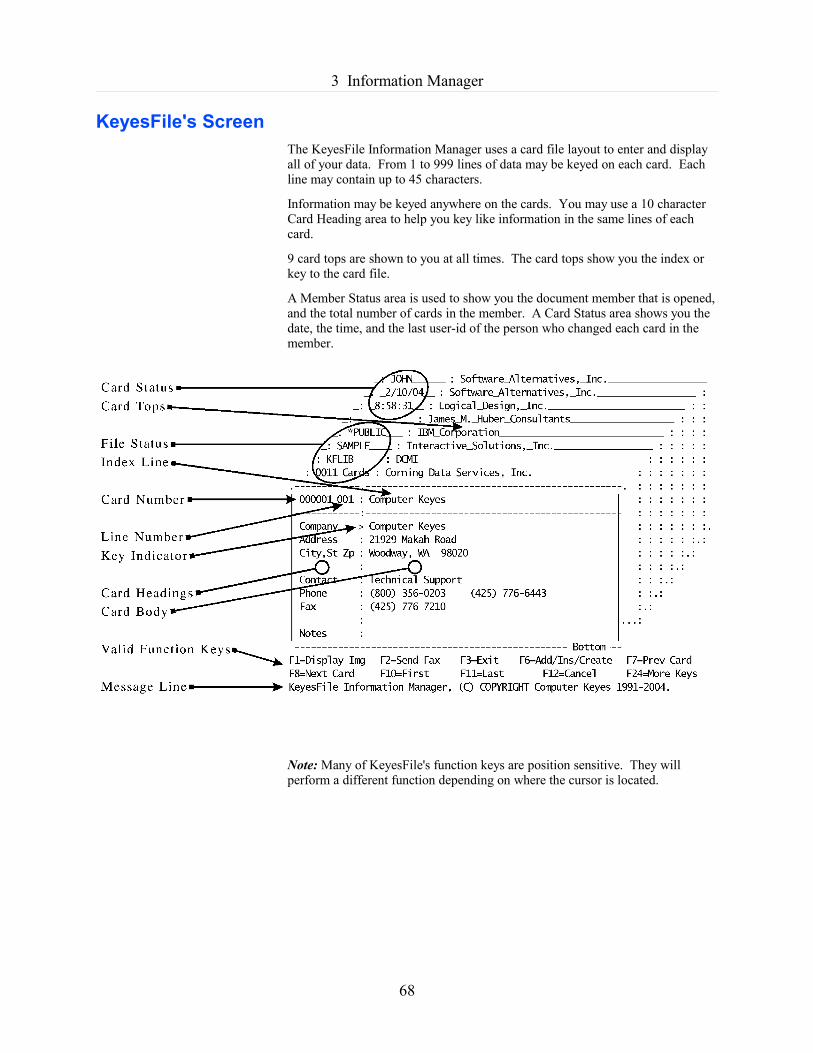
3 Information Manager
KeyesFile's ScreenThe KeyesFile Information Manager uses a card file layout to enter and display all of your data. From 1 to 999 lines of data may be keyed on each card. Each line may contain up to 45 characters.
Information may be keyed anywhere on the cards. You may use a 10 character Card Heading area to help you key like information in the same lines of each card.
9 card tops are shown to you at all times. The card tops show you the index or key to the card file.
A Member Status area is used to show you the document member that is opened, and the total number of cards in the member. A Card Status area shows you the date, the time, and the last user-id of the person who changed each card in the member.
Note: Many of KeyesFile's function keys are position sensitive. They will perform a different function depending on where the cursor is located.
68

3 Information Manager
Getting HelpKeyesFile contains a number of Help screens to assist you in using the program. The Help key is position sensitive. The location of the cursor when you press the Help key determines what information is initially displayed. Using the Roll keys, you can then move through as much of the Help text as you need.
To display Help screens:
1. Move the cursor to the field or area that you want to display Help information for.
2. Press the Help key. KeyesFile will display a Help screen specific to that area.
3. Use the Roll keys to move through the Help text.
4. When you have finished viewing the Help text, press F3 (Exit Help) to return to KeyesFile.
69

3 Information Manager
Adding and Filling In CardsLine #1 of each card is considered the primary key to KeyesFile. You should choose an important piece of information to enter in the first line. The primary key will always be shown to you to help you identify the specific cards that are being displayed. KeyesFile uses the text that you enter into each line to select and sort the cards.
You may select any line on the card to be the key. When you select a line, KeyesFile will only display cards that have something entered for that line. When you select the primary key, all cards will be displayed, even cards with the first line left blank.
To add a new card:
1. Move the cursor to the Index line (top of the first card).
2. Press F6 (Add/Insert/Create).KeyesFile will add a new blank card to the card file.
To fill in a blank card:
1. Move the cursor to the Card Body.
2. Type the text for the card.
Adding Lines to a CardAdditional lines on the card can be made available using the Roll keys (when the cursor is in the Card Body).
OR
Press F11 (Last) when the cursor is in the Card Body to move the cursor to the next available line to be entered for a card.
70

3 Information Manager
Moving Through Your CardsYou can scroll through a card file card by card or bring a specific card directly to the front. KeyesFile always shows you the cards in alphabetical order based on the selected key.
To change the selected key:
1. Move the cursor to the colon : in the Key Indicator column of the line that you wish to select as the key.
2. Press the Enter key.The symbol > will be placed in the Key Indicator column where the cursor was located.KeyesFile will show you the cards in a new order based on the newly selected key. The Card Tops will be split showing you both the newly selected key and the primary key for each card selected.Only those cards that have some information entered into the selected line will be shown, except when the primary key is selected.
Scrolling through Your CardsThe functions below, except for F7 (Prev Card) and F8 (Next Card), require that the cursor be located in the Index line or somewhere on the other Card Tops.
Press this: To do this:Roll Up Scroll to the next 9 cards.Roll Down Scroll to the previous 9 cards.F7 Scroll to the previous card.F8 Scroll to the next card.F10 Bring the first card to the front.F11 Bring the last card to the front.
To bring a specific card to the front:
1. Move the cursor to the Index line at the top of the card.
2. Type a portion of the index line text for the card you want to bring to the front.You may type just enough text to distinguish the card from the other cards.
3. Press the Field Exit key.
Note: If you would like to display one of the 9 cards that are visible, move the cursor to that card's top and press the Enter key.
71
3 Information Manager
To bring a specific card number or line number to the front:
1. Move the cursor to the Card Number/Line Number area, and press the Enter key.KeyesFile will highlight the card number and line number to show that they are activated.
2. Type the new number and press the Enter key.KeyesFile will jump directly to the specified card and/or line number. If the card number does not exist, KeyesFile will ask you to confirm the creation of a new card.
Displaying a Subsetted List of CardsYou can display a subset of a list of cards by supplying a generic name followed by an asterisk * in the Index line. Only cards that match the generic name will be selected for display.
For example, if you type the three characters 07* on the Index line, this would define the subsetted list of all cards that have the two characters 07 in the first two columns of the selected key. If the selected key line was a date field, then only cards that have a July date would be displayed.
To display a subsetted list:
1. Move the cursor to the Index line at the top of the card.
2. Type the generic portion of the index line text that will define a subsetted list followed by an asterisk *.
3. Press the Field Exit key.An asterisk * will be displayed in the Key Indicator column instead of the usual > character to inform you that a subsetted list of cards is being displayed.
Cancelling a Subsetted ListIf you create a subset of a list of cards, and then decide you no longer want to work with this subset, you can return to the full list in one of two different ways.
To cancel a subsetted list:● Return to the Index line and key starting text without an asterisk.
OR● Change the selected key to the same or a different key, by moving the cursor
to the desired Key Indicator column and pressing the Enter key.
KeyesFile will change the * back to a > character in the Key Indicator column.
72

3 Information Manager
Searching for Text in CardsYou can find specific text in the cards by using the Search command. You can start a search at any point in the card file. KeyesFile will search forward from the current card and, when it reaches the last card, automatically continues searching from the beginning of the card file.
When searching for text, KeyesFile ignores capitalization. KeyesFile will search cards according to the selected key in the order that is shown to you. If you are displaying a subsetted list of cards, only those cards will be searched. If you wish to search all cards, select the primary key before starting the Search command.
To search for text:
1. Bring to the front of the card file the card that you want to begin the search.
2. Press F14 (Search).
3. Type the text that you want to find in the specific line that you wish to search, or in the Index line to search all lines in the cards.
Note: KeyesFile will work much faster when searching for text in a specific line, rather than searching all lines in the cards.
4. Press the Enter key.KeyesFile searches for the text and selects the first occurrence. If there are no occurrences of the text in the cards that are selected for display, KeyesFile will display a message telling you that the text was not found.
5. To find the next occurrence of the same text, press F16 (Find Next).
73

3 Information Manager
Editing Text on CardsYou can make changes or add text to existing cards by selecting the card that you want to change, moving the cursor to the desired location, and adding or typing over any existing text.
If you change the text in the selected key, KeyesFile automatically places the card in its correct alphabetical order when you press the Enter key.
Scrolling Through a CardThere are up to 999 lines that can be entered on each card. The functions below require that the cursor be located within the Card Body.
Press this: To do this:Roll Up Scroll to the next 9 lines.Roll Down Scroll to the previous 9 lines.F10 Bring the cursor to the first line.F11 Bring the cursor to the next available line at the bottom of the card.
Inserting a Line in a CardIf you want to move existing lines of text down in a card, you can make room for additional text to be inserted.
To insert a line in a card:
1. Move the cursor to the line that you want to move down.
2. Press F6 (Add/Insert/Create).
KeyesFile will move all lines of the card down to the next line, starting at the cursor location. The current line will be filled with blanks.
Deleting a Line from a CardFor safety reasons, KeyesFile will not allow a line to be deleted unless the text from that line has been cleared. You can clear a line by placing the cursor in the first position and pressing the Field Exit key.
To delete a line from a card:
1. Clear the text from the line that you want to remove.
2. Move the cursor to the line.
3. Press F13 (Delete).KeyesFile will delete the current line, and move all the following lines up one line.
74

3 Information Manager
Copying Text to Another Line or CardYou can copy one or more lines of text into a blank area of any card. The text can be gathered from one or more cards, in any order. The resulting copy will be output in the order that the text was gathered.
If you wish to move text to a different position on a card, use the copy function, then clear the original text.
To copy text:
1. Free up enough lines in the target card to hold the text to be copied. You may want to use F6 (Insert) to make room for the copy.
2. Move the cursor to the first line to be copied and press F22 (Copy).KeyesFile will highlight the selected line.
3. You may select additional lines to be copied by moving the cursor to each additional line and pressing F22 (Copy). If you make a mistake, you may press F12 (Cancel) and start the selection over again.
4. Bring the target card to the front of the file.
5. Place the cursor at the beginning of the blank area in the target card and press the Enter key.KeyesFile will copy the text to the new location only if there is sufficient room to make the copy without overlapping any other text on the following lines.
Undoing ChangesYou can use the Home key (Alt+Home on some terminals) to undo changes that were just made to a card.
You must press the Home key twice to activate Undo. The first time you press the Home key, the cursor will be moved to the home position. The second time you press the Home key, it will undo all changes that were made since the last time you pressed any function key, a Roll key, or the Enter key.
75
3 Information Manager
Using Card HeadingsCard headings may be entered on the left side of the card. One set of headings will be used for all cards in each file. The headings will make it easier for you to enter like information in the same line of every card.
To enter card headings:
1. Move the cursor to the Card Headings, and press the Enter key.The Card Headings area will be highlighted to show that it is activated.
2. Type the text for the headings.Additional lines for the headings can be made available using the Roll keys.
ORPress F11 (Last) to move the cursor to the next available line to be entered for a card heading.
3. When you have finished working with the card headings, press the Enter key.The cursor will return to the Index Line.
Editing Card HeadingsWhen working with Card Headings, the insert, delete, and copy functions will affect a line for all cards in the card file. Before performing one of these functions KeyesFile will ask you to confirm it.
Press this: To do this:Roll Up Scroll to the next 9 heading lines.Roll Down Scroll to the previous 9 heading lines.F6 Insert a new line at the current cursor position for all cards in the card
file.F10 Bring the cursor to the first line.F11 Bring the cursor to the next available line of headings at the bottom of
the card headings.F13 Delete the current line from all cards in the card file.F22 Select the current line for all cards in the card file to be copied.
76

3 Information Manager
Deleting a CardYou can delete a card from a card file with the following procedure.
To delete a card:
1. Bring to the front of the card file the card you want to delete.
2. Move the cursor to the Index line at the top of the card.
3. Press F13 (Delete).You will be asked to confirm the deletion.
4. Press the Enter key.
77

3 Information Manager
Duplicating a CardIf the information to be keyed in a card is similar to another existing card, you might want to copy the entire card then edit the copy as necessary.
To duplicate a card:
1. Move the cursor to the Index line or to the Card Top of the card that you wish to duplicate.
2. Press F22 (Copy).KeyesFile adds an exact copy of the card to the card file. The original card will become the current card. You may press F8 (Next Card) to move to the copy.
78
3 Information Manager
Printing Lines from CardsYou can print an image of an entire card, or you can select specific lines from the cards to be printed on the default printer. After selecting lines to be printed, you can print individual cards or a series of cards by selecting the first and last card in the series to print.
Printing a Card ImageWhen printing a card image, KeyesFile will include card headings and lines around the text.
To print an image of a card:
1. Move the cursor to the Index line, or Card Top of the card that you want to print.
2. Press F21 (Print).KeyesFile will print an image of the card, which will include all lines down to the last line that contains headings or text for the selected card.
Selecting Lines to be PrintedTo print selected lines you must first select the lines to be printed then either print those lines for individual cards or for a series of cards.
To select lines to be printed:
1. Move the cursor to the first line on a card to be printed.
2. Press F21 (Print).The selected line will be highlighted.
3. You may select additional lines to be printed by moving the cursor to each line and pressing F21 (Print).
Note: You may print blank lines, for proper spacing, by selecting lines with no data on them. If you make a mistake, you may press F12 (Cancel) and start the selection over again.
79

3 Information Manager
Printing Individual CardsAfter selecting lines to be printed, you may select the individual cards that you want to print.
To print one or more individual cards:
1. Bring the card that you want to print to the front.
2. Move the cursor to the Card Body and press the Enter key.KeyesFile will print the previously selected lines in the order that the lines were selected, then ask if you would like to print the same lines for additional cards.
3. To select additional cards to be printed, repeat steps 1 and 2 above.
4. When you are finished selecting cards to be printed, press F12 (Cancel).
Printing a Series of CardsAfter selecting lines to be printed, you may select a series of cards that you want to print.
When printing a series of cards, KeyesFile uses the selected key to determine the order and total number of cards to be printed.
To print a series of cards:
1. Move the cursor to the Index line, or the Card Top of the first card that you want in the series to be printed.
2. Press the Enter key.KeyesFile will ask you to select the last card in the series to be printed.
Note: You may use any method to scroll through the cards to find the last card in the series. However, you should not change the selected key between the selection of the first card and the last card.
3. Move the cursor to the Index line, or the Card Top of the last card that you want in the series to be printed.
4. Press the Enter key.KeyesFile will print the previously selected lines for all of the cards from the first card selected to the last, in the order that the lines were selected. When it is finished KeyesFile will ask if you would like to print the same lines for additional cards.
5. To select additional series of cards to be printed, repeat steps 1 through 4 above.
6. When you are finished selecting cards to be printed, press F12 (Cancel).
80

3 Information Manager
Managing KeyesFile MembersKeyesFile uses a database file called KEYFILE and a logical file called KEYFILEA. Your individual KeyesFile document members will be members of those files.
Opening a KeyesFile MemberYou can open a new member or change to a different member at any time.
To open a KeyesFile member:
1. Move the cursor to the Member Name area, and press the Enter key.The Member Name area will be highlighted to show that it is activated.
2. Type the name of the new or existing member name that you want to open.
3. If the member is private or locked, and you are not the owner, then you must also provide the appropriate password.For a locked member, if you do not provide a password, you will still be allowed to open the member and work with any of the lines that are not locked.
4. Press the Enter key.KeyesFile will open the member named if it already exists. You will be asked to confirm the creation of a new member if it does not exist.
Determining Document Member Names and SizesThe number of cards that have been created in each member is displayed in the Member Status area, but this does not tell you how many lines you have created for the cards. You can determine the names of all the KeyesFile document members and their total sizes using F4 (Prompt).
To determine member names and sizes:
1. Move the cursor to the Member Name area.
2. Press F4 (Prompt), with the cursor on the member name.KeyesFile will display a complete file description of the data base file called KEYFILE.
3. Use the Roll keys to scroll through the member names and sizes.
4. When you are finished you can return to KeyesFile by pressing the Enter key or F3 (Exit).
81

3 Information Manager
Copying and Merging MembersYou can copy a KeyesFile member to another member name. If the other member already exists, you can merge or consolidate two sets of cards. Before you can copy or merge a member you must open it.
To copy or merge a KeyesFile member:
1. Open the KeyesFile member that you want to make a copy of.
2. Move the cursor back to the Member Name area and press the Enter key.The Member Name area will be highlighted to show that it is activated.
3. Leave the cursor in the Member Name area and press F22 (Copy).KeyesFile will ask you to type a new name to be copied into.
4. Key a new member name to be created or merged into.
5. Press the Enter key.KeyesFile will copy the original member that was open to the new name supplied. If the new name already exists, you will be asked to confirm that you want to merge the two members together. If the existing member is private or locked, you must be the owner to copy into it.
Deleting a KeyesFile MemberTo delete an entire KeyesFile member, you must open it first, and you must have delete capability in the KeyesFax library.
To delete a KeyesFile member:
1. Open the KeyesFile member that you want to delete.Only the owner of a private or locked member can delete it.
2. Move the cursor back to the Member Name area and press the Enter key.The Member Name area will be highlighted to show that it is activated.
3. Leave the cursor in the Member Name area and press F13 (Delete).KeyesFile will ask you to confirm the deletion of the member.
4. Press the Enter key.
Be sure that you have the correct member before you delete it. You can only replace a deleted member with a backup copy of the file KEYFILE.
82

3 Information Manager
Securing a KeyesFile MemberYou may designate each KeyesFile member as either *PUBLIC, *PRIVATE, or *LOCKnnn. A public member can be used by any person that has access to the KeyesFax library, based on their iSeries security profile. Private and locked members are owned by a single person, but can be used by anyone who knows the proper password. Passwords are set by the owner.
A locked member can be used by any person that has access to the KeyesFax library, but only those who know the password can add, change, or delete any of the locked lines in the cards. nnn specifies the last line number that is locked. By specifying *LOCK999 you can allow a member to be used for inquiry only. Smaller locks will allow some information to be added or changed for the cards.
To change the member security:
1. Open the KeyesFile member that you want to change.If the member is public, anyone can change the security. Otherwise, only the owner can change the security.
2. Move the cursor back to the Member Name area and press the Enter key.The Member Name area will be highlighted to show that it is activated.
3. Type either *PUBLIC, *PRIVATE, or *LOCKnnn in the secured line.nnn is the last line number to lock. For example, *LOCK010 will lock the first 10 lines of each card in the card file.
4. If you selected *PRIVATE or *LOCKnnn, you must also type a password in its line.
5. Press the Enter key.
To change the password:
1. Open the KeyesFile member that you want to change the password.Only the owner of a member can change the password.
2. Move the cursor to the Password area and press the Enter key.The Password area will be highlighted to show that it is activated.
3. Type the new password and press the Enter key.
83

3 Information Manager
Importing and Exporting DataThe KeyesFile Information Manager uses a database file where each record contains a single line of card data. This file format is very efficient for storage and retrieval purposes, but is extremely difficult to work with for your applications. We have included import and export programs to make the sharing of this data much easier for you.
Each line of data for the card file is 45 characters long. The import and export programs use a file that combines one or more lines from the card file into a single record for you to use. The first 45 characters of the import/export file is a reserved area. Characters 46 to the end of the file contain the data that is from or going to the card file.
You can choose the number of card lines that will be imported or exported. You can choose 1, 10, 20, 50, or 100 card lines. If you choose 1 line, the import/export file is built at 90 characters wide, with the 1 card line mapping to columns 46 through 90 of the file. If you choose 10 lines, the file is built at 495 characters wide, with the 10 card lines mapping to columns 46 through 495. 20 lines will build a 945 character file, 50 lines uses a 2295 character file, and 100 lines uses a 4545 character file.
Importing Data to KeyesFileYou can import data to a KeyesFile member from an existing database file so that you do not have to rekey the information. First you must decide how many card lines you will be importing (1, 10, 20, 50, or 100). You will then built an import file the appropriate width that contains the data that you wish to be placed in the card file. Each of the records in the import file will contain all of the lines for one card in the KeyesFile member. You may then run the KFIMPORT command either from the KeyesFile menu or the command line. You can import data to an existing KeyesFile member.
From database file:
This is the name of the import file that you have built. Each record will contain up to 1, 10, 20, 50, or 100 card lines.
Library:
This defaults to *LIBL and specifies the library that the database file can be found in.
To KeyesFile member:
This names the KeyesFile member that you will be importing the data into. Records will be added to the member.
Number of lines per card:
This defaults to 100. You can specify 1, 10, 20, 50, or 100 lines depending on how you built the import file.
84

3 Information Manager
Exporting Data from KeyesFileYou can export data from a KeyesFile member to database file so that you can sort, select, process, or print the data with your own application programs. First you must decide how many card lines you will be exporting (1, 10, 20, 50, or 100). You may then run the KFEXPORT command either from the KeyesFile menu or the command line. It will build the appropriate size file and export data to it. Each of the records in the export file will contain all of the included lines for one card in the KeyesFile member.
From KeyesFile member:
This names the KeyesFile member that you will be exporting the data out of.
To database file:
This is the name of the export file that will be built. Each record will contain up to 1, 10, 20, 50, or 100 card lines.
Library:
This defaults to *CURLIB and specifies what library the database file should be built in.
Number of lines per card:
This defaults to 100. You can specify 1, 10, 20, 50, or 100 lines depending on how you want the export file built.
85

3 Information Manager
Using KeyesFile as a PhonebookAny KeyesFile member can be used as a Phonebook to supply information to the Message Editor.
While using the Message Editor, you can press F17 (Phonebook) to access one of your KeyesFile members. The default member that you will be placed in can be set in the FAXSETUP program. You can switch to a different KeyesFile member by moving the cursor up to the member name field, activating it, and changing the name.
After opening a member, you can use any of the standard search features to locate the desired entry. Move the cursor to the body of the card and press F20 (Select) to select the information in that card. You may only select a single card for the Message Editor. When you press F3 (Exit) the selected information will be returned to the Message Editor and pasted into the recipient box.
The FAXSETUP program contains the default Phonebook member name that you can set to any of your available KeyesFile member names. It also contains heading search values that the program will use for the selection. The default heading search values are "Fax", "Contact", and "Company". The program will look for these headings in your KeyesFile member and retrieve the information in the corresponding lines for the record that you select.
86

3 Information Manager
Creating a PBX MemberYou can create a PBX member for broadcast faxing with a list of phone numbers and substitution fields from any of your KeyesFile members, using the CRTPBXMBR (Create PBX Member) command.
Parameters in the CRTPBXMBR command allow you to set the name of the KeyesFile member, the name of the PBX member that you will be building, and the heading search values to be selected. The first heading search value should be used to locate the fax number in the KeyesFile member. The remaining optional parameters can be used to create from 1 to 9 substitution fields in the PBX member.
The default heading search values are "Fax", "Contact", and "Company". This would be used to create a PBX member with a fax number and two substitution parameters containing the contact name and the company name from the selected entries. The program will look for these headings in your KeyesFile member and retrieve the information in the corresponding lines for the cards that you select.
To select individual cards:
1. Bring the card that you want to select to the front.
2. Move the cursor to the Card Body and press F20 (Select).KeyesFile will store the information on the selected card, then ask if you would like to select additional cards.
3. To select additional cards, repeat steps 1 and 2 above.
4. When you are finished selecting cards, press F3 (Exit).
To select a series of cards:
1. Move the cursor to the Index line, or Card Top of the first card that you want in the series to be selected.
2. Press F20 (Select).KeyesFile will ask you to find the last card in the series to be selected.
Note: You may use any method to scroll through the cards to find the last card in the series. However, you should not change the selected key between the selection of the first card and the last card.
3. Move the cursor to the Index line, or the Card Top of the last card that you want in the series to be selected.
4. Press the Enter key.KeyesFile will gather the fax number and substitution parameters from each of the cards in the series, in the order that the lines were selected. When it is finished KeyesFile will ask if you would like to select additional cards.
5. To select additional series of cards, repeat steps 1 through 4 above.
6. When you are finished selecting cards, press F3 (Exit).
87

3 Information Manager
- - - - blank page - - - -
88

4 PC Tools
4 4 PC ToolsPC Tools
An Introduction to ImagingVisual images are probably the most easily understood form of information; humans have pretty acute visual senses. KeyesFax images are actually bitmaps, that is, images that have been represented in digital form and stored as arrays of pixels for ultimate display on a monitor or for printing on a printer or fax machine.
Image scanners and programs such as PC Paintbrush, Corel Draw, and PageMaker, store bitmapped images in specific formats. There are a lot of graphics file formats, with more cropping up every day. One of the most popular PC formats is TIFF, or the Tagged Image File Format.
There are many different encoding schemes used for image compression, each with its own advantages and disadvantages. Each may be more efficient than the other in some aspect, such as speed, ease of use, future compatibility, or compactness.
Image ToolsIn this package we have supplied a number of tools that you can use to convert, store, edit, display, print, and fax images of various types. We have provided all the tools that you should need to create and merge forms overlays, signatures, or logos into your applications. You will also be able to send faxes from any of your PC applications.
89

4 PC Tools
Image File TypesKeyesFax can use a variety of image file types including; PC fax files, PCL, PCX, TIFF, FAX, and CKX. PC fax files, PCL, PCX and TIFF (class B or class F) documents can be transferred from a PC in their original ASCII file format. FAX and CKX image documents are created by our system on the iSeries. It does not matter what the resolution of the images are. We can display any size image, to the limit of your PC's memory. When images are too large to fit on a screen, our programs will automatically shrink them down to fit, then allow you to zoom in on any portion of the image to get a better view.● PC fax files can be produced by any Windows program that has printing
capability. Our HTTP Server can upload these files and fax them from the iSeries.
● PCL (HP Printer Command Language) images are generated when you send PC graphics output to a file instead of a printer port. You define the printer file as if you have any model Laser Jet with any font cartridges, but without Postscript. Any resident or cartridge fonts may be used and will be mapped to the available fax fonts when converted to a fax image. See Fax Fonts in the Appendix for more information. Soft fonts are not supported.
● PCX images can be used by a wide variety of PC programs. KeyesFax is able to convert an image to or from a monochrome PCX image in order to upload or download it from a PC.
● TIFF images are used in many applications. KeyesFax is able to use TIFF class B (Binary) and class F (Fax) images.
● CKX images are a modified version of the PCX format that are more efficient for the iSeries to decode than PCX images. You may convert any of the other types of images to a CKX image to be used as a forms overlay or to use our editing commands. Our editing commands allow you to cut and paste, merge, or flip over CKX images.
● FAX images are used by our programs for sending and receiving fax documents. They are 1728 pixels wide at 204 dpi horizontal resolution and are either scanned in at 98 dpi or 196 dpi vertical resolution (Normal or High). The KeyesFax system can convert spool files, text documents, Message members, or other image types into FAX images.
Where Images are StoredAll image files are stored as data base file members on the iSeries. We have supplied different files to contain different kinds of images; CKXFILE, FAXFILE, IMGFILE, OUTFILE, PCLFILE, PCXFILE, RCVFILE, and TIFFILE. We encourage you to create additional files to separate your images into logical groups. You can create new files using IBM's CRTPF command or some of our commands, such as CPYPG and CVTIMG, allow you to create new files. The files should have 256 byte records, *NOMAX for member size, and FILE as the last four characters of the name.
90

4 PC Tools
Activating and Using the HTTP ServerThe HTTP Server will allow you to access and control the Receive Queue and the Fax Queue from anywhere using an Internet browser. You will also be able to view fax images and create new faxes from your PC.
Configuring the HTTP ServerYou will be using the HTTP Server powered by Apache (available from V5R2 and higher). You should not need to change the default configuration, as we shipped it. If you decide to change the configuration, you will have to do this using the Administration Server. After starting the IBM HTTP server with the *ADMIN server instance, you can access it from a browser by addressing your iSeries IP address:2001.
91

4 PC Tools
Starting the HTTP ServerBefore you can connect to the HTTP Server with your PC, you will need to start the server. This can be done using the command STRHTTPSRV, or from a menu item, as described below:
1. Select item 1 (Work with Fax Lines) from the Fax Communications menu.
2. Press F9 to start the HTTP Server.
3. The status for the HTTP Server should change to RDY within 10 seconds, if it is functioning correctly. This is shown to you at the top of the screen.
Installing the KeyesFax ImageMaker Print DriverYou can find the software to be installed on your PC's on our website (www.ckeyes.com) in the Downloads section.
Installing the Print Driver in Windows:
You will have to have Administrator rights to your PC, for these instructions.
1. Download the KF13PC.EXE file from our website at www.ckeyes.com. This can be found in the Downloads section.
2. Run the KF13PC.EXE self-expanding file by double clicking it, from your PC. This will expand the file into whatever folder it was in.
3. Run the SETUP.EXE program to install the driver on your system. Follow the instructions in the Setup Wizard.
When you print to the “KeyesFax ImageMaker Print Driver” from any PC application, it will allow you to name the resulting TIFF file as it writes it to your disk drive. You will pick these files up, using the HTTP Server, to send faxes from your PC applications.
92
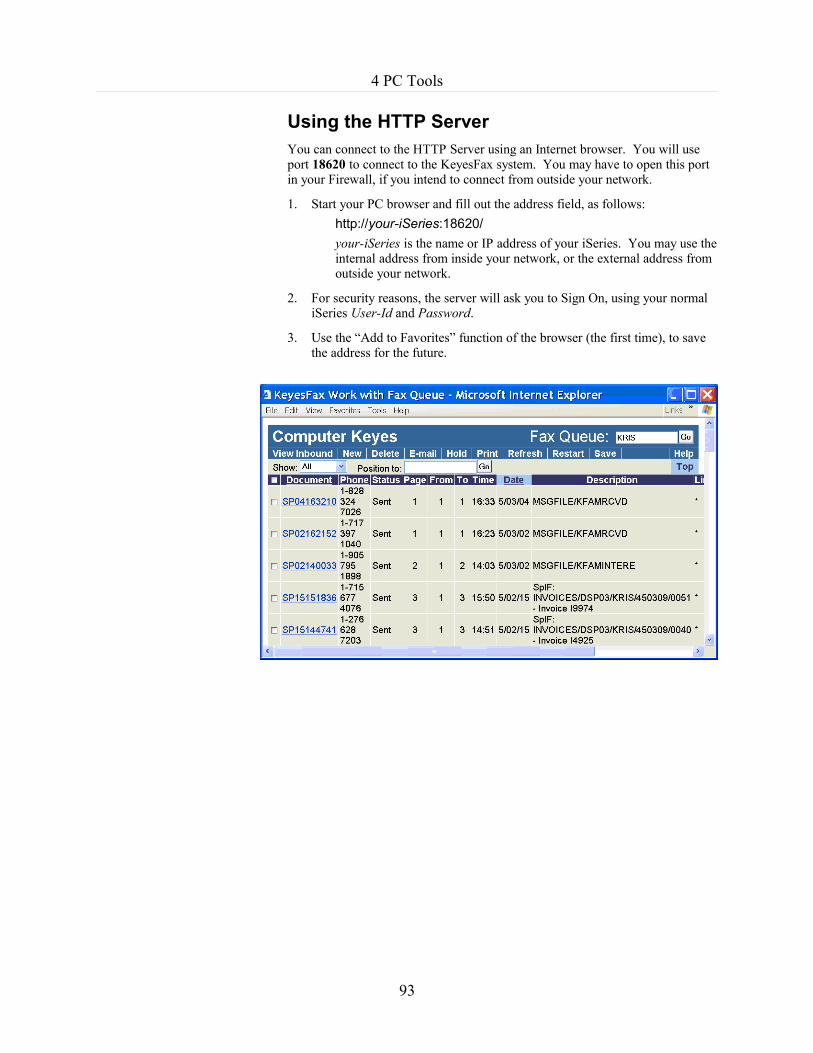
4 PC Tools
Using the HTTP ServerYou can connect to the HTTP Server using an Internet browser. You will use port 18620 to connect to the KeyesFax system. You may have to open this port in your Firewall, if you intend to connect from outside your network.
1. Start your PC browser and fill out the address field, as follows:http://your-iSeries:18620/your-iSeries is the name or IP address of your iSeries. You may use the internal address from inside your network, or the external address from outside your network.
2. For security reasons, the server will ask you to Sign On, using your normal iSeries User-Id and Password.
3. Use the “Add to Favorites” function of the browser (the first time), to save the address for the future.
93

4 PC Tools
Displaying ImagesThe HTTP Server can be used to display any of the Fax images that you have in your Fax Queue or Receive Queue.
Viewing an Image:
The Tutorial has instructions on how to establish a default viewer on your PC for viewing Fax images. We recommend that you use the “Windows Picture and Fax Viewer”. It has all the capabilities needed to properly view and even annotate the Fax images.
1. Make sure the HTTP Server is running. You can see its status at the top of the Work with Fax Lines screen.
2. Start your Internet Browser software and connect to:http://your-iSeries:18620/your-iSeries is the name or IP address of your iSeries. You may use the internal address from inside your network, or the external address from outside your network.
3. This will ask you to Sign On, using your normal iSeries User-Id and Password.
4. Click the Document Name field to open the Fax you wish to display.
5. Click the View Image button to view the image.
94

4 PC Tools
Faxing PC Images & DocumentsYou can fax any PC image or document through KeyesFax on the iSeries.
1. Open the image or document with any PC application that can print it.
2. Print the document to the KeyesFax ImageMaker Print Driver. This will create a TIFF file (.tif). We recommend that you place the "Output File" in your "My Documents" folder. This is the default location that the HTTP server will browse for the print files.
3. Start your Internet Browser and connect to your iSeries on port 18620.
4. After signing on, press the New button to create a new Fax.
5. On the Send a Fax screen press the PC button to the right of Attachments:
6. Press the Browse button on the Attach PC file screen, find the print file (from step 2), open it and press the OK button to upload the document to the iSeries. You can add additional attachments, as desired.
7. Type the desired Coversheet fields, especially the To Fax #. You can use the Phonebook button to search for fax numbers, if this has been configured. When you have finished, press the Send button to send the Fax.
8. On your Fax Queue, you can press the Refresh button to see the new Fax as it is processed.
95

4 PC Tools
Creating Attachments or Forms OverlaysYou can upload any PC image or document to the iSeries and save it as a Fax image or Overlay.
1. Open the image or document with any PC application that can print it.
2. Print the document to the KeyesFax ImageMaker Print Driver. This will create a TIFF file (.tif). We recommend that you place the "Output File" in your "My Documents" folder.
3. Start your Internet Browser and connect to your iSeries on port 18620.
4. After signing on, press the New button to create a new Fax.
5. On the Send a Fax screen press the PC button to the right of Attachments:
6. Press the Browse button on the Attach PC file screen, find the print file (from step 2), open it and press the OK button to upload the document to the iSeries.
7. Clear the Coversheet checkbox, remove the To Fax #, and press the Send button to send the Fax.
8. On your Fax Queue, press the Refresh button, after a few seconds the new Fax should appear.
9. When the conversion phase has completed the status will change to “No Phone#s”. You can Save the new document as an Image or Overlay by selecting the new document's checkbox (on the left) and pressing the Save button.
10. When you save an Overlay, you can adjust the form Up/Down and/or Left/Right if it does not fit the text properly.
Annotating ImagesIf you are using the Windows Picture and Fax Viewer, you can add annotations including highlighting, boxes, lines, and text to the Fax images. After this you may save it to your PC, or send it back to the KeyesFax system by printing to the KeyesFax ImageMaker Print Driver.
Monitoring an IFS Folder for FaxingYou can have KeyesFax monitor an IFS folder for faxing TIFF images. When TIFF images are placed in this IFS folder, using our KeyesFax ImageMaker Print Driver, KeyesFax will transfer the image into the IBM i, convert it to a Fax image, and send it to the FaxQueue ready for faxing.
The Fax number, User-Id, and Attention-to values can be automatically passed to the Fax system in the name of the image placed in the folder. Code ^Fax followed by the fax number or “^Fax PBX member” to send to a list. KeyesFax will extract the fax number or list from the name. If ^Fax is not found in the name, then the document will be sent the FaxQueue with a status of “No Phone #”. A user can subsequently assign a fax number and restart the fax to transmit it. Or they can use the “S” option to save the fax image as an Overlay.
Example: ^Fax 555-1212 ^User My-id ^Attn Joe Somebody ^ anything.TIFF
96

4 PC Tools
Using your Fax Machine as a ScannerThe following instructions will use your fax machine to create a forms overlay from an existing preprinted form.
1. The first step is to choose a resolution for the overlay. *NORMAL resolution will convert and transmit twice as fast as *HIGH resolution faxes. However, you must choose *HIGH resolution if data will be printed on the form in Landscape mode using fonts that are smaller than 10 cpi. You should set the default resolution in the Fax Setup parameter.
2. Bring an empty form to your fax machine, set the resolution to either Standard (*NORMAL) or Fine (*HIGH), and fax it to your iSeries.
3. Locate the faxed in form using the Work with Receive Queue (WRKRCVQ) program. It will be found under the Fax operator's user-id, as specified in the Fax Setup parameter.
4. Code an S (Save as Image/Overlay) in the Options column.
5. Fill out the appropriate parameters on the Save as Image or Overlay screen.
6. Press the OK Button to Save the fax.
Exporting a Fax to the IFSYou may Export a Fax to the IFS as either a PDF document or a TIFF image.
1. Select a Fax that you would like to export, by checking the box for the desired entry.
2. Press the Export button to start the process.
3. Fill out the desired type, Filename, and Path for the export.
4. Press the OK button. The Fax image will be converted to either a PDF document or a TIFF image before it is copied to the IFS.
97
4 PC Tools
Working with Images on the iSeriesYou may use the following programs to work with images.● You can combine two or more image members together or copy selected
pages of images into another image member using the CPYPG (Copy Pages) command.
● You can convert an image to a different type and scale the image to a different resolution using CVTIMG (Convert Image).
● You can cut and paste, merge, adjust, flip over, or reverse CKX images using EDITIMG (Edit Image).
● STSIMG (Status of an Image) is a program that can be used to display the status of an image member. It will report the image type, the number of pages, the resolution, and how much disk space an image uses.
● You can print images using PRTIMG (Print Image).
More information about these programs can be found in the chapter titled Commands.
Using WRKIMGF (Work with Image Files) CommandThe easiest way to copy, convert, edit, load, get the status of, or print an image is using IBM's PDM while working with image files. You can do this using WRKIMGF (Work with Image Files).
While using this program you will be able to perform any of the IBM options, plus any of the KeyesFax user options to edit, copy, fax, print, etc. the document members. The KeyesFax user options are described below:
Enter this: To do this:CI Convert ImageCP Copy PagesEI Edit ImageFM Fax MessageKF KeyesFile Information ManagerPI Print ImageRI Rename ImageSF Send FaxSI Status ImageX or SD Select Document
98

4 PC Tools
Editing ImagesImage editing can be especially useful for creating forms to be faxed. You can easily cut out a logo to be used for a fax header or clip out important pieces from a document, such as a signature or a picture. You can also use EDITIMG to adjust a form horizontally or vertically so that it looks correct when you merge text into the form.
Before you can edit an image, you will need to know the exact location in pixels of the cut or paste that you wish to make. This information can be obtained as follows:
1. Start by converting the image to a CKX image in CKXFILE. Only CKX images can be edited.
2. Fax or print the image to paper.
3. With a ruler, you can measure the upper left corner of where you wish to make the cut or the paste.
4. *Normal resolution will be roughly 200 dpi horizontal and 100 dpi vertical. *High resolution will be about 200 x 200 dpi. You can calculate the X and Y coordinates by multiplying 200 times the number of inches across for X and 200 or 100 times the number of inches down for Y.
5. Now move the cursor to the lower right corner of the image where you wish to make the cut and again calculate the X and Y coordinates.
6. Use these coordinates in the EDITIMG program (EI user option) to make the appropriate cut or paste.
99

4 PC Tools
- - - - blank page - - - -
100
5 Fax
5 5 FaxFax
The Benefits of Automated FaxThere are a wide variety of reasons why companies choose to automate their fax systems. They may hope to streamline the fax process eliminating the dreaded Fax Trot which takes you from your desk, to a printer, to the fax machine, then back to your desk. Or they may wish to expand the use of fax as a delivery system making it cost-effective to fax business forms, such as invoices, purchase orders, statements, acknowledgments, or lab reports.
Some companies justify automated fax through increased efficiency and cost savings. With automated fax, you can reduce labor costs, shorten billing or purchasing cycles, catch mistakes by confirming customer orders, or get an edge over competitors by speeding price quotations. KeyesFax usually pays for itself in a matter of months.
Other reasons may include the increased quality and elimination of mechanical difficulties related to the fax scanner. Automated fax eliminates document printing, copying, paper jams, and other document feeding problems.
Using KeyesFax to Print with an OverlayYou can design forms to be overlayed onto your spooled files for faxing. These same documents can be printed to any LaserJet compatible printer, as well as faxed.
To automate printing of some or all of your faxes you can code printing commands within your spooled files or in the Spooled File Setup screens (see the chapter Output Queue for more information).
Using KeyesFax to send E-mail MessagesYou can add e-mailing capability to the KeyesFax system to allow some of your documents to be e-mailed instead of faxed, by adding KeyesMail to your system.
To send an e-mail from KeyesFax, you simply supply up to 3 e-mail addresses just like you do the fax numbers. KeyesFax will separate any pages that are to be e-mailed and pass them on to the KeyesMail system. After e-mailing each document KeyesMail will update the Fax Queue to show an E-mailed status.
E-mail addresses can be supplied in the same manner that fax numbers are supplied to each of the documents.● They can be coded as parameters to our API's.● They can be coded as Spooled File Attributes.● They can be coded as commands (¬Email) within the spooled files.
101

5 Fax
Fax CommunicationAll fax communication is performed in a FAXCOM subsystem, through one or more of your communication ports, attached to fax modems that are connected to your phone lines.
A program called AUTORCVx is used to monitor each fax line for inbound fax messages and to do several automatic processing tasks:● It releases scheduled outbound faxes when they are ready.● It checks the output queue FAXCOM & FAXNGT for any entries that are
ready to be faxed.● It checks the file NIGHTFILE, during night hours, for any documents that
are ready to be faxed.● If you have the PC Option, it will check for PC Documents that are ready to
be faxed – coming from either the monitoried IFS folder or the HTTP server.
Working with Fax LinesThe WRKFAXL (Work with Fax Lines) program (shown below) is used to control and track fax activity on your system. A user must have *JOBCTL or *SPLCTL special authority to use this program.
102
5 Fax
Starting Fax CommunicationEach time you IPL your computer, before you can send or receive any fax messages, you must start one or more of your fax lines.
To start fax communication:● Run the Work with Fax Lines item from the Fax Communication menu, then
select option 1 for one or more lines to start them.OR
● Type the command from any command line, or place in your QSTRUP CL program.
Enter: STRFAXCOM fax-linefax-line is the number (1-24) of the fax line that you wish to start. The default *ALL will start all available fax lines.
Ending Fax CommunicationIf you wish to stop fax communications for one or more fax lines, you must end the fax lines. After ending a fax line, it usually takes 15-20 seconds before the communication is actually turned off.
To end fax communication:● Run the Work with Fax Lines item from the Fax Communication menu, then
select option 4 for one or more lines to end them.OR
● Type the command from any command line.Enter: ENDFAXCOM fax-linefax-line is the number (1-24) of the fax line that you wish to end. The default *ALL will end all fax lines.
Fax Communication SetupThe FAXSETUP (Fax Communication Setup) program is used to define data areas (KFDATAx), one for each fax line. The information in each data area is used in both the Send and Receive Fax programs as well as the Print Image program. You can change any of the values in these data areas at anytime, and it will take effect immediately. To change the Fax communication data areas:● Run the Fax Communication Setup item from FCMENU.
OR● Run the Work with Fax Lines item and select option 2 for one or more lines
to change their setup.OR
● Type the command from any command line.Enter: FAXSETUP fax-linefax-line is the number (1-24) of the fax line that you wish to make a change to. You may use *ALL to make the same change to all fax lines.
103

5 Fax
Faxing Image or Text DocumentsYou will be able to send any image or text document as a fax. The KSNDFAX (Send Fax) program automatically converts text and/or image documents into a FAX image and places them in OUTFILE. If you resend the same document member name again at a later time, the program will give you the choice of using the FAX image in OUTFILE without having to convert it over again, or replacing it.
Note: A text document is actually any width source physical file member from 80 to 228 bytes per record. See How to Build Fax Messages later in this chapter for more information.
Faxing Spooled FilesYou will be able to send printer files as faxes. There are three different methods you may choose from. You can use one of our API's (KFAXSPLF, FAXASCII or FAXAFPDS), you can route the spool file to our FAXCOM or FAXNGT output queues for automatic faxing, or you can use our Fax a Spool File item on the Fax Communication menu to manually send a fax.
Using an API:
The API's can be used by an application to fax a spool file that it has created. It allows you fax the spool files in either portrait or landscape mode. It will add the spool file pages to an optional coversheet. You can program the application to pass parameters to the coversheet for an easier operator workload. You can even allow the operator to modify the text that came out of the spool file, if desired.
Using FAXCOM or FAXNGT output queues:
You can send any spooled file as a fax by simply routing or moving the entry to our FAXCOM or FAXNGT output queues. Fax commands can be coded inside the spooled files, or fax parameters can be extracted from other information (such as customer or vendor numbers) that is already available in the printer data. The Output Queues chapter, later in this manual, will show you how to define faxing from the output queues.
Using Fax a Spooled File from the menu:
This item starts the KWRKSPLFF (Work with Spooled Files plus Fax) program used for manually selecting spooled files for faxing. This program works similarly to IBM's WRKSPLF except that option 1 allows you to send a spooled file as a fax with an optional coversheet.
104

5 Fax
Faxing from PC ApplicationsYou will be able to upload and fax PC documents through the iSeries. There are two different methods available to you. You can use the HTTP Server with an Internet Browser to upload and fax documents through the iSeries, or you can route printer files directly to our FAXCOM output queue using Shared Printer support, where they will be automatically picked up and faxed.
Using the HTTP Server:
The KeyesFax ImageMaker Print Driver on the PC works by creating a print file that is a TIFF image (.tif). The HTTP Server can upload any of the print files to the iSeries, add an optional coversheet, and fax them through the iSeries. You may supply recipient information using a built in phone book. Please see Faxing PC Images & Documents in the Image chapter for more information.
Using Virtual Printer support:
You may assign one of your PC line printer ports to our printer file FAXCOM on the iSeries using Network Printer support. Be sure to specify the 'Printer Data Type' as ASCII. Any printer data sent from your word processor to the FAXCOM output queue will be automatically converted and faxed to the phone number that you supply using a ^Fax command within your document. See How to Build Fax Documents in this section for information about the fax commands.
Any of the fax commands, such as ^Attn, ^Desc, etc. can be included in the document as long as they are keyed using one of the printer's resident fonts, such as Courier. The negate symbol (¬) does not exist in many of the resident fonts, so you should use the (^) symbol instead when keying any of the fax commands.
Faxing at NightThe easiest method of faxing spooled files during night hours, is by routing or moving the entry to our FAXNGT output queue. The desired night hours can be set using our FAXSETUP (Fax Communication Setup) program.
You may also schedule faxes to be sent after a particular time either by using the ¬Time fax command inside a document or by specifying the desired time on the Transmit time parameter of the fax API's.
105

5 Fax
How to Build Fax MessagesYou can fax normal spool files or any iSeries source physical file members. The source files can be defined with any width from 80 to 228 characters wide.
Fax CommandsFax commands can be included in your documents to direct the program that does the conversion to fax. The commands can be used to direct everything about a fax. This includes setting phone numbers, changing margins and fonts, merging images, giving page descriptions, attention to, printing instructions, and even specifying coversheet parameters.
The iSeries negate symbol (¬) or a PC's caret (^) must be the first thing on a line when specifying fax commands. This is followed by the command name and the parameter values for the different fax commands. The first letter of each command must be a capital letter, the following letters may be either upper or lower case. Parameters for each of the commands follow separated by at least 1 space.
• ¬Attn attention-to-name• ¬Cx coversheet-parameters• ¬Desc description• ¬Email address• ¬End• ¬Fax List distribution-list-id/qualifier• ¬Fax PBX pbxfile-member• ¬Fax # phone-number• ¬Font font-name,point-size,text-tightness• ¬From email-from-address• ¬Image image-file/image-member• ¬Margin left-margin• ¬MBox mailbox• ¬Merge image-file/image-member• ¬Page page-number• ¬Px printer-name• ¬Space space-amount• ¬Subj email-subject• ¬Temp email-template• ¬Time transmit-time,transmit-date• ¬Width text-characters,font-size
Note: Multiple commands may be placed on the same line, separated by spaces. Lines with fax commands will be removed from the fax image unless you code a trailing negate symbol, as shown below:
¬Margin 10 ¬Merge Invoice ¬ 12345
The negate symbol coded after the ¬Merge command will cause the commands but not the line itself to be removed from the faxed document. The text 12345 will still be printed on the fax, in the above example.
106

5 Fax
Spooled File example:
The following example shows how recommended fax commands would be coded in a spooled file page for an Order Confirmation.
Notes: In this example, the top two print lines were used to specify fax commands which give the destination fax number, the name of a forms overlay, and a description to assist in tracking the fax.
These fax commands will be stripped out of the spooled file before it is converted to a fax image. Notice that trailing negate signs (¬) have been placed after the fax commands on both lines. This is used to prevent the entire print lines from being stripped out of the spooled file, which would cause the page to be shortened.
107
¬Fax # (800) 555-1234 ¬Merge OrderForm ¬¬Desc OC1234 for ABC Company ¬
#OC1234
ABC Company123 AddressAnytown, USA
15 Parts being ordered $25.00 5 Other parts ordered $16.00
Total $41.00

5 Fax
¬Attn attention-to-name
The Attn command can be used in place of a coversheet. The attention-to-name will print at the top of the fax to identify the recipient.
attention-to-name can be from 1 to 25 characters in length.
¬Cx coversheet-parameter
There are 10 different coversheet commands, that you can use to fill the coversheet parameters. These values, if specified, will replace the fields that are found in the existing cover member. The cover member must already exist in the cover file. You can use the Fax a Message item on FCMENU to create the original cover members.
• ¬CF Cover-file Coversheet's file name• ¬CM Cover-member Coversheet's member name• ¬CN Cover-notes 76 characters of notes• ¬FC From-company Sender's company name• ¬FE From-email-address Sender's e-mail address• ¬FF From-fax-number Sender's fax number• ¬FN From-name Sender's name• ¬FP From-phone-number Sender's voice number• ¬TC To-company Recipient's company name• ¬TN To-name Recipient's name
Note: The Cover member parameter will last for a single recipient only (in a multi-recipient spooled file). You must specify at least this parameter and the Recipient's Name and Company for each of the faxes that you intend to send with a coversheet. The From parameters are all 35 characters long. The To parameters are both 30 characters in length.
¬Desc description
The Desc command can be used to help you identify individual pages of a document that you will be faxing. Every page that has been given a description will have that description included with the completion messages when it is faxed. You may wish to code information such as customer, invoice, or purchase order numbers in the description.
description can be from 1 to 30 characters in length.
108

5 Fax
¬Email address
The Email command can only be used if you have installed the optional KeyesMail library on your iSeries. Up to three Email commands may be used for each page to specify the destination addresses for the document. You can send individual pages of a multi-page document to separate fax numbers and e-mail addresses, by specifying different ¬Fax and ¬Email commands for each page. The ¬Email command lines may be placed anywhere within a page.
If more than one page is to be sent to the same destinations, you may either specify the exact same addresses, or not code a ¬Email command for the additional pages. If you have pages that you do not want to be sent, code a ¬Email or a ¬Fax # command with no parameter.
address specifies the address of the recipient(s). The address can be a KeyesMail mailbox name, a KeyesMail address list name, a *All department-name, or an Internet address.
The following example shows how you could fax one of the Order Confirmations with an overlay and also e-mail it to 3 different recipients.
109
¬Fax # (800) 555-1234 ¬Merge OrderForm ¬¬Email [email protected] ¬Email [email protected] ¬¬Email [email protected] ¬¬Desc OC1234 for ABC Company ¬
#OC1234
ABC Company123 AddressAnytown, USA
15 Parts being ordered $25.00 5 Other parts ordered $16.00
Total $41.00

5 Fax
¬End
The End command is used in documents to force the end of a page. Pages can be made any size from 2" to many feet long. Blank lines at the end of spool file pages are always included unless an ¬End command is used to shorten the page.
You should code an ¬End command whenever you have included any ¬Image commands in your document. ¬Image commands add length to a page making them longer than normal. The ¬End command shows the conversion program where to cut off each page.
For example, the following lines at the bottom of a spooled file shows you how you might cut off the bottom of a page after including an image called Signature. The image would otherwise make the page too long:
¬Fax List distribution-list-id/qualifier
The Fax List command can be used to fax the same pages to multiple recipients, where the recipients are found in a distribution list. Individual pages or groups of pages can be sent to different distribution lists, if desired. Optionally you may code substitution fields in the document to personalize each fax sent. See Broadcast Faxing & Substitution fields later in this chapter for more information.
distribution-list-id/qualifier specifies the name of the distribution list that contains a list of directory entries. Each directory entry should contain a fax phone number in the Fax field.
¬Fax PBX pbxfile-member
The Fax PBX command can be used to fax the same pages to multiple recipients, where the recipient's phone numbers (or e-mail addresses) are found in a PBXFILE member. Individual pages or groups of pages can be sent to different member lists, if desired. Optionally you may code substitution fields in the document to personalize each fax sent. See Broadcast Faxing & Substitution fields later in this chapter for more information.
pbxfile-member specifies the member name of the PBXFILE that contains a list of phone numbers and optionally substitution parameters that you wish this document to be faxed to.
110
Sincerely,¬Image SignatureJohn Hancock
¬End

5 Fax
¬Fax # phone-number
The Fax # command specifies the destination fax number for the document. You can send individual pages of a multi-page document to separate phone numbers, by specifying different ¬Fax commands for each page. The ¬Fax command line may be placed anywhere within a page.
If more than one page is to be sent to the same destination, you may either specify the exact same number, or not code a ¬Fax command for the additional pages. If you have pages that you do not want to be sent, code a ¬Fax # command with no phone number.
phone-number specifies the phone number of the destination fax machine. Be sure to specify the area code for long distance calls. You can also include a special code *P followed by a printer name, as part of the phone number, to print the fax on a LaserJet compatible printer.
The following example shows how you would include a phone number at the top of a document.
Notes: Be sure to include an area code for long distance calls. You may include an area code on all fax numbers, including those in your local calling area, for easier programming. It is not necessary and not desirable to include a "1" prior to the area code on the fax numbers.
The KeyesFax system will automatically alter the phone numbers before dialing them. By default, all numbers that include an area code will be considered long distance numbers, unless they are found in the Local Area Code file. Long distance numbers will have a "1-" added before the area code, automatically.
Local numbers will be stripped of the area code, or dialed without the "1-", as you direct in the Work with Local Area Codes program. More information about this program can be found at the end of this section.
If you need to dial a "9" before each number, to access an outside line, do not include this as part of the phone number. Instead you should code "ATDT9," in the Dialing prefix parameter in the Fax Setup command.
For overseas calls, you must include the entire calling sequence, including: "011", country code, city code, and the phone number.
111
¬Fax # (800) 555-1234 ¬
This is the rest of the document which should normally start on line #3 or lower. This is done because the top 1/4" of each fax page is trimmed off to include the Transmitting Terminal Identification. . . .

5 Fax
¬Font font-name,point-size,text-tightness
The Font command can be used to select any of the available fonts listed in the Appendix. The fonts are all completely scaleable from 4 to 99 point in height and the width can also be scaled using a text tightness value.
The default point size is 11. This will create a font that prints at 6 lines per inch. Another useful point size is 8 which will print at 8 lines per inch. A point size of 22 will create characters exactly twice as large as an 11 point font. Therefore, 22 point characters will print at 3 lines per inch.
There are two different types of fonts, proportional fonts and fixed fonts. Each character of a proportional font will have a different width, whereas, each character of a fixed font will be the same width as the others. The two fixed fonts are LGothic and Courier. The available proportional fonts are Arial, HelvLgt, Sans, Script, Serif, Souvenir, Tekton, and Times.
When you specify a fixed font, the text-tightness value is used to specify the number of characters that will print across the 8 inch fax page. For example, a text tightness of 80 (the default value), when used with a fixed font, would produce a 10 character per inch font and print 80 characters across the page.
When you specify a proportional font, the text-tightness value is used to control the percentage of the normal width of the characters. For example, a text tightness of 100 (the default value), when used with a proportional font, would produce normal characters (100% of their normal width). A value of 50 would produce narrow characters (50% of their normal width). And a value of 200 would produce wide characters (200% or twice their normal width).
font-name is used to select the font. If the font is not found, the system will default to using the LGothic font.point-size is used to control the height of the font. If you do not name a point size, the size will remain the same as it was.text-tightness is used to control the width of the font. For fixed fonts, this value is the number of characters that will print across the page. For proportional fonts, this value is the percentage of the normal width. If you do not give a text tightness, the normal character width will be used according to the point size and the type of font.
Note: The Font command is similar to the easier to use Width command but it has more control over the selection of fonts and their sizes. The Width command only works with the standard fonts of LGothic and HelvLgt with point sizes of 8, 11, & 22. These standard fonts are faster to create, therefore, if you stick with these fonts in most of your document, it will convert faster than if you regularly use non-standard fonts or sizes.
112

5 Fax
For example, lines of text with Font commands are shown below:¬Font ArialArial font, 11 point¬Font Arial,24Arial font, 24 point¬Font Arial,24,50Arial font, 24 point, 50% text tightness¬Font Courier,11,80Courier font, 11 point, 6 lines per inch, 10 chars per inch¬Font Courier,24Courier font, 24 point¬Font LGothic,11Letter Gothic fixed font, 11 point¬Font Sans,11Sans Serif font, 11 point¬Font SerifSerif font, 11 point¬Font SouvenirSouvenir font, 11 point¬Font Script,16,125Script font, 16 point, 125% text tightness¬Font Tekton,16Tekton font, 16 point¬Font TimesTimes font, 16 point
The resulting fax would read as follows:
113

5 Fax
¬From address
The From command is only used if you have installed the optional KeyesMail library on your iSeries and you have named an e-mail address for a recipient.
address specifies the sender's return address.
¬Image image-file/image-member
The Image command is used to include an image with your fax. Any type of image from small strips to multiple page documents can be included using the image command. Any lines prior to the Image command line are included with the first page of the image document. Any lines after the command line are included with the last page of the included image. If you wish the image to start on a new page, be sure to use a ¬Page command just before the ¬Image command.
The resolution of included images must be the same as the resolution of the fax that you are creating. Please see Scaling PC Images to Fax Resolution in the Image chapter for additional information about image resolutions.
Note: You may include any type of image document, however, the conversion program will have to convert any of the other types to a FAX image before it can be included. For best performance, you should only include FAX images.
image-file/ can be optionally specified to designate which file the image member is located in. If no image file is named, the conversion program will search in IMGFILE then FAXFILE for the member.image-member is a mandatory parameter which specifies the image document to be included. For best performance, it should be a FAX image.
For example, the following lines show a letter head and a signature included in the first page of a letter, and a price sheet sent as a new page.
114
¬Image ImgFile/LtrHead
Dear Bill,Our price sheet will follow on page 2.
Thank you,¬Image SignatureJohn Hancock
¬Page 2¬Image PriceSheet¬End
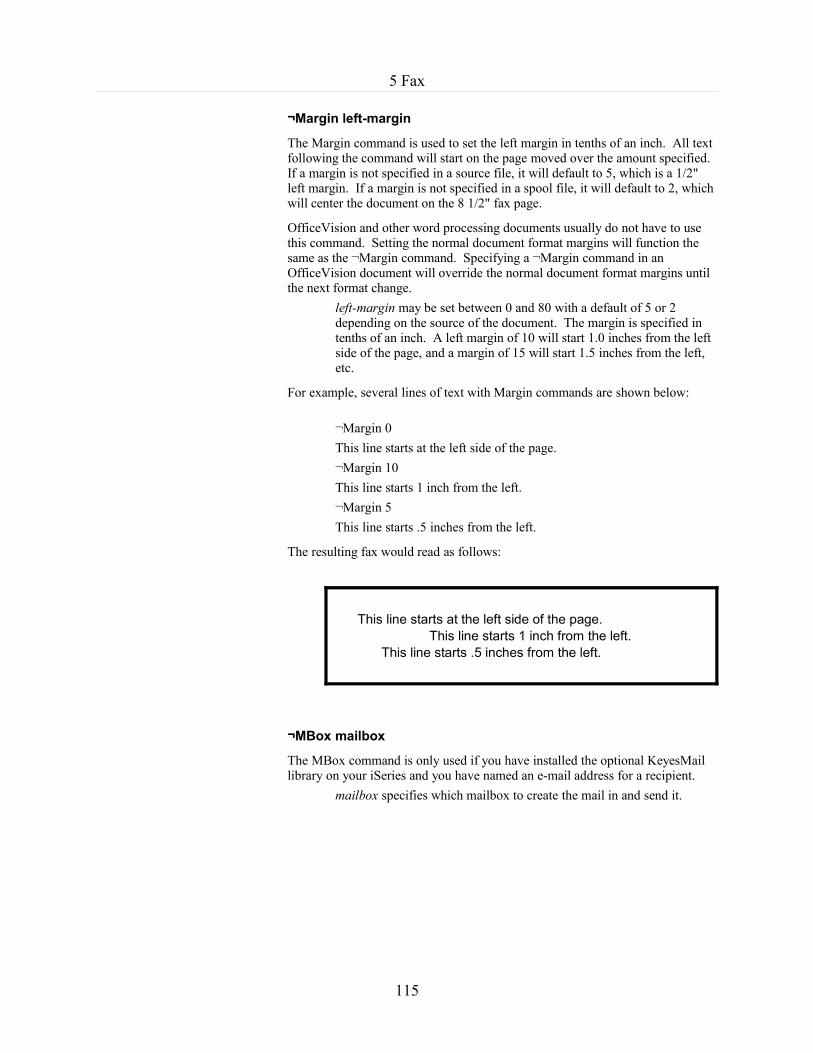
5 Fax
¬Margin left-margin
The Margin command is used to set the left margin in tenths of an inch. All text following the command will start on the page moved over the amount specified. If a margin is not specified in a source file, it will default to 5, which is a 1/2" left margin. If a margin is not specified in a spool file, it will default to 2, which will center the document on the 8 1/2" fax page.
OfficeVision and other word processing documents usually do not have to use this command. Setting the normal document format margins will function the same as the ¬Margin command. Specifying a ¬Margin command in an OfficeVision document will override the normal document format margins until the next format change.
left-margin may be set between 0 and 80 with a default of 5 or 2 depending on the source of the document. The margin is specified in tenths of an inch. A left margin of 10 will start 1.0 inches from the left side of the page, and a margin of 15 will start 1.5 inches from the left, etc.
For example, several lines of text with Margin commands are shown below:
¬Margin 0This line starts at the left side of the page.¬Margin 10This line starts 1 inch from the left.¬Margin 5This line starts .5 inches from the left.
The resulting fax would read as follows:
¬MBox mailbox
The MBox command is only used if you have installed the optional KeyesMail library on your iSeries and you have named an e-mail address for a recipient.
mailbox specifies which mailbox to create the mail in and send it.
115
This line starts at the left side of the page.
This line starts 1 inch from the left.This line starts .5 inches from the left.

5 Fax
¬Merge image-file/image-member
The Merge command is used to merge an image (usually a forms overlay) with the text that follows in the fax message. Only single page images can be merged. Lines of text that follow the Merge command are merged with the image starting at the top. It does not matter whether the image or the text ends first during the merge. If there are more lines of text than will fit within the image, these lines will follow the image. Other images may be included or merged on the same page, if desired, but two images cannot be merged on top of each other.
The resolution of merged images must be the same as the resolution of the fax that you are creating, otherwise the image would appear either too large or too small on the finished fax. Please see Scaling PC Images to Fax Resolution in the Image chapter for additional information about image resolutions.
You may only merge CKX images.
Note: Merging images is not as fast as including images. If you are using the Merge command to place a company logo at the top of a page, you can speed the conversion process considerably by cutting the logo off the top of the image and using the ¬Image command instead of the ¬Merge command.
image-file/ can be optionally specified to designate which file the image member is located in. If no image file is named, the conversion program will search in IMGFILE then FAXFILE for the member.image-member is a mandatory parameter which specifies the image document to be merged. It must be a CKX image.
For example, the following lines show how each page of an order confirmation might be coded in a spool file:
In this example, #OC1234 will be printed on line 3 of the order form merged with its forms overlay called OrderForm.
116
¬Merge OrderForm ¬Fax # (800) 555-1234 ¬¬Desc OC1234 for ABC Company ¬
#OC1234
ABC Company123 AddressAnytown, USA
15 Parts being ordered $25.00 5 Other parts ordered $16.00
Total $41.00
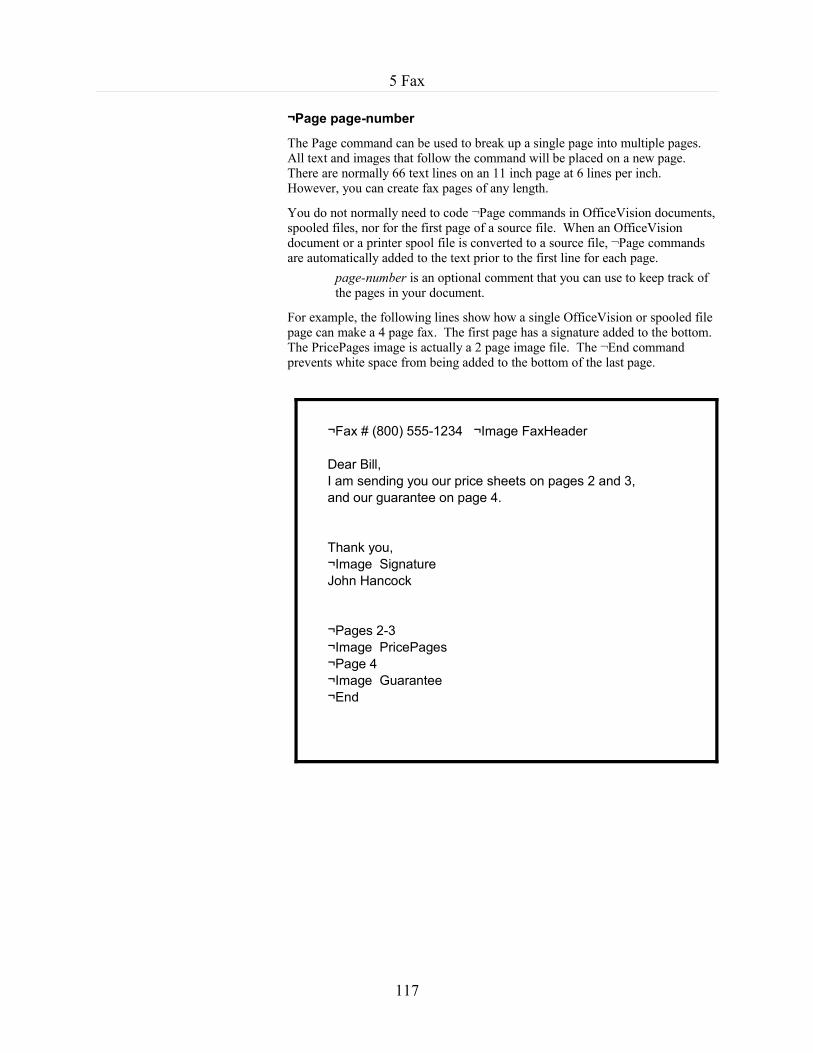
5 Fax
¬Page page-number
The Page command can be used to break up a single page into multiple pages. All text and images that follow the command will be placed on a new page. There are normally 66 text lines on an 11 inch page at 6 lines per inch. However, you can create fax pages of any length.
You do not normally need to code ¬Page commands in OfficeVision documents, spooled files, nor for the first page of a source file. When an OfficeVision document or a printer spool file is converted to a source file, ¬Page commands are automatically added to the text prior to the first line for each page.
page-number is an optional comment that you can use to keep track of the pages in your document.
For example, the following lines show how a single OfficeVision or spooled file page can make a 4 page fax. The first page has a signature added to the bottom. The PricePages image is actually a 2 page image file. The ¬End command prevents white space from being added to the bottom of the last page.
117
¬Fax # (800) 555-1234 ¬Image FaxHeader
Dear Bill,I am sending you our price sheets on pages 2 and 3,and our guarantee on page 4.
Thank you,¬Image SignatureJohn Hancock
¬Pages 2-3¬Image PricePages¬Page 4¬Image Guarantee¬End

5 Fax
¬Px printer-name
There are 3 different printer commands, that you can use to print fax images to any HP LaserJet. The second character of the command determines when the document will be printed.
• ¬PR Printer-name Print all pages to the printer• ¬PF Printer-name Print only failed pages• ¬PS Printer-name Print only sent pages
Note: This command does not print the original spooled file pages to the named printer. It prints the converted fax image, which will include any forms overlay or images that you have included with the document.
¬Space space-amount
The Space command can be used to add white space to a document in tenths of an inch. All text following the command will be moved down the page the amount specified.
space-amount can be specified between 0 and 110 in tenths of an inch. The value 10 will insert 1.0 inches of white space. The value 15 will insert 1.5 inches of white space, etc.
In the following example, the number 12345 will be printed down the page with a .5 inches gap below the words "This is the top line."
This is the top line.¬Space 5 ¬ 12345
¬Subj email-subject
The Subj command is only used if you have installed the optional KeyesMail library on your iSeries and you have named an e-mail address for a recipient.
email-subject is from 1 to 35 characters of e-mail subject to be used with the e-mail message.
¬S1 - ¬S10 substitution-value
These commands can be used to fill the 10 Scan Field Values, described in the Output Queue chapter under the Spooled File Setup Screens. These fields can be used to pass information to your exit programs or as substitution fields into any of the other fields. They are especially useful for passing information from *USERASCII printer files.
¬Template member
The Template command is only used if you have installed the optional KeyesMail library on your iSeries and you have named an e-mail address for a recipient.
member specifies which e-mail message member you wish to use as an e-mail template. The spooled file will be converted into an attachment and added to a copy of this e-mail member, before mailing. The template may contain additional addresses and attachments, as desired.
118

5 Fax
¬Time transmit-time,transmit-date
The Time command can be used to schedule a fax to be transmitted at some time in the future.
transmit-time specifies the time of day that the document should be transmitted. The time should be entered using the HHMM format, and must be from 0000 to 2400.transmit-date can be optionally specified to give the day that the document should be transmitted. The date should be entered using the YYMMDD format. If not specified, the date will default to the current date.
For example, the following command would schedule a fax for 11:15PM for the current date.
¬Time 2315 ¬
119

5 Fax
¬Width text-characters,font-size
The Width command can be used to set standard font styles and sizes. You can choose a proportional font (HelvLgt) or a fixed font (LGothic). The proportional font is best when it is used with regular correspondence, but does not work well for printed matter in columns. The Font command can be used to give you a larger variety of fonts, but these two standard fonts are faster for the fax system to create.
OfficeVision documents do not need to use this command, as normal format changes will set the font characteristics. The font style is set by the typestyle parameter, and the size is set by the lines per inch parameter.
text-characters is used to control the number of characters that can be printed across the page, and can be 0 or any number from 20 to 200 characters, with a default of 0. A width of 0 causes the program to use the proportional font (HelvLgt). Widths from 20 to 200 specify the fixed font (LGothic) that works well when information must be lined up in columns.A width of 80 produces characters at 10 characters per inch. A width of 40 will spread the characters out to 5 characters per inch, while 120 shrinks them down to 15 characters per inch. Any number that you choose will fit that many characters in 8 inches. Divide the Width by 8 inches (the fax paper width) to figure out the characters per inch.font-size is an optional parameter that you can use to control the height of the characters. The choices are N or 6 for normal characters at 6 lines per inch, D or 3 for double high characters at 3 lines per inch, and 8 which prints smaller characters at 8 lines per inch. If the font size is not specified it will default to Normal (6 lpi).
For example, several lines of text with Width commands are shown below:¬Width 96I can type up to 96 characters at 12 CPI on this line.¬Width 80I can type only 80 characters at 10 CPI on this line.¬Width 40,DThis line prints at 5 CPI.¬Width 120,8These smaller characters will print at 8 lines per inch.
The resulting fax would read as follows:
120
I can type up to 96 characters at 12 CPI on this line.
I can type only 80 characters at 10 CPI on this line.
This line prints at 5 CPI.These smaller characters will print at 8 lines per inch.

5 Fax
Faxing in Landscape ModeThe default method of generating a fax is in Portrait mode. You may switch a page to Landscape mode for faxes that are too wide to fit on the standard 8 1/2" wide fax paper.
Text in a Landscape mode fax is turned sideways and can be up to 228 characters long, using one of several different font sizes, with up to 67 lines per page. The top and bottom 1/4" of the fax is always left blank. Any image merged with the text will start down 1/4" from the top to leave room for the Transmitting Terminal Identification (TTI).
A landscape fax page will look as follows:
¬Landscape lpi,cpi,paper-length,merge-file/merge-member
To create a fax in Landscape mode, you must include a ¬Landscape command on the first line of the page. Once you have switched into Landscape mode all other command lines will be ignored, except for ¬Attn, ¬Desc, ¬End, ¬Fax, ¬Page, and ¬Time commands until the next page has started. The next page will revert back to Portrait mode unless you again include another ¬Landscape command.
The KFAXSPLF (Fax Spool File) command can automatically fax spool files in Landscape mode, if you code *YES in the Landscape mode parameter. Spool files routed to the FAXCOM output queue can automatically be faxed in Landscape mode, if you code LANDSCAPE in the Forms type field of the spool file.
You may merge an image, such as a form, with the text by specifying a merge member on the ¬Landscape command. The image must have been scanned in or produced sideways (left side up) for it to have the correct orientation on the final fax. If you choose a font smaller than 10 characters per inch, the program will convert that page using *HIGH resolution. It will not be able to use a *NORMAL resolution forms overlay.
121
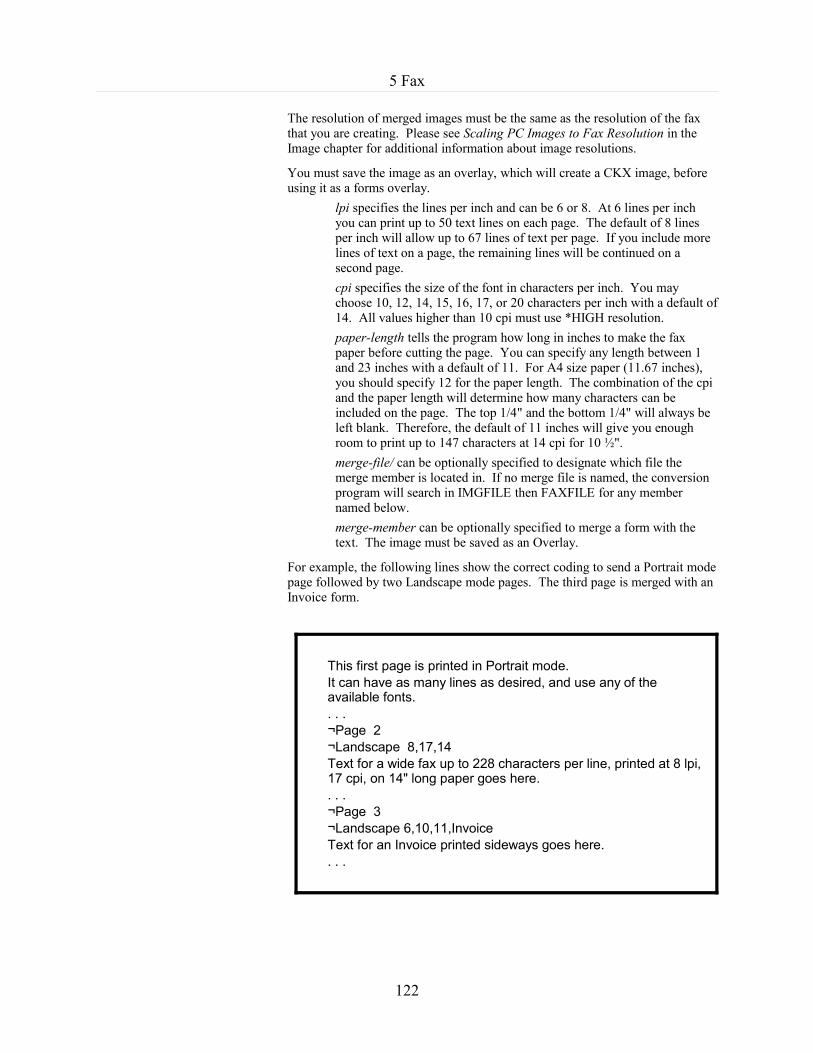
5 Fax
The resolution of merged images must be the same as the resolution of the fax that you are creating. Please see Scaling PC Images to Fax Resolution in the Image chapter for additional information about image resolutions.
You must save the image as an overlay, which will create a CKX image, before using it as a forms overlay.
lpi specifies the lines per inch and can be 6 or 8. At 6 lines per inch you can print up to 50 text lines on each page. The default of 8 lines per inch will allow up to 67 lines of text per page. If you include more lines of text on a page, the remaining lines will be continued on a second page.cpi specifies the size of the font in characters per inch. You may choose 10, 12, 14, 15, 16, 17, or 20 characters per inch with a default of 14. All values higher than 10 cpi must use *HIGH resolution.paper-length tells the program how long in inches to make the fax paper before cutting the page. You can specify any length between 1 and 23 inches with a default of 11. For A4 size paper (11.67 inches), you should specify 12 for the paper length. The combination of the cpi and the paper length will determine how many characters can be included on the page. The top 1/4" and the bottom 1/4" will always be left blank. Therefore, the default of 11 inches will give you enough room to print up to 147 characters at 14 cpi for 10 ½".merge-file/ can be optionally specified to designate which file the merge member is located in. If no merge file is named, the conversion program will search in IMGFILE then FAXFILE for any member named below.merge-member can be optionally specified to merge a form with the text. The image must be saved as an Overlay.
For example, the following lines show the correct coding to send a Portrait mode page followed by two Landscape mode pages. The third page is merged with an Invoice form.
122
This first page is printed in Portrait mode.It can have as many lines as desired, and use any of the available fonts.. . .¬Page 2¬Landscape 8,17,14Text for a wide fax up to 228 characters per line, printed at 8 lpi, 17 cpi, on 14" long paper goes here.. . .¬Page 3¬Landscape 6,10,11,InvoiceText for an Invoice printed sideways goes here.. . .

5 Fax
Text AttributesText attributes define how text will appear on a page, such as italic, bold, underline, superscript, subscript, or reverse image. You can use text attribute control codes in Portrait mode only. Text attributes will be ignored in Landscape mode.
Text attribute control is achieved using either the negate symbol (¬) or a PC's caret (^) followed immediately by an i, b, u, s, S, or r to produce italicized, bolded, underlined, subscripted, superscripted , or reverse image characters, respectively. Any letter, word, or phrase on a text line can be surrounded by these text attribute control codes to change their characteristics.
If you want to italicize characters you would place (¬i) before and after the characters. To bold a word, you would surround the word with (¬b), etc. The text attribute control codes can be used in any combination except for both subscript and superscript together.
Substitution fields in distribution lists cannot contain any text attribute control codes, but you can surround a substitutable variable in the text file with any codes desired which will affect the entire substituted variable.
Note: The pairs of text attribute control codes on a text line are stripped out of the final text to be converted, without using up places within the line.
For example, several lines of text with text attribute control codes are shown below:
The resulting fax would read as follows:
123
This word is in ¬iitalics¬i this one is ¬bbolded¬b.This word is ¬uunderlined¬u.These are both ¬b¬ibold & italics¬b¬i.This line has a subscripted number. Water = H¬s2¬sOThis line has a superscripted number. E=MC¬S2¬S¬r This line is in reverse image. ¬r
This word is in italics this one is bolded.This word is underlined.These are both bold & italics.This line has a subscripted number. Water = H2OThis line has a superscripted number. E=MC2
This line is in reverse image.
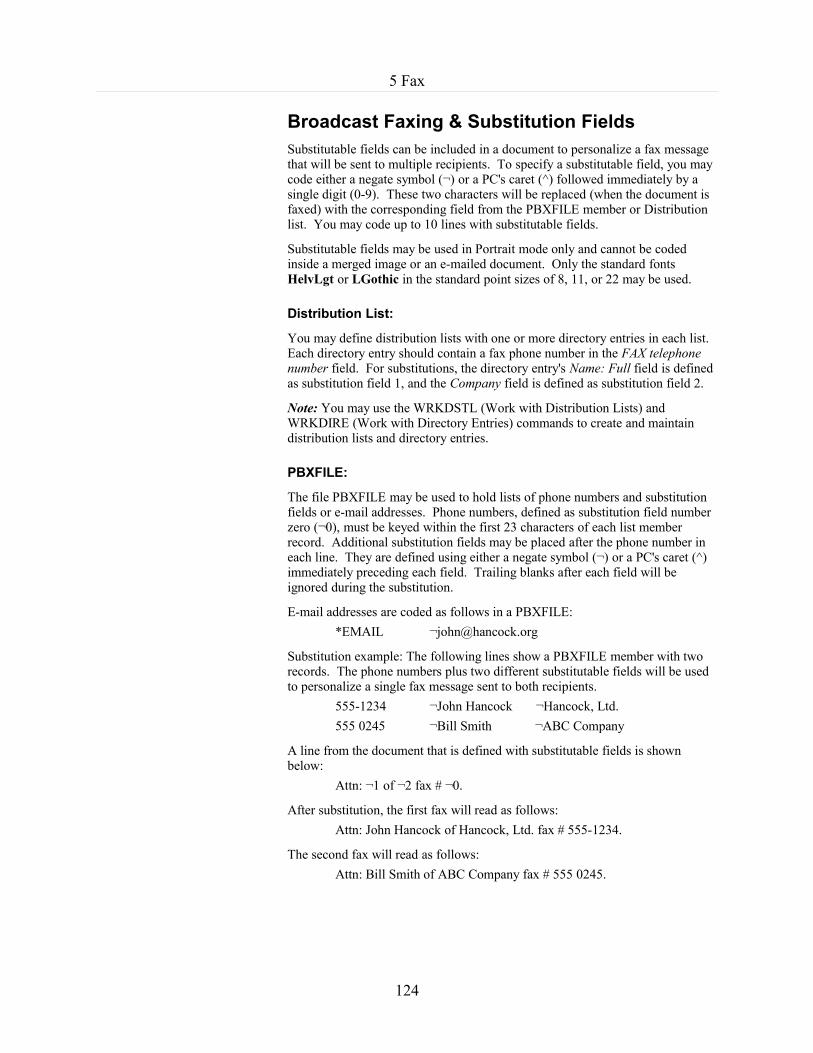
5 Fax
Broadcast Faxing & Substitution FieldsSubstitutable fields can be included in a document to personalize a fax message that will be sent to multiple recipients. To specify a substitutable field, you may code either a negate symbol (¬) or a PC's caret (^) followed immediately by a single digit (0-9). These two characters will be replaced (when the document is faxed) with the corresponding field from the PBXFILE member or Distribution list. You may code up to 10 lines with substitutable fields.
Substitutable fields may be used in Portrait mode only and cannot be coded inside a merged image or an e-mailed document. Only the standard fonts HelvLgt or LGothic in the standard point sizes of 8, 11, or 22 may be used.
Distribution List:
You may define distribution lists with one or more directory entries in each list. Each directory entry should contain a fax phone number in the FAX telephone number field. For substitutions, the directory entry's Name: Full field is defined as substitution field 1, and the Company field is defined as substitution field 2.
Note: You may use the WRKDSTL (Work with Distribution Lists) and WRKDIRE (Work with Directory Entries) commands to create and maintain distribution lists and directory entries.
PBXFILE:
The file PBXFILE may be used to hold lists of phone numbers and substitution fields or e-mail addresses. Phone numbers, defined as substitution field number zero (¬0), must be keyed within the first 23 characters of each list member record. Additional substitution fields may be placed after the phone number in each line. They are defined using either a negate symbol (¬) or a PC's caret (^) immediately preceding each field. Trailing blanks after each field will be ignored during the substitution.
E-mail addresses are coded as follows in a PBXFILE:*EMAIL ¬[email protected]
Substitution example: The following lines show a PBXFILE member with two records. The phone numbers plus two different substitutable fields will be used to personalize a single fax message sent to both recipients.
555-1234 ¬John Hancock ¬Hancock, Ltd.555 0245 ¬Bill Smith ¬ABC Company
A line from the document that is defined with substitutable fields is shown below:
Attn: ¬1 of ¬2 fax # ¬0.
After substitution, the first fax will read as follows:Attn: John Hancock of Hancock, Ltd. fax # 555-1234.
The second fax will read as follows:Attn: Bill Smith of ABC Company fax # 555 0245.
124

5 Fax
Faxing Forms Design or PCL5 Printer DataForms design companies will typically download your forms to your LaserJet printer then send only your regular printer data to the printer with macros added to merge the appropriate form with each page of data. They do this for more efficient processing. In this way, the form does not have to be downloaded and processed by the printer for every page.
If your forms design software creates PCL5 printer data, the KeyesFax software can convert and fax the completed documents, with form, directly from the forms design software.
However, in many cases, you can get better performance using the KeyesFax method of merging a forms overlay with your regular SCS printer files, before the forms design software processes the data. This method skips a lot of steps, saving a lot of computer time in the process. You simply have to create a forms overlay using the data from your forms design software, then merge this form with your original SCS printer files for faxing.
To prepare a forms overlay:
The following instructions will convert a PCL5 printer file into a forms overlay which can be merged with your standard SCS printer data for faxing.
1. Create the form as usual using your forms design software.
2. Print the form, without any data, to a spool file with a printer device type of *USERASCII.
3. Place your fax machine's phone number in the User Data field, then move the spool file entry to our FAXCOM output queue and release it.
4. If the fax communication system is running correctly, it should automatically convert the form into a FAX image and fax it to your fax machine.
5. If the form looks good, go on to step 6 below. If it is not complete, this may be caused by missing PCL Macro data. See How to use PCL Macros on the following page, then repeat back to step 3 above.
6. Start the Work with Fax Queue (WRKFAXQ) program and find the new document in your queue. The document member that you just faxed will have a name that starts with HP followed by a number that corresponds to the date and time it was created.
7. Code an S (Save as Image/Overlay) in the Options column.
8. Fill out the appropriate parameters on the Save as Image or Overlay screen.
Note: You may call the Overlay anything that you wish and place it in any Image file, we recommend that you place it in IMGFILE. When making an Overlay, you may adjust the image up, down, left, or right, as needed for alignment with your SCS printer files.
125

5 Fax
To merge the forms overlay with your fax:
The forms overlay that you created using the previous instructions is ready for merging with your printer files. There are three different methods of specifying that you want a form to be merged with a printer file being faxed:
• You can specify the form name in the Front side overlay field of your spooled file and place the spooled file in our FAXCOM output queue.
• You can use the ¬Merge command in the printer file for Portrait mode pages or the ¬Landscape command for Landscape pages.
• You can specify the Merge image member name parameter in the KFAXSPLF command.
How to Create PCL5 Printer DataThe KeyesFax conversion programs can convert PCL5 printer files into FAX images. PCL5 printer files can include:
• Scalable Fonts from 4 to 99 point• Raster graphics• GL/2 vector graphics• Shading & cross-hatch patterns• Pie charts• Macros
We have supplied some tools that will allow you to create PCL5 printer data directly from your RPG or COBOL programs. PCL5 and GL/2 vector graphics data contain escape sequences that all start with an ASCII Esc character followed by standard ASCII characters (in most cases).
We have provided a program FAXEBCPCL (Fax EBCDIC PCL Spool Files) that transforms standard EBCDIC spool files into ASCII PCL, converts them to a fax images and faxes them. It will translate the EBCDIC negate character (¬) into an ASCII Esc character, strip out blanks at the ends of each line, and add Carriage Return/Line Feeds for each print line to the data. Using this technique you should be able to print any type of PCL graphics, lines, boxes, shading patterns, etc. using regular RPG or COBOL SCS printer files. For example, the following line in a printer file would print a line across the page:
¬*p212y0X¬*c2b3326a0P
126
5 Fax
Fax Communication Queues and DevicesThe Fax Communication system contains a number of queues that will assist you in controlling the system.
Message QueuesSend and Receive Fax messages are routed to each user's message queue and a copy goes into a FAXCOM message queue. They keep you informed about what faxes have been sent or received. You can display the messages in this queue from the Fax Communication menu, using a function key in the Work with Fax Lines program, or by entering DSPMSG FAXCOM on any command line.
Job QueuesAll outgoing fax jobs are run through the FAXCOM job queue. Conversions are scheduled in the IMGCONV job queue and image printing is scheduled in the IMGPRT job queue. When you schedule a fax for later transmission, the job is placed on HOLD in the FAXCOM job queue and an entry is made in the FAXSCHED file. You can work with the jobs in these job queues using a function key in the Work with Fax Lines program or by entering our WRKFCJOBQ command.
Holding or Releasing the Job QueuesWhen you start fax communication using our STRFAXCOM program, the system will automatically start the FAXCOM subsystem and all the job queues. The FAXCOM job queue is then held and released, as necessary, by the system to keep the fax lines active. When you end fax communication for all the lines, the system will hold the FAXCOM job queue, but will continue to run the IMGCONV and IMGPRT job queues. You can hold or release these job queues using our FCJOBQ command or by ending the FAXCOM subsystem.
Ending the Fax Communication SubsystemThe FAXCOM subsystem is automatically started when you start fax communication using our STRFAXCOM program, and normally you do not need to end the subsystem. But, if you will be backing up the KeyesFax library or powering down the system, you will need to end all fax lines and the FAXCOM subsystem before doing this. You can end the FAXCOM subsystem using an item on the Fax Communication menu or by entering FCSBS *END.
127

5 Fax
Output QueueAny spool file that you route or move to the FAXCOM or FAXNGT output queues will be automatically converted and faxed or e-mailed.
The conversion program will search in the spooled file for any ¬Fax or ¬Email commands for the destination. Phone numbers placed in the User Data field of the spool file will override any commands found in the data. Key the area code and the fax number in the available 10 characters of the field and KeyesFax will either add a '1' to the front of the number for long distance dialing or strip out the area code for local calls.
If phone numbers are printed in the spool file without a ¬Fax command, you can specify the location of those numbers in the User data field, using the following format: (L=ll,C=ccc) where ll is the line number and ccc is the column number of the fax phone number on each page of the printout.
The system will use the spool file's Output priority as the Fax job priority and will use the Accounting code field in the Fax History Log. The Save file after printing field determines whether or not the spool file will be deleted or placed on HOLD after it is converted to a FAX image.
The Record length field will be used to select a font that will be small enough to fax the entire page in Portrait mode. You can override the font size using the Forms Type field. You may code 'WIDTH xxx' where xxx is the number of columns to be faxed from 80-200. Or, you may code 'LANDSCAPE' to fax the spool file sideways. This will fax up to 147 column wide documents on an 11 inch long page at 14 cpi.
The Starting page and Ending page fields can be used to fax only the pages desired.
You may merge a form with the spool file by coding the name of the forms overlay in the Front side overlay field. The forms overlay should be a CKX image placed in IMGFILE. You can adjust the top and left margins of the text in the form by specifying the Offset down and Offset across fields of the Front side overlay in tenths of an inch.
E-mail addresses can be coded within the spooled data using a ¬Email command. An address can be placed in the User Defined Data field of the spooled file attributes. This is done by coding ¬Email followed by the address anywhere in the User Defined Data field. Fax numbers will override any e-mail addresses.
You may also code an ¬Attn command, a ¬Desc command and any of the ¬Cx (coversheet) commands in the User Defined Data field to pass this information to KeyesFax.
Note: The system will change the Forms Type field to *SCHEDULED when the program has started the conversion process.
128

5 Fax
The Fax QueueAll outgoing fax activity for each user can be tracked and controlled using a Fax Queue. Using our WRKFAXQ (Work with Fax Queue) program you can change many of the fax parameters, place faxes on hold, delete, display, print, and restart them. This is available on the Fax Communication menu or by entering WRKFAXQ on any command line. More information can be found in the chapter titled Fax Queue.
The Receive QueueAll inbound faxes are logged into a Receive Queue. Using our WRKRCVQ (Work with Receive Queue) program you can refax all or some of the pages, change the description, copy, delete, display, edit, print, rename, route, save, add notes, and change the status for the faxes. The status will change from *New to <blank> after you access a new fax. You can manually change the status to anything that you would like. The Receive Queue can be accessed from the Fax Communication menu or by entering WRKRCVQ on any command line. More information can be found in the chapter titled Receive Queue.
The Fax Schedule FileEach outgoing fax that is scheduled for a later time is placed on hold in the FAXCOM job queue, and an entry is made in the FAXSCHED file. You can display the entries in FAXSCHED to determine what has already been scheduled. This can be done using a function key in the Work with Fax Lines program.
Fax Schedule file layout:01 - 03 FAX04 - 13 Job Name (SFddhhmmss)14 - 23 User Id24 - 29 Scheduled Date (yymmdd)30 - 33 Scheduled Time (hhmm)34 - 43 Document Name44 - 48 Not used
Varying the Fax Line, Ctl, and DeviceThe FAXCOM line, controller, and device are automatically varied ON or OFF as needed by the system, when you start or end each fax line. However, you may find it necessary to manually vary the line ON or OFF for testing purposes or after certain communication failures. You can vary the FAXCOM line ON or OFF using the VRYFAX command.
Note: You can tell when the line is varied ON correctly when the TR LED is lit on the front panel of the modem.
129

5 Fax
The Fax History LogEach time one of the fax programs attempts to send or receive a fax, an entry in a Fax History Log (LOGFILE) is created. This file is provided for accounting purposes only.
Fax History Log layout:01 - 03 'SND' or 'RCV'04 - 13 Document Name14 - 23 User Id24 - 48 Called or Calling Phone Number49 - 54 Date (yymmdd)55 - 58 Time (hhmm)59 - 60 Successful Pages61 - 80 Reason for Failure81 - 81 Fax line #82 - 85 Connect Seconds86 - 90 Accounting Code
Note: The Fax History Log was not intended to be used to check the status of a fax line or to check if a fax had been sent. That is better done using the Fax Queue or by checking the FAXCOM message queue or one of the other log files called SENTFILE and FAILFILE.
Printing a Fax History LogYou can print three different kinds of logs, by user, by date, and by accounting code. You may start the printout from an item on the Fax Communication menu or by running the FAXLOG command with the following parameters:
Period beginning date:
Key the date in the appropriate format for your system. This is used in selecting the entries for the printout.
Period ending date:
Key the date in the appropriate format for your system. This is used in selecting the entries for the printout.
Sort by:
The default value is DATE which prints a report for each day that there was activity between the period beginning and ending dates. You can enter USER which prints a report for each user between the two dates, or ACCT which prints a report for each accounting code between the two dates. The report by user only lists outgoing faxes.
130

5 Fax
Submit to batch or interactive:
This defaults to *BATCH. You can specify *INTER which will cause the program to run interactively instead of being submitted to the default job queue.
Purging the Fax History LogYou should periodically purge old entries from the Fax History Log. If you do not, it will continue to grow. You can purge the log using an item on the Fax Communication menu or by running the FAXLOGP command with the following parameters:
Period ending date:
Key the date in the appropriate format for your system. All entries on or before this date will be purged from the log.
Submit to batch or interactive:
This defaults to *BATCH. You can specify *INTER which will cause the program to run interactively instead of being submitted to the default job queue.
131

5 Fax
Ongoing Fax System MaintenanceOngoing maintenance that is needed for the Fax system consists of removing old log entries from the Fax History Log, SENTFILE, and FAILFILE, and deleting old entries from the Fax Queue and the Receive Queue.● Fax History Log (LOGFILE)
This log contains a history of all fax line activity. It can be purged as described on the previous page.
● SENTFILEThis log file contains a confirmation of all faxes that were successfully transmitted. It is a source file that can be purged of old entries as described below.
● FAILFILEThis log file contains an entry for each fax that failed to be transmitted after all retries were exhausted. It is a source file that can be purged of old entries as described below.
● OUTFILEThis is a file that contains converted FAX images used for outbound fax transmissions. Members are automatically removed as old faxes are deleted from the Fax Queue.
● RCVFILEThis is a file that contains received FAX images for viewing, printing, or archiving. Members are automatically removed as old faxes are deleted or routed out of the Receive Queue.
● SPLFILEThis is a file that contains a copy of the original text for each of your regular *SCS printer files that you send as a fax. Members are automatically removed as old faxes are deleted from the Fax Queue.
Important Note: The files OUTFILE, RCVFILE, and SPLFILE will continue to grow in size, as new FAX image members are added. They will eventually use up all of your disk space if you do not regularly purge old fax entries from the Fax Queue and Receive Queue, as described on the following pages.
Purging Fax LogsYou can access SENTFILE or FAILFILE from the FCMENU or by using WRKIMGF (Work with Image Files).
You may purge these History Files using an item from FCMENU or by using the command PURGELOGS (Purge Fax Logs). This command will keep the last 100 to 15,000 entries in the log files, for future reference.
132
5 Fax
Purging the Fax QueueEach time a fax is prepared for transmission, a member is created in SPLFILE, if it was a spooled file, and in OUTFILE to contain the outbound Fax image. These files are used for viewing the original data and/or restarting failed faxes. You should regularly purge old entries from the Fax Queue, to keep it clean. If you do not, these files will continue to grow until they use up all of your available disk space.
Each user can keep their own Fax Queue clean, by manually deleting the faxes out of their Fax Queue. This can be done using the program WRKFAXQ (Work with Fax Queue). They can use option 4 (Delete) on individual fax entries, or press F7 (Delete all sent faxes) to purge many entries, at one time.
You may also purge the Fax Queue using the command PURGEFAXQ (Purge Fax Queue) in an interactive or batch mode with the following parameters:
Period ending date:
All faxes will be purged that were either sent or attempted to be sent on or before this date. If you specify *TODAY, today's date will be used for the period ending date. You can specify *YESTERDAY to purge all faxes that were sent prior to today.
The default value of *LASTWEEK will purge faxes that were sent on or before this day last week. Also available is *LASTMONTH which will purge faxes that were sent on or before this date last month. Dates are given in your system's date format (QDATFMT).
User to purge:
The default value of *CURRENT is used to purge your own faxes. You may specify another specific user or *ALL may be used to purge all user's faxes. You must have *SECADM special authority to be able to specify *ALL. Otherwise, you must have been given specific authority by a user in order to purge their faxes.
Type of faxes to purge:
The default value of *SENT is used to purge only faxes that have been sent or were consolidated and sent on or before the period ending date. If you specify *FINISHED the system will also remove any other fax that was attempted but failed on or before the period ending date. Some types of failures do not record a date in the Fax Queue and therefore will not be purged using *FINISHED. You can specify *ALL to purge all types of faxes finished or not. If you specify *ALL the creation date will be used in place of the Sent date to do the purge.
Submit to batch or interactive:
The default value of *BATCH will cause the program to be submitted to your default job queue. If you specify *INTER the system will purge the Fax Queue interactively.
133

5 Fax
Purging the Receive QueueEach time a fax is received by the iSeries, a member is created in RCVFILE to contain the Fax image. This file is used for printing, viewing, refaxing, and routing the Fax to other locations. You should regularly purge old entries from the Receive Queue, to keep it clean. If you do not, this file will continue to grow until it uses up all of your available disk space.
The Fax operator and each user that had received faxes routed to them can keep their own Receive Queue clean, by manually deleting the faxes out of their Receive Queue. This can be done using the program WRKRCVQ (Work with Receive Queue). They can use option 4 (Delete) on individual fax entries to purge them.
You may also purge the Receive Queue using the command PURGERCVQ (Purge Receive Queue) in an interactive or batch mode with the following parameters:
Period ending date:
All faxes will be purged that were received on or before this date. Use the system date format (QDATFMT). If you specify *TODAY, today's date will be used. You can specify *YESTERDAY to purge all faxes that were received prior to today.
The default value of *LASTWEEK will purge faxes that were received on or before this day last week. Also available is *LASTMONTH which will purge faxes that were received on or before this date last month.
User to purge:
The default value of *CURRENT is used to purge your own faxes. You may specify another specific user or *ALL may be used to purge all user's faxes. You must have *SECADM special authority to be able to specify *ALL. Otherwise, you must have been given specific authority by a user in order to purge their faxes.
Status of faxes to purge:
The default value of *ALL is used to purge all faxes regardless of their status. You can specify *NEW, CURRENT, or ARCHIVED to purge only faxes with that status.
File to purge from:
The default value of RCVFILE tells the program to only purge faxes that are located in RCVFILE. You can specify another file or *ALL which will purge all faxes defined in the Receive Queue regardless of their location.
Submit to batch or interactive:
The default value of *BATCH will cause the program to be submitted to your default job queue. If you specify *INTER the system will purge the Receive Queue interactively.
134

5 Fax
Automatic Printing of Inbound FaxesYou can set up your system to automatically print your inbound faxes on any HP compatible laser printer available to your iSeries. Each inbound fax line can print to the same or a different printer, as desired.
Setting up for Auto PrintingSet the Route to Printer Device parameter to the printer device name that you wish to use, in the FAXSETUP (Fax Communication Setup) program. Be sure that the printer device is an HP compatible laser printer. This will cause the inbound fax program to print each fax after it is received. If you change this parameter to ' ' for any of the fax lines, the program will stop printing each received fax from that line.
The PRTIMG program is used to print the faxes. It is placed on the IMGPRT job queue. You may hold, release, or work with the IMGPRT job queue using a function key in the Work with Fax Lines program or running FCJOBQ or WRKFCJOBQ commands.
You may manually print faxes using the PRTIMG command or using option 6 (Print) in the WRKRCVQ (Work with Receive Queue) program.
135

5 Fax
Automatic Routing of Received FaxesYou can set up your system to automatically route inbound faxes to different printers, image files, message queues, or directly to E-mail (if you have the optional KeyesMail system). Routing is based on the sender's phone number, the fax line that it was received on, or based on DID (Direct Inward Dial) routing. As each fax is received, the system checks for a KeyesFile member called ROUTEFAX. If it exists, the fax will be routed per those instructions.
How the Routing Entries WorkThe sender's fax number is first cleaned up by stripping off any leading blanks, 0's or 1's and any embedded non-numeric characters. This number is then compared to each routing entry (for the length of the routing entry) to see if it matches. The routing entries are processed in alphabetical order as they are found in the card file.
Each matching routing entry causes that card to be processed until it is terminated or it runs out of routing entries.
Maintaining the ROUTEFAX MemberRouting entries are maintained using the KeyesFile Information Manager program as described in an earlier Chapter. You can start the program by typing the following on a command line:
Enter: KF ROUTEFAX
Routing Phone#:This number is compared to the cleaned up sender's fax phone number. Matching entries cause the card to be processed. An * can be used to signify all remaining fax numbers. You can adjust the order that the routing entries are
136

5 Fax
processed by inserting one or more leading spaces to cause a routing entry to fall prior to others.
For example: Suppose you wanted faxes from phone number 2065551212 to be routed to one place, the remaining numbers in area code 206 to be routed differently, and all the rest of the faxes to be routed to a third place. You would need to place routing entry 2065551212 prior to entry 206 followed by the last entry * in the card file. To do this, you will need to key two leading spaces in front of 2065551212, one leading space in front of 206, and no spaces in front of *. This will cause the routing entries to fall alphabetically in the correct order for processing, as follows:
1st entry: 2065551212 2nd entry: 206
3rd entry: *
For DID routing, you must enter the DID routing value as DID:xxx in the Routing Phone # field. (Where xxx = the DID extension from 1 to 7 digits.)
Description:
You may key a line of description for each routing entry.
Routing Line#:
To route based on the Fax line that the fax was received on, you may enter a two digit fax line number in this field. Enter 01for fax line #1, 02 for line #2, etc.
To Print Queue:
To route a received fax to an HP compatible laser printer, place the printer device name in this field.
To Message Queue:
This is used to route a message to a specific message queue.
To Image File:
This can be used to route a copy of the received fax to the specified image file.
To E-mail Address:
You can name any e-mail address, mailbox, or address list to have a copy of the received fax sent as a PDF attachment. This option requires the KeyesMail libraries to be on the library list.
Remove RcvFile member :
If you key a Y in this field, the received fax image member will be removed from RCVFILE only if the image was also routed to either a printer or another image file.
Terminate routing:
Key a Y in this field to terminate the routing program whenever this card is selected for processing. This gives you a method of routing each received fax to more than one location.
137
5 Fax
Other Topics
Previewing a FAX ImageYou will be able to preview FAX images before they are sent if you purchased the optional PC Tools package. To preview a fax you must prevent the iSeries from sending the fax until you have had a chance to view it. This can be done by scheduling the fax for a later time using a ¬Time command in your document.
You can display the fax using the HTTP Server. When you are ready to fax the document, simply change the scheduled time to a time that has already passed.
Using Fax Accounting CodesAccounting codes can be assigned to each outbound fax. If it is not specifically assigned on the KFAXSPLF or KSNDFAX commands, the system will use a subset of the Job Accounting Code. A subset of the Accounting Code for a spool file that is routed to FAXCOM will be used as the Fax Accounting Code. The first 5 characters of the Accounting Codes are used for the Fax Accounting Code. This subset can be changed to a different set of 5 characters, if necessary.
IBM's CHGUSRPRF (Change User Profile) command can be used to assign Accounting Codes to each user, if desired. Computer generated faxes would get their own Accounting Codes, by assigning the codes to the spool files. This will give you an easy way to separate fax usage by department. The Fax History Log will be able to list and summarize total usage for each Accounting Code.
Fax Job PrioritiesEach outbound fax can have a priority (1-9) assigned to it, with 1 being the highest and 9 the lowest priority. The default priority is 5. For large computer generated fax jobs with multiple faxes, you may wish to lower the priority (say to 6) so that more important faxes will not be held up waiting for the large jobs to complete. This priority only affects how soon a fax will be scheduled, not how fast the job runs, so it will not affect your systems performance. Higher priority faxes will always be scheduled prior to the lower priority ones.
The output priority in spool files routed to FAXCOM will be used as the Fax Job Priority.
Tracking Your FaxesYou may use the Work with Fax Queue program to track and control your faxes. The system will automatically send a completion message to the user who issued each fax job, if you code Y in the Send Completion Messages parameter in the FAXSETUP program. For program generated faxes, you may want to route these completion messages to a special message queue for the job to track the progress, or you can specify *NONE to reduce the number of messages generated.
Successful and failed messages are also logged in SENTFILE and FAILFILE to be used as proof of delivery or for resending broadcast faxes. The messages in these files are separated into individual members by User.
138
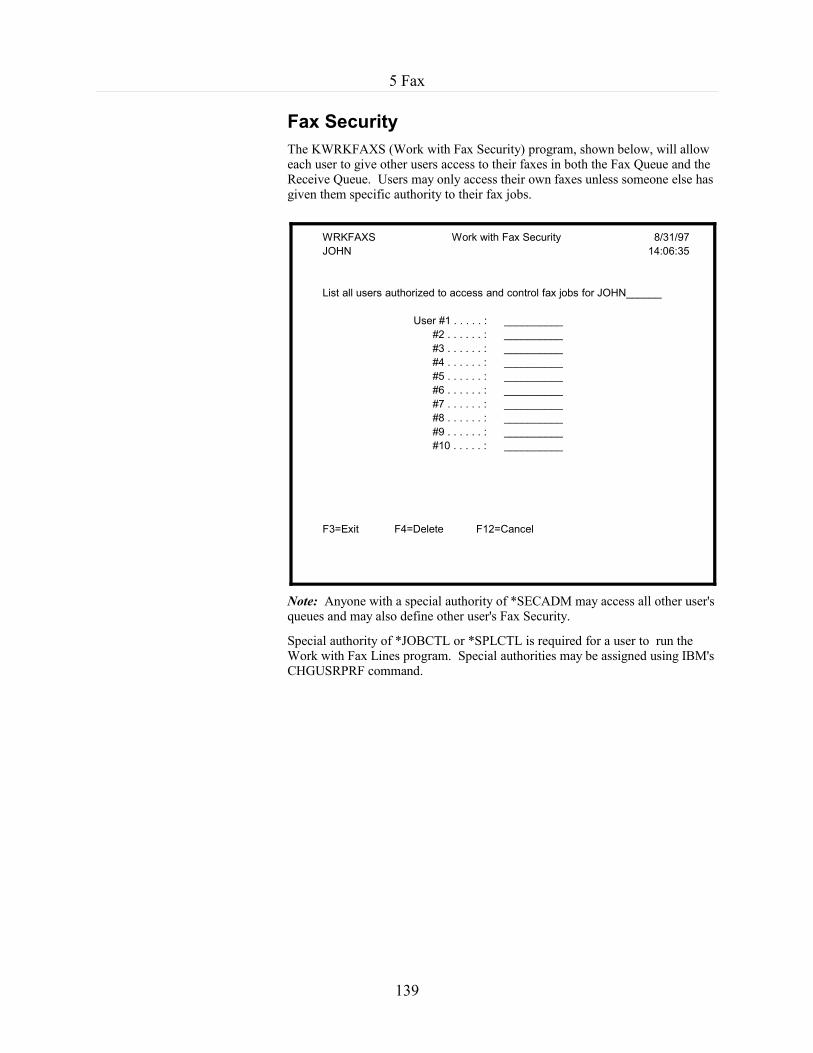
5 Fax
Fax SecurityThe KWRKFAXS (Work with Fax Security) program, shown below, will allow each user to give other users access to their faxes in both the Fax Queue and the Receive Queue. Users may only access their own faxes unless someone else has given them specific authority to their fax jobs.
Note: Anyone with a special authority of *SECADM may access all other user's queues and may also define other user's Fax Security.
Special authority of *JOBCTL or *SPLCTL is required for a user to run the Work with Fax Lines program. Special authorities may be assigned using IBM's CHGUSRPRF command.
139
WRKFAXS Work with Fax Security 8/31/97JOHN 14:06:35
List all users authorized to access and control fax jobs for JOHN______
User #1 . . . . . : __________#2 . . . . . . : __________#3 . . . . . . : __________#4 . . . . . . : __________#5 . . . . . . : __________#6 . . . . . . : __________#7 . . . . . . : __________#8 . . . . . . : __________#9 . . . . . . : __________#10 . . . . . : __________
F3=Exit F4=Delete F12=Cancel

5 Fax
Local Area CodesThe KWRKLACS (Work with Local Area Codes) program, shown below, will allow you to enter data into a Local Area Code file called KFLAC.
The Local Area Code file should contain an entry for each Area that is within your local calling area. You can get this information from your local phone book.
By default, the KeyesFax system will assume that all phone numbers that include an area code, are long distance. It will include a (1) in front of all 10 digit numbers that are not found in the Local Area Code file.
The Local Area Code file allows you to tell the system how to dial phone numbers within your local calling area. You can direct it to either dial the Area Code without a (1) in front, or dial just a (1) then the seven digit number, or just dial the seven digit number without the area code.
Area Name field:
Name each area separately that has a different area code or a different way to dial the local number. Your phone book will probably already have a name for each of the different areas.
Area Code field:
Give the area code for the Area Name that you are describing.
140
WRKLACS Work with Local Area Codes 8/30/04JOHN 14:06:35
Area Name: Seattle Area Code: 206 Dial: A=Area Code, 1=OnePrefixes:
All
More...Key (ALL) in the first Prefix if entire area code is part of local calling area.
F3=Exit F7=Previous Area F8=Next Area F12=Cancel
Enter all prefixes within each of your local calling areas, then press Enter.

5 Fax
Dial field:
The Dial field allows you to tell the system how to dial the phone numbers within this Area. blank This tells the system to dial only the seven digit number. The
area code will be stripped out of the number. (A) This tells the system to dial the area code, but not (1), in front
of the seven digit number. (1) This tells the system to dial a (1) in front of the seven digit
number, after stripping out the area code.
Prefixes:
Key all of the phone number prefixes that are within this Area, then press the Enter key. All the prefixes within an Area must have the same method of dialing. This information can be obtained from your local phone book, usually under the title (Local Calling Area).
If you have more prefixes than will fit on one screen, you may use the Roll keys to access more spaces.
You may add additional prefixes in the spaces at the end of each screen, then you must press the Enter key. The new prefixes will be added to the Area, and redisplayed to you in numerical order.
You may delete prefixes from an Area by removing them from the screen, then you must press the Enter key.
If all the prefixes are within an Area you may code ALL in the first prefix field.
Exporting Fax ImagesYou can Export a Fax image to the IFS as either a PDF document or as a TIFF image. The command KEXPFAX can be used to export any Fax to the IFS. Both the Fax Queue and the Receive Queue have an option that you can use to export a fax. The selected fax image will be converted to the selected type and copied to the IFS into the Path and Filename that you supply. If you leave the Filename parameter blank, the original Fax image name will be used. If you do not supply a filename extension the appropriate extension (.pdf/.tif) will be automatically applied.
141

5 Fax
- - - - blank page - - - -
142

6 Message Editor
6 6 Message EditorMessage Editor
The Message Editor was designed to be a fast and extremely easy to use editor for preparing quick fax messages. It can also be used to quickly prepare a coversheet when faxing spool files or images from your applications.
You can start the editor from the KeyesFile Information Manager using F2 (Send Fax), from a command line (using FAXMSG), from PDM (using FM), from FAXASCII, FAXAFPDS, KFAXSPLF or KSNDFAX when you call for a coversheet, or from any of your applications.
The Message Editor has the ability to preset the recipient's name, company, and phone number, your name, company, and phone number(s), and any standard message text to make your job easier. It also allows your applications to pass new values for all of the sender and recipient fields.
Using a CoversheetBefore calling for a coversheet, you must create a message member to be used for the coversheet. You can do this using item 9 (Fax a Message) from the FCMENU or using the FAXMSG command. Key in the message to be used on the coversheet, plus as much of the Sender information that will be the same for all the coversheets.
The recipient information and many of the other fields can be passed from your applications to the coversheet. This can be done using command parameters or by coding fax commands inside your spooled files.
Faxing Messages from KeyesFileKeyesFile, the information manager, will automatically call the Message Editor for you when you move the cursor to a message file/member name in your data, and press F2 (Send a Fax). The file name must have the letters MSG as part of the name so that KeyesFile will recognize it as a Message file. For example:
MSGFILE/member-name
If you call the Message Editor from KeyesFile, it will pass as much of the recipient information that it can find automatically for you. It looks through your current card for any line with the heading Name or Contact and passes that information to the editor. It looks for any line with the heading Company and passes that data. Lastly it looks for any heading line with the letters Fax in it and passes that data as the Fax phone number.
Message FileYou may use either MSGFILE or COVERFILE to build your coversheets. If you use the "Edit the Cover Page" feature of KFAXSPLF command, changes made to COVERFILE members are temporary. They only last for the current fax. Changes that are made to MSGFILE members are permanent. Any changes are used on all following faxes.
143

6 Message Editor
The Message Editor ScreenThe Message Editor screen contains all the fields necessary to send a complete fax on your letterhead, with any attachments that you wish to include. The message text section can expand for you to as many lines and pages that you need.
Getting HelpThe editor contains a number of Help screens to assist you in using the program. The Help key is position sensitive. The location of the cursor when you press the Help key will determine what information is displayed.
Faxing the MessageWhen you have finished preparing the message or coversheet, you can fax it using F2 (Fax Message).
To fax the Message member:
1. Press F2 (Fax Message). The program will ask you to confirm that you want to fax the Message member.
2. Press the Enter key. The Fax Message including any attachments will be prepared for faxing to the phone number that it finds in the Fax To field.
3. If you keyed a Y in Override KFaxSplF Cmd, you will be shown the prompted KFAXSPLF command. You may override any parameters necessary and press Enter to continue.
If the Fax Communication system has been started, the prepared fax will be converted to an image and transmitted.
144
Msg file: MSGFILE Member: TESTMBR EditHeader: FAXHDR Footer: FAXFTR
. -- To: ---------------------------------. . -- From: ----------------------------------. | Recipient's Name | Name | Your Name | | Recipient's Company | Comp | Your Company | | Recipient's Fax # | Fax# | Your Fax Number | | | Ph# | Your Phone Number | | Override KFaxSplF Cmd: | Mail | Your E-mail Address | ------------------------------------------ ----------------------------------------------
Date: Pages:Message:
Attachments: OvrTyp Bottom1 2 34 5 6F2=Fax Msg F3=Exit F4=Adjust F6=Insert/OvrTyp F24=More Keys

6 Message Editor
Function keysPress this: To do this:Home key Move to the home position, then Undo changes.Roll keys Scroll to the previous or next 10 text lines.F2 Fax the current message with any attachments. The program will ask
you to confirm that you wish to fax the message. Press the Enter key and the message will be faxed to the number specified in the To Fax field.
F3 Exit the Message Editor.F4 Adjusts the current paragraph on word boundaries and switches to
Overtype mode.F6 Toggles insert/overtype mode at the current cursor position. The last
line in the current page must be blank to make room for inserted text.
F10 Brings the cursor to the first line on the first page.F11 Brings the cursor to the last line on the last page.F12 Ends the previous function request.F13 When the cursor is in the Member Name area, it deletes the current
Message member.When the cursor is in the Message text area, it will delete the current
line and move the following lines on the same page up one line.
F17 Opens up the default Phonebook, which is a KeyesFile member that you name in your Fax Setup parameter.
F20 Clears the entire message to allow for new text.F22 Selects the current line of text to be copied.F23 Activates the spell checker which will check for capitalization errors,
duplicate words, and for spelling mistakes, starting at the current cursor position.
F24 Displays the next set of function keys available for the current display.
Accessing the PhonebookYou may use F17 (Phonebook) to open the default Phonebook, which is a KeyesFile member that you can name in a Fax Setup parameter. You can choose a different member, if desired, by activating the member name field while in the KeyesFile Information Manager and changing it.
Once you have located the card that has the recipient information that you want, move the cursor to the card body and press F20 (Select). The program will search the heading fields for the words Contact, Company, and Fax and save the data for the corresponding lines from the card. When you return to the Message Editor (using F3) this information will be pasted into the recipient fields.
145

6 Message Editor
The Fax Header / Footer ImagesThe Fax Header and Footer fields are used to customize your fax messages with a company logo and footer similar to your company's letterhead, if desired.
The image files that you name in these fields should be FAX images that will be included at the top and the bottom of your fax messages.
You may name image members using the following format:
file-name/member-namefile-name can be optionally specified just prior to the member name separated by a slash. If the file name is not given, the editor will search for the image member in IMGFILE then FAXFILE.member-name is the name of the FAX image containing the header or footer for your fax.
Note: If you have not named a Fax Header image, the value that you key in the From Company field will be used to create a header for the fax message. If you do not name a Footer image, a ½" bottom margin will be used instead.
Creating the Header / Footer ImagesThe Fax Header can be from 1½ to 2¼ inches long, and the Footer image is usually from ½ to ¾ inches long. The combined length of the two images should not exceed 3 inches long, or the resulting fax will be longer than 11 inches.
To Create a Header / Footer image:
1. Follow the instructions in the Image section to create a forms overlay with your company logo at the top. You can use any of the methods to create the original FAX image with the logo.
2. Cut the forms overlay image to the appropriate length using either the EDITIMG (Edit Image) program.
3. Convert the new image into a FAX image and place the result in the desired image file, usually IMGFILE, with an appropriate name.
Note: See the Image section for detailed instructions on Creating Attachments or Forms Overlays, Working with Images on the iSeries, and Editing Images.
146

6 Message Editor
The Message Editor Fields
To/From/Company/Fax/Phone/E-mail
The fields in the boxes at the top of the Message screen identify the recipient and the sender.
The Fax number field in the To box will be used to dial the fax machine and must therefore be accurate. The rest of the fields are optional. You can send a broadcast fax by coding *PBX member-name in place of a phone number. You can also do substitution into the To and Company fields from the PBX member.
Override KFaxSplF Cmd (Y/N):
Key a Y in this field if you wish to have the KFAXSPLF command prompted when you fax the message. This will allow you to override one or more of the command parameters, such as the phone number, the delay time, the priority, or the fax line number to be used. This parameter is not available while creating a coversheet.
Date
The Date is automatically generated for new Message members. You can type any value in this 21 character field.
Pages
The Pages field is used to tell the recipient how many total pages you will be faxing. When you press F2 to fax the message, the editor will check the number of pages and warn you if its count is different.
Message
You can key up to 28 lines of message text on the first page and up to 54 lines on each additional page. Use the Roll/Page keys to access the additional lines of text.
Attachments
The Attachments fields are used to include additional pages with your fax message. The image members that you name here should be FAX images that you had previously generated or faxed into the iSeries. The image members are named using the following format:
file-name/member-namefile-name can be optionally specified just prior to the member name separated by a slash. If the file name is not given, the editor will search for the image member in IMGFILE then FAXFILE.member-name is the name of the FAX image that you want to include with your fax message as an attachment.
147

6 Message Editor
Editing the Message TextType the text just as you wish to see it on the finished fax document. The editor will automatically adjust the text as you type past the end of each line. You can correct typing mistakes using the Backspace key. You may also use the Delete key to remove text from a line.
To delete a line from the text:
1. Move the cursor to the line that you want to remove.
2. Press F13 (Delete). The program will delete the current line, and move all the following lines on the current page up one line.
To insert text in a paragraph:
1. Move the cursor to the position where you want to insert text.
2. Toggle the editor into Insert mode using F6 (Insert/OvrTyp). The program will move all text on the current page down to the next line, starting at the current cursor position. The current line will be filled with blanks to the right of the cursor.
3. When you are finished inserting new text, toggle the editor back into OvrTyp mode using F6 or F4 and the paragraph will be readjusted.
To adjust paragraph line endings:
If you have used the Delete key to remove text from a line. You may need to adjust the paragraph line endings.
1. Move the cursor to the line where you want to adjust line endings.
2. Press F4 (Adjust). The program will adjust the current paragraph line endings at word boundaries. The program will stop adjusting lines when it finds a blank character or a text command in the left hand column of a text line.
Undoing ChangesYou can use the Home key (Alt+Home on some keyboards) to undo changes made to the text in a line.
You must press the Home key twice to activate Undo. The first time you press the Home key, the cursor will be moved to the home position. The second time will undo all changes that you made since the last time you pressed any function key, a Roll key, the Enter key, or you typed past the end of a line.
148

6 Message Editor
Copying Lines of TextYou can copy lines of text from one place in your message to another, or copy text lines to a different Message member.
To copy text to another line or another member:
1. Free up enough lines on the target page to hold the text to be copied.
2. Move the cursor to the first line to be copied and press F22 (Copy). The selected line will be highlighted.
3. You may select additional lines to be copied by moving the cursor to each additional line on one or more pages and pressing F22 (Copy). If you make a mistake, you may press F12 (Cancel) and start the selection over again.
4. Display the target page of text in the current or another member.
5. Place the cursor at the beginning of the blank area on the target page and press the Enter key.
Note: The program will copy the text to the next location only if there is sufficient room to make the copy without overlapping any other text on the following lines. The resulting copy will be output in the order that the text was gathered.
Fax CommandsThe following fax commands can be used to enhance your message.
¬End Cut the current page short. This is especially useful if you have included an image on the current page that would otherwise increase the page length beyond 11 inches.
¬Font name,pt,tight Change the font and its size.¬Image (file/)member Insert an image on the faxed page. Especially useful
for including a Signature.¬Margin ## Change the left margin in tenths of inches. The
default margin is set at 8 tenths of an inch.¬Merge (file/)member Merge an image with the following text.¬Width ## Change the font. (## of 80=fixed font,
00=proportional font, etc.)
149

6 Message Editor
Text AttributesAny of the standard text attributes described in the Fax chapter can be used in your message to enhance the text.
• ¬b Bold ¬b• ¬i Italics ¬i• ¬r Reverse Image ¬r• ¬s Subscript ¬s• ¬S Superscript ¬S• ¬u Underline ¬u
Spell CheckingYou may use F23 (Spell Check) to start the spell checker. It will check for capitalization errors, duplicate words, and for spelling mistakes in your message starting at the current cursor position. When an error is detected, the following screen will pop up:
The word that needs attention will be underlined on the screen and typed in the Replace with field. Alternative spelling suggestions will be listed on the screen for spelling errors.
Choosing a suggestion:
You may use the Roll keys to find a suggested spelling that you wish to choose. Once located you may move the cursor to the general area of the suggestion and press the Enter key. The chosen word will be placed in the Replace with field, capitalized appropriately, and the action field will be changed to 3 (Replace). To replace the word in the original text, you need only press the Enter key again.
If you cannot find an appropriate suggestion, you may type another word in the Replace with field and choose 3 (Replace).
150
Msg file: MSGFILE Member: xxxSAMPLE Edit Header: SAMPLEFAX/FAXHDR Footer:
To: Recipients Name From: Your NameCompany: Recipients Company Company: Your CompanyFax: XXX-XXXX Fax: (206) 555-1212
Phone: (206) 555-1234 Override KF
Message:This is a short message that I will use to see how the Message Editormmmmmmmmorworks. I should learn how to use the Phonebook, the spell checker, howmmmmmmmhowto adjust lines, how to copy lines, and how to insert new information.
Att OvrTyp Bottom1 2 34 5 6F2=Fax Msg F3=Exit F4=Adjust F6=Insert/OvrTyp F24=More Keyshhhhhhhhhhys
Spell Checker
This is a short mesage that I will use to see how the Message- - - - - -
mesage Spelling ErrorReplace with Language: American SuggestionsMASSAGE 1 1. SkipMESSAGE 2. Skip AllMESSAUGE 3. Replace
5. Add to Main Dictionary6. Add to User Dictionary
Bottom 7. Exit Spell Checker
Move cursor to a suggestion & press Enter to select it

6 Message Editor
Selecting an action:
For each incident you may select an action to be taken.1. Skip Skip this word, leaving it as is.2. Skip All Skip this word and all others with the same spelling.3. Replace Replace the word with the one that is typed in the
Replace with field.4. Remove Remove the word from the text. This is only
available for duplicate word errors.5. Add to Main Dictionary This will add the word to the main
dictionary that everyone uses.6. Add to User Dictionary This is the recommended add option. It
will add the word to a user specific dictionary.
7. Exit Spell Checker This will stop the Spell Checker.
Correcting capitalization errors:
The correctly capitalized word will be placed in the Replace with field for you. You may correct the original text by choosing 3 (Replace).
Correcting duplicate word errors:
The duplicated word will be placed in the Replace with field. You may change the word and replace the original with the new word by choosing 3 (Replace), or you may choose 4 (Remove) to have the word removed from the original message.
Changing your language:
You may change the language dictionary that the system uses for spell checking this document by entering a new value in the Language: field and pressing the Enter key. The available languages are:
American, British, Danish, French, German, Italian, and Spanish
The Default System Language field is set in the Fax Communication Setup screen.
151

6 Message Editor
Managing Message MembersThe Message Editor uses an 80 character wide database file that you can make as many different copies of that you want. Each user can have their own personal files, or the users may share files. Each message member will be a member of the designated message file.
Opening a Message MemberYou can open a new Message member or change to a different member at any time.
To open a Message member:
1. Move the cursor to the Msg File or Member name area at the top of the editor's screen, and press the Enter key.
The Member Name area will change color to show that it is activated.
2. Type the name of the new or existing file/member name that you want to open and press Enter.
3. The editor will open the member named if it already exists. You will be asked to confirm the creation of a new member if it does not exist. You are given a chance to copy another member into any newly created member at this time.
Deleting a Message memberTo delete an entire Message member, you must open it first, and you must have delete capability in the KeyesFax library.
To delete a Message member:
1. Open the Message member that you want to delete.
2. Move the cursor back to the member name area and press Enter.
The Member Name area will change color to show that it is activated.
3. Leave the cursor in the Member name area and press F13 (Delete).
The editor will ask you to confirm the deletion of the member.
4. Press the Enter key.
152

7 Output Queue
7 7 Output QueueOutput Queue
The output queues called FAXCOM and FAXNGT are monitored for spooled files that you wish to fax. When the fax system is running, spooled files will usually be scheduled for processing within one minute of a spooled file becoming Ready in one of these output queues. Spooled files will be converted into a fax images and faxed. If you have KeyesMail libraries on your library list, then you can also specify e-mail commands to have some or all of the pages e-mailed.
After processing a spooled file, it will be removed from the output queue unless you specify *YES on the Save spooled file attribute using an OVRPRTF command.
Note: FAXNGT is only monitored during Night Hours that you establish in the Fax Setup parameters.
Specifying Fax ParametersFax numbers and other fax and e-mail parameters can be specified using any of the following techniques:● Some of the Spooled File Attributes can be used to specify fax parameters for
the spooled file.● The program Work with Fax Spooled Files can be used to specify fax
parameters for each of your spooled files.● You can code Fax commands within your spooled files to direct exactly how
each page should be faxed.● An Exit program can be used to look up data within your own master files
and set any of the fax parameters for each page of your spooled files.
Each of these methods can be used separately or together to specify fax parameters. The last method that you use, in the above order, will override any previous values for that parameter, with one exception. If you code a fax number in the User Data field, of the Spooled File Attributes, the entire spooled file will be faxed to that fax number.
Spooled files with multiple recipients will be burst into separate documents. Each document will be faxed, with optional coversheets, or e-mailed as you have specified in the parameters.
153

7 Output Queue
Spooled File AttributesSpecial parameters can be placed in some of the Spooled File Attributes to direct the fax job, using an OVRPRTF command.
Accounting CodeThe system will use the Accounting code field in the Fax History Log.
Form TypeYou can override the Record Length value by coding 'WIDTH xxx' in the Forms Type field. Where xxx is the number of columns to be faxed from 80-200. You may code 'LANDSCAPE' in this field to fax the spooled file sideways. This will also use the Record length to determine the proper font to use.
Front Side OverlayYou may merge a form with the spooled file by coding the name of a KeyesFax overlay in the Front side overlay field. The image member must be an Overlay saved in IMGFILE. You can adjust the top and left margins of the text by specifying the Offset down and Offset across fields in tenths of an inch.
Output PriorityThe system will use the spooled file's Output priority as the Fax job priority.
Page Range to PrintThe Starting page and Ending page fields can be used to select pages for faxing.
Record LengthThe Record length field will be used to select an appropriate font for faxing. In Portrait mode, you can override the record length by coding 'WIDTH xxx' in the Forms Type field. Where xxx is the number of columns to be faxed from 80-200.
Save FileThe Save file field determines whether or not the spooled file will be deleted or placed on HOLD after it is processed.
154

7 Output Queue
User DataYou may key the area code and fax number in the available 10 characters of the field and KeyesFax will use this for faxing the entire spooled file. KeyesFax will either add a "1"(for long distance) or strip off the area code (for local calls) as defined in your Work with Local Area Code screens.
Note: Phone numbers found in this field will override any Fax numbers embedded within the spooled file.
User Defined DataYou may code several of the fax parameters in this field, as shown below:
¬Attn attention-to-name
This command can be used to specify the intended recipient's name.
¬Cx coversheet-parameter
These commands can be used to specify any of the coversheet parameters.
¬Desc description
This command can be used to specify the description of the document to be faxed.
¬Email recipient's-address
This command can be used to specify the recipient's address for e-mailing. This feature requires KeyesMail libraries on your library list.
155

7 Output Queue
Work with Fax Spooled FilesFax parameters can be specified for each of your spooled files, using the Work with Fax Spooled Files program (shown below). This program can be started from FCMENU (Item 35) or using the KFSPOOL command.
You may add a new spooled file description by entering the spooled file name on the top line.
Option 2 (Change) may be used to change existing spooled file descriptions.
Option 3 (Copy) may be used to copy a description to another name.
Option 4 (Delete) may be used to remove entries that are no longer needed.
156
WRKFSF Work with Fax Spooled Files Dateuser-id Time
Position to:
Options 2=Change 3=Copy 4=Delete
Option Spooled File Enter new Spooled File here to add
_ FORMS_ INVOICES_ ORDERS
BottomF3=Exit F12=Cancel F17=Top F18=Bottom

7 Output Queue
Spooled File Setup ScreensWhen adding a new spooled file or selecting option 2 (Change) the following screens are used to define the fax parameters desired:
157
WRKFSF Setup Screen Dateuser-id Spooled File: INVOICES Time
Type choices, press Enter.Phone number . . . . . : ¬1 Description . . . . . . . . : Invoice #¬2 Attention to . . . . . . . . : ¬3
Cover member . . . . . : Name or *USERCover file . . . . . . . . . : Print to/ when . . . . . . : PRT02 F A=All, F=Failures, S=Sent, blank=NoneExit Program . . . . . . : EXTINV
Scan Field Locations:Line Column Size Line Column Size
#1 14 11 20 #2 15 11 20#3 16 11 25 #4 #5 #6 #7 #8 #9 #10
F3=Exit F12=Cancel More . . .You can use ¬n to place Scan Field Values into the other fields.
WRKFSF Cover Sheet Fields Dateuser-id Spooled File: INVOICES Time
Type choices, press Enter.To Name . . . . . . . . . .: To Company . . . . . . . :
From Name . . . . . . . .: From Company . . . . . : From Fax # . . . . . . . . : From Phone # . . . . . . : From E-mail Addr . . . :
Cover Notes . . . . . . . :
F3=Exit F12=Cancel BottomYou can use ¬n to place Scan Field Values into the other fields.

7 Output Queue
Setup Screen Fields
Phone number:
For spooled files that always go to the same recipient, you may code a phone number here. For broadcast faxing, you may code (*PBX member-name) instead of a phone number. You can code a Scan Field value, which can extract a different number for each page of the spooled file.
Description:
You may specify a page description here. This description can be used to help you identify individual pages of a document that you will be faxing. The descriptions will be given back to you in completion messages, when it is faxed. You may wish to code up to 30 characters of information such as customer, invoice, or document numbers in the description.
Attention to:
The Attention to value can take the place of a coversheet. This name will print at the top of the fax to identify the intended recipient.
Cover member:
To include a coversheet with the fax, you can name the member to be used in this field. The special value *USER can be used to signify the user-id of the person that created the spooled file.
If you specify a cover member, you must create that cover member in the file that you name below. You must also include coversheet parameters for the recipient information. This can be done in the spooled file, with an Exit program, or on the following screen.
Cover file:
This tells the program where to look for the cover member. You may use either MSGFILE or COVERFILE for cover pages. You can build the coversheets using option 9 (Fax a Message) from FCMENU, or using the FAXMSG command.
Print fax:
You can selectively print the fax pages by naming the destination printer in this field. The destination must be an HP LaserJet or compatible printer. Specify when you want the pages printed using the following parameter.A All the fax pages will be printed.F Only the fax pages that failed will be printed.S Only the fax pages that were successfully sent will be printed.
Leave these fields blank to not print the fax pages.
158
7 Output Queue
Exit Program:
An exit program can be used to look up phone numbers in your master files. All the parameters including the Scan Field Values are sent to the exit program for each page of the spooled file, as it is being processed. The exit program can add to or change any of the parameters, as needed. The Scan Field Values can be used by the exit program for chaining or substitution into other fields.
A sample exit program called EXTPGM can be found in the source file called QRPGSRC in KFLIB. You may copy this source code to any other name, in any library so that you can add your own custom code, to make your exit programs.
Scan Field Locations:
Key the line number, column number, and length for up to 10 different fields to be extracted from each *SCS spooled file page. The values found at these locations are passed to the exit program and can be used for chaining to your master files. They can also be used for substitution into any of the other fields.
To specify a substitution value, you may code ¬n (where n is the Scan Field number) anywhere within the other fields. For example, the phone number field could be coded as simply ¬1, assuming you have defined the location of the phone number in Scan Field #1.
The Scan Field Locations can only be defined for standard *SCS printer files. However, *USERASCII printer files can fill the same Scan Field Values using special Fax commands ¬S1 - ¬S10, embedded within the PCL data. See the Fax chapter for more information.
Coversheet FieldsThese fields are only used when you have specified a Cover Member.
To Name:
This is the name of the recipient. It will appear on the coversheet.
To Company:
You may key the recipient's company name in this field.
From Name:
You may code the name of the sender in this field. You may leave all of the sender fields blank to accept the values that were last keyed in the selected cover member.
From Company:
You may code the sender's company name in this field. If the cover member does not have a Fax Header image specified, then this field will be used to create a line of text with large type across the top of the coversheet.
159

7 Output Queue
From Fax #:
This is the fax number of the sender.
From Phone #:
This is the voice phone number of the sender.
From E-mail Addr:
You may code the e-mail address of the sender, or any other additional information to be included on the coversheet.
Cover Notes:
You may include up to 76 characters of notes for the coversheet. These notes, if provided, will appear just above the Message that is keyed in the cover member.
160

7 Output Queue
Fax Commands within Spooled FilesYou may include Fax and E-mail commands within your *SCS and *USERASCII spooled files, to direct exactly how and where each of the pages should be faxed or e-mailed.
Fax commands can be coded on any line of each spooled file page. A command must be the first thing on a line and can be followed with additional commands on the same line. The commands will be stripped out of the spooled files so that they will not appear on the finished documents. Lines with commands on them will be entirely stripped out of the spooled file, shortening the page, unless you code a trailing negate character (¬) after the command.
If you do not code any fax number or e-mail address commands on a page - that page will be considered a continuation of the previous page. Any individual commands that you do not code on a page will assume the values from the previous page.
A list of the valid commands and examples can be found in the Fax chapter.
Note: E-mail commands can only be used if you also have the KeyesMail libraries on your library list. Each page can be sent as a fax or an e-mail or both.
Spooled File example:
The following example shows how Fax commands can be coded in a spooled file for an Order Confirmation with an overlay.
Notes: In this example, the top five print lines were used to specify both Fax and E-mail commands. These commands will be stripped out of the spooled file before it is merged with the OrderForm overlay and both faxed and e-mailed to its destinations.
161
¬Fax # 800 555-1212 ¬Merge OrderForm ¬¬Email [email protected] ¬¬Email [email protected] ¬¬Subj Order acknowledgement ¬¬Desc Order #OC1234 ¬ #OC1234
ABC Company123 AddressAnytown, USA
15 Parts being ordered $25.005 Other parts ordered $16.00
Total $41.00

7 Output Queue
- - - - blank page - - - -
162

8 Fax Queue
8 8 Fax QueueFax Queue
The Fax Queue contains an entry for every document that is to be faxed through the iSeries. Each user may track and control their fax jobs using the Work with Fax Queue program (shown below). This program can be started from the Fax Communication menu or by entering WRKFAXQ on a command line.
User FieldThe Work with Fax Queue program defaults to showing you your own fax queue when it is started. You may access other user's fax queues by typing their User-ID in the User field and pressing Enter.
Note: A user may only access their own fax queue unless another user has given them specific access to their queue using the Work with Fax Security program, described in the Fax chapter. Users with a special authority of *SECADM may access all fax queues, by entering *ALL in this field.
Position toType one or more characters in the Position to field and press Enter to jump directly to a specific creation date, document name, or phone number in the queue, depending on the selected sort order.
Note: You can change the order that the fax queue is presented to you by moving the cursor to the desired column and pressing the Enter key. It can be sorted by the Creation Date, Document Name or Phone number.
163
WRKFAXQ Work with Fax Queue 1/24/05JOHN User: JOHN 15:15:07By: Crt Date Show: All Position to: ________Options: 1=Details 2=Change 3=Hold 4=Delete 5=Display 6=Print
7=Display SplF 8=Page Descs 9=Restart E=E-mail S=Save as Img/Ovl X=Export
Opt User Document Phone Status Page From To Time Date _ JOHN SP24121047 011 45 75 1234 Sent 6 1 6 1218 050124 _ JOHN SP24120813 011 45 75 1234 NoCarrier 1 1 2 1210 050124 _ JOHN CP23111828 555-1234 Sent 2 1 2 1124 050123 _ JOHN CP23110120 *FAX NoPhone# 3 4 _ JOHN PC22142718 555-1234 Sent 1 1 1 1429 050122 _ JOHN SP22141734 *FAX UseOpt1 1 3 _ JOHN PC22135058 555-1234 Sent 5 1 5 1353 050122 _ JOHN PC22133732 *PBX LIST01 UseOpt1 1 2 _ JOHN PC21140529 555-1212 Held 1 2 _ JOHN PC21132138 555-1234 Sent 5 1 5 1324 050121 _ JOHN SP21131141 1-206 555-1234 Sending 1 1 2 1314 050121 _ JOHN SP21121253 1-206 555-1234 Cnsoldatd 1 1
More...
F3=Exit F5=Refresh F7=Delete all Sent Faxes F11=Change DisplayF12=Cancel F17=Top F18=Bottom F21=Receive Queue

8 Fax Queue
Status columnThe Status column will show you what is happening or has happened to each of your faxes. You can press the F5 (Refresh) key to update the current Status on the screen. The Status can be many different things. Here are just a few of the important ones:
Sent The fax was sent at the time shown on the far right. The last page sent is also shown.
Held The fax is held. It can be restarted using option 9.*HOLD The fax has been put on hold. This status will change to Held
when the job actually ends.Cnsolidatd The fax has been consolidated with another fax to the same
recipient. This will change to Sent (when it is).Will retry The fax has failed, but will retry at the scheduled time (shown
on the right).Faxcom JQ The fax is waiting its turn to be sent.ImgconvJQ The fax is waiting its turn to be converted to a FAX image.Converting The fax is still being converted to a FAX image.Use Opt 1 Use option 1 to see the details of this fax. This usually means
that there is more than one recipient.
Note: You can change the types of faxes that are being shown to you by moving the cursor to the Status column and pressing Enter. This causes the screen to toggle between showing you All the faxes in your queue, and showing you only those that were Not Sent.
Function keysPress this: To do this:Roll/Page keys Scrolls through the entries in the Fax Queue.F3 Exit the program.F5 Update the entries on the screen.F7 Prepare a list of all entries on your screen that have a status of Sent to
allow you to delete them.F11 Toggles the display to show additional fields for each fax job.F12 Returns you to the previous screen.F17 Positions you to the top of the list of entries.F18 Positions you to the bottom of the list of entries.F21 Switches to the Work with Receive Queue program.
Purging the Fax QueueYou may purge the Fax Queue of sent faxes manually using F7 or in a batch mode using the command PURGEFAXQ (Purge Fax Queue) described in the Fax section.
164

8 Fax Queue
Options
Option 1=Details
When a fax job contains multiple phone numbers, it will be summarized on the main Work with Fax Queue screen. This usually happens for documents where you named *FAX, *PBX, or *LIST for the phone number field. Option 1 is used to open a window on the screen (shown below) to show you the details. You may use any of the other options on the expanded listing.
Option 2=Change
This option opens a window on the screen (shown below) and allows you to change many of the fax parameters.
165
WRKFAXQ Work with Fax Queue 2/10/05JOHN User: JOHN 15:15:07By: Crt Date Show: All Position to: ________Options: 1=Details 2=Change 3=Hold 4=Delete 6=Print 7=Display SplF
8=Page Descs 9=Restart S=Save as Image/Overlay E=E-mail
Opt User Document Phone Status Page From To Time Date _ JOHN SP24121047 011 45 75 1234 Sent 6 1 6 1218 020124 _ JOHN SP24120813 011 45 75 1234 NoCarrier 1 1 2 1210 020124 _ JOHN CP23111828 555-1234 Sent 2 1 2 1124 020123 _ JOHN CP23110120 *FAX NoPhone# 3 4 _ JOHN PC22142718 555-1234 Sent 1 1 1 1429 020122 1 JOHN SP22141734 *FAX UseOpt1 1 3 _ JOHN PC22135058 555-1234 Sent 5 1 5 1353 020122 _ JOHN PC22133732 *PBX LIST01 UseOpt1 1 2 _ JOHN PC21140529 555-1212 Held 1 2 _ JOHN PC21132138 555-1234 Sent 5 1 5 1324 020121 _ JOHN SP21131141 1-206 555-1234 Sending 1 1 2 1314 020121 _ JOHN SP21121253 1-206 555-1234 Cnsoldatd 1 1
More...
F3=Exit F5=Refresh F7=Delete all Sent Faxes F11=Change DisplayF12=Cancel F17=Top F18=Bottom F21=Receive Queue
Expanded *Fax Listing
Opt Document Phone Status Page From To Time Date _ PT30143734 555-1212 Sent 1 1 1 1442 050130 _ PT30143735 555-1234 Sent 3 2 3 1445 050130
BottomF3=Exit F5=Refresh F7=Delete Sent Faxes F11=Change DisplayF12=Cancel F17=Top F18=Bottom
Change
Document Phone From To Time DateSP31151141 1-206 555-1234 001 002 1515 050131Attn: John Smith Pty: * Line: * Retries: 2Desc: SplF: FAXMSG/DSP02/062535/1 - MSGFILE/MSG43324 +Consolidated from: SP31151253/JOHN 0625420000
Make changes and press Enter or F12=Cancel

8 Fax Queue
Option 2=Change continued
If the fax is not currently being faxed, any changes you make will alter the fax job when it starts. However, once the fax has become Active, Dialing, Connecting, or Sending it is too late to make changes to the current job. But, if it is necessary to make changes, do the following:
• Place the fax on Hold using option 3. The job will be cancelled prior to sending the next page.
• Wait for the status to change from *HOLD to Held (this happens when the job has finally ended).
• Make any desired changes using option 2.• Restart the fax using option 9. The restarted job will have all the
changes applied.
If you change the Scheduled Time or Date, the system will wait until that time before attempting to fax it out. If the time has already passed, the job will be sent as soon as both the fax and the fax line are ready.
Note: When automatic call consolidation occurs, the system will show you the document names, User ID's, and the Job Numbers of the consolidated entries in the Description field. It will show you both where any added documents came from, and where the consolidated documents went to. This will assist you in tracking your faxes.
Option 3=Hold
This option places the fax job on Hold until you release it. The status will change from *HOLD to Held to let you know when the job has actually ended. Jobs that are on the IMGCONV Job Queue or are still Converting are not stopped until they are finished converting to FAX images. If the fax has already become Active, Dialing, Connecting, or Sending the fax will be cancelled before the next page is sent. You can use option 9 to restart a fax.
Option 4=Delete
This option will end a fax job and remove the FAX image member out of OUTFILE. If more than one fax refers to the same image member, that member will be left in OUTFILE until the last fax is deleted. If the fax has already become Active, Dialing, Connecting, or Sending the fax will be cancelled before the next page is sent.
Option 6=Print
You may print a fax document to any HP compatible laser printer available to your iSeries using this option.
166

8 Fax Queue
Option 7=Display Spooled File
If the original document was a spooled file, you may view the original text using this option.
Option 8=Page Descriptions
Page descriptions that were entered using the ¬Desc command can be viewed using this option.
Option 9=Restart
You may restart any fax that has completed or has been Held. Any changes that you make to the parameters will take affect on the restarted job.
You may also restart a new part for a spooled file that has different pages going to different recipients. This option will allow you to select the desired pages from the original spooled data, edit the data, and supply a new phone number for the destination.
Option E=E-mail
If you have the KeyesMail libraries on your library list, you can use this option to e-mail the fax as an attachment. This option will allow you to specify the desired addresses for the recipients, select the desired pages, and supply a brief message to go with the attached document.
Option S=Save as Image/Overlay
Any Fax image that you have sent can be turned into either an Image or an Overlay using this option. Images can be included with other documents as attachments. A Forms Overlay can be merged with other spooled files to make completed documents.
You may call the Image or Overlay anything that you wish and place it in any Image file, we recommend IMGFILE. When making an Image for an attachment, you may add pages to any existing image in the same file, or replace the pages. When making an Overlay, you may adjust the image up, down, left, or right, as needed for alignment.
See Creating Attachments or Forms Overlays in the Image section for more information.
Option X=Export
You can Export a Fax image to the IFS as either a PDF document or as a TIFF image. This option will convert the selected Fax image then copy it to the designated filename and path. If you leave the filename blank, the original fax document name will be allow you to specify the desired addresses for the recipients, select the desired pages, and supply a brief message to go with the attached document.
167

8 Fax Queue
User Defined OptionsA CL program called FXQUSROP (Fax Queue User Options) has been provided to you so that you can create your own custom user options. Any option (alpha or numeric) that the operator types in the option column, that is not one of the predefined options, will be sent to the FXQUSROP program to check if it is user defined. Please see the program located in the source file QCLSRC in the KeyesFax library for additional instructions.
Fax SecurityNo one else may access your faxes using the Fax Queue unless you specifically give them the authority. You can give other users temporary access using the Work with Fax Security program. Please see Fax Security in the Fax chapter for more information.
Note: Users with special authority of *SECADM may access all other user's faxes.
168

9 Receive Queue
9 9 Receive QueueReceive Queue
The Receive Queue contains all of the fax images that you receive on the iSeries plus any other images that you might have copied or saved using the tools provided in the two programs Work with Receive Queue and Work with Fax Queue. Each user may control their own documents using the Work with Receive Queue program (shown below). This program can be started from the Fax Communication menu or by entering WRKRCVQ on a command line.
Note: When faxes are received they are initially routed to the Fax operator as specified in the FAXSETUP (Fax Communication Setup) program. Automatic routing of the faxes can be performed using a ROUTEFAX KeyesFile member, if desired. See Automatic Routing of Received Faxes in the Fax chapter for more information.
User FieldThe Work with Receive Queue program defaults to showing you your own queue when it is started. You may access other user's queues by typing their User-ID in the User field and pressing Enter.
Note: A user may only access their own queue unless another user has given them specific access to their queue using the Work with Fax Security program, described in the Fax chapter. Users with a special authority of *SECADM may access all the queues, by entering *ALL in this field.
169
WRKRCVQ Work with Recieve Queue 2/10/05JOHN User: JOHN 15:17:27By: Date Position to:
Options: 1=Send Fax 2=Change 3=Copy 4=Delete 6=Print 7=Rename8=Route 9=Notes A=Archive C=Convert Image E=E-mailS=Save as Image/Overlay T=Image Type X=Export
Opt Document File Status Pages Received From Date _ F013115112 RCVFILE *New 6 206 555 1212 050131 _ F013104542 RCVFILE *New 2 206 555 1234 050131 _ F013011422 JOHNFILE 2 206 555 1245 050130 _ F013010122 JOHNFILE 3 404 555 1256 050130 _ C#011456 CONTRACTS Image 3 202 555 1384 050118 _ Brochure IMGFILE Image 2 404 555 1429 050112 _ POForm IMGFILE Overlay 1 202 555 1111 050103
BottomF3=Exit F5=Refresh F11=Change Display F12=CancelF22=Fax Queue

9 Receive Queue
Position toType one or more characters in the Position to field and press Enter to jump directly to a specific date, document name, file name, or status in the queue, depending on the selected sort order.
Note: You can change the order that the receive queue is presented to you by moving the cursor to the desired column and pressing the Enter key. It can be sorted by the Date, Document Name, File Name, or Status.
Function keysPress this: To do this:Roll/Page keys Scrolls through the entries in the Receive Queue.F3 Exit the program.F5 Updates the entries on the screen.F11 Toggles the display to show additional fields for each fax (shown
below).F12 Returns you to the previous screen.F22 Switches to the Work with Fax Queue program.
You can toggle to this screen using F11 (Change Display)
Purging the Receive QueueYou may purge the Receive Queue of old entries manally using option 4 or in a batch mode using the command PURGERCVQ (Purge Receive Queue) described in the Fax section.
170
WRKRCVQ Work with Recieve Queue 2/10/05JOHN User: JOHN 15:17:27By: Date Position to:
Options: 1=Send Fax 2=Change 3=Copy 4=Delete 6=Print 7=Rename8=Route 9=Notes A=Archive C=Convert Image E=E-mailS=Save as Image/Overlay T=Image Type X=Export
Opt Document File Status Pages Received From Date _ F013115112 RCVFILE *New 6 206 555 1212 050131
JOHN Rcv: 013100 at 15:11 line #2 from 206 555 1212 15:11 _ F013104541 RCVFILE *New 2 206 555 1234 050131
JOHN Rcv: 013100 at 04:54 line #1 from 206 555 1234 04:54 _ F013011422 JOHNFILE 2 206 555 1245 050130
JOHN Rcv: 013000 at 11:42 line #2 from 206 555 1245 11:42 _ F013010122 JOHNFILE 3 404 555 1256 050130
JOHN Rcv: 013000 at 10:12 line #2 from 404 555 1256 10:12 _ C#011456 CONTRACTS Image 3 202 555 1384 050118
JOHN Big Project contract from XYZ Corp 14:23 _ BROCHURE IMGFILE Image 1 404 555 1429 050112
JOHN Letter from Jane Doe about Big Project 11:09More...
F3=Exit F5=Refresh F11=Change Display F12=CancelF22=Fax Queue
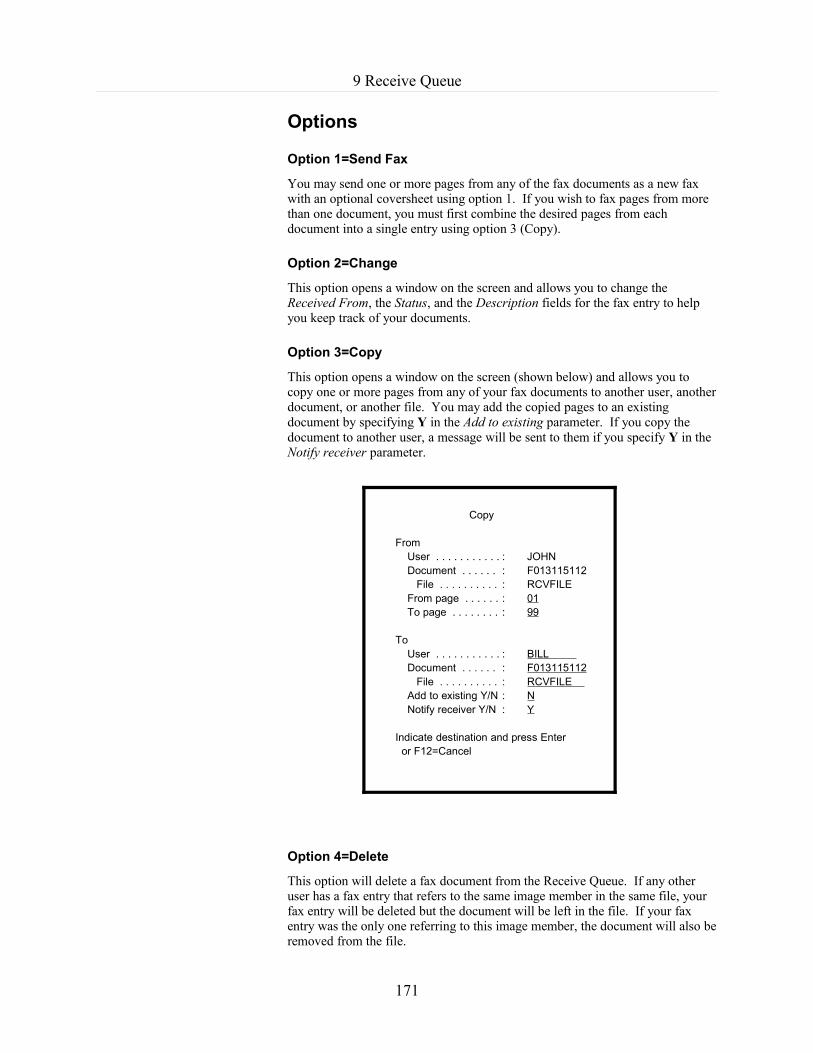
9 Receive Queue
Options
Option 1=Send Fax
You may send one or more pages from any of the fax documents as a new fax with an optional coversheet using option 1. If you wish to fax pages from more than one document, you must first combine the desired pages from each document into a single entry using option 3 (Copy).
Option 2=Change
This option opens a window on the screen and allows you to change the Received From, the Status, and the Description fields for the fax entry to help you keep track of your documents.
Option 3=Copy
This option opens a window on the screen (shown below) and allows you to copy one or more pages from any of your fax documents to another user, another document, or another file. You may add the copied pages to an existing document by specifying Y in the Add to existing parameter. If you copy the document to another user, a message will be sent to them if you specify Y in the Notify receiver parameter.
Option 4=Delete
This option will delete a fax document from the Receive Queue. If any other user has a fax entry that refers to the same image member in the same file, your fax entry will be deleted but the document will be left in the file. If your fax entry was the only one referring to this image member, the document will also be removed from the file.
171
Copy
FromUser . . . . . . . . . . . : JOHNDocument . . . . . . : F013115112 File . . . . . . . . . . : RCVFILEFrom page . . . . . . : 01To page . . . . . . . . : 99
ToUser . . . . . . . . . . . : BILL Document . . . . . . : F013115112 File . . . . . . . . . . : RCVFILE Add to existing Y/N : NNotify receiver Y/N : Y
Indicate destination and press Enter or F12=Cancel

9 Receive Queue
Option 6=Print
You may print a fax document to any HP compatible laser printer available to your iSeries using option 6.
Option 7=Rename
You may rename a fax document using option 7. If any other user has a fax entry that refers to the same image member in the same file, their fax entry will also be renamed in their Receive Queue.
Option 8=Route
This option opens a window on the screen (shown below) which allows you to route all pages of a document to another user, another document, or another file. The original fax entry in your Receive Queue is removed after the new entry is made.
You may add the routed pages to an existing document by specifying Y in the Add to existing parameter. If you route the document to another user, a message will be sent to them if you specify Y in the Notify receiver parameter.
Option 9=Notes (Obsoleted)
The Windows Image Viewer program (now obsoleted) had the capability to add Notes to any fax image. Each page of a fax could have up to 1024 bytes of text entered. These Notes can be viewed on any terminal using option 9. A scrolling window will open up showing you the Notes for all the pages in the document. You may use the Page keys to scroll through the Notes.
172
Route
FromUser . . . . . . . . . . . : JOHNDocument . . . . . . : F013115112 File . . . . . . . . . . : RCVFILEFrom page . . . . . . : 01To page . . . . . . . . : 99
ToUser . . . . . . . . . . . : BILL Document . . . . . . : F013115112 File . . . . . . . . . . : RCVFILE Add to existing Y/N : NNotify receiver Y/N : Y
Indicate destination and press Enter or F12=Cancel

9 Receive Queue
Option A=Archive
To help you track and/or process the faxes that are in the Receive Queue, you can setup and use the Archive function. This option calls a user definable CL program called RCQARC located in the source file QCLSRC. You may modify this CL program to route/copy the archived faxes to another file, tape, disk, or optical drive.
Option C=Convert Image
This option opens a window on the screen (shown below) which allows you to convert the image to a different type.
Option E=E-mail
If you have the KeyesMail libraries on your library list, you can use this option to e-mail your documents as attachments. This option will allow you to specify the desired addresses for the recipients, select the desired pages, and supply a brief message to go with the attached document.
Option S=Save as Image/Overlay
Any Fax image that you have received can be saved as either an Image or an Overlay using this option. Images can be included with other documents as attachments. A Forms Overlay can be merged with spooled files to make completed documents.
You may call the Image or Overlay anything that you wish and place it in any Image file, we recommend IMGFILE. When making an Image for an attachment, you may add pages to any existing image in the same file, or replace the pages. When making an Overlay, you may adjust the image up, down, left, or right, as needed for alignment.
See Creating Attachments or Forms Overlays in the Image section for more information.
Option T=Image Type
This option will cause the type of the image to be displayed on the bottom of the screen.
173
Convert Image Type
Type choices, press Enter.
Document member to convert . . . . > F013115112File . . . . . . . . . . . . . . . . . . . . . .> RCVFILE
To document type . . . . . . . . . . . . . CKXFile . . . . . . . . . . . . . . . . . . . . . . CKXFILE Replace existing member . . . . .> N
Submit to batch or interactive . . . . *INTER

9 Receive Queue
Option X=Export
You can Export a Fax image to the IFS as either a PDF document or as a TIFF image. This option will convert the selected Fax image then copy it to the designated filename and path. If you leave the filename blank, the original fax document name will be allow you to specify the desired addresses for the recipients, select the desired pages, and supply a brief message to go with the attached document.
User Defined OptionsA CL program called RCQUSROP (Receive Queue User Options) has been provided to you so that you can create your own custom user options. Any option (alpha or numeric) that the operator types in the option column, that is not one of the predefined options, will be sent to the RCQUSROP program to check if it is user defined. Please see the program located in the source file QCLSRC in the KeyesFax library for additional instructions.
Updating the Receive QueueYou may add existing documents to the Receive Queue using the UPDRCVQ (Update Receive Queue) program. It will add all of the members in any of your image files to the queue for a selected user. This program is intended to be used for preloading fax documents or other images that already exist from a previous release of the fax system.
Fax SecurityNo one else may access your faxes using the Receive Queue unless you specifically give them the authority. You can give other users temporary access using the Work with Fax Security program. Please see Fax Security in the Fax section for more information.
Note: Users with special authority of *SECADM may access all other user's faxes.
174

10 Commands
10 10 CommandsCommands
This section describes the KeyesFax commands that you can include in your applications. It describes each of the command's parameters in detail.
All of the commands can be started from the command line. Many of them can be started from the KeyesFile or Fax Communication menu. Many of them have a user option that you can use in IBM's PDM while working with image files.
Any of these commands can be run from your CL programs. If desired, you can call the CL programs that these commands run, directly from your application programs. This is accomplished by defining and passing each of the parameters that the program uses.
For example, to display an image from an RPG program, you might code the following:
C* Display image DOC when operator presses F1C KA CALL 'DSPIMG'C PARM DOC MEMB 10C PARM FILE 10C PARM 1 PAGE# 30C PARM MSG 78
175

10 Commands
CRTPBX (Create PBX member) CommandUsing the Create PBX member program, you can take a text file and convert it into the appropriate layout for a PBX member. This program was intended to be used with your applications to create a PBX member quickly for a list of customers.
Assume that you maintain a list of names, addresses, and fax phone numbers in one of your applications. If your application can print out a series of lines for each desired entry into a spool file, the CRTPBX program can assist you in converting that into a PBXFILE member, as follows:
1. Using your application, print a series of lines to a spool file that include the Fax number, Contact, and Company names of each entry that you will be including in the PBX member. Print one value to each line in the spool file and do not leave any blank lines between entries.
2. Convert the spool file to a text file, using KCVTSPLF.
3. Convert that text to a PBX member with substitution fields.
Text member:
This is the name of a text member that contains fax numbers and substitution fields, one field per line in the file. Every fax number must have the same number of substitution lines following it.
File:
This is the name of the file that the text member can be found in.
Number of substitution parameters:
This tells the program how many substitution parameters will be found after each fax number in the text member. Each substitution field in the text file is concatenated to the fax number to make a single record for each entry in the PBX member.
To PBX member:
This is the name of the PBX member that will be created from the text file. The member will be placed in PBXFILE.
Member option:
The default is *NONE. You may specify *REPLACE to replace an existing PBX member, or *ADD to add to an existing PBX member.
176

10 Commands
CRTPBXMBR (Create PBX member from KeyesFile) CmdUsing the Create PBX member from the KeyesFile program, you can quickly prepare a PBX member list from any of your existing KeyesFile members.
Assume that you maintain a list of contacts, companies, and fax numbers in our KeyesFile Information Manager. By selecting a series of cards for each desired entry, you can quickly create a PBX member with substitution fields.
After the CRTPBXMBR program opens the KeyesFile member, use F20 on card bodies to select each entry to be included in the PBX member. You may also select a series of entries by pressing F20 while the cursor is on a card top. You then move to the last card in the series and press the Enter key with the cursor again on the card top.
When you have finished selecting entries, press F3 to exit the KeyesFile Information Manager. The program will then create a PBX member that will include all the entries that you had selected.
PBX member name:
This is the name of the PBX member that will be created from the KeyesFile entries. The member will be placed in PBXFILE.
Member option:
The default is *NONE. You may specify *REPLACE to replace an existing PBX member, or *ADD to add to an existing PBX member.
Member description:
This description will be placed on the member in the PBXFILE.
KeyesFile member name:
This is the name of the KeyesFile member that you will be selecting entries from to make the PBX member.
Fax number heading:
Enter a keyword that the program can use to find the fax number in the KeyesFile member. The default value of FAX instructs the program to look for any card heading with the word FAX in it.
Parameter 1 heading:
Enter a keyword that the program can use to find parameter #1 in the KeyesFile member. The default value of CONTACT instructs the program to look for any card heading with the word CONTACT in it.
Parameter 2 heading:
Enter a keyword that the program can use to find parameter #2 in the KeyesFile member. The default value of COMPANY instructs the program to look for any card heading with the word COMPANY in it.
177

10 Commands
Parameter 3 heading:
Enter a keyword that the program can use to find parameter #3 in the KeyesFile member, if you will be using a third parameter. The program will look for any card heading with this word in it.
Parameter 4 heading:
Enter a keyword that the program can use to find parameter #4 in the KeyesFile member, if you will be using a fourth parameter. The program will look for any card heading with this word in it.
Parameter 5 heading:
Enter a keyword that the program can use to find parameter #5 in the KeyesFile member, if you will be using a fifth parameter. The program will look for any card heading with this word in it.
Parameter 6 heading:
Enter a keyword that the program can use to find parameter #6 in the KeyesFile member, if you will be using a sixth parameter. The program will look for any card heading with this word in it.
Parameter 7 heading:
Enter a keyword that the program can use to find parameter #7 in the KeyesFile member, if you will be using a seventh parameter. The program will look for any card heading with this word in it.
Parameter 8 heading:
Enter a keyword that the program can use to find parameter #8 in the KeyesFile member, if you will be using a eighth parameter. The program will look for any card heading with this word in it.
Parameter 9 heading:
Enter a keyword that the program can use to find parameter #9 in the KeyesFile member, if you will be using a ninth parameter. The program will look for any card heading with this word in it.
178
10 Commands
CSDSPLF (Consolidate Spool File to NIGHTFILE) CmdThis command has been obsoleted by the FAXNGT output queue. But it can still be used to convert any spool file into a text file with up to 228 characters per line, placing it temporarily in the file SPLFILE. It will then convert the text file to a FAX image, placing the result into NIGHTFILE ready for faxing. The program can be used to consolidate multiple spool files into the same member in NIGHTFILE, so that a single call can be made to each destination.
The destination phone number must be placed in the spool file using a ¬Fax command line. To consolidate multiple spool files, you must specify the same "To document member name" in NIGHTFILE. The document member names can be created using Customer Numbers or Phone Numbers so that two or more faxes to the same destination will be consolidated into a single call.
You can run this program from the command line but it is intended to be called from an application program as it generates a document to be faxed. Your application should define the printer file as "User Controlled", opening and closing each document so that it can create a different spool file for each destination. This program can then be called from within your application to prepare each spool file for faxing.
To document member name:
This is a 10 character required field that specifies the member name to be placed in NIGHTFILE. If the member already exists in the file, this new document will be added as additional pages to the existing member.
Spooled file:
This is a 10 character required field that is the name of the spooled file that you wish to prepare for faxing.
Job name or *:
This 10 character required field identifies the job that built the spooled file. You may specify * to designate the current job when calling this program from your application.
Number:
This is a 6 digit number that the iSeries assigns to each job to help distinguish one from the next. You may leave this parameter blank if you coded * for the Job Name parameter above.
Spooled file number:
This is a 5 character field used to separate multiple spooled files from the same job. The default is *ONLY, or you may specify *LAST to designate the last entry made.
179

10 Commands
Remove after conversion:
This is a 4 character field that defaults to *YES. If you specify *NO, the spool file entry will be left in the output queue on HOLD after it is converted to a FAX image.
Landscape mode (sideways):
This is a 4 character field that defaults to *NO. If you specify *YES each page of the spool file will be set up for Landscape mode instead of the default Portrait mode printing.
Width of print line:
This 3 digit number defaults to 80 and is used for Portrait mode only. This controls the number and size of characters that will be printed across the page. A width of 0 uses a proportional font, 20-200 uses a fixed font that will fit that many characters within the 8 inch wide fax.
Lines per Inch:
This 1 digit number defaults to 8 lines per inch for Landscape mode only. You may specify 6 or 8.
Characters per Inch:
This 2 digit number defaults to 14 characters per inch for Landscape mode only. You may specify 10, 12, 14, 17, or 20. If you choose any characters per inch value other than 10 in Landscape mode, the Fax resolution must be *HIGH.
Paper length:
This 2 digit number defaults to 11 inches for Landscape mode only. You may specify any length from 1 to 23 inches long.
Merge image member name:
This is a 10 character field that you can use to merge an image with each of the spooled pages.
Merge file name:
This is a 10 character field that tells the program where to look for the merge member. If left blank, the program will search in IMGFILE then FAXFILE for the member.
Fax resolution:
This is a 7 character field that defaults to *DFT. A normal fax will be built using 98 dots per inch (dpi) vertical resolution. If you specify *HIGH, the fax will be built using 196 dpi resolution. The horizontal resolution remains at 204 dpi. A high resolution fax takes twice as long to convert, display, and to transmit but will produce a sharper image. If you are using Landscape mode and you choose a characters per inch value larger than 10, you must select *HIGH resolution.
180

10 Commands
The default value of *DFT will set the resolution to the value that you have set in the Fax Setup parameter (Default resolution).
Note: If you include or merge other images with your text, be sure that the other images have been built using the same resolution. If not, the other images will not be able to be included on the page. A failure message will be issued, "Resolution does not match".
Convert in batch/interactive:
This is a 6 character field that defaults to *BATCH. You can specify *INTER which will cause the program to run interactively instead of being submitted to the IMGCONV job queue. This job queue is part of the FAXCOM subsystem and is started automatically when you run STRFAXCOM.
Accounting code:
This is a 5 character field that defaults to *JOBD which causes the program to use the first 5 characters of the job's accounting code. The accounting code is used in the Fax History Log to separate the telephone connect times.
Message:
This is a 78 character field that the Consolidate Spool File program will use to pass a completion message back to your application.
181

10 Commands
CVTIMG (Convert Image Type) CommandThis program converts images or text documents into a different image type and optionally scales the image when converting to a FAX image. The CI user option may be used to run this command while working with image files. The following conversions are supported:
• ASC to FAX• CKX to FAX or PCX• FAX to CKX• PCL to FAX• PCX to CKX or FAX• TIFF to CKX or FAX• Text to FAX• Text to Text (with a different record length)
Document member to convert:
This is one or more document member names that you wish to convert to a different type. You can specify *ALL to convert all of the documents in a particular file to a different type.
File:
This is the name of the file that the members can be found in. The default value of *SEARCH causes the program to search in IMGFILE, FAXFILE, and TXTFILE for the document members. If you specified *ALL for the member name, you must name a specific file.
Delete original after convert:
This defaults to N. If you specify Y, the original image member will be automatically deleted after the conversion.
To document type:
This can be CKX, FAX, PCX, or TXT.
To document file:
This names the file to place the new image in. The default value of *FROMFILE will replace the original member.
Replace existing member:
This defaults to N. You will have to specify Y to allow the program to replace an existing member. You must specify Y if you name *FROMFILE in the previous parameter.
182

10 Commands
Submit to batch or interactive:
This defaults to *INTER. You can specify *BATCH which will cause the program to be submitted to the IMGCONV job queue. This job queue is part of the FAXCOM subsystem and is started automatically when you run STRFAXCOM (Start Fax Communication). You can alternatively start the FAXCOM subsystem manually using FCSBS (Fax Com Subsystem).
Fax resolution:
This defaults to *DFT and is only used when converting to a FAX image. If you specify *HIGH, the resulting FAX image will be two times larger, take twice as long to convert and to transmit, but will be a sharper image. We recommend using *NORMAL resolution whenever possible.
The default value of *DFT will set the resolution to the value that you have set in the Fax Setup parameter (Default resolution).
Cut wide images in strips:
This defaults to *NO and is only used when converting a large image to a FAX image. You may specify *YES to cause the program to cut a large image into strips that will fit on the 8 1/2" wide paper of a fax machine. If you do not cut the image, the conversion program will scale (shrink) a large image to fit within the 8 1/2".
Scale horizontal resolution:
This defaults to *AUTO and is only used when converting to a FAX image. For large images *AUTO allows the program to automatically scale the horizontal resolution to fit within the 1728 pixels of a standard fax page (8 1/2" wide). You may specify the exact percentage that you wish to scale the image by specifying a number from 1 to 999%. 100% will leave the image the same size, 50% will shrink the image to half its original size, etc.
Scale vertical resolution:
This defaults to *AUTO and is only used when converting to a FAX image. For large images *AUTO allows the program to automatically scale the vertical resolution the same value that it scaled the horizontal resolution. You may specify the exact percentage that you wish to scale the image by specifying a number from 1 to 999%. 100% will leave the image the same size, 33% will shrink the image to 1/3 its original size, etc.
183

10 Commands
KCVTSPLF (Convert Spool File) CommandThis is used to convert any spool file into a Text document in preparation for faxing the spool file. The spool file will be converted into text up to 228 characters per line and placed in SPLFILE. You will then be able to edit the text using IBM's SEU, adding or merging images as desired, and use the Send Fax program to fax it.
You can use F11 while Working with Output Queues to find the Spooled File Name, the Job Name, the Job Number, and the Spooled File Number needed for this command if you are running it manually. When calling the command from within an application, you would normally use '*' in the Job Name field.
Spooled file:
This is a 10 character field that is the name of the spooled file that you wish to convert to a Text document.
Job name or *:
This 10 character field identifies the job that built the spooled file. You may specify * to designate the current job when calling this program from an application.
Number:
This is a 6 digit number that the iSeries assigns to each job to help distinguish one from the next. You may leave this parameter blank if you coded * for the Job Name parameter above.
Spooled file number:
This is a 5 character field used to separate multiple spooled files from the same job. The default is *ONLY, or you may specify *LAST to designate the last entry made.
Description:
This is a 23 character field that you may use to describe the document that you are faxing. This description will be added to the OUTFILE member description so that you can identify the document to refax it. You may enter up to 21 characters of description surrounded by quotes.
To text member:
This is a 10 character field that is the name of the member that will be created from the spooled file.
File:
This is a 10 character field that is the name of the file that the text member will be placed in. The default is SPLFILE.
184

10 Commands
Member option:
This 8 character field defaults to *NONE. *REPLACE will allow you to replace an existing member. *ADD allows you to add to an existing member.
Phone number location:
This 25 character field can be used to specify a location of the fax phone number in the document. The format of this parameter, if specified is (L=ll, C=ccc), where ll is the line number and ccc is the column number of the fax phone number in the printed document.
For example: If the fax phone number was located in line 6 column 25 of the printed text, you would specify L=6, C=25 in this parameter.
Landscape Mode:
This is a 4 character field that defaults to *NO. If you specify *YES each page of the spool file will be set up for Landscape mode instead of the default Portrait mode printing.
Width of print line:
This 3 digit number defaults to 80 and is used for Portrait mode only. This controls the number and size of characters that will be printed across the page. A width of 0 uses a proportional font, 20-200 uses a fixed font that will fit that many characters in 8 inches.
Lines per Inch:
This 1 digit number defaults to 8 lines per inch for Landscape mode only. You may specify 6 or 8.
Characters per Inch:
This 2 digit number defaults to 14 characters per inch for Landscape mode only. You may specify 10, 12, 14, 17, or 20.
Paper length:
This 2 digit number defaults to 11 inches for Landscape mode only. You may specify any length from 1 to 23 inches long.
Merge image member name:
This is a 10 character field that you can use to merge an image with each of the spooled pages.
Merge file name:
This is a 10 character field that tells the program where to look for the merge member. If left blank, the program will search in IMGFILE then FAXFILE for the member.
185

10 Commands
From page number:
This is a 3 digit number that defaults to 1. This selects the first page that is taken out of the spool file.
To page number:
This is a 3 digit number that defaults to 999. You may specify a smaller number here if you do not wish to convert all pages.
Offset down (tenths of inch)
This is a 3 digit number that defaults to 0. Use this to specify the top margin in tenths of inches. For example, specify 5 to move the first spool file line down .5 inches from the top of the page.
Offset across (tenths of inch)
This is a 2 digit number that defaults to 2. Use this to specify the left margin in tenths of inches. For example, specify 5 to move the left margin to .5 inches from the left side of the page.
186

10 Commands
EDITIMG (Edit Image) CommandThis program is used to cut, paste, merge, or flip over any CKX image. CKX images can be edited using any of the following different methods. You can start the Edit Image command from the KeyesFile menu, from the command line, using the EI user option in IBM's PDM while working with image files, or by coding the command in any CL program. The easiest method for editing an image will usually be in IBM's PDM while working with image files.
Before you can cut or paste a CKX image, you will need to know the exact location in pixels of the cut or paste. This information can be obtained as follows.
1. Start by displaying the image that you wish to edit.
2. Move the cursor to the upper left corner where you wish to make the cut or the paste.
3. You can read the X and Y coordinates of the cursor location in the lower left corner of the screen (lower right for the DOS viewer).
4. Now move the cursor to the lower right corner where you wish to make the cut.
5. You can again read the X and Y coordinates of the cursor location.
6. Use these coordinates in the EDITIMG program to make the appropriate cut or paste.
Note: If you cannot display an image, you can try faxing it to a local fax machine and measuring the X and Y coordinates using a ruler. A *NORMAL fax has 204 dots per inch (dpi) horizontal resolution and 98 dpi vertical resolution. A *HIGH fax has 196 dpi vertical resolution.
Document member:
This is the name of the CKX image that you wish to either cut a piece out of, paste into another image, flip over, or reverse the colors.
Document file:
This is the name of the file that the member can be found in. The default value of *SEARCH causes the program to search in IMGFILE, FAXFILE, and TXTFILE for the document member.
To document member:
This is the name of the CKX image that you wish to either place the cut piece into or paste into. The default value of *FROMMBR can only be used if the To document file parameter names a different file other than the from file.
187
10 Commands
To document file:
This is the name of the file that the target member will be located in. The default value of *FROMFILE can only by used if the To document member parameter names a different member than the from member.
Edit type:
This defaults to *CUT which is used to cut a rectangle out of a CKX document. You can specify *PASTE which is used to paste a CKX image into another CKX image at a specific location. You can specify *FLIP which is used to turn a CKX image over. Or you can specify *REV to reverse the colors black and white.
X minimum (left side):
This is the upper left X coordinate (horizontal) of the rectangle that is to be cut or the destination of a paste.
Y minimum (top):
This is the upper left Y coordinate (vertical) of the rectangle that is to be cut or the destination of a paste.
X maximum (right side):
This is the lower right X coordinate of the rectangle that is to be cut.
Y maximum (bottom):
This is the lower right Y coordinate of the rectangle that is to be cut.
Transparent or opaque paste:
This defaults to *TRANS or you can specify *OPAQUE when you are pasting an image into another. A transparent paste merges one image into the other in the desired location. An opaque paste will block out a complete rectangle in the target image the exact size of the image being pasted.
Submit to batch or interactive:
This defaults to *INTER. You can specify *BATCH which will cause the program to be submitted to the IMGCONV job queue. This job queue is part of the FAXCOM subsystem and is started automatically when you run STRFAXCOM. You can alternatively start the FAXCOM subsystem manually using FCSBS (Fax Com Subsystem).
188

10 Commands
FAXAFPDS (Fax an AFPDS Spooled File) CommandThis command is used to fax AFPDS type spooled files. The program runs IBM's Host Print Transform to convert the AFPDS spooled file to an image and converts that to a Fax Image for transmission. You cannot use any of our Fax Commands embedded within the spooled file data.
Note: Please refer to the KFAXSPLF command for information about the command parameters.
189

10 Commands
FAXASCII (Fax a USERASCII Spooled File) CommandThis command is used to fax USERASCII type spooled files. The program will convert the PCL that is generated by most third party forms packages to a fax image. You may embed Fax Commands inside the spooled file and send it to the page as if it would be printed. The Fax Commands will be stripped out of the PCL, used to control the fax, and not printed on the page.
Note: Please refer to the KFAXSPLF command for information about the command parameters.
190

10 Commands
FAXMSG (Fax a Message) CommandThis command starts the Message Editor so that you can create and fax a message. From the Message Editor you will be able to copy another message into your new message to reduce the amount of typing that is needed. You can also look up and retrieve recipient information using the Phonebook feature.
The recipient and sender parameters defined below can be used by an application to pass information to the Message Editor, to assist the user.
Message member name:
This is a 10 character field that is the name of the Message member to be edited and sent as a FAX image. The default value of *SEARCH will cause the program to use IBM's PDM to assist you in finding the desired member name.
Message file name:
This is a 10 character field that tells the program where to find the Message member. You can specify *SEARCH which will use IBM's PDM to assist you in locating the desired file.
Edit the message:
This is a 1 character field that defaults to Y. If you code an N the message will be faxed without any operator intervention. When you code a Y, the Message Editor will allow you to alter the message before it is faxed.
To:
This 30 character parameter can be used to pass the contact name to the Message Editor. This name will be pasted into the recipient box.
Company:
This 30 character parameter can be used to pass the company name to the Message Editor. This name will be pasted into the recipient box.
Fax #:
This 25 character parameter can be used to pass the fax number to the Message Editor. This number will be pasted into the recipient box to be used for the destination of the fax.
Description:
This 50 character parameter will be used as the text description for any new Message members that you create.
From:
This 35 character parameter can be used to set the Sender's name for the message.
191

10 Commands
From Company:
This 35 character parameter can be used to set the Sender's Company name for the message.
From Fax #:
This 35 character parameter can be used to set the Sender's Fax number for the message.
From Phone #:
This 35 character parameter can be used to set the Sender's voice phone number for the message.
From E-mail address:
This 35 character parameter can be used to set the Sender's e-mail address (or any other additional information) for the message.
Total pages:
This 3 digit parameter can be used to set the total number of pages on the message. The value should include the coversheet, as well as all the attached pages being sent.
Cover notes:
This 76 character parameter can be used to send a special note at the top of the message. When faxed, it will appear just above the body of the Message.
192

10 Commands
FAXSETUP (Fax Communication Setup) CommandThe Fax Communication Setup program is used to define data areas (KFDATAx), one for each fax line. The information is used in both the Send and Receive Fax programs as well as the Display Image and Print Image programs. You can change the values in these data areas at anytime, and it will take effect immediately.
Fax Com line number:
When you first prompt FAXSETUP command, you may enter a number from 1 to 24 to designate which fax line is to be changed. You can enter *ALL to make a change to all fax lines.
Modem speaker:
The choices here are ON, OFF, or AUTO, the default is AUTO. ON will leave the speaker on at all times during communication, OFF will leave it off. AUTO will begin dialing or answer a call with the speaker on, then turn the speaker off when a connection has been made.
Modem initialization string:
This field must be used to initialize your modem for the type of Flow Control that it will be using. Typically, you should not code 'ATZ' or 'AT&F' commands, as this will remove the preset KeyesFax modem settings.
For Hardware Flow Control:
US Robotics modems will require the string ATX2 to eliminate false busy signals from a double ring. Multi-Tech, Practical Peripherals and most Hayes compatible modems can be left blank. The IBM Integrated modems will use AT&S0. This includes the 2771, 2772, 2793, & 2805 Integrated modems. The IBM 7858 modem does not need an initialization string.
For Software Flow Control:
US Robotics modems will require the string AT&H2X2. Multi-Tech, Practical Peripherals and most Hayes compatible modems will use AT&K4. The IBM Integrated modems will use AT&S0. This includes the 2771, 2772, 2793, & 2805 Integrated modems. The IBM 7858 modem does not need an initialization string.
You may also have to use this field if your telephone system or modem requires special treatment that is different from the standard modem defaults. For example, you may need to change some of the modem register values that control pause times or delays for certain long-distance services. Refer to your modem manual for the proper coding of any modem commands that you need to make.
Dialing prefix:
The dialing prefix default ATDT is set to touch-tone dialing with no additional access codes or pauses. If the modem will be dialing through a PBX system or a long distance carrier that requires access numbers, you will make those changes here. For example, if you entered ATDT9,555-1111 W 12345 the modem would dial 9 to get an outside line, wait 2 seconds, dial 555-1111 to access a long-distance carrier, wait for a dial tone or go-ahead tone, dial 12345 for an access
193

10 Commands
code, then dial the phone number of the remote fax machine as specified in the Send Fax program. Refer to your modem manual for the proper coding of the dial command.
Dialing suffix:
A dialing suffix is added after dialing the telephone number. It can be used to add access codes for each fax call.
Transmitting terminal ident:
This is your company name. It will be placed at the top of each outgoing fax along with the CSI, the date, and the time of transmission. A 1993 Federal Law states that all outgoing fax transmissions must have an identification.
Calling/sending identification:
This is the CSI and the TSI used by the modem to identify itself to a remote fax machine. You should key up to 20 digits of your inbound fax phone number with area code for identification. For example, you would enter (800) 555-1111 to identify your fax number.
Override Modem Class
The default value of 'A' will allow the system to auto select Class 1, Class 2.0, or Class 2.1 based on the modems capability. You may force the system to use a specific Class, by entering a '1' or a '2', in this parameter. Use “1” for 2793 Integrated modems.
Number rings before answering:
This designates how many rings you want the program to wait before answering an incoming call. You may enter 0 through 9, with a default of 1. If you enter 0, the Auto Receive program will not answer any incoming calls. This is how you would set the system up if you wanted to send faxes only. The Auto Receive program continues to run all the time in order to check for scheduled outgoing faxes.
Outbound fax line:
The default value of Y tells the system to use this fax line as an outbound line. If you enter an N, the system will not choose this line when you code *ANY in the Fax Com line number parameter when sending a fax. However, you can still use this line to send a fax by coding the specific line number in the Fax Com line number parameter when sending a fax.
Fax operator:
Any valid user-id may be entered with a default of QSYSOPR. The fax operator receives important messages from the system that may need immediate attention, such as: a fax has been received or communication on one of the fax lines has stopped.
Allow high resolution Fax receive:
Your choices are YES and NO, with a default of YES. If you specify NO, the Auto Receive program will ensure that all faxes being received are changed to
194

10 Commands
Normal resolution. Normal resolution faxes (98 dpi) are recommended for most applications. High resolution faxes (196 dpi) require twice as much time to receive, convert, transmit, or display than Normal resolution.
Maximum connect speed:
The choices here are 2400, 4800, 7200, 9600, 12000, 14400, 16800, 19200, 21600, 24000, 26400, 28800, 31200, or 33600, with a default of 33600. It is recommended that you set the maximum connect speed to 33600 for any modem with High Speed capability. Modems with Class 2.1 have the higher speeds. The system will automatically fallback to a slower speed if it detects a poor quality line during its initial connection with a fax machine.
Failed Send Fax retry count:
You may enter a number from 0 to 9, with a default of 2. This designates how many times the Fax system will try to resend a fax that has failed.
Number minutes between retries:
You may enter a number from 01 to 15, with a default of 05. This designates the number of minutes that the Send Fax program will wait before rescheduling a fax that has failed.
Route to Printer Device:
Enter an HP compatible laser printer device name to cause all inbound faxes to be automatically printed on that device. Leave this parameter blank to stop printing inbound faxes. To blank this parameter, enter ' '.
Auto Fax FAXCOM Output Queue:
The default value of Y causes the Auto Receive program to automatically convert and fax any spool files that are placed in the FAXCOM output queue. The system will only pick up a spool file that has a status of READY. You may code an N to stop the automatic faxing of spool entries that are placed in FAXCOM.
Auto Fax PC Documents:
The default value of Y causes the Auto Receive program to check to see if any PC documents that were sent from attached PC's or images placed in the IFS Folder – are available to be faxed. You may code an N to stop the automatic faxing of PC documents. This feature requires the PC Option to be purchased.
Coding an N will prevent the system from checking for PC documents to be faxeed. If you have multiple lines, not all the lines need to do the checking. Any one line can find new entries and schedule them on the first available fax line.
DID Configuration (blank=None):
DID (Direct Inward Dial) modems must be configured to match the telephone company parameters for the DID line. Leave this field blank if you do not have a DID line. For DID lines you must enter exactly 5 digits, defined as follows:
In position 1 - DSx defines the start profile; x=0 disables detection, x=1 is WINK start, x=2 is IMMEDIATE start, x=3 is DELAY dial.
195
10 Commands
In position 2 - DNx defines the number of DID digits expected; x=0-7 range of values.
In positions 3 & 4 - DTxx defines a wait for digits time-out; x=00-30 seconds (usually 15).
In position 5 - DDx defines the format of the incoming digits: x=0 is DTMF (default), x=1is PULSE, x=2 is MF (multi frequency).
Night Fax Start Time:
This designates the time that you wish to start night faxing using the format HHMM. For example, to start faxing entries from NIGHTFILE or from the FAXNGT output queue starting at 11:15PM, enter 2315.
Night Fax End Time:
This designates the time that you wish to end night faxing using the format HHMM. For example, to end faxing entries from NIGHTFILE or from the FAXNGT output queue after 06:00AM, enter 0600. If you do not wish to do any night faxing, enter 0000 in both the Start and End Times.
Monitor IFS Folder for faxing:
Name an IFS folder that you wish to Monitor for automatically converting and sending faxes from PC's. When TIFF images are placed in this IFS folder, KeyesFax will transfer each image to the IBM i, convert it to a Fax image, and send it to the FaxQueue ready for faxing.
The Fax number, User-Id, and Attention to values can be automatically passed to the Fax system in the name of the image placed in the folder. Code ^Fax followed by the fax number or "^Fax PBX member" to send to a list. KeyesFax will extract the fax number or list from the name. If ^Fax is not found in the name, then the document will be sent to the FaxQueue with a status of "No Phone #". A user can subsequently assign a fax number and restart the fax to transmit it. Or they can use the “S” option to save the image as an Overlay.
You may code ^User followed by the User-Id in the image name. KeyesFax will extract the User-Id from the name and place the new fax in the Fax Queue for that user. If the User-Id is not found in the name, the Fax Operator as coded in the Fax Setup will be used.
You may code ^Attn followed by the Attention to name. KeyesFax will extract the Attention to name from the image name and place this at the top of the Fax page. You may wish to code a trailing ^ after the name to mark the end.
Example image name:
^Fax 555-1212 ^User My-Id ^Attn John Q Public ^ other stuff.TIFF
Auto Purge Sent Faxes:
Key a Y in this parameter if you wish all sent faxes to be automatically purged from the system. The FAX image will be removed from OUTFILE as each fax is successfully transmitted.
The default value of N will allow you to restart or resend faxes without having to rebuild the FAX image. You will be able to easily restart a fax using the Fax Queue.
196

10 Commands
Auto Purge Failed Faxes:
Key a Y in this parameter if you wish all failed faxes to be automatically purged from the system. The FAX image will be removed from OUTFILE after all retries have been exhausted.
The default value of N will allow you to restart or resend a failed fax without having to rebuild the FAX image. You will be able to easily change/restart a failed fax using the Fax Queue.
Send Completion Messages:
Key a Y in this parameter if you wish to have Completion messages sent to the users. These Completion messages will advise the user whether or not each fax has successfully faxed or not.
If you key an N the user will only be sent messages if one of their faxes fails to be transmitted after all retries have been exhausted.
Conversion Run Priority:
The run priority of fax conversions can be set with this parameter. The default value of 50 is the same priority that normal batch jobs use. If you wish to slow the fax conversion compared to your other batch jobs, change the priority to 60. If you wish to speed the fax conversion compared to your other batch jobs, change the priority to 40.
Burst PCL before conversion:
USERASCII spooled files (PCL) can be converted before or after bursting, by destination phone number. It is usually more efficient to burst the PCL before conversion. But, sometimes this will not create good results, depending on how the macros were prepared. If you notice that forms are missing on the faxes, try changing this parameter to “N”.
Number of HTTP clients:
Enter the number of HTTP clients that you want to run. Each HTTP client can handle multiple users, simultaneously. If user response time is slow, increasing the number of clients may help.
HTTP Server Original/ Apache:
Enter an “O” if you are using the original IBM HTTP Server. Enter an “A” if you are using the HTTP Server that is powered by Apache. IBM switched from the original HTTP Server to the Apache Server during V5R1. You may be using either one, until V5R3.
KF PC Server address:
This is the TCP/IP address of your iSeries computer. The PC Image Viewer will connect to the iSeries using this address when connecting to the KeyesFax PC Server. Enter the address in a dotted decimal format. (xxx.xx.xxx.x)
Server Port (usually 18472):
Set this value to the PC Server Port. This is usually 18472.
197

10 Commands
Server Run Priority:
This is the Run priority that you wish the PC Server to use. The default value of 15 will run the servers with higher priority than normal Workstations. You may wish to adjust the priority to acheive your desired system performance.
PC Client backlog:
Enter the number of PC clients that you will allow to wait for an available connection. If more than this number of clients are waiting to connect to the PC Server, the additional clients will be denied a connection.
This number plus the number of PC clients value can be used to finely tune the iSeries server to achieve your desired performance.
PC Communication timeout:
Enter the number of seconds that the PC Server should wait for responses from a PC. If responses are not received within this time period, the server will assume that the PC has stopped responding and will close the connection.
Default Fax resolution:
This is used to set the default resolution when creating new fax images. A *Normal fax will be built using 98 dots per inch (dpi) vertical resolution. If you specify *High, the fax will be built using 196 dpi resolution. The horizontal resolution remains at 204 dpi. A High resolution fax takes twice as long to convert and to transmit but will produce a sharper image.
Note: If you include or merge other images with your text, be sure that the other images have been built using the same resolution. If not, the conversion will fail with an error message stating "Resolution does not match".
Default Paper length:
Set this value to "S" to use Standard (8.5" x 11") paper size. You may also set it to "A" for A4 size paper (8.4" x 11.69"). This is used when converting PCL spooled files to Fax images and when printing Fax images.
Default Consolidation:
Use this to set the default value for allowing consolidation when sending faxes. The default for this field is Y. This will allow the system to consolidate each fax with other faxes to the same recipient. The system will only consolidate faxes that have the same phone number, priority, scheduled time, attention to name, and number of retries. Specify N if you do not wish to allow faxes to be consolidated.
Default consolidation delay:
This is a 2 digit number that defaults to Blank. A positive value in this parameter can be used to help the system consolidate multiple documents to the same recipient. Enter a value that is long enough to allow additional pages to be added to the first page of a series. A value of 00 or Blank will send the pages immediately after conversion.
Resend No Confirmations:
198

10 Commands
This is a 1 character field that determines whether or not you want the system to resend a page when it loses the confirmation for that page. Normally a fax is not considered 'Sent' unless each page is confirmed by the receiving fax machine. Some hardware configurations have a hard time receiving the confirmations, which can cause the system to resend the same page again. If you do not want the system to resend a page when it misses a confirmation, code an “N” in this parameter. If the confirmation is not received, the status will change to “Sent?”.
Default Phonebook name:
While using our Message Editor to build a coversheet or to send a fax, you can access a Phonebook to fill in the recipient information. Enter the name of the default KeyesFile member name that you wish to use for the Phonebook in this parameter.
If you leave this parameter blank, the user will have to provide the Phonebook name each time they want to access it. This parameter can only be set for fax line number 1.
Phonebook Fax # Heading:
Set this value to the Heading in your Phonebook where you store the Fax #. When a card is selected in the Phonebook, the system will search the Headings for this value to find which card line you placed the fax number on. This parameter can only be set for fax line number 1.
Phonebook Contact Heading:
Set this value to the Heading in your Phonebook where you store the Contact. When a card is selected in the Phonebook, the system will search the Headings for this value to find which card line you placed the contact's name on. This parameter can only be set for fax line number 1.
Phonebook Company Heading:
Set this value to the Heading in your Phonebook where you store the Company. When a card is selected in the Phonebook, the system will search the Headings for this value to find which card line you placed the company name on. This parameter can only be set for fax line number 1.
Default System Language:
Set this value to one of the available language dictionaries. This dictionary will be used, by default, for each user when they spell check their Fax messages. A user can override the default language dictionary when they are spell checking a message.
The available languages are AMERICAN, BRITISH, DANISH, FRENCH, GERMAN, ITALIAN, and SPANISH.
199

10 Commands
KEXPFAX (Export Fax to IFS) CommandThis program converts a Fax image to either a PDF document or a TIFF image and will export the result to the IFS.
Fax member to export:
This is the name of the fax image that you wish to export to the IFS. The image will be converted to either a PDF document or a TIFF image.
File:
This is the name of the file that the fax member can be found in.
Export as PDF or TIFF image:
P = PDF
The fax will be converted to a PDF document.
T = TIFF
The fax will be converted to a TIFF image.
To Filename:
This is a 60 character field that you can use to name the resulting document on the IFS. If you leave this field blank, the original member name will be used. If you do not provide a filename extension, the maximum length will be 56 characters and the appropriate extension (.PDF/.TIF) will be added automatically.
To IFS Path:
This is a 50 character field that specifies the target Path where the resulting document will be placed in the IFS.
200

10 Commands
KFAXSPLF (Fax Spool File) CommandUsing the Fax Spool File program, you will be able to send any printer spool file entry as a fax. Routing a spool file to the FAXCOM output queue is much easier, however KFAXSPLF can give you more options. This program automatically converts the spool file entry into a text file, placing it in the source file SPLFILE. It will add the text to an optional cover sheet, then allow you to modify the text from the spool file, if desired.
When you are finished, the program converts the resulting text file into a FAX image and places it in OUTFILE ready for faxing. The OUTFILE entry remains on the system, so that you can resend the same fax without having to convert it again. To resend a fax, you may use the Restart option in the Fax Queue.
You can run this program from the command line but it is intended to be called from an application program as it generates a document to be faxed. It can be called in a CL program after your application has completed producing a report to be faxed. Or, it can be called directly from within your application program multiple times as it generates each document to be faxed. However, we recommend that you call the CL program FAXSPLF instead of this program, in your applications.
Note: KFAXSPLF can only be used for standard *SCS printer files. If you are faxing AFPDS spooled files, you must use the FAXAFPDS command. USERASCII spooled files (PCL) are faxed using the FAXASCII command. All three of these commands use similar parameters.
Phone number, *FAX, *EMAIL:
This is a 25 character required field that specifies the phone number of the destination fax machine. The default value of *FAX instructs the program to look for the phone number in the spool file itself. The ¬Fax command is used in the spool file to specify the phone number.
You may code the special value *EMAIL, to e-mail the fax image as an attachment. You may code the e-mail address in a parameter that will appear after you press the Enter key. This feature requires the libraries for KeyesMail Version 3.0 or higher to be included on your library list.
You may also code a phone number location using the format (L=ll,C=ccc): where ll is the line number and ccc is the column number of the fax phone number on each printed page.
Spooled file:
This is a 10 character required field that is the name of the spooled file that you wish to fax. This comes from the name of the printer output file that you define in your program.
Job name or *:
This is a 10 character required field that identifies the job that built the spooled file. You may specify * to designate the current job.
201

10 Commands
User name:
This is a 10 character field used to specify the user profile of the job that created the spooled file. You may leave this parameter blank if you coded * for the Job Name parameter above.
Number:
This is a 6 character field used to specify the number of the job that created the spooled file. You may leave this parameter blank if you coded * for the Job Name parameter above.
Spooled file number:
This is a 5 character field used to separate multiple spooled files from the same job. The default is *LAST. You may specify *ONLY, *LAST, or the specific number to select the desired entry.
Attention to name:
This is a 25 character field that you can use to provide a name or title in the top line that is printed on each fax page. Using this parameter can eliminate the need for a fax cover sheet in many cases. You may enter up to 23 characters of data surrounded by quotes.
Remove SplF after faxing:
This is a 4 character field that defaults to *YES. If you specify *NO, the spool file entry will be left in the output queue on HOLD after it is faxed. *YES will remove the spool file after converting it to a FAX image. Specify *CTL to remove the spool file after it is transmitted successfully. Use *CTL if you wish to print failed faxes.
Description:
This is a 23 character field that you may use to describe the document that you are faxing. This description will be added to the Fax Queue description so that you can identify the document to refax it. You may enter up to 21 characters of description surrounded by quotes.
Cover page member name:
This is a 10 character field that defaults to *NONE. If you want to include a coversheet with the spool file, enter the name of the Message member or text document that you wish to use as a cover page.
File:
This is a 10 character field that tells the program where to look for the cover page member. The default is COVERFILE which is a Message file. You may also wish to use MSGFILE (in place of COVERFILE). If you decide to Edit the Cover Page (see the next parameter), changes that you make to a COVERFILE member are temporary. They only last for the current fax. Changes that you make to a MSGFILE member will be recorded in MSGFILE and are therefore used on all following faxes.
202
10 Commands
Edit the cover page:
This is a 1 character field that defaults to Y. If you code an N the cover page will be faxed without any operator intervention. When you code a Y, the Message Editor will allow you to alter the cover page before it is faxed.
Edit spool file:
This is a 1 character field that defaults to N. Change this parameter to a Y if you want the program to put you in IBM's SEU to allow you to edit the coversheet text and the converted spool file document before it is converted to a fax image.
E-mail address:
This is a 60 character field that you can code the E-mail address for e-mailing the fax image as an attachment. This feature requires KeyesMail Version 3.1 or higher libraries on your library list. Place 'quotes' around the address so that you can use lower case characters.
Print Fax pages:
This is a 1 character field that you can use to print fax pages. A value of "A" will always print the fax pages. A value of "F" will only print those pages that fail to be faxed. A value of "S" will only print those pages that were successfully faxed. The default value of "N" calls for no printing of the fax pages.
To Printer:
This 10 character field is used to specify the printer that you wish to use for printing the fax pages. It is only used when the "Print" parameter from above has been coded with a value other than "N".
Landscape mode (sideways):
This is a 4 character field that defaults to *NO. If you specify *YES each page of the spool file will be faxed in Landscape mode instead of the default Portrait mode.
Width of print line:
This 3 digit number defaults to 80 and is used for Portrait mode only. This controls the number and size of characters that will be printed across the page. A width of 0 uses a proportional font, 20-200 uses a fixed font that will fit that many characters in the available 8 inches on the fax page.
Lines per Inch:
This 1 digit number defaults to 8 lines per inch for Landscape mode only. You may specify 6 or 8.
Characters per Inch:
This 2 digit number defaults to 14 characters per inch for Landscape mode only. You may specify 10, 12, 14, 15, 16, 17, or 20. If you specify any value larger than 10 cpi in Landscape mode, you must use *HIGH for the Fax resolution parameter.
203

10 Commands
Paper length in inches:
This 2 digit number defaults to 11 inches for Landscape mode only. You may specify any length from 1 to 23 inches long. Use 12 for A4 size paper.
Merge image member name:
This is a 10 character field that you can use to merge an image with each of the spooled pages.
Merge file name:
This is a 10 character field that tells the program where to look for the merge image member, if it was specified. If left blank, the program will search in IMGFILE then FAXFILE for any member named above.
Coversheet substitutions:
If you are using a coversheet, the following 9 parameters can be used to fill the recipient and sender fields on the coversheet. Any fields not specified will default to the values already keyed in the named cover member.
To name: The recipient's name.
To company: The recipient's company name.
From: The sender's name.
From Company: The sender's company name.
From Fax #: The sender's fax number.
From Phone #: The sender's voice phone number.
From E-mail address: The sender's e-mail address or any other additional information.
Total pages: The total pages (including the coversheet).
Cover notes: Important notes about the fax document.
Fax resolution:
This is a 7 character field that defaults to *DFT. A *NORMAL fax will be built using 98 dots per inch (dpi) vertical resolution. If you specify *HIGH, the fax will be built using 196 dpi resolution. The horizontal resolution remains at 204 dpi. A high resolution fax takes twice as long to convert, display, and to transmit but will produce a sharper image.
The default value of *DFT will set the resolution to the value that you have set in the Fax Setup parameter (Default resolution).
Note: If you include or merge other images with your text, be sure that the other images have been built using the same resolution. If not, the other images will not ba able to be included on the page. A failure message will be issued, "Resolution does not match".
204

10 Commands
Convert in batch/interactive:
This is a 6 character field that defaults to *BATCH. You can specify *INTER which will cause the program to run interactively instead of being submitted to the IMGCONV job queue. This job queue is part of the FAXCOM subsystem and is started automatically when you run STRFAXCOM.
Allow call consolidation:
This is a 4 character field that defaults to *DFT. A *YES value will allow the system to consolidate this fax with other faxes to the same recipient. The system will only consolidate faxes that have the same phone number, priority, scheduled time, attention to name, and number of retries. Specify *NO if you do not wish to allow this fax to be consolidated with others.
The default value of *DFT will set this parameter to the value that you have set in the Fax Setup parameter (Default consolidation).
Consolidation delay (minutes):
This is a 2 digit number that defaults to *DFT. A positive value in this parameter can be used to help the system consolidate multiple documents to the same recipient. Enter a value that is long enough to allow additional pages to be added to the first page of a series. A value of 00 will send pages immediately after conversion.
The default value of *DFT will set this parameter to the value that you have set in the Fax Setup parameter (Default consolidation delay).
Transmit time (HHMM):
This is a 4 digit number that defaults to 0, which causes the fax to be sent immediately. You can specify the exact time that you wish the fax to be transmitted. The time should be specified using the format HHMM, and must be from 0000 to 2400.
Transmit date (YYMMDD):
This is a 6 digit number that defaults to 0, which causes the fax to be sent today. You can specify the exact time that you wish the fax to be transmitted. The date should be specified using the format YYMMDD.
From page number:
This is a 3 digit number that defaults to 1. This selects the first page that is taken out of the spool file to be converted into a FAX image.
To page number:
This is a 3 digit number that defaults to 999. You may specify a smaller number here if you do not wish to convert all pages of a spool file into a FAX image.
Offset down (tenths of inch):
This is a 3 digit number that defaults to 0. Use this to specify the top margin in tenths of inches. For example, specify 5 to move the first spool file line down .5 inches from the top of the page.
205

10 Commands
Offset across (tenths of inch):
This is a 2 digit number that defaults to 2. Use this to specify the left margin in tenths of inches. For example, specify 5 to move the left margin to .5 inches from the left side of the page.
Job priority (on JOBQ):
This 5 character field defaults to *JOBD which uses the scheduling priority for the current job to set the FAXCOM job queue priority. You may specify a number from 1 through 9, where 1 is the highest priority and 9 is the lowest priority.
Fax Com line number:
This 4 character field defaults to *ANY which allows the system to fax the document from the first available fax line. You may code a fax line number to use a specific line for this fax only.
Failed Send Fax retry count:
This 5 character field defaults to *LINE which instructs the program to use the value that was defined in the FAXSETUP program for the fax line. You may code a value from 0 to 9 to force the program to use a specific retry count for this fax only.
Route completion message:
This 10 character field defaults to *USER to specify where the completion message should be sent. *USER will direct the completion message to the user's message queue. You may override the message queue by specifying any other valid message queue name or *NONE.
Accounting code:
This is a 5 character field that defaults to *JOBD which causes the program to use the first 5 characters of the job's accounting code. The accounting code is used in the Fax History Log to separate the telephone connect times.
206

10 Commands
Adding KFAXSPLF to your ApplicationsA programmer can add a call to the Fax Spool File program to any of your applications. It has the ability to add a cover page that is already filled out with the recipients name and company. It can also be set up with your name, company, and a standard message to make adding the cover page very efficient.
Rather than having to pass all of the parameters for the KFAXSPLF program, we recommend that you call a smaller program called FAXSPLF that has fewer parameters to be passed. FAXSPLF runs the KFAXSPLF command with the parameters that you pass to it. You can modify the FAXSPLF code to suit your needs. You may add or remove any of the parameters in FAXSPLF to make your application work the way you want it to.
A call to FAXSPLF from your application would look as follows:
C CLOSEINVFAXC 'Invoice' CAT INVNR:1 DESC 23C CALL 'FAXSPLF'C PARM PHONE PHONE# 25C PARM 'INVFAX' SPFILE 10C PARM ATTN 25C PARM DESC 23C PARM 'COVER' CVPAGE 10C PARM 'INVFORM' MNAME 10C PARM 'IMGFILE' FNAME 10C PARM '*NORMAL' RESOL 7C PARM '*USER' COMPM 10C PARM CONTC TO 30C PARM CONAME COMPY 30C OPEN INVFAX
Note: This RPG Code for calling FAXSPLF has been included in the KeyesFax library. It is located in the file called QRPGSRC in the member called CALLFAXSPL. It is intended to be pulled into your application. Before calling FAXSPLF you must close the printer file, which makes the spool file available for processing.
If you wish to merge your printer data with a forms overlay, simply pass the member name and file that contains your overlay. Be sure to create the forms overlay with the same resolution that you specify in this call.
207

10 Commands
KSNDFAX (Send Fax) CommandThe Send Fax program automatically converts text and/or image documents into a FAX image and places it in OUTFILE for faxing. If you resend the same document member name again at a later time, the program will give you the choice of using the FAX image in OUTFILE without having to convert it over again, or deleting and replacing it.
Note: A text document is actually any width source physical file member from 80 to 228 bytes per record. See How To Build Fax Messages in the Fax chapter for more information.
Document member name:
This is a 10 character field that is the name of the image or text document member to be sent. You can specify *SEARCH or a generic name (*generic*) if you are unsure of the name of the document. The program will then use IBM's PDM to assist you in finding the desired member. When you have found it, you can use either the X or SF user options to select the member.
File:
This is a 10 character field that tells the program where to look for the document member. The default is *SEARCH which causes the program to search in IMGFILE, then FAXFILE, and finally TXTFILE for the member.
Edit existing text document:
This is a 1 character field that defaults to Y and is ignored for all but text documents. This will cause the program to put you in IBM's SEU to allow you to edit a text document. Change this parameter to N if you do not wish to edit the document.
Phone number, *FAX, *LIST, *PBX:
This is a 25 character field that specifies the phone number of the fax machine. The default value of *FAX directs the program to get the phone number out of the document. The ¬Fax text command is used in the document to specify the phone number. If you specify *LIST the program will get the phone numbers out of one or more directory entries found in a distribution list. If you specify *PBX, the program will get phone numbers out of a PBXFILE member.
Distribution list id:
This is an 8 character field that is only needed when *LIST is coded in the Phone number parameter. Distribution lists can be maintained using the WRKDSTL (Work with Distribution Lists) and WRKDIR (Work with Directory) commands.
List ID qualifier:
This is an 8 character field that is only needed when *LIST is coded in the Phone number parameter. Code the qualified name for the distribution list.
208

10 Commands
PBX file member name:
This is a 10 character field that specifies the name of the phone list member from the PBXFILE. It is only used if you specified *PBX in the Phone number parameter. The phone list member may contain one or more phone numbers in it that you wish to send the fax to. It also may contain substitution data used for personalizing the fax messages sent to each number. The default value of *SEARCH will cause the program to assist you in finding the desired member. When you have found it, you can use the X user option to select the member.
Edit the PBX member:
This is a 1 character field that defaults to N and is ignored unless *PBX is specified for the Phone number parameter. Change this parameter to Y if you wish to edit the list. The program will put you in IBM's SEU to allow you to edit the phone list member.
Attention to name:
This is a 25 character field that you can use to provide a name or title in the top line that is printed on each fax page. Using this parameter can eliminate the need for a fax cover sheet in many cases. You may key up to 23 characters of data surrounded by quotes.
Cover page member name:
This is a 10 character field that defaults to *NONE. If you want to include a coversheet with the document, enter the name of the Message member that you wish to use as a cover page.
File:
This is a 10 character field that tells the program where to look for the cover page member. The default is COVERFILE. You may also wish to use MSGFILE (in place of COVERFILE). If you decide to Edit the Cover Page, changes that you make to a COVERFILE member are temporary. They only last for the current fax. Changes that you make to a MSGFILE member will be recorded in MSGFILE and are therefore used on all following faxes.
Edit the cover page:
This is a 1 character field that defaults to Y. If you code an N the cover page will be faxed without any operator intervention. When you code a Y, the Message Editor will allow you to alter the cover page before it is faxed.
Print Fax pages:
This is a 1 character field that you can use to print fax pages. A value of "A" will always print the fax pages. A value of "F" will only print those pages that fail to be faxed. A value of "S" will only print those pages that were successfully faxed. The default value of "N" calls for no printing of the fax pages.
To Printer:
This 10 character field is used to specify the printer that you wish to use for printing the fax pages. It is only used when the "Print" parameter from above has been coded with a value other than "N".
209

10 Commands
Fax resolution:
This is a 7 character field that defaults to *DFT. A *NORMAL fax will be built using 98 dots per inch (dpi) vertical resolution. If you specify *HIGH, the fax will be built using 196 dpi resolution. The horizontal resolution remains at 204 dpi. A high resolution fax takes twice as long to convert, display, and to transmit but will produce a sharper image.
The default value of *DFT will set the resolution to the value that you have set in the Fax Setup parameter (Default resolution).
Note: If you include or merge other images with your text, be sure that the other images have been built using the same resolution. If not, the other images will not be able to be included on the page. A failure message will be issued, "Resolution does not match".
Coversheet substitutions:
If you are using a coversheet, the following 9 parameters can be used to fill the recipient and sender fields on the coversheet. Any fields not specified will default to the values already keyed in the named cover member.
To name: The recipient's name.
To company: The recipient's company name.
From: The sender's name.
From Company: The sender's company name.
From Fax #: The sender's fax number.
From Phone #: The sender's voice phone number.
From E-mail address: The sender's e-mail address or any other additional information.
Total pages: The total pages (including the coversheet).
Cover notes: Important notes about the fax document.
Convert in batch/interactive:
This is a 6 character field that defaults to *BATCH. You can specify *INTER which will cause the program to run interactively instead of being submitted to the IMGCONV job queue. This job queue is part of the FAXCOM subsystem and is started automatically when you run STRFAXCOM.
Allow call consolidation:
This is a 4 character field that defaults to *DFT. A *YES value will allow the system to consolidate this fax with other faxes to the same recipient. The system will only consolidate faxes that have the same phone number, priority, scheduled time, attention to name, and number of retries. Specify *NO if you do not wish to allow this fax to be consolidated with others.
The default value of *DFT will set this parameter to the value that you have set in the Fax Setup parameter (Default consolidation).
210

10 Commands
Consolidation delay (minutes):
This is a 2 digit number that defaults to *DFT. A positive value in this parameter can be used to help the system consolidate multiple documents to the same recipient. Enter a value that is long enough to allow additional pages to be added to the first page of a series. A value of 00 will send pages immediately after conversion.
The default value of *DFT will set this parameter to the value that you have set in the Fax Setup parameter (Default consolidation delay).
Transmit time (HHMM):
This is a 4 digit number that defaults to 0, which causes the fax to be sent immediately. You can specify the exact time that you wish the fax to be transmitted. The time should be specified using the format HHMM, and must be from 0000 to 2400.
Transmit date (YYMMDD):
This is a 6 digit number that defaults to 0, which causes the fax to be sent today. You can specify the exact time that you wish the fax to be transmitted. The date should be specified using the format YYMMDD.
From page number:
This is a 3 digit number that defaults to 1. After a transmission failure, this parameter will allow you to retransmit the same fax without repeating pages that were successful.
To page number:
This is a 3 digit number that defaults to 999. You may specify a smaller number here if you do not wish to send all pages of a FAX image. This is useful for retransmitting pages that were unclear.
Job priority (on JOBQ):
This 5 character field defaults to *JOBD which uses the scheduling priority for the current job to set the FAXCOM job queue priority. You may specify a number from 1 through 9, where 1 is the highest priority and 9 is the lowest priority.
Fax Com line number:
This 4 character field defaults to *ANY which allows the system to fax the document from the first available fax line. You may code a fax line number to use a specific line for this fax only.
Failed Send Fax retry count:
This 5 character field defaults to *LINE which instructs the program to use the value that was defined in the FAXSETUP program for the fax line. You may code a value from 0 to 9 to force the program to use a specific retry count for this fax only.
211

10 Commands
Route completion message:
This 10 character field defaults to *USER to specify where the completion message should be sent. *USER will direct the completion message to the user's message queue. You may override the message queue by specifying any other valid message queue name or *NONE.
Accounting code:
This is a 5 character field that defaults to *JOBD which causes the program to use the first 5 characters of the job's accounting code. The accounting code is used in the Fax History Log to separate the telephone connect times.
212

10 Commands
PRTIMG (Print Image) CommandThe Print Image program can print faxes to any HP compatible laser printer available to your iSeries. You can start the Print Image command from the command line, using the PI user option in IBM's PDM while working with Image files, or you can call the Print Image program from any of your applications.
Note: The Print Image command is automatically called for each inbound fax, if the Route to Printer Device parameter has been coded with a printer name in the FAXSETUP program. Users may manually run this program using option 6 in the Work with Receive Queue and Work with Fax Queue programs.
Document member name:
This is a 10 character field that is the name of the image document member to be printed. You can specify *SEARCH or a generic name (*generic*) if you are unsure of the name of the document. The program will then use IBM's PDM to assist you in finding the desired member. When you have found it, you can use either the X or PI user options to print the member.
File:
This is a 10 character field that tells the program where to look for the document member. The default is *SEARCH which causes the program to search in IMGFILE, then FAXFILE, and finally TXTFILE for the member.
Printer device:
This is a 10 character field which specifies which laser printer that you wish to print on.
Starting page number:
This is a 3 digit number which specifies the first page that is to be printed. The default is 1.
Ending page number:
This is a 3 digit number which specifies the last page that is to be printed. The default is 999.
Print in batch/interactive:
This is a 6 character parameter that defaults to *BATCH. This causes the job to be placed on the IMGPRT job queue. This job queue is part of the FAXCOM subsystem and is started automatically when you run STRFAXCOM. You can specify *INTER to run the program from the interactive workstation.
213

10 Commands
Page length in inches:
This is a 2 digit number which specifies the length (in inches) of the paper in your laser printer. Specify 11, 12, or 14 inches. Use 12 for A4 size paper. The default *DFT value will set the paper length to the default value that you set in the Fax Setup parameter.
Number of copies:
This is a 2 digit number which specifies the number of copies to be printed of each page of the image. The default is 1.
Top line text (optional):
You can have any text message, up to 80 characters long, print at the top of the page using this parameter.
Printing Images from your ApplicationsA programmer can add a call to the Print Image program in any of your applications. The call statement must pass all of the parameters described above for the command, plus one additional parameter; message.
Message:
This is a 78 character field that the Print Image program will use to pass a completion message back to your application.
For example, the lines below show the RPG source code that you would add to your application to have an image document printed from one of your applications. It assumes that the document that you wish to print is known by the application program as the field called DOC, and that command function 6 is used to print the image.
C* Print image DOC when operator presses F6C KF CALL 'PRTIMG'C PARM DOC MEMB 10C PARM 'IMGFILE' FILE 10C PARM 'PTR01' PTRNM 10C PARM 1 PAGEF 30C PARM 999 PAGET 30C PARM *BATCH SBMJB 6C PARM 11 PAGEL 20C PARM 1 COPIES 20C PARM TOPLN 80C PARM MSG 78
214

10 Commands
PURGEFAXQ (Purge Fax Queue) CommandThis program can be used to purge entries from the Fax Queue. You may specify the period ending date, the user, the type of faxes that you wish to purge, and how to submit the job.
Each time a fax is prepared for transmission, a member is created in SPLFILE, if it was a spooled file, and in OUTFILE to contain the outbound Fax image. These files are used for viewing the original data and/or restarting failed faxes. You should regularly purge old entries from the Fax Queue, to keep it clean. If you do not, these files will continue to grow until they use up all of your available disk space.
Note: A user may only purge their own faxes unless another user has given them specific access to their faxes using the Work with Fax Security program, described in the Fax chapter. You must have the special authority of *SECADM to be able to specify *ALL for the User-Id parameter. This criteria can be changed by altering the program called CHKFXS (Check Fax Security) located in the source file called QRPGSRC. For example, you could grant a specific user the access to all user's faxes, so that they could run this purge.
Period ending date:
All faxes will be purged that were either sent or attempted to be sent on or before this date. If you specify *TODAY, today's date will be used for the period ending date. You can specify *YESTERDAY to purge all faxes that were sent prior to today.
The default value of *LASTWEEK will purge faxes that were sent on or before this day last week. Also available is *LASTMONTH which will purge faxes that were sent on or before this date last month.
User to purge:
The default value of *CURRENT is used to purge your own faxes. You may specify another specific user or *ALL may be used to purge all user's faxes.
Type of faxes to purge
The default value of *SENT is used to purge only faxes that have been sent or were consolidated and sent on or before the period ending date. If you specify *FINISHED the system will also remove any other fax that was attempted but failed on or before the period ending date. Some types of failures do not record a date in the Fax Queue and therefore will not be purged using *FINISHED.
You may code *ALL to purge all types of faxes, finished or not, in the Fax Queue. In order for this to work, the system will use the creation date instead of the sent date to do the purge.
Submit to batch or interactive:
The default value of *BATCH will cause the program to be submitted to your default job queue. If you specify *INTER the system will purge the Fax Queue interactively.
215

10 Commands
PURGELOGS (Purge Fax Logs) CommandThis program can be used to purge the Fax logs from the KeyesFax system. The logs are called SENTFILE and FAILFILE.
The purge program will remove entries from the front of the logs, keeping records in the file that are at the end. You may choose the number of records to keep.
Note: You must have the special authority of *SECADM to be able to use this program.
Number of records to keep:
Specify the number of records that you want to keep in the file after it is purged. The default value of 1000 will keep the last 1000 records in each of the log members.
Submit to Batch or Interactive:
The default value of *BATCH will cause the program to be submitted to a job queue. if you specify *INTER the program will run interactively.
216

10 Commands
PURGERCVQ (Purge Receive Queue) CommandThis program can be used to purge entries from the Receive Queue. You may specify the period ending date, the user, the status, the file that you wish to purge, and how to submit the job.
Each time a fax is received by the iSeries, a member is created in RCVFILE to contain the Fax image. This file is used for printing, viewing, refaxing, and routing the Fax to other locations. You should regularly purge old entries from the Receive Queue, to keep it clean. If you do not, this file will continue to grow until it uses up all of your available disk space.
Period ending date:
All faxes will be purged that were received on or before this date. If you specify *TODAY, today's date will be used for the period ending date. You can specify *YESTERDAY to purge all faxes that were received prior to today.
The default value of *LASTWEEK will purge faxes that were received on or before this day last week. Also available is *LASTMONTH which will purge faxes that were received on or before this date last month.
User to purge:
The default value of *CURRENT is used to purge your own faxes. You may specify another specific user or *ALL may be used to purge all user's faxes. You must have *SECADM special authority to be able to specify *ALL. Otherwise, you must have been given specific authority by a user in order to purge their faxes.
Status of faxes to purge:
The default value of ' ' is used to purge all faxes that have been accessed (viewed/ printed/ copied). To purge other entries you must enter the status 'surrounded by quotes' in the exact case as they appear in the Receive Queue. You may use the special value of *ALL to purge all faxes regardless of their status.
File to purge from:
The default value of RCVFILE tells the program to only purge faxes that are located in RCVFILE. You can specify another file or *ALL which will purge all faxes defined in the Receive Queue regardless of their location.
Caution: Saved Images and Overlays will be purged, if you specify both *ALL for the File and *ALL for the Status parameters.
Submit to batch or interactive:
The default value of *BATCH will cause the program to be submitted to your default job queue. If you specify *INTER the system will purge the Receive Queue interactively.
217

10 Commands
WRKIMGF (Work with Image Files) CommandThe easiest way to copy, convert, display, edit, or print images is using IBM's PDM while working with image files. You can start the Work with Image Files command from the Work with Fax program, from a command line, or from another CL program.
This command uses IBM's PDM to work with image and text documents. While using this program you will be able to perform any of the IBM options, plus any of the KeyesFax user options to copy, display, edit, fax, etc. the document members. The available options are described below:
Enter this: To do this:
CI Convert Image
CP Copy Pages
DN Display Notes
EI Edit Image
FM Fax Message
KF KeyesFile
PI Print Image
RI Rename Image
SF Send Fax
SI Status Image
X or SD Select Document
Note: If these options do not work when entered on an image or text member, please see Activating KeyesFax custom user options in the Introduction section.
Document member name:
This is the name of the document member that you wish to work with. If you name a specific member, PDM will be started and only that member will be shown to you for working with. If you give a generic name (*generic*) you must also name a specific file. All of the members that fit the generic name will be selected by PDM in that file. The default value of *SEARCH allows you to work with all members in the selected file.
File:
This is the name of the specific file that you wish to work with. The default value of *SEARCH will cause the PDM program to show you all of the files in the KeyesFax library that have FILE as the last four characters. Enter option 12 (Work With) or the user option X (Select) on the desired file to work with the members in that file. If you named a specific member, *SEARCH will cause PDM to search in IMGFILE, FAXFILE, and TXTFILE for the member.
218

Appendix
AppendixAppendix
Trouble Shooting
Status does not change to RDY Ready after starting fax communication:
This is usually caused by the fax modem not VARYING ON.• Use WRKHDWRSC *CMN to make sure that all other devices defined
for the same resource name are VARIED OFF.• Verify that the fax modem is plugged into the correct communications
line and is turned ON.• Check to see that you have activated the system with a valid KeyesFax
License Number.• Check the FAXCOM message queue for any messages.• Check to see if you have a library on your library list that is not a
*PUBLIC library.
Everything is correct but the modem will not VARY ON:
You may have a fax modem that is either defective or not compatible with the iSeries I/O Ports.
• Try switching to a different Class 1 or Class 2.0 Fax modem.
The Fax Queue entry shows "Failed" in the Status:
This indicates that the fax has failed to be converted properly. The reason for the failure will be recorded in the FaxCom message queue.
• Look in the FaxCom message queue for a message describing the failure.
All the faxes are failing with a status of "No Carrier":
This status indicates that the modem has dialed a phone number that has not reached a fax machine.
• Check the phone number that was dialed, in the Fax Queue. See if the system has added a "1-" to the phone number, that you had not expected.
• Make sure that you have not coded a "9" (to get an outside line) as part of the phone number. The "9" will be considered part of the area code and the fax system will add "1-" in front of the number, causing the failure.
• Code 'ATDT9,' in the Dialing prefix parameter of the Fax Setup program (option 2 in FCMENU), if you must dial a "9" for your PBX system.
• Make sure that you have correctly described your local calling area to the system (option 32 in FCMENU).
219

Appendix
The fax connection is often lost between pages:
This is usually caused by your documents containing different resolutions for each page. Some fax modems and many fax machines cannot switch resolutions between pages.
• Make sure that all of the pages within one fax have the same resolution either Normal or High.
• If you are sending some pages in Landscape mode, they will normally have to be prepared in High resolution. Be sure to prepare all other pages in High resolution that go with them.
• If you have a logo or letter head image at the top of some pages, be sure that they were prepared in the desired resolution.
Spool files placed in FAXCOM output queue just sit there:
This can be caused by several different things.• Check to see that the spool file has a status of READY and that the
Forms type is not SCHEDULED.• Check to see that the FAXSETUP parameter (Auto Fax FAXCOM
output queue) is set to Y.• Use the Work with Fax Lines program to see that the fax system is
running. If the status is Ready, use F13 to check that the program AUTORCVx is running in the FAXCOM subsystem and has a status of ICFW (not MSGW).
• A data queue has been assigned to the FAXCOM output queue. This link might have been removed. Using the WRKOUTQD command, check to see if the FAXCOM data queue is still assigned to the FAXCOM output queue. If not, you can reestablish the link using IBM's CHGOUTQ command on the FAXCOM output queue. Change the DTAQ parameter to be FAXCOM located in the QUSRSYS library.
Only two or three inches of each fax page is sent:
This is usually caused by flow control problems.• Check to see that the appropriate Initialization string for your fax
modem has been defined in the FAXSETUP parameters.
The PRTIMG program prints garbage on the Laser Printer:
Two different programs have been supplied to do the printing of fax images. The faster program uses PCL5 code that may not be compatible with your printer. A slower yet more compatible program, which does not use PCL5, can be used instead.
• Use WRKOBJ PRTFAX* to locate three programs in the KeyesFax library. When the programs are shipped, PRTFAX is a copy of PRTFAXPCL5. Copy PRTFAXPCL1 replacing the program PRTFAX instead.
220

Appendix
Summary of Fax Commands¬Attn attention-to-name¬Cx coversheet-parameters¬Desc description¬Email address¬End¬Fax List distribution-list-id/qualifier¬Fax PBX pbxfile-member¬Fax # phone-number¬Font font-name,point-size,text-tightness¬Image image-file/image-member¬Landscape lpi,cpi,paper-length,merge-file/merge-member¬Margin left-margin¬Merge image-file/image-member¬Page page-number¬Px printer-name¬Space space-amount¬Time transmit-time,transmit-date¬Width text-characters, font-size
Text Attributes
Enter this: To do this:
¬itext¬i text¬btext¬b text¬utext¬u textH¬s2¬sO H2OE=MC¬S2¬S E=MC2
¬r text ¬r text
Substitution Fields
Enter this: To do this:
Attn: ¬1 at ¬2. Attn: John Smith at ABC Company.
Scalable Font Names
Proportional: Fixed:
Arial CourierHelvLgt LGothicSansScript StandardSerif point sizes:Souvenir 08 = 8 lpiTekton 11 = 6 lpiTimes 22 = 3 lpi
221

Appendix
Line DrawingYou can draw lines and boxes in your documents to be faxed using the line drawing characters as shown below: (not available in all countries)
When you include one of these EBCDIC hex values in a document, the fax program will create the line drawing character as shown in the chart. To produce one of these special EBCDIC characters on any standard IBM terminal, you must press the Hex key followed by the specified EBCDIC value. An unusual symbol or blank may appear on the screen, but the fax will be produced with the correct line drawing characters. For example: To create the upper left box corner, you would type Hex 8 C.
Note: If your keyboard does not have a key labeled Hex, you may activate the Hex function by pressing the Cmd key followed by the key to the left of the 1 key on the upper row of the keyboard.
222

Appendix
International Character SetThe following table shows the full international character set available to you when sending fax messages.
Notes:
Hex 41 is a required space used in Word Processors.
The fax system will use your iSeries code page system value to select an appropriate translation table. It will map your code page to these values when converting any text to fax code.
The line drawing characters defined in the block from 8C to AE will replace the original characters for all languages except Danish, as set in the Default system language parameter in the FAXSETUP program.
223

Appendix
Scalable FontsTen scalable fonts shown below are available for converting spool files to FAX images. The CL program SETFONT is used to map the fonts used in a PCL printer file to one of these 10 fonts. You may change the mapping, as desired.
224

Appendix
Granting Authority to Start Fax CommunicationA user must have the authority to the KFFAX user profile in order to start fax communication. This can be easily granted, as follows:
1. Enter: WRKOBJ KFFAX
2. Select option 2 (Edit authority) for the object of type *USRPRF.
3. Press F6 (Add new users).
4. Add each user desired with the Object Authority of *USE. You may add Group Profiles, which will give authority to everyone within that group.
225

Appendix
Running a Communications TraceIf you have trouble communicating with a particular fax machine, you may be asked to run a communication trace to help track down the cause of the problems. The following steps will create a 6-10 page trace of the desired event.
1. STRCMNTRC CFGOBJ(FAXCOMLIN1) CFGTYPE(*LIN)
2. Send or receive the fax in question.
3. ENDCMNTRC CFGOBJ(FAXCOMLIN1) CFGTYPE(*LIN)
4. PRTCMNTRC CFGOBJ(FAXCOMLIN1) CFGTYPE(*LIN)CODE(*ASCII)
5. DLTCMNTRC CFGOBJ(FAXCOMLIN1) CFGTYPE(*LIN)
Debugging an Exit ProgramIf you write Exit Programs, to be used with FCMENU item 35 (Work with Spooled Files), you may need to debug one of the programs, during development. This is not an easy task, since the Exit Program will always be executed in Batch mode from a Job Queue. To solve this problem, we have created two commands to assist in the debugging process.● TESTEXTPCL is used for debugging *USERASCII (PCL) spooled files.● TESTEXTSCS is used for debugging standard *SCS spooled files.
The following technique can be used for debugging your Exit Programs:
1. Create a test spooled file and place it on Hold, in any output queue. Ideally, it will only contain one or two pages, just enough to run a quick test of your Exit Program.
2. Be sure that you have created an entry in item 35 (Work with Spooled Files) using the correct spooled file name, and make sure that it has a reference to your Exit Program.
3. Start the Debug program of your choice (STRDBG or STRISDB) and set the location for a break point.
4. Start the processing of the spooled file using either TESTEXTPCL or TEXTEXTSCS depending on the type of spooled file, as shown below:
TESTEXTPCL PHONENUM(*FAX) SPLFILE(xxxx)
JOBNAME(xxxx) NUMBER(xxxx) SPLNBR(x)
RMVENTRY(*NO)
This should call your Exit program Interactively, allowing you to debug it.
226

Appendix
Creating an Ethernet Device Server for FaxingThese instructions are intended to help you create an Ethernet Device Server for faxing. An Ethernet line from your IBM i is connected to an Ethernet Device Server, such as a Digi PortServer or a Perle IOLAN, which is then connected to a Fax Modem. These instructions have been made for a Digi PortServer, but can be used to install other similar devices.
1. Plug the device (Digi PortServer) into your network using an ethernet cable. Plug the serial cable into a fax modem. Attach the power cable.
2. Set the IP Address for your device, using instructions from the website of the Device Server. You will need the MAC address of the device to do this. We found the MAC address printed on the bottom of the device. For the Digi PortServer, we set the IP address, using a PC, as follows:On your PC, you will need to get to an Administrator Command Prompt. Do this by selecting the Start menu, finding the Command Prompt, Right-Click the Command Prompt and select Run as Administrator.
Enter: arp -s (the new IP Address) (the MAC Address)
3. Ping the device at the new IP Address, wait 30 seconds, then Ping it again.
You should see the following on your screen:
4. You can access the device configuration by entering the IP address, that you just set, in the URL of a browser. The default username and password for a Digi device will be root and dbps, respectively.Configure the Port Profile to TCP Sockets.
baud rate – 115200data bits – 8parity – nonestop bits – 1flow control – HardwareEnable DCD on 8-pin RJ45 connectors (Altpin)
5. Create the Fax Communications Line using the CRTFAXCOM command and specify *ETHDEVS in the Resource Name parameter. It will then ask you for the IP Address and Port Number for the Device. The Port numbers usually start at 2001.
227
Appendix
6. In the Fax Communications Setup (item 1 from FCMENU) make the following settings:
Modem initialization string . . > 'AT&S1'
Override Modem Class . . . . . . > A
Maximum connect speed . . . . . > 33600
228

Index
IndexIndex
AAccounting codes (for fax) 18, 128, 138, 154, 181, 206, 212Activating custom user options 32Adding cards 70Adding KFAXSPLF to your applications 207Adding libraries to your library list 26Adding lines to a card 70Adding PRTIMG to your applications 214Adjusting lines in Message Editor 63, 148AFPDS spooled file faxing 189Allow high resolution fax 194Annotating Images 96Applications for Image & Fax 13Archiving faxes (in Receive Queue) 173Arial font 112, 224Attaching documents to a Message 147Attachments (creating) 96, 97, 167, 173Attention to name 19, 108, 158, 202, 209Attn (fax command) 108, 128, 155Authority to Start Fax Communications (Granting) 225Auto Fax FAXCOM Output Queue parameter 46Auto retry (failed fax) 195Automated fax (benefits) 101Automatic printing of inbound fax 135, 195, 213AUTORCVx (Auto Receive Fax) program 102
BBacking up KeyesFax 16, 37Bolding characters 123, 150Broadcast faxing 18, 110, 124Building Fax Messages 106
CCall Consolidation 179, 205, 210Call Consolidation (tracking) 166CALLFAXSPL (Calling Fax Spool File) code 207Capitalization errors (correcting) 151
229

Index
Card Body 68Card Headings 68, 76Card Number 68, 72Card Status 68Card Tops 53, 68CF (coversheet command) 108, 128, 155Changing a fax (using Fax Queue) 165Changing current library 25, 27, 28Changing passwords in KeyesFile 83Changing selected key 71Changing the index 55Character set 223CI (Convert Image) option 32, 98, 218CKX images 21, 33, 90, 101CKXFILE 33CM (coversheet command) 108CN (coversheet command) 108Command summary 38Commands (detail) 175Communications Trace (Running) 226Connect speed 195Connecting the Fax Modem 29Connecting to the HTTP Server 49Consolidated calls (tracking) 166Consolidating calls 164, 179, 205, 210Consolidation (default value) 198Consolidation delay 205, 211Consolidation delay (default value) 198Controlling your Fax documents from a browser 50Conversion Run Priority 197Converting image types 182Converting Spool Files 39, 184Copying a card 56Copying a Fax (in Receive Queue) 171Copying a KeyesFile member 82Copying lines in the Message Editor 65, 149Copying lines on a card 75Copying programs to a new library 24Copying text 75Courier font 112, 224Cover Notes 160Cover page (adding to spool file) 158, 202, 209Cover page (eliminating with Attention to name) 19, 158, 202, 209COVERFILE 33, 143, 202, 209Coversheet (Creating) 143Coversheet (faxing in batch mode) 159, 202, 209
230
Index
Coversheet (faxing without) 19, 158, 203, 209Coversheet commands 108Coversheet substitutions 159, 204, 210CP (Copy Pages) option 32, 98, 218CPYFRMIFS (Copy PFM from IFS) 38CPYPG (Copy Pages) command 38CPYSPLPFM (Copy Spooled File to PFM) 38CPYTOIFS (Copy PFM to IFS) 38Creating a new Fax message 60Creating a PBX member (from KeyesFile) 87, 177Creating a PBX member (from your files) 176Creating cards 70Creating Fax Header/Footer (for Message Editor) 146Creating PCL printer data in EBCDIC 126CRTFAXCOM (Create Fax Com Objects) command 28, 38CRTFAXSBS (Create Fax Subsystem) command 28, 38CRTPBX (Create PBX Member) 39, 176CRTPBXMBR (Create a PBX member from KeyesFile) 39, 87, 177CRTSRCPF (Create Source Physical File) command 37CSDSPLF (Consolidate Spool File to Nightfile) command 39, 179CSI (Calling/sending identification) 194Cursor location (in KeyesFile) 53, 68Custom user options 32Cut and Paste images 99, 187CVTIMG (Convert Image Type) command 39, 98, 182CVTSPLF (Convert Spool File) command 39, 184CVTSPLTXT (Convert Spool to Text) program 25
DDebugging an Exit program 226Deleting a card 77Deleting a fax (in Fax Queue) 166Deleting a fax (in Recieve Queue) 171Deleting a KeyesFile member 82Deleting a line (KeyesFile) 74Deleting a line (Message Editor) 148Deleting a Message member 152Desc (fax command) 108, 128, 155, 167Descriptions (Fax page) 108, 167Details option (Fax Queue) 165DI (Display Image) option 32Dialing prefix (Fax) 193Dictionary (adding words) 151Dictionary (changing your language) 151
231

Index
Dictionary (default) 199Dictionary files 35DID Configuration 195DID routing 137DID Routing 13Digi PortServer 227Directory entries 124, 208Displaying cards 54Displaying Images 94Displaying Notes for a Fax (in Receive Queue) 172Displaying Spooled file original text (from Fax Queue) 167Distribution lists 110, 124, 208DN (Display Notes) option 32, 218Documents (where they are stored) 33Duplicate word errors (correcting) 151Duplicating a card 56, 78
EE-mail automation 15, 101, 128, 155E-mail commands 15, 101, 128, 155E-mail messages (sending from KeyesFax) 101E-mailing from the Fax Queue 15E-mailing from the Receive Queue 15E-mailing spooled files 203EDITIMG (Edit Image) command 39, 99, 187Editing a card 56Editing a message 61Editing a Spool File 203Editing Card Headings 76Editing Coversheets 48, 203, 209Editing FAX images 99Editing Images 39, 99Editing Message members 48, 148Editing text on cards 74EI (Edit Image) option 32, 98, 218EIA-232 cable connection 29Email (email command) 109, 128, 155End (fax command) 110, 149End time for night faxing 196ENDFAXCOM (End Fax Communication) command 39, 103ENDHTTPSRV (End HTTP Server) 40Ending Fax Communication 103Ending page (spool file) 128Entering KeyesFax License Number 27
232

Index
Ethernet Device Server 227Exercises (tutorial) 45Exit program 159Exit program (debugging) 226Expanding Fax Listing (in Fax Queue) 165Export a Fax image 141, 167, 174Export a Fax to the IFS 97Export Fax to IFS 200Exporting
PDF document 97TIFF image 97
Exporting KeyesFile data 84, 85
FFAILFILE 19, 33, 132, 138Fax (Adding to your applications) 207Fax (Benefits) 101Fax (Creating a new Fax message) 60Fax (Displaying) 21, 138Fax (fax command) 110, 111Fax (How to instructions) 16Fax (Personalizing) 124Fax (Previewing) 138Fax (Summary of commands) 221Fax accounting codes 128, 138, 154Fax Commands 106, 149, 161, 221Fax Communication (Job Queue) 127Fax Communication (Message Queue) 127Fax Communication (Output Queue) 128, 153Fax Communication (Starting and Ending) 103Fax Communication (Subsystem) 102, 127Fax Communication Objects (Creating) 28Fax Communication Setup program 30, 41, 193Fax Communication Subsystem (Creating) 30Fax conversion priority 197Fax documents (building and editing) 106Fax documents (where they are stored) 33Fax Footer (in Message Editor) 146Fax Header (in Message Editor) 146Fax History Log 130Fax History Log (printing) 130Fax History Log (purging) 131Fax images 21, 34, 90, 101Fax instructions (How to) 16
233

Index
Fax instructions (summary) 221Fax introduction 22, 101Fax job priorities 18, 128, 138, 154, 206, 211Fax Line (Vary On) 129Fax machine making a forms overlay 97Fax machine used as a scanner 17, 97, 101Fax Message (text editor) 17, 191Fax Modem 22, 29Fax number (extracting from a file) 16Fax number (in document) 16, 111Fax number list (in document) 110Fax operator 19, 194Fax Queue 19, 129, 133, 163Fax resolution (default) 198Fax Schedule File 34, 129Fax Security (authorizing access) 139, 168, 174Fax Setup 30, 103, 193Fax Spool File 14, 40, 104, 201Fax Spool File with a Coversheet 47, 202Fax system 22Fax Trot 101Fax Tutorial 46Fax Viewer (selecting the default) 50FAXAFPDS (Fax Spool File (*AFPDS)) command 40FAXASCII (Fax Spool File (*USERASCII)) command 40FAXCOM message queue 19, 127FAXCOM output queue 14, 33, 104, 128, 153, 195FAXCOM subsystem 102, 127FAXEBCPCL (Fax Spool File with EBCDIC PCL Data) 40, 126FAXFILE 34, 90Faxing a PC document 51Faxing at night 105, 153Faxing Coversheets in batch mode 202, 209Faxing from KeyesFile 58, 143Faxing from PC's 22Faxing from Receive Queue 171Faxing from your PC 13Faxing Image documents 104Faxing Messages 143, 144, 191Faxing PC documents 105, 195Faxing PC Images 105Faxing PC Images & Documents 95Faxing PCL files 20Faxing Spool Files 46, 104, 153, 195Faxing Spool Files with a Coversheet 16, 17, 47, 202Faxing Text documents 104
234

Index
Faxing without a Coversheet 19, 203FAXLOG (Print Fax History Log) command 40, 130FAXLOGP (Purge Fax History Log) command 40, 131FAXMSG (Fax a Message) command 40, 191FAXNGT 34FAXNGT output queue 104, 128, 153FAXQUEUE 34FAXSCHED 34, 129FAXSETUP (Fax Communications Setup) command 30, 40, 193FAXSPLF (Fax Spooled File) program 25, 207FAXSPLNE (Fax Spool File with ¬E Esc Sequence) cmd 40FC (coversheet command) 108FCJOBQ (Faxcom Job Queue) command 40FCSBS (Faxcom Subsystem) command 41FE (coversheet command) 108Files (where they are stored) 33Filling in cards 70Find Next (Search) 73First card (bringing forwards) 72Flow control modem setting (XON/XOFF) 193FM (Fax Message) option 32, 98, 218FN (coversheet command) 108Font (fax command) 112, 149Font names 112, 221Font samples 113, 224Font size 112, 120Fonts (Scalable) 224Forms design software 125Forms overlay (creating) 97, 167, 173Forms overlay (merging with fax) 116, 121, 125, 180, 185, 204Forms Overlays (creating) 96Forms type (spool files) 121, 128, 154FP (coversheet command) 108From (email command) 114Front side overlay (spool files) 128, 154Function keys (in Fax Queue) 164Function keys (in KeyesFile) 71, 73, 74, 75, 76, 77, 78Function keys (in Message Editor) 145Function keys (in Receive Queue) 170FXQUSROP (Fax Queue User Options) program 168
GGeneric name 72Getting help (KeyesFile) 69
235

Index
Getting help (Message Editor) 144GL/2 vector graphics 126
HHeadings 68, 76Help key (in KeyesFile) 69HelvLgt font 112, 120, 224History Log (Fax) 130Hold a fax (in Fax Queue) 166Home key (UnDo) 56, 75, 148HTTP Server 13, 20HTTP Server (activating and using) 91HTTP Server (Apache or Original) 197HTTP Server (configuring) 91HTTP Server (displaying images) 94HTTP Server (starting) 92HTTP Server (using) 93, 105
IICF File 28Image (fax command) 114, 149Image documents (where they are stored) 33, 90Image file types 90, 182Image introduction 21, 89Image Tools 89Image Viewers 13Images (including with documents) 114Images (working with) 98IMGFILE 34, 90Implementing our programs 14Importing KeyesFile data 84Inbound fax line (setup) 194Inbound Fax routing 136Including images in documents 114Index (changing) 55Index line (in KeyesFile) 53, 68, 71Indicator column 72Information Manager (Starting and Stopping) 67Insert Mode (in Message Editor) 63, 148Inserting a line in a card 74Inserting text in the Message Editor 63, 148Installation Instructions 23
236

Index
Installation Library 23, 24International character set 223Italics 123, 150
JJob accounting 18Job priorities 206, 211Job Queue (FAXCOM) 40, 127Job Queue (IMGCONV) 127Job Queue (IMGPRT) 127Jumping to a card 54Jumping to the first card 54
KKeeping track of your Fax messages 58KEXPFAX (Export Fax) command 41Key Indicator (> or *) 68, 71, 72Key Indicator column 68, 72KeyesFax files (where they are stored) 33KeyesFax ImageMaker Print Driver 20, 105KeyesFax ImageMaker Print Driver (installing) 92KeyesFax ImageMaker Print Driver (using) 51KeyesFax License 27, 41KeyesFile Information Manager 21KeyesFile Information Manager (Starting and Stopping) 67KeyesFile's screen 68KEYFILE 34, 67, 81KF (KeyesFile) command 41, 67KF (KeyesFile) option 32, 98, 218KFAXSPLF (Fax Spool File) 14, 201KFAXSPLF (Fax Spool File) command 41KFAXSPLFS (Fax Spool Files) command 41KFDATAx (data areas) 30KFEXPORT (Export Data from KeyesFile) command 41, 85KFIMPORT (Import Data to KeyesFile) command 41, 84KFLAC 34KFLICENSE (KeyesFax License) command 30, 41KFSAVLIB (KeyesFax Save Library) command 41KFSPOOL (KeyesFax Spooled File Setup) command 41, 156KFUPDATE (KeyesFax Update) command 23, 26, 42KFVERSION (KeyesFax Version) 42KSNDFAX (Send Fax) command 14, 42, 208
237

Index
KWRKOUTQ (Work with Output Queue plus Fax) cmd 42KWRKRCVQ (Work with Receive Queue) 42
LLandscape (fax command) 121Landscape mode 19, 121, 185, 203Language dictionary (changing) 151Language dictionary (default) 199Length of paper (default) 198LEXICON 35LEXSOUND 35LEXUSER 35LGothic font 112, 120, 224Library list (adding to) 26Library to install KeyesFax in 24License Number (recording) 27Line drawing 222Line number 68, 72Local Area Codes 111, 140Locked members 81, 83LOGFILE 35, 130, 132Long distance calls 140
MMaintenance (purging files) 134Managing KeyesFile members 81Managing Message members 152Margin (fax command) 115, 149Margins (setting) 115MBox (email command) 115Member names (KeyesFile) 81Member names (Message Editor) 152Member sizes (KeyesFile) 81Member status (KeyesFile) 68Merge (fax command) 116, 149Merging a form with a spool file 116, 121, 128, 154, 180, 185, 204Merging KeyesFIle members 82Message Editor 17, 143Message Editor (advanced features) 62, 148, 149, 150Message Editor (spell checking) 150Message Editor (starting) 47Message Editor screen 48, 144
238

Index
Message Line 68Messages (Displaying Fax Communication) 19, 127Messages (stopping them) 18, 197modem 22, 29Modem speaker 193Monitor IFS Folder for faxing 31, 196Moving through the cards 71MSGFILE 143, 202, 209
NNegate symbol (¬) 105, 123, 124Night faxing 17, 35, 39, 104, 105Night faxing (start & end times) 196NIGHTFILE 35, 39, 179Notes for a Fax (viewing in Receive Queue) 172Number of HTTP clients 197Number of minutes between retries 195Number of rings before answer 194
OOffset across (in Spool file) 128, 154, 186, 206Offset down (in Spool file) 128, 154, 186, 205Old faxes (finding out about them) 19Opening a KeyesFile member 81Opening a Message member 152Options (Activating) 32Options for PDM (Custom) 32Outbound fax line (setup) 194OUTFILE 35, 90, 132OUTFILE (Purging) 132Output priority (in spool file) 128, 138, 154Output queue (FAXCOM) 104, 128, 153, 195Output queue (FAXNGT) 104, 128, 153, 196Over Type Mode (in Message Editor) 63, 148Overlay (printing with) 101Overlay (with Spool Files) 116, 121, 125, 180, 185, 204Override KFaxSplF Cmd (Y/N) 144, 147Owner of a KeyesFile member 81, 82, 83
239
Index
PPage (fax command) 117Page descriptions (in Fax Queue) 167Pages in Spool file (Starting and Ending) 128, 154Paper length (default value) 198, 214Password 68, 81, 83Password (changing) 83Paste (Transparent or Opaque) 188Pasting Images 98PBX member (creating) 176, 177PBX member (using) 110PBXFILE 35, 110, 208, 209PC browser 13PC client backlog 198PC Fax Tools 49PC Server address 197PC Server setup 197PCL fonts 224PCL Images 22, 35, 39, 90, 98, 125PCL printer data (creating in EBCDIC) 126PCL5 printer data 125PCLFILE 35, 90PCX Images 21, 36, 39, 90, 98PCXFILE 36, 90PDF document (Exporting to IFS) 167, 174PDF document (exporting to) 141Personalized fax messages 18, 124PF (fax command) 118Phone number (in the Fax document) 111, 128, 155Phone number (selecting for Fax) 60Phone number location (in a spool file) 128, 185, 201Phonebook (default headings) 199Phonebook (default name in FAXSETUP) 86, 199Phonebook (with Message Editor) 62, 86, 145PI (Print Image) option 32, 98, 218Point size of fonts 112Port (PC Server) 197PR (fax command) 118Presetting Recipients Information 143, 191, 204, 210Presetting Sender Information 204, 210Previewing an outbound fax 19, 138Primary key 71Print Driver (installing) 92Print Driver (using) 51Printing a Fax (in Fax Queue) 166Printing a Fax (in Receive Queue) 172
240

Index
Printing a series of cards 80Printing cards 79, 80Printing Fax History Log 130Printing fax pages 158, 203, 209Printing images from your applications 213Printing images on a laser printer 135Printing inbound faxes automatically 135, 195Printing lines from cards 79Printing outbound faxes automatically 118, 158Printing with an Overlay 101Priorities (conversions) 197Priorities (fax job) 18, 128, 138, 154, 206, 211Private members 81, 83Proportional fonts 120PRTIMG (Print Image) command 42, 135, 213PS (fax command) 118Public members 83PURGEFAXQ (Purge Fax Queue) command 43, 133, 164, 215PURGELOGS (Purge Fax Logs) command 43, 132, 216PURGERCVQ (Purge Receive Queue) command 43, 134, 170, 217Purging failed faxes (automatically) 197Purging FAILFILE members 132Purging Fax History Log 131Purging Fax Logs 216Purging OUTFILE members 132Purging RCVFILE members 132Purging sent faxes (automatically) 196Purging SENTFILE members 132Purging SPLFILE members 132Purging the Fax Queue 133, 164, 215Purging the Receive Queue 134, 170, 217
QQAUOOPT File (custom user options) 32
RRCQUSROP (Receive Queue User Options) program 174RCVFILE 36, 90, 132RCVQUEUE 36Receive Queue 17, 129, 134, 169Receive Queue screen 169, 170Record length (in Spool file) 128, 154
241

Index
Renaming a Fax (in Receive Queue) 172Resending a failed fax 18Resolution (default value) 198Resolution of a document 180, 204, 210Resolution of an image 183Restarting a fax (from Fax Queue) 18, 167Retry (minutes between) 195Retry count (failed Fax) 195, 206, 211Reverse image (text attribute) 123, 150RI (Rename Image) option 32, 98, 218Rings before answer (number of) 194RMVFAXCOM (Remove Fax Com Objects) command 43RMVMBD (Remove Members by Date) command 43RNMIMG (Rename Image) command 43Roll keys 71, 74, 76Route to Printer Device (inbound faxes) 135Route your inbound Fax messages 20ROUTEFAX member in KeyesFile 136Routing a Fax (in Receive Queue) 172Routing Received Faxes (automatic) 136RSTDOC (Restore Document) command 43Run Priority (conversions) 197Run priority for PC Server 198Running a Communications Trace 226
SSample Files 45Sans font 112, 224Save file after printing (in Spool file) 128, 154Saving a forms overlay 167, 173Saving an image (attachment) 167, 173SAVLIB (Save Library) command 37SAVOBJ (Save Object) command 37Scalable fonts 112, 224Scaling PC Images 183Scan fields 159Scanner (Fax machine used as) 101Scheduled (Form Type) 128Scheduling a fax 17, 119, 129, 205, 211Script font 112, 224Scrolling through cards 53, 71Scrolling through lines 57, 74SD (Select Document) option 32, 98, 218Searching by a key 55
242

Index
Searching for text in a card 73Securing a KeyesFile member 83Security (authorizing access to faxes) 139, 168, 174Selected key 71Selecting a Fax phone number 60Selecting lines to be printed (in KeyesFile) 79Send a Fax from your PC 20Sending a Fax 14, 60Sending a Fax from Receive Queue 171Sending a Fax with an Overlay 17Sent? (status) 199SENTFILE 19, 36, 132, 138Serial number of iSeries 27Serif font 112, 224Server Port 197SETFONT (Set PCL Fonts) program 224Setting fonts 120Setting left margin 115Setting PCL fonts 224SF (Send Fax) option 32, 98, 218SI (Status Image) option 218SI (Status of an Image) option 32, 98Size of member (determining) 81SLTDOC (Select Document) command 43Souvenir font 112, 224Space (fax command) 118Special Authorities (*JOBCTL & *SPLCTL) 102, 139Special Authority (*SECADM) 139, 163, 168, 169, 174, 217Spell Checking (in Message Editor) 63, 150SPLFILE 36, 132, 184, 201Spool file (displaying original text) 167Spool file (editing) 203Spool file (fax example) 107Spool file (faxing) 153, 201Spool file (Setup Screens) 157, 158Standard fonts 112, 120Standard message (faxing) 143Start time for night faxing 196Starting Fax Communication 14, 45, 103Starting Fax Communication (granting authority to) 225Starting Image Viewers 49Starting page (in Spool file) 128, 154Starting the HTTP Server 49Status of faxes (in Fax Queue) 164Status of faxes (in Receive Queue) 171STRFAXCOM (Start Fax Communication) command 43, 103
243

Index
STRHTTPSRV (Start KeyesFax HTTP Server) command 44STSIMG (Status of an Image) command 44Subj (email command) 118Subscripts 123, 150Subsetted list (Canceling) 72Subsetted list of cards 72Substitution Fields 124, 221Subsystem (FAXCOM) 102, 127Superscripts 123, 150Sx (fax command) 118System maintenance 132
TTC (coversheet command) 108Tekton font 112, 224TEMPFILE 36Template (email command) 118Terminate routing entries 137Text attributes 123, 150, 221Text tightness of fonts 112TIFF Images 21, 36, 90TIFFILE 36, 90Time (fax command) 105, 119Time scheduled transmission 17, 105, 119, 205, 211Times font 112, 224TMPFILE 36TN (coversheet command) 108Trace (Running a Communications) 226Tracking consolidated faxes 166Tracking your faxes 19, 48, 138, 163Transmit date & time 119, 205, 211Trouble shooting 219TTI (Transmitting Terminal Identification) 194Tutorial introduction 45TXTFILE 37
UUnderlining 123, 150Undoing changes (Home key) 56, 75, 148Updating a previous release 23Updating the Receive Queue 174UPDRCVQ (Update Receive Queue) command 44, 169
244

Index
User data (fax parameters) 128, 155User defined data (fax parameters) 155User defined options (in Fax Queue) 168User defined options (in Receive Queue) 174User options (in PDM) 32USERASCII spooled file faxing 190Using the HTTP Server 49
VVary ON or OFF (Fax Communication Line) 129Viewing old Fax messages 58Virtual Printer support 105VRYFAX (Vary Fax) command 44, 129
WWidth (fax command) 120, 149Work with Fax Spooled Files 156Work with Output Queue plus Fax 47Work with Receive Queue 169Work with Spooled Files plus Fax 104Working with Fax Lines 102Working with Fax Queue 48, 163Working with Fax Security 139Working with Image and Other documents 218Working with Images 98, 218WRKDIR (Work with Directory) command 124, 208WRKDSTL (Work with Distribution Lists) command 124, 208WRKFAXL (Work with Fax Lines) command 42, 102, 103WRKFAXQ (Work with Fax Queue) command 42, 129, 163WRKFAXS (Work with Fax Security) command 44, 139WRKFCJOBQ (Work with FAXCOM Job Queues) cmd 44WRKHDWRSC (Work with Hardware Resources) cmd 28WRKIMGF (Work with Image Files) command 17, 44, 218WRKLACS (Work with Local Area Codes) command 44, 140WRKRCVQ (Work with Receive Queue) command 129, 169
XX (Select Document) option 32, 98, 218
245