vermicomposting curriculum
TRANSCRIPT

A 5th Grade SchoolEnrichment Curriculum
Leader’s Guide

iiNorth Carolina State University | 4-H Vermicomposting
Introduction to Vermicomposting
The 4-H Vermicomposting program offers fi fth-grade students an opportunity to explore a micro-community. This community contains producers, consumers, and decomposers (as all communities do), and students are encouraged to refl ect upon their learning as they achieve mastery of the concepts in producing this curriculum we have kept in mind that teachers are busy people. Therefore, each of the six lessons is tied to the Department of Public Instruction Standard Course of Study.
The curriculum includes an accompanying CD, which offers a visual reference not found in traditional classroom lectures. In addition, there is a training PowerPoint presentation with subject matter backup from Rhonda Sherman, Extension Specialist at N.C. State University. Training for the 4-H Vermicomposting Curriculum is generally provided by your County 4-H Agent.
Few supplies are needed, which also makes this a popular curriculum with agents and teachers alike. A further benefi t of using this curriculum is your inclusion in the 4-H Vermicomposting wiki, which provides you an opportunity to ask questions and offer suggestions for improving the curriculum. Rhonda Sherman and Jackie Helton, Extension Assistant – Curriculum, moderate this wiki and will respond to your questions in a timely manner.
We hope that you enjoy using this curriculum as much as we have enjoyed producing it.

iiiNorth Carolina State University | 4-H Vermicomposting
Table of Contents
Lesson 1 1Introduction to Vermicomposting
What is Vermicomposting?
Lesson 2 5Developing a Functional Worm Bin
Setting up a Worm Bin
Lesson 3 11Identifying the Anatomy of an Earthworm
Earthworm Anatomy
Lesson 4 15Identifying Different Decomposers in a Worm Bin
Other Critters in a Worm’s Neighborhood
Lesson 5 21Identifying Ways to Reduce the Amount of Waste in our Lives
Recycle, Reuse, Re-Imagine!
Lesson 6 26Harvesting Worms and Vermicompost from Worm Bins
to Harvest Castings
Vermicomposting Glossary 28

1North Carolina State University | 4-H Vermicomposting
LessonWhat is Vermicomposting?
Introduction to Vermicomposting
Materials• PowerPoint presentation on vermicomposting
• Vermicomposting statement cards for evaluation
Standard Course of Study:Competency Goal 1: The learner will conduct investigations to build an understanding of the interdependence of plants and animals.
1.1 Describe and compare several common ecosystems (communities of organisms and their interaction with the environment).
1.2 Identify and analyze the functions of organisms within the population of the ecosystem:
Consumers •
Decomposers •
Learning Objectives:By completing this lesson, students will be able to:
Identify • the concepts of vermicomposting
List • several advantages of vermicomposting to recycle food waste
Indicate • how vermicomposting is benefi cial to plants and soils
Recall • some ways earthworms have infl uenced history
Describe • categories of earthworms
Length of Lesson:45–50 minutes
Teaching & Learning Sequence:Begin the lesson by asking students to share examples of organic material decomposing, such as rotting food, decaying animals on highways, or decomposing leaves in the yard. Explain that the decaying process is a natural part of the life cycle of living things, and that all organic material begins to decompose, or decay, once it dies. Explain that decomposing material can be used to enrich soil and add nutrients by using worms in a process called vermicomposting. Vermicomposting uses worms and microorganisms to convert dead organic matter into nutrient-rich humus. The organic matter passes through the worm’s digestive tract and is excreted as castings.
At this point, you may use the PowerPoint presentation to help present information on vermicomposting.
1
Earthworms in compost
Life Skill: Learning to Learn—Acquiring, Evaluating, and Using Information

2North Carolina State University | 4-H Vermicomposting
Ask students the following questions about worms. After
each question, you can provide information that clarifi es the
importance of earthworms:
What is vermicomposting? What consumes food scraps and
organic matter in worm bins?
Vermicomposting is the process of using worms and microorganisms
to convert organic matter into nutrient-rich humus. Earthworms and
microorganisms eat the organic matter.
Where does vermicomposting take place?
Vermicomposting can occur wherever food scraps or other organic matter
are being generated or delivered. Worm composting bins can be found in
classrooms, homes, apartments, offi ces, or on farms. Vermicomposting is also being used to solve North Carolina’s
hog waste problems.
What are some advantages of vermicomposting?
It saves electricity and water that are • consumed by garbage disposal units.
Trashcans won’t get smelly • from decomposing food scraps.
It produces a soil amendment • that helps soil and plants.
It requires little space, • labor, or maintenance.It spawns free worms•
for fi shing.
What are some benefi ts of castings?
Castings help air and water to permeate soil. When castings are added to soil, they boost nutrients that are available to the plant and enhance soil structure and drainage. Castings can be mulched or mixed into the soil in gardens and around trees and yard plants. They can also be used as a top dressing on outdoor plants or sprinkled on lawns as a soil conditioner.
How are some ways that earthworms might have affected history?
Earthworms have been mentioned in history as far back as Aristotle, who described them as “the intestines of the earth.” In the time of the Egyptian pharaohs, Cleopatra declared earthworms sacred and established laws protecting them. Charles Darwin studied earthworms for 39 years and demonstrated that they improve soil conditions and enhance plant productivity. Darwin went so far as to say, “It may be doubted whether there are many other animals in the world which have played so important a part in the history of the world.”
How do you think scientists classify different types of earthworms?
There are at least 4,000 species of earthworms worldwide. The smallest is half an inch long, and the largest ever
Lesson Development
found was in South Africa, measuring 22 feet long. The Giant Gippsland earthworm of Australia grows to 12 feet long and can weigh 1½ pounds.
Earthworms have been classifi ed in several ways; perhaps the most useful is based on their behavior and habitat. Marcel Bouche developed a classifi cation that divides worms into the following three categories: epigeic, endogeic, and anecic.
Epigeic – (• ep-i-JEE-ik) types live at the surface in freshly decaying plant or animal residues.Endogeic – (en-do-JEE-ik)• types live underground and eat soil to extract nutrition from degraded organic residues. Anecic – (an-EE-sik) • types burrow deep in the soil but come to the surface at night to forage for freshly decaying organic matter.
Earthworms in the epigeic category are most commonly used in vermicomposting. The species of worms that are usually associated with processing organic materials are Eisenia fetida (commonly known as red wiggler, tiger worm, or brandling worm). They can be found in areas of decaying vegetation such as fallen leaves, manure piles, or under rotting logs.
Time LineBC AD
600 300 0 300 600 900 1200 1500 1800 2100/ / / / / / / / / /
384 – 322 69 – 30 1809 – 1882Aristotle Cleopatra Darwin
Microorganisms help to decompose the organic
Giant Gippsland Worm
matter in the worm bin.

3North Carolina State University | 4-H Vermicomposting
Closure: At this point in the lesson, students have been provided with a great
deal of background information on worms and their importance in the vermicomposting process. Students should remember that:
• Worms aid in the process of vermicomposting by digesting organic materials in a worm bin and excreting castings that enrich the soil.
• Vermicomposting is a natural process that can turn waste into a benefi cial product.
• One type of worm, Eisenia fetida (known as red wiggler, tiger worm, or brandling worm) is most commonly used in vermicomposting bins. These worms typically live on the soil’s surface in freshly decaying plant material or animal residues.
Evaluation:To determine what students have learned about worms and their role
in vermicomposting, students will be asked to recall information from the lesson and provide statements that support a particular position.
The class will be divided into groups of four or fi ve. Each group will be provided with a card with one of several statements related to
vermicomposting. The members of the group will attempt to recall information from the presentation about vermicomposting that supports their card’s
statement.
The statements on the cards include (printable cards found at the end of this lesson):
• Vermicompost is benefi cial in several ways when added to soil.
• Earthworms have been important throughout Earth’s history.
• Earthworms can be classifi ed by the way they behave and where they live.
• Some types of worms are better suited to vermicomposting than others.
• Vermicomposting can save water.
After giving groups a few minutes to discuss the information they recall about their statement, each group will read their statement and provide facts that support it to the class. The class as a whole will discuss whether the points made by the group support the statement or not. You may need to refer back to the PowerPoint presentation to review points that were not clear to the students.
In Lesson 2, students will examine the external features of the worm and its response to stimuli and learn the importance of each feature.
Reflection (ask students)
What have you learned about earthworms and vermicomposting that you did not previously know?
How would you convince your parents that they should participate in a home vermicomposting project?
GlossaryOrganic: Characteristic of, pertaining to, or derived from living organisms
Decompose: To rot; putrefy
Nutrients: Substances that provide nourishment for growth or metabolism. Plants absorb nutrients mainly from the soil in the form of minerals and other inorganic compounds, and animals obtain nutrients from ingested foods.
Soil structure: Determined by how individual soil granules clump or bind together
Species: A class of individuals having some common characteristics or qualities; distinct sort or kind
Epigeic: An earthworm that lives primarily in leaf litter on the soil’s surface and feeds on surrounding plant debris
Endogeic: An earthworm that primarily feeds on soil and plant roots
Anecic: An earthworm known for burying leaf litter in the soil and pulling it into underground burrows for consumption
Food scraps that can be used in worm bins inclu
de
Castings consist of undigested materials such as plant residues, bacteria, and soils.
fruits and vegetables. Don’t use this as an excuse
to not eat your vegetables!

4North Carolina State University | 4-H Vermicomposting
Evaluation Statement Cards Vermicompost is
benefi cial in several ways when added to soil.
Earthworms have been important throughout
Earth’s history.
Earthworms can be classifi ed by the way
they behave and where they live.
Some types of worms are better suited
to vermicomposting than others.
Vermicomposting can save water.

5North Carolina State University | 4-H Vermicomposting
LessonSetting up a Worm Bin
Developing aFunctional Worm Bin
Standard Course of Study:Competency Goal 1: The learner will conduct investigations to build an understanding of the interdependence of plants and animals.
1.01 Describe and compare several common ecosystems (communities of organisms and their interaction with the environment).
1.02 Identify and analyze the functions of organisms within the population of the ecosystem:
Consumers •
Decomposers •
Learning Objectives:By completing this lesson, students will be able to:
Identify • the ingredients that go into a worm bin
Describe • the importance of each ingredient in a worm bin
Assemble • the ingredients of a worm bin
Length of Lesson:45–50 minutes
Teaching & Learning Sequence:
2
Life Skill: Learning to Learn—Acquiring, Evaluating, and Using Information
Materials• PowerPoint presentation on setting up a worm bin
• Rulers or tape measure
• Power drill tool (used by instructor to drill holes in worm bin before the lesson)
• Water bucket
• Weight scale (measuring food)
• Worm bin description cards (for evaluation exercise)
• Worm bin (wooden box/plastic container)
• Bedding (shredded paper)
• Water
• Handful of soil or compost
• 1 pound (about 1,000) of Eisenia fetida worms
• Food scraps (vegetables, fruits — especially melons or pumpkins — coffee grounds)
• Spray bottle
Begin the lesson by reviewing the importance of worms and their role in the process of vermicomposting. Review the types of worms that are best suited for vermicomposting and the process of vermicomposting itself. For example, you could ask these questions for students to assess their previous knowledge:
What is vermicomposting?
What types of creatures are important in vermicomposting?
Can you use any type of worm for vermicomposting? If not, what kinds of worms are best for vermicomposting?
What kinds of living conditions are these worms found in?
What is added to soil as a result of vermicomposting?
How are castings benefi cial to soil?
Inform the students that vermicomposting has become an increasingly popular way of managing organic materials and turning waste into a benefi cial resource.
Thousands of people are vermicomposting all over the world. Students in schools vermicompost their lunch leftovers, households have worm bins for their kitchen waste, farmers vermicompost animal manure, and businesses feed worms food waste and other organic materials.

6North Carolina State University | 4-H VermicompostingNorth Carolina State University | 4-H Vermicomposting
In this lesson, students will discuss the ingredients of their worm bin. Determine where the bin
will be kept; it needs to be stored where the temperature will be
maintained between 55°F and 77°F.
Show the students the bin where the worms will be kept. If the bin is going
to be outside, it is best to use a wooden box made from untreated, non-aromatic
wood. If the worm bin is to remain inside, a plastic container will be suitable.
The holes in the worm bin should be drilled before the lesson, as having
power tools around students in this setting could be dangerous.
Have the students measure the length and width of the worm bin with rulers
or a tape measure to determine the size of the bin in square feet. Explain that one
pound of worms can be added to one square foot of worm bin. Place a plastic
tray under the worm bin to collect any moisture that may seep out.
Explain to the students that the worms will need bedding material in which to
burrow and for people to bury the food scraps. Explain that the bedding material should be a nontoxic material that holds
moisture and allows air to circulate. Ask students for ideas of these types of
materials, and ask for them to explain their reasoning. After this discussion,
explain that the best types of materials include shredded paper, such as
black-and-white newspapers, paper bags, white office paper, or cardboard. Do not use glossy paper or magazine pages. A handful of soil can be added to the bedding to supply roughage for the worms and provide extra microorganisms to the bin environment.
At this point, ask the students what they predict will happen in the worm bin if it is set up properly. Ask them how the worms’ chances of survival might change if the conditions in the worm bin were different. How do the conditions in a worm bin compare to those in a compost heap, or the conditions in a vegetable garden? What conditions are needed in each situation for it to be successful?
Before the bedding material is added to the worm bin, explain to the students that since worms’ bodies are 80 percent water, their bedding must contain that much moisture so they do not dry out. How does the percentage of water in a worm’s body compare to the percentage of water in a person’s body? Why is it important for both worms and people, and all animals, to be properly hydrated?
Demonstrate that the best way to moisten the bedding is by placing it in a bucket of water and giving it time (about 20 minutes) to soak up the water. Squeeze out excess moisture and fluff it up (to allow air to circulate) and then place it in the worm bin. About six to eight inches of moist bedding should be placed in the worm bin. Then add a handful of soil to the bedding. If the bedding dries out, use a spray bottle to moisten it.
The bedding is not only a place for the worms to live. It also serves a very important purpose: to cover up the food that is added to the bin. If the food scraps are uncovered, they could attract fruit flies and get moldy and smelly.
Lesson Development
So, ALWAYS cover the food scraps with two to three inches of bedding. As the bedding disappears (the worms and microorganisms eat it!), add new moist bedding so you always have enough to cover the food.
Remind students that one species of earthworm, Eisenia fetida, works best for composting because these worms live near the soil surface and are used to digesting decaying plant matter and other types of organic matter. Explain that worms eat about half of their weight in food each day. One pound of worms will consist of 500 to 2,000 worms, depending on the size of the worms that are used.
Do not buy worms from a bait shop. You need at least a thousand worms, and bait shops only sell about a dozen per cup. Buy them by the pound from a worm grower. Worm growers can be found in North Carolina Worm Resources at http://www.bae.ncsu.edu/topic/vermicomposting/vermiculture/nc.html or in the Directory of Vermiculture Resources by State in the U.S. and by Country: Worms, Supplies, and Information at http://www.bae.ncsu.edu/topic/vermicomposting/vermiculture/directory-by-state.html.
Most worm growers will ship worms, so you don’t have to live near them. You can also ask your county Cooperative Extension office if they are aware of local worm growers.
Shredded paper to use as bedding. Do not use glossy paper or magazine pages.
Worm menuAsk students to identify the kinds and sizes of food scraps that are acceptable to place in the worm bin. This is in the PowerPoint presentation. Be sure to identify foods that are acceptable for the worm bin:
Vegetables
Fruits - especially melons or pumpkins
Coffee grounds
Worm bin. A plastic container with holes for proper air circulation. Holes are also added in the bottom for drainage.

7North Carolina State University | 4-H Vermicomposting
Worm Bin TroubleshootingProblems Causes SolutionsBin Smells Bad Overfeeding Stop feeding for 2 weeks
Food scraps exposed Bury food completelyBin too wet Mix in dry bedding; leave lid offNot enough air Fluff bedding; drill holes in bin
Bin Attract Flies Food scraps exposed Bury food completely
Too much food; especially citrus Don’t overfeed worms
Worms Are Dying Bin too wet Mix in dry bedding; leave lid offBin too dry Thoroughly dampen beddingExtreme temperatures Move bin where temperature is 55°- 77°FNot enough air Fluff bedding; drill holes in itNot enough food Add more bedding and food scraps
Worms Crawling Away Bin conditions not right See solutions aboveShine bright light on bin
Mold Forming Conditions too acidic Cut back on citrus fruits
Bedding Drying Out Too much ventilation Dampen bedding; keep lid on
Water Collecting In Bottom
Poor ventilation Leave lid off for a couple of days; add dry bedding
Feeding too many watery scraps Cut back on coffee grounds & food scraps with high water content
Ask students why excess liquid from food must be drained off before adding it to
the bin. Explain that smaller pieces of food scraps will be easier for the worms to break down than larger pieces, so all food scraps
should be crushed, ground down, or broken before being added to the worm bin. Cover the food scraps completely with bedding to
prevent fruit fl ies or mold.
Explain to students that since the worms will eat the food scraps in the food bin,
they are serving in the role of “consumers” in the bin. The microorganisms that are also
in the soil will help to decompose the food scraps over time.
Ask students to identify examples of certain foods that should not be added to the worm bin. With each suggestion, explain why that food type is or is not a
proper food to add to the worm bin. Meat, bone, fi sh, or dairy products have proteins
that cause odors as they decompose and will attract pests to the worm bin. Greasy
or oily foods and fat will coat worms’ skin, preventing them from being able to
breathe. Pet or human manure may contain pathogens or viruses that are harmful to
humans. Adding more than four pounds of food scraps to a worm bin over the course
of a week will give the worms more than they can eat, creating anaerobic
(an area with no oxygen) conditions to set in and cause odor.
At this point, food is ready to be placed into the worm bin. The students will need to
measure out up to ½ pound of food scraps and place them in section 1 of the worm
bin. The food scraps should be covered by several inches of bedding material so they will not attract pests or develop mold.
Next, place the worms on top of the bedding. The worms will move away from the light and burrow into the bedding. Be sure to have students wash their hands thoroughly with warm water and soapafter handling the worms.
Discuss the worm bin record with the class. Have students label the top of the worm bin with numbers to designate where to bury the food each time.
The sample chart could be designed in this manner (also found at the end of this lesson):
Garbage Record Set up Date
DATEOZ. OF FOOD
TEMPBURYING
LOCATIONCOMMENTS
9/1 8 68 #1Set up worm bin. Added bedding and food scraps.
IMPORTANT: Wait until the food is completely consumed before adding more this fi rst time.
Burying locations for the top of bin:
1 2 3
4 5 6
7 8 9
(cont.) Lesson Development
Shredding paper to soak for use as bedding.
Sherman, R. 1994. Worms can recycle your garbage . AG-473-18. Raleigh: N.C. Cooperative Extension Service.
8North Carolina State University | 4-H Vermicomposting
Closure: Review the different parts of a worm bin and explain how each part is
important in maintaining the health and well-being of the worms. Explain how a properly constructed worm bin will let students
witness the vermicomposting process at work and apply it to the way in which organic materials are processed back into the soil in nature.
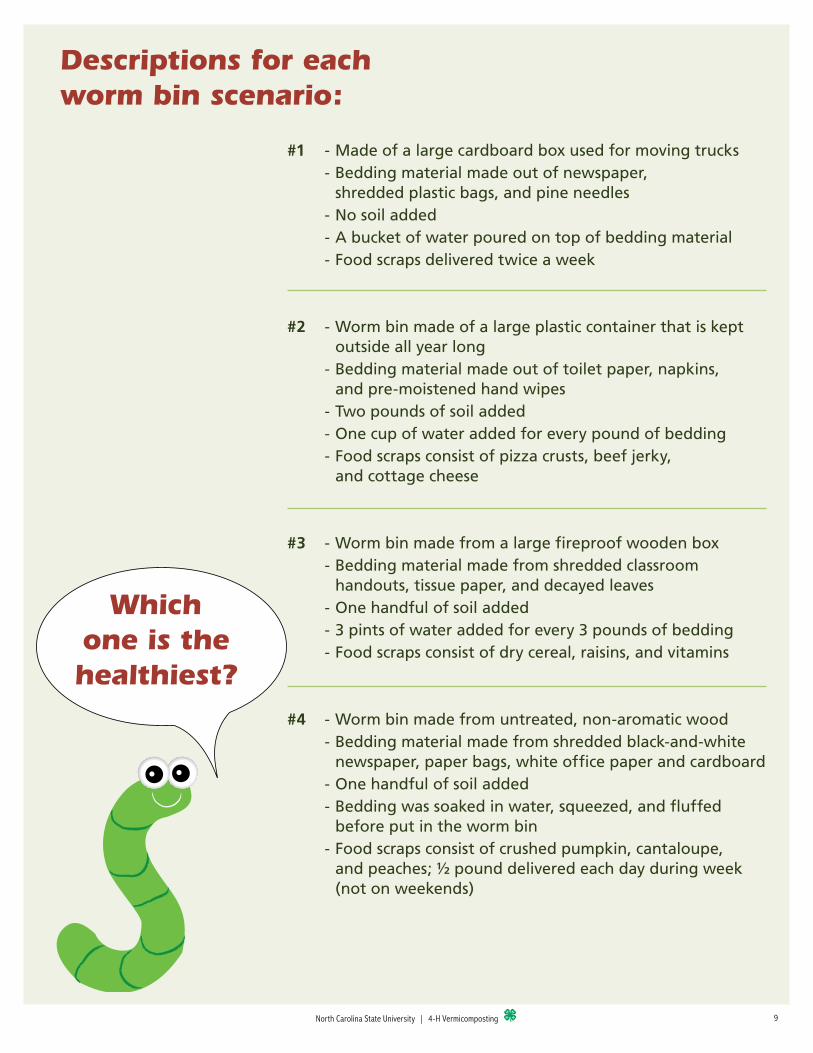
Evaluation:On the day prior to this lesson, the instructor should provide copies of a handout describing four different worm bin
scenarios. (The scenarios are listed on the next page.) Instruct the students to assess each scenario at home and with other
students prior to this lesson to judge to which scenario would be the healthiest for the worms.
To determine if the students truly understand the importance of the different parts of a worm bin, engage them in a role-playing activity
where four students will each represent a different worm bin, with different features for each bin. The rest of the students will be worms that
are searching for a proper worm bin to call home. Each of the students playing the worm will visit the representative of each individual bin and listen to their pitch that explains why their worm bin is the best choice for them. The worms will be able to ask the representatives questions about their worm bins and defend their worm bin. At the end of the activity, the instructor will ask the students representing the “worms” to move toward the student who represented the best choice for worm bin. Hopefully, a majority of the students will choose the worm bin that featured the most optimal conditions.
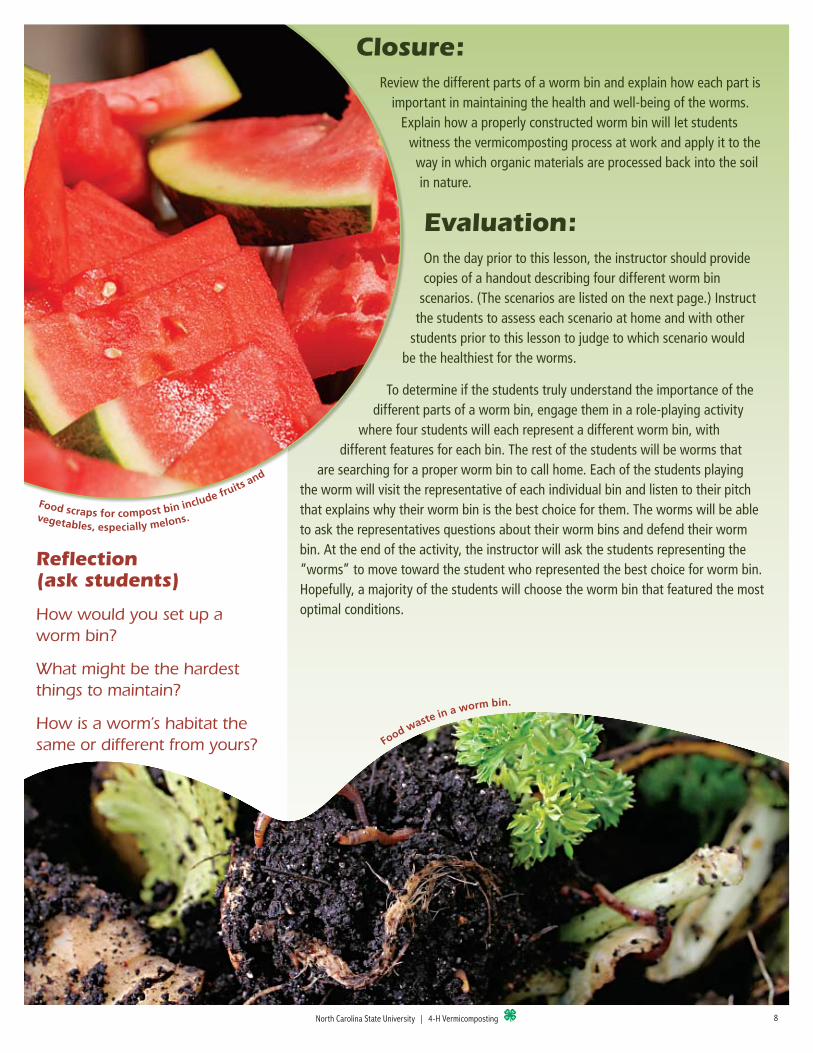
Food scraps for compost bin include fruits
and
vegetables, especially melons.
Reflection (ask students)
How would you set up a worm bin?
What might be the hardest things to maintain?
How is a worm’s habitat the same or different from yours? Food waste in a worm bin.
9North Carolina State University | 4-H Vermicomposting
#1 - Made of a large cardboard box used for moving trucks - Bedding material made out of newspaper, shredded plastic bags, and pine needles - No soil added - A bucket of water poured on top of bedding material - Food scraps delivered twice a week
#2 - Worm bin made of a large plastic container that is kept outside all year long - Bedding material made out of toilet paper, napkins, and pre-moistened hand wipes - Two pounds of soil added - One cup of water added for every pound of bedding - Food scraps consist of pizza crusts, beef jerky, and cottage cheese
#3 - Worm bin made from a large fireproof wooden box - Bedding material made from shredded classroom handouts, tissue paper, and decayed leaves - One handful of soil added - 3 pints of water added for every 3 pounds of bedding - Food scraps consist of dry cereal, raisins, and vitamins
#4 - Worm bin made from untreated, non-aromatic wood - Bedding material made from shredded black-and-white newspaper, paper bags, white office paper and cardboard - One handful of soil added - Bedding was soaked in water, squeezed, and fluffed before put in the worm bin - Food scraps consist of crushed pumpkin, cantaloupe, and peaches; ½ pound delivered each day during week (not on weekends)
Descriptions for each worm bin scenario:
Which one is the healthiest?

10North Carolina State University | 4-H Vermicomposting
DATEOZ. OF FOOD TEMP
BURYING LOCATION COMMENTS
Garbage Record Date________________________
1 2 3
4 5 6
7 8 9
Burying locations for the top of bin.
Don’t forget to cover food scraps
with bedding.

11North Carolina State University | 4-H Vermicomposting
LessonEarthworm Anatomy
Identifying the Anatomy of an
Earthworm
Materials• PowerPoint presentation on earthworm anatomy
• Worms
• Moist paper towels or Petri dishes
• Magnifying glasses
• White drawing paper
• Crayons or colored pencils
Standard Course of Study:Competency Goal 1: The learner will conduct investigations to build an understanding of the interdependence of plants and animals.
1.02 Identify and analyze the functions of organisms within the population of the ecosystem:
Consumers •
Learning Objectives:By completing this lesson, students will be able to:
Identify • parts of a worm’s external anatomy
Identify • the different parts of a worm’s internal anatomy and their functions
Identify • Eisenia fetida’s egg capsules
Describe • the texture, odor, and appearance of a worm
Describe • the movements of a worm
Length of Lesson:45–50 minutes
Teaching & Learning Sequence:Begin the lesson by reviewing the ingredients that go into a worm bin and their importance. Review the types of food that may be added to the bin and the amount. Discuss what should not go into a worm bin and why.
3
Life Skill: Learning to Learn—Acquiring, Evaluating, and Using Information

12
Outer Anatomy of the Earthworm
Internal Organs of the Earthworm
Worms Eat Our Garbage: Classroom Activities for a Better Environment. Mary Appelhof. 1993. Published by Flower Press, Kalamazoo, MI.
North Carolina State University | 4-H Vermicomposting
Use the PowerPoint to go over the outer anatomy of the earthworm and the
functions of each part, including:
Lesson Development
Anus1. —where waste is excreted from the worm
Segments2. —the areas of the worm’s outer body that bend and stretch and aid in movement
Setae3. —stiff hairs on the exterior of the worm that serve as feelers or sensory aides
Clitellum4. —located near the front of the worm; the worm’s genitalia is located here
Mouth5. —where the worm ingests food
Next, use the PowerPoint slides to discuss the internal organs of earthworms. Worms
do not have teeth. Microorganisms and moisture break down organic matter in the worm bin, and worms suck in microorganisms and bits of organic
matter. The worm coats its food with saliva and then pushes the food down
its esophagus to the crop (a storage compartment). Next, the food goes to
the gizzard, where it is ground up by strong muscles, and then on to the
intestine, where digestive juices break down the food further. The rest is
passed out of the anus as castings.
Be sure to mention that worms breathe through their skin, instead of through
lungs or gills. They require a moist environment for the exchange of air to
take place, so that is why the worm bin bedding needs to stay damp.

13North Carolina State University | 4-H Vermicomposting
Worm Capsules - An average of 3 baby worms
will emerge from each worm capsule.
(cont.) Lesson Development Show students the PowerPoint slide on worm capsules so they will be
able to identify them in the worm bin. Worms reach maturity in six weeks. They can reproduce up to three times a week, and an average of three worms will emerge from each egg capsule. About 10 babies are produced per week for each mature worm. In optimum conditions, 10 mature worms could produce 2,600 offspring within six months.
Activity #1:Assign students into groups of two each and give each group a
number. Provide each pair of students with a moist paper towel or Petri dish, a worm, a magnifying glass, and a recording sheet
containing the following questions:
How does the worm feel to the touch?•
What does the worm do when you touch it?•
Which end is the head or tail, and how can you tell?•
Can you see the worm’s mouth?•
Where are the worm’s eyes? •
How does the worm move?•
Does the worm have an odor?•
What color is the worm? Does it have any markings?•
Can you see through the skin? What do you see?•
Does the worm have a clitellum (swollen band) around it?•
*Note: The worms may release a yellowish fl uid when handled. This smelly fl uid serves as a defense mechanism to repel predators. The species name, Eisenia fetida, is derived from the root word fetid, which means smelly.
Ask the students to record their answers, and have them write their names and the group number in the upper right hand corner. Give the students 20 minutes to answer the questions.
Evaluation/Refl ection:After students are fi nished answering questions on their recording sheet, ask individuals these questions:
What were the most important observations that you made concerning • the movements of the worm that you examined?
How do your observations about worms compare to what you expected • them to look like? Smell like? Feel like? If your observations were different from your preconceptions about worms, describe why you believe they were different.
What skills were most useful in this activity? How might the skills you • used in this activity apply to other parts of your life?
Describe how observing and understanding a worm’s outer anatomy • will be useful in maintaining a successful worm bin.

14North Carolina State University | 4-H Vermicomposting
Activity #2:Instruct each group of students to get a supply of white drawing paper and
some crayons or colored pencils to use in the next part of the activity.
For the next 7-minute period, each group will meet with another group in the class and verbally describe their worm to the other group as precisely as possible. The members of the other group will do their best to draw the fi rst group’s worm accurately. The members of the group that is drawing can ask as many clarifying questions as they like. After 7 minutes have elapsed, ask each pair of students to compare the drawing and the description. Ask members of the class questions such as these after one student has drawn a picture of his or her partner’s description of the worm.
Evaluation/Refl ection:What did you notice about the drawings • that were made?
What have you determined about the importance of • listening carefully to another person’s descriptions?
What have you learned about providing clear • descriptions to others?
Once the students have had a chance to compare their drawings, have the partners in each group switch tasks. Provide 7 minutes for the groups to complete the second round of drawing their partners’ descriptions and see if the comparisons are closer now that students have discussed the importance of providing clear instructions, as well as the value of listening to others’ descriptions.
After completing the activities, collect the worms, paper towels or Petri dishes, magnifying glasses, recording sheets, drawing papers, and coloring utensils and return to their appropriate areas.
This activity combines students’ growing understanding of a worm’s anatomy with their listening skills, as well as the ability to verbally describe an object effectively.
Closure: At the end of the activity, collect all of the recording sheets and worm drawings. Explain that the drawings that show the greatest amount of attention to detail will be available to display, if the student wishes. Review the importance in identifying the different areas of a worm’s exterior anatomy as well as the way it moves, its texture, and its smell.
Unlike the picture above, worms have no eyes and
are sensitive to light. Worms have no lungs or g
ills
and breathe through their skin.

15North Carolina State University | 4-H Vermicomposting
LessonOther Critters in a Worm’s Neighborhood
Identifying different
decomposers in a worm bin
Materials• Gummy worms (optional)
• Worm bin
• Decomposers recording sheet
• Magnifying glass
• Library books concerning decomposers
(look for books in the school or local library)
• PowerPoint presentation on other critters in the worm’s neighborhood
Standard Course of Study:Competency Goal 1: The learner will conduct investigations to build an understanding of the interdependence of plants and animals.
1.01 Describe and compare several common ecosystems (communities of organisms and their interaction with the environment).
1.02 Identify and analyze the functions of organisms within the population of the ecosystem:
Consumers •
1.03 Explain why an ecosystem can support a variety of organisms.
1.05 Determine the interaction of organisms within an ecosystem.
Length of Lesson:45–50 minutes
Teaching & Learning Sequence:On a series of cards, write the following anatomical terms for a worm’s outer body (mouth, anus, segment, clitellum, and setae - also attached at the end of this lesson), put them in a hat or other receptacle, and have students draw out the terms one at a time. Each student who draws out a term must identify the purpose of that feature on a worm’s body. Students who are correct may have their choice of a gummy worm. You may also call on students to describe their observations of the worms from the previous lesson. At the end of the review, you may want to provide a gummy worm to each student who did not get called on, if they choose.
4
These creatures are consumers, like
Life Skill: Learning to Learn—Acquiring, Evaluating, and Using Information
Learning Objectives:By completing this lesson, students will be able to:
Identify • the presence of an enchytraeid and determine what it feeds on
Identify • the presence of an acarina and how it is grouped
Identify • the presence of drosophilidae and what it feeds on
Identify • the presence of a collembola
Identify • the presence of an isopod and describe its appearance
the worms, because they eat the organic matter in the bin.

16
Eye detail of the fruit fl y.
North Carolina State University | 4-H Vermicomposting
In this lesson, students will learn that worms are most
likely not the only decomposing organisms in the worm bin. Even though they were not purposely
placed there, other creatures exist in the worm bin that are
present in decaying leaves, soil, or decomposing food. Students
will learn that these organisms are consumers because they eat the
organic matter in the bin.
Lesson Development
These are the creatures that will be discussed in this lesson:
White worms (enchytraeids):
These thin, segmented, white worms are so small (one-fourth to one inch) that they are often mistaken for baby redworms (which are actually pinkish and somewhat see-through).
Mites (acarina):
These round, eight-legged creatures are so tiny that they are hard to see. They are usually white, brown, or bright red, and appear in clusters.
Fruit fl ies (drosophilidae):
These tiny fl ies feed on ripening or fermenting fruit.
Springtail (collembola):
These tiny (one-sixteenth inch) white creatures will spring away in different directions if you try to touch them. You’ll often see several hundred in the worm bin, appearing as a sprinkling of salt.
Sow bugs (isopod):
These gray or brown half-inch-long creatures resemble tiny armadillos with their series of fl attened plates on their bodies.
Go through the PowerPoint presentation with your students to review previous lessons and learn about the decomposers in this lesson.
17
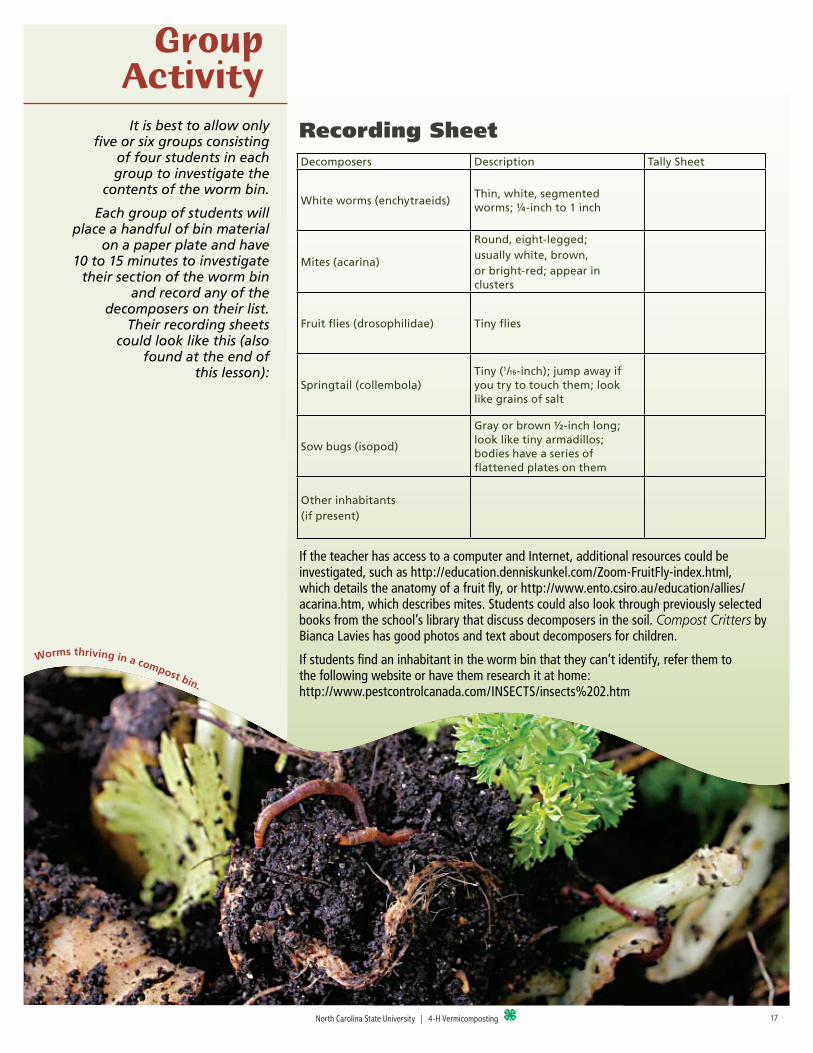
Recording Sheet
North Carolina State University | 4-H Vermicomposting
Decomposers Description Tally Sheet
White worms (enchytraeids)Thin, white, segmented worms; ¼-inch to 1 inch
Mites (acarina)
Round, eight-legged;usually white, brown,or bright-red; appear in clusters
Fruit flies (drosophilidae) Tiny flies
Springtail (collembola)Tiny (1/16-inch); jump away if you try to touch them; look like grains of salt
Sow bugs (isopod)
Gray or brown ½-inch long; look like tiny armadillos; bodies have a series of flattened plates on them
Other inhabitants(if present)
Group Activity
It is best to allow only five or six groups consisting
of four students in each group to investigate the
contents of the worm bin.
Each group of students will place a handful of bin material
on a paper plate and have 10 to 15 minutes to investigate
their section of the worm bin and record any of the
decomposers on their list. Their recording sheets
could look like this (also found at the end of
this lesson):
If the teacher has access to a computer and Internet, additional resources could be investigated, such as http://education.denniskunkel.com/Zoom-FruitFly-index.html, which details the anatomy of a fruit fly, or http://www.ento.csiro.au/education/allies/acarina.htm, which describes mites. Students could also look through previously selected books from the school’s library that discuss decomposers in the soil. Compost Critters by Bianca Lavies has good photos and text about decomposers for children.
If students find an inhabitant in the worm bin that they can’t identify, refer them to the following website or have them research it at home: http://www.pestcontrolcanada.com/INSECTS/insects%202.htm
Worms thriving in a compost bin.

18North Carolina State University | 4-H Vermicomposting
Closure: After all of the students have had the chance to investigate the contents of
the worm bin for possible decomposers, review the probability that there are numerous examples of decomposers in the contents of the worm
bin, just as there are in nature. You could encourage the students to investigate the contents of a small portion of their yard or a garden to see if they can identify any other possible decomposers, as well. Students can also investigate compost piles at farms, greenhouses, or the residences of neighbors or relatives to see if these types of creatures live in the compost.
Evaluation:Upon the conclusion of the lesson, students should be asked to role-play as one of the examples of the decomposers discussed in
this lesson. They should be asked to write a minimum of a paragraph providing a fi rst-person narrative of their existence inside the worm
bin and what their life is like, in terms of what they look like, what they eat, where they live, or other creatures they encounter. You can choose
whether to include creativity in the student’s writing as a factor regarding their evaluation.
Reflection:
How did it feel to play the role of a microorganism?
Where else are microorganisms present, and how do they influence our lives?
GlossaryEnchytraeid: Enchytraeid worms are smaller than earthworms. The highest populations are found in acid soils, but the numbers are not uniformly distributed. They are sensitive to drought and do not tolerate desiccation. Enchytraeid feed on bacteria and fungi. They have no enzymes for digesting complex polysaccharides and thus do not digest the organic matter they ingest.
Acarina: subclass of the arthropod class Arachnida that includes the mite and tick
Drosophilidac: a diverse, cosmopolitan family of fl ies, including fruit fl ies, vinegar fl ies, wine fl ies, pomace fl ies, and grape fl ies
Isopod: Isopods are omnivores or scavengers feeding on dead or decaying plants or animals. Some may eat live plants. Isopods breathe with gills, so they are restricted to areas with high humidity, under rocks or logs, in leaf litter, or in crevices. Some species are nocturnal. Some species roll up into a ball when disturbed. They are commonly known as sowbugs or pillbugs.
Armadillos are not found in compost bins.
Some creatures have gray or brown half-inch-lo
ng
series of fl attened plates on their bodies.bodies that resemble timy armadillos with their
These tiny fl ies feed on ripening or fermenting fruit.

19North Carolina State University | 4-H Vermicomposting
Anatomical terms for a worm’s outer body MOUTH
ANUS
SEGMENT
CLITELLUM
SETAE

20North Carolina State University | 4-H Vermicomposting
Recording Sheet
Recording Sheet
Decomposers Description Tally Sheet
White worms (enchytraeids)Thin, white, segmented worms; ¼-inch to 1 inch
Mites (acarina)Round, eight-legged;usually white, brown,or bright-red; appear in clusters
Fruit flies (drosophilidae) Tiny flies
Springtail (collembola)Tiny (1/16-inch); jump away if you try to touch them; look like grains of salt
Sow bugs (isopod)Gray or brown ½-inch long; look like tiny armadillos; bodies have a series of flattened plates on them
Other inhabitants(if present)
I

21North Carolina State University | 4-H Vermicomposting
LessonRecycle, Reuse, Re-Imagine!
Identifying ways to reduce the
amount of waste in our lives
Materials• Metal food cans outfi tted with rope lengths for metal can stilt race (optional)
• Plastic cup
• Polystyrene cup
• Plastic fork, knife, spoon
• Oatmeal box
• Tin or aluminum can
• Cereal box
• Plastic bag (quart size or less)
• 1 sheet of notebook paper
• Table scraps (leftover food from lunch or snack inside a bag or container)
• Bread wrapper
• Milk jug
• 10 different cardboard boxes (such as those used in grocery stores)
• PowerPoint presentation on recycle, reuse, re-Imagine
Alternate Lesson Materials:
• Recycling Journal• Weight Scale (such as a bathroom scale)
Standard Course of Study:Competency Goal 1: The learner will conduct investigations to build an understanding of the interdependence of plants and animals.
1.05 Explain and evaluate some ways that humans affect ecosystems.
Pollutants •
1.07 Determine how materials are recycled in nature.
Length of Lesson:45–50 minutes
Teaching & Learning Sequence:IntroductionTo introduce the lesson to the students, ask these questions or similar questions:
How do worms break organic material into smaller pieces?•
How does this process aid in enriching the soil for plants?•
What is the concept of recycling?•
Why is recycling an important component in maintaining • the quality of the environment?
What are some ways that people can recycle or reuse previously existing • items so they won’t take up as much space in landfi lls?
5
Life Skill: Learning to Learn— Acquiring, Evaluating, and Using Information
Learning Objectives:By completing this lesson, students will be able to:
Identify • methods to decrease the amount of materials that are thrown away
Identify • proper methods of reusing materials for other purposes
Develop • ways to improve the amount of recycling in their community

22
To reduce and re
use - U
se both sides o
f paper
North Carolina State University | 4-H Vermicomposting
Vermicomposting is a method of waste reduction. In this lesson,
you will demonstrate or provide descriptions of how items that
typically are thrown in the trash can be reduced, reused, recycled
or composted. These practices will decrease the amount of materials being dumped in landfi lls, which will in turn reduce pollution and
conserve valuable resources.
Introduce a series of items that are typically thrown away, including plastic cups, polystyrene cups, plastic utensils
(such as forks, knives, or spoons), oatmeal boxes, tin or aluminum cans,
cereal boxes, plastic bags, notebook paper, table scraps, bread wrappers,
and milk jugs. Place them all in an empty trashcan to demonstrate how
quickly these items fi ll the space. Ask the students to think about different ways to reduce the number of items that are
thrown away. (In the meantime, a series of medium-sized cardboard boxes can
be placed next to each other from left to right on top of a series of tables or desks.
These boxes should be underneath a blackboard or whiteboard for
the boxes to be labeled.)
Once the students have identifi ed several ways in which items can be
reused or recycled, and several of the boxes have been labeled with these
methods, it is time to see how quickly the students can determine a proper method
for disposing of these items. Divide the students into two equal groups if possible.
(Have a student go twice in a group if necessary.) Provide each student with a
small sticker labeled either “1” or “2” to represent the group number.
Have each group of students race against the other to try to place the items in the full trashcan into an appropriate reuse/recycle container. Each group will have one member at a time grab an item from the central trashcan and place that item in the reuse/recycle box that is the most appropriate for that item. Students will place their stickers on the item they grab from the trashcan placing it in the reuse/recycle container. (At this point, a student should be selected to serve as a scorekeeper.)
The team that fi nishes the race fi rst will be awarded two points for every member of the team, and the team that fi nishes second will be awarded one point for every member of the team. The teacher will then examine the items that were placed in each reuse/recycle box, as well as the numbers on the stickers. For each item that is placed in an appropriate box, that team is awarded 2 additional points. The group that wins will ultimately have the most points.
Lesson Development
Be sure to emphasize the importance of observing the rules in the classroom, such as walking quickly, but not running, during the race.
Ten possible methods include:
send to recycling center• use ceramic coffee mugs & wash• wash and reuse• use other side of paper• buy in larger quantities• buy in bulk and repackage in used • containers such as bags and bottlessend to landfi ll• make into craft projects• use plastic cups and wash• add to compost pile or worm bin•
Of course, it isn’t necessary for all of these strategies to be identifi ed; in fact, other methods may be determined instead.
Craft project made with recycled material

23
To reduce and re
use - U
se ceramic m
ugs and wash them.
North Carolina State University | 4-H Vermicomposting
Encourage students to continue to look around their schools, classrooms, homes, and communities, and think of ways to increase recycling and reusing
materials and reducing waste.
Another way of demonstrating how previously used items can be used in new ways is to use the materials in a
game. Allow students to work in groups of three or four and have them discover
creative classroom uses for items that would have been thrown away.
There are other ways in which materials are reused for new purposes.
Many artists reuse discarded objects to create recycled art, such as the
examples on this Web site: http://www.wastefreelunches.org/art.html
If time permits, allow 10 to 15 minutes for students to break into groups of three or four and write
down a list of ideas to increase the use of recycling and reduce the amount
of waste in their daily lives. (They can write on both sides of the paper if
needed!) Be prepared to share with the group if called upon. Have
students in each group write their names on their list and
turn in the lists for the teacher to review.
(cont.) Lesson Development
For an alternate activity that would take place over the course of a week, have students use a recycling journal and list all of the items that the members of the class throw away every day for a week. At the end of each day, weigh the amount of trash that is thrown away. Have students determine whether or not each type of item that is thrown away could be recycled, and record their answers.
Below is an example of how the recycle journal could appear:
Day Item Total Pounds for the Day
Could be recycled?
Monday Paper 2 lbs. Yes
Monday Snack items 10 lbs. Yes/No
Following the end of the week, display the recycling journal data to students (by using an overhead projector or making photocopies for each student or another method) and have them answer the following questions in their own personal science journal.
Which of the materials that you threw away took up the most space?•
Describe ways in which you and your class can recycle some of your trash.•
Describe ways that you and your class can avoid producing some of the trash.•
Have students discuss the answers to these questions in class and brainstorm methods for recycling or reducing the amount of trash that is disposed of.
As an extension activity, the students could use the data from this week and project how many pounds of trash the class would generate in one school year. They could also use that data to project how many pounds of trash the entire school could generate.

2424North Carolina State University | 4-H Vermicomposting
Closure: As the lesson ends, review the concept of recycling and reusing materials
for other purposes.
Evaluation:To evaluate students’ understanding of this lesson, ask them to select three to six items from their home, school, or elsewhere that will most likely end up in a landfi ll and identify how each item can either be recycled or reused. Have the student submit a list containing the items they have brought, how each item can be recycled or reused, and why the item was most likely thrown away. The students’ items should be in a bag with their name on it and brought to the instructor in the next class meeting so the
student can demonstrate where to place the items if necessary.

25North Carolina State University | 4-H Vermicomposting
Day Item Total Pounds for the Day
Could be recycled?
Which of the materials that you threw away took up the most space?
Describe ways in which you and your class can recycle some of your trash.
Describe ways that you and your class can avoid producing some of the trash.
Recycle Journal

26North Carolina State University | 4-H Vermicomposting
LessonTo Harvest Castings
Harvesting Worms and Vermicompost from Worm Bins
Materials• Worm bin
• Plastic sheet or used shower curtain (dry)
• Scoops or small hand shovels for harvesting
• Natural or artifi cial light source
• PowerPoint presentation on harvesting castings
Standard Course of Study:Competency Goal 1: The learner will conduct investigations to build an understanding of the interdependence of plants and animals.
1.01 Describe and compare several common ecosystems (communities of organisms and their interaction with the environment).
1.02 Identify and analyze the functions of organisms within the population of the ecosystem:
Producers •
1.03 Explain why an ecosystem can support a variety of organisms
1.04 Discuss and determine the role of light, temperature, and soil composition in an ecosystem’s capacity to support life. (This objective will not apply to the lesson if Method #2 is not utilized.)
Learning Objectives:Students will be able to:
Identify • the presence of worm castings
Harvest • castings and replenish bedding materials using one of two methods
Length of Lesson:60 + minutes
6
Life Skill: Learning to Learn—Acquiring, Evaluating, and Using Information
Teaching & Learning Sequence:In this lesson, it is important for students to remember the proper composition of a worm bin. Explain how the castings that are excreted by worms following digestion contain nutrients that enrich the soil that plants grow in. In this manner, the worms are serving in the role of producers, since they are producing useful material for growing plants and enriching soil. After four to
six months, castings accumulate to a couple of inches deep in the bin and need to be harvested. If castings are left in the bin too long, they become uncomfortable for the worms.
Divide students into four or fi ve smaller groups and have them discuss these questions and report the results of the discussion once the class regroups.
Be sure to monitor each group for the participation of each student.
• What are castings made of?
• Why are castings helpful for plants?
• Why is it important to harvest, or remove, the castings from the worm bin on a regular basis?

27North Carolina State University | 4-H Vermicomposting
The method by which you will harvest the castings will
depend on whether you want to completely remove all of the contents of the worm bin all at
once. To remove castings all at once, use Method #2.
Method #2 will probably bemore useful if you are using the worm bin for only a portion of
the year and will need to share the materials
with another class.
If you wish to harvest the vermicompost in stages, use Method #1. Method #1 requires more time to complete, and will probably be better
for classes that will be hosting the worm bin throughout the school year.
Method #1:If you choose Method #1, place food
scraps on only one side of the worm bin for several weeks, causing most, if not
all, of the worms to move to that side of the bin. Then students may remove the
castings from the side that is vacant. Once one side of the bin has been harvested, add fresh bedding. Then students may
begin placing food scraps on this side of the bin for several weeks, prompting the worms to migrate over there. After most of the worms have migrated, harvest the
opposite side of the bin and replenish the bedding. Once both sides of the bin have
been harvested, food scraps can be added to both sides of the bin once again.
Although this method is less messy, it will require greater long-term planning to make sure both sides of the bin are replenished adequately.
Method #2:Carefully have your students empty the contents of the worm bin onto a plastic sheet or used shower curtain where there is strong sunlight or artifi cial light. While the students are waiting to begin harvesting the castings, clean the worm bin adequately and replenish the bedding. Wait at least 20 minutes, and then have the students scrape off the top layer of castings. The worms will continue to move away from the light, which allows students to scrape off an additional layer of castings every 15 minutes or so. After several rounds of scrapings, you will fi nd the worms in a cluster as they continue to avoid the light. Scoop up the worms and gently return them to the bin with fresh bedding.
While students are harvesting the castings, ask them to look for worm egg capsules. Worm egg capsules are lemon-shaped and about the size of a match head. They have a shiny appearance and are light brown in color. Each worm egg capsule will normally produce about three baby worms. Once the egg capsules have been located and examined, place them back inside the bin so they can hatch and thrive in the worm bin.
Lesson Development
Worm castings
Closure: When concluding this lesson, have students recount what they learned about the appearance of the castings they harvested, as well as the worm egg capsules they might have found. Have students describe their observations about how the worms behaved in the presence of bright light, and how this might affect their presence in different environments, such as in a rain forest, in a cold climate, or in a desert.
Evaluation:During the time that students are harvesting the castings, ask them these questions:
What do you like about this castings harvesting activity?
What part of this activity is the hardest to do?
What are you learning from this activity that you didn’t know before, or did not expect to learn?
How are the observations that you are making during this activity similar to or different from your previous experience with worms?
How does observing the behavior of worms help you better understand the behavior of other animals?
Wor
ms i
n layers o
f a compost bin

28North Carolina State University | 4-H Vermicomposting
Acarina: subclass of the arthropod class Arachnida that includes the mite and tick
Anecic (an-EE-sik): an earthworm known for burying leaf litter in the soil and pulling it into underground burrows for consumption
Anus: where waste is excreted from the worm
Castings: excreted end product of organic matter passing through the digestive system of the worm
Clitellum: located near the front of the worm; the worm’s genitalia is located here
Decompose: to rot; putrefy
Drosophilidac: a diverse, cosmopolitan family of fl ies, including fruit fl ies, vinegar fl ies, wine fl ies, pomace fl ies, and grape fl ies
Enchytraeid: Enchytraeid worms are smaller than earthworms. The highest populations are found in acid soils, but the numbers are not uniformly distributed. They are sensitive to drought and do not tolerate desiccation. Enchytraeid feed on bacteria and fungi. They have no enzymes for digesting complex polysaccharides and thus do not digest the organic matter they ingest.
Endogeic (en-do-JEE-ik): an earthworm that primarily feeds on soil and plant roots
Epigeic (ep-i-JEE-ik): an earthworm that lives primarily in leaf litter on the soil’s surface and feeds on surrounding plant debris
Isopod: Isopods are omnivores or scavengers feeding on dead or decaying plants or animals. Some may eat live plants. Isopods breathe with gills, so they are restricted to areas with high humidity, under rocks or logs, in leaf litter, or in crevices. Some species are nocturnal. Some species roll up into a ball when disturbed. They are commonly known as sowbugs or pillbugs.
Mouth: where the worm ingests food
Nutrients: Substances that provide nourishment for growth or metabolism. Plants absorb nutrients mainly from the soil in the form of minerals and other inorganic compounds, and animals obtain nutrients from ingested foods.
Organic: characteristic of, pertaining to, or derived from living organisms
Segments: the areas of the worm’s outer body that bend and stretch and aid in movement
Setae: stiff hairs on the exterior of the worm that serve as feelers or sensory aids
Soil structure: Determined by how individual soil granules clump or bind together
Species: A class of individuals having some common characteristics or qualities; distinct sort or kind
Vermicomposting Glossary
E08-503264H-16-14PW
Distributed in furtherance of the acts of Congress of May 8 and June 30, 1914. North Carolina State University and North Carolina A&T State University commit themselves to positive action to secure equal opportunity regardless of race, color, creed, national origin, religion, sex, age, veteran’s status, or disability. In addition, the two Universities welcome all persons without regard to sexual orientation. North Carolina State University, North Carolina A&T State University, U.S. Department of Agriculture, and local governments cooperating.
CreditsPrepared by: Rhonda Sherman, Extension Solid Waste Specialist, Biological & Agricultural Engineering, North Carolina State UniversityRebecca Liverman, Extension 4-H Agent, Washington County, North CarolinaDr. Ed Maxa, Associate Professor and Extension Curriculum Specialist, 4-H Youth Development and Family & Consumer Sciences, North Carolina State University
Graphic Layout:Imp Designs, Raleigh, North Carolina