ver. english upad user guide - 新技教育 · start itunes on your computer and connect your ipad...
TRANSCRIPT
UPAD USER GUIDEVer. English
Copyright (C) 2010 Pockeysoft. All rights reserved.
Contents
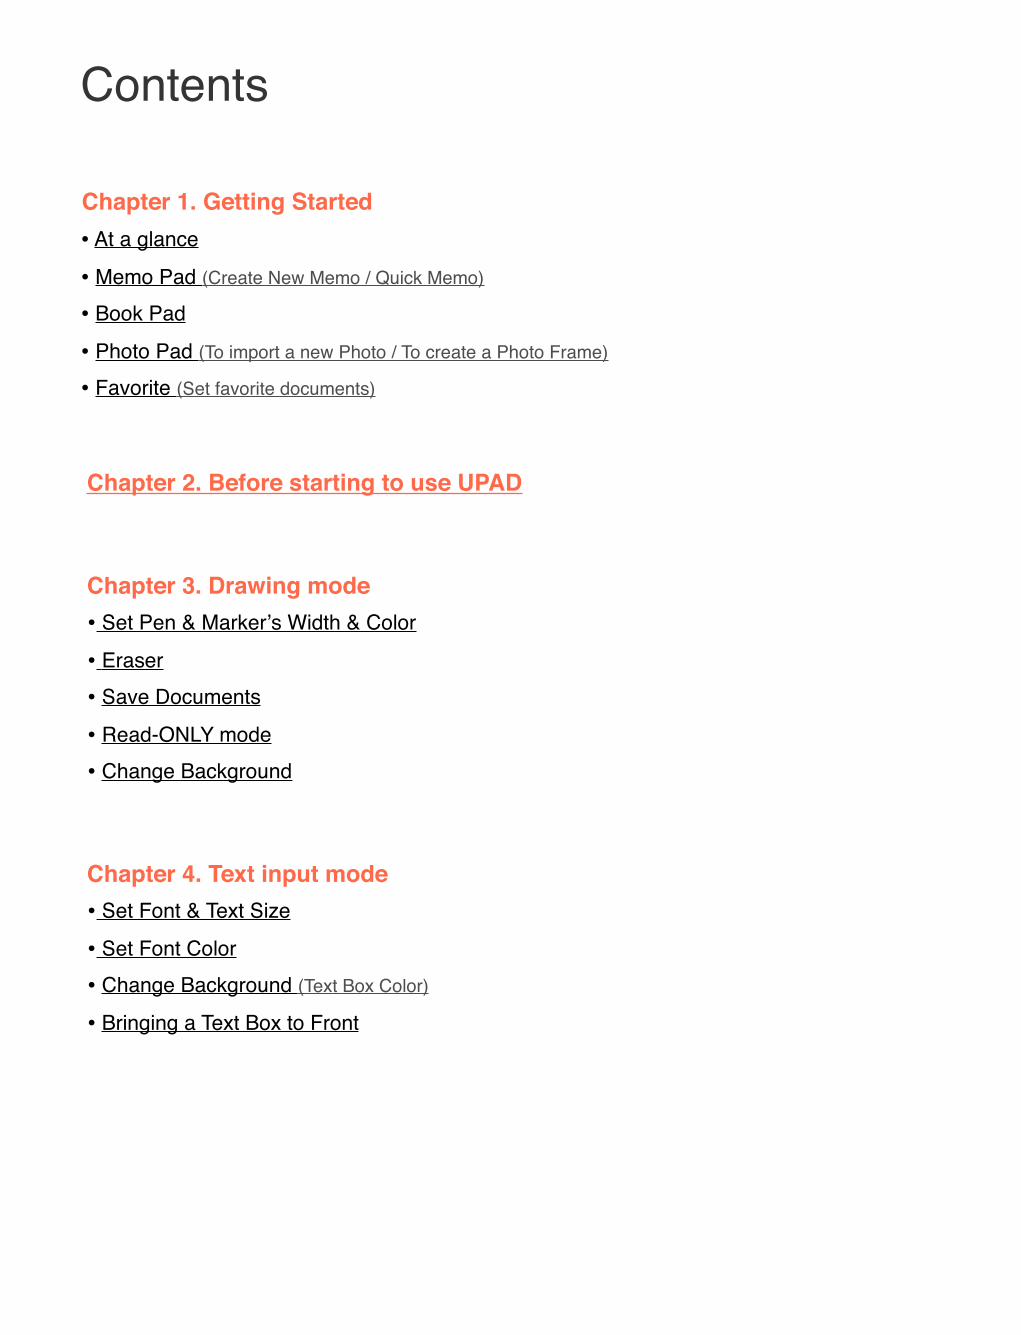
Chapter 1. Getting Started• At a glance
• Memo Pad (Create New Memo / Quick Memo)
• Book Pad
• Photo Pad (To import a new Photo / To create a Photo Frame)
• Favorite (Set favorite documents)
Chapter 2. Before starting to use UPAD
• Set Pen & Markerʼs Width & Color
• Eraser
• Save Documents
• Read-ONLY mode
• Change Background
Chapter 3. Drawing mode
• Set Font & Text Size
• Set Font Color
• Change Background (Text Box Color)
• Bringing a Text Box to Front
Chapter 4. Text input mode
Chapter 5. Add Images• Add a new Image
• Rotate
• Scale
• Photo Frame
• Image Mask
• Bring to Front
• Transparency
Chapter 6. Magnifying input Window & Palm-rest• Magnifying input Window
• Palm-rest
Chapter 7. Password• Set Document Password / Unlock password
• Set Folder Password / Unlock password
Chapter 8. Export• Export to PDF / Upload to DropBox or Google Docs
• Export to E-mail
• Export to Photo Album
• Upload to Twitter / Setup Twitter account
• Upload to Facebook / Setup Facebook account
Chapter 10. Grid• Set Grid
Chapter 9. Mirroring•VGA OUT
Chapter 12. Bookmark• Add Bookmark
• Bookmark Page Preview
Chapter 11. Ruler• Draw Figure
• Ruler Grid Set
• Erase a Select Area
Chapter 13. Edit Pages• Edit Pages
• Insert a Page
• Move a Page
• Copy Page
• Delete Page
Chapter 14. Import PDF document• Import PDF Document From E-mail
• Import PDF Document From iTunes
Chapter 15. Backup & Restore• Backup
• Restore
• Backup file Management (iTunes)
• Backup file Management (E-Mail)
Chapter 16. Contact Us
• Contact us
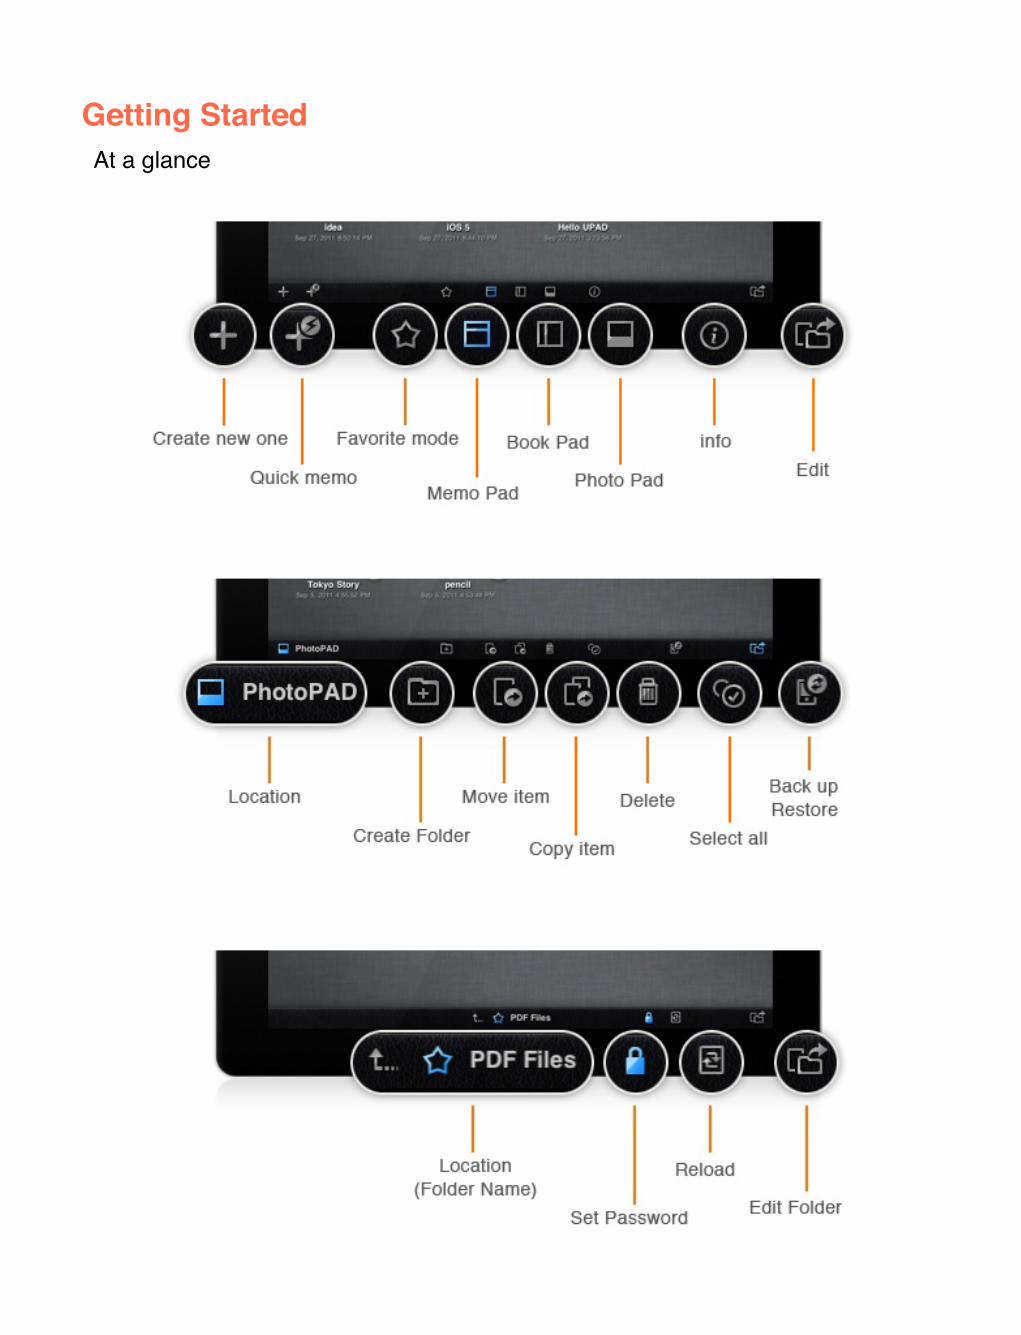
Getting StartedAt a glance

1. Select MemoPAD mode.2. Tap “+” icon to launch template selection window.
3. Choose a template to use. Swipe left and right to see more templates.
Quick Memo
This mode let you start to take a quick memo on the last template you chose.1. Select MemoPAD mode.
2. Tap Quick Memo icon.
Memo PadCreating a New Memo
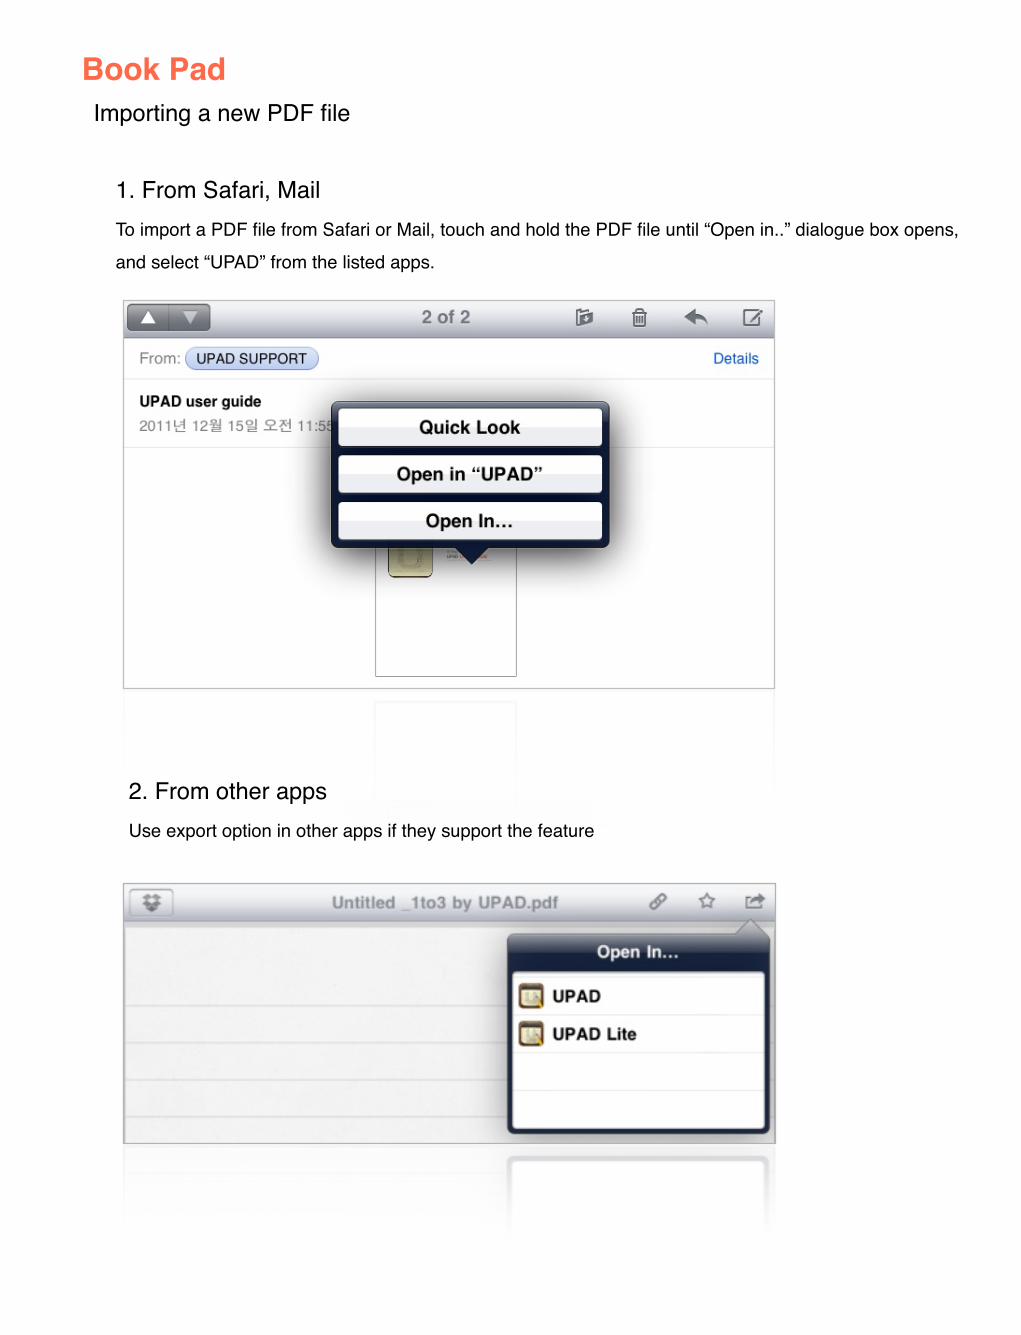
1. From Safari, Mail To import a PDF file from Safari or Mail, touch and hold the PDF file until “Open in..” dialogue box opens, and select “UPAD” from the listed apps.
Book PadImporting a new PDF file
2. From other apps Use export option in other apps if they support the feature
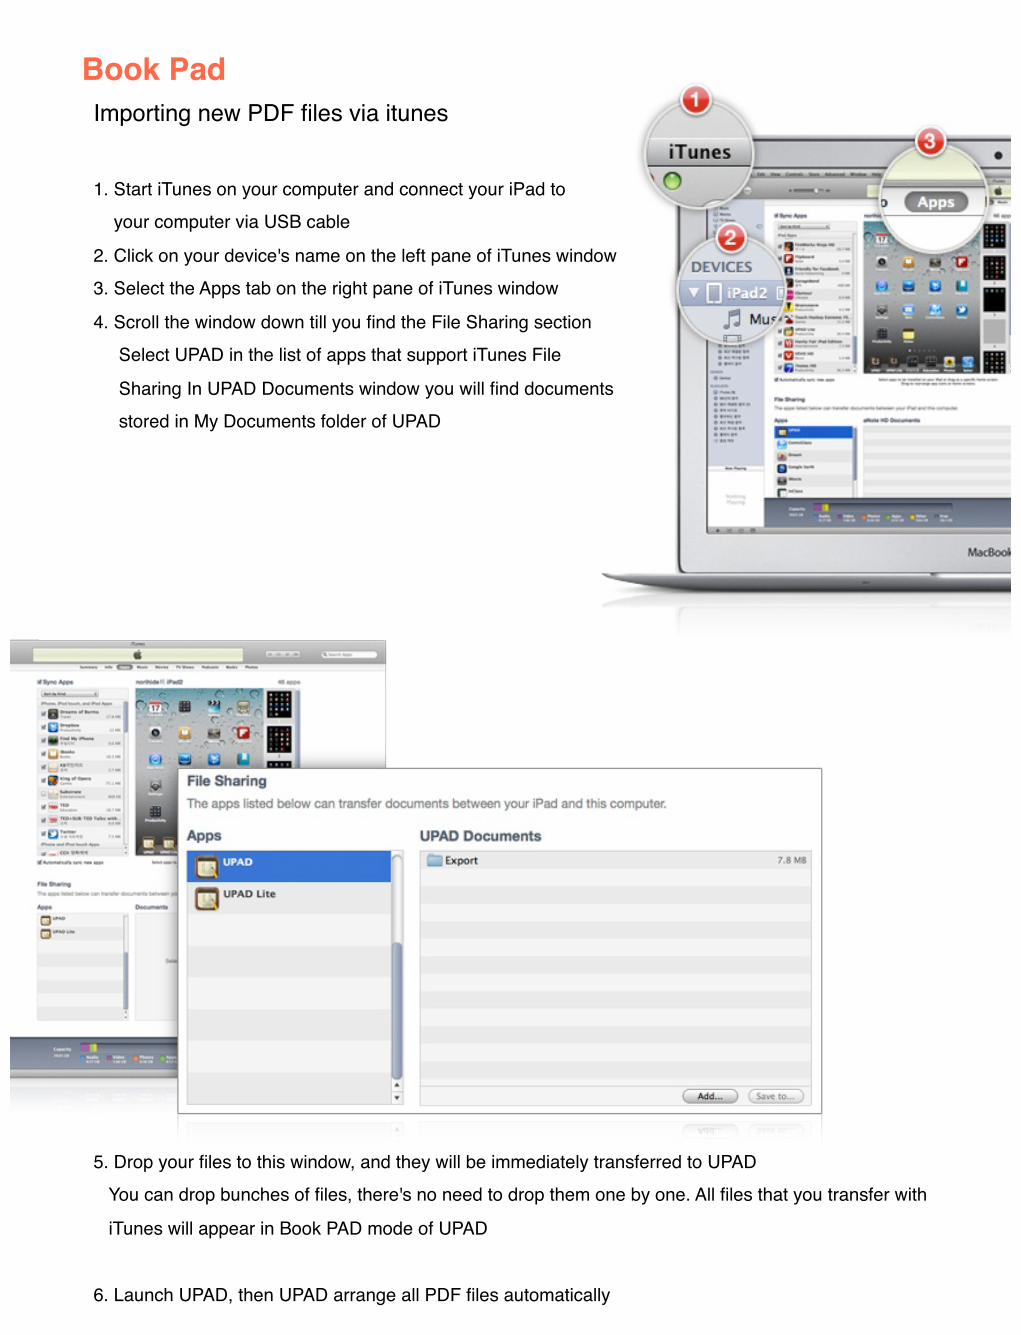
1. Start iTunes on your computer and connect your iPad to your computer via USB cable
2. Click on your device's name on the left pane of iTunes window3. Select the Apps tab on the right pane of iTunes window
4. Scroll the window down till you find the File Sharing section Select UPAD in the list of apps that support iTunes File
Sharing In UPAD Documents window you will find documents stored in My Documents folder of UPAD
5. Drop your files to this window, and they will be immediately transferred to UPAD You can drop bunches of files, there's no need to drop them one by one. All files that you transfer with
iTunes will appear in Book PAD mode of UPAD
6. Launch UPAD, then UPAD arrange all PDF files automatically
Book PadImporting new PDF files via itunes
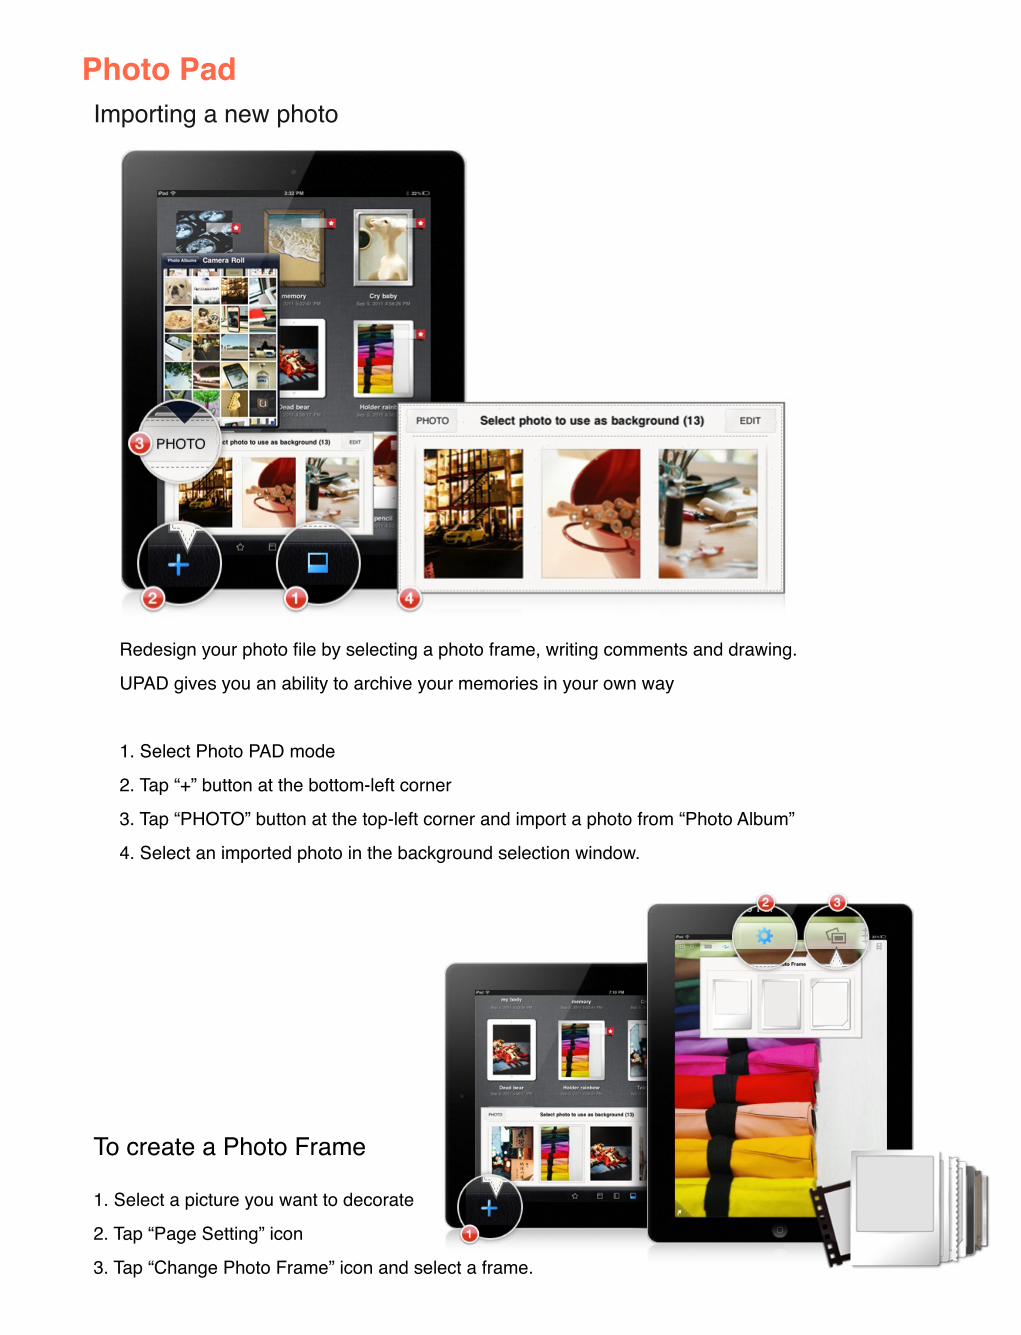
Redesign your photo file by selecting a photo frame, writing comments and drawing.
UPAD gives you an ability to archive your memories in your own way
1. Select Photo PAD mode
2. Tap “+” button at the bottom-left corner
3. Tap “PHOTO” button at the top-left corner and import a photo from “Photo Album”
4. Select an imported photo in the background selection window.
1. Select a picture you want to decorate
2. Tap “Page Setting” icon
3. Tap “Change Photo Frame” icon and select a frame.
To create a Photo Frame
Photo PadImporting a new photo
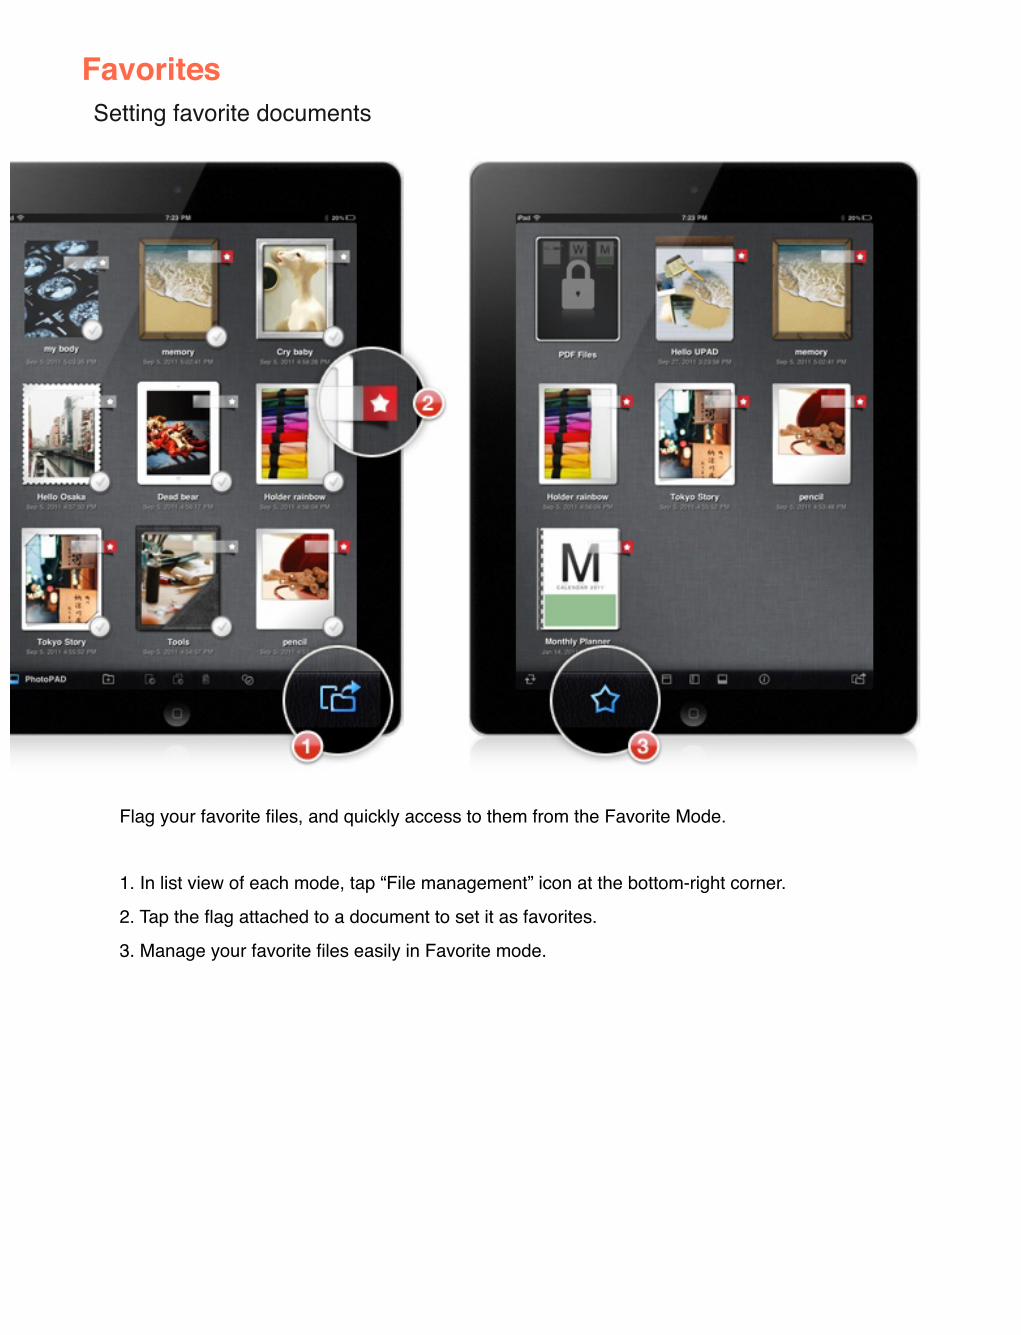
Flag your favorite files, and quickly access to them from the Favorite Mode.
1. In list view of each mode, tap “File management” icon at the bottom-right corner.
2. Tap the flag attached to a document to set it as favorites.
3. Manage your favorite files easily in Favorite mode.
FavoritesSetting favorite documents
Important notice before using UPAD!!
Backing up UPAD dataIt is highly recommended to back up UPAD data regularly to secure your valuable contents. Use UPAD backup feature to make backups before updating UPAD or iOS.
( WARNING : Normal iTunes sync or backup does not back up UPAD data. It only transfers UPAD app,
not data saved in UPAD.)
�������������� ����������������������������
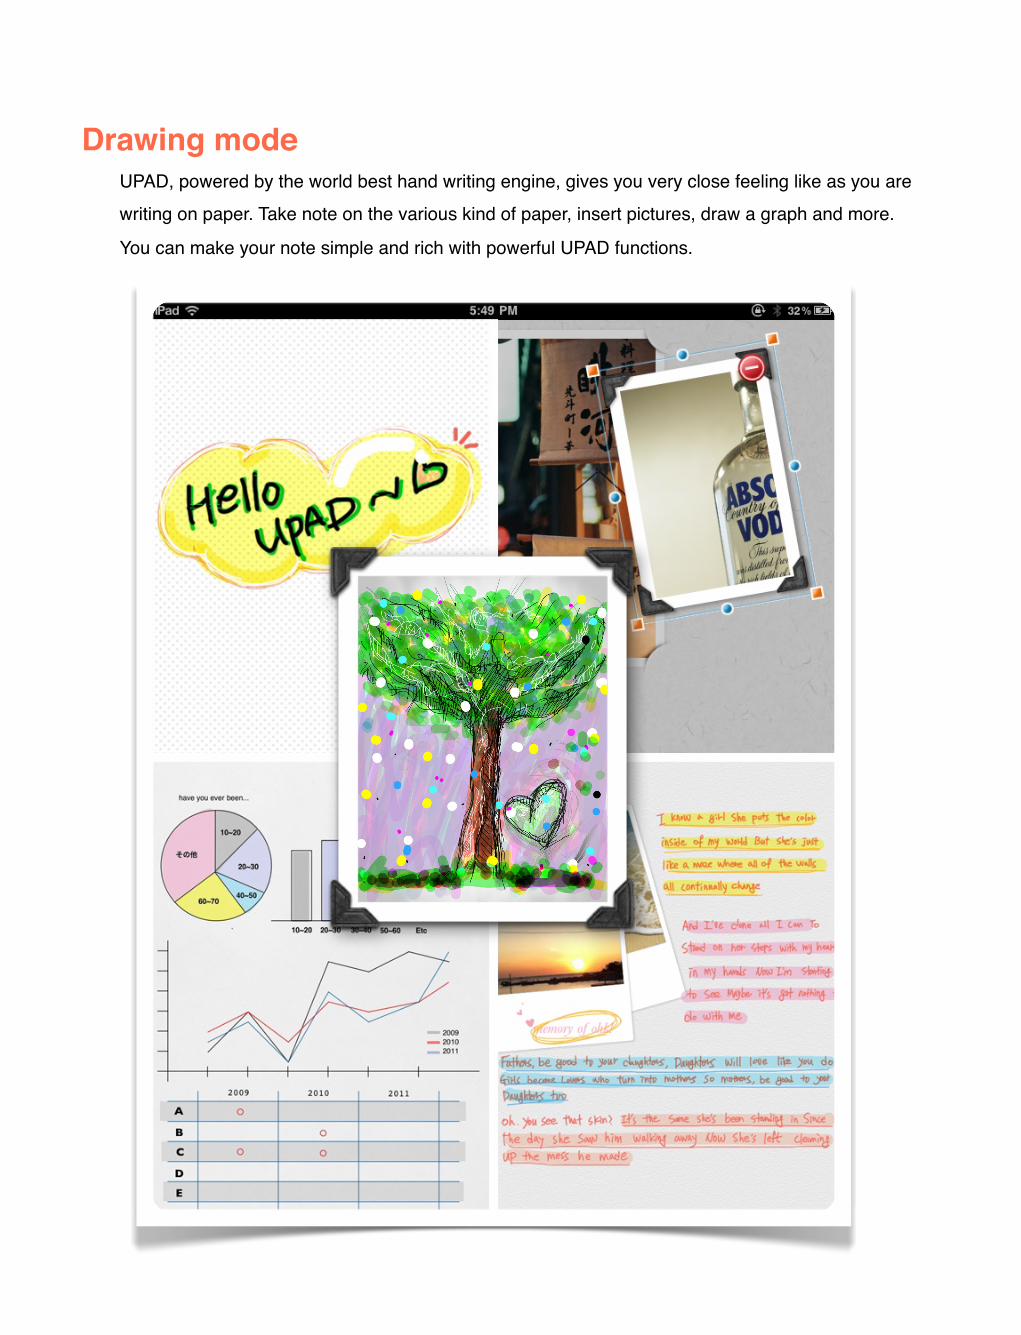
Drawing modeUPAD, powered by the world best hand writing engine, gives you very close feeling like as you are writing on paper. Take note on the various kind of paper, insert pictures, draw a graph and more.
You can make your note simple and rich with powerful UPAD functions.
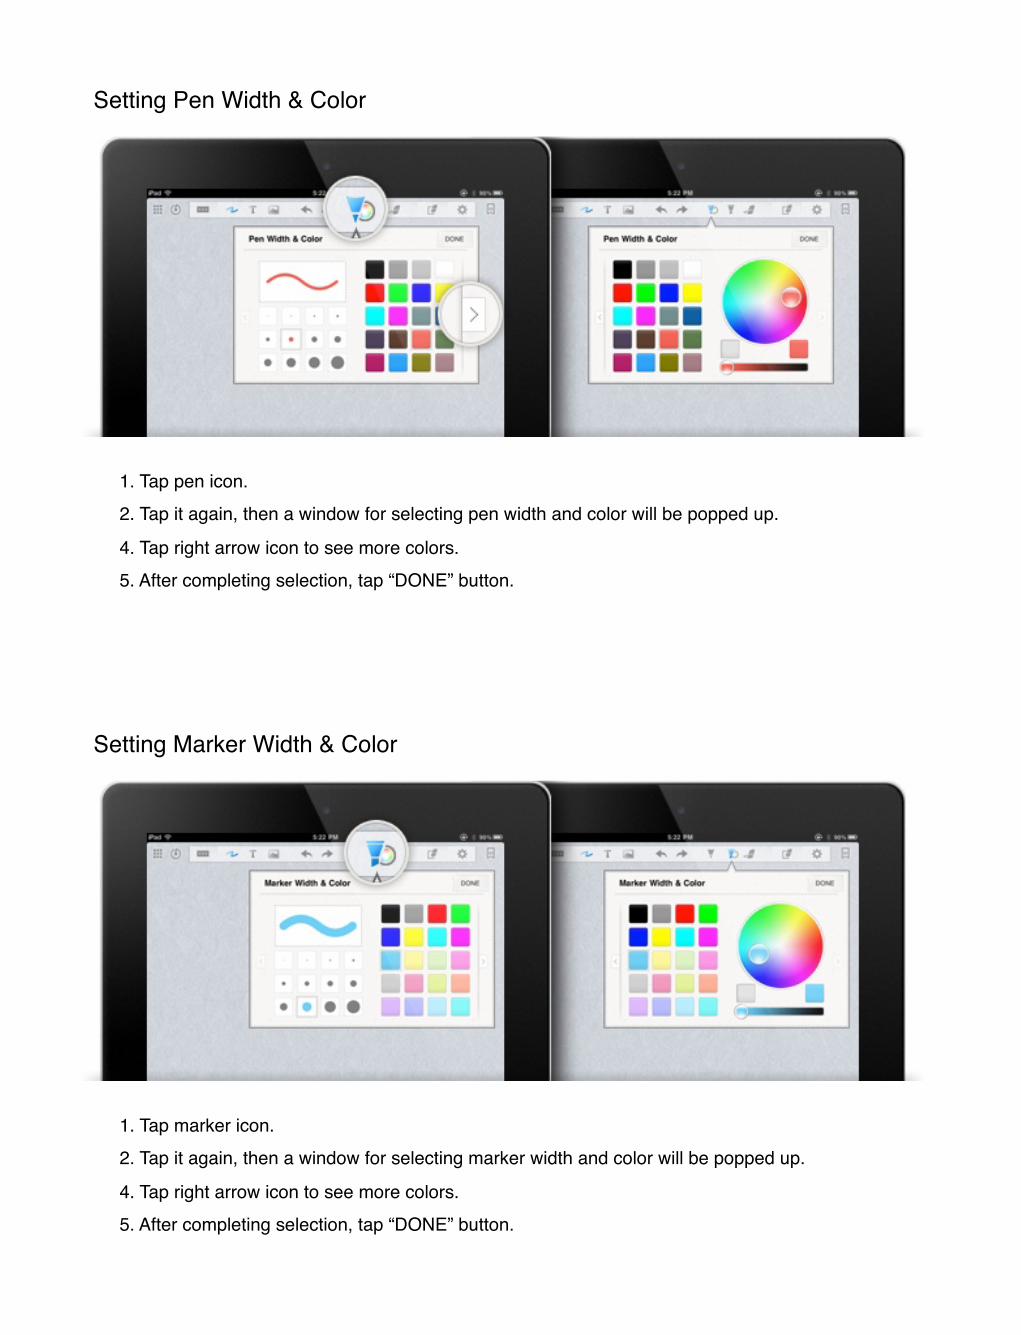
Setting Pen Width & Color
1. Tap pen icon.2. Tap it again, then a window for selecting pen width and color will be popped up.
4. Tap right arrow icon to see more colors. 5. After completing selection, tap “DONE” button.
Setting Marker Width & Color
1. Tap marker icon.2. Tap it again, then a window for selecting marker width and color will be popped up.
4. Tap right arrow icon to see more colors. 5. After completing selection, tap “DONE” button.

Stroke Eraser
This eraser lets you delete the contents easily. It erases the strokes at once followed by its movement.
Erase All
Clear all contents at once, including drawing notes, pictures and typed text boxes. (Undo is possible to revert this action.)

Saving Documents
UPAD supports auto-saving but you can save your data manually whenever you want to. Use this function to ensure your data more safely.
Read-ONLY mode
Tap the icon and set a document as ready only. Hide all input menu and just read your note. Flick left or right with a finger to turn pages.
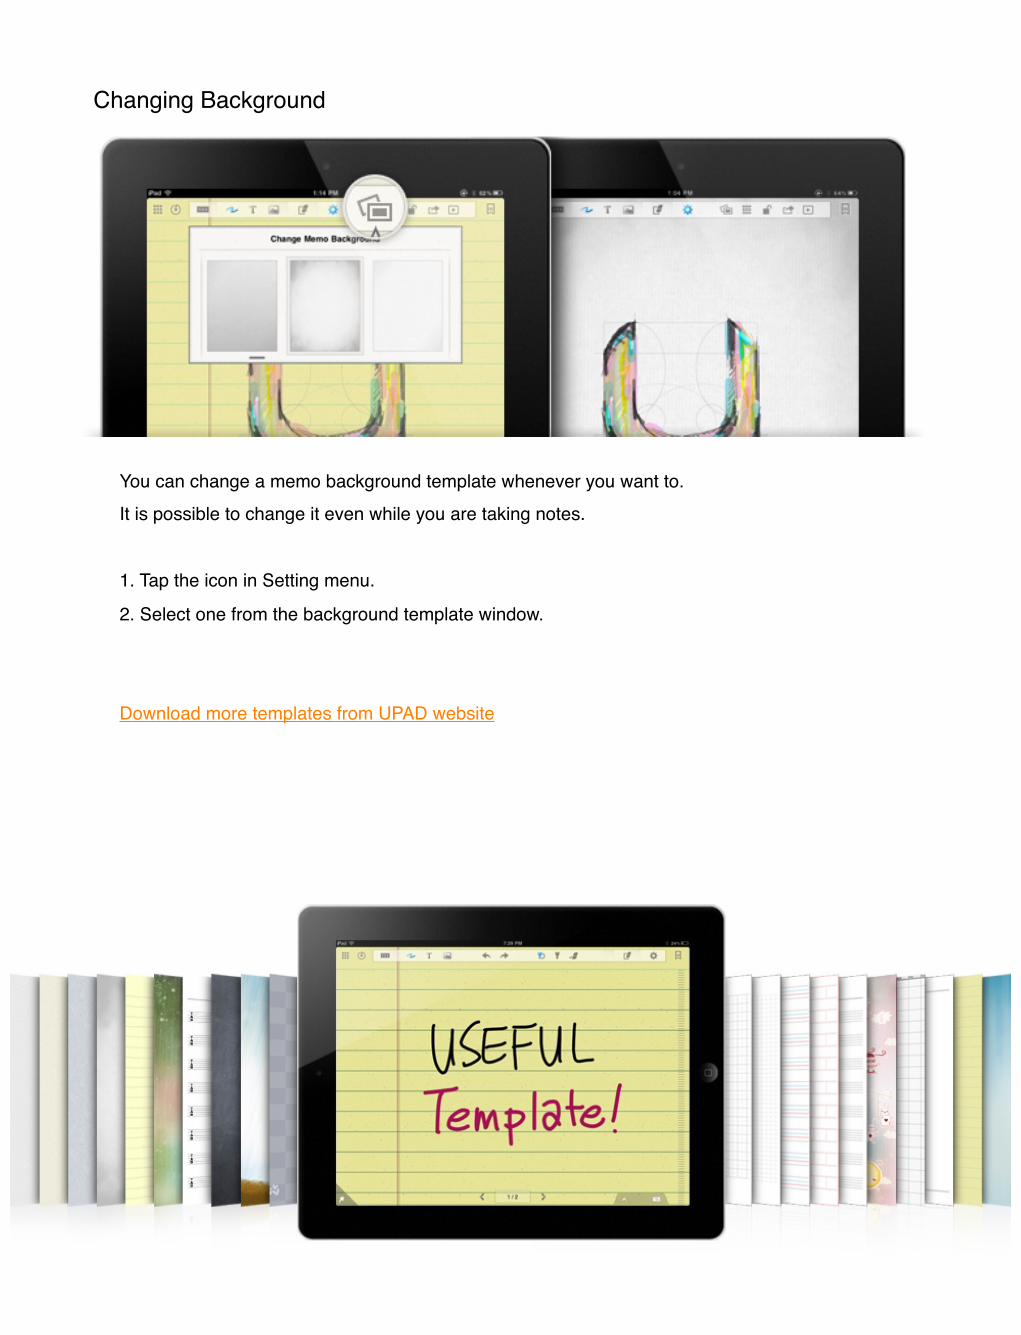
Changing Background
You can change a memo background template whenever you want to. It is possible to change it even while you are taking notes.
1. Tap the icon in Setting menu.
2. Select one from the background template window.
Download more templates from UPAD website
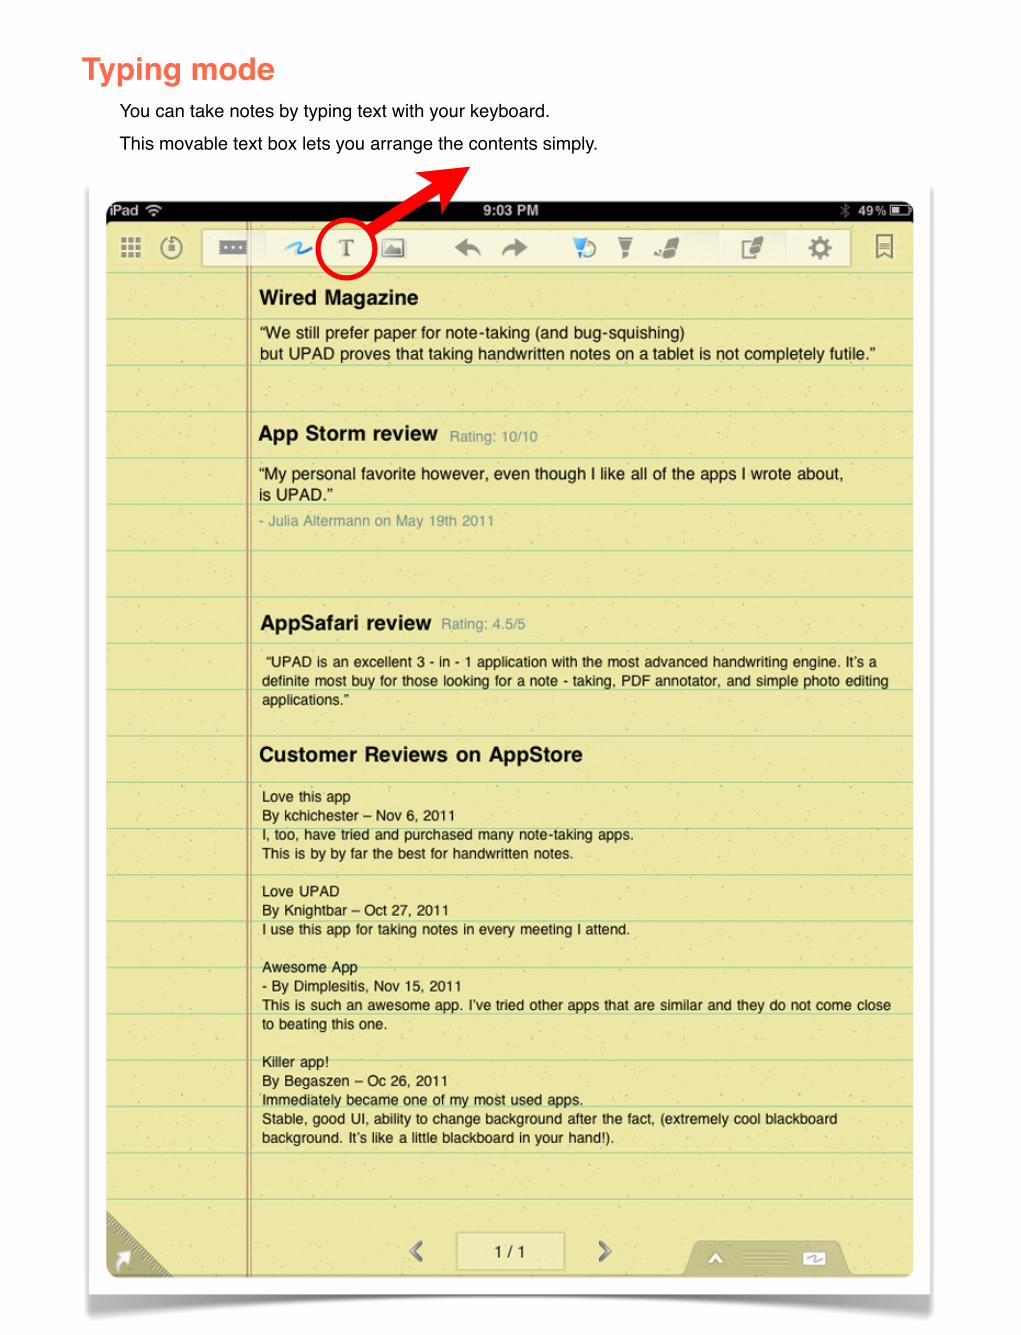
Typing modeYou can take notes by typing text with your keyboard. This movable text box lets you arrange the contents simply.
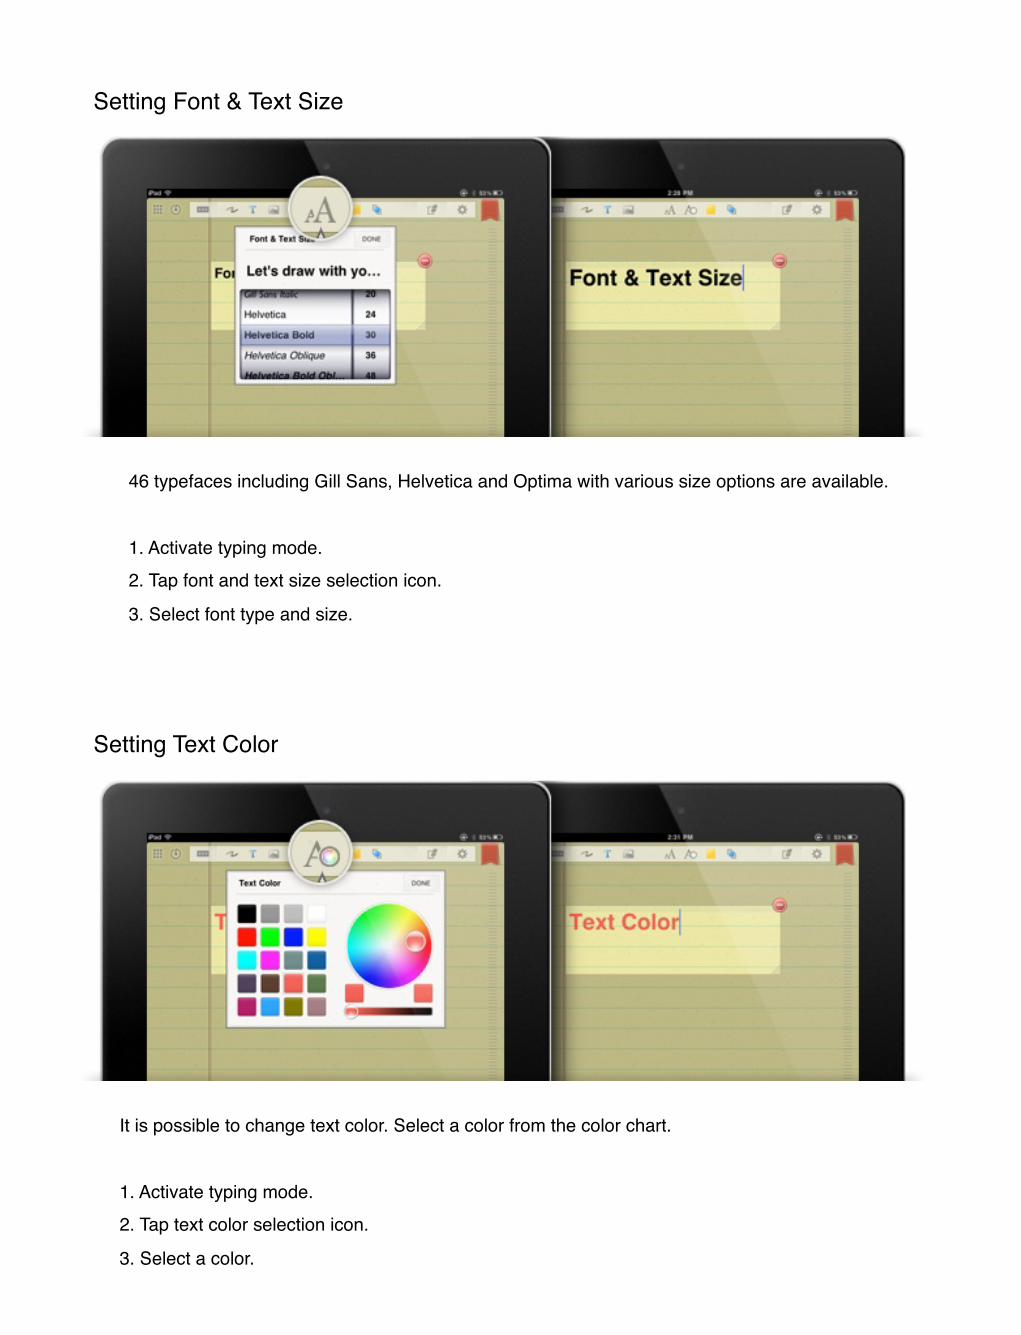
Setting Font & Text Size
46 typefaces including Gill Sans, Helvetica and Optima with various size options are available.
1. Activate typing mode.2. Tap font and text size selection icon.
3. Select font type and size.
Setting Text Color
It is possible to change text color. Select a color from the color chart.
1. Activate typing mode.2. Tap text color selection icon.
3. Select a color.
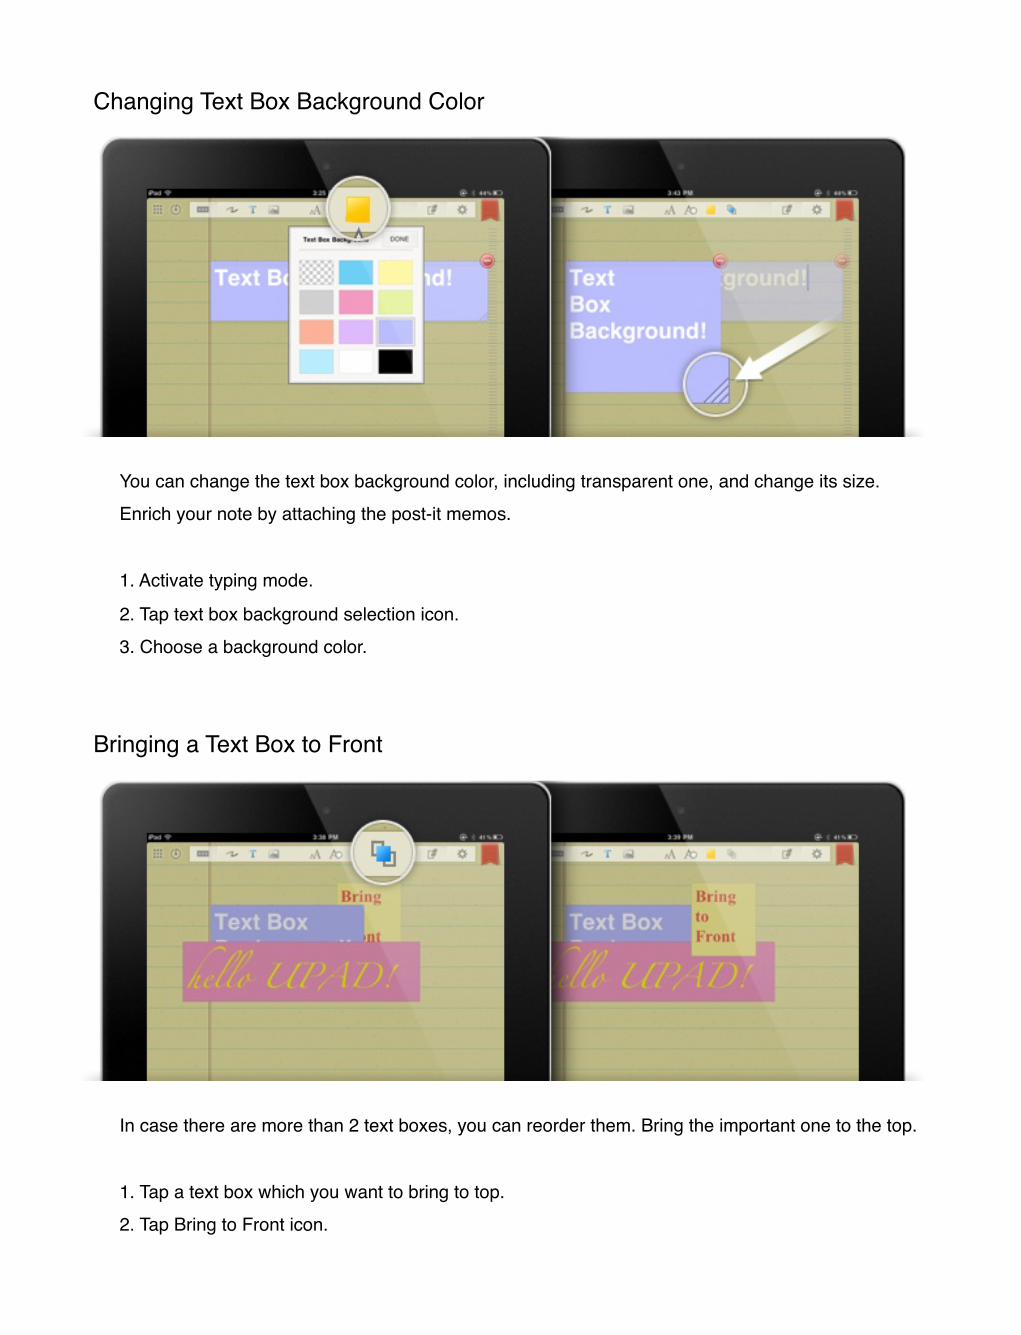
Changing Text Box Background Color
You can change the text box background color, including transparent one, and change its size. Enrich your note by attaching the post-it memos.
1. Activate typing mode.
2. Tap text box background selection icon. 3. Choose a background color.
Bringing a Text Box to Front
In case there are more than 2 text boxes, you can reorder them. Bring the important one to the top.
1. Tap a text box which you want to bring to top.2. Tap Bring to Front icon.
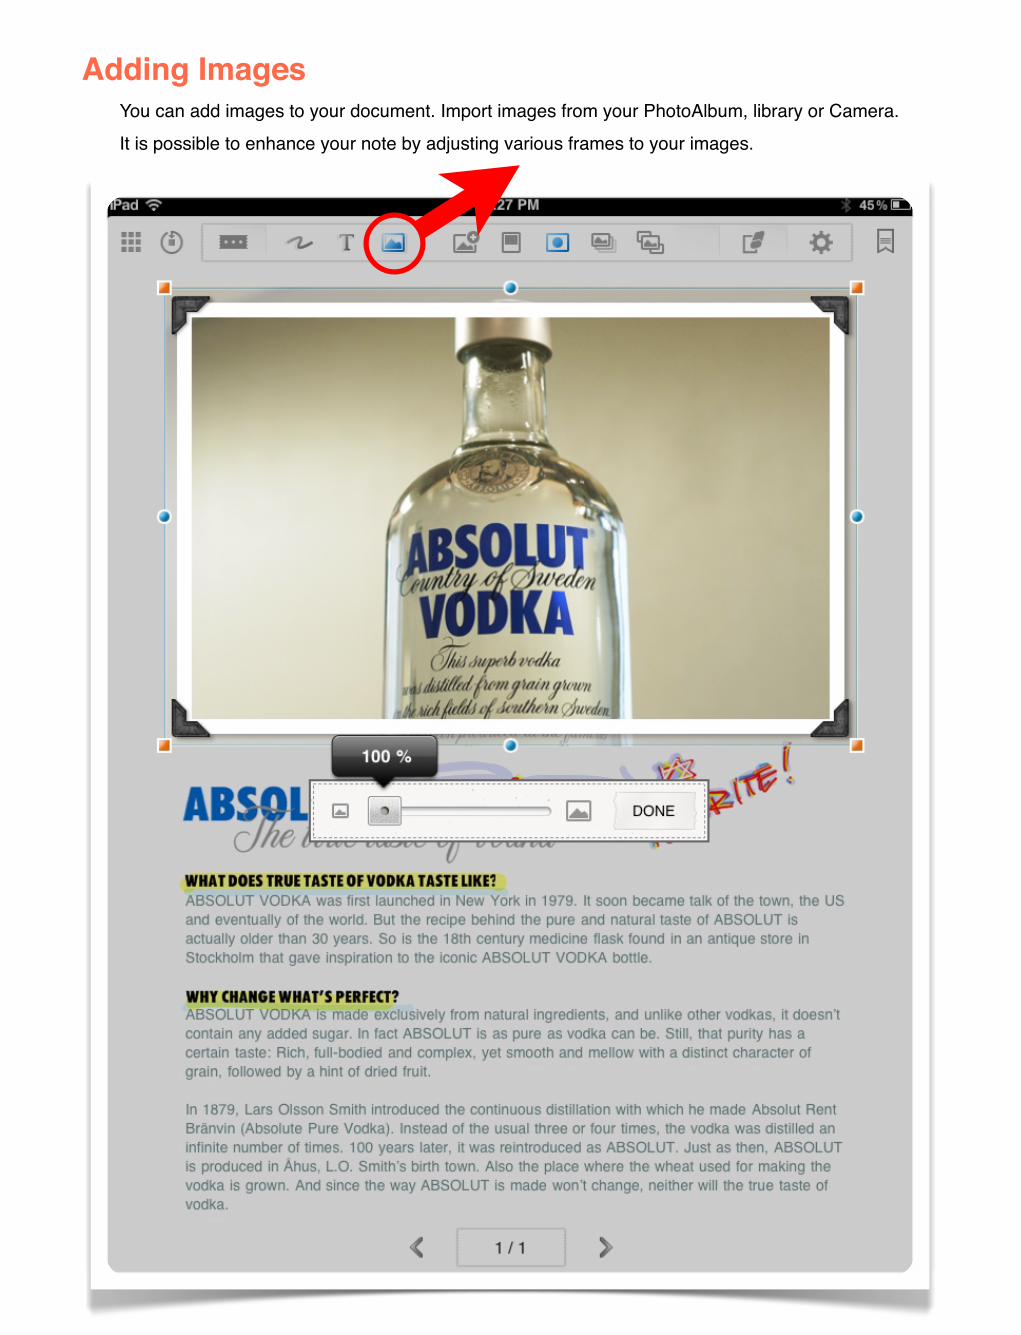
Adding ImagesYou can add images to your document. Import images from your PhotoAlbum, library or Camera. It is possible to enhance your note by adjusting various frames to your images.
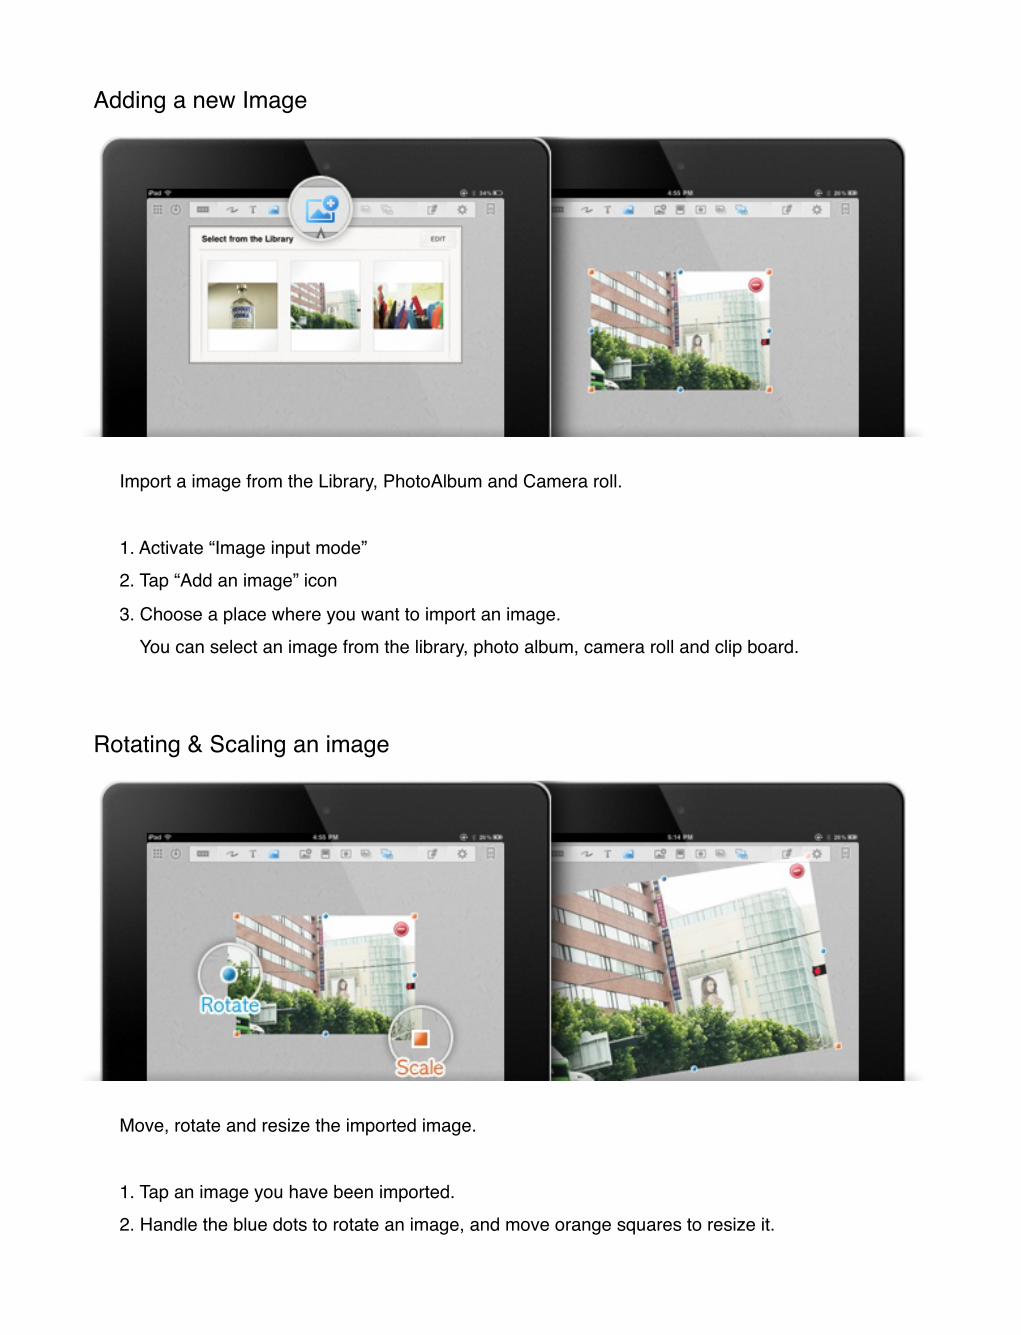
Import a image from the Library, PhotoAlbum and Camera roll.
1. Activate “Image input mode” 2. Tap “Add an image” icon
3. Choose a place where you want to import an image. You can select an image from the library, photo album, camera roll and clip board.
Adding a new Image
Rotating & Scaling an image
Move, rotate and resize the imported image.
1. Tap an image you have been imported. 2. Handle the blue dots to rotate an image, and move orange squares to resize it.

Decorate an image by adjusting 10 kinds of photo frames.
1. Tap an image you want to adjust photo frame.2. Tap “Photo Frame” icon.
Changing Photo Frame
Image Mask
Select a particular part of the image as you want and make it more special.
1. Tap an image you want to adjust photo frame.2. Tap “Image Mask” icon.
3. Control the frame and set mask location and size.
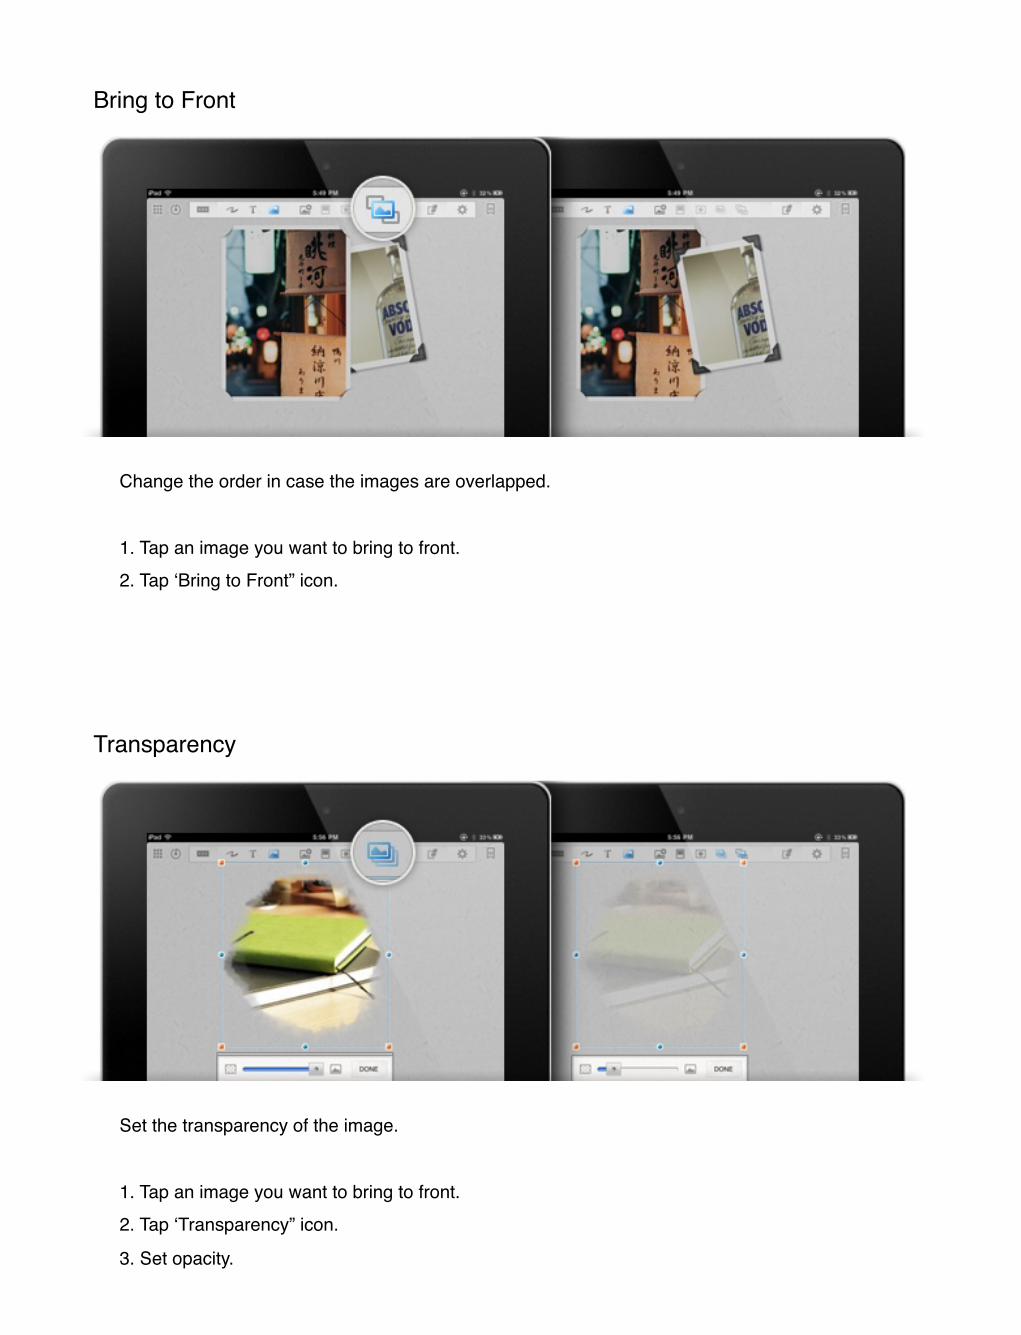
Change the order in case the images are overlapped.
1. Tap an image you want to bring to front. 2. Tap ʻBring to Front” icon.
Bring to Front
Transparency
Set the transparency of the image.
1. Tap an image you want to bring to front. 2. Tap ʻTransparency” icon.
3. Set opacity.

Magnifying input Window & Palm-restMagnifying input window helps you to write precise note with your finger and stylus. Palm-rest allows you to take notes without any interruption of the unwanted static of your palm. Rest your wrist on the screen and unleash your ideas on UPAD screen
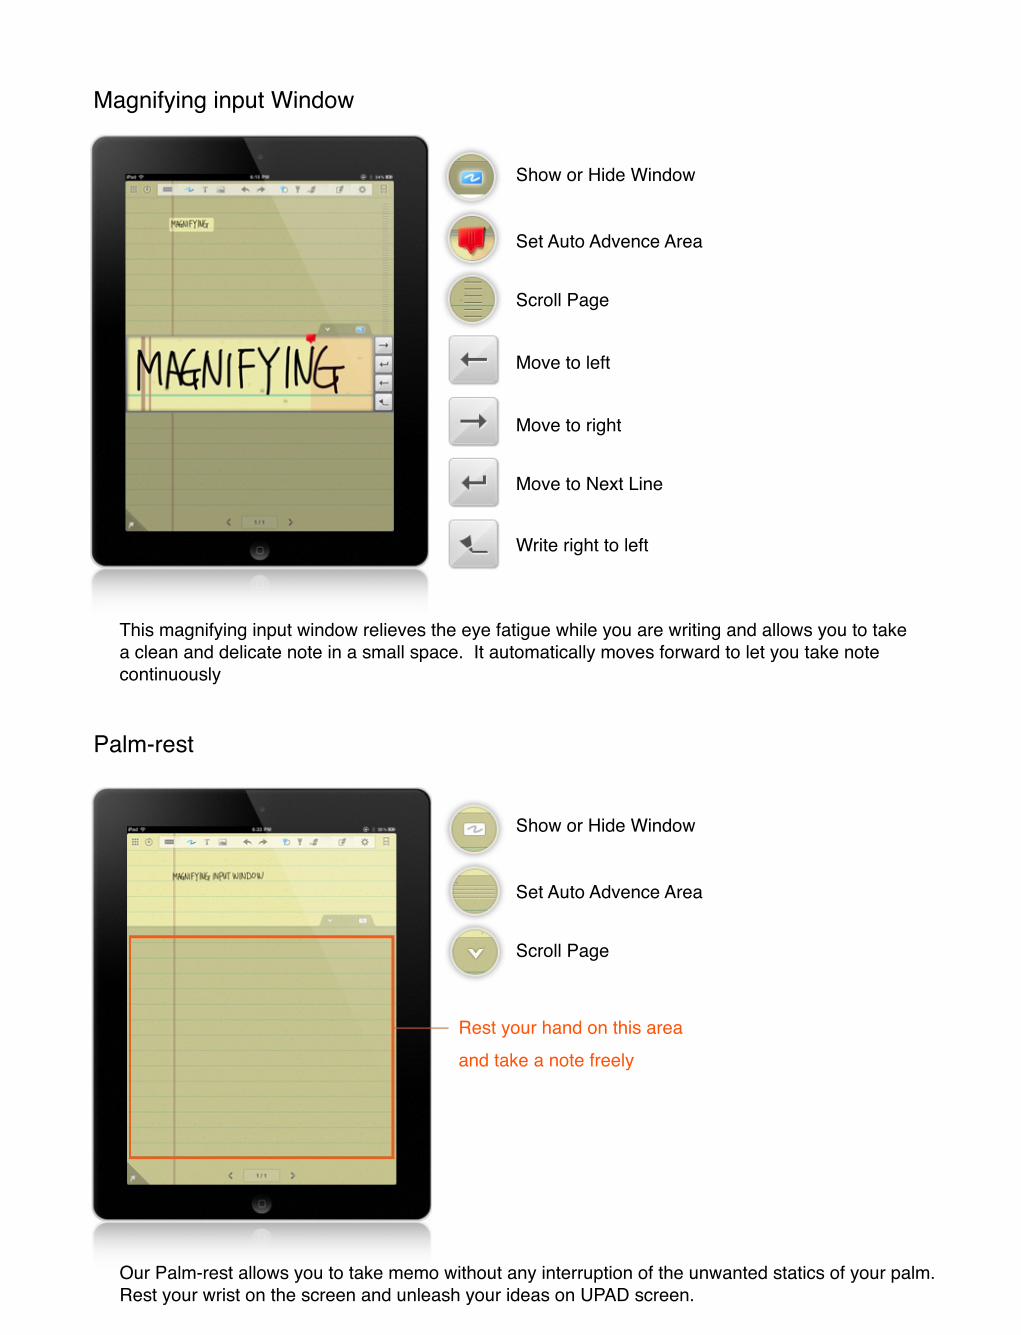
Magnifying input Window
This magnifying input window relieves the eye fatigue while you are writing and allows you to take a clean and delicate note in a small space. It automatically moves forward to let you take note continuously
Show or Hide Window
Set Auto Advence Area
Scroll Page
Move to left
Move to right
Move to Next Line
Write right to left
Our Palm-rest allows you to take memo without any interruption of the unwanted statics of your palm. Rest your wrist on the screen and unleash your ideas on UPAD screen.
Show or Hide Window
Set Auto Advence Area
Scroll Page
Palm-rest
Rest your hand on this area and take a note freely
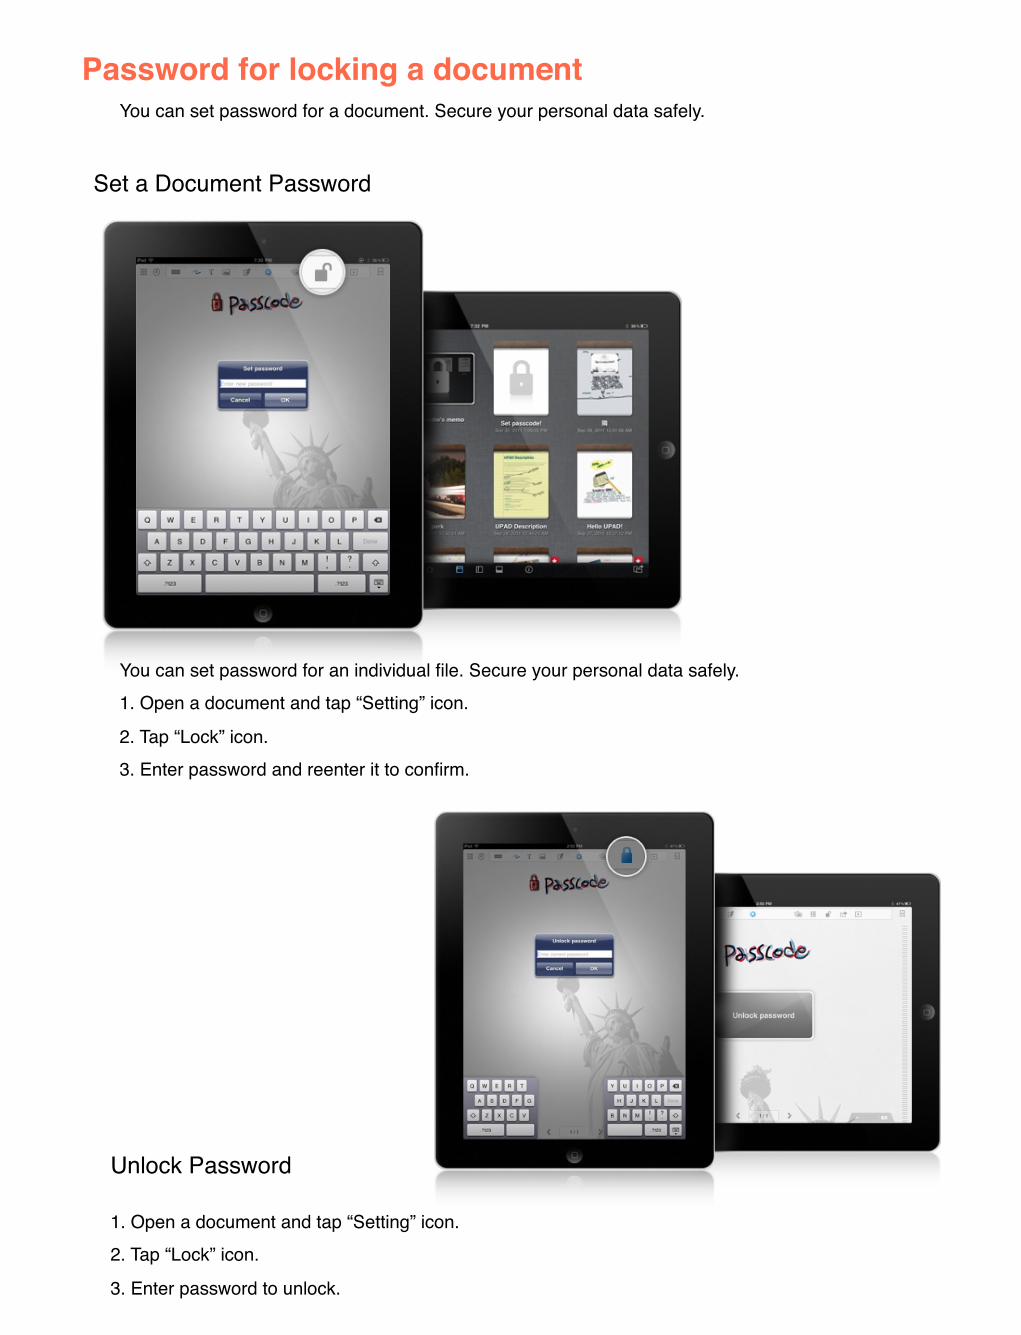
1. Open a document and tap “Setting” icon. 2. Tap “Lock” icon.
3. Enter password to unlock.
Password for locking a documentYou can set password for a document. Secure your personal data safely.
Set a Document Password
You can set password for an individual file. Secure your personal data safely.1. Open a document and tap “Setting” icon.
2. Tap “Lock” icon. 3. Enter password and reenter it to confirm.
Unlock Password
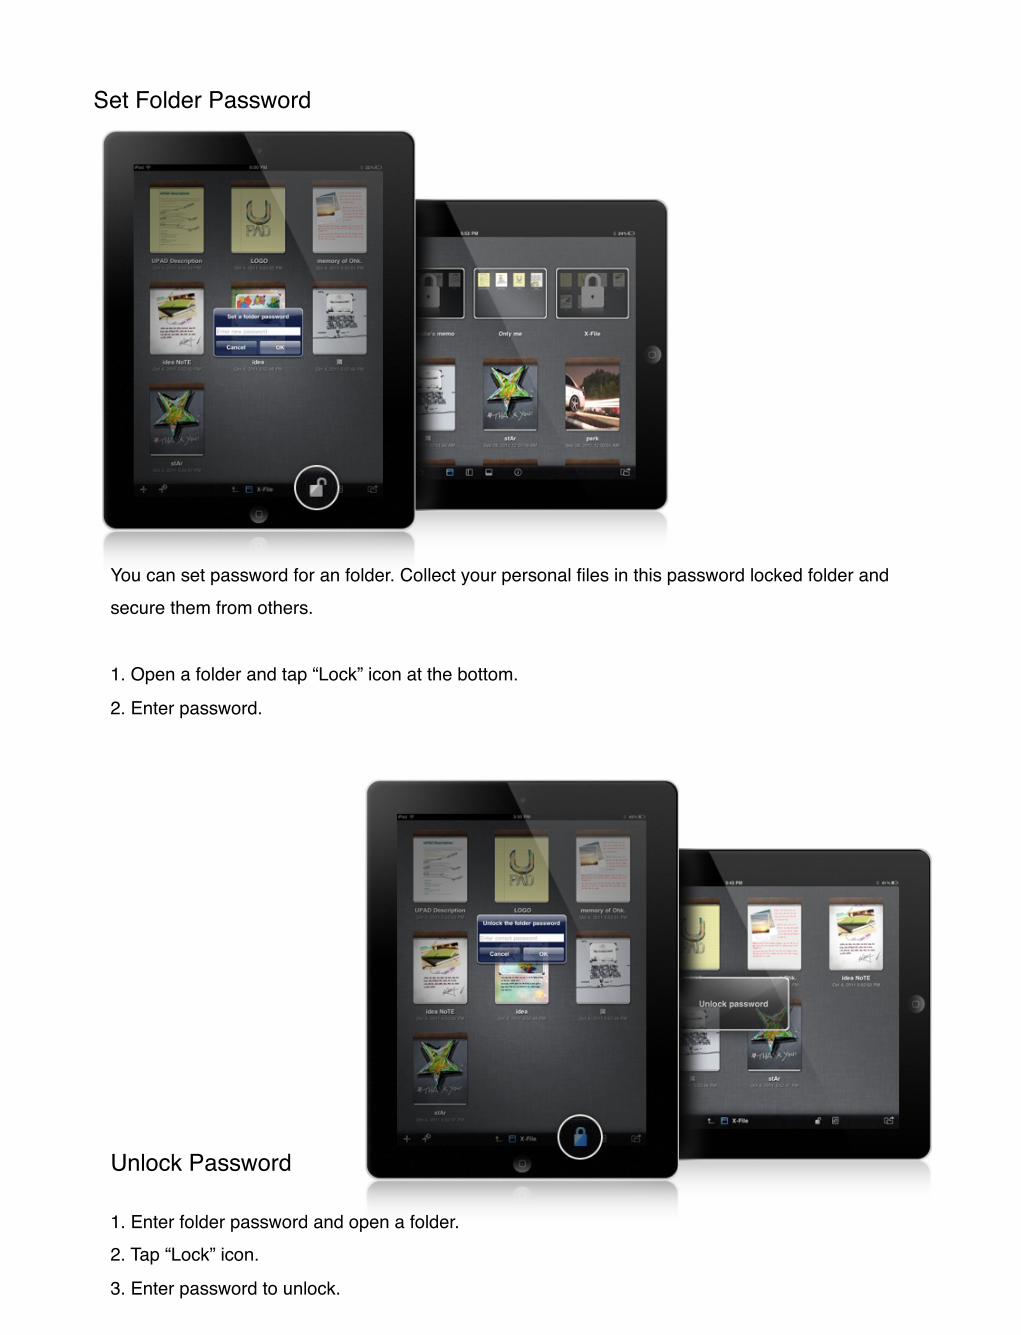
You can set password for an folder. Collect your personal files in this password locked folder and secure them from others.
1. Open a folder and tap “Lock” icon at the bottom.
2. Enter password.
Set Folder Password
Unlock Password
1. Enter folder password and open a folder. 2. Tap “Lock” icon.
3. Enter password to unlock.
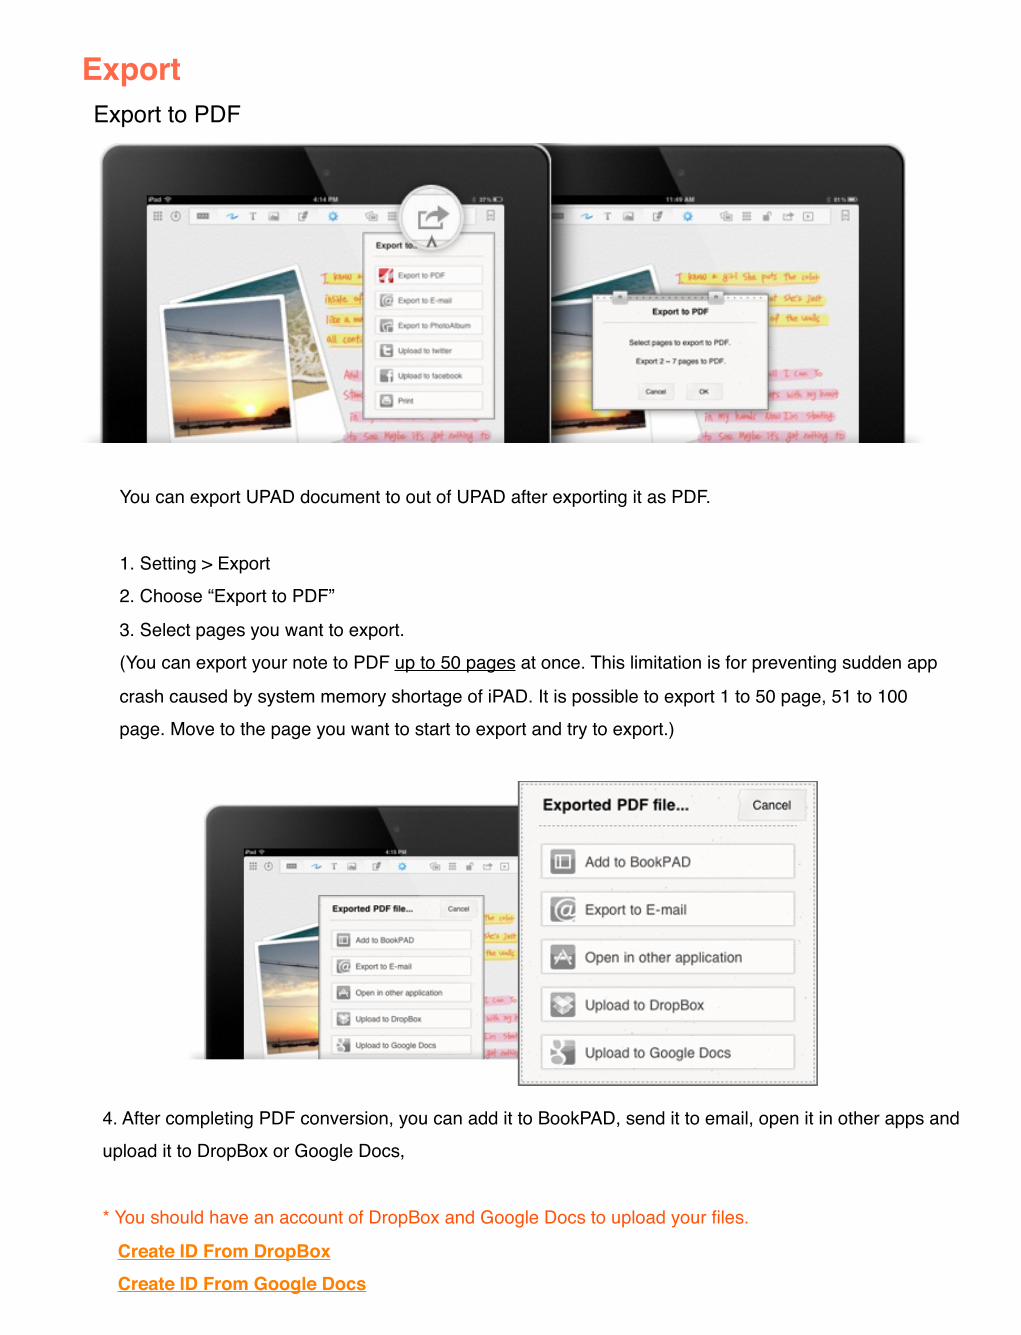
ExportExport to PDF
You can export UPAD document to out of UPAD after exporting it as PDF.
1. Setting > Export 2. Choose “Export to PDF”
3. Select pages you want to export. (You can export your note to PDF up to 50 pages at once. This limitation is for preventing sudden app
crash caused by system memory shortage of iPAD. It is possible to export 1 to 50 page, 51 to 100 page. Move to the page you want to start to export and try to export.)
4. After completing PDF conversion, you can add it to BookPAD, send it to email, open it in other apps and upload it to DropBox or Google Docs,
* You should have an account of DropBox and Google Docs to upload your files.
Create ID From DropBox
Create ID From Google Docs
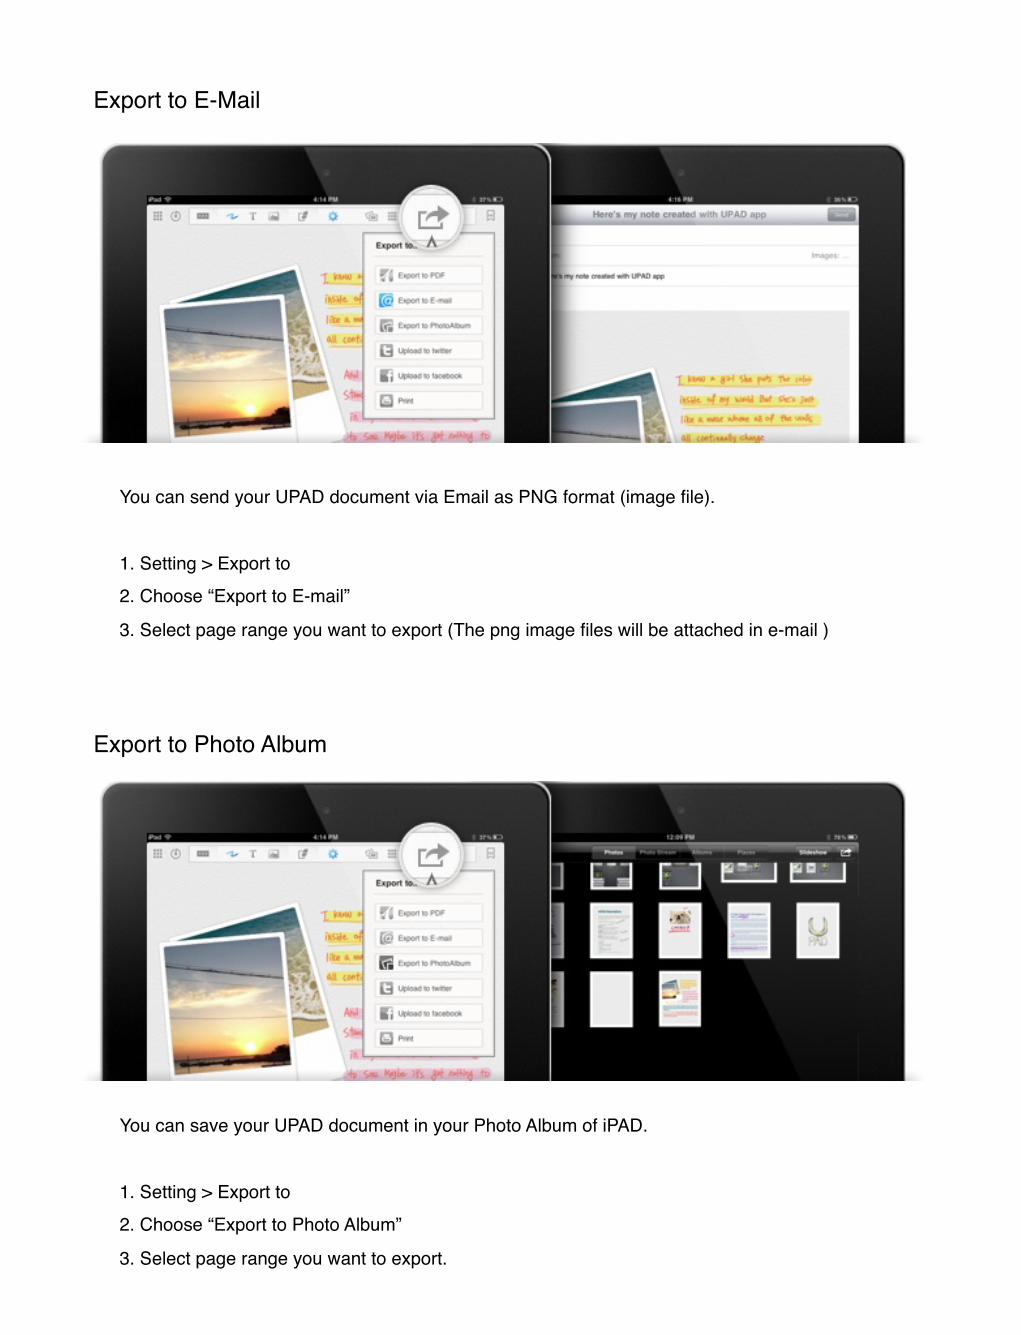
Export to E-Mail
You can send your UPAD document via Email as PNG format (image file).
1. Setting > Export to 2. Choose “Export to E-mail”
3. Select page range you want to export (The png image files will be attached in e-mail )
Export to Photo Album
You can save your UPAD document in your Photo Album of iPAD.
1. Setting > Export to 2. Choose “Export to Photo Album”
3. Select page range you want to export.
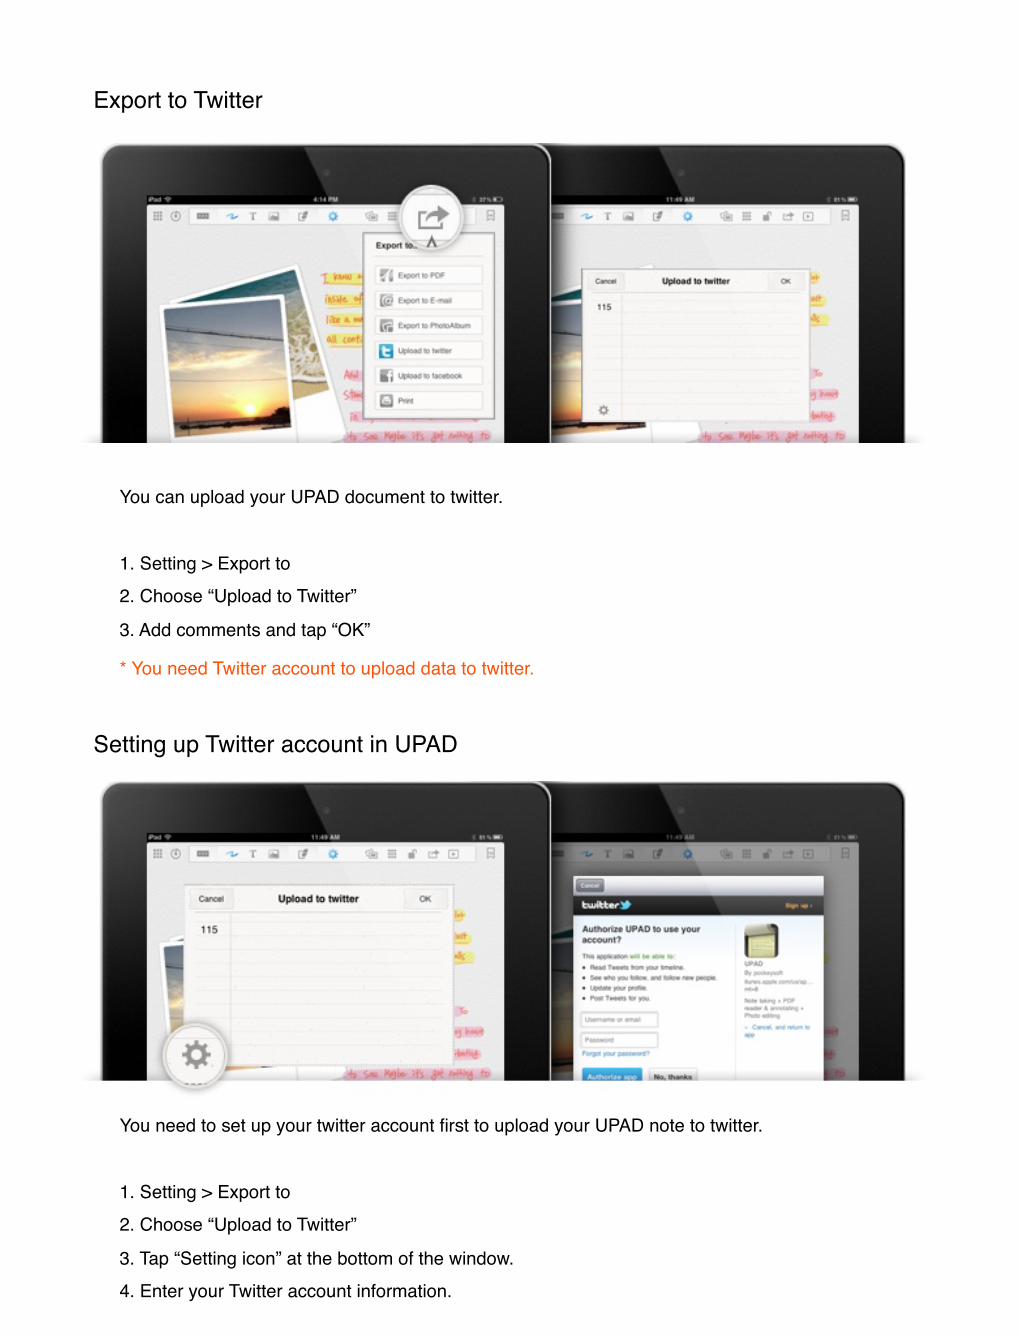
Export to Twitter
You can upload your UPAD document to twitter.
1. Setting > Export to 2. Choose “Upload to Twitter”
3. Add comments and tap “OK”
Setting up Twitter account in UPAD
You need to set up your twitter account first to upload your UPAD note to twitter.
1. Setting > Export to 2. Choose “Upload to Twitter”
3. Tap “Setting icon” at the bottom of the window. 4. Enter your Twitter account information.
* You need Twitter account to upload data to twitter.

Export to Facebook
You can upload your UPAD document to Facebook.
1. Setting > Export to 2. Choose “Upload to Facebook”
3. Add comments and tap “OK”
Setting up Facebook account in UPAD
You need to set up your Facebook account first to upload your UPAD note to twitter.
1. Setting > Export to 2. Choose “Upload to Facebook”
3. Tap “Setting icon” at the bottom of the window. 4. Enter your Facebook account information.
* You need Facebook account to upload data to Facebook.

MirroringVGA OUT
You can connect your iPAD to a desktop monitor or an external screen. Project your writing in real-time with VGA output. During the meeting in the office or a presentation in the classroom, share your UPAD with others
in a bigger screen.
1. Connect your iPAD to the external screen via Digital AV Adapter or Apple VGA Adapter2. Setting > VGA out
It should be connected by Digital AV Adapter of APPLE.
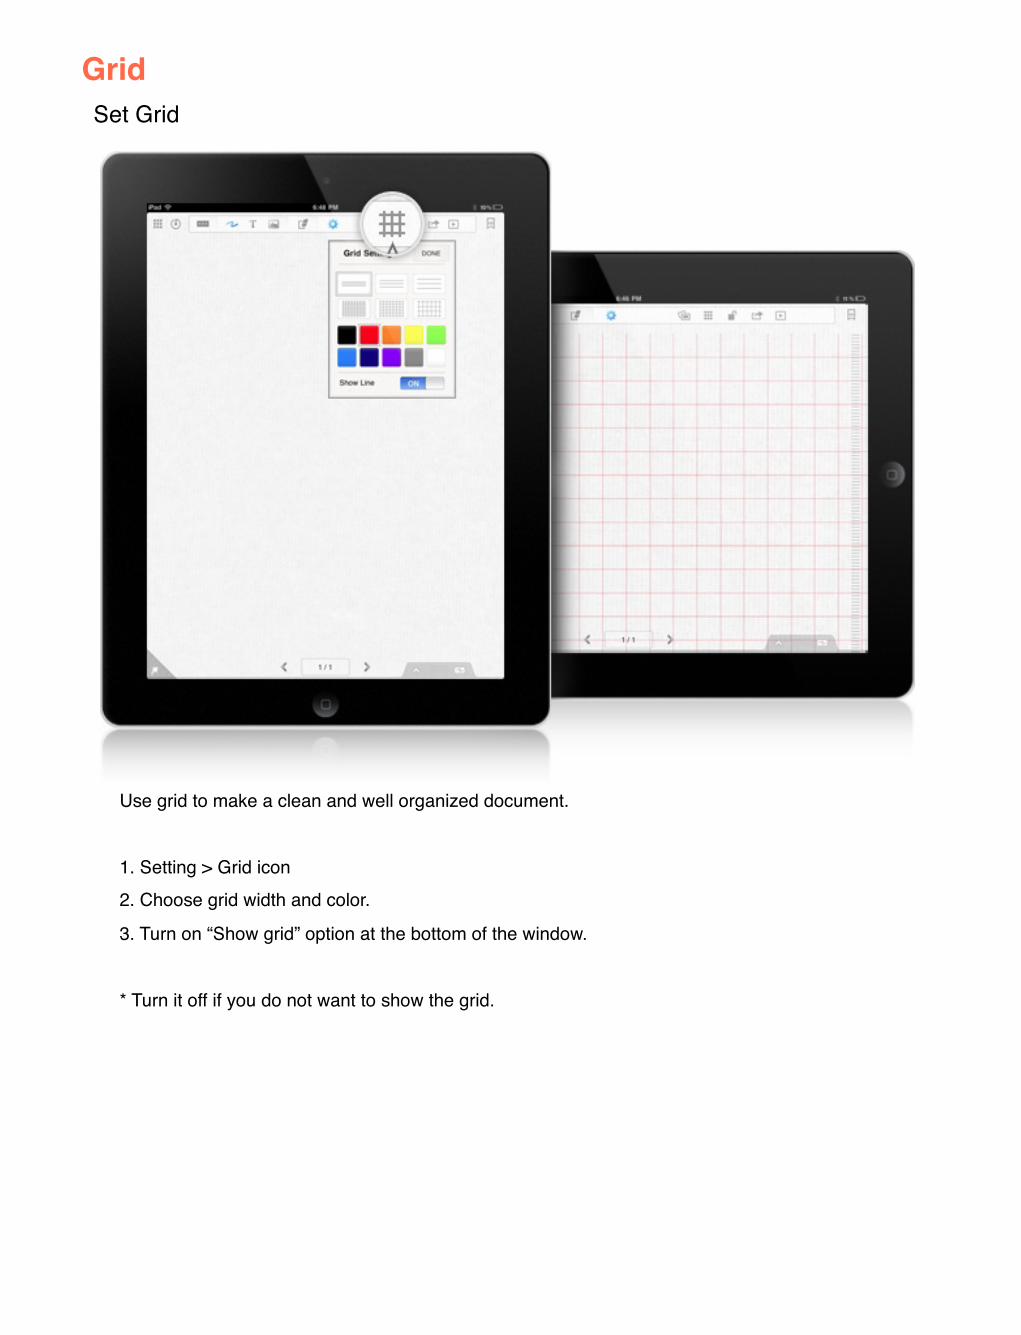
GridSet Grid
Use grid to make a clean and well organized document.
1. Setting > Grid icon 2. Choose grid width and color.
3. Turn on “Show grid” option at the bottom of the window.
* Turn it off if you do not want to show the grid.
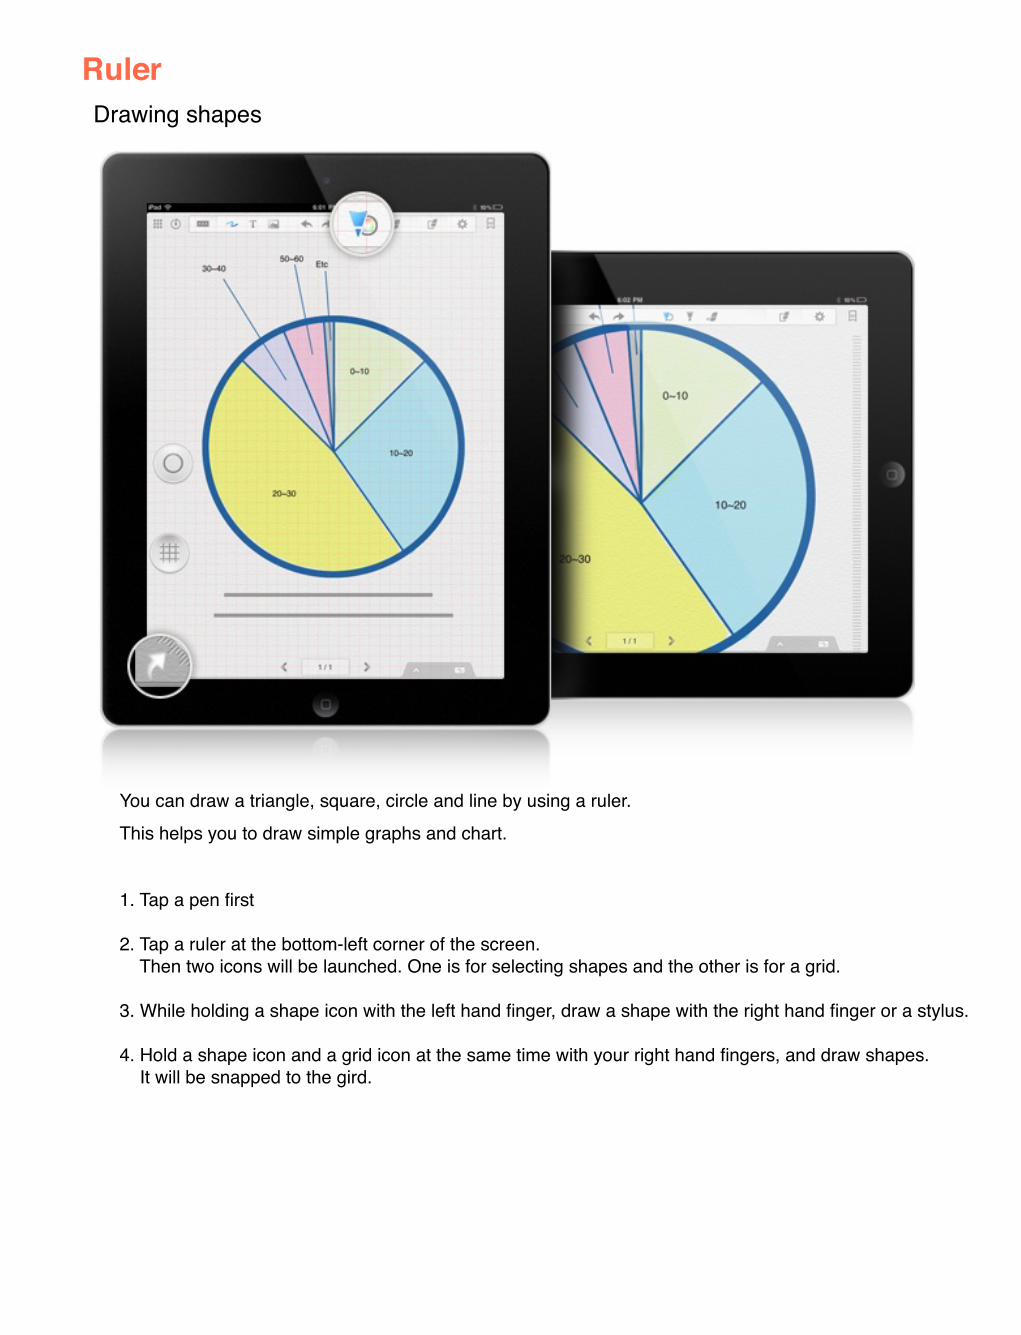
RulerDrawing shapes
You can draw a triangle, square, circle and line by using a ruler.This helps you to draw simple graphs and chart.
1. Tap a pen first
2. Tap a ruler at the bottom-left corner of the screen. Then two icons will be launched. One is for selecting shapes and the other is for a grid.
3. While holding a shape icon with the left hand finger, draw a shape with the right hand finger or a stylus.
4. Hold a shape icon and a grid icon at the same time with your right hand fingers, and draw shapes. It will be snapped to the gird.
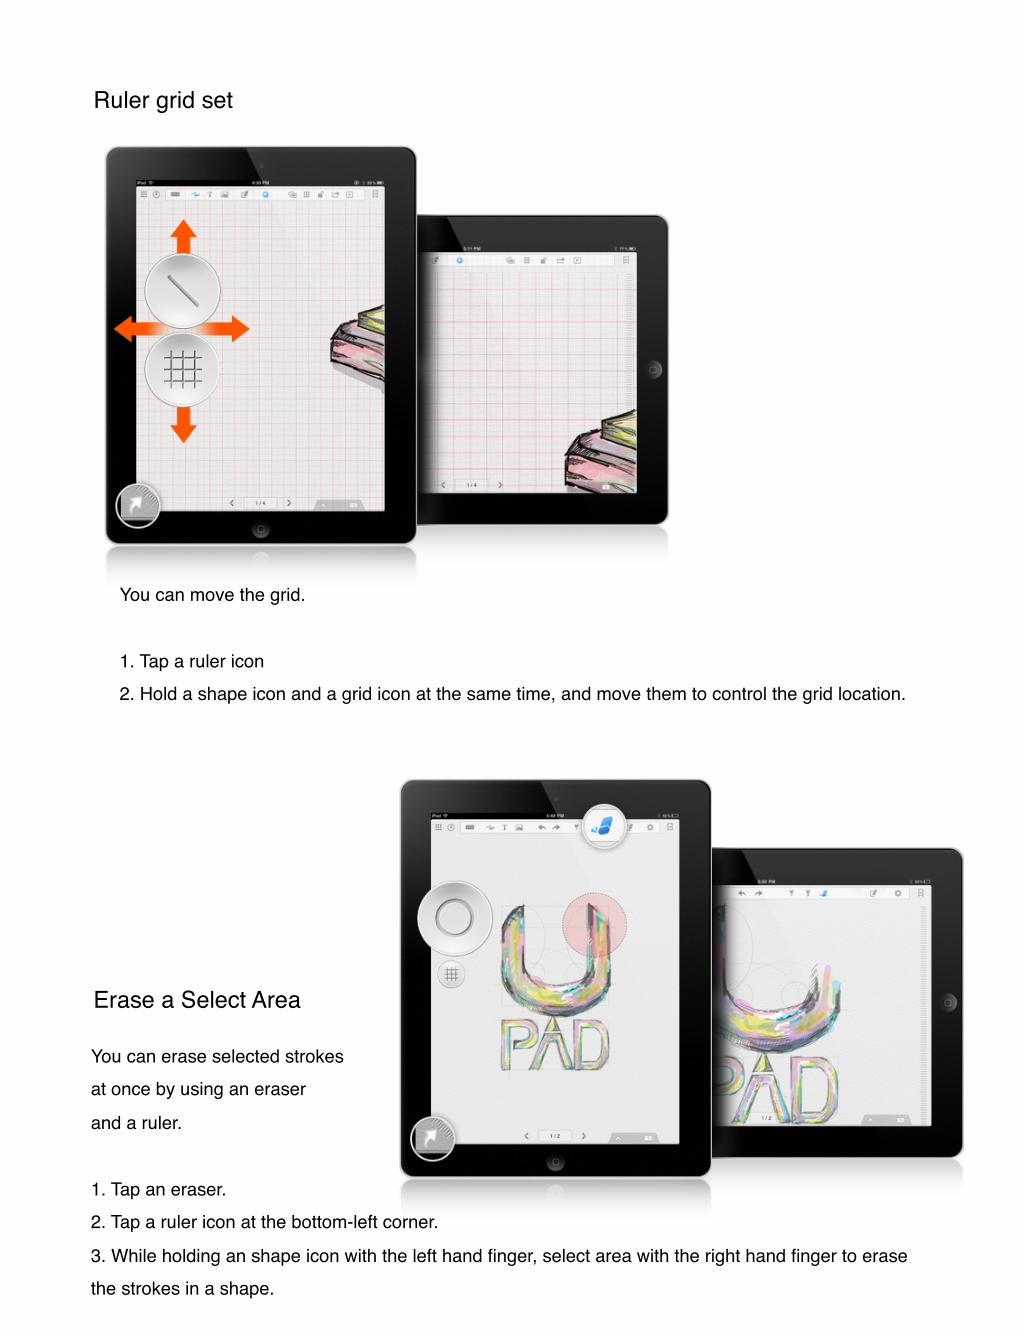
You can move the grid.
1. Tap a ruler icon2. Hold a shape icon and a grid icon at the same time, and move them to control the grid location.
Erase a Select Area
You can erase selected strokes at once by using an eraser
and a ruler.
1. Tap an eraser. 2. Tap a ruler icon at the bottom-left corner.
3. While holding an shape icon with the left hand finger, select area with the right hand finger to erase the strokes in a shape.
Ruler grid set
BookmarkAdd Bookmark
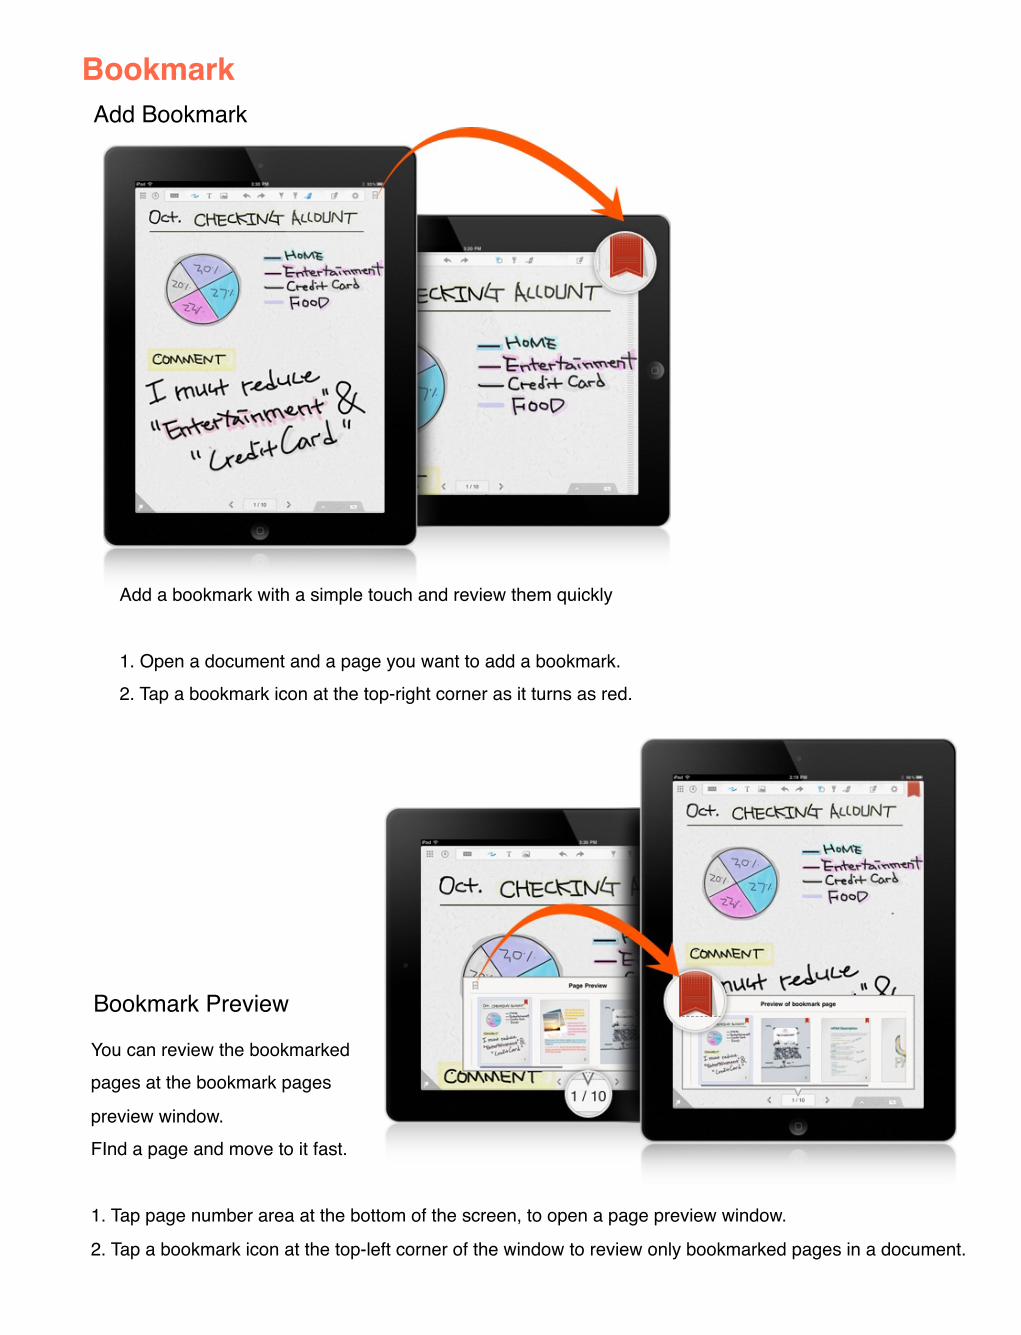
Add a bookmark with a simple touch and review them quickly
1. Open a document and a page you want to add a bookmark.2. Tap a bookmark icon at the top-right corner as it turns as red.
You can review the bookmarked pages at the bookmark pages
preview window. FInd a page and move to it fast.
1. Tap page number area at the bottom of the screen, to open a page preview window.
2. Tap a bookmark icon at the top-left corner of the window to review only bookmarked pages in a document.
Bookmark Preview
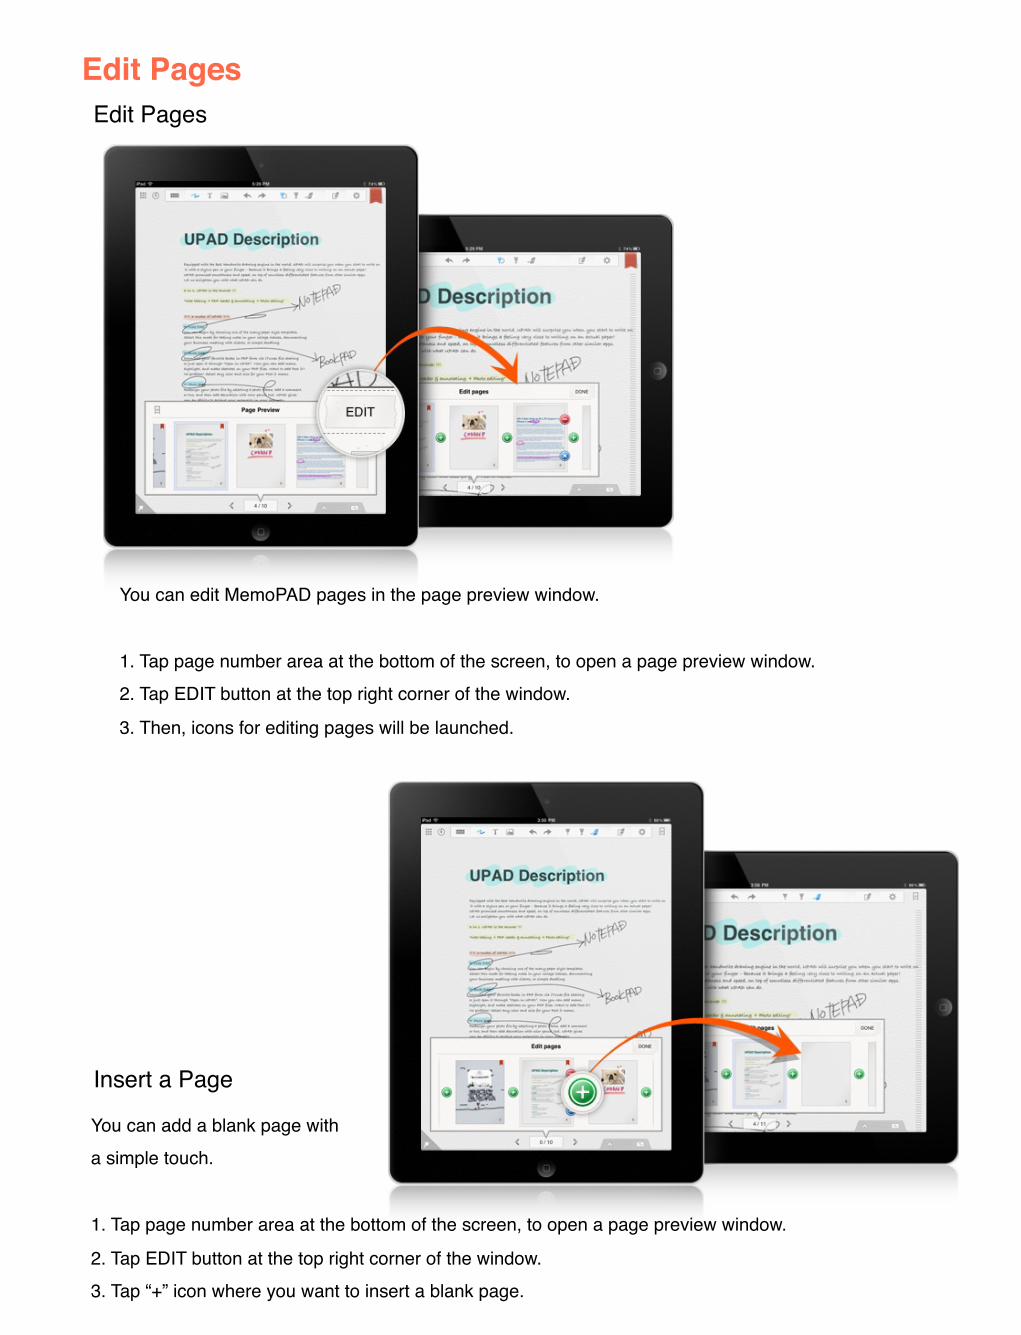
You can edit MemoPAD pages in the page preview window.
1. Tap page number area at the bottom of the screen, to open a page preview window.2. Tap EDIT button at the top right corner of the window.
3. Then, icons for editing pages will be launched.
You can add a blank page witha simple touch.
1. Tap page number area at the bottom of the screen, to open a page preview window.
2. Tap EDIT button at the top right corner of the window. 3. Tap “+” icon where you want to insert a blank page.
Insert a Page
Edit PagesEdit Pages

Move a Pages
You can move a page in a document.
1. Tap page number area at the bottom of the screen, to open a page preview window.
2. Tap EDIT button at the top right corner of the window.3. Tap a page you want to move, and tap it again to make it movable.
4. Move a page to where you want to.
You can duplicate a page.
1. Tap page number area at the bottom of the screen, to open a page preview window.2. Tap EDIT button at the top right corner of the window.
3. Tap a page you want to copy. 4. Tap X icon to duplicate a page.
Copy a Page
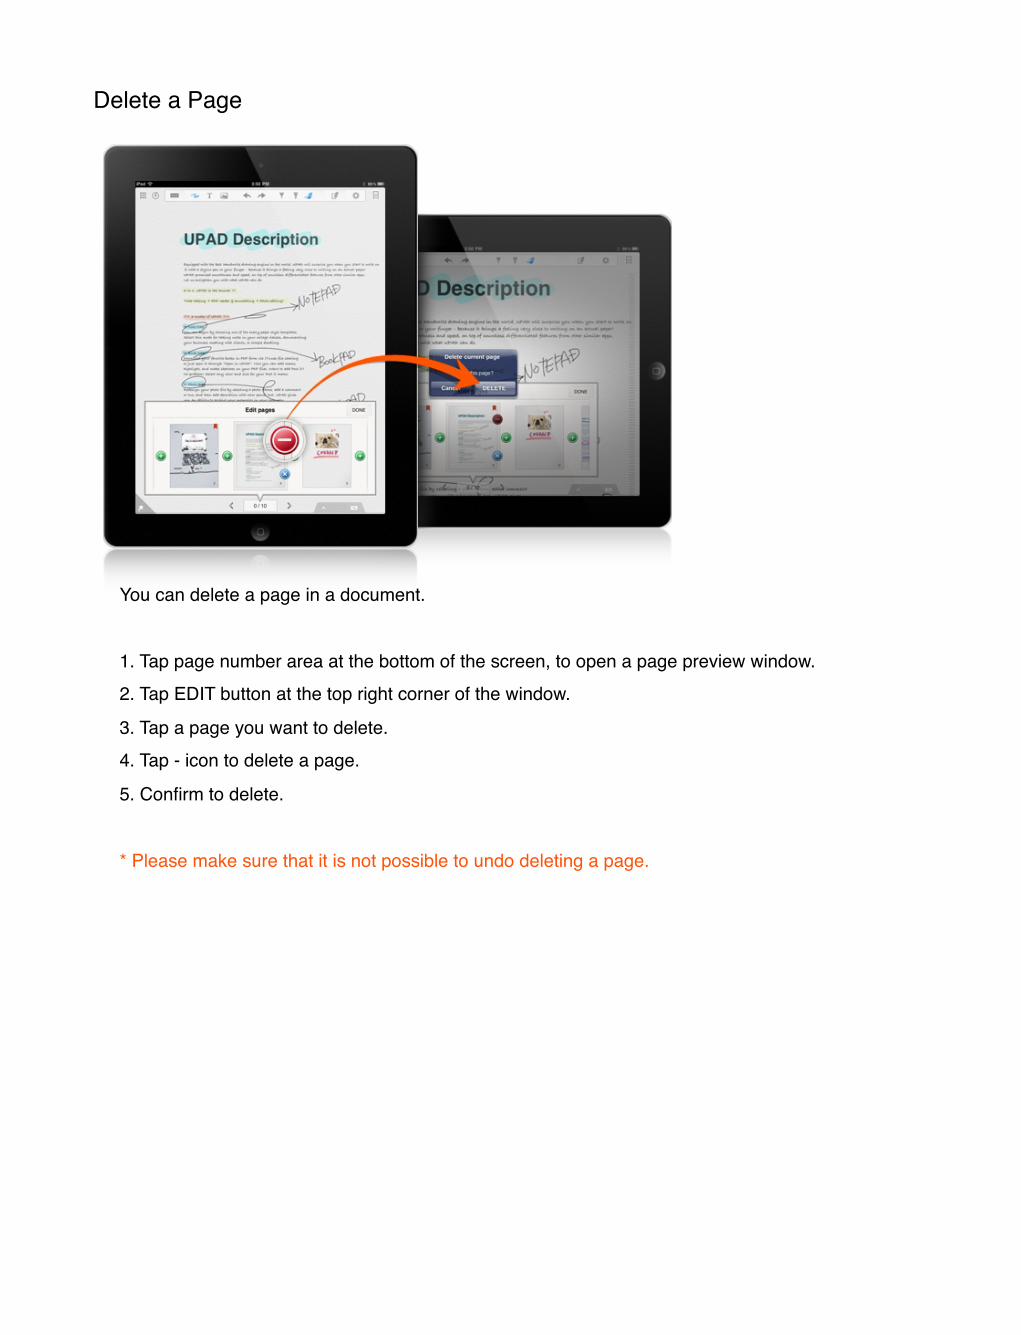
Delete a Page
You can delete a page in a document.
1. Tap page number area at the bottom of the screen, to open a page preview window.2. Tap EDIT button at the top right corner of the window.
3. Tap a page you want to delete. 4. Tap - icon to delete a page.
5. Confirm to delete.
* Please make sure that it is not possible to undo deleting a page.
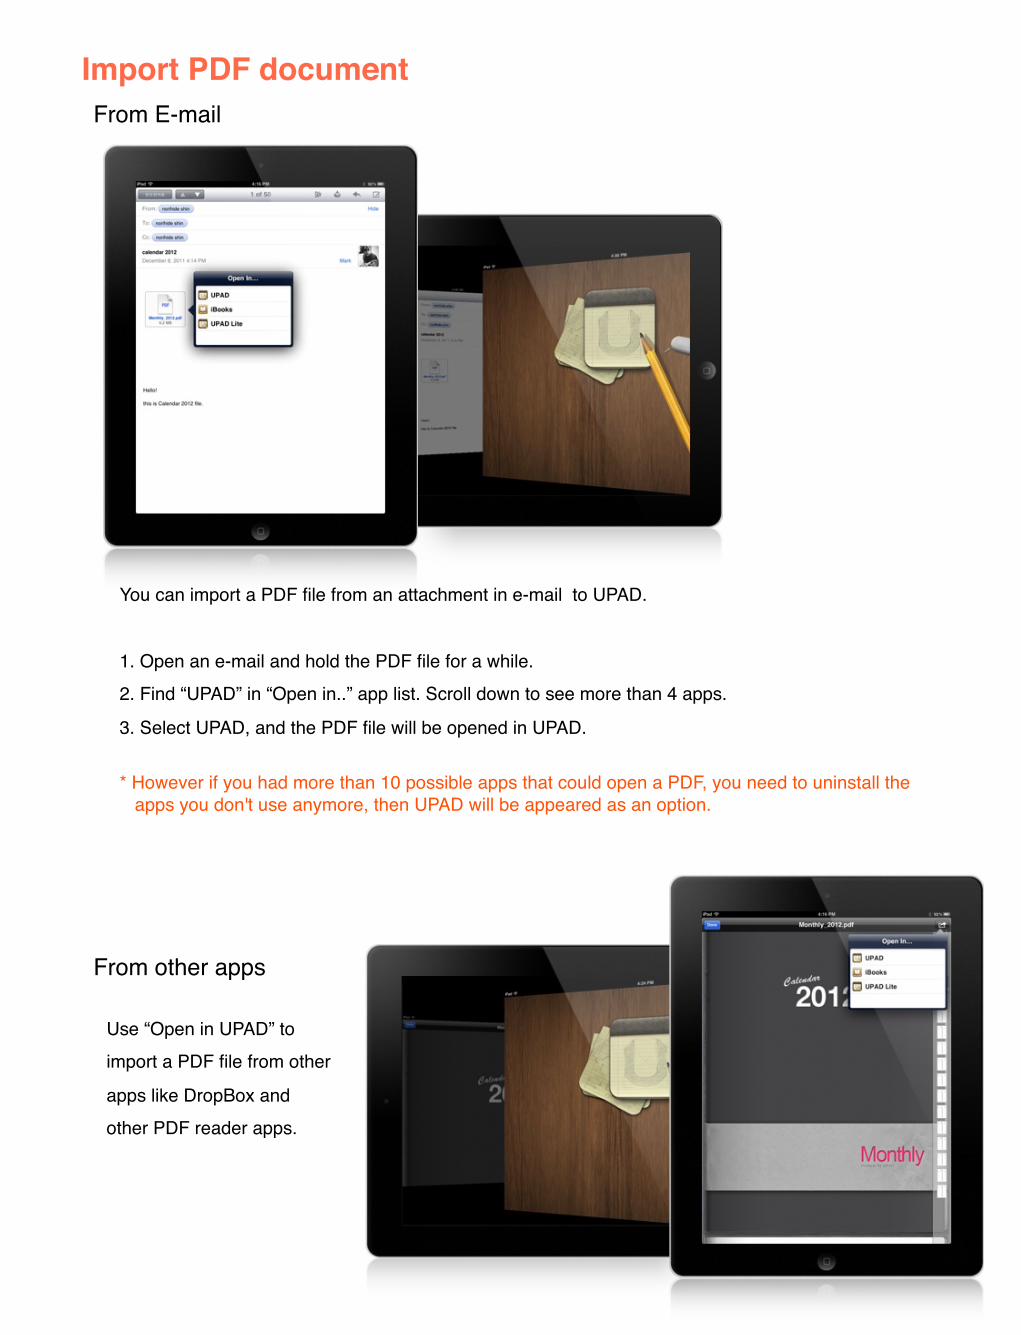
Import PDF documentFrom E-mail
You can import a PDF file from an attachment in e-mail to UPAD.
1. Open an e-mail and hold the PDF file for a while. 2. Find “UPAD” in “Open in..” app list. Scroll down to see more than 4 apps.
3. Select UPAD, and the PDF file will be opened in UPAD.
* However if you had more than 10 possible apps that could open a PDF, you need to uninstall the apps you don't use anymore, then UPAD will be appeared as an option.
Use “Open in UPAD” to import a PDF file from other
apps like DropBox and other PDF reader apps.
From other apps
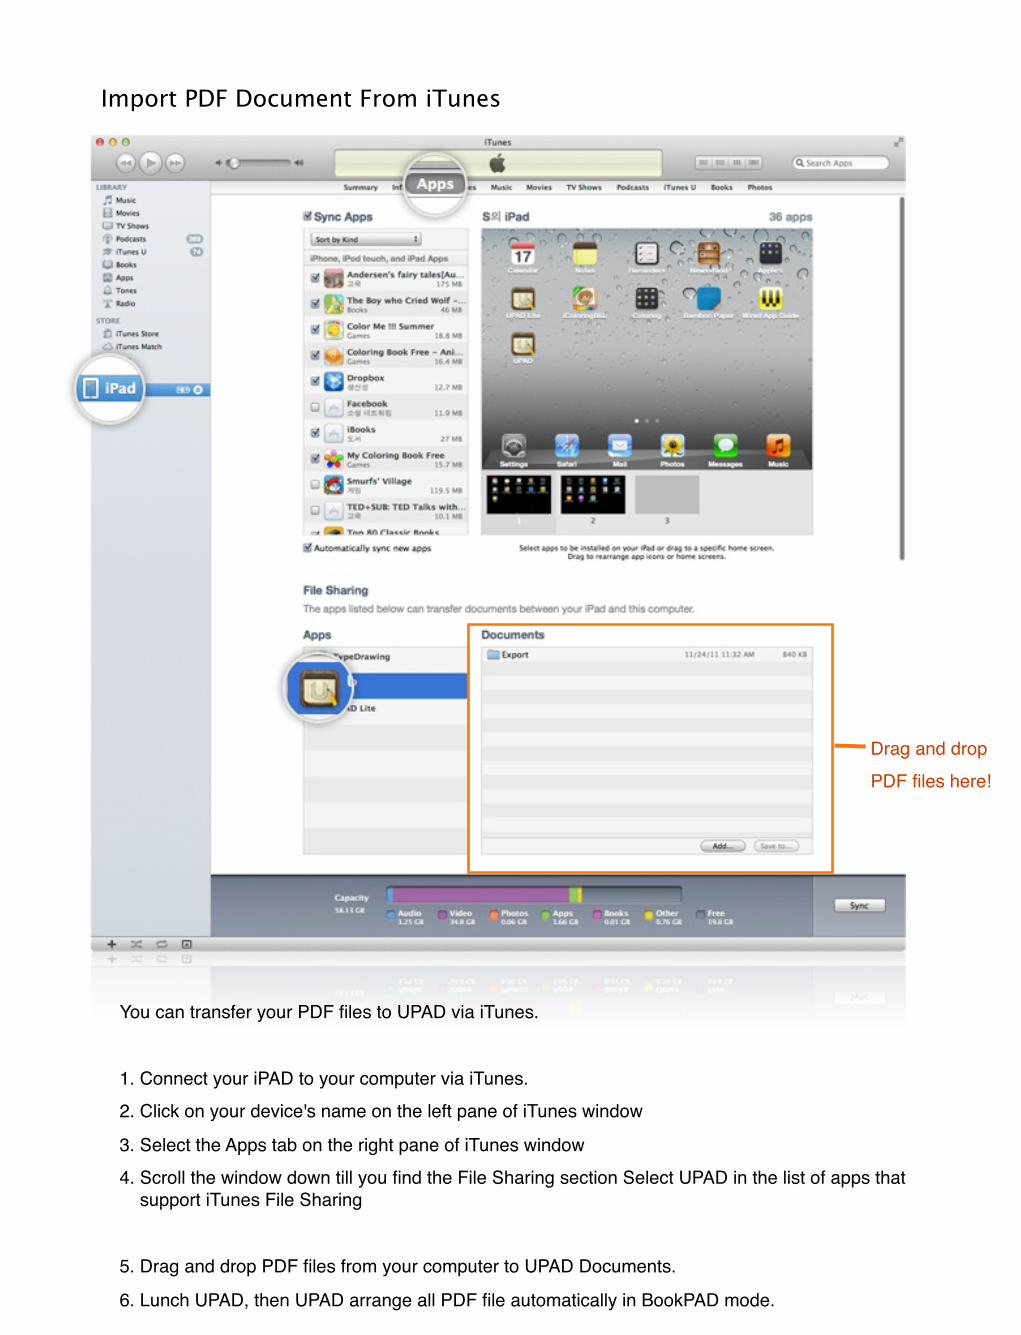
Import PDF Document From iTunes
You can transfer your PDF files to UPAD via iTunes.
1. Connect your iPAD to your computer via iTunes. 2. Click on your device's name on the left pane of iTunes window
3. Select the Apps tab on the right pane of iTunes window4. Scroll the window down till you find the File Sharing section Select UPAD in the list of apps that support iTunes File Sharing
5. Drag and drop PDF files from your computer to UPAD Documents.
6. Lunch UPAD, then UPAD arrange all PDF file automatically in BookPAD mode.
Drag and dropPDF files here!
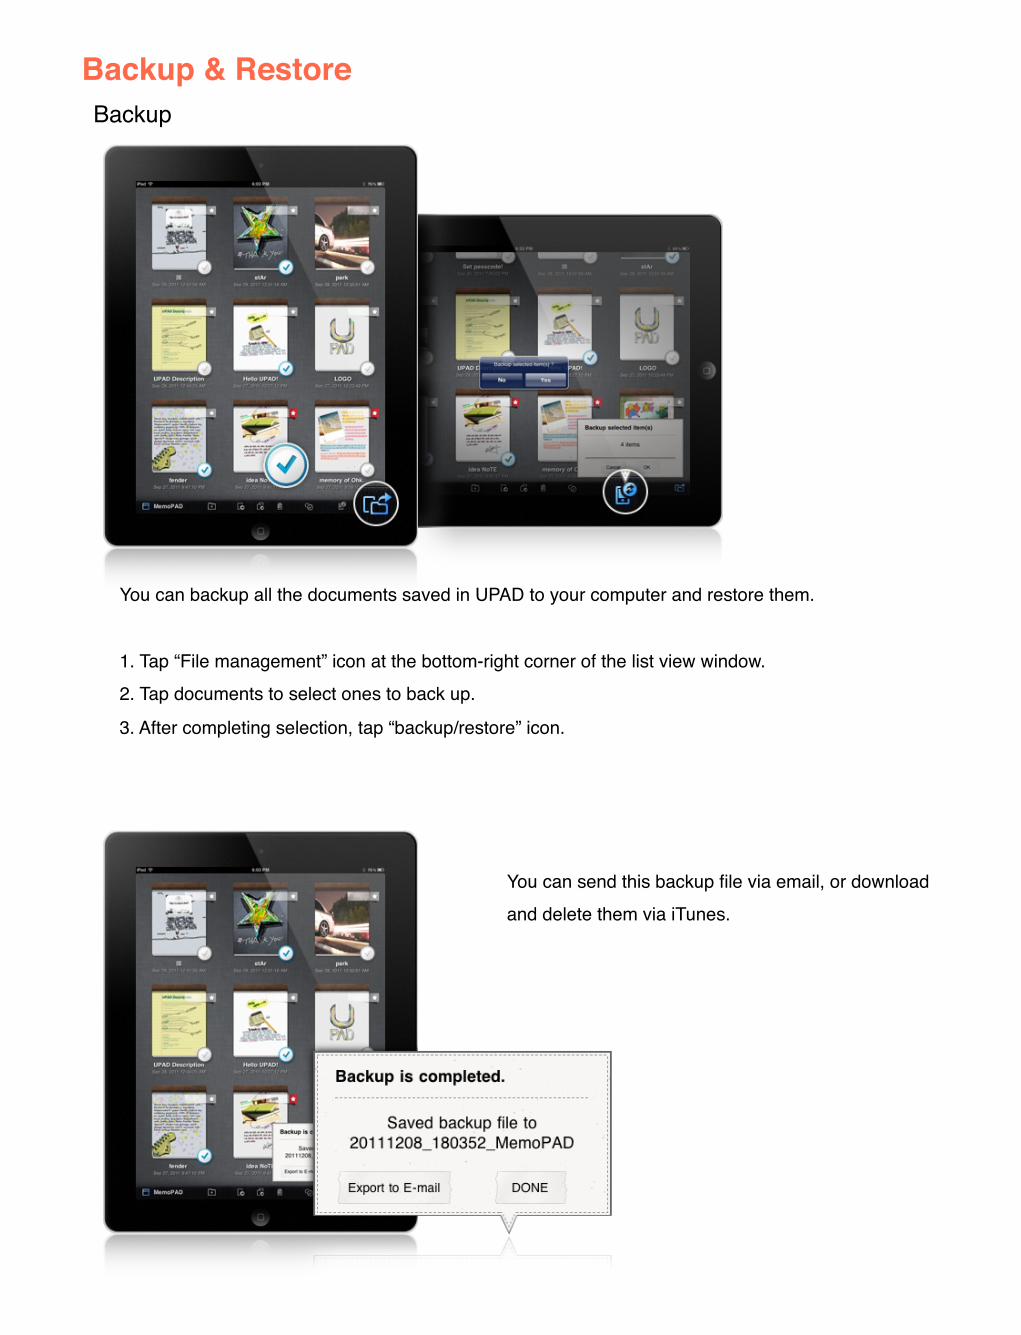
Backup & RestoreBackup
You can backup all the documents saved in UPAD to your computer and restore them.
1. Tap “File management” icon at the bottom-right corner of the list view window. 2. Tap documents to select ones to back up.
3. After completing selection, tap “backup/restore” icon.
You can send this backup file via email, or download and delete them via iTunes.
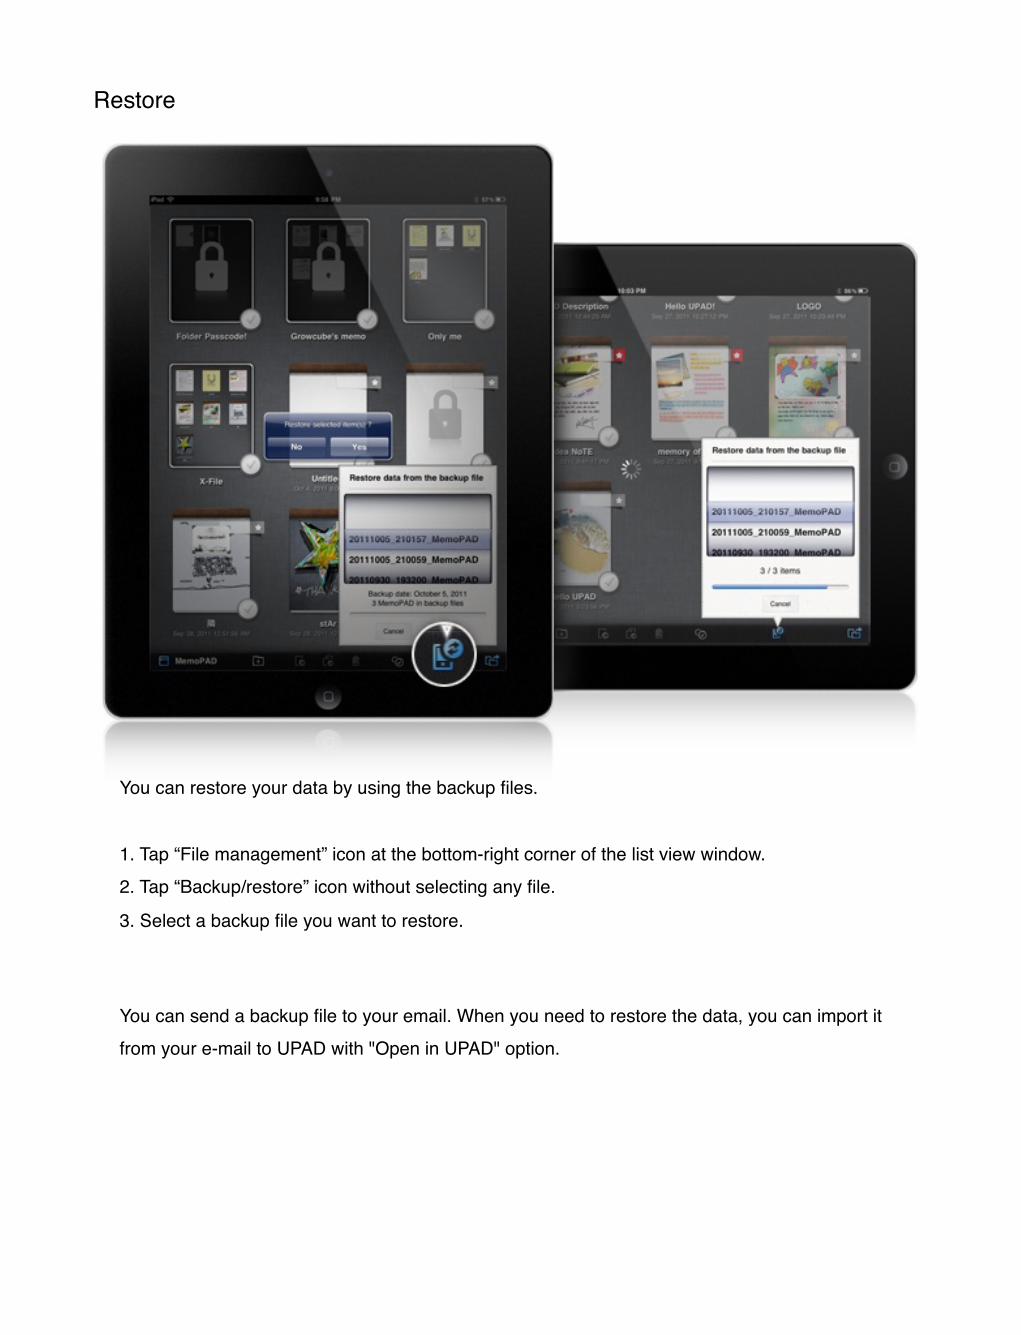
Restore
You can restore your data by using the backup files.
1. Tap “File management” icon at the bottom-right corner of the list view window.2. Tap “Backup/restore” icon without selecting any file.
3. Select a backup file you want to restore.
You can send a backup file to your email. When you need to restore the data, you can import it from your e-mail to UPAD with "Open in UPAD" option.
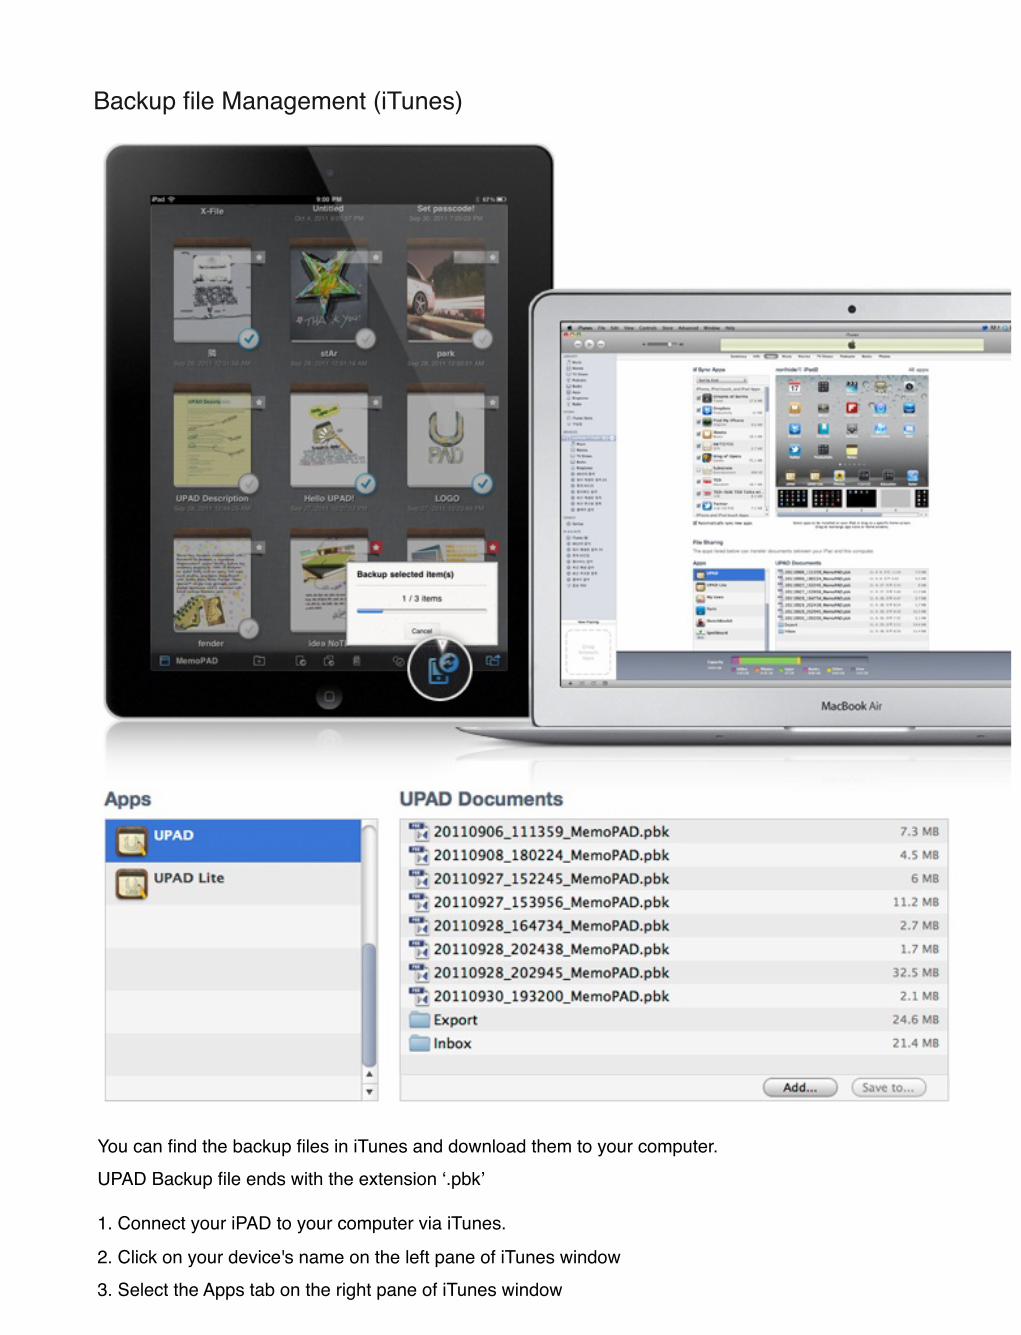
Backup file Management (iTunes)
You can find the backup files in iTunes and download them to your computer. UPAD Backup file ends with the extension ʻ.pbkʼ
1. Connect your iPAD to your computer via iTunes.
2. Click on your device's name on the left pane of iTunes window3. Select the Apps tab on the right pane of iTunes window

4. Scroll the window down till you find the File Sharing section Select UPAD in the list of apps that support iTunes File Sharing In UPAD Documents window you will find documents stored in UPAD.
To download backups, drag and drop them to your computer.
To delete backups, use the “delete” key of your keyboard.

Backup file Management (E-Mail)
You can share a UPAD backup file via email. (up to 30MB)
1. Hold the attached backup file for a while. 2. Choose “UPAD” in the “Open in..” apps list.
3. UPAD will be launched and the data will be restored automatically.
Contact Us
Thank you for contacting UPAD support teamPlease read our user guide, FAQ and upcoming update features.if you canʼt find any proper solution, donʼt hesitate to e-mail us.