vanguard - weatherby -6-manual safety operation ® the manual safety on the weatherby® vanguard®...
TRANSCRIPT

VANGUARD

-1- -2-
INTRODUCTION Thank you for buying a Weatherby® firearm, and welcome to the family. We realize that you had many products to choose from and hope you feel as we do, that you purchased the finest quality production firearm on the market today. When my late father started this company in 1945, it was as a means to turn his revolutionary vision of rifle design and cartridge performance into practical realities. At the time, I'm sure he had little idea that Weatherby® would come to be one of the most respected and revered brands in the firearms industry. That is a level of respect we appreciate and you have our assurance that it will not be taken for granted. This Owner's Manual is designed to assist you in learning how to use and care for your Weatherby® Vanguard® rifle. Please read it very carefully and follow all instructions and safety warnings. In closing, let me assure you that we are committed to the hunter, shooter and sportsman; and delivering the uncompromising craftsmanship, performance and value that you require in all that we do. Good Shooting!
-- SSAFETY -- FFIRST AND FOREMOST
FFIREARMS ARE DANGEROUS WEAPONS, WHICH CAN CAUSE SERIOUS INJURY OR DDEATH. WHEN USING ANY FIREARM, SAFETY MUST BE YOUR FIRST AND CONSTANT CCONCERNN. RREAD AND UNDERSTAND THE FOLLOWING SAFETY RULES KKNOW YOUR FIREARM. Before assembling or using your Weatherby® Vanguard® rifle, read and understand the instructions and safety warnings contained in this Owner's Manual in order to learn how to use the firearm safely and correctly. AALWAYS TREAT YOUR FIREARM AS IF IT WERE LOADED. Use the manual safety lever as outlined in this manual. Never move the safety to "FIRE" until YOU are ready to fire. KKEEP THE MUZZLE POINTED IN A SAFE DIRECTION. The safe direction may be "up" on some occasions, and "down" on others. Never point the muzzle toward anything not intended as a target. UUSE ONLY THE CORRECT AMMUNITION FOR YOUR FIREARM. Be sure to use only the correct ammunition for your Weatherby® Vanguard® rifle as stamped on the side of the barrel. AALWAYS UNLOAD YOUR FIREARM WHEN NOT SHOOTING. Never transport or store a loaded firearm in a vehicle or building. Unload your firearm before climbing a fence or obstruction, or entering a slippery area. MMAINTAIN YOOUR FIREARM. Keep the barrel clean and free of obstructions. Clean your firearm regularly and have it inspected periodically to make sure it is mechanically correct and functioning properly. Worn or damaged parts can be dangerous. DDO NOT MAKE ADJUSTMENTTS. Never make changes or alterations to your firearm. Use only Weatherby® parts. Do not make any adjustments to the trigger, or change the shape or size of the sear or other parts. Repair should be performed by a Weatherby® Authorized Service Center. MMAKE YOURSELF SAFE. Always wear shooting glasses. When target shooting or plinking, use ear protection also. If your firearm is equipped with a muzzle brake or is "ported", wear ear protection at all times. Never drink alcoholic beverages before or during shooting.
RREMEMBER -- FFIREARMS SAFETY DEPENDS ON YOU!!
WEATHERBY® VANGUARD
® RIFLE
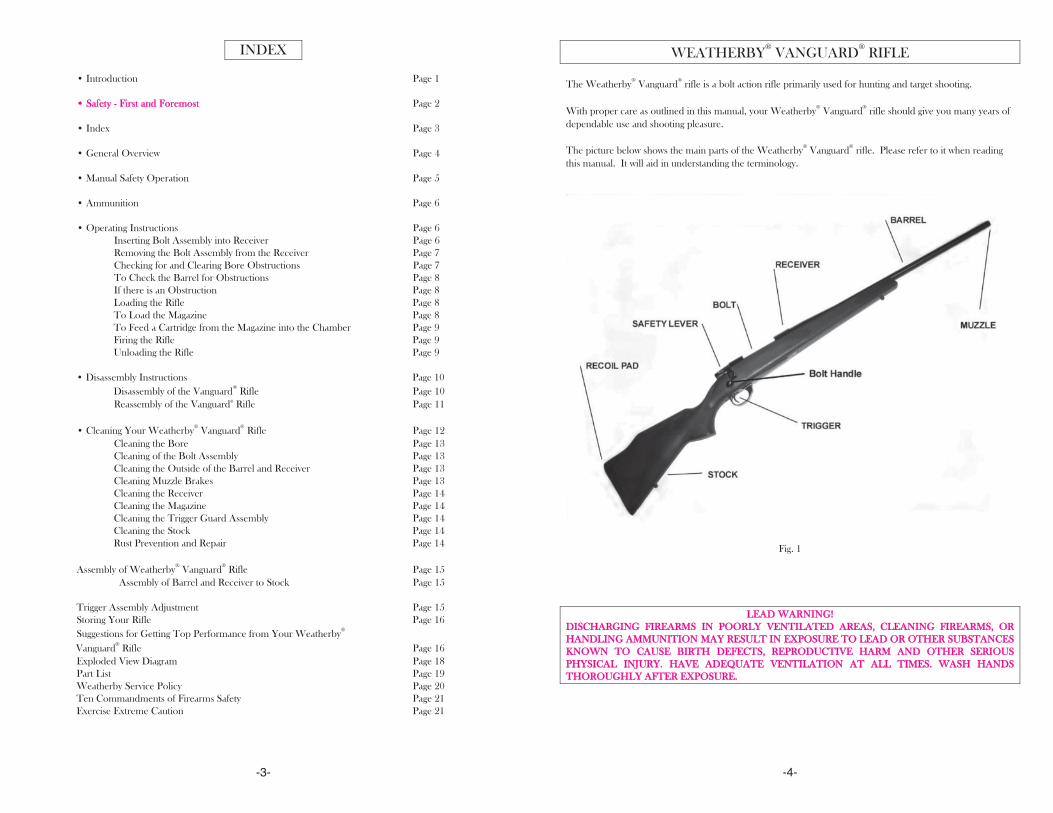
The Weatherby® Vanguard® rifle is a bolt action rifle primarily used for hunting and target shooting. With proper care as outlined in this manual, your Weatherby® Vanguard® rifle should give you many years of dependable use and shooting pleasure. The picture below shows the main parts of the Weatherby® Vanguard® rifle. Please refer to it when reading this manual. It will aid in understanding the terminology.
Fig. 1
LLEAD WAARNING! DDISCHARGING FIREARMS IN POORLY VENTILATED AREAS, CLEANING FIREARMS, OR HHANDLING AMMUNITION MAY RESULT IN EXPOSURE TO LEAD OR OTHER SUBSTANCES KKNOWN TO CAUSE BIRTH DEFECTS, REPRODUCTIVE HARM AND OTHER SERIOUS PPHYSICAL INJURY. HAVE ADEQUATE VENTILATIOON AT ALL TIMES. WASH HANDS TTHOROUGHLY AFTER EXPOSURE.
-3- -4-
INDEX • Introduction Page 1 • Safety - First and Foremost Page 2 • Index Page 3 • General Overview Page 4 • Manual Safety Operation Page 5 • Ammunition Page 6 • Operating Instructions Page 6 Inserting Bolt Assembly into Receiver Page 6 Removing the Bolt Assembly from the Receiver Page 7 Checking for and Clearing Bore Obstructions Page 7 To Check the Barrel for Obstructions Page 8 If there is an Obstruction Page 8 Loading the Rifle Page 8 To Load the Magazine Page 8 To Feed a Cartridge from the Magazine into the Chamber Page 9 Firing the Rifle Page 9 Unloading the Rifle Page 9 • Disassembly Instructions Page 10 Disassembly of the Vanguard® Rifle Page 10 Reassembly of the Vanguard® Rifle Page 11 • Cleaning Your Weatherby® Vanguard® Rifle Page 12 Cleaning the Bore Page 13 Cleaning of the Bolt Assembly Page 13 Cleaning the Outside of the Barrel and Receiver Page 13 Cleaning Muzzle Brakes Page 13 Cleaning the Receiver Page 14 Cleaning the Magazine Page 14 Cleaning the Trigger Guard Assembly Page 14 Cleaning the Stock Page 14 Rust Prevention and Repair Page 14 Assembly of Weatherby® Vanguard® Rifle Page 15 Assembly of Barrel and Receiver to Stock Page 15 Trigger Assembly Adjustment Page 15 Storing Your Rifle Page 16 Suggestions for Getting Top Performance from Your Weatherby® Vanguard® Rifle Page 16 Exploded View Diagram Page 18 Part List Page 19 Weatherby Service Policy Page 20 Ten Commandments of Firearms Safety Page 21 Exercise Extreme Caution Page 21

-5- -6-
MANUAL SAFETY OPERATION The manual safety on the Weatherby® Vanguard® rifle is a lever-type safety located on the right side of the action immediately behind the bolt handle. When in proper condition and correctly engaged in the "SAFE" position, the manual safety blocks the trigger and prevents accidental discharge under normal usage.
WWARNING!!! NNever depend on any mechanical safety mechanism or device to prevent the dangers of careless handling oor ppointing a firearm in an unsafe direction. WWhen manipulating the manual safety, keep all fingers outside the trigger guard. The rifle will fire if the ttrigger is pulled when the safety is not in the "SAFE" position. TThe safety should always be in thee "SAFE" position except when the rifle is intended to be fired. NNever pull the trigger when the safety is in the “Safe” position. The manual safety can only be moved between the "SAFE" and "OFF SAFE" positions when the rifle is cocked. TTo minimize thee possibility of accidental discharge, it is strongly recommended that the safety always be pplaced in the "SAFE" position except when the rifle is intended to be fired. To engage the manual safety, use your thumb to rotate the safety lever rearward until it stops and stays in place in the “Safe” position (refer to Fig. 2). When the safety lever is in the “Safe” position, it also locks the bolt handle in the closed (fully down) position.
Fig. 2 Fig. 3
To disengage the manual safety, rotate the safety lever forward until it stops in alignment with the red “F” on the bolt sleeve which indicates that the rifle is ready to fire and the safety is in the “Off Safe” position (refer to Fig. 3).
AMMUNITION Weatherby® Vanguard® rifles are chambered for calibers and cartridges ranging from .223 Remington to .338 Winchester Magnum, for which factory-loaded ammunition manufactured in accordance with U.S. industry standards is commercially available. Exercise care to assure that you are using only the correct ammunition for your rifle. Always make certain that the caliber and cartridge indicated on the factory loaded cartridge headstamp matches the caliber and cartridge type marked on the barrel of your rifle.
WWARNNING!! UUse of incorrect or overloaded ammunition can result in death or serious injury and damage to your firearm ddue to excessive pressure. Even the strongest firearm can be "blown up" by excessive pressure. UUse only ffactory--lloaded ammunition of the corrrect caliber as marked on the rifle's barrel. AAlways wear shooting glasses and hearing protectors when shooting.
AMMUNITION NOTICE WEATHERBY, INC. SPECIFICALLY DISCLAIMS RESPONSIBILITY FOR ANY INJURY OR DAMAGE WHATSOEVER OCCURRING IN CONNECTION WITH, OR AS A RESULT OF, THE USE OF FAULTY, OR NON-STANDARD, OR "REMANUFACTURED" OR HAND-LOADED OR RELOADED AMMUNITION, OR OF AMMUNITION OTHER THAN FOR WHICH THE FIREARM WAS ORIGINALLY CHAMBERED.
OPERATING INSTRUCTIONS INSERTING BOLT ASSEMBLY INTO RECEIVER KKeeping the muzzle of the rifle pointed in a safe direction, and your fingers out of the trigger guard and aaway from the trigger:: 1. Inspect the rifle and remove any ammunition present in the chamber or magazine (refer to items 3 & 4 of Unloading the Rifle, page 9) 2. Move the safety to the forward “Off Safe” position (refer to Manual Safety Operation, page 5).
3 Fit the front end of the bolt assembly into the rear of the receiver.
4. Depress the bolt release lever as far as possible (refer to Fig. 4). 5. Slide the bolt assembly forward into the receiver about three inches and release the bolt release lever. 6. The bolt now may now be pushed forward to the fully closed position, and locked by exerting pressure
downward on the bolt handle.

-7- -8-
1. Move the manual safety to the "Off Safe" position (refer to Manual Safety Operation, page 5). 2. Unload the rifle (refer to Unloading the Rifle, page 9). 3. Remove the bolt (refer to Removing the Bolt Assembly from the Receiver, page 7). 4. Visually check the bore for obstructions by looking through the barrel from the breech end through the
muzzle. IF THERE IS AN OBSTRUCTION 1. Push a rifle bore cleaning tool through the bore from the breech end until the end of tool exits the
muzzle. 2. If the obstruction cannot be easily cleared, contact a Weatherby® Authorized Service Center or a
qualified gunsmith. LOADING THE RIFLE
WWARNING!! UUse of incorrect or overloaded ammunition can result in death or serious injury and damage to your firearm ddue to excessive pressure. Even the strongest fireearm can be "blown up" by excessive pressure. UUse only ffactory--lloaded ammunition as marked on the rifle's barrel. TThe accidental chambering and discharge of cartridges of the wrong caliber can result in damage to your rifle aand possible injury to the shoooter. Carry only the proper caliber ammunition with you when shooting. AAlways wear shooting glasses and hearing protectors when shooting.
AMMUNITION NOTICE WEATHERBY, INC. SPECIFICALLY DISCLAIMS RESPONSIBILITY FOR ANY INJURY OR DAMAGE WHATSOEVER OCCURRING IN CONNECTION WITH, OR AS A RESULT OF, THE USE OF FAULTY, OR NON-STANDARD, OR "REMANUFACTURED" OR HAND-LOADED OR RELOADED AMMUNITION, OR OF AMMUNITION OTHER THAN FOR WHICH THE FIREARM WAS ORIGINALLY CHAMBERED. TTo Load the Magazine KKeepiing tthe muzzle oof the rifle pointed in a safe ddirection aand your fingers out of the trigger guard and away ffrom the trigger at all times
1. Move the manual safety lever to the "Off Safe" position (refer to Manual Safety Operation, page 5).
2. Open the bolt by lifting the bolt handle until it stops and pull the bolt to the rear until it stops. 3. Visually check to make sure no cartridge is in the chamber 4. Insert desired number of cartridges of the proper caliber and cartridge type (refer to Ammunition, page 6)
into the magazine by pressing them individually into the top of the magazine box with the bullets pointed toward the barrel.
5. Use your thumb or fingers to press the top cartridge down as you push the bolt forward so the bolt does not
strip the top cartridge from the magazine and load it into the chamber.
Fig. 4 REMOVING THE BOLT ASSEMBLY FROM THE RECEIVER KKeeping the muzzle of the rifle pointed in a safe direction, and your fingers out of the trigger guard and aaway from the trigger (except as instructted below): 1. Move the safety lever to the “Off Safe” position (refer to Manual Safety Operation, page 5) 2. Open the bolt by rotating the bolt handle upward until the bolt rotation stops 3. Move the bolt rearward until the bolt hits against the bolt stop
4. Inspect the rifle to make sure no rounds are in the magazine or chamber (refer to Unloading the Rifle,
page 9) 5. Push down on the bolt release lever (refer Fig 4). 6. Move the bolt straight rearward until the bolt clears the receiver CHECKING FOR AND CLEARING BORE OBSTRUCTIONS The barrel of your rifle should always be checked for obstructions before assembly, before loading and iimmediately following any occurrence in the field which might result in mud, dirt or other debris entering the bore.
WWARNING!!G!! Never attempt to check for or clear a bore obstruction by loading a cartridge into the chamber of the barrel and firing! If there is a bore obstruction this will cause excessive pressures which may result in death or serious injury and damage to your rifle. TO CHECK THE BARREL FOR OBSTRUCTIONS Keeping the muzzle of the rifle pointed in a safe direction and your fingers out of the trigger guard and away from the trigger at all times

-9--10-
TTo Feed a Cartridge from the Magazine into the Chamber
KKeepiing tthe muzzle of the rifle pointed in a safe direction and your fingers out of the trigger guard and away ffrom the trigger at all times 1. Move the manual safety from “On Safe” to the "Off Safe" position (refer to Manual Safety Operation, page
5). 2. Open the bolt by lifting the bolt handle until it stops and pulling the bolt to the rear until it stops. 3. Close the bolt by pushing the bolt handle forward. As the bolt moves forward it will strip a round from the
magazine and feed it into the chamber. 4. With the bolt fully forward rotate the bolt handle down until it stops. The rifle is now ready to fire. Keep
your fingers out of the trigger guard and away from the trigger until you are ready to fire the rifle. 5. Immediately move the safety lever rearward to the “On Safe” position (refer to Manual Safety Operation,
page 5).
WWARNING!! IIf the manual safety is not in the "SAFEE" position, the rifle is ready to fire. Do not touch tthe trigger until YYOU aare ready to fire. FIRING THE RIFLE PPulling the trigger fires the rifle when a cartridge is in the chamber. 1. With a cartridge of the proper caliber and type in the chamber of the barrel, and kkeeping the muzzle of the
rrifle pointed in a safe direction and your fingers out of the trigger guard and away from the trigger, rotate the manual safety lever to the “Off Safe” position (refer to Manual Safety Operation, page 5).
2. Hold the recoil pad snugly to your shoulder and carefully point the muzzle of the rifle at your intended
target, using properly installed sights or riflescope to aim. 3. Squeeze (pull) the trigger with steadily increasing pressure until the rifle fires.
WWARNING!G!! Do not touch the trigger until you are actually ready to fire the rifle, or an unintended discharge may occur, possibly resulting in death or injury to a bystander, or damage to an unintended target. UNLOADING THE RIFLE ALWAYS UNLOAD YOUR RIFLE IMMEDIATELY AFTER YOU FINISH SHOOTING. Keeping the muzzle of the rifle pointed in a safe direction and your fingers out of the trigger guard and away from the trigger at all times 1. Move the manual safety lever to the "Off Safe" position (refer to Manual Safety Operation, page 5). 2. Open the bolt to remove any cartridge from the chamber and pull the bolt to the rear until the bolt stops
against the bolt stop, the cartridge will be ejected from the receiver.
3. Visually and manually check to make certain that the bolt has extracted any live round or fired cartridge case from the chamber. If a live round or fired cartridge case remains in the chamber, remove the bolt from the rifle (refer to Removing the Bolt Assembly from the Receiver, page 7), and immediately take the rifle to a Weatherby Authorized Service Center or a qualified gunsmith (keeping the bolt out of the rifle at all times).
4. To unload the magazine, open the floor plate by depressing the floor plate release. (Fig. 5). The floor
plate will swing out, allowing any cartridges in the magazine to drop free. Do not allow the cartridges to fall to the ground as they may be damaged or become dirty, making loading and chambering more difficult. Subsequent loading of a damaged or dirty cartridge may cause a live round to become jammed in the chamber of the firearm resulting in an unsafe condition.
Fig. 5
5. Visually and manually reconfirm that there are no cartridges remaining in the magazine or the chamber.
6. Reposition the magazine follower inside the magazine box and close the floorplate.
NNOTICE: IF THE BOLT IS PUSHED ALL THE WAY FORWARD AND A CARTRIDGE IS INTHE MAGAZINE, THAT CARTRIDGE WILL BE CHAMBERED AND THE RIFLE CAN BE FIRED.
THERFORE, AALWAYS DOUBLE CHECK THE MAGAZINE AND CHAMBER.
DISASSEMBLY INSTRUCTIONS DISASSEMBLY OF THE VANGUARD® RIFLE Before attempting to disassemble your Vanguard® rifle, study the exploded view diagram on page 17 of this Owner’s Manual to familiarize yourself with the general appearance and position of each part. 1. Unload the rifle. (refer to Unloading the Rifle, page 9) 2. Move the safety lever to the “Off Safe” position (Refer to Manual Safety Operation, page 5). 3. Raise the bolt handle and draw the bolt all the way to the rear. 4. VISUALLY CHECK THE CHAMBER AND THE MAGAZINE TO BE CERTAIN THERE ARE NO CARTRIDGES IN THE RIFLE

-11- -12-
5. Remove the trigger guard assembly and stock.
a. Press the floorplate release to open the floorplate. b. With a screwdriver of the proper size, remove the front and rear trigger guard screws. c. Remove the trigger guard assembly from the stock. d. Remove the stock.
6. Remove the bolt assembly (refer to Removing the Bolt Assembly from the Rifle, page 9) 7. To field strip the bolt: a. Referring to Fig. 6 (below), hold the bolt body(B) stationary while rotating the bolt sleeve(A) in a
clockwise direction (as viewed from the rear) approximately 170° until firing pin/bolt sleeve assembly separates from the bolt body (B).
b. Withdraw the firing pin/bolt sleeve assembly (A) from the bolt body (B).
Fig. 6 NOTE: Further disassembly is not recommended. If further disassembly is required, contact a Weatherby Authorized Service Center or qualified gunsmith.
RREASSEMBLY OF VANGUARDD®® RRIFLE These instructions assume the rifle has been disassembled as described in Disassembly of Vanguard® Rifle, above. 1. Reassemble the bolt as follows:
a. Referring to the Fig. 7 (below), insert the firing pin bolt sleeve assembly (A) into the bolt body (B), aligning the square boss (C) on the bolt sleeve shank (D) with the indexing groove (E) on the bolt body (B). b. Rotate the firing pin bolt sleeve assembly (A) counter-clockwise (as viewed from the rear), until the nose of the cocking piece (G) falls into the detent (E) near the cam opening (F).
2. Insert bolt assembly into the receiver (refer to Inserting Bolt Assembly into Receiver, page 8). 3. Place the receiver barrel trigger assembly into the stock (refer to Assembly of Weatherby® Vanguard® Rifle,
page 15).
4. Insert the magazine box into it’s cavity on the underside of the stock and push it all the way into the receiver. 5. Holding the rifle in a vertical position, place the trigger guard assembly (with follower and follower spring) into its cavity and hold in place. 6. Turn rifle to horizontal position with trigger guard pointed up, and install trigger guard screw (refer to
Assembly of Weatherby® Vanguard® Rifle, page 15). NOTE: The shorter screw is the front trigger guard screw and the longer screw is the rear trigger guard screw.
7. With a screwdriver of the proper size, lightly tighten both trigger guard screws. 8. Grasp the barrel and pull it to the rear to seat the barrel and receiver properly in the stock. 9. Tighten the trigger guard screws to the proper torque and in the proper sequence as follows. Always tighten
the rear screw first to a torque of 35 inch pounds, followed by a torque of 35 inch pounds to the front screw. For wood and synthetic stocks this is the final torque value that should be used. On composite stocks with aluminum bedding blocks, apply additional torque to 55 inch pounds to the rear screw followed by 55 inch pounds to the front screw.
Fig. 7
CLEANING YOUR WEATHERBY®
VANGUARD® RIFLE Any firearm requires regular cleaning and periodic maintenance. To assure safe and reliable functioning of your Weatherby® Vanguard® rifle, it is very important that you clean it immediately after each use, and periodically during extended storage periods, to remove powder residue, dirt, dust and excess lubricant, and to prevent rust. During cleaning, inspect components to determine whether they are in proper working order. A basic cleaning kit consists of proper-sized cleaning rod, bore brush(es) and patches; gun cleaning solvent, gun lubricant, and lint-free cloth. The cleaning rod must have a tip with a slot into which patches can be inserted. Additionally, plastic bristle gun cleaning brushes, cotton swabs and pipe cleaners are very handy tools for cleaning away dirt in hard to reach places. To properly clean your rifle, it must first be dissembled (refer to Disassembly Instructions, page 11), the parts and components cleaned as discussed below, then reassembled (refer to Assembly Instructions, page 15). CCAUTION: Apply solvents and lubricants properly and sparingly. Do not spray or apply directly on
ammunition. Solvents and lubricants may affect the propellant, causing it not to ignite, but the energy from the primer may be sufficient to propel the propellant and bullet into the bore of the barrel, causing an obstruction, and resulting in damage to the rifle and serious injury to the shooter and bystanders upon firing a subsequent cartridge.

-13- -14-
CLEANING THE BORE 1. Remove the bolt (refer to Removing the Bolt Assembly from the Receiver, page 7) 2. With a bore cleaning brush of the proper size attached to the cleaning rod, apply gun cleaning solvent to the brush. 3. Push the cleaning rod all the way through the bore from the camber end several times.
4. With a clean patch inserted in the tip attached to the cleaning rod, push the rod all the way through the
barrel bore from the chamber end until the cloth emerges from the muzzle. Remove the dirty patch and withdraw the rod.
5. Repeat step 4 as many times as needed until the patch is clean as it emerges from the muzzle. 6. Using a clean patch or lint-free cloth wrapped around the tip of your finger or similarly shaped object,
remove all solvent from the muzzle of the barrel bore. 7. Insert a patch saturated with gun lubricant into the cleaning rod tip and push it through the bore from the
chamber end. Remove the patch and withdraw the rod. 8. Insert a dry, clean patch into the cleaning rod tip and push it through the bore from the chamber end, to
remove excess lubricant. Remove the patch and withdraw the rod. 9. Using a clean patch or lint-free cloth wrapped around the tip of your finger or similarly shaped object,
apply a light coat of gun lubricant to the muzzle of the barrel bore.
CLEANING OF THE BOLT ASSEMBLY 1. Clean all parts with a gun cleaning solvent and dry with a clean, lint-free cloth. Use of a small brush will help
in cleaning recesses of the bolt sleeve and firing pin spring. 2. Apply a llight coat of gun oil.
WWARNING!!!! Excess lubrication in the bore or chamber of any firearm may create excessive chamber pressures or a partial bore obstruction, resulting in possible damage to the firearm and serious injury to the shooter and bystanders upon firing. BE SURE ALL EXCESS LUBRICANT HAS BEEN REMOVED.
CLEANING THE OUTSIDE OF THE BARREL AND RECEIVER 1. Using a patch or clean cloth saturated with cleaning solvent, wipe down all accessible surfaces of the
barrel and receiver. (A clean tooth brush may be handy for cleaning the corners and recesses of the receiver)
2. With a clean, dry, lint-free cloth, remove all cleaning solvent.
3. Using a patch or clean, lint-free cloth, apply a light coat of gun lubricant to the outside surfaces of the
barrel and receiver being careful to remove any excess lubricant. CLEANING MUZZLE BRAKES If your rifle is equipped with a removable (“screw-off)” muzzle brake, use the supplied wrench to unscrew the muzzle brake from the barrel. When viewing from the muzzle, turn the muzzle brake counter clockwise to unscrew.
1. With a bore cleaning brush of proper size attached to the cleaning rod, apply gun cleaning solvent to the
brush.
2 Push the brush all the way through the muzzle brake several times. Repeat step 2 as many times as needed until all powder residue has been cleaned from the bore of the brake. Use of a plastic bristle gun cleaning brush will help to clean the threads and exterior of the muzzle brake.
3 Insert a patch saturated with gun lubricant into the cleaning rod tip and push it through the muzzle brake. Remove the patch and withdraw the rod.
4 Insert a dry, clean patch into the cleaning rod tip and push it through the muzzle brake to remove excess
lubricant. Remove the patch and withdraw the rod. 5 Using a patch or clean cloth, apply a light coat of gun lubricant to the outside surfaces of the muzzle
brake, being careful to remove any excess lubricant. CLEANING THE RECEIVER 1. Using a small lint-free cloth, clean the inside and outside of the receiver with gun-cleaning solvent and dry
thoroughly with a clean cloth. Use of a plastic bristle gun cleaning brush will help to clean the recesses of the receiver.
2. With a clean cloth or patch, apply a light coat of gun lubricant to all accessible surfaces of the receiver. CLEANING THE MAGAZINE 1. Using a lint-free cloth, clean the inside of the magazine, follower and spring with gun-cleaning solvent; and
dry thoroughly with a clean cloth. 2. With a clean cloth or patch, apply a light coat of gun lubricant to inside surface of the magazine and to
the follower and spring. CLEANING THE TRIGGER GUARD ASSEMBLY 1. Using a small lint-free cloth, clean the outside of the trigger guard assembly and with a clean tooth brush,
brush the exposed surfaces of the trigger guard assembly with gun-cleaning solvent; and dry thoroughly with a clean cloth.
CLEANING THE STOCK Usually, wiping the stock with a clean, dry cloth or a silicon cloth is all that is necessary. If you have been hunting or shooting in wet weather, allow the stock to dry thoroughly before storage. RUST PREVENTION AND REPAIR During normal maintenance, after a thorough cleaning, allow 2-3 hours at room temperature, for all metal parts to dry completely. Then apply a liberal amount of high grade Gun Oil to all metal parts, wiping off any excess with a clean dry cloth. If rusting does occur it may only be surface rust due to excessive moisture. You may be able to clean it by using a plastic bristle gun cleaning brush and gun cleaning solvent. If you are unable to remove rust on your rifle, please contact a Weatherby Authorized Service Center or qualified gunsmith. Immediate attention to this problem is imperative to prevent irreparable rust damage. DO NOT ALLOW RUST TO GO UNTREATED!

-15- -16-
ASSEMBLY OF WEATHERBY®
VANGUARD® RIFLE
ASSEMBLY OF BARREL AND RECEIVER TO STOCK 1. With the barreled action resting upside down on a horizontal surface such as a workbench or table, place the
stock onto the barreled action, aligning the recoil lug and the trigger guard screw holes.
2. Insert the magazine box, seating it completely against the receiver.
3. Insert the trigger guard assembly with its follower and spring into the stock and hold in place.
4. Insert the trigger guard screws and, with a screw driver of proper size, lightly seat the screws while holding the rifle in a vertical position with the butt down. Pull down on the barrel to help seat the recoil lug on the receiver with the mating surface in the stock.
5. Tighten the trigger guard screws to the proper torque and in the proper sequence as follows. Always tighten the rear screw first to a torque of 35 inch pounds, followed by a torque of 35 inch pounds to the front screw. For wood and synthetic stocks this is the final torque value that should be used. On composite stocks with aluminum bedding blocks, apply additional torque to 55 inch pounds to the rear screw followed by 55 inch pounds to the front screw.
TRIGGER ASSEMBLY ADJUSTMENT The Vanguard® trigger assembly has two adjustment screws. The adjusting screw on the front of the trigger assembly adjusts for the weight of the trigger pull, and is for your use. The adjusting screw on the rear of the trigger assembly adjusts sear engagement (“creep”), and is for use by Weatherby factory and Authorized Service Center personnel only.
WWARNING!!! Do not attempt to adjust sear engagement, make any adjustments other than as described below, or modify the trigger assembly in any way. Improper adjustment or modification of any firearm trigger assembly can result in the firearm discharging prematurely due to “hair trigger”, minor bumps or movement, possibly resulting in serious injury or death. The trigger assembly has been set at the factory for weight of trigger pull appropriate for most shooters. If you require a heavier or lighter weight of trigger pull, adjust as follows:
1. Unload the rifle (refer to Unloading the Rifle, page 9), remembering to VVISUALLY CHECK THE CCHAMBER AND THE MAGAZINE TO BE CCERTAIN THERE ARE NO CARTRIDGESS IIN THE RIFLE.
2. Remove the trigger guard and stock (refer to Disassembly of Vanguard® Rifle, page 10). 3. Loosen the lock nut on the front adjusting screw.
4. To increase weight of the trigger pull, with a screw driver of proper size turn the front adjusting screw clockwise (when viewed from the front) until desired weight of trigger pull is established. To decrease weight of trigger pull, with a screw driver of proper size turn the front adjusting screw counter-clockwise (when viewing from the front) until desired weight of trigger pull is established.
5. Tighten the lock nut on front adjusting screw securely. 6. Replace stock and trigger guard assembly (refer to Reassembly of Vanguard® Rifle, steps 3 thru 9
page 11).
NOTE: For safety reasons, weight of trigger pull can not be adjusted below approximately 2-¾ pounds.
STORING YOUR RIFLE
Your Weatherby® Vanguard® rifle may be stored fully assembled. If storing your rifle fully assembled, release the pressure on the hammer spring as follows: 1. Make certain the rifle is not loaded by following proper unloading procedures (refer to
Unloading the Rifle, Page 10). 2 With the bolt open and PPoointing the muzzle of the rifle in a safe direction, pull the trigger slightly while
closing the bolt.
Do not store your rifle in a leather case, scabbard or foam lined gun case. Leather and foam can attract moisture and cause rusting. For your safety, and the safety of others, store your rifle out of the reach of children, either in a gun safe or with a lock or other safety device properly installed; and store your ammunition in a separate, locked location, also out of the reach of children.
SUGGESTIONS FOR GETTING TOP PERFORMANCE FROM YOUR
WEATHERBY® VANGUARD® RIFLE 1. With the rifle unloaded, check and tighten muzzle brakes frequently -- before, during and after shooting.
Muzzle brake threads may loosen with repeated recoil, which may result in changes in point of impact or damage to muzzle brakes or barrel threads with extended use.

-17- -18-
2 Make sure that all trigger guard screws are tightened before firing the rifle. Always tighten the rear guard screw first and the front last (refer to ASSEMBLY OF WEATHERBY® VANGUARD® RIFLE page 15 line 5). Loose trigger guard screws not only contribute to inaccuracy but can also cause stock damage. CCheck these screws periodically as recoil and atmospheric conditions can cause them to work loose. 3 Be sure your scope is secure. Loose mount screws are a definite source of inaccuracy. If you experience
accuracy problems it is our recommendation that you contact your local gunsmith or an Authorized Weatherby Service Center to check your scope.
2 The condition of the bore is important in obtaining optimum accuracy from you rifle. Be sure to follow
the instructions for “Cleaning the Bore” on page 13. 3. The accuracy of any firearm can vary depending upon the brand and type of ammunition used in it. If
your rifle does not exhibit the consistent point of impact you expect, you should try several brands and types of ammunition, after referring to point 1, above, before concluding that it is "inaccurate".
DDO NOT ALTER THE STOCK BEDDING IN AANY WAY.. Once a stock has been
aaltered, it cannot be reworked by our Service Department or a Weatherby Authorized SService Center.
4. Consult the factory before returning any product for inspection or repair.
EXPLODED VIEW DIAGRAM
-19- -20-
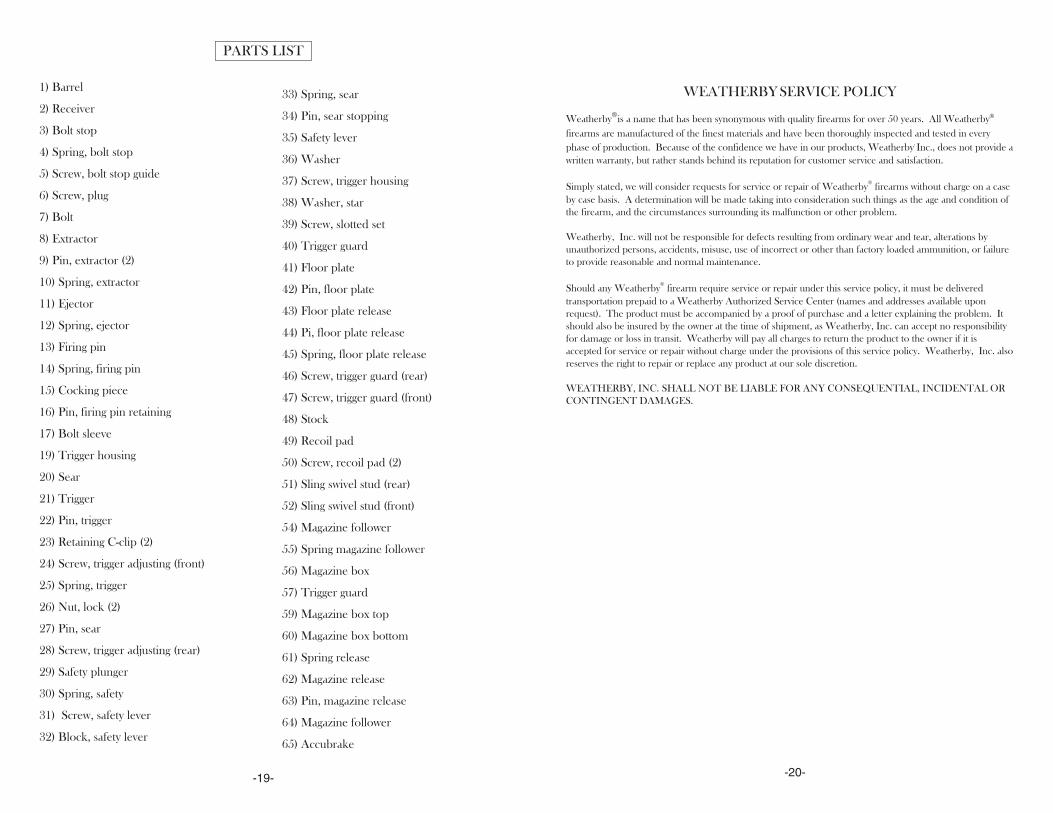
PARTS LIST
1) Barrel
2) Receiver
3) Bolt stop
4) Spring, bolt stop
5) Screw, bolt stop guide
6) Screw, plug
7) Bolt
8) Extractor
9) Pin, extractor (2)
10) Spring, extractor
11) Ejector
12) Spring, ejector
13) Firing pin
14) Spring, firing pin
15) Cocking piece
16) Pin, firing pin retaining
17) Bolt sleeve
19) Trigger housing
20) Sear
21) Trigger
22) Pin, trigger
23) Retaining C-clip (2)
24) Screw, trigger adjusting (front)
25) Spring, trigger
26) Nut, lock (2)
27) Pin, sear
28) Screw, trigger adjusting (rear)
29) Safety plunger
30) Spring, safety
31) Screw, safety lever
32) Block, safety lever
33) Spring, sear
34) Pin, sear stopping
35) Safety lever
36) Washer
37) Screw, trigger housing
38) Washer, star
39) Screw, slotted set
40) Trigger guard
41) Floor plate
42) Pin, floor plate
43) Floor plate release
44) Pi, floor plate release
45) Spring, floor plate release
46) Screw, trigger guard (rear)
47) Screw, trigger guard (front)
48) Stock
49) Recoil pad
50) Screw, recoil pad (2)
51) Sling swivel stud (rear)
52) Sling swivel stud (front)
54) Magazine follower
55) Spring magazine follower
56) Magazine box
57) Trigger guard
59) Magazine box top
60) Magazine box bottom
61) Spring release
62) Magazine release
63) Pin, magazine release
64) Magazine follower
65) Accubrake
WEATHERBY SERVICE POLICY Weatherby® is a name that has been synonymous with quality firearms for over 50 years. All Weatherby® firearms are manufactured of the finest materials and have been thoroughly inspected and tested in every phase of production. Because of the confidence we have in our products, Weatherby, Inc., does not provide a written warranty, but rather stands behind its reputation for customer service and satisfaction. Simply stated, we will consider requests for service or repair of Weatherby® firearms without charge on a case by case basis. A determination will be made taking into consideration such things as the age and condition of the firearm, and the circumstances surrounding its malfunction or other problem. Weatherby, Inc. will not be responsible for defects resulting from ordinary wear and tear, alterations by unauthorized persons, accidents, misuse, use of incorrect or other than factory loaded ammunition, or failure to provide reasonable and normal maintenance. Should any Weatherby® firearm require service or repair under this service policy, it must be delivered transportation prepaid to a Weatherby Authorized Service Center (names and addresses available upon request). The product must be accompanied by a proof of purchase and a letter explaining the problem. It should also be insured by the owner at the time of shipment, as Weatherby, Inc. can accept no responsibility for damage or loss in transit. Weatherby will pay all charges to return the product to the owner if it is accepted for service or repair without charge under the provisions of this service policy. Weatherby, Inc. also reserves the right to repair or replace any product at our sole discretion. WEATHERBY, INC. SHALL NOT BE LIABLE FOR ANY CONSEQUENTIAL, INCIDENTAL OR CONTINGENT DAMAGES.

TEN COMMANDMENTS OF
FIREARMS SAFETY
Prevention is the solution to hunting and shooting casualties. Every hunting and shooting accident that has occurred could have been prevented. Most such accidents happen as a result of people ignoring basic firearms safety rules. Prevention involves knowing and obeying those basic safety rules. Responsible, knowledgeable, and safe hunters and shooters will learn, remember and follow these simple rules: 1. Control the direction of your firearm's muzzle. Carry your firearm safely, keeping the safety on until
ready to shoot. Keep your finger off the trigger until ready to shoot. 2. Identify your target and what is beyond it. Know the identifying features of the game you hunt or the
targets you intend to shoot. 3. Treat every firearm with the respect due a loaded firearm. 4. Be sure the barrel and action are clear of obstructions and that you have only ammunition of proper
size and type for the firearm you are carrying. 5. Whenever not in use, keep your firearm unloaded and store all ammunition in a separate location. 6. Never point a firearm at anything you do not want to shoot. Avoid all horseplay with a firearm. 7. Never climb a fence or tree, or jump a ditch or log, with a loaded firearm. Never pull a firearm
toward you by the muzzle. 8. Never shoot at a flat hard surface or water. During target practice, be sure your backstop or shot-fall
area is adequate. 9. Store firearms and ammunition separately beyond the reach of children and careless adults. 10. Avoid alcoholic beverages or other mood-altering drugs before or while shooting.
EXERCISE EXTREME CAUTION
HHeed and follow these additional gun handling warnings whenever using any firearmm • Be sure the barrel is clear of any obstruction before loading. Make it a habit to check the barrel
every time before reloading. • Never place a loaded gun into a vehicle or lean the gun against any object. The gun should be
emptied and placed into a case when not in use. • Keep the safety on at all times. Move the safety to the "FIRE" position only when you are sure that a
shot is imminent. • While loading or unloading, make sure the gun is pointed in a safe direction. Keep your finger off
the trigger while operating the action. • Treat every gun as if it is loaded - it may be! • If you do not thoroughly understand the proper use and care of your gun, seek the advice of
someone you know is competent. • Do not abuse your hunting privileges. Both can be taken away from you due to public pressure
against "slob" hunters.
Weatherby® VANGUARD® RIFLE OWNER'S MANUAL WEATHERBY® and VANGUARD® are registered trademarks of Weatherby, Inc. Revised 05/04/2010
-21- -22-

REVISED & PRINTED May 2010Weatherby, Inc.
1605 Commerce Way • Paso Robles, CA 93446 • (805) 227-2600www.weatherby.com
WARNING
Children are attracted to and can operate firearmsthat can cause severe injuries or death.
Prevent child access by always keeping guns locked awayand unloaded when not in use. If you keep a loaded firearm
where a child obtains and improperly uses it, you may be finedor sent to prison.
ADVERTENCIA
A los niños los atraen las armas de fuego y laspueden hacer funcionar. Elios pueden causarses
lesiones graves y la muerte.Evite que los niños tengan acceso a las armas de fuego
guardándolas siempre con ilave y descargadas cuando no las estéutilizando. Si usted tiene un arma de fuego cargada en un lugar
en que un niño tiene acceso a elia y la usa indebidamente,le pueden dar una multa o enviario a la carcel.