utilizing mobile devices - core-ct mobile devices asset management december 6, 2016 1 utilizing...
TRANSCRIPT
Utilizing Mobile Devices Asset Management December 6, 2016
1
Utilizing Mobile Devices
In Core-CT 9.2, Asset Management will adopt PeopleSoft’s Fluid UI. Fluid UI was designed as
an improvement over the existing “Classic” user interface. Fluid provides greater flexibility with
cascading style sheets, and effortless page scaling between large to reduced viewing devices.
Users can equate the fluid homepage to the portal home page. In Fluid, the homepage
aggregates related information and displays tiles that provide access to fluid applications. To
navigate in Fluid, users utilize “tiles,” which are equivalents to pagelets in Classic PeopleSoft.
By selecting a tile on a homepage, users can access the underlying application ad perform
routine tasks. Tiles, generally, are depicted by a graphic that portrays the underlying
application’s purpose.
Note: The screenshots included in this job aid were captured on an iPad. It is important to
understand that Fluid may appear slightly different on individual devices due to page renderings
i.e. an iPhone 6 vs. an iPad may look different due to screen size and resolution. However, the
functionality and process flows remain the same across devices.
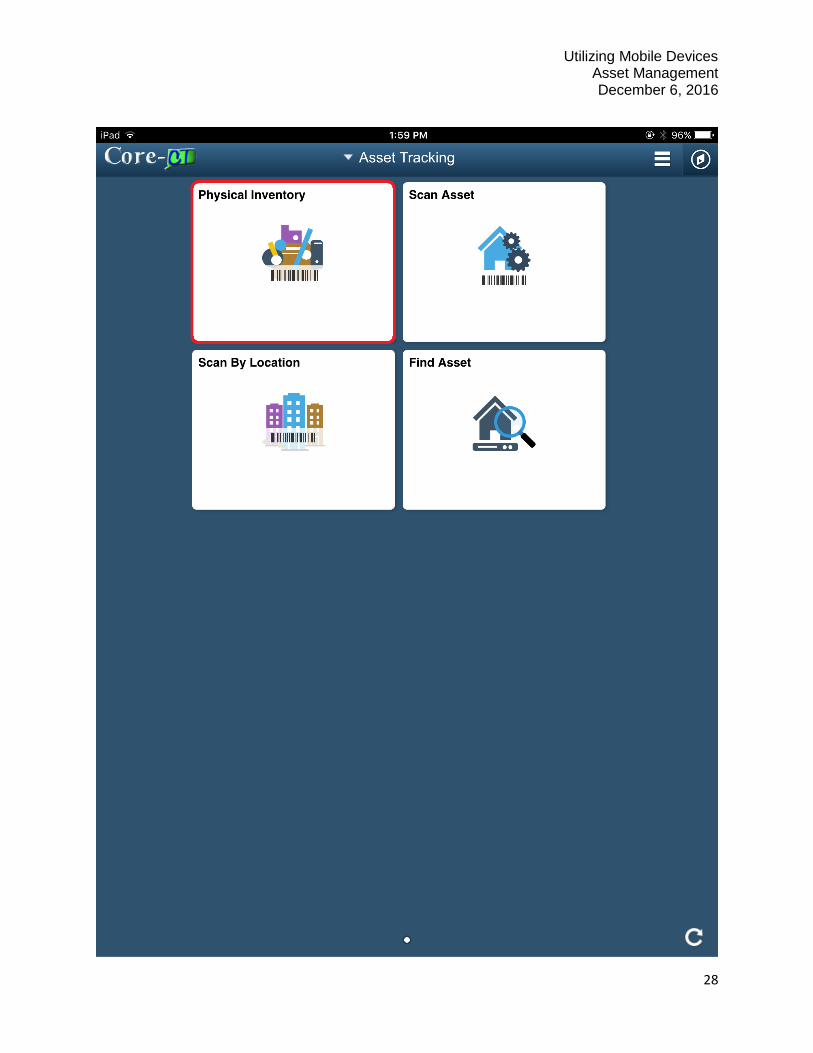
Asset Tracking Homepage The asset tracking tiles are part of the PeopleSoft Fluid User Interface and can be accessed
from your mobile device or mobile scanning device. The Asset Tracking Homepage is not
customizable for Core-CT users. Additionally, it is host to four tiles:
Physical Inventory
Scan Asset
Scan by Location
Find Asset
Inventory Scanners will utilize the Physical Inventory Tile, while Inventory Processors will utilize
the Scan Asset, Scan by Location, and Find Asset Tiles.

Utilizing Mobile Devices Asset Management December 6, 2016
2

Utilizing Mobile Devices Asset Management December 6, 2016
3
The Menu button, 3 bar icon in the top right corner, allows users to return to the Asset Tracking
Homepage or Sign Out. Note: The Menu actions will change depending on what tile a user is
using.

Utilizing Mobile Devices Asset Management December 6, 2016
4

Utilizing Mobile Devices Asset Management December 6, 2016
5
Physical Inventory Tile You will use the Physical Inventory tile to perform mobile physical inventory, scan assets,
retrieve and display asset information from the Asset Repository, and automatically populate the
Physical Inventory interface and Scan History tables with scan records—all from your mobile
scanning device. The Physical Inventory tile is part of the PeopleSoft Fluid User Interface and
can be accessed from your mobile scanning device (with web browsing capability).
This section will walk you through the entire physical inventory process using Fluid. You will use
the Physical Inventory tile after running the Generate Scan Scope process and before you
generate results and transactions.
During the scanning process an individual uses the Physical Inventory tile along with a scanning
device to scan a barcode; asset information is automatically retrieved from the Asset Repository
and presented to the scanning device. Scanned assets appear in list form on the left side of the
page. This process also populates the Physical Inventory and Scan History tables with scan
records.
Define Inventory Occurrence
Navigation:
Asset Management > Physical Inventory > Define Inventory Occurrence
1. Click the Add a New Value tab

Utilizing Mobile Devices Asset Management December 6, 2016
6
2. Enter the PI ID

Utilizing Mobile Devices Asset Management December 6, 2016
7
3. Click the Add button

Utilizing Mobile Devices Asset Management December 6, 2016
8
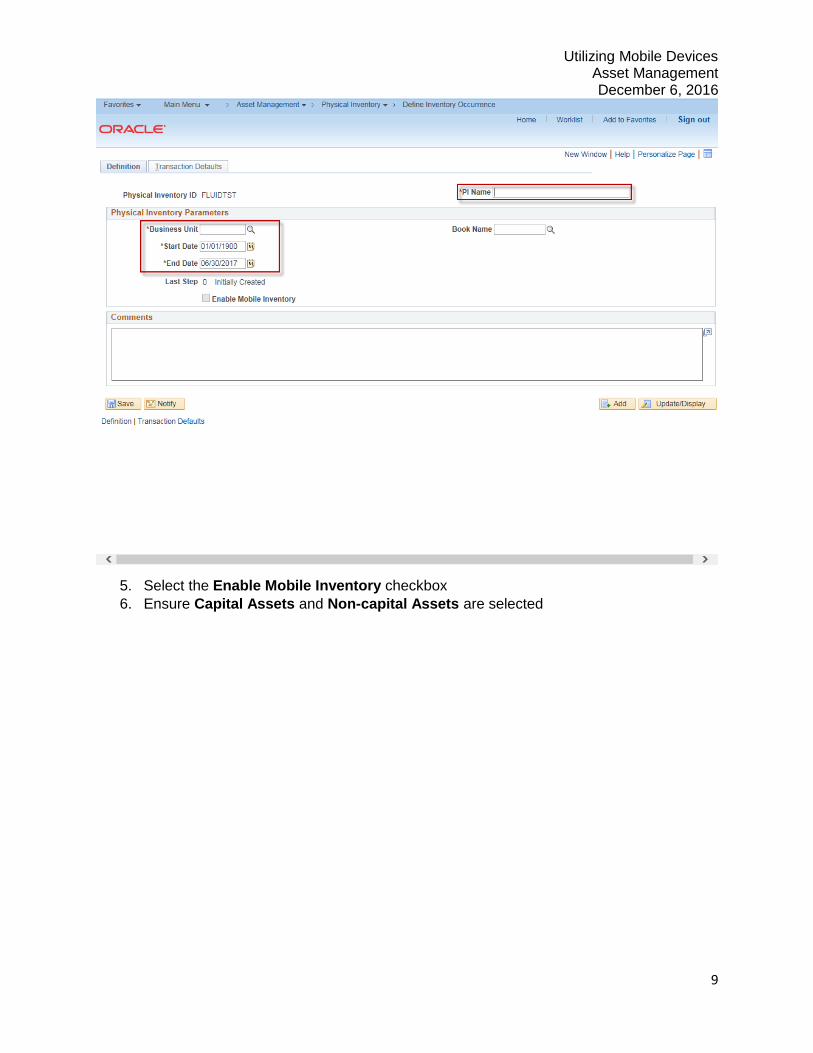
4. Enter PI Name and Physical Inventory Parameters
Utilizing Mobile Devices Asset Management December 6, 2016
9
5. Select the Enable Mobile Inventory checkbox
6. Ensure Capital Assets and Non-capital Assets are selected

Utilizing Mobile Devices Asset Management December 6, 2016
10
7. Click Enter Criteria tab

Utilizing Mobile Devices Asset Management December 6, 2016
11
8. Enter the Selection Criteria

Utilizing Mobile Devices Asset Management December 6, 2016
12
9. Click the Transaction Defaults tab

Utilizing Mobile Devices Asset Management December 6, 2016
13
10. Ensure the Auto Approval box is checked and the Non-Fin Adds, Physical Asset
Changes, and Asset Updates are selected

Utilizing Mobile Devices Asset Management December 6, 2016
14
11. Enter the Transaction Defaults

Utilizing Mobile Devices Asset Management December 6, 2016
15
12. Click Save

Utilizing Mobile Devices Asset Management December 6, 2016
16
Use the Load/Match/Reconcile PI Info page to execute each step of the Physical Inventory
process. It is recommended that you add a new run control ID for each physical inventory. Also
use this run control ID for subsequent steps within the same PI ID.
Generate Scan Scope
This process automatically defines a set of assets that should be scanned and provides that list
to the Physical Inventory page, which is accessible from your mobile scanning device.
Navigation:
Asset Management > Physical Inventory > Load/Match/Reconcile PI Info
1. Click the Add a New Value tab

Utilizing Mobile Devices Asset Management December 6, 2016
17
2. Enter a new Run Control ID

Utilizing Mobile Devices Asset Management December 6, 2016
18
3. Click the Add button

Utilizing Mobile Devices Asset Management December 6, 2016
19
4. Enter PI ID or Inventory Occurrence to be processed

Utilizing Mobile Devices Asset Management December 6, 2016
20

Utilizing Mobile Devices Asset Management December 6, 2016
21

Utilizing Mobile Devices Asset Management December 6, 2016
22
Note: The process will change from six steps to four steps, this is correct for mobile
inventorying.
5. Click Run

Utilizing Mobile Devices Asset Management December 6, 2016
23
6. The Run Physical Inventory (AMPl1000) process is checked
7. Select PSUNX Server Name

Utilizing Mobile Devices Asset Management December 6, 2016
24
8. Click OK
9. Click Process Monitor link
Utilizing Mobile Devices Asset Management December 6, 2016
25
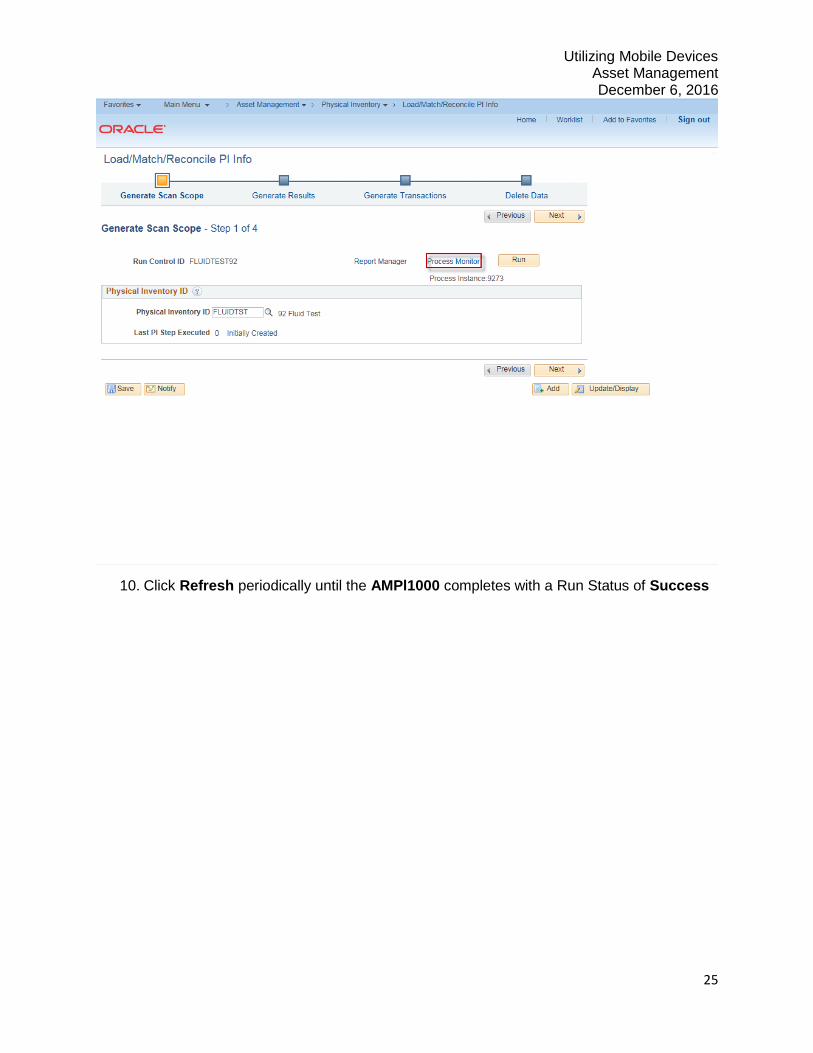
10. Click Refresh periodically until the AMPl1000 completes with a Run Status of Success

Utilizing Mobile Devices Asset Management December 6, 2016
26
Scan Assets
1. Log in to Mobile Device

Utilizing Mobile Devices Asset Management December 6, 2016
27
2. Click the Physical Inventory Tile
Utilizing Mobile Devices Asset Management December 6, 2016
28

Utilizing Mobile Devices Asset Management December 6, 2016
29
3. Enter PI ID
OR
Use the Flashlight icon to search for a PI ID

Utilizing Mobile Devices Asset Management December 6, 2016
30

Utilizing Mobile Devices Asset Management December 6, 2016
31
4. Click Done

Utilizing Mobile Devices Asset Management December 6, 2016
32

Utilizing Mobile Devices Asset Management December 6, 2016
33
5. Enter Scan Value
OR
Click the Side Arrow icon to reveal all values

Utilizing Mobile Devices Asset Management December 6, 2016
34
6. Select the desired Asset

Utilizing Mobile Devices Asset Management December 6, 2016
35
7. Repeat step 6 to scan additional tag numbers

Utilizing Mobile Devices Asset Management December 6, 2016
36
Edit Assets
1. Click the Scan Next field
2. Enter 49500000025 in the Scan Next field
3. Click GO

Utilizing Mobile Devices Asset Management December 6, 2016
37

Utilizing Mobile Devices Asset Management December 6, 2016
38
4. Click on the Edit button to make changes to the scan record

Utilizing Mobile Devices Asset Management December 6, 2016
39
5. Input changes as needed

Utilizing Mobile Devices Asset Management December 6, 2016
40
6. Click Done

Utilizing Mobile Devices Asset Management December 6, 2016
41
7. The ribbon confirms the updated asset scan

Utilizing Mobile Devices Asset Management December 6, 2016
42
Find an Asset
1. Click on the Menu Bar (3 Horizontal Lines)

Utilizing Mobile Devices Asset Management December 6, 2016
43
2. Select Find Asset

Utilizing Mobile Devices Asset Management December 6, 2016
44
3. Click on the Side Arrow to expand the Search Criteria on the left side of the page

Utilizing Mobile Devices Asset Management December 6, 2016
45
4. Input Search Criteria

Utilizing Mobile Devices Asset Management December 6, 2016
46
Note: You may enter the desired search criteria; this example uses the Unit and Tag
fields.

Utilizing Mobile Devices Asset Management December 6, 2016
47

Utilizing Mobile Devices Asset Management December 6, 2016
48
5. Click the Search button

Utilizing Mobile Devices Asset Management December 6, 2016
49
6. Select the Asset

Utilizing Mobile Devices Asset Management December 6, 2016
50
7. Click on Confirm Manual Scan

Utilizing Mobile Devices Asset Management December 6, 2016
51
8. The ribbon confirms the manual scan

Utilizing Mobile Devices Asset Management December 6, 2016
52
New Asset
1. Click on the Menu Bar (3 Horizontal Lines)

Utilizing Mobile Devices Asset Management December 6, 2016
53
2. Select New Asset

Utilizing Mobile Devices Asset Management December 6, 2016
54

Utilizing Mobile Devices Asset Management December 6, 2016
55
3. Input the Asset Details in the empty fields
Note: You may enter the desired asset details; this example uses the Tag and
Description fields.

Utilizing Mobile Devices Asset Management December 6, 2016
56
4. Click Done

Utilizing Mobile Devices Asset Management December 6, 2016
57
5. The ribbon confirms the new asset scan

Utilizing Mobile Devices Asset Management December 6, 2016
58

Utilizing Mobile Devices Asset Management December 6, 2016
59
Generate Results
After scanning barcodes in combination with the Physical Inventory tile (which inserts scanned
records into the PI_SCAN table), review the scanned data before running step 2 (generate
results).
Step 2 performs matching between a physical inventory scan scope and scanned data, and
creates physical inventory results for review
Navigation:
Asset Management > Physical Inventory > Load/Match/Reconcile PI Info
1. Enter Run Control ID
2. Click Search

Utilizing Mobile Devices Asset Management December 6, 2016
60
3. Click Run

Utilizing Mobile Devices Asset Management December 6, 2016
61
4. The Run Physical Inventory AMPl1000 process is checked
5. Select PSUNX Server Name
6. Click OK

Utilizing Mobile Devices Asset Management December 6, 2016
62
7. Select Process Monitor

Utilizing Mobile Devices Asset Management December 6, 2016
63
8. Click Refresh periodically until AMPl1000 completes with a Run Status of Success and
Distribution Status of Posted

Utilizing Mobile Devices Asset Management December 6, 2016
64
Review Results
Navigation:
Asset Management > Physical Inventory > Review Matching Results
1. Enter Physical Inventory ID

Utilizing Mobile Devices Asset Management December 6, 2016
65
2. Click Search

Utilizing Mobile Devices Asset Management December 6, 2016
66
3. Review Results

Utilizing Mobile Devices Asset Management December 6, 2016
67
4. Click the Details tab to view the values produced from the scanner versus the original
values from the system
5. Click Previous in List and Next in List to view additional Matching Results
OR
Click Return to Search and choose an entry to view from the search listing

Utilizing Mobile Devices Asset Management December 6, 2016
68
Generate Transactions
Navigation:
Asset Management > Physical Inventory > Load/Match/Reconcile PI Info
1. Enter Run Control ID

Utilizing Mobile Devices Asset Management December 6, 2016
69
2. Click Search

Utilizing Mobile Devices Asset Management December 6, 2016
70
3. Click Run

Utilizing Mobile Devices Asset Management December 6, 2016
71
4. The Run Physical Inventory AMPl1000 process is checked
5. Select PSUNX Server Name
6. Click OK

Utilizing Mobile Devices Asset Management December 6, 2016
72
7. Select Process Monitor

Utilizing Mobile Devices Asset Management December 6, 2016
73
8. Click Refresh periodically until AMPl1000 completes with a Run Status of Success and
Distribution Status of Posted

Utilizing Mobile Devices Asset Management December 6, 2016
74
Load Transactions
Asset Management > Send / Receive Information > Load Transactions > Load Transactions into
AM
1. Enter Run Control ID

Utilizing Mobile Devices Asset Management December 6, 2016
75
2. Click Search

Utilizing Mobile Devices Asset Management December 6, 2016
76
3. Set the System Source field
4. Set the Process Frequency field

Utilizing Mobile Devices Asset Management December 6, 2016
77
5. Click Run

Utilizing Mobile Devices Asset Management December 6, 2016
78
6. The Asset Transaction Loader (AMlF1000) process is checked
7. Select PSUNX Server Name
8. Click OK

Utilizing Mobile Devices Asset Management December 6, 2016
79
9. Select Process Monitor

Utilizing Mobile Devices Asset Management December 6, 2016
80
10. Click Refresh periodically until AMlF1000 completes with a Run Status of Success and
Distribution Status of Posted

Utilizing Mobile Devices Asset Management December 6, 2016
81

Utilizing Mobile Devices Asset Management December 6, 2016
82
Delete Data When you no longer need your physical inventory data, select one of the following options and
click the Run button.
Navigation:
Asset Management > Physical Inventory > Load/Match/Reconcile PI Info
1. Enter Run Control ID
2. Click the Search button

Utilizing Mobile Devices Asset Management December 6, 2016
83
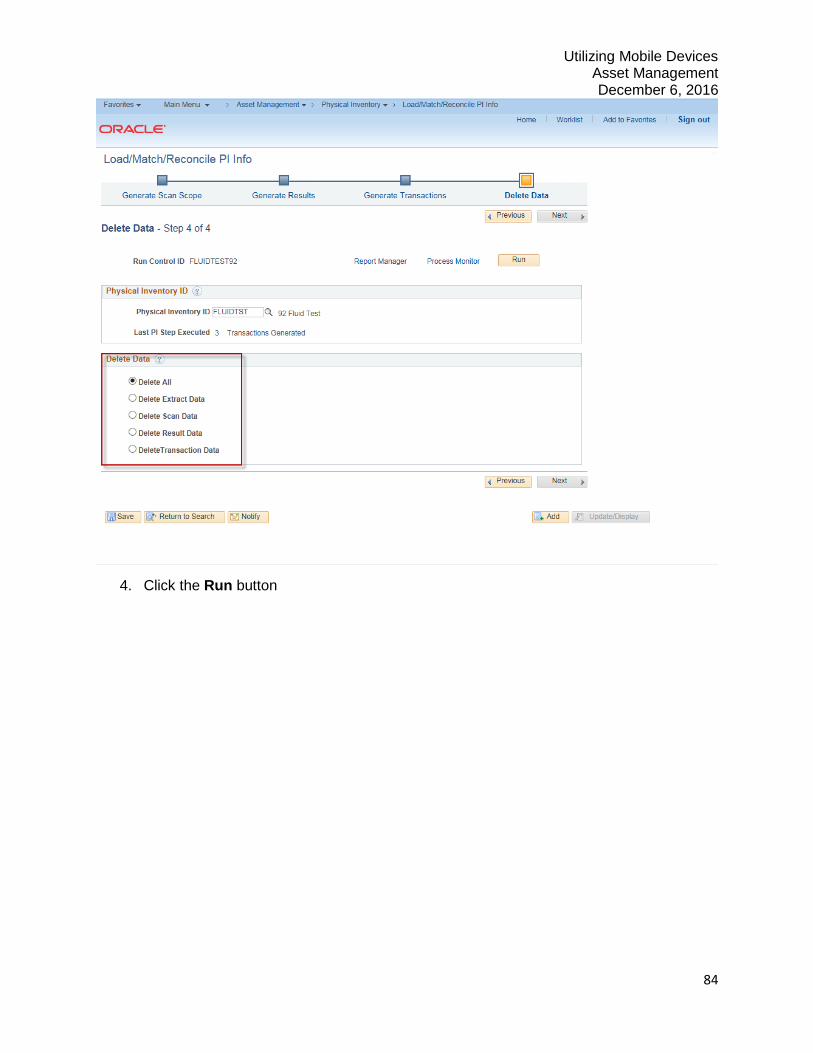
3. Select the appropriate form of Delete Data
Delete All - Select to delete all physical inventory data generated for the specified
Physical Inventory ID: (Scan Data, Result Data, and Transaction Data).
Delete Extract Data – Select to delete the physical inventory extract data.
Delete Scan Data – Select to delete the physical inventory scan data.
Delete Result Data – Select to delete the physical inventory results data.
Delete Transaction Data – Select to delete the physical inventory transaction data.
Utilizing Mobile Devices Asset Management December 6, 2016
84
4. Click the Run button

Utilizing Mobile Devices Asset Management December 6, 2016
85
5. The Asset Transaction Loader (AMlF1000) process is checked
6. Select PSUNX Server Name
7. Click OK

Utilizing Mobile Devices Asset Management December 6, 2016
86
8. Click the Process Monitor link

Utilizing Mobile Devices Asset Management December 6, 2016
87
9. Click Refresh periodically until AMlF1000 completes with a Run Status of Success and
Distribution Status of Posted

Utilizing Mobile Devices Asset Management December 6, 2016
88

Utilizing Mobile Devices Asset Management December 6, 2016
89
Scan Asset Tile Use the Scan Asset tile to retrieve general information, preventative maintenance schedules,
and work orders associated with a scanned asset. The asset information is retrieved from the
Asset Repository.
1. Click the Scan Asset tile

Utilizing Mobile Devices Asset Management December 6, 2016
90
2. Enter Search Criteria

Utilizing Mobile Devices Asset Management December 6, 2016
91
Note: You may enter the desired search criteria; this example uses the Unit and Asset
ID fields.

Utilizing Mobile Devices Asset Management December 6, 2016
92
3. Click Search

Utilizing Mobile Devices Asset Management December 6, 2016
93
4. Click the Asset in the Search Results section to display more details

Utilizing Mobile Devices Asset Management December 6, 2016
94

Utilizing Mobile Devices Asset Management December 6, 2016
95

Utilizing Mobile Devices Asset Management December 6, 2016
96
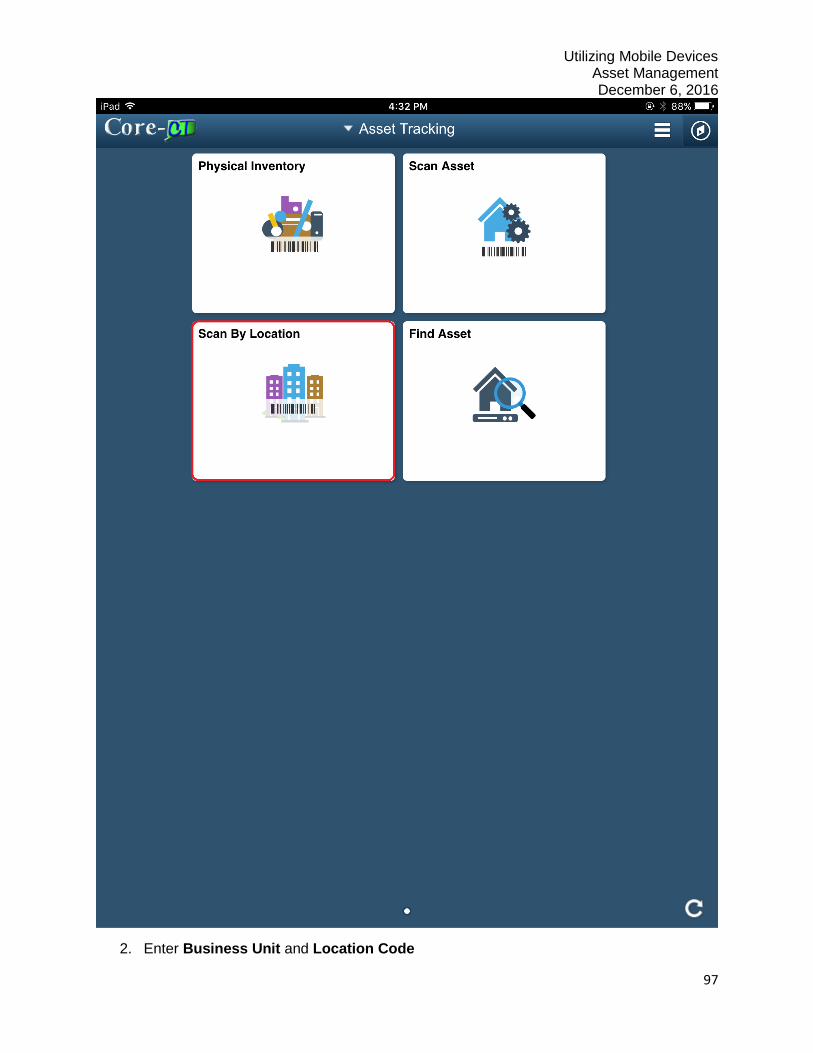
Scan by Location Tile Use the Scan by Location tile to scan assets within a specific location and build an audit history
for assets in that location. Audit history is stored in the Scan History tables.
1. Click Scan by Location tile
Utilizing Mobile Devices Asset Management December 6, 2016
97
2. Enter Business Unit and Location Code

Utilizing Mobile Devices Asset Management December 6, 2016
98
3. Change the Force Asset Location Update

Utilizing Mobile Devices Asset Management December 6, 2016
99
4. Click Done

Utilizing Mobile Devices Asset Management December 6, 2016
100
5. Scan Tag Number of Asset in a different location than the one entered above

Utilizing Mobile Devices Asset Management December 6, 2016
101
6. The page confirms the asset location change

Utilizing Mobile Devices Asset Management December 6, 2016
102
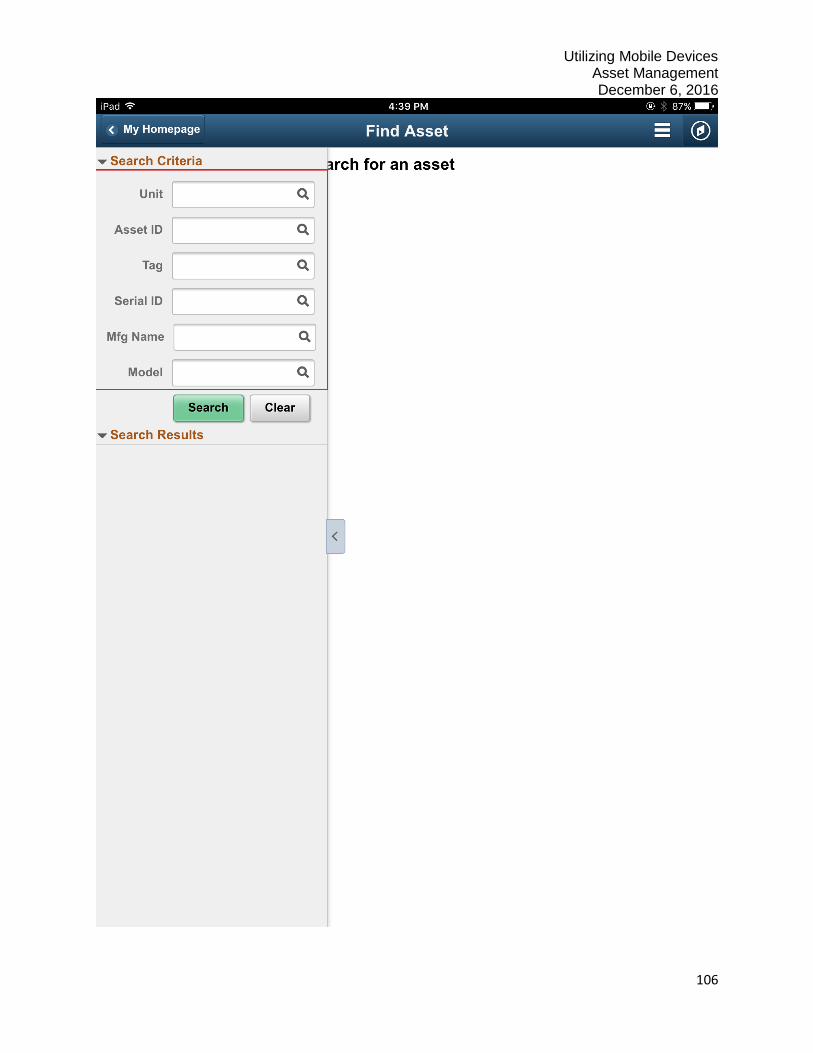
Find Asset Tile Use the Find Asset tile to retrieve information for assets without scanning a barcode.
1. Click on the Find Asset Tile

Utilizing Mobile Devices Asset Management December 6, 2016
103
2. Click the Side Arrow icon to display the search criteria

Utilizing Mobile Devices Asset Management December 6, 2016
104
3. Input Search Criteria

Utilizing Mobile Devices Asset Management December 6, 2016
105
Note: You may enter the desired search criteria; this example uses the Unit and Asset
ID fields.
Utilizing Mobile Devices Asset Management December 6, 2016
106

Utilizing Mobile Devices Asset Management December 6, 2016
107
4. Click Search

Utilizing Mobile Devices Asset Management December 6, 2016
108
5. Click the Asset in the Search Results section to display more details

Utilizing Mobile Devices Asset Management December 6, 2016
109