uss ii ilio-sacral - synthes.vo.llnwd.netsynthes.vo.llnwd.net/o16/llnwmb8/int mobile/synthes...
TRANSCRIPT

TECHNIQUE GUIDE
Modular System for Stable Fixation in the Sacrum and Illium
USS II ILIO-SACRAL
Instruments and implants approved by the AO Foundation.This publication is not intended for distribution in the USA.

WarningThis description alone does not provide sufficient background for direct use of the instrument set. Instruction by a surgeon experienced in handling these instruments is highly recommended.
Reprocessing, Care and Maintenance of Synthes InstrumentsFor general guidelines, function control and dismantling of multi-part instruments, please refer to: www.synthes.com/reprocessing
USS II Ilio-Sacral Technique Guide DePuy Synthes 1
INTRODUCTION USS II Ilio-Sacral 2
Indications and Contraindications 4
PRODUCT INFORMATION Implants 5
Instruments 7
SURGICAL TECHNIQUE Iliac Fixation with Iliac Connector 9
S2 Fixation with S2 Connector 18 Insertion S2 connector left/right 21 Insertion S2 connector for rod end 23
Remobilisation of the Polyaxial Connection for Implant Removal 25
TABLE OF CONTENTS
21
6.2 7.0 8.0
2 DePuy Synthes USS II Ilio-Sacral Technique Guide
USS II ILIO-SACRAL
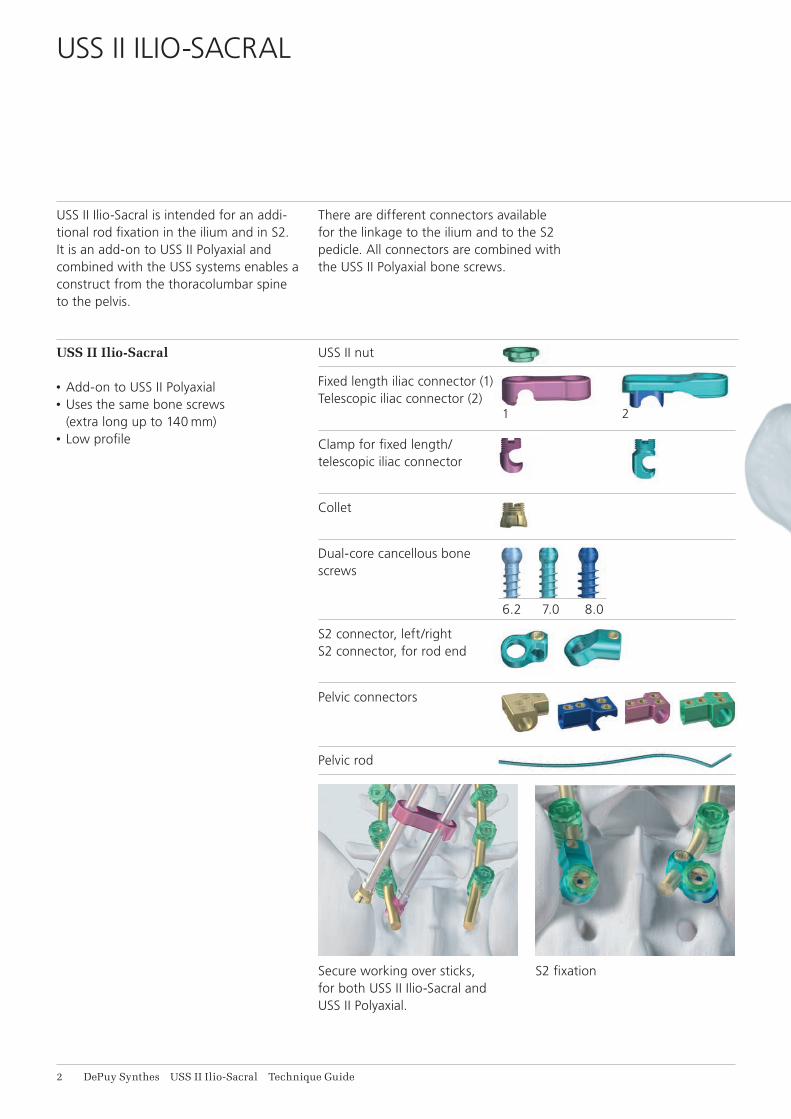
USS II Ilio-Sacral is intended for an addi-tional rod fixation in the ilium and in S2. It is an add-on to USS II Polyaxial and combined with the USS systems enables a construct from the thoracolumbar spine to the pelvis.
There are different connectors available for the linkage to the ilium and to the S2 pedicle. All connectors are combined with the USS II Polyaxial bone screws.
USS II Ilio-Sacral
• Add-on to USS II Polyaxial• Uses the same bone screws
(extra long up to 140 mm)• Low profile
USS II nut
Fixed length iliac connector (1)Telescopic iliac connector (2)
Clamp for fixed length/ telescopic iliac connector
Collet
Dual-core cancellous bone screws
S2 connector, left/right S2 connector, for rod end
Pelvic connectors
Pelvic rod
Secure working over sticks, for both USS II Ilio-Sacral and USS II Polyaxial.
S2 fixation


4 DePuy Synthes USS II Ilio-Sacral Technique Guide
INDICATIONS AND CONTRAINDICATIONS
Notes• The iliac connectors provide additional stabiliza-
tion for an S1 screw fixation. It is recommended to always combine an iliac connector with an S1 screw.
• For degenerative diseases, it is recommended to use an S2 fixation where possible in addition to the S1 screw.
IndicationsUSS II Ilio-Sacral is indicated for fixation of long posterior rod constructs in the ilium and in S2, both in combina-tion with an S1 fixation.
S1 fixation combined with iliac fixation:• Severe scoliosis (e.g. neuromuscular)
S1 fixation combined with S2 fixation:• Degenerative diseases (e.g. spondylolisthesis)
Contraindications• Fractures and tumours with insufficient anterior support• USS II Ilio-Sacral should not be used where no fixation
in S1 is possible.
USS II Ilio-Sacral Technique Guide DePuy Synthes 5
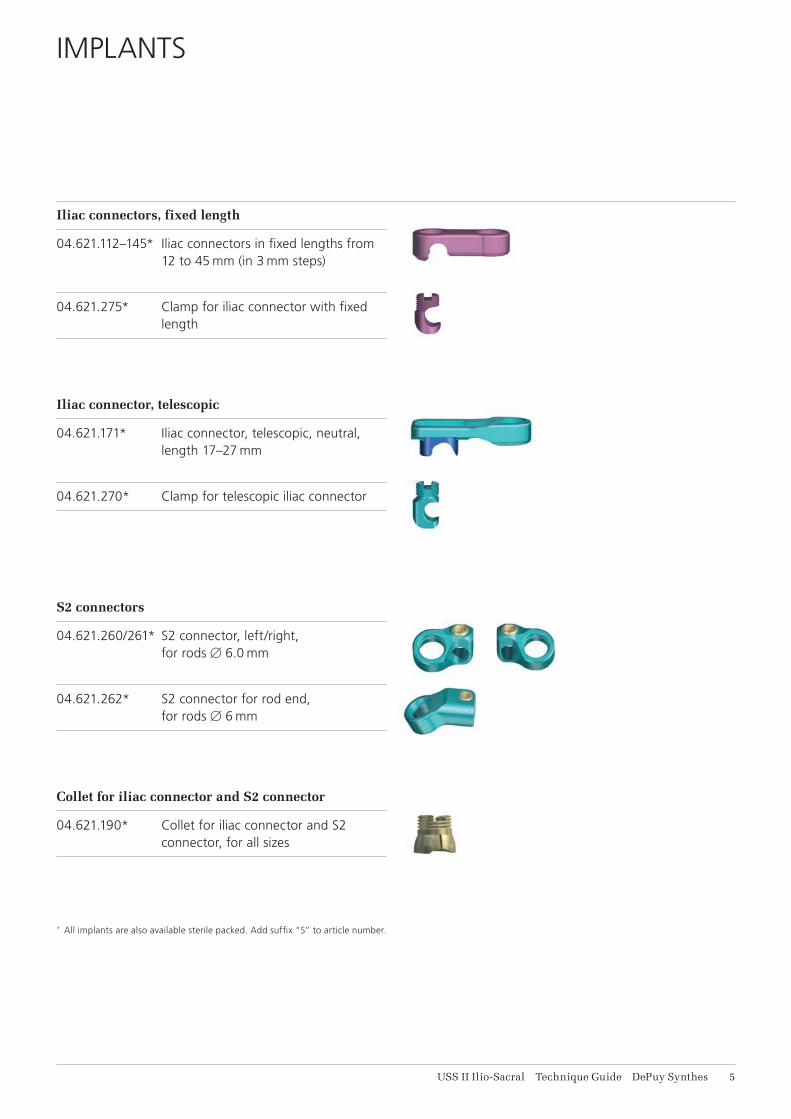
Iliac connectors, fixed length
04.621.112–145* Iliac connectors in fixed lengths from 12 to 45 mm (in 3 mm steps)
04.621.275* Clamp for iliac connector with fixed length
Iliac connector, telescopic
04.621.171* Iliac connector, telescopic, neutral, length 17–27 mm
04.621.270* Clamp for telescopic iliac connector
S2 connectors
04.621.260/261* S2 connector, left/right, for rods ⌀ 6.0 mm
04.621.262* S2 connector for rod end, for rods ⌀ 6 mm
Collet for iliac connector and S2 connector
04.621.190* Collet for iliac connector and S2 connector, for all sizes
IMPLANTS
* All implants are also available sterile packed. Add suffix “S” to article number.

6 DePuy Synthes USS II Ilio-Sacral Technique Guide
USS II nut
499.294* USS II nut
USS II Polyaxial cancellous bone screws with dual core
Art. Nos. ⌀ Lengths Colour
04.607.232–239* 6.2 mm 30–65 mm light blue
04.607.252–269* 7.0 mm 30–140 mm turquoise
04.607.272–289* 8.0 mm 30–140 mm blue
Optionally USS II Polyaxial pedicle screws can be used.
Pelvic connectors*
04.300.000* L-connector
04.300.001* Claw-connector
04.300.002* T-connector, small
04.300.003* T-connector, large
Pelvic rods*
04.306.010 Pelvic rod, left
04.306.012 Pelvic rod, right
* Implants are also available sterile packed. Add suffix “S” to article number.
Implants

USS II Ilio-Sacral Technique Guide DePuy Synthes 7
The USS General Instruments (187.200) are recom-mended for use as basic instrument set.
USS II Polyaxial instruments needed for USS II Ilio-Sacral
03.607.001 Screwdriver, bihexagonal 3.0 mm, with T-Handle
03.607.003 USS II Polyaxial Holding Sleeve for No. 03.607.001
03.607.002 Screwdriver Shaft for USS II Polyaxial cancellous bone screws with lengths M70 mm
388.622 Handle for Screw Holder or 03.607.006 USS II Polyaxial Handle for Screw Holder
03.607.055
03.607.000 USS II Polyaxial Reamer
INSTRUMENTS

8 DePuy Synthes USS II Ilio-Sacral Technique Guide
03.607.005 USS II Polyaxial Screw Holder
388.584 Socket Wrench for twelve point nut, with L-Handle
USS II Ilio-Sacral instruments
03.621.011 Clamp Holder (for clamps 04.621.270 and 275)
03.621.031–33 Templates for Iliac Connectors (short, medium, long)
03.621.012 Socket Wrench, cannulated, with Straight Handle for USS-II Nut
Additional instruments
319.011 Depth Gauge for Pedicle Screws, measuring range up to 110 mm
388.143 Socket Wrench 5.0 mm, with T-Handle
314.070 Screwdriver, hexagonal, small, 2.5 mm, with Groove
Instruments

USS II Ilio-Sacral Technique Guide DePuy Synthes 9
1Instrument spine down to S1
Instrument the spine with a rod construct down to S1 according to the surgical technique of the implant sys-tem used (e.g. USS II Polyaxial). In S1, it is recommended to use a USS II Polyaxial cancellous bone screw for easy rod introduction.
Note: Leave at least 3 cm excess rod caudally to the S1 screw for later placement of the iliac connector.
AlternativeInstead of applying the iliac connectors to the rod as the last step in the surgery, it is also possible to insert all screws and iliac connectors first, and then apply the rod.
2Determine size of iliac connector
Required instruments
03.621.031–33 Templates (short, medium, long)
Use the templates to determine the proper implant size. Either the telescopic or the fixed-length iliac connector may be used.
Notes• Fixed length connector: The distances indicated on
the template correspond to the implant size (mm).• Telescopic connector: The distance varies between
17 and 27 mm.
ILIAC FIXATION WITH ILIAC CONNECTOR

11 DePuy Synthes USS II Ilio-Sacral Technique Guide
3Attach clamp
Required instrument
03.621.011 Clamp Holder
Pick up the corresponding clamp for the telescopic or fixed-length connector from the tray using the Clamp Holder.
Note: The Clamp Holder is approx. twice as long as the USS II Polyaxial Screw Holder.
Attach the clamp to the rod from the midline. If neces-sary, remove excessive bone below the rod to create enough space for the clamp.
Clamp for fixed-length iliac connector
Clamp for telescopic iliac connector
Note: To prevent possible tissue irritation remove enough bone on the ilium so that the iliac connector will be seated below the original iliac crest.
Iliac Fixation with Iliac Connector

USS II Ilio-Sacral Technique Guide DePuy Synthes 11
4Place iliac connector and create screw entry point
Required instrument
03.621.011 Clamp Holder
Drop the iliac connector over the Clamp Holder. With the implant in place, verify that the correct implant size has been chosen.
Use a pedicle probe to drill the screw hole in the center of the opening of the iliac connector. This ensures that the screw will be placed at the correct distance to the rod.
After drilling the screw hole, remove the iliac connector.
Alternative screw placement in the ilium: The screw may be placed from the inner side of the iliac crest in order to reduce the extent of soft tissue exposure.
12 DePuy Synthes USS II Ilio-Sacral Technique Guide
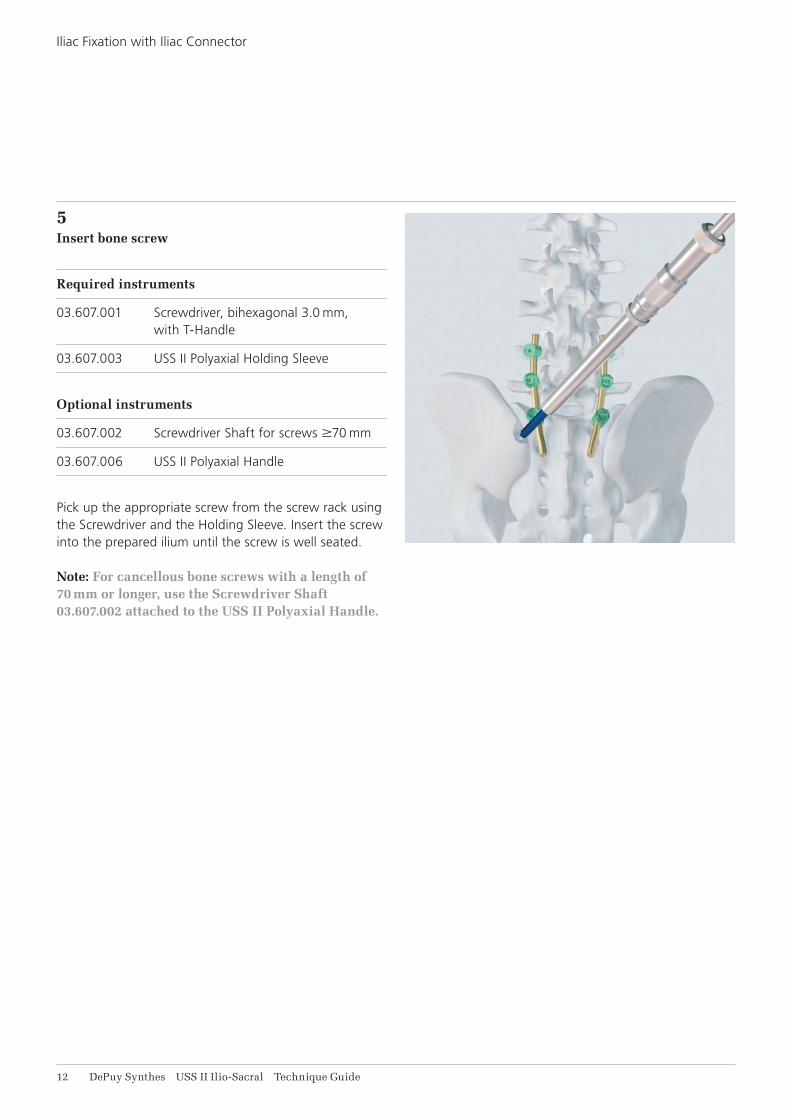
5Insert bone screw
Required instruments
03.607.001 Screwdriver, bihexagonal 3.0 mm, with T-Handle
03.607.003 USS II Polyaxial Holding Sleeve
Optional instruments
03.607.002 Screwdriver Shaft for screws M70 mm
03.607.006 USS II Polyaxial Handle
Pick up the appropriate screw from the screw rack using the Screwdriver and the Holding Sleeve. Insert the screw into the prepared ilium until the screw is well seated.
Note: For cancellous bone screws with a length of 70 mm or longer, use the Screwdriver Shaft 03.607.002 attached to the USS II Polyaxial Handle.
Iliac Fixation with Iliac Connector

USS II Ilio-Sacral Technique Guide DePuy Synthes 11
6Expose screw head
Required instruments
03.607.000 USS II Polyaxial Reamer
03.607.001 Screwdriver, bihexagonal 3.0 mm, with T-Handle
Place the Reamer guided by the Screwdriver over the screw head. Ream away excessive bone by moving the reamer back and forth until the red mark on the screw-driver shaft becomes visible.
Note: If more bone that may block the connector has to be removed, use a chisel or gauge pliers.

14 DePuy Synthes USS II Ilio-Sacral Technique Guide
7Click on the collet
Required instruments
03.607.005 USS II Polyaxial Screw Holder
03.607.006 USS II Polyaxial Handle(388.622) (Handle for Screw Holder)
Use the USS II Polyaxial Screw Holder to pick up a collet from the tray. Optionally, attach the Handle for a better hold.
Click on the collet and orient the notch on the collet in direction of the screw angulation to achieve larger an-gles. Afterwards release the Handle leaving the Screw Holder attached to the collet.
Note: Make sure that no tissue is stuck between the screw head and the collet.
Iliac Fixation with Iliac Connector

USS II Ilio-Sacral Technique Guide DePuy Synthes 15
8Insert iliac connector
Required instruments
03.621.011 Clamp Holder
Attach the clamp to the rod from the midline.
Slide the iliac connector over both the Clamp Holder and the Screw Holder.

1
2
16 DePuy Synthes USS II Ilio-Sacral Technique Guide
9Lock iliac connector
Required instruments
03.621.012 Socket Wrench, cannulated, with Straight Handle for USS-II Nut
388.584 Socket Wrench for twelve point nut, with L-Handle
388.143 Socket Wrench 5.0 mm, with T-Handle
Pick up a nut using the Socket Wrench with Straight Handle (black), place it over the collet of the iliac screw and tighten it slightly. (1)
Notes• Always first place a nut on the collet (iliac screw)
and then one on the clamp (rod).• Pre-tighten the nut on the iliac screw at least
2 revolutions. This is how the iliac connector is firmly attached to the bone screw while the poly-axiality is still maintained. Pull on the Screw Holder to check if the collet has been attached correctly.
Secondly, apply a nut on the clamp, and tighten it slightly. (2)
For final tightening, change the Socket Wrench with black handle to the one with L-Handle. Use the Socket Wrench with T-Handle as counter-torque.
Iliac Fixation with Iliac Connector
USS II Ilio-Sacral Technique Guide DePuy Synthes 17
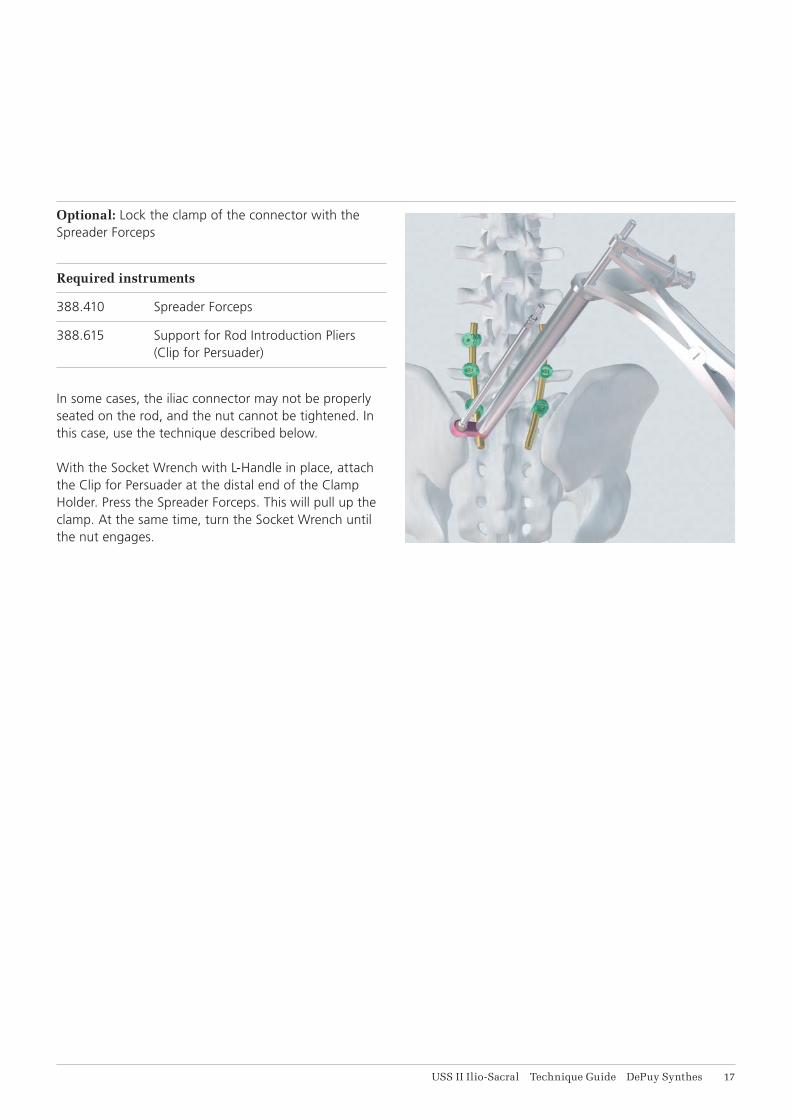
Optional: Lock the clamp of the connector with the Spreader Forceps
Required instruments
388.410 Spreader Forceps
388.615 Support for Rod Introduction Pliers (Clip for Persuader)
In some cases, the iliac connector may not be properly seated on the rod, and the nut cannot be tightened. In this case, use the technique described below.
With the Socket Wrench with L-Handle in place, attach the Clip for Persuader at the distal end of the Clamp Holder. Press the Spreader Forceps. This will pull up the clamp. At the same time, turn the Socket Wrench until the nut engages.

18 DePuy Synthes USS II Ilio-Sacral Technique Guide
1Instrument spine down to S1
Place the pedicle screws according to the surgical tech-nique of the system used (e.g. USS II Polyaxial)
2Prepare hole for the S2 pedicle screw
Required instruments
388.540 Pedicle probe ⌀ 3.8 mm with Canevasit Handle
388.539 Pedicle probe ⌀ 4.8 mm with Canevasit Handle
Open the pedicle using a pedicle probe.
S2 FIXATION WITH S2 CONNECTOR

USS II Ilio-Sacral Technique Guide DePuy Synthes 19
3Insert S2 screw
Required instruments
03.607.001 Screwdriver, bihexagonal 3.0 mm, with T-Handle
03.607.003 USS II Polyaxial Holding Sleeve
Pick up the appropriate screw from the screw rack using the Screwdriver and the Holding Sleeve. Insert the screw into the prepared pedicle until the screw is well seated. Ideally, the screw is placed bicortically.
4Expose screw head
Required instruments
03.607.001 Screwdriver, bihexagonal 3.0 mm, with T-Handle
03.607.000 USS II Polyaxial Reamer
Place the Reamer guided by the Screwdriver over the screw head. Ream away excessive bone by moving the reamer back and forth until the red mark on the screw-driver shaft becomes visible.

21 DePuy Synthes USS II Ilio-Sacral Technique Guide
5Click on the collet
Required instruments
03.607.005 USS II Polyaxial Screw Holder
388.622 Handle for Screw Holder
(03.607.006) (USS II Polyaxial Handle)
Use the USS II Polyaxial Screw Holder to pick up a collet from the tray. Optionally, attach the Handle for a better hold.
Click on the collet and orient the notch on the collet in direction of the screw angulation to achieve larger an-gles. Afterwards release the Handle leaving the Screw Holder attached to the collet.
Notes• Make sure that no tissue is stuck between the
screw head and the collet.• Alternatively a USS II Polyaxial 3-D head may be
clicked on the screw instead of using the S2 connector.
S2 Fixation with S2 Connector

USS II Ilio-Sacral Technique Guide DePuy Synthes 21
Insertion S2 connector left/right
6aInsert S2 connector (left or right)
Required instruments
388.584 Socket Wrench for twelve point nut, with L-Handle
03.607.005 USS II Polyaxial Screw Holder
Slide the connector over the Screw Holder onto the collet.
Pick up a nut using the Socket Wrench with L-Handle, and place it over the collet of the S2 screw.
Pre-tighten the nut on the S2 screw at least two revolu-tions. This is how the S2 connector is firmly attached to the bone screw while the polyaxiality is still maintained. Check for a secure seat by pulling on the Screw Holder.

22 DePuy Synthes USS II Ilio-Sacral Technique Guide
7aInsert rod and lock nuts
Required instruments
03.607.005 USS II Polyaxial Screw Holder
388.584 Socket Wrench for twelve point nut, with L-Handle
388.143 Socket Wrench 5.0 mm, with T-Handle
03.607.001 Screwdriver, bihexagonal 3.0 mm, with T-Handle
Insert the rod into the connector.
Connect the rod to the remaining screws according to the surgical technique of the implant system used (e.g. USS II Polyaxial).
Use the Screwdriver to lock the set screw on the S2 connector.
Use the Socket Wrench with T-Handle as counter-torque for final tightening.
S2 Fixation with S2 Connector
USS II Ilio-Sacral Technique Guide DePuy Synthes 21
Insertion S2 connector for rod end
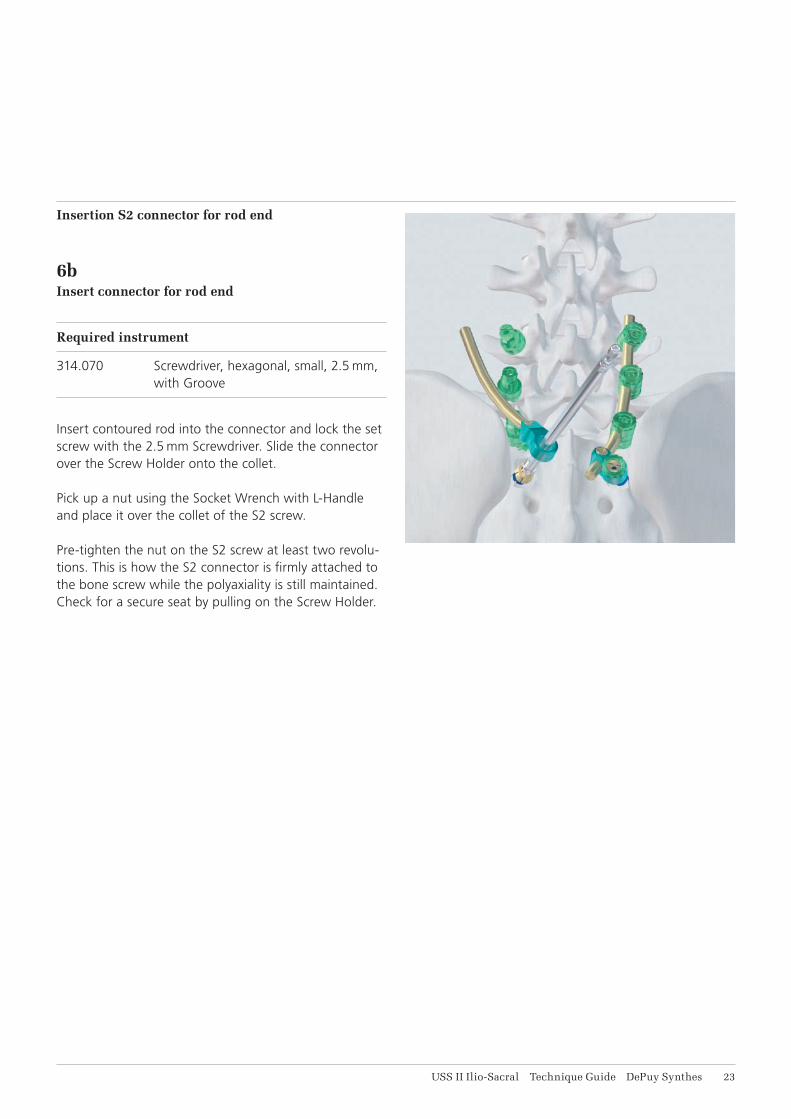
6bInsert connector for rod end
Required instrument
314.070 Screwdriver, hexagonal, small, 2.5 mm, with Groove
Insert contoured rod into the connector and lock the set screw with the 2.5 mm Screwdriver. Slide the connector over the Screw Holder onto the collet.
Pick up a nut using the Socket Wrench with L-Handle and place it over the collet of the S2 screw. Pre-tighten the nut on the S2 screw at least two revolu-tions. This is how the S2 connector is firmly attached to the bone screw while the polyaxiality is still maintained. Check for a secure seat by pulling on the Screw Holder.

24 DePuy Synthes USS II Ilio-Sacral Technique Guide
7bConnect rod to remaining screws and lock nuts
Required instruments
03.607.005 USS II Polyaxial Screw Holder
388.584 Socket Wrench for twelve point nut, with L-Handle
388.143 Socket Wrench 5.0 mm, with T-Handle
Connect the rod to the remaining screws according to the surgical technique of the implant system used (e.g. USS II Polyaxial).
Use the Socket Wrench with T-Handle as counter-torque for final tightening.
S2 Fixation with S2 Connector

USS II Ilio-Sacral Technique Guide DePuy Synthes 25
Required instruments
388.584 Socket Wrench for twelve point nut, with L-Handle
03.607.005 USS II Polyaxial Screw Holder
03.607.006 USS II Polyaxial Handle
After removing the nuts, move the collet back and forth using the Screw Holder. The collet will come loose.
REMOBILISATION OF THE POLYAXIAL CONNECTION FOR IMPLANT REMOVAL

01230123
Synthes GmbHEimattstrasse 34436 OberdorfSwitzerlandTel: +41 61 965 61 11Fax: +41 61 965 66 00www.depuysynthes.com ©
DeP
uy S
ynth
es S
pine
, a d
ivis
ion
of S
ynth
es G
mbH
. 201
5.
All
right
s re
serv
ed.
036.
000.
791
DS
EM
/SP
N/0
115/
0262
03
/15
This publication is not intended for distribution in the USA.
All surgical techniques are available as PDF files at www.synthes.com/lit