using gelatin for moulds and prosthetics
DESCRIPTION
gelatin moldTRANSCRIPT

http://www.instructables.com/id/Using-gelatin-for-moulds-and-prosthetics/
Home Sign Up! Browse Community Submit
All Art Craft Food Games Green Home Kids Life Music Offbeat Outdoors Pets Photo Ride Science Tech
Using gelatin for moulds and prostheticsby marshon on May 22, 2010
Table of Contents
Using gelatin for moulds and prosthetics . . . . . . . . . . . . . . . . . . . . . . . . . . . . . . . . . . . . . . . . . . . . . . . . . . . . . . . . . . . . . . . . . . . . . . . . . . . . . . . . . . . . . . . . . . . . 1
Intro: Using gelatin for moulds and prosthetics . . . . . . . . . . . . . . . . . . . . . . . . . . . . . . . . . . . . . . . . . . . . . . . . . . . . . . . . . . . . . . . . . . . . . . . . . . . . . . . . . . . . . 2
Step 1: The basic mix . . . . . . . . . . . . . . . . . . . . . . . . . . . . . . . . . . . . . . . . . . . . . . . . . . . . . . . . . . . . . . . . . . . . . . . . . . . . . . . . . . . . . . . . . . . . . . . . . . . . . . . 2
Step 2: Making the basic 'goo' . . . . . . . . . . . . . . . . . . . . . . . . . . . . . . . . . . . . . . . . . . . . . . . . . . . . . . . . . . . . . . . . . . . . . . . . . . . . . . . . . . . . . . . . . . . . . . . . . 3
Step 3: Cool it all down . . . . . . . . . . . . . . . . . . . . . . . . . . . . . . . . . . . . . . . . . . . . . . . . . . . . . . . . . . . . . . . . . . . . . . . . . . . . . . . . . . . . . . . . . . . . . . . . . . . . . . 4
Step 4: Using the basic mix . . . . . . . . . . . . . . . . . . . . . . . . . . . . . . . . . . . . . . . . . . . . . . . . . . . . . . . . . . . . . . . . . . . . . . . . . . . . . . . . . . . . . . . . . . . . . . . . . . . 5
Step 5: Foaming gelatin . . . . . . . . . . . . . . . . . . . . . . . . . . . . . . . . . . . . . . . . . . . . . . . . . . . . . . . . . . . . . . . . . . . . . . . . . . . . . . . . . . . . . . . . . . . . . . . . . . . . . . 7
Step 6: To make the Peter Gaal nose . . . . . . . . . . . . . . . . . . . . . . . . . . . . . . . . . . . . . . . . . . . . . . . . . . . . . . . . . . . . . . . . . . . . . . . . . . . . . . . . . . . . . . . . . . . 7
Step 7: Pour the plaster . . . . . . . . . . . . . . . . . . . . . . . . . . . . . . . . . . . . . . . . . . . . . . . . . . . . . . . . . . . . . . . . . . . . . . . . . . . . . . . . . . . . . . . . . . . . . . . . . . . . . . 9
Step 8: Casting the gelatin . . . . . . . . . . . . . . . . . . . . . . . . . . . . . . . . . . . . . . . . . . . . . . . . . . . . . . . . . . . . . . . . . . . . . . . . . . . . . . . . . . . . . . . . . . . . . . . . . . . . 11
Step 9: Colouring . . . . . . . . . . . . . . . . . . . . . . . . . . . . . . . . . . . . . . . . . . . . . . . . . . . . . . . . . . . . . . . . . . . . . . . . . . . . . . . . . . . . . . . . . . . . . . . . . . . . . . . . . . 12
Related Instructables . . . . . . . . . . . . . . . . . . . . . . . . . . . . . . . . . . . . . . . . . . . . . . . . . . . . . . . . . . . . . . . . . . . . . . . . . . . . . . . . . . . . . . . . . . . . . . . . . . . . . . . . 13
Comments . . . . . . . . . . . . . . . . . . . . . . . . . . . . . . . . . . . . . . . . . . . . . . . . . . . . . . . . . . . . . . . . . . . . . . . . . . . . . . . . . . . . . . . . . . . . . . . . . . . . . . . . . . . . . . . . 13
http://www.instructables.com/id/Using-gelatin-for-moulds-and-prosthetics/
Author:marshon MarshonUntidy, disorganised and a bit silly.I am a photographer, artist, body artist, sculptor, prosthetic maker, model engineer, and general idiot who likes making stuff and messing about.
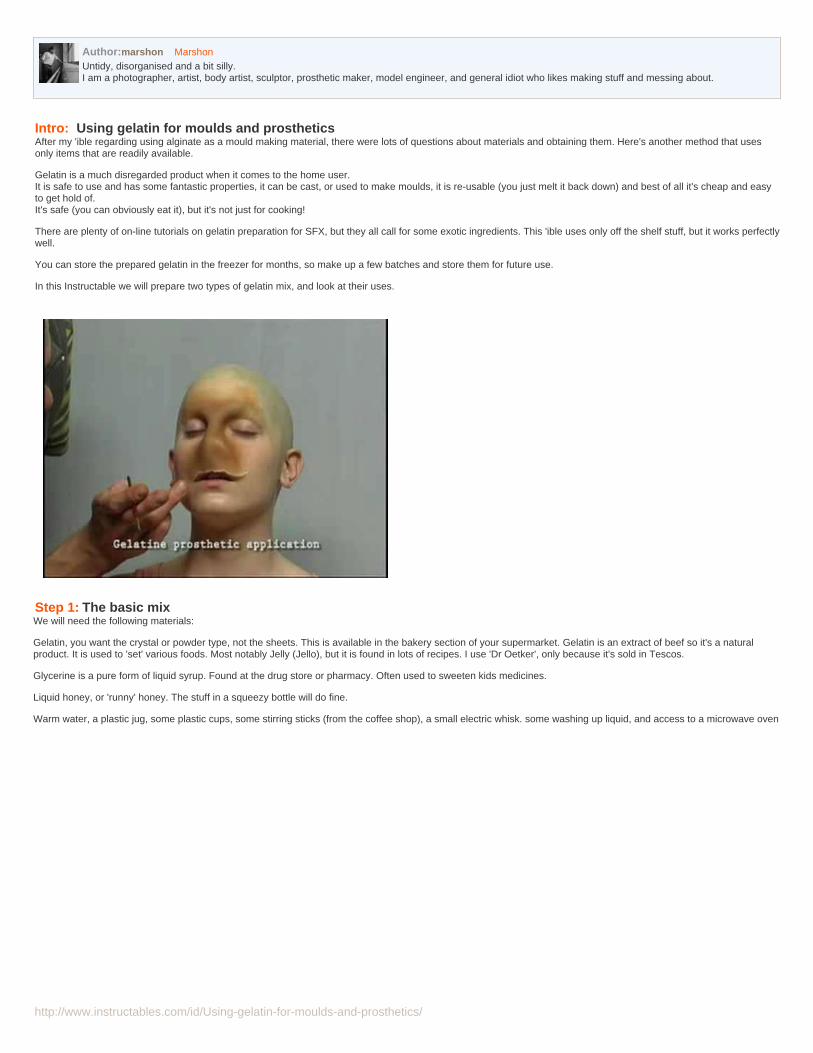
Intro: Using gelatin for moulds and prostheticsAfter my 'ible regarding using alginate as a mould making material, there were lots of questions about materials and obtaining them. Here's another method that usesonly items that are readily available.
Gelatin is a much disregarded product when it comes to the home user.It is safe to use and has some fantastic properties, it can be cast, or used to make moulds, it is re-usable (you just melt it back down) and best of all it's cheap and easyto get hold of.It's safe (you can obviously eat it), but it's not just for cooking!
There are plenty of on-line tutorials on gelatin preparation for SFX, but they all call for some exotic ingredients. This 'ible uses only off the shelf stuff, but it works perfectlywell.
You can store the prepared gelatin in the freezer for months, so make up a few batches and store them for future use.
In this Instructable we will prepare two types of gelatin mix, and look at their uses.
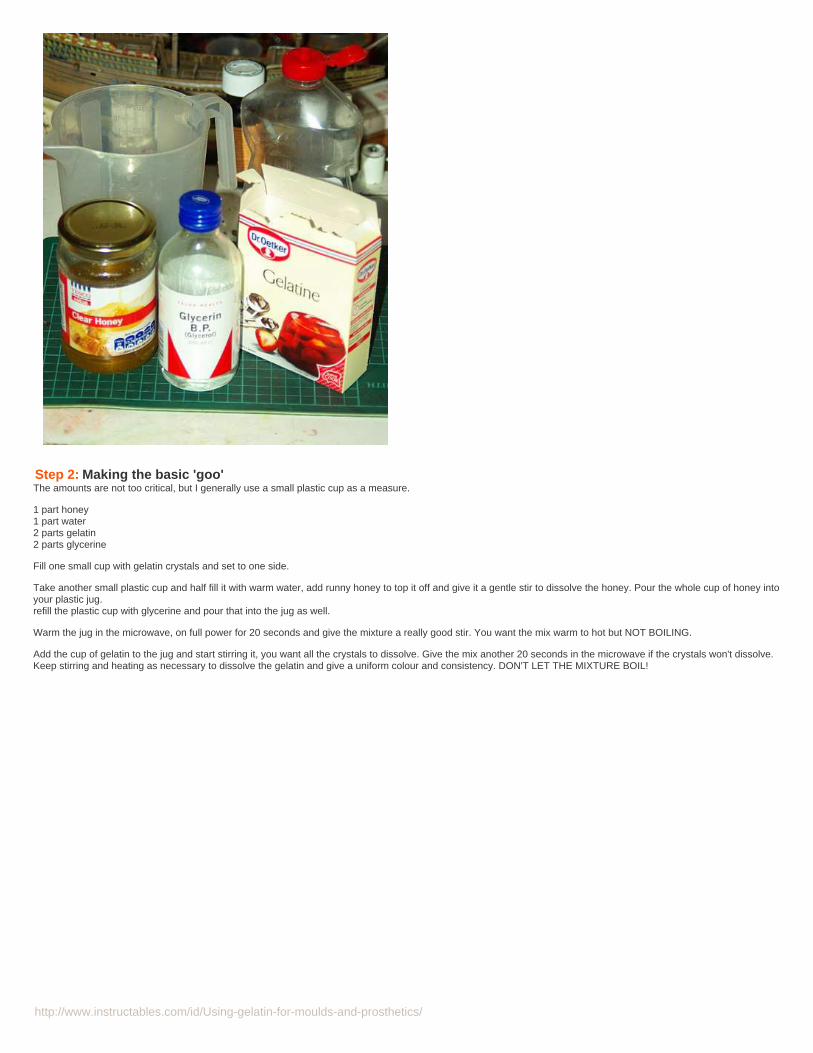
Step 1: The basic mixWe will need the following materials:
Gelatin, you want the crystal or powder type, not the sheets. This is available in the bakery section of your supermarket. Gelatin is an extract of beef so it's a naturalproduct. It is used to 'set' various foods. Most notably Jelly (Jello), but it is found in lots of recipes. I use 'Dr Oetker', only because it's sold in Tescos.
Glycerine is a pure form of liquid syrup. Found at the drug store or pharmacy. Often used to sweeten kids medicines.
Liquid honey, or 'runny' honey. The stuff in a squeezy bottle will do fine.
Warm water, a plastic jug, some plastic cups, some stirring sticks (from the coffee shop), a small electric whisk. some washing up liquid, and access to a microwave oven
http://www.instructables.com/id/Using-gelatin-for-moulds-and-prosthetics/
Step 2: Making the basic 'goo'The amounts are not too critical, but I generally use a small plastic cup as a measure.
1 part honey1 part water2 parts gelatin2 parts glycerine
Fill one small cup with gelatin crystals and set to one side.
Take another small plastic cup and half fill it with warm water, add runny honey to top it off and give it a gentle stir to dissolve the honey. Pour the whole cup of honey intoyour plastic jug.refill the plastic cup with glycerine and pour that into the jug as well.
Warm the jug in the microwave, on full power for 20 seconds and give the mixture a really good stir. You want the mix warm to hot but NOT BOILING.
Add the cup of gelatin to the jug and start stirring it, you want all the crystals to dissolve. Give the mix another 20 seconds in the microwave if the crystals won't dissolve.Keep stirring and heating as necessary to dissolve the gelatin and give a uniform colour and consistency. DON'T LET THE MIXTURE BOIL!
http://www.instructables.com/id/Using-gelatin-for-moulds-and-prosthetics/
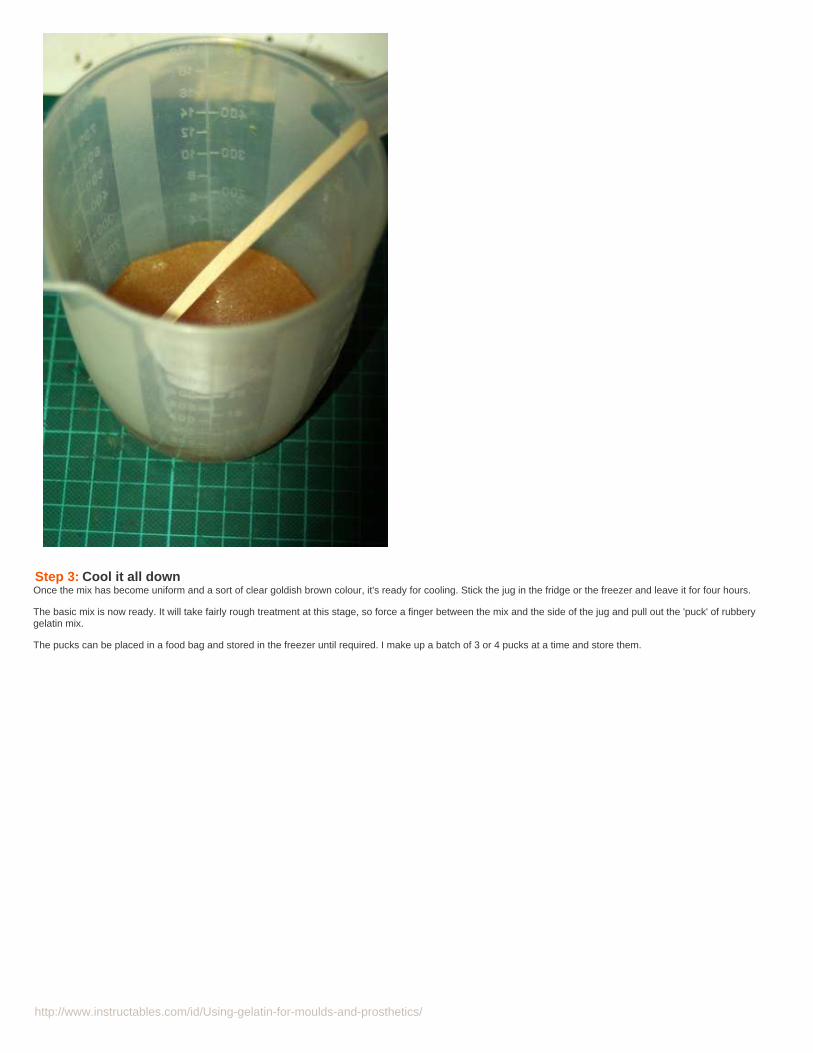
Step 3: Cool it all downOnce the mix has become uniform and a sort of clear goldish brown colour, it's ready for cooling. Stick the jug in the fridge or the freezer and leave it for four hours.
The basic mix is now ready. It will take fairly rough treatment at this stage, so force a finger between the mix and the side of the jug and pull out the 'puck' of rubberygelatin mix.
The pucks can be placed in a food bag and stored in the freezer until required. I make up a batch of 3 or 4 pucks at a time and store them.
http://www.instructables.com/id/Using-gelatin-for-moulds-and-prosthetics/
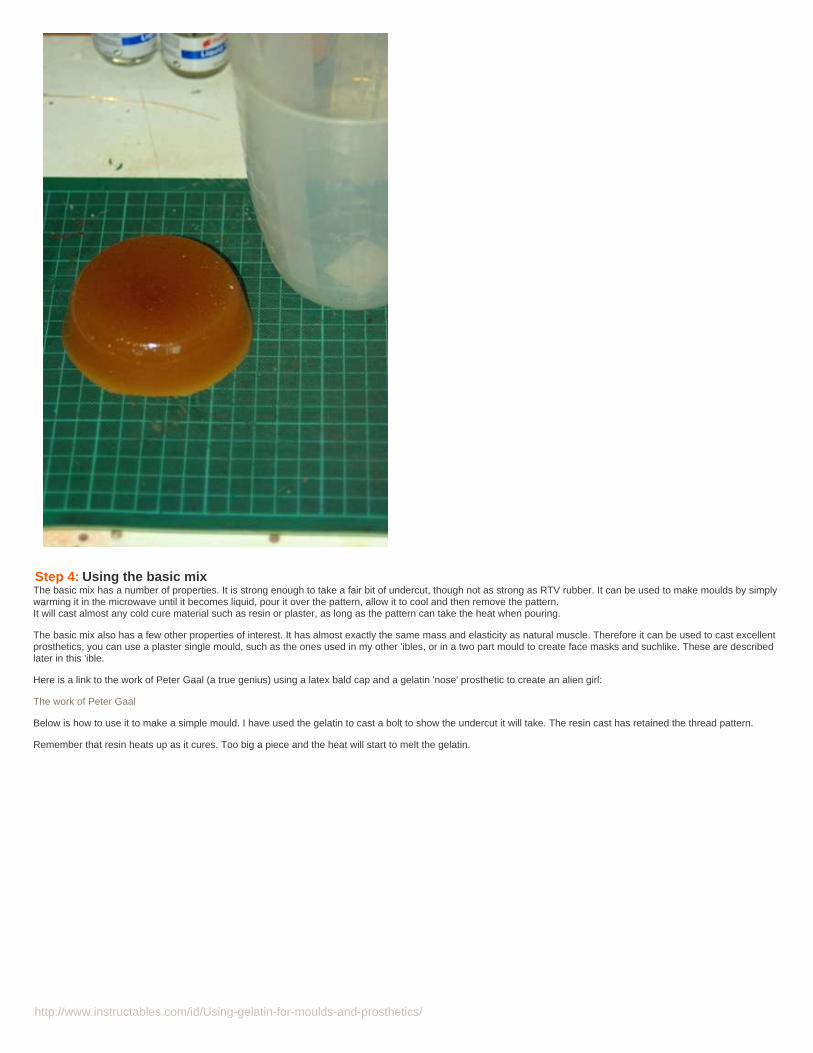
Step 4: Using the basic mixThe basic mix has a number of properties. It is strong enough to take a fair bit of undercut, though not as strong as RTV rubber. It can be used to make moulds by simplywarming it in the microwave until it becomes liquid, pour it over the pattern, allow it to cool and then remove the pattern.It will cast almost any cold cure material such as resin or plaster, as long as the pattern can take the heat when pouring.
The basic mix also has a few other properties of interest. It has almost exactly the same mass and elasticity as natural muscle. Therefore it can be used to cast excellentprosthetics, you can use a plaster single mould, such as the ones used in my other 'ibles, or in a two part mould to create face masks and suchlike. These are describedlater in this 'ible.
Here is a link to the work of Peter Gaal (a true genius) using a latex bald cap and a gelatin 'nose' prosthetic to create an alien girl:
The work of Peter Gaal
Below is how to use it to make a simple mould. I have used the gelatin to cast a bolt to show the undercut it will take. The resin cast has retained the thread pattern.
Remember that resin heats up as it cures. Too big a piece and the heat will start to melt the gelatin.

http://www.instructables.com/id/Using-gelatin-for-moulds-and-prosthetics/
http://www.instructables.com/id/Using-gelatin-for-moulds-and-prosthetics/
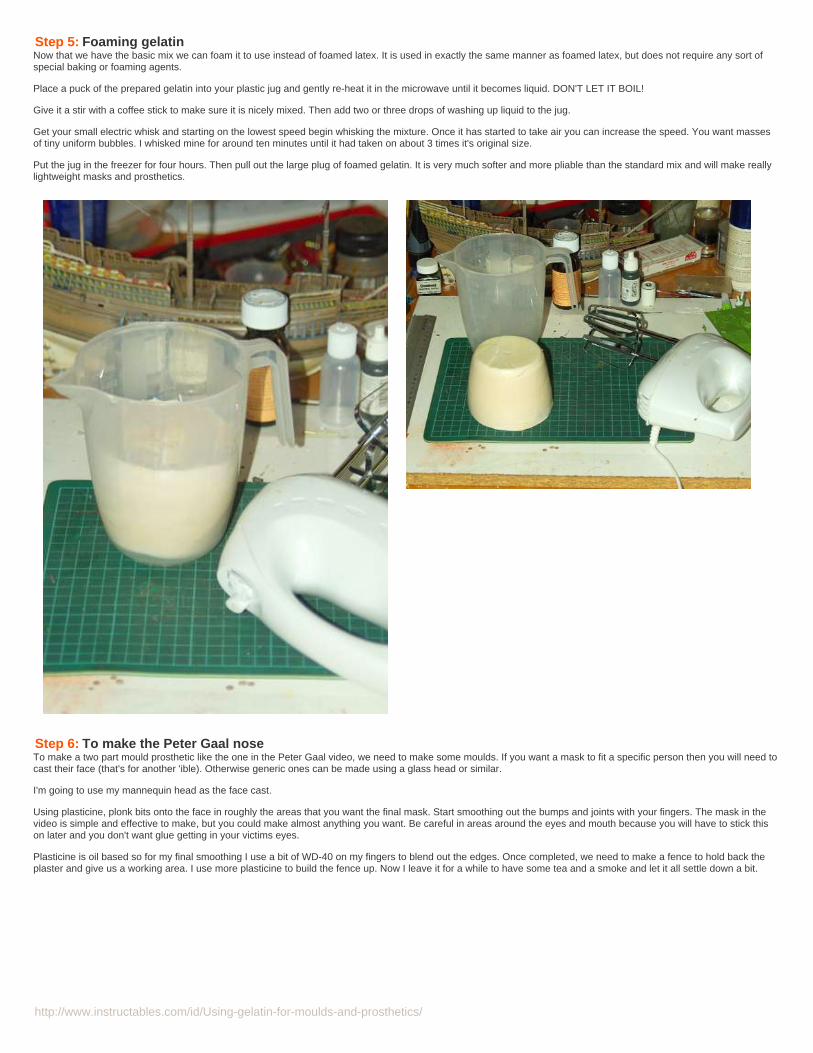
Step 5: Foaming gelatinNow that we have the basic mix we can foam it to use instead of foamed latex. It is used in exactly the same manner as foamed latex, but does not require any sort ofspecial baking or foaming agents.
Place a puck of the prepared gelatin into your plastic jug and gently re-heat it in the microwave until it becomes liquid. DON'T LET IT BOIL!
Give it a stir with a coffee stick to make sure it is nicely mixed. Then add two or three drops of washing up liquid to the jug.
Get your small electric whisk and starting on the lowest speed begin whisking the mixture. Once it has started to take air you can increase the speed. You want massesof tiny uniform bubbles. I whisked mine for around ten minutes until it had taken on about 3 times it's original size.
Put the jug in the freezer for four hours. Then pull out the large plug of foamed gelatin. It is very much softer and more pliable than the standard mix and will make reallylightweight masks and prosthetics.
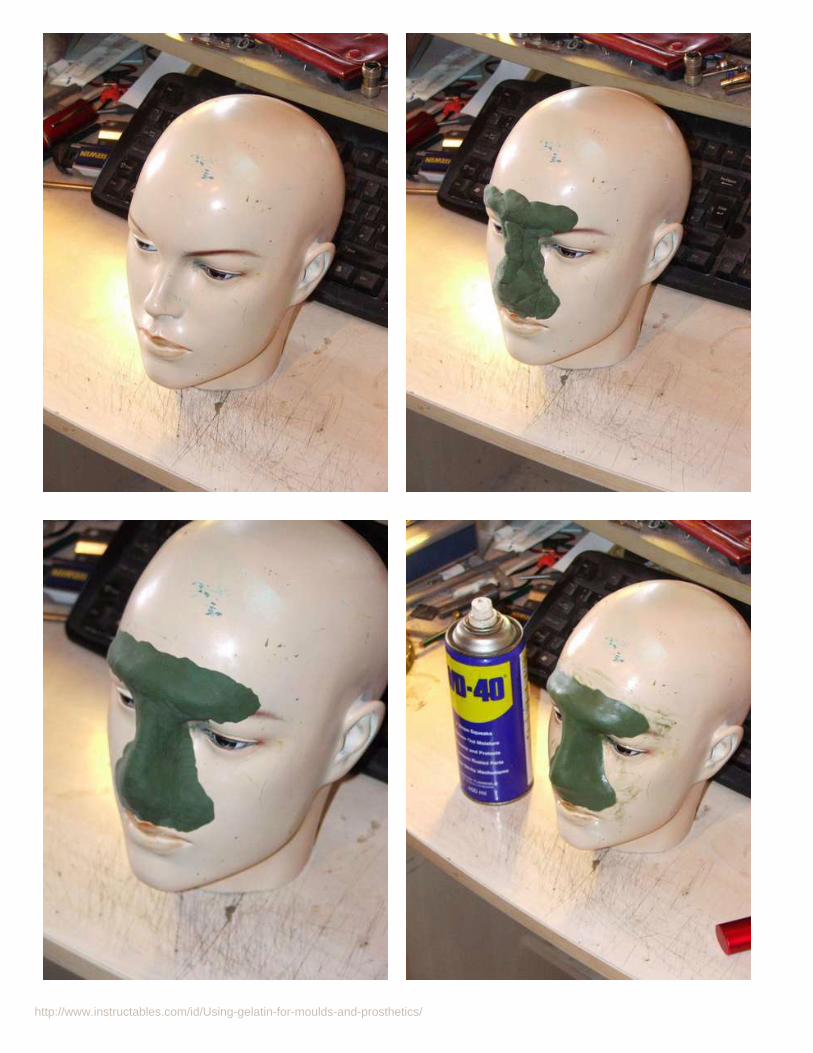
Step 6: To make the Peter Gaal noseTo make a two part mould prosthetic like the one in the Peter Gaal video, we need to make some moulds. If you want a mask to fit a specific person then you will need tocast their face (that's for another 'ible). Otherwise generic ones can be made using a glass head or similar.
I'm going to use my mannequin head as the face cast.
Using plasticine, plonk bits onto the face in roughly the areas that you want the final mask. Start smoothing out the bumps and joints with your fingers. The mask in thevideo is simple and effective to make, but you could make almost anything you want. Be careful in areas around the eyes and mouth because you will have to stick thison later and you don't want glue getting in your victims eyes.
Plasticine is oil based so for my final smoothing I use a bit of WD-40 on my fingers to blend out the edges. Once completed, we need to make a fence to hold back theplaster and give us a working area. I use more plasticine to build the fence up. Now I leave it for a while to have some tea and a smoke and let it all settle down a bit.
http://www.instructables.com/id/Using-gelatin-for-moulds-and-prosthetics/
http://www.instructables.com/id/Using-gelatin-for-moulds-and-prosthetics/
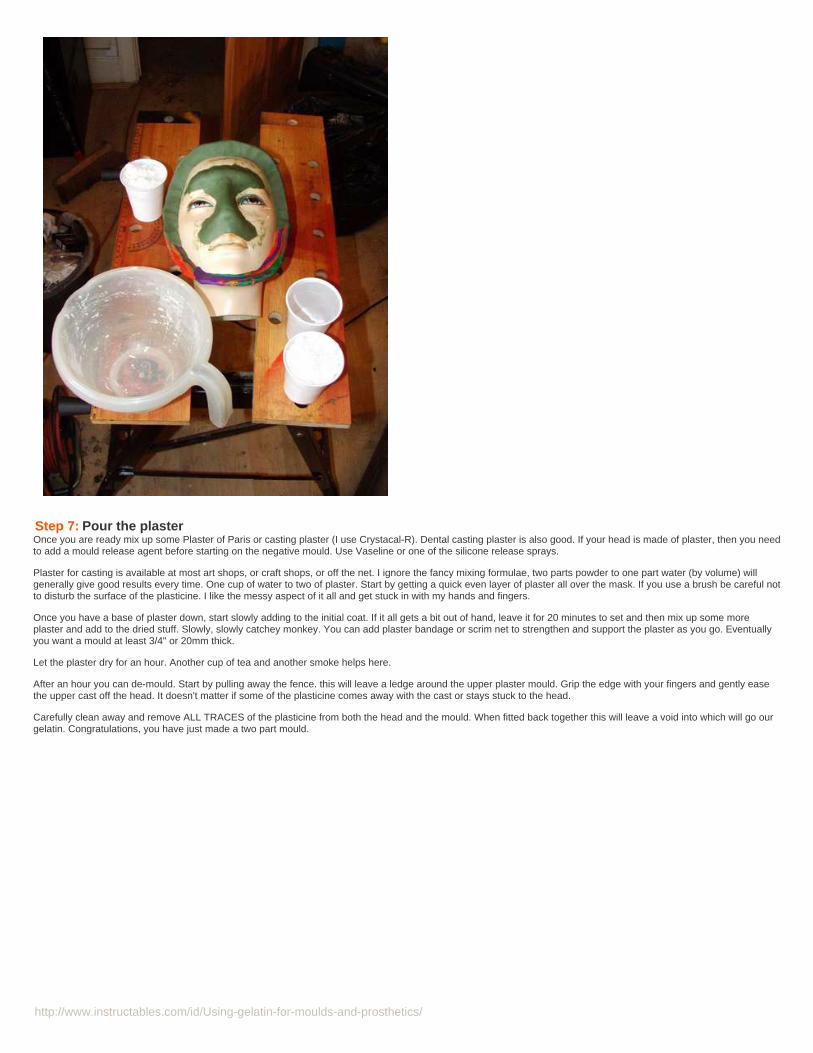
Step 7: Pour the plasterOnce you are ready mix up some Plaster of Paris or casting plaster (I use Crystacal-R). Dental casting plaster is also good. If your head is made of plaster, then you needto add a mould release agent before starting on the negative mould. Use Vaseline or one of the silicone release sprays.
Plaster for casting is available at most art shops, or craft shops, or off the net. I ignore the fancy mixing formulae, two parts powder to one part water (by volume) willgenerally give good results every time. One cup of water to two of plaster. Start by getting a quick even layer of plaster all over the mask. If you use a brush be careful notto disturb the surface of the plasticine. I like the messy aspect of it all and get stuck in with my hands and fingers.
Once you have a base of plaster down, start slowly adding to the initial coat. If it all gets a bit out of hand, leave it for 20 minutes to set and then mix up some moreplaster and add to the dried stuff. Slowly, slowly catchey monkey. You can add plaster bandage or scrim net to strengthen and support the plaster as you go. Eventuallyyou want a mould at least 3/4" or 20mm thick.
Let the plaster dry for an hour. Another cup of tea and another smoke helps here.
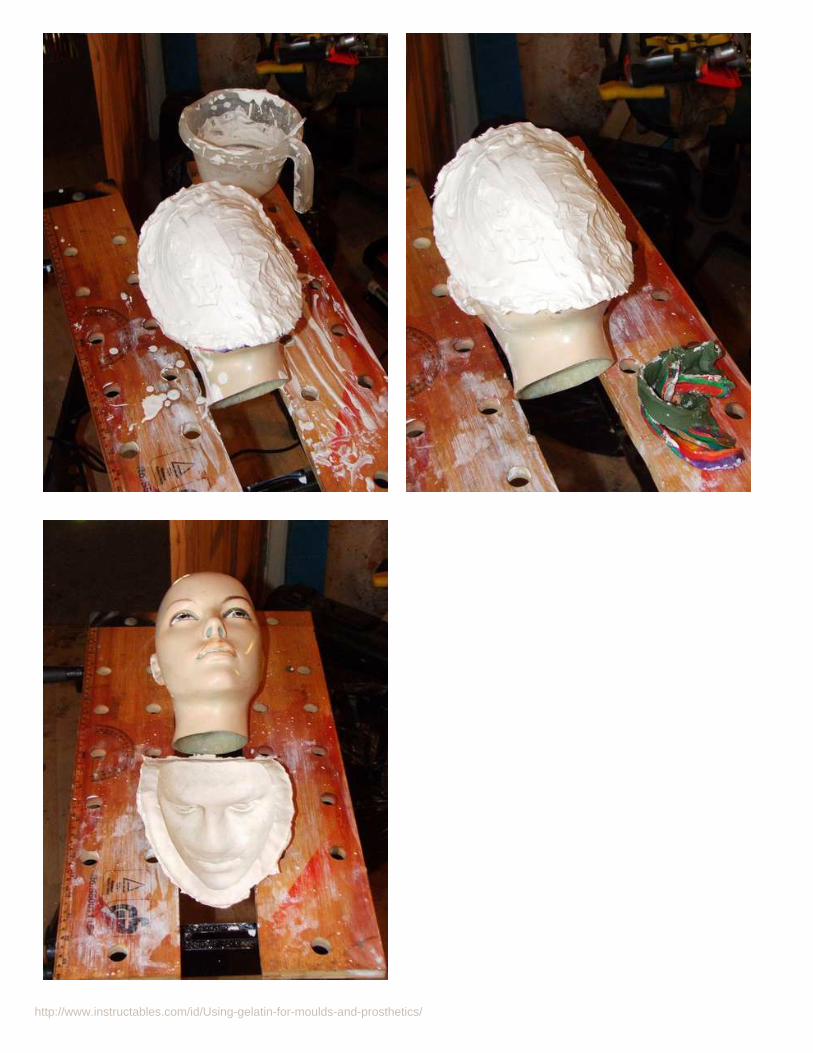
After an hour you can de-mould. Start by pulling away the fence. this will leave a ledge around the upper plaster mould. Grip the edge with your fingers and gently easethe upper cast off the head. It doesn't matter if some of the plasticine comes away with the cast or stays stuck to the head.
Carefully clean away and remove ALL TRACES of the plasticine from both the head and the mould. When fitted back together this will leave a void into which will go ourgelatin. Congratulations, you have just made a two part mould.
http://www.instructables.com/id/Using-gelatin-for-moulds-and-prosthetics/
http://www.instructables.com/id/Using-gelatin-for-moulds-and-prosthetics/
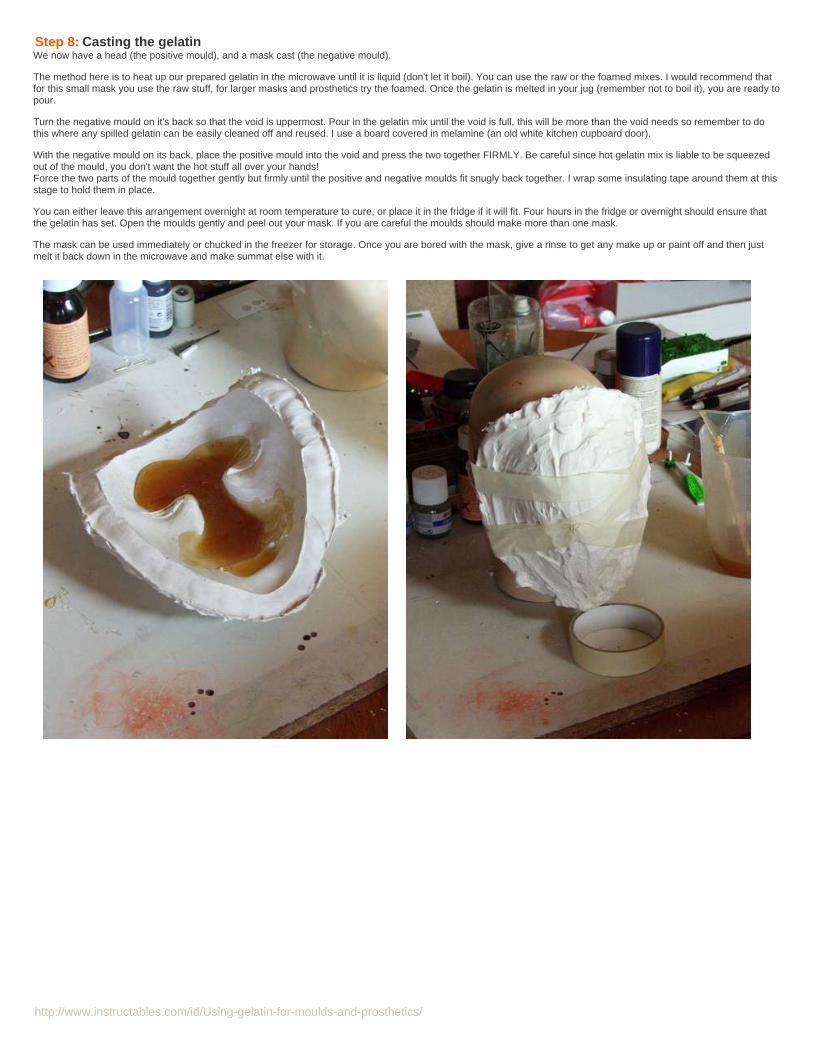
Step 8: Casting the gelatinWe now have a head (the positive mould), and a mask cast (the negative mould).
The method here is to heat up our prepared gelatin in the microwave until it is liquid (don't let it boil). You can use the raw or the foamed mixes. I would recommend thatfor this small mask you use the raw stuff, for larger masks and prosthetics try the foamed. Once the gelatin is melted in your jug (remember not to boil it), you are ready topour.
Turn the negative mould on it's back so that the void is uppermost. Pour in the gelatin mix until the void is full, this will be more than the void needs so remember to dothis where any spilled gelatin can be easily cleaned off and reused. I use a board covered in melamine (an old white kitchen cupboard door).
With the negative mould on its back, place the positive mould into the void and press the two together FIRMLY. Be careful since hot gelatin mix is liable to be squeezedout of the mould, you don't want the hot stuff all over your hands!Force the two parts of the mould together gently but firmly until the positive and negative moulds fit snugly back together. I wrap some insulating tape around them at thisstage to hold them in place.
You can either leave this arrangement overnight at room temperature to cure, or place it in the fridge if it will fit. Four hours in the fridge or overnight should ensure thatthe gelatin has set. Open the moulds gently and peel out your mask. If you are careful the moulds should make more than one mask.
The mask can be used immediately or chucked in the freezer for storage. Once you are bored with the mask, give a rinse to get any make up or paint off and then justmelt it back down in the microwave and make summat else with it.

http://www.instructables.com/id/Using-gelatin-for-moulds-and-prosthetics/
Step 9: ColouringGelatin prosthetics will take normal make up, face paint or body paint well. Here I have added some normal liquid foundation and some powder to one side of the nosepiece.
If your prosthetics have well feathered edges then you should be able to get a seamless blend. Use a little witchazel to dissolve away the edges.
Gelatin requires either Spirit Gum or Pros-Aide as an attachment glue.

http://www.instructables.com/id/Using-gelatin-for-moulds-and-prosthetics/
Related Instructables
Cast latexbackbone and ascorpion SFXdesign. bymarshon
Foamed GelatinProsthetics byslicendice How to Apply a
Prosthetic - 3Minute Video(video) bynimbafx
Walking DeadStyle ProstheticApplication(video) bynimbafx
Gelatin wounds.by feralucce
Effectiveprosthetics foryour YouTubevideos bymarshon
Comments
42 comments Add Comment
timdomul says: Mar 17, 2011. 2:40 PM REPLYfor the foamed gelatine do you have to re-whisk the mixture, or does it stays "foamed"?
marshon says: Mar 17, 2011. 3:52 PM REPLYOnce 'set' it stays foamed. If re-melted numerous times it may need another whisk.
timdomul says: Mar 17, 2011. 4:12 PM REPLYok thanks, and for demold do you use anything? or it pops off easily?
marshon says: Mar 17, 2011. 11:27 PM REPLYI have used plaster, alginate and RTV moulds and haven't needed to use a release agent. You just pull the gelatin out.
nigandjules says: Feb 28, 2011. 5:01 AM REPLYHi, I am vegetarian, do you think there is a way of using vegetarian jelly or agar agar, sorry to complicate things!
Jules (the same one)! x
marshon says: Feb 28, 2011. 5:27 AM REPLYYour not actually going to eat this stuff. I would have thought that removing the main ingredient would have changed the properties of the mix so far thatit wouldn't be usable.
If you're not allergic to latex, I'd try using that instead since it's made from a plant extract.
Babache says: Feb 14, 2011. 3:39 PM REPLYFirst of all i want to thank and congratulate you because your tutorial is very good.i try the mix, and it works very well.But I have two problems: one of them was that the gelatine was very sticky (i dont know if it was because of the honey)and the other was that the foamed gelatine was very fragile, it brokes very easily. can you tell me if it is normal or im doing something wrong? Thank you.Your tutorial is amizing ;D
marshon says: Feb 14, 2011. 6:55 PM REPLYHmm, it could be that the ambient temperature is higher where you are. I've only noticed any real 'stickiness' in very hot weather.Yes foamed gelatin is only about as strong as foamed latex would be.
Babache says: Feb 14, 2011. 9:51 PM REPLYoh ok, yes i think is that, after it colds enough it wasnt sticky anymore. Thanks for your reply, see you.
Nelyan says: Feb 6, 2011. 1:54 AM REPLYI actually joined instructables purely because of this tutorial. I found it last summer and tried it out as an alternative for latex mask. My first plastermold waspretty simple and the foamed version turned out fine. My problem was the yucky smell (I think it comes from the gelatin) that eventually turned down to justthe smell of the honey (for these last 4 or so moths?). I stored the mask in the plastermold in a cupboard and only thing happened to the mask was the smellturning better and minor shrinkage on the edges of the mask.
So help me, marshon, what can I do to the smell?And now that I just yesterday made another patch, are the bubbles a problem in the gelatin pluck or can I try out molding my next mask?

http://www.instructables.com/id/Using-gelatin-for-moulds-and-prosthetics/
marshon says: Feb 6, 2011. 7:10 AM REPLYI generally ignore the smell, but try adding one or two drops of vanilla or almond essence to the mix, it should replace the smell of beef extract.
hellp mee says: Dec 16, 2010. 10:33 AM REPLYHi. Well i will get straight to the point. .
I have a deep wound C-section scar!! That goes paralell And well i wish i could fix it w cosmetic surgery but i don't have thr money for it: / so i came up withthe idea of covering it w like liquid latter, camouflage it w something. But idk how.. the scar is like half centimeter deep and 22mm long! :'( it really had beenso hard living w this scar..I've had yrs w it. Please if someone can help. O and I've tried "camouflaging" it w tattoo covering but didn't really do anything.Mostly because my scar is deep maybe a fill idk. Anyone has ideas? Plz reply. Thx VERY VERY MUCH.
marshon says: Dec 16, 2010. 11:22 AM REPLYPM me or send me an email addy, there are a number of options you can try using cosmetic SFX products.It will all depend on what type of outcome you are expecting ....
hellp mee says: Dec 16, 2010. 10:35 AM REPLYSorry ment to say LIQUID. LATEX.
shooga says: Nov 8, 2010. 9:09 PM REPLYThank you for this one!!! I have one small question.. after watching this video on youtube: http://www.youtube.com/watch?v=DpaSbbAoyuE&NR=1
I wanted to know (bc they sell the stuff and its expensive) if your basic gelatin mixture is the same stuff?? as in I can use it in the same way (making burnsover hair/body) when its room temperature. I donate time at a charity haunted house and wanted to make this.. buying it from them would be out of our pricerange lol and also if washed clean of makeup.. is this reusable? like microwaved again and used? Thank you so much!!!!
marshon says: Nov 8, 2010. 11:51 PM REPLYOK, their basic mix uses 300 bloom gelatin which is a little tougher than food grade gelatin, and they will be using Sorbitol instead of honey. Other thanthat it's exactly the same stuff.Most moms would have this stuff in their kitchen, so it's worth making a single batch and testing it to see?Yes, you can wash it off gently with cold water to get rid of make up or paint, and yes you can simply melt it down again in the microwave to use it.
I personally would NEVER attempt to use the molten gelatin directly onto skin, it gets far too hot for that. Better to make the prosthetic on a manequinnhead and then transfer it to your model.
I suggest you make up a small sample batch and test it on yourself first.
shooga says: Nov 9, 2010. 12:08 AM REPLYThanx soooo much!! and yeah I wouldn't plan to put that hot mess on anyone.. it seemed as tho they had let it get quite cool before applying to theskin.. I'll try it out this week . thanx again and again!!!
OmalleySFX says: Nov 5, 2010. 1:28 PM REPLYThis looks phenominal. Denfinitely going on my favorites. My only real question is this: as this mixture is basically Gelatin, Honey, and Glycerine, does afinished prosthetic piece feel sticky to the touch in normal temperatures? I deal with a lot of fussy models and actors, so their comfort level has be comeparamount. Honestly, I just don't want to hear their bitching and moaning.Thanks for your reply and thanks for this 'ible. I'll definitely be subscribing!
marshon says: Nov 7, 2010. 2:17 PM REPLYThe puck that is produced is not too sticky at room temperature. I usually dust them with talc which gives a very skin like feel to them.
I have found that they don't stand up very well to excessive heat, certainly the midday sun on a hot summers day will make them go tacky.I'd also be careful under very hot studio lights, mine are generally for stills work which uses flash heads so no real temperature problems.
Gary_b says: Nov 6, 2010. 8:17 AM REPLYHi, sorry if this has an obvious answer, but what is the idea behind adding the honey?
Thanks :)
marshon says: Nov 7, 2010. 2:13 PM REPLYThe standard movie props use a substance called Sorbitol which is a sugar substitute, it helps add elasticity and strength. In order to make these entirelyfrom high street sore products I have sunbstituted the honey.
divat8 says: Oct 24, 2010. 5:51 PM REPLYhey nice tutorial!!! just one question is there a way to make a bald cap out of this?

http://www.instructables.com/id/Using-gelatin-for-moulds-and-prosthetics/
marshon says: Oct 24, 2010. 7:42 PM REPLYI don't think it would have enough tensile strength plus it needs to be mould cast. You can buy non latex bald cap liquid, can't remember the name of thestuff though.
divat8 says: Oct 25, 2010. 4:35 PM REPLYooook thanks
Diegoale2000 says: Sep 26, 2010. 7:30 PM REPLYI drink Tea, but I don't smoke.... I'm not sure what to do...is there an alternative to having a smoke, or can I not complete the Instructable?
jk jk, Great Instructable, I'm currently working on it, and I'm letting my plasticine dry/settle
mikoto says: Aug 31, 2010. 9:50 PM REPLYGreat instructable this will add a new dimension to the costuming that I create. My victims (Models) will surely appriciate this.
bluesquirrel says: May 26, 2010. 6:49 PM REPLYIs there a difference in how long the appliance will last between it being made with the foamed gelatin/soap mix or the unfoamed? Can the foamed mix bepoured into a mold as well with the same results but a lighter appliance being cast, in the end?
Thank you in advance for any and all replies, and also for all these fantastic i'bles! I'm learning so much from you :D
marshon says: May 26, 2010. 7:10 PM REPLYYou can pour and cast the foamed stuff just the same as the raw material. If you are frreezing the appliances then there's no diifference in the longevity.
The foamed stuff works better in a two part mould than a single one.
The only real difference is in the weight, somewhat in the strength (foamed are a bit weaker), and in the reaction to external heat sources, the foamed willstart to get tacky and melt at a lower temperature than the raw.
Neither are as strong as latex, but then you can't reuse the latex either. Most of my prosthetics only get used once and then for stills shoots so mine tendto get melted down pretty quickly anyway.
bluesquirrel says: May 26, 2010. 8:42 PM REPLYAh, how hot does it have to be before the foamed appliances start to break down? I'm considering making an appliance similar to the nose coveringfor a satyr costume, to make my face a little more goat-ish. And in one instance I'd need an appliance to keep for several hours at a time, if not a dayor two. Freeze-storage might not be available :(
marshon says: May 27, 2010. 1:08 AM REPLYI have no idea at what actual temperature it would break down. Mostly the freezing is to stop it going mouldy, and it would easily last a couple ofhours and should last a number of days. Why not try making a lump and leave it out for two days and see what happens? You can always re-meltit and put ir back in the fridge when you have finished.
bluesquirrel says: May 28, 2010. 8:49 PM REPLYOne final question; are you using food grade glycerin? I want to ask because there's also glycerin that should only be applied topically. Withthe prosthetic I'm making covering most of my upper lip, I dont want to be nibbling and accidentally swallow a chunk of it if the glycerin is non-food-grade.
marshon says: May 28, 2010. 9:05 PM REPLYIn all honesty I have no idea, but I always use the same brand (it's a pharmacy own brand from 'Boots' the chemist). I just asked for liquidglycerin, which they sell as a linctus additive so it must be food grade.
rimar2000 says: May 26, 2010. 5:16 PM REPLYVery interesting. Seems cheapest than alginate, and easiest to find it.
marshon says: May 26, 2010. 7:12 PM REPLYYes, but takes longer to prepare and there's the issue of heat to consider. Alginate is much quicker and it's totally cold cure.
joghurtgumi93 says: May 26, 2010. 7:12 AM REPLYis this stuff too hot to be applied directly to skin while liquid?

http://www.instructables.com/id/Using-gelatin-for-moulds-and-prosthetics/
marshon says: May 26, 2010. 1:19 PM REPLYOh dear .....
ON NO ACCOUNT put the hot mixture on your skin. It is basically red hot syrup, so it is as sticky as hell and it won't come off as it burns into your skin.A trip to the ER for certain.
If you want to cast your skin use Alginate.
tufty2112 says: May 26, 2010. 5:03 AM REPLYQuite a few times you mention that boiling the mix is a bad idea. Does this just destory the mix and make it unuseable or is it dangerous?
marshon says: May 26, 2010. 6:34 AM REPLYNo it's not dangerous other than it's boiling sugar, but the gelatin gets it's strength and setting abilities from very long protein strands that act like elasticfibres. Boiling the mix breaks down these strands, reducing both the strength of the mix and it's setting abilities. If boiled for too long it won't set and if itdoes it will be too weak to use effectively.
! xD ! says: May 25, 2010. 8:19 PM REPLYVery amazing. If you leave the mask out, does it melt? If so, how quickly?
marshon says: May 25, 2010. 8:27 PM REPLYAt normal room temperature it shouldn't melt at all. I extremely hot weather it may start to feel tacky.If you have ever made Jelly (Jello) from one of those packets where you dissolve the blocks of Jelly in water? It has the same properties as the block ofJelly just out of the packet but tougher and stronger.I have had the stuff under studio lights for 6 hours and it hasn't melted yet. However having said that, it will start to melt if you put something that feel hotto the touch against it.
Part of the reason for freezing it is to stop it from turning into a culture and going mouldy. Basically it's toffee.
RevJesseJ says: May 25, 2010. 7:31 PM REPLYBrilliant! Thank you for this instructable! This really helps me. Using products I can get at the grocery store to make monsters makes me very happy! I dohave a question for you. In step 5 you mentioned "washing up liquid" and adding a few drops. By washing up liquid, do you mean liquid soap? Thanks againfor this 'ible!
marshon says: May 25, 2010. 7:38 PM REPLYYes, sorry for that, I mean the liquid soap used for washing dishes, or any high foaming liquid soap should do it. A couple of drops of bubble bath likeMatey should also work.