user's manual tympanometerafhcan.org/manuals/pub-114 rev b v.pdf · 11 example of noise...
TRANSCRIPT

User's Manual
Tympanometer Earscan ES-TRAM
Document ID: PUB-114
Revision B

User's Manual Tympanometer ES-TRAM
PUB-114 Rev B.doc ii
The names of any providers and patients used in illustrations or examples in this document are fictitious.
Every effort has been made to ensure this manual is accurate, complete, and useful. Please contact us if you have any suggestions for improvement:
AFHCAN Training Department 4000 Ambassador Drive Anchorage, AK 99508 Phone: 877 885-5672 Fax: 907 729-2269 Email: [email protected]
Copyright © 2006 Alaska Native Tribal Health Consortium (ANTHC). All rights reserved. No part of this publication may be reproduced, stored in a retrieval system, or transmitted, in any form, or by any means, including photocopying, electronic, mechanical, recording or otherwise, without the prior written permission of Alaska Native Tribal Health Consortium.

User's Manual Tympanometer ES-TRAM
PUB-114 Rev B.doc iii
Table of Contents
Section Title Page Preface ............................................................................................................................................ v
About this Document .................................................................................................................. v One Device, Two Functions, and Two Sections ......................................................................... v Related Documents ..................................................................................................................... v For More Information ................................................................................................................. v
Section 1 – Introduction ................................................................................................................ 1 1.1 Becoming Familiar With the Tympanometer ...................................................................... 1
1.1.1 Functional Description .................................................................................................. 1 1.1.2 Main Components ......................................................................................................... 2 1.1.3 Hardware Controls and Indicators ................................................................................ 4 1.1.4 Tympanometer Screen .................................................................................................. 7
1.2 Particulars of the AFHCAN Installation ............................................................................ 12 Section 2 – Operation .................................................................................................................. 13
2.1 Basic Operating Procedures ............................................................................................... 13 2.1.1 Starting the Tympanometer ........................................................................................ 13 2.1.1 Calibration .................................................................................................................. 13 2.1.2 Normal Tympanogram ................................................................................................ 14 2.1.3 Fast Tympanogram ..................................................................................................... 15
Section 3 – Clinical Considerations ............................................................................................ 17 3.1 Guidelines for Clinical Success ......................................................................................... 17 3.2 Common Mistakes ............................................................................................................. 17 3.3 Tips and Tricks .................................................................................................................. 17
Section 4 – Routine Maintenance ............................................................................................... 19 4.1 Care and Cleaning .............................................................................................................. 19 4.2 Elementary Troubleshooting .............................................................................................. 20

User's Manual Tympanometer ES-TRAM
PUB-114 Rev B.doc iv
List of Illustrations
Figure Title Page 1 Earscan module - front ........................................................................................................ 2 2 Earscan module – back ........................................................................................................ 3 3 Earscan module – connectors on right side ......................................................................... 3 4 Earscan module – connectors and power switch on top ...................................................... 3 5 Ear cuffs and calibration cavity ........................................................................................... 4 6 Comparison of tympanogram on LCD display and on-screen report .................................. 4 7 Initial screen for tympanometry .......................................................................................... 7 8 Instructional screen for the CAL button .............................................................................. 8 9 Instructional screen for the IMP button ............................................................................... 9 10 Tympanometer screen showing calibration data ................................................................. 9 11 Example of noise introduced during calibration ............................................................... 10 12 Instructional screen for the SPEC button .......................................................................... 10 13 Audiometry error message ................................................................................................ 11 14 Data from normal tympanogram displayed on Tympanometer screen ............................. 11 15 Elements of the tympanogram ........................................................................................... 12 16 Removing the probe tip ..................................................................................................... 19
List of Tables
Table Title Page 1 Earscan-generated messages ............................................................................................... 5 2 Active buttons on Earscan electronics module and their functions ..................................... 6 3 Buttons on Tympanometer screen their functions ............................................................... 8

User's Manual Tympanometer ES-TRAM
PUB-114 Rev B.doc v
Preface
About this Document This document is part of the set of user manuals provided with the AFHCAN Cart. These user manuals, covering various topics, are normally assembled into a binder delivered with each Cart. This modular design has the following advantages:
• the set of manuals provided with your cart includes documents for the specific peripheral devices installed
• each document is a stand-alone publication, so as new devices or features are added to the Cart, new manuals can be added to the existing binder
• user information that is common to all items of equipment does not need to be repeated in each module, but can be covered in separate modules and referenced as needed
One Device, Two Functions, and Two Sections The Earscan ES-TRAM includes audiometry and tympanometry functions in the same unit. Because these functions are handled by separate areas in the AFHCAN software, the two functions are covered in their own sections of this binder. Refer to the Audiometry Section for information on audiometry.
Related Documents This document assumes you have read the introductory hardware and software manuals included in this binder.
The original manuals provided with the equipment were included in a set of materials delivered with the AFHCAN Cart. Those manuals can be used to supplemental the information provided in this document. Be aware, however, that items installed on an AFHCAN Cart may have been modified slightly, so the features as described in the original product manuals may not apply.
For More Information This document describes the equipment to a level of detail that will meet most user's needs in the context of clinical use of the AFHCAN Cart. For more information, contact AFHCAN Customer Support:
AFHCAN Customer Support Phone: 888 449-4435 Fax: 907 729-2269 email: [email protected]
Additional information can be found on the manufacturer's web page:
www.microaud.com

User's Manual Tympanometer ES-TRAM
PUB-114 Rev B.doc vi

PUB-114 Rev B.doc 1
Section 1 – Introduction
1.1 Becoming Familiar With the Tympanometer This manual describes the principal features and operation of the Micro Audiometrics Earscan Acoustic Impedance Microprocessor, as installed on an AFHCAN Cart.
1.1.1 Functional Description
The tympanometer automatically measures the flexibility of the eardrum, the volume of the ear canal, and ability of the ear to limit its reaction to loud sounds (this response to loud sounds is called the acoustic reflex). Results of these tests are displayed both graphically and numerically.
The test takes place in two parts: the first part generates the tympanogram, and the second part generates two loud tones that test the acoustic reflex. When a normal tympanogram is selected, the two tests only takes about 12 seconds. For children who have trouble sitting still, a fast tympanogram can be selected, which takes about 7 seconds. With the fast tympanogram, fewer measurements are taken, so there is a slight loss of resolution in the data. With either type of test, if the instrument is removed before the acoustic reflex test is complete, the tympanogram data will still be displayed, but no results will be graphed for the acoustic reflex tests.
The tympanometer works as follows: a probe with a rubber tip(ear cuff) fits into the ear canal making an air-tight seal. The probe generates a very small amount of positive air pressure in the ear canal, and reduces that to a small negative pressure. Normally, when the pressure applied to the eardrum is higher or lower than ambient atmospheric pressure, the eardrum will be pushed inward or pulled outward. As the eardrum nears its limit of travel, it tends to be tighter. As the tympanometer sweeps through the pressure range, it also generates a sound. A microphone senses how much of this sound is reflected off the eardrum. The amount of sound reflected off the eardrum at any moment indicates how tight it is. Each change in pressure results in a different degree of tightness. The graph of pressure and tightness at a sequence of pressures results in a tympanogram. Monitoring the amount of air necessary to sweep through a range of air pressures allows the volume of the ear canal to be estimated.
In the acoustic reflex test, two loud tones are presented to the ear. If a sound is loud enough, muscles in the middle ear pull the stapes out of the oval window on the cochlea thus protecting the inner ear. This response can be measured by the Earscan tympanometer. The Earscan acoustic reflex test is a very limited, screening level test. A full battery of acoustic reflex testing is outside the capabilities of the Earscan tympanometer.
User interaction with the tympanometer takes place primarily through the controls and display on the Earscan module.
User's Manual Tympanometer ES-TRAM
PUB-114 Rev B.doc 2
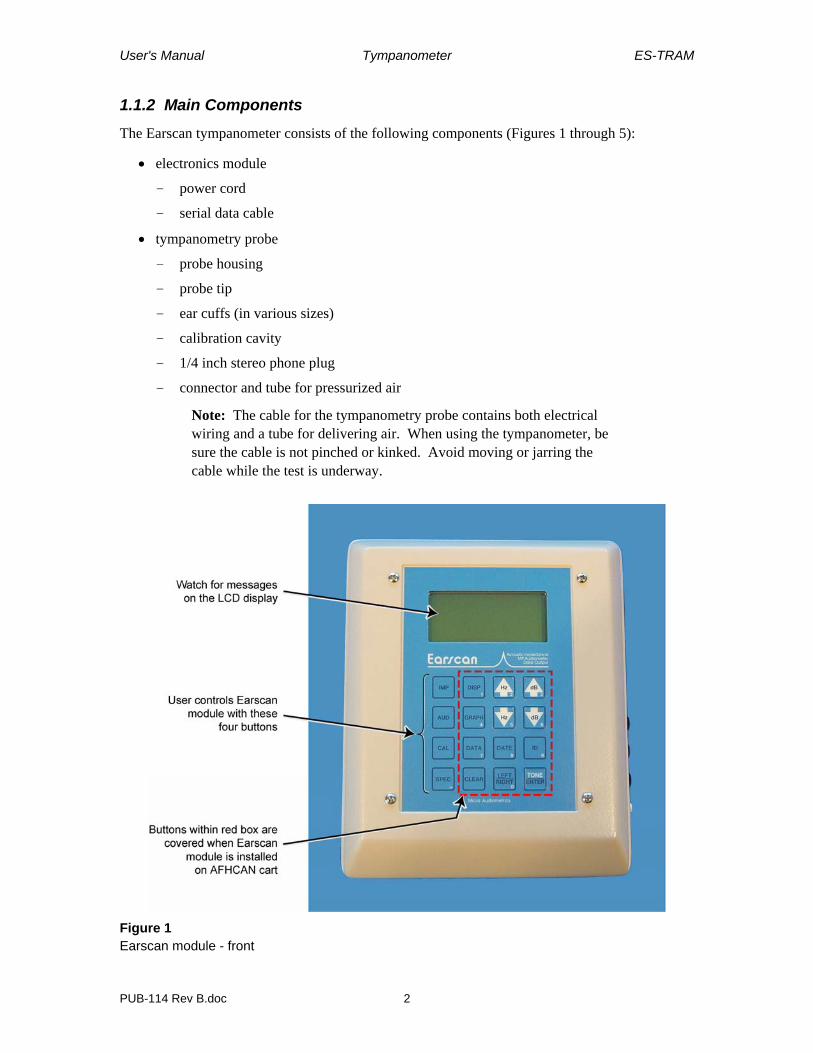
1.1.2 Main Components
The Earscan tympanometer consists of the following components (Figures 1 through 5):
• electronics module
- power cord
- serial data cable
• tympanometry probe
- probe housing
- probe tip
- ear cuffs (in various sizes)
- calibration cavity
- 1/4 inch stereo phone plug
- connector and tube for pressurized air
Note: The cable for the tympanometry probe contains both electrical wiring and a tube for delivering air. When using the tympanometer, be sure the cable is not pinched or kinked. Avoid moving or jarring the cable while the test is underway.
Figure 1 Earscan module - front

User's Manual Tympanometer ES-TRAM
PUB-114 Rev B.doc 3
Figure 2 Earscan module – back
Figure 3 Earscan module – connectors on right side
Figure 4 Earscan module – connectors and power switch on top

User's Manual Tympanometer ES-TRAM
PUB-114 Rev B.doc 4
Figure 5 Ear cuffs and calibration cavity
1.1.3 Hardware Controls and Indicators
The Earscan tympanometer includes the following controls and indicators:
• Power On/Off switch – located on the top of the electronics module; used to apply power to the device (leave this in the ON position; power to the device is normally controlled via the Cart's main power switch)
• LCD display panel – located on the front of the electronics module; used to display data (Figure 6) as well as the messages generated by the tympanometer (refer to Table 1 for a list of messages)
• Pushbutton controls – located on the front of the electronics module; only four buttons are active when the device is installed on an AFHCAN Cart (refer to Table 2 for functional descriptions)
Figure 6 Comparison of tympanogram on LCD display and on-screen report

User's Manual Tympanometer ES-TRAM
PUB-114 Rev B.doc 5
Table 1 Earscan-generated messages
Message on LCD Display Meaning
AIR LEAK Indicates that the ear cuff may not be seated fully against the opening of the ear canal. To correct the situation, ensure the probe is aligned properly with the opening of the ear canal, the right size ear cuff is being used, and the probe is held in place with a sufficient but not excessive degree of firmness.
BLOCK Indicates the opening to the tympanometry probe is blocked. This can occur if the opening in the ear cuff is covered or plugged with foreign material such as ear wax. To correct the situation, remove the ear cuff and ensure it is clean (see cleaning procedures in maintenance or in the user manual). The white tip to which the ear cuff mounts can also be removed for cleaning. Refer to the Micro Audiometrics user manual for more information on removing and cleaning the tip. In addition, check the ear canal for excessive wax or the presence of a foreign body.
BUSY Indicates that the Earscan module is sending its data to the computer.
CALIBRATING Indicates that a calibration tympanogram is underway. Wait until the Earscan display says REMOVE PROBE!
IMP=Norm Tymp AUD=Audiometry CAL=Cal Tymp SPEC=Fast Tymp
This is the Earscan's normal startup screen. It indicates the Earscan module is waiting for the user to push a button to initiate a test. This display would appear if the Earscan module were powered up after the Tympanometry screen has been brought up on the AFHCAN Cart. (Note: device is normally left ON.) Push the IMP button on the Earscan module to initiate a normal tympanometry test, SPEC to initiate a fast tympanometry test, or CAL to initiate tympanometry calibration. (Calibration should be performed at least once each day when the tympanometer is used to compensate for changes in atmospheric pressure and temperature.) Note that the function of the SPEC button has been modified for the AFHCAN installation. The audiometry function of the Earscan device is covered in a separate section.
INSERT PROBE IN CAL CAVITY
This message is displayed after the user pushes the CAL button on the Earscan module. Remove an ear cuff from the probe tip, if necessary, and install the calibration cavity.
MICRO AUDIOMETRICS
EX71A
This message displays briefly when the Earscan module is first powered up. Micro Audiometrics is the manufacturer. The third line (in this case, "EX71A") identifies the EPROM version (which is similar to a software version).

User's Manual Tympanometer ES-TRAM
PUB-114 Rev B.doc 6
Message on LCD Display Meaning
NO DATA Indicates that a normal or fast tympanometry test has been initiated and the Earscan device is ready to begin testing, but the probe is not in proximity to an ear. Proceed with test by inserting probe into ear.
NORMAL TYMP Indicates that the user has pushed the IMP button on the Earscan module to initiate a normal tympanometry test. Insert the probe into the patient's ear and proceed with the test.
NOT CONNECTED Indicates the Earscan module is on (power switch set to the ON position), but the Tympanometer button has not been pushed (see the Add To Case screen) and the AFHCAN software is not yet displaying the Tympanometer screen. To correct the situation, simply continue through the AFHCAN software as necessary to display the Tympanometer screen. However, be aware that the NOT CONNECTED message will remain on the Earscan display until you push a button on the Earscan module to initiate calibration or testing. Once a button is pushed on the Earscan module, the Earscan display will update with an appropriate message.
REMOVE PROBE! Indicates that the test has been successfully completed.
STEADY This message displays briefly during a normal or fast tympanometry test as the Earscan verifies the probe has a good seal (no air leaks) and is not blocked. Continue holding the probe in the patient's ear.
-> TESTING <- Indicates a test is underway. This message applies to normal or fast tympanometry. Continue holding the probe in the ear until instructed to remove it.
Table 2 Active buttons on Earscan electronics module and their functions
Button Function
If the Tympanometer screen is displayed on the AFHCAN Cart, pressing the IMP button on the Earscan tympanometer module will place the device in normal tympanogram mode (impedance mode in Earscan's manual). In this mode, one or more tympanometry tests can be performed. The device automatically senses when the probe has been inserted properly into the ear canal and begins the test. On completion of the test, a REMOVE PROBE! message will appear on the LCD display. The message BUSY will appear while the data is being sent to the computer. When the data has been sent, the tympanogram will appear on the LCD display. At this point, the device is ready to begin another tympanogram. It is not necessary to press IMP again. If you do press IMP, however, the screen will display the instructions for a normal tympanogram.

User's Manual Tympanometer ES-TRAM
PUB-114 Rev B.doc 7
Button Function
If the Tympanometer screen is displayed, and the AUD button is pressed, a message will be displayed on the Cart saying that audiometry cannot be done from the Tympanometer screen. An audiometry test will be initiated by the device, but no audiometry data will be captured into the case.
If the Tympanometer screen is displayed, pressing the CAL button on the tympanometer will initiate a calibration tympanogram. On completion of the calibration procedure, the tympanometer will automatically switch into the normal tympanogram mode, allowing one or more tympanometry tests to be performed in sequence. There is no harm in pressing the IMP button, but it is not necessary.
If the Tympanometer screen is displayed, pressing the SPEC button on the tympanometer will place the device in fast-tympanogram mode. The main difference between a fast tympanogram and a normal tympanogram is the time it takes to perform the test. The same basic data is collected.
1.1.4 Tympanometer Screen
Figure 7 shows the first screen that appears when the Tympanometer button is pressed on the Add To Case screen. The screen provides basic instructions at the top, and illustrates which buttons to push on the Earscan tympanometer module. The on-screen buttons are not active. Table 3 describes the functions of the buttons on the Tympanometer screen.
Figure 7 Initial screen for tympanometry

User's Manual Tympanometer ES-TRAM
PUB-114 Rev B.doc 8
Table 3 Buttons on Tympanometer screen and their functions
Button Function
Pressing the Save button saves all selected tympanometry data obtained in this session to the case and returns to the Case screen.
Pressing the Back button discards all tympanometry data obtained in this session and returns to the Add To Case screen.
Pressing any one of the three tympanometry buttons on the Earscan module will bring up an instructional screen relevant to that button. The sequence below shows a normal sequence beginning with calibration.
Figure 8 shows the screen that appears if you push the CAL button on the Earscan module. The Earscan LCD display will display a message to place the calibration cavity on the probe. Once the calibration cavity is placed, the calibration test will begin automatically. A trace of the calibration results will be displayed on the LCD display, then a message will appear to remove the probe.
Figure 8 Instructional screen for the CAL button

User's Manual Tympanometer ES-TRAM
PUB-114 Rev B.doc 9
Removing the calibration cavity completes the calibration test, which brings up the screen shown in Figure 9. Note that the system automatically switches to normal tympanometry. At this point you could attach an ear cuff to the probe and proceed immediately into the test.
Figure 9 Instructional screen for the IMP button
If you click on the thumbnail of the calibration data, a screen similar to the one shown in Figure 10 will appear.
Figure 10 Tympanometer screen showing calibration data
User's Manual Tympanometer ES-TRAM
PUB-114 Rev B.doc 10
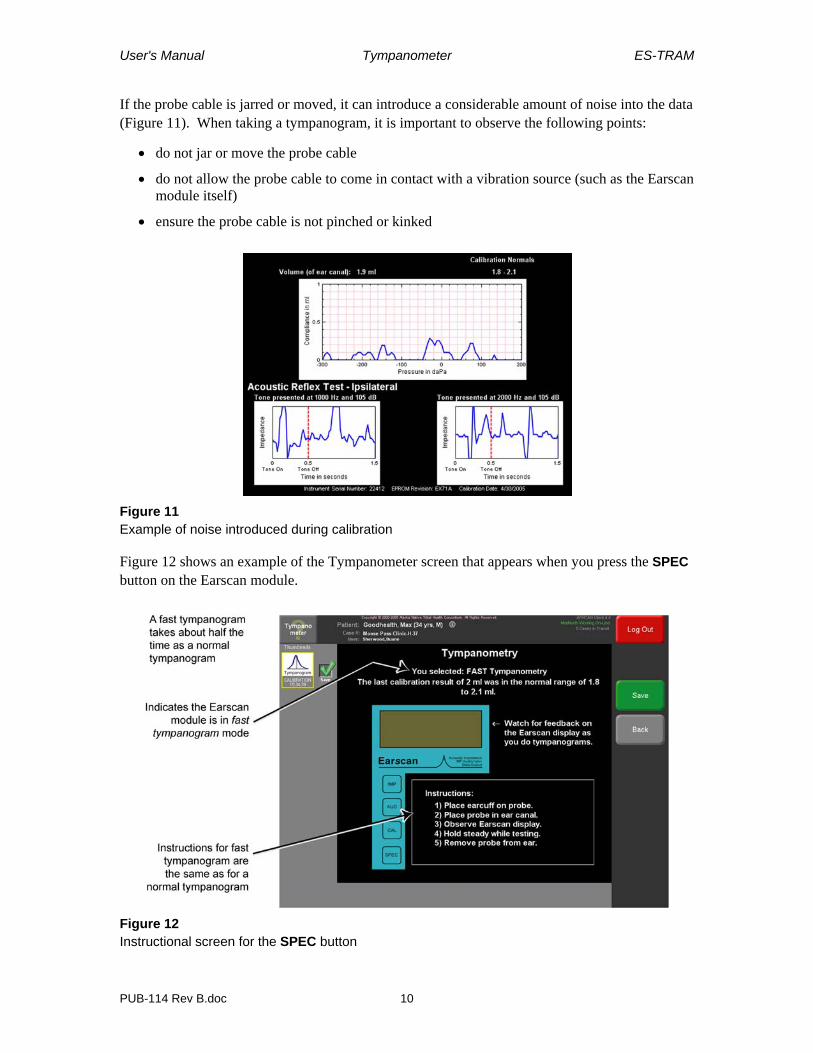
If the probe cable is jarred or moved, it can introduce a considerable amount of noise into the data (Figure 11). When taking a tympanogram, it is important to observe the following points:
• do not jar or move the probe cable
• do not allow the probe cable to come in contact with a vibration source (such as the Earscan module itself)
• ensure the probe cable is not pinched or kinked
Figure 11 Example of noise introduced during calibration
Figure 12 shows an example of the Tympanometer screen that appears when you press the SPEC button on the Earscan module.
Figure 12 Instructional screen for the SPEC button

User's Manual Tympanometer ES-TRAM
PUB-114 Rev B.doc 11
If the AUD button on the Earscan module is pushed while the Tympanometry screen is displayed, the message shown in Figure 13 will appear. To stop the audiometry test, press the AUD button again, and press OK on the screen to clear the error messages.
Figure 13 Audiometry error message
Once the Earscan module has entered normal tympanometry mode, one or more normal tympanograms can be taken in sequence. It is not necessary to press the IMP button again unless you want to change to one of the other modes (calibration or fast tympanogram). As soon as the test is complete, a screen similar to Figure 14 will come up.
Figure 14 Data from normal tympanogram displayed on Tympanometer screen
User's Manual Tympanometer ES-TRAM
PUB-114 Rev B.doc 12
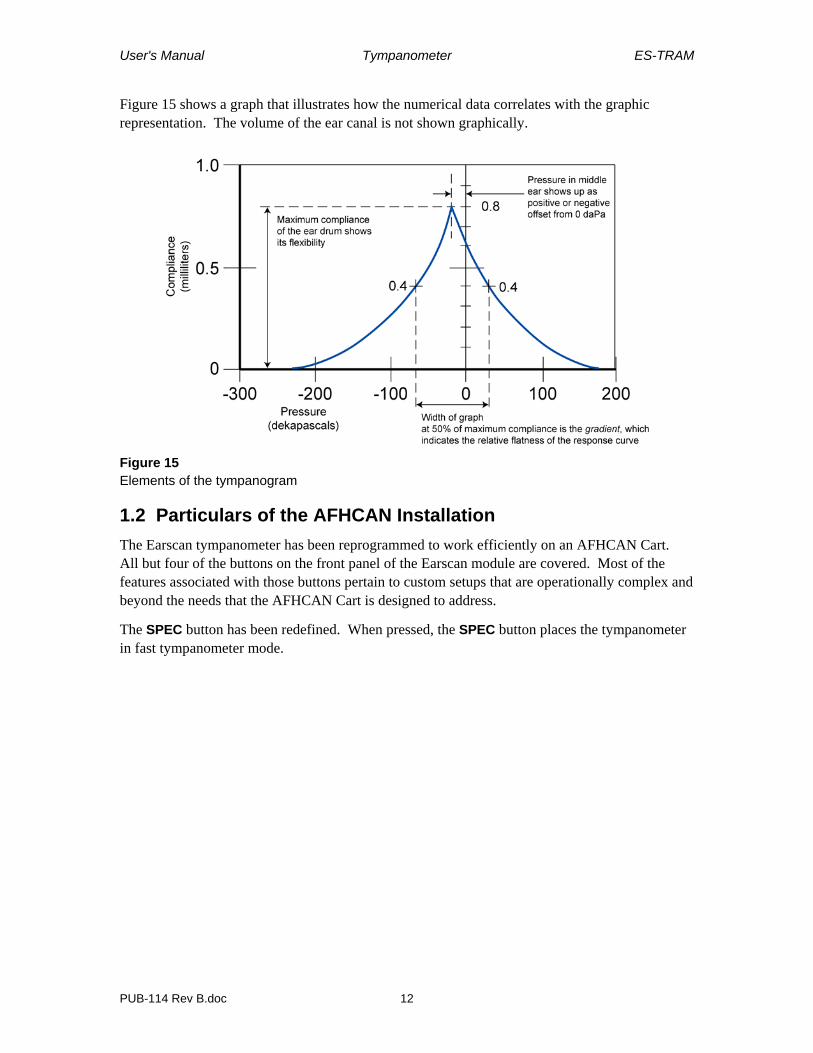
Figure 15 shows a graph that illustrates how the numerical data correlates with the graphic representation. The volume of the ear canal is not shown graphically.
Figure 15 Elements of the tympanogram
1.2 Particulars of the AFHCAN Installation The Earscan tympanometer has been reprogrammed to work efficiently on an AFHCAN Cart. All but four of the buttons on the front panel of the Earscan module are covered. Most of the features associated with those buttons pertain to custom setups that are operationally complex and beyond the needs that the AFHCAN Cart is designed to address.
The SPEC button has been redefined. When pressed, the SPEC button places the tympanometer in fast tympanometer mode.

PUB-114 Rev B.doc 13
Section 2 – Operation
2.1 Basic Operating Procedures Operating the tympanometer involves using both the on-screen displays of the AFHCAN software, and the LCD display on the Earscan module.
2.1.1 Starting the Tympanometer
Initiate tympanometry as follows:
1. If necessary, turn on the tympanometer by setting the On/Off power switch to the 1 position. (Normally the device is left ON.)
2. From the Add To Case screen, press the Tympanometer button. The AFHCAN software will bring up the Tympanometer screen on the monitor.
2.1.1 Calibration
The tympanometer should be calibrated once each day before use. It does no harm to calibrate with each new patient, and to include the calibration data in the case. Proceed as follows:
1. On the Earscan module, push the CAL button.
2. Place the calibration cavity on the probe tip, and hold the cable steady during the test.
- testing begins when a good seal is obtained
- watch for messages on the LCD display
- once testing starts, it takes about 15 seconds for the REMOVE PROBE! message to appear on the LCD display
3. Remove the calibration cavity and return it to its container.
4. The Tympanometer screen will now have a thumbnail of the calibration data in the left area of the screen. The top of the screen will say You have selected NORMAL Tympanometry.
Note: calibration results will also be displayed at the top of the screen. If the results fall outside the range of 1.8 to 2.1 milliliters, contact AFHCAN Customer Support.
5. At this point, you have the following options.
a) click on the thumbnail to view the calibration data.
b) click on the green checkmark to deselect the calibration data
c) proceed with a normal tympanogram (at this point, pressing the IMP button is optional) (See section 2.1.2)
d) press the SPEC button on the Earscan module to place the device in Fast Tympanogram mode (see Section 2.1.3)

User's Manual Tympanometer ES-TRAM
PUB-114 Rev B.doc 14
2.1.2 Normal Tympanogram
The following is the procedure for doing a normal tympanogram:
1. Press the IMP button on the Earscan module. On the monitor, the Tympanometer screen will say You selected: NORMAL Tympanometry.
2. Look at the patient's ear canal and notice its size and alignment.
3. Select an appropriately sized ear cuff, clean it with an alcohol swab, and place it on the probe tip.
4. Brief the patient about the test with the following information:
a) you will feel a small change in pressure during the test
b) at the end of the test, you will hear two loud tones – they are part of the test
c) try to hold as still as possible and avoid swallowing during the test
5. Watch the LCD display and respond to messages as appropriate:
a) if the LCD display says AIR LEAK, reposition the probe in the patient's ear canal and try to obtain a good seal
b) if the LCD display says BLOCK, remove the probe and check the ear cuff and tip for any wax or other debris and clean, if necessary, and check the patient's ear for excessive wax or the presence of a foreign object. Reposition the probe and try again
c) when the LCD display says STEADY, hold the probe steady
d) when the LCD display says -> TESTING <-, continue to hold the probe steady
e) when the LCD display says REMOVE PROBE!, the test is complete, and the probe can be removed.
Note: Normal tympanometry takes about 12 seconds to complete the tympanogram and the acoustic reflex tests. If you remove the ear probe after 7 seconds of testing (just before the tones take place), the tympanometer may download the tympanogram data without the data from the acoustic reflex tests. If a tympanogram was successfully downloaded, it will be good medical information, and may be sufficient for your purposes.
f) when the LCD display says BUSY, it is downloading the data to the computer
g) on completion of the download, the response curve of the tympanogram will be displayed on the LCD display
6. The data from the tympanogram will automatically be displayed on the Tympanometer screen.
a) press the Right or Left button as appropriate to label which ear was tested
b) if there is a question about the quality of the data, retest the ear

User's Manual Tympanometer ES-TRAM
PUB-114 Rev B.doc 15
7. For the sake of comparison, it is always a good practice to test the other ear.
8. On the Tympanometer screen:
a) click all thumbnails to review the data
b) click on the box next to the thumbnail to add or remove a green checkmark
c) press the Save button to save all checked tympanograms into the case
9. It is standard practice to leave the Power On/Off switch on the Earscan module ON (set to the 1 position).
2.1.3 Fast Tympanogram
Fast tympanometry is useful for very young patients who may have trouble sitting still. Fast tympanometry is the same as normal tympanometry in all respects but the following:
• to place the Earscan module in fast tympanometry mode, press the SPEC button
• it takes 5 seconds to generate the basic response curve, and about 10 seconds for the complete test
Once the tympanometer is in fast tympanometry mode, follow steps 2 through 9 for normal tympanograms.

User's Manual Tympanometer ES-TRAM
PUB-114 Rev B.doc 16

PUB-114 Rev B.doc 17
Section 3 – Clinical Considerations
3.1 Guidelines for Clinical Success A good tympanogram has the following characteristics:
• results for both the right and left ears have been obtained for the sake of comparison
• calibration has been performed
3.2 Common Mistakes Avoid the following:
• ensure the probe cable is not pinched or kinked, as this can reduce air flow to the probe
• do not move the probe cable when testing is underway
• do not allow the probe cable to contact a source of mechanical vibration during the testing
• the act of swallowing can introduce noise and affect the result
3.3 Tips and Tricks The following pointers may be helpful:
• there are several factors that contribute to an air-tight seal between the ear cuff and the ear canal:
- use the right size ear cuff
- position the probe with respect to the opening of the ear canal (move whole probe left and right, or up and down as needed to center on the opening of the ear canal)
- align the probe with respect to the ear canal's internal alignment (once the hole in the ear cuff is centered in the opening, angle the back of the probe up and down, or left and right as needed to match the alignment of the ear canal)
- use adequate pressure to seat the ear cuff against the opening of the ear canal
• it may be easier to obtain consistent results for a series of tests if the ears are allowed to "rest" for a few moments between tests
• straighten the ear canal by pulling the pinna up and back for adults or straight back for children

User's Manual Tympanometer ES-TRAM
PUB-114 Rev B.doc 18

PUB-114 Rev B.doc 19
Section 4 – Routine Maintenance
4.1 Care and Cleaning In general, the Earscan module and cables can be wiped down with a damp cloth.
Ear cuffs can be cleaned with alcohol, surgical soap, or disinfectant soap.
If ear wax or other debris has accumulated in the probe tip, it can be removed for cleaning. Proceed as follows (Figure 16):
Figure 16 Removing the probe tip
1. Using a suitable wrench (not pliers), unscrew the white probe tip from the probe housing.
2. Being careful not to bend or disturb the hypodermic tube which the tip fits over, pull the tip free from the probe housing.
3. Use a pipe cleaner or similar object to push debris from inside the probe tip. The tip may be washed in a mild soap solution.
4. Before replacing the probe tip, remove any material from the threads such as Teflon tape.
5. Lubricate the threads with a small amount of petroleum jelly.
6. Being careful not to push any lubricant or debris into the hypodermic tube, place the tip over the hypodermic tube and engage the threads.
7. Thread the tip back into the probe housing and gently tighten using a wrench. Be careful not to deform the plastic. Wipe off any excess thread lubricant.
8. Verify that the threads were sealed properly by performing a calibration test.

User's Manual Tympanometer ES-TRAM
PUB-114 Rev B.doc 20
4.2 Elementary Troubleshooting The only user-level troubleshooting available on the Earscan tympanometer are the basic things such as:
• verify that all plugs are fully inserted into their connection jacks
• ensure that power is available to the unit and the power cord is plugged in at both ends
• check to see that the power switch is on
• visually examine the probe cable to ensure it is not pinched, kinked, or otherwise damaged
• ensure that the probe tip is fully screwed into the probe housing
• check the probe tip for the presence of debris and clean as outlined above, if necessary

PUB-114 Rev B.doc 21
Index acoustic reflex
calibration data (image), 9 defined, 1 ear's response, 1 effect of noise during calibration (image), 10 on-screen results (image), 11 test duration, 14 test not completed, 14 test process, 1
Add To Case screen, 7, 8 AIR LEAK message, 5, 14 AUD button
error message, 7, 11 error message (image), 11 in startup display, 5 not applicable to tympanometry, 5 on front panel (image), 2
Back button function, 8 on Tympanometer screen (image), 7
BLOCK message, 5, 14 BUSY message, 5, 6, 14 buttons, front panel
unused, 12 unused (image), 2
CAL button function, 7 on front panel (image), 2 on-screen instructions (image), 8 procedure, 5, 13 result when pushed, 5, 8
CALIBRATING message, 5 calibration
data dislay (image), 9 example of noise in cable, 10 general reference, 6, 8, 9, 17 initiating, 7 operational check, 19 procedure, 5, 13 removing calibration data from case, 13 results displayed, 8 test parameters, 13 testing frequency, 5, 13 thumbnail of calibration data, 9
calibration cavity correctly installed (image), 4 general reference, 2 procedure, 5, 8, 9, 13
calibration tool. See calibration cavity Case screen, 8 ear cuff
AIR LEAK error message, 5
BLOCK error message, 5 cleaning, 5, 19 correctly installed (image), 4 function, 1 general reference, 2 obtaining good seal, 17 procedure, 5, 9, 14 three sizes (image), 4
Earscan module active front panel buttons, 6 audiometry error message, 11 back (image), 3 cleaning, 19 connectors and power switch on top (image), 3 connectors on right (image), 3 EPROM version, 5 front panel (image), 2 general reference, 4, 5, 6, 10, 11, 13, 14, 15 included items, 2 on-screen instructions, 7, 8 precaution, 10 ready indication, 5, 6 sending data, 5 unused buttons on front panel, 12
electronics module. See Earscan module functional description. See (device), function IMP AUD CAL SPEC message, 5 IMP button
function, 6 on front panel (image), 2 on-screen instructions (image), 9 procedure, 5, 7, 11, 13, 14 result when pushed, 6
INSERT PROBE IN CAL CAVITY message, 5 LCD display
data display (image), 4 function, 4 general reference, 6, 8, 13 list of messages displayed, 5 monitored by operator, 13 monitored by user, 1 on front panel (image), 2 responses to specific messages, 14 specific messages. See (message text)
Left button, 11 messages displayed on LCD
details. See (text of specific message) list of, 5
MICRO AUDIOMETRIX EX71A message, 5 modes of operation
calibration, 5, 11 fast tympanogram, 7, 11, 12, 13, 15

User's Manual Tympanometer ES-TRAM
PUB-114 Rev B.doc 22
impedence mode. See normal tympanogram normal tympanogram, 1, 6, 7, 11
NO DATA message, 6 NORMAL TYPM message, 6 NOT CONNECTED message, 6 power distribution strategy, 4 power switch, cart main, 4 power switch, tympanometer
function, 4 general reference, 6 normally ON, 4 on top of unit (image), 3 procedure, 13, 15 troubleshooting, 20
probe. See tympanometry probe probe cable
avoid kinking, 2, 10, 17 cleaning, 19 dual function (air and electrical), 2 dual function (image), 3 inspection, 20 susceptibility to noise, 2, 10, 13, 17
probe housing (image), 19 general reference, 2, 19, 20
probe tip, 19 (image), 19 cleaning, 19 general reference, 2, 20 installing calibration cavity, 13 installing ear cuff, 14 removal, 19
REMOVE PROBE! message, 5, 6, 13, 14 Right button, 11 Save button
function, 8 on Tympanometer screen (image), 7 procedure, 15
sequence of operation, 1 SPEC button
altered function, 5, 12 function, 7 on front panel (image), 2 on-screen instructions (image), 10 procedure, 5, 13, 15 result when pushed, 10
STEADY message, 6, 14 TESTING message, 6, 14 tympanogram
desired characteristics, 17 duration of test, 14 general reference, 1 interpretation (image), 12 LCD display and on-screen (image), 4 multiple tests, 11 on-screen results (image), 11
procedure, 10 procedure (fast), 15 procedure (normal), 14 process of generation, 1 saving to case, 15
tympanometer function, 1 power switch. See power switch, tympanometer principal components, 2 sequence of operation, 1
Tympanometer button, 7 tympanometer module. See Earscan module Tympanometer screen
calibration data display (image), 9 calibration instructions (image), 8 data display (image), 11 fast tympanometry instructions (image), 10 first screen (image), 7 image label text box (image), 11 Left button (image), 11 normal tympanometry instructions (image), 9 Right button (image), 11
tympanometry probe automatic sensing, 6 BLOCK message, 5 calibration procedure, 5, 8, 13 components of, 2 correct alignment, 5, 17 correct handling, 17 general reference, 6, 9 noise from rough handling, 10 precaution, 2 premature removal, 14 procedure, 6, 14