user's guide print and deliver shipping label service† general overview of service...
TRANSCRIPT

User’s Guide Print and Deliver Shipping
Label Service January 2015
Version 2.0

υ
Contents General Overview of Service .......................................................................................................2
Description of Service ..............................................................................................................2
Purpose ...................................................................................................................................3
Getting Started ............................................................................................................................3
Eligibility for Print and Deliver Shipping Label Service .............................................................3
Using the Print and Deliver Shipping Label Service Application ..................................................4
Accessing the Application ........................................................................................................4
Initial Setup of Print and Deliver Shipping Label Service..........................................................7
An Overview of the Service Homepage ...................................................................................8
Return Locations for Print and Deliver Shipping Label Service ................................................8
Individual Return Locations ..................................................................................................8
Adding Bulk Return Locations ..............................................................................................9
Search/Update/Delete Return Locations ............................................................................10
View Bulk Return Locations Upload File ............................................................................12
Placing Requests for Print and Deliver Shipping Label Service .............................................13
Individual Request Entry ....................................................................................................13
Large File Upload...............................................................................................................15
Managing Profile ...................................................................................................................16
Frequently Asked Questions .....................................................................................................17
Appendix A – Physical Scan Events ..........................................................................................19
Appendix B – Bulk File Format Guidelines ................................................................................21

φ
General Overview of Service
Description of Service Print and Deliver Shipping Label Service (PDSL) is a unique service offered by the USPS that will save your business money and time by printing returns labels and providing them to your customers by either:
Deliver to a Specified Address – USPS will physically deliver the return label to a domestic address.
Pickup at Post Office – The return label will be printed and made available for pick up at the selected Post Office.
Pickup at Self Service Kiosk (SSK) – Your customers will have the flexibility of printing the return label from any Postal SSK.
There are two types of Return Services available for use with the Print and Deliver Shipping Label Service, which includes USPS Return Service or Parcel Return Service (PRS). The Print and Deliver Shipping Label Service application will check whether or not the Merchant’s Permit ID is linked to the selected Return Service. If the Permit ID is not linked, then instructions will be provided on how to register for the desired Return Service. Here, are the available types of Return Services:
1. USPS Returns – Offers flexible return label options including First-Class Package Return Service, Priority Mail Return Service, or Ground Return Service. In addition, Merchants are able to select the return location for their merchandise. Merchants are charged for postage based on an average weight/rate when their return packages receive their first physical scan. For more information, please visit https://www.usps.com/business/returns.htm. To see a complete list of first physical scan events, please go to Appendix A. The application allows for individual entry of a return label or a large file upload of up to 100K return labels can be requested. Return location types available for selection: Distribution Center – When the customer (recipient) drops the return merchandise back
into the USPS Network, it will be shipped back to your Distribution Center. Retail Store – When the customer (recipient) drops the return merchandise back into the
USPS Network, it will be shipped back to a store of your choosing.
2. Parcel Return Service – Offers a dedicated return service for shippers with a high volume of returns. Merchants are charged after the manifest verification process in a reverse-logistics manner. In addition, Merchants are able to select their return facility such as a RDU, RNDC, or RCF. For more information, please visit https://www.usps.com/business/parcel-return-service.htm.

χ
Purpose The purpose of this Guidebook is to aid customers in signing up for and using the Print and Deliver Shipping Label Service capability. This service can be accessed through the Business Customer Gateway (BCG).
Getting Started
Eligibility for Print and Deliver Shipping Label Service In order to use the Print and Deliver Shipping Label Service Application, you must first meet the following requirements:
Requirement Information and Resources
Register as a Business Customer Gateway (BCG) User
If you do not already have a BCG account, go to https://gateway.usps.com/eAdmin/view/signin and click the “Register for free” button. Information and help for BCG registration can be found here: https://ribbs.usps.gov/intelligentmail_gateway/documents/tech_guides/BusinessCustomerGateway.pdf
Establish a Centralized Automated Payment System (CAPS) Account
If you do not have a CAPS account, go to https://caps.usps.gov/ for more information.
Establish a permit imprint account; linked to a CAPS account.
If you do not have a permit imprint account, go to: http://pe.usps.com/businessmail101/postage/applyP
ermit.htm. Establish Customer
Registration IDs (CRIDs) for each location; linked to a CAPS account; be a Business Service Administrator for these CRIDS.
For more information about getting a CRID, go to: https://ribbs.usps.gov/intelligentmail_mail_id_app/documents/tech_guides/MIDCRIDAcquisitionQuickStep.pdf.
Obtain access to the Mailer ID (MID) and Manage Mailing Activity business services in BCG.
For more information on Mailer IDs, go to: https://ribbs.usps.gov/index.cfm?page=intellmailmailidapp

ψ
Using the Print and Deliver Shipping Label Service Application
Accessing the Application After you have been granted access to the required services, navigate to the Shipping Services page (left-hand navigation bar) on the Business Customer Gateway.
1. Navigate to https://gateway.usps.com/eAdmin/view/signin and sign into the Business Customer Gateway (BCG).
2. Click the “Shipping Services” button on the left navigation pane.
ω
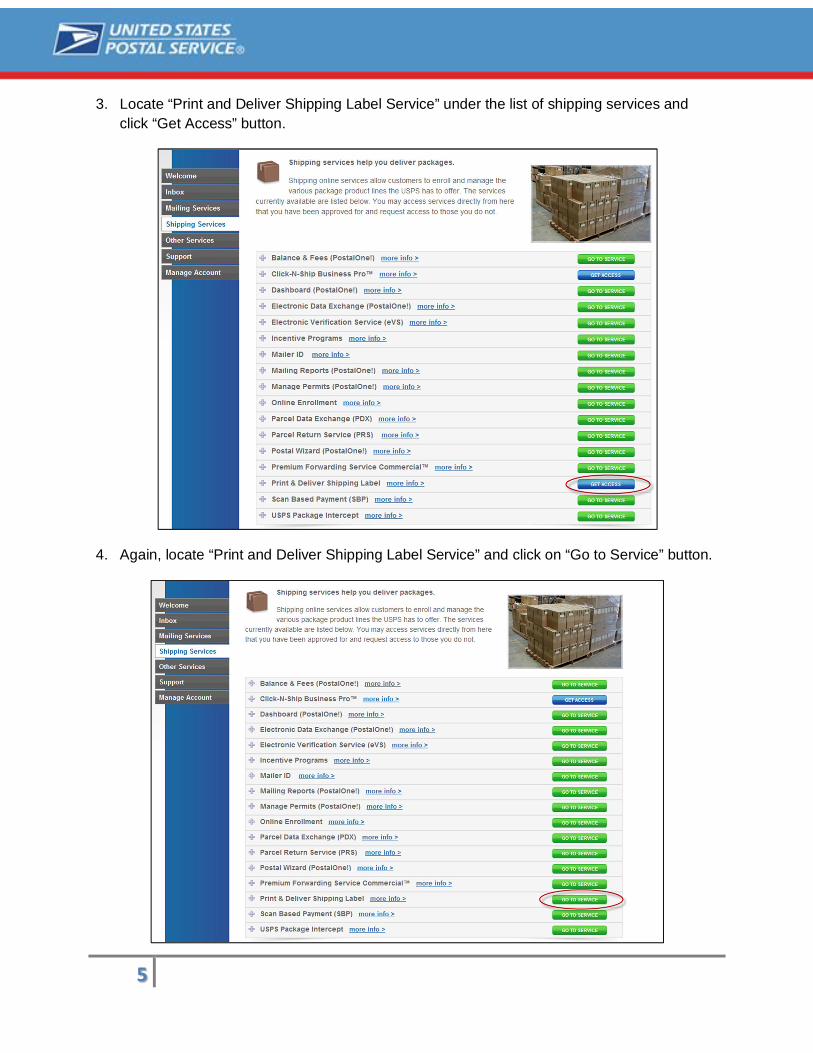
3. Locate “Print and Deliver Shipping Label Service” under the list of shipping services and click “Get Access” button.
4. Again, locate “Print and Deliver Shipping Label Service” and click on “Go to Service” button.

ϊ
5. To use this service, you must agree to the Terms and Conditions. Use the scrollbar on the right to read. Click the checkbox and then click on the “Agree” button.
6. You will be directed to the Print and Deliver Shipping Label Service initial setup page which
is described in the next section.
Note: This service is only available when you are signed into your Business Customer Gateway account, and have all the required services as well as a Permit Imprint account linked to your CAPS account.

ϋ
Initial Setup of Print and Deliver Shipping Label Service The first time you access the Print and Deliver Shipping Label Service application, an initial profile setup will be required. This setup will allow you to pre-select options for submitting Print and Deliver Shipping Label Service requests. Regardless, there will be an option to modify these pre-selected options at a later time when you create new requests.
1. Select the desired default Mailer ID (MID), you would like to use for creating PDSL Service Requests. The application will check to determine if a Permit ID of the selected Return Service is currently linked to the Mailer ID. If they are not, then instructions will be provided on how to get registered with the desired Return Service.
2. For the notifications section, select the checkbox if PDSL status updates are desired. 3. If notifications are desired, select the dropdown to select the method of how you would like
to receive updates (Email/Text). Also, enter the email address where you would like to receive updates.

ό
An Overview of the Service Homepage The Print and Deliver Shipping Label (PDSL) Service homepage is the first screen you will encounter after selecting the Print and Deliver Shipping Label Service link from the Business Customer Gateway homepage. From here, you can initiate new Print and Deliver Shipping Label Service requests or review recently submitted Print and Deliver Shipping Label Service requests.
The Print and Deliver Shipping Label Service homepage has three key functional areas which are: Manage PDSL, Manage Return Locations, and Manage Merchant Profile. Please find a focused view on the navigation menu where each part (marked by a letter on the right) is briefly explained.
A. To create an individual PDSL Service Request. B. To create PDSL Service Requests by uploading a file. C. To view the status of a PDSL Service Request. D. To view the status of a PDSL bulk upload file request. E. To add return locations for future use PDSL Service
Requests. F. To search, view, and make updates to return locations. G. To add return locations in bulk by uploading a file. H. To view locations bulk upload file request. I. To manage profile settings.
There are two ways of creating PDSLs briefly described below.
1. File Upload – Upload a file with information to submit Print and Deliver Shipping Label Service requests
a. Regular file: Up to 25 records b. Large file: 26 to 100K records
2. Manual Entry – Enter customer information, return location information, customer receiving method, return product type, and extra services.
Return Locations for Print and Deliver Shipping Label Service
Individual Return Locations To add a return location, please click on the “Add Location” button (under Manage Return Locations sub-section) located on the left-hand navigation menu. Required fields are designated with an “*”. An example of the Add Return Location page is shown below. Note: Addresses for return locations will be validated.

ύ
Steps for adding a Return Location:
1. Select the Return Location Type from the dropdown. 2. Enter the Business Name. 3. Enter the Address. 4. Enter the Address 2 (if needed). 5. Select the State from the dropdown. 6. Enter the ZIP Code. 7. Click on the “Add Location” button.
Adding Bulk Return Locations To add bulk return locations in a single upload, click on the “Upload Bulk Locations” button (under Manage Return Locations sub-section) located on the left-hand navigation menu. The Bulk Return Location Template file format can be found in Appendix B. Note: Addresses for return locations will be validated.

υτ
Steps for uploading a Bulk Locations file:
1. Click on the “Browse” button. 2. Select the .CSV bulk file for upload (file must adhere to template guidelines). 3. Click on the “Upload” button.
Search/Update/Delete Return Locations To search/update return locations, click on the “Search/Update Return Locations” button (under Manage Return Locations sub-section) located on the left-hand navigation menu. See below for Search Return Location page.
Steps for searching Return Locations:
1. Select the Return Location Type from the dropdown (required field). 2. Enter any other search field (if desired), and click on the “Search Location” button.

υυ
The application will then perform a search and retrieve Return Locations results in a table (if the return locations meet the search criteria). See image below.
For updating Return Locations, please see the image shown below:
Steps for updating Return Locations:
1. Perform search as described in the above steps. 2. In the search results table, click on the Name of the return location you would like to update.
3. Make any changes to the return location data fields you deem necessary. 4. Click on the “Update Location” button.

υφ
To delete Return Locations, please see the steps shown below:
1. Perform search as described in the above steps. 2. In the search results table, select the checkbox on the far right-hand side of the desired
Return Location you would like to delete.
3. Click the “Delete” button located at the column heading.
View Bulk Return Locations Upload File To view previously submitted bulk return locations upload files, click on the “View Bulk Upload Files” button (under Manage Return Locations sub-section) located on the left-hand navigation menu.
Steps for Bulk Upload Location files:
1. Enter the File Name of the Bulk Upload Location file, or: 2. Enter a desired search range (for the uploaded date). 3. Click on the “Search Bulk Upload File” button.
The application will then perform a search and retrieve Bulk File results in a table (if search criteria were met). See image below.

υχ
Placing Requests for Print and Deliver Shipping Label Service
Individual Request Entry To create an individual PDSL Service requests, click the “Create Return Label” button (under Manage PDSL sub-section) located on the left-hand navigation menu. Required fields are designated with an “*”. Also note that addresses entered into the application must be validated.
Steps for Creating a PDSL Service request:
1. Enter the first name. 2. Enter the last name. 3. Enter the address 1 (and address line 2 if needed to indicate apartment, suite, etc.). 4. Enter the city. 5. Select the state from the dropdown. 6. Enter the ZIP code. 7. Select the notification mode (to receive notification of status of PDSL) and enter the
email/text information. 8. Click the “Check Availability” button. 9. The application will check whether the address is valid. If it is a valid address, the
application will display the screen below (see continued step 10). Otherwise, an error message will be displayed.

υψ
10. Then, select the Return Service Type from the dropdown. 11. Select the desired Mailer ID from the dropdown. 12. Select the Return Location Type from the dropdown. 13. To find the desired Return Location, enter the City, State, or Zip Code, and click on the
“Search Return Location” button. (Note: If the Return Location has not previously been entered, then select the “Add Location” button – please refer to the Individual Return Location section for step-by-step instructions)
14. Select the Delivery Option from the dropdown. a. If the “Delivered” option was selected, please skip to next step. b. If “Pickup at Post Office” was selected, the Post Office locator will assist in selecting
the desired Post Office location for the pickup of the return label. Steps are indicated below for selecting the Post Office.
i. Enter Zip Code for Post Office ii. Then, click on Find Post Office button
15. Select how you would like to receive notifications and enter notification information. 16. Select the checkbox for notifications (if desired). 17. Review the Print and Deliver Shipping Label Service request and click on the “Create Return
Label” button.
Once the request has been submitted, the request can be found in the recently submitted requests section.

υω
Large File Upload Files can be uploaded with up to 100K return labels through the Print and Deliver Shipping Label Service application. To upload a bulk file of PDSLs, please click on the “Upload Bulk Return Label” button (under Manage PDSL sub-section) located on the left-hand navigation menu. The Bulk PDSL Template file format can be found in Appendix B.
Note: Addresses for return locations will be validated.
Steps for uploading a bulk PDSL upload file:
1. Click on the “Browse” button. 2. Select the .CSV bulk file for upload (file must adhere to template guidelines). 3. Click on the “Upload” button.

υϊ
Managing Profile To manage your profile, click on the “Manage Profile” button (under Manage Merchant Profile sub-section) located on the left-hand navigation menu.
1. Select the desired default Mailer ID (MID). The application will check to determine if a Permit
ID of the selected Return Service is currently linked to the Mailer ID. 2. For the notifications section, select the checkbox if PDSL status updates are desired. 3. If notifications are desired, select the dropdown to select the method of how you would like
to receive updates (Email/Text). Also, enter the email address where you would like to receive updates.

υϋ
Frequently Asked Questions Q: What is a Print and Deliver Shipping Label? A: A Print and Deliver Shipping Label (PDSL) is a package return instruction and return shipping label used in the shipping business. It is used when a merchant wants their customer to return an item. PDSLs are delivered to a customer at their home or office or can be picked up at a Post Office or Postal Self Service Kiosk. Q: How do I get Print and Deliver Shipping Label? A: Customers must work with the merchant or business as return policies vary. Q: Where will my Print and Deliver Shipping Label be sent? A: The merchant will instruct the customer as to where the label will be sent. The merchant can send the Print and Deliver Shipping Label to their customer’s address or have a Print and Deliver Shipping Label sent to a Post Office for pickup at the Retail counter or Postal Self Service Kiosk. Q: How do I use a Print and Deliver Shipping Label? A: Place the label so it does not wrap around the edge of the package. Adhere the label to the package. If tape or glue is used, DO NOT TAPE OVER THE BARCODE. Be sure all edges are secure. Q: How does my package get picked up? A: Customers can schedule a free Package Pickup online at USPS.com, hand the package to their carrier, take it to a Post Office or drop in a USPS collection box. Q: What if I didn’t receive my Print and Deliver Shipping Label? A: Customers must work with their merchants directly. Q: What return products are available for Print and Deliver Shipping Label Service? A: The products that are available are:
- Parcel Return Service (PRS) o Customers can drop off returns at collection boxes, retail locations, or schedule
pickups online at www.usps.com.
- USPS Return Service
o Priority Mail Return Service o First-Class Package Return Service o Ground Return Service

υό
Q: How are Print and Deliver Shipping Label Service shipments paid? A: USPS Return Service – uses Scan Based payment. The merchant is charged after the first physical scan. For, Parcel Return Service (PRS) - the Postal Service will charge the merchant the appropriate PRS price at the destinating unit. Q: What are the delivery address options for Print and Deliver Shipping Labels once they
are picked up from a customer? A: Delivery options include Delivery to Address, Pick Up at Post Office, or Pick Up at Self-
Service Kiosk (SSK). Q: Who should I contact on questions regarding Print and Deliver Shipping Label
Service? A: Merchants with questions concerning Print and Deliver Shipping Label Service should contact
their USPS Account Representative.

υύ
Appendix A – Physical Scan Events Please find a list of first physical scan events below:
01 Delivered
02 Attempted / Notice Left
03 Accept or Pickup
04 Refused
05 Undelivered as Addressed
06 Forwarded
07 Arrival at Unit
08 Mis-sent
09 Return to Sender
10 Processed
11 Dead Letter
12 Visible Damage
13 Authorized Agent
14 Arrival at Pickup Point
15 Mis-shipped
16 Available for Pickup
17 Pick Up by Agent
21 No Such Number
22 Insufficient Number
23 Moved, Left No Address
24 Forward Expired
25 Addressee Unknown
26 Vacant
27 Unclaimed
28 Deceased
29 Other
31 Return to Sender / Not Picked Up
32 Dead Mail / Disposed by Post Office
33 Dead Mail / Sent to Recovery Center
42 USPS Hand Off to Shipping Partner
43 Picked Up
51 Business Closed
52 Notice Left
53 Receptacle Blocked
54 Receptacle Full / Item Oversized
55 No Secure Location Available
56 No Authorized Recipient Available

φυ
Appendix B – Bulk File Format Guidelines Purpose The purpose of this File Format Guide is to aid customers in following file format standards, required by the Print and Deliver Shipping Label Service (PDSL) application, for uploading both:
1. Multiple PDSL Service requests in a single upload. 2. Multiple Return Locations in a single upload.
Users can create the file at their own discretion and upload it via the Print and Deliver Shipping Label Service interface.
File Naming The name of the file should be unique. The naming convention for the file should be ‘CALLTAGRETURN_YYYYMMDDHHMM.CSV’
YYYY = year
MM = numeric representation of the month
DD = day of the month
HHMM = the hour and minute of the file generated.
E.g.: ‘CALLTAGRETURN_201305061642.CSV’
Bulk File Requirements File Format The PDSL - Bulk File Format is a pipe-delimited text file, containing one header record and multiple detail records. Each record should be per line and a carriage return at the end of record. The start of a record should not include a pipe; however the end of the record can contain a pipe. File Layout File will be laid out with a header row and can have multiple detail rows. Record Details This section describes the record details.
Record Position The number of this record element. The first is 1, the second 2 and so on. Name The name of the field

φφ
Required Field Whether or not the field is required
Y – Yes
N – No
C – Conditional (See notes for details)
Field Format The expected format of the record and its expected maximum length. Formats are noted as follows:
N – Numeric
A/N – Alphanumeric
Unless otherwise noted, spaces are implicitly valid whitespace.
The expected maximum length of the field is noted parenthetically after the format. Thus a field labeled A/N (20) is alphanumeric, and expected to be up to 20 characters.
Description Description of the field
Example An example of a valid record
Notes Any notes regarding the field, including additional format or content limitations
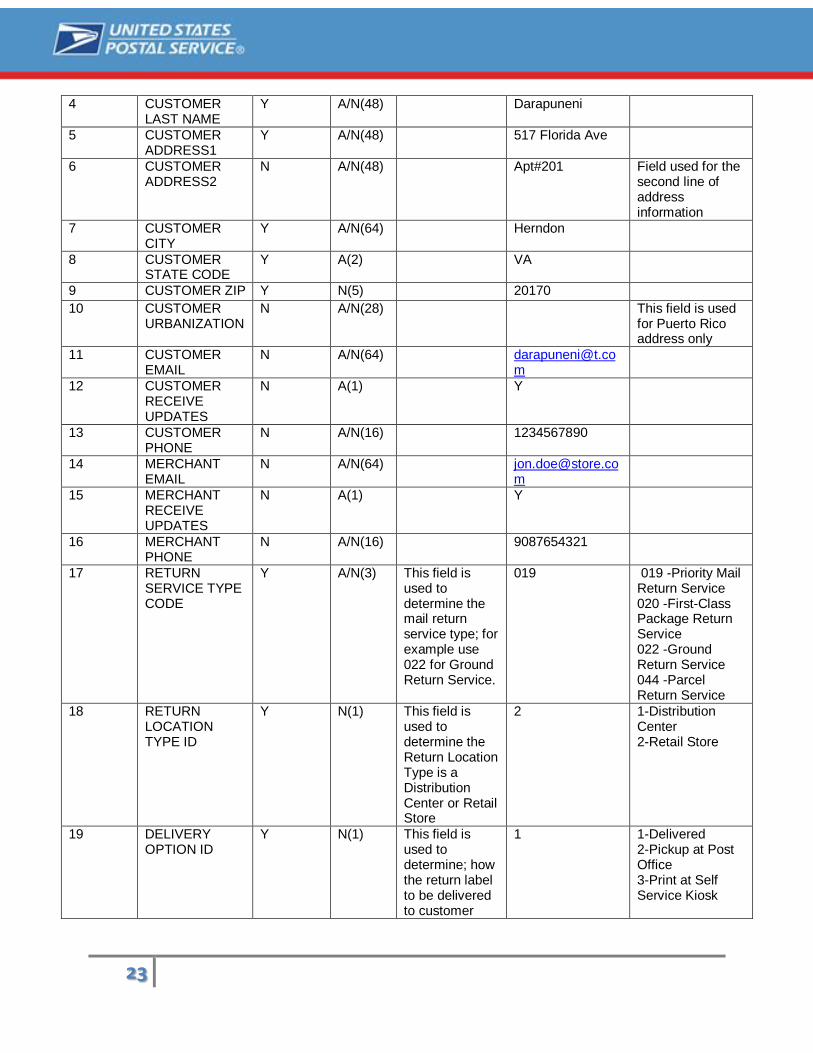
File Details for PDSL Service Requests This section describes the data element requirements for uploading bulk PDSL Requests.
Record Position Field Name
Required Field
Format (Size) Description Example
Content Rules and limitations
1 MID Y A/N(9) This is the MID which will be used to generate an extract report.
103221
2 BUSINESS NAME
Y A/N(64) USPS Business Office
Business Name must match with the Existing Return Location Name, this only applicable for SBP Merchant
3 CUSTOMER FIRST NAME
Y A/N(48) Venu
φχ
4 CUSTOMER LAST NAME
Y A/N(48) Darapuneni
5 CUSTOMER ADDRESS1
Y A/N(48) 517 Florida Ave
6 CUSTOMER ADDRESS2
N A/N(48) Apt#201 Field used for the second line of address information
7 CUSTOMER CITY
Y A/N(64) Herndon
8 CUSTOMER STATE CODE
Y A(2) VA
9 CUSTOMER ZIP Y N(5) 20170 10 CUSTOMER
URBANIZATION N A/N(28) This field is used
for Puerto Rico address only
11 CUSTOMER EMAIL
N A/N(64) [email protected]
12 CUSTOMER RECEIVE UPDATES
N A(1) Y
13 CUSTOMER PHONE
N A/N(16) 1234567890
14 MERCHANT EMAIL
N A/N(64) [email protected]
15 MERCHANT RECEIVE UPDATES
N A(1) Y
16 MERCHANT PHONE
N A/N(16) 9087654321
17 RETURN SERVICE TYPE CODE
Y A/N(3) This field is used to determine the mail return service type; for example use 022 for Ground Return Service.
019 019 -Priority Mail Return Service 020 -First-Class Package Return Service 022 -Ground Return Service 044 -Parcel Return Service
18 RETURN LOCATION TYPE ID
Y N(1) This field is used to determine the Return Location Type is a Distribution Center or Retail Store
2 1-Distribution Center 2-Retail Store
19 DELIVERY OPTION ID
Y N(1) This field is used to determine; how the return label to be delivered to customer
1 1-Delivered 2-Pickup at Post Office 3-Print at Self Service Kiosk

φψ
File Details for Return Locations This section describes the data element requirements for uploading.
Record Position Field Name
Required Field
Format (Size) Description Example
Content Rules and Limitations
1 LOCATION NAME
Y A/N(64) Store-Chantilly
2 LOCATION TYPE
Y N(1) This field is used to determine if the Return Location Type is a Distribution Center or Retail Store.
2 1-Distribution Center 2-Retail Store
3 ADDRESS1 Y A/N(48) 4368 Chantilly Shopping Center
4 ADDRESS2 N A/N(48) Field used for the second line of address information
5 CITY Y A/N(64) Chantilly 6 STATE Y A(2) VA 7 ZIP Y N(5) 20151 8 URBANIZATION N A/N(28) 9 PHONE N A/N(16) 571393081
