usermanualpicoeng5.0
DESCRIPTION
User Manual Axioo PicoTRANSCRIPT
USER GUIDE
i
Notebook’s User Guide This manual guides you in setting up and using your new notebook. Information contained herein is for reference only and does not constitue a commitment on the part of the manufacturer or any subsequent vendor. No part of this manual may be reproduced, stored in a retrieval system, or transmitted, in any form or by any means, electronic, mechanical, photocopy, recording, or otherwise, without prior written permission.
Trademarks
The product name contained herein is for identification and trademark from the manufacturer only. Intel, the Intel logo, Centrino and the Centrino logo, Intel Core and Core Inside are trademarks or registered trademarks of Intel Corporation or its subsidiaries in the United States and other countries. Windows, Windows Vista and the Windows logo are trademarks or registered trademarks of Microsoft Corporation in the United States and/or other countries. All other product and brand names may be trademarks or registered trademarks of their respective owners. Actual models may differ slightly in appearance to illustrations provided.

USER GUIDE
ii
AXIOO MANUAL BOOK Ver. Pico5.00
2008.05.00

CONTENT
iii
Content CHAPTER User Guide ................................................................................. i CONTENTS.................................................................................. iii 1 INTRODUCTION ......................................................................... 1-1 Overview .......................................................................................... 1-2 Non Included ............................................................................ 1-2 Operating system ...................................................................... 1-2 Feature Highlight .............................................................................. 1-2 Processor .................................................................................. 1-2 Chipset ..................................................................................... 1-2 Wireless LAN ............................................................................ 1-2 Memory System......................................................................... 1-3 USB 2.0 .................................................................................... 1-3 Graphic System ......................................................................... 1-3 Audio System ............................................................................ 1-3 Insyde BIOS.............................................................................. 1-3 Power and System Management................................................. 1-3 Unpacking the Notebook ................................................................... 1-4 Panoramic View ................................................................................ 1-4 Built-In Camera ......................................................................... 1-5 Power Button ............................................................................ 1-5 Keyboard .................................................................................. 1-5 Device/Power Status Indicators .................................................. 1-5 Touchpad and Button ................................................................ 1-6 Front View........................................................................................ 1-7 Speaker .................................................................................... 1-7 Left View .......................................................................................... 1-8 DC-In Hole................................................................................ 1-8 Kensington Lock Hole ................................................................ 1-8 Ventilator .................................................................................. 1-8 USB 2.0 Port ............................................................................. 1-8 Right View........................................................................................ 1-9 USB 2.0 Port ............................................................................. 1-9 3-in-1 Card Reader .................................................................... 1-9

CONTENT
iv
Headphone Jack ........................................................................ 1-10 Microphone Jack........................................................................ 1-10 External Monitor (VGA) Port ....................................................... 1-10 LAN RJ-45 Jack ......................................................................... 1-10 Rear View......................................................................................... 1-10 Battery Pack.............................................................................. 1-10 Bottom View ..................................................................................... 1-11 Battery Pack Battery Release Latch............................................. 1-11 Battery Lock Switch ................................................................... 1-11 Battery Pack.............................................................................. 1-11 Notebook Acessories ......................................................................... 1-12 AC Adapter................................................................................ 1-12 Battery...................................................................................... 1-12 2 GETTING STARTED ..................................................................... 2-1 Make Sure You Have Everything ........................................................ 2-2 Using The Notebook.......................................................................... 2-2 Selecting a Place to Work........................................................... 2-2 Keeping Yourself Comfortable .................................................... 2-3 Avoiding Strain and Stress.......................................................... 2-3 Setting the Notebook ........................................................................ 2-4 Connecting to The AC Adapter.................................................... 2-4 Charging the Battery.................................................................. 2-5 Using the Notebook For the First Time ............................................... 2-6 Turning On the Notebook........................................................... 2-6 Turning Off the Notebook .......................................................... 2-6 3 LEARNING THE BASICS .............................................................. 3-1 Using Operating System .................................................................... 3-2 Using Keyboard................................................................................. 3-2 Function Keys............................................................................ 3-3 Ctrl, Fn, Alt Keys........................................................................ 3-3 Windows® Special Keys.............................................................. 3-3 Character Keys .......................................................................... 3-3 Cursors Control Keys ................................................................ 3-4 Screen Control Keys .................................................................. 3-4 Numeric Keys ............................................................................ 3-4 Using Touchpad ................................................................................ 3-4 Display Devices................................................................................. 3-6 Switching Displays with Keyboard............................................... 3-6 Management Power Feature .............................................................. 3-6 Advanced Configuration and Power Interface .............................. 3-6

CONTENT
v
3-in-1 Card Reader............................................................................ 3-7 Using the Notebook at the Office ...................................................... 3-7 Using the Notebook Lock ........................................................... 3-7 Setting Up Communications ............................................................... 3-8 Connecting the Notebook to a Network....................................... 3-8 4 BATTERY..................................................................................... 4-1 Energy Saving Design........................................................................ 4-2 Managing Power Usage .................................................................... 4-2 Running The Notebook On Battery Power........................................... 4-2 Maximazing Battery Life ............................................................ 4-2 Charging Batteries ............................................................................ 4-3 Charging The Main Battery......................................................... 4-3 New Battery .............................................................................. 4-3 Battery Power .................................................................................. 4-4 What To Do When The Battery Runs Low ................................... 4-4 Battery Life ............................................................................... 4-4 Discharging The Battery Completely .......................................... 4-4 Charging The Battery Fully ......................................................... 4-4 Maintaining The Battery ............................................................ 4-5 Conserving The Battery Power.................................................... 4-5 Disposing Of Used Batteries Safely..................................................... 4-5 Removing The Battery....................................................................... 4-5 Battery Removal Process............................................................ 4-6 Installing The Battery Pack......................................................... 4-7 5 CONNECTING TO THE PERIPHERAL ........................................... 5-1 Adding a Printer ................................................................................ 5-2 USB Printer ............................................................................... 5-2 Parallel Printer........................................................................... 5-3 Using the USB Port............................................................................ 5-3 Using an External Monitor Port........................................................... 5-4 Switching The External Monitor Port ........................................... 5-4 Using the External Audio System........................................................ 5-5 Connecting External Speaker...................................................... 5-5 Connecting a Microphone........................................................... 5-5 Using the LAN Port............................................................................ 5-6 Using the Wireless LAN ..................................................................... 5-6 What Is Wireless Networking? .................................................... 5-7 Using Wireless Networking ......................................................... 5-7

CONTENT
vi
6 BIOS CONFIGURATION .............................................................. 6-1 Preface............................................................................................. 6-2 POST (Power on Self Test) ......................................................... 6-2 Failing the POST ............................................................................... 6-3 Main Menu........................................................................................ 6-4 Advanced Menu ................................................................................ 6-5 Security Menu................................................................................... 6-6 Boot Menu........................................................................................ 6-7 Exit Menu ......................................................................................... 6-8 7 IF SOMETHING GOES WRONG.................................................... 7-1 Problems When You Turn On The Notebook ....................................... 7-2 The Notebook Will Not Start ...................................................... 7-2 The Notebook Display “Non-System disc” or “disc error” message 7-2 The Notebook Is Not Accesing the Operating System................... 7-2 Fixing Device-Realted Problems ......................................................... 7-2 Power Problems ........................................................................ 7-2 Memory Module Problems ......................................................... 7-3 Keyboard Problems.................................................................... 7-4 Display Problems ....................................................................... 7-4 Disk Drive Problems................................................................... 7-5 Sound System Problems............................................................. 7-6 Printer Problems........................................................................ 7-6 Viruses ............................................................................................. 7-7 8 CARING FOR THE NOTEBOOK..................................................... 8-1 Precaution ........................................................................................ 8-2 Tips For Using Notebook ................................................................... 8-2 Important Safety Instructions ............................................................ 8-3 Instructions For Care and operation ................................................... 8-4 Cleaning The Notebook ..................................................................... 8-6 Maintaining The Harddisk .................................................................. 8-6 Maintaining The LCD Quality.............................................................. 8-7 Battery Care Guidelines .................................................................... 8-7 Moving The Notebook ....................................................................... 8-8 When You Travel .............................................................................. 8-8

CONTENT
vii
9 INSTALLING DRIVER FOR WINDOWS® ...................................... 9-1 Installing operating System For Notebook........................................... 9-2 Installing Windows® XP® ................................................................... 9-2 Installing Windows® Vista®................................................................ 9-4 Installing Windows® Vista® Using Axioo Recovery DVD (Optional) ........ 9-6 How To Activate Windows® XP®......................................................... 9-9 How To Activate Windows® XP® by Using The Internet................ 9-10 How To Activate Windows® XP® by by a Phone ........................... 9-10 How To Activate Windows® Vista® ..................................................... 9-11 Installing Notebook Driver ................................................................ 9-12 Installing Driver For Windows® XP® ................................................... 9-12 Installing the Chipset Driver ....................................................... 9-13 Installing the VGA device driver.................................................. 9-13 Installing the Audio device driver................................................ 9-13 Installing LAN Driver.................................................................. 9-14 Installing Touchpad Driver ......................................................... 9-14 Installing Card Reader ............................................................... 9-14 Installing System Control Manager (SCM).................................... 9-14 Installing Wireless LAN Driver..................................................... 9-15 Installing Bluetooth driver (Optional) .......................................... 9-15 Installing Battery Driver Update (Optional).................................. 9-15 Installing Camera Driver Update ................................................. 9-16 10 CONFIGURATION FOR WINDOWS®............................................ 10-1 Setting The Notebook Configuration For Windows® ............................ 10-2 Wireless Networking Cofiguration ............................................... 10-2 Configuring the Touch Pad and Button........................................ 10-4 Power Option Configuration ....................................................... 10-4 APPENDIX .................................................................................. A-1 Appendix A: Specification .................................................................. A-2 Appendix B: Warranty ....................................................................... A-6 Appendix C: ISO 13406-2 .................................................................. A-8

CONTENT
viii

CHAPTER 1 – INTRODUCTION
1 - 1
1 I N T R O D U C T I O N This chapter refers to the hardware and essential software required to run the notebook.

CHAPTER 1 – INTRODUCTION
1 - 2
Overview
This manual refers to the hardware and essential software required to run the notebook.
Not Included – Operating System (e.g. Windows® XP®, Windows® Vista®, or Linux) have their own manuals. If you have questions about the operating systems or programs then please consult the appropriate manuals.
Operating System – Your notebook may already come with system software pre-installed. Where this is not the case, or where you are re-configuring your notebook for a different system, you will find this manual refers to the following operating systems:
• Microsoft® Windows® XP® (Home or Professional) • Windows® Vista® • Linux
NOTE: If using Windows® XP® operating system make sure you have installed Windows® XP® Service Pack 2.
Feature Highlight Before we go to identify each part of your Notebook, we will first introduce you to other notable features of your notebook.
This notebook uses the platform with Intel® AtomTM Mobile Technology that offers double CPU performance when multitasking, so that you can get all PC’s performance with all notebook’s performance.
Processor
• Intel® AtomTM processor N270 ~ 1.6Ghz, FSB 533MHz, integrated with cache memory 512KB L2.
Chipset – Intel 945GSE (MCH)+ ICH7-M (ICH)
Wireless LAN – Using Wireless 802.11 b/g for support wireless LAN.

CHAPTER 1 – INTRODUCTION
1 - 3
Memory System
• (included) Onboard 1GB (DDR2 667 MHz, PC5300) • One SODIMM 200-pin socket, support DDRII 533/667 MHz module • Up to 2GB (SODIMM 512/1024 MB module)
USB 2.0 – Provides three USB 2.0 for fastest I/O data transmission with speed 480Mbps (High-Speed USB).
Graphic System – Integrated with Intel GMA 950, support Dynamic Video Memory Technology, support Microsoft® DirectX 9.0C.
Audio System – High Definition Audio, compatible with Direct Sound 3D. Built-in Microphone and two speakers.
Inside BIOS – American Megatrends, Inc.
Power and System Management
• Integrated SMM (System Management Mode) on system chipset that shuts down components not in use to reduce power consumption. To execute power management, you can set up the parameter in Power Options properties at Control Panel of Windows®.
• Suspend hot key allows you to suspend the system operation instantly and resume at the press of the power button.
• Password System for User and Supervisor included on the BIOS SETUP Program to protect unauthorized use of your notebook.

CHAPTER 1 – INTRODUCTION
1 - 4
Unpacking The Notebook Your notebook comes securely packaged in a sturdy cardboard shipping carton. Upon receiving your notebook, open the carton and carefully remove the contents. In addition to this User Guide, the shipping carton should also contain the following items:
• Notebook • User Manual • AC Adapter and Power Cable • Li_Ion Battery • Utility CD
Carefully inspect each component to make sure that nothing is missing and/or damaged. If any of these items is missing or damaged, notify your dealer immediately.
Panoramic View
1. Built-in Camera 2. Power Button 3. Keyboard 4. Device/Power Status Indicators 5. Touch Pad Buttons

CHAPTER 1 – INTRODUCTION
1 - 5
Built-in Camera – The built-in camera features a 1.3 mega pixel CMOS web camera.
Power Button – Press this button to turn your computer on or off (see “Turning on the Notebook” on page 2-6). This button may also be configured to be used as a suspend/resume key in the power management control panel of your operating system (see “Power Option Configuration” on page.10-4).
WARNING: Do not try to turn off the notebook when the drive is accessing. This could cause data loss or damage.
Keyboard - Provides all functions a standard keyboard.
• The computer has a “Win Key” keyboard including a numeric keypad.
• Wide extra space below the keyboard panel for your wrist or palm to rest comfortably when typing or using the notebook.
• Using Fn key to enable the system function (see “Function Keys” on page 3-3).
Device/Power Status Indicator
Icon Color Description
Green HDD is accessing
Green Scroll Lock fuction is activated
Green Num Lock fuction is activated
Green Caps Lock fuction is activated
Green Batterey is being charged Orange Batterey is in low batteray status
Green Power On/Off / when the system is activated

CHAPTER 1 – INTRODUCTION
1 - 6
Green Wireless function is enabled
Press this buttin to turn the Webcam function On or Off
Touchpad and Button
The pointing device features a sensitive glide pad for precise movements. It functions the same way as a two-button mouse. The right Touch Pad button has the same functions of a right mouse button; the left Touch Pad button has the same functions of a left mouse button. The central button may be used to scroll up and down, or may be configured to perform a variety of functions (see ”Using Touchpad” on page 3-4).
CHAPTER 1 – INTRODUCTION
1 - 7
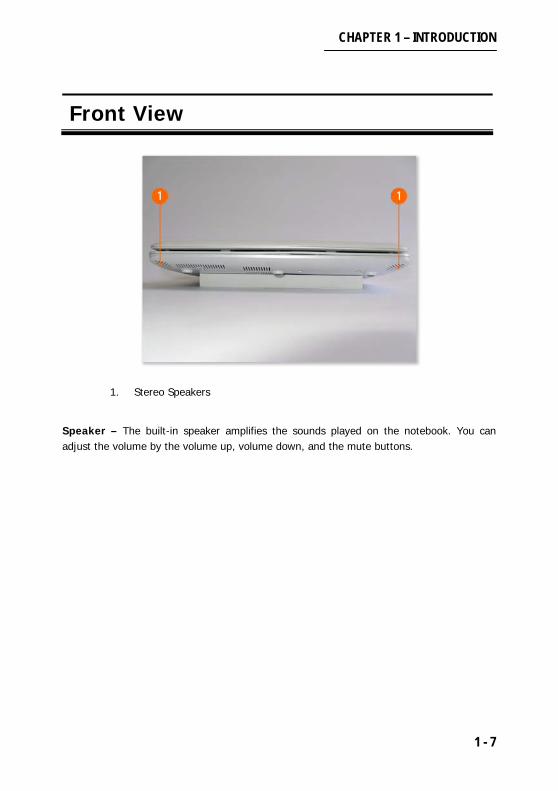
Front View
1. Stereo Speakers
Speaker – The built-in speaker amplifies the sounds played on the notebook. You can adjust the volume by the volume up, volume down, and the mute buttons.

CHAPTER 1 – INTRODUCTION
1 - 8
Left View
1. Dc-In Hole 2. Kensington® Lock Hole 3. Ventilator 4. USB Port
DC-In Hole – Plug the supplied AC adapter into this jack to power your notebook. Kensington Lock Hole – To prevent possible theft, a Kensington-type lock can be attached to this slot. Locks can be purchased at any computer store. Ventilator – The ventilator is designed to cool the system. DO NOT blok the ventilator for air circulation. USB 2.0 Port – These USB 2.0 compatible ports (USB 2.0 is fully USB 1.0 complaint) are for low-speed peripherals such as keyboards, mice or scanner, and for highspeed peripherals such as external HDDs, digital video cameras or highspeed scanners etc. Data transfer rate USB 2.0 up to 480Mbps. Device can be plugged into the notebook, and unplugged from the notebook, without the need to turn the system off (hot swapping).
NOTE: If the power rating of your USB device is 550mA or above, make sure you use the power supply which comes with the device.

CHAPTER 1 – INTRODUCTION
1 - 9
Right View
1. USB 2.0 Port 2. Card Reader 3. Microphone and Headphone Jack 4. External Monitor (VGA) Port 5. LAN RJ-45 Jack
USB 2.0 Port – These USB 2.0 compatible ports (USB 2.0 is fully USB 1.0 complaint) are for low-speed peripherals such as keyboards, mice or scanner, and for highspeed peripherals such as external HDDs, digital video cameras or highspeed scanners etc. Data transfer rate USB 2.0 up to 480Mbps. Device can be plugged into the notebook, and unplugged from the notebook, without the need to turn the system off (hot swapping).
NOTE: If the power rating of your USB device is 550mA or above, make sure you use the power supply which comes with the device.
3-in-1 Card Reader – Card Reader slot allows you to install digital storage card with formats: MMC (Multi Media Card), SD (Secure Digital), and MS (Memory Stick).
CHAPTER 1 – INTRODUCTION
1 - 10
Headphone Jack – Headphones or speakers maybe connected through this jack
CAUTION: Set your system’s volume to a reduced level before connecting to this jack.
Microphone Jack – Records on your notebook with an external microphone.
External Monitor (VGA) Port – Connect an external VGA monitor (CRT) to this port to allow dual video or simultaneous display on the LCD and external VGA monitor.
LAN RJ-45 Jack – This supports LAN (Network) functions.
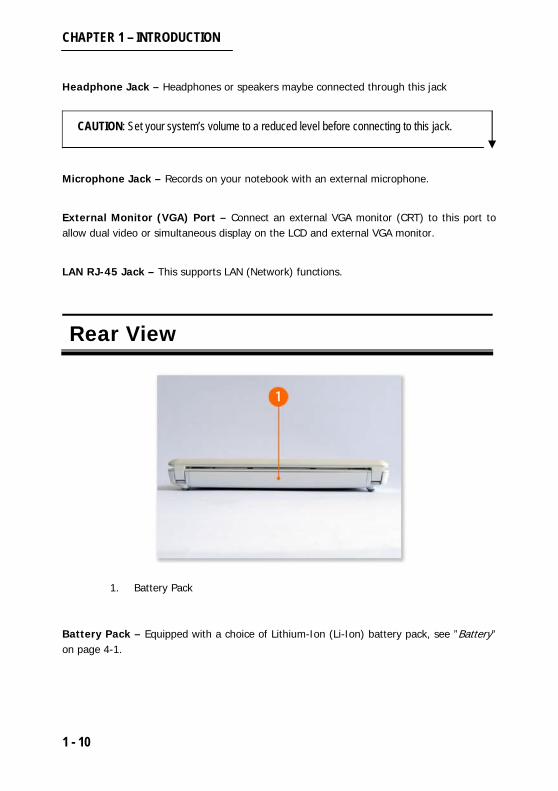
Rear View
1. Battery Pack Battery Pack – Equipped with a choice of Lithium-Ion (Li-Ion) battery pack, see ”Battery” on page 4-1.

CHAPTER 1 – INTRODUCTION
1 - 11
Bottom View
1. Battery Release Latch 2. Battery Lock Switch 3. Battery Pack
Battery Release Latch – The Battery Release Latch secures the battery pack.
Battery Lock Switch – Once the button is slid to unlock position, the battery is removable.
Battery Pack – Equipped with a choice of Lithium-Ion (Li-Ion) battery pack, see ”Battery” on page 4-1.

CHAPTER 1 – INTRODUCTION
1 - 12
Notebook Accessories This notebook is equipped with AC adapter accessories and a Li-Ion battery.
AC Adapter - The AC Adapter supplies external power to your notebook and charges the internal battery pack simultaneously. The AC adapter has an auto-switching design that can connect to any 100VAC ~ 240VAC power outlets. Change your power cord when visiting a country with a different connector outlet. The AC adapter charges the battery whether the notebook is switched off or switched on.
Battery - Aside from the AC adapter, your notebook can also be powered through the internal battery pack. The battery pack uses rechargeable Lithium-Ion (Li-Ion) battery cells that provide long computing hours when fully charged and power management enabled. You should always leave the battery inside your notebook even when using the AC adapter as it also acts as a back-up power supply in case power from the AC adapter is cut off. It is also very important to have the battery pack always charged to prevent battery cell degradation.

CHAPTER 2 – GETTING STARTED
2 - 1
2 G E T T I N G S T A R T E D This chapter provides tips for working comfortably with your Axioo® notebook and provides explanations on using your notebook for the first time. This chapter also describes how to connect the components of your Axioo® notebook.

CHAPTER 2 – GETTING STARTED
2 - 2
Make Sure You Have Everything
Before moving on the next set of instructions, make sure that you have received all items/components. If any items are missing and/or damaged, notify your dealer immediately (see “Unpacking The Notebook” on page 1-4).
Using The Notebook Before using the notebook, there are several things that can be used for guidance or tips.
Selecting a Place to Work
Place the notebook on a flat surface, which is large enough for the notebook and any other items you need to use, such as a printer. Leave enough space around the notebook and other equipment to provide adequate ventilation and prevent overheating
To keep your notebook in prime operating condition, protect your work area from:
- Equipment that generates a strong electromagnetic field, such as stereo speakers (other that speaker that are connected to the notebook) or speakerphones.
- Dust, moisture, and direct sunlight. Use the notebook within a temperature range of 5° – 35° C and 20% - 80% non-condensing humadity.
- Liquids and corrosive chemicals.
CAUTION: if you spill liquid into the notebook, turn it off, unplug it from the AC power source, and let it completely dry before turning it on again. If the notebook does not operate correctly after you turn it back on, contact your dealer.
WARNING: Avoid prolonged physical contact with the underside of the notebook. If the notebook is used for long periods, its case can become very warm. While the temperature may not feel too hot to touch, if you maintain physical contact with the notebook for a long time (if you rest the notebook on your lap, for example), your skin might suffer low-heat injury.
CAUTION: Never apply heavy pressure to the notebook or subject it to sharp impacts. Excessive pressure or impact can damage notebook component.

CHAPTER 2 – GETTING STARTED
2 - 3
Keeping Yourself Comfortable
Strain and stress injuries are becoming more common as people spend more time using their notebooks. However, with a little care and proper use of the equipment, you can work comfortably throughout the day.
1. Position the display panel or external monitor so that sunlight or bright indoor lighting does not reflect off the screen. Use tinted wondows or shades to reduce glare.
2. Avoid placing your notebook in front of a bright light that could shine directly in your eyes.
3. Place the notebook on a flat surface at a comfortable and distance. If you are using an external monitor, the top of the display should be no higher then eye level.
4. Use a chair with a back and adjust it to support your lower back comfortably.
5. Keep your forearms, wrists, and hands in a relaxed position Remember to:
1. Alter your posture frequently.
2. Strech and exercise your body several times a day.
3. Take periodic breaks when you work at the notebook for long periods of time. Frequent and short breaks are better than fewer and longer breaks.
Avoiding Strain and Stress
The key to avoiding discomfort or injury fron strains is to vary your activities. If possible, schedule a variety of tasks into your working day. Finding ways to break up the routine can reduce stress and improve your efficiency.
1. Take frequent breaks to change position, stretch your muscles, and relieve your eyes. A break of two or three minutes every half hours is more effective than a long break after several hours.
2. Avoid performing repetitive activities for long periods. Intersperse such activities with other tasks.

CHAPTER 2 – GETTING STARTED
2 - 4
3. Focusing your eyes on your notebook screen for long periods can cause eyestrain. Look away from the notebook.
Setting the Notebook Setting up your notebook may include:
• Connecting the AC Adapter.
• Charging the battery.
Connecting the AC Adapter
Your notebook contains a rechargeable battery pack, which needs to be charged before you can use it for the first time.
The AC adapter enables you to power the notebook form an AC outlet and to charge the notebook’s batteries. The AC adapter provides external power source to your notebook and charges the internal battery pack at the same time. The AC adapter also has an auto-switching design that can connect to any 100VAC ~ 240VAC power outlets.
Follow these steps to connect the AC power to the notebook.
1. Connect the power cable to the AC adapter.
2. Plug the AC adapter into the notebook’s power socket.

CHAPTER 2 – GETTING STARTED
2 - 5
3. Connect the power cable to an AC power outlet.
Whenever possible, it is advisable to always have the AC adapter connected to the notebook and the battery pack installed. This ensures continues power supply and prevents any data loss incurring from sudden power breakdown.
DANGER: To avoid electric shock, do not modify forcibly bend, damage, place heavy objects on top of, or apply treat to the power cable. If the power cable becomes damaged or the plug overheats, discontinue use. Never remove the power plug from the outlet with wet hands.
DANGER: Never charge the battery using other AC adapter. It can cause a fire or explosion.
CAUTION: Using the wrong AC adapter could damage your notebook. Never pull directly on the power cable to unplug it. Hold the power plug when removing the cable from outlet.
CAUTION: The surface of adapter plastic housing may get hot as operating. Do not touch the plastic surface when the adapter is operating to prevent possible hazard.
Charging the Battery
Before you can use the battery to power the notebook, you must charge it. Connect notebook to an AC power outlet using the AC adapter and power cable.
Once the notebook is connected to a power outlet, you can charge the battery with the notebook turned off or on. When the notebook is turned off, the battery charges about 4 hours.
When the notebook is turned on and is not consuming full power (under 18W), the battery charges in about 4 o 11 hours.
CAUTION : Once the battery is charged for the first time, avoid leaving the notebook plugged in and turned off for more than a few hours at a time. Continuing to charge a fully charged battery can damage the battery.

CHAPTER 2 – GETTING STARTED
2 - 6
Using The Notebook For The First Time The power button is placed on top of the notebook. Press the button to turn on the notebook and make sure that the Power LED indicators is switched on.
CAUTION: Do not force the display panel open beyond the point where it moves easily. Never lift or move the notebook by grasping the display panel.
Turning On the Notebook
1. Open the Display Panel.
2. If you have a printer connected to your notebook, turn the printer on and wait until it indicates it is ready.
3. Turn on the notebook by momentarily pressing then releasing the power button.
When you release the power button, the Power LED on the system indicator panel comes on.
NOTE : When turning on the notebook for the first time, do not turn it off until the operating system has loaded completely. Turning off the notebook during its initial startup will cause an error next time you start the notebook.
CAUTION: To avoid data loss, never turn off the notebook while a drive is in use
Turning Off the Notebook
If you are not going to use the notebook for a while, it is best to turn off the power of the notebook for longer use.
1. If you have work in progress and expect to resume shortly, use the Microsoft® Windows® Standby command to save your system settings so that, when you turn on the notebook again, you automatically return to where you left off.
2. To turn off the Notebook for a long period of time, use “Shut Down” command in the Microsoft® Windows®.

CHAPTER 2 – GETTING STARTED
2 - 7
3. Never turn off the power if the hard disk drive light is on. Doing so many damages your hard disk drive.
4. After turning off the notebook, make it a habit to leave the LCD panel open for a while whenever used for an extended period of time. This allows the inside parts of the notebook to cool off. And never close the LCD panel for along period of time when notebook is on and power saving feature are disable.
NOTE: If the system hangs, and the Ctrl + Alt + Del key combination does not work, press the power button for 4 seconds, or longer, to force the system to turn it self off.

CHAPTER 2 – GETTING STARTED
2 - 8

CHAPTER 3 – LEARNING THE BASICS
3 - 1
3 L E A R N I N G T H E B A S I C S This chapter provides important information about the basic features of the notebook. This chapter describes how to use standard features in the notebook for your daily activity.

CHAPTER 3 – LEARNING THE BASICS
3 - 2
Learning the Basics
In this section will be described how to use standard features in the notebook for your daily activity. If you are a beginner in computer and operating system, read the manual book of operating system and the mechanism on the notebook.
Using Operating System The operating system is a must ingredient in using your computer. It is the platform for all your software application programs to run on. The most popular operating system today is Microsoft® Windows®. If you have an operating system already installed in your computer, then you would be up and running after you power on your computer and boot up the system.
Using Keyboard
Your notebook is equipped with a standard keyboard that provides all the functionality of a full-sized 101 or 102-keys IBM keyboard. A side from the standard typewriter-layout keyboard of your notebook, there are a number of extra features and function controls on the built-in keyboard including Windows®
system hot keys.

CHAPTER 3 – LEARNING THE BASICS
3 - 3
Function Keys
The function keys (not to be confused with the Fn key) are the 12 keys at the top of the keyboard.
F1 through F12 are called function keys because they perform programmed functions when pressed. Used in combination with the Fn key, function keys marked with icons execute specific functions on the notebook.
Keypad Description Fn + F2 Activated Display Fn + F3 Touchpad Switch Fn + F4 Brightness Down Fn + F5 Brightness Up Fn + F6 Web Cam Switch Fn + F7 Audio Volume Down Fn + F8 Audio Volume Up Fn + F9 Speaker Switch Fn + F11 Bluetooth/Wireless LAN Switch Fn + F12 Activated Sleep mode
Ctrl, Fn and Alt Keys
The Ctrl, Fn and Alt keys do different things depending on the program you are using. For more information, see your program documentation.
Windows® Special Keys
The keyboard provides two keys that have special functions in Windows®.
1. The Windows® logo key activates the Start menu.
Character Keys
Typing with the character keys is very much like typing on a typewriter, except that:
1. The spacebar creates a space character instead of just passing over an area of the page.
2. The lowercase letter I and the number 1 are not interchangeable.
3. The uppercase letter O and the number 0 are not interchangeable.

CHAPTER 3 – LEARNING THE BASICS
3 - 4
The Caps Lock keys shift the letter keys to upper case- the number and symbol keys are not affected. The Caps Lock LED on the keyboard indicator panel illuminates when you press the Caps Lock.
Cursor Control Keys
Keys Function Description Up Arrow Key Move the cursor up one line at a time.
Down Arrow Key Move the cursor down one line at a time.
Left Arrow Key Move the cursor to the left one space at a time.
Right Arrow Key Move the cursor to the right one space at a time.
Screen Control Keys
Keys Function Description Home Moves the cursor to the beginning of a screen or line.
PgUp Moves the cursor up one screen at a time.
PgDn Moves the cursor down one screen at a time.
End Moves the cursor to the end of a screen or line.
Numeric Keys
To turn the numeric keys on and off, press Fn + Num Lock keys simultaneously. The numeric mode light on the status panel glows when the numeric key is on (see “Device/Power Status Indicator” on page 1-5).
Using Touchpad This notebook comes with a built-in Glide Pad pointing device that is found on the center of the palm-rest surface.
Touchpad offers a number of options that let you customize how it functions. To access these options, locate the Control Panel and double click on the Mouse icon. The options let you control the size and color of the cursor, cursor speed; the accepted double-click speed, and selection button orientation.
CHAPTER 3 – LEARNING THE BASICS
3 - 5
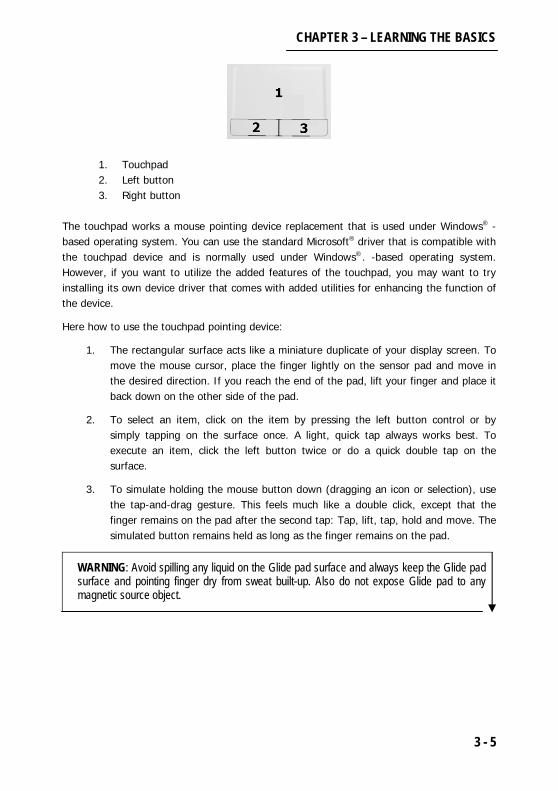
1. Touchpad 2. Left button 3. Right button
The touchpad works a mouse pointing device replacement that is used under Windows®
- based operating system. You can use the standard Microsoft®
driver that is compatible with the touchpad device and is normally used under Windows®. -based operating system. However, if you want to utilize the added features of the touchpad, you may want to try installing its own device driver that comes with added utilities for enhancing the function of the device.
Here how to use the touchpad pointing device:
1. The rectangular surface acts like a miniature duplicate of your display screen. To move the mouse cursor, place the finger lightly on the sensor pad and move in the desired direction. If you reach the end of the pad, lift your finger and place it back down on the other side of the pad.
2. To select an item, click on the item by pressing the left button control or by simply tapping on the surface once. A light, quick tap always works best. To execute an item, click the left button twice or do a quick double tap on the surface.
3. To simulate holding the mouse button down (dragging an icon or selection), use the tap-and-drag gesture. This feels much like a double click, except that the finger remains on the pad after the second tap: Tap, lift, tap, hold and move. The simulated button remains held as long as the finger remains on the pad.
WARNING: Avoid spilling any liquid on the Glide pad surface and always keep the Glide pad surface and pointing finger dry from sweat built-up. Also do not expose Glide pad to any magnetic source object.

CHAPTER 3 – LEARNING THE BASICS
3 - 6
Display Devices Besides the built-in LCD, you can also use an external VGA monitor as your display device. A VGA monitor connects to the external monitor (VGA) port.
Switching Displays with Keyboard
You can switch display devices with the Fn + Display (F2) toggle. With the video driver installed, you also can use its built-in controls to switch the display options. If you have not installed the video driver, refer to Chapter 9 for setup instructions. To switch the display options:
1. Plug the VGA monitor into the appropriate port.
2. Press and hold the Fn key, while simultaneously pressing the F2 key.
3. You may toggle through the options to display the notebook’s LCD only, the external display alone and the LCD and the external display together.
Management Power Feature
To conserve power, especially when using the battery, your notebook computer uses the ACPI power management system. Power management conserves power by controlling individual components of the computer (the monitor and hard disk drive) or the whole system.
Advanced Configuration and Power Interface
The ACPI interface provides the computer with enhanced power saving techniques and gives the operating system (OS) direct control over the power and thermal states of devices and processors. For example, it enables the OS to set devices into low-power states based on user settings and information from applications. ACPI is fully supported in Windows®
XP®.
NOTE: Power management functions will vary slightly depending on your operating system. For more information it is best to refer to the user’s manual of your operating system.

CHAPTER 3 – LEARNING THE BASICS
3 - 7
3-in-1 Card Reader The card reader allows you to use some of the latest digital storage cards. Push the card into the slot and it will appear as a removable device, and can be accessed in the same way as your hard disk. Before use it, make sure you install the Card Reader driver.
1. MMC (MultiMedia Card)
2. SD (Secure Digital)
3. MS (Memory Stick)
Using the Notebook at the Office By connecting an external monitor, external full-size keyboard, and a mouse, you can work with the notebook as if it were a standard office notebook.
An external monitor connects to the monitor port.
Any USB devices including an external keyboard and pointing device connect to the USB ports.
Using a Notebook Lock
You may want to secure the notebook to a heavy object such as your desk. The easiest way to do this is to purchase a notebook cable lock.
1. Loop the cable through or around some part of a heavy subject. Make sure there is no way for a potential thief to slip the cable off the object.
2. Pass the locking end through the loop.
3. Insert the cable’s locking end into the security lock slot, then rotate the key ¼ turn and remove it.
The notebook is now securely locked.

CHAPTER 3 – LEARNING THE BASICS
3 - 8
Setting Up Communications
Connecting the Notebook to a Network
To access a network:
1. At the office, you need to connect a network cable with an RJ-45 connector to the LAN port. For specific information about connecting a LAN or WAN, consult your network administrator.
2. You can also access a network with wireless connection (WiFi).
3. When you are at home or traveling, you need a dial-up connection. Ask your network administrator for the telephone number of the network.
NOTE: When you are connected to a network, disable the Microsoft® Windows®. The standby command can disrupt your network connection.
CHAPTER 4 – BATTERY
4 - 1
4 B A T T E R Y This chapter explains you everything about battery, included installing the battery pack, using battery, removing battery, etc.

CHAPTER 4 – BATTERY
4 - 2
Energy Saving Design
Your notebook enters a low-power state when it is not being used. It has a number of other features that enhance its energy efficiency.
Managing Power Usage Your notebook’s power-saving options greatly increase the length of time you can use the notebook before you need to recharge the battery.
To change the power usage mode, click Start, point to Settings, and then click Control Panel. In Control Panel, double-click the Power Option icon to display the Power Option Properties window.
Select the power scheme with the most appropriate settings for your notebook. Keep in mind that changing any settings on the Power Option Properties window will modify the currently selected scheme.
Consult your Microsoft® Windows®
documentation for more information on the Power Option utility.
Running the Notebook On Battery Power
The notebook uses a removable Lithium Ion (Li-ION) battery pack that provides power when you are away from an AC power source. You can recharge it many times.
Maximizing Battery Life
A main battery can be recharged many times. Gradually over time it will lose its ability to hold a charge. To maximize the life of your main battery:
1. Do not leave the notebook plugged in and unused for more than a few hours. Overcharging the main battery may shorten its life.

CHAPTER 4 – BATTERY
4 - 3
2. If you are not going to use to notebook for a long period of times, remove the battery.
3. Alternate between battery packs if you have a spare.
4. Make sure the notebook is off when you are replacing the battery.
5. Store spare battery packs in a cool dry place out of direct sunlight.
Charging Batteries The battery need to be charged before you can use it to power the notebook. You can charge the battery using your notebook.
Charging the Main Battery
To charge the batteries while they are in your notebook, plug the notebook into a live AC outlet. It takes approximate 3 hours to charge each battery to full while the notebook is off. It takes much longer to charge a battery to full while the notebook is on.
The battery may not start charging immediately if:
1. The battery is extremely hot or cold.
To ensure that the battery charges to its full capacity wait until it reaches room temperature: 5-35ºC (41ºF – 95ºF).
2. The battery is almost completely discharged.
Leave the power connected, and the battery should begin charging after few minutes.
New Battery
Always completely discharge, then fully charge, a new battery (and subsequently at least once every 30 days or after about 20 partial discharges) before using it.

CHAPTER 4 – BATTERY
4 - 4
Battery Power
What to Do When the Battery Runs Low
When the battery runs low you have these options:
1. Plug the notebook into a live AC outlet and recharge the battery.
2. Save your work and turn off the notebook.
If you don’t manage to do any of these things before the battery completely runs out of power, the notebook automatically enters Standby and keeps track of where you were so, when you turn on the power by using AC adapter again, you can continue where you left off.
Battery Life
Your notebook’s battery life is dependent upon many factors, including the programs you are running, and peripheral device attached. Power Option settings in the OS will help prolong the battery life if configured appropriately.
Battery life may be shortened through improper maintenance. To optimize the life and improve its performance, fully discharge and recharge the battery at least once every 30 days.
We recommend that you do not remove the battery yourself. Please consult your service representative should you need to remove the battery for any reason.
Discharging the Battery Completely
Use the notebook with battery power until it shuts down due to a low battery. Don’t turn off the notebook by yourself even when you see a message that indicates the battery critically low, just let the notebook use up all of the battery power and shut down on its own. Disable the Power Options function in the Control Panel, especially any Alarms (unclick the tick boxes) and Schemes (change all the settings to Never). As the battery nears the end of its life save and close any critical files.
Charging the Battery Fully
When charging the battery, don’t stop until the LED charging indicator light changes from orange to green.

CHAPTER 4 – BATTERY
4 - 5
Maintaining the Battery
Completely discharge and charge the battery at least once every 30 days or after about 20 partial discharges.
Conserving the Battery Power
The LCD display consumes a lot of power, so lowering the brightness level will save power. Different applications and external devices consume battery power even when they are not being used (see the sidebar note for further recommendations on battery conservation).
Disposing Of Used Batteries Safely You can recharge a main battery many times. It should last for years. When the useful life of the battery expires or if the battery becomes damaged, you must discard it responsibly.
Batteries should not be disposed of together with household waste.
Removing the Battery If you are confident in undertaking upgrade procedures yourself, for safety reasons it is best to remove the battery.
WARNING: Please check with your service representative before undertaking any upgrade procedures to find out if this will VOID your warranty.

CHAPTER 4 – BATTERY
4 - 6
Battery Removal Process
1. Turn the notebook off, and turn it over and locate the battery bay.
2. Slide the battery lock in the direction of the arrow 1 & 2, the battery pack will pop up a little.
3. Release the battery in the direction of arrow 3.
4. Take off the battery pack.

CHAPTER 4 – BATTERY
4 - 7
Installing Battery Pack
1. Fix the battery pack as the direction of arrow.
2. Push the battery latch in the direction of arrow until there is a sound of click.

CHAPTER 4 – BATTERY
4 - 8

CHAPTER 5 CONNECTING TO PERIPHERALS
5 - 1
5 C O N N E C T I N G T O P E R I P H E R A L S This chapter describes how to connecting the notebook with peripherals.

CHAPTER 5 CONNECTING TO PERIPHERALS
5 - 2
Adding a Printer The most commonly used peripheral is a printer. The following conventions will help you to add a printer; however it is always best to refer to the printer manual for specific instructions and configuration options.
USB Printer
To connect with USB printer:
1. Set up the printer according to its instructions (unpacking, paper tray, toner/ink cartridge etc).
2. Turn on the notebook.
3. Turn on the printer.
4. Connect the printer’s USB cable to one of the USB ports on the notebook.
5. Operating System will identify the printer and either load one of its own drivers or ask you to supply one.
NOTE: When you are connecting a printer, make sure you have installed printer driver properly.

CHAPTER 5 CONNECTING TO PERIPHERALS
5 - 3
NOTE: Make sure that the device is turn on before you try to use it. See the manual book which is included in the device for further information.
Parallel Printer
This is still the most common type of printer. A Parallel to USB converter may be purchased at most computer stores.
To connect with parallel printer:
1. Set up the printer according to its instructions (unpacking, paper tray, toner/ink cartridge etc).
2. Connect the printer’s parallel cable to the Parallel to USB converter, and then plug the converter into the USB port.
3. Turn on the printer.
4. Turn on the notebook.
5. Windows® (some operating systems may require a driver to recognize the
parallel to USB adapter) will identify the printer and either load one of its own drivers or ask you to supply one.
Using the USB Port

CHAPTER 5 CONNECTING TO PERIPHERALS
5 - 4
USB or Universal Serial Port is a peripheral bus standard developed by Compaq, DEC, IBM, Intel, Microsoft, NEC and Northern Telecom. Personal computers equipped with USB will allow computer peripherals to automatically configure as soon as they are physically attached - without the need to reboot or run setup. USB will also allow multiple devices to run simultaneously on a computer, with peripherals such as floppy drive, mouse, digital cameras, scanners, printers, CD-RW drives, modems, keyboards, games devices and acting as additional plug-in sites, or hubs.
Using an External Monitor Besides the built-in LCD, you can also use an external monitor (CRT) as your display device. A monitor connects to the external monitor (VGA) port.
Switching the External Monitor Port
Your notebook is equipped with VGA port; you can switch display devices with the Fn + F2 toggle. With the video driver installed, you can also use its built-in controls to switch the display options.

CHAPTER 5 CONNECTING TO PERIPHERALS
5 - 5
Using the External Audio System At the right side of your notebook, you will find the built-in audio ports. You can connect a Microphone jack, an earphone or a powered speaker.
Connecting an External Speaker
You can connect self-powered stereo speakers to the notebook to provide better sound reproduction than the built-in speakers and save wear on them. To connect self-powered external speakers do as follows:
1. Turn off the notebook.
2. Position the speakers where you want them.
3. Plug the mini plug connector from the speakers into the Headphone jack on the left side of the notebook.
4. Plug the speakers into a power source.
5. Turn on the speakers and adjust the volume control to no more than 80% of maximum.
6. Turn on the notebook and adjust the volume from the volume control in the taskbar system tray. You may want to play something audible to check the volume level.
Connecting a Microphone
If you want to use a microphone for recording, voice commands or notebook telephony, you can connect one to microphone jack. To connect a microphone, do as follows:
1. Make sure the microphone you get is a standard notebook microphone with a mini plug connector.
2. Plug the microphone into the microphone jack on the notebook.
3. Adjust the microphone volume in the Windows® Sounds and Multimedia control
panel’s Audio panel section by clicking on the Volume button for Sound Recording.

CHAPTER 5 CONNECTING TO PERIPHERALS
5 - 6
Using the LAN Port This notebook comes with an internal 10/100Mbps LAN module that connects your computer to other computers/networks through a LAN (Local Area Network) and supports data transfer rates at 10Mbps and can be up to 100Mbps.
The built-in LAN module provides a standard RJ-45 connector.
To connect the twisted-pair cable to your LAN port:
1. Locate the twisted-pair cable in the accessories box in notebook shipping carton. Each end of the cable has a RJ-45 connector.
2. Connect one end of the cable into the network wall outlet or HUB.
3. Connect the other end of the cable into the computer RJ-45 LAN port.
Using the Wireless LAN This section explains how to use the hardware and software that comprise the notebook’s Wireless Networking feature.
CHAPTER 5 CONNECTING TO PERIPHERALS
5 - 7
What is Wireless Networking?
This notebook comes with an advanced Wireless Networking feature. This networking standard, Wireless LAN 802.11a/b/g/n, is a high-speed wireless network connection that allows you to connect to a network without connecting a cable to the built-in LAN adapter via the LAN port. The wireless network connection uses two-way radio transmission to communicate with an “Access Point” transceiver that is physically connected to the network by cable
Using Wireless Networking
All the drivers and software you need to use the Wireless networking feature are preinstalled and set up on the notebook. To connect a wireless network, follow these steps:
1. Press hotkey button for Wireless LAN to run the wireless LAN module.
2. Open icon Wireless Network Connection in the taskbar.
3. Type IP address, DNS, and Gateway.
4. If you are in Access Point area, Available Wireless Network will be displayed.
5. Select one of available network and press connect button.

CHAPTER 5 CONNECTING TO PERIPHERALS
5 - 8

CHAPTER 6 – BIOS CONFIGURATION
6 - 1
6 B I O S C O N F I G U R A T I O N This chapter describes how to configure the notebook through the BIOS (Basic Input Output System).

CHAPTER 6 – BIOS CONFIGURATION
6 - 2
Preface This chapter give a brief introduction to the computer’s built-in software. If your computer has never been set up, or you are making important changes to the systems (e.g hard disk setup), then you should review this chapter first and note the original settings found in Setup. Even if you are beginner, keep a record of the settings you find and any changes you make This information could be useful if your system ever needs servicing.
Do not make any changes unless you are sure of what you are doing. Many of the settings are required by system, and changing them could cause it to become unstable or worse. If you have any doubts, consult your service representative.
POST (Power on Self Test)
Each time you turn on the computer, the system takes a few seconds to conduct a POST, including a quick test of the on-board RAM (memory).
As the POST proceeds, the computer will tell you if there is anything wrong. If there is a problem that prevents the system from booting, it will display a system summary and prompt you to run Setup.
If there are no problems, the Setup prompt (press <F2> to enter SETUP) will disappear and the system will load the operating system. Once that starts, you can’t get into Setup without rebooting.

CHAPTER 6 – BIOS CONFIGURATION
6 - 3
1. BIOS information 2. CPU type 3. Memory Status. 4. Enter Setup prompt appears only during POST
NOTE: The POST screen as pictured is a guideline only. The POST screen on your computer may appear slightly different.
Failing The POST Error can be detected during the POST. There are two categories, ”fatal” and ”non-fatal”.
Fatal Errors
This stops the boot process and generally indicates that there is something seriously wrong with you system. Take the computer to your service representative or authorized service center immediately.
Non-Fatal Errors
This kind of error still allows you to boot. You will get a message identifying the problem (make a note of this message!) followed by the prompt:
• Press <F1> to resume
• Press <F2> to enter the Setup.
Press F1 to see if the boot process can continue. It may work, without the correct configuration.
Press F2 to run Setup program and try to fix the problem. If you still get an error message after you change the setting, of if ”cure” seems even worse, call for help.
Accessing the BIOS Setup Program
To access the BIOS Setup program, press the [F2] key as soon as the computer starts up and you see the InsydeH2O BIOS screen.

CHAPTER 6 – BIOS CONFIGURATION
6 - 4
Main Menu
System Time & Date - The hour is displayed in 24-hour format. The values set in these two fields take effect immediately. IDE Information – Displays the type of the IDE devices installed in the notebook. System Information – Provides the information about the firmware, processor, and system memory.

CHAPTER 6 – BIOS CONFIGURATION
6 - 5
Advanced Menu
Intel(R) SpeedStep(tm) – This item allow you to enable or disable Intel SpeedStep technology. AHCI Mode – Use this item to enable or disable the AHCI Mode. Legacy USB Support – Disabled: Disables the legacy USB support. Enabled: Enables the legacy USB support. PCI Latency Timer – Controls how long each PCI device can hold the bus before another takes over.

CHAPTER 6 – BIOS CONFIGURATION
6 - 6
Security Menu The notebook’s advanced security system allows you to set a password to prevent unauthorized access to system resources, data, and the BIOS Setup program. This section covers each Security parameter. Selecting Security from the menu bar displays the Security menu.
A Note about Passwords
The BIOS Setup program allows you to specify passwords in the Security menu. The passwords control access to the BIOS and certain Security menu options during system startup.
Passwords are not case-sensitive. A password can be entered using either upper or lower case letters. When you choose your password, it should be composed of characters A-Z, 0-9 and be eight characters in length.
NOTE: The supervisor password must be set before the power-on password can be set.

CHAPTER 6 – BIOS CONFIGURATION
6 - 7
Supervisor Password is/Power-On Password is – A message is always shown when entering this field. When this field is highlight, press Enter and the messages box is shown.
User can type the password in the field Enter New Password, and re-enter password in the field Confirm New Password for verification.
If password on boot is required, the password must be set; otherwise it cannot be enabled.
NOTE: To clear existing passwords press Enter and type the existing password. Then press Enter for the new password (without typing any password entry) and Enter again to confirm the password clearance.
Boot Menu
When you turn the computer on it will look for an operating system (e.g. Windows® XP) from the devices listed in this menu, and in this order. If it cannot find the operating system on that device, it will try to load it from the next device in the order specified in the Boot Menu. Boot devices usually are hard drives, floppy drives (removable devices), and CD-ROM’s.

CHAPTER 6 – BIOS CONFIGURATION
6 - 8
Set Boot Priority – These items showing the sequence of boot device where BIOS attempts to load the disk operating system. 1st, 2nd, and 3rd Boot Option – These items allow you to set the sequence of boot device where BIOS attempts to load the disk operating system.
Exit Menu
Choosing to “Discard Changes” or “Exit Discarding Changes” will wipe out any changes you have made to the Setup. You can also choose to restore the original Setup Defaults which will return the Setup to its original state and erase any previous changes you have made in a previous session.

CHAPTER 7 – IF SOMETHING GOES WRONG
7 - 1
7 I F S O M E T H I N G G O E S W R O N G This chapter aims to help you solving many problems by yourself without additional helps. It covers the problems you are most likely to encounter.

CHAPTER 7 – IF SOMETHING GOES WRONG
7 - 2
Problems When You Turn On The Notebook
The Notebook Will Not Start
Make sure you attached the AC adapter and power cable property or installed a charged battery. Press and hold down the power button for a few seconds.
The notebook displays the “Non-system disk” or ‘Disk error” message
The Notebook displays the Non-sytem disk or disk error message. Make sure there is no diskette in the diskette drive. If there is one, remove it and press any key to continue. If press any key does not work press Ctrl, Alt, and Del, or press the reset button to restart the notebook.
The Notebook Is Not Accessing the Operating System
Your Notebook normally loads operating system from the hard disk. If you have a hard disk problem, you will not be able to start the Notebook. Insert the system diskette into the diskette drive, then press the power button.
Fixing Device – Related Problems
Power Problems
Your notebook receives power through the AC adapter or from the main battery. Power problems are interrelated. For example, a faulty AC adapter or power cable will neither power the notebook not recharge the main battery.
Here are some typical problems and how to solve them:
The AC Power LED does not come on when you plug in the AC adapter and power cable.
Make sure the AC adapter and power cable are finely plugged into both a working wall putlet and the notebook.

CHAPTER 7 – IF SOMETHING GOES WRONG
7 - 3
If the AC power light still does not come on, check that the wall outlet is working properly by plugging in a lamp or other appliance.
The AC adapter and power cable work correctly, but the battery will not charge
The battery does not charge while the notebook is consuming full power. Try turning off the notebook.
The main battery may not be inserted correctly in the notebook. Turn off the notebook, remove the battery clean the contacts with a soft dry clith (if necessary) and replace the battery.
The battery maybe too hot or too cold to charge properly. Its temperature need to be in the range 5º s/d 50º Centigrade. If you think this is the probable cause, let the battery reach room temperature and try again.
If the battery has completely discharged, it will note begin charging immediately. Leave the AC adapter and power cable connected, wait 20 minutes and see whether the battery is charging.
If the battery light is glowing after 20 minutes, let the notebook continue charging the battery for at least another 20 minutes before you turn on the notebook.
If the battery light does not glow after 20 minutes, the battery may have reached the end of its useful life. Try replacing it.
The battery appears not to power the notebook for as long as it usually does
Check the power options using the Windows® Power Management utility. Have you add the device, such as a PC Card or memory module, that takes its power from the battery? Is your software using the hard disk more? Is the display power set to turn off automatically? Was the battery fully charged to begin with? All these conditions affect how long the charge lasts.
Memory Module Problems
Incorrectly connected or faulty memory module may cause errors that seem to be device-related. So it is wortwhile checking for these first:
1. Click Start, then click shutdown.
2. Click the button next to Shut Down, then click OK.

CHAPTER 7 – IF SOMETHING GOES WRONG
7 - 4
The operating system will turn off the notebook automatically.
3. Remove the memory module.
4. Reinstall the memory module.
5. Check the error again.
6. If the error recurs remove the memory module entirely and check for the error again using the second or another module.
If removing the memory module eliminates the error, the module may be faulty. If the error occurs without the module installed, the module is not causing the error.
Keyboard Problems
If when you type strange things happen or nothing happens, the problem may be related to the keyboard itself.
You have connected an external keyboard and Windows® displays one or more keyboard error message.
If you have a second keyboard, try it. If it works, the first keyboard may be defective or incompatible with your notebook.
Display Problems
Here are some typical display problems and their solutions:
The screen does not look right
You can change the display settings by clicking a blank area of the desktop with the track point secondary button, then clicking Properties. This causes operating system to open the Display Properties dialog box. The Appearance tab of this dialog box allows you to choose the colors for the screen. The Settings tab allows you to choose the screen resolution.
The built-in screen flickers
Some flickering is a normal result of the way the screen produces colors. To reduce the amount of flickering, try using fewer colors.
To Change the number of colors displayed:
1. Point at the desktop and click with the secondary button.

CHAPTER 7 – IF SOMETHING GOES WRONG
7 - 5
2. Click Properties, and then Settings.
3. Change the colors option and click Ok.
For more information see Windows® Help.
The display is blank
Display Auto Off may have gone into effect. Press any key to activate the screen.
If you are using the built-in screen, make sure the display priority is not set for an external monitor. To do this, press Fn button combination (see “Function Keys” on page 3-3) to return the display priority to its previous setting.
If you are using an external monitor:
1. Check that the monitor is turned on.
2. Check that the monitor’s power cable is firmly plugged into a working power outlet.
3. Check that the cable connecting the external monitor to the notebook is firmly attached.
4. Try adjusting the contrast and brightness control on the external monitoring.
Disk Drive Problems
Problems with the hard disk or with a diskette drive usually show up as an inability to access the dick or as sector errors.
You are having trouble accessing a disk; one or more files appear to be missing
Make sure you are identifying the drive by its correct name.
Run the ScanDisk, which analyzes directories, files and File Allocation Table (FAT) on the disk and repairs any damage it finds.
To run ScanDisk:
1. Click Start, point to Programs, Accessories, and System Tools and click ScanDisk.
2. Click the drive you want to test.
3. Select the type of test you want to use.
CHAPTER 7 – IF SOMETHING GOES WRONG
7 - 6
A Thorough Test is more complete but takes much more time than a standard test
4. Click Start
ScanDisk runs a test for the disk.
Some programs run correctly but others do not
This may be a software configuration problem. If a program does not run properly, review the program’s hardware configuration requirements. Most software documentation lists the minimum hardware requirements.
See “Notebook Specifications” to review the hardware configuration of thin notebook.
Sound System Problems
You do not hear any sound from the notebook
Adjust the volume control.
If you are using headphone or speakers, check that they are securely connected to your notebook. In Setup, check that the sound function is enabled.
The notebook emits a loud, high-pitched noise
This is feedback between the microphone and speakers. It occurs in any sound system when input from a microphone is fed to the speakers and the speaker volume is too loud. Adjust the volume control.
Printer Problems
The printer can not be added to the system or will not work
The printer is not turned on, is not correctly connected to the notebook, or has an internal problem. Make sure the printer is on. Check all connections and cables and then try to reinstall the driver. You may refer to the printer’s manual for instructions on printing a “selftest” page (a “self-test” page will print regardless of computer connections and is a means of ensuring that the printer is actually working).
There is no paper in the printer, or the paper is incorrect for the settings designated in your software. Put more paper in the printer (also fan the paper to make sure it does not stick together and cause a paper jam) and check the paper size macthes your software’s “print” settings.

CHAPTER 7 – IF SOMETHING GOES WRONG
7 - 7
The printer driver is not installed or is configured incorrectly. Check that the printer is properly installed and configured (correct port etc) Also check that you have installed the latest driver compatible with you OS (upload drivers are usually available for download from the printer manufacture’s website).
The printer is a network printer and it is not properly connected to the network. All networks are configured differently so please check with your network administrator to get the correct setup
Viruses 1. Install an Anti-Virus program and keep the definitions file (the file which tells your
program which viruses to look for) up to date. New notebook viruses are discovered daily, and some of them may seriously harm your notebook and cause you to lose data. Anti-Virus programs are commercially available and the definitions file updates are usually download able directly from the internet.
2. Be careful when opening e-mail from sources you don’t know. Viruses are often triggered from within e-mail attachments so take care when opening any attached file. You can configure most Anti Virus programs to check e-mail attachments. Note : You should also beware of files from people you know as the virus may have infected an address book and been automatically forwarded without the person’s knowledge.
3. Keep “Boot Floppy Disk” or “Bootable CD-ROM” (the disk provides basic information which allows you to startup your notebook) handy. You may refer to your OS’s documentation for instructions on how to make one, and many Anti Virus programs will also provide such a disk (or at least instruction on how to make one).

CHAPTER 7 – IF SOMETHING GOES WRONG
7 - 8

CHAPTER 8 – CARING FOR THE NOTEBOOK
8 - 1
8 C A R I N G F O R T H E N O T E B O O K The aim of this chapter is to provide help in using your notebook and to provide guidance in looking after your notebook.

CHAPTER 8 – CARING FOR THE NOTEBOOK
8 - 2
Precaution
Make sure to read the following general precaution and give attention for manual book:
1. Pressure and impact on the notebook Never apply heavy pressure or impact your notebook. Over pressure may cause damage to the notebook and may cause the notebook to be ineffectual.
2. Heat on the notebook The notebook will overheat when it used over a long period of time. When this happens avoid direct contact with the notebook and I/O port metal.
3. Mobile Phone Ensure that the distance between your notebook and a mobile phone is more that 30cm so that there will be no interference with the notebooks audio system.
4. Work environment Do not use the notebook in an industrial and medical environment, and on board an aircraft. In aircraft, permission will be required for using a notebook.
Tips For Using Notebook 1. Save your job frequently.
Your job in the notebook memory is temporary until you store it to the disk. You will lose all you job since the last save. For example, error system happened and you must restart the notebook.
NOTE : Some program have storage features automatically. This feature store the file to the hard disk in the remained interval. For more detail, you can see software documentation.
2. take frequent breaks to avoid physic exhaustion and relieve your eyes.
3. Before turn off the notebook, always use Shut Down command in the Microsoft® Windows®.

CHAPTER 8 – CARING FOR THE NOTEBOOK
8 - 3
Important Safety Instructions The notebook take the most beating from end users. This section gives you detailed infromation about how to maintain a safe working environment while using the notebook. You can maintain its condition and performance by following these guidelines. Please read it carefully to ensure maximum safety.
1. Before cleaning the notebook, make sure it is disconnected from any external power supplies (i.e AC adapter, car adapter and so on).
2. The socket-outlet shall be installed near the notebook and shall be easily accessible.
3. Use only a power adapter approved for use with this notebook.
4. While unplugging the power cord, disconnect it by the plug head, not by its wire.
5. Make sure the socket and any extension cords you may use can support the total current load of all the connected devices.
6. Make sure the voltage of the power source when connect the notebook to the power outlet.
7. Place the power cord in such a way that people can not step on it. Do not place anything over the power cord.
8. If the notebook is not in use for a long time, disconnect it from mains to avoid possible damage by transient over-voltage.
9. Never pour any liquid into openings as this may cause fire or electrical shock.
10. Never open the body of notebook. For safety reason, the notebook should only be opened by qualified service personnel.
11. If one of the following situations arises, have the notebook checked by service personnel:
The power cord or plug is damaged.
Liquid has penetrated into the notebook.
The notebook has been exposed to moisture.
The notebook has not worked well or you can not get it work according to user manual.
The notebook has dropped and damaged.

CHAPTER 8 – CARING FOR THE NOTEBOOK
8 - 4
The notebook has obvious sign of breakage.
12. Do not leave this notebook in an environment unconditioned. Storage temperature above 60oC (140oF) may damage the notebook.
13. To avoid any damage happened to the internal device, you should first disconnect the AC adapter and remove the battery pack from the notebook when replacing any internal device.
Instructions For Case and Operation The notebook is quite rugged, but it can be damaged. To prevent this, follow these suggestions:
1. Do not drop it, or expose it to shock. If the notebook falls, the case and the components could be damaged.
Don’t expose the notebook to any shock or vibration.
Don’t place it on an unstable surface.
Don’t place anything heavy on the notebook.
2. Keep it dry, and do not overheat it. Keep the notebook and power supply away
from kind of heating element. This is an electrical appliance. If water or any other liquid gets into it, the notebook could be badly damaged.
Don’t expose it to excessive heat or direct sunlight.
Don’t leave it in a place where foreign matter or moisture may affect the system.

CHAPTER 8 – CARING FOR THE NOTEBOOK
8 - 5
Don’t use or store the notebook in a humid environment
Don’t place the notebook on any surface that will block the vents.
3. Avoid interference. Keep the notebook away from high capacity transformers,
electric motors, and other strong magnetic fields. These can hinder proper performance and damage your data.
4. Follow the proper working procedures for the notebook. Shut the notebook down properly and don’t forget to save your work. Remember to periodically save your your data as data may be lost if the battery is depleted. Don’t turn off the power until you properly shut down all programs.
Don’t turn off any peripheral devices when the notebook is on.
Don’t disassemble the notebook by yourself.
Perform routine maintenance on your notebook.

CHAPTER 8 – CARING FOR THE NOTEBOOK
8 - 6
5. take care when using peripheral devices.
Use only approved brands of peripherals.
Unplug the power cord before attaching peripherals devices.
Cleaning the Notebook When it is necessary to clean the plastic case and keyboard, use a soft, lint-free cloth, slightly dampened with a mild detergent solution or use contents of any commercially available notebook cleaning kit.
Never use alcohol, petroleum-based solvents, or harsh detergents to clean the notebook. Also never spray any liquids directly on the notebook case, keyboard, or screen. If the liquid-crystal display (LCD) screen has become smeared or dusty, clean the screen by first applying a mild glass cleaner to a soft , clean lint-free cloth, and gently wipe the glass.
Never apply liquids directly on the screen surface. Moreover, do not use paper towels to clean the display screen. Paper can scratch the display screen matte.
Maintaning The Hard disk Losing your data has the same consequences as a system break down. Users must make it a habit of doing hard disk maintenance every week or so. Here is some maintenace you could do:
1. Always back up your data files from your hard disk.
2. Install the virus detecting program to monitor virus that could tamper your files.
3. use SCANDISK once in a while to correct any errors found in the directory and File Allocation Table. This will also free up space from any unused sectors

CHAPTER 8 – CARING FOR THE NOTEBOOK
8 - 7
4. Never move or raise the notebook while the hard disk is being accessed, most especially don’t jar the hard disk as this may cause a hard disk crash.
5. Use hard disk maintenance programs like Disk Defragmenter of Windows®. These reorganize your hard disk by eliminating fragmentation and improving your hard disk access time.
6. Install a system password in your notebook so others won’t be able to use the hard disk.
Maintaining The LCD Quality When it comes to screen problems, heat plays a big part. After a good working session, the typical routine is to shut the machine and close the cover. But the display surface – no matter what type it is – and the components inside the notebook radiates heat, when you close the cover, you trap the heat againts the screen. Leave the notebook’s cover open for about ten minutes while the heat disperses. Make this habit.
You should also enable the power management of your notebook to turn off the LCD power and display when the system is in inactivity for some time. Adding screen savers is also acceptable.
Follow the safety guidelines mentioned earlier and how to clean your notebook.
Battery Care Guidelines The battery pack furnished with the notebook requires reasonable care and handling to ensure efficient operation and maximum life. There is a risk of fire and chemical burn if the battery pack is handled improperly
TO ensure that the battery pack endures normal life cycle, always observe the following precautions when handling the battery pack:
1. Handle batteries carefully. Do not try to disassemble, crush, puncture, open, drop, mutilate, short external contacts, disposed of in water or fire, or expose it to temperatures higher than 60 C.
2. Recharge batteries only as described in this manual and only in ventilated areas. Never use an external charger other that the one supplied with you notebook.
3. Do not leave batteries in hot locations for more than a day or two.

CHAPTER 8 – CARING FOR THE NOTEBOOK
8 - 8
4. Do not leave your battery in your notebook for longer than 1 month without plugging in the power adapter.
5. Do not leave battery in storage for more that 2 months without recharging it to prevent over discharge. Over discharge will hurt the battery.
6. Dispose dead battery properly to protect the environment. The batteries contain hazardous chemicals and should not be thrown out with household or office trash
Moving The Notebook Before moving your notebook, even accross the room, make sure that all disk activity has ended and all external peripheral cables are disconnected
When You Travel For safety and convenience when traveling, please follow these instructions:
1. Backup all needed files on your hard disk before traveling.
2. Recharge your battery overnight to ensure full battery power before you leave.
3. Do not forget to bring along the AC adapter and extra battery pack.
4. Try to bring backup software as well.
5. Check the voltage rating and the outlet type of your destination. If the power cord of the adapter is different, then you need to purchase a suitable one consult your dealer.
6. Carry your notebook in its carrying case or in a briefcase. Never check-in the notebook as a luggage.
CAUTION : Do not pick up the notebook by its display/panel or the back (where the ports are located).

CHAPTER 9 – INSTALLING OPERATING SYSTEM AND DRIVER
9 - 1
9 I N S T A L L I N G O P E R A T I N G S Y S T E M A N D D R I V E R This chapter describes how to install the driver for Windows® in the notebook.

CHAPTER 9 – INSTALLING OPERATING SYSTEM AND DRIVER
9 - 2
Installing Operating System For Notebook
Before using your notebook, you must install operating system for the notebook. To install Windows®
directly from combo drive, please go to Boot menu of BIOS setup menu. For more information see chapter 6 “BIOS Configuration”.
Installing Windows® XP®
Follow these steps to install operating system for your notebook.
1. First, turn on the notebook.
2. Change the notebook configuration to booting from CD (see “Boot Menu” on chapter 6).
3. Insert Windows® XP® CD Installation to the CDROM / DVD / CDRW.
4. “Press any key to boot from CD” will appears, press enter.
5. Windows Setup ...
6. When ”press F6 if you need to install a third party SCSI or RAID driver” message appears, press F6 key.
7. Select ”S” to specify AHCI driver.
8. Select ”Intel® 82801HEM/HBM SATA AHCI Controller (Mobile ICH8M-E/M)” and press enter.
9. Select ”Enter” to continue Windows® XP® installation.
10. Windows® XP® Now Professional Setup will appears:
There are three choices:
• To set up Windows® XP® Now, press Enter
• To repair a Windows® XP® Installation using recovery Console, press R
• To quit setup without installing Windows® XP®, press F3
Press enter.

CHAPTER 9 – INSTALLING OPERATING SYSTEM AND DRIVER
9 - 3
11. Windows® XP® Licensing Agreement
Press F8 = I Agree
12. Select a drive where you will install Windows® XP®, for example drive C:\
13. Make sure file system for Windows® XP®.
Select “Format the partition using the NTFS files system”, press enter.
Windows® will format your hard disk to NTFS, wait until finish.
14. Further, copying file system, wait until completed. And then Windows® will reboot.
15. When “Press any key to boot from CD” appears, don’t press any key.
16. Installation process, installing Windows® device, wait for awhile.
17. “Regional And Language Options” will appear, regional setting is a menu to regulate currency format, list separator, decimal symbol, language. These rules in every country is different, example to list separator for Indonesia by using (.)
dot, but for English (United States) by using (,) comma.
Select Customize, in the location select Indonesia. Click Apply and click Ok. Then click Next.
18. Personalize Your Software
Name : optional
Organization : optional
Then click Next.
19. Your Product Key
Type Serial Number
Then click Next.
20. Computer Name and Administrator Password.
Computer Name : optional
Administrator Password : optional
Confirm Password : optional
Then click Next.

CHAPTER 9 – INSTALLING OPERATING SYSTEM AND DRIVER
9 - 4
21. Date and Time Settings
Date & time : optional
Time Zone : select (GMT + 07.00) Bangkok,
Hanoi, Jakarta.
Then click Next.
22. Networking Settings
Select typical setting
Then click Next.
23. Workgroup or computer domain, then click Next.
24. Completing Installation, Windows® will restart automatically.
25. After that will enter to Windows® XP® Professional
26. Confirmation Display setting, click Ok and click Ok once more.
27. Welcome to Microsoft® Windows®, Next.
28. Type user and click Next.
29. Finish.
Installing Windows® Vista®
There are two methods for installing Windows® Vista®, use one of the methods below.
Method 1: Run the Setup program after you start the computer by using the current operating system
1. Start the computer by using the current operating system.
2. Insert the Windows® Vista®
DVD in the computer's DVD drive.
3. Use one of the following procedures, as appropriate:
• If Windows® automatically detects the DVD, the Install now screen appears.
Click Install now.
• If Windows® does not automatically detect the DVD, follow these steps:
a. Click Start, click Run, type Drive: \setup.exe, and then click OK. Note Drive is the drive letter of the computer's DVD drive.
b. Click Install now.
CHAPTER 9 – INSTALLING OPERATING SYSTEM AND DRIVER
9 - 5
4. When you reach which type of installation do you want? Screen, click Custom (advanced), and then follow the instructions that are displayed on the screen to install Windows®
Vista®.
Method 2: Run the Setup program after you start the computer by using the Windows®
Vista®
1. Start the computer by using the Windows® Vista®
DVD. To do this, insert the Windows®
Vista® DVD in the computer's DVD drive, and then restart the
computer.
NOTE: To start computer from the Windows® Vista® DVD, the computer must be configured to start from the DVD drive. For more information about how to configure the computer to start from the DVD drive, see the documentation that is included with the computer, or contact the computer manufacturer.
2. When the "Press any key to boot from CD" message is displayed on the screen,
press a key.
3. Follow the instructions that are displayed on the screen to install Windows®
Vista®.
Upgrade Procedure
To upgrade your computer to Windows® Vista®, follow these steps:
1. Start the computer by using the current operating system. Verify that the Microsoft Windows®
operating system that is currently installed on the computer is eligible for upgrade to Windows®
Vista®.
2. Insert the Windows® Vista®
DVD in the computer's DVD drive.
3. Use one of the following procedures, as appropriate:
• If Windows® automatically detects the DVD, the Install now screen appears.
Click Install now.
• If Windows® does not automatically detect the DVD, follow these steps:
a. Click Start, click Run, type Drive: \setup.exe, and then click OK. Note Drive is the drive letter of the computer's DVD drive.
b. Click Install now.
4. When you reach which type of installation to you want? Screen, click Upgrade to upgrade the current operating system to Windows®
Vista®.

CHAPTER 9 – INSTALLING OPERATING SYSTEM AND DRIVER
9 - 6
Installing Windows® XP Using Axioo Recovery Windows® XP DVD (Optional)
Following is the steps for installing Windows® XP using Axioo Recovery DVD.
1. Turn your notebook on.
2. Insert Axioo Recovery DVD in to DVD Rom.
3. When appear “Press any key to boot from CD”, press Enter.
4. Wait until confirmation message appear, as picture below:
5. This process will delete your data make sure you have backed up your important data. Then type “Y” and press Enter button.
6. Recovery is running.

CHAPTER 9 – INSTALLING OPERATING SYSTEM AND DRIVER
9 - 7
7. If installation process have finished, type “Q” then press Enter button to restart your notebook. Release the Axioo Recovery DVD from DVD-ROM.
8. After restarting will appear screen as below.
9. Click Next button.
10. Choose your time and date setting as your location, for Indonesia choose “(GMT +07.00) Bangkok, Hanoi, Jakarta”. Then click Next button.

CHAPTER 9 – INSTALLING OPERATING SYSTEM AND DRIVER
9 - 8
11. Tick “I accept the license terms”, then click Next button.

CHAPTER 9 – INSTALLING OPERATING SYSTEM AND DRIVER
9 - 9
12. Type Serial Number that consists of 25 number and letter at the bottom of your notebook. Click Next button.
13. Choose “Help Protect my PC by tuning on automatic update now” , then click Next button.
14. Type Computer Name and Computer Description, click Skip button if you don’t want setting the internet connection and go to the 19 step, click Next button if you want setting the internet connection, you can setting the internet connection after finishing installation Operating System.
15. Checking your internet connectivity, click Skip button if you want to cancel internet setting and go to the 19 step.
16. Choose Digital Subscriber line (DSL) or Cable modem if you want to use DSL or use modem. Or Choose Local Area Network (LAN) if you want to use LAN for internet connection, then click Next button.
17. Choose Yes, I use username and password to connect if you need username and password if you use internet or Choose No, this computer is always connected to the internet if you don’t need username and password for internet connection and go to the 19 step, click Next button.
18. Type username and password as you want, click Next button. 19. Choose “Yes, activate the Windows over the internet now”, click Next button. 20. Type User name for the computer at least one user, click Next button. 21. After finishing Set up Windows® then click Start button to run Windows®
XP®.

CHAPTER 9 – INSTALLING OPERATING SYSTEM AND DRIVER
9 - 10
How to Activate Windows® XP® You can activate Windows®
XP® by using the following ways:
1. How to activate Windows® XP® by using the Internet.
If you are using this way, Windows® Product Activation wizard will establishes a
connection with an activation server, sends your installation ID, and then processes the activation request.
2. How to activate Windows® XP® by using a modem.
If you have a modem but you don’t have an internet connection, wizard will detect your modem and establish a connection with an activation server through your line phone.
3. How to activate Windows® XP® by phone.
If you don’t have any modem or internet connection, you can activate Windows®
XP® by calling customer service Microsoft. Activation wizard will display the number that you can contact.
How to Activate Windows® XP® by Using the Internet
To activate Windows® XP® by using an internet connection, follow these steps:
1. Click Start, point to All Programs, point to Accessories, point to System Tools, and then click Activate Windows®. Or, click the Windows®
Activation icon in the notification area.
2. Click Yes, let's activate Windows® over the Internet now.
3. Click Read the Windows® Product Activation Privacy Statement, click Back,
and then click Next.
4. Use one of the following methods:
a. If you want to register and activate Windows® at the same time, click Yes,
I want to register and activate Windows® at the same time, click Read
the Windows® Registration Privacy Statement, click Back, click Next,
type your contact information in the appropriate boxes in the registration form, and then click Next. An asterisk (*) appears next to required information.
or

CHAPTER 9 – INSTALLING OPERATING SYSTEM AND DRIVER
9 - 11
b. If you only want to activate Windows®, click No, I don't want to register now; let's just activate Windows®, and then click Next.
5. When activation is completed and you receive the following message, click OK.
6. You have successfully activated your copy of Windows®.
How to Activate Windows® XP® by Phone
To contact a Microsoft® customer service representative to activate Windows®
by phone, follow these steps:
1. Click Start, point to All Programs, point to Accessories, point to System Tools, and then click Activate Windows®
or
click the Windows® Activation icon in the notification area.
2. Click Yes, I want to telephone a customer service representative to active Windows®
now.
3. Click Read the Windows® Product Activation Privacy Statement, click Back
and then click Next.
4. Follow the steps in the Activate Windows® by phone dialog box and then click
Next.
5. When activation is completed and you receive the following message, click OK.
6. You have successfully activated your copy of Windows®.
How to Activate Windows® Vista® You must activate Windows®
within 30 days after installation or Windows® will stop
working.
Activation helps verify that your copy of Windows® is genuine and that it has not been
used on more computers than the Microsoft Software License Terms allow. In this way, activation helps prevent software counterfeiting. With an activated copy of Windows®, you’ll be able to use every Windows®
feature.
Open Windows® Activation by clicking the Start button, clicking Computer, clicking
Properties, and then clicking Click here to activate Windows® now. If you are prompted for
an administrator password or confirmation, type the password or provide confirmation.

CHAPTER 9 – INSTALLING OPERATING SYSTEM AND DRIVER
9 - 12
Installing Notebook Driver If you have been installed operating system for your notebook, install the component driver in the notebook. Before install the driver, contact your dealer to make sure that the dealer does not yet install the driver.
Installing Driver For Windows® XP® The notebook comes with sophisticated components that support notebook performance. Each component comes with the driver that must be installed.
In this section will be explained how to install the driver for Windows® XP®
operating system.

CHAPTER 9 – INSTALLING OPERATING SYSTEM AND DRIVER
9 - 13
Installing the Chipset Driver
Your notebook computer uses the advanced chipset. Installing the driver to enhance the stability and .
Installing Chipset device driver for Windows® XP®
1. Click Chipset Driver button on the driver’s installer menu.
2. The Setup box appears.
3. Click Next to start installation.
4. Click YES on License Agreement Intel Chipset Device Software.
5. Click Next to continue installing driver.
6. Tick the option "Yes, I want to restart my computer now.", and press Finish to restart your system
Installing the VGA Driver
Following is the procedure for installing the VGA driver to your notebook.
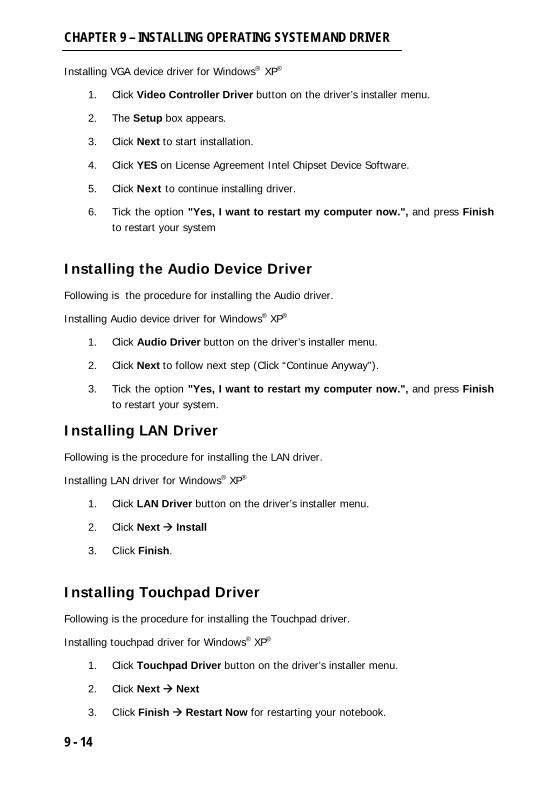
CHAPTER 9 – INSTALLING OPERATING SYSTEM AND DRIVER
9 - 14
Installing VGA device driver for Windows® XP®
1. Click Video Controller Driver button on the driver’s installer menu.
2. The Setup box appears.
3. Click Next to start installation.
4. Click YES on License Agreement Intel Chipset Device Software.
5. Click Next to continue installing driver.
6. Tick the option "Yes, I want to restart my computer now.", and press Finish to restart your system
Installing the Audio Device Driver
Following is the procedure for installing the Audio driver.
Installing Audio device driver for Windows® XP®
1. Click Audio Driver button on the driver’s installer menu.
2. Click Next to follow next step (Click “Continue Anyway”).
3. Tick the option "Yes, I want to restart my computer now.", and press Finish to restart your system.
Installing LAN Driver
Following is the procedure for installing the LAN driver.
Installing LAN driver for Windows® XP®
1. Click LAN Driver button on the driver’s installer menu.
2. Click Next Install
3. Click Finish.
Installing Touchpad Driver
Following is the procedure for installing the Touchpad driver.
Installing touchpad driver for Windows® XP®
1. Click Touchpad Driver button on the driver’s installer menu.
2. Click Next Next
3. Click Finish Restart Now for restarting your notebook.

CHAPTER 9 – INSTALLING OPERATING SYSTEM AND DRIVER
9 - 15
Installing Card Reader
Following is the procedure for installing the Card Reader.
Installing Card Reader and Express Card driver for Windows® XP®
1. Click CardReader Driver button on the driver’s installer menu.
2. Click Next Next
3. Click Ok Installation your CardReader successful
Installing System Control Manager (SCM)
Your notebook computer uses the SCM. They are explanation about Installing the driver.
Installing System Control Manager (SCM) for Windows® XP®
1. Click SCM Driver button on the driver’s installer menu.
2. Click Next to start installation.
3. Tick the option “Yes, I want to restart my computer now.” And press Finish button to restart your operating system.
Installing Wireless LAN Driver
Before installing Wireless LAN 802.11 b/g driver, make sure that the Wireless LAN module is on (LED will be green).
WARNING (Wireless Device Operation Aboard Aircraft): The use of any portable electronic transmission devices aboard aircraft is usually prohibited. Make sure the module(s) are OFF if you are using the notebook aboard aircraft. When your notebook ’Boots Up’ the modules will be ON.
Installing Wireless LAN 802.11 b/g driver for Windows®
XP®
1. Click Wireless Driver button on the driver’s installer menu.
2. Click Next Next Install
3. Click Finish to End installation.

CHAPTER 9 – INSTALLING OPERATING SYSTEM AND DRIVER
9 - 16
Installing Bluetooth Driver (Optional)
If you have included Bluetooth module in your purchase order, so you will get the right software CD.
Before installing Bluetooth driver, make sure you have turned the module on (LED will be blue) to option Bluetooth press “Fn+F11”.
Installing Bluetooth Driver for Windows® XP®
1. Click Bluetooth Driver button in the driver’s installer menu.
2. Click Next. Tick “I accept the terms in the license agreement “ then Click Next. Click Install.
3. Click Finish to End the Installation then Click Yes to restart your notebook.
Installing Battery Driver Update (Optional) Following is the procedure for installing Battery Driver Update (Optional)
Installing Battery Driver for Windows® XP®
1. Click Battery Driver Update button in the driver’s installer menu.
2. Click Next to start Installation.
3. Tick the option "I Agree.", and Click Next.
4. Installation process.
5. Click Finish to restart your notebook.
Installing Camera Driver Update
Following is the procedure for installing Camera Driver Update
Installing Camera Driver for Windows® XP®
6. Click Camera Driver Update button in the driver’s installer menu.
7. Click Next to start Installation.
8. Tick the option "I Agree.", and Click Next.
9. Installation process.
10. Click Finish to restart your notebook.

CHAPTER 10 – CONFIGURATION FOR WINDOWS
10 - 1
10 C O N F I G U R A T I O N F O R W I N D O W S This chapter describes how to configuring anything about Windows® system operating in your notebook.

CHAPTER 10 – CONFIGURATION FOR WINDOWS
10 - 2
Setting The Notebook Configuration For Windows®
In this section will be described notebook configuration setting for Windows® XP®.
Wireless Networking Configuration
The Notebook comes with Wireless LAN. This device is wireless networking connection standard with high speed that allow you to access network without connect the cable. Follow these steps to configuration:
1. Click Start Connect to Wireless Network Connection Advanced.
2. Select tab sheet General, then hardware information and connection protocol will appears.

CHAPTER 10 – CONFIGURATION FOR WINDOWS
10 - 3
3. Double-click Internet Protocol (TCP/IP), The properties display will appears. If you want to use dynamic IP, select “Obtain an IP Address automatically”, and click Ok
4. If you don’t , select “Use The Following IP Address”
5. Type “IP Address”, “Subnet Mask”, “Default Gateway”
6. Select “Use The Following DNS Server Addresses”
7. Type “Preferred DNS Server”, “Alternate DNS Server”
8. Click Ok
9. Select tab sheet “Wireless Network”.
10. Tick “Use Windows to configure my wireless network setting”
11. Click Ok to complete the wireless configuration.

CHAPTER 10 – CONFIGURATION FOR WINDOWS
10 - 4
Configuring the TouchPad and Button
After installing the TouchPad driver, you can configure its functions by double-clicking the TouchPad icon on the taskbar. Then you can configure TouchPad tapping, buttons, and pointer motion and sensitivity option for your choices. To adjust touchpad settings, use the Mouse Properties window, which you can open by clicking Control Panel Hardware and Sound Mouse.
Select the desired settings and click Apply. Click OK to save the settings and close the window.
Power Option Configuration
Besides AC adaptor, your notebook also can get power from internal battery. Notebook battery use rechargeable battery with Lithium Ion Cell that support long consumption and support power management. Follow these steps to configuration Power Option:
1. Click Start Control Panel Performance and Maintenance Power Option. ”Power Option Properties” display will be appears.
2. Select “Power Schemes” tab, in the Power schemes portion you can change power setting. The options also allow you to change setting in the Setting for Home/Office Desk Power scheme manually to turn off the monitor, turn off the hard disk, and standby system.

CHAPTER 10 – CONFIGURATION FOR WINDOWS
10 - 5
3. Select “Alarm” tab, tick “Activate low battery alarm when power level reaches”
and “Activate critical battery alarm when power level reaches”

CHAPTER 10 – CONFIGURATION FOR WINDOWS
10 - 6
4. Select the “Power Meter” tab; make sure “Show details for each battery”
checkbox has been ticked to display battery status.
5. Select “Advanced” tab, in the Option portion you can setting to display battery icon on the taskbar, and to type password when notebook back from standby system. Besides, in the Power button you allow to adjust the action that can be done by notebook when notebook’s screen is closed, press power button, and press sleep button.
6. In the Hibernate mode, there are some settings and information about
hibernate.
7. Click Ok, complete the configuration.

APPENDIX
A - 1
A P P E N D I X This appendix gives information on the technical and hardware specifications of your notebook.

APPENDIX
A - 2
Specification
This appendix gives information on the technical and hardware specifications of your notebook. Please note that the information mentioned here may not be exactly the same with your notebook as specification is subject to change without notice or modifying this manual.
Designed with an advanced modular architecture, your notebook PC also allows you for several levels of customization and expansion that are previously available only on desktop PCs.
PROCESSOR
• Intel® AtomTM Processor N270 ~ 1.6Ghz, FSB 533MHz, integrated with cache memory 512KB L2.
CHIPSET
• Intel 945GSE (MCH)+ ICH7-M (ICH)
MEMORY
• (included) Onboard 1GB (DDR2 667 MHz, PC5300) • One SODIMM 200-pin socket, support DDRII 533/667 MHz module • User-upgradeable to maximum 2GB (SODIMM 512/1024 MB module)
GRAPHICS CONTROLLER
• Integrated with Intel GMA 950 • Support Dynamic Video Memory Technology • Support Microsoft DirectX 9.0C
LCD
• 10” WXGA TFT (1024x600)

APPENDIX
A - 3
STORAGE
• One harddisk module SATA 2.5” • One Nand Flash (Optional)
KEYBOARD
• WinKey keyboard • Built-In Touchpad
SOUND SYSTEM
• High Definition Audio • Compatible with Direct Sound 3D • Built-in Microphone • Built-In Speaker
I/O PORT
• Three Port USB 2.0 • One External Monitor VGA Port • One Headphone Jack • One Microphone Jack • One Internal Microphone • One RJ-45 Jack for LAN • One DC-In Jack
SLOT
• One Card Reader 3-in-1 (MMC/MS/SD)
COMMUNICATION
• 10/100 Mb Base-T Ethernet • Wireless 802.11 b/g • 1.3M pixel Video Camera Module
POWER
• AC Adapter • AC Input 100~240V, 47~63Hz.

APPENDIX
A - 4
• AC Output 20V, 3.25A (75W) • DC Output 20V, 3.25A • One Battery Smart Lithium-Ion 3 Cells / One Battery Smart Lithium-Ion 6 Cells
SECURITY
• Kensington® Lock Hole
SUPPORT O.S
• Linux, Windows XP and Windows Vista
BIOS
• American Megatrends, Inc.
POWER MANAGEMENT
• Support Hibernate Mode • Support Standby Mode • Support Battery Low Sleep Mode • Support Resume • Support Wake On LAN
INDICATOR
• Indicator LED (Power/Suspend, Battery, HDD, Num Lock, Caps Lock, Scroll Lock, Wireless LAN, Power)
ENVIRONMENT
• Temperature Operating : 5C ~ 35C Non-Operating : -20C ~ 60C
• Humidity Operating : 20% ~ 80% Non-Operating : 10% ~ 90%

APPENDIX
A - 5
WEIGHT AND DIMENSION
• 260mm (W) x 180mm (D) x 19-31.5 mm (H) • 1.2 Kg with 3 cells battery

APPENDIX
A - 6
Warranty
Axioo Notebook gives you a warranty for this notebook. If your product requires a warranty service, please bring it to Service Point Axis or visit www.axiooworld.com to get further information.
Our Warranty According to and following all the terms listed in this limited warranty, Axioo assures that this product is free from defect, whether on the material or during the production process, when this product is bought for the first time by the buyer, and for the one or two years period afterward, according to the type of notebook that you buy.
What We Will Do If during the period of warranty this product fails to operate in normal usage, which is caused by the material defect or incorrect production process, then the official distributor of Axioo or official service partners where you bought the product, by its policy, will repair or replace this product according to the terms and conditions mentioned in the period of warranty. Axioo and its partners have the right to charge if it appears that this product doesn’t have warranty based on these following conditions.
Conditions 1. The warranty only applies if the seal from Axioo is not in a condition of damaged
or ripped. Things which indicate that the product has been taken apart not by Axioo or its partners will automatically cancel the warranty from Axioo side. Damaging the seal on this product will also cancel the warranty.
2. The warranty period is not extended if your notebook in a service or totally replaced, when it still in the warranty period. The remaining time of the warranty will follow accordingly to the date listed on the seal. Broken parts or components which will be replaced will belong to Axioo.
3. This warranty doesn’t cover defects/failures which are caused by worn-out due to normal or abnormal usage, or with improper way based on Axioo instructions which are defined in the product usage and care manual.
4. Warranty does not apply on product failure due to accidents, natural disaster, hardware or software modifications, damage caused by liquids or high voltage outside the limit recommended by Axioo.

APPENDIX
A - 7
5. This warranty does not cover software that you use. If there is a failure in the software, whether on installation or usage, please contact the technical support from that software.
6. LCD set is guaranteed by the International standard rules 13406-2. Explanations about ISO 13406-2 can be seen in Appendix ISO 13406-2.
Axioo doesn’t responsible sending the product. The online warranty registration submitted by purchaser to Axioo within two weeks time after the purchase of the hardware product and the warranty is non-transferable to anyone who subsequently purchases. Warranty doesn’t cover the product if damage caused by computer virus attack or repaired by a party not authorized by Axioo. Warranty can’t cover if Customer cannot provide the sales receipt, purchase invoice or warranty registration reference no. Axioo may exchange the product if the complaint is of 5 or more “dead pixels" for a 14-inch (or less) LCD monitor (but is not obliged to). Warranty covers one or more from the conditions stated above. Conditions of the warranty can change without prior notice. Other matter related to warranty shall be final and conclusive and you irrevocably agree to abide by Axioo’s decisions. Warranty covers one or more from the conditions stated above. Conditions of the warranty can change without prior notice.

APPENDIX
A - 8
ISO 13406-2 class II
Axioo applies International Standard ISO 13406 Class II to assure the quality of Axioo notebook LCD. ISO 13406-2 is an ISO standard to define the maximum pixel error which is still tolerable.
Definition of pixel is One LCD screen consists of arrays of pixels where the amount depends on the LCD resolution (Example: 1280 x 800 means consists of 1.024.000 pixel). Every pixel consists of three compositor sub-pixels which are Red, Green, and Blue.
Types of pixel error are categorized into Type 1 Pixel is always ON Type 2 Pixel is always OFF Type 3 Sub Pixel is ON or OFF Type 4/Cluster Sub Pixel is ON or OFF in a 5 x 5 pixel cluster
The number of pixel error which is still allowed can be calculated using the formula
The Number of Pixel Tolerance = (The number of pixel in resolution / 1.000.000) x Multiplier for each category.
The value of total Pixel Tolerance will be rounded up.
Following the ISO Standard 13406 Class II, the variable of multipliers for each category is defined as following
Type 1 = 2 x Type 2 = 2 x Type 3 = 5 x Type 4 = 2 x

APPENDIX
A - 9
Following are the number of pixel error which is still tolerable based on the size of the LCD
Type 1
Type 2
Type 3
Cluster Size Width Height
Amount of Pixel
Amount of Pixel in millions x2 x2 X5 x2
10.6” 1,280 768 983,040.00 0.98 2 2 5 2 12” 1,024 768 768,432.00 0.79 2 2 4 2 12.1” 1,280 800 1,024,000.00 1.02 2 2 5 2 14” 1,280 768 983,040.00 0.98 2 2 5 2 14.1” 1,280 800 1,024,000.00 1.02 2 2 5 2

APPENDIX
A - 10