userguide
TRANSCRIPT
JavaTM Platform Micro EditionSoftware Development Kit
Version 3.0
April 2009
Sun Microsystems, Inc.www.sun.com
om

Copyright © 2009 Sun Microsystems, Inc., 4150 Network Circle, Santa Clara, California 95054, U.S.A. All rights reserved.
Sun Microsystems, Inc. has intellectual property rights relating to technology embodied in the product that is described in this document. Inparticular, and without limitation, these intellectual property rights may include one or more of the U.S. patents listed athttp://www.sun.com/patents and one or more additional patents or pending patent applications in the U.S. and in other countries.
U.S. Government Rights - Commercial software. Government users are subject to the Sun Microsystems, Inc. standard license agreement andapplicable provisions of the FAR and its supplements. Use is subject to license terms.
This distribution may include materials developed by third parties.
Sun, Sun Microsystems, the Sun logo, Java, JavaFX, Java 2D, J2SE, Java SE, J2ME, Java ME, Javadoc, JavaTest, JAR, JDK, NetBeans, phoneME,and Solaris are trademarks or registered trademarks of Sun Microsystems, Inc. or its subsidiaries in the U.S. and other countries.
Products covered by and information contained in this service manual are controlled by U.S. Export Control laws and may be subject to theexport or import laws in other countries. Nuclear, missile, chemical biological weapons or nuclear maritime end uses or end users, whetherdirect or indirect, are strictly prohibited. Export or reexport to countries subject to U.S. embargo or to entities identified on U.S. export exclusionlists, including, but not limited to, the denied persons and specially designated nationals lists is strictly prohibited.
DOCUMENTATION IS PROVIDED "AS IS" AND ALL EXPRESS OR IMPLIED CONDITIONS, REPRESENTATIONS AND WARRANTIES,INCLUDING ANY IMPLIED WARRANTY OF MERCHANTABILITY, FITNESS FOR A PARTICULAR PURPOSE OR NON-INFRINGEMENT,ARE DISCLAIMED, EXCEPT TO THE EXTENT THAT SUCH DISCLAIMERS ARE HELD TO BE LEGALLY INVALID.
Copyright © 2009 Sun Microsystems, Inc., 4150 Network Circle, Santa Clara, California 95054, États-Unis. Tous droits réservés.
Sun Microsystems, Inc. détient les droits de propriété intellectuels relatifs à la technologie incorporée dans le produit qui est décrit dans cedocument. En particulier, et ce sans limitation, ces droits de propriété intellectuelle peuvent inclure un ou plus des brevets américains listés àl'adresse http://www.sun.com/patents et un ou les brevets supplémentaires ou les applications de brevet en attente aux États - Unis et dansd'autres pays.
Utilisation est soumise aux termes du contrat de licence.
Cette distribution peut inclure des éléments développés par des tiers.
Sun, Sun Microsystems, le logo Sun, Java, JavaFX, J2SE, Java 2D, Java SE, J2ME, Java ME, Javadoc, JavaTest, JAR, JDK, NetBeans, phoneME, andSolaris sont des marques de fabrique ou des marques déposées enregistrées de Sun Microsystems, Inc., ou ses filiales, aux États-Unis et dansd'autres pays.
Les produits qui font l'objet de ce manuel d'entretien et les informations qu'il contient sont régis par la législation américaine en matière decontrôle des exportations et peuvent être soumis au droit d'autres pays dans le domaine des exportations et importations. Les utilisationsfinales, ou utilisateurs finaux, pour des armes nucléaires, des missiles, des armes biologiques et chimiques ou du nucléaire maritime,directement ou indirectement, sont strictement interdites. Les exportations ou réexportations vers des pays sous embargo des États-Unis, ouvers des entités figurant sur les listes d'exclusion d'exportation américaines, y compris, mais de maniéré non exclusive, la liste de personnes quifont objet d'un ordre de ne pas participer, d'une façon directe ou indirecte, aux exportations de des produits ou des services qui sont régi par lalégislation américaine sur le contrôlé des exportations et la liste de ressortissants spécifiquement désignes, sont rigoureusement interdites.
LA DOCUMENTATION EST FOURNIE "EN L'ÉTAT" ET TOUTES AUTRES CONDITIONS, DÉCLARATIONS ET GARANTIES EXPRESSESOU TACITES SONT FORMELLEMENT EXCLUES, DANS LA MESURE AUTORISÉE PAR LA LOI APPLICABLE, Y COMPRIS NOTAMMENTTOUTE GARANTIE IMPLICITE RELATIVE À LA QUALITÉ MARCHANDE, À L'APTITUDE À UNE UTILISATION PARTICULIÈRE OU ÀL'ABSENCE DE CONTREFAÇON.
PleaseRecycle
mes
Contents
1. Getting Started 1
Quick Start 1
Tips for Legacy Toolkit Users 2
2. Java ME Platform SDK Features 5
Emulation Platforms 5
CLDC and MIDP Stack 6
CDC Stack 6
BD-J Stack 7
JavaFX Platform 7
Managing Java Platforms 8
J2SE and CDC Platforms 9
J2ME Platforms (CLDC and MIDP) 9
Adding a Java Platform 9
Selecting a Platform Type 10
Choose Platform Folder and Name (Java SE and CDC) 10
Choose Location (JavaSE and CDC) 11
Create a Platform for Legacy CDC Projects 11
Choose Java ME MIDP Platform Folders 11
Choose Custom Java ME MIDP Platform Emulator 12
Support for Third-Party Emulators and Real Devices 13
Automatic Update 14
Using the Plugins Manager 14
Installing a Plugin Globally 16
3. Using Sample Projects 19
Running a Project 19

Troubleshooting 21
Sample Project Overview 21
Configuring the Web Browser and Proxy Settings 24
Resolving Reference Problems 24
Running MIDP and CLDC Sample Projects 25
Running the Demos Sample Project 26
Running FPDemo 32
Running Games 32
Running Network Demo 33
Running PhotoAlbum 34
Running UIDemo 34
4. Creating and Editing Projects 37
About Projects 38
CLDC Projects 38
CDC Projects 39
Creating a CLDC Project 40
Choose Project 40
Name and Location 41
Platform Selection 41
Specify WTK Project 42
Creating a CDC Project 42
Choose Project (CDC) 43
Platform Selection (CDC) 44
Specify CDC Toolkit Project 44
Working With Projects 44
Viewing Project Files 45
Creating a New MIDlet 46
Importing MIDP Projects 47
Importing CDC Projects 47
Adding Files to a Project 48
Find in Files 48
5. Viewing and Editing Project Properties 51
Viewing General Project Properties 52
Selecting a Platform 52
Editing Application Descriptor Properties 53
CDC Attributes 53
MIDP Attributes 53
MIDlets 54
Push Registry 56
API Permissions 57
Building a Project 57
Configuring Ant 58
Compiling 59
Adding Libraries and Resources 59
Creating JAR and JAD Files (Packaging) 60
Obfuscating 60
Signing 60
Exporting a Key 61
Running Settings 62
Running a MIDP Project 62
Running a CDC Project 62
6. Running Projects in the Emulator 65
Understanding the Emulator 65
Viewing Device Properties 66
Platform Properties 67
Device Information 67
Device Properties 67
Setting Device Properties 68
Running a Project from the Device Selector 68
Running Projects Simultaneously on a Single Device 69
Emulator Options 70
Adding a Device Instance 71
7. Searching the WURFL Device Database 73
Searching for Devices 73
Filtering the WURFL Search 75
8. Finding Files in the Multiple User Environment 77
Switching Users 77
Installation Directories 78
User Directories 79
/javame-sdk 79
/javame-sdk/3.0/work 80
/javame-sdk/toolbar/3.0 80
/JavaMESDKProjects 80
9. Profiling Applications 81
Saving Profiler Data 81
Loading Profiler Data 83
Viewing Profiler Data 83
Saving Customized Snapshots and Images 86
Loading a Customized Snapshot 86
10. Monitoring Network Traffic 87
Using the Network Monitor 87
Filtering Messages 89
Sorting Messages 89
Saving and Loading Network Monitor Information 90
Clearing the Message Tree 90
11. Lightweight UI Toolkit 91
Adding the LWUIT Library 91
Using the LWUIT Resource Manager 92
12. Security and MIDlet Signing 93
Security Domains 94
Setting Security Domains 95
Specifying the Security Domain for an Emulator 95
Specifying the Security Domain for a Project 95
Signing a Project 95
Managing Keystores and Key Pairs 96
Working With Keystores and Key Pairs 97
Managing Root Certificates 99
13. BD-J Support 101
Creating a Stubs for BD-J Platform Project 101
Compiling, Deploying, and Running a Stubs for BD-J Platform Project 103
14. CLDC Emulation on a Windows Mobile Device 105
CLDC Emulator Installation for a Device Running Windows Mobile 105
Testing On-device Debugging 115
15. Installing CLDC Emulation on a Windows Mobile Emulator 117
CLDC Installation for Windows Mobile 117
16. On-device Debugging 127
On-device Debugging Procedure 127
Attach a Command Line Debugger 128
Attach a Graphical Debugger 128

Sample CLDC Debugging Session 129
17. Command Line Reference 131
Launching the SDK 132
Running the Device Manager 132
Managing Device Addresses (device-address) 133
Running the Emulator From the Command Line 133
MIDlet Options 134
CDC Options 136
Debugging and Tracing Options 136
Building a Project from the Command Line 137
Checking Prerequisites 138
Compiling Class Files 138
Preverifying Class Files 138
Packaging a MIDLet Suite (JAR and JAD) 139
Command Line Security Features 140
Changing the Emulator’s Default Protection Domain 141
Signing MIDlet Suites (jadtool.exe) 141
Managing Certificates (MEKeyTool) 142
Generating Stubs (wscompile) 143
Running the Payment Console From the Command Line 145
Virtual Machine Memory Profiler (Java Heap Memory Observe Tool) 145
Running the Java Heap Memory Observe Tool 146
Viewing the Heap Snapshot 147
Running WMA Tool 147
smsreceive 148
cbsreceive 148
mmsreceive 148
smssend 150

cbssend 150
mmssend 150
18. Logs 153
Java ME Platform SDK GUI Logs 153
Device Manager Logs 153
Device Instance Logs 154
19. JSR Support 155
JCP APIs 156
20. JSR 75: PDA Optional Packages 159
FileConnection API 159
PIM API 161
Running PDAPDemo 161
Browsing Files 162
The PIM API 164
21. JSR 82: Bluetooth and OBEX Support 167
Bluetooth Simulation Environment 167
OBEX Over Infrared 168
Setting Bluetooth and OBEX Preferences 168
OBEX Preferences 168
Bluetooth Internal Properties 168
Bluetooth System Properties 169
Bluetooth BCC Properties 169
Running the Bluetooth Demo 170
22. JSR 135: Mobile Media API Support 171
Media Types 172
Adaptive Multi-Rate (AMR) Content 172
Media Capture 172
MMAPI MIDlet Behavior 173
Ring Tones 173
Download Ring Tones 173
Ring Tone Formats 173
Running the MMAPI Sample Project 175
Running AudioDemo 175
Running MMAPIDemos 176
Running the Multimedia Sample Project 180
23. JSR 172: Web Services Support 181
Generating Stub Files from WSDL Descriptors 181
Creating a New Mobile Web Service Client 182
Running JSR172Demo 183
24. JSR 177: Smart Card Security (SATSA) 185
Card Slots in the Emulator 186
Java Card Platform Simulator (cref) 186
Adjusting Access Control 187
Specifying PIN Properties 187
Specifying Application Permissions 188
Access Control File Example 190
Running SATSADemos 192
APDUMIDlet 193
SATMIDlet 193
CryptoMIDlet 194
MohairMIDlet 194
Running SATSAJCRMIDemo 195
25. JSR 179: Location API Support 197
Setting the Emulator’s Location at Runtime 197
Running the CityGuide Sample Project 199
26. JSRs 184, 226, and 239: Graphics Capabilities 203
Mobile 3D Graphics (JSR 184) 204
Choosing a Graphics Mode 204
Quality Versus Speed 205
Content for Mobile 3D Graphics 205
Running Demo3D Samples 206
Java Bindings for OpenGL ES (JSR 239) 207
Scalable 2D Vector Graphics (JSR 226) 207
Running SVGDemo 208
Running SVGContactList 213
27. JSR 205: Wireless Messaging API (WMA) Support 215
Using the WMA Console to Send and Receive Messages 215
Launching the WMA Console 215
WMA Console Interface 216
Emulator Phone Numbers 217
Sending a Text SMS Message 217
Sending a Binary SMS Message 217
Sending Text or Binary CBS Messages 217
Sending MMS Messages 217
Receiving Messages in the WMA Console 218
Running WMADemo 218
28. JSR 211: Content Handler API (CHAPI) 221
Using Content Handlers 221
Defining Content Handler Properties 222
Defining Content Handler Actions 224
Running the CHAPIDemo Content Browser 225
29. JSR 238: Mobile Internationalization API (MIA) 227
Setting the Emulator’s Locale 227
Using the Resource Manager 228
Working With Locales 228
Working With Resource Files 228
Running i18nDemo 229
30. JSR 229: Payment API Support 233
Running the Payment Console 233
Running JBricks 234
31. JSR 256: Mobile Sensor API Support 237
Creating a Mobile Sensor Project 237
Using a Mobile Sensor Project 238
Creating a Sensor Script File 239
Running the Sensors Sample Project 239
SensorBrowser 240
Marbles 240
Index 243
CHAPTER 1
Getting Started
The JavaΤΜ Platform Micro Edition Software Development Kit is a natural startingpoint for learning and using Java ME technology. The focus of this user interface isemulation and deployment. Using this simple yet powerful tool you can create, edit,compile, package, and sign an application. After testing your application in the JavaME Platform SDK emulation environment, you can move to deploying anddebugging on a real device.
This SDK provides supporting tools and sample implementations for the latest inJava ME technology. The SDK provides support for Connected Limited DeviceConfiguration (CLDC) and Connected Device Configuration (CDC) platforms andmany optional packages (see the list of JCP APIs). In addition, it suppliesdistribution support for BD-J projects and allows you to run JavaFX™ distributionsin the SDK framework.
See the Quick Start and Tips for Legacy Toolkit Users for a brief overview ofessential features and concepts.
Quick StartThe Java ME Platform SDK offers an intuitive user interface. The tips in offer somehints for getting started as quickly as possible.
■ Access the documentation. The online help is the primary documentation for theSDK. Many windows and dialogs feature a help button that openscontext-sensitive help in the help viewer.
Select Help > Help Contents to open the JavaHelp Online Help viewer. You canalso type F1. Remember to use the search capability and the index to help youfind topics.
1

Note – If you require a larger font size, the help topics are also available as aprintable PDF and a set of HTML files. You can also run the SDK with a differentsize font, as described in Launching the SDK.
■ Run sample projects. Running sample projects is a good way to become familiarwith the SDK.
See Running a Project for a general overview of how to run a project.
■ See the Projects View and the Files view for a visual overview of the logical andphysical layout of a project. When viewing items in the tree, use the context menu(right-click) to see the available actions. See Working With Projects.
■ A project has a default device platform property that is used if you run from thetoolbar (the green arrow), the Run menu, or the project’s context menu.
You can run an application on different devices without resetting the main projector changing the default device in the project properties. See Running a Projectfrom the Device Selector.
■ The emulator is a remote process, and once it has started it is a separate processfrom the build process running in the SDK. Stopping the build process or closinga project does not affect the application running in the emulator. You must be sureto terminate the application (the emulator can remain open). See Running aProject.
The SDK provides two unique instances for most devices. For example,DefaultCldcPhone1 and DefaultCldcPhone2 are the same except for the phonenumber. This means you can perform tests that require two devices (messaging,for example) without customization. If you want to run more than two emulatorsyou can easily make a copy that preserves the settings you require. See Adding aDevice Instance.
■ See Creating a CLDC Project and Creating a CDC Project.
See Working With Projects and Tips for Legacy Toolkit Users.
Tips for Legacy Toolkit UsersIf you used the Sun Java Wireless Toolkit for CLDC or the CDC Toolkit in the past,the advice in Quick Start still applies because although the user interface is quitedifferent, the project concept is similar. These tips apply legacy terms and ideas tothe SDK.
■ Runtime focus is less on the project and more on device capabilities and theemulation process.
2 Java ME Platform SDK Help • April 2009
In legacy toolkits you had to be careful to match the platforms, the APIs, and thecapability of the output device. The SDK matches project requirements and devicecapabilities for you, so mismatches do not occur.
As mentioned in the Quick Start, clicking the green arrow runs the main project.You can right-click any project and select run.
In the device selector you can test many devices without changing the projectproperties. Right-click any device and choose Run. Only projects that arecompatible with the device are show in the context menu.
■ Import applications from legacy toolkits to SDK projects. The installation of thelegacy toolkit must exist.
See Specify WTK Project and Specify CDC Toolkit Project.
■ Toolkit settings are Application Descriptors in the SDK. Right-click on a projectand select Properties. Choose the Application Descriptor category.
■ Toolkit utilities are generally accessible from the Tools menu in the SDK.
For example, the WMA console, profiling tools, monitoring tools and more can bestarted from the SDK Tools menu.
■ The emulator is familiar, but there are some fundamental differences.
It’s important to realize that the emulator is now a remote process, and once it hasstarted it is independent of the build process running in the SDK. Stopping thebuild process or closing a project does not affect the application running in theemulator. You must be sure to terminate the application (the emulator can remainopen). For more on this, see Running a Project.
In the Wireless Toolkit you could simultaneously run multiple versions of adevice because the toolkit would increment the phone number automatically eachtime you launched a project. Because the emulator is a remote process, the phonenumber is a property that must be set explicitly for the device instance.
The SDK provides two unique instances for most devices. For example,DefaultCldcPhone1 and DefaultCldcPhone2 are the same except for the phonenumber. This means you can perform tests that require two devices (messaging,for example) without customization. If you want to run more than two emulatorsyou can easily make a copy that preserves the settings you require. See Adding aDevice Instance.
The emulator has additional display functionality. See Emulator Options.
See also Quick Start and Working With Projects.
Chapter 1 Getting Started 3

4 Java ME Platform SDK Help • April 2009
CHAPTER 2
Java ME Platform SDK Features
The SDK supports three technology platforms, also called stacks. They are: CLDCand MIDP Stack, CDC Stack, and BD-J Stack, as discussed in Emulation Platforms.In addition, it supplies the JavaFX runtime, as discussed in JavaFX Platform.
A project runs on a particular emulation platform. The device manager determineswhether a device is appropriate for your project based on the platform, the APIsyour application uses, and a set of device properties. If you run an application andan appropriate emulator or device is already running, the SDK automatically installsand runs your application. You don’t have to launch the emulator over and over.
The SDK supports integration with devices running Windows Mobile andthird-party emulators. You can use the SDK to deploy to a real device and performon-device debugging.
See JCP APIs, Emulation Platforms, and Working With Projects.
Emulation PlatformsAn emulator simulates the execution of an application on one or more target devices.For example, the CLDC platform enables you to run applications on several sampledevices with different features, such as screen size, keyboard, runtime profile andother characteristics.
An emulation platform allows you to understand the user experience for anapplication and test basic portability.
Java ME Platform SDK provides two well-known emulation platforms: CLDC withMIDP and CDC with AGUI. Both platforms include predefined devices withdifferent screen sizes, runtime profiles, and input methods.
The SDK also provides a way to prepare a CDC application for execution on aBlu-ray disc player, as described in BD-J Stack.
5
The SDK includes the JavaFX runtime and includes two default phone skins forJavaFX. You can use the SDK to run JavaFX project Java application descriptor (JAD)files or Java archive (JAR™) files. See JavaFX Platform.
See CLDC and MIDP Stack, CDC Stack, BD-J Stack, and JavaFX Platform.
CLDC and MIDP StackCLDC/MIDP applications conform to both the Connected Limited DeviceConfiguration and Mobile Information Device Profile (MIDP). The CLDC/MIDPstack is based on the open source phoneME™ Feature project athttps://phoneme.dev.java.net.
■ CLDC 1.1 and MIDP 2.1
■ Optimized Mobile Service Architecture (MSA) stack with extensions (JSR 248)
■ Java Technology for the Wireless Industry (JTWI) stack (JSR 185)
■ All the JSRs listed in TABLE 19-1
CLDC/MIDP applications are targeted for devices that typically have the followingcapabilities:
■ A 16-bit or 32-bit processor with a clock speed of 16MHz or higher
■ At least 160 KB of non-volatile memory allocated for the CLDC libraries andvirtual machine
■ At least 192 KB of total memory available for the Java platform
■ Low power consumption, often operating on battery power
■ Connectivity to some kind of network, often with a wireless, intermittentconnection and limited bandwidth
Typical devices might be cellular phones, pagers, low-end personal organizers, andmachine-to-machine equipment. In addition, CLDC can also be deployed in homeappliances, TV set-top boxes, and point-of-sale terminals.
See Creating a CLDC Project.
CDC StackA Java ME Platform, Connected Device Configuration application is an applicationtargeted for network-connected consumer and embedded devices, includinghigh-end mobile phones, smart communicators, high-end PDAs, and set-top boxes.
6 Java ME Platform SDK Help • April 2009
Devices that support CDC typically include a 32-bit microprocessor or controller andmake about 2 MB of RAM and 2.5 MB of ROM available to the Java applicationenvironment.
CDC is based upon the open source project phoneME™ Advanced, found athttps://phoneme.dev.java.net. A CDC application conforms to the ConnectedDevice Configuration with a set of profiles that include Personal Basis Profile andAGUI:
■ CDC 1.1 with PBP 1.1
■ AGUI 1.0
See Creating a CDC Project.
BD-J StackThe BD-J stack automates creating a BD-J project that is ready to be burned to aBlu-ray disc or run in an emulator.
A project wizard simplifies tasks for compiling and bundling the project. Thebundled package can be run on an Blu-ray playback software that must bedownloaded and installed separately.
See Creating a Stubs for BD-J Platform Project.
JavaFX PlatformThe SDK can run a JavaFX application in JAD or JAR form. The SDK does notsupport creating or compiling JavaFX projects. The NetBeans™ IDE, combined withthe JavaFX SDK, supports JavaFX application development with full editor support,draggable components, and more. Download the development environment fromhttp://www.javafx.com/.
When your application is complete, you can use the Java ME SDK to run its JAD orJAR file on an emulator or device. In the Device Selector, right-click on a device andselect Run JAR or JAD... from the context menu, then browse to select the file.
Chapter 2 Java ME Platform SDK Features 7
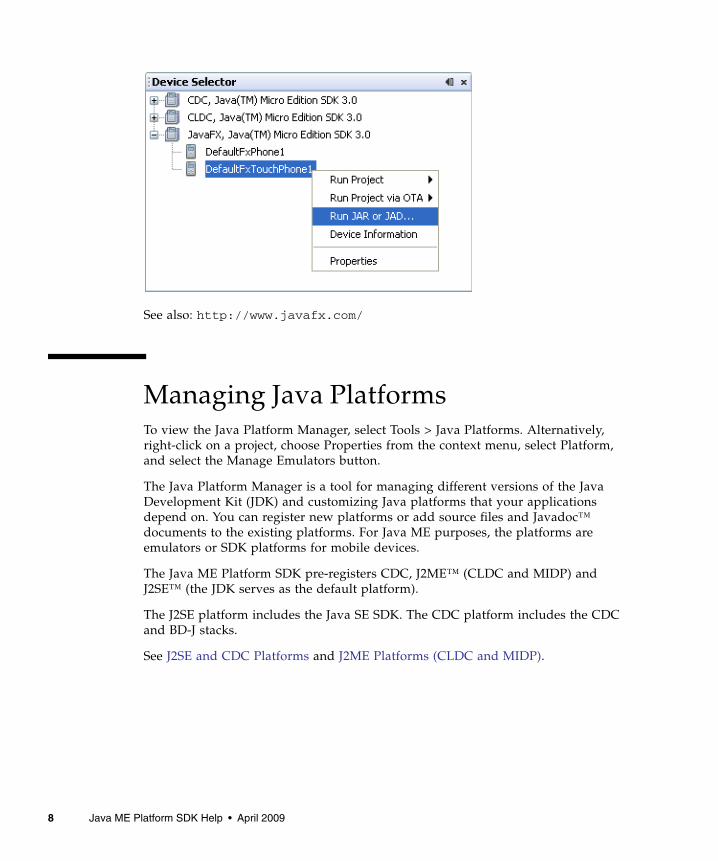
See also: http://www.javafx.com/
Managing Java PlatformsTo view the Java Platform Manager, select Tools > Java Platforms. Alternatively,right-click on a project, choose Properties from the context menu, select Platform,and select the Manage Emulators button.
The Java Platform Manager is a tool for managing different versions of the JavaDevelopment Kit (JDK) and customizing Java platforms that your applicationsdepend on. You can register new platforms or add source files and Javadoc™documents to the existing platforms. For Java ME purposes, the platforms areemulators or SDK platforms for mobile devices.
The Java ME Platform SDK pre-registers CDC, J2ME™ (CLDC and MIDP) andJ2SE™ (the JDK serves as the default platform).
The J2SE platform includes the Java SE SDK. The CDC platform includes the CDCand BD-J stacks.
See J2SE and CDC Platforms and J2ME Platforms (CLDC and MIDP).
8 Java ME Platform SDK Help • April 2009
J2SE and CDC PlatformsTo view the Java Platform Manager, select Tools > Java Platforms. The J2SE platformsupports the Java ME Platform SDK. The CDC platform supports the CDC Stack,which also supports the BD-J Stack. In the standard Java ME Platform SDKinstallation the J2SE and CDC platforms have the same options:
Classes. View the platform’s classpaths. Add a JAR or folder containing additionalclasses, moving the classes up and down in the list determines their place in theclasspath.
Sources. Add JAR files or source files to the Sources tab to register source code.
Javadoc. Add Javadoc documentation to support any new classes or sources filesyou have added.
See Managing Java Platforms and Adding a Java Platform.
J2ME Platforms (CLDC and MIDP)To view the Java Platform Manager, select Tools > Java Platforms. The J2MEplatform supports CLDC projects. This platform also serves to run JavaFX projects(see JavaFX Platform):
Devices. View all the CLDC devices (including JavaFX devices) that the DeviceManager has discovered. Click Refresh to reconfigure the platform and refresh thelist.
Sources. Add JAR files or source files to the Sources tab to register source code.
Javadoc. Add Javadoc documentation to support any new classes or sources filesyou have added.
Tools & Extensions. View the tools and extensions for this platform.
See Managing Java Platforms, and Adding a Java Platform.
Adding a Java PlatformTo view the Add Java Platform wizard, select Tools > Java Platforms, and click theAdd Platform button. You can add platforms that are installed on the SDK’s hostmachine. This wizard sports adding several platforms, however,
Chapter 2 Java ME Platform SDK Features 9
The wizard is described in the following topics: Selecting a Platform Type, ChoosePlatform Folder and Name (Java SE and CDC), Choose Java ME MIDP PlatformFolders, and Choose Custom Java ME MIDP Platform Emulator.
See Create a Platform for Legacy CDC Projects.
Selecting a Platform TypeTo see this page, select Tools > Java Platforms, and click the Add Platform button.Select platform type is the first page of this wizard. The platform types are asfollows:
Java Standard Edition. The standard Java SDK. There is no need to add SDKs, theJava ME Platform SDK uses only the JDK you specified at installation time.
Java ME MIDP Platform Emulator. One or more CLDC emulators that arecompliant with the Universal Emulator Interface Specification (UEI) and usetechnology based on the phoneME™ Feature project (seehttps://uei.dev.java.net and https://phoneme.dev.java.net).
Custom Java ME Platform Emulator. A platform emulator that is not compliantwith the UEI standard.
Java ME CDC Platform Emulator. One or more CDC emulators that are compliantwith the UEI and use technology based on phoneME™ Advanced (seehttps://phoneme.dev.java.net). The CDC platform includes the CDC andBD-J stacks.
See Selecting a Platform.
Choose Platform Folder and Name (Java SE andCDC)To see this page, select Tools > Java Platforms, and click the Add Platform button.Select Java Standard Edition or Java ME CDC Platform Emulator, and click Next.
In the “Look in” field, browse to select a Platform folder. Select a directory and clickNext. On the Platform Name page, perform these steps:
1. Specify a platform name.
2. Browse to select the platform sources (typically a zip or JAR file).
3. Browse to choose Javadoc documentation (optional).
Continue to Choose Location (JavaSE and CDC).
10 Java ME Platform SDK Help • April 2009
Choose Location (JavaSE and CDC)This is the final page in the Add Java Platform wizard. If you have chosen aplatform, the Platform Name field is populated for you. You might have to wait asecond for this to happen. This wizard page also displays the Sources and Javadoctabs. Click the Add... button to add files to this project. Click Next when you arefinished.
See Adding a Java Platform.
Create a Platform for Legacy CDC ProjectsThe Java ME Platform SDK version 3.0 platform name for CDC does not match thename in the legacy CDC toolkit and the CDC Mobility Pack. The legacy name is“Sun Java Toolkit 1.0 for Connected Device Configuration” while the SDK name is“CDC Java(TM) Platform Micro Edition SDK 3.0”. To ensure a successful import, youcan create a new platform and give it the legacy name.
The following procedure allows you to import legacy CDC projects withoutReference errors (see Resolving Reference Problems).
1. Select Tools > Java Platforms. Select “CDC Java(TM) Platform Micro EditionSDK 3.0”, and in the Classes tab, note the libraries required for the platform.
2. Click Add Platform... and click Next.
3. Select Java ME CDC Platform Emulator and click Next.
4. On the Choose Platform page, select the SDK installation directory. Click Next.
5. On the Platform Name page, type “Sun Java Toolkit 1.0 for Connected DeviceConfiguration” in the Name field. In the Sources tab, add the following libraries:agui.jar, cdc_1.1.jar, fp_1.0.jar, fp_1.1.jar, pbp_1.1.jar, andsecop_1.0.jar.
Click Finish, and Close.
See: Importing CDC Projects and Resolving Reference Problems.
Choose Java ME MIDP Platform FoldersTo see this page, select Tools > Java Platforms, and click the Add Platform button.Choose Java ME MIDP Platform Emulator and click Next. In the Platform Folderspanel you see the installation directory for the Java ME Platform SDK is detected. Ifother platforms are installed on your system they can be detected and added to JavaME Platform SDK.
Chapter 2 Java ME Platform SDK Features 11
1. To discover additional platforms, click Find More Java ME Platform Folders... Thewindow “Choose directory to search for platforms” opens.
2. This utility finds Java ME platforms and emulators in the scope you specify, anddisplays them in the Platform Folders window. Choose a folder, or type in alocation (for example, C:\).
3. If you detected the platform you want, click the box in front of the platform. Yousee a green check indicating the platform is to be installed. Uncheck anyplatforms you do not want to install and click Next.
Detected Platforms
When the platform is discovered and installed, you see three tabs that displayinformation on the platform: Description, Javadocs, and Sources. The Descriptionstab displays platform details, such as supported devices, profiles, configurations,and optional packages.
Click Finish.
Some emulators might fail to install. If this happens you can try to perform a custominstallation as described in Choose Custom Java ME MIDP Platform Emulator.
Choose Custom Java ME MIDP PlatformEmulatorYou can use the Add Java Platform wizard to install an emulator that is not UEIcompliant. To see this page, select Tools > Java Platforms, and click the Add Platformbutton. Choose Custom Java ME MIDP Platform Emulator and click Next.
See General Information, Bootstrap Libraries, and Sources & Javadoc.
General InformationThis wizard page defines the general parameters for an emulator that is not UEIcompliant. You must supply this information:
Platform Home. The path to the directory where the emulator platform is installed.You can enter a path, or use the Browse button to navigate to the directory.
Platform Name. A name for the emulator platform.
Device Name. A name for the specific device the platform emulates.
12 Java ME Platform SDK Help • April 2009
Preverify Command. The command line syntax that invokes the preverifyapplication to preverify a MIDlet. MIDlet class files must be preverified before theycan be run on a device or emulator. The toolkit silently handles preverificationduring the build process. See the CLDC specification for more information onpreverification.
Execution Command. The command line syntax that invokes the emulator toexecute a MIDlet.
Debugger Command. The command line syntax that invokes the emulator to debuga MIDlet.
To see descriptions of the command line syntax parameters, click in the appropriatefield. The description is displayed in the area below the debugger command. ClickNext when you are finished.
See Running the Emulator From the Command Line.
Bootstrap LibrariesBased on the General Information you entered, the wizard detects the libraries andAPIs the platform or emulator uses. To add libraries, click the Browse button andchoose a library file. Click Next when you are finished.
Sources & JavadocGiven the files and libraries you have chosen to this point, the wizard detectslibraries and APIs. To add additional source files or Javadoc files, click the browsebutton and choose the files you want to add.
Click Finish to register the emulator platform.
Support for Third-Party Emulators andReal DevicesHaving an emulator does not eliminate the need to test your application on actualtarget devices. An emulator can only approximate a device’s user interface,functionality, and performance. For example, an emulator may not accuratelysimulate processing speed, so an application may run faster or slower on a targetdevice than it does on an emulator.
Chapter 2 Java ME Platform SDK Features 13
Java ME SDK simplifies deployment to and debugging on real devices running theSun Java runtime. This version supports Windows Mobile platform based devices,and includes a bundled Java runtime for Windows Mobile devices.
The Microsoft Device Emulator is an example of third-party emulator integration. Itmeans you can deploy applications to Microsoft Device Emulator as easily as youcan run on our built-in emulators. See the following topics: CLDC EmulatorInstallation for a Device Running Windows Mobile and CLDC Installation forWindows Mobile.
Automatic UpdateThe Java ME SDK supports automatic updating of individual plugins. The samemechanism can be used to update the entire SDK.
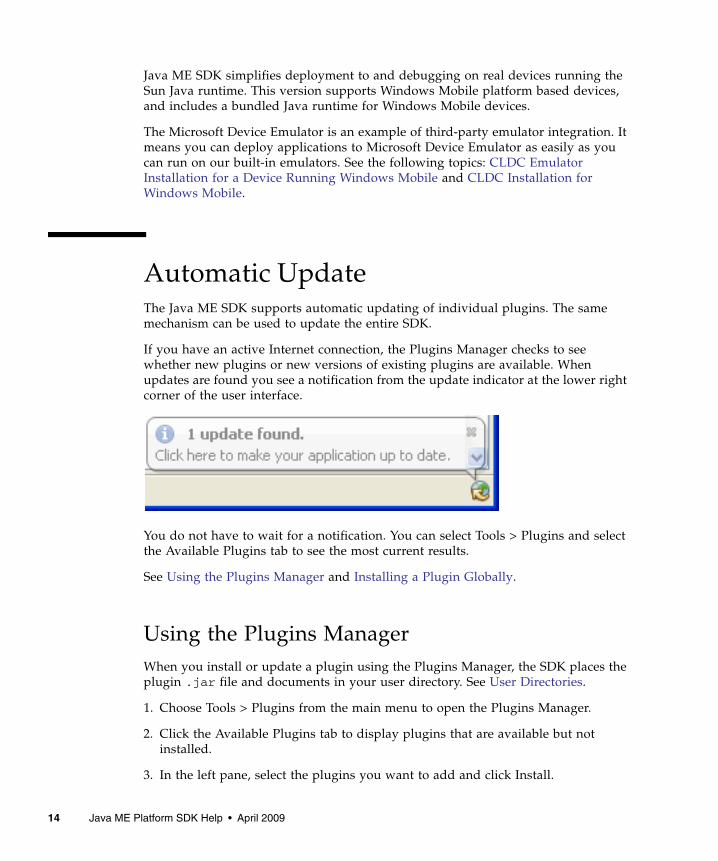
If you have an active Internet connection, the Plugins Manager checks to seewhether new plugins or new versions of existing plugins are available. Whenupdates are found you see a notification from the update indicator at the lower rightcorner of the user interface.
You do not have to wait for a notification. You can select Tools > Plugins and selectthe Available Plugins tab to see the most current results.
See Using the Plugins Manager and Installing a Plugin Globally.
Using the Plugins ManagerWhen you install or update a plugin using the Plugins Manager, the SDK places theplugin .jar file and documents in your user directory. See User Directories.
1. Choose Tools > Plugins from the main menu to open the Plugins Manager.
2. Click the Available Plugins tab to display plugins that are available but notinstalled.
3. In the left pane, select the plugins you want to add and click Install.
14 Java ME Platform SDK Help • April 2009

4. Complete the pages in the installer to download and install the plugin.
See Available Plugins, Downloaded, Installed Plugins and Plugin Settings.
Available PluginsTo access this tab, select Tools > Plugins to open the Plugins Manager, then select theAvailable Plugins tab. To check the update center and refresh the list of availableplugins, click Reload Catalog.
DownloadedTo access this tab, select Tools > Plugins to open the Plugins Manager, then select theDownloaded tab. The left pane displays the manually downloaded plugins that youcan install. The right pane displays a description of the selected plugin.
Click Add Plugins to use the file browser to add any plugins that you downloadedto your local system. To install the plugin, select the Install checkbox for the pluginand click Install.
Installed PluginsTo access this tab, select Tools > Plugins to open the Plugins Manager, then select theInstalled tab. The left pane displays a list of the installed plugins. The active columndisplays the state of the selected plugin.
When you select a plugin in the left pane, the description of the plugin is displayedin the right pane. You can activate and deactivate installed plugins in the right pane.A deactivated plugin is not loaded on SDK startup. If a plugin is deactivated, it stillexists on your local system and you can reactivate the plugin without downloadingit again.
The plugin is installed and activated.
The plugin is installed but deactivated.
The SDK needs to be restarted to fully deactivate the plugin.
Chapter 2 Java ME Platform SDK Features 15
An installed plugin can be active or inactive. If a listed plugin is inactive, you mightneed to install additional plugins to use the plugin.
If you want to completely remove a plugin from your local system, select thecheckbox for the plugin in the left pane and then click Uninstall.
Plugin SettingsTo access this tab, select Tools > Plugins to open the Plugins Manager, then select theSettings tab. This tab displays the default update center for the SDK - the Java MESDK Toolbar Update Center.
By default the Plugins Manager checks for updates once per week, as determined bythe Check Interval selection. You can select a different interval from the dropdownlist.
Click the Add button to Add an update center URL.
Click the Proxy Settings button to edit the proxy settings to allow access to updatecenters.
Force install into shared directories determines whether the plugin is installed foran individual user or all users in the multiple user environment. If the box isunchecked (default) the plugin is only installed for the user. If it is checked, theinstallation is global, as described in Installing a Plugin Globally.
Installing a Plugin GloballyBy default the SDK installation is a multiple user environment, as described in UserDirectories. The typical plugin installation described in Using the Plugins Manageraffects only your user directory. To install a plugin globally you must have writeaccess to the SDK installation directory.
1. Choose Tools > Plugins to open the Plugins Manager.
2. Click the Settings tab and then select Force install into shared directories.
3. Click the Available Plugins tab, select the Install checkbox for the plugin and clickInstall. You can also install manually downloaded plugins in the Downloaded tab.
4. Follow the wizard instructions to complete the installation of the plugin.
5. Restart the SDK to activate the new plugin, if necessary.
The SDK places .jar files and docs for globally installed plugins in the SDKinstallation directory instead of in an individual user directory.
16 Java ME Platform SDK Help • April 2009

See Using the Plugins Manager.
Chapter 2 Java ME Platform SDK Features 17

18 Java ME Platform SDK Help • April 2009
CHAPTER 3
Using Sample Projects
The Java ME Platform SDK sample projects introduce you to the emulator’s APIfeatures and the SDK features, tools, and utilities that support the various APIs.These features can help you customize the sample projects or create applications ofyour own.
The source code for every demonstration application is available in theinstalldir/apps directory. Subdirectories contain projects, and each project has a srcdirectory that contains Java programming language source code.
For example, if the SDK is installed inC:\Java_ME_Platform_SDK_3.0, the source code for the SMS sender MIDlet(example.sms.SMSSend) in WMADemo resides in:installdir\apps\WMADemo\src\example\sms\SMSSend.java.
For an explanation of the directory structure, see Installation Directories and UserDirectories. See also: Sample Project Overview, Running a Project, and RunningMIDP and CLDC Sample Projects.
Running a ProjectTo run a sample project, go to the Start Page tab and single-click a sample projectname. The project opens in the Project window and starts running in the emulator.
Note – If you can’t see the Project window choose Window > Projects. To seeconsole output, select Window > Output > Output.
19
Follow these steps to run a your own projects.
1. Select File > Open Project, and browse to select a project.
The project is added to the Projects window.
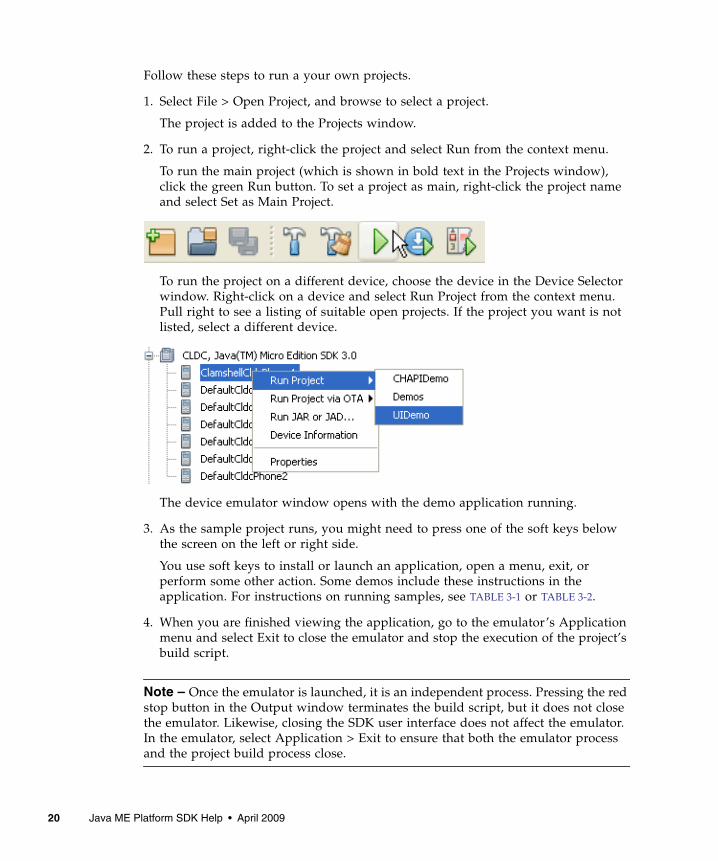
2. To run a project, right-click the project and select Run from the context menu.
To run the main project (which is shown in bold text in the Projects window),click the green Run button. To set a project as main, right-click the project nameand select Set as Main Project.
To run the project on a different device, choose the device in the Device Selectorwindow. Right-click on a device and select Run Project from the context menu.Pull right to see a listing of suitable open projects. If the project you want is notlisted, select a different device.
The device emulator window opens with the demo application running.
3. As the sample project runs, you might need to press one of the soft keys belowthe screen on the left or right side.
You use soft keys to install or launch an application, open a menu, exit, orperform some other action. Some demos include these instructions in theapplication. For instructions on running samples, see TABLE 3-1 or TABLE 3-2.
4. When you are finished viewing the application, go to the emulator’s Applicationmenu and select Exit to close the emulator and stop the execution of the project’sbuild script.
Note – Once the emulator is launched, it is an independent process. Pressing the redstop button in the Output window terminates the build script, but it does not closethe emulator. Likewise, closing the SDK user interface does not affect the emulator.In the emulator, select Application > Exit to ensure that both the emulator processand the project build process close.
20 Java ME Platform SDK Help • April 2009
TroubleshootingSometimes even a “known good“ application, such as a sample project, does not runsuccessfully. The problem is usually your environment.
■ Some demonstrations require specific setup and instructions. For example, if asample uses web services and you are behind a firewall, you must configure theemulator’s proxy server settings or web access will fail. See Configuring the WebBrowser and Proxy Settings.
■ If an application must run over the air (OTA), the SDK automatically installs it inthe device instance.
To perform the installation, MIDlet Suites useinstalldir/runtimes/cldc-hi-javafx/bin/runMidlet.exe.
CDC applications use installdir/runtimes/cdc-hi/bin/cvm.exe.
Because these programs are launched remotely, virus checking software canprevent them from running. If this happens, the project compiles, but theemulator never opens. In the console you see warnings that the emulator cannotconnect.
Consider configuring your antivirus software to exclude runMidlet.exe andcvm.exe from checking.
See also Troubleshooting.
Sample Project OverviewThe Java ME Platform SDK includes demonstration applications that highlight someof the technologies and APIs that are supported by the emulator.
Most demonstration applications are simple to run. Running a Project containsinstructions for running most demonstrations. Sample projects usually have someadditional operation instructions.
Chapter 3 Using Sample Projects 21
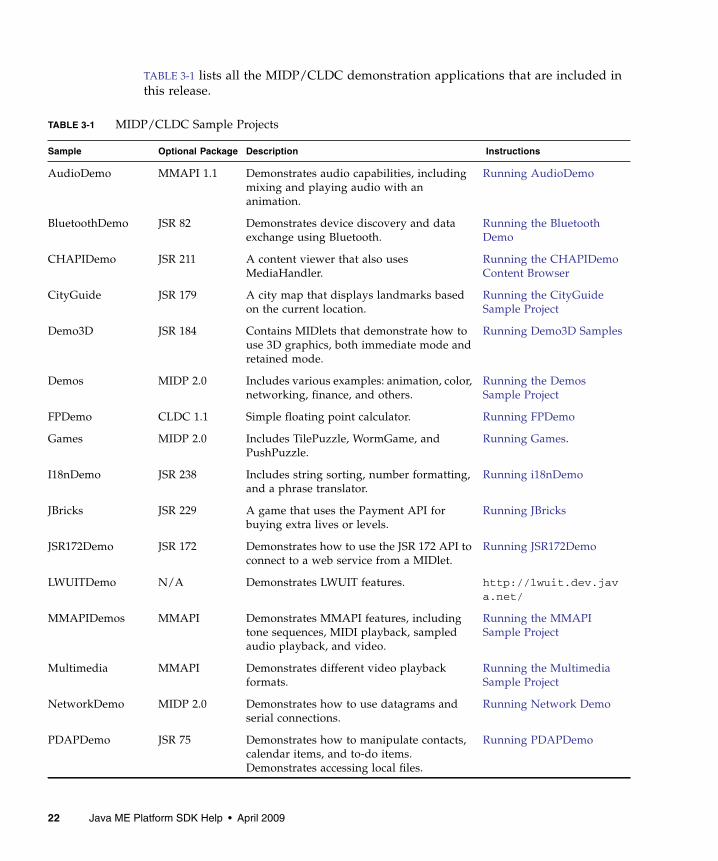
TABLE 3-1 lists all the MIDP/CLDC demonstration applications that are included inthis release.
TABLE 3-1 MIDP/CLDC Sample Projects
Sample Optional Package Description Instructions
AudioDemo MMAPI 1.1 Demonstrates audio capabilities, includingmixing and playing audio with ananimation.
Running AudioDemo
BluetoothDemo JSR 82 Demonstrates device discovery and dataexchange using Bluetooth.
Running the BluetoothDemo
CHAPIDemo JSR 211 A content viewer that also usesMediaHandler.
Running the CHAPIDemoContent Browser
CityGuide JSR 179 A city map that displays landmarks basedon the current location.
Running the CityGuideSample Project
Demo3D JSR 184 Contains MIDlets that demonstrate how touse 3D graphics, both immediate mode andretained mode.
Running Demo3D Samples
Demos MIDP 2.0 Includes various examples: animation, color,networking, finance, and others.
Running the DemosSample Project
FPDemo CLDC 1.1 Simple floating point calculator. Running FPDemo
Games MIDP 2.0 Includes TilePuzzle, WormGame, andPushPuzzle.
Running Games.
I18nDemo JSR 238 Includes string sorting, number formatting,and a phrase translator.
Running i18nDemo
JBricks JSR 229 A game that uses the Payment API forbuying extra lives or levels.
Running JBricks
JSR172Demo JSR 172 Demonstrates how to use the JSR 172 API toconnect to a web service from a MIDlet.
Running JSR172Demo
LWUITDemo N/A Demonstrates LWUIT features. http://lwuit.dev.java.net/
MMAPIDemos MMAPI Demonstrates MMAPI features, includingtone sequences, MIDI playback, sampledaudio playback, and video.
Running the MMAPISample Project
Multimedia MMAPI Demonstrates different video playbackformats.
Running the MultimediaSample Project
NetworkDemo MIDP 2.0 Demonstrates how to use datagrams andserial connections.
Running Network Demo
PDAPDemo JSR 75 Demonstrates how to manipulate contacts,calendar items, and to-do items.Demonstrates accessing local files.
Running PDAPDemo
22 Java ME Platform SDK Help • April 2009
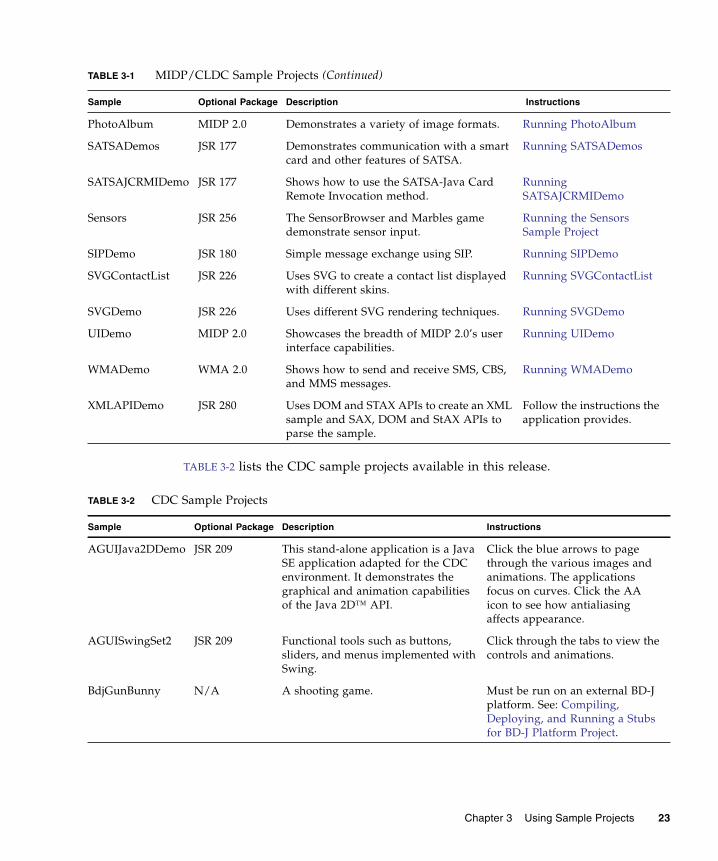
TABLE 3-2 lists the CDC sample projects available in this release.
PhotoAlbum MIDP 2.0 Demonstrates a variety of image formats. Running PhotoAlbum
SATSADemos JSR 177 Demonstrates communication with a smartcard and other features of SATSA.
Running SATSADemos
SATSAJCRMIDemo JSR 177 Shows how to use the SATSA-Java CardRemote Invocation method.
RunningSATSAJCRMIDemo
Sensors JSR 256 The SensorBrowser and Marbles gamedemonstrate sensor input.
Running the SensorsSample Project
SIPDemo JSR 180 Simple message exchange using SIP. Running SIPDemo
SVGContactList JSR 226 Uses SVG to create a contact list displayedwith different skins.
Running SVGContactList
SVGDemo JSR 226 Uses different SVG rendering techniques. Running SVGDemo
UIDemo MIDP 2.0 Showcases the breadth of MIDP 2.0’s userinterface capabilities.
Running UIDemo
WMADemo WMA 2.0 Shows how to send and receive SMS, CBS,and MMS messages.
Running WMADemo
XMLAPIDemo JSR 280 Uses DOM and STAX APIs to create an XMLsample and SAX, DOM and StAX APIs toparse the sample.
Follow the instructions theapplication provides.
TABLE 3-2 CDC Sample Projects
Sample Optional Package Description Instructions
AGUIJava2DDemo JSR 209 This stand-alone application is a JavaSE application adapted for the CDCenvironment. It demonstrates thegraphical and animation capabilitiesof the Java 2D™ API.
Click the blue arrows to pagethrough the various images andanimations. The applicationsfocus on curves. Click the AAicon to see how antialiasingaffects appearance.
AGUISwingSet2 JSR 209 Functional tools such as buttons,sliders, and menus implemented withSwing.
Click through the tabs to view thecontrols and animations.
BdjGunBunny N/A A shooting game. Must be run on an external BD-Jplatform. See: Compiling,Deploying, and Running a Stubsfor BD-J Platform Project.
TABLE 3-1 MIDP/CLDC Sample Projects (Continued)
Sample Optional Package Description Instructions
Chapter 3 Using Sample Projects 23
Configuring the Web Browser and ProxySettingsIf you are behind a firewall you might need to configure the proxy server so thatMIDP applications using web services can succeed.
Note – CDC emulators do not work through a proxy. Communications such asdownloading images from the Internet fail on CDC emulators.
The settings are typically the same as those you are using in your web browser.
1. Select Tools > Options.
2. Select the General options icon.
3. In the Web Browser field, choose the browser that will be affected by these proxysettings. Click Edit to add or remove a browser from the dropdown list.
4. Choose a Proxy Setting:
■ No Proxy
■ Use System Proxy Settings
■ Manual Proxy Settings
To set the HTTP Proxy, fill in the proxy server address field and the portnumber.
The HTTP Proxy is the host name or numeric IP address of the proxy server touse to connect to HTTP and FTP sites. The Proxy Port is the port number of theproxy server.
To set the HTTPS or Socks proxy, click More and fill out the Advanced ProxyOptions form.
Resolving Reference ProblemsSometimes when you open a project you can see it has a reference warning. In theProjects tab the project name is red, and the icon shows a warning symbol, as seenbelow:
24 Java ME Platform SDK Help • April 2009
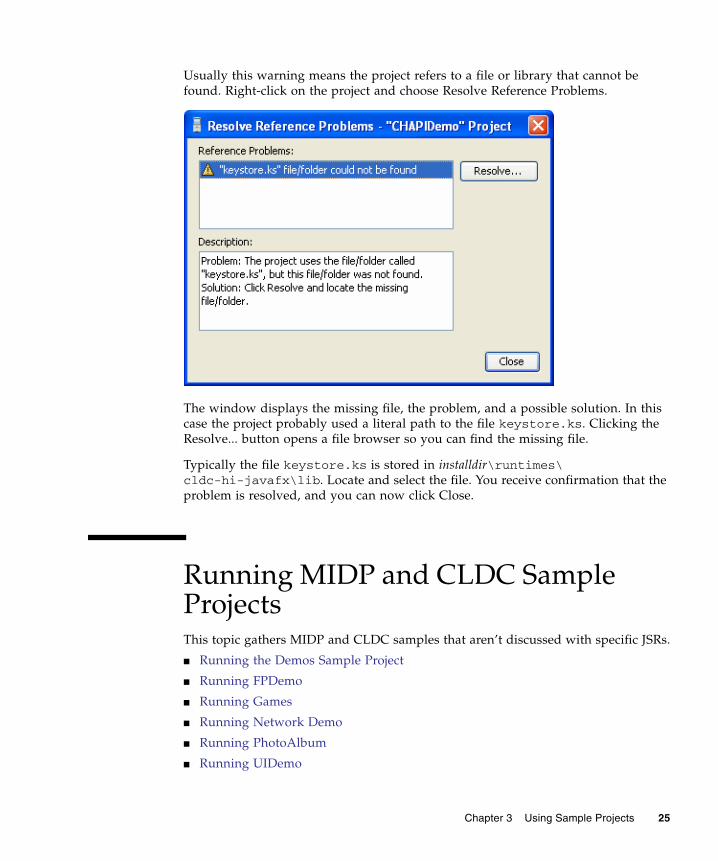
Usually this warning means the project refers to a file or library that cannot befound. Right-click on the project and choose Resolve Reference Problems.
The window displays the missing file, the problem, and a possible solution. In thiscase the project probably used a literal path to the file keystore.ks. Clicking theResolve... button opens a file browser so you can find the missing file.
Typically the file keystore.ks is stored in installdir\runtimes\cldc-hi-javafx\lib. Locate and select the file. You receive confirmation that theproblem is resolved, and you can now click Close.
Running MIDP and CLDC SampleProjectsThis topic gathers MIDP and CLDC samples that aren’t discussed with specific JSRs.
■ Running the Demos Sample Project
■ Running FPDemo
■ Running Games
■ Running Network Demo
■ Running PhotoAlbum
■ Running UIDemo
Chapter 3 Using Sample Projects 25
For other CLDC demos, see TABLE 3-1.
Running the Demos Sample ProjectThis demo contains several MIDlets that highlight different MIDP features.
■ Colors
■ Properties
■ Http
■ FontTestlet
■ Stock
■ Tickets
■ ManyBalls
■ MiniColor
■ Chooser
■ HttpExample
■ HttpView
■ PushExample
ColorsThis application displays a large horizontal rectangle that runs the width of thescreen. Below, ten small vertical rectangles span the screen. Finally, three horizontalcolor bars indicate values for blue, green, and red (RGB). Values are expressed asdecimal (0-255) or hexadecimal (00-ff) based on the first menu selection.
■ To select a vertical bar to change, use the up navigation arrow to move to thecolor bars. Use the right navigation arrow to highlight a color bar. The largerectangle becomes the color of the selected bar.
■ Use the up or down selection arrows to choose the value to change (red, green, orblue). Use the left or right arrow keys to increase or decrease the selected value.The second menu item allows you to jump in increments of 4 (Fine) or 32 (coarse).
■ You can change the color on any or all of the vertical bars.
26 Java ME Platform SDK Help • April 2009

PropertiesThis MIDlet displays your system property values. The output is similar to thefollowing values:
HttpThis test application uses an HTTP connection to request a web page. The request isissued with HTTP protocol GET or POST methods. If the HEAD method is used, thehead properties are read from the request.
Preparing to Run the Demo
Before beginning, examine your settings as follows.
■ Right-click on Demos and select Properties.
■ Select the Running category.
■ Select Regular Execution.
Check Specify the Security Domain and select Maximum.
■ Click OK.
■ If you are using a proxy server, you must configure the emulator’s proxy serversettings as described in Configuring the Web Browser and Proxy Settings. TheHTTP version must be 1.1.
■ If you are running antivirus software, you might need to create a rule that allowsthis MIDlet to allow connections to and from a specific web site. SeeTroubleshooting.
Running the Demo
Launch the Http MIDlet. To test, choose the Menu soft key and choose Get, Post, orHead to test the selected URL.
Http Test returns the information it is able to obtain. If the information fills thescreen use the down arrow to scroll to the end. The amount of information dependson the type of request and on the amount of META information the page provides. Toprovide body information or content, the page must declare CONTENT-LENGTH asdescribed in RFC 2616.
Free Memory = 2333444Total Memory = 4194304microedition.configuration = “CLDC-1.1“microedition.profiles = “MIDP-2.1“microedition.platform = “j2me“microedition.platform = “en-US“microedition.platform = “IS08859_1“
Chapter 3 Using Sample Projects 27
Using Menu Options
Use the Menu soft key for the following actions.
■ Choose 2 to GET information from the selected page.
■ Choose 3 to obtain the POST information from the selected page.
■ Choose 4 to display the HEAD attributes for the page.
■ Choose 5 to bring up the current list of web pages. You can chose a new page oradd your own page to the list. To specify a new URL, choose the Add soft button,then select the Menu soft button and choose OK. The screen displays http://.Type in the rest of the URL, making sure to end with a slash (/). For examplehttp://www.internetnews.com/. Press the OK soft button. The Http Testscreen shows your new URL and prompts for an action.
FontTestletThis MIDlet shows the various fonts available: Proportional, Regular, Regular Italic,Bold Plain, and Bold Italic. Choose 1 or 2 from the menu to toggle between thesystem font (sans serif) and the monospace font.
StockLike the Http demonstration, This sample uses an HTTP connection to obtaininformation. Use the same preparation steps as Http.
Run the Demos project and launch the Stock MIDlet.
By default, the screen displays an empty ticker bar at the top. Below the ticker, themenu list shows four applications: Stock Tracker, What If? Alerts, and Settings. Youmust add stock symbols before you can use the first three applications.
Add Stock Symbols to the Ticker
To add a stock symbol to the ticker, use the navigation arrows to select Settings.
Select Add Stock.
The display prompts you to enter a stock symbol. Type JAVA and select the Donesoft key. The stock you added and its current value is now displayed in the ticker.Add a few more stock symbols, such as IBM and HPQ.
28 Java ME Platform SDK Help • April 2009

Change the Update Interval
By default the update interval is 15 minutes. Select Updates to change the interval.Use the navigation arrows to select one of Continuous, 15 minutes, 30 minutes,1 hour, or 3 hours. Select the Done soft key.
Remove a Stock
Select Remove a Stock. You see a list of the stocks you have added. Use thenavigation keys to select one or more stocks to remove. Choose the Done soft key.
Stock Tracker
Stock Tracker displays a list of the stocks you added and their current values. Stocktracker displays additional information about the selected stock, for example, thelast trade and the high and low values.
Choose a stock and press Select.
What If?
What If? is an application that asks for the original purchase price and the number ofshares you own. It calculates your profit or loss based on the current price.
Select a stock symbol.
Enter the purchase price and the number of shares, then press Calc.
Alerts
This application sends you a notification when the price changes to a value youspecify.
From the main menu, select Alerts.
Select Add.
Choose a Stock. The screen prompts, “Alert me when a stock reaches”.Enter an integer.
The alert is placed on the Current Alerts list. To remove an alert, press Remove andselect the alert. Choose the Done soft key.
Chapter 3 Using Sample Projects 29
When the value is reached you will hear a ring and receive a message. For example,Symbol has reached your price point of $value and is currently trading at$current_value. Once the alert is triggered it disappears from the Current Alerts list.
TicketsThis demonstrates how an online ticket auction application might behave. The homescreen displays a ticket ticker across the top. The Choose a Band field displaysAlanis Morrisette by default.
To select a band, highlight the band name and press Select. Use the down arrow tohighlight a different band, moby, for example, then press Select. The availableauction appears.
To make a bid, select the Menu soft key and choose 2. Use the arrow keys to movefrom field to field. Fill out each field. Select the Next soft key. The application asksyou to confirm your bid. Use the arrow keys to highlight Submit then press Select.You receive a Confirmation number. Click Bands to return to the welcome page.
To set an alert, select the Menu soft key and choose 3. Use the navigation arrows tomove to the field and type in a value higher than the current bid. Select the Save softkey. You are returned to the welcome page. You can trigger the alert by making a bidthat exceeds your alert value. Your settings determine how often the applicationchecks for changes, so the alert may not sound for a few minutes.
To add a band, select the Menu soft key and choose 4. Type in a band name or acomma-separated list of names. Choose the Save soft key. After confirmation you arereturned to the welcome page. The added band(s) are displayed in the Choose aBand drop-down menu.
Note – This is only a demonstration. To fully describe the band you must edit thefile workdir\apps\Demos\src\example\auction\NewTicketAuction.java.
To remove a band, select the Menu soft key and choose 5. Navigate to a band thenchoose Select to mark the check box. You can select multiple bands. Choose the Savesoft key.
To display the current settings for ticker display, updates, alert volume, and date,select the Menu soft key and choose 6. If desired, use the arrow keys and the selectkey to change these values. Choose the Save soft key.
30 Java ME Platform SDK Help • April 2009
ManyBallsThis MIDlet starts with one ball traveling the screen. Use the up and down arrows toaccelerate or decelerate the ball speed (fps). Use the right or left arrows to increaseor decrease the number of balls.
MiniColorThis MIDlet sets an RGB value. It has two modes, a version in which you usenavigation keys to change color values, and a virtual version where you pressnavigation keys to control a virtual keypad.
Keyboard controls work as you would expect. First cursor up or down to highlight acolor, and then use left and right keys to lower and raise the value of the selectedcolor.
The virtual keyboard requires an extra step to select each control before you canchange its value. In virtual mode, use the navigation keys to highlight a virtualcontrol, then press select to activate the control.
1. Click the Virtual soft key.
The application displays a 4-way control.
The up and down keys select a color. The left and right keys lower and raise thevalue of the selected color.
Use keyboard navigation keys to choose a control on the display, then pressSelect.
2. Select the first bar (blue).
A white box surrounds the selected color.
Blue and has a value of 0 so you don’t see any blue yet.
3. Choose the right control and press select.
Each click raises the value by 32.
ChooserThe Chooser application uses a variety of controls to change text color, backgroundcolor, and fonts.
■ Choose Menu > Text Color. Change the color as described for MiniColor andselect the OK soft button.
■ Choose Menu > Background Color. Change the color as described for MiniColorand select the OK soft button.
Chapter 3 Using Sample Projects 31

■ Choose Menu > Fonts. You can change the font Face, Style, and Size.
Cursor up and down to highlight a property, then select. The left and right keysjump between lists. Up and down keys move item by item.
Click OK to continue.
HttpExampleThis sample makes an HTTP communication. A popup confirms the transaction wassuccessful.
HttpViewThis application displays a predefined URL. You can also enter a new URL.
■ Launch the HttpView application.
■ Select Menu > 2 to get the contents of the URL.
■ Select Menu > 6 to view application instructions.
PushExampleThis application simulates a feed. As soon as you connect, you receive and display agraphic. Select Done to continue.
Running FPDemoFPDemo is a simple floating point calculator.
1. Enter a number in the first field.
2. To choose an operator, highlight the drop-down list and click to select. Cursordown to highlight an operator, then click to make a selection.
3. Enter a second value.
4. Press the Calc soft button to calculate the result.
Running GamesThis application features three games: TilePuzzle, WormGame, and PushPuzzle.
32 Java ME Platform SDK Help • April 2009

TilePuzzle. The desired result, “Rate your mind pal“ is shown first. From the softMenu, select 1, Start. The scrambled puzzle is displayed. The arrow keys move theempty space, displacing tiles accordingly. From the menu you can Reset, or changeoptions.
WormGame. From the soft Menu, select 1, Launch. Use the arrow keys to move theworm to the green box without touching the edge of the window. Once the game islaunched, use the soft menu to change game options.
PushPuzzle. Use the blue ball to push the orange boxes into the red squares in thefewest number of moves.
Running Network DemoThis demo has two MIDlets: Socket Demo and Datagram Demo. Each demo requiresyou to run two emulator instances so that you can emulate the server and clientrelationship. For example, run the demo on DefaultCldcMsaPhone1 andDefaultCldcMsaPhone2.
Socket DemoIn this application one emulator acts as the socket server, and the other as the socketclient.
1. In the first emulator, launch the application, then select the Server peer. ChooseStart. The emulator explains that the demo wants to send and receive data overthe network and asks, “Is it OK to use network?” Choose Yes. The Socket Serverdisplays a screen that indicates it is waiting for a connection.
2. In the second emulator, launch the application, select the Client peer, then chooseStart. The emulator explains that the demo wants to send and receive data overthe network and asks, “Is it OK to use network?” Choose Yes. The Socket Clientdisplays a screen that indicates it is connected to the server. Use the downnavigation arrow to highlight the Send box. Type a message in the Send box, thenchoose the Send soft key.
For example, in the client, type Hello Server In the Send box. Choose the Sendsoft key. The emulator activates a blue light during the transmission.
3. On the emulator running the Socket Server, the Status reads: Message received- Hello Server. You can use the down arrow to move to the Send box andtype a reply. For example, Hello Client, I heard you. Select Send.
4. Back in the Socket Client, the status shows the message received from the server.Until you send a new message, the Send box contains the previous message yousent.
Chapter 3 Using Sample Projects 33
Datagram DemoThis demo is similar to Socket Demo. Run two instances of the emulator. One acts asthe datagram server, and the other as the datagram client.
1. In the first emulator, launch Datagram Demo, then select the Server peer. ChooseStart. The emulator explains that the demo wants to send and receive data overthe network and asks, “Is it OK to use network?“ Choose Yes. Initially, theDatagram Server status is Waiting for connection, and the Send box isempty.
2. In the second emulator, launch Datagram Demo, select the Client peer, thenchoose Start. The emulator explains that the demo wants to send and receive dataover the network and asks, “Is it OK to use network?“ Choose Yes. The DatagramClient status is: Connected to server. Use the down navigation arrow tohighlight the Send box. Type a message in the Send box, then choose the Send softkey. For example, type Hello datagram server.
3. On the emulator running the Datagram Server, the Status displays: Messagereceived - Hello datagram server. You can use the down arrow to moveto the Send box and type a reply to the client.
4. In the Datagram Client, the status field displays the message received from theserver. The Send box contains the last message you sent.
Running PhotoAlbumThe PhotoAlbum demo displays both static and animated images or videos. Whenyou are displaying an image, you can use the Options soft menu to change theborders. If the images is animated, you can change the speed of the playback.
Running UIDemoUIDemo showcases a variety of MIDP user interface element implementations. Mostelements have some interactive capability (navigate and select) and some allowkeypad or keyboard input.
Input interaction is similar across demos. You can choose items from lists or type indata.
This demo implements three list selection methods:
■ Exclusive (radio buttons)
■ Multiple (check boxes)
■ Pop-Up (a drop list).
34 Java ME Platform SDK Help • April 2009
When entering data, you can use the soft menu to apply one of the following inputtypes to text boxes and fields (note, some elements do not use all input types). Whena field is selected, the soft Menu label displays Qwerty. Open the menu and you seethe input types numbered 1 through 5.
1. Qwerty. Any character on the keyboard
2. 123. Any numeral
3. ABC. Any letter
4. Predict. Predicts next character based on prior input
5. Symbols. Any symbol
With the exception of Predict, these categories act as filters. For example, if youassign 123 to a field and you type “abc”, nothing is entered in the field.
CustomItem. This demo features text fields, and text fields in table form. To type inthe table, select a cell, then click to open a text entry panel and type your input.From the menu, select OK.
StringItem. Displays labels, a hyperlink, and a button. The soft menu action variesdepending on the selected element.
Gauge. Interactive, non-interactive, indefinite and incremental gauges.
Alert. Uses pop-ups to display alerts. Set the alarm type and the length of thetimeout from drop lists. Select the alert type and select the Show soft button.
ChoiceGroup. Radio buttons, check boxes, and pop-ups on one screen.
List. Select exclusive, implicit, or multiple to display the list type on a subsequentscreen.
TextBox. Use text fields, radio buttons, check boxes, and pop-ups. Select a text boxtype and press the Show button.
TextField. Text fields with the five input types
DateField. Set date and time using drop lists.
Ticker. A scrolling ticker.
Chapter 3 Using Sample Projects 35

36 Java ME Platform SDK Help • April 2009
CHAPTER 4
Creating and Editing Projects
A project is a group of files comprising a single application. Files include sourcefiles, resource files, XML configuration files, automatically generated Apache Antbuild files, and a properties file.
The Java ME Platform SDK creates its project infrastructure directly on top ofApache Ant. With this infrastructure in place, you can build and run your projectswithin the SDK or from the command line. The build process is controlled by projectproperties, as described in Building a Project.
■ About Projects
■ CLDC Projects
■ CDC Projects
■ Creating a CLDC Project
■ Choose Project
■ Name and Location
■ Platform Selection
■ Specify WTK Project
■ Creating a CDC Project
■ Choose Project (CDC)
■ Platform Selection (CDC)
■ Specify CDC Toolkit Project
■ Working With Projects
■ Viewing Project Files
■ Creating a New MIDlet
■ Importing MIDP Projects
■ Importing CDC Projects
■ Adding Files to a Project
■ Find in Files
37

About ProjectsA project contains all the supporting files for one application. When a project iscreated, the SDK performs these tasks:
■ Creates a source tree you can examine in the Working With Projects or ViewingProject Files views.
■ Sets the emulator platform for the project.
■ Sets the project run and compile-time classpaths.
■ Creates a build script that contains actions for running, compiling, debugging,and building Javadoc. The build process is controlled by project properties, asdescribed in Building a Project.
The SDK provides two views of the project:
■ The Working With Projects window provides a logical view of the project.
■ The Viewing Project Files window displays a physical view of the project.
Project settings are controlled in the project Properties window. Typically, youright-click on an item or subitem in a tree (a project, a file, or a device) and selectProperties.
View these topics to learn about project properties: Creating a CLDC Project,Creating a CDC Project, Working With Projects, Viewing Project Files and AddingFiles to a Project.
See also: Building a Project, Building a Project from the Command Line.
CLDC ProjectsThe CLDC/MIDP platform is based on the Mobile Information Device Profile and ConnectedLimited Device Configuration (JSRs 118 and 139).
A MIDP application (a MIDlet), is deployed as a MIDlet suite. A MIDlet suite isdistributed as a Java archive (JAR) file and a Java Application Descriptor (JAD) file.
The JAR file includes the Java classes for each MIDlet in the suite, Java classesshared between MIDlets, resource files, and other supporting files. The JAR file alsoincludes a manifest describing the JAR contents and specifying attributes theapplication management software (AMS) uses to identify and install the MIDletsuite.
38 Java ME Platform SDK Help • April 2009
The JAD file contains attributes that allow the AMS to identify, retrieve, and installthe MIDlets in a project. The SDK automatically creates JAD and JAR files when youbuild the project.
When the application is run, the name of the main application class is passed to theJava virtual machine. This class must include a method named main() that handlesthe application’s class loading, object creation, and method execution. The projectmanages its own life cycle and system resource needs. When the main() methodexits, the application terminates.
See Creating a CLDC Project, Working With Projects, and Viewing Project Files.
CDC ProjectsThe CDC platform is implemented to support Advanced Graphics and User InterfaceOptional Package for the J2ME Platform, Personal Basis Profile 1.1, and the Connected DeviceConfiguration (JSRs 209, 217 and 218). The AGUI API combines the PBP API and asubset of Java Platform, Standard Edition (Java SE) Swing capabilities.
Java ME Platform SDK version 3.0 supports CDC projects running as standaloneapplications. This means the CDC project structure and behavior are much the sameas that of CLDC projects.
Note – An Xlet cannot be run standalone. It depends upon an application managerto manage its life cycle (its state) and system services. Xlets are not supported in thisrelease.
Like MIDP projects, a standalone CDC project requires a main application class thatincludes a method named main() that handles class loading, object creation, andmethod execution. The application interacts directly with the Java runtimeenvironment to manage its own life cycle and system resource needs. When themain() method exits, the standalone application terminates.
See Creating a CDC Project, Creating a Stubs for BD-J Platform Project, WorkingWith Projects, and Viewing Project Files.
Chapter 4 Creating and Editing Projects 39

Creating a CLDC ProjectA CLDC project uses the MIDP application template and preselects devices thatsupport MIDP and CLDC. The SDK provides a wizard for creating new projectsquickly and easily. Most project properties can be edited later by changing theproject properties.
The project provides a basic infrastructure for CLDC development. You providesource files, resource files, and project settings as needed.
1. Select File > New Project.
The New Project wizard opens. Java ME SDK is the only category.
2. Follow the prompts in the New Project wizard, consulting Help if necessary. SeeChoose Project, Name and Location, Platform Selection, and Specify WTK Project.
3. To run the new project, follow the steps in Running a Project, except select yournew project instead of a sample project.
4. Be sure to exit or close the application when you are finished.
Once the emulator is launched, it runs as an independent process. Pressing thered stop button in the SDK user interface or closing the SDK does not stop theapplication running in the emulator.
Applications usually provide a way to terminate. For example, most of thesamples offer an Exit soft key, or an option in the soft menu. You can close theapplication and leave the emulator running (so you do not have to wait for theemulator to open the next time you run the project).
If you want to close the emulator and stop the project build process, selectApplication > Exit.
Now that the project has been created, you can modify its properties as described inthe following topics: Viewing General Project Properties, Selecting a Platform,Editing Application Descriptor Properties, Building a Project, Running a MIDPProject.
Choose ProjectThis is the first page in the New Project wizard. For MIDP the project options are asfollows:
MIDP Application. Create a new MIDP application in a CLDC/MIDP project.
40 Java ME Platform SDK Help • April 2009

Import Wireless Toolkit Project. Create a project by importing a Sun Java WirelessToolkit project from an existing toolkit installation.
For CDC the project options are as follows:
CDC Application. Create a new CDC application in a CLDC project.
Import CDC Toolkit Project. Create a project by importing a CDC Toolkit projectfrom an existing toolkit installation.
Name and LocationThis is the second page in the New Project wizard.
Project Name. Enter a project name. If you are importing an existing project thisfield is prepopulated with the old filename prefixed.
Project Location. The default location is C:\Documents and Settings\user\MyDocuments\JavaMESDKProjects.
Project Folder.The Project Folder value is extrapolated from Project Name andProject Location.
Set as Main Project. Check this box to make the project the Main Project when it isfirst opened. The Main project is automatically the focus of all actions initiated fromthe user interface (for example, the actions on the Run menu, which provide thesame functionality as clicking icons on the main tool bar).
Create Hello MIDlet. This check box is only visible for a new MIDP project. Itinserts sample MIDlet code as a template for your development. You can compileand run the MIDlet immediately.
Create Main Class. This check box is only visible for a new CDC project. Enter thefully qualified name of the main class without the .java extension. For example:com.me.MyClass.
Platform SelectionYou can view this form in the New Project wizard, or, in the Projects view.Right-click a project, select Properties, and select Platform.
These settings help you test how your project runs on devices with differentcapabilities. Your choice of device limits your choice of Device Configuration, DeviceProfile, and Optional Packages (if applicable).
Emulator Platform. In the New Project wizard this field is predetermined.
Chapter 4 Creating and Editing Projects 41
Device. Select a device. Only devices appropriate for the platform appear in theDevice drop-down menu. The device selection determines the remaining options.
Device Configuration. Select a CLDC version.
Device Profile. Select a MIDP version. The available selections are determined bythe Device Configuration.
Optional Packages. This pane is visible when you are viewing an existing project.You can check or uncheck optional packages to approximate device capabilities.
Specify WTK ProjectTo see this form, start the New Project wizard and select Import Wireless ToolkitProject.
WTK Location. Browse to select the location of your Sun Java Wireless Toolkitinstallation. Choose the installation directory.
Detected Applications. When the WTK Location is selected the DetectedApplications window displays the available projects. Highlight a project, and clickNext.
See Importing MIDP Projects.
Creating a CDC ProjectThe SDK provides a wizard for creating new projects quickly and easily. Mostproject properties can be edited later on. CDC core, FP, and PBP APIs areautomatically included in every CDC project.
1. Select File > New Project.
The New Project wizard opens.
2. Follow the prompts in the New Project wizard, consulting help if necessary. SeeChoose Project (CDC), Name and Location, Platform Selection (CDC), and SpecifyCDC Toolkit Project.
3. The Name and Location page has the following fields:
Project Name. The name you supply is the default name for the Main class, if youuse one.
Project Location. Browse to the project location. The default is/JavaMESDKProjects.
42 Java ME Platform SDK Help • April 2009
Project Folder. This value is extrapolated from the Name and Location entries.
4. Set as Main Project. Check this box to set this project as main. Toolbar actions,such as Build and Run, operate on the main project. The main project is displayedin bold font in the project tree.
5. Create Main Class. If you want to create a sample Main class in the project, checkthe box and supply a project name. If the box is not checked, the project will nothave a Main class.
6. Select platform.
Select the platform, a device, and the profile. Click Finish.
If an AGUI device is selected, the AGUI API is added to the project.
7. To run the new project follow the steps in Running a Project, except you can selectyour new project instead of a sample project.
When you are finished viewing the application, go to the emulator’s Applicationmenu and select Exit to close the emulator and stop the execution of the project’sbuild script.
Note – Once the emulator is launched, it runs as an independent process. Pressingthe red stop button in the Output window terminates the build script, but it does notclose the emulator. Likewise, closing the SDK does not affect the emulator. In theemulator, select Application > Exit to ensure that both the emulator and the projectbuild process close.
To modify the project, right-click on the project node and select Properties.
See the following topics: Viewing General Project Properties, Selecting a Platform,Editing Application Descriptor Properties, Building a Project, and Running a CDCProject
Choose Project (CDC)You can view this page in the New Project wizard. The CDC project options are asfollows:
CDC Application. Create a new CDC application in a CLDC project.
Import CDC Toolkit Project. Create a project by importing a CDC Toolkit projectfrom an existing toolkit installation.
Chapter 4 Creating and Editing Projects 43
Platform Selection (CDC)You can view this form in the New Project wizard, or, in the Projects view, right-clicka project, select Properties, and select Platform.
These settings help you test how your project runs on devices with differentcapabilities. Your choice of device limits your choice of Device Configuration andDevice Profile.
Java Platform. A choice of CDC or Stubs for BD-J Platform. Stubs for BD-J Platformis a special type of CDC platform.
Device. Select a device. Only devices appropriate for the platform appear in theDevice drop-down menu. The device selection determines the remaining options.
Profile. PBP-1.1 is the only option.
See Creating a CDC Project and Creating a Stubs for BD-J Platform Project.
Specify CDC Toolkit ProjectTo see this form, start the New Project wizard and select Import CDC Toolkit Project.
Project Location. Browse to select the location of your legacy CDC Toolkit project.
See Importing CDC Projects.
Working With ProjectsThe logical view of the project, shown in the Projects window, provides a hierarchyof sources and resources. Right-click on the project node to see actions related to theproject:
New. Opens a form to build a new object for the current project. The new object isplaced in the project’s file structure by default, but you can control the file name andlocation. The possible objects are dependent on the currently selected project. Forexample, if the project is CLDC, the options are MIDlet, Java class, Java package, orJava interface. Selecting New > Other allows you to add different types of files to theproject. For a sample procedure, see Generating Stub Files from WSDL Descriptors.
Build. Builds a distribution Java archive (JAR) file. The build process is controlled byproject properties, as described in Building a Project.
Clean & Build. Cleans, then builds a distribution JAR file.
44 Java ME Platform SDK Help • April 2009
Clean. Cleans the build files.
Run. Runs the project with the default device, as specified on the Selecting aPlatform property page.
Set as Main Project. Toolbar actions, such as clicking the green Run button, act uponthe main project.
Close. Close the current project. Be sure that any processes are stopped, as closing aproject might not stop the emulator.
The Source Packages node encapsulates all the Java packages in the project.Right-click on the Source Packages node and choose New to add a new MIDlet toyour application.
The Resources node encapsulates all resources and libraries of the activeconfiguration. Right-click the Resources node to add Projects, JARs, folders, andlibraries as resources for your application. You cannot add or remove inheritedresources.
See also: Viewing Project Files, Creating a CLDC Project, Creating a CDC Project,Creating a Stubs for BD-J Platform Project, About Projects, and Importing CDCProjects.
Viewing Project FilesThe Files window displays a physical view of all project files. Right-click to viewproject properties or choose an action related to the project.
build. The output directory for the compiled classes listed below. This directory alsocontains manifest.mf, the manifest file that will be added to the JAR file.
■ compiled. Contains all compiled classes.
■ obfuscated. Holds the obfuscated versions of the class files.
■ preprocessed. Holds the source files after they are preprocessed. The files willdiffer from the original source files if you are using project configurations.
■ preverified. Holds the preverified versions of the class files. These files arepackaged into your project’s distribution JAR.
■ preverifysrc. Versions of the source files before they are preverified.
dist. The output directory of packaged build outputs (JAR files and JAD files). Thedist directory also contains generated Javadoc documentation.
lib. Contains libraries you have added to the project. See Adding Libraries andResources.
Chapter 4 Creating and Editing Projects 45
nbproject. The directory that contains the project Ant script and other metadata.Thisdirectory contains the following files:
■ build-impl.xml. The IDE-generated Ant script. Do not edit build-impl.xmldirectly. Always override its targets in build.xml.
■ private/private.properties. Properties that are defined for you alone. Ifyou are sharing the project, any properties you define in this file are not checkedin with other project metadata and are only applied to your SDK installation.
■ project.properties. Ant properties used to configure the Ant script. This fileis automatically updated when you configure the project’s properties. Manualediting is possible, but it is not recommended.
■ project.xml and genfiles.properties. Generated metadata files. It ispossible to edit project.xml manually, it is not recommended. Do not editgenfiles.properties.
res.Resource files you have added to the project. See Adding Libraries andResources.
src.The project source files.
build.xml. The build script. This build script only contains an import statement thatimports targets from nbproject/build-impl.xml. Use the build.xml tooverride targets from build-impl.xml or to create new targets.
See also: Creating a CLDC Project, Creating a CDC Project, Creating a Stubs for BD-JPlatform Project, and Importing CDC Projects.
Creating a New MIDletTo create a new MIDlet from the Files view, right-click a project and select New >MIDlet. With this form you can specify the name of the MIDlet and its locationwithin the selected project.
MIDlet Name. The name of the new MIDP class.
Midlet Class Name. The name that users see when the application runs on a device.
MIDlet Icon. The path to an icon associated with the MIDlet. Users see the iconwhen the application runs on a device.
Project. Displays the name of the project.
Package. Specifies the location of the MIDlet class. You can select an existingpackage from the drop down menu, or type in the name of a new package. The newpackage is created along with the class.
46 Java ME Platform SDK Help • April 2009
Created File. Displays the name and location of the MIDlet.
When the new MIDlet is created the SDK automatically adds it to the project’sApplication Descriptor File.
Importing MIDP ProjectsIf you created a project using the Sun Java Wireless Toolkit for CLDC you can importyour MIDlets into Java ME SDK projects. You can also use this procedure to create aproject based upon a legacy sample project.
1. Select File > New Project.
2. In the Projects area select Import Wireless Toolkit project. Click Next.
3. Specify the toolkit installation home. Use browse to open the top-level installationdirectory.
4. The wizard detects any applications in the legacy installation and displays theirlocations on disk. Select a project and click Next.
5. Supply the Project Name, Location, and Folder for the new project (see/JavaMESDKProjects). Note that the default name project name and foldername are based on the name of the project you are importing. Click Next.
6. Select the Platform type, the default device, and the configuration and profile, ifapplicable. Click Finish. Your new project opens in the Projects window.
7. If the legacy project used signing, you must configure the signing properties. asdescribed in Managing Keystores and Key Pairs.
Importing CDC ProjectsIf you created a project using the CDC Toolkit, you can import your applications intoJava ME SDK projects. You can also use import to create a project based upon asample project.
Note – Standalone projects created in the CDC Toolkit can be imported. Xlets cannotbe imported.
Chapter 4 Creating and Editing Projects 47
1. The CDC platform name for the Java ME Platform SDK version 3.0 does notmatch the legacy platform name in the CDC Toolkit 1.0 and the CDC MobilityPack. Consequently, you get a reference error when you import a legacy CDCproject. To avoid this error, create a platform with the legacy name, as describedin Create a Platform for Legacy CDC Projects.
You only need to do this once.
2. Select File > New Project.
3. In the Projects area select the import action for CDC Toolkit. Click Next.
4. Browse to select the project location.
The wizard detects any applications in the legacy installation and displays theirlocations on disk. Select a project and click Next.
5. Supply the Project Name, Location, and Folder for the new project. Note, thedefault name project name and folder name are based on the name of the projectyou are importing. Click Finish.
The imported project opens in the Projects window.
See also: Create a Platform for Legacy CDC Projects, Viewing Project Files
Adding Files to a ProjectFor all projects, right-click to use the context menu to add files to a project. Usingthis method places files in the proper location in project source or resources.
To add a MIDlet, Java class, Java package, Java interface or Other files, right-click theproject name or the Source Packages node, choose New, and select the file type.
To add files by format (Project, JAR, Folder, Library) right-click the Resources nodeand select a format. See Adding Libraries and Resources.
Find in FilesTo search a project’s files, right-click on the project and select Find...
The Find in Files utility supports searching a project’s file contents or file names. Thesearch input fields supports simple text matching and regular expressions.
48 Java ME Platform SDK Help • April 2009

Containing Text. The string you are looking for. If File Name Patterns is empty, allfiles are searched.
File Name Patterns. The files you are searching in. If the Containing Text field isempty you get a listing of files that match the pattern.
The Options Whole Words, Match Case, and Regular Expression further restrict thesearch. Regular Expression Constructs are fully explained in:
http://java.sun.com/javase/6/docs/api/java/util/regex/Pattern.html#sum
Chapter 4 Creating and Editing Projects 49

50 Java ME Platform SDK Help • April 2009
CHAPTER 5
Viewing and Editing ProjectProperties
To view project properties, right-click the project node and select Properties. Thistool allows you to customize the following project properties:
■ Viewing General Project Properties
■ Selecting a Platform
■ Editing Application Descriptor Properties
■ MIDP Attributes
■ MIDlets
■ Push Registry
■ API Permissions
■ See also Using Content Handlers
■ Building a Project
■ Compiling
■ Adding Libraries and Resources
■ Creating JAR and JAD Files (Packaging)
■ Obfuscating
■ Signing
■ Running Settings
51
Viewing General Project PropertiesTo view this property page, right-click on a project and choose Properties and selectthe General category. The general properties page displays basic project properties.You can set application versioning here, but all other values cannot be edited.
The project name, folder, and source location are set when the project is created. TheApplication Version Number field displays the version number of the current build.
Application Versioning
The Application Version Counter field displays the next version number to be used.The default advance is 0.0.1. To advance the number beyond this, use the dropdownmenu to select a new digit, or enter the value into the field. For example, changingthe value to 3 results in a build number of 0.0.3. Changing the value to 100 results inthe version number 0.1.0.
Required Projects
This area displays projects you have added to this project. It might be a dependentproject or an external library. See Adding Libraries and Resources.
Selecting a PlatformAn emulator platform simulates the execution of an application on one or moretarget devices. To view this property page, right-click on a project and chooseProperties and select the Platform category.
CDC and CLDC/MIDP platform types are listed in the Select Platform Typedropdown. The emulator platform is supplied based on the platform type. The Stubsfor BD-J Platform is a type of CDC platform. See Creating a Stubs for BD-J PlatformProject.
Select a platform type from the dropdown menu.
By default, the devices in the device menu are also suitable for the platform type andemulator platform. The device you select is the default device for this project. It isused whenever you use the Run command. Your device selection influences theDevice Configuration and Device Profile options, and the available optionalpackages.
For CLDC, select the optional packages you want to include in this project. Theselected APIs are automatically added to the project’s classpath.
52 Java ME Platform SDK Help • April 2009
See: Creating a CLDC Project, Creating a CDC Project, and Creating a Stubs for BD-JPlatform Project
Editing Application DescriptorPropertiesTo view this property page, right-click on a project, choose Properties, and select theApplication Descriptor category. The Application Descriptor properties page enablesadding, editing, or deleting project attributes, as discussed in the following topics:
CDC Attributes and MIDP Attributes, MIDlets, Push Registry, API Permissions, andUsing Content Handlers
CDC AttributesTo view this property page, right-click on a CDC project and choose Properties.Select the Application Descriptor category.
Application Name. Enter the display name of the application on the target device.
ApplicationVendor. The company name or author name for the application.
Description. A concise description of the application.
Detail Description. A detailed descriptionof the application.
MIDP AttributesTo view this property page, right-click on a MIDP project and choose Properties.Select the Application Descriptor category, and select the Attributes tab.
The General Attributes table lists the attributes currently contained in the JAD andJAR manifest files:
Type. Lists whether the attribute is required or optional.
Name. The name of the attribute.
Value. The values for each attribute.
To avoid errors in verification:
Chapter 5 Viewing and Editing Project Properties 53
■ Make sure all required attributes have a defined value.
■ Do not begin user-defined attribute keys with MIDlet- or MicroEdition-.
See: Editing an Attribute, and Adding an Attribute
Adding an AttributeFollow these steps to add an attribute.
1. Click Add... to open the Add Attribute window.
2. Choose an attribute from the Name combo box, or delete the current entry andadd your own custom entry. Do not begin a user-defined attribute name withMIDlet- or MicroEdition-.
3. Enter a value for the attribute.
4. Click OK.
Editing an AttributeFollow these steps to edit an attribute.
1. Select an attribute.
2. Click Edit... to open the Edit Attribute window.
3. Enter a value for the attribute.
4. Click OK.
API permissions, Push Registry Entries, and API Permissions have their ownproperty pages. See: MIDlets, Push Registry, and Signing.
Removing an AttributeSelect an Attribute and click Remove to delete it from the list.
MIDletsTo view this page, right-click on a project and choose Properties. Select theApplication Descriptor category, and select the MIDlets tab.
54 Java ME Platform SDK Help • April 2009

The MIDlets table lists the MIDlets contained in the suite and the followingproperties:
Name. The displayable name of the MIDlet that the user sees when the MIDlet is runon a mobile device.
Class. The Java class for the MIDlet.
Icon. An icon (a .png file), representing the MIDlet that the user sees when theMIDlet is run on a mobile device.
Adding a MIDletFollow these steps to add a MIDlet.
1. Click Add... to open the Add MIDlet window. It lists the MIDLets available in theproject.
2. Enter a name, then select a MIDlet class from the dropdown menu. You can alsochoose an icon for the MIDlet from the MIDlet icon dropdown menu.
3. Click OK.
Editing a MIDletFollow these steps to edit a MIDlet.
1. Select a MIDlet.
2. Click Edit... to open the Edit MIDlet window.
3. Enter a value for the attribute.
4. Click OK. The revised values are listed in the table.
Removing a MIDLetSelect a MIDlet and click Remove to delete it from the list.
Changing MIDlet Display OrderThe list order determines the order in which the MIDlets are displayed. Select aMIDLet and select Move Up or Move Down to change its position.
Chapter 5 Viewing and Editing Project Properties 55
Push RegistryTo view this page, right-click on a project and choose Properties. Select theApplication Descriptor category, and select the Push Registry tab.
Adding a Push Registry EntryFollow these steps to edit a Push Registry entry.
1. Click Edit... to open the Edit Push Registry window.
2. Enter Class Name, Sender IP, and Connection String values.
■ Class Name. The MIDlet's class name.
■ Sender IP. A valid sender that can launch the associated MIDlet. If the value isthe wildcard (*), connections from any source are accepted. If datagram orsocket connections are used, the value of Allowed Sender can be a numeric IPaddress.
■ Connection String. A connection string that identifies the connection protocoland port number.
3. Click OK.
The new values are listed in the table. A push registration key is automaticallygenerated and shown as an attribute in the MIDlet suite's Java ApplicationDescriptor (JAD) file. To view the JAD file, choose the Application DescriptorProperty settings from the left pane.
To make use of the Push Registry, you must also have permission to access the PushRegistry API, javax.microedition.io.PushRegistry. API Permissions arehandled in the API Permissions property page.
Remove a Push Registry EntrySelect an entry and click Remove to delete it from the list.
Change Push Registry Display OrderThe list order determines the order in which the MIDlets are displayed. Select anentry and select Move Up or Move Down to change its position.
56 Java ME Platform SDK Help • April 2009
API PermissionsThese properties set permission attributes for protected APIs called by the MIDletsuite. To view this property page, right-click on a project and choose APIPermissions. Select the Application Descriptor category, and select the Attributestab.
The Requested Permissions table in this page has two fields:
■ API. The API permissions requested by the MIDlet.
■ Required. If checked, the permission is required. At installation, if the requiredpermission can not be granted by the application management software, theapplication will not be installed. If the box is not checked, the permission isoptional. If an optional permission is denied, the application might continue tofunction, although its functionality can be limited.
Adding Permission Requests
1. Click the Add Button. The API Permission for API dialog opens.
2. Choose an API from the dropdown list or enter an API into the combo box andclick OK.
3. In the Requested Permissions table, check the Required box if you wantinstallation to fail in the event that permission cannot be granted.
For more information, see "Security for MIDP Applications" in the MIDP 2.0(JSR 118) specification, available at:http://developers.sun.com/techtopics/mobility/midp/articles/pushreg/.
Building a ProjectWhen you build a project, the SDK compiles the source files and generates thepackaged build output (a JAR file) for your project. You can build the main projectand all of its required projects, or build any project individually.
In general you do not need to build the project or compile individual classes to runthe project. By default, the SDK automatically compiles classes when you save them.You can use properties to modify the following build tasks:
■ Compiling
■ Adding Libraries and Resources
■ Obfuscating
■ Creating JAR and JAD Files (Packaging)
Chapter 5 Viewing and Editing Project Properties 57
■ Signing
Configuring AntTo view this form, select Tools > Options, select Miscellaneous, and click the Ant tab.
Ant Home. The installation directory of the Ant executable the SDK uses. To changeAnt versions, type the full path to a new Ant installation directory in this field orclick Browse to find the location. You can only switch between versions 1.5.3 andhigher of Ant.
The Ant installation directory must contain a lib/ subdirectory which contains theant.jar binary. For example, for the standard Ant 1.7.1 release, the Ant installationdirectory is ant/lib/apache-ant-1.7.1. If you enter a directory that does notmatch this structure, the SDK gives you an error.
You can also specify the following options:
Save All Modified Files Before Running Ant. If selected, saves all unsaved files inthe SDK before running Ant. It is recommended to leave this property selectedbecause modifications to files in the SDK are not recognized by Ant unless they arefirst saved to disk.
Reuse Output Tabs from Finished Processes. If selected, writes Ant output to asingle Output window tab, deleting the output from the previous process. If notselected, opens a new tab for each Ant process.
Always Show Output. If selected, raises the Output window tab if the Ant outputrequires user input or contains a hyperlink. Output that contains hyperlinks usuallydenotes an error or warning. If not selected, the SDK displays the Output windowfor all Ant processes.
Verbosity Level. Sets the amount of compilation output. Set the verbosity lower tosuppress informational messages or higher to get more detailed information.
Classpath. Contains binaries and libraries that are added to Ant’s classpath. ClickAdd Directory or Add JAR/ZIP to open the Classpath Editor.
Properties. Configures custom properties to pass to an Ant script each time you callAnt. Click Manage Properties to edit the properties in the property editor. Thisproperty is similar to the Ant command-line option, -Dkey=value. The followingdefault properties are available:
${build.compiler.emacs}. If you are compiling using Jikes (build.compiler=jikes), setting this property to true enables Emacs-compatible error messages. It isrecommended that you leave this property set to true even if you are not using Jikes,since the SDK prefers Emacs-compatible error messages.
58 Java ME Platform SDK Help • April 2009
CompilingTo view this property page, right-click on a project and choose Properties. In theProperties window Build category, choose Compiling.
This page enables you to set the following options:
Generate Debugging Info. If checked, the compiler generates line numbers andsource files information. This is the -g option in javac. If unchecked, no debugginginformation is generated (the -g:none option in javac).
Compile with Optimization. If checked, the compiled application is optimized forexecution. This is the -O option in javac. Optimizing can slow down compilation,produce larger class files, and make the program difficult to debug.
Report Uses of Deprecated APIs. If checked, the compiler lists each use or overrideof a deprecated member or class. This is the -deprecated option in javac. Ifunchecked, the compiler shows only the names of source files that use or overridedeprecated members or classes.
Encoding. Overrides default encoding used by preprocessor and compiler. Thedefault value is the default encoding used by your VM.
Adding Libraries and ResourcesTo view this property page, right-click on a project and choose Properties. In theProperties window Build category, choose Libraries and Resources.
This page allows you to add a dependent project, libraries, and other supportingfiles to the current project.
Add Project. The JAR file produced by another project, as well as the associatedsource files and Javadoc documentation. Adding this item to a classpath sets up adependency between the current project and the selected JAR file.
Add Library. A Library is a collection of JAR files or folders with compiled classes,which can optionally have associated source files and Javadoc documentation. If thePackage checkbox is checked the library is included in the application’s JAR file. If itis not checked, the library is copied into the \lib directory.
Add JAR file. A JAR file created by another project.
Add Folder. The root of a package or directory containing files.
Once a library or resource is added, it is visible in the Libraries and Resources table,which reflects the order of the libraries and resources in the classpath. To change theorder in the classpath, select the listing and click Move Up or Move Down. You canalso remove libraries and resources from this page.
Chapter 5 Viewing and Editing Project Properties 59

Each row in the table has a Package check box. If Package is checked, the library orresource is bundled and added to the project JAR file. If Package is not checked, thelibrary or resource is copied to the /lib subdirectory at build time.
Creating JAR and JAD Files (Packaging)To view this property page, right-click on a project and choose Properties. In theProperties window Build category, choose Creating JAR.
You can set the following options:
JAD File Name. Name of the JAD file created by the project sources. The file namemust have a .jad extension. Does not apply to CDC projects.
JAR File Name. Name of the JAR file created by the project sources. The file namemust have a .jar extension.
Compress JAR. If checked, the JAR file is compressed.
ObfuscatingTo view this property page, right-click on a project and choose Properties. In theProperties window Build category, choose Obfuscating.
Use the Obfuscation properties page to set the level of obfuscation for project files.
Move the Obfuscation slider to set the level. The Level Description windowdescribes the impact each level has.
You can add more obfuscation parameters in the Additional Obfuscation Settingswindow. The default obfuscator included with the SDK is ProGuard. You can findmore details about command parameters for this obfuscator at:http://proguard.sourceforge.net.
SigningTo view this property page, right-click on a project and choose Properties. In theProperties window Build category, choose Signing. These properties allow you toenable signing and assign key pairs to a CLDC project. See Security Domains.
Sign Distribution. Check this box to enable signing for the MIDlet suite. If it isunchecked, this page is disabled.
60 Java ME Platform SDK Help • April 2009
Keystore. A file that stores one or more key pairs as a keystore (.ks) file. Thedropdown menu lists all available keystores. Click the Unlock button to unlock akeystore for use.
Alias. A name assigned to a key pair within a keystore. The dropdown menu liststhe aliases available for the selected keystore. Click the Unlock button to unlock akey pair for use.
The Certificate Details window provides information about the certificate assignedto the key pair.
Click Open Keystores Manager to manage keystores and key pairs. See ManagingKeystores and Key Pairs and Exporting a Key.
Note – CDC projects cannot be signed with this tool. To sign a CDC project use theJDK jarsigner command from the command line. For example:jarsigner.exe -keystore keystore.ks -storepass keystorepwdMyCdcApp.jar dummyCA
Exporting a KeyTo view this dialog, right-click on a project and choose Properties. In the Propertieswindow Build category, choose Signing and click Export key into Java MESDK/Platform/Emulator. Or, Select Tools > Keystores, then select a keystore and akey, and click Export.
The Export window has the following components:
Keystore File. Displays the name of the keystore file to which the key pair belongs.This field cannot be edited.
Key Pair Alias. The name given to the key pair within the keystore. This field cannotbe edited.
Certificate Details. Displays the details of the certificate of the key to be exported.
Emulator. The drop-down menu lists all the device emulators available. See SecurityDomains.
Security Domain. Enables you to select a security domain for the key pair. Themenu lists all domains supported by the selected emulator platform.
Keys Registered in the Platform. Lists all keys that have been registered in theselected platform. Click to select the key you want to export.
Delete Key. Deletes a selected key from the Keys Registered in the Emulatorwindow.
Chapter 5 Viewing and Editing Project Properties 61
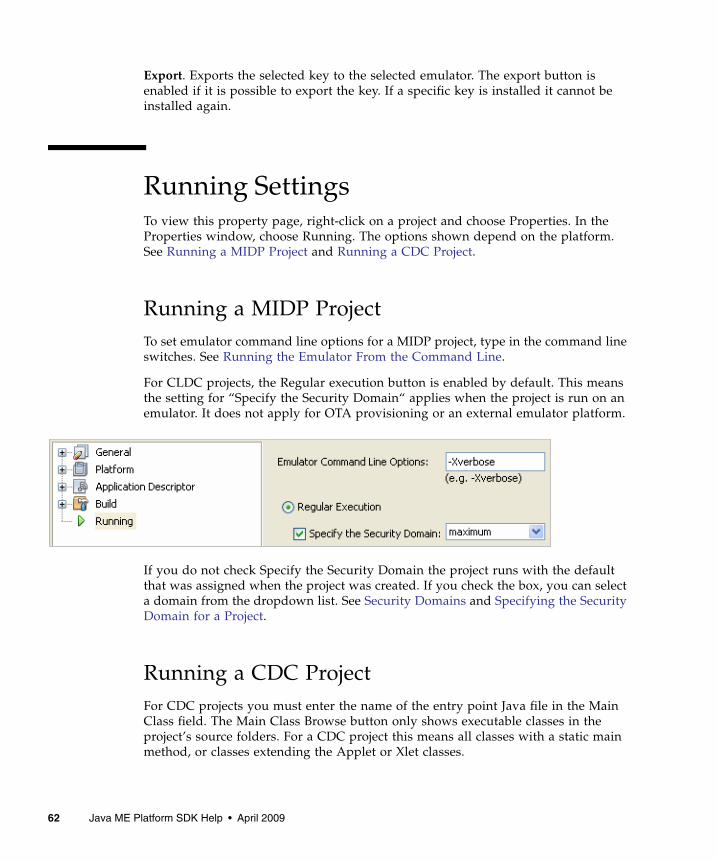
Export. Exports the selected key to the selected emulator. The export button isenabled if it is possible to export the key. If a specific key is installed it cannot beinstalled again.
Running SettingsTo view this property page, right-click on a project and choose Properties. In theProperties window, choose Running. The options shown depend on the platform.See Running a MIDP Project and Running a CDC Project.
Running a MIDP ProjectTo set emulator command line options for a MIDP project, type in the command lineswitches. See Running the Emulator From the Command Line.
For CLDC projects, the Regular execution button is enabled by default. This meansthe setting for “Specify the Security Domain“ applies when the project is run on anemulator. It does not apply for OTA provisioning or an external emulator platform.
If you do not check Specify the Security Domain the project runs with the defaultthat was assigned when the project was created. If you check the box, you can selecta domain from the dropdown list. See Security Domains and Specifying the SecurityDomain for a Project.
Running a CDC ProjectFor CDC projects you must enter the name of the entry point Java file in the MainClass field. The Main Class Browse button only shows executable classes in theproject’s source folders. For a CDC project this means all classes with a static mainmethod, or classes extending the Applet or Xlet classes.
62 Java ME Platform SDK Help • April 2009

Arguments are passed only to the main class, not to individual files. If an Xlet isexecuted, all arguments are passed to all the Xlets you specify.
For VM options, see Running Settings and CDC Options.
Chapter 5 Viewing and Editing Project Properties 63

64 Java ME Platform SDK Help • April 2009
CHAPTER 6
Running Projects in the Emulator
The Java ME Platform SDK emulator simulates a MIDP device on your desktopcomputer. The emulator does not represent a specific device, but it provides correctimplementations of its supported APIs. The SDK uses the device manager to detectdevices and displays the available devices in the Device Selector window. SeeRunning the Device Manager.
The Java ME Platform SDK provides default devices with Sun skins. A skin is a thinlayer on top of the emulator implementation that defines the appearance, screencharacteristics, and input controls.
If the Device Selector window is not visible, select Window > Device Selector.
See also:
■ Viewing Device Properties
■ Setting Device Properties
■ Running a Project from the Device Selector
Understanding the EmulatorWhen the Java ME Platform SDK is launched the Device Manager isautomatically launched to detect devices. The Device Manager is a service and youcan see it running in your Windows system tray. In the task manager, the process islabeled device-manager.exe.
The Device Manager icon looks like this:
You can right-click on the icon to exit the service.
65
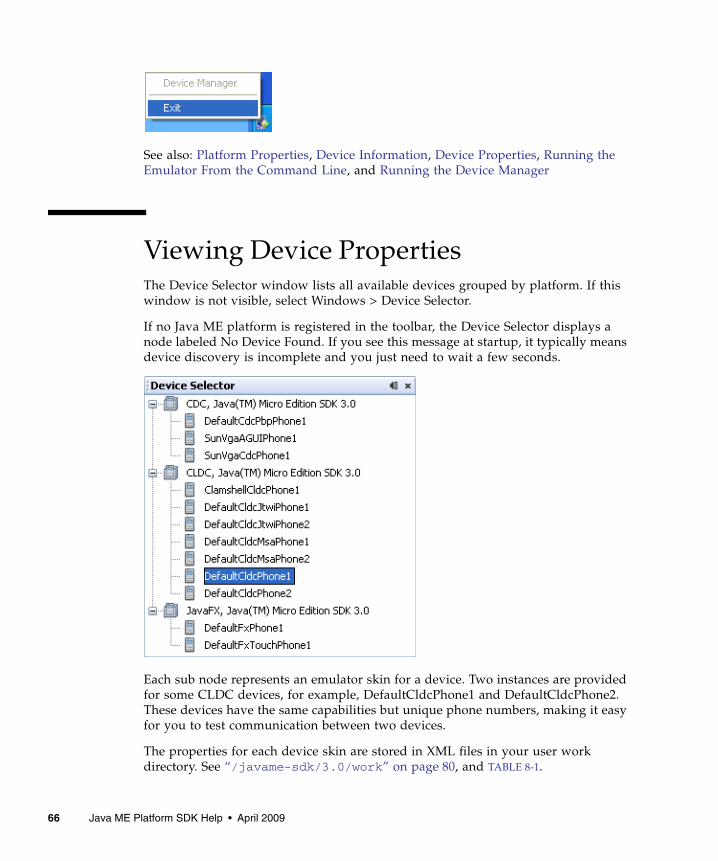
See also: Platform Properties, Device Information, Device Properties, Running theEmulator From the Command Line, and Running the Device Manager
Viewing Device PropertiesThe Device Selector window lists all available devices grouped by platform. If thiswindow is not visible, select Windows > Device Selector.
If no Java ME platform is registered in the toolbar, the Device Selector displays anode labeled No Device Found. If you see this message at startup, it typically meansdevice discovery is incomplete and you just need to wait a few seconds.
Each sub node represents an emulator skin for a device. Two instances are providedfor some CLDC devices, for example, DefaultCldcPhone1 and DefaultCldcPhone2.These devices have the same capabilities but unique phone numbers, making it easyfor you to test communication between two devices.
The properties for each device skin are stored in XML files in your user workdirectory. See “/javame-sdk/3.0/work” on page 80, and TABLE 8-1.
66 Java ME Platform SDK Help • April 2009

See also: Platform Properties, Device Information, and Device Properties
Platform PropertiesTo view platform properties from the device selector, right-click on the platformnode (for example, CDC) and select Properties. The platform properties display in aseparate window.
If you have selected Window > Properties, the Properties window is, by default,docked in the upper right portion of the user interface. Selecting a node in theProject or Files trees causes any available properties to be displayed.
Device InformationIn the Device Selector window, right-click on a device node and select DeviceInformation. The Device Information tab in the Main window displays a picture ofthe device and displays details, supported hardware capabilities, keyboard support,supported media formats, and the supported runtimes.
Device PropertiesIn the Device Selector window, right-click on the platform node and selectProperties. The device properties display in a separate window.
If you have selected Window > Properties, the Properties window is docked in theSDK. Selecting any node causes its properties to be displayed.
See Setting Device Properties.
Setting Device PropertiesIn the Device Selector Window, right-click on a device and select Properties. Anyproperties shown in gray font cannot be changed. You can adjust the deviceproperties shown in black.
Debug Port. The debugging port number. A default is supplied but it can bechanged.
Chapter 6 Running Projects in the Emulator 67
Enable Profiler. Check this box to enable profiling. This is a CPU snapshot collectedduring emulation. See Saving Profiler Data.
If you want a profile of the Java Heap contents during the virtual machine execution,see Virtual Machine Memory Profiler (Java Heap Memory Observe Tool).
Enable Network Monitor. Check this box to enable the network monitor.
Phone Number. You can set the phone number to any appropriate sequence,considering country codes, area codes, and so forth. If you reset this value, thesetting applies to future instances.
The number is a base value for the selected device. If the emulator is running andanother emulator is opened, the phone number for the second instance isincremented by one.
Heapsize. The heap is the memory allocated on a device to store your applications’sobjects. The Heapsize property is the maximum heap size for the emulator. You canchoose a new maximum size from the dropdown menu.
Security Domain. Select a security setting from the dropdown menu. See SecurityDomains. Applies to CLDC and JavaFX platforms.
Locale. Type in the locale as defined in the MIDP 2.0 specification:http://jcp.org/en/jsr/detail?id=118
Running a Project from the DeviceSelectorThe SDK determines which open projects are suitable for a device. Right-click on thedevice and select a project from the context menu. If projects are not suitable theyare displayed in gray font.
68 Java ME Platform SDK Help • April 2009
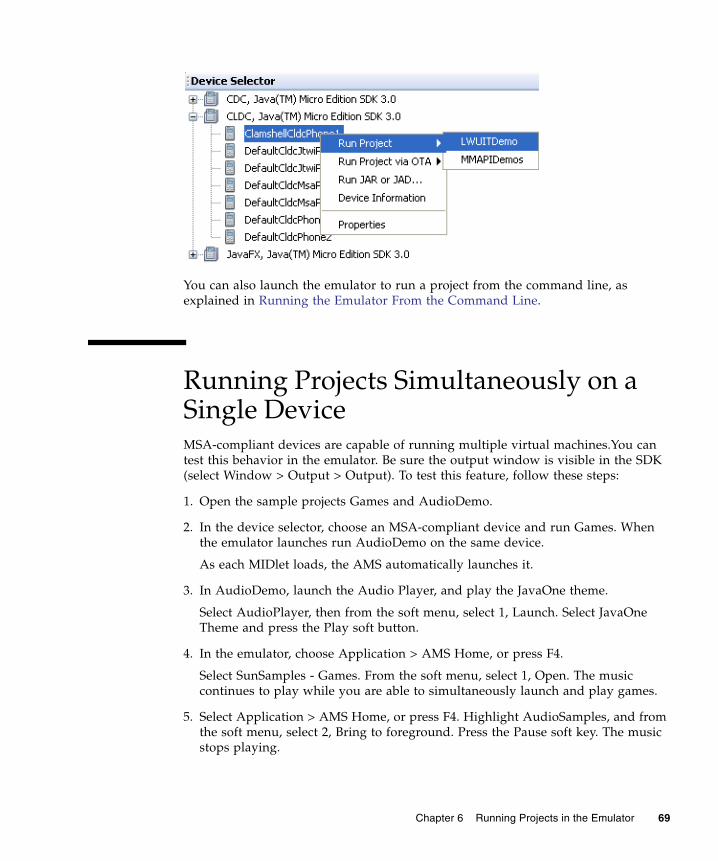
You can also launch the emulator to run a project from the command line, asexplained in Running the Emulator From the Command Line.
Running Projects Simultaneously on aSingle DeviceMSA-compliant devices are capable of running multiple virtual machines.You cantest this behavior in the emulator. Be sure the output window is visible in the SDK(select Window > Output > Output). To test this feature, follow these steps:
1. Open the sample projects Games and AudioDemo.
2. In the device selector, choose an MSA-compliant device and run Games. Whenthe emulator launches run AudioDemo on the same device.
As each MIDlet loads, the AMS automatically launches it.
3. In AudioDemo, launch the Audio Player, and play the JavaOne theme.
Select AudioPlayer, then from the soft menu, select 1, Launch. Select JavaOneTheme and press the Play soft button.
4. In the emulator, choose Application > AMS Home, or press F4.
Select SunSamples - Games. From the soft menu, select 1, Open. The musiccontinues to play while you are able to simultaneously launch and play games.
5. Select Application > AMS Home, or press F4. Highlight AudioSamples, and fromthe soft menu, select 2, Bring to foreground. Press the Pause soft key. The musicstops playing.
Chapter 6 Running Projects in the Emulator 69

6. Select Application > AMS Home, or press F4. Highlight AudioSamples and fromthe soft menu, select 1, Open. Select Bouncing Ball from the list and from the softmenu, select 1, Launch. Select MIDI background and press the Play soft button.
7. Select Application > AMS Home, or press F4. Select Application > SwitchRunning MIDlet. Select Audio Player and select Switch to. You can press the Playsoft button to resume the Audio Player.
Emulator OptionsThe emulator has Application, View, and Help menus.
The Application menu is only populated for CLDC and JavaFX platforms. TheApplication options are as follows:
Option Accelerator Description
AMS Home F4 Exit the current application and return to theApplication Management Software home.
Change Locale This option only works with localized MIDlets.Enter a locale identifier. The format is similar to thatof the Supported Locales for Java SE 6, as follows:2-letter-lang-code separator 2-letter-country-codeFor example, en-US, cs-CZ, zh-CN, ja-JP. Theseparator can be a dash or an underscore.
Resume F6 Resume a suspended application.
Suspend F5 Pause a running application.
Switch Running MIDlet F7 When you have multiple MIDlets running, togglebetween them. You see a list of running MIDlets andyou can chose the one you want to view.
Exit Close the emulator process and stop the buildprocess (or processes).
70 Java ME Platform SDK Help • April 2009
The View menu is available in full to CLDC and JavaFX platforms. For CDCplatforms, the only View option available is Always On Top.
Adding a Device InstanceAs described in Viewing Device Properties, a particular device emulator can havemore than one instance, and each instance is differentiated by a number appended tothe emulator name, as seen in TABLE 8-1. Each device instance is stored in anumbered directory in /javame-sdk/3.0/work.
To create your own instance, follow these steps:
1. Close the Java ME Platform SDK.
2. In /javame-sdk/3.0/work, copy a numbered directory and rename it with thenext number in the sequence.
3. In the new directory, open the properties.xml file and change the nameproperty string to a unique name.
You can also change the values in device.properties.
4. In the system tray, right-click on the Device Manager icon and select Exit from thecontext menu.
Option Description
Always On Top Keeps the emulator in the foreground. This is especially usefulwhen you are running multiple emulator instances and youwant to see them all and send messages between devices.
External Events Generator The external events generator is a utility for simulatingexternal file systems or applications communicating with theapplication running on the emulator. Inputs can come from ascript file on your PC or they can be injected based on yourinteraction with a user interface.The external events generator provides a tab to support JSRimplementations that require external event emulation: FileConnection (75), Location (179), Payment (229), and Sensors(256). See FileConnection API, Running the CityGuide SampleProject, Running JBricks, Using a Mobile Sensor Project.
Orientation Choose a degree of rotation (0, 90, 180, or 270 degreesclockwise from the 0 position) or, rotate clockwise by 90degrees from the last position (F8) or counterclockwise by 90degrees (F9).
Chapter 6 Running Projects in the Emulator 71

5. Start the Java ME Platform SDK.
In the Device Selector you see a new node named Other. All your custom devices arelisted here. To assign this device to a project, right-click the project, select Properties,and choose Platform. Your instance appears in the Device drop list.
You can also edit the device adaptor to create a new instance. For example, to createa second instance of the ClamshellCldcPhone, follow these steps:
1. Go to installdir\toolkit-lib\process\device-manager\device-adapter\ClamshellCldcPhone.
2. Make a copy of 1.bean, and name it 2.bean.
3. Edit 2.bean to change the device number to 2. For example,ClamshellCldcPhone2.
4. Exit the SDK and exit the Device Manager.
5. Start the SDK. ClamshellCldcPhone2 is listed in the Other category.
72 Java ME Platform SDK Help • April 2009
CHAPTER 7
Searching the WURFL DeviceDatabase
The Wireless Universal Resource File (WURFL) is an XML file that acts as a globaldatabase of mobile device capabilities. WURFL is an open source project athttp://wurfl.sourceforge.net/. The WURFL DB(http://www.wurflpro.com/) is a web-based interface that allows WURFLcontributors to add or change device information in the WURFL.
The SDK uses a WURFL module to discover devices based on API support or onphysical characteristics such as physical memory size or display size.
See: Searching for Devices, Filtering the WURFL Search
Searching for DevicesFollow these steps to search the WURFL database:
1. Select Tools > Device Database Search.
The WURFL Device Search tab opens in the main window.
2. Check Use Filter to see search options.
If you do not check Use Filter, all devices in the database are listed. See Filteringthe WURFL Search.
3. Make a selection from the dropdown menu on the left.
If applicable, the center dropdown displays a list of conditions. The menu on theright displays a value.
4. To add another search criteria, click the + button.
Click the - button to remove a search setting.
73
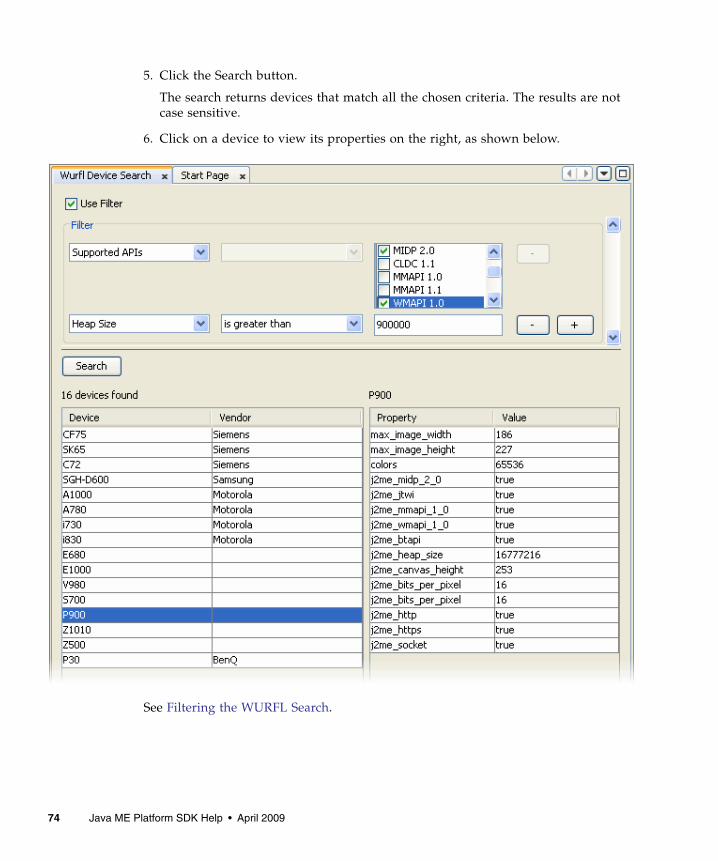
5. Click the Search button.
The search returns devices that match all the chosen criteria. The results are notcase sensitive.
6. Click on a device to view its properties on the right, as shown below.
See Filtering the WURFL Search.
74 Java ME Platform SDK Help • April 2009
Filtering the WURFL SearchAs discussed in Searching for Devices, you can use the filter to set search constraints.You should set at least one constraint.
Supported Properties
This utility searches on a predefined list of constraints that have correspondingproperties in the Java ME Platform SDK.
■ Supported APIs
You can check the APIs you want. Note, checking an API does not exclude APIsthat are not checked.
■ MIDP 1.0, MIDP 2.0
■ CLDC 1.0, CLDC 1.1
■ MMAPI 1.0, MMAPI 1.1
■ WMAPI 1.0, WMAPI 1.1, WMAPI 2.0
■ Bluetooth API
■ 3D API
■ Localization API
■ Vendor
■ Device
■ Resolution Width/Height
The device resolution.
■ Maximum Image Width/Height
The maximum image size that the device can display.
■ Physical Memory Size
The built-in memory size.
■ Heap Size
Memory limit in bytes at runtime.
■ Number of Colors
The number or colors the device’s display supports.
■ Supports Wi-Fi
■ Supported Image Formats
Check the image type. Unchecked types might still be supported.
■ bmp
Chapter 7 Searching the WURFL Device Database 75

■ jpeg
■ gif
To see the full list of WURFL contstraints, go to:http://wurfl.sourceforge.net/help_doc.php.
See also Searching for Devices.
76 Java ME Platform SDK Help • April 2009
CHAPTER 8
Finding Files in the Multiple UserEnvironment
The Java ME Platform SDK can be installed on a system running a supportedversion of Windows. All users with an account on the host machine can access theSDK. This feature is called the Multiple User Environment.
Note – The Multiple User Environment supports access from several accounts. Itdoes not support multiple users accessing the SDK simultaneously. See SwitchingUsers.
To support multiple users the SDK creates an installation directory that is used as asource for copying. This document uses the variable work to represent the SDKworking directory and installdir to represent the installation directory. Each user’spersonal files are maintained in a separate working directory named /javame-sdkthat has a subdirectory for each version installed. See User Directories.
■ Installation Directories
■ User Directories
To locate logs, see Java ME Platform SDK GUI Logs, Device Manager Logs, andDevice Instance Logs.
Switching UsersMultiple users cannot run the SDK simultaneously, but, you can run the SDK fromdifferent user accounts on the SDK host machine. When you switch users, you mustclose the SDK and exit the Device Manager, as described in Understanding theEmulator. A different user can then launch the SDK and own all processes.
77

Installation DirectoriesThe Java ME SDK installation directory structure conforms to the UniversalEmulator Interface Specification, version 1.0.2. This structure is recognized by allIDEs and other tools that work with the UEI. The installation directory has thefollowing structure:
■ apps. Contains examples for supported platforms:
■ BD-J: BdjGunBunny
■ CDC and AGUI: AGUIJava2DDemo and AGUISwingSet2 as described inTABLE 3-2.
■ CLDC and MIDP: all others, as shown in TABLE 3-1.
■ bin. Contains the following command line tools.
– cref.Java Card simulator for working with SATSA JSR 177. See Java CardPlatform Simulator (cref).
– device-manager. The device manager is a component that must be runningwhen you work with Java ME Platform SDK. After installation it starts as aservice, and it will automatically restart every time your computer restarts.When it is running, it appears in the Windows system tray as an icon.Right-click on the icon to view its controls.
– device-address. device-address.exe is a tool for viewing, adding, andremoving devices that the SDK is not able to discover automatically. SeeManaging Device Addresses (device-address).
– emulator. UEI compliant emulator. See Running the Emulator From theCommand Line.
– jadtool. Tool for signing MIDlets. See Signing MIDlet Suites (jadtool.exe).
– mekeytool. Management of ME keystores. See Signing MIDlet Suites(jadtool.exe).
– payment-console. Minimalistic console for viewing payment transactions.An equivalent tool exists in the Java ME SDK user interface.
– preverify. The Java ME preverifier.
– resourcesmanager. A tool for managing JSR 238 resource bundles. Anequivalent tool exists in the Java ME Platform SDK user interface.
– runBDJ. Run a BD-J project in a player.
– wma-tool. A command line tool for sending and receiving SMS, CBS, andMMS messages. See Running WMA Tool.
– wscompile. Compiles of stubs and skeletons for JSR 172. See Generating Stubs(wscompile).
78 Java ME Platform SDK Help • April 2009

■ docs. Release documentation.
■ lib. JSR JAR files for compilation.
■ on-device. Windows Mobile Java Runtime for ARM.
■ toolbar. A simple development environment.
User DirectoriesAt installation time you are prompted to specify a location for user files. The defaultlocation is:
C:\Documents and Settings\user\javame-sdk
If you do not remember the location you specified, select Help > About in the mainwindow. This documentation sometimes uses users.home to represent this path.
You cannot choose another location after the installation. If you desire a differentdirectory, you must reinstall.
The user directories are: /javame-sdk, /javame-sdk/3.0/work, and/javame-sdk/toolbar/3.0.
/javame-sdk
This directory contains device instances and session information. If you delete thisdirectory, it will be recreated automatically when the device manager is restarted.
Chapter 8 Finding Files in the Multiple User Environment 79
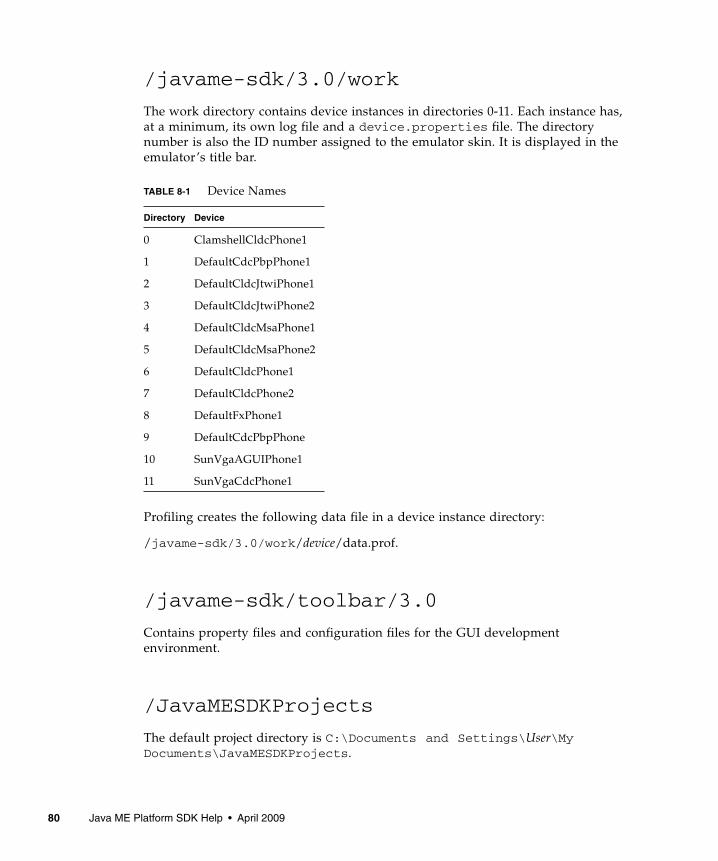
/javame-sdk/3.0/work
The work directory contains device instances in directories 0-11. Each instance has,at a minimum, its own log file and a device.properties file. The directorynumber is also the ID number assigned to the emulator skin. It is displayed in theemulator’s title bar.
Profiling creates the following data file in a device instance directory:
/javame-sdk/3.0/work/device/data.prof.
/javame-sdk/toolbar/3.0
Contains property files and configuration files for the GUI developmentenvironment.
/JavaMESDKProjects
The default project directory is C:\Documents and Settings\User\MyDocuments\JavaMESDKProjects.
TABLE 8-1 Device Names
Directory Device
0 ClamshellCldcPhone1
1 DefaultCdcPbpPhone1
2 DefaultCldcJtwiPhone1
3 DefaultCldcJtwiPhone2
4 DefaultCldcMsaPhone1
5 DefaultCldcMsaPhone2
6 DefaultCldcPhone1
7 DefaultCldcPhone2
8 DefaultFxPhone1
9 DefaultCdcPbpPhone
10 SunVgaAGUIPhone1
11 SunVgaCdcPhone1
80 Java ME Platform SDK Help • April 2009
CHAPTER 9
Profiling Applications
The profiler keeps track of every method in your application. For a particularemulation session, it figures out how much time was spent in each method and howmany times each method was called.
The SDK supports offline profiling. Data is collected during the emulation session.After you close the emulator a profiler data snapshot is written to a .prof you canload and view in the SDK. As you view the snapshot you can investigate particularmethods or classes and save a customized snapshot (a .nps file).
Note – This feature might slow the execution of your application.
Continue to:
■ Saving Profiler Data
■ Loading Profiler Data
■ Viewing Profiler Data
■ Saving Customized Snapshots and Images
■ Loading a Customized Snapshot
Saving Profiler DataFollow these steps to enable data collection:
1. In the Device Selector window, right-click on a device and choose Properties.
2. Check the Enable Profiler option, and note the location of the profiler output file.
81
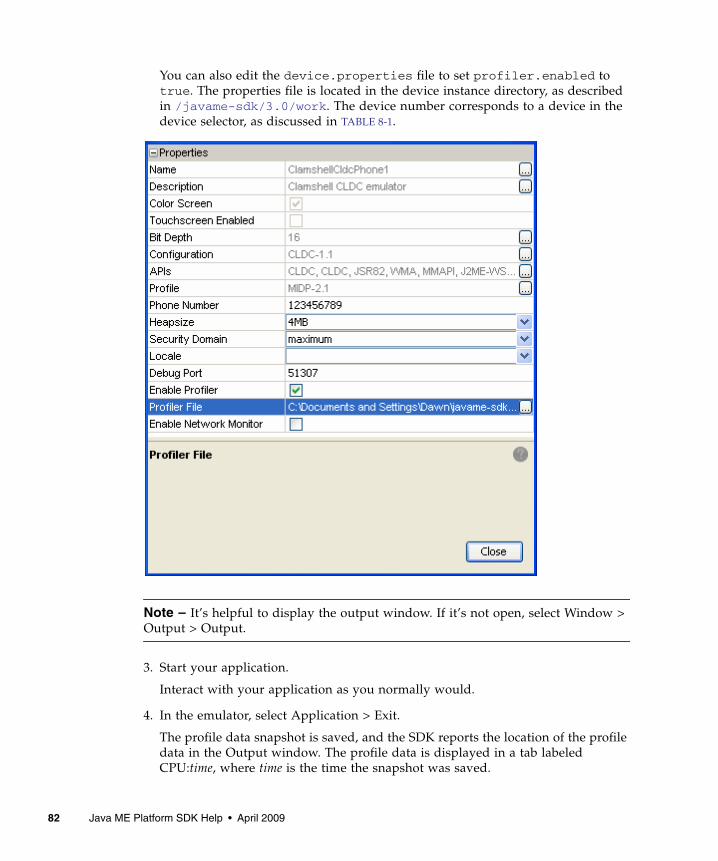
You can also edit the device.properties file to set profiler.enabled totrue. The properties file is located in the device instance directory, as describedin /javame-sdk/3.0/work. The device number corresponds to a device in thedevice selector, as discussed in TABLE 8-1.
Note – It’s helpful to display the output window. If it’s not open, select Window >Output > Output.
3. Start your application.
Interact with your application as you normally would.
4. In the emulator, select Application > Exit.
The profile data snapshot is saved, and the SDK reports the location of the profiledata in the Output window. The profile data is displayed in a tab labeledCPU:time, where time is the time the snapshot was saved.
82 Java ME Platform SDK Help • April 2009
See Loading Profiler Data.
Loading Profiler DataThis procedure views data collected with the Profiler, as described in Saving ProfilerData.
Follow these steps to retrieve profile data:
1. In the main window toolbar, select Tools >Import Java ME SDK Snapshot...
2. Choose the data.prof file.
The default location is: C:\Documents and Settings\user\javame-sdk\3.0\work\device-number\data.prof.
The Profiler opens in its own tab in the main window labeled CPU:time.
See Saving Profiler Data and Viewing Profiler Data.
Viewing Profiler DataThis procedure views data collected with the Profiler. See Saving Profiler Data. Thedata can be seen immediately after it is collected, as described in Saving ProfilerData, or when it is imported, as described in Loading Profiler Data.
Note – The profiling values obtained from the emulator do not reflect actual valueson a real device.
Chapter 9 Profiling Applications 83
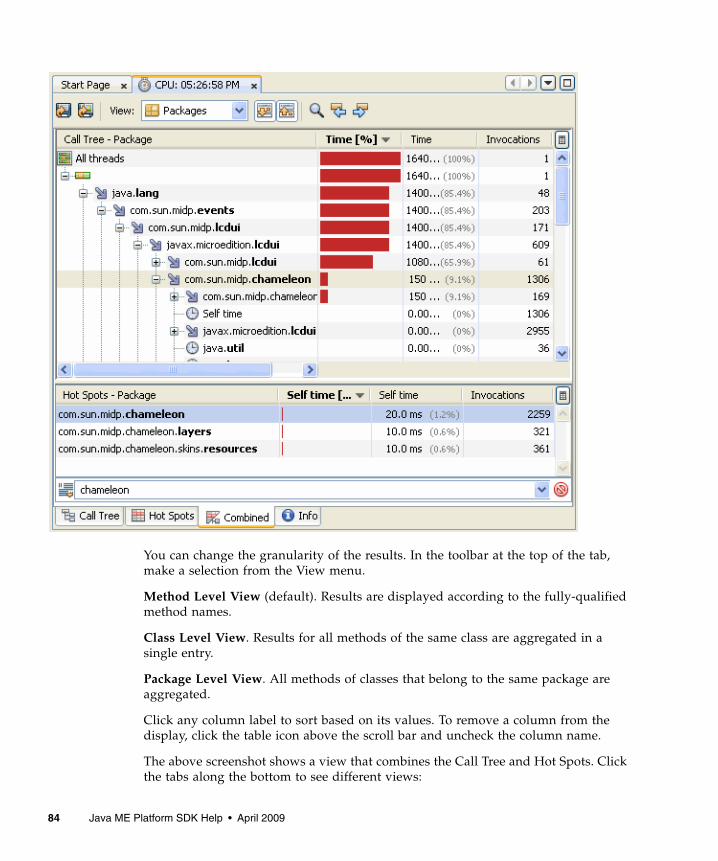
You can change the granularity of the results. In the toolbar at the top of the tab,make a selection from the View menu.
Method Level View (default). Results are displayed according to the fully-qualifiedmethod names.
Class Level View. Results for all methods of the same class are aggregated in asingle entry.
Package Level View. All methods of classes that belong to the same package areaggregated.
Click any column label to sort based on its values. To remove a column from thedisplay, click the table icon above the scroll bar and uncheck the column name.
The above screenshot shows a view that combines the Call Tree and Hot Spots. Clickthe tabs along the bottom to see different views:
84 Java ME Platform SDK Help • April 2009
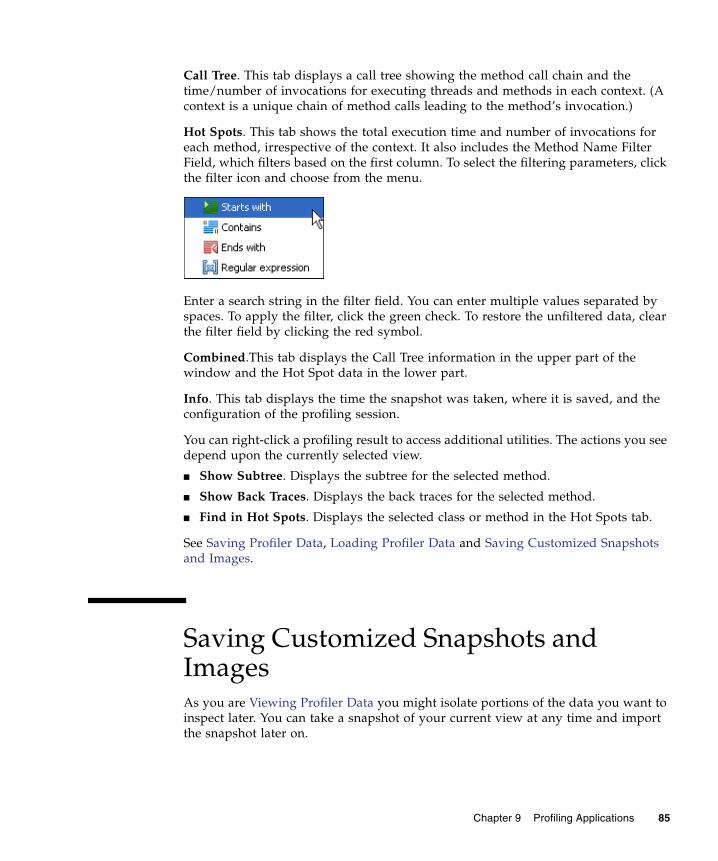
Call Tree. This tab displays a call tree showing the method call chain and thetime/number of invocations for executing threads and methods in each context. (Acontext is a unique chain of method calls leading to the method’s invocation.)
Hot Spots. This tab shows the total execution time and number of invocations foreach method, irrespective of the context. It also includes the Method Name FilterField, which filters based on the first column. To select the filtering parameters, clickthe filter icon and choose from the menu.
Enter a search string in the filter field. You can enter multiple values separated byspaces. To apply the filter, click the green check. To restore the unfiltered data, clearthe filter field by clicking the red symbol.
Combined.This tab displays the Call Tree information in the upper part of thewindow and the Hot Spot data in the lower part.
Info. This tab displays the time the snapshot was taken, where it is saved, and theconfiguration of the profiling session.
You can right-click a profiling result to access additional utilities. The actions you seedepend upon the currently selected view.
■ Show Subtree. Displays the subtree for the selected method.
■ Show Back Traces. Displays the back traces for the selected method.
■ Find in Hot Spots. Displays the selected class or method in the Hot Spots tab.
See Saving Profiler Data, Loading Profiler Data and Saving Customized Snapshotsand Images.
Saving Customized Snapshots andImagesAs you are Viewing Profiler Data you might isolate portions of the data you want toinspect later. You can take a snapshot of your current view at any time and importthe snapshot later on.
Chapter 9 Profiling Applications 85
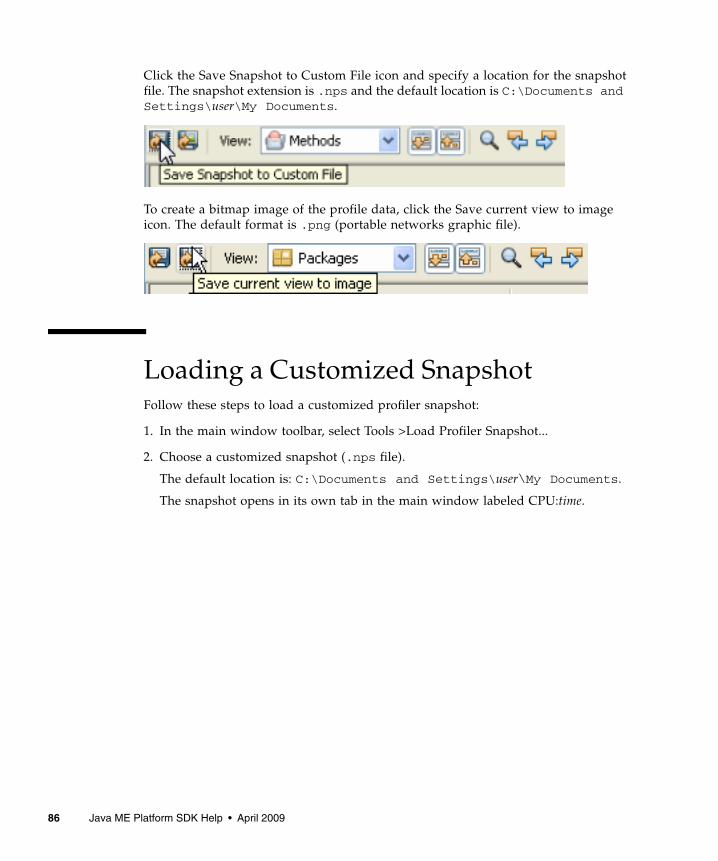
Click the Save Snapshot to Custom File icon and specify a location for the snapshotfile. The snapshot extension is .nps and the default location is C:\Documents andSettings\user\My Documents.
To create a bitmap image of the profile data, click the Save current view to imageicon. The default format is .png (portable networks graphic file).
Loading a Customized SnapshotFollow these steps to load a customized profiler snapshot:
1. In the main window toolbar, select Tools >Load Profiler Snapshot...
2. Choose a customized snapshot (.nps file).
The default location is: C:\Documents and Settings\user\My Documents.
The snapshot opens in its own tab in the main window labeled CPU:time.
86 Java ME Platform SDK Help • April 2009
CHAPTER 10
Monitoring Network Traffic
MIDP applications, at a minimum, are capable of HTTP network connections, butmany other types of network connections are also possible. The network monitorprovides a convenient way to see the information your application is sending andreceiving on the network. This is helpful if you are debugging network interactionsor looking for ways to optimize network traffic.
Networking monitoring works for emulators only (it is not supported for realdevices).
■ Using the Network Monitor
■ Filtering Messages
■ Sorting Messages
■ Saving and Loading Network Monitor Information
■ Clearing the Message Tree
Using the Network MonitorFollow these steps to monitor network traffic:
1. In the Device Selector window, right-click on a device and choose Properties.
2. Check the Enable Network Monitor option. When you next run an application onthe device, the network monitor opens.
You can also edit the device.properties file to set netmon.enabled to true.The properties file is located in the device instance directory, as described in/javame-sdk/3.0/work.
3. Start your application.
87
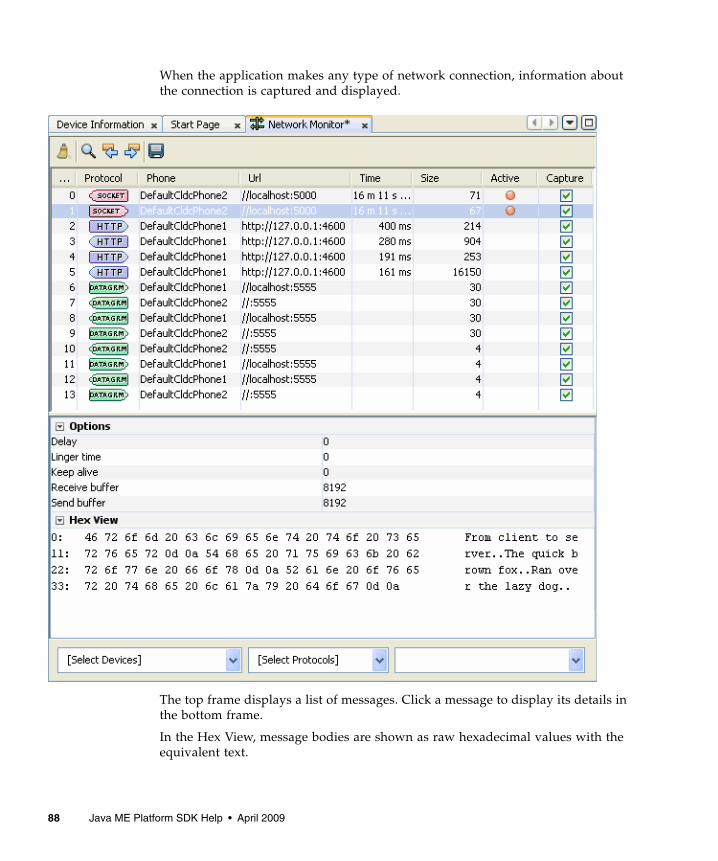
When the application makes any type of network connection, information aboutthe connection is captured and displayed.
The top frame displays a list of messages. Click a message to display its details inthe bottom frame.
In the Hex View, message bodies are shown as raw hexadecimal values with theequivalent text.
88 Java ME Platform SDK Help • April 2009
Note – You can examine messages that are still in the process of being sent.Incomplete messages are indicated by bold highlighting in the message tree.
See also: Filtering Messages, Sorting Messages, Saving and Loading NetworkMonitor Information, Clearing the Message Tree
Filtering MessagesFilters are useful for examining some subset of the total network traffic.
■ In the [Select Devices] list check only the devices you want to view.
■ In the [Select Protocols] list check only the protocols you want to view. Thesupported protocols are datagram, socket, http, and https.
■ Click the magnifying glass in the Network Monitor toolbar to search for a specificstring in the data in the Phone or URL columns.
See also: Using the Network Monitor, Sorting Messages, Saving and LoadingNetwork Monitor Information, Clearing the Message Tree
Sorting MessagesTo arrange the message tree in a particular order, click on the Sort By combo box andchoose a criteria.
Time. Messages are sorted in chronological order of time sent or received.
URL. Messages are sorted by URL address. Multiple messages with the sameaddress are sorted by time.
Connection. Messages are sorted by communication connection. Messages using thesame connection are sorted by time. This sort type enables you to see messagesgrouped by requests and their associated responses.
Note – Sorting parameters are dependent on the message protocol you choose. Forinstance, sorting by time is not relevant for socket messages.
See also: Using the Network Monitor, Filtering Messages, Saving and LoadingNetwork Monitor Information, Clearing the Message Tree
Chapter 10 Monitoring Network Traffic 89
Saving and Loading Network MonitorInformationTo save your network monitor session, click the disk icon in the Network Monitortoolbar.
Choose a file name. This file name will be used for all the network monitor savesyou make in this Java ME SDK session. The default directory is C:\Documents andSettings\User\My Documents\ and the default file extension is.nmd (network monitor data).
To load a network monitor session, choose Tools > Load Network MonitorSnapshot... and browse to the data you saved.
See also: Using the Network Monitor, Filtering Messages, Sorting Messages,Clearing the Message Tree
Clearing the Message TreeTo remove all messages from the network monitor choose the clear icon (the broomicon on the right of the Network Monitor tool bar).
See also: Using the Network Monitor, Filtering Messages, Sorting Messages, Savingand Loading Network Monitor Information
90 Java ME Platform SDK Help • April 2009

CHAPTER 11
Lightweight UI Toolkit
The Lightweight UI Toolkit (LWUIT) is a lightweight widget library inspired bySwing but designed for constrained devices such as mobile phones and set-topboxes. Lightweight UI Toolkit supports pluggable theme-ability, a component andcontainer hierarchy, and abstraction of the underlying GUI toolkit. The termlightweight indicates that the widgets in the library draw their state in Java sourcewithout native peer rendering.
LWUIT is an open source project at https://lwuit.dev.java.net/. For moreinformation see the Lightweight UI Toolkit Developer’s Guide.
LWUIT supports the following resource elements: images, animation, bitmap fonts,localization bundles, and themes. Resources are delivered as a bundle - a binary filethat can be loaded and used on the device. Java ME Platform SDK supports LWUITwith an integrated Resource Manager for creating and maintaining resource bundles.
■ Adding the LWUIT Library
■ Using the LWUIT Resource Manager
Adding the LWUIT LibraryThe LWUIT library can be added to any MIDP project.
1. Right-click on a project and select Properties.
2. In the Build category, select Libraries & Resources, and click the Add Library...button.
3. In the Add Libraries window, select LWUIT and click Add Library.
You can see the package under Libraries and Resources.
91

Using the LWUIT Resource ManagerThe Resource Manager is a graphical tool for creating resource bundles and addingthem to the build process.
1. Select a project that contains the LWUIT libraries.
2. Select Tools > LWUIT Resources.
The Resource Manager opens.
3. To add a bundle, right-click anywhere within the Resource Manager window andselect Add Bundle from the context menu.
4. Enter a bundle name and click OK.
You are ready to add resources to the new bundle.
5. Select a resource, and select Windows > Properties to view and edit the resource.
Experiment with adding resources. Resources are fully described in the LightweightUI Toolkit Developer’s Guide. Here is a brief summary of the resource types:
JPG and PNG files. The file name can be changed and you can choose to pack thefile to save space.
Animations. GIF files. You just supply a name.
Font. There are two font types:
System (Create New).
Created from a system font. You can choose the system font in properties.Available fonts are: Dialog, DialogInput, Monospaced, Serif, and SansSerif.
■ From File (Create from File).
Choose the file from which the font resource will be created. You can edit thefont’s name, boldness, the size of the font, and whether or not antialiasing is used.
Localization. Choose the main localization bundle, for example,foobar.properties. This main bundle is then added with a "default" ID. Otherlocales are added with their proper ID. For example, foobar_en_GB.propertiesis added with the ID en_GB. Unfortunately this resource must be recreated in theresource manager when more locales are added (or removed).
Theme. Adds the .conf theme file. See the Lightweight UI Toolkit Developer’sGuide.
92 Java ME Platform SDK Help • April 2009
CHAPTER 12
Security and MIDlet Signing
The Java ME Platform SDK supports the security policies and domains defined byboth JSR 185 (Java Technology for the Wireless Industry or JTWI) and JSR 248(Mobile Service Architecture or MSA). The SDK provides tools to sign MIDlet suites,manage keys, and manage root certificates. The security domains are furtherdescribed in Security Domains.
MIDP 2.0 (JSR 118) includes a comprehensive security model based on protectiondomains. MIDlet suites are installed into a protection domain that determines accessto protected functions. The MIDP 2.0 specification also includes a recommendedpractice for using public key cryptography to verify and authenticate MIDlet suites.
The general process to create a cryptographically signed MIDlet suite is as follows:
1. The MIDlet author, probably a software company, buys a signing key pair from acertificate authority (the CA).
2. The author signs the MIDlet suite with the signing key pair and distributes theircertificate with the MIDlet suite.
3. When the MIDlet suite is installed on the emulator or on a device, theimplementation verifies the author’s certificate using its own copy of the CA’sroot certificate. Then it uses the author’s certificate to verify the signature on theMIDlet suite.
4. After verification, the device or emulator installs the MIDlet suite into thesecurity domain that is associated with the CA’s root certificate.
For definitive information, consult the MIDP 2.0 specification. For an overview ofMIDlet signing using the Java ME Platform SDK, read the article UnderstandingMIDP 2.0's Security Architecture, which is available athttp://developers.sun.com/techtopics/mobility/midp/articles/permissions/
93
If you need more background on public key cryptography, try the article MIDPApplication Security 1: Design Concerns and Cryptography, which is available athttp://developers.sun.com/techtopics/mobility/midp/articles/security1/. See the following topics:
■ Security Domains
■ Setting Security Domains
■ Signing a Project
■ Managing Keystores and Key Pairs
■ Managing Root Certificates
Security DomainsThe SDK supports five security domains for MSA:
unidentified_third_party. Provides a high level of security for applicationswhose origins and authenticity cannot be determined. The user is promptedfrequently when the application attempts a sensitive operation.
identified_third_party. Intended for MIDlets whose origins were determinedusing cryptographic certificates. Permissions are not granted automatically, but theuser is prompted less often than for the unidentified_third_party domain.
manufacturer. Intended for MIDlet suites whose credentials originate from themanufacturer’s root certificate.
minimum. All permissions are denied to MIDlets in this domain.
maximum. All permissions are granted to MIDlets in this domain. Maximum is thedefault setting.
The SDK includes four JTWI security domains:
untrusted - Provides a high level of security for applications whose origins andauthenticity cannot be determined. The user is prompted frequently when theapplication attempts a sensitive operation.
trusted - All permissions are granted to MIDlets in this domain.
minimum - All permissions are denied to MIDlets in this domain.
maximum - All permissions are granted to MIDlets in this domain (equivalent totrusted.) Maximum is the default value.
94 Java ME Platform SDK Help • April 2009

Setting Security DomainsIn the SDK, when you use Run via OTA your packaged MIDlet suite is installeddirectly into the emulator where it is placed in a security domain. The emulator usespublic key cryptography to determine the appropriate security domain.
■ If the MIDlet suite is not signed, it is placed in the default security domain.
■ If the MIDlet is signed, it is placed in the protection domain that is associatedwith the root certificate of the signing key’s certificate chain. See “Signing aProject” on page 95.
Specifying the Security Domain for an EmulatorTo choose the security domain you want the emulator to use, right-click on thedevice in the Device Selection window and select a security domain. The SDK knowsthe runtimes the device can support and supplies only possible domains. The defaultfor both MSA and JTWI is Maximum. See Setting Device Properties.
Specifying the Security Domain for a ProjectYou can set a security domain in a project. Follow these steps to specify the projectsecurity domain:
1. Right-click on a project and select Properties.
2. In the Category area, select Running (the green triangle).
3. Select Regular Execution and check the Security domain box. In this contextregular execution means you are running in the emulator, as opposed to runningOTA.
4. Select the domain from the drop-down menu.
Signing a ProjectDevices use signing information to check an application's source and validity beforeallowing it to access protected APIs. For test purposes, you can create a signing keypair to sign an application. The key pair consists of two keys:
Chapter 12 Security and MIDlet Signing 95
■ A private key that is used to create a digital signature, or certificate.
■ A public key that anyone can use to verify the authenticity of the digitalsignature.
You can create a key pair with the Keystores Manager as described in ManagingKeystores and Key Pairs.
Follow these steps to sign a project with a signing key pair.
1. Right-click on a project and select Properties.
2. From the Build hierarchy, select Signing.
3. Check the Sign Distribution checkbox.
4. Choose a keystore from the Keystores drop-down menu, or click Open KeystoresManager to create a new keystore.
The Certificate Details area displays the Alias, Subject, Issuer, and validity datesfor the selected keystore.
5. Choose a key pair alias from the drop-down menu.
A keystore might be accessed by several key pairs, each with a different alias. Ifyou prefer to use a unique key pair, select Open Keystores Manager and create anew key pair. See Creating a Keystore.
6. Click OK.
Note – CDC projects cannot be signed with this tool. To sign a CDC project use theJDK jarsigner command from the command line. For example:jarsigner.exe -keystore keystore.ks -storepass keystorepwdMyCdcApp.jar dummyCA
See Signing.
Managing Keystores and Key PairsFor test purposes, you can create a signing key pair to sign a MIDLet. The KeystoresManager administers this task, as described in the remainder of this topic.The keypair consists of two keys:
■ A private key that is used to create a digital signature, or certificate.
■ A public key that can be used by anyone to verify the authenticity of thesignature.
96 Java ME Platform SDK Help • April 2009
To deploy on a device, you must obtain a signing key pair from a certificateauthority recognized by the device. You can also import keys from an existing JavaSE platform keystore.
The following topics describe the user interface:
■ Security Domains
■ Creating a New Key Pair
■ Removing a Key Pair
■ Importing an Existing Key Pair
You can also use the command line tools described in Command Line SecurityFeatures.
Working With Keystores and Key PairsThe Keystores Manager handles creating and using keystores. The keystores knownto the Keystores Manager are listed when you sign a project, as described in Signing.
Keystores contain key pairs, which you can also manage from this dialog. You mustselect a keystore to access the key pair tools.
See Creating a Keystore, Adding an Existing Keystore, Creating a New Key Pair,Removing a Key Pair and Importing an Existing Key Pair
Creating a KeystoreFollow these steps to create a new keystore.
1. Select Tools > Keystores.
The Keystores Manager opens.
2. Click Add Keystore.
The Add Keystores window opens.
3. Choose Create Keystore.
4. Supply a name, location, and password.
The default location is C:\Documents and Settings\User.
5. Click OK.
The new keystore appears in the Keystores list.
Chapter 12 Security and MIDlet Signing 97
Adding an Existing KeystoreYou can make an existing keystore available to Java ME Platform SDK.
1. Select Tools > Keystores.
The Keystores Manager opens.
2. Click Add Keystore.
The Add Keystores window opens.
3. Choose Add Existing Keystore.
4. Browse to the location of the keystore and select the keystore file. Click OK.
The default location is C:\Documents and Settings\User.
5. Click OK.
The new keystore appears in the Keystores list.
Creating a New Key Pair1. Select Tools > Keystores.
The Keystores Manager opens.
2. Select a Keystore in the Keystores area on the left.
If you prefer a different keystore, select Add Keystore to create a new keystore oradd an existing keystore.
3. Click the New button.
4. Fill in the Create Key Pair dialog.
You must provide an alias to refer to this key pair.
The six Certificate Details fields are provisionally optional. You must complete atleast one field.
Key Pair Alias. The name used to refer to this key pair.
Common Name. Common name of a person, such as "Jane Smith"
Organization Unit. Department or division name, such as "Development"
Organization Name. Large organization name, such as "Sun Microsystems Inc."
Locality Name. Locality (city) name, such as "Santa Clara"
State Name. State or province name, such as "California"
Country. Two-letter country code, such as "US"
98 Java ME Platform SDK Help • April 2009
The password is optional. If you do provide a password, it must have at least sixcharacters.
5. Click OK.
The new key is displayed in the Keys area under its alias. You can now select thiskeypair when you sign a project. See “Signing a Project” on page 95.
Removing a Key Pair1. Select Tools > Keystores.
2. In the Keys area, click on a Key Pair.
3. Select Delete.
Importing an Existing Key PairIf you have keys in a Java SE platform keystore that you would like to use forMIDlet signing, you can import the signing keys to the Java ME SDK.
1. Select Tools > Keystores.
2. Click Add Keystores.
The Add Keystores window opens.
3. Click Add Existing Keystore.
4. Browse to the keystore location.
5. Click OK.
Managing Root CertificatesThe Java ME Platform SDK command line tools described in Managing Certificates(MEKeyTool) manage the emulator’s list of root certificates.
Real devices have similar lists of root certificates, although you typically cannotmodify them. When you deploy your application on a real device, you must usesigning keys issued by a certificate authority whose root certificate is present on thedevice. This makes it possible for the device to verify your application.
Each emulator instance has its own _main.ks file located inusers.home/javme-sdk/3.0/work/emulator-instance/appdb.
Chapter 12 Security and MIDlet Signing 99

The micro keystore, _main.mks resides in the following directory.
installdir\runtimes\cldc-hi\appdb\_main.mks
This directory also contains keystore.ks and serverkeystore.ks. You can usethe -import option to import certificates from these keystores as described inManaging Certificates (MEKeyTool).
100 Java ME Platform SDK Help • April 2009
CHAPTER 13
BD-J Support
The Java ME Platform SDK ships with a JAR file containing stubs for the BD-Jplatform. The stubs allow you to compile a CDC project as a Blu-ray Disc Java (BD-J)application. Once built, the application can be burned to a Blu-ray disc and playedon a Blu-ray disc player, or, it can be played online with a full-featured player suchas TotalMedia Theatre, WinDVD, or PowerDVD.
The SDK supports TotalMedia Theatre. If it is installed, running a BD-J projectlaunches your application in the TotalMedia Theatre Player.
To obtain source and Javdocs for the stubs, contact the Blu-ray Disc Association(http://www.blu-raydisc.com). You can email license requests [email protected].
See the following topics:
■ Creating a Stubs for BD-J Platform Project
■ Compiling, Deploying, and Running a Stubs for BD-J Platform Project
Creating a Stubs for BD-J PlatformProjectFollow these steps to create a BD-J Project.
1. Select File > New Project, and choose CDC Application. Click Next.
2. Set the project name, location, and Main class name and click Next.
3. Select Platform. From the Java Platform menu, choose Stubs for BD-J Platformand click Finish.
A simple BD-J hello World project is created.
101
4. To set BD-J preferences and permissions, right-click on the project and chooseProperties. In the Category area select Application Descriptor. Click the BD-J tabon the right.
The properties in this window are used to create a Permission Request File (PRF).This is an XML file and its format is controlled by Blu-ray disc specifications.Typically permissions apply to signed applications. Unsigned applications are notallowed access.
■ Application ID is a required value. The default is generally acceptable. Thisvalue is a 16-bit hexadecimal string. The recommended range is 0x0000 to0x3FFF for unsigned applications, and 0x4000 to 0x7FFF for signedapplications.
■ Organization ID is a required value. The default is generally acceptable, but itcan be changed. This value is a 32-bit hexadecimal string. The recommendedrange is 0x7FFF0001 to 0x7FFFFFFF.
■ The SDK uses the Service Access, User Settings and Preferences, and NetworkPermissions values to create a permissions file.
■ File Access - Allows a signed application to access persistent storage.
■ Lifecycle Control - Allows an application to control the lifecycle (stop, pause,or resume) of any application that it has launched. It cannot affect applicationsit has not launched.
■ Service Selection - Allows a signed application to select a new service(assuming other permissions also permit the selection).
■ User Settings and Preferences - Checking Read or Write requests permissionfor all preferences. The user preferences are: User Language, Parental Rating,DefaultFontSize, and Country Code. For example, check Read to enable Readpermission for all preferences.
■ Network Permissions - Allows a signed application to specify the hosts andactions that receive the permissions.
For example, enter connect = * to request permission for all hosts toconnect. To open all permissions for all hosts, enter:connect, listen, resolve, accept = *
■ By default the deployment directory ${build.dir}/deploy is created in:
C:\Documents and Settings\User\My Documents\JavaMESDKProjects\Application\build\deploy
The deployment directory contains the JAR file.
102 Java ME Platform SDK Help • April 2009
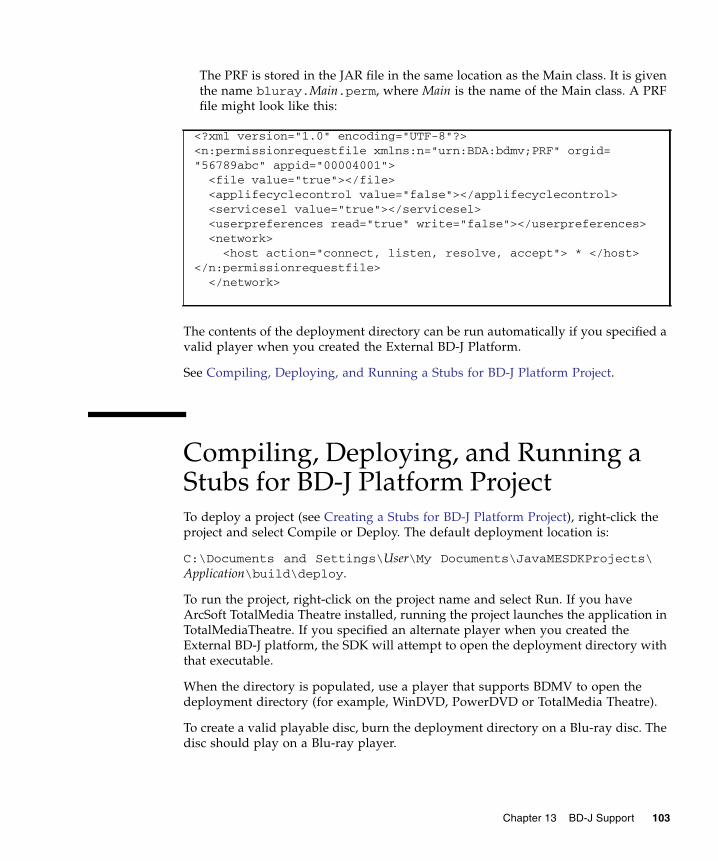
The PRF is stored in the JAR file in the same location as the Main class. It is giventhe name bluray.Main.perm, where Main is the name of the Main class. A PRFfile might look like this:
The contents of the deployment directory can be run automatically if you specified avalid player when you created the External BD-J Platform.
See Compiling, Deploying, and Running a Stubs for BD-J Platform Project.
Compiling, Deploying, and Running aStubs for BD-J Platform ProjectTo deploy a project (see Creating a Stubs for BD-J Platform Project), right-click theproject and select Compile or Deploy. The default deployment location is:
C:\Documents and Settings\User\My Documents\JavaMESDKProjects\Application\build\deploy.
To run the project, right-click on the project name and select Run. If you haveArcSoft TotalMedia Theatre installed, running the project launches the application inTotalMediaTheatre. If you specified an alternate player when you created theExternal BD-J platform, the SDK will attempt to open the deployment directory withthat executable.
When the directory is populated, use a player that supports BDMV to open thedeployment directory (for example, WinDVD, PowerDVD or TotalMedia Theatre).
To create a valid playable disc, burn the deployment directory on a Blu-ray disc. Thedisc should play on a Blu-ray player.
<?xml version="1.0" encoding="UTF-8"?><n:permissionrequestfile xmlns:n="urn:BDA:bdmv;PRF" orgid="56789abc" appid="00004001">
<file value="true"></file><applifecyclecontrol value="false"></applifecyclecontrol><servicesel value="true"></servicesel><userpreferences read="true" write="false"></userpreferences><network>
<host action="connect, listen, resolve, accept"> * </host></n:permissionrequestfile>
</network>
Chapter 13 BD-J Support 103

104 Java ME Platform SDK Help • April 2009
CHAPTER 14
CLDC Emulation on a WindowsMobile Device
This procedure describes how to install Sun Java CLDC Emulation software on a realdevice and make it available to the Java ME Platform SDK software on the hostcomputer. It also provides a procedure for testing on-device debugging.
■ CLDC Emulator Installation for a Device Running Windows Mobile
■ Testing On-device Debugging
CLDC Emulator Installation for a DeviceRunning Windows Mobile1. Connect the device to your host computer and register it with ActiveSync.
2. Copy the Sun Java CLDC Emulation Installation CAB file onto the clipboardusing Windows Explorer.
a. Browse to JavaMESdkHome\emulator-dev-install.
b. Right-click on sun-java-cldc-emu.cab.
c. Select Copy from the context menu.
3. Paste the CAB file into the device root directory.
a. In Windows Explorer, open Mobile Device.
105
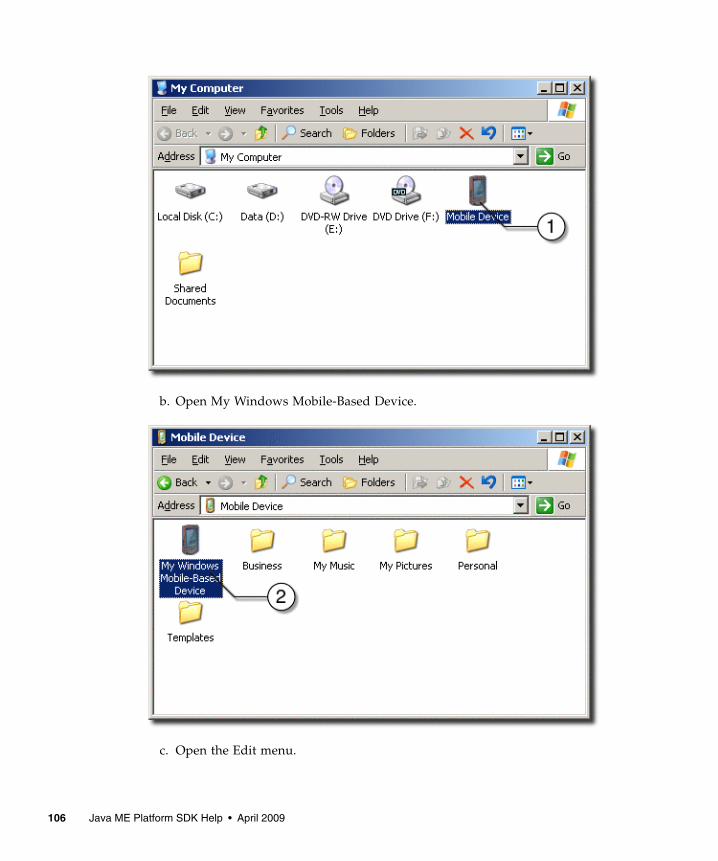
b. Open My Windows Mobile-Based Device.
c. Open the Edit menu.
106 Java ME Platform SDK Help • April 2009
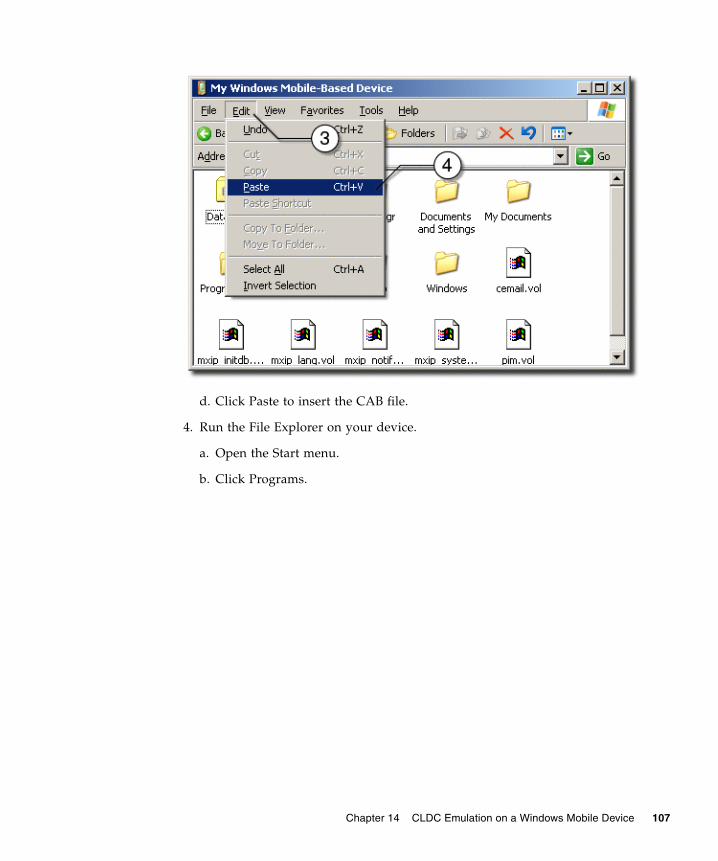
d. Click Paste to insert the CAB file.
4. Run the File Explorer on your device.
a. Open the Start menu.
b. Click Programs.
Chapter 14 CLDC Emulation on a Windows Mobile Device 107
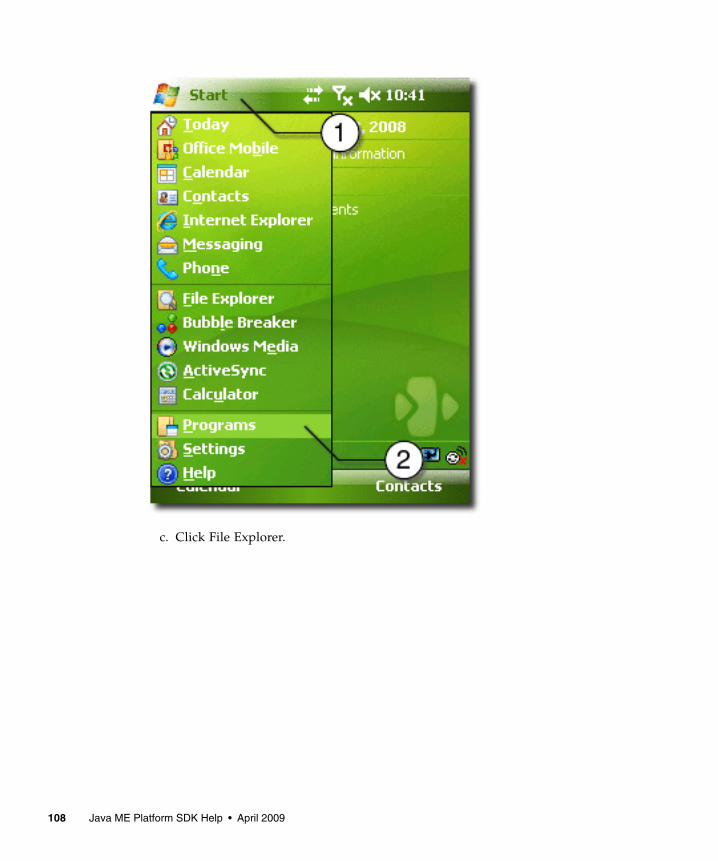
c. Click File Explorer.
108 Java ME Platform SDK Help • April 2009
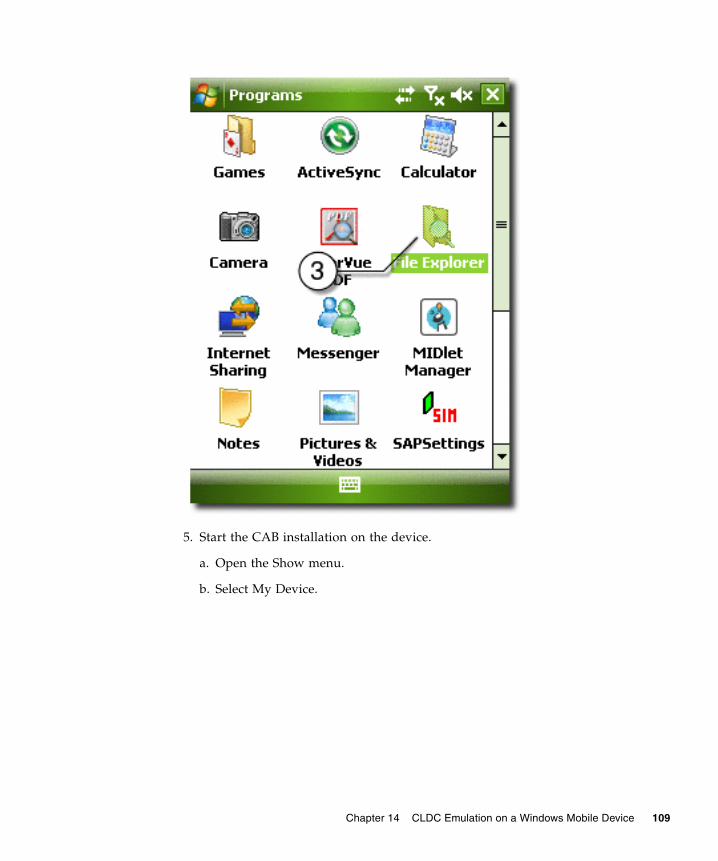
5. Start the CAB installation on the device.
a. Open the Show menu.
b. Select My Device.
Chapter 14 CLDC Emulation on a Windows Mobile Device 109
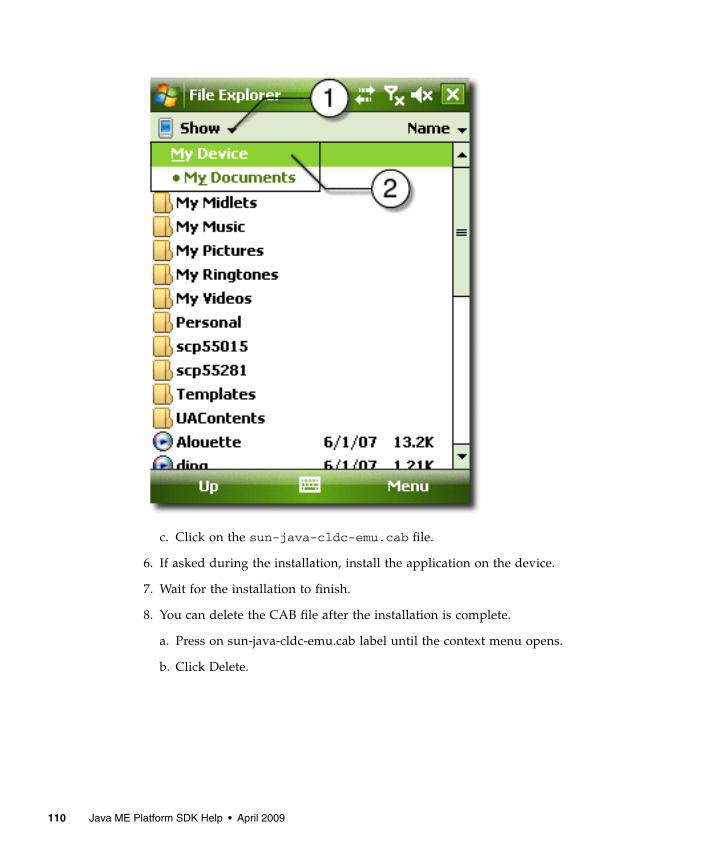
c. Click on the sun-java-cldc-emu.cab file.
6. If asked during the installation, install the application on the device.
7. Wait for the installation to finish.
8. You can delete the CAB file after the installation is complete.
a. Press on sun-java-cldc-emu.cab label until the context menu opens.
b. Click Delete.
110 Java ME Platform SDK Help • April 2009
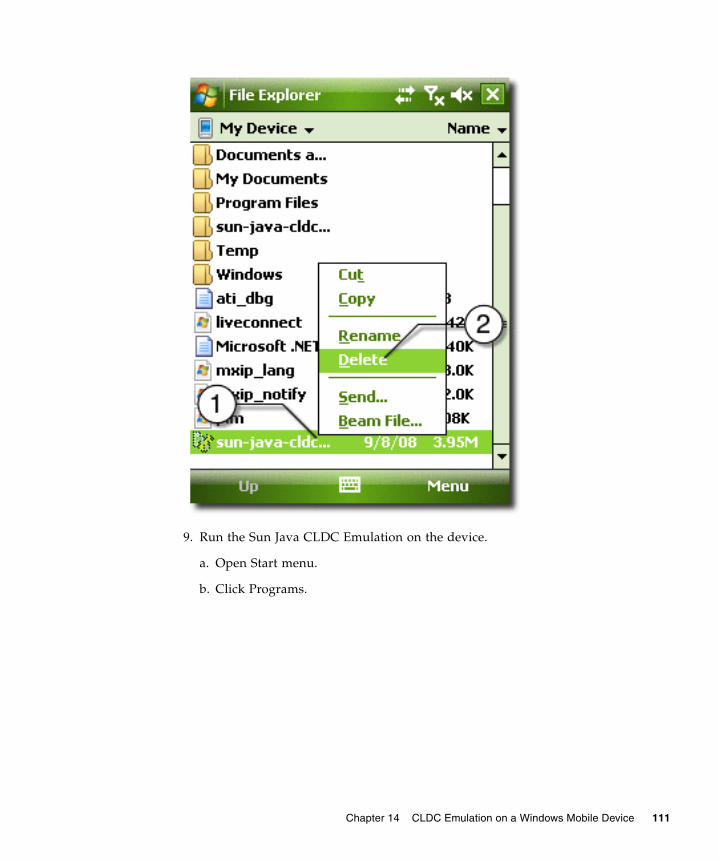
9. Run the Sun Java CLDC Emulation on the device.
a. Open Start menu.
b. Click Programs.
Chapter 14 CLDC Emulation on a Windows Mobile Device 111
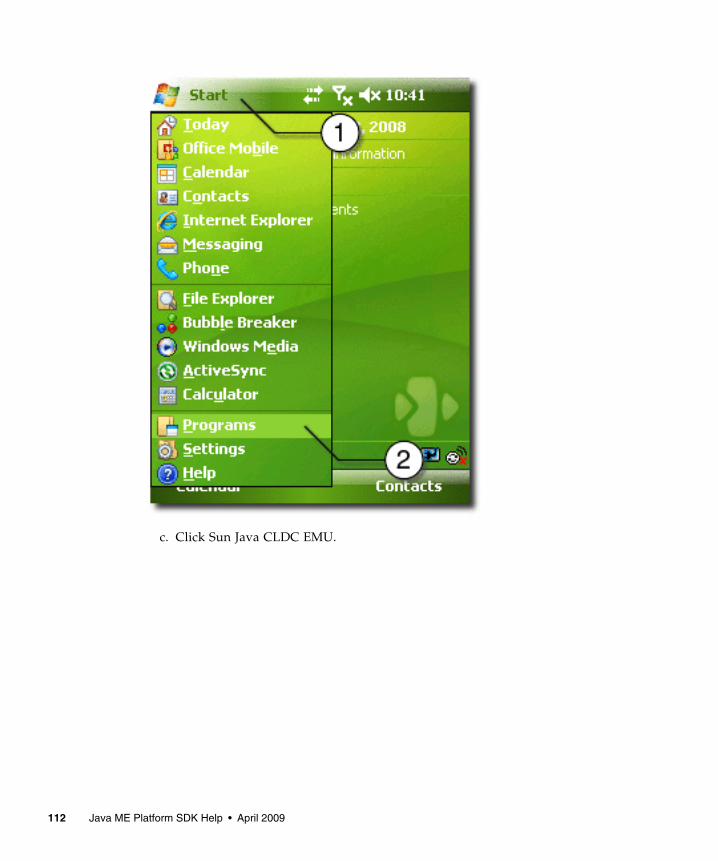
c. Click Sun Java CLDC EMU.
112 Java ME Platform SDK Help • April 2009

10. Wait for the Sun Java CLDC Emulation to start.
Chapter 14 CLDC Emulation on a Windows Mobile Device 113
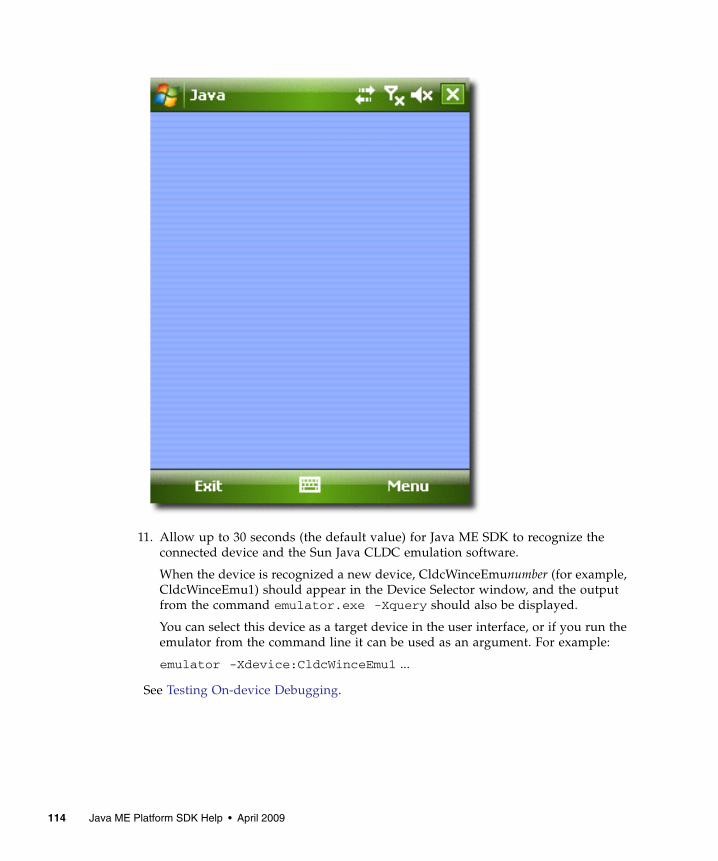
11. Allow up to 30 seconds (the default value) for Java ME SDK to recognize theconnected device and the Sun Java CLDC emulation software.
When the device is recognized a new device, CldcWinceEmunumber (for example,CldcWinceEmu1) should appear in the Device Selector window, and the outputfrom the command emulator.exe -Xquery should also be displayed.
You can select this device as a target device in the user interface, or if you run theemulator from the command line it can be used as an argument. For example:
emulator -Xdevice:CldcWinceEmu1 ...
See Testing On-device Debugging.
114 Java ME Platform SDK Help • April 2009
Testing On-device DebuggingThis procedure provides instructions for running the FPDemo sample project on adevice running Windows Mobile.
Before starting this procedure:
■ Integrate the device as described in CLDC Emulator Installation for a DeviceRunning Windows Mobile.
■ Confirm the device is connected and that it appears in the Device Selectorwindow.
■ If the output console is not visible, select Window > Output > Output to open it.
This procedure features command line debugging, but you can use a graphicaldebugger in a similar fashion.
1. In the Java ME Platform SDK, select File > Open Sample Project > FPDemo.
2. In the Projects window, right-click on FPDemo and select Properties.
3. Choose the Platform category. From the Device drop-down menu, select the nameof the connected device. Click OK.
4. Select FPDemo and select Run > Run in Debug Mode, or click the correspondingicon on the toolbar.
The application is now deployed and started on the connected device.
Note the Port number displayed in the Output console.
5. Open a Windows shell.
6. Start jdb with the following command:
db -sourcepath installdir\apps\FPDemo\src -connectcom.sun.jdi.SocketAttach:hostname=127.0.0.1,port=port-number
7. Set the breakpoint at the place where the demo handles its menu commands:
stop in calculator.CalculatorMIDlet.commandAction
8. In the FPDemo application, enter two numbers, choose an operation, and invokethe Calc command.
The debugger displays the place where the execution stops.
9. To step through the source past the point where the result is calculated, use thenext command until you get past the following line:
res = n1 <op> n2;
Chapter 14 CLDC Emulation on a Windows Mobile Device 115
10. Check that the input and the calculated values are correct:
eval n1, eval n2, eval res
11. Override the calculated value as follows:
set res = new-value
12. Clear the breakpoint as follows:
clear calculator.CalculatorMIDlet.commandAction
13. Let the application continue:
cont
You can see that the application displays the overridden result.
14. Exit the debugger:
exit
15. Exit FPDemo.
116 Java ME Platform SDK Help • April 2009

CHAPTER 15
Installing CLDC Emulation on aWindows Mobile Emulator
This procedure describes how to install the Sun Java CLDC platform binary for theARM processor into the Windows Mobile Emulator.
CLDC Installation for Windows Mobile1. Download and install Microsoft Device Emulator with device images for
Windows Mobile 6.
2. Download and install Microsoft Virtual PC.
Note – Installs virtual switch driver required for emulated network adapters.
3. Run Windows Mobile 6 Professional Emulator and bind its emulated NE2000Network Adapter to a desktop network card.
117

■ Consult the Microsoft device emulator documentation for instructions.
■ Don’t use ActiveSync for networking (cradling the emulator).
4. Write down the IP address of the emulator.
Open the Start menu on the emulator, click Settings, click Connections, clickNetwork Cards, Click NE2000 Compatible Ethernet Driver.
118 Java ME Platform SDK Help • April 2009
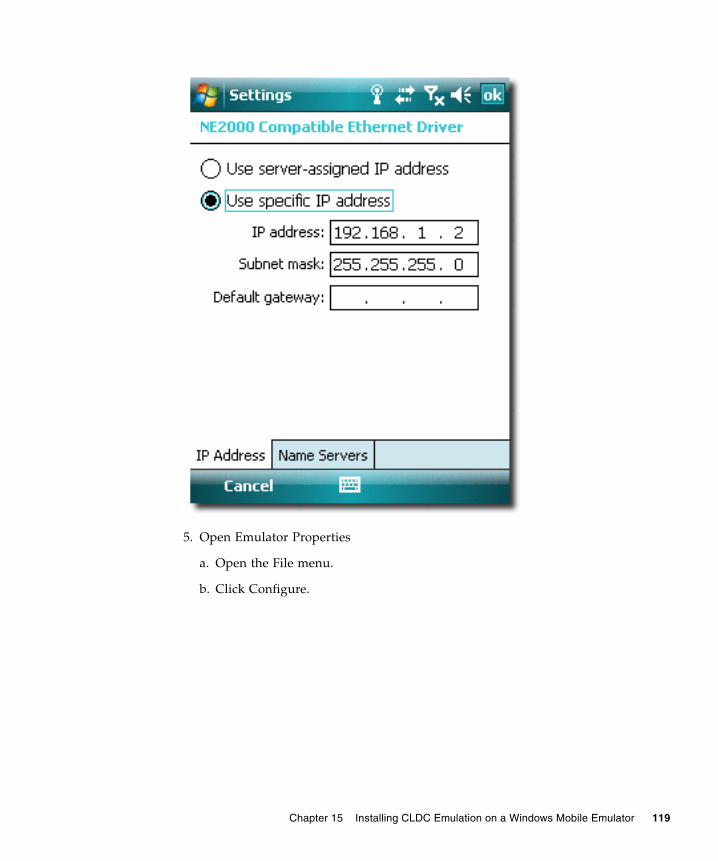
5. Open Emulator Properties
a. Open the File menu.
b. Click Configure.
Chapter 15 Installing CLDC Emulation on a Windows Mobile Emulator 119
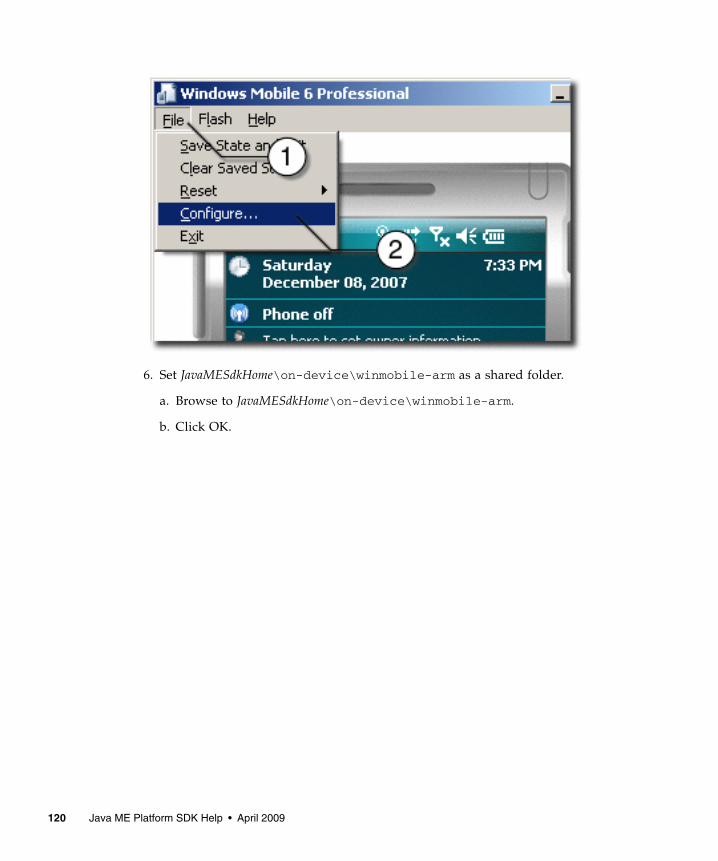
6. Set JavaMESdkHome\on-device\winmobile-arm as a shared folder.
a. Browse to JavaMESdkHome\on-device\winmobile-arm.
b. Click OK.
120 Java ME Platform SDK Help • April 2009
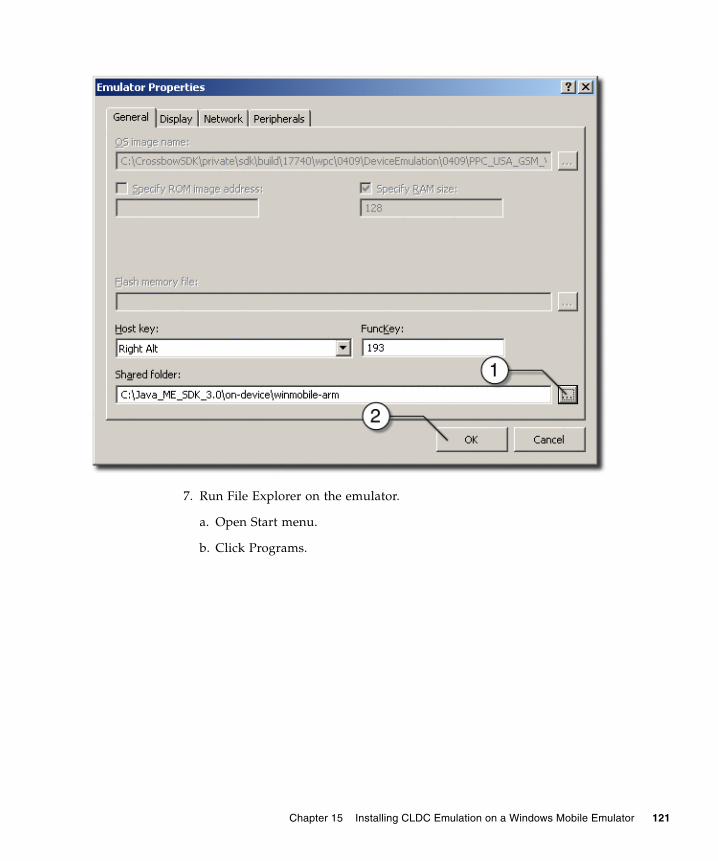
7. Run File Explorer on the emulator.
a. Open Start menu.
b. Click Programs.
Chapter 15 Installing CLDC Emulation on a Windows Mobile Emulator 121
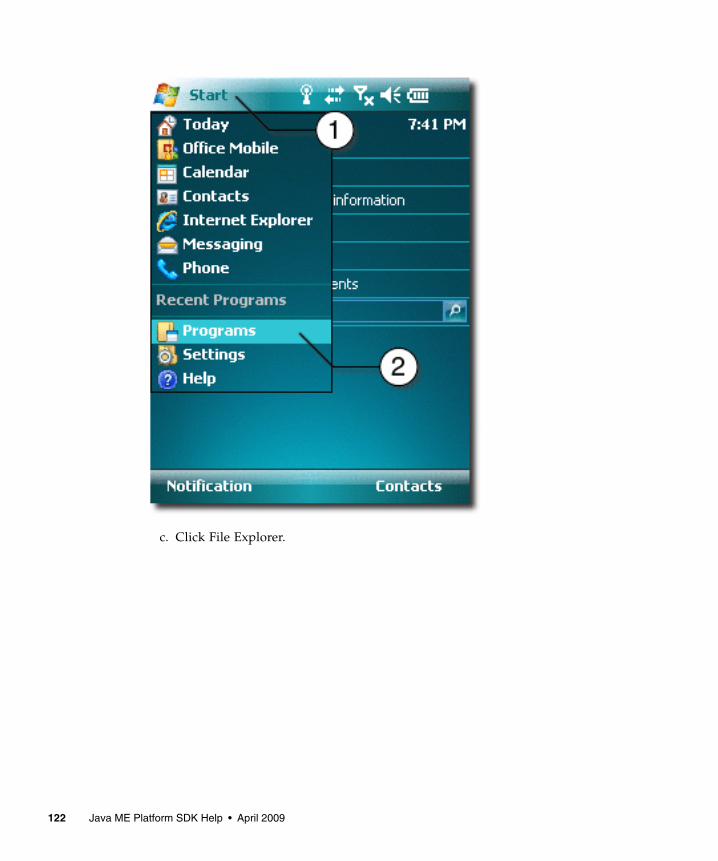
c. Click File Explorer.
122 Java ME Platform SDK Help • April 2009
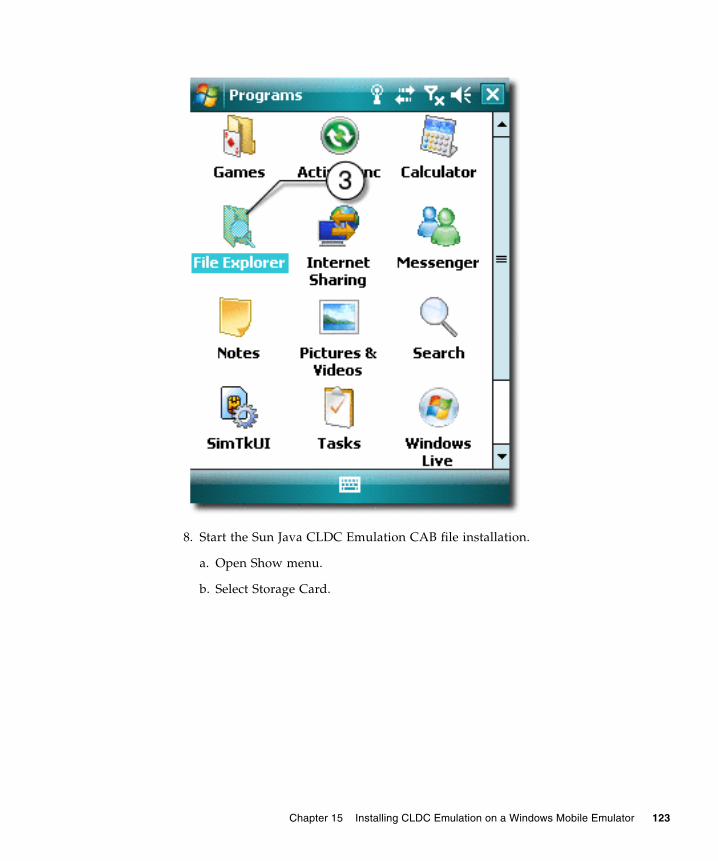
8. Start the Sun Java CLDC Emulation CAB file installation.
a. Open Show menu.
b. Select Storage Card.
Chapter 15 Installing CLDC Emulation on a Windows Mobile Emulator 123
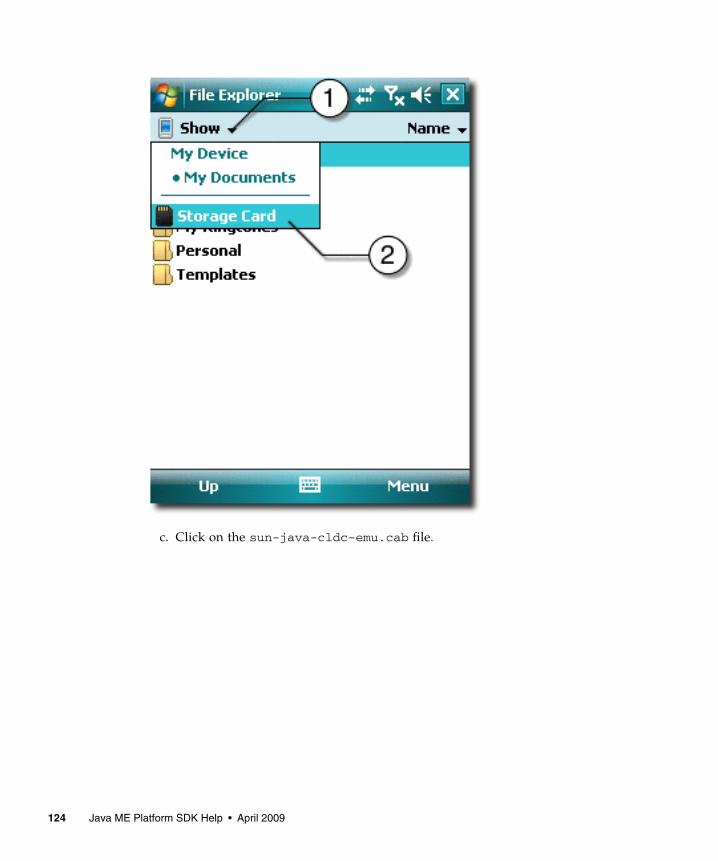
c. Click on the sun-java-cldc-emu.cab file.
124 Java ME Platform SDK Help • April 2009
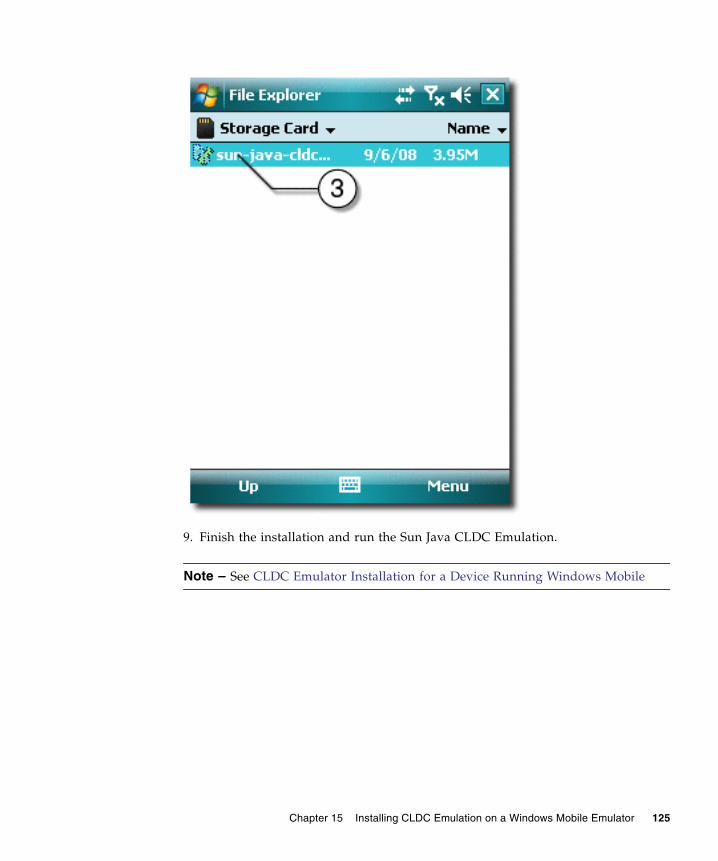
9. Finish the installation and run the Sun Java CLDC Emulation.
Note – See CLDC Emulator Installation for a Device Running Windows Mobile
Chapter 15 Installing CLDC Emulation on a Windows Mobile Emulator 125

10. Use the installdir/bin/device-address tool to register the emulator IP addressin the SDK. See Managing Device Addresses (device-address).
a. Execute the following command to ensure the SDK registers the emulator:
device-address.exe add ip address
address should be the IP address written down in step 4.
b. After the device registers the emulator the device selector window shoulddisplay the device as CldcWinceEmunumber and it should also appear in theoutput when you issue the emulator.exe -Xquery command.
126 Java ME Platform SDK Help • April 2009
CHAPTER 16
On-device Debugging
This section discusses the on-device debugging process for CLDC and CDC.When aproject is run in debug mode, a graphical debugger or a command line debugger canbe attached so that you can set and remove breakpoints.
See On-device Debugging Procedure and Sample CLDC Debugging Session.
On-device Debugging ProcedureBefore starting this procedure ensure your environment is properly configured:
■ Integrate the device as described in CLDC Emulator Installation for a DeviceRunning Windows Mobile.
■ Confirm the device is connected and that it appears in the Device Selectorwindow.
■ If the output console is not visible, select Window > Output > Output to open it.
■ If the project you want to debug is not main, right-click and select Set as MainProject.
■ Only one debug process can run on a port. In the device selector, right-click on adevice and look for the Debug Port property. By default the port number is 51307.If you are debugging on 51307 and you wish to debug an additional project, youmust run on a different device and change its port number property.
This procedure features command line debugging, but you can use a graphicaldebugger in a similar fashion.
1. Select the project you want to debug and select Run > Run Project in Debug Modeor click the Run Main Project in Debug mode icon on the toolbar.
The first time you debug you see this dialog.
127
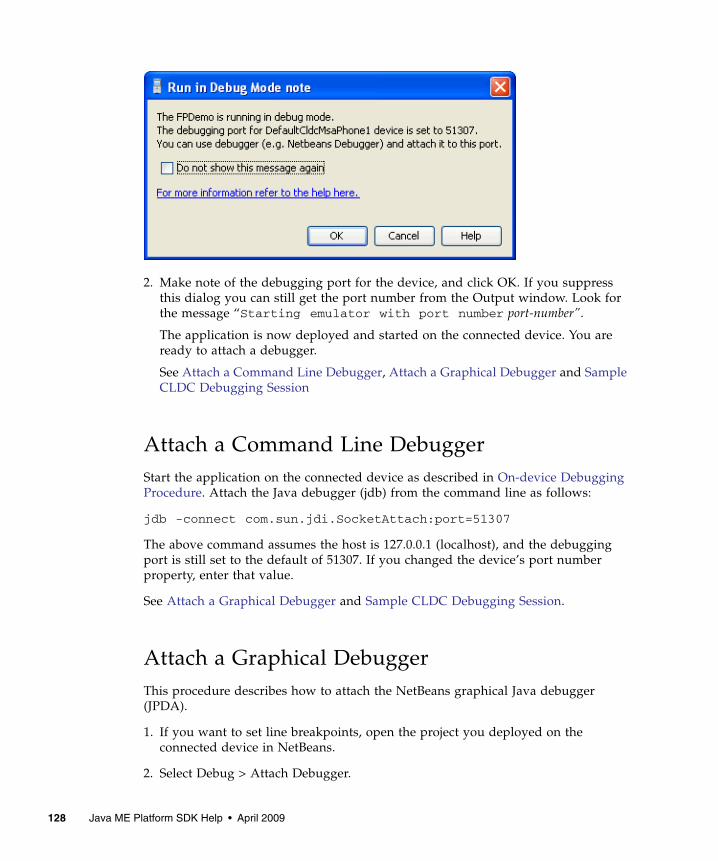
2. Make note of the debugging port for the device, and click OK. If you suppressthis dialog you can still get the port number from the Output window. Look forthe message “Starting emulator with port number port-number”.
The application is now deployed and started on the connected device. You areready to attach a debugger.
See Attach a Command Line Debugger, Attach a Graphical Debugger and SampleCLDC Debugging Session
Attach a Command Line DebuggerStart the application on the connected device as described in On-device DebuggingProcedure. Attach the Java debugger (jdb) from the command line as follows:
jdb -connect com.sun.jdi.SocketAttach:port=51307
The above command assumes the host is 127.0.0.1 (localhost), and the debuggingport is still set to the default of 51307. If you changed the device’s port numberproperty, enter that value.
See Attach a Graphical Debugger and Sample CLDC Debugging Session.
Attach a Graphical DebuggerThis procedure describes how to attach the NetBeans graphical Java debugger(JPDA).
1. If you want to set line breakpoints, open the project you deployed on theconnected device in NetBeans.
2. Select Debug > Attach Debugger.
128 Java ME Platform SDK Help • April 2009
3. In the Attach window, choose Java Debugger (JPDA) and click OK. You areprompted for connection settings
■ Connector: SocketAttach
■ Host: localhost, or leave as is
■ Port: the port number of the device running in debug mode.
The debugger attaches to the device.
Sample CLDC Debugging SessionThis procedure provides instructions for running the FPDemo sample project on adevice running Windows Mobile. You can use this procedure with any project.
1. In the Java ME Platform SDK, select File > Open Sample Project > FPDemo.
2. In the Projects window, right-click on FPDemo and select Properties.
3. Choose the Platform category. From the Device drop-down menu, select the nameof the connected device. Click OK.
4. Select FPDemo and select Run > Run Project in Debug Mode, or click the RunMain Project in Debug mode icon on the toolbar.
5. Open a Windows shell.
6. Start jdb with the following command:
db -sourcepath installdir\apps\FPDemo\src -connectcom.sun.jdi.SocketAttach:hostname=127.0.0.1,port=port-number
In this case the port number is 51307 to match the default debugging portnumber.
7. Set the breakpoint at the place where the demo handles its menu commands:
stop in calculator.CalculatorMIDlet.commandAction
8. In the FPDemo application, enter two numbers, choose an operation, and invokethe Calc command.
The debugger displays the place where the execution stops.
9. To step through the source past the point where the result is calculated, use thenext command until you get past the following line:
res = n1 <op> n2;
10. Check that the input and the calculated values are correct:
Chapter 16 On-device Debugging 129

eval n1, eval n2, eval res
11. Override the calculated value as follows:
set res = new-value
12. Clear the breakpoint as follows:
clear calculator.CalculatorMIDlet.commandAction
13. Let the application continue:
cont
You can see that the application displays the overridden result.
14. Exit the debugger:
exit
15. Exit FPDemo.
130 Java ME Platform SDK Help • April 2009
CHAPTER 17
Command Line Reference
This topic describes how to operate the Java ME Platform SDK from the commandline and details the command line tools required to build and run an application.
■ Launching the SDK
■ Running the Device Manager
■ Managing Device Addresses (device-address)
■ Running the Emulator From the Command Line
■ MIDlet Options
■ CDC Options
■ Debugging and Tracing Options
■ Building a Project from the Command Line
■ Checking Prerequisites
■ Compiling Class Files
■ Preverifying Class Files
■ Packaging a MIDLet Suite (JAR and JAD)
■ Command Line Security Features
■ Changing the Emulator’s Default Protection Domain
■ Signing MIDlet Suites (jadtool.exe)
■ Managing Certificates (MEKeyTool)
■ Generating Stubs (wscompile)
■ Running the Payment Console From the Command Line
■ Virtual Machine Memory Profiler (Java Heap Memory Observe Tool)
■ Running the Java Heap Memory Observe Tool
■ Viewing the Heap Snapshot
■ Running WMA Tool
■ smsreceive
131
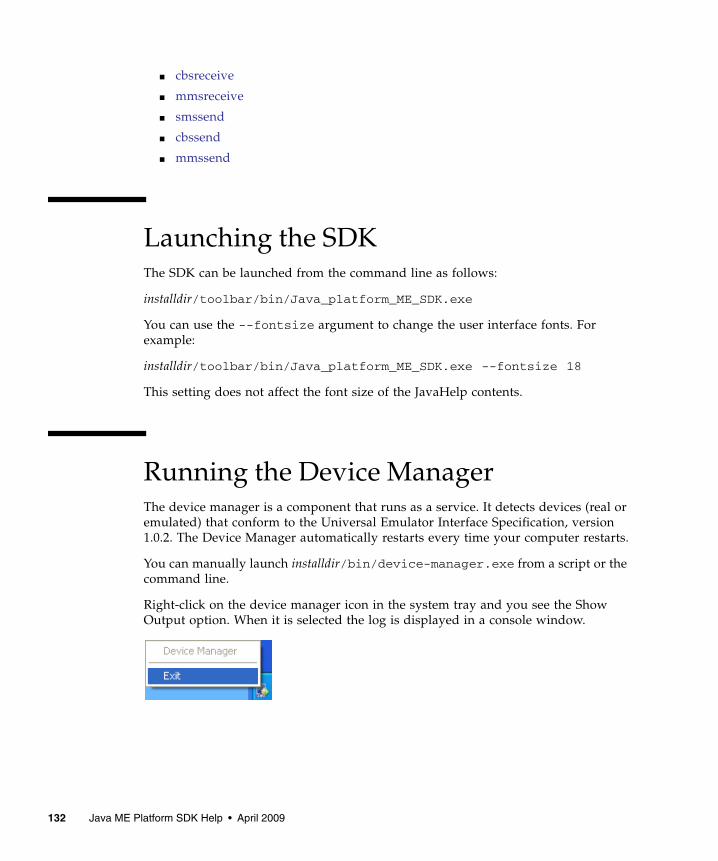
■ cbsreceive
■ mmsreceive
■ smssend
■ cbssend
■ mmssend
Launching the SDKThe SDK can be launched from the command line as follows:
installdir/toolbar/bin/Java_platform_ME_SDK.exe
You can use the --fontsize argument to change the user interface fonts. Forexample:
installdir/toolbar/bin/Java_platform_ME_SDK.exe --fontsize 18
This setting does not affect the font size of the JavaHelp contents.
Running the Device ManagerThe device manager is a component that runs as a service. It detects devices (real oremulated) that conform to the Universal Emulator Interface Specification, version1.0.2. The Device Manager automatically restarts every time your computer restarts.
You can manually launch installdir/bin/device-manager.exe from a script or thecommand line.
Right-click on the device manager icon in the system tray and you see the ShowOutput option. When it is selected the log is displayed in a console window.
132 Java ME Platform SDK Help • April 2009
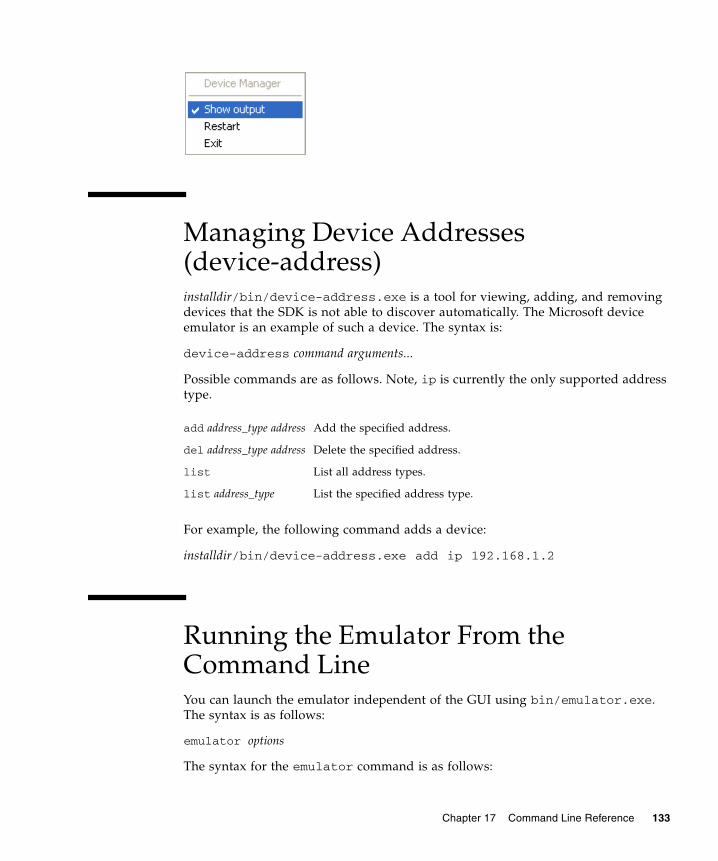
Managing Device Addresses(device-address)installdir/bin/device-address.exe is a tool for viewing, adding, and removingdevices that the SDK is not able to discover automatically. The Microsoft deviceemulator is an example of such a device. The syntax is:
device-address command arguments...
Possible commands are as follows. Note, ip is currently the only supported addresstype.
For example, the following command adds a device:
installdir/bin/device-address.exe add ip 192.168.1.2
Running the Emulator From theCommand LineYou can launch the emulator independent of the GUI using bin/emulator.exe.The syntax is as follows:
emulator options
The syntax for the emulator command is as follows:
add address_type address Add the specified address.
del address_type address Delete the specified address.
list List all address types.
list address_type List the specified address type.
Chapter 17 Command Line Reference 133

The general options are as follows:
■ -classpath path
-cp path
Specifies a search path for application classes. The path consists of directories, ZIPfiles, and JAR files separated by colons.
■ -Dproperty=value
Sets a system property value.
■ -help
Display a list of valid options.
■ -version
Display version information about the emulator.
■ -Xdevice:skin-name
Run an application on the emulator using the given device instance name. SeeTABLE 8-1.
■ -Xmain:main-class-name
Run the main method of a Java class, as in Java SE.
■ -Xquery
Print emulator skin information on the standard output stream and exitimmediately. The information includes the skin name, screen size, and othercapabilities.
This is a simple example of running the emulator from the command line:
emulator.exe -Xdescriptor:C:\Java_ME_platform_SDK_3.0\apps\Games\dist\Games.jad
emulator.exe also supports MIDlet Options, CDC Options, and Debugging andTracing Options.
MIDlet OptionsOptions for running MIDlets in the emulator are as follows:
■ -Xautotest:JAD-file-URL
Run in autotest mode. This option installs a MIDlet suite from a URL, runs it,removes it, and repeats the process. The purpose is to run test compatibility kits(TCKs) with the emulator, using a test harness such as JT Harness, JavaTest™ orJava Device Test Suite (JDTS). For example:
emulator -Xautotest:http://localhost:8080/test/getNextApp.jad
134 Java ME Platform SDK Help • April 2009
Given the above command, -Xautotest causes the emulator to repeatedlyinstall, run, and remove the first MIDlet from the MIDlet suite provided throughthe HTTP URL. Once the emulator starts, it queries the test harness, which thendownloads and installs the TCK MIDletAgent.
■ -Xdescriptor:jad-file
Run an application locally using the given JAD file.
■ -Xdomain:domain-name
Set the MIDlet suite’s security domain.
■ -Xjam:command=application
Run an application remotely using the Application Management Software (AMS)to run using OTA provisioning. If no application is specified with the argument,the graphical AMS is run. The commands are as follows:
install=jad-file-url | force | list | storageNames|
Install the application with the specified JAD file onto a device.
■ force. If an existing application has the same storage name as the applicationto be installed, force removes the existing application before installing thenew application.
■ list. List all the applications installed on the device and exit. The list iswritten to standard output before the emulator exits.
■ storageNames. List all applications installed on the device. The list is writtento standard output before the emulator exits. Each line contains one storagename in numerical order. The list contains only the name so the order isimportant. For example the first storage name must be storage number 1.
Also:
run=[storage-name | storage-number]
Run a previously installed application. The application is specified by its validstorage name or storage number.
remove=[storage-name | storage-number | all]
Remove a previously installed application. The application is identified by itsvalid storage name or storage number. If all is supplied, all previously installedapplications are removed.
■ transient=jad-file-url
Install, run, and remove the application with the specified JAD file. Specifyingtransient causes the application to be installed and run and then removedthree times.
This example includes OTA installation:
emulator.exe -Xjam:install=http://www.myserver.com/apps/MyApp.jad-Xdevice:DefaultCldcMsaPhone2
Chapter 17 Command Line Reference 135

The above command returns the ID of the installed application. Once you obtain theID you can run it with: emulator.exe=Xjam:run=ID
See also Running the Emulator From the Command Line, CDC Options, andDebugging and Tracing Options.
CDC OptionsThe following options apply to CDC projects.
■ -Xmsn
Specifies the initial size n, in bytes, of the memory allocation pool, or heap size.This value must be a multiple of 1024 greater than 1 megabyte. Append the letterk or K to indicate Kilobytes or m or M to indicate megabytes. The default value is64 megabytes (64M).
■ -Xmxn
Specifies the maximum size n, in bytes, of the memory allocation pool, or heapsize. This value must be a multiple of 1024 greater than 1 megabyte. Append theletter k or K to indicate Kilobytes or m or M to indicate megabytes. The defaultvalue is 64 megabytes (64M).
■ -Xssn
Sets thread stack size to n.
■ -Xxlet:classpath=class-path, class=fully-qualified-name,[arg=argument]*
Run an Xlet application.
See also Running the Emulator From the Command Line and Debugging andTracing Options.
Debugging and Tracing OptionsYou can use the following options with the emulator for debugging and tracing bothCLDC and CDC projects.
■ -Xdebug
Enable runtime debugging. The -Xrunjdwp option must be called to support-Xdebug.
■ -Xrunjdwp:debug-settings
Start a Java debug wire protocol session, as specified by a list of comma-separateddebug settings. Both -Xrunjdwp and -Xdebug must be called.
Valid debug settings include the following:
136 Java ME Platform SDK Help • April 2009
■ transport=transport-mechanism - Transport mechanism used to communicatewith the debugger. The only transport mechanism supported is dt_socket.
■ address=host:port - Transport address for the debugger connection. If host isomitted, localhost is assumed to be the host machine.
■ server={y|n} - Starts the debug agent as a server. The debugger must connectto the port specified. The possible values are y and n. Currently, only y issupported (the emulator must act as a server).
■ suspend={y|n} - The possible values are y and n.
When suspend is set to n, the application starts immediately and the debuggercan be attached at any time during its run.
When suspend is set to y, the application does not start until a debuggerattaches to the debugging port and sends a resume command. This means thatan application can be debugged from the very beginning.
■ -Xverbose:trace-options
Display trace output, as specified by a list of comma-separated options, asfollows:
■ gc - Trace garbage collection
■ class - Trace class loading
■ all - Use all tracing options
This example shows debugging:
emulator.exe -Xdevice:DefaultCldcMsaPhone2 -Xdebug-Xrunjdwp:transport=dt_socket, suspend=y,server=y,address=51307-Xdescriptor:C:\Java_ME_platfrom_SDK_3.0\appps\Games\dist\Games.jad
See also MIDlet Options, CDC Options, and Running the Emulator From theCommand Line.
Building a Project from the CommandLineIn the user interface, building a project is a single step. Behind the scenes, however,there are two steps. First, Java source files are compiled into Java class files. Next,the class files are preverified, which means they are prepared for the CLDC VM. Seethe following topics:
■ Checking Prerequisites
■ Compiling Class Files
Chapter 17 Command Line Reference 137
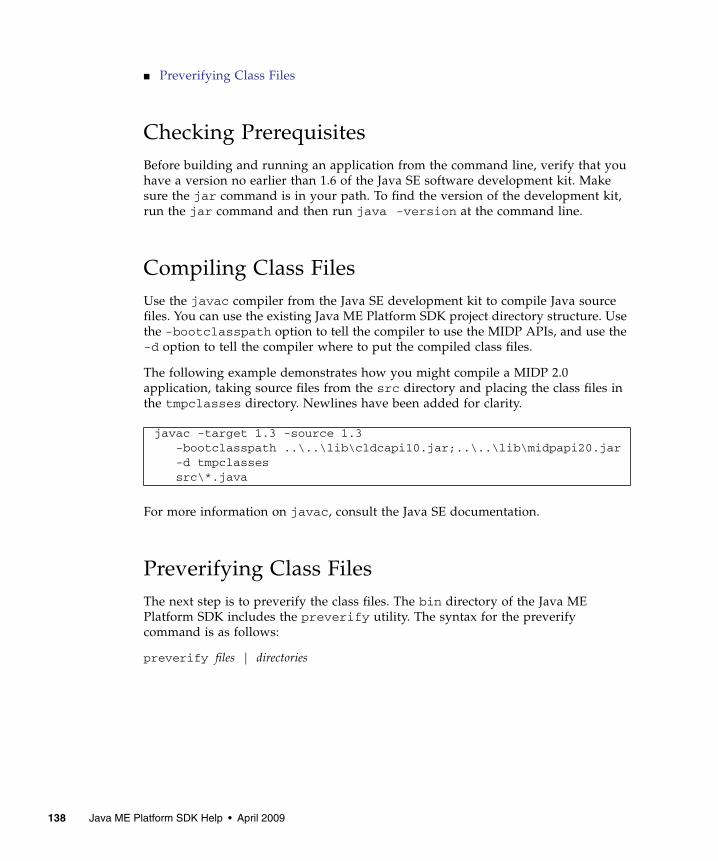
■ Preverifying Class Files
Checking PrerequisitesBefore building and running an application from the command line, verify that youhave a version no earlier than 1.6 of the Java SE software development kit. Makesure the jar command is in your path. To find the version of the development kit,run the jar command and then run java -version at the command line.
Compiling Class FilesUse the javac compiler from the Java SE development kit to compile Java sourcefiles. You can use the existing Java ME Platform SDK project directory structure. Usethe -bootclasspath option to tell the compiler to use the MIDP APIs, and use the-d option to tell the compiler where to put the compiled class files.
The following example demonstrates how you might compile a MIDP 2.0application, taking source files from the src directory and placing the class files inthe tmpclasses directory. Newlines have been added for clarity.
For more information on javac, consult the Java SE documentation.
Preverifying Class FilesThe next step is to preverify the class files. The bin directory of the Java MEPlatform SDK includes the preverify utility. The syntax for the preverifycommand is as follows:
preverify files | directories
javac -target 1.3 -source 1.3-bootclasspath ..\..\lib\cldcapi10.jar;..\..\lib\midpapi20.jar-d tmpclassessrc\*.java
138 Java ME Platform SDK Help • April 2009
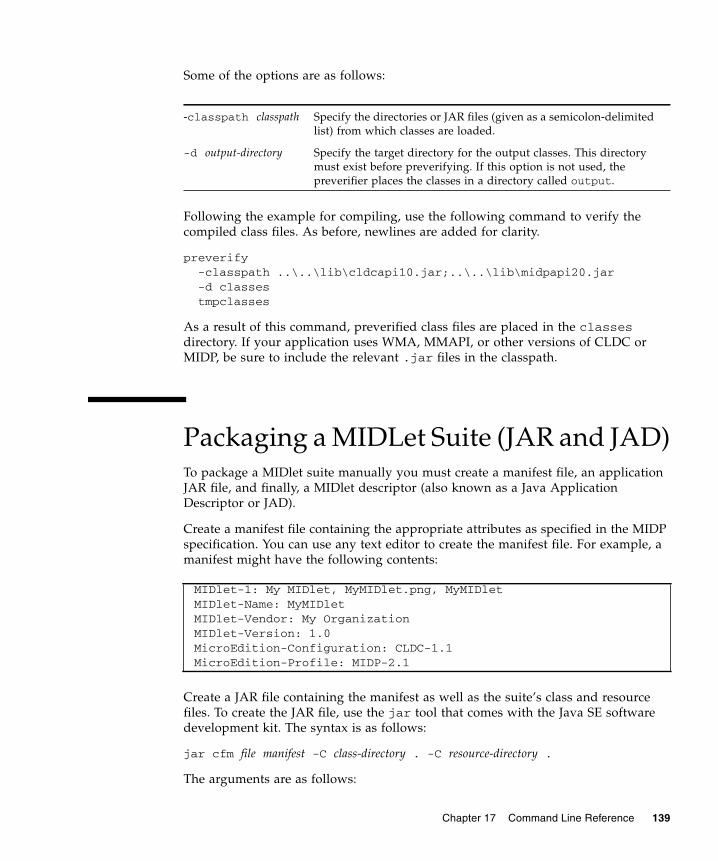
Some of the options are as follows:
Following the example for compiling, use the following command to verify thecompiled class files. As before, newlines are added for clarity.
preverify-classpath ..\..\lib\cldcapi10.jar;..\..\lib\midpapi20.jar-d classestmpclasses
As a result of this command, preverified class files are placed in the classesdirectory. If your application uses WMA, MMAPI, or other versions of CLDC orMIDP, be sure to include the relevant .jar files in the classpath.
Packaging a MIDLet Suite (JAR and JAD)To package a MIDlet suite manually you must create a manifest file, an applicationJAR file, and finally, a MIDlet descriptor (also known as a Java ApplicationDescriptor or JAD).
Create a manifest file containing the appropriate attributes as specified in the MIDPspecification. You can use any text editor to create the manifest file. For example, amanifest might have the following contents:
Create a JAR file containing the manifest as well as the suite’s class and resourcefiles. To create the JAR file, use the jar tool that comes with the Java SE softwaredevelopment kit. The syntax is as follows:
jar cfm file manifest -C class-directory . -C resource-directory .
The arguments are as follows:
-classpath classpath Specify the directories or JAR files (given as a semicolon-delimitedlist) from which classes are loaded.
-d output-directory Specify the target directory for the output classes. This directorymust exist before preverifying. If this option is not used, thepreverifier places the classes in a directory called output.
MIDlet-1: My MIDlet, MyMIDlet.png, MyMIDletMIDlet-Name: MyMIDletMIDlet-Vendor: My OrganizationMIDlet-Version: 1.0MicroEdition-Configuration: CLDC-1.1MicroEdition-Profile: MIDP-2.1
Chapter 17 Command Line Reference 139
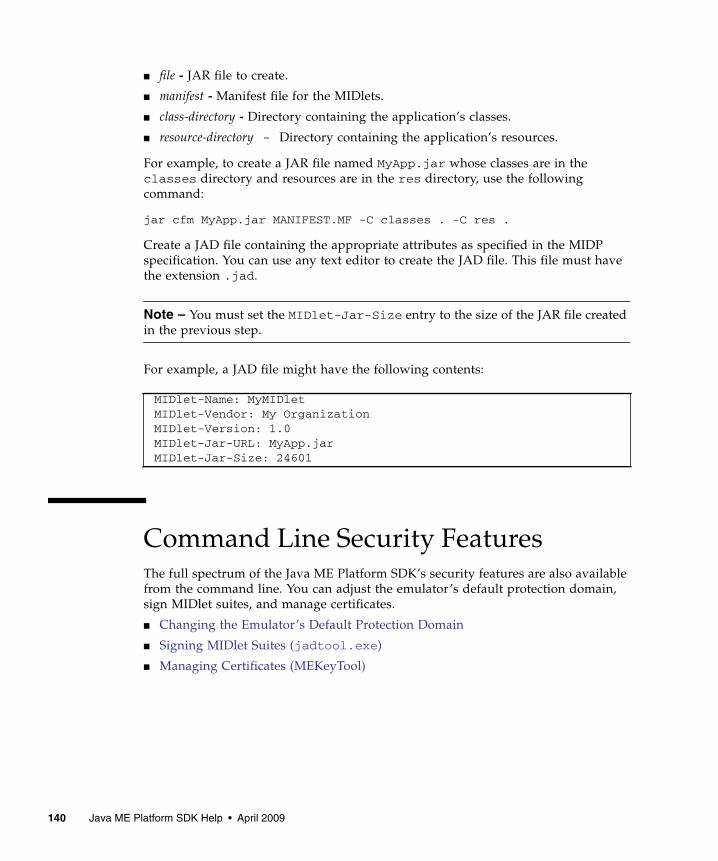
■ file - JAR file to create.
■ manifest - Manifest file for the MIDlets.
■ class-directory - Directory containing the application’s classes.
■ resource-directory - Directory containing the application’s resources.
For example, to create a JAR file named MyApp.jar whose classes are in theclasses directory and resources are in the res directory, use the followingcommand:
jar cfm MyApp.jar MANIFEST.MF -C classes . -C res .
Create a JAD file containing the appropriate attributes as specified in the MIDPspecification. You can use any text editor to create the JAD file. This file must havethe extension .jad.
Note – You must set the MIDlet-Jar-Size entry to the size of the JAR file createdin the previous step.
For example, a JAD file might have the following contents:
Command Line Security FeaturesThe full spectrum of the Java ME Platform SDK’s security features are also availablefrom the command line. You can adjust the emulator’s default protection domain,sign MIDlet suites, and manage certificates.
■ Changing the Emulator’s Default Protection Domain
■ Signing MIDlet Suites (jadtool.exe)
■ Managing Certificates (MEKeyTool)
MIDlet-Name: MyMIDletMIDlet-Vendor: My OrganizationMIDlet-Version: 1.0MIDlet-Jar-URL: MyApp.jarMIDlet-Jar-Size: 24601
140 Java ME Platform SDK Help • April 2009
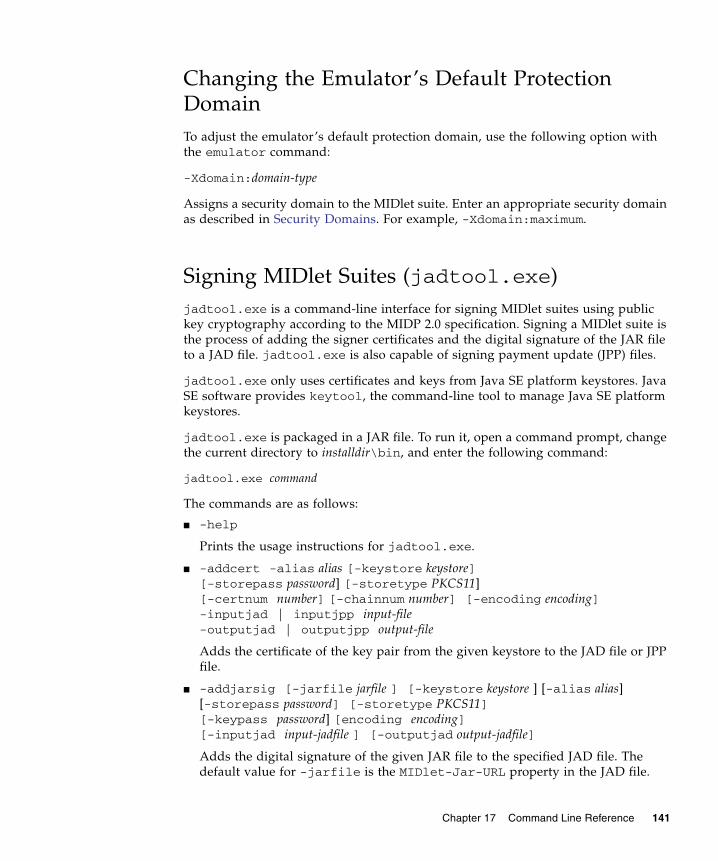
Changing the Emulator’s Default ProtectionDomainTo adjust the emulator’s default protection domain, use the following option withthe emulator command:
-Xdomain:domain-type
Assigns a security domain to the MIDlet suite. Enter an appropriate security domainas described in Security Domains. For example, -Xdomain:maximum.
Signing MIDlet Suites (jadtool.exe)jadtool.exe is a command-line interface for signing MIDlet suites using publickey cryptography according to the MIDP 2.0 specification. Signing a MIDlet suite isthe process of adding the signer certificates and the digital signature of the JAR fileto a JAD file. jadtool.exe is also capable of signing payment update (JPP) files.
jadtool.exe only uses certificates and keys from Java SE platform keystores. JavaSE software provides keytool, the command-line tool to manage Java SE platformkeystores.
jadtool.exe is packaged in a JAR file. To run it, open a command prompt, changethe current directory to installdir\bin, and enter the following command:
jadtool.exe command
The commands are as follows:
■ -help
Prints the usage instructions for jadtool.exe.
■ -addcert -alias alias [-keystore keystore][-storepass password] [-storetype PKCS11][-certnum number] [-chainnum number] [-encoding encoding]-inputjad | inputjpp input-file-outputjad | outputjpp output-file
Adds the certificate of the key pair from the given keystore to the JAD file or JPPfile.
■ -addjarsig [-jarfile jarfile ] [-keystore keystore ] [-alias alias][-storepass password] [-storetype PKCS11][-keypass password] [encoding encoding][-inputjad input-jadfile ] [-outputjad output-jadfile]
Adds the digital signature of the given JAR file to the specified JAD file. Thedefault value for -jarfile is the MIDlet-Jar-URL property in the JAD file.
Chapter 17 Command Line Reference 141
■ -showcert [([-certnum number] [-chainnum number]) | -all[-encoding encoding]-inputjad filename | -inputjpp filename
Displays information about certificates in JAD and JPP files.
■ -addjppsig -keypass password -alias alias [-keystore keystore][-storepass password][-keystore none|keystore][-storetype PKCS11] [-encoding encoding]-inputjpp filename -outputjpp filename
Adds a digital signature of the input JPP file to the specified output JPP file.
The default values are as follows:
■ -encoding - UTF-8
■ -jarfile - MIDlet-Jar-URL property in the JAD file
■ -keystore - %HOMEPATH%\.keystore
■ -certnum - 1
■ -chainnum - 1
Managing Certificates (MEKeyTool)MEKeyTool manages the public keys of certificate authorities (CAs), making itfunctionally similar to the keytool utility that comes with the Java SE SDK. The keyscan be used to facilitate secure HTTP communication over SSL (HTTPS).
Before using MEKeyTool, you must first have access to a Java CryptographyExtension keystore. You can create one using the Java SE keytool utility.
See http://java.sun.com/javase/6/docs/technotes/tools/windows/keytool.html.
To run MEKeyTool, open a command prompt, change the current directory toinstalldir\bin, and enter the following command:
mekeytool.exe -command
The command keywords follow.
The Java ME Platform SDK contains a default ME keystore called _main.ks, whichis located in the installdir\runtimes\cldc-hi-javafx\appdb. This keystoreincludes all the certificates that exist in the default Java SE platform keystore thatcomes with the Java SE installation.
142 Java ME Platform SDK Help • April 2009
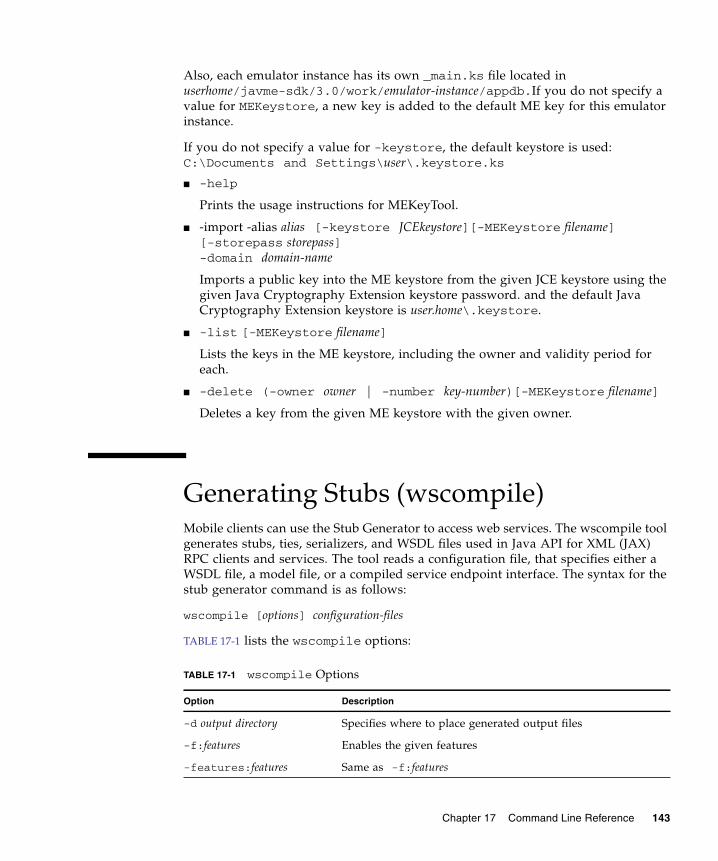
Also, each emulator instance has its own _main.ks file located inuserhome/javme-sdk/3.0/work/emulator-instance/appdb.If you do not specify avalue for MEKeystore, a new key is added to the default ME key for this emulatorinstance.
If you do not specify a value for -keystore, the default keystore is used:C:\Documents and Settings\user\.keystore.ks
■ -help
Prints the usage instructions for MEKeyTool.
■ -import -alias alias [-keystore JCEkeystore][-MEKeystore filename][-storepass storepass]-domain domain-name
Imports a public key into the ME keystore from the given JCE keystore using thegiven Java Cryptography Extension keystore password. and the default JavaCryptography Extension keystore is user.home\.keystore.
■ -list [-MEKeystore filename]
Lists the keys in the ME keystore, including the owner and validity period foreach.
■ -delete (-owner owner | -number key-number)[-MEKeystore filename]
Deletes a key from the given ME keystore with the given owner.
Generating Stubs (wscompile)Mobile clients can use the Stub Generator to access web services. The wscompile toolgenerates stubs, ties, serializers, and WSDL files used in Java API for XML (JAX)RPC clients and services. The tool reads a configuration file, that specifies either aWSDL file, a model file, or a compiled service endpoint interface. The syntax for thestub generator command is as follows:
wscompile [options] configuration-files
TABLE 17-1 lists the wscompile options:
TABLE 17-1 wscompile Options
Option Description
-d output directory Specifies where to place generated output files
-f:features Enables the given features
-features:features Same as -f:features
Chapter 17 Command Line Reference 143
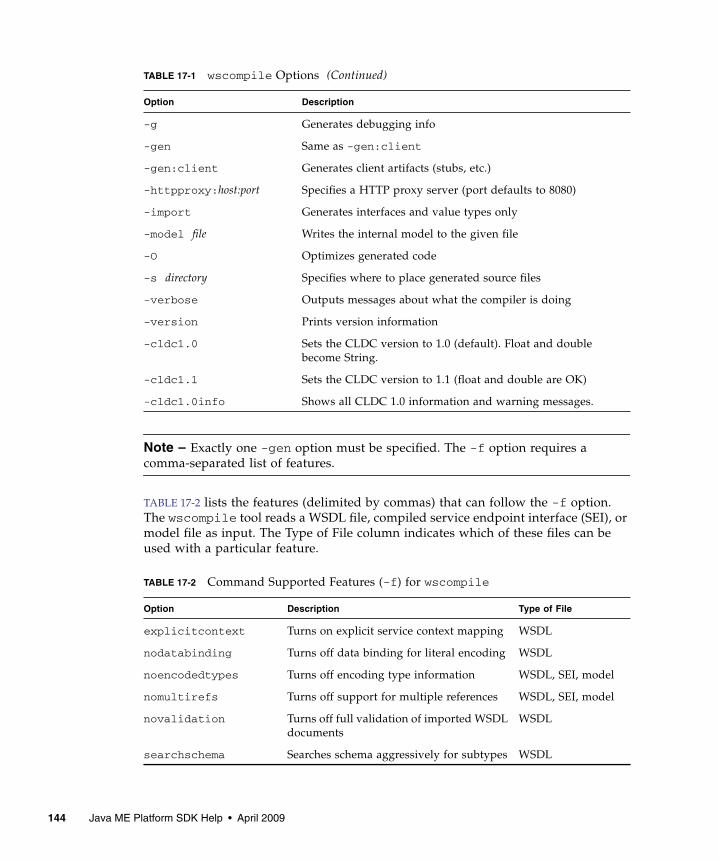
Note – Exactly one -gen option must be specified. The -f option requires acomma-separated list of features.
TABLE 17-2 lists the features (delimited by commas) that can follow the -f option.The wscompile tool reads a WSDL file, compiled service endpoint interface (SEI), ormodel file as input. The Type of File column indicates which of these files can beused with a particular feature.
-g Generates debugging info
-gen Same as -gen:client
-gen:client Generates client artifacts (stubs, etc.)
-httpproxy:host:port Specifies a HTTP proxy server (port defaults to 8080)
-import Generates interfaces and value types only
-model file Writes the internal model to the given file
-O Optimizes generated code
-s directory Specifies where to place generated source files
-verbose Outputs messages about what the compiler is doing
-version Prints version information
-cldc1.0 Sets the CLDC version to 1.0 (default). Float and doublebecome String.
-cldc1.1 Sets the CLDC version to 1.1 (float and double are OK)
-cldc1.0info Shows all CLDC 1.0 information and warning messages.
TABLE 17-2 Command Supported Features (-f) for wscompile
Option Description Type of File
explicitcontext Turns on explicit service context mapping WSDL
nodatabinding Turns off data binding for literal encoding WSDL
noencodedtypes Turns off encoding type information WSDL, SEI, model
nomultirefs Turns off support for multiple references WSDL, SEI, model
novalidation Turns off full validation of imported WSDLdocuments
WSDL
searchschema Searches schema aggressively for subtypes WSDL
TABLE 17-1 wscompile Options (Continued)
Option Description
144 Java ME Platform SDK Help • April 2009

Examples
Running the Payment Console From theCommand LineThe Payment Console displays payment related transactions sent from a mobileapplication that implements Payment API (JSR 229) features. This console monitorsPayment Update File requests and Premium Priced SMS payments. It is a commandline version of the console discussed in Running the Payment Console.
The Device Manager must be running before you launch the Payment Console.
To launch the Payment Console from the command line, useinstalldir/bin/payment-console.exe.
Virtual Machine Memory Profiler (JavaHeap Memory Observe Tool)The Java Heap Memory Observe Tool (also known as the Heap Walker) recordsdetailed information about the Java heap at a specific point in the virtual machineexecution. It collects and displays:
■ global pointers
■ data for all objects (classes, sizes, addresses and references)
■ addresses for all roots
serializeinterfaces Turns on direct serialization of interfacetypes
WSDL, SEI, model
wsi Enables WSI-Basic Profile features (default) WSDL
resolveidref Resolves xsd:IDREF WSDL
nounwrap No unwrap. WSDL
wscompile -gen -d generated config.xmlwscompile -gen -f:nounwrap -O -cldc1.1 -d generated config.xml
TABLE 17-2 Command Supported Features (-f) for wscompile (Continued)
Option Description Type of File
Chapter 17 Command Line Reference 145

■ names of all classes
Please note the following:
■ The memory profiler uses the same connection technology as the debugger (seeOn-device Debugging Procedure). Because they use the same transport layer, thememory profiler and Java debugger cannot be used simultaneously.
Note – For the memory profiler, the Xrunjdwp -suspend option must be set to n.
■ The memory monitor slows down your application startup because every objectcreated is recorded.
■ The memory usage you observe with the emulator is not exactly the same asmemory usage on a real device. Remember, the emulator does not represent a realdevice, it is just one possible implementation of its supported APIs.
See also: Running the Java Heap Memory Observe Tool
Running the Java Heap Memory Observe ToolThe Java Heap Memory Observe tool is launched from the command line as follows:
1. The following command starts the emulator from the \bin directory and opens asample application:
emulator.exe -Xdevice:DefaultCldcMsaPhone1 -Xdebug-Xrunjdwp:transport=dt_socket,suspend=n,server=y,address=51307-Xdescriptor:C:\Java_ME_platform_SDK_3.0\apps\Games\dist\Games.jad -Xdomain:maximum
2. In a separate command window, start the memory profiler from the \bindirectory. The port number must match the address in the Xrunjdwp call:
memory-profiler.exe -host 127.0.0.1 -port 51307
The profiler window opens.
3. Click the Connect button and wait for the profiler to attach to the process. It maytake several seconds. After the connection, press Resume.
4. To take a snapshot of the heap, click the Pause button on the bottom right. Thevirtual machine is suspended while the profiler collects the snapshot information.The memory panel is then repopulated and the Resume button becomes active.
See Viewing the Heap Snapshot
146 Java ME Platform SDK Help • April 2009
Viewing the Heap SnapshotThe memory monitor elements are as follows:
memory panel - At the top of the window you see a grid of rectangles representingmemory blocks. This is the memory panel. The key on the top right indicates themeaning of each graphical image. For example, blocks that are completely black areat 100% utilization. Clicking a single block opens a dialog showing all the objects inthat block.
loaded classes - A list of loaded classes is displayed in the lower-left corner.Choosing a class from the list causes the location of all objects in the class to bedisplayed in class objects list immediately to the right.
class objects - The class objects list is populated when you select a class from the listof loaded classes. Select an object to see the class details. These include the addressof the object, its type, and all references to and from the object. If the object is live,the “Show path from the root” button is enabled. Clicking this button opens the Pathfrom the Root window, which displays dependencies that prevent this object frombeing garbage collected.
statistics - At the bottom right of the Memory Observer window, click the Statisticsbutton to see a table showing the information for each class. Some objects areinternal to the virtual machine. For each class, you see the Object number, size of allobjects in the heap, the average size of the object, the percentage of the heap used bythe selected class, the percentage of objects live in the selected class, and thepercentage of objects that are in the old generation.
See Virtual Machine Memory Profiler (Java Heap Memory Observe Tool) andRunning the Java Heap Memory Observe Tool
Running WMA ToolTo send and receive SMS, CBS, and MMS messages from the command line, useinstalldir/bin/wma-tool.exe.
The device manager must be running before you launch wma-tool.
When the tool is started, it outputs the phone number it is using.
Each protocol has send and receive commands. The requested command is passed tothe tool as a first argument. Possibilities are:
■ smsreceive - receives SMS messages
■ cbsreceive - receives CBS messages
Chapter 17 Command Line Reference 147
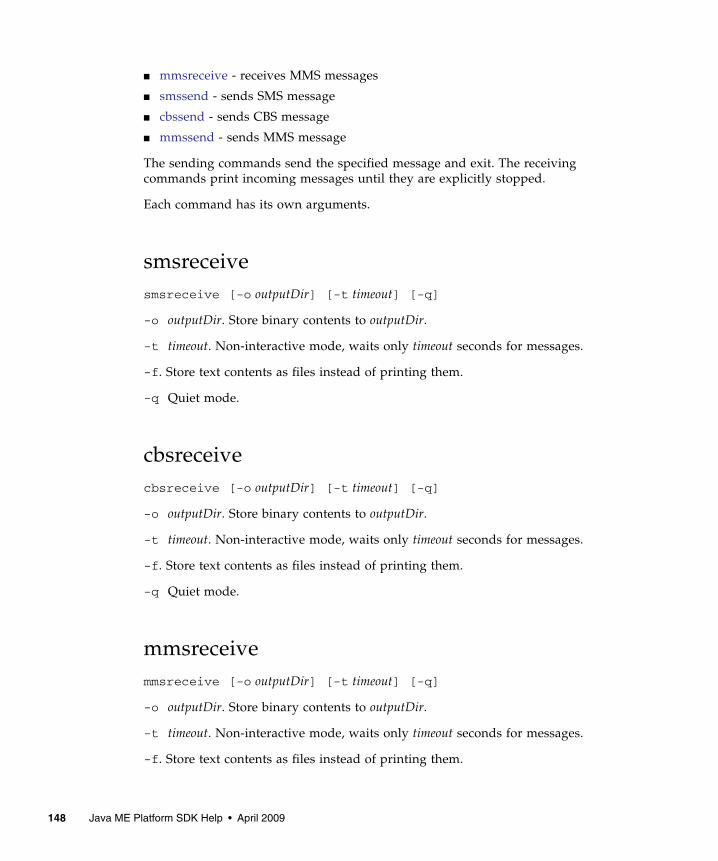
■ mmsreceive - receives MMS messages
■ smssend - sends SMS message
■ cbssend - sends CBS message
■ mmssend - sends MMS message
The sending commands send the specified message and exit. The receivingcommands print incoming messages until they are explicitly stopped.
Each command has its own arguments.
smsreceivesmsreceive [-o outputDir] [-t timeout] [-q]
-o outputDir. Store binary contents to outputDir.
-t timeout. Non-interactive mode, waits only timeout seconds for messages.
-f. Store text contents as files instead of printing them.
-q Quiet mode.
cbsreceivecbsreceive [-o outputDir] [-t timeout] [-q]
-o outputDir. Store binary contents to outputDir.
-t timeout. Non-interactive mode, waits only timeout seconds for messages.
-f. Store text contents as files instead of printing them.
-q Quiet mode.
mmsreceivemmsreceive [-o outputDir] [-t timeout] [-q]
-o outputDir. Store binary contents to outputDir.
-t timeout. Non-interactive mode, waits only timeout seconds for messages.
-f. Store text contents as files instead of printing them.
148 Java ME Platform SDK Help • April 2009

-q Quiet mode.
Chapter 17 Command Line Reference 149
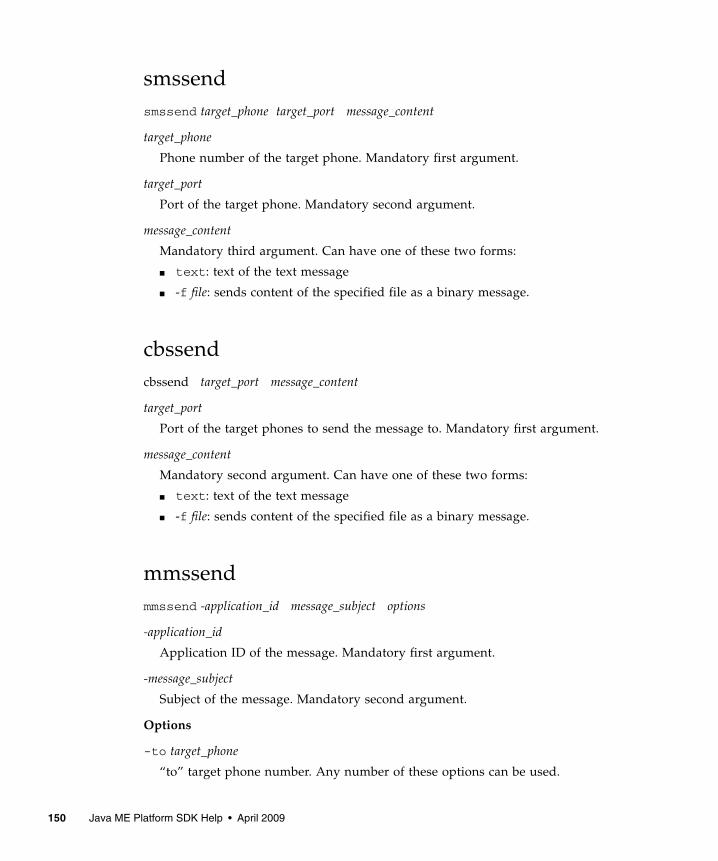
smssendsmssend target_phone target_port message_content
target_phone
Phone number of the target phone. Mandatory first argument.
target_port
Port of the target phone. Mandatory second argument.
message_content
Mandatory third argument. Can have one of these two forms:
■ text: text of the text message
■ -f file: sends content of the specified file as a binary message.
cbssendcbssend target_port message_content
target_port
Port of the target phones to send the message to. Mandatory first argument.
message_content
Mandatory second argument. Can have one of these two forms:
■ text: text of the text message
■ -f file: sends content of the specified file as a binary message.
mmssendmmssend -application_id message_subject options
-application_id
Application ID of the message. Mandatory first argument.
-message_subject
Subject of the message. Mandatory second argument.
Options
-to target_phone
“to” target phone number. Any number of these options can be used.
150 Java ME Platform SDK Help • April 2009
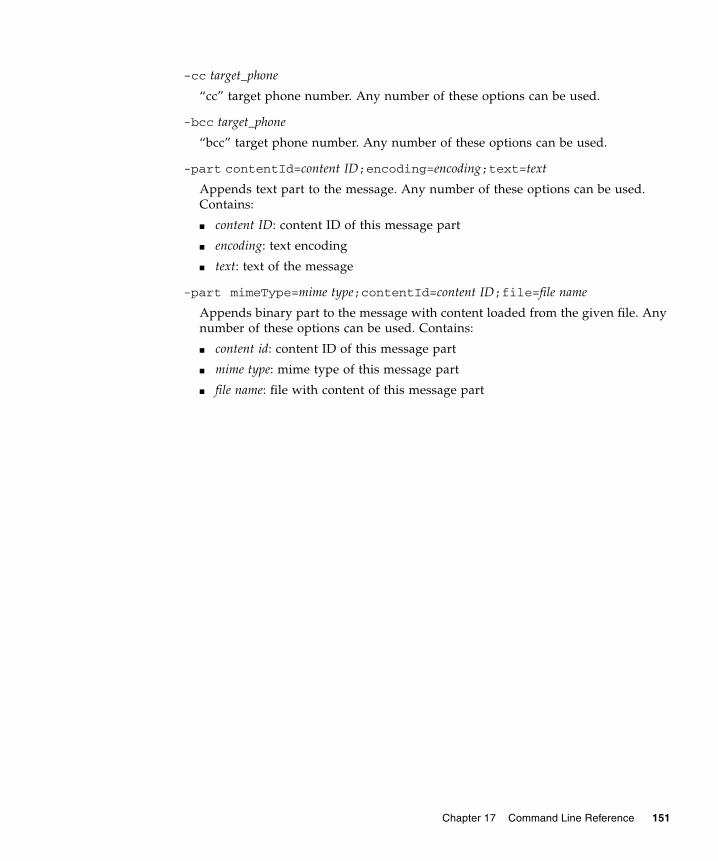
-cc target_phone
“cc” target phone number. Any number of these options can be used.
-bcc target_phone
“bcc” target phone number. Any number of these options can be used.
-part contentId=content ID;encoding=encoding;text=text
Appends text part to the message. Any number of these options can be used.Contains:
■ content ID: content ID of this message part
■ encoding: text encoding
■ text: text of the message
-part mimeType=mime type;contentId=content ID;file=file name
Appends binary part to the message with content loaded from the given file. Anynumber of these options can be used. Contains:
■ content id: content ID of this message part
■ mime type: mime type of this message part
■ file name: file with content of this message part
Chapter 17 Command Line Reference 151

152 Java ME Platform SDK Help • April 2009
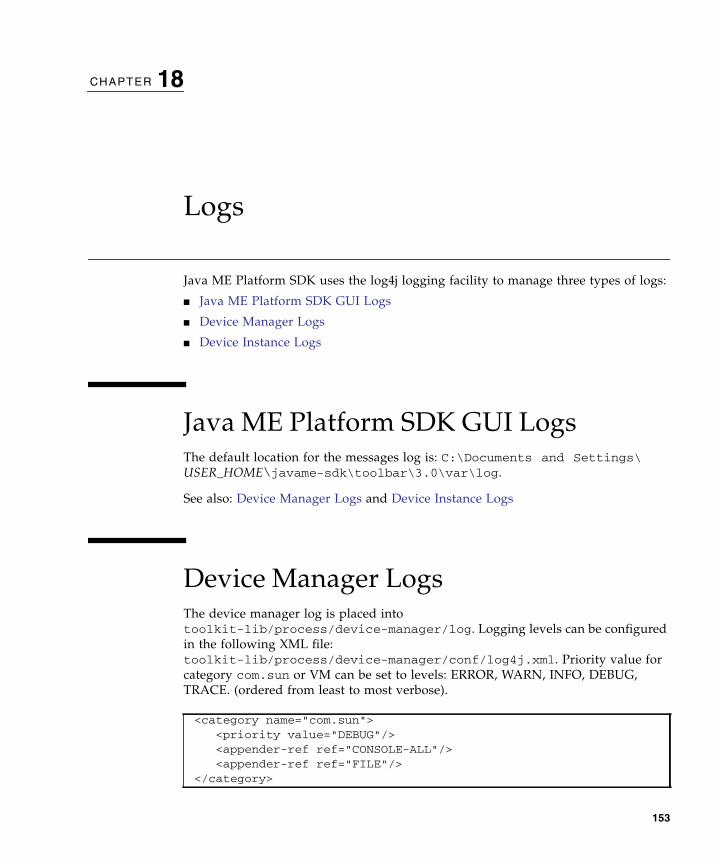
CHAPTER 18
Logs
Java ME Platform SDK uses the log4j logging facility to manage three types of logs:
■ Java ME Platform SDK GUI Logs
■ Device Manager Logs
■ Device Instance Logs
Java ME Platform SDK GUI LogsThe default location for the messages log is: C:\Documents and Settings\USER_HOME\javame-sdk\toolbar\3.0\var\log.
See also: Device Manager Logs and Device Instance Logs
Device Manager LogsThe device manager log is placed intotoolkit-lib/process/device-manager/log. Logging levels can be configuredin the following XML file:toolkit-lib/process/device-manager/conf/log4j.xml. Priority value forcategory com.sun or VM can be set to levels: ERROR, WARN, INFO, DEBUG,TRACE. (ordered from least to most verbose).
<category name="com.sun"><priority value="DEBUG"/><appender-ref ref="CONSOLE-ALL"/><appender-ref ref="FILE"/>
</category>
153

See also: Java ME Platform SDK GUI Logs and Device Instance Logs
Device Instance LogsEach device (or emulator) instance writes its own log into its directory underUSER_HOME/javame-sdk/3.0/work/emulator-instance. See/javame-sdk/3.0/work.
Like a device manager log it can be configured. Editinstalldir/toolkit-lib/modules/emulator-cldc/conf/log4j.xml asdescribed for Device Manager logs.
See also: Java ME Platform SDK GUI Logs and Device Manager Logs
<category name="VM"><priority value="INFO"/><appender-ref ref="CONSOLE-ALL"/><appender-ref ref="FILE"/>
</category>
154 Java ME Platform SDK Help • April 2009
CHAPTER 19
JSR Support
The Java ME Platform SDK supports many standard Application ProgrammingInterfaces (APIs) defined through the Java Community Process (JCP) program. JCPAPIs are often referred to as JSRs, named after the Java Specification Requestprocess.
See TABLE 19-1 for a full list of supported APIs. The Java ME SDK providesdocumentation describing how certain APIs are implemented in the SDK. Manysupported APIs do not require special implementation considerations, so they arenot discussed in this help set.
The CLDC/MIDP platform is based on the Mobile Information Device Profile and ConnectedLimited Device Configuration (JSRs 118 and 139).
The CDC platform is implemented to support Advanced Graphics and User InterfaceOptional Package for the J2ME Platform, Personal Basis Profile 1.1, and the Connected DeviceConfiguration (JSRs 209, 217 and 218).
JSRs that are not part of the platform are referred to as “optional packages.“ Alloptional packages are supported onthe CLDC/MIDP Platform.
In Java ME SDK version 3.0 the CDC platform does not support JSR 239 (JavaBinding for OpenGL ES API, and JSR 280 (XML API for Java ME).
See also TABLE 19-1.
155

JCP APIsTABLE 19-1 Supported JCP APIs
JSR, API Name, URL
JSR 75, PIM and File PDA Optional Packages for the J2ME Platformhttp://jcp.org/en/jsr/detail?id=75
JSR 82, Bluetooth and OBEX Java APIs for Bluetoothhttp://jcp.org/en/jsr/detail?id=82
JSR 118, MIDP 2.0 Mobile Information Device Profilehttp://jcp.org/en/jsr/detail?id=118
JSR 135, MMAPI 1.1 Mobile Media APIhttp://jcp.org/en/jsr/detail?id=135
JSR 139, CLDC 1.1 Connected Limited Device Configurationhttp://jcp.org/en/jsr/detail?id=139
JSR 172, Web Services J2ME Web Services Specificationhttp://jcp.org/en/jsr/detail?id=172
JSR 177, SATSA Security and Trust Services API for Java MEhttp://jcp.org/en/jsr/detail?id=177
JSR 179, Location Location API for Java MEhttp://jcp.org/en/jsr/detail?id=179
JSR 180, SIP SIP API for Java MEhttp://jcp.org/en/jsr/detail?id=180
JSR 184, 3D Graphics Mobile 3D Graphics API for J2MEhttp://jcp.org/en/jsr/detail?id=184
JSR 185, JTWI 1.0 Java Technology for the Wireless Industryhttp://jcp.org/en/jsr/detail?id=185
JSR 205, WMA 2.0 Wireless Messaging APIhttp://jcp.org/en/jsr/detail?id=205
JSR 209, AGUI 1.0 Advanced Graphics and User Interface Optional Package for theJ2ME Platformhttp://www.jcp.org/en/jsr/detail?id=209
JSR 211, CHAPI Content Handler APIhttp://jcp.org/en/jsr/detail?id=211
JSR 217, PBP 1.1 Personal Basis Profile 1.1http://www.jcp.org/en/jsr/detail?id=218
156 Java ME Platform SDK Help • April 2009

JSR 218, CDC Connected Device Configurationhttp://jcp.org/en/jsr/detail?id=218
JSR 226, SVG Scalable 2D Vector Graphics API for J2MEhttp://jcp.org/en/jsr/detail?id=226
JSR 229, Payment Payment APIhttp://jcp.org/en/jsr/detail?id=229
JSR 234, AMMS Advanced Multimedia Supplementshttp://jcp.org/en/jsr/detail?id=234
JSR 238, MIA Mobile Internationalization APIhttp://jcp.org/en/jsr/detail?id=238
JSR 239 Java Binding for OpenGL ES APIhttp://jcp.org/en/jsr/detail?id=239
JSR 248, MSA 1.0 Mobile Service Architecturehttp://jcp.org/en/jsr/detail?id=248
JSR 256 Mobile Sensor APIhttp://jcp.org/en/jsr/detail?id=256
JSR 280, XML API XML API for Java MEhttp://jcp.org/en/jsr/detail?id=280
TABLE 19-1 Supported JCP APIs (Continued)
JSR, API Name, URL
Chapter 19 JSR Support 157

158 Java ME Platform SDK Help • April 2009
CHAPTER 20
JSR 75: PDA Optional Packages
The Java ME Platform SDK supports JSR 75, the PDA Optional Packages (PDAP) forthe J2ME Platform. JSR 75 includes two independent APIs:
■ The FileConnection optional package allows MIDlets access to a local device filesystem.
■ The Personal Information Management (PIM) optional package includes APIs formanipulating contact lists (address book), calendars, and to-do lists.
This chapter describes how the Java ME Platform SDK implements theFileConnection and PIM APIs.
FileConnection APIOn a real device, the FileConnection API typically provides access to files stored inthe device’s memory or on a memory card.
In the Java ME Platform SDK emulator, the FileConnection API enables MIDlets toaccess files stored on your computer’s hard disk.
The files that can be accessed using FileConnection are stored in subdirectories ofUSER_HOME/javame-sdk/3.0/work/emulator-instance/appdb/filesystem. Forexample, the DefaultCldcPhone1 emulator skin comes with a root directoryinstalled called root1, which contains a Readme file and an empty directory namedphotos. The full path of the file is:USER_HOME/javame-sdk/3.0/work/emulator-instance/appdb/filesystem\root1\photos.
159

Note – If multiple instances of the same emulator skin run simultaneously, the JavaME Platform SDK generates unique file paths for each one. For instance, the firstdirectory is named DefaultCldcPhone1 and the second instance is namedDefaultCldcPhone2.
Each subdirectory of filesystem is called a root. The Java ME Platform SDKprovides a mechanism for managing roots. While the emulator is running, chooseView > External Events Generator from the emulator window’s menu. A utilitywindow opens. Click the File Connection tab.
In the File Connection panel you can mount, unmount, or delete filesystem roots.Mounted roots are displayed in the top list, and unmounted roots are moved to thebottom list. Mounted root directories and their subdirectories are available toapplications using the FileConnection API. Unmounted roots can be remounted inthe future.
■ To add a new empty filesystem root directory, click Mount Empty and fill in aname for the directory.
160 Java ME Platform SDK Help • April 2009

■ To mount a copy of an existing directory, click Mount Copy, and browse to choosea directory you want to copy. When the File System Root Entry dialog opens,enter the name for this root. A deep copy of the selected directory is placed intothe emulator’s filesystem with the specified root name.
■ To make a directory inaccessible to the FileConnection API, select it in the list andclick Unmount. A dialog opens asking for the name of this root. The selected rootis unmounted and moved to the Unmounted roots list.
■ To completely remove a mounted directory, select it and click Unmount & Delete.
■ To remount an unmounted directory, select it and click Remount. The root ismoved to the mounted roots list.
■ To delete an unmounted directory, select it and click Delete. The selected root isremoved from the list.
PIM APIThe Java ME Platform SDK emulator stores contact, calendar, and to-do informationin standard files on your desktop computer’s hard disk. All information is stored in:
USER_HOME/javame-sdk/3.0/work/emulator-instance/appdb/filesystem/skin/pim.
This directory is shared by all running emulators. Lists are stored in subdirectoriesof the contacts, events, and todo directories. For example, a contact list calledContacts is contained inUSER_HOME/javame-sdk/3.0/work/emulator-instance/appdb/filesystem/skin/Contacts:
Inside the list directory, items are stored in vCard (.vcs) or vCalendar (.vcf)format (see http://www.imc.org/pdi/). Contacts are stored in vCard format,while calendar and to-do items are both stored in vCalendar format.
Running PDAPDemoPDAPDemo shows how to use the PIM and FileConnection APIs that are part of theJSR 75 specification.
Chapter 20 JSR 75: PDA Optional Packages 161
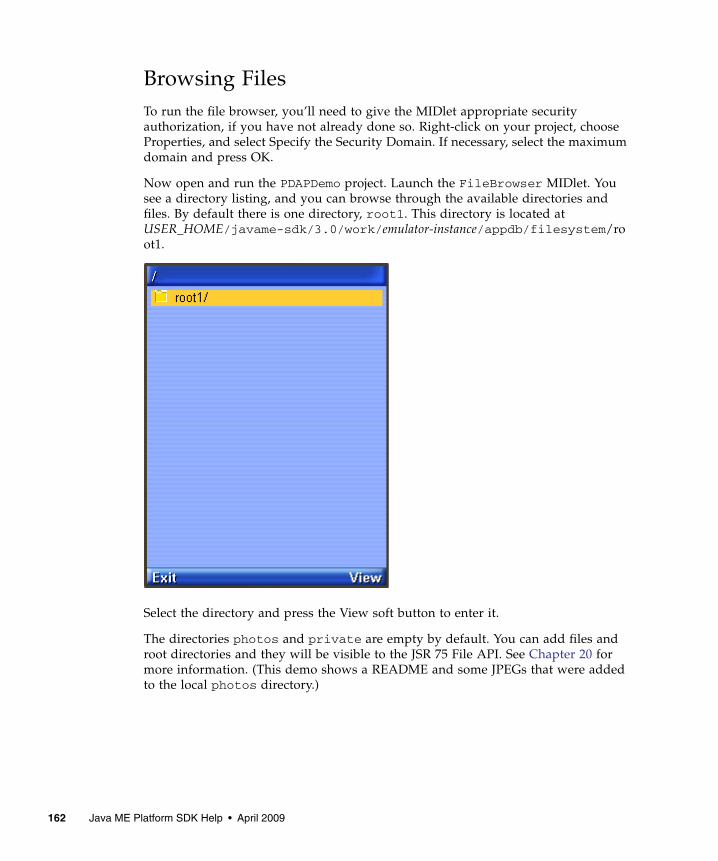
Browsing FilesTo run the file browser, you’ll need to give the MIDlet appropriate securityauthorization, if you have not already done so. Right-click on your project, chooseProperties, and select Specify the Security Domain. If necessary, select the maximumdomain and press OK.
Now open and run the PDAPDemo project. Launch the FileBrowser MIDlet. Yousee a directory listing, and you can browse through the available directories andfiles. By default there is one directory, root1. This directory is located atUSER_HOME/javame-sdk/3.0/work/emulator-instance/appdb/filesystem/root1.
Select the directory and press the View soft button to enter it.
The directories photos and private are empty by default. You can add files androot directories and they will be visible to the JSR 75 File API. See Chapter 20 formore information. (This demo shows a README and some JPEGs that were addedto the local photos directory.)
162 Java ME Platform SDK Help • April 2009
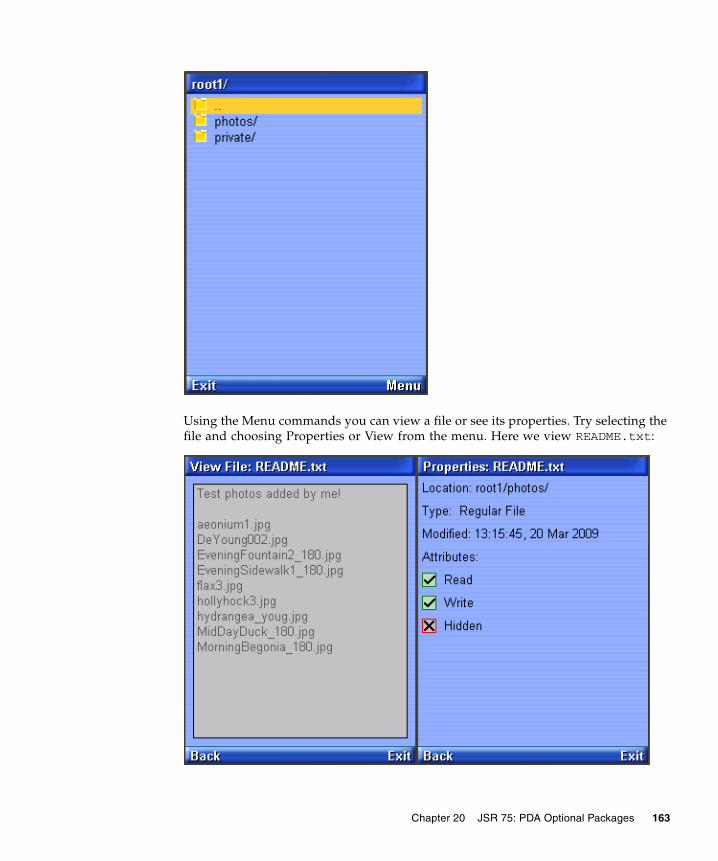
Using the Menu commands you can view a file or see its properties. Try selecting thefile and choosing Properties or View from the menu. Here we view README.txt:
Chapter 20 JSR 75: PDA Optional Packages 163
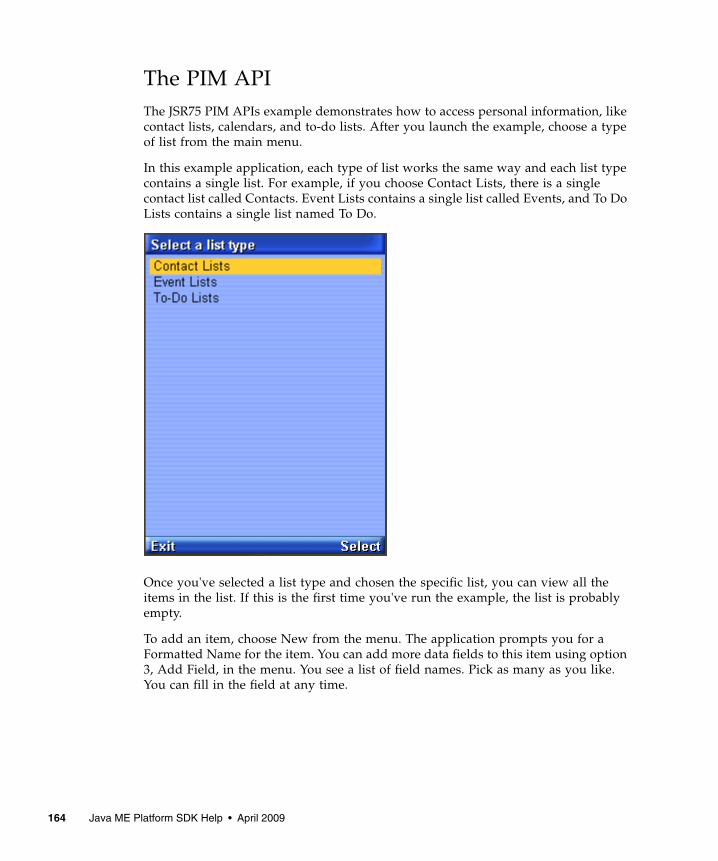
The PIM APIThe JSR75 PIM APIs example demonstrates how to access personal information, likecontact lists, calendars, and to-do lists. After you launch the example, choose a typeof list from the main menu.
In this example application, each type of list works the same way and each list typecontains a single list. For example, if you choose Contact Lists, there is a singlecontact list called Contacts. Event Lists contains a single list called Events, and To DoLists contains a single list named To Do.
Once you've selected a list type and chosen the specific list, you can view all theitems in the list. If this is the first time you've run the example, the list is probablyempty.
To add an item, choose New from the menu. The application prompts you for aFormatted Name for the item. You can add more data fields to this item using option3, Add Field, in the menu. You see a list of field names. Pick as many as you like.You can fill in the field at any time.
164 Java ME Platform SDK Help • April 2009
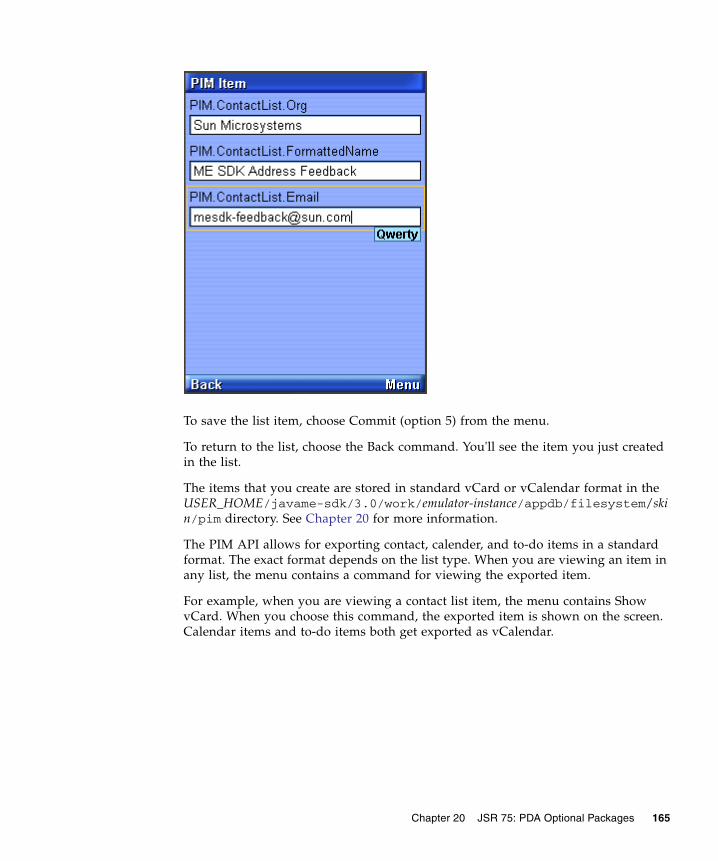
To save the list item, choose Commit (option 5) from the menu.
To return to the list, choose the Back command. You'll see the item you just createdin the list.
The items that you create are stored in standard vCard or vCalendar format in theUSER_HOME/javame-sdk/3.0/work/emulator-instance/appdb/filesystem/skin/pim directory. See Chapter 20 for more information.
The PIM API allows for exporting contact, calender, and to-do items in a standardformat. The exact format depends on the list type. When you are viewing an item inany list, the menu contains a command for viewing the exported item.
For example, when you are viewing a contact list item, the menu contains ShowvCard. When you choose this command, the exported item is shown on the screen.Calendar items and to-do items both get exported as vCalendar.
Chapter 20 JSR 75: PDA Optional Packages 165

166 Java ME Platform SDK Help • April 2009

CHAPTER 21
JSR 82: Bluetooth and OBEXSupport
The Java ME Platform SDK emulator supports JSR 82, the Java APIs for Bluetooth.The emulator is fully compliant with version 1.1 of the specification, which describesintegration with the push registry. JSR 82 includes two independent APIs:
■ The Bluetooth API provides an interface to Bluetooth wireless networking,including device discovery and data exchange.
■ The OBEX API allows applications to use the Object Exchange (OBEX) protocolover Bluetooth or other communication channels.
This chapter describes how the Java ME Platform SDK implements the Bluetoothand OBEX APIs.
Bluetooth Simulation EnvironmentThe Java ME Platform SDK emulator enables you to develop and test applicationsthat use Bluetooth without having actual Bluetooth hardware. The SDK simulates aBluetooth environment for running emulators. Multiple emulator instances candiscover each other and exchange data using the Bluetooth API.
For an example, see Running the Bluetooth Demo.
167
OBEX Over InfraredThe Java ME Platform SDK implements OBEX transfer over simulated Bluetooth andinfrared connections. The simulated infrared connection follows the IrDA standard(see http://www.irda.org/). Simulated infrared transfers can take place betweenmultiple running emulators.
Setting Bluetooth and OBEX PreferencesThe Java ME Platform SDK enables you to configure the Bluetooth and OBEXsimulation environment. Choose Edit > Preferences and select Bluetooth/OBEX todisplay the following window.
OBEX PreferencesDevices using IrDA in the real world discover other devices by listening. You canconfigure how long the Java ME Platform SDK emulator waits to discover anotherdevice using the Discovery timeout field in the IrDA OBEX section of the preferenceswindow. Enter a value in milliseconds.
At the API level, the discovery timeout value determines how long a call toConnector.open("irdaobex://discover...") blocks before it returns orthrows an exception.
The maximum packet length affects how much data is sent in each packet betweenemulators. Shorter packet values result in more packets and more packet overhead.
Bluetooth Internal PropertiesIn the Bluetooth section of the preferences window, the Device discovery timeout isthe amount of time, in milliseconds, the emulator waits while attempting to locateother devices in the simulated Bluetooth environment.
Bluetooth Address of Next Emulator is the Bluetooth address to be assigned to thefirst emulator instance. Subsequent instances of the emulator receive anautomatically generated address.
168 Java ME Platform SDK Help • April 2009
Bluetooth System PropertiesThe System Properties tab in the Bluetooth section of the preferences containsproperties that can be retrieved in an application using the getProperty() methodin javax.bluetooth.LocalDevice.
The Bluetooth properties are fully described in the JSR 82 specification.
Bluetooth BCC PropertiesThe Bluetooth Control Center (BCC) controls Bluetooth settings. Some devices mightprovide a GUI to customize Bluetooth settings. In the Java ME Platform SDK, theBCC is configured using the BCC Properties tab of the Bluetooth preferences. Theproperties are as follows.
TABLE 21-1 BCC Properties
Property Description
Enable Bluetoothsupport
If this property is disabled, LocalDevice.getLocalDevice()throws a BluetoothStateException and no connections can becreated. This is useful to test the behavior of your application ondevices that support JSR 82 but might have the Bluetooth featureturned off.
Device isdiscoverable
Indicates whether or not this emulator can be discovered by otheremulators.
Friendly name A human-readable name for the emulator in the simulated Bluetoothenvironment. If the name is left blank, the emulator does not supportthe friendly name feature.
Encryption Determines whether connection encryption is supported (on) or not(off). In addition, the force settings means all connections must beencrypted. See the documentation for RemoteDevice’s encrypt()method for details.
Authorization Similar to the Encryption property. See RemoteDevice’sauthorize() method.
Authentication Similar to Encryption and Authorization. See RemoteDevice’sauthenticate() method.
Chapter 21 JSR 82: Bluetooth and OBEX Support 169
Running the Bluetooth DemoThis application contains MIDlets that demonstrate the use of JSR 82’s BluetoothAPI. It shows how images can be transferred between devices using Bluetooth.
You must run two emulator instances to see this process, and each device must havea different phone number.
For example, use DefaultCldcMsaPhone1 to launch Bluetooth Demo, then chooseServer. The emulator asks you if you want to allow a Bluetooth connection. ChooseYes. The server starts and displays a list of images. At the beginning, none of theimages are available on the Bluetooth network
Select the images you want to make available.
From the menu choose Publish image (or type or click 1). The icon color changesfrom purple to green, indicating it is published.
Use DefaultCldcMsaPhone2 to launch Bluetooth Demo, then select Client. TheMIDlet tells you it’s ready to search for images. Click the Find soft button. TheMIDlet finds the other emulator and get a list of images from it. Select one from thelist and choose Load.
■ If you are running the demonstration in a trusted protection domain, the image istransferred using simulated Bluetooth and is shown on the client emulator.
■ If you are not running in a trusted protection domain, the first emulator (theserver) displays a prompt asking if you want to authorize the connection from theclient. Choose Yes. The image is displayed in the client emulator.
170 Java ME Platform SDK Help • April 2009
CHAPTER 22
JSR 135: Mobile Media API Support
JSR 135, the Mobile Media API (MMAPI), provides a standard API for rendering andcapturing time-based media, like audio or video. The API is designed to be flexiblewith respect to the media formats, protocols, and features supported by variousdevices. See the following topics:
■ Media Types
■ Adaptive Multi-Rate (AMR) Content
■ Media Capture
■ MMAPI MIDlet Behavior
■ Ring Tones
■ Download Ring Tones
■ Ring Tone Formats
■ Running the MMAPI Sample Project
■ Running AudioDemo
■ Running MMAPIDemos
■ Running the Multimedia Sample Project
For information on programming with MMAPI, see the following articles:
Mobile Media API Overview:http://developers.sun.com/techtopics/mobility/apis/articles/mmapi_overview/
The J2ME Mobile Media API: http://jcp.org/en/jsr/detail?id=135
171
Media TypesThe emulator’s MMAPI implementation supports the following media types.
Adaptive Multi-Rate (AMR) ContentThe Java ME Platform SDK simulates support for Adaptive Multi-Rate (AMR)content (http://www.ietf.org/rfc/rfc3267.txt). Although the Java MEPlatform SDK cannot decode AMR content, the implementation returns a player forAMR content when requested.
On Windows, AMR files are converted to regular WAVE files and passed to Qsound.Because the Windows version interfaces with the 3GPP implementation, you do nothave to do anything to get AMR files to play.
Media CaptureThe Java ME Platform SDK emulator supports audio and video capture. Audiocapture is supported by using the capture capabilities of the system upon which theemulator runs.
Video capture is supported by simulating a camera input.
Consult the MobileMediaAPI example application for details and source code thatdemonstrates how to capture audio and video.
MIME Type Description
audio/amr Adaptive Multi-Rate
audio/midi MIDI files
audio/sp-midi Scalable Polyphony MIDI
audio/x-tone-seq MIDP 2.0 tone sequence
audio/x-wav WAV PCM sampled audio
image/gif GIF 89a (animated GIF)
video/mpeg MPEG video
video/vnd.sun.rgb565 Video capture
172 Java ME Platform SDK Help • April 2009
MMAPI MIDlet BehaviorMIDlets have a lifecycle that is defined in the MIDP specification. MIDlets can bepaused by events such as incoming phone calls. A well-behaved MIDlet releasesimportant device resources when it is paused and reallocates or restarts thoseresources when the MIDlet is resumed. In the MMAPI arena, stop any Players thatare rendering content when a MIDlet is paused.
The Java ME Platform SDK prints a message to the console if you pause a MIDletand it does not stop its running Players. You can test this feature using the PausingAudio Test MIDlet in the MobileMediaAPI demonstration application.
The warning message is printed only once for each running emulator.
Ring TonesMMAPI can be used to play ring tones, as demonstrated in Simple Tones and SimplePlayer. The ring tone formats mentioned here are in common use. You can downloadring tones or create your own.
Download Ring TonesRing tone files can be downloaded from many internet sites, including the following:
■ http://www.surgeryofsound.co.uk/
■ http://www.convertyourtone.com/
■ http://www.filmfind.tv/ringtones/
Ring Tone FormatsThis section provides samples of several formats
■ RTTTL, the Ringing Tones text transfer language format, is explained at
http://www.convertyourtone.com/rtttl.html
■ Nokia Composer
This is a rendition of Beethoven’s 9th symphony in Nokia Composer format:
Chapter 22 JSR 135: Mobile Media API Support 173

16g1,16g1,16g1,4#d1,16f1,16f1,16f1,4d1,16g1,16g1,16g1,16#d1,
16#g1,16#g1,16#g1,16g1,16#d2,16#d2,16#d2,4c2,16g1,16g1,16g1,
16d1,16#g1,16#g1,16#g1, 16g1,16f2,16f2,16f2,4d2
■ Ericsson Composer
Beethoven’s Minuet in G:
a b + c b + c b + c b + C p + d a B p + c g A
p f g a g a g a g A p b f G p a e F
Beethoven’s 9th symphony theme:
f f f # C # d # d # d C p f f f # c # f #f # f f +# c + #c + # c # A ff f c # f # f # f f + # d + # d + # d
■ Siemens Composer Format
Inspector Gadget theme:
C2(1/8) D2(1/16) Dis2(1/8) F2(1/16) G2(1/8)
P(1/16) Dis2(1/8) P(1/16) Fis2(1/8) P(1/16)
D2(1/8) P(1/16) F2(1/8) P(1/16) Dis2(1/8)
P(1/16) C2(1/8) D2(1/16) Dis2(1/8) F2(1/16)
G2(1/8) P(1/16) C3(1/8) P(1/16) B2(1/2) P(1/4)
C2(1/8) D2(1/16) Dis2(1/8) F2(1/16) G2(1/8) P(1/16)
Dis2(1/8) P(1/16) Fis2(1/8) P(1/16) D2(1/8) P(1/16)
F2(1/8) P(1/16) Dis2(1/8) P(1/16) C3(1/8) B2(1/16)
Ais2(1/8) A2(1/16) Gis2(1/2) G2(1/8) P(1/16) C3(1/2)
■ Motorola Composer
Beethoven’s 9th symphony:
4 F2 F2 F2 C#4 D#2 D#2 D#2 C4 R2 F2 F2 F2 C#2 F#2 F#2
F#2 F2 C#+2 C#+2 C#+2 A#4 F2 F2 F2 C2 F#2 F#2 F#2 F2
D#+2 D#+2 D#+2
■ Panasonic Composer
Beethoven’s 9th symphony:
444** 444** 444** 1111* 4444** 4444** 4444** 111*
0** 444** 444** 444** 1111** 4444** 4444** 4444**
444** 11** 11** 11** 6666* 444** 444** 444** 111**
4444** 4444** 4444** 444** 22** 22** 22**
■ Sony Composer
174 Java ME Platform SDK Help • April 2009
Beethoven’s 9th sympony:
444****444****444****111#*****444#****444#****444#****
111*****(JD)0000444****444****444****111#****444#****
444#****444#****444****11#****11#****11#****666#*****
444****444****444****111****444#****444#****
444#****444****22#****22#****22#****
Running the MMAPI Sample ProjectThe following projects demonstrate ways to implement MMAPI 1.1. See RunningAudioDemo, Running MMAPIDemos.
Running AudioDemoDemonstrates audio capabilities, including mixing and playing audio with ananimation. Select a MIDlet from the list, and from the menu, select 1, Launch.
■ Audio Player.
Select a sound clip and press the Play soft button. Click Back to return to the listof clips.
■ Bouncing Ball. Select No Background and press the Play soft button. Two ballsrandomly bounce in the screen, emitting a tone whenever they contact a wall.
Wave background, tone seq background, and MIDI background play the sametwo-ball audio visual sequence with the additional audio background.
■ Mix Demo shows that different audio formats can play simultaneously. Select aMIDlet and press the Play soft button.
Tone+Wav - The audio clip starts playing and the Tone soft button is displayed.Press the Tone button to hear a tone playing over the original audio clip.
Tone+ToneSeq - The audio clip starts playing and the Tone soft button isdisplayed. Press the Tone button to hear a tone playing over the original audioclip.
ToneSeq+Wav - The tone sequence and the wav sequence play simultaneously.Press the Pause soft button to interrupt, and press Play to resume.
Chapter 22 JSR 135: Mobile Media API Support 175
Running MMAPIDemosThe MMAPIDemos application contains four MIDlets that showcase the SDK’smultimedia capabilities:
■ Simple Tones
■ Simple Player
■ Video
■ Pausing Audio Test
Simple TonesSimple Tones demonstrates how to use interactive synthetic tones. Select a sample,then click Play on the lower right.
■ Short Single Tone and Long Single Tone use Manager.playTone() to play toneswith different pitch.
■ Short MIDI event plays a chord on the interactive MIDI device (locator"device://midi"). The shortMidiEvent() method of MIDIControl is usedto trigger the notes of the chord.
■ To run the MMAPI Drummer demo, click or type number keys (0-9). Eachnumber plays a different sound.
Simple PlayerThe Simple Player application demonstrates the range of audio and videocapabilities of the emulator. It includes sample files in a variety of formats and canplay files from the emulator's persistent storage or from HTTP URLs.
The player portion uses a generic javax.microedition.media.Player interface.The player displays duration, media time, and controls for running the media file. Ifmetadata is available in a file, the player enables you to view the information, suchas author and title. In the case of MIDI files, if karaoke text is present in the file, itdisplays on the screen during play. Graphical user interface controls can be viewedon the display screen if applicable. You can access these controls by selecting one ofthe media samples in Simple Player, then pressing the Menu button to view andselect the desired command.
Select Simple Player then click Launch. The demo includes the following mediasamples:
176 Java ME Platform SDK Help • April 2009
■ Bong plays a short WAV file. You can adjust certain playback features, asdescribed later in this document. The display shows the duration of the sound inminutes:seconds:tenths of a second, for example 00:17:5. This audio sample is aresource file in the MIDlet suite JAR file.
■ MIDI Scale plays a sample musical scale. The display shows the title of theselected music file, the duration of the song, the elapsed time during playback,and the current tempo in beats per minute (bpm). This MIDI file is stored in theMIDlet suite JAR file.
■ Simple Ring Tone plays a short sequence of Beethoven's Fifth Symphony. Thedisplay shows the title of the selected music file, the duration of the song, theelapsed time in seconds and tenths of a second during playback, and the currenttempo in beats per minute (bpm). This ringtone file (.jts format) is stored in theMIDlet suite JAR file.
■ WAV Music plays a brief audio file. The display shows the title of the audio file,the duration of the audio the elapsed time during playback, and the playback ratein percent. This WAV file is retrieved from an HTTP server.
■ MIDI Scale plays a MIDI file that is retrieved from an HTTP server.
■ The Animated GIF example shows an animated GIF that counts from 1 to 5. Thefile is stored in the MIDlet suite JAR file.
■ Audio Capture from a default device lets you capture audio from a microphoneor connected device. The sound is captured and played back on the speaker. Toavoid feedback, use a headset.
■ Video Capture Simulation simulates viewing input video such as might bepossible on a device equipped with a camera.
■ MPEG1 Video [http]. Plays an MPEG video found athttp://java.sun.com/products/java-media/mma/media/test-mpeg.mpg.
■ [enter URL] allows you to play back media files from arbitrary HTTP servers.Type a valid URL (for example,http://java.sun.com/products/java-media/mma/media/test-wav.mpg) at the insertion point and click OK to play a file. If you want to open an HTTPdirectory from which to select media, be sure to add a slash to the end of the URL.
In addition, Simple Player parses ring tones in Ringing Tones text transfer language(RTTTL). See http://www.convertyourtone.com/rtttl.html for informationon RTTTL.
The Simple Player includes a common set of commands that control media playback.The commands are available from the Simple Player menu, and some haveassociated keypad buttons. TABLE 22-1 describes these commands.
Chapter 22 JSR 135: Mobile Media API Support 177
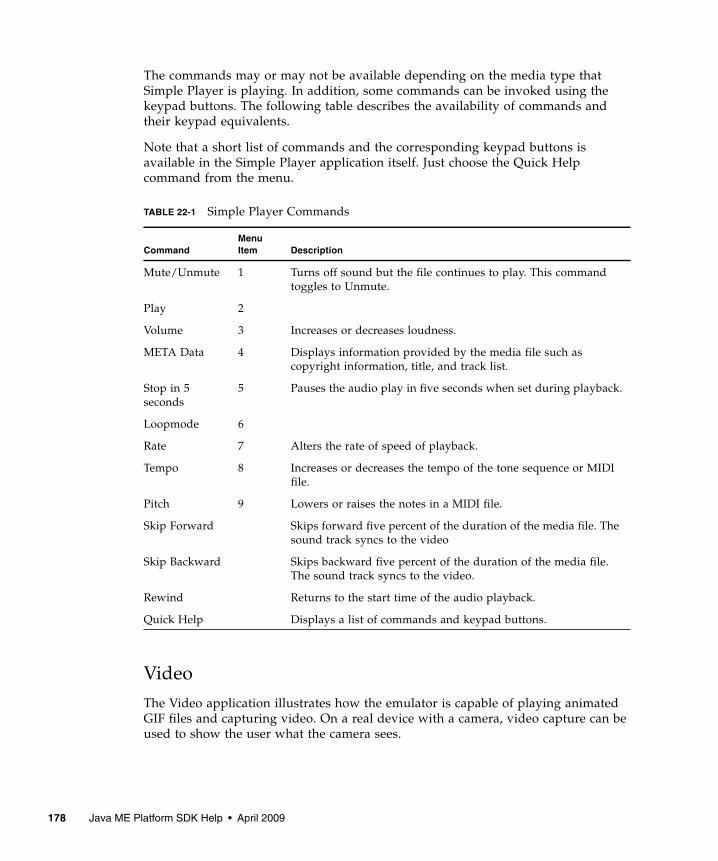
The commands may or may not be available depending on the media type thatSimple Player is playing. In addition, some commands can be invoked using thekeypad buttons. The following table describes the availability of commands andtheir keypad equivalents.
Note that a short list of commands and the corresponding keypad buttons isavailable in the Simple Player application itself. Just choose the Quick Helpcommand from the menu.
VideoThe Video application illustrates how the emulator is capable of playing animatedGIF files and capturing video. On a real device with a camera, video capture can beused to show the user what the camera sees.
TABLE 22-1 Simple Player Commands
CommandMenuItem Description
Mute/Unmute 1 Turns off sound but the file continues to play. This commandtoggles to Unmute.
Play 2
Volume 3 Increases or decreases loudness.
META Data 4 Displays information provided by the media file such ascopyright information, title, and track list.
Stop in 5seconds
5 Pauses the audio play in five seconds when set during playback.
Loopmode 6
Rate 7 Alters the rate of speed of playback.
Tempo 8 Increases or decreases the tempo of the tone sequence or MIDIfile.
Pitch 9 Lowers or raises the notes in a MIDI file.
Skip Forward Skips forward five percent of the duration of the media file. Thesound track syncs to the video
Skip Backward Skips backward five percent of the duration of the media file.The sound track syncs to the video.
Rewind Returns to the start time of the audio playback.
Quick Help Displays a list of commands and keypad buttons.
178 Java ME Platform SDK Help • April 2009
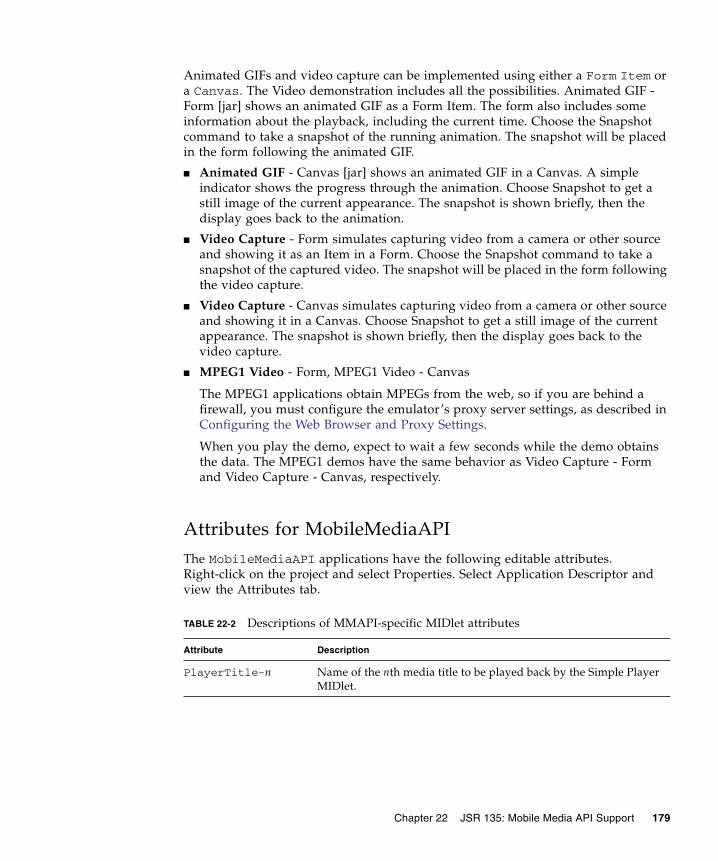
Animated GIFs and video capture can be implemented using either a Form Item ora Canvas. The Video demonstration includes all the possibilities. Animated GIF -Form [jar] shows an animated GIF as a Form Item. The form also includes someinformation about the playback, including the current time. Choose the Snapshotcommand to take a snapshot of the running animation. The snapshot will be placedin the form following the animated GIF.
■ Animated GIF - Canvas [jar] shows an animated GIF in a Canvas. A simpleindicator shows the progress through the animation. Choose Snapshot to get astill image of the current appearance. The snapshot is shown briefly, then thedisplay goes back to the animation.
■ Video Capture - Form simulates capturing video from a camera or other sourceand showing it as an Item in a Form. Choose the Snapshot command to take asnapshot of the captured video. The snapshot will be placed in the form followingthe video capture.
■ Video Capture - Canvas simulates capturing video from a camera or other sourceand showing it in a Canvas. Choose Snapshot to get a still image of the currentappearance. The snapshot is shown briefly, then the display goes back to thevideo capture.
■ MPEG1 Video - Form, MPEG1 Video - Canvas
The MPEG1 applications obtain MPEGs from the web, so if you are behind afirewall, you must configure the emulator’s proxy server settings, as described inConfiguring the Web Browser and Proxy Settings.
When you play the demo, expect to wait a few seconds while the demo obtainsthe data. The MPEG1 demos have the same behavior as Video Capture - Formand Video Capture - Canvas, respectively.
Attributes for MobileMediaAPIThe MobileMediaAPI applications have the following editable attributes.Right-click on the project and select Properties. Select Application Descriptor andview the Attributes tab.
TABLE 22-2 Descriptions of MMAPI-specific MIDlet attributes
Attribute Description
PlayerTitle-n Name of the nth media title to be played back by the Simple PlayerMIDlet.
Chapter 22 JSR 135: Mobile Media API Support 179
Running the Multimedia Sample ProjectThis MIDlet simply plays different multimedia samples. The sample formats are:AMR narrow band, MIDI audio, Wave audio, MPEG video, and animated GIF.
PlayerURL-n Location of the nth media title, PlayerTitle-n, to be played backby the Simple Player MIDlet.
VideoTest-n The name of the nth media title to be played back by the Videoapplication.
VideoTest-URLn Location of the nth media title, VideoTest-n, to be played backby the Video application.
TABLE 22-2 Descriptions of MMAPI-specific MIDlet attributes (Continued)
Attribute Description
180 Java ME Platform SDK Help • April 2009

CHAPTER 23
JSR 172: Web Services Support
The Java ME Platform SDK emulator supports JSR 172, the J2ME Web ServicesSpecification. JSR 172 provides APIs for accessing web services from mobileapplications. It also includes an API for parsing XML documents.
Generating Stub Files from WSDLDescriptorsThe Java ME Platform SDK provides a stub generator that automates creating sourcecode for accessing web services that conform to the J2ME Web Services Specification.You can add stubs to any MIDP application. The following is a general procedure foradding stubs:
1. In the Projects window, expand the tree for a project.
2. Right-click on the Source Packages node and select New > Other.
3. In the Categories pane select Other, and in the File Types area choose MobileWebservice Client.
4. In the Generate J2ME Webservice Stub page, you can either:
■ Click Running Web Service and enter the URL for the WSDL
■ Click Specify the Local filename for the retrieved WSDL and browse to a file onyour system.
In either case, you must enter a Package name, then click Finish. The newpackage appears in the project and includes an interface file and a stub file.
5. You can now edit your source files to call the content the stub provides, thenbuild and run.
181
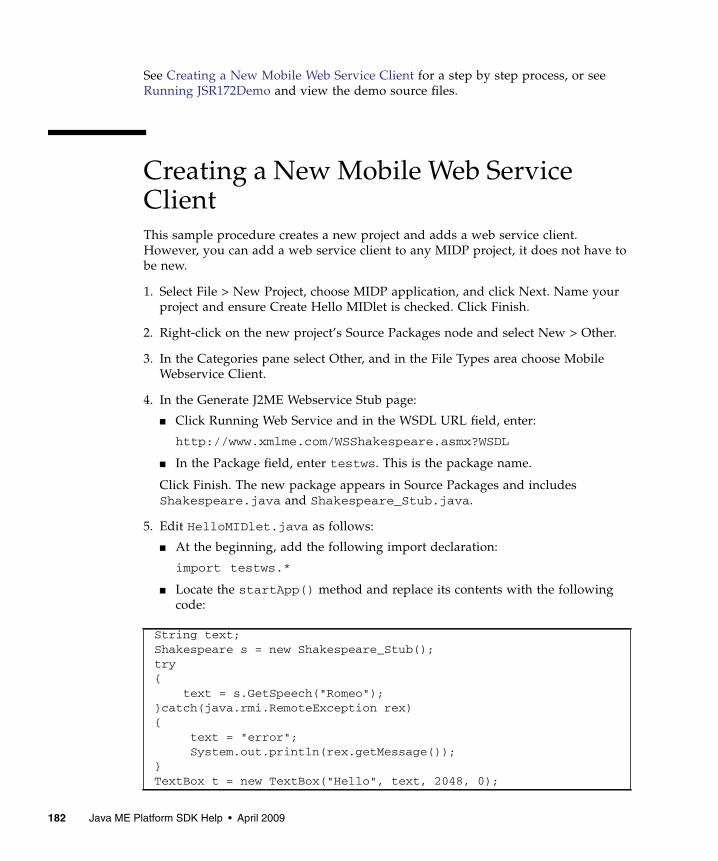
See Creating a New Mobile Web Service Client for a step by step process, or seeRunning JSR172Demo and view the demo source files.
Creating a New Mobile Web ServiceClientThis sample procedure creates a new project and adds a web service client.However, you can add a web service client to any MIDP project, it does not have tobe new.
1. Select File > New Project, choose MIDP application, and click Next. Name yourproject and ensure Create Hello MIDlet is checked. Click Finish.
2. Right-click on the new project’s Source Packages node and select New > Other.
3. In the Categories pane select Other, and in the File Types area choose MobileWebservice Client.
4. In the Generate J2ME Webservice Stub page:
■ Click Running Web Service and in the WSDL URL field, enter:
http://www.xmlme.com/WSShakespeare.asmx?WSDL
■ In the Package field, enter testws. This is the package name.
Click Finish. The new package appears in Source Packages and includesShakespeare.java and Shakespeare_Stub.java.
5. Edit HelloMIDlet.java as follows:
■ At the beginning, add the following import declaration:
import testws.*
■ Locate the startApp() method and replace its contents with the followingcode:
String text;Shakespeare s = new Shakespeare_Stub();try{
text = s.GetSpeech("Romeo");}catch(java.rmi.RemoteException rex){
text = "error";System.out.println(rex.getMessage());
}TextBox t = new TextBox("Hello", text, 2048, 0);
182 Java ME Platform SDK Help • April 2009

6. Build and run the project. You see a quote from Shakespeare’s Romeo and Julieton the device screen.
You can vary the above procedure to use a local WSDL file. Open the following webpage in a browser:
http://www.xmlme.com/WSShakespeare.asmx?WSDL
Save it to a local file. For example, c:\ws\WSShakespeare.wsdl. Follow theprocedure above, except at Step 4, specify the local file name.
Running JSR172DemoJSR172Demo shows how to access a web service from a MIDlet. The web service isalready running on an Internet server, and it conforms to the J2ME Web ServicesSpecification.
If you are using a proxy server, you must configure the emulator’s proxy serversettings as described in Configuring the Web Browser and Proxy Settings. Build andrun the example.
JSR172Demo contains a single MIDlet named Server Script. Launch it and follow theprompts. You can browse through simulated news headlines, all of which areretrieved from the web service.
t.addCommand(exitCommand);t.setCommandListener(this);display.setCurrent(t);
Chapter 23 JSR 172: Web Services Support 183

184 Java ME Platform SDK Help • April 2009

CHAPTER 24
JSR 177: Smart Card Security(SATSA)
The Security and Trust Services APIs (SATSA) provide smart card access andcryptographic capabilities to applications running on small devices. JSR 177 (theSATSA specification) defines four distinct APIs as optional packages:
■ SATSA-APDU - Enables applications to communicate with smart cardapplications using a low-level protocol.
■ SATSA-JCRMI - Provides an alternate method for communicating with smartcard applications using a remote object protocol.
■ SATSA-PKI -Enables applications to use a smart card to digitally sign data andmanage user certificates.
■ SATSA-CRYPTO - A general-purpose cryptographic API that supports messagedigests, digital signatures, and ciphers.
The Java ME Platform SDK emulator fully supports SATSA. This topic describeshow you can use the Java ME Platform SDK to work with SATSA in your ownapplications.
For a more general introduction to SATSA and using smart cards with small devices,see the SATSA Developer’s Guide, which is available athttp://java.sun.com/j2me/docs/satsa-dg/.
If you need to develop your own Java Card applications, download the Java CardDevelopment Kit, available at http://java.sun.com/products/javacard/.
185
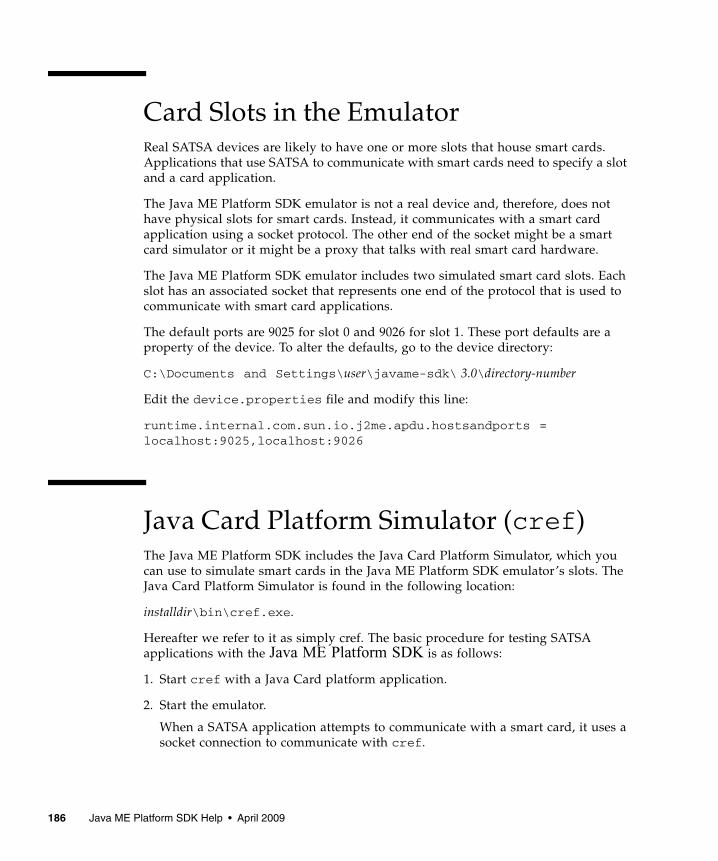
Card Slots in the EmulatorReal SATSA devices are likely to have one or more slots that house smart cards.Applications that use SATSA to communicate with smart cards need to specify a slotand a card application.
The Java ME Platform SDK emulator is not a real device and, therefore, does nothave physical slots for smart cards. Instead, it communicates with a smart cardapplication using a socket protocol. The other end of the socket might be a smartcard simulator or it might be a proxy that talks with real smart card hardware.
The Java ME Platform SDK emulator includes two simulated smart card slots. Eachslot has an associated socket that represents one end of the protocol that is used tocommunicate with smart card applications.
The default ports are 9025 for slot 0 and 9026 for slot 1. These port defaults are aproperty of the device. To alter the defaults, go to the device directory:
C:\Documents and Settings\user\javame-sdk\ 3.0\directory-number
Edit the device.properties file and modify this line:
runtime.internal.com.sun.io.j2me.apdu.hostsandports =localhost:9025,localhost:9026
Java Card Platform Simulator (cref)The Java ME Platform SDK includes the Java Card Platform Simulator, which youcan use to simulate smart cards in the Java ME Platform SDK emulator’s slots. TheJava Card Platform Simulator is found in the following location:
installdir\bin\cref.exe.
Hereafter we refer to it as simply cref. The basic procedure for testing SATSAapplications with the Java ME Platform SDK is as follows:
1. Start cref with a Java Card platform application.
2. Start the emulator.
When a SATSA application attempts to communicate with a smart card, it uses asocket connection to communicate with cref.
186 Java ME Platform SDK Help • April 2009
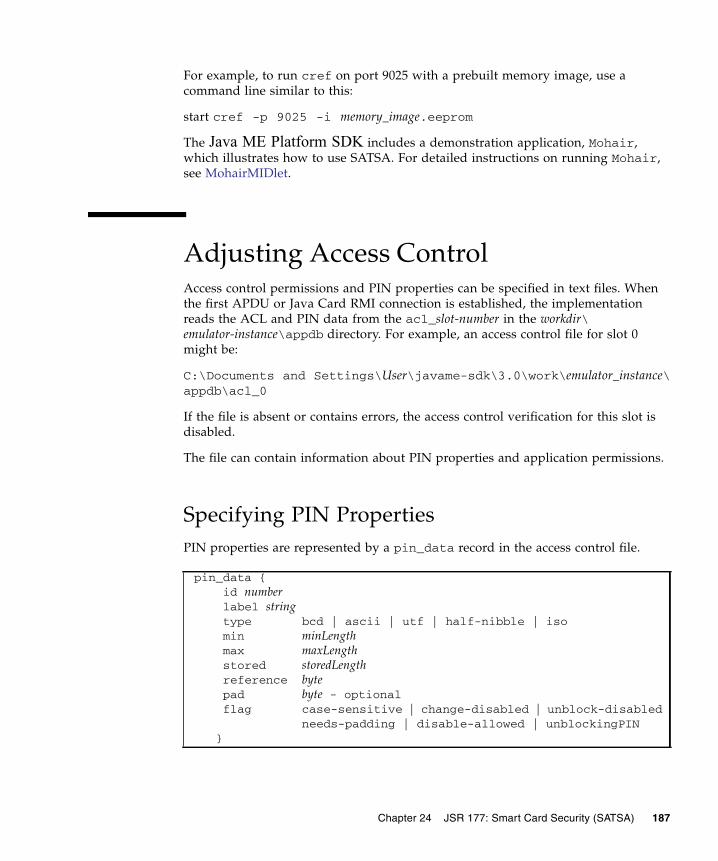
For example, to run cref on port 9025 with a prebuilt memory image, use acommand line similar to this:
start cref -p 9025 -i memory_image.eeprom
The Java ME Platform SDK includes a demonstration application, Mohair,which illustrates how to use SATSA. For detailed instructions on running Mohair,see MohairMIDlet.
Adjusting Access ControlAccess control permissions and PIN properties can be specified in text files. Whenthe first APDU or Java Card RMI connection is established, the implementationreads the ACL and PIN data from the acl_slot-number in the workdir\emulator-instance\appdb directory. For example, an access control file for slot 0might be:
C:\Documents and Settings\User\javame-sdk\3.0\work\emulator_instance\appdb\acl_0
If the file is absent or contains errors, the access control verification for this slot isdisabled.
The file can contain information about PIN properties and application permissions.
Specifying PIN PropertiesPIN properties are represented by a pin_data record in the access control file.
pin_data {id numberlabel stringtype bcd | ascii | utf | half-nibble | isomin minLengthmax maxLengthstored storedLengthreference bytepad byte - optionalflag case-sensitive | change-disabled | unblock-disabled
needs-padding | disable-allowed | unblockingPIN}
Chapter 24 JSR 177: Smart Card Security (SATSA) 187

Specifying Application PermissionsApplication permissions are defined in access control file (acf) records. The recordformat is as follows:
The acf record is an Access Control File. The AID after acf identifies theapplication. A missing AID indicates that the entry applies to all applications. Theacf record can contain ace records. If there are no ace records, access to anapplication is restricted by this acf.
acf AID fnumbers separated by blanks {ace {
root CA name...apdu {
eight numbers separated by blanks...
}...jcrmi {
classes {classname...}hashModifier stringmethods {method name and signatiure...
}}...pin_apdu {
id numberverify | change | disable | enable | unblockfour hexadecimal numbers
...}...pin_jcrmi {
id numberverify | change | disable | enable | unblockmethod name and signature
...}
...}
...}
188 Java ME Platform SDK Help • April 2009
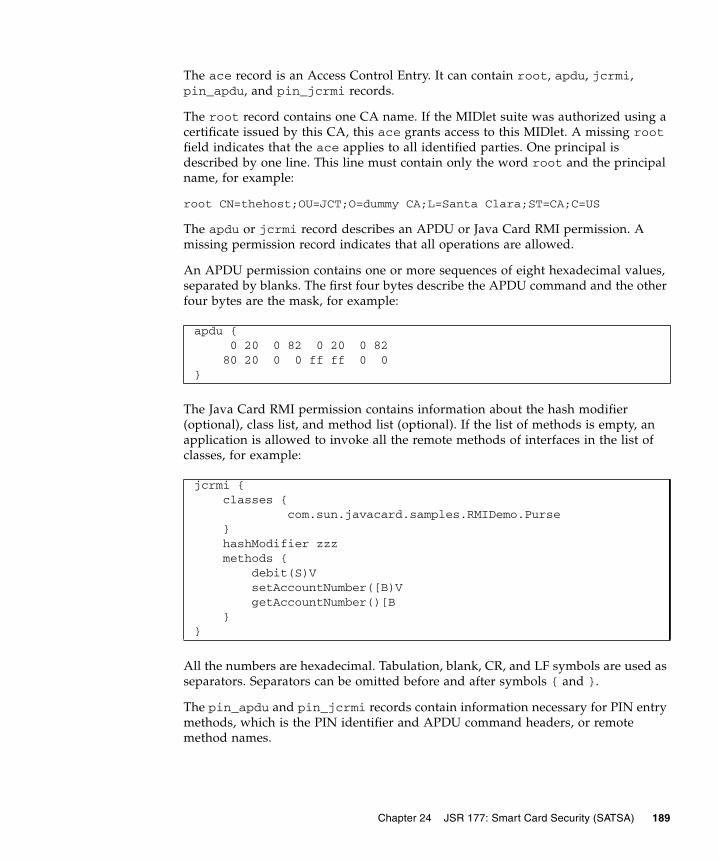
The ace record is an Access Control Entry. It can contain root, apdu, jcrmi,pin_apdu, and pin_jcrmi records.
The root record contains one CA name. If the MIDlet suite was authorized using acertificate issued by this CA, this ace grants access to this MIDlet. A missing rootfield indicates that the ace applies to all identified parties. One principal isdescribed by one line. This line must contain only the word root and the principalname, for example:
root CN=thehost;OU=JCT;O=dummy CA;L=Santa Clara;ST=CA;C=US
The apdu or jcrmi record describes an APDU or Java Card RMI permission. Amissing permission record indicates that all operations are allowed.
An APDU permission contains one or more sequences of eight hexadecimal values,separated by blanks. The first four bytes describe the APDU command and the otherfour bytes are the mask, for example:
The Java Card RMI permission contains information about the hash modifier(optional), class list, and method list (optional). If the list of methods is empty, anapplication is allowed to invoke all the remote methods of interfaces in the list ofclasses, for example:
All the numbers are hexadecimal. Tabulation, blank, CR, and LF symbols are used asseparators. Separators can be omitted before and after symbols { and }.
The pin_apdu and pin_jcrmi records contain information necessary for PIN entrymethods, which is the PIN identifier and APDU command headers, or remotemethod names.
apdu {0 20 0 82 0 20 0 8280 20 0 0 ff ff 0 0
}
jcrmi {classes {
com.sun.javacard.samples.RMIDemo.Purse}hashModifier zzzmethods {
debit(S)VsetAccountNumber([B)VgetAccountNumber()[B
}}
Chapter 24 JSR 177: Smart Card Security (SATSA) 189
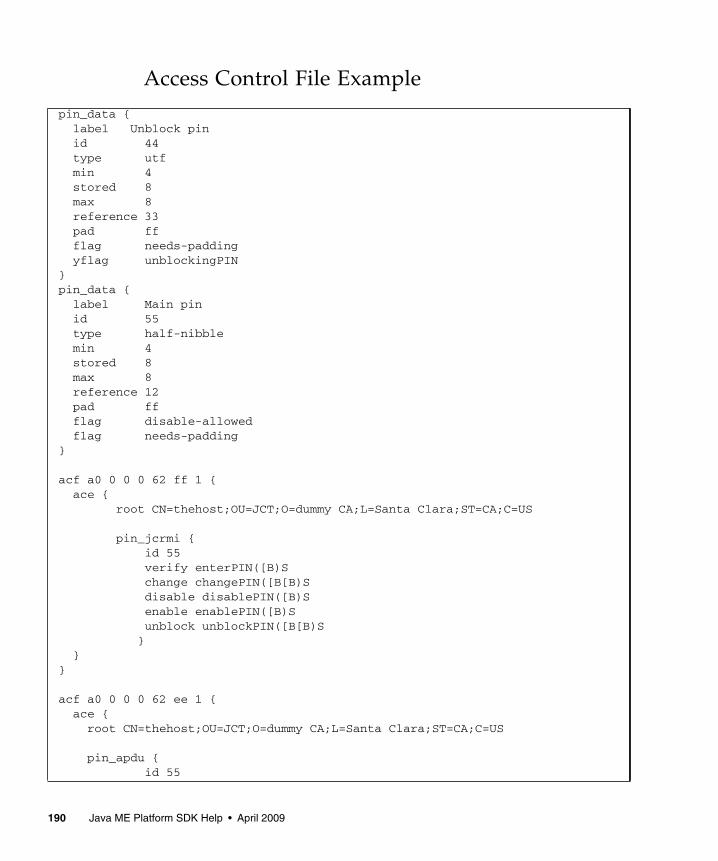
Access Control File Example
pin_data {label Unblock pinid 44type utfmin 4stored 8max 8reference 33pad ffflag needs-paddingyflag unblockingPIN
}pin_data {
label Main pinid 55type half-nibblemin 4stored 8max 8reference 12pad ffflag disable-allowedflag needs-padding
}
acf a0 0 0 0 62 ff 1 {ace {
root CN=thehost;OU=JCT;O=dummy CA;L=Santa Clara;ST=CA;C=US
pin_jcrmi {id 55verify enterPIN([B)Schange changePIN([B[B)Sdisable disablePIN([B)Senable enablePIN([B)Sunblock unblockPIN([B[B)S}
}}
acf a0 0 0 0 62 ee 1 {ace {
root CN=thehost;OU=JCT;O=dummy CA;L=Santa Clara;ST=CA;C=US
pin_apdu {id 55
190 Java ME Platform SDK Help • April 2009

verify 1 2 3 1change 4 3 2 2disable 1 1 1 3enable 5 5 5 4unblock 7 7 7 5
}}
}
acf a0 0 0 0 62 3 1 c 8 1 {ace {
root CN=thehost;OU=JCT;O=dummy CA;L=Santa Clara;ST=CA;C=US
jcrmi {classes {
com.sun.javacard.samples.RMIDemo.Purse}
hashModifier xxxmethods {
setAccountNumber([B)VgetBalance()Scredit(S)V
}}
}ace {
jcrmi {classes {
com.sun.javacard.samples.RMIDemo.Purse}
debit(S)VgetAccountNumber()[B
}}
}}
acf a0 00 00 00 62 03 01 0c 02 01 {ace {
root CN=thehost;OU=JCT;O=dummy CA;L=Santa Clara;ST=CA;C=USapdu {
0 20 0 82 0 20 0 8280 20 0 0 ff ff 0 0
}apdu {
80 22 0 0 ff ff 0 0}
}
Chapter 24 JSR 177: Smart Card Security (SATSA) 191

Running SATSADemosSATSADemos includes demonstrations of SATSA, the Security and Trust ServicesAPIs. Most of the demonstrations show how to communicate with a smart card. Theemulator can communicate with a simulated smart card using a socket protocol. Thesmart card simulator, cref, is included with the SDK, as discussed in Java CardPlatform Simulator (cref).
The following sections contain instructions for each menu choice for this demo. Foreach demo, follow this sequence:
1. Start the instance(s) of cref from the command line.
2. Be sure to set the project security domain to maximum.
Right-click on the project, select Properties and choose Running. Enable Regularexecution and check Specify the Security Domain. Choose maximum from the list.
3. Run the project.
}acf a0 00 00 00 62 03 01 0c 02 01 {
ace {apdu {
0 20 0 82 ff ff ff ff}
}}
acf a0 00 00 00 62 03 01 0c 06 01 {
ace {apdu {
0 20 0 82 ff ff ff ff}
}}
192 Java ME Platform SDK Help • April 2009

APDUMIDletThis MIDlet demonstrates communication with a smart card using ApplicationProtocol Data Units (APDUs), small packets of data. APDUMIDlet expects to findtwo simulated smart cards. You can run the smart card simulator using cref, whichis part of the Java Card Development Kit.
The Mohair application includes pre-built memory images that you can use withcref. The memory images contain Java Card applications with which Mohairinteracts. The memory images are in the root directory of the Mohair project.
1. Right-click on the project, select Properties, and choose Running. Enable Regularexecution and check Specify the Security Domain. Choose maximum from the list.
2. Start up two instances of cref, one for each simulated card slot (assuming thecurrent directory is the SDK installation directory):
start bin\cref -p 9025 -i apps\SATSADemos\demo2.eeprom
start bin\cref -p 9026 -i apps\SATSADemos\demo2.eeprom
Note that the port number arguments (9025 and 9026 in this example) must matchthe SATSA port numbers. Also, make sure you use the correct path todemo2.eeprom.
3. Once you have the two smart card simulators running, run SATSADemos. SelectAPDUMIDlet, select the Menu soft key and select Launch (1). Press Go whenprompted.
SATMIDletSATMIDlet demonstrates smart card communication with a slight variation onAPDU communication.
To set up the simulated smart card, use cref, very much like you did forAPDUMIDlet. This time you don’t have to specify a port number, and the memoryimage is different:
1. Right-click on the project, select Properties, and choose Running. Enable Regularexecution and check Specify the Security Domain. Choose maximum from the list.
2. Start cref as follows:
start bin\cref -i apps\SATSADemos\sat.eeprom
Note that the port number arguments (9025 and 9026 in this example) must matchthe SATSA port numbers. Also, make sure you use the correct path tosat.eeprom.
Chapter 24 JSR 177: Smart Card Security (SATSA) 193
3. Once you have the smart card simulator running, run SATSADemos. SelectSATMIDlet, select the Menu soft key and select Launch (1). Press Go whenprompted.
CryptoMIDletCryptoMIDlet demonstrates the general cryptographic features of SATSA. It doesnot interact with a smart card in any way. Choose the MIDLet and launch it to seethe cryptography results. Use the up and down navigation keys to scroll the display.
MohairMIDletMohairMIDlet has two functions. The first, “Find slots”, displays all the availablecard slots. Each slot has a number followed by ‘C’ or ‘H’ indicating whether the slotis cold-swappable or hot-swappable. After viewing the slots select Back to return tothe first screen.
The second part of MohairMIDlet, SATSA-PKI Sign test, uses a smart card togenerate a digital signature. As with the earlier demonstrations, you need to runcref with the right memory image to prepare for the connection fromMohairMIDlet.
1. Right-click on the project, select Properties, and choose Running. Enable Regularexecution and check Specify the Security Domain. Choose maximum from the list.
2. Type the following from the SDK installation directory:
start bin\cref -i apps\SATSADemos\sat.eeprom
3. In the emulator, select SATSA-PKI Sign test. The following confirmation messageappears:
This certificate will be used: MohairAuth
Select the OK soft key.
4. For PIN 1, type: 1234
Select the OK soft key. The following confirmation message appears:
This string will be signed: JSR 177 Approved
5. Select the OK soft key. The following confirmation message appears:
This certificate will be used: MohairAuth
Select the OK soft key.
6. For non repudiation key 1 PIN, type: 2345
194 Java ME Platform SDK Help • April 2009
Select the soft menu and choose OK (option 2).
Running SATSAJCRMIDemoThis application contains a single MIDlet, JCRMIMIDlet, which shows how tocommunicate with a card application using Java Card RMI, a card-friendly remoteobject protocol. As with some of the MIDlets in SATSADemos, you need to start upcref with an appropriate memory image.
1. Right-click on the project, select Properties, and choose Running. Enable Regularexecution and check Specify the Security Domain. Choose maximum from the list.
2. Start cref from the SDK installation directory as follows:
start bin\cref -p 9025 -i apps\SATSADemos\demo2.eeprom
3. Now run JCRMIMIDlet to see how your application can communicate with adistributed object on the card.
Chapter 24 JSR 177: Smart Card Security (SATSA) 195

196 Java ME Platform SDK Help • April 2009
CHAPTER 25
JSR 179: Location API Support
The JSR 179 Location API gives applications the opportunity to use a device’slocation capabilities. For example, some devices include Global Positioning System(GPS) hardware. Other devices might be able to receive location information fromthe wireless network. The Location API provides a standard interface to locationinformation, regardless of the underlying technique.
In the Location API, a location provider encapsulates a positioning method andsupplies information about the device’s location. The application requests a providerby specifying required criteria, such as the desired accuracy and response time. If anappropriate implementation is available, the application can use it to obtaininformation about the device’s physical location.
The Java ME Platform SDK includes a simulated location provider. You can use theemulator’s External Events Generator to specify where the emulator should think itis located. In addition, you can configure the properties of the provider itself, andyou can manage a database of landmarks.
Setting the Emulator’s Location atRuntimeYou can specify the simulated location of the emulator while it is running. To dothis, choose View > External Events Generator from the emulator window’s menu.Click the Location tab.
197
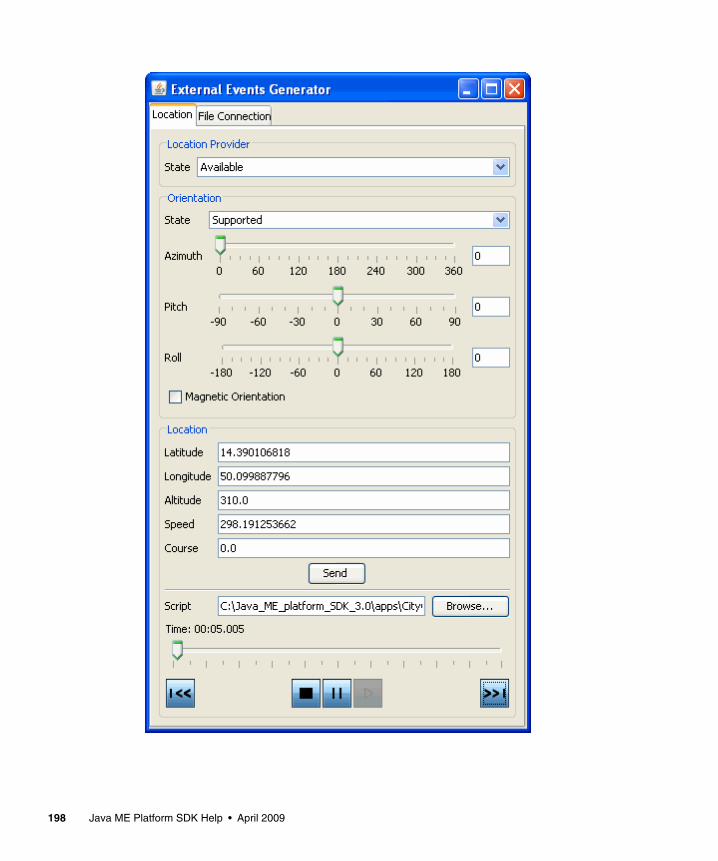
198 Java ME Platform SDK Help • April 2009
In the Location area of the tab, you can fill in values for the latitude, longitude,altitude, speed, and course. Applications that use the Location API can retrieve thesevalues as the location of the emulator.
For more elaborate testing, you can set up a location script that describes motionover time. Location scripts are XML files consisting of a list of locations, calledwaypoints, and associated times. The Java ME Platform SDK determines the currentlocation of the emulator by interpolating between the points in the location script.Here, for example, is a simple location script that specifies a starting point (time="0") and moves to a new point in ten seconds:
The altitude measurement is in meters, and the time values are in milliseconds.
Use a text editor to create your location script. You can load it into the external eventwindow by pressing the Browse button next to the Script field. Immediately beloware controls for playing, pausing, stopping, and moving to the beginning and end ofthe location script. You can also drag the time slider to a particular point.
Some devices are also capable of measuring their orientation. To make this kind ofinformation available to your application, change the State field in the Orientationbox to Supported and fill in values for azimuth, pitch, and roll. The MagneticOrientation checkbox indicates whether the azimuth and pitch measurements arerelative to the Earth’s magnetic field or relative to true north and gravity.
To test how your application handles unexpected conditions, try changing the Statefield in the Location Provider box to Temporarily Unavailable or Out of Service.When your application attempts to retrieve the emulator’s location, an exception isthrown and you can see how your application responds.
Running the CityGuide Sample ProjectCityGuide demonstrates how to use the Location API (JSR 179). It shows a walker’scurrent position superimposed on a city map. The walker moves around the city andlandmarks are highlighted and identified as the walker approaches. In this demo weget the walker’s location from an XML script named citywalk.xml (the event file)that submits the device location information.
<waypoints><waypoint time="0"
latitude="14" longitude="50" altitude="310" /><waypoint time="10000"
latitude="14.5" longitude="50.1" altitude="215" /></waypoints>
Chapter 25 JSR 179: Location API Support 199

Because location prompts occur frequently, it is best to run this demonstration inmanufacturer (trusted) mode, as explained in Security Domains. In the userinterface, right-click on your project and select the Running category. Select Specifythe Security Domain, and select manufacturer or maximum.
Open and run the CityGuide project. In the emulator, launch the CityGuide MIDlet.Click Next to view the map page.
Choose View > External Events Generator from the emulator window menu. On theLocation tab click the browse button. Select the following event file ininstalldir\apps\CityGuide\citywalk.xml.
The player buttons at the bottom of the window are now active. Press the green playbutton (right-pointing triangle) to run the script.
The display shows four types of landmarks: restaurants, museums, shops, andtheaters. To adjust the landmark display, open the soft menu and choose the Settingscommand.
Use the navigation keys to highlight a category, then use Select to check or uncheckan item.
When you are near a landmark (shown highlighted on the map), open the soft menuand choose the Detail command to see more information. See Chapter 25 for moredetails on location scripts.
200 Java ME Platform SDK Help • April 2009
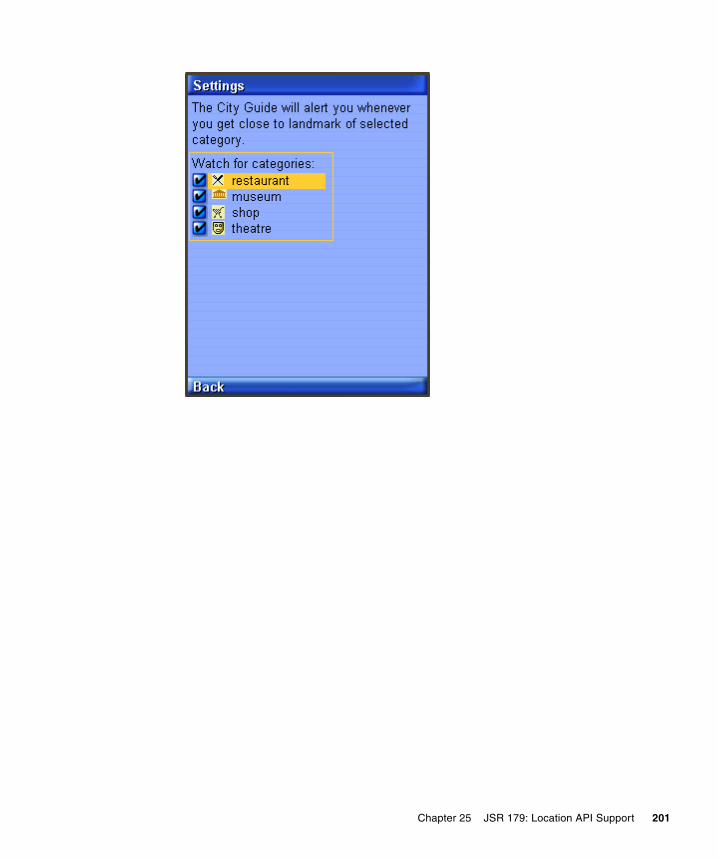
Chapter 25 JSR 179: Location API Support 201

202 Java ME Platform SDK Help • April 2009
CHAPTER 26
JSRs 184, 226, and 239: GraphicsCapabilities
The Java ME Platform SDK offers three APIs that provide comprehensivecapabilities for interactive 2D and 3D graphics:
The Mobile 3D Graphics (JSR 184) API for J2ME, JSR 184, provides 3D graphicscapabilities with a low-level API and a high-level scene graph API. This chapterprovides a brief overview and general guidelines for working with JSR 184.
The Scalable 2D Vector Graphics (JSR 226) for J2ME, JSR 226, supports renderingsophisticated and interactive 2D content.
Java Bindings for OpenGL ES (JSR 239), JSR 239, provides a Java language interfaceto the open standard OpenGL ES graphics API.
■ Mobile 3D Graphics (JSR 184)
■ Choosing a Graphics Mode
■ Quality Versus Speed
■ Content for Mobile 3D Graphics
■ Running Demo3D Samples
■ Java Bindings for OpenGL ES (JSR 239)
■ Scalable 2D Vector Graphics (JSR 226)
■ Running SVGDemo
■ Running SVGContactList
203
Mobile 3D Graphics (JSR 184)JSR 184 is a specification that defines the Mobile 3D Graphics (M3G) API for theJ2ME. This API provides 3D functionality in a compact package that’s appropriatefor CLDC/MIDP devices. The API provides two methods for displaying 3D graphicscontent:
The immediate mode API makes it possible for applications to directly create andmanipulate 3D elements.
Layered on top of this is a scene graph API, also called retained mode, that makes itpossible to load and display entire 3D scenes that are designed ahead of time.
For more information, consult the JSR 184 specification athttp://jcp.org/en/jsr/detail?id=184.
Choosing a Graphics ModeApplications are free to use whichever approach is most appropriate or to use a
combination of the retained mode and immediate mode APIs.
JSR 184 provides a standard API for CLDC/MIDP devices, enabling a newgeneration of 3D applications. The immediate mode API, in turn, is compatible withOpenGL ES, a standard lightweight API for 3D graphics. Seehttp://khronos.org/ for more information on OpenGL ES.
Immediate ModeImmediate mode is appropriate for applications that generate 3D graphics contentalgorithmically, such as scientific visualizations or statistical graphs. The applicationcreates 3D objects and manipulates them directly.
For an example of immediate mode, see the Life3D MIDlet in the Demo3D exampleapplication.
204 Java ME Platform SDK Help • April 2009
Retained ModeMost applications, particularly games, use the retained mode or scene graph API. Inthis approach, a graphic designer or artist uses 3D modeling software to create ascene graph. The scene graph is saved in the JSR 184 file format. The scene graph fileis bundled with the application. At runtime, the application uses the scene graphAPI to load and display the file.
Applications can manipulate parts of a loaded scene graph to animate characters orcreate other effects. The basic strategy is to do as much work as possible in themodeling software. At runtime, the application can grab and manipulate parts of thescene graph, which can also include paths for animation or other effects.
For an example of retained mode, see the retainedmode MIDlet in the Demo3Dexample application.
Quality Versus SpeedOne of the challenges of MIDP development is the constrained environment oftypical devices. Compared to desktop computers, MIDP devices have slowprocessors and little memory. These challenges extend into the arena of 3D graphics.To accommodate a wide variety of implementations, the JSR 184 specificationprovides various mechanisms to make the display of a 3D scene as efficient aspossible.
One approach is scoping, a technique where you tell the 3D graphics implementationwhen objects are not going to interact with each other. For example, if you defined ascene graph for a house, you could use scoping to specify that the light in thebasement doesn’t affect the appearance of the bedroom on the second floor. Scopingsimplifies the implementation’s task because it reduces the number of calculationsrequired to show a scene.
In general, the best way to improve the rendering speed of 3D scenes is to makesome compromises in quality. The Mobile 3D Graphics API includes rendering hintsso that applications can suggest how the implementation can compromise quality toimprove rendering speed.
Content for Mobile 3D GraphicsMost mobile 3D applications use scene graphs in resource files to describe objects,scenes, and characters. Usually it is not programmers but graphic designers or artistswho create the scene graphs, using standard 3D modeling tools.
Chapter 26 JSRs 184, 226, and 239: Graphics Capabilities 205
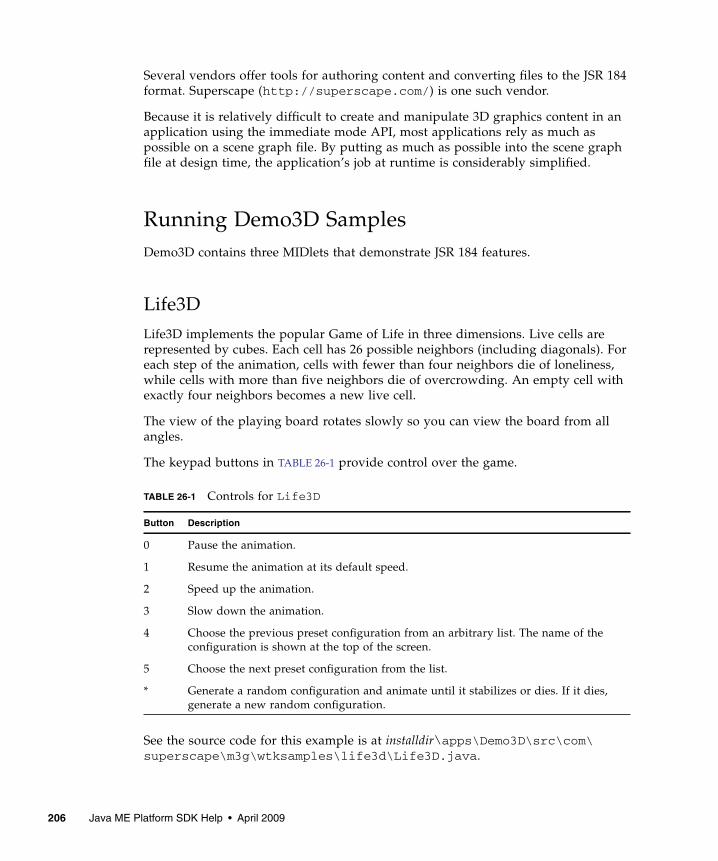
Several vendors offer tools for authoring content and converting files to the JSR 184format. Superscape (http://superscape.com/) is one such vendor.
Because it is relatively difficult to create and manipulate 3D graphics content in anapplication using the immediate mode API, most applications rely as much aspossible on a scene graph file. By putting as much as possible into the scene graphfile at design time, the application’s job at runtime is considerably simplified.
Running Demo3D SamplesDemo3D contains three MIDlets that demonstrate JSR 184 features.
Life3DLife3D implements the popular Game of Life in three dimensions. Live cells arerepresented by cubes. Each cell has 26 possible neighbors (including diagonals). Foreach step of the animation, cells with fewer than four neighbors die of loneliness,while cells with more than five neighbors die of overcrowding. An empty cell withexactly four neighbors becomes a new live cell.
The view of the playing board rotates slowly so you can view the board from allangles.
The keypad buttons in TABLE 26-1 provide control over the game.
See the source code for this example is at installdir\apps\Demo3D\src\com\superscape\m3g\wtksamples\life3d\Life3D.java.
TABLE 26-1 Controls for Life3D
Button Description
0 Pause the animation.
1 Resume the animation at its default speed.
2 Speed up the animation.
3 Slow down the animation.
4 Choose the previous preset configuration from an arbitrary list. The name of theconfiguration is shown at the top of the screen.
5 Choose the next preset configuration from the list.
* Generate a random configuration and animate until it stabilizes or dies. If it dies,generate a new random configuration.
206 Java ME Platform SDK Help • April 2009
retainedmode
The retainedmode MIDlet plays a scene file that shows a skateboarder in anendless loop.
PogoRooPogoRoo displays a kangaroo bouncing up and down on a pogo stick. To steer thekangaroo, use the arrow keys. Press up to go forward, down to go backward, andleft and right to change direction. You might need to hold down the key to see aneffect.
Java Bindings for OpenGL ES (JSR 239)JSR 239 defines the Java programming language bindings for two APIs, OpenGL forEmbedded Systems (OpenGL ES) and EGL. OpenGL ES is a standard API for 3Dgraphics, a subset of OpenGL, which is pervasive on desktop computers. EGL is astandard platform interface layer. Both OpenGL ES and EGL are developed by theKhronos Group (http://khronos.org/opengles/).
While JSR 184 (which is object oriented) requires high level functionality, OpenGL isa low level graphics library that is suited for accessing hardware accelerated 3Dgraphics. Explore the OpenGLESDemo sample project code.
Scalable 2D Vector Graphics (JSR 226)The Java ME Platform SDK emulator supports JSR 226, the Scalable 2D VectorGraphics API for J2ME. Scalable Vector Graphics (SVG) is a standard defined by theWorld Wide Web Consortium. It is an XML grammar for describing rich, interactive2D graphics.
The Scalable Vector Graphics (SVG) 1.1 specification (available athttp://www.w3.org/TR/SVG11/) defines a language for describingtwo-dimensional graphics in XML.
SVG Tiny (SVGT) is a subset of SVG that is appropriate for small devices such asmobile phones. See http://www.w3.org/TR/SVGMobile/. SVGT is a compact,yet powerful, XML format for describing rich, interactive, and animated 2D content.Graphical elements can be logically grouped and identified by the SVG markup.
Chapter 26 JSRs 184, 226, and 239: Graphics Capabilities 207
Java ME applications using SVG content can create graphical effects that adapt to thedisplay resolution and form factor of the user's display.
SVG images can be animated in two ways. One is to use declarative animation, asillustrated in Play SVG Animation. The other is to repeatedly modify the SVG imageparameters (such as color or position), through API calls.
While it is possible to produce SVG content with a text editor, most people prefer touse an authoring tool. Here are two possibilities:
■ Ikivo Animator - http://www.ikivo.com/animator/
■ Adobe Illustrator -http://www.adobe.com/products/illustrator/main.html
Running SVGDemoThis project contains MIDlets that demonstrate different ways to load manipulate,render, and play SVG content.
SVG BrowserThe SVGBrowser MIDlet displays SVG files residing in the phone file system. Beforerunning this demo, place an SVG file in your device skin’s file structure at:
device\appdb\filesystem\root1
For your device location, see “/javame-sdk/3.0/work” on page 80. Launch thedemo. The application displays the contents of root1. Select your SVG file andchoose the Open soft key.
Render SVG ImageRender SVG Image loads an SVG image from a file and renders it. Looking at thedemo code you can see that the image is sized on the fly to exactly fit the displayarea. The output is clear and sharp.
Play SVG AnimationThis application plays an SVG animation depicting a Halloween greeting card. Press8 to play, 5 to start, and 0 to stop. If you press 8, pressing 5 resumes the animation.If you press 0, pressing 5 starts the animation from the beginning.
208 Java ME Platform SDK Help • April 2009
The SVG file contains a description of how the various image elements evolve overtime to provide this short animation.
In the following code sample, the JSR 226 javax.microedition.m2g.SVGImageclass is used to load the SVG resource. Then, thejavax.microedition.m2g.SVGAnimator class can take all the complexity ofSVG animations and provides a java.awt.Component orjavax.swing.JComponent which plays the animation. The SVGAnimator classprovides methods to play, pause and stop the animation.
Create SVG Image from ScratchThis demo builds an image using API calls. It creates an empty SVGImage,populates it with a graphical content, and then displays that content.
Bouncing BallsBouncing Balls plays an SVG animation. Press 8 to play, 5 to start, and 0 to stop. Ifyou press 8, pressing 5 resumes the animation. If you press 0, pressing 5 starts theanimation from the beginning.
import javax.microedition.m2g.ScalableGraphics;import javax.microedition.m2g.SVGImage;
...String svgURI = ...;SVGImage svgImage = (SVGImage) SVGImage.createImage(svgURI, null);SVGAnimator svgAnimator = SVGAnimator.createAnimator(svgImage);
// If running a JSE applet, the target component is a JComponent.JComponent svgAnimationComponent = (JComponent)svgAnimator.getTargetComponent();...
svgAnimator.play();...svgAnimator.pause();...svgAnimator.stop();
Chapter 26 JSRs 184, 226, and 239: Graphics Capabilities 209

Optimized MenuIn this demo, selected icons have a yellow border. As you move to a new icon, itbecomes selected and the previous icon flips to the unselected state. If you navigateoff the icon grid, selection loops around. That is, if the last icon in a row is selected,moving right selects the first icon in the same row.
This demo illustrates the flexibility that combining UI markup and Java offers: a richset of functionality (graphics, animations, high-end 2D rendering) and flexibility ingraphic manipulation, pre-rendering or playing.
In this example, a graphic artist delivered an SVG animation defining the transitionstate for the menu icons, from the unselected state to the selected state. The programrenders each icon's animation sequence separately into off-screen buffers (for fasterrendering later on), using the JSR 226 API.
With buffering, the MIDlet is able to adapt to the device display resolution (becausethe graphics are defined in SVG format) and still retain the speed of bitmaprendering. In addition, the MIDlet is still leveraging the SVG animation capabilities.
The task of defining the look of the menu items and their animation effect (the job ofthe graphic artist and designer) is cleanly separated from the task of displaying themenu and starting actions based on menu selection (the job of the developer). Thetwo can vary independently as long as both the artist and the developer observe theSVG document structure conventions.
Picture DecoratorIn this sample you use the phone keys to add decorations to a photograph. The keyvalues are:
1 key shrink
2 key next picture
3 key grow
4 key help
5 key horizontal flip
6 ley vertical flip
7 key rotate counter-clockwise
8 key previous picture
9 key rotate clockwise
# display picker options
210 Java ME Platform SDK Help • April 2009
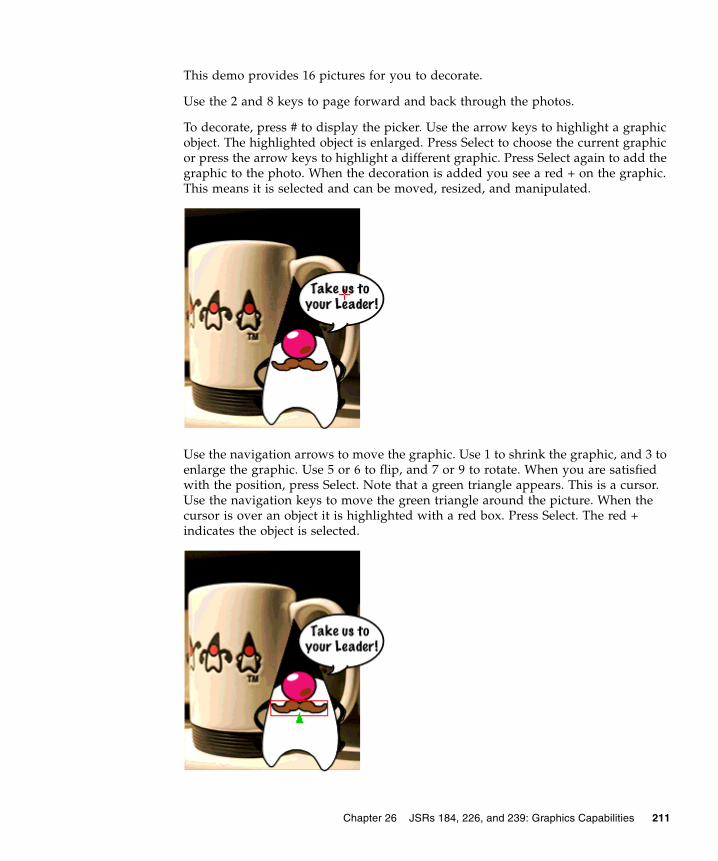
This demo provides 16 pictures for you to decorate.
Use the 2 and 8 keys to page forward and back through the photos.
To decorate, press # to display the picker. Use the arrow keys to highlight a graphicobject. The highlighted object is enlarged. Press Select to choose the current graphicor press the arrow keys to highlight a different graphic. Press Select again to add thegraphic to the photo. When the decoration is added you see a red + on the graphic.This means it is selected and can be moved, resized, and manipulated.
Use the navigation arrows to move the graphic. Use 1 to shrink the graphic, and 3 toenlarge the graphic. Use 5 or 6 to flip, and 7 or 9 to rotate. When you are satisfiedwith the position, press Select. Note that a green triangle appears. This is a cursor.Use the navigation keys to move the green triangle around the picture. When thecursor is over an object it is highlighted with a red box. Press Select. The red +indicates the object is selected.
Chapter 26 JSRs 184, 226, and 239: Graphics Capabilities 211
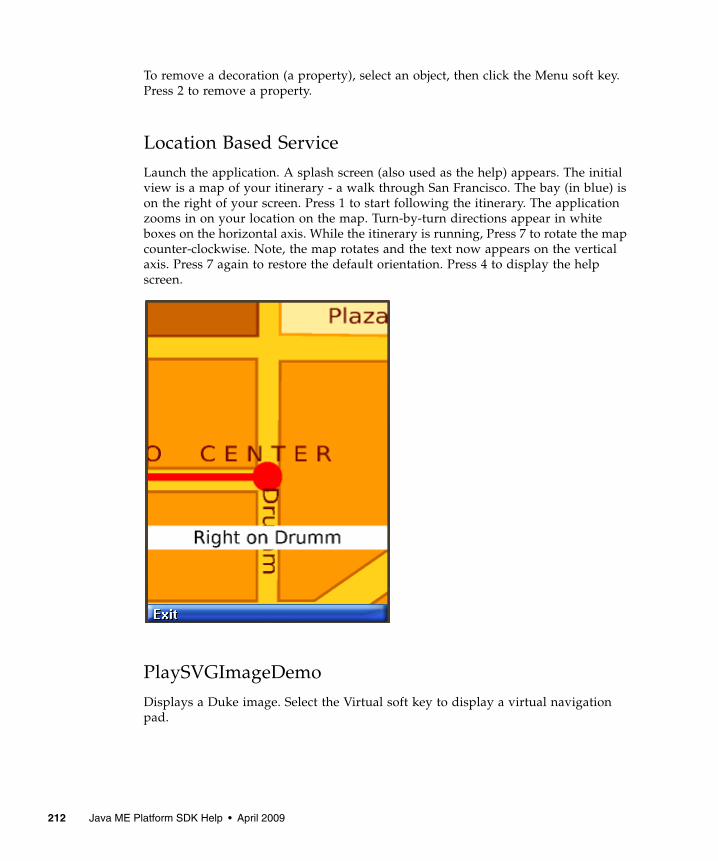
To remove a decoration (a property), select an object, then click the Menu soft key.Press 2 to remove a property.
Location Based ServiceLaunch the application. A splash screen (also used as the help) appears. The initialview is a map of your itinerary - a walk through San Francisco. The bay (in blue) ison the right of your screen. Press 1 to start following the itinerary. The applicationzooms in on your location on the map. Turn-by-turn directions appear in whiteboxes on the horizontal axis. While the itinerary is running, Press 7 to rotate the mapcounter-clockwise. Note, the map rotates and the text now appears on the verticalaxis. Press 7 again to restore the default orientation. Press 4 to display the helpscreen.
PlaySVGImageDemoDisplays a Duke image. Select the Virtual soft key to display a virtual navigationpad.
212 Java ME Platform SDK Help • April 2009
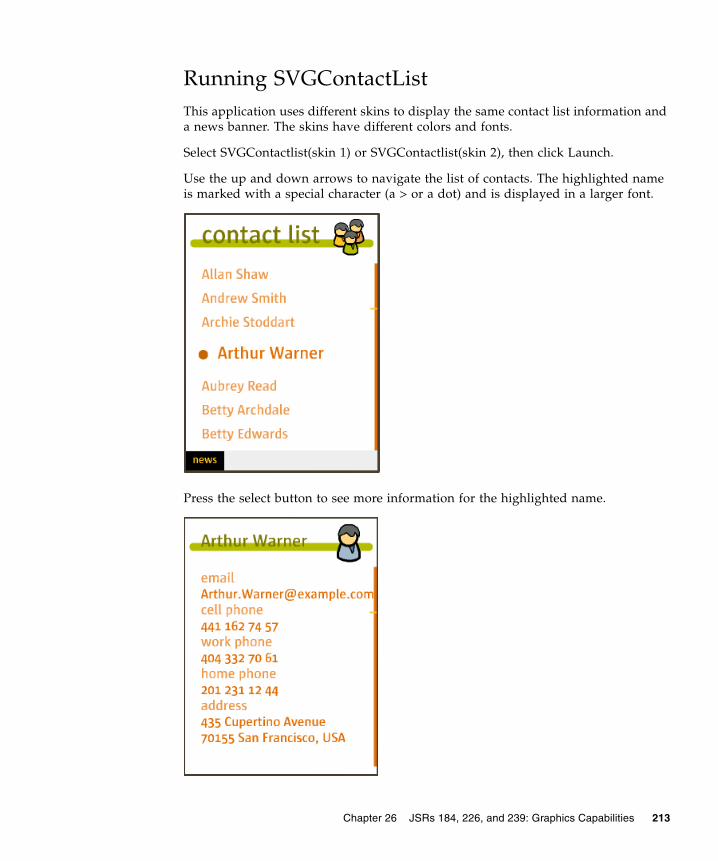
Running SVGContactListThis application uses different skins to display the same contact list information anda news banner. The skins have different colors and fonts.
Select SVGContactlist(skin 1) or SVGContactlist(skin 2), then click Launch.
Use the up and down arrows to navigate the list of contacts. The highlighted nameis marked with a special character (a > or a dot) and is displayed in a larger font.
Press the select button to see more information for the highlighted name.
Chapter 26 JSRs 184, 226, and 239: Graphics Capabilities 213

Press select again to return to the contact list.
214 Java ME Platform SDK Help • April 2009
CHAPTER 27
JSR 205: Wireless Messaging API(WMA) Support
The Java ME Platform SDK supports the Wireless Messaging API (WMA) with asophisticated simulation environment. WMA 1.1 (JSR 120) enables MIDlets to sendand receive Short Message Service (SMS) or Cell Broadcast Service (CBS) messages.WMA 2.0 (JSR 205) includes support for MMS messages as well.
This chapter describes the tools you can use to develop WMA applications. It beginsby showing how to configure the emulator’s support of WMA. Next, it describes theWMA console, a tool for testing WMA applications.
Many of the tasks in this topic can also be accomplished from the command line. SeeRunning WMA Tool.
Using the WMA Console to Send andReceive MessagesThe WMA console is a tool that enables you to send messages to and receivemessages from applications that use JSRs 120 or 205. You can, for example, use theWMA console to send SMS messages to a MIDlet running on the emulator.
See Launching the WMA Console and WMA Console Interface
Launching the WMA ConsoleTo launch the WMA console, select Tools > WMA Console. If the WMA Outputwindow is not visible, select Window > Output > WMA Console Output.
215
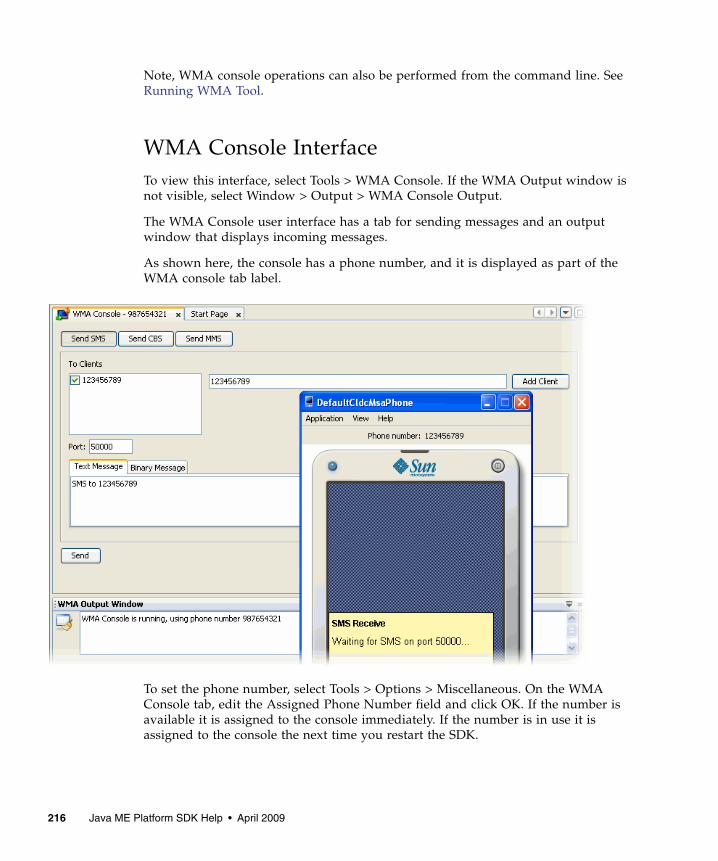
Note, WMA console operations can also be performed from the command line. SeeRunning WMA Tool.
WMA Console InterfaceTo view this interface, select Tools > WMA Console. If the WMA Output window isnot visible, select Window > Output > WMA Console Output.
The WMA Console user interface has a tab for sending messages and an outputwindow that displays incoming messages.
As shown here, the console has a phone number, and it is displayed as part of theWMA console tab label.
To set the phone number, select Tools > Options > Miscellaneous. On the WMAConsole tab, edit the Assigned Phone Number field and click OK. If the number isavailable it is assigned to the console immediately. If the number is in use it isassigned to the console the next time you restart the SDK.
216 Java ME Platform SDK Help • April 2009

Emulator Phone NumbersEach running instance of the emulator has a simulated phone number that is shownin the emulator window. The phone numbers are important because they are used asaddresses for WMA messages. By default, the first emulator instance has a phonenumber of 123456789. Subsequent instances of the emulator have unique numbers inascending order.
Sending a Text SMS MessageTo send a text SMS message, click Send SMS. The send window appears.
The window automatically lists the phone numbers of all running emulatorinstances. Select one or more destinations and enter a port number if you wish. Typeyour message and click Send.
Sending a Binary SMS MessageTo send the contents of a file as a binary message, click Send SMS to bring up thesend window. Click the Binary SMS tab.
Selecting recipients is the same as for sending text SMS messages. You can type inthe path of a file directly, or click Browse to open a file chooser.
Sending Text or Binary CBS MessagesSending CBS messages is similar to sending SMS messages except that you don’tneed to choose recipients. To send a text or binary CBS message, click Send CBS inthe WMA console. Specify a message identifier and enter the content of yourmessage.
Sending MMS MessagesMMS messages consist of one or more files, usually images or sounds. An MMSmessage can be sent to multiple recipients. To send an MMS message from the WMAconsole, click the Send MMS button.
The window for composing MMS messages has two tabs, one for recipients and onefor content. On the Header tab, begin by filling in a subject and recipient.
Chapter 27 JSR 205: Wireless Messaging API (WMA) Support 217

To add more recipients, click the Add button. For example, to send a message to arunning emulator whose number is 5550001, type 5550001 in the To field.
To remove a recipient, first select its line, then click Remove.
To add optional media files (Parts) to the message, click the Parts tab and click Add.Most media files will have information to fill the Content Location, Content ID,Mime-Type (text/plain for simple MMS), and Encoding fields, but you can edit thesefields as well.
To remove a part, select it and press Remove.
Receiving Messages in the WMA ConsoleThe WMA console window has its own phone number displayed on the WMAConsole tab. You can send messages from your applications running on the emulatorto the WMA console.
Received messages are displayed in the WMA output window.
Running WMADemoThe WMADemo sample project shows how to send and receive SMS, CBS, and MMSmessages.
The Java ME Platform SDK offers a flexible emulation environment to supportmessaging. Messages can be exchanged between emulator instances and can begenerated or received using the WMA console utility.
Because this sample makes use of the push registry, you can't see all of its featuresjust by using the Run button. Use the Run via OTA feature to install the applicationinto the emulator in a process that mirrors how applications are installed on realdevices.
In this demo you send messages between the demo application running on theemulator and the WMA console. Using the WMA console to send messages to theemulator exercises the push registry.
1. To launch the console choose Tools > WMA Console.
218 Java ME Platform SDK Help • April 2009

2. Click on the Send SMS button in the WMA console window. Choose the numberthat corresponds to the emulator, probably 123456789. If you're not sure whatnumber the emulator is using, look for a number above the emulator screen.Choose the number in the SMS message window, then fill in a port number of50000. Type your text message in the Message field and click on Send.
3. The emulator asks if it can launch the WMADemo application. You might receiveseveral permission requests based on your firewall settings.
Choose Yes. The SMSReceive MIDlet is launched and immediately displays theincoming SMS message.
You can also use the WMA console to send and receive CBS and MMS messages.
If you are attempting to send text messages to WMADemo using the WMA consolespecify the following port numbers:
■ For SMS specify the port number 50000.
■ Use port 50001 for CBS messages.
■ For MMS messages, use example.mms.MMSDemo as the application ID. Thisinformation is part of the Application Descriptor. To view it, right-click on theWMA Demo project and select properties. In the properties window, select theApplication Description category and view the Push Registry tab.
For example, to send an MMS message from the WMA console to the emulator,make sure that WMADemo has been installed using Run via OTA.
1. Launch the demo and choose MMS Receive.
2. In the WMA console, click on Send MMS to open the MMS composition window.Fill in a message subject, the application ID example.mms.MMSDemo, and thetelephone number of the running emulator.
3. Click on the Parts tab. The WMA console allows you to select files from your harddisk to send as parts of the MMS message. Click Add to add a file to the message.Use the file browser to find the file you want to send and click OK.
4. Click on Send to send the message.
The image and its information are displayed.
Chapter 27 JSR 205: Wireless Messaging API (WMA) Support 219

220 Java ME Platform SDK Help • April 2009
CHAPTER 28
JSR 211: Content Handler API(CHAPI)
JSR 211 defines the Content Handler API (CHAPI). The basic concept idea is thatMIDlets can be launched in response to incoming content (files). Modern mobilephones can receive content using SMS, infrared, Bluetooth, e-mail, and othermethods. Most content has an associated content type. CHAPI specifies a system bywhich MIDlets can be launched in response to specific types of content.
In the Java ME Platform SDK Content Handlers are integrated in a project asapplication descriptors. Content Handlers you define are packaged with theapplication.
See Using Content Handlers and Running the CHAPIDemo Content Browser.
Using Content HandlersFollow these steps to work with content handlers.
1. In the Projects window, right-click a project name and choose Properties from thecontext menu.
2. In the Category pane, select Application Descriptor, and click the ContentHandler tab.
3. In the Content Handlers table, each line in the list represents the settings for acontent handler.
As shown below, two content handlers have been configured, one for TextViewerand one for ImageViewer.
221
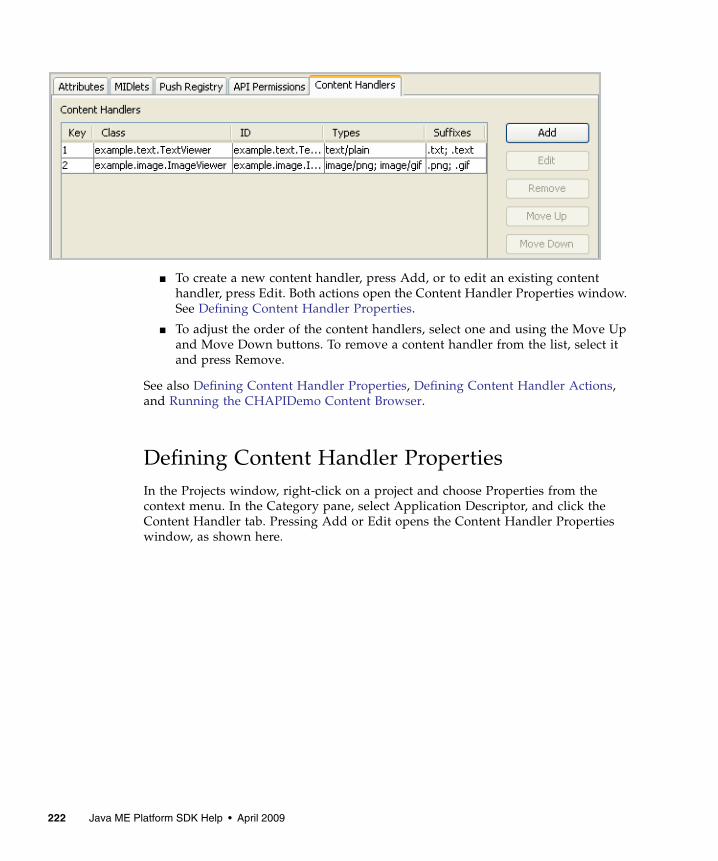
■ To create a new content handler, press Add, or to edit an existing contenthandler, press Edit. Both actions open the Content Handler Properties window.See Defining Content Handler Properties.
■ To adjust the order of the content handlers, select one and using the Move Upand Move Down buttons. To remove a content handler from the list, select itand press Remove.
See also Defining Content Handler Properties, Defining Content Handler Actions,and Running the CHAPIDemo Content Browser.
Defining Content Handler PropertiesIn the Projects window, right-click on a project and choose Properties from thecontext menu. In the Category pane, select Application Descriptor, and click theContent Handler tab. Pressing Add or Edit opens the Content Handler Propertieswindow, as shown here.
222 Java ME Platform SDK Help • April 2009
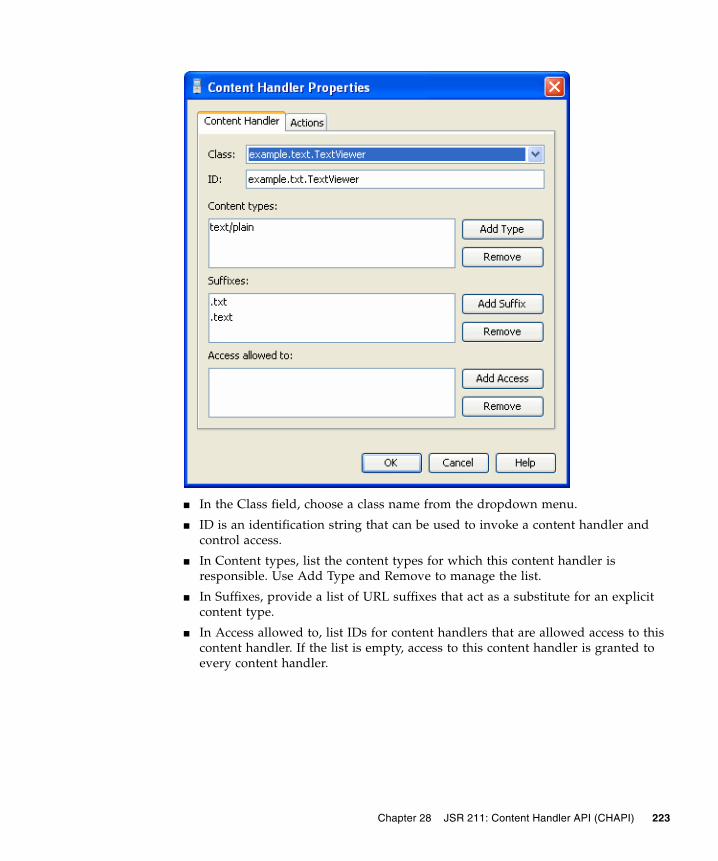
■ In the Class field, choose a class name from the dropdown menu.
■ ID is an identification string that can be used to invoke a content handler andcontrol access.
■ In Content types, list the content types for which this content handler isresponsible. Use Add Type and Remove to manage the list.
■ In Suffixes, provide a list of URL suffixes that act as a substitute for an explicitcontent type.
■ In Access allowed to, list IDs for content handlers that are allowed access to thiscontent handler. If the list is empty, access to this content handler is granted toevery content handler.
Chapter 28 JSR 211: Content Handler API (CHAPI) 223
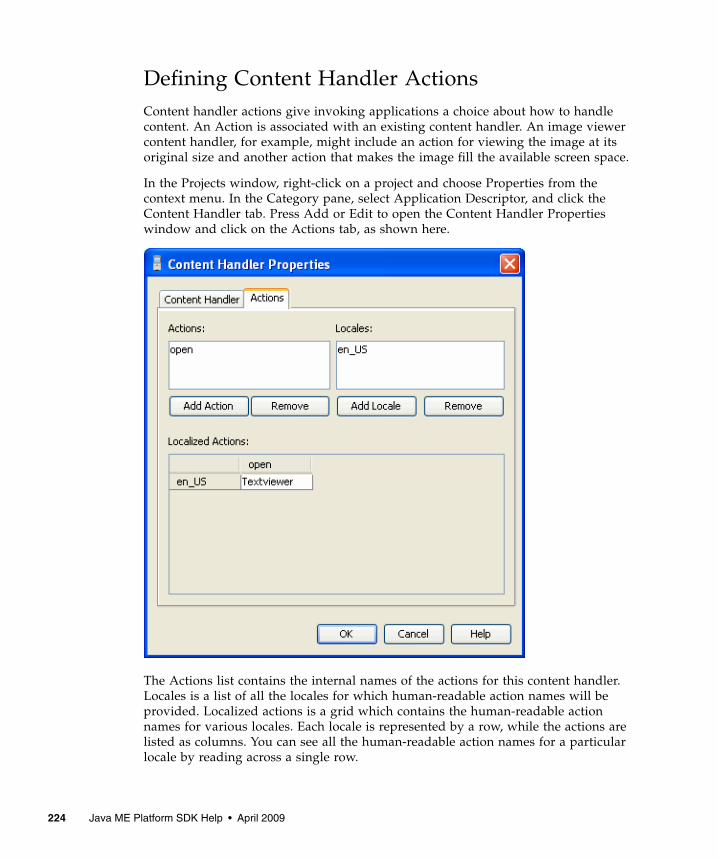
Defining Content Handler ActionsContent handler actions give invoking applications a choice about how to handlecontent. An Action is associated with an existing content handler. An image viewercontent handler, for example, might include an action for viewing the image at itsoriginal size and another action that makes the image fill the available screen space.
In the Projects window, right-click on a project and choose Properties from thecontext menu. In the Category pane, select Application Descriptor, and click theContent Handler tab. Press Add or Edit to open the Content Handler Propertieswindow and click on the Actions tab, as shown here.
The Actions list contains the internal names of the actions for this content handler.Locales is a list of all the locales for which human-readable action names will beprovided. Localized actions is a grid which contains the human-readable actionnames for various locales. Each locale is represented by a row, while the actions arelisted as columns. You can see all the human-readable action names for a particularlocale by reading across a single row.
224 Java ME Platform SDK Help • April 2009
Running the CHAPIDemo ContentBrowserThis demo is a content browser that takes advantage of the content handler registry.It allows you to view different types of content from different sources.
■ In the user interface, select File > Open Sample Project > CHAPIDemo.
In the device selector, right-click on a device, select Run Project OTA, and chooseCHAPIDemo.
■ You are asked to enter the password for the keystore. Type: keystorepwd
■ You are asked to enter the password for the “dummyca“ key pair alias withinthe keystore. Type: keypwd
■ On the Favorite Links page, choose CHAPI Demo. Press the menu soft buttonand choose 1, Go.
The Text Viewer displays a Media Player URL and links to various media files.
■ Select Duke.png. Use the arrows to highlight the link, then select the file. UsingCHAPI, the ImageViewer MIDlet runs and displays the Duke image. Select theBack soft key to return to the Text Viewer.
■ Install the Media Player to view media.
■ Select the URL http:handlers/MediaHandler.jad.
Select the Menu soft button and select item 1, Go.
■ The application asks, “Are you sure you want to install Media Handler?“ Selectthe Install soft key. For the rest of this demo, click Install if you are asked forconfirmation.
The installation finishes and you return to the Text Viewer.
■ View different media files.
Select a URL from the list, select the Menu soft button and select item 1, Go.
Chapter 28 JSR 211: Content Handler API (CHAPI) 225

226 Java ME Platform SDK Help • April 2009

CHAPTER 29
JSR 238: Mobile InternationalizationAPI (MIA)
JSR 238, the Mobile Internationalization API, is designed for applications that are tobe displayed in multiple languages and used in multiple countries. The combinationof country (or region) and language is a locale.
The central concept of JSR 238 is a resource, which is a string, image, or other objectthat is suitable for a particular locale. For example, an application that is to bedistributed in Europe might include resources for Italian-speaking people living inItaly, Italian-speaking people living in Switzerland, Spanish-speaking people livingin Spain and so on.
Resources are stored in files in a format defined in JSR 238. The resource files arebundled as part of the MIDlet suite JAR file. The Java ME Platform SDK provides aresource manager that simplifies the job of creating and maintaining resource files.
Setting the Emulator’s LocaleYou can change an emulator’s locale from the Device Selector.
1. Right-click on a device and choose Properties.
2. In the Properties window, find the Locale property and click ... to open the Localewindow.
3. Select the locale from the dropdown list.
Alternatively, while the emulator is running, select Application > Change Locale andtype in the locale you want to use.
227

Using the Resource ManagerTo launch the resource manager, select a project, then choose Tools > i18n ResourcesManager.
All the resources for the selected project are displayed in the Resource Manager. Seethe sample project i18nDemo described in “Running i18nDemo” on page 229.
See also: Working With Locales and Working With Resource Files.
Working With LocalesLocales are represented as folders under the top-level global node. The localedirectories contain resource files which, in turn, hold the actual resources that can beused by the application.
Locales are represented by standard language and country codes as described in theMIDP 2.0 specification. For example, pt-BR represents Portuguese-speaking peopleliving in Brazil.
■ To add a locale, right-click on the top-level global node and choose Add Locale.Choose the locale from the combo box, or type it directly, and click OK.
■ To rename a locale, right-click the locale directory and choose Rename.
■ To remove a locale and all its contained resource files, right-click the localedirectory and choose Delete.
Working With Resource FilesResource files can be global (at the top level) or specific to a locale.
■ To create a new global resource file, right-click the top-level global directory andchoose Add new resource file. Choose a name for the file.
■ To rename a resource file, right-click the file and choose Rename.
■ You can copy, cut, and paste entire resource files. Right-click a file and chooseCopy or Cut. Then right-click the locale directory (or the top-level global) andchoose Paste.
■ To remove a resource file, right-click the file and choose Delete.
228 Java ME Platform SDK Help • April 2009

Working With ResourcesClick on a resource file to display its contents.
■ To add an image or another type of binary data, click the Add button.
■ In the Configure New Resource window, select Add string resource.
■ Browse to select the file you want to add.
■ The automatically supplied Identifier value can be changed.
■ Click OK to add the resource.
■ To edit a resource, double-click in the resource field.
■ For strings you can edit an existing value.
■ Double-clicking a binary file opens a file chooser.
Running i18nDemoThis MIDlet suite demonstrates the JSR 238 Mobile Internationalization API. TheMIDlets String Comparator and Formatter show how to sort strings and displaynumbers appropriately for different locales. The third MIDlet, MicroLexicon, is asmall phrase translator that comes in handy if you need to ask for a beer in Prague,Herzliya, Beijing, Milan, or several other locations.
Chapter 29 JSR 238: Mobile Internationalization API (MIA) 229

Note – The default fonts for the Java ME Platform SDK do not support Chinese andJapanese. To use these languages, follow these steps before running this demo:
1. Install a True Type font that supports Chinese or Japanese.2. Modify installdir\toolkit-lib\devices\skin-directory\conf\skin.properties to specify that font.
To run a MIDlet, highlight the MIDlet, then use the Launch soft button to run theMIDlet.
String Comparator
The String Comparator MIDlet demonstrates how strings (city names) are sorteddifferently depending on locale. Launch the MIDlet. Use the Menu soft button toview the menu. Click or Type 2 to select Sort - default, and the list is sortedalphabetically. Click or Type 3 to select Sort - slovak. It’s easy to see the difference inthe cities that begin with the letter Z, with and without the mark on top. Click Exitto return to the list of MIDlets.
Formatter
The second MIDlet, Formatter, simply displays times and numbers formatted fordifferent locales. Click next to view all four screens. Click Exit to return to the list ofMIDlets.
MicroLexicon
The final MIDlet, MicroLexicon, translates phrases from one language to anotherlanguage. To set the source language, follow the steps in Setting the Emulator’sLocale.
To select the target language from the list, use the navigation arrows to highlightChoose Language. Click the Select button to view the language drop down. Use thenavigation arrows to choose a language and then click Select. Click the Next softbutton.
MicroLexicon displays a list of phrases. Highlight one and press the Select button onthe emulator.
MicroLexicon displays the flag of the target language and the translated phrase.
MicroLexicon is powered by MIDlet resources. To understand how you can use theJava ME Platform SDK to localize an application, choose Tools > i18n ResourcesManager. All the resources, both text and images, used by MicroLexicon, appear. Youcan edit the resources and run MicroLexicon again to see what happens.
230 Java ME Platform SDK Help • April 2009
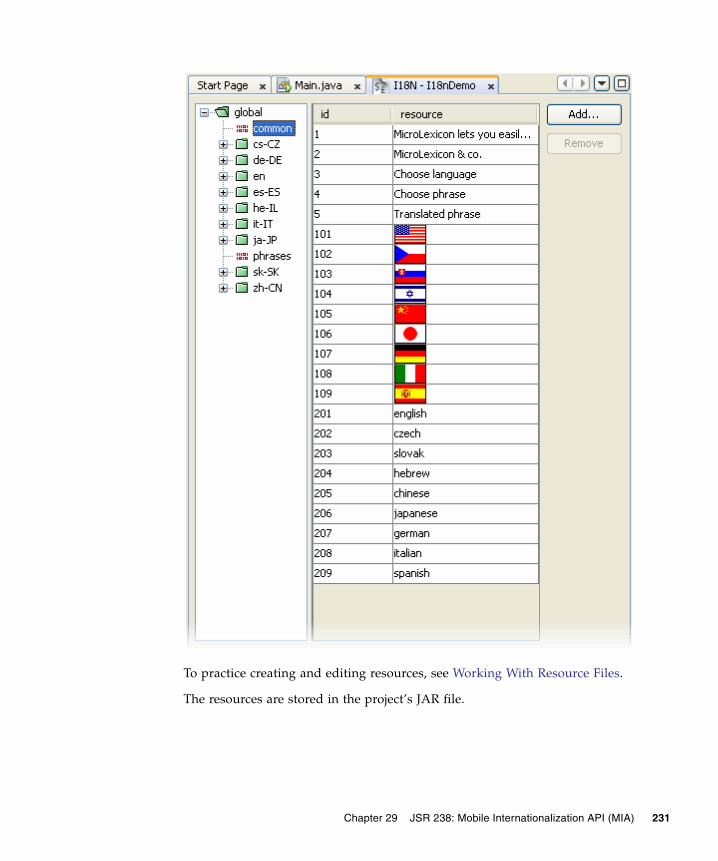
To practice creating and editing resources, see Working With Resource Files.
The resources are stored in the project’s JAR file.
Chapter 29 JSR 238: Mobile Internationalization API (MIA) 231

232 Java ME Platform SDK Help • April 2009

CHAPTER 30
JSR 229: Payment API Support
JSR 229, the Payment API, enables applications to make payments on behalf of theirusers. The Payment API supports different payment mechanisms through paymentadapters. A device that implements the Payment API has one or more adapters.MIDlet suites use descriptor attributes to specify what types of payment adaptersthey can use.
The Java ME SDK implements the Payment API with a sample payment adapter thatsimulates both Premium Priced SMS (PPSMS) and credit card payments. In addition,the SDK makes it easy to set the necessary attributes in the MIDlet’s descriptor andJAR file manifest. Finally, a payment console enables you to easily track paymentsmade or attempted by an application.
Because the Payment API is closely tied to provisioning and external devicepayment mechanisms, and because payments can only succeed in a trustedprotection domain, always test and debug your Payment API applications using theRun via OTA feature.
■ Running the Payment Console
■ Running JBricks
Running the Payment ConsoleThe Payment Console is a simple monitoring tool that displays payment relatedtransactions sent from a mobile application using the Payment API (JSR 229). Thepayment console monitors Payment Update File requests and Premium Priced SMSpayments.
The Payment Console is implemented as an Http server running within the DeviceManager process. The root for the Http server is installdir/apps.
233
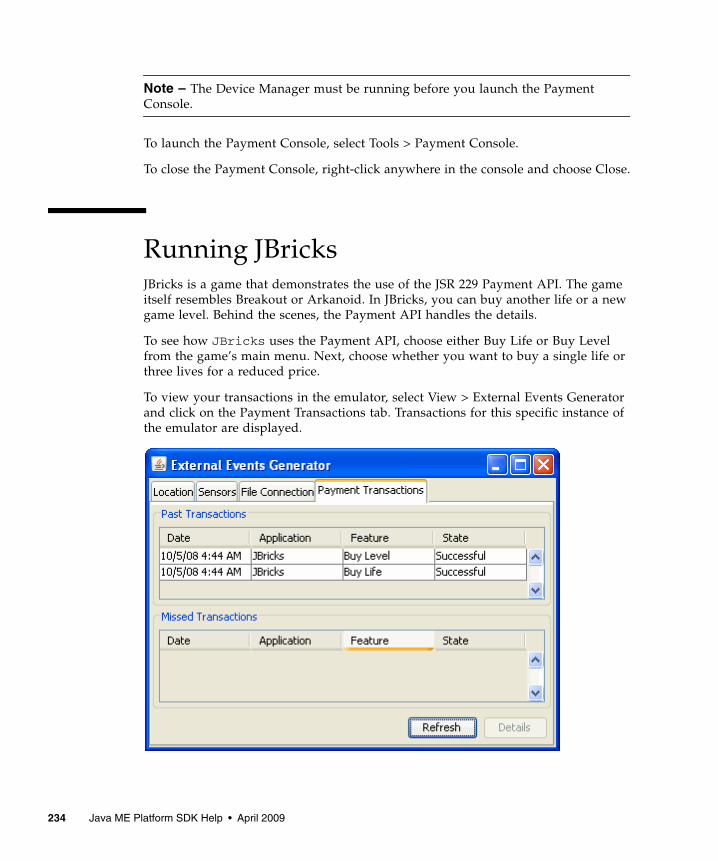
Note – The Device Manager must be running before you launch the PaymentConsole.
To launch the Payment Console, select Tools > Payment Console.
To close the Payment Console, right-click anywhere in the console and choose Close.
Running JBricksJBricks is a game that demonstrates the use of the JSR 229 Payment API. The gameitself resembles Breakout or Arkanoid. In JBricks, you can buy another life or a newgame level. Behind the scenes, the Payment API handles the details.
To see how JBricks uses the Payment API, choose either Buy Life or Buy Levelfrom the game’s main menu. Next, choose whether you want to buy a single life orthree lives for a reduced price.
To view your transactions in the emulator, select View > External Events Generatorand click on the Payment Transactions tab. Transactions for this specific instance ofthe emulator are displayed.
234 Java ME Platform SDK Help • April 2009
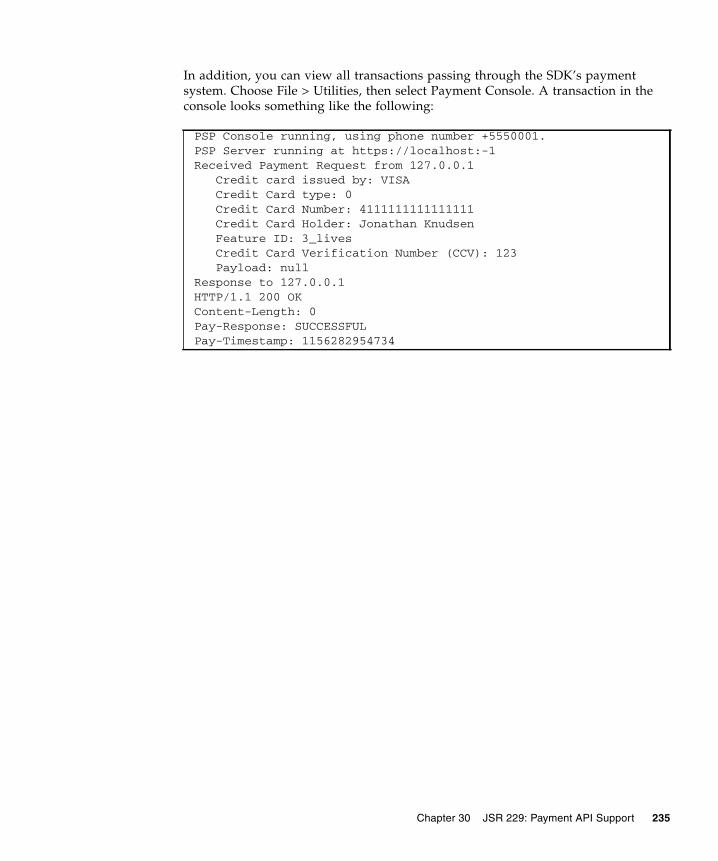
In addition, you can view all transactions passing through the SDK’s paymentsystem. Choose File > Utilities, then select Payment Console. A transaction in theconsole looks something like the following:
PSP Console running, using phone number +5550001.PSP Server running at https://localhost:-1Received Payment Request from 127.0.0.1 Credit card issued by: VISA Credit Card type: 0 Credit Card Number: 4111111111111111 Credit Card Holder: Jonathan Knudsen Feature ID: 3_lives Credit Card Verification Number (CCV): 123 Payload: nullResponse to 127.0.0.1HTTP/1.1 200 OKContent-Length: 0Pay-Response: SUCCESSFULPay-Timestamp: 1156282954734
Chapter 30 JSR 229: Payment API Support 235

236 Java ME Platform SDK Help • April 2009
CHAPTER 31
JSR 256: Mobile Sensor API Support
The JSR 256 Mobile Sensor API allows Java ME application developers to fetch datafrom sensors. A sensor is any measurement data source. Sensors can vary fromphysical sensors such as magnetometers and accelerometers to virtual sensors thatcombine and manipulate the data they have received from various kinds of physicalsensors. An example of a virtual sensor might be a level sensor indicating theremaining charge in a battery or a field intensity sensor that measures the receptionlevel of the mobile network signal in a mobile phone.
JSR 256 supports many different types of sensor connection (wired, wireless,embedded and more) but this SDK release only provides preconfigured support forsensors embedded in the device.
The SDK GUI provides sensor simulation. The emulator’s External Events GeneratorSensors tab allows you to run a script that simulates sensor data.
You can use the custom API available with the SDK to create a custom sensorimplementation with additional capabilities and support for different connectiontypes.
Creating a Mobile Sensor ProjectTo use this API, create a project with the target platform Custom. You must selectMIDP 2.0 or higher and CLDC 1.1 before you can select the Mobile Sensor APIoptional package.
To set permissions, click the Settings button and choose the Permissions icon.
A sensor project freely detects sensors, but this does not imply you can get data fromthe sensors you find. You might need to explicitly set permissions in your project soyou can interact with certain sensors.
237
The following permissions work with the preconfigured embedded sensors shippedwith the SDK:
■ javax.microedition.io.Connector.sensor
Required to open a sensor connection and start measuring data.
■ javax.microedition.sensor.ProtectedSensor
Required to access a protected sensor.
■ javax.microedition.sensor.PrivateSensor
Required to access a private sensor.
A sensor is private or protected if the sensor’s security property has the valueprivate or protected. The security property is an example of a sensor property youmight create for yourself in your own sensor configuration. You can create your ownoptional properties using com.sun.javame.sensorN.proplist andcom.sun.javame.sensorN.prop.any_name, where N is the sensor number andany_name is the name of your property. The security sensor property was created asfollows:
Using a Mobile Sensor ProjectA Sensor project can be installed over the air. In the emulator window, select View >External Events Generator, and select the Sensors tab. In this tab you can view allsensors currently available in the emulator, with the sensor ID, name, andavailability. If the sensor supports change to availability you can click on the checkbox to change it. As mentioned earlier, the provided implementation does notsupport availability change, but a custom implementation you create might do so.
When you select a sensor row the bottom of the dialog displays any custom sensorcontrols. For example, the acceleration sensor, has three channels: axis_x, axis_y, andaxis_z. Each channel has a slider that changes the current channel value, and an editbox you can use to input a value. The channel unit label is displayed on the far right.
Under the channels there is script player control that allows you to play sensor valueevents from a script file of the format discussed in Creating a Sensor Script File. SeeRunning the Sensors Sample Project for a description of how to use the Sensorsdemo.
# add security into proplistcom.sun.javame.sensor<N>.proplist: security# add security property valuecom.sun.javame.sensor<N>.prop.security: private
238 Java ME Platform SDK Help • April 2009
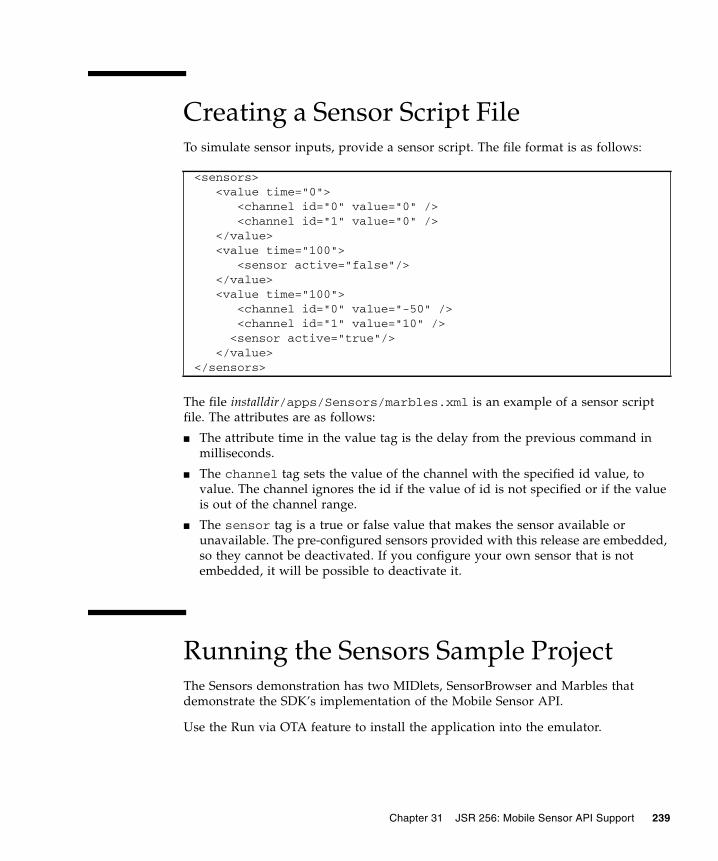
Creating a Sensor Script FileTo simulate sensor inputs, provide a sensor script. The file format is as follows:
The file installdir/apps/Sensors/marbles.xml is an example of a sensor scriptfile. The attributes are as follows:
■ The attribute time in the value tag is the delay from the previous command inmilliseconds.
■ The channel tag sets the value of the channel with the specified id value, tovalue. The channel ignores the id if the value of id is not specified or if the valueis out of the channel range.
■ The sensor tag is a true or false value that makes the sensor available orunavailable. The pre-configured sensors provided with this release are embedded,so they cannot be deactivated. If you configure your own sensor that is notembedded, it will be possible to deactivate it.
Running the Sensors Sample ProjectThe Sensors demonstration has two MIDlets, SensorBrowser and Marbles thatdemonstrate the SDK’s implementation of the Mobile Sensor API.
Use the Run via OTA feature to install the application into the emulator.
<sensors><value time="0">
<channel id="0" value="0" /><channel id="1" value="0" />
</value><value time="100">
<sensor active="false"/></value><value time="100">
<channel id="0" value="-50" /><channel id="1" value="10" /><sensor active="true"/>
</value></sensors>
Chapter 31 JSR 256: Mobile Sensor API Support 239
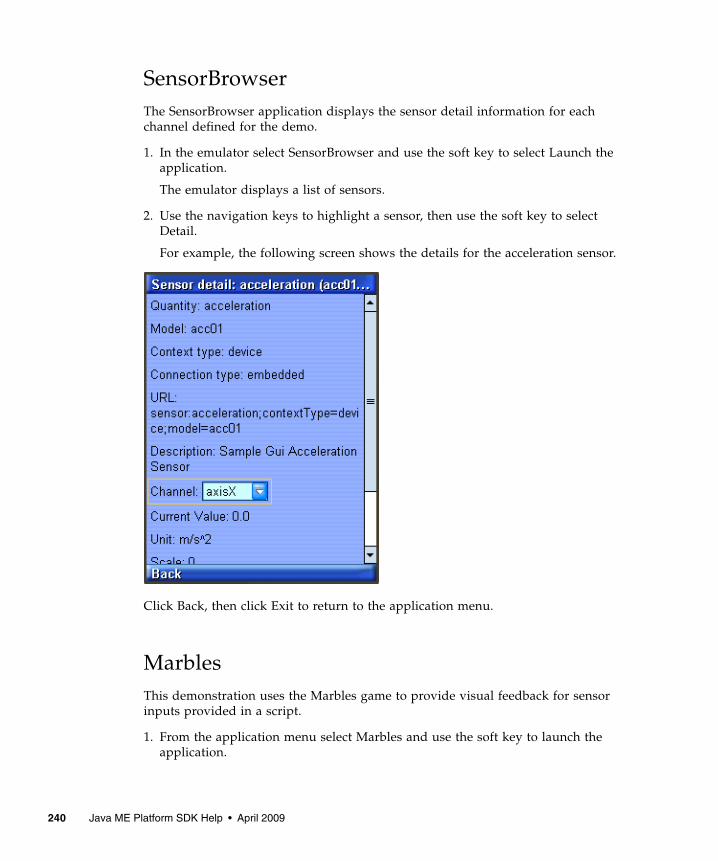
SensorBrowserThe SensorBrowser application displays the sensor detail information for eachchannel defined for the demo.
1. In the emulator select SensorBrowser and use the soft key to select Launch theapplication.
The emulator displays a list of sensors.
2. Use the navigation keys to highlight a sensor, then use the soft key to selectDetail.
For example, the following screen shows the details for the acceleration sensor.
Click Back, then click Exit to return to the application menu.
MarblesThis demonstration uses the Marbles game to provide visual feedback for sensorinputs provided in a script.
1. From the application menu select Marbles and use the soft key to launch theapplication.
240 Java ME Platform SDK Help • April 2009
2. In the emulator, select View > External Events Generator, and select the Sensorstab.
The emulator displays a list of the sensors in this application.
3. Click the Browse button and choose the following file:installdir/apps/Sensors/marbles.xml.
4. Observe the movement of the marbles on the emulator screen. On the externalevents screen you can see the sliders move as the script runs. You can use thefamiliar controls to play, pause, and stop the script.
Chapter 31 JSR 256: Mobile Sensor API Support 241

242 Java ME Platform SDK Help • April 2009
Index
Aadding a Java platform, 9AMR, 172AMS, 39application versioning, 52autoupdate, 14
BBD-J stack, 7Bluetooth, 167building (command line), 137
CCBS message, sending, 217CDC stack, 6certificate management, 99-classpath option, 139CLDC and MIDP stack, 6command line operations, 131command path, 138Common Name, 98content handler, 221
actions, 224properties, 222
cref, 186
Ddebug port, 68debugging
from command line, 136
options, 136demonstrations, 21device
information, 67search, 73
device manager, 5device-address tool, 126, 133
Eemulator, 5, 65
default protection domain, 141skins, 66
emulator command, 133emulator phone number, 217
FFileConnection API, 159Files window, 45font size, 2, 132
Ggenerating stub from command line, 143
Hheap size, 68, 75-help option, 134
I-import command, 143IrDA, 168
243
JJ2ME Web Services Specification, 181JAD file, 38
creating, 60JadTool, 141JAR file, 38
add, 59creating and compressing, 60
Java Cryptography Extension (JCE) keystore, 142JavaFX platform, 7JCP, 155JSR, 155JSR 75, 159JSR 82, 167, 170JSR 118, 93JSR 120, 215JSR 135, 171JSR 172, 181, 183JSR 177, 185JSR 179, 197, 199JSR 184, 204, 206JSR 185, 93JSR 205, 215JSR 211, 225JSR 226, 207JSR 229, 233, 234JSR 238, 227, 229JSR 239, 207JSR 248, 93JSR 256, 237JSR 75, 161, 164JTWI security domains, 94
Kkey
exporting, 61key management, 96key pair
alias, 98creating, 98importing, 99
keystore, JCE, 142keystore.ks, 25keytool utility, 142
Llocale, 68Location API, 197logical view, 44
MM3G, 204managing certificates from command line, 142manifest file, creating, 139MEKeyTool, 142messages tree sorting, 89method profiling, 81MIA, 227MMAPI, 171, 176Mobile 3D Graphics API, 203, 204Mobile Internationalization API, 227Mobile Media API, 171Mobile Media API (MMAPI), 171
capture, 172mobile sensor, 237Mobile Sensors API, 237, 239MSA security domains, 94multiple user environment, 77
Nnetwork monitor, 68
filtering, 89sorting messages, 89
network monitoring, 87
OOBEX, 167OBEX preferences, 168obfuscate project, 60OpenGL ES, 207Organization Name, 98Organization Unit, 98
Ppackaging, 60packaging using command line, 140Payment API, 233, 234PDA Optional Packages, 159PDAP, 159
244 Java ME Platform SDK Help • April 2009
permissions, 95Personal Information Management (PIM) API, 159phone number, 68PhoneME Advanced, 6, 7, 10physical view, 45PIM API, 161platform
adding, 9port
debug, 68preverifying, 137
example from command line, 139profiler, 68, 81ProGuard obfuscator, 60project, 37, 38
add, 59build, 44clean, 45clean and build, 44close, 45import, 47new, 44run, 45set as main, 45settings, 38
Projects window, 44properties
device, 67, 68enable profiler, 81platform, 67searchable in WURFL, 75
protection domains, 93proxy server settings, 21
Rreference problem, 25resolve reference problem, 25resources, 45ring tones, 173roots in the FileConnection API, 160run options, 134Run via OTA, 95
SSATSA, 185
SATSA demos, 192SDK, running from command line, 131sensor, 237sensor security, 237settings, 38signed MIDlet suites, 93signing MIDlet suites, 95, 141SMS binary message, sending, 217SMS text message, sending, 217source packages, 45State Name, 98stub generator for web services, 181SVG, 207SVGDemo, 208SVGT, 207switch users, 77
Ttoolbar, running from the command line, 131tracing options, 137
UUEI, 78user switching, 77
V-version option, 134versioning applications, 52
WWeb Services specification, 181web services, stub generator, 181Wireless Messaging API, 215WMA, 215WMA console, 215, 219wscompile, 143WURFL, 73
X-Xdebug option, 136-Xquery option, 137-Xrunjdwp option, 136
-Xverbose option, 137
Index 245

246 Java ME Platform SDK Help • April 2009