user manual - diagnostic box | homethediagnosticbox.com/downloads/cyclonepro_manual.pdfuser manual -...
TRANSCRIPT
VERSION 1.0 3/07/2015
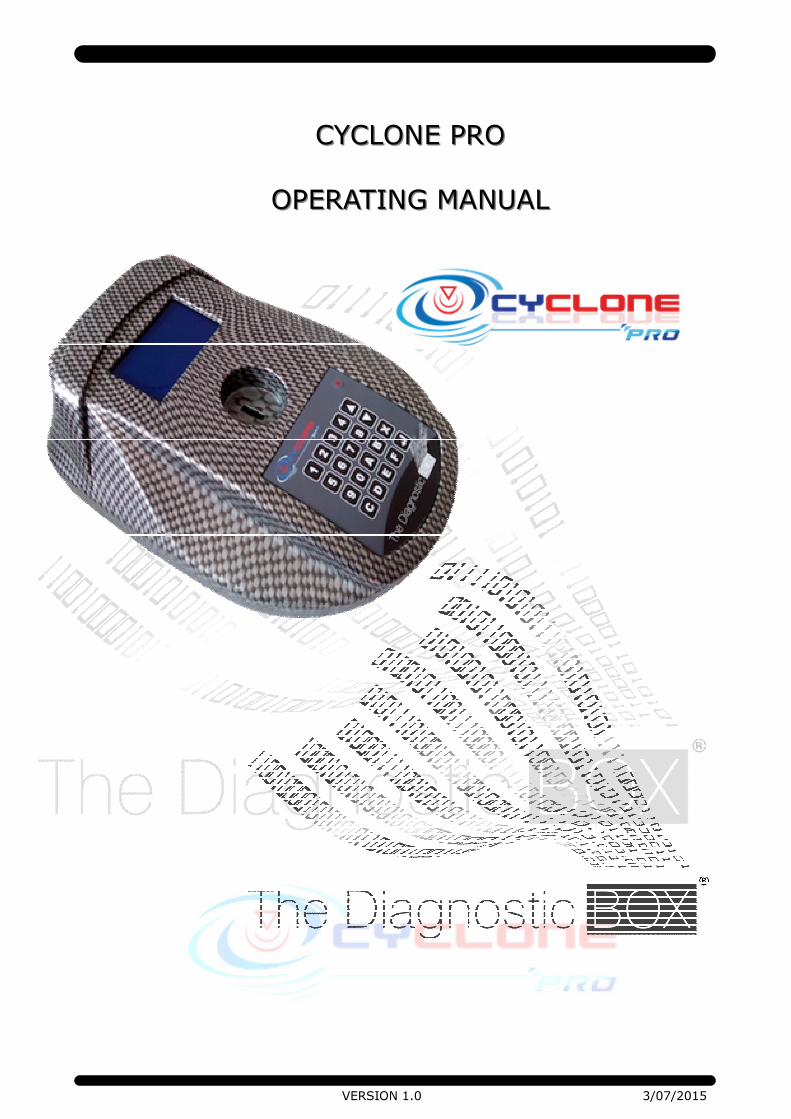
CYCLONE PROCYCLONE PRO
OPERATING MANUALOPERATING MANUAL
2 VERSION 1.0 3/07/2015
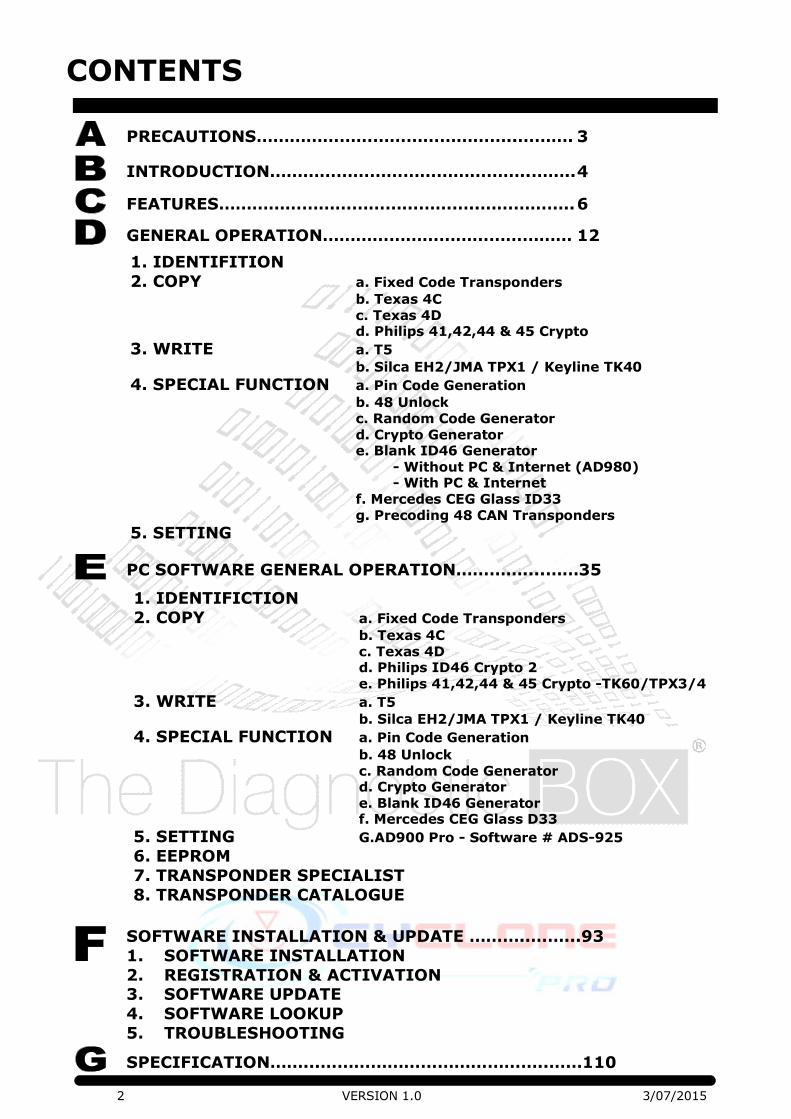
PRECAUTIONS………………………………………..………. 3
CONTENTS
1. IDENTIFITION
2. COPY a. Fixed Code Transponders
b. Texas 4C c. Texas 4D d. Philips 41,42,44 & 45 Crypto 3. WRITE a. T5
b. Silca EH2/JMA TPX1 / Keyline TK40
4. SPECIAL FUNCTION a. Pin Code Generation
b. 48 Unlock c. Random Code Generator d. Crypto Generator e. Blank ID46 Generator - Without PC & Internet (AD980) - With PC & Internet f. Mercedes CEG Glass ID33 g. Precoding 48 CAN Transponders
5. SETTING
1. IDENTIFICTION
2. COPY a. Fixed Code Transponders
b. Texas 4C c. Texas 4D d. Philips ID46 Crypto 2 e. Philips 41,42,44 & 45 Crypto -TK60/TPX3/4
3. WRITE a. T5
b. Silca EH2/JMA TPX1 / Keyline TK40
4. SPECIAL FUNCTION a. Pin Code Generation
b. 48 Unlock c. Random Code Generator d. Crypto Generator e. Blank ID46 Generator f. Mercedes CEG Glass D33 5. SETTING G.AD900 Pro - Software # ADS-925
6. EEPROM
7. TRANSPONDER SPECIALIST
8. TRANSPONDER CATALOGUE
INTRODUCTION………………………………………..…….. 4
FEATURES………………………………………..…………….. 6
GENERAL OPERATION……………………………………… 12
PC SOFTWARE GENERAL OPERATION…………....……35
SOFTWARE INSTALLATION & UPDATE ………..……...93
1. SOFTWARE INSTALLATION
2. REGISTRATION & ACTIVATION 3. SOFTWARE UPDATE
4. SOFTWARE LOOKUP
5. TROUBLESHOOTING
SPECIFICATION……...…………………………………..……110
3 VERSION 1.0 3/07/2015
Cyclone Pro - PRECAUTIONS
1. The hand held diagnostic tool is an electronic piece of
equipment, and should not be exposed to excessive sunlight,
high temperatures or immersed in liquids.
2. Do not operate the equipment by magnetic sources as this will
interfere with the antenna.
3. Keep the unit in a clean environment.
4. Observe normal health and safety precautions when using this
equipment.
5. Incorrect connections may damage sensitive electronic devices fitted to the product and the immobiliser.
6. Observe normal anti static handling procedures when using
this device or handling electronic components.
7. Keep the antenna area of the unit clean and free of debris or
foreign objects.
VERSION 1.0 3/07/2015
Cyclone Pro - INTRODUCTION
The professional duplicating machine, Cyclone Pro, has been designed and built to keep
pace with the constant evolution of transponder car keys.
The Cyclone Pro key duplicator features the most innovative electronic components in
the field of radio frequencies thus allowing easy detection, reading and cloning
(duplication) of fixed and crypto code transponders.
The Cyclone Pro can either be used as a stand alone tool or with PC software which
increases its ability and ease of use.
Major features include the ability for copying of Crypto 42, 46, Texas 4C and 4D
transponders.
The Cyclone Pro has been developed to cater for future developments with the ever
expanding technology of transponders within Automotive vehicle systems.
The Cyclone Pro offers complete flexibility. Once the main unit is purchased the
functionality can be expanded by adding additional software.
The machine of the future for transponder developments, is the Cyclone Pro....for
professional locksmiths.
Features:
Copy Fixed Code Transponders
Copy Crypto Transponders
Copy Philips 41,42,44 & 45 Crypto Copy Texas 4D Crypto Transponder onto Silca EH2/ JMA TPX2/ Keyline TK40
Copy Texas 4C Fixed Code Transponder onto Silca EH2 or JMA TPX1
Copy Mercedes CEG GLASS ID33 Rolling Transponders Display Transponder Information
Calculate Pin-Codes From Transponders
Calculate Pin-Codes From Chassis Numbers Unlock Most 48 Transponders (75%)
Generate Crypto Transponders from blank T5 transponders.
Crypto ID46 Transponders for Renault – Chrysler and Jeep
Generate Transponder Logic For Fixed Transponders Calculate EEPROM Logic From Transponders
Modify transponder logic/detail.
These features are described in the section C. Features that are standard on the basic
package and those that are purchased as additional modules are identified.
The EEPROM Reading function is an advanced function and also requires an EEPROM-reader.
The Transponder Specialist function should only be used by experts and is not technically supported by The Diagnostic Box.
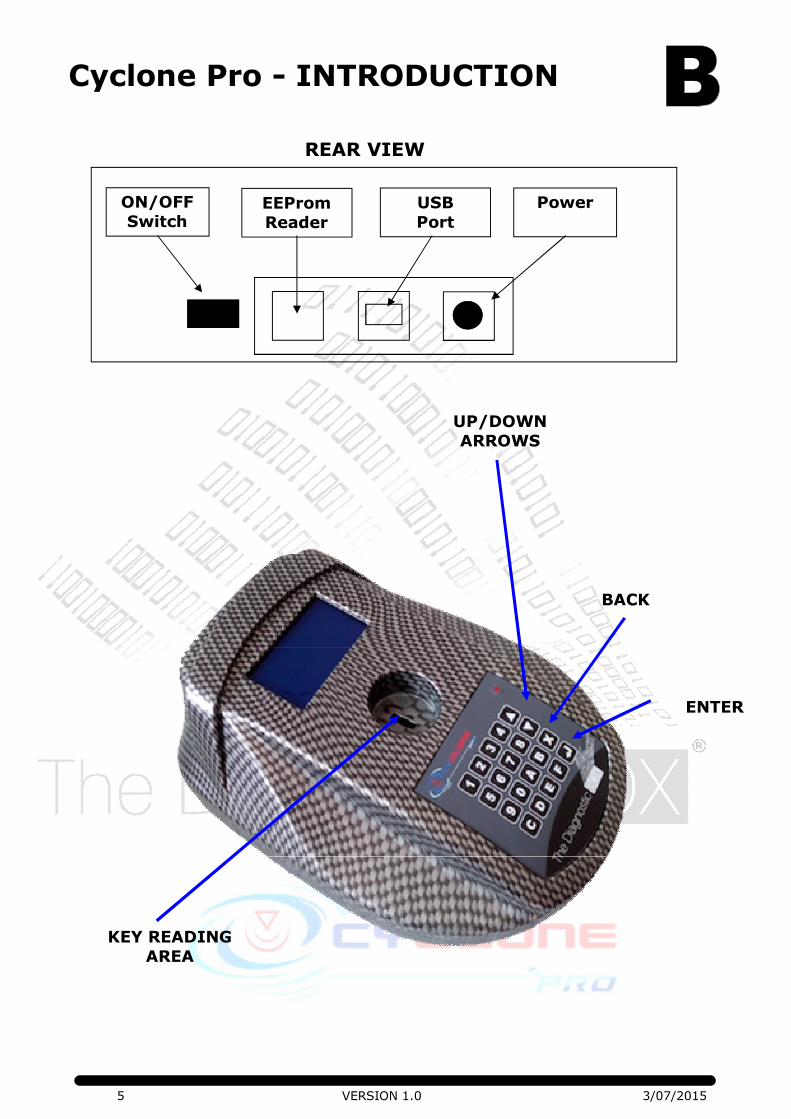
5 VERSION 1.0 3/07/2015
Cyclone Pro - INTRODUCTION
UP/DOWN
ARROWS
BACK
ENTER
REAR VIEW
ON/OFF
Switch USB
Port EEProm
Reader
Power
KEY READING
AREA
6 VERSION 1.0 3/07/2015
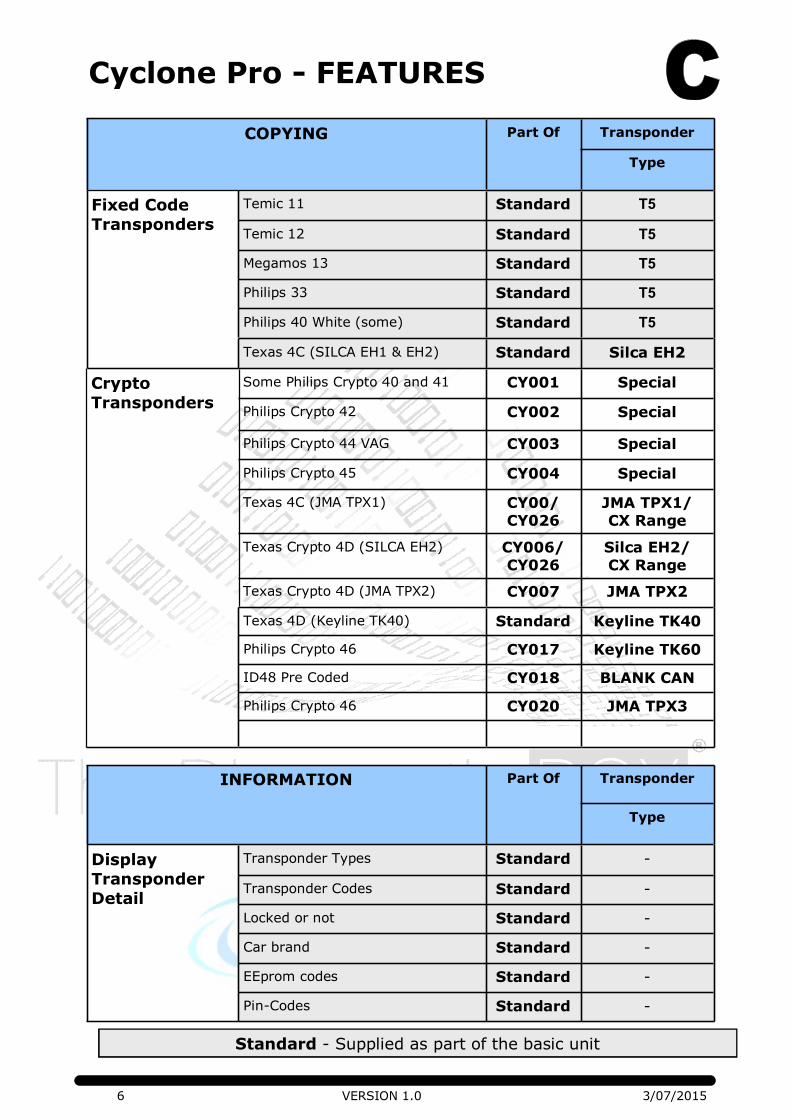
Cyclone Pro - FEATURES
COPYING Part Of Transponder
Type
Fixed Code
Transponders
Temic 11 Standard T5
Temic 12 Standard T5
Megamos 13 Standard T5
Philips 33 Standard T5
Philips 40 White (some) Standard T5
Texas 4C (SILCA EH1 & EH2) Standard Silca EH2
Crypto
Transponders
Some Philips Crypto 40 and 41 CY001 Special
Philips Crypto 42 CY002 Special
Philips Crypto 44 VAG CY003 Special
Philips Crypto 45 CY004 Special
Texas 4C (JMA TPX1) CY00/
CY026
JMA TPX1/
CX Range
Texas Crypto 4D (SILCA EH2) CY006/
CY026
Silca EH2/
CX Range
Texas Crypto 4D (JMA TPX2) CY007 JMA TPX2
Texas 4D (Keyline TK40) Standard Keyline TK40
Philips Crypto 46 CY017 Keyline TK60
ID48 Pre Coded CY018 BLANK CAN
Philips Crypto 46 CY020 JMA TPX3
INFORMATION Part Of Transponder
Type
Display
Transponder
Detail
Transponder Types Standard -
Transponder Codes Standard -
Locked or not Standard -
Car brand Standard -
EEprom codes Standard -
Pin-Codes Standard -
Standard - Supplied as part of the basic unit

7 VERSION 1.0 3/07/2015
Cyclone Pro - FEATURES
UNLOCKING Part Of Trans-ponder
Type
Most 48 Transponders
Most transponders are locked during programming so that the
transponders cannot be used
again. Cyclone Pro can unlock most
megamos crypto transp.
Standard -
Chrysler Remote Unlocking
RKE unlocking of K0BDT04A CY090 -
GENERATING Part Of Trans-ponder
Type
Crypto Transponders From Blank Crypto Transponders For Renault/Chrysler Jeep
You can generate 46 Renault, Chrysler and Jeep
transponders from blank 46 trans-
ponders.
Standard Blank 46
Transponder Logic For Fixed Transponders
Standard T5
Crypto Transponders From Blank Crypto Transponders for MB
Mercedes C-E-G Class ID33 CY008 Special
Transponder Logic For Philips Crypto Transp
Philips Crypto 40,41,42,44 (VAG), 44 mitsu & 45
CY009 Blank
PCF7935
Transponder Logic For Texas Crypto Transp.
Texas Crypto 61,62 & 65 CY010 Texas
Crypto 60
Transponder Logic For Philips Crypto 46 Transponders
Mitsubishi Lancer/Colt, VW Touareg / Phaeton, Porsche Cay-
enne, Peugeot 307, Audi A8, Cit-
roen C3 / Picasso, BMW E60-64/E65/E87
CY013 Blank 46
Transponder Logic For Philips Crypto 60 Transponders
ID60 to ID67-68-69-70 CY026 Blank 60
Standard - Supplied as part of the basic package
8 VERSION 1.0 3/07/2015
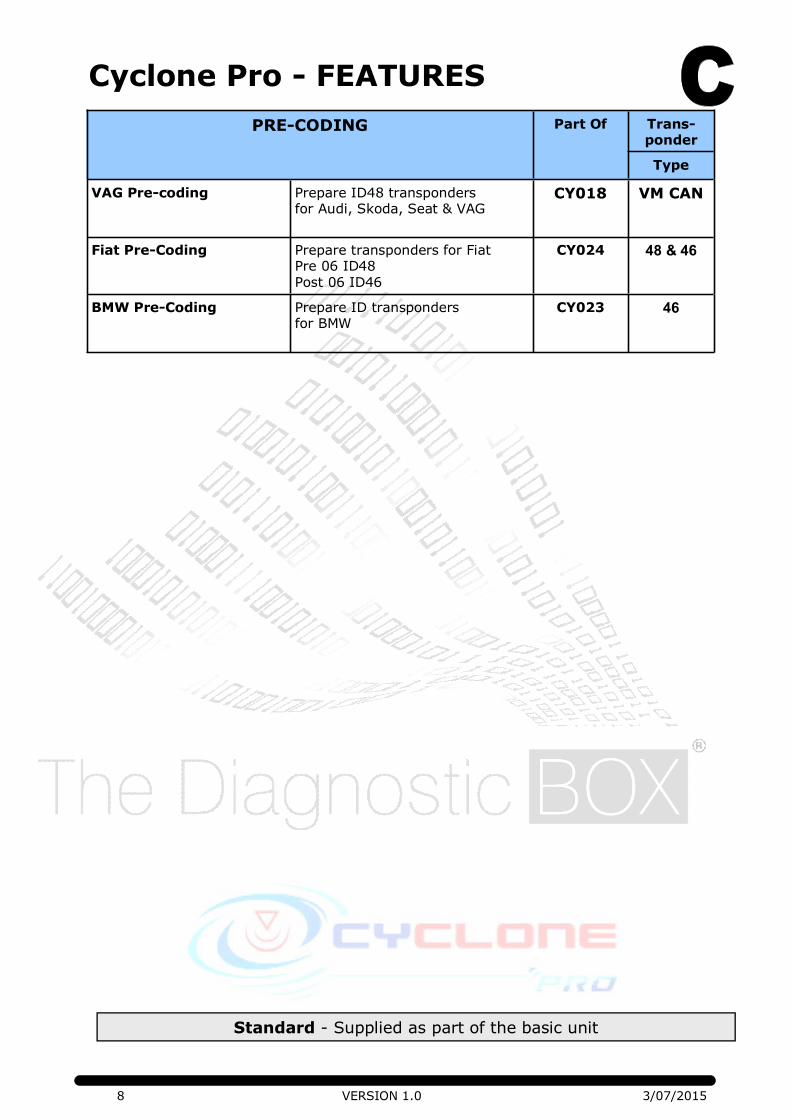
Cyclone Pro - FEATURES
PRE-CODING Part Of Trans-ponder
Type
VAG Pre-coding Prepare ID48 transponders for Audi, Skoda, Seat & VAG
CY018 VM CAN
Fiat Pre-Coding Prepare transponders for Fiat Pre 06 ID48
Post 06 ID46
CY024 48 & 46
BMW Pre-Coding Prepare ID transponders for BMW
CY023 46
Standard - Supplied as part of the basic unit
9 VERSION 1.0 3/07/2015
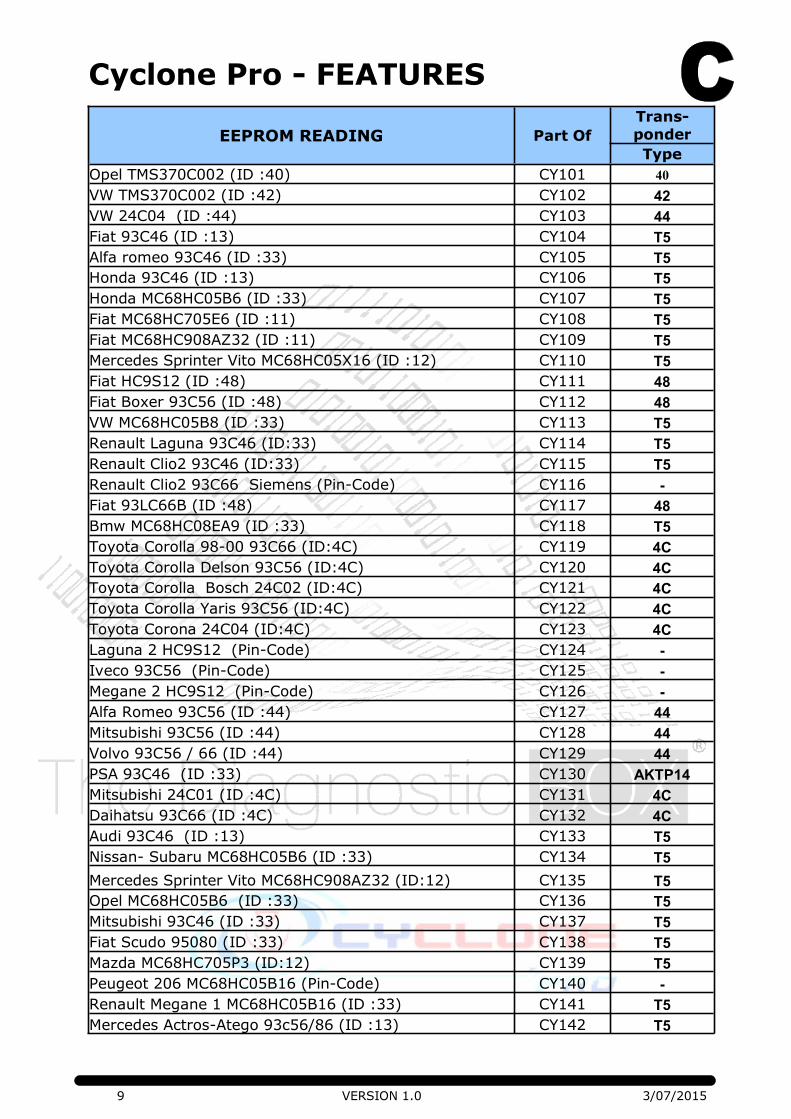
Cyclone Pro - FEATURES
EEPROM READING Part Of
Trans-
ponder
Type
Opel TMS370C002 (ID :40) CY101 40
VW TMS370C002 (ID :42) CY102 42
VW 24C04 (ID :44) CY103 44
Fiat 93C46 (ID :13) CY104 T5
Alfa romeo 93C46 (ID :33) CY105 T5
Honda 93C46 (ID :13) CY106 T5
Honda MC68HC05B6 (ID :33) CY107 T5
Fiat MC68HC705E6 (ID :11) CY108 T5
Fiat MC68HC908AZ32 (ID :11) CY109 T5
Mercedes Sprinter Vito MC68HC05X16 (ID :12) CY110 T5
Fiat HC9S12 (ID :48) CY111 48
Fiat Boxer 93C56 (ID :48) CY112 48
VW MC68HC05B8 (ID :33) CY113 T5
Renault Laguna 93C46 (ID:33) CY114 T5
Renault Clio2 93C46 (ID:33) CY115 T5
Renault Clio2 93C66 Siemens (Pin-Code) CY116 -
Fiat 93LC66B (ID :48) CY117 48
Bmw MC68HC08EA9 (ID :33) CY118 T5
Toyota Corolla 98-00 93C66 (ID:4C) CY119 4C
Toyota Corolla Delson 93C56 (ID:4C) CY120 4C
Toyota Corolla Bosch 24C02 (ID:4C) CY121 4C
Toyota Corolla Yaris 93C56 (ID:4C) CY122 4C
Toyota Corona 24C04 (ID:4C) CY123 4C
Laguna 2 HC9S12 (Pin-Code) CY124 -
Iveco 93C56 (Pin-Code) CY125 -
Megane 2 HC9S12 (Pin-Code) CY126 -
Alfa Romeo 93C56 (ID :44) CY127 44
Mitsubishi 93C56 (ID :44) CY128 44
Volvo 93C56 / 66 (ID :44) CY129 44
PSA 93C46 (ID :33) CY130 AKTP14
Mitsubishi 24C01 (ID :4C) CY131 4C
Daihatsu 93C66 (ID :4C) CY132 4C
Audi 93C46 (ID :13) CY133 T5
Nissan- Subaru MC68HC05B6 (ID :33) CY134 T5
Mercedes Sprinter Vito MC68HC908AZ32 (ID:12) CY135 T5
Opel MC68HC05B6 (ID :33) CY136 T5
Mitsubishi 93C46 (ID :33) CY137 T5
Fiat Scudo 95080 (ID :33) CY138 T5
Mazda MC68HC705P3 (ID:12) CY139 T5
Peugeot 206 MC68HC05B16 (Pin-Code) CY140 -
Renault Megane 1 MC68HC05B16 (ID :33) CY141 T5
Mercedes Actros-Atego 93c56/86 (ID :13) CY142 T5
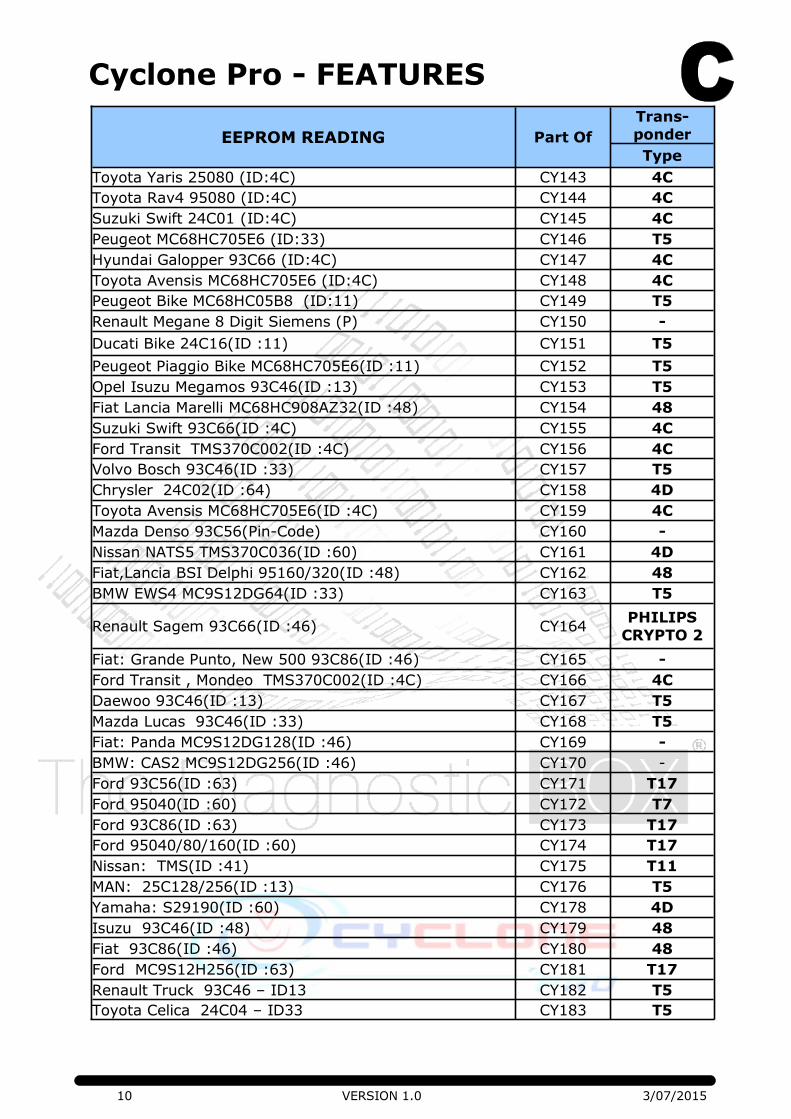
10 VERSION 1.0 3/07/2015
Cyclone Pro - FEATURES
EEPROM READING Part Of
Trans-
ponder
Type
Toyota Yaris 25080 (ID:4C) CY143 4C
Toyota Rav4 95080 (ID:4C) CY144 4C
Suzuki Swift 24C01 (ID:4C) CY145 4C
Peugeot MC68HC705E6 (ID:33) CY146 T5
Hyundai Galopper 93C66 (ID:4C) CY147 4C
Toyota Avensis MC68HC705E6 (ID:4C) CY148 4C
Peugeot Bike MC68HC05B8 (ID:11) CY149 T5
Renault Megane 8 Digit Siemens (P) CY150 -
Ducati Bike 24C16(ID :11) CY151 T5
Peugeot Piaggio Bike MC68HC705E6(ID :11) CY152 T5
Opel Isuzu Megamos 93C46(ID :13) CY153 T5
Fiat Lancia Marelli MC68HC908AZ32(ID :48) CY154 48
Suzuki Swift 93C66(ID :4C) CY155 4C
Ford Transit TMS370C002(ID :4C) CY156 4C
Volvo Bosch 93C46(ID :33) CY157 T5
Chrysler 24C02(ID :64) CY158 4D
Toyota Avensis MC68HC705E6(ID :4C) CY159 4C
Mazda Denso 93C56(Pin-Code) CY160 -
Nissan NATS5 TMS370C036(ID :60) CY161 4D
Fiat,Lancia BSI Delphi 95160/320(ID :48) CY162 48
BMW EWS4 MC9S12DG64(ID :33) CY163 T5
Renault Sagem 93C66(ID :46) CY164 PHILIPS
CRYPTO 2
Fiat: Grande Punto, New 500 93C86(ID :46) CY165 -
Ford Transit , Mondeo TMS370C002(ID :4C) CY166 4C
Daewoo 93C46(ID :13) CY167 T5
Mazda Lucas 93C46(ID :33) CY168 T5
Fiat: Panda MC9S12DG128(ID :46) CY169 -
BMW: CAS2 MC9S12DG256(ID :46) CY170 -
Ford 93C56(ID :63) CY171 T17
Ford 95040(ID :60) CY172 T7
Ford 93C86(ID :63) CY173 T17
Ford 95040/80/160(ID :60) CY174 T17
Nissan: TMS(ID :41) CY175 T11
MAN: 25C128/256(ID :13) CY176 T5
Yamaha: S29190(ID :60) CY178 4D
Isuzu 93C46(ID :48) CY179 48
Fiat 93C86(ID :46) CY180 48
Ford MC9S12H256(ID :63) CY181 T17
Renault Truck 93C46 – ID13 CY182 T5
Toyota Celica 24C04 – ID33 CY183 T5
11 VERSION 1.0 3/07/2015
Cyclone Pro - FEATURES
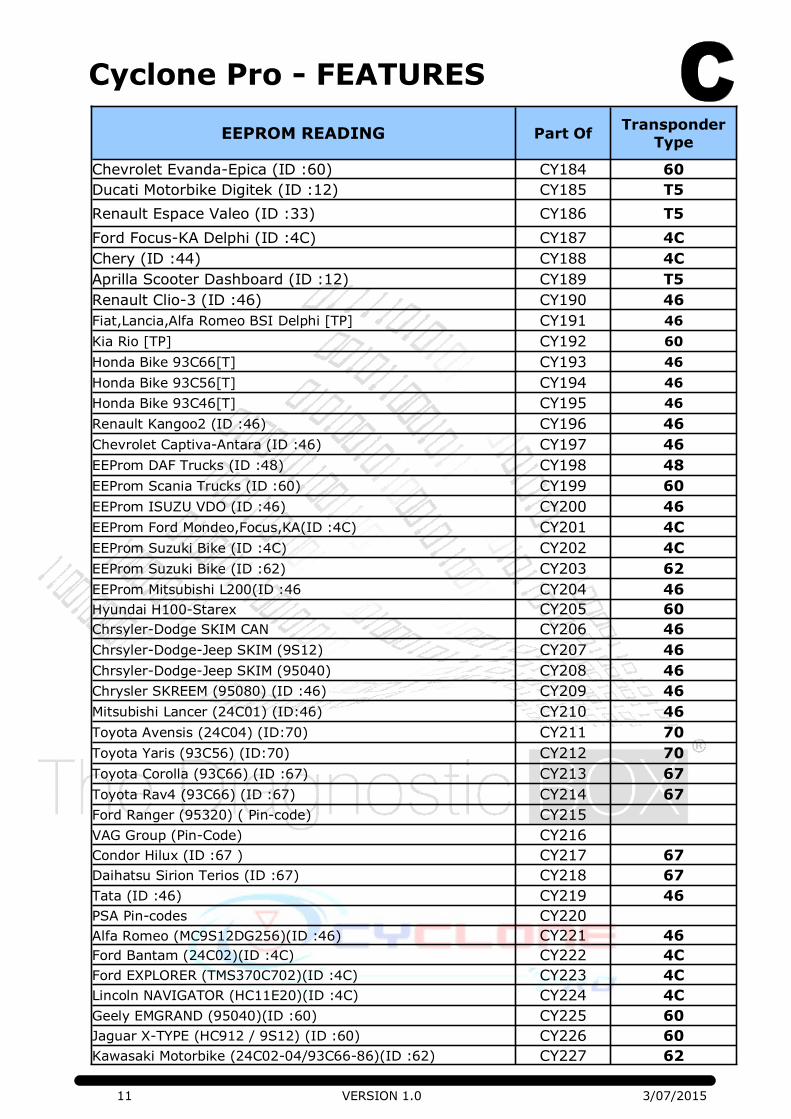
EEPROM READING Part Of
Chevrolet Evanda-Epica (ID :60) CY184 60
Ducati Motorbike Digitek (ID :12) CY185 T5
Renault Espace Valeo (ID :33) CY186 T5
Ford Focus-KA Delphi (ID :4C) CY187 4C
Chery (ID :44) CY188 4C
Aprilla Scooter Dashboard (ID :12) CY189 T5
Renault Clio-3 (ID :46) CY190 46
Fiat,Lancia,Alfa Romeo BSI Delphi [TP] CY191 46
Kia Rio [TP] CY192 60
Honda Bike 93C66[T] CY193 46
Honda Bike 93C56[T] CY194 46
Honda Bike 93C46[T] CY195 46
Renault Kangoo2 (ID :46) CY196 46
Chevrolet Captiva-Antara (ID :46) CY197 46
EEProm DAF Trucks (ID :48) CY198 48
EEProm Scania Trucks (ID :60) CY199 60
EEProm ISUZU VDO (ID :46) CY200 46
EEProm Ford Mondeo,Focus,KA(ID :4C) CY201 4C
EEProm Suzuki Bike (ID :4C) CY202 4C
EEProm Suzuki Bike (ID :62) CY203 62
EEProm Mitsubishi L200(ID :46 CY204 46
Hyundai H100-Starex CY205 60
Chrsyler-Dodge SKIM CAN CY206 46
Chrsyler-Dodge-Jeep SKIM (9S12) CY207 46
Chrsyler-Dodge-Jeep SKIM (95040) CY208 46
Chrysler SKREEM (95080) (ID :46) CY209 46
Mitsubishi Lancer (24C01) (ID:46) CY210 46
Toyota Avensis (24C04) (ID:70) CY211 70
Toyota Yaris (93C56) (ID:70) CY212 70
Toyota Corolla (93C66) (ID :67) CY213 67
Toyota Rav4 (93C66) (ID :67) CY214 67
Ford Ranger (95320) ( Pin-code) CY215
VAG Group (Pin-Code) CY216
Condor Hilux (ID :67 ) CY217 67
Daihatsu Sirion Terios (ID :67) CY218 67
Tata (ID :46) CY219 46
PSA Pin-codes CY220
Alfa Romeo (MC9S12DG256)(ID :46) CY221 46
Ford Bantam (24C02)(ID :4C) CY222 4C
Ford EXPLORER (TMS370C702)(ID :4C) CY223 4C
Lincoln NAVIGATOR (HC11E20)(ID :4C) CY224 4C
Geely EMGRAND (95040)(ID :60) CY225 60
Jaguar X-TYPE (HC912 / 9S12) (ID :60) CY226 60
Kawasaki Motorbike (24C02-04/93C66-86)(ID :62) CY227 62
Transponder
Type
VERSION 1.0 3/07/2015
GENERAL OPERATION
13 VERSION 1.0 3/07/2015
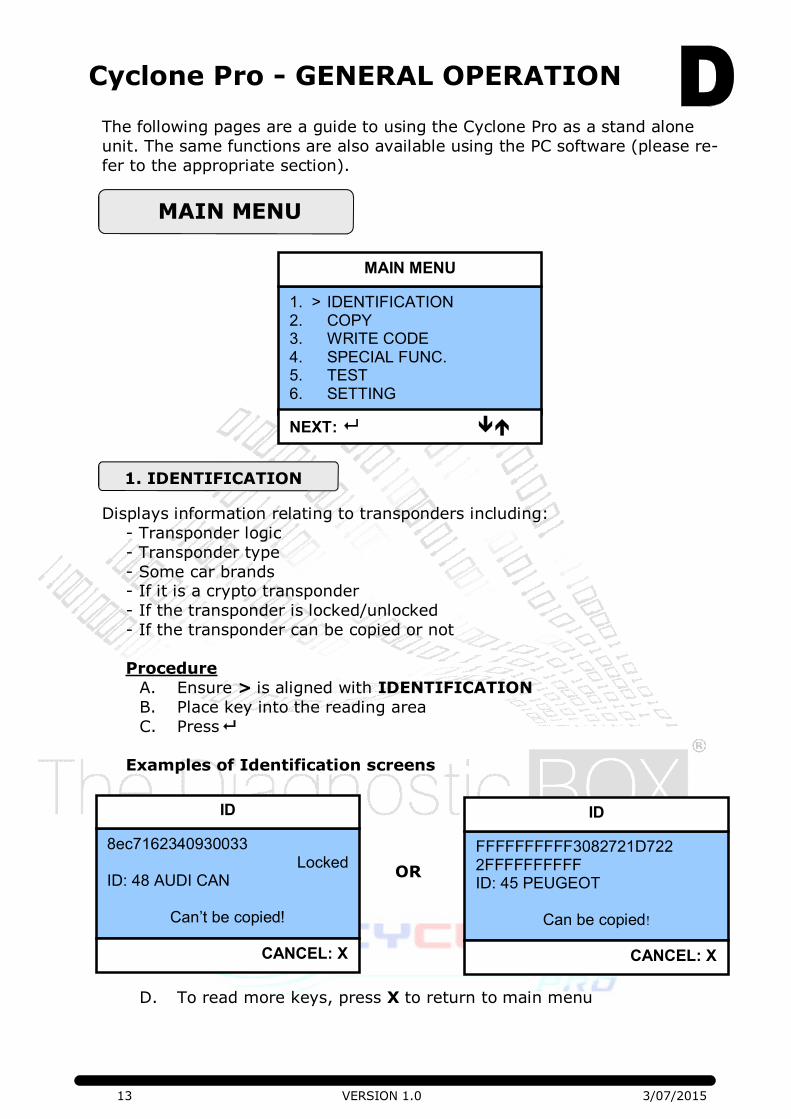
Cyclone Pro - GENERAL OPERATION
The following pages are a guide to using the Cyclone Pro as a stand alone
unit. The same functions are also available using the PC software (please re-
fer to the appropriate section).
Displays information relating to transponders including:
- Transponder logic
- Transponder type
- Some car brands - If it is a crypto transponder
- If the transponder is locked/unlocked
- If the transponder can be copied or not
Procedure
A. Ensure > is aligned with IDENTIFICATION
B. Place key into the reading area
C. Press
Examples of Identification screens
D. To read more keys, press X to return to main menu
1. > IDENTIFICATION 2. COPY 3. WRITE CODE 4. SPECIAL FUNC. 5. TEST 6. SETTING
NEXT:
MAIN MENU
8ec7162340930033 Locked
ID: 48 AUDI CAN
Can’t be copied!
CANCEL: X
ID
FFFFFFFFFF3082721D722 2FFFFFFFFFF ID: 45 PEUGEOT
Can be copied!
CANCEL: X
ID
OR
MAIN MENU
1. IDENTIFICATION
14 VERSION 1.0 3/07/2015
Cyclone Pro - GENERAL OPERATION
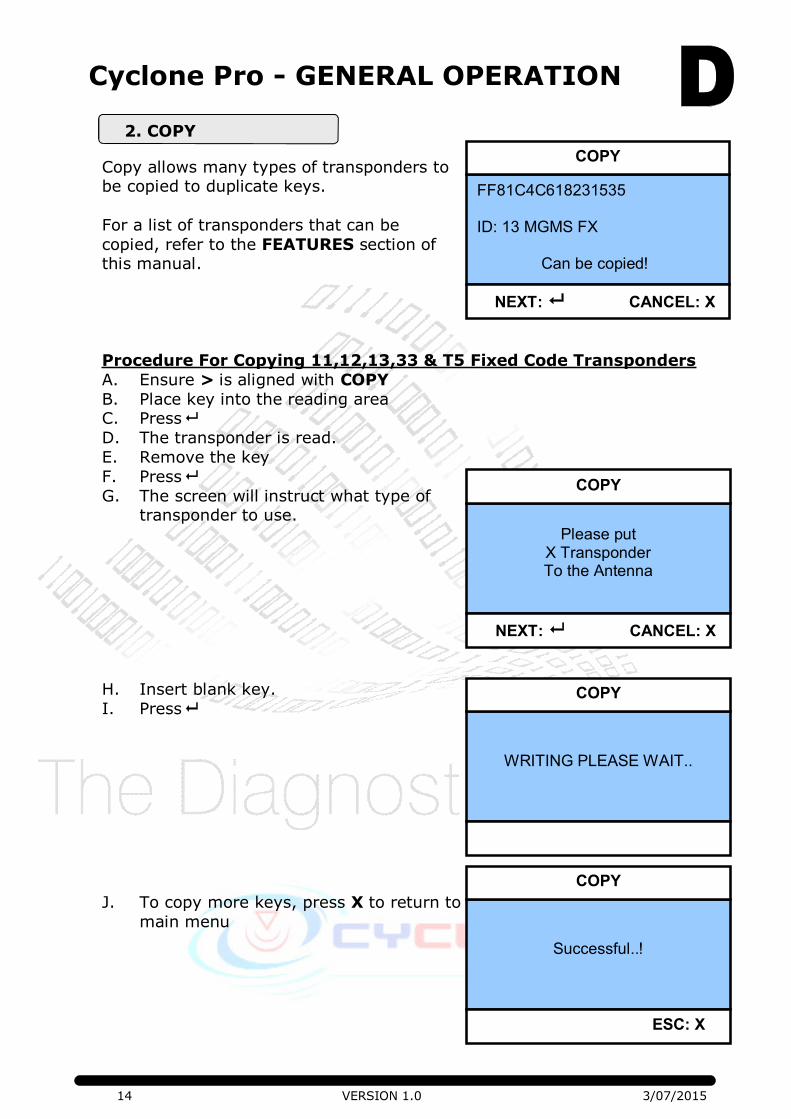
Copy allows many types of transponders to be copied to duplicate keys.
For a list of transponders that can be
copied, refer to the FEATURES section of this manual.
Procedure For Copying 11,12,13,33 & T5 Fixed Code Transponders
A. Ensure > is aligned with COPY
B. Place key into the reading area C. Press
D. The transponder is read.
E. Remove the key
F. Press
G. The screen will instruct what type of transponder to use.
H. Insert blank key.
I. Press
J. To copy more keys, press X to return to
main menu
FF81C4C618231535 ID: 13 MGMS FX
Can be copied!
NEXT: CANCEL: X
COPY
Please put X Transponder To the Antenna
NEXT: CANCEL: X
COPY
WRITING PLEASE WAIT..
COPY
Successful..!
ESC: X
COPY
2. COPY
15 VERSION 1.0 3/07/2015
Cyclone Pro - GENERAL OPERATION
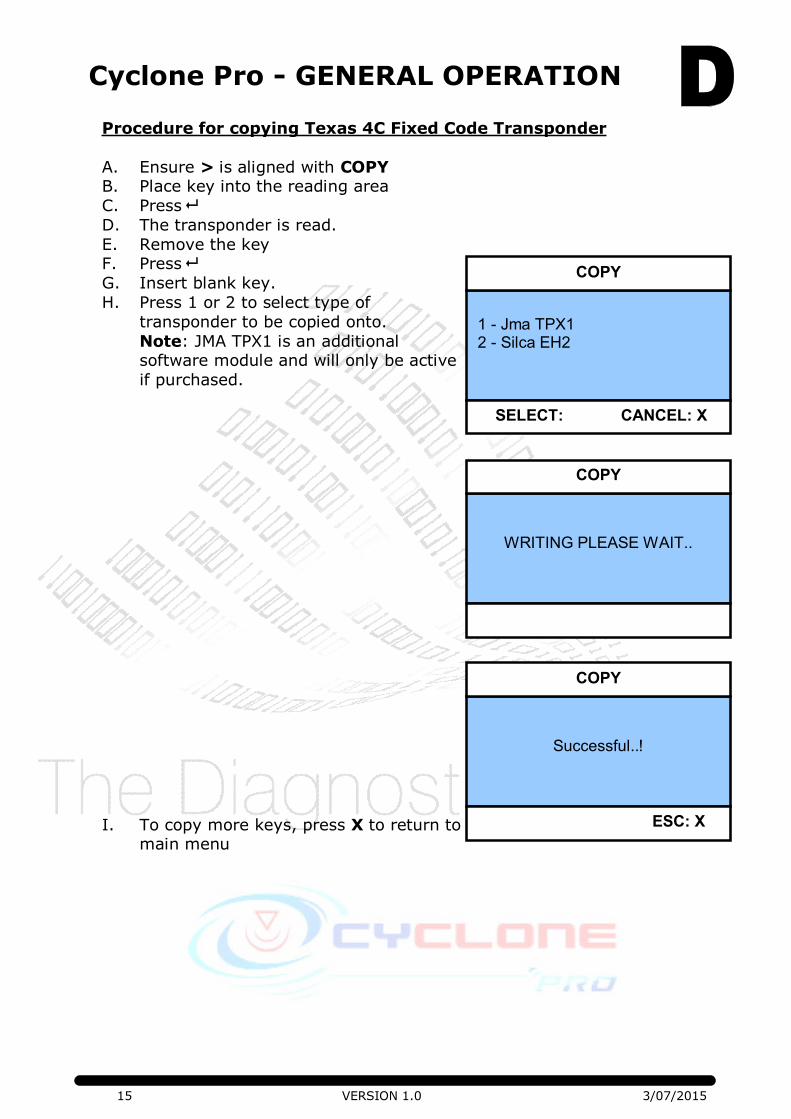
Procedure for copying Texas 4C Fixed Code Transponder
A. Ensure > is aligned with COPY B. Place key into the reading area
C. Press
D. The transponder is read.
E. Remove the key F. Press
G. Insert blank key.
H. Press 1 or 2 to select type of
transponder to be copied onto.
Note: JMA TPX1 is an additional software module and will only be active
if purchased.
I. To copy more keys, press X to return to main menu
1 - Jma TPX1 2 - Silca EH2
SELECT: CANCEL: X
COPY
WRITING PLEASE WAIT..
COPY
Successful..!
ESC: X
COPY
16 VERSION 1.0 3/07/2015
Cyclone Pro - GENERAL OPERATION
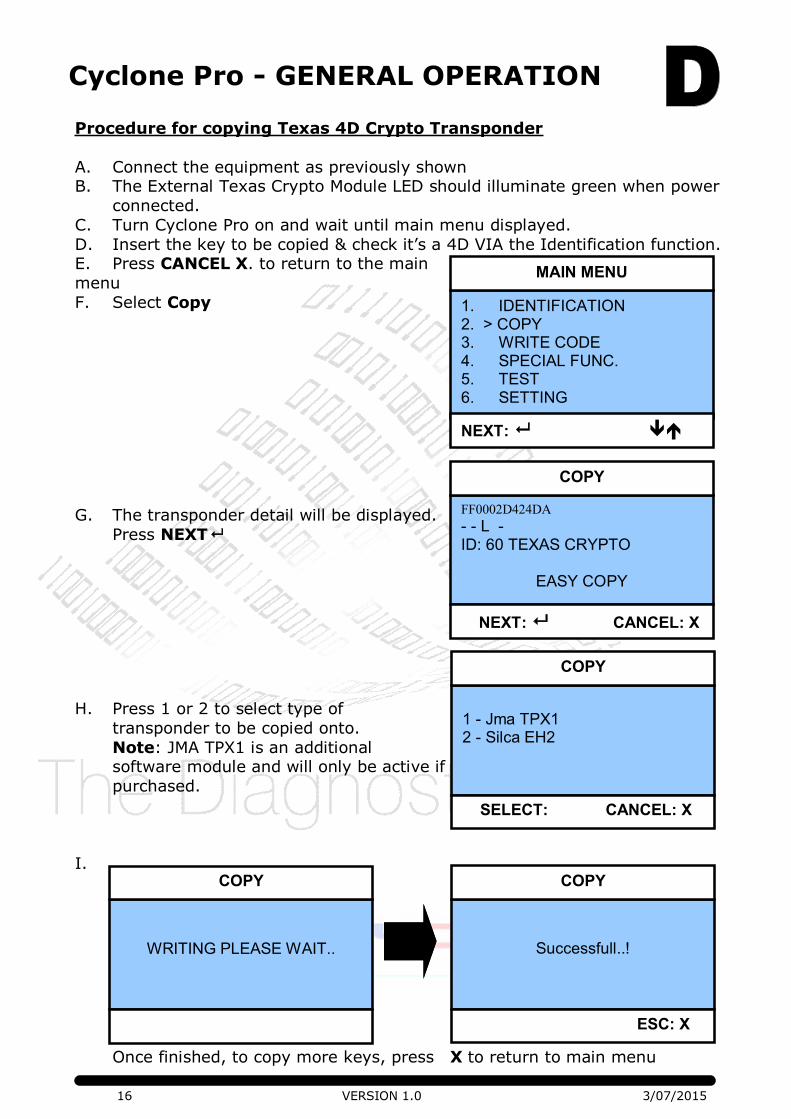
Procedure for copying Texas 4D Crypto Transponder
A. Connect the equipment as previously shown B. The External Texas Crypto Module LED should illuminate green when power
connected.
C. Turn Cyclone Pro on and wait until main menu displayed.
D. Insert the key to be copied & check it’s a 4D VIA the Identification function. E. Press CANCEL X. to return to the main
menu
F. Select Copy
G. The transponder detail will be displayed.
Press NEXT
H. Press 1 or 2 to select type of
transponder to be copied onto.
Note: JMA TPX1 is an additional software module and will only be active if
purchased.
I.
Once finished, to copy more keys, press X to return to main menu
1. IDENTIFICATION 2. > COPY 3. WRITE CODE 4. SPECIAL FUNC. 5. TEST 6. SETTING
NEXT:
MAIN MENU
FF0002D424DA
- - L - ID: 60 TEXAS CRYPTO
EASY COPY
NEXT: CANCEL: X
COPY
1 - Jma TPX1 2 - Silca EH2
SELECT: CANCEL: X
COPY
WRITING PLEASE WAIT..
COPY
Successfull..!
ESC: X
COPY
17 VERSION 1.0 3/07/2015
Cyclone Pro - PC SOFTWARE
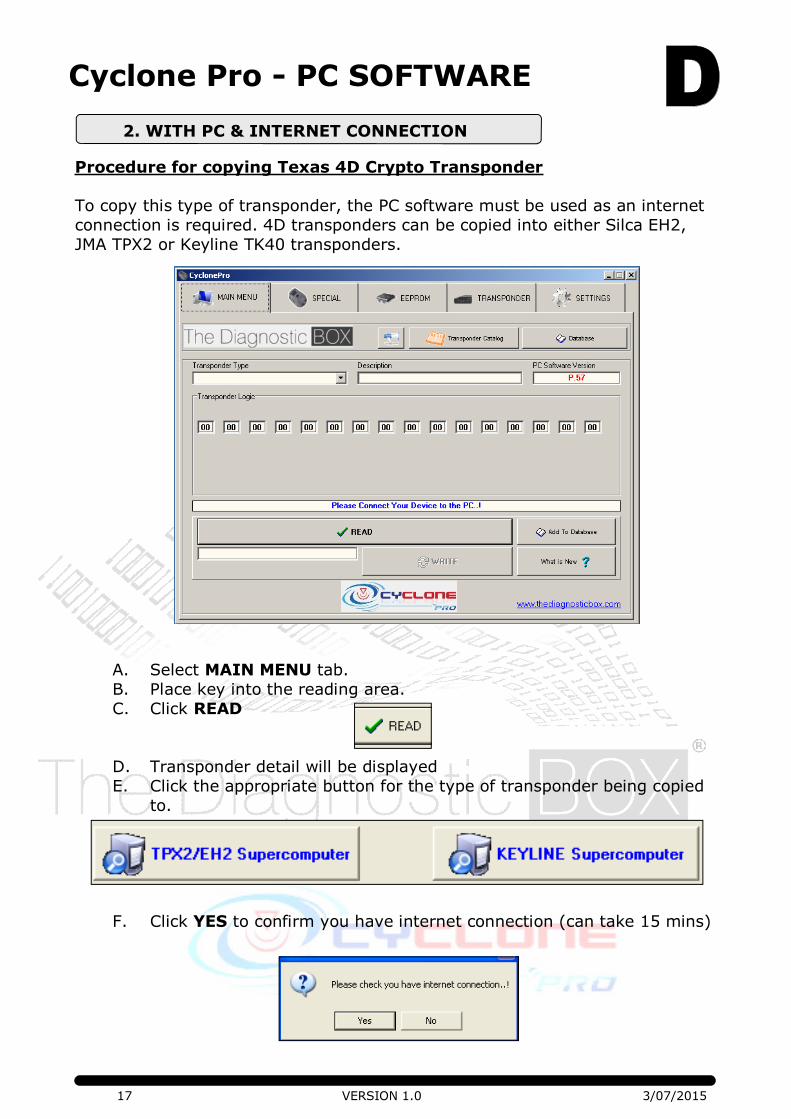
Procedure for copying Texas 4D Crypto Transponder
To copy this type of transponder, the PC software must be used as an internet
connection is required. 4D transponders can be copied into either Silca EH2,
JMA TPX2 or Keyline TK40 transponders.
A. Select MAIN MENU tab.
B. Place key into the reading area.
C. Click READ
D. Transponder detail will be displayed
E. Click the appropriate button for the type of transponder being copied
to.
F. Click YES to confirm you have internet connection (can take 15 mins)
2. WITH PC & INTERNET CONNECTION

18 VERSION 1.0 3/07/2015
Cyclone Pro - PC SOFTWARE
G. When the web calculation has finished one of the following dialog box
will appear, click OK.
EH2 or TPX2 Selected
i) Remove the key that has just been read.
ii) Place either an EH2 or TPX1 transponder into the key reading
area.
iii) Select the appropriate transponder type to copy onto. iv) Next click WRITE.
v) The status bar will indicate if the copying process was successful.
TK40 Selected
i) Remove the key that has just been read.
ii) Place a TK40 transponder into the key reading area.
iii) Next click WRITE.
v) The status bar will indicate if the copying process was successful.
19 VERSION 1.0 3/07/2015
Cyclone Pro - GENERAL OPERATION
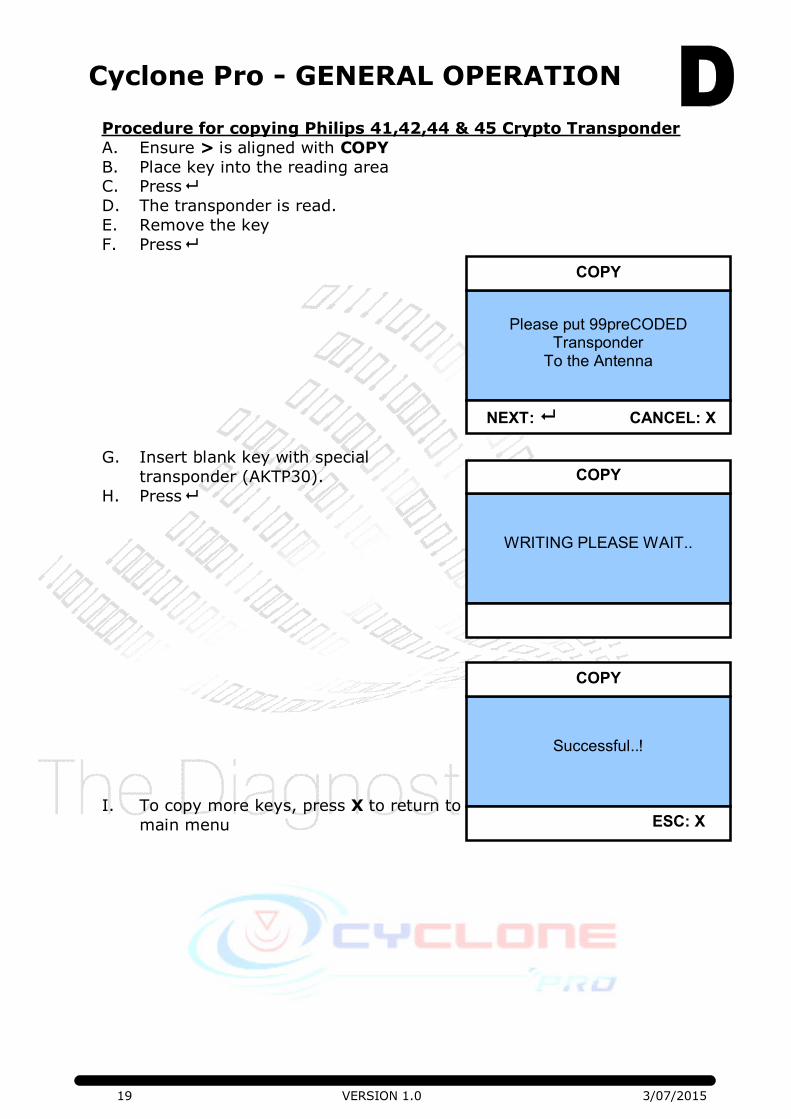
Procedure for copying Philips 41,42,44 & 45 Crypto Transponder
A. Ensure > is aligned with COPY
B. Place key into the reading area C. Press
D. The transponder is read.
E. Remove the key
F. Press
G. Insert blank key with special
transponder (AKTP30).
H. Press
I. To copy more keys, press X to return to
main menu
Please put 99preCODED
Transponder To the Antenna
NEXT: CANCEL: X
COPY
WRITING PLEASE WAIT..
COPY
Successful..!
ESC: X
COPY
20 VERSION 1.0 3/07/2015
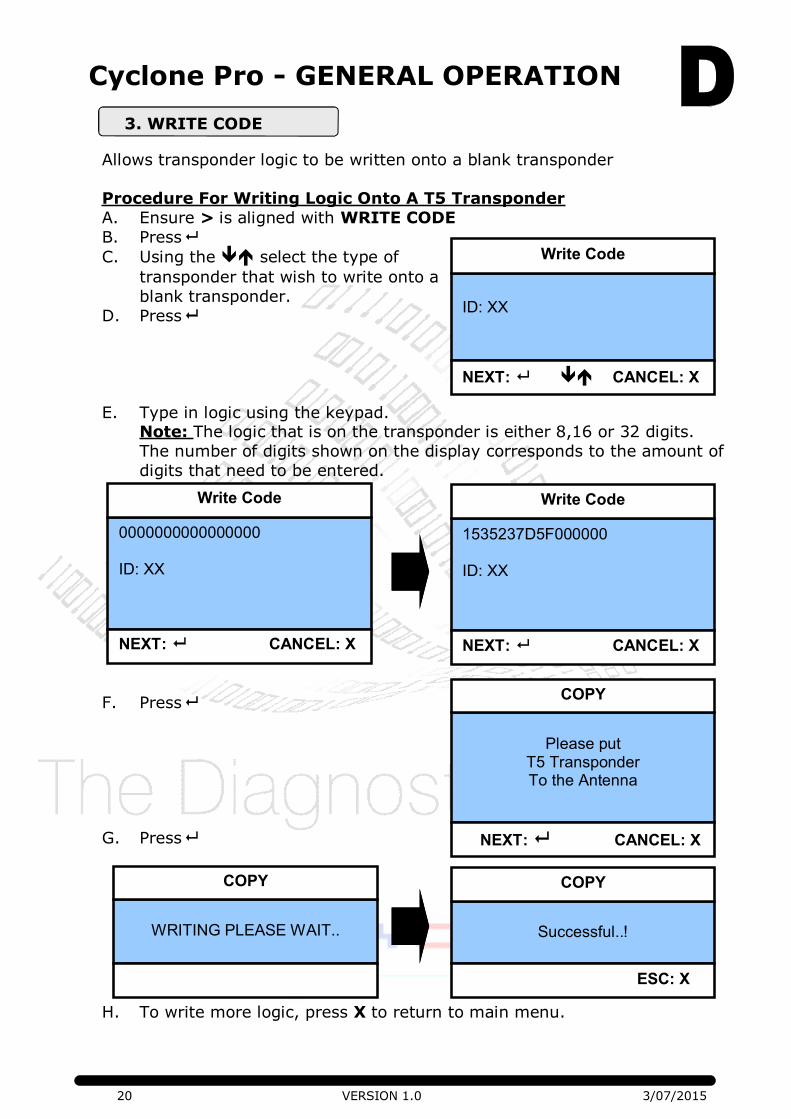
Cyclone Pro - GENERAL OPERATION
Allows transponder logic to be written onto a blank transponder
Procedure For Writing Logic Onto A T5 Transponder
A. Ensure > is aligned with WRITE CODE
B. Press
C. Using the select the type of
transponder that wish to write onto a
blank transponder.
D. Press
E. Type in logic using the keypad. Note: The logic that is on the transponder is either 8,16 or 32 digits.
The number of digits shown on the display corresponds to the amount of
digits that need to be entered.
F. Press
G. Press
H. To write more logic, press X to return to main menu.
ID: XX
NEXT: CANCEL: X
Write Code
Please put T5 Transponder To the Antenna
NEXT: CANCEL: X
COPY
0000000000000000 ID: XX
NEXT: CANCEL: X
Write Code
1535237D5F000000 ID: XX
NEXT: CANCEL: X
Write Code
Successful..!
ESC: X
COPY
WRITING PLEASE WAIT..
COPY
3. WRITE CODE

21 VERSION 1.0 3/07/2015
Cyclone Pro - GENERAL OPERATION
Procedure For Writing Texas 4C Logic Onto A Silca EH2 or JMA TPX1
Transponder
A. Ensure > is aligned with WRITE CODE B. Press
C. Using the select ID 4C type of transponder logic.
D. Press
E. Type in logic using the keypad.
F. Press
G. Press 1 or 2 to select type of
transponder to be copied onto.
Note: JMA TPX1 is an additional
software module and will only be active if purchased.
H. To write more logic, press X to return to main menu
ID: 4C
NEXT: CANCEL: X
Write Code
0000000000000000000000000 0000000 ID:4C TEXAS
NEXT: CANCEL: X
Write Code
7E5B801F000000000069B 57E0000 ID:4C TEXAS
NEXT: CANCEL: X
Write Code
1 - Jma TPX1 2 - Silca EH2
SELECT: CANCEL: X
COPY
Successful..!
ESC: X
COPY
WRITING PLEASE WAIT..
COPY
22 VERSION 1.0 3/07/2015
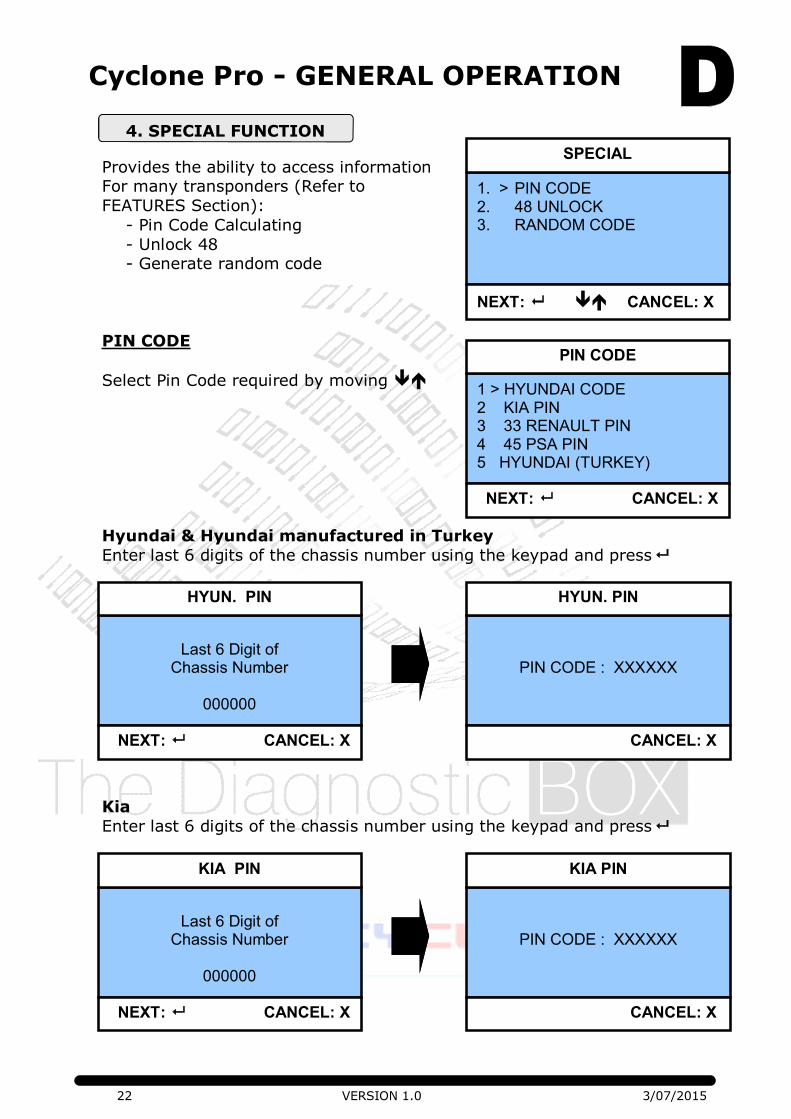
Cyclone Pro - GENERAL OPERATION
Provides the ability to access information For many transponders (Refer to
FEATURES Section):
- Pin Code Calculating
- Unlock 48 - Generate random code
PIN CODE
Select Pin Code required by moving
Hyundai & Hyundai manufactured in Turkey
Enter last 6 digits of the chassis number using the keypad and press
Kia
Enter last 6 digits of the chassis number using the keypad and press
1. > PIN CODE 2. 48 UNLOCK 3. RANDOM CODE
NEXT: CANCEL: X
SPECIAL
1 > HYUNDAI CODE 2 KIA PIN 3 33 RENAULT PIN 4 45 PSA PIN 5 HYUNDAI (TURKEY)
NEXT: CANCEL: X
PIN CODE
Last 6 Digit of
Chassis Number
000000
NEXT: CANCEL: X
HYUN. PIN
PIN CODE : XXXXXX
CANCEL: X
HYUN. PIN
Last 6 Digit of
Chassis Number
000000
NEXT: CANCEL: X
KIA PIN
PIN CODE : XXXXXX
CANCEL: X
KIA PIN
4. SPECIAL FUNCTION
23 VERSION 1.0 3/07/2015
Cyclone Pro - GENERAL OPERATION
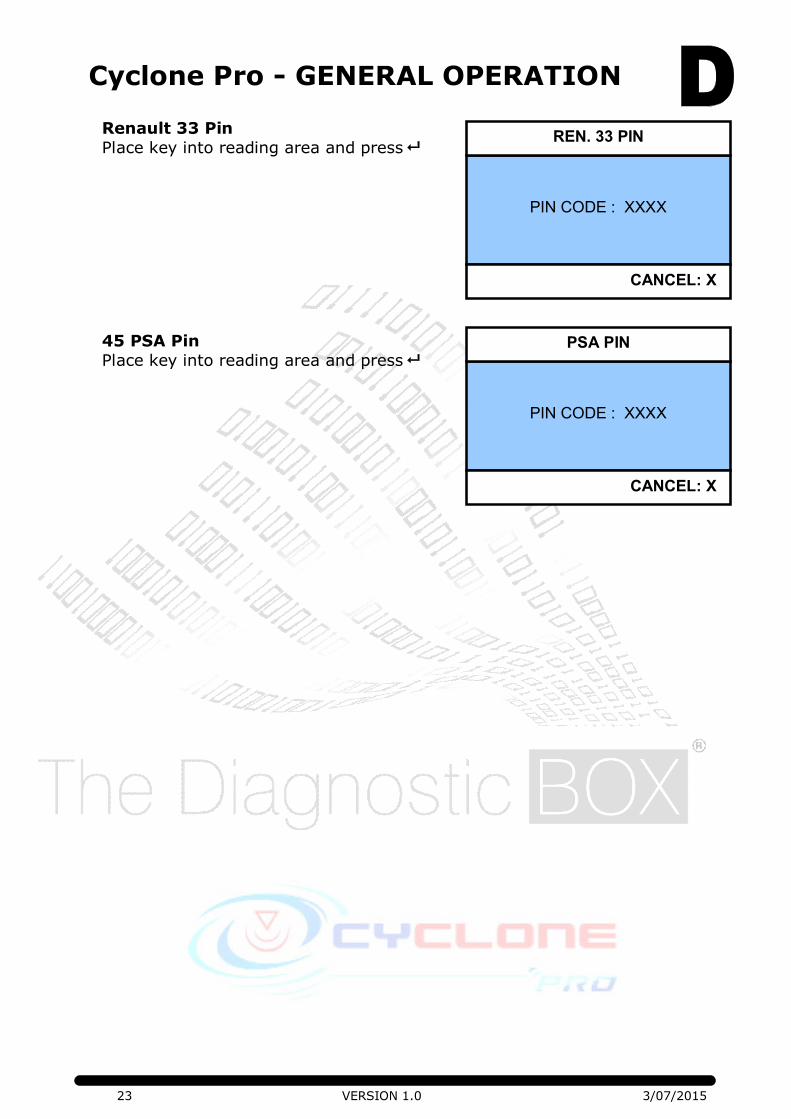
Renault 33 Pin
Place key into reading area and press
45 PSA Pin
Place key into reading area and press
PIN CODE : XXXX
CANCEL: X
PSA PIN
PIN CODE : XXXX
CANCEL: X
REN. 33 PIN
24 VERSION 1.0 3/07/2015
Cyclone Pro - GENERAL OPERATION
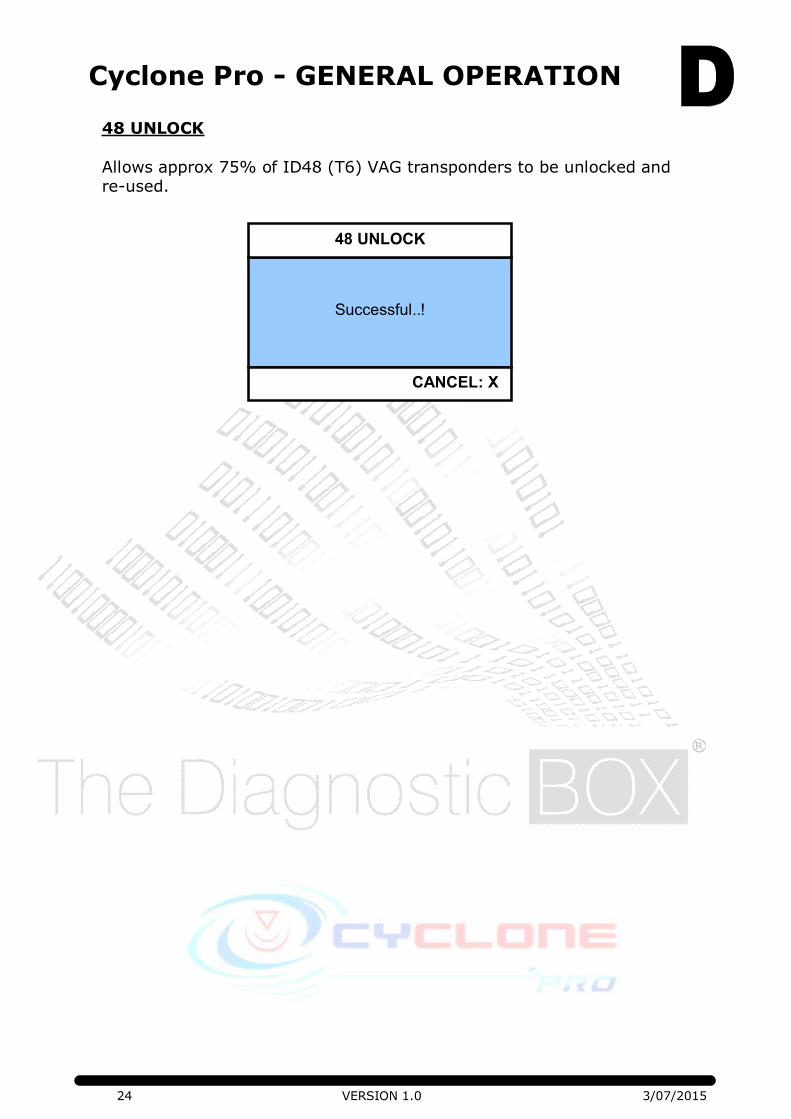
48 UNLOCK
Allows approx 75% of ID48 (T6) VAG transponders to be unlocked and re-used.
Successful..!
CANCEL: X
48 UNLOCK
25 VERSION 1.0 3/07/2015
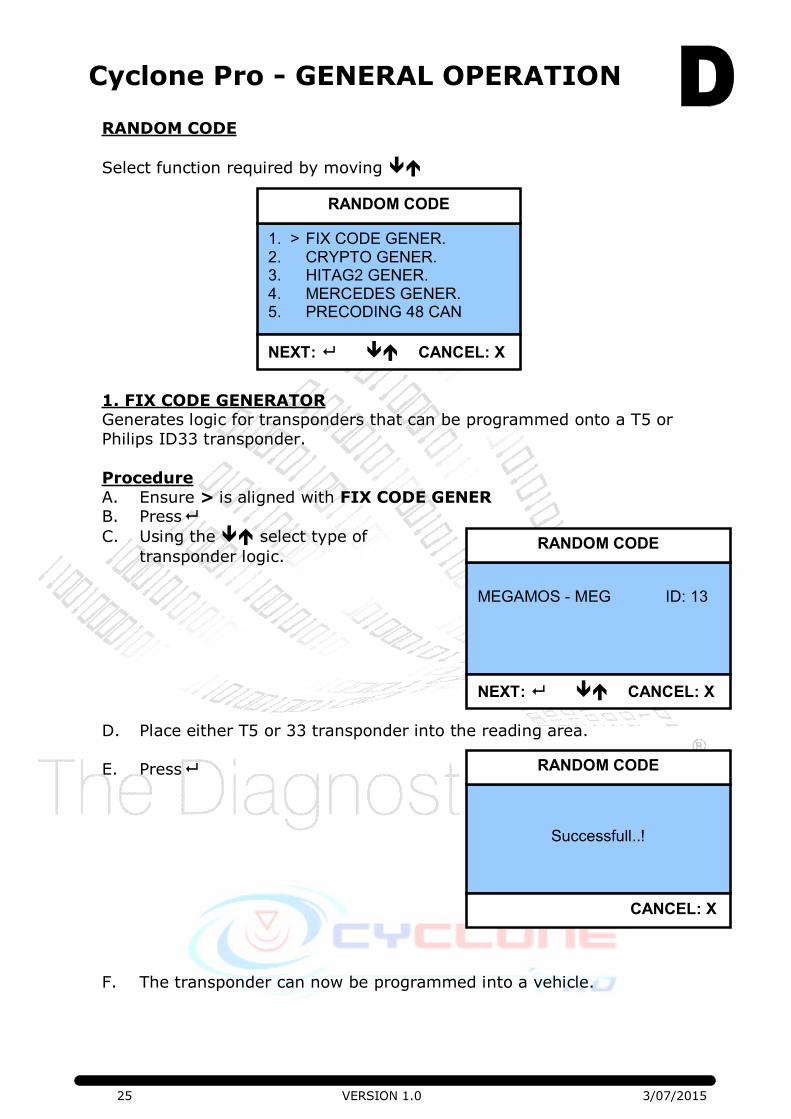
Cyclone Pro - GENERAL OPERATION
RANDOM CODE
Select function required by moving
1. FIX CODE GENERATOR Generates logic for transponders that can be programmed onto a T5 or
Philips ID33 transponder.
Procedure
A. Ensure > is aligned with FIX CODE GENER B. Press
C. Using the select type of
transponder logic.
D. Place either T5 or 33 transponder into the reading area.
E. Press
F. The transponder can now be programmed into a vehicle.
MEGAMOS - MEG ID: 13
NEXT: CANCEL: X
RANDOM CODE
Successfull..!
CANCEL: X
RANDOM CODE
1. > FIX CODE GENER. 2. CRYPTO GENER. 3. HITAG2 GENER. 4. MERCEDES GENER. 5. PRECODING 48 CAN
NEXT: CANCEL: X
RANDOM CODE
26 VERSION 1.0 3/07/2015
Cyclone Pro - GENERAL OPERATION
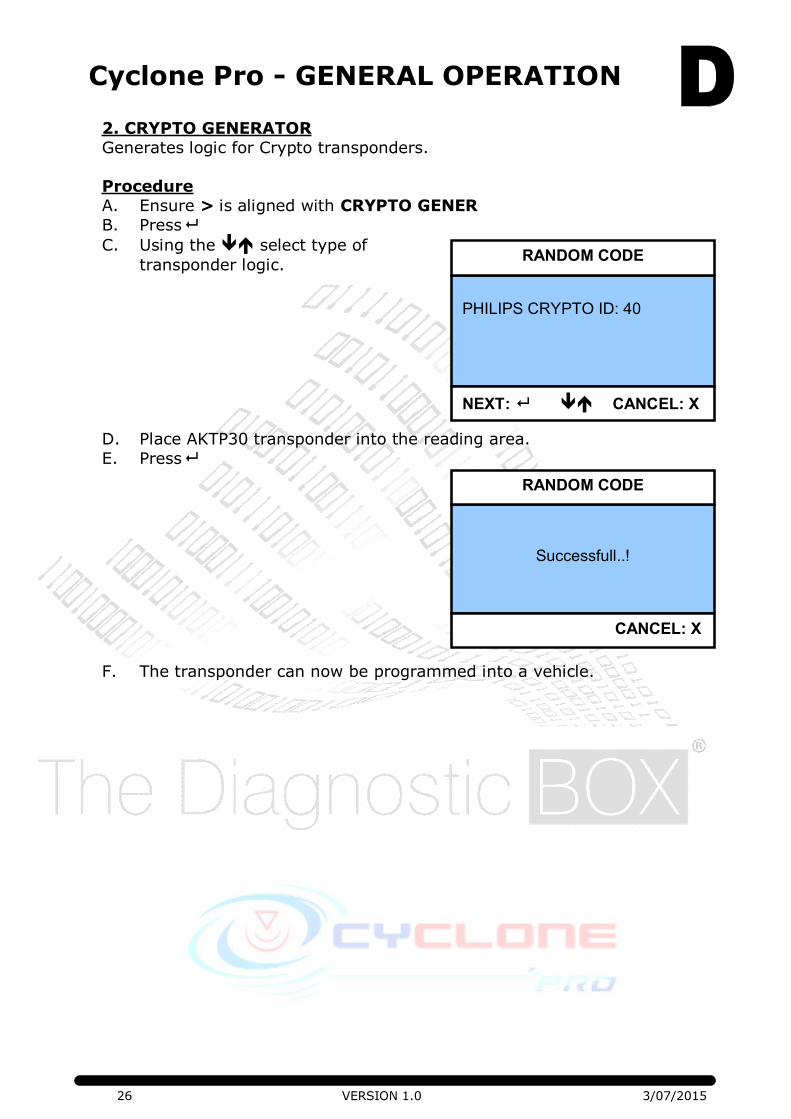
2. CRYPTO GENERATOR
Generates logic for Crypto transponders.
Procedure
A. Ensure > is aligned with CRYPTO GENER
B. Press
C. Using the select type of
transponder logic.
D. Place AKTP30 transponder into the reading area.
E. Press
F. The transponder can now be programmed into a vehicle.
PHILIPS CRYPTO ID: 40
NEXT: CANCEL: X
RANDOM CODE
Successfull..!
CANCEL: X
RANDOM CODE
27 VERSION 1.0 3/07/2015
Cyclone Pro - GENERAL OPERATION
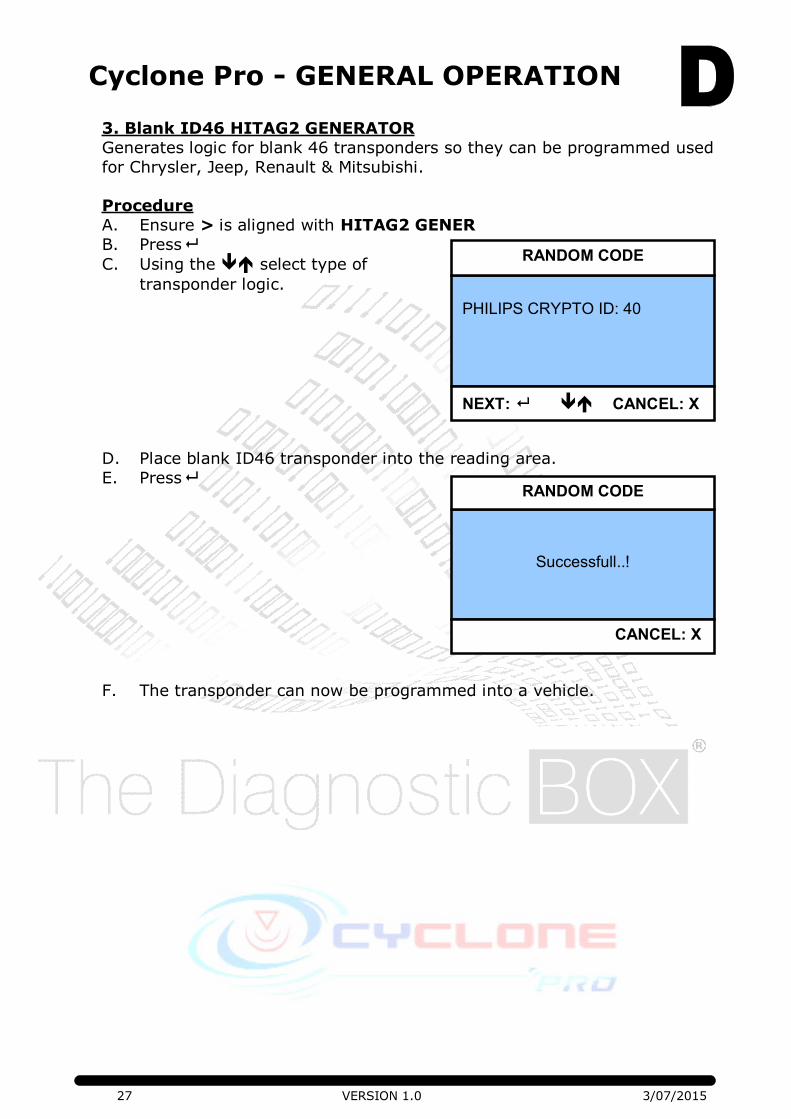
3. Blank ID46 HITAG2 GENERATOR
Generates logic for blank 46 transponders so they can be programmed used
for Chrysler, Jeep, Renault & Mitsubishi.
Procedure
A. Ensure > is aligned with HITAG2 GENER
B. Press
C. Using the select type of
transponder logic.
D. Place blank ID46 transponder into the reading area.
E. Press
F. The transponder can now be programmed into a vehicle.
PHILIPS CRYPTO ID: 40
NEXT: CANCEL: X
RANDOM CODE
Successfull..!
CANCEL: X
RANDOM CODE
28 VERSION 1.0 3/07/2015
Cyclone Pro - GENERAL OPERATION
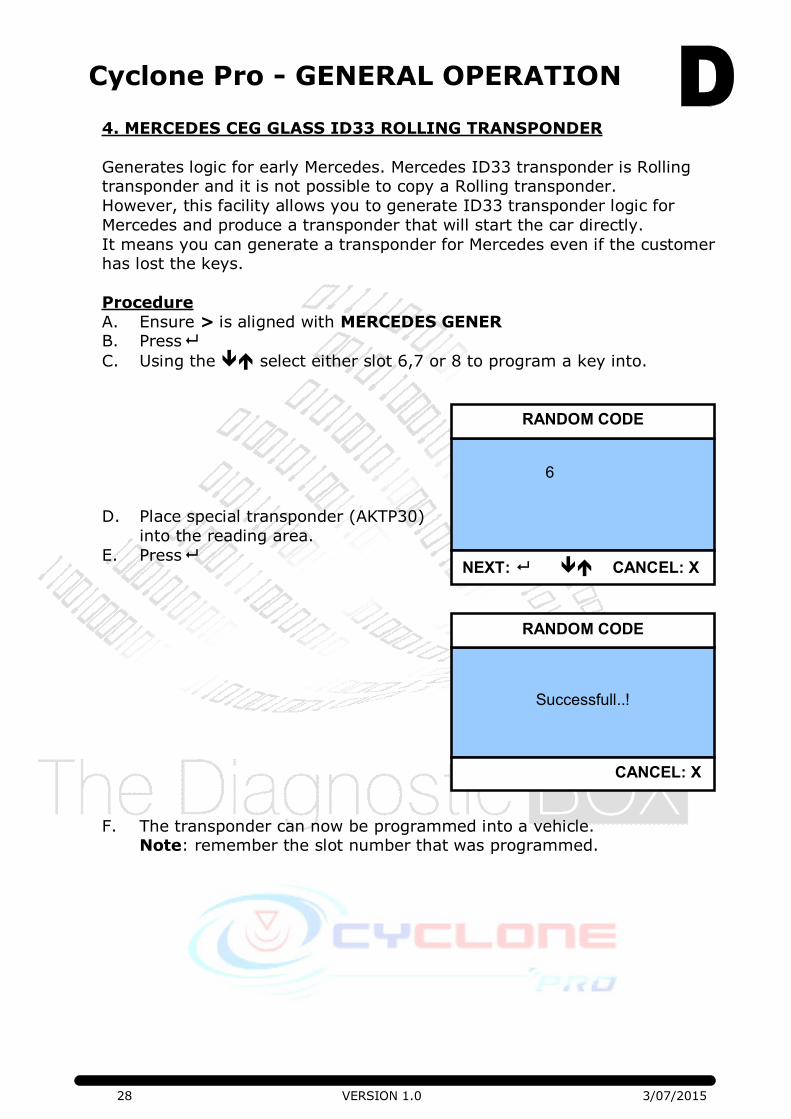
4. MERCEDES CEG GLASS ID33 ROLLING TRANSPONDER
Generates logic for early Mercedes. Mercedes ID33 transponder is Rolling transponder and it is not possible to copy a Rolling transponder.
However, this facility allows you to generate ID33 transponder logic for
Mercedes and produce a transponder that will start the car directly.
It means you can generate a transponder for Mercedes even if the customer has lost the keys.
Procedure
A. Ensure > is aligned with MERCEDES GENER B. Press
C. Using the select either slot 6,7 or 8 to program a key into.
D. Place special transponder (AKTP30)
into the reading area.
E. Press
F. The transponder can now be programmed into a vehicle. Note: remember the slot number that was programmed.
6
NEXT: CANCEL: X
RANDOM CODE
Successfull..!
CANCEL: X
RANDOM CODE
29 VERSION 1.0 3/07/2015
Cyclone Pro - GENERAL OPERATION
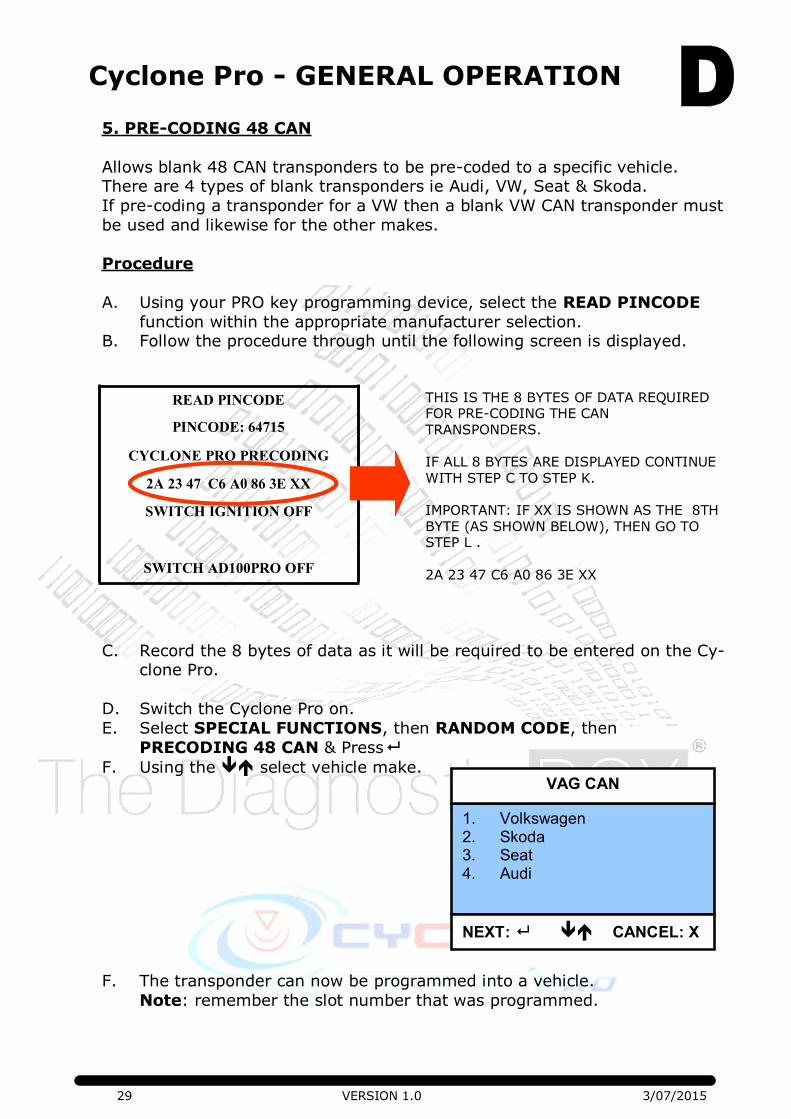
5. PRE-CODING 48 CAN
Allows blank 48 CAN transponders to be pre-coded to a specific vehicle. There are 4 types of blank transponders ie Audi, VW, Seat & Skoda.
If pre-coding a transponder for a VW then a blank VW CAN transponder must
be used and likewise for the other makes.
Procedure
A. Using your PRO key programming device, select the READ PINCODE
function within the appropriate manufacturer selection. B. Follow the procedure through until the following screen is displayed.
C. Record the 8 bytes of data as it will be required to be entered on the Cy-clone Pro.
D. Switch the Cyclone Pro on.
E. Select SPECIAL FUNCTIONS, then RANDOM CODE, then
PRECODING 48 CAN & Press
F. Using the select vehicle make.
F. The transponder can now be programmed into a vehicle.
Note: remember the slot number that was programmed.
READ PINCODE
PINCODE: 64715
CYCLONE PRO PRECODING
2A 23 47 C6 A0 86 3E XX
SWITCH IGNITION OFF
SWITCH AD100PRO OFF
THIS IS THE 8 BYTES OF DATA REQUIRED FOR PRE-CODING THE CAN
TRANSPONDERS.
IF ALL 8 BYTES ARE DISPLAYED CONTINUE
WITH STEP C TO STEP K.
IMPORTANT: IF XX IS SHOWN AS THE 8TH
BYTE (AS SHOWN BELOW), THEN GO TO STEP L .
2A 23 47 C6 A0 86 3E XX
1. Volkswagen 2. Skoda 3. Seat 4. Audi
NEXT: CANCEL: X
VAG CAN
30 VERSION 1.0 3/07/2015
Cyclone Pro - GENERAL OPERATION
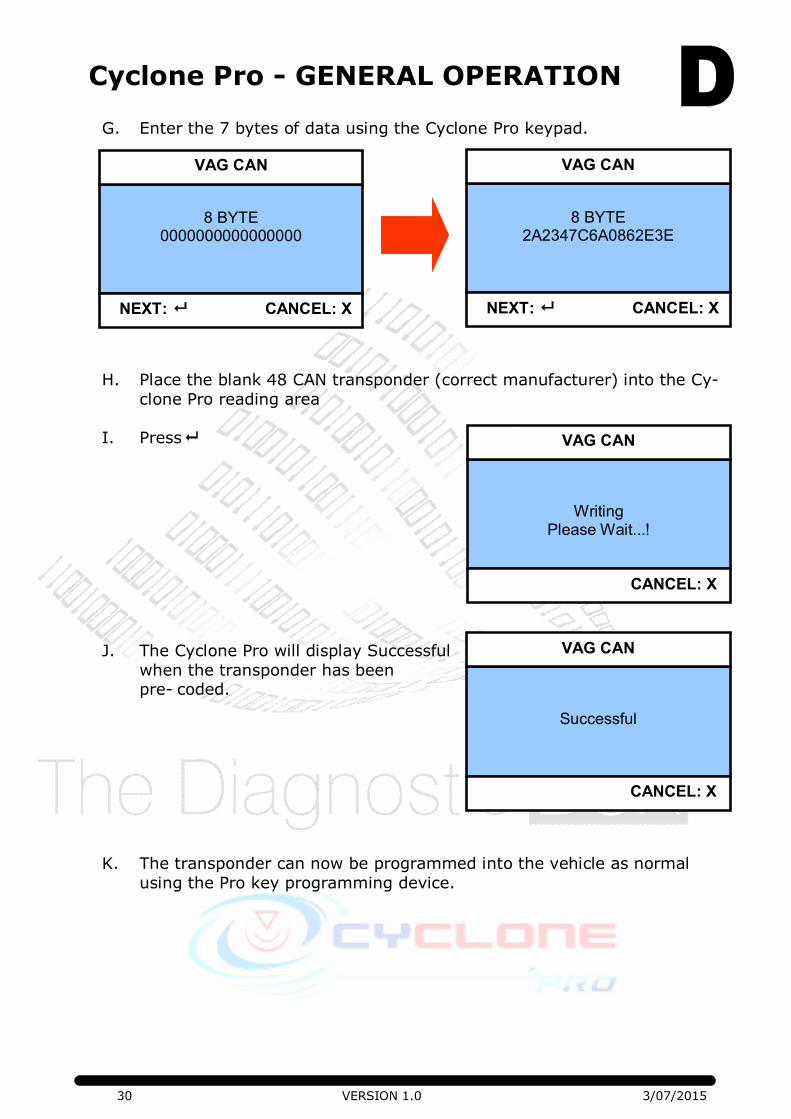
G. Enter the 7 bytes of data using the Cyclone Pro keypad.
H. Place the blank 48 CAN transponder (correct manufacturer) into the Cy-
clone Pro reading area
I. Press
J. The Cyclone Pro will display Successful
when the transponder has been pre- coded.
K. The transponder can now be programmed into the vehicle as normal
using the Pro key programming device.
8 BYTE
0000000000000000
NEXT: CANCEL: X
VAG CAN
8 BYTE
2A2347C6A0862E3E
NEXT: CANCEL: X
VAG CAN
Writing Please Wait...!
CANCEL: X
VAG CAN
Successful
CANCEL: X
VAG CAN

31 VERSION 1.0 3/07/2015
Cyclone Pro - GENERAL OPERATION
L. IF XX APPEARS AS THE 8TH BYTE OF DATA, GO TO STEP M.
Note: For this procedure you will need to have the Cyclone Pro in/next to the vehicle for convenience. You can use the vehicle lighter socket to
power the Cyclone Pro with an appropriate cable.
M. Record the 8 bytes of data as it will be required to be entered on the Cy-clone Pro.
N. Select KEY STATUS menu option from the key programming tool.
The following screen will be displayed.
The status of various key information is displayed as either a YES or No
CORRECT TRANSPONDER is what you are interested in for this procedure.
At this stage:
i) Leave the Key programming tool connected to the vehicle and displaying this screen.
ii) The ignition can be switched off and the key removed as the tester
will remain powered.
O. Switch the Cyclone Pro on. P. Select SPECIAL FUNCTIONS, then RANDOM CODE, then
PRECODING 48 CAN & Press
Q. Using the select vehicle make.
Q. Enter the 7 bytes of data using the
Cyclone Pro keypad. Where the last byte
is XX enter this as 00.
1. Volkswagen 2. Skoda 3. Seat 4. Audi
NEXT: CANCEL: X
VAG CAN
DECODING BLOCK
CORRECT TRANSPONDER Yes or No
KEY PROGRAMMED: Yes or No
TRANSPONDER LOCKED: Yes or No
PRESS ENTER KEY
32 VERSION 1.0 3/07/2015
7 BYTE
AD100Pro CODE 00000000000000
NEXT: CANCEL: X
VAG CAN
7 BYTE
2A2347C6A08600
NEXT: CANCEL: X
VAG CAN
Cyclone Pro - GENERAL OPERATION
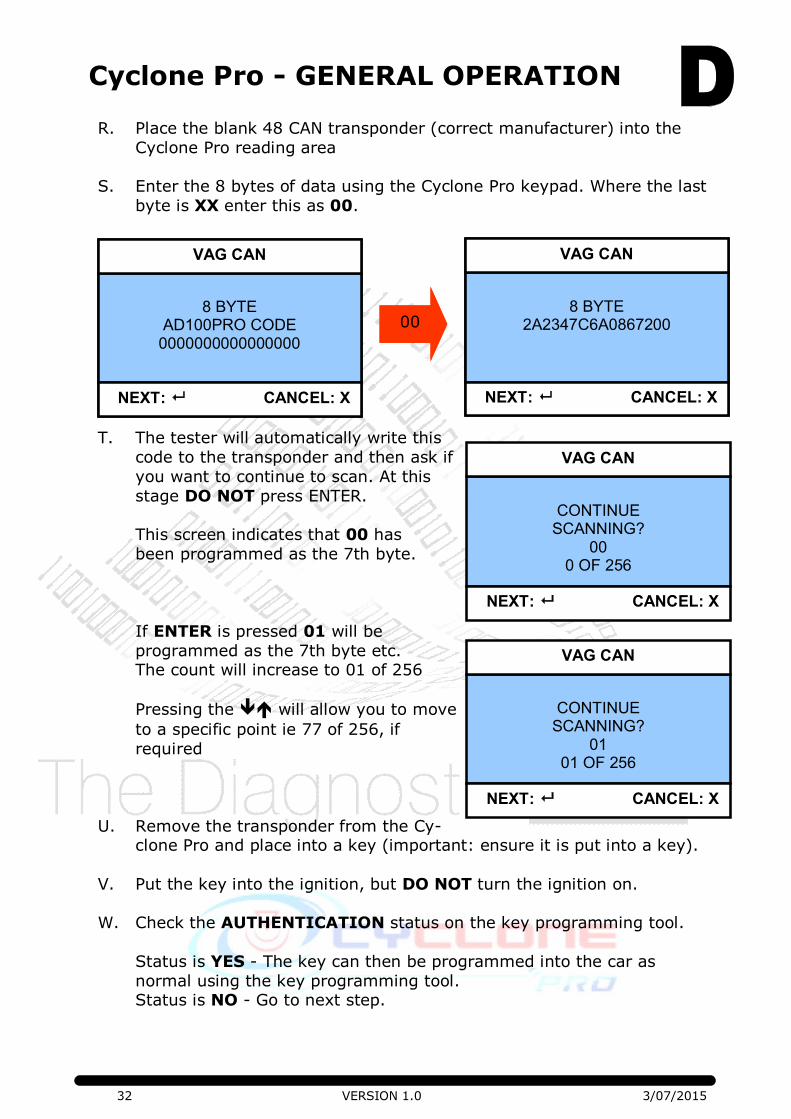
R. Place the blank 48 CAN transponder (correct manufacturer) into the
Cyclone Pro reading area
S. Enter the 8 bytes of data using the Cyclone Pro keypad. Where the last
byte is XX enter this as 00.
00
T. The tester will automatically write this
code to the transponder and then ask if
you want to continue to scan. At this
stage DO NOT press ENTER.
This screen indicates that 00 has
been programmed as the 7th byte.
If ENTER is pressed 01 will be
programmed as the 7th byte etc. The count will increase to 01 of 256
Pressing the will allow you to move
to a specific point ie 77 of 256, if
required
U. Remove the transponder from the Cy-clone Pro and place into a key (important: ensure it is put into a key).
V. Put the key into the ignition, but DO NOT turn the ignition on.
W. Check the AUTHENTICATION status on the key programming tool.
Status is YES - The key can then be programmed into the car as
normal using the key programming tool. Status is NO - Go to next step.
CONTINUE
SCANNING? 00
0 OF 256
NEXT: CANCEL: X
VAG CAN
CONTINUE
SCANNING? 01
01 OF 256
NEXT: CANCEL: X
VAG CAN
8 BYTE
2A2347C6A0867200
NEXT: CANCEL: X
VAG CAN
8 BYTE
AD100PRO CODE 0000000000000000
NEXT: CANCEL: X
VAG CAN
33 VERSION 1.0 3/07/2015
Cyclone Pro - GENERAL OPERATION
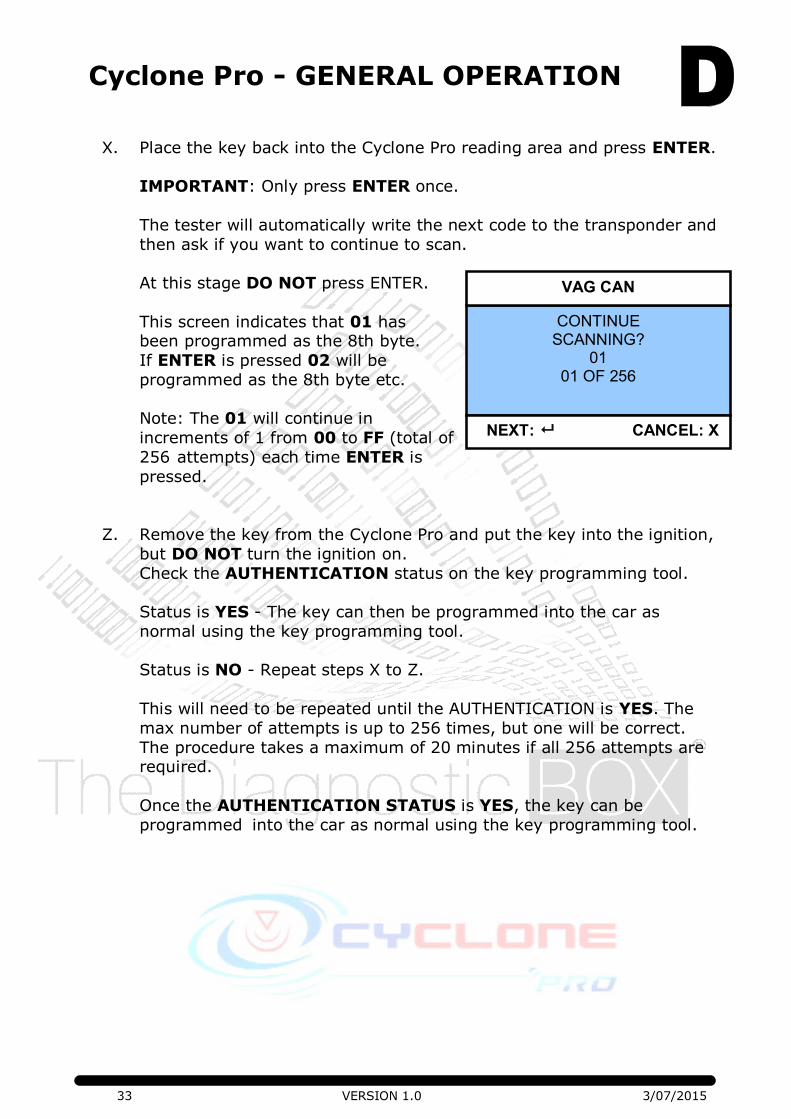
X. Place the key back into the Cyclone Pro reading area and press ENTER.
IMPORTANT: Only press ENTER once.
The tester will automatically write the next code to the transponder and
then ask if you want to continue to scan.
At this stage DO NOT press ENTER.
This screen indicates that 01 has been programmed as the 8th byte.
If ENTER is pressed 02 will be
programmed as the 8th byte etc.
Note: The 01 will continue in
increments of 1 from 00 to FF (total of
256 attempts) each time ENTER is
pressed.
Z. Remove the key from the Cyclone Pro and put the key into the ignition,
but DO NOT turn the ignition on.
Check the AUTHENTICATION status on the key programming tool.
Status is YES - The key can then be programmed into the car as
normal using the key programming tool.
Status is NO - Repeat steps X to Z.
This will need to be repeated until the AUTHENTICATION is YES. The
max number of attempts is up to 256 times, but one will be correct.
The procedure takes a maximum of 20 minutes if all 256 attempts are required.
Once the AUTHENTICATION STATUS is YES, the key can be
programmed into the car as normal using the key programming tool.
CONTINUE SCANNING?
01 01 OF 256
NEXT: CANCEL: X
VAG CAN
34 VERSION 1.0 3/07/2015
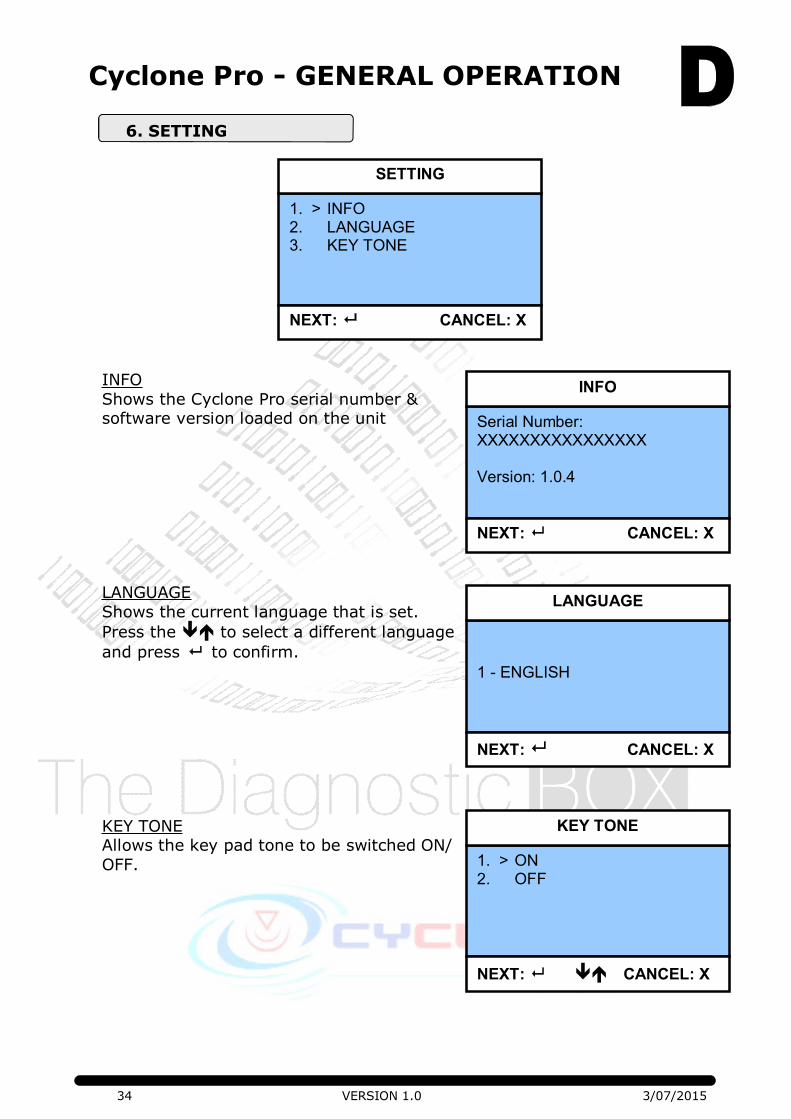
Cyclone Pro - GENERAL OPERATION
INFO
Shows the Cyclone Pro serial number & software version loaded on the unit
LANGUAGE
Shows the current language that is set.
Press the to select a different language
and press to confirm.
KEY TONE Allows the key pad tone to be switched ON/
OFF.
1. > INFO 2. LANGUAGE 3. KEY TONE
NEXT: CANCEL: X
SETTING
Serial Number: XXXXXXXXXXXXXXXX Version: 1.0.4
NEXT: CANCEL: X
INFO
1 - ENGLISH
NEXT: CANCEL: X
LANGUAGE
1. > ON 2. OFF
NEXT: CANCEL: X
KEY TONE
6. SETTING
VERSION 1.0 3/07/2015
PC SOFTWARE GENERAL OPERATION
36 VERSION 1.0 3/07/2015
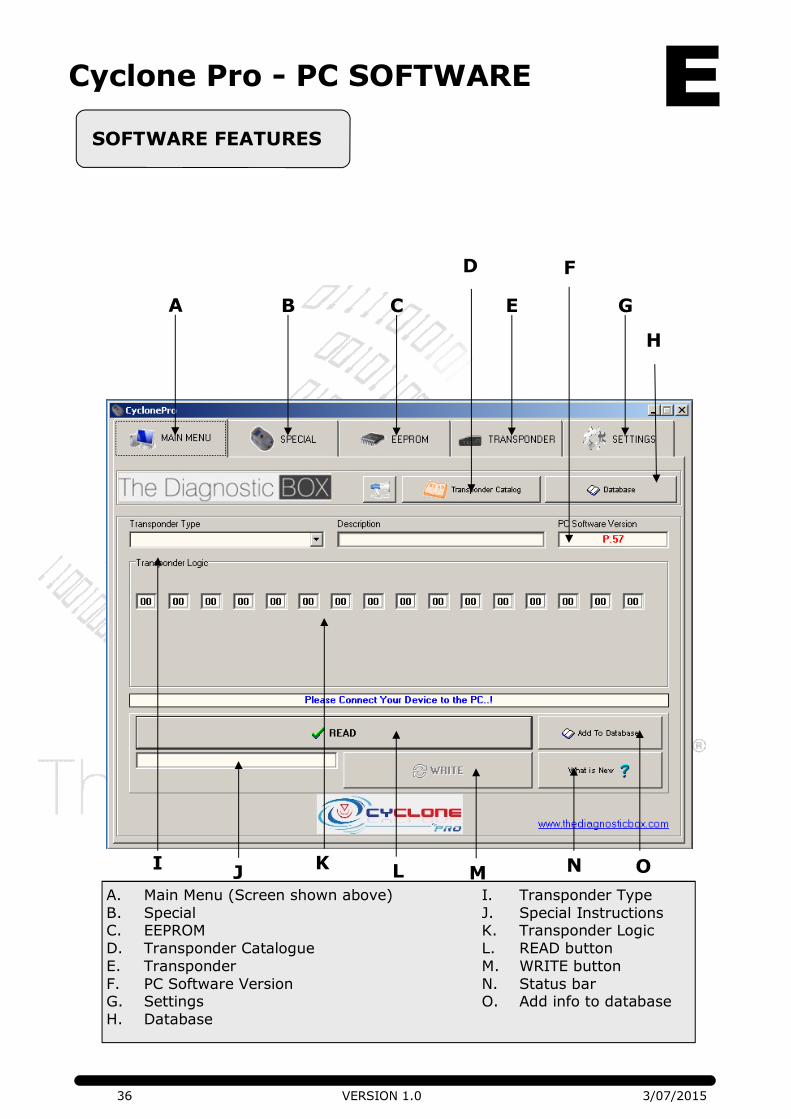
A B C E G
D F
I K J L M N O
Cyclone Pro - PC SOFTWARE
SOFTWARE FEATURES
H
A. Main Menu (Screen shown above) I. Transponder Type
B. Special J. Special Instructions C. EEPROM K. Transponder Logic
D. Transponder Catalogue L. READ button
E. Transponder M. WRITE button
F. PC Software Version N. Status bar G. Settings O. Add info to database
H. Database
37 VERSION 1.0 3/07/2015
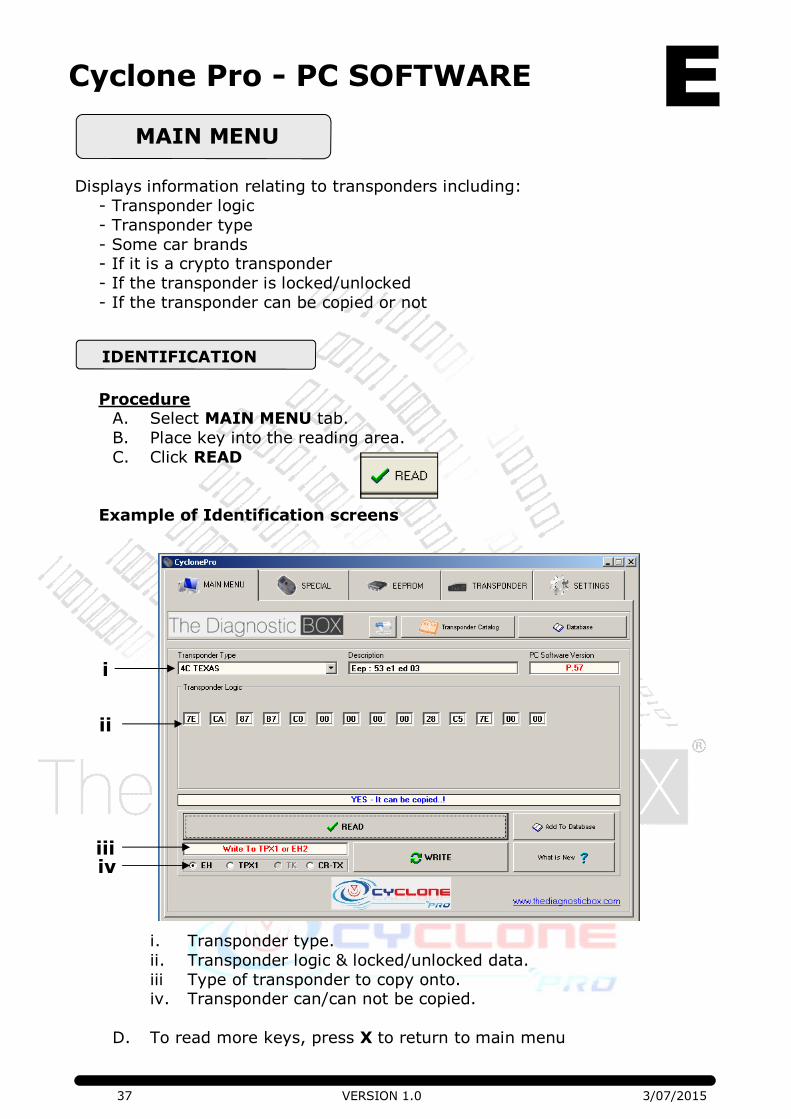
Cyclone Pro - PC SOFTWARE
Displays information relating to transponders including:
- Transponder logic
- Transponder type
- Some car brands - If it is a crypto transponder
- If the transponder is locked/unlocked
- If the transponder can be copied or not
Procedure A. Select MAIN MENU tab.
B. Place key into the reading area.
C. Click READ
Example of Identification screens
i. Transponder type.
ii. Transponder logic & locked/unlocked data.
iii Type of transponder to copy onto. iv. Transponder can/can not be copied.
D. To read more keys, press X to return to main menu
MAIN MENU
IDENTIFICATION
i
ii
iii iv
38 VERSION 1.0 3/07/2015
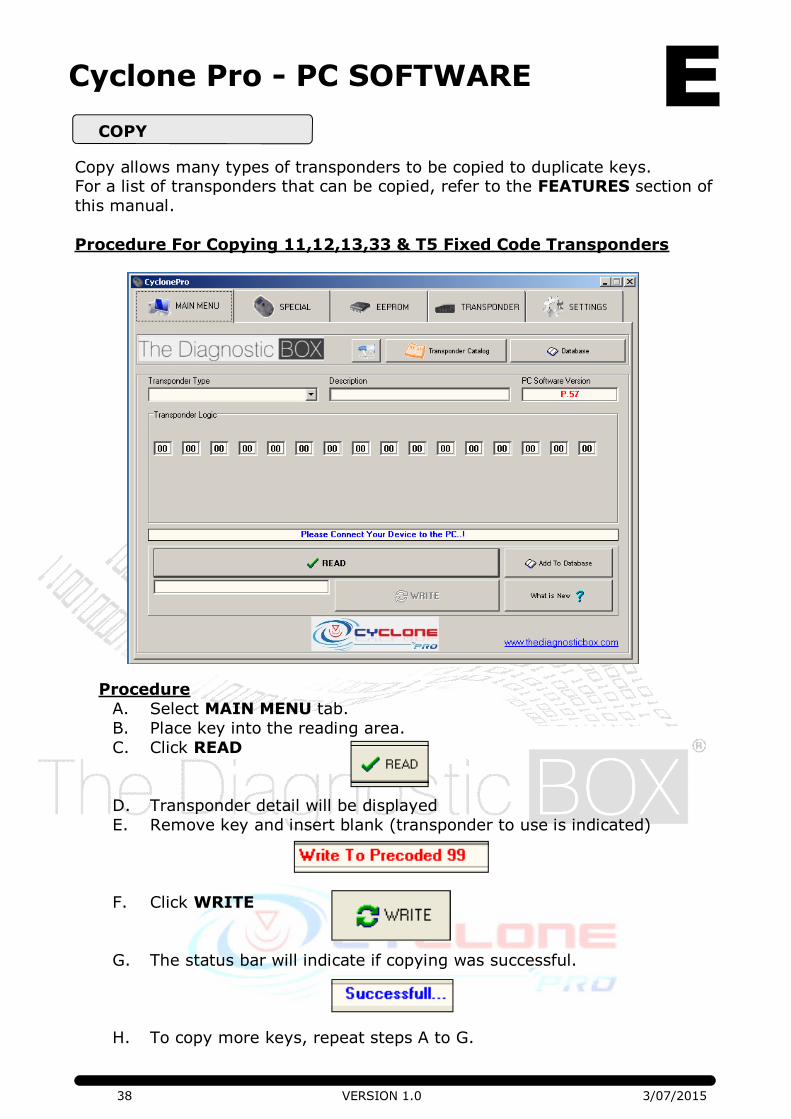
Cyclone Pro - PC SOFTWARE
Copy allows many types of transponders to be copied to duplicate keys. For a list of transponders that can be copied, refer to the FEATURES section of
this manual.
Procedure For Copying 11,12,13,33 & T5 Fixed Code Transponders
Procedure
A. Select MAIN MENU tab.
B. Place key into the reading area.
C. Click READ
D. Transponder detail will be displayed
E. Remove key and insert blank (transponder to use is indicated)
F. Click WRITE
G. The status bar will indicate if copying was successful.
H. To copy more keys, repeat steps A to G.
COPY
39 VERSION 1.0 3/07/2015
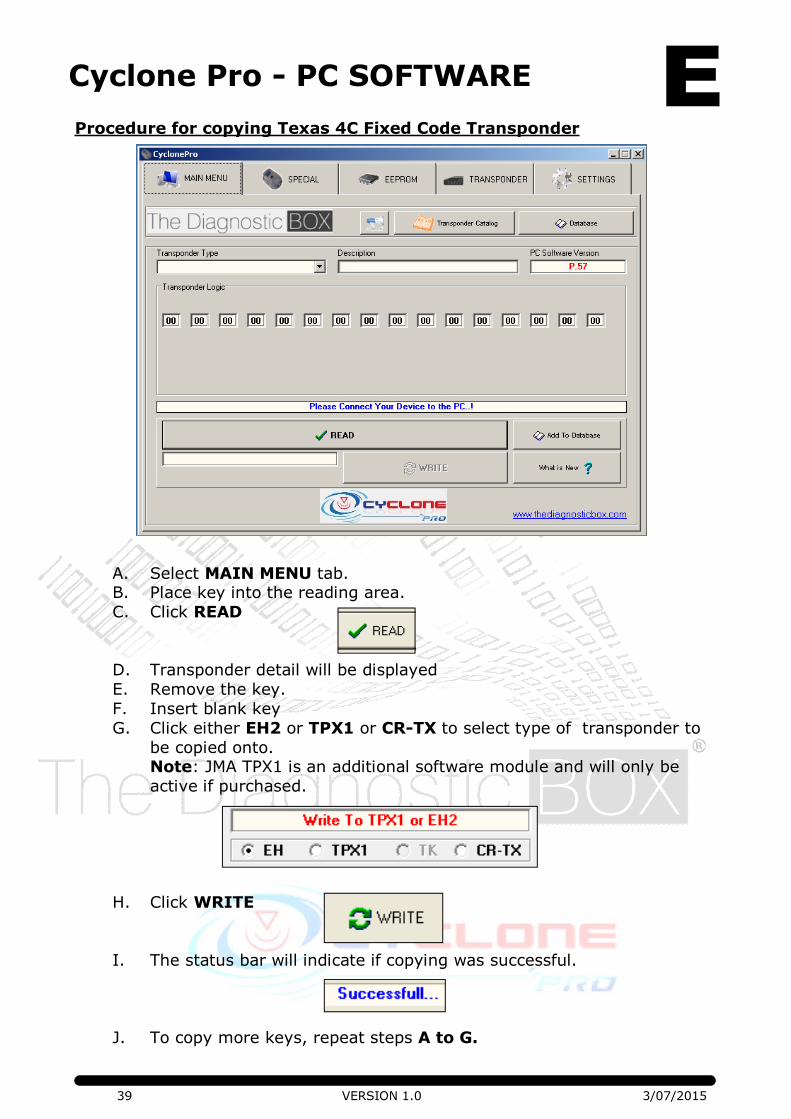
Cyclone Pro - PC SOFTWARE
Procedure for copying Texas 4C Fixed Code Transponder
A. Select MAIN MENU tab. B. Place key into the reading area.
C. Click READ
D. Transponder detail will be displayed
E. Remove the key.
F. Insert blank key
G. Click either EH2 or TPX1 or CR-TX to select type of transponder to
be copied onto. Note: JMA TPX1 is an additional software module and will only be
active if purchased.
H. Click WRITE
I. The status bar will indicate if copying was successful.
J. To copy more keys, repeat steps A to G.
40 VERSION 1.0 3/07/2015
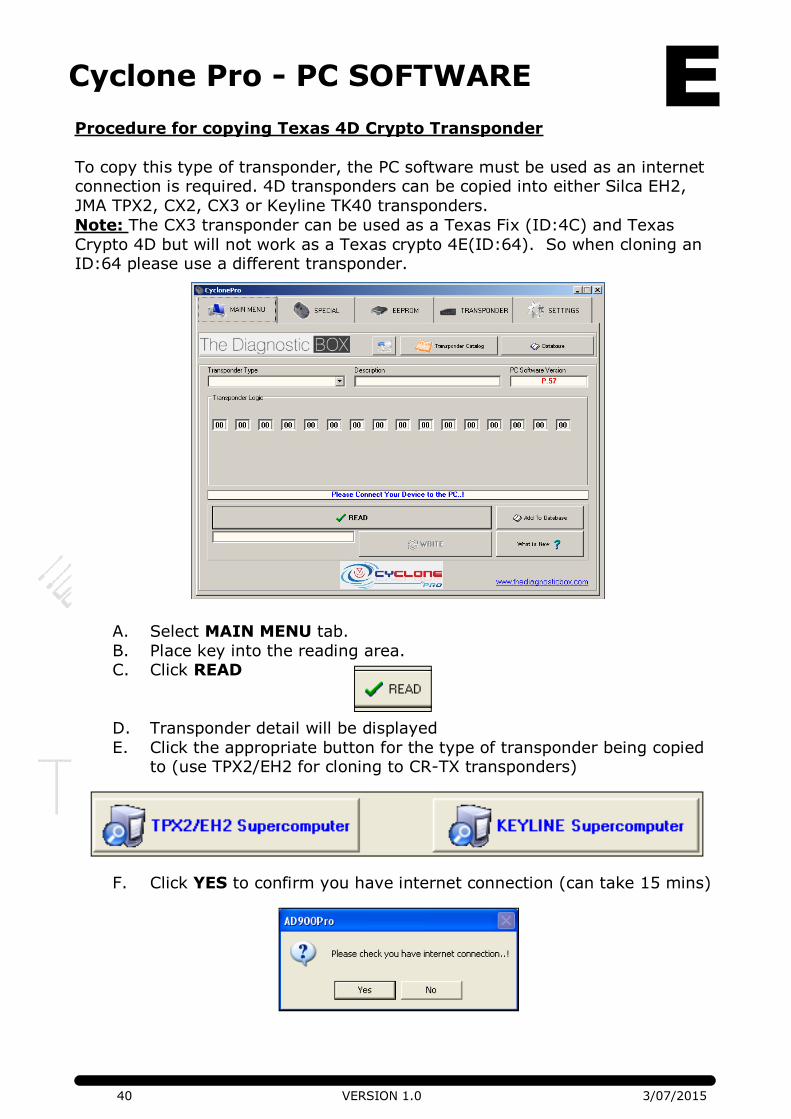
Cyclone Pro - PC SOFTWARE
Procedure for copying Texas 4D Crypto Transponder
To copy this type of transponder, the PC software must be used as an internet connection is required. 4D transponders can be copied into either Silca EH2,
JMA TPX2, CX2, CX3 or Keyline TK40 transponders.
Note: The CX3 transponder can be used as a Texas Fix (ID:4C) and Texas
Crypto 4D but will not work as a Texas crypto 4E(ID:64). So when cloning an ID:64 please use a different transponder.
A. Select MAIN MENU tab.
B. Place key into the reading area. C. Click READ
D. Transponder detail will be displayed
E. Click the appropriate button for the type of transponder being copied to (use TPX2/EH2 for cloning to CR-TX transponders)
F. Click YES to confirm you have internet connection (can take 15 mins)
41 VERSION 1.0 3/07/2015
Cyclone Pro - PC SOFTWARE
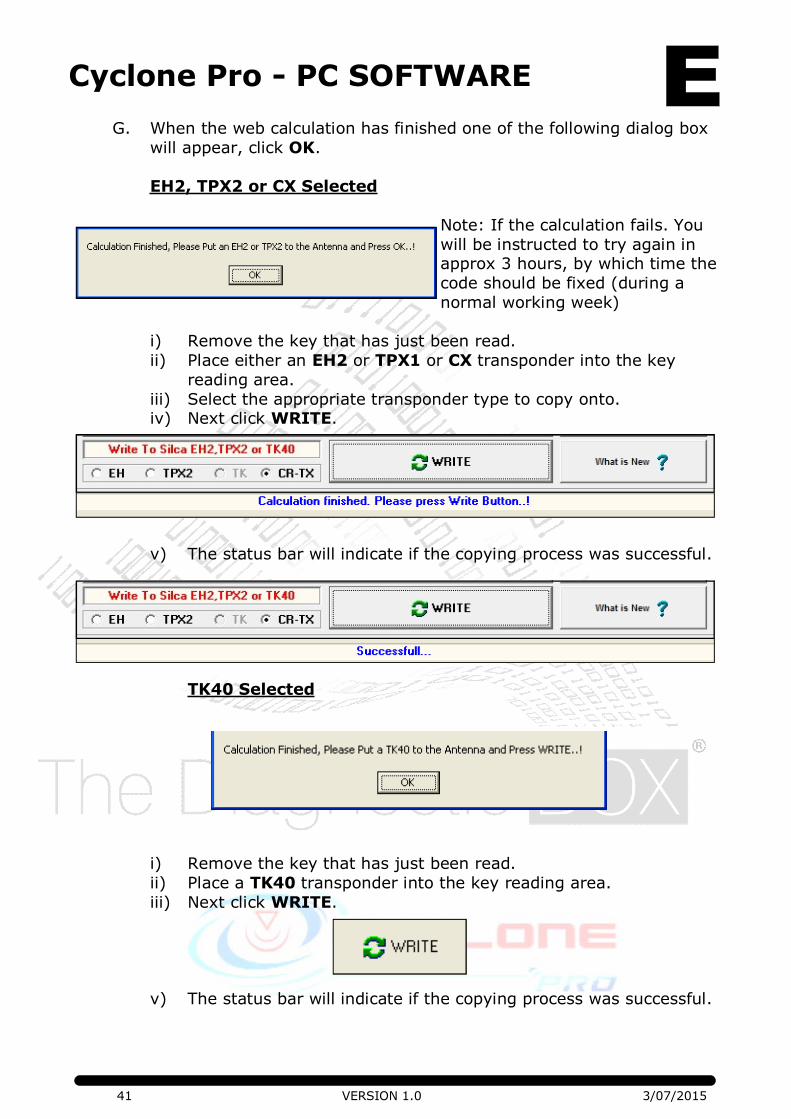
G. When the web calculation has finished one of the following dialog box
will appear, click OK.
EH2, TPX2 or CX Selected
Note: If the calculation fails. You
will be instructed to try again in approx 3 hours, by which time the
code should be fixed (during a
normal working week)
i) Remove the key that has just been read.
ii) Place either an EH2 or TPX1 or CX transponder into the key
reading area.
iii) Select the appropriate transponder type to copy onto. iv) Next click WRITE.
v) The status bar will indicate if the copying process was successful.
TK40 Selected
i) Remove the key that has just been read.
ii) Place a TK40 transponder into the key reading area.
iii) Next click WRITE.
v) The status bar will indicate if the copying process was successful.
42 VERSION 1.0 3/07/2015
Cyclone Pro - PC SOFTWARE
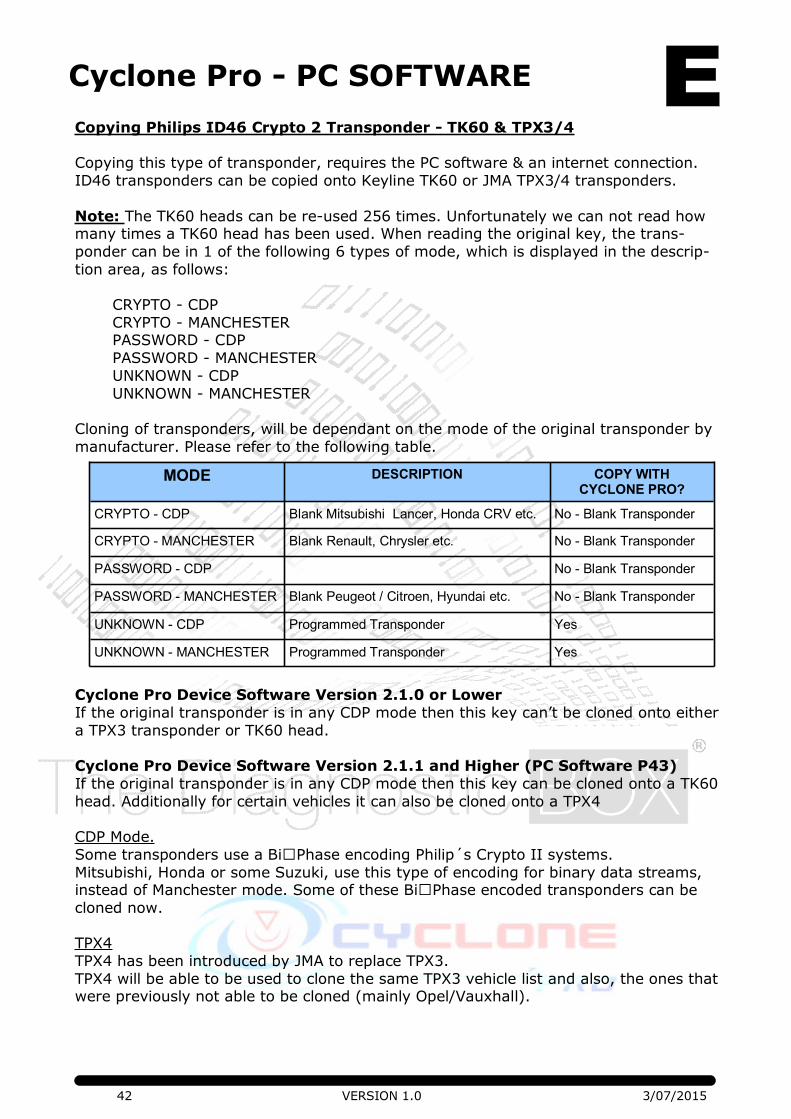
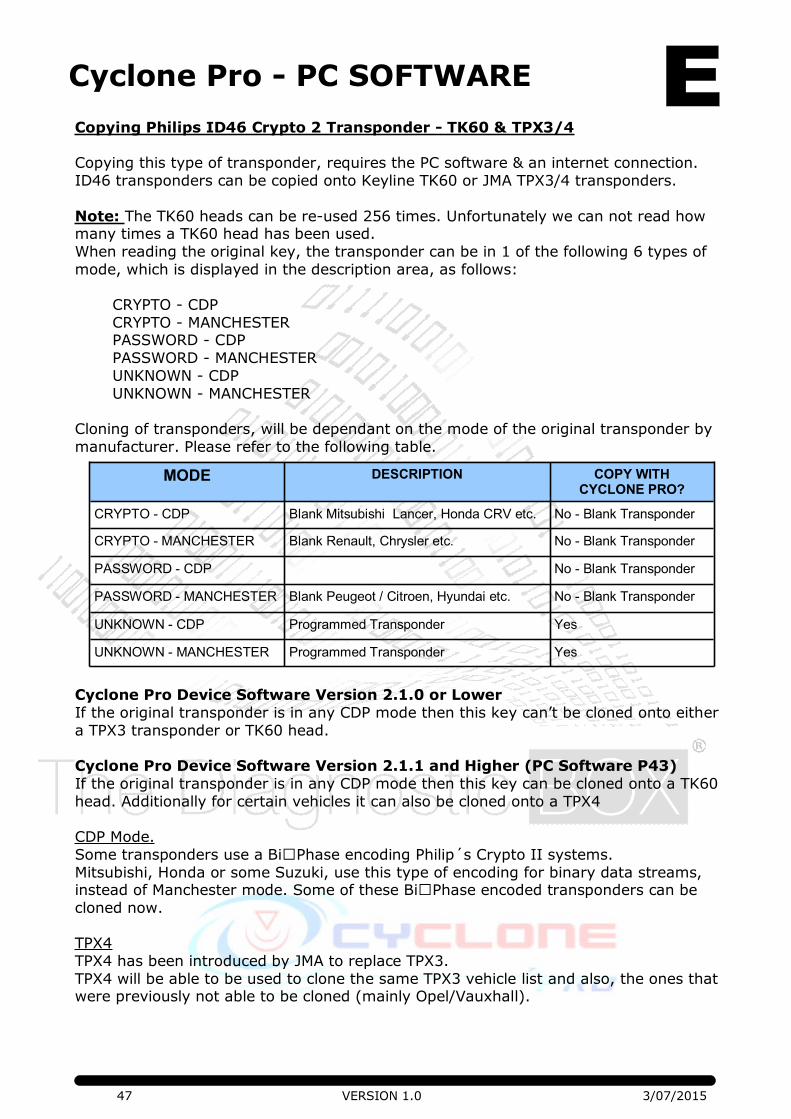
Copying Philips ID46 Crypto 2 Transponder - TK60 & TPX3/4
Copying this type of transponder, requires the PC software & an internet connection.
ID46 transponders can be copied onto Keyline TK60 or JMA TPX3/4 transponders.
Note: The TK60 heads can be re-used 256 times. Unfortunately we can not read how many times a TK60 head has been used. When reading the original key, the trans-
ponder can be in 1 of the following 6 types of mode, which is displayed in the descrip-
tion area, as follows:
CRYPTO - CDP
CRYPTO - MANCHESTER PASSWORD - CDP
PASSWORD - MANCHESTER
UNKNOWN - CDP
UNKNOWN - MANCHESTER
Cloning of transponders, will be dependant on the mode of the original transponder by
manufacturer. Please refer to the following table.
Cyclone Pro Device Software Version 2.1.0 or Lower
If the original transponder is in any CDP mode then this key can’t be cloned onto either
a TPX3 transponder or TK60 head.
Cyclone Pro Device Software Version 2.1.1 and Higher (PC Software P43)
If the original transponder is in any CDP mode then this key can be cloned onto a TK60
head. Additionally for certain vehicles it can also be cloned onto a TPX4
CDP Mode.
Some transponders use a Bi
Mitsubishi, Honda or some Suzuki, use this type of encoding for binary data streams, instead of Manchester mode. Some of these Bicloned now.
TPX4
TPX4 has been introduced by JMA to replace TPX3.
TPX4 will be able to be used to clone the same TPX3 vehicle list and also, the ones that were previously not able to be cloned (mainly Opel/Vauxhall).
MODE DESCRIPTION
CRYPTO - CDP Blank Mitsubishi Lancer, Honda CRV etc.
CRYPTO - MANCHESTER Blank Renault, Chrysler etc.
PASSWORD - CDP
PASSWORD - MANCHESTER Blank Peugeot / Citroen, Hyundai etc.
UNKNOWN - CDP Programmed Transponder
UNKNOWN - MANCHESTER Programmed Transponder
COPY WITH CYCLONE PRO?
No - Blank Transponder
No - Blank Transponder
No - Blank Transponder
No - Blank Transponder
Yes
Yes
43 VERSION 1.0 3/07/2015
Cyclone Pro - PC SOFTWARE
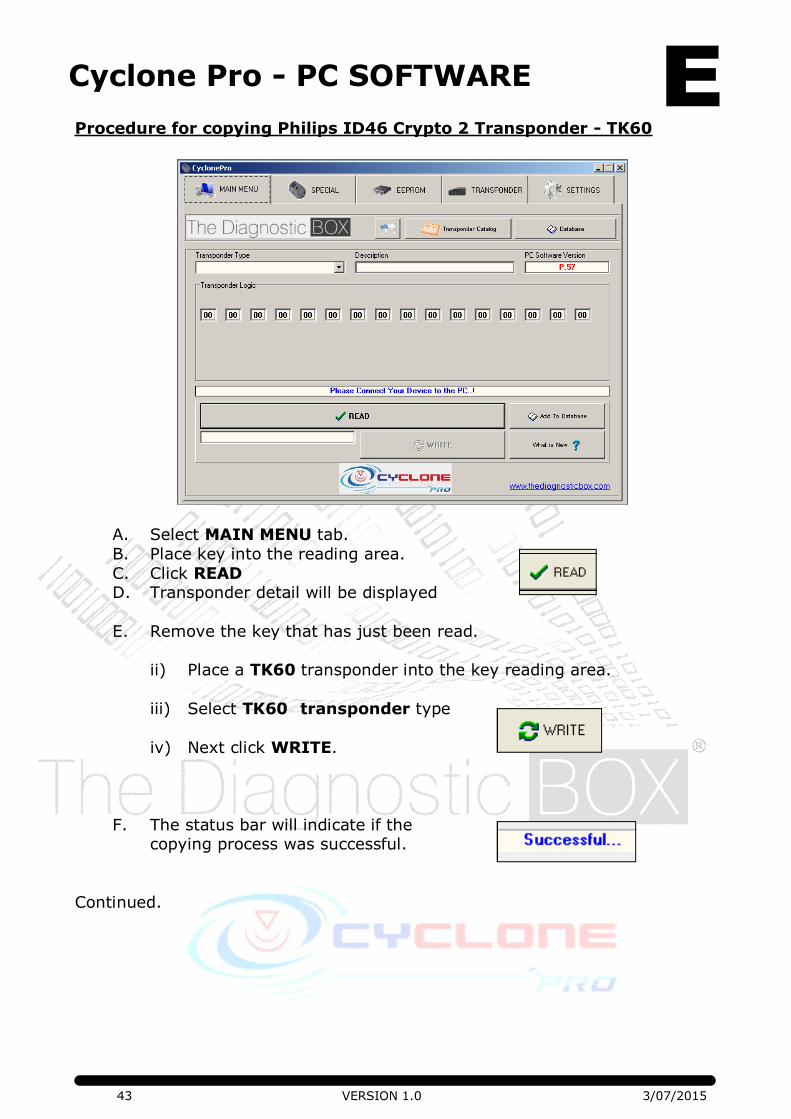
Procedure for copying Philips ID46 Crypto 2 Transponder - TK60
A. Select MAIN MENU tab.
B. Place key into the reading area.
C. Click READ D. Transponder detail will be displayed
E. Remove the key that has just been read.
ii) Place a TK60 transponder into the key reading area.
iii) Select TK60 transponder type
iv) Next click WRITE.
F. The status bar will indicate if the copying process was successful.
Continued.
44 VERSION 1.0 3/07/2015
Cyclone Pro - PC SOFTWARE
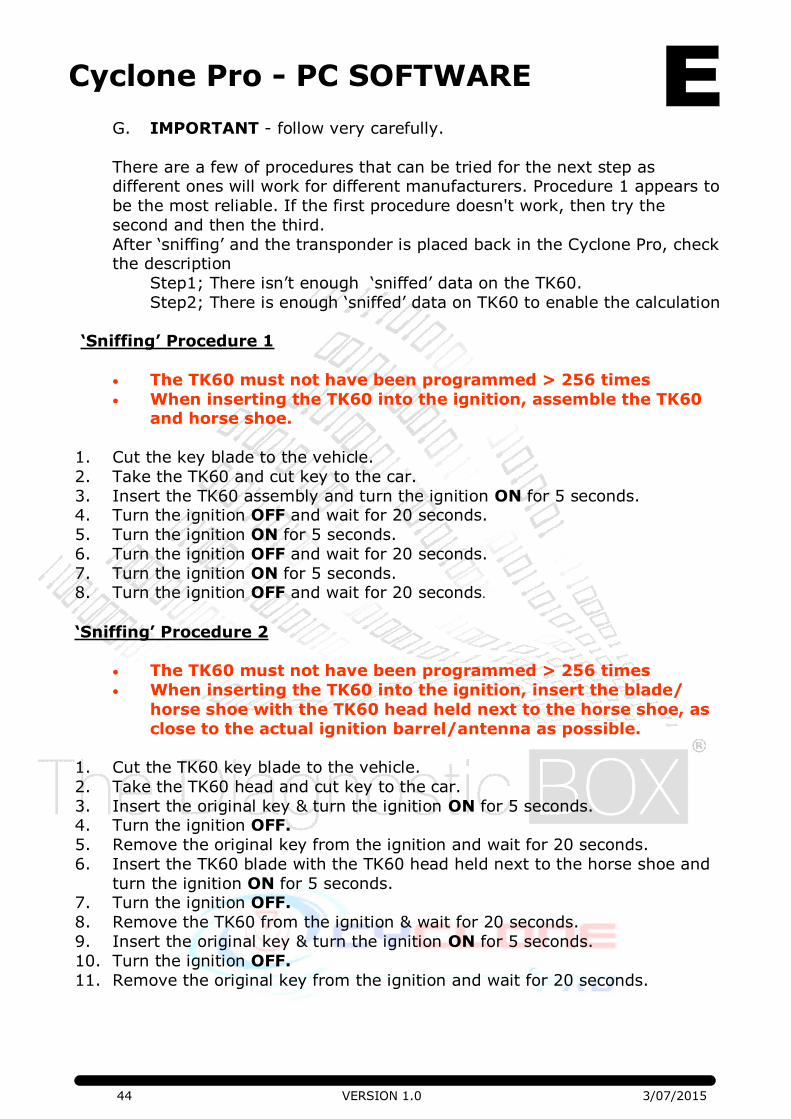
G. IMPORTANT - follow very carefully.
There are a few of procedures that can be tried for the next step as different ones will work for different manufacturers. Procedure 1 appears to
be the most reliable. If the first procedure doesn't work, then try the
second and then the third.
After ‘sniffing’ and the transponder is placed back in the Cyclone Pro, check the description
Step1; There isn’t enough ‘sniffed’ data on the TK60.
Step2; There is enough ‘sniffed’ data on TK60 to enable the calculation
‘Sniffing’ Procedure 1
The TK60 must not have been programmed > 256 times
When inserting the TK60 into the ignition, assemble the TK60 and horse shoe.
1. Cut the key blade to the vehicle.
2. Take the TK60 and cut key to the car.
3. Insert the TK60 assembly and turn the ignition ON for 5 seconds. 4. Turn the ignition OFF and wait for 20 seconds.
5. Turn the ignition ON for 5 seconds.
6. Turn the ignition OFF and wait for 20 seconds.
7. Turn the ignition ON for 5 seconds. 8. Turn the ignition OFF and wait for 20 seconds.
‘Sniffing’ Procedure 2
The TK60 must not have been programmed > 256 times
When inserting the TK60 into the ignition, insert the blade/
horse shoe with the TK60 head held next to the horse shoe, as
close to the actual ignition barrel/antenna as possible.
1. Cut the TK60 key blade to the vehicle.
2. Take the TK60 head and cut key to the car.
3. Insert the original key & turn the ignition ON for 5 seconds. 4. Turn the ignition OFF.
5. Remove the original key from the ignition and wait for 20 seconds.
6. Insert the TK60 blade with the TK60 head held next to the horse shoe and
turn the ignition ON for 5 seconds. 7. Turn the ignition OFF.
8. Remove the TK60 from the ignition & wait for 20 seconds.
9. Insert the original key & turn the ignition ON for 5 seconds.
10. Turn the ignition OFF.
11. Remove the original key from the ignition and wait for 20 seconds.
45 VERSION 1.0 3/07/2015
Cyclone Pro - PC SOFTWARE
12. Insert the TK60 blade with the TK60 head held next to the horse shoe and
turn the ignition ON for 5 seconds.
13. Turn the ignition OFF. 14. Remove the TK60 from the ignition & wait for 20 seconds.
15. Insert the original key & turn the ignition ON for 5 seconds.
16. Turn the ignition OFF. 17. Remove the original key from the ignition and wait for 20 seconds.
18. Insert the TK60 blade with the TK60 head held next to the horse shoe and
turn the ignition ON for 5 seconds. 19. Turn the ignition OFF.
20. Remove the TK60 from the ignition.
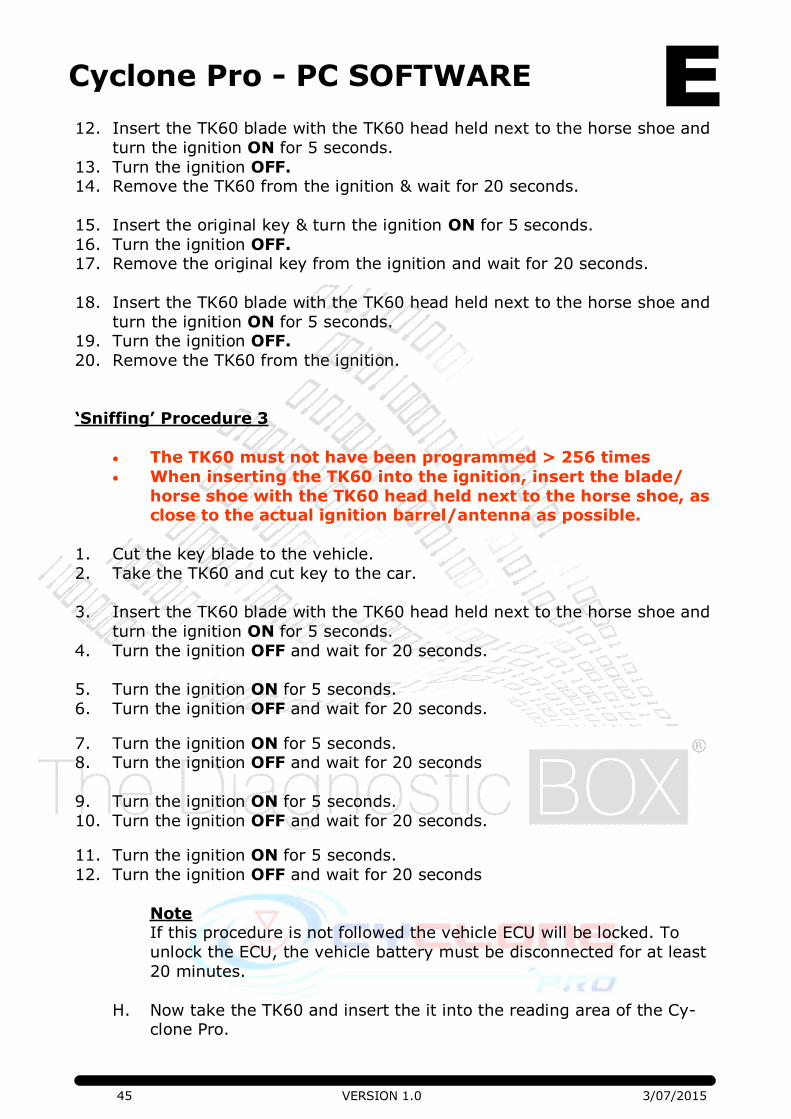
‘Sniffing’ Procedure 3
The TK60 must not have been programmed > 256 times
When inserting the TK60 into the ignition, insert the blade/
horse shoe with the TK60 head held next to the horse shoe, as close to the actual ignition barrel/antenna as possible.
1. Cut the key blade to the vehicle.
2. Take the TK60 and cut key to the car.
3. Insert the TK60 blade with the TK60 head held next to the horse shoe and
turn the ignition ON for 5 seconds.
4. Turn the ignition OFF and wait for 20 seconds.
5. Turn the ignition ON for 5 seconds.
6. Turn the ignition OFF and wait for 20 seconds.
7. Turn the ignition ON for 5 seconds. 8. Turn the ignition OFF and wait for 20 seconds
9. Turn the ignition ON for 5 seconds.
10. Turn the ignition OFF and wait for 20 seconds.
11. Turn the ignition ON for 5 seconds.
12. Turn the ignition OFF and wait for 20 seconds
Note If this procedure is not followed the vehicle ECU will be locked. To
unlock the ECU, the vehicle battery must be disconnected for at least
20 minutes.
H. Now take the TK60 and insert the it into the reading area of the Cy-clone Pro.
46 VERSION 1.0 3/07/2015
Cyclone Pro - PC SOFTWARE
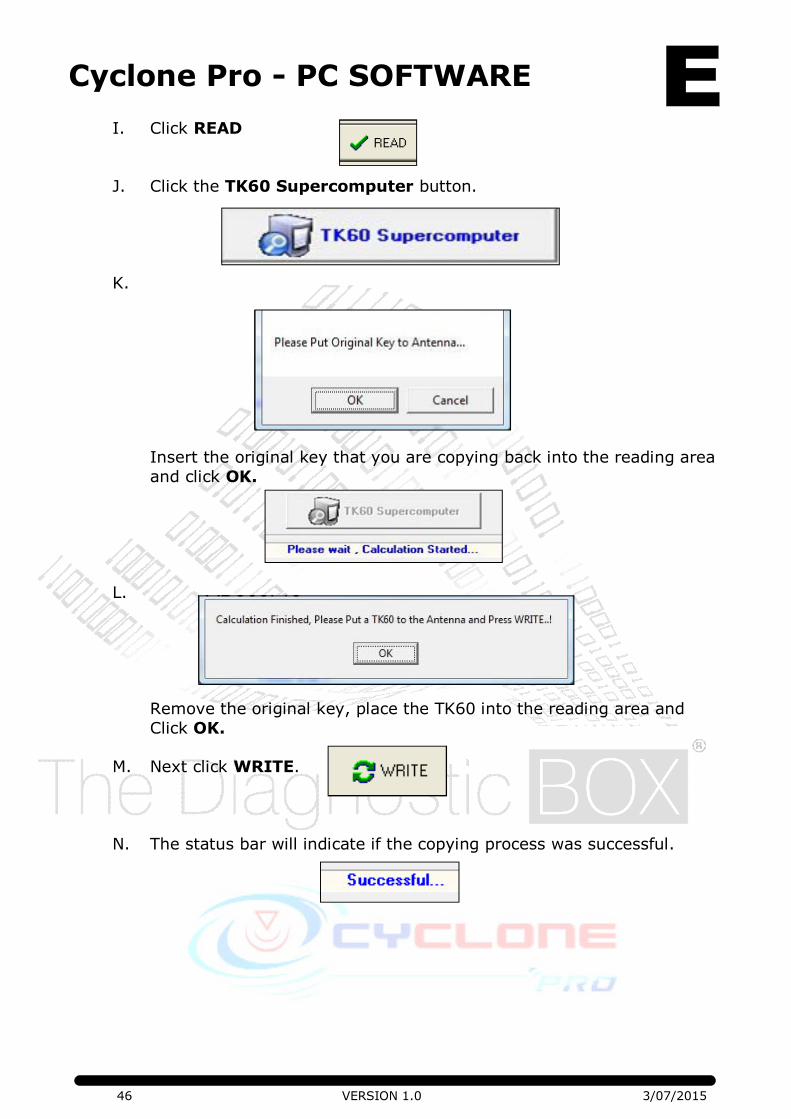
I. Click READ
J. Click the TK60 Supercomputer button.
K.
Insert the original key that you are copying back into the reading area
and click OK.
L.
Remove the original key, place the TK60 into the reading area and
Click OK.
M. Next click WRITE.
N. The status bar will indicate if the copying process was successful.
47 VERSION 1.0 3/07/2015
Cyclone Pro - PC SOFTWARE
Copying Philips ID46 Crypto 2 Transponder - TK60 & TPX3/4
Copying this type of transponder, requires the PC software & an internet connection.
ID46 transponders can be copied onto Keyline TK60 or JMA TPX3/4 transponders.
Note: The TK60 heads can be re-used 256 times. Unfortunately we can not read how many times a TK60 head has been used.
When reading the original key, the transponder can be in 1 of the following 6 types of
mode, which is displayed in the description area, as follows:
CRYPTO - CDP
CRYPTO - MANCHESTER PASSWORD - CDP
PASSWORD - MANCHESTER
UNKNOWN - CDP
UNKNOWN - MANCHESTER
Cloning of transponders, will be dependant on the mode of the original transponder by
manufacturer. Please refer to the following table.
Cyclone Pro Device Software Version 2.1.0 or Lower
If the original transponder is in any CDP mode then this key can’t be cloned onto either
a TPX3 transponder or TK60 head.
Cyclone Pro Device Software Version 2.1.1 and Higher (PC Software P43)
If the original transponder is in any CDP mode then this key can be cloned onto a TK60
head. Additionally for certain vehicles it can also be cloned onto a TPX4
CDP Mode.
Some transponders use a Bi
Mitsubishi, Honda or some Suzuki, use this type of encoding for binary data streams, instead of Manchester mode. Some of these Bicloned now.
TPX4
TPX4 has been introduced by JMA to replace TPX3.
TPX4 will be able to be used to clone the same TPX3 vehicle list and also, the ones that were previously not able to be cloned (mainly Opel/Vauxhall).
MODE DESCRIPTION
CRYPTO - CDP Blank Mitsubishi Lancer, Honda CRV etc.
CRYPTO - MANCHESTER Blank Renault, Chrysler etc.
PASSWORD - CDP
PASSWORD - MANCHESTER Blank Peugeot / Citroen, Hyundai etc.
UNKNOWN - CDP Programmed Transponder
UNKNOWN - MANCHESTER Programmed Transponder
COPY WITH CYCLONE PRO?
No - Blank Transponder
No - Blank Transponder
No - Blank Transponder
No - Blank Transponder
Yes
Yes
48 VERSION 1.0 3/07/2015
Cyclone Pro - PC SOFTWARE
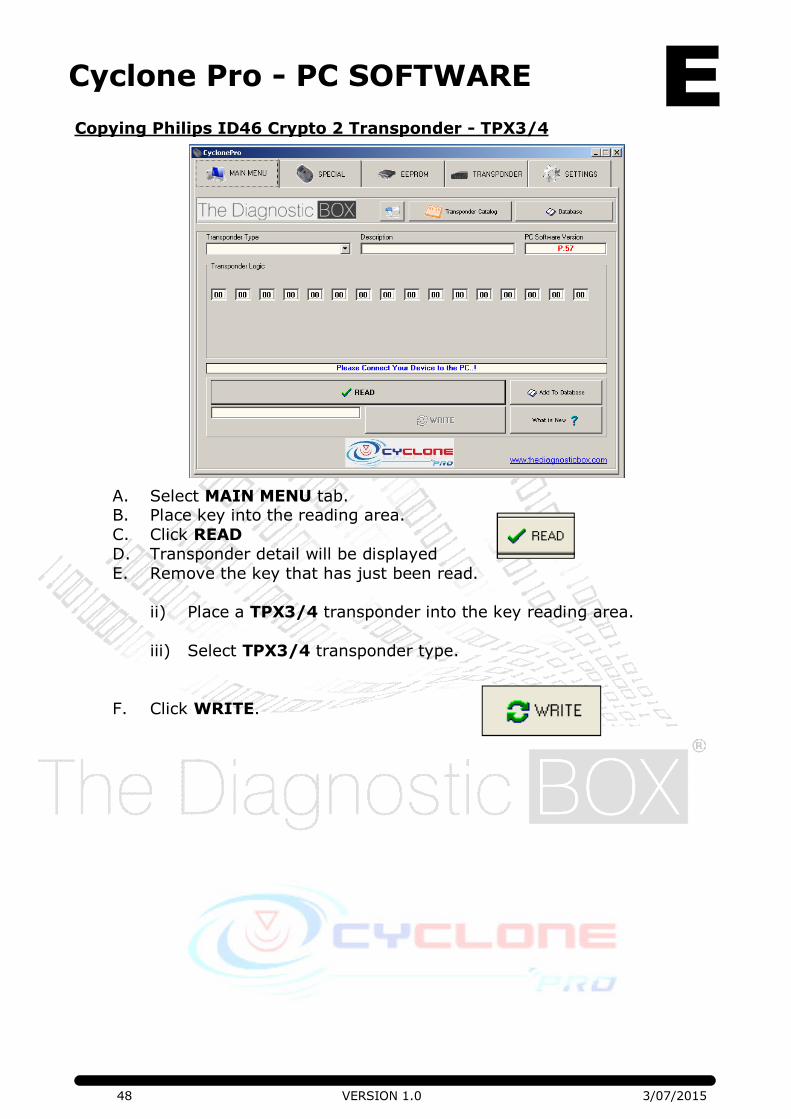
Copying Philips ID46 Crypto 2 Transponder - TPX3/4
A. Select MAIN MENU tab. B. Place key into the reading area.
C. Click READ
D. Transponder detail will be displayed
E. Remove the key that has just been read.
ii) Place a TPX3/4 transponder into the key reading area.
iii) Select TPX3/4 transponder type.
F. Click WRITE.
49 VERSION 1.0 3/07/2015
Cyclone Pro - PC SOFTWARE
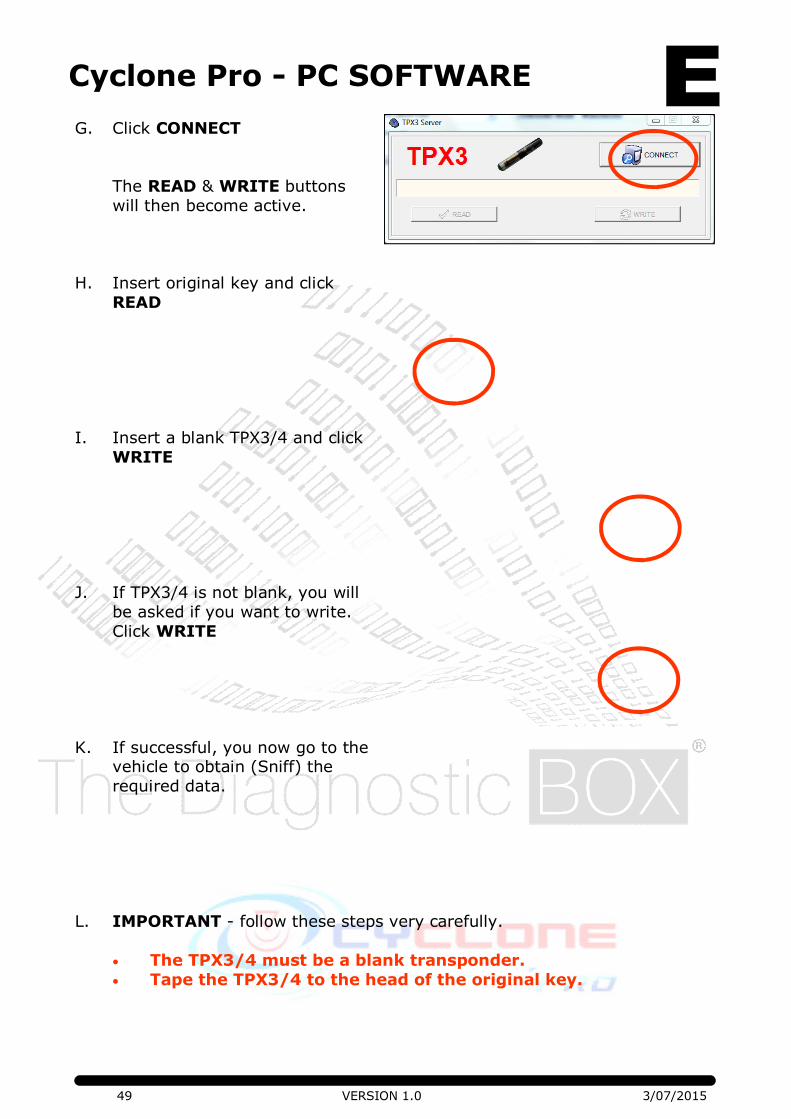
G. Click CONNECT
The READ & WRITE buttons
will then become active.
H. Insert original key and click
READ
I. Insert a blank TPX3/4 and click
WRITE
J. If TPX3/4 is not blank, you will
be asked if you want to write.
Click WRITE
K. If successful, you now go to the vehicle to obtain (Sniff) the
required data.
L. IMPORTANT - follow these steps very carefully.
The TPX3/4 must be a blank transponder.
Tape the TPX3/4 to the head of the original key.
50 VERSION 1.0 3/07/2015
Cyclone Pro - PC SOFTWARE
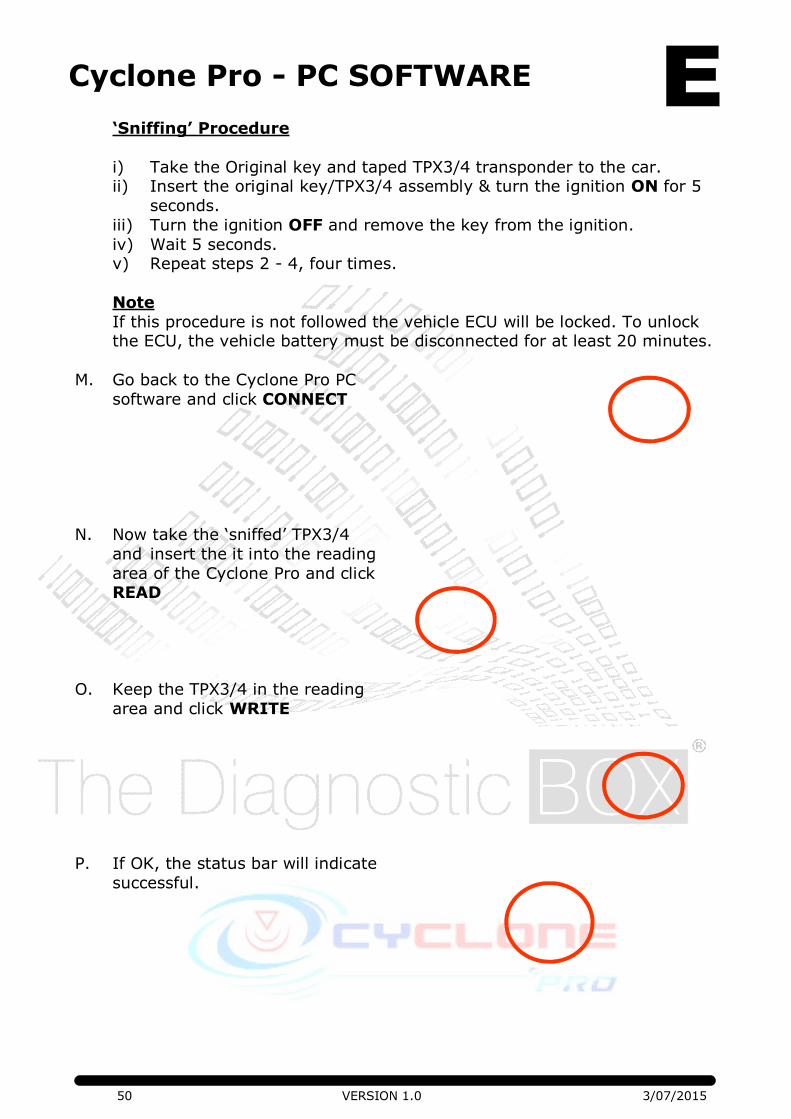
‘Sniffing’ Procedure
i) Take the Original key and taped TPX3/4 transponder to the car. ii) Insert the original key/TPX3/4 assembly & turn the ignition ON for 5
seconds.
iii) Turn the ignition OFF and remove the key from the ignition.
iv) Wait 5 seconds. v) Repeat steps 2 - 4, four times.
Note
If this procedure is not followed the vehicle ECU will be locked. To unlock the ECU, the vehicle battery must be disconnected for at least 20 minutes.
M. Go back to the Cyclone Pro PC
software and click CONNECT
N. Now take the ‘sniffed’ TPX3/4
and insert the it into the reading
area of the Cyclone Pro and click READ
O. Keep the TPX3/4 in the reading
area and click WRITE
P. If OK, the status bar will indicate
successful.

51 VERSION 1.0 3/07/2015
Cyclone Pro - PC SOFTWARE
51
Q. Now take the ‘original key and
insert the it into the reading
area of the Cyclone Pro and click WRITE
R. Wait
S. Insert the ‘sniffed’ TPX3/4 into
the reading area of the Cy-
clone Pro and click WRITE
T. Check this vehicle is compatible
with TPX3/4 and click WRITE
Note: some vehicles TPX3 will
not work with. This is a problem
with the JMA TPX3 not the
Cyclone Pro
U. When finished SUCCESS will be
indicated.
NOTE
After ‘sniffing’ and the transponder is placed back in the Cyclone Pro, check
the description Step1; There isn’t enough ‘sniffed’ data on the TPX3/4.
Step2; There is enough ‘sniffed’ data on TPX3/4 to enable the
calculation
52 VERSION 1.0 3/07/2015
Cyclone Pro - PC SOFTWARE
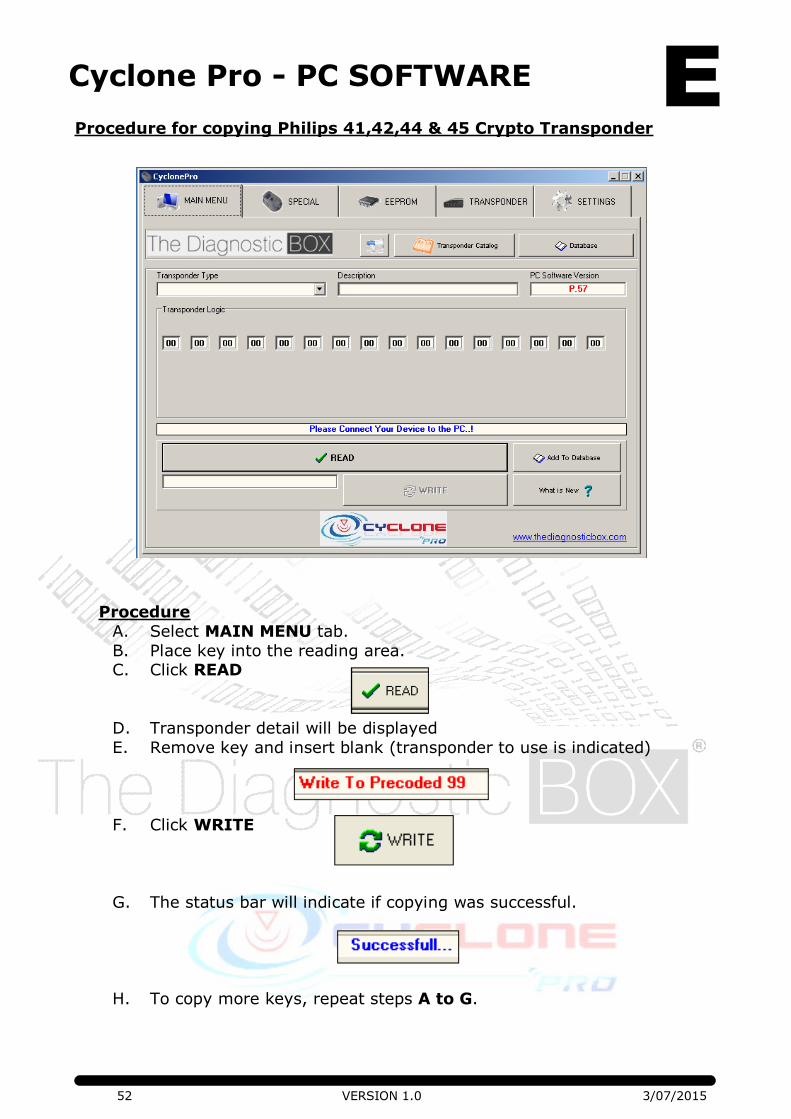
Procedure for copying Philips 41,42,44 & 45 Crypto Transponder
Procedure
A. Select MAIN MENU tab.
B. Place key into the reading area. C. Click READ
D. Transponder detail will be displayed
E. Remove key and insert blank (transponder to use is indicated)
F. Click WRITE
G. The status bar will indicate if copying was successful.
H. To copy more keys, repeat steps A to G.
53 VERSION 1.0 3/07/2015
Cyclone Pro - PC SOFTWARE
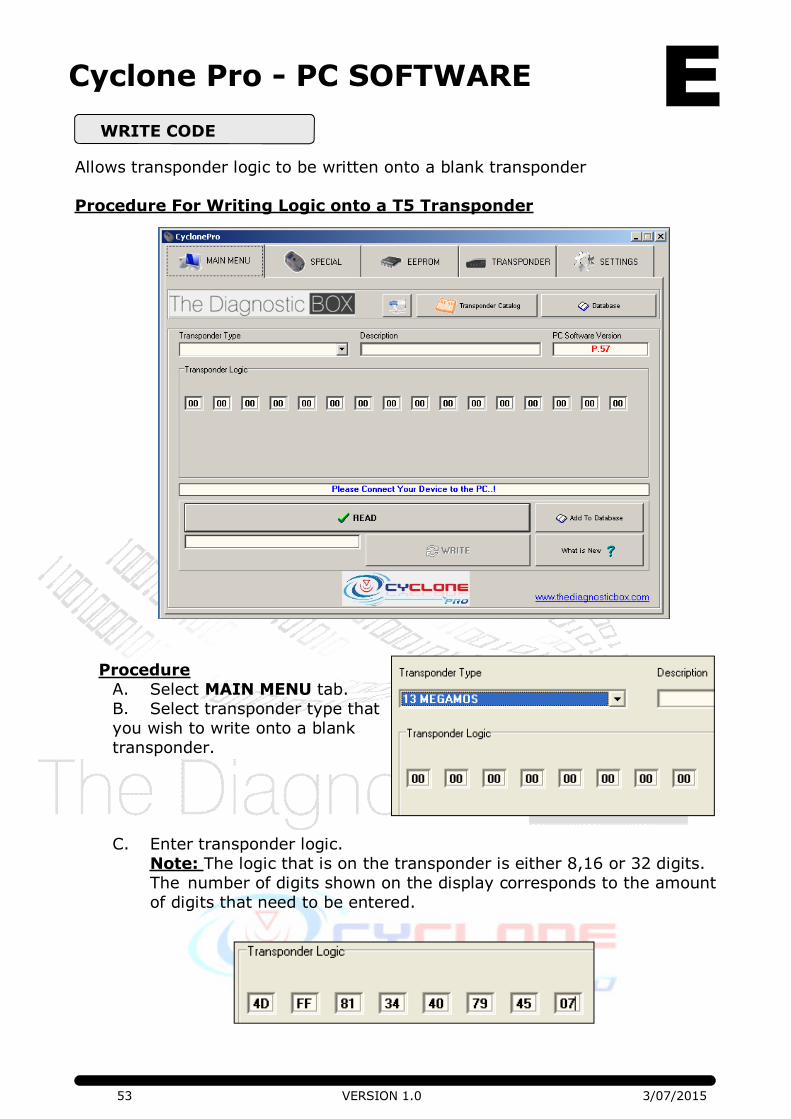
Allows transponder logic to be written onto a blank transponder
Procedure For Writing Logic onto a T5 Transponder
Procedure
A. Select MAIN MENU tab.
B. Select transponder type that
you wish to write onto a blank
transponder.
C. Enter transponder logic.
Note: The logic that is on the transponder is either 8,16 or 32 digits.
The number of digits shown on the display corresponds to the amount
of digits that need to be entered.
WRITE CODE
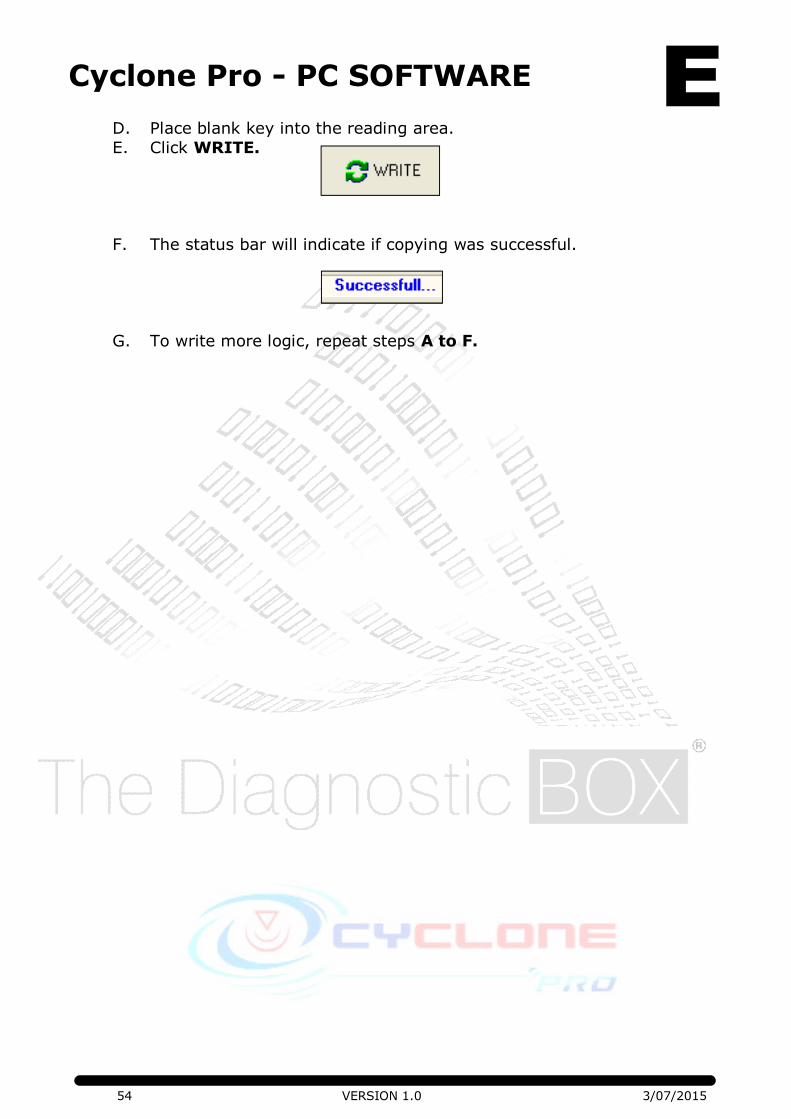
54 VERSION 1.0 3/07/2015
Cyclone Pro - PC SOFTWARE
D. Place blank key into the reading area.
E. Click WRITE.
F. The status bar will indicate if copying was successful.
G. To write more logic, repeat steps A to F.
55 VERSION 1.0 3/07/2015
Cyclone Pro - PC SOFTWARE
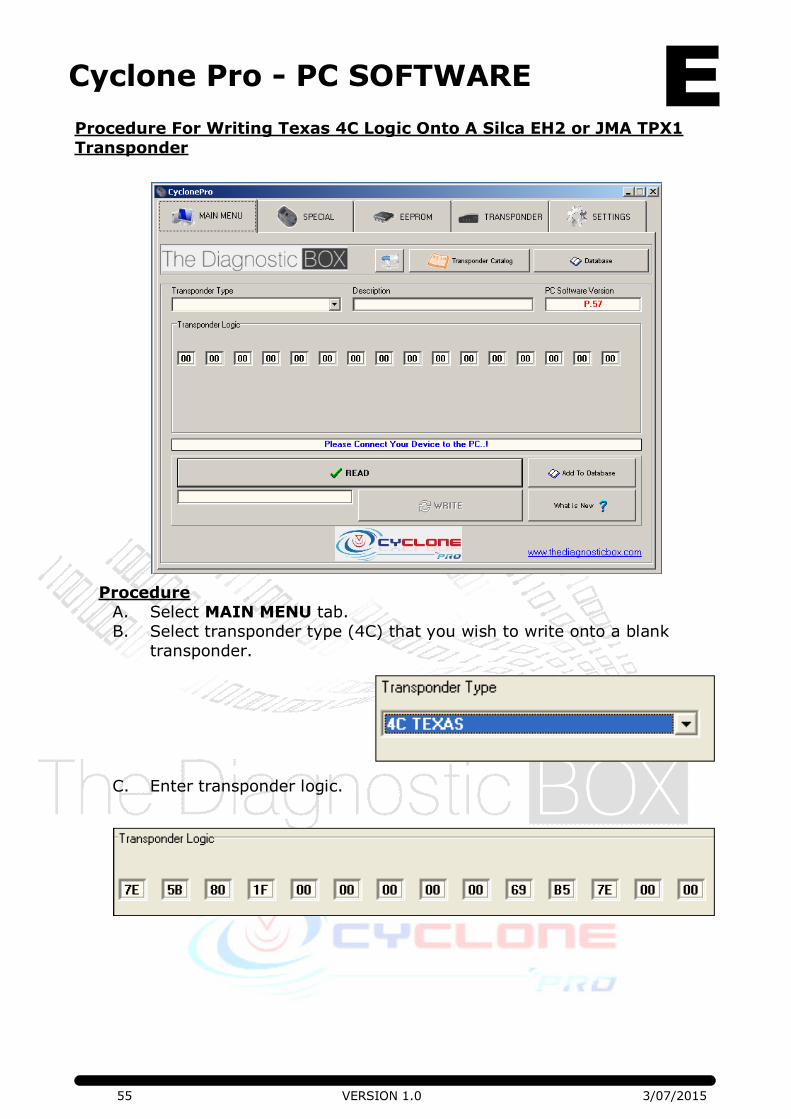
Procedure For Writing Texas 4C Logic Onto A Silca EH2 or JMA TPX1
Transponder
Procedure
A. Select MAIN MENU tab.
B. Select transponder type (4C) that you wish to write onto a blank
transponder.
C. Enter transponder logic.
56 VERSION 1.0 3/07/2015
Cyclone Pro - PC SOFTWARE
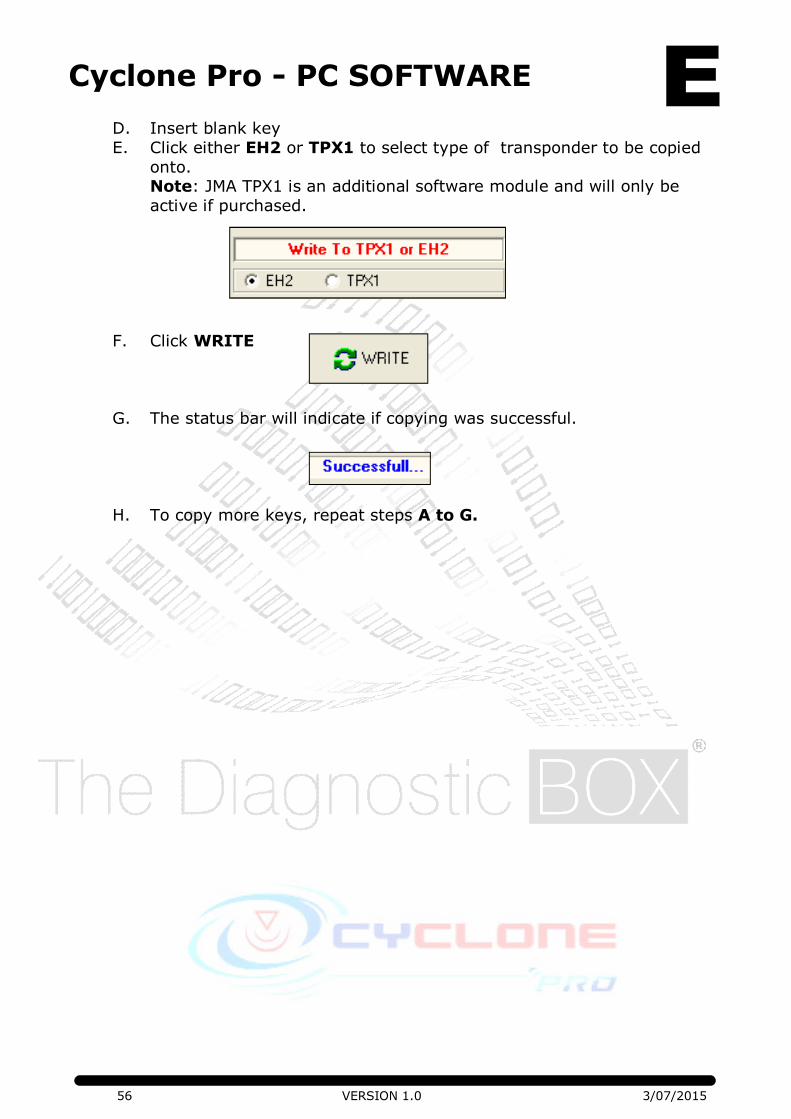
D. Insert blank key
E. Click either EH2 or TPX1 to select type of transponder to be copied
onto. Note: JMA TPX1 is an additional software module and will only be
active if purchased.
F. Click WRITE
G. The status bar will indicate if copying was successful.
H. To copy more keys, repeat steps A to G.
57 VERSION 1.0 3/07/2015
Cyclone Pro - PC SOFTWARE
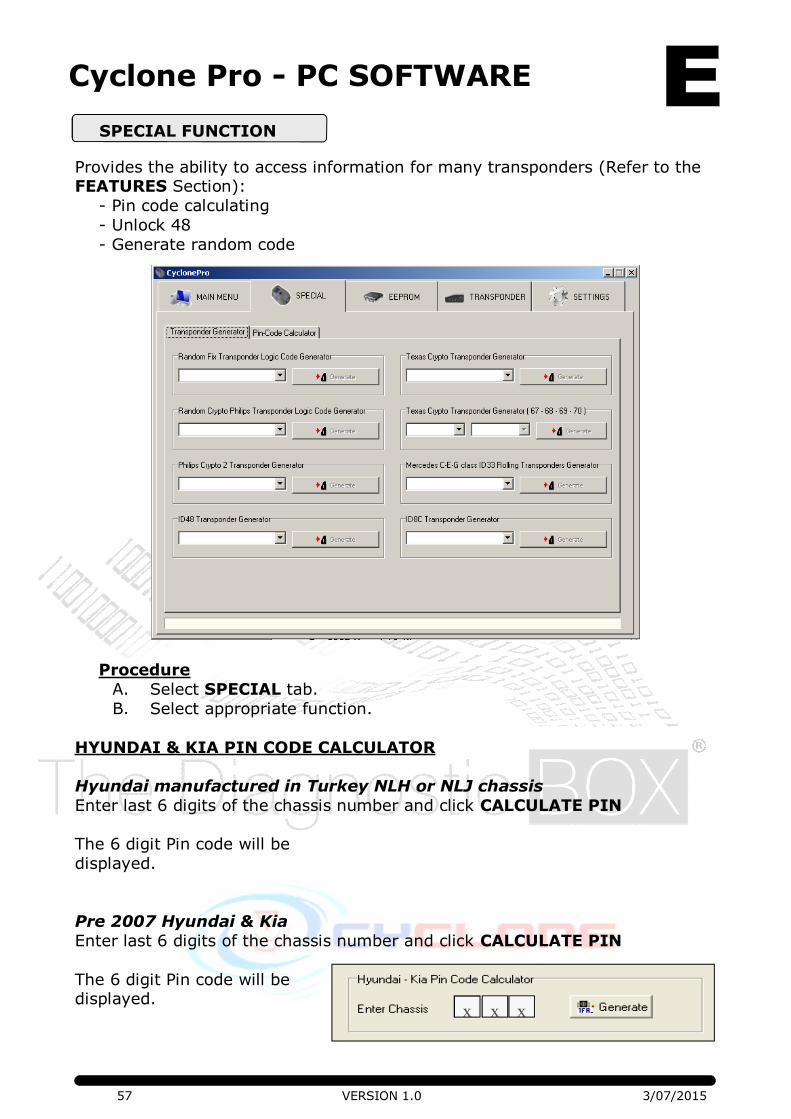
Provides the ability to access information for many transponders (Refer to the FEATURES Section):
- Pin code calculating
- Unlock 48
- Generate random code
Procedure
A. Select SPECIAL tab.
B. Select appropriate function.
HYUNDAI & KIA PIN CODE CALCULATOR
Hyundai manufactured in Turkey NLH or NLJ chassis
Enter last 6 digits of the chassis number and click CALCULATE PIN
The 6 digit Pin code will be
displayed.
Pre 2007 Hyundai & Kia
Enter last 6 digits of the chassis number and click CALCULATE PIN
The 6 digit Pin code will be displayed.
SPECIAL FUNCTION
x x x
58 VERSION 1.0 3/07/2015
Cyclone Pro - PC SOFTWARE
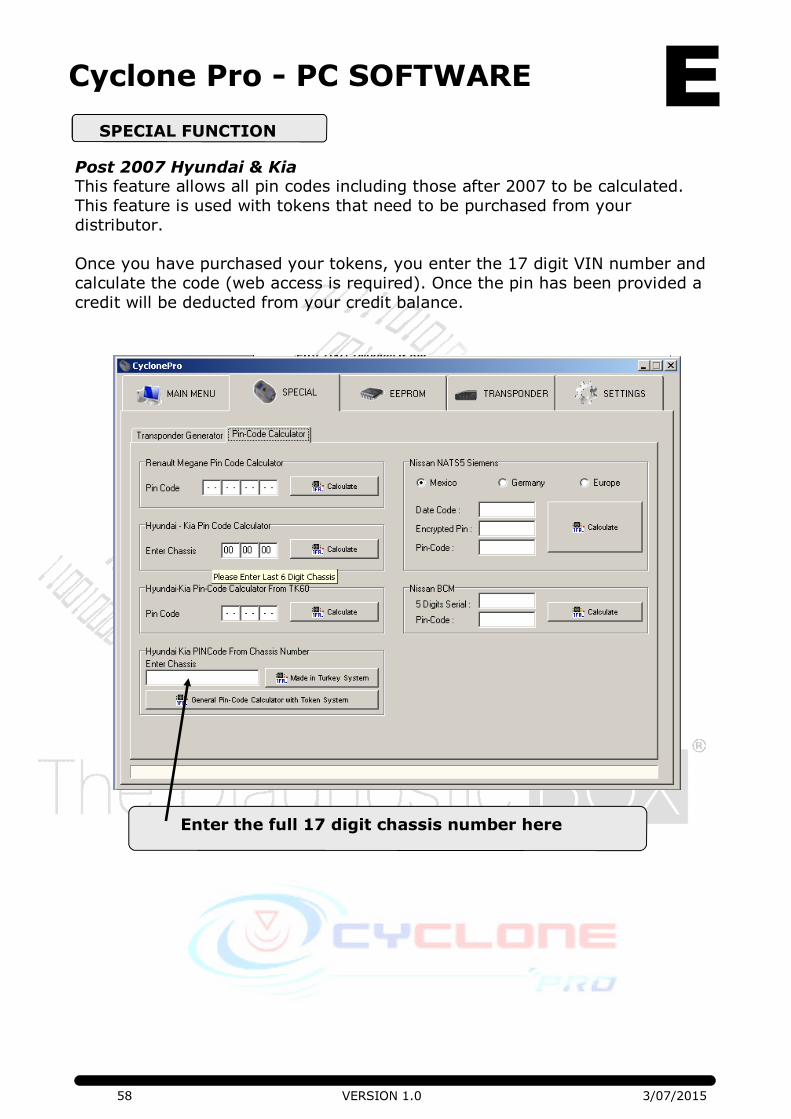
Post 2007 Hyundai & Kia This feature allows all pin codes including those after 2007 to be calculated.
This feature is used with tokens that need to be purchased from your
distributor.
Once you have purchased your tokens, you enter the 17 digit VIN number and
calculate the code (web access is required). Once the pin has been provided a
credit will be deducted from your credit balance.
SPECIAL FUNCTION
Enter the full 17 digit chassis number here
59 VERSION 1.0 3/07/2015
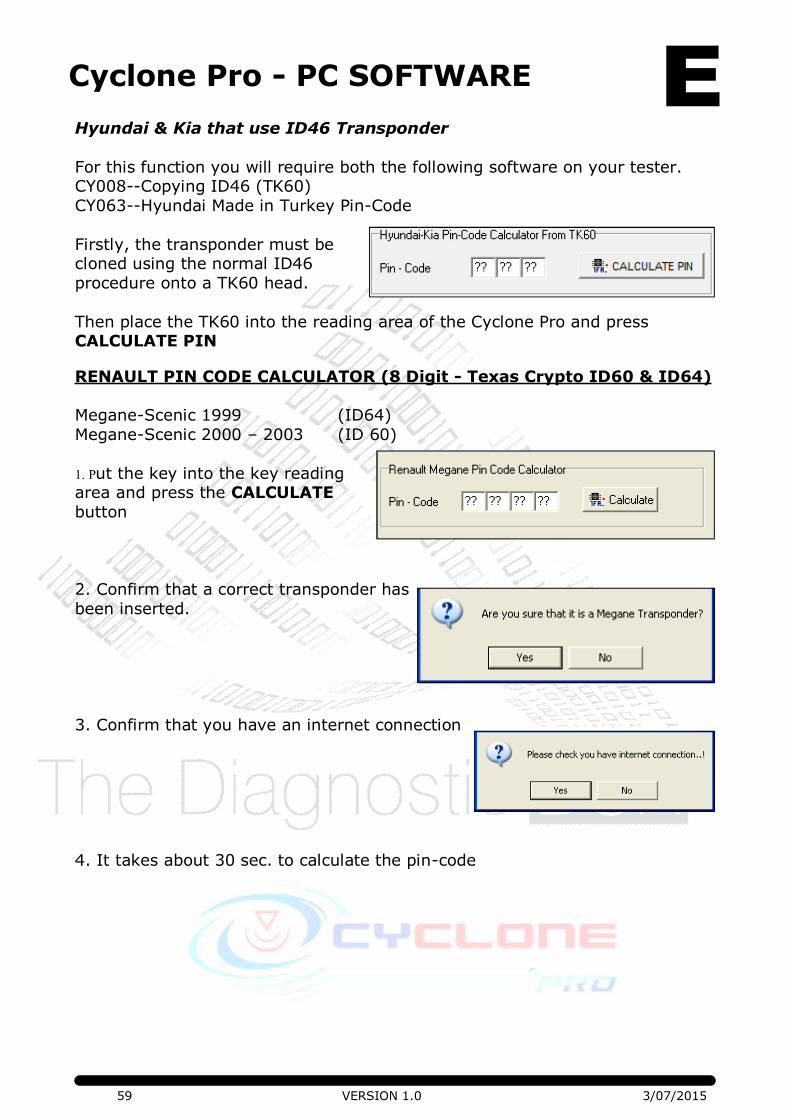
Cyclone Pro - PC SOFTWARE
Hyundai & Kia that use ID46 Transponder
For this function you will require both the following software on your tester. CY008--Copying ID46 (TK60)
CY063--Hyundai Made in Turkey Pin-Code
Firstly, the transponder must be cloned using the normal ID46
procedure onto a TK60 head.
Then place the TK60 into the reading area of the Cyclone Pro and press CALCULATE PIN
RENAULT PIN CODE CALCULATOR (8 Digit - Texas Crypto ID60 & ID64)
Megane-Scenic 1999 (ID64)
Megane-Scenic 2000 – 2003 (ID 60)
1. Put the key into the key reading area and press the CALCULATE
button
2. Confirm that a correct transponder has
been inserted.
3. Confirm that you have an internet connection
4. It takes about 30 sec. to calculate the pin-code
60 VERSION 1.0 3/07/2015
Cyclone Pro - PC SOFTWARE
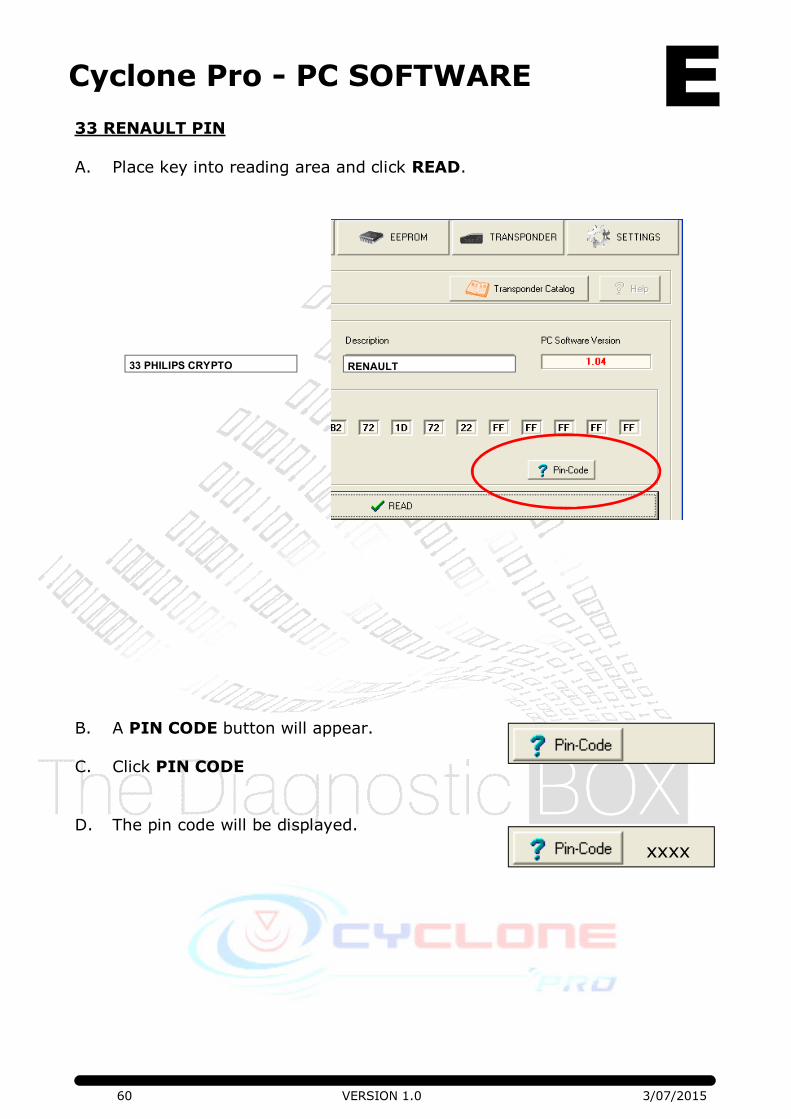
33 RENAULT PIN
A. Place key into reading area and click READ.
B. A PIN CODE button will appear.
C. Click PIN CODE
D. The pin code will be displayed. xxxx
33 PHILIPS CRYPTO RENAULT
61 VERSION 1.0 3/07/2015
Cyclone Pro - PC SOFTWARE
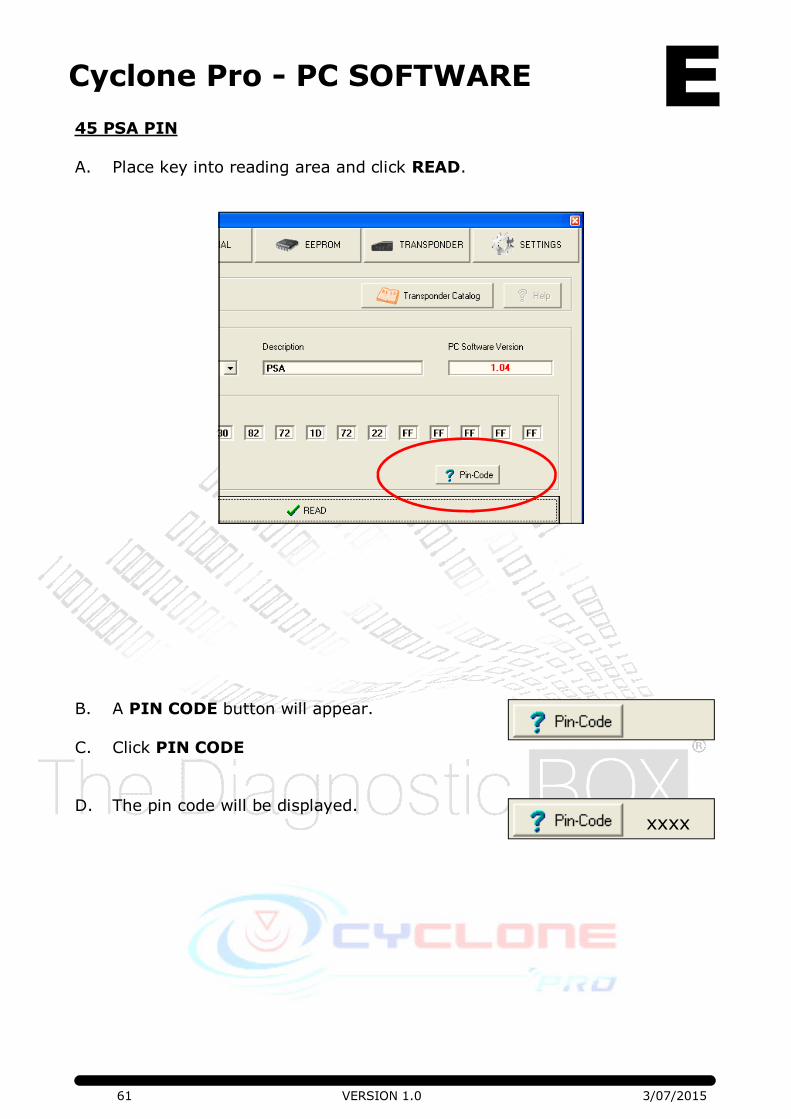
45 PSA PIN
A. Place key into reading area and click READ.
B. A PIN CODE button will appear.
C. Click PIN CODE
D. The pin code will be displayed.
xxxx
62 VERSION 1.0 3/07/2015
Cyclone Pro - PC SOFTWARE
HYUNDAI/KIA PIN CODE CALCULATOR FROM TK60
Once a TK60 has been cloned, the pin code can be read from the TK60 head. This will then allow a transponder (less expensive than a TK60) to be
programmed into the vehicle using a Pro key programmer.
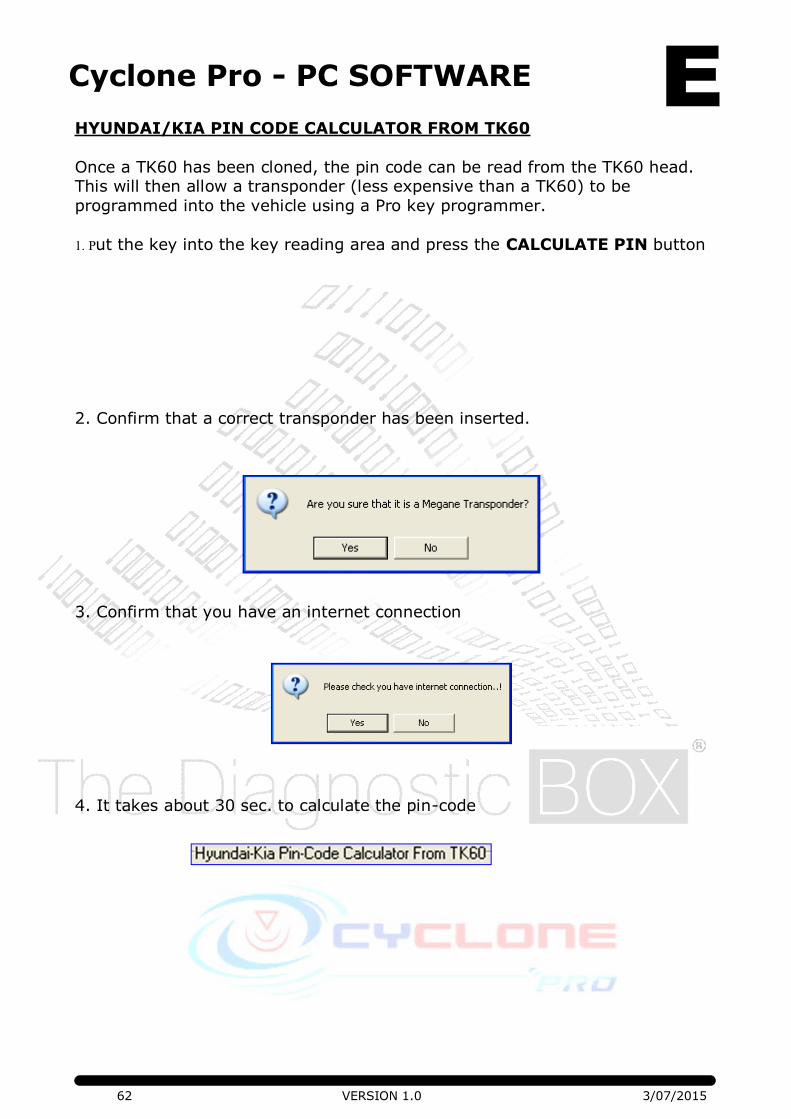
1. Put the key into the key reading area and press the CALCULATE PIN button
2. Confirm that a correct transponder has been inserted.
3. Confirm that you have an internet connection
4. It takes about 30 sec. to calculate the pin-code
63 VERSION 1.0 3/07/2015
Cyclone Pro - PC SOFTWARE
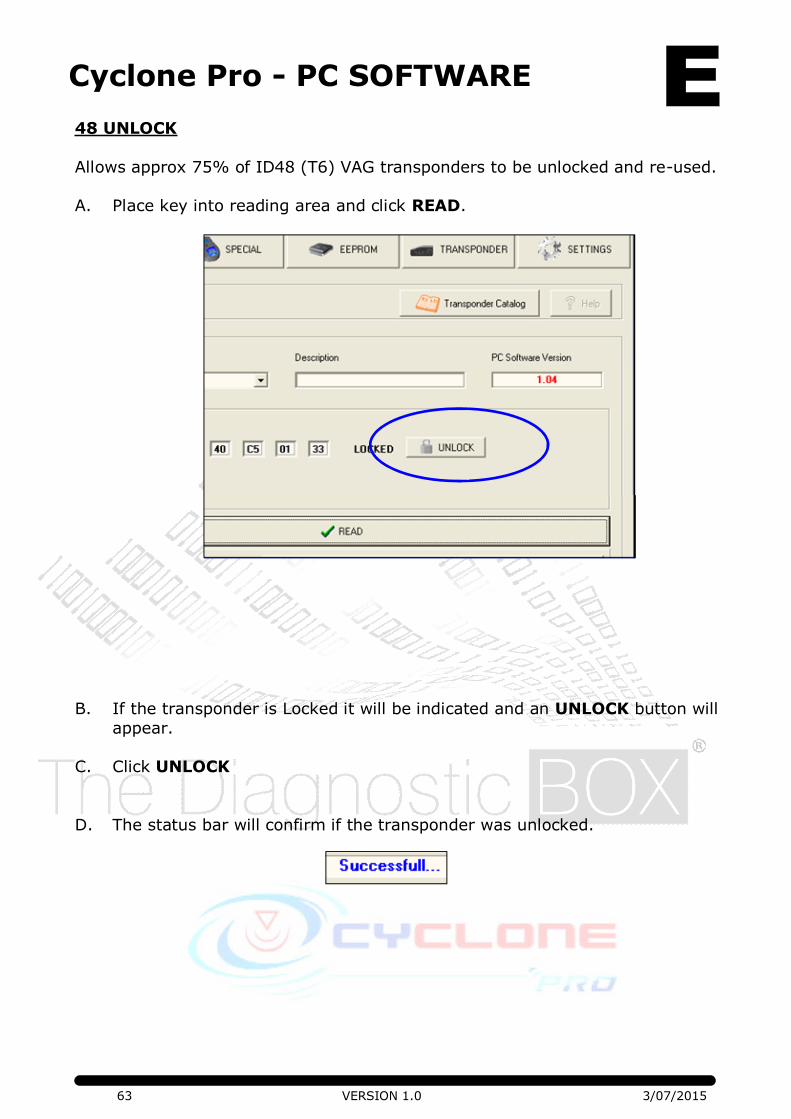
48 UNLOCK
Allows approx 75% of ID48 (T6) VAG transponders to be unlocked and re-used.
A. Place key into reading area and click READ.
B. If the transponder is Locked it will be indicated and an UNLOCK button will
appear.
C. Click UNLOCK
D. The status bar will confirm if the transponder was unlocked.
64 VERSION 1.0 3/07/2015
Cyclone Pro - PC SOFTWARE
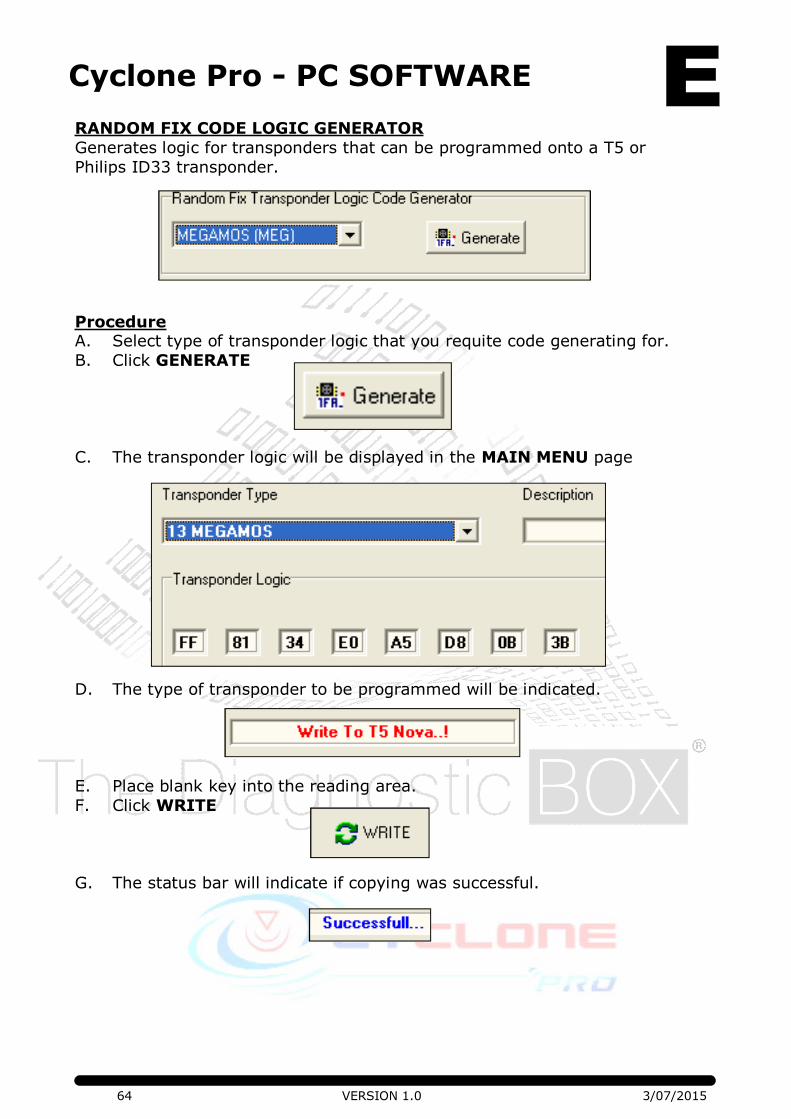
RANDOM FIX CODE LOGIC GENERATOR
Generates logic for transponders that can be programmed onto a T5 or
Philips ID33 transponder.
Procedure A. Select type of transponder logic that you requite code generating for.
B. Click GENERATE
C. The transponder logic will be displayed in the MAIN MENU page
D. The type of transponder to be programmed will be indicated.
E. Place blank key into the reading area.
F. Click WRITE
G. The status bar will indicate if copying was successful.

65 VERSION 1.0 3/07/2015
Cyclone Pro - PC SOFTWARE
RANDOM CRYPTO PHILIPS TRANSPONDER LOGIC CODE GENERATOR
Generates logic for Crypto transponders.
Procedure
A. Select type of transponder logic that you requite code generating for.
B. Click GENERATE
C. The transponder logic will be displayed on the MAIN MENU page.
D. The type of transponder to be programmed will be indicated.
E. Place blank key into the reading area. F. Click WRITE
G. The status bar will indicate if copying was successful.
66 VERSION 1.0 3/07/2015
Cyclone Pro - PC SOFTWARE
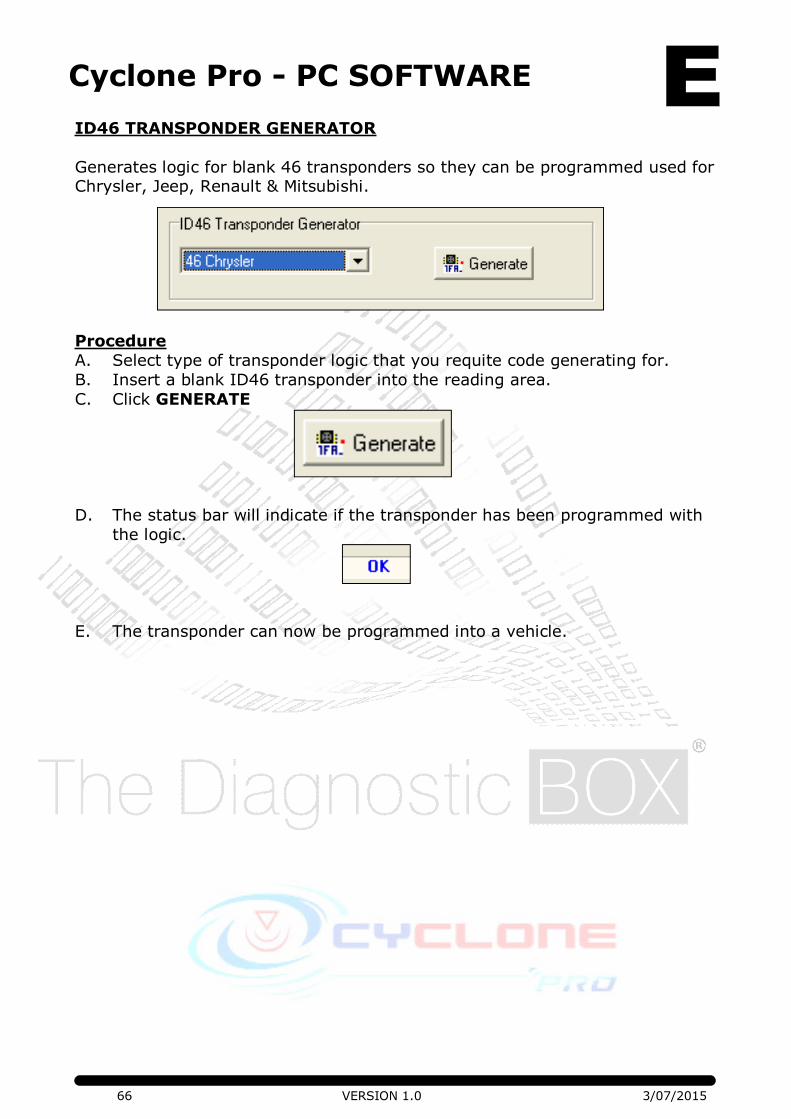
ID46 TRANSPONDER GENERATOR
Generates logic for blank 46 transponders so they can be programmed used for Chrysler, Jeep, Renault & Mitsubishi.
Procedure
A. Select type of transponder logic that you requite code generating for.
B. Insert a blank ID46 transponder into the reading area.
C. Click GENERATE
D. The status bar will indicate if the transponder has been programmed with
the logic.
E. The transponder can now be programmed into a vehicle.
67 VERSION 1.0 3/07/2015
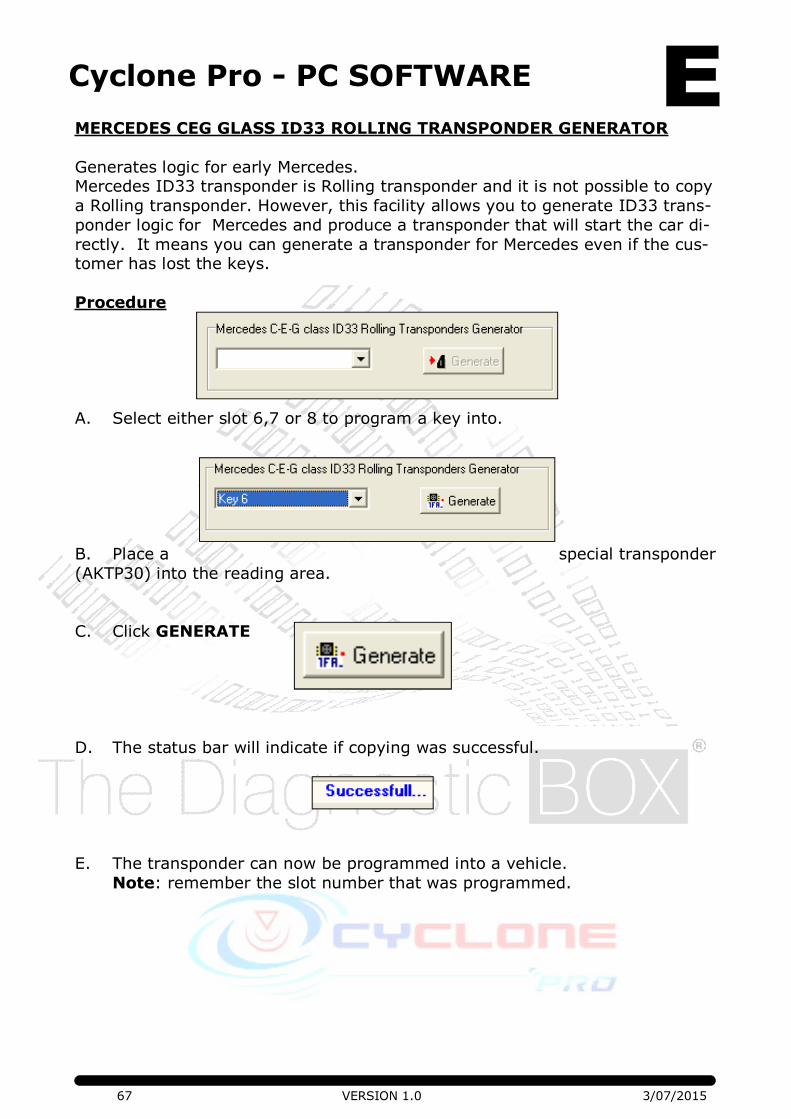
Cyclone Pro - PC SOFTWARE
MERCEDES CEG GLASS ID33 ROLLING TRANSPONDER GENERATOR
Generates logic for early Mercedes. Mercedes ID33 transponder is Rolling transponder and it is not possible to copy
a Rolling transponder. However, this facility allows you to generate ID33 trans-
ponder logic for Mercedes and produce a transponder that will start the car di-
rectly. It means you can generate a transponder for Mercedes even if the cus-tomer has lost the keys.
Procedure
A. Select either slot 6,7 or 8 to program a key into.
B. Place a special transponder
(AKTP30) into the reading area.
C. Click GENERATE
D. The status bar will indicate if copying was successful.
E. The transponder can now be programmed into a vehicle.
Note: remember the slot number that was programmed.
68 VERSION 1.0 3/07/2015
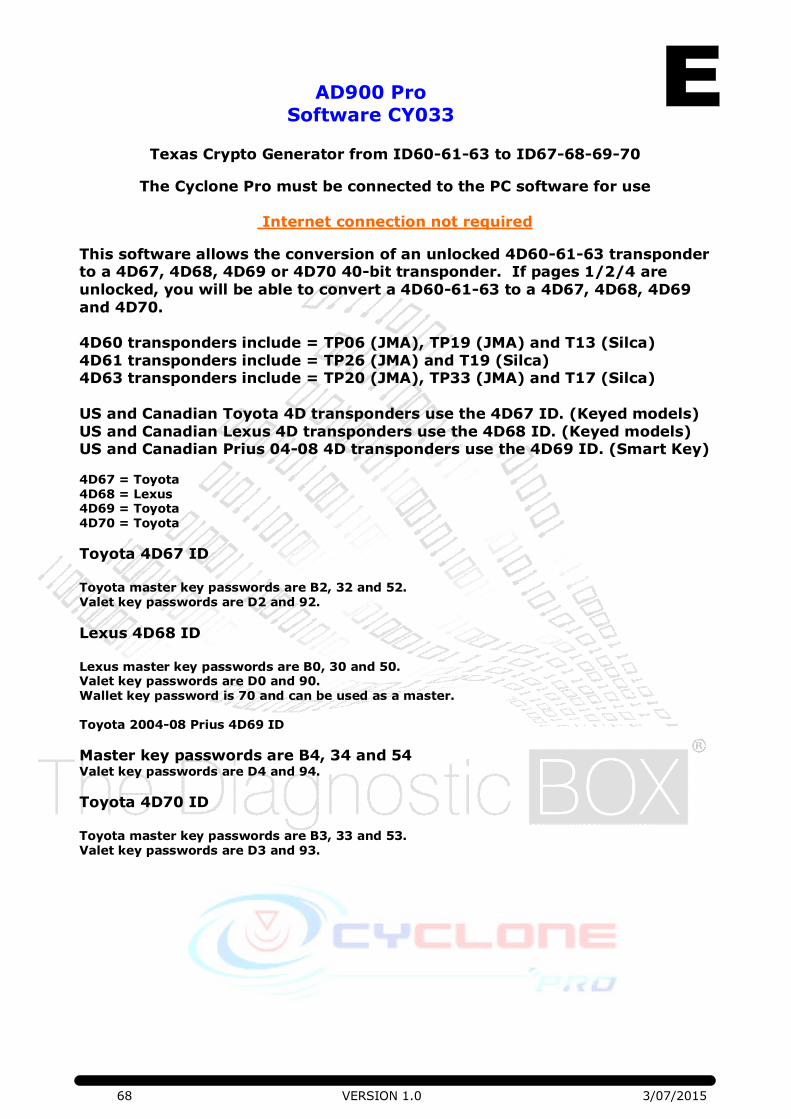
AD900 Pro
Software CY033
Texas Crypto Generator from ID60-61-63 to ID67-68-69-70
The Cyclone Pro must be connected to the PC software for use
Internet connection not required
This software allows the conversion of an unlocked 4D60-61-63 transponder to a 4D67, 4D68, 4D69 or 4D70 40-bit transponder. If pages 1/2/4 are
unlocked, you will be able to convert a 4D60-61-63 to a 4D67, 4D68, 4D69
and 4D70.
4D60 transponders include = TP06 (JMA), TP19 (JMA) and T13 (Silca)
4D61 transponders include = TP26 (JMA) and T19 (Silca) 4D63 transponders include = TP20 (JMA), TP33 (JMA) and T17 (Silca)
US and Canadian Toyota 4D transponders use the 4D67 ID. (Keyed models)
US and Canadian Lexus 4D transponders use the 4D68 ID. (Keyed models) US and Canadian Prius 04-08 4D transponders use the 4D69 ID. (Smart Key) 4D67 = Toyota 4D68 = Lexus 4D69 = Toyota 4D70 = Toyota
Toyota 4D67 ID
Toyota master key passwords are B2, 32 and 52. Valet key passwords are D2 and 92.
Lexus 4D68 ID Lexus master key passwords are B0, 30 and 50. Valet key passwords are D0 and 90. Wallet key password is 70 and can be used as a master. Toyota 2004-08 Prius 4D69 ID
Master key passwords are B4, 34 and 54 Valet key passwords are D4 and 94.
Toyota 4D70 ID
Toyota master key passwords are B3, 33 and 53. Valet key passwords are D3 and 93.
69 VERSION 1.0 3/07/2015
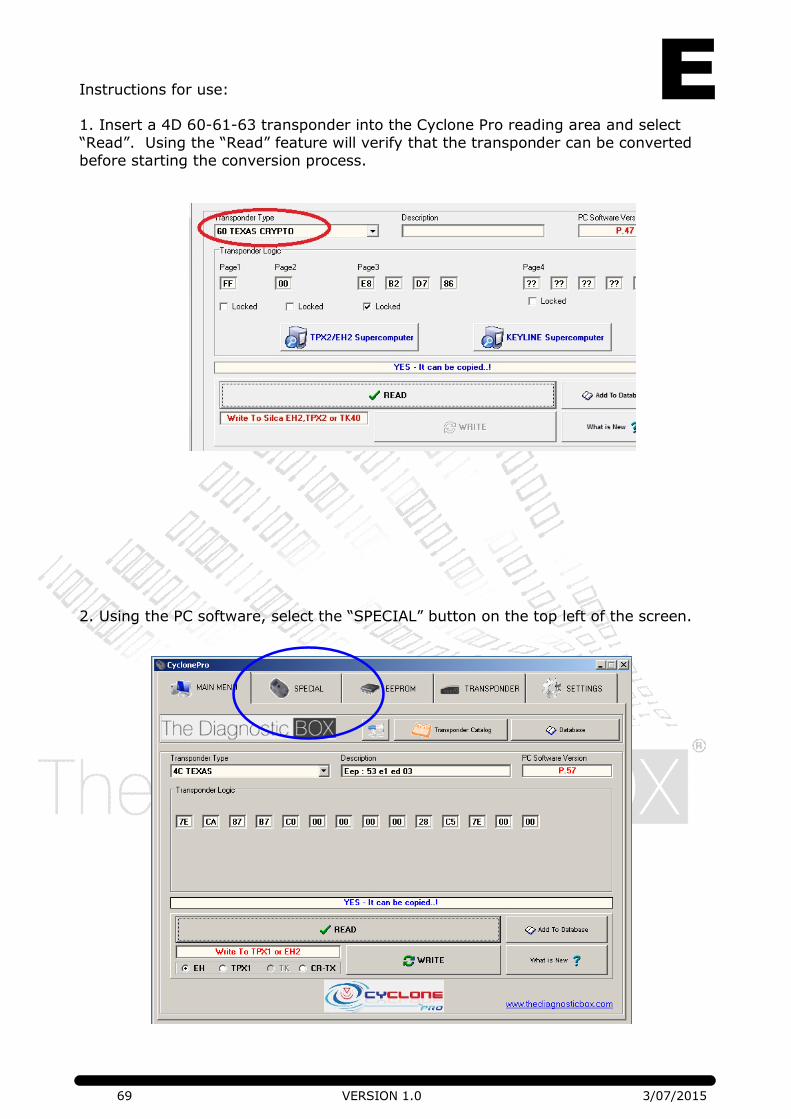
Instructions for use:
1. Insert a 4D 60-61-63 transponder into the Cyclone Pro reading area and select
“Read”. Using the “Read” feature will verify that the transponder can be converted
before starting the conversion process.
2. Using the PC software, select the “SPECIAL” button on the top left of the screen.

70 VERSION 1.0 3/07/2015
3. The 4D 67-68-69-70-software window is located at the bottom left of the
“SPECIAL” screen,
Select the type of transponder required for your application on the first window. 4D
67-68-69-70 will be shown in a drag down box.
4. Once the type of transponder is selected (example 4D67), select the master or
valet encoding required. Any selection listed, as “master” will work as a master key. Any selection listed, as “slave” will work as a valet key. 4D68-69-70 screens are also
shown below. 4D67 Screenshot

71 VERSION 1.0 3/07/2015
4D68 Screenshot
4D69 Screenshot

72 VERSION 1.0 3/07/2015
4D70 Screenshot
5. Once the type and master/valet function is selected, insert a 4D60 transponder
into the AD900 Pro. Press the “generate” selection on your screen located to the right of the master/slave drag down box.
In approximately 10 seconds, the 4D60-61-63 transponder will be converted to the
transponder selected. Once the transponder is converted, it cannot be re-configured as the transponder locks pages 1, 2, and 4. Return to the “Main Menu” by pressing
the “Main Menu” button on the top left of the screen.

73 VERSION 1.0 3/07/2015
6. Read the converted transponder by selecting “Read”. The transponder
should now be converted to a 4D67 Master Toyota transponder as seen be-low. The converted transponder is now ready for use.

74 VERSION 1.0 3/07/2015
Cyclone Pro - PC SOFTWARE
This function is used in conjunction with an EEPROM reader (not sold by The Diagnostic Box). Depending on the system the transponder information
and/or the pin code can be read.
The file that is read by the EEPROM reader is programmed into the special
transponder by using the Cyclone Pro and PC software program.
EEPROM

75 VERSION 1.0 3/07/2015
Cyclone Pro - PC SOFTWARE
Procedure
A. Select EEProm tab.
B. Select the EEprom module that you want to work with from the pull down tab.
There are 4 different methods of doing these EEproms, which for explanation
purposes we will refer to as Type A, B, C, and D.
Method 1 - Obtains the pin code and writes the key in the menu.
Method 2 - Writing to the transponder only.
Method 3 - Pre-coding transponder and reading the pincode. (used by the
Fiat and Alfa derivative cars).
Method 4 - Read the pin code only (as used on any vehicles using the
Phillips crypto 2 (id46) chips).
The following pages all assume that you have read the file from the EEprom
module using your EEprom reader and saved it to a known location on your PC. This manual does not cover the reading of the EEprom file with an
EEprom reader.

76 VERSION 1.0 3/07/2015
Cyclone Pro - PC SOFTWARE
METHOD 1 - Obtains the pin code and writes the key in the menu.
Example module selected - (CY113) VW Golf with a Siemens 6 pin box.
A. Select the module from the drop down menu.
B. Click the OPEN FILE button and point to the
location you have saved the EEprom or
Processor file (dump) that you have read with your programmer

77 VERSION 1.0 3/07/2015
Cyclone Pro - PC SOFTWARE
C. Select the file that you need and click Open.
E. The path to the file selected will appear under the OPEN FILE button.
F. You now have 2 options.
Option 1 - Calculate Pin
Clicking this option will provide you with the pin code, that can then be
used to program the key into the vehicle using a key programming tool eg AD100Pro.
Option 2 Program Transponder
Insert a T5 transponder in the Cyclone Pro and click this option to program a transponder. You can now take this transponder, fit it into a
key and start the car.

78 VERSION 1.0 3/07/2015
Cyclone Pro - PC SOFTWARE
METHOD 2 - Writing to the transponder only.
Example module selected - (CY139) Mazda with a Temic box, ID33
A. Select the module from the drop down menu.
B. Click the OPEN FILE button and point to the
location you have saved the EEprom or
Processor file (dump) that you have read with your programmer

79 VERSION 1.0 3/07/2015
Cyclone Pro - PC SOFTWARE
C. Select the file that you need and click Open.
D. The path to the file selected will appear under the OPEN FILE button.
E. Insert a T5 transponder in the Cyclone Pro and click this option to program a transponder. You can now take this transponder, fit it into a
key and start the car.

80 VERSION 1.0 3/07/2015
Cyclone Pro - PC SOFTWARE
METHOD 3 - Pre-coding transponder and reading the pincode. (used
by the Fiat and Alfa derivative cars).
Example module selected - (CY117) Fiat,Lancia,Alfa Romeo BSI Delphi (TP)
This allows a T6 to be pre-coded to a virgin T6 transponder . It also reads the
5 digit pin number, to program this key to the car with your key programming
tool eg AD100Pro
A. Select the module from the drop down menu.
B. Click the OPEN FILE button and point to the
location you have saved the EEprom or
processor file (dump) that you have read
with your programmer

81 VERSION 1.0 3/07/2015
Cyclone Pro - PC SOFTWARE
C. Select the file that you need and click Open.
D. The path to the file selected will appear under the OPEN FILE button.
E. Click Calculate Pin, which will provide you
with the pin code.
E. Insert a virgin T6 transponder in the Cyclone
Pro and click Program Transponder.
This will pre-code the transponder.
F. The key can now be programmed into the vehicle using a key
programming tool eg AD100Pro, and the pin code provided.

82 VERSION 1.0 3/07/2015
Cyclone Pro - PC SOFTWARE
Alternatively the transponder can be prepared so that the car is ready to start
with no programming with the diagnostic tool .
A. Click Prepare immobiliser unit dump
B. The following EEPROM Box will appear, which
will advise how many keys are currently programmed (in this case there are 2).
Click Prepare immobiliser unit dump
C. This will give you 2 options.
Option 1 - Add Key
Follow step D.
Option 2 - ERASE All Keys
Jump to step E.

83 VERSION 1.0 3/07/2015
Cyclone Pro - PC SOFTWARE
D. Option 1 - ADD KEY
i) Insert a T6 transponder to the reader on the device and press the Add Key
button.
ii) This will read the locked information
from the T6 transponder and write this to the dump, which will be called
New dump.bin. As you can see it now
shows 3 keys.
iii) Now write this dump back to the EEprom with your EEprom reader.
iv) Fit the immobiliser/Bsi unit back to the vehicle and start it without
the use of a diagnostic tool.
E. Option 2 - ERASE ALL KEYS
i) Click the Erase All Keys button.

84 VERSION 1.0 3/07/2015
Cyclone Pro - PC SOFTWARE
iii) Select the main page and click Open File
iv) Select the new file called New Dump.bin and click OPEN

85 VERSION 1.0 3/07/2015
Cyclone Pro - PC SOFTWARE
v) Click Prepare immobiliser unit dump
vi) 0 keys will be displayed.
vii) Click Add Key.
viii) 1 key will be displayed.
viiii) Once completed. Write this file back to the
vehicle immobilser/ Bsi unit with your EEProm
reader. The programming is now complete without the
use of a diagnostic tool

86 VERSION 1.0 3/07/2015
Cyclone Pro - PC SOFTWARE
NOTE:
If you are doing one of these white boxes
as fitted to the Fiat Ducato range , then follow these same instructions.

87 VERSION 1.0 3/07/2015
Cyclone Pro - PC SOFTWARE
METHOD 4 - Read the pin code only (as used on any vehicles using the
Phillips crypto 2 (id46) chips).
Example module selected - (CY126) Renault Megane (ID26)
A. Select the module from the drop down menu.
B. Click the OPEN FILE button and point to the
location you have saved the EEprom or
processor file (dump) that you have read
with your programmer

88 VERSION 1.0 3/07/2015
Cyclone Pro - PC SOFTWARE
C. Select the file that you need and click Open.
D. The path to the file selected will appear under the OPEN FILE button.
E. Click Calculate Pin Code. This will
provide you with the pin code, that
can then be used to program the key into the vehicle using a key programming tool eg AD100Pro.

89 VERSION 1.0 3/07/2015
Cyclone Pro - PC SOFTWARE
This facility is designed to allow the transponder to be fully configured and
should only be used by an individual that is fully knowledgeable in this area.
There is also a facility to reset certain remote controls for some Renault and
Opel/GM vehicles.
Eg Renault 1 button - When programming a Renault remote control to a car, you cannot use this remote control for another car, because it will be locked to
the first car. If you change the IC of this remote control (PCF7946AT etc.) you
can reset the remote control. But you should preprogram the IC using the
transponder specialist function.
The Diagnostic Box are unable to provide any technical support in this area
given its specialist nature.
TRANSPONDER SPECIALIST

90 VERSION 1.0 3/07/2015
Cyclone Pro - PC SOFTWARE
Re-Programming Renault Remote Controls
1. Carefully take Renault key card apart.
2. Remove the PCF7946/47 chip/transponder.
3. Replace with a virgin PCF7946/47 chip/transponder.
4. Put the Renault key card with the virgin chip/transponder into the reading area
5. Select the correct key card from the pull down
menu.
6. Clicks PROGRAM on this page.
7. Program the new key card into car with the AD100Pro/MVP Pro

91 VERSION 1.0 3/07/2015
Cyclone Pro - PC SOFTWARE
The SETTINGS page allows the following:
Language - Select language
Com Port - Select correct com port that the tester is
connected to. (Normally this does not need to be
changed)
PC Software Version* - Software version currently loaded on the PC. Device Version* - Software version currently loaded on the tester.
Serial Number* - Serial number of the tester.
Status* - Successful will appear at the bottom of the screen
if the tester is connected correctly. Login: - Enter Username & Password to be able to update
your device and tester software.
Register Your Device: - Only needs to be completed once.
Activation: - When you have registered your device you will receive an e-mail back that contains an activation
code. This code needs to be entered on this screen
to activate the device. Only needs to be completed
once. Forgotten Password - Used to request a new password.
Note: You may need to click CONNECT to display the information above (*).
SETTING

92 VERSION 1.0 3/07/2015
Cyclone Pro - PC SOFTWARE
A. This facility provides a database of manufacturers, vehicles, transponders
fitted, transponder type, if it can be copied and what it can be copied onto.
B. Select Transponder Catalogue
C. You can either search by Manufacturer, Transponder ID or simply scroll
down the list.
D. Quick Report allows you to export or print the file.
TRANSPONDER CATALOGUE

VERSION 1.0 3/07/2015
PC SOFTWARE
INSTALLATION &
UPDATE PROCEDURE

94 VERSION 1.0 3/07/2015
Cyclone Pro - SOFTWARE INSTALLATION
The Cyclone Pro is supplied with the latest software available at the time.
However it is recommended that you update the software regularly.
If you have purchased any additional software modules, you will also need to
update your tester to activate this software.
First step is to install the loader program. Do not connect the Cyclone Pro tester until instructed.
Procedure
A. Visit www.thediagnosticbox.com website B. Select Downloads from the main menu.
C. Then select PC SOFTWARE from Cyclone Pro section.
D. Click Save
E. Select to save the file to
the Desktop. Then click Save.
Loader Program Installation

95 VERSION 1.0 3/07/2015
F. Double click on the setup.exe
Vista & Windows 7 Users Right click on the setup.exe icon on
the desktop.
Select Run as administrator .
Click Yes to the User Account Control dialogue box.
G. Select Language & click OK
H. Click NEXT
Cyclone Pro - SOFTWARE INSTALLATION

96 VERSION 1.0 3/07/2015
I. Click INSTALL
J. Click FINISH
K. The Cyclone Pro & Launch USB
Driver.exe icons will be displayed on your
desktop.
L. Double click the Launch USB Driver .exe icon.
This will then install automatically
Cyclone Pro - SOFTWARE INSTALLATION

97 VERSION 1.0 3/07/2015
A. Connect power to the tester but do not switch the tester on.
B. Connect the USB cable from the tester to the PC USB port. C. Switch the tester on.
Note: The first time you connect to the PC, Windows will detect
new hardware and automatically install. Wait until Windows
confirms a successful installation. D. Open the PC program by double clicking on the Cyclone Pro icon on the
desktop.
E. Select the SETTINGS tab
E. The first time you connect to the PC and open the PC program you may need to select the correct com port from the pull down list in the
SETTINGS tab. Normally this is not necessary.
Note: You may need to click the REFRESH LIST
button.
F. The next time you connect to the same USB port it will detect the Cyclone Pro automatically. However
sometimes it is still necessary to select manually.
Connecting CYCLONE PRO To The PC
Cyclone Pro - SOFTWARE INSTALLATION
NOTE:
When using Cyclone Pro in conjunction with the PC
Software Program, ensure that the Cyclone Pro is switched on first, before opening the PC software.
This ensures that the PC detects the com port
correctly.

98 VERSION 1.0 3/07/2015
This process is only required once for your device.
A. Connect power to the tester but do not switch the tester on. B. Connect the USB cable from the tester to the PC USB port.
C. Switch the tester on and wait for the main menu to be displayed.
D. Open the PC program by double clicking on the Cyclone Pro icon on the
desktop. E. Select SETTINGS.
F. Check the correct Com port is selected by clicking CONNECT.
G. Select the tab Register For Device
H. Enter a USERNAME, PASSWORD & valid E-MAIL ADDRESS.
IMPORTANT
Keep this information
safe as you will
require it for updating your tester and PC
software)
Registration & Activation
Cyclone Pro - Registration & Activation

99 VERSION 1.0 3/07/2015
I. Click Register For Device.
J. Confirm you have an internet connection.
K. The status bar at the bottom of the Settings
screen should indicate that the process has been
successful.
L. You will receive an e-mail back to the e-mail address you entered that will
confirm the following:
Please do not reply to this e-mail
User Name : tester
Password : 1234
Activation Code : 5C90F929
M. Select the Activation tab, enter the activation code and click Activate
the Device
Cyclone Pro - Registration & Activation

100 VERSION 1.0 3/07/2015
N. Confirm you have an internet connection
O. You will then be presented with the following screen that confirms
activation was successful.
If you wish to update either your device or the PC software you will need to
go to the login tab and logon using your details . You will then be
presented with the following screen.
Cyclone Pro - Registration & Activation

101 VERSION 1.0 3/07/2015
Cyclone Pro - SOFTWARE UPDATE
If this is the first time you are connecting your tester to the PC please refer to
section F and follow the Connecting Cyclone Pro To The PC & Registration/
Activation instructions first. If you have already activated your tester then please proceed with the following instructions.
A. Connect power to the tester but do not switch the tester on.
B. Connect the USB cable from the tester to the PC USB port. C. Switch the tester on.
D. Double click the Cyclone Pro icon on your desktop to open
the software program.
E. The PC program will open. click Settings
F. Enter Username & Password and click Login
Note:
Ensure that the correct com port is selected. The serial number will be displayed if it is correct.
G. Click Connect
PC Software Update Procedure

102 VERSION 1.0 3/07/2015
Cyclone Pro - SOFTWARE UPDATE
H. Confirm you have an internet connection
The following screen will then be displayed. PC Software Version - Software version currently loaded on the PC.
Device Version - Software version currently loaded on the tester.
Serial Number - Serial number of the tester.
Status - OK will appear at the bottom of the screen.
I. Click Check Current Version for PC Software UPDATE
J. Click YES to confirm you have
internet connection.

103 VERSION 1.0 3/07/2015
Cyclone Pro - SOFTWARE UPDATE
K. The current software
version available on the
internet to download will be displayed.
L. Click UPDATE to
download the latest
version of software.
M. Click YES to confirm you have
internet connection.
N. The updater software will start.

104 VERSION 1.0 3/07/2015
Cyclone Pro - SOFTWARE UPDATE
If this is the first time you are connecting your tester to the PC please refer to
the section Connecting AD100Pro To The PC first.
A. Connect power to the tester but do not switch the tester on.
B. Connect the USB cable from the tester to the PC USB port.
C. Switch the tester on.
D. Double click the Cyclone Pro icon on your desktop to open the software program.
E. The PC program will open. Click Settings
F. Enter details and Login.
Note: Ensure that the correct com port is selected. The serial number will be displayed if it is correct.
G. Click Connect
Device Software Update Procedure

105 VERSION 1.0 3/07/2015
Cyclone Pro - SOFTWARE UPDATE
H. Confirm you have an internet connection
Device Version - Software version currently loaded on the tester. Serial Number - Serial number of the tester.
Status - OK will appear at the bottom of the screen.
I. Select either Standard or Beta software Standard - Latest released software.
Beta - New software still under development
J. Click Check Current Version.
K. Click YES to confirm you have
internet connection.

106 VERSION 1.0 3/07/2015
Cyclone Pro - SOFTWARE UPDATE
L. The current software version
available on the internet to
download will be displayed.
M. Click UPDATE to download the latest version of software.
N. Click YES to confirm you have
internet connection.
O. The status bar will indicate the software update progress.
Note: Sometimes the device will get to 100% and then start again. This is
normal and should be left until completed.
P. The status bar will indicate when software update is complete.
Q. You can now use your device as normal.

107 VERSION 1.0 3/07/2015
Cyclone Pro - SOFTWARE UPDATE
Software Lookup Device
Facility to look at the software modules that you have loaded on your Cyclone
Pro and those that are not.
1. Click Software Lookup From Device
2. Click Check. A list of Software You Have and Software You Don’t Have
will be displayed
Software Lookup

108 VERSION 1.0 3/07/2015
Cyclone Pro - SOFTWARE UPDATE
Software Lookup Internet
Facility to look at the software modules that you have available for download and
those not. Used to check if additional software purchased is ready for download. Note: You can only see the software on the tester that you have purchased
1. Click Software Lookup Internet
2. Enter the serial number of you’re
Cyclone Pro. Note: it will only work for your tester.
3. Click OK.
4. Click Check. A list of Software You Have and Software You Don’t Have
Will be displayed.

109 VERSION 1.0 3/07/2015
Cyclone Pro - TROUBLESHOOTING
If the Cyclone Pro needs re-setting, use the following procedure.
1. Press the ENTER button and the number 3 button at the same time. 2. Whilst both buttons are being pressed, switch the unit on.
3. The unit should power up and the screen should be blank.
4. Release the buttons.
5. Update the Cyclone Pro as normal.
If the power is lost during an update procedure and the Cyclone Pro ends up
blank ie just a blue screen, then perform the following steps:
1. Connect the Cyclone Pro to the PC via the USB
2. Switch the Cyclone Pro on.
3. Open the PC software.
4. DO NOT click CONNECT.
5. Select the correct COMM port.
6. Click Check current version (device)
7. Click Update.
8. Wait until tester updated.
9. Should be ok now.
If you have forgotten the password to login, then you can request a new
Password as follows:
1. Select the FORGOTTEN PASSWORD tab from the SETTINGs page.
2. Fill in your e-mail address.
3. Click SUBMIT
4. A new password will be e-mailed back to you.
Re-Setting The Cyclone Pro
Cyclone Pro Blue Screen
Forgotten Password

VERSION 1.0 3/07/2015
Cyclone Pro - SPECIFICATION
SPECIFICATION
SIZE (mm) 200 (w) x 250 (d) x 90 (h)
WEIGHT 928g
VEHICLES COVERED ALL MAKES
DISPLAY LCD
POWER 9 to 12 V dc
CURRENT 0.5 Amps
FIELD FREQUENCY 125kHz
PC INTERFACE USB
OPERATING
TEMPERATURE
-5°C to 40 °C
PC SOFTWARE YES