user manual coms-module devicenet - kunbus · ii coms-module devicenet ... 77 6.4memory of the...
TRANSCRIPT

User ManualCOMS-Module DEVICENET
PR100065 • 15/09/2015

Table of Contents KUNBUS GmbH
ii COMS-Module DEVICENET
Table of Contents1 General information........................................................................................................................ 4
1.1 Disclaimer.................................................................................................................................. 41.2 Notes regarding this user manual.............................................................................................. 41.3 Validity ....................................................................................................................................... 51.4 Limitation of Liability .................................................................................................................. 51.5 Customer Service ...................................................................................................................... 5
2 Safety Guidelines............................................................................................................................ 62.1 User ........................................................................................................................................... 62.2 Symbols..................................................................................................................................... 62.3 General Safety Guidelines......................................................................................................... 72.4 Environmental Conditions.......................................................................................................... 7
3 Overview .......................................................................................................................................... 83.1 Introduction................................................................................................................................ 83.2 Spacer bolt ................................................................................................................................ 93.3 Application Interface ................................................................................................................ 113.4 Fieldbus Connection Socket.................................................................................................... 153.5 Status LEDs............................................................................................................................. 163.6 Coding switch .......................................................................................................................... 18
4 Components .................................................................................................................................. 204.1 Module Components ............................................................................................................... 204.2 Storage Unit............................................................................................................................. 214.3 Data Broker ............................................................................................................................. 224.4 Fieldbus Interface .................................................................................................................... 304.5 CDI - Configuration and Debug Interface ................................................................................ 304.6 DPR - Dual Port RAM.............................................................................................................. 314.7 SDI - Serial Data Interface....................................................................................................... 334.8 Synchronous serial interface ................................................................................................... 344.9 Scripter .................................................................................................................................... 47
5 Commissioning ............................................................................................................................. 485.1 Installation ............................................................................................................................... 485.2 Configuration ........................................................................................................................... 495.3 Firmware Update ..................................................................................................................... 49
6 Memory Register ........................................................................................................................... 506.1 Overview of the Memory Register ........................................................................................... 506.2 General Device Parameters .................................................................................................... 536.3 Register for the Mapping ......................................................................................................... 776.4 Memory of the Communication Channels ............................................................................... 806.5 Fieldbus specific Registers...................................................................................................... 83

KUNBUS GmbH Table of Contents
COMS-Module DEVICENET iii
7 Communication model ................................................................................................................. 937.1 Object structure and use ......................................................................................................... 93
8 CDI ............................................................................................................................................... 1048.1 Setting up a Serial Connection .............................................................................................. 1048.2 CDI Menus............................................................................................................................. 107
9 Disposal ....................................................................................................................................... 1419.1 Dismantling and Disposal ...................................................................................................... 141
10 Technical data ............................................................................................................................. 14210.1Technical data ....................................................................................................................... 142
11 Appendix...................................................................................................................................... 14311.1Configuration via Modpoll ...................................................................................................... 143

COMS-Module DEVICENET 4 / 144
1 General information
1.1 Disclaimer© 2015 KUNBUS GmbH, Denkendorf (Deutschland)
The contents of this user manual have been prepared by theKUNBUS GmbH with the utmost care. Due to the technicaldevelopment, the KUNBUS GmbH reserves the right to change orreplace the contents of this user manual without prior notice. You canalways obtain the latest version of the user manual at our homepage:www.kunbus.de
The KUNBUS GmbH shall be liable exclusively to the extentspecified in General Terms and Conditions (www.kunbus.de/agb.html).
The contents published in this user manual are protected bycopyright. Any reproduction or use for the in-house requirements ofthe user is permitted. Reproduction or use for other purposes are notpermitted without the express, written consent of the KUNBUSGmbH. Contraventions shall result in compensation for damages.
Trademark protection– KUNBUS is a registered trademark of the KUNBUS GmbH– Windows® and Microsoft® are registered trademarks of the Microsoft,
Corp.– Modbus is a registered trademark of the Modbus-IDA Organization.
KUNBUS GmbHHeerweg 15 c73770 DenkendorfDeutschland
www.kunbus.de
1.2 Notes regarding this user manualThis user manual provides important technical information that canenable you, as a user, to efficient, safe and convenient integration ofthe COMS-Module into your applications and systems. It is intendedfor trained, qualified personnel, whose sound knowledge in the fieldof electronic circuits and expertise of DeviceNet TM is assumed.
As an integral part of the module, the information provided hereshould be kept and made available to the user.
Gen
eral
info
rmat
ion

COMS-Module DEVICENET 5 / 144
1.3 ValidityThis document describes the application of the KUNBUS COMS-Moduls with the product number:– PR100065, Release 00
1.4 Limitation of LiabilityWarranty and liability claims will lapse if:– the product has been used incorrectly,– damage is due to non-observance of the operating manual,– damage is caused by inadequately qualified personnel,– damage is caused by technical modification to the product (e.g.
soldering).
1.5 Customer ServiceIf you have any questions or suggestions concerning this product,please do not hesitate to contact us:
KUNBUS GmbHHeerweg 15 C
+49 (0)711 3409 7077
Gen
eral
info
rmat
ion

COMS-Module DEVICENET 6 / 144
2 Safety Guidelines
2.1 UserThe Modul may only be assembled, installed and put into operationby trained, qualified personnel. Before assembly, it is absolutelyessential that this documentation has been read carefully andunderstood. Expertise in the following fields is assumed:– Electronic circuits,– Basic knowledge of DeviceNet,– work in electrostatic protected areas,– Locally applicable rules and regulations for occupational safety.
2.2 SymbolsThe symbols used have the following meaning:
DANGER HazardObserve this information without fail!There is a safety hazard that can lead to serious injuries and death.
CAUTION CautionThere is a safety hazard that can result in minor injuries and materialdamage.
NOTICE NoteHere you will find important information without a safety hazard.
Saf
ety
Gui
delin
es

COMS-Module DEVICENET 7 / 144
2.3 General Safety Guidelines
DANGER Danger of electric shockIf unsuitable power supply is used, this can cause an electric shock.Ø This can cause death, serious injuries and material damage to your
systems and modules.èOnly use a power supply that complies with the regulations for safety
extra-low voltage (SELV) or protective extra-low voltage (PELV).
CAUTION Fault due to mechanical loadA continuous mechanical load of over 5 G or shock loads of over 15 G cancause faults on your modules.èComply with these load limits and avoid any unnecessary loads.
CAUTION Fault due to missing or unsuitable spacer boltIncorrect or missing spacer bolts can result in high mechanical loads onyour module and control board. This can cause faults.èAlways use spacer bolts suitable for the connector height of the circuit
board so that the module does not lie on the circuit board. You can find detailed information in section "Spacer bolt [} 9]"
CAUTION Damage due to subsequent processingAvoid subsequent processing of theCOMS-Modul.Ø Soldering can cause components to become detached and thus
damage or destroy the module.Ø Please note that the warranty shall become invalid if the products are
changed technically.èSpeak to your contact person at the KUNBUS GmbH about customised
solutions.
2.4 Environmental ConditionsOperate the COMS-Modul only in an environment that complies withthe operating conditions in order to prevent any damage.
Suitable Environmental Conditions:
Operating temperature 0 °C to +60 °CHumidity 0% not 95%, non-condensing
Saf
ety
Gui
delin
es

COMS-Module DEVICENET 8 / 144
3 Overview
3.1 IntroductionWith the KUNBUS COMS-Modul you can make a sensor or actuatorfieldbus-capable. To do this, simply insert the module into yourapplication and connect it to the fieldbus.
The COMS-Modul thereby saves you time-consuming in-housedevelopments.
Illustration 1: Overall view
Ove
rvie
w

COMS-Module DEVICENET 9 / 144
3.2 Spacer boltThere are three holes on the module for spacer bolts. These spacerbolts have 2 tasks:– they stabilise the COMS module with a direct connection to the main
board– they are part of the earthing concept.
Illustration 2: Holes for spacer bolts
Suitable spacer bolts Suitable spacer bolts have the following properties:– Conductive material– Holes for M3 screws– Diameter: maximum 8 mm
Connections These spacer bolts are an important part of the earthing concept ofthe COMS-Modul.– Connect hole 1 to protective earth on the fieldbus side– Hole 2 is not electrically connected.– Connect the spacer bolts of hole 3 to GND (earth power supply)
Ove
rvie
w

COMS-Module DEVICENET 10 / 144
Height of spacer bolts The height of the spacer bolts depends on the height of the plugconnector used on the application side.
We recommend using the ERNI 254589 plug connector. The spacerheight for this plug connection is 10.75 to 12.3 mm above the circuitboard.
WARNING Fault due to missing or unsuitable spacer boltIncorrect or missing spacer bolts can result in high mechanical loads onyour module and control board. This can cause faults.èAlways use spacer bolts suitable for the connector height of the circuit
board so that the module does not lie on the circuit board.
Ove
rvie
w

COMS-Module DEVICENET 11 / 144
3.3 Application InterfaceThe main board is connected to the device controller via a 32-pinconnector strip. You have the option to plug the module in directly.
CAUTION Mechanical loads can lead to faults on the moduleèUse suitable spacer bolts to prevent mechanical loads. (e.g.
Ord. No. 9774110360 from Würth Elektronik).
Illustration 3: Application Interface
Pin assignment on theapplication interface
The module can be operated in serial or parallel mode. In serialmode you can choose whether you want to use the module asmaster or slave.
You can activate the modes via logical levels:
Mode Switchover levelSerial slave mode "a14": +3.3 V, "a6" +3.3 VSerial master mode "a14": +3.3 V, "a6": 0 VParallel mode "a"14" GND
You can change over the operating mode via pin a14.
Ove
rvie
w

COMS-Module DEVICENET 12 / 144
Slave Mode ("a14": +3.3V, "a6" +3.3V)
Pin Designation Direction Commenta1 CDI.TX [OUT] Send CDIa2 receive CDI.RX [IN] CDIa3 GND Supplya4 SPI.SCK [IN] SPI Clocka5 SPI.MOSI [IN] SPI Data Ina6 SPI.MODE.DIR [IN] SPI Mode
1 = Slavea7 SPI.MID [IN] SPI Middlea8 UART.TX [OUT] Send SDIa9 UART.TE [OUT] SDI 1 = transmitter activ-
atedfor RS485 operation
a10-a13 Reserved Do not connect!a14 MODE [IN] Mode-Select
1 = Serial Modea15 RESET [IN] Module-Reset ( low-active )a16 GND Supply
b1-b2 Reserved Do not connect!b3 GND Supplyb4 SPI.MISO [OUT] SPI Data Outb5 SPI.CS [IN] SPI Chip-Selectb6 SPI.READY [OUT] SPI Readyb7 SPI.RESET [OUT] Reset signal for the SSCb8 UART.RX [IN] Receive SDI
b9-b15 Reserved Do not connect!b16 +3V3 Supply
Ove
rvie
w

COMS-Module DEVICENET 13 / 144
SSC Master ("a14": +3.3V "a6": 0V)
Pin Designation Direction Commenta1 CDI.TX [OUT] Send CDIa2 receive CDI.RX [IN] CDIa3 GND Supply -a4 SPI.SCK [OUT] SPI Clocka5 SPI.MOSI [OUT] SPI Data Outa6 SPI.MODE.DIR [IN] SPI Mode
0 = Master
a7 SPI.MID [IN] SPI Middlea8 UART.TX [OUT] Send SDIa9 UART.TE [OUT] SDI 1 = transmitter activ-
atedfor RS485 operation
a10-a13 Reserved Do not connect!a14 MODE [IN] Mode-Select
1 = Serial Modea15 RESET [IN] Module-Reset ( low-active )a16 GND Supply
b1-b2 Reserved Do not connect!b3 GND Supply -b4 SPI.MISO [IN] SPI Data Inb5 Reserved Do not connect!b6 SPI.LOAD [OUT] Load signal for the SSCb7 SPI.RESET [OUT] Reset signal for the SSCb8 UART.RX [IN] Receive SDI
b9-b15 Reserved Do not connect!b16 +3V3 Supply
Ove
rvie
w

COMS-Module DEVICENET 14 / 144
Parallel Operating Mode ("a"14" GND)
Pin Designation Direction Commenta1 CDI.TX [OUT] Send CDIa2 receive CDI.RX [IN] CDIa3 GND Supplya4 ADDR0 [IN] Address-Bit 0a5 ADDR1 [IN] Address-Bit 1a6 ADDR2 [IN] Address-Bit 2a7 ADDR3 [IN] Address-Bit 3a8 ADDR4 [IN] Address-Bit 4a9 ADDR5 [IN] Address-Bit 5
a10 ADDR6 [IN] Address-Bit 6a11 ADDR7 [IN] Address-Bit 7a12 ADDR8 [IN] Address-Bit 8a13 ADDR9 [IN] Address-Bit 9a14 MODE [IN] Mode-Select
0 = Parallel Modea15 RESET [IN] Module-Reset ( low-active )a16 GND Supply
b1-b2 Reserved Do not connect!b3 GND Supplyb4 DATA0 [IN/OUT] Databus-Bit 0b5 DATA1 [IN/OUT] Databus-Bit 1b6 DATA2 [IN/OUT] Databus-Bit 2b7 DATA3 [IN/OUT] Databus-Bit 3b8 DATA4 [IN/OUT] Databus-Bit 4b9 DATA5 [IN/OUT] Databus-Bit 5
b10 DATA6 [IN/OUT] Databus-Bit 6b11 DATA7 [IN/OUT] Databus-Bit 7b12 CS_B [IN] Chip-Select
(low-active)b13 WR_B [IN] Write-Enable
(low-active)b14 RD_B [IN] Read-Enable
(low-active)b15 Reserved Do not connect!b16 +3.3V Supply
Ove
rvie
w

COMS-Module DEVICENET 15 / 144
3.4 Fieldbus Connection SocketThe module has a one 5-pin Combicon socket for connecting to thefieldbus.
Illustration 4: Fieldbus Connection Socket
Pin assignment for DeviceNet
Pin Assignment1 V -2 CAN_L3 Shield4 CAN_H5 V +
Ove
rvie
w

COMS-Module DEVICENET 16 / 144
3.5 Status LEDsThe COMS-Module are fitted with LEDs for status indication.Lightpipes guide the LED signals to the side.
Illustration 5: Status LEDs
LED No. State MeaningDeviceNetNetworkStatus
1 off Device is offlinePossible causes:
– The Dup_MAC_ID-Test has not yet been completed– No voltage present (s. module status LED)– No network connection
green, on Connection establishedgreen,flashes
Online, no connection was established
red Critical errorAn error has occurred preventing the connection to the network (e.g. duplicate MACID, fieldbus is offline.
red, flashes At least one connection is in timeout state.red / green,flashes alternately
Communication errorA network access error was detected.
Ove
rvie
w

COMS-Module DEVICENET 17 / 144
ModuleStatus
2 off Module not runninggreen,flashes
Start-upAt least one system component has not yetfinished its initialisation. This also includes theautomatic bitrate detection.
green, on Normal operationAll system components are running perfectly.
red, flashes Configuration errorAt least one system component is not runningdue to a configuration error.
red, on Internal system errorA fatal internal system error has occurred.The error is entered in the error stack.
DeviceNetModuleStatus
3 off No voltage connected.green Normal operationgreen,flashes
Determining automatic baud rate.
red Unrecoverable errors were detected.red, flashes Recoverable errors were detected, e.g. invalid
configuration.red / green,flashes alternately
Self-test
ScriptStatus
4 flashes Script deactivated or not loadedgreen, on Script is runningoff No Errorred, on Error in Script
Ove
rvie
w

COMS-Module DEVICENET 18 / 144
3.6 Coding switch
Illustration 6: Coding switch
With the 8-pin address switch you can set the MAC-ID and bitrate ofthe module. The MAC-ID is assigned in binary format.
Set an address switch above to be set by bit value 0. Set the addressswitch below to be switched by bit value 1.
The settings can be interpreted in 2 ways by the module. Theconfiguration in the CDI menu determines which setting is activated.
Automatic bitrate detection Select in the CDI menu "MAC-ID 2x BCD, Bitrate automaticdetection". In this mode the bitrate is detected automatically.
All 8 DIP switches are available for the assignment of the MAC-ID:
Bit 1 2 3 4 5 6 7 8Use Tens digit of the MAC-ID Single digit of the MAC-ID
Example of of how to set a MAC-ID:Set toggle switches 2 and 8 to bit value 1. You have now set MAC-ID41.
Ove
rvie
w

COMS-Module DEVICENET 19 / 144
Manual setting of the bitrate Select in the CDI menu "MAC-ID 6 bit, Bitrate 2Bit". In this mode youcan set the bitrate and MAC-ID manually.– Set the bitrate with bit 1 and 2.– Set the MAC-ID with bit 3-8.
Bit 1 2 3 4 5 6 7 8Use Bitrate MAC-ID
Ove
rvie
w

COMS-Module DEVICENET 20 / 144
4 Components
4.1 Module ComponentsThe module is divided into independent components to ensure a highlevel of flexibility in the application.
The following pages describe the individual components:
Illustration 7: Components
Com
pone
nts

COMS-Module DEVICENET 21 / 144
4.2 Storage UnitThe storage unit is the central component for all functions of theCOMS-Module. It is subdivided into individual Memory Register witha width of 16 bits each. In these Memory registers the followinginformation is stored:– Input and output data– Configuration settings– Module Status– Error states
The functionality of the addressing was incorporated from Modbus.The register assignment depends on the application and is notspecified by the Modbus specification. A Memory Register accordingto this specification has a register number between 1 (0x0001) and amaximum of 65536 (0x10000), of which the module only uses a smallpart, however.
With 8-bit values, 1 byte remains unused. 32-bit values are stored in2 registers.
The 16-bit values are stored internally in the memory in Little Endianorder. This must be taken into account when you access data via thefieldbus interface, SDI or SSC.
NOTICE! In the description of the individual memory registersand CDI, the memory registers are also referred to as Modbusregisters.
In section Overview of the Memory Register [} 50] we havecompiled a detailed overview of registers for you.
Com
pone
nts

COMS-Module DEVICENET 22 / 144
4.3 Data BrokerThe Data Broker decouples individual components from each otherand distributes the data streams between the interfaces. Thetargeted forwarding of the data ensures a high level of functionalitybetween the data sources and data sinks of the module.
Illustration 8: Internal mapping by the Data Broker
MappingYou have the option to define the allocation (mapping) yourself. Thisallows you to define which input register the Data Broker shouldaccept data from and which output register it should transfer data to.
You can define up to 8 register areas with freely definable lengths inthe respective output register area for each of the interfaces. Anyregister area of the same length is assigned to the output registerareas from one of the input register areas of all interfaces. Here, the8 target areas are always on consecutive output register positions,starting with the lowest register address for the respective interface.
Com
pone
nts

COMS-Module DEVICENET 23 / 144
Illustration 9: Mapping
NOTICE ViewpointPlease note that the description of the input and output values is writtenfrom the perspective of the module and not from the perspective of theoverall system or controller.èOutput: Values that the module sends to the fieldbus or application.èInput: Values that the module receives from the fieldbus or application.
You can configure standard values that the Data Broker writes in therelevant output register instead of an input register in the event of afailure of a data provider. That has the advantage that the dataprocessing cannot abort uncontrollably.
The module uses the Little Endian byte order for the internalprocessing. You can also configure the Data Broker so that itexchanges the high and low byte when copying if necessary. To dothis, add the value 0x8000 or 32768 for the required mapping area(see details below).
Extended MappingSome applications work with data that is viewed bit by bit. To makethe mapping for such applications even more flexible, an "ExtendedMapping" is provided. This mapping basically works in the same wayas the mapping described above:
Com
pone
nts

COMS-Module DEVICENET 24 / 144
Individual areas of the output Memory Register are assigned fromareas of the input Memory registers. In Extended Mapping you definesuch assignments for up to 16 areas. When doing so, enter a numberof consecutive bits for each of these areas.
The limit of a register must not be exceeded: The area may be up to1024 bits long. Unlike the simple mapping described above,however, the 16 target areas do not necessarily have to be atconsecutive addresses. You are totally free to define the position ofthe first bit of the target area by entering an output register addressand the corresponding bit position (0 to 15). The source area is alsodefined by entering the input register and a start bit position.
Illustration 10: Extended Mapping
All mapping areas are processed sequentially. The Data Broker firstcopies all simple mapping areas cyclically. After that, it executes theExtended Mapping. In the course of this, it is quite possible tointentionally overwrite a target area by several sources of data.
NOTICE It is possible that bits are overwritten unintentionally by various inputsources.Make sure that the target areas do not overlap unintentionally.
Com
pone
nts
COMS-Module DEVICENET 25 / 144
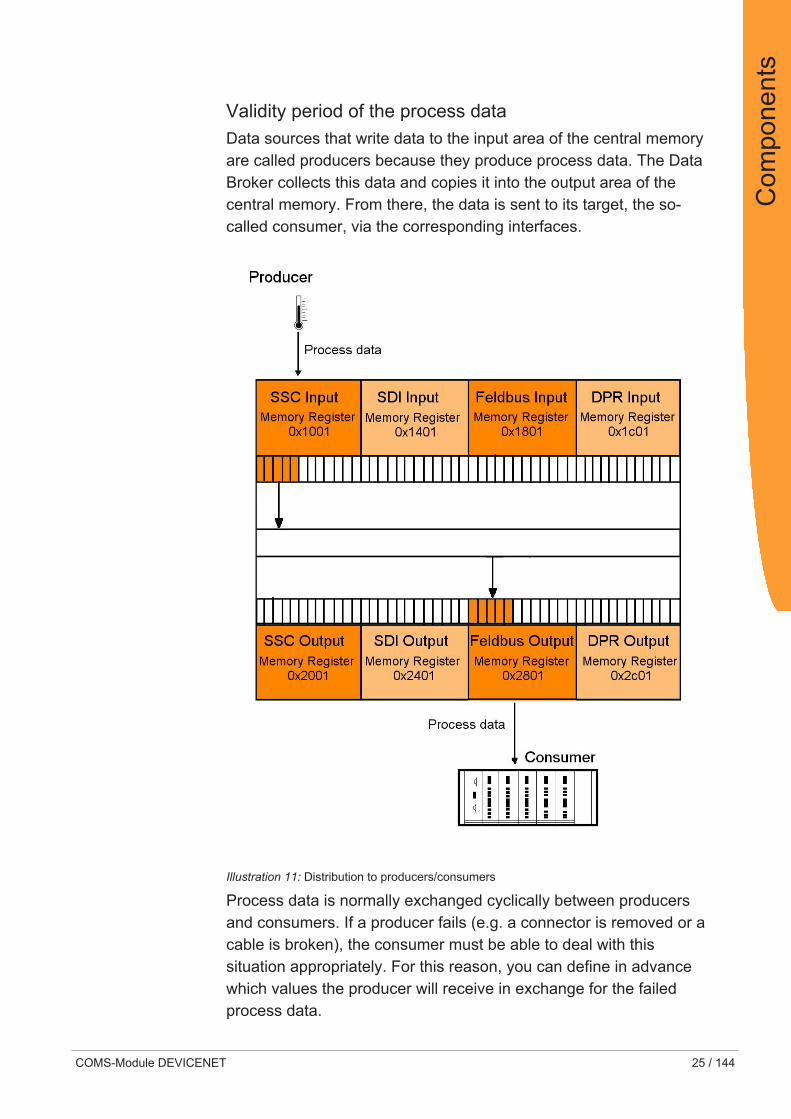
Validity period of the process dataData sources that write data to the input area of the central memoryare called producers because they produce process data. The DataBroker collects this data and copies it into the output area of thecentral memory. From there, the data is sent to its target, the so-called consumer, via the corresponding interfaces.
Illustration 11: Distribution to producers/consumers
Process data is normally exchanged cyclically between producersand consumers. If a producer fails (e.g. a connector is removed or acable is broken), the consumer must be able to deal with thissituation appropriately. For this reason, you can define in advancewhich values the producer will receive in exchange for the failedprocess data.
Com
pone
nts

COMS-Module DEVICENET 26 / 144
The COMS-Module allow a separate validity period to be defined foreach producer (SDI, SSC, DeviceNet , DPR ). When a producersupplies new process data, a stopwatch is started. If the producerdoes not supply any new process data before the predefined validityperiod expires, then the old data is invalid after this time.
Each consumer predefines which data he is to receive from the DataBroker in such a case:– All bytes at 0– All bytes at 1– retain the last valid data
The set validity periods from COMS-Modul are saved permanently inthe Memory registers. They are also available after a restart.Likewise, the rule defined for a consumer, as to how to proceed if thevalidity period is exceeded. The respective time values of the validityperiod must be adapted, of course, to the cycle time of the interfaceconcerned.– For DeviceNet this cycle time is determined by parameters of the
master.– For SSC interface the time is determined from the shift register chain
length, the cycle frequency, and for short or fast register chains, it isdetermined by the cycle time of the COMS module.
– During SPI slave mode and SDI transfer, the master determines thecycle time of the respective interface, as well the base board whenusing the DPR.
Example of a MappingThe following example explains, step-by-step, how to map the firstthree SDI input registers and the first five SSC input registers to thefield output register.
If you would like to participate in this example, you will need afunctional CDI connection. Section "Setting up a Serial Connection[} 104]" explains how this works.
Input options in the CDI menu:
You can enter hexadecimal (with prefixed 0x) or decimal numbers inthe CDI menu.
[Esc] Go back one level[Enter] Confirm input/selection[b] Value is displayed in binary code[h] Value is displayed in hexadecimal
code[d] Value is displayed in decimal
code
Com
pone
nts

COMS-Module DEVICENET 27 / 144
◦ Open the main menu of the CDI as described in the Appendix "Settingup a serial connection using PuTTY".
Main Menu The main menu is your access point for operating the module usingthe CDI. After a reset, the module transmits this main menu to theterminal.
--------------------------------------------------KUNBUS-COM – Main Menu--------------------------------------------------1 – Module Information2 – Interface Configuration3 - Monitor Communication4 – Module Status-------------------------------------------------->
Configuration menu ◦ In the main menu enter [2]+[Return].ð You will be taken to the configuration menu "2-Interface Configuration"
In this menu you have the option to set the mapping for the databroker and the operational parameters for the different interfaces.– Select "Fieldbus Output Mapping" to define the data source for the
fieldbus output register.
--------------------------------------------------KUNBUS-COM – Interface Configuration--------------------------------------------------Operating Mode: Config
1 - SDI Communication2 - CDI Communication3 - SSC Communication4 - DPR Configuration6 - SDI Output mapping7 - SSC Output mapping8 - Fieldbus Output mapping9 - DPR Output mapping11 - Fieldbus Specific12 - Set Arbitrary Register13 - Script Interpreter14 - Reset Module15 - Reset to Factory Settings16 - Extended Mapping-------------------------------------------------->
Com
pone
nts

COMS-Module DEVICENET 28 / 144
– With the selection 1-8 are 8 positions available to create a mapping.
--------------------------------------------------KUNBUS-COM - Fieldbus Outputmapping--------------------------------------------------Src Register Number1 - 1 (0x0001) | 02 - 1 (0x0001) | 03 - 1 (0x0001) | 04 - 1 (0x0001) | 05 - 1 (0x0001) | 06 - 1 (0x0001) | 07 - 1 (0x0001) | 08 - 1 (0x0001) | 0
9 - Default Data: all zero10 - Valid Time: disabled-------------------------------------------------->
◦ Enter [1] + [Return].◦ Specify the first 3 registers of the SDI input register as data source
(start address 0x1401).◦ Confirm your entry with [Return]ð After confirming, you will return automatically to the "Fieldbus Output
Mapping" menu
You can find an overview of the start addresses in the section"Overview of the Memory Register [} 50]".
--------------------------------------------------KUNBUS-COM – Edit one map entry--------------------------------------------------Source Register: 0x1401Number of Registers: 3
◦ Create another mapping at the next free position◦ Select the first 5 registers of the SSC input register as data source (start
address 0x1001)
--------------------------------------------------KUNBUS-COM – Edit one map entry--------------------------------------------------Source Register: 0x1001Number of Registers: 5
Com
pone
nts

COMS-Module DEVICENET 29 / 144
In the menu for fieldbus outputmapping, you can see the finishedmapping.
--------------------------------------------------KUNBUS-COM - Fieldbus Outputmapping--------------------------------------------------Src Register Number1 - 1521 (0x1401) | 32 - 4097 (0x1001) | 53 - 1 (0x0001) | 04 - 1 (0x0001) | 05 - 1 (0x0001) | 06 - 1 (0x0001) | 07 - 1 (0x0001) | 08 - 1 (0x0001) | 0
9 - Default Data: all zero10 - Valid Time: disabled-------------------------------------------------->
The new mapping becomes active after a restart of the module. Toperform a restart, you have the following options:1. Switch the module off and on again.2. [Esc] takes you to the CDI menu [2] "Interface Configuration".
Here, enter [14] + [Return].
In CDI menu [2] "Interface Configuration" under menu item"Set Arbitrary Register" you now have the option to write thevalues in the SDI-In data area. The registers 0x1401 - 0x1500 areavailable to you for this purpose.
In menu [3] "Monitor Communication", under menu item "Arbitrary Register" you can view the fieldbus output registerfrom address 0x2801.
NOTICE Fault due to fine settingsSome settings lead to malfunctioning of the module.If you already want to test some settings now, read section CDI Menus[} 107]CDI Menus.
Also see about this2 [} 77]
2 Register for the Mapping [} 77]2 Setting up a Serial Connection [} 104]
Com
pone
nts

COMS-Module DEVICENET 30 / 144
4.4 Fieldbus InterfaceThe fieldbus interface connects the Modul to DeviceNet.
It also enables access to the fieldbus specific Memory Register.
You can find the overview of the available Modbus registers in thesection "Overview of the Memory Register".
Also see about this2 Overview of the Memory Register [} 50]
2 Overview of the Memory Register [} 50]
4.5 CDI - Configuration and Debug InterfaceAt the application interface, serial cables are available (RS232interface with 3.3 V logic levels). You can connect these cables to aterminal or PC with terminal simulation (e.g. PuTTY) using aninterface IC on the main board (see the application sample circuitdiagram, Appendix 2). You can read and change parameters usingstructured menus. The CDI is also used for downloading scripts andfirmware updates.
The CDI is suitable for configuration during the development and fordiagnostic purposes. To configure several modules automatically, werecommend performing the settings with "Modpoll". "Modpoll" isfreely-available software. You can find an introduction and exampleof this in the Appendix Configuration via Modpoll [} 143].
The serial interface is located at the application interface. Therespective cables are provided there with 3.3 V logic levels. Toconnect these cables, you have the following options:– Connect the cables directly with the UART inputs of the microprocessor
on the main board– Convert the cables to standardised levels using level converters or
interface ICs. Afterwards, place the converted levels onto connectors forconnecting a PC or terminal.
We deliver the Modul to you with the following default settings toenable access via the CDI :
• 115200 bit/s
• 8 data bits
• 1 stop bit
• Even parity (Even)
In section CDI Menus [} 107], we have compiled a detaileddescription of the menus for you.
Com
pone
nts
COMS-Module DEVICENET 31 / 144
4.6 DPR - Dual Port RAM-The COMS-Modul contains a special memory module (RAM with 1Kbyte length), whose memory addresses the processor of themodule can also access, like an external processor, which isconnected to the module via the DPR interface.
If the application where the COMS-Modul is used should exchangeextensive data quickly, then this type of communication between thebase board and COMS-Modul is ideal. This absolutely requires theuse of a microprocessor on the base board, however, which operatesthe DPR interface.
Many pins of the application interface are required for this parallelaccess to the DPR. This results in a different PIN assignment in theDPR mode of the module (this is switched on and off via the logiclevel on PIN a14). In parallel access mode, no SSC or SDI interfacesare available.
The data exchange between application circuitry and the COMS-Modul via DPR can take place in two different ways:– Process data is read in and read out cyclically from the Data Broker via
two fixed address ranges for input and output data. In this case, theDPR reacts like another communication interface, as a producer andconsumer. The data is distributed according to the specifications set inthe Data Broker.
– Messages are exchanged via two address ranges for an input andoutput "mailbox" by means of defined handshaking. The messagesinclude:– Commands for writing and reading the memory registers– Addresses of the memory registers– Data lengths– Register contents to be written or read
This communication via mailboxes replaces the Modbuscommunication via SDI in parallel access mode (which is notavailable in this mode). All parameters in parallel access mode canonly be read or written via CDI interface or DPR mailboxes.
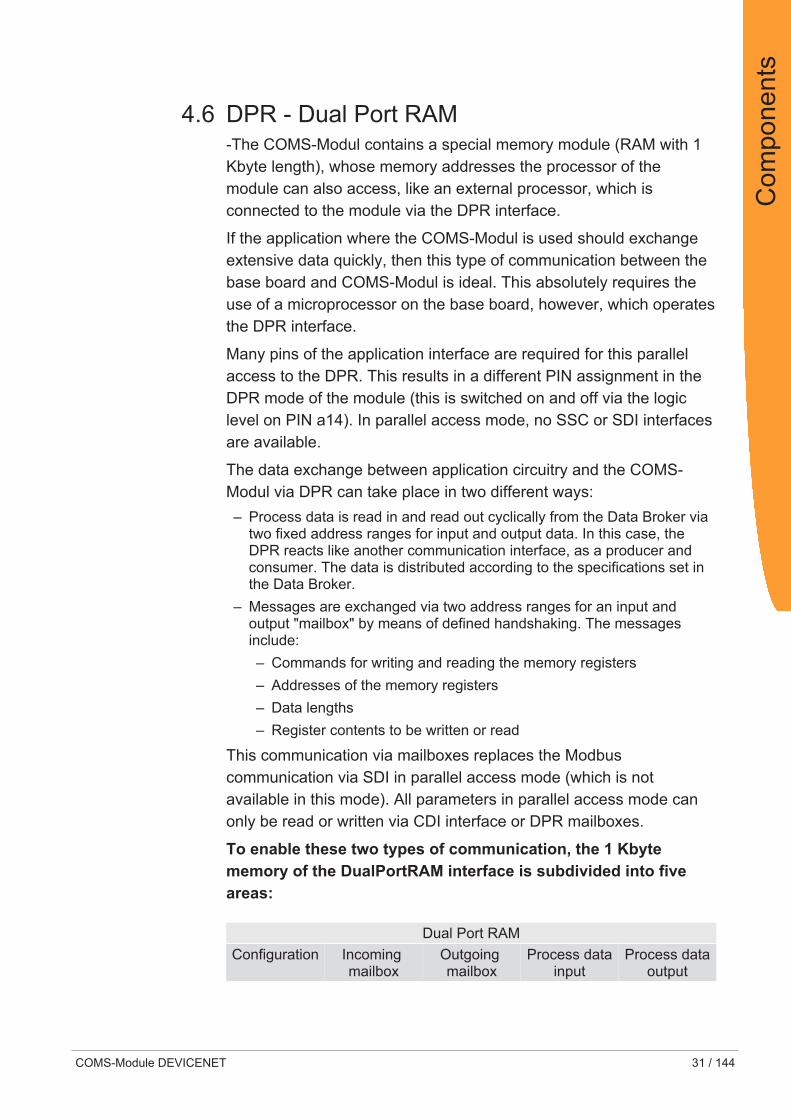
To enable these two types of communication, the 1 Kbytememory of the DualPortRAM interface is subdivided into fiveareas:
Dual Port RAMConfiguration Incoming
mailboxOutgoing mailbox
Process datainput
Process dataoutput
Com
pone
nts

COMS-Module DEVICENET 32 / 144
The size of the individual areas can be adapted to the respectiveapplication and is saved non-volatile in parameter registers. Theconfiguration area has a fixed length and provides the necessaryaddress offsets as well as handshaking data for external access tothe remaining areas.
We recommend using our Evaluation Board and the C source filesprovided with this as a template for developing the application side ofa DPR interface. Upon request, we can also provide you with thedocuments and source codes of the Evaluation Board separately.Therefore, in this section we will only describe the basic procedurewhen using the DPR interface.
Each mailbox controls and coordinates the data transmissionindividually during communication by means of corresponding controlvalues, length specifications and error codes in the relevant headersof the data packets. The process data of memory areas alsocoordinates the exchange of data between the base board andCOMS module by means of a corresponding data header.
NOTICE Important instructions on using the DPRèYou can operate the KUNBUS-COMS module either in DPR mode or in
SPI/SSC mode.
ð You determine the mode by setting the logic level on PIN a14 (+3.3V = 1 = SPI/SSC mode, GND = 0 = DPR mode). you will findinformation about the current interface mode in the CDI menu: "4 -Module Status > 1 - Common Status"
èIf you use the Scripter [} 47] in DPR mode, you must bear in mind thatthe scripter can only communicate via the CDI.
ð Changes to parameter registers are then still only possible via theDPR mailboxes.
Com
pone
nts

COMS-Module DEVICENET 33 / 144
4.7 SDI - Serial Data InterfaceThe serial data interface allows the application to access theindividual Memory Register via the Modbus-RTU protocol. Thisallows you to configure the COMS-Modul automatically and to writeproductive data in the input registers or to read it from the outputregisters.
The serial data interface is located at the application interface. Therespective cables are provided there with 3.3 V logic levels. Toconnect these cables, you have the following options:– Connect the cables directly with the UART inputs of the microprocessor
on the main board– Convert the cables to standardised levels using level converters or
interface ICs. Afterwards, place the converted levels onto connectors forconnecting a PC or terminal.
We deliver the Modul to you with the following default settings toenable access via the SDI :
• automatic baudrate detection
• 8 data bits
• 1 stop bit
• Even parity (Even)
Automatic bitrate detection means that the module tests the followingbitrates until it has received a correct Modbus-RTU telegram:
• 2400 bit/s
• 4800 bit/s
• 9600 bit/s
• 19200 bit/s
• 38400 bit/s
• 57600 bit/s
• 115200 bit/s
NOTICE! During automatic bitrate detection the module does notsend a reply to the master until the correct bitrate has beendetected. This procedure can require up to 40 polls of themaster.
TIP: Set a fixed bitrate if the automatic bitrate detection lasts toolong for you.You can make the settings optionally using theCDI [} 107] or inthememory register 0x0005 [} 57].
Com
pone
nts
COMS-Module DEVICENET 34 / 144
4.8 Synchronous serial interfaceA synchronous serial interface is available to you on the applicationinterface. To use this interface, you have to set the logical level of pina14 to high (3.3 V).
The synchronous serial interface can be used in 2 operating modes.Select the operating mode you require via the logical level on pin a6:– 0 (GND) = SPI Slave for connecting to an SPI Master– 1 (3.3 V) = SSC Master for connecting to a shift register chain
The following pins are available for operating as an SPI Slave forconnecting to an SPI Master:– a4 SPI Clock (input)– a5 SPI Data in (MOSI, input)– b4 SPI Data out (MISO, output)– b5 SPI Chip Select (CS, input)– b6 SPI ready (output)
The following pins are available for operating as an SSC Master forconnecting to a shift register chain:– a4 SSC Clock (output)– a5 SSC Data out (MOSI, output)– a7 SSC centre tap (MID, input)– b4 SSC Data in (MISO, input)– b6 SSC Strobe Signal (LOAD, output)– b7 SSC Reset (output)
Output data from the Data Broker is written to the SSC outputregister area and input data is read from the SSC input register areain both operating modes. The SPI Slave operating mode also allowsan SPI Master write and read access to all other Memory Registerthat are enabled for this. This section describes how this functions indetail.
Operating mode as SPI SlaveIn SPI Slave mode, the transmission of the process data between anSPI Master and the SSC Input or Output registers takes place in datablocks, which, in addition to the actual process data, also containmetadata (e.g. for indicating the register addresses for source andtarget areas). Such data blocks are transmitted with a hardwarehandshake. The actual data transmission lines MOSI, MISO andClock are used with 3.3 V logic in the usual manner, as describedbelow in the document S12SPIV4 "SPI Block Guide" von Motorola /Freescale®. Here, you can freely select the normally alterable
Com
pone
nts
COMS-Module DEVICENET 35 / 144
parameters CPOL (Clock polarity) and CPHA (Clock Phase) inCOMS-Modul and define these permanently via the CDI Menu[} 113] or memory register [} 63]. The bit sequence (MSB first orMSB last) is fixed for COMS modules, the module always starts thetransmission with the MSB (bit of highest value) of a byte. All bytesbelonging to a block are transmitted in a continuous sequence. Theclock signal required is input to PIN a4 externally from the Master.
The COMS-Modul can process maximum clock frequencies of20 MHz.
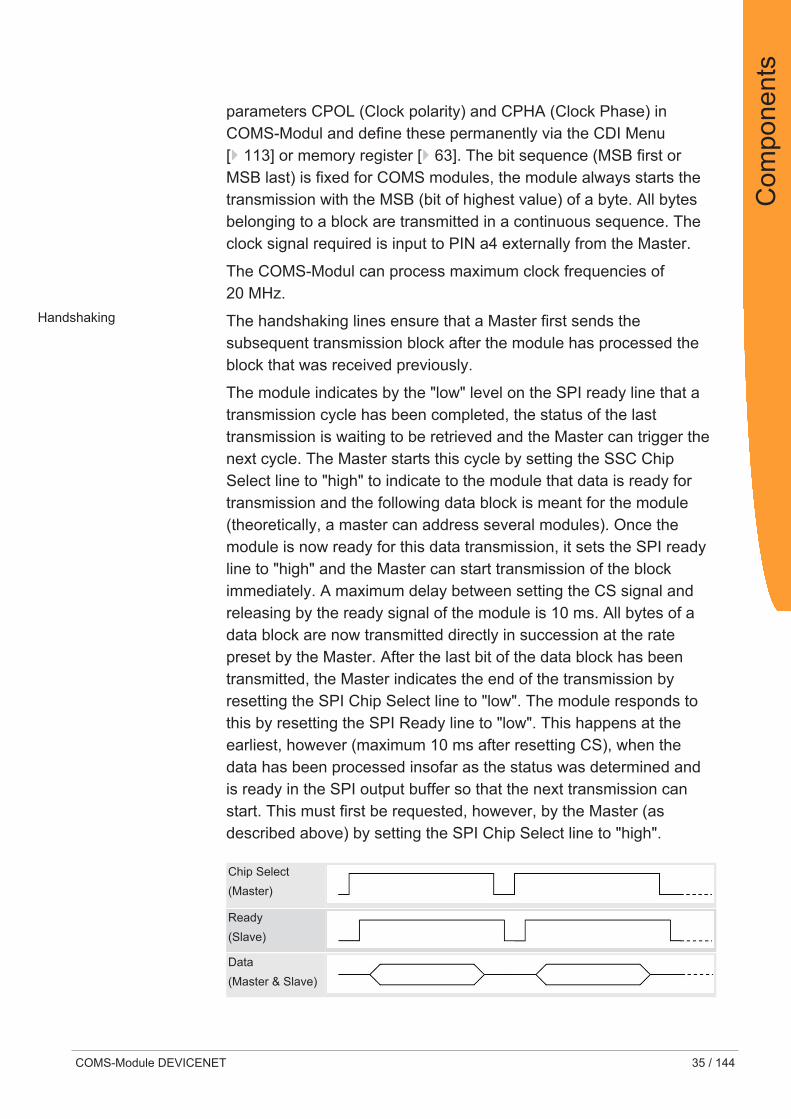
Handshaking The handshaking lines ensure that a Master first sends thesubsequent transmission block after the module has processed theblock that was received previously.
The module indicates by the "low" level on the SPI ready line that atransmission cycle has been completed, the status of the lasttransmission is waiting to be retrieved and the Master can trigger thenext cycle. The Master starts this cycle by setting the SSC ChipSelect line to "high" to indicate to the module that data is ready fortransmission and the following data block is meant for the module(theoretically, a master can address several modules). Once themodule is now ready for this data transmission, it sets the SPI readyline to "high" and the Master can start transmission of the blockimmediately. A maximum delay between setting the CS signal andreleasing by the ready signal of the module is 10 ms. All bytes of adata block are now transmitted directly in succession at the ratepreset by the Master. After the last bit of the data block has beentransmitted, the Master indicates the end of the transmission byresetting the SPI Chip Select line to "low". The module responds tothis by resetting the SPI Ready line to "low". This happens at theearliest, however (maximum 10 ms after resetting CS), when thedata has been processed insofar as the status was determined andis ready in the SPI output buffer so that the next transmission canstart. This must first be requested, however, by the Master (asdescribed above) by setting the SPI Chip Select line to "high".
Chip Select(Master)
Ready(Slave)
Data(Master & Slave)
Com
pone
nts

COMS-Module DEVICENET 36 / 144
Protocol KUNBUS has defined a separate protocol for the data exchange viathe synchronous serial interface. This protocol allows you to performvarious read and write access operations. Here, the Master firstalways sends a transmission block with at least 5 bytes. The first 3 to5 bytes of this transmission block consist of meta data (targetaddress, etc.). Depending on the access type, another transmissionblock of variable data length follows the first block. Write and readaccess to the memory register of the module is performed. Onlymemory registers that have been enabled can be written or read, ofcourse. The following areas cannot be written:
Input data areas:– Fieldbus– SDI– DPR
Output data areas:– Fieldbus– SSC– SDI– DPR
When writing to the SSC input data area, the time monitoring is resetfor this area (see Valid Time, Section "Data Broker [} 22]").
Read access to the DPR areas is fundamentally not possible. Themodule can never be in SPI/SSC mode and DPR mode at the sametime. Consequently, access to DPR areas would make no sense.
The various access types are explained below.Writing 1 byte This access type is used if 1 byte is written to a memory register of
the module by the Master.
The Master first sends a transmission block with a fixed length of 5bytes, which have the following content:
Transmission block with fixed lengthCommandcode(1 byte)
Address area(2 bytes)
Data area(1 byte)
Mask area(1 byte)
Description
0x01 0x0000-0xFFFF 0x00-0xFF 0x00-0xFF WRITE_LOW_BYTE0x02 0x0000-0xFFFF 0x00-0xFF 0x00-0xFF WRITE_HIGH_BYTE0x00 0xXXXX 0xXX 0xXX NO_OPERATION*
Theoretically, you could use all memory register addresses between0 and 0xFFFF. In practice, however, the write access is limited toregisters that are enabled for this purpose. The byte can be written tothe high or low byte position of the 16-bit wide register by selecting
Com
pone
nts

COMS-Module DEVICENET 37 / 144
the associated command code. The mask byte only makes itpossible to write single bits to the target register. Thereby, only bitsthat are set to "1" in the mask are transferred from the data byte (i.e.these bits are set to the value as found in the data byte). All other bitsare left unchanged in the register.
During transmission of this first block, the module sends the status ofthe previous data transmission. The module first returns the statusfor the previous access when sending the next transmission block. If,however, no further write or read operation should follow the writeaccess, then the Master must send another transmission block withthe command code 0 ("NO_OPERATION") for retrieving the status,in which the module returns the status for the last write accessoperation.
The status response from the module is structured as follows for allwrite access types:
Transmission block with fixed lengthStatus code(1 byte)
Error code(2 bytes)
Not used(2 bytes)
Description
0x00 0xXXXX 0xXXXX NO_PREVIOUS_OPERATION0x01 0x0000 0xXXXX WRITE_SUCCESS0x02 ERROR_CODE1 0xXXXX WRITE_FAILURE
1 See Table "ErrorCode"
The first byte returns the status. If it is set to "0", the Master thenindicates that it cannot return any current status information sincethere was no previous operation (this is usually the response to thevery first block transmission). A "1" indicates the successfulcompletion of the previous transmission. In the case of a 2, themodule sends the error code of an error in the subsequent byte,which occurred during the previous block transmission. The possibleerror codes are listed at the end of this subsection.
Writing 2 bytes (Word) This access type basically proceeds as when writing 1 byte. It differsin the following points:– Instead of a mask byte, the second byte of the 16-bit wide user data is
transmitted with the data block. Access to individual bits in the targetregister is not possible with this access type.
– The 16-bit wide register content to be written must be prepared by theMaster in such a way that the higher-value byte is transmitted as the 4thbyte and the lower-value byte is transmitted as the 5th byte ("Big-Endian" or "Motorola format").
Com
pone
nts

COMS-Module DEVICENET 38 / 144
Transmission block with fixed lengthCommandcode(1 byte)
Address area(2 bytes)
Data area(2 byte)
Description
0x04 0x0000-0xFFFF 0x0000-0xFFFF WRITE_WORD0x00 0xXXXX 0xXXXX NO_OPERATION*
The status response has the same structure and meaning as writeaccess with 1 byte
Writing more than 2 byteswith one access (bulk-write)
This access type is suitable for larger volumes of data. The numberof target registers to be written and start address are transmitted withthe first transmission block. As with the previous access types, thefirst transmission block also has a fixed length of 5 bytes here. Afterthis block with metadata, the user data follows in a separatetransmission block with variable length. The maximum permittednumber of target registers to be written depends on the target area: Amaximum of 128 registers (each 16-bit = 1 word) are permitted forwriting to the SSC input register area. A maximum of 16 registers perblock is to be written for all other target areas.
All 16-bit wide register contents to be written must be prepared bythe Master in such a way that the higher-value byte is transmitted asthe first byte and the lower-value byte is transmitted as the secondbyte ("Big-Endian" or "Motorola format"). The register contents mustbe sent in ascending address order, i.e. the start address first.
Transmission block with fixed lengthCommandcode(1 byte)
Address area(2 bytes)
Data length(2 bytes)
Description
0x08 0x0000-0xFFFF 1-16/128 WRITE_BULK0x00 0xXXXX 0xXXXX NO_OPERATION*
NOTICE The maximum data length for writing in the SSC input data area is 128registers (256 bytes).If this value is exceeded, errors in the data communication will result.
In the case of a transmission block of variable length, the modulesends bytes with the value 0 to the master.
The status response has almost the same structure and meaning aswrite access with 1 byte. In the event of an error, a 16-bit wideregister address is at position 4 and 5 for this transmission type, atwhich the first error occurred. The status is transmitted in the firsttransmission block that follows the data block with variable length.
Com
pone
nts

COMS-Module DEVICENET 39 / 144
Transmission block with fixed lengthStatus code(1 byte)
Error code(2 bytes)
Address area**(2 bytes)
Description
0x00 0xXXXX 0xXXXX NO_PREVIOUS_OPERATION0x01 0x0000 0xXXXX WRITE_SUCCESS0x02 ERROR_CODE1 0x0000-0xFFFF WRITE_FAILURE
1 See Table "ErrorCode"
** Address where an error occursReading 2 bytes (Word) This access type is used if just 1 register is to be read from a
memory register of the module by the Master. The Master first sendsa data block with a fixed length of 5 bytes, which have the followingcontent:
Transmission block with fixed lengthCommandcode(1 byte)
Address area(2 bytes)
Not used(2 bytes)
Description
0x10 0x0000-0xFFFF 0xXXXX READ_WORD0x00 0xXXXX 0xXXXX NO_OPERATION*
* This command allows the master to request the status of a readrequest without an additional read or write request having to beexecuted.
Theoretically, you could use all memory register addresses between0 and 0xFFFF. In practice, however, the write access is limited toregisters that are enabled for this purpose.
During transmission of the first data block, the module sends thestatus of the previous data transmission. The module first returns thedata to be read when sending the next data block. If, however, nofurther write or read operation should follow the read access, thenthe Master must send another data block with the command code 0("NO_OPERATION") for retrieving the data to be read, in which themodule returns the status for the last write access operation.
The response from the module is structured as follows for all readaccess operations:
Transmission block with fixed lengthStatus code(1 byte)
Error code(2 bytes)
Data area(2 byte)
Description
0x00 0xXXXX 0xXXXX NO_PREVIOUS_OPERATION0x01 0x0000 0x0000-0xFFFF READ_SUCCESS0x02 ERROR_CODE1 0xXXXX READ_FAILURE
1 See Table "ErrorCode"
Com
pone
nts

COMS-Module DEVICENET 40 / 144
The first byte returns the status. If it is set to "0", the Master thenindicates that it cannot return any current status information sincethere was no previous operation (this is usually the response to thevery first block transmission). A "1" indicates the successfulcompletion of the previous transmission. In the case of a 2, themodule sends the error code of an error in the subsequent byte,which occurred during the previous block transmission.
If the status is "1", the 2 bytes after that at position 4 and 5 containthe content of the memory register to be read at the address that wastransmitted at the last block with the read command. The 16-bit wideregister content read is prepared by the module in such a way thatthe higher-value byte is transmitted as the 4th byte and the lower-value byte is transmitted as the 5th byte ("Big-Endian" or "Motorolaformat").
In the case of status "0" or "2", both data bytes at position 4 and 5are invalid and must be discarded by the Master.
Reading more than 2 bytes(Bulk-Read)
In this access type, the number of source registers to be read as wellas the start address are transmitted with the first transmission blockthat has a fixed length of 5 bytes. After this block with metadata, thetransmission of the read data follows in a separate transmissionblock with variable length. Therefore, this access type is suitableprimarily for larger volumes of data. The maximum permitted numberof source registers to be read depends on the source area: Amaximum of 128 registers (each 16-bit = 1 word) are permitted forreading from the SSC output register area. A maximum of 16registers per block is to be read for all other source areas. Byteorder:
All 16-bit wide register contents read are prepared by the module insuch a way that the higher-value byte is transmitted as the first byteand the lower-value byte is transmitted as the second byte ("Big-Endian" or "Motorola format"). The register contents are sent inascending address order, i.e. the start address first.
Transmission block with fixed lengthCommandcode(1 byte)
Address area(2 bytes)
Data length(2 bytes)
Description
0x20 0x0000-0xFFFF 1-16/128/256 READ_BULK0x00 0xXXXX 0xXXXX NO_OPERATION*
Com
pone
nts

COMS-Module DEVICENET 41 / 144
The Master sends a block of variable length with 0 bytes to themodule.
The status response has almost the same structure and meaning asread access with 1 byte. In the event of an error, a 16-bit wideregister address is at position 4 and 5 for this transmission type, atwhich the first error occurred. The status is transmitted in the firsttransmission block that follows the data block with variable length.
In the event of an error during bulk access (status "2"), the datatransmitted by the module from the data block with variable length isinvalid and must be discarded by the Master.
Transmission block with fixed lengthStatus code(1 byte)
Error code(2 bytes)
Address area(2 bytes)
Description
0x00 0xXXXX 0xXXXX NO_PREVIOUS_OPERATION0x01 0x0000 0xXXXX READ_SUCCESS0x02 ERROR_CODE1 0x0000-0xFFFF READ_FAILURE
1See Table “ Error code“
** Address where an error occurs
Transmission block with variable length (1-16/128 words)Data area0x0000-0xFFFF"
Simultaneous reading andwriting of more than 2 byteswith one access (bulk read/write)
In this access type, the number of source registers to be read ortarget registers to be written are transmitted with the firsttransmission block that has a fixed length of 5 bytes. After this blockwith metadata, the transmission of the read data follows in aseparate transmission block with variable length. Unlike with Bulk-Read or Bulk-Write, no random start address can be defined for thisaccess type. The start address for the block to be read is preset with0x2001 (SSC input register) and with 0x1001 (SSC output register)for the block to be written. Byte order:
All 16-bit wide register contents to be read or written are prepared bythe module in such a way that the higher-value byte is transmitted asthe first byte and the lower-value byte is transmitted as the secondbyte ("Big-Endian" or "Motorola format"). The register contents aresent in ascending address order, i.e. the start address first.
Com
pone
nts

COMS-Module DEVICENET 42 / 144
Transmission block with fixed lengthCommand code(1 byte)
Notused(2 bytes)
Data length(2 bytes)
Description
0x40 0xXXXX 1-128 READ_WRITE_BULK0x00 0xXXXX 0xXXXX NO_OPERATION*
Transmission block with variable length (1-16/128 words)Data area0x0000-0xFFFF"
The status response has almost the same structure and meaning asread access with 1 byte. In the event of an error, a 16-bit wideregister address is at position 4 and 5 for this transmission type, atwhich the first error occurred when reading or writing. The status istransmitted in the first transmission block that follows the data blockwith variable length.
Transmission block with fixed lengthStatus code(1 byte)
Error code(2 bytes)
Not used(2 bytes)
Description
0x00 0xXXXX 0xXXXX NO_PREVIOUS_OPERATION0x10 0x0000 0xXXXX READ_WRITE_SUCCESS0x20 ERROR_CODE1 0xXXXX READ_WRITE_FAILURE
In the event of an error during bulk access (status "2"), the datatransmitted by the module from the data block with variable length isinvalid and must be discarded by the Master.
Com
pone
nts

COMS-Module DEVICENET 43 / 144
Error Codes Error code Designation Description0x01 INVALID_DATA_
ADDRESSInvalid data addressThe master tries to access an invalid ad-dress.The slave ignores the instruction.
0x02 INVALID_DATA_LENGTH
Invalid data lengthThe data length predefined by the master istoo great.The slave ignores the instruction.
0x04 INVALID_DATA Invalid dataThe master tries to write data containingvalues outside a valid range.The slave ignores the instruction.
0x08 INVALID_ACCESS Invalid accessThe master tries to access an invalid areaor a valid address.The slave ignores the instruction.
0x10 INVALID_RANGE Invalid rangeThe master tries to write beyond the limitsof an SSC input data area or to write bey-ond the limits of an SSC, SDI, FBS or DPRoutput data area.The slave ignores the instruction.
0x20 UNDEFINED_ERROR Undefined errorAn undefined error has occurred.The slave ignores the instruction.
Table 1: Error Code
Com
pone
nts

COMS-Module DEVICENET 44 / 144
SSC Master Operating ModeIn this operating mode, output data is read from the SSC outputregister area via the serial synchronous interface and input data iswritten to the SSC input register area. This takes place via ahardware shift register chain.
Illustration 12: Hardware shift register chain, example with 4 inputs and outputs
The advantage of such an interface is the possibility of forwardinginput and output signals to the fieldbus without the need ofmicroprocessor controlled application circuitry. Switches, contacts,relay coils or solenoid valves, for example, can therefore beconnected directly via DeviceNet without using a microprocessor.
The COMS-Modul with its clock (Pin a4) clocks the output data intothe input register of the chain via the MOSI line (Pin a5), where it isshifted bit by bit until the end. At the same time, the input data isshifted bit by bit via the MISO line into the COMS-Modul with thesame clock pulse. Prior to each such shift procedure, the modulesets the LOAD line to high (Pin b6). In this way, the parallel outputsof all shift register modules receive the data from the input buffers inthe previous cycle. The input shift registers, on the other hand, utilise
Com
pone
nts

COMS-Module DEVICENET 45 / 144
the positive edges from the LOAD signal to copy all parallel inputvalues simultaneously to their output buffers. From there, they areshifted bit by bit to the SSC input register area of the COMS-Modulduring the current cycle.
The clock rates of the COMS-Moduls can be adapted manually orautomatically in 3 levels and are about 300, 1200 or 4800 Kbit/s. Theload impulse is between 5 and 15 µs long (active low). The delaybetween the load edge (positive edge of the load impulse) and thefirst clock edge (from high to low) is between 1 and 2 µs. Thesevalues are completely uncritical when using the shift register modules74HC165 (Input) and 74HC594 (Output).
An optional RESET line (Pin b7, active low) initialises the shiftregister modules during the starting process of the COMS-Moduls(i.e. also during each reset of the module).
With an arrangement of the output and input shift register as shownin this example, all registers are switched in series so that theCOMS-Modulhas its own output data shifted back into the inputregister again for checking purposes. A test sample shifted throughthe complete chain without a LOAD signal allows the COMS-Modultodetect how long the entire chain is by means of the necessary clocksignals for such a shifting procedure. A centre pickoff between theoutput and input modules allows the COMS-Modul to also detect thecorresponding number of inputs and outputs during this run of a testsample. If bit errors occur, the clock rate is reduced in automaticmode by one level. Hence, with such a structure the COMS-Modulcan find the right setting for the chain lengths and maximumpossible transmission rate independently. It is also possible,however, to assign the lengths and clock rates manually via the CDImenu. In this case, the centre pickoff can also be omitted (it is onlyneeded for determining the allocation between outputs and inputs).The entire chain length is monitored constantly during ongoingoperation and must match the configured length. If the moduledetects a difference, then it shuts down the SSC communication andreports an error status via its status register.
The COMS-Modulcan operate a maximum of 32 input shift registersplus 32 output shift registers. These limits must be observed.
Note on cycle time: The cycle time of the shift register interface isnormally independent of its chain length since the COMS-Modulin itswork cycle only starts the transmission of a shift procedure. The shiftprocedure itself then takes place independently of the work cycle ofthe COMS-Moduls. Its length is determined by the number of cycles
Com
pone
nts

COMS-Module DEVICENET 46 / 144
as well as the clock rate. After completion of a shift procedure, thenext shift cycle starts with the next work cycle of the module. Themaximum delay between the completion and start of a shift cycle is10 ms.
Note ! If the shift procedure is longer than a work cycle of themodule, the cycle time is determined by the length and speed of theshift register chain.
Com
pone
nts

COMS-Module DEVICENET 47 / 144
4.9 ScripterThe COMS-Modul includes a software component that allows you toset up customer-specific data exchange protocols for SDI or CDIserial interfaces. If, for example, the module is to communicate in anapplication with a serial-controlled servomotor, this servomotorexpects a preset protocol to be processed in order to receive theactuator values or to return sensor values. With the aid of theScripter you can load small executable program sequences into themodule that are then executed there cyclically. With the appropriatedata exchange protocol the module can receive such actuator valuese.g. via DeviceNet and transmit these via the serial interface of themodule (SDI or CDI) to the servomotor. The program sequencesrequired are loaded once into the module in the form of a script viathe CDI interface of the module and then always executed therecyclically. KUNBUS provides you with a PC tool for creating andtesting such scripts. You can read all the necessary details in theseparate manual on the Scripter.
NOTICE! Please note that when using the Scripter and activatinga script the interface (CDI or SDI) selected for its communicationis always assigned for the Scripter. If you choose the CDI interface,you can then no longer use this interface to check and enter moduleparameters ("CDI menus" are then no longer available). If youchoose the SDI interface as a serial communication channel for theScripter, you can then no longer process any Modbus protocol withaccess to the memory register via this interface.
As a reminder: The SDI interface is no longer available when themodule works in DPR mode.
Com
pone
nts

COMS-Module DEVICENET 48 / 144
5 Commissioning
5.1 InstallationTo connect the module directly to the control board, proceed asfollows:ü Attach suitable spacer bolts on the control board. Each module has
three identical holes for spacer bolts. These bolts stabilise the modulewith a direct connection onto the control board.
◦ Fasten the module "head first" to the application contact strip of thecontrol board. The spacer bolts must be on the corresponding holes inthe board and the module kept parallel at a distance to the controlboard.
◦ Fasten the module by screwing down the spacer bolts to the moduleboard
ð You have successfully integrated your application and can nowconfigure it.
Also see about this2 Spacer bolt [} 9]
Com
mis
sion
ing

COMS-Module DEVICENET 49 / 144
5.2 ConfigurationThis section describes how to configure the module and associatedcomponents and applications.
NOTICE Ø The module has no undo function.èChanges are applied after a reset or start of the operating mode without
any further confirmation.ð If you want to reset all values, use the function "Reset to factory
settings". [} 125] Please note that all previous settings made will be lost.
Configuration using the CDITo configure the Modul and put it into operation using the CDI, youneed a PC or notebook with a serial interface (RS-232) or USB/serialadapter. Make sure that the adapter drivers are installed.
Communication with the CDI (Configuration and Debug Interface) ofthe module takes place using a terminal program (e.g. PuTTY forMicrosoft Windows®).
TIPP!: Das CDI is suitable for configuration during the developmentand for diagnostic purposes. To configure several modulesautomatically, we recommend performing the settings with Modpoll.You can find an introduction and example of this in the AppendixConfiguration via Modpoll [} 143].
Configuration using the SDI The COMS-Modul has a UART interface with 3.3 V logic levels. Yourmain board must convert these lines to standardised RS-485 signalsso that Modbus/RTU devices can access these. Conversion tostandardised RS-232 signals is generally necessary forcommunication with a PC. The base board of the evaluation boardhas both interfaces that can each be selected via jumpers.
Configuration using the SDI requires a Modbus master device.
One of the following devices is suitable for this:– Master computer,– Control panel,– Programming device,– SPS with the possibility of Modbus-RTU communication.
To communicate with the SDI of the module using a PC, you needModbus software (e.g. Modpoll).
5.3 Firmware UpdateIf a firmware update is required, please contact our support([email protected]). We will be delighted to provide you with all theinformation you need for your product.
Com
mis
sion
ing

COMS-Module DEVICENET 50 / 144
6 Memory Register
6.1 Overview of the Memory RegisterThe storage unit is the central component for all functions of theCOMS-Module. It is subdivided into individual Memory Register witha width of 16 bits each. In these Memory registers the followinginformation is stored:– Input and output data– Configuration settings– Module Status– Error states
The functionality of the addressing was incorporated from Modbus.The register assignment depends on the application and is notspecified by the Modbus specification. A Memory Register accordingto this specification has a register number between 1 (0x0001) and amaximum of 65536 (0x10000), of which the module only uses a smallpart, however.
With 8-bit values, 1 byte remains unused. 32-bit values are stored in2 registers.
The 16-bit values are stored internally in the memory in Little Endianorder. This must be taken into account when you access data via thefieldbus interface, SDI or SSC.
NOTICE! In the description of the individual memory registersand CDI, the memory registers are also referred to as Modbusregisters.
Bitwise access to input andoutput data
Optionally, you can address input and output data areas bitwise. Thefunctions 01 Read Coil Status, 02 Read Input Status and 05 ForceSingle Coil are defined in Modbus for this purpose. Since each bithas a separate address, they are assigned to the bits in the registersas follows: Coil 0x0001 corresponds to the lowest value bit 0 ofregister 0x0001, Coil 0x0002 corresponds to bit 1, etc. coil 0x11 isthe bit 0 from register 0x0001 etc.
Mem
ory
Reg
iste
r

COMS-Module DEVICENET 51 / 144
The table below shows the start addresses of the data areas:
Area Memory Register Coil/Input AddressInput SSC 0x1001 - 0x1080 0x0001 – 0x0800Input SDI 0x1401 – 0x1500 0x2001 – 0x4000Input FBS 0x1801 - 0x1880 0x4001 – 0x6001Input DPR 0x1c01 … 0x6001 …Output SSC 0x2001 – 0x2080 0x8001 – 0x8800Output SDI 0x2401 – 0x2500 0xa001 – 0xb000Output FBS 0x2801 - 0x2880 0xc001 – 0xe001Output DPR 0x2c01 … 0xe001 …
Register assignment of the memory areaThe following table contains a brief overview of the registerassignment of the general memory area. You can find a detailedoverview of the individual registers on the following pages.
Register number Assignment Description0x0001 – 0x0100[} 53]
General Device Parameters
e.g. Setting of the bitrates,mailbox sizes etc.
0x0101 – 0x0e00 Reserved -0x0e01 – 0x0ea0[} 77]
Register for mappingthe output data
Each channel occupies 2 x 8 registers
0x0f01 – 0x0xf40[} 79]
Register for mappingof the extended DataBroker
16 mappings occupy4 registers each
0x1001 – 0x2000[} 80]
Input memory of thecommunication chan-nels
Each communicationchannel has a preallocatedmemory area of 128 - 256 registers.
0x2001 – 0x3000[} 81]
Output memory of thecommunication channels
Each communicationchannel has a preallocatedmemory area of 128 - 256 registers.
0x3001 – 0x4000 Reserved -0x4001 – 0x5000 Fieldbus-specific
(s. following table)See the description of theindividual fieldbus variants
0x5001 – 0x10000 Reserved -
Mem
ory
Reg
iste
r

COMS-Module DEVICENET 52 / 144
The following table contains a brief overview of the registerassignment of the memory area for DeviceNet. You can find adetailed overview of the individual registers on the following pages.
Register Description0x4001 [} 83] Fieldbus Status0x4002 [} 83] Module Status0x4003 - 0x4004 [} 84] DeviceNet Device ID0x4005 - 0x4006 [} 84] Fieldbus Device Type0x4007 – 0x4008 [} 84] Fieldbus Version0x4009 [} 85] Firmware Version0x400a - 0x400b [} 85] Serial number0x400c [} 85] Current node address0x400d [} 86] Configured Node Address0x400e Reserved0x400f [} 86] current Fieldbus Bitrate0x4010 [} 87] Configured Fieldbus Bitrate0x4011 - 0x4012 [} 87] Fieldbus Configuration Bits0x4016 - 0x4035 [} 89] Product Name0x4036 [} 90] Size of input image0x4037 [} 90] Size of output image0x4101 [} 90] Status of the poll connection0x4102 [} 91] Status of the cyclical connection0x4103 [} 91] Status of the Bit Strobe connection0x4104 [} 92] Configuration of Quick Connect0x4105 [} 92] Configuration Offline Connection0x4106 [} 92] Configuration of the MAC Address Offline
Connection Status.
Mem
ory
Reg
iste
r

COMS-Module DEVICENET 53 / 144
6.2 General Device Parameters0x0001 Set operating mode In this memory register you have the option, the operating mode to
set
Modbus Register 0x0001Value Range 0x0000-0x0003Default Value 0x0000Number of bytes available 2Permanently stored NoAccess Read/WriteMeaning0x0000 or 0x0001 Operation
Cyclical data exchange takes place.0x0002 Restoring default settings (Factory Reset)
Resetting of all permanent parameters totheir original respective settings. A modulereset takes place automatically and doesnot have to be done manually here.
0x0003 ResetImplementing a reset. Your settings can firstbe applied after a reset.
Mem
ory
Reg
iste
r

COMS-Module DEVICENET 54 / 144
0x0002-0x0003 Currentmodule status
In these memory registers you will find information for the currentmodule status.
Bit 5 indicates whether there is an error in the configuration of theSSC Master mode. It is only set, however, during the initialisation ofthe module. If an error occurs during ongoing operation, this is notdisplayed here.
Memory Register 0x0002 (bit 0-15) contains the Low Word, MemoryRegister 0x0003 (bit 16-31) contains the High Word.
Modbus Register 0x0002-0x0003Value Range -Initial value -Number of bytes available 4Permanently stored NoAccess Read OnlyMeaningBit 0 Fieldbus Run State
1: The field bus is in cyclical data exchange0: The cyclical data connection is interrupted
Bit 1(Only available in SSC mode)
SSC SSR Master Run State1: The synchronous serial interface is in SSC mode and is exchanging data cyclically0: No cyclical data exchange takes place.
Bit 2 Synchronous Serial Mapping ConfigurationError State1: Configuration error in the mapping of theSCC interface.0: Configuration is ok.
Bit 3 SDI Mapping Configuration Error1: Configuration error in the mapping for theSDI.0: Configuration is ok.
Bit 4 Fieldbus Communication Mapping Configuration Error1: Configuration error in the mapping for theFBS interface.0: Configuration is ok.
Bit 5 Synchronous Serial Configuration Error1: General configuration error of the SCC interface0: Configuration is ok.
Mem
ory
Reg
iste
r

COMS-Module DEVICENET 55 / 144
Bit 6 SDI Configuration Error1: General configuration error of the SDI.0: Configuration is ok.
Bit 7 Fieldbus Communication Configuration Error1: General configuration error of the FBS interface0: Configuration is ok.
Bit 8 DPR Run State1: DPR interface is in RUN mode0: DPR interface is not in operation
Bit 9 DPR Configuration Error1: General configuration error of the DPR interface0: Configuration is ok
Bit 10 DPR Mapping Error1: Configuration error in the mapping of theDPR interface0: Configuration is ok
Bit 11-13 ReservedBit 14 Extended Mapping Error
1: Configuration error in the mapping0: Configuration is ok
Bit 15 Script Run Status1: Script was loaded successfully and isrunning cyclically.0: Script is stopped
Bit 16 Script Error State1: An error has occurred during execution ofthe script0: Script runs without errors
Example: The status value "0x0093" ("00000_00010010011b")means:
Bit 0: (1) The field bus is in cyclical data exchange
Bit 1: (1) The synchronous serial interface is in SSC mode and is exchanging data cyclically
Bit 2: (0) SSC mapping ok.
Bit 3: (0) SDI mapping ok.
Bit 4: (1) Fieldbus mapping incorrect.
Bit 5: (0) SSC configuration ok.
Mem
ory
Reg
iste
r

COMS-Module DEVICENET 56 / 144
Bit 6: (0) SDI configuration ok.
Bit 7: (1) Fieldbus configuration incorrect.
Bit 8: (0) DPR is deactivated.
Bit 9: (0) DPR configuration ok.
Bit 10: (0) DPR mapping ok.0x0004 Set device addressfor the SDI interface
In this memory register you have the option, to set a unique deviceaddress for communication via the SDI interface (Modbus)
A Modbus network (RS485) can consist of several modules.Therefore, the Modbus protocol provides the unique addressing viadevice addresses. If you want to access the COMS-Modulwith aModbus Master (e.g. PC with Modpoll), the Master must use thedevice address set in this register as the first byte in the sendtelegram.
The new settings are applied after a reset (Power Off/On or writeMemory Register 0x0001 with value 0x0003).
Modbus Register 0x0004Value Range 0x01-0xF7Default Value 0x01Number of available bytes
1
Permanently stored YesAccess Read/Write
Mem
ory
Reg
iste
r
COMS-Module DEVICENET 57 / 144
0x0005 Set bitrate for the SDIinterface
In this memory register you have the option, to define with whichbitrate the SDI interface should communicate.
Automatic bitrate detection means that the module tests the followingbitrates until it has received a correct Modbus-RTU telegram:
• 2400 bit/s
• 4800 bit/s
• 9600 bit/s
• 19200 bit/s
• 38400 bit/s
• 57600 bit/s
• 115200 bit/s
NOTICE! During automatic bitrate detection the module does notsend a reply to the master until the correct bitrate has beendetected. This procedure can require up to 40 polls of themaster.
TIP: Set a fixed bitrate if the automatic bitrate detection lasts toolong for you.The new settings are applied after a reset (Power Off/On or writeMemory Register 0x0001 with value 0x0003).
Modbus Register 0x0005Value Range 0x00-0x07Default Value 0x00Number of available bytes
1
Permanently stored YesAccess Read/WriteMeaning0x00 Automatic bitrate detection0x01 2400 bit/s0x02 4800 bit/s0x03 9600 bit/s0x04 19200 bit/s0x05 38400 bit/s0x06 56700 bit/s0x07 115200 bit/s
Mem
ory
Reg
iste
r

COMS-Module DEVICENET 58 / 144
0x0006 Set parity bits for theSDI interface
In this memory register you have the option, to set the parity bit forthe data transmission of the SDI interface.
The number of stop bits is adjusted automatically to the parity toensure that a transmission always contains the same number of bits.
The new settings are applied after a reset (Power Off/On or writeMemory Register 0x0001 with value 0x0003).
Modbus Register 0x0006Value Range 0x00-0x02Default Value 0x00 (Even Parity)Number of available bytes
1
Permanently stored YesAccess Read/WriteMeaning0x0000 Even Parity, 1 Stop-Bit0x0001 Odd Parity, 1 Stop-Bit0x0002 No Parity, (2 Stop-Bits)
0x0007 Current bitrate of theSDI interface
In this memory register you will find information about the currentlyused bitrate of the SDI interface.
Modbus Register 0x0007Value Range 0x0000-0x0007Initial value -Number of bytes available 1Permanently stored NoAccess Read OnlyMeaning0x0000 The bitrate is unknown or has not yet been
determined by the automatic bitrate detection.
0x0001 2400 bit/s0x0002 4800 bit/s0x0003 9600 bit/s0x0004 19200 bit/s0x0005 38400 bit/s0x0006 57600 bit/s0x0007 115200 bit/s
Mem
ory
Reg
iste
r

COMS-Module DEVICENET 59 / 144
0x0012 Set bitrate for the CDI In this memory register you have the option, to set the bitrate for theCDI
The new settings are applied after a reset (Power Off/On or writeMemory Register 0x0001 with value 0x0003).
Modbus Register 0x0012Value Range 0x01-0x07Default Value 0x07Number of bytes available 1Permanently stored YesAccess Read/WriteMeaning0x01 2400 bit/s0x02 4800 bit/s0x03 9600 bit/s0x04 19200 bit/s0x05 38400 bit/s0x06 57600 bit/s0x07 115200 bit/s
NOTICE Automatic bitrate detection with the CDI is not possible.Ø If the configuration that was entered is invalid, the corresponding
registers use the following settings in order not to block the interface byincorrect data:
è115200 bit/s, 8 databits, 1 stop bit, even parity
Mem
ory
Reg
iste
r

COMS-Module DEVICENET 60 / 144
0x0013 Set transmissionformat for the CDI interface
In this memory register you have the option, to set the format of thedata transmission for the CDI interface
Modbus Register 0x0013Value Range 0x00-0x07Default Value 1Number of bytes available 1Permanently stored YesAccess Read/WriteMeaningBit 0 Parity Enable (PEN)
1: Activate parity check0: Do not activate parity check
Bit 1 Even or Odd (EOP)Only relevant if parity check is activated.1: Odd Parity0: Even Parity
Bit 2 Stop Bit (STB)1: Use synchronisation with 2 stop bits0: Use synchronisation with 1 stop bit.
Example: The value "0x05" ("00000_101b") means:– Bit 0: (1) Activate parity check.– Bit 1: (0) Set Even Parity.– Bit 2: (1) Use synchronisation with 2 stop bits.
Bit order:
b15 b14 b13 b12 b11 b10 b9 b8 b7 b6 b5 b4 b3 b2 b1 b0SBT EOP PEN
Mem
ory
Reg
iste
r

COMS-Module DEVICENET 61 / 144
0x0014 Current bitrate of theCDI interface
In this memory register you will find information about the currentlyused bitrate for the CDI interface.
Modbus Register 0x0014Value Range 0x01-0x07Number of bytes available 1Permanently stored NoAccess Read OnlyMeaning0x01 2400 bit/s0x02 4800 bit/s0x03 9600 bit/s0x04 19200 bit/s0x05 38400 bit/s0x06 57600 bit/s0x07 115200 bit/s
0x0015 Current datatransmission format of theCDI interface
In this memory register you will find information about the currentformat of a data byte for the CDI .
Modbus Register 0x0015Value Range 0x00-0x07Number of bytes available 1Permanently stored NoAccess Read OnlyMeaningBit 0 Parity Enable (PEN)
1: Activate parity control0: Do not activate parity control
Bit 1 Even or Odd (EOP)Only relevant if parity control is activated.1: Odd Parity0: Even Parity
Bit 2 Stop Bit (STB)1: Use synchronisation with 2 stop bits0: Use synchronisation with 1 stop bit.
Example: The value "0x05" ("00000_101b") means:– Bit 0: (1) Parity control activated.– Bit 1: (0) Even Parity Control set.– Bit 2: (1) Synchronisation with 2 stop bits used.
Mem
ory
Reg
iste
r

COMS-Module DEVICENET 62 / 144
Bit order:
b15 b14 b13 b12 b11 b10 b9 b8 b7 b6 b5 b4 b3 b2 b1 b0SBT EOP PEN
0x0016 Configure SSC mode Prerequisite: You have activated the SSC-Master-Mode [} 34] .In this memory register you have the option, to set the SSC mode ofthe module
Modbus Register 0x0016Value Range 0x0000-0x0002Default Value 0x01Number of bytes available 1Permanently stored YesAccess Read/WriteMeaning0x00 SSC SSR Master Mode, disabled0x01 SSC SSR Master Mode auto0x02 SSC SSR Master Mode configured
0x0017 Current SSC Mode In this memory register you will find information for the current SSCmode of the module.
You can find further information on this topic in section"Synchronousserial interface [} 34]".
Modbus Register 0x0017Value Range 0x0000-0x0003Number of bytes available 1Permanently stored NoAccess Read OnlyMeaning0x0000 SSC SSR Master Mode deactivated0x0001 SSC SSR Master Mode
(shift register, automatic detection)0x0002 SSC SSR Mode
(shift register, manual configuration)0x0003 SSC SPI Slave Mode0x0004 SSC SSR Master Mode Error Status
Mem
ory
Reg
iste
r

COMS-Module DEVICENET 63 / 144
0x0018 Configure SPI mode In this memory register you have the option, Clock and data level forthe SPI interface to set
This setting is only used in the SPI slave mode. In SSC Master Modethe SPI Controller always uses setting 4: "lagging edge, CLK high,MSB first" (see also Synchronous serial interface [} 34])
Modbus Register 0x0018Value Range 0x0001-0x0004Default Value 4Number of bytes available 1Permanently stored YesAccess Read/WriteMeaning0x0001 Leading edge
(CPHA=0, CLK low (CPOL=0), MSB first0x0002 Leading edge
(CPHA=0, CLK high (CPOL=1), MSB first0x0003 Lagging edge
(CPHA=1, CLK low (CPOL=0), MSB first0x0004 Lagging edge
(CPHA=1, CLK high (CPOL=1), MSB first
0x0019 Current configurationof the SPI controller
In this memory register you will find information about the currentconfiguration of the clock and data level for the SPI interface.
This setting is only used in the SPI slave mode. In SSC Master Modethe SPI Controller always uses setting 4: "lagging edge, CLK high,MSB first" (see also Synchronous serial interface [} 34]).
Modbus Register 0x0019Value Range 0-4Number of bytes available 1Permanently stored NoAccess Read OnlyMeaning0x0000 SSC Mode active0x0001 Leading edge (CPHA=0, CLK low
(CPOL=0), MSB first0x0002 Leading edge (CPHA=0, CLK high
(CPOL=1), MSB first0x0003 Lagging edge (CPHA=1, CLK low
(CPOL=0), MSB first0x0004 Lagging edge (CPHA=1, CLK high
(CPOL=1), MSB first
Mem
ory
Reg
iste
r

COMS-Module DEVICENET 64 / 144
0x001b Current bitrate of theSSC interface
In this memory register you will find information about the currentbitrate of the SSC interface.
These values are only significant if you operate the module in slavemode. In slave mode the DeviceNet-Master determines the bitrate.
Modbus Register 0x001bValue Range 0-3Number of bytes available 2Permanently stored NoAccess Read OnlyMeaning0x00 Bitrate not set or invalid0x01 ~ 300 Kbit/s0x02 ~ 1200 Kbit/s0x03 ~ 4800 Kbit/s
0x001c Configure number ofSSC Outputs
Prerequisite: You have activated the Master Mode
In this memory register you have the option, to set the number ofoutput shift register modules for the cyclical data exchange. The sizeof each shift register module is 8 bits.
When you carry out a manual configuration here, you must makesure that the automatic register detection is not set, since thesevalues are given priority. If the number of connected shift registermodules does not match this register, the SSC interface switches toerror state.
Modbus Register 0x001cValue Range 0-32Default Value 0Number of bytes available 1Permanently stored YesAccess Read/WriteMeaning0x00 0 Shift registers0x01 1 Shift registers0x02 – 0x1F …..0x20 32 Shift registers
Mem
ory
Reg
iste
r

COMS-Module DEVICENET 65 / 144
0x001d Current number ofoutput shift register modules
Prerequisite: You have activated the Master Mode.
In this memory register you will find information about the currentnumber of output shift register modules for the cyclical dataexchange on the SSC interface.
Modbus Register 0x001dValue Range 0-32Number of bytes available 2Permanently stored NoAccess Read OnlyMeaning0x00 0 Shift registers0x01 1 Shift registers0x02 – 0x0F …0x20 32 Shift registers
0x001e Configure number ofinput shift register modules
Prerequisite: You have activated the Master Mode
In this memory register you have the option, to set the number ofinput shift register modules for the cyclical data exchange. The sizeof each shift register module is 8 bits.
When you carry out a manual configuration here, you must makesure that the automatic register detection is not set, since thesevalues are given priority. If the number of connected shift registermodules does not match this register, the SSC interface switches toerror state.
Modbus Register 0x001eValue Range 0-32Default Value 0Number of bytes available 1Permanently stored YesAccess Read/WriteMeaning0x00 0 Shift registers0x01 1 Shift registers0x02-0x1F …0x20 32 Shift registers
Mem
ory
Reg
iste
r

COMS-Module DEVICENET 66 / 144
0x001f Current number ofinput shift register modules
Prerequisite: You have activated the Master Mode.
In this memory register you will find information about the currentnumber of output shift register modules for the cyclical dataexchange on the SSC interface.
Modbus Register 0x001fValue Range 0-32Default Value -Number of bytes available 2Permanently stored NoAccess Read OnlyMeaning0x00 0 Shift registers0x01 1 Shift registers0x02-0x1F …0x20 32 Shift registers
0x0021 Default values in thedata communicationconfigure
In this memory register you have the option, to specify the behaviourof the memory register in case no data from outside is receivedanymore on the SSC Modbus RTU or fieldbus interface.
Modbus Register 0x0021Value Range 0x00-0x3fDefault Value 0x00Number of bytes available 1Permanently stored YesAccess Read/WriteMeaningBit 1, Bit 0: SS1 and SS0 (SSC interface)
00: Output data is set to 0 (default value)01: Output data is set to 110: The data last written is retained
Bit 3, Bit 2: FB1 and FB0 (fieldbus interface)00: Output data is set to 0 (default value)01: Output data is set to 110: The data last written is retained
Mem
ory
Reg
iste
r

COMS-Module DEVICENET 67 / 144
Bit 5, Bit 4: SS1 and SS0 (SDI interface)00: Output data is set to 0 (default value)01: Output data is set to 110: The data last written is retained
Bit 7, Bit 6: DPV1 and DPV0 (DPR interface)00: Output data is set to 0 (default value)01: Output data is set to 110: The data last written is retained
15 14 13 12 11 10 9 8 7 6 5 4 3 2 1 0DPV DPV SD SD FB FB SS SS
0x0022 Validity period of theprocess data on the SSCinterface
In this memory register you have the option, to set the validity periodof the process data on the SSC interface
The next production must take place within the specified period,otherwise the input data is marked as invalid. Output registers thatare supplied with process data via the Data Broker from this inputarea then adjust themselves to the preselected safe values. You setthese values in the Memory Register 0x0021.
You can find detailed information on this topic in section "Data Broker[} 22]".
Modbus Register 0x0022Value Range 0-255Default Value 0x00Number of bytes available 1Permanently stored YesAccess Read/WriteMeaning0 The data is valid indefinitely in acyclic
operation.1-255 Validity period in milliseconds (ms)
The next production must follow within thistime
Mem
ory
Reg
iste
r

COMS-Module DEVICENET 68 / 144
0x0023 Validity period of theprocess data on the SDIinterface
In this memory register you have the option, to define the validityperiod of the process data on the SDI interface.
The next production must take place within the specified period,otherwise the input data is marked as invalid. Output registers thatare supplied with process data via the Data Broker from this inputarea then adjust themselves to the preselected safe values. You setthese values in the Memory Register 0x0021.
You can find detailed information on this topic in section "Data Broker[} 22]".
Modbus Register 0x0023Value Range 0-255Default Value 0x00Number of bytes available 1Permanently stored YesAccess Read/WriteMeaning0 The data is valid indefinitely in acyclic
operation.1-255 Validity period in milliseconds (ms)
The next production must follow within thistime
Mem
ory
Reg
iste
r

COMS-Module DEVICENET 69 / 144
0x0024 Validity period of theprocess data on theDeviceNet interface
In this memory register you have the option, to define the validityperiod of the process data on the DeviceNet interface.
The next production must take place within the specified period,otherwise the input data is marked as invalid. Output registers thatare supplied with process data via the Data Broker from this inputarea then adjust themselves to the preselected safe values. You setthese values in the Memory Register 0x0021.
You can find detailed information on this topic in section "Data Broker[} 22]".
Modbus Register 0x0024Value Range 0-255Default Value 0x00Number of bytes available 1Permanently stored YesAccess Read/WriteMeaning0 The data is valid indefinitely in acyclic
operation.1-255 Validity period in milliseconds (ms)
The next production must follow within thistime
0x0027 Configure size of theIn-Mailbox
In this memory register you have the option, to set the size of the In-Mailbox of the DPR
This value has a header of 12 bytes. When specifying the value, youmust not include the length of the header for the required data size,however.
Make sure that the sum total of the values in the Memory Register0x0027-0x002a does not exceed the configurable total size of theDPR. This total size of 1024 bytes is made up as follows:– Header: 40 bytes– Configurable size: 984 bytes
Modbus Register 0x0027Value Range 20-500Constant value 110Number of bytes available 2Permanently stored YesAccess Read/Write
Mem
ory
Reg
iste
r

COMS-Module DEVICENET 70 / 144
0x0028 Configure size of theOut-Mailbox
In this memory register you have the option, to determine the size ofthe Out-Mailbox of the DPR.
This value has a header of 12 bytes. When specifying the value, youmust not include the length of the header for the required data size,however.
Make sure that the sum total of the values in the Memory Register0x0027-0x002a does not exceed the configurable total size of theDPR. This total size of 1024 bytes is made up as follows:– Header: 40 bytes– Configurable size: 984 bytes
Modbus Register 0x0028Value Range 20-500Default Value 110Number of bytes available 2Permanently stored YesAccess Read/Write
0x0029 Configure length ofthe incoming process datapackets
In this memory register you have the option, to define the size of theprocess data input area.
You can find further information in section"DPR - Dual Port RAM[} 31]".
This value has a header of 2 bytes. When specifying the value, youmust not include the length of the header for the required data size,however.
Make sure that the sum total of the values in the Memory Register0x0027-0x002a does not exceed the configurable total size of theDPR. This total size of 1024 bytes is made up as follows:– Header: 40 bytes– Configurable size: 984 bytes
Modbus Register 0x0029Value Range 0x0000 – 0x0200 (0 – 512 bytes)Default Value 0x017e (382 bytes)Number of bytes available 2Permanently stored YesAccess Read/Write
Mem
ory
Reg
iste
r

COMS-Module DEVICENET 71 / 144
0x002a Configure length ofthe outgoing process datapackets
In this memory register you have the option, to define the size of theprocess data output area.
You can find further information in section "DPR - Dual Port RAM[} 31]".
This value has a header of 2 bytes. When specifying the value, youmust not include the length of the header for the required data size,however.
Make sure that the sum total of the values in the Memory Register0x0027-0x002a does not exceed the configurable total size of theDPR. This total size of 1024 bytes is made up as follows:– Header: 40 bytes– Configurable size: 984 bytes
Modbus Register 0x002aValue Range 0x0000 – 0x0200 (0 – 512 bytes)Default Value 0x017e (382 bytes)Number of bytes available 2Permanently stored YesAccess Read/Write
0x002b Size of the Dual-Port-RAM
In this memory register you will find information to define the size ofthe Dual-Port-RAM.
This value includes the 5 headers of Memory Register0x0027-0x002b. This is a total of 40 bytes.
Make sure that the sum total of the values of register 0x0027-0x002a(incl. header) does not exceed the size of DPR:
Total size:1024 byte
Header:40 byte
Configurable size:984 byte
Modbus Register 0x002bValue Range -Default Value 1024 bytes (incl. header)Number of bytes available 2Permanently stored NoAccess Read Only
Mem
ory
Reg
iste
r

COMS-Module DEVICENET 72 / 144
0x002c Configure validityperiod of the Dual-Port-RAM
In this memory register you have the option, to define the validityperiod for the process input data in the DPR interface.
The next production must take place within the specified period,otherwise the input data is marked as invalid. Output registers thatare supplied with process data via the Data Broker from this inputarea then adjust themselves to the preselected safe values. You setthese values in the Memory Register 0x0021.
You can find detailed information on this topic in section "Data Broker[} 22]".
Modbus Register 0x002cValue Range 0-255Default Value 0x00Number of bytes available 1Permanently stored YesAccess Read/WriteMeaning0 The data is valid indefinitely.1-255 Validity period in milliseconds (ms)
The next production must follow within thistime
0x002d Current Size of theInput Mailbox
In this register you will find information about the current statusregarding the size of the input area of the mailbox.
This value has a header of 12 bytes. This register only indicates theconfigured size, however, and does not include the header.
Modbus Register 0x002dValue Range 20-500Initial value -Number of bytes available 2Permanently stored NoAccess Read Only
Mem
ory
Reg
iste
r

COMS-Module DEVICENET 73 / 144
0x002e Current Size of theOutput Mailbox
In this register you will find information about the current statusregarding the size of the output area of the mailbox.
This value has a header of 12 bytes. This register only indicates theconfigured size, however, and does not include the header.
Modbus Register 0x002eValue Range 20-500Default Value -Number of bytes available 2Permanently stored NoAccess Read Only
0x002f Current length of theprocess data in the input area
In this register you will find information about the current size of theprocess data input area.
This value has a header of 2 bytes. This register only indicates theconfigured size, however, and does not include the header.
Modbus Register 0x002fValue Range 0Initial value -Number of bytes available 2Permanently stored NoAccess Read Only
0x0030 Current length of theprocess data in the outputarea
In this register you will find information about the current size of theprocess data output area
This value has a header of 2 bytes. This register only indicates theconfigured size, however, and does not include the header.
Modbus Register 0x0030Value Range 0Initial value -Number of bytes available 2Permanently stored NoAccess Read Only
Mem
ory
Reg
iste
r

COMS-Module DEVICENET 74 / 144
0x0032 Script EnableRegister
In this register you have the option to activate or to deactivate theexecution of a script.
You will find information about creating a script in the "KUNBUS-Scripter" documentation supplied.
Modbus Register 0x0032Value Range 0x00 - 0xffDefault Value 0x00Number of bytes available 1Permanently stored YesAccess Read/WriteMeaning0 Deactivated1 Activated
0x0033 Script Port Register In this register you have the option to select the interface by whichthe script should communicate.
NOTICE Please note that activation of a script influences the individual port.E.g.: If the CDI port is used by the script, the CDI menu can no longer beused until you have deactivated the script.If the CDI port is used by the script, you can only deactivate the script bywriting the value 0 in the memory register 0x0032. You must restart themodule to apply the deactivation.
Modbus Register 0x0033Value Range 0x00-0x01Default Value 0x01Number of bytes available 1Permanently stored YesAccess Read/WriteMeaning0 CDI Interface1 SDI Interface
Mem
ory
Reg
iste
r

COMS-Module DEVICENET 75 / 144
0x0034 Script Status Register In this register you will find information about the current status of thescripts.
Modbus Register 0x0034Value Range 0x00-0xffDefault Value 0x00Number of bytes available 1Permanently stored NoAccess Read OnlyMeaning0 The running script is in the initialisation
phase1 The script is running cyclically2 The running script is waiting for data input
or for a waiting period to elapse3 The script was stopped or no script for run-
ning is loaded or running script is deactiv-ated
4 Script cannot run due to a serious error
0x0035 Script Loop Register In this register you have the option to monitor whether your script isrunning. During each run of the script, the value in the register isincremented.
Modbus Register 0x0035Value Range 0x0000- 0xffffInitial value 0Number of bytes available 2Permanently stored NoAccess Read Only
Mem
ory
Reg
iste
r

COMS-Module DEVICENET 76 / 144
0x0036 SSC Error Register In this memory register you will find information about possible errorsthat have occurred when connecting the module to an external shiftregister chain.
Modbus Register 0x0036Value Range 0x00-0x05Default Value -Number of bytes available 1Permanently stored NoAccess Read OnlyMeaning0 No Error1 Centre tap is not receiving any data, line de-
fective2 Data In is not receiving any data3 Number of input registers is not as expected4 Number of output registers is not as expec-
ted5 General error, e.g. electrical faults
Also see about this
2 Data Broker [} 22]
Mem
ory
Reg
iste
r

COMS-Module DEVICENET 77 / 144
6.3 Register for the MappingIn the following Memory registers you have the option to define thedata mapping of the Data Broker for the input and output areas of theinterfaces.
For each consumer (target register) there is a register area, in whichall sources ("producers") are listed from which it obtains data. Thedata of the source areas is stored in the target area continuously insuccession ("consumer") as well as the entries for this consumer. A maximum of 8 entries per consumer are possible. Each entryoccupies 2 Memory Register. In the first Memory Register you canspecify the base number of the Memory Register from which the datais copied. In the second Memory Register you determine the numberof values you want to copy. Here, you can also exchange the HighByte and Low Byte (swap).
In the event of an invalid mapping, an error message flag is set in thestatus register 0x0002.
In section " Data Broker [} 22]" we will explain how a mapping works.You will also find an example of a mapping.
0x0e01-0x0e10 Output DataMapping SSC
Modbus Register 0x0e01 – 0x0e10Value Range -Default Value 0x00Number of bytes available 32Permanently stored YesAccess Read/WriteMeaningRegister 0,2,4,6,8,10,12,14 Base register numberRegister 1,3,5,7,9,11,13,15 Bit 0-14: Number of registers to be copied.
Bit 15: generated when setting a changefrom high and low byte (swap)
Mem
ory
Reg
iste
r

COMS-Module DEVICENET 78 / 144
0x0e21-0x0e30 Output DataMapping SDI
Modbus Register 0x0e21 – 0x0e30Value Range -Default Value 0x00Number of bytes available 32Permanently stored YesAccess Read/WriteMeaningRegister 0,2,4,6,8,10,12,14 Base register numberRegister 1,3,5,7,9,11,13,15 Bit 0-14: Number of registers to be copied.
Bit 15: generated when setting a changefrom high and low byte (swap)
0x0e41-0x0e50 Output DataMapping Fieldbus
Modbus Register 0x0e41 – 0x0e50Value Range -Default Value 0x00Number of bytes available 32Permanently stored YesAccess Read/WriteMeaningRegister 0,2,4,6,8,10,12,14 Base register numberRegister 1,3,5,7,9,11,13,15 Bit 0-14: Number of registers to be copied.
Bit 15: generated when setting a changefrom high and low byte (swap)
0x0e61-0x0e70 Output DataMapping DPR
Modbus Register 0x0e61 – 0x0e70Value Range -Default Value 0x00Number of bytes available 32Permanently stored YesAccess Read/WriteMeaningRegister 0,2,4,6,8,10,12,14 Base register numberRegister 1,3,5,7,9,11,13,15 Bit 0-14: Number of registers to be copied.
Bit 15: generated when setting a changefrom high and low byte (swap)
Mem
ory
Reg
iste
r

COMS-Module DEVICENET 79 / 144
0x0f01-0xf40 ExtendedOutput Mapping
In these memory registers have the option, to define a bit-accuratemapping. Individual bits can be mapped from any input data area tothe output data area of your choice.
You can create a total of 16 different mappings.
Please note that a bit-accurate mapping requires very much run-timeperformance. Only use this function if you really need it.
To define a bit-accurate mapping, 4 registers must be defined ineach case:– In memory register 0xf01 enter the input memory register from which
your data should originate.– In memory register 0xf02 enter the output memory register in which you
require the data.– In memory register 0xf03 enter the source and target position of the bits
that you want to map.– Define the source position via bit 0-3.– Define the target position via bit 4-7.
– In the memory register 0xf04 define the number of memory registersthat you want to copy.– With bit 15 you can optionally swap the High Byte and Low Byte.
Modbus Register 0x0f01 – 0xf40Value Range -Default Value 0x00Number of bytes available 128Permanently stored YesAccess Read/WriteMeaningRegister 0, 4, 6, 8,…, 60 Source register numberRegister 1, 5, 9,..., 61 Target register numberRegister 2, 6, 10, ..., 62 Bit 0-3: Source bit position
Bit 4-7: Target bit positionRegister 3, 7, 11,..., 63 Bit 0-14: Number of registers to be copied.
Bit 15: generated when setting a changefrom high and low byte (swap)
Mem
ory
Reg
iste
r

COMS-Module DEVICENET 80 / 144
6.4 Memory of the Communication ChannelsThe following memory registers contain the input and output data ofthe communication channels. Cyclical process data is written there orread from there.
The Data Broker distributes this data cyclically according to theMapping entries. At the same time, the input data of the producers isassigned to the output data of the consumers.
The data can be read from the input registers at any time via theModbus protocol. It is only possible to write to input registers via therespective communication channels (only in the case of SDI is thisthe Modbus communication itself, of course). The initial value in theinput registers is 0 until a register is written with process data.
Output registers that are not written by the Data Broker also containthe initial value 0 regardless of the setting for the drop-off value in theevent of validity periods of the source data being exceeded. Outputregisters can solely be written by the Data Broker. Read access isnot possible via Modbus, however.
The DPR input and output registers are only available in DPR mode.Otherwise, access is not possible and any attempt to do so (e.g.reading via Modbus or access by the Data Broker) will result in anerror.
0x1001 Input SSC Modbus Register 0x1001-0x1080Coil Address 0x0001 – 0x0800Value Range -Initial value 0x00Number of bytes available 256Permanently stored NoAccess Read Only
0x1401 Input SDIModbus Register 0x1401-0x1501Coil Address 0x2001 – 0x4000Value Range 0x00-0xffInitial value 0x00Number of bytes available 512Permanently stored NoAccess Read/Write
Mem
ory
Reg
iste
r

COMS-Module DEVICENET 81 / 144
0x1801 Input Fieldbus Modbus Register 0x1801-0x1880Coil Address 0x4001 – 0x6001Value Range -Initial value 0x00Number of bytes available 256Permanently stored NoAccess Read Only
0x1c01 Input DPR You can only read this register if the COMS-Modul is in DPR mode.
If the COMS-Modul is not running in DPR mode, selecting thisregister as a source register for a mapping entry will result in anerror.
Modbus Register 0x1c01-0x1d01Coil Address 0x6001 …Value Range -Initial value 0x00Number of bytes available 0-512 (configurable)Permanently stored NoAccess Read Only
0x2001 Output SSC Modbus Register 0x2001-0x2080Value Range -Coil Address 0x8001 – 0x8800Initial value 0x00Number of bytes available 256Permanently stored NoAccess Read Only
0x2401 Output SDI Modbus Register 0x2401-0x2501Coil Address 0xa001 – 0xb000Value Range -Default Value 0x00Number of bytes available 0-512 (configurable)Permanently stored NoAccess Read Only
0x2801 Output Fieldbus Modbus Register 0x2801-0x2880Coil Address 0xb001 – 0xe001Value Range -Initial value 0x00Number of bytes available 256Permanently stored NoAccess Read Only
Mem
ory
Reg
iste
r

COMS-Module DEVICENET 82 / 144
0x2c01 Output DPR You can only read this register if the COMS-Modul is in DPR mode.
If the COMS-Modul is not running in DPR mode, selecting thisregister as a source register for a mapping entry will result in anerror.
Modbus Register 0x2c01-0x2d01Coil Address 0xe001 …Value Range -Initial value 0x00Number of bytes available 0-512 (configurable)Permanently stored NoAccess Read Only
Mem
ory
Reg
iste
r

COMS-Module DEVICENET 83 / 144
6.5 Fieldbus specific Registers0x4001 Fieldbus Status In this memory register you will find information about the current
communication status of the fieldbus interface.
Modbus Register 0x4001Value Range 0-6Number of bytes available 2Permanently stored NoAccess Read OnlyValues:0 Undefined1 Offline2 Online but no connection is known yet3 Online, at least one connection is
established4 Connection timeout5 Critical connection errors6 Device in offline mode identified.
0x4002 Module Status In this memory register you will find information about the DeviceNetstate of the module.
Modbus Register 0x4002Value Range 0-5Default Value 0Number of bytes available 2Permanently stored NoAccess Read OnlyMeaning0 Initialisation, status is undefined1 Operating Mode2 Automatic bitrate detection running3 A minor error was detected
(e.g. configuration error)4 A serious error was detected5 Standby
Mem
ory
Reg
iste
r

COMS-Module DEVICENET 84 / 144
0x4003-0x4004 ManufacturerID
In this memory register you have the option, to change the fieldbusspecific manufacturer number for your application.
The Memory Register 0x4003 contains the High Word, MemoryRegister 0x4004 contains the Low Word of the manufacturer number.
Only the register with the Low-Word (0x4004) is used. This value isdisplayed in identity object (class 1, attribute 1).
Modbus Register 0x4003 - 0x4004Value Range 0 - 0xffffffffDefault Value 0Number of bytes available 4Permanently stored YesAccess Read / Write
0x4005-0x4006 Device Type These Memory Register contain the device type of the module.
Memory Register 0x4005 contains the High Word, Memory Register0x4006 contains the Low Word. Only the Low Word is used.
The device type is displayed in identity object (class 0x001, attribute2).
Modbus Register 0x4005 - 0x4006Value Range 0x00000000 - 0xffffffffDefault Value 12 (data transmission connection)Number of bytes available 4Permanently stored YesAccess Read / Write
0x4007-0x4008 FieldbusVersion
In this memory register you will find information about the fieldbusversion.
The Memory Register 0x4007 contains the High Word, MemoryRegister 0x4008 contains the Low Word of the fieldbus version.
Only the Low-Word in register 0x4008 is used.
This value is displayed in identity object (class 0x001, attribute 4).
Modbus Register 0x4007 - 0x4008Value Range 0x00000000 - 0xffffffffDefault Value 0Number of bytes available 4Permanently stored YesAccess Read Only
Mem
ory
Reg
iste
r

COMS-Module DEVICENET 85 / 144
0x4009 Firmware Version In this memory register you will find information for the firmwareversion.
Modbus Register 0x4009Value Range 0x0000 - 0xffffDefault Value -Number of bytes available 2Permanently stored ConstantAccess Read Only
0x400a-0x400b SerialNumber
In these memory registers have the option, to change the serialnumber of the COMS-Moduls.
In the delivered condition the KUNBUS serial number is stored.
The Memory Register 0x400a contains the High Word, register0x400b contains the Low Word of the serial number.
The value is displayed in the Identity Objects, Class 0x0001, Attribute 6.
Modbus Register 0x400a-0x400bValue Range 0x00000000 - 0xffffffffDefault Value KUNBUS Serial numberNumber of bytes available 4Permanently stored YesAccess Read/Write
0x400c Current Node ID In this register you will find information about the current node ID.
Modbus Register 0x400cValue Range 0-63, 0xffffDefault Value 0xffffNumber of bytes available 2Permanently stored NoAccess Read OnlyMeaning0-63 Current node ID0xffff Module does not yet have a node ID
Mem
ory
Reg
iste
r

COMS-Module DEVICENET 86 / 144
0x400d Configured Node ID In this register you have the option to enter the node ID of themodule. You can configure these values using the CDI or SSCregister. If you assign the address yourself, the value ranges 0-63are available to you. If 63 is entered, the node ID is assigned viaoffline connection set.
Whether this address is used depends on the configuration bits(0x4011-0x4012 Fieldbus Configuration).
Modbus Register 0x400dValue Range 0-0xffffDefault Value 0-63Number of bytes available 2Permanently stored YesAccess Read / WriteMeaning0-63 Node ID of the fieldbus module>63 The node ID is assigned via offline
connection set
0x400f Current FieldbusBitrate
In this memory register you will find information for the settings of thebitrate currently used.
Modbus Register 0x400fValue Range 0-3, 0xffffDefault Value 0xffffNumber of bytes available 2Permanently stored NoAccess Read OnlyMeaning0: 125 kbit/s1: 250 kbit/s2: 500 kbit/s3 Automatic bitrate detection0xffff: Bitrate not yet known
Mem
ory
Reg
iste
r

COMS-Module DEVICENET 87 / 144
0x4010 Configured FieldbusBitrate
In this memory register you have the option, of storing a bitrate.Whether this bitrate is used depends on the selection you make inthe Memory registers 0x4011-0x4012.
Modbus Register 0x4010Value Range 0 - 3Default Value 0Number of bytes available 2Permanently stored YesAccess Read / WriteValues0: 125 kbit/s1: 250 kbit/s2: 500 kbit/s3: Automatic bitrate detection
0x4011-0x4012 FieldbusConfiguration Bits
In this memory register you have the option, is to be selected howthe COMS-Modul gets node-ID and bitrate.
Modbus Register 0x4011 - 0x4012Value Range -Default Value 0x00000009Number of bytes available 4Permanently stored YesAccess Read / WriteMeaningBit 0-1 00:
Node ID and bitrate are obtained via thememory register 0x400d and 0x4010.01: Node ID and bitrate are obtained via theSSC. You can find the settings for this under thedeclaration of bits 2 and 310: Node ID and bitrate are obtained via theOffline Connection Set of the field bus.11: Invalid input
Mem
ory
Reg
iste
r

COMS-Module DEVICENET 88 / 144
Bit 2-3 00:Occupies 2 input registers, of which 10 bitsare used Node ID in BCD format:
– Bit 0-3: for setting the single digit– Bit 4-7: for setting the tens digit– Value range per digit: 0-9
Valid input values:– 0-63 Node address of the fieldbus module– 64-99 The node address is obtained via the
Offline Connection Set
Bitrate in BCD format:– Bit 8-9
0: 125 kbit/s1: 250 kbit/s2: 500 kbit/s3:automatic bitrate detection01:Node ID in BCD format:- Value range per digit: 0-9- 0-63 Node ID of the module- 64-99 The node ID is obtained via the Offline Connection SetBitrate:The bitrate is assigned via the automaticbitrate detection.10: Node ID and bitrate are set via 8-bit binaryvalues.Bitrate:
– Bit 6-7
01: 125 kbit/s01: 250 kbit/s10: 500 kbit/s11: automatic bitrate detectionNode ID:
– Bit 0-5
0-63: Node ID of the module
Mem
ory
Reg
iste
r

COMS-Module DEVICENET 89 / 144
0x4014-0x4015 Product Code In this memory register you will find information about the productnumber of the module. The product code of KUNBUS is stored in thedelivered condition. You have the option to change the product code.
The Memory Register 0x4014 contains the High Word, MemoryRegister 0x4015 contains the Low Word of the product number.
This value is displayed in identity object (class 0x0001, attribute 3).
Only the Low-Word in register 0x4015 is used.
Modbus Register 0x4014 - 0x4015Value Range 0x00000000 - 0xffffffffDefault Value -Number of bytes available 24Permanently stored YesAccess Read / WriteMeaning The default value is the KUNBUS product
number of the COMS-Moduls
0x4016-0x4035 ProductName
In this memory register you have the option, to change the productname. The product name of the module assigned by KUNBUS isstored In the delivered condition.
You can change the product name using the Modbus register. If thename is shorter than 32 bytes, you have to fill up the remaining byteswith 0.
This value is displayed in identity object (class 0x0001, attribute 7).
Modbus Register 0x4016 - 0x4035Value Range 38 Byte StringDefault Value "KUNBUS-COMS DeviceNetTM"Number of bytes available 32Permanently stored YesAccess Read / Write
Mem
ory
Reg
iste
r

COMS-Module DEVICENET 90 / 144
0x4036 Size of Input Image In this memory register you will find information about the number ofbytes the Data Broker can receive via DeviceNet.
You define this value using the configuration parameters by themaster.
Modbus Register 0x4036Value Range 64Default Value 64Number of bytes available 2Permanently stored NoAccess Read Only
0x4037 Größe Output-Image In this memory register you will find information about the number ofbytes the Data Broker can transmit via DeviceNet.
Modbus Register 0x4037Value Range 64Default Value 64Number of bytes available 2Permanently stored NoAccess Read Only
0x4101 Connection StatusPolled
In this register you will find information about the status of the pollconnection.
Modbus Register 0x4101Value Range 0-4Default Value 0Number of bytes available 1Permanently stored NoAccess Read OnlyMeaning0x00 No connection available0x01 Configuring connection0x02 Waiting for connection ID0x03 Connection established0x04 Connection expired
Mem
ory
Reg
iste
r

COMS-Module DEVICENET 91 / 144
0x4102 Bit-Strobe In this register you will find information about the status of the bit-strobe connection.
Modbus Register 0x4103Value Range 0-4Default Value 0Number of bytes available 1Permanently stored NoAccess Read OnlyMeaning0x00 No connection available0x01 Configuring connection0x02 Waiting for connection ID0x03 Connection established0x04 Connection expired
0x4103 Status of the cyclicalconnection
In this register you will find information about the status of the cyclicalconnection.
Modbus Register 0x4102Value Range 0-4Default Value 0Number of bytes available 1Permanently stored NoAccess Read OnlyMeaning0x00 No connection available0x01 Configuring connection0x02 Waiting for connection ID0x03 Connection established0x04 Connection expired
Mem
ory
Reg
iste
r

COMS-Module DEVICENET 92 / 144
0x4104 Quick Connect In this register you have the option to configure the Quick-Connectfunction.
In active mode this function causes the commissioning sequence tobe skipped. This allows the connection to be established faster.
Modbus Register 0x4104Value Range 0-1Default Value 0Number of bytes available 1Permanently stored YesAccess Read / WriteMeaning0x00: Quick Connection deactivated0x01: Quick Connection activated
0x4105 Offline Connection In this register you will find information about whether a MACaddress has been assigned via the "Offline Connection Set Owner".
Modbus Register 0x4105Value Range 0x00 – 0x01Default Value 0x00Number of bytes available 1Permanently stored YesAccess Read OnlyMeaning0x00: MAC address was not assigned via Offline
Connection Set0x01: MAC address was assigned via Offline
Connection Set
0x4106 Offline MAC Address Prerequisite: The module is in the "Offline Connection" state.
In this memory register you will find information for the MAC addressthat was assigned via the "Offline Connection Set Owner".
Modbus Register 0x4106Value Range 0 - 63Default Value 0x00Number of bytes available 1Permanently stored YesAccess Read OnlyMeaning MAC address that was assigned via Offline
Connection Set.
Mem
ory
Reg
iste
r

COMS-Module DEVICENET 93 / 144
7 Communication model
7.1 Object structure and use
Object structureDeviceNetTM uses the application layer CIPTM (Common IndustrialProtocol) specified by the ODVA (Open DeviceNet VendorAssociation - http://www.odva.org). DeviceNet is physically based onCAN (Controller Area Network).
CIP is a connection oriented protocol. It allows the exchange of I/Odata via cyclical I/O messages and the exchange of general data forconfiguration, diagnosis and management via explicit messages. CIPdefines 4 essential functions for this purpose:– Uniform object model for addressing the data– Uniform communication model for exchanging data– Uniform configuration methods– Uniform device profiles
Each DeviceNet device is characterised by a collection of objects.Each object has a defined behaviour. Each object belongs to a class.Objects belonging to the same class are called instances of thisclass. Data elements within an object are called attributes. Allattributes can be addressed with class, instance and attributeidentifiers (IDs). Services are explicit tasks that an object canexecute.
The following sections describe which objects, attributes andservices in the COMS-Modul were implemented.
Class Code 0x01HexThis class contains information for identification of the module.
The COMS-Modul supports the following services in this class:– Get Attribute Single (0x0e): This function returns the content of specific
attributes.– Reset Service (0x05)
– Type 0: The module restarts the DeviceNet software.– Type 1: The module is reset to the original settings.
The COMS-Modul supports the following services in the instances:
Com
mun
icat
ion
mod
el

COMS-Module DEVICENET 94 / 144
Instance 0 # Name Access Type Value1 Revision Get UINT 0x1
Instance 1 # Name Access Type Description1 Vendor ID Get UINT 1168 (KUNBUS GmbH Industrial
Communication)2 Device Type Get UINT 0x00c3 Product Code Get UINT 0x0034 Revision Get STRUCTof: 1.2
Major USINT Main versionMinor USINT Minor version number
5 Status Get WORD s. Device Status table6 Serial number Get UDINT Assigned by KUNBUS during the
production process.7 Product name Get SHORT_STRING KUNBUS COMS DeviceNet
Bit(s) Name0 There is a connection to the master/scanner1 Reserved (set to 0)2 Configured (always set to 0)3 Reserved (set to 0)4-70000b0010b0011b0100b0110b0111bOthers
Extended Device StatusUnknownTimeoutNo IO connection configuredNot implementedConnection in run modeConnection in idle modeReserved
8 A recoverable error has occurred9 An unrecoverable error has occurred10 A serious recoverable error has occurred11 A serious unrecoverable error has occurred12-15 Reserved (set to 0)
Table 2: Device Status
Class Code 0x02 HexThis class represents a communication connection point. A service inany class or instance can be triggered by this.
Class Code 0x03 HexIn this class you will find information about the configuration andstatus of a DeviceNet port.
The COMS-Modul supports the following services in this class:
Com
mun
icat
ion
mod
el

COMS-Module DEVICENET 95 / 144
Class Services– Get Attribute Single (0x0e)
Instance Services– Get Attribute Single (0x0e)– Set Attribute Single (0x10)– Allocate Master/Slave Connection Set (0x4b)– Release Master/Slave Connection Set (0x4c)
The COMS-Modul supports the following data in this class:
Instance 0 # Name Access Type Value1 Revision Get UINT 0x2
Instance 1 # Name Access Type Description1 MAC ID Get USINT Value Range 0–63.
Default value: 63You have the following options forsetting the MAC-ID:
– Via the DIP switches on yourapplication.
– Via the CDI menu– Via the Offline Connection Set
2 Bitrate Get USINT Value Range– 0: 125 kBit/s– 1: 250 kBit/s– 2: 500 kBit/s– 3: Automatic bitrate detection
Default value: 125 kBit/sYou have the following options forsetting the bitrate:
– Via the DIP switches on yourapplication.
– Via the CDI menu3 BOI Get/Set BOOL Bus–Off Interrupt4 Bus–Off Counter Get/Set USINT This value indicates how often the
module changes to the Off state.Value Range 0-255
5 Allocation Informa-tion
Get STRUCTof: You can find more information aboutthis in the DeviceNet specificationsvolume 3, in chapter 5.11.
Allocation ChoiceByte
BYTE
Master’s MAC ID USINT Value range 0–63, 255 MAC ID fromthe master A change is only possibleby an assignment from the master.
6 MAC ID SwitchChanged
Get BOOL This value indicates whether thenode ID has been changed since thelast restart.0 = No change1 = Change since the last start
Com
mun
icat
ion
mod
el

COMS-Module DEVICENET 96 / 144
7 Bit Rate SwitchChanged
Get BOOL This value indicates whether thebitrate has been changed since thelast restart.0 = No change1 = Change since the last start
8 MAC ID SwitchValue
Get USINT Current value of the switches for thenode ID
9 Bit Rate SwitchValue
Get USINT Current value of the switches for thebitrate.
10 Quick_Connect Get/Set BOOL Activates or deactivates Quick Connect.0 = Deactivated1 =Activated
Class Code 0x04 HexThis object enables you to access the input and output data.
The COMS-Modul supports the following services in this class:
Class Services– Get Attribute Single (0x0e)
Instance Services– Get Attribute Single (0x0e)– Set Attribute Single (0x10)
The COMS-Modul supports the following data in this class:
Instance 0 # Name Access Type Value1 Version Get UINT 0x1
Instance 0x64 # Name Access Type Value3 Data Get Array of BYTE Enables access to the input data
area
Instance 0x96 # Name Access Type Value3 Data Get/Set Array of BYTE Enables access to the output data
areaC
omm
unic
atio
n m
odel

COMS-Module DEVICENET 97 / 144
Class Code 0x05 HexThe COMS-Modul supports the following services in this class:
Class Services– Get Attribute Single (0x0e)
Instance Services– Get Attribute Single (0x0e)– Set Attribute Single (0x10)
The COMS-Modul supports the following data in this class:
Instance 0 # Name Access Type Value1 Version Get UINT 0x2
Instance 1 # Name Access Type Description1 State Get USINT State of the object
3: Established5: Latent deletion
2 Instance type Get USINT Indicates whether it is an I/O connection or explicit connection.
3 TransportClasstrigger
Get BYTE Determines the behaviour of theconnection
4 DeviceNet produced connection id
Get UINT Positioned in CAN identifier field ifdata is transmitted via the existingconnection in a DeviceNet- Subnet.
5 DeviceNet consumed connection id
Get UINT Value is in the CAN Identifier field.It signals that messages can be received.
6 DeviceNetinitial commcharacteristics
Get BYTE Defines the message group of thisconnection based on productionand consumption.
7 Produced connection size
Get UINT Maximum number of bytes thatwere transmitted via this connection
8 Consumed connection size
Get UINT Maximum number of bytes thatwere received via this connection
9 Expected packetrate
Get/Set UINT Defines the timing of the currentconnection
12 Watchdogtimeout action
Get/Set USINT Controls the behaviour duringinactivity and Watchdog Timeouts
13 Produced connection pathlength
UINT Number of bytes of the attribute"Produced_connection_path"
14 Produced connection path
Packed EPATH Displays the application object(s)whose data was produced in thecurrent connection.
15 Consumed connection pathlength
UINT Number of bytes of the attribute"Consumed_connection_path"
16 Consumed connection path
Packed EPATH Displays the application object(s)whose data was used in the currentconnection.
Com
mun
icat
ion
mod
el

COMS-Module DEVICENET 98 / 144
Instance 2 # Name Access Type Description1 State Get USINT State of the object
3: Established5: Latent deletion
2 Instance type Get USINT Indicates whether it is an I/O connection or explicit connection.
3 TransportClasstrigger
Get BYTE Determines the behaviour of theconnection
4 DeviceNet produced connection id
Get UINT Positioned in CAN identifier field ifdata is transmitted via the existingconnection in a DeviceNet- Subnet.
5 DeviceNet consumed connection id
Get UINT Value is in the CAN Identifier field.It signals that messages can be re-ceived.
6 DeviceNet initialcomm characteristics
Get BYTE Defines the message group of thisconnection based on consumptionand production.
7 Produced connection size
Get UINT Maximum number of bytes thatwere transmitted via this connec-tion
8 Consumed connection size
Get UINT Maximum number of bytes thatwere received via this connection
9 Expected packetrate
Get/Set UINT Defines the timing of the currentconnection
12 Watchdogtimeout action
Get/Set USINT Controls the behaviour during in-activity and Watchdog Timeouts
13 Produced connection pathlength
UINT Number of bytes of the attribute"Produced_connection_path"
14 Produced connection path
Packed EPATH Displays the application object(s)whose data was produced in thecurrent connection.
15 Consumed connection pathlength
UINT Number of bytes of the attribute"Consumed_connection_path"
16 Consumed connection path
Packed EPATH Displays the application object(s)whose data was used in the currentconnection.
Instance 3 # Name Access Type Description1 State Get USINT State of the object
3: Established5: Latent deletion
2 Instance type Get USINT Indicates whether it is an I/O connection or explicit connection.
3 TransportClasstrigger
Get BYTE Determines the behaviour of theconnection
4 DeviceNet pro-duced connec-tion id
Get UINT Positioned in CAN identifier field ifdata is transmitted via the existingconnection in a DeviceNet- Subnet.
5 DeviceNet con-sumed connec-tion id
Get UINT Value is in the CAN Identifier field.It signals that messages can be received.
6 DeviceNet initialcomm character-istics
Get BYTE Defines the message group of thisconnection based on consumptionand production.
Com
mun
icat
ion
mod
el

COMS-Module DEVICENET 99 / 144
7 Produced connection size
Get UINT Maximum number of bytes thatwere transmitted via this connection
8 Consumed connection size
Get UINT Maximum number of bytes thatwere received via this connection
9 Expected packetrate
Get/Set UINT Defines the timing of the currentconnection
12 Watchdogtimeout action
Get/Set USINT Controls the behaviour during inactivity and Watchdog Timeouts
13 Produced connection pathlength
UINT Number of bytes of the attribute"Produced_connection_path"
14 Produced connection path
Packed EPATH Displays the application object(s)whose data was produced in thecurrent connection.
15 Consumed connection pathlength
UINT Number of bytes of the attribute"Consumed connection path"
16 Consumed connection path
Packed EPATH Displays the application object(s)whose data was used in the currentconnection.
Instance 4 # Name Access Type Description1 State Get USINT State of the object
3: Established5: Latent deletion
2 Instance type Get USINT Indicates whether it is an I/O connection or explicit connection.
3 TransportClasstrigger
Get BYTE Determines the behaviour of theconnection
4 DeviceNet produced connection id
Get UINT Positioned in CAN identifier field ifdata is transmitted via the existingconnection in a DeviceNet- Subnet.
5 DeviceNet consumed connection id
Get UINT Value is in the CAN Identifier field.It signals that messages can be received.
6 DeviceNet initialcomm character-istics
Get BYTE Defines the message group of thisconnection based on consumptionand production.
7 Produced connection size
Get UINT Maximum number of bytes thatwere transmitted via this connection
8 Consumed connection size
Get UINT Maximum number of bytes thatwere received via this connection
9 Expected packetrate
Get/Set UINT Defines the timing of the currentconnection
12 Watchdogtimeout action
Get/Set USINT Controls the behaviour during inactivity and Watchdog Timeouts
13 Produced connection pathlength
UINT Number of bytes of the attribute"Produced_connection_path"
14 Produced con-nection path
Packed EPATH Displays the application object(s)whose data was produced in thecurrent connection.
15 Consumed connection pathlength
UINT Number of bytes of the attribute"Consumed connection path"
Com
mun
icat
ion
mod
el

COMS-Module DEVICENET 100 / 144
16 Consumed connection path
Packed EPATH Displays the application object(s)whose data was used in the currentconnection.
17 Production inhibittime
UINT Defines the minimum time betweenthe data productions.This attribute is necessary for allI/O client connections.Excluded from this are connectionswith cyclical production triggers.
Instance 10…12 # Name Access Type Description1 State Get USINT State of the object
3: Established5: Latent deletion
2 Instance type Get USINT Indicates whether it is an I/O connection or explicit connection.
3 TransportClasstrigger
Get BYTE Determines the behaviour of theconnection
4 DeviceNet produced connection id
Get UINT Positioned in CAN identifier field ifdata is transmitted via the existingconnection in a DeviceNet- Subnet.
5 DeviceNet consumed connection id
Get UINT Value is in the CAN Identifierfield. It signals that messages canbe received.
6 DeviceNet initialcomm characteristics
Get BYTE Defines the message group ofthis connection based on consumption and production.
7 Produced connection size
Get UINT Maximum number of bytes thatwere transmitted via this connection
8 Consumed connection size
Get UINT Maximum number of bytes thatwere received via this connection
9 Expected packetrate
Get/Set UINT Defines the timing of the currentconnection
12 Watchdog timeoutaction
Get/Set USINT Controls the behaviour during inactivity and Watchdog Timeouts
Com
mun
icat
ion
mod
el

COMS-Module DEVICENET 101 / 144
Class Code 0x2b Hex - Acknowledge Handler ObjectThe COMS-Modul supports the following services in this class:
Class Services– Get Attribute Single (0x0e): This function resets the content of certain
attributes.
Instance Services– Get Attribute Single (0x0e): This function resets the content of certain
attributes.– Set Attribute Single (0x10): This function changes the value of an
attribute
The COMS-Modul supports the following data in this class:
Instance 0 # Name Access Type Value1 Version Get UINT 0x00012 Max Instance Get UINT 0x0001
Instance 1 # Name Access Type Description Value1 Acknowledge
TimerGet/Set UINT Waiting time for the
acknowledgementValue range1-65, 535 ms0=invaliddefault value: 16
2 Retry Limit Get/Set USINT Number of timeouts tobe expected. Afterwards, a messageis sent to the controllerreporting that the repetition limit was exceeded.
Default value: 1
3 Producing Connection Instance
Get/Set UINT Connection instancecontaining the path ofthe production datawhich have sent an acknowledge to thecontroller.
Default value: 4
4 Ack List Size Get BYTE Maximum number ofparticipating instancesin the acknowledge list.
1
5 Ack List Get Array ofUSINT
List of all active connection instancescontaining acknowledges.
N/A
6 Data with AckPath List Size
Get BYTE Maximum number ofparticipants from theattribute "Data with AckPath List"
1
7 Data with AckPath List
Get Array ofUSINT
List of all connectionparticipants. Used toforward data that wasreceived with an acknowledge
N/A
Com
mun
icat
ion
mod
el

COMS-Module DEVICENET 102 / 144
Class Code Hex 0xa0 - I/O Data Input MappingIn this object you have the option to access the I/O data. The processdata input area is distributed here to the various attributes in instance1 of this class.
You can also access these values via class 3, instance 0x96-0x9a.
The COMS-Modul supports the following services in this class:
Class Services– Get Attribute Single (0x0e): This function resets the content of certain
attributes.
Instance Services– Get Attribute Single (0x0e): This function resets the content of certain
attributes.
The COMS-Modul supports the following data in this class:
Instance 0 # Name Access Type Value1 Version Get UINT 0x0001
Instance 1 # Name Access Type Description1 Data Get Array of USINT The first 64 bytes of the
process data input areaAlso available in instance0x64
Com
mun
icat
ion
mod
el
COMS-Module DEVICENET 103 / 144
I/O Data Output MappingIn this object you have the option to access the I/O data. The processdata output area is distributed here to the various attributes ininstance 1 of this class.
You can also access these values via class 4, instance 0x64-0x69.
The COMS-Modul supports the following services in this class:
Class Services– Get Attribute Single (0x0e)
Instance Services– Get Attribute Single (0x0e)– Set Attribute Single (0x10)
The COMS-Modul supports the following data in this class:
Instance 0 # Name Access Type Value1 Version Get UINT 0x0001
Instance 1 # Name Access Type Description1 Data Get Array of USINT The first 64 bytes of the process
data output areaAlso available in instance 0x96
Com
mun
icat
ion
mod
el

COMS-Module DEVICENET 104 / 144
8 CDI
8.1 Setting up a Serial ConnectionThe CDI interface of the COMS-Module is a UART interface(asynchronous serial interface) with 3.3V CMOS signal level.
If you connect a switch with level converter (e.g. "EXAR -SP3232EUEY") to the application connector via the RX and TXconnections of this interface, an RS232 interface is available to youfor connecting a terminal (you can find details from our sample circuitdiagram under "RS232 Interface for CDI" in the Appendix).
Illustration 13: Setting up a Serial Connection
You can connect the serial COMx interface of a PC to such aterminal interface (or a serial USB converter) and then access theCDI menus using a terminal emulation. We provide you with PuTTYas a terminal emulation on our support webpage.
CD
I

COMS-Module DEVICENET 105 / 144
How to start PuTTY:
Illustration 14: Putty Serial
◦ Change to the "Connection > Serial" view◦ Select the serial interface that you want to access the CDI with (here:
COM1)◦ Configure the interface with the default settings of the CDI interface (for
values see Fig above). Deactivate the dataflow control as well.◦ Change to the "Session" view.◦ Activate "Serial" as connection type. The "Serial line" and "Speed" fields
are already preallocated with the settings you specified beforehand.◦ Assign a name under "Saved Sessions" to save these settings.◦ Click on "Save".◦ Click on "Open".ð The main menu will open in the terminal window.
NOTICE! If the terminal window remains black, click on the [ESC]key to start the data transmission via the CDI.
CD
I

COMS-Module DEVICENET 106 / 144
Illustration 15: Putty Session
CD
I

COMS-Module DEVICENET 107 / 144
8.2 CDI MenusMain Menu The main menu is your access point for operating the module using
the CDI. After a reset, the module transmits this main menu to theterminal.
--------------------------------------------------KUNBUS-COM – Main Menu--------------------------------------------------1 – Module Information2 – Interface Configuration3 - Monitor Communication4 – Module Status-------------------------------------------------->
Menu 1 – "Module Information"1.Module Information In this menu you will find general information about the module:
– Software revision– Checksum of the firmware– Serial number of the module– Module type (unique throughout KUNBUS)
--------------------------------------------------KUNBUS-IC - Module Information--------------------------------------------------Revision: 1.2.1567Firmware CRC: 0xcea54a13Serial Number: 4294967280Module Type: (3) DeviceNet
CD
I

COMS-Module DEVICENET 108 / 144
Menu 2 – "Interface Configuration"2. Interface Configuration In this menu you have the option to define the operational
parameters for the different interfaces.
Here, you can set the mapping for the data broker.
Changes that you make in these menus are first activated after arestart.
The selection "12 – Set Arbitrary Register" allows youwrite access to all writeable Modbus registers of the module.
--------------------------------------------------KUNBUS-COM – Interface Configuration--------------------------------------------------Operating Mode: Running
1 - SDI Communication2 - CDI Communication3 - SSC Communication4 - DPR Configuration6 - SDI Output mapping7 - SSC Output mapping8 - Fieldbus Output mapping9 - DPR Output mapping11 - Fieldbus Specific12 - Set Arbitrary Register13 - Script Interpreter14 - Reset Module15 - Reset to Factory Settings16 - Extended Mapping-------------------------------------------------->
2.1 SDI Communication In this menu you will find information about the settings for theModbus RTU communication. You can configure the values in thesubmenus.
--------------------------------------------------KUNBUS-COM - SDI Communication--------------------------------------------------1 – Bitrate: Automatic Bitrate detection2 – Parity: Even Parity, 1 Stopbit-------------------------------------------------->
NOTICE! When the COMS module is in DPR mode, you cannotconfigure the SDI settings. The CDI aborts the action with acorresponding error message.
CD
I

COMS-Module DEVICENET 109 / 144
2.1.1 SDI CommunicationBitrate
In this menu you have the option, to select the appropriate Bitrate foryour application.
The default value is "Automatic Bitrate detection".
--------------------------------------------------KUNBUS-COM – SDI Communication: Set Bitrate--------------------------------------------------1 – Automatic Bitrate detection2 – 2400 Bit/s3 – 4800 Bit/s4 – 9600 Bit/s5 – 19200 Bit/s6 – 38400 Bit/s7 – 57600 Bit/s8 – 115200 Bit/s-------------------------------------------------->
2.1.2 SDI Communication- Set Parity
In this menu you have the option to select the appropriate parity foryour application from the displayed values.
The default value is "Even Parity (1 stop-bit)".
The number of stop-bits is based automatically on the parity setting.This ensures that a transmission always contains the same numberof bits per byte.
--------------------------------------------------KUNBUS-COM – SDI Communication: Set Parity--------------------------------------------------1 – Even Parity (1 Stopbit)2 – Odd Parity (1 Stopbit)3 – No Parity (2 Stopbits)-------------------------------------------------->
2.1.3 Set Modbus NodeAddress
In this menu you have the option, to enter the Modbus NodeAddress.
Permitted input values: 1-247
--------------------------------------------------------KUNBUS-COM - SDI Communication: Set Modbus Node Address--------------------------------------------------------Enter a Modbus Node Address between 1 and 247:-------------------------------------------------------->
2.2 CDI Communication In this menu you will find information about the currently set values ofbitrate and parity. In the submenus you can configure the values.
--------------------------------------------------KUNBUS-COM – CDI Communication--------------------------------------------------1 – Bitrate: 115200 Bit/s2 – Parity: Even Parity, 1 Stopbit-------------------------------------------------->
CD
I

COMS-Module DEVICENET 110 / 144
2.2.1 CDI Communication -Set Bitrate
In this menu you have the option, to select the appropriate Bitrate foryour application.
The default value is 115200 bit/s.
Automatic bitrate detection via the CDI is not possible.
--------------------------------------------------KUNBUS-COM – CDI Communication: Set Bitrate--------------------------------------------------1 – 2400 Bit/s2 – 4800 Bit/s3 – 9600 Bit/s4 – 19200 Bit/s5 – 38400 Bit/s6 – 57600 Bit/s7 – 115200 Bit/s-------------------------------------------------->
2.2.2 CDI Communication - Set Parity
In this menu you have the option to select the appropriate parity foryour application from the displayed values.
The default value is "Even Parity (1 stop-bit)".
The number of stop-bits is based automatically on the parity setting.This ensures that a transmission always contains the same numberof bits per byte.
--------------------------------------------------KUNBUS-IC - CDI Communication: Set Bitrate--------------------------------------------------1 - Even Parity, 1 Stopbit2 - Even Parity, 2 Stopbit3 - Odd Parity, 1 Stopbit4 - Odd Parity, 2 Stopbit5 - No Parity, 1 Stopbit6 - No Parity, 2 Stopbit-------------------------------------------------->
CD
I

COMS-Module DEVICENET 111 / 144
SSC ModeIn this menu you have the option, to configure the shift register chain.
You can choose between the following modes using the Direction Pin(b2):– SSC SSR Master Mode (Default value, Direction Pin not set)– SSC SPI Slave Mode (Direction Pin set)
2.3 Select SSC SSR MasterMode
Prerequisite: The Direction Pin (b2) is not set. As a result, themaster mode is active.
In this menu you have the following options:– SSC SSR Master Mode, disabled: With this option, you switch off the
SSC.– SSC SSR Master Mode, auto detect shift registers: With this option, the
number of input/output shift registers and the bitrate is determinedautomatically.
– SSC SSR Master Mode, configured shift registers: With this option, youcan define the number of input/output shift registers and the bitrateyourself.– Enter [3] + [Enter] to select this mode as the configuration source.– With the option [9] you open the configuration menu.
--------------------------------------------------KUNBUS-COM- Select SSC SSR Master Mode--------------------------------------------------Mode: SSC SSR Master Mode, configured shift registers
1 - SSC SSR Master Mode, disabled2 - SSC SSR Master Mode, auto detect shift registers3 - SSC SSR Master Mode, configured shift registers-------------------------------------------------->
2.3.3 SSC SSR Master Mode,configure shift registers
Prerequisite: In menu "2.3 - Select SSC SSR Master Mode" youhave selected the configuration source "SSC SSR Master Mode,configure shift registers".
In this menu you have the following options:– Number of input shift registers– Number of output shift registers– Bitrate
--------------------------------------------------KUNBUS-COM- SSC SSR Master Mode, configure shift registers--------------------------------------------------1 - Number of overall Input Registers: 02 - Number of overall Output Registers: 03 - Configured Bitrate: 300 kBit/s-------------------------------------------------->
CD
I

COMS-Module DEVICENET 112 / 144
2.3.3.1 Number of overallInput Registers
In this menu you have the option to define the number of input shiftregisters. Valid input values are between 0 and 32.
--------------------------------------------------KUNBUS-COM - SSC SSR Number of input shift registers-------------------------------------------------->
2.3.3.2 Number of overallOutput Registers
In this menu you have the option to define the number of output shiftregisters. Valid input values are between 0 and 32.
--------------------------------------------------KUNBUS-COM - SSC SSR Number of output shift registers-------------------------------------------------->
2.3.3.3 SSC SSR Bitrate In this menu you have the option to set the bitrate. With option [1]"Auto detect Bitrate" the bitrate is determined automatically.
The values specified are to be regarded as reference values for"fast", "medium" and "slow". In SSC master mode these values arefallen short of by approx. 10%.
In slave mode the DeviceNet-Master determines the bitrate.
--------------------------------------------------KUNBUS-COM - SSC SSR Bitrate--------------------------------------------------1 - Auto detect Bitrate2 - 300 kBit/s3 - 1200 kBit/s4 - 4800 kBit/s-------------------------------------------------->
2.3 SSC SPI Slave Mode In this menu you have the option to make settings for the SSC SPISlave Mode.
In the first line you will see the current settings.
Using the option [1] "Configure settings" you can configure thesettings.
--------------------------------------------------KUNBUS-COM - SSC SPI Slave Settings--------------------------------------------------Settings: Polarity Normal, Falling Edge, CLK High, MSB first
1 - Configure settings-------------------------------------------------->
CD
I

COMS-Module DEVICENET 113 / 144
2.3.1 SSC SPI Slave Settings In this menu you have the option to select the following combinationof clock and data level.
You can find more information on this topic in section"Synchronousserial interface [} 34]".
--------------------------------------------------KUNBUS-COM - SSC SPI Slave Settings--------------------------------------------------1 - Polarity Normal, Rising Edge, CLK Low, MSB first2 - Polarity Normal, Rising Edge, CLK High, MSB first3 - Polarity Normal, Falling Edge, CLK Low, MSB first4 - Polarity Normal, Falling Edge, CLK High, MSB first-------------------------------------------------->
Note! Unfortunately, the representation in this CDI menu is notcompletely correct. In the memory register 0x0018 [} 63] you can seethe correct representation.
2.4 Dualport RAMConfiguration
In this menu you have the option, to configure the Dual-Port-RAM.
Please note that you cannot configure the DPR when the module isin SSC mode.
--------------------------------------------------KUNBUS-COM – Dualport RAM Configuration--------------------------------------------------The DPR has a size of NNN bytes.They are split into 4 sections:
1 – Mailbox In (20-500 Bytes): NNN12 – Mailbox Out (20-500 Bytes): NNN23 – Process Data In: (0-512 Bytes) NNN34 – Process Data Out: (0-512 Bytes) NNN4
Press ESC to store the values.-------------------------------------------------->
The sum total of the values NNN1 to NNN4 must not be greater thanthe value NNN. If the sum total of all values is greater than the entirememory size, the COMS module uses the default values.
CD
I

COMS-Module DEVICENET 114 / 144
--------------------------------------------------KUNBUS-COM – Dualport RAM Configuration--------------------------------------------------The DPR has a size of 984 bytes.They are split into 4 sections
1 – Mailbox In (20-500 Bytes): 3002 – Mailbox Out (20-500 Bytes): 1103 – Process Data In: (0-512 Bytes) 3824 – Process Data Out: (0-512 Bytes) 382
The length of the 4 sections together is too long.-------------------------------------------------->
If you quit the dialog using the [Esc] key, the values valid previouslywill remain unchanged.
2.6 SDI Output Mapping In this menu you have the option, to configure the Data BrokerMapping for SDI.
Here you can specify up to eight different register areas (startaddress and number of successive registers) as data sources.Optionally, you can activate a timeout and specify default data thatshould be valid in the event of a timeout.
--------------------------------------------------KUNBUS-COM - SDI Outputmapping--------------------------------------------------Src Register Number1 - 1 (0x0001) | 02 - 1 (0x0001) | 03 - 1 (0x0001) | 04 - 1 (0x0001) | 05 - 1 (0x0001) | 06 - 1 (0x0001) | 07 - 1 (0x0001) | 08 - 1 (0x0001) | 0
9 - Default Data: all zero10 - Valid Time: disabled-------------------------------------------------->
CD
I

COMS-Module DEVICENET 115 / 144
Configuring Output Mapping
--------------------------------------------------KUNBUS-COM – Edit one map entry--------------------------------------------------Source Register:
ü First determine the start address of the source register. You can get an overview of the start addresses in the menuRegister forthe Mapping [} 77].
◦ To do this, select a register from the input data area of thecommunication channels and then enter the number of registers to beused.ð After entering the number of registers, you will return automatically
to the mapping overview.◦ Restart the module.ð Your mapping is now configured and will be applied in the operating
mode.
--------------------------------------------------KUNBUS-COM– Edit one map entry--------------------------------------------------Source Register: 0x1001Number of Registers:
NOTICE! In the event of an invalid mapping (e.g. due to aregister address outside the permitted input range or a registernumber that is too high) an error message appears.
Default data in Data BrokerIn this menu you have the option, to define the default data forconsumers used in the event of invalid production data.
If the data in the input registers should be invalid e.g. because nodata has arrived anymore from outside, the Data Broker uses thefollowing values:– All bits are 1– All bits are 0– All bits remain unchanged
--------------------------------------------------KUNBUS-COM – Default data in data broker--------------------------------------------------1 - all data bit are zero2 - all data bit are one3 - old production values are used-------------------------------------------------->
CD
I

COMS-Module DEVICENET 116 / 144
Production valid timeIn this menu you have the option,to determine the validity period ofthe register contents to be read out.
The value range of the validity periods can be defined between 0 and255 ms.
If no new data from the producer should arrive in the input registerswithin the predefined period, the Data Broker uses the data setamong the default values.
--------------------------------------------------KUNBUS-COM – Production valid time (0 = disabled)-------------------------------------------------->
2.7 SSC Output Mapping In this menu you have the option, to configure the Data BrokerMapping for SSC.
Here you can specify up to eight different register areas (startaddress and number of successive registers) as data sources.Optionally, you can activate a timeout and specify default data thatshould be valid in the event of a timeout.
--------------------------------------------------KUNBUS-COM - SSC Outputmapping--------------------------------------------------Src Register Number1 - 1 (0x0001) | 02 - 1 (0x0001) | 03 - 1 (0x0001) | 04 - 1 (0x0001) | 05 - 1 (0x0001) | 06 - 1 (0x0001) | 07 - 1 (0x0001) | 08 - 1 (0x0001) | 0
9 - Default Data: all zero10 - Valid Time: disabled-------------------------------------------------->
CD
I

COMS-Module DEVICENET 117 / 144
Configuring Output Mapping
--------------------------------------------------KUNBUS-COM – Edit one map entry--------------------------------------------------Source Register:
ü First determine the start address of the source register. You can get an overview of the start addresses in the menuRegister forthe Mapping [} 77].
◦ To do this, select a register from the input data area of thecommunication channels and then enter the number of registers to beused.ð After entering the number of registers, you will return automatically
to the mapping overview.◦ Restart the module.ð Your mapping is now configured and will be applied in the operating
mode.
--------------------------------------------------KUNBUS-COM– Edit one map entry--------------------------------------------------Source Register: 0x1001Number of Registers:
NOTICE! In the event of an invalid mapping (e.g. due to aregister address outside the permitted input range or a registernumber that is too high) an error message appears.
Default data in Data BrokerIn this menu you have the option, to define the default data forconsumers used in the event of invalid production data.
If the data in the input registers should be invalid e.g. because nodata has arrived anymore from outside, the Data Broker uses thefollowing values:– All bits are 1– All bits are 0– All bits remain unchanged
--------------------------------------------------KUNBUS-COM – Default data in data broker--------------------------------------------------1 - all data bit are zero2 - all data bit are one3 - old production values are used-------------------------------------------------->
CD
I

COMS-Module DEVICENET 118 / 144
Production valid timeIn this menu you have the option,to determine the validity period ofthe register contents to be read out.
The value range of the validity periods can be defined between 0 and255 ms.
If no new data from the producer should arrive in the input registerswithin the predefined period, the Data Broker uses the data setamong the default values.
--------------------------------------------------KUNBUS-COM – Production valid time (0 = disabled)-------------------------------------------------->
2.8 Fieldbus Output Mapping In this menu you have the option, to configure the Data BrokerMapping for .
Here you can specify up to eight different register areas (startaddress and number of successive registers) as data sources.Optionally, you can activate a timeout and specify default data thatshould be valid in the event of a timeout.
--------------------------------------------------KUNBUS-COM - Outputmapping--------------------------------------------------Src Register Number1 - 1 (0x0001) | 02 - 1 (0x0001) | 03 - 1 (0x0001) | 04 - 1 (0x0001) | 05 - 1 (0x0001) | 06 - 1 (0x0001) | 07 - 1 (0x0001) | 08 - 1 (0x0001) | 0
9 - Default Data: all zero10 - Valid Time: disabled-------------------------------------------------->
CD
I

COMS-Module DEVICENET 119 / 144
Configuring Output Mapping
--------------------------------------------------KUNBUS-COM – Edit one map entry--------------------------------------------------Source Register:
ü First determine the start address of the source register. You can get an overview of the start addresses in the menuRegister forthe Mapping [} 77].
◦ To do this, select a register from the input data area of thecommunication channels and then enter the number of registers to beused.ð After entering the number of registers, you will return automatically
to the mapping overview.◦ Restart the module.ð Your mapping is now configured and will be applied in the operating
mode.
--------------------------------------------------KUNBUS-COM– Edit one map entry--------------------------------------------------Source Register: 0x1001Number of Registers:
NOTICE! In the event of an invalid mapping (e.g. due to aregister address outside the permitted input range or a registernumber that is too high) an error message appears.
Default data in Data BrokerIn this menu you have the option, to define the default data forconsumers used in the event of invalid production data.
If the data in the input registers should be invalid e.g. because nodata has arrived anymore from outside, the Data Broker uses thefollowing values:– All bits are 1– All bits are 0– All bits remain unchanged
--------------------------------------------------KUNBUS-COM – Default data in data broker--------------------------------------------------1 - all data bit are zero2 - all data bit are one3 - old production values are used-------------------------------------------------->
CD
I
COMS-Module DEVICENET 120 / 144
Production valid timeIn this menu you have the option,to determine the validity period ofthe register contents to be read out.
The value range of the validity periods can be defined between 0 and255 ms.
If no new data from the producer should arrive in the input registerswithin the predefined period, the Data Broker uses the data setamong the default values.
--------------------------------------------------KUNBUS-COM – Production valid time (0 = disabled)-------------------------------------------------->
2.9 DPR Output Mapping In this menu you have the option, to configure the Data BrokerMapping for DPR.
Here you can specify up to eight different register areas (startaddress and number of successive registers) as data sources.Optionally, you can activate a timeout and specify default data thatshould be valid in the event of a timeout.
--------------------------------------------------KUNBUS-COM - DPR Outputmapping--------------------------------------------------Src Register Number1 - 1 (0x0001) | 02 - 1 (0x0001) | 03 - 1 (0x0001) | 04 - 1 (0x0001) | 05 - 1 (0x0001) | 06 - 1 (0x0001) | 07 - 1 (0x0001) | 08 - 1 (0x0001) | 0
9 - Default Data: all zero10 - Valid Time: disabled-------------------------------------------------->
CD
I

COMS-Module DEVICENET 121 / 144
Configuring Output Mapping
--------------------------------------------------KUNBUS-COM – Edit one map entry--------------------------------------------------Source Register:
ü First determine the start address of the source register. You can get an overview of the start addresses in the menuRegister forthe Mapping [} 77].
◦ To do this, select a register from the input data area of thecommunication channels and then enter the number of registers to beused.ð After entering the number of registers, you will return automatically
to the mapping overview.◦ Restart the module.ð Your mapping is now configured and will be applied in the operating
mode.
--------------------------------------------------KUNBUS-COM– Edit one map entry--------------------------------------------------Source Register: 0x1001Number of Registers:
NOTICE! In the event of an invalid mapping (e.g. due to aregister address outside the permitted input range or a registernumber that is too high) an error message appears.
Default data in Data BrokerIn this menu you have the option, to define the default data forconsumers used in the event of invalid production data.
If the data in the input registers should be invalid e.g. because nodata has arrived anymore from outside, the Data Broker uses thefollowing values:– All bits are 1– All bits are 0– All bits remain unchanged
--------------------------------------------------KUNBUS-COM – Default data in data broker--------------------------------------------------1 - all data bit are zero2 - all data bit are one3 - old production values are used-------------------------------------------------->
CD
I
COMS-Module DEVICENET 122 / 144
Production valid timeIn this menu you have the option,to determine the validity period ofthe register contents to be read out.
The value range of the validity periods can be defined between 0 and255 ms.
If no new data from the producer should arrive in the input registerswithin the predefined period, the Data Broker uses the data setamong the default values.
--------------------------------------------------KUNBUS-COM – Production valid time (0 = disabled)-------------------------------------------------->
2.11 Fieldbus Specific In the following menu items, you have the option to make field-specific settings.
Using the selection [1]-[3] + [Return] select the required configurationsource.
Using the selection [9] + [Return] you can make adjustments to theconfiguration source.
KUNBUS-COM - DeviceNet Settings--------------------------------------------------Actual Config Source: Shift register
1 - Modbus Register2 - Switch attached to shift register3 - Offline connection setting from DeviceNet master
9 - Configure Actual Selection-------------------------------------------------->
2.11.1 Modbus RegisterSettings
In this register you have the option to assign node-ID and bitrate viathe memory register.
--------------------------------------------------KUNBUS-COM - DeviceNet Mbus Register setting--------------------------------------------------Node ID (0x400d): 63Bitrate (0x4010): 125 kBit
1 - Change Node ID2 - Change Bitrate-------------------------------------------------->
CD
I

COMS-Module DEVICENET 123 / 144
2.11.1.1 Set Node-ID In this register you have the option to enter the desired node-ID andto save it permanently.
Valid value range: 0-63
--------------------------------------------------KUNBUS-COM - DeviceNet Mbus Register. Set Node ID-------------------------------------------------->
2.11.1.2 Change Bitrate Here, you can set the bitrate.
-------------------------------------------------KUNBUS-COM - DeviceNet Mbus Register. Set Bitrate--------------------------------------------------1 - 125 kBit2 - 250 kBit3 - 500 kBit4 - Atomatic bitrate detection-------------------------------------------------->
2.11.2 Switch attached toshift register
In this menu you have the option, for changing the format forevaluating the MAC ID from the shift registers.
The evaluation can take place as a two's complement or as a binarycoded decimal number:– MAC-ID 2x BCD, Bitrate automatic detection
1byte is read from the SCC. The MAC-ID is set via the 2 BCD switch.The bitrate is detected automatically.
– MAC-ID 6 Bit, Bitrate 2 Bit: 1 byte is read from the SCC. The upper 6 bits define the MAC-ID, thelower two bits define the bitrate.
--------------------------------------------------KUNBUS-COM - DeviceNet Switch Settings--------------------------------------------------Actual: Node-ID 6 Bit, Bitrate 2 Bit
1 - MAC-ID 2x BCD, Bitrate automatic detection2 - MAC-ID 6 Bit, Bitrate 2 Bit-------------------------------------------------->
2.11.3 Offline connectionsetting from DeviceNetmaster
With this selection, another network subscriber (Offline ConnectionSet Owner) or the DeviceNet Master assigns the MAC-ID.
CD
I

COMS-Module DEVICENET 124 / 144
2.12 Set Arbitrary Register In this menu you have the option,to make adjustments to thewriteable registers that do not have their own menu item.
First enter the register number:
--------------------------------------------------KUNBUS-COM – Set Arbitray Register--------------------------------------------------Register Number:
If the register number does not exist or is write-protected, you willreceive a corresponding error message.
--------------------------------------------------KUNBUS-COM – Set Arbitray Register--------------------------------------------------Register Number: 0x5001 <<Register doesn‘t exist or no write access.Register Number:
If the register number is valid, the dialog first shows you the set valuein decimal, hexadecimal and binary notation.
--------------------------------------------------KUNBUS-COM – Set Arbitray Register--------------------------------------------------Register Number: 0x0013Current Value : 1 0x0001 0000_0000_0000_0001bEnter New Value:
Now specify a new value for the register and press [Return] toconfirm your entry.
--------------------------------------------------KUNBUS-COM – Set Arbitray Register--------------------------------------------------Register Number: 0x0013Current Value : 1 0x0001 0000_0000_0000_0001bEnter New Value: 2New Value Set : 2 0x0002 0000_0000_0000_0010b
Register Number:
The configuration interface detects whether it is a decimal,hexadecimal or binary value based on the notation and displays thesaved value once again for confirmation.
CAUTION Please note that some settings could lead to functional incapacity ofthe CDI interface.You can only remedy such an inaccurate setting with a functional SDI orDPR interface.Ø When correcting the error, all settings made previously are reset.èWrite the value 0x0002 in the register 0x0001ð You have set the module to the original settings. The CDI interface is
now available again.
CD
I

COMS-Module DEVICENET 125 / 144
2.13 Script Interpreter In this menu you have the option, to activate or deactivate a scriptand to select the desired port.
NOTICE Please note that activation of a script influences the individual port.Never activate a script with the setting "Port used by script: CDI" if you donot have any other fully functional access (SDI, DPR) to the parametermemory registers except via the CDI interface! In such a case, your moduleis no longer configurable! You can switch the status between disabled andenabled by entering [1]+[Return].
– You can define the SDI or CDI as port. You switch between bothoptions by entering [2]+[Return].
--------------------------------------------------KUNBUS-COM - Script Interpreter--------------------------------------------------1 - State: disabled2 - Port used by script: SDI-------------------------------------------------->
2.14 Reset Module With this option you can restart the module. All changes that youhave set will be activated in the operating mode after a restart. Thefieldbus connection is interrupted during the restart.
2.15 Reset to FactorySettings
With this option, you reset all parameters of the COMS module to thedefault values.
You have to confirm the selection by entering the number "36" forreasons of security. Afterwards, the module restarts.
NOTICE Loss of all settingsBear in mind that with this function you will delete all settings that you havepreviously made.
2.16 Extended (Bit)Mapping In this menu you will find information about the current settings of theextended Data Broker. You can configure the individual values in thecorresponding submenus.
The Extended Mapping is executed after the general Mapping. Youcan combine both mapping functions by copying the larger areas withthe standard mapping and change individual bits with the extendedmapping afterwards.
You can define a total of 16 mappings. A mapping can be up to 1024bits long.
CD
I

COMS-Module DEVICENET 126 / 144
You must store the following information for each mapping:– Address of the source register– Bit position within the source register– Address of the target register– Bit position within the target register– Number of bits to be copied
Info!:– Bitwise copying requires performance.
The module works cyclically. During each cycle, the different interfacesare operated in series and the data from the Data Broker is distributedbetween the input and output data areas. Since all interfaces processthe data traffic independently of each other (asynchronous) and storethe data produced or used in a buffer, they are independent of themodule's cycle. In the case of very fast interfaces and a long cycle time,it is possible, however, that the Data Broker does not distribute allincoming data completely if several data packets arrive at the interfacewithin a cycle. Conversely, it may happen in the case of slow interfacesthat the 2nd cycle will already proceed and the output values of aninterface will be changed by the Data Broker before the values from thefirst cycle have been transmitted via the interface.For this reason, the cycle times of the module can be relevant. Theseare normally less than 1 ms. Individual cycles, however, can also lastmore than 5 ms. If you use the Extended Mapping very extensively, thecycle times can increase considerably.– Therefore, only use it if necessary.– Only use it for small areas.
– Bear in mind that the mappings are processed sequentially. If targetareas overlap, this can cause problems.
--------------------------------------------------KUNBUS-COM - Extended (Bit)Mapping--------------------------------------------------Source | Bitp | Dest. | Bitp | Length
1 - 0x0001 | 0 | 0x0001 | 0 | 02 - 0x0001 | 0 | 0x0001 | 0 | 03 - 0x0001 | 0 | 0x0001 | 0 | 04 - 0x0001 | 0 | 0x0001 | 0 | 05 - 0x0001 | 0 | 0x0001 | 0 | 06 - 0x0001 | 0 | 0x0001 | 0 | 07 - 0x0001 | 0 | 0x0001 | 0 | 08 - 0x0001 | 0 | 0x0001 | 0 | 09 - 0x0001 | 0 | 0x0001 | 0 | 010 - 0x0001 | 0 | 0x0001 | 0 | 011 - 0x0001 | 0 | 0x0001 | 0 | 012 - 0x0001 | 0 | 0x0001 | 0 | 013 - 0x0001 | 0 | 0x0001 | 0 | 014 - 0x0001 | 0 | 0x0001 | 0 | 015 - 0x0001 | 0 | 0x0001 | 0 | 016 - 0x0001 | 0 | 0x0001 | 0 | 0
-------------------------------------------------->
CD
I

COMS-Module DEVICENET 127 / 144
The submenu for entering the mapping is displayed by entering anumber from 1 to 16:
--------------------------------------------------KUNBUS-COM - Extended Mapping, 1 Entry--------------------------------------------------Entry : 1Source : 0x1001, Bitpos: 2Destination: 0x2001, Bitpos: 0(Bit)Length: 8
1 - change mapping2 - clear mapping-------------------------------------------------->
Any mapping that might exist is deleted by entering [2]+[Enter].
After entering [1]+[Enter], the Source Address, Bitpos, DestinationAddress, Bitpos and Bit length are polled sequentially:
Source– Specify here which register the data should originate from.
--------------------------------------------------KUNBUS-COM - Extended Mapping, 1 Entry--------------------------------------------------Entry : 1Source : 0x1401, Bitpos: 14Destination: 0x2401, Bitpos: 2(Bit)Length: 0x2400, Bitpos: 2
1 - change mapping-------------------------------------------------->1Source Register >
Source Bit Position– Specify here the exact position of the bit that you want to map.
--------------------------------------------------KUNBUS-COM - Extended Mapping, 1 Entry--------------------------------------------------Entry : 1Source : 0x1401, Bitpos: 14Destination: 0x2401, Bitpos: 2(Bit)Length: 0x2400, Bitpos: 2
1 - change mapping-------------------------------------------------->1Source Register >0x1810Source Bit Position >
CD
I

COMS-Module DEVICENET 128 / 144
Destination Register– Specify here the register where you want to output the data.
--------------------------------------------------KUNBUS-COM - Extended Mapping, 1 Entry--------------------------------------------------Entry : 1Source : 0x1401, Bitpos: 14Destination: 0x2401, Bitpos: 2(Bit)Length: 0x2400, Bitpos: 2
1 - change mapping-------------------------------------------------->1Source Register >0x1810Source bit position >5Destination Register >
Destination Bit Position– Specify the exact position of the bit that you want to map the data on.
--------------------------------------------------KUNBUS-COM - Extended Mapping, 1 Entry--------------------------------------------------Entry : 1Source : 0x1401, Bitpos: 14Destination: 0x2401, Bitpos: 2(Bit)Length: 0x2400, Bitpos: 2
1 - change mapping-------------------------------------------------->1Source Register >0x1810Source bit position >5Destination Register >0x2405Destination Bit Position >
Bit Length– Specify here the number of bits you want to map.
--------------------------------------------------KUNBUS-COM - Extended Mapping, 1 Entry--------------------------------------------------Entry : 1Source : 0x1401, Bitpos: 14Destination: 0x2401, Bitpos: 2(Bit)Length: 0x2400, Bitpos: 2
1 - change mapping-------------------------------------------------->1Source Register >0x1810Source bit position >5Destination Register >0x2405Destination bit position >3Number of bits to map >
CD
I

COMS-Module DEVICENET 129 / 144
Main menu with mapping entryAfter confirming the number of bits with the enter key, you will returnautomatically to the main menu.
Here, you will now see the mapping you created in the previoussteps:
--------------------------------------------------KUNBUS-COM - Extended (Bit)Mapping--------------------------------------------------Source | Bitp | Dest. | Bitp | Length
1 - 0x1810 | 5 | 0x2405 | 3 | 272 - 0x0001 | 0 | 0x0001 | 0 | 03 - 0x0001 | 0 | 0x0001 | 0 | 04 - 0x0001 | 0 | 0x0001 | 0 | 05 - 0x0001 | 0 | 0x0001 | 0 | 06 - 0x0001 | 0 | 0x0001 | 0 | 07 - 0x0001 | 0 | 0x0001 | 0 | 08 - 0x0001 | 0 | 0x0001 | 0 | 09 - 0x0001 | 0 | 0x0001 | 0 | 010 - 0x0001 | 0 | 0x0001 | 0 | 011 - 0x0001 | 0 | 0x0001 | 0 | 012 - 0x0001 | 0 | 0x0001 | 0 | 013 - 0x0001 | 0 | 0x0001 | 0 | 014 - 0x0001 | 0 | 0x0001 | 0 | 015 - 0x0001 | 0 | 0x0001 | 0 | 016 - 0x0001 | 0 | 0x0001 | 0 | 0
-------------------------------------------------->
The extended mapping is stored permanently in the module, but isfirst executed after a restart.
CD
I

COMS-Module DEVICENET 130 / 144
Menu 3 – "Monitor Communication"3 Monitor Communication In this menu you have the option to view the current values of the
Memory Register.
--------------------------------------------------KUNBUS-COM – Modbus Register Monitor--------------------------------------------------1 – SSC In2 – SDI In3 - Fieldbus In (from Master)4 - DPR In (from Base Board)5 – SSC Out6 – SDI Out7 - Fieldbus Out (to Master)8 - DPR Out (to Base Board)9 - Arbitrary Register-------------------------------------------------->
3.1 Monitor SSC InputRegisters
In this menu you will get an overview of the current values of theinput areas of the shift register chain.
In the first row you see the setting values for the display. Here, youcan select a binary [b], hexadecimal [h] or decimal [d] format.
--------------------------------------------------KUNBUS-COM – Monitor SSC Input Registers--------------------------------------------------
b=binary, h=hex, d=decimal, n=next, p=previous <cr>=refresh
0x1001: 0x0000 0x0000 0x0000 0x0000 0x0000 0x00000x1009: 0x0000 0x0000 0x0000 0x0000 0x0000 0x00000x1011: 0x0000 0x0000 0x0000 0x0000 0x0000 0x00000x1019: 0x0000 0x0000 0x0000 0x0000 0x0000 0x00000x1021: 0x0000 0x0000 0x0000 0x0000 0x0000 0x00000x1029: 0x0000 0x0000 0x0000 0x0000 0x0000 0x00000x1031: 0x0000 0x0000 0x0000 0x0000 0x0000 0x00000x1039: 0x0000 0x0000 0x0000 0x0000 0x0000 0x0000>
CD
I

COMS-Module DEVICENET 131 / 144
3.2 Monitor SDI InputRegisters
In this menu you will get an overview of the input area's currentvalues of the SDI interface.
In the first row you see the setting values for the display. Here, youcan select a binary [b], hexadecimal [h] or decimal [d] format.
--------------------------------------------------KUNBUS-COM – Monitor SDI Input Registers--------------------------------------------------
b=binary, h=hex, d=decimal, n=next, p=previous <cr>=refresh
0x1401: 0x0000 0x0000 0x0000 0x0000 0x0000 0x00000x1409: 0x0000 0x0000 0x0000 0x0000 0x0000 0x00000x1411: 0x0000 0x0000 0x0000 0x0000 0x0000 0x00000x1419: 0x0000 0x0000 0x0000 0x0000 0x0000 0x00000x1421: 0x0000 0x0000 0x0000 0x0000 0x0000 0x00000x1429: 0x0000 0x0000 0x0000 0x0000 0x0000 0x00000x1421: 0x0000 0x0000 0x0000 0x0000 0x0000 0x00000x1439: 0x0000 0x0000 0x0000 0x0000 0x0000 0x0000
3.3 Monitor Fieldbus Input (from Master)
In this menu you will get an overview of the input area's currentvalues of the DeviceNet interface.
In the first row you see the setting values for the display. Here, youcan select a binary [b], hexadecimal [h] or decimal [d] format.
--------------------------------------------------KUNBUS-COM – Monitor Fieldbus Input (from Master)--------------------------------------------------
b=binary, h=hex, d=decimal, n=next, p=previous <cr>=refresh
0x1801: 0x0000 0x0000 0x0000 0x0000 0x0000 0x00000x1809: 0x0000 0x0000 0x0000 0x0000 0x0000 0x00000x1811: 0x0000 0x0000 0x0000 0x0000 0x0000 0x00000x1819: 0x0000 0x0000 0x0000 0x0000 0x0000 0x00000x1821: 0x0000 0x0000 0x0000 0x0000 0x0000 0x00000x1829: 0x0000 0x0000 0x0000 0x0000 0x0000 0x00000x1831: 0x0000 0x0000 0x0000 0x0000 0x0000 0x00000x1839: 0x0000 0x0000 0x0000 0x0000 0x0000 0x0000>
CD
I
COMS-Module DEVICENET 132 / 144
3.4 Monitor Dualport RAMInput (from Base Board)
In this menu you will get an overview of the input area's currentvalues of theDual-Port-RAM.
In the first row you see the setting values for the display. Here, youcan select a binary [b], hexadecimal [h] or decimal [d] format.
NOTICE! Please note that dots are displayed instead of numberswhen the module is in SSC mode.
--------------------------------------------------KUNBUS-COM – Monitor Dualport RAM Input (from Base Board)--------------------------------------------------
b=binary, h=hex, d=decimal, n=next, p=previous <cr>=refresh
0x1c01: 0x0000 0x0000 0x0000 0x0000 0x0000 0x0000 0x00000x1c09: 0x0000 0x0000 0x0000 0x0000 0x0000 0x0000 0x00000x1c11: 0x0000 0x0000 0x0000 0x0000 0x0000 0x0000 0x00000x1c19: 0x0000 0x0000 0x0000 0x0000 0x0000 0x0000 0x00000x1c21: 0x0000 0x0000 0x0000 0x0000 0x0000 0x0000 0x00000x1c29: 0x0000 0x0000 0x0000 0x0000 0x0000 0x0000 0x00000x1c31: 0x0000 0x0000 0x0000 0x0000 0x0000 0x0000 0x00000x1c39: 0x0000 0x0000 0x0000 0x0000 0x0000 0x0000 0x0000>
3.5 Monitor SSC OutputRegisters
In this menu you will get an overview of the output area's currentvalues of the shift register chain.
In the first row you see the setting values for the display. Here, youcan select a binary [b], hexadecimal [h] or decimal [d] format.
--------------------------------------------------KUNBUS-COM – Monitor SSC Output Registers--------------------------------------------------
b=binary, h=hex, d=decimal, n=next, p=previous <cr>=refresh
0x2001: 0x0000 0x0000 0x0000 0x0000 0x0000 0x00000x2009: 0x0000 0x0000 0x0000 0x0000 0x0000 0x00000x2011: 0x0000 0x0000 0x0000 0x0000 0x0000 0x00000x2019: 0x0000 0x0000 0x0000 0x0000 0x0000 0x00000x2021: 0x0000 0x0000 0x0000 0x0000 0x0000 0x00000x2029: 0x0000 0x0000 0x0000 0x0000 0x0000 0x00000x2031: 0x0000 0x0000 0x0000 0x0000 0x0000 0x00000x2039: 0x0000 0x0000 0x0000 0x0000 0x0000 0x0000>
CD
I

COMS-Module DEVICENET 133 / 144
3.6 Monitor SDI OutputRegisters
In this menu you will get an overview of the output area's currentvalues of the SDI interface.
In the first row you see the setting values for the display. Here, youcan select a binary [b], hexadecimal [h] or decimal [d] format.
--------------------------------------------------KUNBUS-COM – Monitor SDI Output Registers--------------------------------------------------
b=binary, h=hex, d=decimal, n=next, p=previous <cr>=refresh
0x2401: 0x0000 0x0000 0x0000 0x0000 0x0000 0x00000x2409: 0x0000 0x0000 0x0000 0x0000 0x0000 0x00000x2411: 0x0000 0x0000 0x0000 0x0000 0x0000 0x00000x2419: 0x0000 0x0000 0x0000 0x0000 0x0000 0x00000x2421: 0x0000 0x0000 0x0000 0x0000 0x0000 0x00000x2429: 0x0000 0x0000 0x0000 0x0000 0x0000 0x00000x2431: 0x0000 0x0000 0x0000 0x0000 0x0000 0x00000x2439: 0x0000 0x0000 0x0000 0x0000 0x0000 0x0000>
3.7 Monitor Fieldbus Output (to Master)
In this menu you will get an overview of the output area's currentvalues of the DeviceNet interface.
In the first row you see the setting values for the display. Here, youcan select a binary [b], hexadecimal [h] or decimal [d] format.
--------------------------------------------------KUNBUS-COM – Monitor Fieldbus Output (to Master)--------------------------------------------------
b=binary, h=hex, d=decimal, n=next, p=previous <cr>=refresh
0x2801: 0x0000 0x0000 0x0000 0x0000 0x0000 0x00000x2809: 0x0000 0x0000 0x0000 0x0000 0x0000 0x00000x2811: 0x0000 0x0000 0x0000 0x0000 0x0000 0x00000x2819: 0x0000 0x0000 0x0000 0x0000 0x0000 0x00000x2821: 0x0000 0x0000 0x0000 0x0000 0x0000 0x00000x2829: 0x0000 0x0000 0x0000 0x0000 0x0000 0x00000x2831: 0x0000 0x0000 0x0000 0x0000 0x0000 0x00000x2839: 0x0000 0x0000 0x0000 0x0000 0x0000 0x0000>
CD
I

COMS-Module DEVICENET 134 / 144
3.8 Monitor Dualport RAMOutput (from Base Board)
In this menu you will get an overview of the output area's currentvalues of theDual-Port-RAM
In the first row you see the setting values for the display. Here, youcan select a binary [b], hexadecimal [h] or decimal [d] format.
NOTICE! Please note that dots are displayed instead of numberswhen the module is in SSC mode.
--------------------------------------------------KUNBUS-COM – Monitor Dualport RAM Output (from Base Board)--------------------------------------------------
b=binary, h=hex, d=decimal, n=next, p=previous <cr>=refresh
0x1c01: 0x0000 0x0000 0x0000 0x0000 0x0000 0x0000 0x00000x1c09: 0x0000 0x0000 0x0000 0x0000 0x0000 0x0000 0x00000x1c11: 0x0000 0x0000 0x0000 0x0000 0x0000 0x0000 0x00000x1c19: 0x0000 0x0000 0x0000 0x0000 0x0000 0x0000 0x00000x1c21: 0x0000 0x0000 0x0000 0x0000 0x0000 0x0000 0x00000x1c29: 0x0000 0x0000 0x0000 0x0000 0x0000 0x0000 0x00000x1c31: 0x0000 0x0000 0x0000 0x0000 0x0000 0x0000 0x00000x1c39: 0x0000 0x0000 0x0000 0x0000 0x0000 0x0000 0x0000>
3.9 Arbitrary Register In this menu you will get an overview of all registers. Use thisfunction to view registers that do not have their own menu item.
First enter the register number (e.g. “0x4001”):
--------------------------------------------------KUNBUS-COM – Monitor Arbitray Register--------------------------------------------------
Register Number: 0x4001
The CDI then displays 64 registers from the specified register value.
In the first row you see the setting values for the display. Here, youcan select a binary [b], hexadecimal [h] or decimal [d] format.
--------------------------------------------------KUNBUS-COM – Monitor Arbitray Register--------------------------------------------------
b=binary, h=hex, d=decimal, n=next, p=previous <cr>=refresh
0x4001: ...... ...... 0x0490 ...... 0x002b ...... 0x01020x4009: 0x0ef5 0x0001 0xe240 ...... ...... 0x0000 ......0x4011: ...... 0x0001 ...... ...... 0x0004 0x0055 0x004e0x4019: 0x0042 0x0055 0x0053 0x002d 0x0043 0x004f 0x004d0x4021: 0x0020 0x0045 0x0074 0x0068 0x0065 0x0072 0x004e0x4029: 0x0074 0x002f 0x0049 0x0050 0x0000 0x0017 0x00000x4031: 0x0000 0x0008 0x00e1 0x0000 0x0020 ...... ......0x4039: ...... ...... ...... ...... ...... ...... ......>
The CDI represents registers that do not exist by dots.
CD
I

COMS-Module DEVICENET 135 / 144
Menu 4 – "Module Status"
4 Module Status In the following submenu you will get an overview of the currentoperating state of the module and of all interfaces.
--------------------------------------------------KUNBUS-COM – Module Status--------------------------------------------------1 – Common Status2 – SDI Status3 - SSC Status4 – CDI Status5 – Fieldbus Status6 - DPR Status7 - Error Stack8 – Script Status-------------------------------------------------->
4.1 Common Status In this menu you will find information about the current operatingstate of all communication channels.
The CDI displays the states of the interfaces, connection mode forthe main board, configuration errors as well as errors in the DataBroker Mapping.
The first row displays whether the module is in SSC mode or DPRmode. Please make sure that SSC and SDI are deactivated in DPRmode. The DPR is deactivated in SSC mode. Only a short messageis then displayed in the corresponding status menus.
--------------------------------------------------KUNBUS-COM – Common Status Flags--------------------------------------------------<cr> = refresh; <Esc> = return
Baseboard connection mode: DPR
Fieldbus State: is runningFieldbus Configuration: is okFieldbus Mapping: is ok
Synchron serial communication: is stoppedSync. serial comm. Configuration: is okSync. serial comm. Mapping: is ok
Modbus RTU (SDI) Mapping: is okModbus RTU (SDI) Configuration: is ok
Dual Port RAM: is runningDual Port RAM Configuration: is okDual Port RAM Mapping: is ok-------------------------------------------------->
CD
I

COMS-Module DEVICENET 136 / 144
4.2 SDI Status In this menu you will find information about the current interfaceparameters and node ID.
If the interface is running in "Automatic Bitrate detection" mode andno bitrate has been detected yet, the message "Actual Bitrate:undefined" will be displayed instead of the interface parameters.
--------------------------------------------------KUNBUS COM – SDI Status--------------------------------------------------<cr> = refresh; <Esc> = return
Modbus Node Address: 1Actual Bitrate: 38400 Bit/sActual Parity: evenActual Stopbits: 1 Stopbit-------------------------------------------------->
4.3 SSC Status In this menu you will find information about the status of the SSCinterface. The representation is dependent on the selected mode andconfigurations:
SSC SSR Master Mode, auto detect shift registers– You have selected "auto detect shift registers" as the configuration
source for the SSC.
In this menu you will find the following information:– Number of shift registers– Bitrate
If the shift register chain is not working, the text "Shift Register chainnot working" will be displayed instead of the interface parameters.
--------------------------------------------------KUNBUS-COM - SSC Status--------------------------------------------------<cr> = refresh; <Esc> = return
SSC SSR Master Mode, auto detect shift registers
Actual Number of Input registers: 1/1Actual Number of Output registers: 1/1Actual Bitrate: 4800 kBit/s-------------------------------------------------->
CD
I

COMS-Module DEVICENET 137 / 144
SSC SSR Master Mode, configured registers– You have selected "configured shift registers" as the configuration
source for the SSC.
In this menu you will find the following information:– Number of shift registers– Bitrate
If the number of configured registers does not match the number ofconnected registers or the shift register chain is not working, you willsee the message "Shift Register Chain not working“.
--------------------------------------------------KUNBUS-COM- SSC Status--------------------------------------------------<cr> = refresh; <Esc> = return
SSC SSR Master Mode, configured shift registersActual Number of Input registers: 1/1Actual Number of Output registers: 1/1Actual Bitrate: 4800 kBit/s-------------------------------------------------->
SSC SSR Master Mode, disabledYou will find this representation if the SSC Master was switched offvia the menu.
--------------------------------------------------KUNBUS-COM - SSC Status--------------------------------------------------<cr> = refresh; <Esc> = return
SSC SSR Master Mode, disabled-------------------------------------------------->
SSC SPI Slave Mode– You have selected "SSC SPI Slave Mode" as the configuration source.
In this menu you will find information about clock and data level.
--------------------------------------------------KUNBUS-COM - SSC Status--------------------------------------------------<cr> = refresh; <Esc> = return
SSC SPI Slave Mode
Actual SPI Settings: Polarity Normal, Falling Edge, CLK High, MSBfirst-------------------------------------------------->
CD
I

COMS-Module DEVICENET 138 / 144
4.4 CDI Status In this menu you will find information about the current parameters ofthe CDI.
--------------------------------------------------KUNBUS-COMS-Modul – CDI Status--------------------------------------------------<cr> = refresh; <Esc> = return
Actual Bitrate: 115200 Bit/sActual Parity: evenActual Stopbits: 1 Stopbit-------------------------------------------------->
4.5 Fieldbus Status In this menu you can find information about the current status of thefieldbus interface.
--------------------------------------------------KUNBUS-COM - DeviceNet Status--------------------------------------------------<cr> = refresh; <Esc> = return
Vendor Id: 1168Device Type: 0x000cProduct Code: 3Revision: 0x0102Serial number: 4294967280Product Name: KUNBUS-COM DeviceNetNode ID: 0Bitrate: 125 kBit/sNetwork Status: OfflineModule Status: Minor fault detected-------------------------------------------------->
4.6 DPR Status In this menu you will find information about the status of the DPR andabout the parameters of the DPR.
--------------------------------------------------KUNBUS-COM – DPR Status--------------------------------------------------<cr> = refresh; <Esc> = return
DPR Status: ReadyIn Mailbox Size: 32In Mailbox State: emptyOut Mailbox Size: 122Out Mailbox State: emptyIn Process Data Size: 384Out Process Data Size: 384-------------------------------------------------->
CD
I

COMS-Module DEVICENET 139 / 144
4.7 Error Stack In this menu you will find information about the errors that lastoccurred. Please have these entries ready at hand when you contactour support. We can help you faster by evaluating the entries.
If the value is 0x00000000, no error has occurred.
The Error Stack occupies the register 0x000a to 0x0011 andprovides space for 4 entries at a length of 32 bits each.
The register x+0 (0x….0000) contains the High-Word of the error.The register x+1 (0x….0000) contains the Low-Word of the error.
If all four entries are occupied and another error occurs, this error willreplace the oldest error in the Error Stack. The latest error is alwaysdisplayed first.
--------------------------------------------------KUNBUS-COM – Error Stack--------------------------------------------------<cr> = refresh; <Esc> = return
Entry 0: = 0x00000000Entry 1: = 0x00000000Entry 2: = 0x00000000Entry 3: = 0x00000000-------------------------------------------------->
4.8 Script Interpreter Status In this menu you will find information about the current Script-Status.
--------------------------------------------------KUNBUS-COM - Script Interpreter Status--------------------------------------------------<cr> = refresh; <Esc> = return
Port used by script: CDIExecution status: StoppedLoop counter: 0-------------------------------------------------->
CD
I

COMS-Module DEVICENET 140 / 144
4.9 Emergency Menu In the unlikely event of a serious error, you can open this menu.– You can try to start the module by entering "R".– You can reset the EEPROM to the factory settings with the "F" key.
This can be useful, for example, if a permanently stored value triggers aserious software error after a firmware update.
If the error cannot be remedied, please contact our support. Have thenumber of the error entry ready for this purpose.
--------------------------------------------------KUNBUS-COM - Fatal Error Handler--------------------------------------------------A severe error occurred. Error Stack:
Entry 0: = 0x34030000Entry 1: = 0x00000000Entry 2: = 0x00000000Entry 3: = 0x00000000--------------------------------------------------press 'R' for Reset orpress 'F' for Reset with Factory Defaults-------------------------------------------------->
Also see about this
2 Synchronous serial interface [} 34]
2 General Device Parameters [} 63]
CD
I

COMS-Module DEVICENET 141 / 144
9 Disposal
9.1 Dismantling and DisposalThis section contains important information explaining how to safelydismantle, replace and dispose of the COMS-Modul correctly.
Dismantling
DANGER Danger of electric shockBefore dismantling, make sure that the device in which your module isinstalled is no longer connected to the power supply.èRemove the mains plug of the device from the power supply.èProceed in accordance with the device manufacturer's documentation to
ensure that the device is disconnected from the power supply and nodamage will result when dismantling.
WARNING Fault due to electrostatic dischargeObserve all regulations necessary for working in electrostatically protectedareas in order to avoid any faults on the module.èMake sure that you yourself and the module are earthed.
ü The device, in which your module is installed, has been disconnectedfrom the power supply.
ü You have removed the cover of the housing, if applicable, inaccordance with the manufacturer's instructions.
◦ Release the safety lever, if applicable, and remove your modulecarefully out of the socket.
◦ If you want to insert a new module, proceed as described in sectionInstallation [} 48].
Disposal
Dispose of any defective module at a collection point for wasteelectronic equipment in accordance with EU Directive 2002/96/EC.Do not dispose of the module in your household waste.
Dispose of any defective module in accordance with the localregulations for waste electronic equipment.
Dis
posa
l

COMS-Module DEVICENET 142 / 144
10 Technical data
10.1 Technical data
Dimensions
Length 85 mmWidth 65 mmHeight 12 mmWeight 29 g
Environmental Conditions
Operating temperature 0 °C to +60 °CHumidity 0% not 95%, non-condensingMechanical shock load 15 GPermanent mechanical stress 5 GCondensing not allowedStorage temperature -30 °C to +85 °C
Tech
nica
l dat
a

COMS-Module DEVICENET 143 / 144
11 Appendix
11.1 Configuration via ModpollPrerequisite: You have made the SDI interface on the applicationconnector suitable for a PC by your application hardware (e.g. a levelconverter).
Tip!: With the KUNBUS-COM Evaluation Board you have a Sub-Dconnector at your disposal with RS-232 levels that can be connectedto a serial COM interface of the PC or to a serial USB converter.
Complete ApplicationConfiguration
To configure the module conveniently for application, we recommendthat you make the setting adjustments with the aid of the Modpollprogram supplied.ü To do this, open the command line prompt in the first step and then
change to the directory where Modpoll is located. Drag and drop themodpoll.exe file into the input panel.
◦ Always begin new commands with the input "Modpoll".ð Define your application by specifying the protocol type, register address,
baudrate etc. We have compiled the relevant Modpoll commands foryou in the following table.
Example for the Configurationof the SSC Output Register
modpoll –m rtu –r 0x1401 –t 4:hex –b 19200 COM1 0x1234
modpoll –m rtu –r 0x2401 –t 4:hex –b 19200 COM1
Overview of the ModpollCommands
Start modpoll.exeHelp -hProtocol selectionModbus ASCII Protocol -m asciiModbus RTU Protocol -m rtuModbus TCP Protocol -m tcpNested Modbus RTU via TCP -m encAddressesSlave address -a #Register address -r #Number of registers -c #I/ODiscrete output (coil) -t 0Discrete input -t 116-bit input register -t 316-bit input register with hexadecimal display -t 3:hex32-bit integer data type in the input register table -t 3:int32-bit module 1000 data type in the input registertable
-t 3:mod
App
endi
x
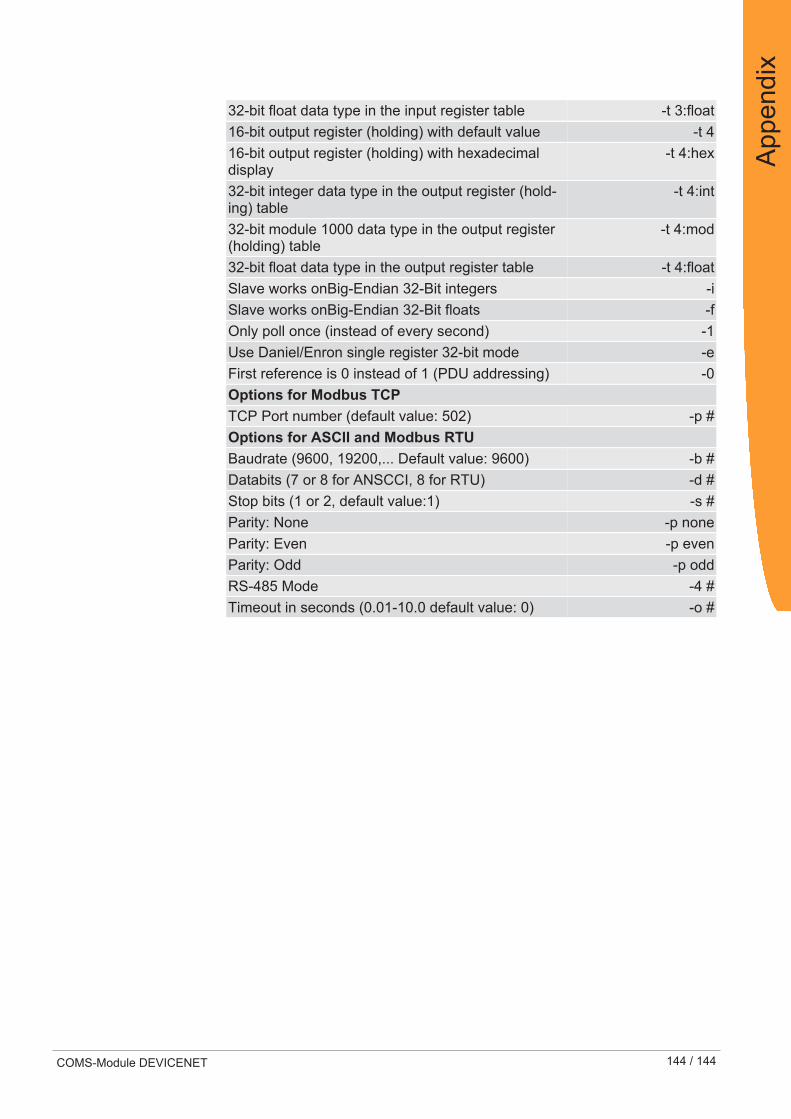
COMS-Module DEVICENET 144 / 144
32-bit float data type in the input register table -t 3:float16-bit output register (holding) with default value -t 416-bit output register (holding) with hexadecimaldisplay
-t 4:hex
32-bit integer data type in the output register (hold-ing) table
-t 4:int
32-bit module 1000 data type in the output register(holding) table
-t 4:mod
32-bit float data type in the output register table -t 4:floatSlave works onBig-Endian 32-Bit integers -iSlave works onBig-Endian 32-Bit floats -fOnly poll once (instead of every second) -1Use Daniel/Enron single register 32-bit mode -eFirst reference is 0 instead of 1 (PDU addressing) -0Options for Modbus TCPTCP Port number (default value: 502) -p #Options for ASCII and Modbus RTUBaudrate (9600, 19200,... Default value: 9600) -b #Databits (7 or 8 for ANSCCI, 8 for RTU) -d #Stop bits (1 or 2, default value:1) -s #Parity: None -p noneParity: Even -p evenParity: Odd -p oddRS-485 Mode -4 #Timeout in seconds (0.01-10.0 default value: 0) -o #
App
endi
x