user guide - hb trader supportsupport.hold.com/software/sterling/sterling_user_guide.pdfwelcome to...
TRANSCRIPT

Volume
1
STERLING TECHNOLOGIES INC.
Sterling Trader® Pro
User Guide

STERLING TRADER® PRO
User Guide
© Sterling Technologies Inc. 225 West Washington Street • Suite 1014 Phone 312.346.9600 • Fax 312.346.7244
www.sterlingtechnologiesinc.comwww.sterlingfinancialsystems.com
Document Version – February 17, 2005, Revision 4.0.0

Table of Contents
Introduction Welcome to Sterling Trader® Pro………...………………………………………………………1
Sterling Trader® Pro Taskbar – Section 1 Logging-In to Sterling Trader® Pro………………………………………………………………2 The Sterling Trader® Pro Taskbar……………………………………………………………......2
Order Entry in Sterling Trader® Pro – Section 2 Level I Order Entry……………………………………………………………………………......3
Quick View……..…………………………………………………………………………3 Expanded View……....……………………………………………………………………3 Order Entry Keystrokes Grouped by Category……....……………………………………4 Hot Keys……....……………..……………………………………………………………5
Mini Order Entry…………………………………………………………………………………..7 Pegged Orders………..……………………………………………………………………………8 Discretionary Orders………………………………………………………………………………9 Server-Side Stops (S-STP)…………………………………………………………………….....10 Basket Orders…………………………………………………………………………………….12 Level II Order Entry………………………………………………………………………….......13
Canceling Orders……...…………………………………………………………………15 Sterling Trader® Pro Order Entry – Advanced Features………........………………………16
Highlighting…….……………………………………………………………………16 Level II Settings……...………………………………………………………………17 Use Global and Local Settings to Preload Your Custom Defaults……...……………….18 Global Order Entry Settings Window……..……………………………………………..18 Local Order Entry Settings……...……………………………………………………….22
Futures in Sterling Trader® Pro – Section 3 Futures Order Entry……………………………………………………………………………...24
Futures Order Entry Settings…………………………………………………………….25 Futures Monitor………………………………………………………………………………….32
Window-Linking in Sterling Trader® Pro – Section 4 Linking in Sterling Trader® Pro…………………………………………………………………35

Which Windows in Sterling Trader® Pro Can Be Linked?..............................................35 How are windows “Linked” in Sterling Trader® Pro?............………………………......37 How Are Links Saved?......................................................................................................37 How Many Link Groups Can Be Saved?...........................................................................37 How Are Links Removed?.................................................................................................37 Setting Up Automatic Linking Using Global Order Entry Settings...…...……………....38 Set as Focus Window..……..………………………………………………………….....39
Real-Time Market Quotes in Sterling Trader® Pro – Section 5
Stock Watch...…….……………………………………………………………………………...40 Order Entry Capability…………………………………………………………………...41 Spread List……………………………………………………………………………….42
Time and Sales…………………………………………………………………………………...42 Market Watch...…….………………………………………………………………………….....43 Top Ten...…….………………………………………………………………………..................44
Linked to Focus Window and Chart…….……………………………………………….45 Fundamental Data……………………………………………………………………………......46 News……………………………………………………………………………………………..46 MDX (Market Data Extensions)…………………………………………………………………47 Alerts……………………………………………………………………………………………..47
Order Monitoring Tools in Sterling Trader® Pro – Section 6 Trading Monitor……………………………………………………………………………….....48
Filtering Data……....…………………………………………………………………….50 Trade Summary…………………………………………………………………………..............51 Activity Log……………………………………………………………………………………...52
Position Monitoring Tools in Sterling Trader® Pro – Section 7 Position Summary………………………………………………………………………………..54
Order Entry Capability……....…..…………………………………………………….....55 Order Entry Detail……....………………………………………………………………..56
Charts in Sterling Trader® Pro – Section 8 Opening a Chart……………….....................................................................................................57 “Create New Chart” Pop-Up Window………...............................................................................57 Selecting a Chart Type……….......................................................................................................58 Tick Chart – Selecting...……........................................................................................................58 Tick Chart – Display Features………...........................................................................................59 Tick Chart – Toolbar Features……………...................................................................................59 Tick Chart – Examining the Underlying Price Detail………........................................................61

Bar Chart – Selecting……….........................................................................................................61 Bar Chart – Display Features (Variable Minute Intervals)………................................................62 Bar Chart – Toolbar Features (Bar Types)……............................................................................63 Bar Chart – Examining the Underlying Price Detail……….........................................................64 Day Chart – Selecting; Toolbar Features.……………………………………………………......64 Day Chart – Different Time Intervals (Daily, Weekly, Monthly)…………………………….....65 Spread Charts – Setting Up and Loading..…………………………………………………….....65 Chart Studies – Selecting...............................................................................................................67 Chart Studies – Advanced Features:
Creating a Template (“Set Current As Default”)……...………….……………………...67 Loading an Existing or Previously Saved Chart...……………….………………………67
Examples of Chart Studies: Bollinger Bands with Volume Study……...…………………………………………......68 Daily Day Bar Chart, Candlestick Bar Type; Volume Study, Bollinger Bands…………68 12 Minute Bar Chart with Simple Moving Average (SMA)..……………….………......69 1 Minute Bar Chart with Weighted Moving Average (WMA).…………….……………69 2 Minute Bar Chart with Bollinger Bands (BOLL).……………………….……….........70 1 Hour Bar Chart with Stochastic (STC)………………………………….………..........70 20 Minute Bar Chart with Momentum Dividend (MMD).………………….……...........71 15 Minute Bar Chart with Average Directional Movement Index (ADX)……...……….71 15 Minute Bar Chart with Moving Average Convergence/Divergence (MACD)……….72 5 Minute Bar Chart with Relative Strength Index (RSI)...………………………….…...72 30 Minute Bar Chart with Trend (TRN)..…………………………………………..........73 30 Minute Bar Chart with Exponential Trend (ETRN)……...……………………..........73
Sterling Trader® Pro Miscellaneous Tools – Section 9 Messenger……………………………………………………………………………………......74 Clock…………………………………………………………………………………………......75
Sterling Trader® Pro Key Word Index Sterling Trader® Pro Key Word Index………………………………………………………......76

Welcome to Sterling Trader® Pro
Congratulationtrading platformmanagement funtime market quoyou in planningelectronic access
s on choosing Sterling Trader® Pro as your one-stop, all-inclusive ; it will provide you with the most refined order-entry and order-ctionality available within the industry. In addition, it will deliver real-tes, news, alerts, chart analyses and other tools that will greatly assist and executing your trading strategy. This package offers you direct to the leading U.S. and Canadian exchanges and ECNs – thus making
available at your fingertips a trading platform that delivers convenient access to all of the major listed and over-the-counter markets.
Please take a few minutes to read over and become familiar with this Sterling Trader® Pro User Guide; refer back to it as often as needed. Note that there is a detailed Key Word Index at the back, which may save you time initially in locating the topics you are most interested in. We hope that this Sterling Trader® Pro User Guide becomes an effective tool for you – enabling you to explore and customize the full depth of features contained within Sterling Trader® Pro.
1
Section
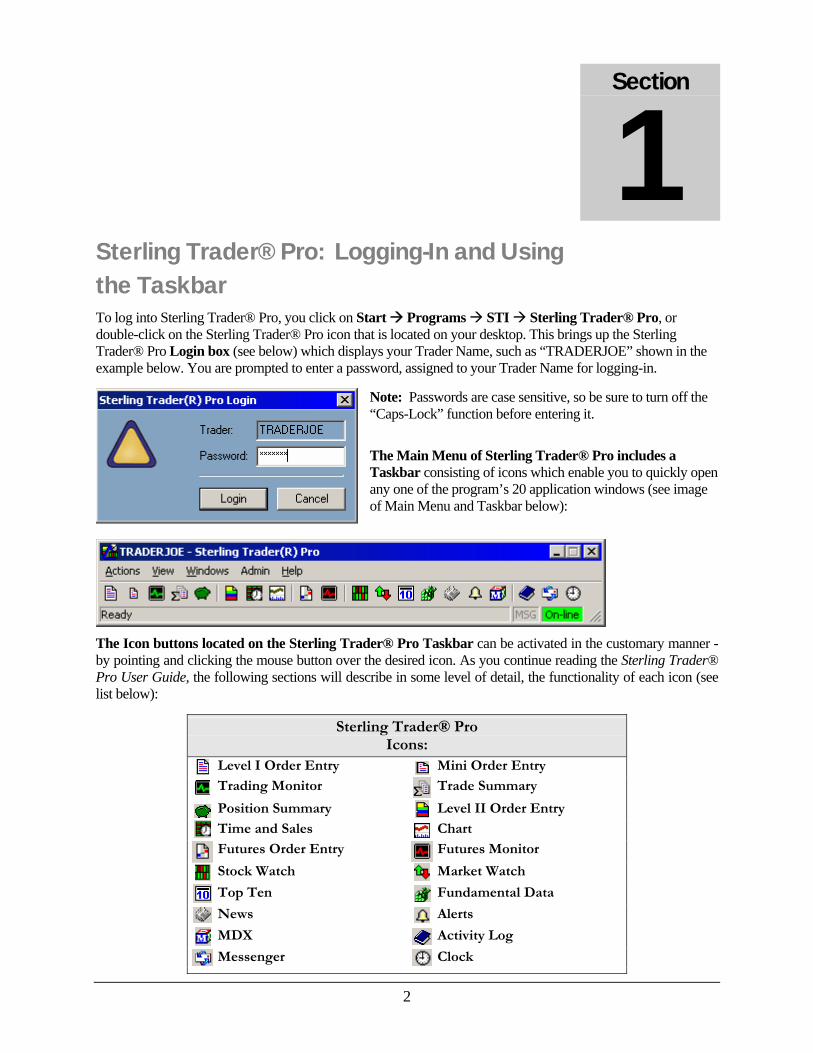
1Sterling Trader® Pro: Logging-In and Using the Taskbar To log into Sterling Trader® Pro, you click on Start Programs STI Sterling Trader® Pro, or double-click on the Sterling Trader® Pro icon that is located on your desktop. This brings up the Sterling Trader® Pro Login box (see below) which displays your Trader Name, such as “TRADERJOE” shown in the example below. You are prompted to enter a password, assigned to your Trader Name for logging-in.
Note: Passwords are case sensitive, so be sure to turn off the “Caps-Lock” function before entering it.
The Main Menu of Sterling Trader® Pro includes a Taskbar consisting of icons which enable you to quickly open any one of the program’s 20 application windows (see image of Main Menu and Taskbar below):
The Icon buttons located on the Sterling Trader® Pro Taskbar can be activated in the customary manner - by pointing and clicking the mouse button over the desired icon. As you continue reading the Sterling Trader® Pro User Guide, the following sections will describe in some level of detail, the functionality of each icon (see list below):
2
Sterling Trader® Pro Icons:
Level I Order Entry Mini Order Entry
Trading Monitor Trade Summary
Position Summary Level II Order Entry
Time and Sales Chart
Futures Order Entry Futures Monitor
Stock Watch Market Watch
Top Ten Fundamental Data
News Alerts
MDX Activity Log
Messenger Clock

Section
2Sterling Trader Pro® Order Entry
Level I OrderLevel I Order Encan be sent; the and Position SumMonitor. Level Ia user can toggl
3
Entry try is one of the five windows in Sterling Trader® Pro from which orders
other four are Level II Order Entry, Mini-Order Entry, Stock Watch mary. In addition, orders can be changed or cancelled from the Trading
Order Entry offers both “Quick” and “Expanded” views, between which e by selecting “View” under the Menu Bar and then clicking the desired
setting. See the examples below:
Level I Order Entry: Quick View
Level I Order Entry: Toggling from Quick View to Expanded View

Level I Order Entry: Expanded View
Sterling Trader® Pro is able to run multiple instances of the Level I Order Entry window simultaneously. In fact, there is no set limit to the number of Level I Order Entry windows that can be opened-up and executed from at any one time. The images above and on the preceding page illustrate a Level I Order Entry window in both “Quick” and “Expanded” modes. Expanded view offers additional functionality to the “Quick” view, such as the ability to do each of the following: to select Special Order Designations (AON, DNI DNR) and specific Price Types; to set the Tif (Time-in-Force) value; and to specify an order destination preference (Preference). These Expanded View fields can be selected either by clicking on the drop-down arrows (“Point and Click”) in each of the respective fields, or by using an assortment of keystrokes called “Quick Fill”.
“Quick Fill” is a time-saving feature within all the Sterling Order Entry windows that enables a user to make precise Data Field selections by means of a single keystroke combination. This compares favorably to using the mouse, which requires two clicks per data field when making selections from a pull-down menu. Therefore the Quick Fill feature makes possible rapid order-entry from within an integrated quote-line. The tables below arrange the Quick Fill keystrokes available by group for each of the Sterling Order Entry data fields:
“Quick Fill” - Order Entry Keystrokes - by Category:
Side: Quantity: Symbol: Price:
B – BUY E – SSHRT EX (Sell Short Exempt) M – BUY- (Buy on down-tick) P – SELL+ (Sell on up-tick) S – SELL T – SSHRT (Sell Short)
H – Hundreds M – One ThousandK – Thousands
First letter displays nearest symbol - e.g.:
I – IBM IN – INTC C – CPQ CS – CSCO
B – BAS C – MKT CLO L – CLO M – MKT O – MKT OB T – WOW W – MKT WOW
Account: Price Type: Tif (Time-in-Force): Destination:
First letter displays full Account Name - e.g.:
T – TRADER S – SHORT C – CASH A – ACCOUNT
C – CLO L – STP LMT O – OB S – STOP W – WOW
D – DAY E – EXT F – FOK G – GTC I – IOC O – OPG X – GTX
A – ARCA B – BRUT C – CHX D – NTRD F – ATTN H – CME I – ISLD K – TRAC M – AMEX N – NY/AM O – OES Q – NASDAQ S – SLIP T – INCA X – NYSE+ Y – NYSE
4

5
Level I Order Entry: Hot Keys
In addition to the “Point-and-Click” and “Quick Fill” techniques for sending orders, Level I Order Entry offers a third method of rapid order-entry capability which is called “Hot Keys.” Hot Keys can be set up locally for each instance of the Level I Order Entry window by following this two-step procedure: First, from the menu of the Level I Order Entry window, you click on View Local Order Entry Settings. You select the local settings for the data fields that you want this window to load by default, such as Account, Destination and Tif (Time-in-Force), specified for either Listed or OTC symbols. You also select default pre-load settings for additional fields such as Price Type, Quantity to open position, Quantity if increasing position, and Quantity if closing position. In addition, you choose the default quantity of shares to pre-fill in this window when entering a new symbol; this can be either the Quantity if increasing position or the Quantity if closing position. These settings are now “in-force” locally for this one instance of the Level I Order Entry window. Next, from the Main Menu of Sterling Trader® Pro, you click on View Global Order Entry Settings Hot Keys. You will now see the Hot Keys setup screen. Note that some 19 Hot Key keystroke combinations are automatically provided by the Sterling Trader® Pro System, and their default functions cannot be changed. These are colored blue and are found in the center of the screen’s display list. They include operations such as Esc (Cxl Last), Alt+V (Cvr All), Alt+R (Rsrv Order) and Alt+A (Cxl All), along with some 15 others. The functions of these 19 Hot Keys cannot be changed; only the default keystroke combinations can be re-set, e.g. you can change the Alt+R keystroke to Alt+4 (the “Order Attributes” screen, displaying: quantity for Reserve Orders, Peg Type or Peg difference, and Price discretion). The one exception to this is the Esc (Cxl Last) keystroke, which is fixed and cannot be changed. All other keystroke combinations can be created and changed at will. Those keystroke combinations shown at the bottom of the Hot Keys setup screen which are red-colored and are grayed out, such as Ctrl+Esc, Alt+Tab or Alt+Esc, are invalid – not available as keystroke combinations for Hot Keys; they are reserved as Microsoft Windows system keystrokes and cannot be used as Sterling Hot Keys.
So to create a new Hot Key or to change an existing Hot Key, you just click on the “Add” or “Edit” button on the upper-right corner of the Hot Keys setup screen. Once in the “Edit Hot Key” or “Add Hot Key” setup mode that follows, you point to or navigate to those column heading labels for which you want to pre-load Local Settings, for instance Account, Destination, and Tif (Time-in-Force), or again, fields such as Side, Quantity, Symbol, and Price Type. If you set the value for these fields to “Default” for the specific Hot Key in question (for instance F1 or F2), then the Hot Key setting for that specified field will adopt the Local (“Default”) value established for that specified field from the Local Order Entry Settings window. With this technique, every Order Entry window will now in effect have customized Hot Keys, specific to that window.
Another option worth noting for inclusion as a value in these Hot Key field settings is the “Current” value. “Current” means that the Hot Key will inherit whatever value that field is currently displaying on the face of the order entry window – in other words, the last or most recent value that is shown or displayed for that field, and not the default value established for that field from the Local Order Entry Settings window for that order entry window. For instance, if the default quantity for shares in the Local Order Entry Settings window is set to 500, but the current value actually displaying in the quantity field on the face of that order entry window (based on the most recent order) is 300, and the Hot Key being used has “Current” inserted as the pre-load value for the “Quantity” field, then sending an order with that Hot Key will transmit 300 shares (the currently displaying value for quantity) instead of the default value of 500 shares (the value pre-set in the Local Order Entry Settings setup window). If however “Default” had been set as the quantity value for that Hot Key, then the default quantity of 500 shares would have been transmitted for that order, instead of 300.
Conversely, you can choose to override local settings for Hot Keys with global defaults, by filling-in those value fields with specific settings – e.g. ARCA, ISLD or BULLET for Destination; DAY, GTC or EXT for Tif; LMT, MKT, (Bid) or (Ask) for Price Type – instead of “Default.” The particular Hot Key will then always pre-load with that specific value. A user can also establish global settings in the Global Order Entry Settings setup screen that will override all local settings, both for Hot Keys and all other pre-load defaults as well. If no local settings have been defined for a particular order entry window, then either the user-defined or default global settings will be in-force, and a setting of “Default” for a particular field will in fact mean the default global setting, since no local setting for that order entry window has been defined. So when examining the “Default” settings for the different fields in the Hot Keys tab, you can choose to keep the current global setting defaults (established in the Global Order Entry Settings setup screen), or you can change the default settings with

user-defined preferences which will become Global. By default the Sterling Trader® Pro System will automatically provide some 19 Hot Key keystroke combinations that can be used in the Level I Order Entry window (as well as in the other order entry windows), and their default functions cannot be changed. These include the Esc (Cxl Last) key for canceling orders. In addition, the F1 through F3 function keys have been preset with the basic Hot Key functions of BUY, SELL and SSHRT, in order to make you familiar with Hot Keys – and ultimately proficient in using them. Then you can continue composing additional, customized Hot Key keystroke combinations of your own, by using the Alt and Shift keys in combination with numbers and letters (those not already in use). To change the default Hot Keys settings and create custom Hot Keys, you click on the “Add” or “Edit” buttons within the Hot Keys tab located under View Global Order Entry Settings (see the following two illustrations below):
Click the Add or Edit buttons…
Note on Canceling Orders: Orders can be canceled in a variety of ways when using Hot Keys: you can cancel Specific Orders, Last Order Sent (LIFO or FIFO), All, All Buys, All Sells, All Shorts, etc. Hot Key functions can be performed from one or more of the following order entry-capable windows: Level I, Level II, Mini Order Entry, Stock Watch (by first right-clicking on a symbol, then opening-up a Level I or Level II window) and Trading Monitor. You can review the different Cxl keystroke Hot Key combinations and what order entry windows they can be performed from, by either highlighting the various Cxl Hotkeys and then clicking “Edit”; or by double-clicking the different Hotkey actions in the Hot Keys tab shown in the illustration above. Note that in addition to canceling the last order sent, you can choose to cancel multiple orders by repeatedly pressing the Esc key. This feature is set up in the “Level I” tab of the Global Order Entry Settings window. If you choose the ability to cancel multiple orders by repeatedly pressing the Esc key, then you should also pay attention to whether the order canceled is either Last in Last Out (LILO), or first in First Out (FIFO) order.
6

…to Edit a Hot Key for a Specific Function…
Mini Order EnMini Order Entrsent. The main flexibility; you cthe symbol is enEntry window ca
7
try y is one of five windows in Sterling Trader® Pro from which orders can be advantage of using Mini Order Entry windows is their small size and an fit multiple instances of these windows in a small area (see below). As tered, all the other fields are automatically filled-in, since each Mini Order n have its own Local Order Entry Settings applied, along with the Hot Key
settings. Therefore, multiple orders can be launched rapidly, one at a time. There is no set limit to the number of Mini Order Entry windows that can be opened and traded from at any given time. They can easily fit into any layout and will preserve a lot of your “desktop real estate.” See the examples:

8
Pegged OrdeIn the Sterling destinations: ARCorders can be founthe “ECN/Exchaare various types
rs Trader® System, pegging is supported for orders sent to the following A, BRUT, INCA, INET and NASDAQ. The default settings for pegged d in the Global Order Entry Settings window of Sterling Trader® Pro, under
nge” tab (see illustration below). Depending upon the destination selected, there of pegged orders that can be prepared, including “Primary”, “Market”, “Mid-
Market”, and “Best”. These pegged order type settings can in some instances be further modified by entering “Peg Difference” or “Peg Limit Price” amounts. A “Peg Difference” means either the addition or subtraction of a specified quantity of pennies per each pegged order. A “Peg Limit Price” can also be joined to a pegged order; the limit price itself may be set up as “Last”, “Bid”, or “Ask”. If needed, the “Peg Limit Price” can be further refined by adding increments of pennies to the limit price (see the “Limit price” combo-box in the example below). Please note that each particular ECN has its own specific implementation of pegging. Consult with the different ECNs (ARCA, BRUT, INCA, INET and NASDAQ) for further information explaining their own specific implementation of pegging.
Once you are in the order entry window, pegged orders are selected from the pull-down menu of the “Price” field combo-box that is found on the order entry bar (near top of the Level I or Level II Order Entry window). As is shown in the illustrations on the following page, the price value labeled “PEG” is selected from the pull-down menu. What the “PEG” designation means in each particular instance depends on the settings that were chosen from the setup screen described above, as well as the specific implementation of pegging offered by each particular ECN, as was mentioned above. In the current example (for ARCA), PEG means “Primary PEG”. While the focus is on the order entry window, you can also verify what default settings are in effect for the “Peg Type”, “Peg Difference” and “Limit Price” fields, by pressing the Hot Key Alt+R. This displays the “Order Attributes” setup screen which is shown below, to the right of the Level II Order Entry window:

DiscretionaryA discretionary oto be added-to range over whicdiscretionary amany price betwe
9
Orders rder is a limit order for which you define a discretionary amount that is or subtracted-from the limit price itself, thereby increasing the price h an order is eligible to be filled. For a BUY order, for instance, the ount is added to the limit price; the order is eligible to be executed at
en the limit price and the limit price plus (+) the discretionary amount. For a SELL order, the discretionary amount is subtracted from the limit price, so the sell order is eligible to be filled at any price between the actual limit price and the limit price minus (-) the discretionary amount. In the Sterling Trader® System, discretionary orders are supported for the ARCA, BRUT and NASDAQ destinations. You determine the default settings that are to be used for discretionary orders by going to the “ECN/Exchange” tab of the Global Order Entry Settings window of Sterling Trader® Pro. Please note that you can also override these default settings on a per-order, as needed basis, by use of the “Order Attributes” dialog box. The “Order Attributes” dialog box is displayed by pressing the Hot Key keystroke combination of Alt+R. From this window you can change the “Price discretion” amount for that current order – right there on the spot; then you can send the order immediately, from this same window. Please refer to the illustrations shown on the following page to see how Discretionary Order settings can first be set in place as defaults; then they can be modified, as needed:
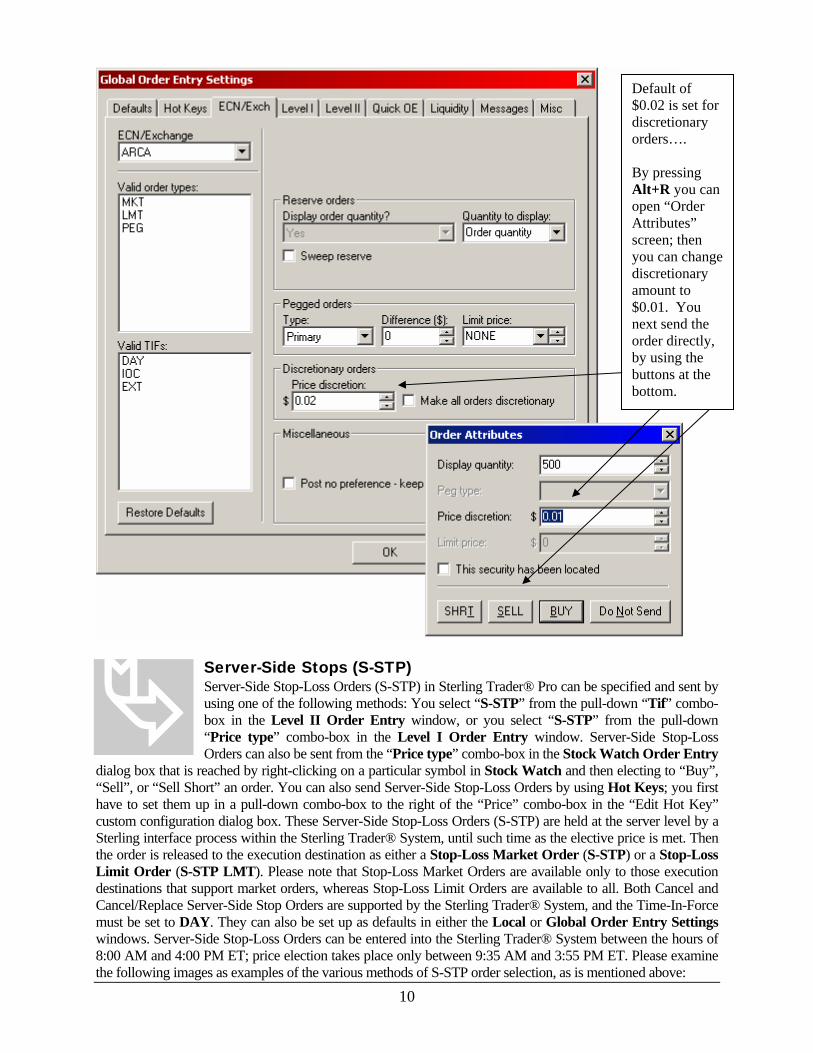
Default of $0.02 is set for discretionary orders…. By pressing Alt+R you can open “Order Attributes” screen; then you can change discretionary amount to $0.01. You next send the order directly, by using the buttons at the bottom.
Server-SideServer-Side Stopusing one of the box in the Leve“Price type” coOrders can also b
Stops (S-STP)
10
-Loss Orders (S-STP) in Sterling Trader® Pro can be specified and sent by following methods: You select “S-STP” from the pull-down “Tif” combo-l II Order Entry window, or you select “S-STP” from the pull-down mbo-box in the Level I Order Entry window. Server-Side Stop-Loss e sent from the “Price type” combo-box in the Stock Watch Order Entry
dialog box that is reached by right-clicking on a particular symbol in Stock Watch and then electing to “Buy”, “Sell”, or “Sell Short” an order. You can also send Server-Side Stop-Loss Orders by using Hot Keys; you first have to set them up in a pull-down combo-box to the right of the “Price” combo-box in the “Edit Hot Key” custom configuration dialog box. These Server-Side Stop-Loss Orders (S-STP) are held at the server level by a Sterling interface process within the Sterling Trader® System, until such time as the elective price is met. Then the order is released to the execution destination as either a Stop-Loss Market Order (S-STP) or a Stop-Loss Limit Order (S-STP LMT). Please note that Stop-Loss Market Orders are available only to those execution destinations that support market orders, whereas Stop-Loss Limit Orders are available to all. Both Cancel and Cancel/Replace Server-Side Stop Orders are supported by the Sterling Trader® System, and the Time-In-Force must be set to DAY. They can also be set up as defaults in either the Local or Global Order Entry Settings windows. Server-Side Stop-Loss Orders can be entered into the Sterling Trader® System between the hours of 8:00 AM and 4:00 PM ET; price election takes place only between 9:35 AM and 3:55 PM ET. Please examine the following images as examples of the various methods of S-STP order selection, as is mentioned above:

The Limit Price is set to 32.25 and the Time-In-Force (Tif) field is set to S-STP.
Stop Limit Price is set at 32.07 and the Price Type is set to S-STP LMT.
The Price Type is set to S-STP LMT and the Stop Limit Price is set at 32.12.
The Limit Price is set to “(Ask) + .03” and the Price Type is set to S-STP.
11

12
Basket OrdeThe Sterling Baenables a user tobe sent “all-togeefficiency becaudestinations, “all
rs sket Add-On application comes integrated with Sterling Trader® Pro. It define a “basket” of orders, which consists of a group of symbols that can ther” – in a single action. Basket orders can improve trading speed and se you are able to send multiple orders, directed to different execution at once”. Otherwise you would have to transmit different orders multiple
times. It is reached from the Main Menu by clicking on Windows Basket Add-on. This takes you to the Sterling Basket Add-On window. Sterling Basket Add-On enables you to send baskets consisting of multiple orders all at once with a single click of the mouse. A “basket” consists of multiple symbols grouped together in one set. You can define customized “baskets” consisting of symbols that are grouped together by any category that you designate, such as by industry or type of market. You can manually add individual baskets from within the “Basket Setup” screen by clicking the “Add Basket” button. This opens up the “Add New Basket” dialog box, into which you designate the Basket Name, Button Name, and File Name. After this is established, you begin entering the “Symbol”, “Quantity”, and “Destination” fields to that basket, and after each entry, you click “Add” in order to set it in your basket file. After you have set up all of your entries for that basket, you next “Save” it. After the basket has been saved, it will appear in the “Available Baskets list on the left panel of the Basket Setup window. To activate the basket, you still need to check the box to the left of the basket name. Then, after you click the “Save Changes” button at the bottom of the Basket Setup window, the now activated button (with the button name that you have defined) will appear on the far left column of the Sterling Basket Add On window. When you click on this button, the symbols, order sizes and execution destinations will load in the window, and your basket order is now ready to be sent. Please see the following illustrations for further description and amplification:
Please note: You must explicitly select your account name from the pull-down list in the “Account” combo-box, located just to the left of the “Multiplier” combo-box (shown above near the top of the illustration). If your account is not found in the pull-down list of this combo-box, then you will need to add it by clicking the “Accounts” menu at the top left, typing in the account name and then clicking “Add Account”. You will now see the account name appear in the large window at the top of the “Accounts” set-up screen. You can also remove or delete selected accounts from this same “Accounts” set-up screen.

Level II OrdThe Level II Orcapability combiinstances of the display them wisettings profile. Y
er Entry der Entry window in Sterling Trader® Pro delivers superb order-routing ned with point-and-click ease. You are able to open and trade from as many Level II Order Entry window as you like – there is no limit. You can th a variety of settings, or you can set them up with one default display
ou can “link” them to the other order-entry windows, to quotes windows, to Time and Sales windows and to Charts (more about “Linking” later – pp. 31-32, 35-39). You can save them as part of a layout. The Level II Order Entry window offers full Level II quotation information, along with optional Book quotation information from among the leading sources in the industry, including (though not limited to) the following: Island, Archipelago, Instinet, Attain, New York Open Book, and New York Liquidity Book – along with a growing list of others. The following illustration represents a Level II Order Entry window with Island Book (ISB), ARCA Book (ARB) and INCA Book (INB) quote information, as well as displaying direct connections to a variety of ECNs. The illustration just after it shows a Level II Order Entry window with New York Open Book displayed. ECNs with direct access connections available are identified in the Level II window by an “ECN Direct Access Indicator,” represented by the lightning bolt symbol; it is located just left of the quote. Book quotes are similarly represented in the window, with the Book Icon that is also displayed to the immediate left of the quote, as is the lightening bolt. The time column can be displayed with seconds. A scroll bar can be added to the right margin of the Level II window, so as to enable you to view the entire depth (all levels) of the market makers, if so desired. For reference, please note the locations of these display tools as they are shown in the following illustration (see below):
Stock Symbol Entry
Preference
Destination
Time Display – Showing Seconds
Book Icons
ECN Direct Access
Indicator – “Lightening
Bolt”
Order Status
Showing Last
Message in System
Quick Position for Currently Selected Symbol.
13

Book Icons – “New York Open Book”
The Level II Order Entry window offers the same “Point-and-Click” and “Hot Key” functionality as does the Level I. It also offers the time-saving technique of Quick Fill. All of these methods enable rapid order-entry capability. As with the Level I Order Entry window, Hot Keys can be set up locally for each instance of the Level II Order Entry window by the following two-step procedure: First, from the menu of the Level II Order Entry window, you click on View Local Order Entry Settings. You then select the local settings for the data fields that you want this window to pre-load by default, such as Account, Destination and Tif (Time-in-Force), specified for either Listed or OTC symbols. You also select default pre-load settings for additional fields such as Price Type, Quantity to open position, Quantity if increasing position or the Quantity if closing position. In addition, you choose the default quantity of shares to pre-fill in this window when entering a new symbol; this can be either the Quantity if increasing position or the Quantity if closing position. These defaults are now set locally for this one instance of the Level II Order Entry window, and will be pre-loaded whenever a new symbol is entered or the Clr (Clear) button is clicked. Second, from the Main Menu of Sterling Trader® Pro, you click on View Global Order Entry Settings Hot Keys. You will now see the Hot Keys setup screen. Note that some 19 Hot Key keystroke combinations are automatically provided by the Sterling Trader® Pro System, and their default functions cannot be changed. These are colored blue and are found in the center of the screen’s display list. They include operations such as Esc (Cxl Last), Alt+V (Cvr All), Alt+R (Rsrv Order) and Alt+A (Cxl All), along with some 15 others. The functions of these 19 Hot Keys cannot be changed; only the default keystroke combinations can be re-set, e.g. you can change the Alt+R keystroke to Alt+4 (the “Order Attributes” screen, displaying: quantity for Reserve Orders, Peg Type or Peg difference, and Price discretion). The one exception to this is the Esc (Cxl Last) keystroke, which is fixed and cannot be changed. All other keystroke combinations can be created and changed at will. Those keystroke combinations shown at the bottom of the Hot Keys setup screen which are red-colored and are grayed out, such as Ctrl+Esc, Alt+Tab or Alt+Esc, are invalid – not available as keystroke combinations for Hot Keys; they are reserved as Microsoft Windows system keystrokes and cannot be used as Sterling Hot Keys.
So to create a new Hot Key or to change an existing Hot Key, you just click on the “Add” or “Edit” button on the upper-right corner of the Hot Keys setup screen. Once in the “Edit Hot Key” or “Add Hot Key” setup mode that follows, you point to or navigate to those column heading labels for which you want to pre-load Local Settings, for instance Account, Destination, and Tif (Time-in-Force), or again, fields such as Side, Quantity,
14

15
Symbol, and Price Type. If you set the value for these fields to “Default” for the specific Hot Key in question (for instance F1 or F2), then the Hot Key setting for that specified field will adopt the Local (“Default”) value established for that specified field from the Local Order Entry Settings window. With this technique, every Order Entry window will now in effect have customized Hot Keys, specific to that window.
Another option worth noting for inclusion as a value in these Hot Key field settings is the “Current” value. “Current” means that the Hot Key will inherit whatever value that field is currently displaying on the face of the order entry window – in other words, the last or most recent value that is shown or displayed for that field, and not the default value established for that field from the Local Order Entry Settings window for that order entry window. For instance, if the default quantity for shares in the Local Order Entry Settings window is set to 500, but the current value actually displaying in the quantity field on the face of that order entry window (based on the most recent order) is 300, and the Hot Key being used has “Current” inserted as the pre-load value for the “Quantity” field, then sending an order with that Hot Key will transmit 300 shares (the currently displaying value for quantity) instead of the default value of 500 shares (the value pre-set in the Local Order Entry Settings setup window). If however “Default” had been set as the quantity value for that Hot Key, then the default quantity of 500 shares would have been transmitted for that order, instead of 300.
Alternately, you can choose to override local settings for Hot Keys with global defaults, by filling-in those value fields with specific settings – e.g. ARCA, ISLD or BULLET for Destination; DAY, GTC or EXT for Tif; LMT, MKT, (Bid) or (Ask) for Price Type – instead of “Default.” The particular Hot Key will then always pre-load with that specific value. A user can also establish global settings in the Global Order Entry Settings setup screen that will override all local settings, both for Hot Keys and all other pre-load defaults as well. If no local settings have been defined for a particular order entry window, then either the user-defined or default global settings will be in-force, and a setting of “Default” for a particular field will in fact mean the default global setting, since no local setting for that order entry window has been defined. So when examining the “Default” settings for the different fields in the Hot Keys tab, you can choose to keep the current global setting defaults (established in the Global Order Entry Settings setup screen), or you can change the default settings with user-defined preferences which will become global. By default the Sterling Trader® Pro System will automatically provide some 19 Hot Key keystroke combinations that can be used in the Level II Order Entry window (as well as in the other order entry windows), and their default functions cannot be changed. These include the Esc (Cxl Last) key for canceling orders. In addition, the F1 through F3 function keys have been preset with the basic Hot Key functions of BUY, SELL and SSHRT, in order to make you familiar with Hot Keys – and ultimately proficient in using them. Then you can continue composing additional, customized Hot Key keystroke combinations of your own, by using the Ctrl, Alt and Shift keys in combination with numbers, letters or the 12 function keys (those combinations not already in use). The 11 keystroke combinations shown at the bottom of the Hot Keys setup screen (which are red-colored and are grayed out), such as Ctrl+Esc, Alt+Tab or Alt+Esc, are invalid – not available as keystroke combinations for Hot Keys; they are reserved as Microsoft Windows system keystrokes. To change the default Hot Keys settings and create custom Hot Keys, you click on the “Add” or “Edit” buttons within the Hot Keys tab, located under View Global Order Entry Settings.
For further detail on the different types of Hot Key combinations available, please refer to the Hot Keys tab located under View Global Order Entry Settings. Canceling Orders You can cancel orders from the Level II Order Entry window using any of the following methods:
1. Esc key: Using the Esc key, you cancel open orders one-at-a-time, consecutively, in either a LIFO (Last-In First Out) or FIFO (First-In First Out) sequence. In Sterling Trader® Pro, you choose the sequence you want by going to the “Miscellaneous” tab of the Global Order Entry Settings window. At the top-right you find a combo-box labeled “Esc key cxl sequence” (LIFO / FIFO).
2. Cancel (X) button: You cancel open orders by clicking the (gray) “Cancel” (X) button, found on the 2nd row of the Level II Order Entry window, right-center. This button is shown on page 9. It is located between the “Tif” (indicating “Day”) and “Preference” (indicating “NASD”) buttons. It cancels open orders one-at-a-time and consecutively, processing them in the sequence you have chosen (LIFO / FIFO).
3. Open Orders Bar: You can cancel from the (red) “Cancel” button located on the left side of the “Open Orders Bar.” The “Open Orders Bar” is shown in the Level II “Highlighting” example on p. 17.

Sterling Trader® Pro Order Entry – Advanced Features: Highlighting
You can enable Entry window. Iyou click View is a section labelabeled “Highligright of the “Mak
“Highlighting” of Books, ECNs or Market Makers in the Level II Order t is a simple two-step process. First, from the menu of the Level II window,
Settings. At the top of the middle column of the Level II Settings screen led “Market makers.” There is a check box located second-from-the-top ht specific makers.” Check-off this box. Then, just below that and to the ers” button you select the background (“Back”) and text (“Text”) colors for
your highlighting mode. After making your selections click “OK” to activate the color settings. Of course, for your highlighting you will want to choose those color-combinations that will stand-out against the normal color scheme of your Level II window. For instance, if your default color profile for the Level II window is “Classic” or “Soft,” you might want to try a highlight of yellow text against a black background. This color combination will ensure that your highlighted Market Makers stand out. Second, to activate a particular highlight, you right-click on any Book, ECN or Market Maker quote displayed in your Level II window, on either the “Bid” or “Ask” side, and select “Highlight” from the pop-up menu that follows. That Market Maker quote will now be highlighted on both sides of the Level II window. You can remove a highlight from a quote in the Level II window in the same manner, first by right-clicking on the highlighted quote, then selecting “Remove Highlight” from the pop-up menu. See the illustrations below for further detail:
To Access the “Level II Settings” window – Click: View Settings
16

17
To Enable Highlighting, check-off the box labeled:
“Highlight specific makers”
Then, select your Background and Text colors for Highlighting.
Below is an example of how highlighted Market Makers will display – standing-out against the color scheme of other Market Makers that are “normally displayed” in your Level II window:

Sterling Trader® Pro Order Entry – Advanced Features: Use Global anThe Sterling Trathe following deII Order Entry a preference for
18
d Local Settings to Preload Your Custom Defaults der® Pro system takes many factors into account in determining which of fault order entry settings will be pre-loaded for a user’s Level I and Level windows. Within each of the five categories listed below, users can specify what default settings should be pre-loaded into their Level I or Level II
Order Entry windows, thereby customizing the preload default settings. Below are the categories to which user preferences can be applied:
• When the “Clear” button is pressed: “Clear All Fields”
“Initialize all fields based on local Order Entry settings”
• After sending order: “Clear All Fields” “Clear Side, Quantity and Price fields only” “Leave all fields unchanged” “Initialize all fields based on local Order Entry settings”
• After sending order set focus to the: “Side field” “Price field”
• When current position changes: “Update Side, Quantity and Price fields” “Leave all fields unchanged”
• When Symbol or Account changes: “Update affected fields” “Leave all fields unchanged”
Global Order Entry Settings Window In order to locate the dialog boxes to be used for preloading the default order entry settings mentioned above, you click on the tabs labeled Level I and Level II in the Global Order Entry Settings window. You reach these tabs from the Main Menu of Sterling Trader® Pro, by clicking View Global Order Entry Settings. The manner in which the 5 categories below are set-up will determine just how the Level I and Level II Order Entry windows are to “return” data display feedback in response to user-originated activities, such as sending Orders, changing Symbols, pressing the “Clear” button to re-load default settings, and so on. Please refer to the illustrations on the following two pages for examples of how to access these settings. This first set of illustrations below shows the settings that apply to the Level I Order Entry window:

19
Level I tab used for Setup of the Global pre-load defaults for
Order Entry Settings
Tab Order tab controls tabbing to certain data fields as well as
their sequence of tabbing… Note: Settings displayed in this
snapshot are the Global defaults for the Level I tab. If a user wants to return to these Global selection
defaults after making changes, then the user simply clicks the “Restore
Defaults” button at the bottom-right.
Global Order Entry Settings – as applied to the Level II Order Entry window:

20
Note: Global default settings for the Level II tab as shown above are slightly different from the defaults for
the Level I tab. For instance, this Level II tab also includes checkboxes for single-click routing – “Route
to ECN if available” and to “Enable double-click preferencing” (for SNET or NASDAQ).
Level II tab used for Setup of the Global pre-loading defaults
for Order Entry Settings
Tab Order tab controls tabbing to certain data fields as well as
their sequence of tabbing…

Making changes to the “Defaults” tab of the Global Order Entry Settings window, for setting-up the pre-load
Defaults…then checking-off the “Propagate Changes” box at bottom left….
This is the “Propagation Confirmation” dialog box that appears after making changes
in the “Defaults” tab of the Global Order Entry Settings window – for setting up the
pre-load Defaults.
When you click on the “Yes” button at the bottom-left of this dialog box, the changes made will be activated, propagating to all local instances of the Level I, Level II and Mini Order Entry windows.
21

Local Order Entry Settings As was mentioned previously (pages 4, 7 and 11) there is no system limit to the number of Level I, Level II or Mini Order Entry windows that can be opened and traded from, at any given time. What is especially noteworthy about this is the fact that every such instance of an opened order entry window – Level I, Level II, or Mini Order Entry – can have its own distinct Local Order Entry Settings applied to it. This allows for an unusual level of order-entry customization made available to the user of Sterling Trader® Pro. And these Local Settings will take precedence over Global Settings by default – unless the user specifies otherwise. This concept was just described in the previous paragraph with the concept of propagating changes from the Global to the Local Settings. For convenience sake, the Local Order Entry Settings window includes a button called “Restore to Global” – another way of quickly and painlessly converting an order entry window back from “Local Settings” to a previously configured default or template “Global Setting.” In effect, the Local Order Entry Settings window is identical to the “Defaults” tab of the Global Order Entry Settings window – with the only exception being the inclusion of the “Restore to Global” button just described. Again, every instance of an opened Level I, Level II or Mini Order Entry window can have its own default (Local) settings applied to it. The Local Order Entry Settings window is reached by following the path of View Local Order Entry Settings… from the Menu Bar at the top of the Level I, Level II or Mini Order Entry window (see following illustration):
Advanced Customization: Configuring Local Order Entry Settings to be “In Effect” for Specific (Local) Instances of Order Entry Windows – Thereby Overriding Global Order Entry Settings Each specific instance of an active Level I, Level II or Mini Order Entry window can have its own particular (Local) Settings preloaded by default and saved – either if that window has remained open up to the time that the user logs out of Sterling Trader® Pro, or when the user saves that specific layout. Then, those default Local Settings will be loaded the next time the user logs back into Sterling Trader® Pro, either as part of the saved layout, or as part of the “Load settings from previous shutdown” startup option found in the View General Settings... setup box reached from the Main Menu. Therefore, these settings will in fact apply individually to each particular instance of the Level I, Level II or Mini Order Entry window – taking precedence over the default Global Order Entry Settings that were previously discussed on pp. 14-17.
The illustrations on the following page serve as examples to compare the setup and configuration features of the Local Order Entry to the Global Order Entry Settings windows:
22

The Local Order Entry Settings
dialog box. Note how it is nearly identical to the
“Defaults” tab of the Global
Order Entry Settings window
shown at page bottom.
The primary difference is the
“Restore to Global” button
located at bottom-right.
This is the “Defaults” tab of the Global Order Entry Settings window. Notice, it is nearly identical to the Local Order Entry Settings window shown on the top of this page.
The only differences are: the “Restore Defaults” button on the bottom-right…
…and the “Propagate changes” check-box located at the bottom left.
23

Section
3Sterling Trader® Pro Futures Trading
Futures TradFutures quotes, Fthe front-end of located in the FuMenu by clickingOrder Entry tha
24
ing in Sterling Trader® Pro utures order-handling, and Futures risk-control capabilities are all built into Sterling Trader® Pro. Futures quotes and order-entry controls are each tures Order Entry window, which can be reached either from the Main Windows Futures Order Entry, or by clicking the Icon for Futures t is located on the Taskbar of Sterling Trader® Pro ( ). From the Futures
Order Entry window you are able to view real-time Futures quotes and send Futures orders. Another Futures-related window is the Futures Monitor; it is the counterpart to the Trading Monitor for tracking Futures orders and fills. From this window you are able to oversee the status of all your Futures orders and trades, updated real-time as quotes change. From here you can also make adjustments to your positions, by changing or canceling existing orders as needed. Let us now examine the windows in more detail.
Futures Order Entry ( ): Futures Order Entry is the window from where you will track Futures prices, along with the depth of the market. All of the price fields essential for informed and effective decision-making are available in column format, including the following:
Price fields include: ‘Price’ (price-levels); ‘Bid’ (number of contracts bid at that price-level); ‘BidTot’ (number of contracts bid at or above that price-level); ‘Ask’ (number of contracts offered at that price-level); ‘AskTot’ (number of contracts offered at or below that price-level); ‘Mine’ (number of orders that belong to the logged-in Account).
Control buttons include: ‘Pull All’ (cancels all of your open orders for the selected Futures symbol); ‘Pull Buys’ (cancels all of your open Buy orders for the selected symbol); ‘Pull Sells’ (cancels all of your open Sell orders for the selected symbol); ‘Trade Out’ (covers all of your open positions for the selected symbol at the market).
Default Quantity buttons are located below the control buttons and are five in number (1-5). They represent the number of contracts per trade. The default quantities for each of these buttons are, in descending order: 25, 10, 5, 2, and 1. You can re-set these buttons to any desired quantity, from the View Settings screen.
At midpoint between the control buttons at the upper-left and the quantity buttons at the bottom-left are two arrow buttons for scrolling up-and-down the Price Fields, along with a ‘Re-center’ button.
The Order Entry Bar is located below the Price field, control button and quantity button sections. It includes the following combo-boxes: ‘Quantity’; ‘Price’; ‘Account’; ‘Destination’; ‘Price type’; ‘Stop Limit Price’ (where applicable); ‘Tif’ (Time-in-force); BUY and SELL.
The Position Bar is located below the Order Entry Bar, and it displays the following fields: (Contracts) ‘Bought’; ‘@’ (at what Price); ‘Pos’ (Position); (Contracts) ‘Sold’; ‘@’ (at what Price); ‘P/L’ (Profit and Loss for that symbol)

For visual representation of how the data fields just described appear in the Futures Order Entry window, please view the following illustrations:
‘Bid’ – number of contracts bid at a specific price-level.
‘BidTot’ – number of contracts bid at or above that price-level.
‘Ask’ – number of contracts offered at that price-level.
‘AskTot’ – number of contracts offered at or below that price-level.
25
‘Mine’ – number of open orders that belong to the logged-in Account.
‘Order Entry Bar’ and ‘Position Bar’
Note: These fields can be included or excluded via the “View” menu at the top.
Futures Order Entry Settings setup window – the following fields can be controlled: Column fields can be included or excluded. Defaults can be set for: Account, Destination, and Tif (Time-In-Force). Quantities can be set for the different Quantity buttons from here.

Viewing Futures Prices in Sterling Trader® Pro Futures prices can be viewed from each of the following windows: Futures Order Entry, Stock Watch, Chart, Time and Sales, and the Level I, Level II, and Mini Order Entry windows. Please note that Futures Order Entry and Level II Order Entry will only display Futures quotes from CME Direct, showing all five levels. The other order entry windows, Level I and Mini Order Entry, will only display Level I Futures quotes from market data providers other than CME Direct, such as S&P Comstock. The Stock Watch, Chart and Time and Sales windows can display quotes from both – CME Direct and other market data providers (e.g. S&P Comstock). Please see the following montage for examples of the various displays of Futures quotes:
Quotes coming from CME Direct.
Quotes coming from S&P Comstock.
26

Quotes coming from both CME Direct and S&P Comstock.
Futures Quotes coming from S&P Comstock only.
Sending Orders from Futures Order Entry There are three methods for sending orders from the Futures Order Entry window:
First, you can send orders from the Order Entry Bar: you select the Price you want from the Price column. Note that you can save time by having the other Order Entry Bar fields (‘Account’, ‘Destination’, ‘Price Type’, ‘Tif’) prefilled from the View Settings menu of the Futures Order Entry window. When everything is loaded, you can then click the BUY or SELL buttons; when the contract is bought or sold you will see it show up in the Position Bar, in the ‘Bought’ or ‘Sold’ data fields.
A second method for sending Futures orders is by right-clicking on a particular Price-level; it doesn’t matter whether you right-click in the ‘Price’ column at the center of the window, or in one of the ‘Bid’ or ‘Ask’ columns at the left or right of the ‘Price’ column – so long as the correct Price-level is specified. When right-clicking in this manner, you invoke a pop-up menu that enables you to send Buy or Sell Futures orders specifying one of three order types: at the Price specified, i.e. as a Limit Order; at the specified Price as a Stop Limit Order; or as a Market Order.
The third method of sending Futures orders is by left-clicking on one of the quantity columns that are grouped together at particular Price-levels. These quantity columns are displayed as ‘Bid’, ‘BidTot’, ‘Ask’, and ‘AskTot’, located to the right or left of the center ‘Price’ column. When left-clicking on a particular Price-level in this manner, the order will be immediately sent without requiring any further action.
Also in Futures Order Entry you can view any of your Futures orders that are still open, at their respective Price-levels. The number of orders (contracts) currently open at each Price-level is shown in the ‘Mine’ column, located at the far right. You will see the number of contracts that have already been filled, displayed in the ‘Bought’ or ‘Sold’ fields, located at the bottom-left corner of the Position Bar. If you have bought or sold more than one contract per side, then those ‘Price’ fields will display the average execution price for that side. When you hold a position in a particular Futures contract, the ‘Pos’ data field will indicate whether your position is long, short or flat. Your ‘P/L’ and ‘Position’ fields will display data that is updated real-time, as transactions occur. You will see the Position and P/L data that applies only to that Futures instrument currently displayed in the Futures Order Entry window. To see other positions held in other Futures instruments, or to see the P/L generated from these, you may open up other instances of the Futures Order Entry window. Or, you can obtain a full view all of your Futures trading activity in one screen, by opening up a Futures Monitor window. To learn more about the Futures Monitor, please turn to pp. 32-33.
Canceling Orders There are four methods for canceling Futures orders: three of them can be performed in the Futures Order Entry window; the fourth can be carried out in the Futures Monitor. First, you can cancel an open order from the ‘Mine’ column of Futures Order Entry by left-clicking on the number representing the open order currently
27

displaying at a particular Price-level; the open order at that Price-level will be canceled. If you have more than one open order at the same Price-level displaying in the ‘Mine’ column (such as 2 or 3), then by left-clicking on that number you will cancel at once all such open orders at that same Price-level. When canceling in this manner, if you have multiple open orders at a single Price-level, you can only cancel the entire quantity at the same time; you cannot cancel only one, or a portion of the open orders at that single Price-level. You may notice too that as you “hover” over the number in the ‘Mine’ column with your mouse, an “x” marker appears, indicating the impending action of canceling all the open orders at that Price-level. Once the action of canceling one or more open orders at a single Price-level is completed, the open order(s) number disappears from the ‘Mine’ column.
A second method of canceling orders in Futures Order Entry is by right-clicking on an open order displaying in the ‘Mine’ column at a particular Price-level. Essentially this has the same effect as left-clicking on that open order in the ‘Mine’ column: when you choose ‘Cancel’ from the pop-up menu that results from right-clicking, you will be canceling at once all such open orders at that same Price-level. If, however, you choose ‘Cancel All’ from the right-click pop-up menu, then by this action you will cancel all open orders for that instrument, at all Price-levels. If you right-click outside of the ‘Mine’ column, for instance in the ‘Price’ column or in one of the ‘Bid’ or ‘Ask’ columns, then only the ‘Cancel All’ option will be available from the right-click menu.
Canceling open orders from the ‘Mine’ column: 1. Left-click on the number of open orders at a particular Price-level. 2. Right-click on the number of open orders at a particular Price-level and select ‘Cancel’.
The third method for canceling orders in Futures Order Entry is by clicking one of the ‘Pull’ control buttons that are located at the upper-left side of this window: ‘Pull All’ will cancel all open orders for the selected Futures symbol; ‘Pull Buys’ will cancel all open Buy orders for the selected symbol; and ‘Pull Sells’ will cancel all open Sell orders for the selected symbol.
Please note: The ‘Trade Out’ control button, located just below these three ‘Pull’ buttons, does not cancel open orders; instead it covers all of your positions for the selected symbol in one shot, at the market price.
28

3rd Method of canceling open orders from Futures Order Entry: The 3 ‘Pull’ cancel buttons.
‘Trade Out’ and
‘Re-center’ buttons
Average Execution Price per Contract Contracts: Bought and Sold
Current Position: One Contract
Current P/L: $ 75.00
The fourth method of canceling Futures open orders takes place in the Futures Monitor window. This cancel method allows you to cancel a specific open order at a certain Price-level, even when there are multiple open orders at that same Price-level. Therefore this fourth cancel method provides more specificity than cancel methods 1-3 described above. Again, please note that while methods 1-3 are performed in Futures Order Entry, this method is accomplished in the Futures Monitor. Please see the example below:
29

Adjusting the Display of Futures Order Entry Many of the data fields shown in the Futures Order Entry window at the top of the previous page can be customized to adjust their appearance. For instance, if you do not wish to see the ‘Bid Tot’, ‘Ask Tot’, or ‘Mine’ columns displayed, you can turn them off; but the ‘Bid’, ‘Ask’, and ‘Price’ columns are fixed and cannot be removed from the display. Also, you can select certain values to be always pre-loaded by default; these include ‘Account’, ‘Destination’, ‘Tif’, and the various quantities to be in effect for each of the five quantity buttons. All of these settings are controlled from within the Futures Order Entry Settings screen, which is reached by following the menu path of View Settings. Please refer back to the illustration shown at the bottom of p. 25 in order to see the Futures Order Entry Settings screen, and to note the locations of the various data fields described above.
Using the “Futures” tab in the Global Order Entry Settings window: There are still more settings that affect the behavior of the Futures Order Entry window. As with the Level I and Level II Order Entry windows, these settings can be found in the Global Order Entry Settings window, from where they are controlled. They are located in the “Futures” tab (see the illustration below). The Global Order Entry Settings window is reached from the Main Menu of Sterling Trader® Pro by clicking on View Global Order Entry Settings. Once there, you select the “Futures” tab, where you find the following settings:
Choices include: “Joins Bid/Ask” “Takes Bid/Ask” “Does Nothing”
Choices include: “Nowhere”
“After the last price”
“In the column header”
Left-clicking the Bid/Ask columns: From the drop-down combo-box you set left-clicking with the mouse in the Bid/Ask columns to indicate your intent to “Take the Bid/Ask”, “Join the Bid/Ask”, or do nothing.
Left-clicking on an open order displaying in a cell from the “Mine” column will cancel that order. This is activated by check-box.
30

Change the cursor to display what the left-click action would be, when hovering over a contract in the Bid/Ask column – either ‘B’ (Buy) or ‘S’ (Sell). This is activated by check-box.
Display a confirmation box before sending an order. This is activated by check-box.
Decide whether or not you want to “Prefill defaults after sending order”. These prefill default values are discussed on pp. 25-26 under the heading “Futures Order Entry Settings” setup window. This is activated by check-box.
From the drop-down combo-box you can decide where you want to “Display the last size” – either ‘After the last price’ or ‘In the column header’. Or you can decide not to display it (display it ‘Nowhere’).
Display the number of (open) orders in the ‘Mine’ column. This is activated by check-box.
Linking Functionality in Futures Order Entry Futures Order Entry can be linked to other windows in Sterling Trader® Pro. Linking is accomplished in the usual manner, from the ‘Actions’ menu – Actions Link Windows. Please note that the Futures symbology used in linking must be common to all windows in a particular linked group. For instance, linked groups that include the Futures Order Entry and Level II Order Entry windows must use the CME Direct symbology; they must also be linked to other windows that are at least capable of displaying the CME Direct symbology, such as Chart, Stock Watch and Time and Sales. Other linked groups that contain windows not capable of displaying CME Direct quotes, such as Level I and Mini Order Entry, cannot be linked to the Futures Order Entry window. Nor can they be linked to the Level II Order Entry window – if Futures symbols are shown in the group – because Level II Order Entry cannot display Level I Futures quotes from non-CME Direct market data sources. They can only be linked to other windows like themselves that display Level I Futures quotes from non-CME Direct market data providers, or to windows that can display both: Stock Watch, Chart and Time and Sales. The following illustrations provide examples of linked window groups for Futures prices:
Above: The Futures Order Entry window is shown linked to the Level II Order Entry and Chart windows.
Note 1: All three windows are included in the same linked group (Link Group 1). Note 2: CME Direct quotes and symbology type (e.g. ‘ESH5’ instead of ‘/ES5HG’) is shared between the Futures Order Entry window and the other two windows.
31

Below is another example of a linked group of windows (Group 2) displaying Futures prices; but these quotes are coming from a non-CME Direct market data source, such as S&P Comstock. Please note that the Futures Order Entry and Level II Order Entry windows are not included in this link group:
Futures Monitor ( ): The Futures Monitor in Sterling Trader® Pro is the window from where you can examine the status and detail of your Futures trading activity – and make changes to orders as needed. Like the Trading Monitor for equities trading, the Futures Monitor shows you the status and detail for all Futures trading activity, including all Instruments and Contracts traded. Thus you can dynamically track the status of all your Futures orders (“All Orders” and “Open Orders”) and Futures trade executions (“Executions” and “Prior Date Executions”). You will find here the same depth and level of detail as is contained in the Trading Monitor; there are some 48 data fields available for display in the “All Orders” and “Open Orders” tabs, and 42 data fields available for display in the “Executions” and “Prior Date Executions” tabs. To examine the complete list of all data fields available, simply click on View Settings from the Futures Monitor menu and select the “Columns” tab. From here you will find four scrolling lists of data fields, one for each of the four tabs.
Futures Monitor Settings: In addition to selecting the data fields for viewing, there are further settings that control the manner in which the data fields are displayed. For instance, you can Sort and Filter data by any column. You Sort by left-clicking on a column heading, and you Filter by right-clicking on a column heading, then selecting Filter Add/Edit Filter from the pop-up menu that follows. From there, you are presented with a dialog box of filtering options: filtering by text, numerical values, or by pull-down list – depending upon the type of data field you wish to filter by. You can Save filters, or Load filters that were previously saved, from the
32

Filter menu item of the Futures Monitor window. Then from the “General tab” of the View Settings menu item, you can further customize the display settings of your Futures Monitor with the following options: “Save sort upon exiting”, “Sort orders/trades as they are updated”, “Restore applied filter when re-opening window”, and “Use the same file name when exporting data”. See the illustration on the following page for more detail:
In the above example, you have selected all display options, including “Show grid lines”, “Abbreviate ‘Side’ column”, “Color text of entire row based on side”, “Color text of partially filled orders”, and “Color ‘X’ button a different color if order has been ‘pending cancel’ for more than 10 seconds”. Other selections include the ‘Font’, the ‘Startup tab’ (one of the four: “All Orders”, “Open Orders”, “Executions”, and “Prior Date Executions”. You’ve elected to “Save sort upon exiting”, “Sort orders/trades as they are updated”, “Restore applied filter when re-opening window”, and “Use the same file name when exporting data” (this setting enables having all future Export files sent to the same filename at the same location – by default. The Export function will write all of the data from the current Futures Monitor view into a text file in comma-delimited format. To the right, you have the various ‘Theme’ selections, along with notification choices for when a full or partial execution arrives (“Display notification message”, “Beep”, or “Play a Sound”). From the “All Orders” view, it looks like this:
33

Viewing from the “Open Orders” tab, it will look like this:
Viewing from the “Executions” tab, it will look like this:
Viewing from the “Prior Date Executions” tab, it will look like this:
34

Section
4Sterling Trader® Pro Window-Linking Feature
Linking in StLinking in SterLevel I and Levlink together an“Groups,” and mThe “Group Nu
35
erling Trader® Pro ling Trader® Pro can be enabled for the following four (4) windows: el II Order Entry, along with Time and Sales and Chart. Users can y combination of these windows. Windows are linked together into embership in each specific group is designated by a “Group Number.”
mber” is automatically assigned at the time that the group is created. If a newly opened window is subsequently added and “linked” to a specified group, then
that particular “Group Number” is also assigned to the newly added window; the “Group Number” displays in parenthesis on the title bar, just to the right of the symbol. See the illustration below:

Seen immediately below is a Chart that is linked to three (3) other windows that are displayed at the bottom of the previous page (Level I and Level II Order Entry, and Time and Sales). Note that each window in its Title Bar displays a “(2)” in parenthesis, signifying a common membership in Group 2:
Changing the symbol in any one window in this three-window “Link Group 1” below automatically changes the symbol displayed in the other two windows of the link group:
36

Notice that each of the three linked windows in the preceding page has a “(1)” in parenthesis to the right of the Symbol Name (also in parenthesis) on the window’s Title Bar, indicating common membership in the same Link Group (Group 1). There can be any number of Linked “Groups” of windows contained in any one Layout.
How are windows “Linked” in Sterling Trader® Pro? Linking is accomplished in one of two ways:
From the Toolbar: The “Linking-Activate” Icon is located on the Chart window’s Toolbar ( ). Simply clicking on this Icon activates the linking function so that the next window that the mouse clicks on (so long as it is one of the four types of “link-able” windows mentioned) will become a part of the Link Group of the original window. Therefore, the clicked-on window will display the same symbol as the first window from where the Link Group originated from. Also, if the mouse clicks on the Icon of one of the four link-able windows to open up a new window, that newly opened window will open up in a “linked state” as part of the Link Group that the original window belonged to, and will display the same symbol as the Link Group to which it now belongs. Note: the “Linking Activate” Icon can also be displayed on the Toolbars of the other 3 “linkable” windows: Level I and Level II Order Entry, as well as Time and Sales.
De-activating the Link Function from the Toolbar is done by clicking on the “De-activate Link” ( ) button, which becomes highlighted in red as soon as the Link function has been enabled. Clicking on this red “De-activate Link” Toolbar button effectively stops the linking function and changes the color of the small rectangle above the Icon’s link chain back to gray.
From the Menu: The Link Function can also be activated from the Main Menu of each of the four linkable windows of Sterling Trader® Pro. The path to select is: Actions Link Windows Start. Once this is done, the mouse pointer becomes a linking tool in the same manner as described above with the Toolbar “Linking-Activate” Icon, and it remains activated until it is de-activated.
De-activating the Link Function from the Main Menu for any one of the four (4) windows that are link-able is done in the same manner as was done the activating, only in the reverse - You follow the path to Actions Link Windows Stop.
How Many Link Groups Can be Saved?
Please note that, although while is no set limit as to the number of Link Groups that can be created at any given time for any given layout, care should be exercised in creating them. These Linked Groups and the combinations of Linked windows that are spawned by them will certainly take up considerable desktop space, potentially causing clutter. Therefore we urge users to exercise some caution when activating this Linking feature, particularly when utilizing the Automatic Linking Setup feature in the Global Order Entry Settings window which is described on the following pages 38-39.
How Does One Remove “Linked” windows from a Link Group?
It is also possible to remove a particular window or windows from a Linked Group of windows. This process takes place from the Main Menu of the window you wish to remove from a particular Linked Group. You do it by choosing the menu path to Actions Link Windows Remove from Group. Likewise you can change a window’s group membership from one Linked Group to another, by clicking on Actions Link Windows Add to Group. A pull-down list of the currently active Linked Groups will appear in a detail box called “Group to join.”
Note: Please see the illustration on the following page for visual clarification:
37

Setting Up Automatic Linking Using Global Order Entry Settings: At the user’s discretion, automatic linking can be set up from within the Global Order Entry Settings setup window, so that any time a new instance of a Level I or Level II Order Entry window is opened up, it will automatically open up a linked Chart and a linked Time and Sales window, as well. Every new instance of such a window will therefore initiate a new Linking Group. These linked windows can be modified to join other, existing Link Groups. See the two (2) illustrations below and on the next page for details on how such selections are made from the Global Order Entry Settings setup window of Sterling Trader® Pro:
Level I Order Entry window Setup:
Automatically Link these windows upon opening.
Open up a Time and Sales and Chart window automatically At Startup
38

Level II Order Entry window: Setup Options
Open up a Time and Sales and Chart window automatically at Startup.
Automatically Link these windows upon opening.
Set as Focus Window A designated order entry window can be set up as the focus window, with the “Set as Focus Window” feature. This selection is found under the “Actions” menu of the 3 order entry windows in Sterling. When the focus window feature is set, the icon for that particular order entry window (located on the upper-left corner of the title bar) toggles or changes to become a target icon (a red “bulls-eye”), replacing the original icon. There can only be one focus window set at any given time. If a user sets the focus to a different order entry window from the one originally set, then the target icon (the red “bulls-eye”) switches to the title bar of that other order entry window. It now becomes the only focus window.
The primary purpose of the designated focus window is to automatically “switch to” and “load” with the symbol selected from the invoking window. The secondary purpose is simply to switch to that focus window, without loading a symbol (as, for instance, when switching from one of the non-symbol specific windows such as Clock, Messenger or Activity Log). The focus window itself must be one of the 3 windows in Sterling Trader® Pro specifically dedicated to order entry – Level I, Level II or Mini Order Entry. There can be only one designated focus window at a given time. The invoking window can be from among any of the non-order entry windows in the Sterling Trader® Pro system. This includes all of the symbol-specific windows, such as Stock Watch, Chart, Position Summary, Trading Monitor, Bullet Monitor, Trade Summary, Time and Sales, Market Watch, Top Ten, Fundamental Data, News and MDX. Also included are the remaining, non-symbol specific windows, such as the Activity Log, Messenger and Clock. All of the non-order entry windows are capable of switching to the designated focus window.
When switching from a Stock Watch window (the “invoking” window) to the designated focus window, the symbol “invoked” from the Stock Watch page will be the symbol that is currently highlighted or selected from the list. It is “invoked” either by right-clicking and selecting “Switch to Focus Window” from the pull-down menu, or by using a Hotkey after one is set up.
39

Section
5Sterling Trader® Pro Market Quotes (Real-Time)
Stock WatchStock Watch is views of their fathis by listing anviewing needs andifferent monitor
40
a window in Sterling Trader® Pro that enables users to fashion customized vorite equities for market price monitoring in real-time mode. You can do d sorting the equities into any variety of groupings or arrays to suit your d preferences. You can choose from among an extensive selection of 26 ing categories (see list below) to keep a real-time watch on these equities
every trading day. A user can open up as many as three (3) Stock Watch windows simultaneously. The 26 categories of data available for column display monitoring in Stock Watch are:
Symbol, Last, Change, % Change, Bid, Ask, Size, Bid Sz, Ask Sz, Volume, High, Low, Open, Last Size, Alerts, Updated, Last Trend, Quote Trend, Close, Trd/Sz 1, Trd/Sz 2, Trd/Sz 3, OpnCng, %OpnCng, Opg Bid, Opg Ask.
You can configure a Stock Watch page without difficulty in the following manner:
From the Sterling Trader® Pro Main Menu, select Windows Stock Watch. A blank Stock Watch window will appear. From the menu of this blank Stock Watch window, select Actions New List. This allows the user to begin setting up and customizing the blank Stock Watch page. You may want to first create “Labels” in order to categorize your stocks by Industry Group, or by some other category. To do so, go to Symbols Add Label… from the Stock Watch menu; a white highlight now appears on the left-hand side of the Stock Watch window. You can now type in a descriptive label such as “Aerospace,” “Entertainment,” “Telecommunications,” “Banking” and the like. When you have finished typing the labels representing industry groups, you will notice that they are of a different color - yellow - than the equity symbols which are represented in white. You may now proceed with entering the actual equity symbols. This can be done either by double-clicking anywhere on the screen which will open up a blank line, or by selecting Symbols Add… from the Stock Watch menu. After you’ve entered equity symbols and labels, you may wish to move the symbols and labels up or down, or insert blank spacing between them, arranging them in the order of your preference. To do this you will go to the Stock Watch menu and select Symbols and from there, you can choose Add… Delete, Add Label… Move Up, Move Down, Insert Blank Row, and so on. Also you may double-click on a particular row to add a stock symbol in that way. Once you how have composed your list in this manner, you may then go into View
Settings… to enter the “Stock Watch Settings” selection window. From here, you can adjust the color settings for the Stock Watch window, you can choose from among a list of 16 different monitoring categories to keep a real-time watch on these equities every trading day. These 16 categories are displayed in checkbox form in the Columns section of the Stock Watch Settings window. Below the Columns section there is a “Display” area where you can do the following formatting on your Stock Watch page: Show Gridlines, Highlight ‘Symbol’, Highlight ‘Last’, Highlight ‘Bid/Ask’. In addition, you can adjust the Font Settings.

After you’ve created a Stock Watch page to your liking, you can save it by following the menu path of Actions Save List or Save List As… from the Stock Watch Menu Bar; by saving the list you will give it a unique name. Then in the future, you can simply load this and other lists into Stock Watch by selecting Actions Load List… from the Stock Watch menu. In addition, the Stock Watch window also provides order entry capability – one of four (4) windows in Sterling Trader® Pro from which orders can be sent. This is done by right-clicking on the row containing any given symbol; a pull-down menu appears, from which one can choose to Buy, Sell or Sell Short that particular equity. In making one of these selections the user is then taken to a Stock Watch Order Entry detail window, from where the order is placed. There are three (3) Hot Keys that can be used in the Stock Watch window to bring up the Stock Watch Order Entry detail window, in a specific ordering mode: Alt + B (Buy), Alt + S (Sell), Alt + T (Sell Short). As with right-clicking, these three Hot Key selections take the user to a Stock Watch Order Entry detail window, from where the order is then placed. The Stock Watch Order Entry detail window is similar in appearance and functionality to the Level I Order Entry window in Quick View mode. See the below illustration for an example of an active Stock Watch page, with an Order to Buy 1000 shares of SUNW being sent after right-clicking on the symbol and selecting “Buy.” This brings up the Stock Watch Order Entry detail window, from which the order is placed:
In addition, users are able to enter customized “Spreads” into the Stock Watch window. This is done by clicking on either Symbols Add New Spread, or Symbols Spread List, from the menu bar of the window. There is one master “Spread List” which can hold multiple spreads. Within this “Spread List” window, there is an “Activate” button which, when clicked, will place one Spread display at a time onto the face of the Stock Watch window. Please see the illustration below:
41

At left is an example of a Spread List appended to the bottom of a Stock Watch List (see yellow “Spreads” column heading label at left-center).
“Last” column indicates the latest Spread price differential between 2 symbols – from left to right.
“Chg” column indicates the Change in differential of the Spread, as when comparing difference between Prior Day’s Close and Latest (Last) Prices.
Time and SaTime and Saletransaction tradtrading activity Size, Market, S
Observe the exa
42
les s in Sterling Trader® Pro enables you to view precise, transaction by ing activity for particular equities. A full day’s worth of Historical can be examined. Available data fields can include: Time, Price, Last ymbol, Condition, Bid, Ask, and Size. mple below:

There are several different Display Mode settings which can be applied, to enable a user to “filter out” or exclude particular data that is either unnecessary or nonessential. The fields to which these display mode filters can be applied are: “All,” “Trades Only,” “Quotes Only.”
Depending upon the source of the data feed, Bid and Ask quotes can be displayed for both Listed and Over-the-Counter equities, encompassing regular trading hours as well as before and after regular trading hours - including the “cross-over” period.
(See the example below of a “Time and Sales Settings” detail window):
The Time and Sales window within Sterling Trader® Pro can be easily accessed from the Main Menu, by following the menu path of Windows Time and Sales, or by clicking on the Time and Sales Icon.
Market Wat
Market Watchvariety of MarkDow Jones Indindices. Below
43
ch
is a window in Sterling Trader® Pro that enables users to monitor a et Sector Indexes, as well as Spreads. For example, one can track the ustrials, the S&P 500, the NASDAQ Composite and many other
are examples of two Market Watch windows, looking at both Futures and Market Indices running within Sterling Trader® Pro:
Futures Market Indices

Another example shows a Market Watch window with Spreads activated. This is done by clicking on either Symbols Add New Spread, or Symbols Spread List, from the Menu Bar of the window. There is one master “Spread List” which can hold multiple spreads. Within this “Spread List” window, there is an “Activate” button which, when clicked, will place one Spread display at a time onto the face of the Market Watch window. Please see the illustration below to view output:
At left is an example of a Spread List appended to the bottom of a Market Watch page (see yellow “Spreads” column heading label at left-center).
As with Stock Watch, the “Last” column in this Market Watch window indicates the latest Spread price differential between the two symbols – from left to right. The “Chg” column indicates Change in the Spread differential, when comparing between the Prior Day’s Close and Latest Prices (“Last”). The Market Watch window within Sterling Trader® Pro can be easily accessed from the Main Menu by selecting the following menu path of: Windows Market Watch, or by clicking on the Market Watch Icon.
Top Ten Top Ten is a w“Top Ten” listActive”, “Tick One can track t15 exchanges:
indow in Sterling Trader® Pro that enables users to view a variety of s, including: “$Gainers”, “$Losers”, “%Gainers”, “%Losers”, “Most Most Active After Hours”, and “Volume Most Active After Hours”. he Top Ten ranking for any of the above 7 categories for the following AMEX, Boston Stock Exchange, Canadian Venture Exchange, CBOE
Non-options, Chicago Stock Exchange, Cincinnati Stock Exchange, NASDAQ Bulletin Board, NASDAQ Listed Equities, NASDAQ NMS, NASDAQ OTC, NASDAQ UPT, NYSE, Pacific Stock Exchange, Philadelphia Stock Exchange and Toronto Stock Exchange. Please note that in the case of the two “After Hours” categories (“Tick Most Active” and “Volume Most Active”), only the following four exchanges apply: Chicago Stock Exchange, NASDAQ Bulletin Board, NASDAQ Listed Equities and NASDAQ NMS. Please note that Top Ten lists can be “linked” to other windows to become part of linked groups, as does the Stock Watch window. They can also participate in switching to focus windows, to be used as the “invoking window” for purpose of loading specific symbols into the focus window.
Please see the illustration shown on the following page: a Top Ten window that is linked to both a focus window and a Chart; any symbol selected from the Top Ten window can be loaded into the other two…
44

This is the pull-down selection menu from the Top Ten window.
45

FundamentFundamental Dfollowing data ExDivDate, DivClose, Vol, SpCdisplays the “Di
al Data ata is a window in Sterling Trader® Pro that enables users to view the fields: 52wkH, 52wkL, AvgVol, EPS, P/E, ShrOut, MktCap, Beta, Amt, DivFreq, ListExch, Last, Change, Bid Ask, Size, High, Low, Open, ode, and Cusip. For exactitude, the “DivAmt” field (Dividend Amount)
vAmt” value in four (4) decimal places, instead of two (2).
The information displayed in the Fundamental Data window of Sterling Trader® Pro is updated in real-time, as changes happen. This is especially noticeable with the display of current Price information, and fields that are impacted by the current Price information, such as P/E, MktCap and ShrOut (Shares Outstanding). In order to satisfy user requests, certain fields and their respective values (e.g. Quotes as opposed to static Financial Reports) have been arranged in this window so as to keep all the non-quote type fund data in the left column, and the dynamic quote data in the right column. Note also that this window can be re-sized to maximize space. Below is an example of the Fundamental Data window:
At left is an example of a “Fundamental Data” window for the symbol Coca Cola (KO).
News News is a windonews stories. Yotime, or separatScreen” mode. SNews window (
w in Sterling Trader® Pro that enables you to view headlines and full-text u can choose either to view both the headline and story panes at the same
ely. If you choose to display both at the same time, you will be in “Split plit Screen mode enables you to display story headlines at the top of the in the headline pane) and the full-text of the story at the bottom of the
window, in the story pane. In this way both the headline and story can be viewed at the same time. If desired, you can choose to view only the one pane or the other. You do this by un-checking the check box labeled "Display both the headline and story panes at the same time" that is located on the bottom of the “News Settings” setup screen. It is reached by clicking View Settings from of the News window menu. In this single-pane mode, you can still toggle between these two panes if you wish, still keeping the 2 window panes separate. This is done by double-clicking or by pressing “Enter” on a specific headline in the headline pane; this takes you to the full-text of that particular story. Or, if you want to go back to the headline pane when viewing the full-text of a particular story, you doing the same from anywhere in the story pane. The News window can be filtered by symbol – so as to view only stories relating to a particular symbol. If no symbol is entered in the symbol bar for filtering, then the News window will be in an “All Symbols” mode, from which users can view all stories currently being broadcast, as they are logged chronologically. At present, Dow Jones BroadTape (BT) and Comtex (CX) news sources are available for display.
46

MDX (MarkeMDX is a windOpening Indicatview all 4 of thesee the illustratiby clicking on V
47
t Data Extensions) ow in Sterling Trader® Pro that enables you to view Market Imbalances, ions, Delays or Halts, and Trade Distribution Times. You can choose to se categories at the same time, individually, or in any combination. Please on below. You control these settings from the menu of the MDX window iew Settings:
Alerts Alerts in Sterlinwill notify you oFor instance, yoloses a certain adevice itself can
g Trader® Pro is a window that enables you to set up custom alerts that f certain market pricing events that may occur with bid, ask or last prices.
u can be notified when a stock’s price reaches a new high or low; gains or mount of pennies or points; or hits a pre-defined price point. The alerting be in the form of a pop-up notification message, a beep or custom sound.

Section
6Sterling Trader® Pro Order Monitoring Tools
Trading MonTrading Monitothe status of “Allevel of detail didisplay in the “Ain the “Execution
48
itor r in Sterling Trader® Pro enables you to dynamically track, in real-time, l Orders,” “Open Orders,” “Executions” and “Executions by Date.” The sclosed in this window is substantial; there are 48 data fields available for ll Orders” and “Open Orders” tabs, and 42 data fields available for display s” and “Prior Date Executions” tabs. This level of detail will enable you to
monitor, control and examine all your ordering and trading activity. The 4 separate views available for monitoring in the Trading Monitor window are reached by clicking on any of the 4 View Selection tabs found at the bottom left of the window. As was stated above, these are: All Orders, Open Orders, Executions, and Executions by Date. Below is an illustration of Trading Monitor in “All Orders” view mode:
As is seen above, the All Orders view tab displays the Time, Symbol, Side, Quantity, Leaves Qty, Price, Executed Quantity, Account, Destination and Status for every order by default, including those executed and those still open. Then there are still many other fields available for monitoring, including Trader, Group, Date, Execution Broker, Sequence #, etc. These data fields are also available in the Open Orders view tab. Of particular interest is the real-time activity viewable in the All Orders view, where the “Status” indicator accurately reflects the state of an order throughout its various stages, such as “Sending,” “Pending New,” “New” or “Part Fill,” - until it is executed (“Filled”) or canceled (“Canceled”).

The example below illustrates how the display of the status of live sent orders transitions from “Sending” to “Pending New” to “Filled.” Note that the rows representing orders with the “Sending” or “Pending New” status are in Italics in order to visually indicate the order’s transitional status (see illustration below):
At the time of this activity the display of the order status immediately switches from the Open Orders view to the Executions view (if the order is filled) or remains in the Open Orders view (if the order is canceled or partially filled). Every order continues to be displayed in the All Orders view, regardless of whether its status changes to filled, partially filled, or canceled. The Executions and Prior Date Executions tab views, in addition to most of the data fields just noted above, offer other data fields such as Execution Price, Clear, ECN Fee, Specialist, Possible Duplicate, Order Date, Order Time, Order Received ID, and others. To examine a complete list of all data fields available, simply click on View Settings from the Trading Monitor menu and select the “Columns” tab. From here you will find four scrolling lists of data fields, one for each of the four tabs.
49

Filtering Data You select the data fields you want to view from the Columns tab of the View Settings menu item. In addition to viewing the data fields themselves, there are further settings that control the manner in which the data fields are displayed. You can Sort and Filter data by any column. You Sort by clicking on a column heading, and you Filter by right-clicking on a column heading, then selecting Filter Add/Edit Filter from the pop-up menu that follows. From there, you are presented with a dialog box of filtering options: filtering by text, numerical values, or by pull-down list – depending upon the type of data field you wish to filter by. You can Save filters or Load filters that were previously saved, from the Filter menu item of the Trading Monitor window. Then from the General tab of the View Settings menu item, you can further customize the display settings of your Trading Monitor with the following options: “Save sort upon exiting,” “Restore applied filter when re-opening window,” and “Use the same file name when exporting data.” Please refer to the following images for further illustration of filter selection:
Each of the four views in the Trading Monitor window has drill-down capabilities which can display in detail the complete Order History for any given trade or order. Any of these detail screens can be immediately accessed by “drilling-down” or double-clicking on any row displaying a particular trade. See below for an example of an Order History detail window:
50

Note - Canceling Orders: Orders can be canceled from the Trading Monitor window without difficulty, by utilizing any one of the following methods:
1. Using the Esc key, which cancels the last order sent. 2. Using the Alt + X keystroke, which cancels a specific order. 3. By clicking on the red Cxl (X) button, displayed in the Cxl column, when that column has been
selected for display in “Trading Monitor View Settings.” This cancels a specific order. 4. From the Trading Monitor Menu Bar: By first selecting an order row, then by clicking Actions
Cancel or Actions Cancel All. 5. By right-clicking on an order row in the Trading Monitor window; this pulls up the equivalent to the
Actions pull-down menu. Then select either the Cancel or Cancel All commands. If so desired, you can cancel all currently listed open orders in this manner, while right-clicking on a single order line in the Trading Monitor window.
These cancel functions can be performed from either the “All Orders” or “Open Orders” screen views. Also – Changing Orders: Orders can be changed from the Trading Monitor window in much the same manner of ease as they are canceled:
1. By using the Alt+Q or Alt+P keystrokes, which pop open the Order Change window in either the “Change Quantity” or “Change Price” auto load modes.
2. From the Trading Monitor Menu Bar: By first selecting an order row, then by clicking Actions Change. This pops open the Order Change window.
3. By right-clicking on a particular order row in the Trading Monitor window; this pulls up the equivalent to the Action pull-down menu. Then select the Order Change window.
The Trading Monitor window within Sterling Trader® Pro is easily accessed from the Main Menu by selecting the following menu path of: Windows Trading Monitor.
Trade SummThe Trade Sumactivity on a “Syand Total Cost split into 2 viewThe “Symbol S
51
ary mary window offers a concise, simplified analysis of daily trading mbol / Side” basis. At a glance you are able to see the Average Price
per side (Buy, Sell, Sell Short) for each symbol traded. This window is s: “Symbol Summary” at the top and “Side Summary” at the bottom. ummary” pane organizes the trader’s daily trading information by
“Account”, “Side”, “Symbol”, “Shares”, “Average Price” and “Total Cost”. The “Side Summary” pane arranges the trader’s information by “Side”, “Total Shares” and “Total Cost” only. This window can be filtered by Account. You will find the Trade Summary window most useful for calculating at a glance how your buys and sells are “matching up” in the current trading day. Please refer to the following page for an illustration of its utility:

Activity LogActivity Log prwithin Sterling Tdetail, on a transpecificity that includes a detai
52
ovides a real-time monitoring tool for daily trading activity occurring rader® Pro. It enables a user to review all of their individual trades in
saction-by-transaction basis for the current day. It provides drill-down discloses precise information relating to the order’s history. This
led log of all messages both sent to, and received back from, the order destinations used. These messages consist of order requests sent from the user’s computer, as well as the “confirm” and order “execution” messages received back from the order destinations used – ECNs and exchanges alike. The information covered is for all trades executed in the current trading day. The order history data provided here includes the messages sent to and from the user’s terminal to the exchanges and ECNs, including the following information: Date, Time-Stamp and Exchange Order I.D.
The following are a couple of examples of Activity Log windows; the first one illustrates “drilling-down” for detailed order history:
This is an example of “Order History” detail; it is activated by “drilling-down” on the log of a trade as is displayed from the row on the Activity Log window. This trade was transacted at 13:53:51:
See the following example of a list of trade logs from the Activity Log window:

53

Section
7Sterling Trader® Pro Position Monitoring Tools
Position SumPosition SummcomprehensivelAccount, and A(Symbol), Acct$Bot, $Sld, Ope
54
mary ary in Sterling Trader® Pro is a window that enables the user to
y monitor their trading positions. Positions are summarized by ccounts can be monitored by the following 32 data fields: Sym
(Account), Qty Bot, Qty Sld, Pos, $Unrealized, $Realized, Trades, ning Position, $Total P/L, Last, Change, Group, OPP, PosAvgPrc, Qty
SLng, Qty SShrt, $Sld Lng, $Sld Shrt, AEP Bot, AEP Sld, AEP SLng, AEP SShrt, Total Qty, $Comm, $Net P/L, Bullets, Conver, Hedges, P/L/Shr.
See the example on the following page of the main window of Position Summary:
Position Summary is a window that, much like Trading Monitor, enables users to “drill down” (by double-clicking on that particular position’s row) in order to view specific trades that comprise the account’s position, including the time-stamp of each trade, the ECN or Exchange the trade routed through, the Tif, etc. For an example of how this drill-down detail works in Position Summary, look at the following two illustrations (immediately below and on next page):

Drilling down on 10:54:00 to show Order History detail
Above: An illustration of the “Order History” detail window within Position Summary, logging the transaction executed at 10:54:00.
In addition, the Position Summary window also provides Order Entry capability - one of five (5) such windows in Sterling Trader® Pro from which orders can be sent. The other four are: Stock Watch, Level I Order Entry, Level II Order Entry and Mini Order Entry. Orders can be sent from the Position Summary window by right-clicking on the row containing any given symbol’s position; a pull-down menu appears, from which one can choose to Buy, Sell or Sell Short that particular equity. Other choices include Covering All, or some portion of one’s position: there are numerous options available for doing this, including the following: All, All @ MKT, Half, Selected @ MKT (All, 25% 50%, 75%), All Longs, All Shorts. In making one of these selections the user is then taken to a Position Summary Order Entry detail window, from where the order is then placed. There are also 6 Hot Keys that can be used in this window to quickly send individual orders or transact multiple orders. These are: Alt+B(Buy), Alt+S(Sell), Alt+T(Sell Short), Alt+V(Cvr All), Alt+L(Cvr All Long), Alt+H(Cvr All Short). As with right-clicking, these 6 Hot Key selections either take the user to the Position Summary Order Entry detail window, or open up a notification box from which multiple orders can be transacted.
Looking at the following illustrations (see below), you can see how to send an order from an active Position Summary window. First you access the Position Summary Order Entry detail window - by right-clicking on the symbol and selecting the desired action: Cover, Buy, Sell or Short. In this example, we will “Cover” or Sell Half of the position, using the following technique to send the order from the Position Summary Order Entry detail window, as shown:
Note: The Position Summary Order Entry detail window is similar in appearance and functionality to the Level I Order Entry window in Quick View mode.
Right-Clicking on the Row Displaying QQQ Position of 7000 Shares…
(See Next Page):
55

Position Summary Order Entry Detail window appears, after right-clicking and selecting “Cover”:
From here, you request to Cover Half… of the Position “QQQ” (7000 shares)…
The above is what the Position Summary Order Entry detail window looks like.
56

Section
8Sterling Trader Pro® Charting Package
Chart Chart is an excusers to visuallywide variety of offers a broad rfurther enhance
iting new add-on package offered by Sterling Trader® Pro. It enables plot market trends in Tick, Bar and Daily Chart formats using a
time-period increments, including real-time and historical data. It also ange of Technical Studies (11 at present) that users can customize to their analytical advantage.
Opening a Chart: There are a variety of ways to open a Chart in Sterling Trader® Pro. The first time you log-in to your Chart-enabled package, you are presented with a pop-up window called Create a New Chart. By default a Tick Chart for the Last 5 Minutes is ready to be loaded; all that is required of you is to type-in the symbol you want to display. This default time period can be easily changed by clicking on the pull-down menu labeled Tick Time: Today or Previous Days. Other Tick Time increments available are: Last 10 Minutes, Last 30 Minutes, Last 1 Hour, Last 4 Hours and Full Day. Clicking on the Chart Icon from the Toolbar of the Main Menu of Sterling Trader® Pro is another way of opening a new instance of a Chart window; a third way is by simply clicking on Windows Chart from the Main Menu of Sterling Trader® Pro (see the examples below):
57

Selecting a Chart Type: There are several ways to select a Chart Type in Sterling Trader® Pro: First, after entering the desired symbol and thus activating the Chart Toolbar, locate the Chart Type scroll-down selection box found on the right side of the Toolbar. Clicking on the down-arrow reveals the three available Chart Types, which are Tick, Bar and Daily Charts (see example below):
Other ways of selecting a Chart Type are as follows: from the Menu Bar of the Chart window, click Actions Edit Chart; this takes you to the Edit Current Chart pop-up window. This window is essentially the same as the Create New Chart pop-up window, the only difference being that this Edit Current Chart pop-up window already has a symbol assigned to it; the Create New Chart pop-up window is blank. From here you click on one of the Chart Type tabs. If it is a Tick Chart, then the same Time Periods are available as with the Create New Chart screen: Last 5 Minutes, Last 10 Minutes, Last 30 Minutes, Last 1 Hour, Last 4 Hours and Full Day (for Today). To display a Tick Chart for the Previous Days Time Period, you first select that radio-button; then you click on the down arrow alongside of the date displaying from the scroll-down box. This produces a pop-up calendar from which you can select a date (see the illustration at the top of p. 22). Again, if a Chart window already has a symbol assigned to it, then from the Menu Bar of the Chart window you can click on Charting Chart Type; from there you can select either a Tick or Bar Chart. This menu choice functions in the same manner as the Chart Type scroll-down selection box at the right side of the Toolbar - insofar as Chart Type selection is concerned.
Tick Chart – Selecting: After a Tick Chart has been selected in one of the ways described above, there are additional parameters to be considered in determining the scope and display of the Tick Chart. These parameters are reached by clicking Actions Edit Chart from the Menu Bar of the Chart window. This brings you to the Edit Current Chart pop-up window mentioned above. From there you select a Time Period either for Today (Current Day) or for Previous Days. If Today is chosen, then the Tick
58

begins with the current heartbeat and extends back as far as you want it to go: Last 5 Minutes, Last 10 Minutes, Last 30 Minutes, Last 1 Hour, Last 4 Hours and Full Day. By default, the Tick will always begin with the current heartbeat, unless you specify otherwise (we will show how this is done in a moment). Here is an illustration showing how the different Time Periods can be selected:
If you choose to display the Tick data for Previous Days, the Tick Chart will display that previous day’s entire Tick data. Just how this Tick data is to be displayed will be covered in the following section.
Tick Chart – Display Features: There are two navigation functions that give users full control over how the Tick data will be displayed: They are called “Zooming” (either in or out) and “Scrolling” (either left or right). Zooming determines just how much Tick data is to be plotted and displayed on a Tick Chart at a given time; the Ticks can be packed together densely, or set apart to display sparsely. It is the zooming feature that controls this very important display function. Working in conjunction with the zooming function is the scrolling function. The scrolling function determines whether you are proceeding “back in time” chronologically (i.e. left) or proceeding “forward” chronologically (i.e. right). At the top of p. 23 is an example of “zooming-in” all the way to see Tick data sparsely plotted to display a minute or two of actual Ticks. If you “zoom-out” you will see Tick data packed together tightly, revealing more of a trend and covering a greater time period. In the middle of p. 23 is an example of “zooming-out” all the way to see Tick data packed tightly together, covering a much wider chronological range of Ticks. Therefore, much more of a price pattern can be revealed.
Tick Chart – Toolbar Features: To the right of the Chart Type scroll-down selection box at the right side of the Toolbar are Icons for the “Scrolling” “Zooming” display functions just described above: Scroll Left, Scroll Right, Scroll to End; and, Select Zoom Region, Zoom In, Zoom Out. Other Toolbar selections included are: Insert Study, Insert Horizontal Line, Insert Drawing Line, Select Chart Data.
59

Here is an example of “Zooming-In” all the way to see sparsely plotted Tick data in detail:
Here is an example of “Zooming-Out” all the way to see Tick data densely packed together, revealing more of a price pattern:
60

Tick Chart- Examining the Underlying Price Detail: You can examine the Price Detail underlying the Ticks in two ways. From the Toolbar, click on the Select Chart Data Icon, then drag the mouse pointer over the area of the Tick Chart displaying the Ticks for which you want to see the underlying Price detail, and select that area. Click inside the “maze” that designates the selected area: You will now see Price and Volume data for every Tick in the selected area (see the example below):
Bar Chart – Selecting: After a Bar Chart has been selected - either from the Menu Bar of the Chart window or from the Chart Type scroll-down selection box at the right side of the Chart Toolbar - there are additional parameters to be considered in determining the scope and display of the Bar Chart. These parameters are reached by clicking Actions Edit Chart from the Menu Bar of the Chart window. This brings you to the Edit Current Chart pop-up window. From there, you click on the Bar Chart tab where, on the left, you select a Bar “Time” (Period) that extends back from the current time (heartbeat) to any of these Prior Days “Time” Periods: Last Hour, Last 4 Hours, Last Full Day, Last 2 Days, Last 3 Days. By default, the Bar Chart always begins with the current heartbeat and extends back in time, unless otherwise specified. To display a Bar Chart for a Prior Days Time Period, you first select the Start/End Date: radio-button; then you click on the down arrow alongside of the dates displaying from the respective scroll-down boxes, labeled as Start Date and End Date. This produces a pop-up calendar from which you can select the specific Start and End dates (see the illustration at the top of the following page):
61

Bar Chart – Display Features: Located just to the right of the Bar “Time” (Period) selection area on the Edit Current Chart pop-up window is the Bar “Interval” scroll-down box (see the illustration above). The “Interval” scroll-down selection box adjusts the Intervals of Time which the displayed Bars are to represent. Bar Time “Intervals” available for display are 1-2-3-4-5-6, 10-12-15-20-30 and 60 Minutes. Located just below the Bar “Interval” scroll-down box is a “Bar Style” scroll-down box. Presently there are three available Bar Styles that can be displayed: Candle Stick, OHLC and OpenClose. The illustration above shows an OHLC Bar Style; the Candle Stick Bar Style is displayed below:
62

This illustration is an example of the OpenClose Bar Style:
Bar Chart – Toolbar Features: Besides setting-up Time Periods (controlling the scope of the Chart) and Intervals of Time (controlling the appearance and display of the Bar Styles), other important features of a Bar Chart’s purpose and utility need to be assigned. Almost all of these features can be selected right from the Chart Toolbar. As with the Tick Chart, to the right of the Chart Type scroll-down selection box on the Toolbar are icons for the “Scrolling” and “Zooming” display functions that have already been described: Scroll Left, Scroll Right, Scroll to End; and, Select Zoom Region, Zoom In, Zoom Out. These scrolling and zooming features work in essentially the same manner for Bar Charts as they do for the Tick Charts. The main difference lies in the scope of available data that Bar Charts can display – much greater than that of Tick Charts. To the left of the Chart Type scroll-down selection box on the Toolbar are other icons for selecting important features such as Linking (including two toggle icons: Start Linking, Stop Linking), Insert Study, Insert Horizontal Line, Insert Drawing Line, and Select Chart Data. The only feature controls which cannot be directly accessed from the Chart’s Toolbar are the following: Selecting the “Bar Type” as was described above (Candle Stick, OHLC, OpenClose), adjusting the Intervals of Time which the Bars will represent, and determining how one wants to display the “Active Data Window” (Always, Mouse Click, Never). These features can only be accessed from the Chart’s pull-down menus.
63

The Link Windows feature was previously discussed at length in “Section 3” in this User Guide; suffice it to say here that, Linking is a tool that can enable the user to instantly converge and intersect several interrelated and supplemental sources of relevant market data all together at once time. This in turn allows for the kind of split-second recognition and analysis of those relevant market data factors which play a key role in order-entry decision-making. Please refer back to “Section 3” for more details on the uses of the Linking feature in Sterling Trader® Pro.
Bar Chart - Examining the Underlying Price Detail: You can examine the Price Detail underlying the Bars in the same way as is done from the Tick Chart. From the Toolbar, you click on the Select Chart Data Icon, drag the mouse pointer over the area of the Bar Chart displaying the Bars for which you want to see underlying Price detail, and then select that area. Click inside the “maze” that designates the selected area. You will now see underlying price detail for each Bar that includes Date/Time, High, Low, Open, Close, and Volume. This includes more underlying Price Data than can be examined from a Tick Chart. A Tick Chart only displays Date/Time, Price and Volume underlying data (see example below):
Bar Chart - Underlying Price Detail:
Day Chart – Selecting: After a Day Chart has been selected - either from the Menu Bar of the Chart window or from the Chart Type scroll-down selection box at the right side of the Chart Toolbar - there are additional parameters to be considered for determining its scope and display. These parameters are reached by clicking Actions Edit Chart from the Menu Bar of the Chart window. This brings you to the Edit Current Chart pop-up window. From there, you click on the Day Chart tab on the right; then, you select a “Time” (Period) that extends back from the current time (heartbeat) to any of the following Prior Date “Time Periods”: 1 Month, 6 Months, 1 Year, 5 Years. By default, a Day Chart will always
64

begin with the current period (right up to the latest “heartbeat”) and extend backwards in time - unless you specify otherwise. To display a Daily Chart backwards for a Prior Days Time-Period, you first select the Start/End Date: radio-button; then you click on the down arrow alongside of the dates displaying from the respective scroll-down boxes, labeled as Start Date and End Date. This produces a pop-up calendar from which you can select the specific Start and End dates – exactly the same as with the Bar Chart. In fact, the only significant difference between selecting a Daily Chart and a Bar Chart is found in the “Time-Intervals”; a Day Chart offers the following “Time-Intervals”: Daily, Weekly, and Monthly. See the following illustration for easy identification of these data field selections:
Spread Charts: “Spreads” were previously covered in Section 4 (pp. 26-28), while describing Stock Watch and Market Watch. As noted, users of Sterling Trader® Pro are able to enter customized “Spreads” into their Stock Watch or Market Watch windows. This is done by clicking on either Symbols Add New Spread or Symbols Spread List from the Menu Bar of the Stock Watch or Market Watch window. From there, one references the “Spread List”. There is one master “Spread List” created per Sterling Trader® Pro workstation, and this list holds multiple Spreads. Within this “Spread List” window there is an “Activate” button which, when clicked, loads one Spread display at a time onto the face of the Stock Watch or Market Watch windows. The Chart window in Sterling Trader® Pro can also display “Spreads”. The “Spreads” menu item is located on the Chart Menu Bar and is reached by clicking Charting Spreads. The Spread must first be set up and “Activated” in the “Spread List” screen itself, before it can be loaded onto a Chart. Once activated from the “Spread List”, you load it onto the Chart by clicking the “Chart” button in the Chart’s “Spread List” screen. Clicking on this “Chart” button after highlighting a selected Spread will load that Spread onto a Chart. “Historical” Spread Charts are available in Bar Chart Mode – but only in those with the “Line” Bar Style. Spreads are also available for the other variable-minute Bar Styles, such as “CandleStick”, “OHLC”, and “OpenClose”. But these Spreads will only display as they are being built – in real-time; the “Historical” Spread Data is not available for these other three Bar Styles – only with the “Line” Bar Style. Please note also that Spreads cannot be linked.
65

Daily Spread for SPX:QQQ; % Change Axis Type
30 Minute Spread for SPX:QQQ; % Change Axis Type
66

67
Chart Studies – Selecting: There are currently eleven (11) Studies available for viewing and data analysis in the Chart window, and they are: Volume, Simple Moving Avg., Weighted Moving Avg., Bollinger Band, Stochastic, Momentum Dividend, ADX, MACD, Relative Strength Index, Trend, Exponential Trend. Once a Chart window is opened and a symbol is selected, you click on Charting Studies from the Chart menu. You select Studies by highlighting the Study of your choice from the “Available Studies” List on the left side of the Chart Studies Selection Menu; then you click on the “Insert” button which moves the Study over to the right side of the selection menu into a List called “Available Studies.” From there you then click the Apply and OK buttons to finalize your choices.
Chart Studies – Advanced Features: If so desired, you can specify that a certain Study or Studies will be automatically included by default with every newly-opened Chart window as it is first loaded, in effect making it into a Template. After the desired configuration has been set up in a particular Chart window, say a 5-Minute Bar Chart that includes a Volume Study at the bottom, you can make this into a Template by clicking View Set Current As Default from the Chart menu. From this point forward, every new instance of a Chart that you open up will be a 5-Minute Bar Chart with a Volume Study at the bottom, in effect becoming your Template for loading new Charts. If you wish to modify a particular instance of a Chart further by adding or changing particular Studies, Bar Types, Bar Time Increments or by switching to the Tick Chart type, you can then Save that particular Chart by clicking Actions Save Chart. You will then be prompted to give the newly Saved Chart a name, which can be something like “IBM 5 Min Bar Vol.chr.” The .chr extension will be automatically added to the saved name you give to a particular Chart by Sterling Trader® Pro. This saved instance of a Chart does not replace the default Template for all newly-opened Charts just referred to above, but is Saved in addition to it. The way to “load” a previously saved Chart is by clicking Actions Load Chart from the Chart menu. From there, usually inside the “Charts” folder which is located under the “SterlingTraderPro” folder, you will see a complete list of all your saved Charts, each having a .chr extension.
Beginning with the following page you will find examples of the eleven (11) Studies currently available for viewing and data analysis in the Sterling Trader® Pro Chart window.

The following are examples of each Chart Study. Note that some of these Studies may be combined for enhanced effect; as with, for instance, this 5-Minute Bar Chart below that includes both a Volume Study and Bollinger Bands:
Daily Day Bar Chart, Candlestick Bar Type; Volume Study (VOL) with Bollinger Bands (BOLL):
68

12 Minute Bar Chart with Simple Moving Average (SMA):
1 Minute Bar Chart with Weighted Moving Average (WMA):
69

2 Minute Bar Chart with Bollinger Bands (BOLL):
1 Hour Bar Chart with Stochastic (STC):
70

20 Minute Bar Chart with Momentum Dividend (MMD):
15 Minute Bar Chart with Average Directional Movement Index (ADX):
71

15 Minute Bar Chart with Moving Average Convergence/Divergence (MACD):
5 Minute Bar Chart with Relative Strength Index (RSI):
72

30 Minute Bar Chart with Trend (TRN):
30 Minute Bar Chart with Exponential Trend (ETRN):
73

Section
9Sterling Trader Pro® Miscellaneous Tools – Section 9
Messenger The Messengerwith Sterling Trvia an instantanbetween users Pro and Sterlin
window is a convenient “instant messaging” tool that comes bundled ader® Pro. It enables users to communicate directly with one another eous, real-time messaging screen. It allows for direct communication
of the Sterling Trader® System, including users of Sterling Trader® g Trader® Manager. For instance, managers can communicate with a
specified, individual trader; or with entire group of traders. Traders can communicate directly with other, specified traders. The only messages sent or received from the Messenger window of Sterling Trader® Pro are from among users with active accounts in the local Sterling Trader® System.
See the illustration on the following page for an example of how Messenger can work for you:
In-Box
Out-Box
74

Clock
The Clock displayappearance can bvisual styles. Pleafew of the many ti
of Sterling Trader® Pro is a tool that is both useful and flexible. Its e adapted to blend in conveniently with many different layouts and se examine the group of images on the following page to find just of me displays that are available, and how they are selected:
The Clock window view within Sterling Trader® Pro can be easily accessed from the Main Menu by selecting the following menu path of: Windows Clock.
75

S t e r l i n g T r a d e r ® P r o K e y W o r d I n d e x
A Accounts…………4-5; 12,14,18,24,27,30,48,51,54,74 Activity Log………….………………….....……2, 39, 52-53 Advanced Features……………………………….16-23; 67 Alerts…………………………………………………1-2, 40, 47 All Orders Tab (Trading Monitor)....…….32-33, 48-51 Archipelago (ARCA)………………….4-5, 8-9, 13, 16-17 Arca Book (ARB)......…….……………………….13, 16-17
B Bar Chart……………………………………58, 61-65, 67-73 Bar Chart, Underlying Price Data………………..61, 64 Bar Chart Styles…………………………………...62-63, 65 Basket Orders.……………………………………………….12 Bollinger Band Study (Chart)……………….…67-68, 70 Book Information.………………………….…………..13-17 Buy (Shares)......4,6, 9-10, 15,24, 27-28, 31,41,51,55 Broker, Execution..................................................48 Brut Book (BRUT)..……………………………………..4, 8-9
C Canceling Orders…..3,6,10,15,24,27-30,33,48-49,51 Changing Orders….....……………………3, 9, 24, 32, 51 Chart…………………..1-2, 13, 26, 31, 35-39, 44, 57-73 Chart (Bar)…………………………………58, 61-65, 67-73 Chart (Bar Style)…………………………………..62-63, 65 Chart (Opening)……………………………………………...57 Chart (Spread Charts)………………………………...65-66 Chart (Studies)…………………………..57, 59, 63, 67-73 Chart (Tick)………………………………..57-61, 63-64, 67 Chart (Toolbar Features)...……..37, 57-59, 61, 63-64 Chart (Underlying Price Detail)…………..………61, 64 Clock…………………………………………………………….75 Condition of Sale……………………………………….42-43 Confirm Orders……………………………………..31, 52-53 Confirmation of “Propagate Changes”..................21
D Default Settings (Global)......5-6, 8-10, 14-15, 18-21,
30, 37-38 Default Settings (Local)…..5, 7, 10, 14-15, 18, 22-23 Daily Chart, Day Bar....…………………57-58, 64-66, 68 Destinations (Order)....4-5, 8-15, 24-25, 27,30,48,52 Detail Windows…..32-33, 37-38, 41,43, 50-56, 61,64 Discretionary Orders…………………………………….9-10
Drilling Down……………………………………50-52, 54-55
E ECN Fee………………………………………………………..49 ECNs.…………………………….8-9, 13, 16-17, 20, 52, 54 Entry (Order) Level I.........3-6, 8,10,18,22,26, 30-31,
35-39, 41, 55 Entry (Order) Level II…………8, 10, 13-23, 26, 31-32,
35-39, 55 Equities...……………...…………………….………40, 42-44 Exchanges……………………………………8-9, 44, 52, 54 Execution Broker……………………………………………48 Execution (Orders).…………..10, 12, 32-34, 48-49, 52 Executions by Date…………………………..32-34, 49-50 Expanded View (Level I Order Entry)……………….3-4 Exponential Trend Study (Chart)…………..…….67, 73
F Fees (ECN)………………………………………….…………49 Fill (Quick Fill)………….………………………………4-5, 14 Filtering Data………………………..32-33, 43, 46, 50-51 Focus Window, Set As…………………………..39, 44-45 Focus Window – Linking with Groups…………..44-45 Fundamental Data…………………………………2, 39, 46 Futures……………………………………………………..24-34 Futures Monitor………………………………………….32-34 Futures Order Entry……………………………………24-32 Futures, Linking Functionality…………………….31-32
G Global Settings…..5-6, 8-10, 14-15, 18-21, 30, 37-38 Gridlines (Show)………………………………………..33, 40 Group, Link Group……13, 31-32, 35-39, 44-45, 63-65
H Hot Keys...……………………………...5-10, 14-15, 41, 55 Highlighting Market Makers (Level II)..............16-17 History (Order)……………………………………..50-53, 55
I Icon Buttons..2,13,24,37,39, 43-44, 57,59,61, 63-64 Indexes; Indices (Market)….…………………………….43 Inserting Rows……………………………………………….40 Island ECN (ISLD)………………….……………4-5, 13, 15 Island Book (ISB)……………………………………………13
76

S t e r l i n g T r a d e r ® P r o K e y W o r d I n d e x
L Labels, Adding..…….……………………………………….40 Level I Order Entry…………3-6, 8,10,18,22,26, 30-31,
35-39, 41, 55 Level II Order Entry…………..8, 10, 13-23, 26, 31-32,
35-39, 55 Level II Order Entry – Advanced Features.......16-23 Linking.………………….13, 31-32, 35-39, 44-45, 63-65 Linking (Activating)………………………..………….35-39 Linking (Automatic)………………………..………….38-39 Linking (De-activating)…………….……..………………37 Linking (Groups)……..13, 31-32, 35-39, 44-45, 63-65 Load List (Spreads) Stock Watch………..……….41-44 Load List (Spreads) Chart……………………………65-66 Local Order Entry Settings..........5, 7, 10, 14-15, 18,
22-23 Log (Activity Log)…………………...............2, 39, 52-53 Log (Orders)………………………………………………52-56 Logging In…...………………….………………………………2
M Main Menu………2,5,12,14,18,22,24,30,37,40, 43-44,
51, 57, 75 Market Watch…………………………………………….43-44 MDX (Market Data Extensions)………………………..47 Messenger………………………………………………….....74 Mini Order Entry..........2-3, 6-7, 21-22, 26, 31, 39, 55 Monitoring Futures Positions.……………………..32-34 Monitoring Futures Prices…………………………..24-32 Monitoring Orders and Trades…..…………………48-53 Monitoring Positions..…….…………………32-34, 54-56 Monitoring Stocks……………………..……………….40-47 MACD Study (Chart)………..…………………………67, 72 Moving Down (Symbols/Labels in Stock Watch)…40 Moving Up (Symbols/Labels in Stock Watch)……..40
N NASDAQ (ECN)………………………………........4, 8-9, 20 News…………………………………………………………….46
O Open Orders…………..…………15, 24-25, 27-34, 48-51 Opening a Chart……………………………………………..57 Order Destinations….4-5, 8-15, 24-25, 27, 30, 48, 52
Order Entry (Level I)..…….3-6, 8,10,18,22,26, 30-31, 35-39, 41, 55
Order Entry (Level II)............8, 10, 13-23, 26, 31-32, 35-39, 55
Order Entry (Level II) – Advanced………………..16-23 Order Execution……………….10, 12, 32-34, 48-49, 52 Order History………………………………………..50-53, 55 Order Preferencing………………………………..4, 15, 20 Order Status Tabs.……………………………32-34, 48-51 Orders, Pegged……….……………………………5, 8-9, 14
P Pegged Orders……………….…………………….5, 8-9, 14 Position Monitoring….……………….………32-34, 54-56 Position Summary………………………………………54-56 Possible Duplicate………………………………………….49 Preferencing, Level I and Level II……………4, 15, 20 Price Types…………….....4-5, 10-11, 14-15, 24-25, 27 Prior Date Executions……………………….32-34, 49-50
Q Quick Fill......……………………………………………4-5, 14 Quick View.....……………………………………….3, 41, 55 Quote Trend………………………………………………40-42
R Realized ($Realized)……………………………………….54 Rows, Inserting………………………………………………40
S
Sell (Shares)……4, 6, 9-10, 15, 24, 27-28, 31, 41, 51, 54-55
Set As Focus Window……………………………39, 44-45 Server-Side Stops (S-STP)…………………………..10-11 Settings (Global)…5-6, 8-10, 14-15, 18-21, 30, 37-38 Settings (Local)……………..5, 7, 10, 14-15, 18, 22-23 Simple Moving Average (SMA) Chart………………...69 SNET (SelectNet)……………….…………………………..20 Special Order Designations....……………………………4 Spread Chart……………………………………………..65-66 Spreads (Stock Watch, Market Watch)…………41-44 Stochastic Study (Chart)……………………………67, 70 Stock Watch..…………………………………….………40-42 Studies (Chart)…………………………..57, 59, 63, 67-73
77

S t e r l i n g T r a d e r ® P r o K e y W o r d I n d e x
T Tab Order, Level I and Level II…………………….19-20 Taskbar Icons…………………………………………….2, 24 Tick Chart………………………………….57-61, 63-64, 67 Time and Sales…………….2, 13, 26, 31, 35-39, 42-43 Toolbar Features (Chart)………..37, 57-59, 61, 63-64 Top Ten……………………………………………2, 39, 44-45 Trade Summary…………………………………2, 39, 51-52 Trader Name……………………………………………………2 Trading Monitor...……………………………………….48-51 Trading Monitor, Filtering Data……………………50-51 Trend Study (Chart)…………………………………..67, 73
U Underlying Price Detail (Chart)…………………..61, 64 Unrealized Earnings ($Unrealized)……………………54
W Weighted Moving Average Study (Chart)……..67, 69
Z Zooming-In; Zooming Out (Chart)…………...59-60, 63
78