user guide for trainees on how to operate...
TRANSCRIPT
USER GUIDE FOR TRAINEES
ON HOW TO OPERATE
THE PORTAL

2
INDEX Page 1. How to access the portal 5 2. Standards: 2.1 Achieving the Standard 6 2.2 Self-Assessment 7 2.3 Teaching Assessment 8 3. Assessments: 3.1 Subject Assessment 10 3.1.1 Graded Assessments
• Assignments • Tasks • How do I find out what tasks have been set? • How do I upload my completed tasks to the portal? • How do I access my Subject Knowledge Audit and
Action Plan? • How do I upload my Subject Knowledge Audit and
Action Plan? • How do I access the Log of English Experience? • How do I upload my Log of English Experience?
10 11 11 11 12
13
13 14
14 3.2 Non-Subject Assessment 15 3.2.1 General Course 15 3.3 Assessment Guidance 16 3.4 Observation sheets 16 4. Evaluations 4.1 How to complete evaluations 16 5. Resources: 5.1 View Course Resources 17 5.2 Create Trainee Resources section 17 5.3 Add to the Trainee Resources 17 5.4 View the Trainee Resources 18 5.5 Timetable 18 6. User Profile: 6.1 Change password 18 7. Verifying Evidence 7.1 How to add evidence for ‘Achieving the Standard’ 18 7.2 How to add evidence for ‘Monitoring Other Subjects’ 19 7.3 How to add evidence for ‘Working with Other Year Groups’ 20 8. Latest Messages 20 9. Reflective Journal Descriptors 21
3

4
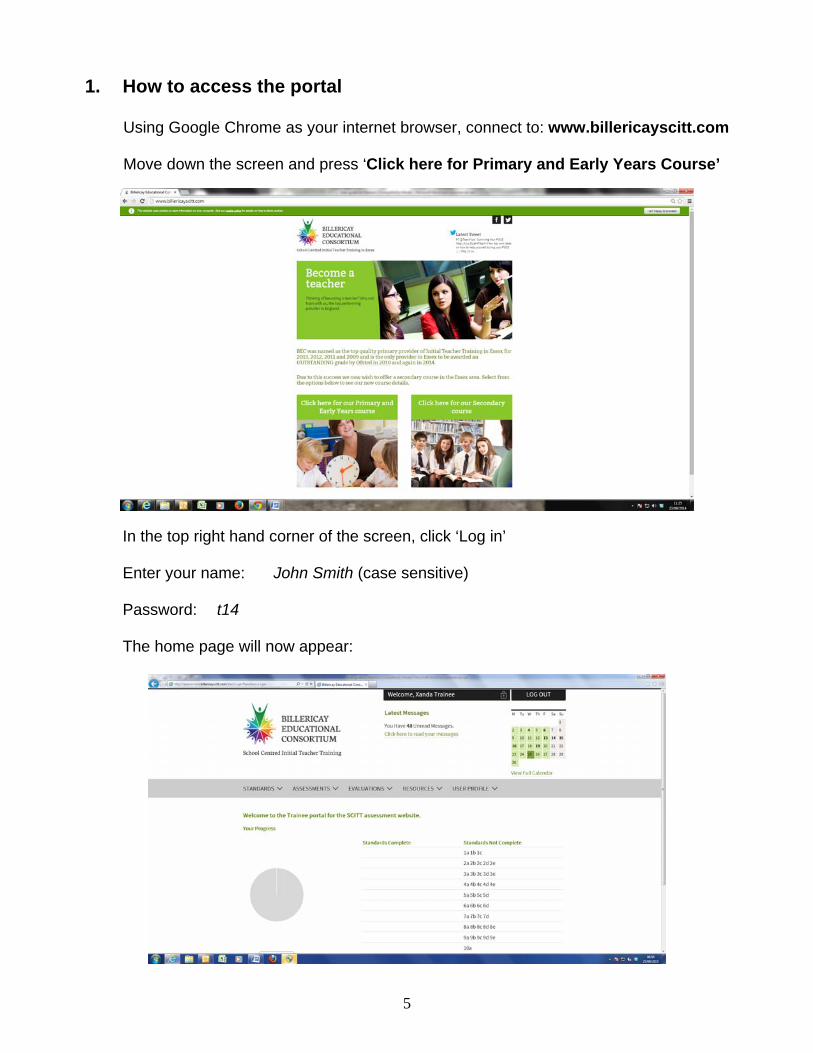
1. How to access the portal
Using Google Chrome as your internet browser, connect to: www.billericayscitt.com
Move down the screen and press ‘Click here for Primary and Early Years Course’
In the top right hand corner of the screen, click ‘Log in’
Enter your name: John Smith (case sensitive) Password: t14 The home page will now appear:
5

2. Standards
Click on the Standards tab. 2.1 Achieving the Standard
Press on ‘Manage your Standards Evidence’ This part of the portal allows trainees to demonstrate that they have met the Teachers’ Standards by submitting evidence, which will need to be verified. Click option 1 – ‘Set high expectations which inspire, motivate and challenge pupils’
You will see: • Every standard under standard 1 is listed, eg 1a ‘Establish a safe and
stimulating environment for pupils, rooted in mutual respect’, 1b ‘Set goals that stretch and challenge pupils of all backgrounds, abilities and dispositions’, etc
• Then a list of the possible types of evidence to meet the standards is listed (this list is not exhaustive)
• On occasions a directive will be highlighted in red (see standard 3a)
6

Using 1a as an example, the progress box on the right hand side of the page details:
• Whether the standard has been met (the progress status will turn green
when the correct number of pieces of evidence have been submitted and verified)
• How many pieces of evidence are needed to meet the standard (5) • How many pieces of evidence have been submitted and graded as good (1) • How many pieces of evidence have been submitted and graded as
outstanding (1)
In this example the trainee has two pieces of evidence, one graded as good and one graded as outstanding. A further 3 pieces of evidence need to be submitted for the standard to be met. At the top of the screen under the heading ‘Achieving the Standard’ it explains that the system will select the highest graded pieces of evidence as the year progresses. If you need a copy of this screen click ‘View Printable Version of all Submitted Evidence’ found at the top of this page in green text. Information on how to add evidence to the ‘Achieving the Standards’ screen can be found in section 7.1 of this document. Standards
Click on the Standards tab.
2.2 Self Assessment
This part of the portal is not presently being used.
Standards Click on the Standards tab.
7

2.3 Teaching Assessment
Monitoring other Subjects • Click on ‘Monitoring other Subjects’
To gain an understanding of the purpose of this screen, please read the paragraph at the top of the screen. THIS SCREEN IS USED AS A MONITORING TOOL TO ENSURE TRAINEES OBSERVE AND TEACH ALL THE NON-CORE SUBJECTS. Trainees are to add evidence throughout the year for mentors to verify. If you have observed your mentor or other teachers delivering the lesson then you are to complete an observation sheet and load an entry into the first column against the curriculum subject. If you have taught the lesson you are to load an entry using a copy of your lesson observation into the second column against the curriculum subject. Two entries are required in each box, and all need to be verified by mentors. There is no expectation that trainees teach MFL (Modern Foreign Langugages), but if confident you are free to do so. Information on how to add entries to this screen can be found in Section 7.2 of this booklet.
8

Standards Click on the Standards tab.
Teaching Assessment
Working with other Year Groups • Click on ‘Working with other Year Groups’
To gain an understanding of the purpose of this screen, please read the paragraph at the top of the screen. THIS SCREEN IS USED AS A MONITORING TOOL TO ENSURE TRAINEES WORK WITH ALL YEAR GROUPS ACROSS THE PRIMARY RANGE During the course of the year, trainees will be entering the date of when they have worked with children in other year groups. Trainees are to produce evidence that they have been working with pupils in all age groups. Mentors will need to verify this evidence. We are only looking for 7 entries (EYFS through to Yr 6). If trainees are working in split years, eg 1/2, then this will cover both year groups. Information on how to add these entries can be found under section 7.3 of this document.
9

3. Assessments
3.1 Subject Assessments
Under each of the subject headings are details of: Graded Assessments • Assignments • Tasks
Trainee Development • Subject Knowledge Audit and Action Plan • Evidence Log • Recommended reading
3.1.1 Graded Assessments (for the purpose of this training guide we will use English) • Press ‘Assessments’ tab • Under ‘Subject Assessments’ click English – you will have a ‘Graded
Assessments’ heading
10

Assignments: • Trainees will not load the 5 modules onto the portal, namely:
• The Essential Curriculum • The Wider Curriculum • Theories, Themes and Issues • Developing Classroom Experience • Qualifying School Experience
Hard copies of these assignments will be handed into the SCITT office. However, an assignment cover sheet will need to be uploaded under ‘Non-subject Assessments’, ‘General Course’ – see 3.2.1.
Tasks How do I find out what tasks have been set? • Press ‘Assessments’ tab • Under ‘Subject Assessment’ heading click English • Press ‘Tasks’ • All assessed tasks will be listed • The following information is given:
• The name of the task • The deadline which trainees must always meet • The date when trainee completed the task • The grade awarded to the task
When the task has been set or a trainee wishes to preview the content of the task press ‘View’. ‘Assessment Instructions’: Full details of the task will be provided. ‘Downloadable Assessment Materials’: The tutor may provide some materials to assist you in the completion of the task.
‘Deadline Date’: Date the task must be submitted.
11

How do I upload my completed tasks to the portal? • Click on ‘Assessments’ tab • Click on the relevant subject beneath heading ‘Subject Assessments’, eg
English • Click on ‘Tasks’ • Click on ‘Complete’ • Scroll down to ‘Complete this assignment’ • Type any additional instructions you wish to make the marker aware of (no
excuses) • Click ‘Upload new material’
Title: Curriculum subject plus task number, eg English Task 2 Description: If you need to add any additional information Material type: Please select ‘Resource type’, click ‘File’ or ‘URL Location’
• In order to select your material from your hard drive, click ‘Choose File’ and select relevant evidence/files. Only load one piece of evidence at a time
• Press ‘Save’
The task is now sitting ‘in a cloud’. If you wish to add further evidence, say at a later date, then: • Click subject under heading ‘Subject Assessments’ • Click ‘Tasks’ • Click ‘Complete’ and then ‘Upload new material’ • ‘Upload Assessment Material’ screen will appear; complete Title box with
curriculum subject and task number, eg English Task 2; provide further details: ‘Select Resource Type’ from your database by clicking ‘Choose File’ and then press ‘Save’
When you are sure you have completed the task and now wish to send it to the marker: • Click subject under heading ‘Subject Assessments’ • Click ‘Tasks’ • Click ‘Complete’ • Scroll to the bottom of the page and tick the box next to the words ‘I
confirm I have completed this assessment and uploaded all completed supporting materials’
• Click ‘Confirm complete’ button
A screen will now confirm the ‘Assessment has been submitted’ and the task’s final column will show ‘Completed’.
12

How do I access my Subject Knowledge Audit and Action Plan? • Press ‘Assessments’ tab • Select the subject under the heading ‘Subject Assessments’,
eg English • Under ‘Trainee Development’ select ‘Subject Knowledge Audit and Action
Plan’ • Press ‘Update’
The next screen will: • Allow you to download the document under ‘download material’ • Save the documents to your hard drive • Complete the document How do I upload my Subject Knowledge Audit and Action Plan? Once the document is complete then upload the document again by: • Press ‘Assessments’ tab • Select subject under ‘Subject Assessments’ heading • Select ‘Subject Knowledge Audit and Action Plan’ • Click ‘Update’ • Scroll down the screen to ‘Update this assignment’ • Type any additional instructions you wish to make the marker aware of (no
excuses) • Click ‘Upload new material’
Title: Curriculum subject plus the words Subject Knowledge Audit and
Action Plan Description: Is it first/second/third/fourth submission Material type: Press ‘Select Resource Type’, click ‘File’, then ‘Choose
File’ and select the SK Audit and Action Plan from your hard drive and other evidence/files, if applicable
• Press ‘Save’ The document(s) are now available for the tutor to view.
13
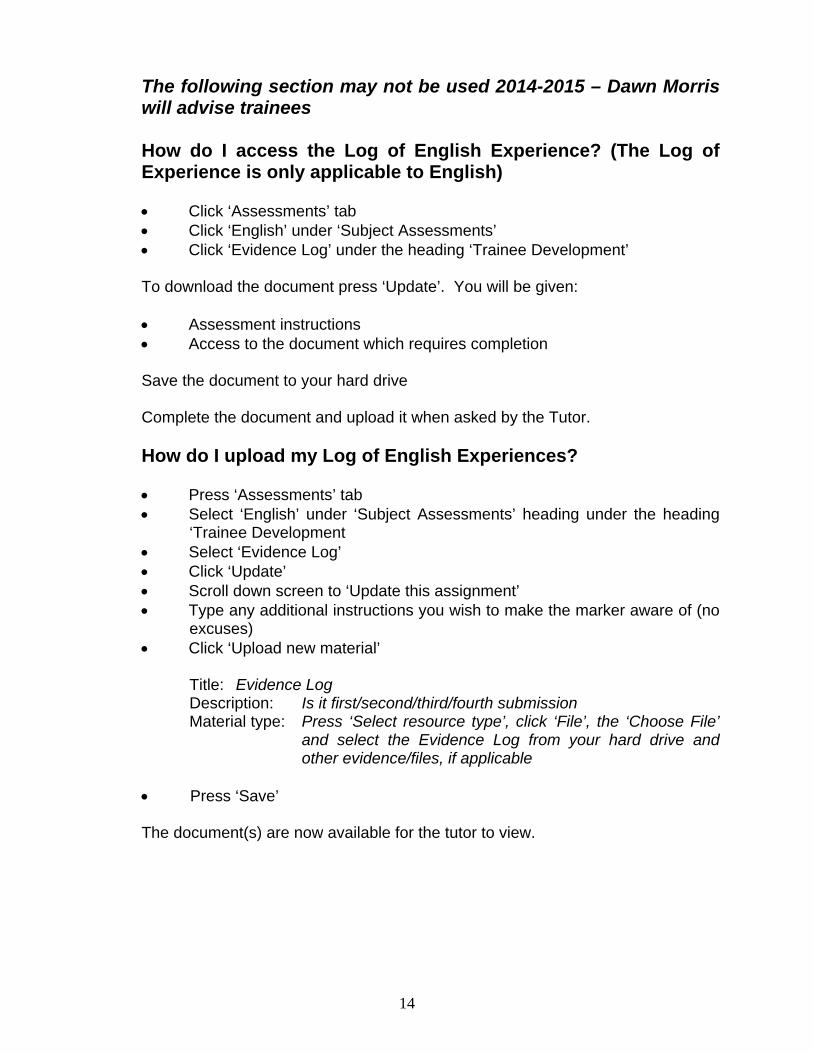
The following section may not be used 2014-2015 – Dawn Morris will advise trainees How do I access the Log of English Experience? (The Log of Experience is only applicable to English) • Click ‘Assessments’ tab • Click ‘English’ under ‘Subject Assessments’ • Click ‘Evidence Log’ under the heading ‘Trainee Development’
To download the document press ‘Update’. You will be given: • Assessment instructions • Access to the document which requires completion
Save the document to your hard drive
Complete the document and upload it when asked by the Tutor. How do I upload my Log of English Experiences? • Press ‘Assessments’ tab • Select ‘English’ under ‘Subject Assessments’ heading under the heading
‘Trainee Development • Select ‘Evidence Log’ • Click ‘Update’ • Scroll down screen to ‘Update this assignment’ • Type any additional instructions you wish to make the marker aware of (no
excuses) • Click ‘Upload new material’
Title: Evidence Log Description: Is it first/second/third/fourth submission Material type: Press ‘Select resource type’, click ‘File’, the ‘Choose File’
and select the Evidence Log from your hard drive and other evidence/files, if applicable
• Press ‘Save’
The document(s) are now available for the tutor to view.
14

3.2 Non-Subject Assessment
Pre-Course and Preliminary This part of the site is not in use.
3.2.1 General Course This part of the site deals with those areas that do not directly fit into the subjects listed under the ‘Subject Assessments’ heading, see section 3.1. For example:
• cover sheet for the Essential Curriculum Assignment • cover sheet for the Wider Curriculum Assignment • cover sheet for the Theories, Themes & Issues Assignment • documentation to be completed following the Pupil Referral Unit (PRU)
visit
Action required - when you hand in your assignment, plus a copy, you will need to:
• download the relevant Assignment cover sheet: • click ‘Assessments’ tab • under ‘Non-subject Assessments’ click ‘General Course’ • click ‘Assignment’ • click ‘View’ against the relevant cover sheet • click on the link beneath the heading ‘download material’ • complete the Student Number • save to hard drive
Then load this document onto the portal:
• click ‘Assessments’ tab • click under ‘General Course’ • click ‘Assignment’ • click ‘Complete’ • ‘Trainee notes’ – leave blank • click ‘upload new material’ • complete title, e.g. cover sheet ‘Essential Curriculum’ • description – leave blank • under ‘material type’ click ‘File’ • choose ‘File’ • click ‘Save’ • click in the box ‘I confirm I have completed this assessment and
uploaded all completed supporting materials’ • click ‘Confirm complete’
15
You will then see a message in red ‘Assessment has been submitted’.
3.3 Assessment Guidance
Details of 3 formal assignments and guidance on how assignments and tasks are presented and graded are provided in clearly defined documents. Details of the two classroom related modules are found here.
3.4 Observation Sheets View Your Observation Sheets This section allows you to review your performance to ensure you are making continued progress as the course develops.
4. Evaluations
All areas of the programme are evaluated. We would ask that you visit this part of the site twice a week to ensure you are completing the evaluations promptly once the lecture has been delivered.
4.1 How do I complete Evaluations?
• Press ‘Evaluations’ tab • Click ‘View your Evaluations’ The screen provides you with: • Evaluation Title – title of the lecture or classroom experience • Evaluation Date – when loaded onto the system
If present – press ‘Take the evaluation’ If absent – press ‘Set as absent’ • Grade the questions, and if you wish to make a constructive comment then
complete ‘What went well’ and ‘Even better if’ • Press ‘Take evaluation’ and those details will be sent to the SCITT office
for onward transmission to the tutor, to enable them to make any adjustments to the next lecture
16

5. Resources
Course Resources 5.1 View Course Resources
Most documents used on the course can be found under this section. Key documents for trainees would include: • Resources Folder – Autumn term. All the documents in your green folder, in
case you ever lost them • Newsletters – in case you lose yours. The Admin office will upload
Newsletters every Wednesday • Lecture notes under the subject heading
Trainee Resources
5.2 Create Trainee Resource Section
This area of the site allows trainees to contribute to a resource area to provide trainees and other mentors with ideas for planning, teaching and learning and research. Before you enter a resource onto the portal, please make sure there is an appropriate heading by clicking ‘View the Trainee Resources’. If there is not an appropriate heading in the list then press ‘Create Trainee Resource Section’ and type the new heading under ‘Section Name’, then press ‘Submit’.
5.3 Add to the Trainee Resource Section
If you have an item to add to the Resource section of the portal (this could be a website, book, planning document etc) then click on ‘Add to the Trainee Resources’: • Select the Resource section from the drop down list • Add the title of the document • Type notes on why you found the resource so useful and the impact on your
lesson, confidence, pupil progress etc • Press ‘Enter Document Information’
The next screen allows you to upload the document, if there is one. Please ensure you enter at least 3 items onto this part of the portal during the year.
17
5.4 View the Trainee Resources
Select a title under the section menu to reveal all the resources members of our school led ITT group have found useful in enhancing the quality of their teaching and learning.
5.5 Timetable
The current timetable can be viewed under ‘View Course Timetable’.
6. User Profile 6.1 Change Password
If you wish to change your password please complete the relevant boxes.
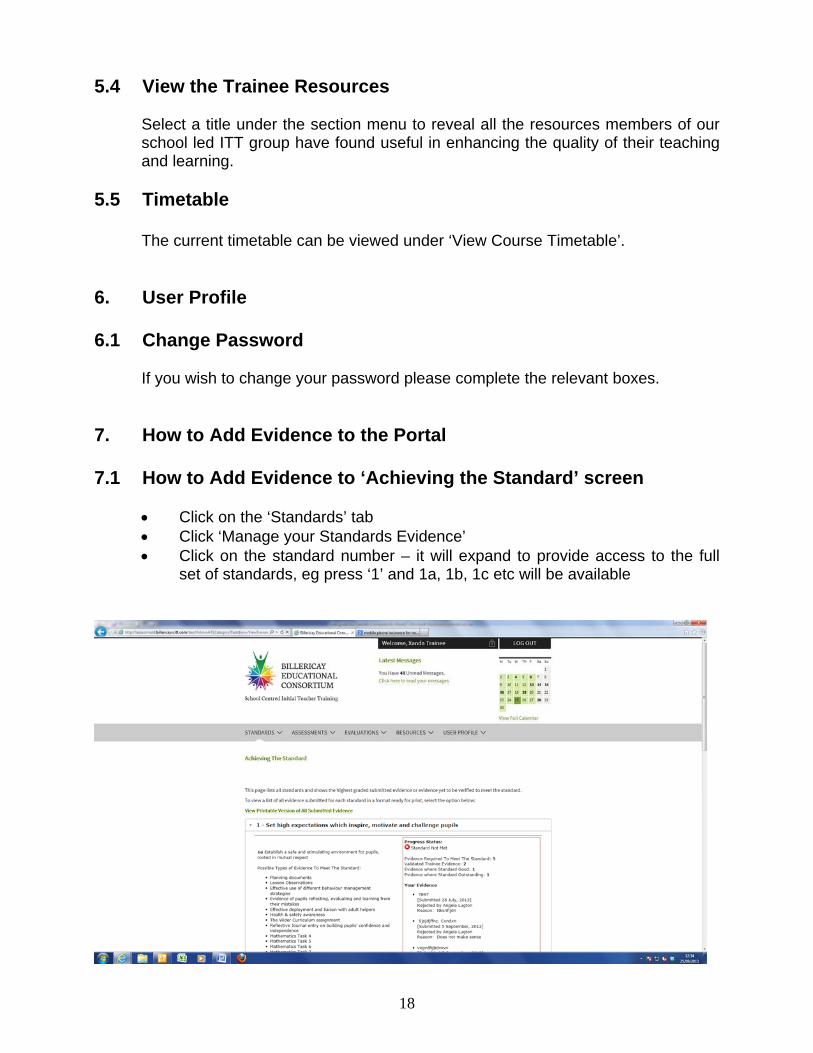
7. How to Add Evidence to the Portal 7.1 How to Add Evidence to ‘Achieving the Standard’ screen
• Click on the ‘Standards’ tab • Click ‘Manage your Standards Evidence’ • Click on the standard number – it will expand to provide access to the full
set of standards, eg press ‘1’ and 1a, 1b, 1c etc will be available
18

• In the ‘Progress Status’ box at the bottom, click on the words ‘Add New Evidence’
• Use the text box to briefly explain the type of evidence • Signatory – select from the drop down box the name of the person to verify
your piece of evidence • Click ‘Submit Evidence’
To add a document from your hard drive or storage database, click ‘Browse’. Click ‘Upload Evidence Document’.
7.2 How to add evidence for ‘Monitoring Other Subjects’
• Click on the ‘Standards’ tab • Click on ‘Monitoring other Subjects’ • Click ‘Add’ against the relevant curriculum subject, making sure you select
the correct column • Enter your ‘Evidence Date’ – click the calendar box to select the date. DO
NOT TYPE THE DATE STRAIGHT INTO THE BOX • Signatory: select from the drop down box the name of the person to verify
your piece of evidence • Click ‘Submit Evidence’
19

This will send a message to the signatory that there is some evidence requiring verification. Place the hardcopy of evidence somewhere safe for your mentor to read through before verifying.
7.3 How to add evidence for ‘Working with Other Year Groups’
• Click on the ‘Standards’ tab • Click on ‘Working with other Year Groups’ • Beneath your name click on ‘Add’ • Enter your evidence – complete the screen using the drop down menus
Subject: Use the drop down list. For EYFS use the closest curriculum
subject School: Select your school Year Group Taught: Type in details Date working with Children: Use the calendar button Signatory: Select the person who is to verify this evidence
Press ‘Submit Evidence’ button – this will generate a message to the signatory that a piece of evidence requires verifying. Keep the hardcopy of the piece of evidence safe. This could be an observation sheet where you have observed the lesson but also worked with the pupils, a piece of reflective writing, etc.
8. Latest Messages
This section is detailed in the middle of the Home page. • Press ‘Click here to read your messages’
You will see: • Messages confirming your mentor has verified an entry relating to ‘Achieving
the Standards’ • Messages confirming your mentor has verified an entry relating to
‘Monitoring of Other Subjects’ • Messages confirming your mentor has verified an entry relating to ‘Working
with Other Year Groups’ • Any documents loaded onto the system by the Admin team are normally
added to the ‘Course Resources’ section, under the main heading of ‘Resources’
• You can create a new message by pressing the ‘New message’ box on the top left hand side of the screen
20
21
9. Reflective Journal Descriptors
Please find below details of the Reflective Journal Descriptors to assist mentors when grading entries you submit as evidence: Outstanding Reflection on practice and experience, in both discussion and writing, shows a well developed capacity to engage in higher order critical thinking, synthesising in order to make sense, re-constructing events in terms of theories that can be applied to a broader range of experiences and drawing on this process to identify alternative scenarios. There is evidence of the ability to critique alternative views, research evidence and personal teaching. An appropriately self-critical and reflective attitude supports the study of own professional practice. Good Reflection on practice and experience, in both discussion and writing, shows good ability to think deeply and to make sense of situations through critical analysis and evaluation. There is evidence of reasoning about events and experiences in terms of suggesting alternative, examining assumptions and beginning to conceptualise characteristics to enable future generalisations to be made. There is clear evidence of ability to study own professional practice. There are clear and relevant links with theoretical frameworks.