user guide - edmonds community...
TRANSCRIPT

User Guide
2
© 2015 Hobsons Version 061215
Table of Contents
Radius at a Glance.......................................................................................................6
The Radius Site Map ...................................................................................................7
Radius Data Diagrams .................................................................................................8
Common Radius Features............................................................................................9 List Views ..........................................................................................................................9
Create New List View ............................................................................................................ 10 Nested Logic.......................................................................................................................... 12 Customize List Columns ........................................................................................................ 15
Actions ............................................................................................................................16 Execute an Action ................................................................................................................. 17
Tools ............................................................................................................................. ..21 Export............................................................................................................................. .22
Contact Module ........................................................................................................ 23 Creating a New Contact....................................................................................................24 Importing Contacts ..........................................................................................................24
How to Import Contacts ....................................................................................................... 24 Organizations ..................................................................................................................27
How to Manually Add an Organization................................................................................. 27 Importing Organizations ....................................................................................................... 28 Merge Organizations ............................................................................................................ 29
Lifecycles ........................................................................................................................ .31 Tasks ...............................................................................................................................32
Create New Task ................................................................................................................... 33 Appointments..................................................................................................................34
Create an Appointment ........................................................................................................ 34 Locations .........................................................................................................................35
Programs Module ..................................................................................................... 36 Programs ........................................................................................................................ .36
Create a New Program.......................................................................................................... 37 Registrations....................................................................................................................38
Create a New Registration .................................................................................................... 39 Invoices .......................................................................................................................... .40
Create a New Invoice ............................................................................................................ 40 Payments ....................................................................................................................... .41
Create a New Payment ......................................................................................................... 41 Application Forms ............................................................................................................42
Create Application Form ....................................................................................................... 42 Sites ................................................................................................................................45
3
© 2015 Hobsons Version 061215
Create a New Site ................................................................................................................. 45 Communication Plans ......................................................................................................46
Create a Communication Plan .............................................................................................. 46 Email Templates ..............................................................................................................52 Discounts.........................................................................................................................55 Self Service Center ...........................................................................................................55 Iterations.........................................................................................................................58 Recommendations ...........................................................................................................64 Requirements ..................................................................................................................66 Recommender Forms .......................................................................................................67
Sales Module ............................................................................................................ 70 Leads ............................................................................................................................. ..70
Manual Lead Entry ................................................................................................................ 70 Opportunity.....................................................................................................................72
Manual Opportunity Creation .............................................................................................. 72
Inquiry Module ......................................................................................................... 72 Inquiries ......................................................................................................................... .73
Create New Inquiry ............................................................................................................... 73 Inquiry Forms ..................................................................................................................74
Event Module ........................................................................................................... 78 Events ............................................................................................................................ .78 Attendees ....................................................................................................................... .81 Targets ............................................................................................................................82 Event Communications ....................................................................................................83 Locations .........................................................................................................................83 Event Forms.................................................................................................................... .84
Marketing Module .................................................................................................... 86 Campaigns ...................................................................................................................... .86
Select Target List ................................................................................................................... 87 View & Edit Message ............................................................................................................ 88 Preview and Test................................................................................................................... 88 Schedule................................................................................................................................ 89
Exclusions ....................................................................................................................... .90
Cases Module ........................................................................................................... 91 Cases ............................................................................................................................. ..92
Creating a New Case ............................................................................................................. 92 Case Messages .................................................................................................................94
Create New Case Message.................................................................................................... 95
Analytics ................................................................................................................... 98 Dashboards .....................................................................................................................98 Reports........................................................................................................................... .99
Setup Options ......................................................................................................... 101
Personal Settings .................................................................................................... 102
4
© 2015 Hobsons Version 061215
Account Information ...................................................................................................... 102 Edit Account Information ................................................................................................... 102 Change a User Password..................................................................................................... 102 Create User Email Signature ............................................................................................... 103
Users & Permissions................................................................................................ 103 Data Sharing Settings ..................................................................................................... 103
Institutional Default Permissions........................................................................................ 103 Field Level Security ........................................................................................................ 104 Groups.......................................................................................................................... . 104
Creating a Group................................................................................................................. 104 Profiles .......................................................................................................................... 105
Creating a Profile ................................................................................................................ 105 Roles ................................................................................................................................... 108 Creating a New Role ........................................................................................................... 108 Create a Role....................................................................................................................... 109 Edit a Role ........................................................................................................................... 110
Security Settings ............................................................................................................ 110 Users ............................................................................................................................ . 110
Create a New User ............................................................................................................. 111 The List View ....................................................................................................................... 112
Organization Settings .............................................................................................. 113 Configure Search Settings............................................................................................... 113
Customize Form Field Lists ................................................................................................. 113 Create Mail Profiles........................................................................................................ 114
Create a New Mail Profile ................................................................................................... 114 Mailboxes ...................................................................................................................... 115
Create a New Mailbox ........................................................................................................ 115 Organization Details....................................................................................................... 117 Payment Gateway Settings............................................................................................. 117 Payment Gateway Transaction Log ................................................................................. 117 Recycle Bin ................................................................................................................... . 119
Emptying the Recycle Bin ................................................................................................... 119
Radius Web Services ............................................................................................... 120 Summary ............................................................................................................................. 120 What is a Web Service? ...................................................................................................... 120 The Components of a Web Service..................................................................................... 121 Radius Web Service Set-up ................................................................................................. 122 Creating a Web User Account............................................................................................. 123 Radius Web Services Use Cases .......................................................................................... 127 Available Field Attributes.................................................................................................... 130 Web Service Methods for Radius ....................................................................................... 131 List All Modules................................................................................................................... 131 Get a Module’s Meta Data ................................................................................................. 131 List All Fields for a Module.................................................................................................. 131 Get an Entity ....................................................................................................................... 131 Create an Entity .................................................................................................................. 132
5
© 2015 Hobsons Version 061215
Update an Entity ................................................................................................................. 133 Delete an Entity .................................................................................................................. 134 Search for Entities............................................................................................................... 134 Usage Limits & Best Practices ............................................................................................. 136 Product Releases & Web Services ...................................................................................... 136 Resources............................................................................................................................ 137
Import Tools ........................................................................................................... 138
Tab Settings ............................................................................................................ 139 Organize Tabs ................................................................................................................ 139 Rename Tabs ................................................................................................................. 140
Workflow Settings .................................................................................................. 140 Workflow Rules ............................................................................................................. 141 Workflow Alerts............................................................................................................. 143
To create a Workflow Alert: ............................................................................................... 143 Workflow Tasks ............................................................................................................. 144
To create a Workflow Task: ................................................................................................ 145
Modules ................................................................................................................. 146 Field Lists ...................................................................................................................... . 147
Field Types .......................................................................................................................... 148 Edit................................................................................................................................ 151 Field Dependency .......................................................................................................... 151 Quick Link Settings ......................................................................................................... 154 Assignment Rules........................................................................................................... 155 Edit Page Layout ............................................................................................................ 159 Duplicate Contact Settings ............................................................................................. 160
Radius Data Diagram............................................................................................... 162
6
© 2015 Hobsons Version 061215
RADIUS AT A GLANCE
R a d i u s a t a G l a n c e Radius is structured to provide users with the ability to engage students throughout the
entire student lifecycle. Additionally it allows for increased efficiency and
communication as institutions manage recruitment, enrollment, and overall student
success.
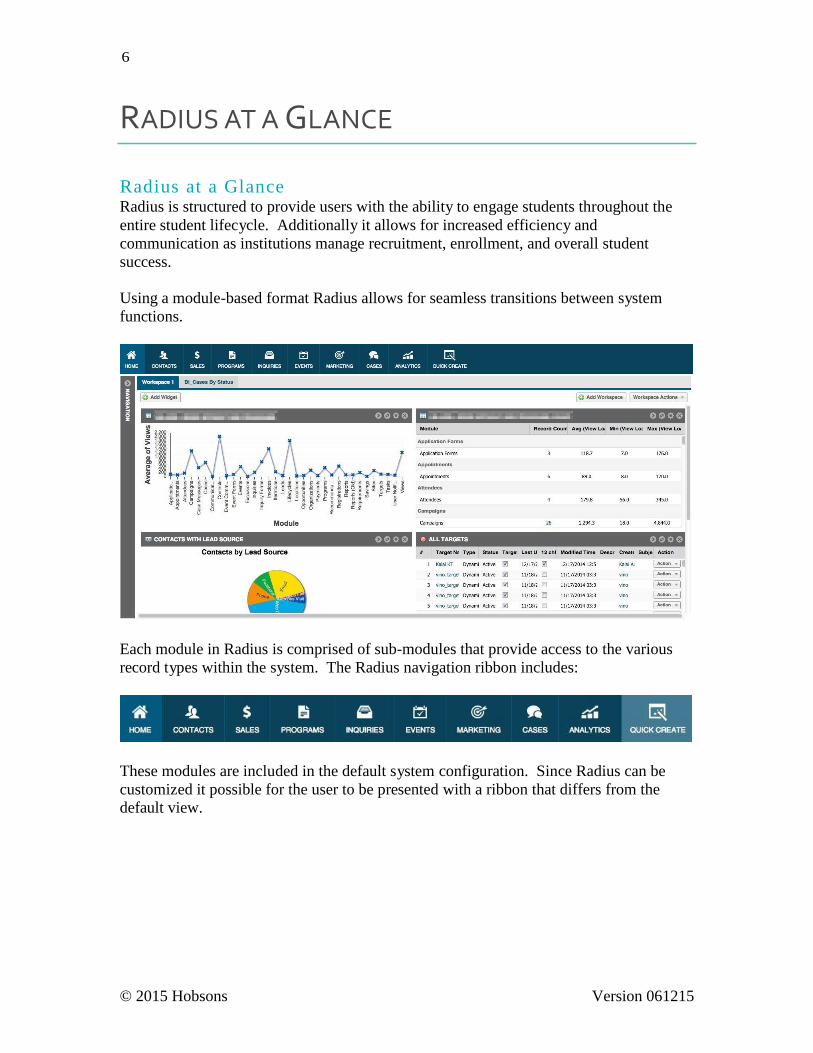
Using a module-based format Radius allows for seamless transitions between system
functions.
Each module in Radius is comprised of sub-modules that provide access to the various
record types within the system. The Radius navigation ribbon includes:
These modules are included in the default system configuration. Since Radius can be
customized it possible for the user to be presented with a ribbon that differs from the
default view.
7
© 2015 Hobsons Version 061215
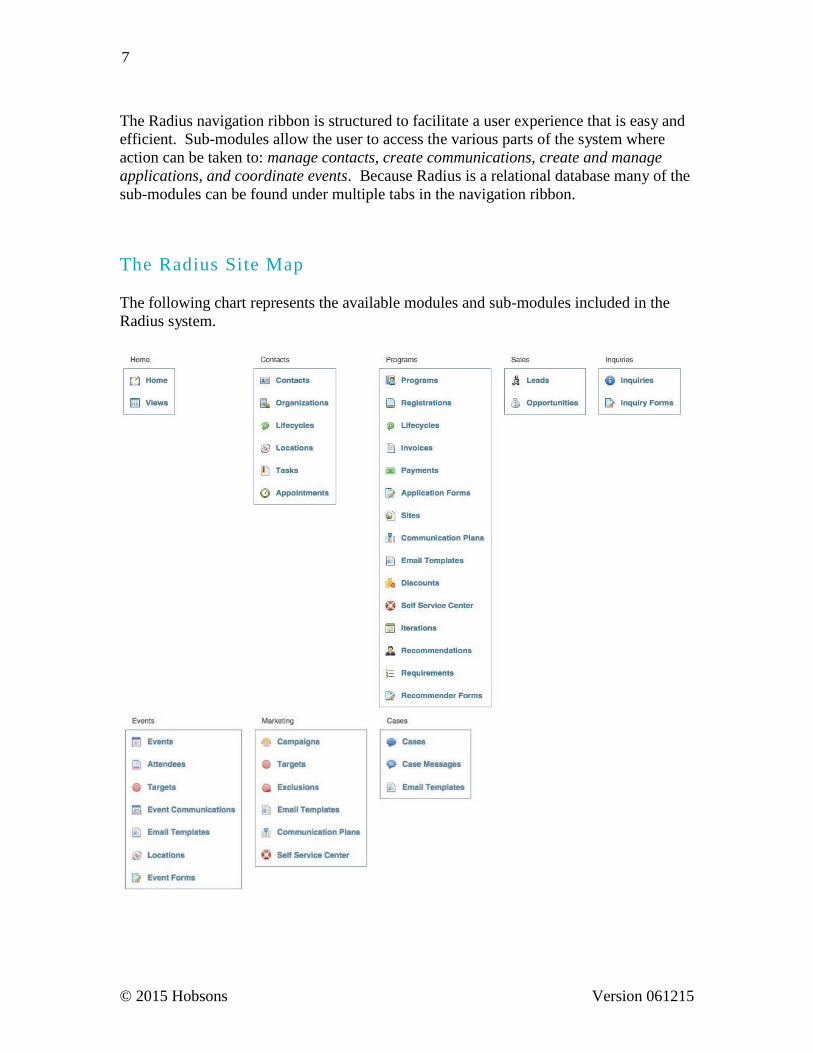
The Radius navigation ribbon is structured to facilitate a user experience that is easy and
efficient. Sub-modules allow the user to access the various parts of the system where
action can be taken to: manage contacts, create communications, create and manage
applications, and coordinate events. Because Radius is a relational database many of the
sub-modules can be found under multiple tabs in the navigation ribbon.
T h e R a d i u s S i t e M a p The following chart represents the available modules and sub-modules included in the
Radius system.
8
© 2015 Hobsons Version 061215
R a d i u s D a t a D i a g r a ms The Radius system is a complex relational database. A comprehensive set of diagrams
can be found in Appendix A.
9
© 2015 Hobsons Version 061215
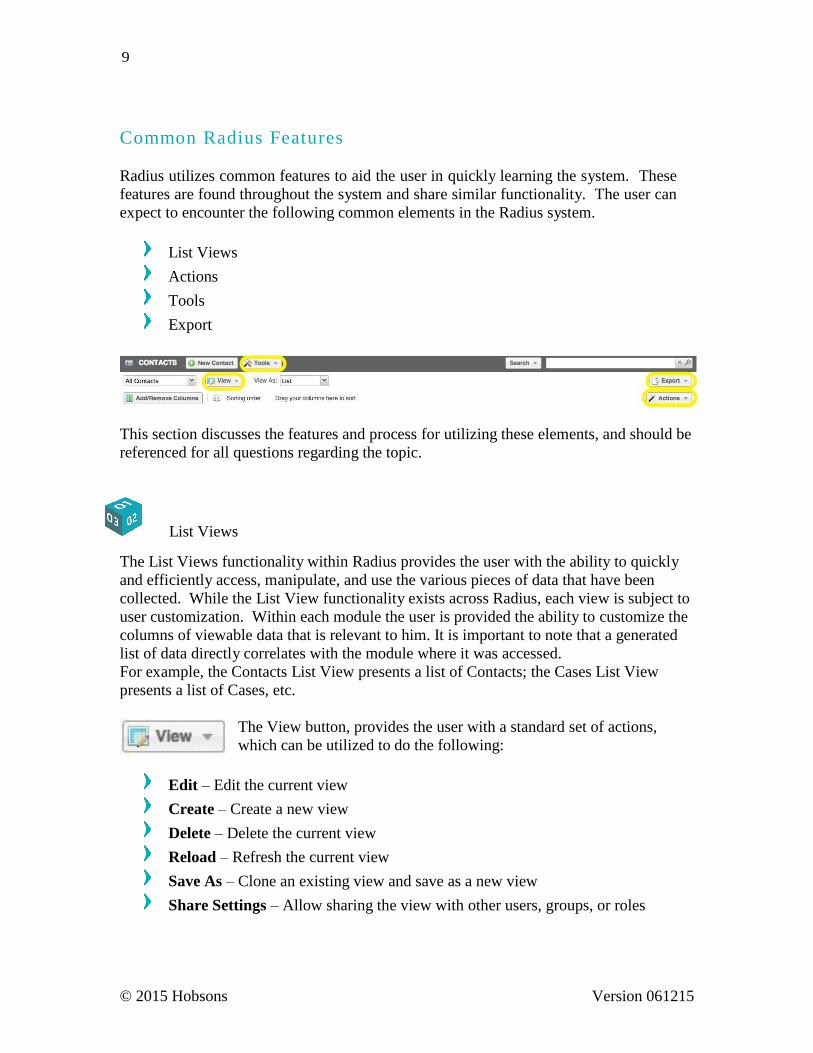
C o m m o n R a d i u s F e a t u r e s
Radius utilizes common features to aid the user in quickly learning the system. These
features are found throughout the system and share similar functionality. The user can
expect to encounter the following common elements in the Radius system.
List Views
Actions
Tools
Export
This section discusses the features and process for utilizing these elements, and should be
referenced for all questions regarding the topic.
List Views
The List Views functionality within Radius provides the user with the ability to quickly
and efficiently access, manipulate, and use the various pieces of data that have been
collected. While the List View functionality exists across Radius, each view is subject to
user customization. Within each module the user is provided the ability to customize the
columns of viewable data that is relevant to him. It is important to note that a generated
list of data directly correlates with the module where it was accessed.
For example, the Contacts List View presents a list of Contacts; the Cases List View
presents a list of Cases, etc.
The View button, provides the user with a standard set of actions,
which can be utilized to do the following:
Edit – Edit the current view
Create – Create a new view
Delete – Delete the current view
Reload – Refresh the current view
Save As – Clone an existing view and save as a new view
Share Settings – Allow sharing the view with other users, groups, or roles
10
© 2015 Hobsons Version 061215
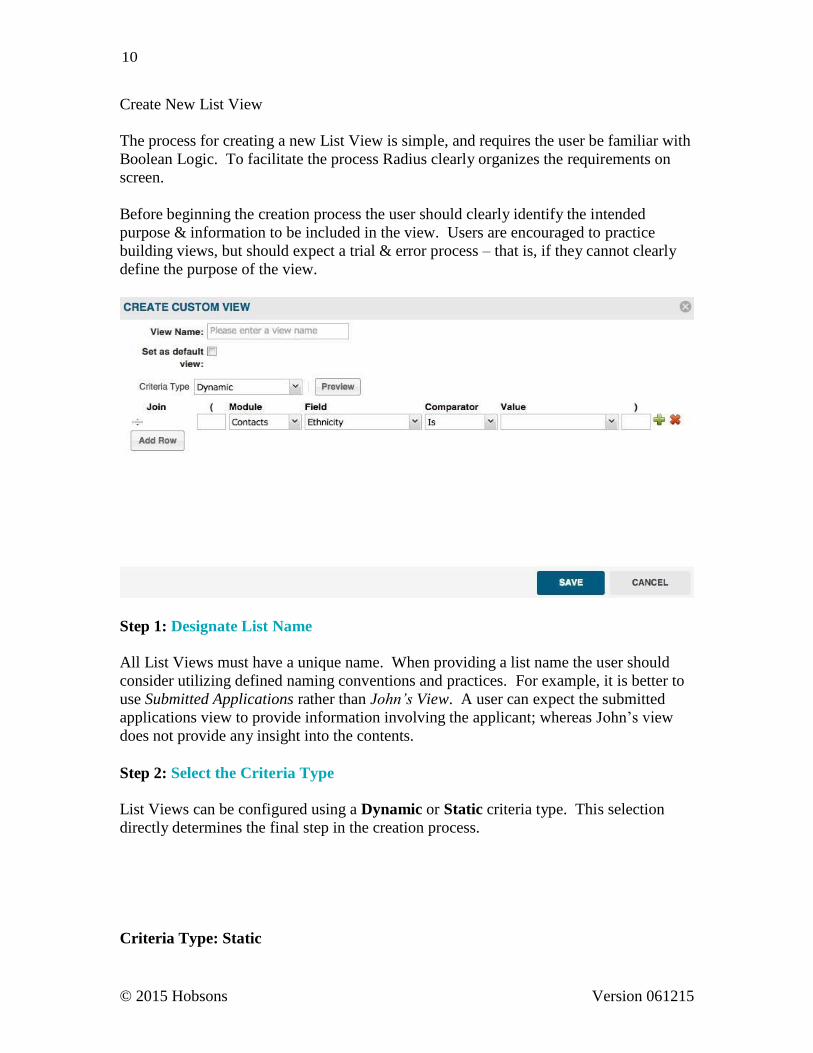
Create New List View
The process for creating a new List View is simple, and requires the user be familiar with
Boolean Logic. To facilitate the process Radius clearly organizes the requirements on
screen.
Before beginning the creation process the user should clearly identify the intended
purpose & information to be included in the view. Users are encouraged to practice
building views, but should expect a trial & error process – that is, if they cannot clearly
define the purpose of the view.
Step 1: Designate List Name
All List Views must have a unique name. When providing a list name the user should
consider utilizing defined naming conventions and practices. For example, it is better to
use Submitted Applications rather than John’s View. A user can expect the submitted
applications view to provide information involving the applicant; whereas John’s view
does not provide any insight into the contents.
Step 2: Select the Criteria Type
List Views can be configured using a Dynamic or Static criteria type. This selection
directly determines the final step in the creation process.
Criteria Type: Static
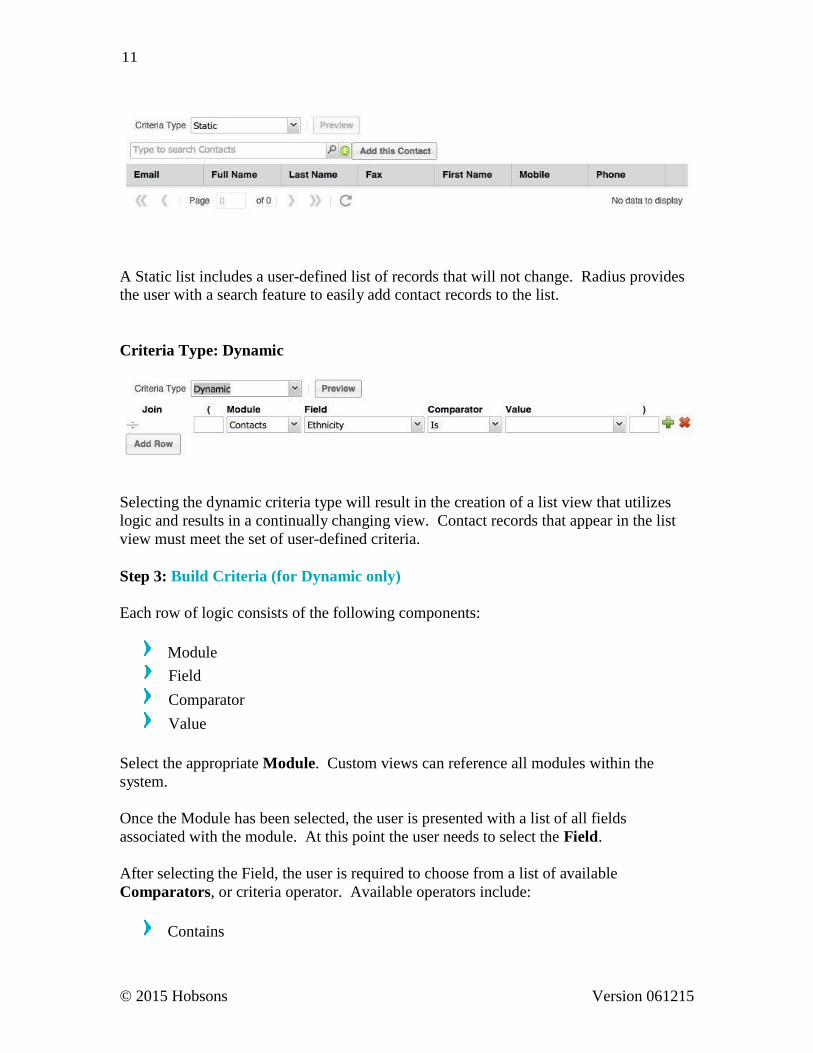
11
© 2015 Hobsons Version 061215
A Static list includes a user-defined list of records that will not change. Radius provides
the user with a search feature to easily add contact records to the list.
Criteria Type: Dynamic
Selecting the dynamic criteria type will result in the creation of a list view that utilizes
logic and results in a continually changing view. Contact records that appear in the list
view must meet the set of user-defined criteria.
Step 3: Build Criteria (for Dynamic only)
Each row of logic consists of the following components:
Module
Field
Comparator
Value
Select the appropriate Module. Custom views can reference all modules within the
system.
Once the Module has been selected, the user is presented with a list of all fields
associated with the module. At this point the user needs to select the Field.
After selecting the Field, the user is required to choose from a list of available
Comparators, or criteria operator. Available operators include:
Contains
12
© 2015 Hobsons Version 061215
Doesn’t Contain
Ends With
Is
Is (Case Sensitive)
Is Empty
Is Not Empty
Isn’t
Starts With
Users are presented with the full set of operators; however, the field type will determine
the usability of an operator. For example, the selection “Ends With” would not be
applicable for a field that utilizes a pick-list.
Finally, the user must select, or provide, the value(s) to be included in the logic
statement.
To complete the logic statement, place ( ) at the beginning and end of the line. If
additional lines of logic are desired, the user can click to add or delete a row. Finally, rows are joined with And, Or, Minus.
Nested Logic
When creating a complex query in Views, Reports, and Targets, the user may find the
need to use a mix of "and, or, minus" joins to combine multiple lines of filter logic.
Parentheses "(" can be used to identify which parts of the query logic are to be solved
first and which parts of the query logic should be solved as a group to be compared to
other logic outside of the group. Simply type a parenthesis inside each open parenthesis
and closed parenthesis field needed to begin and end a bracketed group. One group can
be nested completely inside another group if needed—just make sure that there are
always an equal number of opening and closing parentheses.
Bracketed expressions are solved from the inner most brackets first. Just as in ordinary
algebra, there is an order regarding which operators are evaluated first.
Understanding Order of Operations:
Query logic will be evaluated in the following order:
1. ()
2. NOT [MINUS]
3. AND
4. OR
13
© 2015 Hobsons Version 061215
For example: If a user queries, Contact State (Line 1) is OH AND Program (Line 2) is
Biology, they will find results for all contacts interested in Biology that live in Ohio.
Line 1: Contact State = OH
AND
Line 2:
Contact Gender =
Biology
For example: If a user queries, Contact State (Line 1) is OH AND Program (Line 2) is
Biology OR Program (Line 3) is Chemistry, they will find results for all contacts
interested in Biology that live in Ohio and all other contacts that are interested in
Chemistry regardless of their state.
For example:
Line 1: Contact State = OH
AND Line 2: Contact Program = Biology
OR Line 3: Contact Program = Chemistry
If a user is interested in finding Biology and Chemistry contacts in Ohio only, they will
need to include parentheses around lines 2 and 3.
For example:
Line 1: Contact State = OH
AND ( Line 2: Contact Program = Biology
OR Line 3: Contact Program = Chemistry)
If a user adds Line 4 to MINUS or subtract from that list Applicants below 3.0 they will
find all contacts interested in Biology and Chemistry in Ohio only that have a high GPA -
3.0 or higher.
For example:
Line 1: Contact State = OH
AND ( Line 2: Contact Program = Biology
OR Line 3: Contact Program = Chemistry)
MINUS Line 4: GPA < 3.0
Caution: The MINUS operator is the least used operator because it could exclude
valuable references if not used correctly. If a user would like to exclude targets (or
contacts, lifecycles, etc.), they can use the pull down tab under “Join” on the left and
choose MINUS. A MINUS sign will exclude any/all targets referenced after the MINUS
14
© 2015 Hobsons Version 061215
sign. Attaching a MINUS sign indicates that the user does not want targets they are
specifying. We strongly recommend users use parenthesis to eliminate confusion.
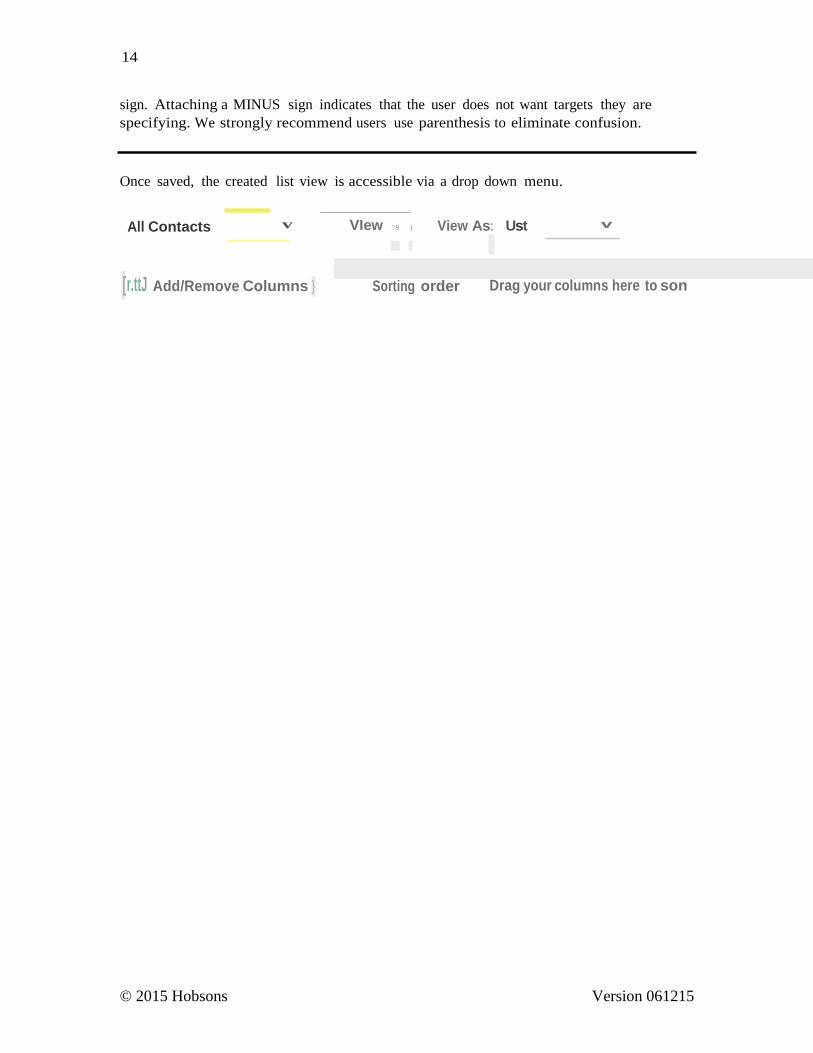
Once saved, the created list view is accessible via a drop down menu.
All Contacts v VIew "9 ] View As: Ust v
[r.ttJ Add/Remove Columns } Sorting order Drag your columns here to son
15
© 2015 Hobsons Version 061215
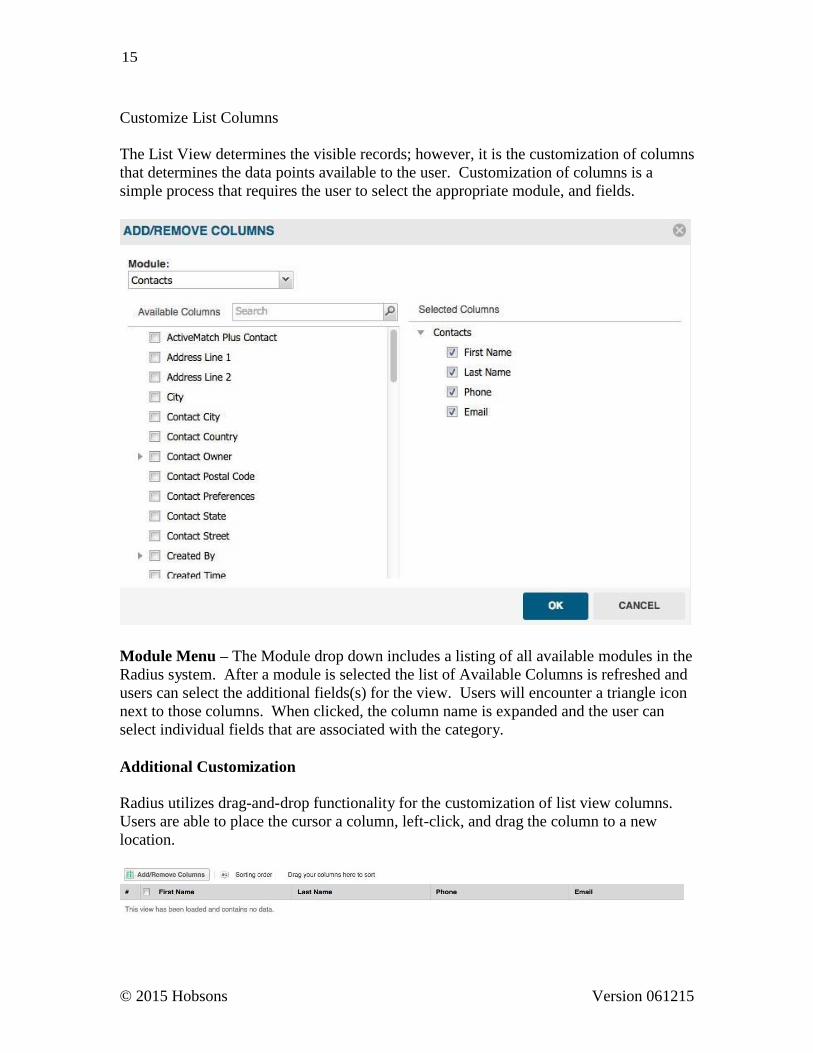
Customize List Columns
The List View determines the visible records; however, it is the customization of columns
that determines the data points available to the user. Customization of columns is a
simple process that requires the user to select the appropriate module, and fields.
Module Menu – The Module drop down includes a listing of all available modules in the
Radius system. After a module is selected the list of Available Columns is refreshed and
users can select the additional fields(s) for the view. Users will encounter a triangle icon
next to those columns. When clicked, the column name is expanded and the user can
select individual fields that are associated with the category.
Additional Customization
Radius utilizes drag-and-drop functionality for the customization of list view columns.
Users are able to place the cursor a column, left-click, and drag the column to a new
location.
16
© 2015 Hobsons Version 061215
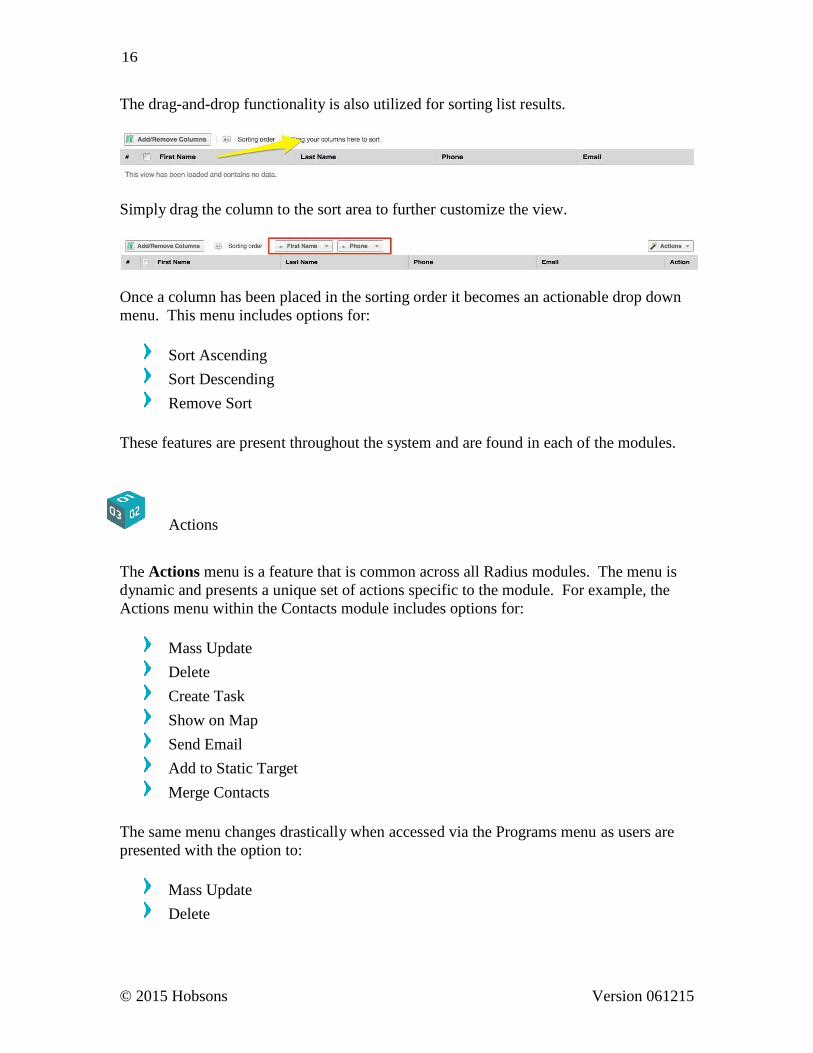
The drag-and-drop functionality is also utilized for sorting list results.
Simply drag the column to the sort area to further customize the view.
Once a column has been placed in the sorting order it becomes an actionable drop down
menu. This menu includes options for:
Sort Ascending
Sort Descending
Remove Sort
These features are present throughout the system and are found in each of the modules.
Actions
The Actions menu is a feature that is common across all Radius modules. The menu is
dynamic and presents a unique set of actions specific to the module. For example, the
Actions menu within the Contacts module includes options for:
Mass Update
Delete
Create Task
Show on Map
Send Email
Add to Static Target
Merge Contacts
The same menu changes drastically when accessed via the Programs menu as users are
presented with the option to:
Mass Update
Delete
17
© 2015 Hobsons Version 061215
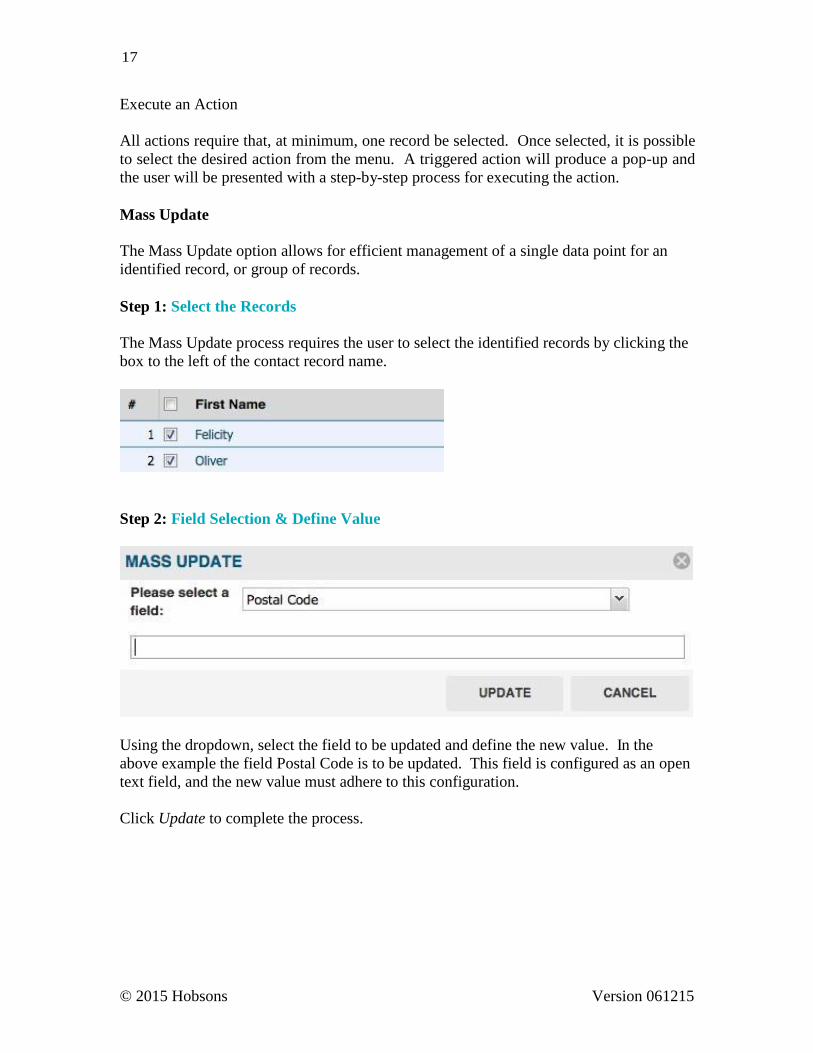
Execute an Action
All actions require that, at minimum, one record be selected. Once selected, it is possible
to select the desired action from the menu. A triggered action will produce a pop-up and
the user will be presented with a step-by-step process for executing the action.
Mass Update
The Mass Update option allows for efficient management of a single data point for an
identified record, or group of records.
Step 1: Select the Records
The Mass Update process requires the user to select the identified records by clicking the
box to the left of the contact record name.
Step 2: Field Selection & Define Value
Using the dropdown, select the field to be updated and define the new value. In the
above example the field Postal Code is to be updated. This field is configured as an open
text field, and the new value must adhere to this configuration.
Click Update to complete the process.

18
© 2015 Hobsons Version 061215
Show on Map
Radius includes integration between the list view and Google Maps, which can generate a
map based on the contact’s core address. This feature can be utilized for both single and
multiple records.
After selecting the records, trigger the Show on Map functionality by using the drop-
down menu.
19
© 2015 Hobsons Version 061215
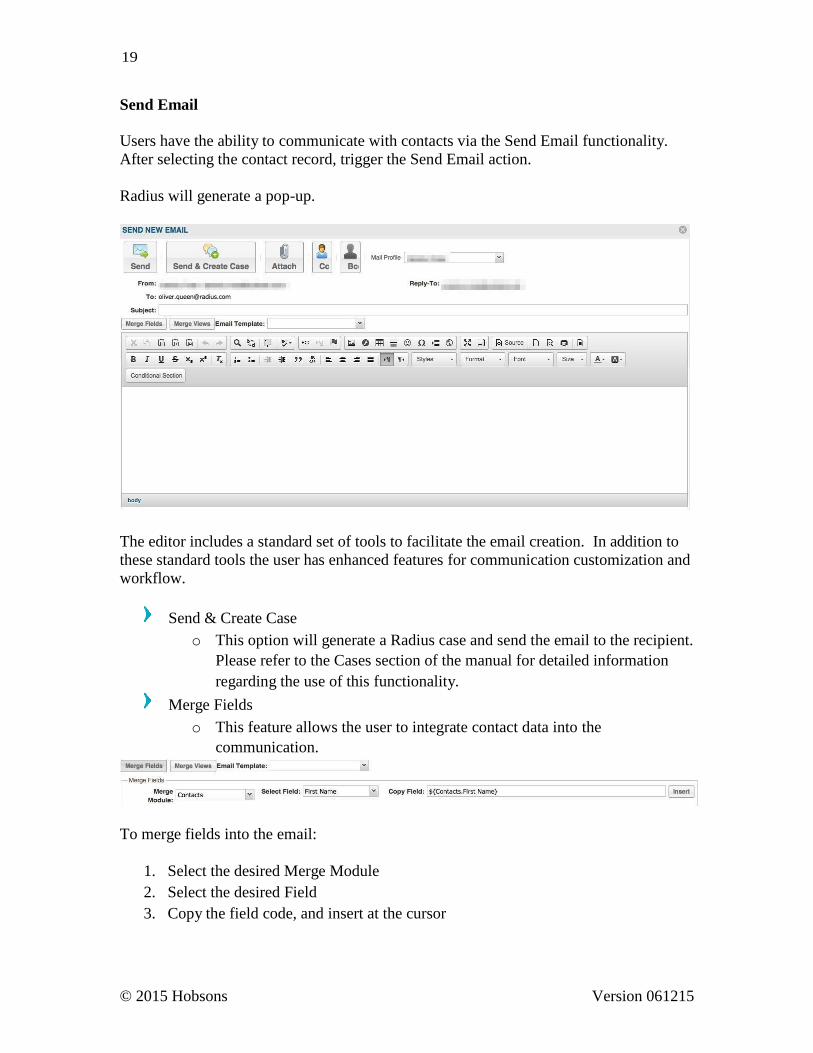
Send Email
Users have the ability to communicate with contacts via the Send Email functionality.
After selecting the contact record, trigger the Send Email action.
Radius will generate a pop-up.
The editor includes a standard set of tools to facilitate the email creation. In addition to
these standard tools the user has enhanced features for communication customization and
workflow.
Send & Create Case
o This option will generate a Radius case and send the email to the recipient.
Please refer to the Cases section of the manual for detailed information
regarding the use of this functionality.
Merge Fields
o This feature allows the user to integrate contact data into the
communication.
To merge fields into the email:
1. Select the desired Merge Module
2. Select the desired Field
3. Copy the field code, and insert at the cursor

20
© 2015 Hobsons Version 061215
Add to Static Target
A Static Target is a fixed list of Contacts that is defined by the user. As the name
suggests, this list must be managed by the user and will not change as new contact
records enter the system.
The user has access to this feature throughout the system and can add records as needed.
To add a contact record to a Static Target:
1. Select the contact record(s).
Radius will generate a pop-up.
2. Use the search field to find existing Targets, or click the green plus icon to create
a Target
3. Click Add to complete the process.
In addition to these actions, there are module-specific actions. Use of these actions is
detailed in later sections of this guide.
21
© 2015 Hobsons Version 061215
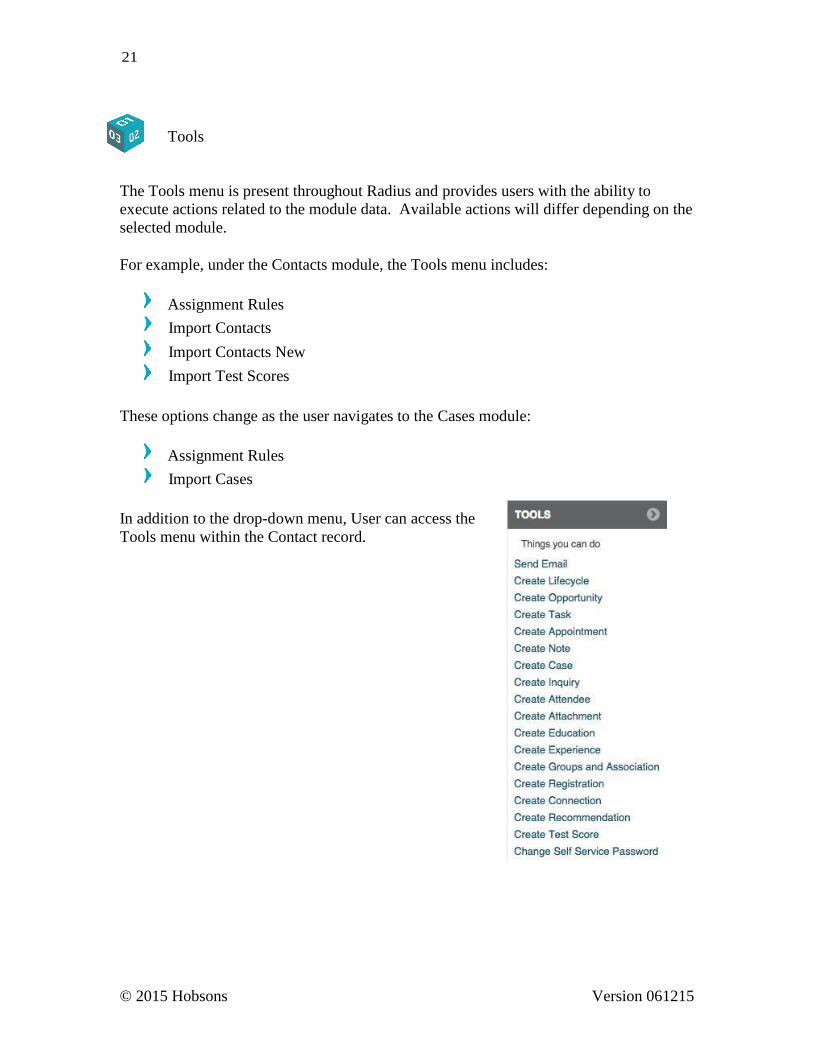
Tools
The Tools menu is present throughout Radius and provides users with the ability to
execute actions related to the module data. Available actions will differ depending on the
selected module.
For example, under the Contacts module, the Tools menu includes:
Assignment Rules
Import Contacts
Import Contacts New
Import Test Scores
These options change as the user navigates to the Cases module:
Assignment Rules
Import Cases
In addition to the drop-down menu, User can access the
Tools menu within the Contact record.
© 2015 Hobsons Version 061215
22
Export
The Export functionality allows the user to export the visible List View as a PDF, Excel,
or CSV format. To export:
Set the desired List View
Select the Export format
Once selected, Radius will generate the report and it will download to the user’s machine.
© 2015 Hobsons Version 061215
23
THE CONTACT MODULE
C o n t a c t M o d u l e As previously discussed, Radius is a relational database. Central to this relational model
is the Contact Record. All data found within the system is associated with a contact
record.
The Contacts Module contains functionality that is key to the creation and management
of contact records and their associated data.
The following section will provide a guide to the functionality within the Contacts
Module and will cover each of the following topics:
1. Contacts
a. Creating a New Contact
b. Importing Contacts
2. Organizations
a. Creating a New Organization
b. Importing Organizations
c. Merging Organizations
3. Lifecycles
a. Roles and stages
4. Locations
5. Tasks
6. Appointments
© 2015 Hobsons Version 061215
24
Creating a New Contact
Step 1: Click New Contact Button
Click on the New Contact button towards the top left of the page.
Step 2: Complete the Onscreen Form
Complete the contact form (fields with a red asterisk are required). Click Save.
To create another contact record, click on Save and New instead.
*Note that contacts can also be created manually via the Contact List View and the
Quick Create module.
This process can be used for creating individual records. For the bulk creation of
contacts, the user should utilize the Import functionality.
Importing Contacts
The Import Contacts functionality is used to upload multiple contact records into the
system at one time. This functionality is beneficial when users have a large list of
contacts that would be time consuming to import manually.
The import layout must include existing system or custom fields. New fields cannot be
created within the system during the import process.
During the import process Lifecycle Roles and Lifecycle Stages may also be assigned
(more on assigning lifecycle roles & stages in the next section).
By default, the user conducting the import will be listed as the owner of all imported
records. Organizations may also be created via the import functionality.
How to Import Contacts
© 2015 Hobsons Version 061215
25
Step 1: Select Import File
Click on Contacts then select Import Contacts (New) from the Tools Dropdown Menu.
Select the file for import by using the Browse functionality. Hobsons recommends
importing .csv files only. Step 2: Designate the Lifecycle Role/Stage
Select a Lifecycle Role and Stage (if applicable). Please note that doing so will assign
this Lifecycle Role and Stage to all contacts within the import file. This will also override
a preexisting contact’s current role and stage within the system.
Imported contacts may be added to a static target. If these contacts will be used in an
email campaign or event invitation then this is a good practice. Search for an existing
target or create a new one by clicking the green plus sign to the right of the Add to Static
Target box.
By default, the user importing the contact list is made the contact owner of each record.
Another user may be selected as contact owner or an assignment rule can be utilized.
Step 3: Schedule Import
Check the Schedule Import option to schedule the import for a date in the future. You
will then be prompted to input a date and time.
Step 4: Designate Duplicate Check Settings
Select Duplicate Check Settings. Choose whether the duplicate within the import file
should update a preexisting contact and whether a new contact should be created within
the system if a duplicate record is not found.
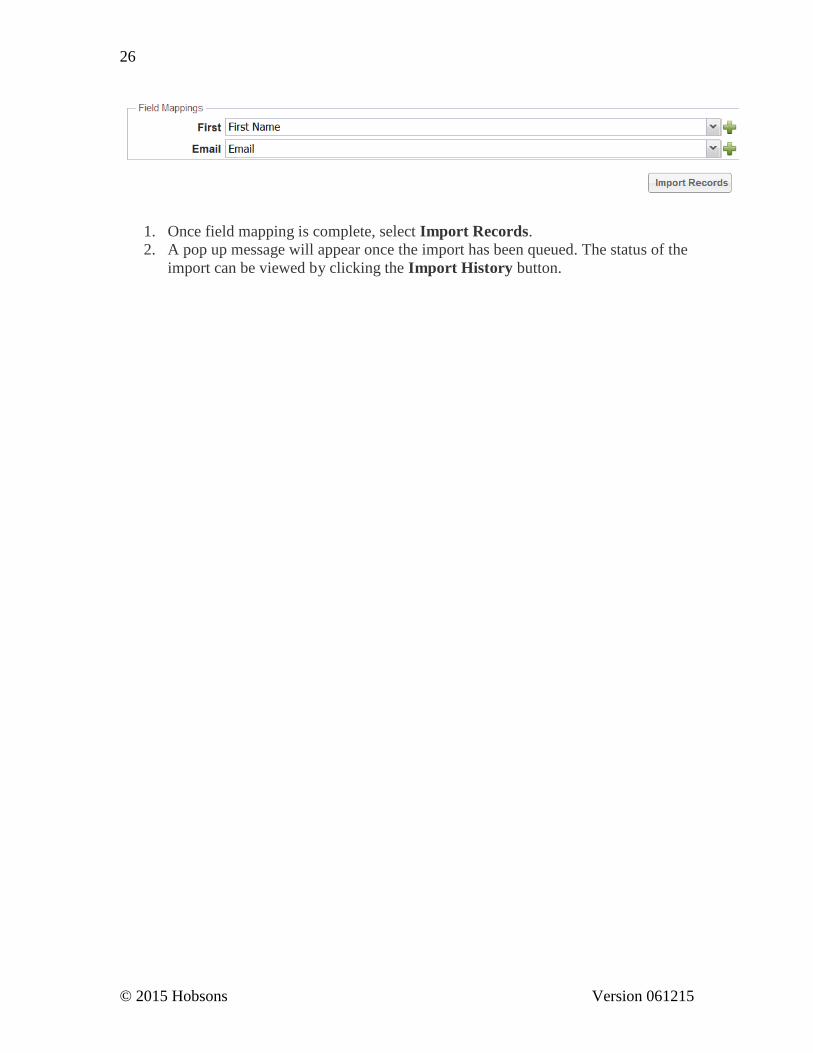
Step 5: Designate Field Mappings
Once a file to import has been selected and verified by the system, the Field Mappings
section will appear. Map each field found within the import layout to a field currently
found within the system.
The user has the ability to map a single field to many system fields. In the example
below, the import layout field “First” has been mapped to system field “First Name.”
© 2015 Hobsons Version 061215
26
1. Once field mapping is complete, select Import Records.
2. A pop up message will appear once the import has been queued. The status of the
import can be viewed by clicking the Import History button.
© 2015 Hobsons Version 061215
27
Organizations
Organizations are groups for which contacts are affiliated. Some examples of
organizations include high schools, companies, and non-profit organizations. Their usage
is beneficial because they enhance the comprehensiveness of the contact record.
Organizations are particularly useful when utilizing Events (see the section on Events for
more information).
Contact records can be associated with multiple organizations, and there is no limit to the
number of organizations for which a contact record may be associated.
Similar to contact records, organizations can be added manually or imported into the
system. See below for step-by-step instructions on how to create organizations within
Radius.
How to Manually Add an Organization
Adding a new organization is similar to adding a new contact. Follow these steps to
manually create a new organization within the system:
Step 1: Initiate the Creation of an Organization
Navigate to the Contacts menu and select Organizations.
Click on the New Organization button towards the top of the page.
Step 2: Provide Organization Details
Complete all relevant fields. Please note that fields with red asterisks are required.
The Description field may be used to provide all users in the system with helpful
information to further identify the organization.
Step 3: Save Created Organization
Click Save once finished. The user may also click Save & New to add another
organization.
© 2015 Hobsons Version 061215
28
Importing Organizations
It is possible to import a list of organizations into Radius. This is beneficial when users
have a large number of organizations they wish to input into the system at one time.
Importing organizations is very similar to importing contacts and can be accomplished by
following the steps below:
Step 1: Initiate the Creation of an Organization
Click on Contacts then select Import Organizations (New) from the Tools Dropdown
Menu.
Step 2: Select the Import File
Select the file for import by using the Browse functionality. Import files must be
formatted using .csv.
Step 3: Determine the Organization Owner
By default, the user importing the organization list is made the owner of each record.
Another user may be selected as organization owner or an assignment rule can be
utilized.
Step 4: Determine the Import Schedule
Check the Schedule Import option to schedule the import for a date in the future. At this
point the user is presented with options for scheduling the import process.
Step 5: Designate Duplicate Check Criteria
Select Duplicate Check Settings. Choose whether the duplicate within the import file
should update a preexisting contact and whether a new contact should be created within
the system if a duplicate record is not found.
Step 6: Field Mapping
Once a file to import has been selected and verified by the system, the Field Mappings
section will appear. Map each field found within the import layout to a field currently
found within the system.
For each field click the drop down arrow to the right and select the corresponding system
field. In the example below, the import layout field “First” has been mapped to system
field “First Name.”

© 2015 Hobsons Version 061215
29
Once field mapping is complete, select Import Records.
A pop up message will appear once the import has been queued. The status of the import
can be viewed by clicking the Import History button.
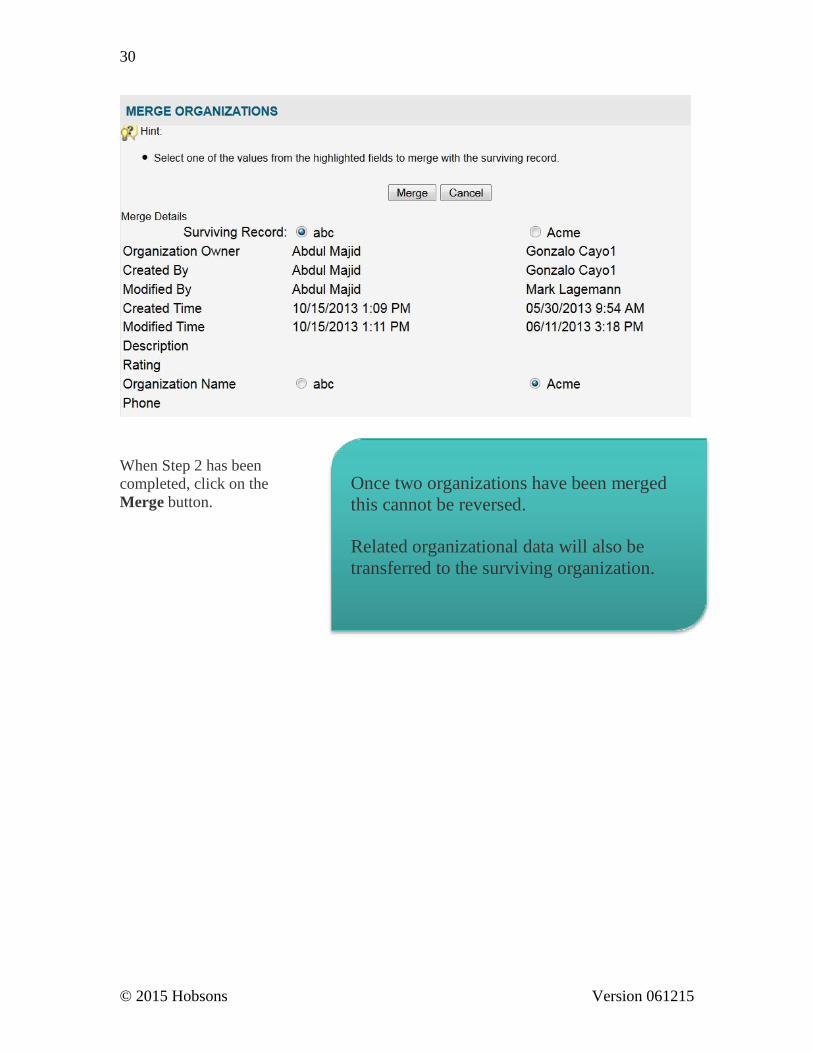
Merge Organizations
The Merge Organizations functionality allows you to merge the data of duplicate
organizations into a single organization record. All data associated with the organization
will be transferred from the non-surviving record to the surviving record.
The merge of organizations is a permanent action and cannot be reverted once
triggered.
Step 1: Select the Organizations
Select Organizations under the Contacts Module.
From the list view, select the two organizations you wish to merge by checking the box
to the left of each organization name.
Step 2: Trigger the Merge Process
From the Actions dropdown toward the top right of the page, select the Merge
Organizations option.
From the Merge Organizations screen select the surviving record you wish to keep as
well as which data points to associate with the surviving record. In the example below,
“ABC” has been selected as the surviving record while “ACME” has been selected as the
organization name to retain.
© 2015 Hobsons Version 061215
30
When Step 2 has been
completed, click on the
Merge button.
Once two organizations have been merged
this cannot be reversed.
Related organizational data will also be
transferred to the surviving organization.
© 2015 Hobsons Version 061215
31
Lifecycles
Lifecycles assist in the tracking of contacts as they move through the admissions process.
A lifecycle demonstrates exactly where a contact record falls within the admissions
process at any given point in time. Is the contact a lead, a prospect, or an applicant?
These are all examples of lifecycles. Users have the option of assigning contacts both a
lifecycle role and stage.
A lifecycle role allows the user to categorize a contact's progress, status, or type
within the Radius tenant. While not a comprehensive list, some examples of
lifecycle roles include: lead, prospect, applicant, admit, student, or alum.
A lifecycle stage is a subcategory of the role and is dependent upon it. A
dynamic relationship exists between the role and the stage. For example, a
contact record’s role might be Applicant and the Stage might be Accepted or
Denied. Each role will have its own unique stages that do not appear as options
when selecting other roles.
Both the lifecycle role and lifecycle stage can easily be assigned and edited for any
contact within Radius.
To assign a lifecycle to a contact within Radius, follow these steps:
Step 1: Navigate to Lifestyles Menu
Navigate to the Contacts module then select Lifecycles.
Click on the New Lifecycle button.
Step 2: Search for Contact Record
Enter a contact name or search for a name by clicking on the magnifying glass icon.
Step 3: Select the Lifecycle Role, Owner, & Stage
Select the appropriate lifecycle role, owner and stage. Also identify whether this role is
the primary role by clicking on the checkbox. Please note that fields with a red asterisk
are required.
Click Save.
© 2015 Hobsons Version 061215
32
Tasks
The task functionality enables users to create, track, and complete action items within the
system. For example, a user might set up a task in order to track their progress on an
email communication they wish to send to contacts. Once the email is sent, the user
would then mark the task as complete. It is also possible to assign tasks to other users
within the system.
Task Views
Tasks can be sorted according to column headers. For example, a user who wishes to
view tasks according to the Task Owner, would hover over the Task Owner column, click
on the dropdown arrow, and select Group by this field. The user can sort tasks by Created
Time, which will sort tasks in either ascending or descending order based upon your
selection.
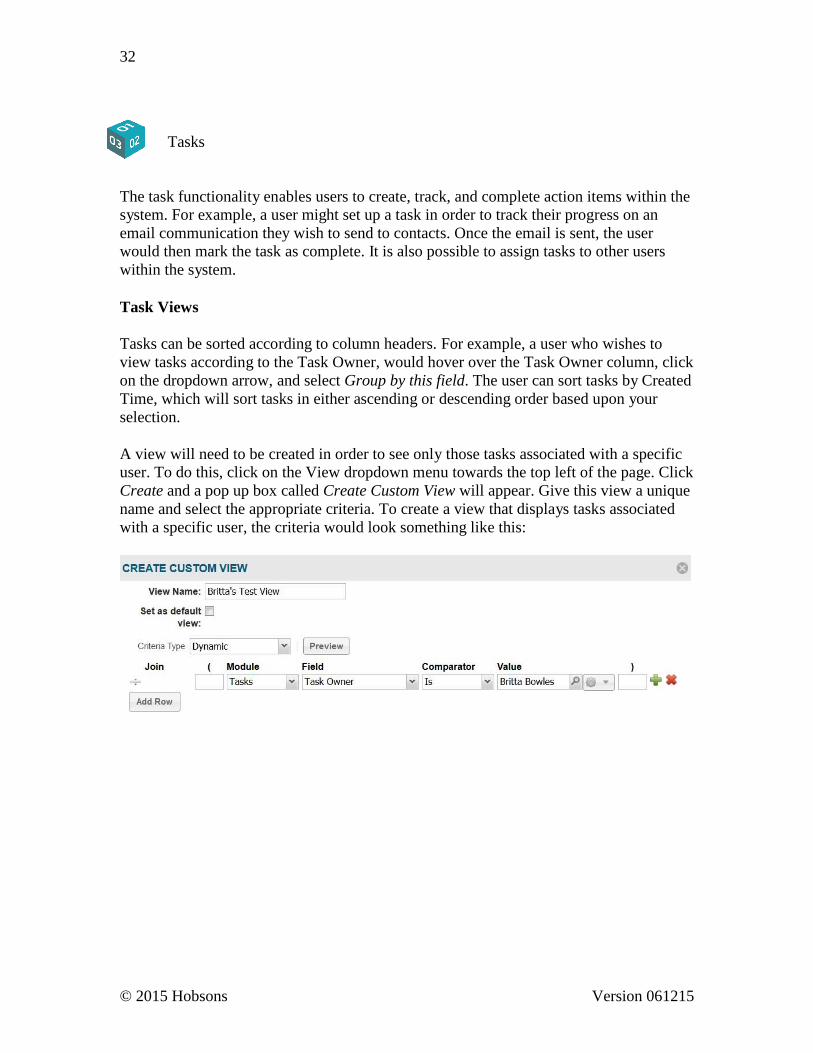
A view will need to be created in order to see only those tasks associated with a specific
user. To do this, click on the View dropdown menu towards the top left of the page. Click
Create and a pop up box called Create Custom View will appear. Give this view a unique
name and select the appropriate criteria. To create a view that displays tasks associated
with a specific user, the criteria would look something like this:
© 2015 Hobsons Version 061215
33
Create New Task
To create new tasks navigate to the Contacts Module and select Tasks from the
dropdown menu. From there, follow these quick steps:
Step 1: Initiate the Creation of a New Task
Click on the New Task button towards the top left corner of the page.
Step 2: Select Task Subject and Date
Enter a task subject and the date for which the task is due.
Step 3: Designate the Task Owner
If desired, the Task can be assigned to any Radius user. From this menu search and
select the appropriate user.
Step 4: Associate with a Specific Contact or Campaign
Tasks can be associated with a specific contact or campaign. This is optional but can
enhance the overall use of the Radius system.
Step 5: Assign the Task Status
Select a task status. A status allows you to track a task until completion.
Step 6: Send Notification Email
The Send Notification Email box allows the user to toggle the use of task creation
notification. When used, Radius will automatically notify the task owner of the newly
assigned task. It is a best practice to utilize this feature.
Step 7: Save the Task
After all required fields are completed, click Save to finalize the creation process.
© 2015 Hobsons Version 061215
34
Appointments
An Appointment is a way to schedule a meeting that is to take place with multiple
participants in a certain location. Think of an appointment as an invitation to a meeting; it
will take place in a certain place, with certain people, at a certain time.
Create an Appointment
Step 1: Initiate the Creation of an Appointment
Navigate to the Contacts Module and select Appointments.
Click the New Appointment button towards the top of the page.
Step 2: Provide Appointment Details
Enter the appropriate values. Please note that fields with red asterisks are required. The
following fields will need to be populated with information:
o Subject: The topic of the meeting.
o Start Date & Time: When the meeting will begin.
o End Date & Time: When the meeting will end.
Step 3: Save Appointment
Once all fields are complete, click Save. To add another appointment, click Save & New.
© 2015 Hobsons Version 061215
35
Locations
Within the Contacts Module, locations specify where an appointment will take place.
To create a new location in Radius, follow these steps:
Step 1: Initiate the Creation of a Location
Navigate to Contacts, select Locations, and then click on the New Location button.
Step 2: Designate the Name, Owner, & Status
Specify the location, location owner, and location status (fields with a red asterisk are
required).
Step 3: Additional Details
Additional information about the location such as address and a brief description may be
added to further distinguish the location.
Step 4: Save Location
Once all fields are complete, click Save. To add another location, click Save & New.
© 2015 Hobsons Version 061215
36
PROGRAMS
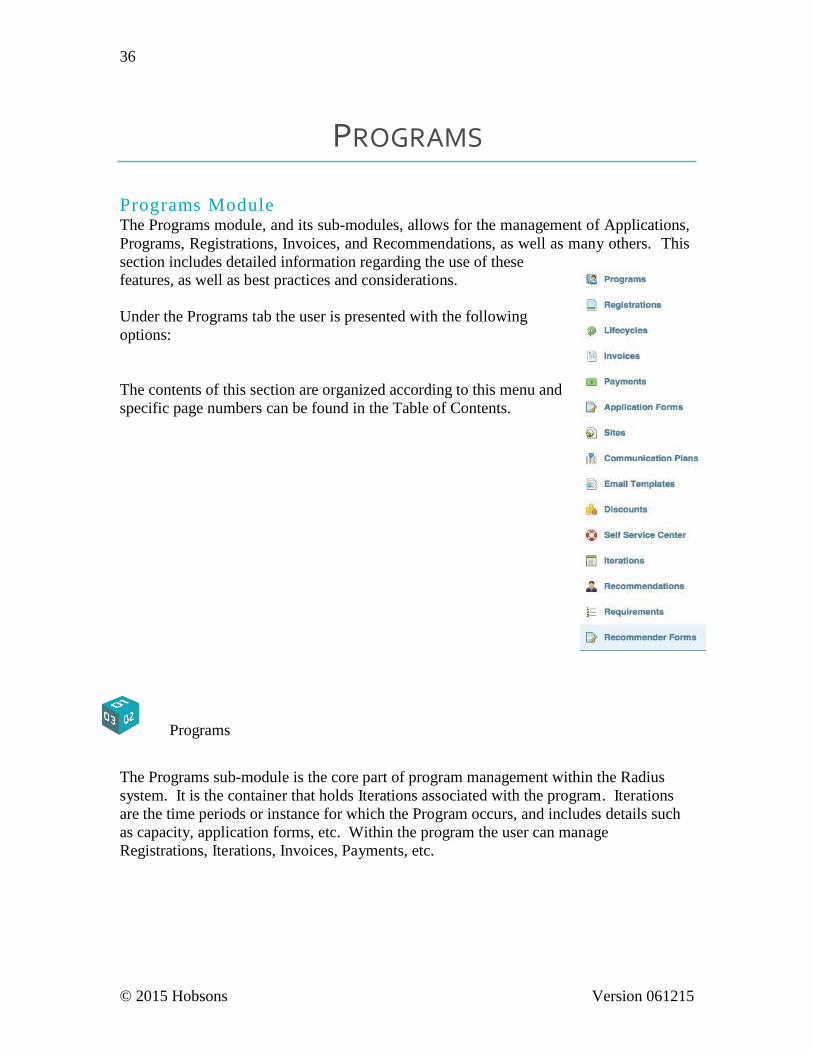
P r o g r a ms M o d u l e The Programs module, and its sub-modules, allows for the management of Applications,
Programs, Registrations, Invoices, and Recommendations, as well as many others. This
section includes detailed information regarding the use of these
features, as well as best practices and considerations.
Under the Programs tab the user is presented with the following
options:
The contents of this section are organized according to this menu and
specific page numbers can be found in the Table of Contents.
Programs
The Programs sub-module is the core part of program management within the Radius
system. It is the container that holds Iterations associated with the program. Iterations
are the time periods or instance for which the Program occurs, and includes details such
as capacity, application forms, etc. Within the program the user can manage
Registrations, Iterations, Invoices, Payments, etc.
© 2015 Hobsons Version 061215
37
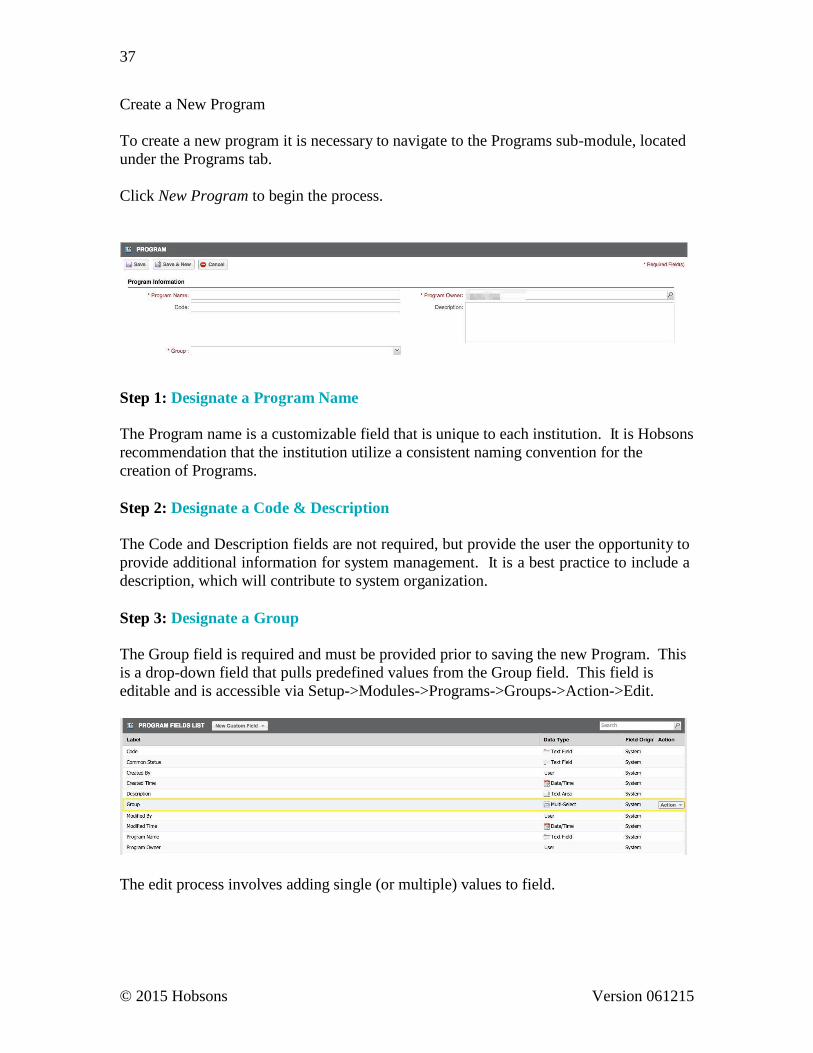
Create a New Program
To create a new program it is necessary to navigate to the Programs sub-module, located
under the Programs tab.
Click New Program to begin the process.
Step 1: Designate a Program Name
The Program name is a customizable field that is unique to each institution. It is Hobsons
recommendation that the institution utilize a consistent naming convention for the
creation of Programs.
Step 2: Designate a Code & Description
The Code and Description fields are not required, but provide the user the opportunity to
provide additional information for system management. It is a best practice to include a
description, which will contribute to system organization.
Step 3: Designate a Group
The Group field is required and must be provided prior to saving the new Program. This
is a drop-down field that pulls predefined values from the Group field. This field is
editable and is accessible via Setup->Modules->Programs->Groups->Action->Edit.
The edit process involves adding single (or multiple) values to field.

© 2015 Hobsons Version 061215
38
Registrations
The Registration is the record of a Contact registering (or applying) for a Program. Every
time a constituent registers/applies for a program, a Registration record is automatically
created. There are three distinct methods for which a contact can be registered for a
program iteration:
Self Registration: This occurs when the contact completes (and submits) an
online application form.
Manual Registration by an Admin User: This process is initiated by the Radius
user, and is completed in the Registrations module.
Import Registrations: This action is initiated by the Radius Admin User, and
upon completion, results in the creation of multiple program registrations.
© 2015 Hobsons Version 061215
39
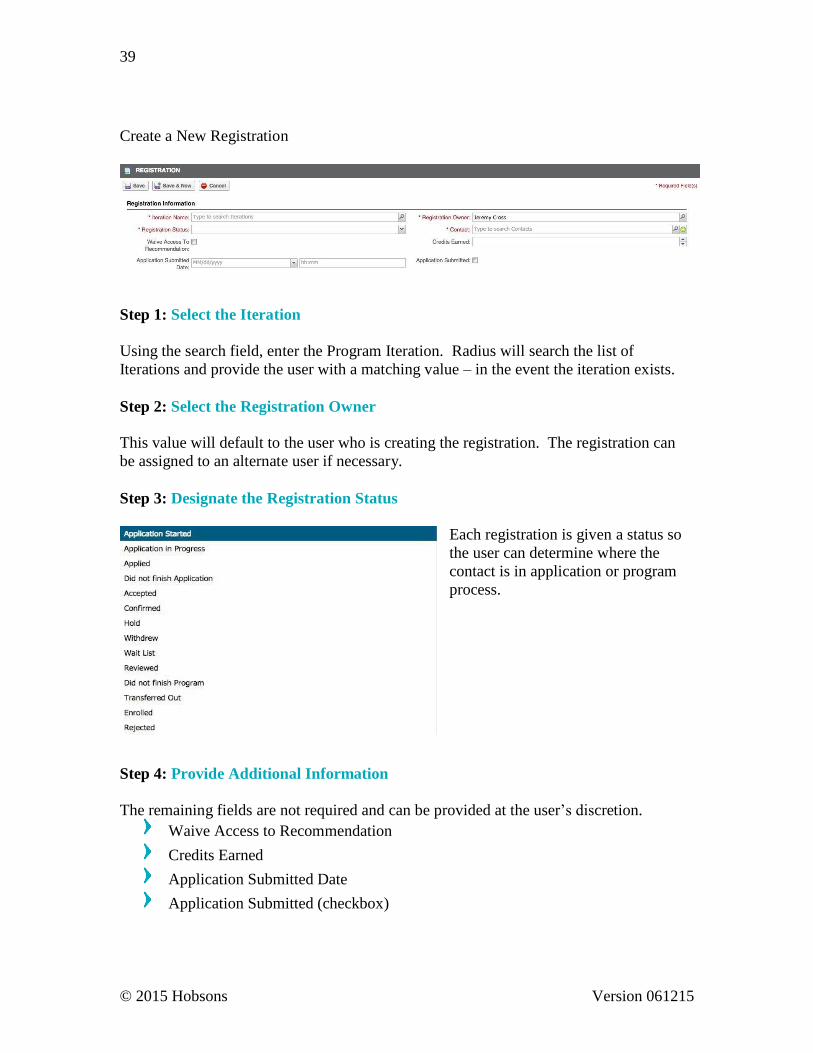
Create a New Registration
Step 1: Select the Iteration
Using the search field, enter the Program Iteration. Radius will search the list of
Iterations and provide the user with a matching value – in the event the iteration exists.
Step 2: Select the Registration Owner
This value will default to the user who is creating the registration. The registration can
be assigned to an alternate user if necessary.
Step 3: Designate the Registration Status
Each registration is given a status so
the user can determine where the
contact is in application or program
process.
Step 4: Provide Additional Information
The remaining fields are not required and can be provided at the user’s discretion.
Waive Access to Recommendation
Credits Earned
Application Submitted Date
Application Submitted (checkbox)

© 2015 Hobsons Version 061215
40
Invoices
Radius provides institutions the ability to create and manage invoices as part of the
program management process. When an iteration or term is created in Radius the user
must determine if the system will automatically create an invoice when an application is
started. As payments are posted Radius automatically updates the invoice.
Create a New Invoice
To initiate the creation of a new invoice click the New Invoice icon.
The process for creating an invoice consists of the Invoice Information and Payment
Information.
Invoice information
Step 1: Select the Program Name
Using the search functionality, select the Program for which the invoice is affiliated.
Step 2: Select the Iteration Name
Using the search functionality, select the Iteration related to the selected Program.
Step 3: Select the Registration

© 2015 Hobsons Version 061215
41
Invoices are connected to the Contact record via a Registration. After completing the
Program Name and Iteration Name fields, the user has the ability to search for available
Registrations.
Step 4: Designate a Due Date & Payment Method
These fields are not required, but add to the completeness of the iteration record.
Upon completing the Program & Iteration fields, Radius will populate an additional
Payment Information section. From this section, users can:
Add Line Items
Add Program Charges
Apply Discounts
Click Save to complete the process.
Payments
Any application for an iteration or program of study will have a payment function that is
defined in the iteration. The payment function in Radius allows the user to capture
payments online or give instructions for offline payment. The cost of the application and
any additional items are defined in the iteration. Various discounts can also be defined as
a part of the payment experience.
Create a New Payment
Designate the Program Name – using the search functionality, select the
Program for which the Payment will be affiliated
Designate the Iteration Name – using the search functionality, select the specific
Program Iteration.
Designate the Registration – using the search functionality, select the
Registration record related to the Contact.
© 2015 Hobsons Version 061215
42
Select the Invoice – using the search functionality, select the open Invoice for
which the Payment will be applied.
Provide the Payment Date
Select the Payment Type – Payment type is a drop-down menu including the
various payment options in Radius.
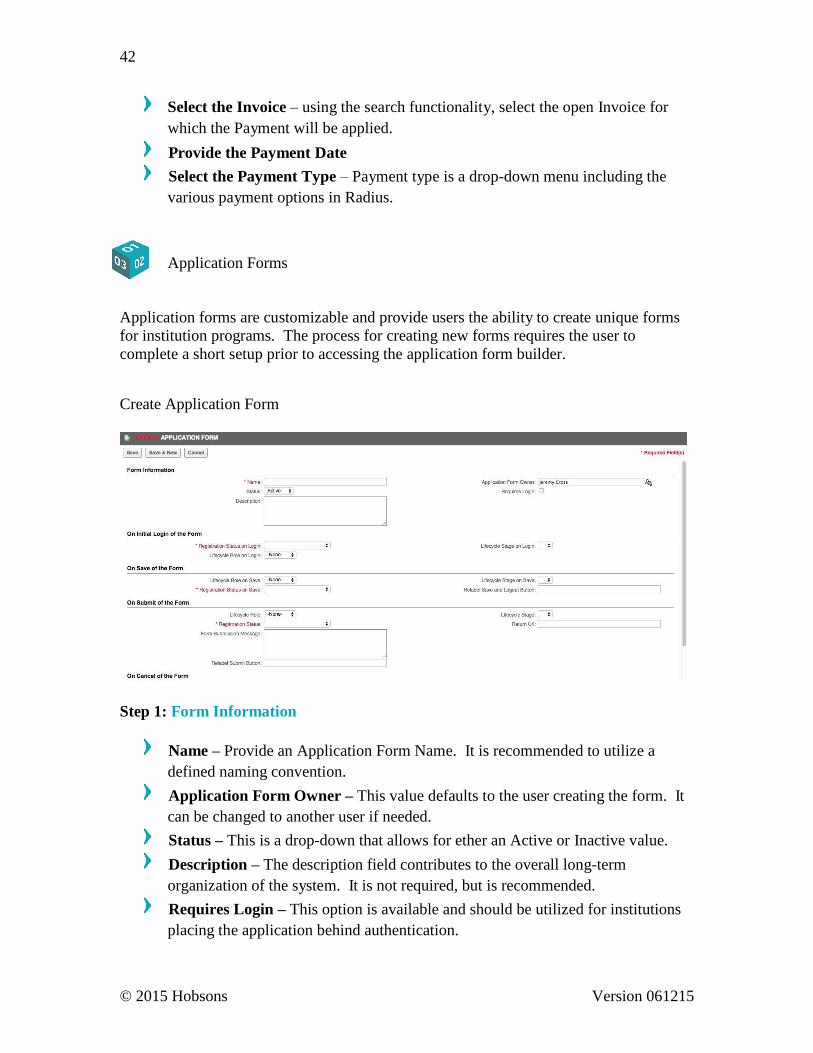
Application Forms
Application forms are customizable and provide users the ability to create unique forms
for institution programs. The process for creating new forms requires the user to
complete a short setup prior to accessing the application form builder.
Create Application Form
Step 1: Form Information
Name – Provide an Application Form Name. It is recommended to utilize a
defined naming convention.
Application Form Owner – This value defaults to the user creating the form. It
can be changed to another user if needed.
Status – This is a drop-down that allows for ether an Active or Inactive value.
Description – The description field contributes to the overall long-term
organization of the system. It is not required, but is recommended.
Requires Login – This option is available and should be utilized for institutions
placing the application behind authentication.
© 2015 Hobsons Version 061215
43
Step 2: On Initial Login of the Form
Registration Status on Login – This is a drop-down that includes the various
Registration Status options. When the contact logs into the form for the first time
they are given a status. This value determines their initial status.
Lifecycle Role on Login – This field is not required; however, users can select a
Role that is applied upon logging into the form.
Lifecycle Stage on Login – Similar to the Lifecycle Role, this is not required but
allows the user to further track the contact through the process.
Step 3: On Save of the Form
Lifecycle Role on Save – Upon saving the form, contacts will receive this Role.
This is not a required field.
Lifecycle Stage on Save – Upon saving the form, contacts will receive this Stage.
This is not a required field.
Registration Status on Save – This is a required field and determines the
contact’s registration status.
Relabel Save and Logout Button – This field provides the user the opportunity
to customize the Save and Logout button labels
Step 4: On Submit of Form
Lifecycle Role – This value determines which Role will be applied to the contact
record upon submission of the form.
Lifecycle Stage - This value determines which Stage will be applied to the
contact record upon submission of the form.
Registration Status – This is a required field and determines the Contacts
Registration Status upon submission of the form.
Form Submission Message – This is the message the contact will see upon
submission of their application form.
Return URL – After submitting the application the contact is redirected to this
URL.
Relabel Submit Button – This field provides the user the opportunity to
customize the Submit button label.
Step 5: On Cancel of the Form
Registration Status on Cancel – In the event the contact cancels the application
process, their Registration Status will default to this value.

© 2015 Hobsons Version 061215
44
Lifecycle Role on Cancel – In the event the contact cancels the application
process, their Lifecycle Role will default to this value.
Lifecycle Stage on Cancel – In the event the contact cancels the application
process, their Lifecycle Stage will default to this value.
Return URL on Cancel – In the event the contact cancels the application
process, this is the URL for which they will be directed.
Relabel Cancel Button - This field provides the user the opportunity to
customize the Cancel button label.
Click Save to complete this part of the process. After saving Radius will refresh and the
user is redirected to the Application Forms page.
Here the user can view a list of Application Forms, as defined by the List View. To
access the Application Form Builder, select the designated application form.
Once open, users are presented with
The Application Form Builder is a tool that permits the user to customize the fields,
structure, and design of the application form. Prior to beginning, it is recommended that
users possess a clear understanding as to the application purpose and desired content and
structure.
© 2015 Hobsons Version 061215
45
Sites
Sites allow the user to display and promote all types of information about the Institution’s
Programs and Offerings. Since programs may change frequently, the Radius Site
functionality allows the user to have immediate access to edit or unpublish websites.
Create a New Site
Click the New Site icon
Designate a Site name – this field is required
Provide a site Description – this field is not required but is recommended
Save the new site
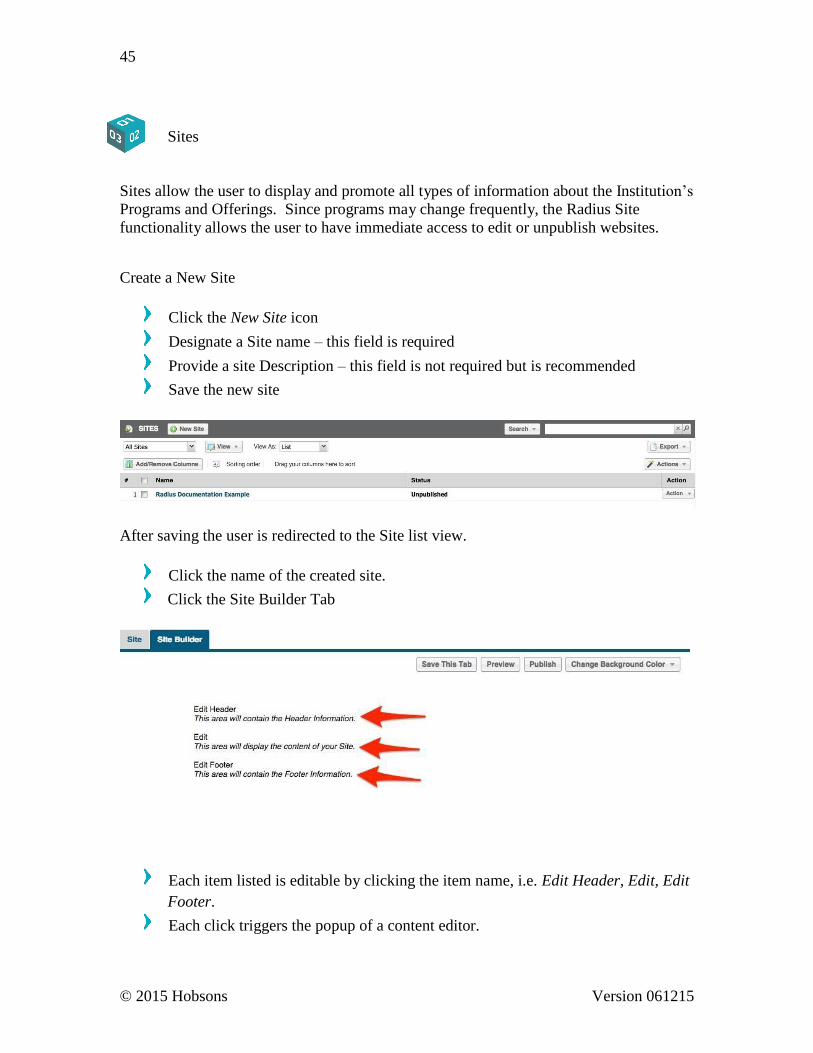
After saving the user is redirected to the Site list view.
Click the name of the created site.
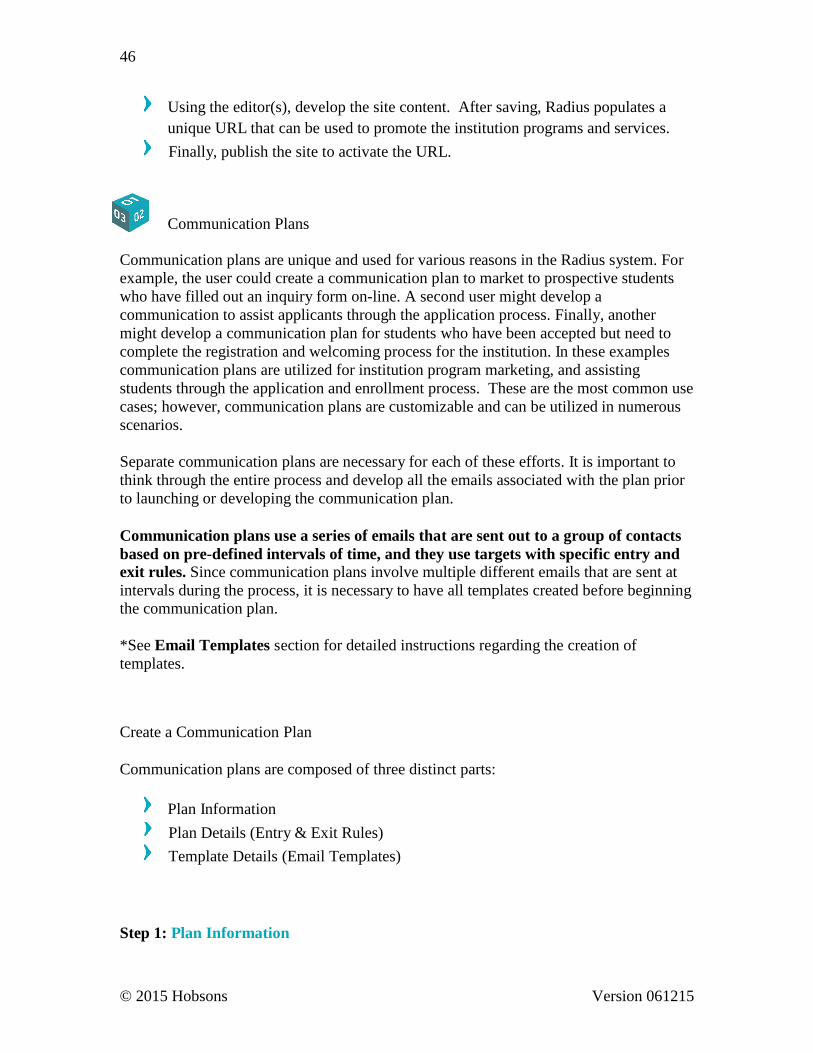
Click the Site Builder Tab
Each item listed is editable by clicking the item name, i.e. Edit Header, Edit, Edit
Footer.
Each click triggers the popup of a content editor.
© 2015 Hobsons Version 061215
46
Using the editor(s), develop the site content. After saving, Radius populates a
unique URL that can be used to promote the institution programs and services.
Finally, publish the site to activate the URL.
Communication Plans
Communication plans are unique and used for various reasons in the Radius system. For
example, the user could create a communication plan to market to prospective students
who have filled out an inquiry form on-line. A second user might develop a
communication to assist applicants through the application process. Finally, another
might develop a communication plan for students who have been accepted but need to
complete the registration and welcoming process for the institution. In these examples
communication plans are utilized for institution program marketing, and assisting
students through the application and enrollment process. These are the most common use
cases; however, communication plans are customizable and can be utilized in numerous
scenarios.
Separate communication plans are necessary for each of these efforts. It is important to
think through the entire process and develop all the emails associated with the plan prior
to launching or developing the communication plan.
Communication plans use a series of emails that are sent out to a group of contacts
based on pre-defined intervals of time, and they use targets with specific entry and
exit rules. Since communication plans involve multiple different emails that are sent at
intervals during the process, it is necessary to have all templates created before beginning
the communication plan.
*See Email Templates section for detailed instructions regarding the creation of
templates.
Create a Communication Plan
Communication plans are composed of three distinct parts:
Plan Information
Plan Details (Entry & Exit Rules)
Template Details (Email Templates)
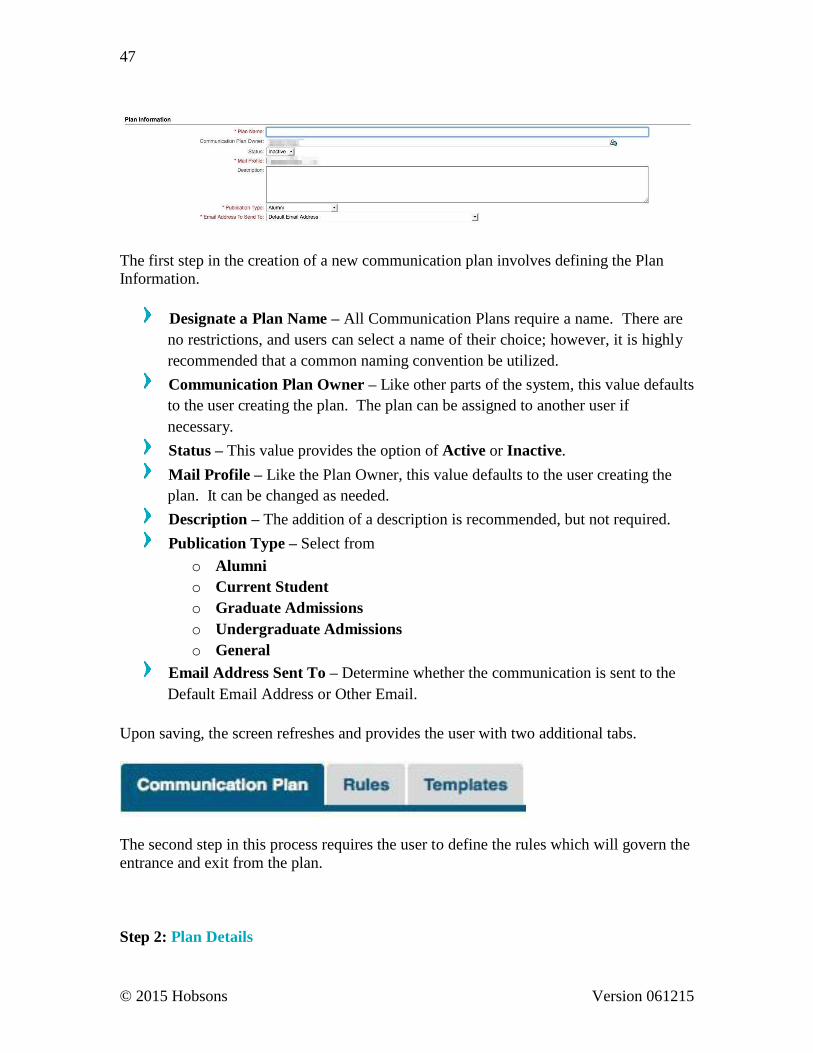
Step 1: Plan Information
© 2015 Hobsons Version 061215
47
The first step in the creation of a new communication plan involves defining the Plan
Information.
Designate a Plan Name – All Communication Plans require a name. There are
no restrictions, and users can select a name of their choice; however, it is highly
recommended that a common naming convention be utilized.
Communication Plan Owner – Like other parts of the system, this value defaults
to the user creating the plan. The plan can be assigned to another user if
necessary.
Status – This value provides the option of Active or Inactive.
Mail Profile – Like the Plan Owner, this value defaults to the user creating the
plan. It can be changed as needed.
Description – The addition of a description is recommended, but not required.
Publication Type – Select from
o Alumni
o Current Student
o Graduate Admissions
o Undergraduate Admissions
o General
Email Address Sent To – Determine whether the communication is sent to the
Default Email Address or Other Email.
Upon saving, the screen refreshes and provides the user with two additional tabs.
The second step in this process requires the user to define the rules which will govern the
entrance and exit from the plan. Step 2: Plan Details
© 2015 Hobsons Version 061215
48
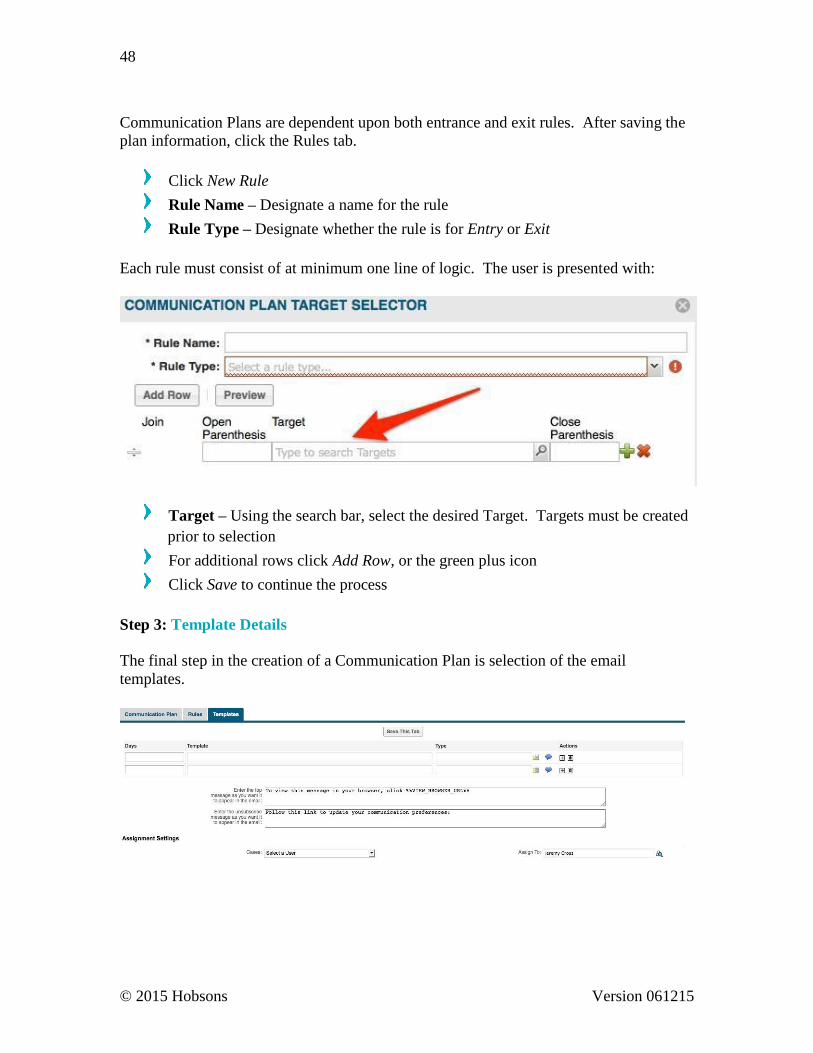
Communication Plans are dependent upon both entrance and exit rules. After saving the
plan information, click the Rules tab.
Click New Rule
Rule Name – Designate a name for the rule
Rule Type – Designate whether the rule is for Entry or Exit
Each rule must consist of at minimum one line of logic. The user is presented with:
Target – Using the search bar, select the desired Target. Targets must be created
prior to selection
For additional rows click Add Row, or the green plus icon
Click Save to continue the process
Step 3: Template Details
The final step in the creation of a Communication Plan is selection of the email
templates.
© 2015 Hobsons Version 061215
49
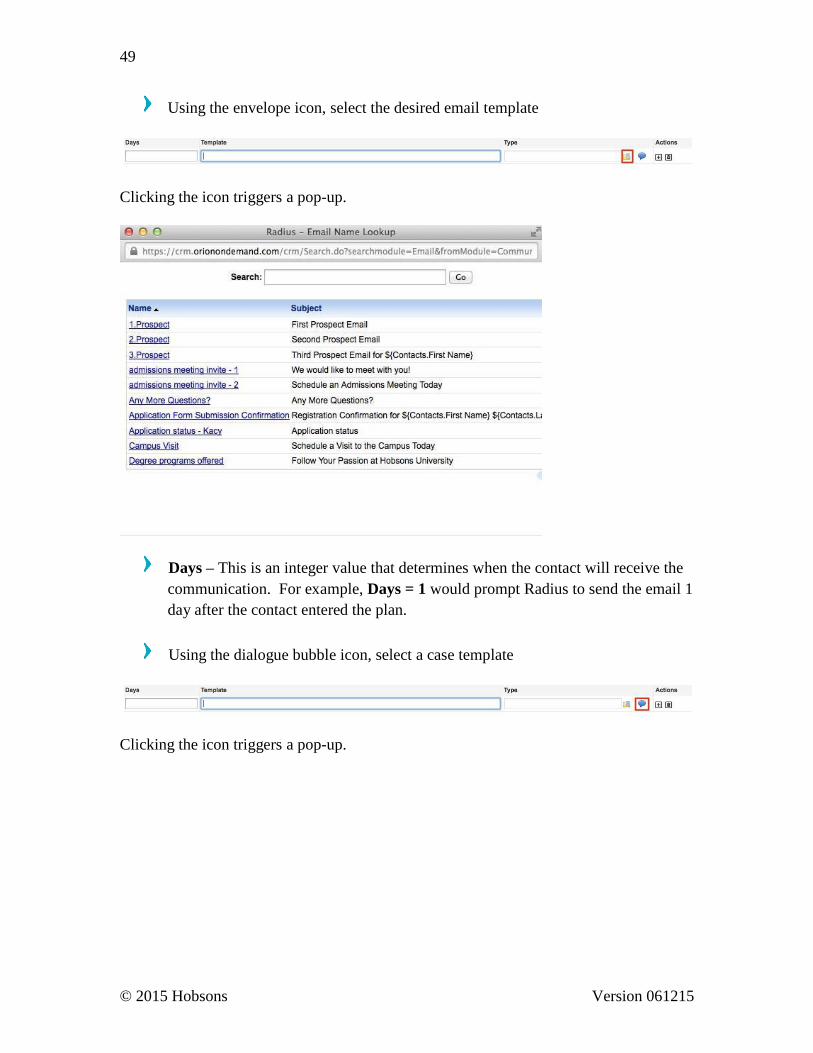
Using the envelope icon, select the desired email template
Clicking the icon triggers a pop-up.
Days – This is an integer value that determines when the contact will receive the
communication. For example, Days = 1 would prompt Radius to send the email 1
day after the contact entered the plan.
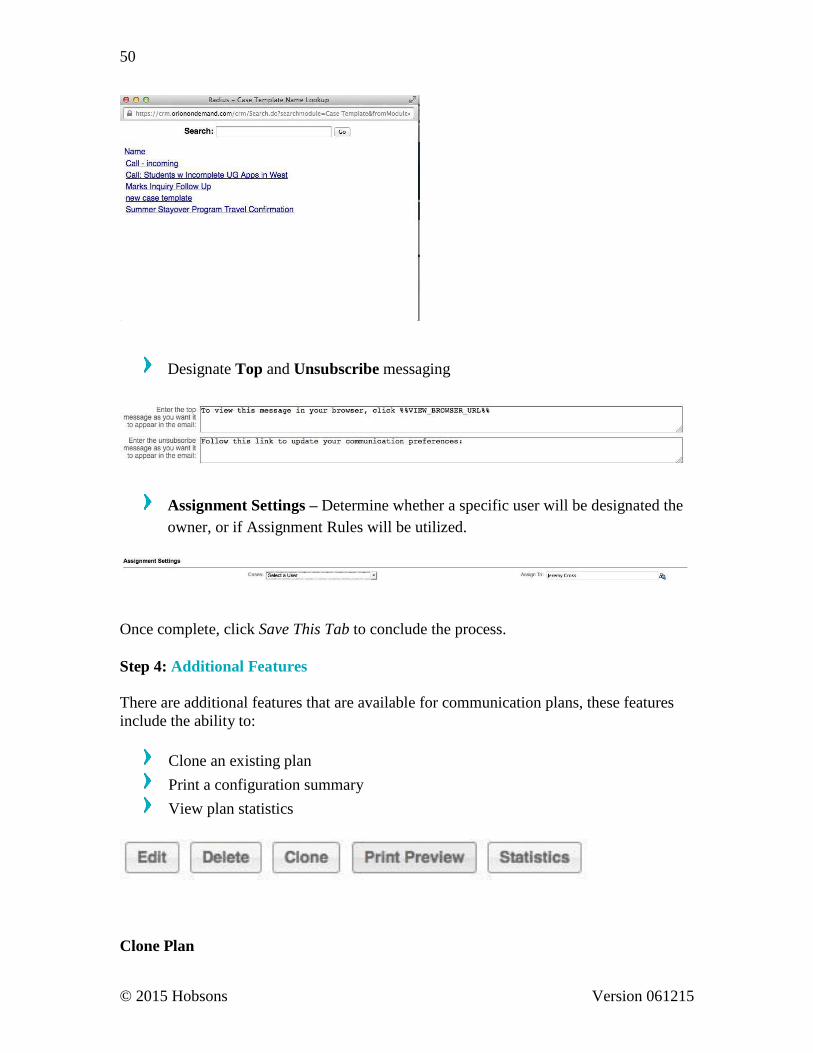
Using the dialogue bubble icon, select a case template
Clicking the icon triggers a pop-up.
© 2015 Hobsons Version 061215
50
Designate Top and Unsubscribe messaging
Assignment Settings – Determine whether a specific user will be designated the
owner, or if Assignment Rules will be utilized.
Once complete, click Save This Tab to conclude the process.
Step 4: Additional Features
There are additional features that are available for communication plans, these features
include the ability to:
Clone an existing plan
Print a configuration summary
View plan statistics
Clone Plan
© 2015 Hobsons Version 061215
51
When cloning a communication plan, Radius replicates the existing plan and permits the
user to make changes and save the copy. This is similar to a “Save As” function found in
other products.
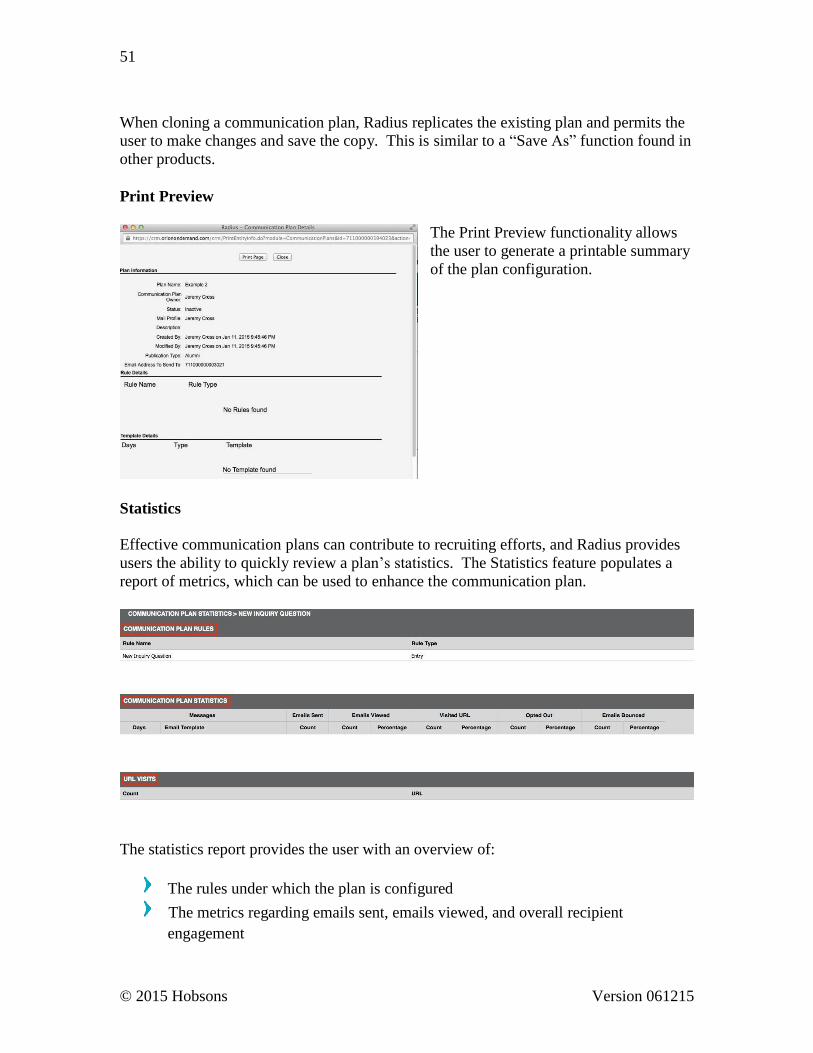
Print Preview
The Print Preview functionality allows
the user to generate a printable summary
of the plan configuration.
Statistics
Effective communication plans can contribute to recruiting efforts, and Radius provides
users the ability to quickly review a plan’s statistics. The Statistics feature populates a
report of metrics, which can be used to enhance the communication plan.
The statistics report provides the user with an overview of:
The rules under which the plan is configured
The metrics regarding emails sent, emails viewed, and overall recipient
engagement

© 2015 Hobsons Version 061215
52
The total URL visits for links included in the communications
Email Templates
Users can create and save email templates for sending bulk emails to contact records,
whether for immediate or future use. Radius allows for creation using simple text email
or rich HTML-based emails with pictures and rich text. Text can be hand entered or copy
and pasted content from Microsoft Word. Upon saving the template, Radius will
automatically clear any non-standard HTML created by Microsoft Word that can
adversely affect the success of the email delivery. Cleaning HTML may impact text
formatting and style, so Hobsons recommends users review the saved template. The
editor is structured so both beginner and advanced users can create email
communications.
The creation of an email template consists of two parts:
Email Template Information
Email Template Body
Step 1: Email Template Information
Email Name – Designate a unique name for the email communication. This is an
internal field and is not visible to recipients.
Email Subject – Designate a subject for the email communication. NOTE: This
field is visible to the recipient.
Folder – All emails must be filed in a folder. This practice contributes to the
long-term organization of the Radius system. Clicking the magnifying glass icon
will trigger a drop-down where available folders reside. Additional folders may
be created via the Email Templates list view.
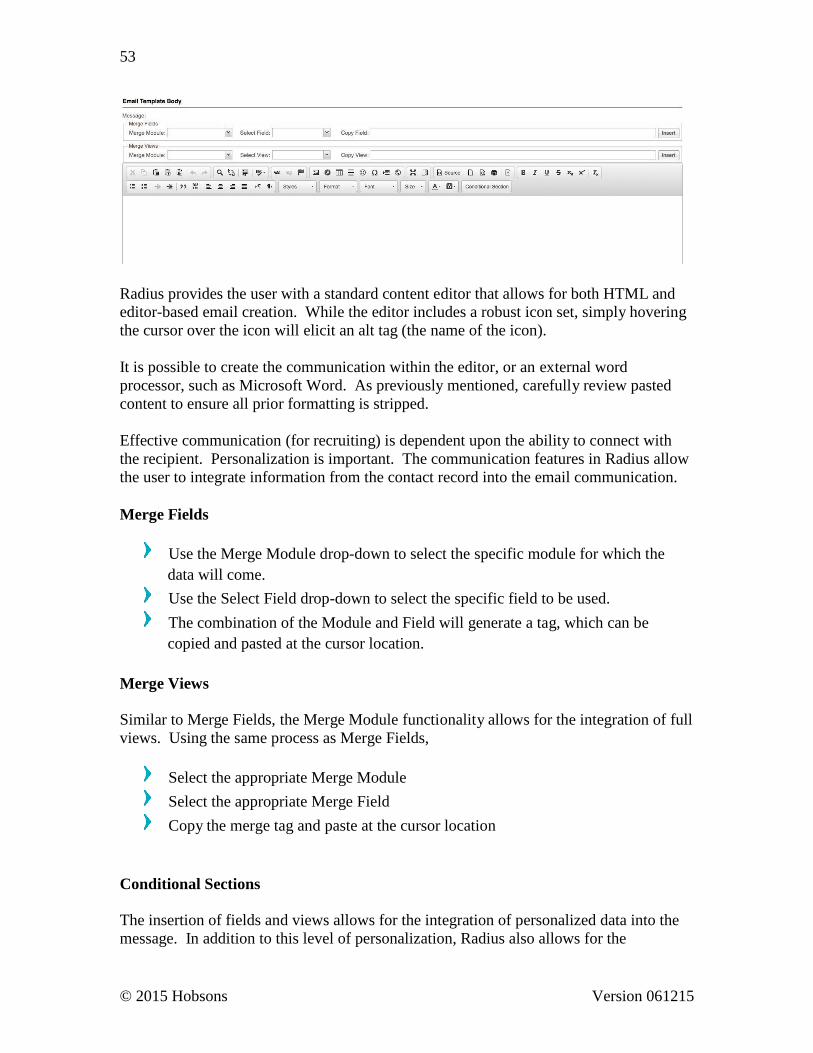
Step 2: Email Template Body
© 2015 Hobsons Version 061215
53
Radius provides the user with a standard content editor that allows for both HTML and
editor-based email creation. While the editor includes a robust icon set, simply hovering
the cursor over the icon will elicit an alt tag (the name of the icon).
It is possible to create the communication within the editor, or an external word
processor, such as Microsoft Word. As previously mentioned, carefully review pasted
content to ensure all prior formatting is stripped.
Effective communication (for recruiting) is dependent upon the ability to connect with
the recipient. Personalization is important. The communication features in Radius allow
the user to integrate information from the contact record into the email communication.
Merge Fields
Use the Merge Module drop-down to select the specific module for which the
data will come.
Use the Select Field drop-down to select the specific field to be used.
The combination of the Module and Field will generate a tag, which can be
copied and pasted at the cursor location.
Merge Views
Similar to Merge Fields, the Merge Module functionality allows for the integration of full
views. Using the same process as Merge Fields,
Select the appropriate Merge Module
Select the appropriate Merge Field
Copy the merge tag and paste at the cursor location
Conditional Sections
The insertion of fields and views allows for the integration of personalized data into the
message. In addition to this level of personalization, Radius also allows for the
© 2015 Hobsons Version 061215
54
integration of conditional sections. These sections utilize logic to determine whether a
contact can view the specific email content.
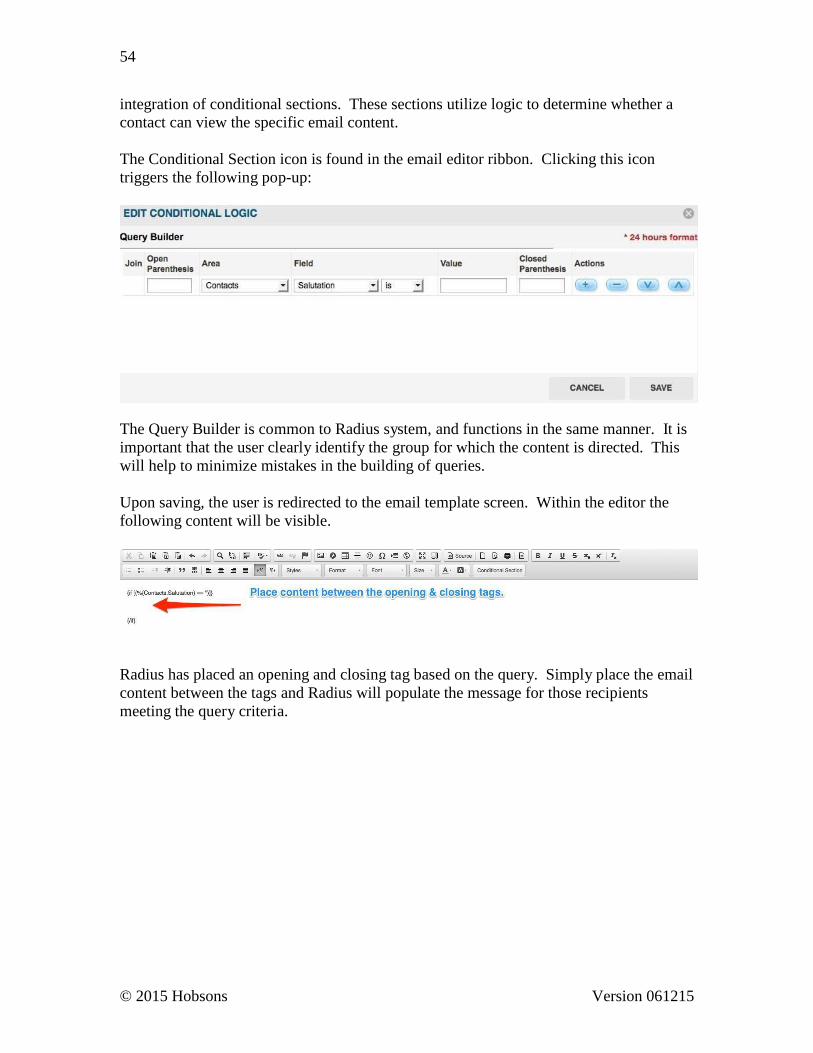
The Conditional Section icon is found in the email editor ribbon. Clicking this icon
triggers the following pop-up:
The Query Builder is common to Radius system, and functions in the same manner. It is
important that the user clearly identify the group for which the content is directed. This
will help to minimize mistakes in the building of queries.
Upon saving, the user is redirected to the email template screen. Within the editor the
following content will be visible.
Radius has placed an opening and closing tag based on the query. Simply place the email
content between the tags and Radius will populate the message for those recipients
meeting the query criteria.
© 2015 Hobsons Version 061215
55
Discounts
Radius provides users the ability to create discounts, which can be applied to program
fees. Discounts can be structured as:
A percentage or fixed amount
A discount code or radio button
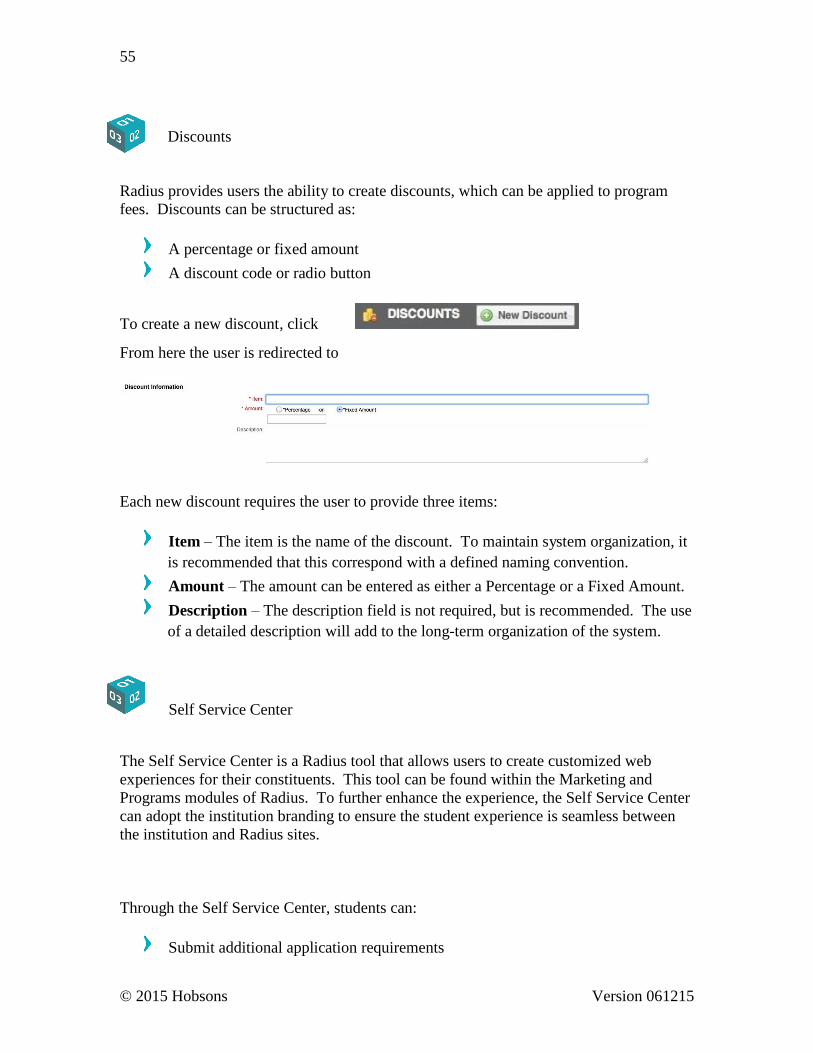
To create a new discount, click
From here the user is redirected to
Each new discount requires the user to provide three items:
Item – The item is the name of the discount. To maintain system organization, it
is recommended that this correspond with a defined naming convention.
Amount – The amount can be entered as either a Percentage or a Fixed Amount.
Description – The description field is not required, but is recommended. The use
of a detailed description will add to the long-term organization of the system.
Self Service Center
The Self Service Center is a Radius tool that allows users to create customized web
experiences for their constituents. This tool can be found within the Marketing and
Programs modules of Radius. To further enhance the experience, the Self Service Center
can adopt the institution branding to ensure the student experience is seamless between
the institution and Radius sites.
Through the Self Service Center, students can:
Submit additional application requirements

© 2015 Hobsons Version 061215
56
Check the status of an application
Make a payment
Update student contact profile information
Change their password
The Self Service Center configuration process requires the user to complete a series of
tabs that correspond with the student view of the system.
Branding
The Branding tab allows the user to configure the look of the Self Service Center. Using
the content editor, users can customize the Header and Footer, and assign the Reset and
Change Password email templates. It is common for the branding to correlate with that
of the institution.
Home
Content on the Home tab reflects what the student will see upon logging into the Self
Service Center. Using the editor, users can customize the design and messaging visible
to the student. Additionally, users can determine whether the tab is visible through the
use of the Display and Do No Display radio buttons.
Applications
The Applications tab includes a full list of all active applications, and permits users to
view and take actions on submitted applications. The user can customize the specific
language for the Public Description. As with the Home tab, the Applications tab can be
toggled between Display and Do Not Display.
Contact Preferences
© 2015 Hobsons Version 061215
57
The Contact Preferences tab allows the student to view their communication
subscriptions, as well as manage those subscriptions. To prevent students from
inadvertently unsubscribing from all communications, it is important to use varied
publication types. Publication Types can be edited via the Modules section of the Setup
menu.
Change Password
Through the Self Service Center students can manage their password. This tab is always
visible and users can customize the messaging.
Profile
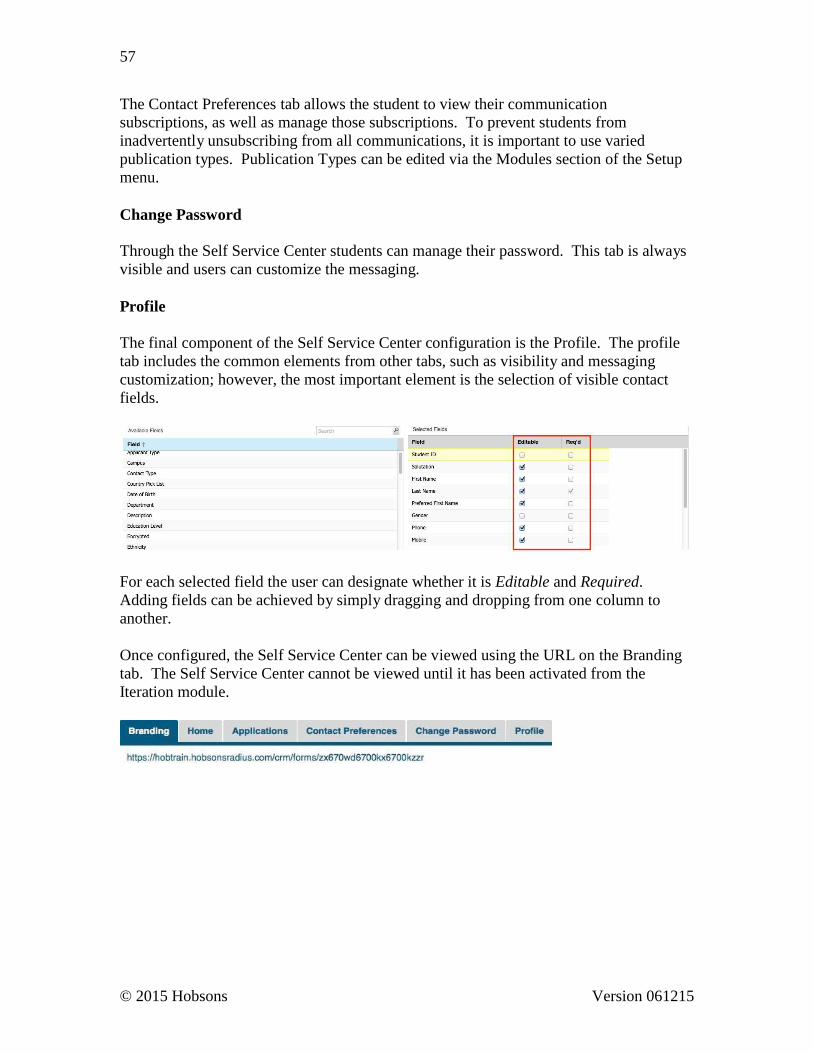
The final component of the Self Service Center configuration is the Profile. The profile
tab includes the common elements from other tabs, such as visibility and messaging
customization; however, the most important element is the selection of visible contact
fields.
For each selected field the user can designate whether it is Editable and Required.
Adding fields can be achieved by simply dragging and dropping from one column to
another.
Once configured, the Self Service Center can be viewed using the URL on the Branding
tab. The Self Service Center cannot be viewed until it has been activated from the
Iteration module.
© 2015 Hobsons Version 061215
58
Iterations
Iterations are the occurrence of a Program, and applicable actions such as the online
application, capacity, registration cutoff, pricing details, recommenders, requirements,
etc. The creation of an iteration involves the completion of numerous sections, and
Radius walks the user through step-by-step.
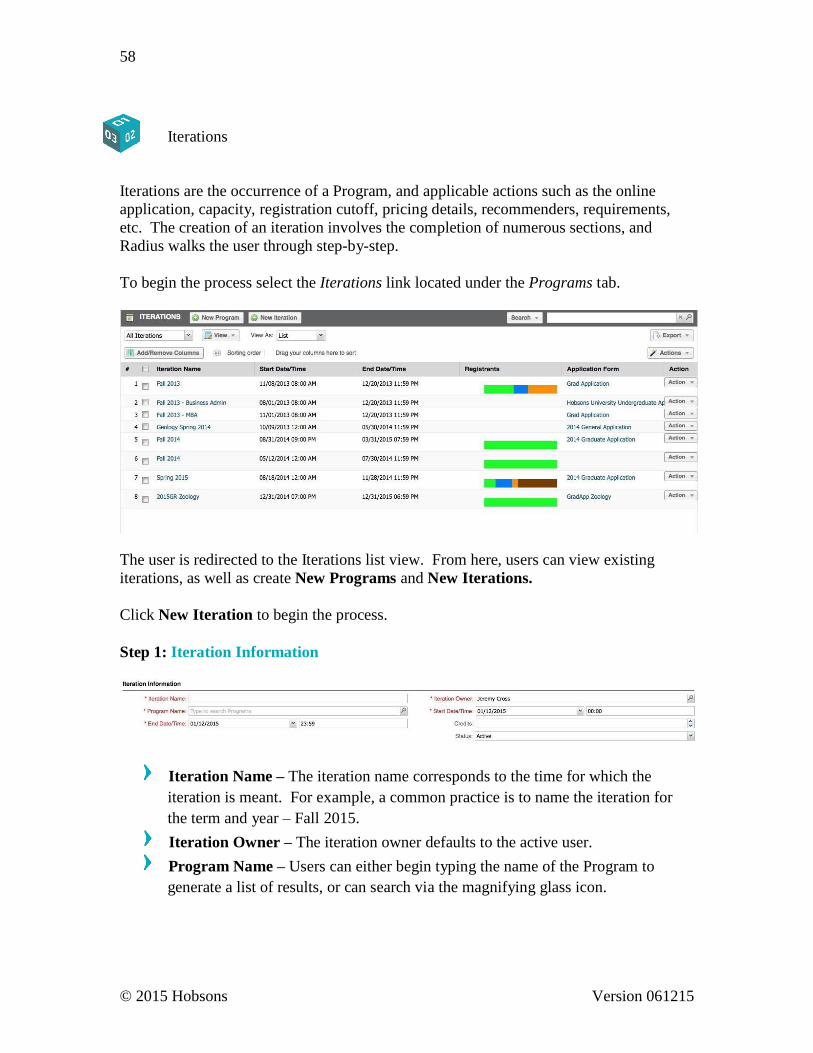
To begin the process select the Iterations link located under the Programs tab.
The user is redirected to the Iterations list view. From here, users can view existing
iterations, as well as create New Programs and New Iterations.
Click New Iteration to begin the process.
Step 1: Iteration Information
Iteration Name – The iteration name corresponds to the time for which the
iteration is meant. For example, a common practice is to name the iteration for
the term and year – Fall 2015.
Iteration Owner – The iteration owner defaults to the active user.
Program Name – Users can either begin typing the name of the Program to
generate a list of results, or can search via the magnifying glass icon.
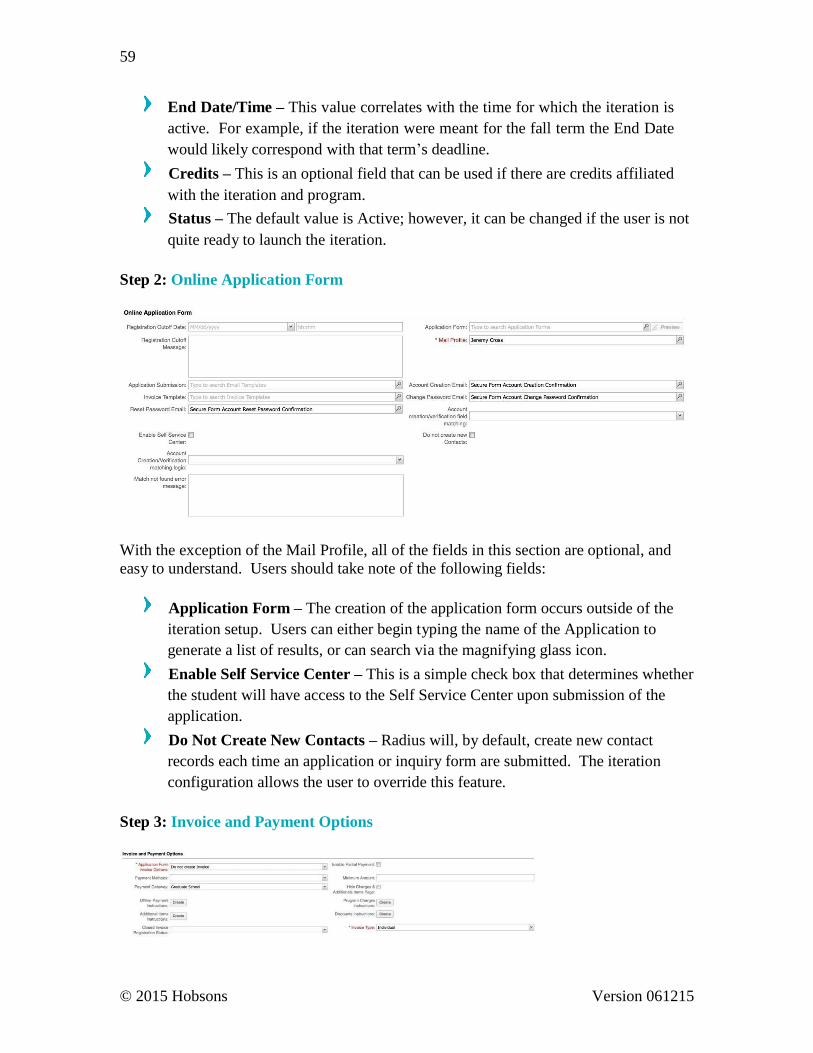
© 2015 Hobsons Version 061215
59
End Date/Time – This value correlates with the time for which the iteration is
active. For example, if the iteration were meant for the fall term the End Date
would likely correspond with that term’s deadline.
Credits – This is an optional field that can be used if there are credits affiliated
with the iteration and program.
Status – The default value is Active; however, it can be changed if the user is not
quite ready to launch the iteration.
Step 2: Online Application Form
With the exception of the Mail Profile, all of the fields in this section are optional, and
easy to understand. Users should take note of the following fields:
Application Form – The creation of the application form occurs outside of the
iteration setup. Users can either begin typing the name of the Application to
generate a list of results, or can search via the magnifying glass icon.
Enable Self Service Center – This is a simple check box that determines whether
the student will have access to the Self Service Center upon submission of the
application.
Do Not Create New Contacts – Radius will, by default, create new contact
records each time an application or inquiry form are submitted. The iteration
configuration allows the user to override this feature.
Step 3: Invoice and Payment Options
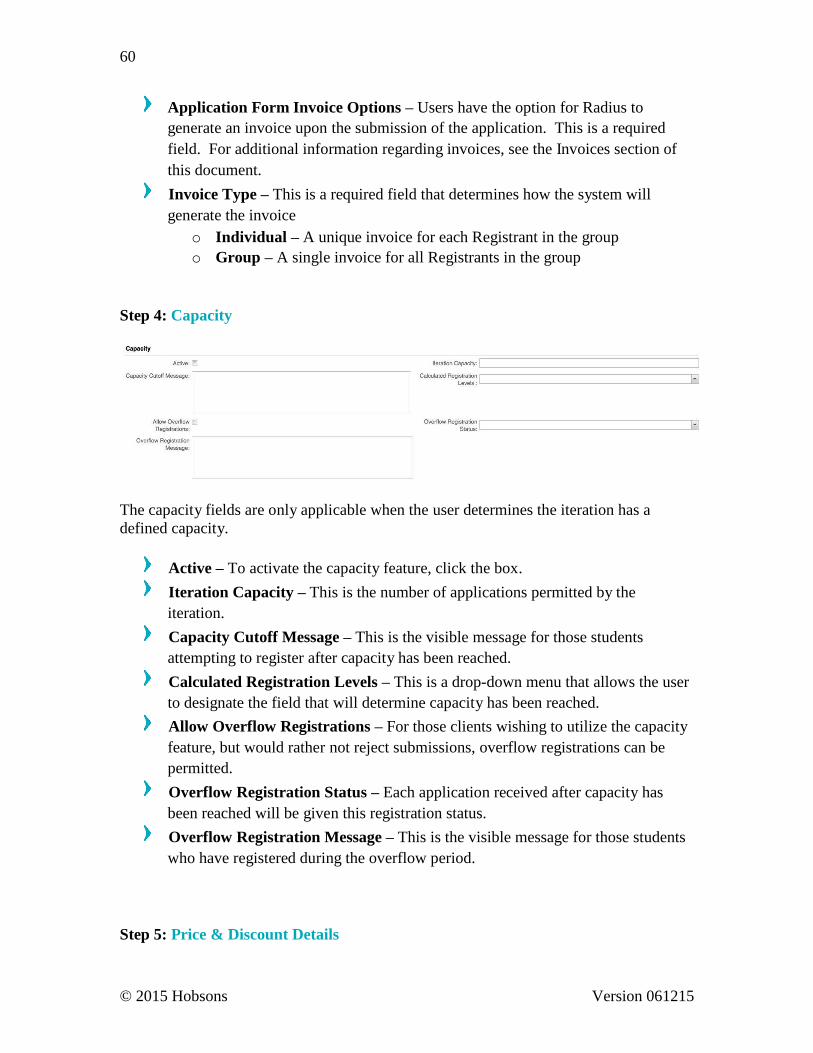
© 2015 Hobsons Version 061215
60
Application Form Invoice Options – Users have the option for Radius to
generate an invoice upon the submission of the application. This is a required
field. For additional information regarding invoices, see the Invoices section of
this document.
Invoice Type – This is a required field that determines how the system will
generate the invoice
o Individual – A unique invoice for each Registrant in the group
o Group – A single invoice for all Registrants in the group
Step 4: Capacity
The capacity fields are only applicable when the user determines the iteration has a
defined capacity.
Active – To activate the capacity feature, click the box.
Iteration Capacity – This is the number of applications permitted by the
iteration.
Capacity Cutoff Message – This is the visible message for those students
attempting to register after capacity has been reached.
Calculated Registration Levels – This is a drop-down menu that allows the user
to designate the field that will determine capacity has been reached.
Allow Overflow Registrations – For those clients wishing to utilize the capacity
feature, but would rather not reject submissions, overflow registrations can be
permitted.
Overflow Registration Status – Each application received after capacity has
been reached will be given this registration status.
Overflow Registration Message – This is the visible message for those students
who have registered during the overflow period. Step 5: Price & Discount Details
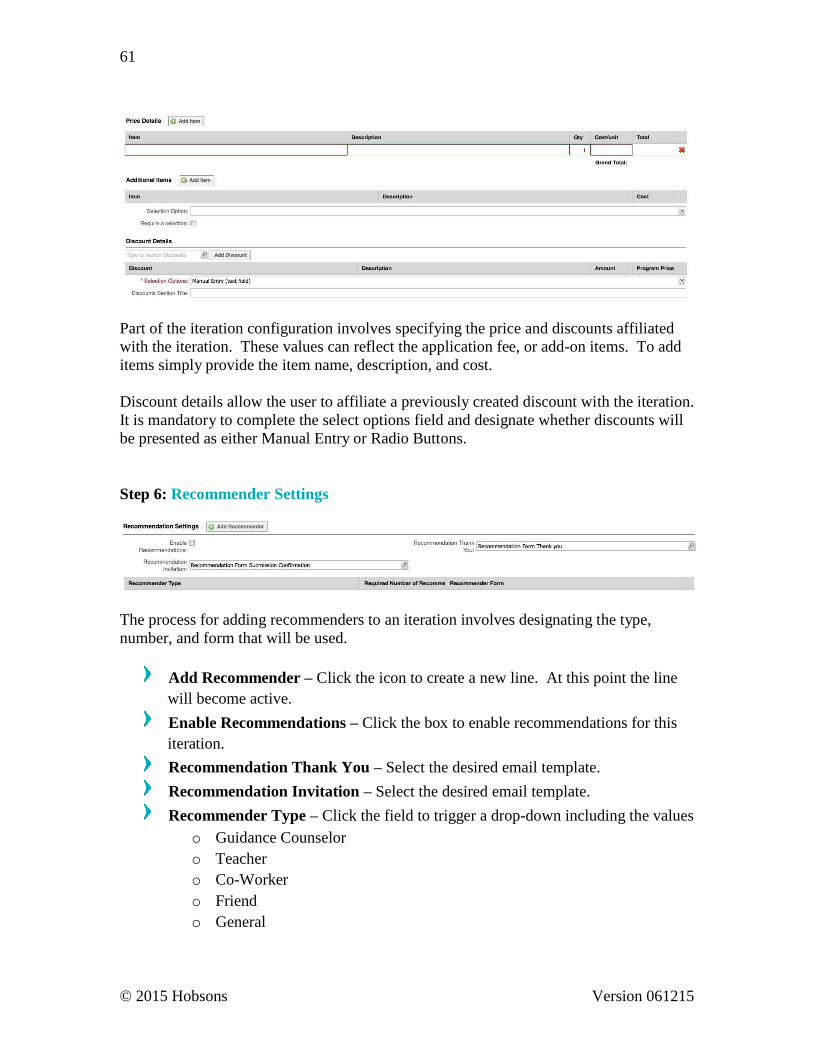
© 2015 Hobsons Version 061215
61
Part of the iteration configuration involves specifying the price and discounts affiliated
with the iteration. These values can reflect the application fee, or add-on items. To add
items simply provide the item name, description, and cost.
Discount details allow the user to affiliate a previously created discount with the iteration.
It is mandatory to complete the select options field and designate whether discounts will
be presented as either Manual Entry or Radio Buttons.
Step 6: Recommender Settings
The process for adding recommenders to an iteration involves designating the type,
number, and form that will be used.
Add Recommender – Click the icon to create a new line. At this point the line
will become active.
Enable Recommendations – Click the box to enable recommendations for this
iteration.
Recommendation Thank You – Select the desired email template.
Recommendation Invitation – Select the desired email template.
Recommender Type – Click the field to trigger a drop-down including the values
o Guidance Counselor
o Teacher
o Co-Worker
o Friend
o General
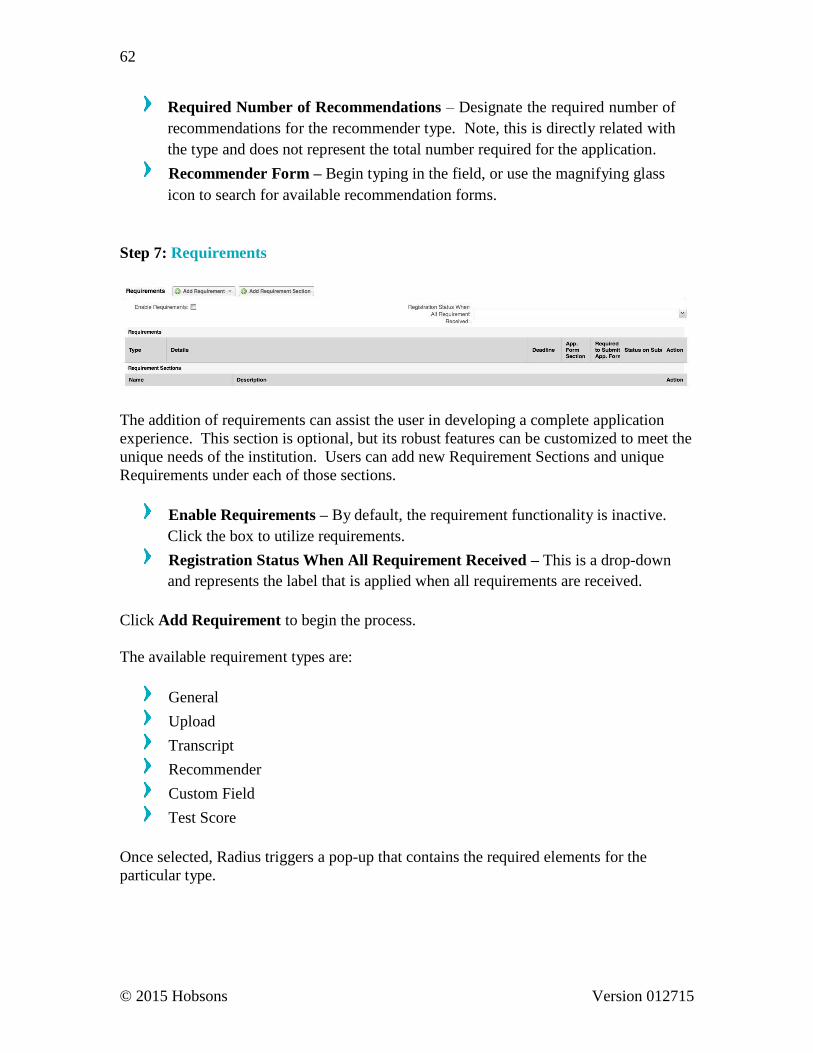
62
© 2015 Hobsons Version 012715
Required Number of Recommendations – Designate the required number of
recommendations for the recommender type. Note, this is directly related with
the type and does not represent the total number required for the application.
Recommender Form – Begin typing in the field, or use the magnifying glass
icon to search for available recommendation forms.
Step 7: Requirements
The addition of requirements can assist the user in developing a complete application
experience. This section is optional, but its robust features can be customized to meet the
unique needs of the institution. Users can add new Requirement Sections and unique
Requirements under each of those sections.
Enable Requirements – By default, the requirement functionality is inactive.
Click the box to utilize requirements.
Registration Status When All Requirement Received – This is a drop-down
and represents the label that is applied when all requirements are received.
Click Add Requirement to begin the process.
The available requirement types are:
General
Upload
Transcript
Recommender
Custom Field
Test Score
Once selected, Radius triggers a pop-up that contains the required elements for the
particular type.

63
© 2015 Hobsons Version 012715
Each pop-up is similar in nature and includes fields such as:
Deadline
Description
Form Section
Name
Required
Status on Submit
Step 8: Assignment Rules
The final component of the Iteration is the Assignment Rules. Like other parts of the
system, assignment rules can be associated with the active user, or can utilize logic.
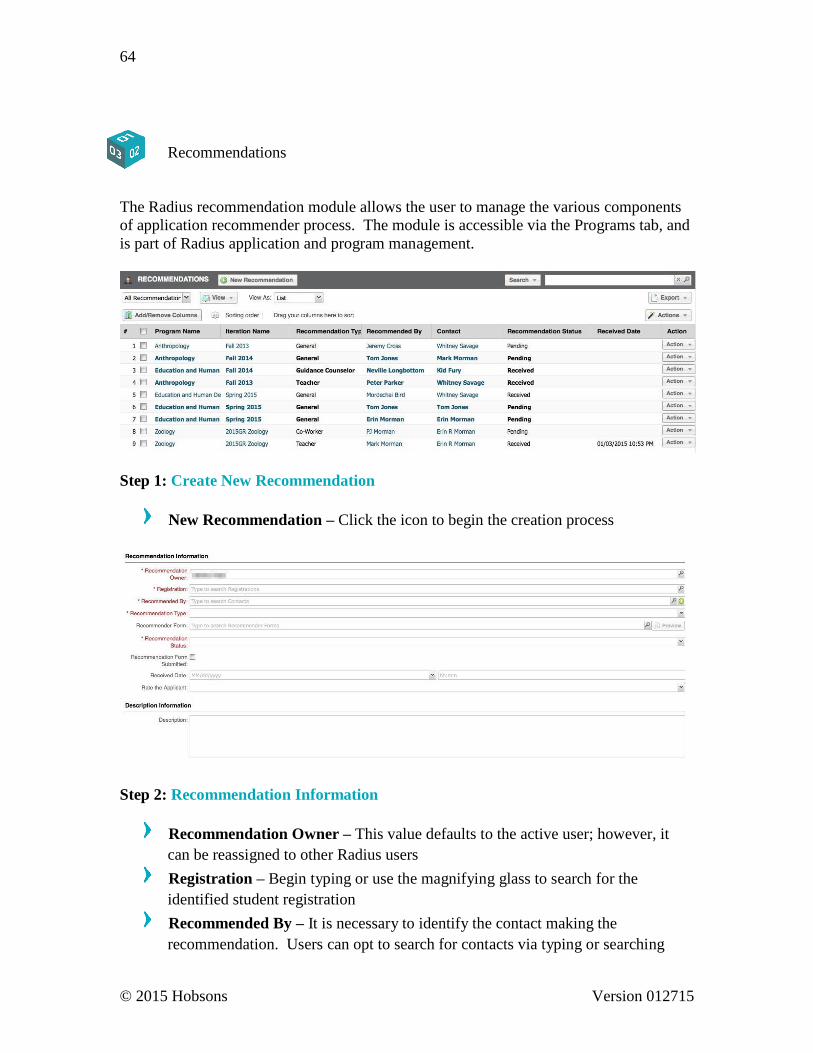
64
© 2015 Hobsons Version 012715
Recommendations
The Radius recommendation module allows the user to manage the various components
of application recommender process. The module is accessible via the Programs tab, and
is part of Radius application and program management.
Step 1: Create New Recommendation
New Recommendation – Click the icon to begin the creation process
Step 2: Recommendation Information
Recommendation Owner – This value defaults to the active user; however, it
can be reassigned to other Radius users
Registration – Begin typing or use the magnifying glass to search for the
identified student registration
Recommended By – It is necessary to identify the contact making the
recommendation. Users can opt to search for contacts via typing or searching
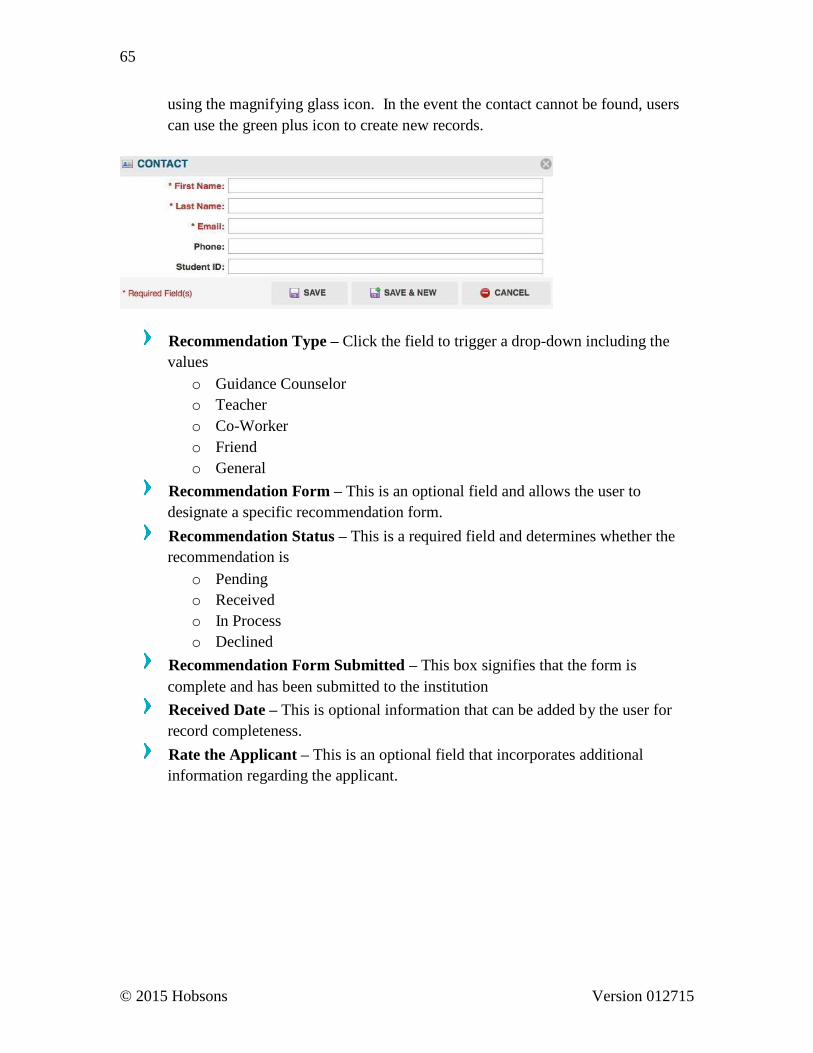
65
© 2015 Hobsons Version 012715
using the magnifying glass icon. In the event the contact cannot be found, users
can use the green plus icon to create new records.
Recommendation Type – Click the field to trigger a drop-down including the
values
o Guidance Counselor
o Teacher
o Co-Worker
o Friend
o General
Recommendation Form – This is an optional field and allows the user to
designate a specific recommendation form.
Recommendation Status – This is a required field and determines whether the
recommendation is
o Pending
o Received
o In Process
o Declined
Recommendation Form Submitted – This box signifies that the form is
complete and has been submitted to the institution
Received Date – This is optional information that can be added by the user for
record completeness.
Rate the Applicant – This is an optional field that incorporates additional
information regarding the applicant.
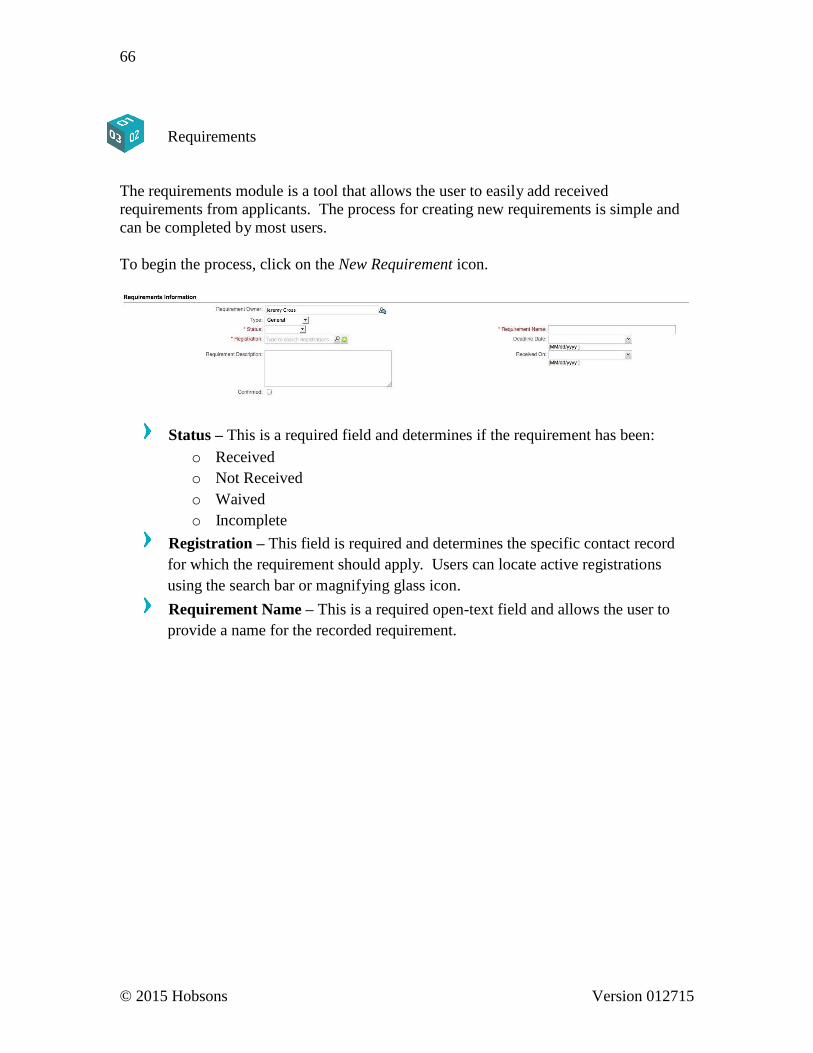
66
© 2015 Hobsons Version 012715
Requirements
The requirements module is a tool that allows the user to easily add received
requirements from applicants. The process for creating new requirements is simple and
can be completed by most users.
To begin the process, click on the New Requirement icon.
Status – This is a required field and determines if the requirement has been:
o Received
o Not Received
o Waived
o Incomplete
Registration – This field is required and determines the specific contact record
for which the requirement should apply. Users can locate active registrations
using the search bar or magnifying glass icon.
Requirement Name – This is a required open-text field and allows the user to
provide a name for the recorded requirement.
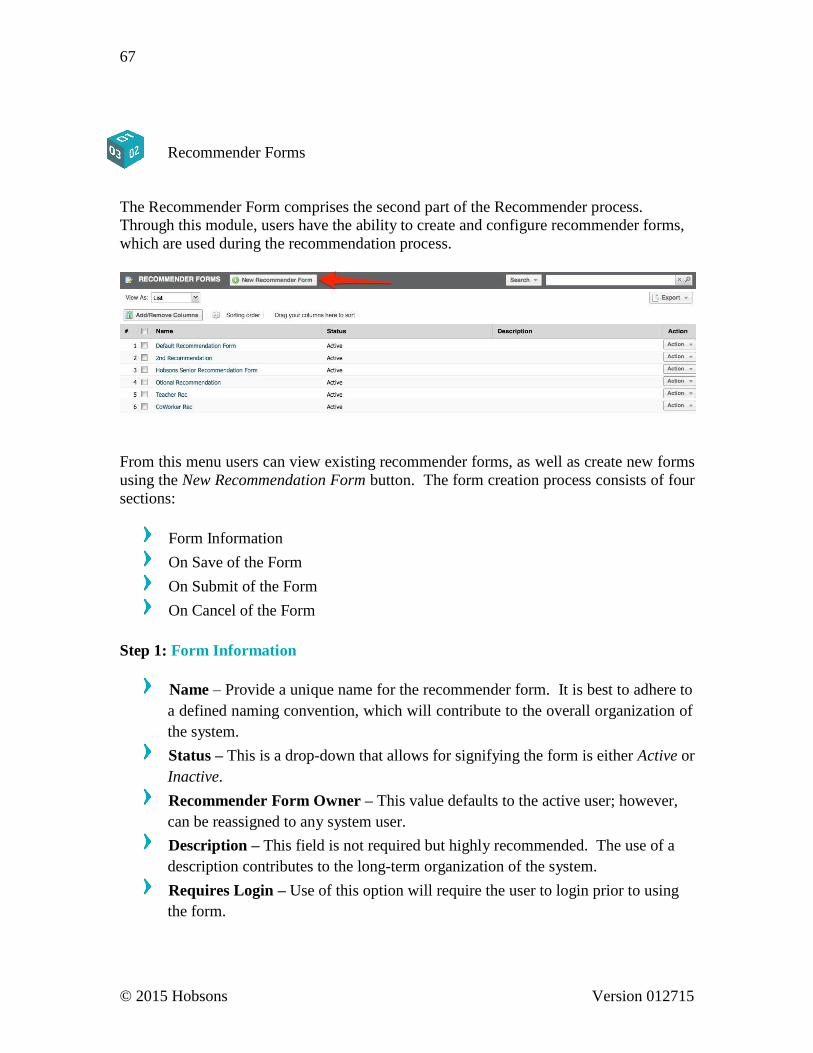
67
© 2015 Hobsons Version 012715
Recommender Forms
The Recommender Form comprises the second part of the Recommender process.
Through this module, users have the ability to create and configure recommender forms,
which are used during the recommendation process.
From this menu users can view existing recommender forms, as well as create new forms
using the New Recommendation Form button. The form creation process consists of four
sections:
Form Information
On Save of the Form
On Submit of the Form
On Cancel of the Form
Step 1: Form Information
Name – Provide a unique name for the recommender form. It is best to adhere to
a defined naming convention, which will contribute to the overall organization of
the system.
Status – This is a drop-down that allows for signifying the form is either Active or
Inactive.
Recommender Form Owner – This value defaults to the active user; however,
can be reassigned to any system user.
Description – This field is not required but highly recommended. The use of a
description contributes to the long-term organization of the system.
Requires Login – Use of this option will require the user to login prior to using
the form.

68
© 2015 Hobsons Version 012715
Step 2: On Save of the Form
Recommenders Status on Save – This is the label given to the recommender
upon saving the form. The status options include:
o Pending
o In Process
o Received
o Declined
Step 3: On Submit of the Form
Recommender Status – This is the label given to the recommender upon
submitting the form. The status options include:
o Pending
o In Process
o Received
o Declined
Form Submission Message – This is an optional field that determines the
message the recommender will receive upon submission of the form.
Return URL – This is the site for which the user will be redirected upon
submission of the form.
Relabel Submit Button – This option provides the user to customize the label of
the submit button.
Step 4: On Cancel of the Form
Recommenders Status on Cancel - This is the label given to the recommender
upon submitting the form. The status options include:
o Pending
o In Process
o Received
o Declined
Return URL on Cancel – This is the site for which the user will be redirected
upon cancellation of the form.
Relabel Cancel Button – This option provides the user to customize the label of
the submit button.
Click Save to complete the process.
After configuring the form settings, the user is redirected to the Recommender Forms
list view.
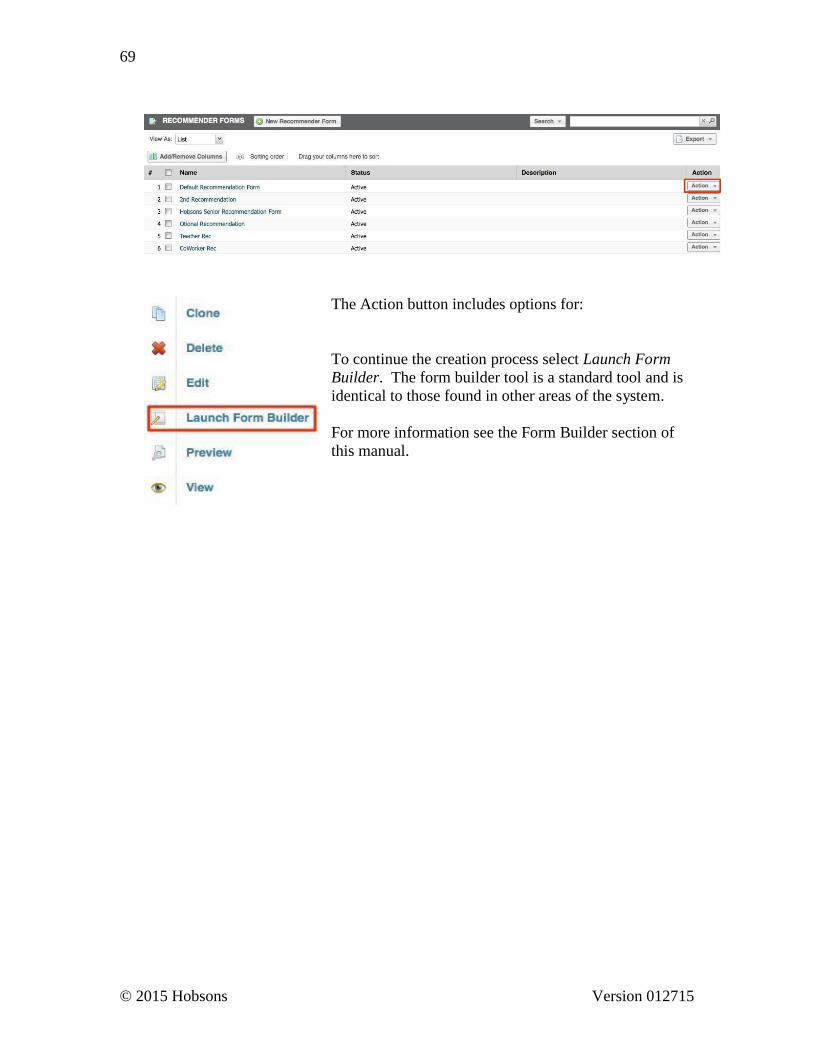
69
© 2015 Hobsons Version 012715
The Action button includes options for:
To continue the creation process select Launch Form
Builder. The form builder tool is a standard tool and is
identical to those found in other areas of the system.
For more information see the Form Builder section of
this manual.
70
© 2015 Hobsons Version 012715
SALES
S a l e s M o d u l e The Sales tab contains features that support business-to-business sales. This module is
designed for executive education programs in order to manage their business
opportunities in Radius. In other words, the Sales module is developed specifically for
admissions and enrollment professionals in continuing education and graduate programs.
Leads and Opportunities were created to help these types of programs manage their
selling and outreach to businesses and executives. For example, if the user wants to reach
out to a business to help them develop custom courses for employee development, he or
she can manage this process in the Sales tab.
The Sales module allows for the creation of Leads and Opportunities:
Lead – A lead is a person with whom to engage to provide or sell services. This
is not yet a contact in Radius. If the intent is to communicate with this lead,
create them as a contact record.
Opportunities – An opportunity is a record that has been generated once the lead
has been converted. Once the lead is converted to a contact, an opportunity can
be created. Opportunities are directly related to Organizations, hence, the
business-to-business relationship tracking
Leads
As previously mentioned, a Lead is a person with whom to engage with the intention to
provide/sell services. Leads can enter the system via a manual process or via an import.
Manual Lead Entry
Click New Lead within the Sales list view
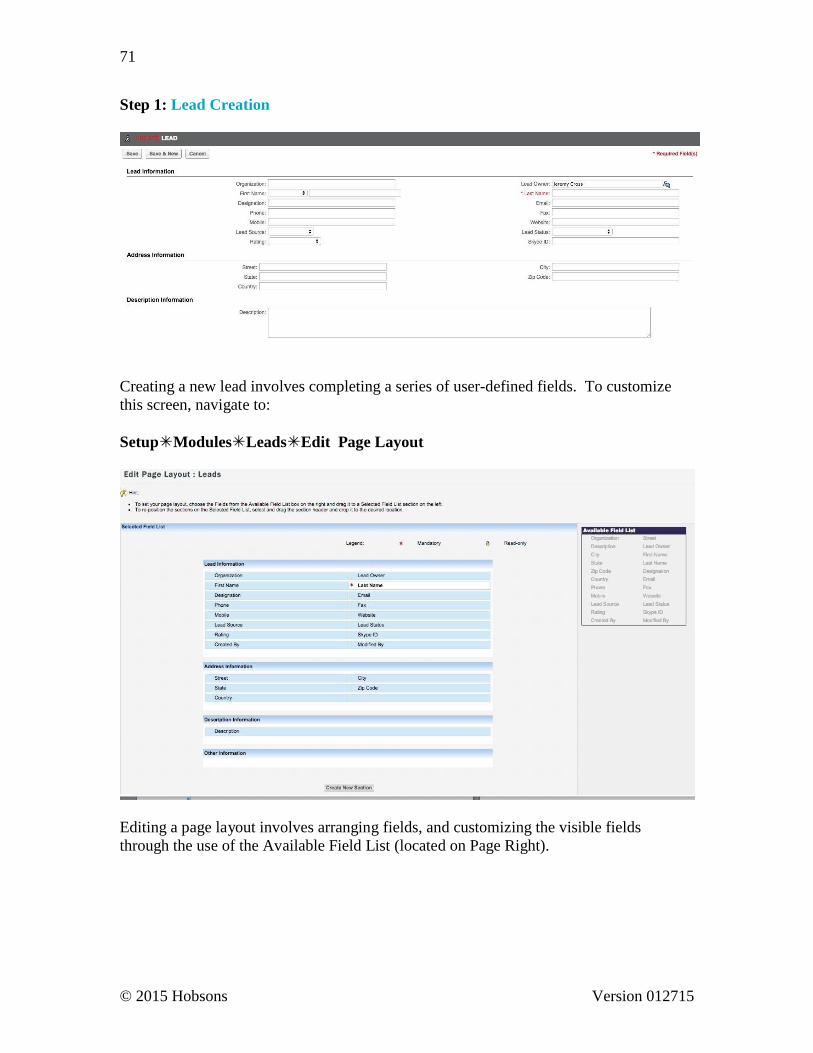
71
© 2015 Hobsons Version 012715
Step 1: Lead Creation
Creating a new lead involves completing a series of user-defined fields. To customize
this screen, navigate to:
SetupModulesLeadsEdit Page Layout
Editing a page layout involves arranging fields, and customizing the visible fields
through the use of the Available Field List (located on Page Right).
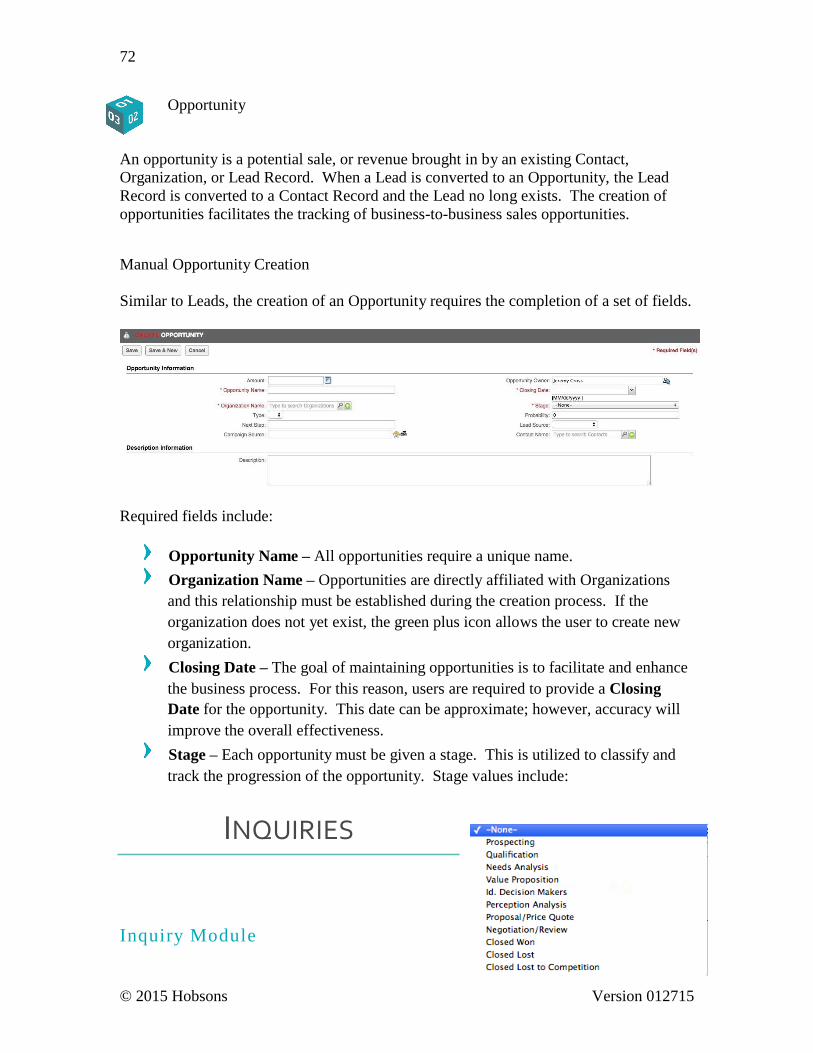
72
© 2015 Hobsons Version 012715
Opportunity
An opportunity is a potential sale, or revenue brought in by an existing Contact,
Organization, or Lead Record. When a Lead is converted to an Opportunity, the Lead
Record is converted to a Contact Record and the Lead no long exists. The creation of
opportunities facilitates the tracking of business-to-business sales opportunities.
Manual Opportunity Creation
Similar to Leads, the creation of an Opportunity requires the completion of a set of fields.
Required fields include:
Opportunity Name – All opportunities require a unique name.
Organization Name – Opportunities are directly affiliated with Organizations
and this relationship must be established during the creation process. If the
organization does not yet exist, the green plus icon allows the user to create new
organization.
Closing Date – The goal of maintaining opportunities is to facilitate and enhance
the business process. For this reason, users are required to provide a Closing
Date for the opportunity. This date can be approximate; however, accuracy will
improve the overall effectiveness.
Stage – Each opportunity must be given a stage. This is utilized to classify and
track the progression of the opportunity. Stage values include:
INQUIRIES
I n q u i r y M o d u l e
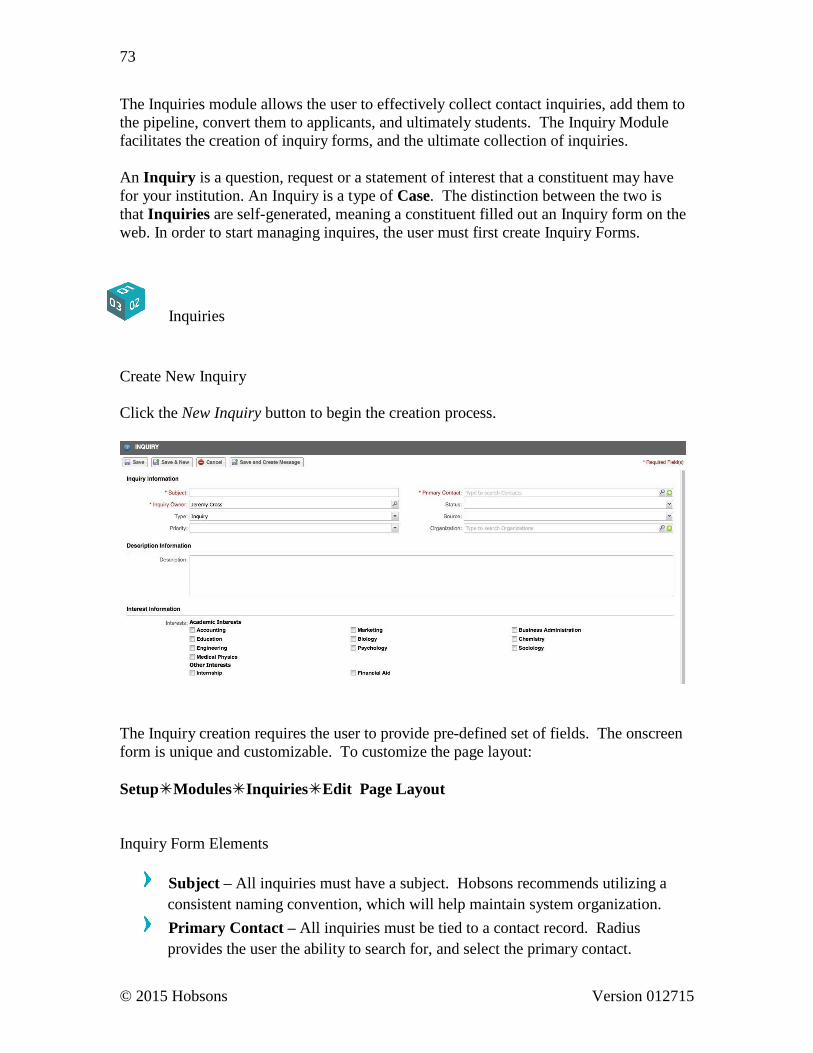
73
© 2015 Hobsons Version 012715
The Inquiries module allows the user to effectively collect contact inquiries, add them to
the pipeline, convert them to applicants, and ultimately students. The Inquiry Module
facilitates the creation of inquiry forms, and the ultimate collection of inquiries.
An Inquiry is a question, request or a statement of interest that a constituent may have
for your institution. An Inquiry is a type of Case. The distinction between the two is
that Inquiries are self-generated, meaning a constituent filled out an Inquiry form on the
web. In order to start managing inquires, the user must first create Inquiry Forms.
Inquiries
Create New Inquiry
Click the New Inquiry button to begin the creation process.
The Inquiry creation requires the user to provide pre-defined set of fields. The onscreen
form is unique and customizable. To customize the page layout:
SetupModulesInquiriesEdit Page Layout
Inquiry Form Elements
Subject – All inquiries must have a subject. Hobsons recommends utilizing a
consistent naming convention, which will help maintain system organization.
Primary Contact – All inquiries must be tied to a contact record. Radius
provides the user the ability to search for, and select the primary contact.
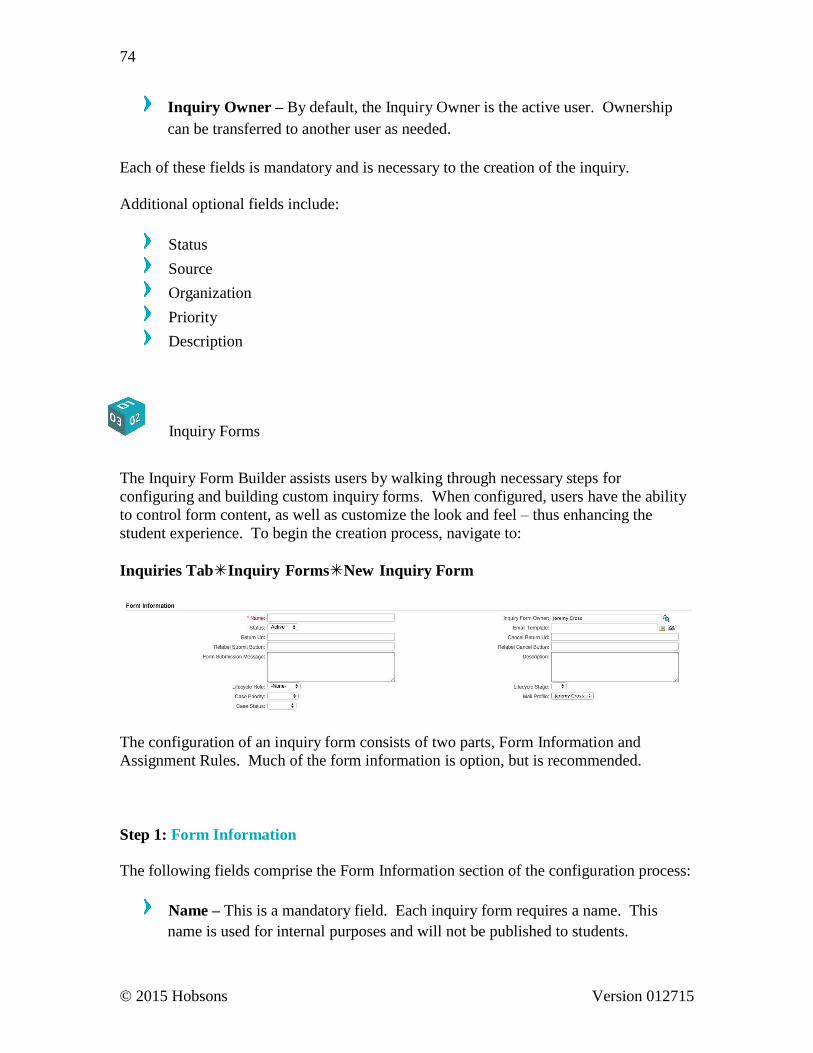
74
© 2015 Hobsons Version 012715
Inquiry Owner – By default, the Inquiry Owner is the active user. Ownership
can be transferred to another user as needed.
Each of these fields is mandatory and is necessary to the creation of the inquiry.
Additional optional fields include:
Status
Source
Organization
Priority
Description
Inquiry Forms
The Inquiry Form Builder assists users by walking through necessary steps for
configuring and building custom inquiry forms. When configured, users have the ability
to control form content, as well as customize the look and feel – thus enhancing the
student experience. To begin the creation process, navigate to:
Inquiries TabInquiry FormsNew Inquiry Form
The configuration of an inquiry form consists of two parts, Form Information and
Assignment Rules. Much of the form information is option, but is recommended.
Step 1: Form Information
The following fields comprise the Form Information section of the configuration process:
Name – This is a mandatory field. Each inquiry form requires a name. This
name is used for internal purposes and will not be published to students.
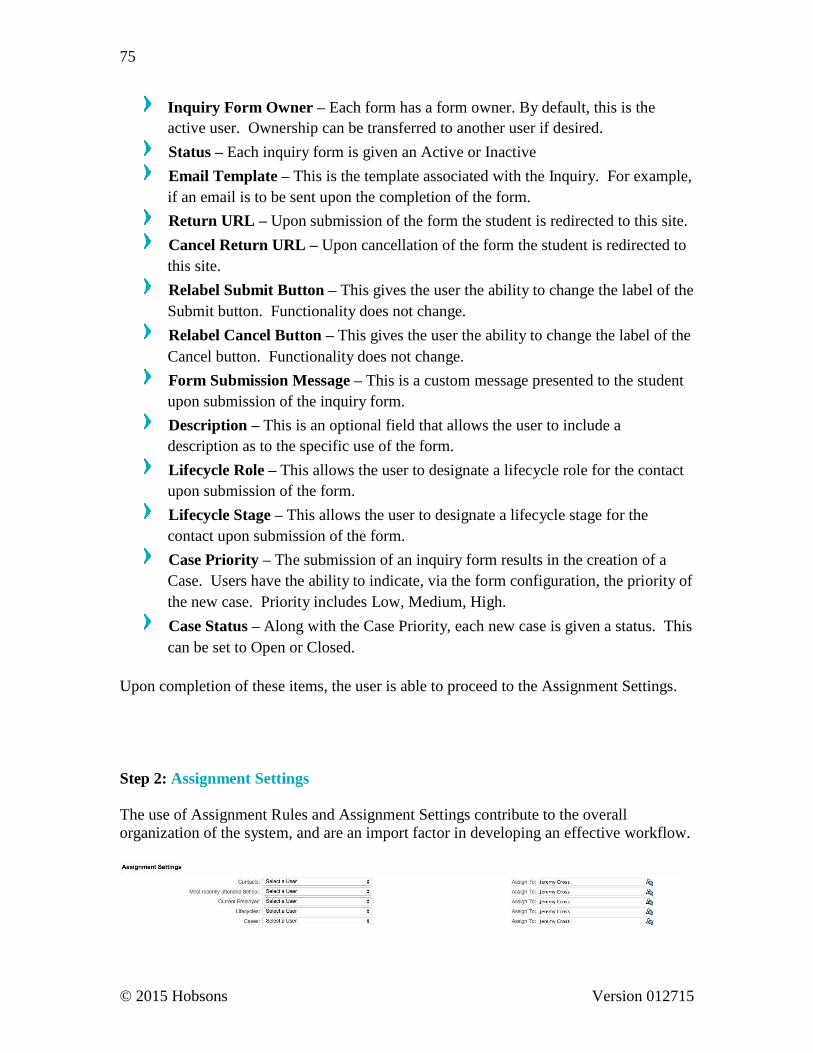
© 2015 Hobsons Version 012715
75
Inquiry Form Owner – Each form has a form owner. By default, this is the
active user. Ownership can be transferred to another user if desired.
Status – Each inquiry form is given an Active or Inactive
Email Template – This is the template associated with the Inquiry. For example,
if an email is to be sent upon the completion of the form.
Return URL – Upon submission of the form the student is redirected to this site.
Cancel Return URL – Upon cancellation of the form the student is redirected to
this site.
Relabel Submit Button – This gives the user the ability to change the label of the
Submit button. Functionality does not change.
Relabel Cancel Button – This gives the user the ability to change the label of the
Cancel button. Functionality does not change.
Form Submission Message – This is a custom message presented to the student
upon submission of the inquiry form.
Description – This is an optional field that allows the user to include a
description as to the specific use of the form.
Lifecycle Role – This allows the user to designate a lifecycle role for the contact
upon submission of the form.
Lifecycle Stage – This allows the user to designate a lifecycle stage for the
contact upon submission of the form.
Case Priority – The submission of an inquiry form results in the creation of a
Case. Users have the ability to indicate, via the form configuration, the priority of
the new case. Priority includes Low, Medium, High.
Case Status – Along with the Case Priority, each new case is given a status. This
can be set to Open or Closed.
Upon completion of these items, the user is able to proceed to the Assignment Settings.
Step 2: Assignment Settings
The use of Assignment Rules and Assignment Settings contribute to the overall
organization of the system, and are an import factor in developing an effective workflow.
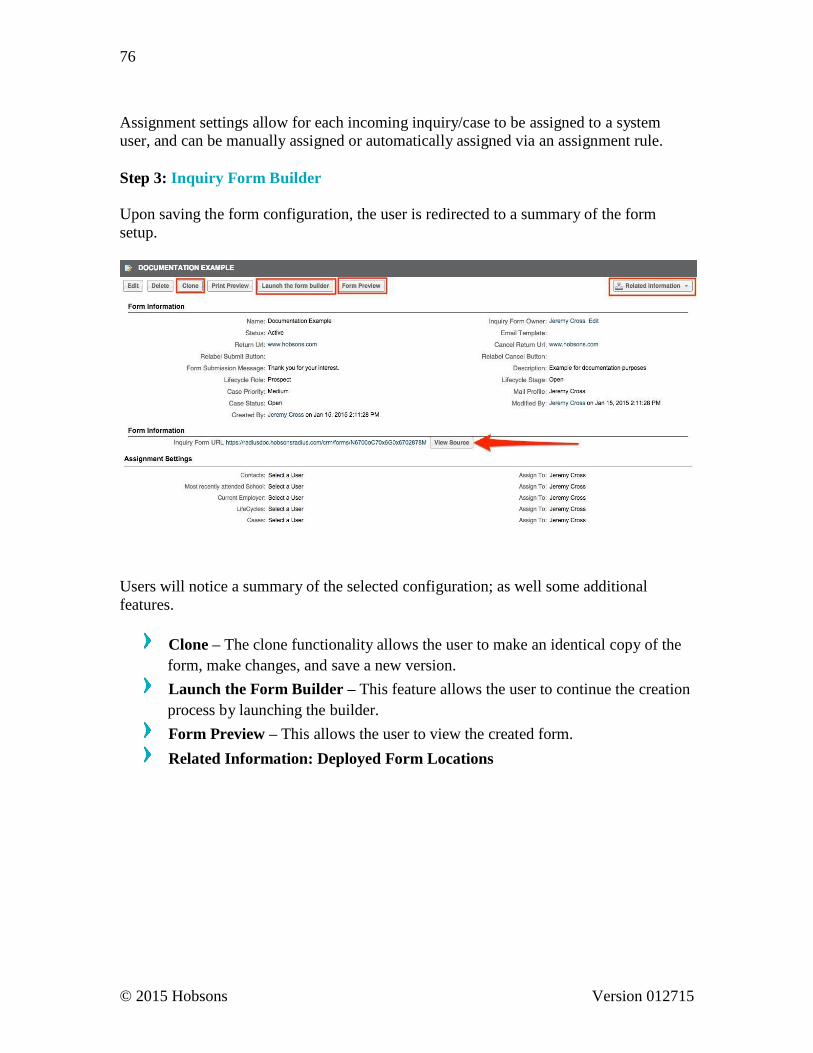
© 2015 Hobsons Version 012715
76
Assignment settings allow for each incoming inquiry/case to be assigned to a system
user, and can be manually assigned or automatically assigned via an assignment rule.
Step 3: Inquiry Form Builder
Upon saving the form configuration, the user is redirected to a summary of the form
setup.
Users will notice a summary of the selected configuration; as well some additional
features.
Clone – The clone functionality allows the user to make an identical copy of the
form, make changes, and save a new version.
Launch the Form Builder – This feature allows the user to continue the creation
process by launching the builder.
Form Preview – This allows the user to view the created form.
Related Information: Deployed Form Locations
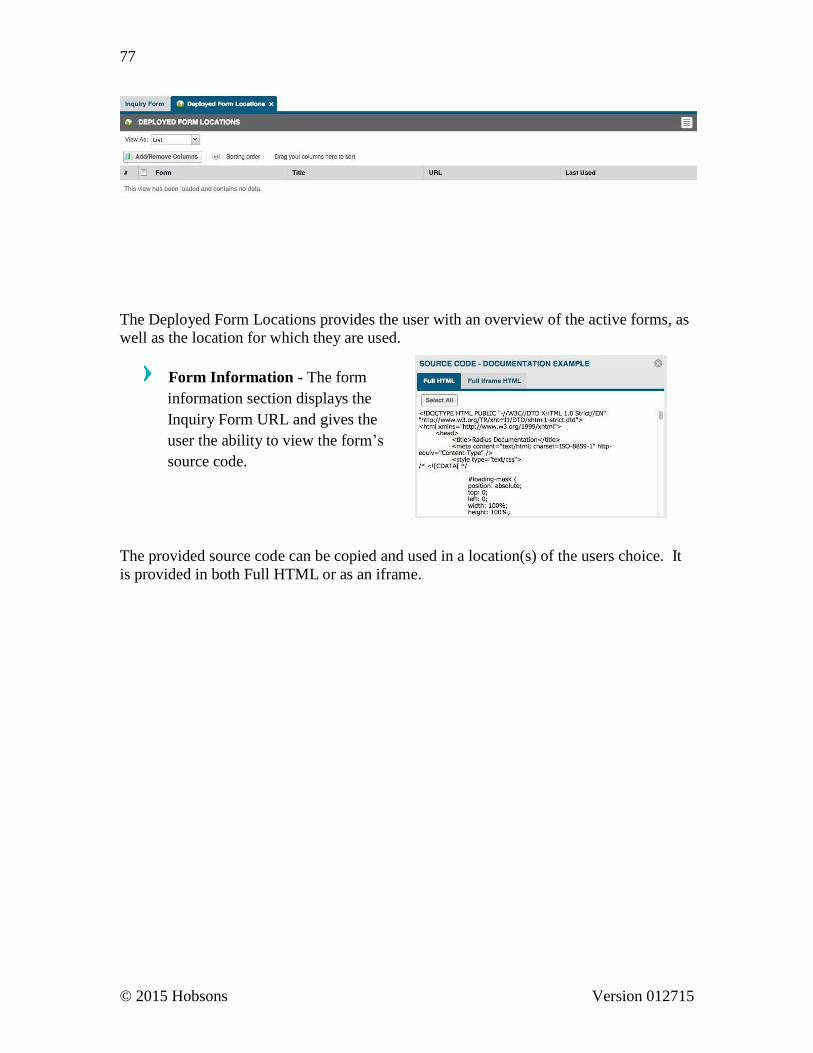
© 2015 Hobsons Version 012715
77
The Deployed Form Locations provides the user with an overview of the active forms, as
well as the location for which they are used.
Form Information - The form
information section displays the
Inquiry Form URL and gives the
user the ability to view the form’s
source code.
The provided source code can be copied and used in a location(s) of the users choice. It
is provided in both Full HTML or as an iframe.
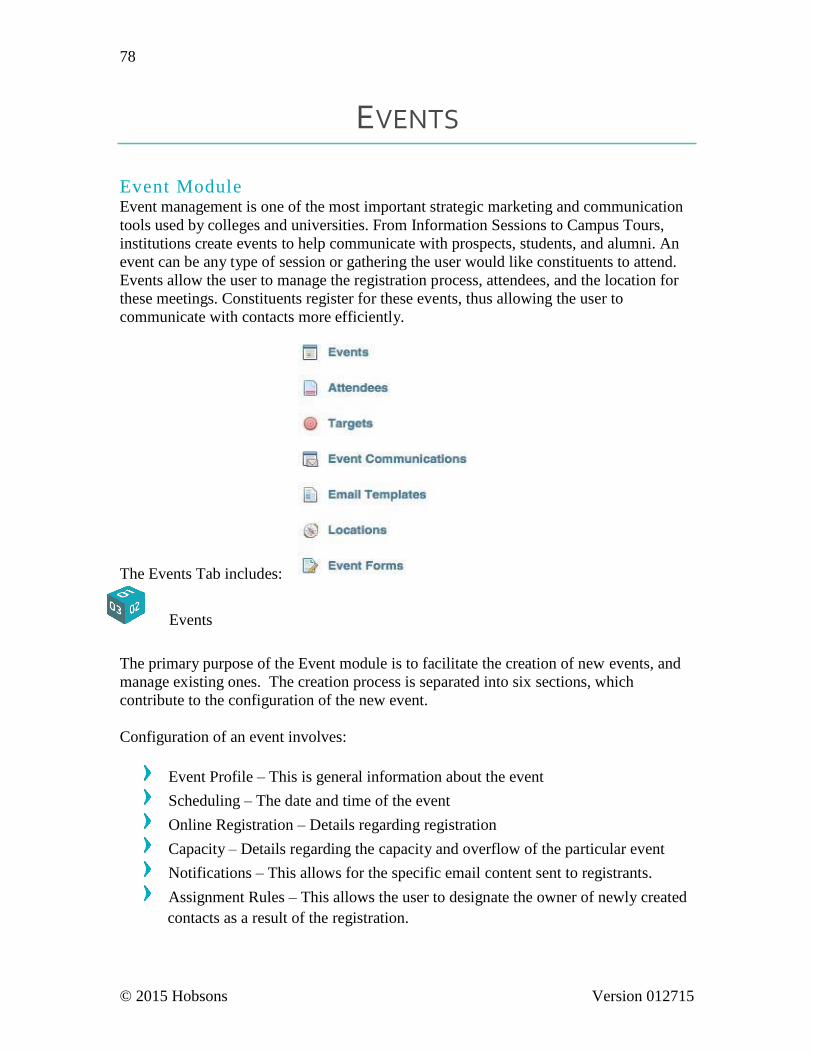
© 2015 Hobsons Version 012715
78
EVENTS
E v e n t M o d u l e Event management is one of the most important strategic marketing and communication
tools used by colleges and universities. From Information Sessions to Campus Tours,
institutions create events to help communicate with prospects, students, and alumni. An
event can be any type of session or gathering the user would like constituents to attend.
Events allow the user to manage the registration process, attendees, and the location for
these meetings. Constituents register for these events, thus allowing the user to
communicate with contacts more efficiently.
The Events Tab includes:
Events
The primary purpose of the Event module is to facilitate the creation of new events, and
manage existing ones. The creation process is separated into six sections, which
contribute to the configuration of the new event.
Configuration of an event involves:
Event Profile – This is general information about the event
Scheduling – The date and time of the event
Online Registration – Details regarding registration
Capacity – Details regarding the capacity and overflow of the particular event
Notifications – This allows for the specific email content sent to registrants.
Assignment Rules – This allows the user to designate the owner of newly created
contacts as a result of the registration.
© 2015 Hobsons Version 012715
79
Radius is structured to allow the user to easily navigate the creation of event content.
Below is a list of form fields, and clarification/considerations for their use.
Event ProfileLocations
o Every event must be affiliated with a location. Users have the option of
searching for existing locations, or create a new one by using the green
plus icon.
Event ProfileCategory
o The category field is not required; however, is an internal field that can
assist users in effectively maintaining data associated with university
events.
Event ProfileHost & Presenter
o These fields are not required, but their use is recommended. A contact in
Radius can be categorized as a host, presenter, or both. As a
host/presenter, they can appear on the public listing of the event.
SchedulingTime
o Note that Radius uses a 24-hour clock. All times must be entered in this
format.
Online RegistrationEvent Form
o To utilize online registration, an event form must be affiliated with the
event setup. To add a form, use the magnifying glass icon, search for the
form, and select.
Online RegistrationAttendee Status
o The Attendee Status field is required and allows the user to designate a
status for those individuals registering for the event. The default Radius
values include Accepted, Rejected, and Under Review. These values can
be changed via SetupModulesAttendeesAttendee Status.
Notifications
o The notifications functionality provides the user the ability to create
communications to be used during the duration of the event. Users are
required to provide the Email Template, as well as a schedule for which
Radius will send the communication. By default, three communications
will be present – Registration Confirmation, Did Not Respond, and
Reminder for Registered. Users can add to this list at their discretion.
To add to the list, use the Add Notification button. This will trigger a pop-
up
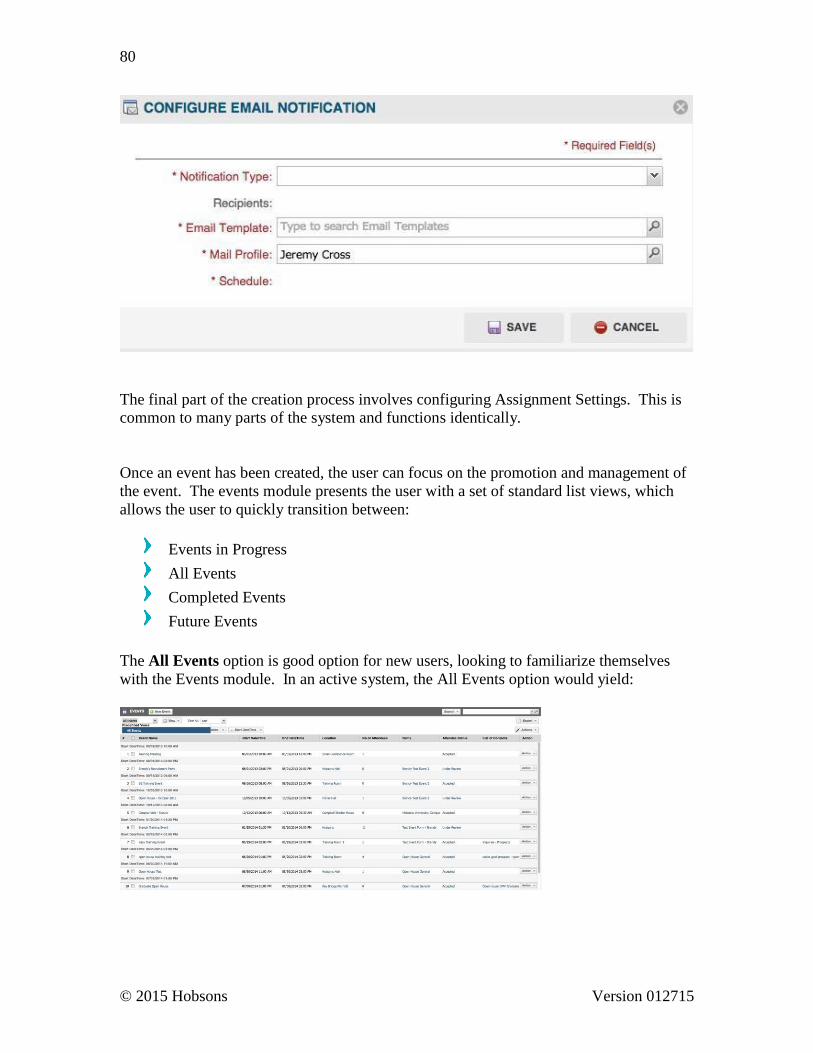
© 2015 Hobsons Version 012715
80
The final part of the creation process involves configuring Assignment Settings. This is
common to many parts of the system and functions identically.
Once an event has been created, the user can focus on the promotion and management of
the event. The events module presents the user with a set of standard list views, which
allows the user to quickly transition between:
Events in Progress
All Events
Completed Events
Future Events
The All Events option is good option for new users, looking to familiarize themselves
with the Events module. In an active system, the All Events option would yield:
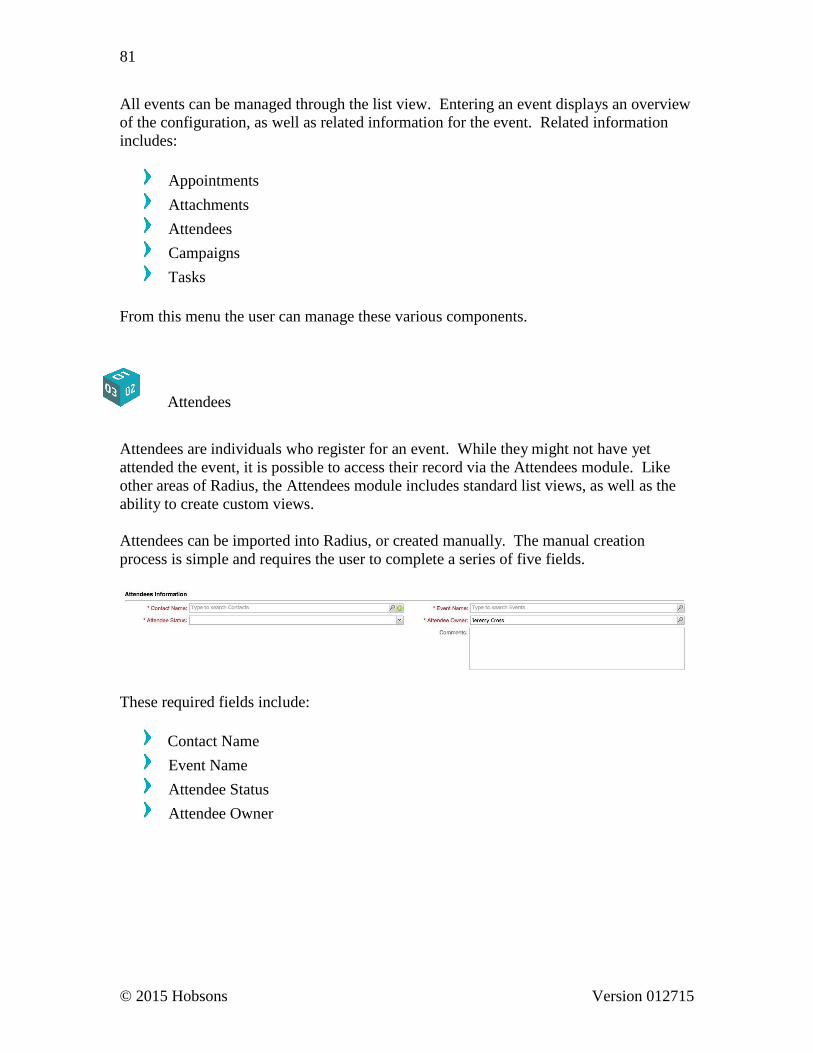
© 2015 Hobsons Version 012715
81
All events can be managed through the list view. Entering an event displays an overview
of the configuration, as well as related information for the event. Related information
includes:
Appointments
Attachments
Attendees
Campaigns
Tasks
From this menu the user can manage these various components.
Attendees
Attendees are individuals who register for an event. While they might not have yet
attended the event, it is possible to access their record via the Attendees module. Like
other areas of Radius, the Attendees module includes standard list views, as well as the
ability to create custom views.
Attendees can be imported into Radius, or created manually. The manual creation
process is simple and requires the user to complete a series of five fields.
These required fields include:
Contact Name
Event Name
Attendee Status
Attendee Owner
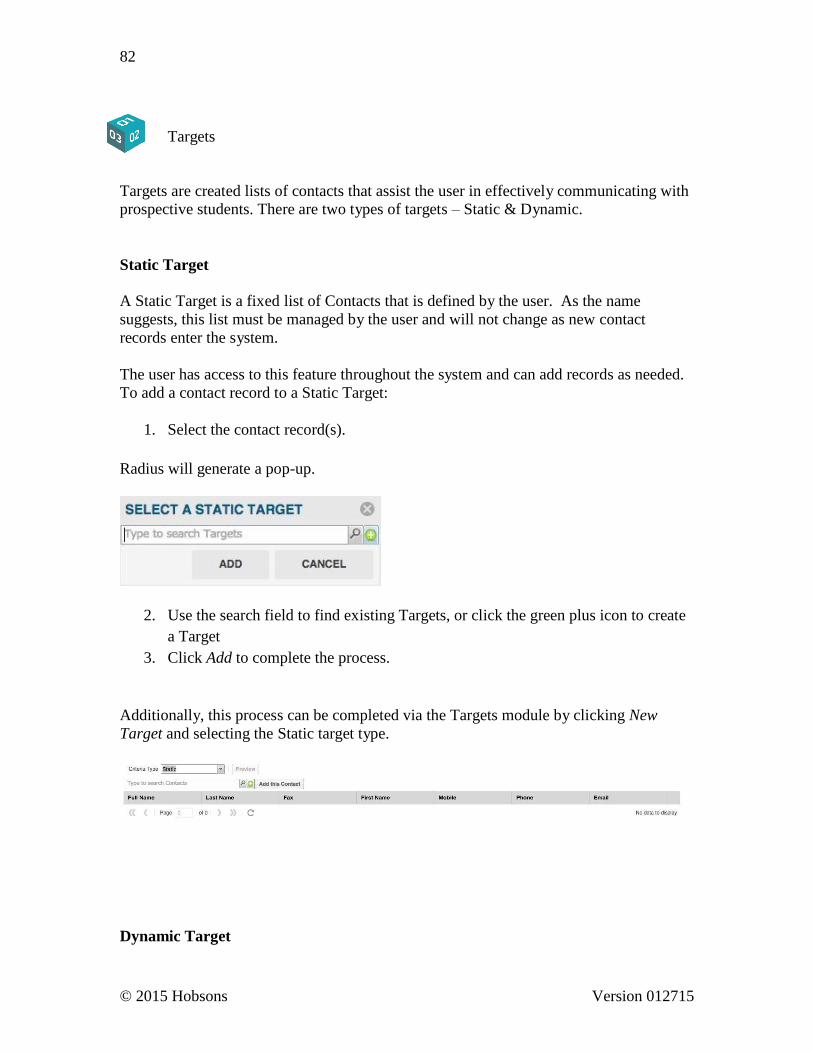
© 2015 Hobsons Version 012715
82
Targets
Targets are created lists of contacts that assist the user in effectively communicating with
prospective students. There are two types of targets – Static & Dynamic.
Static Target
A Static Target is a fixed list of Contacts that is defined by the user. As the name
suggests, this list must be managed by the user and will not change as new contact
records enter the system.
The user has access to this feature throughout the system and can add records as needed.
To add a contact record to a Static Target:
1. Select the contact record(s).
Radius will generate a pop-up.
2. Use the search field to find existing Targets, or click the green plus icon to create
a Target
3. Click Add to complete the process.
Additionally, this process can be completed via the Targets module by clicking New
Target and selecting the Static target type.
Dynamic Target
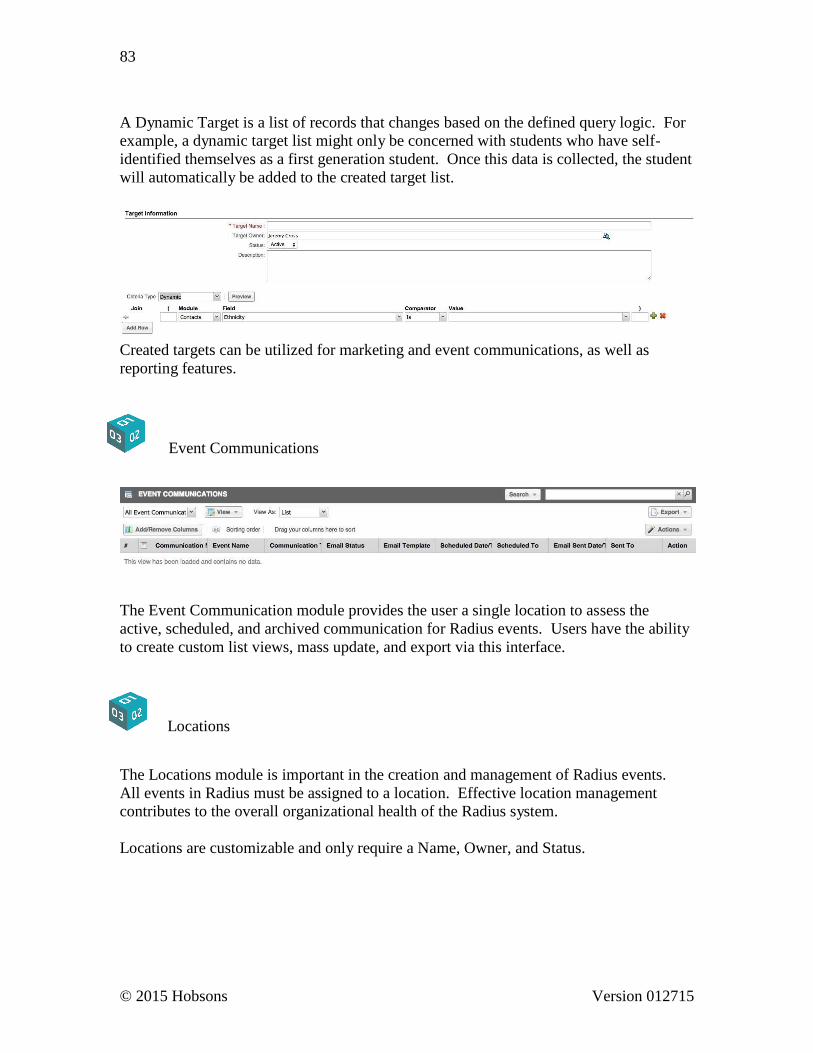
© 2015 Hobsons Version 012715
83
A Dynamic Target is a list of records that changes based on the defined query logic. For
example, a dynamic target list might only be concerned with students who have self-
identified themselves as a first generation student. Once this data is collected, the student
will automatically be added to the created target list.
Created targets can be utilized for marketing and event communications, as well as
reporting features.
Event Communications
The Event Communication module provides the user a single location to assess the
active, scheduled, and archived communication for Radius events. Users have the ability
to create custom list views, mass update, and export via this interface.
Locations
The Locations module is important in the creation and management of Radius events.
All events in Radius must be assigned to a location. Effective location management
contributes to the overall organizational health of the Radius system.
Locations are customizable and only require a Name, Owner, and Status.
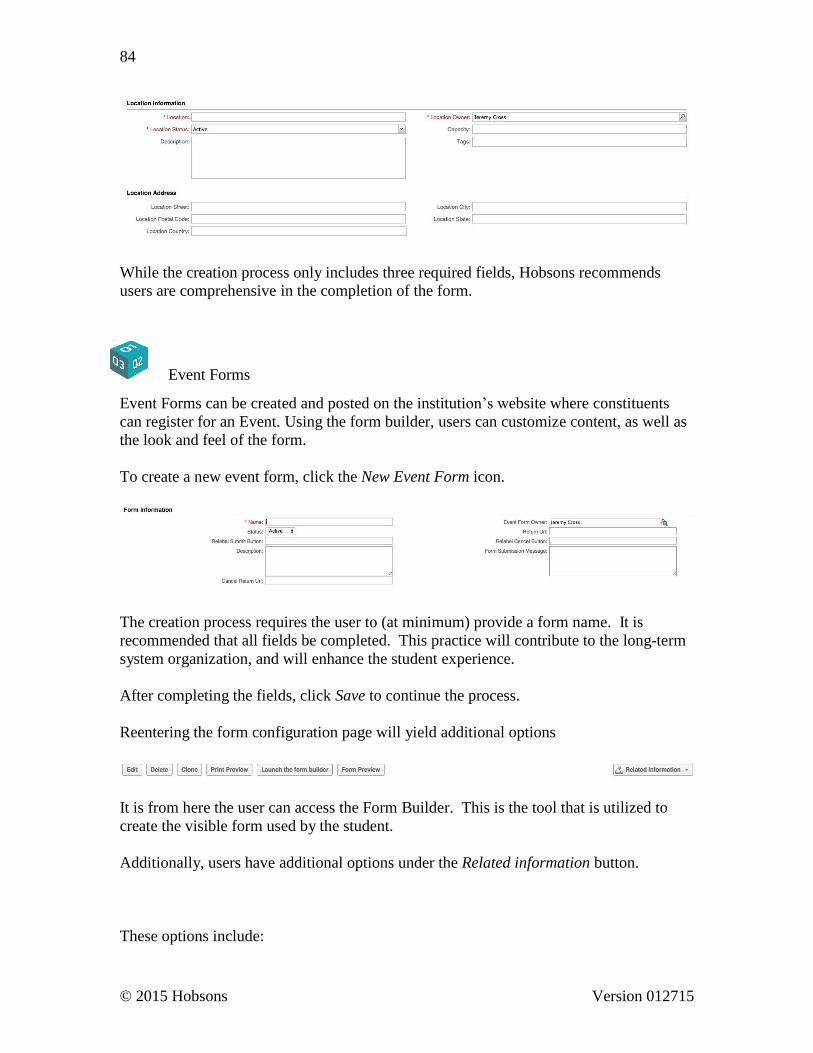
© 2015 Hobsons Version 012715
84
While the creation process only includes three required fields, Hobsons recommends
users are comprehensive in the completion of the form.
Event Forms
Event Forms can be created and posted on the institution’s website where constituents
can register for an Event. Using the form builder, users can customize content, as well as
the look and feel of the form.
To create a new event form, click the New Event Form icon.
The creation process requires the user to (at minimum) provide a form name. It is
recommended that all fields be completed. This practice will contribute to the long-term
system organization, and will enhance the student experience.
After completing the fields, click Save to continue the process.
Reentering the form configuration page will yield additional options
It is from here the user can access the Form Builder. This is the tool that is utilized to
create the visible form used by the student.
Additionally, users have additional options under the Related information button.
These options include:

© 2015 Hobsons Version 012715
85
0 Appointments
®1 Attachments
Deployed Form Locations
WI Events •
I!J Tasks
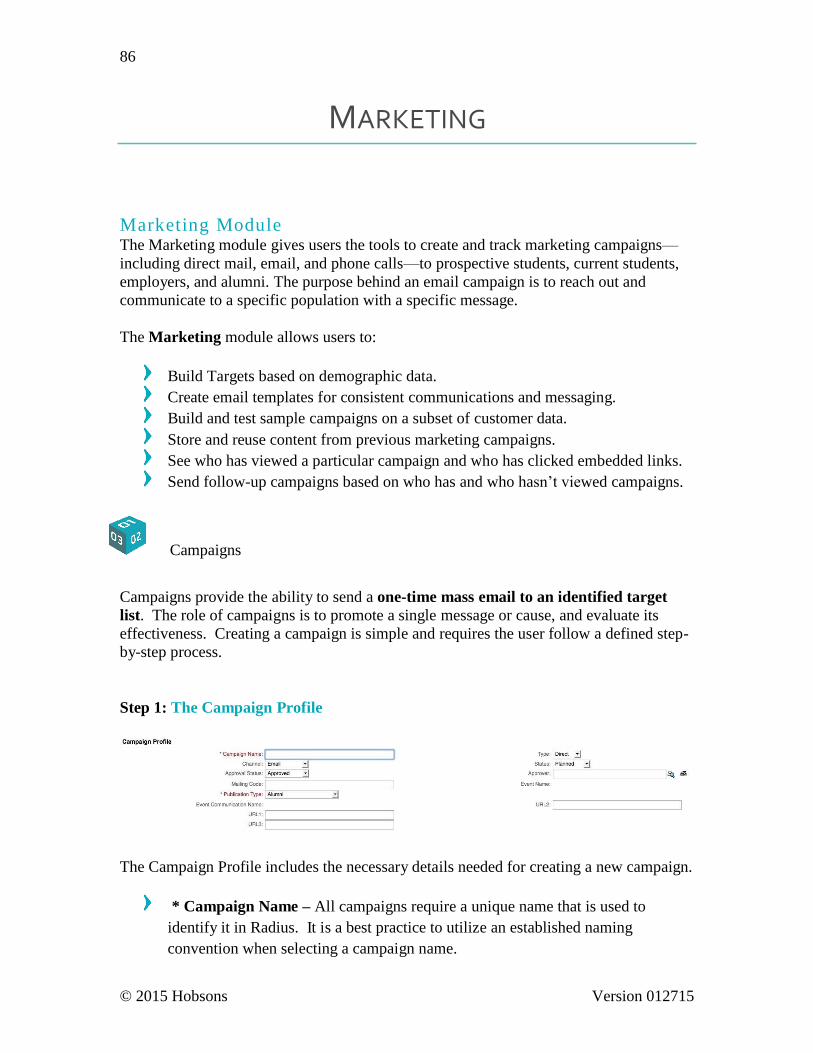
© 2015 Hobsons Version 012715
86
MARKETING
M a r k e t i n g M o d u l e The Marketing module gives users the tools to create and track marketing campaigns—
including direct mail, email, and phone calls—to prospective students, current students,
employers, and alumni. The purpose behind an email campaign is to reach out and
communicate to a specific population with a specific message.
The Marketing module allows users to:
Build Targets based on demographic data.
Create email templates for consistent communications and messaging.
Build and test sample campaigns on a subset of customer data.
Store and reuse content from previous marketing campaigns.
See who has viewed a particular campaign and who has clicked embedded links.
Send follow-up campaigns based on who has and who hasn’t viewed campaigns.
Campaigns
Campaigns provide the ability to send a one-time mass email to an identified target
list. The role of campaigns is to promote a single message or cause, and evaluate its
effectiveness. Creating a campaign is simple and requires the user follow a defined step-
by-step process.
Step 1: The Campaign Profile
The Campaign Profile includes the necessary details needed for creating a new campaign.
* Campaign Name – All campaigns require a unique name that is used to
identify it in Radius. It is a best practice to utilize an established naming
convention when selecting a campaign name.
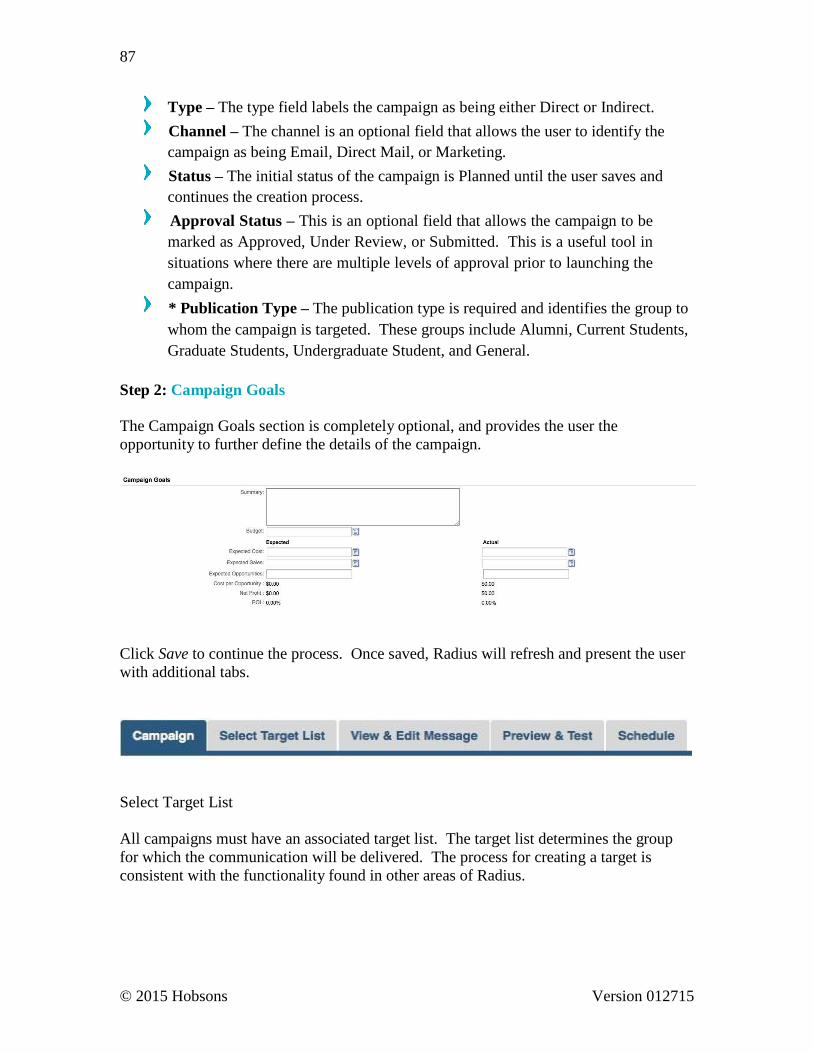
© 2015 Hobsons Version 012715
87
Type – The type field labels the campaign as being either Direct or Indirect.
Channel – The channel is an optional field that allows the user to identify the
campaign as being Email, Direct Mail, or Marketing.
Status – The initial status of the campaign is Planned until the user saves and
continues the creation process.
Approval Status – This is an optional field that allows the campaign to be
marked as Approved, Under Review, or Submitted. This is a useful tool in
situations where there are multiple levels of approval prior to launching the
campaign.
* Publication Type – The publication type is required and identifies the group to
whom the campaign is targeted. These groups include Alumni, Current Students,
Graduate Students, Undergraduate Student, and General.
Step 2: Campaign Goals
The Campaign Goals section is completely optional, and provides the user the
opportunity to further define the details of the campaign.
Click Save to continue the process. Once saved, Radius will refresh and present the user
with additional tabs.
Select Target List
All campaigns must have an associated target list. The target list determines the group
for which the communication will be delivered. The process for creating a target is
consistent with the functionality found in other areas of Radius.
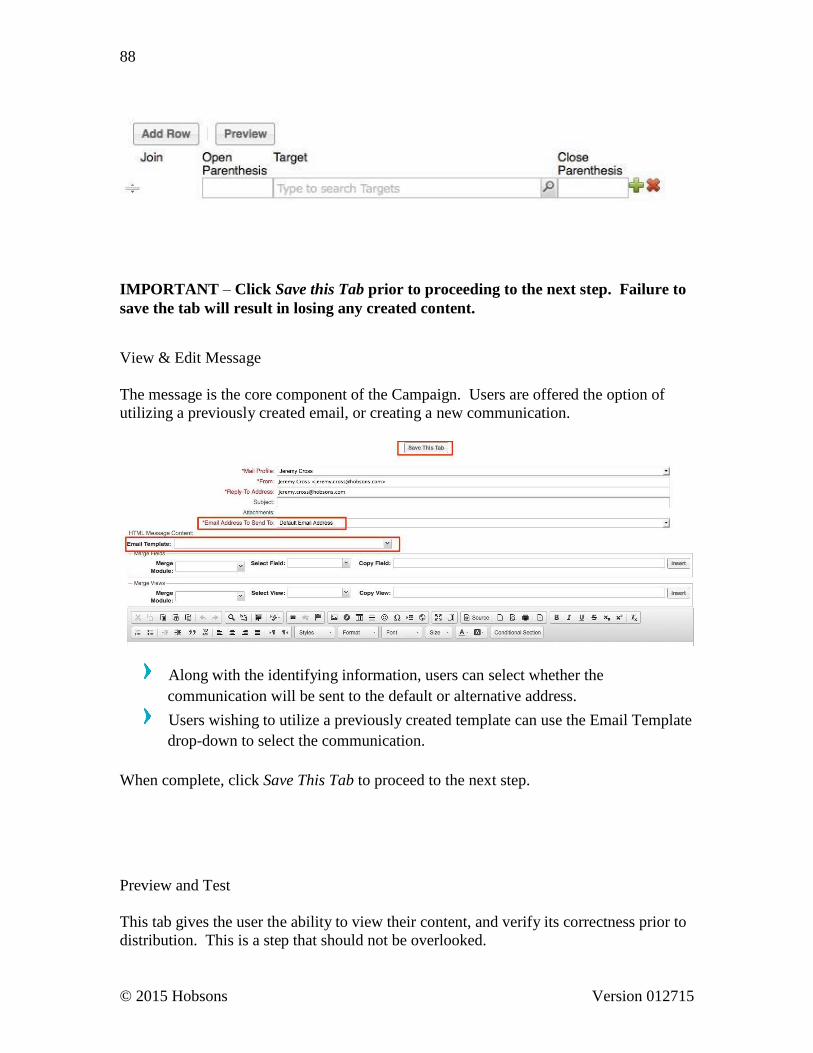
© 2015 Hobsons Version 012715
88
IMPORTANT – Click Save this Tab prior to proceeding to the next step. Failure to
save the tab will result in losing any created content.
View & Edit Message
The message is the core component of the Campaign. Users are offered the option of
utilizing a previously created email, or creating a new communication.
Along with the identifying information, users can select whether the
communication will be sent to the default or alternative address.
Users wishing to utilize a previously created template can use the Email Template
drop-down to select the communication.
When complete, click Save This Tab to proceed to the next step.
Preview and Test
This tab gives the user the ability to view their content, and verify its correctness prior to
distribution. This is a step that should not be overlooked.
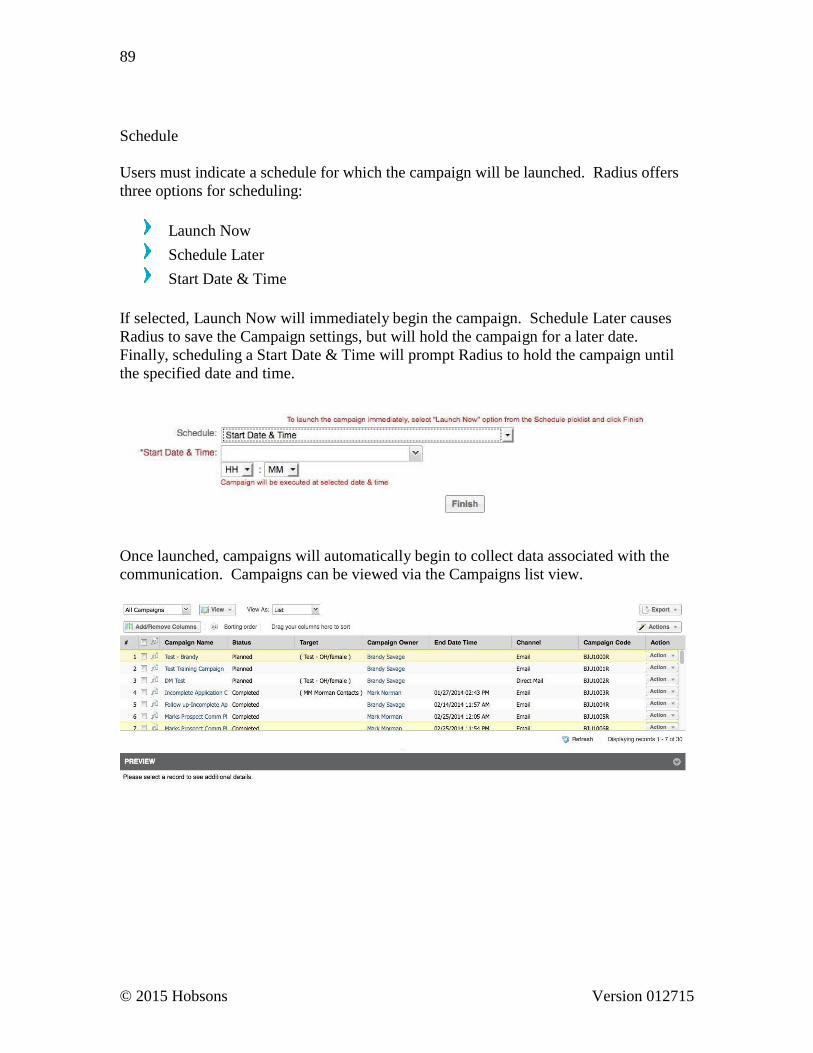
© 2015 Hobsons Version 012715
89
Schedule
Users must indicate a schedule for which the campaign will be launched. Radius offers
three options for scheduling:
Launch Now
Schedule Later
Start Date & Time
If selected, Launch Now will immediately begin the campaign. Schedule Later causes
Radius to save the Campaign settings, but will hold the campaign for a later date.
Finally, scheduling a Start Date & Time will prompt Radius to hold the campaign until
the specified date and time.
Once launched, campaigns will automatically begin to collect data associated with the
communication. Campaigns can be viewed via the Campaigns list view.
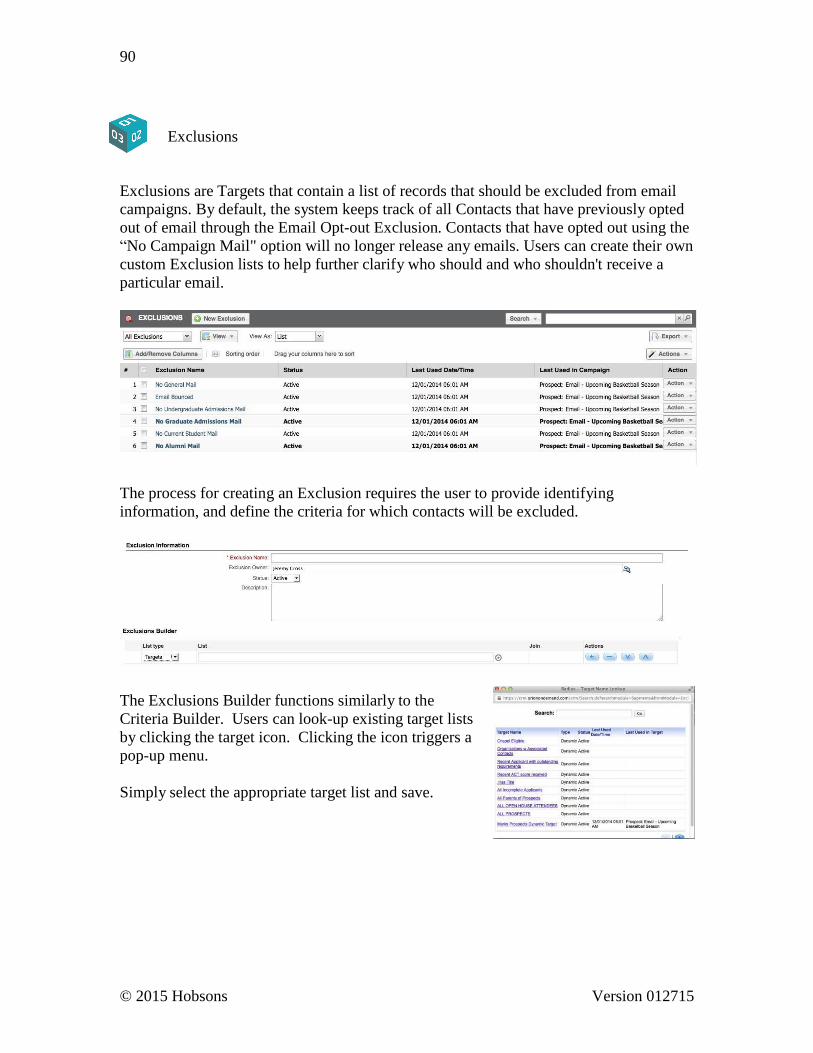
© 2015 Hobsons Version 012715
90
Exclusions
Exclusions are Targets that contain a list of records that should be excluded from email
campaigns. By default, the system keeps track of all Contacts that have previously opted
out of email through the Email Opt-out Exclusion. Contacts that have opted out using the
“No Campaign Mail" option will no longer release any emails. Users can create their own
custom Exclusion lists to help further clarify who should and who shouldn't receive a
particular email.
The process for creating an Exclusion requires the user to provide identifying
information, and define the criteria for which contacts will be excluded.
The Exclusions Builder functions similarly to the
Criteria Builder. Users can look-up existing target lists
by clicking the target icon. Clicking the icon triggers a
pop-up menu.
Simply select the appropriate target list and save.
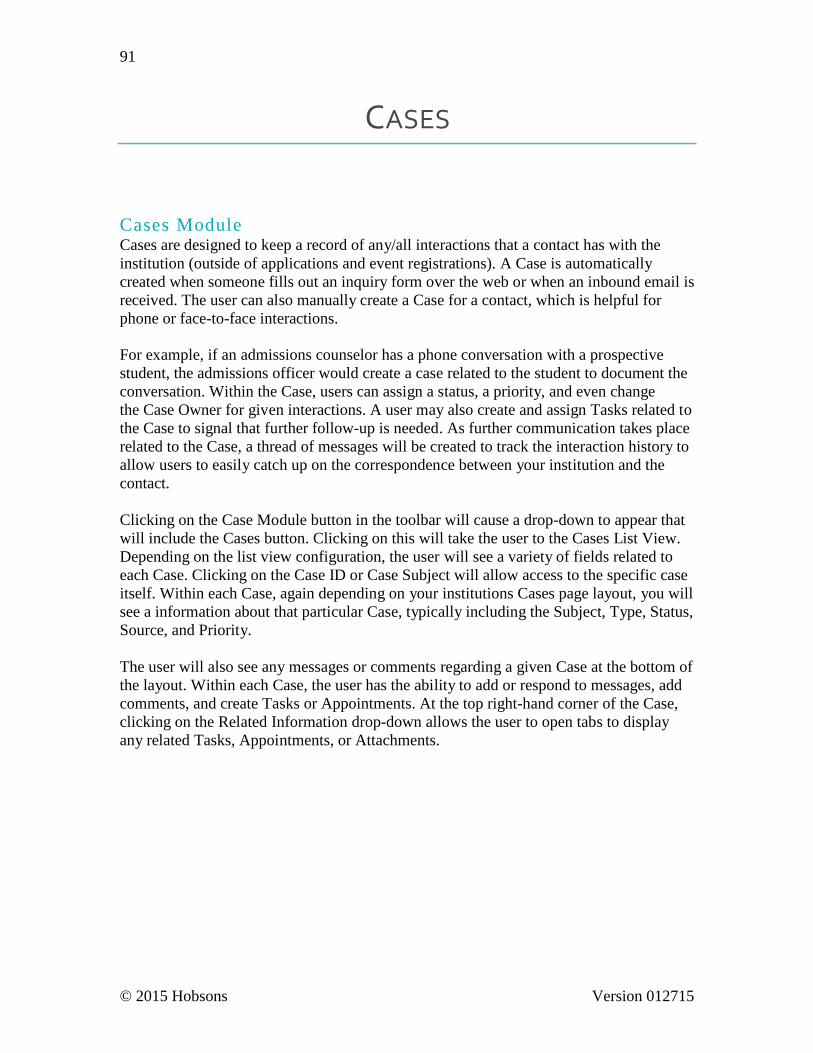
© 2015 Hobsons Version 012715
91
CASES
C a s e s M o d u l e Cases are designed to keep a record of any/all interactions that a contact has with the
institution (outside of applications and event registrations). A Case is automatically
created when someone fills out an inquiry form over the web or when an inbound email is
received. The user can also manually create a Case for a contact, which is helpful for
phone or face-to-face interactions.
For example, if an admissions counselor has a phone conversation with a prospective
student, the admissions officer would create a case related to the student to document the
conversation. Within the Case, users can assign a status, a priority, and even change
the Case Owner for given interactions. A user may also create and assign Tasks related to
the Case to signal that further follow-up is needed. As further communication takes place
related to the Case, a thread of messages will be created to track the interaction history to
allow users to easily catch up on the correspondence between your institution and the
contact.
Clicking on the Case Module button in the toolbar will cause a drop-down to appear that
will include the Cases button. Clicking on this will take the user to the Cases List View.
Depending on the list view configuration, the user will see a variety of fields related to
each Case. Clicking on the Case ID or Case Subject will allow access to the specific case
itself. Within each Case, again depending on your institutions Cases page layout, you will
see a information about that particular Case, typically including the Subject, Type, Status,
Source, and Priority.
The user will also see any messages or comments regarding a given Case at the bottom of
the layout. Within each Case, the user has the ability to add or respond to messages, add
comments, and create Tasks or Appointments. At the top right-hand corner of the Case,
clicking on the Related Information drop-down allows the user to open tabs to display
any related Tasks, Appointments, or Attachments.
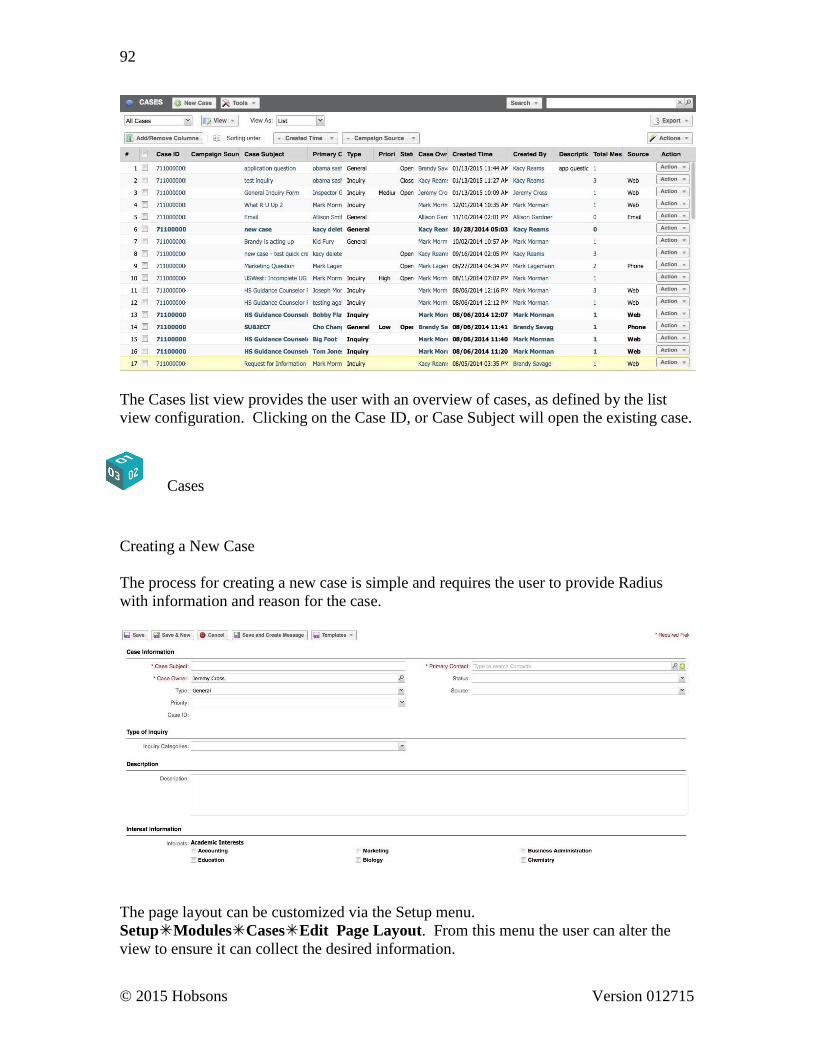
© 2015 Hobsons Version 012715
92
The Cases list view provides the user with an overview of cases, as defined by the list
view configuration. Clicking on the Case ID, or Case Subject will open the existing case.
Cases
Creating a New Case
The process for creating a new case is simple and requires the user to provide Radius
with information and reason for the case.
The page layout can be customized via the Setup menu.
SetupModulesCasesEdit Page Layout. From this menu the user can alter the
view to ensure it can collect the desired information.
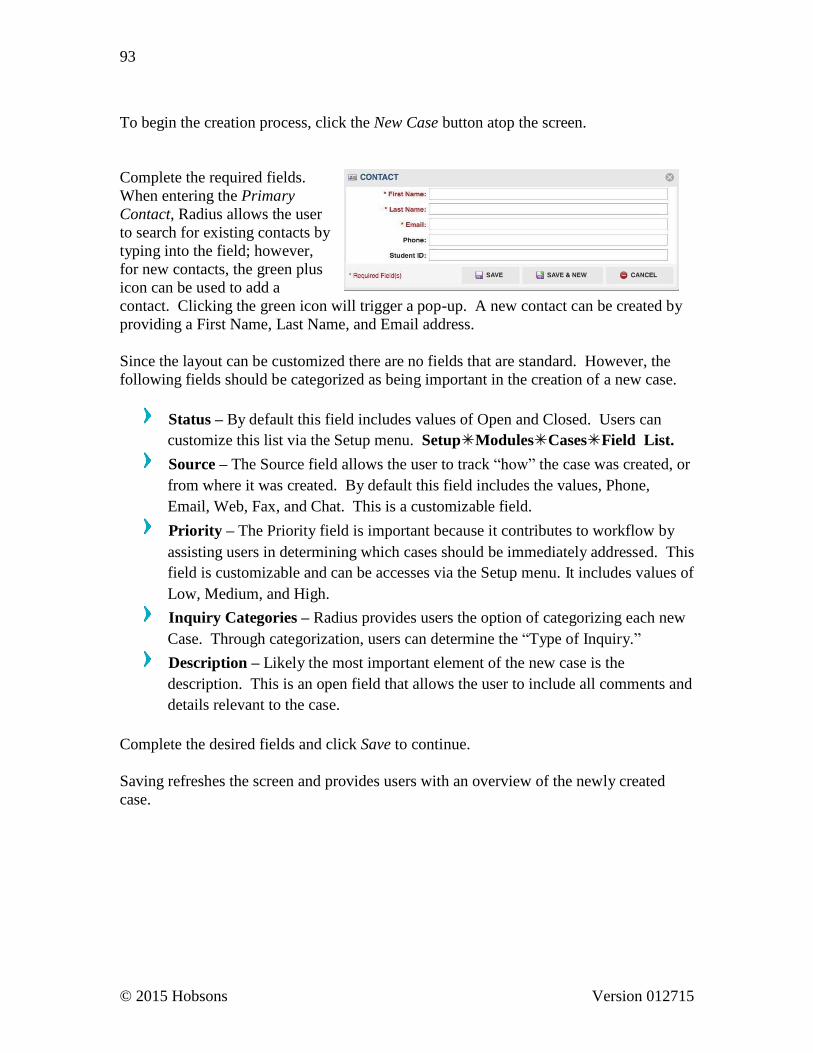
© 2015 Hobsons Version 012715
93
To begin the creation process, click the New Case button atop the screen.
Complete the required fields.
When entering the Primary
Contact, Radius allows the user
to search for existing contacts by
typing into the field; however,
for new contacts, the green plus
icon can be used to add a
contact. Clicking the green icon will trigger a pop-up. A new contact can be created by
providing a First Name, Last Name, and Email address.
Since the layout can be customized there are no fields that are standard. However, the
following fields should be categorized as being important in the creation of a new case.
Status – By default this field includes values of Open and Closed. Users can
customize this list via the Setup menu. SetupModulesCasesField List.
Source – The Source field allows the user to track “how” the case was created, or
from where it was created. By default this field includes the values, Phone,
Email, Web, Fax, and Chat. This is a customizable field.
Priority – The Priority field is important because it contributes to workflow by
assisting users in determining which cases should be immediately addressed. This
field is customizable and can be accesses via the Setup menu. It includes values of
Low, Medium, and High.
Inquiry Categories – Radius provides users the option of categorizing each new
Case. Through categorization, users can determine the “Type of Inquiry.”
Description – Likely the most important element of the new case is the
description. This is an open field that allows the user to include all comments and
details relevant to the case.
Complete the desired fields and click Save to continue.
Saving refreshes the screen and provides users with an overview of the newly created
case.
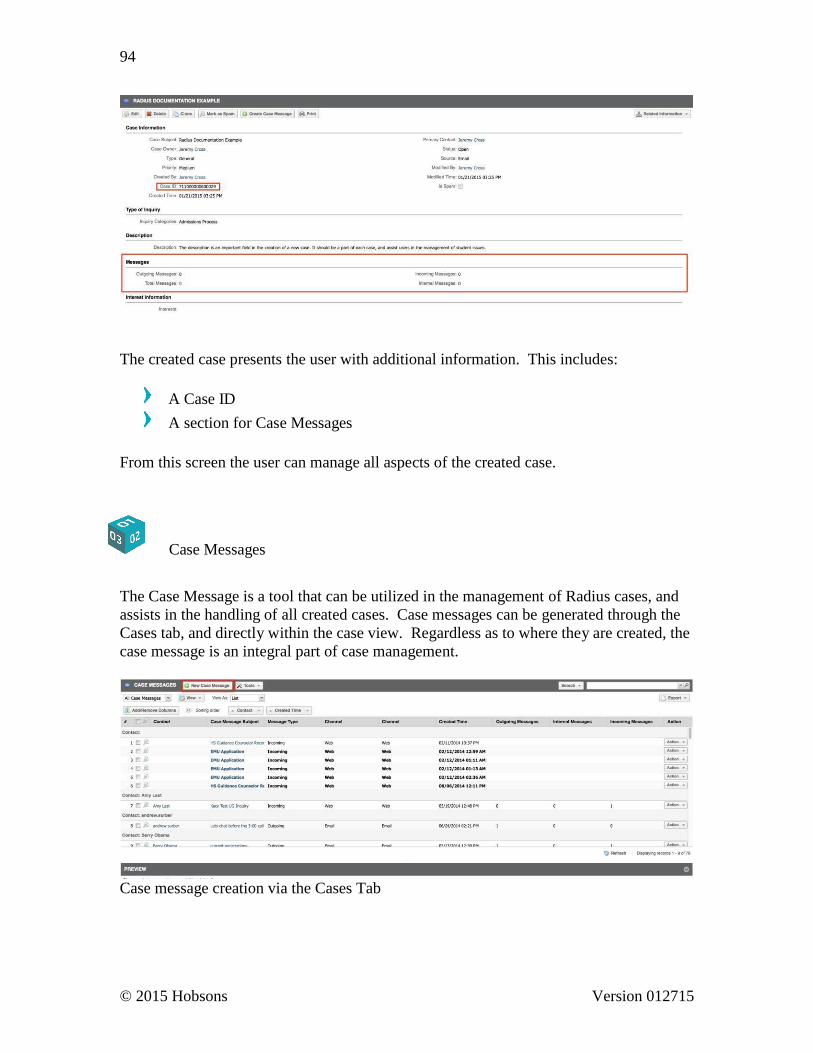
© 2015 Hobsons Version 012715
94
The created case presents the user with additional information. This includes:
A Case ID
A section for Case Messages
From this screen the user can manage all aspects of the created case.
Case Messages
The Case Message is a tool that can be utilized in the management of Radius cases, and
assists in the handling of all created cases. Case messages can be generated through the
Cases tab, and directly within the case view. Regardless as to where they are created, the
case message is an integral part of case management.
Case message creation via the Cases Tab
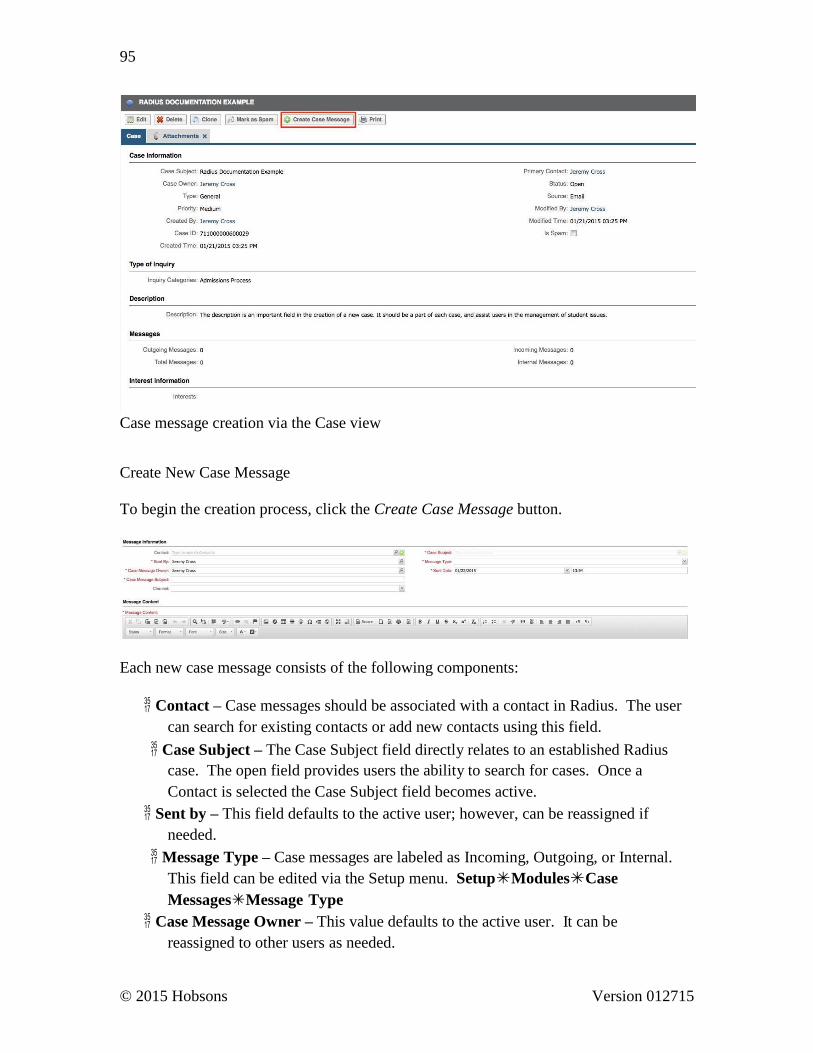
© 2015 Hobsons Version 012715
95
Case message creation via the Case view
Create New Case Message
To begin the creation process, click the Create Case Message button.
Each new case message consists of the following components:
Contact – Case messages should be associated with a contact in Radius. The user
can search for existing contacts or add new contacts using this field.
Case Subject – The Case Subject field directly relates to an established Radius
case. The open field provides users the ability to search for cases. Once a
Contact is selected the Case Subject field becomes active.
Sent by – This field defaults to the active user; however, can be reassigned if
needed.
Message Type – Case messages are labeled as Incoming, Outgoing, or Internal.
This field can be edited via the Setup menu. SetupModulesCase
MessagesMessage Type
Case Message Owner – This value defaults to the active user. It can be
reassigned to other users as needed.

© 2015 Hobsons Version 012715
96
Sent Date – Radius utilize a 24-hour format.
Case Message Subject – This is an open text field. While the message subject is
not restricted, it is a best practice to utilize a consistent naming convention.
Message Content – Case messages are created using the Radius content editor.
The editor incorporates a common set of editing tools found in programs such as
Microsoft Word and Google Docs.
Once created, click Save to complete the process.
Upon saving a case message the user is presented with additional functionality. This
functionality includes the ability to Send Email, and Create Attachments.
When clicked, the Send Email functionality will trigger a pop-up. Users are then
provided an efficient method for sending an email to the contact. Email created with this
method automatically becomes part of the original case.
In addition to sending emails, users can attach files to a case message. Radius maintains
a log of all files and generates a history
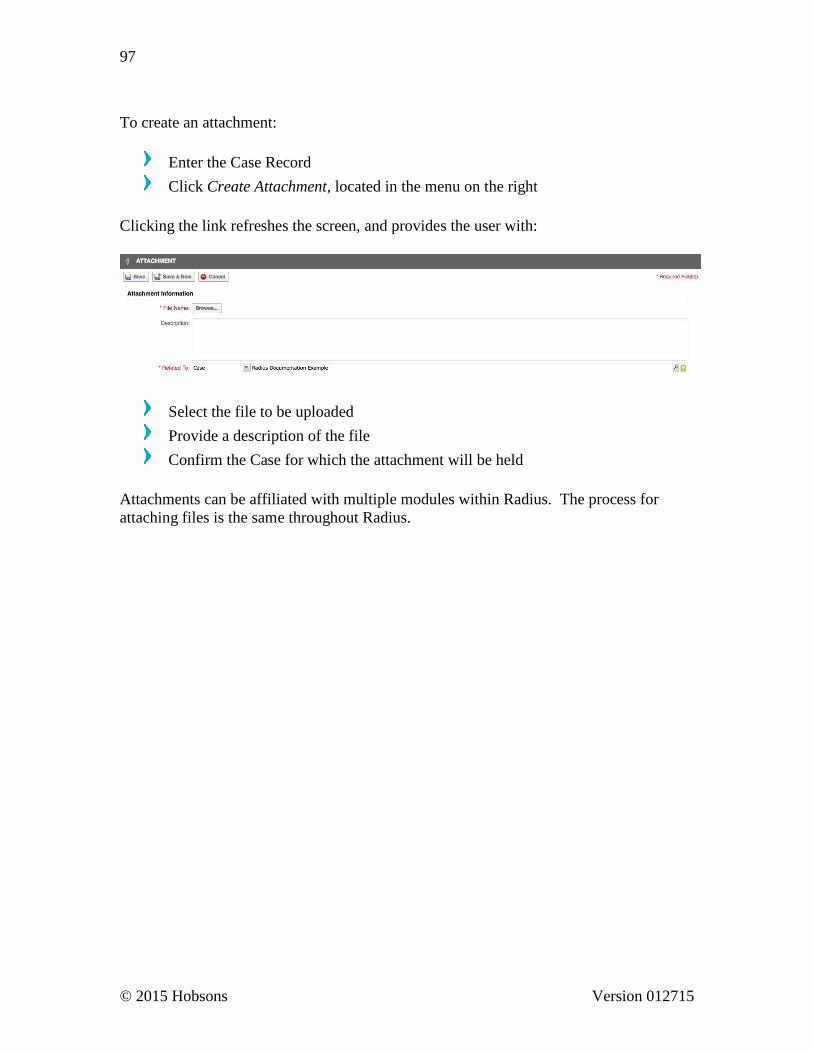
© 2015 Hobsons Version 012715
97
To create an attachment:
Enter the Case Record
Click Create Attachment, located in the menu on the right
Clicking the link refreshes the screen, and provides the user with:
Select the file to be uploaded
Provide a description of the file
Confirm the Case for which the attachment will be held
Attachments can be affiliated with multiple modules within Radius. The process for
attaching files is the same throughout Radius.
© 2015 Hobsons Version 012715
98
ANALYTICS
A n a l y t i c s The Analytics functionality allows user to better understand system data, and make
informed decisions based on the available data. This module allows for the generation of
reports, and the creation of dashboards.
Dashboards
Dashboards are a pictorial representation of data, which gives a real-time snapshot of an
organization's key metrics. On a single screen, the user can see comparisons, patterns,
and trends in prospect-related data.
Radius users are presented with Dashboards for Cases, Campaigns, Contacts, and
Lifecycles. Below is a description of each of these dashboards.
Dashboard Description
Cases The Cases Dashboard provides a year-over-year breakdown of Cases by
Status, Top Cases Owners and Messages.
Campaigns
The Campaigns Dashboard provides Campaign effectiveness by showing
the Top URL Visits across Campaigns, and the Top Campaigns by Emails
Sent/Viewed
Contacts
The Contacts Dashboard provides a year-over-year breakdown of Contacts
based on Contact Owners, Contact Sources and their most recently attended
institution.
Lifecycles The Lifecycles Dashboard provides a year-over-year breakdown
of Lifecycles by Role/Stage and the Top Lifecycle Owners.
These Dashboards provide users with an efficient method for accessing data already in
Radius. Users can expect to encounter the following features:
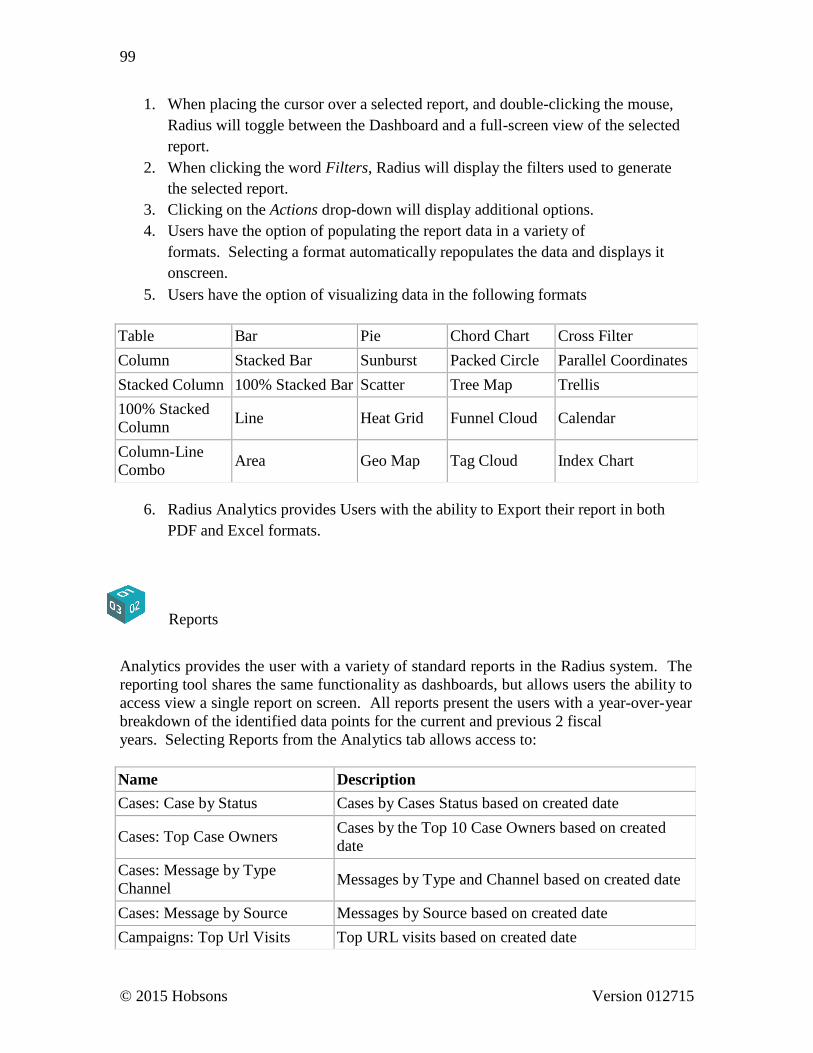
© 2015 Hobsons Version 012715
99
1. When placing the cursor over a selected report, and double-clicking the mouse,
Radius will toggle between the Dashboard and a full-screen view of the selected
report.
2. When clicking the word Filters, Radius will display the filters used to generate
the selected report.
3. Clicking on the Actions drop-down will display additional options.
4. Users have the option of populating the report data in a variety of
formats. Selecting a format automatically repopulates the data and displays it
onscreen.
5. Users have the option of visualizing data in the following formats
Table Bar Pie Chord Chart Cross Filter
Column Stacked Bar Sunburst Packed Circle Parallel Coordinates
Stacked Column 100% Stacked Bar Scatter Tree Map Trellis
100% Stacked
Column
Line
Heat Grid
Funnel Cloud
Calendar
Column-Line
Combo
Area
Geo Map
Tag Cloud
Index Chart
6. Radius Analytics provides Users with the ability to Export their report in both
PDF and Excel formats.
Reports
Analytics provides the user with a variety of standard reports in the Radius system. The
reporting tool shares the same functionality as dashboards, but allows users the ability to
access view a single report on screen. All reports present the users with a year-over-year
breakdown of the identified data points for the current and previous 2 fiscal
years. Selecting Reports from the Analytics tab allows access to:
Name Description
Cases: Case by Status Cases by Cases Status based on created date
Cases: Top Case Owners Cases by the Top 10 Case Owners based on created
date
Cases: Message by Type
Channel
Messages by Type and Channel based on created date
Cases: Message by Source Messages by Source based on created date
Campaigns: Top Url Visits Top URL visits based on created date
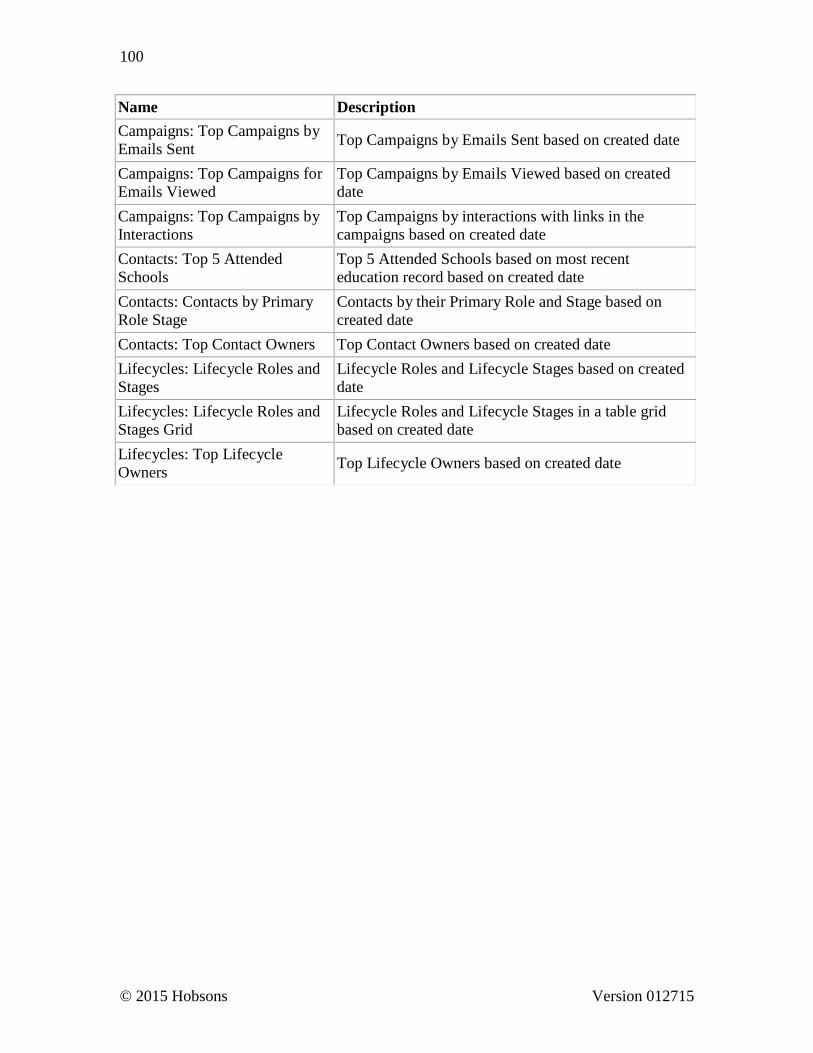
© 2015 Hobsons Version 012715
100
Name Description
Campaigns: Top Campaigns by
Emails Sent
Top Campaigns by Emails Sent based on created date
Campaigns: Top Campaigns for
Emails Viewed
Top Campaigns by Emails Viewed based on created
date
Campaigns: Top Campaigns by
Interactions
Top Campaigns by interactions with links in the
campaigns based on created date
Contacts: Top 5 Attended
Schools
Top 5 Attended Schools based on most recent
education record based on created date
Contacts: Contacts by Primary
Role Stage
Contacts by their Primary Role and Stage based on
created date
Contacts: Top Contact Owners Top Contact Owners based on created date
Lifecycles: Lifecycle Roles and
Stages
Lifecycle Roles and Lifecycle Stages based on created
date
Lifecycles: Lifecycle Roles and
Stages Grid
Lifecycle Roles and Lifecycle Stages in a table grid
based on created date
Lifecycles: Top Lifecycle
Owners
Top Lifecycle Owners based on created date
© 2015 Hobsons Version 012715
101
RADIUS SETUP
Rad iu s S et u p F u n ct ion alit y
S e t u p O p t i o n s Within the Radius setup portion of the system the user has the ability to manage various
sub-modules and system workflow. These sub modules include:
Personal Settings Allows the User to edit individual account settings
Users & Permissions Allows for the management of system security and the creation of new users
Organization Settings Allows for the management of search settings, mailboxes, organization details, etc.
Import Tools Allows the user to view the system import history
Tab Settings Allows for the renaming and organization of module tabs
Workflow Settings Allows for the organization of workflow alerts, rules, & tasks
This document provides an overview of the sub modules, outlines the functionality, and
offers how-to instructions for effective usage of the system feature. It is important to
note that the information included in this appendix is most relevant for administrative
users. However, general users are encouraged to read this document in order to provide a
well-rounded understanding of the Radius system.

© 2015 Hobsons Version 012715
102
P e r s o n a l S e t t i n g s Within this section of the Setup menu the user is provided with options regarding the
management of individual user accounts. These settings are applicable to both general
and administrative users.
Account Information
For users who need to edit or view demographic data pertaining to their user account, the
Account Information screen provides access to the necessary functionality needed for
managing user data. From this screen the user is presented with the following options:
User Information
Address Information
Locale Information
Mail Profile
The viewable data on this screen represents the relevant demographic information related
to the particular user. Users with the necessary permissions are provided with the ability
to edit their information.
Edit Account Information
There are multiple methods for editing information found on the Account Information
screen. The same information can be edited regardless of the method utilized.
Located in the upper left corner of the screen, the Edit icon is the most direct method for
editing User Information. Click the link to unlock those fields that can be
edited. Once the desired changes have been made, click the save icon
to complete the action.
The inline edit icon is visible for all editable fields. Clicking the icon allows the user to
make the desired edits. Once the changes have been made, click the save
icon to complete the action.
Administrators and those users granted the appropriate permissions have access to clone
account information. Details regarding this process are outlined in the Users &
Permissions section of this document.
Change a User Password
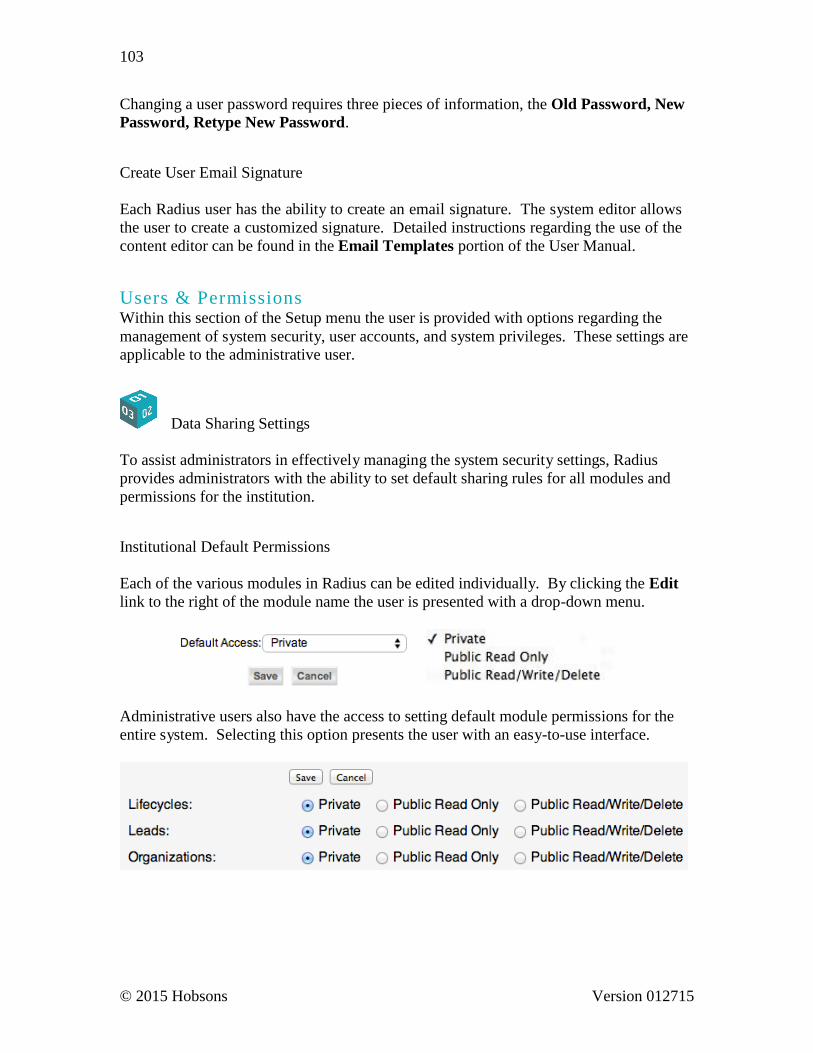
© 2015 Hobsons Version 012715
103
Changing a user password requires three pieces of information, the Old Password, New
Password, Retype New Password.
Create User Email Signature
Each Radius user has the ability to create an email signature. The system editor allows
the user to create a customized signature. Detailed instructions regarding the use of the
content editor can be found in the Email Templates portion of the User Manual.
U s e r s & P e r mi s s i o n s Within this section of the Setup menu the user is provided with options regarding the
management of system security, user accounts, and system privileges. These settings are
applicable to the administrative user.
Data Sharing Settings To assist administrators in effectively managing the system security settings, Radius
provides administrators with the ability to set default sharing rules for all modules and
permissions for the institution.
Institutional Default Permissions
Each of the various modules in Radius can be edited individually. By clicking the Edit
link to the right of the module name the user is presented with a drop-down menu.
Administrative users also have the access to setting default module permissions for the
entire system. Selecting this option presents the user with an easy-to-use interface.
© 2015 Hobsons Version 012715
104
Field Level Security The ability to set field level security in Radius requires the user to select both a Profile
and Module List. The combination of these two elements generates a detailed list of the
fields associated with the module. Each profile is granted full access to all fields in
Radius unless otherwise specified by an administrative user.
The user has the option of defining each field’s:
Visibility This determines whether the selected field is visible to users assigned to a specific profile
Read-Only For users with the ability to view a particular field, the read-only access toggles the ability to edit data.
Groups
Groups provide the Radius administrator with the ability to manage multiple users in an
effective manner. Once created, users can be assigned to the group. A group defines
“Who is the user affiliated with?”
Creating a Group
Step 1: Determine a group Name and Description
The group name is a required field and must be supplied. Following the group name the
administrator user is provided the option to include a Group Description. While
providing a description is not required, it is recommended that one is included.
Step 2: Select the Group Source Type
The group source type determines the users who will be affiliated with the newly created
group. Users have the option of selecting:

© 2015 Hobsons Version 012715
105
Groups Previously created groups can be selected as a source. It should be noted that the configuration of the source group directly influences the configuration of the newly
created group.
Roles All created roles can be used as the source for the new group. All users assigned to the particular role are included in the newly created group.
Roles and Subordinates Like Roles, this source option includes all users assigned to the particular role. Additionally, any subordinate affiliated with the primary role will be included in the
selection.
Users The final source type is the User. This type allows the administrator to select individual users to add to the group.
Profiles
Profiles allow the administrative user the ability to manage module-level permissions for
system users. It is at this level that the administrator is defining “What can the user do?”
Creating a Profile
Step 1: Create a new profile or edit an existing profile
Upon selecting the Profiles tab, the user is prompted to create or edit a profile.
Step 2: New Profile
Create a Profile Name.
Select Cloned Profile. The cloned configuration establishes the foundation for
the newly created profile.
Create a Profile Description. While this field is not required, it is recommended
the user provide a brief description of the profile’s configuration and intended
use.
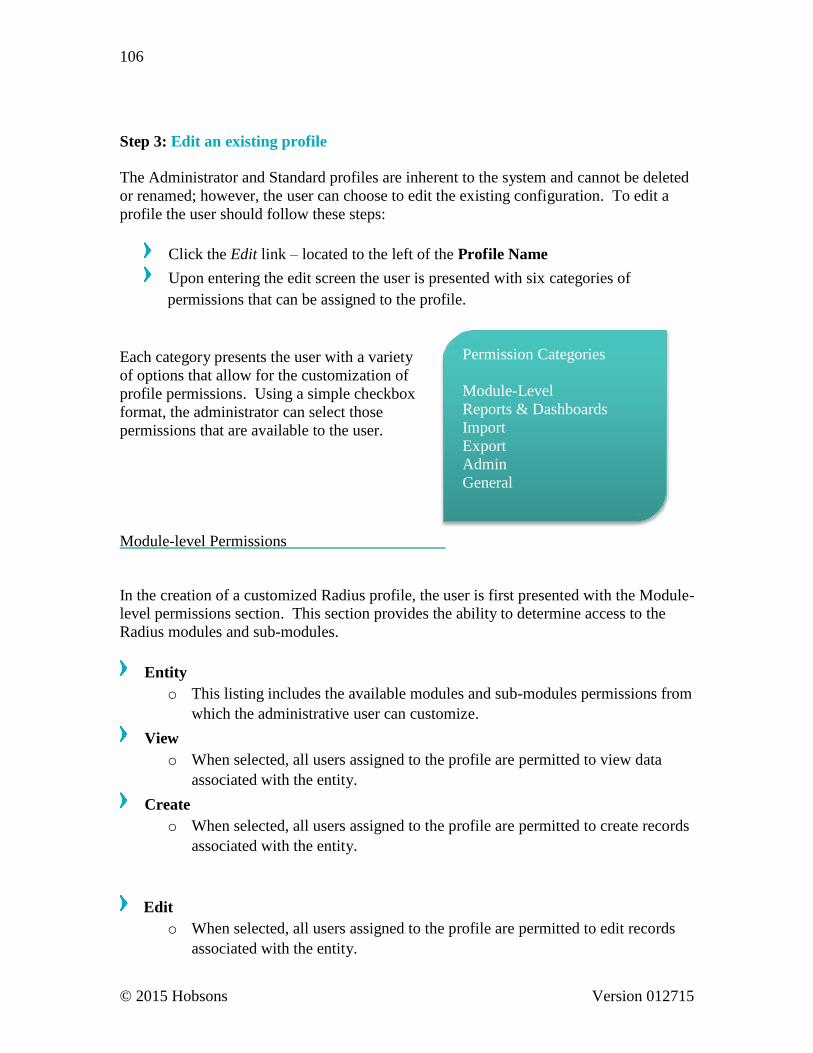
© 2015 Hobsons Version 012715
106
Step 3: Edit an existing profile The Administrator and Standard profiles are inherent to the system and cannot be deleted
or renamed; however, the user can choose to edit the existing configuration. To edit a
profile the user should follow these steps:
Click the Edit link – located to the left of the Profile Name
Upon entering the edit screen the user is presented with six categories of
permissions that can be assigned to the profile.
Each category presents the user with a variety
of options that allow for the customization of
profile permissions. Using a simple checkbox
format, the administrator can select those
permissions that are available to the user.
Module-level Permissions
Permission Categories
Module-Level
Reports & Dashboards
Import
Export
Admin
General
In the creation of a customized Radius profile, the user is first presented with the Module-
level permissions section. This section provides the ability to determine access to the
Radius modules and sub-modules.
Entity
o This listing includes the available modules and sub-modules permissions from
which the administrative user can customize.
View
o When selected, all users assigned to the profile are permitted to view data
associated with the entity.
Create
o When selected, all users assigned to the profile are permitted to create records
associated with the entity.
Edit
o When selected, all users assigned to the profile are permitted to edit records
associated with the entity.
© 2015 Hobsons Version 012715
107
Mass Update
o When selected, all users assigned to the profile are permitted to mass update
data points associated with the entity.
Delete
o When selected, all users assigned to the profile are permitted to delete records
associated with the entity.
Mass Delete
o When selected, all users assigned to the profile are permitted to mass delete
records associated with the entity.
Mass Email
o When selected, all users assigned to the profile are permitted to queue emails
en masse.
Reports and Dashboards Permissions
The second component of the profile customization is the configuration of permissions
pertaining to the generation of reports and dashboards. Administrative users can grant
users the ability to manage Reports and Dashboards, as well as schedule the delivery of
created reports.
Import Permissions
The third component of the profile customization is the configuration of permissions
pertaining to import functionality. Users who are granted these permissions have the
ability to import data into the various Radius modules.
Export Permissions
The fourth component of the profile customization is the configuration of permissions
pertaining to the export functionality. Users who are granted these permissions have the
ability to export data from the various Radius modules.
Admin Permissions
The fifth component of the profile customization is the configuration of permissions
pertaining to administrative functionality in Radius.
© 2015 Hobsons Version 012715
108
General Permissions
The final component of the profile customization is the configuration of permissions
affiliated with multiple Radius modules.
Roles
Roles provide structure and organization of new user accounts, and allows for the
duplication of the Organization-wide hierarchy. For this reason, each newly created
account must be assigned a single user role. It is at this level that the administrator is
defining “Who is the user?”
Creating a New Role
The Roles page presents the user with an overview of existing roles, as well as the
defined hierarchy. Upon viewing the page the user is presented with two options for
viewing the available roles.
Option 1
Tenant Name
President
Manager
Custom Role 1
Custom Role 2

© 2015 Hobsons Version 012715
109
Option 2 Clicking the chart view icon displays the list of roles in an organizational chart format.
President*
Manager
Advisor Admin
Student Worker
The President role is inherent to the system and cannot be deleted
Create a Role
Step 1: Click the New Role Icon
Step 2: Role Details
Designate a Role Name. The Role Name is a required field. Users should carefully
consider utilizing standard naming conventions prior to naming each role. It is a best
practice to utilize names that correlate with the various institutional positions. Ex.
Student Worker, Admissions Counselor, Assistant Director, etc.
Identify who the role will Report To. This is not a required field; however, use of this
feature provides the user with the ability to build organizational hierarchies in the
Radius system. There are two icons to the right of the field. The first launches a pop-
up listing all previously created roles.
Determine if the new role can Share Data with Peers. When this box is selected all
users assigned to this role will have the ability to view data with other users within
the system.
Provide a Description of the role. Adding a description to the role allows for long-
term organization of the system.
Click Save.
© 2015 Hobsons Version 012715
110
Edit a Role
Step 1: Click an Existing Role
There are two methods for editing an existing role. The first option is to click on
the name of the role; however, Radius provides the user with an additional
method.
Place the cursor over the Role name. While hovering above the name a series of
three icons will appear.
[Insert Icon] – This allows the user to Create a Subordinate Role.
[Insert Icon] – This allows the user to Edit the selected role.
[Insert Icon] – This allows the user to delete the selected role. Only user created
roles can be deleted from the system. This excludes the President role.
Once the desired method is selected the user is presented with an overview of the
identified role. From this screen the user can Create a New User, Edit the Role,
or Return to the Roles List.
Click on the Edit icon. The user is presented with the same screen as encountered
in the role creation process. See instructions in the above section.
Security Settings
There are a variety of settings that contribute to the overall security of the Radius system.
It is the combination of these settings that ensure institutional data is protected from
misuse. Within the Security Settings section the user can customize the number of
invalid logins before the user is locked out of the system. Once locked out it is necessary
for an administrator to unlock the account by resetting the user’s password.
Users
The creation of new users is a task that must be manually performed and is the
responsibility of an administrative user. While the process is not difficult, it is important
to give attention to the required fields.
© 2015 Hobsons Version 012715
111
Create a New User
Step 1: Click the New User icon
The creation of a new user consists of completing five clearly labeled sections, User
Information, Address Information, Locale Information, Password Protection, and
Mail Profile.
Many of the fields presented to the user are self-explanatory; however, the
administrator should take note of the following items:
o Role – This field references all previously created roles in the Radius system.
Using a simple drop-down menu, the administrator must select a role for the
new user.
o Radius Id – Along with the user password, this is the second component of
the user’s credentials.
BEST PRACTICE: The Radius Id serves as
the username for accessing the system. It
is recommended a consistent naming
convention be utilized for all new users.
A best practice is to use the user’s email
address.
o Profile – Like the Role, it is necessary to assign a Profile to the new user
account. Select the appropriate Profile using the drop down menu.
o Password Hint – It is necessary for the administrative user to select both a
password hint and answer. The new user has the ability to change this
information but it is recommended the initial setting be recognizable to the
user.
o Friendly Name – This is the name that will appear in all Email
communications sent by the user.
Step 2: Click Save
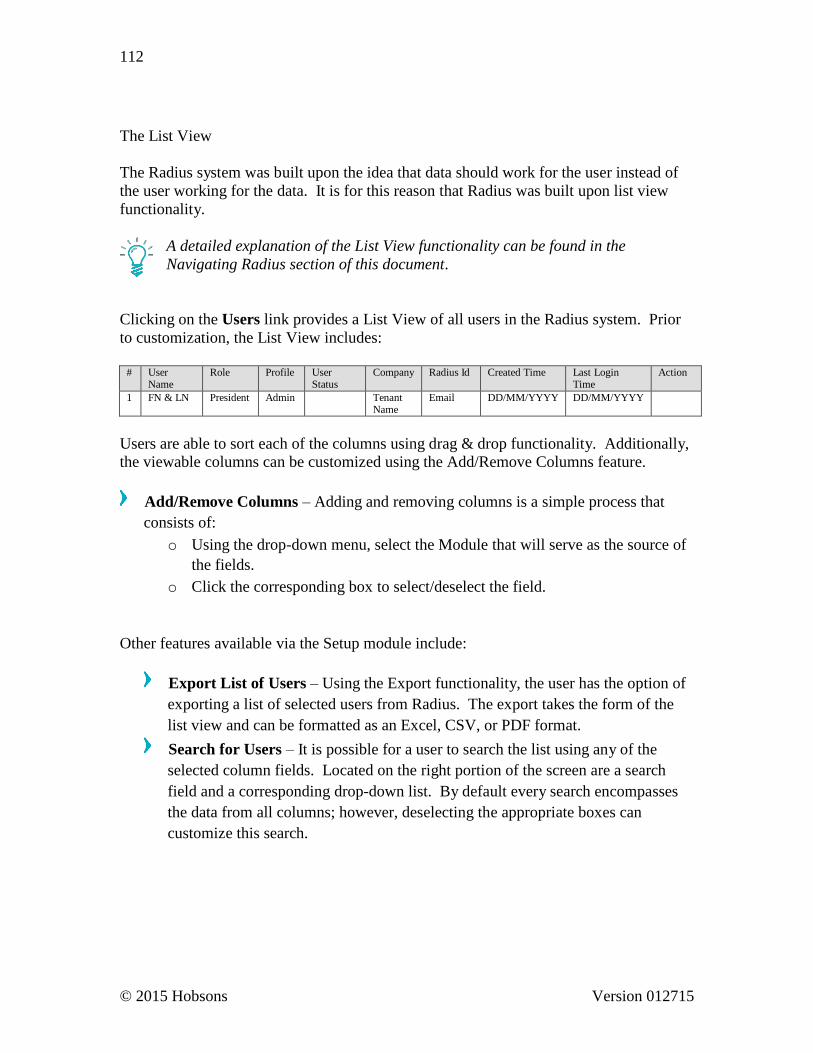
© 2015 Hobsons Version 012715
112
The List View
The Radius system was built upon the idea that data should work for the user instead of
the user working for the data. It is for this reason that Radius was built upon list view
functionality.
A detailed explanation of the List View functionality can be found in the
Navigating Radius section of this document.
Clicking on the Users link provides a List View of all users in the Radius system. Prior
to customization, the List View includes:
# User
Name Role Profile User
Status Company Radius Id Created Time Last Login
Time Action
1 FN & LN President Admin Tenant Name
Email DD/MM/YYYY DD/MM/YYYY
Users are able to sort each of the columns using drag & drop functionality. Additionally,
the viewable columns can be customized using the Add/Remove Columns feature.
Add/Remove Columns – Adding and removing columns is a simple process that
consists of:
o Using the drop-down menu, select the Module that will serve as the source of
the fields.
o Click the corresponding box to select/deselect the field.
Other features available via the Setup module include:
Export List of Users – Using the Export functionality, the user has the option of
exporting a list of selected users from Radius. The export takes the form of the
list view and can be formatted as an Excel, CSV, or PDF format.
Search for Users – It is possible for a user to search the list using any of the
selected column fields. Located on the right portion of the screen are a search
field and a corresponding drop-down list. By default every search encompasses
the data from all columns; however, deselecting the appropriate boxes can
customize this search.
© 2015 Hobsons Version 012715
113
O r g a n i z a t i o n S e t t i n g s Within this section of the Setup menu the user is provided with options regarding the
management of settings related to the organization’s Radius tenant. These settings are
applicable to the administrative user.
Configure Search Settings Radius features a Global Search option that allows users the ability to conduct a search
without entering the specific module. This functionality is not meant to replace the
module-level search; instead it provides convenient access to data that is often
referenced.
Customize Form Field Lists
The user has the option of customizing the searchable fields for each of the modules
within Radius.
A maximum of 6 fields can be searched using the global search option.
Step 1: Select the Desired Module
Using the drop down list, choose the module that will provide the list of available
searchable fields. Available modules include:
Application Forms
Appointments
Attendees
Campaigns
Cases
Contacts
Discounts
Email Templates
Event Forms
Events
Exclusions
Inquiries
Inquiry Forms
Invoices
Iteration Recommenders
Iterations
Leads
Lifecycles
Locations
Opportunities
Organizations
Payments Programs
Recommendations
Recommender Forms
Registrations
Requirements
Sites
Targets
Tasks
Test Score Values
User Notifications
Views
Step 2: Make Selection(s)
© 2015 Hobsons Version 012715
114
Click the Edit icon located above the list of fields. The list of red X’s will change to
clickable boxes after clicking the icon.
Create Mail Profiles
Radius allows for the creation of multiple Mail Profiles, which are used in a variety of
locations throughout the system. Through the use of mail profiles, users can configure
settings that will be utilized when sending messages from the system.
Create a New Mail Profile
Mail profile creation consists of three sections, Properties, Profile Address, and
Accessibility Details.
Properties
Friendly Name: This is a required field that determines the name that is visible to
recipients.
From Address: This is a required field that determines the email address that is
visible to the recipient(s).
Reply-To Address: This is a required field that determines the address for which
all replies are directed.
Mailbox: By default this option is set to System Mailbox. User-created
mailboxes can be selected. The decision to select an alternative mailbox will
depend upon the user’s strategic utilization of Radius mailboxes.
Active: Users have the ability to delete mail profiles; however, in the event that
the profile should no longer be used, the profile can be made inactive.
Profile Address
© 2015 Hobsons Version 012715
115
Within this section the user is required to provide Radius with address information. The
client’s business address is often provided.
Accessibility Details
There are three distinct options regarding the accessibility of created mail profiles. Users
can selected from the following:
No restrictions – all users can view the mail profile
Restricted – only the user can view the created profile
Selected access – identified users can view the created profile
Mailboxes
Mailboxes allow users to utilize an external email account to facilitate the creation of
contact records and cases within the Radius system.
Scenario
As part of the recruiting effort at Hobsons University the Admissions Office maintains a
dedicated email address for the collection of prospective student inquiries. When a
prospective student sends an email to the designated address the inquiry is received by
both the inbox and Radius. Once received, Radius will create a new Contact Record
(based on the sender’s email address), as well as generate a Case within the system.
Create a New Mailbox
Step 1: Click on New Mailbox
The New Mailbox button can be found on the left side of the user interface.
Step 2: Mailbox Information
It is required that each mailbox be provided a Name. The selected name is for
internal purposes only and will be used for system organization. While it is not
required, it is a best practice to provide a short description as well.
Purpose – This field is also required and helps determine if the newly created
account will function as an Incoming & Outgoing, or simply an Outgoing
mailbox.
© 2015 Hobsons Version 012715
116
Send / Receive Duration – This value determines the amount of time between
sending/receiving mail. By default, this value is 5 minutes.
Step 3: Outgoing Mail Server Information
The information required for this section corresponds with email address linked to
Radius. Server information is specific to the email client, and typically can be found
under the user account settings.
Reply E-mail Address – This is the full email address of the selected account.
For example, a user who intends to link a Gmail account would enter
SMTP Mail Server / IP Address – This information is specific to the selected
email account. Typically this information is accessible via the account settings.
Below is a table of settings for commonly used email clients.
Email Client Outgoing Server
Gmail smtp.gmail.com
Outlook.com (formerly Hotmail) smtp-mail.outlook.com
Yahoo smtp.mail.yahoo.com
Port – Like the SMTP Mail Server, the Port is unique to the email client and
typically can be found within the email account settings.
Additional Fields – Along with these required fields, the user should indicate
whether the email address requires Authentication, the account is SSL Enabled,
and most importantly provide the account’s Username and Password.
Step 4: Incoming Mail Server Information
The information required for this section corresponds with the email address linked to
Radius. Unlike the Outgoing Mail Server, the Incoming Mail Server Settings are only
necessary if the User has indicated that the account will be used for both Incoming &
Outgoing.
Radius supports both POP3 and IMAP server types and it is the user’s decision as to
which of these server types to utilize.
Step 5: Assignment Settings
The configuration of a Mailbox allows the user to integrate Assignment Settings to
enhance workflow and efficiency. The configuration of Assignment Settings requires the
user to determine the following for both Contacts and Cases:
© 2015 Hobsons Version 012715
117
Select a User or Select an Assignment Rule
The User for which the newly created Contact or Case will be assigned
Finally, the user can configure Radius to send an Auto Acknowledgement email. This is
not required; however, its usage is recommended.
Organization Details
The Organization Details link directs users to a summary of the institution’s details
captured by Radius. Users with the appropriate permissions have the ability to edit these
fields. An Edit button can be found at bottom-center, and upon being clicked will unlock
each field – with exception of Company Name.
Payment Gateway Settings
Radius supports numerous payment gateways to ensure the institution can fully integrate
Radius into existing systems. The Radius configuration of a Payment Gateway is
dependent upon the selected institutions selected provider. Radius currently supports the
following payment gateway providers:
PayPal
Payflow
YourPay
CyberSource
CyberSource Secure Acceptance
TouchNet
Authorize.net
Custom
SallieMae
QuickPAY
CASHNet
ACIOfficial
PointNPay
To facilitate the setup of each these payment gateways, Radius triggers a pop-up that
informs the user of the specific details needed for a successful configuration.
Payment Gateway Transaction Log
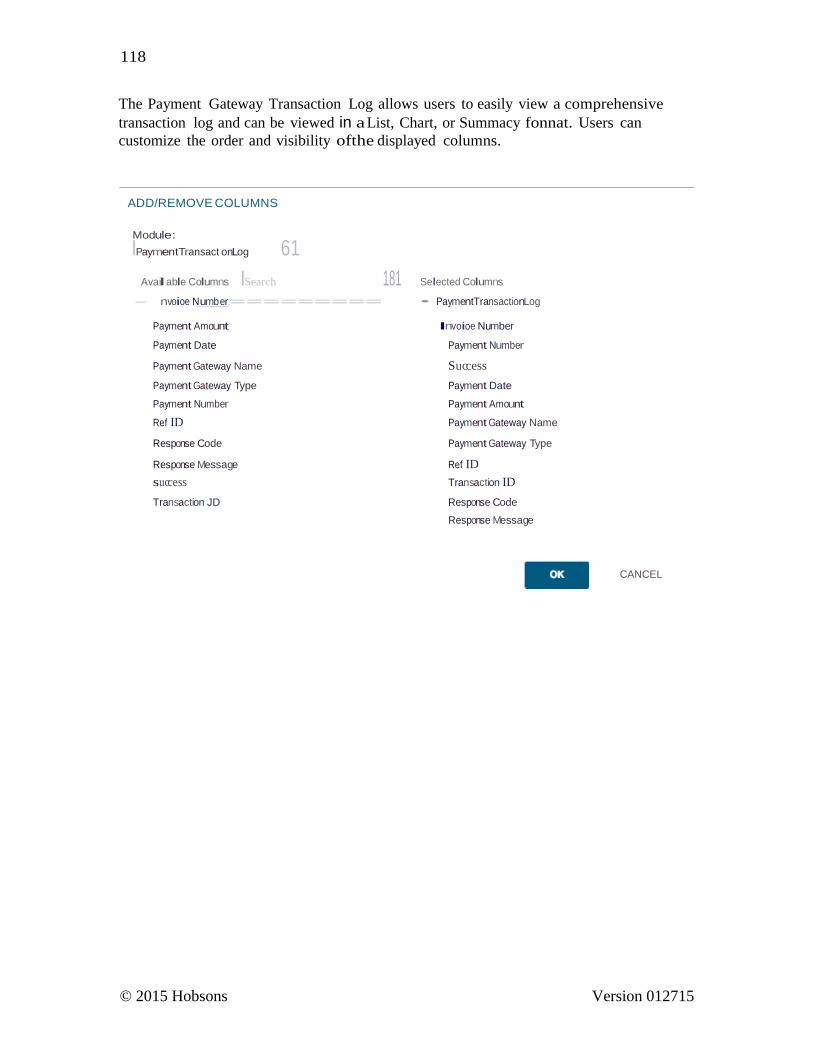
© 2015 Hobsons Version 012715
118
The Payment Gateway Transaction Log allows users to easily view a comprehensive
transaction log and can be viewed in a List, Chart, or Summacy fonnat. Users can
customize the order and visibility ofthe displayed columns.
ADD/REMOVE COLUMNS
Module:
IPaymentTransact onLog 61
Avail able Columns ISearch 181 Selected Columns
- nv-oioe N_um_b_e_r:========= • PaymentTransactionLog
Payment Amount Invoioe Number
Payment Date Payment Number
Payment Gateway Name Success
Payment Gateway Type Payment Date
Payment Number Payment Amount
Re.f ID Payment Gateway Name
Response Code Payment Gateway Type
Response Message Re.f ID
success Transaction ID
Transaction JD Response Code
Response Message
CANCEL
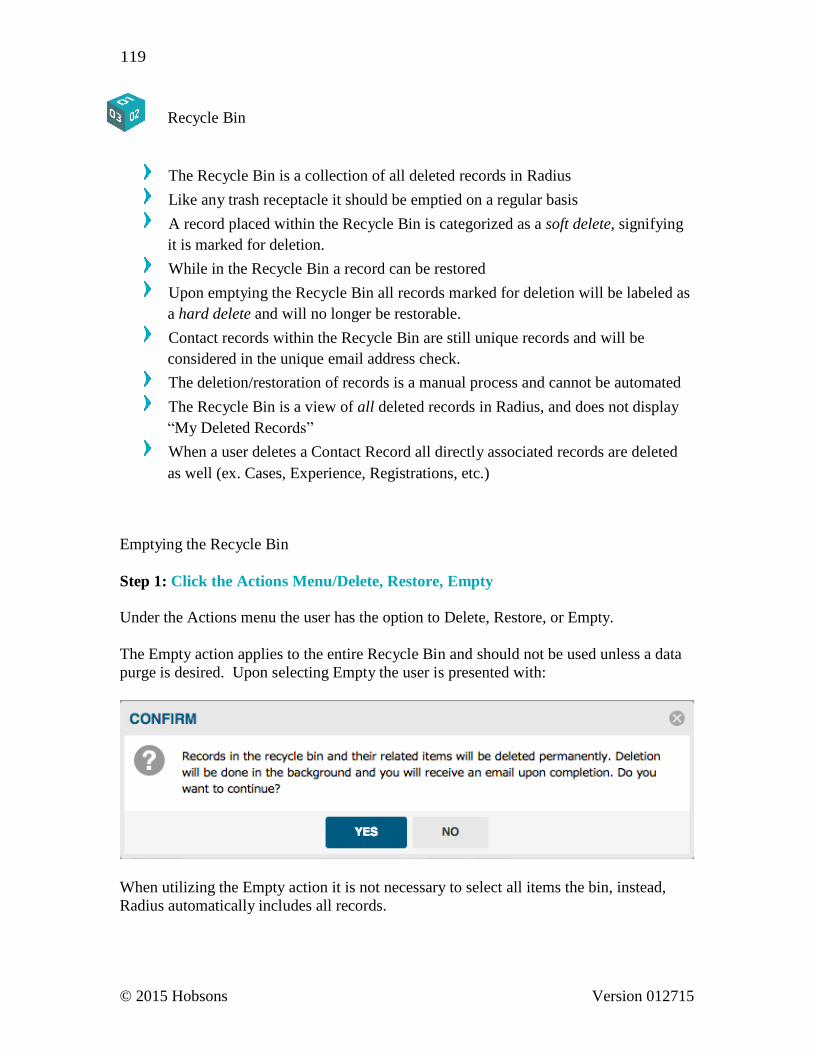
© 2015 Hobsons Version 012715
119
Recycle Bin
The Recycle Bin is a collection of all deleted records in Radius
Like any trash receptacle it should be emptied on a regular basis
A record placed within the Recycle Bin is categorized as a soft delete, signifying
it is marked for deletion.
While in the Recycle Bin a record can be restored
Upon emptying the Recycle Bin all records marked for deletion will be labeled as
a hard delete and will no longer be restorable.
Contact records within the Recycle Bin are still unique records and will be
considered in the unique email address check.
The deletion/restoration of records is a manual process and cannot be automated
The Recycle Bin is a view of all deleted records in Radius, and does not display
“My Deleted Records”
When a user deletes a Contact Record all directly associated records are deleted
as well (ex. Cases, Experience, Registrations, etc.)
Emptying the Recycle Bin
Step 1: Click the Actions Menu/Delete, Restore, Empty
Under the Actions menu the user has the option to Delete, Restore, or Empty.
The Empty action applies to the entire Recycle Bin and should not be used unless a data
purge is desired. Upon selecting Empty the user is presented with:
When utilizing the Empty action it is not necessary to select all items the bin, instead,
Radius automatically includes all records.
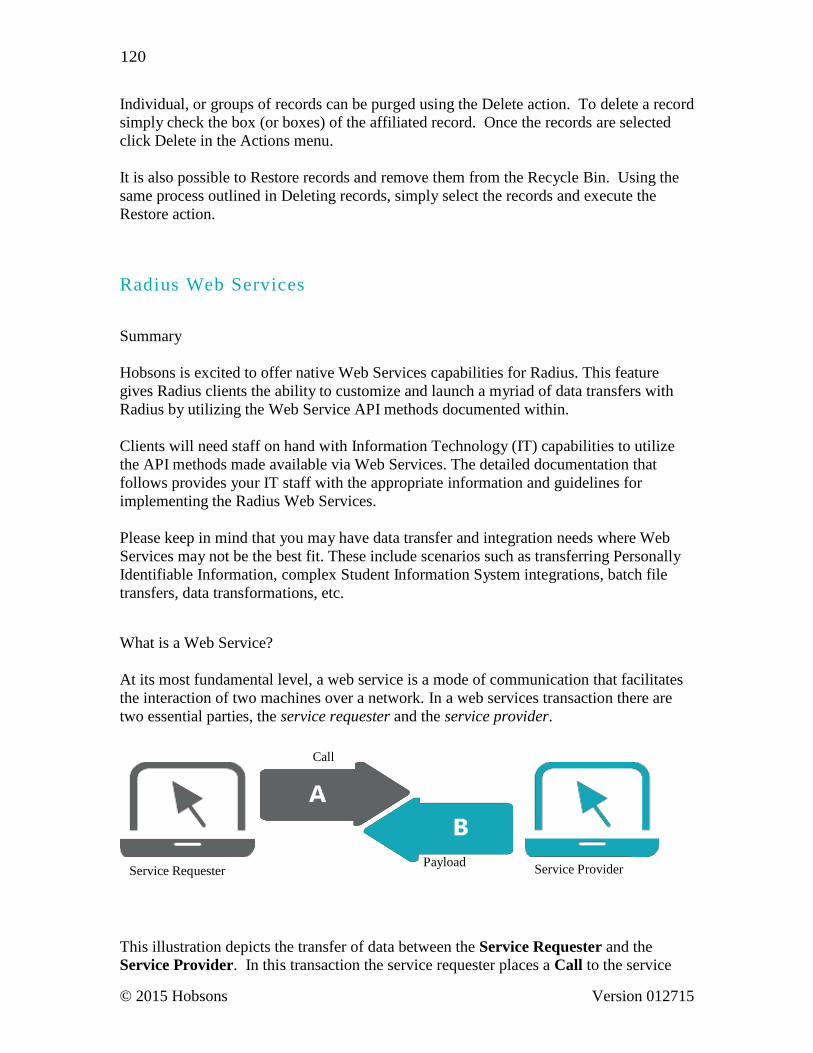
© 2015 Hobsons Version 012715
120
Individual, or groups of records can be purged using the Delete action. To delete a record
simply check the box (or boxes) of the affiliated record. Once the records are selected
click Delete in the Actions menu.
It is also possible to Restore records and remove them from the Recycle Bin. Using the
same process outlined in Deleting records, simply select the records and execute the
Restore action.
R a d i u s W e b S e r v i c e s
Summary
Hobsons is excited to offer native Web Services capabilities for Radius. This feature
gives Radius clients the ability to customize and launch a myriad of data transfers with
Radius by utilizing the Web Service API methods documented within.
Clients will need staff on hand with Information Technology (IT) capabilities to utilize
the API methods made available via Web Services. The detailed documentation that
follows provides your IT staff with the appropriate information and guidelines for
implementing the Radius Web Services.
Please keep in mind that you may have data transfer and integration needs where Web
Services may not be the best fit. These include scenarios such as transferring Personally
Identifiable Information, complex Student Information System integrations, batch file
transfers, data transformations, etc.
What is a Web Service?
At its most fundamental level, a web service is a mode of communication that facilitates
the interaction of two machines over a network. In a web services transaction there are
two essential parties, the service requester and the service provider.
Call
Service Requester Payload
Service Provider
This illustration depicts the transfer of data between the Service Requester and the
Service Provider. In this transaction the service requester places a Call to the service
© 2015 Hobsons Version 012715
121
provider. Upon submitting a successful call, the service provider will return the Payload.
Radius serves as the service provider in this transaction and can accept Web Service
requests from numerous types of service requesters, such as a Student Information
System or lead generation service. Regardless of the specific requester, the setup and use
processes remain the same.
The Components of a Web Service
There are few elements to a web service; however, these elements are essential for
executing a successful transmission of data. Each web service transaction consists of:
URL
HTTP Method
GET
POST
PUT
DELETE
Payload – If using POST, PUT, or DELETE
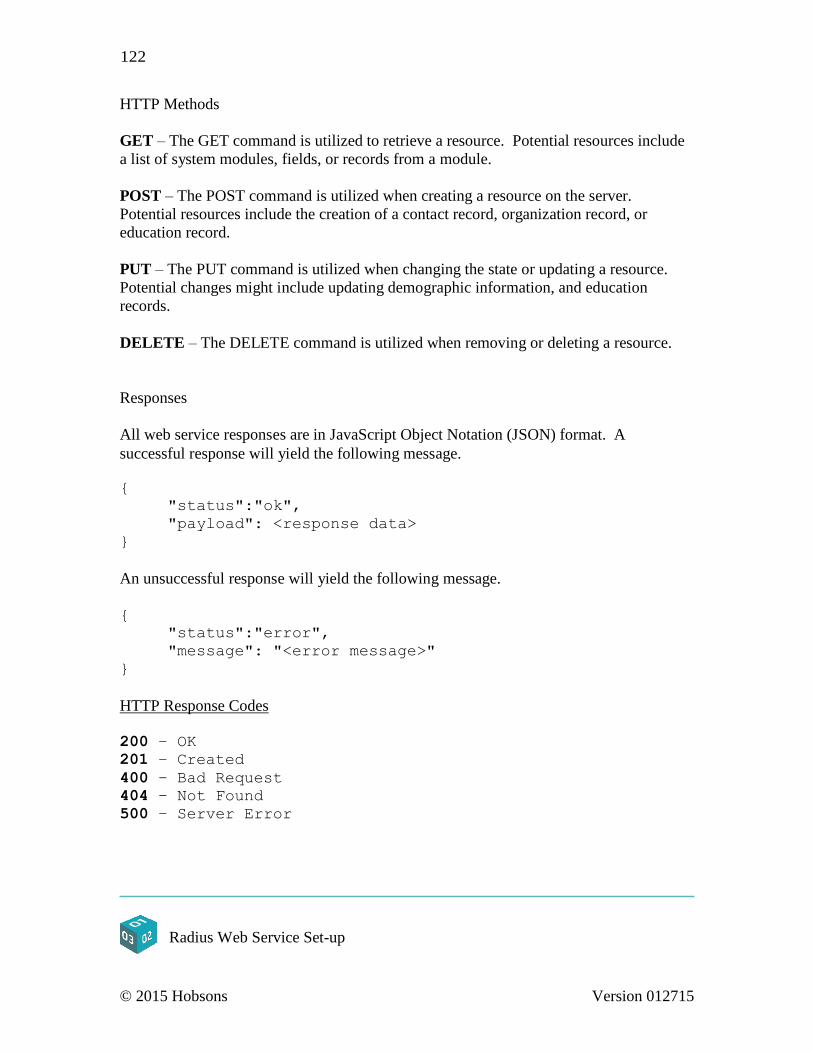
© 2015 Hobsons Version 012715
122
HTTP Methods
GET – The GET command is utilized to retrieve a resource. Potential resources include
a list of system modules, fields, or records from a module.
POST – The POST command is utilized when creating a resource on the server.
Potential resources include the creation of a contact record, organization record, or
education record.
PUT – The PUT command is utilized when changing the state or updating a resource.
Potential changes might include updating demographic information, and education
records.
DELETE – The DELETE command is utilized when removing or deleting a resource.
Responses
All web service responses are in JavaScript Object Notation (JSON) format. A
successful response will yield the following message.
{
"status":"ok",
"payload": <response data>
}
An unsuccessful response will yield the following message. {
"status":"error",
"message": "<error message>"
}
HTTP Response Codes 200 – OK
201 – Created
400 – Bad Request
404 – Not Found 500 – Server Error
Radius Web Service Set-up
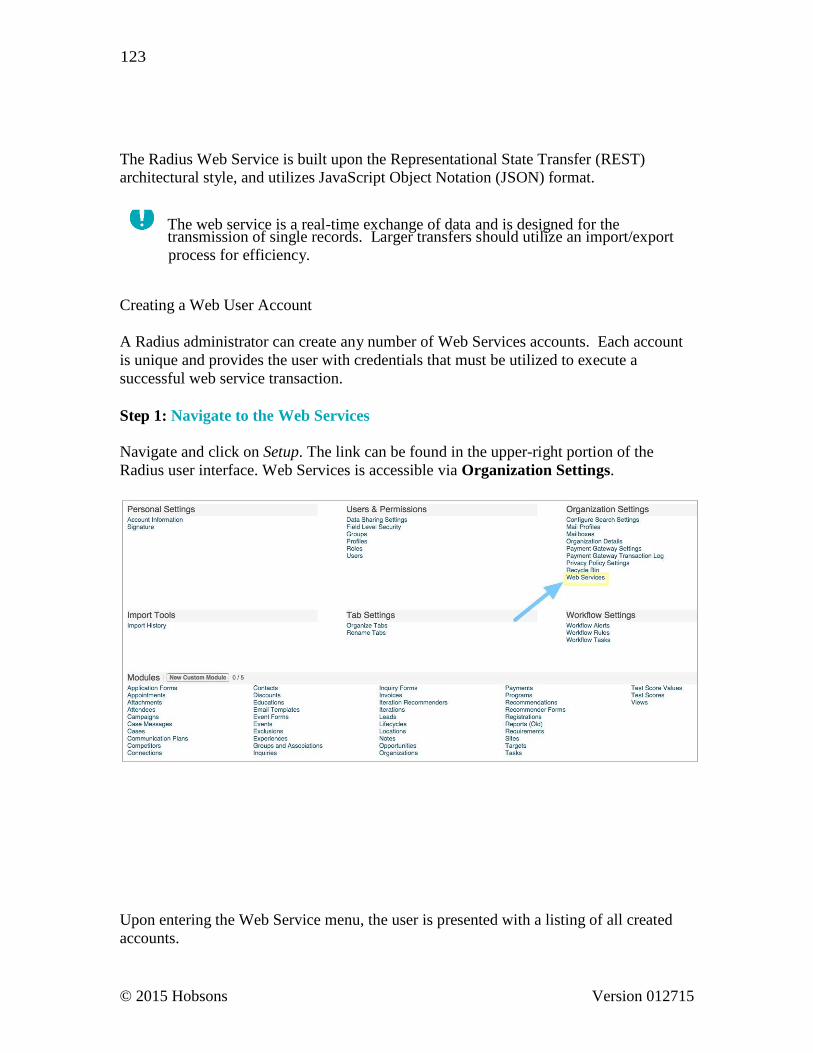
© 2015 Hobsons Version 012715
123
The Radius Web Service is built upon the Representational State Transfer (REST)
architectural style, and utilizes JavaScript Object Notation (JSON) format.
The web service is a real-time exchange of data and is designed for the transmission of single records. Larger transfers should utilize an import/export
process for efficiency.
Creating a Web User Account
A Radius administrator can create any number of Web Services accounts. Each account
is unique and provides the user with credentials that must be utilized to execute a
successful web service transaction.
Step 1: Navigate to the Web Services
Navigate and click on Setup. The link can be found in the upper-right portion of the
Radius user interface. Web Services is accessible via Organization Settings.
Upon entering the Web Service menu, the user is presented with a listing of all created
accounts.
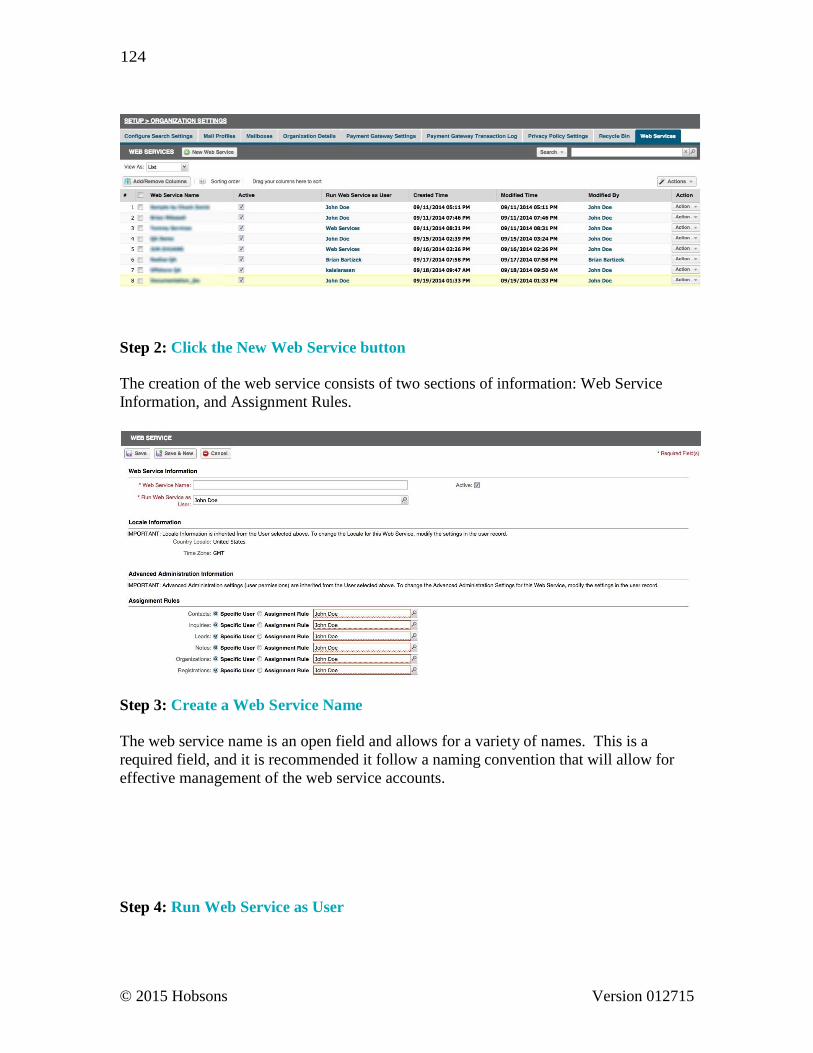
© 2015 Hobsons Version 012715
124
Step 2: Click the New Web Service button The creation of the web service consists of two sections of information: Web Service
Information, and Assignment Rules.
Step 3: Create a Web Service Name
The web service name is an open field and allows for a variety of names. This is a
required field, and it is recommended it follow a naming convention that will allow for
effective management of the web service accounts. Step 4: Run Web Service as User
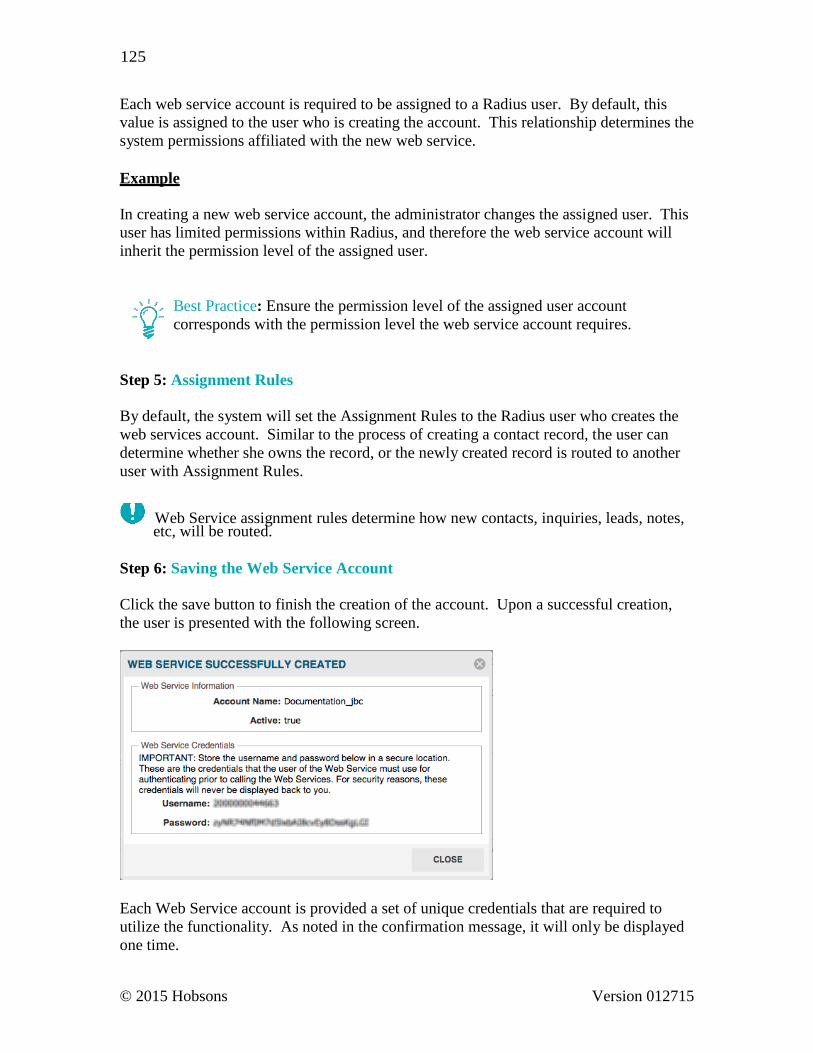
© 2015 Hobsons Version 012715
125
Each web service account is required to be assigned to a Radius user. By default, this
value is assigned to the user who is creating the account. This relationship determines the
system permissions affiliated with the new web service.
Example
In creating a new web service account, the administrator changes the assigned user. This
user has limited permissions within Radius, and therefore the web service account will
inherit the permission level of the assigned user.
Best Practice: Ensure the permission level of the assigned user account
corresponds with the permission level the web service account requires.
Step 5: Assignment Rules
By default, the system will set the Assignment Rules to the Radius user who creates the
web services account. Similar to the process of creating a contact record, the user can
determine whether she owns the record, or the newly created record is routed to another
user with Assignment Rules.
Web Service assignment rules determine how new contacts, inquiries, leads, notes, etc, will be routed.
Step 6: Saving the Web Service Account
Click the save button to finish the creation of the account. Upon a successful creation,
the user is presented with the following screen.
Each Web Service account is provided a set of unique credentials that are required to
utilize the functionality. As noted in the confirmation message, it will only be displayed
one time.
© 2015 Hobsons Version 012715
126
Hobsons highly recommends that users immediately record these credentials, as
well as utilize a secondary method such as a screenshot.
In the event the account credentials are lost, it is possible to generate a new set.
Navigate to the web services account list
Click on the name of the web service account
Click the Edit button at the top of the menu
Make changes if desired and click the Save and Generate New Credentials button
Record new credentials and provide to account user
Once a web services account has been created, the user has the appropriate credentials
needed to access Radius. Generating new credentials invalidates the old credentials.
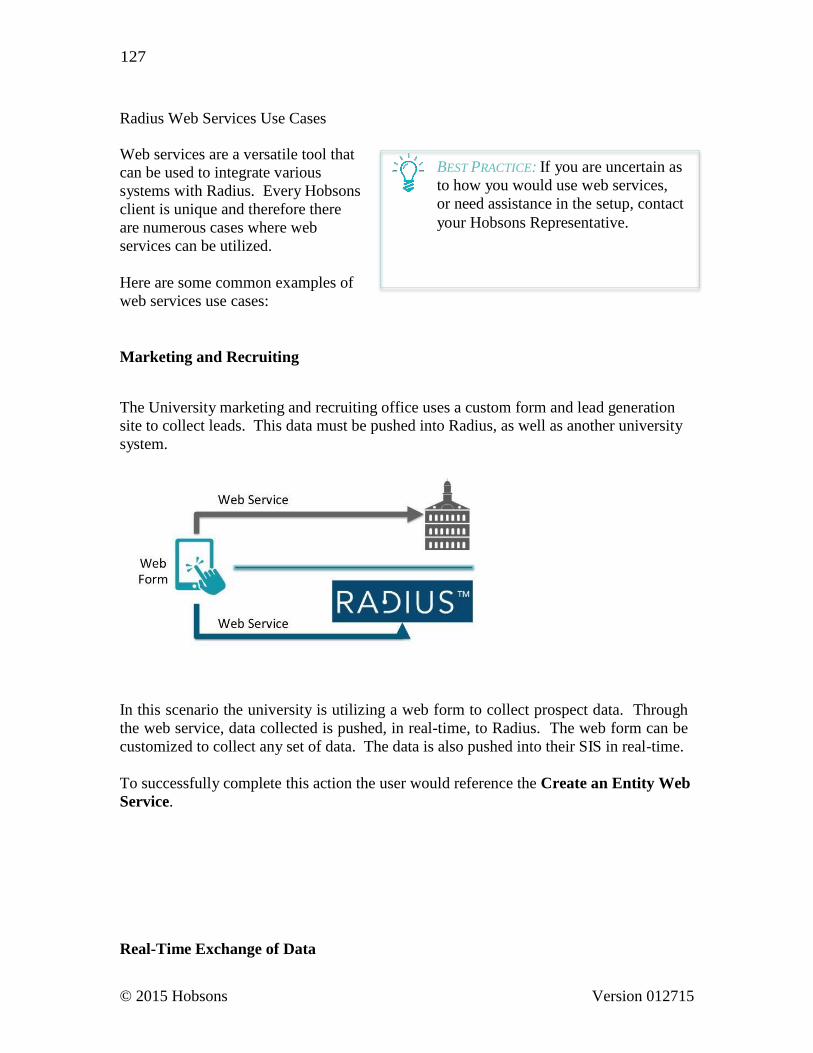
© 2015 Hobsons Version 012715
127
Radius Web Services Use Cases Web services are a versatile tool that
can be used to integrate various
systems with Radius. Every Hobsons
client is unique and therefore there
are numerous cases where web
services can be utilized.
Here are some common examples of
web services use cases:
Marketing and Recruiting
BEST PRACTICE: If you are uncertain as
to how you would use web services,
or need assistance in the setup, contact
your Hobsons Representative.
The University marketing and recruiting office uses a custom form and lead generation
site to collect leads. This data must be pushed into Radius, as well as another university
system.
In this scenario the university is utilizing a web form to collect prospect data. Through
the web service, data collected is pushed, in real-time, to Radius. The web form can be
customized to collect any set of data. The data is also pushed into their SIS in real-time.
To successfully complete this action the user would reference the Create an Entity Web
Service.
Real-Time Exchange of Data
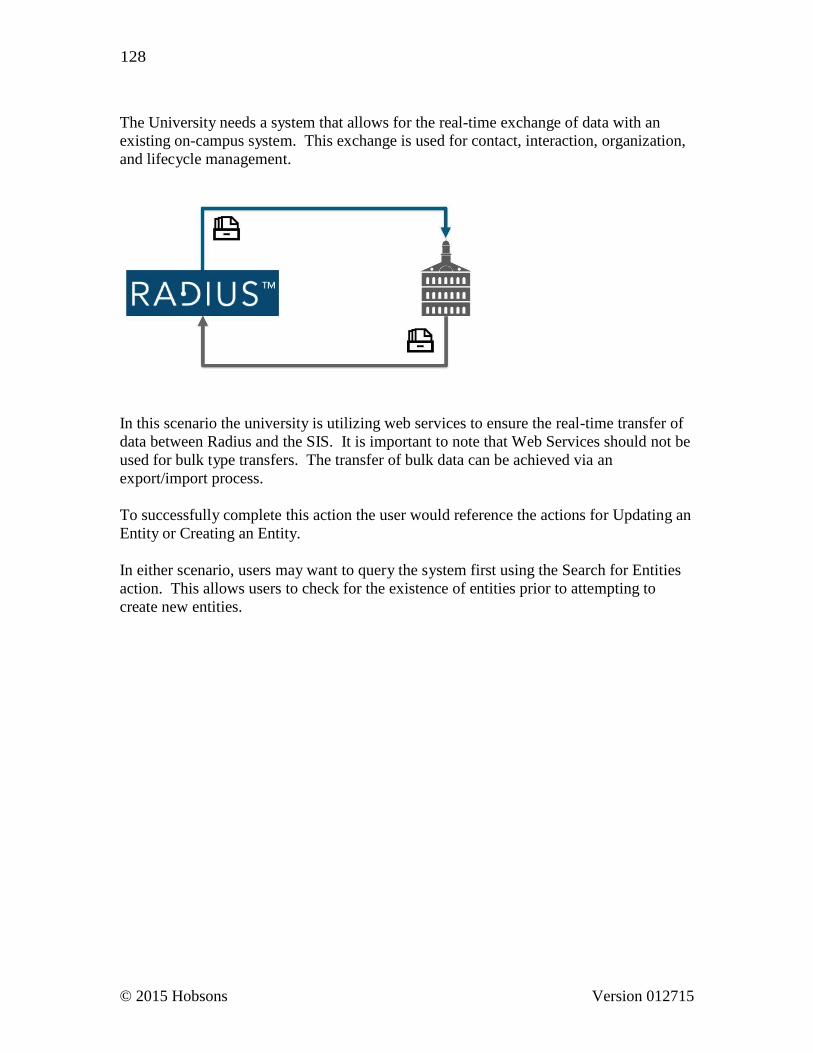
© 2015 Hobsons Version 012715
128
The University needs a system that allows for the real-time exchange of data with an
existing on-campus system. This exchange is used for contact, interaction, organization,
and lifecycle management.
In this scenario the university is utilizing web services to ensure the real-time transfer of
data between Radius and the SIS. It is important to note that Web Services should not be
used for bulk type transfers. The transfer of bulk data can be achieved via an
export/import process.
To successfully complete this action the user would reference the actions for Updating an
Entity or Creating an Entity.
In either scenario, users may want to query the system first using the Search for Entities
action. This allows users to check for the existence of entities prior to attempting to
create new entities.
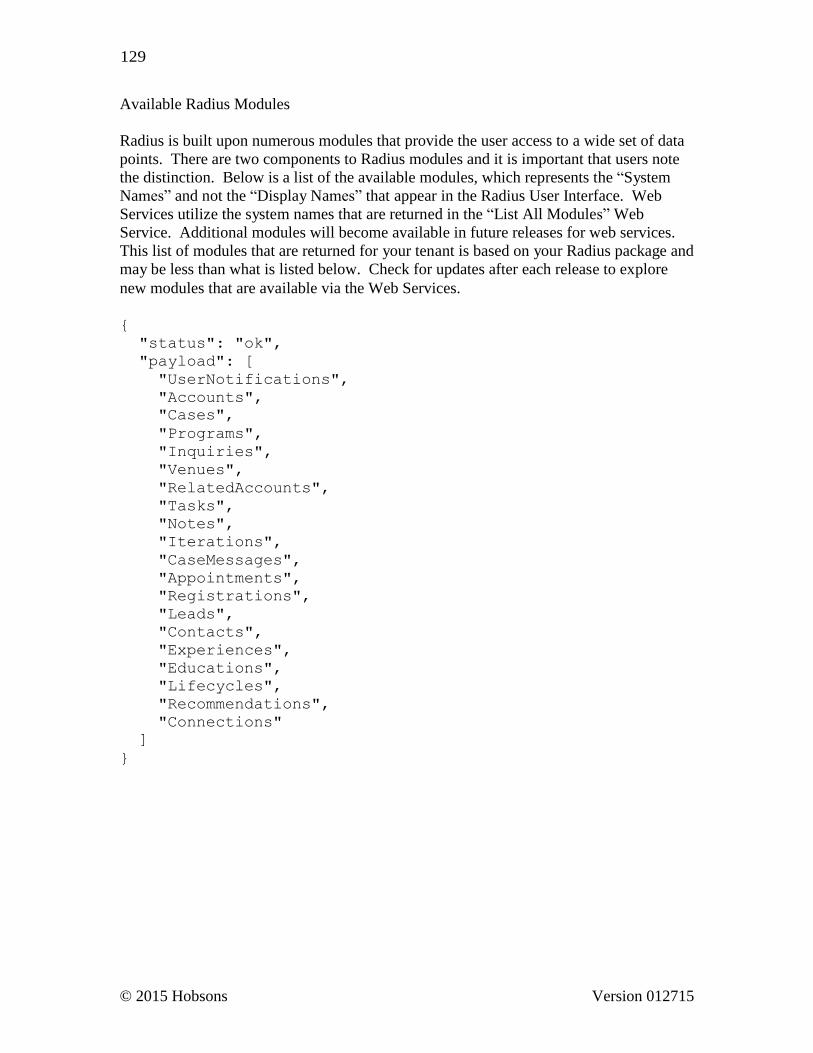
© 2015 Hobsons Version 012715
129
Available Radius Modules
Radius is built upon numerous modules that provide the user access to a wide set of data
points. There are two components to Radius modules and it is important that users note
the distinction. Below is a list of the available modules, which represents the “System
Names” and not the “Display Names” that appear in the Radius User Interface. Web
Services utilize the system names that are returned in the “List All Modules” Web
Service. Additional modules will become available in future releases for web services.
This list of modules that are returned for your tenant is based on your Radius package and
may be less than what is listed below. Check for updates after each release to explore
new modules that are available via the Web Services. {
"status": "ok",
"payload": [
"UserNotifications",
"Accounts",
"Cases",
"Programs",
"Inquiries",
"Venues",
"RelatedAccounts",
"Tasks",
"Notes",
"Iterations",
"CaseMessages",
"Appointments",
"Registrations",
"Leads",
"Contacts",
"Experiences",
"Educations",
"Lifecycles",
"Recommendations",
"Connections"
]
}
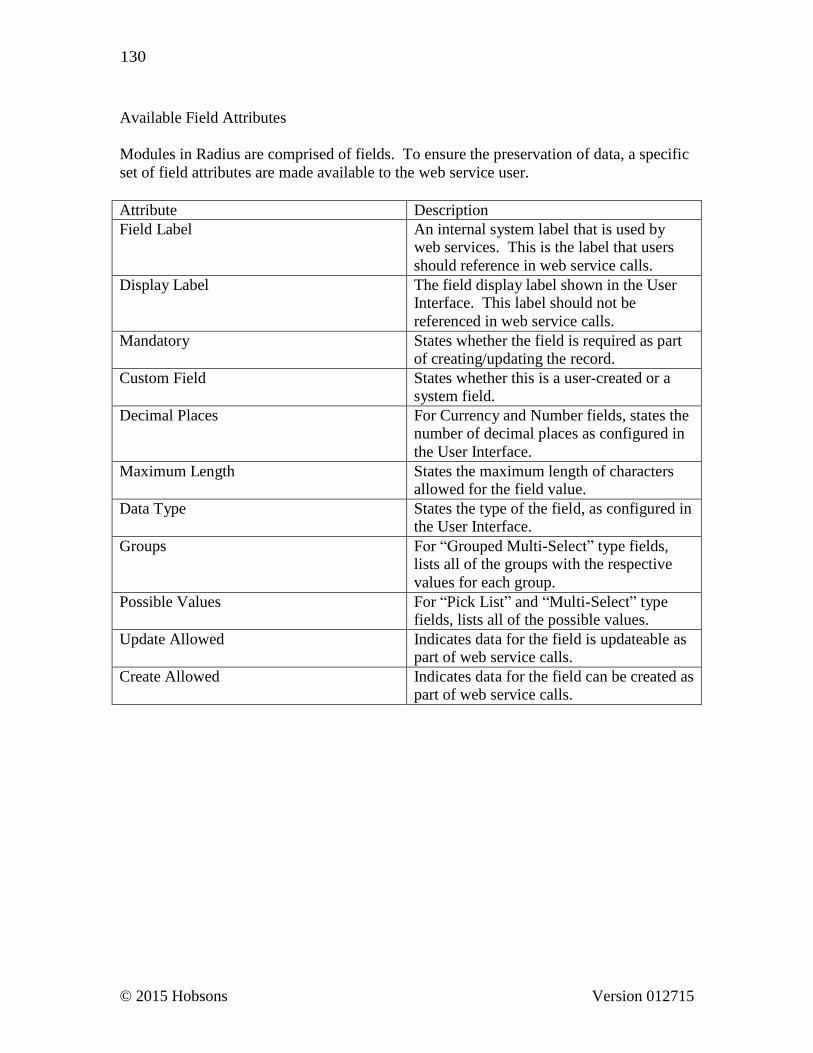
© 2015 Hobsons Version 012715
130
Available Field Attributes
Modules in Radius are comprised of fields. To ensure the preservation of data, a specific
set of field attributes are made available to the web service user.
Attribute Description
Field Label An internal system label that is used by web services. This is the label that users
should reference in web service calls.
Display Label The field display label shown in the User Interface. This label should not be
referenced in web service calls.
Mandatory States whether the field is required as part of creating/updating the record.
Custom Field States whether this is a user-created or a system field.
Decimal Places For Currency and Number fields, states the number of decimal places as configured in
the User Interface.
Maximum Length States the maximum length of characters allowed for the field value.
Data Type States the type of the field, as configured in the User Interface.
Groups For “Grouped Multi-Select” type fields, lists all of the groups with the respective
values for each group.
Possible Values For “Pick List” and “Multi-Select” type fields, lists all of the possible values.
Update Allowed Indicates data for the field is updateable as part of web service calls.
Create Allowed Indicates data for the field can be created as part of web service calls.
131
© 2015 Hobsons Version 020415
Web Service Methods for Radius The examples within this section can be utilized as a reference for accessing data within
Radius. For maximum security of data, all Web Service calls (URL’s) are required to use
HTTPS.
<host> for US clients: api.hobsonsradius.com
<host> for EMEA clients: emeaapi.hobsonsradius.com
List All Modules
URL: https://<host>/crm/webservice/modules
HTTP Method: GET
Optional parameters:
useDisplayLabels=true - Return display labels instead of system labels.
Default is false.
Returns: A list of module names available through the web service.
Get a Module’s Meta Data
URL: https://<host>/crm/webservice/modules/{moduleName}
HTTP Method: GET
Path variables:
moduleName - a valid module name
Returns: The display label for the module, as configured in the Radius UI as well as a
list of the modules fields.
List All Fields for a Module
URL: https://<host>/crm/webservice/modules/{moduleName}/fields
HTTP Method: GET
Path variables:
moduleName - a valid module name
Optional parameters:
includeDetails=true - Return detailed field information
Returns: A list of all the fields available in the module. Get an Entity
URL: https://<host>/crm/webservice/modules/{moduleName}/{entityId}
132
© 2015 Hobsons Version 020415
HTTP Method: GET
Path variables:
moduleName - a valid module name
entityId - the unique ID of the entity
Optional parameters:
returnFields - A comma separated list of fields to include when returning the
entity. Invalid field labels in the returnFields request are ignored.
Returns: The entity with the given ID. If the returnFields parameter is populated, only
those fields specified will be returned. Otherwise all available fields will be
returned.
Create an Entity
URL: https://<host>/crm/webservice/modules/{moduleName}
HTTP Method: POST
Path variables:
moduleName - a valid module name
Request body: A CreateFields object in JSON format
Returns: The entity ID. If the returnFields parameter is populated, only those fields
specified will be returned.
Details:
The CreateFields object consists of:
createFields - A set of field label/field value pairs.
returnFields (optional) - A set of field labels indicating which fields should be
returned for the created entity. Defaults to Entity ID. Invalid field
labels in the returnFields request are ignored.
133
© 2015 Hobsons Version 020415
Examples:
A sample request body to create a contact: {
"createFields": {
"First Name": "aFirstName",
"Last Name": "aLastName"
},
"returnFields": [
"Entity ID",
"First Name",
"Last Name"
]
}
A sample successful response: {
"status":"ok",
"payload":{
"entity":{
"Entity ID":2000000220005,
"First Name": "aFirstName",
"Last Name": "aLastName"
}
}
}
Update an Entity URL: https://<host>/crm/webservice/modules/{moduleName}/{entityId}
HTTP Method: PUT
Path variables: moduleName - a valid module name entityId - the unique ID of the entity
Optional parameters: returnFields - A comma separated list of fields to include when returning the entity. Invalid field labels in the returnFields request are ignored.
Request body: JSON containing key/value pairs of field labels and values to update
Returns: The entity ID. If the returnFields parameter is populated, only those fields
specified will be returned.
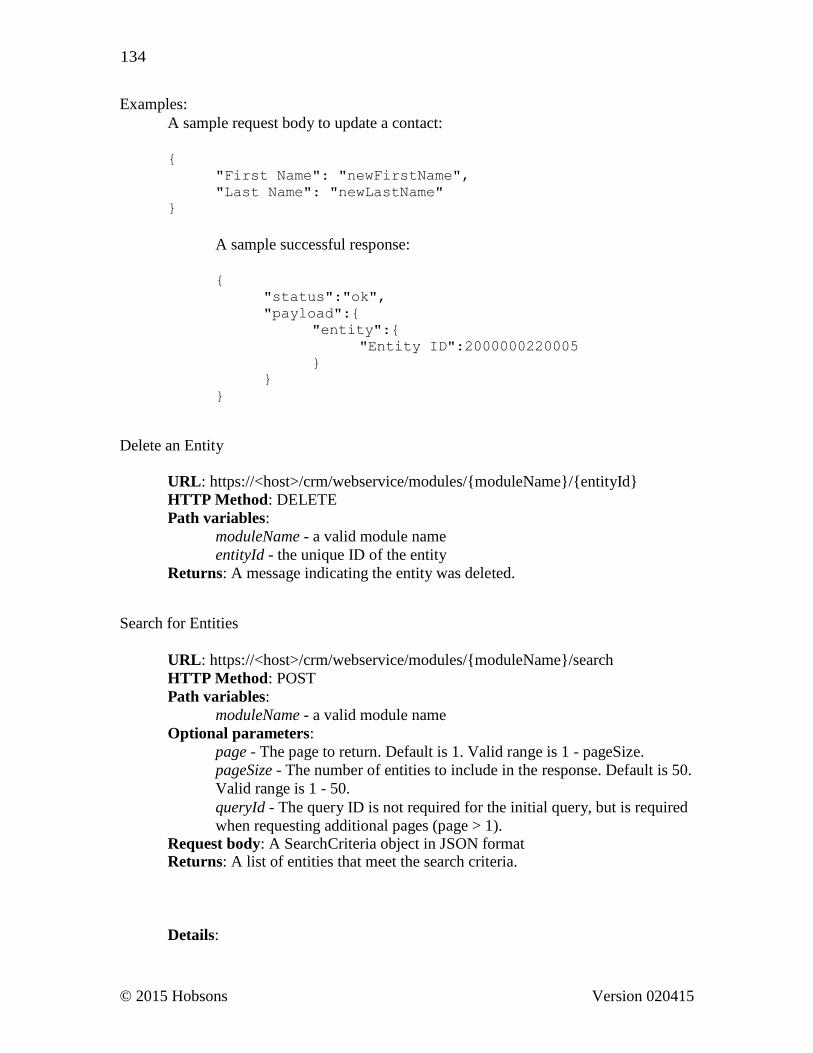
134
© 2015 Hobsons Version 020415
Examples:
A sample request body to update a contact:
{
"First Name": "newFirstName",
"Last Name": "newLastName"
}
A sample successful response:
{
"status":"ok",
"payload":{
"entity":{
"Entity ID":2000000220005
}
}
}
Delete an Entity
URL: https://<host>/crm/webservice/modules/{moduleName}/{entityId}
HTTP Method: DELETE
Path variables:
moduleName - a valid module name
entityId - the unique ID of the entity
Returns: A message indicating the entity was deleted.
Search for Entities
URL: https://<host>/crm/webservice/modules/{moduleName}/search
HTTP Method: POST
Path variables:
moduleName - a valid module name
Optional parameters:
page - The page to return. Default is 1. Valid range is 1 - pageSize.
pageSize - The number of entities to include in the response. Default is 50.
Valid range is 1 - 50.
queryId - The query ID is not required for the initial query, but is required
when requesting additional pages (page > 1). Request body: A SearchCriteria object in JSON format Returns: A list of entities that meet the search criteria.
Details:
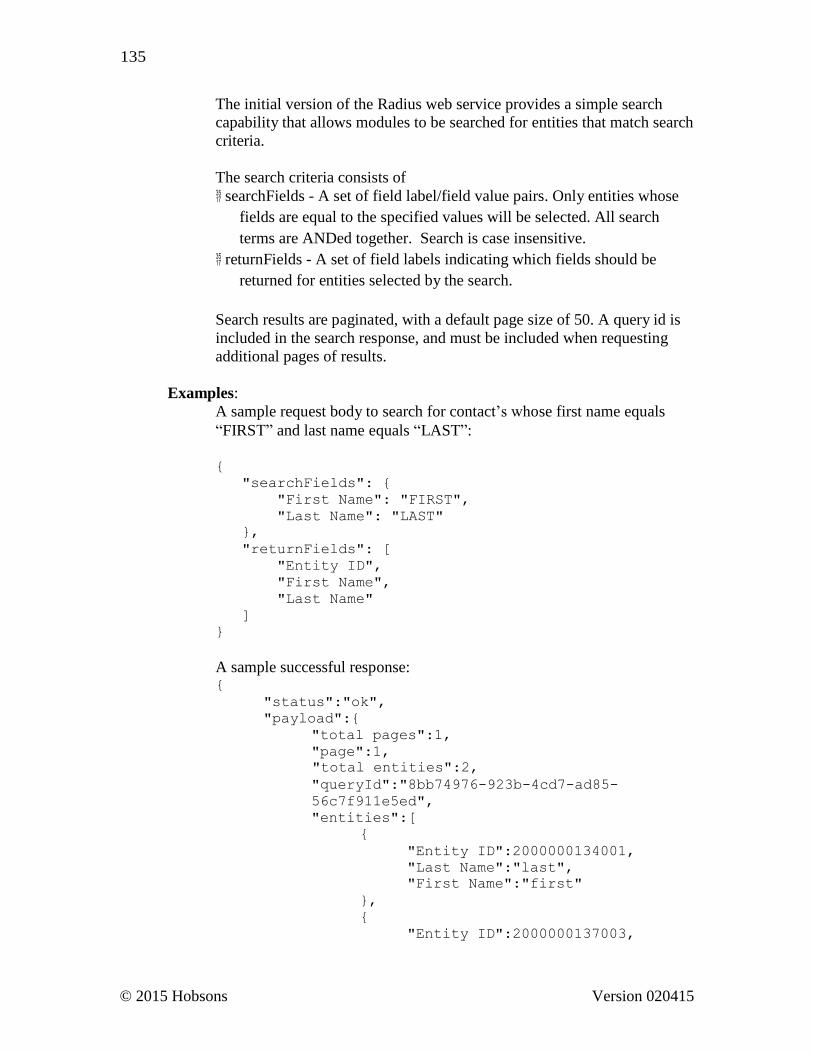
135
© 2015 Hobsons Version 020415
The initial version of the Radius web service provides a simple search
capability that allows modules to be searched for entities that match search
criteria.
The search criteria consists of
searchFields - A set of field label/field value pairs. Only entities whose
fields are equal to the specified values will be selected. All search
terms are ANDed together. Search is case insensitive.
returnFields - A set of field labels indicating which fields should be
returned for entities selected by the search.
Search results are paginated, with a default page size of 50. A query id is
included in the search response, and must be included when requesting
additional pages of results.
Examples:
A sample request body to search for contact’s whose first name equals
“FIRST” and last name equals “LAST”:
{
"searchFields": {
"First Name": "FIRST",
"Last Name": "LAST"
},
"returnFields": [
"Entity ID",
"First Name",
"Last Name"
]
}
A sample successful response: {
"status":"ok",
"payload":{
"total pages":1,
"page":1,
"total entities":2,
"queryId":"8bb74976-923b-4cd7-ad85-
56c7f911e5ed",
"entities":[
{
"Entity ID":2000000134001,
"Last Name":"last",
"First Name":"first"
},
{
"Entity ID":2000000137003,

136
© 2015 Hobsons Version 020415
"Last Name":"LAST",
"First Name":"FIRST"
}
]
}
}
Usage Limits & Best Practices
Web services are a powerful tool that, when used properly, can enhance the client’s
efficiency and overall productivity. With its wide variety of uses and customization, the
client has the ability to determine how and when the feature is utilized. As a Radius user,
it is important to note the usage limits and best practices for Radius web services.
Hobsons reserves the right to add entity properties at any time in order to enhance the
product functionality. It is recommended that clients account for this during the
implementation of their solution. Failure to account for this can result in the breaking
of the integration after Web Services functionality is released in the future.
Renaming Custom Fields in Radius will result in the breaking of the web service.
Limit the administrative capabilities to authorized staff only and educate them on this
topic.
The web service functionality will be rolled out in phases. Clients will be notified via
release communications as new functionality is added.
All pieces of data are case sensitive. Failure to adhere to this will result in web
service errors.
Field dependencies do not validate via web services. It is the responsibility of the
client to insert proper data into those fields that have dependencies.
Product Releases & Web Services
Periodically, Hobsons will schedule product releases that integrate enhancements and
new features to Radius. Hobsons schedules product releases during hours that will
cause the minimal amount of disruption to clients. During these times, it is important
137
© 2015 Hobsons Version 020415
to note there will be down time and Radius Web Services may be unavailable.
Clients will need to account for down time and accommodate for it in their code that
references Radius Web Services. Hobsons does not store or queue web service calls
made by clients, vendors, etc. In the event of an outage, clients need to capture the
error condition, accommodate for it, and send the request at a later time when the
Radius Web Services become available.
Resources
There are various resources available on the Internet. Below are some resources that
provide additional information on the fundamentals of web services.
Rest Web Services Demystified
Building a RESTful Web Service
JSON.org Working with web services takes practice and a basic understanding of the necessary
components. There are a number of web-based tools that will allow for practice. These
tools can be found by conducting an Internet search. Two options (listed below) have a
user interface that is simple to use.
Advanced REST Client (Chrome)
RESTClient (Firefox) It is important to understand the user’s Locale Setting and how this impacts Dates &
Times in Web Service calls. Dates and Times are returned in the "Natural Date/Time
Format" that is human-readable, based on the Locale preferences of the user specified for
the Web Service.
Date Format by Country
Time Zones
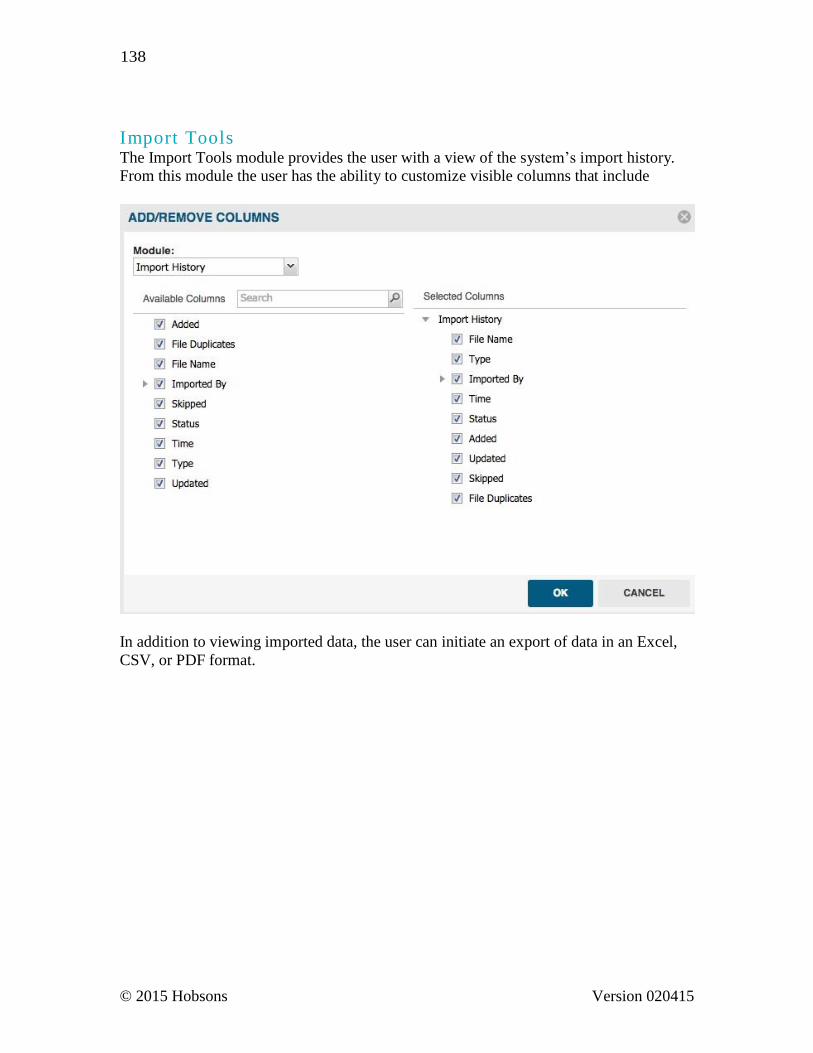
138
© 2015 Hobsons Version 020415
I mp o r t T o o l s The Import Tools module provides the user with a view of the system’s import history.
From this module the user has the ability to customize visible columns that include
In addition to viewing imported data, the user can initiate an export of data in an Excel,
CSV, or PDF format.
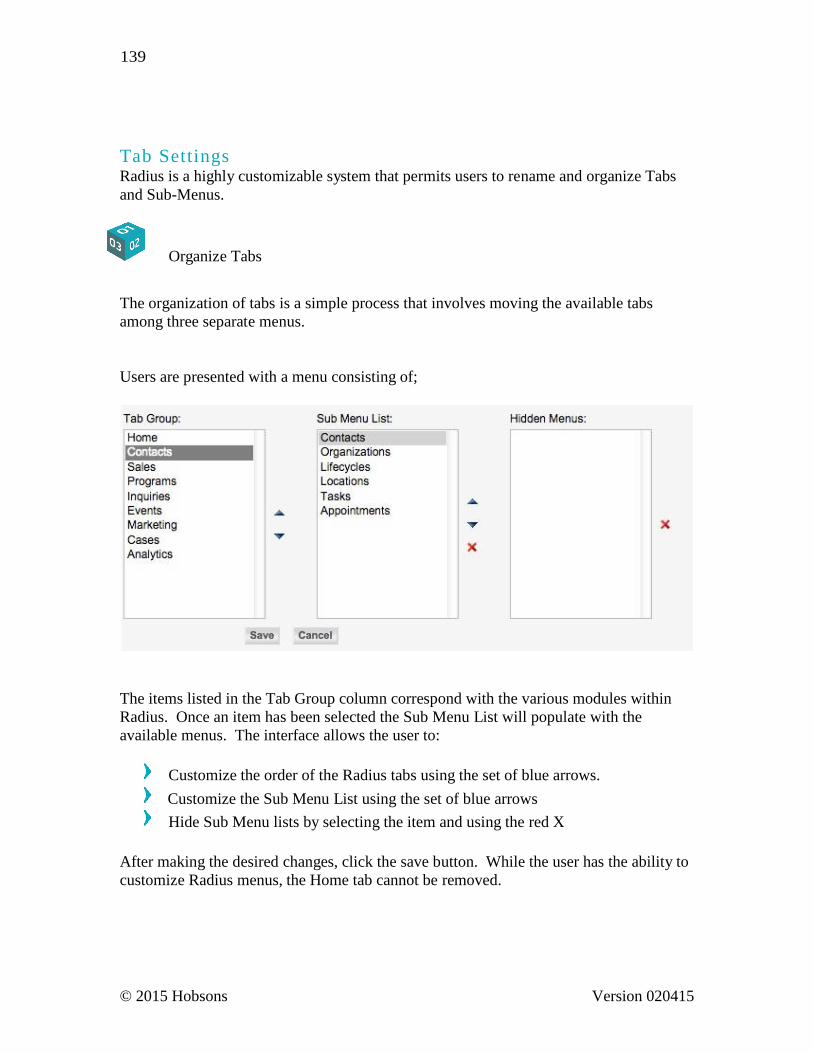
139
© 2015 Hobsons Version 020415
T a b S e t t i n g s Radius is a highly customizable system that permits users to rename and organize Tabs
and Sub-Menus.
Organize Tabs
The organization of tabs is a simple process that involves moving the available tabs
among three separate menus.
Users are presented with a menu consisting of;
The items listed in the Tab Group column correspond with the various modules within
Radius. Once an item has been selected the Sub Menu List will populate with the
available menus. The interface allows the user to:
Customize the order of the Radius tabs using the set of blue arrows.
Customize the Sub Menu List using the set of blue arrows
Hide Sub Menu lists by selecting the item and using the red X
After making the desired changes, click the save button. While the user has the ability to
customize Radius menus, the Home tab cannot be removed.
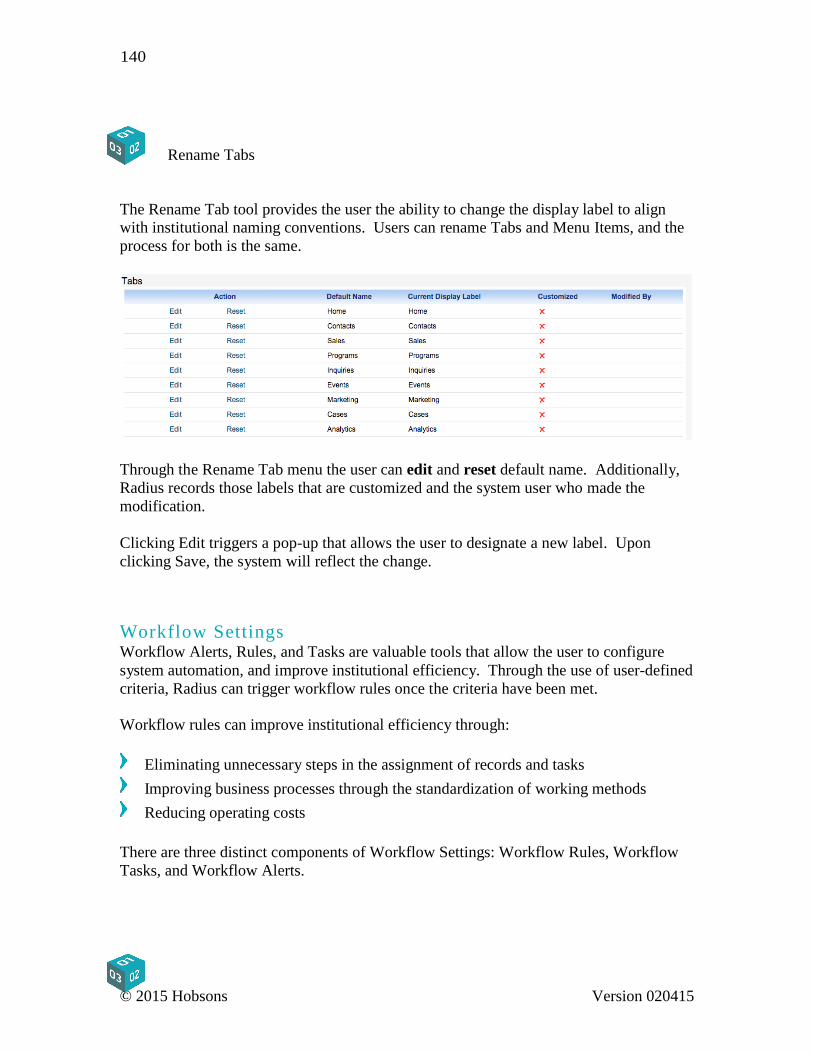
140
© 2015 Hobsons Version 020415
Rename Tabs
The Rename Tab tool provides the user the ability to change the display label to align
with institutional naming conventions. Users can rename Tabs and Menu Items, and the
process for both is the same.
Through the Rename Tab menu the user can edit and reset default name. Additionally,
Radius records those labels that are customized and the system user who made the
modification.
Clicking Edit triggers a pop-up that allows the user to designate a new label. Upon
clicking Save, the system will reflect the change.
W o r k f l o w S e t t i n g s Workflow Alerts, Rules, and Tasks are valuable tools that allow the user to configure
system automation, and improve institutional efficiency. Through the use of user-defined
criteria, Radius can trigger workflow rules once the criteria have been met.
Workflow rules can improve institutional efficiency through:
Eliminating unnecessary steps in the assignment of records and tasks
Improving business processes through the standardization of working methods
Reducing operating costs
There are three distinct components of Workflow Settings: Workflow Rules, Workflow
Tasks, and Workflow Alerts.
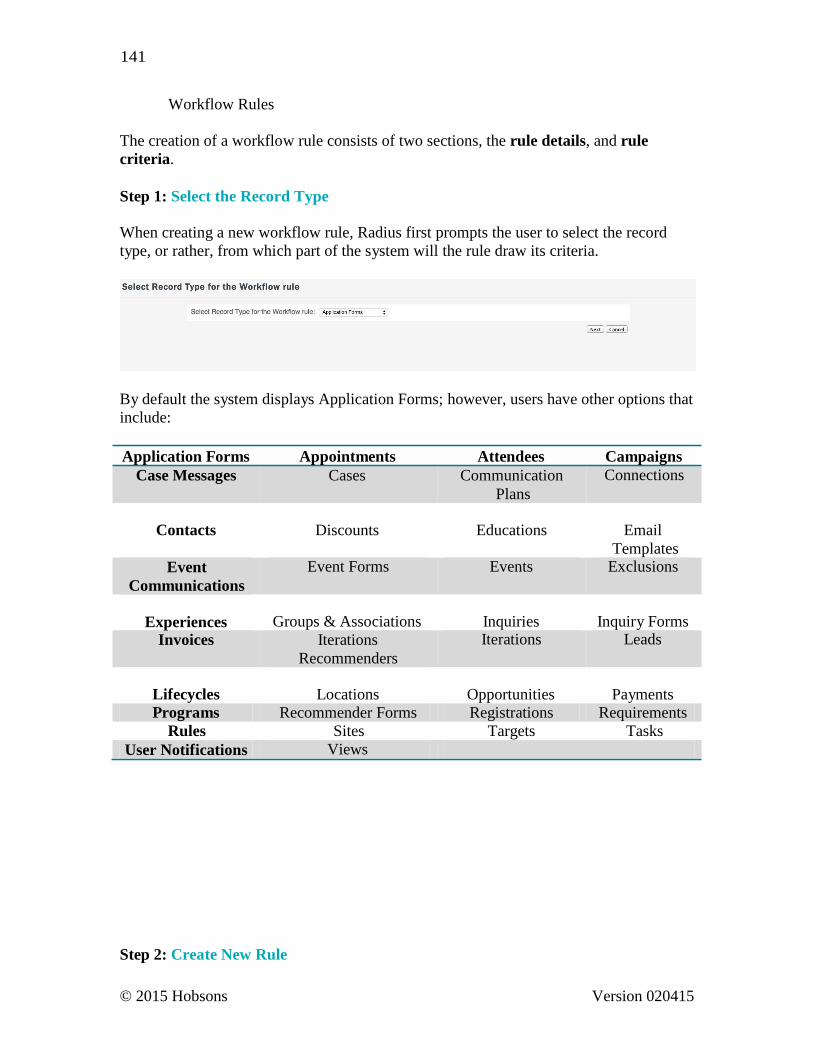
141
© 2015 Hobsons Version 020415
Workflow Rules
The creation of a workflow rule consists of two sections, the rule details, and rule
criteria.
Step 1: Select the Record Type
When creating a new workflow rule, Radius first prompts the user to select the record
type, or rather, from which part of the system will the rule draw its criteria.
By default the system displays Application Forms; however, users have other options that
include:
Application Forms Appointments Attendees Campaigns
Case Messages Cases Communication
Plans
Connections
Contacts Discounts Educations Email
Templates
Event
Communications
Event Forms Events Exclusions
Experiences Groups & Associations Inquiries Inquiry Forms
Invoices Iterations
Recommenders
Iterations Leads
Lifecycles Locations Opportunities Payments
Programs Recommender Forms Registrations Requirements
Rules Sites Targets Tasks
User Notifications Views
Step 2: Create New Rule

142
© 2015 Hobsons Version 020415
All workflow rules require identifying details and a set of defined criteria.

143
© 2015 Hobsons Version 020415
When establishing the rule details, the only required field is the Rule Name, and while
required, the Execution Time must be set between one of two options.
Enter a Rule Name. The rule name should align with a defined naming
convention. The naming convention is unique to the institution.
While not required, users should provide a Description. Providing a detailed
description is a best practice that will support the long-term health of the Radius
system.
Determine if the rule will be Active. This setting can be changed at any time.
New Radius users should make new workflow rules inactive until all criteria logic
can be reviewed.
Finally, set the Execution Time. Workflow rules are triggered by criteria, but are
executed on one of two times:
o When new records are created
o When new records are created and existing records are edited.
The next step in workflow rule creation is the building of criteria. The construction of
rule criteria requires that the user follow three steps.
1. Select a field from the Record Type
2. Select an Operator – examples include is, isn’t, contains, starts with, etc.
3. Enter the desired Value
When entering a field value it is necessary that the user be knowledgeable of
available options. For example, if the user plans to utilize the field Modified By
she should be aware that is an open text field. In this situation the user needs to
know the names of other system users. Workflow rules can be built on multiple lines of criteria. Users can incorporate
additional lines of logic by clicking the Add Criteria button, located in the lower-left
portion of the screen.
A new workflow rule is not
actionable until either a Workflow
Alert or Workflow Task is created.
144
© 2015 Hobsons Version 020415
Once finished, the user should click Save to complete the process.
Workflow Alerts A Workflow Alert is an email notification that is sent to selected recipients upon the
execution of a workflow rule. There is a one to one relationship between a Workflow
Rule and the Workflow Alert.
To create a Workflow Alert:
Navigate to Workflow Alerts Click on New Alert
Specify a Name for the alert
Using the dropdown, select the Email Template. Users must select from previously
created emails, and are unable to create them on-demand.
Select the recipients of the alert.
Select the source type
o Groups
o Roles
o Roles and Subordinates
o Users
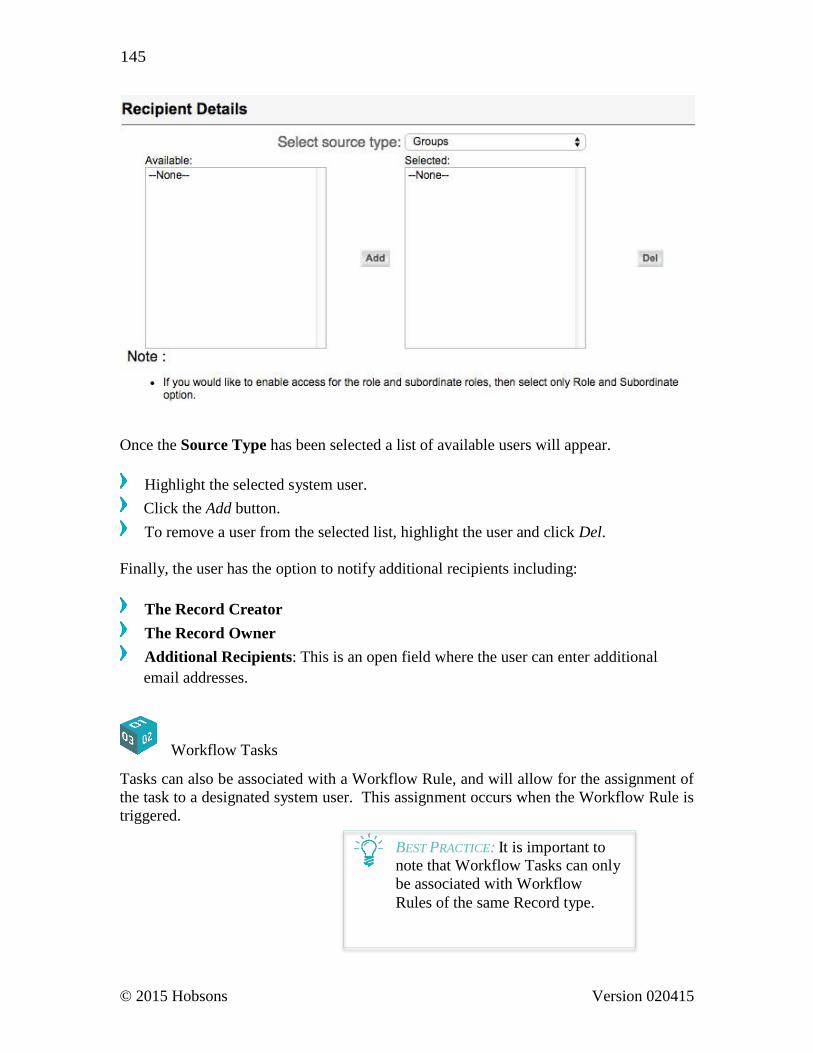
145
© 2015 Hobsons Version 020415
Once the Source Type has been selected a list of available users will appear.
Highlight the selected system user.
Click the Add button.
To remove a user from the selected list, highlight the user and click Del.
Finally, the user has the option to notify additional recipients including:
The Record Creator
The Record Owner
Additional Recipients: This is an open field where the user can enter additional
email addresses.
Workflow Tasks
Tasks can also be associated with a Workflow Rule, and will allow for the assignment of
the task to a designated system user. This assignment occurs when the Workflow Rule is
triggered.
BEST PRACTICE: It is important to
note that Workflow Tasks can only
be associated with Workflow
Rules of the same Record type.
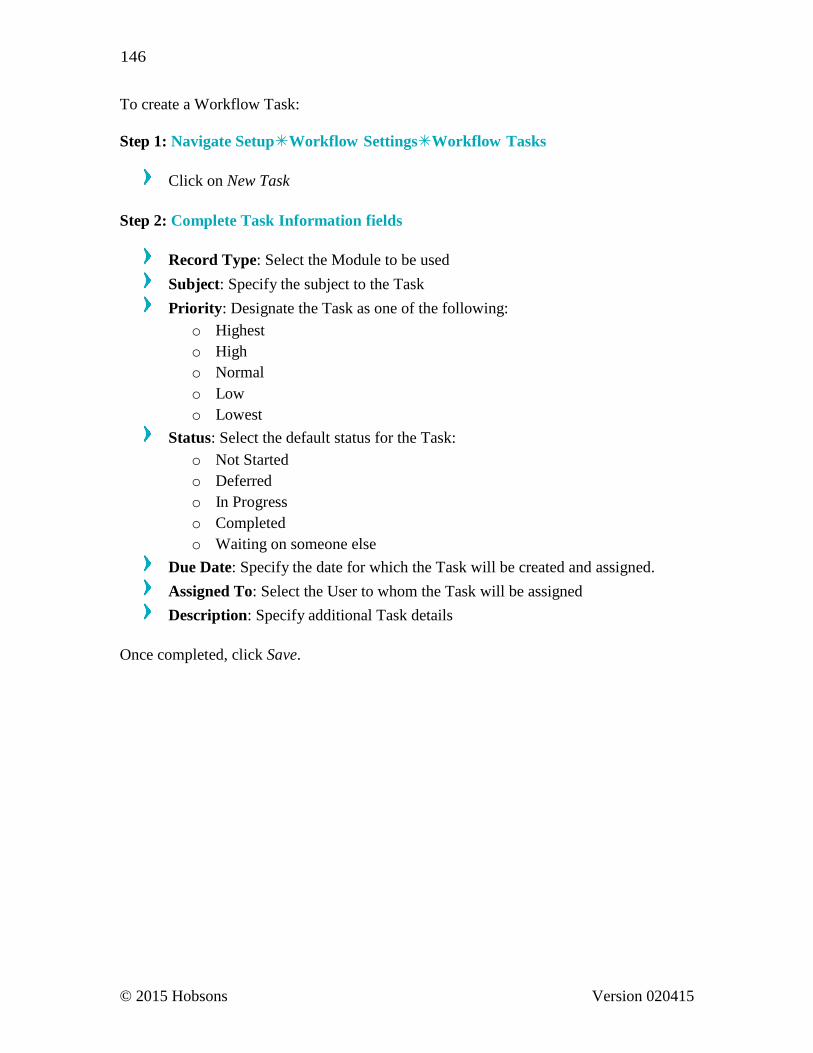
146
© 2015 Hobsons Version 020415
To create a Workflow Task:
Step 1: Navigate SetupWorkflow SettingsWorkflow Tasks
Click on New Task
Step 2: Complete Task Information fields
Record Type: Select the Module to be used
Subject: Specify the subject to the Task
Priority: Designate the Task as one of the following:
o Highest
o High
o Normal
o Low
o Lowest
Status: Select the default status for the Task:
o Not Started
o Deferred
o In Progress
o Completed
o Waiting on someone else
Due Date: Specify the date for which the Task will be created and assigned.
Assigned To: Select the User to whom the Task will be assigned
Description: Specify additional Task details
Once completed, click Save.
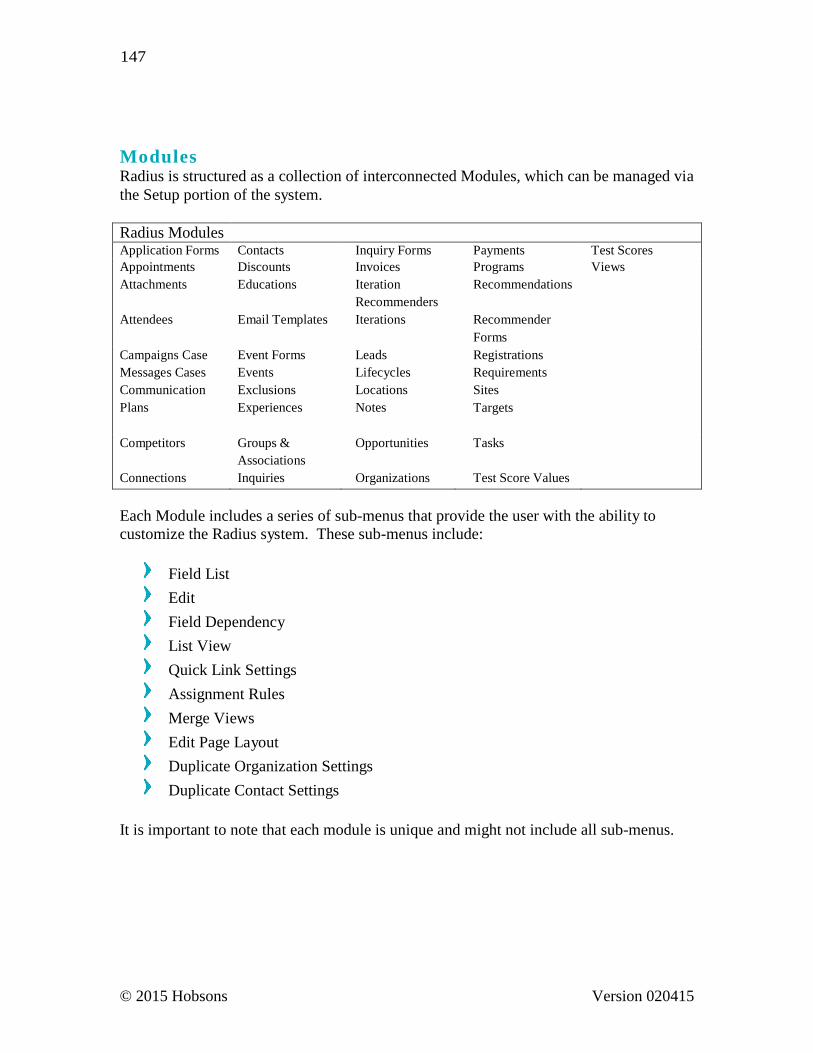
147
© 2015 Hobsons Version 020415
M o d u l e s Radius is structured as a collection of interconnected Modules, which can be managed via
the Setup portion of the system.
Radius Modules Application Forms Contacts Inquiry Forms Payments Test Scores
Appointments
Attachments
Attendees
Discounts
Educations
Email Templates
Invoices
Iteration
Recommenders
Iterations
Programs
Recommendations
Recommender
Views
Forms Campaigns Case
Messages Cases
Communication
Plans
Event Forms
Events
Exclusions
Experiences
Leads
Lifecycles
Locations
Notes
Registrations
Requirements
Sites
Targets
Competitors
Connections
Groups &
Associations
Inquiries
Opportunities
Organizations
Tasks
Test Score Values
Each Module includes a series of sub-menus that provide the user with the ability to
customize the Radius system. These sub-menus include:
Field List
Edit
Field Dependency
List View
Quick Link Settings
Assignment Rules
Merge Views
Edit Page Layout
Duplicate Organization Settings
Duplicate Contact Settings
It is important to note that each module is unique and might not include all sub-menus.
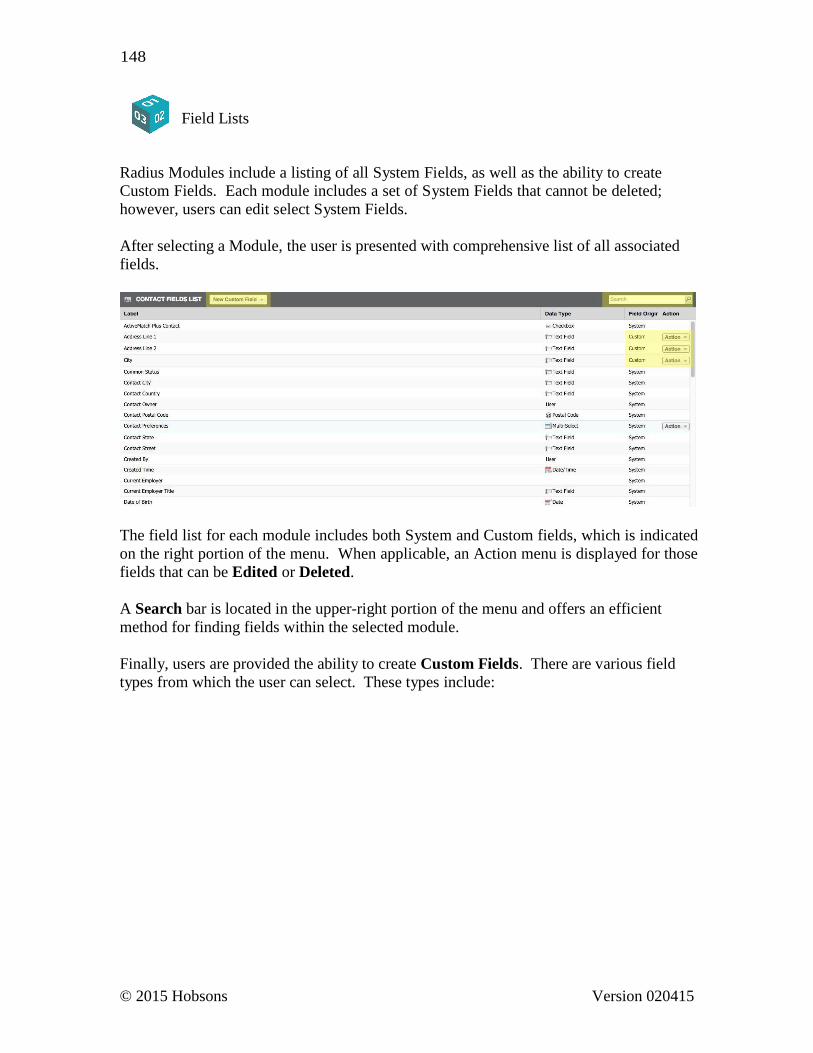
148
© 2015 Hobsons Version 020415
Field Lists
Radius Modules include a listing of all System Fields, as well as the ability to create
Custom Fields. Each module includes a set of System Fields that cannot be deleted;
however, users can edit select System Fields.
After selecting a Module, the user is presented with comprehensive list of all associated
fields.
The field list for each module includes both System and Custom fields, which is indicated
on the right portion of the menu. When applicable, an Action menu is displayed for those
fields that can be Edited or Deleted.
A Search bar is located in the upper-right portion of the menu and offers an efficient
method for finding fields within the selected module.
Finally, users are provided the ability to create Custom Fields. There are various field
types from which the user can select. These types include:
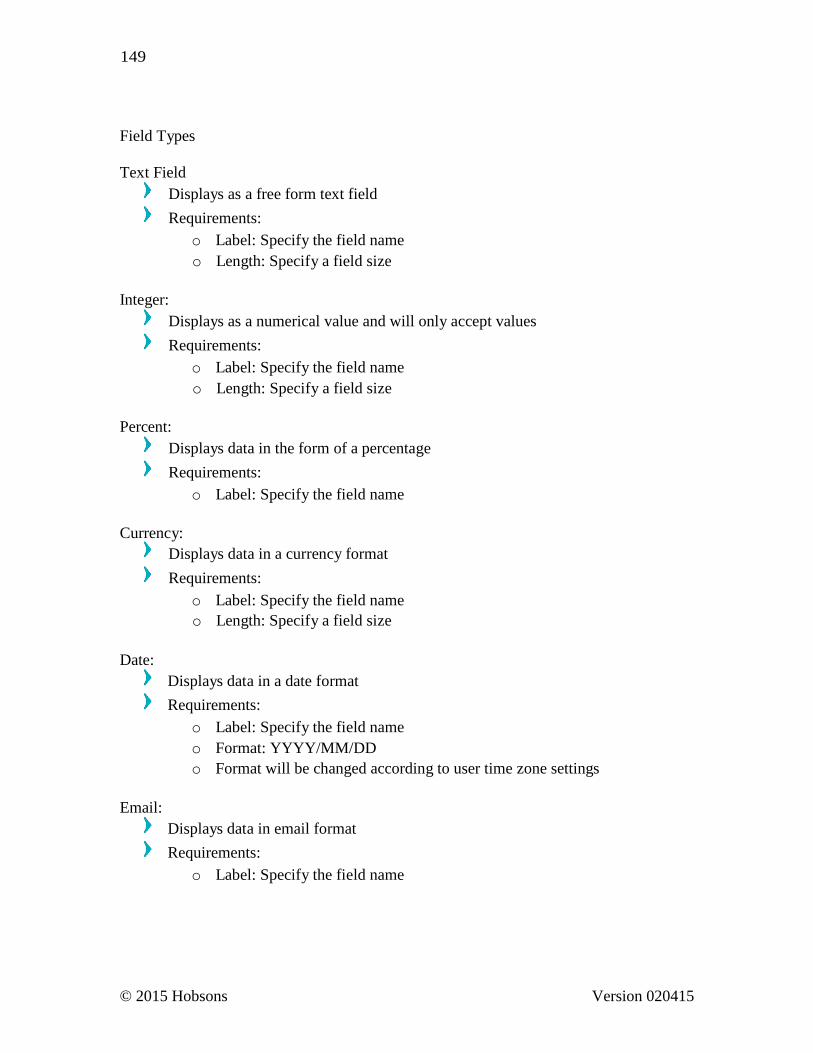
149
© 2015 Hobsons Version 020415
Field Types
Text Field
Displays as a free form text field
Requirements:
o Label: Specify the field name
o Length: Specify a field size
Integer:
Displays as a numerical value and will only accept values
Requirements:
o Label: Specify the field name
o Length: Specify a field size
Percent:
Displays data in the form of a percentage
Requirements:
o Label: Specify the field name
Currency:
Displays data in a currency format
Requirements:
o Label: Specify the field name
o Length: Specify a field size
Date:
Displays data in a date format
Requirements:
o Label: Specify the field name
o Format: YYYY/MM/DD
o Format will be changed according to user time zone settings
Email:
Displays data in email format
Requirements:
o Label: Specify the field name

150
© 2015 Hobsons Version 020415
Phone:
Displays data in phone number format
Requirements:
o Label: Specify the field name
o Length: Specify the field size (integer number)
Pick list:
Displays data in a pick list format
Requirements:
o Label: Specify the field name
o Pick List Values:
Values will automatically sort alphabetically.
First value in list will appear as the default value.
URL:
Displays data in URL format
Requirements:
o Label: Specify the field name
Text Area:
Displays data in long text field
Field accommodates 64,000 characters
Requirements:
o Label: Specify the field name
Checkbox:
Displays data in a true (checked) or false (unchecked) type value
Requirements:
o Label: Specify the field name
o Enable by default: Check a box by default on new Contact forms
Multi-Select:
Displays data as a pick list with multiple selection of values
Requirements:
o Label: Specify the field name
o Pick List Values: Specify the pick list values
o Sort Values Alphabetically: Will automatically sort the values.
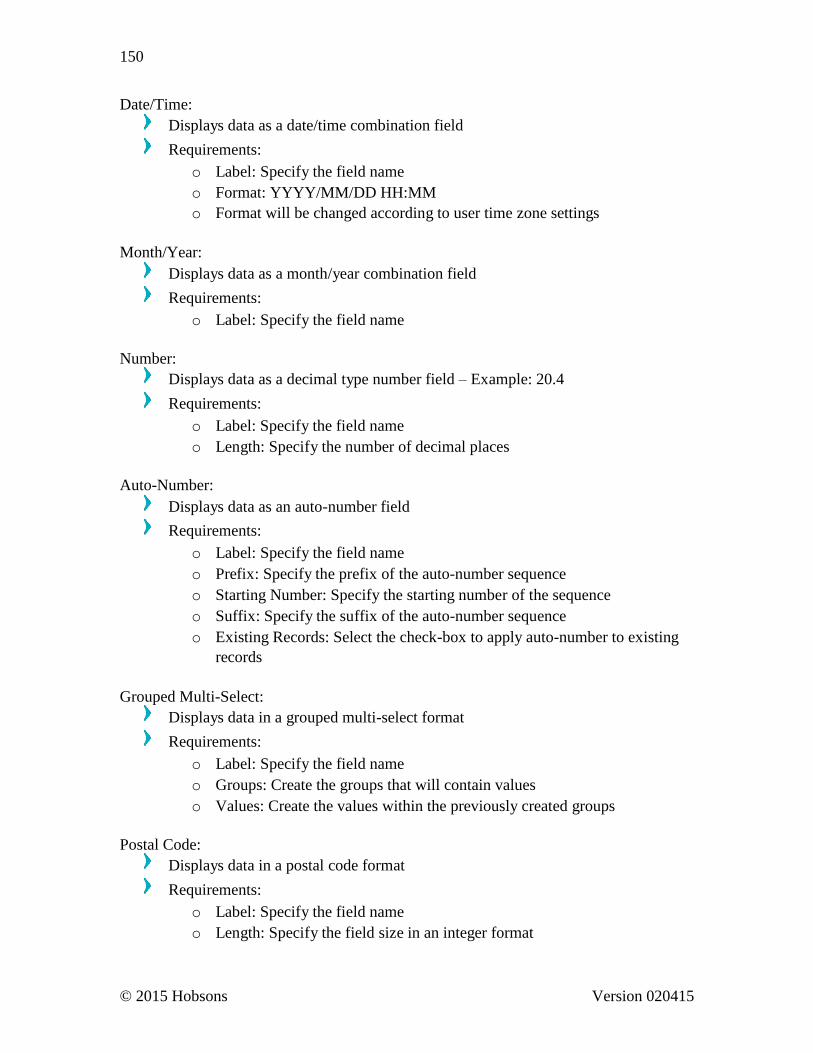
© 2015 Hobsons Version 020415
150
Date/Time:
Displays data as a date/time combination field
Requirements:
o Label: Specify the field name
o Format: YYYY/MM/DD HH:MM
o Format will be changed according to user time zone settings
Month/Year:
Displays data as a month/year combination field
Requirements:
o Label: Specify the field name
Number:
Displays data as a decimal type number field – Example: 20.4
Requirements:
o Label: Specify the field name
o Length: Specify the number of decimal places
Auto-Number:
Displays data as an auto-number field
Requirements:
o Label: Specify the field name
o Prefix: Specify the prefix of the auto-number sequence
o Starting Number: Specify the starting number of the sequence
o Suffix: Specify the suffix of the auto-number sequence
o Existing Records: Select the check-box to apply auto-number to existing
records
Grouped Multi-Select:
Displays data in a grouped multi-select format
Requirements:
o Label: Specify the field name
o Groups: Create the groups that will contain values
o Values: Create the values within the previously created groups
Postal Code:
Displays data in a postal code format
Requirements:
o Label: Specify the field name
o Length: Specify the field size in an integer format

© 2015 Hobsons Version 020415
151
Date/Time:
Radius modules are editable so they may align with established institutional naming
conventions. Users can modify the default names and labels for all system modules.
Prior to making edits, the user should keep record of all changes for documentation
purposes.
Step 1: Name the Module
It is necessary to provide both a Singular and Pluralized version of the name. For
example, if editing the Locations tab the user would provide “Location” and
“Locations.”
Step 2: Module Label
The Module Label is the “title” of a record. The label can contain both free-form text and
field values. This label will display anywhere the record is uniquely represented, for
example, in the Recent Items and the detail view Title bar.
Prior to editing, default module labels will be present. To add labels:
Click the Wand icon – located on the right portion of the screen
Clicking the icon triggers a drop-down menu to appear. The drop-down provides the user
with a list of available labels. Using the list, select the desired labels and click Save when
finished making edits.
Field Dependency
Radius allows for the creation of Field Dependencies, which establishes a “parent-child”
relationship between two pick lists. Field dependencies can be created for any record
type; however, prior to establishing the dependency the user should confirm the field
exists.
Step 1: Create a New Dependency

© 2015 Hobsons Version 020415
152
Setup”Selected Module”Field Dependency
Click the New icon
Step 2: Establish the Parent-Child Relationship
After clicking New, users are presented the opportunity to select a Field Parent and
Field Child.
Every Radius Module has a unique set of fields that determines the available options in
the drop down menu. In the above the user is attempting to create a new Field
Dependency within the Contacts module, and has selected “Intended Entry Term” and
“Majors of Interest.”
In the above example available majors are based upon the selected entry term. Once the
“Intended Entry Term” has been set, Radius limits the available choices within “Majors
of Interest.”
Why would a user create this Field Dependency?
This particular situation might arise for an institution where the available majors are
dependent on a particular term.
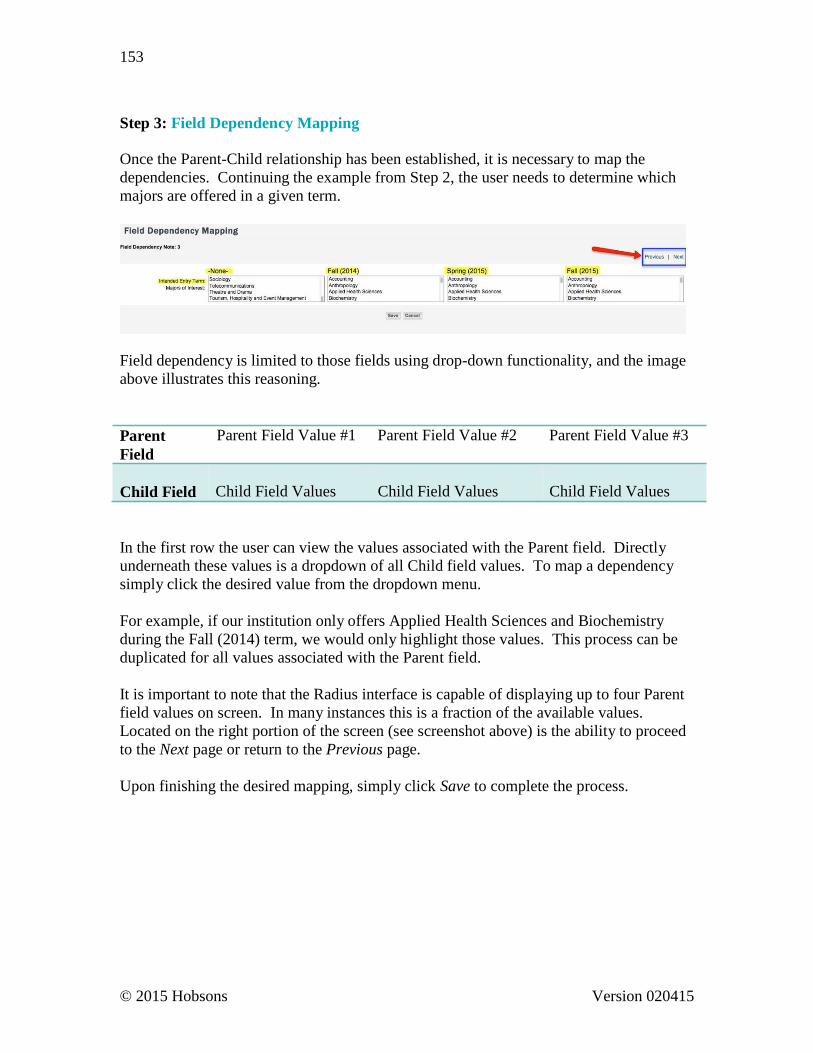
© 2015 Hobsons Version 020415
153
Step 3: Field Dependency Mapping Once the Parent-Child relationship has been established, it is necessary to map the
dependencies. Continuing the example from Step 2, the user needs to determine which
majors are offered in a given term.
Field dependency is limited to those fields using drop-down functionality, and the image
above illustrates this reasoning.
Parent
Field
Parent Field Value #1 Parent Field Value #2 Parent Field Value #3
Child Field Child Field Values Child Field Values Child Field Values
In the first row the user can view the values associated with the Parent field. Directly
underneath these values is a dropdown of all Child field values. To map a dependency
simply click the desired value from the dropdown menu.
For example, if our institution only offers Applied Health Sciences and Biochemistry
during the Fall (2014) term, we would only highlight those values. This process can be
duplicated for all values associated with the Parent field.
It is important to note that the Radius interface is capable of displaying up to four Parent
field values on screen. In many instances this is a fraction of the available values.
Located on the right portion of the screen (see screenshot above) is the ability to proceed
to the Next page or return to the Previous page.
Upon finishing the desired mapping, simply click Save to complete the process.
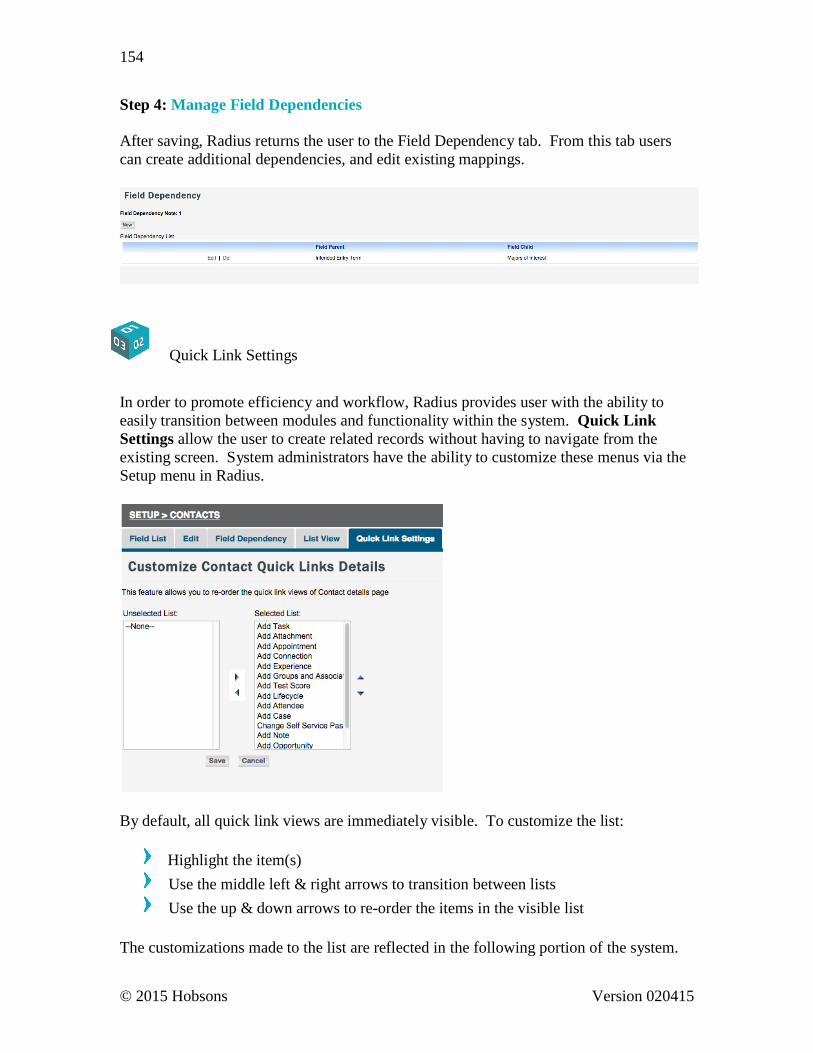
© 2015 Hobsons Version 020415
154
Step 4: Manage Field Dependencies
After saving, Radius returns the user to the Field Dependency tab. From this tab users
can create additional dependencies, and edit existing mappings.
Quick Link Settings
In order to promote efficiency and workflow, Radius provides user with the ability to
easily transition between modules and functionality within the system. Quick Link
Settings allow the user to create related records without having to navigate from the
existing screen. System administrators have the ability to customize these menus via the
Setup menu in Radius.
By default, all quick link views are immediately visible. To customize the list:
Highlight the item(s)
Use the middle left & right arrows to transition between lists
Use the up & down arrows to re-order the items in the visible list
The customizations made to the list are reflected in the following portion of the system.

© 2015 Hobsons Version 020415
155
It is important to note that the available quick links will differ between the various Radius
modules.
Assignment Rules
Assignment rules facilitate the automatic assignment of inbound records to ensure they
are assigned to the appropriate user. The process for creating a new assignment rule
simple; however, depends heavily upon the user’s ability to clearly define the desired
outcomes.
There are two types of Assignment Rules:
Random Assignment
Criteria Assignment
o Assigns records based on one or more user-defined rules. These rules
determine the order and conditions for record distribution.
Assignment Rules can be created for any inbound point of entry – including:
Importing Contact Records
Inquiry Forms
Event Forms
Application Forms
Mailboxes
Additionally, Assignment Rules are available for imports of less than 10,000 records.

© 2015 Hobsons Version 020415
156
Step 1: Create a New Assignment Rule
Navigate to Setup Select a Module Assignment Rules
Click Create New Rule
Provide a Rule Name
Select a Rule Type
o Random Assignment
o Criteria
Click Save
At this point the creation process differs and is dependent upon the selected Rule Type.
Step 2: Criteria Based Assignment Rule
After saving the newly created rule, the user is directed to
Click Create New Rule Entry button. The user is taken to the following screen.
Criteria based assignment rules are a series of logic statements, built upon user-defined
criteria. The Query Builder guides the user through the query creation process. There

© 2015 Hobsons Version 020415
157
are six components that are necessary for completing a single line of query logic. These
components include:
Parenthesis (Open and Closed)
o The set of parenthesis signifies the beginning and end of a statement.
Area
o The Area refers to specific module/sub-module from which the user
wishes to pull data.
Field
o The Field determines the available values from which the user can utilize
in the creation of the query.
Operator
o The Operator connects the Field and the Value. Operators include
Non-Numerical Fields Numerical Fields
Is <
Isn’t <=
Contains =
Doesn’t Contain <>
Starts With >
Ends With >=
Is Empty Is Empty
Is not Empty Is not Empty
Value
o The available Values are limited to the selected Field and are the unique
piece of data for which the user is searching.
o The format of the data is dependent on the configuration of the field. For
example, if the field was configured as a drop-down the user will have the
ability to use the drop-down in the building of the query.
Criteria based assignment rules can be as simple as a single line, or can consist of
numerous lines of logic. To add, remove, or reposition lines, Radius provides the
following set of Actions
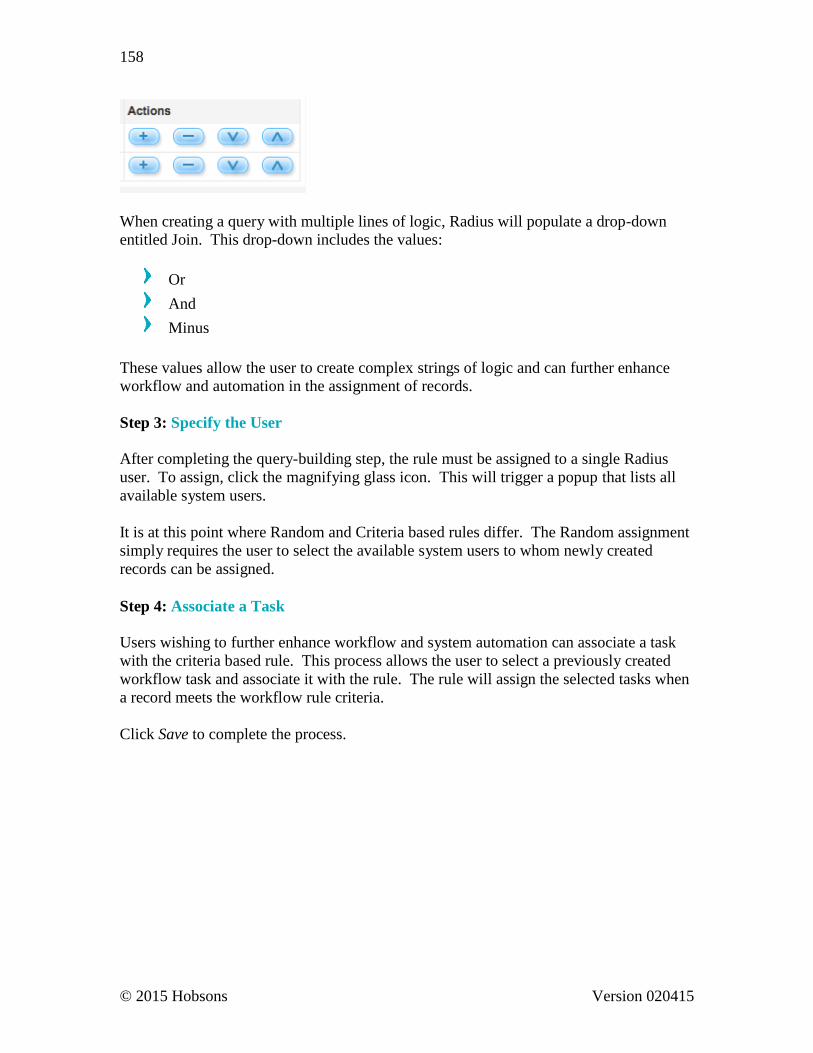
© 2015 Hobsons Version 020415
158
When creating a query with multiple lines of logic, Radius will populate a drop-down
entitled Join. This drop-down includes the values:
Or
And
Minus
These values allow the user to create complex strings of logic and can further enhance
workflow and automation in the assignment of records.
Step 3: Specify the User
After completing the query-building step, the rule must be assigned to a single Radius
user. To assign, click the magnifying glass icon. This will trigger a popup that lists all
available system users.
It is at this point where Random and Criteria based rules differ. The Random assignment
simply requires the user to select the available system users to whom newly created
records can be assigned.
Step 4: Associate a Task
Users wishing to further enhance workflow and system automation can associate a task
with the criteria based rule. This process allows the user to select a previously created
workflow task and associate it with the rule. The rule will assign the selected tasks when
a record meets the workflow rule criteria.
Click Save to complete the process.
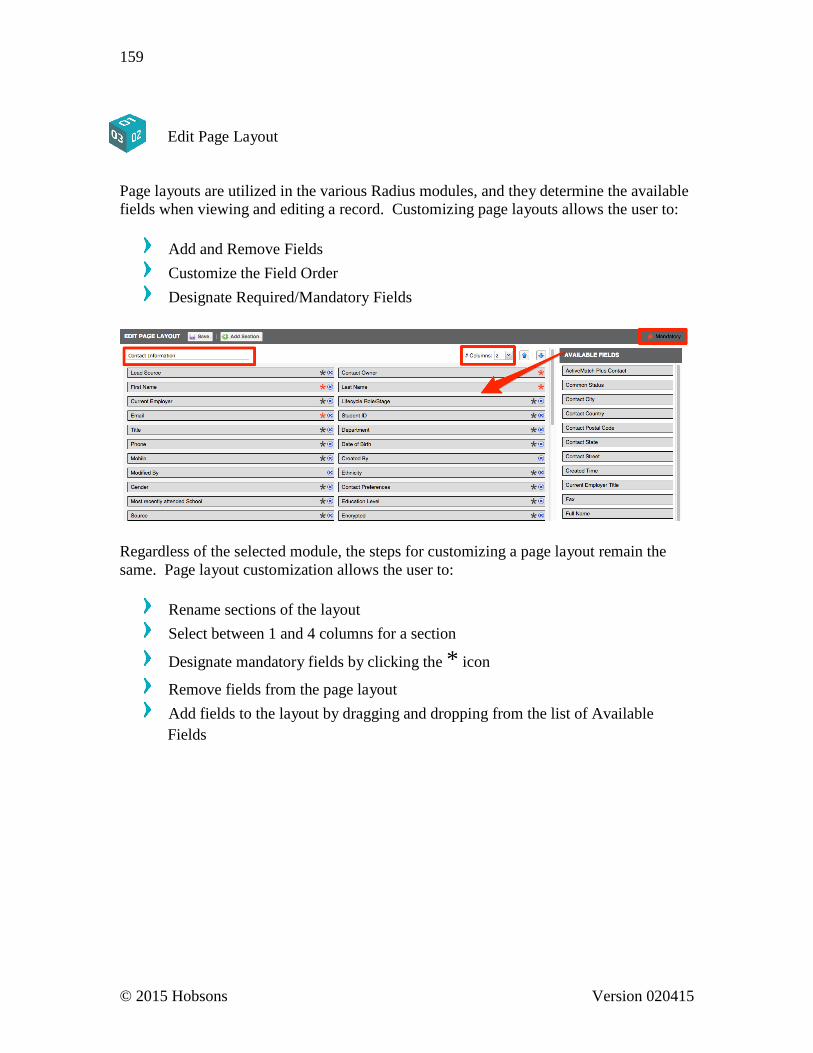
© 2015 Hobsons Version 020415
159
Edit Page Layout
Page layouts are utilized in the various Radius modules, and they determine the available
fields when viewing and editing a record. Customizing page layouts allows the user to:
Add and Remove Fields
Customize the Field Order
Designate Required/Mandatory Fields
Regardless of the selected module, the steps for customizing a page layout remain the
same. Page layout customization allows the user to:
Rename sections of the layout
Select between 1 and 4 columns for a section
Designate mandatory fields by clicking the * icon
Remove fields from the page layout
Add fields to the layout by dragging and dropping from the list of Available
Fields

© 2015 Hobsons Version 020415
160
Duplicate Contact Settings
Duplicate Contact Settings allow the user to configure the parameters that are used for
comparing inbound contacts with existing contacts. The duplicate check uses the student
ID and email address combined with a user-set weighted threshold. Each field in the
weighted threshold is given a numerical value, all of which are totaled and compared. If
the sum of the inbound contact field values is equal to or greater than the threshold value,
then the inbound contact information is appended to the matching contact record.
There are two stages of verification a record is subjected to before it is added/appended.
The first of these stages is the Absolute Matching Criteria.
Users have the option of selecting from three different Absolute Matching Criteria. If an
incoming record matches the selected criteria, the identified record is immediately
appended. In the event the record fails this test, the system will create a new record.
Users who desire a second verification be performed can configure Threshold Matching
Criteria.
Threshold Matching Criteria provides the user the ability to designate the threshold a
record must meet (or surpass) prior to appending an existing record.
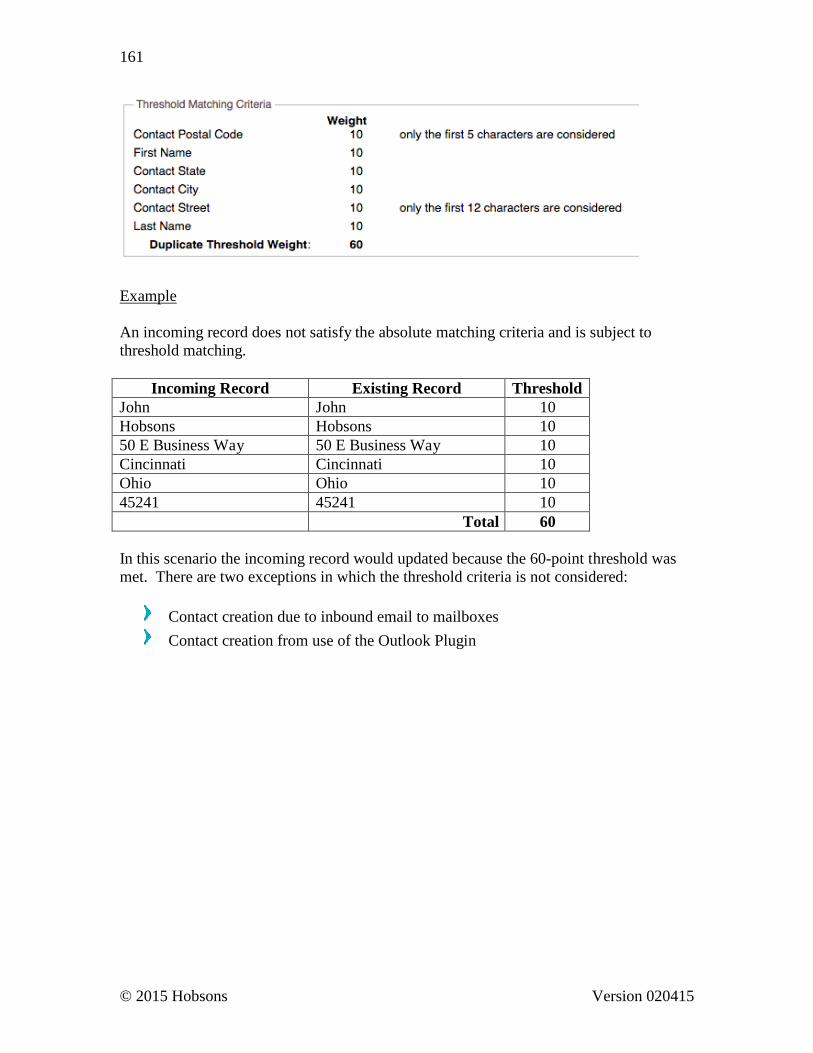
© 2015 Hobsons Version 020415
161
Example
An incoming record does not satisfy the absolute matching criteria and is subject to
threshold matching.
Incoming Record Existing Record Threshold
John John 10
Hobsons Hobsons 10
50 E Business Way 50 E Business Way 10
Cincinnati Cincinnati 10
Ohio Ohio 10
45241 45241 10
Total 60
In this scenario the incoming record would updated because the 60-point threshold was
met. There are two exceptions in which the threshold criteria is not considered:
Contact creation due to inbound email to mailboxes
Contact creation from use of the Outlook Plugin

© 2015 Hobsons Version 020415
162
APPENDIX A
R a d i u s D a t a D i a g r a m Since Radius is a relational database it is important to understand the structure of system.
The following illustrations represent the data structure of the system.

© 2015 Hobsons Version 020415
163
-
II
:I: 0 OJ (/)
0 z (/)
Contact
Organ1zat1ons
L1fecycles
Locat1ons
Tasks
Appointments
lnqUines
lnqu1ry Forms
Interactions
E-ma11 Templates
Targets
E-ma1l Templates
Comm Plans
Campaigns
ExclUSIOns
Self Serv1ce Cntr
Events
Attendees
Targets
E-ma11 Templates
Locations
Event Forms
Programs
Term/Iteration
Applicants
Application Forms
L1fecycles
Ema1 l Templat es
lnvo1ces Payment
Gateway S1 tes
Requirements
Commumcat1on Plans
Discounts
Recommendations
Self Serv1ce Center
Reports
Dashboards
lnqUines
Interactions
Reports
;o Q)
c. c CJ)
s: 0c. c
CD CJ)
164
© 2015 Hobsons Version 020415
...
"*
II
*i\Q.t.l!elfimti11W
Wf11mBelul§elpwl
Mleitl.ll9§111@i•lM
lti!J·i·ilelr;mtili.W
M4i1Mb!eel§e!QW
1®•¥
moo _ 3
:I: 0 OJ (/)
0 z (/)
ui§Ub
w.;nmUui4ei@W
IG''¥ Wj11melui§ellfW
1®1¥
&iQ•l•Jie!fjjtJj1fll
WjUtfiblui§e!pM
m& Wf11mBelul§elpwl
1®'¥
WMifiDeleai#)eiCWI
MJulele]eiii@I•JtW
Mii!!J·' lhilj'jttDI.W
M4im,J,U§eiEW
€@:£ IBi•I.JieUmg;nw W£1i1Mh!eel§e!fWI
M4iEta e!eel§eiN'
m;
lti!j.i !ielmtmi.W
W4iEDeleel#je!QW
Ml!mW!1¥li11&MI ••·ieiml@f4W
M§ltrdltJ.!Ji,Jdl
d:(
W£1i6file!eel§eii£M
1®'¥
MM·J.IU4Ait.!... M!.1,Jml!eleM
ww.mmi:Jinmw . ::ti!lfimlt.:. ww llliAa•i§lt§e!Ag+M
Mill 4!1MM
Q)
;7\
CD C/)
c "'C
Q)
() 0
,:.:.:.J.. Q)
0,..... ·.V
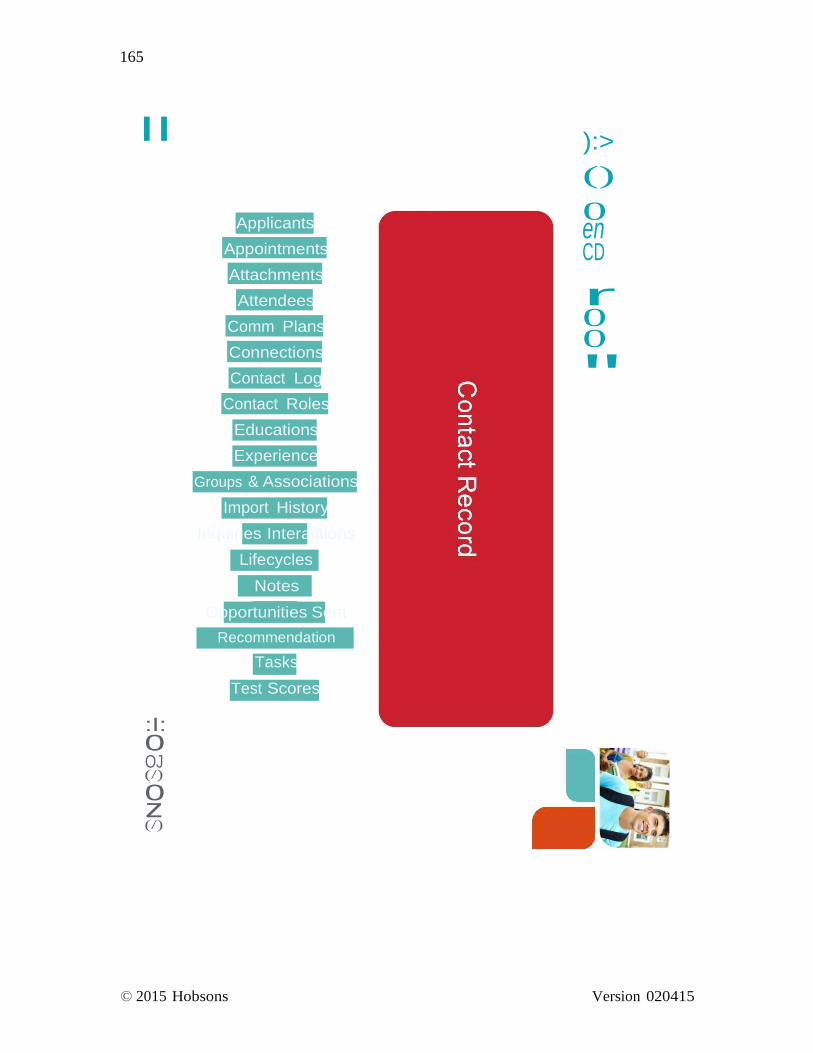
165
OJ (/)
0 z (/)
© 2015 Hobsons Version 020415
II
:I: 0
Applicants
Appointments
Attachments
Attendees
Comm Plans
Connections
Contact Log
Contact Roles
Educations
Experience
Groups & Associations
Import History
Inquiries Interactions
Lifecycles
Notes
Opportunities Sent
Recommendation
Tasks
Test Scores
):>
()
0 en CD
r 0 0
"
OJ (/)
0 z (/)
© 2015 Hobsons Version 020415
166
II
en
Appointments
Attachments
Appomtments
Attachments
Invo1ce H1story
Notes
Payment Gateway
Transactions
Payments
Import History
)> "'0 "'0
('") Q)
::J ,-+.
Tasks
Payment
Transact1on Log
Notes Payments
Attachments
Notes
Recommendations
Attachments
Notes
Requirements

OJ (/)
0 z (/)
© 2015 Hobsons Version 020415
167
II
:I: 0
Tasks

OJ (/)
0 z (/)
© 2015 Hobsons Version 020415
168
II
=
:I: 0
)>
CD
c::J..
CD CD CJ)
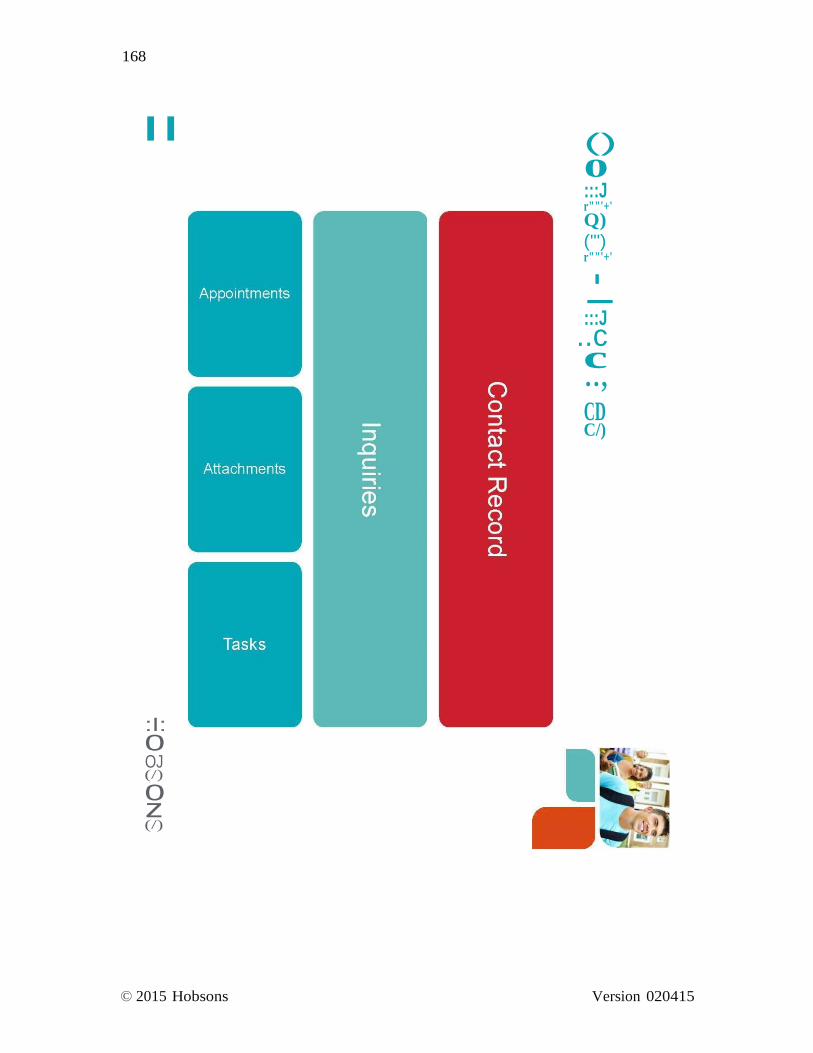
OJ (/)
0 z (/)
© 2015 Hobsons Version 020415
168
-
II ()
0 :::J r""'+'
Q) ('") r""'+'
I
:::J
..c c.., CD C/)
:I: 0

OJ (/)
0 z (/)
© 2015 Hobsons Version 020415
169
-
-
II ()
0 :::J r""'+'
Q) ('") r""'+'
I
:::J r""'+'
C.D, Q) ('") r""'+'
0 :::J C/)
:I: 0

OJ (/)
0 z (/)
© 2015 Hobsons Version 020415
170
II
-
-·
:I: 0
r
ct ('")
'< ('")
CD en
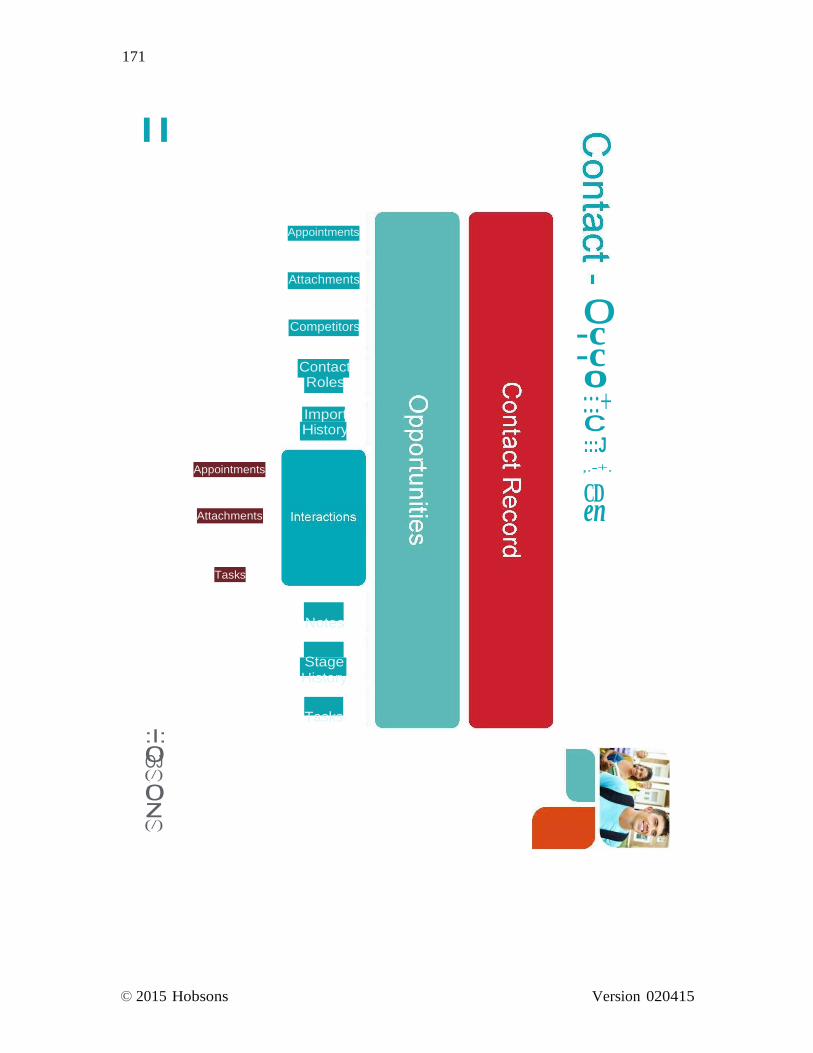
OJ (/)
0 z (/)
© 2015 Hobsons Version 020415
171
II
Appointments
Appointments
Attachments
Attachments
Competitors
Contact Roles
Import History
0 -c -c 0 :::+ c :::J ,.-+.
Cen
D
Tasks
Notes
Stage History
:I: 0
Tasks
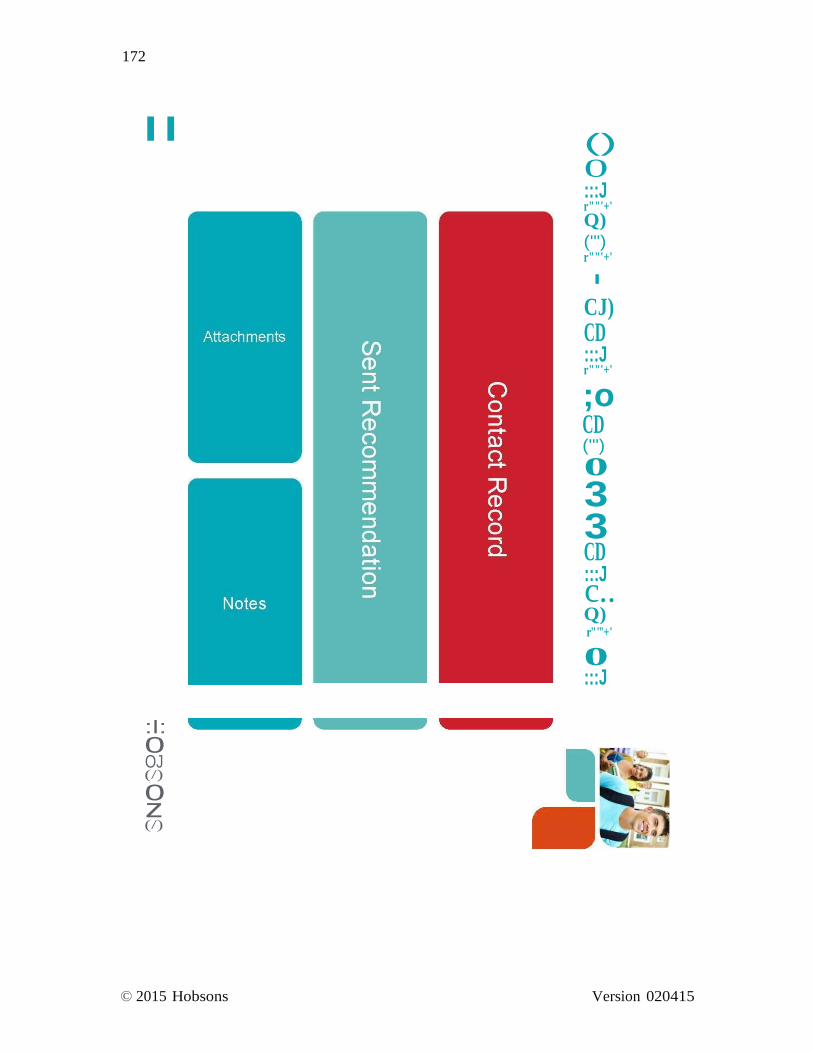
OJ (/)
0 z (/)
© 2015 Hobsons Version 020415
172
-
II ()
0 :::J r""'+'
Q) ('") r""'+'
I
CJ) CD :::J r""'+'
;o CD ('")
0
3 3 CD
c:::.J.
Q) r""'+'
0 :::J
:I: 0
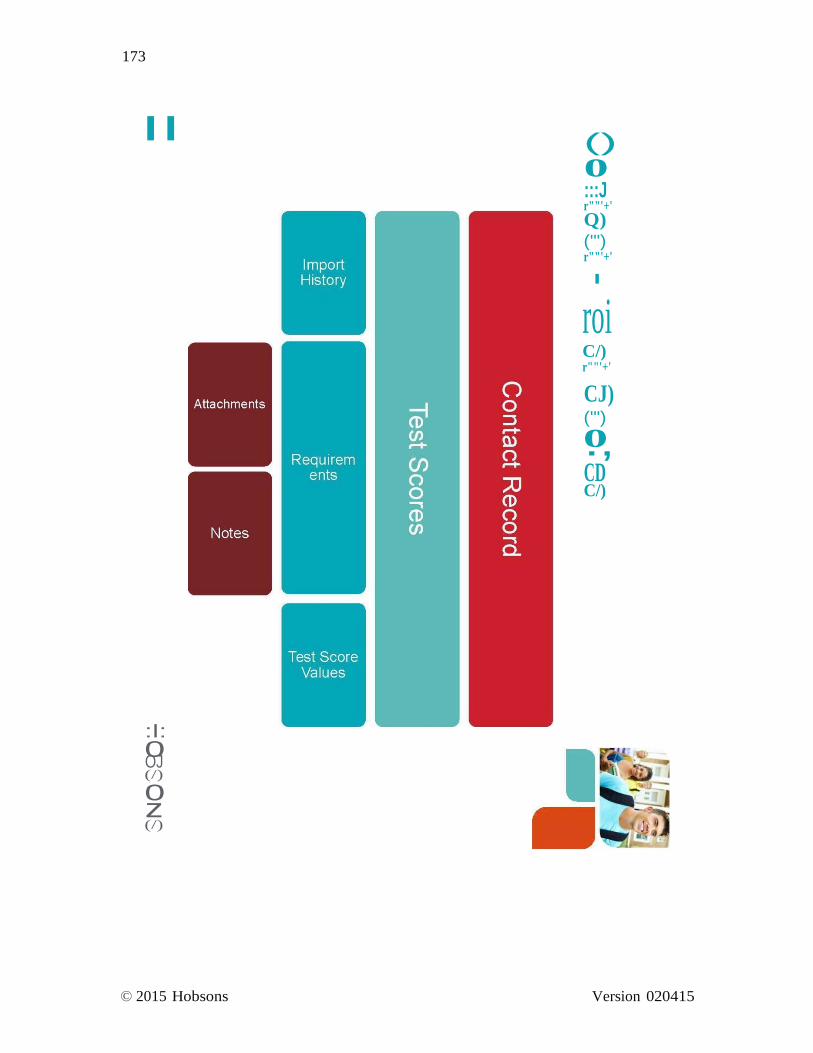
OJ (/)
0 z (/)
© 2015 Hobsons Version 020415
173
II ()
0 :::J r""'+'
Q) ('") r""'+'
I
roi C/) r""'+'
CJ) ('")
0., CD C/)
:I: 0
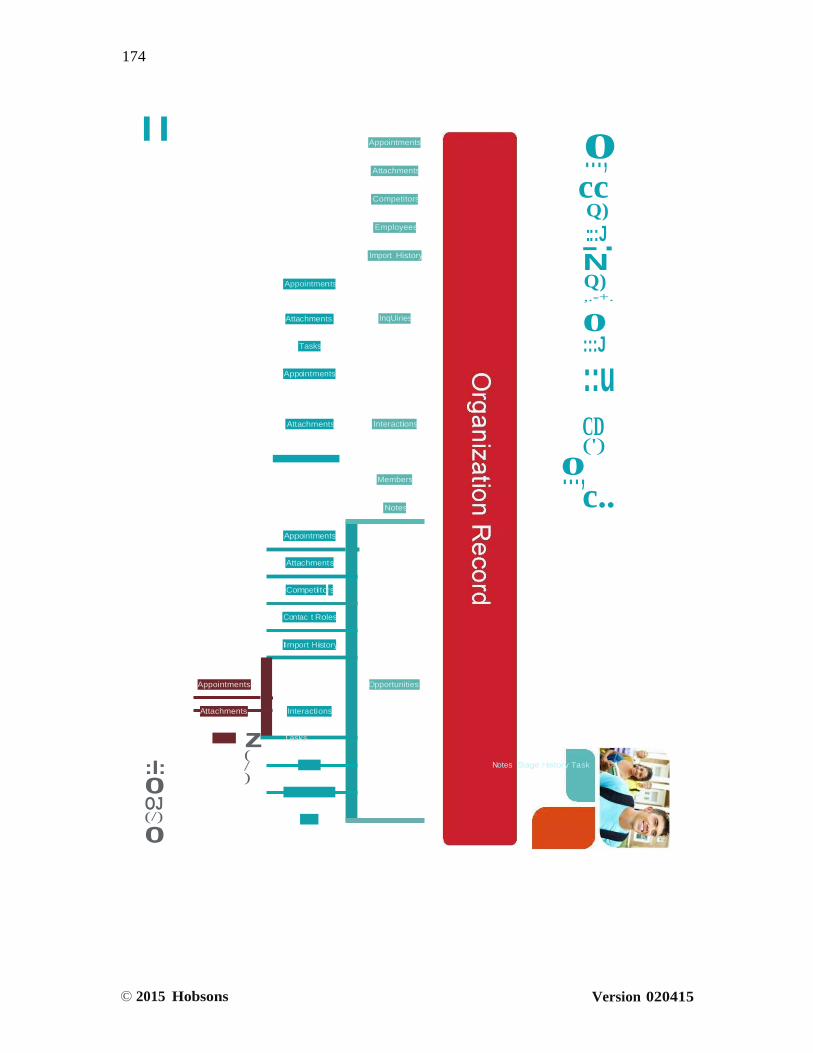
174
© 2015 Hobsons Version 020415
N
II
Appointments
Appointments
Attachments
Competitors
Employees
Import History
0..., cc Q)
-:::J·
Q) ,.-+.
Attachments InqUiries
Tasks
Appointments
0 :::J
::u
-Attachments
Appointments
Attachments
Competitors
Contac t Roles
Import History
Interactions
Members
Notes
CD (')
0..., c..
Appointments Opportunities
Attachments Interactions
:I: 0 OJ (/)
0
z (/)
Tasks
Notes Stage History Ta sk
175
© 2015 Hobsons Version 020415
Students
Tasks
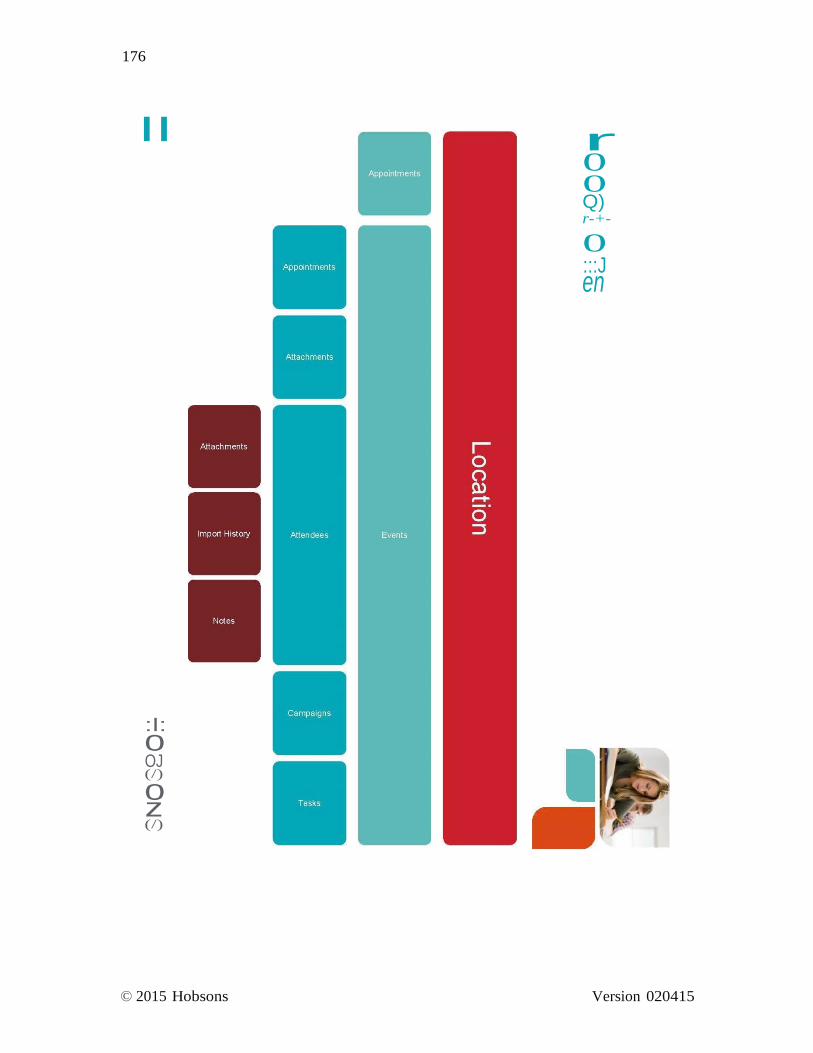
176
© 2015 Hobsons Version 020415
II
:I: 0 OJ (/)
0 z (/)
r 0 0 Q) r-+-
0 :::J en

177
© 2015 Hobsons Version 020415
--
II
WAf€M
"..",U 0 c.c., Q)
3 en
••
y;..!liii@E
+.@iiijQM
''IW!"HP* ++fA
..... .
- a.
mw
M.&P:iNi* **fA .,,dtif4Q*
++te
:I: 0 OJ (/)
0
178
© 2015 Hobsons Version 020415
z (/)
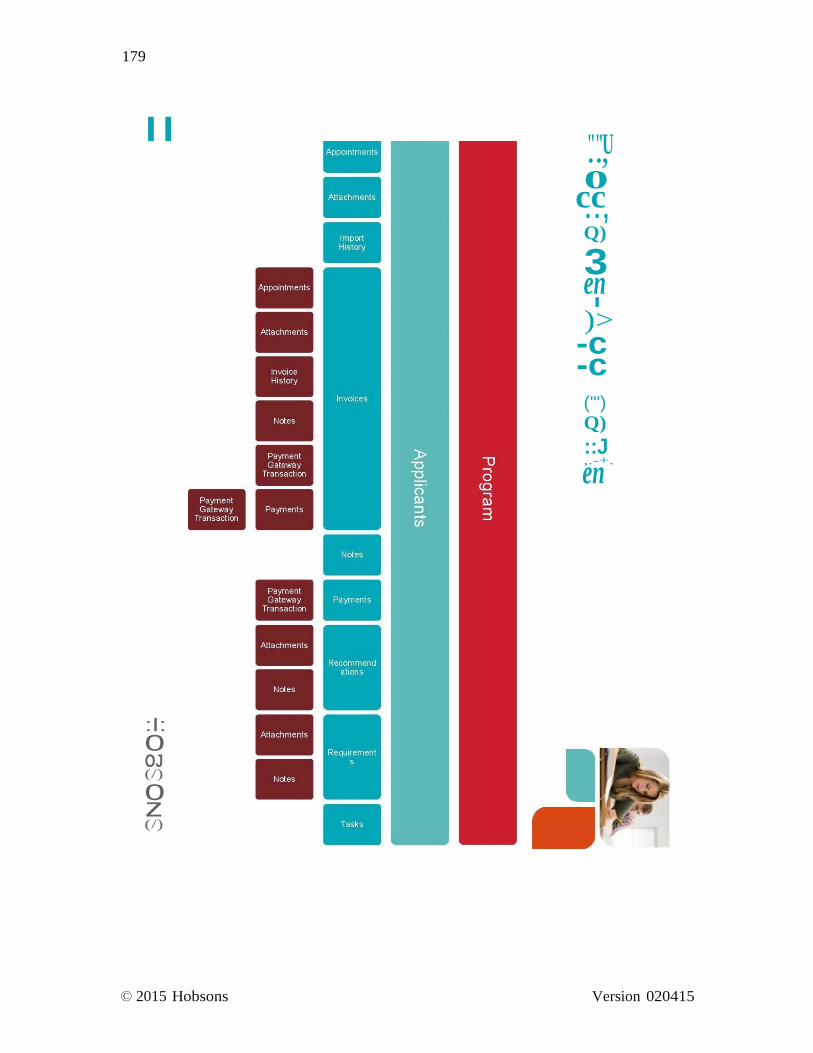
179
© 2015 Hobsons Version 020415
en
II "..",U 0 c.c., Q)
3 en I
)> -c -c
('") Q)
::J ,.-+.
:I: 0 OJ (/)
0 z (/)
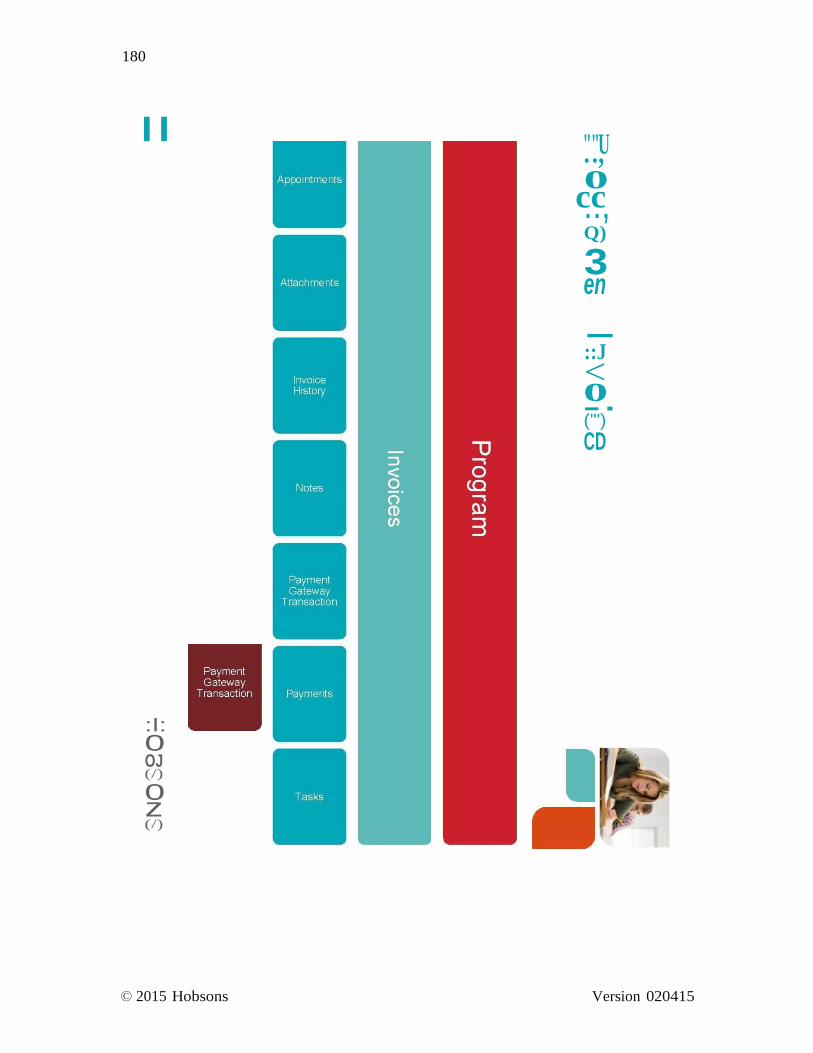
180
© 2015 Hobsons Version 020415
-
-·
II "..",U 0 c.c., Q)
3 en
::J
< 0 ('")
CD
:I:
0 OJ (/)
0 z (/)
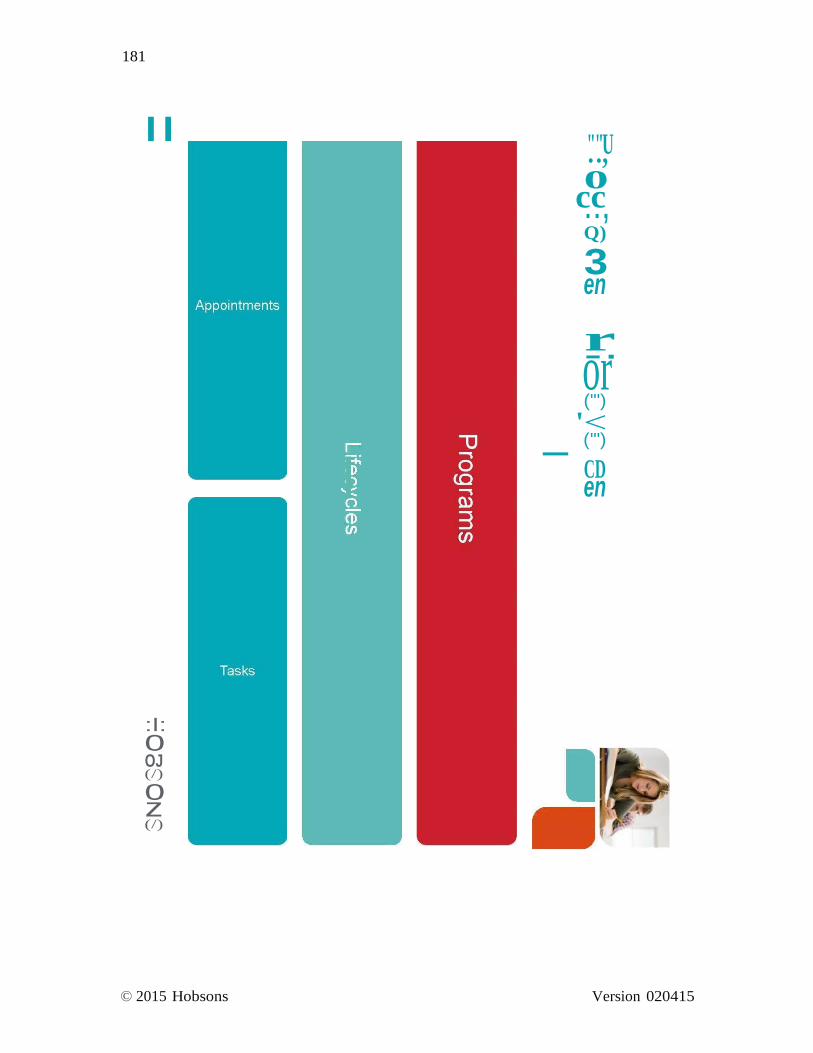
181
© 2015 Hobsons Version 020415
or
-
II "..",U 0 c.c., Q)
3 en
r-·
('")
'< ('")
CD en
:I: 0 OJ (/)
0 z (/)

182
© 2015 Hobsons Version 020415
or
-
II "..",U 0 c.c., Q)
3 en
r-·
('")
'< ('")
CD en
:I: 0 OJ (/)
0 z (/)
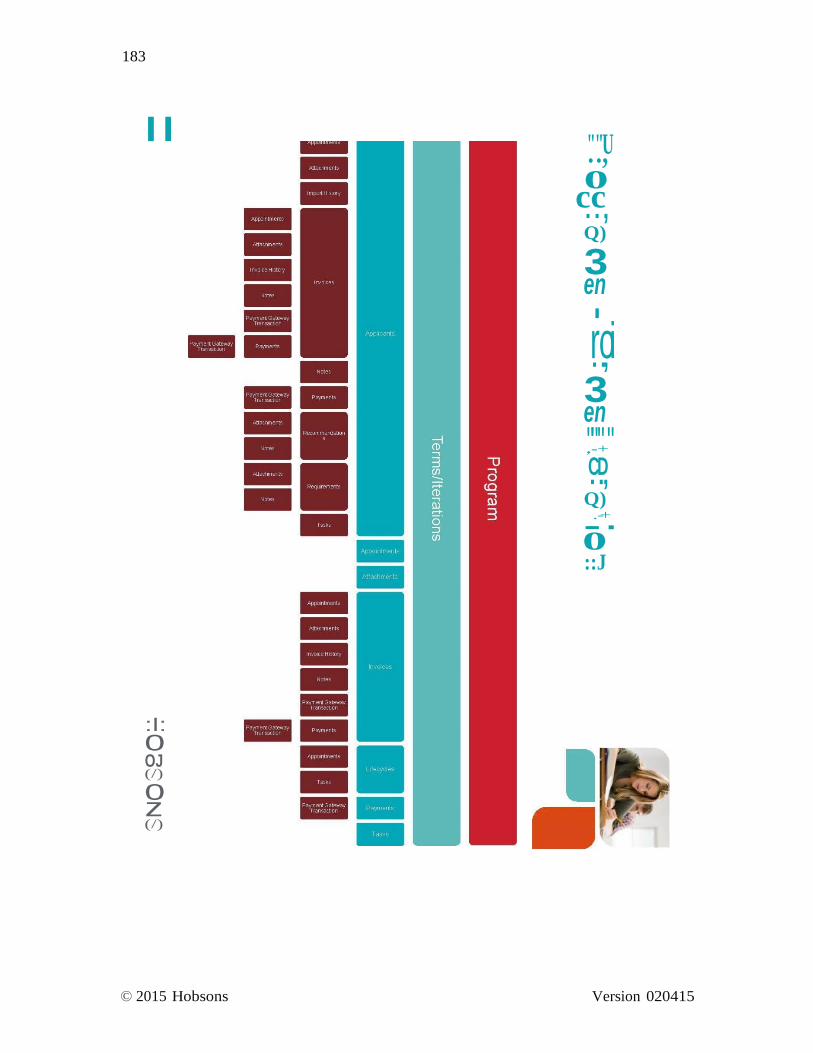
183
© 2015 Hobsons Version 020415
0
II "..",U 0 c.c., Q)
3 en I
r..o,i 3 en ,"."-"+" C..D, Q)
-.-+
· ::J
:I: 0 OJ (/)
0 z (/)
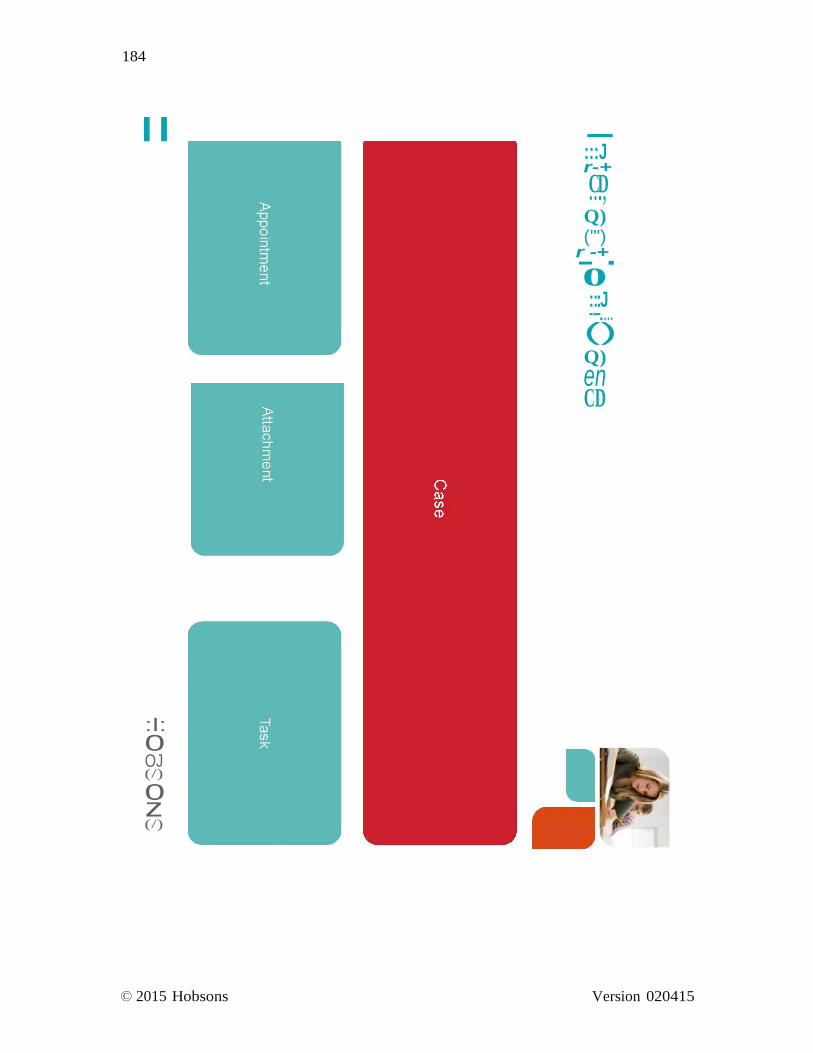
184
© 2015 Hobsons Version 020415
-
0
II :::J r-+
C...D., Q) ('")
r--+· :--:-:.J....
() Q)
en CD
:I: 0 OJ (/)
0 z (/)
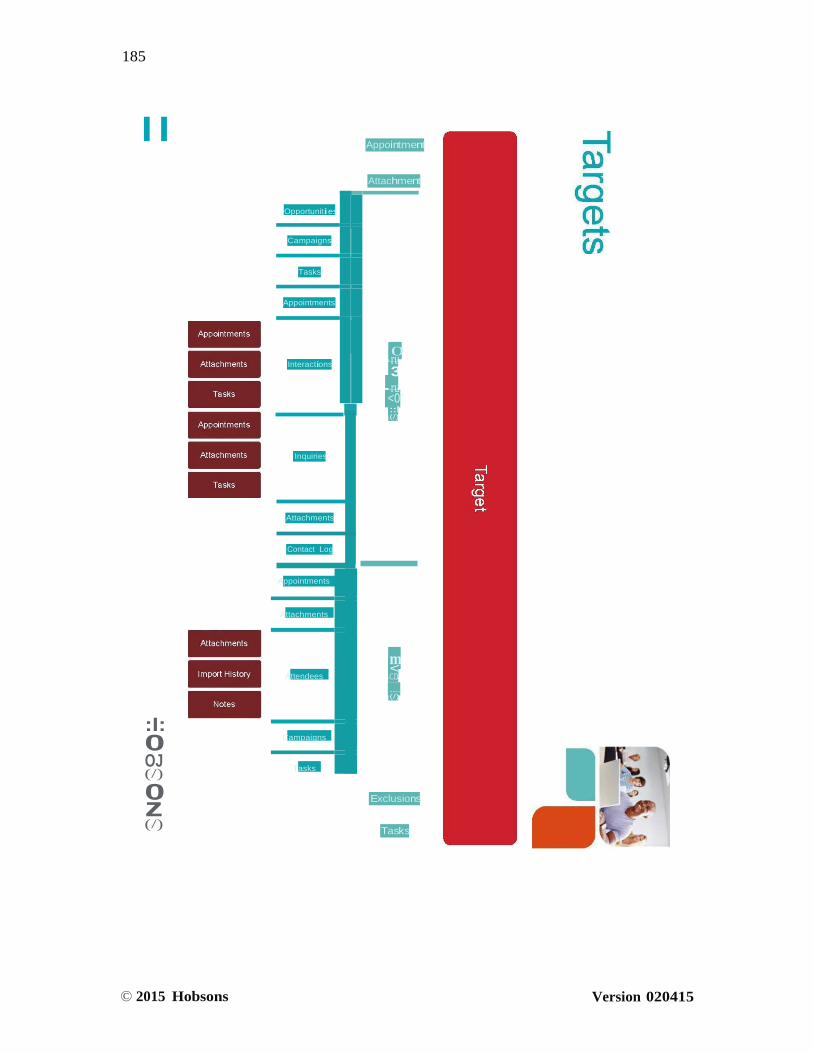
185
© 2015 Hobsons Version 020415
"'0
::l
Opportunities
0 ru 3 ru
<0"
Campaigns
Tasks
Appointments
Interactions
Appointments
Attachments
Attendees
Campaigns
Tasks
II
:I: 0 OJ (/)
0 z (/)
Inquiries
Attachments
Contact Log
Appointment Attachment
::l (/)
m < CD
........ (/)
Exclusions
Tasks
186
© 2015 Hobsons Version 020415
-
- ·
II
:I: 0 OJ (/)
0 z (/)
() 0
3 3 c ::::J
('") Q)
0-·
::::J C/)
""U Q)
::::J C/)

187
© 2015 Hobsons Version 020415
-·
II
:I: 0 OJ (/)
0 z (/)
() Q)
3 "'C Q)
cc
188
© 2015 Hobsons Version 020415
::J
Ql
Ql
II
Attachments
Appointments
Attachments
m < CD ,:.:.:.J.. C/)
)>
1t Import History c.
Cl) Cl) C/)
Notes
Appointments
Attachments
Campaigns
Contact Log
Inquiries ()
3 "0
ce· ::J C/)
:I: 0 OJ (/)
0 z (/)
Interactions
Opportunities
Tasks