user guide - admiralty planner... · passage planner user guide v4.1 ... products you hold in the...
TRANSCRIPT

V1.0
User guide

Passage Planner User Guide V4.1
Upgrading to v4.1
Users of 3.4 or older versions of e-Navigator Planning Station or 1.3 or older versions of the e-NP Reader will need to follow these instructions to begin using the v4.1 application.
1. Request an ADMIRALTY Registration Key from your ADMIRALTY Chart agent.
This single registration key will be used for e-Navigator Planning Station, the e-NP Reader and Passage Planner, depending on what you are licenced to use.
2. When you have received your registration key, Uninstall your previous versions of e-Navigator Planning Station and e-NP Reader.
These applications will no longer receive updates when the v4.1 application has been activated.
Failure to remove these products may cause issues with your v4.1 application when installed.
3. Install the v4.1 application using the ADMIRALTY gateway quarterly DVD.
The ‘Installing the Application’ section of the user guide will provide further details about this process.
Passage Planner User Guide V4.1
Installing the application
The ADMIRALTY gateway disc is required to install the application.
The installation process can only be run on a Windows user profile with Admin rights.
1. Insert the DVD into the DVD drive of your computer. An ‘AutoPlay’ dialogue box will appear automatically.
Click Open folder to view files.
2. Double-click the file Planning Station_4_1.exe.
3. An ‘ADMIRALTY 4.1 Setup’ window will appear. Click Install.
4. A progress bar will appear, showing that the installation files are being processed.
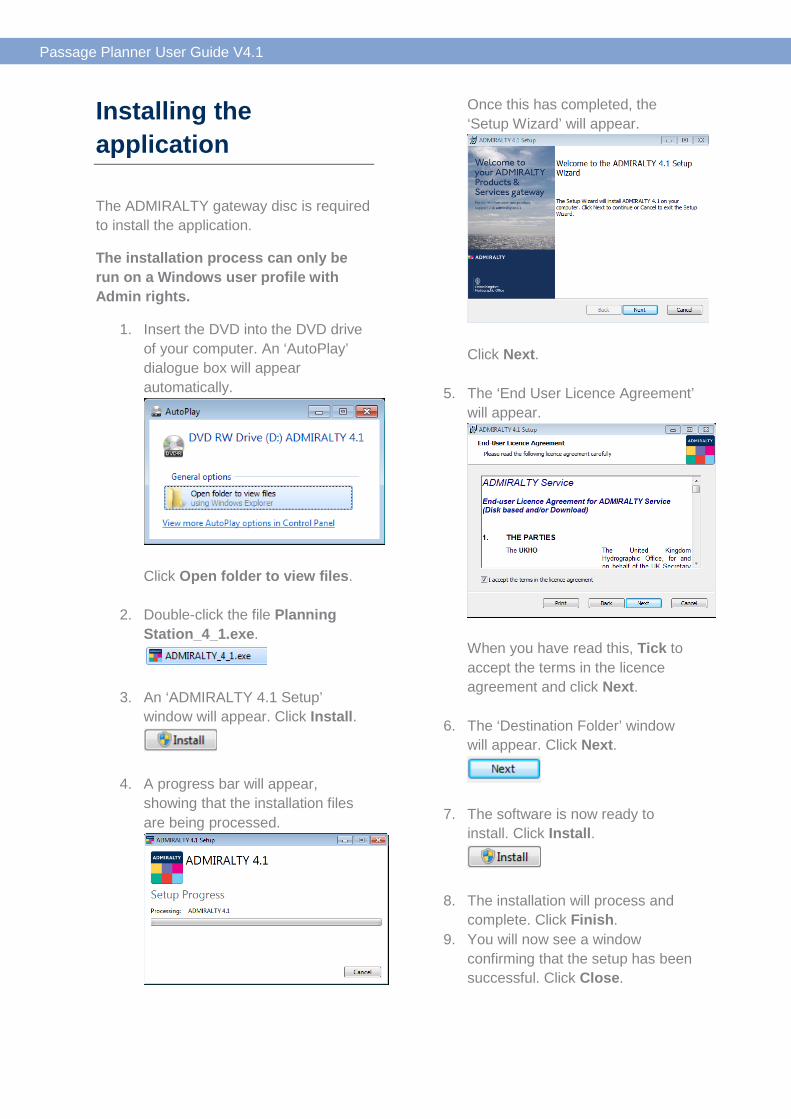
Once this has completed, the ‘Setup Wizard’ will appear.
Click Next.
5. The ‘End User Licence Agreement’ will appear.
When you have read this, Tick to accept the terms in the licence agreement and click Next.
6. The ‘Destination Folder’ window will appear. Click Next.
7. The software is now ready to install. Click Install.
8. The installation will process and complete. Click Finish.
9. You will now see a window confirming that the setup has been successful. Click Close.

Passage Planner User Guide V4.1
The ADMIRALTY icon will now be available from your desktop.
IMPORTANT
The application must be run for the first time on a Windows user profile with Admin rights.
Once the application has been opened for the first time, it can then be closed prior to registration, and from that point forwards all functions can be accessed without the need for Admin rights.

Passage Planner User Guide V4.1
Registering
The ADMIRALTY gateway software will need to be installed following the instructions provided in the User Guide: ‘Installing the Application’ before you can register.
To register the application, the ADMIRALTY registration key will need to be saved to the desktop of the PC where the application has been installed. Your ADMIRALTY Chart Agent will supply this file.
Registering via the internet
1. Double-click the ADMIRALTY file which should be saved on your desktop.
2. The application will launch with your unique registration Key automatically entered into the appropriate field.
Click Next.
3. The ‘Set Machine Name’ page will appear. This allows you to register your installation as ‘Master’, ‘Back-up’ or ‘Reserve’.
‘Back-up’ and ‘Reserve’ should only be used for the e-NP service.
Select the machine name you want to use and click Next.
4. A warning will appear advising that updates will no longer be sent for older versions of ADMIRALTY e-Navigator Planning Station and ADMIRALTY e-Reader.
To proceed, click OK.
5. Select Internet and click Next.
6. Click Register.
This will communicate with the UKHO to register the application. This may take a few minutes depending on your connection.
7. When the process has finished, a ‘Successfully registered ADMIRALTY software’ message will be displayed. Click Finish.
8. The application will need to be restarted before you have access to your ADMIRALTY products. Close the application and open it again using the desktop icon. The home screen will now show a list of your licenced products on the right-hand side of the ‘Home’ screen.

Passage Planner User Guide V4.1
The options and information shown on the ‘Home’ screen will vary depending on the products you have subscribed.
Registering via email
1. Double-click the ADMIRALTY file which should be saved on your desktop.
2. The application will launch with your unique registration Key automatically entered into the appropriate field.
Click Next.
3. The ‘Set Machine Name’ page will appear. This allows you to register your installation as ‘Master’, ‘Back-up’ or ‘Reserve’.
‘Back-up’ and ‘Reserve’ should only be used for the e-NP service.
Select the machine name you want to use and click Next.
4. A warning will appear advising that updates will no longer be sent for older versions of ADMIRALTY e-Navigator Planning Station and ADMIRALTY e-Reader.
To proceed, click OK.
5. Select Email and click Next.
6. Click Browse to bring up the file browser window.
Navigate to the location where you would like to save the request file. When a location has been selected, click OK to close the Browse window.
7. Click Save.

Passage Planner User Guide V4.1
8. The wizard will provide on-screen
instructions for emailing the saved request file.
Follow these instructions in your chosen email client to email the registration request file to the UKHO. Once this has been sent, click Finish.
9. A response email will be sent from the UKHO via email to the address used to send the request. Save the response file to a location on the PC where the application is installed.
If you have closed the application since sending the request file, proceed to Step 10. Alternatively, Proceed to Step 12.
10. Open the application if it has been closed since sending the request and click the Wizards Icon on the top-right menu bar.
11. On the ‘Available Wizards’ menu, click Registration.
12. On the ‘Registration – Status’ page, click Apply to load the registration response.
13. Click Browse to bring up the file browser window.
Navigate to the folder where the response file is saved and click Ok. The application will automatically point to the response file.
14. Click Load.
15. When the process has finished, a ‘Successfully processed Registration Response’ message will be displayed. Click Finish.
16. The application will need to be restarted before you have access to your ADMIRALTY products. Close the application and open it again using the desktop icon. The home screen will now show a list of your licenced products on the right-hand side of the ‘Home’ screen.

Passage Planner User Guide V4.1
The options and information shown on the ‘Home’ screen will vary depending on the products you have subscribed.

Passage Planner User Guide V4.1
Searching for products and ports
The application allows users to search for products and ports on the geographic display. The search function can be used on the ‘Catalogue’, ‘Updates’, ‘Renew’ and ‘View’ screens.
Searching for products You can search for ports within the ‘Catalogue’, ‘Updates’, ‘Renew’ and ‘View’ screens. However, you can only search for products you hold in the ‘Updates’ and ‘Renew’ and ‘View’ screens.
1. To begin searching for products, navigate to the relevant screen within the application.
2. Click Search on the geographic display toolbar.
3. Enter the name or location of the product you are trying to find.
4. The application will display the results. Click the Locate the item on the map icon and the geographical display will move to your searched Product.
Searching for ports You can search for ports within the ‘Catalogue’, ‘Updates’ and ‘Renew’ and ‘View’ screens.
1. Open the relevant screen within the application.
5. Click Search on the geographic display toolbar.
2. Enter the Port you would like to search for.
3. The application will display the results. Click the Locate the item on the map icon and the geographical display will move to your searched Port.

Passage Planner User Guide V4.1
Setting up default values for my passage plans
1) Before using Passage Planner click on settings in the top right of the screen.
2) Then select ‘Vessel’
3) Enter as much information as
possible within the vessel settings. Adding this data now will save you time later as it will automatically populate new plans created within Passage Planner.
Passage Planner User Guide V4.1
Creating passage plans
You can create a new plan or edit existing plans within ADMIRALTY Passage Planner. You can also share your plan with another Passage Planner user and view your saved plans on another computer with Passage Planner.
Creating a new passage plan
To create a plan, click on ‘New plan’ and give it a name. When you click ‘Create’ you will be taken to the ‘Planning Menu’. Saved plan files are stored in your ‘Documents’ folder. You will then be able to see them under ’Existing passage plans’ in future.
Editing a passage plan
If you need to open or edit an existing plan, select the plan listed under ‘Existing passage plans’. This will then take you to the Planning Menu.
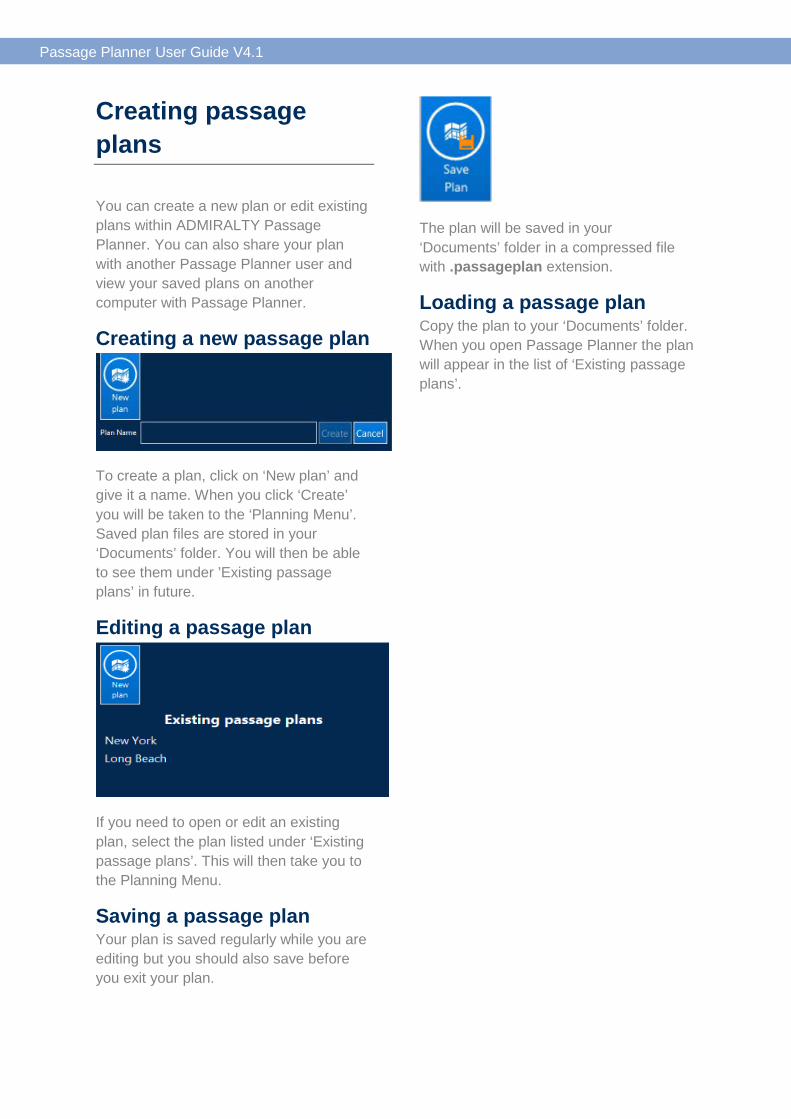
Saving a passage plan Your plan is saved regularly while you are editing but you should also save before you exit your plan.
The plan will be saved in your ‘Documents’ folder in a compressed file with .passageplan extension.
Loading a passage plan Copy the plan to your ‘Documents’ folder. When you open Passage Planner the plan will appear in the list of ‘Existing passage plans’.

Passage Planner User Guide V4.1
Setting up a passage plan
The ‘Planning Menu’ has been designed to be completed in order. You will then save time later as it will populate other areas of your plan.
Vessel particulars Your vessel’s particulars will automatically feed through from the entries in Vessel Settings that you added on installation. However, if anything needs to be edited for the plan you can edit them here. Please note that the vessel’s breadth and depth details must be entered as they are used in the under-keel clearance calculations.
Passage details You may add details for the report cover page including the name of the charterer and type of cargo. You should add a default charter speed for use in the scheduling calculations. This can be edited later if required.
Port details Add details about the departure port and the destination port for the cover page of your report.
Watchkeeping Set up codes for Bridge Teams, engine readiness and position fixing. You can then assign these codes to each waypoint. A summary of the codes will be printed on the report cover page
Reviewers You can name the reviewers of the document so they can confirm that they have reviewed the plan. The names and ranks that you enter will be included in the report cover page for sign off.
Checklist A standard checklist is available to help while planning.
Status of passage plan You can show the planning progress using the dropdown from ‘Draft’, through to ‘Approved’. Then anyone accessing can see how the Passage Plan is progressing.
Passage Planner User Guide V4.1
Creating and editing routes within passage plans
A passage plan must be loaded in Passage Planner before you can create, import or edit the route. Select a plan from the list in the right hand panel.
Creating a route
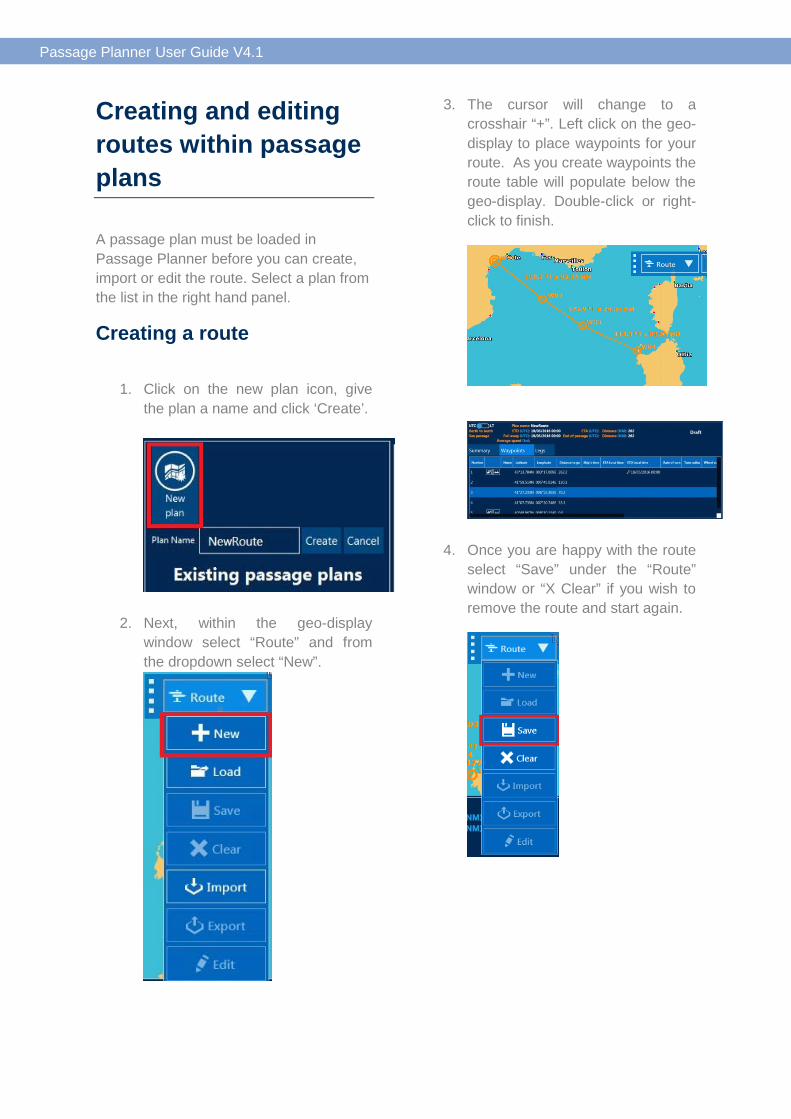
1. Click on the new plan icon, give the plan a name and click ‘Create’.
2. Next, within the geo-display window select “Route” and from the dropdown select “New”.
3. The cursor will change to a crosshair “+”. Left click on the geo-display to place waypoints for your route. As you create waypoints the route table will populate below the geo-display. Double-click or right-click to finish.
4. Once you are happy with the route
select “Save” under the “Route” window or “X Clear” if you wish to remove the route and start again.

Passage Planner User Guide V4.1
Editing a route
Adding a Waypoint
1. Click on “Route” and select “Edit” which will change your cursor to a crosshair.
2. Left click on the course line on the geo-display in the position you want to add the additional waypoint. The new waypoint will be shown and added to the route table.
Deleting a Waypoint
To remove a waypoint, select the waypoint in the route table below the geo-display and press the delete key on the keyboard. You will see the waypoint and leg removed in the geo-display and route table.
Changing the position a Waypoint
1. Left click and hold over the waypoint on the geo-display and drag it into the new position.
2. Alternatively, if you have a precise location, select the waypoint in the route table. In the right hand panel you can either enter Latitude and Longitude values in degrees and decimals with North or South ( e.g. 48.2N), or you can edit the displayed value. The geo-display will update the position once you click outside the selection boxes.
Passage Planner User Guide V4.1
Importing A Route
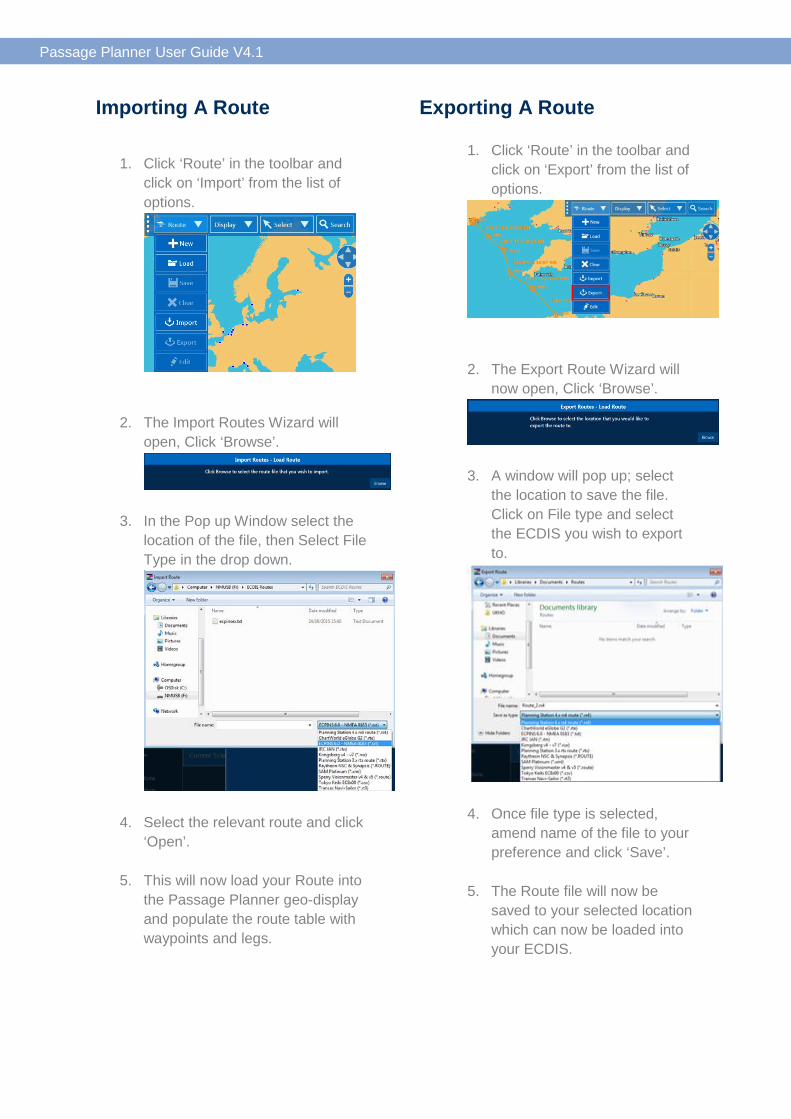
1. Click ‘Route’ in the toolbar and click on ‘Import’ from the list of options.
2. The Import Routes Wizard will open, Click ‘Browse’.
3. In the Pop up Window select the location of the file, then Select File Type in the drop down.
4. Select the relevant route and click ‘Open’.
5. This will now load your Route into the Passage Planner geo-display and populate the route table with waypoints and legs.
Exporting A Route
1. Click ‘Route’ in the toolbar and click on ‘Export’ from the list of options.
2. The Export Route Wizard will
now open, Click ‘Browse’.
3. A window will pop up; select
the location to save the file. Click on File type and select the ECDIS you wish to export to.
4. Once file type is selected, amend name of the file to your preference and click ‘Save’.
5. The Route file will now be
saved to your selected location which can now be loaded into your ECDIS.

Passage Planner User Guide V4.1
6. Click ‘Finish’ in the Export
Wizard.

Passage Planner User Guide V4.1
Adding a schedule to a passage plan
You will need to ensure that you have a route within your plan.
Select any waypoint in the table view and select the planned arrival or departure time. After selecting whole hours, the minutes can be manually edited.
Passage Planner will populate all the scheduling for your passage using the default charter speed that you will have entered under ’Passage details’
You can edit a speed for any of the legs in the right hand panel when in ‘Summary’ or ‘Legs’ table view. If you overwrite a speed from the default entry it will become ‘locked’ and will be fixed as part of your schedule planning. You can unlock by clicking on the key symbol and the speed reverts to default and the application will update the schedule.
You can also lock the times on your passage. If there are any waypoints that you must pass at a specific time, enter
that time on the waypoint. This will then become ‘locked’ and your passage will be rescheduled accordingly including adjusting the unlocked speeds for each leg. You can clear the locked time by clicking the key symbol and the application will update the schedule.
If required, you can plan for a waiting time at a waypoint by entering a different ETA and ETD at a waypoint.
Passage Planner User Guide V4.1
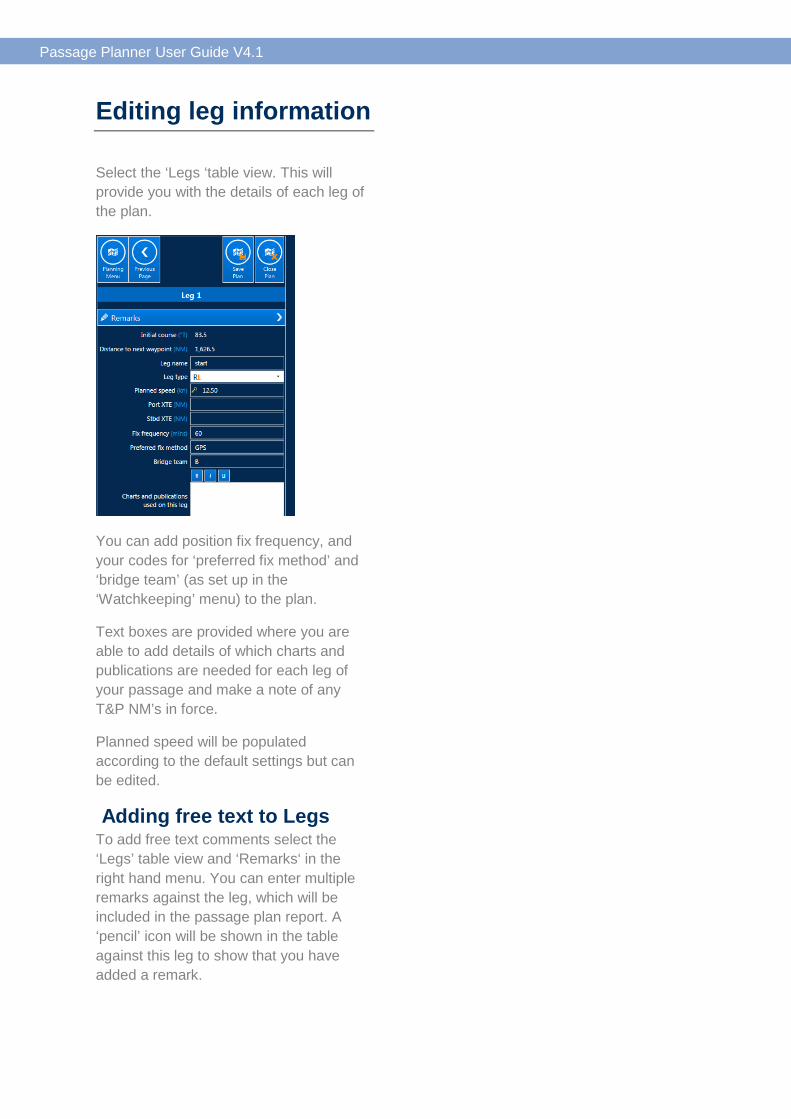
Editing leg information
Select the ‘Legs ‘table view. This will provide you with the details of each leg of the plan.
You can add position fix frequency, and your codes for ‘preferred fix method’ and ‘bridge team’ (as set up in the ‘Watchkeeping’ menu) to the plan.
Text boxes are provided where you are able to add details of which charts and publications are needed for each leg of your passage and make a note of any T&P NM’s in force.
Planned speed will be populated according to the default settings but can be edited.
Adding free text to Legs To add free text comments select the ‘Legs’ table view and ‘Remarks‘ in the right hand menu. You can enter multiple remarks against the leg, which will be included in the passage plan report. A ‘pencil’ icon will be shown in the table against this leg to show that you have added a remark.

Passage Planner User Guide V4.1
Editing waypoint information
In the table or map view, select the waypoint that you would like to edit and the waypoint menu will appear in the right-hand panel.
Types of waypoint
You can assign a ‘type of waypoint’ to your waypoint. ‘Full Away on Passage (FAOP)’ and ‘End of Passage (EOP)’ are used by the application to identify the beginning and end of the sea passage section of the plan. ‘Clearance Event’ and ‘Pilot Point’ are for information only to alert the user to possible events that may occur at the waypoint in question.
Link to ADMIRALTY TotalTide If you have ADMIRALTY TotalTide installed you will be able to link data to your Passage Plan. You will be given an option of tidal stations near your selected waypoint (within approximately 60 nautical miles) to use to calculate tide heights and times. You have the option to include tide information in your printed reports.
Note: You can only retrieve the tidal information if you have entered a passing time for the waypoint
Adding free text to waypoints To add free text to a waypoint select the ‘Waypoints’ table view and ‘Remarks’ in the right hand menu. You can enter multiple remarks against the waypoint, which will be included in the passage plan report. A ‘pencil’ icon will be shown in the table against this waypoint to show that you have added a remark.
Passage Planner User Guide V4.1
Integrating ADMIRALTY TotalTide within Passage Planner
Providing you have a valid ADP license with Total Tide installed you can utilise tidal level data within your passage plan.
Note: You can only retrieve the tidal information if you have entered a passing time for the waypoint
Configure your ADMIRALTY TotalTide
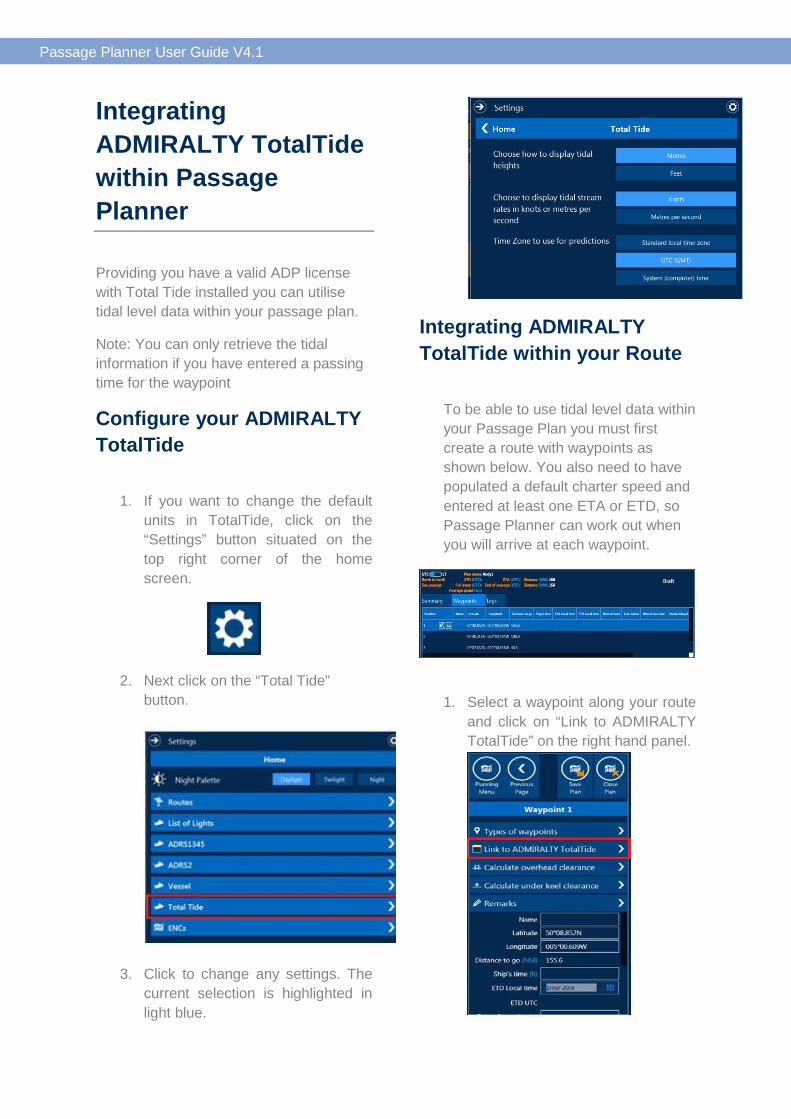
1. If you want to change the default units in TotalTide, click on the “Settings” button situated on the top right corner of the home screen.
2. Next click on the “Total Tide” button.
3. Click to change any settings. The current selection is highlighted in light blue.
Integrating ADMIRALTY TotalTide within your Route
To be able to use tidal level data within your Passage Plan you must first create a route with waypoints as shown below. You also need to have populated a default charter speed and entered at least one ETA or ETD, so Passage Planner can work out when you will arrive at each waypoint.
1. Select a waypoint along your route
and click on “Link to ADMIRALTY TotalTide” on the right hand panel.

Passage Planner User Guide V4.1
2. Next, select the dropdown arrow
on the “Linked tidal station” window and select a tidal station. Tidal stations in close proximity to the waypoint’s position will be listed.
3. Once you have selected a station it will display in the “Linked tidal station” window. You can remove the linked station by selecting the “X Unlink” box. Add the data to the printable report by selecting the “x” selection box.
4. As you click on each waypoint you can see which tidal station you have linked to it. You are again given the option to remove the link or include the tidal data in the end report.
5. Choosing to show the tidal level data in the end report gives you the hourly tidal levels for the days on and around the date of your ETA at each waypoint. You will also include a tidal curve and a list of high and low water times for those dates. Examples shown below.

Passage Planner User Guide V4.1
6. The tide heights for a linked tidal station can be used when you calculate your overhead and under keel clearance at the waypoint. You are also able to link or unlink tidal stations when you are using the overhead and under keel clearance wizards.

Passage Planner User Guide V4.1
Calculating clearances Under keel clearance
Before you start calculating clearances please ensure you have populated all of your vessel information. It is recommended that this is entered on installation, then the information is filled into any plan that you create. Items that might change can be edited in the plan later.
From the Planning Menu, check that you have entered a “Default charter speed” within the “Passage Details” page and that the “Vessel Particulars” page has been filled from the defaults that were previously entered in the Settings menu.
1. Select a waypoint from your route and select “Calculate under keel clearance” in the right hand panel.
2. When you have read the information about calculating squat, click “Next”
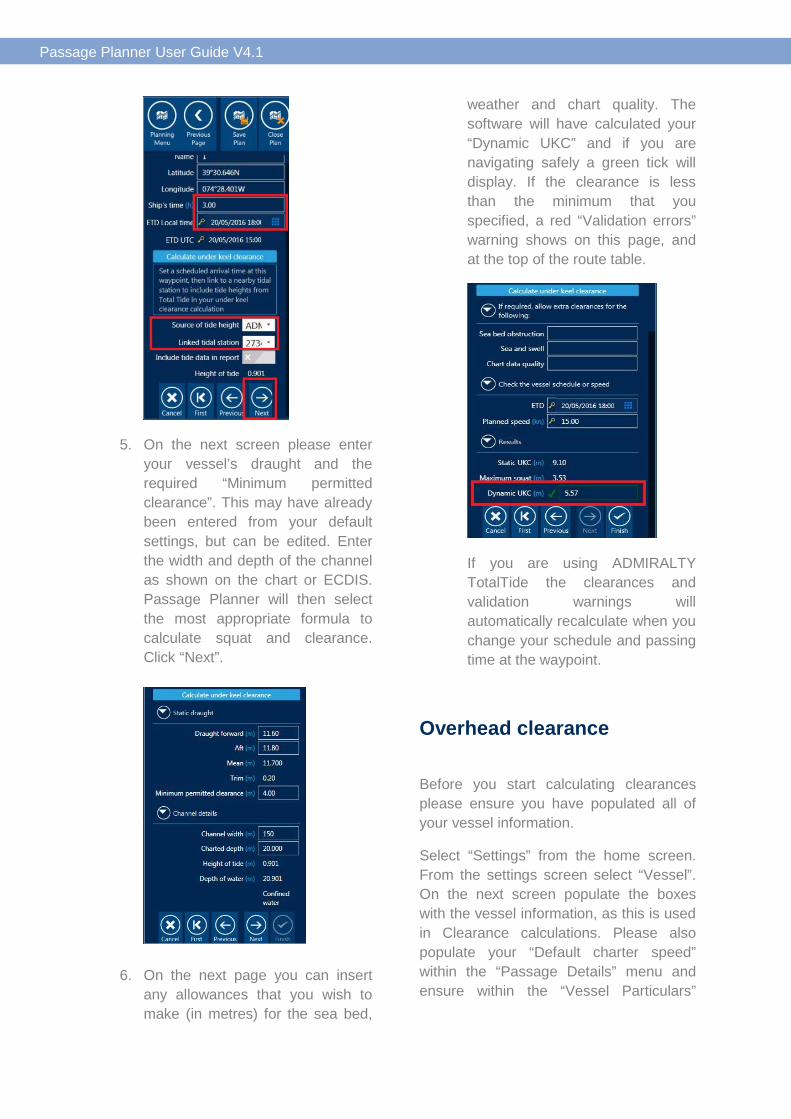
3. If you are using the link to ADMIRALTY TotalTide, ensure you have set both your “Ships time” (the time difference between local time and UTC), and “ETA Local time”.
4. Select a “Source of tide height” using the dropdown. You can use Admiralty Total Tide if you have a valid licence, or select “Manual tide heights” and enter a manual value. You can also choose to make no allowance for tide. Once linked, click “Next” at the bottom of the window.
Passage Planner User Guide V4.1
5. On the next screen please enter your vessel’s draught and the required “Minimum permitted clearance”. This may have already been entered from your default settings, but can be edited. Enter the width and depth of the channel as shown on the chart or ECDIS. Passage Planner will then select the most appropriate formula to calculate squat and clearance. Click “Next”.
6. On the next page you can insert
any allowances that you wish to make (in metres) for the sea bed,
weather and chart quality. The software will have calculated your “Dynamic UKC” and if you are navigating safely a green tick will display. If the clearance is less than the minimum that you specified, a red “Validation errors” warning shows on this page, and at the top of the route table.
If you are using ADMIRALTY TotalTide the clearances and validation warnings will automatically recalculate when you change your schedule and passing time at the waypoint.
Overhead clearance
Before you start calculating clearances please ensure you have populated all of your vessel information.
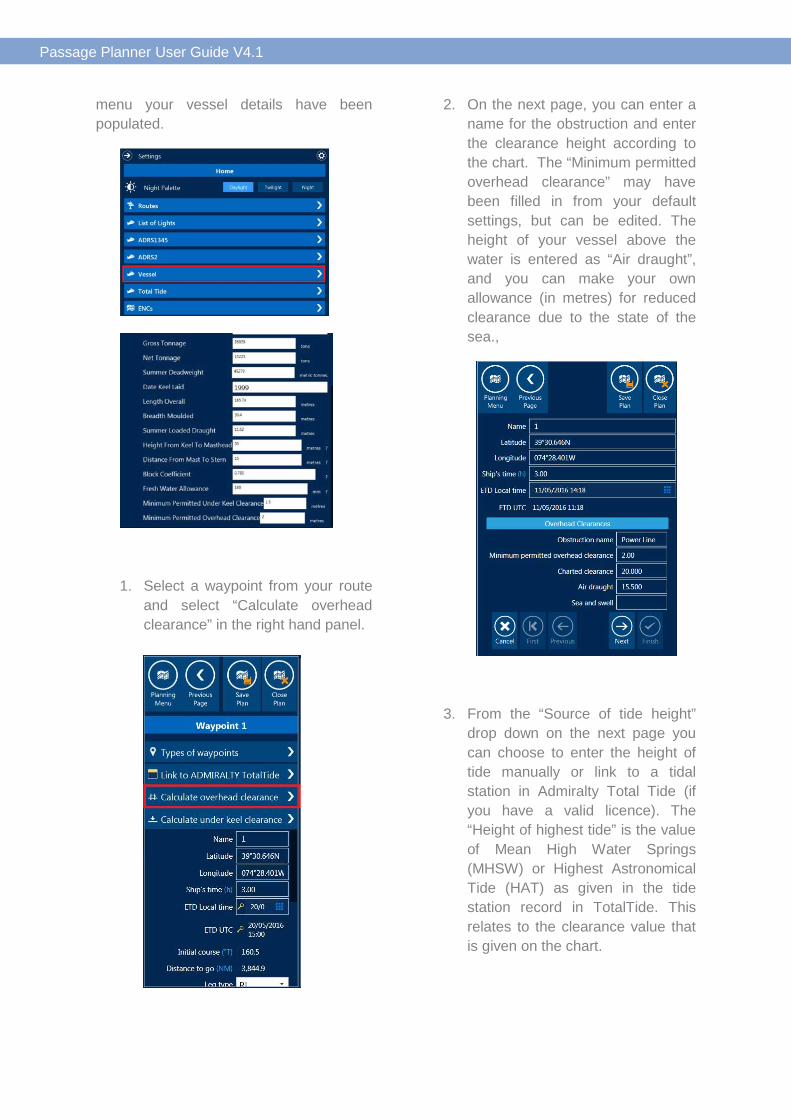
Select “Settings” from the home screen. From the settings screen select “Vessel”. On the next screen populate the boxes with the vessel information, as this is used in Clearance calculations. Please also populate your “Default charter speed” within the “Passage Details” menu and ensure within the “Vessel Particulars”
Passage Planner User Guide V4.1
menu your vessel details have been populated.
1. Select a waypoint from your route and select “Calculate overhead clearance” in the right hand panel.
2. On the next page, you can enter a name for the obstruction and enter the clearance height according to the chart. The “Minimum permitted overhead clearance” may have been filled in from your default settings, but can be edited. The height of your vessel above the water is entered as “Air draught”, and you can make your own allowance (in metres) for reduced clearance due to the state of the sea.,
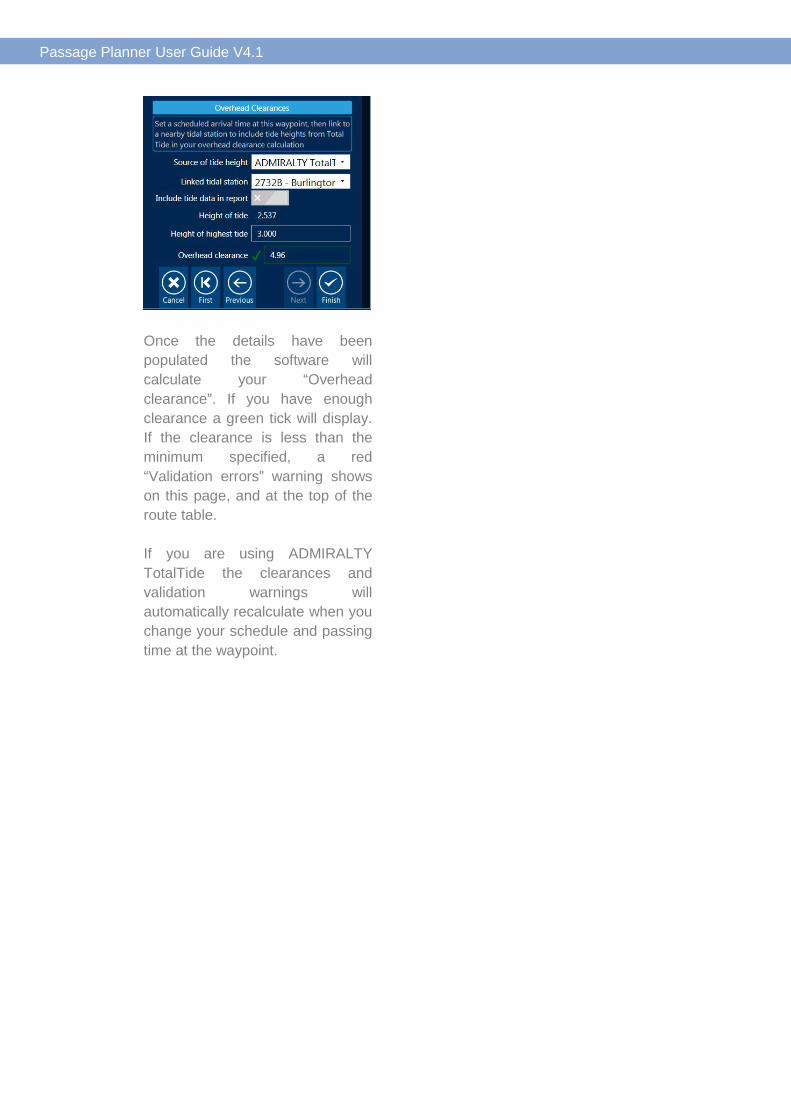
3. From the “Source of tide height” drop down on the next page you can choose to enter the height of tide manually or link to a tidal station in Admiralty Total Tide (if you have a valid licence). The “Height of highest tide” is the value of Mean High Water Springs (MHSW) or Highest Astronomical Tide (HAT) as given in the tide station record in TotalTide. This relates to the clearance value that is given on the chart.
Passage Planner User Guide V4.1
Once the details have been populated the software will calculate your “Overhead clearance”. If you have enough clearance a green tick will display. If the clearance is less than the minimum specified, a red “Validation errors” warning shows on this page, and at the top of the route table. If you are using ADMIRALTY TotalTide the clearances and validation warnings will automatically recalculate when you change your schedule and passing time at the waypoint.

Passage Planner User Guide V4.1
Checking aspects of the passage plan
As you fill out your Passage Plan there’s a “Checklist” functionality, where the software keeps track of which parts of your plan you have considered and reports a percentage complete. This is to ensure you have planned thoroughly and ensure you have everything you require for a successful passage. It also makes your progress clear to other reviewers of the plan.
The checklist can be viewed once a plan has been created as shown below. It will be set at 0% until you open it and begin completing it.
1. Click on “Checklist” in the Planning Menu.
2. As you complete the planning tasks, click in the toggle box to the right of each statement to mark them complete.
3. Your progress through the planning tasks is indicated at the top of the page and on the planning menu.
Passage Planner User Guide V4.1
Reviewing the passage plan
Passage plan reviewers
The names of the bridge team can be included in the passage plan document. Each person is able to indicate that they have reviewed the plan.
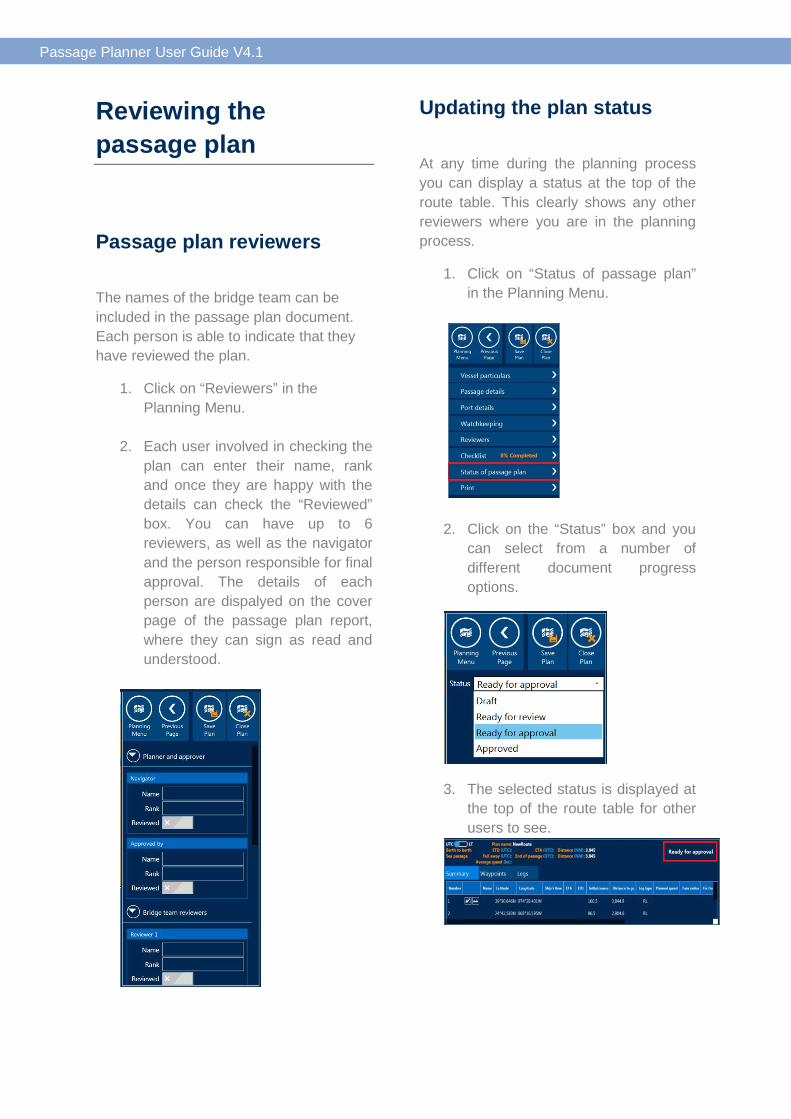
1. Click on “Reviewers” in the Planning Menu.
2. Each user involved in checking the plan can enter their name, rank and once they are happy with the details can check the “Reviewed” box. You can have up to 6 reviewers, as well as the navigator and the person responsible for final approval. The details of each person are dispalyed on the cover page of the passage plan report, where they can sign as read and understood.
Updating the plan status
At any time during the planning process you can display a status at the top of the route table. This clearly shows any other reviewers where you are in the planning process.
1. Click on “Status of passage plan” in the Planning Menu.
2. Click on the “Status” box and you can select from a number of different document progress options.
3. The selected status is displayed at the top of the route table for other users to see.

Passage Planner User Guide V4.1
Printing a Passage Plan
Once population of the passage plan with information is complete, users can generate a PDF and print a hard copy. This document will gather all the information within the plan into one easily viewable document which can be passed to other users for checking or for displaying to Port State Authority.
1. Select “Print” from the Passage Plan menu.
2. Select the information to print or generate in the PDF document using the selection tabs shown above.
- Cover page: Displays the vessel
details and plan overview details. - Charts and publication report: Lists
the AVCS ENC’s you hold on your vessel. Providing you have entered start and end dates for your passage the software checks that the ENC permits will not expire throughout transit.
- Bridge Notebook displays a checklist table of the transit legs to populate.
- Tide Heights and times: This option is only viewable and able to print/generate if you hold a current Admiralty Total Tide license and have selected the data to display within the plan.
- Passage Plan summary: Displays tables of waypoint information, timings and bridge teams.
3. Select “Print Passage Plan”. This will then open Adobe PDF viewer and display the plan with the user-selected sections. This can then be printed. If the plan is edited or changed re-selecting the “Print Passage Plan” will generate an updated PDF plan.

Passage Planner User Guide V4.1
4. The software will automatically save the plan throughout its creation and create a “(Plan Name).PassagePlan” file saved in the default location of “Documents” on the computer it’s been created. To load another plan or to load it on another PC running Passage Planner the “.PassagePlan” file must exist within the “Documents” folder.

Passage Planner User Guide V4.1
Information and Settings
Information page The ‘Info’ page holds the licence information for your installation.
• Clicking on the ‘Info’ icon within the application will provide the licence details for your vessel.
• If you need to contact the UKHO at any point theses details will be required by Customer Services.
• The Info page also allows you to open a log which can help Customer Services to diagnose any issues you may experience when using the application.
• Click on the ‘Open Logs’ icon to produce a text file containing a record of the application logs, your request files and you response files.
Settings page
• Clicking on the ‘Settings’ icon within the application will provide you a list of options.
• The options presented will differ depending on your licence subscription.
• From here you can also change the application to the ‘Twilight’ and ‘Night’ Palettes for viewing in different lighting conditions.

Passage Planner User Guide V4.1
Uninstalling the application
1. Go to the Programs and Features panel on the PC where the application is installed.
2. Select ‘ADMIRALTY 4.1’ from the list of programs and click Uninstall.
3. A pop up window will appear. Click Uninstall.
4. The PC will complete the uninstallation process and a message will appear to indicate that the application has been removed successfully.
Click Close.
5. Some files will remain on the PC following this process. To remove them, navigate to the ADMIRALTY gateway disc and double-click the
file Remove ADMIRALTY Software Files.bat. This will run through a process and delete any outstanding data. When the process is finished you will receive a message advising the removal process has been completed successfully.
Press any key and the window will close. The application has now been completely uninstalled.

Passage Planner User Guide V4.1

are trademarks of the Secretary of State for Defenceand
© Crown Copyright 2016. All rights reserved. Correct at the time of publishing.
Planning for the future?
Plan with ADMIRALTY Maritime Products & Services, brought to you by the United Kingdom Hydrographic Offi ce.
For more world-class, world-leading products and services visit our website www.admiralty.co.uk
Serving our users 24/7, worldwide, 365 days a year
For more information and advice, contact our global network of chart agents.
Alternatively our in-house customer service team is available day in, day out – whatever the query and wherever your journey takes you.
The United Kingdom Hydrographic Offi ce,
Admiralty Way, Taunton, Somerset,
TA1 2DN, United Kingdom
Telephone +44 (0)1823 723366
www.admiralty.co.uk
013