planner gantt user manual
TRANSCRIPT
All Right Reserved © JiJi Technologies Private Limited
Planner Gantt User Manual
1. Introduction
2. Installation prerequisite
3. Installing the app
4. Sign-in to the app
5. Viewing plans
6. Plan / Collection settings
7. Task management
8. Milestone
9. Dependencies and Auto scheduling
10. Duration and Auto scheduling
11. Filters
12. Resource workload and Resource management
13. Planning mode
14. Office365 Teams comments integration
15. Custom fields
16. Reports
17. Export / Import
18. Pdf export
19. Import fields from previous version
All Right Reserved © JiJi Technologies Private Limited
1. Introduction Apps4Pro Planner Gantt is the desktop app, which needs to be installed on your
computer to plan and manage Planner tasks in Gantt chart with ease. This app requires a
valid Apps4Pro license and Office365 enterprise license (login to the app with the O365
account, so the app will fetch the Plans you are member of) to use.
2. Installation Prerequisites When you start installing the app, it will run a pre-installation check and install the below
components by itself.
• .net core runtime 3.1
• .net desktop runtime 3.1
• Microsoft edge webview2 runtime (any version)
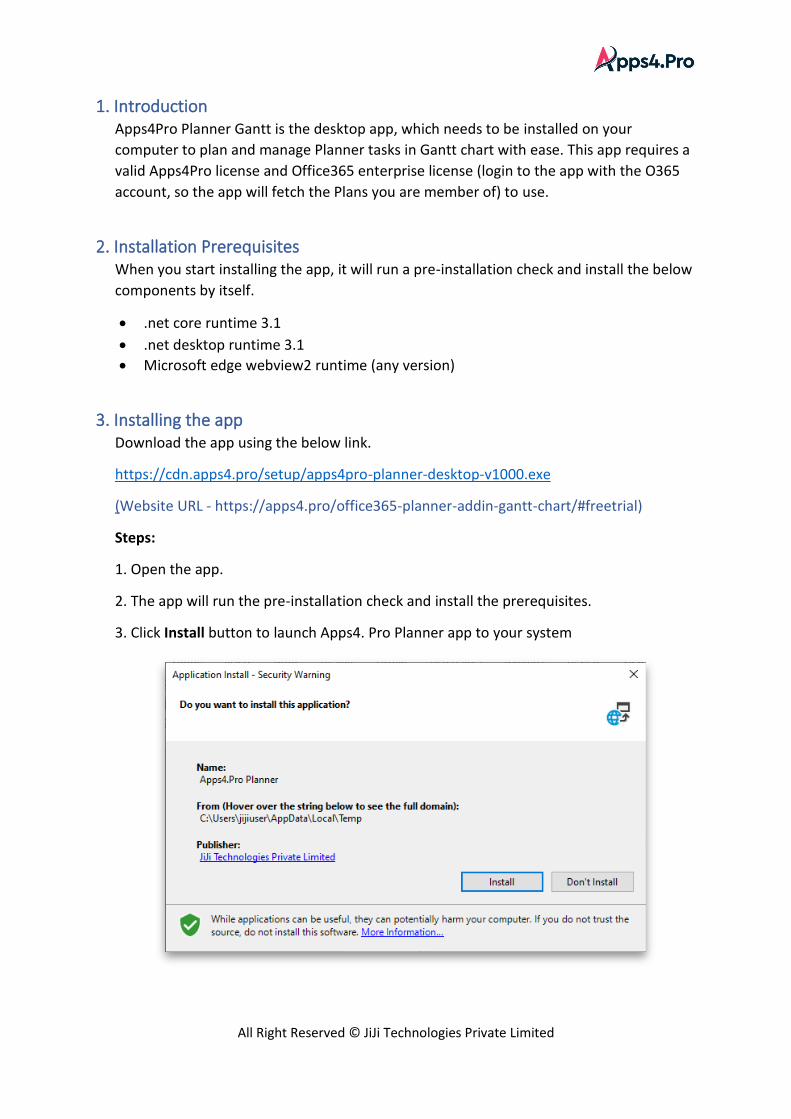
3. Installing the app Download the app using the below link.
https://cdn.apps4.pro/setup/apps4pro-planner-desktop-v1000.exe
(Website URL - https://apps4.pro/office365-planner-addin-gantt-chart/#freetrial)
Steps:
1. Open the app.
2. The app will run the pre-installation check and install the prerequisites.
3. Click Install button to launch Apps4. Pro Planner app to your system

All Right Reserved © JiJi Technologies Private Limited
4. Sign-in to the app Sign in your office 365 work account in the app to start using the app.
5. Viewing plans Once logged in all the plans you are owner / member of is listed in Plan tab. You can also
explore plans via groups tab. Select any one of the plans and its tasks will be shown in the
app.
You can also view multiple plans and make changes in all plans at a time. The multiple
plans are stored as a collection and later you can edit the plans in the collection.
Besides Gantt chart, you can view the overall view of the plan with the help of Dashboard
view.
All Right Reserved © JiJi Technologies Private Limited
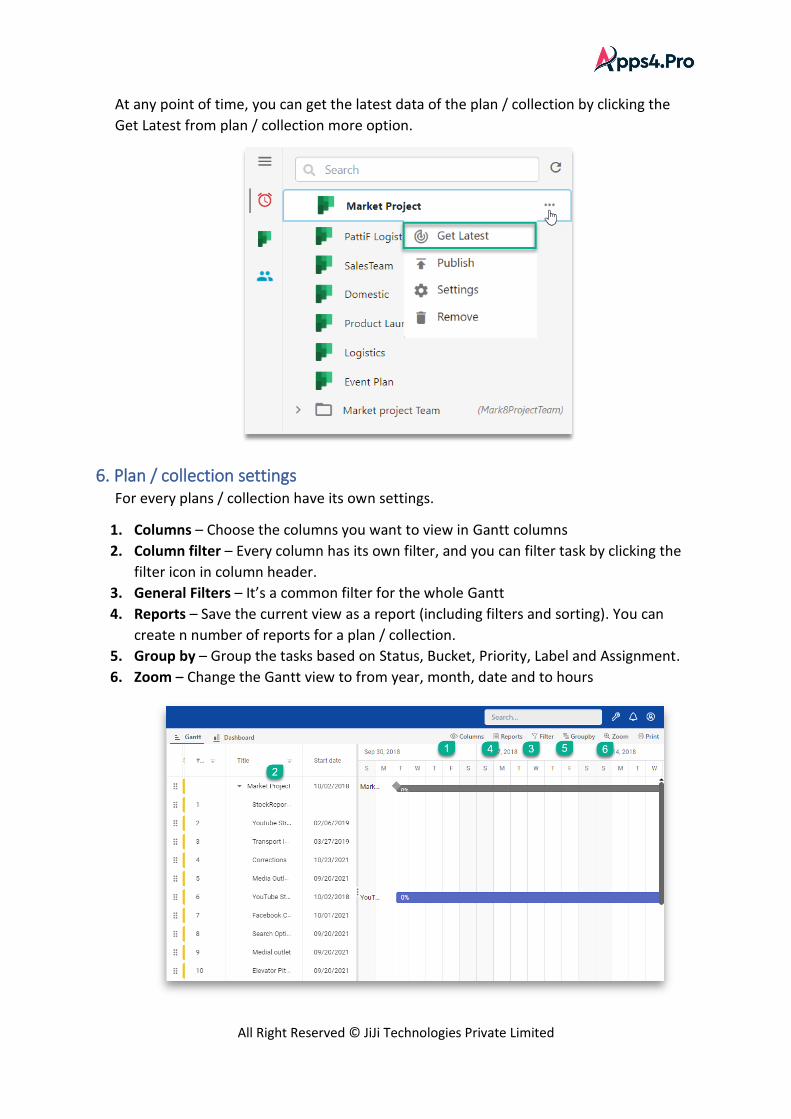
At any point of time, you can get the latest data of the plan / collection by clicking the
Get Latest from plan / collection more option.
6. Plan / collection settings For every plans / collection have its own settings.
1. Columns – Choose the columns you want to view in Gantt columns
2. Column filter – Every column has its own filter, and you can filter task by clicking the
filter icon in column header.
3. General Filters – It’s a common filter for the whole Gantt
4. Reports – Save the current view as a report (including filters and sorting). You can
create n number of reports for a plan / collection.
5. Group by – Group the tasks based on Status, Bucket, Priority, Label and Assignment.
6. Zoom – Change the Gantt view to from year, month, date and to hours
All Right Reserved © JiJi Technologies Private Limited
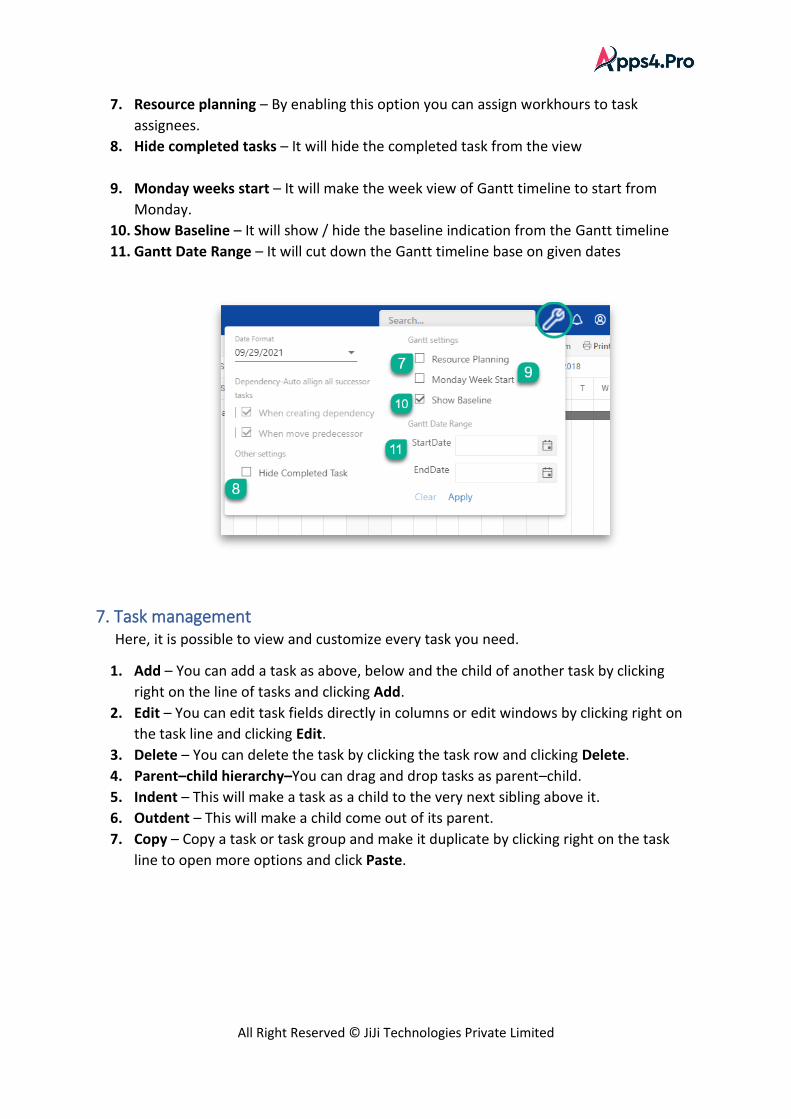
7. Resource planning – By enabling this option you can assign workhours to task
assignees.
8. Hide completed tasks – It will hide the completed task from the view
9. Monday weeks start – It will make the week view of Gantt timeline to start from
Monday.
10. Show Baseline – It will show / hide the baseline indication from the Gantt timeline
11. Gantt Date Range – It will cut down the Gantt timeline base on given dates
7. Task management Here, it is possible to view and customize every task you need.
1. Add – You can add a task as above, below and the child of another task by clicking
right on the line of tasks and clicking Add.
2. Edit – You can edit task fields directly in columns or edit windows by clicking right on
the task line and clicking Edit.
3. Delete – You can delete the task by clicking the task row and clicking Delete.
4. Parent–child hierarchy–You can drag and drop tasks as parent–child.
5. Indent – This will make a task as a child to the very next sibling above it.
6. Outdent – This will make a child come out of its parent.
7. Copy – Copy a task or task group and make it duplicate by clicking right on the task
line to open more options and click Paste.
All Right Reserved © JiJi Technologies Private Limited
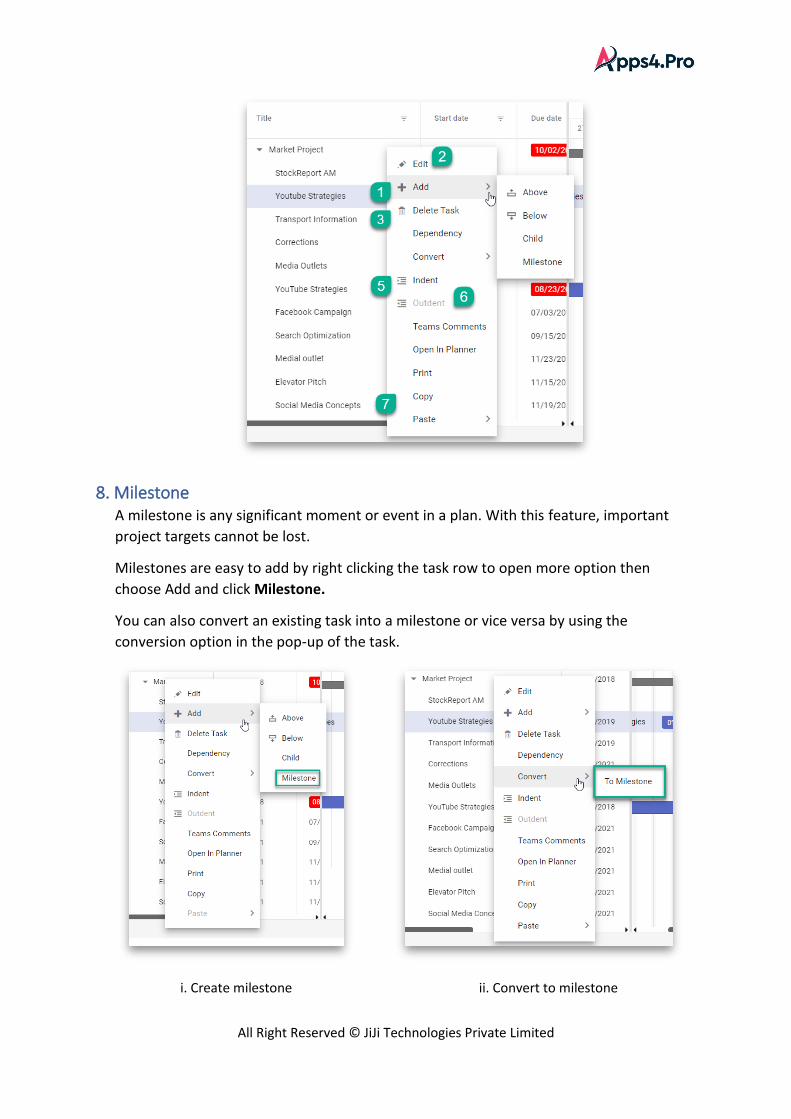
8. Milestone A milestone is any significant moment or event in a plan. With this feature, important
project targets cannot be lost.
Milestones are easy to add by right clicking the task row to open more option then
choose Add and click Milestone.
You can also convert an existing task into a milestone or vice versa by using the
conversion option in the pop-up of the task.
i. Create milestone ii. Convert to milestone
All Right Reserved © JiJi Technologies Private Limited
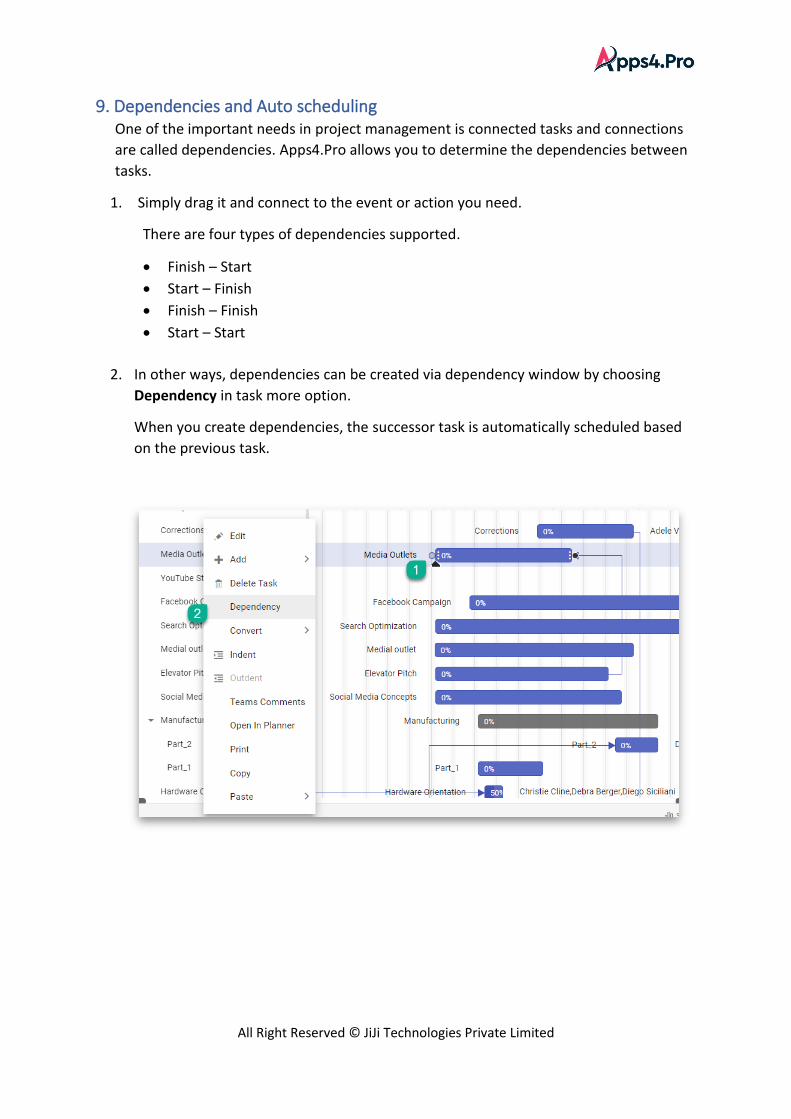
9. Dependencies and Auto scheduling One of the important needs in project management is connected tasks and connections
are called dependencies. Apps4.Pro allows you to determine the dependencies between
tasks.
1. Simply drag it and connect to the event or action you need.
There are four types of dependencies supported.
• Finish – Start
• Start – Finish
• Finish – Finish
• Start – Start
2. In other ways, dependencies can be created via dependency window by choosing
Dependency in task more option.
When you create dependencies, the successor task is automatically scheduled based
on the previous task.
All Right Reserved © JiJi Technologies Private Limited
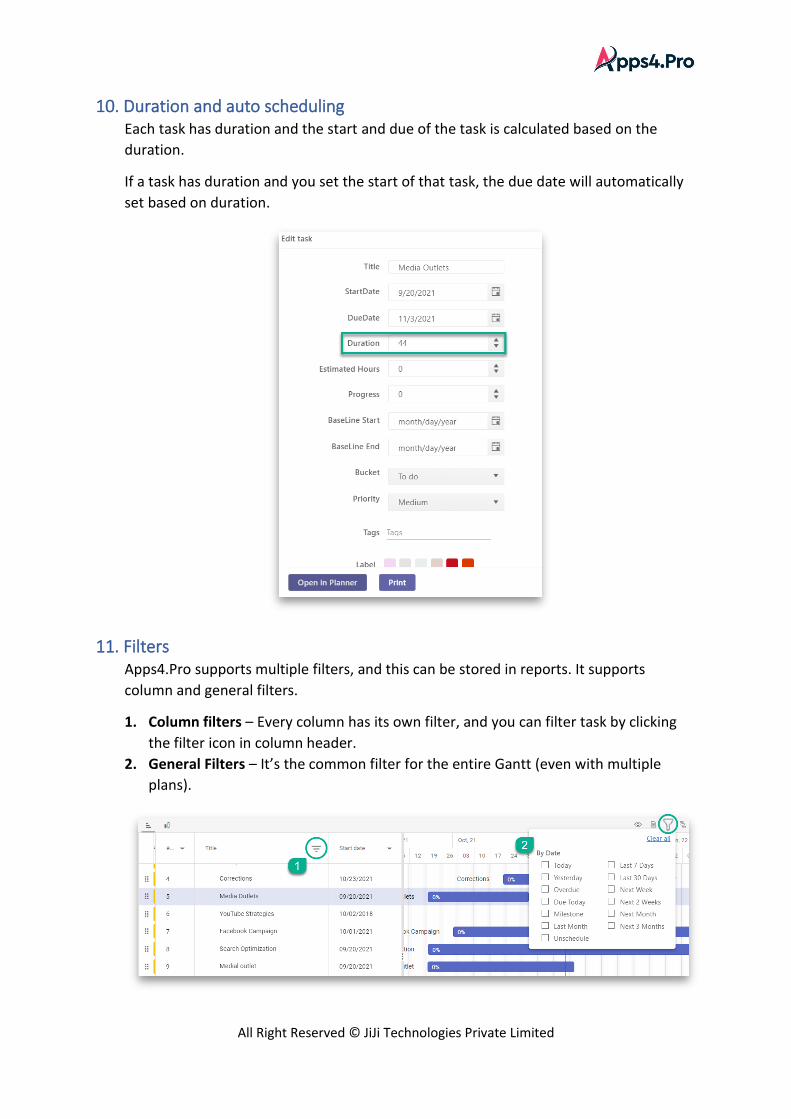
10. Duration and auto scheduling Each task has duration and the start and due of the task is calculated based on the
duration.
If a task has duration and you set the start of that task, the due date will automatically
set based on duration.
11. Filters Apps4.Pro supports multiple filters, and this can be stored in reports. It supports
column and general filters.
1. Column filters – Every column has its own filter, and you can filter task by clicking
the filter icon in column header.
2. General Filters – It’s the common filter for the entire Gantt (even with multiple
plans).
All Right Reserved © JiJi Technologies Private Limited
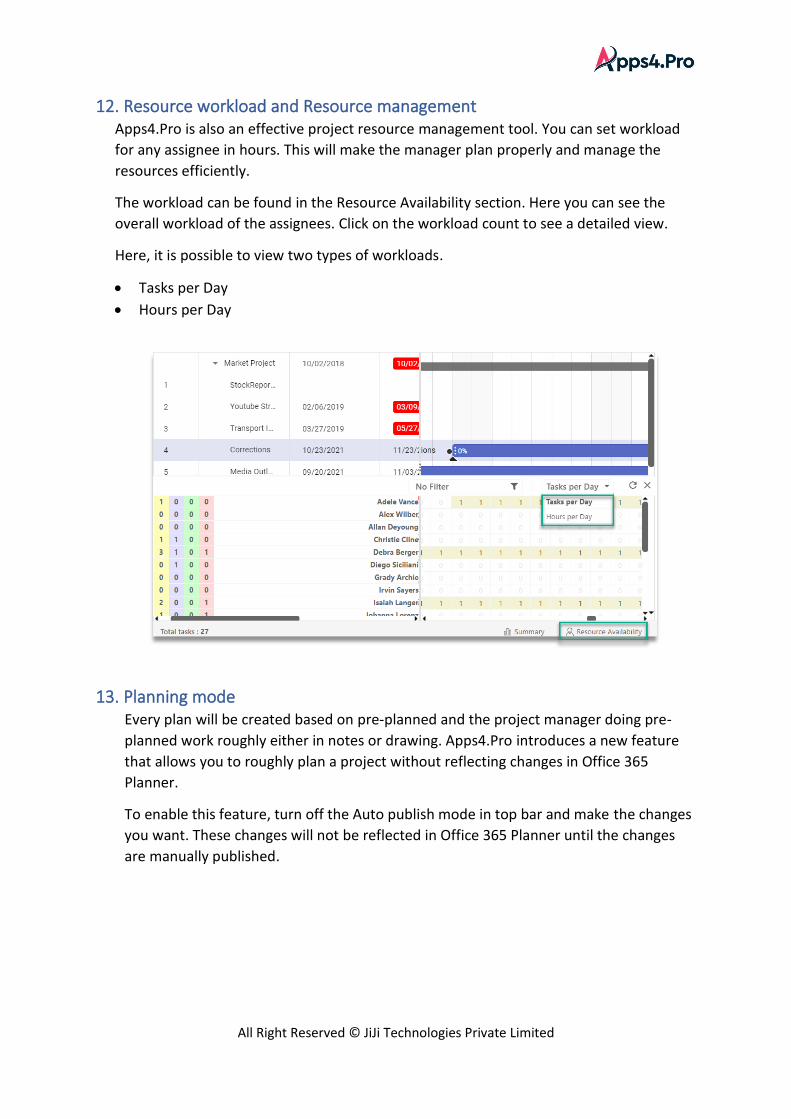
12. Resource workload and Resource management Apps4.Pro is also an effective project resource management tool. You can set workload
for any assignee in hours. This will make the manager plan properly and manage the
resources efficiently.
The workload can be found in the Resource Availability section. Here you can see the
overall workload of the assignees. Click on the workload count to see a detailed view.
Here, it is possible to view two types of workloads.
• Tasks per Day
• Hours per Day
13. Planning mode Every plan will be created based on pre-planned and the project manager doing pre-
planned work roughly either in notes or drawing. Apps4.Pro introduces a new feature
that allows you to roughly plan a project without reflecting changes in Office 365
Planner.
To enable this feature, turn off the Auto publish mode in top bar and make the changes
you want. These changes will not be reflected in Office 365 Planner until the changes
are manually published.
All Right Reserved © JiJi Technologies Private Limited
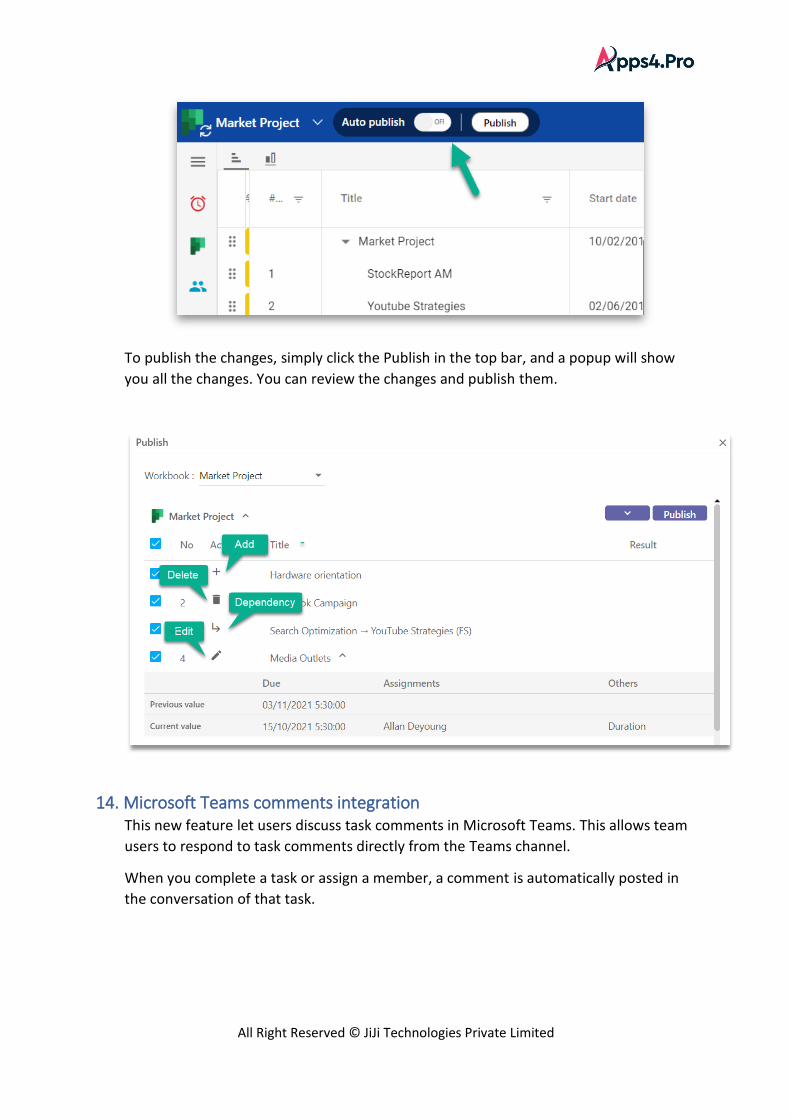
To publish the changes, simply click the Publish in the top bar, and a popup will show
you all the changes. You can review the changes and publish them.
14. Microsoft Teams comments integration This new feature let users discuss task comments in Microsoft Teams. This allows team
users to respond to task comments directly from the Teams channel.
When you complete a task or assign a member, a comment is automatically posted in
the conversation of that task.
All Right Reserved © JiJi Technologies Private Limited
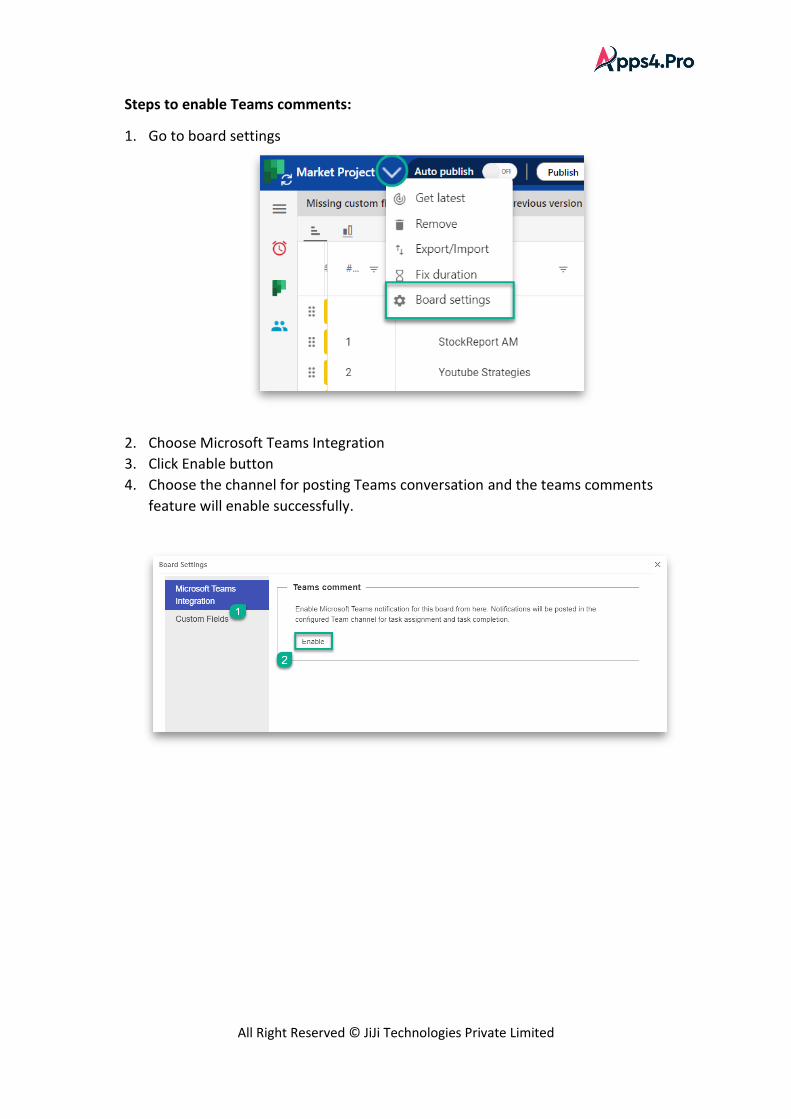
Steps to enable Teams comments:
1. Go to board settings
2. Choose Microsoft Teams Integration
3. Click Enable button
4. Choose the channel for posting Teams conversation and the teams comments
feature will enable successfully.
All Right Reserved © JiJi Technologies Private Limited
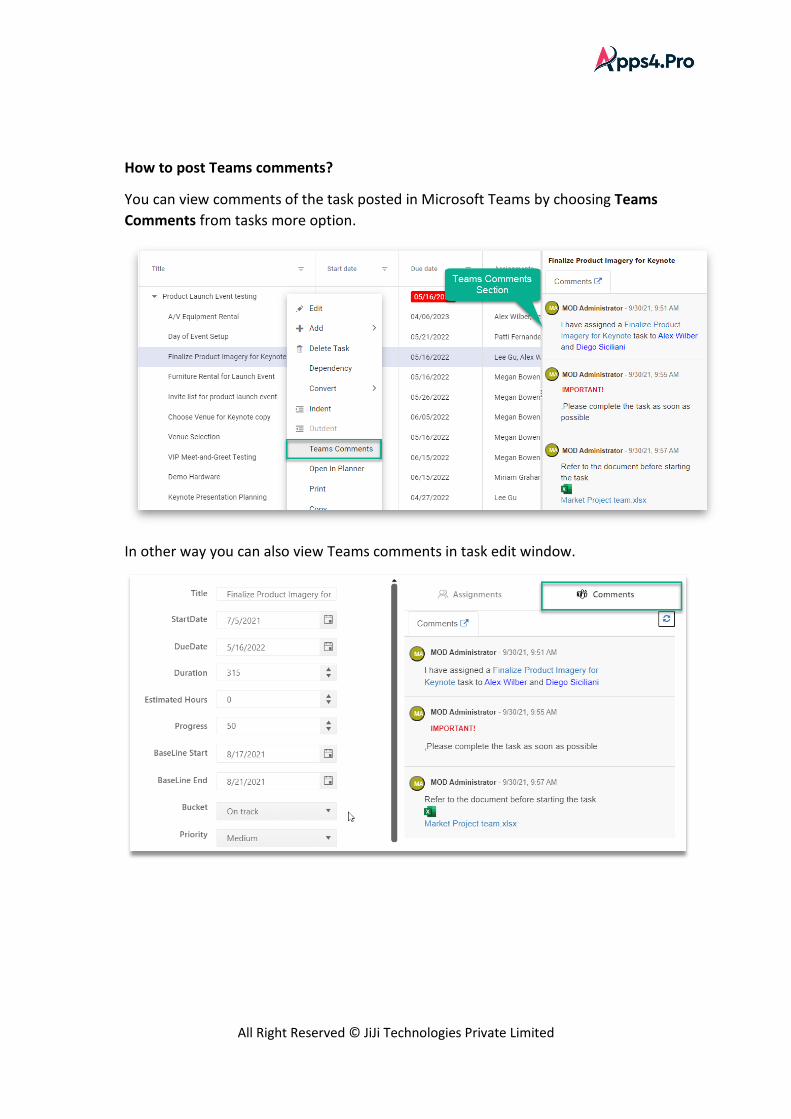
How to post Teams comments?
You can view comments of the task posted in Microsoft Teams by choosing Teams
Comments from tasks more option.
In other way you can also view Teams comments in task edit window.
All Right Reserved © JiJi Technologies Private Limited
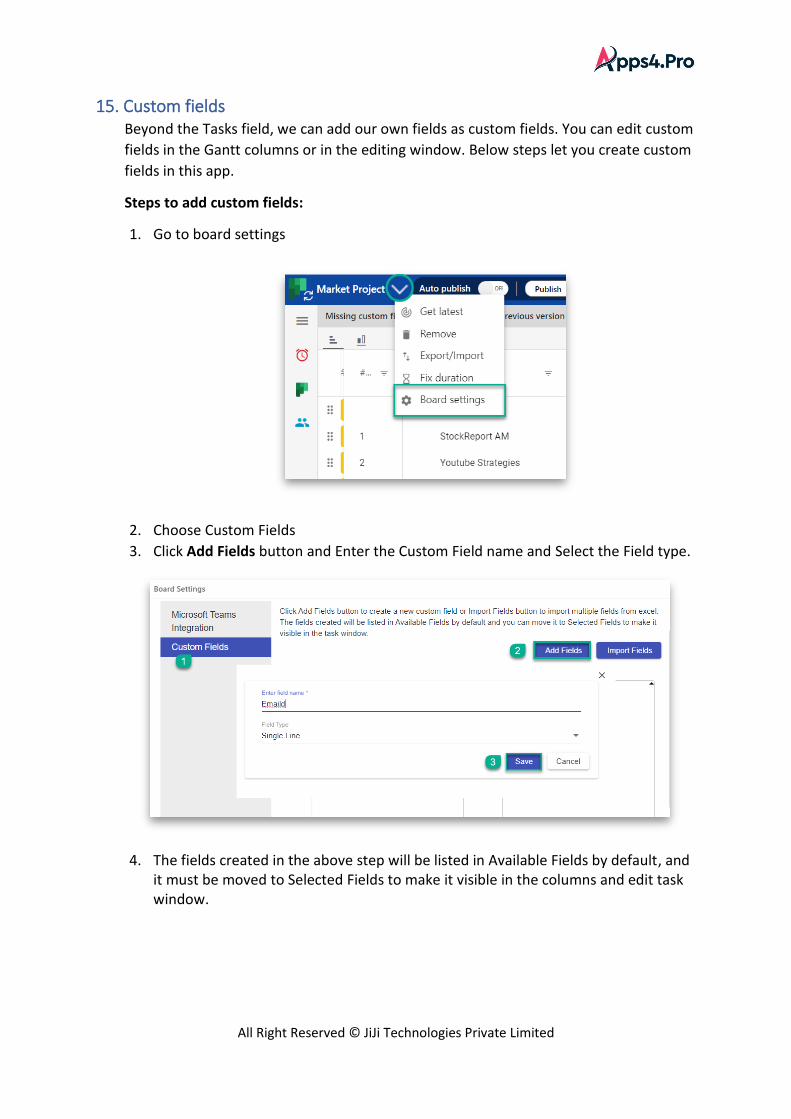
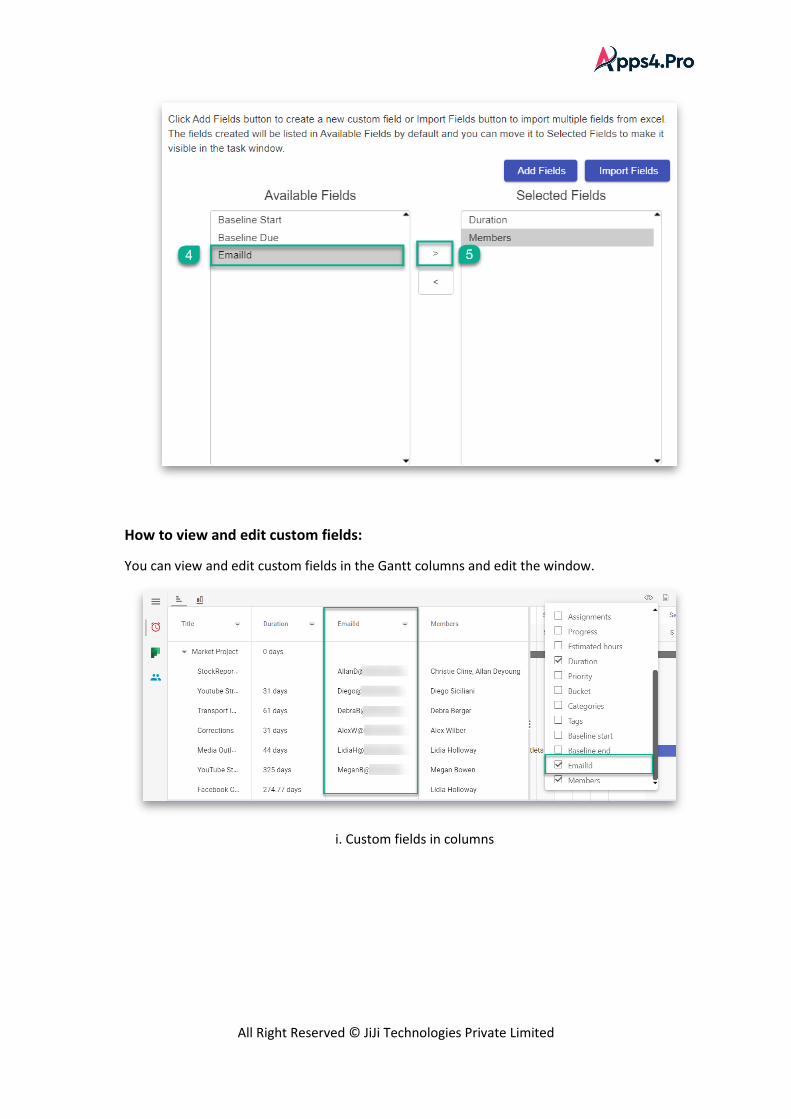
15. Custom fields Beyond the Tasks field, we can add our own fields as custom fields. You can edit custom
fields in the Gantt columns or in the editing window. Below steps let you create custom
fields in this app.
Steps to add custom fields:
1. Go to board settings
2. Choose Custom Fields
3. Click Add Fields button and Enter the Custom Field name and Select the Field type.
4. The fields created in the above step will be listed in Available Fields by default, and it must be moved to Selected Fields to make it visible in the columns and edit task window.
All Right Reserved © JiJi Technologies Private Limited
How to view and edit custom fields:
You can view and edit custom fields in the Gantt columns and edit the window.
i. Custom fields in columns
All Right Reserved © JiJi Technologies Private Limited
ii. Custom fields in edit window
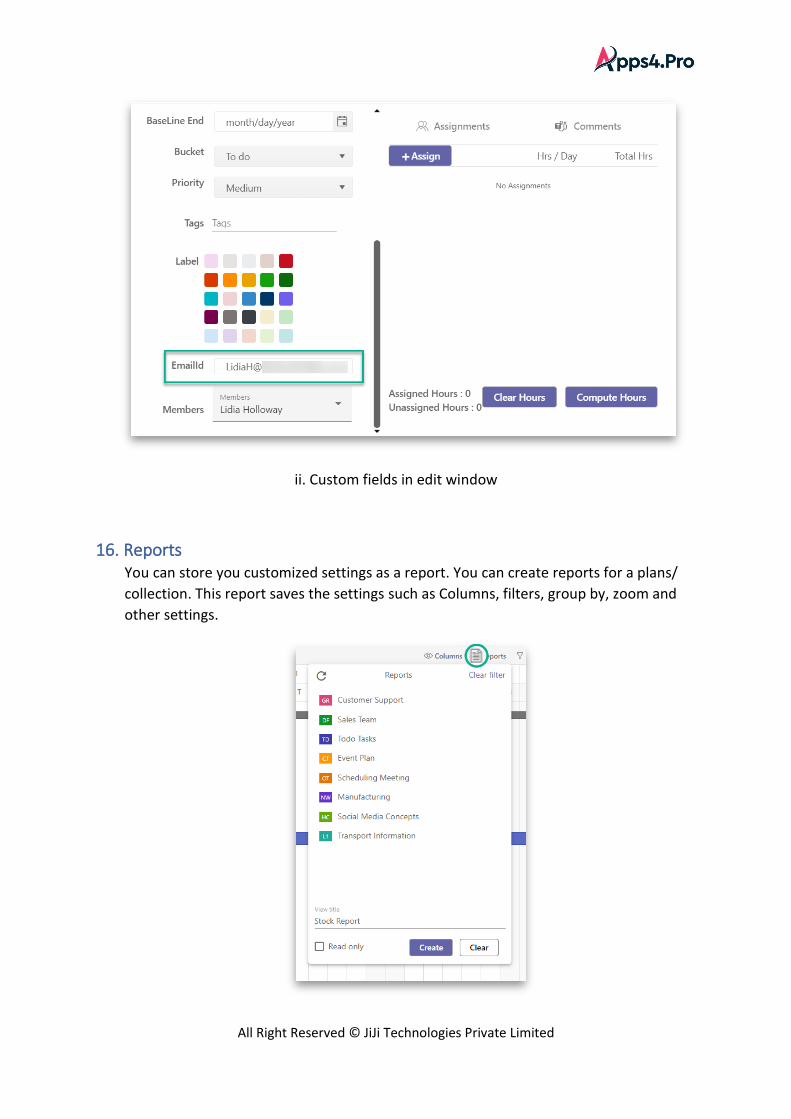
16. Reports You can store you customized settings as a report. You can create reports for a plans/
collection. This report saves the settings such as Columns, filters, group by, zoom and
other settings.
All Right Reserved © JiJi Technologies Private Limited
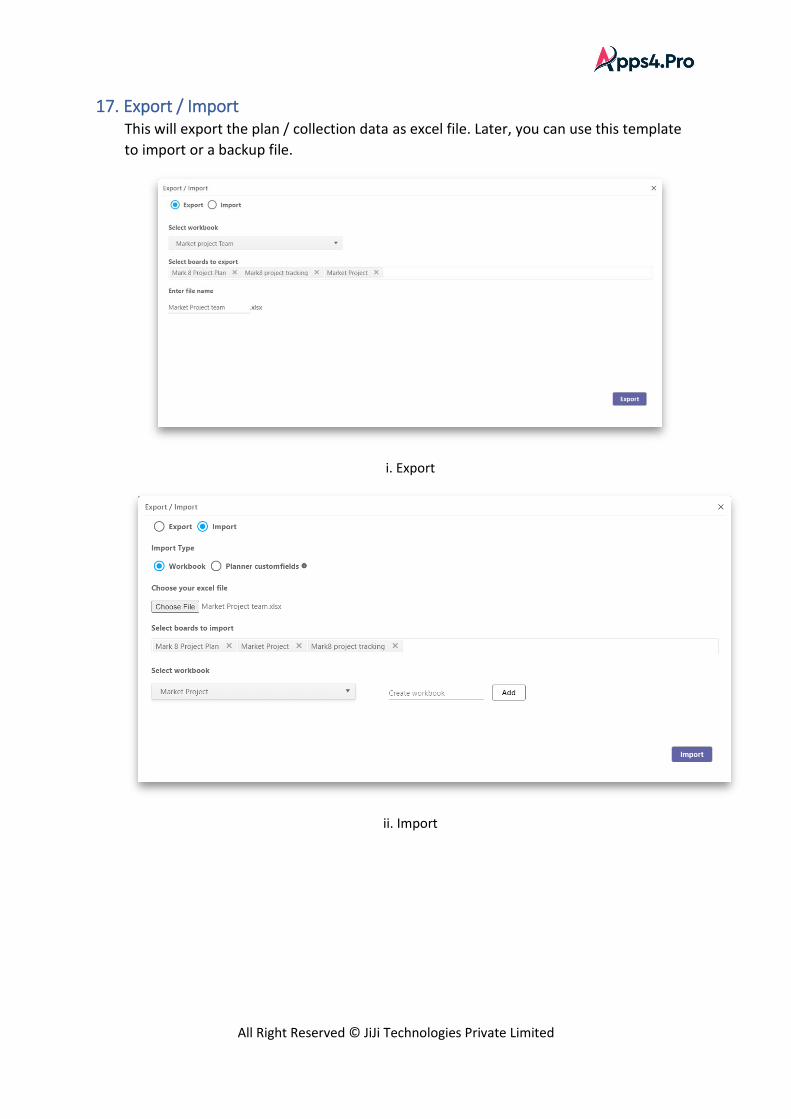
17. Export / Import This will export the plan / collection data as excel file. Later, you can use this template
to import or a backup file.
i. Export
ii. Import
All Right Reserved © JiJi Technologies Private Limited
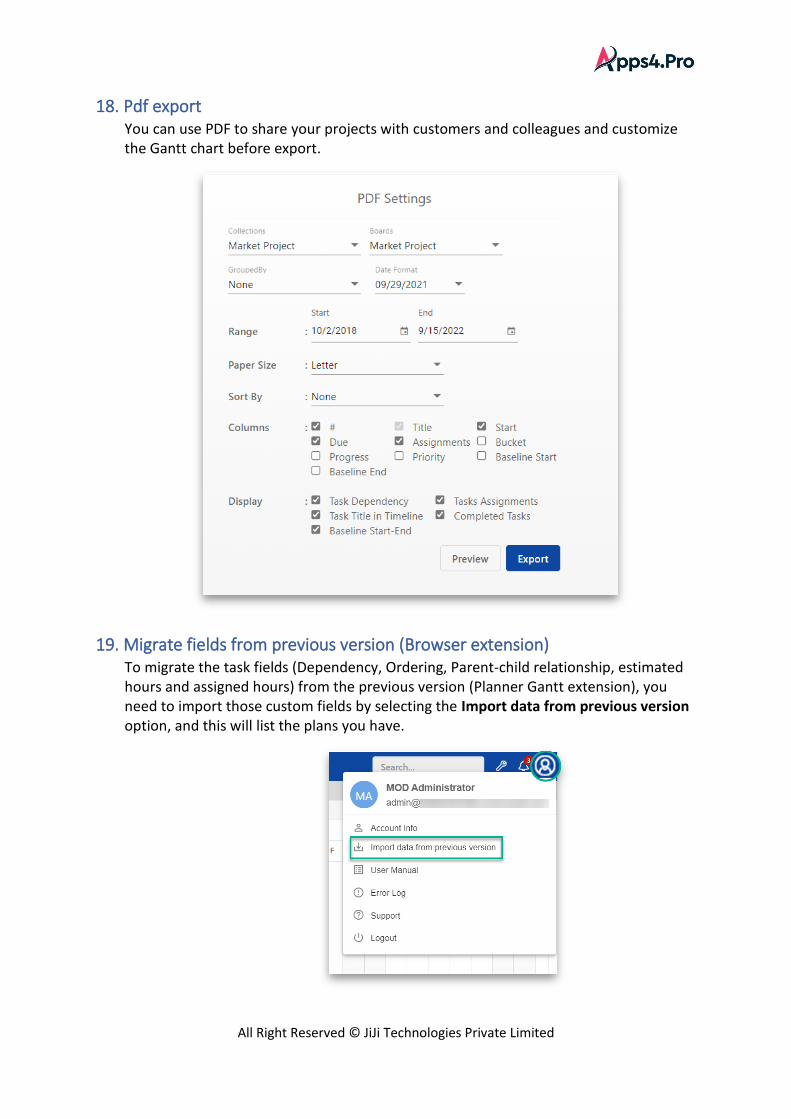
18. Pdf export You can use PDF to share your projects with customers and colleagues and customize the Gantt chart before export.
19. Migrate fields from previous version (Browser extension) To migrate the task fields (Dependency, Ordering, Parent-child relationship, estimated hours and assigned hours) from the previous version (Planner Gantt extension), you need to import those custom fields by selecting the Import data from previous version option, and this will list the plans you have.
All Right Reserved © JiJi Technologies Private Limited
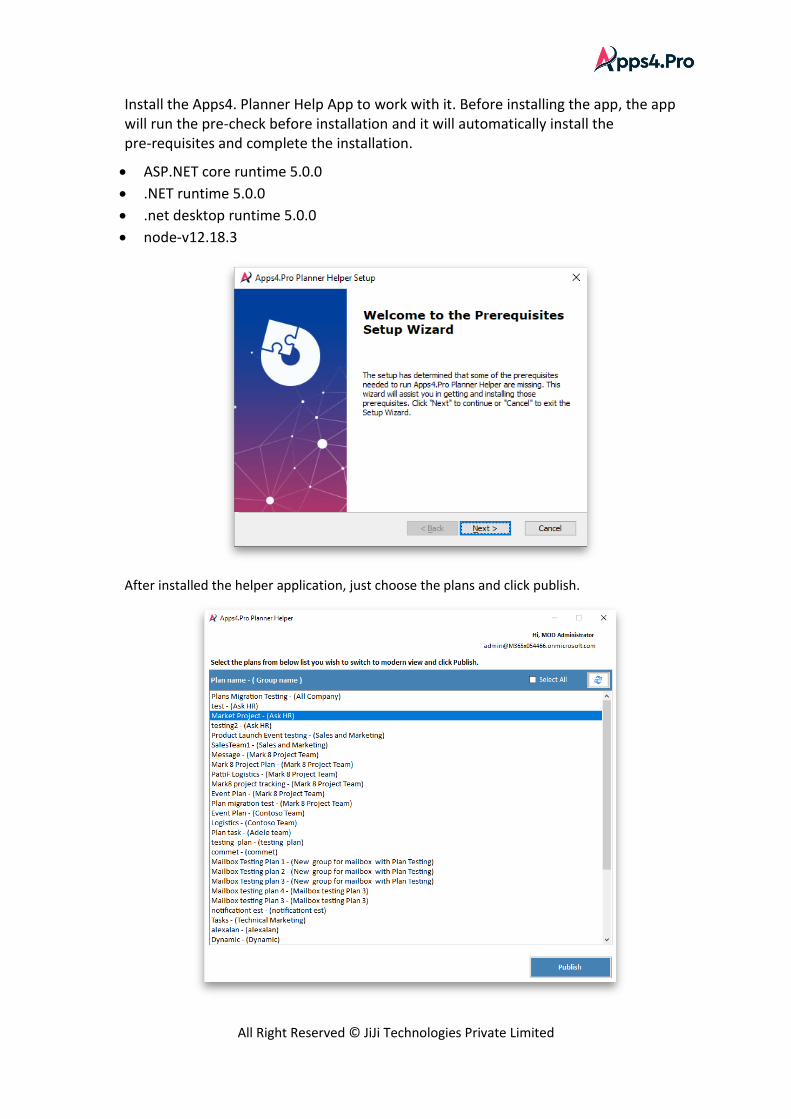
Install the Apps4. Planner Help App to work with it. Before installing the app, the app will run the pre-check before installation and it will automatically install the pre-requisites and complete the installation.
• ASP.NET core runtime 5.0.0
• .NET runtime 5.0.0
• .net desktop runtime 5.0.0
• node-v12.18.3
After installed the helper application, just choose the plans and click publish.