use security equipment
TRANSCRIPT

USE SECURITY EQUIPMENT
FACILITATOR/LEARNER GUIDE
Unit Standard No: 244176
Unit Standard Credits: 2
NQF Level: 2
SKILLS PROGRAM 1
BOOK 4

2

3
REVIEW AND ALTERATION OF TRAINING MATERIAL
What follows is a brief explanation of the process that was followed in the alteration of this training
material. A working group was formed after inviting interested parties to attend a meeting at SASSETA.
The working group was mandated to review the material and thereafter make the necessary changes so
as to provide the industry with a more user friendly set of materials which better reflects the needs of the
security industry.
It must be understood that this is the first review and by no means the final review. The working group
was placed under enormous pressure to get a workable set of materials into the hands of the accredited
security industry training providers as quickly as possible. We therefore have no doubt that even though
the materials have been vastly improved upon, there are still areas that may require change. This we
plan to do in the next renewal phase after we receive feedback from training providers who have used
the material for approximately a year.
Our review process focused on the following:
• Removal of unnecessary information/duplication from the learning material.
• Ensure alignment with the unit standards.
• Re-draft all formative and summative assessments.
• Correct inappropriate use of language.
TASK TEAM
The task team that completed the work on this training material deserves a very special “thank you”,
considering that all their time and efforts were provided free of charge. Nobody was paid for any of the
work done on behalf of the task team. SASSETA provided funding for the expenses incurred in printing,
typesetting, lunch and refreshments.
The task team members are as follows:
Andre Pretorius International Firearm Training Academy
Andre Wilken SSN
Dave Dodge ESKOM
Eddie Du Plooy/ Elvis Masera SBV Services
Jean Du Plessis Lyttleton Firearm Training Centre
Leon van Rooyen NAD
Lionel Arries SASSETA (observer/adviser)
Marion Colley Pexco Security and Training
A very sincere thank you to all of these individuals and the companies they work for, who allowed them
to participate during business hours. This could not have been done without your commitment.
Sincerely
Andre Pretorius
Task Team Chairman
4
PROGRAM GUIDE 6-7
1. Introduction 6
2. Purpose of this learning program 6
3. Standards and qualifications 6
4. Assessments 6
5. Security program matrix 7
Study unit 1: Batons 8-15
1. Introduction 9
2. Types of batons 10
3. The grip of the tonfa 11
4. The grip and carry positions of the straight baton 11
5. Defensive manoeuvres with the Tonfa 12
6. Defensive manoeuvres with the straight baton 14
7. Baton retention when a person reaches for your baton while you are in a……...
15
8. Sparring 15
9. Legal guidelines 15
10. Safety guidelines 15
Study unit 2: Constraint apparatus 16-22
1. Definition 17
2. Description of handcuffs 17
3. Types of handcuffs 17
4. The use of handcuffs 18
5. Perform an arm bar takedown and apply handcuffs. 20
6. Legal guidelines 21
7. Safety guidelines 22
Study unit 3: Defensive sprays 23-28
1. Introduction 24
2. Definition 24
3. Effects 24
4. How to use Mace Self Defense Spray 25
5. Safety guidelines 26
6. Spray patterns 27
Study unit 4: Two way radio communication 29-37
1. Introduction 30
2. Definition 30
3. Components of a two way radio 30

5
4. Radio procedures 30
5. Principles of voice procedure 31
6. The phonetic alphabet 33
7. Common words and phrases 34
8. Radio controls 34
9. Principles of radio procedures 37
Study unit 5: Metal detectors 38-45
1. Introduction 39
2. Definition 40
3. Searching with a hand held metal detector. 40
4. Operating a handheld metal detector 41
5. Practical use of the scanner 42
6. Legal guidelines when using a hand metal detector. 43
7. Safety guidelines. 43
8. Function and characteristics of Walk through metal detector. 43
Study unit 6: Body armor 46-52
1. What is body armor 47
2. Different types of body armor 47
3. Standards of body armor 47
4. The purpose of having body armor 50
5. Benefits of wearing Body Armor 50
6. Safety Instructions 52
7. Legal guidelines 52
Study unit 7: Flashlights 53-60
1. Introduction 54
2. How to use the flashlight 55
3. Changing the battery of the flashlight 57
4. Carry the flash light 58
5. Battery-powered vs. Re-chargeable? 59
6. Safety guidelines when using a flashlight. 60
Study unit 8: Maintenance of security equipment 61-71
1. Safe storage of security equipment 62
2. Basic maintenance check of security equipment 62
3. Storage methods 70
4. Procedure for reporting defective equipment 70
Unit Standard 72-74
Learner Workbook Section 75-82

6
1. Introduction This learning program is part of a complete qualification. The qualification is General Security Practices NQF level 3.
2. Purpose of this learning program A person credited with this unit standard will be able to:
♦ Explain the safekeeping and storing of security equipment.
♦ Demonstrate the use of security equipment.
♦ Confirm the working condition of security equipment.
2.1 Target group This program is compiled for the following target group:
♦ Security members
♦ South African Defense Force members
♦ South African Police Force members
♦ Correctional Services
♦ Individuals who wishes to complete the NQF level 3 National Certificate in security Practices.
3. Standards and qualifications
Unit standards are the “building blocks” of qualifications. All qualifications are plotted on the National Qualifications Framework (NQF).
Unit standards comprises of outcomes. An outcome is a statement that describes the required competency that must be demonstrated by the learner on successful completion of a training intervention.
4. Assessments The assessment criteria in this unit standard describes the evidence that is needed that will show that you have demonstrated the outcome correctly. Kindly refer to the unit standard attached hereto for the assessment criteria listed under each Specific Outcome in order for you to see what you will be assessed against.
You will be required to complete 2 written exams. The first is a formative assessment (open book exam) and the second is a summative assessment (closed book exam). The purpose of the formative assessment is to prepare you for the summative assessment.
The learner guide will remain the property of the learner once the LEARNING PROGRAM has
been completed.

7
5. Security program matrix
SKILLS PROGRAM 1: SASSETA E
1 246694 Explain the requirements for becoming a security service provider
Level 3 4 Credits
2 244184 Apply legal aspects in a security environment
Level 3 8 Credits
3 244182 Give evidence in court Level 3 4 Credits
4 244176 Use security equipment Level 2 2 Credits 5 244181 Perform hand over and take over
responsibilities Level 3 2 Credits
6 244177 Conduct a security patrol in area of responsibility
Level 3 7 Credits
7 244179 Handle complaints and problems Level 3 6 Credits 8 12484 Perform basic fire fighting Level 2 4 Credits 9 116534 Carry out basic first aid treatment in the
workplace Level 3 2 Credits
SKILLS PROGRAM 2: SASSETA D
1 24418
9
Conduct access and egress control Level 4 7 Credits
2 24282
5 Conduct evacuations and emergency drills Level 4 4 Credits
3 11505 Identify, handle and defuse security related conflict
Level 4
12 Credits
4 11770
5
Demonstrate knowledge of the Firearms Control Act 2000 (Act No. 60 of 2000)
Level 3
3 Credits
5 11392
4
Apply basic business ethics in a work
environment
Level 2
2 Credits
6 11946
5
Write/present/sign texts for a range of
communicative contexts
Level 3
5 Credits
7 11497
9
Operate a computer workstation in a
business environment
Level 3
2 Credits
SKILLS PROGRAM 3: SASSETA C
1
113909 Coach a team member in order to enhance individual performance in work environment
Level 3
5 Credits
2 13912
Apply knowledge of self and team in order to develop a plan to enhance team performance
Level 3
5 Credits
3
244578 Describe how to manage reactions arising from a traumatic event
Level 3
2 Credits
4
113852 Apply occupational health, safety and
environmental principles
Level 3
10 Credits
5
13936 Outline the legal environment of a selected industry
Level 3
2 Credits
6
119472 Accommodate audience and context needs in oral/signed communication
Level 3
5 Credits
7 11508 Write security reports and take statements Level 4 10 Credits
Access control
officer/Grade D
Asset & Reaction
officer/Grade C
Patrol Security
officer/Grade E

8
SSTTUUDDYY UUNNIITT 11
BBAATTOONNSS
LLEEAARRNNIINNGG OOUUTTCCOOMMEESS
OOnn ccoommpplleettiioonn ooff tthhiiss ssttuuddyy uunniitt yyoouu wwiillll bbee aabbllee ttoo……..
♦ Describe 2 types of batons. ♦ Discuss safety guidelines for batons. ♦ Demonstrate defensive manoeuvre skills when using a baton/tonfa ♦ Demonstrate the correct carry method when carrying a baton.

9
1. Introduction
The tonfa was originally a wooden handle that fit into a hole on the side of a millstone used to grind rice and other grains, dating back to 15th century Okinawa.
The handle, which was easily disengaged from the millstone, became a very effective weapon of defense. The Tonfa's circular movements as a farm implement evolved into its rotating strikes as a weapon. They may be used for blocks, thrusts, and strikes.
In 1906, the ownership of weapons was prohibited on the Okinawan Islands by the Japanese invaders. As a result, an exploration of self-defense techniques and new weapons for self-defense began. By spinning the tonfa around the short handle, tremendous striking force may be generated. By using the long portion in conjunction with the short handle, the tonfa may be used for numerous come-a-longs and arm locks.
Two tonfa were often used simultaneously, and were very efficient against armed assailants. The side of the tonfa was used for blocking, and the ends for direct punches. Continued practice with the tonfa can help improve balance, coordination and physical strength.
The simple tonfa has a very interesting history. During the 17th Century the inhabitants of the island of Okinawa were banned by the invading Japanese government from carrying weapons such as swords and knives. Adding to this problem to the people of Okinawa was the scarcity of workable metal in the Ryukyu Islands. These conditions and the need for personal protection gave rise to the development of the Martial Arts of Okinawa: Karate and Kobudo.

10
2. Types of batons
2.1. The Straight baton A handled device for incapacitating dangerous suspects without endangering nearby civilians. The user holds the handgrip which has a trigger connected to a source of thrust, such as an air cartridge. When the user pulls the trigger, the air cartridge is fired and extends a shaft outwards, which has an end piece at the other end for catching suspects. The end piece unfolds into a flat surface and has needles with retractable barbs attached to the flat surface. These retractable barbs engage the suspect and incapacitate him. A cam inside of the end piece can be operated to retract the barbs and release the suspect.
2.2 The tonfa

11
3. The grip of the tonfa
This is the most basic of grips and will enable you to protect yourself quite well.
4. The grip and carry positions of the straight baton
Vertical carry position. Using the one-hand grip, hold your baton down and slightly out to the side of your strong leg, vertical to the ground. Raise your support hand chest high and place it in a good defensive position.
Outside-the-arm carry position. Using the one-hand grip, hold your baton on the outside of your strong upper arm, just below your strong shoulder, horizontal to the ground. Raise your support hand chest high and place it in a good defensive position.
Two-handed carry position. Using the one-hand grip, place your support hand on the long portion of your baton, about one hand width from the long end. Completely grip the long portion with your fingers, centering the baton on your midline at a 45-degree angle.
Tonfa are gripped for the purposes outlined here in a
very easy to learn manner by simply gripping the
handle with your fist and holding the long end of the
shaft parallel to your forearm

12
5. Defensive manoeuvres with the Tonfa
Holster Side Block
Correct Grip

13
Some Major Considerations:
♦ Practice, practice, practice.
♦ Start slow and simple, then build the speed and complexity up over time. ♦ Don’t be over excited and get carried away with force
♦ Remember you are learning defense. Unless you and your partner are incredibly advanced in the use of the tonfa and have a mutual agreement do not strike back!
♦ Never try to hurt your opponent.
♦ Never train whilst intoxicated, drugged or in a bad mood. ♦ If you are injured in any way, stop immediately and assess the damage.
♦ If your opponent accidentally hits you do not take it personally and never try to get revenge!
♦ Keep your tonfa well maintained.
Front Jab

14
6. Defensive manoeuvres with the straight baton
6.1 Blocks:
Front Jab Long Extension Front Jab Side View
High Block Low Block

15
7. Baton retention when a person reaches for your baton while you are in a……... One-hand carry position. As the suspect grips the long portion of your baton, quickly grab the long end with your support hand. Rotate your baton in a circular motion using both of your hands to the outside of the suspect's gripping hand(s), forearm(s), or wrist (s). Simultaneously take a step to the outside of the suspect's body. If one of the suspect's hands is on the long end when you try to place your support hand there, grab the hand on the long end and continue as if it were the long end. Once the long portion is above the suspect's hand(s), forearm(s), or wrist(s), drive the baton in a strong downward motion to completely separate the hold on your baton using your strength and body weight.
Two-handed carry position. As the suspect grips the long portion of your baton, quickly rotate your baton in a circular motion, placing both of your hands to the outside of the suspect's gripping hand(s), forearm(s), or wrist(s). Simultaneously take a step to the outside of the suspect's body. Once the long portion is above the suspect's hand(s), forearm(s), or wrist(s), use your strength and your body weight to drive the baton in a strong downward motion to completely separate the hold.
8. Sparring Sparring with the tonfa can be done against a multitude of different weapons. These can include swords, staffs, spears, knives and really any weapon you can think of. I would not recommend practicing against steel or edged weapons though. Sparring against these will lessen the life of your tonfa and also increase the likelihood of any accidental injury being much worse than it could have been. Experienced Martial Artists should be able to easily adapt their own style’s blocks and forms to match the ability of the Tonfa. You will be amazed at how your Martial training will benefit from this form of sparring.
9. Legal guidelines Batons, although not as lethal as firearms, can be legally regarded as deadly weapons so you should exercise care when using one. In the learner reference guide on legal aspects, the use of force in effecting an arrest is discussed. So, do not use the baton unless it is absolutely necessary, for instance, in order to protect a life or to prevent a person from fleeing during arrest. For the latter remember to use minimum, reasonable force.
10. Safety guidelines There are not many personal safety risks involved in using a baton. The major factor is to be careful not to hit yourself as this can prove to be painful. Other aspects to bear in mind are:
• Do not swing your baton around. Chances are that you might hit an innocent bystander.
• Make sure to carry your baton in such a manner that it cannot be taken from you and used against you.
• Exercise care when entering and existing vehicles as the baton might damage other equipment inside the vehicle.
• Do not hit hard surfaces with the baton as this might cause the baton to break and the pieces might hurt yourself or bystanders. The impact created when hitting a hard surface might cause injury to your arm, hand and wrist.

16
SSTTUUDDYY UUNNIITT 22
CCOONNSSTTRRAAIINNTT AAPPPPAARRAATTUUSS
LLEEAARRNNIINNGG OOUUTTCCOOMMEESS
OOnn ccoommpplleettiioonn ooff tthhiiss ssttuuddyy uunniitt yyoouu wwiillll bbee aabbllee ttoo……..
♦ Describe 2 types of handcuffs. ♦ Describe the purpose of handcuffs. ♦ Demonstrate skills and knowledge for the correct use of handcuffs ♦ Discuss the legal guidelines that apply when using handcuffs. ♦ Describe the safety aspects for the use of handcuffs.

17
1. Definition Handcuffs are restraint devices designed to secure an individual's wrists close together.
2. Description of handcuffs They comprise two halves, linked together by a chain or hinge. Each half has a rotating part which engages with a ratchet which is closed around a person's wrist. Without the key, the person cannot move their wrists more than a few centimeters (inches) apart, making many tasks difficult or impossible. This is usually done to prevent suspected criminals from escaping police custody.
3. Types of handcuffs
There are two distinct subtypes of contemporary metal handcuffs:
♦ one in which the cuffs are held together by a short chain, ♦ and another, of more recent origin, which uses a hinge for this purpose.

18
Since the hinged handcuffs are somewhat smaller when fully extended they are seen as being more easily utilized by a police officer who has relatively small hands, and are also regarded by some observers as more secure because the wrists end up being held closer together than with the chain subtype, and are also bound more rigidly. A third type, the rigid handcuff, has a metal block or bar between the cuffs. Whilst bulkier to carry it permits several variations in cuffing and, with one hand cuffed, can be used in control and restraint techniques. Various accessories are available to improve the security or increase the rigidity of handcuffs, including boxes that fit over the chain or hinge and can themselves be locked with a padlock.
3.1 Double locks
Handcuffs with double locks have a lock-spring which when engaged, usually using the top of the key, stops the cuff from ratcheting tighter to prevent the suspect from tightening them. Tightening could be intentional or by struggling, when tightened the handcuffs may cause nerve damage or loss of circulation. Double locks also make picking the locks more difficult.
3.2 Plasticuffs
Plastic restraints, known as wrist ties, plasticuffs, flexicuffs, flex-cuffs, tri-fold cuffs, or zip-strips, are lightweight, disposable plastic strips resembling electrical cable ties. They can be carried in large quantities by security officers and are therefore well-suited for situations where many may be needed, such as during large-scale protests and riots.
3.3 Keys Most modern handcuffs can be opened with the same standard universal handcuff key. This allows for easier trans- port of prisoners and keeps one out of trouble if one loses one's keys.
However, there are handcuff makers who use keys based on different standards. Maximum security handcuffs require special keys. Handcuff keys usually do not work with thumbcuffs.
4. The use of handcuffs
4.1. Compliant suspect
• Tell the suspect to turn and face away from you, spread his feet apart until you tell him to stop, and point his toes out. The suspect's feet should be more than shoulder width apart.
• Tell the suspect to lock his elbows and move both arms back along his side until both arms are fully extended behind him, keeping his elbows locked.
19
• Tell the suspect to turn both hands until his palms are turned outward, with his thumbs pointing up, and bend forward at the waist until told to stop. The suspect should be bent at the waist at least a 45-degree angle.
• Tell the suspect not to move. Check your position, and adjust as necessary.
• Shuffle up to the suspect, staying out of arms reach, and tap one of the suspect's hands. At the same time, move back and be ready to respond to resistance by the suspect. This is an "attitude" check to determine if the suspect is planning to resist handcuffing.
• Take out your handcuffs using your strong hand, and position them in a proper carry position. Do not divert your eyes from the suspect.
• Do not make any handcuff noise, such as ratcheting the single strand.
• Approach the suspect carefully, from the outside, at a 45-degree angle.
• Use your support hand to grasp the back side of the suspect's hand (using a reverse-handshake grip) at the knuckles where fingers meet. Place your support hand (thumb) over or under the suspect's thumb, depending on the size of your hand.
• Pull the suspect's hand back away from his body. Position the center of the single strand of the bottom handcuff on the suspect's handcuffing notch at the base of his thumb, and push the handcuff on using one smooth motion. As the single strand rotates and catches the latch, snug up the cuff using either the index finger of your support hand or the little finger of your strong hand.
• Ensure that the cuff is snug, then instantly release your reverse handshake grip and move your support hand to grip the suspect's second hand in a handshake grip at the knuckles where the fingers meet the hand. Place your support hand (thumb) over or under the suspect's thumb, depending on the size of your hand.
• Grip the suspect's second hand, then instantly position the top cuff over the suspect's handcuffing notch at the base of the thumb and push the cuff on with one smooth motion. Snug up the cuff using either the index finger of your strong hand or the index finger of your support hand.
CAUTION: DO NOT RELEASE YOUR HANDSHAKE GRIP. ENSURE THAT YOU MAINTAIN POSITIVE PHYSICAL CONTROL OF THE SUSPECT.
• Release your grip on the handcuffs while maintaining a firm handshake grip on the suspect's hand with your support hand. Check the cuffs for correct fit around the suspect's wrists. Adjust the handcuffs as necessary, without releasing the grip you have with your support hand. Engage the double-lock mechanism in both handcuffs without releasing your handshake grip on the suspect.
4.2 Non-Compliant suspect
Performance Steps:
Place the suspect in a rear-wristlock position and apply handcuffs.
• Escort the suspect to the nearest fixed object or structure.
• Give loud commands, as appropriate.

20
• Position the suspect flat against a supporting fixed object or structure so that the controlled shoulder joint cannot move forward.
• Use your support side and apply body weight against the suspect to further enhance the stability of the position.
• Tell the suspect to extend his uncontrolled arm straight out at a 90 degree angle, palm facing out.
• Reverse the angle of the wristlock by going palm to palm with the suspect's hand and your strong hand. Release your support hand and re-grip the suspect's hand with your support hand. Bend the wrist back so that the fingertips are pointing toward the suspect's back. Create enough space between your support wrist and the suspect's wrist to allow for handcuffing.
• Take out your handcuffs with your strong hand, without rotating your trunk/hip or changing the position of the wristlock. Assume the proper carry position for hand- cuffs.
• Position the single strand of the bottom handcuff above the thumb side of the suspect's wrist. Push the handcuff on and snug it up.
• Move control of the wristlock to the handcuffs by moving your support hand down to your strong hand, and exchanging hand positions. Your support hand should now be holding the handcuff in a proper carry position, with the single strand down.
• Tell the suspect to bring his other hand to the small of his back, then grasp the second hand with your strong hand in a handshake grip at the knuckles where the fingers meet the hand. Your strong hand may be placed over or under the suspect's thumb, depending on the size of your hand.
• Position the second cuff over the thumb side of the second wrist. Push it on with a smooth motion and snug it up.
• Maintain your support-hand grip on the handcuffs, and release your strong-hand grip. Use your strong hand to retrieve your handcuff key, double lock the handcuffs, and return the key. Use your strong hand and reapply the wristlock. Release your support-hand grip and slide your support hand to the suspect's controlled elbow and grip it. This places the suspect in the handcuff escort position.
5. Perform an arm bar takedown and apply handcuffs.
♦ Move your feet and your body to above the suspect's controlled shoulder, without moving the suspect's arm or your hands. Do not straddle the suspect's head.
♦ Move your support foot forward until your toe touches the top of the suspect's shoulder. Place the shin area of your support leg across the suspect's controlled shoulder blade; do not use your knee.
♦ Place your strong knee on the ground next to and outside of the suspect's controlled arm. Squeeze the suspect's controlled arm between your legs.
♦ Place your support hand on top of the wristlock, and release your strong hand.

21
♦ Retrieve your handcuffs with your strong hand and place them in a proper carry position.
♦ Rotate your strong hand, palm up. Place your strong hand between yourself and the suspect's controlled wrist while keeping your strong hand palm up.
♦ Align the bottom handcuff (the one closest to your little finger) with the suspect's wrist. Straighten the suspect's wrist with your support hand. Push the bottom handcuff straight onto the wrist with your strong hand and snug it up.
♦ Place the suspect back in the wristlock using your support hand.
♦ Tell the suspect to bring the other hand to the small of his back. As the hand reaches the small of his back, transfer control of the controlled arm to the handcuffs and your strong hand, release your support-hand grip, and reach down and grip the suspect's thumb and index finger.
♦ Lift the suspect's un-handcuffed hand straight up a few inches. Move your strong hand down toward the un-handcuffed hand and cuff up on the little-finger side of the suspect's wrist.
♦ Maintain your body position and release the handcuffs. Retrieve your handcuff key, double lock the handcuffs, and return the key.
6. Legal guidelines Using handcuffs can have very serious consequences, especially if used incorrectly. Handcuffs should only be used if:
• The arrest is lawful;
• It is absolutely necessary to use them in order to prevent an arrested person from fleeing;
• They are applied in such a manner that the arrested person is not injured by their application;
• The dignity of the arrested person is kept in mind (for example, do not handcuff a person publicly if he submits to the arrest).
Please note:
Never handcuff a person to another object like a fence, table or security gate. This could result in a civil law suit, especially if done in public. (Have you noticed how the public stares at an arrested person?).
Never leave the handcuffed suspect alone. This creates an opportunity for escape. Remember that while he is in your custody, you are responsible for his well being. A third party may assault the suspect in your absence and you will be held responsible.

22
7. Safety guidelines
• Handcuffs (especially the type used by security officers) have one shortfall: the keys are interchangeable. This means that if the arrested person has handcuffs keys, he can easily free himself and escape.
• A suspect’s hands should always be cuffed behind his back making use of the double lock function of the cuffs. The double lock function requires more than one action with the key before the ratchet will be released.
• Never handcuff a suspect to your person. As you have seen in the movies it is possible for him to overpower you, injure you and escape.
• If you carry a firearm, make sure that it is out of reach of the suspect at all times, especially while placing or removing the cuffs.
• They are called handcuffs for a reason - do not use them as leg or ankle cuffs, and don’t ever handcuff a hand to an ankle!
• Never handcuff two or more suspects to each other. This creates a security risk as well as a risk of injury to the suspects.

23
SSTTUUDDYY UUNNIITT 33
DDEEFFEENNSSIIVVEE SSPPRRAAYYSS
LLEEAARRNNIINNGG OOUUTTCCOOMMEESS
OOnn ccoommpplleettiioonn ooff tthhiiss ssttuuddyy uunniitt yyoouu wwiillll bbee aabbllee ttoo……..
♦ Discuss the purpose of defense sprays. ♦ Explain the effects of defensive sprays.
♦ Demonstrate skills and knowledge in the correct use of defensive sprays.
♦ Explain the various spray patterns of defensive sprays.
♦ Describe the safety aspects for the use of defense sprays.

24
1. Introducing The most popular, non-lethal, personal defense product on the market today is the self defense spray (also known as pepper spray). The primary chemical compound used in self defense spray today is OC (Oleoresin Capsicum) which is a natural chemical derived from hot pepper plants. OC pepper is an inflammatory agent which causes two reactions when an individual is sprayed with this type of pepper spray. First, the person's eyes clamp shut, hard. If the person manages to open their eyes, they are unable to see well because the OC pepper dilates the capillaries of the eyes and causes temporary blindness. Second, an immediate fit of uncontrollable coughing doubles the person over and often sends them to their knees. The OC pepper causes an instant inflammation of breathing tissues making breathing difficult. The condition is temporary but very debilitating. OC pepper has the affect of putting up a "brick wall" between the assailant and victim even if they are on drugs, drunk or psychotic.
2. Definition Pepper spray (also known as OC spray (from "Oleoresin Capsicum"), OC gas, capsicum spray, or oleoresin capsi- cum) is a lachrymatory agent (a chemical compound that irritates the eyes to cause tears, pain, and even temporary blindness) that is used in riot control, crowd control, and personal self-defense, including defense against dogs and bears.
3. Effects To achieve the desired effects, a defense spray must be aimed towards the face of the aggressor. The general effects of most defense sprays are
♦ Disorientation ♦ Eyes slamming shut ♦ Restricted breathing ♦ Uncontrollable coughing ♦ Blindness and ♦ Intense burning sensation.
Effects generally last 20 to 30 minutes.

25
4. How to use Mace Self Defense Spray
Mace Triple Action self defense spray contains a unique formulation of CN-tear gas and OC-pepper solution in a solvent blend with dry nitrogen as a propellant. Together they provide our strongest, most effective and humane deterrent available for protection against attack.
When you sense that you are in a potentially dangerous situation, carry your Mace defense spray in your hand, slip your thumb under the safety cover and be ready to spray the assailant by pressing down on the red button with your thumb.
Notice how the unit is shaped so that you can tell by the feel how it should be held. The safety cover will prevent access to the red button if you hold the unit backward. The shape of yourself defense spray will enable you to know, even in the dark or in a stressful situation, when the device is properly oriented and ready for use.
If you have to use your defensive spray, point and spray short bursts at the facial area of your assailant. Because of the oleoresin capsicum, direct eye or nasal contact offers more favorable effects.
Do not attempt to punish the attacker by continuous spraying because you may cause unnecessary suffering. Do not try to take the attacker into custody, you might be injured if you do. Contact the police when you are safely away.
Your self defense spray is designed to be actuated in short 1/2 second bursts aimed at the face. When actuated, a stream of tear gas and oleoresin capsicum will issue from the unit a distance of approximately 10-12 feet (more or less, depending on the pressure of the defensive spray and wind conditions). Avoid spraying directly into the wind. Use the self defense spray when it is in the upright position, otherwise it may not function properly then or afterwards.
If you intend to rely on your unit as a defense, you should test the functioning of the spray periodically by discharging one or two bursts outdoors in a safe are away from all persons and animals in the vicinity. Take care that you do not exhaust the contents of the unit you intend to rely upon.

26
Your best protection is to avoid potentially dangerous situations if you can. Always be aware of your environment and the people around you. Be especially alert after dark. Do everything you possibly can to escape from an assailant before resorting to the use of your self defense spray.
4.1 Tips for the Use of Defensive Sprays
Aim for the Eyes Hitting the eyes is more likely to cause immediate incapacitation than hitting the skin or nostrils. Beware: Eyeglasses or protective goggles can prevent the spray from reading the eyes.
Spray and Run The attacker won't always feel pain instantly so don't stick
around to see how good your aim is. A strong wind or struggling with your attacker can get some of the spray on you.
Monitor Shelf Life Heat and age can cause spray cans to lose propellant, and
some of the active ingredients can lose effectiveness over time. Be sure your canister is fresh and in proper working order.
Store Properly Store in a cool, dry environment at room temperature.
Avoid direct sunlight and high temperatures. Do not leave canisters in unventilated vehicles exposed to direct sunlight on hot days.
5. Safety guidelines Pepper Spray MUST ONLY be used legitimately and responsibly, the careless or malicious use of pepper spray products will get you in deep trouble with the law. Keep pepper sprays out of the reach of children.
When Using Pepper Spray, here are some points to keep in mind:
♦ Pepper Spray is a pressurized aerosol and should be replaced after a year as the container might have lost some pressure.
♦ Do not alert dates or casual acquaintances to the fact that you are carrying a self defense spray.
♦ Do not threaten an assailant with pepper spray, it just takes away the surprise and proves to them you'd rather NOT use it.
♦ Do not stick your arm out in front of you to fire pepper spray for self defense. It's much too easy for it to be taken away before you use it.
♦ A good women's self defense diversion is to shout "STOP" and at the same time raise the arm not holding the spray in a defensive gesture. Do this while you hold your pepper spray at eye level, about 6" in front of your face. Use your outstretched arm to help you aim the spray for your attackers eyes. Not only will this hopefully attract some attention it will divert attention away from the spray. If he goes for your outstretched hand he'll walk right into the spray.
♦ AIM FOR THE EYES ♦ Spray in short bursts - 1-2 seconds at the most. Fan your aim from side to side to cover a
wider area. This is especially helpful with pepper spray -stream sprayers.
♦ Do not close your eyes. Not only will you lose sight a moving assailant (not good) closing your eyes makes it difficult for most people to aim.
♦ Don't bring out or aim your pepper spray unless and until you're going to use it.

27
♦ If you're buying pepper spray in a small -keychain size, buy a second container and use to practice. (in a safe spot outdoors) You'll learn the range, the spray pattern and how it feels to shoot it. You'll know what to expect. Practice taking the sprayer out of your pocket (or purse) raising it to the correct spot and spraying without hesitation.
♦ Keep it close at hand. If you feel exposed or threatened put your sprayer somewhere that you can get at it immediately.
♦ Once you spray a person, stick around exactly long enough to know they're down and then get the heck out of there as fast as you can. Don't hang around for any reason.
♦ If you are in a situation where you're likely going to be overwhelmed - for example there are too many targets or you've missed the opportunity to fire, throw it as far away from you as possible.
♦ Self defense products, pepper spray products or any action for women's self defense is only as good at the brain that's in charge. Please be careful with alcohol and/or drugs. Many rape victims were impaired at the time of the attack.
♦ If, for any reason, you are in a situation where the most likely outcome is that someone will be able to take the spray away from you, throw it away as far as you can.
6. Spray patterns
There are three basic types of spray patterns. The advantages and disadvantages of each are listed below.
6.1 Ballistic Stream
Advantages Dis-advantages
Reduces likelihood of contaminating other subjects in the immediate area.
Requires accurate aim to hit target.
Potential for inhalation by sprayer reduced. Only affects area struck by stream.
Less likely to be affected by wind or to be blown back in your Face
Potential for irritation of target's respiratory system reduced.
Longer range. Takes longer to create irritation than a mist spray.
6.2 Full Cone Mist Spray

28
Advantages Disadvantages
Requires less accuracy Potential for increased exposure to surrounding area, to innocent bystanders and to the sprayer
Covers a wider area, so more likely to hit target
Strong winds can diminish effectiveness
Potential for inhalation increased, enhancing effectiveness on target
Potential for inhalation increased, enhancing effectiveness on innocent bystanders and sprayer

29
SSTTUUDDYY UUNNIITT 44
TTWWOO WWAAYY RRAADDIIOO CCOOMMMMUUNNIICCAATTIIOONN
LLEEAARRNNIINNGG OOUUTTCCOOMMEESS
OOnn ccoommpplleettiioonn ooff tthhiiss ssttuuddyy uunniitt yyoouu wwiillll bbee aabbllee ttoo……..
♦ Identify the components of a two way radio. ♦ Explain the operating procedures for a two way radio. ♦ Explain the principles of voice procedure. ♦ Use the phonetic alphabet during a radio transmission. ♦ Use common radio terminology during a radio transmission. ♦ Explain the principles of radio procedures.

30
1. Introduction Communications among responders vary with the severity of the incident at hand. They range from simple and straightforward to intense and complex. Flexible standards have been established to guide radio communications accordingly. At one extreme (e.g., in an exchange between regular colleagues about a minor incident) the protocol may be nearly (but not quite) as informal as in ordinary conversation. At the other extreme (e.g., among teams from several patrol routes responding to a major incident) the protocol may be nearly (but not quite) as formal as in a planned operation.
2. Definition Radios may operate at any frequency where they are licensed to do so, though typically they are used in the various bands between 60 and 900 MHz. They may use simple modulation schemes such as AM or FM, or more complex techniques such as digital coding, spread spectrum, and so on. Licensing terms for a given band will usually specify the type of modulation to be used.
For example, airband radiotelephones used for air to ground communication between pilots and controllers operates in the VHF band from 118.0 to 136.975 MHz, using amplitude modulation.
3. Components of a two way radio
4. Radio procedures
4.1 Do’s & Don’ts
♦ Don’t use abusive language over the radio. ♦ Don’t play music in the background. ♦ Keep the radio/control room secured. ♦ Treat radios as technical equipment and handle them with care to prevent damage. ♦ Use the radio for the transmission of official messages only.
Antenna
Volume
Frequency/channel
Press to talk/PTT
Charger

31
4.2 Operating rules Only one station can speak at a time. To prevent confusion the following rules must be adhered for:
• Listen out before speaking to ensure that the frequency is clear and do not cut in on other transmissions. Allowance must be made for transmission where you can hear only one of the participants in a conversation.
• Observe short pauses between phrases and at the end of a conversation to allow for break-in-working. The press-to-talk (PTT) switch or the voice-operated switch (VOX) must be released when pausing.
• Answer all calls immediately and in the correct sequence.
• Ensure that the radio set returns to receive after each transmission. A jammed PTT • switch will reduce a good net to a state of chaos.
• To utilise circuit time more efficiently, all messages or their substance must be written down prior to transmission. Those messages which must be delivered by the receiving operator to another person or which are preceded by the pro-word “MESSAGE” must be written down.
• Transmission via radio should be clear with a natural emphasis on each word and should be spoken in natural phrases, not word by word.
• if this procedure is followed, no complaints can result
• When it is necessary for a station to initiate test signals, either for the adjustment of a transmitter, before making a call, or for the adjustment of a receiver, such signals will not continue for longer than 10 seconds, and will consist of spoken numerals (1,2,3, etc) followed by the call sign of the transmitting station.
• The station that begins the transmission must also terminate it.
5. Principles of voice procedure
The principles of good voice procedure are well defined by the use of the key words “BASS”, “RSVP” and these must be memorised by every radio user. Details are:

32
5.1 BASS
Brief: message must be brief and only contain important facts.
Accurate: details given must be clear and accurate.
Security: never transmit classified information unless it is disguised in some way.
Speed: do not rush the message but be brief and concise.

33
5.2 RSVP
Rhythm: use short phrases with pauses.
Speed: remember the receiver may wish to write down the message.
Volume: do not shout but speak slightly louder than normal.
Pitch: pitch the voice slightly higher than normal.
6. The phonetic alphabet A message transmitted over a radio can sometimes be very indistinct and difficult to understand.
During world war 1 a system of accurately transmitting a radio message was devised whereby each letter of the alphabet was given a word, so that any message could be spelt out and by so doing remove any chance of misunderstanding.
This system of words became the phonetic alphabet and was standardized internationally. The phonetic alphabet is still used today whenever radio communication takes place, from the Police and Defense Force to International Air Traffic Control and amateur radio communicators.
This ensures that any message which although it might contain call signs, codes, difficult words or names will be understood by the receiver of that message.

34
A
ALPHA
J
JULIET
S
SIERRA
B
BRAVO
K
KILO
T
TANGO
C
CHARLIE
L
LIMA
U
UNIFORM
D
DELTA
M
MIKE
V
VICTOR
E
ECHO
N
NOVEMBER
W
WHISKEY
F
FOXTROT
O
OSCAR
X
X-RAY
G
GOLF
P
PAPPA
Y
YANKEE
H
HOTEL
Q
QUEBEC
Z
ZULU
I
INDIA
R
ROMEO
All radio users must know this phonetic alphabet.
7. Common words and phrases As with the phonetic alphabet, the following phrases are globally accepted as ‘radio-speak’. Using these phrases ensures that all radio operators – even from other countries and our emergency services – will understand each other. CALL SIGN: Call sign of station as registered and reflected on the radio licence. ABBREVIATED CALL: Unofficial domestic call, signs arranged by individual companies. OVER: My message is complete and I am expecting a reply. OUT: My message is complete - do not reply. MAYDAY: Emergency Call (repeat at least twice) SAY AGAIN: Repeat your message I SAY AGAIN: I am repeating my previous message or portion thereof. RELAY TO ....(Call Sign): Pass my message on to ....... (Call Sign)
8. Radio controls
Before commencing a transmission, the user must ensure that the net is clear. The operator uses his own call sign to identify himself first and thereafter the call sign of the station or stations he is calling. Once the link is established an abbreviated call sign (ACS) may be used.

35
8.1 Single Call This is a single transmission between two stations.
The communication process consists of four definite phases.:
♦ Waiting for a break in air traffic ♦ Establishing contact ♦ Sending the message ♦ Ending contact
Waiting for a Break in Air Traffic:
• Never interrupt other traffic unless it is an emergency
Establishing Contact:
• Establish contact be first identifying yourself
• Assume you are Foxtrot and you want to communicate to whiskey. You will initiate contact by transmitting:
• Whiskey this is Foxtrot - message - over@
• Whiskey will respond:
• Whiskey - send message - over@
Sending the Message
As contact has now been established communication can now take place. Before communicating the person whom intents to communicate must first identify himself by using his own call sign before mentioning the other party’s call sign.
Bear in mind that every time a statement has been completed and a response is expected, such a transmission must be completed with the word “over”
Ending Contact
Should the exchange of information be completed, either party may end the transmission with the pro-word “out”.
Other stations on the net will now know that the channel is open for new communication. Sender's call sign: Z R 123 ♦ Receiver's call sign: A 1 ♦ The phonetic alphabet is used to spell out the call sign, i.e. Zulu Romeo 123, or Alpha 1and
the message transmission would be ………. ♦ If the control call signs isZR123, control would say: ♦ Alpha 1, Alpha 1; Alpha 1; this is Zulu Romeo 123
………..Over ♦ And ZR123 would respond: ♦ Zulu Romeo 123, Alpha 1 standing by, send
………..Over

36
8.1. Multiple call Senders of messages are the only persons that can end a message i.e. "Zulu Romeo 123 Out". All other persons responding to the originator must reply "Roger over". Note that when ending a message, the operator will use the word "over" or "out", depending upon whether a reply is required or not. The phrase "over" and "out" is never used.
This occurs when the control station calls a number of outstations on the net. The operator at control uses his own call sign to identify himself, and thereafter the call signs of the stations he is calling. • ALPHA 1, DELTA 2 and PAPPA 6 this is BASE
message over.
Station will answer in the same sequence as called
• BASE this is ALPHA 1send over. • DELTA 2 send over. • PAPPA 6 send over.
BASE will now send the message and all of the stations will reply in alphabetical order.
As soon as BASE has been satisfied he will end the trans- mission.
8.3 All Stations Call
This is when the Control Station is calling all the stations on the net.
All stations this is BASE message over. • ALPHA 1 send over, BRAVO 3 send over, CHARLIE 4
send over.
♦ BASE confirm postings for today over. • ALPHA 1 (message) over, BRAVO 3 (message) over,
CHARLIE 4 (message) over. • BASE out.
Stations will respond in order of numerical sequence of call signs. “All Stations” call would normally only be used on a small net.
8.4 Emergency Calls
Emergency calls are designed to arouse the attention of all stations. Emergency procedures must be pre-planned.
• BASE this is ALPHA 1 MAYDAY MAYDAY over. • ALPHA 1 this is BASE send (your emergency) over.
8.5 Relay Messages It sometimes happens, mainly as a result of distance, that two stations cannot speak to one another. If, however, there is a station between any two such stations, which has communication with both, such station can be used as a relay.

37
Procedure
• CONTROL wants to send a message to TANGO 2, and he uses TANGO 3 as a relay station. CONTROL must confirm that TANGO 3 has communication with TANGO 2.
• If so, CONTROL sends the message to TANGO 3, for relay to TANGO 2.
• TANGO 3 relays the message to TANGO 2, and gets an answer back from TANGO o 2.
• TANGO 3 relays TANGO 2's answer to CONTROL.
♦ TANGO 3 this is CONTROL, do you have communication with TANGO 2, over ♦ TANGO 3 positive, over ♦ CONTROL, relay message to TANGO 2, over ♦ TANGO 3, send, over ♦ CONTROL, they must come over to my location, over ♦ TANGO 3, roger, out ♦ TANGO 2, this is TANGO 3, message from CONTROL, over ♦ TANGO 2, send, over ♦ TANGO 3, CONTROL wants you to move over to his location ♦ TANGO 2, roger, over ♦ TANGO 3, out ♦ CONTROL this is TANGO 3, message, over ♦ CONTROL send, over ♦ TANGO 3, message sent, over ♦ CONTROL roger, over ♦ TANGO 3, out
9. Principles of radio procedures
• Do not use abusive language over the air. Apart from prejudicing voice procedure, this can result, in licenses being revoked.
• Do not play music in the background. • Do keep the radio room secure. • Do treat radios as technical equipment and handle them with care to prevent
damage. • Do use radios for the transmission of official messages only; the transmission of music
or other entertainment is prohibited. • Always use the correct call sign. • Ensure that the battery is always fully charged. • Always carry out a radio test before going on duty. • Keep messages short, concise and to the point. • Prepare all messages mentally before transmitting them. • Use codes as far as possible. • Excessive testing of the radio is forbidden. • Remember to release the transmit button after each message.
• Never switch the radio off.

38
SSTTUUDDYY UUNNIITT 55
MMEETTAALL DDEETTEECCTTOORRSS
LLEEAARRNNIINNGG OOUUTTCCOOMMEESS
OOnn ccoommpplleettiioonn ooff tthhiiss ssttuuddyy uunniitt yyoouu wwiillll bbee aabbllee ttoo……..
♦ Discuss the purpose of hand-held metal detectors. ♦ Demonstrate the correct use of a handheld metal detector. ♦ Demonstrate skills in the use of a metal detector when a search from the front and
back needs to be conducted.
♦ Discuss the legal guidelines that apply when using hand held metal detectors.
♦ Explain the function of a walk through metal detector.
♦ Describe the safety aspects for the use of hand held metal detectors.

39
1. Introduction
Mention the words metal detector and you'll get completely different reactions from different people. For instance, some people think of combing a beach in search of coins or buried treasure. Other people think of airport security, or the handheld scanners at a concert or sporting event. The fact is that all of these scenarios are valid. Metal-detector technology is a huge part of our lives, with a range of uses that spans from leisure to work to safety. The metal detectors in airports, office buildings, schools, government agencies and prisons help ensure that no one is bringing a weapon onto the premises. Consumer-oriented metal detectors provide millions of people around the world with an opportunity to discover hidden treasures (along with lots of junk). In this study unit, you'll learn about metal detectors and the various technologies they use. Our focus will be on consumer metal detectors, but most of the information also applies to mounted detection systems, like the ones used in airports, as well as hand- held security scanners.

40
2. Definition
2.1 Handheld metal detector
The hand-held metal detector is a battery operated, lightweight device used to sense the presence of objects made of any type of metal. This device is light and portable and can be used with ease at any location on a site.
2.2. Walk through metal detector The walk through metal detector is an electronic operated device which typically are used in a variety of environmental conditions and can be used both indoors and outdoors to sense the presence of objects made of any type of metal
3. Searching with a hand held metal detector.
The security officer must do a hand held metal detector search according to the following steps and know how to use a HHMD:
♦ Make sure that the hand held metal detector is in working order.
♦ Searches must be done by moving the hand held metal detector + 20mm (2cm) from the body or item.
♦ Security equipment Page 34 of 55 Use and maintain basic security equipment - 12328 NQF 03 General Security Practices

41
♦ The person must face the security officer when the search is being done.
♦ Start with the headgear and hair by moving the detector from the left side over the crown of the head to the right side of the head.
♦ Move the detector from the collar and shoulders down the front of the person to the waist on the left side then from the shoulder to the waist down the right side. Repeat at the back.
4. Operating a handheld metal detector Turn on the power switch, if a click sound is heard, it indicates that the power has been connected and the green LED will turn on at the same time. If no click sound is heard, it indicates that no battery has been installed or the battery is not well connected. If the click sound is heard one after another, it indicates that the battery can NOT be used anymore and a new battery shall be installed.
♦ When the switch click sound stops, the highly sensitive detection can be performed.Grasp the handle and detect with the detection face around the object being detected, there will be an alarm when a metal object is detected.
In the mean time, the green LED will turn into red. When the When the detection stops, the alarm stops and the red LED turns into green.

42
4.1. Sensitivity adjustment
• The sensitivity shall be adjusted when performance instability is observed or sound is produced when detecting human body without any metal stuff because requirement or the sensitivity is too high.
• Insert a small straight –shaped screw driver into the small hole of the handle of the detector and rotate clockwise until a sound is heard, then rotate counter- clockwise barely to the position where no sound is produced, then rotate for another half a circle, until the sensitivity meets the requirement
5. Practical use of the scanner
5.1. The scan from behind
♦ Stand behind person to be searched, instruct person to assume a position with arms outstretched to their sides, palms out parallel with the floor/ground, legs spread out with feet shoulder width apart.
♦ Place side of wand, regardless of left or right, at the top of their head, maintaining a distance of 1”-2” from the body, and scan over each side of their head, then sweep from neck down the center of the back to the waist and buttocks, scanning to the sides of their waist and back up to the shoulder –both sides - work your way from top of one shoulder outwards to the extended hand. Go out past the fingertips and return under the hand, scanning the underside of the arm (pay attention to alerts on watches/jewelry on wrists). Sweep inwards to the armpit, and continue downwards to the foot. At the foot ensure that you scan across the outmost upper side of the shoe.
♦ For boots and hiking shoes the scanner will alarm on detecting eyelets and speed lace rings. It is best to have them remove those shoes for inspection, depending on the security threat you are facing).

43
♦ Continue the scan around the heel and scan the inside top of the foot, - have them lift their foot up to scan the bottom of their foot, then sweep upwards between the legs to the crotch (Note: for dresses stop at hem or just above the knee and go down the other leg.
♦ You will to need to conduct a slower scan around the buttocks and thigh/abdomen area from front and rear). Again, maintain 1”-2” distance and go downwards inside the opposite thigh to the floor, repeating the scan for foot as before, except this time go from inside foot/ankle area to outside of the ankle and foot (scan bottom of that foot too). Proceed back up the other side of the person to armpit, out to the hand and around it, to the top of the shoulder.
4.2. The scan from the front
♦ Now step in front of person while their arms are still outstretched, and begin the scan with the wand parallel with their shoulders and begin the scan outwards to the hand, then back to the armpit and down to the waist. Ensure that you keep the wand 1”-2” for this scan to reduce grounds for harassment complaints.
♦ Pay attention to alarms on shirt buttons. Scan the belt front area, and then go down one side to the ankles, back up between the legs, down to the other ankle, and back up the other leg. Focus here will be caution on the sock area, and calf/thigh areas for secured weapons.
Note on Hats and Coats: best method is have them remove them and screen through x-ray if available.
♦ If the coats are on then you must conduct the same screen as normal from behind, but from the front ask that the coat be opened. Holding the coat front lapel then insert the wand from the front inside to scan the underside of the jacket from armpit to waist. Do the same for the other side. – For Hats, scan the perimeter of the hat and the bill of the hat.
♦ Speed of Movement of the Seeker – per National Institute of Justice standards you Should move the detector at a speed of about 0.5 meter per second for Small Objects: handcuff key, small caliber cartridge, small non-ferrous/non-magnetic stainless steel knife. Speed for Very Small Objects will be 0.5/meter/second: disposable razor blade, hypodermic, metal ink pen refill. Speed for detection of a pistol; 2 meter/sec, and 4” knife will be at 1meter/second.
To assist in this we recommend that you take a yardstick / meter stick and lay it on a table top. Practice scanning from one end to the other as you say in your head: “one and two”. This will give you a half second count for establishing .5/meter/second. You should be at the middle of the yardstick on the word “and”, and at end of the yardstick after saying “two”. (A count of “one thousand one” is for 1 meter/ second.)
Use these counts mentally as you use the scanner on a test subject to establish the speed at which you will conduct your scans. Use it mentally as well to prevent too fast of movement during real scans.

44
Remember: the object is to conduct the scan without contacting the person. Certain facilities will have some leeway with this, particularly correctional facilities.
6. Legal guidelines when using a hand metal detector. As a security officer you do not have the right to search any person without his or her consent. Using the HHMD is also regarded as a search and you will need the person’s permission to search them.
Should the HHMD show that there is a metal object on the person, you may not remove it yourself. Ask the person to explain the object and to remove it if you believe it is necessary.
7. Safety guidelines.
• When using HHMD’s the security officer should always bear the following in mind:
• Position yourself in such a way that you will be able to defend yourself should the person being searched decide to attack you.
• Do not use HHMD’s to search people with pacemakers (heart beat assistance items) as the HHMD might interfere with its operation.
• Do not attempt to open or maintain the HHMD yourself, as there are many safety risks involved in doing so. Only authorized trained technicians may perform maintenance tasks.
8. Function and characteristics of Walk through metal detector
• Six detecting areas: allocation of six mutual over-lapping detecting areas, adopt the advanced digital pulse technology, both side of the gate can transmit and receiving the signal, can eliminate the false alarm areas and accurately determine the location of the metal objects.
• Indication of the alarming areas: the monitor can accurately indicate the prohibited articles which are hidden at the places of human body with corresponding height. The alarming areas can be indicated by the column lamps at the right side of operation panel.
• Adjustable area sensibility: with the highest sensibility, it can detect the metal article as small as one coin. With the range of 0-99, it can automatically adjust the sensibility, according the weight, volume, and location of the metal parts and eliminate the false alarming for the coin, key, jewellery, leather belt buckle, etc.
♦ High capability of anti-interference: the adoption of digital, analogy and left and right balanced technology can prevent false or omitted alarming, which greatly enhance the capability of anti-interference.

45
♦ Protection with password: the protection from the password can only allow the authorized person for the operations. It is highly safe.
♦ Functions of statistic counting: the intelligent counter can calculate the number of the passenger flow and the times of alarming.
♦ Harmless to human body: adopt the technology of low electromagnetic to transmit, the product is harmless to heartbeat of human body,
♦ pregnant women, magnetic software, tapes and video recording tapes.
♦ Power safety: the power device for the product is installed at the top of the main unit. The power supply can be controlled by the operation panel.
• Convenience in installation: Series products adopt integration design. It only takes twenty minutes to install the gate. The user's manual are attached with the product.
• Application scope: it can be used in the factory, prison, court, exhibition hall, stadium, entertainment lieu, etc., where the prohibited articles need to be checked for safety.

46
SSTTUUDDYY UUNNIITT 66
BBOODDYY AARRMMOOUURR
LLEEAARRNNIINNGG OOUUTTCCOOMMEESS
OOnn ccoommpplleettiioonn ooff tthhiiss ssttuuddyy uunniitt yyoouu wwiillll bbee aabbllee ttoo……..
♦ Explain what body armor is. ♦ Discuss the different types of body armor. ♦ Describe the purpose of body armor. ♦ Explain the benefit of wearing/using body armor. ♦ Describe the safety aspects for the use of body armor.

47
1. What is body armor?
Body armor is a protective piece designed to stop projectiles. Modern body armors are also known as bullet- proof vests.
They are used by police, the Army and private security as default vest. The name bulletproof is deceptive though, as no body armor currently available can stop all bullets.
2. Different types of body armor
Two big groups of body armors can be established:
• the set used by law enforcement officers
• and the sets used by the Army Among the first group, there are different types of body armor characterized by increasing protection power. The classification is not easy, due to the large number of available ammunition calibers and the variations among similar caliber cartridges.
3. Standards of body armor
Type I Minimum level of protection.
Type IIA Protects from lower velocity 9 mm and 40 S&W ammunition.
Type II Protects against high velocity 357 Magnum and higher velocity 9 mm
ammunition.
Type IIIA Protects from high velocity 9 mm and 44 Magnum ammunition. Not recommended in hot or humid climate.
Type III Protects against 7.62 mm Full Metal Jacketed (FMJ) bullets. Type IV Protects against .30 caliber armor piercing (AP) bullets. Special type No standard custom made, it is be based in any of the standards with
addition for special requirements.

48
3.1 Body armor standards chart Types of ballistic resistance for body armor.
Type Bullet caliber and type Bullet mass (grains) Impact velocity
I • .22 long rifle high velocity
• .38 round nose lead
• 40
• 158
• 1.050
• 850
IIA • .357 jacketed soft point
• 9mm full metal jacket
• 158
• 124
• 1.250
• 1.090 II • 357 jacketed soft point
• 9mm full metal jacket
• 158
• 124
• 1.395
• 1.175 IIIA
• .44 magnum lead semi wadcutter gas checked
• 9mm full metal jacket
• 240
• 124
• 1.400
• 1.400
III • 7.62 mm full metal jacket • 150 • 2.750
IV • .30-06 armor piercing • 166 • 2.850

49
BODY ARMOR PLATE
LIQUID BODY ARMOR

50
4. The purpose of having body armor First, armor stops weapons or projectiles from reaching a person's body. Second, it diffuses the weapon's energy so that the final impact causes less damage. While it's not effective in every situation, armor can generally help protect people from serious injury or death, especially against the right weaponry
5. Benefits of wearing body armor
• Body armor saves lives. According to industry estimates, more than 1,200 officers
have been saved from death or serious injury because they were wearing their
armor. This figure includes lives saved and serious injury avoided from assaults and
accidents as well as from ballistic threats.
• Body armor offers flexibility to the wearer in a number of ways:
♦ It is available in various levels of protection to accommodate the range of ballistic
threats facing wearers (including street assaults and the officers’ own weapons and
ammunition).
♦ It can be worn as a concealable undergarment; incorporated into a uniform shirt,
vest, coat, or other type of outer garment; or worn over the uniform and easily
recognizable (such as armor worn by special tactical teams).
♦ Many models are available in a variety of coverage's, some armor panels cover the
front and back of the torso, while others also wrap around the sides.
♦ Ballistic panels can be removed from the carrier on some models so the carrier can be thrown into the washing machine. Many different types of carrier materials are available.

51
5.1 Angle of incident
The angle between the line of flight of the bullet and the perpendicular to the front surface of the backing material fixture as shown in the image below:
No Armor Protects From All Ballistic Threats
Although some restrictions apply, the advantages of wearing body armor far outweigh any limitations.
Note the following restrictions:
♦ Soft body armor is not designed to protect against rifle bullets or edged or pointed weapons.
♦ Hard or tactical armor, designed to defeat rifle bullets, incorporates metal or ceramic plates and is generally too heavy, bulky, and conspicuous for routine wear.
♦ Armor that incorporates ballistic plates designed to de- feat rifle bullets offers protection only from rifle bullets that impact the limited areas covered by the plates. However, the soft armor supporting the plates will provide ballistic protection against handgun ammunition that the soft armor is labeled to defeat.
♦ Armor designed to defeat armor-piercing bullets may provide protection only against a single-bullet impact on the ballistic plate. Again, the soft armor supporting the plates will provide ballistic protection against handgun ammunition that the soft armor is labeled to defeat.
♦ Armor cannot be expected to provide adequate protection from ballistic threats that strike
too close to the edge of an armor, or too close to another impact. Although manufacturers have recently come out with new fabrics that claim to be more comfortable, there generally is a trade-off between comfort and protection. The higher the level of protection worn, the more layers of ballistic material and stitching are required, adding to an armor’s weight and bulk. Although discomfort may result from an armor’s weight, bulk, or stiffness, such discomfort may be due to a bad fit or the strapping on of armor too tightly. If possible, conduct a wear test before purchasing armor.

52
6. Safety Instructions
No body armor is bulletproof. Manufacturers rate armor in accordance with the standard threat levels. Although body armor will generally protect against bullets identified by manufacturers’ at those specific threat levels, the armor could be penetrated if impacted by a bullet of a higher threat level.
Remember, bullets may also penetrate armor when the impact is too close to the edge of the armor or too close to another impact. Follow these guidelines for safe use of your armor:
• Be sure to read the label on your armor. Familiarize yourself with its level of protection. Labels on armor must identify designated levels of protection and warn if the armor does not protect against rifle fire or sharp-edged or pointed instruments.
• Manufacturers may also add additional safety instructions or information to labels.
• Read and retain for future reference any safety literature accompanying your armor.
• Follow care and maintenance instructions to ensure your armor’s intended performance (see “Care and Maintenance”).
• Seek medical attention if you are shot while wearing your armor, even if the bullet does not penetrate. Although armor protects against blunt trauma from non- penetrating bullets, internal injuries requiring medical attention may still result.
• Replace your armor immediately if it has been impacted by a bullet or damaged in any way. Some manufacturers replace armor free of charge if they are provided with official documentation concerning the incident.
• Make sure your vest’s level of protection corresponds to the types of threats you face on the streets and that your vest protects against your service weapon and ammunition.
• Remember that proper fit aids in your armor’s effectiveness and comfort.
• Conduct visual inspections of your armor.
• Become educated about proper cleaning methods (see “Care and Maintenance”).
• Follow the inspection/replacement procedures recommended by the manufacturer and your
department.
• Keep manufacturer addresses and telephone numbers handy. Many manufacturers provide
a tollfree 800 number for their customers.
WEAR YOUR ARMOR.
7. Legal guidelines The only applicable legal guidelines for the use of body armor are found within the Occupational Health and Safety Act, referring to the use and issue of personal protective equipment and the employee’s duty to use issued equipment to ensure his safety.

53
SSTTUUDDYY UUNNIITT 77
FFLLAASSHHLLIIGGHHTTSS
LLEEAARRNNIINNGG OOUUTTCCOOMMEESS
OOnn ccoommpplleettiioonn ooff tthhiiss ssttuuddyy uunniitt yyoouu wwiillll bbee aabbllee ttoo……..
♦ Demonstrate skills and knowledge for the correct use of a flashlight. ♦ Demonstrate knowledge and skills in changing the battery of the flashlight during
take over of shifts. ♦ Demonstrate the correct carry method of a flashlight during a security patrol.

54
1. Introduction
All security officers should have a working flashlight, even when working during daylight. They may have to enter a darkened building or room. Any flashlight is better than no flashlight, but the most common is the “maglight” style. The three -battery maglight is more than enough illumination for anything short of search and rescue work.
Security officers should employ the same mentality for law enforcement gear as with their field gear, “If you can’t afford to loose it, don’t take it.” Many maglights are rechargeable and this is a great way to insure the light doesn’t go out at an inopportune moment.
The maglight is not to be used as an impact weapon unless as a last resort in a deadly force situation.
Even though not used as an impact weapon, the flashlight can still be used in selfdefense. It’s presence in the hands of an officer intimidating and practical. At night, a suspect’s eyes are adapted to darkness in some degree and shinning a maglight into the eyes will not only blind, but actually stun an offender momentarily. Placing weight in the light may cause a lawful use of force to become unlawful.

55
2. How to use the flashlight
2.1 Holding the flashlight
• The officer should take the flashlight in their non-firing hand. It is grasped with the pinkie finger near the lens and the thumb near the rear of the light. The index finger will turn the light on and off.
• When shinning the light, the officer should hold it over the shoulder, up and away from the body. This is in case an offender starts shooting at the source of the light. It reduces the chances of the officer being hit.
• This method of holding the flashlight also provides the officer with a self defense option. In a worse case scenario, the officer can swing the light down, using the butt of the light as the impact point. This is not a traditional use of force and should only be used in a life or death situation. If the officer employ the light in this manner, they try to strike at the weapon or wrist of the offender.

56
• Also, a strike to the collarbone will likely break it, incapacitating both arms.
• If at all possible, the officer should avoid using the maglight as an impact weapon due to possible liability and use of force issues.
When utilizing the light in this manner, it is very easy to seriously injure or kill an offender so extreme care must be taken. Once again, the flashlight should not be used to strike an offender unless the situation would call upon deadly force.

57
3. Changing the battery of the flashlight
♦ Unscrew the tail cap to install or replace the batteries
♦ Unscrew the tail cap to install or replace
the batteries.
♦ Lock-out Tail cap.
Models with a lock-out tail cap have machined marks aligned in the lock-out position to prevent accidental activation.
♦ To unlock and place in momentary-on
position, rotate the tail cap clockwise approximately one turn.
♦ Momentary-On ♦ Depress the tail cap pushbutton to
activate the light in momentary mode.
♦ Constant-On.
♦ From the momentary-on position, rotate the tail cap clockwise approximately one- half turn to achieve constant-on activation.

58
4. Carry the flash light
Security officers should take note that belt holders are part of the standard gear when a flash light forms part of the uniform.
The image on the left and below shows a typical belt clipper/flashlight pouch where the flashlight can be worn during duty.
This holder will hold your flashlight firmly in place to enable you to move or run without losing your torch.

59
5. Battery-powered vs. Re-chargeable?
5.1 Battery operated flashlight
Non-rechargeable flashlights don't use ordinary AA, C, and D size alkaline batteries. They use 123A lithium batteries because of their multiple advantages over alkalines:
♦ longer shelf life (10 years), higher
♦ power density, higher unit voltage (3 volts), lighter
♦ weight, better cold weather performance, and better volt- age maintenance.
5.2 Re-chargeable flashlight
The rechargeable batteries use time-tested Nickel-Cadmium technology. Coupled with Rapid Smart Chargers you'll get reliable performance and hundreds of charging cycles from your battery.

60
7. Safety guidelines when using a flashlight. In order to protect themselves, workers should follow these precautions:
• Read and follow manufacturers’ recommendations for product use • DO NOT MIX batteries of different brands • DO NOT MIX old and new batteries • DO NOT MIX alkaline with non-alkaline batteries • DO NOT USE damaged batteries • Ensure that proper polarity is observed when installing batteries • PRIOR TO THEIR USE IN FLAMMABLE ATMOSPHERES, inspect approved battery
powered flashlights to ensure that the batteries are in good condition,
• and that the proper batteries are installed correctly.
• DO NOT inspect the flashlight in a hazardous area or near an open flame.

61
SSTTUUDDYY UUNNIITT 88
MMAAIINNTTEENNAANNCCEE OOFF SSEECCUURRIITTYY EEQQUUIIPPMMEENNTT
LLEEAARRNNIINNGG OOUUTTCCOOMMEESS
OOnn ccoommpplleettiioonn ooff tthhiiss ssttuuddyy uunniitt yyoouu wwiillll bbee aabbllee ttoo……..
♦ Demonstrate knowledge by explaining the importance of good storage methods of all security equipment.
♦ Demonstrate knowledge and skills by explaining maintenance check for all security equipment.
♦ Demonstrate knowledge by explaining the purpose of issuing security equipment.

62
1. Safe storage of security equipment
The importance of safe keeping of all security equipment at a security site must not be underestimated.
The purpose of placing all equipment in safe storage can only be explained by outlining the implications of not receiving and returning of the equipment.
1.1 Implications It takes a lot of money to buy the correct equipment for each site. All equipment are usually been placed at the site due to site specifications and therefore your co-workers will also use some of it to complete the job and to protect himself and the property being guarded.
If one shift does not comply with the general rule the shifts to follow will not be able to perform their functions properly.
All equipment needs to be placed in an inventory list and signed by each shift taking over from each other. Failing to inspect the inventory can result in:
♦ Non-compliance of job function ♦ Financial losses ♦ Investigation into theft and or loss.
It is therefore imperative that an complete check on the working condition needs to be done for every shift take over, issuing of the equipment and returning of the equipment.
2. Basic maintenance check of security equipment
2.1 Communication equipment - two-way radio
During hand over and take over of shifts the officer needs to take note of the working conditions of the following:
♦ Antenna ♦ Battery ♦ On/Off switch ♦ Volume ♦ Squelch ♦ Radio number ♦ Condition of radio ♦ Channel

63
Pre and post-shift checks
♦ Check for visible signs of damage to the casing of the HHMD.
♦ The unit operates with a normal carbon-zinc battery and the internal circuitry incorporates a low battery warning, which consists of a constant audible alarm. When hearing this alarm, the battery should be changed immediately as the unit will not operate properly with a low battery. It is always a good idea to carry a spare battery with you.
♦ Test the unit on yourself or a colleague before going on duty, to make sure that it will sense metal objects.
♦ Be sure to switch OFF the power after use.
♦ The battery shall be taken out when detector will be kept unused for long periods.
♦ No sound will be produced when the probe is fixedly positioned to the metal object. Sound is produced only when the probe crosses the metal object.
♦ Be sure to switch off the power when the battery is re charged.
♦ Charger voltage: 9v for AC; 10v for DC.
Antenna
Volume
Frequency/channel
Press to talk/PTT
Charger

64
2.2 Flashlight
At least twice yearly, clean threads and O-rings with clean cloth and apply a thin coat of silicone-based grease or lubricant to both. If flashlight is used in wet environment, lubricate O-rings frequently to maintain watertight seal. After prolonged exposure to moisture, the bezel, lamp, and batteries should be removed, inspected, and dried if necessary.
Pre shift check
♦ Check the lamp ♦ Check the battery ♦ Check the general condition of the flashlight.
Post shift check
♦ The lamp ♦ Check the battery ♦ Check the general condition

65
2.3 Batons
Pre-shift checks
Belt clip
• No tears or damage to the canvas material. • The metal rivets are securely in place • No cracks or breakages on the plastic ring.
Baton
• Batons are durable and do not need a lot of maintenance.
• Check for visible signs of wear and tear, cracks and breakages. • Do not accept faulty equipment when starting your duty.
Post-shift checks
• Same as for pre-shift checks.

66
2.4 Video equipment/Electronic equipment The security officer should do a check to ensure that all the VCR's are actually recording as they should be. A check should also be done to see that everything that should be on 'record' is in fact on 'record'.
Alarm checks: On each shift the camera security officer should do an alarm check by checking all the alarms and panic buttons. This can be performed before assuming duty to ensure all the equipment is in good working condition.
The alarm check sheet needs to be checked, their location, their code number, the telephone number to phone when doing the check and a place to mark whether the alarm is working or not
Once completed, an OB entry should have been made stating the:
♦ time; ♦ which of the alarms are not working; ♦ and which of the alarms were not tested due to no personnel being present.
Ensure that all electronic equipment is in good working condition. This can be done by:
♦ Ensuring that each of the equipment can power on and off. ♦ Ensure that each of the equipment is still in working condition by authenticate the previous
shifts recordings.

67
2.5 Handcuffs Pre-shift checks
Pouch
• No tears in the canvas material.
• The metal rivets are securely in place with no tears in the material around them.
Handcuffs
• Handcuffs are durable and do not need much maintenance. Check for visible signs of wear and tear, cracks and breakages. Test the ratchet and locking mechanisms daily and oil them lightly from time to time.
• Ensure that the key unlocks the locking mechanism. • Do not accept faulty equipment when signing on for duty.
Post-shift checks
• Same as for pre-shift checks.

68
2.6 Offensive and defensive equipment Pre and post shift checks
• Ensure that the safety seal, which indicates whether the trigger has been activated, is still in place.
• You should be issued with a pouch that holds the canister. Make sure that this pouch is not damaged in any way.
• Check for visible sign of damage to the canister, trigger and safety seal.
• As a rule of thumb, the weight of the canister will indicate if it is still full.
• If the seal has been broken, the trigger or pouch damaged or it feels very light, refuse to accept it and request a new canister.
Do not leave your defense spray in any area that may exceed 125 degrees or drop below -15 degrees. Excessive heat or cold may cause the can to leak or burst.
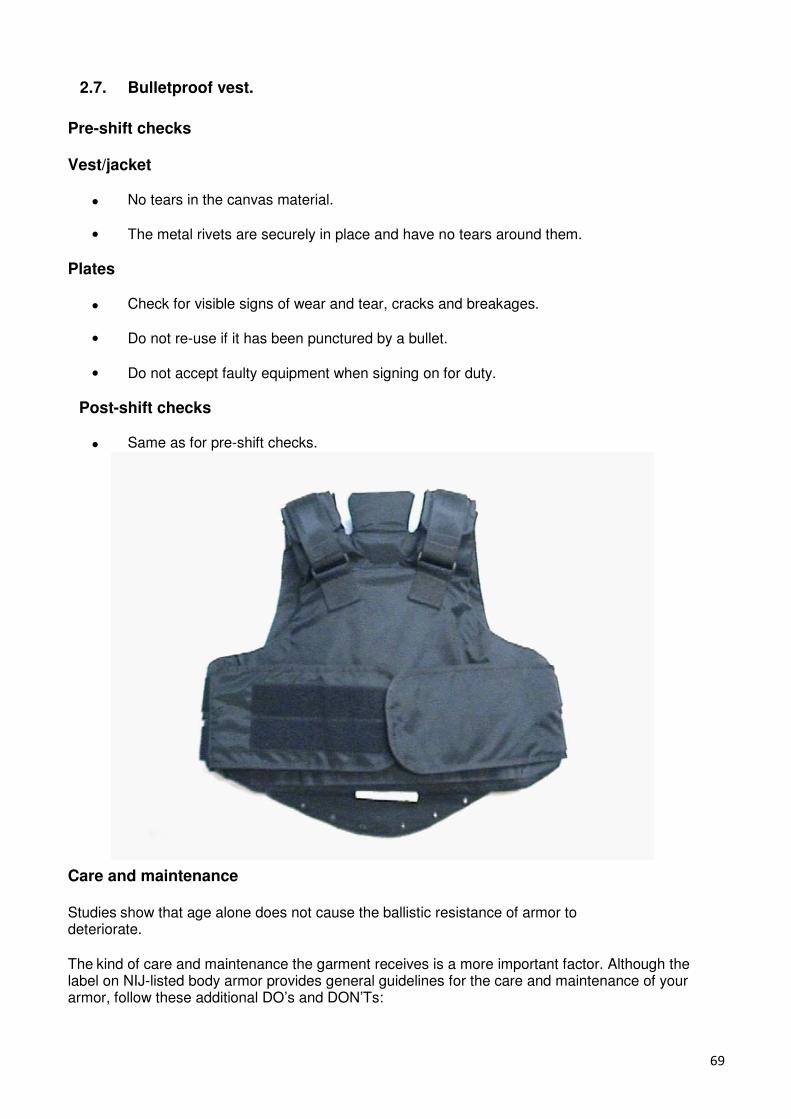
69
2.7. Bulletproof vest.
Pre-shift checks Vest/jacket
• No tears in the canvas material.
• The metal rivets are securely in place and have no tears around them.
Plates
• Check for visible signs of wear and tear, cracks and breakages.
• Do not re-use if it has been punctured by a bullet.
• Do not accept faulty equipment when signing on for duty.
Post-shift checks
• Same as for pre-shift checks.
Care and maintenance
Studies show that age alone does not cause the ballistic resistance of armor to deteriorate.
The kind of care and maintenance the garment receives is a more important factor. Although the label on NIJ-listed body armor provides general guidelines for the care and maintenance of your armor, follow these additional DO’s and DON’Ts:

70
♦ DO follow the manufacturer’s instructions for the care and maintenance of your armor.
♦ DO hand wash your armor with a mild detergent in cold or warm water, and rinse it thoroughly to remove all traces of detergent.
♦ DO drip dry the armor indoors.
♦ DO regularly inspect your armor for cuts, tears, and other damage to the carrier and ballistic elements.
♦ DO contact the manufacturer with any questions about cleaning the armor. ♦ DO NOT machine wash or dry your armor; machine laundering can affect the ballistic
material.
♦ DO NOT use bleach or products containing bleach in laundering your armor.
♦ DO NOT use commercial laundries because they may use harsh chemicals that can
affect your armor’s protective capabilities. ♦ DO NOT dry clean your armor because dry cleaning solvents can affect your armor’s
protective capabilities.
♦ DO NOT dry your armor outdoors. Some ballistic fabrics degrade as a result of ultraviolet exposure.
♦ DO NOT attempt to make repairs to your armor. Armor should be returned to the
manufacturer for repairs or replacement.
3. Storage methods All equipment needs to be stored in a secure place. This can be done by locking the equipment either into a storage cabinet or inside a store room/safe.
When equipment needs to be booked out, an entry into either a asset register or inside the occurrence book can be made.
The entry should include the working condition of the equipment as well as the following important information:
♦ Date and time of equipment booked out ♦ Name and contact details to whom it was booked out. ♦ The reason for being booked out. ♦ The serial number/asset number
When it is returned the register needs to be completed again to indicated that it has been returned.
4. Procedure for reporting defective equipment Defective equipment needs to be reported to the site manager. It is each shift supervisors responsibility to report the faulty equipment by making an entry in the Occurrence book during shift take over.
If defective equipment is not properly recorded and or reported the responsibility of replacing it rests with the individual who have booked it out.

71
4.1 Standard operating procedure for reporting defective equipment
♦ Step 1: Security officer on duty who receives information on/or discovers defective equipment must make an entry in the Occurrence Book.
♦ Step 2: All relevant information shall be recorded in the Occurrence Book. ♦ Step 3: All defective security equipment as listed in the inventory that are booked out and
received again within the security controlled site must be reported immediately to the Security Supervisor and the shift supervisor that takes over.
♦ Step 4: On shift take over report any defective equipment to the Site manager before the
first patrol and or 10: 00 the morning.
♦ Step 5: Failing in adhering to the procedure may result in an internal investigation and
ultimately in disciplinary actions.

72
UNIT STANDARD
Use security equipment
SAQA US
ID
UNIT STANDARD TITLE
244176 Use security equipment
ORIGINATOR ORIGINATING PROVIDER
SGB Security
QUALITY ASSURING BODY
-
FIELD SUBFIELD
Field 08 - Law, Military Science and Security Safety in Society
ABET BAND
UNIT STANDARD TYPE
OLD NQF LEVEL NEW NQF LEVEL CREDITS
Undefined Regular Level 2 NQF Level 02 2
REGISTRATION STATUS REGISTRATION START
DATE
REGISTRATION END
DATE
SAQA DECISION
NUMBER
Registered 2007-11-28 2010-11-28 SAQA 0474/07
LAST DATE FOR ENROLMENT LAST DATE FOR ACHIEVEMENT
2011-11-28 2014-11-28
PURPOSE OF THE UNIT STANDARD
This unit standard will enable learners to use security equipment in various situations. Learners will be able to
understand when and how certain equipment may be used and under which conditions. Learners will also be able to ascertain whether the equipment is in working condition or whether it should be referred to a
maintenance team. This unit standard will also enable learners to handle, store and handover security equipment.
A person credited with this unit standard will be able to:
• Explain the safekeeping and storing of security equipment.
• Demonstrate the use of security equipment.
• Confirm the working condition of security equipment.
LEARNING ASSUMED TO BE IN PLACE AND RECOGNITION OF PRIOR LEARNING
• Communication at NQF Level 1 or equivalent.
UNIT STANDARD RANGE
This unit standard applies to persons working in a security environment who have to use security equipment
during the course of their duty. Equipment is used in accordance with its intended purpose, and maintained to ensure serviceability when needed during the course of duty.
Security equipment includes but is not limited to:
• PR 24 or Tonfa baton.
• Straight baton.
• Constraint apparatus.
• Flashlights (rechargeable and battery operated).
• Defensive sprays.
• Two way radios.
• Portable searching equipment.
• Walk through metal detectors.
• Body Armour.
• Keys.
Specific Outcomes and Assessment Criteria:
73
SPECIFIC OUTCOME 1
Explain the safekeeping and storing of security equipment.
ASSESSMENT CRITERIA
ASSESSMENT CRITERION 1
Methods in which security equipment is carried and worn are described to inform practical use.
ASSESSMENT CRITERION 2
The reasons for receiving and returning security equipment in a working condition are described for hand over
and take over purposes.
ASSESSMENT CRITERION 3
Storage methods of equipment are described for safekeeping purposes.
SPECIFIC OUTCOME 2
Explain the use of security equipment.
ASSESSMENT CRITERIA
ASSESSMENT CRITERION 1
Types of security equipment are described according to their uses.
ASSESSMENT CRITERION 2
The use of security equipment is explained within a given situation.
ASSESSMENT CRITERION 3
Safeguarding of security equipment is explained within the context of the safety of the user, general public and equipment.
ASSESSMENT CRITERION RANGE
The use of security equipments may refer to but is not limited to handling and ensuring equipment is clean,
used and carried according to prescribed methods.
SPECIFIC OUTCOME 3
Confirm the working condition of security equipment.
ASSESSMENT CRITERIA
ASSESSMENT CRITERION 1
Security equipment is inspected in order to ascertain its working condition.
ASSESSMENT CRITERION 2
Defects in security equipment are identified to contribute towards the functionality of such equipment.
ASSESSMENT CRITERION 3
Procedures of dealing with and reporting on defective equipment are described with reference to potential
consequences.
UNIT STANDARD ACCREDITATION AND MODERATION OPTIONS
• An individual wishing to be assessed (including through RPL) against this unit standard may apply to an
assessment agency, assessor or provider institution accredited by the relevant ETQA.

74
• Anyone assessing a learner against this unit standard must be registered as an assessor with the relevant
ETQA.
• Any institution offering learning that will enable achievement of this unit standard or assessing this unit
standard must be accredited as a provider with the relevant ETQA.
• Moderation of assessment will be conducted by the relevant ETQA at its discretion.
UNIT STANDARD ESSENTIAL EMBEDDED KNOWLEDGE
• Workplace policies and procedures regarding the use and maintenance of security equipment.
UNIT STANDARD DEVELOPMENTAL OUTCOME
N/A
UNIT STANDARD LINKAGES
N/A
Critical Cross-field Outcomes (CCFO):
UNIT STANDARD CCFO IDENTIFYING
Identify and solve problems related to the utilisation and functioning of security equipment.
UNIT STANDARD CCFO WORKING
Work effectively with others in the process of using and checking security equipment.
UNIT STANDARD CCFO COLLECTING
Collect, analyse, organise and critically evaluate information related to the use and functioning of security
equipment.
UNIT STANDARD CCFO COMMUNICATING
Communicate effectively with others when using security equipment.
UNIT STANDARD CCFO DEMONSTRATING
Demonstrate an understanding of the world as a set of related systems where the improper use and
functioning of security equipment will have a negative impact on the security situation.

75
LEARNER WORKBOOK SECTION FORMATIVE ASSESSMENT (OPEN BOOK EXAM)
USE SECURITY EQUIPMENT
UNIT STANDARD 244176
Full Name and Surname: ___________________________________________
ID Number: ___________________ Date of Assessment: ______________
Name of Assessor: _______________________________________________
Learner Signature: _______________ Assessor Signature: ______________
Pass mark is 70% (91 out of 131)
Competent: Not Yet Competent:
SKILLS PROGRAM 1
BOOK 4

76
1. Name the 2 (two) batons below: (2 Marks)
2. Analyse the photographs below and explain the different defensive manoeuvres.
(3 Marks)
A B C
A
B
C

77
3. List the 4 (four) safety guidelines for batons. (4 Marks)
4. Fill in the missing words: (3 Marks)
Handcuffs are ______________________ devices designed to __________________ an
individual’s __________________ closed together.
5. List 4 (four) legal guidelines when using handcuffs. (4 Marks)
6. There are certain safety guidelines when using handcuffs. List 5 (five) safety
guidelines. (5 Marks)
7. Fill in the missing words: (7 Marks)
Pepper spray is a ________________________ agent (a _______________ compound that irritates
the ____________ to cause __________, pain, and even temporary __________) that is used in
__________ control, crowd control, and personal _____________________, including defense
against dogs.

78
8. Are the following statements TRUE or FALSE? Circle the correct answer. (6 Marks) The effects of defensive spray are:
A Disorientation TRUE FALSE
B Permanent blindness TRUE FALSE
C Eyes slamming shut TRUE FALSE
D Uncontrolled coughing TRUE FALSE
E Intense burning sensation TRUE SALSE
F Drowsiness TRUE FALSE
9. Fill in the missing words: (3 Marks) Pepper spray must only be used ______________ and _________________. Keep pepper
spray out of reach of _________________.
10. List 8 (eight) point to keep in mind when using pepper spray. (8 Marks)
11. Identify the components of the two way radio. (5 Marks)

79
12. Explain the principles of good voice procedures by making use of the BASS
principles, (4 Marks) B
A
S
S
13. Explain the principles of good voice procedures by making use of the RSVP principles. (4
Marks) R
S
V
P
14. Complete the phonetic alphabet by filling in the missing words: (15 Marks)
A
ALPHA
J
S
SIERRA
B
K
KILO
T
C
CHARLIE
L
U
D
M
MIKE
V
VICTOR
E
N
W
F
O
X
X-RAY
G
P
PAPPA
Y
H
HOTEL
Q
Z
ZULU
I
R
ROMEO

80
15. Explain the following common words and phrases, globally accepted as “radio-speak”. (8 Marks)
Over:
Out:
Roger:
Mayday:
Say again:
I say again:
Relay:
16. Fill in the missing words: (3 Marks)
The hand-held metal detector is a ________________ operated, ____________________ device
used to sense the presence of objects made of any type of ____________.
17. Fill in the missing words: (4 Marks)(metal, indoors, electronic, outdoors) The walk through metal detector is an ___________________ operated device which typically are
used in a variety of environmental conditions and can be used both _________ and
______________ to sense the presence of objects made of any type of ____________.
18. Name the 4 (four) safety guidelines when using the hand held metal detector.
(4 Marks)
19. Fill in the missing words: (3 Marks)
Body armor is a ________________ piece designed to stop ______________. Modern body armors
are also known as __________________ ______________ vests.
20. Name 2 benefits of wearing body armour. (2 Marks)

81
21. Fill in the missing words: (1 Mark)
Even though not used as an impact weapon, the flashlight can still be used in ________________.
It’s presence in the hands of an officer intimidating and practical.
22. List 6 (six) safety guidelines when using a flashlight. (6 Marks)
23. List 2 (two) pre and 2 (two) post shift checks on the flashlight. (4 Marks)
PRE
POST
24. List 2 (two) pre and 2 (two) post shift checks on the baton. (4 Marks)
PRE
POST
25. List 2 (two) pre and 2 (two) post shift checks on the handcuffs. (4 Marks)
PRE
POST

82
26. List 2 (two) pre and 2 (two) post shift checks on the bullet proof vest. (4 Marks)
PRE
POST
27. Where should equipment be stored? (1 Mark)
28. Where would you book the equipment out when needed? (2 Marks)
29. Fill in the missing words: (3 marks)(supervisor, occurrence book, site manager) Defective equipment needs to be reported to the ______________ ______________. It is each shift
___________________ responsibility to report the faulty equipment by making an entry in the
__________________ _________________ during shift take over.
30. List the 5 (five) steps in the standard operating procedure for reporting defective equipment. (5 Marks)
TOTAL MARKS: ___________
131