use & care - appliances onlinemanuals.appliancesonline.com.au/ksm6100wf/ksm6100wf.pdf · to...
TRANSCRIPT

Refrigeration
Use & Care

2 Contents Kelvinator Refrigeration
Congratulations and thank you for choosing our refrigerator. We are sure you will find your new refrigerator a pleasure to use. Before you use the refrigerator, we recommend that you read through the entire user manual, which provides the description of the refrigerator and its functions.
To avoid the risks that are always present when you use an electric appliance, it is important that the refrigerator is installed correctly and that you read the safety instructions carefully to avoid misuse and hazards.
We recommend that you keep this instruction booklet for future reference and pass it on to any future owners.
After unpacking the refrigerator please check it is not damaged. If in doubt, do not use the refrigerator but contact your local Electrolux Customer Care Centre.
environmental tip
Information on disposal for users
• Most of the packing materials are recyclable. Please dispose of those materials through your local recycling depot or by placing them in appropriate collection containers.
• If you wish to discard this refrigerator, please contact your local authorities and ask for the correct method of disposal.
1. Ensure appliance is on a flat surface.
2. Leave standing in stable upright position for half an hour prior to turning ‘on’.
3. Plug into power socket and turn on.
4. Temperature controls are pre-set to ‘mid’ adjust as required.
5. Leave run for 2 – 3 hours before storing food.
For optimum usage, safety information and handy hints please read full document.
Important safety instructions 3
Installing your new refrigerator 4
Side by Side model features 6
Top and Bottom Mount model features 7
Refrigerator & freezer operation 8
Controlling the temperature 8
Using your refrigerator 10
Changing the light bulb 10
Cleaning your refrigerator 11
Energy consumption 12
Safety 12
Helpful hints 13
Troubleshooting 14
Warranty 15
Conditions of use
This appliance is intended to be used in household and similar applications such as: • Staff kitchen areas in shops, offices and other
working environments• Farm Houses • By clients in hotels, motels, and other residential
type environments• Bed and Breakfast type environments• Catering and similar non-retail applications
warning
R600a refrigerant warning
This appliance contains a small quantity of environmentally friendly, but flammable, non-synthetic R600a refrigerant. It does not damage the ozone layer. Avoid safety hazards by carefully installing, handling, servicing and disposing of this appliance. If your appliance contains R600a refrigerant it will be indicated on the rating plate inside the appliance:
•Ensurethatthetubingoftherefrigerantcircuitisnotdamaged during transportation and installation.
•Leakingrefrigerantmaycauseeyeinjuriesorignite.
•Theroomforinstallingappliancemustbeatleast 1m3per8gofrefrigerant.Theamountofrefrigerantintheappliancecanbefoundontheratingplateinside the appliance.
•Ifyouareunsureoftherefrigerantchecktheratingplate inside the refrigerator compartment.
•ItishazardousforanyoneotherthananAuthorisedService Person to service this appliance. In QueenslandAustraliatheAuthorisedServicePersonMUSTholdaGasWorkAuthorisationforhydrocarbonrefrigerants to carry out servicing or repairs which involve the removal of covers.
Congratulations
Kelvinatorquickstartguide
Contents
Please read the user manual carefully and store in a handy place for later reference.
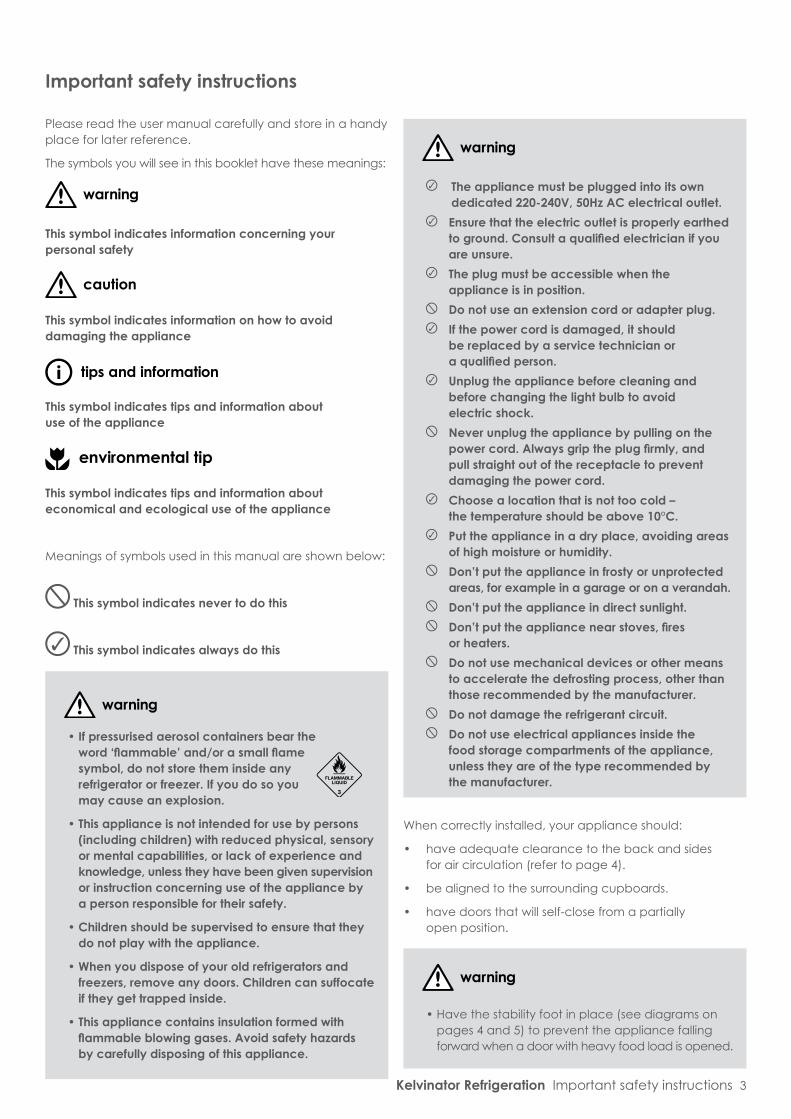
The symbols you will see in this booklet have these meanings:
warning
Thissymbolindicatesinformationconcerningyour personal safety
caution
Thissymbolindicatesinformationonhowtoavoiddamaging the appliance
tips and information
Thissymbolindicatestipsandinformationabout use of the appliance
environmental tip
Thissymbolindicatestipsandinformationabouteconomical and ecological use of the appliance
Meanings of symbols used in this manual are shown below:
Thissymbolindicatesnevertodothis
Thissymbolindicatesalwaysdothis
warning
•Ifpressurisedaerosolcontainersbearthe word‘flammable’and/orasmallflame symbol,donotstoretheminsideany refrigeratororfreezer.Ifyoudosoyou may cause an explosion.
•Thisapplianceisnotintendedforusebypersons(including children) with reduced physical, sensory ormentalcapabilities,orlackofexperienceandknowledge,unlesstheyhavebeengivensupervision orinstructionconcerninguseoftheapplianceby apersonresponsiblefortheirsafety.
•Childrenshouldbesupervisedtoensurethatthey do not play with the appliance.
•Whenyoudisposeofyouroldrefrigeratorsandfreezers,removeanydoors.Childrencansuffocate if they get trapped inside.
•Thisappliancecontainsinsulationformedwithflammableblowinggases.Avoidsafetyhazards bycarefullydisposingofthisappliance.
Important safety instructions
warning
Theappliancemustbepluggedintoitsown
dedicated220-240V,50HzACelectricaloutlet.
Ensurethattheelectricoutletisproperlyearthedtoground.Consultaqualifiedelectricianifyouare unsure.
Theplugmustbeaccessiblewhentheappliance is in position.
Do not use an extension cord or adapter plug.
If the power cord is damaged, it should bereplacedbyaservicetechnicianor aqualifiedperson.
Unplugtheappliancebeforecleaningandbeforechangingthelightbulbtoavoid electricshock.
Neverunplugtheappliancebypullingonthe powercord.Alwaysgriptheplugfirmly,andpull straight out of the receptacle to prevent damaging the power cord.
Choose a location that is not too cold – thetemperatureshouldbeabove10°C.
Put the appliance in a dry place, avoiding areas of high moisture or humidity.
Don’tputtheapplianceinfrostyorunprotected areas, for example in a garage or on a verandah.
Don’tputtheapplianceindirectsunlight.
Don’tputtheappliancenearstoves,fires or heaters.
Do not use mechanical devices or other means to accelerate the defrosting process, other than thoserecommendedbythemanufacturer.
Do not damage the refrigerant circuit.
Do not use electrical appliances inside the food storage compartments of the appliance, unlesstheyareofthetyperecommendedbythe manufacturer.
When correctly installed, your appliance should:
• have adequate clearance to the back and sides for air circulation (refer to page 4).
• be aligned to the surrounding cupboards.
• have doors that will self-close from a partially open position.
warning
• Have the stability foot in place (see diagrams on pages 4 and 5) to prevent the appliance falling forward when a door with heavy food load is opened.
Kelvinator Refrigeration Important safety instructions 3

Installing your refrigerator
The appliance should arrive with the front adjustable rollers wound down to tilt the top of the refrigerator backwards by about 10 -15mm from upright.
The stability foot should also be wound fully up so it will not interfere with the operation of the rollers (see diagram in Step 3 below).
caution
Therollersaredesignedforforwardorbackwardmovementonly.Theyarenotcastors.Movingtherefrigeratorsidewaysmaydamageyourfloorand the rollers.
1. Roll the refrigerator into its final position.
2. The top of the refrigerator should be tilted back by approximately 10 -15mm. This will allow the doors to self-close providing a consistent door seal.
3. If the refrigerator is not tilted back, you can adjust the two front rollers by turning the large, plastic roller nut (see diagram below). This will increase the height of the rollers. One turn of the nut will tilt the refrigerator back approximately 10mm. If you have difficulty turning the roller nut you can have someone tilt the refrigerator back, so that you have better access. Alternatively, you can access the rollers from the side, using a flat screwdriver to help you turn the nut (see diagram below).
4. Check the alignment of the refrigerator to the surrounding cupboards. The top of the refrigerator should be level from side to side (see diagram below). If you need to adjust the level, use the adjustable rollers as discussed in Step 3.
Installing your new refrigerator
ClearancearoundyourSidebySiderefrigerator
Your Side by Side Refrigerator can be installed between cupboards or fixtures but you must allow for the following spaces around the cabinet.
1. allow a minimum of 5mm clearance on both sides.
2. allow 10mm clearance at the back of the refrigerator.
3. allow a minimum of 10mm clearance above hinge covers.
4. allow a 250 or 350mm clearance on the hinge side of the doors, if you place the refrigerator next to the wall. This will make cleaning easier.
5. make sure that cupboards or fixtures do not stick out further than the refrigerator cabinet.
ClearancearoundyourTopandBottomMountrefrigerator
1. allow a minimum of 5mm clearance on both sides.
2. allow 10mm clearance at the back of the refrigerator.
3. allow a minimum of 10mm clearance above hinge covers.
4. If you do not have a cupboard with a rear gap, the recommended clearance area on top increases from 50mm to 90mm.
5. When positioned in a corner area, spacing of at least 350mm on the hinge side will allow the doors to open enough to enable the removal of bins and shelves.
Note: Doors on all models are designed to sit proud of cabinetry (not flush). The refrigerator should be placed against a wall and the gap between the rear of the refrigerator and the wall should be no greater than 75mm.
90mm
50mm
30m
m
30mmRecommended
airspace
CABINETDOOR
350mm
10-15mm
Fixed rearrollers
Height adjustablefront rollers
Top of refrigeratoris level ie. horizontal
Adjust front rollersfor uneveness of flooreg. wind this roller down or up
Aligned tocupboardsie. even gap
4 Installing your new refrigerator Kelvinator Refrigeration
Stability foot wound up
Large plasticroller nut
10mm
5mm
5mmRecommended
airspace
CABINET
DOORS
10mm 35mm
FreezerDoor
FridgeDoor
250mm
350mm
10mm
5mm
5mmRecommended
airspace
CABINET
DOORS
10mm 35mm
FreezerDoor
FridgeDoor
250mm
350mm
Kelvinator Refrigeration Installing your new refrigerator 5
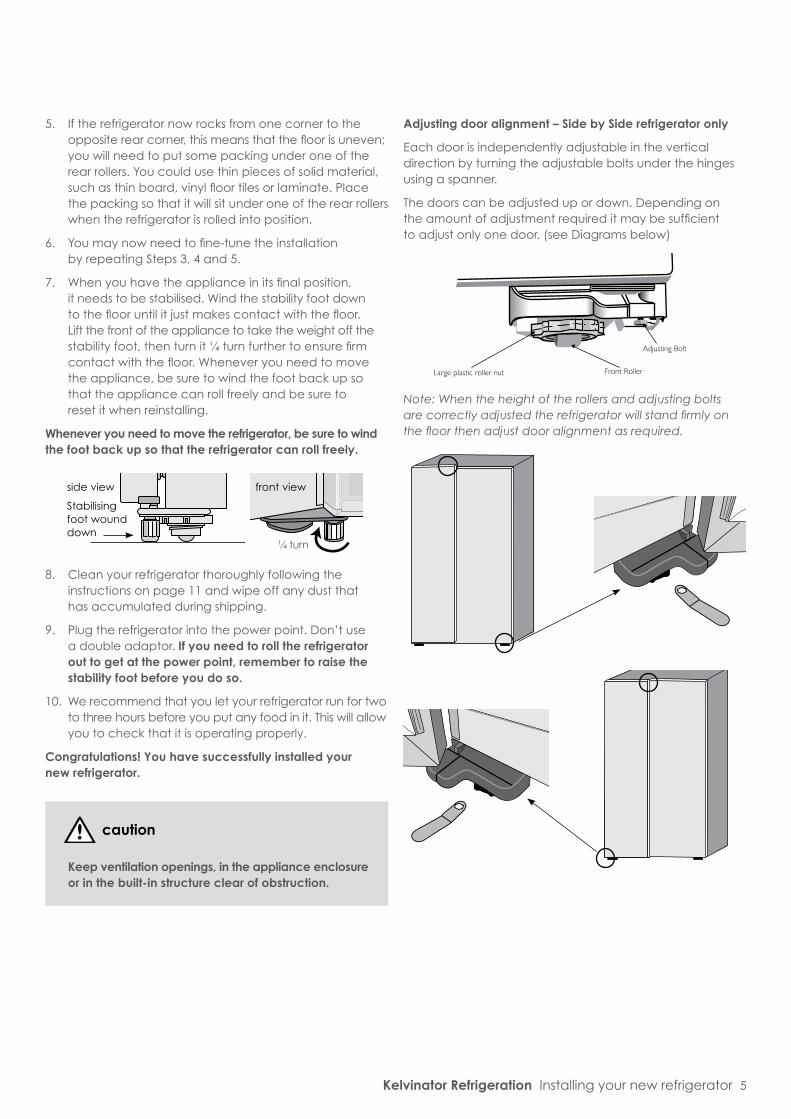
5. If the refrigerator now rocks from one corner to the opposite rear corner, this means that the floor is uneven; you will need to put some packing under one of the rear rollers. You could use thin pieces of solid material, such as thin board, vinyl floor tiles or laminate. Place the packing so that it will sit under one of the rear rollers when the refrigerator is rolled into position.
6. You may now need to fine-tune the installation by repeating Steps 3, 4 and 5.
7. When you have the appliance in its final position, it needs to be stabilised. Wind the stability foot down to the floor until it just makes contact with the floor. Lift the front of the appliance to take the weight off the stability foot, then turn it ¼ turn further to ensure firm contact with the floor. Whenever you need to move the appliance, be sure to wind the foot back up so that the appliance can roll freely and be sure to reset it when reinstalling.
Wheneveryouneedtomovetherefrigerator,besuretowind thefootbackupsothattherefrigeratorcanrollfreely.
8. Clean your refrigerator thoroughly following the instructions on page 11 and wipe off any dust that has accumulated during shipping.
9. Plug the refrigerator into the power point. Don’t use a double adaptor. If you need to roll the refrigerator outtogetatthepowerpoint,remembertoraisethestabilityfootbeforeyoudoso.
10. We recommend that you let your refrigerator run for two to three hours before you put any food in it. This will allow you to check that it is operating properly.
Congratulations! You have successfully installed your new refrigerator.
caution
Keep ventilation openings, in the appliance enclosure orinthebuilt-instructureclearofobstruction.
Adjustingdooralignment–SidebySiderefrigeratoronly
Each door is independently adjustable in the vertical direction by turning the adjustable bolts under the hinges using a spanner.
The doors can be adjusted up or down. Depending on the amount of adjustment required it may be sufficient to adjust only one door. (see Diagrams below)
Note: When the height of the rollers and adjusting bolts are correctly adjusted the refrigerator will stand firmly on the floor then adjust door alignment as required.
Large plastic roller nut Front Roller
Adjusting Bolt
Stabilising foot wound down
side view front view
¼ turn
6 Parts of your refrigerator Kelvinator Refrigeration
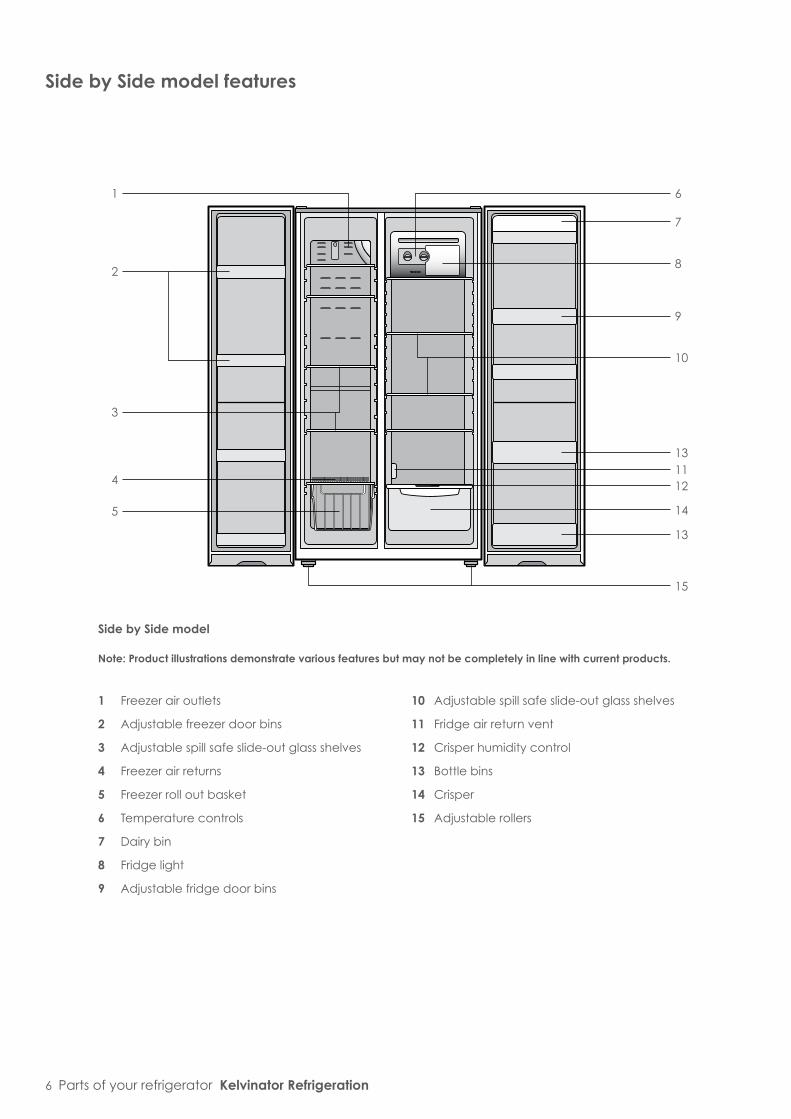
SidebySidemodel
Note:Productillustrationsdemonstratevariousfeaturesbutmaynotbecompletelyinlinewithcurrentproducts.
1 6
2
3
15
8
7
9
10
1113
13
12
14
1 Freezer air outlets
2 Adjustable freezer door bins
3 Adjustable spill safe slide-out glass shelves
4 Freezer air returns
5 Freezer roll out basket
6 Temperature controls
7 Dairy bin
8 Fridge light
9 Adjustable fridge door bins
10 Adjustable spill safe slide-out glass shelves
11 Fridge air return vent
12 Crisper humidity control
13 Bottle bins
14 Crisper
15 Adjustable rollers
SidebySidemodelfeatures
4
5

Kelvinator Refrigeration Parts of your refrigerator 7
1 Freezer air outlets
2 Wire shelves
3 Freezer air returns
4 Fridge air outlets
5 Temperature controls
6 Glass shelves
7 Crisper humidity control
8 Crisper divider (where fitted)
9 Full width crisper (where fitted)
11 Adjustable rollers
12 Dairy compartment
13 Half width door bins
14 Full width door bins (two bins on selected models only)
15 Stabilising foot
16 Fridge light
TopMountmodeladditionalfeatures
10 Full width freezer door bins
BottomMountmodeladditionalfeatures
17 Freezer basket
TopMountmodel BottomMountmodel
Note:Productillustrationsdemonstratevariousfeaturesbutmaynotbecompletelyinlinewithcurrentproducts.
14
14
8
13
1 11 1312 4
2
4
516
6
7
89
10 1015 1514
1216
5
1
2
7
9
3
17
6
3
TopandBottomMountmodelfeatures

The refrigerator transfers heat from food placed inside the appliance to the outside air.
Thisprocessmakestherear,thesidesandtheareaadjacenttothedoors,particularlyatinitialstartup, feelwarm.Thisisnormal.
There is a cooling coil located behind the rear wall of the cabinet. This coil cools and removes moisture from the air. A fan then circulates cold, dry air throughout the cabinet.
This air circulation means that foods are refrigerated far more quickly than in refrigerators where the air remains relatively static.
Avoidplacingfoodagainstairoutletsasthiswillaffect air circulation.
A light frosting will occasionally occur on the cold interior of the freezer when the door is opened frequently. This is normal and will disappear after a few days in most climates.
Make sure you fully close the freezer door after you load or remove food. If the door is left partly open, a heavy frost will coat the inside of the freezer. If a frost develops, remove it. Take care to properly close the door and the frost will not reoccur. If the food is placed forward of the ribs on the bottom of the freezer, it will keep the door open. Ensure that all food is stored behind the ribs.
Your new energy efficient appliance uses a high-speed compressor and other energy efficient components that may produce different noises to your old appliance.
These sounds are normal and include:
• compressor running noise.
• air movement noise from the small fan motor.
• occasional gurgling, similar to water boiling.
• a popping noise, heard during automatic defrosting.
• a clicking noise, just prior to the compressor starting up.
These noises are normal and not cause for alarm.
Further details can be found on page 13.
Set the temperature by using the main temperature controls at the rear of the refrigerator compartment. When you first start your refrigerator, set both refrigerator and freezer controls to MID. The refrigerator temperature control is affected by altitude and it is recommended that it be set warmer to compensate. e.g. at 1000 metres above sea level set the refrigerator temperature control to one setting warmer than MID.
tips and information
A good indication of optimal freezer temperature is ice cream that is frozen, but still soft enough for easy scooping.
For the fridge compartment, we recommend using drinking water and simply adjusting the fridge controls until the water is at your ideal temperature.
To change settings. When you change temperature settings, make small adjustments and wait 24 hours before assessing whether you need to make any further changes.
SidebySidetemperaturecontrol
Adjustingtherefrigeratortemperature–sidebysidemodel
1. Select the refrigerator control (right knob).
2. Rotate the knob clockwise to set colder.
3. Rotate the knob anti-clockwise to set less cold.
Adjustingthefreezertemperature–SidebySidemodel
1. Select the freezer control (left knob).
2. Rotate the knob clockwise to set colder.
3. Rotate the knob anti-clockwise to set less cold.
Refrigeratorandfreezeroperation
Ribs
Controlling the temperature
8 Refrigerator & freezer operation/Controlling the temperature Kelvinator Refrigeration
less cold
colderfreezer
mid
fridge
colder
less cold
mid
less cold
colderfreezer
mid
fridge
colder
less cold
mid

The refrigerator temperature control is affected by altitude and is recommended that it be set warmer to compensate. e.g. at 1000 metres above sea level set the refrigerator temperature control to one half setting warmer than MID.
Wait24hoursafterchangingsettings: When you change temperature settings, make small adjustments and wait 24 hours before assessing whether you need to make any further changes.
NB: Testing ice cream is a good way to check the freezer temperature. Testing drinking water is a good way to check the refrigerator compartment temperature.
tips and information
• Coldest freezer setting is not recommended in normal and very hot climates as this will limit the cooling to the refrigerator section.
• In very cold climates (where temperatures are below 10°C) the freezer may need to be set colder.
• Adjustment of the fridge compartment temperature may cause a small movement in freezer temperature.
ChillChannel–SidebySidemodelonly
The chill channel allows air to circulate through your refrigerator. For optimum cooling, keep the channel behind your shelves clear.
Try to avoid storing plates, trays or any object that may extend beyond the back edge of your shelves. Doing so may block the cold air flow from the vents located in the control housing, causing uneven temperatures in your refrigerator. This may also freeze items stored on the top shelf.
TopMounttemperaturecontrol
Adjustingtherefrigeratortemperature–TopMountfreezer(TM)model
1. Select the refrigerator control (bottom knob).
2. Rotate the knob clockwise to set colder.
3. Rotate the knob anti-clockwise to set less cold.
Adjustingthefreezertemperature–TopMountfreezer (TM)model
1. Select the freezer control (top knob).
2. Rotate the knob clockwise to set colder.
3. Rotate the knob anti-clockwise to set less cold.
BottomMounttemperaturecontrol
Adjustingtherefrigeratortemperature–BottomMountfreezer(BM)model
1. Select the refrigerator control (top knob).
2. Rotate the knob clockwise to set colder.
3. Rotate the knob anti-clockwise to set less cold.
Adjustingthefreezertemperature–BottomMountfreezer(BM)model
1. Select the freezer control (bottom knob).
2. Rotate the knob clockwise to set colder.
3. Rotate the knob anti-clockwise to set less cold.
Kelvinator Refrigeration Controlling the temperature 9
colderlesscold
colderlesscold
mid fridgefreezer mid
colderlesscold
colderlesscold
mid fridgefreezer mid
less cold
colder
colder
less cold
freezer
mid
mid
fridge
less cold
colder
colder
less cold
freezer
mid
mid
fridge
10 Using your refrigerator/Changing the light bulb Kelvinator Refrigeration
ChangingthelightbulbUsing your refrigerator
This section tells you how to make the most of the many useful features and how to clean them.
Doorstoragebins
Both refrigerator and freezer are fitted with door storage bins. You can adjust the refrigerator bins to meet different storage needs. All the door bins are completely removable for cleaning. If you want to remove or adjust a bin, lift it over the support lugs on the inner door panel. To replace, push the bin down over the support lugs to lock it in place.
Crisperbin
You can use the crisper bin to store vegetables, fruit or smallgoods. You can change the humidity inside the bin by sliding the humidity control.
•Storingvegetables You should store vegetables in the crisper bin remembering to set the humidity control to more humid (closed).
•Storingfruit&smallgoods You can also store fruit & smallgoods in the crisper bin remembering to set the humidity control to less humid (open).
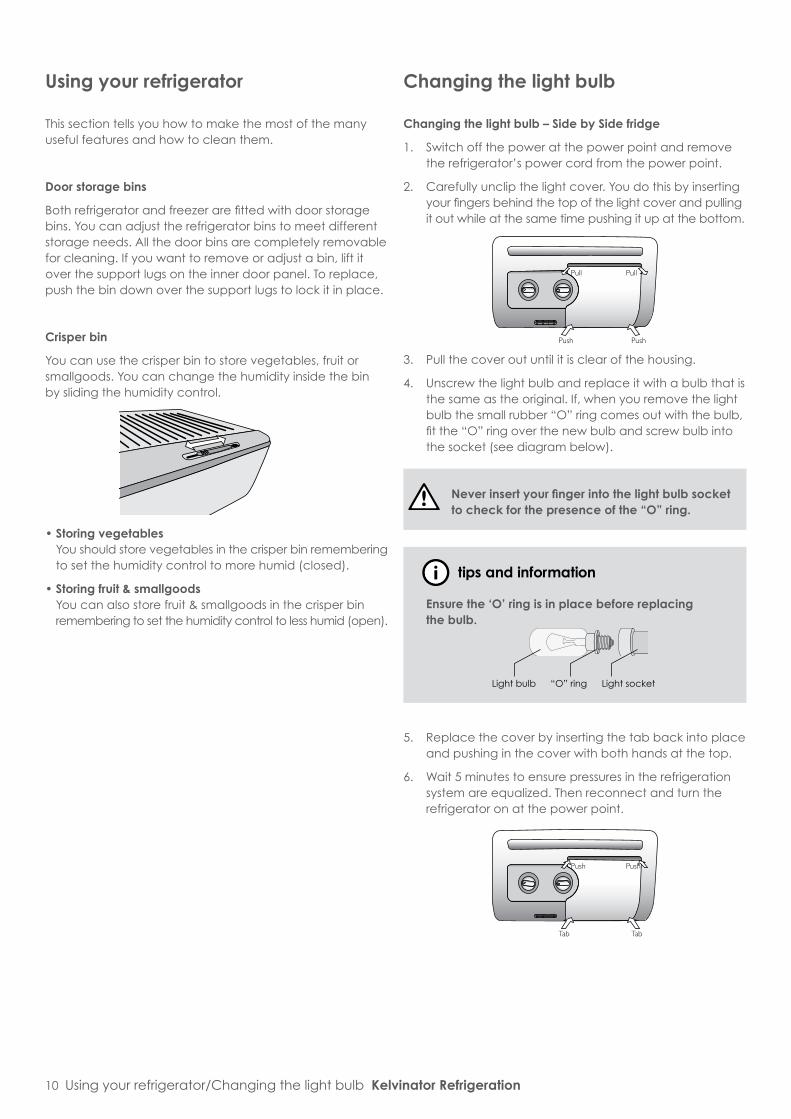
Changingthelightbulb–SidebySidefridge
1. Switch off the power at the power point and remove the refrigerator’s power cord from the power point.
2. Carefully unclip the light cover. You do this by inserting your fingers behind the top of the light cover and pulling it out while at the same time pushing it up at the bottom.
3. Pull the cover out until it is clear of the housing.
4. Unscrew the light bulb and replace it with a bulb that is the same as the original. If, when you remove the light bulb the small rubber “O” ring comes out with the bulb, fit the “O” ring over the new bulb and screw bulb into the socket (see diagram below).
warning Neverinsertyourfingerintothelightbulbsocket tocheckforthepresenceofthe“O”ring.
tips and information
Ensurethe‘O’ringisinplacebeforereplacing thebulb.
5. Replace the cover by inserting the tab back into place and pushing in the cover with both hands at the top.
6. Wait 5 minutes to ensure pressures in the refrigeration system are equalized. Then reconnect and turn the refrigerator on at the power point.
Push Push
PullPull
Tab Tab
PushPush
Light bulb “O” ring Light socket

Kelvinator Refrigeration Cleaning your refrigerator 11
Cleaning your refrigerator
Changingthelightbulb–TopandBottomMountfridge
1. Switch off the power at the power point and remove the refrigerator’s power cord from the power point.
2. Carefully unclip the light cover. You do this by pushing the light cover tabs at the front towards the back of the cabinet, then lowering the cover down.
3. Unscrew the light bulb and replace it with a bulb that is the same as the original, as specified on the rating plate behind the cover. If, when you remove the light bulb the small rubber “O” ring comes out with the bulb, fit the “O” ring over the new bulb and screw bulb into the socket (see diagram below).
warning Neverinsertyourfingerintothelightbulbsocket tocheckforthepresenceofthe“O”ring.
tips and information
Ensurethe‘O’ringisinplacebeforereplacing thebulb.
4. Replace the light cover by hooking the light cover lugs into the rear of the housing and pressing the front of the cover until it clips in.
5. Wait 5 minutes to ensure pressures in the refrigeration system are equalized. Then reconnect and turn the refrigerator on at the power point.
warning
Beforecleaning:Turnapplianceoffatthepowerpoint,thenremovepowercordfromsocket.Thiswillmakesurethereisnochanceofgettinganelectricshock.
Doors and exterior
You should only clean the doors with lukewarm soapy water and a soft cloth, rinsing with clean water and then wipe the surface with clean water and a soft clean cloth to remove soap residue.
caution
Donotusestainlesssteelcleaners,abrasivepadsorothercleanersastheyarelikelytoscratchthesurface.Damage to this product after delivery is not covered byyourwarranty.
Interior
You should clean the appliance interior regularly. It will be easiest to clean when the food supply is low. Wash the interior with a soft cloth and use an unscented mild soap with luke- warm water. Thoroughly dry all surfaces and removable parts. Avoid getting water on appliance controls. If you have taken out any removable parts, replace them and switch the power on before re-stocking the appliance with food. Naturally, you should keep the interior of your appliance hygienic by promptly and thoroughly wiping up any food spills.
Door seals
Take care to keep door seals clean. Sticky food and drink can cause seals to stick to the cabinet and tear when you open the door. Wash seal with a mild detergent and warm water. Rinse thoroughly and dry.
warning
Neverusehotwater,solvents,commercialkitchencleaners, aerosol cleaners, metal polishes, caustic or abrasivecleaners,orscourerstocleanthisappliance,astheywilldamageit.Manycommerciallyavailablecleaning products and detergents contain solvents thatwilldamageyourrefrigerator.Whencleaning, use only a soft cloth with an unscented mild soap andlukewarmwater.
Light bulb “O” ring Light socket
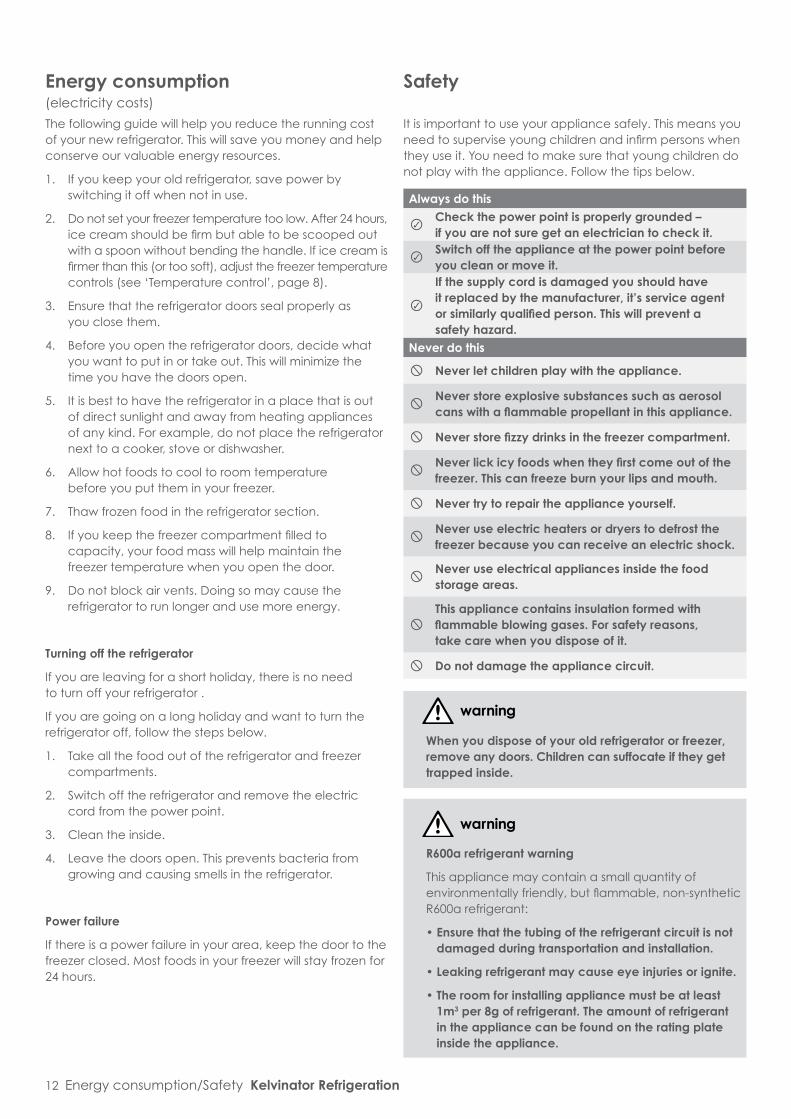
Safety
It is important to use your appliance safely. This means you need to supervise young children and infirm persons when they use it. You need to make sure that young children do not play with the appliance. Follow the tips below.
AlwaysdothisCheckthepowerpointisproperlygrounded– ifyouarenotsuregetanelectriciantocheckit.Switchofftheapplianceatthepowerpointbeforeyou clean or move it.If the supply cord is damaged you should have itreplacedbythemanufacturer,it’sserviceagent orsimilarlyqualifiedperson.Thiswillpreventa safetyhazard.
Never do this
Never let children play with the appliance.
Neverstoreexplosivesubstancessuchasaerosolcanswithaflammablepropellantinthisappliance.
Neverstorefizzydrinksinthefreezercompartment.
Neverlickicyfoodswhentheyfirstcomeoutofthefreezer.Thiscanfreezeburnyourlipsandmouth.
Never try to repair the appliance yourself.
Never use electric heaters or dryers to defrost the freezerbecauseyoucanreceiveanelectricshock.
Never use electrical appliances inside the food storage areas.
Thisappliancecontainsinsulationformedwithflammableblowinggases.Forsafetyreasons, takecarewhenyoudisposeofit.
Do not damage the appliance circuit.
warning
Whenyoudisposeofyouroldrefrigeratororfreezer,remove any doors. Children can suffocate if they get trapped inside.
12 Energy consumption/Safety Kelvinator Refrigeration
warning
R600a refrigerant warning
This appliance may contain a small quantity of environmentally friendly, but flammable, non-synthetic R600a refrigerant:
•Ensurethatthetubingoftherefrigerantcircuitisnotdamaged during transportation and installation.
•Leakingrefrigerantmaycauseeyeinjuriesorignite.
•Theroomforinstallingappliancemustbeatleast 1m3per8gofrefrigerant.Theamountofrefrigerantintheappliancecanbefoundontheratingplateinside the appliance.
Energyconsumption(electricity costs)
The following guide will help you reduce the running cost of your new refrigerator. This will save you money and help conserve our valuable energy resources.
1. If you keep your old refrigerator, save power by switching it off when not in use.
2. Do not set your freezer temperature too low. After 24 hours, ice cream should be firm but able to be scooped out with a spoon without bending the handle. If ice cream is firmer than this (or too soft), adjust the freezer temperature controls (see ‘Temperature control’, page 8).
3. Ensure that the refrigerator doors seal properly as you close them.
4. Before you open the refrigerator doors, decide what you want to put in or take out. This will minimize the time you have the doors open.
5. It is best to have the refrigerator in a place that is out of direct sunlight and away from heating appliances of any kind. For example, do not place the refrigerator next to a cooker, stove or dishwasher.
6. Allow hot foods to cool to room temperature before you put them in your freezer.
7. Thaw frozen food in the refrigerator section.
8. If you keep the freezer compartment filled to capacity, your food mass will help maintain the freezer temperature when you open the door.
9. Do not block air vents. Doing so may cause the refrigerator to run longer and use more energy.
Turningofftherefrigerator
If you are leaving for a short holiday, there is no need to turn off your refrigerator .
If you are going on a long holiday and want to turn the refrigerator off, follow the steps below.
1. Take all the food out of the refrigerator and freezer compartments.
2. Switch off the refrigerator and remove the electric cord from the power point.
3. Clean the inside.
4. Leave the doors open. This prevents bacteria from growing and causing smells in the refrigerator.
Power failure
If there is a power failure in your area, keep the door to the freezer closed. Most foods in your freezer will stay frozen for 24 hours.

Helpful hints for storing food
Alwaysdothis
Buythefreshest,bestqualityfoodandputitintherefrigeratorassoonaspossible.
Cover food with plastic wrap or foil to stop it drying outandtohelppreventbadsmells.
Rinseandwrapfishandpoultrybeforeyouputthemin the refrigerator.
Minimisebacteriabyremovingstuffingfrom poultrybeforeyouputitintherefrigerator.
Whenyoustoreeggsintherefrigeratorcompartment,store them with the pointed end down.
Never do this
Storebananas,avocadosormangoesintherefrigerator.Thiscancausethemtogoblack or to go soft.
Put hot or warm food in the refrigerator. Allowittocoolfirst.
Helpfulhintsforfreezingfood
You can use the freezer to store food which you buy in bulk when prices are low. You can also cook extra food and freeze it for later use.
Alwaysdothis
Buythefreshest,bestqualityfoodandputitinthefreezerassoonaspossible.
Placefoodinplasticbagsorplasticwrapbefore youputitinthefreezer.
Squeezetheairoutofplasticbagsasthis prevents frost.
Whenyoubuyfrozenfoodsinthesupermarket, keepthemintheirpackagingwhenyoustorethem.
Defrostfood,especiallychickenandfish,intherefrigeratorcompartment.Thisstopsbacteria from growing.
Leavefoodinitswrappingwhileitdefrosts.
Use defrosted food immediately.
Never do this
Neverrefreezedefrostedfood.
Helpful hints
Kelvinator Refrigeration Helpful hints 13

14 Troubleshooting
If you think something may be wrong with your refrigerator, you can carry out some easy checks before calling for service. You may locate the problem, sparing yourself from inconvenience and saving time and money.
Problem SolutionWhen your appliance is not operating
• Check that the power cord is plugged into the power outlet properly and that the outlet is switched ‘ON’.
• Try running another appliance from the power outlet. If no power is coming from the outlet you may have blown a fuse or tripped a circuit of your household power supply.
• Try adjusting the temperature control to a slightly “colder” position.
• It is normal for the freezer fan NOT to operate during the automatic defrost cycle, or for a short time after the appliance is switched on.
When there is refrigerator/ freezer noise
Modern refrigerators/freezers with increased storage capacity use high speed compressors. These can provide a seemingly high level of sound which is quite normal. Normal operational sounds include:• Occasional gurgling, similar to water boiling.• Air flow noise (air circulates because of a small fan).• A popping noise heard during automatic defrost.
Other strange sounds may mean that you need to check and take action. For example, noises may mean that:• The cabinet is not level.• The floor is uneven or weak.• Bottles are badly placed and rattling.• There are vibrations from an object on top of or behind or beside the refrigerator.• The back of the refrigerator cabinet is touching the wall.
Remember it is quite normal for noise to seem louder just after the refrigerator starts operating.
If there are odours inside the appliance
• The interior may need cleaning.
• Some foods produce odours.
• Some containers and wrapping can cause odours.
• Ask yourself if the odour started about the same time you started storing something unusual.
When the motor seems to run more than expected
Your new appliance provides you with large capacities in both the refrigerator section and the separate freezer. It is normal for the motor to operate frequently. However, to keep operation to a minimum, check the following:• Are doors kept open too long or too often?• Are controls set too cold? Refer to page 8 “Temperature control”.• Have large amounts of warm food just recently been stored? Summer, festive seasons and holidays
usually mean a lot more work for your appliance.
• If the day is hot or the room is very warm, the appliance will need to run more than normal.
• The appliance will run more than normal just after you install it or when it has been turned off for a long time.
If the temperature in the refrigerator is too warm
• Check that the appliance has enough clearance at the sides, back and top. Refer to page 4 “Installing your new refrigerator”.
• Refer to page 8 “Temperature control”.
• You may have kept the door open too long or too frequently.
• Food containers or packaging may be holding a door open.
If the temperature in the refrigerator is too cold
• Refer to page 8 “Temperature control”.
• Increase the temperature to avoid high energy consumption.
If heavy frosting occurs in the freezer
Make sure you fully close the freezer and fridge doors. If the doors are left partly open a heavy frost will coat the inside of the freezer. If a frost develops, remove it. Take care to properly close the doors and the frost will not reoccur.
If water drips on the floor
The defrost water tray, (located on the compressor at the back of the cabinet), may not be properly positioned, or the drain tube may not be properly positioned to direct water into this tray. You may need to pull the refrigerator away from the wall to check the tray and tube.
Freezer Door opens after closing fridge door
It is normal for the freezer door to momentarily open and re-close when the food compartment door is closed. If the freezer door stays open, it indicates that the refrigerator cabinet needs to be tilted backwards a little further. If you call a service person to solve this problem, you will be charged for the cost of a service call, as this is not a warranty fault.
If you still require service
If you have a problem, and the problem persists after you have made the checks mentioned above, contact your nearest Electrolux approved Service Centre or the dealer you bought the refrigerator from. Be ready to quote the model number, 9-digit PNC and 8-digit serial number, which is stated on the label inside the refrigerator compartment.
Troubleshooting

This document sets out the terms and conditions of the product warranties for Electrolux Appliances. It is an important document. Please keep it with your proof of purchase documents in a safe place for future reference should you require service for your Appliance.1. Inthiswarranty
(a) ‘acceptablequality’asreferredtoinclause10ofthiswarrantyhasthesamemeaningreferredtointheACL;
(b) ‘ACL’meansTradePracticesAmendment(AustralianConsumerLaw)Act(No.2)2010;
(c) ‘Appliance’meansanyElectroluxproductpurchasedbyyouaccompaniedbythisdocument;
(d) ‘ASC’meansElectrolux’authorisedservicedcentres;
(e) ‘Electrolux’meansElectroluxHomeProductsPtyLtdof163O’RiordanStreet,Mascot,NSW2020,ABN51004762341inrespectofAppliancespurchasedinAustraliaandElectrolux(NZ)Limitedof3-5NiallBurgessRoad,MountWellington,inrespectofAppliancespurchasedinNewZealand;
(f) ‘majorfailure’asreferredtoinclause10ofthiswarrantyhasthesamemeaningreferredtointheACLandincludesasituationwhenanAppliancecannotberepairedoritisuneconomicforElectrolux,atitsdiscretion,torepairanApplianceduringtheWarrantyPeriod;
(g) ‘WarrantyPeriod’means:
(i) wheretheApplianceisusedforpersonal,domesticorhouseholduse(i.e.normalsinglefamilyuse)assetoutintheinstructionmanual,theApplianceiswarrantedagainstmanufacturingdefectsinAustraliaandNewZealandfor24monthsandfortheAppliance’scompressor,condenser,evaporatoranddrier,anadditional36monthspartsonlywarrantyapplies,followingthedateoforiginalpurchaseoftheAppliance;
(ii) wheretheApplianceisusedforcommercialpurposes(includingbeingusedtodirectlyassistabusinessorwheretheApplianceisusedinamulti-familycommunalorsharetypeenvironment),theAppliancewillthenbewarrantedagainstmanufacturingdefectsinAustraliafor3monthsandinNewZealandfor3months,followingthedateoforiginalpurchaseoftheAppliance.
(h) ‘you’meansthepurchaseroftheAppliancenothavingpurchasedtheApplianceforre-sale,and‘your’hasacorrespondingmeaning.
2. ThiswarrantyonlyappliestoAppliancespurchasedandusedinAustraliaorNewZealandandisinadditionto(anddoesnotexclude,restrict,ormodifyinanyway)anynon-excludablestatutorywarrantiesinAustraliaorNewZealand.
3. DuringtheWarrantyPeriodElectroluxoritsASCwill,atnoextrachargeifyourApplianceisreadilyaccessibleforservice,withoutspecialequipmentandsubjecttothesetermsandconditions,repairorreplaceanypartswhichitconsiderstobedefective.ElectroluxoritsASCmayuseremanufacturedpartstorepairyourAppliance.YouagreethatanyreplacedAppliancesorpartsbecomethepropertyofElectrolux.Thiswarrantydoesnotapplytolightglobes,batteries,filtersorsimilarperishableparts.
4. PartsandAppliancesnotsuppliedbyElectroluxarenotcoveredbythiswarranty.
5. Youwillbearthecostoftransportation,travelanddeliveryoftheAppliancetoandfromElectroluxoritsASC.Ifyouresideoutsideoftheservicearea,youwillbearthecostof:
(a) travelofanauthorisedrepresentative;
(b) transportationanddeliveryoftheAppliancetoandfrom ElectroluxoritsASC,
Inallinstances,unlesstheApplianceistransportedbyElectroluxoran
Electroluxauthorisedrepresentative,theApplianceistransportedattheowner’scostandriskwhileintransittoandfromElectroluxoritsASC.
6. Proofofpurchaseisrequiredbeforeyoucanmakeaclaimunderthiswarranty.
7. Youmaynotmakeaclaimunderthiswarrantyunlessthedefectclaimedisduetofaultyordefectivepartsorworkmanship.Electroluxisnotliableinthefollowingsituations(whicharenotexhaustive):
(a) theApplianceisdamagedby: (i) accident (ii) misuseorabuse,includingfailuretoproperlymaintainorservice (iii) normalwearandtear (iv) powersurges,electricalstormdamageorincorrectpowersupply (v) incompleteorimproperinstallation (vi) incorrect,improperorinappropriateoperation (vii) insectorvermininfestation (viii)failuretocomplywithanyadditionalinstructionssuppliedwith
theAppliance;
(b) theApplianceismodifiedwithoutauthorityfromElectroluxinwriting;
(c) theAppliance’sserialnumberorwarrantysealhasbeenremovedordefaced;
(d) theAppliancewasservicedorrepairedbyanyoneotherthanElectrolux,anauthorisedrepairerorASC.
8. Thiswarranty,thecontracttowhichitrelatesandtherelationshipbetweenyouandElectroluxaregovernedbythelawapplicablewheretheAppliancewaspurchased.WheretheAppliancewaspurchasedinNewZealandforbusinesspurposestheConsumerGuaranteeActdoesnotapply.
9. Totheextentpermittedbylaw,Electroluxexcludesallwarrantiesandliabilities(otherthanascontainedinthisdocument)includingliabilityforanylossordamagewhetherdirectorindirectarisingfromyourpurchase,useornonuseoftheAppliance.
10.ForAppliancesandservicesprovidedbyElectroluxinAustralia,theAppliancescomewithaguaranteebyElectroluxthatcannotbeexcludedundertheAustralianConsumerLaw.Youareentitledtoareplacementorrefundforamajorfailureandforcompensationforanyotherreasonablyforeseeablelossordamage.YouarealsoentitledtohavetheAppliancerepairedorreplacediftheAppliancefailstobeofacceptablequalityandthefailuredoesnotamounttoamajorfailure.ThebenefitstoyougivenbythiswarrantyareinadditiontoyourotherrightsandremediesunderalawinrelationtotheAppliancesorservicestowhichthewarrantyrelates.
11.AtalltimesduringtheWarrantyPeriod,Electroluxshall,atitsdiscretion,determinewhetherrepair,replacementorrefundwillapplyifanAppliancehasavalidwarrantyclaimapplicabletoit.
12.ForAppliancesandservicesprovidedbyElectroluxinNewZealand,theAppliancescomewithaguaranteebyElectroluxpursuanttotheprovisionsoftheConsumerGuaranteesAct,theSaleofGoodsActandtheFairTradingAct.
13.Toenquireaboutclaimingunderthiswarranty,pleasefollowthesesteps:
(a) carefullychecktheoperatinginstructions,usermanualandthetermsofthiswarranty;
(b) havethemodelandserialnumberoftheApplianceavailable;
(c) havetheproofofpurchase(eganinvoice)available;
(d) telephonethenumbersshownbelow.
14.Youacceptthatifyoumakeawarrantyclaim,ElectroluxanditsASCmayexchangeinformationinrelationtoyoutoenableElectroluxtomeetitsobligationsunderthiswarranty.
WarrantyFORSALESINAUSTRALIAANDNEWZEALAND
APPLIANCE:REFRIGERATION
Important NoticeBeforecallingforservice,pleaseensurethatthestepslistedinpoint13abovehavebeenfollowed.
FOR SERVICE ortofindtheaddressofyournearest
stateservicecentreinAustraliaPlEASE CAll 13 13 49
Forthecostofalocalcall(Australiaonly)
SERVICE AUSTRAlIA
ELECTROLUXHOMEPRODUCTSwww.electrolux.com.au
FOR SPARE PARTS ortofindtheaddressofyourneareststatesparepartscentreinAustralia
PlEASE CAll 13 13 50 Forthecostofalocalcall(Australiaonly)
FOR SERVICE ortofindtheaddressofyournearest
authorisedservicecentreinNewZealandFREE CAll 0800 10 66 10
(NewZealandonly)
SERVICE NEW ZEAlAND
ELECTROLUXHOMEPRODUCTSwww.electrolux.co.nz
FOR SPARE PARTS ortofindtheaddressofyournearest
statesparepartscentreinNewZealandFREE CAll 0800 10 66 20
(NewZealandonly)
GFR_Warr_Apr11

Issue Date Sep 2011
© Copyright 2011 Electrolux Home Products Pty Ltd ABN 51 004 762 341
Print code: KMAN_KFRI_Sep11 Part number: 1458539
Ifyou’dlikefurtherinformationaboutKelvinatorappliances,pleasevisityourretailer, phoneoremailourCustomerCareteamorvisitourwebsite.
Phone: 1300 363 640
Fax: 1800 350 067
Email: [email protected]
Web: www.kelvinator.com.au