updated 5-10-19 - files.nc.gov · personnel administration curriculum within the personnel...
TRANSCRIPT

Updated 5-10-19

For assistance with any TRAINING needs, please contact:
BEST SHARED SERVICES
Phone -(Raleigh area): (919) 707-0707
Phone - (Toll Free): (866) 622-3784
Email: BEST @osc.nc.gov
Web: https://www.osc.nc.gov/state-agency-resources/training
North Carolina Office of the State Controller
Linda Combs, State Controller

Create and Maintain Employee Data Table of Contents
PA310
updated 5-10-19 North Carolina Office of the State Controller Page i
TABLE OF CONTENTS
INTRODUCTION ................................................................................................. 1
Overview ........................................................................................................................................................1
Prerequisites .................................................................................................................................................1
Integrated HR/Payroll System Training Curriculum .......................................................................1
Personnel Administration Curriculum .................................................................................................2
Strategy for Training .................................................................................................................................2
Course Map ..................................................................................................................................................3
Course Objectives ......................................................................................................................................3
Reference Materials ...................................................................................................................................4
Lesson 1: Review of PA Infotypes .............................................................. 5
Objectives .....................................................................................................................................................5
PA Infotypes and Time, Benefits & Payroll .......................................................................................6
Actions (IT0000) ...................................................................................................................................................... 7
Organizational Assignment - IT0001 .............................................................................................................. 8
Personal Data – (IT0002) ...................................................................................................................................... 9
Addresses - IT0006 ............................................................................................................................................. 10
Planned Working Time - IT0007 .................................................................................................................... 11
Basic Pay - IT0008 ............................................................................................................................................... 13
Data Specifications - IT0041 ........................................................................................................................... 14
Lesson 2: Introduction to Actions ............................................................ 19
Objectives .................................................................................................................................................. 19
Actions ........................................................................................................................................................ 20
Actions You Will Create in This Class ............................................................................................... 21
PA Support Materials ............................................................................................................................. 22
Data System Functions .......................................................................................................................... 22
Workflow .................................................................................................................................................... 23
ZPAA076 – Workflow ......................................................................................................................................... 24

Table of Contents Create and Maintain Employee Data
PA310
Page ii North Carolina Office of the State Controller updated 5-10-19
In-box ...................................................................................................................................................................... 25
Lesson 3: Entering Employees in the Integrated HR/Payroll System .... 27
Objectives .................................................................................................................................................. 27
The Integrated HR/Payroll System and the Retirement System ............................................ 27
Assigning Employees to the Integrated HR/Payroll System .................................................... 28
New Hire Action ....................................................................................................................................... 29
New Hire Process - Employee ........................................................................................................................ 30
EE Group/Subgroup ........................................................................................................................................... 31
Bank details ........................................................................................................................................................... 32
Save versus Next Record .................................................................................................................................. 32
Monitoring of Tasks (IT0019) .......................................................................................................................... 32
Communication (IT0105) .................................................................................................................................. 33
Additional Personal Data (IT0077) .................................................................................................... 51
ACA - Temp Actions ............................................................................................................................... 52
Non-Beacon to Beacon (NC) Action................................................................................................. 53
Non-Beacon to Beacon Process .................................................................................................................... 54
Reinstatement/Reemployment Action ............................................................................................ 58
Reinstatement/Reemployment Process...................................................................................................... 59
Finding an Employee ............................................................................................................................. 60
Additional Information .......................................................................................................................... 61
General Information Reminders ......................................................................................................... 72
Social Security Cards .......................................................................................................................................... 72
Complete Processing of a PCR ....................................................................................................................... 72
Lesson 4: Adjusting Salaries ...................................................................... 73
Objectives .................................................................................................................................................. 73
Salary Adjustment Action ..................................................................................................................... 73
Salary Adjustment Process .............................................................................................................................. 74
Appointment Change Action .............................................................................................................. 79
Appointment Change Process ........................................................................................................................ 80
Reallocation Action ................................................................................................................................. 85

Create and Maintain Employee Data Table of Contents
PA310
updated 5-10-19 North Carolina Office of the State Controller Page iii
Reallocation Process .......................................................................................................................................... 86
Lesson 5: Promoting Employees ............................................................... 91
Objectives .................................................................................................................................................. 91
Promotion Action .................................................................................................................................... 91
Promotion Process .............................................................................................................................................. 92
Lesson 6: Separating Employees .............................................................. 97
Objectives .................................................................................................................................................. 97
Two Types of Separation ...................................................................................................................... 97
Separation Action .................................................................................................................................... 98
Separation Effective Date ................................................................................................................................. 99
Separation Effective Date Example ............................................................................................................. 100
Separation Process ........................................................................................................................................... 101
Overview ............................................................................................................................................................... 102
Separation Pay Continuation ............................................................................................................ 106
Separation Pay Continuation Process........................................................................................................ 107
Overview ............................................................................................................................................................... 108
Retirement Processing ........................................................................................................................ 113
Separation Action - Retirement Reason ....................................................................................... 113
Vacation Payouts ............................................................................................................................................... 114
Longevity .............................................................................................................................................................. 114
One-time Deferrals ........................................................................................................................................... 114
Rescinding a Retirement Action .................................................................................................................. 114
Catching Mistakes ................................................................................................................................. 115
Lesson 7: Entering Transfers ................................................................... 117
Objectives ................................................................................................................................................ 117
Transfer Action ....................................................................................................................................... 117
Transfer Process ................................................................................................................................................. 118
Transfer Process for Temp to Perm or Perm to Temp ........................................................................ 119
Overview ............................................................................................................................................................... 127

Table of Contents Create and Maintain Employee Data
PA310
Page iv North Carolina Office of the State Controller updated 5-10-19
Lesson 8: Workflow Process & Inquiry .................................................. 135
Objectives ................................................................................................................................................ 135
Purpose of Workflow ........................................................................................................................... 135
Key Terms ................................................................................................................................................. 136
PA Workflow Process Flow ............................................................................................................................ 137
Integrated HR/Payroll System Workflow Process ..................................................................... 138
Services for Objects .......................................................................................................................................... 138
PA Workflow Process ....................................................................................................................................... 138
Workflow Approver Relationships .............................................................................................................. 139
Workflow - In Process ...................................................................................................................................... 139
PCR Troubleshooting ....................................................................................................................................... 139
Accessing the Workflow Inbox (SBWP) ..................................................................................................... 141
Deleting a PA PCR ................................................................................................................................. 147
Workflow Report Overview................................................................................................................ 148
Searching for PA PCRs ..................................................................................................................................... 149
Report Options ................................................................................................................................................... 149
Modify Layout ..................................................................................................................................................... 150
Save Layout ......................................................................................................................................................... 150
Use a Layout ........................................................................................................................................................ 151
Lesson 9: Reviewing Additional Actions ................................................ 157
Objectives ................................................................................................................................................ 157
EE HR Overview (ZEMP) ...................................................................................................................... 158
EE Infotype Overview (pc00_m02_linf0) ........................................................................................ 159
Range Revision Action ......................................................................................................................... 160
Range Revision Process ...................................................................................................................... 160
Range Revision - No Funds Available........................................................................................................ 161
Work Against .......................................................................................................................................... 162
Work Against Process ...................................................................................................................................... 163
Examples of Correct Work Against Usage ............................................................................................... 165
Dual Employment .................................................................................................................................. 166

Create and Maintain Employee Data Table of Contents
PA310
updated 5-10-19 North Carolina Office of the State Controller Page v
Dual Employment - Time and Overtime ................................................................................................... 167
Miscellaneous Dual Employment Policies ................................................................................................ 167
CP30 ....................................................................................................................................................................... 168
Dual Employment Policy Examples ............................................................................................................ 168
Demotion Action ................................................................................................................................... 169
Investigatory w/Pay Action ................................................................................................................ 170
Suspension Action ................................................................................................................................ 170
Cancel Salary Adjustment Action .................................................................................................... 171
Career Progression Action ................................................................................................................. 172
Reasons for a Career Progression ............................................................................................................... 173
Employment/Salary Verification ...................................................................................................... 174
PA Change Log....................................................................................................................................... 175
The Initial Screen ............................................................................................................................................... 176
Leave of Absence Class ....................................................................................................................... 178
Lesson 10: Course Review ....................................................................... 179
Next Steps ................................................................................................................................................ 179
Course Assessment/Evaluation ........................................................................................................ 180
Table of Contents Create and Maintain Employee Data
PA310
Page vi North Carolina Office of the State Controller updated 5-10-19
This page intentionally left blank

Create and Maintain Employee Data Introduction
PA310
updated 5-10-19 North Carolina Office of the State Controller Page 1
Overview
The course introduction is an opportunity to get to know the others who are attending class as
well as to agree on classroom courtesy. The instructor will inform you about the building
facilities and when breaks will occur.
The late arrival session policy is applicable for Day 2 of class as well as the first day. If you are
late the second day (past the first 30 minutes of class), you will be asked to take the second day
of class the next time it is offered.
NOTE: PA is the acronym for Personnel Administration.
Prerequisites
• PA210 - Personnel Administration Terms, Concepts, and Display Data
You should have taken the only prerequisite (PA210) required for this class before attending
today. You either took it virtually (online) or in the classroom, like today.
PA313 is the class that follows the PA310 class. It is offered both as an instructor-led or virtual
course. After successful completion of PA313, the requirements for the HR Master Data
Maintainer security role will be completed.
Integrated HR/Payroll System Training Curriculum
The Integrated HR/Payroll System training program comprises several courses and different
modules. Based on your HR role, you will attend courses in the Personnel Administration module.

Introduction Create and Maintain Employee Data
PA310
Page 2 North Carolina Office of the State Controller updated 5-10-19
Personnel Administration Curriculum
Within the Personnel Administration module, there are several courses. Your position determines
which courses you may be required to attend.
Strategy for Training
TELL ME (Concepts)
Instructor will discuss the process, responsibilities, and describe the transactions – LISTEN
SHOW ME (Demonstrations)
Instructor will demonstrate job-related tasks performed in the Integrated HR/Payroll System –
HANDS OFF.
LET ME (Exercises)
Student will complete the exercises which allows for hands-on practice in class – HANDS ON
SUPPORT ME (Availability)
Instructor will be available to answer questions while the students complete the exercises

Create and Maintain Employee Data Introduction
PA310
updated 5-10-19 North Carolina Office of the State Controller Page 3
Course Map
You can see the Course Map of the class at the beginning of each lesson. The lessons covered in
this class include:
• Lesson 1: Review of PA Infotypes
• Lesson 2: Introduction to Actions
• Lesson 3: Entering Employees in the Integrated HR/Payroll System
• Lesson 4: Adjusting Salaries
• Lesson 5: Promoting Employees
• Lesson 6: Separating Employees
• Lesson 7: Entering Transfers
• Lesson 8: Workflow Process & Inquiry
• Lesson 9: Reviewing Additional Actions
• Lesson 10: Course Review
The Create & Maintain Grievances Student Guide can be used as a reference when you return to
the workplace. For example, you can use the exercises for practicing in the Integrated HR/Payroll
System training environment.
Course Objectives
Upon completion of this course, you should be able to:
• Describe the process for the various Actions
• Create new records associated with the life cycle of an employee
• Modify existing employee data
• Understand Workflow from the beginning of the process to completion
• Lesson 10: Course Review
The Create and Maintain Employee Data Student Guide can be used as a reference when you
return to the workplace. For example, you can use the exercises for practicing in the Integrated
HR/Payroll System training environment.
You may also find it useful to take the Employee Self-Service and Manager Self-Service courses
although they are not required for the PA curriculum. They are, however, mandatory for other
requirements.

Introduction Create and Maintain Employee Data
PA310
Page 4 North Carolina Office of the State Controller updated 5-10-19
Reference Materials
• Student Guide
• Job Aids
• Other Resources
• Online help - from the SAP portal
• Work instructions - Business Process Procedures (BPPs)
The materials above can be accessed through the OSC Training HELP website. Use the following
link to access the HELP website:
https://www.osc.nc.gov/state-agency-resources/training
SUMMARY
This course is intended to give HR professionals an understanding of the Integrated HR/Payroll
System Personnel Administration module. This course will provide you with demonstration and
practice for creating and modifying employee data.

Create and Maintain Employee Data Lesson 1: Review of PA Infotypes
PA310
updated 5-10-19 North Carolina Office of the State Controller Page 5
Objectives
• Recall terms and concepts from the PA210 Terms, Concepts, and Display Data course.
• Understand that entries made in PA affect an employee’s time, benefits, or pay.
• Review the various Infotypes in PA Actions.
Integrated HR/Payroll System Integration
Based on the data you viewed in PA210 Terms, Concepts and Display Data, you should have a
good understanding of the various infotypes that are part of an employee’s personnel record.
Because the Integrated HR/Payroll System is an integrated system, every entry made in
Personnel Administration affects some component of an employee’s time and pay.
Some infotypes for which PA is responsible are applied directly to the employee. Many of the
infotypes that affect an employee’s time and pay display automatically during PA Actions. Other
infotypes are applied to the position which also affect how the employee enters time and is
subsequently paid.

Lesson 1: Review of PA Infotypes Create and Maintain Employee Data
PA310
Page 6 North Carolina Office of the State Controller updated 5-10-19
PA Infotypes and Time, Benefits & Payroll
• IT0000 - Actions
• IT0001 - Organizational Assignment
• IT0002 - Personal Data
• IT0006 - Address (permanent)
• IT0007 - Planned Working Time
• IT0008 - Basic Pay
• IT0041 - Date Specifications
• IT0552 - Time Specification/Employ. Period
• IT2003 - Substitution
• IT2001 - Absences
The infotypes listed above are entered in PA, but affect an employee’s time, benefits and payroll.
It is important to understand how the entries made in PA are related to results in those areas.
Note that the previous list represents only a few PA infotypes; it is in no way a complete list of all
PA infotypes.

Create and Maintain Employee Data Lesson 1: Review of PA Infotypes
PA310
updated 5-10-19 North Carolina Office of the State Controller Page 7
Actions (IT0000)
The Actions IT0000 infotype indicates the events that occurred on the employee’s personnel
record. Some examples are: New Hire, Promotion, Separation, etc. Actions are covered in more
detail later in the class. In addition, the infotype shows the employment status (Active, Inactive,
Withdrawn). Time, Payroll and Benefits use information from IT0000.

Lesson 1: Review of PA Infotypes Create and Maintain Employee Data
PA310
Page 8 North Carolina Office of the State Controller updated 5-10-19
Organizational Assignment - IT0001
Time, Payroll and Benefits pull information from Organizational Assignment IT0001. All the
fields on this infotype default from the position assigned to the employee.
• Personnel area: Used by Payroll to determine where wages and salaries are posted and
from where they are paid
• Subarea: Identifies various working schedules for Time Management rules
• Cost Center, Fund, Functional Area, Business Area: Are related to Finance and Funding
• Employee Group: Drives benefits eligibility, leave and pay calculations
• Employee Subgroup: Defines work status (full time, part time) overtime rules, and
impacts benefits
• Payroll area: Determines the payroll cycle

Create and Maintain Employee Data Lesson 1: Review of PA Infotypes
PA310
updated 5-10-19 North Carolina Office of the State Controller Page 9
• Contract: Identifies if employee will pay full or partial cost for health insurance premiums
and retiree status
• Percentage: Always 100%
• Position and Job: The position to which the employee is assigned and the job to which
the position is related
• Organizational Unit: An entity within the organizational structure
Personal Data – (IT0002)
The Personal Data (IT0002) infotype displays Social security number, date of birth and marital
status—information that is important for tax reporting, payroll, and benefits.
NOTE: All personal data changes must be maintained by BEST HR.
Critical! – Do not change the Name Format field default. This field should ALWAYS be
“00.”
DO NOT CHANGE

Lesson 1: Review of PA Infotypes Create and Maintain Employee Data
PA310
Page 10 North Carolina Office of the State Controller updated 5-10-19
If you skip this infotype in the New Hire Action, you will have to
provide BEST HR with the information to create the infotype.
That is why it is very important to Save the infotype.
The lack of an Infotype 0002 causes errors on interfaces,
PERNRs with no names, etc.
You cannot maintain in PA30. If you do not save this infotype,
you may receive a call from the Integrated HR/Payroll
Functional team as to why it was skipped.
Addresses - IT0006
The various tax infotypes (Residence Tax, Work Tax Area, Unemployment State) are dynamically
associated with IT0006 – permanent address. If IT0006 is skipped during the New Hire Action,
the tax infotypes do not display, and the employee’s record will error out in payroll.
NOTE: When entering an address, always select the appropriate subtype and begin with
Address line 1 and only use Address line 2 when necessary to enter additional address
information. (There is a limitation of 32 characters on each line.)
If the address information is incorrect, employees do not receive W2s at the end of the year.

Create and Maintain Employee Data Lesson 1: Review of PA Infotypes
PA310
updated 5-10-19 North Carolina Office of the State Controller Page 11
Planned Working Time - IT0007
The Work Schedule Rule (WSR) is the foundation upon which an employee’s time is processed in
the Integrated HR/Payroll System. Each employee is assigned a WSR in PA that best represents
his or her work pattern. The WSR combines an assigned holiday calendar (the main State holiday
calendar or an alternate calendar approved by OSHR) with a repeatable pattern of work
representing an employee’s scheduled work days as well as scheduled non-work days. The WSR
can represent work patterns repeated over a single or multiple weeks and may include day,
evening and night shift designations that trigger premium payments (if applicable) at rates
designated on the employee’s position (if the position is appropriately flagged). The WSR does
not limit the number of hours an employee can record on any given day, but will allow leave to
be taken on scheduled work days only. Many fields are dynamic and trigger other time
functions. For example, Time Sheet Defaults (IT0315) are directly related to the Time
Management Status field on IT0007. A Time Mgmt Status of “1” indicates that a time sheet is
required, whereas a “9” indicates a Time Sheet is not required. If a negative time employee is on
Leave of Absence, IT0007 must be revised to change the employee to positive during the Leave
and changed back to negative upon Reinstatement/Reemployment. The Employment percent
field should always be 100%.
An employee should be assigned as a negative time employee only if he or she is working 5
days a week, 8 hours a day.

Lesson 1: Review of PA Infotypes Create and Maintain Employee Data
PA310
Page 12 North Carolina Office of the State Controller updated 5-10-19
Enter the number of hours this individual will work per week, and click Enter to have the system
validate the details. The Planned Working Schedule and Time Mgmt status defaults from the
employee's enterprise structure.
It is critical that you review for correctness (including the working week) and change the work
schedule as appropriate for the employee if it is different from the one that defaults. If the
individual is part-time, be sure to check the Part-time employee box. The defaulted work
schedule is based on information provided by the various agencies and Integrated HR/Payroll
System team members.
Work Schedule Comparison - Example
To show how IT0007 affects an employee’s pay, the following describes two employees hired on
the same day but given two different work schedules. Both employees are paid $6,250 monthly
salary.
Employee A starts on Sept. 19 and is assigned work schedule D01N08GN which has 22 possible
work days in the month. Counting Sept. 19th, the employee worked 8 days of the possible 22.
The Pay is figured by this formula: 8 days divided by 22 times the monthly rate ($6,250) =
$2,272.73 paid for the month for Employee A (based on IT0007 and IT0008).
Employee B’s work schedule (D92WVA01) has 16 possible work days in the month. Counting the
first day Employee B reported to work (9/19), the employee worked 6 out of the 16 days. The
number of days worked (6) divided by the possible work days (16) times the monthly salary
($6,250) calculates a pay of $2,343.75.

Create and Maintain Employee Data Lesson 1: Review of PA Infotypes
PA310
updated 5-10-19 North Carolina Office of the State Controller Page 13
You can see that both employees were paid correctly, yet the specific work schedule, in
conjunction with IT0008, determined two different pay outcomes for the employees once again
illustrating how entries made in PA affect employee pay or time.
Basic Pay - IT0008
On the Basic Pay (IT0008) infotype, the pay scale values (pay scale type, pay scale area, pay scale
group and level) have been designed to default based on the rules assigned to the employee's
position. If the pay scale values do not default, please contact BEST Shared Services or your BEST
HR Specialist.
NOTE: If the Level field is not entered on the PCR, it will not default on the infotype. You
must enter it later. If left blank, it will cause some fields on BI reports to be blank.
Enter the Reason for the action (in the case of a New Hire, there is only one reason), and the
person's Amount if hourly. Click Enter and the system will validate the salary and provide the
hourly rate.
NOTE: If the person is on an hourly position, enter their HOURLY rate, and the system
will calculate their salary.
• Reason - enter or select from the drop-down menu
• Next increase - this field is blank except for the Judicial Branch, which uses it to track the
next increase for employees in specific Jobs.
• Annual Salary - populates from the workflow, verify this field for accuracy

Lesson 1: Review of PA Infotypes Create and Maintain Employee Data
PA310
Page 14 North Carolina Office of the State Controller updated 5-10-19
• Amount - will be blank; if the employee is paid hourly instead of annually, enter the
hourly amount in the Amount field
• Number/Unit - will be blank
• Unit - will be blank
NOTE: Employees can be different from the position. For example, the position may be
annual salary and the employee may be hourly (if Supplemental Staff working against a
permanent position).
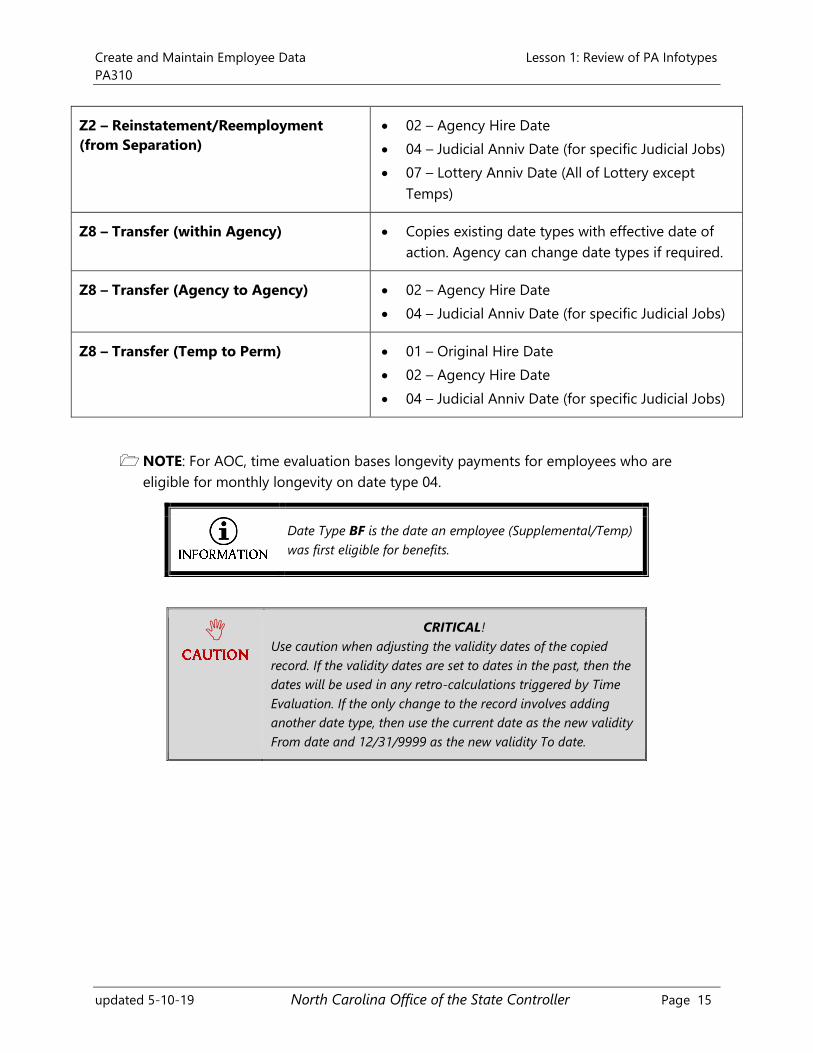
Data Specifications - IT0041
Z0 - New Hire
Z7 - Non-Beacon to Beacon
ZS – Adjusted Hire Date
01 – Original Hire Date
02 – Agency Hire Date
04 – Judicial Anniv Date (for specific Judicial Jobs)
BF – Benefit Elig Date (for Supplemental/Temps)
ZG – Separation 03 – Last Day Worked (defaults date from PCR)
Z2 – Reinstatement/Reemployment
(from LOA)
• Copies existing date types with effective date of
action. Agency can change date types if required.
Create and Maintain Employee Data Lesson 1: Review of PA Infotypes
PA310
updated 5-10-19 North Carolina Office of the State Controller Page 15
Z2 – Reinstatement/Reemployment
(from Separation)
• 02 – Agency Hire Date
• 04 – Judicial Anniv Date (for specific Judicial Jobs)
• 07 – Lottery Anniv Date (All of Lottery except
Temps)
Z8 – Transfer (within Agency) • Copies existing date types with effective date of
action. Agency can change date types if required.
Z8 – Transfer (Agency to Agency) • 02 – Agency Hire Date
• 04 – Judicial Anniv Date (for specific Judicial Jobs)
Z8 – Transfer (Temp to Perm) • 01 – Original Hire Date
• 02 – Agency Hire Date
• 04 – Judicial Anniv Date (for specific Judicial Jobs)
NOTE: For AOC, time evaluation bases longevity payments for employees who are
eligible for monthly longevity on date type 04.
Date Type BF is the date an employee (Supplemental/Temp)
was first eligible for benefits.
CRITICAL!
Use caution when adjusting the validity dates of the copied
record. If the validity dates are set to dates in the past, then the
dates will be used in any retro-calculations triggered by Time
Evaluation. If the only change to the record involves adding
another date type, then use the current date as the new validity
From date and 12/31/9999 as the new validity To date.
Lesson 1: Review of PA Infotypes Create and Maintain Employee Data
PA310
Page 16 North Carolina Office of the State Controller updated 5-10-19
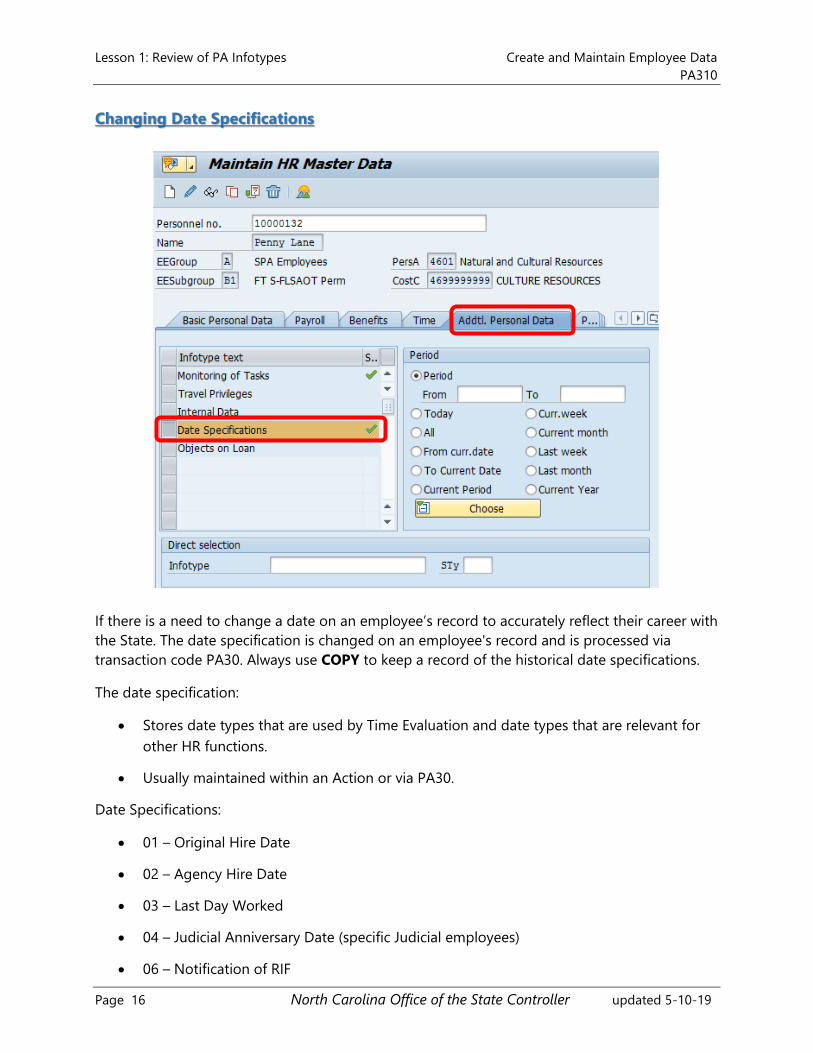
Changing Date Specifications
If there is a need to change a date on an employee’s record to accurately reflect their career with
the State. The date specification is changed on an employee's record and is processed via
transaction code PA30. Always use COPY to keep a record of the historical date specifications.
The date specification:
• Stores date types that are used by Time Evaluation and date types that are relevant for
other HR functions.
• Usually maintained within an Action or via PA30.
Date Specifications:
• 01 – Original Hire Date
• 02 – Agency Hire Date
• 03 – Last Day Worked
• 04 – Judicial Anniversary Date (specific Judicial employees)
• 06 – Notification of RIF

Create and Maintain Employee Data Lesson 1: Review of PA Infotypes
PA310
updated 5-10-19 North Carolina Office of the State Controller Page 17
• 07 – Lottery Anniversary Date
• 08 - Supplemental Hire Date
• BF – Benfit Elig Date
• NR – 457 Catch-Up Date
These fields are included on interfaces and reports. Therefore,
it is very important for the fields to be correct.
Additional Resources
Refer to the OSC Training website in HELP documents for more
information about Date Specifications.
Search for the following support document titles:
• Change Date Specifications
• Longevity
KNOWLEDGE CHECK: WHICH INFOTYPE?
Question Answer
1. Displays the SSN, date of birth and marital status?
2. Displays the emergency contact information?
3. Captures the events that occur on an employee’s personnel
record?
4. Do you enter a Reason code on the Basic Pay infotype? (system
will not require this...you must remember to enter the code.)?
5. Houses the Work Schedule Rule (WSR)?
SUMMARY
This lesson reviewed terms and concepts from the PA210 Terms, Concepts, and Display Data
course. It also demonstrated how entries made in PA affect an employee’s time, benefits, or pay.
The lesson also reviewed the various Infotypes in PA Actions.

Lesson 1: Review of PA Infotypes Create and Maintain Employee Data
PA310
Page 18 North Carolina Office of the State Controller updated 5-10-19
THIS PAGE
INTENTIONALLY LEFT BLANK

Create and Maintain Employee Data Lesson 2: Introduction to Actions
PA310
updated 5-10-19 North Carolina Office of the State Controller Page 19
Objectives
• Describe the various Actions associated with the life cycle of an employee
• Describe various helpful tips and tricks
• Explain the Workflow process

Lesson 2: Introduction to Actions Create and Maintain Employee Data
PA310
Page 20 North Carolina Office of the State Controller updated 5-10-19
Actions
As discussed in the PA Terms, Concepts and Display Data course, the life cycle of an employee
comprises many different events. The Integrated HR/Payroll System defines those events as a
specific infotype called Actions (IT0000). Actions for the State of North Carolina are shown
above. LOA stands for Leave of Absence.
An Action combines logically related infotypes into one infogroup. The infotypes in the
infogroup are sequentially arranged and automatically display. This helps to simplify the data
entry for the Action. You do not have to remember whether a particular infotype should be
included—the Integrated HR/Payroll System automatically includes the infotypes that are
associated with a particular Action. Depending upon the employee’s specific data, you may not
need to enter data on each of the infotypes presented in the Action.

Create and Maintain Employee Data Lesson 2: Introduction to Actions
PA310
updated 5-10-19 North Carolina Office of the State Controller Page 21
Each Action has one or more reasons that are associated with the life cycle event. When you
create an Action in the Integrated HR/Payroll System you determine and select the appropriate
reason for the employee’s life cycle event.
With the Actions infotype (IT0000) you can display an overview of all the important changes
related to an employee, and then document the most important stages an employee passes
through in his or her history with the State. Only the current data was downloaded into the
Integrated HR/Payroll System.
NOTE: Refer to Business Objects (BOBJ) Reports for employee history.
Actions You Will Create in This Class
• New Hire
• Reinstatement / Reemployment
• Salary Adjustment
• Appointment Change
• Reallocation
• Promotion
• Transfer
• Separation
• Separation with Pay Continuation
The State of North Carolina has a variety of Actions that you will use. However, in this course,
you will only create a selected few, as listed above. This course is designed to give you the
opportunity to learn four basic functions: getting an employee into the system, making salary
adjustments based on work events, transferring and separating the employee. Additional Actions
are discussed, although specific exercises are not performed in this class. Leave of Absence is
covered in a subsequent class, PA420 Leave of Absence as well as in PA370 Short-Term Disability.
The demonstrations and exercises that are presented hereafter assume that all necessary policies
and procedures have been followed, and appropriate forms, etc. have been submitted and
approved. All the approvals and processes that you had to do prior to the Integrated
HR/Payroll System are still the same.
In addition, the necessity of keeping appropriate hard copies of personnel records (applications,
reviews, etc.) remains. These documents should still be saved and stored as they were prior to
the Integrated HR/Payroll System.

Lesson 2: Introduction to Actions Create and Maintain Employee Data
PA310
Page 22 North Carolina Office of the State Controller updated 5-10-19
PA Support Materials
We will access the Training HELP website and view the following PA support materials as we go
through the course:
• Personnel Areas and Subareas
• Employee Groups and Subgroups
• PA Infotypes
• PA Actions Reasons and Definitions
• Business Process Procedures (BPPs)
• Other Job Aids as necessary
• Tutorials
The instructor will show you how to display various online job aids located in the Training HELP
website.
Data System Functions
There are several ways to Maintain Master Data as listed below:
Create
Create a new infotype for an existing employee
Change
You will not use! A decision has been made that Integrated
HR/Payroll System users will use the Copy function with the original
date to overwrite existing data and correct data. You will not use the
Pencil icon. You can only correct a current (not historical) record. Only
BEST Shared Services can make changes to historical records.
Delete
Do not use! Only BEST can perform this with OSHR approval.
Eliminate a record. This function should be used with caution, because
it permanently removes the information from the database, and
cannot be retrieved.
Best Business Practice: Have BEST Shared Services make
these changes.
Delimit
Enter an end date on an infotype to make it inactive
Copy
Modify or update an infotype to ensure that history is maintained (if
you change the effective date accordingly). If you don’t use a new
effective date, you are overwriting history on some infotypes.

Create and Maintain Employee Data Lesson 2: Introduction to Actions
PA310
updated 5-10-19 North Carolina Office of the State Controller Page 23
Display
Detailed view of an infotype
Overview
Summary view of an infotype
Refresh
The employee record is updated without leaving PA20.
Miscellaneous Tips and Tricks
Case sensitivity
The Integrated HR/Payroll System is case sensitive. The standard for the State uses upper and
lower case (Title Case). It is important to maintain this format for consistency in reports and
searches. This is true for all entries, including Actions and PA30 transactions.
Gather all data before initiating Action
It is a best practice to gather all the employee’s information before initiating an Action—don’t
start the Action until you can finish it. There may be occasions, like a New Hire, when the
information is not available (bank details, tax, etc.). In that case, after you get the approval via
Workflow, let the PCR stay in the inbox until the employee arrives before you initiate the Action.
If the employee is a no-show, you only have to cancel the PCR since the Action was not initiated.
When you do initiate the Action, if the bank and tax information is still not available, you must
set the Bank Details (IT0009) to check. See the note in Exercise 3.1 concerning Bank Details. Tax
withholding automatically sets to single, zero allowances.
Workflow
All PA Actions need approval before the Action can be executed. The Integrated HR/Payroll
System Workflow enables approvals (or rejections) to be obtained electronically. In the
Integrated HR/Payroll System, you can attach documents to the Workflow as well as write notes.
NOTES ENTERED DURING PA WORKFLOW MUST FOLLOW OSHR’S ACTION NOTES
TEMPLATE: https://www.osc.nc.gov/documents/action-notes-template
NOTE: Keep in mind that the notes and documents associated with Workflow do not
automatically move forward when processing the infotypes of the approved workflow
document.

Lesson 2: Introduction to Actions Create and Maintain Employee Data
PA310
Page 24 North Carolina Office of the State Controller updated 5-10-19
The authority to approve an Action is associated to the Position, and not to the person and
person’s role. If a person leaves an approver Position, the authority to approve stays with the
Position. A person who is subsequently assigned to that Position, also assumes the approval
authority (unless the Position is changed by Security).
NOTE: The OSC Security Team delimits all roles on a vacant position that require training.
The Data Owner will need to submit a Security form to add the appropriate roles when
the position is filled.
ZPAA076 – Workflow
Use Transaction code ZPAA076 to initiate the Integrated HR/Payroll System electronic approval
process, referred to as Workflow (WF).
On the initial Employee Action Request screen enter the applicable data. After the Action type
and Reason is entered, the second Employee Action Request screen is displayed. This screen has
two columns. The left column displays the current status of the employee. On the right, enter the
new data pertinent to the Action being processed. If the employee is hourly, be sure that the Pay
Scale Area field is “hourly”. Enter the hourly amount in the hourly field (not the annual salary
field).
For Work/Against (W/A), the basic pay data should reflect the employee data and not the
assigned position data.
The Work Against is identified by the Position Title (i.e., WA Master Chef). Use PO13 to reflect
the correct position title.

Create and Maintain Employee Data Lesson 2: Introduction to Actions
PA310
updated 5-10-19 North Carolina Office of the State Controller Page 25
It is critical to review the data entry for accuracy before initiating WF. After WF is initiated, you
will not be able to go back in and correct an error. In that case, you have two choices (a) contact
the Approver and ask him or her to reject it so that it automatically comes back to you. You
make the corrections and send back through the WF process, or, (b) if the WF has already been
approved by all approvers and is still in your inbox, you can “reject execution” if the action has
not been entered. BEST Shared Services is not part of the PA Actions approval process.
When you initiate Workflow, you will receive a Personnel Change Request (PCR) number. Be sure
to make a record of the PCR number so that you can track it.
After all the data is entered and WF is initiated, the Integrated HR/Payroll System sends the
request to the appropriate Approver who can approve or reject the request (there may be more
than one level of approval).
In-box
The second part of the Workflow is to see if your Workflow item has been approved or rejected.
Access the SAP Business Workplace from the Easy Access screen.
From the Business Workplace screen, click Inbox > Workflow. All the approved or rejected PCRs
that you have initiated are listed on the right. Double-click the approved PCR, and the applicable
screen automatically displays for the Action. You are now ready to execute the appropriate
Action.

Lesson 2: Introduction to Actions Create and Maintain Employee Data
PA310
Page 26 North Carolina Office of the State Controller updated 5-10-19
Workflow is always the first step before you initiate an Action. You do not use Workflow for
PA30 transactions. If you are ever in doubt whether Workflow is needed, access the Personnel
Actions screen using PA40. If the Action is on the list, it must be processed through Workflow. If
you attempt to bypass Workflow for an Action, you will receive the error message below and not
be allowed to continue.
KNOWLEDGE CHECK
QUESTION ANSWER
1. Each Action has one or more ___ associated with the event.
2. Use the ___ function to enter new data into the system
3. When you use the ___ function, you should be sure to use a
new effective date.
4. The Integrated HR/Payroll System is case sensitive. You should
use the ___ case when entering data.
5. When you initiate Workflow on ZPAA076, you receive a ___.
SUMMARY
This lesson described the various Actions associated with the life cycle of an employee and the
workflow process was described.

Create and Maintain Employee Data Lesson 3: Entering Employees in the Integrated HR-Payroll System
PA310
updated 5-10-19 North Carolina Office of the State Controller Page 27
Objectives
• Process Actions using Workflow
• Use the appropriate Action to assign employees to the Integrated HR/Payroll System
• Select the applicable reason for each Action
• Distinguish between the hire Actions for new employees
The Integrated HR/Payroll System and the Retirement
System
When processing a New Hire, the Hiring Action screen displays when you execute the PCR from
your inbox. The employee’s basic data (name, gender, SSN, etc.) is entered. The information is
sent to the Retirement System, which is external to the Integrated HR/Payroll System. The
Retirement System assigns an external Personnel Number.
Lesson 3: Entering Employees in the Integrated HR-Payroll System Create and Maintain Employee Data
PA310
Page 28 North Carolina Office of the State Controller updated 5-10-19
CRITICAL: Ensure that the Personnel No. field is blank. If you have recently processed a
New Hire, the Personnel No. field may be pre-populated with that previous number.
After the Personnel Number is assigned, the Personnel Action screen is automatically displayed.
You will then select the New Hire action and continue entering the necessary data to complete
the transaction.
CAUTION! Never manually assign a personnel number or (although the Integrated
HR/Payroll System will not prevent you from doing so) or enter a bogus Social Security
number. Manually assigning a number causes the employee personnel number to be out
of sync with the Retirement System.
NOTE: If the Retirement System is down and you need to initiate a New Hire, contact
BEST Shared Services for assistance.
Assigning Employees to the Integrated HR/Payroll
System
Use the Actions described below to assign an employee to the Integrated HR/Payroll System. It
is important to understand when to use a specific Action before entering employee data. Follow
State policy regarding effective hire date when first day worked follows a beginning payroll
period after a weekend or holiday.
Before an employee record is entered into the Integrated HR/Payroll System, use the BOBJ
Cross-Agency Verification report (BP002-Employee History) found in the Cross-Agency
Verification folder to search for the employee by last name and last four digits of the Social
Security number to ensure that he or she is not already in the system. You should also use the
PPOSE or PO13D transactions to ensure that the Position to which the employee will be
assigned is vacant.
New Hire is used to create a personnel record for a newly hired employee who has never been
employed by any State agency. This Action includes employees who are temporaries or National
Guard.
Non-Beacon to Beacon is used for an employee currently working for a Non-BEACON agency
or when a State University employee is transferring without a break in service (separation of 31
calendar days) to a BEACON agency. It is also used when an employee previously worked for a
Non-BEACON agency or State University and is returning after a break in service to a BEACON
agency. (Example - NCSU to DOT)
Also, this action is used if a former employee left State employment before his or her agency
implemented BEACON (the former employee has a record in PMIS, but does not have any record
in the Integrated HR/Payroll System).

Create and Maintain Employee Data Lesson 3: Entering Employees in the Integrated HR-Payroll System
PA310
updated 5-10-19 North Carolina Office of the State Controller Page 29
Reinstatement/Reemployment is used to return employees to State employment or return
them from some type of leave.
Quick Entry is used to hire contractors, volunteers, board members, and federal employees who
need access to the Integrated HR/Payroll System but are not paid by the system. This function is
performed by the BEST HR team.
New Hire Action

Lesson 3: Entering Employees in the Integrated HR-Payroll System Create and Maintain Employee Data
PA310
Page 30 North Carolina Office of the State Controller updated 5-10-19
New Hire Process - Employee
As the New Hire diagram illustrates, there are several steps that must take place outside of the
Integrated HR/Payroll System before a New Hire Action is executed in the Integrated HR/Payroll
System. The process described is for hiring new employees. The New Hire transaction is not used
if an individual is being hired as supplemental staff, such as contractor, federal, or board
member. In these cases, the Quick Hire Action is used.
Before an individual can be hired, a vacant Position must exist. The vacancy occurs because (1)
an existing Position was vacated, or (2) a new Position for an organizational unit was approved
and established by the State. Each type of vacancy must be posted in accordance with State
policy.
After the vacancy posting time frame has expired, all qualified candidates are interviewed. A
qualified candidate is selected and sent a State-approved Offer Package. After the candidate
receives and accepts the Offer, the Manager or Supervisor sends the new hire information to HR
via manual form, email, phone call, fax, or other distribution method.
HR initiates the Workflow approval process. The initiator of the Action reviews his or her Inbox
to see when the final approval is received. After the initiator activates the PCR from the Inbox,
the Hiring Action screen is automatically displayed. HR completes basic data on the Hiring
screen, and it is automatically sent to the State Retirement System for a Personnel Number
assignment. HR chooses the New Hire Action to continue entering the new hire data.
Reasons for the New Hire
• New Hire
• National Guard

Create and Maintain Employee Data Lesson 3: Entering Employees in the Integrated HR-Payroll System
PA310
updated 5-10-19 North Carolina Office of the State Controller Page 31
* * * * * * * * * * * * * * * * * * * * * * * * * * * * * * * * * * * * * * * * * * * * * * * * * * * * *
EXERCISE: Logging into the Integrated HR/Payroll System
SCENARIO
You need to log into the Integrated HR/Payroll system to be able to
perform the exercises for this class.
Instructions
The instructor will assist you in accessing the system. Follow along as your instructor logs into
the Integrated HR/Payroll System.
Activities include:
• Signing on with the User ID given to you by your instructor
Be sure to click the Open button when the Portal pop-up box displays.
• Adding the following transactions to your Favorites folder:
ZPAA076
PA20
PA30
ZPA0189
• Change the technical settings display
Extras > Settings > Display technical names
• Adding the following URL to your Favorites folder:
https://www.osc.nc.gov/state-agency-resources/training/training_help_documents
* * * * * * * * * * * * * * * * * * * * * * * * * * * * * * * * * * * * * * * * * * * * * * * * * * * * *
EE Group/Subgroup
The Integrated HR/Payroll System defaults the Employee Group of all new hires as a permanent
employee. When you are entering new hire data, you must change the Employee Sub-group on
Workflow as applicable if you are entering a probationary or time limited employee.
Lesson 3: Entering Employees in the Integrated HR-Payroll System Create and Maintain Employee Data
PA310
Page 32 North Carolina Office of the State Controller updated 5-10-19
Bank details
The completion of the Bank Details infotype (IT0009) must be entered for payroll to run on the
new employee. If the bank details are not available at the time of the data entry, set up a paper
check. It is your responsibility to obtain that information and update the infotype before the
system is closed for payroll processing. Even if you have instructed the employee to enter the
data in ESS, you still must follow up with the employee to ensure he or she makes the entry prior
to payroll closing.
IMPORTANT: Only change an Employee’s bank details if you have documentation to do
so from the employee, such as a direct deposit form signed by the employee which
includes a bank deposit slip or voided check. You need to keep this documentation after
you make the change.
Save versus Next Record
Even if you make no changes to an infotype, you should still Save. The infotype may be
connected to dynamic infotypes which will not display if you have not saved.
The only time you would use the Next record button is when you do not need to enter data in
the infotype. For example, if you do not need to enter data on the Monitoring of Tasks (IT0019)
infotype, you would use the Next record button. If you used Save instead of Next record, you
would receive an error message and not be able to move forward. The general rule is: Save
infotypes that are pre-populated, even if you do not make any changes. If the infotype is blank
and you are not entering data in any of the blank required fields, use Next Record.
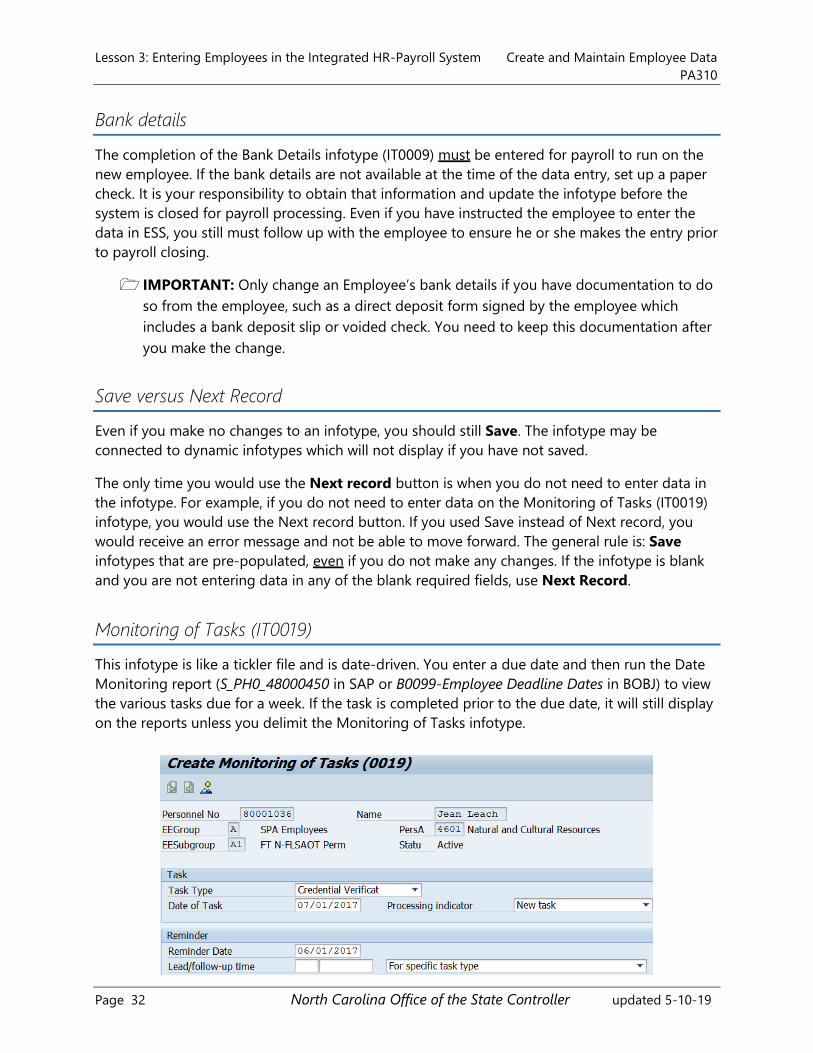
Monitoring of Tasks (IT0019)
This infotype is like a tickler file and is date-driven. You enter a due date and then run the Date
Monitoring report (S_PH0_48000450 in SAP or B0099-Employee Deadline Dates in BOBJ) to view
the various tasks due for a week. If the task is completed prior to the due date, it will still display
on the reports unless you delimit the Monitoring of Tasks infotype.

Create and Maintain Employee Data Lesson 3: Entering Employees in the Integrated HR-Payroll System
PA310
updated 5-10-19 North Carolina Office of the State Controller Page 33
You can enter comments in the Comments section at the bottom of the screen, however this
section does not allow for word-wrapping. You must keep track of how many characters you
have entered on each line. Also, the Comments section only allows entry on three lines. If you
want to enter without word-wrap issues or you need more than three lines of text, use the
preferred access method below from the Edit > Maintain text menu path on an infotype screen.
Comments
The Comments function is useful as you are entering data (via an Action or a PA30). You can
enter comments on many infotypes by selecting Edit > Maintain text from the menu (if grayed
out, adding comments is not available for that infotype). A new window displays where you can
enter comments. The standard for comments is to preface your remarks by the date and your
name. Keep in mind the remarks must be professional. You cannot report from the comments. It
is a best practice to make sure that you document all PA Actions or infotype revisions by
entering comments.
Communication (IT0105)
First Telephone Number at Work (Subtype)
The system now accepts only one format for the telephone number in the Communication
infotype... First telephone number at work. Only use dashes (not slashes). If a number is entered
in an unacceptable format, the system will respond with an error message:
If the number is not entered in the correct format, one the following messages will display:

Lesson 3: Entering Employees in the Integrated HR-Payroll System Create and Maintain Employee Data
PA310
Page 34 North Carolina Office of the State Controller updated 5-10-19
Examples of correct and incorrect formats:
919-707-0707 (919) 707-0707
919/707-0707
919=707-0707
1-919-707-0707
919.707.0707
9197070707
* * * * * * * * * * * * * * * * * * * * * * * * * * * * * * * * * * * * * * * * * * * * * * * * * * * * *
EXERCISE 3.1: New Hire Action
SCENARIO
The Cultural Resources Library is undergoing a digitization process and
will hire a new Digitization Clerk into its organizational unit (20010287).
• The new employee will begin working today at a salary that is
equivalent to the minimum salary range.
• The new employee will be issued a badge and two keys.
• The employee’s military status is Reserve.
Instructions
There are three parts to this Exercise:
I. Initiate Workflow (WF)
II. Watch as Instructor demonstrates the Agency and Funding approval process
III. Complete Approved PCR from the Initiator’s Inbox
It is important to complete all the exercises in their entirety because some subsequent exercises
depend upon the data that was entered in previous exercises.

Create and Maintain Employee Data Lesson 3: Entering Employees in the Integrated HR-Payroll System
PA310
updated 5-10-19 North Carolina Office of the State Controller Page 35
PART I - Initiate Workflow (WF) as Initiator
1. Assume the following: you have already run the BOBJ Cross-Agency Verification report
(BP002-Employee History) and were not able to locate the employee in the system. You
used PPOSE and verified that the position is vacant.
2. On the Easy Access screen, type ZPAA076 in the Command field.
3. Click Enter . The Employee Action Request screen is displayed.
4. Enter the following data:
Last 4 digits (SSN) Any of your choosing (make up a nine-digit social
security number for training purposes).
Important! Write down the nine numbers you
used on your Transaction Log because you will
need them again.
At this point, enter the last 4 digits as applicable in the
Last 4 digits (SSN) field.
FOR TRAINING EXERCISES ONLY! If you
receive a message that the security number is
already assigned to another employee, just
continue entering a combination of numbers
until one is accepted.
Employee Name Any of your choosing - Be sure you write down the
name you use on your Transaction Log because you will
need this person in subsequent exercises.
Effective on Today’s date (in your work environment, follow State
policy if the employee reports to work one day after the
beginning of a payroll period that falls on a weekend or
holiday). Be sure to write this on your Transaction Log.
Action Type New Hire
Reason New Hire
5. Click the Enter button.
6. Click the Create button. The second screen of the Employee Action Request screen is
displayed.

Lesson 3: Entering Employees in the Integrated HR-Payroll System Create and Maintain Employee Data
PA310
Page 36 North Carolina Office of the State Controller updated 5-10-19
7. From the table below, select the Position number assigned to you by your instructor and
enter it into the EE Position field.
HINT: Press the Tab key. (Use the Tab key rather than the Enter key so that hard stops will
function as needed.)
Be sure to write the position you used on your Transaction Log.
8. Click Enter .
Observe that the Employee Group and Employee Subgroup fields are now populated.
9. Enter the following data:
EE Group/Subgroup Change to the appropriate subgroup to indicate that the
employee is full time, subject to overtime, and is a
probationary employee (use the matchcode and then
double-click the correct selection).
• SPA Employees
• FT S-FLSAOT Prob. (B2)
NOTE: When the Position number is entered, the
Employee Subgroup defaults to FT S-FLSAOT Perm.
Because this is a New Hire, the employee should be
in probationary status.
Annual Salary Enter the minimum of the salary range.
NOTE: Do not enter data in the Hourly Salary field
for a permanent employee. This is for Temporary
employees only.

Create and Maintain Employee Data Lesson 3: Entering Employees in the Integrated HR-Payroll System
PA310
updated 5-10-19 North Carolina Office of the State Controller Page 37
Pay Scale Grade Level GR
NOTE: Observe the Last Date Worked field will not be used now, but would be used
in appropriate Actions.
TIPS & TRICKS: Employee Group and Subgroup Changes
on a Position
When a position has been revised by OM to change the
employee group and subgroup, that change does not feed to
PA until a new PA Action is created. To change the
Employee Group and Subgroup of an employee, it is
necessary to do an Appointment Change Action.
10. Click the Enter button.
11. Click the Save button. The Information pop-up is displayed with the assigned PCR
number.
12. Write the system-issued PCR number on your Transaction Log. (Back at work you would
write it on your new hire paperwork).
13. Click to close the pop-up.
14. Click the Services for Object button.
NOTE: This button is not available until you have saved the Employee Action
Request. The Services for Object button displays either an icon menu or a drop-down
menu depending upon whether you click on the right or left of the icon.
15. Select Create > Create Note.
16. Enter a note title.
17. Click in the note section and add notes based off OSHR’s Action Notes Template
(https://www.osc.nc.gov/documents/action-notes-template). Type applicable
information to send along with the PCR. Listen as your instructor explains how to access
OSHR’s Action Notes Template.
NOTE: The notes that you write are recorded only in the Workflow PCR; they do not
follow in the PA Action. However, you can copy and paste from WF into the Action
when you are processing the infotypes.
18. Click the green check to close the notes. If applicable, close the notes icon menu.

Lesson 3: Entering Employees in the Integrated HR-Payroll System Create and Maintain Employee Data
PA310
Page 38 North Carolina Office of the State Controller updated 5-10-19
19. Click Enter .
20. Click Save .
21. Click the button. The Information pop-up is displayed indicating that the PCR
has been submitted.
22. Click the green check button to close the Information pop-up which will take you
back to the Employee Action Request (first screen).
PART II - Watch as the Instructor demonstrates the two approval levels
(Agency and Funding)
PART III - Complete approved PCR from Initiator’s Inbox
NOTE: If you are on the Employee Action Request screen, use the Back button to
return to the Easy Access Screen.
23. From the Easy Access screen, click the SAP Business Workplace button.
24. Click the node beside Inbox to expand it.
25. Before you process the PCR, make a copy of the note to paste it into the Actions infotype:
• Select (do not double-click) the Workflow PCR to select it.
• At the bottom of the screen, single-click the header (not tracker) link: PA PCR xxxxx
##### (where X and # represent employee’s name and PCR number).
• At the Employee Action Request screen, click the Services for Object button to
review the notes or attachments.
• Select Attachment List.
• Highlight the line item for the note.
• Double-click or use the eyeglasses.
• Highlight the entire note, including the title.
• Right-click and select Copy. You can keep either the copied note in the clipboard
for use later, or paste it to a Word document for later use.

Create and Maintain Employee Data Lesson 3: Entering Employees in the Integrated HR-Payroll System
PA310
updated 5-10-19 North Carolina Office of the State Controller Page 39
Do not leave the PCR open in a second session.
• Click the red X to close the Display note pop-up.
• Click the red X to close the Services for Objects pop-up. It is a best practice to
make sure the PCR is closed before you process the approved PCR Actions because
an open PCR uses a lot of memory.
• Click the Back button.
26. With the PCR still selected, click the Execute (or double-click the PCR line item). The
system automatically takes you to the applicable screen for the Action (in this exercise, it is
the Hiring Action screen).
27. On the Hiring Action screen, enter the following data:
SSN On the Hiring Action screen, you must enter the
complete nine-digit social security number you recorded
earlier on your Transaction Log. In Workflow (ZPAA076),
you only entered the last 4 digits.
CAUTION! Be sure the last 4 digits are the
same as the ones you previously entered on
the Employee Action Request screen.
For Training purposes only: If you receive a message
that the social security number is already assigned to
another employee, just continue entering a combination
of numbers (except the last 4 digits) until one is
accepted.
DOB 11/15/1980 (Be sure to use all eight [8] digits).
Gender Use a gender that matches the name you chose.
28. Click the Enter button and then the Execute button. The Personnel Actions
screen is displayed with an assigned personnel number.
29. Write the new Personnel number (PERNR) on your Transaction Log.

Lesson 3: Entering Employees in the Integrated HR-Payroll System Create and Maintain Employee Data
PA310
Page 40 North Carolina Office of the State Controller updated 5-10-19
30. On the Personnel Actions screen, enter:
From Today’s date (this must always match the date you
entered on the Employee Action Request screen).
Remember to use all 8 digits when entering the
date.
Action Type New Hire
31. Click the Enter button.
32. Click the Execute button.
NOTE: It is a best practice to always save a pre-populated infotype even if you do not
make changes. In some cases, there are dynamic infotypes that display only when the
previous infotype was saved. If you use the Next record button instead of saving,
those dynamic infotypes will not display and the employee’s record will be
incomplete.

Create and Maintain Employee Data Lesson 3: Entering Employees in the Integrated HR-Payroll System
PA310
updated 5-10-19 North Carolina Office of the State Controller Page 41
33. Complete the following fields:
Create Actions
(IT0000)
Enter note copied
from the Employee
Action Request
screen
From the menu bar:
• Select Edit
• Select Maintain text.
• Click the Enter button if a warning message
displays indicating that person and position have
different group/subgroup
• Click the Enter button.
• Use Ctrl+V (or right-click and select Insert) to paste
the note from the PCR.
• Click the Enter button.
• Click the Save button.
• Click Enter as needed to bypass warning
messages again.
Reason for Action Observe the field defaulted from the Employee Action
Request screen.
Reference Per. No Leave blank
Position Observe the field defaulted from the Employee Action
Request screen.

Lesson 3: Entering Employees in the Integrated HR-Payroll System Create and Maintain Employee Data
PA310
Page 42 North Carolina Office of the State Controller updated 5-10-19
EE Group/Subgroup Observe the field defaulted from the Employee Action
Request screen.
If you forgot to make the applicable changes on the
Workflow PCR, you can make the changes now. Be
aware, however, that when an audit is run of your
Actions, this will show as a discrepancy.
Click the Enter button.
Click the Save button.
A warning message displays indicating that the
employee and position have different groups/subgroups.
Click the Enter button to bypass the warning.
Create Personal Data
(IT0002)
Critical! – Do not change the Name Format field.
NOTE: It is important to SAVE this infotype.
Marital status Single
Gender A gender that matches the name you chose
Dependents Leave blank (this field is not used during the New Hire
Action.)
Click Enter and Save .
Create Organizational
Assignment (IT0001) Click Enter and Save .
Delimit vacancy Yes
Create Date
Specifications (IT0041)
Review for accuracy.
Click Enter and Save .
Create Related
Experience (IT9822)
Enter Related Work Exp: 0 and Related Education: 48.
Click Enter and Save .

Create and Maintain Employee Data Lesson 3: Entering Employees in the Integrated HR-Payroll System
PA310
updated 5-10-19 North Carolina Office of the State Controller Page 43
Create Addresses
(IT0006)
4 Paws Ln
Raleigh
NC 27604
Permanent address NOTE: Enter address information on Address
line 1. Only use Address line 2 if all the information
doesn’t fit on line 1.
Telephone 919-244-8754
Tax screens (IT0207,
IT0208, IT0209)
These all default from the previous information you
entered. Review for accuracy.
NOTE: On IT0208, the Predominant Tax Area field
is used only for employees who work in and are
taxed by multiple locations within the state of
Pennsylvania. This field will default to “No” and
should not be altered.
Click Enter and Save .
Create Withholding
Info W4/W5 US
(Required) (IT0210)
NOTE: The initial set-up is done by HR. Changes
can be made by the employee via ESS. If updated
after the first day of the month, the changes take
effect the following pay period.
If the employee is exempt from taxes, you will select the
exempt option and choose “reportable” from the list.
If the employee wants an additional amount withheld,
enter the dollar amount in the “add. Withholding” field.
Federal Filing Status Single (01)
Allowances 1
Click Enter and Save .
Create Withholding
Info W4/W5 US – State
Filing Status (IT0210)
See the note above on Federal W4 regarding the other
information about this infotype.
Single (01)

Lesson 3: Entering Employees in the Integrated HR-Payroll System Create and Maintain Employee Data
PA310
Page 44 North Carolina Office of the State Controller updated 5-10-19
State Allowances 1
Click Enter and Save.
Create Addresses
(IT0006)
NOTE: Enter address information on Address
line 1. Only use Address line 2 if all the information
doesn’t fit on line 1.
Emergency Havya Bach
65 Red Cross Rd
Raleigh NC 27604
Telephone: 919-898-4545
Click Enter and Save .
Mailing address PO Box 5104
Raleigh NC 27604
Click Enter and Save .
Create Monitoring of
Tasks (IT0019)
You are using the Monitoring of Tasks infotype to
remind you of a task that you need to follow up on
concerning the employee (like a tickler file).
Task Type For this exercise, use End of Probation. In your work
environment, you would make the selection based upon
the task for which you want to be reminded.
Date of task Enter 12 months (1 year) from date of hire (date of
hire is today’s date). In your work environment, you
would enter a date applicable to your Agency process.
Click Enter .
Reminder date This field has been designed to automatically populate.
You can change the date if a different date better meets
your needs.
Add comments.
EE probation ends on <date>.
Click Enter .

Create and Maintain Employee Data Lesson 3: Entering Employees in the Integrated HR-Payroll System
PA310
updated 5-10-19 North Carolina Office of the State Controller Page 45
Processing indicator Defaults to “New Task.” Do not change.
Click Save .
Create I-9 Status
(IT0094)
Residence status Click the drop-down and select Citizen.
Be aware that if an employee is not a citizen, you would
make a different choice in the drop-down, and a second
infotype (IT0048 Residence Status) would display. See
the Student Guide for details concerning how to process
IT0048.
NOTE: The Integrated HR/Payroll System entry for
non-Citizen employees does not replace
Windstar—you must still enter non-Citizen
employees into the Windstar system, the official
system of record for non-citizen employees.
ID Type Click the drop-down and select U. S. Passport.
NOTE: There are other options in the Employment
verification section like birth certificate, social security
number, etc.
Issuing Authority US Dept of State
ID# 12345678
Dates Issues 10/1/2010, expires 10/1/2020
Click Enter and Save .
Create Communication
(IT0105)
NOTE: This is the
telephone number
used in the NC
Gov employee
directory.
919-259-4574. This infotype is for the entry of the
employee’s office telephone.
NOTE: Remember to use the correct format when
entering the telephone number.
Click Enter and Save .
Lesson 3: Entering Employees in the Integrated HR-Payroll System Create and Maintain Employee Data
PA310
Page 46 North Carolina Office of the State Controller updated 5-10-19
You may receive a warning that the ID number is already
in use. Click Enter to bypass the warning.
Create Planned
Working Time (IT0007)
It is critical that you review this infotype. The planned
working time defaults based from the employee’s
organizational structure. It is especially important to
check the part-time box when applicable.
For this exercise, accept the default. Observe that when
you click Enter, the hour field automatically populates.
The weekly workday field does not default. Do not enter
data in the weekly workday field.
Click Enter and Save .
NOTE: Be sure the Annual Work hours equal 2080.
Be sure the Employee Percent is 100%.
Create Basic Pay
(IT0008)
You should use
Edit > Maintain
text to write a
note when
applicable
Reason: New Hire --- STOP!!!
NOTE: Observe that the salary defaulted
from WF. Observe also that the value is USD
which has automatically populated. If the
employee was assigned to a DOT position, the
Integrated HR/Payroll System will automatically
change the field to USDN. All permanent DOT
positions require 5 decimals on the Basic Pay
infotype (0008). If the DOT employee is a
temporary employee, the field will remain as USD
because 5 decimals are not required for DOT
temporary employees.
Click Enter and Save .
Possible subsequent
activities
• Click the green check to get to the enrollment
screen.
• Double-click the Automatic offer option for TSERS
to display.
• Click the Enroll button.
• Click Enroll again.

Create and Maintain Employee Data Lesson 3: Entering Employees in the Integrated HR-Payroll System
PA310
updated 5-10-19 North Carolina Office of the State Controller Page 47
• Click Continue.
• Click the Back button (top of screen).
• Click the red X to return to the data entry screen.
Create Bank Details
(Required) (IT0009)
You should always
use Edit >
Maintain text to
write an applicable
note when needed
The completion of the Bank Details infotype (IT0009)
must be entered for payroll to run on the new employee.
If the bank details are not available at the time of the
data entry, set up a paper check. It is your responsibility
to obtain that information and enter the infotype before
the system is closed for payroll processing. Even if you
have instructed the employee to enter the data in ESS,
you still must follow up with the employee to ensure he
or she makes the entry prior to payroll closing. You must
obtain high level approval before you can change the
field from “direct deposit” to “check.”
IMPORTANT: Only change an Employee’s bank
details if you have documentation to do so from
the employee, such as a direct deposit form signed
by the employee which includes a bank deposit slip
or voided check. You need to keep this
documentation after you make the change.
Bank routing (key) 041203824
Bank account
number
5487542
Bank Control key 01 (01 is checking; 02 is savings)
Click Enter and Save .
Create Additional
Personal Data (IT0077)
Ethnic Origin Use your own
Military status Drilling Reservist

Lesson 3: Entering Employees in the Integrated HR-Payroll System Create and Maintain Employee Data
PA310
Page 48 North Carolina Office of the State Controller updated 5-10-19
Veteran status Non-veteran
NOTE: If “Recently Separated Veteran” is chosen, a
new date box displays. You will need to enter the
employee’s discharge date.
Disability status None/prefer not to report
Click Enter and Save .
Subtypes for “Quota
Corrections” pop-up
Military Leave (Training)
NOTE: When an employee is no longer eligible for
the military quota, you must copy IT0077 and
change the Veteran status. You will then create an
IT2012 (subtype ZMLE) to stop the automatic
accruals that take place in October of each year.
Refer to the Time Job Aid: Delimiting Military
Training Leave
Create Quota
Corrections (IT2013)
Quota number: ___ hours (prorated...follow your
instructor’s directions at this point)
Do not change time transfer.
Click Enter and Save .
Subtype for Infotype
“Education”
Select 06 for Bachelor (BAC) Degree
Click the green check.
Create Education
(IT0022)
Start and to 9/01/1998 - 5/30/2002
College attended NC State University
NOTE: Be sure you are consistent in the way you
enter the college name. For example, you would
not enter NC State on one employee and enter
North Carolina State on another employee.
Consistency assists when you are running reports.

Create and Maintain Employee Data Lesson 3: Entering Employees in the Integrated HR-Payroll System
PA310
updated 5-10-19 North Carolina Office of the State Controller Page 49
Verified Use the drop-down menu and select the option that
indicates that verification is pending.
NOTE: Per OSHR policy, Education Verification
must be completed within 90 days of hire.
Enter and Save.
Monitoring of Tasks
(IT0019)
This time, the Monitoring of Tasks (IT0019) gives you an
opportunity to follow up on the verification of the
education. Monitoring of Tasks displays on your
manager’s self-service. To view a list of your tasks, you
must run the Date Monitoring Report (transaction
S_PH0_48000450).
Task type Credential Verification
Date of task Enter 60 days from today. In your work environment,
you would enter a date applicable to your Agency
process.
Click Enter.
Processing Indicator Defaults to New Task. Do not change.
Reminder date This field has been designed to automatically populate.
You can change the date if a different date better meets
your needs.
If education is verified prior to the reminder date, the
task is not automatically deleted; it will still display on
the report and on MSS. You can delimit the infotype on
the day you verify the education which will keep it from
displaying on the report.
Enter and Save
Subtypes for infotype
Certification and
Licensing
Click X to remove pop-up window.
This infotype is used when the position requires a
specific certificate or license.

Lesson 3: Entering Employees in the Integrated HR-Payroll System Create and Maintain Employee Data
PA310
Page 50 North Carolina Office of the State Controller updated 5-10-19
Create Objects on loan
(IT0040)
State ID #45.
1/piece(s)
NOTE: On the initial hire, you are to enter only one
item on loan. If the employee receives more than
one item--like in this case key # B05 and key #A12-
- you will use PA30 to add the additional items;
however, you will perform that part of the exercise
in this class).
Enter and Save
34. Click the Back button at the Personnel Actions screen (the system automatically
returns you to Personnel Actions when you finish the last infotype within the Action.
35. The pop-up is displayed indicating that the item must be explicitly completed. Click
Complete Work Item .
NOTE: It is critical that you complete this last step. Also, be aware that if you
cancelled the PCR without finishing the Action (which put the PCR back into your
Inbox), when you click the Complete Work Item button, you will receive another
screen where you must indicate again that you have finished the Personnel Action.
36. Click at the Decision Step in Workflow screen (middle option).
37. Click the Back button to return to the Easy Access screen.
TIPS & TRICKS: Multiple infotypes for a specific item
In most cases, each infotype is presented only one time in an
Action. When an employee needs more than one infotype
(bank details, objects-on-loan, certifications etc.), enter the
applicable data during the Action and use transaction code
PA30 to enter the additional data.
38. On the Easy Access screen, type PA30 in the Command field and click Enter. .
39. Type 0040 in the Infotype field and press Enter.
40. Click Create .
41. Select the code for Office Keys from the matchcode in the Object on loan field.
42. Enter 2/pieces in the Number/unit field.

Create and Maintain Employee Data Lesson 3: Entering Employees in the Integrated HR-Payroll System
PA310
updated 5-10-19 North Carolina Office of the State Controller Page 51
43. Click Enter and Save. The system again displays the PA30 screen.
44. Click the Overview button to view a list of the Objects on Loan you created.
This exercise is complete.
* * * * * * * * * * * * * * * * * * * * * * * * * * * * * * * * * * * * * * * * * * * * * * * * * * * * *
Additional Resources
Refer to the OSC Training website in HELP documents for more
information about the New Hire Action.
Search for the following support document titles:
• New Hire Action
• New Hire Action Guide
• PA Actions Reasons Definitions
Additional Personal Data (IT0077)
Effective 12/7/14, SAP has added additional fields to the Veteran Status data box due to an
update from the US Department of Labor. Options now include:
• Special Disabled Veteran • Disabled Veteran
• Vietnam Era Veteran • Not a Protected Veteran
• Other Protected Veteran • Prefers Not to Answer
• Recently Separated Veteran • Non-Veteran
• Armed Forces Service Medal
Veteran
For more detailed information regarding the purpose and use of IT0077 - Additional Personal
Data, access the new job aid, Military and Veteran Status, located on the Training HELP website.

Lesson 3: Entering Employees in the Integrated HR-Payroll System Create and Maintain Employee Data
PA310
Page 52 North Carolina Office of the State Controller updated 5-10-19
ACA - Temp Actions
Qualified Temporary employees are now eligible for Benefits. This will affect how the employee
is added into the Integrated HR/Payroll System. See the BEST Conference Call Webinar on
10-21-14 for more detailed information about the Temp Hire action.
LINK: https://www.osc.nc.gov/2014-hrpayroll-conference-calls
Based on the selection you make in the Residence Status field on the I-9 Residence Status
(0094) infotype, additional infotypes will display (as a reminder, you chose Citizen in both New
Hire exercises). Also, remember that you still must enter non-citizen employees into Windstar
(the official record keeping system for the State).
Non-Resident Alien
When you select Non-Resident Alien on IT0094, there are two Create Residence Status (0048)
infotypes that display (see illustration above) in the following order:
• Record type: US01 – Visa Information (U.S.)
• Record type: US02 – I-94 Information (U.S.)
You determine which IT0048 you need to use: US01 or US02. If you do not need US01, use the
Next Record button to page forward to US02.
Resident Alien

Create and Maintain Employee Data Lesson 3: Entering Employees in the Integrated HR-Payroll System
PA310
updated 5-10-19 North Carolina Office of the State Controller Page 53
When you select Resident Alien on IT0094, only one Create Residence Status (0048) infotype is
displayed. In the Residence status field, select the applicable type from the list. There are 57
options in the drop-down list, including both US01- Alien’s Visa Information and US02 - I-94
Information.
Non-Beacon to Beacon (NC) Action
The Non-Beacon to Beacon Action is used when:
• The employee may be returning to the same agency as the one he or she left (as well as
to the same position) or may be going to a new agency and position.
• A University or General Assembly employee is leaving the University/General Assembly
system and accepting a position with a state agency.

Lesson 3: Entering Employees in the Integrated HR-Payroll System Create and Maintain Employee Data
PA310
Page 54 North Carolina Office of the State Controller updated 5-10-19
• Transfer Lateral
• Transfer Reassignment
• Transfer Promotion
• Return to St w/in 12 mths same S/G
• Return to St w/in 12 mths higher
S/G
• Return to St w/in 12 mths lower S/G
• Return to State w/in 5 yrs
• Return to State after 5 yrs
• Grade-Band Transfer (see NOTE
below)
• Class/Pay Plan Change
• EPA-SPA
NOTE: If you use the Grade-Band transfer reason, on Workflow enter Pay Scale type, Pay
Scale Area and Pay Scale Group before you press Enter. Otherwise, you will get an error
message. You can press Enter to bypass the error message and then enter the fields as
well.
Non-Beacon to Beacon Process

Create and Maintain Employee Data Lesson 3: Entering Employees in the Integrated HR-Payroll System
PA310
updated 5-10-19 North Carolina Office of the State Controller Page 55
As you enter the information for the employee, the same infotypes display for the Non-Beacon
to Beacon action as display for a new hire. This is logical since there is no employee record in the
agency’s Integrated HR/Payroll System—all the employee’s information is in his or her agency’s
current non-Integrated HR/Payroll System. Therefore, you are creating a completely new HR file
in the Integrated HR/Payroll System, including all the applicable infotypes, (which includes
enrolling the employee into the applicable Retirement System).
You should make sure that you obtain any active leave balances and/or prior State service on
the employee. You will verify the balances and the creditable service from the previous agency. If
you have a dual role as both the HR Master Data Maintainer and the Leave Administrator, you
will use PA30 to create infotype 2013 - Quota corrections for each transferring leave balance
(this infotype is not presented during the Non-Beacon to Beacon Action) and IT0552 – Display
Time Specification/Employment Period.
NOTE: IT0552 has been enhanced with a link to the OSHR document for creditable
service conditions. The star in front of the employer lets the user know they should
reference the document.
If your role consists only of being the HR Master Data Maintainer, you must contact the Leave
Administrator to ensure that the employee’s leave balances are brought up to date.
Important! When an employee (or Non-Beacon to Beacon) received a pro-rated
longevity, you need to create a IT02012/Z033 to document the pro-rated longevity
already received so employee doesn't get a full payment when the year is complete.
Additional Resources
Refer to the OSC Training website in HELP documents for more
information about the Non-Beacon to Beacon Action.
Search for the following support document titles:
• Non-Beacon to Beacon Action
• Non-Beacon to Beacon Action Guide
• PA Actions Reasons Definitions
• Estimated Longevity Eligibility Length of Service

Lesson 3: Entering Employees in the Integrated HR-Payroll System Create and Maintain Employee Data
PA310
Page 56 North Carolina Office of the State Controller updated 5-10-19
Integrated HR/Payroll System Actions are designed to be
completed from beginning to end; it is not appropriate for one
person in the Agency to enter some of the infotypes and
someone else to go in and use PA30 to complete the infotypes
individually. The Action has dynamic processes that take place
behind the scenes which affect time and payroll. Completing the
Action in a piece-meal manner does not allow these dynamic
processes to take place which causes errors in the employee’s
time and payroll processes at a later date.
Using PA30 to add IT0552
Creditable service earned PRIOR to BEACON must be entered via PA30 on IT0552; however, you
will not perform that part of the exercise in this class.

Create and Maintain Employee Data Lesson 3: Entering Employees in the Integrated HR-Payroll System
PA310
updated 5-10-19 North Carolina Office of the State Controller Page 57
TIPS & TRICKS: Prior State Service –
IT0552 – Time Specifications/Employment Period
New Hire/Non-Beacon to Beacon Actions
You can insert prior State service for new hires and Non-Beacon
to Beacon actions only. Once an employee is entered in the
Integrated HR/Payroll System, the system automatically
calculates creditable service and the longevity through the Time
service dates (after you verify that the employee is entitled). If
the employee has prior service from more than one agency,
create a separate IT0552 for each service record. IT0552
calculates the number of months of prior service based on the
dates that were entered. If the months do not calculate
correctly, contact BEST HR through submission of a ticket.
Insert Prior State Service and Incorrect IT0552s
IT0552 is maintained by BEST HR through submission of a
ticket. Do not change the date on the original (conversion)
IT0552 so that it calculates the total time. If the conversion
data is incorrect or you need to insert prior State service, submit
a completed creditable state service form to BEST HR (rather
than manipulating the end date on the original IT0552).
For example, an employee has an Integrated HR/Payroll System
record of 50 total service months with the State and leaves
State employment to work for a local government agency from
which the State accepts time worked. When the employee is
reinstated into the Integrated HR/Payroll System, submit the
completed form to BEST HR.
Length of Service
If you have the “Display Time” role, you can use PT_BAL00 to
view the latest number of months of service. See the online
Length of Service Job Aid for details on accessing the
transaction.

Lesson 3: Entering Employees in the Integrated HR-Payroll System Create and Maintain Employee Data
PA310
Page 58 North Carolina Office of the State Controller updated 5-10-19
Reinstatement/Reemployment Action
• Return to State within 12 months
(same salary grade)
• Return to State within 12 months
(higher salary grade)
• Return to State within 12 months
(lower salary grade)
• Return to State within 5 years
• Return to State after 5 years
• Return from Short-Term Disability
Trial Rehab
• Return from Short-Term Disability
Complete
• Return from Long-Term Disability
• Return from Disciplinary Suspension
• Return from Investigatory
Placement
• Return from Military
• Return from WC with Restrictions
• Return from WC Complete
• Return from Educational Leave
• Return from FMLA
• Return from Family Illness
• Return from Parental
• Return from LOA Other
• Return to Supplemental
• Rtn from STD with Restrictions
• Non-BEACON Transfer Lateral
• Non-BEACON Transfer Reassignment
• Non-BEACON Transfer Promotion
• Non-BEACON Transfer EPA-SPA
• Non-BEACON Transfer Class/Pay Plan
Change
• Return from Military Care Giver Leave

Create and Maintain Employee Data Lesson 3: Entering Employees in the Integrated HR-Payroll System
PA310
updated 5-10-19 North Carolina Office of the State Controller Page 59
Sick Leave Balance
If employee is returning within five years, the sick leave quota will still be active in the system.
However, in the future if employee returns after five years, then the re-instating agency will
need to delimit the ‘old’ sick leave quota to a date before the reinstatement date.
Reinstatement/Reemployment Process
Although there is only one Reinstatement/Reemployment Action, there are two instances in
which it is used: (1) returning an employee from LOA (covered in Advanced Create and Maintain
Employee Data) or (2) reinstating a former Integrated HR/Payroll System employee (who has a
record in the Integrated HR/Payroll System). The difference between the two are the number of
infotypes the Action presents. When you are returning an employee from LOA, you are
presented with fewer infotypes than when you are returning a previous Integrated HR/Payroll
System employee to employment. In the latter, you are presented with the same number of
infotypes as a New Hire Action. The above process describes a Reinstatement/Reemployment
from Separation.
Employees who separated within three months of cutover to the Integrated HR/Payroll System
were converted into the system. Therefore, if any of those employees come back to work for the
State, you should use the Reinstatement/Reemployment Action.

Lesson 3: Entering Employees in the Integrated HR-Payroll System Create and Maintain Employee Data
PA310
Page 60 North Carolina Office of the State Controller updated 5-10-19
Cost Distribution Infotype (0027)
This infotype is created for every employee when they are separated. The position defaults to
99999999. When an employee is separated, the cost distribution is assigned to the employee.
This ensures that employees who receive any type of payment after separation will be able to
receive those payments. IT0027 copies IT1018 on the position.
Very Important! - During a Reinstatement/Reemployment
Action, the Cost Distribution Infotype (0027) will
automatically be delimited from the system when you
complete the process.
Finding an Employee
Finding employees
Before you can process existing or previous employee data you must access the employee’s
record. There are a variety of ways you can search for an employee:
1. Personnel Number: Enter the Personnel Number into the Personnel no. field.
2. Shortcut:
A. Use a shortcut (=n.xxxx) in the Personnel No. field to search by last name.

Create and Maintain Employee Data Lesson 3: Entering Employees in the Integrated HR-Payroll System
PA310
updated 5-10-19 North Carolina Office of the State Controller Page 61
(Example: =n.hendrix - NO spaces.)
A list of all employees with that last name displays. Double-click to select the
appropriate employee.
B. Use a shortcut (=c..####) in the Personnel No. field to search by SSN.
(Example: =c..123456789 - NO spaces.)
3. Matchcode: Use the Matchcode at the end of the Personnel No. field to search by last and
first name, or by Personnel Number, or by org assignment.
Verifying the Action is appropriate
Before you initiate an Action on a current employee, it is a best practice to verify that the Action
you are about to take is applicable. For example, you cannot reinstate an employee who does
not have a Separation Action as the current record. Use PA20 and the overview of the Actions
infotype to verify that the Action you are about to take is appropriate.
Additional Information
Position default number
Observe on the Organizational Assignment infotype that the employee’s Position number
defaulted to one with a series of 9s. When an employee is separated, his or her position always
defaults to 99999999.
Prior service verification
As indicated earlier, prior service is not entered during the New Hire, Non-BEACON to BEACON
or Reinstatement/Reemployment Actions. After you verify that the employee is entitled to prior
service, you must access PA 30 and enter the dates of prior service on infotype Time
Specification/Employ. Period (IT0552). This is for the New Hire and Non-Beacon to Beacon
only. For Reinstatement/Reemployment actions, you must fax the completed creditable service
form to BEST.
NOTE: IT0552 has been enhanced with a link to the OSHR document for creditable
service conditions. The star in front of the employer lets the user know they should
reference the document.
Viewing previous employee data
If your security access permits, run the BOBJ Cross-Agency Verification report (BP002-Employee
History) found in the Cross-Agency Verification folder to validate the employee’s personnel
record as required.
Lesson 3: Entering Employees in the Integrated HR-Payroll System Create and Maintain Employee Data
PA310
Page 62 North Carolina Office of the State Controller updated 5-10-19
Reinstatement/Reemployment within 90 days
When an employee is reinstated/reemployed within 90 days, the system presents the Direct
Deposit with the 12/31/9999 date and deletes the check on IT0009 (Bank Details). When an
employee is reinstated/reemployed after 90 days, the system presents the Check with the
12/31/9999 date.
Longevity
Important! When an employee is reinstated (or Non-Beacon
to Beacon) and received a pro-rated longevity you need to
create a IT02012/Z033 to document the pro-rated longevity
already received so employee doesn't get a full payment
when the year is complete.
* * * * * * * * * * * * * * * * * * * * * * * * * * * * * * * * * * * * * * * * * * * * * * * * * * * * *
EXERCISE 3.2: Reinstatement/Reemployment
SCENARIO
Karla Hart formerly worked with the State of North Carolina and left for
the private sector. After only a few months, she decided to come back to
the State. The employee is returning to Cultural Resources as an
Information & Communications Spec I, which is the same position (salary
and grade) that she held before she left.
The salary is the minimum of the salary range.
Instructions
NOTE: In your work environment, you only add a certification or license when it is a
requirement of the position. In Karla’s case, the license is not a requirement but is being
presented here for you to enter to give you the training experience.
If a returning employee’s data on an infotype has not changed, you STILL save the infotype in
the Action.
In this exercise, some of the employee’s information, like addresses, has changed since she was
last employed by the State. Make the changes as applicable during the Reinstatement/
Reemployment Action; however, remember to save a pre-populated infotype even though no
changes were made.

Create and Maintain Employee Data Lesson 3: Entering Employees in the Integrated HR-Payroll System
PA310
updated 5-10-19 North Carolina Office of the State Controller Page 63
There are three parts to this Exercise:
I. Initiate Workflow (WF)
II. Wait as Instructor demonstrates the Agency and Funding approval process
III. Complete Approved PCR from the Initiator’s Inbox
PART I - Initiate Workflow (WF) as Initiator
1. Assume the following: you have already run the Cross-Verification Report and were not
able to locate the employee in the system. You used PPOSE and verified that the position is
vacant.
2. On the Easy Access screen, type ZPAA076 in the Command field.
3. Click Enter . The Employee Action Request screen is displayed.
4. From the table below, select the Personnel number for Karla Hart assigned to you by your
instructor and enter it into the Personnel number field.
Record the Personnel number you used on your Transaction Log.
5. Click Enter .
NOTE: You do not need to enter the SSN except on New Hire and Non-Beacon to
Beacon Actions.

Lesson 3: Entering Employees in the Integrated HR-Payroll System Create and Maintain Employee Data
PA310
Page 64 North Carolina Office of the State Controller updated 5-10-19
6. Enter the following data:
Effective on Today’s date. Record on your Transaction Log.
Action Type Reinstatement/Reemployment
Reason Select the appropriate reason. The employee was
separated three months ago.
01 Rtn S w/in 12 months (same salary/grade)
7. Click the Enter button.
8. Click the Create button. The second screen of the Employee Action Request screen is
displayed. Observe that the Current column has data concerning the employee as a quick
reference.
Observe that the position field is 9s. When an employee is separated, the position field is
either automatically changed to 9s by the Integrated HR/Payroll System, or in the case of a
Separation Pay Continuation, by the Master Data Maintainer.
9. From the table below, select the Position number assigned to you by your instructor and
enter it into the EE Position field.
Record the Position number you used on your Transaction Log.
10. Click Enter .
Observe that the Employee Group and Employee Subgroup fields are now populated.

Create and Maintain Employee Data Lesson 3: Entering Employees in the Integrated HR-Payroll System
PA310
updated 5-10-19 North Carolina Office of the State Controller Page 65
11. Enter the following data:
EE Group/Subgroup If B1 does not default, change to the appropriate
subgroup to indicate that the employee is full-time,
subject to overtime.
NOTE: When the Position number is entered, the
Employee Subgroup defaults to FT N-FLSAOT Perm
and must be changed as applicable for the Action.
Annual Salary Minimum of salary range
NOTE: By design, the step-by-step directions to complete the Action are deliberately
left out of this exercise. Use the information you have learned in previous exercises to
complete the applicable sections. Alert your instructor or navigator if you need
assistance.
To complete Part I, use the information you learned from previous exercises to:
• Save the PCR and receive the PCR number with the date
• Write a note for the approvers
• Initiate Workflow
PART II - Wait for Instructor or Navigator to approve the PCR
There are two approval levels:
• Agency
• Funding
Your instructor and/or navigator will perform this part.
PART III - Complete Approved PCR
NOTE: In this exercise, you are entering data on an employee who already exists in
the system. As a result, on each infotype you will receive a message indicating that
the previous record will be delimited. Press Enter or click the Enter button to bypass
the warning.

Lesson 3: Entering Employees in the Integrated HR-Payroll System Create and Maintain Employee Data
PA310
Page 66 North Carolina Office of the State Controller updated 5-10-19
For Part III, use the information you learned from previous exercises to process the approved
PCR. As the Initiator:
• Execute the approved PCR
• Enter the applicable date and Action on Personnel Actions screen
• Write the system-generated PERNR on your Transaction Log.
• Process each infotype as applicable as outlined below.
Critical! – Do not change the Name Format field default on IT0002. This field should
ALWAYS be “00.” Don’t forget to SAVE the infotype.
• Remember that on the Actions and Basic Pay infotypes you should always use Edit >
Maintain text to write the appropriate note. Use steps in Ex 3.1 for help in copying and
pasting comments from the PCR to the Actions Infotype.
• Explicitly complete Workflow item
Personal Data (IT0002) Last Name: HartXX (XX=the specific PERNR you are
using for class)
First Name: Karla
Verify all other displayed data to ensure any changes
needed are made now
Addresses (IT0006)
Permanent
NOTE: Enter
address
information on
Address line 1.
3368 Ali Katt Ave
Apex, NC 27502
Telephone: 919-257-4578
Tax screens (IT0207,
IT0208, IT0209)
These all default from the previous information you
entered. Review for accuracy.
Click Enter and Save .
Federal Withholding
(IT0210)
Single, with 1 allowance

Create and Maintain Employee Data Lesson 3: Entering Employees in the Integrated HR-Payroll System
PA310
updated 5-10-19 North Carolina Office of the State Controller Page 67
State Withholding
(IT0210)
Single, with 1 allowance
Addresses (IT0006)
Emergency
Mailing
Add the name Darren Deeds. The address stays the
same.
The address stays the same.
Monitoring of Task
(IT0019)
Employee has over 12 months of service in the system
relating to this position. In this situation, she has no need
for probation.
Skip this record.
Create I-9 Status
(IT0094)
US Citizen
US Dr. License #7761272
Issuing Authority - NCDMV
Issued 07/01/2012, Exp. 07/01/2020
---------------------------------------------------------
Valid Social Security Card
Issuing Authority - SS Administration
Communication
(IT0105)
919-707-4566
Create Planned
Working Time (IT0007)
It is critical that you review this infotype. The planned
working time defaults based from the employee’s
organizational structure. It is especially important to
check the part-time box when applicable.
For this exercise, accept the default. Observe that when
you press Enter, the hour field automatically populates.
The weekly workday field does not default. Do not enter
data in the weekly workday field.
NOTE: IT0007 - Planned Working Time date will
change to first of the month in which the employee
is being reinstated sunless
separation/reinstatement is in the same month.
This only applies to monthly employees returning
from separation. This does not apply to Return
from LOAs.

Lesson 3: Entering Employees in the Integrated HR-Payroll System Create and Maintain Employee Data
PA310
Page 68 North Carolina Office of the State Controller updated 5-10-19
Enter and Save
Create Basic Pay
(IT0008)
Reason: Reinstatement/Reemployment
Salary defaulted from the Workflow PCR
Possible subsequent
activities
Enroll the employee into TSERS
Create Bank Details
(IT0009)
Bank routing 011001742 – Bank of America
Bank account
number
2157884
Change to Direct Deposit
Bank Control key 01 (01 is checking; 02 is savings).
Observe that when the employee separated, the bank
method field may have defaulted from direct deposit.
You must change the default back to direct deposit.
NOTE: The system no longer changes the default
of the bank method of a separated employee to
paper check.
Accept delimit message.
Create Additional
Personal Data (IT0077)
Ethnic Origin – use your own
Military Status – Inactive
Veteran Status
• Click the radio button in front of Protected
Veterans and click Enter to activate the
selections beneath it.
• Click the checkbox in front of Recently Separated
Veteran.
• Enter the Discharge date (04/01/2018) in the
Discharge Date field located just above the
Protected Veterans radio button.

Create and Maintain Employee Data Lesson 3: Entering Employees in the Integrated HR-Payroll System
PA310
updated 5-10-19 North Carolina Office of the State Controller Page 69
• Disability Status – None/prefer not to report
Subtypes for infotype
“Education”
Master’s degree from Wake Forest
08/01/2016 to 12/15/2018
Create Monitoring of
Tasks (IT0019)
Reason: Credential Verification.
Indicate that you will verify within 90 days and that you
want to be reminded 15 days prior.
Subtypes for infotypes
“Certification and
Licensing”
Select 0011 – Licensed counselor
Create Certification
and Licensing (IT0795)
The Start and To dates must be exactly the same as
the Valid from and Valid To dates.
Start Date 07/01/2018
To Date 06/30/2024
Identification The certificate # is NC0932454
Doc Status Select Renewable
Valid from 07/01/2018
Valid to 06/30/2024
Copy Date
Specifications (IT0041)
Delete the Last Day Worked information.
Verify dates and Save .
Create Related
Experience (IT9822)
Enter Related Work Exp: 3 and Related Education: 72.
Click Enter and Save .
Create Objects on loan
(IT0040)
Office key #987

Lesson 3: Entering Employees in the Integrated HR-Payroll System Create and Maintain Employee Data
PA310
Page 70 North Carolina Office of the State Controller updated 5-10-19
12. Click the Back button when you are automatically returned to the Personnel Actions
screen.
13. The pop-up displays indicating that the item must be explicitly completed. Click Complete
Work Item .
NOTE: It is critical that you complete this last step.
TIPS & TRICKS: Date Specifications Codes
01 – Original Hire Date - An employee's Original Hire Date
will represent the date the employee was first hired by the
State. This date will remain the same throughout the
employee's State career and should not be changed.
02 – Agency Hire Date - An employee's Agency Hire Date is
initially set to the employee's hire date. This date type is
maintained when an employee is reinstated following a leave of
absence or transfers from one State agency to another State
agency. If an employee is hired at Judicial, then the following
date types are also maintained to track agency specific service.
03 – Last Day Worked – represents the employee’s final day of
work prior to a separation from the State.
04 – Judicial Anniversary Date – represents the date an
employee is hired into or transfers to Judicial specific jobs. The
anniversary date will be used to manage agency specific
service.
06 – Notification of RIF – The date an employee is officially
notified his/her current position will no longer be available. This
date also represents the beginning or the 12-month period of
RIF eligibility and benefits.
07 – Lottery Anniversary Date – represents the data into
which an employee is hired or transfers to NCEL. The
anniversary date will be used to accrue an employee’s personal
leave day each year and to manage agency specific service.
08 - Supplemental Hire Date - represents the date the
Supplemental Staff was hired or reinstated.
BF – Benefit Elig Date - The date an employee
(Supplemental/Temp) was first eligible for benefits.
NR – 457 Catch-Up Date – An employee’s normal retirement
date represents the date at which the employee will turn 65 and
is thus eligible for additional contributions into his or her 457
Savings Plan. Date type NR will be created only if an employee
is eligible and requests to make additional 457 contributions.
(Created by BEST Benefits Only)

Create and Maintain Employee Data Lesson 3: Entering Employees in the Integrated HR-Payroll System
PA310
updated 5-10-19 North Carolina Office of the State Controller Page 71
DON’T FORGET...
Check the Leave balances to ensure that they are correct upon the Reinstatement/
Reemployment Action (Reason: Return to State Government within 12 months).
• For example, the system grants pro-rated Community Service Leave on top of what the
employee may have already for those employees who leave and reinstate within the
same calendar year. The system is hard-coded in the background to allow only the
consumption of 24 hours of CSL; therefore, it will incorrectly display.
• If a Holiday which the employee was not eligible to have upon Separation was not
reduced at Separation, it will move to Holiday Comp upon Reinstatement-giving an
employee an overstated Leave balance.
This exercise is complete.
* * * * * * * * * * * * * * * * * * * * * * * * * * * * * * * * * * * * * * * * * * * * * * * * * * * * *
Additional Resources
Refer to the OSC Training website in HELP documents for more
information about the Reinstatement/Reemployment Action.
Search for the following support document titles:
• Reinstatement/Reemployment Action
• Reinstatement/Reemployment Action Guide
• PA Actions Reasons Definitions
• Longevity Job Aid

Lesson 3: Entering Employees in the Integrated HR-Payroll System Create and Maintain Employee Data
PA310
Page 72 North Carolina Office of the State Controller updated 5-10-19
General Information Reminders
Social Security Cards
Please do not email copies of Social Security Cards to BEST Shared Services. All Social Security
Card copies should be faxed to the BEST secure line at 919-855-6861. This fax number does not
produce physical copies on a machine.
Complete Processing of a PCR
Just because a PA PCR is “set to complete” does not mean that the action is processed.
Remember that all applicable infotypes must be saved.
SUMMARY
This lesson described how to process various Actions. We also learned how to use the
appropriate Action to assign employees to the Integrated HR/Payroll System. This lesson also
explained how to select the applicable reason for each Action. We learned how to distinguish
between the three hiring actions for an employee.

Create and Maintain Employee Data Lesson 4: Adjusting Salaries
PA310
updated 5-10-19 North Carolina Office of the State Controller Page 73
Objectives
• Distinguish between making a salary adjustment, appointment change, and a
reallocation
• Identify the job adjustments that must be made prior to creating a reallocation action
Salary Adjustment Action

Lesson 4: Adjusting Salaries Create and Maintain Employee Data
PA310
Page 74 North Carolina Office of the State Controller updated 5-10-19
• Salary Adjustment
• Correct New Hire Salary
• Increase to Minimum
• Acting Pay
• Retention Adjustment
• Trainee Adjustment
• Lead Worker Adjustment
• EPA Supplement Payment
• In-range–Higher Level
• In-Range-Increase Variety
• In-Range–Equity
• In-Range-Retention
• In-Range-Turnover
• In-Range – Other Labor Market
• Geographic Differential
• Site Differential
• Career Growth Recogn Award
• Legislative Increase
• Performance Increase
• LEO Sworn
• Temp In-Range for Job Change
• Auto Sal Adj – AOC Only
• Salary Adjustment Fund
NOTE: Some of the reasons above apply to career banding and some do not. If you do
not see the applicable reason in Salary Adjustment for career banding, you will use the
Career Progression Action.
DOT - The Department of Transportation (DOT) is currently using a Salary Adjustment
Action for SBP and will continue doing so with In-Range Labor Market as the reason. For
more information about SBP for DOT, contact the Office of State Human Resources.
Salary Adjustment Process

Create and Maintain Employee Data Lesson 4: Adjusting Salaries
PA310
updated 5-10-19 North Carolina Office of the State Controller Page 75
A Salary Adjustment is a general increase in an employee’s salary within the employee’s current
salary range and within the Agency where the employee is currently employed.
Cancel Salary Adjustment Action
If you give a salary adjustment for any of the reasons listed on the previous page and later
determine that it needs to be cancelled, use the Cancel Salary Adjustment Action. The same
reasons for the Salary Adjustment Action are applicable for the Cancel Salary Adjustment Action.
* * * * * * * * * * * * * * * * * * * * * * * * * * * * * * * * * * * * * * * * * * * * * * * * * * * * *
EXERCISE 4.1: Salary Adjustment Action
SCENARIO
Assume today is the first day of next month. The supervisor of the first
employee you hired (Exercise 3.1) has been in a serious accident and is
out on leave for at least four months. Your employee, who is a
Digitization Clerk, is being asked to assume some of the major
responsibilities of the supervisor (Digital Project Manager) for a specific
length of time. Adjust the salary of the Digitization Clerk so that the
employee is receiving acting pay of an additional $4,000 (in annual
salary).
• The effective date is the 1st day of next month and will end four
months from that date.
In your work environment, you would use PA30 to enter a reminder
(Monitoring of Tasks) to remove the acting pay from the employee at
the end of four months.
Instructions
There are three parts to this Exercise:
I. Initiate Workflow
II. Wait for Approver to approve PCR
III. Complete Approved PCR

Lesson 4: Adjusting Salaries Create and Maintain Employee Data
PA310
Page 76 North Carolina Office of the State Controller updated 5-10-19
PART I - Initiate Workflow
1. Assume the following: you have already run the Cross-Verification Report and were not
able to locate the employee in the system. You used PPOSE and verified that the position is
vacant.
2. On the Easy Access screen, type ZPAA076 in the Command field.
3. Click Enter . The Employee Action Request screen is displayed.
Personnel Number Use the personnel number from the employee you hired
in Exercise 3.1. Refer to your Transaction Log for the
PERNR that was assigned.
For quick reference, write the name and PERNR on your
Transaction Log for Exercise 4.1.
Effective on 1st day of next month
Action Type Salary Adjustment
Reason Acting Pay
4. Click the Enter button.
5. Click the Create button. The second screen of the Employee Action Request screen is
displayed.
6. Enter the following data:
Annual Salary Add $4,000 to current Annual salary.
NOTE: The resulting salary will place the employee
in “Z” step. In addition to the note in Workflow,
you would write the appropriate note on both
Actions and Basic Pay infotypes to explain the
reason for the increase.

Create and Maintain Employee Data Lesson 4: Adjusting Salaries
PA310
updated 5-10-19 North Carolina Office of the State Controller Page 77
To complete Part I, use the information you learned from previous exercises to:
• Save the PCR and record the PCR number effective date of the Action.
• Write a note for the approvers.
• Initiate Workflow.
PART II - Wait for Approver to Approve the PCR
There are two approver levels:
• Agency
• Funding
Your instructor and/or navigator will perform this part.
PART III - Complete approved PCR
For Part III, use the information you learned from previous exercises to process the approved
PCR:
• Execute the approved PCR.
• Enter the applicable date and select the Action on Personnel Actions screen.
• Process each infotype as applicable including a note on Actions and Basic Pay infotypes
as appropriate:
CAUTION! Do not enter an end date on IT0001. Even though the Salary Adjustment
is for only four months, you do not enter an end date on the Salary Adjustment
Action. At the time that the salary adjustment ends, you will use a new Action (Cancel
Salary Adjustment) to end the current Action.
Don’t forget to enter the Reason on IT0008.
• Explicitly complete Workflow item.
This exercise is complete.
* * * * * * * * * * * * * * * * * * * * * * * * * * * * * * * * * * * * * * * * * * * * * * * * * * * * *

Lesson 4: Adjusting Salaries Create and Maintain Employee Data
PA310
Page 78 North Carolina Office of the State Controller updated 5-10-19
Additional Resources
Refer to the OSC Training website in HELP documents for more
information about Salary Adjustment Actions.
Search for the following support document titles:
• Salary Adjustment Action
• Salary Adjustment Action Guide
• PA Actions Reasons Definitions
• Monitoring of Tasks

Create and Maintain Employee Data Lesson 4: Adjusting Salaries
PA310
updated 5-10-19 North Carolina Office of the State Controller Page 79
Appointment Change Action
• Time-Limited to Permanent
• Probation Time-Limited to T/L
• Part Time to Full Time *
• Full Time to Part Time *
• Change in hours *
• Exten of Appt - no money involved
• Supplemental to Probation
• Intermittent to Probation
• Probation to Permanent
• Permanent to Time-Limited
• Supplemental to Permanent
• Permanent to Supplemental
• Permanent to Intermittent
• Change in FLSA
• Supplemental to Time-Limited
• Supplemental to Probation TL
• Time-Limited to Probation
• OSC Maintenance Use Only
IMPORTANT! * Do not merely change the hours on IT0007;
use the Appointment Change Action as applicable.

Lesson 4: Adjusting Salaries Create and Maintain Employee Data
PA310
Page 80 North Carolina Office of the State Controller updated 5-10-19
Appointment Change Process
An Appointment Change occurs when there is a change in employee’s type of appointment
such as permanent, probation, time-limited, time-limited probationary, trainee, etc. The
Appointment Change Action allows you to give the salary increase at the same time you modify
the Employee Subgroup (a Salary Adjustment Action only allows you to modify the salary).
When you create an Appointment Change, not all infotypes that display will require that you
change information. Your Agency, as well as the type of appointment change, determines this.
Here are some of the infotypes or fields that you may need to change:
• Employee Subgroup
if moving from Full-Time (FT) to Part-Time (PT), or vice versa
if moving from probationary to permanent
• Planned Working Time - if moving from FT to PT, or vice versa
• Basic Pay - if salary has changed (usually changes with trainee-to-permanent)
• Monitoring of Tasks – any subsequent activities to monitor

Create and Maintain Employee Data Lesson 4: Adjusting Salaries
PA310
updated 5-10-19 North Carolina Office of the State Controller Page 81
Employee Subgroup
Keep in mind when you save the Copy Actions (IT0000) infotype for this type of scenario, the
employee subgroup determines if the employee is eligible for overtime.
Basic Pay (IT0008) – USD or USDN
Observe that on the salary infotype (IT0008) the value is USD. However, if the employee was a
permanent DOT employee, the field would read USDN because DOT permanent positions
require 5 decimal currency. In that case, the Integrated HR/Payroll System will automatically
change the USD field to USDN. The 5-decimal currency rule does not apply to DOT temporary
employees.
Changing temporary employees to permanent employees
If a temporary employee accepts a permanent position, one of the following is applicable:
1. If they change position numbers, it is either a Transfer or a Promotion.
2. If they don't change position numbers, it is an Appointment Change. You will also modify
the salary as applicable in the Appointment Change Action. Be sure to justify salary in
Maintain Text.
CAUTION!
If the Action moves the employee from one payroll type to
another (bi-weekly to monthly or monthly to bi-weekly), you
only initiate the Workflow. When the Workflow is approved,
contact BEST to complete the Action.

Lesson 4: Adjusting Salaries Create and Maintain Employee Data
PA310
Page 82 North Carolina Office of the State Controller updated 5-10-19
* * * * * * * * * * * * * * * * * * * * * * * * * * * * * * * * * * * * * * * * * * * * * * * * * * * * *
EXERCISE 4.2: Appointment Change Action
SCENARIO
Gina Naylor was hired in Natural and Cultural Resources as an
Administrative Services Assistant V in probationary status and has
completed her one year.
• Create an Appointment Change Action to change the employee’s
status to permanent, full time, not subject to FLSA overtime.
See the Student Guide for information about changing temporary
employees to permanent employees
Instructions
There are three parts to this Exercise:
I. Initiate Workflow
II. Wait for approver to approve PCR
III. Complete Approved PCR
PART I - Initiate Workflow
1. On the Easy Access screen, type ZPAA076 in the Command field.
2. Click Enter . The Employee Action Request screen is displayed.
3. From the table below, select the Personnel number for Gina Naylor assigned to you by
your instructor and enter it into the Personnel number field.

Create and Maintain Employee Data Lesson 4: Adjusting Salaries
PA310
updated 5-10-19 North Carolina Office of the State Controller Page 83
Record the Personnel number you used on your Transaction Log.
4. Click Enter .
5. Enter the following data:
Effective on Today’s date. Record the date on your Transaction Log.
Action Type Appointment Change
Reason Probation to Perm
6. Click the Enter button.
7. Click the Create button. The second screen of the Employee Action Request screen is
displayed.
8. Enter the following data:
EE Group/Subgroup A1
Annual Salary Current salary
To complete Part I, use the information you learned from previous exercises to:
• Save the PCR and receive the PCR number
• Write a note for the approvers
• Initiate Workflow
PART II - Wait for Approver to Approve PCR
Note to instructor and navigator: There are two approval levels:
• Agency
• Funding
Your instructor and/or navigator will complete this part.

Lesson 4: Adjusting Salaries Create and Maintain Employee Data
PA310
Page 84 North Carolina Office of the State Controller updated 5-10-19
PART III - Process Approved PCR
For Part III, use the information you learned from previous exercises to process the approved
PCR:
• Execute the approved PCR.
• Enter the applicable date and Action on Personnel Actions screen.
• Process each infotype as applicable including a note on Actions.
In this case, you don’t need Monitoring of Tasks; therefore, it is appropriate to use
Next Record to skip it.
• Explicitly complete Workflow item.
Create Basic Pay
(IT0008)
Reason: Appointment Change
The Salary defaulted from Employee Action
Request screen.
Monitoring of Tasks
(IT0019)
Use Next Record to skip since there are no follow-up
tasks for this employee.
TIPS & TRICKS: Execute info group button
If you accidentally click the Back button during an Action,
the system backs you out to the Personnel Actions screen. To
return to the infotype you were previously on, select the
same Action, date, and personnel number, and click Execute.
On the Actions Infotype (IT0000), select Execute info group.
A warning message is displayed indicating that the
personnel action is not saved. Click Continue and page
forward until you get to the infotype you accidentally exited.
You may notice that some infotypes did not retain the prior
information you entered (like taxes and monitoring of tasks).
Simply re-enter the data. Continue entering data on each
infotype until the Action is complete. Do not use PA30 and
individually complete the infotypes because dynamic
processes that are connected to payroll, time and benefits
will fail to process (processing the Action causes the dynamic
processes to occur).

Create and Maintain Employee Data Lesson 4: Adjusting Salaries
PA310
updated 5-10-19 North Carolina Office of the State Controller Page 85
Additional Resources
Refer to the OSC Training website in HELP documents for more
information about the Appointment Change Action.
Search for the following support document titles:
• Appointment Change Action
• PA Actions Reasons Definitions
This exercise is complete.
* * * * * * * * * * * * * * * * * * * * * * * * * * * * * * * * * * * * * * * * * * * * * * * * * * * * *
Reallocation Action
Reallocation is the assignment of a position to a different classification, documented through
data collection and analysis according to customary professional procedure and approved by
the agency HR or OSHR.

Lesson 4: Adjusting Salaries Create and Maintain Employee Data
PA310
Page 86 North Carolina Office of the State Controller updated 5-10-19
For purposes of the Salary Adjustment Fund, the following references are considered
reallocations:
• Reallocation – assignment of a graded or banded position to a higher-level classification
to recognize higher level duties.
• Grade-Band Transfer – initial reallocation of graded positions to banded classes where
salary increases are required to recognize higher level duties (see the Career Banding
Salary Administration Policy).
• Reallocation Up
• Real Inc Partial
• Real Inc – Eff Date Complete
• Reallocation Down
• Reallocation Horizontal
• Class/Pay Plan Change
Reallocation Process
There are two components to a Reallocation: OM and PA. The agency OM must first initiate
Workflow to process the change to the position. This must be done before Personnel
Administration initiates the Reallocation Workflow for the employee.

Create and Maintain Employee Data Lesson 4: Adjusting Salaries
PA310
updated 5-10-19 North Carolina Office of the State Controller Page 87
If funding is available HR PA initiates the Reallocation WF Action with the applicable reason,
salary changes are made, and the Action is completed. If funding is not available, HR PA still
initiates the Reallocation WF Action and chooses the appropriate reason for the employee. In
this case, HR must then execute PA30 Maintain Master Data (IT0052-subtype 0200 Wage
Maintenance) to reserve the balance. Enter the amount of the reallocation, not the entire salary.
If later some of the funds become available, you would process a series of Reallocation WF
Actions and PA30s to give the funds to the employee, and reduce the balance. For example,
assume that you put $1,500 in reserve for the employee whose annual salary is $25,000. A few
months later $500 of the funds are released. You would initiate the WF for the Reallocation
funds release date, not the original Reallocation date. The Reallocation reason would be Real Inc
Partial. On IT0008, the salary amount would be the old salary plus the released reserve, in this
example $25,500.
The last step is to use PA30 to create IT0052-subtype 0200 Wage Maintenance and reduce the
reserve balance by the amount released, in our example by $500.

Lesson 4: Adjusting Salaries Create and Maintain Employee Data
PA310
Page 88 North Carolina Office of the State Controller updated 5-10-19
* * * * * * * * * * * * * * * * * * * * * * * * * * * * * * * * * * * * * * * * * * * * * * * * * * * * *
EXERCISE 4.3: Reallocation
Before executing the Workflow PCR, verify the employee’s current grade. Use transaction code
PA20 to view the Basic Pay (IT0008) infotype. The current grade should be 59.
When processing the Reallocation Action, observe on the PCR that the employee’s grade has
already been changed. That change is a result of the Position change made by Agency HR.
Before initiating a Reallocation, make sure that Agency HR has made the appropriate OM
changes. This is critical!
SCENARIO
Emily Stafford holds an Accounting Clerk IV position. The position has
been reallocated to an Accounting Clerk V. The effective date is the first
of next month and the reason will be Reallocation Up.
• Her current salary is $36,500.
She is approved for an increase to $40,150 (a 10% increase). Create the
applicable Actions and transactions to indicate that Emily has the
Reallocation and new salary.
Reallocation Action
There are several Actions and transactions needed to complete this scenario. First, if no funds
are available, you must make an entry on the employee’s record that a Reallocation was
authorized, but no funds were available. Then you must put the balance of the funds in reserve.
This step is necessary in case the funds are eventually released, and the employee is entitled to
some or all the reserve funds.
Instructions
Enter Reallocation on the Employee’s Record
1. Verify employee’s current salary (PA20, Basic Pay IT0008).
2. Initiate transaction code ZPAA076.

Create and Maintain Employee Data Lesson 4: Adjusting Salaries
PA310
updated 5-10-19 North Carolina Office of the State Controller Page 89
3. From the table below, select the Personnel number for Emily Stafford assigned to you by
your instructor and enter it into the Personnel number field.
4. Record the Personnel number you used on your Transaction Log.
5. Click Enter.
6. Enter the following data:
Effective on First day of next month (Record on your Transaction Log)
Action Type Reallocation
Reason Reallocation Up
Personnel Actions
7. When PCR is approved, execute from your Inbox to access the Personnel Actions screen.
8. Enter the date (the same as the PCR).
9. Select Reallocation.
10. Click Execute.
11. Save infotypes as applicable.
12. On the Create Basic Pay infotype (IT0008), enter reason code ZA (Reallocation).
13. Be sure to explicitly complete Infotype creation process.
This exercise is complete.
* * * * * * * * * * * * * * * * * * * * * * * * * * * * * * * * * * * * * * * * * * * * * * * * * * * * *

Lesson 4: Adjusting Salaries Create and Maintain Employee Data
PA310
Page 90 North Carolina Office of the State Controller updated 5-10-19
SUMMARY
This lesson described how to distinguish between making a salary adjustment, appointment
change, and a reallocation. We also learned how to identify the job adjustments that must be
made prior to creating a reallocation.

Create and Maintain Employee Data Lesson 5: Promoting Employees
PA310
updated 5-10-19 North Carolina Office of the State Controller Page 91
Objectives
• Identify how to access help
• Promote an employee
Promotion Action
A Promotion is a movement to a position assigned a higher salary grade or movement between
positions from one career-banded class to another with a higher journey market rate or
movement from one position to another within the same banded class with a higher
competency level. A promotion also results in an increase in salary, in accordance with the State
Promotion Policy.

Lesson 5: Promoting Employees Create and Maintain Employee Data
PA310
Page 92 North Carolina Office of the State Controller updated 5-10-19
Promotion Process
Several steps must take place before a Promotion Action is executed in the Integrated
HR/Payroll System.
First, a funded and established Position must exist. The Position is either vacant or there is
official notification that a vacancy is pending (for example, an employee has submitted his or her
resignation).
The Position must be posted in accordance with State policy. After the posting timeframe has
expired, all qualified candidates are interviewed and a qualified candidate is selected. After the
candidate receives and accepts the promotion offer, the Manager or Supervisor sends the
employee information to HR, using a variety of distribution methods (i.e. manual form, email,
phone call, fax, or other method).
HR gathers any additional information and initiates the Integrated HR/Payroll System approval
workflow. After the approval is received via Inbox, HR executes the PCR and the Promotion
Action.
Reasons for Promotion
• Promotion
• Promotion Inc-After Eff Date
• Acting Promotion
NOTE: Create an IT0019 via PA30 to create a reminder to cancel the Acting Pay
Action at the end date of the acting pay period.

Create and Maintain Employee Data Lesson 5: Promoting Employees
PA310
updated 5-10-19 North Carolina Office of the State Controller Page 93
Delimiting Vacancies
During the Promotion Action process, the Integrated HR/Payroll System prompts you to select
the following:
• Create a vacancy for the Position the employee held prior to being promoted. Select Yes.
• Delimit the vacancy on the Position to which you are promoting the employee. Select
Yes.
Work Schedule Maintenance
You should also be aware that the work schedule will default from the Position. You should
change the work schedule based on the approved schedule if it is different from the one listed.
The default work schedule is based on information provided by your Agency and by the
Integrated HR/Payroll System team members. It is important to review this work schedule for
correctness, including the working hours.
* * * * * * * * * * * * * * * * * * * * * * * * * * * * * * * * * * * * * * * * * * * * * * * * * * * * *
EXERCISE 5.1: Promotion Action
SCENARIO
The supervisor for Karla Hart is promoting her from an Informational &
Communications Spec I position to an Informational & Communications
Spec II position. The promotion will be effective as of the 15th of the next
month. The accompanying pay increase is in accordance with State
policy. Process the promotion in the Integrated HR/Payroll System.
Don’t forget! You must have reinstated the Karla Hart assigned to you in
a previous exercise before you can promote her.
• Before you begin, use PA20 to view the Actions infotype to make
sure that the Karla Hart assigned to you indicates “Reinstated” as her
last action.
Instructions
There are three parts to this Exercise:
I. Initiate Workflow
II. Wait for Approver to approve PCR
III. Complete Approved PCR

Lesson 5: Promoting Employees Create and Maintain Employee Data
PA310
Page 94 North Carolina Office of the State Controller updated 5-10-19
PART I - Initiate Workflow
1. Before you begin, use PA20 to view the Actions infotype to make sure that the Karla Hart
assigned to you indicates "Reinstated" as her last action. Following along as your instructor
guides you through this process.
• Access transaction PA20 on the SAP Easy Access screen.
• Use your Karla Hart from Exercise 3.3.
• In the Direct Selection field, enter 0000.
• Select All in the Period section.
• Click the Overview button.
• Verify that the current record is a Reinstatement/Reemployment Action (you should have
completed this in Exercise 3.3).
• Click the Back button to go back to the SAP Easy Access screen.
2. On the Easy Access screen, type ZPAA076 in the Command field.
3. Click Enter . The Employee Action Request screen is displayed.
4. From the table below, select the Personnel number for Karla Hart assigned to you by your
instructor and enter it into the Personnel number field.
Record the Personnel number you used on the Transaction Log.
5. Click Enter .

Create and Maintain Employee Data Lesson 5: Promoting Employees
PA310
updated 5-10-19 North Carolina Office of the State Controller Page 95
6. Enter the following data:
Effective on 15th day of next month (Enter on your Transaction Log)
Action Type Promotion
Reason Promotion
Annual Salary Minimum of new position’s salary range
To complete Part I, use the information you learned from previous exercises to:
• Use the following Position number to complete Part I. Don’t forget to record it on
your Transaction Log.
• Save the PCR and record the PCR number and effective date of the Action.
(Transaction Log)
• Write a note for the approvers.
• Initiate Workflow.
PART II - Wait for Approver to Approve the PCR
There are two approver levels: (Agency and Funding) which your instructor will perform.

Lesson 5: Promoting Employees Create and Maintain Employee Data
PA310
Page 96 North Carolina Office of the State Controller updated 5-10-19
PART III - Complete approved PCR
NOTE: If the PCR results in moving the employee from one payroll type to a different
payroll type, you would not process the PCR. Contact BEST.
For Part III, use the information you learned from previous exercises to process the approved
PCR:
• Execute the approved PCR.
• Enter the applicable date and select the Action on Personnel Actions screen.
• Process each infotype as applicable including a note on Actions and Basic Pay infotypes
as appropriate:
Accept delimit pop-up boxes.
Don’t forget to enter the Reason (Promotion) on IT0008.
• Explicitly complete Workflow item.
This exercise is complete.
* * * * * * * * * * * * * * * * * * * * * * * * * * * * * * * * * * * * * * * * * * * * * * * * * * * * *
Additional Resources
Refer to the OSC Training website in HELP documents for more
information about Promotion Actions.
Search for the following support document titles:
• Promotion Action
• Promotion Action Guide
• PA Actions Reasons Definitions
SUMMARY
This lesson described how to promote employees.

Create and Maintain Employee Data Lesson 6: Separating Employees
PA310
updated 5-10-19 North Carolina Office of the State Controller Page 97
Objectives
• Distinguish between the two types of separation.
• Identify when it is appropriate to use each type of separation.
• Separate employees.
Two Types of Separation
Two Actions involve employee separation: Separation Pay Continuation and Separation. It is
important to determine which Separation Action is appropriate. Before entering either type of
separation, make sure that (1) time evaluation has been run (Hint: Use PA20 transaction to view
the IT0003 for the employee. The PDC recalculation date represents the last time eval has been
run), and (2) time balances are accurate.
Separation Pay Continuation is used only for:
• Retirement - Law Enforcement Supplement for Law Enforcement Officers (LEOs) who
retire before age 62. You will use the other Separation after age 62.
• Reduction-in-Force (RIF) – Severance and/or health insurance
• Separation Short-Term Disability – separated but still receiving STD benefits
Separation is used for all employees who do not qualify under the Separation with Pay
Continuation Action.
Cost Distribution Infotype (IT0027)
The Cost Distribution infotype (IT0027) is assigned to every employee. When an employee is
separated, the position defaults to 99999999; therefore, no cost distribution is assigned. During
both types of Separation, save the infotype so that it is assigned to the person. This infotype
allows you to create a payout to an employee if needed after the separation. If the Cost
Distribution infotype has not been saved, the payout cannot be processed. If the employee is
reinstated later, the infotype will delimit in the background during the Reinstatement/
Reemployment Action if processed correctly.

Lesson 6: Separating Employees Create and Maintain Employee Data
PA310
Page 98 North Carolina Office of the State Controller updated 5-10-19
Separation Action
Before processing a Separation, you should ensure that all time sheets have been (1) entered,
(2) approved and (3) released. If the timesheets are not up-to-date, correct, approved, and
released you cannot enter the payout of leave during the Separation Action. When this happens,
you will complete the Separation by-passing the leave payout infotype. When the timesheet has
been run and released, you will use PA30 to create Time Quota Compensation (IT0416) to payout
the employee’s applicable leave.
NOTE: The Separation Action automatically converts the direct deposit to a check 90
days from the action effective date. It is important to ensure that the address is correct
prior to entering the Separation into the Integrated HR/Payroll System.
BEST BUSINESS PROCESS: Do not create IT0416s prior to entering the Separation
action. This should be created after the action is entered in the system.

Create and Maintain Employee Data Lesson 6: Separating Employees
PA310
updated 5-10-19 North Carolina Office of the State Controller Page 99
Separation Effective Date
The State of North Carolina defines your effective separation date as the last day you are still an
employee. The Integrated HR/Payroll System defines it as the first day you are no longer an
employee.
On the Workflow (WF) Employee Action Request, enter the last day worked (or on payroll if
retiree) --do not add a day. The Integrated HR/Payroll System automatically adds one day to the
last day worked within the Action.
Examples:
1. The employee is separating for personal reasons, and the last day worked is 8/25/2017.
The effective date is 8/25/2017.
2. The employee is retiring effective 9/1/2017. The employee’s last day worked is 8/28/2017,
because he or she is exhausting vacation the remainder of the month. The effective date
will be 8/31/2017. The last day worked would be 8/28/2017.
NOTE: If an employee gives the reason “Retirement” for Separation before they have
worked half the month or they don’t have or want to exhaust leave to the end of the
month, you will still enter as a Separation-Retirement with the date given. This could
have an effect on the employees Benefits, and their health plan will terminate at the end
of the current month. Employees may be without coverage for a month(s) before the
retirement health coverage begins.
After you receive the Workflow approval PCR, enter the last day worked as the effective date on
the Personnel Actions screen in the Integrated HR/Payroll System. Beginning with the next
screen, IT0000-Copy Actions, the Integrated HR/Payroll System has already added one day to the
date you entered on all subsequent infotypes within the Action. Save the infotypes and do not
change the dates until you get to infotype 0416 -Create Time Quota Compensation (you only
complete this infotype if you have leave payout). Change the date on that one infotype (0416)
to reflect the same date as the effective date of the Action. If you change the dates on any
infotype other than 0416, the employee will not receive the last day of pay. (See example
below.)

Lesson 6: Separating Employees Create and Maintain Employee Data
PA310
Page 100 North Carolina Office of the State Controller updated 5-10-19
Separation Effective Date Example
1. Last date worked is 8/31/2017, which is entered on the WF Employee Action Request. Be
sure to enter the same date in “Last Day Worked” (see previous page if retiree).
2. After receiving the Workflow approval, enter 8/31/2017 on the Personnel Actions Screen
(PA), select the Action and Execute.
3. Copy Actions (IT0000) is displayed with a date of 9/1/2017. Do not change the date.
Save the infotype.
4. Enter to by-pass the delimit message, and click Yes to create vacancy.
5. Copy Organizational Assignment (IT0001) is displayed. Do not change the date. Save the
infotype.
6. Change Date Specifications (IT0041) is displayed. Do not change the date. Verify the last
day worked is accurate. Save the infotype.
7. Create Cost Distributions (IT0027) is displayed. Do not change the date. SAVE the infotype.
8. Infotypes for infotype Time Quota Compensation is displayed. Perform either (a) or (b) as
described below:
a) If no payout, close the pop-up.
b) If payout, select the appropriate subtype. Time Quota Compensation is displayed.
Change the date to reflect the same date as the effective date of the Action (in our
example, 8/31/2017). Enter the number of hours of payout. Save.
9. Delimit Objects on Loan (0040). Do not change the date. Delimit the applicable items
and Save the infotype.
10. Click the Back button when automatically returned to the PA screen.
11. Click the Complete Workflow Item button.

Create and Maintain Employee Data Lesson 6: Separating Employees
PA310
updated 5-10-19 North Carolina Office of the State Controller Page 101
Separation Process
NOTE: When you use the separation reason Beacon to Non-Beacon (see below), the
Integrated HR/Payroll System automatically stops pro-rated longevity by running the
Time Transfer Specifications (IT2012) infotype in the background. After you separate an
employee using the Beacon to Non-Beacon reason, you should use PA20 to view IT2012.
• Better Employment
• Personal Reasons
• Involuntary Separation
• Did Not Report
• Voluntary Resigned W/O Notice
• RIF w/no Severance/Health Ins
• No Reason Given
• Long Term Disability
• Retirement
• Retirement Disability
• Contract Ended
• Time-Limited Appt Term
• Supplemental Appt Term
• Appointment Ended
• Not Re-Elected
• Dismissed – Gross Inefficiency
• Dismissed – Conduct
• Dismissed – Unsat Performance
• Prior to achieving perm status
• Pay in lieu of notice
• Death
• Other
• Terminate while on FMLA
• Beacon to Non-Beacon Agency (pro-rate
longevity will not be paid—see note on
slide above)
• Cancel Sep Pay Continuation
• Removal from Office – AOC Only
• RIF Discontinue Service Retire
• Unavailable to work
• 115C Dismissal
* * * * * * * * * * * * * * * * * * * * * * * * * * * * * * * * * * * * * * * * * * * * * * * * * * * * *

Lesson 6: Separating Employees Create and Maintain Employee Data
PA310
Page 102 North Carolina Office of the State Controller updated 5-10-19
Overview
Effective Date
The State of North Carolina defines your effective separation date as the last day you are still an
employee. The Integrated HR/Payroll System defines it as the last day you are no longer an
employee. DO NOT add a day to the Employee Action Request nor any of the infotypes in the
Personnel Action (except 0416). The Integrated HR/Payroll System automatically adds one day to
the last day worked within the action.
Time Quota Compensation - IT0416
You must change the date on the Create Time Quota Compensation (0416) infotype to the
effective date of the Action. This infotype displays only if you selected a leave payout subtype.
Quota Correction - IT2013
If the employee has over 240 hours of vacation, notify the Leave Administrator to create a Quota
Correction (IT2013). If it is a RIF employee, review OSHR guidelines and make the Leave
Administrator aware.
Cost Distribution - IT0027
The Cost Distribution infotype displays in both types of Separation Action. In each case, you save
the infotype to create the existing record. This record is needed to process any subsequent
payouts to a separated employee who is in withdrawn status.
You should always ensure that time evaluation has been run for
the employee and that the time balances to be paid out are
accurate. Check to see that the last timesheet has been entered,
released, and approved.
Agency-Specific Deductions
HR must notify their Agency Payroll office and request them to delimit any agency-specific
deductions such as parking, cell phone, etc.

Create and Maintain Employee Data Lesson 6: Separating Employees
PA310
updated 5-10-19 North Carolina Office of the State Controller Page 103
EXERCISE 6.1: Separation Action
SCENARIO
Nicole Ahrens has informed you that the 15th of next month is the last
day she will work. She is resigning effective that day for personal reasons
and has leave that needs to be paid out.
• As you enter the Separation Action, you should remember to delimit
any items on loan that the employee returned. If the employee has
not returned the items on loan, but you need to process the Action
to get him or her off payroll, you can go ahead and complete the
Separation Action, but in that case, do not delimit the items on loan.
You should then complete a PA30 on Monitoring of Tasks (0019) to
create a reminder to retrieve the items.
Instructions
There are three parts to this Exercise:
I. Initiate Workflow
II. Wait for Approver to approve PCR
III. Complete Approved PCR
PART I - Initiate Workflow
1. On the Easy Access screen, type ZPAA076 in the Command field.
2. Click Enter . The Employee Action Request screen is displayed.
3. From the table below, select the Personnel number for Nicole Ahrens assigned to you by
your instructor and enter it into the Personnel number field.

Lesson 6: Separating Employees Create and Maintain Employee Data
PA310
Page 104 North Carolina Office of the State Controller updated 5-10-19
Don’t forget to record the Personnel number you used on your Transaction Log.
4. Click Enter .
5. Enter the following data:
Effective on 15th day of next month (Transaction Log)
Action Type Separation
Reason Personal Reasons
To complete Part I, use the information you learned from previous exercises to:
• Save the PCR and record the PCR number. (Transaction Log)
• Don’t forget to enter the Last Day Worked.
• Write a note for the approvers.
• Initiate Workflow.
Don’t forget to record the Personnel number you used on your Transaction Log.
PART II - Wait for Approver to Approve the PCR
There are two approver levels: (Agency and Funding) which your instructor will perform.
PART III - Complete approved PCR
For Part III, use the information you learned from previous exercises to process the approved
PCR:
• Execute the approved PCR.
• Enter the applicable date and select the Action on Personnel Actions screen.
• Process each infotype as applicable including a note on Actions and Basic Pay infotypes
as appropriate:
Subtypes for infotype Time Quota compensation pop-up: select vacation payout

Create and Maintain Employee Data Lesson 6: Separating Employees
PA310
updated 5-10-19 North Carolina Office of the State Controller Page 105
Infotype 0416: Change the Date!
— Enter hours equal to those in the Rem. Column.
• Explicitly complete Workflow item.
This exercise is complete.
* * * * * * * * * * * * * * * * * * * * * * * * * * * * * * * * * * * * * * * * * * * * * * * * * * * * *
Additional Resources
Refer to the OSC Training website in HELP documents for more
information about Separation Actions.
Search for the following support document titles:
• Separation Action
• PA Actions Reasons Definitions

Lesson 6: Separating Employees Create and Maintain Employee Data
PA310
Page 106 North Carolina Office of the State Controller updated 5-10-19
Separation Pay Continuation
Important! When Separation Pay Continuation is used, the pay continuation is for a
specified timeframe; therefore, eventually, a “regular” Separation Action must be
performed.
In the next exercise, you will process an Action combined with a PA30 – Maintain Employee
Data.
Important! - When you process a Separation Pay Continuation action, there are two
manual entries that are required:
Enter 99999999 on IT0000 – Actions in the position field
Click the Assignment button on IT0001 – Organizational Assignment and enter the
Org Unit number of the highest level of the Organizational Unit to which you have
permission or re-enter the existing org unit. Failure to perform this last step will
prevent you from entering the Separation at the appropriate time.

Create and Maintain Employee Data Lesson 6: Separating Employees
PA310
updated 5-10-19 North Carolina Office of the State Controller Page 107
Separation Pay Continuation Process
• Retirement (Law Enforcement Supplement who retires prior to age 62) *
• Reduction in Force Severance and/or Health Insurance
• Separation Short-Term Disability
If the employee does not meet all of these criteria, then the Separation Action, rather than the
Separation Pay Continuation Action, is the appropriate one to use for the separation.
The employee must be a sworn, certified (Basic Law Enforcement Training) law
enforcement officer, a participant in the Law Enforcement Retirement Program, and has
served at least half of his or her time in State service in a qualified law enforcement
Position.
You only use the Separation Pay Continuation for qualified law
enforcement officers who are retiring prior to their 62nd
birthday. If they are retiring on or after 62, you will use the
Separation Action.
In the law enforcement retirement example, the effective date is the last day of the month of
the employee’s 62nd birthday. After you complete Separation Pay Continuation, you should
create a Separation action with the last day of the month of their 62nd birthday as the effective
date.
PROCESS INFORMATION: Create the Separation action
the next business day. This allows the benefits interface to
process overnight.

Lesson 6: Separating Employees Create and Maintain Employee Data
PA310
Page 108 North Carolina Office of the State Controller updated 5-10-19
* * * * * * * * * * * * * * * * * * * * * * * * * * * * * * * * * * * * * * * * * * * * * * * * * * * * *
EXERCISE 6.2: Separation Pay Continuation Action
SCENARIO
The department for which your employee (Inez Hayes) works is being
downsized. As a result, Inez will be given severance for four months.
Inez has applicable leave that she wants to be paid out also.
Overview
When you initiate a Separation Pay Continuation, there are at least three aspects of the process
(1) Separation Pay Continuation Action (2) PA30 Monitoring of Tasks (3) Separation Action.
Position number IT0000 - Actions
In the Separation Pay Continuation, the Integrated HR/Payroll System does not default the
position to 99999999. You must manually change the position number to the default value for
the position to show as vacant. Do not change the position number to 9s in Workflow. You
change the position number to 9s on the Actions infotype when you process the approved
PCR (Personnel Actions).
Assignment button IT0001 – Organizational Assignment
On a Separation Pay Continuation during the Action, you must use the Assignment button on
IT0001 to enter the Org Unit to which the position belongs. If you fail to process this step, you
will not be able to create a Separation Workflow.
Effective Date
The State of North Carolina defines your effective separation date as the last day you are still an
employee. The Integrated HR/Payroll System defines it as the last day you are no longer an
employee. DO NOT add a day to the Employee Action Request, nor any of the infotypes in the
Personnel Action (except 0416). The Integrated HR/Payroll System automatically adds one day to
the last day worked within the action.
NOTE: If an employee gives the reason “Retirement” for Separation before they have
worked half the month or they don’t have or want to exhaust leave to the end of the
month, you will still enter as a Separation-Retirement with the date given. This could
have an effect on the employees Benefits, and their health plan will terminate at the end
of the current month. Employees may be without coverage for a month(s) before the
retirement health coverage begins.

Create and Maintain Employee Data Lesson 6: Separating Employees
PA310
updated 5-10-19 North Carolina Office of the State Controller Page 109
Time Quota Compensation - IT0416
You must change the date on the Create Time Quota Compensation (0416) infotype to the
effective date of the Action. This infotype displays only if you selected a leave payout subtype.
Quota Correction - IT2013
If the employee has over 240 hours of vacation, notify the Leave Administrator to create a Quota
Correction (IT2013). If it is a RIF employee, review OSHR guidelines and make the Leave
Administrator aware.
Monitoring of Tasks - IT0019
Create a PA30 Monitoring of Tasks to remind you at the end of the pay continuation to go in
and initiate a regular Separation. For the following exercise (Inez Hayes), you would enter a due
date that is four months from the Separation Pay Continuation Action to remind you to execute
a regular Separation on that date. After you complete the Separation Pay Continuation, you
should create a Separation action with the last day of the month of their 62nd birthday as the
effective date.
Cost Distribution - IT0027
The Cost Distribution infotype displays in both types of Separation Action. In each case, you save
the infotype to create the existing record. This record is needed to process any subsequent
payouts to a separated employee who is in withdrawn status.
You should always ensure that time evaluation has been run for
the employee and that the time balances to be paid out are
accurate. Check to see that the last timesheet has been entered,
released, and approved.
Date Specification - IT0041 (if RIF)
When the Separation Pay Continuation is due to RIF, IT0041 must be used to document when
the employee was notified of the RIF.
Use the ZSEV Severance Pay Calculations report for projected calculations for RIF.
Agency-Specific Deductions
HR must notify their Agency Payroll office and request them to delimit any agency-specific
deductions such as parking, cell phone, etc.

Lesson 6: Separating Employees Create and Maintain Employee Data
PA310
Page 110 North Carolina Office of the State Controller updated 5-10-19
Instructions
There are four parts to this Exercise:
I. Initiate Workflow
II. Wait for Approver to approve PCR
III. Process Approved PCR
IV. Complete the PA30 transaction
PART I - Initiate Workflow
1. On the Easy Access screen, type ZPAA076 in the Command field.
2. Click Enter . The Employee Action Request screen is displayed.
3. From the table below, select the Personnel number for Inez Hayes assigned to you by your
instructor and enter it into the Personnel number field.
Don’t forget to record the Personnel number you used on your Transaction Log.
4. Click Enter .
5. Enter the following data:
Effective on 15th day of next month (Transaction Log)
Action Type Separation Pay Continuation
Reason RIF Severance and/or Health Ins

Create and Maintain Employee Data Lesson 6: Separating Employees
PA310
updated 5-10-19 North Carolina Office of the State Controller Page 111
To complete Part I, use the information you learned from previous exercises to:
• Save the PCR and record the PCR number. (Transaction Log)
• Write a note for the approvers.
• Initiate Workflow.
PART II - Wait for Approver to Approve the PCR
There are two approver levels (Agency and Funding Approvers)
Your instructor and/or navigator will perform this part.
PART III - Complete approved PCR
For Part III, use the information you learned from previous exercises to process the approved
PCR:
• Execute the approved PCR.
• Enter the applicable date and select the Action on Personnel Actions screen.
• Process each infotype as applicable including a note on Actions and Basic Pay infotypes
as appropriate:
Actions: change the position number to 9s
Organizational Assignment:
▪ Click the Assignment button.
▪ Click the Organizational Unit radio button.
▪ Enter: 20010330 (for this scenario. In your work environment, enter the Org Unit
to which the position belongs.
▪ Click Continue. You are returned to IT0001. If necessary, enter 99999999 in the
position number field.
▪ Click Save.
Date Specifications
▪ Enter: Notification of RIF on the 10th day of the previous month
Subtypes for infotype Time Quota pop-up: Select Vacation Payout

Lesson 6: Separating Employees Create and Maintain Employee Data
PA310
Page 112 North Carolina Office of the State Controller updated 5-10-19
Create Time Compensation:
▪ Change the date!
▪ Enter the number of hours that are reflected in the Rem. Column.
• Explicitly complete Workflow item.
* * * * * * * * * * * * * * * * * * * * * * * * * * * * * * * * * *
PROCESS INFORMATION: Perform the following tasks after the Separation Pay Continuation
Action:
• For LEOs – complete the Separation Action the next business day
• For RIFs – complete the Separation Action after the Health Insurance Ends (usually 12
months)
Coordinate with BEST Benefits before completing the action
Use #22 - RIF Eligibility Ends for Monitoring of Task
* * * * * * * * * * * * * * * * * * * * * * * * * * * * * * * * * *
This exercise is complete.
Additional Resources
Refer to the OSC Training website in HELP documents for more information
about Separation Pay Continuations.
Search for the following support document titles:
• Separation Pay Continuation Action
• PA Actions Reasons Definitions
• Severance Pay Calculations

Create and Maintain Employee Data Lesson 6: Separating Employees
PA310
updated 5-10-19 North Carolina Office of the State Controller Page 113
Retirement Processing
Retirement Separations need to be completed at least 60 days prior to the retirement effective
date.
• The Integrated HR/Payroll System is a date-driven system and will not process any IT416
Leave Payouts until the payroll date entered.
• Additionally, benefit elections will be termed based on the date of separation, NOT the
date of entry into the system.
This is to ensure Retirees who are Medicare Eligible can enroll in a Medicare Advantage Plan
within the time frame allowed.
Agencies can monitor separations processing based on when the Form 6 is submitted by the
employee – Employees are encouraged to submit the Form 6 at least 120 days prior to their
retirement.
Employees need to be made aware that it is extremely important that they notify their Agency
HR staff of their retirement to ensure timely processing of their Insurance Benefits.
NOTE: Ensure RIF and Retirement Separations are processed as timely as possible. Late
processing of a RIF or Retirement separation can result in the employee being dually
enrolled in the State Health Plan. This results in billing discrepancies for the Agencies and
the Insurance Vendor.
Separation Action - Retirement Reason
You should process the employee’s Separation Action for Retirement Reason 60 days prior to
the retirement health plan effective date for the active health plan to be terminated.
IMPORTANT: Best Practice is for the employee to notify the
agency at least 60 days prior to their retirement date.
See the table below for an example of an employee with an August 1st retirement date.
Employee needs to inform Agency by: June 1, 2017
Retirement Action must be completed by: July 1, 2017
Retirement Date August 1, 2017

Lesson 6: Separating Employees Create and Maintain Employee Data
PA310
Page 114 North Carolina Office of the State Controller updated 5-10-19
Retirement Health Plan Effective Date September 1, 2017
Vacation Payouts
The agency can choose when to payout the vacation/bonus leaves either the last active payroll
or the payroll following the retirement.
In the example dates above, July is the last active payroll for a monthly employee and if the
IT0416 payouts are entered before the July payroll is finalized, the payment will occur in July.
If they are processed after the Integrated HR/Payroll System finalizes the July payroll, the
payouts will be paid to the employee in August.
NOTE: The effective date of the IT0416 record must be when the employee is active.
Longevity
A prorated longevity payment will be made in the July payroll since the retirement action is
completed prior to the July payroll.
One-time Deferrals
If the vacation payouts are processed after the last active payroll, employees wishing to defer
their longevity pay and their leave payouts to their 401K/457 Savings plans would need to
submit two one-time deferral forms:
• one form for the longevity pay in July
• one form for the leave payout in August.
If the payouts are paid in the last active payroll, only a single one-time deferral form is required.
Rescinding a Retirement Action
If an employee does not retire on the date entered, the action will need to be deleted. Agencies
would follow the established process for deleting actions. If longevity was paid, this payment will
be recouped in the next payroll, and the employee will receive their longevity at their regularly
scheduled anniversary month.
The employee’s health plan and other benefit plans would need to be reinstated as an active
employee.

Create and Maintain Employee Data Lesson 6: Separating Employees
PA310
updated 5-10-19 North Carolina Office of the State Controller Page 115
Catching Mistakes
Review actions after entry.
BEST PRACTICE: If an issue is discovered, discuss with your BEST HR Specialist before trying to
correct. Submit a ticket to BEST – [email protected] or (919) 707-0707.
Run reports regularly to catch mistakes.
• B0006: Actions by Type
• Run report on Separations and Separation Pay Continuation Actions
• After report is run, pull in “Employee” and “Position” from Free Characteristics (check to
make sure position number is all 9s)
SUMMARY
This lesson described how to distinguish between the two types of separation. We also learned
how to identify when it is appropriate to use each type of separation.

Lesson 6: Separating Employees Create and Maintain Employee Data
PA310
Page 116 North Carolina Office of the State Controller updated 5-10-19
THIS PAGE
INTENTIONALLY LEFT BLANK

Create and Maintain Employee Data Lesson 7: Entering Transfers
PA310
updated 5-10-19 North Carolina Office of the State Controller Page 117
Objectives
• Transfer an employee within an agency.
• Transfer an employee Agency to Agency
• Transfer an employee from one Integrated HR/Payroll System agency to a different
Integrated HR/Payroll System agency.
• Transfer an employee Temp to Perm or Perm to Temp
Transfer Action

Lesson 7: Entering Transfers Create and Maintain Employee Data
PA310
Page 118 North Carolina Office of the State Controller updated 5-10-19
• Agency to Agency – Lateral
• Agency to Agency – Reassignment
• Agency to Agency – Promotion
• Within Agency – Lateral
• Within Agency – Reassignment
• Grade-Band Transfer
• Class/Pay Plan Change
• EPA-SPA
• Temp to Perm
• Perm to Temp
• Within Agency Reorganization
• Agency to Agency Reorganization
Transfer Process
A Transfer Action is used to move an employee from one position to another within the present
Integrated HR/Payroll System agency or between Integrated HR/Payroll System agencies
without a break in service.
Normally a transfer between agencies results in an employee reporting to work in the Receiving
agency the first workday following the last day worked at the Releasing agency. The Releasing
agency does not separate the employee in the Integrated HR/Payroll System; however, the
Releasing agency should delimit any items on loan that the employee returned and agency-
specific items (parking). If the Releasing agency does not delimit the items on loan, the
Receiving agency can delimit them at the time of transfer (assuming the employee returned the
items).
NOTE: For Mass Transfers, call your BEST HR Specialist for information.

Create and Maintain Employee Data Lesson 7: Entering Transfers
PA310
updated 5-10-19 North Carolina Office of the State Controller Page 119
NOTE: Remember to contact the Releasing agency to establish the effective date of the
transfer prior to creating the PA PCR.
NOTE: If the PCR results in moving the employee from one payroll type to a different
payroll type, you will initiate only the Employee Action Request screen. When the PCR is
approved and back in your inbox, you must contact BEST.
Transfer Process for Temp to Perm or Perm to Temp
Process for Temp to Perm or Perm to Temp
• Provide BEST HR with the information below to process the action
Approved PCR number
Planned Working Time - Work schedule, Negative or Positive time recording,
Working Period [Sat (mdnt) - Fri, etc.] and Weekly working hours
EE's work location phone number (IT0105-Communication)
Once the action has been processed at BEST, your BEST HR Specialist will notify you by phone or
email that the action has been processed. You will then need to set your PCR to complete and
review/maintain the EE's infotypes/records in the system.

Lesson 7: Entering Transfers Create and Maintain Employee Data
PA310
Page 120 North Carolina Office of the State Controller updated 5-10-19
Additional Resources
Refer to the OSC Training website in HELP documents for more
information about Transfers.
Search for the following support document titles:
• Transfer Action
• Transfer Checklist
Agency to Agency Communication
The Releasing agency only:
• Ensures time has been entered, released and approved before time eval runs
• Delimits objects on loan (using PA30) that the employee returned and parking (if
applicable)
• Verifies accuracy of leave accruals
• Discusses overtime comp with the employee (only paid if S-FLSA-OT; otherwise lost if not
used within OT comp aging period).
The Receiving agency discusses above bullet points with the Releasing agency and reviews the
BOBJ Cross-Agency Verification report (BP002-Employee History) to verify information. The
Receiving agency does not create a New Hire Action, but uses the Transfer Action with the
appropriate reason.
If the transfer moves the employee type to a different employee type, you must change the
Employee Subgroup. If the employee is going from one payroll type to a different payroll type,
you will initiate only the PCR and when it is approved, contact BEST.
Unless the employee is assigned to a position that entitles him or her to a different retirement
program, the Receiving Agency does not enroll the employee since the record will transfer from
the Releasing Agency.
The agency that owns the employee can use PA20 to view the IT0003 for the employee. The PDC
recalculation date represents that the last time eval has been run.

Create and Maintain Employee Data Lesson 7: Entering Transfers
PA310
updated 5-10-19 North Carolina Office of the State Controller Page 121
* * * * * * * * * * * * * * * * * * * * * * * * * * * * * * * * * * * * * * * * * * * * * * * * * * * * *
EXERCISE 7.1: Transfer Action - Within Agency (Lateral)
SCENARIO
Helen Stephens is an Office Assistant IV at the MOA Deputy Director
CFO organizational unit. She is making a lateral transfer to the MOA
Educational Service org unit.
• She will be transferring to a new position number and will keep her
current salary as full-time, subject-FLSA employee
• The effective date is today.
• At the new division, she receives a cell phone.
• The employee will have a new work location phone number.
Instructions
There are three parts to this Exercise:
I. Initiate Workflow
II. Wait for Approver to approve PCR
III. Process Approved PCR
PART I - Initiate Workflow
1. On the Easy Access screen, type ZPAA076 in the Command field.
2. Click Enter . The Employee Action Request screen is displayed.
3. From the table below, select the Personnel number for Helen Stephens assigned to you by
your instructor and enter it into the Personnel number field.

Lesson 7: Entering Transfers Create and Maintain Employee Data
PA310
Page 122 North Carolina Office of the State Controller updated 5-10-19
4. Click Enter .
5. Enter the following data:
Effective on Today’s date (Transaction Log)
Action Type Transfer
Reason Within Agency - Lateral
6. Click Enter .
7. Click Create . The second screen of the Employee Action Request screen is displayed.
8. From the table below, select the Position number to which you will transfer Helen
Stephens. Use the student number assigned to you by your instructor and enter it into the
EE Position number field. (Transaction Log)
9. Enter the following data:
EE Group/Subgroup The Employee Group and Employee Subgroup fields are
now populated. When the Position number is entered,
the Employee Subgroup defaults to FT Perm (S or N
FLSAOT depending upon the position). You should
change as applicable for the Action.
For this Exercise, Save the default.

Create and Maintain Employee Data Lesson 7: Entering Transfers
PA310
updated 5-10-19 North Carolina Office of the State Controller Page 123
Annual Salary Same as previous salary (Hint: look in Current column)
10. Click Enter.
11. Click Save. The Information pop-up is displayed with the assigned PCR number.
12. Write the PCR number on the employee paperwork (in class, use your Transaction Log).
13. Click to close the pop-up.
14. Click Services for Object.
NOTE: The Services for Object button displays either an icon menu or a drop-down
menu depending upon whether you click on the right or left of the icon.
15. Select Create > Create Note.
16. Enter a note title.
17. Click in the note section and enter the applicable information to send along with the PCR.
Begin the note with your name and the date.
NOTE: The notes you write are recorded only in the Workflow PCR; they do not
follow to the PA Action.
18. Click to close the notes. If applicable, close the notes icon menu.
19. Click Initiate Workflow. The Information pop-up is displayed indicating that the PCR has
been submitted. (Transaction Log)
20. Click to close the Information pop-up. You are returned to the Employee Action
Request (first screen).
21. You must now wait until the PCR has been approved and returned to your Inbox.
PART II - Wait for Approver to Approve the PCR
There are two approver levels (Agency and Funding). Your instructor and/or navigator will
perform this part.
PART III - Complete Approved PCR
NOTE: In this exercise, you are processing an employee who already has an existing
record; therefore, each infotype will have a warning message that the previous record will
be delimited. Enter to bypass the warning message. Remember to save infotypes.

Lesson 7: Entering Transfers Create and Maintain Employee Data
PA310
Page 124 North Carolina Office of the State Controller updated 5-10-19
22. From the Easy Access screen, click SAP Business Workplace .
23. Click the node beside Inbox to expand it.
24. Double-click Workflow. The PCRs that have been approved (or rejected) are listed in the
right column.
25. Select the PCR you want to process.
26. Click Execute (or double-click the PCR line item). The system automatically takes you to
the applicable screen for the Action (in this exercise, it is Personnel Actions)
27. On the Personnel Actions screen, enter:
From Today’s date (should always match the date you
entered on the Employee Action Request screen)
Action Type Transfer
28. Click Enter.
29. Click Execute.
BEST PRACTICE: It is a best practice to always save a pre-populated infotype even if
you do not make changes. In some cases, there are dynamic infotypes that display
only when the previous infotype was saved. If you use the Next record button instead
of saving, those dynamic infotypes will not display and the employee’s record will be
incomplete.
30. Complete the following fields:
Actions (IT0000)
Reason for Action Observe the field defaulted from PCR
Reference Per. No Do not change defaulted data.
Position Observe the field defaulted from PCR
EE Group/Subgroup Observe the field defaulted from PCR

Create and Maintain Employee Data Lesson 7: Entering Transfers
PA310
updated 5-10-19 North Carolina Office of the State Controller Page 125
If you forgot to make the applicable changes on the
Employee Action Request screen, you can make the
changes now. Be aware, however, that when an audit is
run of your Actions, this will show as a discrepancy.
Enter and Save
Organizational
Assignment (IT0001)
Enter and Save
Create vacancy Yes
Delimit vacancy Yes
Create Related
Experience (IT9822)
Enter Related Work Exp: 120 and Related Education: 0.
Click Enter and Save .
Date Specifications
(IT0041)
Review for accuracy
Enter and Save
Planned Working Time
(IT0007)
It is critical that you review this infotype. The planned
working time defaults based from the employee’s
organizational structure—company code, personnel area
and subarea, cost center, business area, fund and
functional area.
For this exercise, accept the default. Observe that when
you click Enter, the hour field automatically populates.
The weekly workday field does not default. Do not enter
data in the weekly workday field.
Enter and Save
Possible subsequent
activities
Use the X to cancel. Since this is a “within” Agency
transfer, the employee is already enrolled in the
applicable retirement from the Releasing Agency.
Basic Pay (IT0008) Reason: Transfer
Observe that Salary populated from PCR.
Enter and Save

Lesson 7: Entering Transfers Create and Maintain Employee Data
PA310
Page 126 North Carolina Office of the State Controller updated 5-10-19
Unemployment State
(IT0209)
Enter and Save
Objects on loan
(IT0040)
Use the down arrow to select the cell phone option.
Number/unit: 1 piece(s)
Loan object #: BR549
31. Click the Back button at the Personnel Actions screen (the system automatically returns
you to Personnel Actions when you finish the last infotype within the Action).
32. The pop-up is displayed indicating that the item must be explicitly completed. Click
Complete Work Item .
It is critical that you complete this last step.
PART IV - Access PA30 to Complete Infotype Processing
If the employee is receiving an updated telephone number, you would follow the below steps
(you will not complete these steps in class):
From the Maintain HR Master Data screen. Perform the
following data entry processes:
• Direct selection and in the Infotype field, enter 0105
and then choose the 0020 subtype.
• Select Create.
• In the Start field enter the effective date of the
action.
• Enter the new telephone number.
• Click the green check. Save.
This exercise is complete.
* * * * * * * * * * * * * * * * * * * * * * * * * * * * * * * * * * * * * * * * * * * * * * * * * * * * *

Create and Maintain Employee Data Lesson 7: Entering Transfers
PA310
updated 5-10-19 North Carolina Office of the State Controller Page 127
* * * * * * * * * * * * * * * * * * * * * * * * * * * * * * * * * * * * * * * * * * * * * * * * * * * * *
EXERCISE 7.2: Transfer Action - Agency to Agency (Promotion)
SCENARIO
Marsha Sanders is being promoted from Facility Survey Consultant I at
DHHS to a Facility Planner III at the Capital Projects Unit Org unit and will
be transferred into a new position number with the new agency. Her new
salary will be the minimum of the salary range for the new position.
• The effective date is today.
• She returned the objects on loan to the Releasing Agency, but the
HR Master Data Maintainer there failed to delimit the infotype 0040 -
Objects on Loan.
• The employee’s work schedule will be as follows:
D01N08GN work schedule rule
Positive Time Recording
Working period will be Wk – Wed (mdnt) - Tues
40 hrs. a week
• In addition, your agency (the Receiving agency) issued Marsha a cell
phone.
Overview
The Releasing Agency and the Receiving Agency should communicate prior to any entry
(processing of the action) into the Integrated HR/Payroll System. This communication process is
critical to ensure that the employee does not lose pay or benefits during the transfer. The
Releasing Agency takes no action in the Integrated HR/Payroll System (except delimiting items
the employee returned) or agency-specific benefits.
When an employee indicates he or she is leaving the agency, the agency should inquire if the
employee is going to another agency. If the employee is going to another agency, the Releasing
Agency does not separate the employee.
Example: Monthly to bi-weekly or bi-weekly to monthly
The Releasing Agency does not enter any actions in the
Integrated HR/Payroll System because, as soon as the
Receiving Agency enters the Transfer action, the employee is
automatically transferred out of the Releasing Agency.
Please refer to the Transfer checklist for the Releasing and
Receiving agency responsibilities on the OSC Training site.
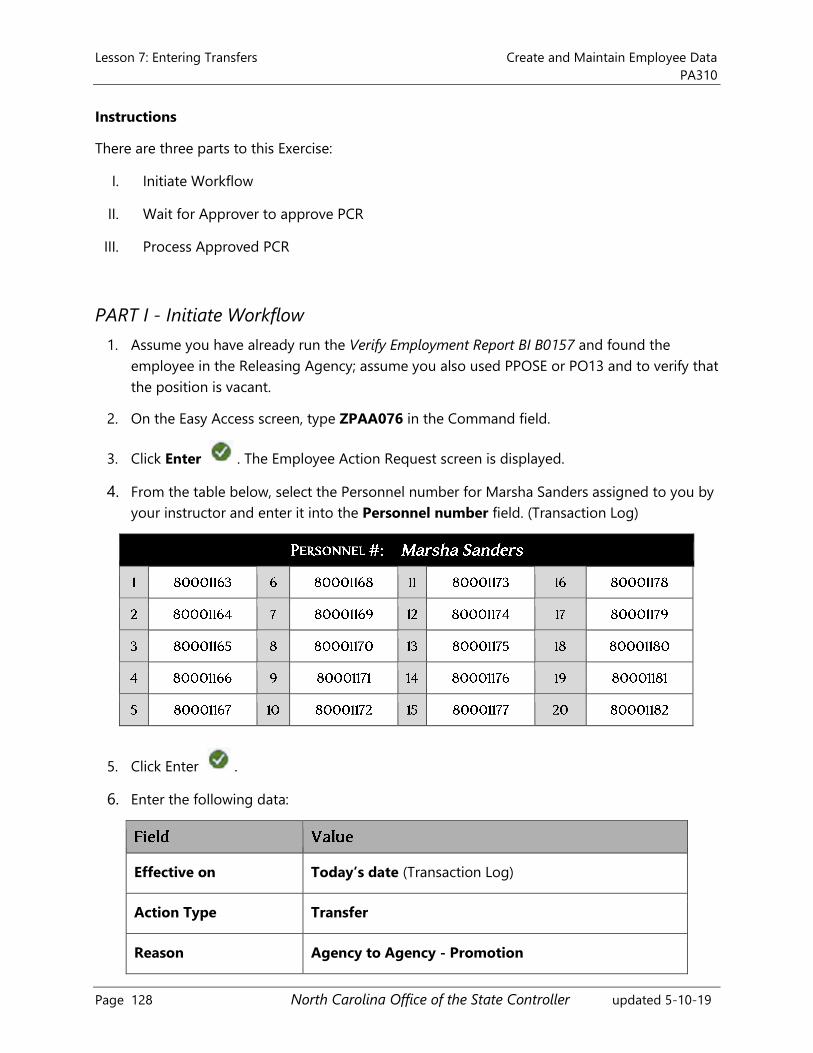
Lesson 7: Entering Transfers Create and Maintain Employee Data
PA310
Page 128 North Carolina Office of the State Controller updated 5-10-19
Instructions
There are three parts to this Exercise:
I. Initiate Workflow
II. Wait for Approver to approve PCR
III. Process Approved PCR
PART I - Initiate Workflow
1. Assume you have already run the Verify Employment Report BI B0157 and found the
employee in the Releasing Agency; assume you also used PPOSE or PO13 and to verify that
the position is vacant.
2. On the Easy Access screen, type ZPAA076 in the Command field.
3. Click Enter . The Employee Action Request screen is displayed.
4. From the table below, select the Personnel number for Marsha Sanders assigned to you by
your instructor and enter it into the Personnel number field. (Transaction Log)
5. Click Enter .
6. Enter the following data:
Effective on Today’s date (Transaction Log)
Action Type Transfer
Reason Agency to Agency - Promotion

Create and Maintain Employee Data Lesson 7: Entering Transfers
PA310
updated 5-10-19 North Carolina Office of the State Controller Page 129
7. Click Enter .
8. Click Create . The second screen of the Employee Action Request screen is displayed.
9. From the table below, select the Position number to which you will transfer Marsha
Sanders. Use the student number assigned to you by your instructor and enter it into the
EE Position number field. (Transaction Log)
10. Enter the following data:
Annual Salary The minimum of the salary range for the new position.
11. Click Enter.
12. Click Save. The Information pop-up is displayed with the assigned PCR number.
13. Write the PCR number on the employee paperwork (in class, use your Transaction Log).
14. Click to close the pop-up.
15. Click Services for Object.
NOTE: The Services for Object button displays either an icon menu or a drop-down
menu depending upon whether you click on the right or left of the icon.
16. Select Create > Create Note.
17. Enter a note title.
18. Click in the note section and enter the applicable information to send along with the PCR.
Begin the note with your name and the date.
Lesson 7: Entering Transfers Create and Maintain Employee Data
PA310
Page 130 North Carolina Office of the State Controller updated 5-10-19
NOTE: The notes you write are recorded only in the Workflow PCR; they do not
follow to the PA Action.
19. Click the green check to close the notes. If applicable, close the notes icon menu.
20. Click Initiate Workflow. The Information pop-up is displayed indicating that the PCR has
been submitted.
21. Click the green check to close the Information pop-up and return to the Employee
Action Request (first screen).
22. You must now wait until the PCR has been approved and returned to your Inbox.
PART II - Wait for Approver to Approve the PCR
There are two approver levels (Agency and Funding). Your instructor and/or navigator will
perform this part.
PART III - Process Approved PCR
NOTE: In this exercise, you are processing an employee who already has an existing
record; therefore, each infotype will have a warning message that the previous record will
be delimited. Enter to bypass the warning message. Remember to save infotypes.
23. From the Easy Access screen, click SAP Business Workplace .
24. Click the node beside Inbox to expand it.
25. Double-click Workflow. The PCRs that have been approved (or rejected) are listed in the
right column.
26. Select the PCR you want to process.
27. Click Execute (or double-click the PCR line item). The system automatically takes you to
the applicable screen for the Action (in this exercise, it is Personnel Actions.)
28. On the Personnel Actions screen, enter:
From Today’s date (should always match the date you
entered on the Employee Action Request screen)
Action Type Transfer

Create and Maintain Employee Data Lesson 7: Entering Transfers
PA310
updated 5-10-19 North Carolina Office of the State Controller Page 131
29. Click Enter.
30. Click Execute.
BEST PRACTICE: It is a best practice to always save a pre-populated infotype even if
you do not make changes. In some cases, there are dynamic infotypes that display
only when the previous infotype was saved. If you use the Next record button instead
of saving, those dynamic infotypes will not display and the employee’s record will be
incomplete.
31. Complete the following fields:
Actions (IT0000)
Reason for Action Observe the field defaulted from PCR
Position Observe the field defaulted from PCR
EE Group/Subgroup Observe the field defaulted from PCR
If you forgot to make the applicable changes on the
Employee Action Request screen, you can make the
changes now. Be aware, however, that when an audit is
run of your Actions, this will show as a discrepancy.
Enter and Save
Organizational
Assignment (IT0001)
Enter and Save
Create vacancy Yes
Delimit vacancy Yes
Date Specifications
(IT0041)
Agency date should be pre-populated.
Enter and Save
Create Related
Experience (IT9822)
Enter Related Work Exp: 120 and Related Education: 0.
Click Enter and Save .

Lesson 7: Entering Transfers Create and Maintain Employee Data
PA310
Page 132 North Carolina Office of the State Controller updated 5-10-19
Planned Working Time
(IT0007)
It is critical that you review this infotype. The planned
working time defaults based from the employee’s
organizational structure—company code, personnel area
and subarea, cost center, business area, fund and
functional area.
For this exercise, you will change the planned
working time based on the info given from the
scenario. You will not need to change the Work
schedule rule (WSR). The Time Mgmt status will need
to be changed. The Working Week will need to be
changed.
Enter and Save
Possible subsequent
activities
Use the X to cancel. The employee is already enrolled in
the applicable retirement from the Releasing Agency.
Basic Pay (IT0008)
Reason: Transfer
Observe that Salary populated from PCR.
Enter and Save
Unemployment State
(IT0209)
Enter and Save
Objects on Loan
(IT0040)
If the employee returned the items and the Releasing
Agency did not delimit the objects, the infotype will
display with the item and the end date of 12/31/9999. In
that case, you can either enter your item and complete a
PA30 to delimit the Releasing Agency’s item, or
alternatively, you can delimit the Releasing Agency’s
item in the Action and do a PA30 to add your item. It
doesn’t matter if you remember to do both if needed.
For this exercise, you will:
Object on loan field: Use the down arrow to select the
cell phone option.
Number/unit: 1 piece(s)
Loan object #: 919-584-1212

Create and Maintain Employee Data Lesson 7: Entering Transfers
PA310
updated 5-10-19 North Carolina Office of the State Controller Page 133
32. When you have completed the last infotype in the series, the Integrated HR/Payroll System
automatically returns you to the List Actions infotype screen.
33. Click the Back button at the Personnel Actions screen (the system automatically returns
you to Personnel Actions when you finish the last infotype within the Action).
34. The pop-up is displayed indicating that the item must be explicitly completed. Click
Complete Work Item .
It is critical that you complete this last step.
When the Releasing Agency notifies you that the employee has returned the item issued to the
employee, follow the steps below to delimit the item (you will not perform these steps in class):
35. Click Back to return to the Maintain HR Master Data (PA30) screen.
36. Use the Overview function to see both items on loan. You should see the item(s) from the
Releasing Agency is still active and the cell phone has been added with an end date of
12/31/9999.
Transaction: PA30 • Enter the personnel number on the Maintain HR
Master Data screen.
• In the Direct selection section and in the Infotype
field, enter 0040.
• Choose the applicable subtype from the
matchcode list in the Sty field for items on loan.
• Click the Delimit button.
• Enter the delimit date in the pop-up. If the pop-up
did not display, enter the delimit date in the Delimit
Date field.
• Click the green check to close the delimit date
notice.
• Select the line item that contains the items that
were issued by the Releasing Agency.
• Click the Delimit button.

Lesson 7: Entering Transfers Create and Maintain Employee Data
PA310
Page 134 North Carolina Office of the State Controller updated 5-10-19
This exercise is complete.
* * * * * * * * * * * * * * * * * * * * * * * * * * * * * * * * * * * * * * * * * * * * * * * * * * * * *
SUMMARY
This lesson described how to transfer an employee within an agency. We also learned how to
transfer an employee from one Integrated HR/Payroll System agency to a different Integrated
HR/Payroll System agency.

Create and Maintain Employee Data Lesson 8: Workflow Process & Inquiry
PA310
updated 5-10-19 North Carolina Office of the State Controller Page 135
Objectives
• Explain the purpose of Workflow
• Define key Workflow terms
• Describe the PA Personnel Workflow process
• Discuss the routing and processing of PA Workflow PCRs
• Understand the purpose of the PCR# and the PCR date
• Identify how to troubleshoot PCRs
• Execute the Workflow Report
Access and execute the Workflow Report for PA
Change the layout of the report
Create a variant for the report
Retrieve a report variant
Purpose of Workflow
Workflow provides an electronic approval process for Employee Actions at various levels:
• Division/Agency
• Funding
• OSHR
Workflow also gives users the ability to create, track and approve Workflow items.

Lesson 8: Workflow Process & Inquiry Create and Maintain Employee Data
PA310
Page 136 North Carolina Office of the State Controller updated 5-10-19
Key Terms
• Action: This term is used in PA to indicate a new record or change to an existing
employee or the position employee is in.
• Documents: A documents option is contained in both the Inbox and Outbox. Documents
are the Integrated HR/Payroll System’s way of tracking all transactions that take place
within the system. You will not use documents very often.
• Initiator: The PA user who enters the data for a PA Action. In PA, the Initiator will
ultimately enter the data for the Action into the employee’s Integrated HR/Payroll
System personnel record after final approval.
• Routing Tables: PA has a custom table created for the State of North Carolina within the
Integrated HR/Payroll System to hold the list of actions/reasons and logic to support the
approval process for employee. The table identifies which Action/Reason goes to which
approval route.
• PCR: A Personnel Change Request (PCR) is a number assigned to each Workflow item.
The PCR can be used to identify and track a Workflow item.
• Workflow Tracker: A link that will show you the name of the Step, Status, Result, Time &
Agent for each Workflow item. The Workflow Tracker shows who initiated, who
approved, and who the next approvers are in the process.
• Workflow Header: Displays the data that was entered by the Initiator for the Workflow
item. The Workflow Header answers this question, “What data was used to execute this
Workflow item?”
• Workflow Log: A more detailed view of the individual steps the document goes through
within the Workflow process (detailed Workflow Tracker). The Workflow Log answers the
question, “Who has the Workflow item in his/her inbox?”
• Approver: Several positions are assigned with approval status at various levels within the
organization. The security access assigned to the position determines if the position
holder has approval authority for PA. The authority to approve belongs to the position,
not the person holding the position. When the person leaves the position, he or she will
no longer have approval authority unless the new position has the authority.
Generally, there are at least two Approvers assigned to each level in an agency or
division so that when the Initiator executes Workflow, the PCR is sent to the Inbox of all
the Approvers at that level. This allows the approval process to continue if one of the
Approvers is out of the office for a period of time.

Create and Maintain Employee Data Lesson 8: Workflow Process & Inquiry
PA310
updated 5-10-19 North Carolina Office of the State Controller Page 137
PA Workflow Process Flow
The PA action is not complete until the PCR has been approved and processed by the Initiator.
The Workflow PCR is simply a form to collect some of the basic information for approval
purposes before the Personnel Action is processed (and the employee’s personnel file is
updated). When the approval process is complete, the Initiator receives the PCR back in his or
her Inbox. The Initiator executes the
PCR from the Inbox and the
Integrated HR/Payroll System
automatically takes the initiator to
the appropriate screen (Hiring for
New Hires and Non-Beacon to
Beacon; Personnel Actions for all
others). The Initiator reviews the
data that defaulted and saves all
applicable infotypes (the system
has bundled all of the appropriate
infotypes that require attention for
the Action). After all infotypes have
been completed, the Initiator
receives the “Complete Workflow Item” button. It is important that only when the PA Action has
been completely processed should the initiator mark the PCR workflow item as complete.
If the PCR is marked complete prior to the Action being completely processed in the system, the
Initiator must use transaction code PA40 to re-execute the Action and enter data and/or save as
applicable every infotype appropriate for that Action.
NOTE: There are only a few fields for which the Initiator will need to enter data.
Additional Resources
Refer to the OSC Training website in HELP documents for more information
about Workflow buttons.
Search for the following support document titles:
• Business Workplace Button Functions
• Business Workplace Overview Tree Functions

Lesson 8: Workflow Process & Inquiry Create and Maintain Employee Data
PA310
Page 138 North Carolina Office of the State Controller updated 5-10-19
Integrated HR/Payroll System Workflow Process
• Notes and documents should be included/attached in the Services for
Objects section of the PCR
• Agency funding approval is last approval level for PA PCRs
• PCR #s begin with 1 (1000000000)
• PCR returns to Initiator to explicitly complete the Workflow after
processing action
• After the PCR has been through the entire approval process it returns
to initiator to work the action and explicitly complete WF.
Services for Objects
The Services for Objects option allows notes and attachments (Word, Excel, Notepad)
to be included with the Workflow PCR. All Approvers at the next levels (unless
marked private) can view the notes or attachments. Only the creator of the private
note can view it.
PA Workflow Process
The Initiator (Agency) initiates the PCR (Personnel Change Request) and completes the final step
after the PCR has been through the entire approval process.
The Agency Funding Approver is usually the last approval step for most PA PCRs.

Create and Maintain Employee Data Lesson 8: Workflow Process & Inquiry
PA310
updated 5-10-19 North Carolina Office of the State Controller Page 139
Workflow Approver Relationships
The list below shows the different levels that an OM or PA Action may be sent for approval. The
PA Routing Table was set up to determine how the PCR is routed. You will see the following
code acronyms when viewing the Workflow Tracker.
DA1 - Division Approver
AA1 - Agency Approver
OA1 - OSHR Approver
FA1 - Funding Approver
Workflow - In Process
After an Initiator Initiates Workflow, the status is updated to N for in process.
After an Approver approves the PCR, the status is set to A for approved and will remain at A for
all approval levels unless an Approver returns (rejects), reserves, or cancels the PCR.
When an Approver returns (rejects) a PCR, the status is changed to R for rejected. The PCR is
automatically sent back to the Inbox of the Initiator.
If the initiator cancels the action, the Workflow status will change to C for cancelled.
PCR Troubleshooting
There are several reasons why a PCR may appear to be “lost.” It is best practice to record the
PCR number, date and position number (if applicable) to track a PCR later in case it is “lost.”
1. If the Initiator saved the PCR but did not click the Initiate Workflow button, the PCR is
not visible in their outbox. Therefore, an Approver who is waiting to see the PCR in
the Approver Inbox will not be able to see it in their inbox. The Initiator can choose
Edit in the ZPAA076 - Employee Action Request transaction.
2. The Initiator or Approver has incorrect security roles to process a PCR.
3. If a user is an Initiator as well as an Approver, it can sometimes be confusing. That is
because the same PCR will leave the Inbox of the Initiator role and be sent to the
Inbox of the Approver role (which to the employee is the same Inbox).

Lesson 8: Workflow Process & Inquiry Create and Maintain Employee Data
PA310
Page 140 North Carolina Office of the State Controller updated 5-10-19
4. In PA, the Initiator has to click a “Completed Workflow Item” button when the
personnel action has been processed. In some cases, the Initiator may have
inadvertently clicked the button prematurely after backing out of an Action without
processing all infotypes. When the initiator has dual approval roles, please allow the
system a few minutes to maneuver through the security chain, and the PCR will come
back in your inbox as scheduled.
5. If a PCR/workflow item is “touched” more than 20 times or too quickly by an
approver, it can disappear from the workflow process automatically. Contact BEST
Shared Services to confirm. A new PCR may need to be created.
KNOWLEDGE CHECK
QUESTION ANSWER
1. The ___ is the PA user who enters the data for a PA Action.
2. The ___ shows who initiated, who approved and who the next
approvers are in the process.
3. The ___ answers the question “Who has the Workflow item in
their inbox?”
4. The ___ can be used to identify and track a Workflow item.
5. Workflow approval security is assigned to the ___.
6. The Funding approver’s place in the Workflow process in PA is
usually ___.
7. In PA, the Initiator must click the ___ button when the action
has been completed.
8. When you use the ___ function, you should be sure to use a
new effective date.

Create and Maintain Employee Data Lesson 8: Workflow Process & Inquiry
PA310
updated 5-10-19 North Carolina Office of the State Controller Page 141
* * * * * * * * * * * * * * * * * * * * * * * * * * * * * * * * * * * * * * * * * * * * * * * * * * * * *
EXERCISE 8.1: Workflow Overview and Navigation
SCENARIO
Follow with your instructor as he/she directs you through the navigation
and discovery of the Workflow Outbox.
Instructions
Accessing the Workflow Inbox (SBWP)
An Initiator accesses the Workflow PCRs that have been sent for him or her to take Action on via
the Workflow option in the Inbox.
The Inbox is accessed either from the Easy Access screen using the Business Workplace button
or by entering SBWP in the Command field.
1. Click the SBWP button to access the SAP Business Workplace.
2. Click the node in front of Outbox .
3. Click the Work items executed by me folder.
4. Pull out your Transaction log and locate the PCR number for Exercise 4.3.
Look through the PCRs in your Outbox and find the one for Range Revision (Rose Brown). Follow
your instructor as he/she shows you how to use the Find button to locate your PCR.

Lesson 8: Workflow Process & Inquiry Create and Maintain Employee Data
PA310
Page 142 North Carolina Office of the State Controller updated 5-10-19
5. If the PCR for the Range Revision for Rose Brown is not selected, SINGLE-click on it to
select it.
6. Click on the Workflow Log button on the menu to display the workflow log
and view potential Approvers who are next in line for the PCR.
7. Click the Agents button to view the list of Approvers for that step.
The Workflow Log is a document within Workflow that contains the Step, Status, Result, Time
and Agent. The Workflow Log answers the question, “Who has the Workflow item in his/her
Inbox?”

Create and Maintain Employee Data Lesson 8: Workflow Process & Inquiry
PA310
updated 5-10-19 North Carolina Office of the State Controller Page 143
After you select the Log option, the next screen
displays the various results for each step. In addition,
the Agents option is displayed. Click the Agents icon to
view the list of the Approvers for that step.
Once an approver approves a PCR, you might want to
obtain a list of possible approvers. As an Initiator, you
would be able to look at the Workflow Log after the
PCR is returned to your Inbox.
Note the Inbox button next to Angela Lisson. That button indicates that if the PCR was in the
approval process, Angela Lisson would be the Approver who has it in her inbox.
8. Click the X at the upper-right corner of the pop-up box to close the box.
9. Close the Click the Back button to return to the Workflow inbox.
10. SINGLE-click the Workflow Tracker at the bottom right corner of the screen.

Lesson 8: Workflow Process & Inquiry Create and Maintain Employee Data
PA310
Page 144 North Carolina Office of the State Controller updated 5-10-19
The Workflow Tracker is a link in the bottom right of the Inbox or Outbox screen (you may have
to scroll to see it). Using Workflow Tracker, you can see which Approver has processed the PCR,
the action the Approver took, and where the PCR is being routed next.
Additional Resources
Refer to the OSC Training website in HELP documents for more information
about PA PCRs.
Search for the following support document titles:
• How to Locate a PA PCR
The Header section of the Tracker will show, at a minimum, the following fields:
• Request ID (PCR Number)
• Action type (code and name)
• Status (the overall status of the work item)
• Creator (Initiator)
In addition, the header will include specific fields pertinent to the PA Action (like employee
name).
The Detail section of the Tracker will list these attributes:
• Sequence (line item sequence)
• Role represents the approver relationship
AA1 Agency Approver
DA1 Division Approver
OA1 OSHR
FA1 Funding Approver
• An X in the Mandatory column indicates that the approval of the specific Approver is
required.
• Ptype is used to signify the Processor (P) and Approvers (A)

Create and Maintain Employee Data Lesson 8: Workflow Process & Inquiry
PA310
updated 5-10-19 North Carolina Office of the State Controller Page 145
• Agent ID represents the Personnel number of the Approver
• Name/Description lists the name of the Employee
• Act/Desc holds value (P) Processed
A = approved
R = rejected
P = processed
See the example below to view what a Rejected PCR looks like on the Tracker.
• An X in the Cmnt column will indicate if a rejection note has been created for the Action.
• To see the comment, highlight the line and click the Notes icon (eyeglasses).
• Actual/Name is the Initiator’s Personnel number and name.
11. Click the Back button to return to the Workflow inbox
12. SINGLE-click the PA PCR at the bottom right section of the Workflow Inbox (just
above the Workflow Tracker).
13. The Employee Action Request screen you completed to initiate the Workflow Process
is now displayed.

Lesson 8: Workflow Process & Inquiry Create and Maintain Employee Data
PA310
Page 146 North Carolina Office of the State Controller updated 5-10-19
By using the Header, you can also access the Services for Object button to see any notes or
attachments that were sent with the PCR.
14. Click the Back button to return to the Workflow inbox.
This exercise is complete.
* * * * * * * * * * * * * * * * * * * * * * * * * * * * * * * * * * * * * * * * * * * * * * * * * * * * *

Create and Maintain Employee Data Lesson 8: Workflow Process & Inquiry
PA310
updated 5-10-19 North Carolina Office of the State Controller Page 147
Deleting a PA PCR
The method the Initiator would use to delete a PCR depends on where it is in the process.
1. If the Workflow is saved but not initiated:
Use the Delete button on the Employee Action Request screen (ZPAA076).
2. If the Workflow was initiated but the PCR has not reached final approval:
The Initiator would contact the Approver and request that the PCR be returned (rejected)
to them. They can then Execute the PCR. When the Decision Step in Workflow screen
displays, they would click the Cancel PCR option (illustrated above). The PCR disappears
from their Inbox. They can still see it in their Outbox > Started WFs; however, it will indicate
it was Completed/deleted.
3. If the Initiator initiated Workflow and the PCR has been approved by final approver
but not yet executed:
The Initiator can use this option only if they have not executed the PCR. The Initiator
would highlight the PCR in their workflow inbox and click the “Other Functions” button.
From the drop-down menu, select “Reject Execution” (see above). The PCR disappears from
their Inbox. They can still see it in their Outbox > Started WFs; however, it will indicate it
was Completed/Deleted.

Lesson 8: Workflow Process & Inquiry Create and Maintain Employee Data
PA310
Page 148 North Carolina Office of the State Controller updated 5-10-19
KNOWLEDGE CHECK
QUESTION ANSWER
1. On the Workflow Tracker, an X in the Cmnt column indicates
whether a ___ has been created for the Action.
2. Use the ___ to see which Approver has put the PCR on reserve.
3. Click the ___ to access the Action screen to view the data
entered for the PCR.
4. When a PA PCR has been completely approved, the ___ receives
the PCR back in his or her Inbox.
5. It is important that only when the PA Action has been
completely processed should the initiator mark the PCR
workflow item as ___.
6. If the PCR is touched more than ___ times, this places it at risk
for being lost.
Workflow Report Overview
The Workflow Report allows Approver and Managers to see at a glance the:
• Type of Actions and reasons created in the Agency
• Actions that are awaiting approval and at which approval level
• Length of time an approval has been waiting
• Transaction codes:
ZPA0189 (PA Workflow Report Current)
ZPAWFMON (PA Workflow Process Monitoring)
• Reports can be run based on security by:
Agency
Groups
Individual PCR
• Access the Workflow Report Job Aid online at the OSC Training HELP page.

Create and Maintain Employee Data Lesson 8: Workflow Process & Inquiry
PA310
updated 5-10-19 North Carolina Office of the State Controller Page 149
Searching for PA PCRs
When using Workflow reports, results can be narrowed by utilizing some or all of the following
criteria:
• Personnel number
• Action type
• Personnel area
• PCR ID
• PCR Workflow Approval Level
Report Options

Lesson 8: Workflow Process & Inquiry Create and Maintain Employee Data
PA310
Page 150 North Carolina Office of the State Controller updated 5-10-19
Modify Layout
• Use the Change Layout option to remove fields that you do not want to display from left
to right.
• Drag and drop columns on the report to change the order.
Save Layout
• Save layout field
Short name (begin with Z for user-specific)
• Name
Longer description for the layout
• User-specific
Only you have access
• Default setting
Indicates you want the layout to display each time the report is run

Create and Maintain Employee Data Lesson 8: Workflow Process & Inquiry
PA310
updated 5-10-19 North Carolina Office of the State Controller Page 151
Use a Layout
• Complete search criteria fields for the report.
• Click the Select layout option.
- - or - -
• From the menu: Settings > Layout > Choose.
• Select the applicable layout option.
• Execute the report.
* * * * * * * * * * * * * * * * * * * * * * * * * * * * * * * * * * * * * * * * * * * * * * * * * * * * *
EXERCISE 8.2: Execute the Workflow Report (PA)
SCENARIO
You need to see if there are any Suspension and Reallocation Actions
awaiting approval for the Natural and Cultural Resources Personnel Area.
In addition, you want to change and save the layout to your
specifications.
NOTE: For PA Actions use transaction code ZPA0189.
Instructions
1. From the Easy Access screen, enter ZPA0189 into the Command Field.
2. Enter.
3. In the Action Type field, use the matchcode to select the codes for New Hire to
Separation.
You must use leading zeros in these fields.
4. In the Personnel Area field, use the matchcode to select Natural and Cultural
Resources.
5. Enter and Execute.

Lesson 8: Workflow Process & Inquiry Create and Maintain Employee Data
PA310
Page 152 North Carolina Office of the State Controller updated 5-10-19
6. Click the Change Layout button and move items on the left Columns Displayed
panel to the Column Set on the right until only those in the list below are visible in
the Columns Displayed:
• Name of Action Type
• Name of Reason Type
• WF Approval Lvl
• PCR ID
• Personnel number
• Effective Date
• Name of employee or applicant
• Created Date
7. Click the green check to close the Change Layout pop-up.
8. Assume you have decided to move the order of the columns. Drag and drop the
columns so that they display left to right as shown below:
• PCR ID
• Name of Action type
• Name of reason for Action
• Effective Date
• Created Date
• Workflow Approval level
• Pers. No.
• Empl./Appl.name
9. Click the Save Layout button. The Save Layout pop-up box displays.
10. In the Save Layout field, enter: ZxxTrng (where xx = your initials).

Create and Maintain Employee Data Lesson 8: Workflow Process & Inquiry
PA310
updated 5-10-19 North Carolina Office of the State Controller Page 153
NOTE: When you use the User-specific button, you must begin the field with the
letter Z. When saving as a public layout, use the forward slash (/) at the beginning of
the Save Layout name.
11. In the Name field enter xx (your initials) Training.
12. Click the User-specific checkbox. This indicates that the layout is restricted to your
user ID. If you do not select User-specific, the layout can be used and modified by
anyone with the security to run the report.
13. Click the green check. A message displays indicating that the layout is saved.
14. Click the Back button to return to the Report criteria screen.
Now save as a variant for the rest of your team to use.
15. On the Menu at the top of the screen, click Goto > Variants > Save as variant. The
Variant Attributes screen is displayed.
16. Create a name in the Variant name field.
17. Create a description of the report in the Descript. Field that identifies the purpose of
the report.
18. Save your variant.
The next time you need to use a Variant:
• Click the Get Variant button or select menu path Goto > Variants > Get.
• In the pop-up box, double-click desired Variant to select.

Lesson 8: Workflow Process & Inquiry Create and Maintain Employee Data
PA310
Page 154 North Carolina Office of the State Controller updated 5-10-19
• The system will populate your report with the fields you set up when you created
the variant.
• Modify and enter data as needed prior to executing the report.
19. Click the Back button to return to the SAP Easy Access screen.
This exercise is complete.
* * * * * * * * * * * * * * * * * * * * * * * * * * * * * * * * * * * * * * * * * * * * * * * * * * * * *
EXERCISE 8.2: Use a Saved Layout to Run the Workflow Report
SCENARIO
You need to see if there are any Promotion PA Actions for Personnel
Area 4601 (Cultural Resources) awaiting approval. You want to use the
layout that you previously saved.
1. From the Easy Access screen, enter ZPA0189 into the Command Field.
2. In the Action Type fields, use the matchcode to select Promotion.
3. In the Personnel Area field, use the matchcode to select Natural and Cultural
Resources.
4. Click in the ALV variant field and select the variant you previously saved.
5. Enter and Execute. The report should display with the same layout as in the previous
exercise.
NOTE: If you forget to select the variant prior to executing the report, you can still
apply the variant after you are in the report by clicking the Select layout button and
choosing the applicable saved layout.
This exercise is complete.
* * * * * * * * * * * * * * * * * * * * * * * * * * * * * * * * * * * * * * * * * * * * * * * * * * * * *

Create and Maintain Employee Data Lesson 8: Workflow Process & Inquiry
PA310
updated 5-10-19 North Carolina Office of the State Controller Page 155
Additional Resources
Refer to the OSC Training website in HELP documents for more information
about Workflow.
Search for the following support document titles:
• Business Workplace Button Functions
• How to Cancel a PCR
• How to Locate a PA PCR
• PA Business Workplace Dynamic Columns & Layouts
• PA Business Workplace Overview Tree Functions
• PA Workflow Inbox
• PA Workflow Routing Process
• PA Workflow Steps in Approval Process
SUMMARY
This lesson described how to:
• Explain the purpose of Workflow
• Define key Workflow terms
• Describe the PA Personnel Workflow process
• Discuss the routing and processing of PA Workflow PCRs
• Understand the purpose of the PCR# and the PCR date
• Identify how to troubleshoot PCRs
• Execute the Workflow Report
Access and execute the Workflow Report for PA
Change the layout of the report
Create a variant for the report
Retrieve a report variant

Lesson 8: Workflow Process & Inquiry Create and Maintain Employee Data
PA310
Page 156 North Carolina Office of the State Controller updated 5-10-19
THIS PAGE INTENTIONALLY LEFT BLANK

Create and Maintain Employee Data Lesson 9: Reviewing Additional Actions
PA310
updated 5-10-19 North Carolina Office of the State Controller Page 157
Objectives
• View the Employee HR Overview (ZEMP) screen
• View the Employee Infotype Overview report
• Describe the Work Against process
• Describe Dual Employment
• Identify additional Actions
Demotion
Investigatory w/Pay
Suspension
Cancel Salary Adjustment
Career Progression
• Describe the Employment Salary Verification Process
• Review the PA Change Log
There are several more Actions available in the Integrated HR/Payroll System than you have had
the opportunity to practice in this class. One of those, Leave of Absence, is discussed in detail in
the PA420 - Leave of Absence and PA370 - Short-Term Disability classes.
The remaining Actions (listed above) are briefly discussed in this lesson.

Lesson 9: Reviewing Additional Actions Create and Maintain Employee Data
PA310
Page 158 North Carolina Office of the State Controller updated 5-10-19
EE HR Overview (ZEMP)
The Employee Overview screen is a “snapshot” of an employee’s information.
The transaction is initiated by entering data to define who and what timeframe an HR user needs
to view an employee’s information.
1. Enter ZEMP in the Command field on the Easy Access screen and press the Enter key or
click the green check ball.
2. Enter an Employee ID.
3. The current date defaults into the Selection Date field. You have the option to enter any
date that the employee has data in the system. If you enter a date that is not valid, you
receive the message ‘No Information for the date Entered.’ If you are not authorized, you
will receive a message indicating that you do not have authorization.
4. Click the Execute button to perform the transaction.

Create and Maintain Employee Data Lesson 9: Reviewing Additional Actions
PA310
updated 5-10-19 North Carolina Office of the State Controller Page 159
Areas of Data include:
• Employee Data
• Latest EE Action & Salary Changes
• Position Data
• Organizational Data
• Time Data
REMEMBER: This screen’s data view is not intended as a source for public information.
EE Infotype Overview
(pc00_m02_linf0)
The EE Infotype Overview is a transaction screen that lists
all active infotypes for an employee during a specified
period of time.
Enter the Transaction Code PC00_M02_LINF0 in the
Command field and press or click Enter. Make the
necessary selections (personnel number and validity
dates). Click the Execute button.
You can expand or collapse any or all of the infotypes.
To see the detail of a specific infotype (i.e., IT0001),
double-click the infotype or select it and click at the top
of the screen. The system will display the detail screen
(same as PA20 – Display Master Data). You can click the
green back arrow to return to the EE Infotype Overview
screen.

Lesson 9: Reviewing Additional Actions Create and Maintain Employee Data
PA310
Page 160 North Carolina Office of the State Controller updated 5-10-19
Range Revision Action
• Labor Market (LM) Full
• Labor Market Partial
• LM After Eff Date Complete
• LM After EFF Date Retro/Min
• LM No Salary Adjustment
• Job Change Full
• Job Change Partial
• Job Chg Eff Date Complete
• Job Chg Eff Date Retro/Min
• Job Chg No Salary Adjustment
The reason, Range Revision Partial, is used when an employee is receiving only part of the funds.
Later, if additional partial funds are released, you will create a new Range Revision and use
partial as the reason with the new effective date and not the date of the original Range Revision
Action. Of course, if the additional released funds are for the full amount, you would use Range
Revision after Effective Date Complete (with the current date) instead of Range Revision Partial.
The reason Range Revision after Effective Date (Retro to Min) can be used only to bring an
employee up to the minimum.
Range Revision Process
Range Revision is a change in the salary range, resulting from changes in the labor market. Any
salary range change must have the approval of the State Human Resources Commission (SHRC).
The revision may result in a change to the minimum and maximum, to the minimum only, or to
the maximum only.

Create and Maintain Employee Data Lesson 9: Reviewing Additional Actions
PA310
updated 5-10-19 North Carolina Office of the State Controller Page 161
After the SHRC approves a salary range revision, OM Production Support will make changes to
the Job class. This must happen before Personnel Administration can initiate the Range Revision
in the Integrated HR/Payroll System.
• NOTE: A change in the Job will automatically change the salary range of all Positions that
are within that Job (Class).
After the Job has been updated, HR must identify the employees who are affected by the
change and then initiate a Range Revision via Workflow for each employee. If funding is
available, the applicable reason and salary changes are made and the Action is completed.
However, if funding is not available, HR still initiates the Range Revision Action, but chooses No
Salary Adjustment as the reason. In this case, HR must then execute additional steps to reserve
the balance.
Range Revision - No Funds Available
Assume that the funds were not available at the time the employee was eligible for the range
revision. You will still initiate the RR Action, but choose No Salary Adjustment as the reason. You
must then execute PA30 Maintain Master Data, IT0052-subtype 0100 Wage Maintenance to
reserve the balance (enter the amount of the revision, not the entire salary). After funds become
available, you will go back to RR and select the appropriate reason. Remember to verify the
position information has been changed before you initiate the RR for the employee.
If later, some or all the funds become available, you will process a series of Range Revisions and
PA30s to give the funds to the employee, and reduce the amount of the balance.

Lesson 9: Reviewing Additional Actions Create and Maintain Employee Data
PA310
Page 162 North Carolina Office of the State Controller updated 5-10-19
Work Against
A Work Against can be used during
many of the Personnel Administration
Actions, including New Hire, Promotion,
Reinstatement/Reemployment, Non-
BEACON to BEACON, and Transfer.
Specific rules for using Work Against are
detailed on the following pages.
The rules for Work Against are
available in the Work Against memo
from the Office of State Human
Resources.
The rules for the Integrated HR/Payroll
System Work Against are explained in the
memo mentioned above. In the past,
there have been vast differences in the
understanding and application of Work
Against. You should review the Integrated HR/Payroll System rules in depth to ensure that your
agency consistently follows the guidelines. You can access the Work Against memo online at the
OSHR website and the Training HELP site.
Additional Resources
Refer to the OSC Training website in HELP documents for more information
about Work Against communication.
Search for the following support document titles:
• Work Against Memo

Create and Maintain Employee Data Lesson 9: Reviewing Additional Actions
PA310
updated 5-10-19 North Carolina Office of the State Controller Page 163
Work Against Process
The various complexities of an Integrated HR/Payroll System Work Against are outlined and
described below and on the following pages.
The Integrated HR/Payroll System employee group and subgroup are used to designate
the employee type.
Employees are no longer hired into positions that are titled specifically to describe the employee
type. For example, there are no longer position titles with the words temporary, intern, or
probationary, etc., as part of the title. Positions are named by the Job Classification title by
default (Engineer I, Engineer II). The employee subgroup is changed to reflect if the employee is
a trainee, probationary, time limited, grant, or temporary employee.
The employee and the position must have the same supervisor.
Whether the WA is for one or more employees assigned to a position, the employees and the
position must report to the same supervisor. (The employee holds the position and the
employee’s position reports to the supervisor’s position.)
The employee record (HR Personnel Administration) must be updated in conjunction with
the position record.
There is only one PA Workflow for W/A, however, that one Workflow involves two separate
components: PA (employee) and OM (position). The HR Master Data Maintainer must change
the working title on the position first. Then you can create the PA PCR for the Employee.

Lesson 9: Reviewing Additional Actions Create and Maintain Employee Data
PA310
Page 164 North Carolina Office of the State Controller updated 5-10-19
The Basic Pay data on the PA PCR must match the W/A title.
The position title should include the initials W/A as a prefix.
The position object name (title) is changed to include the prefix W/A (maintained on PO13 by
the agency)*. HR PA indicates the Work Against title by using the Services for Object button
when creating the initial Workflow. Changing the position with this prefix ensures that reports
accurately reflect all the employees who are assigned to Work Against positions.
*maintained on PO13 by the agency
The position title field will store the Work Against (W/A) title (employee working title) in work
against situations. For example, an Engineer II working against an Engineer III would be handled
as follows:
• Job Class Title: Engineer III
• Position Title before W/A Action: Engineer III
• Notes in PA PCR indicate employee is working as an Engineer II against the Engineer III
• Agency HR Master Data Maintainer modifies the Position Title to reflect the W/A
Engineer II
• BI reports would reflect:
Job Title: Engineer III (does not change)
Position Title: W/A Engineer II (this is now the title of the Engineer III position)
A bona fide and approved job class must be used.
You cannot use an informal working title as the position title of a Work Against. The position
title must be an official job (class) title. For example, Engineer IV is a valid job title. Therefore, an
employee can work against an Engineer IV position, but the employee could not work against a
“Safety Engineer” position. The title the employee is working against should be entered in the
Notes attached to the PCR as previously described.
The timing of the employee record update and the position update must be coordinated
to ensure consistency in data records.
For the Employee’s record to be correct, you must update the position first for the working title
to populate on the PA PCR.

Create and Maintain Employee Data Lesson 9: Reviewing Additional Actions
PA310
updated 5-10-19 North Carolina Office of the State Controller Page 165
Examples of Correct Work Against Usage
An OSHR review lowers employee title and grade (through no fault of the employee).
After a review by OSHR the duties of an employee are determined to be consistent with a title
and grade level lower than the one the employee currently holds. Because the lower title and
grade level were through no fault of the employee, he or she will be allowed to work against the
current title and grade while the position title and grade will be changed to the lower levels.
Example: The employee is currently working as an Environmental Program Manager III, at an 86
grade level. After the review, the position is changed to an Environmental Program Manager I
position at an 82 grade level. As long as the employee remains in the position, he or she will
work against the Environmental Program Manager III position, grade level 86. When the
employee leaves the position, the agency will recruit for the correct position (Environmental
Program Manager I, grade 82 in our example).
Hire two or more employees to work against a bona fide position (example: job sharing).
You can hire two or more employees to work against a position that is a bona fide and approved
job title. The salary, appointment type and work schedule for each of the employees may be the
same or may be different from each other. However, when hiring two or more employees to
work against a position you must follow these additional rules:
• The total cannot exceed one full-time equivalent position.
• The combined salary of the employees cannot exceed the total amount budgeted for the
position.
• The classification, supervisor and all other attributes must be the same for all employees
working against the position.
Despite your best recruiting efforts, you have not been able to fill a bona fide position.
You have an open position that is a bona fide and approved job title. Despite your best
recruiting efforts, you have not been able to fill that position. You can hire an employee to work
against that position, if the person you are hiring and the position both report to the same
supervisor.
Position moved to report to Supervisor.
If the position to which an employee will be working against does not report to the employee’s
supervisor, the W/A position must be moved. The W/A position must belong to the same org
unit as the supervisor’s position with the supervisor’s position designated as the supervisor of
the employee’s W/A position.

Lesson 9: Reviewing Additional Actions Create and Maintain Employee Data
PA310
Page 166 North Carolina Office of the State Controller updated 5-10-19
Dual Employment
There are basically four scenarios to use dual employment:
• BEACON to BEACON (ITS to REVENUE)
• BEACON Employee Performing Dual Employment at Non- BEACON agency (DOT to
NCSU)
All dual employment will be processed by BEST Shared Services. The information in this lesson is
to provide you with a basic understanding of the processes and policies. When dual
employment involves a non-BEACON to BEACON agency, BEST HR will execute a Quick Entry
Action to assign the employee to the position. When the dual employment involves a BEACON
to BEACON agency, BEST Shared Services will assign the holder (employee) to the position and
then create Infotype 0554 – Hourly Rate per Assignment on the employee.
Because the Integrated HR/Payroll System is an integrated system, time, benefits and payroll are
all affected by dual employment (unless the employee is hired into the borrowing agency as a
temporary). In the Integrated HR/Payroll System, the hours of both jobs are combined to
determine benefits and time. That is why it is important for the Parent and Borrowing agency to
sign the agreement before the employee begins working dual employment.
The Parent agency must now be aware that if one of its employees works dual employment and
becomes eligible for benefits (based on extra hours worked), there will be a cost to the Parent
agency. In the past, the number of hours the employee worked at the borrowing agency did not
matter.
Additional Resources
Go to the BEST website to access the Dual Employment form on the OSC
BEST website.
• https://www.osc.nc.gov/state-employees/BEST

Create and Maintain Employee Data Lesson 9: Reviewing Additional Actions
PA310
updated 5-10-19 North Carolina Office of the State Controller Page 167
Dual Employment - Time and Overtime
Time
Employees are changed to positive time when performing Dual Employment. BEST Shared
Services will enter the employee’s time.
Overtime
• When overtime occurs because of additional work, it shall be paid. Compensatory time
cannot be given.
• Overtime shall be paid by the agency where the overtime occurs. This is based on the
standards expressed in the Dual Employment Agreement signed by the employee and
both agencies.
• It is the responsibility of the Borrowing agency to work with the Parent agency to
determine if overtime occurs and to arrive at the appropriate overtime rate according to
FLSA. To calculate “premium rate,” add hourly rates including all non-discretionary
payments (i.e. Shift premium, weekend premium) and divide by standard hours.
Comp Time Agreement of Both Agencies
Both agencies shall agree that comp time earned prior to the Dual Employment Agreement as
well as leave can be taken in either agency, not just the agency where earned.
Ending a Dual Employment
The agency submits the Separation form to BEST requesting termination of services. The form
can be accessed from the BEST website.
Miscellaneous Dual Employment Policies
Payment to the Parent Agency
If both agencies are under the Integrated HR/Payroll System, it will no longer be necessary to
send a check to the Parent agency. The Integrated HR/Payroll System will charge the payment to
the appropriate salary account as shown on the approved Dual Employment Form. The
employee receives one direct deposit (paycheck).
Workers’ Compensation
When an employee who holds two separate jobs is injured on one of them, the employee’s
Workers’ Compensation entitlements are based only upon the average weekly wages earned in
the employment producing the injury (GS 97-2.)--over 40 hours paid - weighted average.
Average weekly wage will be manually calculated and provided to the Workers’ Compensation
specialist.

Lesson 9: Reviewing Additional Actions Create and Maintain Employee Data
PA310
Page 168 North Carolina Office of the State Controller updated 5-10-19
CP30
As indicated above, there are only two circumstances when a CP30 is needed. When the
situation warrants a CP30, it is sent to BEST by the Integrated HR/Payroll System agency that
received the funds. The CP30 is not sent by the employee nor by the secondary agency. When
the parent agency sends the CP30 to BEST, that agency is verifying that funds are available. The
parent agency ensures that the CP30 is sent to BEST only one time.; therefore, if the agency
emailed the CP30, it does not need to then fax the form as well. Sending a CP30 in for an
employee more than once increases the likelihood that the employee may be paid more than
once.
The employee completes a paper time sheet at the second agency which is signed and approved
by the supervisor. The time sheet should have the hourly rate, the position number and contain
the words “Dual Employment.” The time sheet is sent to BEST who will enter the time for the
secondary position. The employee enters time as usual for the primary position.
Dual Employment Policy Examples
Below are examples of how dual employment affects benefits and time:
Permanent full-time (FT) or permanent part-time (PT) employee working temporary in
another agency
A typical dual employment situation involves a permanent FT or PT employee in one agency
doing temporary work for another agency and typically paid a flat amount either in a lump sum
or monthly over the course of employment (it may also be an hourly rate). Benefits are paid by
the full-time, 30-hour or more position.
Permanent part-time employee working permanent part-time in another agency but the
total of two part-time jobs adds up to less than 30 hours per week
Handle as regular dual employment. The benefits involved are leave, NC Flex, 457 Savings Plan.
If the employee works as much as 20 hours per week in one agency, the employee is entitled to
leave benefits in that agency. The leave accrual and usage must be based on the standards
expressed in the Dual Employment Agreement signed by the employee and both agencies.
Permanent part-time employee working permanent part-time in another agency that adds
up to 30 hours or more (not to exceed 40) per week
This type is different from other dual employment. The same approval is required; however,
Parent agency must be willing to pay its share of benefits. In this situation, the employee would
be eligible for full benefits. Both agencies must be willing to pay their prorated share of
retirement, health insurance, etc. If this arrangement cannot be worked out, then the additional
employment must be as a temporary appointment. Parent agency owns the one leave record.
Borrowing agency sends paper copy of timesheet to Parent agency so that Parent agency can
bill Borrowing agency. If Parent agency is in the Integrated HR/Payroll System, the time sheet is
forwarded to BEST Shared Services for entry.

Create and Maintain Employee Data Lesson 9: Reviewing Additional Actions
PA310
updated 5-10-19 North Carolina Office of the State Controller Page 169
Demotion Action
Demotion is a change in status resulting from assignment to a position assigned a lower salary
grade. The action is a demotion if the change in status results from inefficiency in performance
or as a disciplinary action. All necessary disciplinary paperwork must be approved prior to the
demotion process by the appropriate authorities.
Either skip or delimit the objects on loan depending upon your agency’s policy.
• Personal Conduct – Position
• Gross Inefficiency – Position
• Unsatisfactory Performance – Position
• Personal Conduct – Job Reallocation
• Gross Inefficiency – Job Reallocation
• Unsatisfactory Performance –
Job Reallocation
• Personal Conduct – Salary
• Gross Inefficiency – Salary
• Unsatisfactory Performance – Salary
• 115C Demotion
Additional Resources
Refer to the OSC Training website in HELP documents for more information
about Demotions.
Search for the following support document titles:
• Demotion Action
• PA Actions Reasons Definitions

Lesson 9: Reviewing Additional Actions Create and Maintain Employee Data
PA310
Page 170 North Carolina Office of the State Controller updated 5-10-19
Investigatory w/Pay Action
An employee may be placed on Investigatory Status with Pay to allow the agency adequate time
to investigate the validity of the allegations of unsatisfactory performance/unsatisfactory
conduct. If allegations are confirmed, the agency will determine what further disciplinary action
may be warranted.
Reasons for Investigatory w/Pay Action
• Investigatory Placement Leave
• Extended
When an employee is placed on leave with pay, his/her leave balance is not used. Code 9690 -
Investigatory Leave should be entered on the timesheet. Follow agency policy for approvals.
Use the Monitoring of Tasks (IT0019) infotype to remind you about the return date.
Either skip or delimit the objects on loan depending upon your agency’s policy.
Additional Resources
Refer to the OSC Training website in HELP documents for more information
about the Investigatory w/Pay Action.
Search for the following support document titles:
• Investigatory w/Pay Action
• PA Actions Reasons Definitions
Suspension Action
The Suspension Action is used to remove an employee from work for disciplinary reasons
without paying the employee.
• Conduct
• Unsatisfactory Performance
• Gross Inefficiency
• 115C Pre-Disciplinary
• 115C Disciplinary
Since it is presumed that the employee will return to work you would use the Monitoring of
Tasks (IT0019) infotype to remind you about the return date.
Create and Maintain Employee Data Lesson 9: Reviewing Additional Actions
PA310
updated 5-10-19 North Carolina Office of the State Controller Page 171
Either skip or delimit the objects on loan depending upon your agency’s policy. Follow your
agency policy for approvals.
An IT2012 will be created automatically in the background to prevent payment of longevity
because of a suspension. Do not delete or change this infotype. HR should monitor length of
service after the employee is reinstated to be sure they receive the appropriate audit. Issues
should be directed to BEST HR.
Additional Resources
Refer to the OSC Training website in HELP documents for more information
about the Suspension Action.
Search for the following support document titles:
• Suspension Action
• PA Actions Reasons Definitions
Cancel Salary Adjustment Action
A Cancel Salary Adjustment is a decrease in an employee’s salary within the employee’s current
salary range and within the agency where the employee is currently employed.
• Cancel Salary Adjustment
• Cancel Acting Pay/Promotion
• Cancel Lead Adjustment
• Cancel In-range Adjustment
• Cancel Geographic Differential
• Cancel Site Differential
• Cancel CGRA
• Cancel Legislative Increase
• Cancel Career Progression
• Cancel LEO Sworn
• Cancel Temp Comp/Skill
• Cancel Temp IRA for Job Change
• Cancel Auto Sal Adj (AOC Only)
The same reasons that existed to give an employee a salary adjustment also exists to cancel the
adjustment (with the obvious exception that the word cancel precedes it). For example, you give
an employee an acting pay salary adjustment and then decide to cancel the action by selecting
Cancel Acting Pay.

Lesson 9: Reviewing Additional Actions Create and Maintain Employee Data
PA310
Page 172 North Carolina Office of the State Controller updated 5-10-19
Additional Resources
Refer to the OSC Training website in HELP documents for more information
about the Cancel Salary Adjustment Action.
Search for the following support document titles:
• Cancel Salary Adjustment Action
• Salary Adjustment Action
• Salary Adjustment Action Guide
• PA Actions Reasons Definitions
Career Progression Action
A Career Progression is used for employees in banded classes and may be granted in
conjunction with demonstrated competencies or as justified through the labor market. For
example, an employee was hired at a contributing level and given certain goals to reach to
advance to the journey level. After the employee achieves goals, his or her manager requests
that the position be changed to journey. HR will then execute the Career Progression Action on
the employee.
Career Progression is used when pay factors support a salary adjustment within the pay range of
the career-banded class and when the employee attains and uses more advanced competencies
in same position. Salary eligibility is based on application of all F.A.I.R.* pay factors. When an
employee demonstrates required competencies in a position but is not yet at market index, s/he
may receive a Career Progression.

Create and Maintain Employee Data Lesson 9: Reviewing Additional Actions
PA310
updated 5-10-19 North Carolina Office of the State Controller Page 173
Employees with active warning/disciplinary actions or with overall below good or unsatisfactory
ratings are not eligible for a career progression adjustment based on competency assessment.
* F.A.I.R.
• F Financial Resources
• A Appropriate Market Rate
• I Internal Pay Alignment
• R Required Knowledge, Skills, and Abilities
Reasons for a Career Progression
• CP-Comp/Skill
• CP-Labor Market
• CP-Comp Level Change
• Broad Band Level Change
• Broad Band Job Change
• Temporary Comp/Skill
CP-Comp/Skill - pay factors support a salary increase within the pay range of the employee’s
career-banded class in conjunction with the employee’s attainment and demonstrated use of
competencies in the same position. Overall competency level may or may not change. If a salary
increase is not granted due to funding issues, and competency level does not change, a Career
Progression Action is not processed.
CP-Labor Market – an employee’s salary is low in relation to market guidelines applicable to
the employee’s competencies, and a salary increase is in order. Such a situation could be due to
an adjustment in the banded class market rates in conjunction with a labor market study,
implementation of a market reference rate with the agency/university, insufficient funding at
time of career banding implementation to pay employee at appropriate rate, or removal of an
internal equity/pay alignment issue that had prevented an employee from being paid at
appropriate competency rate.
CP-Comp Level Change – employee’s competency level changes although a salary increase is
not granted. Employee’s attainment and demonstrated use of competencies results in a higher
overall competency level. However, due to funding issues or because employee’s salary already
exceeds the appropriate rate, the salary is not increased.
Broad Band Level Change – a change in the level to which an employee is assigned.

Lesson 9: Reviewing Additional Actions Create and Maintain Employee Data
PA310
Page 174 North Carolina Office of the State Controller updated 5-10-19
Broad Band Job Change – a transfer of an employee from one banded occupational group to
another banded occupational group. This may or may not involve position number and salary
change. The Object ID (job) must change, therefore, you must coordinate with Organizational
Management. If a salary change is involved, the reason for the adjustment and justification for
any increase exceeding 10% should be included in the Comments section.
Temporary Comp/Skill - Salary adjustment within the pay range of the employee’s career-
banded class, in conjunction with the employee’s temporary assignment of higher level
competencies in the same position. Overall competency level may or may not change.
NOTE: Additional competencies are not the result of “acting pay or acting promotion.”
Additional Resources
Refer to the OSC Training website in HELP documents for more information
about Career Progression Actions.
Search for the following support document titles:
• Career Progression Action
Employment/Salary Verification
The BEST Shared Services Call Center is responsible for both Employment and Salary
Verifications for the State Agencies.
Employment Verifications
Most Employment Verifications for loans are completed verbally over the phone by the Call
Center Rep when the call is received.
• Person calling
• Company calling from and a contact number
• EE for whom the information is requested
• Information requested – only Public Information can be given out on the phone

Create and Maintain Employee Data Lesson 9: Reviewing Additional Actions
PA310
updated 5-10-19 North Carolina Office of the State Controller Page 175
Salary and Child Support Verifications
Salary and Child Support Verifications require written requests and are completed by a payroll
specialist.
If a Salary Verification request has specific questions pertaining to the employee, such as, “is the
employee still eligible for employment” or requests information on hours worked or out on
leave, the request can be forwarded to the agency for assistance.
If an agency receives a request for an Employment Verification, the request can be sent to BEST
for assistance or the agency can give the requester the BEST phone number to call directly.
PA Change Log
The PA Change Log report transaction
allows you to see a log of changes that
have been made to PA infotypes.
Changes are being logged for most of
the commonly used PA infotypes.
These logs are available for changes
made in the previous six (6) months.
Change log data older than six months
will be archived but still available.
Contact BEST for assistance in
retrieving these records.
The transaction code used for this
report transaction is ZPACHGLOG.
Users with the following roles will be
able to run ZPACHGLOG:
• HR Master Data Maintainer
• HR Master Data Approver
• HR Director Display

Lesson 9: Reviewing Additional Actions Create and Maintain Employee Data
PA310
Page 176 North Carolina Office of the State Controller updated 5-10-19
The Initial Screen
Selection Section
• Entering specific selection criteria will help the program run more quickly and give you
more targeted results.
• Enter the Personnel Number of the employee(s) for whom you want to see change log
data.
• Enter the value of the infotype(s) for which you want to see change log data.
• Enter a date or date range if you know when the change(s) were made.
• Enter the Personnel Number of the person who made the changes.
NOTE: The other settings on the initial screen affect how the results are formatted.
Result Screen
An overview list of changes is presented first. Clicking on a row and then clicking on the Choose
button will display the detail screen for that change.
NOTE: By default, the oldest changes are listed first. The Sort Order selection option on
the initial screen can be used to change the sort order to display by Personnel Number,
Infotype, or the User who made the change.
On the detail screen, you will see a header section and one or more record detail sections.

Create and Maintain Employee Data Lesson 9: Reviewing Additional Actions
PA310
updated 5-10-19 North Carolina Office of the State Controller Page 177
The header section displays the following information:
• Personnel Number and name of the employee
• Infotype value and name
• Changed by and the Date and Time (who and when the change was made)
The record detail sections display:
• The From and To validity dates of the record
• The Type of change Action (Insert, Delete, or Update)
• The Old and New values for the specific Fields on that Infotype
The change shown above caused an existing record (shown at the bottom; effective from
1/14/08 to 12/31/99) to be “Deleted” (indicated with the “D” Action indicator), and replaced by
two “Inserted” records (indicated with the “I” Action). The two new inserted records span the
same effective period as the old record.
Take note of the Action indicators in the example above circled in red.
An asterisk (*) to the left of the Field name in the record detail section indicates there is a
difference between the Old and New values for that Field. This indicator will be most helpful in
cases where an existing record has been Updated (by using the Change button).

Lesson 9: Reviewing Additional Actions Create and Maintain Employee Data
PA310
Page 178 North Carolina Office of the State Controller updated 5-10-19
Additional Resources
Refer to the OSC Training website in HELP documents for more information
about the PA Change Log.
Search for the following support document titles:
• PA Change Log
Leave of Absence Class
The PA420 - Leave of Absence class is an ADVANCED level class. You should take this course only
if you have first become comfortable processing Actions in the Integrated HR/Payroll System.
The class is designed for the mature system user in that the course assumes an experienced
processor of actions and the course content begins at that point. Concepts are presented based
on a strong foundation and comfort level of the SAP Workflow process.
SUMMARY
This lesson described the Work Against process. It also described the Dual Employment process
including time entry and overtime. The lesson also described several other Actions. Elements of
the Employee and Salary Verification process were explained.

Create and Maintain Employee Data Lesson 10: Course Review
PA310
updated 5-10-19 North Carolina Office of the State Controller Page 179
Course Objectives
In this course, you learned to:
• Describe the process for the various Actions
• Create new records associated with the life cycle of an employee
• Modify existing employee data
Next Steps
• Monitor the Integrated HR/Payroll System communication
BEST Shared Services website
URL: https://www.osc.nc.gov/state-employees/BEST
Review conceptual materials
Access the Training HELP site
URL: https://www.osc.nc.gov/state-agency-
resources/training/training_help_documents
Practice what you’ve learned
URL: https://mybeacon.nc.gov
Client 899
Use your current NCID user name and password
Keep your training materials close by as a ready reference.
Want to practice what you have learned from your desk?
Follow the link provided above to access the training client on the Integrated HR/Payroll System
portal. The training client is number 899. Your current NCID user name and password are used
to access the practice environment.
Need transactional assistance?
Remember to access the Training HELP website when you need assistance in completing
transactions. As stated above, the work instructions can be accessed on line through the web
link in the steps above.

Lesson 10: Course Review Create and Maintain Employee Data
PA310
Page 180 North Carolina Office of the State Controller updated 5-10-19
Course Assessment/Evaluation
Follow the instructions given by your instructor to complete your competency assessment and
your evaluation of today’s class in the Learning Management System (LMS).
CONGRATULATIONS!
You’ve completed the course!

Create and Maintain Employee Data Lesson 10: Course Review
PA310
updated 5-10-19 North Carolina Office of the State Controller Page 181

Lesson 10: Course Review Create and Maintain Employee Data
PA310
Page 182 North Carolina Office of the State Controller updated 5-10-19