unix shell and programming - wordpress.comas linux, ubuntu, freebsd, sunos, solaris, sco, and aix....
TRANSCRIPT

UNIX SHELLPROGRAMMING
AND
B.M. HarwaniFounder & Owner
Microchip Computer Education (MCE)Ajmer

3Oxford University Press is a department of the University of Oxford.
It furthers the University’s objective of excellence in research, scholarship, and education by publishing worldwide. Oxford is a registered trade mark of
Oxford University Press in the UK and in certain other countries.
Published in India by Oxford University Press
YMCA Library Building, 1 Jai Singh Road, New Delhi 110001, India
© Oxford University Press 2013
The moral rights of the author/s have been asserted.
First published in 2013
All rights reserved. No part of this publication may be reproduced, stored in a retrieval system, or transmitted, in any form or by any means, without the
prior permission in writing of Oxford University Press, or as expressly permitted by law, by licence, or under terms agreed with the appropriate reprographics
rights organization. Enquiries concerning reproduction outside the scope of the above should be sent to the Rights Department, Oxford University Press, at the
address above.
You must not circulate this work in any other formand you must impose this same condition on any acquirer.
ISBN-13: 978-0-19-808216-3ISBN-10: 0-19-808216-9
Typeset in Timesby Quick Sort (India) Private Limited, Chennai
Printed in India by Raj Kamal Electric Press, Kundli, Haryana
Third-party website addresses mentioned in this book are providedby Oxford University Press in good faith and for information only.
Oxford University Press disclaims any responsibility for the material contained therein.

Dedicated to my mother, Nita Harwani
Mom, whatever I am today is because of the moral values taught by you.
I also pay tribute to the offi cers,men and women of all ranks,of the Indian Armed Forces.
I salute these brave, patriotic, and disciplined people for serving our country.

PrefacePrefaceUnix operating system, developed in the 1960s, is regarded as one of the most powerful operating systems, due to its portability and usage in almost all kinds of environments. It is the result of the combined efforts of many people—students, professors, researchers, and commercial companies. It is a multitasking and multi-user operating system that is portable on several hardware platforms and is very secure. It provides a rich set of tools and utilities that help administrators, programmers, and users, to a great extent, in executing their tasks. Besides this, Unix offers the fl exibility of controlling individual jobs executed by a user.
Since its inception, Unix has been evolving constantly and has given rise to various products such as Linux, Ubuntu, FreeBSD, SunOS, Solaris, SCO, and AIX. In order to understand and learn these products that are widely in use, it is imperative for users to have a clear understanding of the root, that is, the actual Unix operating system—its features, management of devices and fi les, implementation of security, scheduling of CPU, and memory management.
Nowadays, Unix and its by-products are used as servers and in developing mobile applications. Unix has also served as a model for the development of the Internet, thus shifting the focus of computers towards the creation of networks.
ABOUT THE BOOK
The book has been designed to cater to students, teachers, professionals, and developers to help them learn the fundamental concepts of the Unix operating system. It follows a bottom-up approach, that is, it explains basic commands and gradually moves towards advanced commands. Similarly, it begins with small and easy scripts and makes the reader acquainted with the fundamental statements, loops, and conditional statements in a systematic manner. Gradually, it moves on to explain large, complex, and critical scripts. The book focuses on advanced Unix commands that perform critical functions such as setting access permissions, changing ownerships of the fi les, sharing fi les among groups, performing input/output (I/O) redirections, cutting or slicing the fi le vertically, pasting content, comparing fi les, and printing documents. It explains in detail the manipulation of processes and signals and the role of system calls. All the major editors in Unix, namely, stream editor (sed), visual editor (vi), and modeless editor (emacs) are explained in detail.
The book describes Bourne, Korn, and C shell programming and covers all important topics and commands associated with these shells. It also includes numerous programming scripts for better understanding of the three types of shells. The later part of the book includes dedicated chapters on language development tools (Yacc, Lex, and M4), text-formatting tools (troff and nroff), and Unix networking and administration.
KEY FEATURES
The book is packed with numerous student-friendly features that are described here. • Complete scripts along with their outputs are provided for easy implementation of the concepts learnt.• Each command is explained with its syntax with the help of multiple examples.
Preface vii
• Several options of a single command have been provided in a tabular format along with their function, description, and examples for quick understanding and usage.
• Numerous notes are interspersed with the text for providing additional relevant information.• Around 1000 solved examples and over 900 end-chapter exercises (with answers to objective-type
questions) are provided.• Specially designed brain teasers are provided at the end of most chapters for the readers to develop
an analytical approach to problem-solving. • A variety of objective-type questions—state true or false, fi ll in the blanks, and multiple-choice
questions—are provided at the end of every chapter for testing the understanding of the concepts learnt.
• Several review questions and programming exercises are provided for the reader to practise the commands and scripts explained in the chapters.
ONLINE RESOURCES
The companion website of the book, http://oupinheonline.com/book/harwani-unix-shell-programming/9780198082163, provides the following additional resources:
For faculty• Chapter-wise PowerPoint Slides• Answers to select programming exercises given in the book
For students • Chapter-wise executable and complete shell scripts and codes for all the programs given in the
book• Mail Organizer—a small project that sends mail to the desired recipient on a given date• Inventory Management System—a small project that explains maintenance of inventory using
MySQL database server• Debugging exercises with solutions• Flashcards—for active recall of all important Unix commands
ORGANIZATION OF THE BOOK
The book is organized into 15 chapters.
Chapter 1, Unix: An Introduction, focuses on the fundamentals of operating systems, history of Unix, structure of the Unix operating system, Unix environment, and different types of shells.
Chapter 2, Unix File System, explains the different types of regular and device fi les, organization of a fi le system, accessing, mounting, and unmounting a fi le system, different blocks of a fi le system, and structure of inode blocks.
Chapter 3, Basic Unix Commands, describes basic commands such as logging into the system, changing the password, checking who is logged in, displaying date and time of the system, and dealing with fi le operations such as creating fi les, displaying their contents, deleting fi les, creating links to fi les, renaming fi les, and moving fi les. The chapter also explains commands for maintaining directories, creating a directory, changing the current directory, removing a directory, displaying calendars, using

viii Preface
basic calculators, displaying information about current systems, deleting symbolic links, and exiting from a Unix system.
Chapter 4, Advanced Unix Commands, discusses advanced commands such as setting access permissions for the existing fi les and directories, setting default permissions for the newly created fi les and directories, creating groups, changing ownerships of the fi les, and sharing fi les among groups. The chapter covers commands for sorting content, performing I/O redirections, cutting the fi le vertically, pasting content, splitting fi les, counting characters, words, and lines in fi les, using the pipe operator, comparing fi les, eliminating and displaying duplicate lines, among others.
Chapter 5, File Management and Compression Techniques, explains the types of devices, role of device drivers, and the way in which devices are represented in the Unix operating system. It details different disk-related commands required for copying, formatting, fi nding usage, fi nding free space, and making partitions. It also covers compression and decompression of fi les.
Chapter 6, Manipulating Processes and Signals, focuses on processes and their address space, structure, data structures describing the processes and process states, commands related to scheduling processes at the desired time, handling jobs, and switching jobs from the foreground to the background and vice versa. It explains suspending, resuming, and terminating jobs, executing commands in a batch, ensuring process execution even when a user logs out, increasing and decreasing the priority of processes, and killing processes. The chapter also discusses signals, their types, and the methods of signal generation, virtual memory and its role in executing large applications in a limited physical memory, and mapping of a virtual address to the physical memory.
Chapter 7, System Calls, is devoted to the role of system calls in performing different tasks. The chapter explains system calls that are used in fi le handling operations such as opening, creating, reading from and writing to fi les, closing, deleting, and linking to fi les, changing fi le access permissions, accessing fi le information, and relocating and duplicating fi le descriptors. The chapter covers the system calls that perform different tasks related to directory handling such as changing, opening, and reading directories. The chapter throws light on the system calls involved in process handling operations such as the exec(), fork, and wait system calls and those that deal with memory management—allocating memory, freeing memory, changing the size of the allocated memory, fi le locking, and record locking .
Chapter 8, Editors in Unix, explains the usage of the stream editor (sed) in fi ltering out the desired data from the specifi ed fi le, inserting lines, deleting lines, saving fi ltered content into another fi le, loading the content of another fi le into the current fi le, and searching for content that matches specifi c patterns. The chapter also explains the visual editor (vi) and the modeless editor (emacs).
Chapter 9, AWK Script, discusses the role of the AWK scripts in fi ltering and processing content. It explains the different functions used in AWK for printing results, formatting output, and searching for desired patterns. The chapter also details different operators (comparison, logical, arithmetic), functions (string, arithmetic, and search and substitute), and built-in variables to perform the desired operations quickly and with the least effort. It also discusses different loops to perform repetitive tasks, taking input from the user to perform operations on the desired content.
Chapter 10, Bourne Shell Programming, explains different command line parameters used in Bourne shell scripts, conditional statements, loops, reading input, displaying output, testing data, translating content, and searching for patterns in fi les. The chapter also covers displaying the exit status of the

Preface ix
commands, applying command substitution, sending and receiving messages between users, creating and using functions, setting and displaying terminal confi gurations, managing positional parameters, and using fetch options in the command line.
Chapter 11, Korn Shell Programming, helps us in understanding different features of the Korn shell, command line editing, fi le name completion, command name aliasing, command history substitution, and meta characters. It explains different operators, shell variables, basic I/O commands, command line arguments, if else and case statements, strings, fi les, loops, arrays, functions, and I/O redirection.
Chapter 12, C Shell Programming, describes the C shell and its different features. The chapter explains command history, command substitution, fi lename substitution (globbing), fi lename completion, and aliases. It also covers job control, running jobs in the background, and suspending, resuming, and killing jobs. It aids in the understanding of environment variables, shell variables, built-in shell variables, and customizing the shell and C shell operators. The chapter also discusses different fl ow control statements, loops, arrays, and errors.
Chapter 13, Different Tools and Debuggers, describes language development tools Yacc, Lex, and M4 and text-formatting tools, troff and nroff. The chapter covers different preprocessors for nroff and troff such as tbl, eqn, and pic. The chapter also discusses debugger tools, dbx, adb, and sdb.
Chapter 14, Interprocess Communication, covers pipes and messages as also accessing, attaching, reading, writing, and detaching the shared memory segment. It helps the readers in getting acquainted with initializing, managing, and performing operations on sockets (stream and datagram), I/O multiplexing, fi lters, and semaphores.
Chapter 15, Unix System Administration and Networking, discusses the Unix booting procedure, mounting and unmounting fi le systems, managing user accounts, network security, and backup and restore.
ACKNOWLEDGEMENTS
I thank my family, my small world: my wife, Anushka and my wonderful children, Chirag and Naman for inspiring and motivating me and forgiving me for spending long hours on the computer during the course of development of this book.
Speaking of encouragement, I must thank my students who, with their innumerable queries, helped me understand the essential expectations of a reader. This in turn made me add numerous examples and exercises, thus giving a practical approach to the book.
My acknowledgements would remain incomplete if I did not thank the editorial team at Oxford University Press, India, who supported me throughout the development of this book. My special thanks are due to the reviewers for their constructive comments and valuable suggestions.
I have tried to cover the necessary topics and explain them in a simple and user-friendly manner. Any comments or suggestions that can be incorporated in future editions of this book may be sent to me at [email protected].
B.M. Harwani

Brief ContentsBrief ContentsFeatures of the Book ivPreface viDetailed Contents xi
1. Unix: An Introduction 1 2. Unix File System 13 3. Basic Unix Commands 27 4. Advanced Unix Commands 59 5. File Management and Compression Techniques 94 6. Manipulating Processes and Signals 148 7. System Calls 192 8. Editors in Unix 258 9. AWK Script 30510. Bourne Shell Programming 37811. Korn Shell Programming 48012. C Shell Programming 55813. Different Tools and Debuggers 62414. Interprocess Communication 65315. Unix System Administration and Networking 672
Index 697

Detailed ContentsDetailed ContentsFeatures of the Book ivPreface viBrief Contents x
1. Unix: An Introduction 11.1 Operating System 1 1.1.1 Functions of Operating Systems 21.2 History of Unix 31.3 Overview and Features of
Unix System 4 1.3.1 Multitasking 4 1.3.2 Multi-user 5 1.3.3 Portability 5 1.3.4 Job Control 5 1.3.5 Tools and Utilities 5 1.3.6 Security 61.4 Structure of Unix System 6 1.4.1 Hardware 6 1.4.2 Kernel 7 1.4.3 Shell 8 1.4.4 Tools and Applications 91.5 Unix Environment 9 1.5.1 Stand-alone Personal Environment 10 1.5.2 Time-sharing Environment 10 1.5.3 Client–Server Environment 10
2. Unix File System 132.1 Introduction to Files 13 2.1.1 Types of Files 13 2.1.2 Symbolic Links 15 2.1.3 Pipes 15 2.1.4 Sockets 162.2 Organization of File Systems 162.3 Accessing File Systems 17 2.3.1 Mounting File Systems 18 2.3.2 Unmounting File Systems 182.4 Structure of File Systems 20 2.4.1 Boot Block 20 2.4.2 Super Block 20
2.4.3 Inode Block 21 2.4.4 Data Block 24
3. Basic Unix Commands 273.1 login: Logging in to Systems 273.2 Overview of Commands 28 3.2.1 Structure 29 3.2.2 Types of Commands in Unix 29
4. Advanced Unix Commands 594.1 Overview 594.2 File Access Permissions 60 4.2.1 chmod: Changing File
Access Permissions 61 4.2.2 umask: Setting Default
Permissions 62 4.2.3 chown: Changing File Ownership 64 4.2.4 chgrp: Changing Group
Command 65 4.2.5 groups: Displaying Group
Membership 66 4.2.6 groups: Sharing
Files Among Groups 664.3 Input/Output Redirection
in Unix 67 4.3.1 Output Redirection Operator 67 4.3.2 Input Redirection Operator 684.4 Pipe Operator 684.5 cut: Cutting Data from Files 684.6 paste: Pasting Data in Files 714.7 split: Splitting Files into
Lines or Bytes 714.8 wc: Counting Characters,
Words, and Lines in Files 734.9 sort: Sorting Files 73

xii Detailed Contents
4.10 head: Displaying Top Contents of Files 74
4.11 tail: Displaying BottomContents of Files 75
4.12 diff: Finding Differencesbetween Two Files 75
4.13 cmp: Comparing Files 774.14 uniq: Eliminating and
Displaying Duplicate Lines 784.15 comm: Displaying and
Suppressing Unique or Common Content in Two Files 79
4.16 time: Finding Consumed Time 814.17 pg: Showing Content Page-wise 824.18 lp: Printing Documents 824.19 cancel: Cancelling
Print Command 844.20 Understanding .profi le Files 844.21 calendar: Getting Reminders 854.22 script: Recording Sessions 854.23 Conversions between
DOS and Unix 864.24 man: Displaying Manual 874.25 Correcting Typing Mistakes 88
5. File Management andCompression Techniques 94
5.1 Managing and Compressing Files 945.2 Computer Devices 95 5.2.1 Dealing with Devices 96 5.2.2 Block device 97 5.2.3 Major and Minor Numbers 985.3 Disk-related Commands 98 5.3.1 dd: Copying Disks 99 5.3.2 du: Disk Usage 99 5.3.3 df: Reporting Free and
Available Space on File Systems 101 5.3.4 dfspace: Reporting Free
Space on File Systems 103 5.3.5 fdisk: Dividing
Disks into Partitions 1035.4 Compressing and Uncompressing Files 105 5.4.1 gzip Command 105
5.4.2 gunzip Command 107 5.4.3 zip Command 109 5.4.4 unzip Command 111 5.4.5 compress Command 111 5.4.6 uncompress Command 114 5.4.7 pack Command 115 5.4.8 unpack Command 115 5.4.9 bzip2 and bunzip2 Commands 117 5.4.10 bunzip2 Command 119 5.4.11 7-zip—Implementing
Maximum Compression 1195.5 Dealing with Files 123 5.5.1 fi le: Determining File Type 124 5.5.2 fi nd: Locating Files 124 5.5.3 locate: Searching for
Files with Specifi c Strings 129 5.5.4 which/whence: Finding
Locations of Programs or Utilities on Disks 130
5.5.5 fsck: Utility for CheckingFile Systems 130
5.6 Important Unix System Files 135
5.6.1 /etc/passwd 135 5.6.2 /etc/shadow 136 5.6.3 /etc/hosts 136 5.6.4 /etc/hosts.allow and
/etc/hosts.deny 1375.7 Shell Variables 138
5.7.1 User-created Shell Variables 138 5.7.2 System Shell Variables 1385.8 Export of Local and
Global Shell Variables 141
6. Manipulating Processesand Signals 148
6.1 Process Basics 148 6.1.1 Process Address Space 151 6.1.2 Process Structure 151 6.1.3 Creation and
Termination of Processes 1546.2 Process States and Transitions 1546.3 Zombie Process 1566.4 Context Switching 157

Detailed Contents xiii
6.5 Threads 158 6.5.1 Comparison between
Threads and Processes 1586.6 ps: Status of Processes 1596.7 Handling Jobs 161 6.7.1 fg: Foreground Jobs 162 6.7.2 bg: Background Jobs 162 6.7.3 Switching Jobs from Background
to Foreground and Vice Versa 164 6.7.4 jobs: Showing Job Status 1646.8 Scheduling of Processes 165 6.8.1 cron: Chronograph—
Time-based Job Scheduler 166 6.8.2 crontab: Creating Crontab Files 166 6.8.3 at: Scheduling Commands
at Specifi c Dates and Times 167 6.8.4 batch: Executing
Commands Collectively 170 6.8.5 nohup: No Hangups 170 6.8.6 nice: Modifying Priority 171 6.8.7 kill: Killing Processes 1726.9 Signals 173 6.9.1 Classes of Signals 175 6.9.2 Sending Signals Using kill()
and raise() 176 6.9.3 Signal Handling
Using signal() 1776.10 Virtual Memory 183 6.10.1 Paging 184 6.10.2 Demand Paging 184 6.10.3 Segmentation 186 6.10.4 Memory-mapped
Input/Output 187
7. System Calls 1927.1 Introduction 192 7.1.1 Operation Modes 192 7.1.2 Kernel Mode 193 7.1.3 User Mode 1937.2 File-related System Calls 194 7.2.1 open(): Opening Files 195 7.2.2 create(): Creating Files 196 7.2.3 read(): Reading from Files 196
7.2.4 write(): Writing to Files 197 7.2.5 lseek(): Relocating
File Descriptors 199 7.2.6 close(): Closing Files 200 7.2.7 mknod(): Creating Files 201 7.2.8 dup() and dup2(): Duplicating
File Descriptors 202 7.2.9 link() and symlink():
Linking to Files 203 7.2.10 unlink(): Unlinking Files 205 7.2.11 stat(), fstat(), and
lstat(): Accessing File Status Information 205
7.2.12 access(): Checking Permissions 207 7.2.13 chown(), lchown(), and
fchown(): Changing Owner and Group of Files 208
7.2.14 chmod() and fchmod(): Changing Permissions of Files 210
7.2.15 umask(): SettingFile Mode Creation Mask 211
7.2.16 utime(): Changing Access and Modifi cation Times 211
7.2.17 ioctl(): Controlling Devices 2127.3 Directory Handling System Calls 213 7.3.1 mkdir() and rmdir():
Creating and Removing Directories 214
7.3.2 chdir(): Changing Directories 215 7.3.3 getcwd(): Determining
Current Working Directory 216 7.3.4 opendir(): Opening Directories 217 7.3.5 readdir(): Reading Directories 217 7.3.6 telldir(), seekdir(), and
rewinddir(): Knowing, Setting, and Resetting Position in Directory Streams 220
7.3.7 closedir(): Closing Directory Streams 222
7.4 Process-related System Calls 223 7.4.1 exec(): Replacing Executable
Binaries with New Processes 223 7.4.2 fork(): Creating New Processes 225

xiv Detailed Contents
7.4.3 wait(): Waiting 226 7.4.4 exit(): Terminating Processes 2277.5 Interrupted System Call 2287.6 Standard C Library Functions 230 7.6.1 Difference between System
Calls and Library Functions 2307.7 Streams and File Input/
Output Library Functions 231 7.7.1 fopen(): Opening Files 232 7.7.2 fwrite(): Writing into Files 232 7.7.3 fread(): Reading
Data from Files 233 7.7.4 fclose(): Closing Files 234 7.7.5 ffl ush(): Flushing out to Files 234 7.7.6 fseek(): Relocating
File Pointers 234 7.7.7 fgetc(), getc(), and
getchar(): Reading Characters 235 7.7.8 fgets() and gets():
Reading Strings 2367.8 Error Handling 238 7.8.1 Using strerror Function 239 7.8.2 perror(): Displaying Errors 2397.9 Stream Errors 2417.10 Functions for Dynamic
Memory Management 242 7.10.1 malloc(): Allocating
Memory Block 242 7.10.2 calloc(): Allocating
Arrays of Memory Blocks 243 7.10.3 realloc(): Resizing
Allocated Memory 243 7.10.4 free(): Freeing
Allocated Memory 2437.11 File Locking 245 7.11.1 Creating Lock Files 245 7.11.2 Record Locking 247 7.11.3 Competing Locks 249 7.11.4 Deadlock 252
8. Editors in Unix 2588.1 Introduction 2588.2 Stream Editor 259
8.2.1 Actions with Sed 260 8.2.2 Remembered Patterns 2698.3 Visual Editor 270 8.3.1 Creating and Editing Files 271 8.3.2 Inserting and Appending Text 271 8.3.3 Replacing Text 272 8.3.4 Inserting and Joining Lines 273 8.3.5 Exiting and Writing to Files 273 8.3.6 Navigating—Line Positioning
and Cursor Positioning 274 8.3.7 Positioning Cursor on Words 275 8.3.8 Positioning Cursor on Sentences 275 8.3.9 Positioning Cursor on Paragraphs 276 8.3.10 Scrolling through Text 276 8.3.11 Marking Text 276 8.3.12 Deleting and Undoing Text 277 8.3.13 Repeating Previous Commands 278 8.3.14 Going to Specifi ed Lines 278 8.3.15 Searching for and Repeating
Search Patterns 278 8.3.16 Searching for Characters 279 8.3.17 Copying, Changing, Pasting,
and Filtering Commands 280 8.3.18 Set Commands 280 8.3.19 Reading and Writing
across Files 283 8.3.20 Global Substitution—
Find and Replace 285 8.3.21 Ex Mode—Line Editor Mode 287 8.3.22 Abbreviating Text Input 294 8.3.23 Mapping Keys of Keyboard 295 8.3.24 Customizing vi Session 2958.4 Emacs Editor 296 8.4.1 Cursor Movements 297 8.4.2 Quitting Emacs 297 8.4.3 Dealing with Buffers 298 8.4.4 Cutting and Pasting 298 8.4.5 Searching and Replacing 298 8.4.6 Miscellaneous Commands 299
9. AWK Script 3059.1 AWK Command 305 9.1.1 Versions 305

Detailed Contents xv
9.1.2 Advantages and Disadvantages of Using AWK Filters 306
9.2 print: Printing Results 3079.3 printf: Formatting Output 3089.4 Displaying Content of
Specifi ed Patterns 3089.5 Comparison Operators 309 9.5.1 ~ and !~: Matching
Regular Expressions 3109.6 Compound Expressions 3129.7 Arithmetic Operators 3159.8 Begin and End Sections 3159.9 User-defi ned Variables 3169.10 if else Statement 3189.11 Built-in Variables 321 9.11.1 fs: Field Separator 322 9.11.2 ofs: Output Field Separator 3229.12 Changing Input Field Separator 3239.13 Functions 324 9.13.1 String Functions 325 9.13.2 Arithmetic Functions 3349.14 Loops 337 9.14.1 for Loop 337 9.14.2 do while Loop 341 9.14.3 while Loop 3429.15 Getting Input from User 343 9.15.1 getline Command:
Reading Input 3439.16 Search and Substitute
Functions 345 9.16.1 sub() 345 9.16.2 gsub() 347 9.16.3 match() 348 9.16.4 toupper() 349 9.16.5 tolower() 3499.17 Copying Results into
Another File 3619.18 Deleting Content from Files 3639.19 Arrays 3649.20 Associative Arrays 366
10. Bourne Shell Programming 37810.1 Introduction 378
10.2 Beginning Bourne Shell Scripting 379 10.2.1 echo: Displaying
Messages and Values 379 10.2.2 Variables 380 10.2.3 expr: Evaluating Expressions 380 10.2.4 let: Assigning and
Evaluating Expressions 381 10.2.5 bc: Base Conversion 381 10.2.6 factor: Factorizing Numbers 382 10.2.7 units: Scale Conversion 38310.3 Writing Shell Scripts 38310.4 Command Line Parameters 38510.5 read: Reading Input from Users 38510.6 for Loop 38610.7 while Loop 39010.8 until Loop 39210.9 if Statement 39310.10 Bourne Shell Commands 394 10.10.1 test: Testing
Expressions for Validity 395 10.10.2 [ ]: Test Command 397 10.10.3 tr: Applying Translation 400 10.10.4 wc: Counting Lines,
Words, and Characters 403 10.10.5 grep: Searching Patterns 404 10.10.6 egrep: Searching Extended
Regular Expressions 409 10.10.7 Command Substitution 411 10.10.8 cut: Slicing Input 412 10.10.9 paste: Pasting Content 413 10.10.10 sort: Sorting Input 415 10.10.11 uniq: Eliminating and
Displaying Duplicate Lines 421 10.10.12 /dev/null:
Suppressing Echo 422 10.10.13 Logical Operators 426 10.10.14 exec: Execute Command 429 10.10.15 sleep: Suspending Execution 434 10.10.16 exit: Terminating Programs 435 10.10.17 $?: Observing Exit Status 436 10.10.18 tty: Terminal Command 441 10.10.19 write: Sending and
Receiving Messages 442

xvi Detailed Contents
10.10.20 mesg: ControllingDelivery of Messages 443
10.10.21 wall: Broadcasting Message 444 10.10.22 stty: Setting and
Confi guring Terminals 444 10.10.23 w ; who: Activities
of Logged in User 449 10.10.24 last: Listing Last Logged 449 10.10.25 case Statement 451 10.10.26 Functions 455 10.10.27 select: Creating Menus 457 10.10.28 basename: Extracting
Base Filename 460 10.10.29 expr—Advanced Features 462 10.10.30 getopts: Handling
Options in Command Line 464 10.10.31 set: Setting
Positional Parameters 467 10.10.32 shift: Shifting
Command Line Arguments 468 10.10.33 at: Scheduling Execution 46910.11 Trapping Signals 470
11. Korn Shell Programming 48011.1 Introduction 48011.2 Features 480 11.2.1 Command Line Editing 481 11.2.2 Filename Completion 483 11.2.3 Command Name Aliasing 483 11.2.4 Command History Substitution 48411.3 Korn Shell Meta Characters 48411.4 Operators 485 11.4.1 Arithmetic and
Logical Operators 485 11.4.2 Relational Operators 48611.5 Variables 486 11.5.1 Shell Variables 486 11.5.2 Environment Variables 48711.6 Setting Shell Prompts 491 11.6.1 PS1 Variable 492 11.6.2 PS2 Variable 493
11.6.3 PS3 Variable 493 11.6.4 PS4 Variable 49511.7 Setting Display
Environment Variable 496 11.7.1 Terminal 496 11.7.2 Display 49711.8 Steps to Create and Run
Korn Shell Scripts 49711.9 Basic Input/Output Commands 499 11.9.1 echo 499 11.9.2 print 500 11.9.3 read 500 11.9.4 printf 501 11.9.5 typeset 502 11.9.6 Converting Base 10 to Octal 503 11.9.7 unset 50411.10 Variable Substitution 50511.11 Command Line Arguments 506 11.11.1 shift: Shifting
Positional Parameters 508 11.11.2 set: Handling
Positional Parameters 509 11.11.3 test Command 51011.12 Pattern-matching Operators 511 11.12.1 If Else Statement 51111.13 Testing Strings 51311.14 case...esac Statement 52111.15 while Loop 524
11.16 break: Breaking out of Loops 526
11.17 continue: SkippingStatements in Loops 527
11.18 until Loop 52911.19 for Loop 53011.20 Arrays 537 11.20.1 Indexed Array 538 11.20.2 Associative Array 53911.21 Functions 540 11.21.1 return Command 541 11.21.2 Passing Arguments to Functions 542 11.21.3 Creating Local Variables 543 11.21.4 Recursion 544

Detailed Contents xvii
11.22 exit() 54611.23 $? 54611.24 Input/Output Redirection 547
12. C Shell Programming 55812.1 C Shell 558 12.1.1 Features 558 12.1.2 Command History 559 12.1.3 Command Substitution 561 12.1.4 Filename Substitution—Globbing 561 12.1.5 Filename Completion 562 12.1.6 Aliases 563 12.1.7 Job Control 56412.2 Start-up Files 565 12.2.1 .cshrc File 566 12.2.2 .login File 566 12.2.3 .logout File 56712.3 Variables 567 12.3.1 Environment Variables 567 12.3.2 Shell Variables 569 12.3.3 Built-in Shell Variables 569 12.3.4 Unsetting Variable 57012.4 Customizing Shells 571 12.4.1 Setting Primary Prompt 571 12.4.2 Changing History Characters 572 12.4.3 Setting mail Variable 57212.5 C Shell Operators 57312.6 Writing and Executing First
C Shell Script 576 12.6.1 Reading Data 578 12.6.2 User-defi ned Shell Variables 57912.7 Flow Controlling Statements 582 12.7.1 if-then-else Statements 582 12.7.2 Branching with goto 591 12.7.3 exit Command 593 12.7.4 switch, case,
breaksw, and endsw Statements 59512.8 Loops 599 12.8.1 while end Loop 599 12.8.2 repeat Command 602 12.8.3 foreach end Loop 604
12.9 Arrays 61212.10 Displaying Errors 617
13. Different Tools and Debuggers 62413.1 Language Development
Tools—Yacc, Lex, and M4 624 13.1.1 Yet Another Compiler–Compiler 624 13.1.2 Lexical Analyser 625 13.1.3 m4 62613.2 Text-Formatting Tools 628 13.2.1 troff 628 13.2.2 nroff 62913.3 Preprocessors for nroff and troff 630 13.3.1 tbl 630 13.3.2 eqn 633 13.3.3 pic 635 13.3.4 Commands Used in pic 63813.4 Debugger Tools 639 13.4.1 dbx 640 13.4.2 adb 641 13.4.3 sdb 64213.5 strip: Discarding Symbols
from Object Files 64713.6 Version-Control Systems 648 13.6.1 Manual Version Control 648 13.6.2 Automated Version Control 648
14. Interprocess Communication 65314.1 Interprocess Communication 653 14.1.1 Pipes 654 14.1.2 Messages 654 14.1.3 Sockets 654 14.1.4 Shared Memory 65714.2 Synchronization 661 14.2.1 Mutual Exclusion Locks 661 14.2.2 Semaphores 66114.3 Input/Output Multiplexing 664 14.3.1 select() System Call 664 14.3.2 pselect() System Call 66614.4 Filters 666 14.4.1 more Filter 667

xviii Detailed Contents
14.4.2 less Filter 667 14.4.3 tee Command 668
15. Unix System Administrationand Networking 672
15.1 Unix Booting Procedure 672 15.1.1 Single-user Mode 672 15.1.2 Multi-user Mode 67315.2 Mounting Unix File System 67315.3 Unmounting Unix File System 67415.4 Managing User Accounts 674 15.4.1 Creating User Accounts 674 15.4.2 Modifying User Accounts 676 15.4.3 Deleting User Accounts 676 15.4.4 Creating Groups 677 15.4.5 Modifying Groups 677 15.4.6 Deleting Groups 67715.5 Networking Tools 678 15.5.1 ping 678 15.5.2 nslookup 678 15.5.3 telnet 679 15.5.4 arp 680 15.5.5 netstat 681 15.5.6 route 681 15.5.7 ftp 681
15.5.8 Trivial File Transfer Protocol 683 15.5.9 fi nger 683 15.5.10 rlogin 683 15.5.11 Unix Network Security 68415.6 mail Command 685 15.6.1 Sending E-mails 685 15.6.2 Reading Mails 686 15.6.3 Sending Replies 687 15.6.4 Mail Commands 687 15.6.5 Saving Messages 688 15.6.6 Deleting Messages 688 15.6.7 Undeleting Messages 689 15.6.8 Quitting Mail Command 68915.7 Distributed File System 689 15.7.1 Andrew File System 69015.8 Firewalls 691 15.8.1 Advantages 692 15.8.2 Building
Simple Firewalls 69215.9 Backup and Restore 692 15.9.1 tar 693 15.9.2 cpio 693 15.9.3 dd 69315.10 Shut Down and Restart 693
Index 697

Even after four decades of use, Unix is regarded as one of the most powerful operating systems, due to its portability and usage in almost all kinds of environments, ranging from micro to supercomputers.
We cannot even think of using a computer system without an operating system. An operating system is an interface that enables the use of a computer system’s resources; without an operating system, the computer will be a dead piece of electronic device.
In this chapter, before delving into the history and structure of Unix, we will attempt to understand the following: what an operating system is; why it is essential in running a computer system; and in what manner Unix is different from the other operating systems used earlier and in recent times.
1.1 OPERATING SYSTEM
An operating system is the main software component of a computer system. It provides users with an environment that makes it possible to use the hardware devices of a computer. Without an operating system, we cannot access any of the resources of the computer system, including its hardware and software. Examples of popular operating systems available nowadays include Android, BSD, iOS, LINUX, Microsoft Windows, Mac OS X, and z/OS. Apart from Microsoft Windows and z/OS, all the other operating systems in this list are Unix-based.
Let us understand how an operating system is related to hardware, software, and the users (see Fig. 1.1).
11Unix: Unix: An IntroductionAn Introduction
C H A P T E R
After studying this chapter, the reader will be conversant with the following:
• Fundamentals of operating systems• History of Unix• Structure of the Unix operating system• Various types of shells and their responsibilities• Numerous features of the Unix operating system• The Unix environment

2 Unix and Shell Programming
As depicted in Fig. 1.1, it is evident that users are able to interact with hardware through the operating system. The operating system as well as the software creates an environment for the user that enables easy access and use of hardware. Basically, the operating system creates an interface between the user and the hardware.
The following section discusses the functions that an operating system performs, which enable easy operation of a computer system.
1.1.1 Functions of Operating SystemsAn operating system performs the following functions:
Memory and data management All operating systems provide methods for controlling data in the memory. When a job has to be performed, the operating system should allocate the memory for loading that job into the memory.
Communication An operating system should support methods in such a manner that the various computer systems can communicate with one another for exchange of data.
Time sharing Time sharing enables several people to use the same computer simultaneously. A few operating systems support time-sharing features.
Security In a multi-user environment, security should be provided by the operating system. This security prevents one user from interfering with the work done or being done by another user. It also prevents unauthorized personnel from using the computer system.
User-command interpretation This is a function of the operating system using which the commands that are typed in by the user are read and interpreted by the operating system. Through interpretation, the operating system understands what the user wants.
Accounting Through this function, the operating system keeps an account of all the resources used by different processes. Resources, here, means memory, CPU, disk space requirement, and so on.
Program development tools All operating systems provide program development tools, which assist users in writing and maintaining programs. Software development is one of the important features provided by the operating system.
Scheduling A scheduler is the heart of all multi-user operating systems. This program enables many people to use the computer simultaneously. The scheduler assigns the CPU time slice to the ready process. After that time slice, the process is stored in the wait queue, the next process in the ready queue is picked, and the CPU pays attention to it.
Swapping When several users are working simultaneously, their processes are stored in the memory. When the memory is full and a new process has to be activated, the scheduler takes the current process in the memory and copies it to the hard disk. Next, the scheduler starts a new process in the space freed in the memory. This process is known as swapping. After returning to the time slice, the process that was swapped out of the memory is brought in (swapped in), and some other process is swapped out. This feature is available in a virtual memory environment.
Users
Software
Operating system
Hardware
Fig. 1.1 Operating system in relation to hardware, software, and users

Unix: An Introduction 3
1.2 HISTORY OF UNIX
The development of the Unix operating system began in 1957 and had its roots in Bell Labs. The growth of this wonderful, multitasking, highly powerful, affordable, and secure operating system was not an accident, but the result of the joint efforts of many people, including students, professors, researches, and commercial companies. A short date-wise history of the evolution of Unix is given here.
In 1957, Bell Labs required an operating system for their in-house computer centre. They created BESYS to sequence their jobs and to control the system resources. However, they wanted a more effi cient operating system.
In 1964, the researchers from General Electric, MIT, and Bell Labs came together and created a new general-purpose, multi-user, time-sharing operating system known as Multiplexed Information and Computing System (Multics).
In 1969, the Multics project was withdrawn because of the high cost of development and due to differences among its members. When this happened, Ken Thompson, Dennis Ritchie, Douglas Ritchie, and Douglas Mcllroy, along with a few others, began working on Uniplexed Information and Computing System (UNICS) by using an old PDP-7 computer. The name Unics was then shortened to Unix. While working on the early assembly versions of Unix, Thompson worked on a FORTRAN compiler that evolved to support the language B, which was a smaller version of BCPL.
In 1971, the fi rst edition of Unix appeared along with the B compiler. It introduced several well-known Unix commands including cat, chdir, chmod, chown, and cp. Together it included more than 60 commands. However, it did not have the pipe feature. Some of the utilities in this fi rst edition were written in the B compiler. In the next few years, Dennis Ritchie rewrote the B compiler and developed the C compiler.
In 1972, the second edition of Unix was released.In 1973, the third edition of Unix appeared along with the Unix C compiler (cc). The
kernel was still written in assembly language. The pipe feature was also introduced in this version.
In 1973, the fourth edition of Unix was released. The kernel was rewritten in the C compiler.In 1974, the fi fth edition of Unix was released. The source code was made freely available
to universities for educational purposes. Unix also spread outside AT&T and Bell Labs and was provided to academic institutions at a very small charge. It became very popular, as it was inexpensive, could run on the available hardware, was provided along with the source code, and was written in a programming language that was easier to understand. In 1974, Thompson taught Unix for a year at the University of California, Berkeley. When Thompson returned to Bell Labs, students and professors at Berkeley continued to enhance Unix. This led to the formation of the Berkeley Software Distribution, which was commonly known as BSD.
In 1975, the sixth edition of Unix was released. This edition, also known as V6 UNIX, was the fi rst edition that was available outside Bell Labs.
In 1977, 1BSD, the fi rst edition, was released; in 1978, 2BSD, the second edition, was released.
In 1979, the seventh edition of Unix was released. This edition was released along with Steve Bourne’s shell (sh). The kernel was rewritten to make it more portable to other

4 Unix and Shell Programming
types of architecture. At this point, the Unix systems group (USG) was created, and it was focused on enhancing the seventh edition. Three groups were working in all and the original versions of Unix were developed by the computer research group (CRSG) of Bell Labs. The support for internal releases was provided by the USG. The task of developing and writing tools was done by another group at Bell Labs, the programmer’s workbench (PWB).
The development of Unix split into two main branches: System 5 (SYSV) and Berkeley software distribution (BSD). BSD was developed by students and professors at the University of California, Berkeley. SYSV was developed by AT&T and other commercial companies. In 1979, 3BSD, the third edition, was released.
In 1980, 4.0BSD, the fourth version of the BSD Unix variant, was released.In 1982, AT&T transferred its Unix development to Western Electric, which developed
the System III version of Unix.In 1983, Western Electric released System V, whereas System IV was reserved for only
AT&T’s use.In 1984, the USG group, which was renamed the UNIX system development laboratory
(USDL) group, released System V Release 2 (SVR2), which was the fi rst version of Unix that supported paging, shared memory, and other associated features.
In 1985, the eighth edition of Unix was released on the basis of the 4.1BSD version.In 1987, the USDL group, which was renamed AT&T Information Systems (ATTIS)
group, released System V Release 3 (SVR3).In 1988, the ninth version of Unix was developed, and it was based on the 4.3BSD version.In 1989, the tenth version of Unix was developed.Unix is one of the most popular operating systems, which was developed step by step, as
evident from the aforementioned timeline.Let us now have a broad overview of the Unix system.
1.3 OVERVIEW AND FEATURES OF UNIX SYSTEM
The Unix system is a multitasking, multi-user operating system that is portable on several hardware platforms and which is quite secure. It also provides a rich set of tools and utilities that help administrators, programmers, and users, to a great extent, in executing their tasks. Besides this, the system provides the fl exibility of controlling individual jobs executed by the user.
Some of the important features of the Unix operating system are as follows:
1. Multitasking 4. Job Control2. Multi-user 5. Tools and Utilities3. Portability 6. Security
1.3.1 MultitaskingUnix is a multitasking operating system, that is, it can execute multiple tasks simultaneously. In a multitasking environment, the CPU processes a task and when the process waits for an input/output (I/O) operation to be completed, the CPU switches to another task. The switching between tasks is so fast that it appears that the operating system is executing all the tasks simultaneously. Due to multitasking, we can carry out several tasks simultaneously.

Unix: An Introduction 5
For instance, commands for printing a fi le, editing text, and managing fi les can be given simultaneously; all tasks are thus performed simultaneously. With the help of this feature, Unix maximizes the computer resource utilization and hence, the computer’s effi ciency.
1.3.2 Multi-userThe multi-user feature of Unix enables several users to work simultaneously and access system resources concurrently. The operating system not only receives commands from all the users, but also carries out the desired processing and responds accordingly. The operating system manages the consumption of system resources among the users and implements the locking mechanism to maintain the integrity and consistency of applications and data that are accessed simultaneously. The multi-user approach maximizes the computer resource utilization and hence reduces the cost per user. Since the system resources are shared, resource management is done so as to avoid any deadlock.
1.3.3 PortabilityUnix is portable, that is, it is available on a wide range of hardware. Since the Unix operating system is coded in a high-level language, C programming language, it is less hardware dependent and, hence, can be easily moved from one brand of computer to another without a major code rewrite. It is also the kernel that provides an interface between the hardware and other application modules. The application modules interface with the kernel and not the hardware, and hence, when Unix is ported to another hardware platform, only the kernel and not the application modules requires modifi cation. This makes the operating system almost hardware independent and does not require much modifi cation.
1.3.4 Job ControlUnix enables us to control the execution of jobs. For example, we can suspend or resume any job, switch a job from the background to the foreground, and kill a job. The jobs that require user interaction frequently need I/O operation, have specifi c time constraints, and are executed in the foreground. In foreground jobs, the shell waits for a job to be completed and only then displays a prompt to execute another job. Background jobs are those that are executed behind the scenes. Jobs of a lower priority do not require user interaction and are executed in the background. Suspended jobs are paused for a while and can be moved to either the background or the foreground. The job control feature of Unix enables users to execute several jobs and control them on the basis of their priority.
1.3.5 Tools and UtilitiesUnix supports a number of tools and utilities that make the users’ job easier. Tasks such as splitting fi les, merging fi les, searching for content in fi les, arranging fi les, and sending mail can be simply done by issuing certain commands. Unix not only has a vast library of system tools, but also has programming tools that provide a fl exible platform for programmers and developers to create portable and effi cient applications.
Note: Deadlock is a situation wherein two or more competing actions wait for each other to fi nish and, as a result, neither reaches completion.

6 Unix and Shell Programming
1.3.6 SecurityUnix is considered a comparatively more secure operating system. Each user has an identity through a unique user ID and group ID. In order to avoid any unauthorized access, each fi le and directory has an owner and a group that are associated with it. Three permissions are attached to each fi le and directory—read, write, and execute. The set of permissions, r, w, and x, are associated with the three types of users—owners, groups, and others. Hence, we can individually assign the desired permissions to these three types of users. Next let us explore the structure of the Unix system.
1.4 STRUCTURE OF UNIX SYSTEM
The structure of the Unix operating system consists of four parts (as shown in Fig. 1.2): hardware, kernel, shell, and tools and applications. The various parts of the Unix system are discussed in detail in the following sections.
1.4.1 HardwareHardware refers to the physical components that collectively form a computer machine. The following three primary components constitute the hardware of a computer system:
I/O devices Data is supplied or entered into the computer for processing through input devices such as keyboard, mouse, track ball, magnetic ink character recognition (MICR), optical character recognition (OCR), and optical mark recognition (OMR). Output devices display processed data. The two most common output devices are screen and printer.
Central processing unit The central processing unit (CPU) is the heart of the computer. It obtains the data from the user through input devices, processes the entered data into information, and displays the information through output devices. The processed data can be saved in the memory for future use.
Memory It is used for storing data and is of two types: primary and secondary. The primary memory includes RAM and ROM, out of which RAM is volatile in nature. While the data is being processed by the CPU, it is temporarily stored in the RAM. After processing, it is removed and replaced by new data, which has to be processed further. ‘Volatile’ means that the data stored in the RAM is temporary in nature, (i.e., it is overwritten by the new data and the whole data is lost on switching off the computer). The secondary memory includes hard disk drives, pen drives, CDs/DVDs, and so on. These devices are of a permanent nature, that is, once data is written in them, it will be stored until deleted by the user.
Tools and applications
Shell
Kernel
Hardware
Fig. 1.2 Structure of the Unix system

Unix: An Introduction 7
1.4.2 KernelThe kernel is the heart of any operating system. Its main purpose is to ensure that the jobs of the operating system are performed properly. These jobs mainly include the scheduling of tasks, resource management, process management, and fi le management. Resource management refers to the allotment of CPU time, disk space, memory space, and so on to different processes. Process management includes the allocation of resources such as CPU, memory, and other devices. File management includes the management of fi les and their permissions, among others.
The kernel hides all the complexities of accessing hardware and provides a user-friendly interface by doing all the tasks behind the scene.
A brief view of the different tasks performed by the kernel is provided in Fig. 1.3.Let us take a quick look at the operations that a kernel can perform:
1. It controls the execution of processes by enabling their creation, termination or suspension, and communication.
2. It schedules processes fairly for execution on the CPU. The processes share the CPU in a time-shared manner. The CPU executes a process; the kernel suspends it when its time quantum elapses and schedules another process to be executed. Later, the kernel reschedules the suspended process.
3. It allocates the main memory for an executing process. The kernel enables processes to share portions of their address space under certain conditions, but protects the private address space of a process from outside tampering. If the system runs low on free memory, the kernel frees the memory by writing a process temporarily to the secondary memory, which is called a swap device. If the kernel writes entire processes to a swap device, the implementation of the Unix system is called a swapping system, whereas if it writes
pages of memory to a swap device, it is called a paging system.4. It allocates secondary
memory for effi cient stor-age and retrieval of user data. This service consti-tutes the fi le system. The kernel allocates second-ary storage for user fi les, reclaims unused storage, structures the fi le sys-tem in a well-understood manner, and protects unauthorized users from illegal access.
Note: Networking components such as LAN cards, cables, routers, and switches are also considered part of the hardware.
Fig. 1.3 Different tasks performed by the kernel
Applications
System call interface
Kernel
Memorymanagement
Processscheduling
Filesystems
Peripheraldevices
Shells Utilities

8 Unix and Shell Programming
5. It allows processes-controlled access to peripheral devices such as terminals, tape drives, disk drives, and network devices.
6. It provides the necessary functionality to applications, shells, and utilities through the system call interface. The applications of all the respective systems are called in order to get certain tasks performed by the kernel.
After having understood the kernel and the tasks that it performs, we are ready to understand the next part of the Unix structure—the shell.
1.4.3 ShellThe shell is an interface between the user and the kernel. The kernel does not know human language; hence the shell accepts the commands from the user and converts them into a language that the kernel can understand. It is a program that interprets user requests, calls programs from the memory, and executes them one at a time. Several shells such as Bourne, Korn, Bourne-again, and C Shell are available.
The shell also provides the facility of chaining or pipelining commands. This means the output of one command is sent to the input of another command for further processing. In this manner, one input data can be processed by several commands.
There are two major parts of a shell. The fi rst is the interpreter. The interpreter reads out commands and works with the kernel to execute them. The second part of the shell is a programming capability that enables us to write a shell (command) script. A shell script is a fi le that contains a collection of shell commands to perform a specifi ed task. It is also known as a shell program.
Types of shellsShells are independent of the underlying Unix kernel. This fact has enabled the development of several shells for Unix systems. Each type of shell has its own special features.
Bourne shell It is the most common shell in Unix systems and was the fi rst major shell. It was developed by Steve Bourne at the AT&T Labs. This shell was released in 1977 and was called ‘sh’.
Korn shell It was developed by David Korn at AT&Bell Labs. It is built on the Bourne shell. The most stable version of this shell was released in 1988 by AT&T’s Unix System Laboratories as ‘ksh’. The Korn shell also incorporates the features of the C shell (e.g., process control). One of the important features of this shell is that it can run Bourne shell scripts without any modifi cation at all.
Bourne-again shell An enhanced version of the Bourne-again shell, which is also known as ‘bash’, is distributed as the standard shell in almost all Unix systems. This is a freeware shell from the Free Software Foundation (FSF), where it was developed by Brian Fox and Chet Raney.
C shell It is also called the programmer’s shell and exists as ‘csh.’ It was developed by Bill Joy at the University of California, Berkeley. The C shell got its name because its syntax and usage is very similar to the C programming language. A compatible version of the C shell, ‘tcsh’ is used in Linux.
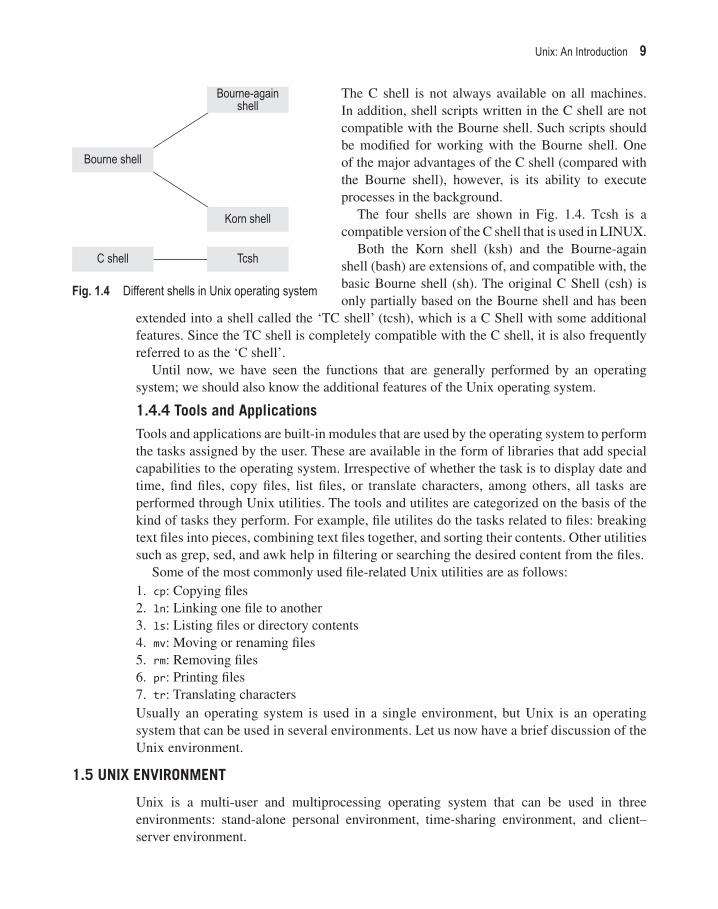
Unix: An Introduction 9
The C shell is not always available on all machines. In addition, shell scripts written in the C shell are not compatible with the Bourne shell. Such scripts should be modifi ed for working with the Bourne shell. One of the major advantages of the C shell (compared with the Bourne shell), however, is its ability to execute processes in the background.
The four shells are shown in Fig. 1.4. Tcsh is a compatible version of the C shell that is used in LINUX.
Both the Korn shell (ksh) and the Bourne-again shell (bash) are extensions of, and compatible with, the basic Bourne shell (sh). The original C Shell (csh) is only partially based on the Bourne shell and has been
extended into a shell called the ‘TC shell’ (tcsh), which is a C Shell with some additional features. Since the TC shell is completely compatible with the C shell, it is also frequently referred to as the ‘C shell’.
Until now, we have seen the functions that are generally performed by an operating system; we should also know the additional features of the Unix operating system.
1.4.4 Tools and ApplicationsTools and applications are built-in modules that are used by the operating system to perform the tasks assigned by the user. These are available in the form of libraries that add special capabilities to the operating system. Irrespective of whether the task is to display date and time, fi nd fi les, copy fi les, list fi les, or translate characters, among others, all tasks are performed through Unix utilities. The tools and utilites are categorized on the basis of the kind of tasks they perform. For example, fi le utilites do the tasks related to fi les: breaking text fi les into pieces, combining text fi les together, and sorting their contents. Other utilities such as grep, sed, and awk help in fi ltering or searching the desired content from the fi les.
Some of the most commonly used fi le-related Unix utilities are as follows:1. cp: Copying fi les2. ln: Linking one fi le to another3. ls: Listing fi les or directory contents4. mv: Moving or renaming fi les5. rm: Removing fi les6. pr: Printing fi les7. tr: Translating charactersUsually an operating system is used in a single environment, but Unix is an operating system that can be used in several environments. Let us now have a brief discussion of the Unix environment.
1.5 UNIX ENVIRONMENT
Unix is a multi-user and multiprocessing operating system that can be used in three environments: stand-alone personal environment, time-sharing environment, and client–server environment.
Bourne shell
C shell
Bourne-againshell
Korn shell
Tcsh
Fig. 1.4 Different shells in Unix operating system

10 Unix and Shell Programming
1.5.1 Stand-alone Personal EnvironmentUnix can be installed on personal computers and used as stand-alone machines. Though the major features of the Unix operating system are exploited in a multi-user environment, its security features, multitasking capability, and portability make it an attractive choice for installation on personal computers.
1.5.2 Time-sharing EnvironmentA time-sharing environment is an environment in which a computer is connected to several terminals and all the terminals share the resources of the central computer: CPU time, hard disk, and printer. The central computer divides its CPU time into small time slices and serves each terminal in the time slot assigned to it. Hence, each terminal waits for its time slot to get its jobs processed by the central computer. Though this environment is economical, the total dependency on the central computer is its major drawback. If the central machine fails, all the terminals connected to it stop working, and hence, this environment is not very popular nowadays. Since all the tasks of the terminals are performed by the central CPU, it is overloaded and hence its response is very poor.
1.5.3 Client–Server EnvironmentThe client–server environment is better than the time-sharing environment, as here, the central computer is not connected to dumb terminals but to workstations or PCs that have their individual processing power. As a result, all the processing tasks are not assigned to the central computer but are divided among the central computer and the connected workstations so that the local and small tasks can be processed at the workstation level (without bothering the central computer), and the main tasks (that require more resources) are transferred to the central computer. The workstations in this environment are known as clients, and the central computer (that serves the requests sent by the clients) is known as server. In this environment, dependency on the central computer is decreased and since the local tasks are performed at the client’s level, the server is not overloaded, hence increasing its response time.
■ SUMMARY ■
Note: We can customize the Unix shell environment by also making use of system variables known as environment variables, which will be discussed in Chapter 10.
1. Operating systems provide an environment that makes it possible for us to use the resources of a computer, namely hardware and software. A few examples of modern-day operating systems include Android, BSD, iOS, LINUX, Microsoft Windows, Mac OS X, and z/OS.
2. The various functions that an operating system performs include memory and data management,
interprocess communication, time sharing, security, user-command interpretation, accounting, program development, scheduling, and swapping.
3. In 1960, Multics started the development of the now well-known Unix operating system. Unix became commercially viable in 1973 when it was entirely recoded in C, thereby facilitating portability in other hardware. A typical structure of the Unix operating

Unix: An Introduction 11
Objective-type QuestionsState True or False
1.1 The Unics operating system was further developed to Unix.
1.2 An operating system creates an environment that enables us to use different resources of a computer system.
1.3 The Korn shell is the oldest of all shells. 1.4 The Korn shell and Bourne-again shell are not
compatible with the Bourne shell. 1.5 Unix is a multi-user and multitasking operating
system.
1.6 The Bourne-again shell (bash) was developed by David Korn.
1.7 The Korn shell was developed by Brian Fox and Chet Raney.
1.8 The Bourne shell derives its name from Stephen Bourne.
1.9 The shell manages all the resources and gets the tasks performed by the desired hardware.
1.10 Unix enables a user to run only one process at a time.
Fill in the Blanks
1.1 Unix operating system is written in language.
1.2 BSD stands for . 1.3 The operating system creates an
between the user and the hardware. 1.4 C shell was developed by . 1.5 When a job has to be performed, the
should allocate the memory for loading that job into the memory.
1.6 In a environment, the central
computer is connected to the workstations or PCs.
1.7 Unix treats each job or task as a . 1.8 Both the Korn shell (ksh) and the Bourne-again
shell (bash) are extensions of, and compatible with, the shell.
1.9 prevents unauthorized personnel from using the computer system.
1.10 schedules processes for execution on the CPU.
system consists of hardware, a kernel, a shell, and various tools and applications.
4. The kernel is the heart of the operating system. It is defi ned as a nucleus of the operating system that manages all the resources and gets the task performed by the desired hardware.
5. A shell acts as an interface between a user and a kernel. Mainly four types of shells are available in the Unix operating system, namely Bourne shell (sh), C shell (csh), Korn shell (ksh), and Bourne-again shell (bash).
6. The main features of the Unix operating system are portability, multitasking, and multi-user capability.
7. Since Unix is a multiprocessing and multitasking operating system, it can be used in three different types of environments: stand-alone personal environ-ment, time-sharing environment, and client–server environment.
8. Currently, Unix is also portable on mobile devices. Almost all mobile operating systems, including iOS, Android, and webOS, run on Unix or LINUX kernels.
■ EXERCISES ■
Multiple-choice Questions
1.1 Which of the following is the heart of any operating system?
(a) Hardware (c) Software (b) Kernel (d) Users
1.2 Korn Shell was developed by (a) David Korn (c) Bill Joy (b) Steve Bourne (d) Ken Thompson

12 Unix and Shell Programming
1.3 The default prompt of the C shell is (a) $ (b) % (c) cs (d) > 1.4 The three environments in which the Unix
operating system can be used are stand-alone personal environment, time-sharing environment, and
(a) client–server environment (b) LAN environment
(c) WAN environment (d) isolated environment 1.5 The shell that is completely compatible with the
C shell is (a) Korn shell (b) Bourne-again shell (c) TC shell (d) Bourne shell
Review Questions 1.1 Write short notes on the following: (a) Different tasks performed by the kernel (b) Role of shell in the Unix operating system (c) Structure of the Unix system 1.2 Explain the functions performed by an operating
system.
1.3 How did the Unix operating system come into the picture? Briefl y explain its history.
1.4 How many different types of shells are there? Explain in detail.
1.5 Explain the time-sharing and client–server environment of the Unix operating system.
State True or False
1.1 True 1.2 True 1.3 False 1.4 False 1.5 True 1.6 False 1.7 False
1.8 True 1.9 True1.10 False
Fill in the B lanks
1.1 ‘C’ 1.2 Berkeley Software
Distribution
1.3 interface 1.4 Bill Joy 1.5 operating system 1.6 client–server 1.7 process 1.8 Bourne 1.9 Security1.10 Scheduler
Multiple-choice Questions
1.1 (b)1.2 (a)1.3 (b)1.4 (a)1.5 (c)
■ ANSWERS TO OBJECTIVE-TYPE QUESTIONS ■

2.1 INTRODUCTION TO FILES
A fi le is a container of text, images, codes, and so on. Everything is a fi le on a Unix system. Not only the data, programs, and applications, but also the directories and input/output (I/O) devices are considered special kinds of fi les. Generally, fi les are ordered in a hierarchical tree-like fashion with a root represented by the character, ‘/’. The directories are the internal nodes of the tree structure, while the fi les are considered to be the leaves. Let us learn about the different types of fi les in Unix.
2.1.1 Types of FilesThe fi les are divided into the following three categories in the Unix operating system:
Ordinary fi les These fi les contain only data.Directory fi les These fi les act as a container and can contain ordinary fi les and device fi les along with directory fi les.Device fi les These fi les represent all the hardware devices.
Ordinary fi lesWe can store anything we want in these fi les. These fi les include data, source programs, objects, executable codes, Unix commands, and any fi le created by the user. Commands such as cat and ls are treated as ordinary fi les. An ordinary fi le is also referred to as a regular fi le.
22Unix File Unix File SystemSystem
C H A P T E R
After studying this chapter, the reader will be conversant with the following:
• Unix fi les and their types• Different types of device fi les• Organization of a fi le system• Accessing, mounting, and unmounting a fi le system• Different blocks of a fi le system• Structure of inode blocks

14 Unix and Shell Programming
The most common type of ordinary fi le is the text fi le. This is just a regular fi le that contains printable characters. For example, the programs that we write are text fi les. However, the Unix commands that we use or the C programs that we execute do not fall into the category of text fi les. The characteristic feature of text fi les is that the data stored inside them is divided into groups of lines, with each line terminated by the newline character. This character is not visible, and it does not appear in the hard copy output. It is generated by the system when we press the <Enter> key.
Examples letter.txt, bank.sh, payment
The fi les in Unix may or may not have any extension. The fi rst two examples depict fi les with extensions .txt and .sh, respectively. The third example depicts a fi le without any extension. In most Unix systems, a fi lename can have approximately 255 characters. If we enter more than 255 characters while specifying a fi lename, only the fi rst 255 characters are effectively interpreted by the system.
Directory fi lesA directory contains no external data, but it stores some details of the fi les and sub-directories it contains. The Unix fi le system is organized into a number of such directories and sub-directories, which can also be created as and when needed. We often need to group a set of fi les pertaining to a specifi c application. This enables two or more fi les in separate directories to have the same fi lename. If a directory contains, for example, 10 fi les, there will be 10 entries in the directory fi le displaying information such as size of the fi le, date and time of creation, or last modifi cation. When an ordinary fi le is created or removed, its entry in the corresponding directory fi le is automatically updated by the kernel with the relevant information about the fi le.
Examples projects, shell_scripts
These examples show two directories named projects and shell_scripts.
Device fi lesIn the Unix operating system, peripheral devices, terminals, printers, CD-ROMs, modems, disks, and tapes are treated as special fi les that are termed device fi les. The representation of devices in the form of device fi les simplifi es the task of using them. For example, printing content on a printer is as simple as copying that content to the printer device fi le. A device fi le interacts with the device driver, making it possible for the user to directly interact with the device driver using standard I/O system calls, hence controlling the device more precisely. There are two types of device fi les based on how data is read or written into them: character devices and block devices.
Character devices Character devices are those in which the read and write operations are performed character by character, that is, one byte at a time. These devices are also known as raw devices. The read and write operations in these device fi les are performed in
Note: We have to assign extensions for the AWK fi les or other programming fi les (e.g., C).
Note: The directory fi le contains the names of all resident fi les in the directory.

Unix File System 15
the actual transfer units of the device, that is, single characters at a time without collecting or combining them into a block. It is quite obvious that character devices are comparatively slow and have a large access time. Examples include virtual terminals, terminals, and serial modems.
Block devices Block devices are those in which the read and write operations are performed one block at a time, where the size of one block can range from 512 bytes to 32 KB. When compared with character devices in which transactions are performed one character at a time, block devices are quite fast. Moreover, block devices use caching to reduce the access time. By caching, we mean that when a block device is accessed, the kernel reads the whole block into a buffer in the memory, so that future read and write operations are performed to the cached version in the memory, hence reducing the access time to a great extent. Finally, the modifi ed buffer contents are written to block devices. The only drawback in using memory buffers is that if the system crashes before modifi ed buffers are written into the block device, the data will be inconsistent. Hence, we need to periodically fl ush out the modifi ed buffers to the block device. Examples include hard disk, DVD/CD ROM, and memory regions.
2.1.2 Symbolic LinksA symbolic link is a special fi le that points to another existing fi le on the system. This link contains the path name of the fi le it is pointing to. We can create several names for the same fi le through symbolic links. In order to create symbolic links, the ln command is used, and for listing them, the long-listing command ls -l is used. These commands will be discussed in detail in Chapter 3. A brief introduction to these commands is as follows. For example, let us assume we have a fi le letter.txt. Through the ln command, we can create its symbolic link in the fi le memo.txt as shown here:
Syntax ln -s source destination
Here, source is the absolute or relative path of the fi le whose link we want to create, and destination is the name of the link.
Example ln -s letter.txt memo.txt
The two fi lenames, letter.txt and memo.txt, refer to the same fi le, and changes made in either fi le will be refl ected in the other fi le.
2.1.3 PipesPipes are used for sending the output of a command as the input to another command. Pipes are created through the vertical bar character ‘|’, which contains commands on either side. The output of the command on the left-hand side is sent as input to the command on the right-hand side. The syntax for creating a pipe is as follows:
Syntax command1 | command2
Example ls | sort
Note: All device fi les are stored in the /dev directory.

16 Unix and Shell Programming
We will discuss two commands, ls and sort, in Chapter 3, but for the time being, it is enough to understand that the output of the ls command is sent to the sort command before outputting the result on the screen. The pipe created through this syntax is known as anonymous pipe, because it is created and later destroyed when the process is over. command1 and command2 on either side of the pipe have their own fi le descriptors that are automatically closed when the process is over. Apart from anonymous pipes, we can also create named pipes. As the name suggests, named pipes have specifi c names that are assigned to them, and exist as special fi les within the fi le system. Named pipes are known as fi rst in fi rst out (FIFO) because of two reasons. First, once the data is read from the pipe, it cannot be read again. Second, the order in which the data is read cannot be deviated. The named pipes are not automatically deleted as in the case of anonymous pipes but have to be explicitly deleted using the rm or unlink command. The command used for creating named pipes is mknod. The three commands, mknod, rm, and unlink, will be discussed in detail in Chapter 3.
2.1.4 SocketsSocket fi les are used for transferring information between two processes that are running on different machines. Socket fi les are basically used as an interface between our Unix process and the networking protocol. For example, while accessing the Internet through a web browser, sockets are used to establish communication between the Unix process and the browser. The creation of socket fi les is explained in detail in Chapter 14.
2.2 ORGANIZATION OF FILE SYSTEMS
The fi le system is organized as a tree with a single root node called root (written as ‘/’); every non-leaf node of the fi le system structure is a directory of fi les, and fi les at the leaf nodes of the tree are directories, regular fi les, or special device fi les. The name of a fi le is indicated by a path name that describes how to locate the fi le in the fi le system hierarchy. A path name is a sequence of component names that are separated by slash characters. A component is an arrangement of characters that designates a fi lename that is uniquely contained in the previous (directory) component. A full path name starts with a slash character and specifi es a fi le that can be found by starting at the fi le system root and traversing the fi le tree, following the branches, which lead to successive component names of the path name. Unix is an operating system that is divided into directories and sub-directories. The system programs and libraries are categorized according to their functions and placed in their respective directories. The forward slash (/) at the top of the tree is the root of the tree. All other directories are the sub-directories of the root directory as shown in Fig. 2.1.
The following is the list of directories and their contents:
bin Executable fi les are kept in this directory and these fi les can be run by users. After compilation, a program is converted into an executable binary and is usually kept in the /bin directory.
dev All the special fi les in the Unix fi le system, such as the keyboard or terminal device drivers, are kept in this directory.

Unix File System 17
etc All administrative fi les of Unix are kept in this directory.
lib This is the central library storage for fi les that are commonly used by other programs. A library is a collection of fi les (usually binary) that can be shared among many processes. The advantage of having a
library is that it is a single source of data and each program can use it without needing a unique copy of these executable functions for itself.
lost + found This is the most likely place where fi les can be found after the system crashes.
tmp Programs usually need extra space to store data on a disk. The /tmp directory is a directory used by programs that need extra buffer area in order to be executed.
Since the memory of a computer is limited in nature, we need to swap in the desired process and swap out the process whose task is done. This swapping is handled by a special fi le system known as the swap fi le system, which is discussed here.
Swap fi le system Swapping is a useful technique that enables us to execute programs and manage fi les that are larger than the computer’s primary memory. The program or fi le that we wish to execute or manage is logically split into small blocks that are known as pages or segments. One of the blocks is loaded into the primary memory where it can be worked on, whereas the remaining blocks of the program or fi le are stored in the physical disk drive. When a part of the program or fi le that is not in the primary memory is required, swapping takes place. Swapping is an operation by which the block of the program or fi le in the primary memory is swapped out to the physical disk drive and the next block from the physical disk drive is loaded into the primary memory. Swapping continues until the desired block is loaded in the primary memory. The concept by which a system appears to have more memory than what it actually has is known as virtual memory. In the Unix operating system, a partitition of hard disk can be treated as virtual memory. Thus, a separate partition known as swap partition is created on the disk that is meant to hold the swapped pages of the program or fi le. Every system should have a swap fi le system that is used by the kernel to control the movement of processes. When the system memory is heavily loaded, the kernel has to move processes out of the memory to this fi le system. When these swapped processes are ready to run, they are loaded back to the memory. Users cannot access this fi le system directly.
2.3 ACCESSING FILE SYSTEMS
Let us assume we have a device such as a fl oppy or CD containing a few fi les, and we want to view and access those fi les. The fi les on these devices make up an individual fi le system with its root as ‘/’. The fi le system on these devices will not be accessible by the Unix system unless it is mounted. Mounting a fi le system means assigning the root directory of the new fi le system to a sub-directory of the root directory of our Unix system. The subdirectory on which the new fi le
bin dev etc lib lost + found tmp
Fig. 2.1 List of fi les and directories in the Unix operating system

18 Unix and Shell Programming
system is mounted is called the mount point of a fi le system. The fi les and directories in the new fi le system or mounted fi le system are accessible when we go into that subdirectory. By mounting a fi le system, it will become a non-distinguishable part of the existing fi le system. Basically, mounting is a procedure of making the main existing fi le system aware of the new fi le system.
2.3.1 Mounting File SystemsBy mounting a fi le system of any device, we make its fi le and directories accessible through the existing Unix fi le system. The format of mounting a fi le system is as follows:
Syntax mount fi lesystem/devicename directory
The device name or fi le system is mounted on the given directory. The directory, also known as mount point, is the name of the directory that the newly mounted fi le system will be assigned to.
Note: For the fi le system to be mounted on a particular directory, the directory should already exist on the current fi le system.
In order to mount a fi le system that has the special device name /dev/fd (for fl oppy disk 0) onto the existing /mnt directory, the following command is used:
#mount /dev/fd /mnt
The new fi le system is simply an extension of the /mnt directory. We can view and access the fi les and directories of the mounted fi le system by changing the directory to the /mnt directory. We can also create directories and fi les in the /mnt directory sub-tree. The mount point (/mnt) should usually be an empty directory, as we will not be able to access its original fi les and subdirectories once a fi le system is mounted on it. The fi les of the /mnt directory will be accessible only when the fi le system is unmounted. The fi le system that is mounted to the main fi le system should be unmounted after its job is done. Before shutting down the Unix system, all the mounted fi le systems need to be unmounted; otherwise this may result in corruption of the content.
2.3.2 Unmounting File SystemsUnmounting a fi le system means detaching the mounted fi le system from the directory of the Unix system on which it was mounted. Once a fi le system is unmounted, we will not be able to access its fi les or directories. A fi le system cannot be unmounted if any of its fi les or directories are still active, that is, if they are currently in use. If we try unmounting a fi le system whose fi le or directory is currently open, we get an error message, ‘device busy’. To unmount a fi le system that is mounted on any directory, fi rst of all, we need to close all the open fi les and directories and then proceed to unmount it. We use the following command without any arguments, in order to know the fi le systems mounted within a fi le system:
mount
It gives a list of the mounted fi le systems. We might obtain the following output:mounted mounted over/dev/fd /mnt

Unix File System 19
This output shows that the fi le system /dev/fd is mounted on the /mnt directory. The command that is used for unmounting the mounted fi le system is umount. The following format is adopted for using the umount command:
Syntax umount fi lesystem name/mount point
Example The command to unmount the fi le system, /dev/fd that we mounted on the /mnt directory will be as follows:
umount /mnt
We cannot unmount the fi le system even if we are sitting in the same fi le system. Thus, unmounting the /dev/fd fi le system while sitting in the /mnt directory is not possible. We have to come out of the /mnt directory before giving the umount command.
Note: A fi le system cannot be dismounted if it is busy, that is, when a fi le or directory on that fi le system is being accessed.
Nowadays, fl oppy disk drives are no longer manufactured or used. Only for the sake of explaining mount and umount commands, the concept of fl oppy disk drives is used. In the currently available Unix operating systems (like Oracle Solaris 10, which we are using in this book) and Linux systems, CD ROMs, DVDs, and USB storage devices are automatically mounted without using the mount command. Thus, mount and umount commands are no longer needed in the currently available Unix operating systems or equivalents. The USB storage device is automatically mounted and is available under the /rmdisk directory, whereas the CD ROM/DVD is automatically mounted and available under the /cdrom directory. This also means that the following commands will navigate us to the CD ROM/DVD drive and will depict its contents:
$ cd /cdrom$ ls
Table 2.1 gives a brief comparison of the fi le systems of Windows and Unix operating systems.
Table 2.1 Comparison between fi le systems of Windows and Unix operating systems
Unix Windows
In Unix, the / (forward slash) represents a separator while defi ning the path to indicate a new directory level. The following command represents two directory levels, usr and projects: cd /usr/projects
In Windows, the \ (backslash) is used for defi ning the path. For example, the directory levels, usr and projects, in Windows are represented as follows:cd \usr\projects
In Unix, the forward slash (/) indicates the root directory, that is, the directory from where all other directories begin. All other hard disk drives, pen drives, CD ROM/DVD drives, etc., are accessed via the root (/) directory. For example, /cdrom represents the CD ROM drive.
In Windows (and in DOS), C:\ indicates the top-level directory of the fi le system. Other hard disk drives, fl oppy disk drives, and CD ROM/DVD drives are indicated by various top-level directory equivalents such as D:\ and E:\.
In Unix, the root account acts as the Unix administrator. In Windows, there is an administrator account that performs the administrative tasks.

20 Unix and Shell Programming
2.4 STRUCTURE OF FILE SYSTEMS
A fi le system is a group of fi les and directories that exists in the form of a tree-like structure with its root in the form of a root directory. A hard disk can be partitioned into several parts with each part having its own fi le system; there can be several fi le systems in a hard disk. A fi le system cannot be split on two different disks; it has to be entirely on a single disk. A fi le system has the following four sections that are known as blocks: boot, super, inode, and data. The fi rst block of a fi le system is called the boot block, and it is followed by super, inode, and data blocks, as shown in Fig. 2.2.
Boot block Super block Inode block Data blocks
Fig. 2.2 File system of Unix
2.4.1 Boot BlockThe boot block is the fi rst block of the fi le system that contains a small bootstrap program. The bootstrap program is a short program that is loaded by the basic input/output system (BIOS) on starting any computer. It checks and initializes the I/O devices and also loads the operating system. During bootstrapping, which is also known as booting, the master boot record (MBR) is loaded into the memory, which in turn, loads the kernel into the memory.
2.4.2 Super BlockThe boot block is followed by the super block. This block contains global fi le information about disk usage and availability of data blocks and inodes. It also contains a pointer to the head of the free list of data blocks.
The super block consists of the following information:
1. Size of the fi le system2. Number of free data blocks available in the fi le system3. List of free data blocks available in the fi le system4. The index of the next free data block in the free data block list5. Size of the inode list6. Number of free inodes available in the fi le system7. List of free inodes in the fi le system8. The index of the next free inode in the free inode list
Figure 2.3 shows a super block containing an array of free data block numbers and a pointer to the head of the free list of data blocks.
The values 109, 125, 104, 175, and 138 in this fi gure refer to the free data block numbers. The entry 109 is a data block that contains a pointer to an array of free data blocks. We assume that the index, which points to the next free data block in the free data block list, is pointing to the last data block number, which is 138.
When a process requests for a data block, it searches the free data blocks in the super block and returns the available data block
Fig. 2.3 List of free data blocks in super block
207 204 292 275 250
109 125 104 175 138 Super block
Data block

Unix File System 21
pointed to by the index, that is, the data block number 138 will be returned and the index will shift to another data block in the list. Thus, after having assigned data block 138 to the requesting process, the index will shift to the point at the data block numbered 175, and the procedure will continue. If the super block contains
only one entry, which is a pointer to the array of free data blocks, all the entries from that block will be copied to the super block free list as shown in Fig. 2.4.
As usual, the requesting process will continue to get block numbers from the ones listed in the super block.
2.4.3 Inode BlockEvery fi le or directory has an inode number—a unique number that recognizes the fi le or directory in the fi le system. All inodes are stored in inode blocks.
We know that a hard disk is organized into blocks (or sectors) and a fi le stored in a hard disk may be scattered in different blocks. The addresses of these blocks (containing fi le parts) are stored in the form of a linked list in an inode block, that is, a table of blocks is maintained for each fi le. Each Unix fi le system has its own inode table in which inode blocks are stored. Each inode is referenced by a device + inode number pair. There are three reserved inode numbers—0, 1, and 2—defi ned as follows:
0 refers to the deleted fi les and directories.1 refers to fi le system creation time, bad blocks count, and so on.2 refers to the root directory of the fi le system.
The inode block contains information on each fi le in the data block. The information comprises owner of the fi le, fi le type, permissions, address of the fi le, and so on. Each inode block usually contains the following entries:
1. Owner: Indicates the owner of the inode2. Group: Indicates the group to which the inode belongs3. File type: Indicates the type of fi le, that is, whether the inode represents a fi le, a directory,
a FIFO, a character device, or a block device (The type value is set to 0 to indicate that the inode is free).
4. Permissions: Indicates the read, write, and execute permissions of the owner (user), group, and other members, for the fi le
5. Access time: Indicates the time at which the fi le was last accessed6. Modifi cation time: Indicates the time at which the fi le was last modifi ed7. Inode modifi cation time: Indicates the time at which the inode was last modifi ed. (The
inode is modifi ed when the contents of the fi le are changed, the permission of the fi le is changed, link for the fi le is created, and so on.)
8. Number of links to the fi le: Indicates the number of links of the fi le9. Physical addresses: Indicates the blocks containing the fi le parts
10. Size: Indicates the actual size of the fi le
A fi le’s inode number can be found using the ls -i command.
Example $ ls -i letter.txt 45267 letter.txt
Fig. 2.4 List of free data blocks copied from data block to super block
207 204 292 275 250 Super block

22 Unix and Shell Programming
Here, 45267 is the inode number. The Unix system also maintains an inode table in the memory for a fi le that it uses. When the fi le is opened, its inode is copied from the hard disk to the system’s inode table.
Note: The inode contains all the attributes of a fi le except the fi lename. The fi lename is stored in the directory in which the fi le is kept. The i number is also not stored in the inode, but is used to locate the position of the inode in the inode blocks.
DirectoryThe directory contains only two fi le attributes: inode number and fi lename. When we create a link for a fi le, no separate inode is allocated for it, but the link count in the inode is incremented by one. A directory entry is also created with the new fi lename. When we remove a linked fi le with the rm command, the link count in the inode is decremented, and the directory entry for that link is also removed. A fi le is removed when its link count becomes zero. The associated disk blocks are also freed in order to make them available for new fi les. A fi le is internally identifi ed by Unix through a unique inode number that is associated with it. A directory fi le contains the names of the fi les and the subdirectories present in that directory along with an inode number for each. The inode number is nothing but an index to the inode table in which information about the fi le is stored. For example, if the inode number of the fi le letter.txt is 45267, it means that the slot number 45267 in the inode table contains information about the fi le letter.txt. Suppose the fi le letter.txt is present in a directory called India. If we attempt to cat the letter.txt fi le, Unix will fi rst check if the user has the read permission for the directory India. If so, it will fi nd out whether this directory has an entry with letter.txt. If such an entry is found, its inode number is fetched from India. This inode number is an index to the inode table. The contents of the fi le letter.txt are read from the disk addresses mentioned in the inode entry of letter.txt and then displayed on the screen. The fi le contents are placed in the form of data blocks dispersed throughout the disk. In each inode, an array is maintained to keep track of the data blocks. The fi rst 10 elements of the array indicate direct indexing, that is, they directly point to the data blocks that contain the fi le content. Thus, a fi le that needs less than or equal to 10 data blocks is accessible via the direct index entries. After direct indexing comes single indirect indexing, which in turn, is followed by double indirect indexing and triple indirect indexing, as shown in Fig. 2.5. If the fi le needs more than 10 blocks, it uses single indirect indexing. It contains a pointer that points to a block, which in turn, contains an array of pointers pointing to the fi le’s data blocks. Double indirect indexing is used for larger fi les where a pointer points to a block of pointers that point to other blocks of pointers, which in turn, point to the fi le’s data blocks. Triple indirect indexing is used for extremely large fi les where a pointer points to a block of pointers that point to other blocks of pointers, which in turn, point to other blocks of pointers, which fi nally point to the fi le’s data blocks. A question arises with regard to the maximum size of a fi le that can be pointed to by an inode.

Unix File System 23
Assuming a data block is of size 4KB and there are 10 direct pointers in an inode, the directly addressable data block size is 10 × 4KB = 40KB. In case of single indirect indexing, a pointer points to an entire block of pointers. If a block is of size 4KB, and each pointer is of 4 bytes, there will be 4 KB/4 pointers, that is, 1024 pointers in a block, where each pointer points to a 4KB block. This means that a single indirect addressing can address a fi le that is 1024 × 4KB in size. Similarly, in double indirect indexing, a pointer points to a block of pointers, which in turn, point to a block of pointers. Hence, a double indirect addressing can address a fi le that is 1024 × 1024 × 4KB in size. By following the same pattern, a triple indirect addressing can address a fi le of 1024 × 1024 × 1024 × 4KB size.
Note: The maximum fi le size that Unix supports is the sum of sizes accessible by the direct, single indirect, double indirect, and triple indirect addressing.
GroupOwner
PermissionsFile type
Access timeModification time
Inode modification timeSize
Direct
Directpointerspointingto file’sdata blocks
DirectSingle indirectDouble indirectTriple indirect
Blocks of pointers
Datablock
Datablock
Datablock
Datablock
Datablock
Datablock
Datablock
Fig. 2.5 Single, double, and triple indirect addressing for large fi les

24 Unix and Shell Programming
2.4.4 Data BlockThe actual data is stored in data blocks. Apart from these direct data blocks, there are also indirect blocks that contain the addresses of the direct blocks. The inode maintains a list of these indirect block addresses. When a fi le is created, the kernel looks up the list available in the super block to look for a free inode. The effi ciency of the system is increased to a great extent, as the list is always updated, and hence, quite reliable. The kernel reads and writes the copy of the super block in the memory when controlling the allocation of inodes and data blocks. The information in the fi le system needs to be written to the disk before the power of the Unix system is turned off. The system checks for a possible mismatch during booting. Since the kernel works with the memory copy of the superblock rather than with the disk copy, the kernel updates the disk copy with the memory copy. This is done with the sync operation.
Note: The kernel always maintains a copy of the superblock in the memory. The in-memory copy actually contains the latest and the correct fi le system status rather than its disk copy.
The information stored in the inode table changes whenever we use any fi le or change its permissions; hence, a copy of the super block and inode table are kept in the memory (RAM) at start-up time, and all changes are made in the RAM copies of the super block and inode table every time some modifi cation occurs. The original super block and inode table in the disk are updated after a fi xed interval of time, say every 30 seconds, by a command called sync. This command synchronizes the inode table in the memory with the one on the disk by simply overwriting the memory copy on to the disk. The disk space allotted to a Unix fi le system is made up of blocks, each of which is typically 512 bytes in size. Some fi le systems may have blocks of 1024 or 2048 bytes.
Note: The standard system block size is 1024 bytes (known as logical block) and the physical block size is 512 bytes long (i.e., one logical block contains two physical blocks).
■ SUMMARY ■
1. In the Unix operating system, there are three types of fi les: ordinary fi les, directory fi les, and device fi les. Ordinary fi les are also referred to as regular fi les, and they may contain printable characters.
2. The device fi les are of two types—character device fi les and block device fi les. In character devices, read and write operations are performed character by character, that is, 1 byte at a time, whereas in block devices, read and write operations are performed one block at a time.
3. Caching is a process in which the block of the disk accessed is kept in buffer in the memory so that in future, read and write operations are performed in the
cached block of the memory. 4. All device fi les are stored in the /dev directory. 5. A symbolic link is a special fi le that points to another
existing fi le on the system. These links are used to create several names for the same fi le. Through the in command, we can create the symbolic link of a fi le.
6. A pipe is represented as a vertical bar character (|) and is used for sending the output of a command as an input to another command. Pipes are of two types: anonymous pipes and named pipes. Named pipes are known as FIFO, as once the data is read from the pipe, it cannot be read again.

Unix File System 25
■ EXERCISES ■
Objective-type QuestionsState True or False
2.1 The fi rst block of the Unix fi le system is known as super block.
2.2 Every fi le or directory has a unique inode number. 2.3 Unix also treats the physical devices as fi les. 2.4 tmp is the folder in which all administrative fi les
are kept. 2.5 Double indirection is used for smaller fi les. 2.6 We can create several names for the same fi le
through symbolic links. 2.7 Named pipes are also known as last in fi rst out
(LIFO). 2.8 In order to see the fi les or directories of any
device, its fi le system needs to be mounted. 2.9 In block devices, read and write operations are
performed one byte at a time.2.10 Pipes are of two types: anonymous and named.
Fill in the Blanks
2.1 In the Unix system, a fi lename may approximately be characters long.
2.2 Every Unix system has a fi le system in it.
2.3 The command is used to unmount a fi le system.
2.4 There are three types of fi les in Unix: , , and .
2.5 Every fi le or directory is represented by a unique number known as .
2.6 The concept by which our system appears to
have more memory than what it actually has is known as .
2.7 Character devices are also known as .
2.8 The boot block is the fi rst block of the fi le system that contains a program.
2.9 Inodes are maintained in an array form and are accessed through their indices known as
.2.10 Ordinary fi les are also referred to as ,
and they contain printable characters.
7. Socket fi les are used for transferring information between two processes that are running on different machines.
8. The fi le system is organized as a tree with a single root node called root that is represented as ‘/’.
9. The concept by which a system appears to have more memory than what it actually has is known as virtual memory.
10. Mounting a fi le system means assigning the root directory of the new fi le system to a subdirectory of the root directory of our Unix system. The
subdirectory on which the new fi le system is mounted is called the mount point of a fi le system.
11. Unmounting a fi le system means detaching the mounted fi le system from the directory of the Unix system on which it was mounted.
12. A Unix fi le system typically consists of four blocks: boot, super, inode, and data.
13. Every fi le or directory has an inode number—a unique number that recognizes the fi le or directory in the fi le system.
14. A fi le’s inode number can be found using the ls -i command.
Multiple-choice Questions
2.1 The fi rst block of a fi le system is (a) super block (c) inode block (b) data block (d) boot block
2.2 If a directory has 10 fi les, the number of entries in the directory fi le will be
(a) 10 (b) 11 (c) 9 (d) 0

26 Unix and Shell Programming
2.3 In the Unix operating system, the fi les are divided into three categories—ordinary, directory, and
(a) special fi les (c) device fi les (b) hidden fi les (d) inode fi les 2.4 The directory in which executable fi les of the
Unix operating system are kept is (a) lib (c) dev (b) etc (d) bin 2.5 The Unix fi le system is organized as a tree with a
single node at the top known as (a) foundation (c) seed (b) root (d) stem 2.6 The indexing by which a pointer points to a block
of pointers that point to other blocks of pointers, which in turn, point to the fi le’s data blocks is known as
(a) direct addressing (b) single indirect addressing (c) double indirect addressing
(d) triple indirect addressing 2.7 The command that synchronizes the inode table
in the memory with the one on the disk is (a) sync (b) synchronizer (c) tally (d) matcher 2.8 The reserved inode number 0 refers to the (a) linked fi les (b) deleted fi les and directories (c) directories (d) device fi les 2.9 The bootstrap program is a short program
loaded by (a) data block (c) BIOS (b) hard disk (d) named pipe2.10 The number of sections or blocks that a fi le
system has is (a) 1 (b) 2 (c) 3 (d) 4
Review Questions 2.1 Write short notes on the following: (a) Inode block (b) Ordinary fi les (c) Pipes (d) Symbolic link (e) Inode table 2.2 What are the different blocks that constitute a
Unix fi le system? 2.3 Explain the procedure of mounting and
unmounting a fi le in a Unix operating system. What is the signifi cance of this process?
2.4 Differentiate the following: (a) Character and block devices (b) Boot block and data block (c) Single and double indirect addressing 2.5 Explain the role of default fi les and directories in
the Unix operating system.
State True or False
2.1 False 2.2 True 2.3 True 2.4 False 2.5 False 2.6 True 2.7 False 2.8 True 2.9 False
2.10 True
Fill in the Blanks
2.1 255 2.2 swap 2.3 umount 2.4 ordinary fi les,
directory fi les, device fi les
2.5 inode number 2.6 virtual memory 2.7 raw devices 2.8 bootstrap 2.9 i number2.10 regular fi le
Multiple-choice Questions
2.1 (d)
2.2 (a) 2.3 (c) 2.4 (d) 2.5 (b) 2.6 (c) 2.7 (a) 2.8 (b) 2.9 (c)2.10 (d)
■ ANSWERS TO OBJECTIVE-TYPE QUESTIONS ■

Unix has a large family of commands. However, even before we discuss how to perform a task with the help of these commands, we need to fi rst log in to the system. Let us see how this is done.
3.1 LOGIN: LOGGING IN TO SYSTEMS
The fi rst step involved while working on the Unix system is to log in or identify ourselves with the system. We should be assigned a user ID and password by the administrator, which would enable us to log in to the system. The user ID and password (along with other information) are assigned while adding a new user to the system. As soon as we switch on the Unix system, we are prompted to log in. The login prompt appears as Login. At the login prompt, we type the user ID (a unique login name provided by the administrator). After having typed the user ID, we are prompted for a password. The password entered here is encrypted and appears in the form of a string of asterisk symbols in the following manner.
33Basic Unix Basic Unix CommandsCommands
C H A P T E R
After studying this chapter, the reader will be conversant with the following:
• Some basic commands that are frequently used• Logging in to the system, changing password, checking who is logged in,
and displaying date and time of the system• Dealing with fi le operations such as creating fi les, displaying their contents,
deleting fi les, creating links to fi les, renaming fi les, and moving fi les• Maintaining directories, creating a directory, changing the current directory,
and removing a directory• Displaying calendars, using basic calculators, displaying information about
current systems, deleting symbolic links, and exiting from a Unix system

28 Unix and Shell Programming
Example login: chirag
password: *****
Note: One of the main security features of the Unix operating system is the displaying of asterisks while typing the password and storing the actual password in an encrypted format (also known as the hash of the password) in the /etc/shadow fi le that can be accessed only by the root.
In case the user ID or password is wrongly entered, we get the following error message:
Login incorrectlogin:
This message informs the user that either the user ID or the password has been entered incorrectly, and a new login prompt is displayed to try again. If the user ID and password are correct, we will be allowed to log in to the Unix system and will be navigated to our home directory, that is, the directory in which our personal fi les and settings are stored. In addition, a message indicating when we last logged in, along with the shell prompt, is displayed:
Last login: Fri Dec 15 10:30:05 on ttys17$
This message indicates the date, time, and terminal from which we last logged in. The message is followed by the default Unix shell prompt by which we can write and execute Unix commands. The default Unix prompt for the Bourne, Bash, and Korn shells is the dollar sign ($). For C and tcsh shells, the prompt is the percentage sign (%). You must be wondering who the administrator refers to. Let us understand this term.
System administrator A system administrator is a person who is responsible for setting up and maintaining the Unix operating system. He/She is responsible for the proper functioning of the Unix system and also ensures that the system resources are optimally utilized. The following are a few of the tasks performed by the system administrator:
1. Set up and maintain user accounts2. Monitor access and privileges and set up security policies3. Monitor system performance and ensure proper utilization of resources4. Install and upgrade software whenever desired5. Take backup at regular intervals and restore systems in case of a crash6. Perform proper starting and shutting down of systems
3.2 OVERVIEW OF COMMANDS
Commands refer to one-line statements that operate on the supplied operands to perform some action. Each command is supported with certain options that add extra features to the command. These options enable the user in driving the command to carry out the desired action. The options are mostly prefi xed with a hyphen (-) and more than one option can be used in a command. We are going to look at very basic internal and external commands that users execute while working on the Unix operating system. These command functions include listing of fi les and directories, making new directories, changing directories, removing directories, creating

Basic Unix Commands 29
fi les, looking at the content of the fi les, copying, renaming, and deleting fi les, viewing system date and time, and knowing the list of users who are logged in, among others. The user performs very general operations while working with the Unix operating system.
3.2.1 StructureAs mentioned in Section 3.2, a traditional Unix command consists of options and operands, where options are generally in the form of a character prefi xed by a hypen (-), which is used for exploiting a particular feature of the command. The argument refers to the content or data to which the command has to be applied. An argument can be a fi le, directory, terminal, device, etc. The syntax of a Unix command is as follows:
Unix_Comannd [-option1][-option2]...[Argument]
Let us understand the different types of commands in Unix.
3.2.2 Types of Commands in UnixThe basic commands in Unix are divided into two broad categories:
Internal commands The shell has a number of built-in commands that are known as internal commands. Some of these, such as cd and echo, do not generate a process, and are directly executed by the shell. These commands are built into the shell and do not exist as separate fi les.
External commands External commands are Unix utilities and programs such as cat and ls. These commands exist in the form of individual fi les and are distributed in different directories. The commonly used user commands are placed in the /bin directory, and the commands that are usually used only by system administrators are placed in the /etc directory. In the subsequent sections, we will be learning about the usage of the basic commands in Unix, namely passwd, ls, mkdir, cd, rmdir, pwd, uname, touch, cat, cp, rm, mv, ln, unlink, tput, who, fi nger, date, cal, echo, bc, globbing, and exit, and some line-continuation characters.
➢ passwd: Changing passwordIt is considered good practice to change the login passwords at regular intervals so as to avoid any possibility of illegal access of the fi les by any unauthorized person. The command for changing the password is passwd.
Syntax $passwd
On executing the passwd command, we will be prompted to enter the old password before giving the new password (to confi rm that only authorized people are changing the password). In addition, the new password should be signifi cantly different from the older one. It should be at least six characters long, and have at least two alphabets, one numeric, and one special character. On executing the command, we may get the output shown in the following example.
Example
$passwdChanging password for chiragOld password: *********New password: **********Re-enter new password: **********

30 Unix and Shell Programming
If the new password and the old password are not very different from each other, we may get the following error:Passwords must differ by at least 3 positionsThe two passwords entered in New password and Re-enter new password should be the same; else we will get the following error:They don't matchTry again
In case the two passwords entered in New password and Re-enter new password are exactly the same, the password of the user will be changed and we will get a confi rming message:
Password updated successfully.
➢ ls: Listing fi les and directoriesThis command shows the fi les and directories on the disk. By default, the fi les and directories are displayed in alphabetical order. If the name of the directory is not specifi ed, it will display the list of fi les and directories of the current working directory.
Syntax $ ls -[options]
There is a list of options available with the ls command, as shown in Table 3.1.
While listing and searching for fi les and directories, we can also make use of wild-card characters. These characters help in fi nding fi les and directories that begin with specifi c character(s), contain specifi c character(s) or a range of characters in their names, consist of names of a specifi c length, and so on. They provide a quick and convenient way of searching for the desired fi les and directories.Wild card matching A string is a wild-card pattern if it contains one of the following characters: ‘?’, ‘*’, or ‘[’.
Table 3.1 List of options available with the ls command
Options Syntax Description
-x ls –x Shows fi les in multiple columns (default)-F ls -F Shows fi les and directories, fi les have / as suffi x-r ls -r Shows fi les sorted in reverse alphabetical order-R ls -R Shows the recursive listing, that is, fi les of directories as well as
subdirectories are also displayed-a ls -a Shows all the hidden and visible fi les; hidden fi les start with a dot (.)-d ls –d directory_name Shows only the directory name instead of listing its content; used
with –l option to know the status of the directory-l ls -l Shows fi les in the long-listing format (shows seven attributes of a
fi le, that is, fi le permissions, number of links, owner, group, size, date and time, and fi le/directory name)
-t ls -t Sorts fi les by modifi cation time; the latest fi le is on the top-u ls -u Sorts fi les according to the last access time, starting with the most
recent fi le-i ls -i Shows inode number of all the fi les

Basic Unix Commands 31
1. ‘?’ matches any single character.2. ‘*’ matches 0 or more instances of any character, that is, it also matches the empty string. 3. [c1-c2] matches a single instance of any character within the range c1 and c2. For
example, [a-d] is equivalent to [‘abcd’]. Similarly, [0–9] represents a value from 0 to 9. [a-zA-Z] represents all lower-case and upper-case letters.
We will learn more about wild cards and fi lename substitution ( globbing) at the end of this chapter.In order to understand these options, let us for a while assume that on giving the ls command in the current directory, we get a list of the following fi les and directories:
$lscoursesnotes.txtprograms.docuniversity..
To get all the fi les beginning with a specifi c character, we can give a command using the following syntax:
Syntax $ ls charactername*
Here, * represents 0 or more occurrences of any character.
Example In order to obtain all the fi les beginning with character n, we can give the following command.
$ ls n*notes.txt
In order to get all the fi les beginning with a character in a given range, we give the command in the following syntax.
Syntax $ ls [c1-c2]*
Here, c1 and c2 represent the beginning and ending character of the range, respectively.
Example In order to get all the fi les beginning with characters a to d, we can give the following command.
$ ls [a-d]*courses
Similarly, we can use the wild-card character, ?, which represents a single character, to get the desired fi les. For example, to get all the fi les that consist of three characters and begin with character a, we can give the following command:
$ ls a??
However, since none of the fi les meet these criteria (assuming no fi lename exists that is three characters long and begins with character a), we will not get anything as the output. In order to get all the fi les that begin with character a followed by any digit, we can give the following command:
$ ls a[0-9]*

32 Unix and Shell Programming
Again, as we can see, no fi le that begins with character a is followed by a digit in our list of directories and thus no output is generated. If we use the –l option for long listing, we may get the following output:
$ls –l -rwxr--r-- 2 chirag it 48 Nov 11:31 courses-rw-rwxr-- 1 chirag it 669 Dec 09:15 notes.txt-rwxrwxrwx 1 chirag it 1560 Nov 11:21 programs.doc-rwxr-xrw- 2 chirag it 65 Dec 05:10 university
Seven attributes are displayed: fi le permissions, number of links, owner, group, size, date and time, and fi le/directory name. In order to see all the fi les, including the hidden fi les, we use the –a option. The output is as follows:
$ls –al-rwxr--r-- 2 chirag it 80 Nov 11:31 .-rwxr--r-- 2 chirag it 72 Nov 11:31 ..-rwxr--r-- 1 chirag it 210 Nov 11:31 .profi le-rwxr--r-- 2 chirag it 48 Nov 11:31 courses-rw-rwxr-- 1 chirag it 669 Dec 09:15 notes.txt-rwxrwxrwx 1 chirag it 1560 Nov 11:21 programs.doc-rwxr-xrw- 2 chirag it 65 Dec 05:10 university
Note: Filenames that begin with the dot (.) are considered hidden fi les in Unix.
By default, the fi le and directory names are sorted alphabetically. We can use the –t option to sort them according to the modifi cation time; the fi le that is created last is displayed at the top.
$ls –lt-rwxrwxrwx 1 chirag it 1560 Nov 11:21 programs.doc-rwxr--r-- 2 chirag it 48 Nov 11:31 courses-rwxr-xrw- 2 chirag it 65 Dec 05:10 university-rw-rwxr-- 1 chirag it 669 Dec 09:15 notes.txt
In order to get the inode number of the specifi ed fi le, we can use the –i option, as shown here:
$ ls –li programs.doc39984 -rwxrwxrwx 1 chirag it 1560 Nov 11:21 programs.doc
The digit 39984 is the inode number of the fi le programs.doc. Let us recall a concept from Chapter 1: each fi le or directory in the Unix operating system has a unique number known as inode number, which recognizes the fi le or directory in the fi le system.
➢ mkdir: Making directoriesThe mkdir command enables us to create one or more new directories.
Syntax $ mkdir –[mp] dirname
The option –m stands for mode and is used for creating the directory with certain specifi c permissions.

Basic Unix Commands 33
The option –p stands for parent and is fi rst used for creating all the non-existing parent directories that are mentioned in the given path. dirname is the directory name that may be either an absolute path name or a relative path name. We may specify more than one directory name on a single command line.
Consider the following example.
$ mkdir courses
This command creates a directory by the name courses under the current directory.
$ mkdir courses faculty placement
This command will create three directories by the names courses, faculty, and placement.
Note: If dirname already exists, the mkdir command aborts and does not overwrite the existing directory.
$ mkdir courses
Since a directory with the name courses already exists, this command generates the following error:
mkdir: can't make directory courses
By default, the directories are created with read, write, and execute permissions for owners and with read and execute permissions for groups and others, respectively. However, in order to create a directory with a particular set of permissions of our choice, we can use the following command:
$ mkdir –m 746 country
This command creates a directory country with read, write, and execute permissions for the owner; only read permission for the group; and read and write permissions for others. The option –p stands for parent and is used for creating a parent directory in the given path.
Note: Absolute and relative paths—A path refers to the exact location of a given fi le or directory. Basically, directories exists in a tree hierarchy, one inside another, and a directory or fi le is referred through a path, where the path components are delimited by the forward slash (/).
A path can be an absolute path or a relative path. The absolute path points to the given fi le or directory regardless of the current working directory and is written in reference to the root directory, whereas the relative path is a path for a given fi le or directory in relation to the current working directory. Remember, the absolute path always starts with a forward slash, which represents the root directory. Moreover, the absolute path of the given fi le or directory is always the same, whereas the relative path changes according to the current directory location. The following are the examples:
(a) Assuming a directory projects exists inside another directory usr, exists on the root and that the current working directory is usr, the following are the two paths to the projects directory:Absolute path: /usr/projectsRelative path: projects
(b) Similarly, if there is another directory experiment inside the directory /usr, and the current working directory is projects, then the following are the two paths to the experiments directory:Absolute path: /usr/experimentsRelative path: ../experiments

34 Unix and Shell Programming
Example $ mkdir –p university/colleges/professors
This command creates a directory university; within the university, a subdirectory colleges gets created, and under that, a sub-subdirectory professors is created. There are several situations in which the directory is not created and the mkdir command is aborted while displaying the following error:
mkdir: Failed to make directory
The reasons for this error can be any of the following:
1. A directory with the same name already exists.2. An ordinary fi le by the same name exists in the current directory.3. The user does not have the read and write permissions to create fi les and directories in
the current directory.
Line-continuation characters Sometimes, we come across commands that are too long to be accommodated in a single line. Such commands are continued in the next consecutive line by making use of the line-continuation character. The line-continuation character is \ (backslash). Hence while writing a long command, when we come to the end of a line, we have to type \ (backslash) and press the Enter key without any space or character following it. The shell displays the ‘>’ symbol to indicate that the current line is in continuation of the previous line. We can continue typing the remaining part of the command to the right of the ‘>’ symbol and press the Enter key when the command is over in order to get its output. We can use the line-continuation character, that is, \ (backslash) any number of times for a single command.
Figure 3.1 demonstrates this by using the mkdir command for creating three direc-tories, courses, faculty, and placement, while using the line-continuation character (i.e., backslash).
➢ cd: Changing directoriesWe use the cd command to change to any directory in the fi le system.
Syntax $ cd pathname
Here, path name is either an absolute or a relative path name for the desired target directory.
Example $ cd ajmer
This command changes our current directory to ajmer (that is assumed to exist in the current directory). When we directly give the directory name (without using ‘/’ as prefi x), it means that it is a relative path (i.e., a path related to the current directory).
$ cd /home/chirag/ajmer
This command takes us to the sub-subdirectory ajmer, which is in the chirag subdirectory of the home directory. The path used in the aforementioned example is an absolute path.
$ cd ..
This command takes us to the parent directory.
Fig. 3.1 Line-continuation character used in the mkdir command
$ mkdir courses \> faculty \> placement
$

Basic Unix Commands 35
Note: .. refers to the parent directory.
We can return to our home directory from any other directory by simply typing the cd command without an argument. We do not need to specify our home directory as an argument, because our shell always knows the name of our home directory.
➢ rmdir: Removing directoriesThis command is used to remove a directory.
Syntax $ rmdir [-p] pathname
Here, the –p option is used for deleting the parent directory if it is empty.
Note: The rmdir command cannot remove a directory until it is empty.
Examples
(a) In order to remove a single directory, consider the following example.
$ rmdir ajmer
This removes the directory ajmer if it is empty; else, we will get the following error:
rmdir: ajmer: Directory not empty
(b) We can delete more than one directory using the following single command.
$ rmdir courses placement
The directories that are empty will be deleted with this command.
$ rmdir university/colleges/professors university/colleges university
This command deletes the professors sub-subdirectory from the colleges subdirectory; then it deletes the colleges subdirectory from the university directory and fi nally, from the university directory.
We can get the same result using the –p option as follows:
$ rmdir –p university/colleges/professors
Remember, we cannot use rmdir to remove our current working directory. If we wish to remove our working directory, we have to fi rst come out of it.
➢ pwd: Print working directorypwd stands for print working directory. It displays the absolute path name of our working directory.
Syntax $ pwd
Example $ pwd
/home/chirag
This output indicates that we are in the home directory of the user ID chirag. We can see that the pwd command displays the full path name of the current directory.
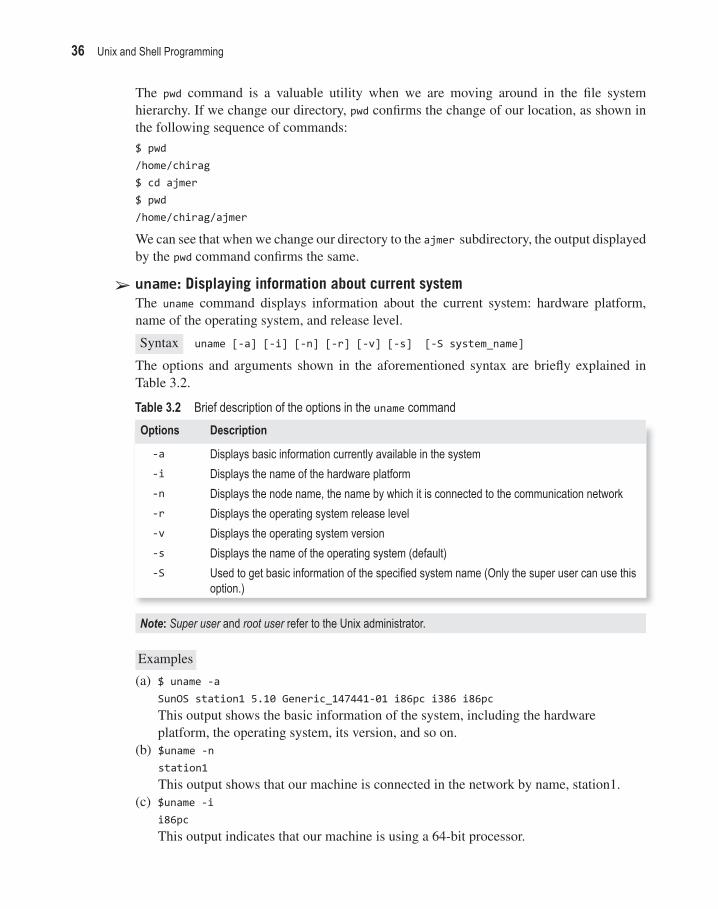
36 Unix and Shell Programming
The pwd command is a valuable utility when we are moving around in the fi le system hierarchy. If we change our directory, pwd confi rms the change of our location, as shown in the following sequence of commands:
$ pwd/home/chirag$ cd ajmer$ pwd/home/chirag/ajmer
We can see that when we change our directory to the ajmer subdirectory, the output displayed by the pwd command confi rms the same.
➢ uname: Displaying information about current systemThe uname command displays information about the current system: hardware platform, name of the operating system, and release level.
Syntax uname [-a] [-i] [-n] [-r] [-v] [-s] [-S system_name]
The options and arguments shown in the aforementioned syntax are briefl y explained in Table 3.2.
Table 3.2 Brief description of the options in the uname command
Options Description
-a Displays basic information currently available in the system
-i Displays the name of the hardware platform
-n Displays the node name, the name by which it is connected to the communication network
-r Displays the operating system release level
-v Displays the operating system version
-s Displays the name of the operating system (default)
-S Used to get basic information of the specifi ed system name (Only the super user can use this option.)
Note: Super user and root user refer to the Unix administrator.
Examples
(a) $ uname -aSunOS station1 5.10 Generic_147441-01 i86pc i386 i86pc This output shows the basic information of the system, including the hardware platform, the operating system, its version, and so on.
(b) $uname -nstation1This output shows that our machine is connected in the network by name, station1.
(c) $uname -ii86pcThis output indicates that our machine is using a 64-bit processor.

Basic Unix Commands 37
(d) $uname -r5.10This output shows the operating system release level.
(e) $uname -sSunOSThis output indicates that our machine has a Linux operating system installed.
➢ touch: Creating fi les and changing time stampsThe touch command is used for creating fi les and changing time stamps. Here, time stamps means both the times, that is, the time the fi le was last accessed and the time the fi le was last modifi ed.
Syntax touch –[ma] time_expression fi lename
Here, the –m option is used for changing the modifi cation time, and the –a option is used for changing the access time. The time_expression that we would provide should be in the following format: MMDDhhmm, where M: month, D: day, h: hour, and m: minute. When the touch command is given without any option and time expression, it simply creates a fi le of zero bytes.
Examples
(a) $ touch chirag.txtThis creates a fi le called chirag.txt of zero byte.We can create several empty fi les quickly with the touch command.
(b) $ touch chirag1 chirag2 chirag3 chirag4 This command creates four new fi les with the following names: chirag1, chirag2, chirag3, and chirag4 (without any contents in them).
(c) $ touch 09211520 chirag.txtThis sets the modifi cation and access time of the fi le chirag.txt to Sep 21 15:20.
(d) $ touch –m 11071015 chirag.txtThis command sets the modifi cation time of the fi le chirag.txt to Nov 07 10:15.
(e) $ touch –a 07120820 chirag.txtThis will set the access time of the fi le chirag.txt to Jul 12 08:20.
Note: The commands ls –l and ls –lu can also be used to set the modifi cation time and access time, respectively, of any fi le.
➢ cat: Showing, creating, and concatenating fi lesThe cat command is basically a short form of concatenate, which means ‘combine’. With the cat command, we can not only create fi les and see their contents but also combine their contents. The operator > can be used with the cat command to combine multiple fi les into a single one. The operator >> can be used to append to an existing fi le.
Syntax cat [-n] [-s] [-v] fi les
The options and arguments shown in the aforementioned syntax are briefl y explained in Table 3.3.

38 Unix and Shell Programming
Showing content To display the contents of any fi le, we just need to specify the fi lename after the cat command
$ cat chirag
This command shows the contents of the fi le chirag. If more than one fi lename is specifi ed, cat will display the contents of all the fi les one after the other, that is, the contents of the fi rst fi le followed by the contents of the second fi le, and so on.
$ cat chirag notes.txt
This command displays the contents of the fi le chirag followed by the contents of the fi le notes.txt. To get the line numbering along with the fi le contents, we use the –n option with the cat command:
$cat –n chirag1 Today it might rain2 Thanks so much3 This is supposed to be a leap year
Note: We assume that the fi le chirag contains a couple of tabs that are deliberately added to the fi le.
Creating files For creating fi les through the cat command, we redirect the standard output to a fi le instead of the monitor, as shown in the following example:
$ cat >chirag
If we press the Enter key, we would fi nd the cursor positioned in the next line, waiting to type the matter that we want to store in the fi le chirag. After typing a few lines, press Ctrl-d.
Note: Ctrl-d keys indicate the end of fi le character (EOF).
Example $ cat >chirag
Today it might rain Thanks so much This is supposed to be a leap year Ctrl-d
Showing hidden characters in files The following command shows the hidden characters and new lines in the form of $ (refer to Fig. 3.2):
Table 3.3 Brief description of options available with the cat command
Options Description
-n It precedes each line output with its line number.
-s It suppresses messages when non-existent fi les are used in the command.
-v It displays non-printing characters, except tabs, new lines, forms, and feeds, that exist in a fi le. To display new lines, the -e option is used along with the –v option. To display tabs and form feeds, the -t option is used along with the –v option. The new lines are represented by ‘$’, tabs are represented by ‘^I’, and form feeds are represented by ‘^L’.

Basic Unix Commands 39
$ cat –ve chirag
The following command shows the hidden characters and tabs in the form of ‘^I’ and form feeds as ‘^L’ as shown in Fig. 3.3.
$ cat –vt chirag
The cat command, apart from displaying the contents of the fi le, also helps concatenate the contents fi le.
Concatenating files To concatenate the contents of two fi les and store them in the third fi le, we can use the following command:
$ cat chirag1 chirag2 >chirag3
This command stores the contents of the fi le chirag1 followed by the contents of the fi le chirag2 into the fi le chirag3. If chirag3 already contains something, it would be overwritten. If we want it to remain intact and the contents of chirag1 and chirag2 to be appended, we should use the following command:
$ cat chirag1 chirag2 >>chirag3
➢ cp: Copying fi lesThe cp command is used to create a duplicate copy of ordinary fi le(s) in another name.
Syntax $ cp –[ir] srcfi le destfi le
Here, srcfi le is the original or source fi lename, and destfi le stands for destination fi lename. If a fi le by the destination fi lename already exists, it will be overwritten with the contents of the source fi le without any warning. The option –i is used for interactive copying, that is, if a fi le by the destination fi lename already exists, then cp will prompt us before overwriting the fi le. The option –r is used for recursive copying and especially when we want to make a copy of an entire directory (along with its subdirectories and fi les) using another directory name.
Example $ cp chirag chirag1
This example makes a copy of the fi le chirag in the name chirag1. We can confi rm this by looking at the content of both the fi les. If the contents of both the fi les are found to be the same, it indicates that the chirag fi le is successfully copied in the name chirag1. With the help of the cat commands, we can look at the contents of the fi les chirag and chirag1.
$ cat chiragMicrochip Computer EducationSri Nagar Road, AjmerGone time never returns
Today it might rain$Thanks so much$This is supposed to be a leap year$
Fig. 3.2 New lines displayed in the form of $
TodayᶺIitᶺImightᶺIᶺIrainThanks so muchThis isᶺIsupposedᶺIto be a leap year
Fig. 3.3 Tabs and form feeds displayed as ^I and ^L

40 Unix and Shell Programming
$cat chirag1Microchip Computer EducationSri Nagar Road, AjmerGone time never returns
The contents of chirag and chirag1 are found to be the same and hence, this confi rms that the fi le chirag is copied in the fi lename chirag1.
$ cp /home/chirag/ajmer/a.bat .
This command copies the fi le a.bat from the directory ajmer (subdirectory of chirag) into the current directory. The period (.) at the end of the cp command denotes the current directory. For interactive copying, we use the following command:
$ cp –i chirag chirag1
If a fi le by the name chirag1 already exists, then, before overwriting it, we will be notifi ed with the following message:
cp: overwrite chirag1 (yes/no)?
Here, we need to enter y followed by the Enter key if we want to overwrite the fi le. For copying an entire directory along with its subdirectories, we use the following command:
$ cp –r courses latestcourses
It will make a copy of the courses directory (along with its fi les and subdirectories) with the name latestcourses.
➢ mv: Renaming fi lesThe mv (move) command changes the name of a fi le. Basically, using the mv command, the fi le is removed from its current location and is copied to another location. In the directory entry, the link to the old fi lename is removed, and it is replaced by a link to the new fi lename.
Syntax $ mv oldname newname
This command in the syntax will change the fi lename from oldname to newname.
Example $mv chirag chirag2
This command moves or renames the fi le chirag to chirag2. When we look at the contents of the fi le chirag2, we get the same contents that were in the fi le chirag, which is shown here.
$ cat chirag2Microchip Computer EducationSri Nagar Road, AjmerGone time never returns
It indicates that the fi le chirag2 is nothing but the same fi le that existed earlier with the name chirag.

Basic Unix Commands 41
$ mv chirag2 ajmeror$ mv chirag2 /home/chirag/ajmer
This moves the fi le chirag2 into the ajmer subdirectory. Now, the fi le chirag2 is no longer available in the current directory. For moving more than one fi le, we use the following command:
$ mv notes.txt programs.doc /home/chirag/ajmer
The fi les notes.txt and programs.doc are removed from the current location and moved to the ajmer subdirectory.
➢ rm: Removing fi lesThis command removes one or more ordinary fi les from a directory. The fi le is removed by deleting its pointer in the appropriate directory. In this way, the link between that fi lename and the physical fi le is broken, hence, the fi le can no longer be accessed.
Syntax $ rm -[irf] fi lename
Here, each fi lename is separated by white space. The options and arguments shown in the aforementioned syntax are briefl y explained in Table 3.4.
Table 3.4 Brief description of options available with the rm command
Options Description
-i It is used for interactive fi le deletion, i.e., we will be prompted for confi rmation before the fi le is deleted.
–r It is used for recursive deletion, i.e., it is used for removing an entire directory along with its fi les and subdirectories.
–f It is used to forcibly remove a fi le for which we do not have the write permission.
We will learn about fi le permissions shortly.
Examples
(a) $rm notes.txtThis command deletes the fi les notes.txt.
(b) $rm –i programs.docThis command prompts us for confi rmation before removing the fi le. The prompt may be as follows: rm: remove programs.doc (yes/no)?
To delete the fi le, we type y followed by the Enter key (or type character n in case we do not want to delete the fi le).
(c) We can delete more than one fi le using a single rm command.
$ rm syllabus notes.txt programs.doc
This command deletes all the three fi les syllabus, notes.txt, and programs.doc.(d) $ rm –r courses
This command removes all the fi les and subdirectories of the courses directory and, fi nally, the courses directory itself.

42 Unix and Shell Programming
(e) To remove a fi le that is write protected (for which we do not have the write permission), we can use the following command.$ rm –f results This command deletes the results fi le even if we do not have the write permission for doing so.
➢ ln: Linking fi lesThe Unix fi le system allows the creation of more than one fi lename for the same physical fi le. In other words, it is possible to have aliases (links) for any given fi le. The ln command may be used for establishing additional links. There are two types of links—hard as well as symbolic links—and both can be created with this command.
Syntax $ ln –[sf] oldname newname
After the ln linking, both newname and oldname refer to the same fi le. The default link type is hard. In order to create a symbolic link, the symbolic option (-s) is used.
Example $ln chirag1 mce1
$ls
Through this command, a hard link will be created for the fi le chirag1 by the name mce1.
Note: When the –s option is not used with the ln command, a hard link is created.
We get several fi lenames and directories in the current directory along with the two fi lenames mce1 and chirag1, and when we write the following command,
$ ls -l chirag1
we get the following output:
-rwxrwxrwx 2 chirag it 7669 Nov 11:21 chirag1
The group of rwx is the permissions for owners, groups, and others; 2 is the number of links (also known as link count) of the fi le; and chirag is the owner. The group name is it. The size of the fi le is 7669 bytes. Next comes the date and time the fi le was last modifi ed. The output ends with the fi lename chirag1. If another link was to be created, the link count would change to 3.
Note: A link count is an integer value that is maintained for each fi le or directory and indicates the total number of links pointing to it. When a new link is created, the link count value is increased by one. Similarly, when a link is removed, the value is decreased by one. When a link count becomes zero, it means the fi le or directory has no links, and hence, the disk space allocated to it is deallocated.
Both mce1 and chirag1 point to the same fi le. When we look at the contents of the fi le mce1, we get the same contents as in chirag1.
$cat mce1Microchip Computer EducationSri Nagar Road, AjmerGone time never returns

Basic Unix Commands 43
Note: If we change the contents of the fi le mce1, the contents of chirag1 will also change, because although the names mce1 and chirag1 are different, both of them refer to the same fi le.
To see the inode numbers of the linked fi les, we give the following command:
$ls -li ichirag1 mce120985 -rwxrwxrwx 2 chirag it 320 Nov 11:21 chirag120985 -rwxrwxrwx 2 chirag it 320 Nov 11:21 mce1
The -li option with the ls command displays the inode number along with the long listing of the specifi ed fi les. We can see that both the fi les have the same inode number, 20985, which confi rms that both point to the same fi le. In order to remove a fi le with more than one link from the fi le system, we should delete all the links with the rm command. For example, let us delete the link mce1 using the following command:
$ rm mce1
The fi le still exists under the name chirag1 as confi rmed by the following command:
$cat chirag1Microchip Computer EducationSri Nagar Road, AjmerGone time never returns
Let us remove the fi le chirag1.
$ rm chirag1
The fi le is now completely inaccessible. If the destination fi le already exists, the link will not be created. Assume we want to make xyz.txt as the link of the fi le abc.txt and xyz.txt is already an existing fi le that has some contents. Let us give the following command:
$ ln abc.txt xyz.txt
The link will not be created and the following error will be displayed:
ln: xyz.txt: File exists
The –f option stands for force option and is used when we want to overwrite an existing fi le (while creating a link) without getting any message.
$ ln -f abc.txt xyz.txt
Hard links The default link that is created is a hard link (which we have been using until now). The following are the characteristics of hard links:
1. Unix hard links can point to programs and fi les, but not to directories.2. If the original program or fi le is renamed, moved, or deleted, the hard link is not broken.3. Hard links in Unix cannot span different fi le systems, that is, we cannot have a hard link on
the /usr fi le system that refers to a program or fi le on the /tmp fi le system. The reason is that hard links share an inode number, whereas each fi le system has its own set of inode numbers.

44 Unix and Shell Programming
Symbolic links Hard links cannot be created for different fi le systems. that is, they can be made within the current directory structure. Symbolic links (symlinks) are used to link to a different fi le system. The symbolic link, also referred to as soft link, is a special type of fi le that references another fi le or directory. It simply contains the name of the fi le that it references and contains no actual data. It gives us power and fl exibility to manage fi les. We can change the symlink to point to the desired fi les. Soft links also inherit the permission of the folder they are pointing at. To create a symbolic link in Unix, let us use the following syntax:
Syntax ln -s target_fi le symbolic_link
Here, target_fi le is the name of the existing fi le for which we want to create the symbolic link, and the symbolic_link is the symbolic link for the target_fi le.
Example Consider a fi le named chirag1. Let us create a symlink called mce1, which points
to the original fi le, inventory.txt.
$ ln -s chirag1 mce1
We fi rst specify the target fi le, the fi le that we want our symlink to point to, and then specify the name of our symbolic link. On executing the ls -al command, we will fi nd that the mce1 fi le will have an ‘l’ in the long format of the ls command, which confi rms that it is a symbolic link.
Note: An orphan symlink is a symbolic link that points nowhere, that is, the original target fi le it used to point to earlier is either deleted or renamed.
20985 -rwxrwxrwx 2 chirag it 320 Nov 11:21 chirag120985 lrwxrwxrwx 2 chirag it 320 Nov 11:21 mce1->chirag1
The difference between symbolic link and hard link is that the symbolic link has the ability to link to directories or fi les on remote computers. In addition, when you delete a target fi le, the symbolic links to that fi le become unusable, whereas the hard links preserve the contents of the fi le.
➢ unlink: Deleting symbolic linksThe unlink command removes the specifi ed fi le, including symbolic links.
Syntax unlink fi lename
Example unlink accounts.txt
If this fi le accounts.txt exists as a linked fi le, it will be deleted.
➢ tput: Exploiting terminal capabilitiesThe tput command is used for exploiting terminal capabilities through the terminfo database. Hence, we can use the tput command to clear the screen, move the cursor, and underline text. The tput command uses the terminfo database to know the different features that are supported by a terminal, and converts the commands given by the user through the tput command into the code that the terminal understands.

Basic Unix Commands 45
Terminfo is a database that defi nes terminal and printer attributes and capabilities. It contains information such as the number of rows and columns in a terminal and the attributes of text displayed on the terminal.
Syntax tput [clear][cup col row] [cols][lines][sc][rc][civis][cnorm][dl n][setb][setf][bold][sgr0][smul[rmul]
Table 3.5 gives a list of options available with the tput command.
Table 3.5 Brief description of the options available with the tput command
Options Description
clear It clears the whole screen.
cup col row It moves the cursor position to the given row and col position.
cols It displays the number of columns on the terminal screen.
lines It displays the number of lines on the terminal screen.
sc It saves the current cursor location.
rc It restores the cursor position, i.e., it returns the cursor to its last saved location.
dl n It deletes n number of lines below, including the current row, i.e., the row in which the cursor is positioned.
bold It makes the text appear in bold.
sgr0 It turns off bold.
Smul It begins underlining text.
Rmul It stops underlining text.
Examples
(a) $ tput cup 10 5This statement moves the cursor to the fi fth row and the tenth column.
(b) $ tput cols This statement displays a value 80, which represents the number of columns of the terminal screen.
(c) $ tput dl 4This statement deletes four lines below, including the current row.
(d) $ tput boldThis statement will make the text appear in bold until the srg0 command is invoked.
(e) $ tput clearIt clears the whole screen.
Note: We know that the tput command is mostly used in scripts but is deliberately provided here, as its option clear is frequently used for clearing the screen while running commands at the command prompt.
➢ who: Who is onlineThe who command displays all users who are currently logged in to the system. It returns the user’s name (ID), terminal, and the time at which he or she logged in.

46 Unix and Shell Programming
Syntax who [-u] [-H] [am i]
These options are briefl y explained in Table 3.6.
Examples
(a) $ whoanil tty1 Oct 15 10:56chirag tty2 Oct 10 11:25ravi tty5 Oct 15 13:07
To know whether the user is active, we use the -u option, which also indicates how long it has been since there was any activity. This is known as idle time. It also returns the process ID for the user.$ who -uanil tty1 Feb 10 14.25 0:45 1103chirag tty2 Feb 08 11:25 old 1568ravi tty5 Feb 10 15:10 . 1456
If we look at this example carefully, we will see three different formats for idle time. The fi rst user has had no activity for 0 hours and 45 minutes. The second user has had no activity for more than 24-hours. Since there is only enough room for 24 hours in the idle time format, when a user is inactive for more than 24 hours, the system simply says ‘old’. The third user’s idle time is a period (.), that is, he/she has carried out an activiy in the last minute.
(b) If we use the H option, Unix displays a header that explains each column.
$ who -uH
NAME LINE TIME IDLE PID COMMENTSanil tty1 Feb 10 14.25 0:45 1103 (:0)chirag tty2 Feb 08 11:25 old 1568 (:0.0)ravi tty5 Feb 10 15:10 . 1456 (:0.0)
(c) If we want to view information about ourselves, we can use the argument am I along with the who command.
$who am I
chirag tty2 Feb 08 11:25
➢ fi nger: Online user’s detailsThe fi nger command displays information of users who are logged in. Compared to the who command, the fi nger command displays more elaborate information pertaining to these
Table 3.6 Brief description of options in the who command
Options Description
-u It displays information regarding users who are logged in. Their login name, name of the terminal through which they are logged in, and the date and time of login are displayed.
-H It displays information pertaining to the users who are logged in along with the column headings.
am I It displays information of the users who are logged in.

Basic Unix Commands 47
Table 3.7 Brief description of the options in the fi nger command
Options Description
-l Displays information of the user in a long format comprising login name, real name, terminal name, write status, idle time, login time, offi ce location, offi ce phone number, user’s home directory, home phone number, login shell, mail status, and the contents of the fi les, .plan, .project, and so on, from the user’s home directory
-s Displays information of the user in a short format comprising login name, real name, terminal name, write status, idle time, login time, offi ce location, and offi ce phone number
-b Suppresses printing the user’s home directory and shell in a long format display
-w Suppresses printing the full name in a short format display
users. Apart from the login name, terminal name, date, and time of the logged-in users, the command also displays other information such as the user’s home directory, phone number, login shell, and mail status, among others.
Syntax fi nger [-b] [-l] [-s] [-w] [username]
These options are briefl y explained in Table 3.7. If no options are specifi ed, the fi nger defaults to the -l option output if username is provided; else, the -s option output is chosen. In the case of fi elds whose information (such as offi ce location and phone number) is not available, the information will not be displayed in the output. To fi nd out who is logged in to which terminal, we use the fi nger command without an argument, as in the following example.
Example $ fi nger
Login Name TTY Idle When Where
chirag chirag tty2 3:10 Sat 08:15 :0 ravi ravi tty3 Sat 11:33 :0.0 root root tty1 10d Sat 08:15 :0.0
This list shows three active logins. The actual time at which each user logged in and the time the terminal has been idle are also listed. The idle time is the time that has elapsed since the last keystroke. From the idle time, we can usually tell whether someone is at the terminal. For example, we can say that there is no root user at the tty1 terminal, because there has been no keystroke for 10 days. The user on the tty2 terminal has not used the terminal for more than three hours. The fi nger command can also be used to get the details of a single user, as shown in the following example.$ fi nger chiragLogin: chirag In real life: (null)Directory: /home/chirag Shell: /bin/bashOn since Mon Dec 26 02:15 on tty2 from :0.0No mail.No Plan.
This output shows the login name, real name (null), home directory, login shell, login time, terminal name, mail status, and so on.

48 Unix and Shell Programming
➢ date: Displaying system date and timeThis command displays the system date and time.
$ date
If no argument is given, the current date and time are displayed:
Sunday 12 February 2012 05:32:20 AM IST
The command can also be used with suitable format specifi ers as arguments. Each format is preceded by a + symbol followed by the % operator, and a single character describing the format.
Syntax date [arguments]
The arguments are used for displaying the date in the desired format. The list of available arguments is given in Table 3.8.
Table 3.8 Brief description of the arguments used in the date command
Arguments Description
%d For displaying day (01–31)
%m For displaying month (01–12)
%b For displaying abbreviated month name (Jan, Feb, etc.)
%y For displaying the year—last two digits (00,…, 99)
%Y For displaying the year with century—four digits
%H For displaying hours—military format (00,01,…, 23)
%I For displaying hours (0,1,…, 12)
%p For displaying a.m./p.m.
%M For displaying minutes (0,1, …, 59)
%S For displaying seconds (0,1,…, 59)
%x For displaying only date (07/15/12)
%X For displaying only time (17:15:30)
%a For displaying abbreviated weekday (Fri)
Examples
(a) $ date + %mIt prints only the month, that is, 07.
(b) $ date +%bIt prints the month name, that is, Jul.
(c) $ date +%YIt prints the year with century, that is, 2012.
(d) $date + "%I %p"It displays the hour with a.m./p.m.05 PM
➢ cal: Displaying calendarThe cal command is used to display the calendar of a specifi ed month and year.

Basic Unix Commands 49
Table 3.9 Brief description of an option in the echo command
Option Description
-n It suppresses a new line after the echoed message or variables. The output of the next echo statement will appear on the current line. This option is usually used while scripting.
Syntax cal {month [1-12]} {year[1-9999]}
Here, values 1–12 represent the month, and values 1–9999 represent the year.
Examples
(a) To display the current month’s calendar, just use the cal command without any arguments (refer to Fig. 3.4).$cal
(b) To display the calendar of March 2012, write the following command (refer to Fig. 3.4).$ cal 3 2012
(c) To display the calendar for a whole year, specify the year in the cal command as shown in Fig. 3.5.$ cal 2012
➢ echo: Displaying messages and resultsThe echo command is used to display messages and the results of computation on the screen.
Syntax echo [-n] message/variables
These options are briefl y explained in Table 3.9.
The echo command recognizes the following Escape characters:\\ represents backslash.\a rings a bell.\b represents the backspace key.\f represents the form feed.\n represents a new line character.\r represents carriage return.\t represents a horizontal tab character.\v represents a vertical tab character.
Example echo "Hello World"
This example displays the message, Hello World on the screen. Figure 3.6 shows how Escape sequences can be used with the echo command. We can see that the \n results in a new line character, displaying the following word, World that appears on the next line. Similarly, \t results in a horizontal tab between the words Hello and World. The third example displays backslash (\) between Hello and World. The fourth example shows how \b takes the cursor one character back, hence overwriting the character ‘o’ of Hello and displaying the word, HellWorld. The fi fth example inserts a vertical tab between the words Hello and World.
➢ bc: Basic calculatorThe bc command activates a basic calculator that is meant for doing simple calculations. The command is executed in the interactive mode, that is, we enter the expression we wish to compute

50 Unix and Shell Programming
Fig. 3.5 Calendar of the entire year
S18
152229
M29
162330
Tu3
101724
W4
111825
Th5
121926
F6
132027
S7
142128
Apr
S18
152229
M29
162330
Tu3
10172431
W4
111825
Th5
121926
F6
132027
S7
142128
Jan
S18
152229
M29
162330
Tu3
10172431
W4
111825
Th5
121926
F6
132027
S7
142128
Jul
MayS
6132027
M
7142128
Tu18
152229
W29
162330
Th3
10172431
F4
111825
S5
121926
OctS
7142128
M18
152229
Tu29
162330
W3
10172437
Th4
111825
F5
121926
S6
132027
AugS
5121926
M
6132027
Tu
7142128
W18
152229
Th29
162330
F3
10172431
S4
111825
NovS
4111825
M
5121926
Tu
6132027
W
7142128
Th18
152229
F29
162330
S3
101724
DecS
29
162330
M
310172431
Tu
4111825
W
5121926
Th
6132027
F
7142128
S18
152229
SepS
29
2330
M
31024
Tu
41125
W
51226
Th
61327
F
71428
S18
1529
S
5121926
M
6132027
Tu
7142128
W18
152229
Th29
1623
F3
101724
S4
111825
FebS
4111825
M
5121926
Tu
6132027
W
7142128
Th18
152229
F29
162330
S3
10172431
Mar
S
3101724
M
4111825
Tu
5121926
W
6132027
Th
7142128
F18
152229
S29
162330
Jun
April 2012# cal
S18
152229
M29
162330
Tu3
101724
W4
111825
Th5
121926
F6
132027
S7
142128
March 2012# cal 3 2012
S
4111825
M
5121926
Tu
6132027
W
7142128
Th18
152229
F29
162330
S3
10172431
Fig. 3.4 Calendar of current month and specifi ed month
$ echo "Hello\nWorld"HelloWorld
$ echo "Hello\tWorld"Hello World
$ echo "Hello\\World"Hello\World
$ echo "Hello\bWorld"HellWorld
$ echo "Hello\vWorld"Hello World
Fig. 3.6 Echo command output

Basic Unix Commands 51
on the command line, and the command immediately displays the result on pressing the Enter key. To quit the interactive mode, we either press Ctrl-d or type quit followed by the Enter key.
Syntax bc [-l]
-l defi nes the math functions and initializes the scale to 20, instead of the default zero. The functions that can be used with the bc command are given in Table 3.10.
Table 3.10 List of functions available with the bc command
Function Description
sqrt() It calculates the square root of the supplied number.
s() It calculates the sine value. The argument should be in radians.
c() It calculates the cosine value. The argument should be in radians.
a() It calculates the arctangent. The result of the function is displayed in radians.
l() It calculates the natural logarithm of the supplied number.
e() It calculates the exponential of the supplied number.
We can use all operators including +, -, *, /, %, ^, where % represents the mod operator, that is, it returns the remainder and ^ represents ‘to the power’. Apart from the -l option, we can also use the scale to specify the number of digits to the right of the decimal point.
Examples bc
$bc 5/3 1 quit
$ bc -l 5/3 1.66666666666666666666 quit $ bc 2 + 2 4 5/3 1 scale = 2 5/3 1.66 3^2 9 sqrt(81) 9.00 quit

52 Unix and Shell Programming
$ x='echo "5/3" | bc -l' $ echo $x 1.66666666666666666666
Filename substitution— GlobbingFilename substitution is the process by which the shell expands a string containing wild cards into a list of fi lenames. The process of fi lename substitutions is also known as globbing. Apart from the wild cards, *, ?, and [c1-c2], which we discussed while learning the ls command, Table 3.11 shows the wild cards that are used in fi lename substitution.
Examples
(a) $ ls * It displays all the names of the fi les and directories in the current directory.
(b) $ ls a*It displays all the names of the fi les and directories that begin with the character a.
(c) $ ls *aIt displays all the names of the fi les and directories that end with the character a.
(d) $ ls *ab*It displays all the names of the fi les and directories that contain ab.
(e) $ ls a*/* It displays all the names of the fi les and directories that begin with the character a in all the directories that are one level under the current directory. The fi lename substitution applies to the fi les in the current directory. To match fi lenames in the subdirectories, we need to use the / character.
(f) $ ls a*/*/* It displays all the names of fi les and directories that begin with the character a in all the directories that are two levels under the current directory.
(g) $ ls ???It displays all the names of the fi les and directories that consist of three characters.
(h) $ ls ???*It displays all the names of the fi les and directories that consist of at least three characters.
(i) $ ls student?.txt It displays all the names of the fi les and directories that begin with the word student followed by one character followed by extension .txt such as stduent1.txt, student2.txt, and studenta.txt.
(j) $ ls [ab]* It displays all the names of the fi les and directories that begin with either character a or character b followed by zero or more occurrences of any character.
(k) $ ls [ab]*[12] It displays all the names of the fi les and directories that begin with either character a or character b followed by zero or more occurrences of any character and which end with either the digit 1 or 2.
Table 3.11 Brief description of the wild cards used in fi lename substitution
Wild card Description
! Used with [ ] to negate the meaning~ Substitutes the user's home directory {characters} Matches the given set of characters

Basic Unix Commands 53
(l) $ ls [ab]*[1-5] It displays all the names of the fi les and directories that begin with either character a or character b followed by zero or more occurrences of any character and which end with any digit from 1 to 5.
(m) $ ls [a-d]* It displays all the names of the fi les and directories that begin with any character from a through d followed by zero or more occurrences of any character.
(n) $ ls [a-d]?? It displays all the names of the fi les and directories that begin with any character from a through d followed by exactly two characters.
(o) $ ls [!a-d]* It displays all the names of the fi les and directories that begin with any character except a through d followed by any number of characters.
(p) $ ls [A-Za-z]* It displays all the names of the fi les and directories that begin with any character from a through z in either upper case or lower case followed by any number of characters.
(q) $ ls [A-Za-z][a-z]* It displays all the names of the fi les and directories that begin with any character from a through z in either upper case or lower case, followed by any character from a through z in lower case, followed by any number of characters.
(r) $ ls [A-Za-z][a-z][12] It displays all the names of the fi les and directories that begin with any character from a through z in either upper case or lower case, followed by any character from a through z in lower case, followed by either digit 1 or 2.
(s) $ ls {aa,bb,cc}* It displays all the names of the fi les and directories that begin with the characters aa, bb, or cc followed by any number of characters.
(t) $ ls a*{d,1,z} It displays all the names of the fi les and directories that begin with the character a followed by any number of characters and, which end with d, 1, or z.
(u) $ ls a*{d,[1-3],[ab]} It displays all the names of the fi les and directories that begin with the character a followed by any number of characters and which end with d, a number from 1 through 3, or by either character a or b.
(v) The tilde (~) character by itself expands to the full path name of the user’s home directory. The following echo command confi rms this:
$ echo ~ /home/bintu
(w) When the tilde is appended before a path, it expands to the home directory and the rest of the path name. Consider the following command.
$ cd ~/data
(x) We will be taken into the directory, data that is present within the user’s home directory. The following pwd command confi rms this.

54 Unix and Shell Programming
$ pwd /home/bintu/data(y) When the tilde is appended before a username, it expands to the full path name of that
user’s home directory. Consider the following command. $ cd ~john We will be taken to the user john’s home directory. The following command confi rms this: $ pwd /home/john
➢ exit: ExitingThe exit command is used to log out of the Unix system, exit from a shell, and exit from a shell script.
Syntax exit
Example exit
To log out of the Unix shell, Ctrl-d is a short cut that is used. Before exiting from the Unix system, we should make sure that all the fi les that were open are saved and closed; else they might get corrupted. Usually, when we exit from the shell, the currently running process or command is automatically killed. In order to run the task in the background even after exiting from the shell, we should use the nohup command (discussed in Chapter 6).
■ SUMMARY ■
1. When compared with the who command, the fi nger command displays more elaborate information per-taining to users who are logged in.
2. The fi nger command not only displays the login name, terminal, date, and time of the logged-in users, but also displays other information such as the user’s home
directory, phone number, login shell, mail status, and much more.
3. Filename substitution or globbing is the process by which the shell expands a string containing wild cards into a list of fi lenames.
■ FUNCTION SPECIFICATION ■
Command Functionls To see a list of fi les and directories, including
hidden fi lesmkdir To create directories. We can also create
directories with specifi c permissions with this command.
cd For changing a directory. We can use both relative and absolute paths for changing the directory.
pwd To know the current working directorytouch To create empty fi les and also change the
modifi cation and access time of a fi le
Command Functionmv For moving fi les from one directory to another
as well as for renaming fi lespasswd For changing the passwordln For creating links of fi les. There are two types
of links—hard links and symbolic links.who To know how many users are currently onlinefi nger To know the current working directorytouch To know who is online, when the user is
logged in, and for how long his/her terminal has been idle.
date For displaying system date and time

Basic Unix Commands 55
■ EXERCISES ■
Objective-type QuestionsState True or False
3.1 The ls command shows the list of fi les and directories that are sorted alphabetically by default.
3.2 The option used with the ls command to see the names of the fi les and directories in reverse order is -R.
3.3 We can create only one directory at a time using the mkdir command.
3.4 The cd command, if given without any ar-guments, will take us to our home directory.
3.5 With the touch command, we can only change the timestamps of the fi les but cannot create fi les.
3.6 While creating a fi le with the cat command, we need to use Ctrl-d to specify the end of the fi le.
3.7 With the rmdir command, we can remove the non-empty directory as well.
3.8 If we use the -i option with the cp command, it will prompt us before overwriting the destination fi le if it already exists.
3.9 The cp command is used for making a copy of the fi les; we cannot use it for copying an entire directory with its fi les and subdirectories.
3.10 We can delete more than one fi le with a single rm command.
3.11 With the rm command, we can forcibly delete a fi le even if we do not have its write permission.
3.12 With the mv command, we can move a fi le from one directory to another but cannot rename it.
3.13 The hard link should be created within the current directory structure.
3.14 We can log out of the Unix system using Ctrl-d.3.15 Through the cal command, we cannot see the
calendar of the previous month.3.16 The mail status of the user can be seen through
the fi nger command.3.17 The uname command can be used to know the
version and release of the operating system.3.18 The wild-card character ‘?’ represents a single
character.3.19 The bc or the basic calculator command can be
used to fi nd the square root of a number.3.20 The unlink command cannot delete symbolic
links.
Fill in the Blanks
3.1 The option used with the ls command to see hidden fi les is .
3.2 The option used with mkdir for creating directories with specifi ed permission is .
3.3 With the cd command, we can give absolute as well as path names.
3.4 The command used to know our current working directory is .
3.5 The format of time expression used to change modifi cation or access time in the touch command is .
3.6 The option used with the rmdir command to
Command Functioncat For displaying contents of fi les, creating fi les,
and concatenating fi lesrmdir For removing a directory provided it is empty
cp For copying fi les as well as an entire directory
rm For deleting fi les as well as an entire directory
cal To display the calendar of the specifi ed month and year. By default, it displays the calendar of the current month.
mv For moving fi les from one directory to another as well as for renaming fi les
cal-y To display the calendar of the current year
Command Functionuname For displaying information of the current
system such as its hardware platform, name of the operating system, and its release level.
unlink To remove the specifi ed fi le, including symbolic links
bc To activate a basic calculator that is meant for doing simple calculations. It can also be used to compute square root, sine value, cosine value, natural logarithms, and exponential values.
exit To log out from the Unix system, a shell, or a shell script

56 Unix and Shell Programming
Multiple-choice Questions
3.1 The command bc-l sets the scale to (a) 20 (c) 10 (b) 5 (d) 6 3.2 The tput cup 7 5 command moves the cursor to
the (a) seventh row and fi fth column (b) fi fth row and seventh column (c) top left corner of the screen (d) right bottom corner of the screen 3.3 The command date +%M will display (a) month in character form (b) month in numerical form (c) minutes (d) a.m./p.m. 3.4 The option used in the cp command for interactive
copying is (a) -i (b) -r (c) -c (d) -d 3.5 The following option is used in the cat command
to suppress messages when a non-existent fi le is used in the command:
(a) -o (b) -v (c) -n (d) -s
3.6 Apart from displaying contents of the fi les, the command used for concatenating fi les is
(a) concat (c) merge (b) cat (d) add_fi les 3.7 There are two types of links of fi les—hard and (a) tough (c) volatile (b) robust (d) symbolic 3.8 The echo command ~ will display (a) error (b) list of fi les and directories (c) home directory of the user (d) profi le fi le 3.9 The following command is used to display the
names of the fi les and directories that consist of at least two characters:
(a) ls??* (c) ls * (b) ls (d) ls ?* 3.10 The option used in the ls command to show fi les
and directories that are sorted on their modi-fi cation time is
(a) -m (b) -a (c) -t (d) -u
delete an empty parent directory is . 3.7 The option is used with the rm
command to recursively delete all the fi les and subdirectories of the specifi ed directory.
3.8 The command used to create a link for a fi le is known as .
3.9 There are two types of links to a fi le: and .
3.10 The option used with the date command to display only the time is .
3.11 The function used to fi nd the natural logarithm in the bc command is .
3.12 The command used to display the calendar of the current year is .
3.13 The command used to display information of the logged-in user, including home directory, login shell, mail status, and phone number is .
3.14 The option used with the ls command to display the inode number of fi les is .
3.15 The option used with the cat command that displays non-printing characters in the fi le is
.
Programming Exercises
3.1 What will the following commands do? (a) $ls [a-d]?? (b) $ls [a-z][0-9]* (c) $ls -Rt (d) $mkdir -m 740 apple (e) $mkdir -p fruits/delicious/apple (f) $touch 07151000 mbacourse.txt (g) $ cat mbacourse.txt lawcourse.txt (h) $rmdir -p fruits/delicious/apple (i) $ cp /fruits/delicious/apple/juice.
txt/college/students (j) $ rm -r college (k) $ mv mbacourse.txt management.txt (l) $ ln -f juice.txt energy.txt (m) $ fi nger Charles (n) $ bc scale = 2 17/3 (o) $cal 10 2012 3.2 Write the command for the following tasks:

Basic Unix Commands 57
Review Questions
Brain Teasers
3.1 Explain the following commands with their syntax and examples.
(a) ls (d) rmdir (b) who (e) cp (c) touch 3.2 Explain the differences between the following: (a) Hard and symbolic links (b) who and fi nger commands (c) cat and touch commands (d) rm and rmdir commands 3.3 What is the use of the bc command? Explain a
few functions that are associated with it.
3.1 In the long-listing command ls –li, if you fi nd two or more fi les having the same inode number, what does it mean?
3.2 Identify the error in the following command and correct it to display all the fi les that consist of exactly four characters.
$ ls **** 3.3 Identify the error in the following command and
correct it to display the hardware platform of the current machine.
$ uname -v 3.4 Can you display the node name, that is, the
name by which your machine is connected in
(a) To display the list of fi les and directories that begin with a vowel
(b) To change the access time of the fi le mbacourse.txt to Feb 10 09:15
(c) To show the contents of the fi le mbacourse.txt along with line numberings
(d) To concatenate the contents of the two fi les mbacourse.txt and lawcourse.txt and store them in a third fi le career.txt
(e) To remove the empty subdirectories, students and teachers, from the college directory
(f) To copy the entire directory teachers along with its subdirectories in the name faculty
(g) To forcibly remove the fi le mbacourse.txt from the college directory
(h) To move the fi le mbacourse.txt from the current directory to the professional sub-directory of the college directory
(i) To change the password (j) To create a link of the fi le mbacourse.txt in
the name management.txt (If a fi le by the name management.txt already exists, we should be asked for a confi rmation before overwriting its contents.)
(k) To get the list of all online users with their activity and column headers
(l) To display day, month, and year in the format 17 Nov 2012
(m) To log out from the Unix system (n) To show all the names of the fi les and
direc tories that begin with any character from a through z followed by exactly three characters
(o) To fi nd the square root of number 17 (The result should be displayed up to fi ve places of decimals.)
3.4 What do you mean by escape characters? Explain their usage through the echo command.
3.5 Explain the term globbing with examples. 3.6 What is the use of the date command? Name the
options that are used with the date command to display only the year, hour in military format, and only the day.
3.7 Explain the command used to exploit terminal capabilities.
3.8 Explain with examples the command that is used to display the calendar of the desired month and year.
the commu nication network? If yes, mention the command.
3.5 Consider the following cat command: $ cat chirag notes.txt It displays an error indicating that the fi le notes.
txt does not exist. How can you avoid this error message?
3.6 If on using s() function in the bc command for fi nding sine value, a wrong answer was obtained, identify the error.
3.7 You want to change your password but the follow-ing command is not working. Where is the error?
$password

58 Unix and Shell Programming
3.8 Is there any way to copy the content of the fi les a.txt and b.txt to a fi le c.txt without deleting the earlier content of fi le c.txt? If yes, what is that?
3.9 What should the command given to display the hardware platform and name of the operating system on a machine be?
3.10 You wish that a confi rmation prompt appears before deleting the fi les. However, by using the following command, the confi rmation message is not prompted. Where and what is the error?
$ rm -f a*.*3.11 The following command creates a hard link of
the fi le a.txt in the name b.txt. What changes are required to be made to this command in order to create a symbolic link instead of a hard link?
$ ln a.txt b.txt3.12 The following bc command displays the result
to 0 places of decimal. What change is required to be made in order to get the result up to 20 decimal places ?
$ bc 17/33.13 What is the mistake in the following command
for changing the modifi cation time of the fi le? a.txt to Oct 15 04:15?
$ touch –a 10150415 a.txt3.14 The following command to recursively
copy the content of the directory projects to experiments is not working. Identify the error and correct it.
$ cp projects experiments3.15 The following date command is not displaying
century in four digits. Identify the error and correct it.
$ date +%y
State True or False
3.1 True 3.2 False 3.3 False 3.4 True 3.5 False 3.6 True 3.7 False 3.8 True 3.9 False3.10 True3.11 True3.12 False
3.13 True3.14 True3.15 False3.16 True3.17 True3.18 True3.19 True3.20 False
Fill in the Blanks
3.1 -a 3.2 -m 3.3 relative
3.4 pwd 3.5 MMDDhhmm 3.6 -p 3.7 -r 3.8 ln 3.9 hard,
symbolic 3.10 %x3.11 l()3.12 cal -y3.13 fi nger3.14 -i3.15 -v
Multiple-choice Questions
3.1 (a) 3.2 (b) 3.3 (c) 3.4 (a) 3.5 (d) 3.6 (b) 3.7 (d) 3.8 (c) 3.9 (a)3.10 (c)
■ ANSWERS TO OBJECTIVE-TYPE QUESTIONS ■

4.1 OVERVIEW
The advanced Unix commands help us perform several tasks such as setting access permissions for the existing fi les and directories, setting default permissions for the newly created fi les and directories, changing ownership of the fi les, and sharing fi les among groups. These commands also include sorting fi le content, performing input/output (I/O) redirections, and piping the output of a command as input to another command. Unix also offers commands for operations such as cutting or slicing the fi le vertically, pasting content, splitting fi les, counting characters, words, and lines in fi les, extracting the top and bottom contents of fi les, presenting content page-wise, and displaying manual commands. These commands also include comparing fi les, eliminating and displaying duplicate lines in two fi les, suppressing the unique and common content in two fi les, printing documents, setting reminders of appointments, carrying out conversions between DOS and Unix fi les, and measuring the time usage in the execution of commands.
44Advanced Unix Advanced Unix CommandsCommands
C H A P T E R
After studying this chapter, the reader will be conversant with the following:
• Advanced commands used in the Unix operating system such as setting access permissions for the existing fi les and directories, setting default permissions for the newly created fi les and directories, creating groups, changing ownerships of the fi les, and sharing fi les among groups
• Sorting content and performing input/output (I/O) redirections, that is, diverting the output of a command to a fi le or providing input to a command from a fi le
• Cutting or slicing the fi le vertically, pasting content, splitting fi les, counting characters, words, and lines in fi les or other content, and using a pipe operator, that is, sending the output of a command as input to another command
• Displaying the top and bottom contents of a fi le, presenting content page-wise, and displaying the manual of any command
• Comparing fi les, eliminating and displaying duplicate lines in two fi les, and displaying and suppressing the unique and common content in two fi les
• Printing documents, setting reminders of appointments, carrying out conversions between DOS and Unix fi les, and measuring time usage in the execution of commands

60 Unix and Shell Programming
The list of advanced commands that will be covered in this chapter is as follows:chmod, umask, chown, chgrp, groups, input/output redirection in Unix, pipe operator, cut,
paste, split, wc, sort, head, tail, diff, cmp, uniq, comm, time, pg, lp, .profi le, calendar, script, dos2unix, and man.
4.2 FILE ACCESS PERMISSIONS
The data in the Unix system is contained in fi les. We may restrict or permit access to this data by restricting or permitting access to the fi les containing the data. There are three types of Unix fi les: ordinary, directory, and special fi les.
We may use fi le permissions to avoid any accidental modifi cations. We can retain the ability to read the fi le while restricting the ability to write in them. Similarly, we can also restrict other users in a multi-user environment from reading our fi les.
There are three classes of system users.The fi rst is the user. The user is usually the system user who created the fi le. The user has full control over restricting or permitting access to the fi le at any time. In addition to individual fi le ownership, it is possible for one or more system users to own the fi le collectively in a kind of group ownership. A system user who is not the fi le owner may access the fi le if this user belongs to the group of system users who are allowed to access the fi le. The last category of system users is the one who is neither the owner nor part of the group and is known as the other user. Hence, there are three classes of system users:
1. User refers to the system user who created the fi le and is also sometimes called owner.2. Group refers to one or more users who may access the fi le as a group.3. Other refers to any other users of the system.There are several permissions for system usage. System users with a read permission
may read the contents of an ordinary fi le while users with a write permission may write in a fi le and change its contents. Write permission is also required to delete the fi le using the rm command (Table 4.1).
Table 4.1 Access modes and permissions
Access mode Ordinary fi le Directory fi le
Read Allows examination of fi le contents Allows listing of fi les within the directory
Write Allows changing of contents of the fi le Allows creation of new fi les and removal of old ones
Execute Allows execution of the fi le as a command Allows searching of the directory
We can view the permissions of a fi le or directory through the long listing command. The following example shows the long listing of fi le mce1.
Example $ ls –l mce1
This statement requests the long directory listing for the ordinary fi le called mce1. We might get the output shown in Fig. 4.1.
The dash (-) in the fi le type fi eld indicates that it is an ordinary fi le. The access permissions fi eld tells us what kinds of access permissions are granted. The number, 1, indicates that there is only one link for this fi le from the directory, which means that this fi le only has one

Advanced Unix Commands 61
name associated with it. The word chirag is the owner’s name; it is the group name that has access to this fi le; 120 refers to the fi le size; Mar 15 12:20 is the date and time the fi le was last modifi ed; and mce1 is the fi lename.
We have seen that long listing shows the permissions for all the three system users—User, Group, and Other—besides other information such as name of the fi le (or directory), size, date, and time of last access. Assume that the permissions for the fi le mce1 are as follows:
r w x r - x r - - 1 chirag it 120 Mar 15 12:20 mce1
The fi rst three characters, r, w, and x, are the permissions for the User. This is followed by the permissions for the Group members. The last three characters represent the permissions for the Other member. The aforementioned output indicates that the User has all the three permissions, r w x (read, write, and execute), for the fi le mce1. The permissions r – x indicate that the Group members have read and execute permissions for the fi le mce1. The missing permission is represented by a hyphen (-). The Other users have only r, that is, read permission for the fi le mce1.
Suppose the permissions for the fi le mce1 are as follows:
r - x - - x - - - 1 chirag it 120 Mar 15 12:20 mce1
The permissions indicate that the User has r - x, that is, read and execute permissions for the fi le mce1. The Group members have - - x, that is, only execute permission for the fi le, and the Other members have no permission (- - -), that is, the Other members cannot read, write, or execute the fi le mce1.
Let us take a look at how we can assign and remove permissions from a fi le or directory.
4.2.1 chmod: Changing File Access Permissions chmod stands for change mode and the command is used for changing the access permission for fi les and directories. Only the owner or super user can change the access permission for fi les.
Syntax chmod [option] mode fi les
Here, option refers to the following elements given in Table 4.2.The keyword mode refers to the three access permissions given in Table 4.3.
Examples(a) $chmod 751 a.txt This command assigns permission 7 to user (i.e., owner), 5 to group, and 1 to other.
Permission 7 means 4(r) + 2(w) + 1(x), that is, the user has all the three permissions, read, write, and execute for the fi le a.txt. Similarly, the group members have 4(r) + 1(x), that is, read and execute, but no write permission for the fi le a.txt. However, the other users can only execute th e fi le. Refer to Fig. 4.2 to view the output of the command.
(b) $chmod 760 a.txt
Fig. 4.1 Output of the long listing command for the fi le mce1
-rw-rw-rw-– 1
File type filenamePermissions Links Owner Group Size Date and timeof last modification
chirag it 120 Mar 15 12:20 mce1

62 Unix and Shell Programming
This command assigns permission 7, 4(r) + 2(w) + 1(x), that is, read, write, and execute permissions for the fi le a.txt to the user (or owner) of the fi le. Permission 6, 4(r) + 2(w), that is, read and write
permission is assigned to the group members of the fi le, and 0 or no permission to other users. The other users cannot read, write, or execute the fi le a.txt. Refer to Fig. 4.2 to view the output of the command.
(c) $chmod o+r a.txt This command adds the read permission to the other members for the fi le a.txt. Other
existing permissions are left undisturbed. Refer to Fig. 4.2 to view the output of the command.
(d) $chmod u-x,g-w+x,o+wx a.txt It removes the execute permission of the user (i.e., owner), removes the write permis-
sion of the group members, adds execute permission to the group members, and adds write and execute permissions to the other users. The existing permissions are left undisturbed. Refer to Fig. 4.2 to view the output of the command.
Note: There should not be any space after the comma (,) or while specifying permissions of the user, group, and others in the command.
(e) $ chmod u=rwx,g=rx, o=x a.txt This command assigns permission, rwx, that is, read, write, and execute permission
to u, that is, the user or owner of the fi le. It also assigns, rx, that is, read and execute permission to the group members of the fi le and x, that is, execute permission to the other users. Previous permissions assigned to user, group, and other members will be removed. Refer to Fig. 4.2 to view the output of the command.
(f) $ chmod u=w a.txt This command assigns write permission to the user, that is, owner of the fi le a.txt.
Previous permissions assigned to the user will be removed. Existing permissions to the group and other users will be undisturbed. Refer to Fig. 4.2 to view the output of the command.
4.2.2 umask: Setting Default PermissionsThe umask command sets the default permissions for the fi les that will be created in the future.
Table 4.3 Brief description of modes used with the chmod command
Mode Description
r or 4 Represents read permission
w or 2 Represents write permission
x or 1 Represents execute permission
Table 4.2 Brief description of options used with the chmod command
Option Description
u Represents User or the owner of the fi le
g Represents Group
O Represents Other
A Represents all (User, Group, and Other). It is the default option
+ Adds access permission
- Removes access permission
= Assigns permission to u, g, o, or a

Advanced Unix Commands 63
Syntax umask ugo
Here, u, g, and o refer to the permissions that we do not want the user, group, and others to have for the new fi les. Yes, you have read correctly, umask is not for assigning but for removing permissions of the three categories of system users—user (owner), group, and other—for the future fi les.
To understand this better, let us fi rst create an empty fi le called chirag using the touch command and then try to list it.
Example$ touch chirag$ ls -l chirag -rw-r--r-- 1 mce it 26 Oct 27 10:12 chirag
The permission of this fi le is 644. Whenever we create a fi le, Unix uses the value stored in a variable called umask to decide the default permissions. umask stands for user fi le creation mask, and is used for defi ning the
permissions to mask or hide, that is, the permissions that we want to deny. The current value of umask can be easily determined by typing umask followed by the Enter key.
$ umask0022
The fi rst 0 indicates that what follows is an octal number. The three digits that follow the fi rst zero refer to the permissions to be denied to the owner, group, and others. This means that for the owner no permission is denied, whereas for both the group and others, write permission (2) is denied.
Whenever a fi le is created, Unix assumes that the permissions for this fi le should be 666. However, since our unmask value is 022, Unix subtracts this value from the default system-wide permissions (666) resulting in a value 644. This value is then used as the permissions for the fi le that we create.
This is the reason why the permissions turned out to be 644 or rw-r--r-- for the fi le chirag that we created.
Similarly, the system-wide default permissions for a directory are 777. This implies that when we create a directory its permission would be 777 − 022, that is, 755.
Note: If a directory does not have an execute permission we will never be able to enter data into it.
To change umask value:
$ umask 342
$ chmod 751 a.txt
$ ls -al a.txt-rwxr-x--x 1 bintu None 21 Dec 30 19:10 a.txt
$ chmod 760 a.txt
$ ls -al a.txt-rwxrw---- 1 bintu None 21 Dec 30 19:10 a.txt
$ chmod o+r a.txt
$ ls -al a.txt-rwxrw-r-- 1 bintu None 21 Dec 30 19:10 a.txt
$ chmod u-x,g-w+x,o+wx a.txt
$ ls -al a.txt-rw-r-xrwx 1 bintu None 21 Dec 30 19:10 a.txt
$ chmod u=rwx,g=rx,o=x a.txt
$ ls -al a.txt-rwxrw-x--1 bintu None 21 Dec 30 19:10 a.txt
$ chmod u=w a.txt
$ ls -al a.txt--w-r-x--x 1 bintu None 21 Dec 30 19:10 a.txt
Fig. 4.2 Output of application of the chmod command on fi le a.txt

64 Unix and Shell Programming
This would ensure that from this point onwards, any new fi le that we create would have the permissions 324 (666 − 342) and any directory that we create would have the permissions 435 (777 − 342).
4.2.3 chown: Changing File OwnershipThe chown command is used for changing the owner and group owner of a fi le.
Syntax chown [-R] new_owner[:[new_group]] fi lenames
The options and arguments of this command are briefl y explained in Table 4.4.
To change both the owner and the group of the fi le, new_owner must be followed by a colon and a new_group with no space in between.
Note: If no new_group is specifi ed after the new_owner and colon, the owner and group of the fi le is changed to new_owner and group of new_owner, respectively.
If the new_owner is missing but colon and new_group are specifi ed then only the group of the fi les is changed, that is, the command will act as the chgrp command. We will learn about the chgrp command next.
Examples By default, when we create or copy a fi le, we become its owner. For example, suppose we have a fi le named notes.txt and we want to change its ownership to another person named Ravi.
Let us fi rst view the current owner of the fi le by giving the following command:(a) $ ls –l notes.txt -rwxrwxr-x 1 chirag it 120 Mar 15 12:20 notes.txt We can see that chirag is the current owner of the fi le. Now chirag can give the following
command to give the ownership of the fi le notes.txt to Ravi.(b) $ chown ravi notes.txt To see whether the ownership is changed, let us again give the ls –l command.(c) $ ls –l notes.txt
-rwxrwxr-x 1 ravi it 120 Mar 15 12:20 notes.txt
We can see that the owner of the fi le notes.txt is changed from chirag to ravi.Now, chirag will no longer be able to change the permissions of the fi le notes.txt and
only ravi can do so.
Table 4.4 Brief description of options used in the chown command
Option Description
-R The command applies recursively to the fi les and subdirectories of the current directory.
new_owner It is the new owner of the fi les, that is, new_owner will become the new owner of the fi les and hence gets all the permissions to access the fi le and modify its access permissions.
new_group It is the group name to which we want to assign the fi les.
fi lenames These are the fi les whose ownership we wish to change.

Advanced Unix Commands 65
Note: This process is one way because we must either be the owner of the file or the super user to change its ownership. After we give the file to ravi, we cannot get its ownership back until and unless ravi issues the chown command to return the ownership to us.
Examples The following are a few more examples.
(a) $ chown chirag:mba notes.txt This command will change the owner and group of the fi le notes.txt to chirag and mba,
respectively.
Note: The user chirag, and group mba must exist before giving the command. The commands to add a new user and group to the system are useradd and groupadd, respectively (discussed in Chapter 15).
(b) $ chown chirag: notes.txt This command will change the owner of the fi le notes.txt to chirag and the group of
the fi le is changed to the one to which chirag belongs.(c) $ chown :mba notes.txt This command will change the group of the fi le notes.txt to mba.(d) $ chown -R chirag projects This command will change the ownership of the fi les and subdirectories of the directory
projects to chirag.
4.2.4 chgrp: Changing Group CommandThe chgrp command is used for changing the group of the specifi ed number of fi les. The fi les will thereby be made accessible to the specifi ed group.
Syntax chgrp [-R] [-h] new_group fi lenames
The options and arguments of this command are briefl y explained in Table 4.5.
By default the fi le we create gets group ownership in the group we belong to, that is, the group to which the owner belongs becomes the default group ownership of the fi le.
For example, if we belong to the group it, our fi le will also have the same group ownership, as can be seen by the following command:
$ ls –l notes.txt-rwxrwxr-x 1 chirag it 120 Mar 15 12:20 notes.txt
The following command is used to change the group ownership of a fi le named notes.txt from group it to group hospital:
Table 4.5 Brief description of the options used in the chgrp command
Option Description
-R It recursively changes the group of the fi les and subdirectories of the specifi ed directory.
-h If the specifi ed fi le is a symbolic link, its group is changed. In the absence of a -h option, the group of the fi le referenced by the symbolic link is changed and not the symbolic link.
new_group It is the group name we want to assign the fi les to.
fi lenames Specifi es the fi les whose group we want to change.

66 Unix and Shell Programming
$ chgrp hospital notes.txt
Note: The group hospital must exist before giving this command.
Now, the group ownership may appear as follows:
$ ls –l notes.txt-rwxrwxr-x 1 chirag hospital 120 Mar 15 12:20 notes.txt
Note: Since we are still the owner of the fi le, we can again change its group ownership any time.
Examples
(a) $chgrp -R hospital projects This command changes the group of all the fi les and subdirectories present in the projects
directory to hospital.(b) $chgrp -h hospital fi nance.txt This changes the group of the symbolic fi le fi nance.txt to hospital.
4.2.5 groups: Displaying Group MembershipThe groups command is used for fi nding the group to which a user belongs.
Syntax groups username1 [ username2 [username3 …]]
Example
(a) % groups chirag mba This example asks the group name of the user, chirag. The output mba signifi es that the
user chirag belongs to the group named mba. We can also fi nd the group membership of more than one user simultaneously as follows:(b) % groups chirag ravi chirag : mba ravi : other This command asks the group names of the two users, chirag and ravi. The output indicates
that the user chirag belongs to the mba group and the user ravi belongs to the other group.
4.2.6 groups: Sharing Files Among GroupsFiles can be shared with a group of users so that they can simultaneously read, work, and operate the fi les(s). For this to happen, a group needs to be created by the system administrator.
To create a group, we give the command with the following syntax:
Syntax groupadd group_name
Example % groupadd bankproject
This will create a group by the name bankproject. After creating a group, the next step is to set the group ownership of the fi le(s) to the given group using the chgrp command.
Syntax $ chgrp groupname fi lename

Advanced Unix Commands 67
Example
(a) $ chgrp bankproject accounts.txt
This will set the group owner of the fi le accounts.txt to our newly created group bankproject. Similarly, we need to change the group ownership of all the fi les that we wish to share with the users of our group bankproject. Thereafter, we need to set the fi le permissions so that everybody in the group can read and write the fi le through the following syntax:
Syntax $ chmod g+rw fi lename
We can also assign access permissions to the group in the following way:
Syntax $ chmod 770 fi lename
This example assigns read, write, and execute permissions to the owner and group members of the fi le and no permission to the other users.
4.3 INPUT/OUTPUT REDIRECTION IN UNIX
The input to a command or a shell is usually provided through the standard input, that is, the keyboard, while the output of the command is displayed on the standard output, that is, on the terminal screen. By default, each command takes its input from the standard input and sends the results to the standard output.
By making use of the I/O redirection operators, we can change the location of providing input to a command and displaying the output of the command. Let us fi rst understand the output redirection operator.
4.3.1 Output Redirection OperatorThe output redirection operator is used to redirect the output (from a command) that is supposed to go to a terminal by default, to a fi le instead. This process of diverting the output from its default destination is known as output redirection. For redirecting the output, the operator that we have to use is the ‘>’ operator in shell command. The ‘>’ symbol is known as the output redirection operator and we can use it to divert the output of any command to a fi le instead of the terminal screen.
Syntax command [> | >>] output_fi le
Here, output_fi le is the name of the fi le where we wish to direct and save the output of the command.
Example $ ls > kk
On using this command, nothing will appear on the output screen and all output, that is, the list of fi les and directories from the ls command is redirected to the fi le kk.
On viewing the contents of the fi le kk, we get the list of fi les and directories in it.
Note: If the fi le kk does not exist, the redirection operator will fi rst create it, and if it already exists, its contents will be overwritten.
In order to append output to the fi le, the append operator, >> is used as shown in the following command:
$ ls >> kk

68 Unix and Shell Programming
4.3.2 Input Redirection OperatorIn order to redirect the standard input, we use the input redirection operator, the < (less than) symbol.
Syntax command < input_fi le
Here, input_fi le is the name of the fi le from where the data will be supplied to the command for the purpose of computation.
Examples(a) $ sort < kk The sort command in the example receives the input stream of bytes from the fi le kk.
We can also combine input and output redirection operators.(b) $ sort < kk > mm On using the command, nothing will appear on the terminal screen; instead the content
of the fi le kk will be sorted and sent directly to the fi le mm.
4.4 PIPE OPERATOR
The pipe operator, represented by the symbol ‘|’, is used on the command line for the purpose of sending the output of a command as an input to another command. The pipe operator is different from the output redirection operator, ‘>’ in a way that the output indirection operator ‘>’ is mostly used for sending the output of a command to a fi le, whereas the pipe operator is used for sending output of a command to some other command for further processing.
Syntax command1 | command2 [| command3…]
Example $ cat notes.txt | wc 4 20 75
Here, the output of the cat command is sent as input to another command, wc. The wc command counts the lines, words, and characters in the fi le notes.txt whose content is passed to it.
We can combine several commands with pipes on a single command line as follows:
$ cat notes.txt | sort| lp
This command sorts the content of the fi le notes.txt and sends the sorted content to the printer for printing.
Note: The pipe operator provides a one-way fl ow of data that is from left to right, whereas the redirection operator enables two-way fl ow of data.
4.5 cut: CUTTING DATA FROM FILES
The cut command is used for slicing (cutting) a fi le vertically.
Syntax cut [-c –f] fi le_name
Here, –c refers to columns or characters and –f refers to the fi elds, that is, words delimited by whitespace or tab.

Advanced Unix Commands 69
Examples
(a) cut -c 6-22,30-35 bank.lst
This command retrieves 6-22 characters and 30-35 columns (characters) from the fi le bank.lst and displays them on the screen.
Let us look at another example.
(b) $ cut -f2 bank.lst
We get the content of the second fi eld of the fi le bank.lst displayed on the screen. Let us assume the fi le bank.lst has the following content.
101 Anil102 Ravi103 Sunil104 Chirag105 Raju
Note: The fi elds in the fi le bank.lst are separated by a tab space.
Here, the cut command will display the second fi eld of the fi le bank.lst, that is, we will get the output shown in Fig. 4.3.
The fi elds in the fi le bank.lst are delimited by a tab. If they are separated by a delimiter other than tab or white space, then the output of the cut command will be different.
Let us assume the fi le bank.lst has the following content.
101,Anil102,Ravi103,Sunil104,Chirag105,Raju
We can see that the fi elds of the fi le bank.lst are delimited by a comma (,) and not by a tab or white space. The following command will not display anything on the screen as the default delimiter for identifying fi elds is either white space or tab.
$ cut -f2 bank.lst
Hence, the file bank.lst will be considered to be consisting of a single field on each line.
To specify the delimiter when the fi elds are delimited by some other character other than tab or white space as in the aforementioned fi le, we use -d (delimiter) to specify the fi eld delimiter as shown in the following example:cut -f2 -d "," bank.lst
This statement will show the second fi eld of the fi le bank.lst where the fi elds are delimited by commas (,).
Assume that the fi elds are delimited by a comma (,). The following statement cuts the fi elds, starting from the fi rst, from the fi le bank.lst:
$ cut -d"," -f1- bank.lst
$ cut -f2 bank.lst
AnilRaviSunilChiragRaju
Fig. 4.3 Output displaying second fi eld of the fi le bank.lst

70 Unix and Shell Programming
Assuming that the fi elds are delimited by commas (,), the following statement cuts the fi rst fi eld, fourth fi eld, and so on, from the fi le bank.lst:
$ cut -d"|" -f1,4- bank.lst
Can we cut the fi elds of two separate fi les and paste them to make a third fi le? Yes, of course. Let us see how.
Assume there are two fi les, Names and Telephone, with the following contents.The Names fi le consists of employee codes and names as follows:
101 Anil102 Ravi103 Sunil104 Chirag105 Raju
The Telephone fi le consists of employee codes and telephone numbers as follows:
101 2429193102 3334444103 7777888104 9990000105 5555111
Let us cut the second fi eld from both the fi les and paste them to make a third fi le, that is, cut the employee names from the Names fi le and telephone numbers from the Telephone fi le and paste them to create a third fi le.
To cut out the second word (fi eld) from the fi le Names, we give the following command:
$ cut -f2 Names
We get the output as shown in Fig. 4.4.Similarly, to cut the telephone numbers, that is, the second fi eld from
the Telephone fi le, we give the following command:
$ cut -f2 Telephone24291933334444777788899900005555111
We can save the output by redirecting the standard output to a fi le.
$ cut -f2 Name > names.txt$ cut -f2 Telephone > numbers.txt
The names and telephone numbers will be saved in two fi les, names.txt and numbers.txt, respectively. To paste the content of the two fi les, we need to understand the paste command. Let us now study this command.
AnilRaviSunilChiragRaju
Fig. 4.4 Output showing second fi eld of fi le Names

Advanced Unix Commands 71
Example Consider the fi le names.txt mentioned in Section 4.5.
$ paste names.txt numbers.txt
The output will be as shown in Fig. 4.5.We can see that the corresponding lines of the fi les
names.txt and numbers.txt are pasted with a tab character in between. By default, the paste command uses the tab character for pasting lines; however, we can specify a delimiter of our choice with the -d command as shown in the following example.
$ paste -d"|" names.txt numbers.txt
This joins the two fi les with the help of the | delimiter and not tab (i.e., between names and telephone numbers,
there will be a ‘|’ symbol instead of the tab character, as shown in Fig. 4.6).
The example shown in Fig. 4.7 serially pastes the contents from the fi les. It combines all the lines of each fi le into one line and displays them one below the other.
4.7 split: SPLITTING FILES INTO LINES OR BYTES
The split command is used to split a fi le into pieces.
Syntax split [-b n [K | M]] [ -l n] [-n] fi le_name dest_fi le
The options and arguments are briefl y explained in Table 4.7.
4.6 paste: PASTING DATA IN FILES
It is used to join textual data together and is very useful if we want to put together textual information located in various fi les.
Syntax paste [-s] [-d "delimiter"] fi les
These options are briefl y explained in Table 4.6.
Table 4.6 Brief description of the options used in the paste command
Option Description
-s The paste command usually displays the corresponding lines of each specifi ed fi le. The -s option refers to a serial option and is used to combine all the lines of each fi le into one line and display them one below the other.
-d This option is for specifying the delimiter to be used for pasting lines from the specifi ed fi les. The default delimiter used to separate the lines from the fi les is the Tab character.
Fig. 4.5 Pasting of two fi les names.txt and numbers.txt with the default tab character in between
Anil 2429193Ravi 3334444Sunil 7777888Chirag 9990000Raju 5555111
Anil:2429193Ravi:3334444Sunil:7777888Chirag:9990000Raju:5555111
Fig. 4.6 Two fi les names.txt and numbers.txt pasted with the ‘|’ symbol in between
Anil Ravi Sunil Chirag Raju2429193 3334444 7777888 9990000 5555111
$ paste -s names.txt numbers.txt
Fig. 4.7 Two fi les names.txt and numbers.txt pasted one below the other

72 Unix and Shell Programming
Example When the split command is given without any option, the fi le is split into pieces that are 1000 lines each, that is, the default option is –l as shown in Fig. 4.8.
We can see that the fi le numbers.txt is split into a single fi le trialaa consisting of the complete content of the fi le numbers.txt (because the size of the fi le numbers.txt is lesser than 1000 lines).
The example in Fig. 4.9 splits the fi le numbers.txt into fi les that are 20 bytes each.
The fi le numbers.txt is split into two pieces, tempaa and tempab, where tempaa
contains the fi rst 20 bytes of the fi le numbers.txt while the fi le tempab contains the remaining number of bytes.
The example in Fig. 4.10 splits the fi le numbers.txt into pieces, each of which consists of two lines.
The fi le numbers.txt is split into three fi les with the following names: demoaa, demoab, and demoac. Each of these fi les contains two lines (as shown in Fig. 4.10).
Table 4.7 Brief description of the options and arguments used in the split command
Option Description
-b n It splits the specifi ed fi le into pieces that are n bytes in size.
-b nK It splits the specifi ed fi le into pieces that are n kilo bytes in size.
-b nM It splits the specifi ed fi le into pieces that are n mega bytes in size.
-l n It splits the specifi ed fi le into n number of lines (default option). The default value of n is 1000.
-n It is the same as -l n.
File_name It is the name of the fi le to be split.
dest_fi le It is the name of the fi le in which the split pieces will be stored. If the dest_fi le is, say, demo, the split pieces will be stored in the fi les demoaa, demoab, demoac, and so on.
$ split numbers.txt trial
$ ls trial*trialaa
$ cat trialaa
24291933334444777788899900005555111
Fig. 4.8 File numbers.txt split into the fi le trialaa Fig. 4.9 File numbers.txt split into two 20-byte
fi les, tempaa and tempab
$ split -b 20 numbers.txt temp
$ ls temp*tempaa tempab
$ cat tempaa242919333344447777
$ cat tempab88899900005555111
Fig. 4.10 File numbers.txt split into three fi les, demoaa, demoab, and demoac, which are two lines each
$ split -1 2 numbers.txt temp
$ ls de*tempaa demoab demoac
$ cat demoaa
24291933334444
$ cat tempab7778889990000
$ cat demoac5555111

Advanced Unix Commands 73
4.8 wc: COUNTING CHARACTERS, WORDS, AND LINES IN FILES
The wc (word count) command is usually used to fi nd the number of lines in any fi le. By default, it displays all the three counts—characters, words, and lines—of any given fi le.
Syntax wc [-l -w -c] [fi lename]
Here, -l counts the number of lines. -w counts the number of words delimited by white space or a tab. -c counts the number of characters.
Example $ wc phone.lst 12 124 650 phone.lst
This command displays the count of lines, words, and characters in the fi le phone.lst, that is, the numerical values 12, 124, and 650 represent the count of lines, words, and characters, respectively in the fi le phone.lst.
If we wish to view only the number of lines in the fi le, we need to only use the –l option, as in the following example:$ wc -l phone.lst12 phone.lst
As we can see, the command displays the count of the number of lines in the fi le phone.lst. Similarly, the -w option will give the total number of words in a fi le, and the -c option gives the total number of characters in a fi le.
4.9 sort: SORTING FILES
It is used for sorting fi les either line-wise or on the basis of certain fi elds, where the fi elds refer to the words that are separated by one of the following: white space, tab, or special symbol.
Syntax sort [-n][-r][-f][-u] fi lename
The options and arguments shown here are briefl y explained in Table 4.8.All lines in the fi lename will be
arranged in alphabetical order on the basis of the fi rst character of the line.
The other syntax for using the sort command is as follows:
Syntax sort +p1 - p2 fi lename
This limits the sort to be applied on the basis of the characters beginning from fi eld p1 and ending at fi eld p2. If p2 is omitted, then sorting will be done on the basis of the characters beginning from fi eld p1 till the end of the line.
Examples
(a) $ sort +2 -4 bnk.lst
Table 4.8 Brief description of the options used in the sort command
Option Description
-n Sorts numerical values instead of ASCII, ignoring blanks and tabs
-r Sorts in reverse order
-f Sorts upper and lower case together, that is, ignores the difference in upper and lower case
-u Displays unique lines, that is, it eliminates duplicate lines in the output
fi lename Represents the fi le to be sorted

74 Unix and Shell Programming
This command skips the fi rst two fi elds and uses the third and fourth fi elds for sorting the fi le bnk.lst.
(b) $ sort +3 -4 bnk.lst This command skips the fi rst three fi elds and uses the fourth fi eld for sorting the fi le bnk.lst.
(c) $ sort +2 bnk.lst This command skips the fi rst two fi elds and uses the third and the rest of the fi elds up till the end of the line for sorting the fi le bnk.lst.
(d) $ sort bnk.lst -o bank.lst This command sorts the fi le bnk.lst and stores the result in bank.lst.(e) $ sort +0 -1 bnk.lst This command sorts the fi le bnk.lst on the basis of the fi rst fi eld.(f) $ sort +1 -4 bnk.lst This command sorts the fi le bnk.lst from the second to the fourth fi elds.(g) $ sort +2b bnk.lst This command sorts the fi le bnk.lst on the third fi eld after ignoring leading blank spaces. The -f option is used to ignore the upper and lower case distinction.(h) $ sort +2bf bnk.lst The command will sort the third fi eld after ignoring leading blank spaces and sort the
upper and lower case data together. The -n option is used for sorting the fi le on the basis of numerical values rather than
ASCII values.(i) $ sort -n +2 -3 a.bat The command sorts the fi le a.bat on the third fi eld, on the assumption that it is a
numerical fi eld. The -r option is used for sorting a given fi le in reverse order.(j) $ sort -r link.lst The command will sort the fi le link.lst in the reverse order. The -u option will eliminate
duplicate lines in the sorted output.(k) $ sort -nu +2 -3 a.bat The command sorts the fi le a.bat on the third fi eld after eliminating duplicate lines.
4.10 head: DISPLAYING TOP CONTENTS OF FILES
The head command is used for selecting the specifi ed number of lines from the beginning of the fi le and displaying them on the screen.
Syntax head –[n] fi le name
Here, n is the number of lines that we want to select.
Example head bnk.lst
When used without an option, this displays the fi rst ten records (lines) of the specifi ed fi le.
head -3 bnk.lst
It displays the fi rst three lines of the fi le bnk.lst.

Advanced Unix Commands 75
We can also specify more than one fi le.
head -3 bnk.lst notes.txt
It will display the fi rst three lines of both the fi les, bnk.lst and notes.txt, one after the other.
4.11 tail: DISPLAYING BOTTOM CONTENTS OF FILES
The tail command is used for selecting the specifi ed number of lines from the end of the fi le and displaying them on the screen.
Syntax tail –[ncbr] fi lename
The options of the command are briefl y explained in Table 4.9.
Note: There is one more option that is used with the tail command. +n gives an instruction to skip n–1 lines and select the rest until the end of the fi le.
Examples
(a) $ tail -3 bnk.lst It will display the last three lines.(b) $ tail -10 bnk.lst It will display the last 10 lines.
(c) $ tail +10 bnk.lst It will start extracting from the tenth line (it will skip nine lines) up to the end of the fi le.(d) $ tail –50c bnk.lst It will display the last 50 characters of the fi le bnk.lst.(e) $ tail –2b bnk.lst It will display the last two disk blocks of the fi le bnk.lst. A disk block is usually 512
bytes big.(f) $ tail –2r bnk.lst It will display the last two lines of the fi le bnk.lst in reverse order, that is, the last line
will appear fi rst followed by the second last line.(g) $ head -25 a.txt | tail +20 > b.txt It extracts lines numbering from 20 to 25 from the fi le a.txt. The head utility extracts the fi rst 25 lines from the fi le a.txt and pipes them to the tail
utility, which skips the fi rst 19 lines and extracts lines 20 to 25. The results are then stored in fi le b.txt.
4.12 diff: FINDING DIFFERENCES BETWEEN TWO FILES
The diff command is used for comparing two fi les. If there are no differences between the two fi les being compared, the command does not display any output. Otherwise it displays the output indicating the changes that need to be made to the fi rst fi le to make it same as the second fi le.
Syntax diff fi le1 fi le2
Table 4.9 Brief description of the options used in the tail command
Option Description
-n Selects the last n lines
-c Selects the last c number of characters
-b Selects a specifi ed number of disk blocks
-r Sorts the selected lines in reverse order

76 Unix and Shell Programming
All the differences found in the two fi les are displayed in a format consisting of two numbers and a character in between. The number to the left of the character represents the line number in the fi rst fi le, and the number to the right of the character represents the line number in the second fi le. The character can be any of the following:
1. d: delete2. c: change3. a: add
Example Assume we have two fi les, users.txt and customers.txt, with the following content.
users.txt customers.txtJohn JohnPeter CharlesTroy Troy
Now on comparing the two fi les, we get the following output.
$ diff users.txt customers.txt2c2< Peter--> Charles
Note: The < character precedes the lines from the fi rst fi le and > precedes the lines from the second fi le.
This output indicates that the two fi les differ by only one line. It indicates that if the second line, Peter, in the fi rst fi le (users.txt) is changed to the second line, Charles, of the second fi le (customers.txt), both fi les will be exactly the same.
To better understand the diff command, let us twist the content of the fi rst fi le users.txt as follows:
users.txtJohnPeterCharles
Keeping the content of the fi le customers.txt same as before, when we compare the two fi les, we get the following output.
$ diff users.txt customers.txt2d1< Peter3a3> Troy
The output indicates that to make the fi le users.txt the same as customers.txt, we have to delete the second line, Peter, and add the third line, Troy, from customers.txt after the third line in users.txt.

Advanced Unix Commands 77
Example Consider we have two fi les, users.txt and customers.txt, with the following content.
users.txt customers.txtJohn JohnPeter CharlesTroy Troy
The following are examples of commands that are used to compare the two fi les.
$cmp users.txt customers.txt
The cmp command compares the fi les users.txt and customers.txt and displays the following output.
users.txt customers.txt differ: byte 6, line 2
The output indicates that the byte location where the fi rst difference between the two fi les (users.txt and customers.txt) occurs is 6.
The following example shows the list of byte locations and the differing byte values in octal format for every difference found in the two fi les:
$cmp -l users.txt customers.txt
4.13 cmp: COMPARING FILES
The cmp command compares two fi les and indicates the line number where the fi rst difference in the fi les occurs. The cmp command does not display anything if the fi les being compared are exactly the same.
Syntax cmp [[-l][-s]] fi le1 fi le2 [skip1] [skip2]
The related options and arguments are briefl y explained in Table 4.10.
Table 4.10 Brief description of the options and arguments used in the cmp command
Option Description
-l It prints the byte number and the differing byte values in octal for each difference.
-s It displays nothing but the return exit status on the screen. The status returned can be any of the following:
0: If the two fi les are identical
1: If the two fi les are different
>1: If an error occurs while reading the fi les
fi le1 and fi le2 These are the fi les to be compared.
skip1 and skip2 These are the optional byte offsets from the beginning of fi le1 and fi le2 respectively, where we wish to begin the comparison of fi les. The offset can be specifi ed in decimal, octal, and hexadecimal. The offsets in hexadecimal and octal formats have to be preceded by ‘0x’ and ‘0’, respectively.

78 Unix and Shell Programming
We get the output shown in Fig. 4.11.The output displays the byte locations of the
difference between the two fi les and also shows that the users.txt fi le is smaller than the customers.txt fi le as it encounters its end of fi le (EOF) marker while being compared with the content of customers.txt.
The following example shows the status returned on comparing the two fi les.
$ cmp -s users.txt customers.txt
This example returns the exit status. On displaying the exit status value (Fig. 4.12), we get a value one, confi rming that the two fi les are not the same but different.
The following example compares the two fi les after skipping the offset of 12 and 14 bytes from the two fi les respectively.
$ cmp -s users.txt customers.txt 12 14
On displaying the return status (Fig. 4.12), we get an output 0, which confi rms that the two fi les are exactly the same after giving the offset values.
4.14 uniq: ELIMINATING AND DISPLAYING DUPLICATE LINES
The uniq command is used to fi nd and display duplicate lines in a fi le. In addition, we can use it to eliminate duplicate lines and display only unique lines.
Syntax uniq [-c | -d | -u ] [ -f fi elds ] [ -s char ] [input_fi le [ output_fi le ] ]
The related options and arguments are briefl y explained in Table 4.11.
Table 4.11 Brief description of the options and arguments used in the uniq command
Option Description
-c It precedes each line with a count of the number of occurrences.
-d It displays only repeated lines (duplicate) in the input.
-u It displays only unique lines in the input.
-f fi elds It ignores the fi rst given number of fi elds on each input line.
-s char It ignores the fi rst given number of characters of each input line. If this option is used along with the -f option, the fi rst given number of characters after the fi rst fi elds will be ignored.
input_fi le It is the name of the fi le whose content we need to compare.
output_fi le It is the name of the fi le where the output of the command will be stored. If no output fi le is specifi ed, the output will appear on the standard output.
$ cmp -s users.txt customers.txt$ echo $?1$ cmp -s users.txt customers.txt 12 14$ echo $?0
Fig. 4.12 Comparison between fi les and display of status
6789
10111213141516
12014516414516212
12416215717112
10315014116215414516312
124162157
$ cmp -1 users.txt customers.txt
cmp: EOF on users.txt
Fig. 4.11 List of byte locations and the differing bytes in the two fi les users.txt and customers.txt

Advanced Unix Commands 79
Example $ uniq a.txt > b.txt
This command removes duplicate lines in the fi le a.txt and saves it in another fi le b.txt.Let us assume the fi le a.txt contains the following content:
a.txtIt may rain todayI am leaving nowIt may rain todayLovely weatherI am leaving now
The following is the command for removing all duplicate lines from a fi le.
$ sort a.txt | uniq
This command sorts and removes all the duplicate lines in the fi le a.txt and displays only the unique lines on the screen. We get the following output.
I am leaving nowIt may rain todayLovely weather
The following command is used to display only the unique lines.
$ sort a.txt | uniq -u
The command sorts and displays only the unique lines in the fi le a.txt on the screen. We get the following output.
Lovely weather
The following command is used to display all the duplicate lines in a fi le.
$ sort a.txt | uniq -d
We get the following output.
I am leaving nowIt may rain today
The following command is used to display the count of duplicate occurrences in a fi le.
$ sort a.txt | uniq -c
We get the following output.
2 I am leaving now2 It may rain today1 Lovely weather
4.15 comm: DISPLAYING AND SUPPRESSING UNIQUE OR COMMON CONTENT IN TWO FILES
The comm command displays or suppresses the content common to two fi les. The output is displayed in a column format, where the fi rst column represents the output related to the fi rst fi le and the second column displays the output related to the second fi le.

80 Unix and Shell Programming
Syntax comm [-1] [-2] [-3 ] fi le1 fi le2
The options and arguments are briefl y explained in Table 4.12.
Table 4.12 Brief description of the options and arguments used in the comm command
Option Description
-1 It suppresses the display of the content that is unique to fi le1. It also displays the unique content in fi le2.
-2 It suppresses the display of the content that is unique to fi le2. It also displays the unique content in fi le1.
-3 It suppresses the display of the content that is common to both fi le1 and fi le2, that is, it displays the unique content in fi le1 and fi le2.
fi le1 and fi le2 These are the two fi les being compared.
$ comm users.txt customers.txt John CharlesPeter Troy$ comm -1 users.txt customer.txt JohnCharles Troy$ comm -2 users.txt customers.txt JohnPeter Troy$ comm -3 users.txt customers.txt CharlesPeter
Fig. 4.13 Output of the comm command on comparing two fi les
Note: When the comm command is executed without any options, the output will comprise three columns, where the fi rst column displays content unique to the fi rst fi le, the second column displays content unique to the second fi le, and the third column displays content common to both the fi les.
Examples Suppose we have two fi les, users.txt and customers.txt, with the following content.users.txt customers.txtJohn JohnPeter CharlesTroy Troy
(a) This example compares the two fi les (users.txt and customers.txt) and displays the out put in three columns. The fi rst column displays content unique to the fi rst fi le, the second column displays content unique to the second fi le, and the third column displays content common to both the fi les (Fig. 4.13).
$comm users.txt customers.txt
(b) This example compares the two fi les, users.txt and customers.txt, suppresses the content that is unique in users.txt, and also displays the unique content in customers.txt (Fig. 4.13).
$comm -1 users.txt customers.txt
(c) This example compares the two fi les, users.txt and customers.txt and suppresses the content that is unique in customers.txt and also displays the unique content in users.txt (refer to Fig. 4.13).
$comm -2 users.txt customers.txt

Advanced Unix Commands 81
(d) This example compares the aforementioned two fi les and suppresses the content that is common in customers.txt and users.txt (Fig. 4.13).
$comm -3 users.txt customers.txt
4.16 time: FINDING CONSUMED TIME
The time command executes a specifi ed command and also displays the time consumed in its execution. The time usage of the specifi ed command is displayed on the screen.
Syntax time command [arguments]
In the aforementioned syntax, command is the command whose time usage is to be determined.
Examples We can determine the time taken to perform the sorting operation by preceding the sort command with the time command.
(a) $ time sort -o newlist invoice.lst real 0m1.18s user 0m0.73s sys 0m0.38s
The real time refers to the time elapsed from the invocation of the command till its termination. The user time shows the time spent by the command in executing itself while sys indicates the time used by the Unix system in invoking the command.
(b) Let us see how much time it takes to store the recursive long listing of fi les and directories sorted on modifi cation time in a fi le.
$ time ls -ltR >k.out real 0m0.04s user 0m0.01s sys 0m0.01s
Real time The real time represents the time taken by the command (from its initiation to termination) to execute.
User time The user time represents the time taken by the command to execute its own code, that is, the code run in user mode. It represents the actual CPU time used in executing the command. For small programs that take milliseconds to execute, this time is often reported as 0.0.
Sys time The sys time is the amount of CPU time spent in the kernel for running the command. It represents the CPU time spent in executing the system calls that are invoked by the command within the kernel.
The time command can be used to isolate the commands that are time consuming so that they can be run in the background. We will learn the process of executing the commands in the background in Chapter 6.
Note: The combination of user and sys time is known as CPU time.

82 Unix and Shell Programming
4.17 pg: SHOWING CONTENT PAGE-WISE
This command displays the specifi ed long fi le page-wise, that is, one screen page at a time. It also enables us to navigate to the previous or following screen. In addition, we can search for the desired pattern in the given fi le. On giving this command, it shows the fi rst screen page of the given fi le and shows the colon (:) at the bottom of the screen where we can use the following character(s) to view the desired content in the given fi le.
Syntax pg [-number] [+ linenumber] [+/pattern/] [fi lename]
Here, -number specifi es the screen size in lines. The default screen size is 23 lines. +line_number shows the fi le from the given line number. +/pattern/ shows the fi le where the given pattern begins. fi lename specifi es the fi lename that we wish to view page-wise along with its path.
The list of commands that can be given on execution of the pg command are briefl y explained in Table 4.13.
Examples
(a) $ pg letter.txtThis command displays the fi le letter.txt one screen page at a time.
(b) $pg letter.txt -10This command displays the content of the fi le letter.txt one screen page at a time where a page consists of 10 lines.
(c) $pg letter.txt +25 This command displays the content of the fi le letter.txt page-wise from the 25th
line.
(d) $pg letter.txt +/happy/ This command displays the content of the fi le letter.txt from the location where the
word happy occurs in the fi le.
4.18 lp: PRINTING DOCUMENTS
The term lp stands for line printer and the command is used for printing fi les.
Syntax lp [ -d printer_destina tion ] [ -n number_of_copies] [ -q priority ] [ -H ] [ -P page_list ] fi le(s)
The options used in this command are briefl y explained in Table 4.14.
Table 4.13 Brief description of the list of commands given on execution of the pg command
Command Description
h Displays help information
q or Q Quits the pg command
<blank> or <newline>
Moves to the next page
$ Moves to the previous page
f Skips the next page
/pattern Searches forward for the given pattern and displays it
?pattern Searches backward for the given pattern and displays it

Advanced Unix Commands 83
Examples The following are the examples of the lp commmand.
(a) $lp notes.txt This command prints the fi le notes.txt on the default printer.(b) $lp -d Deskjet1001 notes.txt
This command prints the fi le notes.txt on the printer named Deskjet1001.(c) $lp -d Deskjet1001 -n 2 notes.txt
This command prints two copies of the fi le notes.txt on the printer named Deskjet1001.
(d) $lp -d Deskjet1001 -P 2, 5-7, 10, 15- notes.txtThis command prints pages 2, 5, 6, 7, 10, and from 15 till the end of the fi le notes.txt on the printer Deskjet1001.
Note: The hyphen after 15 suggests from page 15 onwards.
(e) $lp -d Deskjet1001 notes.txt accounts.txt This command prints the fi le notes.txt and accounts.txt on the printer Deskjet1001.(f) $lp -i 1207 -H hold The print job number 1207 is held for a while.(g) $lp -i 1207 -H resume The print job number 1207 is resumed for printing.(h) $lp -i 1207 -q 100 The print job number 1207 is given the highest priority. A command that goes along with the lp command is the cancel command. Let us now
discuss this briefl y.
Table 4.14 Brief description of the options used in the lp command
Option Description
-d It is used for defi ning the printer destination, that is, the name of the printer we wish to print the fi le(s) with.
-n It is used to defi ne the number of copies to print. The valid range is from 1 to 100.
-P It is used to defi ne the pages of a selected fi le that we wish to print. The page list contains the page numbers and page range separated by commas (,). Examples: 1, 5, 9–11, 20.
-i It is used to identify the job ID assigned to the print command. On giving the lp command, it notifi es the job ID assigned to the task.
-H It is used to control the printing job. The values used with this option are as follows:
1. Hold: Holds the printing job2. Resume: Resumes the printing job3. HH:MM: Holds the job till the specifi ed time4. Immediate: Prints the job immediately
-q - It is used to set the priority of the print job. The valid values are from 1 (indicates lowest priority) till 100 (indicates highest priority). The default priority value is 50.

84 Unix and Shell Programming
4.19 cancel: CANCELLING PRINT COMMAND
The cancel command cancels existing print jobs.
Syntax cancel [ id ] [ printer_destination ]
The options and arguments used in this command are briefl y explained in Table 4.15.
Table 4.15 Brief description of the options used in the cancel command
Option Description
id It indicates the print job ID that we wish to cancel.
printer_destination
It removes all jobs from the specifi ed printer destination.
Examples
(a) $cancel Deskjet1001This command cancels all print jobs sent for printing at the Deskjet1001 printer.
(b) $cancel 1207This command cancels the print job with ID 1207.
4.20 UNDERSTANDING .profi le FILES
The .profi le fi le exists in our home directory and is the start-up fi le that is automatically executed when we log in to the Unix system. The fi le can be used to customize our environment, setting PATH variable and terminal type, and also to write the commands and scripts that we wish to automatically execute when we log in.
Note: The Unix operating system executes several system fi les including the .profi le fi le before returning the command prompt to the user.
The most basic variables used in the .profi le fi le to set up an environment for us are as follows:
1. The PATH variable defi nes the search path to fi nd the commands and applications that we execute. Through the PATH variable, the commands and scripts can be executed in directories other than their source directories (directories where the command or script exists).
2. $HOME is the name of the directory from where we begin our Unix session.3. ENV refers to the environment variables.
We will learn about these variables in detail in Chapter 5.Using any editor, we can add commands to the .profi le fi le, which we wish to execute
automatically when we log in. Chapter 8 will help you use different editors. A new command added to .profi le will come into effect either when we log out and log in again or when we run the .profi le fi le at the command prompt through the following command:
$.$HOME/.profi le

Advanced Unix Commands 85
4.21 calendar: GETTING REMINDERS
The calendar command reads the calendar fi le and displays appointments and reminders for the current day.
Syntax calendar
Example For this command to work, we need to create a fi le named calendar at the root of our home directory and write our appointments or reminders in the following format.
10/7/2012 Today is Board Meeting10/8/2012 Visiting Doctor
Now, if today is 7 October 2012, and we execute the calendar command, the line Today is Board Meeting will appear on the screen.
Note: To avoid executing the calendar command every day, add it at the end of our .profi le fi le that we just discussed.
4.22 script: RECORDING SESSIONS
The script command is used for recording our interaction with the Unix system. It runs in the background recording everything that is displayed on our screen.
Syntax script [-a] fi lename
The options and arguments used in the command are briefl y explained in Table 4.16.
Table 4.16 Brief description of the options used in the script command
Option Description
-a It appends the session into the fi lename. If this option is not specifi ed, the fi lename will be overwritten with the new data.
fi lename This gives the name of the fi le where our session will be recorded. If we do not provide a fi lename to the script command, it places its output in a default fi le named transcript.
Example The following example will begin recording the session in the fi le transact.txt:
$ script transact.txt
To exit from the scripting session, either press Ctrl-d or write exit on the command prompt followed by the Enter key.
Figure 4.14(a) shows how the session is recorded in the fi le transact.txt. The commands executed, cat, sort, mkdir, rmdir, etc., are recorded into the fi le transact.txt. To stop recording, Ctrl-d keys are pressed. To confi rm if the session is properly recorded in the fi le, we execute the cat command to view the contents of the fi le transact.txt. Figure 4.14(b) confi rms that the session is correctly recorded in the fi le transact.txt.

86 Unix and Shell Programming
4.23 CONVERSIONS BETWEEN DOS AND UNIX
There is a difference in format between Unix and DOS fi les. DOS (or Windows) fi les end with both the line feed and carriage return, whereas Unix fi les end only with the line feed character. It also means that in DOS fi les the new line character comprises carriage return and line feed, whereas in Unix fi les, the new line character comprises only the line feed character. The following are the two commands used in conversions between DOS and Unix fi les:
1. dos2unix: Converts text fi les from DOS to Unix format2. unix2dos: Converts text fi les from Unix format to DOS format
The syntax for the dos2unix command is as follows:
Syntax dos2unix [-b] fi le1 [fi le2]
The options and arguments used in this command are briefl y explained in Table 4.17.
Fig. 4.14 Recording a session (a) Recording in the fi le transact.txt (b) Recorded session
$ script transact.txtScript started, file is transact.txt
$ cat bank.lst101 Aditya 0 14/11/2012 current102 Anil 10000 20/05/2011 saving103 Naman 0 20/08/2009 current104 Rama 10000 15/08/2010 saving105 Jyotsna 5000 16/06/2012 saving106 Mukesh 14000 20/12/2009 current107 Yashasvi 14500 30/11/2011 saving108 Chirag 0 15/12/2012 current109 Arya 16000 14/12/2010 current110 Puneet 130 16/11/2009 saving
$ sort -r bank.lst110 Puneet 130 16/11/2009 saving109 Arya 16000 14/12/2010 current108 Chirag 0 15/12/2012 current107 Yashasvj 14500 30/11/2011 saving106 Mukesh 14000 20/12/2009 current105 Jyotsna 5000 16/06/2012 saving104 Rama 10000 15/08/2010 saving103 Naman 0 20/08/2009 current102 Anil 10000 20/05/2011 saving101 Aditya 0 14/11/2012 current
$ mkdir projects
$ rmdir projects
$ Script done, file is transact.txt
$ cat transact.txtScript started on 21 February 201210:24:40 PM IST
$ cat bank.lst101 Aditya 0 14/11/2012 current102 Anil 10000 20/05/2011 saving103 Naman 0 20/08/2009 current104 Rama 10000 15/08/2010 saving105 Jyotsna 5000 16/06/2012 saving106 Mukesh 14000 20/12/2009 current107 Yashasvi 14500 30/11/2011 saving108 Chirag 0 15/12/2012 current109 Arya 16000 14/12/2010 current110 Puneet 130 16/11/2009 saving
$ sort -r bank.lst110 Puneet 130 16/11/2009 saving109 Arya 16000 14/12/2010 current108 Chirag 0 15/12/2012 current107 Yashasvj 14500 30/11/2011 saving106 Mukesh 14000 20/12/2009 current105 Jyotsna 5000 16/06/2012 saving104 Rama 10000 15/08/2010 saving103 Naman 0 20/08/2009 current102 Anil 10000 20/05/2011 saving101 Aditya 0 14/11/2012 current
$ mkdir projects
$ rmdir projects
$ ^d
$ Script done on 21 February 201210:25:19 PM IST
(a) (b)

Advanced Unix Commands 87
Examples
(a) $ dos2unix a.txt b.txt This converts the DOS fi le a.txt into b.txt. The new line characters consisting of the carriage return and line feed character in a.txt will be converted to line feed character and stored in fi le b.txt, which is a fi le in Unix format.
(b) $ dos2unix -b a.txt
The command converts the DOS fi le a.txt into the Unix format. The original DOS format will be backed up and stored as a.txt.bak.The syntax for the unix2dos command is as
follows:
Syntax unix2dos [-b] fi le1 [fi le2]
The options and arguments used in this command are briefl y explained in Table 4.18.
Examples
(a) $ unix2dos a.txt b.txt The command converts the Unix fi le a.txt into b.txt. The new line characters consisting of line feed character in a.txt will therefore be converted to a combination of carriage return and line feed character and stored in fi le b.txt, which is a fi le in DOS format.
(b) $ unix2dos -b a.txt The command converts the Unix fi le a.txt into DOS format. The original Unix format will be backed up and stored as a.txt.bak.
4.24 man: DISPLAYING MANUAL
The term man stands for manual and displays the online documentation of the given Unix command. This command is meant for helping the user by providing usage, syntax, and examples of using the given command.
Syntax man [-] [-k pattern] command
Here, – (hyphen)displays the information without stopping; -k pattern searches all the commands documented in the man pages that contain the specifi ed pattern, and displays the list of matching commands.
Example $ man cp
This example displays the manual of the cp command. If the manual consists of several pages, the fi rst page will be displayed and we can press the spacebar to move on to the next page.$ man -k backup
Table 4.17 Brief description of the options used in the dos2unix command
Option Description
-b It creates a backup of fi le1 with the name fi le1.bak before converting it into Unix format.
File1 It is the fi le in DOS format.File2 It is the fi le in which we wish to store the Unix
format of the fi le. If fi le2 is not used, the original fi le fi le1, will be converted into the Unix format.
Table 4.18 Brief description of the options and arguments used in the unix2dos command
Option Description
-b It creates a backup of fi le1 by name fi le1.bak before converting it into DOS format.
fi le1 It is a fi le in the Unix format.fi le2 It is the fi le in which we wish to store the
DOS format of the fi le. If fi le2 is not used then the original fi le, fi le1 will be converted into the DOS format.

88 Unix and Shell Programming
This example searches the documentation in the man pages and displays the list of commands that contain the pattern backup. In case we get an error—windex directory not found—as shown in Fig. 4.15, we need to create the windex directory by giving the catman –w command. The windex directory once created will show the manual entry of the desired pattern. Figure 4.15 shows the manual entry having the pattern backup.
4.25 CORRECTING TYPING MISTAKES
While typing commands on the terminal screen, it is inevitable that we might commit typing mistakes. To correct the typing mistakes, the default key combinations listed in Table 4.19 are used.
Table 4.19 Default key combinations
Keys Description
Ctrl-h It erases text. Ctrl-c The Interrupt key terminates any currently running process and returns to the prompt. Ctrl-d It represents the exit or end of a transaction. The keys are used to indicate that the entering of text is complete.Ctrl-j It represents the Enter key.Ctrl-s It suspends the output temporarily and is usually used to stop the scrolling of screen output.Ctrl-q Its function is opposite to that of Ctrl-s. It resumes the scrolling of output.Ctrl-z It temporarily suspends a program and provides another shell prompt. In order to resume, it uses the jobs
command to fi nd the program’s name and restarts it with the fg command.Ctrl-u It kills the command line, that is, clears the complete line.Ctrl-\ It terminates the running command and creates a core fi le containing the memory image of the command.
Fig. 4.15 Manual containing the specifi ed pattern
$ man -k backup/usr/dt/man/windex: No such file or directory/usr/man/windex: No such file or directory/usr/oenwin/share/man/windex: No such file or directory
$ catman -w/usr/lib/getNAME: gnome-session-save.l - repeated date
$ man - k backupasadmin-backup-domain asadmin-backup-domain (las) - performs a backupon the domainasadmin-list-backups asadmin-list-backup (las) - lists all backupsand restoresasadmin -restore-domain asadmin-restore-domain (las) - restores files from backupbackup-domain asadmin-backup-domain (las) - performs a backup on the domainlist-backups asadmin-list-backups (las) - lists all backups and restoresnisbackup nisbackup (lm) - backup NIS+ directoriesnistrestore nisrestore (lm) - restore NIS+ directory backuprestore-domain asadmin-restore-domain (las) - restores files form backuptdbackup tdbbackup(lm) - tool for backing up and for validating the inegbrity of samba \&. tdb files

Advanced Unix Commands 89
We can change these default keys for erasing characters and killing a line through the stty command. The stty command is discussed in detail in Chapter 10.
This chapter dealt with numerous advanced Unix commands. It covered the essential commands for changing the permissions of fi les and directories, changing ownership and groups, sharing fi les among groups, pipe operators, etc. In addition, the chapter covered commands such as cut, paste, head, and tail that are used to extract desired regions from given fi les. For comparing fi les, diff, cmp, uniq, and comm commands were discussed. Commands for printing, measuring the time consumed in running certain commands, showing calendar, recording sessions, and confi guring the environment through .profi le have also been explained in detail.
■ SUMMARY ■
1. There are three classes of system users in Unix: Owner, Group, and Other. The read permission has a value = 4, the write permission has a value = 2, and the execute permission has a value = 1.
2. Unix assumes the default permissions of a directory to be 777 and that of a fi le as 666 and subtracts the permissions specifi ed in the umask command to defi ne their permissions at the time of their creation.
3. By default, each command takes its input from the standard input and sends the results to the standard output; however, through I/O redirection, we can change the default location of input and output.
4. The ‘>’ (greater than) symbol is known as the output redirection operator and we can use it to divert the output of any command to a fi le instead of the terminal screen.
The append operator, ‘>>’ is used for appending the output of a command to a fi le, that is, without overwriting its older content. To redirect the standard input, we use the input redirection operator, that is, the ‘<’ (less than) symbol.
5. The pipe operator ‘|’ is used for sending the output of one command as the input to another command.
6. The difference between the pipe operator and the output indirection operator ‘>’ is that the output indirection operator ‘>’ is mostly used for sending the output of a command to a file, whereas the pipe operator is used for sending output of a command to another command for further processing.
7. DOS (or Windows) fi les end with both the line feed and carriage return, whereas Unix fi les end only with the line feed character.
■ FUNCTION SPECIFICATION ■
Command Functionchmod It changes fi le/directory permissions.umask It stands for user fi le creation mask and
sets the default permissions of the fi les that will be created in the future.
chown It transfers ownership of a fi le to another user. Once the ownership of a fi le is transferred to another user, one cannot change its permissions until they become the owner again.
chgrp It changes the group ownership of the fi le.groups It creates a group.
sort It sorts fi les either line-wise or on the basis of certain fi elds.
Command Functioncut It slices (cuts) a fi le vertically. Files can be
cut on the basis of characters and fi elds too. paste It joins content from different fi les.wc (word count)
It calculates the number of characters, words, and lines in a fi le.
head It selects the specifi ed number of lines and characters from the beginning of the given fi le; the default number of lines selected is 10.
tail It selects a specifi ed number of lines and characters from the bottom of the specifi ed fi le; the default number of lines selected is 10.
pg It displays a long fi le page-wise, that is, one screen page at a time.

90 Unix and Shell Programming
4.1 The three classes of system users that are used in assigning permissions to the fi les and directories are Owner, Group, and Family.
4.2 To delete a fi le, a write permission is not required but an execute permission is required.
4.3 By using the umask command, we can specify the permissions that we want to deny.
4.4 The system-wide default permission for a dir-ectory is 666.
4.5 If we transfer the ownership of our fi le to another person, we can no longer change its fi le permissions.
4.6 Either the owner or the super user can change the ownership of a fi le.
4.7 We can make a group of users share permissions on a given set of fi les.
4.8 The sort command can sort the fi le on the basis of a given fi eld in the fi le.
■ EXERCISES ■
Objective-type Questions
State True or False
Command Functionman It displays the online documentation or
manual of the given Unix command.
diff It displays the difference between two fi les in a format that consists of two numbers and a character in between. The number to the left of the character represents the line number in the fi rst fi le, and the number to the right of the character represents the line number in the second fi le.
uniq It fi nds and displays duplicate lines in a fi le. In addition, it can be used to display only the unique lines in a fi le. The -u option of the uniq command removes all duplicate lines from a fi le. The -d option of the uniq command is used to display all duplicate lines in a fi le.
split It splits a fi le into a specifi ed number of lines or bytes.
cmp It compares two fi les and indicates the line number where the fi rst difference in the fi les occurs. It does not display anything if the fi les being compared are exactly the same.
comm It displays or suppresses the content com-mon to two fi les.
time It displays the time usage by a specifi c command. The real time is the elapsed time from the invocation of the command till its termination. The user time represents the
Command Functionamount of time that the command takes to execute its own code. The sys time rep re-sents the time taken by Unix to invoke the command.
lp It stands for line printer and prints fi les. Using the lp command, we can defi ne the printer we wish to use through the -d option, the number of copies through the -n option, the pages to print through the -p option, and priority through the -q option.
cancel It cancels existing print jobs.
profi le fi le It exists in the home directory and is the start-up fi le that automatically executes when we log in to the Unix system. It can be used to customize our environment. It can also be used to write the commands and scripts that we wish to execute auto mat-ically when we log in.
calendar It reads the calendar fi le and displays appointments and reminders for the current day.
script It records our interaction with the Unix system. It runs in the background rec ording everything that shows up on the screen.
dos2unix It converts text fi les from a DOS to a Unix format.
unix2dos It converts text fi les from a Unix format to a DOS format.
Advanced Unix Commands 91
4.9 We cannot sort a fi le in the reverse order through the sort command.
4.10 The ‘<’ symbol is the output redirection operator and the ‘>’ symbol is the input redirection operator.
4.11 The ‘>>’ symbol redirects the output of a command to a fi le after overwriting its earlier content.
4.12 Several commands can be attached using the pipe operator.
4.13 The default number of lines into which the split command splits a fi le is 100 lines.
4.14 The cmp command compares two fi les and in-dicates the line number where the fi rst difference
in the fi le occurs.4.15 The cmp command displays a message ‘exactly
same’ if the fi les compared are exactly the same.
4.16 The comm command either displays or hides the content common to two fi les.
4.17 The time command displays the system time and even allows it to be modifi ed.
4.18 The real time is the elapsed time from the invocation of the command till its termination.
4.19 The calendar command displays the calendar of a specifi ed month and year.
Fill in the Blanks
4.1 There are three types of system users: owner, group, and .
4.2 The command used to change the permission of the fi le or directory is .
4.3 The symbol x in the chmod command represents permission.
4.4 The command used to get the specifi ed nu-mber of lines from the beginning of a fi le is
. 4.5 The option used with the tail command to skip
the specifi ed number of lines is . 4.6 The option used with the tail command to get
the specifi ed number of characters from the end of fi le is .
4.7 Unix assumes the default permissions for a fi le to be .
4.8 The input redirection operator is represented as .
4.9 To display content one screen page at a time, command is used.
4.10 The command is used for displaying the documentation of a command.
4.11 The diff command displays the differences between two fi les that are being compared in a format that consists of two and a
in between. 4.12 The command is used for identifying
and displaying duplicate lines in a fi le. 4.13 The option of the uniq command
removes all duplicate lines from a fi le.4.14 The fi le can be used to customize
our environment.4.15 For recording our interaction with the Unix
system, command is used.4.16 The option of the lp command is
used for defi ning the destination printer while the option is used for defi ning the number of copies to be printed.
4.17 The command is used to display appointments and reminders for the current day.
4.18 The command converts text fi les from the DOS format to the Unix format.
4.19 The command is used for cancelling a print job.
4.1 The command used for setting default permissions of fi les and directories is
(a) chmod (c) default (b) umask (d) chstat 4.2 The three types of system users are User,
Group, and (a) Other (c) Community (b) Society (d) Everyone 4.3 The option used with the chgrp command to
change the group of a symbolic link is (a) -s (b) -l (c) -g (d) -h
4.4 The command used for comparing two fi les is (a) comp (c) uniq (b) compare (d) diff 4.5 The option of the uniq command that removes
all duplicate lines is (a) -d (c) -r (b) -u (d) -m 4.6 The command used to change the group of a fi le
is (a) groups (c) chgrp (b) chmod (d) ls -g
Multiple-choice Questions

92 Unix and Shell Programming
4.7 The statement $chown :accounts a.txt will change
(a) group of the fi le (b) owner of the fi le (c) nothing (d) owner and group of the fi le 4.8 The option used with the sort command to re-
move duplicate lines in a sorted output is (a) -d (b) -q (c) -u (d) -n 4.9 The option used with the tail command that
selects and displays lines in reverse order from the bottom to the top is
(a) -t (c) -b (b) -r (d) -c4.10 The statement $ head -c 10 a.txt b.txt
displays (a) the fi rst 10 lines of a.txt fi le only (b) the fi rst 10 lines of a.txt and b.txt fi les (c) the fi rst 10 characters of a.txt fi le only (d) the fi rst 10 characters of a.txt and b.txt fi les
4.1 What will the following commands do? (a) $chmod 410 management.txt (b) $umask 233 (c) $chgrp jobs mbacourse.txt (d) $head -c 100 mbacourse.txt management
.txt (e) $tail -2 management.txt (f) $man -K disk (g) $cut -d"," -f3 bank.lst (h) $paste -d"<>" names.txt numbers.txt (i) $sort a.txt > b.txt (j) $ split -5 numbers.txt temp (k) $ cmp -s a.txt b.txt 3 5 (l) $ time ls | sort | lp (m) $ lp -d Epson100 -P 10-15, 20 a.txt (n) $ comm a.txt b.txt4.2 Write the command for the following tasks: (a) To assign read, write, and execute permissions
to the owner; read and write permission to the group; and only read permission to others for the fi le mbacourse.txt
(b) To set permissions for the directories to be created in the future as read, write, and exe cute for the owner; read and write for the group; and only read for others
(c) To change the ownership of the fi le mbcourse.txt to charles
(d) To display the fi rst two lines of the fi les mbacourse.txt and management.txt
(e) To display lines starting from the fi fth till the end of the fi le in mbacourse.txt
(f) To show the content of the fi le fi nance.txt located in accounts directory page-wise
(g) To sort the fi le a.txt in reverse order and store it in fi le b.txt
(h) To cut the fi rst and third fi elds of the fi le letter.txt that is delimited by a tab space
(i) To create a group by the following name: latestprojects
(j) To compare two fi les, accounts.txt and fi nance.txt, and show the changes that need to be made in the fi le accounts.txt to make it similar to fi nance.txt
(k) To display all duplicate lines in the fi le accounts.txt
(l) To remove all duplicate lines in the fi le accounts.txt and save it in another fi le correct.txt
(m) To split a fi le accounts.txt into the fi les accountaa, accountab, accountac, and so on, each consisting of 20 bytes
(n) To compare two fi les, a.txt and b.txt, and display the fi rst character that is different in the two fi les
Programming Exercises
Review Questions4.1 Explain the following commands with syntax and
examples. (a) pg (c) dos2unix (b) wc (d) tail4.2 (a) What is the difference between the chown and
chgrp commands?
(b) What is the difference between the cmp and diff commands?
4.3 (a) Explain the different options used in the lp command while printing a fi le.
(b) Explain how a fi le is sorted.4.4 What is the difference between the following pairs

Advanced Unix Commands 93
Brain Teasers 4.1 Suppose you want to assign read, write, and
execute permissions to the user, that is, the owner of the fi le a.txt using the following command. What is wrong with the following command? Correct the mistake.
$ chmod o=rwx a.txt 4.2 Correct the following command to change the
owner and group of the fi le a.txt to user chirag and accounts respectively.
$ chown accounts:chirag a.txt 4.3 Correct the mistake in the following command
in order to change the group of the symbolic fi le b.txt to accounts.
$ chgrp accounts b.txt 4.4 Can you sort the fi le a.txt on the second and
third fi eld skipping the fi rst fi eld? How? 4.5 The following command overwrites the content
of the fi le a.txt. What command will you use to avoid the accidental overwriting of an existing fi le?
$ ls > a.txt
4.6 Correct the mistake in the following command to cut the fi rst and third fi elds of the fi le a.txt delimited by the ‘|’ symbol
$ cut -f1,3 a.txt 4.7 Is there a way to split a fi le a.txt into pieces
that are 10 kB each? If yes, what is that? 4.8 When you compare two fi les, a.txt and b.txt
with the cmp command, no output appears on the screen. What does this mean?
4.9 Correct the mistake in the following command to suppress the display of the content, that is, commands in the fi les a.txt and b.txt.
$ comm -1 a.txt b.txt4.10 Correct the mistake in the following command in
order to print two copies of the fi le a.txt.$ lp a.txt -q 2
4.11 What will happen if you add the calendar command in the .profi le fi le?
4.12 Correct the mistake in the following command to extract line numbers 10 to 15 from the fi le a.txt.
$ head -10 a.txt | tail +15
State True or False
4.1 False 4.2 False 4.3 True 4.4 False 4.5 True 4.6 True 4.7 True 4.8 True 4.9 False4.10 False4.11 False4.12 True4.13 False
4.14 True4.15 False4.16 True4.17 False4.18 True4.19 False
Fill in the Blanks
4.1 Other 4.2 chmod 4.3 execute 4.4 head 4.5 +n 4.6 -c
4.7 666 4.8 < 4.9 pg4.10 man4.11 numbers,
character4.12 uniq 4.13 -u4.14 .profi le4.15 script4.16 -d, -n4.17 calendar4.18 dos2unix4.19 cancel
Multiple-choice Questions
4.1 (b) 4.2 (a) 4.3 (d) 4.4 (d) 4.5 (b) 4.6 (c) 4.7 (a) 4.8 (c) 4.9 (b)4.10 (d)
■ ANSWERS TO OBJECTIVE-TYPE QUESTIONS ■
of commands that are used for extracting content from the fi les?
(a) cut and split commands
(b) head and tail commands4.5 Briefl y explain how the fi le access permissions are
handled in the Unix operating system.

5.1 MANAGING AND COMPRESSING FILES
File management deals with the different types of fi les that are managed in the Unix system. It helps one understand the various ways of searching for the desired fi les, repairing the fi le system, and the important fi les of the Unix system that manage user passwords, store addresses of hosts, and the list of users that are allowed or denied access to the system. Since fi les are stored on disks, different disk-related commands have also been referred to. Compression techniques encompass the various methods of compressing and uncompressing fi les. Compressing fi les is the best way to optimize the disk usage. Moreover, it is quite easy to manage compressed fi les, that is, we can backup and restore the compressed fi les easily. We will see the pros and cons of different commands and the extent of compression they carry out. In this chapter, we will learn the following types of commands:
1. Dealing with devices2. Device drivers
File Management File Management and Compression and Compression TechniquesTechniques 55
C H A P T E R
After studying this chapter, the reader will be conversant with the following:
• The types of devices, role of device drivers, and the way in which devices are represented in the Unix operating system
• Using disk-related commands for copying disks, formatting disks, fi nding disk usage, fi nding free disk space, and dividing the disk into partitions
• Compressing and uncompressing fi les using different commands such as gzip, gunzip, zip, compress, uncompress, pack, unpack, bzip2, bunzip2, and 7-zip
• The types of fi les, locating fi les, searching for fi les with a specifi c string, and fi nding utility on a disk
• Checking a fi le system for corruption• Important fi les of the Unix system, where and how passwords are kept,
where the list of hosts is kept, and how to allow or deny any user from accessing certain resources

File Management and Compression Techniques 95
3. Block and character devices4. Major and minor numbers 5. Disk-related commands: dd, du, df, dfspace, and fdisk6. Compressing and uncompressing fi les: gzip, gunzip, zip, unzip, compress, uncompress,
pack, unpack, bzip2, bunzip2, and 7-zip7. Dealing with fi les: fi le, fi nd, which, locate, and fsck (fi le system check utility)8. Important fi les of the Unix system: etc/passwd, /etc/shadow, /etc/hosts, etc/hosts.
allow, and /etc/hosts.deny9. Shell variables: (a) User-created shell variables (b) System shell variables: CDPATH, HOME, PATH, Primary Prompt (PSI Prompt), and TERM (c) Local and global shell variables: export
Disks are considered to be the essential devices of a computer. Let us fi rst understand what the different devices are and how they are dealt with in the Unix system before discussing the different disks and fi le management commands.
5.2 COMPUTER DEVICES
While working on a computer, we deal with various peripherals such as hard drives, fl oppy and CD-ROM drives, audio and video cards, and serial and parallel ports. These peripherals are also known as devices. These devices combine to make the computer the system it is. In Unix, all devices are considered to be fi les, which are also known as device fi les. We learnt in Chapter 1 that there are several categories of fi les, namely ordinary fi les, directory fi les, device fi les, symbolic links, pipes, and sockets. The question that arises here is how the different categories of fi les can be differentiated. The answer lies in the long listing command. On executing the long listing command, ls -al, the list of fi les and directories that is displayed as a result helps us distinguish the different categories of fi les. The mode fi eld, the fi rst character in the listing, indicates what type of fi le it represents. The fi rst character in the listing may be either a hyphen (-) or one of the following letters: l, c, b, p, s, or d. Table 5.1 explains the different characters that may be displayed in the mode fi eld (of the long listing) and the type of fi le represented by it.
Let us observe the output of the long listing command, which is as follows:$ls -al -rwxrwxrwx 1 chirag it 344 Dec 2 09:20 letter.txtdrwxrwxrwx 1 chirag it 10 Oct 12 10:45 projectslrwxrwxrwx 2 chirag it 669 Feb 8 03:15 xyz.txtprw-r--r-- 1 root root 0 Apr 15 05:20 pipesrwx—— 1 root root 0 May 12 12:30 logcrw-------- 12 bin 6, 0 Dec 5 09:11 lp0brw-rw-rw- 1 root 51, 0 Jul 31 07:28 cd0
The output of this long listing command shows different types of fi les and directories, which are as follows:
Table 5.1 Characters used in the long listing command
Character File type
- Regular fi le
l Symbolic link
c Character special
b Block special
p Named pipe
s Socket
d Directory fi le

96 Unix and Shell Programming
Regular file The fi le letter.txt that is represented by a hyphen (-) in the mode fi eld is a regular fi le. This is the simplest and most common type of fi le in the Unix system. It is just a collection of bytes.
Directory The fi le projects that is represented by character d in the mode fi eld is a directory—a container of several fi le directories.
Symbolic link The fi le xyz.txt that is represented by character l in the mode fi eld is a symbolic link that refers to other fi le(s) of the fi le system.
Named pipe The fi le pipe that is represented by character p in the mode fi eld is a named pipe and is used in interprocess communication, that is, sending the output of one process as input to another process.
Socket The fi le log that is represented by character s in the mode fi eld is a socket and is a special fi le used for advanced interprocess communication.
Special device file The fi les lp0 and cd0 represented by the characters c and b in the mode fi eld are special device fi les. They may be either characters or block device fi les.
Now we can understand how the device fi les can be recognized through the long listing of fi les and directories. Next, we will see how the Unix operating system manages and deals with all the devices of a computer system.
5.2.1 Dealing with DevicesAs mentioned in Section 5.2, all devices are represented as fi les in the Unix operating system. Like fi les, we can open and read a device, write into it, and then close it. The functions for opening, reading, and writing into a device are built into the kernel for each/every device of the system. These functions or routines for specifi c devices are known as the device drivers. Although the terms device driver and device fi les appear to be similar, they are totally different. A device fi le is the representation of a device on the fi le system hierarchy. It is basically a special type of fi le that points to an inode that contains information about the device that it actually represents. The information in the inode includes major and minor device numbers where the major device number defi nes the type of device and the minor device number identifi es a particular device in that type. On the other hand, a device driver is a program that establishes communication between the computer and the device by translating the calls given by the user into calls that the device understands. It hides the inner complexities of how a device works. The commands given by the user to operate a device are passed to the device driver in the form of calls. The device driver then maps those calls to device-specifi c operations. In order to access a particular device, the kernel calls its device driver. The kernel must not only know the type of device but also certain details about that device such as the density of a fl oppy or the partition of the disk for using the device effi ciently. All device fi les are stored in /dev or in its subdirectories and can be listed by executing the following command:$ ls -l /dev brw-rw-rw- 1 root 51, 0 Jul 31 07:28 cd0brw-rw-rw- 1 bin 2, 48 Oct 22 12:10 fd0135ds18

File Management and Compression Techniques 97
brw-rw-Hv- 1 bin 2, 42 Nov 30 19:44 fd196ds15crw-------- 1 bin 6, 0 Dec 5 09:11 lp0cr—r—rp- 1 root 50, 0 Mar 31 06:15 rcdt0crw-rw-rw- 1 bin 2, 48 Jun 22 11:25 rfd0135ds15… … … … … … … …… … … … … … …The fi les that we see in this listing are not device drivers but are just pointers to where the driver code can be found in the kernel. In the mode fi eld of the fi le permissions, we can see that there is a character c or b. The character c represents a character device whereas the character b represents a block device. Following the mode fi eld are the permissions, the links count, and fi nally the owner of the fi le. After the owner, we see two numbers that are separated by a comma (,). These two numbers refer to the major and minor device numbers respectively. The major device number refers to the device type and the minor number refers to different instances of the device. For example, two fl oppy disk drives (second and third rows in the aforementioned listing) can have the same major number (2), but different minor numbers as one represents the 1.2 MB and the other represents the 1.44 MB fl oppy disk drive. Following the major and minor numbers are the date and time of last modifi cation. The last column displays the device fi lenames. When we provide commands to operate a device, the system uses the major and minor numbers of the device fi le to identify the device and henceforth, determines the device driver that will be used to communicate with the device. The device driver simplifi es the input/output (I/O) tasks performed with the respective devices. Hardware devices such as printers, disk controllers, network devices, and serial ports are attached with a device driver that enables the kernel to communicate with them, and hence
get the desired task performed. Device drivers drive the device to perform according to the requests received by the kernel, as shown in Fig. 5.1. A device driver has the following uses:
1. It connects and communicates with the hardware device.2. It is the software that operates the device controller. 3. It resides within the Unix kernel and provides an interface to
hardware devices.
The two general kinds of device fi les in the Unix-like operating systems are character special fi les and block special fi les. The difference between them lies in how data is written into them and read from them, and how it is processed by the operating system and hardware. These together can be called device special fi les, in contrast to named pipes, which are not connected to a device but are not ordinary fi les either. A brief introduction of block and character devices is given in Section 5.2.2.
5.2.2 Block deviceBlock special fi les represent the devices that move data in the form of blocks. When such a device fi le is accessed for reading or writing data, the kernel provides the address of a kernel buffer (i.e., buffer cache) that can be used for data transmission to the device driver. Hence,
Fig. 5.1 Interactions between user, kernel, device driver, and hardware
User
Kernel
Device driver
Hardware
98 Unix and Shell Programming
while reading a block device, the data is fi rst read in the block and then written into the buffer cache, so that when the same data is again required, it is read from the buffer cache instead of being read from the device. Similarly, while writing on a block device, the data is fi rst stored in the buffer cache before writing on the device. The block devices enable random access. In other words, the data can be accessed from these devices in a random order. Examples of block devices include hard disks, CD-ROM drives, and fl ash drives. The character devices (or raw devices) are those that can be accessed directly bypassing the operating system’s buffer caches. This means that the data is read or written into these devices directly without being stored in the buffer cache. In addition, the name ‘character device’ itself signifi es that the data from such a device is accessed one character at a time. Data is accessed from a character device sequentially (not randomly) in the form of a stream of characters. Examples of character devices include serial port, mouse, keyboard, virtual terminal, and printer. In the long listing, the fi rst character in the mode fi eld is c or b. Refer to the long listing shown in Section 5.2.1, where the fl oppy drive, CD-ROM, and the hard disk have b prefi xed to their permissions confi rming that they are block devices. Similarly, printers, raw fl oppy drives, and tape drives have c prefi xed to their permissions, which confi rms that they are raw devices.
5.2.3 Major and Minor NumbersDevices are divided into sets called major device numbers. For instance, all small computer system interface (SCSI) disks have major number 8, fl oppy disks have major number 2, and so on. Further, each individual device has a minor device number too. For example, the device /dev/sda has minor device number 0 and /dev/fd135ds18 has minor number 48. It also means that the major number helps the kernel in recognizing the device category and the minor number makes the recognition more precise. Similarly, the major number 8 informs the kernel that the device is a SCSI disk, and the minor number 0 informs that it is the fi rst disk drive. Similarly, the major number 2 informs the kernel that the device is a fl oppy disk drive and the minor number 48 informs that the device is the fi rst, A: drive. Hence, both the major and minor device numbers collectively identify the device to the kernel. In the output of the long listing command, ls –al, the fi fth column shows a pair of two numbers, separated by a comma. These numbers are the major and minor device numbers. As the major number represents the type of device, we can see in the output that all fl oppy disk drives have the same major number 2. The minor number indicates the special characteristics of the device to recognize it precisely. For example, fd0135ds18 and fd196ds15 represent two fl oppy disk drives, hence both of them have the same major number (2), but different minor numbers (48 and 42) to distinguish that one is fl oppy disk drive A: and the other is fl oppy disk drive B: respectively.
Note: Taking backup is an essential task in an operating system. A backup helps in restoring the data in case of any disk failure or system crash. The commands that we are going to learn in Section 5.3 are concerned with formatting disks, backing up data, restoring, etc.
5.3 DISK-RELATED COMMANDS
In this section, we will focus on different disk-related commands. We will learn about the commands that are used for copying data from one disk to another, formatting disks,

File Management and Compression Techniques 99
displaying usage of disk space, that is, the space used by different fi les and directories of the disk, the amount of free disk space in all the fi le systems in our machines, the amount of free disk space in terms of megabytes (MB) and percentage, and dividing the disk drive into different partitions. Let us see how disks are copied.
5.3.1 dd: Copying DisksThe dd (data dump) command is used for copying data from one medium to another. It reads and writes data in block-sized chunks, where the default size of the block is 512 bytes.
Syntax dd if=INPUT-FILE-NAME of=OUTPUT-FILE-NAME [options]
Here, if represents input and of represents output.
Examples
(a) To backup a hard disk to a fi le, type the following command. dd if=/dev/hda of=/fi le.dd It copies the entire disk, hda, to another fi le, fi le.dd.(b) To backup a hard disk to another disk, type the following command. dd if=/dev/hda of=/dev/hdb It copies the entire disk, hda, to another disk, hdb.
Note: The output from dd can be a new fi le or another storage device.
Table 5.2 shows the common options used with the dd command.
Examples
(a) dd if=/dev/hda of=/dev/hdb conv=noerror,sync Here, hda is the source disk, hdb is the destination disk, sync is for synchronized I/O, and noerror is for continuing the copy operation even if there are read errors.
(b) dd if=/dev/.hda count=1 of=fi le.ddIt copies just one sector of the disk hda.
(c) dd if=/dev/hda skip=1 count=1 of=fi le.dd It skips the fi rst sector and copies just the second sector of the disk hda.
Note: dd uses only raw devices.
5.3.2 du: Disk UsageThis utility is used to get complete information about the usage of disk space by each fi le and directory of the system. If we specify a directory name along with the du utility, we get the list of disk space consumed by the directory and all of its subdirectories.
Syntax du [options] directories
Table 5.3 shows the common options used with the du command.
Table 5.2 Options used with the dd command
Options Description
bs = n Sets the block size to n bytescount = n Copies n blocks and then stops
skip = n Copies after skipping n blocksconv = noerror Prevents dd from stopping on
encountering an errorsync Pads the input block with null bytes
to make it equal to the block size

100 Unix and Shell Programming
Examples
(a) By default, the du command without any options displays the directories (in the current directory). The following are the blocks consumed by each of those directories.
$ du . 2 ./.snap 31068 ./bin
96 ./include/altq 68 ./include/arpa 128 ./include/bsm
Here, du reports the number of blocks used by the current directory (denoted by .) and those used by subdirectories within the current directory.
(b) The number of blocks used by the etc directory and its subdirectories are displayed using the following command.
$ du /etc 54 /etc/defaults 2 /etc/X11 8 /etc/bluetooth 4 /dev/devd
These blocks (to the left of each directory) are 512 bytes in size. (c) To ascertain the blocks (that are 1024 bytes in size) that are used by the subdirectories
in the etc directory, we will use the following command.
$ du –k /etc 27 /etc/defaults 1 /etc/X11 4 /etc/bluetooth 2 /dev/devd
The blocks shown in this output are 1024 bytes in size.(d) To fi nd the usage of every fi le, we can use the following command. $ du -a(e) The option -a displays all the fi les and the blocks used by each fi le. 2 ./.snap 82 ./bin/ctfconvert 20 ./bin/ctfdump 56 ./bin/ctfmerge 18 ./bin/sgsmsg(f) If we want to view only the total number of blocks occupied by the specifi c directory, we
have to use the summary (-s) option. The following example displays the total number of blocks used by the current directory.
$ du -s 3616480
Table 5.3 Options used with the du command
Options Description
-k Displays the block size in units of 1024 bytes, rather than the default 512 bytes
-a Displays the blocks used by each fi le
-s Displays the summary (total) for each of the specifi ed fi les
File Management and Compression Techniques 101
(g) To ascertain the number of blocks used by a specifi c fi le(s), we can use the following command.
$ du –s *.txt 10 abc.txt 7 pqr.txt 11 xyz.txt
This output shows the number of blocks used by the different fi les with extension .txt.
Note: The du command displays information in terms of 512-byte blocks independent of the actual disk block size.
5.3.3 df: Reporting Free and Available Space on File SystemsThis command reports the free disk space for all the fi le systems installed on our machines in terms of disk blocks. The command displays the capacity of each fi le system, the space in use, the free space, and the number of free fi les.
Syntax df [-options][fi lesystem]
Table 5.4. shows the common options used with the df command.
Examples
(a) If we want to have information regarding the free and available disk space of a particular fi le system, we can mention it in the df command. Furthermore, we can use the df command without any option or fi le system (as shown here) in order to obtain information about all the fi le systems installed on our machines.
$ df Filesystem 1K-blocks Used Avail Capacity Mounted on /dev/ad0s1a 507630 165380 301640 35% / devfs 1 1 0 100% /dev /dev/ad0s1e 507630 12 467008 0% /tmp /dev/ad0s1f 73138272 3616480 63670732 5% /usr /dev/ad0s1d 1185230 2050 1088362 0% /var
The fi rst column displays the different partitions on the disk of our system. The second column displays the size of the partitions in terms of blocks of size 1 KB. Similarly, the size of the fi rst partition represented by ad0s1a is of size 507630 KB (507 MB). Out of the 507630 KB, 165380 KB is used up and 301640 KB is free, as represented by the third and fourth columns respectively. The fi fth column shows
Table 5.4 Options used with the df command
Options Description
h Displays the size in human readable formats (KB, MB, and GB)
e Displays only the number of fi les free
k Displays the size in terms of blocks where a block is of 1 KB

102 Unix and Shell Programming
the used (consumed) percentage of the disk. The last column indicates where the partition is connected to the Unix fi le system. For example, the partition ad0s1a (shown in the fi rst row) is the root partition and hence is represented to be mounted on.
(b) To know the amount of free space in a particular partition, we can specify that while giving the df command. For example, in order to know the amount of free disk space in the root partition, we need to give the following command.
$ df / Filesystem 1K-blocks Used Avail Capacity Mounted on /dev/ad0s1a 507630 165380 301640 35% /
This output shows the total size of the root partition in terms of KB, the amount of used space, free space, and percentage of disk space used.
(c) In order to easily remember the size of the partitions, we make use of the –h option to display the size of the partitions in human readable forms.
$ df -h Filesystem Size Used Avail Capacity Mounted on /dev/ad0s1a 506 MB 164 MB 300 MB 35% / devfs 1 KB 1 KB 0 100% /dev /dev/ad0s1e 506 MB 0 506 MB 0% /tmp /dev/ad0s1f 71 GB 5.4 GB 62 GB 5% /usr /dev/ad0s1d 1 GB 1.8 MB 1 GB 0% /var
In this output, the size of the partitions is displayed in megabytes, which is computed by dividing the block sizes in KB by a value 1024.
(d) The option –k of the df command displays the size of the fi le systems in kilo bytes as shown in the following example.
$ df -k Filesystem KBytes Used Avail Capacity Mounted on /dev/ad0s1a 518144 167936 307200 35% / devfs 1 1 0 100% /dev /dev/ad0s1e 518144 0 518144 0% /tmp /dev/ad0s1f 74448896 5662310 65011712 5% /usr /dev/ad0s1d 1048576 18432 1030144 0% /var
(e) The option –e of the df command displays the number of fi les that are free on the fi le systems as shown in the following example.
$ df -e Filesystem ifree /dev/ad0s1a 34596 devfs 0 /dev/ad0s1e 7483620 /dev/ad0s1f 8402 /dev/ad0s1d 56129
This output shows the numbers of fi les free on each of the fi le systems.

File Management and Compression Techniques 103
5.3.4 dfspace: Reporting Free Space on File SystemsThe dfspace command is specifi c to the SCO Unix system. It works in a manner similar to the df command and presents information regarding free space on fi le systems on our disks in a more readable format, that is, it reports the free disk space in terms of megabytes and percentage of the total disk space.
Note: This command will work with SCO Unix and not on Oracle Solaris 10, which this book focuses on.
Syntax dfspace [fi le system]
Here, the fi le system is used to fi nd out the free disk space available on it. If the fi le system is not specifi ed, all fi le systems on the disk are displayed along with the information on available disk space on each of them.
Example $/etc/dfspace
: Disk Space: 6.32 MB of 137.74 MB available (4.59 %) Total disk Space: 10.50 MB of 200 MB available (3.89%)
In the aforementioned example, we have written /etc/dfspace instead of dfspace, because the dfspace command exists in the etc directory. The output reports free disk space for the root fi le system. If there had been other fi le systems installed, their free space would have also been reported. It also reports the total disk space available. It is to be noted that the df and dfspace commands report the disk space available in the fi le system as a whole, whereas du reports the disk space used by specifi ed fi les and directories.
5.3.5 fdisk: Dividing Disks into Partitions Dividing the hard disk into one or more logical disks is called partitions. The partitions, the divisions of the disk, are described in the partition table found in sector 0 of the disk. However, fdisk in Linux creates both partitions as well as fi le systems. A large disk drive is partitioned into smaller segments to increase system performance. It is quite obvious that searching or interacting with a fi le in a smaller disk drive segment will be quite faster when compared to a larger disk drive. There are two types of partitions: primary partition and extended partition. A hard drive can contain up to four primary partitions. A primary partition is necessary to make the drive bootable—an operating system is installed in it. It is not used for data storage. Multiple primary partitions are created to make a multiboot system. For a single boot system, one primary partition is suffi cient. In order to overcome the limitation of having a maximum of four primary partitions on a drive, we make use of the extended partition. An extended partition is the only kind of partition that can have multiple partitions inside. The partitions created inside the extended partition are known as logical drives. An extended partition acts as a container for the logical drives. It cannot hold any data without fi rst installing a logical drive. We can create as many logical drives as we want on an extended partition.
Note: On an IDE drive, the fi rst drive is called hda, and the partitions are shown as hda1, hda2, etc. The second drive is called hdb, and the partitions are shown as hdb1, hdb2, etc. On an SCSI drive, the fi rst drive is called sda, and the partitions are sda1, sda2, and so on. The second drive is called sdb and the partitions are sdb1, sdb2, etc.

104 Unix and Shell Programming
The fdisk command is used to create, delete, and activate partitions.
Syntax fdisk [-l] [-u] [-b sector_size] [-v] [device] [-s partition]
Table 5.5 shows the aforementioned options.
Table 5.6 Menu options of the fdisk command
Option Description
d Deletes a partition
l Lists the partitions
m Displays this menu
n Creates a new partition
p Prints the partition table
q Quits without saving changes
w Writes the partition table to the disk and exits
When the fdisk command is active, it displays a menu of options that we can use to create, list, display, and delete partitions. Table 5.6 gives the menu options of the fdisk command.
We can create a primary partition with one fi le system on it, or an extended partition with multiple logical drives in the partition.
Example $ fdisk -l
This command lists the partition information of the disk drive on our computer system as given here:Disk /dev/hda1: 64 heads, 63 sectors, 1023 cylindersUnits = cylinders of 4032 * 512 bytes
Device Boot Begin Start End Blocks Id System
/dev/hda1 636 636 902 538272 64 Linux native/dev/hda2 903 903 1024 245952 8 Extended /dev/hda3 229 229 635 819189 5 Linux/dev/hda4 903 903 1024 245920+ 4 Linux swap
The fi rst hard disk as a whole is represented as /dev/hda, while individual partitions in this disk take on names hda1, hda2, and so forth. hda1 here is a primary partition, hda2 is an extended partition containing a logical partition hda4. The active partition is indicated by an * in the second column. The second hard disk will have the name /dev/hdb with similar numeric extensions.
Table 5.5 Options used with the fdisk command
Option Description
-l It lists the partition tables for the specifi ed device. The device is usually one of the following: /dev/hda /dev/hdb /dev/sda /dev/sdb
-u It displays the sizes in terms of sections instead of cylinders while listing partition tables.-b sector_size It specifi es sector size of the disk (valid values are 512, 1024, or 2048).-s partition It displays the size of the specifi ed partition in blocks.-v It prints the version number of the fdisk command.

File Management and Compression Techniques 105
5.4 COMPRESSING AND UNCOMPRESSING FILES
In this section, we will learn about the different ways of compressing and uncompressing fi les using commands such as gzip, zip, compress, pack, and bzip2, and gunzip, unzip, uncompress, unpack, and bunzip2, respectively, along with their syntax and examples. The implementation of these commands is discussed in Section 5.4.1.
5.4.1 gzip Command The gzip command compresses the specifi ed fi le and replaces it with the .gz extension fi le, that is, the original fi le is deleted and is replaced by the compressed version having the same primary name (as that of the original fi le) and the secondary name as .gz.
Syntax gzip [-d][-l][-f][-c] fi le_name
Table 5.7 shows the aforementioned options.
Figure 5.2 shows two fi les names.txt and numbers.txt with the initial content that we wish to compress.
Examples
(a) $ gzip -c names.txt This command does not compress the fi le names.txt, but displays the compressed output
on the screen (refer to Fig. 5.2).(b) $ gzip names.txt The fi le names.txt is compressed and renamed names.txt.gz and is confi rmed using the
ls command (refer to Fig. 5.2).(c) $ cat names.txt.gz The command shows the compressed content of the fi le names.txt. We can see (refer to
Fig. 5.2) that the output displayed using the -c option matches the output of this example.(d) $ gzip numbers.txt The fi le numbers.txt is also compressed into the fi le numbers.txt.gz and is confi rmed
using the ls command, which is shown in Fig. 5.2.(e) $ gzip -l *.gz It lists the information of compressed fi les, names.txt and numbers.txt. This is evident
from the list of commands shown in Fig. 5.2. This fi gure shows the compressed size, uncompressed size, compression ratio, and the name of the uncompressed fi le.
Table 5.7 Options used with the gzip command
Option Description-d It decompresses the specifi ed fi le.-l It lists the information of each compressed fi le. The information includes compressed size,
uncompressed size, compression ratio, and name of the uncompressed fi le.-f It means force compression or decompression. This option performs the operation without giving
a confi rmation message and overwrites the existing fi le, if the corresponding fi le already exists.-c It displays the compressed output on the screen, keeping the original fi le unchanged. The command
provides several compressed fi les in the output if there are several input fi les—one for each input fi le.fi le_name It refers to the fi lename that we wish to compress.

106 Unix and Shell Programming
$ ls n*names.txt numbers.txt
$ cat names.txtAnilRaviSunilChiragRaju
$ cat numbers.txt24291933334444777788899900005555111
$ gzip -c names.txt? N names.txt sJ,. 1 32 ? Y \ xA
$ gzip names.txt
$ ls n*names.txt.gz numbers.txt
$ cat names.txt.gz? N names.txt sJ,- 1 32 ? Y \ xA
$ gzip numbers.txt
$ ls n*names.txt.gz numbers.txt.gz
$ gzip -1 *.gz copmressed uncompressed ratio uncompressed_name 54 28 7.1% names.txt 63 40 17.5% numbers.txt 117 68 -27.9% <totals>
$ gzip -d names.txt.gz
$ ls n*names.txt numbers.txt.gz
$ cat >numbers.txt12345
$ ls n*names.txt numbers.txt numbers.txt.gz
$ gzip -d numbers.txt.gzgzip: numbers.txt already exists; do you wish to overwrite <y or n>? n not overwritten
$ gzip -df numbers.txt.gz
$ ls n*names.txt numbers.txt
Fig. 5.2 Compression and uncompression of fi les names.txt and numbers.txt using the gzip command

File Management and Compression Techniques 107
(f) $ gzip -d names.txt.gz The compressed fi le names.txt.gz is uncompressed or decompressed to names.txt and is
confi rmed using the ls command, which is shown in Fig. 5.2.(g) $ gzip -d numbers.txt.gz The compressed fi le numbers.txt.gz is supposed to be uncompressed to numbers.txt.
However, since a fi le numbers.txt already exists, a warning message—gzip: numbers.txt already exists; do you wish to overwrite (y or n)?—is displayed.
(h) $ gzip -df numbers.txt.gz The option -f results in force decompression and overwrites the existing fi le numbers.
txt without displaying any warning message. Figure 5.2 shows both the uncompressed fi les names.txt and numbers.txt.
5.4.2 gunzip CommandThis command is used to uncompress the compressed fi le using the commands gzip, compress, or pack.
Syntax gunzip [-l][-f][-c] fi le_name
Table 5.8 shows the aforementioned options.
Examples We compressed fi les names.txt.gz and numbers.txt.gz. Let us look at the examples to uncompress them using the gunzip command.
(a) $ gunzip -l *.gz It lists the information of compressed fi les names.txt and numbers.txt. Figure 5.3 shows
that the output is the same as gzip -l *.gz. The listing shows the compressed size, uncompressed size, compression ratio, and the name of the uncom pressed fi le.
(b) $ gunzip -c names.txt.gz This command does not uncompress the fi le names.txt.gz, but displays its uncom-
pressed content on the screen (refer to Fig. 5.3).(c) $ gunzip -c names.txt.gz numbers.txt.gz When more than one compressed fi le is used with the -c option, their uncompressed
contents will be displayed on the screen one below the other without any blank line in between (refer to Fig. 5.3). The fi les remain unchanged.
Table 5.8 Options used with the gunzip command
Option Description
-l It lists the information of each compressed fi le. This includes compressed size, uncompressed size, compression ratio, and name of the uncompressed fi le.
-f This means force decompression. It overwrites the existing fi le without confi rmation, if the corresponding uncompressed fi le already exists
-c It displays the content of the compressed fi le in an uncompressed format on the screen keeping it in the compressed form. This option uncompresses the input fi les and arranges the uncompressed content of each fi le one below the other without any blank line in between.
fi le_name It refers to the fi lename that we wish to uncompress.

108 Unix and Shell Programming
(d) $ gunzip names.txt.gz The fi le names.txt.gz is uncompressed and renamed names.txt. This is confi rmed using
the ls command (refer to Fig. 5.3).(e) $ gunzip numbers.txt.gz The compressed fi le numbers.txt.gz is supposed to be uncompressed to numbers.txt.
However, as the fi le numbers.txt already exists, the following warning message—gzip: numbers.txt already exists; do you wish to overwrite ( y or n)?—is displayed.
(f) $ gunzip -f numbers.txt.gz The option -f results in force decompression and hence overwrites the existing fi le
numbers.txt without displaying any warning message. We can see the uncompressed fi les names.txt and numbers.txt in Fig. 5.3.
Note: When we uncompress a fi le, the compressed fi le is automatically deleted from the system.
$ ls n*names.txt.gz numbers.txt.gz
$ gunzip -1 *.gz compressed uncompressed ratio uncompressed_name 54 28 7.1% names.txt 63 40 17.5% numbers.txt 117 68 -27.9% <totals>
$ gunzip -c names.txt.gzAnilRaviSunilChiragRaju
$ gunzip -c names.txt.gz numbers.txt.gzAnilRaviSunilChiragRaju24291933334444777788899900005555111
$ gunzip names.txt.gz
$ ls n*names.txt numbers.txt.gz
$ cat >numbers.txt12345
$ ls n*names.txt numbers.txt numbers.txt.gz
$ gunzip numbers.txt.gzgzip: numbers.txt already exists; do you wish ot overwrite <y or n>? n not overwritten
$ gunzip -f numbers.txt.gz
$ ls n*names.txt numbers.txt
Fig. 5.3 Uncompression of fi les names.txt and numbers.txt using the gunzip command

File Management and Compression Techniques 109
5.4.3 zip CommandThe zip command compresses a set of fi les into a single archive. The syntax for zipping a set of fi les into a compressed form is as follows:
Syntax zip [-g][-F][-q][-r] fi le_name fi les
Table 5.9 shows the aforementioned options.
Examples
(a) $ zip abc * All the fi les in the current directory are compressed into a single fi le abc.zip.
Note: The gzip command can only compress a single fi le whereas the zip command can compress multiple fi les.
A range of fi lenames can be given using wild cards. As the zip command compresses the fi les, the progress will be reported on the screen. When we compress these fi les, the original fi les remain unchanged.
(b) If we wish to add a fi le(s) that we forgot to add in the zip fi le, the following statement will solve the purpose.
$ zip -g abc a.txt
This example adds the fi le a.txt to an existing zip fi le abc.zip.(c) The following is the option to correct the damaged zip fi le.
$ zip -F abc –out pqr
This example fi xes the zip fi le abc.zip if damaged, and copies the fi xed version into another zip fi le pqr.zip.
(d) The following example compresses the fi les with extension .dat from the current directory in the quiet mode, that is, without displaying any response on the screen.
$ zip -q abc *.txt
(e) In order to compress the fi les of subdirectories, we use the -r option.
$ zip –r abc projects
This example compresses all the fi les in the projects directory as well as in its subdirectories and saves them in the abc.zip fi le.
The execution of the aforementioned commands is shown in Fig. 5.4.
Table 5.9 Options used with the zip command
Option Description
-g Adds fi les to an existing zip fi le-F Fixes any zip fi le, if damaged-q Makes the zip command run in the quiet mode, so that the fi les are compressed without
displaying any response on the screen-r Compresses the fi les in the current directory as well as subdirectoriesfi le_name Refers to the archive in which compressed fi les are stored (an extension .zip will be
automatically appended to fi le_name)fi les Refers to the fi les that we wish to compress

110 Unix and Shell Programming
$ ls -ltotal 12-rw-r--r-- 1 root root 18 Feb 22 14:51 customers.txt--w-r-x--x 1 root root 6 Feb 22 14:51 letter.txt-r-----r-- 1 root root 113 Feb 22 14:51 matter.txtdrwxr-xr-x 2 root root 512 Feb 22 14:53 projects-rw-r--r-- 1 root root 892 Feb 22 14:51 transact.txt-rw-r--r-- 1 root root 16 Feb 22 14:51 users.txt
$ zip abc * adding: customers.txt (stored 0%) adding: letter.txt (stored 0%) adding: matter.txt (deflated 21%) adding: projects/ (stored 0%) adding: transact.txt (deflated 64%) adding: users.txt (stored 0%)
$ ls -ltotal 16-rw-r--r-- 1 root root 1370 Feb 22 14:55 abc.zip-rw-r--r-- 1 root root 18 Feb 22 14:51 customers.txt--w-r-x--x 1 root root 6 Feb 22 14:51 letter.txt-r-----r-- 1 root root 113 Feb 22 14:51 matter.txtdrwxr-xr-x 2 root root 512 Feb 22 14:53 projects-rw-r--r-- 1 root root 892 Feb 22 14:51 transact.txt-rw-r--r-- 1 root root 16 Feb 22 14:51 users.txt
$ cat > a.txtTesting^D
$ zip -g abc a.txt adding: a.txt (stored 0%)
$ zip -F abc --Out pqrFix archive (-F) - assume mostly intact archiveZip entry offsets do not need adjusting copying: customers.txt copying: letter.txt copying: matter.txt copying: projects/ copying: transact.txt copying: users.txt copying: a.txt
$ ls -ltotal 158-rw-r--r-- 1 root root 8 Feb 22 14:56 a.txt-rw-r--r-- 1 root root 1516 Feb 22 14:56 abc.zip-rw-r--r-- 1 root root 18 Feb 22 14:51 customers.txt--w-r-x--x 1 root root 6 Feb 22 14:51 letter.txt-r-----r-- 1 root root 113 Feb 22 14:51 matter.txt-rw-r--r-- 1 root root 1516 Feb 22 14:58 pqr.zipdrwxr-xr-x 2 root root 512 Feb 22 14:53 projects-rw-r--r-- 1 root root 892 Feb 22 14:51 transact.txt-rw-r--r-- 1 root root 16 Feb 22 14:51 users.txt
$ zip -q abc *.txt
$ zip -r abc projectsupdating: projects/ (stored 0%) adding: projects/bank.lst (deflated 45%)
Fig. 5.4 Compression of fi les using the zip command

File Management and Compression Techniques 111
5.4.4 unzip CommandThe unzip command is used to unzip the archive and extract all the fi les that were compressed in it.
Syntax unzip [-p][-t][-l][-d directory_name][-f] fi le_name
Table 5.10 shows the aforementioned options.
Examples
(a) To unzip a zipped archive, we use the following unzip command.
$ unzip abc This example extracts all the fi les
stored in the zip fi le abc.zip into the current directory.
(b) $ unzip –d temp abc This command extracts the fi les
in the archive abc.zip into the temporary directory.
(c) $ unzip –p abc This command extracts the fi les in the
archive abc.zip on the screen. The fi le content is displayed on the screen.
(d) $ unzip –t abc This command tests the archive abc.zip and displays a summary message informing us
if the archive is OK or not.(e) $ unzip –l abc This command lists the archive abc.zip and shows the names of the compressed fi les,
their size, modifi cation date, etc.(f) $ unzip –f abc This command extracts and updates only those fi les from the archive abc.zip that exists
in the current directory.
Figure 5.5 demonstrates the execution of the aforementioned commands.
5.4.5 compress CommandThe compress command compresses the specifi ed fi le. It replaces the original fi le with its compressed version that has the same fi lename with a .Z extension added to it.
Syntax compress [-c] [-f] [-v] fi le
Table 5.11 shows the afore mentioned options.
Table 5.10 Options used with the unzip command
Option Description
-p Extracts fi les in the archive (zip fi le) to the screen (i.e., the fi les’ content is displayed on the screen)
-t Tests the archive fi le and determines if it is consistent and prints only the summary message to indicate whether the archive is OK or not
-l Lists the archive fi le, which shows the names of the compressed fi les, their size, modifi cation date, etc
-d directory_name Extracts the compressed fi les from the zip fi le into the specifi ed directory
-f Updates only the existing fi les, that is, only the fi les that exist in the current directory and are newer than the current disk copies are uncompressed from the archive
Table 5.11 Options used with the compress command
Option Description
-c Compresses the fi le and displays the compressed version on the screen; retains the original fi le, that is, no .Z fi le is created
-f Applies force compression of the fi les and overwrites the corresponding .Z fi le if it exists without verifi cation
-v Displays the size of the compressed fi lesfi le Represents the fi les that have to be compressed

112 Unix and Shell Programming
$ ls -ltotal 4-rw-r--r-- l root root 1869 Feb 22 15:01 abc.zip
$ unzip abcArchive: abc.zip extracting: customers.txt extracting: letter.txt inflating: matter.txt creating: projects/ inflating: transact.txt extracting: users.txt extracting: a.txt inflating: projects/bank.lst
$ ls -ltotal 18-rw-r--r-- 1 root root 8 Feb 22 14:56 a.txt-rw-r--r-- 1 root root 1869 Feb 22 15:01 abc.zip-rw-r--r-- 1 root root 18 Feb 22 14:51 customers.txt--w-r-x--x 1 root root 6 Feb 22 14:51 letter.txt-r-----r-- 1 root root 113 Feb 22 14:51 matter.txtdrwxr-xr-x 2 root root 512 Feb 22 14:53 projects-rw-r--r-- 1 root root 892 Feb 22 14:51 transact.txt-rw-r--r-- 1 root root 16 Feb 22 14:51 users.txt
$ ls projectsbank.lst
$ unzip -d temp abcArchive: abc.zip extracting: temp/customers.txt extracting: temp/letter.txt inflating: temp/matter.txt creating: temp/projects/ inflating: temp/transact.txt extracting: temp/users.txt extracting: temp/a.txt inflating: temp/projects/bank.lst
$ ls -ltotal 152-rw-r--r-- 1 root root 8 Feb 22 14:56 a.txt-rw-r--r-- 1 root root 1869 Feb 22 15:01 abc.zip-rw-r--r-- 1 root root 18 Feb 22 14:51 customers.txt--w-r-x--x 1 root root 6 Feb 22 14:51 letter.txt-r-----r-- 1 root root 113 Feb 22 14:51 matter.txtdrwxr-xr-x 2 root root 512 Feb 22 14:53 projectsdrwxr-xr-x 3 root root 512 Feb 22 15:50 temp-rw-r--r-- 1 root root 892 Feb 22 14:51 transact.txt-rw-r--r-- 1 root root 16 Feb 22 14:51 users.txt
$ unzip -p abcJohnCharlesTroyhelloHello this is testing of cut commandI think it is working as per the expectedresult. it is going to rain today
$ unzip -t abcArchive: abc.zip testing: customers.txt OK testing: letter.txt OK testing: matter.txt OK testing: projects/ OK testing: transact.txt OK testing: users.txt OK
$
Fig. 5.5 Screenshots of the unzip command (Contd)

File Management and Compression Techniques 113
Examples
(a) $ compress transact.txt This example compresses the fi le transact.txt and renames it transact.txt.Z.
Note: The original fi le is replaced by another fi le, which has the same name with a .Z extension added to it (i.e., transact.txt is replaced by the fi le transact.txt.Z).
(b) $ compress –c customers.txt It displays the compressed format of the fi le customers.txt on the screen, but does not
compress it.(c) $ compress –f transact.txt If a fi le transact.txt.Z already exists, this command overwrites it with the compressed
Fig. 5.5 (Contd)
testing: a.txt OK testing: projects/bank.lst OkNo errors detected in compressed data of abc.zip.
$ unzip -l abcArchive: abc.zip Length Date Time Name----------- --------- ----- ----- 18 02-22-2006 14:51 customers.txt 6 02-22-2006 14:51 letter.txt 113 02-22-2006 14:51 matter.txt 0 02-22-2006 14:53 projects/ 892 02-22-2006 14:51 transact.txt 16 02-22-2006 14:51 users.txt 8 02-22-2006 14:56 a.txt 347 02-22-2006 14:53 projects/bank.lst -------- -------- 1400 8 files
$ ls -ltotal 360-rw-r--r-- 1 root root 8 Feb 22 14:56 a.txt-rw-r--r-- 1 root root 1869 Feb 22 15:01 abc.zip-rw-r--r-- 1 root root 18 Feb 22 14:51 Customers.txt--w-r-x--x 1 root root 6 Feb 22 14:51 letter.txt-r-----r-- 1 root root 113 Feb 22 14:51 matter.txtdrwxr-xr-x 2 root root 512 Feb 22 14:53 projectsdrwxr-xr-x 3 root root 512 Feb 22 15:50 temp-rw-r--r-- 1 root root 892 Feb 22 14:51 transact.txt-rw-r--r-- 1 root root 16 Feb 22 14:51 users.txt
$ rm a.txt
$ rm matter.txt
$ unzip -f abcArchive: abc.zip
$ ls-ltotal 356-rw-r--r-- 1 root root 1869 Feb 22 15:01 abc.zip-rw-r--r-- 1 root root 18 Feb 22 14:51 Customers.txt--w-r-x--x 1 root root 6 Feb 22 14:51 letter.txtdrwxr-xr-x 2 root root 512 Feb 22 14:53 projectsdrwxr-xr-x 3 root root 512 Feb 22 15:50 temp-rw-r--r-- 1 root root 892 Feb 22 14:51 transact.txt-rw-r--r-- 1 root root 16 Feb 22 14:51 users.txt

114 Unix and Shell Programming
version of the earlier fi le transact.txt without confi rmation. If –f option is not used, the compress command asks for confi rmation before overwriting any existing fi le.
(d) $ compress -v matter.txt This example displays how much compression was carried out by showing the output
given here. matter.txt: Compression: 12.38% -- replaced with matter.txt.ZThe output of these commands is given as a screenshot in Fig. 5.6.
5.4.6 uncompress CommandThis command is used to get the compressed fi le back to its original form. The uncompressed fi le will have the same fi lename with the extension .Z removed.
Syntax uncompress [-c] [-f] fi le
Table 5.12 shows the aforementioned options.
Examples
(a) $ uncompress transact.txt.ZUsing this command, the compressed fi le transact.txt.Z is uncompressed into the fi le transact.txt, that is, the fi le transact.txt.Z is deleted and the original fi le transact.txt is recreated in its original size.
(b) $ uncompress –c matter.txt.Z It displays the uncompressed version of the fi le
matter.txt.Z on the screen, keeping the compressed fi le intact.
$ ls -l transact*-rw-r--r-- l root root 892 Feb 22 14:51 transact.txt
$ compress transact.txt
$ ls -l transact*-rw-r--r-- 1 root root 551 Feb 22 14:51 transact.txt.Z
$ compress -c customers.txt.
$ cat > transact.txttesting^D
$ compress transact.txt
$ compress -f transact.txt
$ ls -l transact*-rw-r--r-- 1 root root 12 Feb 22 16:51 transact.txt.Z
Fig. 5.6 Compression of fi les using the compress command
Table 5.12 Options used with the uncompress command
Option Description
-c It displays the content of the compressed fi le without uncompressing it.
-f It applies force uncompression to the fi le, that is, it overwrites the corresponding fi le if it exists without verifi cation.
fi le It represents the fi le that we wish to uncompress.

File Management and Compression Techniques 115
(c) $ uncompress –f matter.txt.Z Using this command, the compressed fi le matter.txt.Z is uncompressed into the fi le
matter.txt. The –f option performs force uncompression. In other words, if a fi le matter.txt already exists, it is overwritten by the uncompressed version of the fi le matter.txt.Z without confi rmation.
To see the contents of the compressed fi les, we use the zcat command.
Syntax zcat fi le_name.Z
Here, fi le_name.Z represents the compressed fi le.
Example
$ zcat matter.txt.ZThis example will display the content of the com pressed fi le matter.txt.Z without uncompressing it. Fig ure 5.7 shows the output of the aforementioned commands.
5.4.7 pack CommandIt compresses or shrinks fi les. The original fi le is replaced with a packed version. The original fi lename will have the .z extension appended to it.
Syntax pack [-f] fi le_name
-f It applies force to pack the fi le. Sometimes if not much compression is possible, the pack command refuses to pack the fi le. The –f option forcefully packs the fi le into the .z extension even if there is not much saving. fi le It represents the fi le we wish to pack.
Examples
(a) $ pack a.png pack: a.png: 0.3% compression The compressed fi le will be stored in the name a.png.z and the original fi le will be
deleted. In the pack command, the degree of compression is low.(b) $ pack –f matter.txt It packs the fi le matter.txt in the name matter.txt.z forcefully, that is, even when
not much compression is possible, the fi les will still be compressed into matter.txt.z.To view the contents of a packed fi le, we use the pcat command.
Syntax pcat fi le_name.z
Here, fi le_name.z represents the packed fi le whose content we wish to see.
Example $ pcat matter.txt.z
This example will display the content of the packed fi le matter.txt.z without unpacking it. Figure 5.8 shows the output of the aforementioned commands.
5.4.8 unpack CommandThis command is used to get back the original fi le from the packed fi le.
Syntax unpack fi le_name

116 Unix and Shell Programming
$ ls -l transact*-rw-r--r-- 1 root root 551 Feb 22 17:04 transact.txt.z
$ uncompress transactl.txt.Z
$ ls - l transact*-rw-r--r-- 1 root root 892 Feb 22 17:04 transact.txt
$ ls -l matter*-r------r-- 1 root root 99 Feb 22 17:08 matter.txt.Z
$ uncompress -c matter.txt.ZHello this is testing of cut commandI think it is working as per the expectedresult. it is going to rain today
$ cat > matter.txtHello^D
$ uncompress matter.txt.Zmatter.txt already exists; do you wish to overwrite matter.txt (yes or no)? nnot overwritten
$ uncompress -f matter.txt.Z
$ ls -l matter*-r-----r-- 1 root root 113 Feb 22 17:08 matter.txt
$ compress matter.txt
$ ls -l matter*-r-----r-- 1 root root 99 Feb 22 17:08 matter.txt.Z
$ zcat matter.txt.ZHello this is testing of cut commandI think it is working as per the expectedresult.it is going to rain today
Fig. 5.7 Uncompression of fi les using the uncompress command
$ ls -l a*-rw-r--r-- 1 root root 34878 Feb 22 17:28 a.png
$ pack a.pngpack: a.png: 0.3% Compression
$ ls -l a*-rw-r--r-- 1 root root 34779 Feb 22 17:28 a.png.z
$ ls -l matter*-r-----r-- 1 root root 113 Feb 22 17:08 matter.txt
$ pack matter.txtpack: matter.txt: no saving - file unchanged
$ pack -f matter.txtpack: matter.txt: 11.5% Compression
$ ls -l matter*-r-----r-- 1 root root 100 Feb 22 17:08 matter.txt.z
$ pcat matter.txt.zHello this is testing of cut commandI think it is working as per the expectedresult. it is going to rain today
Fig. 5.8 Compression of fi les using the pack command

File Management and Compression Techniques 117
Here, fi le_name unpacks or uncompresses the packed fi le by removing its extension .z.
Example $ unpack matter.txt.z
The packed fi le matter.txt.z will be unpacked to the fi le matter.txt as shown in Fig. 5.9.
$ ls - l matter*-r-----r-- 1 root root 100 Feb 22 17:08 matter.txt.z
$ unpack matter.txt.zunpack: matter.txt: unpacked
$ ls - l matter*-r-----r-- 1 root root 113 Feb 22 17:08 matter.txt
Fig. 5.9 Uncompression of fi les using the unpack command
Table 5.13 Options used with the bzip2 command
Option Description
-d It decompresses the fi le.
-f It performs force operation, that is, it overwrites the corresponding fi le without warning.
-k It keeps the original fi le and creates another compressed fi le with an extension .bz2.
-v Verbose mode shows the compression ratio for each compressed fi le .
Filenames It represents the fi les that have to be compressed.
5.4.9 bzip2 and bunzip2 Commandsbzip2 and bunzip2 are the compression commands similar to gzip/gunzip, but with a different compression method. As far as the technique is concerned, these methods are considered better than gzip/gunzip. However, they comparatively take a longer time to compress and uncompress the fi les. The bzip2 command compresses the specifi ed fi le by replacing it with its compressed version having a .bz2 extension.
Syntax bzip2 [-d][-f][-k][-v] fi lenames
Table 5.13 shows the aforementioned options. Assume that we have two fi les, names.txt and numbers.txt, with the initial content shown in Fig. 5.10, which we wish to compress.
Examples
(a) $ bzip2 names.txt The fi le names.txt is compressed and is renamed names.txt.bz2, which is confi rmed by the ls command (refer to Fig. 5.10).
(b) $ cat names.txt.bz2 The command shows the com-pressed content of the fi le names.txt.bz2 (refer to Fig. 5.10).
(c) $ bzip2 -v numbers.txt The fi le numbers.txt is compressed into the fi le numbers.txt.bz2, but this time in
verbose mode. This means that it displays the information regarding compression ratio, number of bits per byte, and other related information, as shown in Fig. 5.10.

118 Unix and Shell Programming
(d) $ bzip2 -d names.txt.bz2 numbers.txt.bz2 The compressed fi les names.txt.bz2 and numbers.txt.bz2 are uncompressed or
decompressed to names.txt and numbers.txt, respectively, which is confi rmed by the ls command shown in Fig. 5.10.
(e) $ bzip2 -k names.txt The fi le names.txt is compressed and its compressed version is stored in another fi le names.txt.bz2, keeping the original fi le intact. Hence, the original fi le names.txt will not be overwritten by its compression version, but a separate fi le is made to keep the compressed format.
(f) $ bzip2 -d names.txt.bz2 The names.txt.bz2 fi le is supposed to be uncompressed into the fi le names.txt. However, as the fi le names.txt already exists, uncompression does not take place and the following warning message is displayed: bzip2: Output fi le names.txt already exists.
(g) $ bzip2 -df names.txt.bz2 The option -f results in force decompression. The fi le names.txt.bz2 is uncompressed,
overwriting the existing fi le names.txt, without displaying any warning message. We can see both the uncompressed fi les, names.txt and numbers.txt, in Fig. 5.10.
In addition to the bzip2 -d command, we can also uncompress fi les using the bunzip2 command.
Fig. 5.10 Compression and uncompression of fi les names.txt and numbers.txt using the bzip2 command (Contd)
$ ls n*names.txt numbers.txt
$ cat names.txtAnilRaviSunilRaju
$ cat numbers.txt24291933334444777788899900005555111
$ bzip2 names.txt
$ ls n*names.txt.bz2 numbers.txt
$ cat names.txt.bz2 H AY&SY={ : �< ↑ ! 4=L P Q l z PE{ W
$ bzip2 -v numbers.txt numbers.txt: 0.635:1, 12.600 bits/byte, -57.50% saved, 40 in, 63 out.
$ ls n*name.txt.bz2 numbers.txt.bz2

File Management and Compression Techniques 119
5.4.10 bunzip2 CommandThis command uncompresses the fi le that is compressed by the bzip2 command.
Syntax bunzip2 fi lename
Example $ bunzip2 numbers.txt.bz2
The fi le numbers.txt.bz2 is uncompressed into the fi le numbers.txt (i.e., the fi le numbers.txt.bz2 will be deleted).
5.4.11 7-zip—Implementing Maximum CompressionBesides zip, bzip, gzip, and other similar commands, Unix also supports the 7-zip command. The 7-zip command is the fi le archiver command that compresses fi les at the highest
compression ratio (around 30–50% more than the other zip formats). This is because it uses the Lempel–Ziv–Markov chain algorithm (LZMA) compression algorithm, which enables it to have the highest compression ratio. The syntax for this command is as follows:
Syntax 7z [a][d][e][x] [l][t] compressed_fi le [fi les_to_compress]
Table 5.14 shows the aforementioned options.
Examples
(a) The following example compresses all the fi les with extension .txt in the current directory into the fi le data.7z.
$ 7z a data.7z *.txt
Table 5.14 Options used with the 7-zip command
Option Description
a It adds fi le(s) to the compressed_fi le.d It deletes fi le(s) from the compressed_fi le.e It extracts the content from the compressed_fi le
in the current directory, that is, extracts the fi les of the directories (if in the compressed form) into the current directory
x It extracts the content from the compressed_fi le along with the full paths, that is, the fi les of the directories (if in the compressed form) will be extracted into their respective directories. These directories will be created if they do not exist and the fi les will be extracted into them.
l It lists the content in the compressed_fi le.t It tests whether the compressed fi le is OK or not
(i.e., corrupted).
Fig. 5.10 (Contd)
$ bzip2 -d names.txt.bz2 numbers.txt.bz2
$ ls n*names.txt numbers.txt
$ bzip2 -k names.txt
$ ls n*names.txt names.txt.bz2 numbers.txt
$ bzip2 -d names.txt.bz2bzip2: Output file names.txt already exists.
$ bzip2 -fd names.txt.bz2
$ ls n*names.txt numbers.txt

120 Unix and Shell Programming
(b) The following example displays the list of fi les compressed in the fi le data.7z. $ 7z l data.7z (c) The following example tests whether the fi les in the compressed fi le data.7z are OK or
not. If the fi les are found to be OK, the fi lenames are displayed along with a of information about the compressed fi les: size and number of fi les and folders compressed in it.
$ 7z t data.7z
(d) The following example adds the fi les of the directory projects to an existing compressed fi le data.7z.
$ 7z a data.7z projects
(e) The following example extracts the fi les found in the compressed fi le data.7z into the current directory.
$ 7z e data.7z projects
Note: The compressed fi les of subdirectories will also be uncompressed into the current directory, that is, the respective subdirectories will not be created.
To create subdirectories and uncompress fi les into the respective subdirectories, option x is used instead of e.
(f) The following example deletes the directory projects and its fi les from the compressed fi le data.7z.
$7z d data.7z projects
The screenshot of the aforementioned examples is shown in Fig. 5.11.
$ ls - ltotal 10-rw-r--r-- 1 root root 18 Feb 22 14:51 customers.txt-rwx--xr-x 1 root root 6 Feb 22 14:51 letter.txt-rwx--xr-x 1 root root 113 Feb 22 17:08 matter.txtdrwxr-xr-x 2 root root 512 Feb 27 20:30 projects-rw-r--r-- 1 root mba 892 Feb 22 17:21 transact.txt
$ ls -l projectstotal 4-rwxr-xr-x 1 root root 347 Feb 22 14:53 bank.lst-rw-r--r-- 1 root root 6 Feb 27 20:30 hello.txt
$ 7z a data.7z *.txt
7-Zip 4.55 beta Copyright (c) 1999-2007 Igor Pavlov 2007-09-05p7zip Version 4.55 (locale=en_IN.UTF-8,Utf16=on,HugeFiles=on,1 CPU)ScanningCreating archive data.7z
Compressing customers.txtCompressing letter.txtCompressing matter.txtCompressing transact.txt
Fig. 5.11 Compression and uncompression of fi les using the 7-zip command (Contd)

File Management and Compression Techniques 121
Everything is ok
$ ls - ltotal 102-rw-r--r-- 1 root root 18 Feb 22 14:51 customers.txt-rw------- 1 root root 639 Feb 27 20:31 data.7z-rwx--xr-x 1 root root 6 Feb 22 14:51 letter.txt-rwx--xr-x 1 root root 113 Feb 22 17:08 matter.txtdrwxr-xr-x 2 root root 512 Feb 27 20:30 projects-rw-r--r-- 1 root mba 892 Feb 22 17:21 transact.txt $ 7z l data.7z
7-Zip 4.55 beta Copyright (c) 1999-2007 Igor Pavlov 2007-09-05p7zip Version 4.55 (locale=en_IN.UTF-8,Utf16=on,HugeFiles=on,1 CPU)
Listing archive: data.7z
Method = LZMASolod = +Block = 1
Date Time Attr Size Compressed Name------------------- ----- ----------- ----------- ----------------------------2006-02-22 14:51:18....A 18 423 customers.txt2006-02-22 14:51:18....A 6 letter.txt2006-02-22 17:08:46....A 113 matter.txt2006-02-22 17:21:48....A 892 transact.txt------------------- ----- ----------- ----------- -------------------- 1029 423 4 files, 0 folders$ 7z t data.7z
7-Zip 4.55 beta Copyright (c) 1999-2007 Igor Pavlov 2007-09-05p7zip Version 4.55 (locale=en_IN.UTF-8,Utf16=on,HugeFiles=on,1 CPU)
Processing archive: data.7z
Testing customers.txtTesting letter.txtTesting matter.txtTesting transact.txt
Everything is ok
Total:Folders: 0Files: 4Size: 1029Compressed: 639
$ 7z a data.7z projects
7-Zip 4.55 beta Copyright (c) 1999-2007 Igor Pavlov 2007-09-05p7zip Version 4.55 (locale=en_IN.UTF-8,Utf16=on,HugeFiles=on,1 CPU)
Scanning
Fig. 5.11 (Contd)

122 Unix and Shell Programming
Updating archive data.7z
Compressing projects/hello.txtCompressing projects/bank.lst
Everything is ok
$ 7z l data.7z
7-Zip 4.55 beta Copyright (c) 1999-2007 Igor Pavlov 2007-09-05p7zip Version 4.55 (locale=en_IN.UTF-8,Utf16=on,HugeFiles=on,1 CPU)
Listing archive: data.7z
Method = LZMASolid = +Blocks + 1
Date Time Attr Size Compressed Name------------------- ----- ----------- ----------- ----------------------------2006-02-22 14:51:18 ....A 18 423 customers.txt2006-02-22 14:51:18 ....A 6 letter.txt2006-02-22 17:08:46 ....A 113 matter.txt2006-02-22 17:21:48 ....A 892 transact.txt2006-02-27 20:30:21 ....A 6 198 projects/hello.txt2006-02-22 14:53:14 ....A 347 projects/dank.lst2006-02-27 20:30:19 D.... 0 0 projects------------------- ----- ----------- ----------- -------------------- 1382 621 6 files, 1 folders$ rm *.txt
$ rm -r projects
$ ls -ltotla 276-rw------- 1 root root 909 Feb 27 20:36 data.7z
$ 7z e data.7z
7-Zip 4.55 beta Copyright (c) 1999-2007 Igor Pavlov 2007-09-05p7zip Version 4.55 (locale=en_IN/UTF-8,Utf16+on,HugeFiles=on,1 CPU)
Processing archive: data.7z
Extracting customers.txtExtracting letter.txtExtracting matter.txtExtracting transact.txtExtracting projects/hello.txtExtracting projects/bank.lstExtracting projects
Everything is ok
Fig. 5.11 (Contd)

File Management and Compression Techniques 123
$ ls - ltotal 462-rwxr-xr-x 1 root root 347 Feb 22 14:53 bank.lst-rw-r--r-- 1 root root 18 Feb 22 14:51 customers.txt-rw------- 1 root root 909 Feb 27 20:36 data.7z-rw-r--r-- 1 root root 6 Feb 27 20:30 hello.txt-rwx--xr-x 1 root root 6 Feb 22 14:51 letter.txt-rwx--xr-x 1 root root 113 Feb 22 17:08 matter.txtdrwxr-xr-x 2 root root 512 Feb 27 20:30 projects-rw-r--r-- 1 root root 892 Feb 22 17:21 transact.txt
$ 7z d data.7z projects
7-Zip 4.55 beta Copyright (c) 1999-2007 Igor Pavlov 2007-09-05p7zip Version 4.55 (locale=en_IN.UTF-8,Utf16=on,HugeFiles=on,1 CPU)
Updating archive data.7z
Everything is ok
$ 7z l data.7z
7-Zip 4.55 beta Copyright (c) 1999-2007 Igor Pavlov 2007-09-05p7zip Version 4.55 (locale=en_IN.UTF-8,Utf16=on,HugeFiles=on,1 CPU)
Listing archive: data.7z
Method = LZMASolid = +Blocks = 1
Date Time Attr Size Compressed Name------------------- ----- ----------- ----------- ----------------------------2006-02-22 14:51:18 ....A 18 423 customers.txt2006-02-22 14:51:18 ....A 6 letter.txt2006-02-22 17:08:46 ....A 113 matter.txt2006-02-22 17:21:48 ....A 892 transact.txt------------------- ----- ----------- ----------- -------------------- 1029 423 4 files, 0 folders
Total:Folders: 1Files: 6Size: 1382Compressed: 909
Fig. 5.11 (Contd)
5.5 DEALING WITH FILES
In this section, we will learn the different commands that deal with fi les such as fi nding the fi le type (fi nding whether the specifi ed fi le is a regular fi le, directory, device fi le, or something else), locating or searching for fi les with the given criteria, confi rming the

124 Unix and Shell Programming
presence of a specifi ed application program or system utility on the disk drive, and checking the fi le system. Let us see how we can fi nd the fi le type.
5.5.1 fi le: Determining File TypeThis command determines the fi le type, that is, whether the specifi ed name belongs to a fi le or a directory. The command does certain checks or tests on the specifi ed fi le to determine its type.
Syntax fi le [-f fi lelist]fi les
-f fi lelist Determines the type of fi les contained in the fi le fi lelist.Files Filenames whose fi le type we wish to determine.
Examples
(a) $ fi le matter.txt matter.txt: English text
This command determines if the fi le matter.txt is a directory, a special device fi le, or an ordinary fi le. If matter.txt is an ordinary fi le, it checks to see whether it is empty and displays the message ‘empty’.
If the fi le command fi nds that the fi le matter.txt is not empty, it checks to see if it begins with a magic number, that is, a numeric or string constant used to indicate the type of fi le if it is not suitable for human reading. It is to be remembered that fi les that are not ASCII text fi les, such as executable fi les, archive, and library fi les, contain a magic number at the beginning of the fi le.
If the fi le matter.txt does not have a magic number, the fi le command examines its fi rst block comprising 512 bytes and fi nds its language (i.e., whether its language is English, a programming language, or some other special data). On the basis of all these analyses, the fi le command displays the type of the specifi ed fi le.
(b) The following example displays the fi le type of all the fi les and directories in the current directory.
$ fi le *(c) The following example displays the fi le type of all the fi les that are mentioned in the fi le,
fi lenames. $ fi le –f fi lenames The output of these commands is shown in Fig. 5.12.
In this output of the fi le command, the fi le letter.txt is declared as the command text because the execute permission is assigned to this fi le.
Note: For the fi le that does not have the read permission, the fi le command displays the output ‘cannot open for reading’.
5.5.2 fi nd: Locating FilesIt is used to locate one or more fi les that satisfy the given criteria. We can also perform certain operations or actions that we want to perform on the searched fi les.

File Management and Compression Techniques 125
$ ls - ltotal 148-rw-r--r-- 1 root root 34878 Feb 22 17:30 a.png-rw-r--r-- 1 root root 34779 Feb 22 17:28 a.png.z-rw-r--r-- 1 root root 18 Feb 22 14:51 customers.txt--w-r-x--x 1 root root 6 Feb 22 14:51 letter.txt-r-----r-- 1 root root 113 Feb 22 17:08 matter.txtdrwxr-xr-x 2 root root 512 Feb 22 16:39 projects-rw-r--r-- 1 root root 892 Feb 22 17:21 transact.txt
$ file matter.txtmatter.txt: English text
$ file customers.txtcustomers.txt: ascii text
$ file a.pnga.png: PNG image data
$ file a.png.za.png.z: packed data
$ file projectsprojects: directory
$ file *a.png: PNG image dataa.png.z: packed datacustomers.txt: ascii textletter.txt: commands textmatter.txt: English textprojects: directorytransact.txt: ascii text
$ cat filenamesletter.txta.pngtransact.txt
$ file -f filenamesletter.txt: commands texta.png: PNG image datatransact.txt: ascii text
Fig. 5.12 File types using the fi le command
Syntax # fi nd path criteria action_list
Here, path refers to the directory or location of the disk in which we want the fi nd command to search for the desired fi les. The path may include more than one directory separated by a space. The fi nd command searches all the subdirectories specifi ed in the path to fi nd the fi le(s) that meets the given criteria. Table 5.15 shows the options for writing criteria. The action-list in the syntax indicates that we can apply several actions on the fi les that are searched through the fi nd command. Table 5.16 lists the most frequent actions that are applied to the found fi les.

126 Unix and Shell Programming
Table 5.15 Options used with the fi nd command
Options Description
–atime n It fi nds fi les that were accessed n days ago.
–ctime n It fi nds fi les that were created n days ago.
–mtime n It fi nds fi les that were modifi ed more than +n days, less than –n days, or exactly n days ago.
-size n[c] It fi nds fi les that are n blocks or c bytes in size. One block is equal to 512 bytes.
–name pattern It fi nds fi les where the fi lename matches the pattern.
-perm octal_num It fi nds fi les that have given permissions.
–type It fi nds fi les of the specifi ed type. The type is represented through the following characters:
b: Block fi le
c: Character fi le
d: Directory
l: Symbolic ink
f: Regular fi le
p: Named pipe
s: Socket
–user name It fi nds fi les that are owned by the given user_name. We can also use the user ID instead of the username.
–group group_name It fi nds fi les that belong to a given group_name. We can also use the group ID instead of the group name.
Table 5.16 Actions applied to the found fi les
Action Description
-print Default action that displays the path name of the fi les that meet the given criteria
-exec command Executes the Unix system command on the fi les that meet the given criteria
-ok command Same as the exec command, it prompts the user for confi rmation, that is, the user has to press ‘y’ for executing the command
In case of the –exec or ok command, a pair of braces {} is used to represent the fi les that are found by the fi nd command. In other words, the fi les located by fi nd will replace the braces and the specifi ed command will be applied on each found fi le one by one. In order to distinguish between the command being executed and the arguments used by the fi nd command, a semicolon (;) is used. Since the shell also uses the semicolon, we use the ‘escape’ character (a backslash or quotes) to differentiate it. A format of the fi nd command when a command is executed on the found fi les is as follows:
$ fi nd pathname-list condition-list -exec command {} \;
While using complex expressions for fi nding fi les, we can use the operators explained in the next sub-section.
File Management and Compression Techniques 127
Using fi nd operatorsWhile writing expressions for fi nding fi les in the fi nd command, we can use the following fi nd operators (see Table 5.17).
Table 5.17 List of fi nd operators used to connect expressions
Operator Description
! (Negation operator) This performs reverse action, that is, it fi nds the fi les that do not satisfy the specifi ed expression.
-o (OR operator) This is used to connect one or more expressions. On using an operator, the fi les that satisfy even a single expression will also be displayed.
-a (AND operator) This is the default operator. Only the fi les that satisfy all the expressions connected with the –a operator are displayed.
Note: While using –a or –o operators, we may use parentheses ( ) for separation, but they must be ‘escaped’ as they are used by the shell. This means that the parentheses must be prefi xed with a backslash, ‘\(’, ‘\)’
Examples
(a) The following command displays the fi les and their path names that have not been accessed for over a month (+30).
$ fi nd / -atime +30 -print(b) To fi nd fi les that are of a size larger than 20 blocks and which have not been accessed
for over a month (+30), use the following command. $ fi nd / -atime +30 –size +20 –print(c) To search for fi les that are of a size between 1000 and 2000 bytes, use the following command. $ fi nd . -size +1000c -size -2000c -print
We can see in this command that a minus sign designates ‘less than,’ and the plus sign designates ‘greater than’.
(d) To remove fi les that are of a size larger than 20 blocks with the interactive action command ok, enter the following.
$ fi nd / -atime +30 -size +20 -ok rm -f { } \;(e) To list all fi les and directories under the current directory, use the following command. $ fi nd . -print (f) To search for the fi le a.txt in the current directory and its subdirectories, use the
following command. $ fi nd -name 'a.txt' -print(g) To search for the fi le a.txt on the root and all its subdirectories, use the following
command. $ fi nd / -name 'a.txt' -print(h) To display all .c fi les under the current directory, use the following command. $ fi nd . -name '*.c' -print(i) To print all fi les beginning with the word test in the current directory and its
subdirectories, use the following command. $ fi nd . -name 'test*' -print

128 Unix and Shell Programming
(j) To print all fi lenames comprising three characters that begin with an upper-case or a lower-case character in the current directory and its subdirectories, use the following command.
$ fi nd . -name '[a-zA-Z]??' -print (k) To display the list of the directories, use the following command. $ fi nd . -type d -print (l) To fi nd all those .c fi les that were last modifi ed less than three days ago, use the following
command. $ fi nd . -mtime -3 -name "*.c" -print
Note: We can use single quotes as well as double quotes for defi ning the pattern.
(m) To fi nd all those .c fi les that were last modifi ed more than three days ago, use the following command.
$ fi nd . -mtime +3 -name "*.c" -print (n) To fi nd all those .c fi les that were modifi ed exactly three days ago, use the following
command. $ fi nd . -mtime 3 -name "*.c" -print (o) To fi nd the .txt fi les that have the 755 permission, use the following command. $ fi nd . -name '*.txt' -perm 755 -print
We can see that 755 is an octal number representing read, write, and execute permissions for the owner, and read and execute permission for the group and other members.
We can also use the and operator, that is, the -a operator in the aforementioned command. The and operator shows only those fi les that satisfy both the specifi ed expressions. With the and operator, this command can be written as follows.
$ fi nd . -name '*.txt' -a -perm 755 -print
Remember, -a is the default operator, so we can optionally omit it.(p) To fi nd the subdirectories under the current directory having the 755 permission, use the
following command. $ fi nd . -type d -perm 755 –print(q) To fi nd all the fi les that have the User (owner) as root, use the following command.
$ fi nd . -user root -print
Instead of the username, we can use the user ID. The following command is used. $ fi nd . -user 0 -print(r) To fi nd all the fi les that belong to the group projects, use the following command. $ fi nd . -group projects -print As with the username, instead of the group name, we can use the group ID. The
following command is used. $ fi nd . -group 15 -print(s) To fi nd all the fi les except the a.txt fi le, use the following command. $ fi nd . ! -name 'a.txt' -print In this command, ! is the negation operator and it reverses the meaning of the
expression.(t) To fi nd all the fi les except the ones with the extension .txt, use the following command. $ fi nd . ! -name '*.txt' -print

File Management and Compression Techniques 129
(u) To fi nd .txt fi les or fi les that have the 755 permission, use the following command.
$ fi nd . \( -name '*.txt' -o -perm 755 \) -print
The -o operator is the ‘OR’ operator and hence the fi les that satisfy either expression will be displayed. We have used the ‘escaped’ parentheses in this expression, that is, they are prefi xed by a backslash to avoid them from being interpreted by the shell.
(v) To fi nd .txt as well as .doc fi les, use the following command.
$ fi nd . \( -name '*.txt' -o -name '*.doc' \) –print
We can also execute commands on the fi les that we fi nd. The following is an example.
$ fi nd . -name "*.txt" -exec wc -l '{}' ';'
This command counts the number of lines in every .txt fi le in and under the current directory. The count of the lines is displayed before the name of the respective fi le. Basically in this command, all the .txt fi les that are found replace the ‘{ }’ braces, that is, the wc –l command is applied to each of the fi les that is found. The ‘;’ ends the -exec clause.
(w) To display the names of the fi les and subdirectories in the current directory, use the following command.
$ fi nd . -exec echo {} ';'
We can see that the semicolon is quoted.(x) The following example fi nds the .txt fi les that have the 755 permission. From the fi les
that are found, the group read permission is removed, as shown here. $ fi nd . -name '*.txt' -perm 755 -exec chmod g-r '{}' ';';
The fi nd command has several signifi cances, which are as follows:
1. Searching for fi les with a specifi c pattern2. Searching for fi les that are accessed a specifi c number of days ago3. Searching for fi les of a specifi c size4. Searching for fi les with specifi c permissions5. Searching for fi les belonging to a specifi ed user or group6. Applying commands on the found fi les
5.5.3 locate: Searching for Files with Specifi c StringsThis command is used for searching for fi les whose name or path matches a particular search string and for which, the user has access permissions.
Syntax locate [-q][-n] [-i] pattern_to_search
Table 5.18 explains these options.
Examples
(a) $ locate ".txt" This command will fi nd all fi lenames in the fi le system that contain .txt anywhere in their
full paths and for which the user has access permissions. It may display error messages when it comes across the .txt fi les for which the user does not have access permissions.
(b) $ locate –q –n 10 ".txt"

130 Unix and Shell Programming
This command will fi nd the fi rst 10 fi les that contain .txt anywhere in their full paths and for which the user has access permissions. It will not display any error messages on fi nding the fi les for which the user does not have access permissions.
(c) $ locate –i "project.txt" This command will find all project.txt
files, be it in the upper case or lower case, for which the user has access permissions.
One disadvantage of locate is that it stores all fi lenames on the system in an index that is usually updated only once a day. This means locate will not fi nd fi les that have been created very recently. It may also report fi lenames as being present even though the fi le has just been deleted. Unlike fi nd, locate cannot track down fi les on the basis of their permissions, size, and so on.
5.5.4 which/whence: Finding Locations of Programs or Utilities on Disks
This command is used to fi nd out where the specifi ed application program or system utility is stored on the disk.
Note: The command whence works only in the Korn shell. The syntax for using whence is the same as that of the which command.
Syntax which program_name/utility
Here, program_name/utility represents the command or programs whose location we wish to fi nd out.
Example $ which ls
Output /usr/bin/ls
5.5.5 fsck: Utility for Checking File SystemsThe Unix fi le system can easily be corrupted if it is not properly shut down. Therefore, we need to periodically check the fi le system and repair it. If the errors in the fi le system are not repaired then and there, the whole system may crash. The fsck command checks our fi le system, reports the errors that it may come across, and interactively prompts us for ‘Yes’ or ‘No’ decisions to correct those error conditions. It operates in two modes: interactive and non-interactive. In the interactive mode, this command examines the fi le system and stops at each error found in the fi le system. It displays the error description and asks for the user’s
Table 5.18 Options used with the locate command
Options Description-q It suppresses error messages that
are displayed for fi les for which the user does not have access permissions.
-n It limits the result to a specifi ed number.
-i It ignores the case while searching, that is, it returns the result that matches the pattern in upper case or lower case.
pattern_to_search It represents the string that we wish to search for in the path names or in the fi lenames. All the fi les that contain the pattern_to_search string in their path or fi lename will be listed on the screen.

File Management and Compression Techniques 131
response. On the basis of the user action, either the error is removed or fsck will continue checking without making any changes to the fi le system. In the non-interactive mode, fsck tries to repair all the errors found in the fi le system without waiting for the user response. Although this mode is faster, it may delete some important fi les that have become corrupted.
Syntax # fsck [-y] [-n] [ fi lesystem ]
Note: The option –y or –n, if used, runs the fsck command in the non-interactive mode.
Here, fi lesystem is the name of the fi le system to be checked. If we do not specify the fi le system, fsck will use the fi les /etc/checklist or /etc/fstab to know the names of the fi le systems to be checked. The options –y and –n are used to automatically provide answers Yes and No, respectively, to all the queries that appear when using the fsck command.
Examples
(a) # fsck –y This command checks all the fi le systems installed in our machines and displays the
answer ‘Yes’ (meaning granted) for all the queries that come up.(b) # fsck –n This command checks all the fi le systems installed in our machines and displays the
answer ‘No’ for all the queries that come up.
The fsck command runs in several phases as follows:
# fsck /dev/root** Currently Mounted on /** Phase 1 — Check Blocks and Sizes** Phase 2 — Check Pathnames** Phase 3 — Check Connectivity ** Phase 3b — Verify Shadows/ACLs** Phase 4 — Check Reference Counts** Phase 5 — Check Cylinder Groups7899 fi les, 406203 used, 279169 free (257 frags, 34864 blocks, 0.0% fragmentation)
Let us have a quick view of all the phases of the fsck command.
In phase 1, each inode in the fi le system is checked and then the disk blocks pointed to by the inode are checked. Error messages may appear at this stage if the block address in the inode is invalid, a block is already being used by another inode, the expected number of blocks for an ordinary fi le does not match with the actual number of blocks used by the inode, and there are other similar errors. In short, phase 1 performs the following tasks:
1. Checks the inodes, looks for valid inode types, and corrects the inode size and format.2. Checks for bad or duplicate blocks.
In phase 2, fsck checks all directory inodes in the fi le system. First, the inode for the root directory is examined. In case the root inode is corrupted, the fsck will abort. If the inode number of the directory entry is invalid, the inode fi eld of the directory entry is set to zero. It

132 Unix and Shell Programming
is ensured that none of the directory entries points to an unallocated inode. In short, this phase is focused on removing the directory entries that are invalid or pointing to invalid inode(s). Thus, this phase reports errors that result from root inode mode and status, directory inode pointers in a range, directory entries pointing to bad inodes, etc.
Note: This phase removes directory entries pointing to bad inodes used in phase 1.
In phase 3, all the allocated inodes are scanned for unreferenced directories, that is, directories where the inodes corresponding to the parent directory entry do not exist. In this case, we will be prompted to reconnect to any orphaned directories. If our answer is yes, then a link between the orphan directory and the special directory /lost+found will be made. When the fsck command is over, we can examine the entries in /lost+ found and can move them to their respective directories. Phase 4 deals with the inode count or reference count information, which was accumulated in phases 2 and 3. In phase 1, the reference count is fi rst set to the link count value stored in the inode. The link count is the number of links to a physical fi le. Then, in phases 2 and 3, the reference count is decremented each time a valid link is found while scanning the fi le system. Therefore, the reference count value should be zero when phase 4 begins. Phase 5 checks the free block list. Any bad or duplicate blocks in this list are fl agged, which are later salvaged. On salvaging the free list, phase 6 is initiated that reconstructs the free block list. If a fi le system was corrupted and then fi xed, the system is rebooted without a sync operation (to prevent the ‘fi le system fi xing’ from being undone). The reboot process modifi es the fi le system to repair it.
Note: Unless fsck is used in the single-user mode, the fi le system corruption will spread to other mounted fi le systems.
The fsck command checks the integrity of the fi le systems, especially the superblock, which stores summary information of the volume. Whenever data is added or changed on a disk, it is the superblock that is frequently modifi ed to refl ect the changes. There are many chances of the superblock getting corrupted. Hence, the fsck checks the superblock for any errors. The following two checks are essentially done:
1. The size of the fi le system must be greater than the size of the number of blocks identifi ed in the superblock.
2. The total number of inodes must be less than the maximum number of inodes.
Besides checking the superblock, the fsck command also checks the number and status of the cylinder group blocks, inodes, indirect blocks, and data blocks. This command checks if all the blocks that are marked as free are not being used by any fi les. If they are being used, it means the fi les may be corrupted. In addition, fsck confi rms if the number of free blocks plus the number of used blocks equals the total number of blocks in the fi le system. In case of any ambiguity, the maps of unallocated blocks are rebuilt. When inodes are examined, fsck searches for any inconsistency in the format and type, link count, duplicate blocks, bad block numbers, and inode size. Inodes should always be in one of the three states: allocated (being used by a fi le), unallocated (not being used by a fi le), and partially allocated (the procedure of allocation and unallocation is performed, but the

File Management and Compression Techniques 133
data that was supposed to be deleted is still there). The fsck command will clear the inode if inconsistency of any type is detected. The link count is the number of directory entries that are linked to a particular inode. The entire directory structure is examined to fi nd the number of links for every inode. If the stored link count and the actual link count do not match, it confi rms that the disk was not synchronized before the shutdown, that is, while saving the changes in the fi le system, the link count was not updated. In case the stored count is not zero but the actual count is zero, then disconnected fi les are placed in the lost+found directory. In other cases, the actual count replaces the stored count. The output of the fsck command is shown in Fig. 5.13.
# fsck -y/dev/dsk/c0d0s0 IS CURRENTLY MOUNTED READ/WRITE.CONTINUE? yes
** /dev/dsk/c0d0s0** Currently Mounted on /** Phase 1 - Check Blocks and Sizes** Phase 2 - Check Pathnames** Phase 3a - Check Connectivity** Phase 3b - Verify Shadows/ACLs** Phase 4 - Check Reference Counts** Phase 5 - Check Cylinder GroupsFILESYSTEM MAY STILL BE INCONSISTENT.7899 files, 406203 user, 279169 free (257 frags, 34864 blocks,0.0% fragmentation)
***** PLEASE RERUN FSCK ON UNMOUNTED FILE SYSTEM *****/dev/dsk/c0d0s6 IS CURRENTLY MOUNTED READ/WRITE.CONTINUE? yes
** /dev/dsk/c0d0s6** Currently Mounted on /usr** Phase 1 - Check Blocks and Sizes** Phase 2 - Check Pathnames** Phase 3a - Check Connectivity** Phase 3b - Verify Shadows/ACLs** Phase 4 - Check Reference Counts** Phase 5 - Check Cylinder GroupsFILESYSTEM MAY STILL BE INCONSISTENT.150119 files, 3244347 used, 1892040 free (5304 frags, 235842 blocks,0.1% fragmentation)
***** PLEASE RERUN FSCK ON UNMOUNTED FILE SYSTEM *****/dev/dsk/c0d0s3 IS CURRENTLY MOUNTED READ/WRITE.CONTINUE? yes
** /dev/dsk/c0d0s3** Currently Mounted on /var** Phase 1 - Check Blocks and Sizes** Phase 2 - Check Pathnames** Phase 3a - Check Connectivity** Phase 3b - Verify Shadows/ACLs
Fig. 5.13 Output displayed while running the fsck command (Contd)

134 Unix and Shell Programming
Fig. 5.13 (Contd)
** Phase 4 - Check Reference Counts** Phase 5 - Check Cylinder GroupsFILESYSTEM MAY STILL BE INCONSISTENT.19560 files, 83088 used, 156495 free (455 frags, 19505 blocks,0.2% fragmentation)
***** PLEASE RERUN FSCK ON UNMOUNTED FILE SYSTEM *****/dev/dsk/c0d0s7 IS CURRENTLY MOUNTED READ/WRITE.CONTINUE? yes
** /dev/dsk/c0d0s7** Currently Mounted on /export/home** Phase 1 - Check Blocks and Sizes** Phase 2 - Check Pathnames** Phase 3a - Check Connectivity** Phase 3b - Verify Shadows/ACLs** Phase 4 - Check Reference Counts** Phase 5 - Check Cylinder GroupsFILESYSTEM MAY STILL BE INCONSISTENT.2 files, 9 user, 31295480 free (16 frags, 3911933 blocks,0.0% fragmentation)
***** PLEASE RERUN FSCK ON UNMOUNTED FILE SYSTEM *****/dev/dsk/c0d0s5 IS CURRENTLY MOUNTED READ/WRITE.CONTINUE? yes
** /dev/dsk/c0d0s5** Currently Mounted on /opt** Phase 1 - Check Blocks and Sizes** Phase 2 - Check Pathnames** Phase 3a - Check Connectivity** Phase 3b - Verify Shadows/ACLs** Phase 4 - Check Reference Counts** Phase 5 - Check Cylinder GroupsFILESYSTEM MAY STILL BE INCONSISTENT.98 files, 25985 used, 24505 free (9 frags, 3062 blocks,0.0% fragmentation)
***** PLEASE RERUN FSCK ON UNMOUNTED FILE SYSTEM *****/dev/dsk/c0d0s1 IS CURRENTLY MOUNTED READ/WRITE.CONTINUE? yes
** /dev/dsk/c0d0s1** Currently Mounted on /usr/openwin** Phase 1 - Check Blocks and Sizes** Phase 2 - Check Pathnames** Phase 3a - Check Connectivity** Phase 3b - Verify Shadows/ACLs** Phase 4 - Check Reference Counts** Phase 5 - Check Cylinder GroupsFILESYSTEM MAY STILL BE INCONSISTENT.8305 files, 206932 used, 116320 free (400 frags, 14490 blocks,0.1% fragmentation)
***** PLEASE RERUN FSCK ON UNMOUNTED FILE SYSTEM *****

File Management and Compression Techniques 135
5.6 IMPORTANT UNIX SYSTEM FILES
In this section, we will learn about the important fi les of the Unix system such as /etc/passwd, /etc/shadow, /etc/hosts fi le, /etc/hosts.allow, and /etc/hosts.deny. These are the fi les where important information is kept as passwords of the users, IP addresses of the computers on our network, and permissions to access different services, among others. Let us begin with the /etc/passwd fi le. These fi les are very critical and can hinder the performance of the Unix system if modifi ed.
5.6.1 /etc/passwdpasswd is a fi le found in the /etc directory. It contains login names, passwords, home directories, and other information about users. Each line of the fi le contains a series of fi elds, which defi nes a login account. The fi elds in each line of the /etc/passwd fi le are separated by colons. Table 5.19 shows the aforementioned fi elds.
Example $ grep ravi /etc/passwd
ravi:x:235:614:ravi sharma:/home/ravi:/bin/sh
Note: The grep command is used to search for a given pattern in a fi le and displays all the lines where the pattern is found. We will learn about the grep command in detail in Chapter 10.
We can always fi nd a root login in the /etc/passwd fi le, which is as follows:
root:x:0:0:root:/root:/bin/sh
The root user has a user ID of 0 and a group ID of 0. For security reasons, some systems move the list of usernames into the shadow fi le.
Table 5.19 Fields found in the /etc/passwd fi le
Field Description
user name The username is the string entered in response to the login prompt. It is a unique identifi er for the user throughout the session. The program that prompts for the login name reads this fi le to get information pertaining to the user
encrypted password
This program prompts for the login name, reads the information found in this fi eld, and uses the information to validate the password entered by the user
user ID number Each user has an ID number that can be used as a synonym for the username. Both the ID number and the username are unique within the system.
group ID number Each user has one group ID number. Any number of users can be assigned to the same group. The group ID number is used to assign group access permissions to fi les, directories, and devices.
real name This is a sort of comment or complete name of the user (login names are usually unique identifi ers only)
home directory It is the directory that the user reaches after entering the correct logon name and password. This is the name that gets stored in the HOME environment variable
shell program This is a shell program that is run once the user logs in. If nothing is specifi ed, /bin/sh is assumed

136 Unix and Shell Programming
5.6.2 /etc/shadowPasswords are encrypted for security. We only need to use the same algorithm to encrypt a newly entered password and then compare the result against the encrypted version stored in the fi le; if they match, the password is correct. The /etc/passwd fi le must be readable by everyone because it is used by so many programs to fi nd the user ID number, group membership, and home directory. This allows one to get a copy of the /etc/passwd fi le, and thus get a copy of all the password encryptions. It may result in security problems. The solution is to hide the passwords in another fi le. The fi le holding the passwords is known as the shadow fi le and is normally named /etc/shadow. The shadow fi le is only readable by its owner, which is the root. This means that no one can read the passwords unless they have the root access. We can tell by looking at the data in the /etc/passwd fi le whether the actual password is in a shadow fi le, because the password fi eld displays an x rather than an encrypted password. The shadow fi le is a text fi le, and each line displays the password information of a user. The fi elds in each line of the /etc/shadow fi le are separated by colons. Table 5.20 gives a brief description of the fi elds found in this fi le.
The shadow fi le also contains dates and day counters, which can be used to force the users to change their passwords from time to time, under the threat of their account getting disabled.
5.6.3 /etc/hostsThe hosts fi le contains static address information for computers on our local network. Whenever we refer to a computer by its name, the commands that we use must have some way to translate that name into an IP address. Our Internet service provider (ISP) should provide us with the address of one or more name servers that we can use. If we use a dial-up
Table 5.20 Fields found in the /etc/shadow fi le
Field Description
user name The same name found in the /etc/passwd fi leencrypted password The encrypted form of the passwordpassword last changed The day the password was last changed (The date is a count of the
number of days since 1 January 1970.)password may be changed The number of days before the user has permission to change the
password (A value of -1 means that it can be changed any time.)password must be changed The number of days from the time the password is set until the
password expires and must be changedpassword expire warning The number of days prior to the password expiry date that the user has
to be warneddisable after expires The number of days after the password expires that the account is to
be automatically disableddisabled The date that the account was disabled (The date is a count of the
number of days since 1 January 1970.)

File Management and Compression Techniques 137
connection, the address of a name server is normally returned to our computer as part of the initial connection sequence. However, in some cases, we must confi gure the address of the name server into the routing table. If we have a local network, we will need to provide each member of our network with the address of all the other members. If there are many computers on our local network, it is easier to use one of them as a name server by confi guring a daemon to respond to address requests and then confi guring other computers to send address queries to our local name server. The contents of /etc/hosts fi le may be as follows:
127.0.0.1 localhost localhost.localdomain 192.168.0.1 mce1 mce1.localdomain192.168.0.2 mce2 mce2.localdomain192.168.0.3 mce3 mce3.localdomain
The same list of addresses is required for every computer on the network, and a computer’s address can be included in the fi le, so that the fi le can be duplicated everywhere on the network by simply copying it from one computer to another. Each line in the fi le contains an IP address, followed by a list of alias names for the computer. In this example, each computer can be located by its simple name or domain name. The fi rst line of the fi le is always named the local host and always has the address 127.0.0.1. This special loopback address is used by programs on the local computer to address its own services.
5.6.4 /etc/hosts.allow and /etc/hosts.denyWhen an Internet packet arrives, the contents of the hosts.allow fi le are scanned, and if a specifi c permission is found for the requested action, access is granted and no further checking is made. If the hosts.allow fi le did not specifi cally grant permission, the hosts.deny fi le is scanned, and if access is not specifi cally denied, it is granted. Each line specifi es a service followed by a colon, which separates it from the list of hosts being granted or denied that particular service. The keyword ALL can be used to specify all services or all hosts.
$ cat /etc/hosts.deny . ALL: ALL
If the content of hosts.deny fi le is as given, it means that every service is denied to every host. The following example of hosts.allow begins by granting all permissions to every host in the local domain and every host in the domain philips.com. All permissions are also granted to the computer with the IP address 234.51.135.18. Finally, HTTP web service (specifi ed by naming the daemon to receive the message) is granted to every host except the ones in the domain .godrej.com
$ cat /etc/hosts.allowALL: LOCAL.philips.comALL: 234.51.135.18httpd: ALL EXCEPT .godrej.com

138 Unix and Shell Programming
5.7 SHELL VARIABLES
A variable is a medium to store the value to be used for manipulation or storage in a programming language. It offers a symbolic way to represent and manipulate data. The shell also has variables to serve the same purpose. Shell variables are of two types: those created and maintained by the Unix system itself, and those created by the user.
5.7.1 User-created Shell VariablesTo create a shell variable, we can simply use the following syntax:
Syntax name=value
Examples
(a) radius=5 Creates a shell variable having the name radius. Similarly, name="ravi" name is the variable with the value ravi.(b) Null string is a string with no characters. area=" " We can use letters, digits, and the underscore character in variable names. area_circle=56(c) To fi nd out the value of a shell variable, we can use the echo command. Ordinarily, echo
merely echoes its arguments on the screen.
$ echo radius radius
However, if we use a variable name preceded by a $ as an argument to echo, the value of the variable is echoed.
$ echo $radius 5 $ echo The radius of circle is $radius The radius of circle is 5
5.7.2 System Shell VariablesThe shell maintains its own set of shell variables. To fi nd what your system is using, just type set.
$ set
You may get the following output:
EXINIT='set ai nu' HOME=/usr/ravi IFS=MAIL=/usr/mail/raviPATH=.:/bin:/usr/bin

File Management and Compression Techniques 139
PS1=$PS2=>TERM=adm5
Table 5.21 shows the description of these shell variables.
Note: Some variables like PS1 are defi ned by default. Others like PATH are defi ned in our .profi le fi le.
A description of these terms is provided in the following sections.
CDPATH variableThe CDPATH variable contains a list of path names separated by colon (:) as shown.
:$HOME: /bin/usr/fi les
There are three paths in this example. Since the path starts with a colon, the fi rst directory is the current working directory. The second directory is our home directory. The third directory is an absolute path name to a directory of fi les. The contents of CDPATH are used by the cd command using the following rules:
1. If CDPATH is not defi ned, the cd command searches the working directory to locate the requested directory. If the requested directory is found, cd moves to it. If it is not found, cd displays an error message.
2. If CDPATH is defi ned as shown in the previous example, the actions listed are taken when the following command is executed.
$ cd ajmer
Table 5.21 Shell variables
Shell variable Description
EXINIT This refers to the initialization instructions for the ex and vi editors.HOME This is set to the path name of our home directory.IFS (Internal fi eld separator)
This is set to a list of the characters that are used to separate words in a command line. Normally, this list consists of the space character, the tab character, and the newline character.
LOGNAME This gives the user’s login name.MAIL This variable’s value is the name of the directory in which an electronic mail addressed
to us is placed. The shell checks the contents of this directory very often, and when a new content shows up, we are informed about it.
PATH This names the directories that the shell will search in to fi nd the commands that we execute. A colon is used to separate the directory names without spaces.
PS1 (Prompt string 1)
This symbol is used as our prompt. Normally, it is set to $, but we can redefi ne it by merely assigning a new value. For example, the command PS1=# resets the prompt to a # symbol.
PS2 (Prompt string 2)
This prompt is used when a new line is started without fi nishing a command (command continuation symbol).
TERM This identifi es the kind of terminal we use (it helps the shell understand what to interpret as erase key, kill line, etc.)

140 Unix and Shell Programming
(a) The cd command searches the current directory for the ajmer directory. If it is found, the current directory is changed to ajmer.
(b) If the ajmer directory is not found in the current directory, the cd command searches in the home directory, which is the second entry in CDPATH. If the ajmer directory is found in the home directory, it becomes the current directory.
(c) If the ajmer directory is not found in the home directory, cd tries to fi nd it in /bin/usr/fi les, which is the third directory in CDPATH. If the ajmer directory is found in /bin/usr/fi les, it becomes the current directory.
(d) If the ajmer directory is not found in /bin/usr/fi les, the cd command displays an error message and terminates.
$ echo $CDPATH $ CDPATH= : $HOME: /bin/usr/fi les
HOME variableThe HOME variable contains the PATH to our home directory. The default is our login directory. Some commands use the value of this variable when they need the PATH to our home directory. For example, when we use the cd command without any argument, the command uses the value of the HOME variable as the argument.
$ echo $HOME /mnt/disk1/usr/chirag
$ oldHOME=$HOME$ echo $oldHOME /mnt/disk1/usr/chirag
$HOME=$(pwd) /mnt/disk1/usr/chirag/ajmer
$ HOME =$oldHOME$ echo $ HOME /mnt/disk1/usr/chirag
PATH variable The PATH variable is used for a command directory. The entries in the path variable must be separated by colons. It works just like CDPATH. When the SHELL encounters a command, it uses the entries in the PATH variable to search for the command under each directory in the PATH variable. The major difference is that the current directory, which will be searched for by the command, is mentioned at the end in this variable.If we set the PATH variable as follows,
$ PATH =/bin:/usr/bin::
then, the shell will look for the commands that we execute in this sequence—shell will fi rst search the /bin directory, followed by the /usr/bin directory, and fi nally the current working directory.
Primary prompt variableThe primary prompt (PSI prompt) is set in the variable PS1 for the Korn and Bash shells and prompt for the C shell. The shell uses the primary prompt when it accepts a command. The default is the dollar sign($) for the Korn and Bash shells and the percent sign (%) for the C shell.

File Management and Compression Techniques 141
We begin by changing the primary prompt to refl ect the shell we are working in, the Korn shell. Since we have a blank at the end of the prompt, we must use quotes to set it. As soon as it is set, a new prompt is displayed. At the end, we change it back to the default.
$ PS1="mce>"mce > echo $PS1mce>mce > PS1="$"$
SHELL variableThe SHELL variable holds the path of our login shell.
TERM variableIt holds the description for the computer terminal or terminal emulator we are using. The value of this variable determines the keys that we can use for the purpose of editing. The default value of TERM variable is vt100 (a terminal type).
Setting/Unsetting system shell variablesThe following are the ways by which we can set or unset system shell variables: An assignment operator is used to set the value for a system shell variable.
Syntax variable=value
Example $ TERM=vt100
The unset command is used to unset a system shell variable. The syntax for using the unset command is as follows:
Syntax unset shell_variable
Example unset TERM
We can look at the value assigned to a system shell variable through the echo command.
$ echo $TERM
We can use the set command with no arguments to display the variables that are currently set.
$ set
5.8 EXPORT OF LOCAL AND GLOBAL SHELL VARIABLES
When a process is created by the shell, it makes available certain features of its own environment to the child processes. The created process (i.e., the command) can also make use of these inherited parameters for it to operate. These parameters include the following:
1. The PID of the parent process2. The user and group owner of the process

142 Unix and Shell Programming
3. The current working directory4. The three standard fi les5. Other open fi les used by the parent process6. Some environment variables available in the parent process
By default, the values stored in shell variables are local to the shell, that is, they are available only in the shell in which they are defi ned. They are not passed on to a child shell. However, the shell can also export these variables recursively to all child processes so that, once defi ned, they are available globally. This is done using the export command.
Note: A variable defi ned in a process is only local to the process in which it is defi ned and is not available in a child process. However, when it is exported, it is available recursively to all child processes.
The syntax for the export command is as follows:
Syntax export variable[=value]
Examples
(a) $ export welcomemsg This example exports an earlier defi ned shell variable welcomemsg to make it available to
child processes.(b) $ export welcomemsg='Good Morning' This example defi nes a shell variable welcomemsg as well as exports it to be available to
child processes.
Note: While defi ning a shell variable, there should not be any space on either side of the ‘=’ sign.
(c) The following example creates a new shell variable radius.
$ radius=5 $ echo $radius 5 $ sh - Create new shell $ echo $radius $
We can see that the value of the shell variable radius is not seen in the new shell as it does not know about this. If we want the new shell to know about the shell variables created by us, we use the export command. By using the export command, the shell variables are exported to child processes, making it a global variable. The following example demonstrates this implementation.
Example $ radius=5
$ echo $radius5$ export radius
$ sh - Create new shell

File Management and Compression Techniques 143
$ echo $radius5 - The new shell has a copy of radius
$ radius=30 - The copy gets a new value$ echo $radius30
$ Ctrl-d - Return to old shell$ echo $radius5 - We get the original value of radius
The export command causes a new shell to be given a copy of the original variable. This copy has the same name and value as the original. Subsequently, the value of the copy can be changed but when the subshell dies, the copy is gone though the original variable remains. To erase or remove a global variable, we use the unset command.
Syntax unset variable_name
Example $ unset radius
Note: To fi nd out the list of variables exported, just type the set command followed by the enter key: $ set
In this chapter, we understood the different types of fi les, the role of device drivers while operating the devices, differences between block and character devices, usage of disk space, amount of free disk space in all fi le systems, and partition in a disk drive. We learnt how commands such as gzip, gunzip, zip, unzip, compress, uncompress, pack, unpack, bzip2, and bunzip2 can be used for compressing and uncompressing fi les. We also discussed how desired fi les can be found and executed specifi c commands on them. In addition, we learnt how a corrupted fi le system can be repaired. We have also seen the role of important fi les of the Unix system, shell variables, and system shell variables. In Chapter 6, we will learn about handling processes, jobs, and signals in detail.
■ SUMMARY ■
1. All devices are considered to be fi les in Unix. Devices such as fl oppy drive, CD-ROM, and hard disk are known as block devices as data is read from and written into these devices in terms of blocks. Character devices, on the other hand, are also known as raw devices as the read/write operations in these devices are done directly, that is, ‘raw’ without using the buffer cache.
2. A disk can be divided into several partitions. It can have a primary partition and an extended partition. There can be multiple logical drives in an extended partition.
3. The hosts fi le contains static address information for computers on our local network.
4. The hosts.allow fi le defi nes the list of hosts for whom the services are allowed; the hosts.deny fi le defi nes the list of hosts for whom the services are denied.
5. By default, the values stored in shell variables are local to the shell, that is they are available only in the shell in which they are defi ned.
6. The export statement exports the local variables recursively to all child processes so that they are available globally.

144 Unix and Shell Programming
■ FUNCTION SPECIFICATION ■
Command Functiondd (disk data)
Used for copying data from one medium to another.
format Used for formatting disks.du (disk usage)
Used to display information about the usage of disk space by each fi le and directory of the system.
dfspace Used to report the free disk space in terms of megabytes and percentage of the total disk space.
fdisk Used to create, delete, and activate partitions.
gzip Used to compress the specifi ed fi le and replace it with the compressed fi le having the extension .gz. The -l option is used with gzip to know the extent to which a fi le is compressed.
gunzip Used to uncompress a compressed fi le.zip Used to compress a set of fi les into a
single fi le.unzip Used to unzip a zipped archive.compress Used to compress a specifi ed fi le. It
replaces the original fi le with its compressed version that has the same fi lename with a .Z extension added to it.
uncompress Used to uncompress the compressed fi le back to its original form.
zcat Used to see the contents of the compressed fi les.
pack Used to compress the given fi le and replace the original fi le with the same fi lename having a .z extension added to it.
Command Function
The degree of compression in the pack command is less than the compress command.
pcat Used to view the contents of a packed fi le.
unpack Used to uncompress the packed fi le into the original fi le.
bzip2 Used to compress a specifi ed fi le by replacing it with its compressed version having a .bz2 extension.
7-zip Used to compress fi les at the highest compression ratio (around 30–50% more than the other zip formats).
fi le Used to determine the fi le type, that is, if it is a regular fi le, directory, device fi le, etc.
fi nd Used to locate one or more fi les that satisfy the given criteria.
which/whence
Used to fi nd out the location of a specifi ed application program or system utility on the disk.
locate Used to search for fi les whose names match a particular search string.
fsck Used to check and repair a fi le system if corrupted.
passwd A fi le found in the /etc directory contain-ing login names, passwords, home direct-ories, and other information about users.
set Used to see the list of shell variables.
■ EXERCISES ■
5.1 All devices are considered as fi les in Unix. 5.2 All device fi les are stored in /etc or in its
subdirectories. 5.3 CD-ROM is a character device. 5.4 Printer is a character device. 5.5 The minor number represents the type of device. 5.6 The dd command is used for copying data from
one medium to another.
5.7 The term bs in the dd command stands for block size.
5.8 The du utility displays complete information about the usage of disk space by each fi le and directory.
5.9 By default, the du command displays information in terms of 1024-byte blocks.
5.10 The df command reports only the free disk space of the fi le system installed on our machines.
State True or False
Objective-type Questions

File Management and Compression Techniques 145
5.1 Devices are of two types: and .
5.2 The term ‘if’ in the dd command refers to .
5.3 The option used with the du command to see the usage of every fi le is .
5.4 The command compresses the specifi ed fi le and replaces it with the extension .gz.
5.5 The command used to uncompress any com-pressed fi le is .
5.6 The command used to compress a set of fi les into a single, compact archive is .
5.7 The option used with the zip command to fi x any damaged zip fi le is .
5.8 The option of the compress command that displays the amount of compression is
. 5.9 The command used to repair the fi le system is
.5.10 The option used with the fi nd command to search
for fi les that have not been accessed for a given time length is .
5.11 The option used with the fi nd command to search for fi les of the specifi c owner is .
5.12 The option in the compress com-mand stands for verbose and displays how much compression has been done.
5.13 To see the contents of the compressed fi les, command is used.
5.14 The pack command compresses the given fi le and replaces the original fi le with the same fi lename having extension added to it.
5.15 The compresses the specifi ed fi le by replacing it with its compressed version having a .bz2 extension.
5.16 The option of the bzip2 command can be used to uncompress a fi le.
5.17 The command is used to convert a local shell variable into a global variable.
5.18 The system shell variable stores the information of the terminal that we are using.
5.19 The system shell variable indicates the location where emails of a user are stored.
5.20 The path name of the home directory of the user is stored in the variable.
Fill in the Blanks
Multiple-choice Questions
5.1 The fdisk command is used to (a) format a disk (b) remove bad sectors from a disk (c) create partitions (d) repair a fi le system 5.2 The gzip command compresses the fi le with the
extension (a) .gzip (b) .gz (c) .gp (d) .g
5.3 The command used to view the contents of a packed fi le is
(a) pcat (c) show (b) cat (d) catpack 5.4 The user’s log name is stored in (a) LOGNAME (c) OWNER (b) USER (d) LOGIN 5.5 The command to see the list of shell variables
is (a) showvar (c) disp (b) showshell (d) set
5.11 The dfspace command reports the used disk space of the fi le system.
5.12 The -q option of the zip command makes it run in quiet mode.
5.13 The extension added to the fi le that is compressed by the compress command is .C.
5.14 The fi nd command is used for searching for fi les.5.15 The fi le command is used for displaying fi lenames.5.16 The gunzip command is used to uncompress a
compressed fi le that is compressed by the gzip,
compress, or pack commands. 5.17 The fdisk command can be used to create and delete
partitions on a disk, but cannot activate partitions.5.18 A disk can have several primary partitions.5.19 The gzip command compresses the specifi ed fi le
and replaces it with the compressed fi le having the extension .gz.
5.20 By default, the values stored in shell variables are local to the shell, that is, they are available only in the shell in which they are defi ned.

146 Unix and Shell Programming
Programming Exercises 5.1 Write the command for the following tasks: (a) To copy the entire disk, hdb, to a fi le called
back.dd (b) To fi nd the disk usage of every fi le in /
project directory (c) To fi nd the total number of blocks occupied
by the /project directory (d) To display a report of the free disk space for
all the fi le systems installed on our machines (e) To display the free disk space in terms of
megabytes and percentage of total disk space (f) To compress a fi le a.txt to a.txt.gz (g) To add a fi le account.txt to a zipped fi le
fi nance.zip (h) To fi x a zipped fi le fi nance.zip (i) To compress a fi le a.txt and also show how
much compression was done (j) To uncompress a fi le a.txt.bz2 fi le (k) To set the secondary prompt, the prompt that
is displayed when a command is continued to the second line to '>>>'
(l) To display the list of path names
(m) To determine the type of the fi le, accounts.txt
(n) To display the fi les and their path names that have not been accessed for over 10 days
(o) To check the fi le system 5.2 What will the following commands do? (a) $ export project_name (b) $ PS1="UnixPrompt>" (c) $ passwd (d) $ grep john /etc/passwd (e) $ which cat (f) $ fi nd . - mtime - 10 -name "*.txt" -
print (g) $ bunzip2 accounts.txt.bz2 (h) $ pack accounts.txt (i) $ zip -q accounts.zip *.txt (j) $ df -h (k) $ du –s *.txt (l) $du /projects (m) $ locate "projects" (n) $ fi nd / -size +15 -print (o) $ echo $HOME
5.6 The command that is used to fi nd out where an application program or system utility is stored on a disk is
(a) search (b) fi ndapp (c) whence (d) util 5.7 The fsck command is used for (a) fi nding a fi le (b) compressing a fi le (c) uncompressing a fi le (d) repairing a fi le system 5.8 The list of hosts for whom the services are
allowed is stored in the fi le (a) hosts.allow (c) hosts (b) services.txt (d) allowed 5.9 The shell variable that sets the symbol for the
primary shell prompt is (a) PS2 (c) shellpr (b) sprompt (d) PS15.10 The TERM shell variable stores (a) shell duration (b) terminal description (c) logged-in time (d) booting time
Review Questions
5.1 Explain the following commands with syntax and examples:
(a) dd (c) uncompress (b) format (d) unpack 5.2 (a) What are the points of comparison between the
following commands: gzip, zip, compress, and pack?
(b) What is the difference among the following commands: du, df, and dfspace?
5.3 (a) Explain the different options used in the fi nd command to search for a desired fi le.
(b) How is the fi le system repaired in Unix? Explain. 5.4 What is the difference between the following
fi les? (a) /etc/passwd and /etc/shadow (b) /etc/hosts.allow and /etc/hosts.deny 5.5 How is a shell variable created and how can a
local shell variable be made a global variable?

File Management and Compression Techniques 147
5.1 In long listing command ls –l, if you fi nd a fi le with mode fi eld set to l, what does it mean?
5.2 Correct the following command to backup a hard disk to a fi le.
$ dd if=/fi le.dd of=/dev/hda 5.3 Correct the mistake in the following command
for compressing few .txt fi les in the name abc.zip in quiet mode.
$ zip *.txt abc.zip 5.4 Can you uncompress a .bz2 fi le to the standard
output? If yes, how? 5.5 How will you know whether a particular fi le in
the /dev directory represents a character device or block device?
5.6 If a device has a major number 8 and minor number 0, what does it represent?
5.7 Is there any way to uncompress a .bz2 fi le without
using the bunzip2 command? If yes, what is that?
5.8 If we provide the command fi le a.txt, we get the output, ‘cannot open for reading’. What does it mean?
5.9 What command must be given to delete all the fi les that have not been accessed for the last six months?
5.10 Correct the following command to display all .txt fi les in the current directory.
$ fi nd . - name "*.txt" - ls5.11 What will happen if answer Yes is provided to
the question “CLEAR?”, which appears while running fsck command?
5.12 Is the following command to set the primary prompt correct? If not, identify the mistake.
PS2='UnixPrompt>'
Brain Teasers
■ ANSWERS TO OBJECTIVE-TYPE QUESTIONS ■
State True or False
5.1 True 5.2 False 5.3 False 5.4 True 5.5 False 5.6 True 5.7 True 5.8 True 5.9 False5.10 True5.11 False5.12 True5.13 False
5.14 True5.15 False5.16 True5.17 False5.18 False5.19 True5.20 True
Fill in the Blanks
5.1 character, block 5.2 input 5.3 -a 5.4 gzip 5.5 gunzip
5.6 zip 5.7 -F 5.8 -v 5.9 fsck5.10 -atime n5.11 -user name5.12 -v5.13 zcat5.14 .Z5.15 bzip25.16 -d5.17 export5.18 TERM5.19 MAIL
5.20 HOME
Multiple-choice Questions
5.1 (c) 5.2 (b) 5.3 (a) 5.4 (a) 5.5 (d) 5.6 (c) 5.7 (d) 5.8 (a) 5.9 (d)5.10 (b)
5.6 Explain the usage of the following system shell variables:
(a) HOME (c) PS2 (e) TERM (b) MAIL (d) PATH

6.1 PROCESS BASICS
All processes in the Unix system are created when an existing process executes a process creation system call known as fork. The fi rst process in the Unix system, also known as process 0, is related to bootstrapping. The process of starting a computer is known as bootstrapping or booting. During bootstrapping, a computer runs a self test, and loads a boot program into the memory from the boot device. The boot program loads the kernel and passes the control to the kernel, which in turn, confi gures the devices, performs hardware status verifi cation, detects new hardware, and initializes the existing devices and system processes. After performing these initial activities, the kernel creates an init process with process identifi cation 1 (PID 1). The process 0 is a part of the kernel itself and basically functions as a sched (or swapper). It also does the job of swapping, that is, moving in and out of the processes.
The init process always remains in the background while the system is running. It is the ancestor of all further processes. It is the init process that forks the getty process, which
66Manipulating Manipulating Processes and Processes and SignalsSignals
C H A P T E R
After studying this chapter, the reader will be conversant with the following:
• Processes and their address space, structure, data structures describing the processes, and process states
• Difference between a process and a thread• Commands related to scheduling processes at the desired time, handling
jobs, switching jobs from the foreground to the background and vice versa, etc.
• Suspending, resuming, and terminating jobs, executing commands in a batch, ensuring process execution even when a user logs out, increasing and decreasing priority of processes, and killing processes
• Signals, their types, and the methods of signal generation• Virtual memory and its role in executing large applications in a limited
physical memory and mapping of a virtual address to the physical memory

Manipulating Processes and Signals 149
enables users to log in to the Unix system. When a user logs in, the command shell runs as the fi rst process from where other processes are forked in response to the commands, programs, utilities, etc., executed by the user.
Note: The process that calls fork is known as the parent process and the process that is created through fork is known as the child process. The child process is an exact clone of the parent process. Both these processes share the same memory, registers, environment, open fi les, etc. In addition, the parent and child processes have separate address spaces enabling them to execute independently.
A process operates in either user mode or kernel mode:
User mode User mode is the mode in which processes related to user activities get executed. Commands, programs, utilities, etc., executed by the user are run in this mode. These processes being trivial in nature, the code in the user mode runs in a non-privileged protection mode. Switching from user to kernel mode takes place either when a user’s process requests services from the operating system by making a system call or when some interrupt occurs during the events such as timers, keyboard, and hard disk input/output (I/O).
Kernel mode In kernel mode, the system processes, that is, the processes related to managing a computer system and its resources get executed. The processes used to allocate memory to access hardware peripherals such as printer and disk drive run in this mode. These processes are critical in nature, that is, they can make an operating system inconsistent if they are not handled properly. Hence for security reasons, these processes are run in a privileged protection mode.
The user and kernel modes can be better understood with the help of a block diagram (Fig. 6.1) of the kernel architecture.
In Fig. 6.1, the users initially execute their processes in the user mode. When the user process needs some kernel service (such as accessing memory, disk fi le, printer, or other hardware peripherals), it interacts with the kernel through the system call. System calls are functions that run in the kernel mode. Hence while executing system calls, the user process switches from the user mode to the kernel mode.
Figure 6.1 shows the following two main components that make up the kernel:
File subsystemThe fi le subsystem manages the fi les of the Unix system. In the previous chapters, we learnt that everything in Unix is in the form of fi les, that is, all devices and peripherals are considered fi les. Communication between the hardware and their respective device drivers are managed by the fi le subsystem. Even the buffers that are used for storing the data that is either fetched from the devices or is to be written to the devices are managed by the fi le subsystem.
Process control subsystemThe process control subsystem manages all the tasks required for successful execution of processes. It allocates memory to the processes and schedules, synchronizes, and even

150 Unix and Shell Programming
implements communication between them. The processes are basically executable fi les that are designated for certain tasks. For loading the executable fi le into the memory, the process control system interacts with the fi le subsystem and thereafter executes it to perform the required action. The process control subsystem comprises the following three modules:
Interprocess communication An application usually consists of several processes that undergo execution simultaneously. In addition, the data processed by one process has to be input into another process for further processing. This module performs all the tasks required to establish communication among the different processes and also synchronizes them. By process synchronization, we imply that the module manages the locks when two processes update a particular type of content, that is, it ensures that no two processes update the same data simultaneously.
Memory management This module manages memory allocation. It allocates memory to the required process. If the memory is not enough, it transfers certain selected pages of the current process to the secondary storage, hence creating space for the required process. In addition, it frees the memory assigned to the process when it is terminated so that memory can be assigned to some other process.
Scheduler The task of this module is to pick up the ready-to-run processes from the memory and assign the CPU to it. When the current process suspends for some I/O operation,
Fig. 6.1 Block diagram of kernel architecture
System call inteface
User
User mode
Kernel mode
Filesubsystem
Devicedrivers
Processcontrol
subsystemInterprocess
communication
Scheduler
Memorymanagement
Hardware drivers/Interface
Hardware
Buffercache

Manipulating Processes and Signals 151
its job is to seek the next process and schedule it for execution. In addition, when some higher priority process comes in, the scheduler pre-empts the current process and brings in the higher priority process and assigns the CPU to it.
Both the fi le and process subsystems are used for managing the hardware of a system. These interact with the drivers and hardware interface (part of the kernel) for getting the desired task performed by the hardware.
We will now be dealing with the processes in more detail, including the segments that create them and the structures that are involved in handling them.
6.1.1 Process Address SpaceEach process runs in its private address space. A process running in user mode refers to a stack, data, and code areas. When running in kernel mode, the process addresses the kernel data and code areas and uses a kernel stack. In short, a process includes three segments:
1. Text: It represents the program code, that is, the executable instructions.2. Data: It represents the program variables and other data processed by the program code.
It is a global content that can be accessed by the program and its subroutines (if any).3. Stack: It represents a program segment that is used while implementing procedure calls
for storing information pertaining to parameters, return addresses, etc.
Besides these three segments, the process also uses a memory heap to store the dynamic structures. These dynamic structures are those that are created during the execution of the process and are successfully removed when their task is completed, that is, the resources allocated to the dynamic structures are immediately freed when their purpose is fi nished so that those resources can be reused by other structures.
6.1.2 Process StructureA process structure comprises a complex set of data structures that provide the operating system with all the information necessary to manage and dispatch processes. It consists of an address space and a set of data structures in the kernel to keep track of that process. The address space is a section of the memory that contains the execution code, data, signal handlers, open fi les, etc. The information about processes is described in the following data structures:
Process tableThe process table (also known as kernel process table) is an array of structures that contains an entry per process. Every process entry contains process control information required by the kernel to manage the process and is hence maintained in the main memory. The process entry is also known as process control block (PCB) and contains the following information:
Process state It represents the process state, that is, whether it is in ready, running, waiting, sleeping, or zombie mode.
Process identifi cation information It uniquely identifi es a process and consists of the following three elements:

152 Unix and Shell Programming
1. Process identifi er (PID): This refers to a unique number assigned to identify a process.2. User identifi er (UID): This refers to the ID of the user who created the process. The process
identifi cation also includes the group ID of the user (GID), the effective user ID (EUID), set user ID (SUID), fi le system user ID (FSUID), the effective group ID (EGID), set group ID (SGID), and fi le system group ID (FSGID) of the user who also starts the process.
3. Parent process identifi er (PPID): This refers to the identifi er of the parent process that created the process.
Program counter It stores the address of the next instruction to be executed by this process.
CPU registers It helps in initiation of the process using general-purpose and other registers.
CPU scheduling information It includes an algorithm on the basis of which the scheduling of the process is determined.
Memory-management information It stores information of the memory used and released by the process.
Accounting information It stores information such as process numbers, job numbers, and CPU time consumed.
I/O status information It stores information such as the list of I/O devices and the status of open fi les allocated to the process.
User areaThe Unix kernel executes in the context of certain processes. The user area (U area) refers to private information in the context of a process. The U area of a process contains the following:
1. User IDs that determine user privileges2. Current working directory3. Timer fi elds that store the time the process spent in the user and kernel modes4. Information for signal handling5. Identifi cation of any associated control terminal6. Identifi cation of data areas relevant to I/O activity7. Return values and error conditions from system calls8. Information on the fi le system environment of the process9. User fi le descriptor table that stores the fi le descriptors of the fi les that the process has
opened
Note: The process entry also contains certain pointers such as pointers to the user and shared text areas.
You may recall that all the information of a fi le, such as fi le data, access permissions, and access times, is stored in an inode. Inodes are maintained in the inode table. Besides inode table, the kernel has two other fi le structures known as the fi le table and the user fi le descriptor table.
File table It is a global kernel structure that contains information such as storing the byte offset in the fi le and indicating the location from where the next write/read operation will start, mode of opening, and reference count of all the currently opened fi les. The fi le table also contains the permissions that are assigned to the process.

Manipulating Processes and Signals 153
User file descriptor table An individual fi le descriptor is allocated per process. It keeps track of the fi les that are opened by the process.
When a process opens or creates a fi le, a fi le descriptor for it is returned by the kernel, which is stored as a new entry created in the user fi le descriptor table. For reading and writing into a fi le, the fi le descriptor in the user fi le descriptor table is located and the pointers from it to the fi le table and inode table are used to access or write the fi le data (refer to Fig. 6.2).
Fig. 6.2 Relation between user fi le descriptor table, fi le table, and inode table
User file descriptor table File table Inode table
After understanding the process table, let us discuss the next structure that stores information that is private to the process.
Per process region tableThe kernel process table points to per process region table as each process has a per process region (pregion) table associated with it. The per process region table in turn points to the region table to indicate the regions that are private to it and the regions that are shared with other processes. This is to say that an entry in the region table may be shared with other processes too. The per process region table is used to keep the following information of a pregion:
1. A pointer to an inode of the source fi le that contains a copy of the region, if any exists2. The virtual address of the region3. Permissions of the regions, that is, whether the region is read-only, read–write, or read–
execute4. The region types (e.g., text, data, and stack)
Region tableA region is a continuous area of a process’s address space such as text, data, and stack. Region table entries indicate whether the region is shared or private. They also point to the location of the region in the memory (refer to Fig. 6.3). A region table stores the following information:
1. Pointers to inodes of fi les in the region2. The type of region

154 Unix and Shell Programming
3. Region size4. Pointers to page tables that store the region5. Bit indicating if the region is locked6. The process numbers currently accessing the region
6.1.3 Creation and Termination of ProcessesBesides the built-in processes that are auto created on booting the Unix system, we can also create our own processes. In addition, the processes can be terminated after their tasks are completed in order to release the resources acquired by them. In Chapter 7, we will learn about the system calls that are required to create, suspend, and terminate a process.
A process consumes system resources, such as memory, disk space, and CPU time. If there is more than one process running at a time, the kernel allocates system resources to one process, while keeping other processes waiting.
Let us see how the processes change their states and undergo transitions.
6.2 PROCESS STATES AND TRANSITIONS
A process is created through the fork command, and depending on the availability of the primary memory, it is either kept in the memory in ready to run state or is swapped out to the secondary memory in ready to run swapped out state, as shown in Fig. 6.4. The kernel monitors the processes that are in ready to run state in the memory and schedules the process depending on the algorithm used by the operating system. When scheduled, the process executes in the kernel mode, that is, it switches to the kernel running state. From the kernel running state, the process can be moved to the pre-empted state if a process of a higher priority is scheduled. As a result, process switching takes place, wherein the current process is switched to the pre-empted state and another process is scheduled to switch to the kernel running state. In addition, the process running in kernel mode can return to the user mode,
Fig. 6.3 Structures that make up a process
Process1Process table
TextDataStack
Region table
Region sharedby two processes
TextDataStack
Per processregion table
User filedescriptor
table
U area
U areaUser file
descriptortable
Process2

Manipulating Processes and Signals 155
that is, to the user running state. Besides this, a process in the kernel running state can also switch to the sleep state, waiting for the occurrence of an event (like waiting for the user to enter some data). This stage is known as asleep in memory state. The process in the kernel running state can also terminate switching itself to the zombie state. A zombie process is a dead child process that has completed its execution and has sent a SIGCHLD signal to its parent allowing it to read its exit status. Until and unless the parent reads the exit status of the child process, its entry remains in the process table. The process sleeping in the memory can either be swapped out to the secondary storage to sleep and swapped out state or woken up to move to the ready to run in memory state, if the event that it was waiting for occurs. The process in sleep and swapped out state will be moved to the ready to run swapped out state where it waits for the swapper to move it to the ready to run in memory state whenever it is required.
Note: When a process is required, the space for it is created in the primary memory and is swapped into the primary memory by the swapper switching it to the ready to run state.
The process in the preempted state returns to the user mode, that is, the user running state when it is required by the user. The process running in the user mode switches to the kernel mode when an interrupt occurs, a system call is made to access operating system services, or when some fault or exception occurs.
Note: The scheduler decides the process that has to be submitted next to the CPU for action.
The different states of a process are briefl y described in Table 6.1.Almost all the process states discussed are self-explanatory, except one, the zombie
process. We will elaborate on this in Section 6.3.
Fig. 6.4 Different states of a process
Pre-empted
Kernel running
Not enough memory
Ready to runin memory
Asleepin memory
Swap out Sleep andswapped out
Ready to runswapped out
Swap out
Swap in
Zombie
Preempt
ExitSleep
Wakeup Wakeup
Rescheduleprocess
Created
Fork
Primary memoryis availableReturn to user
User running
System call,interrupt
Return

156 Unix and Shell Programming
6.3 ZOMBIE PROCESS
A zombie process is a process that has completed execution and is currently dead, but still has an entry occupied in the process table, waiting for the process that started it to read its exit status. The zombie process does not consume any memory or other resources. Zombie processes are usually created when a child process is spawned, but dies before the parent process reads its exit status. Since the parent process has not received its return value, the process becomes a zombie.
We can identify a zombie process by executing the ps command. Zombie processes contain a character Z in their state fi eld (S), as shown in the following output:
$ ps -el
F S UID PID PPID C PRI NI ADDR SZ WCHAN TTY1 Z 0 146 0 0 0 20 fec20000 0 d6dd12f2 tty010 S 1 6 0 0 40 15 d0b5c488 635 d08f8bfc tty011 R 0 3 1 0 0 12 dob5aad8 1175 d29bb8f2 tty01
The description of the output is as follows:
1. F represents fl ags associated with the process. 2. S represents the state of the process. 3. UID represents the user ID. 4. PID represent the process ID. 5. PPID represents the parent process ID. 6. C represents the utilization of the processor. 7. PRI represents the scheduling parameters for a process. 8. NI represents the nice value (discussed in Section 6.8.6 ) assigned to the process.
Table 6.1 Unix process states
State Description
User running The process executes in user mode.
Kernel running The process executes in kernel mode.
Ready to run in memory The process is ready to run as soon as the scheduler schedules it.
Asleep in memory The process is unable to execute until an event occurs; the process is in main memory (a blocked state).
Ready to run, swapped out The process is ready to run, but the swapper must swap the process into the main memory before the scheduler can schedule it to execute.
Sleeping, swapped The process is waiting for an event and has been swapped to the secondary storage (a blocked state).
Pre-empted The process is in the suspended mode as the higher priority process is scheduled and switched to the kernel running state.
Created The process is newly created and not yet ready to run.
Zombie The process has completed execution and is currently dead, but still has an entry occupied in the process table, waiting for the parent to read its exit status.

Manipulating Processes and Signals 157
9. ADDR represents the memory address of the process.
10. SZ represents the total number of pages in the process.
11. WCHAN represents the address of an event where the process is switched to sleep mode.
12. TTY represents the terminal from where the process is created.
The character Z in the S column confi rms that it is a zombie process. We can see in this output that the process with PID 146 is zombie. The other
characters that may appear in the S column to show the current state of the process are shown in Table 6.2.
To remove or delete a zombie process, the kill command is used. To kill, the zombie process with PID 146, shown in the output, can be deleted using the following statement:
$ kill -9 146
Conventionally, to remove a zombie process, its parent is informed that the child has died by sending a SIGCHLD signal manually using the kill command. Thereafter, the signal handler executes the wait system call that reads its exit status and removes the zombie. In case a parent fails to call the wait system call, the zombie will be left in the process table. On reading the exit status of the zombie process, it is removed. Once removed from the process table, the zombie’s process ID and entry in this table can be reused. In case the parent process refuses to remove the zombie, we can forcefully remove a zombie by removing the parent process.
Note: A zombie process is not the same as an orphan process. An orphan process is a process that is still executing, but whose parent has died. Orphan processes do not become zombie processes, because when a process loses its parent, the init process becomes its new parent.
What is the name of the task that suspends the execution of one process on the CPU while resuming execution of some other process? It is called context switching. We will now discuss this in detail.
6.4 CONTEXT SWITCHING
Depending on the priority, a current running process can be switched from the running state to the blocked state (pre-empted, sleeping, etc.) at any time, and higher priority processes can be scheduled to run. The state of the blocked process is saved so that in the future, it can run further from the state at which it was held. The tasks conducted during process switching, that is, saving the state of the current process and loading the saved state of the new process is known as context switching. While context switching, the information of the program counter and other registers of the blocked process is saved. In addition, its PCB is updated to change its state from the running state to a pre-empted, sleeping, or other state. The PCB of the process that is scheduled to run is updated to indicate its running state.
We usually get confused while differentiating between processes and threads, as both are meant for processing. Then what is the difference between the two? Let us clarify this confusion.
Table 6.2 Brief description of the characters that may appear in the S column
Process States
D Indicates a process in disk
I Indicates an idle process
R Indicates a runnable process
S Indicates a sleeping process
T Indicates a stopped process
Z Indicates a zombie process

158 Unix and Shell Programming
6.5 THREADS
A thread is the smallest unit of processing. A process can have one or more threads. This is shown in Fig. 6.5. Multiple threads within a process share memory resources whereas different processes do not share these resources. In multithreading, a processor switches between different threads. A thread has its own independent fl ow of control as long as its parent process exists and dies if the parent process dies.
Figure 6.5 shows two processes, Process 1 and Process 2, in the user space. Process 1 consists of a single thread whereas Process 2 is multi-threaded.
Threads have some properties of processes. Like pro cesses, a thread consists of the following:
1. A program counter to indicate which instruction to execute next
2. Registers to store data in the variables3. A stack to store information related to the
procedure called
Having properties similar to processes, threads are also known as lightweight processes.
6.5.1 Comparison Between Threads and ProcessesTable 6.3 shows the differences between processes and threads.
Table 6.3 Differences between processes and threads
Process Thread
Processes are individual entities. Threads are part of processes.It takes quite a long time to create and terminate a process.
It comparatively takes lesser time to create a new thread than a process, because the newly created thread uses the current process address space. Similarly, it takes lesser time to terminate a thread than a process.
It takes longer to switch between two processes as they have their individual address spaces.
It takes lesser time to switch between two threads within the same process as they use the same address space.
Communication of data among processes is quite sophisticated as it requires an inter process communication mechanism.
Communication of data among threads is quite easy as they share a common address space.
Fig. 6.5 Threads within processes
Process 1
Single thread Multiple threads
User space
Process 2
Similar to a traditional process, a thread can be in any one of the following states: running, blocked, ready, or terminated. A running thread is the one to which the CPU is assigned and is currently active. A blocked thread is the one that is waiting for some event to occur. On occurrence of the event, the blocked thread turns into a ready state. A ready thread is a thread that has all the resources except the CPU, and hence waits for the CPU’s attention. The thread that has completed its work is said to be in a terminated state. A thread can also be terminated in between, if desired by the process.

Manipulating Processes and Signals 159
When a process is created, it is assigned a unique identifi cation number known as the process identifi er (PID) by the kernel. The PID value can be any value from 0 to 32767. However, this range depends on a particular Unix variant. It is typed as pid_t, whose size may vary from system to system. The name of the process remains same as the name of the program being executed. Every process is created from a parent process. The process that is created is known as the child process and the process from which it is created is known as its parent process. Unix creates the fi rst process with PID as 0 when the system is booted.
Let us take a look at the commands that give us information of the processes running in our system.
6.6 ps: STATUS OF PROCESSES
This command is used to display the list of processes that are running at the moment. The list of the processes along with their PID number, terminal from where the process is executed, the elapsed time (time consumed by the process since it started), and the name of the process will be displayed.
Syntax ps [-a] [-e] [-f] [-l] [-L] [ -u user_name ] [ -g group_IDs ] [ -t terminal] [ -p process_IDs ]
The options of the ps command are briefl y described in Table 6.4.
Table 6.4 Brief description of the options used in the ps command
Options Description
-a It displays information regarding all the processes.
-e It displays information regarding every running process.
-f It displays full information regarding each process.
-l It displays a long listing.
-L It displays threads with lightweight processes (LWP) and number of lightweight process (NLWP) columns.
-u user_name It displays the list of processes of the specifi ed user. We can also specify the user ID instead of the login name. In addition, we can specify more than one username or user IDs separated by a space or comma (,).
-g group_IDs It displays the list of processes of the specifi ed group_ID. We can specify more than one group ID, separated by a space or comma (,).
-t terminal It displays the list of processes associated with the specifi ed terminal.
-p process_IDs It displays information regarding specifi ed process ID numbers.
Examples
(a) $ ps PID TTY TIME CMD 739 tty01 00:00:03 sh 894 tty01 00:00:12 ps

160 Unix and Shell Programming
By default, the ps command displays only the processes that are running at the user’s terminal.
(b) To get the list of processes of the other users logged in to the system, we use the following command.$ ps -a PID TTY TIME CMD 739 tty01 00:00:03 sh 894 tty01 00:00:12 ps -a 224 tty02 00:00:10 sh 901 tty02 00:00:07 cat 724 tty03 00:00:08 sh
The option –a is used for displaying the processes of all the users.
(c) To get the list of processes of a particular user, we give the following command. $ ps –u ravi Here, the option –u is used for displaying a list of processes of only the specifi ed user and ravi
is the login ID of the user whose process list we want to see. We may get the following output. PID TTY TIME CMD 224 tty02 00:00:10 sh 901 tty02 00:00:07 cat
(d) To get complete (full) information of the processes, including the login ID of the user, ID of the parent process, CPU time consumed, etc., we give the following command.$ ps -fHere, the option –f stands for full information. We may get the following output.
UID PID PPID C STIME TTY TIME CMDravi 423 341 3 13:01:39 tty01 00:00:01 -shravi 661 423 9 13:05:78 tty01 00:00:01 ps -f
The fi rst column (UID) displays the login ID of the user. PID stands for the process iden-tifi er and is used for the identifi cation of the process. PPID is the identifi cation of the parent process from where the current process was born (or created). C is the amount of CPU time con sumed by the process. STIME is the time when the process started. The login shell has PID 423 and PPID 341, which implies that the shell is the child process that was created by a system process with PID 341. The parent PID (i.e., PPID) of the ps -f command is 423 as this command was launched by the shell (hence the shell is the parent process of the ps -f command).
(e) To get the list of processes that are created by the user from a particular terminal, we give the following command.$ ps –t tty02PID TTY TIME CMD 224 tty02 00:00:10 sh 901 tty02 00:00:07 cat
The option –t is used for specifying the terminal number.Besides the processes that we create, there are several processes that are automatically
created by the Unix operating system at the time of booting and are used for managing different tasks that include handling memory and other resources.

Manipulating Processes and Signals 161
(f) To see the list of the processes that are system-generated and the ones that are running at the current instant, we give the following command.$ ps -ePID TTY TIME CMD0 ? 00:00:00 sched1 ? 00:00:01 init2 ? 00:00:00 vhand3 ? 00:01:01 bdfl ush970 ? 00:00:00 getty975 ? 00:01:00 gettyMost of the processes that we see in this listing are very important for the functioning of the Unix operating system and hence keep running continuously in the background until the system shuts down. These processes are known as daemons as they run automatically without any request generated from the user. Since these system processes or daemons are not executed from any terminal, we see a ? in the column TTY in the listing provided. We also see in the aforementioned listing that the fi rst process is the sched (scheduler) that schedules the next process from the ready queue and submits it to the CPU for necessary action. The init is the parent process of a daemon and its PID is 1. The vhand is a sort of page stealing daemon that releases pages of the memory for use by other processes. The rest of the processes (found in the list) also help in some way or the other in the proper functioning of the Unix system and do different tasks such as initializing the processes, swapping in and out the active processes, and fl ushing the buffer for different I/O operations, among others.
(g) To see the threads of the currently running processes, we use the following command.$ ps -LPID LWP TTY LTIME CMD 739 1 tty01 0:00 sh 894 1 tty01 0:00 ps This command shows threads with LWP and NLWP columns. As said in Section 6.6, LWP and NLWP represent lightweight processes and number of lightweight process, respectively.
6.7 HANDLING JOBS
A job refers to a command or program executed by the user to perform some task. As discussed in Section 6.6, a process is nothing but a program in execution mode. In other words, we can call our jobs as processes. The jobs or processes are controlled by the shell. For example, the following command is a job or process.
Example $cat letter.txt
There are two types of jobs—foreground and background. Foreground jobs are those that appear active on the terminal and need continuous interaction with the user for their execution. In other words, a foreground job might require input from the user and until and unless it is completed or suspended, no other job or command can be executed, whereas

162 Unix and Shell Programming
background jobs are those, which on execution, immediately display the shell prompt allowing the user to execute other jobs. This means that the background job does not lock the input and output terminals and instead allows the user to execute more processes.
6.7.1 fg: Foreground JobsJobs that require a high level of user interaction are executed as foreground jobs. In addition, the most preferred jobs, whose results we want to see immediately, are executed in the foreground. The foreground job locks the standard input and output terminals and does not allow any other job to begin until and unless it is either suspended or complete. To start a foreground job, just type in a command followed by the Enter key.
Syntax fg [%job]
Here, %job represents the job we wish to run in the foreground.
Examples
(a) $ fg When fg command is used without any arguments, it resumes the fi rst job.(b) $ fg %1 This statement resumes the job whose ID is 1.(c) Any command that is issued initially runs the job in the foreground. The following sort
command executes in the foreground. $ sort letter.txt
Suspending, resuming, and terminating foreground jobsWe can suspend any running foreground job and resume it any time we want. To suspend a running foreground job, we press the Ctrl-z keys and to resume the suspended job, we use the fg command.
Example
$ sort a.lst > b.lst Foreground jobCtrl-z Suspended job
On suspending a foreground job, we immediately get the shell prompt. We can then give any other command that we want to execute. For example,
$ dateTuesday 10 Sep 2012 12:43:44 AM IST
To resume the suspended job, we use the fg command in the following way.
$ fg: It resumes the same suspended job, sort a.lst > b.lst (i.e., sort command).
To terminate (kill) a running foreground job, we use Ctrl-c. After terminating the job, we press the Enter key for getting the command prompt.
6.7.2 bg: Background JobsThe jobs whose results are not urgent, that is, jobs that have no time constraint and usually take a longer time to complete are executed in the background. As mentioned in the

Manipulating Processes and Signals 163
beginning of this section, the background jobs do not lock the standard input and output terminals and immediately display the shell prompt, allowing us to execute jobs of a higher preference. To execute any job in the background, simply add the ampersand symbol (&) after the command.
Syntax bg [%job]
Here, %job represents the job we want to run in the background.
Examples
(a) $ bg This command displays the list of currently running jobs in the background.(b) $ bg %1 This statement resumes or restarts the stopped background job with job ID 1. Assuming we have a fi le letter.txt, we use the following command to sort the fi le
letter.txt in the background and save the sorted rows in the fi le better.txt.$ sort letter.txt > better.txt &[1] 53702Since several jobs (commands) can be executed in the background, the kernel issues and displays a unique job number and PID number of the executed background jobs for our reference. Hence, the number [1] (1 within square brackets) is the job number and 53702 is the PID number of the job (sorting of fi le letter.txt). We can use the job number to stop, restart, or kill the desired background job.
Suspending, resuming, and terminating background jobsTo suspend a background job, we use the stop command. To restart it, we use the bg command. To terminate it, we use the kill command. For all the three commands, (stop, bg, and kill), we need to specify the job number of the desired background job prefi xed by the percent (%) sign.
Syntax stop pid
Here, pid represents the process ID that we wish to suspend.
Examples
To understand how the background jobs are stopped, resumed, or killed, let us look at the following steps:(a) To execute a job in the background, we give the following command.
$ sort letter.txt > better.txt &[1] 53702Here, [1] is the job number of the given background job.
(b) To stop the job of sorting the fi le letter.txt, we specify its job number in the stop command.$ stop %1 [1] + 53702 stopped (SIGSTOP} sort letter.txt > better.txt &
(c) To resume or restart the stopped background job (of sorting the fi le letter.txt), we specify its job number in the bg command.

164 Unix and Shell Programming
$ bg %1[1] sort letter.txt > better.txt &
(d) If we do not want to sort the fi le letter.txt and wish to terminate the background job, we kill the job by specifying its job number by using the following command.$ kill %1 [1] + Terminated sort letter.txt > better.txt &
We can see that all the three commands—stop, bg, and kill—display the program name on the right.
6.7.3 Switching Jobs from Background to Foreground and Vice VersaSometimes, we might want a task (running in the background) to fi nish a little faster or we may expect a background job to request for user input. In such cases, we switch the background job to the foreground job. Similarly, we may also need to switch a task running in the foreground to the background so as to execute other jobs that are of a higher priority. We can switch a job from the background to the foreground and vice versa when the job is in the suspended mode. A foreground job (in suspended mode) can be switched to the background with the bg command. Similarly, to switch a background job to the foreground, we use the fg command.
Since the background jobs run in the background, we might forget their job numbers and hence would also like to see their status (i.e., if they are in the stopped or running mode). To get a list of all the jobs running in the background along with their statuses, we use the jobs command.
6.7.4 jobs: Showing Job StatusThe jobs command displays all the jobs with their job number and the current status (running or stopped mode).
Syntax jobs [ -l][-p ] [ %job_id ][%str][%?str][%%][%+][%−]
The options of the jobs command are briefl y described in Table 6.5.
All the jobs running in the foreground or background will be displayed. The output of the jobs command displays the job number, currency fl ag, and the status of the job.
Examples
(a) $jobs [3] + Stopped(SIGTSTP) sort letter.txt
> better.txt & [2] − Running cat abc.txt | lp [1] + Running chirag1.sh&
In this listing, we see that job 3 has a plus (+) and job 2 has a minus (−) in the second column. These +
Table 6.5 Brief description of the options of the jobs command
Options Description
-l Displays the process ID along with the job ID for each job
-p Displays only the process ID for each job, without the job ID
%job_id Represents the identifi cation number of the job whose status we wish to fi nd out
%str Represents the job whose command begins with the string, str
%?str Represents the job whose command contains the string, str
%% Represents the current job
%+ Represents the current job (same as %%)
%- Represents the previous job

Manipulating Processes and Signals 165
and − signs are known as the currency fl ags. The plus sign (+) indicates the default job. The default job is the job that will be considered when any of the commands, namely stop, bg, fg, and kill, is given without specifying the job number. For example, if we issue the kill command (without specifying the job number of the job that we want to kill), job number 3 will be killed as it is the default job. The currency fl ag minus sign indicates the default job that follows the fi rst job. In other words, when the fi rst default job is terminated or is complete, the job with minus sign will become the default job, that is, its sign currency fl ag will be changed from − sign to + sign.
When any job is suspended (by issuing Ctrl-z command), it automatically becomes the default job and is assigned a + currency fl ag. When another job is also suspended, that one becomes the default job (getting the + currency fl ag) and the earlier suspended job gets the − currency fl ag, and so on.
(b) To display the process ID along with the job ID use the –l option in the following way.$jobs –l [3] + 30178 Stopped(SIGTSTP) sort letter.txt > better.txt &[2] − 30189 Running cat abc.txt | lp[1] 30190 Running chirag1.sh&
(c) To display the status of the job with ID 2, we give the following command.$jobs %2 [2] - Running cat abc.txt | lp
(d) To display the status of the job that contains the lp command, we give the following command.$jobs %?lp [2] - Running cat abc.txt | lp
Note: Process synchronization—When more than one process runs simultaneously, it is quite possible that they try to access and modify the same content (of a fi le or its region) simultaneously. This situation may result in inconsistency and ambiguity, that is, modifi cations made by one process may be lost or overwritten by the modifi cations performed by another. Synchronization among the processes is implemented to maintain consistency and avoid ambiguity. Process synchronization sets up a mechanism where only one process is able to modify the content and other processes that wish to modify the same content are compelled to wait until the fi rst process is complete. Enabling only a single process to modify the content ensures the integrity of the content. We will discuss process synchronization through semaphore in detail in Chapter 14.
6.8 SCHEDULING OF PROCESSES
Scheduling of a process is a mechanism of defi ning a timetable for different processes to auto execute at a prescribed date and time. The tasks that are to be executed at the defi ned period or time can be scheduled. For example, tasks such as sending reminders to save fi les, taking a backup of data, or mailing important information can all be scheduled to run at a specifi c date or time.
Unix provides several commands for scheduling a process to execute within a desired period.
The fi rst topic we will discuss in this section is cron, a time-based job scheduler.
166 Unix and Shell Programming
6.8.1 cron: Chronograph—Time-based Job Schedulercron is a daemon that keeps running and ticks (fi res) every minute, that is, it gets activated every minute and opens its special fi le to check if there are any processes waiting to be executed in that particular minute. If none of the processes is found waiting, it goes to sleep again (to fi re in the next minute). If there are any processes to be executed in that minute, it executes them and again goes to sleep. This daemon continues to execute until the Unix system shuts down.
The cron automatically starts when the Unix system boots. During booting, Unix executes the fi le /etc/cron (to execute cron) and displays the message ‘cron started’ on the terminal. The special fi le that is opened by the cron to view the list of processes that are required to be executed is stored in the /usr/spool/cron/crontabs directory. We can also create our own crontab fi le containing the list of processes along with their schedule and place it in the /usr/spool/cron/crontabs directory. Let us see how a crontab fi le is created.
6.8.2 crontab: Creating Crontab FilesThe crontab command creates a crontab fi le (containing the list of processes and their schedule time) and places it in the /usr/spool/cron/crontabs directory with our login name. For example, if your name is Ravi, then the crontab fi le made for you will be created with the name Ravi in the /usr/spool/cron/crontabs directory. The crontab fi le is made on behalf of the local fi le that we create in our home directory. The local fi le can be given any name, say, a.bat, and it must contain a list of the processes that we want to execute along with the
schedule (date and time at which we want them to be executed) in a specifi c format.
Syntax crontab [-l | -r | -e] [fi lename]
The options of the crontab command are briefl y described in Table 6.6.
The format in which the command and schedule is specifi ed in the local fi le is as follows:
Minute Hour Day Month Day of week Command
Example Let us assume that we want the following task to be executed at the specifi ed date and time.
$ cat a.bat15 12 10,20 * * echo "Keep smiling and
work hard"0 10 1 1 * date > /dev/console
The fi rst command will echo the message at 12:15 on the 10th and 20th day of every month. The second command will display the time at 10 a.m. on January 1, every year. The asterisk in any fi eld designates a wild card that matches any value. For specifying more than one value we can
Table 6.6 Brief description of the options of the crontab command
Options Description
-l It displays the crontab fi le.
-r It removes the crontab fi le.
-e It edits the crontab fi le using the editor defi ned through the VISUAL or EDITOR environment variables. The modifi ed crontab fi le is taken into consideration when saved.
fi lename It refers to the optional fi le where the list of commands and their schedules are defi ned. The crontab fi le has fi ve fi elds for specifying day, date, and time followed by the command that we wish to run at that time. The fi ve fi elds are given here:Minute: The valid value is from 0–59.Hour: The valid value is from 1–23.Day of month: The valid value is from 1–31. Month: The valid value is from 1–12. Day of week: The valid value is from 0–6. Sunday is represented by 0.

Manipulating Processes and Signals 167
use a comma (,). In this example we have used a comma to specify both the 10th and 20th day of every month.
Each fi eld in a.bat is separated by either a space or a tab. The fi rst day of the week, Sunday, is represented by 0.
When we execute the crontab command, the following occurs:
$ crontab a.bat
The contents of a.bat are automatically transferred to the /usr/spool/cron/crontabs directory where they are stored in a fi le with our login name. From there onwards, the cron daemon will read this fi le (crontab fi le) and execute the commands (processes) specifi ed in it regularly.
If we want to make some changes in the scheduling of the processes, we need to edit our local fi le a.bat (in our home directory) and after saving the changes, again execute the crontab command to re-transfer it in the /usr/spool/cron/crontabs directory using our login name (the earlier crontab fi le will be replaced by the new one).
To view the commands that we have supplied to our crontab fi le, we use the -l option with the crontab command:
$crontab -l
To remove the crontab fi le, we use the following command:
$ crontab -r
Another command that allows the scheduling of processes is the at command. We will now study this.
6.8.3 at: Scheduling Commands at Specifi c Dates and TimesThe at command is used for executing Unix commands at a specifi c date and time. Tasks such as taking backup of the disk at regular intervals or sending mail messages at odd hours can be easily accomplished using the at command. We can specify the Unix commands (to be executed) at the command prompt or save them in a fi le and use the fi le to execute the commands.
Syntax at [-f fi lename] [-m] [-l] [-r] time
The options of the at command are briefl y described in Table 6.7.
Table 6.7 Brief description of the options of the at command
Option Description
-f fi lename It reads the commands to be executed from the specifi ed fi lename instead of the standard input.
-m It mails the user when the commands are executed.
-l It lists the commands that are scheduled to run.
-r It cancels the scheduled command.
time It indicates the time at which we wish to execute command(s). We can defi ne the time either specifi cally or relatively. The specifi c time can be given in the following format:hh:mm a.m./p.m
(Contd)
168 Unix and Shell Programming
We can also specify a future time by adding a plus sign (+) followed by the minute, hours, days, weeks, months, or years.
Examples
(a) $at 18:00 echo "Offi ce time over. Time to log out"> /dev/tty02 Ctrl-d Job 3434443 at Sun Nov 16 18:00:00 IST 2012
On pressing Ctrl-d, the at command displays the job number and the date and time of the scheduled execution of the echo command. The job number terminates with ‘a’ indicating that this job has been submitted using the at command.
Now, the following message will be echoed on the tty02 terminal at 6:00 p.m. Offi ce time over. Time to log out.
Note: When the output is redirected to a terminal, as is done in the aforementioned command (/dev/tty02), the message will be echoed on the screen and when redirection is not specifi ed, the message is received by the target through mail command.
(b) We can also execute the commands stored in a fi le as shown in the following example. $at 18:00 jobstodo.sh Ctrl-d Job 3434443.a at Sun Nov 16 18:00:00 IST 2010 By executing this command, all the commands stored in the script fi le jobstodo.sh will
be executed at 6:00 p.m. and their outputs will be mailed to us. You may recall that if the redirection is not specifi ed for any command, its output is sent to the user through mail.
(c) It can be noted that we can also add a.m. or p.m. with the time. For example, in the aforementioned command, we can write $at 18:00 as $ at 6pm
On executing this at command, we will see a message on our screen displaying ‘you have mail’ at 6 p.m.
(d) To view the output of the aforementioned command, we use the following mail command. $mail message 1: To: ravi
Table 6.7 (Contd)
Option Description
Here, a.m./p.m. indicates that time is in the 12-hour format. Without a.m./p.m., the time is assumed to follow a 24-hour clock. We can also specify optional time zone such as EST and GMT after the time.The time can be relatively specifi ed in any of the following ways:now: This indicates the current day and time.today: This indicates the current day.tomorrow: This indicates the day following the current day.midnight: This indicates the time 12:00 a.m., that is, 00:00.noon: This indicates the time 12:00 p.m.

Manipulating Processes and Signals 169
Date: Sun Nov 16 18:00:00 IST 2010 Offi ce time over. Time to logout $(e) To schedule jobs from the given fi le, we give the following command. $ at –f jobs.txt 11:00 todayAll the commands specifi ed in the fi le jobs.txt will be executed at 11 o’clock on that particular day.
Note: The commands specifi ed in jobs.txt will still run even if we exit from the system.
(f) To view the list of jobs submitted using the at command, we give the following command.$at –l
(g) To remove scheduled jobs from the job queue, we use the following command.$ at -r 3434443This command will remove job 3434443 from the job queue.
(h) We can use a lot of keywords when specifying the time for scheduling jobs such as now, today, tomorrow, noon, day, year, month, hours, and minutes. The following are some examples.(i) $ at now + 2 hours(ii) $ at now +1 week(iii) $ at 6pm today(iv) $ at 6pm next month(v) $ at 6pm Fri(vi) $ at 0915 am Nov 16(vii) $ at 9:15 am Nov 16
The two commands that are often discussed along with the at command are atq and atrm.
atq This command lists the jobs that are scheduled to run, similar to the at -l command. The jobs are displayed along with their job number, date, hour, etc.
Syntax atq
Example
$ atq324556 2012-10-15 10:30 a sort a.txt324557 2012-10-16 07:00 a date
atrm This command deletes the specifi ed job number, similar to the at -r command.
Syntax atrm job_no
Example $ atrm 3434443
This command will remove job 3434443 from the job queue.
Note: The difference between the at and crontab commands is that the jobs scheduled by the at command have to be rescheduled after their execution (if we want to execute them again). On the other hand, crontab carries out the submitted job every day for years without the need for rescheduling.

170 Unix and Shell Programming
6.8.4 batch: Executing Commands CollectivelyAs the name implies, the batch command is used for issuing a set of commands that we want to execute collectively (in a batch). The commands given in the batch will be executed later when the system load permits, that is, when the CPU is free, it will execute the commands specifi ed by the batch command.
Syntax batch [-f fi lename] [-m] [-l] [-r] time
The options of the batch command are briefl y described in Table 6.8.
Examples
(a) $batch echo "Keep smiling and work
hard" date > /dev/console sort letter.txt > better.txt Ctrl d job 6646566.b at Sun Nov 16
18:00:00 IST 2010 On pressing Ctrl-d, we will get a
job number that terminates with b indicating that this job is sub-mitted by the batch command. The aforementioned jobs consisting of displaying of the echo message and date, and sorting of letter.txt
will be performed when the load of the system allows the execution of these tasks.
(b) We can also collect the commands in a fi le and execute it using the batch command as follows:
$ batch < jobstodo.sh job 6646566.b at Sun Nov 16 18:00:00 IST 2010
(c) The following command can also be given.
$ batch –f jobstodo.sh
6.8.5 nohup: No HangupsTraditionally, when we log in to the Unix system, a default login shell is started with which we interact. When we log out of the system, the current shell terminates. If the current shell is a child process, the execution returns to the parent process when it exits. If the current shell is the login shell, it terminates when we log out of the system. When the login shell terminates, it kills all the background jobs. To ensure that the processes we have executed do not die even when we log out, we use the nohup command. nohup stands for ‘no hangups’.
Syntax nohup command_name &
Table 6.8 Brief description of the options of the batch command
Option Description
-f fi lename It reads the commands to be executed from the specifi ed fi lename instead of the standard input.
-m It sends mails to the user when the commands are executed.
-l It lists the commands that are collected to run in a batch.
-r It cancels the scheduled command.
time It indicates the time at which we wish to execute commands. Its options are similar to what was discussed in the at command.

Manipulating Processes and Signals 171
Here, command_name represents the command name, shell script, or command name and & ensures that the command is run in the background.
Examples
(a) $ nohup sort letter.txt > better.txt & 1296
We can see that we get the PID of the command (sorting of the fi le) that we wanted to execute in the background. The sorting of the fi le will now continue to run even if we log out of the system and we will fi nd the sorted rows in the fi le better.txt when we log in to the system again.
In the preceding example, the sorted rows of the fi le letter.txt are redirected to another fi le better.txt. In case we do not specify the fi le that the output has to be redirected to, the output of the command will be saved in a fi le called nohup.out. As in the following example, the sorted rows of the fi le letter.txt will be saved in the nohup.out fi le.
(b) $ nohup sort letter.txt & sending output to nohup.out 1296
The nohup.out fi le will be created in the current directory.
6.8.6 nice: Modifying PriorityWe are aware that Unix, being a multitasking operating system, executes several processes together, that is, there may be several processes running in the memory at a time. Each process is assigned a time slot in which it gets the CPU’s attention. If the process is not completed in that time slot, it is added back to the queue to wait for another time slot.
The nice command is used for modifying the priority of the processes. It is obvious that we would like to complete tasks of a higher priority before tasks that are of a lower priority. Using the nice command, we can modify the priority of the processes. The higher priority process will get an earlier time slot and hence will be executed before the other processes in the queue. The priority of a process is decided by a number associated with it. This number is called the ‘nice’ value of the process. Higher the nice value of a process, lower is its priority. The nice value of a process can range from −20 to 19, with 0 being the default nice value.
Syntax nice [-increment | -n increment ] command [argument ... ]
The options of the nice command are briefl y described in Table 6.9.
Table 6.9 Brief description of the options of the nice command
Options Description
Increment It represents a value in the range 1–19 by which we wish to increase the nice value. A default increment value of 10 is assumed. If a value greater than 19 is entered, the highest increment value (19) will be assumed.
-n increment It is used to decrement the priority of the specifi ed command. Only a super user can decrease the nice value of a command, it is otherwise ignored.
command It represents the command whose priority we wish to change and argument refers to the arguments (if any) of the specifi ed command.

172 Unix and Shell Programming
Examples
(a) The following is the command to increase the nice value of one of the processes. $ nice sort letter.txt This would increase the nice value of our sort from 0 to 10, that is, the priority of the
sort command is reduced by 10 units. Since we did not specify the increment value, an increment of 10 is taken as the default.
(b) If we want to increase the nice value by a specifi c value, we give the following command. $ nice -5 sort letter.txt
This statement will increase the nice value of the sort command by 5, and hence, the nice value of the sort command will now become 15. This happens because we had already changed the nice value of the sort command to 10 by implementing the aforementioned statement. You may recall that the value given by us for the increment should be in the range 0 to 19.
(c) To decrease the nice value by a specifi c value, we use the –n option in the following example (assuming the command is given by the super user).
$ nice –n 7 sort letter.txt This command, will decrease the nice value of the sort command by 7 (assuming its previous
nice value is 15) making its current nice value 8, hence increasing its priority by 8 units.
Note: Only the super user can increase the priority of a process (by reducing its nice value).
6.8.7 kill: Killing ProcessesKilling a process means canceling the ongoing execution of a command. Consider a situation where a command is taking a long time to complete or where we do not want to execute a background job any more, or where a program has gone into an infi nite loop. In such a situation, we are left with no other option but to kill (terminate) the job. For killing a job, we only need to fi nd the PID of the job or process that we want to kill (terminate) and pass it to the kill command.
Syntax kill [-s signal_name][-l] PID
The options of the kill command are briefl y described in Table 6.10.Table 6.10 Brief description of the options of the kill command
Options Description
-s signal_name It specifi es the signal that we wish to send to the process. We will be learning about signals in detail in Section 6.9. However for the time being, we can assume signals as symbolic constants each meant for performing a specifi c task.
-l It displays the list of signal names.PID It represents the process identifi er to which we wish to send the signal. If a value 0 is
entered for the PID, the signal will be sent to all the processes in the current process group.
Examples
(a) Assuming the PID of the job that we want to kill is 2098, the following command is given. $ kill 2098

Manipulating Processes and Signals 173
2098 terminated This command will immediately kill (terminate) the process with PID 2098.(b) Consider the following example of sorting a fi le, letter.txt in the background. $ sort letter.txt > better.txt & 53702 Here, 53702 is the PID of this sorting command. (c) If we do not want this sorting to happen, we can kill it by giving the following command. $ kill 53702 53702 terminated(d) We can kill more than one background job with a single kill command by specifying
all the PIDs together. $kill 53702 48901 56005
When a kill command is executed, a termination signal is sent to the process being killed, that is, the process reacts on the basis of the signal sent to them. Some processes do not get killed by this termination signal. For killing such processes, we specify an option, 9, with the kill command.
(e) For sending the SIGSTOP signal to the process with identifi er 53701, we give the following command.
$kill –s SIGSTOP 53701(f) To kill a process with certainty, we send a SIGKILL signal to the process. SIGKILL is a
signal that cannot be caught or ignored, and hence, forcefully kills the specifi ed process, as shown in the following statement.
$kill -s SIGKILL 53701
We have seen that the term signal has appeared enough number of times in our discussion. Let us now talk about this term in detail.
6.9 SIGNALS
A signal is a technique of informing or sending notifi cations to a process about a particular event that requires immediate action. It is considered a software interrupt that can be used to stop the current process and get the desired task performed in between. Each signal has a default action associated with it, which can be changed, so that different signals can take different actions.
All signals have a unique signal name that begins with SIG (for signal) and a number (or integer). A few important signals for shell scripts are given in Table 6.11.
Table 6.11 Brief description of a few important signals
Name Value Description Default action
SIGHUP 1 The signal is generated either when a hangup is detected on the terminal or when the controlling process is terminated.
Exit
SIGINT 2 The signal is generated when the user interrupts using the keyboard by pressing Ctrl-c. Exit
SIGQUIT 3 The signal is generated when the user wishes to quit by pressing Ctrl-\ from the keyboard.
Dump core
(Contd)

174 Unix and Shell Programming
The signals are numbered from 0 to 31. Value in this table represents the positive integer by which these signals are defi ned in the header fi le, <signal.h>.
In Table 6.11, the SIGSTP and SIGSTOP signals appear to be similar. Further details about the two signals are given here:
SIGTSTP is a signal that tells a program to stop temporarily. The signal is sent to a process by its controlling terminal when the user requests to suspend the process by pressing special Ctrl-z keys. By default, SIGTSTP causes the process receiving it to stop until a SIGCONT signal is received.
The same is the case with the SIGSTOP signal. When SIGSTOP is sent to a process, the process is suspended in its current state and will resume execution when the SIGCONT signal is sent.
The difference between the SIGSTP and SIGSTOP signals lies in the fl exibility of handling them. When a process receives the SIGSTOP signal, it has no option but to suspend the process, that is, ‘suspending’ is the required action in the case of the SIGSTOP signal. On the other hand, when a process receives the SIGSTP signal, it has several options to choose from. It can suspend the process (default action), register a signal handler, or ignore it.
Note: SIGSTOP and SIGCONT are generally used for job control in the Unix shell.
Furthermore, the signals are treated as either synchronous or asynchronous signals:
Synchronous signals These signals are also known as traps and usually occur when an unrecoverable error such as an illegal instruction (say, division by zero) or an invalid address reference occurs. The occurrence of a trap is handled by the kernel trap handler to be delivered to the thread that caused the error.
Table 6.11 (Contd)
Name Value Description Default action
SIGSTP 25 The signal is generated to suspend a running process. The process can opt to ignore the signal, register a signal handler, or suspend the process.
Stop
SIGCHLD 18 The signal is generated when the process status of the child process changes. Ignore
SIGABRT 6 This signal is generated to terminate the execution of the program. Dump core
SIGKILL 9 This signal cannot be caught or ignored and is used to terminate a process with certainty.
Exit
SIGALRM 14 It is an alarm clock signal (used in timers). Exit
SIGTERM 15 It is a termination signal that is generated when a particular software is terminated. Exit
SIGCONT 19 This signal is generated to continue a stopped process. Ignore
SIGSTOP 20 It is a stop signal that temporarily suspends the process. The signal cannot be ignored. The suspended process resumes on receiving the SIGCONT signal.
Stop
SIGPIPE 13 This signal is generated when a process attempts to write to a pipe when no process is present on the other end to read it.
Exit
SIGILL 4 This signal is generated on illegal instruction. Dump core
SIGFPE 8 The signal is generated on fl oating point exception Dump core

Manipulating Processes and Signals 175
Asynchronous signals These occur when an external event happens, for example, when a process or thread sends a signal via kill(), and then the user puts the process to sleep. On the occurrence of such a signal, it is delivered to the desired process.
Though signals are synchronously generated by errors in a program, they are mostly asynchronous events that can occur at any random time. The following are a few of the conditions that generate signals:
1. Termination or cancellation of a program by the user by pressing key pairs such as Ctrl-c or Ctrl-z
2. Execution of illegal instructions (e.g., dividing by 0 and using invalid memory reference.)3. Processes that send signals using kill() system call 4. Kernels that need to inform processes when some event occurs
When a signal occurs, it is said to be generated. On generation of the signal, it is disposed or handled by any of the following default actions:
1. Ignore: It ignores the signal; no action is taken.2. Exit: It forces the process to exit.3. Dump core: It terminates the process with dumping of the core. The core fi le will then be
examined by debuggers to understand the reasons for termination.4. Stop: It stops or suspends the process.5. Continue: It continues the stopped process.
Note: The two signals that cannot be ignored are SIGKILL and SIGSTOP as the kernel and the superuser use them to kill or stop any process.
After a signal is delivered, its handling starts. Till the time a signal is generated and delivered or accepted, it is said to be in a pending state. It is also possible for a process to block the signal from being delivered. The blocked signals remain in the pending state until they are either ignored or unblocked. The kernel can deliver the signal once or more than once. If the signal has to be delivered more than once, it is queued. Each process has a signal mask, that is, an array of bits that defi ne blocked signals for a process. The signal mask contains a bit for each signal. If the bit is On, it means that the corresponding signal will be blocked.
SIGINT (signal 2) is sent when the user interrupts a process by pressing the Ctrl-c keys. The SIGHUP signal is generated either when hangup is detected on the terminal or when the controlling process is terminated. The program that catches SIGHUP performs a clean shutdown. The signal SIGTERM (software terminate—signal 15) is used to terminate a software. On pressing Ctrl-\, the SIGQUIT signal is generated.
6.9.1 Classes of SignalsThe signals are basically divided into two classes, which are described as follows:
Reliable signalsOld Unix system signals were unreliable. A frequent problem was race condition (i.e., receiving another signal while the current signal was still being handled). The recent method available

176 Unix and Shell Programming
for signal implementation is quite reliable and more functional. The signals are not lost and hence, are properly handled. Besides this, the state of the signals can also be controlled—they can be blocked, kept in pending state, or can be unblocked to deliver them whenever needed.
Unreliable signalsUnreliable signals are those that are lost or cannot work properly in the absence of their signal handlers. For a signal to work properly, it is required that its signal handler exists or is installed before the signal is generated. In the absence of the signal handler, the default action is taken, that is, the signal is lost or killed.
In unreliable signals, the signal handler does not remain installed once called; hence the signal handler needs to be re-installed immediately after the signal is called. An easy way to do so is to write the instruction to install the signal handler within the signal handler itself. However, this may result in a problem when the signal may arrive before the handler is reinstalled, which can cause the signal to be lost.
Before we learn how signals are handled, let us take a quick look at the functions that generate signals.
6.9.2 Sending Signals Using kill() and raise() The two functions used to send signals are kill() and raise().
The syntax for kill() is as follows:
Syntax int kill(int pid, int signal)
Here, pid is the non-zero (positive) process identifi er to which the signal is sent. If pid is equal to 0, the signal is sent to all processes whose group ID matches with the group ID of the sender process. If the value of the pid is set to −1, the signal will be sent to all the processes for which the sender process has permission. The signal parameter is either the number or name of the signal to deliver. The kill() function returns a value 0 when successful and −1 otherwise, and sets an errno variable to describe the error.
Example kill(getpid(),SIGINT);
This example sends the interrupt signal to the ID of the calling process.The second function used to send signals is raise(). Its syntax is as follows:
Syntax int raise(int signal)
Here, signal represents the integer value or symbolic constant of the signal that we wish to send to the executing program.
Example int return_fl ag = raise(SIGINT);
This statement sends an interrupt signal to the executing program.Usually, when a signal is generated and delivered to a process, the kernel saves the current
state on the stack and calls a signal handler for the respective signal. The signal handler performs the necessary actions and returns to the kernel. Once the signal handler fi nishes its actions, the kernel restores the process state from the stack and resumes execution. The signal() function is used to defi ne signal handlers for signals.

Manipulating Processes and Signals 177
Let us look at the process for handling signals that help in obtaining the desired task on the occurrence of a signal.
6.9.3 Signal Handling Using signal()In order to perform a desired task on the occurrence of a signal, a program defi nes a function called a signal handler. The signal handler function carries the code that we wish to execute on the occurrence of the specifi c signal. On the occurrence of a signal, a process can let the default action take place, block the signal, or catch the signal with a handler.
If the process executes the signal handler (on the occurrence of a signal), it makes use of the stack to store the return address so as to continue the program from the place where the signal was generated.
The signal() function is used to defi ne the signal and the signal handler in the following syntax:
Syntax int (*signal(int sig, void (*sig_handler)()))()
Here, sig_handler is the function that is called on the occurrence or receiving of the signal, sig. The signal() function, when successful, returns a pointer to the function sig_handler. When it fails, the signal() function returns −1 and also sets the value to the errno variable.
The sig_handler() can have any of following three values:
SIG_DFL It is a pointer to the default function. The default function depends on the kind of signal. For example, the default action for the interrupt signal is to terminate the process.
SIG_IGN It is a pointer to the system ignore function, SIG_IGN(), which will ignore all the signals except SIGKILL and SIGSTOP.
Address of the signal handler function It is the function that contains the code we wish to execute on receiving the signal.
Examples
(a) signal(SIGINT, SIG_IGN); This statement will ignore the interrupt signal that occurs on pressing the Ctrl-c keys.(b) signal(SIGINT, SIG_DFL); This statement will execute the default function, that is, it will terminate the program on
the occurrence of the interrupt signal (on pressing the Ctrl-c keys).
The following program demonstrates the handling of different signals. SIGINT, SIGQUIT, and SIGSTOP are generated when the user presses the designated keys. The SIGINT and SIGQUIT signals are caught by the custom signal handlers, whereas the SIGSTOP signal will terminate the program.
signalhandling.c#include <stdio.h>#include <signal.h>
void inthandler(int sig_no);void quithandler(int sig_no);

178 Unix and Shell Programming
main(){ signal(SIGINT, inthandler); signal(SIGQUIT, quithandler); printf("Press Ctrl-c to generate the interrupt signal\n"); printf("Press Ctrl-\\ to generate the quit signal\n"); for(;;); /* infi nite loop */}
void inthandler(int sig_no){ signal(SIGINT, inthandler); /* resetting signal. Some versions of UNIX reset the signal to the default when called*/ printf("\nCtrl-c keys are pressed\n");}
void quithandler(int sig_no){ signal(SIGQUIT, quithandler); printf("\nCtrl-\\ keys are pressed. Quitting from the program\n"); exit(0);}
Output
$ ./signalhandlingPress Ctrl-c to generate the interrupt signalPress Ctrl-\ to generate the quit signal^CCtrl-c keys are pressed^\Ctrl-\ keys are pressed. Quitting from the program
In the output of the program, we can see that a menu is displayed prompting the user to either press Ctrl-c or Ctrl-\ to generate interrupt (SIGINT) or quit (SIGQUIT) signals, respectively. When we press a key combination for generating a signal, the respective signal handler function is invoked. For example, on pressing the Ctrl-c keys, the SIGINT signal will be generated and its handler function, inthandler will be executed displaying the following message: Ctrl-c keys are pressed.
Compiling C programsTo compile a C program, we use the gcc command in the following format:
Syntax $ gcc program.c –o executable_name
Here, program.c represents the C program that we wish to compile and executable_name is the name by which we wish to create the executable fi le.

Manipulating Processes and Signals 179
Examples
(a) $ gcc signalhandling.c -o signalhandlingThis command compiles the C program, signalhandling.c, and creates its executable version with the name, signalhandling. The executable fi le is run by giving the following command.$./signalhandling
Here, dot (.) represents the current directory where the executable fi le is kept.This example only explains how the signals are handled but does not address how
they are generated.
(b) The following program demonstrates both: how the signals are generated as well as how they are handled. Here we create a child process through the fork() system call and the parent process generates signals that are handled by the child process.
signalgenerating.c
#include <stdio.h>#include <signal.h>
void inthandler(int sig_no);void quithandler(int sig_no); void huphandler(int sig_no);
main(){ int pid;
if ((pid = fork()) < 0) { perror("Child process could not be created"); exit(1); } if (pid == 0) { /* Code executed by the child process */ signal(SIGINT, inthandler); signal(SIGQUIT, quithandler); signal(SIGHUP, huphandler); for(;;); /* infi nite loop */ } else { printf("pid is %d\n",pid); /* Code executed by the parent process */ printf("Sending SIGINT signal \n"); kill(pid,SIGINT); sleep(5); printf("Sending SIGQUIT signal \n"); kill(pid,SIGQUIT);
180 Unix and Shell Programming
sleep(5); printf("Sending SIGHUP signal\n"); kill(pid,SIGHUP); sleep(5); printf("Sending SIGSTOP signal - terminating program \n"); kill(pid,SIGSTOP); }}
void inthandler(int sig_no){ signal(SIGINT, inthandler); /* reset signal */ printf("The interrupt signal handled by the child process\n");}
void quithandler(int sig_no){ signal(SIGQUIT, quithandler); /* reset signal */ printf("The quit signal handled by the child process\n");}
void huphandler(int sig_no){ signal(SIGHUP, huphandler); /* reset signal */ printf("The hangup signal handled by the child process\n");}
Output
$ ./signalgeneratingpid is 1358Sending SIGINT signalThe interrupt signal handled by the child processSending SIGQUIT signalThe quit signal handled by the child processSending SIGHUP signalThe hangup signal handled by the child processSending SIGSTOP signal - terminating program
In the output of the program, we can see that a child process is created using the fork() system call. The pid of the newly created process, 1358, is displayed. Four signals, SIGINT, SIGQUIT, SIGHUP, and SIGSTOP are generated through the kill() system call with a time gap of fi ve seconds in between. On the generation of a signal, the respective handler function is invoked automatically. Each signal handler displays the respective message to inform that the respective signal is handled by the child process.
We will now discuss some functions that generate certain specifi c signals.
Manipulating Processes and Signals 181
alarm() and pause() functionsThe alarm function is used for generating the SIGALRM signal. The function actually sets a timer. When the time set through the timer expires, the function generates the SIGALRM signal.
Syntax unsigned int alarm(unsigned int seconds);
Here, seconds refers to the time in seconds, which when expired generates the SIGALRM signal. If the generated SIGALRM signal is ignored or is not handled, the default action, that is, termination of the process will take place. The function returns 0 when the alarm signal is called. The function may also return the number of seconds left to the expiry of the previously set timer, which is still active and has not yet expired.
Example alarm(60);
By executing this statement, the SIGALRM signal will be generated after 60 seconds.
Note: If the SIGALRM signal is generated without defi ning its signal handler, the process will terminate.
The pause function suspends the calling process until a signal is caught.
Syntax int pause(void);
The pause function returns when a signal is caught and its signal handler is executed. On returning from the signal handler, the pause function returns a −1 value and sets an errno variable to the EINTR value.
Example pause();
This statement suspends the calling process until the signal is caught.
abort functionThe abort function causes abnormal program termination.
Syntax void abort(void);
This function sends the SIGABRT signal to the caller process informing us about an abnormal program termination. The signal handler to the SIGABRT signal performs the desired clean-up, release of resources, etc., before the process terminates.
Example abort();
Using this statement, the program is abnormally terminated.
sleep functionThe sleep function suspends the execution of a process for the specifi ed interval of time.
Syntax unsigned sleep(unsigned seconds);
Here, the parameter, seconds, represents the time at which we wish the process to temporarily be suspended. The suspended process will resume after the specifi ed time duration is over. On successful execution, the sleep() function returns a 0 value. If sleep() returns due to the delivery of a signal, the return value will be equal to the seconds that were left.
Example sleep(60);
Using this statement, the execution of the process will suspend for 60 seconds.

182 Unix and Shell Programming
The following program demonstrates the usage of the alarm(), pause(), sleep(), and abort() functions.
usagefunc.c#include <stdio.h>#include <signal.h>vvoid inthandler(int sig_no);void alarmhandler(int sig_no); void huphandler(int sig_no);
main(){ signal(SIGINT, inthandler); signal(SIGALRM, alarmhandler); printf("Alarm set to go off in 10 seconds \n"); alarm(10); /* alarm set to go off in 10 seconds */ printf("The process paused for a while \n"); pause(); printf("The process is going to sleep for 20 seconds \n"); sleep(20); abort(); }
void inthandler(int sig_no){ signal(SIGINT, inthandler); /* reset signal */ printf("The interrupt signal handled by the process\n");}void alarmhandler(int sig_no){ signal(SIGALRM, alarmhandler); /* reset signal */ printf("The alarm signal handled by the process\n");}
Output
$ ./usagefuncAlarm set to go off in 10 secondsThe process paused for a whileThe alarm signal handled by the processThe process is going to sleep for 20 secondsAbort - core dumped
$ ./usagefuncAlarm set to go off in 10 secondsThe process paused for a while^CThe interrupt signal handled by the process

Manipulating Processes and Signals 183
The process is going to sleep for 20 secondsThe alarm signal handled by the processAbort - core dumped
In the output of the program, we can see that if the process is not interrupted, all the scheduled tasks will occur sequentially one after the other. The alarm is set to go off in 10 seconds, the process is paused, the alarm signal is handled, the process is suspended (is set to sleep) for 20 seconds, and fi nally, the process is aborted and the core is dumped. In the second run of the program, we see that besides the scheduled tasks sequence, if the process is interrupted by pressing ^C keys, the function, inthandler, meant to handle the interrupt, is invoked displaying the following message: The interrupt signal handled by the process.
6.10 VIRTUAL MEMORY
The primary physical memory on a computer is limited and situations arise when we need to run applications that are larger than the size of the physical memory. Such large applications certainly cannot be entirely accommodated in the physical memory at one go. To execute large applications, a small part of the application is kept in the memory, and the rest of the application, in a special area of the disk known as swap area. The application runs through its part, which is present in the memory. When the part of the application that is not present in the memory is required, swapping takes place, swapping out the part in the memory to the swap area and swapping in the required part of the application to the memory. With this swapping procedure, an application that is quite larger than the size of the primary memory can be run giving us the illusion of a large physical memory, hence named virtual memory.
Virtual memory refers to the concept of running applications whose size is larger than that of the primary memory. This is achieved by logically splitting the application into small parts and keeping only the parts currently focused by the user in the memory and the rest on the swap area of the disk.
Note: Swap area is a part of the hard disk that is meant for holding swapped pages. Pages, here, refer to the parts or logical pieces of the application.
In the virtual memory technique, an application is assigned a virtual address space, which is a block of memory addresses. When a part of the application is supposed to run, its virtual memory space is mapped to the physical address space (swapping in from the swap area to the physical memory). The process of mapping is performed for each part of the application that is swapped in. The task of mapping virtual memory space into the physical address space is done through the memory management unit (MMU), a part of the CPU. All memory calls between the CPU and the main memory go through the MMU where they are translated from virtual addresses to physical addresses and vice versa.
Virtual memory is implemented in one of the following two ways:
1. Paging2. Segmentation

184 Unix and Shell Programming
6.10.1 PagingEach application is assigned a virtual address space. Since the entire application cannot be accommodated in the physical memory at one go, the virtual address space assigned to the application is divided into small chunks known as pages. To accommodate the pages, the physical memory is also divided into sizes equal to the size of the pages. The corresponding range of consecutive addresses in the physical memory is called page frame (refer to Fig. 6.6). In Fig. 6.6, we have assumed that the size of pages and page frames is 4K.
A page map table is maintained by the MMU to map the pages in the virtual memory to page frames in the physical memory. Depending on the size of the primary memory, more than one page can be kept in the corresponding page frames of the memory.
6.10.2 Demand PagingWhile executing the application, if a part of the application that is not present in the memory is required, an exception called a page fault is thrown. A page fault represents the specifi c page (part of the application) demanded by the application. The process of swapping only the demanded page of the application into the physical memory is known as demand paging. In fact, when a page fault occurs, the page in memory is swapped out to the swap area and the required page is swapped into the memory. The page that has to be swapped out is determined on the basis of the algorithm being used (LRU, LFU, FIFO, etc.) by the operating system. Contrary to demand paging is anticipatory paging, in which the operating system anticipates the pages that might be required next by the application, and hence copies them to the physical memory before they are actually required.
Since the application is assigned a virtual address space, the addresses that the application generates are known as virtual addresses. The virtual addresses used by the application are mapped to the physical addresses using the page map table. The virtual address space assigned to the application is divided into pages, hence the virtual addresses generated by the application comprises a page number and an offset shown in Fig. 6.7.
In Fig. 6.7, ‘p’ represents the page number and ‘d’ represents the offset, that is, ‘p’ represents the sequence number of the page and ‘d’ represents the relative address in the page
Page 1Page 1
Physicaladdress
Page 2Page 2Page 3
Page 3
Page 4 Page 4Physical main memory
Pageframes
PagesPage 5Page 6Page 7
04K8K
12K
04K
Virtualaddress
8K12K16K20K24K28K Page 8
Virtual memory
Fig. 6.6 Demonstration of pages and page frames in the virtual and physical main memory

Manipulating Processes and Signals 185
Virtualaddress
Page map table
Physical memory
CPU
p
f
fd d
Physicaladdress
Fig. 6.7 Mapping virtual address to physical address using page map table.
from the base of that page. The page map table of the memory management unit (MMU) translates the page number to the corresponding frame number.
Now let us look at the command to view the virtual memory of our computer system.
vmstat: Fetching virtual memory informationvmstat displays the virtual memory activity since the computer system was booted.
Syntax vmstat [-c] [-i] [-s] [-S] [interval]
The explanation of the syntax is as follows:-c displays the number of cache fl ushed since booting.-i displays the number of interrupts per device.-s displays the total number of system events since booting.-S displays swapping information.Interval displays the virtual memory information after every interval second.
When used without options, the vmstat command displays a summary of the virtual memory activity since booting. The output of the vmstat command is shown in Fig. 6.8.
$ vmstat kthr memory page disk faults cpu r b w swap free re mf pi po fr de sr cd -- -- -- in sy cs us sy id 0 0 0 1926992 1634216 106 321 112 1 1 0 211 13 0 0 0 372 1678 722 4 3 93
$ vmstat -c vmstat: This machine does not have a virtual address cache
$ vmstat -i interrupt total rate -------------------------- clock 153429 100
Fig. 6.8 vmstat command run with different options (Contd)

186 Unix and Shell Programming
6.10.3 SegmentationThe concept of virtual memory in a computer system is applied in two ways, paging and segmentation. Paging, as discussed in Section 6.10.1 is implemented by dividing the memory into pages of equal size. On the other hand, segmentation is implemented by assigning segments or blocks of memory of variable size to the desired process with gaps between the segments. A process may have one or more segments. In fact, the process address space consists of different segments such as the main code segment, the functions segment, the library code segment, the table segment, and the stack segment.
In segmentation, memory blocks can be of variable sizes. For example, if one segment is of 1024 bytes, then the others can be of 2048 bytes, 512 bytes, etc. In addition, their addresses are not contiguous because they are referenced through the following formula:
virtual_address = (s_no, addr)
SUNW,aud 7 0 ------------------------- Total 153436 100
$ vmstat kthr memory page disk faults cpu r b w swap free si so pi po fr de sr cd -- -- -- in sy cs us sy id 0 0 0 1926136 1633396 0 0 110 1 1 0 207 13 0 0 0 372 1651 713 4 3 93
$ vmstat -s 0 swap ins 0 swap outs 0 pages swapped in 0 pages swapped out 495765 total address trans. faults taken 15021 page ins 149 page outs 43369 pages paged in 288 pages paged out 162152 total reclaims 162150 reclaims from free list 0 micro (hat) faults 495765 minor (as) faults
$ vmstat 3 kthr memory page disk faults cpu r b w swap free re mf pi po fr de sr cd -- -- -- in sy cs us sy id 0 0 0 1922736 1630140 96 295 103 1 1 0 191 12 0 0 0 371 1550 676 4 3 93 0 0 0 1882356 1591560 3 9 0 0 0 0 0 0 0 0 0 350 218 228 0 0 99 0 0 0 1882356 1591600 0 0 0 0 0 0 0 0 0 0 0 347 185 223 0 0 99 0 0 0 1882356 1591600 0 0 0 0 0 0 0 0 0 0 0 348 218 222 0 1 99 0 0 0 1882356 1591600 0 3 0 0 0 0 0 0 0 0 0 360 401 315 1 1 99 0 0 0 1882028 1591448 0 29 1 0 0 0 0 0 0 0 0 396 1010 515 2 1 98 2 0 0 1879640 1589884 0 186 0 0 0 0 0 9 0 0 0 397 1226 528 3 1 96 0 0 0 1879636 1589148 0 0 8 0 0 0 0 1 0 0 0 426 1518 697 3 1 96 0 0 0 1879636 1589148 0 0 0 0 0 0 0 0 0 0 0 364 370 305 0 5 95 0 0 0 1879200 1588688 112 540 1 0 0 0 0 1 0 0 0 415 4065 1003 26 4 70
Fig. 6.8 (Contd)
Manipulating Processes and Signals 187
1. An executing program is known as a process. In a time-sharing system, every process gets a time slot in which it undergoes execution. Every process is assigned a unique identifi cation number known as process identifi er (PID).
2. The system processes are also known as daemons and they keep running continuously in the back-ground.
3. The crontab fi le used to schedule processes is stored in the /usr/spool/cron/crontabs directory. Using the crontab command, a crontab fi le is created with our login name in the /usr/spool/cron/crontabs directory. To remove the crontab fi le, we use the crontab -r command.
4. The fi rst process in the Unix system, also known as process 0, is created during bootstrapping. The init process has PID 1 and is the ancestor of all other processes.
5. The getty process enables users to log in to the Unix system.
6. A process includes three segments: text, data, and stack.
7. The process state indicates if the process is in ready, running, waiting, sleeping, or zombie mode.
8. Parent process identifi er (PPID) represents the identifi er of the parent process that created the process.
9. Files are internally represented by inodes that are maintained in the inode table.
10. When a process opens or creates a fi le, a corresponding fi le descriptor is returned by the kernel.
11. The ready to run swapped out state represents the state when the process is ready to run and is kept on secondary storage. In such a state, the process waits for the swapper to swap it into the main memory before the scheduler can schedule it to execute.
12. The pre-empted state refers to the state when the kernel suspends or pre-empts the current process to schedule a higher priority process.
13. The zombie state represents a state when a process
■ SUMMARY ■
Here, s_no is the segment number and addr is the address within the segment.Hence, in segmentation, address spaces are not contiguous enabling segments to expand
or compress without any fear of overwriting the content of the next segment in sequence.
6.10.4 Memory-mapped Input/OutputMemory-mapped I/O is a method used to perform an I/O operation between the CPU and I/O devices (i.e., peripheral devices). Basically, a computer has two buses: memory bus and I/O bus. The memory bus is used for implementing communication with the memory (physical RAM) and the I/O bus for accessing and managing operations with the I/O devices. In memory mapped I/O, both the I/O devices and memory use the same address bus. In other words, the address in the address bus can refer to a region that can belong to both the RAM as well as the I/O device. The benefi t of using the memory mapped I/O is that the same CPU instruction for accessing physical memory can also be used to access I/O devices. The drawback of using this approach is that the address space meant for accessing physical memory is reduced as a region of address space is reserved for I/O devices.
Thus, a process that is created by a system call, fork, undergoes different transition states during its life cycle. It can be scheduled to run at a specifi c date and time through different commands. The execution of a process can be controlled, suspended, and killed as desired. Different notifi cations can be passed to a process in the form of signals. In order to run larger processes in the small primary memory, the concept of virtual memory has been implemented in the operating system.

188 Unix and Shell Programming
■ FUNCTION SPECIFICATION ■
■ EXERCISES ■
Command Functionps It is used to know the process status.
The command also gives information on system processes, and processes generated by a user and from a particular terminal.
fg It is used for switching a background job to the foreground.
bg It is used for switching a foreground job to the background.
kill It is used for terminating a job or a process.jobs It is used to know the status of the
background jobs.
Command Functioncron It is a daemon that gets activated every
minute.at It is used for executing Unix commands
at a specifi c date and time.batch It is used for specifying the collection of
commands we want to execute when the system load permits.
nohup It is used for ensuring that the background jobs keep running even if we log out of the system.
nice It is used for increasing and decreasing the priority of a process.
Objective-type Questions
State True or False
6.1 In the Unix system, there may be several processes running in the memory at a time.
6.2 Every process in the Unix operating system gets
a time slice in which it undergoes execution. 6.3 Unix creates the fi rst process with a PID of 1. 6.4 We cannot know about the processes created
is terminated, but keeps the resources allocated to it and does not declare its termination status to its parent process.
14. The tasks conducted while process switching, that is, saving the state of the current process and loading the saved state of the new process is known as context switching.
15. A thread is the smallest unit of processing. A process can have one or more threads. A thread has its own independent flow of control as long as its parent process exists and dies if the parent process dies.
16. The zombie process is a process that has completed execution and is currently dead but still occupies an entry in the process table, waiting for the process that started it to read its exit status.
17. A signal is a technique of informing or sending notifi cations to a process or thread of a particular event that requires immediate action. Each signal has a default action associated with it. The default action can be changed for certain signals to take
different actions.18. Virtual memory refers to the concept of running
applications larger than the size of the primary memory. In the virtual memory technique, an application is assigned a virtual address space, which is a block of memory addresses.
19. To accommodate the pages of the application, the physical memory is split into chunks known as page frames.
20. The process of swapping only the demanded page of the application into physical memory is known as demand paging.
21. In paging, the pages are of fi xed sizes and are contiguous too, that is, one page follows the other without any gap in the virtual address space. In segmentation, on the other hand, blocks of memory of variable size are assigned to the process with gaps of empty memory blocks between the segments.
22. Memory-mapped I/O is a method that is used to perform the I/O operation between the CPU and the I/O devices, that is, peripheral devices.

Manipulating Processes and Signals 189
Fill in the Blanks
6.1 It is the job of to decide which process has to be submitted to the CPU for action.
6.2 Every process is assigned a unique identifi cation number known as .
6.3 The command to know the status of the processes running in a Unix system is .
6.4 The command used to see the list of system processes running in a Unix system is .
6.5 To suspend a running foreground job, we press .
6.6 To resume a suspended foreground job, we give the command.
6.7 The command is used to know the job status.
6.8 The crontab fi le is stored in the directory.
6.9 The command used to remove the crontab fi le is .
6.10 The command is used to keep the background jobs running even if we log out of the system.
6.11 The default nice value of a process is .
6.12 The command used to terminate a process is .
6.13 The is an array of structures that contains an entry per process.
6.14 The term PCB stands for .6.15 The represents the identifi er of the
parent process that created the process.6.16 Program counter keeps the address of the
instruction to be executed by a process.
6.17 Files are internally represented by , which are maintained in the .
6.18 The table keeps track of the fi les that are opened by the process.
6.19 When a process opens or creates a fi le, its is returned by the kernel.
6.20 state represents the state when the process is ready to run and is kept on secondary storage.
Multiple-choice Questions
6.1 The process in the Unix system that is created during bootstrapping is
(a) process 1 (c) process 0 (b) init (d) getty 6.2 PID stands for (a) process identifi cation
(b) process is done (c) parent input daemon (d) performance is developing 6.3 A process includes three segments: text, data, and (a) CPU (c) scheduler (b) queue (d) stack
from a particular terminal. 6.5 We can switch a background job to the foreground
but the vice versa is not possible. 6.6 We can execute a process in the background
by adding ampersand symbol (&) after the command.
6.7 The job number should be prefi xed by the percent sign (%) while specifying it in suspending, resuming, and terminating background jobs.
6.8 The daemon cron gets activated every hour. 6.9 The crontab command creates a crontab fi le
with our login name.6.10 The jobs scheduled using the at command have
to be rescheduled after their execution.6.11 The jobs executed through the batch command
run when the system load permits.6.12 By decreasing the nice value of a command, we
decrease its priority.6.13 Processes are only created while bootstrapping
and cannot be created later.6.14 The boot program loads the kernel.6.15 The init process is the ancestor of all other
processes.6.16 The process that calls the fork is known as a
child process and the process that is created is known as a parent process.
6.17 A process includes three segments: text, data, and stack.
6.18 The process table holds information that is private to the process.
6.19 Per process region table defi nes the mapping from the virtual to the physical addresses.
6.20 A region is a continuous area of a process’s address space.

190 Unix and Shell Programming
Review Questions
6.1 Explain the following commands with examples: (a) kill (d) batch (b) crontab (e) nohup (c) at 6.2 Explain how the priority of a job can be changed.
6.3 Explain the difference between foreground and background jobs and how switching between them takes place.
6.4 What is a process and how can we know the status of a process running in a Unix system?
6.4 A process swapped to secondary storage and waiting for an event to occur is said to be
(a) sleeping, swapped (c) waiting (b) zombie (d) secondary 6.5 When a higher priority process is to be executed,
the current process is (a) terminated (b) swapped out (c) pre-empted (d) mailed to a colleague for processing 6.6 The smallest unit of processing is a (a) process (c) bit (b) byte (d) thread 6.7 A zombie process waits for its parent process to
read its
(a) PID (b) fi le descriptor table (c) exit status (d) U area fi le system 6.8 If a signal is delivered more than once, we say it is (a) queued (c) fl ooded (b) not queued (d) killed 6.9 The blocked signals of a process are represented
by an array known as (a) blocked array (c) signal mask (b) signal array (d) masked array6.10 The table that maps the virtual address to the
physical address is known as (a) virtual table (c) translation table (b) address table (d) page map table
Programming Exercises
6.1 What are the following commands expected to do?
(a) $ ps -ef (b) $fg (c) $ bg %3 (d) $ crontab -r (e) $ at -l (f) $ nice -n 10 sort mbacourse.txt (g) $ kill -9 10115 (h) Pressing Ctrl-c keys on the keyboard (i) Pressing Ctrl-z keys on the keyboard (j) Pressing Ctrl-\ keys on the keyboard 6.2 Write the commands for the following tasks: (a) To get the list of the processes of all users
who are logged in to the system (b) To get complete information of the processes
created by the user, charles (c) To get the list of system generated processes
that are running at the current instant (d) To suspend a foreground job (e) To resume the suspended job (f) To stop a background job with job number 5
(g) To terminate a background job with job number 5
(h) To display all the jobs with their job numbers and current status
(i) To schedule the job of sorting a fi le mbacourse.txt on the 5th day of every month at 10:30
(j) To schedule the job of deleting all fi les with extension .bak on 1 January and 1 July every year
(k) To see the list of commands supplied to the crontab fi le
(l) To execute the shell fi le message.sh on 10 Feb ruary at 4 p.m.
(m) To execute the commands in the shell fi le, message.sh, in a batch
(n) To sort the fi le, mbacourse.txt, in the background and ensure that the process is not terminated even if we log out of the system
(o) Increase the priority of a command that sorts the fi le mbacourse.txt

Manipulating Processes and Signals 191
State True or False
6.1 True 6.2 True 6.3 False 6.4 False 6.5 False 6.6 True 6.7 True 6.8 False 6.9 True6.10 True6.11 True6.12 False6.13 False6.14 True6.15 True
6.16 False6.17 True6.18 False6.19 True6.20 True
Fill in the Blanks
6.1 scheduler 6.2 process identifi er
(PID) 6.3 ps 6.4 ps -e 6.5 Ctrl-z 6.6 fg 6.7 jobs 6.8 /usr/spool/
cron/crontabs 6.9 crontab -r6.10 nohup 6.11 206.12 kill6.13 process table6.14 process control
block6.15 parent process
identifi er (PPID) 6.16 next6.17 inodes, inode
table6.18 user fi le
descriptor 6.19 fi le descriptor
6.20 ready to run, swapped out
Multiple-choice Questions
6.1 (c) 6.2 (a) 6.3 (d) 6.4 (a) 6.5 (c) 6.6 (d) 6.7 (c) 6.8 (a) 6.9 (c)6.10 (d)
■ ANSWERS TO OBJECTIVE-TYPE QUESTIONS ■
6.5 Explain the following terms related to a process:
(a) Process table (c) Region table (b) U area (d) Zombie process 6.6 Explain the different states of a process. 6.7 Compare threads with processes. 6.8 What is the benefi t of virtual memory and how
is it implemented? Explain the role of page map table.
6.9 Explain the role of the following: (a) Process control subsystem (b) cron daemon in process scheduling6.10 Explain the following: (a) What are signals and their types? (b) What are the two functions that are com-
monly used to send signals?6.11 How does the signal() function perform signal
handling? Explain with a running code.
Brain Teasers
6.1 If a new process is created and there is not enough primary memory, which state will it go into?
6.2 Assume that a process is asleep in the memory state waiting for an event to occur and that event happens. Which state will the process now switch to?
6.3 Why is communication and data sharing among threads faster than processes?
6.4 Correct the following command to view the list of processes of user, chirag:
$ ps -f chirag
6.5 Correct the error in the following statement: Virtual address comprises frame number and
offset. 6.6 Correct the error in the following statement: In segmentation, the pages are of fi xed size and are
contiguous; hence, when a page expands, it results in overwriting of the content of the next page.
6.7 Correct the error in the following statement: When an application generates a virtual address
that is not present in the physical memory, an exception is thrown, which is known as virtual fault.

7.1 INTRODUCTION
System calls are special functions that run in kernel mode and allow us to access kernel services. Hence, before we go deeper into understanding system calls, let us take a quick look at the user and kernel modes. You may recall that we have already discussed user and kernel modes in detail in Chapter 6.
7.1.1 Operation ModesA process can operate in both user mode and kernel mode. While executing instructions, a process operates in the user mode. However, to access a fi le on the disk, memory, or some
77System CallsSystem Calls C H A P T E R
After studying this chapter, the reader will be conversant with the following:
• The role of system calls in performing different tasks• Working of system calls related to fi le handling operations such as the
system calls used in opening fi les, creating fi les, reading from fi les, writing to fi les, relocating fi le descriptors, closing fi les, linking to fi les, deleting fi les, changing fi le access permissions, accessing fi le information, and duplicating fi le descriptors
• System calls that perform tasks related to directory handling such as changing directory, opening directory, and reading directory
• System calls involved in process handling operations such as the exec() system call, the fork system call, and the wait system call
• Unix library functions and how they differ from system calls• System calls that deal with memory management—allocating memory,
freeing memory, and changing the size of allocated memory• File locking and record locking, the implementation of read and write locks
on the entire fi le and on small regions of the fi les, and how these locks compete with each other and might result in a deadlock
• Conditions that result in a deadlock situation and methods to solve the problem

System Calls 193
peripheral, system calls are used. Thus, to use a system call, the process switches to the kernel mode. Let us now discuss these modes and also understand the difference between them.
7.1.2 Kernel ModeIn kernel mode, the process has complete and unrestricted access to the underlying hardware. It can execute any CPU instruction and reference any memory address. Since the code executed in this mode can access the lowest level and security sensitive functions of the operating system, only trusted codes should be run in this mode, else, it may result in serious security vulnerabilities.
Note: Low-level functions are also known as system calls and are built into the operating system.
7.1.3 User Mode In user mode, the process runs in restricted mode, that is, there are certain restrictions imposed on it. For example, in user mode, the process cannot access the memory locations used by the kernel, perform input/output (I/O) operations that may alter the global state of the system, or access kernel data structures. Being run in restricted mode (i.e., with limited permissions), the code run in user mode does not result in security vulnerabilities. This implies that it cannot access or overwrite system security related fi les.
The three common situations that occur when a process switches to the kernel mode from the user mode are as follows:
When an interrupt occurs In this situation, the status of the current running process is stored in the stack and the necessary code is run to serve the interrupt. This switching of modes happens in the kernel mode. After handling the interrupt, the process resumes execution from the place it was interrupted.
When process requires kernel services Kernel services are provided by switching to the kernel mode. If a user process needs to access a fi le from the disk, use a printer, or manage other peripherals, it needs to switch to the kernel mode. The kernel services are accessed by the respective system calls.
When an exception is raised Exceptions arise when some erroneous statement occurs in the program. The system switches to the kernel mode on the occurrence of an exception.
A system call is basically a request made by our program to the operating system to perform certain tasks such as managing the fi le system, controlling processes, and performing inter-process communication. The system calls execute the code in the kernel and thus the mode of a process is changed from the user to the kernel mode. The system calls are in the form of functions and are meant for performing all kinds of tasks such as managing fi les (creating, opening, closing, reading, writing, and deleting fi les), creating and ending processes, and allowing processes to communicate. There is a system call for each individual operation. In this chapter, we will discuss system calls belonging to the following three categories:
1. File-related system calls2. Directory handling system calls 3. Process-related system calls

194 Unix and Shell Programming
For performing fi le I/O or any I/O operations there are two completely different sets of functions:
High-level I/O functions High-level I/O functions, also known as standard I/O library functions, are the ones that call one or more low-level I/O functions to do their job because of the simple reason that high-level I/O are built on top of the low-level I/O functions. These functions are more portable and easier to operate when compared to low-level I/O functions. Example of high-level I/O functions include fread(), fopen(), fwrite(), and fclose(). These functions access the fi le through memory buffers, that is, the data is fetched from the fi le and is written into the fi le via buffers. The data to be written into the fi le is initially written into the memory buffer and when the buffer is full, the data is physically written into the disk.
Low-level I/O functions Low-level I/O functions, also known as system calls, are built into the operating system and are the functions on which the high-level functions are built. The low-level I/O functions are also referred to as unbuffered fi le I/O because the functions do not use any buffers and all the I/O operations are directly applied physically to the specifi ed target (device). Example of low-level I/O functions include read(), open(), write(), and close(). The low-level I/O are part of the operating system and are executed in the system kernel. As a result, these functions have greater control over the system resources.
7.2 FILE-RELATED SYSTEM CALLS
As the name suggests, the system calls falling in this category help in performing fi le management tasks such as opening a fi le, reading fi le content, writing into the fi le, setting fi le pointer location, and duplicating fi le descriptors. Table 7.1 provides a list of all fi le-related system calls along with their functions. We will learn about each of these in detail in the following sections.
Table 7.1 File-related system calls
System call Description
open(fi lename, fl ags, mode) Opens a fi le with the specifi ed fl ags and mode
create(fi lename, mode) Creates a fi le with the specifi ed mode
read(fd, buf, n) Reads n bytes from an open fi le into the buffer buf
write(fd, buf, n) Writes n bytes in the buffer buf to an open fi le
lseek(fd, offset, location) Relocates the fi le descriptor fd at the specifi ed offset from the given location
close(fd) Closes an open fi le with fi le descriptor fd
mknod(fi lename, mode, dev) Creates a regular fi le, special fi le, or directory with the given mode
dup(fd) Makes a duplicate fi le descriptor fd
dup2(fd1, fd2) Duplicates the fi le descriptor fd1 with the name fd2
link(f1, f2) Creates a link f2 for the fi le f1
symlink () Makes a symbolic link to a fi le
unlink(fi lename) Removes a link of the given fi lename
stat(fi lename, buf) Returns status information of the given fi lename in the status buffer buf
(Contd)

System Calls 195
Table 7.2 Commonly used fl ag values
Flag Description
O_RDONLY Opens the fi le for reading only
O_WRONLY Opens the fi le for writing only
O_RDWR Opens the fi le for reading and writing
O_NONBLOCK Non-blocking access
O_APPEND Appends to the fi le
O_CREAT Creates the fi le if it does not exist
O_TRUNC Truncates the fi le size to 0 deleting older contents
O_EXCL Opens fi les in exclusive mode; open() fails if the fi le already exists
O_SHLOCK Obtains a shared lock
O_EXLOCK Obtains an exclusive lock
O_DIRECT Reduces the cache effects
O_FSYNC For synchronous writing
O_NOFOLLOW Does not follow symlink
Table 7.3 Commonly used mode values
Constant name Description
S_IRWXU Read, write, and execute permissions for the owner
S_IRUSR Read permission for the owner
S_IWUSR Write permission for the owner
S_IXUSR Execute permission for the owner
S_IRWXG Read, write, and execute permissions for the group
S_IRGRP Read permission for the group
S_IWGRP Write permission for the group
S_IXGRP Execute permission for the group
S_IRWXO Read, write, and execute permissions for others
S_IROTH Read permission for others
S_IWOTH Write permission for others
S_IXOTH Execute permission for others
Table 7.1 (Contd)
System call Description
fstat(fd,buf) Returns status information about the fi le with the fi le descriptor fd in the status buffer buf
lstat(symbolic_link,buf) Returns status of the symbolic link in the buffer buf
access(fi lename, mode) Checks for permissions in the given fi lename
chmod(fi lename, mode) Changes the fi le/directory permissions
chown(fi lename, ownerID, groupdID) Changes the owner and group of the given fi lename
umask(new mask) Sets the fi le mode creation mask
ioctl(fd, command, arg) Controls the functions of the specifi ed devices
7.2.1 open(): Opening FilesThe open() system call is used for opening an existing fi le as well as for creating a new fi le if it does not exist.
Syntax 1 int open(fi lename, fl ag);
Syntax 2 int open(fi lename, fl ag, mode);
Here, the fi rst parameter, fi lename, corresponds to the fi lename to be opened or created. The second parameter, fl ag, defi nes how the fi le is going to be used. Some commonly used fl ag values are shown in Table 7.2.
The third parameter, mode, is used to specify the fi le access permissions for the new fi le. Commonly used modes are given in Table 7.3.

196 Unix and Shell Programming
Here, RWX refers to read, write, and execute permissions, respectively.The fi rst syntax (Syntax1) is for opening an existing fi le and the second syntax
(Syntax 2) is for creating a new fi le if it does not exist. Both formats return an integer called the fi le descriptor. The fi le descriptor is then used for reading from and writing into the fi le. If the fi le cannot be opened or created, the system call returns −1.
Note: File descriptor—The kernel refers to any open fi le through a fi le descriptor. It is a non-negative integer that ranges from 0 through OPEN_MAX, the total number of fi les a process can open. OPEN_MAX is an operating system parameter with a default value of 4096. A fi le descriptor initially points to the beginning of the fi le and can be relocated in a fi le. The location of the fi le descriptor indicates the position in the fi le from where the next read or write operation may begin.
Examples
(a) fp = open("xyz.txt", O_RDONLY);This command opens the fi le xyz.txt for a read only purpose. The fi le is opened and the fi le descriptor is assigned to fp.
(b) fp = open("xyz.txt", O_CREAT|O_RDWR, S_IRWXU);This command creates the fi le xyz.txt for reading as well as writing purposes with read, write, and execute permissions only to the owner. The fi le descriptor of the created fi le is assigned to fp.
7.2.2 create(): Creating FilesThe system call used for creating fi les is create(). It is not very popularly used as the fi les can be created through an open() system call too. The syntax for using this system call is as follows:
Syntax int create(fi lename, mode)
Here, fi lename is the name of the new fi le and mode defi nes the fi le’s access permissions. mode refers to read, write, and execute permissions for the owner, group, and others, respectively. If the fi lename specifi ed in the function does not exist, it is created with the specifi ed mode. If the fi le already exists, its earlier contents will be deleted. The mode used in this system call is same as that discussed in Section 7.2.1.
Example fp = create("xyz.txt", S_IRWXU);
This command creates the fi le xyz.txt with read, write, and execute permissions for only the owner. The fi le descriptor of the newly created fi le is assigned to fp.
7.2.3 read(): Reading from FilesThe system call for reading from a fi le is read(). The following is the syntax for using this system call:
Syntax ssize_t read(int fd, void *buf, int size);
Here, the fi rst parameter, fd, is the fi le descriptor of the fi le that is returned from the open() or create() system calls. The second parameter *buf is a pointer pointing to the memory location where the data read from the fi le will be stored. The last parameter, size, specifi es the number of bytes that we want to read from the fi le. The system call returns the number of bytes that are actually read from the fi le.

System Calls 197
Example
The following segment of code reads up to 1024 bytes from the fi le, xyz.txt:int n = 0;int fp = open("xyz.txt", O_RDONLY);void *buf = (char *) malloc(1024);n = read(fp, buf, 1024);
In the aforementioned example, the fi le xyz.txt is opened in the read only mode and the fi le descriptor is assigned to a variable, fp. The fi le descriptor, fp, initially points to the beginning of the fi le. We set the size of the buffer buf (where data read from the fi le will be stored) to 1024 bytes. Finally, read() system call is invoked to read the said number of bytes from the fi le. The actual count of the number of bytes read from the fi le is assigned to the variable n.
Each fi le has a fi le descriptor that indicates the location in the fi le from where the next read or write operation will begin. The fi le descriptor automatically increments the number of bytes read from the fi le through the read() system call. In the aforementioned example, if the offset was zero before the read() call, and it actually reads 1024 bytes, then the offset will remain 1024 when the read() call returns.
7.2.4 write(): Writing to FilesThe system call write() is used for writing the given content to a fi le. The syntax for using the system call is as follows:
Syntax ssize_t write(int fd, void *buf, int size);
It writes the number of bytes, size, to the fi le pointed by fi le descriptor fd from the buffer pointed by *buf. The write operation starts at the location pointed to by the fi le descriptor fd. After the write operation, the fi le descriptor fd advances by the number of bytes that were successfully written. The function returns the actual number of bytes that are written into the fi le. If the system call fails, it returns a value −1.
Examples
(a) int n = 0;int fp = open("xyz.txt", O_CREAT|O_WRONLY|O_TRUNC, S_IRWXU);n = write(fp, "Hello World!", 13);
In this example, the fi le xyz.txt is created in the write only mode; its earlier content, if any, is deleted and the owner of the fi le is given all the three—read, write, and execute—permissions for the newly created fi le. The fi le descriptor of the fi le is assigned to a variable, fp. The fi le descriptor fp initially points to the beginning of the fi le. Using the write() system call, we write the text Hello World! comprising 13 bytes (including the NULL character) into the fi le. If the write() call is successful, the count of the number of bytes written into the fi le is assigned to the variable n.
We have learnt about the read() and write() system calls. For understanding the practical implementation of these two system calls, let us write a program that involves the use of both these calls.
(b) The following program emulates the copy utility where two fi lenames are specifi ed and the content from the fi rst fi lename will be read and written into another fi lename.

198 Unix and Shell Programming
copyemul.c#include <sys/stat.h>#include <fcntl.h>
main(int argc, char *argv[]){ int fd1, fd2; char buf[1024]; long int n;
if((fd1 = open(argv[1], O_RDONLY)) == -1) { perror("Source fi le does not exists "); exit(1); } if((fd2 = open(argv[2], O_CREAT|O_WRONLY|O_TRUNC, S_IRWXU)) == -1) { perror("Problem in creating the target fi le "); exit(1); } while((n=read(fd1, buf, 1024)) > 0) { if(write(fd2, buf, n) != n){ perror("Error in writing into the target fi le"); exit(2); } } close(fd1); close(fd2); }
Output$ gcc copyemul.c -o copyemul
$ cat xyz.txtThis is a test fi le
$ ./copyemul xyz.txt pqr.txt
$ cat pqr.txtThis is a test fi le
We can see in the aforementioned program that the fi rst command line argument following the command script is considered the fi le from which we want to read the content. Hence, the fi le represented by the fi rst command line argument is opened in the read only mode and its fi le descriptor is assigned to fd1. Similarly, the fi le represented by the following command line argument is considered to be the one into which we want to copy the content, hence it is opened in the write only mode. Its earlier content is truncated and read, write, and execute permissions for the owner are assigned to that fi le. The fi le descriptor of the second fi le is

System Calls 199
assigned to fd2. An error message will be displayed on the screen through the perror() function (described in Section 7.8.2) if an error occurs while opening either fi le. Once the two fi les are opened in the respective modes, through a while loop, a chunk of 1024 bytes is read from the fi rst fi le, fi lled into the buffer buf and is written into the second fi le. The process continues until the fi rst fi le is completed, thereby copying all the content of the fi rst fi le into the second fi le. Again, an error message will be displayed if anything goes wrong in the reading or writing process. Finally, the two fi les are closed.
7.2.5 lseek(): Relocating File DescriptorsThe fi le descriptor of the fi le initially points to the beginning of the fi le and indicates the location from where the next byte has to be read or written into the fi le. Through the lseek() call, we can relocate the fi le descriptor to any location in the fi le. It hence allows us to access a fi le randomly. In other words, a fi le descriptor is an integer value that represents the number of bytes from the beginning of the fi le and its value represents the location from where the next read or write operation can occur in the fi le. The syntax for using the lseek() system call is as follows:
Syntax long lseek(int fd, long offset, int location)
A brief introduction of the arguments of this call is given in Table 7.4.
Table 7.4 Brief description of the arguments of lseek() call
Argument Description
fd This represents a fi le descriptor.Offset This represents the number of bytes that we want the fi le descriptor to move from the
position represented by location.location This indicates whether the offset should be located relative to the beginning of the fi le
(SEEK_SET or 0), from the current position of the fi le descriptor (SEEK_CUR or 1), or from the end of the fi le (SEEK_END or 2). The attributes, SEEK_SET, SEEK_CUR, and SEEK_END are represented by the constants 0, 1, and 2, respectively. The attribute SEEK_SET sets the fi le descriptor at the offset bytes from the beginning of the fi le; the value SEEK_CUR sets the fi le descriptor at its current location plus the offset bytes; and the value SEEK_END sets the fi le descriptor at the offset from the end of fi le.
If successful, lseek() returns a long integer that defi nes the location of the fi le descriptor measured in bytes from the beginning of the fi le. If unsuccessful, the position of the fi le descriptor does not change.
Examples
(a) The following example sets fi le descriptor fd at the 10th byte from the beginning of the fi le.lseek(fd, 10, SEEK_SET);
(b) The following example sets fi le descriptor fd at the last byte of the fi le.lseek(fd, 0, SEEK_END);
(c) The following example sets fi le descriptor fd at the 5th byte from the end of the fi le.lseek(fd, -5, SEEK_END);

200 Unix and Shell Programming
7.2.6 close(): Closing FilesThe close() system call is used for closing opened fi les.
Syntax int close(int fd);
To close a fi le, we pass its fi le descriptor to the close() system call. If successful, the call returns the value 0 and otherwise returns the value −1. On closing a fi le, the kernel releases all the resources used by it, provided no other fi le descriptor is still associated with it.
Example
The following example closes the fi le represented by the fi le pointer fd.
close(fd);
We will now write a program that makes use of all the system calls that we have seen till now.The following program uses the system calls open(), read(), lseek(), write(), and
close(). The program requires two fi lenames, which are passed as command line arguments, and the content of the fi rst fi lename is read and written in reverse order into another fi le.openreadcall.c
#include <stdio.h>#include <fcntl.h>#include <sys/stat.h>
main(int argc, char *argv[]){ int fd1, fd2; char c; long int i=0, totalbytes=0; fd1=open(argv[1], O_RDONLY); fd2=open(argv[2], O_CREAT|O_WRONLY|O_TRUNC, S_IRWXU); while(read(fd1, &c, 1)>0) totalbytes++; while(++i <= totalbytes){ lseek(fd1, -i, SEEK_END); read(fd1, &c, 1); write(fd2, &c, 1); } close(fd1); close(fd2);}
Output$ cat xyz.txtThis is a test fi le
$ ./openreadcall xyz.txt xyzreverse.txt
$ cat xyz.txtThis is a test fi le

System Calls 201
$ cat xyzreverse.txtelif tset a si sihTWe can see from the aforementioned program that the fi rst command line argument following the command script that represents the fi le from which we want to read the content, is opened in the read only mode and its fi le descriptor is assigned to fd1. Similarly, the fi le represented by the following command line argument is considered to be the one into which we want to copy the content of the fi rst fi le after reversing it. Hence it is opened in the write only mode; its earlier contents are truncated and the read, write, and execute permissions for the owner are assigned to that fi le. The fi le descriptor of the second fi le is assigned to fd2. Thereafter, we fi nd the length or the total number of bytes in the fi rst fi le by reading each of its characters and incrementing a counter, totalbytes, with every character that is read. Next, the fi le descriptor in the fi rst fi le is positioned at the last character position through the lseek() system call and its last character is read and written into the second fi le. Again, the fi le descriptor is positioned at the second-last character position in the fi rst fi le; this second-last character is read and written into the second fi le and the process continues
until all the characters from the fi rst fi le are written into the second fi le in reverse order. Finally, the two fi les are closed.
7.2.7 mknod(): Creating FilesThe system call, mknod(), is used to create a new regular, directory, or special fi le.int mknod(const char *path, mode_t mode, dev_t dev);Here, path represents the name of the fi le to be created; mode represents the fi le type of the newly created fi le; and dev represents the major and minor device numbers if the fi le to be created is a device fi le (character or block-oriented fi le).
The mode can be any of the following symbolic constants given in Table 7.5.
The mode parameter has the associated permissions that are OR’ed (connected with the OR operator, i.e., ‘|’ operator) with the symbolic constants of the fi le types shown in Table 7.5. The permissions for the new fi le are represented by the symbolic constants shown in Table 7.6.
Table 7.5 Symbolic constants that represent different fi le types
Name Description
S_IFIFO FIFO-pipeS_IFCHR Character-oriented fi leS_IFDIR DirectoryS_IFBLK Block-oriented fi leS_IFREG Regular
Table 7.6 Symbolic constants representing the permissions for the new fi le
Name Description
S_ISUID Set user ID S_ISGID Set group IDS_IRWXU Read, write, and execute permissions for the ownerS_IRUSR Read permission for the ownerS_IWUSR Write permission for the ownerS_IXUSR Execute permission for the ownerS_IRWXG Read, write, and execute permissions for the groupS_IRGRP Read permission for the groupS_IWGRP Write permission for the groupS_IXGRP Execute permission for the groupS_IRWXO Read, write, and execute permissions for othersS_IROTH Read permission for othersS_IWOTH Write permission for othersS_IXOTH Execute permission for others

202 Unix and Shell Programming
The dev parameter is ignored if the fi le type is not a character or block-oriented type. When successful, the method returns 0, otherwise it returns a value −1.
Example The following example creates a regular fi le, by the name stock.txt with read, write, and execute permissions to the user (owner) and only read permissions to the group and other users.
int fl ag;fl ag = mknod("stock.txt", S_IFREG | S_IRWXU| S_IRGRP | S_IROTH, 0);
In this example, the last parameter, dev, is ignored as it is a regular fi le and fl ag is assigned the returned status of the system call.
The following example creates a FIFO fi le with the name letter.txt that assigns read, write, and execute permissions to the user (owner), and read and execute permissions to the group and other users.
int fl ag;fl ag = mknod("letter.txt", S_FIFO | 0755, 0);
Again, the last parameter, dev, is ignored in the aforementioned statement as the fi le is a FIFO fi le.
7.2.8 dup() and dup2(): Duplicating File DescriptorsThe dup system call is used for duplicating a fi le descriptor. You may recall that fi le descriptors are used for accessing fi les. Having more than one fi le descriptor for the same fi le necessitates a single fi le pointer to be shared by all fi le descriptors. It also means that an open fi le can be accessed or shared by several processes simultaneously. Hence, the dup system call duplicates the fi le descriptor fd returning a new descriptor. The dup2 system call copies one fi le descriptor to another specifi ed fi le descriptor.
Syntax int dup(int fd);
Syntax int dup2(int fd, int fd2);
The dup system call returns the fi le descriptor that points to the same fi le as the fd descriptor. The dup2 system call makes the fi le descriptor fd2 point to the same fi le that the fi le descriptor fd is pointing at.
The system calls return or copy the fi le descriptor if successful and return a value of −1 otherwise.
Example
The following example demonstrates the use of dup() and dup2() system calls.dupcall.c
#include <fcntl.h>
main() { int fd1, fd2, fd3,fd4;

System Calls 203
fd1 = open( "xyz.txt", O_RDWR | O_TRUNC ); /* fi le xyz.txt is opened and is represented by fi le descriptor fd1 */
fd2 = open( "pqr.txt", O_RDWR | O_TRUNC ); /* fi le pqr.txt is opened and is represented by fi le descriptor, fd2 */
write( fd1, "Hello", 6 ); /* The text, Hello is written in fi le xyz.txt */
write( fd2, "World", 6 ); /* The text, World is written in fi le pqr.txt */
fd3 = dup(fd1); /* The fi le descriptor fd3 is set to point at the fi le where fi le descriptor fd1 is pointing i.e. at fi le xyz.txt */
write( fd3, "Thanks", 7 ); /* The text, Thanks is written in the fi le xyz.txt */
fd4=dup(fd2); /* The fi le descriptor fd4 is set to point at the fi le where fi le descriptor fd2 is pointing i.e. at fi le pqr.txt */
dup2(fd1,fd2); /* The fi le descriptor leaves the fi le pqr.txt where it was earlier pointing and is set to point at the fi le where fi le descriptor, fd1 is pointing i.e. at fi le xyz.txt */
close(fd1); /* Close fi le with fi le descriptor fd1 */ close(fd4); /* Close fi le with fi le descriptor fd4 */ }
Output
$ cat xyz.txtThis is a test fi le
$ cat pqr.txtThis is a test fi le
$ ./dupcall
$ cat xyz.txtHelloThanks
$ cat pqr.txtWorld
7.2.9 link() and symlink(): Linking to FilesTo link to an existing fi le, the two system calls used are link() and symlink(). The difference between the two system calls is that while the link() system call creates a hard link, the symlink() system call creates a symbolic link. Table 7.7 shows the difference between a hard link and a symbolic link:

204 Unix and Shell Programming
The syntax for the link() system call that creates a hard link is as follows:
Syntax int link(const char *path1, const char *path2);
Here, path1 refers to the original fi lename and path2 refers to the alias fi lename. The link count of the fi le referred to by path1 will be incremented by 1.
The link() call creates a hard link to a fi le.
Example link("xyz.txt", "abc.txt");
The fi le xyz.txt will have a hard link by the name abc.txt. The link abc.txt will be able to show the content of the fi le xyz.txt. If the original fi le xyz.txt is deleted, the link abc.txt can still be used to show the content of the fi le xyz.txt.link() will fail and no link will be created if any of the following conditions occurs:
1. The fi le referenced by path1 does not exist.2. The fi le referenced by path2 already exists or the directory referenced in path2 does not
have write permission.
The symbolic link is created by the symlink() system call. Table 7.7 shows how the symbolic link is different from the hard link that we learnt in Section 7.2.9.
Syntax int symlink(const char *path1, const char *path2);
This syntax creates a symbolic link to the fi le referenced by path1 in the name referenced by path2. The symbolic links to a fi le does not increment the fi le’s link count.
We need to have write and execute permissions for the directory that contains the fi le for which these system calls are executed.
Example symlink("xyz.txt", "abc.txt");
Table 7.7 Differences between hard links and symbolic links
Hard link Symbolic link
In the case of a hard link, two fi lenames point to the same inode and the same set of data blocks. A hard link is a pointer to the fi le’s inode.
A symbolic link has its own inode and hence consumes a small amount of disk space. A symbolic link is a fi le that contains the name of another fi le. It is like a pointer to the fi le’s contents. Here, one fi le contains the actual data and the other fi le only contains the pointer to the fi rst fi le’s content.
A hard link cannot cross a fi le system, that is, both fi lenames must be in the same fi le system. It cannot be created to link a fi le from one fi le system to another fi le on another fi le system. Hard links only know information related to a particular system and hence cannot span fi le systems.
Symbolic links are more fl exible than hard links. They can span fi le systems and even computer systems. A symbolic link can be created to link a fi le on one fi le system to a fi le on another fi le system.
A hard link to a directory cannot be created. A symbolic link to a directory can be created.
In the case of a hard link, a fi le can be deleted without affecting the other. The system deletes the directory entry for one fi lename and leaves the data blocks untouched. The data blocks are only deleted when the link count goes to zero.
With a symbolic link, the two fi lenames are not the same. Deleting the link leaves the original fi le untouched but deleting or renaming the original fi le removes both the fi lename and the data. As a result, the link becomes useless.

System Calls 205
This example creates a symbolic link for the fi le xyz.txt with the name abc.txt. You may remember that xyz.txt is the fi le that contains the actual data and the fi lename abc.txt is just a pointer to the data blocks of xyz.txt. The fi le abc.txt will show the contents of the fi le xyz.txt. However, if the fi le xyz.txt is deleted, the symbolic link abc.txt will become useless, that is, it will lose its content too.
7.2.10 unlink(): Unlinking FilesThe system call used for removing a link to a fi le is unlink():
Syntax int unlink(const char *path);
The link specifi ed through path is removed and the link count of the fi le referenced by the link is decremented by 1. When the link count of the fi le referenced by the link becomes 0 and is not accessed by any process, the fi le is removed, freeing up any space occupied by it. If the fi lename is the last link to a fi le that is still open by a process, the fi le will exist until the process closes the fi le. If the supplied path refers to a symbolic link, it is removed without affecting the fi le that is referenced by the symbolic link. The system call returns a value 0 if the unlinking was successful, and −1 on error.
Example The following example decrements the link of fi le xyz.txt by 1. If the link count of the fi le has become 0, the fi le is deleted.
unlink("xyz.txt");
7.2.11 stat(), fstat(), and lstat(): Accessing File Status InformationThe system calls that control the usage of fi les and also return their status information are stat, fstat, and lstat. Their syntax are as follows:
Syntax int stat(const char *path, struct stat *buf);
Syntax int fstat(int fd, struct stat *buf);
Syntax int lstat(const char *path, struct stat *buf);
The meaning of the arguments used in all these three system calls is briefl y explained in Table 7.8.
stat() It fi lls the buffer buf with the status information of the specifi ed fi le.
fstat() It is same as the stat() system call. Instead of the fi lename, it accepts the fi le des-criptor and fi lls the buffer buf with its status information.
lstat() It returns information about a symbolic link rather than the fi le that it references. The difference between the stat()
Table 7.8 Brief description of arguments used in stat(), fstat(), and lstat() system calls
Argument Description
path Represents the name and the relative or absolute path of the fi le
fd Represents the fi le descriptor of the fi le
buf Represents the pointer to the stat structure that contains the status information of the specifi ed fi le

206 Unix and Shell Programming
and lstat() functions is that, if the specifi ed fi lename refers to a link, the stat() function returns the information of the fi le referred by the link, whereas the lstat() function returns the information of the link itself.
The members of the structure, stat, are shown in Table 7.9.
The st_mode fl ags returned in the stat structure have a number of associated macros. These macros include permissions and fi le-type fl ags and some masks that can be used in testing for specifi c types and permissions (Table 7.10).
The masks to test fi le permissions are listed in Table 7.11.
Macros that can be used to determine fi le types are given in Table 7.12.
For example, to test whether the supplied name through command line arguments belongs to a regular fi le, directory, symbolic link, or something else, the code is as follows:
struct stat statusbuf;mode_t modes;stat(argv[1],&statusbuf);modes = statusbuf.st_mode; if (S_ISREG(modes)) printf("%s is a regular fi le ", argv[1]);else if (S_ISDIR(buf.st_mode)) printf("%s is a directory ", argv[1]);.........
Example The following example demonstrates the use of the fstat() system call and displays the inode number, size, and number of blocks associated with the fi le.
fstatcall.c#include <fcntl.h> #include <sys/stat.h>
Table 7.9 Brief description of the members of the stat structure
stat members Description
st_mode The fi le permissions and fi le-type informationst_ino The inode number of the fi lest_dev The device on which the fi le residesst_uid The user ID of the fi le ownerst_gid The group ID of the fi le ownerst_size The fi le sizest_atime The time the fi le was last accessedst_ctime The time the status of the fi le last changed
permissions—owner, group, or contentst_mtime The time the fi le was last modifi edst_nlink The count of the hard links to the fi lest_blocks The number of blocks of size 512 bytes that have
been allocated
Table 7.11 Few of the masks used to test fi le permissions
Masks Description
S_IRWXU User’s read/write/execute permissions
S_IRWXG Group’s read/write/execute permissions
S_IRWXO Others’ read/write/execute permissions
Table 7.12 Brief description of the macros used to determine fi le types
Macros Description
S_ISBLK() Test for block special fi leS_ISCHR() Test for character special fi leS_ISDIR() Test for directoryS_ISFIFO() Test for pipe or FIFOS_ISREG() Test for regular fi leS_ISLNK() Test for symbolic linkS_ISSOCK() Test for socket
Table 7.10 Symbolic constants representing different fi le types
File-type fl ags Description
S_IFBLK Block special device
S_IFDIR Directory
S_IFCHR Character special device
S_IFIFO FIFO—named pipe
S_IFREG Regular fi le
S_IFLNK Symbolic link

System Calls 207
main()
{
struct stat statusbuf;
int n, fp;
fp = open("xyz.txt", O_WRONLY | O_CREAT, S_IREAD | S_IWRITE);
if(fp == -1) /* Error in opening fi le */
exit(-1);
n = fstat(fp, &statusbuf);
if(n == -1) /* The system call, fstat failed */
exit(-1);
printf("The inode number of the fi le is = %d\n", statusbuf.st_ino);
printf("The size of the fi le is = %d\n", statusbuf.st_size);
printf("The number of blocks allocated to the fi le is = %d\n", statusbuf.st_
blocks);
}
Output
The inode number of the fi le is = 39816
The size of the fi le is = 13
The number of blocks allocated to the fi le is = 2
Note: Whenever a system call or library function fails, it returns a value −1.
7.2.12 access(): Checking PermissionsThe access() system call checks whether the user has the permissions to read, write, or perform other tasks on the specifi ed fi le.
Syntax int access(const char *pathname, int mode);
Here, pathname represents the fi le whose permissions have to be checked and mode represents the permissions that have to be checked for the fi le. The mode can be represented by the following symbolic constants:
1. F_OK: Checks whether the fi le exists2. R_OK: Checks whether the fi le has read permission3. W_OK: Checks whether the fi le has write permission4. X_OK: Checks whether the fi le has execute permission
If we supply the symbolic link instead of fi lename in the access() system call, then the permissions of the fi le referred to by the symbolic link will be tested.
On success, that is, if all the requested permissions exist, the system call returns 0. If any requested permission is denied, the system call returns a value −1 and sets the external variable errno that describes the reason for error.
Example The following program checks whether the fi le xyz.txt exists in the current directory. In addition, it checks if the user has read, write, or execute permissions for the fi le.

208 Unix and Shell Programming
checkfi le.c#include <stdio.h>#include <unistd.h>
main() { char path[]="xyz.txt";
if (access(path, F_OK) != 0) printf("The fi le, %s does not exist!\n", path); else { if (access(path, R_OK) == 0) printf("You have read access to the fi le, %s \n", path); if (access(path, W_OK) == 0) printf("You have write access to the fi le, %s \n", path); if (access(path, X_OK) == 0) printf("You have execute permission to the fi le, %s\n", path); }}
Output
$ ls -al xyz.txt-rwxr--r-- 1 root root 20 Feb 22 19:00 xyz.txt
$ ./checkfi leYou have read access to the fi le, xyz.txtYou have write access to the fi le, xyz.txtYou have execute permission to the fi le, xyz.txt
$ chmod 544 xyz.txt
$ ls -al xyz.txt-r-xr--r-- 1 root root 20 Feb 22 19:00 xyz.txt
$ ./checkfi leYou have read access to the fi le, xyz.txtYou have execute permission to the fi le, xyz.txt
7.2.13 chown(), lchown(), and fchown(): Changing Owner and Group of Files
To change the owner or group of the given fi les, the following system calls can be used:
Syntax int cho wn(const char* fi lename, uid_t ownerID, gid_t groupID)
int lchown( const char* fi lename, uid_t ownerID, gid_t groupID ) int fchown( int fd, uid_t ownerID, gid_t groupID )

System Calls 209
The arguments used in the three system calls, chown(), lchown(), and fchown(), are briefl y explained in Table 7.13.
The system call chown() changes the owner and group IDs of the specifi ed fi lename to the supplied owner and group IDs, respectively. We substitute the value −1 in the system call for the owner ID or group ID that we want to keep unchanged.
System call fchown() is same as chown(), the only difference being that instead of the fi lename, it accepts the fi le descriptor of the fi le whose owner/group has to be changed.
The lchown() system call is used for changing the owner/group of a symbolic link.
Example The following example changes the owner and group IDs of the fi le xyz.txt to 101 and 21 respectively. We assume that a user with ID 101 and a group with ID 21 already exist.
changeownergroup.cmain() { int a,b,c; a = chown("xyz.txt",101, 21 ); /* Changes the owner and group to 101 and 21 respectively */ if ( a == -1 ) perror("Error in changing Owner ID and Group ID of the fi le xyz.txt"); b = chown("xyz.txt",101, -1 ); /* Changes the owner of the fi le to 5 keeping group ID unchanged */ if ( b == -1 ) perror("Error in changing Owner ID of the fi le xyz.txt"); c = chown("xyz.txt",-1, 21 ); /* Changes the group of the fi le to 40 keeping owner ID unchanged */ if ( c == -1 ) perror("Error in changing Group ID of the fi le xyz.txt"); }
Output
$ ls -al xyz.txt-r-xr--r-- 1 root root 20 Feb 23 22:12 xyz.txt
$ ./changeownergroup
$ ls -al xyz.txt-r-xr--r-- 1 101 it 20 Feb 23 22:12 xyz.txt
In this example, we can see that the fi rst chown() call demonstrates the changing owner as well as group IDs, whereas the second and third chown() calls change only the owner ID and group ID respectively. When unsuccessful, the system calls return a value −1, in which case, the error message is displayed via the perror() function.
Table 7.13 Brief description of the arguments used in the chown(), lchown(), and fchown() system calls
Argument Description
fi lename Represents the name and relative or absolute path of the fi le
ownerID Represents the ID of the owner, i.e., user ID
groupID Represents the ID of the group
Fd Represents the fi le descriptor of the fi le

210 Unix and Shell Programming
7.2.14 chmod() and fchmod(): Changing Permissions of FilesTo change the fi le/directory permissions for the three types of system users, user (owner), group, and other, the following system calls are used:
Syntax int chmod( const char* fi lename, int mode )
int fchmod( int fd, mode_t mode );
A brief explanation of the arguments used in these system calls is given in Table 7.14.
Table 7.14 Brief description of the arguments used in the chmod() and fchmod() system calls
Argument Description
fi lename Represents the name of the fi le including its relative or absolute path
Mode Represents the permissions that we wish to assign to the fi le/directory
fd Represents the fi le descriptor of the fi le
Note: The mode parameter can have the values, that is, permissions specifi ed in Table 7.3.
chmod() changes the mode (permissions) of the fi lename to the supplied mode, where the mode is specifi ed as an octal number. Either the owner or super user can change the fi le’s permissions. fchmod() works in the same manner as chmod() with the exception that it accepts the fi le descriptor of the fi le whose permissions we wish to change instead of the fi lename. Both methods return a value 0 when successful and a value −1 otherwise.
Example The following example changes the permissions of the fi le xyz.txt to 744 (octal), which refers to read, write, and execute permissions for the user, and read permission for the group and other users.
changepermission.cmain() { int a; a = chmod("xyz.txt", 0744); /* Assigning r,w and x permissions to the User and only r permissions to the Group and Other for the fi le xyz.txt */ if ( a==-1 ) perror("Error in changing permissions of the fi le xyz.txt"); }
Output
$ ls -al xyz.txt-rw-r--r-- 1 root root 20 Feb 22 19:00 xyz.txt
$ ./changepermission
$ ls -al xyz.txt-rwxr--r-- 1 root root 20 Feb 22 19:00 xyz.txt

System Calls 211
7.2.15 umask(): Setting File Mode Creation MaskThe umask() system call sets the fi le mode creation mask. In simple language, it is a call that defi nes the default permissions for the fi les and directories when created. umask is basically used by the open() and mkdir() system calls to defi ne the default permissions for the fi les and directories being created. The permissions can be specifi ed either in the form of symbolic constants or in the form of a three-digit octal value.
Syntax mod_t umask (mode_t new mask)
The system call returns the value of the previous mask.
Example umask(S_IRGRP | S_IWGRP | S_IROTH | S_IWOTH);
umask(0022);
The permission of the newly created fi le will be default fi le access mode –umask. Similarly, the permission of the newly created directory will be default directory access mode –umask.
The default fi le access mode is 0666 and the default directory access mode is 0777.For example, if the value of umask is set to 0022 and a fi le is created without specifying
the mode (it will have the default access mode, 0666):
fl ag = open("xyz.txt", O_WRONLY | O_TRUNC);
Then the newly created fi le, xyz.txt, will have the following access mode:
0666 – 0022 = 0644
The following command describes a case where the fi le is created with the mode 0544:
fl ag = open("xyz.txt", O_WRONLY | O_TRUNC, 0544);
The fi le xyz.txt will then have the following permissions:
0544 - 0022 = 0522
Similarly, if the value of umask is set to 0077, then the newly created directory will have the following access mode:
0777 – 0077 = 0700
7.2.16 utime(): Changing Access and Modifi cation TimesThe system call utime() is used to change the access and modifi cation times of the specifi ed fi lename.
Syntax int utime(const char *fi lename, struct utimbuf *buf);
Here, fi lename represents the name of the fi le along with its relative or absolute path. The parameter buf represents the pointer to the utimbuf structure that contains the actime and modtime fi elds, which will be used to change the access and modifi cation times of the fi le(s).
The fi elds in the utimbuf structure are as follows:
struct utimbuf { time_t actime; /* represents access time */ time_t modtime; /* represents modifi cation time */};

212 Unix and Shell Programming
If successful, the system call returns 0, else returns −1, and sets the errno variable describing the error.
Example The following example opens the fi le xyz.txt and changes its access and modifi cation times to the system time at which the fi le was opened.
changetimes.c#include <sys/stat.h>#include <fcntl.h>#include <utime.h>
main(){ int n, fp; struct stat statusbuf; struct utimbuf timebuf;
fp = open("xyz.txt", O_RDWR | O_TRUNC ); if(fp == -1) /* Error in opening fi le */ exit(-1); n = fstat(fp, &statusbuf); if(n == -1) /* The system call, fstat failed */ exit(-1); close(fp); timebuf.actime = statusbuf.st_atime; timebuf.modtime = statusbuf.st_mtime; if (utime("xyz.txt", &timebuf) < 0) /* Error in changing access and modifi cation times */ exit(-1);}
Output$ ls -al xyz.txt-r-xr--r-- 1 101 it 20 Feb 23 22:12 xyz.txt
$ ./changetimes
$ ls -al xyz.txt-r-xr--r-- 1 101 it 0 Mar 1 16:19 xyz.txt
7.2.17 ioctl(): Controlling Devicesioctl() is a system call that is used for controlling the functions of the specifi ed devices.
Syntax int ioctl( int fd, int cmd, int arg)
The function represented by cmd is applied on the device whose fi le descriptor fd is provided. arg is optional and represents the arguments for the function cmd. The system calls return a value of −1 if unsuccessful.
Example The following example displays the screen height and width.

System Calls 213
dispscreeninfo.c#include <stdio.h>#include <sys/ioctl.h>#include <termios.h>
main(int argc, char **argv){ struct winsize w; ioctl(0, TIOCSWINSZ, &w); printf("Screen width is %d and Screen height is %d\n", w.ws_col, w.ws_row);}
OutputScreen width is 2053 and Screen height is 3018The command TIOCSWINSZ that fi lls the information of the screen in the winsize structure sz, is executed. Using the ws_col and ws_row members of the winsize structure, the width and height of the screen are displayed.
The following are the members in the winsize structure.struct winsize{unsigned short ws_row; /* height of the screen i.e. number of rows */unsigned short ws_col; /* width of the screen i.e. number of columns */unsigned short ws_xpixel; /* width of the screen in terms of pixels */unsigned short ws_ypixel; /* height of the screen in pixels */};
7.3 DIRECTORY HANDLING SYSTEM CALLS
The system calls in this category help us deal with the directory stream. We can create a new directory stream, change to any directory stream, read a stream, set our position in the directory stream, etc., via these system calls. The list of directory-related system calls are given in Table 7.15.
Table 7.15 List of directory handling system calls
System call Description System call Description
mkdir(d)
rmdir (d)
chdir(d)
getcwd(buf, size)
opendir(d)
readdir(d)
Creates a new directory, d
Removes directory d
Changes a directory to the specifi ed directory, d
Writes the name of the current working directory in the buffer of the given size
Opens the given directory stream
Reads the content of directory d
telldir(d)
seekdir(d, loc)
rewinddir(d)
rename()
closedir(d)
Returns the current position in the given directory stream
Sets the directory entry pointer to the given location, loc, in the given directory stream
Resets the position in the given directory stream to the beginning of the directory
Changes the name or location of the fi le
Closes the given directory stream

214 Unix and Shell Programming
7.3.1 mkdir() and rmdir(): Creating and Removing DirectoriesThe system calls used for making and removing directories are mkdir and rmdir respectively. Let us fi rst discuss the mkdir() system call.
Syntax int mkdir(const char *path, mode_t mode);
This system call makes a new directory with path as its name. The permissions of the newly created directory are determined by the mode parameter. The permissions are the same as that of the mode parameter in the open() system call (refer to Table 7.3 for details).
If successful, the mkdir() system call returns 0; else it returns −1 if not successful.
Example
createdir.c#include <sys/stat.h>
main(){ if (mkdir("/usr/experiments", S_IRWXU | S_IRGRP| S_IROTH) ==-1) { perror("Error in creating directory"); exit(-1); } else printf("Directory successfully created");}
Output
Directory successfully createdIn the aforementioned example, the permissions of the newly created directory can also be specifi ed in the octal format, as shown in the following example:
mkdir("/usr/experiments", 0744);
The system call for removing directories is rmdir(). Its syntax is as follows:
Syntax int rmdir(const char *path);
Here, path represents the directory that we wish to remove. The directory will be removed provided it is empty. If successful, the rmdir() system call returns 0; if not successful, it returns −1.
Example
removedir.cmain(){ if (rmdir("/usr/projects") ==-1) { /* Error in removing projects directory */ perror("Cannot remove the /usr/projects directory"); exit(-1);

System Calls 215
} else printf("The /usr/projects directory successfully removed");}
Output
$ ./removedirCannot remove the /usr/projects directory: File exists
$ ls /usr/projectslockfi le.txt pqr.txt xyz.txt
$ rm /usr/projects/*
$ ls /usr/projects
$ ./removedirThe /usr/projects directory successfully removed
This example tries to remove the projects directory that exists in the usr directory and displays an error if the directory could not be deleted.
7.3.2 chdir(): Changing Directories The system call used to change the directory is chdir(). The chdir() system call changes our working directory to the specifi ed one, that is, from the current working directory, our directory will change to the one whose path is specifi ed. The syntax for using the chdir() system call is as follows:
Syntax int chdir(const char *path);
Here, the path parameter represents the path of the directory.
Example The following code changes the directory to the projects directory that exists in the usr directory and displays an error if unsuccessful.
changedir.cmain() { if (chdir("/usr/projects") != 0) { perror("Cannot change to the projects directory"); exit(1); } else printf("Changed to projects directory");}
OutputChanged to projects directory
Note: For successful execution of the chdir() system call, the process must have execute permission for the directory.

216 Unix and Shell Programming
Let us look at one more example that takes us to the desired directory by invoking the chdir() system call but this time, the call takes the name of the directory through command line arguments.
Example The following program emulates the cd command.
emulatecd.cmain(int argc,char **argv) { if (argc < 2) { perror("Insuffi cient arguments "); exit(1); } if (chdir(argv[1]) != 0) { perror("Cannot change to the specifi ed directory"); exit(1); }}
Output$ ./emulatecdInsuffi cient arguments : Error 0
$ ./emulatecd projectsCannot change to the specifi ed directory: No such fi le or directory
$ ./emulatecd accounts$
In this program, we fi rst check if the count of the command line argument is less than 2. If the directory name is not specifi ed after the command line script, an error message, Insuffi cient arguments, is displayed through the perror() function and the program terminates setting its exit status as 1. If the command line argument is provided, then through the chdir() system call, the location of the current directory is changed to the specifi ed directory. If an error occurs while changing directory, the following error message is displayed via the perror() function: Cannot change to the specifi ed directory.
7.3.3 getcwd(): Determining Current Working DirectoryWe can know the current working directory by calling the getcwd() system call.
Syntax char *getcwd(char *buf, size_t size);
The getcwd() function writes the name of the current directory into the specifi ed buffer, buf. The function returns NULL if the directory name exceeds the size of the buffer defi ned through the parameter, size. When successful, the function returns the buffer buf containing the name of the current directory.
Example The following example shows the path of the current working directory.

System Calls 217
pathcurrentdir.c#include <stdio.h>
main(){ char buf[50];
if (chdir("/usr/projects") != 0) { perror("Cannot change to the projects directory"); exit(1); } if (getcwd(buf, 50) == NULL) { perror("The path of the working directory exceeds 50 characters"); exit(1); } printf("Current working directory is %s\n", buf); }
Output
Current working directory is /usr/projects
7.3.4 opendir(): Opening DirectoriesThe system call meant to open a directory is opendir(). The opendir() system call opens a directory stream represented by the specifi ed directory name so that its contents can be read through the system call, readdir(). The system call will be able to open up to a total of {OPEN_MAX} fi les and directories. OPEN_MAX is an operating system parameter and its default value is 4096. On successful execution of opendir(), it returns a pointer to an object of type DIR; else, a NULL pointer is returned and errno is set to indicate the error. The type DIR represents a directory stream, which is an ordered sequence of all the directory entries in a particular directory. The syntax for using the opendir system call is as follows:
Syntax DIR *opendir(const char *dirname);
Here, dirname is a string that specifi es the name of the directory to open. If the last component of dirname is a symbolic link, the function follows the symbolic link to open the directory referenced by it.
Example The following example opens the directory projects that exists in the usr directory and returns a pointer of type DIR and assigned to mydir.
DIR *mydir;mydir=opendir ("/usr/projects");
7.3.5 readdir(): Reading DirectoriesThe system call used to read the content of a directory is readdir(). The syntax for using the system call is as follows:
218 Unix and Shell Programming
Syntax struct dirent *readdir(DIR *dirp);
The system call returns a pointer to a structure, dirent, which represents the directory entry at the current position in the directory stream specifi ed through the argument dirp.You may recall that the directory stream dirp is the one we get on executing the opendir() system call. The structure dirent describes the directory entry that represents the fi le(s) in the specifi ed directory stream.
The structure of dirent is as follows:
struct dirent{ long d_ino; off_t d_off; unsigned short d_reclen; char d_name [NAME_MAX+1]; }
The following points may be noted:
1. d_ino is an inode number. 2. d_off is the offset or distance from the start of the directory to this dirent. 3. d_reclen is the size of d_name, not counting the NULL terminator. 4. d_name is a NULL-terminated name of the fi le.
With every read operation, the system call buffers several directory entries. It also marks for update the st_atime fi eld of the directory each time the directory is read. If successful, the system call returns a value 1; at the end of the directory, it returns a value 0; on error, it returns −1 and also sets the errno accordingly. The kind of errors that may occur are as follows:
1. EBADF: Occurs when the fi le descriptor fd is invalid.2. EFAULT: Occurs when the argument points outside the calling process’s address
space.3. EINVAL: Occurs when the result buffer is too small.4. ENOENT: Occurs when the directory does not exist.5. ENOTDIR: Occurs when the fi le descriptor does not refer to a directory.
Example The following program shows fi lenames in the specifi ed directory.
showfi lenames.c#include <dirent.h>#include <errno.h>
main(int argc, char *argv[]){ DIR *mydir; struct dirent *fi les;
if (argc == 2) {

System Calls 219
mydir = opendir(argv[1]); if (mydir) { while ((fi les = readdir(mydir))) printf("%s\n", fi les->d_name); } else if (errno == ENOENT) perror("The specifi ed directory does not exist."); else if (errno == ENOTDIR) perror("The specifi ed fi le is not a directory."); else if (errno == EACCES) perror("You do not have the right to open this folder."); else perror("Error in fi nding fi le"); } else perror("Insuffi cient number of arguments.");}
Output
$ ./showfi lenamesInsuffi cient number of arguments.: Error 0
$ ./showfi lenames accountThe specifi ed directory does not exist.: No such fi le or directory
$ ./showfi lenames xyz.txtThe specifi ed fi le is not a directory.: Not a directory
$ ./showfi lenames accounts...lockfi le.txtpqr.txtxyz.txt
In the aforementioned program, we fi rst check if the count of the command line argument is 2, that is, if the name of the directory whose content we want to display is supplied after the command line argument. In the case where the directory name is supplied through the command line argument, the directory stream represented by the former is opened through the opendir() system call. You may recall that the directory stream is an ordered sequence of all the directory entries in a particular directory. Thereafter, through the readdir() system call, each fi le entry in the specifi ed directory is accessed from the directory stream and assigned to the dirent structure. The dirent structure contains complete information of the fi le entry accessed from the directory stream. Filenames are accessed and displayed through the dirent structure.

220 Unix and Shell Programming
7.3.6 telldir(), seekdir(), and rewinddir(): Knowing, Setting, and Resetting Position in Directory Streams
To determine the location to perform the next read/write operation in the directory stream, we fi rst need to know our current position in the directory stream. Thereafter, we can set the position in the directory stream from where we need to perform some action.
Knowing our position in directory streamsThe current position in a directory stream can be known through the system call telldir().
Syntax long int telldir(DIR *dirp);
The system call returns an integer value to indicate the current position in the directory stream specifi ed through the parameter dirp. We get the pointer to the directory stream dirp on executing the opendir() system call.
Example The following example shows the current position in the directory stream after one read in the specifi ed directory.
DIR *mydir;struct dirent *fi les;mydir = opendir("/home/projects");fi les = readdir(mydir);printf("The current position in the directory stream is %ld\n", telldir(mydir));
Setting position in directory streamsThe system call used to set the directory entry pointer in the directory stream is seekdir().
Syntax void seekdir(DIR *dirp, long int loc);
Here, dirp represents the directory stream and the long integer parameter loc represents the location we wish to set the directory entry pointer in the directory stream. The next readdir() operation will begin from the loc. There is one restriction as far as loc is concerned. It must be the value that is returned from the earlier call to the telldir() function. If the value of loc is not obtained from the earlier call to the telldir() function, we might get unexpected results on subsequent call to the readdir() function.
Example The following example shows the setting of the current position in the directory streams.
setposition.c#include <dirent.h>
main(){ DIR *mydir; struct dirent *fi les;

System Calls 221
long int loc; mydir = opendir("/usr/projects"); loc=telldir(mydir); printf("The current location in the directory stream is %ld\n", loc); seekdir(mydir,loc); /* Current Position is set at 0th byte i.e. at the beginning
of the directory stream */ fi les=readdir(mydir); printf("The fi rst directory entry found in this directory is %s
(current directory) \n", fi les->d_name); loc=telldir(mydir); seekdir(mydir,loc); /* Current Position is set at the location determined by
readdir() in the directory stream */ printf("The current position in the directory stream is %ld\n", loc);}
Output
$ gcc setposition.c -o setposition
$ ./setpositionThe current location in the directory stream is 0The fi rst directory entry found in this directory is . (current directory)The current position in the directory stream is 12
Resetting position in directory streamsTo reset our position in a directory stream, the rewinddir() system call is used.
Syntax void rewinddir(DIR *dirp);
Our position in the given directory stream, dirp, will be reset to the beginning of the directory. The system call does not return any value.
Example The following example shows how the current position in the directory stream is set to the beginning of the directory stream using the rewinddir() system call.
rewinddirectory.c#include <dirent.h>
main(){ DIR *mydir; struct dirent *fi les; mydir = opendir("/usr/projects"); fi les = readdir(mydir); printf("The current position in the directory stream is %ld\n", telldir(mydir)); rewinddir(mydir); /* The current position is set to the beginning in the directory stream */ printf("The current position in the directory stream is %ld\n", telldir(mydir));

222 Unix and Shell Programming
}
Output
The current position in the directory stream is 12The current position in the directory stream is 0
7.3.7 closedir(): Closing Directory StreamsThe system call used to close the directory stream is closedir(). The system call closes the specifi ed directory stream and frees the resources allocated to it. The call returns a value 0 on success and −1 otherwise.
Syntax int closedir(DIR *dirp);
Examples
(a) The following example closes the directory stream. DIR *mydir; mydir = opendir("/home/projects"); closedir(mydir);(b) The following program demonstrates the use of all the system calls related to directory
streams: opendir(), readdir(), telldir(), seekdir(), rewinddir(), and closedir().
directorycalls.c#include <dirent.h>main(int argc, char *argv[]){ DIR *mydir; struct dirent *fi les; if (argc == 2) { mydir = opendir(argv[1]); if (mydir) { fi les = readdir(mydir); printf("The current position in the directory stream is %ld\n", telldir(mydir)); seekdir(mydir,0); printf("The current position in the directory stream is %ld\n", telldir(mydir)); fi les = readdir(mydir); printf("The current position in the directory stream is %ld\n", telldir(mydir)); rewinddir(mydir); printf("The current position in the directory stream is %ld\n", telldir(mydir)); closedir(mydir); } else perror("Error in opening directory"); } else

System Calls 223
perror("Insuffi cient number of arguments.");}
Output
$ ./directorycallsInsuffi cient number of arguments.: Error 0
$ ./directorycalls programsError in opening directory: No such fi le or directory
$ ./directorycalls accountsThe current position in the directory stream is 12The current position in the directory stream is 0The current position in the directory stream is 12The current position in the directory stream is 0
7.4 PROCESS-RELATED SYSTEM CALLS
Unix provides several system calls that are used in process handling. These system calls perform several process-related tasks such as creating and ending a program, sending and receiving software interrupts, and allocating memory. Four system calls are provided for creating a process, waiting for a process to complete, and ending a process. These system calls are fork(), the exec() family, wait(), and exit(), described in Table 7.16.
7.4.1 exec(): Replacing Executable Binaries with New Processes
The exec() system call replaces an executable binary fi le with a new process according to the specifi ed arguments. There are several variants of the exec() system call;
all of them perform the same task. They differ on the basis of the way the command line arguments are passed to it. Providing arguments in different data types to the exec() system call provides fl exibility to the programmer. The prototypes for these calls are as follows:
int execl(const char *path, const char *arg0 [, arg1, ..., argn], NULL) int execv(const char *path, char *const argv[]);int execle(const char *path, const char* arg0 [, arg1, ..., argn], NULL, char *const envp[])int execve(const char *path, char *const argv[], char *const envp[]);int execlp(const char *path, const char *arg0 [, arg1, ..., argn], NULL) int execvp(const char *path, char *const argv[])
Here, arg0, arg1, … , argn represents the arguments to be passed to the new process—these arguments are pointers to NULL terminated strings. A NULL pointer terminates the argument list. path refers to the binary fi lename along with its path. argv is an array of character pointers that point to the arguments themselves. You may recall that arguments are character pointers to NULL-terminated strings. envp represents an array of character pointers to
Table 7.16 List of process-related system calls
System Call Description
exec(fi lename, *argv) Loads a fi le and executes it
fork() Creates a new process
wait() Waits for a child process
exit() Terminates the current process

224 Unix and Shell Programming
NULL-terminated strings. These strings defi ne the environment for the new process. The envp array is also terminated by a NULL pointer.
When the binary fi le is transformed to a process, that process replaces the process that executed the exec() system call (a new process is not created). The exec() system call returns −1 on failure.
Letters added to the end of exec indicate the type of arguments supplied to it. For example, l represents a list of arguments, v represents a vector—array of character pointers (argv), e represents environment variable list, and p indicates that the environment variable PATH be used while searching for the executable fi les.
Examples
(a) The following example executes the ls command, specifying the path name of the executable (/bin/ls) and using the argument, -l for the long format. The execl() call initiates the command or program in the same environment in which it is operating.#include <unistd.h>...execl ("/bin/ls", "ls", "-l", (char *)0);
(b) The following command uses the execl() call. In this system call, we have to specify the environment for the command (ls) using the env argument. #include <unistd.h>char *env[] = { "USER=chirag", "PATH=/usr/bin", (char *) 0 };...execle ("/bin/ls", "ls", "-l", (char *)0, env);
(c) The following example uses the execlp() call. The call searches for the location of the ls command among the directories specifi ed in the PATH environment variable.#include <unistd.h>...execlp ("ls", "ls", "-l", (char *)0);
(d) The following example uses the execv() call. In this call, the arguments to the ls command are passed through the args array. #include <unistd.h>char *args[] = {"ls","-l", (char *) 0 };...execv ("/bin/ls", args);
(e) The following example uses the execve() call. In this call, the environment for the command through the env argument and the arguments to the command are passed through the args array.#include <unistd.h>char *args[] = {"ls","-l", (char *) 0 };char *env[] = { "USER=chirag", "PATH=/usr/bin", (char *) 0 };...execve ("/bin/ls", args, env);
(f) The following example uses the execvp() call. The command searches for the location of the ls command among the directories specifi ed by the PATH environment variable. In addition, the arguments to the command are passed through the args array.

System Calls 225
#include <unistd.h>char *args[] = {"ls","-l", (char *) 0 };...execvp ("ls", args);
7.4.2 fork(): Creating New ProcessesThe fork() system call creates a new process. The new process, also known as the child process, will have properties identical to its parent, but with a new process ID. The fork() system call does not take any argument and returns the process ID of the child process to the parent. It also returns a zero to the newly created child process.
Syntax #include <sys/types.h>
#include <unistd.h>pid_t fork(void);
The execution of the fork() system call results in the following conditions:
1. If successful, the fork() system call returns the process ID of the newly created child process to the parent and 0 to the newly created child process.
2. If unsuccessful, the fork() system call returns a negative value.
When a child process is created successfully, Unix makes an exact copy of the parent’s address space and assigns it to the child. Therefore, the parent and child processes will have separate address spaces. Both processes start their execution right after the system call, fork(). Since both processes have identical but separate address spaces, those variables initialized before the fork() call have the same values in both address spaces.
Example The following example executes the fork() system call and analyses its return value to know if the child process is created or the system call failed.
forkexample.c#include <sys/types.h>
main(){ pid_t p;
p = fork();
if (p == 0) { printf("This is a Child process\n"); } else if(p > 0) { printf("This is a Parent process\n"); } else if(p == -1)
226 Unix and Shell Programming
{ printf("Fork was unsuccessful, process could not be created:\n"); }}
OutputThis is a Child processThis is a Parent process
There is one more version of the fork() system call, the vfork() system call, which has been described next.
vfork(): Creating new processes suspending parent processes In the case of the fork() system call, a copy of the address space of the parent process is created and assigned to the child process. On the other hand, in case of the vfork() system call the address space of the parent process is not copied. Instead, the parent process is suspended for a while and its address space is used by the child process. The parent process remains in a suspended state until either the child process exits or calls the exec() system call, in which case the parent’s address space is released, allowing it to continue. While using the parent process’s address space, there are many chances of the child process overwriting the data and stack of the former accidentally. The main benefi t of the vfork() system call is that it is quite faster than the fork() system call as the memory is shared (between the parent and child process), which results in reducing the overheads of spawning a new process with a separate copy of the memory.
The vfork() system call helps in creating a new system context for an execve() operation that is used to execute a specifi ed program. Using the fork() system call for this purpose is a time-consuming as well as a resource depleting operation for the simple reason that entire page table entries have to be copied from the parent to the child. This overhead is not required when creating a new system context for an execve() with the vfork() system call.
Syntax #include <sys/types.h>
#include <unistd.h>pid_t vfork(void);
Example The following statement creates a child process and suspends the parent process if the vfork() call is successful.
pid_t p;p = vfork( );
7.4.3 wait(): WaitingIf a process fi nishes its task and is killed, all of its child processes become orphans and are adopted by the init process. If the parent is a terminal control process, on completing its task it sends a hangup (SIGHUP) signal to all its children. To avoid such situations, we can suspend or make a parent process wait for some time until the child process fi nishes its task. To do so, the wait() system call is used. This implies that the wait() system call is used to block a parent process until one of its child processes either fi nishes its task or is suspended.

System Calls 227
The wait() system call can thus be used to determine when a child process has completed its job. The call returns the PID of the completed child process along with its status. The status information allows the parent process to determine the exit status of the child process. The parent process resumes its execution when the wait() system call returns. If the calling process has no child process, the wait() system returns immediately with a value of −1.
Syntax #include <sys/types.h>
#include <sys/wait.h>pid_t wait(int *status);
Example The following statement makes the parent process sleep until the child process fi nishes its job. The status of the child process, that is, how it is terminated, is returned through the status variable
wait(&status);
7.4.4 exit(): Terminating ProcessesThe exit() system call terminates the execution of a process and returns a value to its parent.
Syntax void exit(status)
int status;
Here, status is an integer between 0 and 255 and is returned to the parent via wait() to represent an exit status of the process. The status value 0 indicates normal termination. When the exit() system call is called, all open fi le descriptors are closed and the child processes (of the process being terminated) will be known as orphans and will become the child process of the init process.
Examples
(a) The following statement demonstrates the normal termination of a process.exit(0);
(b) The following program demonstrates the use of fork(), wait(), and exit() system calls
forkwaitexitcall.c#include <sys/wait.h>main(){ pid_t p; int status;
p = fork();
if (p == 0) { printf("This is a Child process\n"); exit(0);

228 Unix and Shell Programming
} else if(p > 0) { printf("This is a Parent process\n"); wait(&status); /* Makes the parent process to sleep until child process fi nishes its job. The status of the child process i.e. how it terminated is returned through status variable */ printf("Parent is waiting for the child to fi nish"); if (WIFEXITED(status)) printf("\nChild process terminated normally %d\n", WEXITSTATUS(status)); /* WIFEXITED() is a macro that returns true if the process terminates normally */ } else if(p == -1) { printf("Fork was unsuccessful, process could not be created:\n"); }
}
Output
This is a Child processThis is a Parent processParent is waiting for the child to fi nishChild process terminated normally
7.5 INTERRUPTED SYSTEM CALL
While executing a system call, if an asynchronous signal (such as an interrupt or quit) occurs, the system call is said to be interrupted and returns an error condition. To understand the concept more clearly, we need to understand that system calls are divided into two categories:
1. Slow system calls 2. Rest of the system calls
Slow system calls represent those calls that wait for a condition to occur for an infi nite time. This implies that these system calls can be blocked for ever. Some examples of such system calls include read(), write(), and pause().
The pause() system call, by default, puts the calling process into sleep until and unless a signal is caught by this process.
The read() system call can block the caller if the data does not appear at the desired source, which may be a pipe or a terminal device.
The write() system call can block the caller if the target is not ready to accept the incoming data.

System Calls 229
When a system call is slow and a signal arrives while it is blocked or waiting, two consequen-ces are possible. Either the operating system aborts the system call and sets errno to EINTR or it allows the system call to succeed with partial results. In any case, we have to test for the success of the system call and explicitly handle the returned error (if any). A solution to such a problem is to automatically restart the interrupted system calls from the beginning.
Example The following example demonstrates the interrupted system call. The user is prompted to enter some data through the read() system call. Now while the system call is being run, it is interrupted by invoking the SIGINT signal. When the read() system call is interrupted, the following message will be displayed: read: interrupted system call. Similarly, while the read() system call is being run, it is interrupted through another signal, SIGQUIT, which makes the system call read() restart, asking the user to re-enter the data.
interruptprog.c
#include <stdio.h>#include <errno.h>#include <stdlib.h>#include <unistd.h>#include <signal.h>
void sig_handler (int signo){ if (signo == SIGINT) printf("SIGINT has occurred\n"); if (signo == SIGQUIT) printf("SIGQUIT has occurred. Restarting the read call\n");}
int main() { struct sigaction sa; char buf; int n;
sa.sa_handler = sig_handler; sigemptyset(&sa.sa_mask); sa.sa_fl ags = 0; if (sigaction(SIGINT, &sa, NULL)) exit(1); sa.sa_fl ags = SA_RESTART; if (sigaction(SIGQUIT, &sa, NULL))exit(1); n = read(0, &buf, 1); if(n < 0) if(errno == EINTR) perror("read"); else printf("%c", buf); return 0;}

230 Unix and Shell Programming
Output
$ gcc interruptprog.c -o interruptprog
$ ./ interruptproghello^CSIGINT has occurredread: Interrupted system call
$ ./interruptprogthanks^\SIGQUIT has occured. Restarting the read callgrest^CSIGINT has occuredread: Interrupted system call
7.6 STANDARD C LIBRARY FUNCTIONS
We know that almost the whole of the Unix operating system is written in C. This fact enables us to readily use the standard C library functions while writing in C programs for the purpose of I/O operations and for making system calls. The library functions hence reduce much of our coding efforts. To use library functions in programs, all we need is to include its respective header fi le in the program. Some standard C library functions are given in Table 7.17.
7.6.1 Difference between System Calls and Library Functions
System calls and library functions have a common purpose of performing tasks that relieve us from critical programming. However, there are still some differences between the two. To make the difference between the system calls and library functions clear, their respective characteristics are listed as follows:
System calls
1. System calls are part of the operating system and are executed in the system kernel.2. They are basically the entry points into the kernel. For requesting services from the
kernel, our program needs to use system calls.3. They execute in the kernel address space; hence, for running a system call, the program
has to make a mode switch from the user mode to the kernel mode.4. System calls usually cannot be replaced.5. They are system dependent and hence not portable.6. Being a part of the operating system, they can access any critical data (like the data related
to system security) or hardware resource.
Table 7.17 Brief description of library functions
Library function Description
fopen() Opens a stream
malloc() Allocates memory
exit() Terminates and exits from the program
getpid() Gets the ID of the calling process
kill() Kills a process
sleep() Suspends the execution for an interval

System Calls 231
C Library functions
1. Library functions may invoke one or more system calls.2. They are executed in the user address space. 3. They may be replaced, if desired.4. There are no overheads in calling library functions.5. They are not system dependent.6. They provide comparatively more user interface and a richer set of features. 7. An appropriate header fi le has to be included for using library functions.
7.7 STREAMS AND FILE INPUT/OUTPUT LIBRARY FUNCTIONS
In Unix, everything is in the form of streams. This implies that all fi les are considered streams, data transferred between fi les is in the form of streams, data transferred from one command to another is in the form of streams, data transferred to any device including the printer is in the form of streams, etc. Streams, here, refer to a fl ow of bits.
Examples
(a) In the following example, a list of fi les and directories are transferred (in the form of a stream of bits) and saved into the fi le fi les.txt.
$ ls > fi les.txt(b) Similarly, the following example sends fi le content to the printer in the form of a stream. $ cat fi les.txt | lpr
There are three standard streams that are automatically opened when a program is started, namely stdin, stdout, and stderr. These are declared in stdio.h and represent the standard input, output, and error output respectively, which correspond to the low-level fi le descriptors 0, 1, and 2. Besides these three default fi le descriptors, there are others that are automatically assigned by the kernel when we open a fi le.
In this section, we will learn about the different library functions that help in performing different fi le I/O operations. These functions help in opening, closing, reading, and writing in the fi le stream. In addition, we can set the fi le pointer at the desired position in the fi le, fl ush the data in the buffer to the fi le, etc. The list of library functions for performing fi le I/O operations is given in Table 7.18.
Table 7.18 File I/O library functions
Function Description
Fopen(fi lename, mode) Opens a fi le stream in the given mode
Fread(ptr, size, n, stream) Reads n number of items of a given size from the given fi le stream and stores it in the buffer pointed by ptr
Fwrite(ptr, size, n, stream) Writes n number of items of a given size from the buffer pointed by ptr into the given fi le stream
Fclose(stream) Closes the given fi le stream
Ffl ush(stream) Flushes (writes) the buffered data into the fi le immediately
(Contd)

232 Unix and Shell Programming
Note: The library functions in Table 7.18 such as fopen and fread are high level I/O functions and are implemented through low-level I/O functions such as open and read. We have discussed high-level and low-level I/O functions at the beginning of this chapter.
7.7.1 fopen(): Opening FilesThe fopen library function is used for opening fi les.
Syntax FILE *fopen(const char *fi lename, const char *mode);
It opens the fi le named by the fi lename parameter in the specifi ed mode. The mode determines the purpose of opening the fi le, which is, whether it is supposed to be opened for reading, writing, updating, or appending. The mode can be any of the following (refer to Table 7.19).
Table 7.19 Brief description of the different modes in which a fi le can be opened
Mode Description
"r" or "rb" Opens the fi le for reading only"w" or "wb" Opens the fi le for writing and deletes its existing content, if any"a" or "ab" Opens the fi le for appending content—adding content to the end of fi le"r+" or "rb+" or "r+b" Opens the fi le for updating—reading and writing"w+" or "wb+" or "w+b" Opens the fi le for updating and deleting its existing content"a+" or "ab+" or "a+b" Opens the fi le for updating and appending content to the end of fi le
Table 7.18 (Contd)
Function Description
Fseek(stream, offset, whence) Sets the fi le pointer position at the given offset from the whence location in the fi le
fgetc(stream), getc(stream) and getchar()
Returns the next character from the given stream
fputc(c, stream), putc(c, stream), and putchar()
Writes a character to the given stream
Fgets(ptr, n, stream) and gets(ptr)
Reads text of n number of characters from the given stream and assigns it to the string pointed by pointer ptr
The character b in the aforementioned mode indicates that the fi le is a binary rather than a text fi le.
The mode parameter is a string and hence must be enclosed in double quotes. The function fopen(), if successful, returns a FILE * pointer pointing to the fi le, but a value NULL if it fails.
Example The following example opens the binary fi le students.txt in write mode.
FILE *fp;fp=fopen("students.txt","wb");
7.7.2 fwrite(): Writing into FilesThe fwrite library accesses the data from the specifi ed data buffer and writes them to the specifi ed fi le. It returns the number of records successfully written into the fi le.

System Calls 233
Syntax size_t fwrite (const void *ptr, size_t size, size_t nitems, FILE *stream);
Here, ptr represents the pointer to the structure, an array, int, fl oat, etc., containing the data to be written into the fi le. The fi le where we want to write the content is represented by the pointer stream. The argument nitems represents the number of records or structures to be written into the fi le and size represents the size of a single structure.
Example The following example writes a student’s record stored in the structure stud into the fi le students.txt.
writestudrecs.c#include <stdio.h>
struct student{ int roll,marks; char name[20]; };main(){ FILE *fp; struct student stud; fp=fopen("students.txt","wb"); stud.roll=101; strcpy(stud.name,"Chirag"); stud.marks=95; fwrite(&stud,sizeof(struct student),1,fp);}
Output
$ cat students.txtcat: cannot open students.txt
$ ./writestudrecs
$ cat students.txte_Chirag tt z e #
Note: Since the students.txt fi le is a binary fi le, we fi nd some funny symbols in the fi le, which are machine-readable code.
7.7.3 fread(): Reading Data from FilesThe fread library function is used to read data from the specifi ed fi le.
Syntax size_t fread(void *ptr, size_t size, size_t nitems, FILE *stream);
Data is read into the specifi ed data buffer represented by the pointer ptr from the fi le represented by stream. The size of the buffer is specifi ed as size and the number of items successfully read into the data buffer is represented by nitems.

234 Unix and Shell Programming
Example The following example reads a student’s record from the fi le students.txt and fi lls the information in the structure stud.
struct student{ int roll,marks; char name[20]; };void main(){ FILE *fp; struct student stud; fp=fopen("students.txt","rb"); fread(&stud,sizeof(struct student),1,fp);. . .
7.7.4 fclose(): Closing FilesThe fclose library function closes the specifi ed fi le. Any buffered data in the memory that is not yet fl ushed to the stream (fi le) is written into the stream before closing it. When a program ends, all the stream associated to fi les are automatically closed, that is, the fclose function is implicitly called when a program ends.
Syntax int fclose(FILE *stream);
Here, stream represents the pointer to the fi le stream that we wish to close.
Example The following example closes the fi le represented by the fi le pointer fp.
fclose(fp);
7.7.5 ffl ush(): Flushing out to FilesThe ffl ush library function writes all buffered data in a stream to the associated fi le immediately. This library function is called to ensure that no important data is left in the buffer (which is volatile) and is successfully written into the fi le. The fclose function calls the ffl ush function implicitly so as to write the buffered content to the fi le before closing it.
Syntax int ffl ush(FILE *stream);
Here, stream refers to the stream that we wish to fl ush out.
Example The following example fl ushes the standard input device and writes the buffered content (if any) into the associated fi le.
ffl ush(stdin);
7.7.6 fseek(): Relocating File PointersThe fseek function is equivalent to the lseek() system call and is used to set the position of the fi le pointer. The fseek function positions the fi le pointer in the stream for the next read or write operation.

System Calls 235
Syntax int fseek(FILE *stream, long int offset, int whence);
Here, stream represents the fi le and offset represents the number of bytes from whence. The argument whence refers to the location related to which the offset has to be set, that is, whether the offset has to be set from the current, end, or beginning of the fi le.
Example The following sets the fi le pointer at the 0th byte, that is, at the beginning of the fi le.
fseek(fp,0, SEEK_SET);
7.7.7 fgetc(), getc(), and getchar(): Reading CharactersThe fgetc function returns the next character from the specifi c stream, which may be a fi le or stdin (standard input). The function returns the EOF when either some error occurs or the end of fi le is reached.
Syntax int fgetc(FILE *stream);
int getc(FILE *stream); int getchar();
Here, stream represents the fi le from where we wish to read a character.The getc function is equivalent to fgetc, except that it may be implemented as a macro. The getchar function is equivalent to getc(stdin) and reads the next character from the
standard input.
Note: The aforementioned functions return the character as int.
Example The following example reads a character from the fi le pointed by fi le pointer fp and stores it in variable c.
c = fgetc(fp);
Writing charactersThe fputc function writes a character to an output stream that may be a fi le or stdout (output stream). It returns either the value it has successfully written or the EOF on failure.
Syntax int fputc(int c, FILE *stream);
int putc(int c, FILE *stream); int putchar(int c);
Here, c represents the character that we wish to write into the fi le represented by stream.The function putc is equivalent to fputc, the difference being it may be implemented as
a macro. The putchar function is equivalent to putc(c,stdout) that writes a single character to the standard output.
Example The following example writes the character in variable c into the fi le pointed by fi le pointer fp.
fputc(c,fp);

236 Unix and Shell Programming
Example The following example demonstrates the use of fgetc() and fputc() functions. It makes a copy of the fi le xyz.txt with the name pqr.txt by reading each character sequentially from the fi le xyz.txt and writing into the fi le pqr.txt.
copyfi le.c
#include <stdio.h>
main(){ int c; FILE *fp1, *fp2; fp1 = fopen("xyz.txt", "r"); fp2 = fopen("pqr.txt", "w"); while((c = fgetc(fp1)) != EOF) fputc(c,fp2); fclose(fp1); fclose(fp2);}
Output
$ cat xyz.txtThis is a test fi le
$ cat pqr.txtcat: cannot open pqr.txt
$ ./copyfi le
$ cat pqr.txtThis is a test fi le
7.7.8 fgets() and gets(): Reading StringsThe fgets and gets functions are used for reading a string from specifi ed streams. Their syntax is as follows:
Syntax char *fgets(char *s, int n, FILE *stream);
char *gets(char *s);
Here, stream represents the fi le stream from which the string has to be fetched or read. The string of size n−1 bytes will be read and assigned to the string represented by the pointer s.
The fgets function reads a string from the specifi ed fi le. It reads the n−1 number of characters from the fi le represented by the stream and assigns it to the string pointed to by s. Either n−1 number of characters or characters up till the newline character (whichever appears fi rst) are read into the string pointed by s. Why are n−1 number of characters read, and not n? This is because, a terminating NULL byte, \0 is added to mark the end of the string pointed by s. When successful, the functions return a pointer to the string s. If the stream is at the end of a fi le, it sets the EOF indicator for the stream and returns a NULL pointer. In case of error, the function returns a NULL pointer and sets errno variable to indicate the type of error.

System Calls 237
The gets function is similar to fgets, except that it reads from the standard input. All characters entered by the user except the newline character are read and assigned to the string pointed by s after appending a NULL byte, \0 to it.
Examples
(a) The following example reads 80 characters from the fi le pointed by the fi le pointer fp and stores it into the string k.
fgets(k,80,fp);
The following example reads the text from the keyboard and stores it into the string, k.
char k[60];gets(k);
Since the size of variable k is 60, either the fi rst 59 characters (one byte is left for the terminating NULL byte \0) or until the newline character (whichever appears earlier) is stored in the variable, k.
(b) The following program explains how to make use of fopen(), fread(), fwrite(), fseek(), and fclose() library functions to read and write a few records in the fi le randomly.
readwritestudrecs.c
/* Reading and writing students records */#include <stdio.h>
struct student{
int roll,marks; char name[20];
};
main(){
int i; FILE *fp; struct student stud;
fp=fopen("students.txt","wb"); printf("Enter roll, name and marks of three students\n"); for (i=1;i<=3; i++) { scanf("%d %s %d", &stud.roll, stud.name, &stud.marks); fwrite(&stud,sizeof(struct student),1,fp); } fclose(fp); fp=fopen("students.txt","rb"); printf("The records of the student in the fi le students.txt are as given
below\n"); for (i=1;i<=3; i++)

238 Unix and Shell Programming
{ fread(&stud,sizeof(struct student),1,fp); printf("%d %s %d\n", stud.roll, stud.name, stud.marks); } printf("Third student\'s record is \n"); fseek(fp,sizeof(struct student)*2, SEEK_SET); fread(&stud,sizeof(struct student),1,fp); printf("%d %s %d\n", stud.roll, stud.name, stud.marks); printf("First student\'s record is \n"); fseek(fp,0, SEEK_SET); fread(&stud,sizeof(struct student),1,fp); printf("%d %s %d\n", stud.roll, stud.name, stud.marks); fclose(fp);
}
Output
$ gcc readwritestudrecs.c -o readwritestudrecs
$ ./ readwritestudrecsEnter roll, name and marks of the three students101 chirag 85102 john 75103 naman 84
The records of the students in the fi le students.txt are as given below101 chirag 85102 john 75103 naman 84
Third student's record is103 naman 84
First student's record is101 chirag 85
7.8 ERROR HANDLING
Errors often occur while creating or running applications. When an error occurs, the traditional approach that Unix prefers is assigning the error code to the special global variable, errno. The value in the errno variable is overwritten by the error code of the next error in the application. For a user-friendly and robust application, proper error handling must be implemented in an application.
By error handling, we mean that an error (if any), which occurs in the application, should not be displayed in critical error code (not understandable by a layman). It should instead be displayed in a user-friendly text message. In addition, on the occurrence of the error, the application should not crash in the middle of an operation and should instead exit gracefully after displaying the text error message and saving the data that was computed so far (if any).

System Calls 239
To detect and handle errors, we will be using two functions, perror() and strerror().
Note: The error codes are defi ned in the errno.h fi le.
7.8.1 Using strerror FunctionThe strerror() function displays an error message by accepting the error number argument, errno and returns a pointer to the corresponding message string.
Syntax char *strerror(int errno);
Here, errno contains the error code.
Example The following program demonstrates the strerror() function.
strerrorexample.c#include <string.h>#include <errno.h>
main (){ FILE *fp; fp = fopen ("letter.txt","r"); if (fp == NULL) printf ("Error in opening fi le: %s\n", strerror(errno));}
Output
Error in opening fi le: No such fi le or directory
In this example, we try to open the fi le letter.txt. If, while opening the fi le, any error occurs, its description is displayed through the strerror() function.
strerror_r()is a function that is similar to the strerror() function. The difference between the two functions is that instead of returning a pointer to the corresponding error message, strerror_r() renders the message into an error buffer. In addition, the strerror_f() function is thread safe.
Syntax int strerror_r(int errno, char *error_buf, size_t buffer_len);
Here, error_buf is where the error message is rendered for a maximum of buffer_len characters.
7.8.2 perror(): Displaying ErrorsThe library function perror is used for displaying error messages. Whenever a system call or library function fails, it returns a value −1 and assigns a value to an external variable called errno. The value assigned to the errno variable is used by the perror() function to fi nd the error message and write it to the standard error fi le descriptor.
Syntax void perror(const char *s);
Here, s represents the string that we wish to display along with the associated error message.
Example The following example demonstrates how the messages are displayed through the perror() library function.

240 Unix and Shell Programming
demoperror.c #include <stdio.h>#include <errno.h> //required when using perror() function
main (int argc, char *argv[]){ FILE *fp; fp = fopen(argv[1], "r"); if(fp==NULL) { perror(argv[0]); /* Displays demoperror.c: No such fi le or directory */ perror(NULL); /* Displays No such fi le or directory */ perror("File could not be opened"); /* Displays File could not be opened: No
such fi le or directory */ printf("errno = %d\n", errno); /* Displays errno=2 */ exit(1); } printf("File exists and is opened for reading "); fclose(fp);}
Output
$ ./demoperror ./demoperror: Bad address Bad address File could not be opened: Bad address errno = 14
$ ./demoperror bank.lst ./demoperror: No such fi le or directory No such fi le or directory File could not be opened: No such fi le or directory errno = 2
$ ./demoperror xyz.txt File exists and is opened for reading
In the aforementioned example, the library function fopen() will return NULL value if it is unable to open the fi le whose name is supplied as command line argument. The returned NULL value will be assigned to the fi le pointer fp. The statement perror(argv[0]); prints the name of the program followed by a colon (:) and the associated error message No such fi le or directory. The statement perror(NULL); prints only the associated error message No such fi le or directory. The fi nal statement, perror("File could not be opened"); prints the message File could not be opened followed by colon (:), which is followed by the associated error message, No such fi le or directory. The value assigned to the errno variable for this type of error is 2, which is also displayed at the end.

System Calls 241
After understanding the two functions, strerror() and perror(), we will take a quick look at the difference between the two, as shown in Table 7.20.
Table 7.20 Difference between the strerror and perror functions
strerror() perror()
It accepts an error number argument and returns a pointer to the corresponding message string.
It fi nds the error message corresponding to the errno variable and writes it to the standard error fi le descriptor.
The strerror function is declared in string.h. The perror function is declared in stdio.h.
7.9 STREAM ERRORS
When an error occurs while executing a library function or system call, they return values such as −1, NULL, and EOF. Besides returning a value, they also assign a value to the errno variable to describe the error. The errno variable is an external variable.
extern int errno;
The value in errno variable can be used to diagnose the error. Its value must be checked immediately after the execution of the function or system call.
The standard errno values include the following:
1. E2BIG: The argument list passed to the function is too long. 2. EACCESS: Access denied! The user does not have permission to access a fi le, directory,
etc. 3. EBADF: It refers to a bad fi le descriptor. 4. EBUSY: The requested resource is unavailable. 5. ECHILD: The wait() or waitpid() function tried to wait for a child process to exit, but
all children have already exited. 6. EDEADLK: A resource deadlock would occur if the request continued. 7. EEXIST: The fi le or directory already exists. 8. EFAULT: One of the function arguments refers to an invalid address. 9. EINTR: The function was interrupted by a signal, which was caught by a signal handler
in the program, and the signal handler returned normally.10. EINVAL: It refers to an invalid argument passed to the function.11. EIO: An I/O error occurred.12. ENFILE: Too many fi les are already open in this process.13. ENODEV: Device does not exist.14. ENOENT: No fi le was found or the specifi ed path name doesn’t exist.15. ENOEXEC: The fi le is not executable.16. ENOLCK: No locks are available.17. ENOMEM: The system is out of memory.18. ENOSPC: No space is left on the device.19. ENOTDIR: The specifi ed path is not a directory.20. ENOTEMPTY: The specifi ed directory is not empty.21. ENXIO: An I/O request is made to a special fi le for a device that does not exist.

242 Unix and Shell Programming
22. EPERM: The operation is not permitted—no permission to access the specifi ed resource.
23. EPIPE: The pipe to read from or write to does not exist.
We can also check the state of a fi le stream to determine whether an error has occurred or the end of fi le is reached. The syntax for checking the fi le streams is as follows:
Syntax int ferror(FILE *stream);
int feof(FILE *stream);void clearerr(FILE *stream);
Examples
(a) The ferror function tests the error indicator in the supplied stream and returns a nonzero value if it is set; otherwise, it returns zero.
if (ferror(stdin) != 0) fprintf(stderr,"Error in reading data");
(b) The feof function tests the end of fi le indicator within a stream and returns a nonzero value if it is set; otherwise it returns zero.
if (feof(stdin) != 0) fprintf(stderr,"File is over\n");
(c) The clearerr function clears the end of fi le and error indicators for the supplied stream. The function does not return any value.
clearerr(stdin);
7.10 FUNCTIONS FOR DYNAMIC MEMORY MANAGEMENT
Dynamic memory management means allocating the memory as and when required and releasing it when its purpose is complete. The released memory can then be reused by another process. The following are the functions used for managing memory:
malloc(size) Allocated memory block of a given size
calloc(n, size) Allocates n number of memory blocks of a given size and initializes the memory to zero
realloc(ptr, size) Changes the size of the block of allocated memory, ptr, to the given size
free(ptr) Releases the allocated memory block, ptr
7.10.1 malloc(): Allocating Memory BlockThe malloc function allocates a memory block.
Syntax void* malloc(size_t size)
Here, size determines the number of bytes of memory to allocate. If the allocation is successful, malloc returns a pointer to the memory. If memory allocation fails, it returns a NULL pointer. The allocated memory in this function is uninitialized, that is, it is raw memory.

System Calls 243
Example The following example allocates 10 bytes of memory to character type pointer k.
char *k, k = (char *)malloc(10 * sizeof(char));
7.10.2 calloc(): Allocating Arrays of Memory BlocksThe calloc() function allocates an array of memory and initializes the entire memory to zero.
Syntax void* calloc(size_t nmemb, size_t size)
Here, nmemb represents the number of elements in the array and the second argument is the size in bytes of each element. The function, if successful, returns a pointer to the allocated memory, and NULL otherwise.
Example The following example allocates an array of memory to character type pointer k where the array consists of fi ve elements and each element is assigned 10 bytes of memory.
char *k, k = (char*) calloc (5, 10*sizeof(char));
7.10.3 realloc(): Resizing Allocated MemoryThe realloc() function changes the size of the allocated memory. We can increase or decrease the size of the allocated memory through this function.
Syntax void* realloc (void *ptr, size_t size)
Here, ptr represents the block of the memory whose size we wish to change. The new size is represented by the parameter, size. The function returns the pointer to the resized block of allocated memory. The newly allocated memory will be uninitialized. If the ptr argument is set to NULL, the function will be equivalent to the malloc(size) function. If the value of the size argument is set to zero, the function will be equivalent to free(ptr).
Example The following example reallocates 20 bytes of memory to character type poin-ter k.
char *k, k = (char *)realloc(k, 20);
7.10.4 free(): Freeing Allocated MemoryThe free() function deallocates or releases the block of allocated memory.
Syntax void free (void *ptr);
Here, ptr refers to the block of memory pointed to by pointer ptr that we wish to release.
Examples
(a) The following example frees the memory assigned to character type pointer k.
free(k);

244 Unix and Shell Programming
(b) The following program demonstrates the use of malloc(), calloc(), realloc(), and free() library functions.
memorymgmt.c#include <malloc.h>
main(){ char *k, *t; /* k and t are declared as character type pointers */ int i;
k = (char *)malloc(6 * sizeof(char)); /* Memory of 6 bytes is allocated to k */ strcpy(k, "Hello"); /* Text, Hello is stored in k */ printf("The string k contains the text: %s\n", k); /* The text, Hello in k is displayed on the screen */ k = (char *)realloc(k, 13); /* Reallocating the memory to k, incrementing the allocated memory to 13 bytes */ strcpy(k, "Hello World!"); /* Text, Hello World! is stored in k */ printf("The string k now contains the text: %s\n", k); /* The text, Hello World! in k is displayed on the screen */ free(k); /* freeing the memory allocated to k */ t = (char *) calloc (3, 20*sizeof(char)); /* Allocating 3 blocks of memory, each
of 20 bytes to t */ printf("Enter three names\n"); for (i=0;i<=2;i++) {scanf("%s", t);t+=20;} /* Storing the names entered by user in t */ printf("The three names entered are as follows \n");t-=60; for (i=0;i<=2;i++) {printf("%s \n", t); t+=20;} /* Printing the names stored in t on the screen */ free(t); /* Freeing up memory allocated to t */}
Output
$ gcc memorymgmt.c -o memorymgmt
$ ./memorymgmt The string k contains the text: Hello The string k now contains the text: Hello World!

System Calls 245
Enter three names Sanjay Chirag Naman
The three names entered are as follows Sanjay Chirag Naman
7.11 FILE LOCKING
File locking is an essential task that is required in multi-user, multitasking operating systems to maintain fi le integrity. If a program is updating or writing into a fi le, it needs to be locked until the writing procedure is over so that another program that is supposed to read the fi le need not get obsolete content. The idea of fi le locking is to allow only one process at a time to update the content of a fi le, thereby avoiding any ambiguity and inconsistency. Only when the fi rst process has completed its operations on the fi le, should the second process be allowed to manipulate the fi le, keeping the rest of the processes waiting. The fi le lock is created in an atomic way, that is, no other operation will take place while the fi le lock is being created. We can lock an entire fi le or some of its regions depending on our requirement.
7.11.1 Creating Lock FilesLock fi les are created to limit access to the resources. The resources can be a fi le on the disk, memory, or other peripherals. To demonstrate exclusive access, that is, allowing only one process to access a fi le, we are going to see the creation of a lock fi le. The lock fi le is the one that is created and accessed by only one process at a time. Until the lock fi le (which was created by the earlier process) is deleted, no other process will be able to create another lock fi le.
Example The following program shows the creation of an exclusive lock fi le.
lockcreation.c#include <fcntl.h>#include <errno.h>
main(){ int fd; fd = open("lockfi le.txt", O_RDWR | O_CREAT | O_EXCL, 0744); if (fd == -1) { printf("File could not be opened. Error number = %d\n", errno); } else { printf("File opened successfully"); }}

246 Unix and Shell Programming
Output
$ ls lock*.txtlock*.txt: No such fi le or directory
$ ./lockcreationFile opened successfully
$ ls lock*.txtlockfi le.txt
The program calls the open() system call to create a fi le, lockfi le.txt, using the O_CREAT and O_EXCL fl ags. Mode 0744 indicates the permissions in octal form. The fi le will be created with read, write, and execute permissions assigned to the user (owner) and read permission to the group and other users. When this code is executed for the fi rst time, it will create the fi le, lockfi le.txt in exclusive mode but when the code is executed for the second time, the fi le will not be created because of the O_EXCL fl ag. The O_EXCL fl ag represents the exclusive fl ag and it opens the fi le only if it does not already exist.
Now, until and unless the fi le lockfi le.txt is deleted manually, no other process can create the lock fi le and hence cannot access the fi le (or resource). To avoid the overhead of deleting lockfi le.txt manually, we can modify this program in such a way that when the task of the process (that created the lock fi le) is complete, it deletes the fi le by itself, allowing another process to create the lock fi le. The code is modifi ed to appear as follows.
lockcreation2.c#include <fcntl.h>#include <errno.h>
main(){ int fd; fd = open("lockfi le.txt", O_RDWR | O_CREAT | O_EXCL, 0744); if (fd == -1) { printf("File is already locked\n"); } else { printf("Process %d has created the lock fi le and is using it \n", getpid()); /* Here the code that the process needs to execute exclusively can be written */ close(fd); unlink("lockfi le.txt"); }}
Output
File is already locked
In the aforementioned code, the fi le is created in exclusive mode and while it is being used by the process, no other process will be able to create the lock fi le, lockfi le.txt again. When the process (that created the lock fi le) is fi nished with its task, it closes the fi le and deletes it.

System Calls 247
Deleting the fi le lockfi le.txt indicates that the fi rst process has completed its job (that it wished to run exclusively) and another process is welcome to create a lock fi le again.
7.11.2 Record LockingLocking the entire fi le when a program is writing decreases the effi ciency of the program. It is a better approach to lock only the region of the fi le that is being updated leaving the rest of the fi le to be accessed by other programs. Locking only a section or region of the fi le, allowing programs to access other parts of the fi le is called fi le region locking or simply, region locking. The system call used for locking regions of the fi le is the fcntl system call.
Syntax int fcntl(int fd, int command, struct fl ock *fl ock_structure);
fcntl operates on open fi le descriptors and depending on the supplied command parameter, performs different tasks. The three command options for fi le locking are as follows:
1. F_GETLK2. F_SETLK3. F_SETLKW
The third parameter is a pointer to a struct fl ock that consists of the following members (refer to Table 7.21).
The l_type member indicates the type of lock. The following are the types of locks (refer to Table 7.22).
Table 7.21 Members of the fl ock structure
Value Description
short l_type It defi nes the type of desired lock. The available options are given here:F_RDLCK: Read only (shared) lockF_WRLCK: Write (exclusive) lockF_UNLCK: Unlocks the region
pid_t l_pid It represents the process identifi er requesting the lock.
short l_whence It represents location in the fi le to defi ne region. The available options are SEEK_SET, SEEK_CUR, and SEEK_END.
off_t l_start It represents the start byte of the region of the fi le for which lock is requested.
off_t l_len It represents the length of the region in bytes.
Table 7.22 Brief description of the types of locks
Value Description
F_RDLCK This value represents the read (shared) lock. The read lock is shareable among several processes. Since it does not change the content of the fi le, several processes can have a shared lock on the same regions of the fi le. If any process has a shared lock, then no process can get an exclusive lock on that region. The fi le must be opened and must have read or read/write access to get a read lock.
F_UNLCK This indicates that the region is unlocked.
F_WRLCK This value represents the exclusive (or ‘write’) lock. Only a single process can have an exclusive lock on any particular region of a fi le. Once a process has an exclusive lock, no other process will be able to get any other type of lock, neither read nor write lock on that region. The fi le must be opened and must have read/write access to get a write lock.

248 Unix and Shell Programming
The l_whence, l_start, and l_len members defi ne a region in a fi le to be locked. l_whence indicates the location in the fi le, that is, whether it is the beginning, current, or end of the fi le and is represented by the symbolic constants, SEEK_SET, SEEK_CUR, and SEEK_END. l_start represents the fi rst byte related to the location specifi ed in l_whence. The l_len parameter defi nes the number of bytes in the region. The l_pid parameter represents the process identifi er holding a lock.
The three command options for fi le locking are as follows:
F_GETLK commandThe F_GETLK command gets locking information of the fi le represented by the fi le descriptor fd. It is used for determining the current state of locks on a region of a fi le. The process requesting for a lock sets the values of the fi elds in the fl ock structure to indicate the type of the desired lock, region, etc. The fcntl call returns a value other than −1 if it is successful. If the fi le already has locks, the content in the fl ock structure is overwritten with the current status. If the fcntl call succeeds and the lock is granted, the content of fi elds in the fl ock structure remains unchanged.
F_SETLK commandThe F_SETLK command attempts to lock or unlock the region of the fi le represented by the fi le descriptor fd. Again, the fi elds of the fl ock structure are set to defi ne the region that we wish to lock, that is, the l_start, l_whence, and l_len fi elds are set to defi ne the region. If the lock is successful, fcntl returns a value other than −1.
F_SETLKW commandThe F_SETLKW command is same as the F_SETLK command with the difference that if it cannot obtain the lock, the call will wait until it gets the lock.
Note: When a fi le is closed, all the locks held on it are automatically cleared.
Types of locksThe various types of locks are as follows:
Read locks The read (shareable) lock is acquired on a region (record) when a process wishes to only fetch content, but not update it. When a process locks a region through the read lock, other processes can also get read locked on the same region or a part of it, but no write lock can be acquired on that region. Being shareable in nature, several processes can get the read lock on the same region making it possible for all of them to read the content of the fi le simultaneously.
Write locks The write (exclusive) lock is acquired by a process on a region when it wishes to update its content. To maintain fi le integrity and consistency, no other process can get the write lock or read lock on the same region (or part of it) that is already write locked by some other process. Until and unless the region is unlocked, no other process can lock the region through the read or write lock.
Examples The following statements apply a read lock in the fi le lockfi le.txt in the region that extends from the 5th byte to the 15th byte.

System Calls 249
int fd, fl ag;struct fl ock region;fd = open("lockfi le.txt", O_RDWR | O_CREAT, 0744);region.l_type = F_RDLCK;region.l_whence = SEEK_SET;region.l_start = 5;region.l_len = 10;fl ag = fcntl(fd, F_SETLK, ®ion);if (fl ag == -1) { printf("Region could not be locked\n");} else { printf("Region successfully locked\n");}
The following statements apply a write lock (exclusive lock) in the fi le lockfi le.txt in the region that extends from the 20th byte to the 30th byte.int fd, fl ag;struct fl ock region;fd = open("lockfi le.txt", O_RDWR | O_CREAT, 0744);region.l_type = F_WRLCK;region.l_whence = SEEK_SET;region.l_start = 20;region.l_len = 10;fl ag = fcntl(fd, F_SETLK, ®ion);if (fl ag == -1) { printf("Region could not be locked\n");} else { printf("Region successfully locked\n");}
7.11.3 Competing LocksWhen a region is locked with any lock, whether shareable or exclusive, there are quite a few chances that another process attempts to lock the same region—such a situation is one where different locks compete. When a region is locked by a read lock, which is shareable in nature, another process can lock the same region with a shareable lock but no exclusive lock. In case a region is locked by an exclusive lock, it cannot be locked by a lock of any type (neither read nor write) until and unless the region is unlocked.
Example The following code demonstrates competing locks. We will see how certain regions are locked by shareable and exclusive locks.
competinglocks.c#include <stdio.h>#include <unistd.h>#include <fcntl.h>

250 Unix and Shell Programming
int main(){ int fd, fl ag; struct fl ock region; fd = open("lockfi le.txt", O_RDWR | O_CREAT, 0744); if (!fd) { fprintf(stderr, "Unable to open lock fi le for read/write\n"); exit(1); } region.l_type = F_RDLCK; region.l_whence = SEEK_SET; region.l_start = 5; region.l_len = 10; fl ag = fcntl(fd, F_SETLK, ®ion); if (fl ag == -1) { printf("Region could not be locked\n"); } else { printf("Region successfully locked\n"); } region.l_type = F_RDLCK; region.l_whence = SEEK_SET; region.l_start = 5; region.l_len = 5; fl ag = fcntl(fd, F_SETLK, ®ion); if (fl ag == -1) { printf("Region could not be locked\n"); } else { printf("Region successfully locked\n"); } region.l_type = F_WRLCK; region.l_whence = SEEK_SET; region.l_start = 20; region.l_len = 10; fl ag = fcntl(fd, F_SETLK, ®ion); if (fl ag == -1) { printf("Region could not be locked\n"); } else { printf("Region successfully locked\n"); } region.l_type = F_RDLCK; region.l_whence = SEEK_SET; region.l_start = 20; region.l_len = 5; fl ag = fcntl(fd, F_SETLK, ®ion);
System Calls 251
if (fl ag == -1) { printf("Region could not be locked\n"); } else { printf("Region successfully locked\n"); } region.l_type = F_UNLCK; region.l_whence = SEEK_SET; region.l_start = 20; region.l_len = 10; fl ag = fcntl(fd, F_SETLK, ®ion); if (fl ag == -1) { printf("Region could not be unlocked\n"); } else { printf("Region successfully unlocked\n"); } region.l_type = F_RDLCK; region.l_whence = SEEK_SET; region.l_start = 20; region.l_len = 5; fl ag = fcntl(fd, F_SETLK, ®ion); if (fl ag == -1) { printf("Region could not be locked\n"); } else { printf("Region successfully locked\n"); } close(fd);}
OutputRegion successfully lockedRegion successfully lockedRegion successfully lockedRegion successfully lockedRegion successfully unlockedRegion successfully locked
In the aforementioned code, we can see that a region from the 5th to the 15th byte is locked with a shareable (read) lock. Being under shareable lock, a region within the locked region from the 5th till the 10th byte is successfully re-locked in read lock mode. Thereafter, a region from the 20th till the 30th byte is locked with an exclusive (write) lock. An attempt to lock the same region (the 20th to the 30th byte) with read lock fails, as the write lock is an exclusive lock. The same region is then successfully unlocked. Once the exclusive lock is removed, the region from the 20th to the 30th byte is successfully locked with a read lock.
Note: When a region is locked with a shareable lock, another shareable lock can be created for the same region but not an exclusive lock. When a region is locked with an exclusive lock, no other lock can be created.

252 Unix and Shell Programming
7.11.4 DeadlockA deadlock is a situation in which the application hangs because two or more of its processes are unable to proceed as each is waiting for one of the others to release locks on certain regions. Let us assume that there are three running processes P1, P2, and P3, which have acquired write lock on regions R1, R2, and R3 respectively (refer to Fig. 7.1). In order to proceed, the process P1 wants the process P2 to release the write lock on region R2. Similarly, the process P2 is waiting for the process P3 to release the write lock on region R3. The process P3, on the other hand, is waiting for process P1 to release the lock on the region R1 to proceed further. Hence, there is a cycle of processes where each process is waiting for another to release the lock on a region to proceed. As a result, no process is able to fi nish its task and remains suspended for an infi nite time. This situation where each process is stuck waiting for another process to release locks is known as deadlock.
The conditions that may result in a deadlock are as follows:
Mutual exclusion Each region is locked by an exclusive lock (write lock). Shareable lock (read lock) on the required region does not exist, making it impossible for two or more processes to simultaneously access the same region.
Hold and wait Processes are holding a lock on a region and waiting for locks on other region (without releasing existing locks).
No preemption No process is ready to move back and release the region locked by it.
Circular wait Each process is waiting to obtain a lock on the region that is already locked by another process.
The following are the ways to solve the deadlock problem:
Detection and recovery If a deadlock occurs, take necessary action to resolve it. Action may include preempting a process and releasing the locks acquired by it. Deadlock can be detected by making a resource allocation/request graph and checking for cycles. Avoid making cycles by implementing the cycle detection algorithm.
Prevention Prevent deadlocks by checking before assigning region locks. If granting of a lock on a region may result in a deadlock, it should not be granted.
Ignoring In this approach, it is assumed that a deadlock will never occur. This approach is used when there is a large time gap between the occurrence of deadlocks. In addition, there is not much loss in effi ciency or data during the deadlocks.
Avoidance Deadlock can be avoided if the operating system knows in advance the requirement of resources by all the processes during their lifetime. The benefi t of this information is that when a request for a resource
Fig. 7.1 Cycle appearing among three processes resulting in a deadlock
R1
R2
R3
P1
P2
P3

System Calls 253
appears, the operating system will fi rst check and ensure that the allocation of resources will not result in a deadlock. The operating system will therefore grant the resource only when it leads to a safe state. To determine whether the requested resource should be granted or not, the system must have the knowledge of resources currently available, the resources currently allocated to each process, and the future requests and releases of each process. One algorithm that is used for deadlock avoidance is the Banker’s algorithm, which requires resource usage limit to be known in advance. Practically, it is not possible to know in advance what every process will request. This means that deadlock avoidance is often impossible.
In this chapter, we learnt about system calls of different categories including system calls that are dealt in fi le handling, directory handling, and process handling. We also saw different library functions. We discussed the library functions related to streams and the ones that are used in dynamic memory management. We also understood handling of stream errors. To maintain fi le integrity, we studied how a fi le and its regions are locked. Finally, we saw the conditions that may result in deadlock and how this problem can be solved.
1. A system call is a request made to the operating system. It executes in the kernel address space.
2. Every open fi le is referred to using a fi le descriptor. The location of the fi le descriptor indicates the positions in the fi le from where the next read or write operation may begin.
3. The value of the fi le descriptor ranges from 0 through OPEN_MAX.
4. Besides the create() system call, a fi le can be created through the open() system call too.
5. The integer value represented by the fi le descriptor represents the distance, offset, or the number of bytes from the beginning of the fi le.
6. A fi le can be opened in several modes including read only, write only, reading and writing, append, and exclusive as desired.
7. File access permission for the new fi le can be defi ned in the open() system call. We can read the specifi ed number of bytes from a given fi le through the read() system call.
8. The fi le descriptor automatically increments by the number of bytes read or within the fi le through the read() and write() system calls, respectively.
9. The location of the fi le descriptor in a fi le can be set through the lseek() system call.
10. We can have more than one name for a single fi le by linking to it via the link() system call.
11. The unlink() system call removes a given link to a fi le and also deletes the fi le if it is the last link.
12. To change the fi le access permission, the chmod() system call is used.
13. The system calls used to access status information of a fi le such as its inode number, protection mode, and time when it was last accessed or modifi ed are stat(), lstat(), and fstat().
14. The system call used for changing directory is chdir(). The system call used for opening a directory is opendir(). It returns a directory stream. The system call used for reading content of a directory is readdir().
15. Each entry in a directory is read and stored into a dirent structure.
16. The exec() system call is used for transforming executable binary fi le into a process.
17. The fork() system call is used for creating a new process.
18. The system call wait() is used to make a process wait for some time to allow another process to fi nish.
19. The Unix library functions may invoke one or more system calls.
20. Unlike system calls, the library functions are executed in the user address space.
21. An appropriate header fi le has to be included in a program in order to use library functions.
■ SUMMARY ■

254 Unix and Shell Programming
22. The system calls are system dependent and hence not portable, whereas the library functions are not system dependent, and hence portable.
23. The library function perror() is used for displaying error messages.
24. Whenever a system call or library function fails, it returns a value –1 and assigns a value to an external variable called errno.
25. The system call mknod() is used to create a new regular, directory, or special fi le.
26. The stat() system call fi lls a buffer with status information of the specifi ed fi lename.
27. When the link count of the fi le referenced by the link becomes 0 and is not accessed by any proc ess, the fi le is removed freeing any space occup ied by it.
28. The system call chown() changes the owner ID and group ID of the specifi ed fi lename to the supplied ownerID and groupID, respectively.
29. chmod() changes the mode (permissions) of a fi lename to the supplied mode, where mode is specifi ed as an octal number.
30. Only the owner or the super user can change a fi le’s permissions.
31. fchmod() works in the same way as chmod() with the exception that it accepts the fi le descriptor of the fi le whose permissions we wish to change instead of the fi lename.
32. The dup system call is used for duplicating a fi le descriptor. It makes a duplicate of the supplied fi le descriptor and returns it.
33. The dup2 system call copies one fi le descriptor to another specifi ed fi le descriptor.
34. The symbolic link is created by the symlink() system call.
35. When the link count of the file referenced by the link becomes 0 and is not accessed by any process, the file is removed freeing up any space occupied by it.
36. The access() system call checks whether the user has the permissions to read, write, or perform other tasks on the specifi ed fi le.
37. The umask() system call sets the fi le mode creation mask.
38. The three standard streams that are automatically opened when a program is started are stdin,
stdout, and stderr having fi le descriptors 0, 1, and 2, respectively.
39. The fopen library function is used for opening fi les. The fread library function is used to read data from the specifi ed fi le. The fwrite library function accesses data from the specifi ed data buffer and writes them to the specifi ed fi le. The fclose library function closes the specifi ed fi le.
40. Any buffered data in the memory that is not yet fl ushed to the fi le stream is written into the stream before closing it.
41. The ffl ush library function converts all buffered data into a stream to be written immediately to the associated fi le.
42. The getchar function is equivalent to getc(stdin) and reads the next character from the standard input.
43. The fputc function writes a character to an output stream, which may be a fi le or stdout (output stream).
44. The putchar function is equivalent to putc(c, stdout) that writes a single character to the standard output.
45. The system calls used for making and removing directories are mkdir and rmdir, respectively.
46. We can know the current working directory by calling the getcwd system call.
47. The system call used to know our current position in a directory stream is telldir(). The system call used to set the directory entry pointer in the directory stream is seekdir(). The system call used to close the directory stream is closedir().
48. The malloc() function allocates a memory block. The calloc() function allocates an array of memory and initializes all of the memory to zero. The realloc() function changes the size of the allocated memory.
49. If a program is updating or writing into a fi le, it needs to be locked until the writing procedure is over so that another program that is supposed to read the fi le does not get obsolete content.
50. When a region is locked with any lock, whether shareable or exclusive, there are chances that another process attempts to lock the same region; such a situation is one where different locks compete.

System Calls 255
■ EXERCISES ■
Objective-type QuestionsState True or False
7.1 The system calls execute in the user address space. 7.2 The Unix library functions may invoke one or
more system calls. 7.3 The system calls are system dependent and hence
are not portable. 7.4 System calls can perform all kinds of tasks
except interprocess communication. 7.5 A fi le can be created through open() system call. 7.6 A fi le descriptor can be a negative integer. 7.7 A fi le descriptor points at the beginning of a fi le
and its location cannot be changed. 7.8 On closing a fi le, all the resources allocated to it
are freed. 7.9 By creating a link to a fi le, we basically create
another fi lename for it.7.10 The fi le descriptor cannot be duplicated.7.11 The chmod() system call can change the links of
the specifi ed fi le.7.12 Either the owner or the super user can change the
fi le’s permissions.7.13 The fchmod() system call accepts the fi le
descriptor of the fi le whose permissions we wish to change instead of the fi lename.
7.14 The ioctl system call is used for unlinking the specifi ed fi le.
7.15 The dup system call is used for duplicating a fi le descriptor.
7.16 The default fi le descriptors for the three standard fi le streams, stdin, stdout, and stderr are 8, 9, and 10, respectively.
7.17 The symbolic link is created by the creat() system call.
7.18 The symbolic link to a fi le increments the fi le’s link count by 2 instead of 1.
7.19 By unlink() system call, the link count of the fi le is decremented by one.
7.20 The umask() system call masks the fi les, that is, makes the fi le hidden for security reasons.
Fill in the Blanks
7.1 For executing system calls, the mode of a process is changed from to .
7.2 The default value of operating system parameter OPEN_MAX is .
7.3 The O_TRUNC fl ag older contents of the fi le.
7.4 The mode S_IRWXO when applied to a fi le will assign permissions to
. 7.5 The value SEEK_CUR in lseek() system call
sets the fi le descriptor at its plus the .
7.6 On failure, the system call close() returns a value .
7.7 For deleting fi les, the system call used is .
7.8 For successful execution of the chdir() system call, the process must have permissions to the directory.
7.9 The structure describes the dir-ectory entry that represent the fi les in the specifi ed directory stream.
7.10 The ENOENT error occurs when does not exists.
7.11 The exec() system call transforms an executable binary fi le into a .
7.12 The system call can be used for knowing when a child process has completed its job.
7.13 The library function is used for displaying error messages.
7.14 Whenever a system call or library function fails, it returns value and assigns a value to an external variable called .
7.15 The system call is used to create a new regular, directory, or special fi le.
7.16 The stat() system call is used for giving of the specifi ed fi lename.
7.17 The system call returns information about a symbolic link itself rather than the fi le that it references.
7.18 The system call used for removing a link to a fi le is .
7.19 When the link count of the fi le referenced by the link becomes and is not accessed by any process, the fi le is removed.
7.20 The system call chown() changes the and of the specifi ed fi lename.

256 Unix and Shell Programming
Multiple-choice Questions
7.1 The fi le’s permissions can be changed either by the owner or the
(a) group member (c) super user (b) other user (d) friend 7.2 The system call that copies one fi le descriptor to
another specifi ed fi le descriptor is (a) copy (c) copy_fd (b) dup2 (d) make 7.3 The fi le descriptor assigned to the stderr stream is (a) 2 (b) 10 (c) 0 (d) 1 7.4 The system call by which a symbolic link is
created is (a) symboliclink() (c) create() (b) slink() (d) symlink() 7.5 The system call that checks whether the user has
the permissions to read, write, or perform other tasks on the specifi ed fi le is
(a) check() (c) permissions() (b) access() (d) S_IRWXU
7.6 The standard stream for input is (a) keyboard (c) standardin (b) instream (d) stdin 7.7 The library function to read data from the
specifi ed fi le is (a) fread (c) readfi le (b) fetch (d) readdata 7.8 The library function that is implicitly called
when a program ends is (a) fclose (c) terminate (b) bye (d) fread 7.9 The library function used to set the position of
the fi le pointer in the fi le is (a) fsetpos (c) ffl ush (b) fclose (d) fseek7.10 The system call used to remove the empty
directory is (a) deldir (c) emptydir (b) remove (d) rmdir
Programming Exercises
7.1 What are the following commands expected to do? (a) fp = open("xyz.txt", O_CREAT|O_
WRONLY|O_TRUNC, S_IRWXU); (b) void *buf = (char *) malloc(512); (c) write(fd2, buf, n) (d) mknod("stock.txt", S_IFREG | S_IRWXU,
dev); (e) fd2 = dup(fd1); (f) lseek(fd1, -10, SEEK_END); (g) stat("xyz.txt",&statusbuf); (h) chown("xyz.txt",2, 15 ) (i) chmod("xyz.txt", 0755); (j) c = fgetc(fp1); 7.2 Write down the commands for performing the
following tasks: (a) To write a character in variable c in the fi le
pointed by fi le pointer fp (b) To open the fi le xyz.txt in read mode (c) To read the content of the directory, projects. (d) To set the permission of the fi le xyz.txt to
octal value 0765 (e) To display an error message, "File does
not exist" (f) To change the owner of the fi le xyz.txt to
user with ID 25 (g) To create a link of the fi le aa.txt with the
name bb.txt (h) To write the text, "Good Morning" in the fi le
xyz.txt pointed to by fi le pointer fp (i) To make a duplicate of the fi le descriptor fp
with the name fq (j) To close the fi le pointed by the pointer, fp
Review Questions
7.1 Write short notes on the following system calls: (a) opendir() (b) lseek() (c) unlink() (d) wait() (e) write()
7.2 What are the system calls that are used for accessing fi le information? Explain these along with their syntax.
7.3 Which system call is used in opening a fi le? List all its fl ags and modes.
7.4 What are the differences between the following?

System Calls 257
(a) fork() and vfork() system calls. (b) System calls and library functions 7.5 Write a program that emulates the cat command,
that is, displays the content of the specifi ed fi le on the screen.
7.6 Explain the difference between the following: (a) calloc() and malloc() (b) read lock and write lock (c) open and fopen
(d) fgets and gets 7.7 Explain the following: (a) Deadlock (b) File Locking (c) ffl ush 7.8 How is a record or region locked in a fi le?
Explain with a running code. 7.9 Explain the systems calls required in making,
opening, reading, and closing a directory stream.
Brain Teasers
7.1 How will you set the fi le pointer in a fi le to read its last 5 bytes?
7.2 Can you emulate the cat command, that is, read the content of a fi le and display on the screen. How?
7.3 What fl ag will you use while opening a fi le so that its existing content is not deleted?
7.4 You are trying to create a link of the fi le a.txt with a name b.txt through the link() system call. However, the link() system call fails. What might be the reason?
7.5 Unlink() system call is removing the link of a fi le. In what situations does it delete a fi le?
7.6 I am trying to fi nd the status information of a link through the stat() system call but am not able
to succeed. What is the mistake I am making? 7.7 Correct the mistake in the following statement
for opening a fi le, xyz.txt in read only mode: open("xyz.txt", "r"); 7.8 Correct the mistake in the following statement
for writing a text message Hello in the fi le referred to by the fi le descriptor to fd.
fwrite( fd, "Hello", 6 ); 7.9 Correct the mistake in the following statement for
setting the fi le pointer to the begining of the fi le: lseek(fd, 0, SEEK_END); 7.10 Correct the mistake in the following statement
for reading 1024 bytes from the fi le referred to by the fi le descriptor fd into the buffer buf:
read(fd, 1024, buf);
State True or False
7.1 False 7.2 True 7.3 True 7.4 False 7.5 True 7.6 False 7.7 False 7.8 True 7.9 True7.10 False7.11 False7.12 True7.13 True7.14 False
7.15 True7.16 False7.17 False7.18 False7.19 True7.20 False
Fill in the Blanks
7.1 user mode, kernel mode
7.2 4096 7.3 deletes 7.4 (read, write,
and execute), other
7.5 current location, offset
7.6 -1 7.7 unlink 7.8 read 7.9 dirent7.10 directory 7.11 process7.12 vfork7.13 perror()7.14 -1, errno7.15 mknod()7.16 status information7.17 lstat()7.18 unlink()7.19 0
7.20 owner ID, group ID
Multiple-choice Questions
7.1 (c) 7.2 (b) 7.3 (a) 7.4 (d) 7.5 (b) 7.6 (d) 7.7 (a) 7.8 (a) 7.9 (d)7.10 (d)
■ ANSWERS TO OBJECTIVE-TYPE QUESTIONS ■

8.1 INTRODUCTION
A text editor is a program that enables us to create and edit content in a computer fi le. It also provides several facilities. Some of these are listed here:
1. Search facility to quickly search for desired patterns2. Navigation facility to navigate to a desired location in the fi le3. Facility to copy and paste content4. Facility to fi nd and replace content
The following are the standard text editors available on most Unix systems:
ed It is a line-oriented text editor for the Unix operating system that was originally written in PDP-11/20 assembler by Ken Thompson in 1971. It is an interactive program that is used to create, display, and modify text fi les. Editing in the ed editor is performed in two modes, the command mode and the input mode. When invoked, ed is initially in the command mode. In this mode, commands entered from the keyboard are executed to manipulate the contents of
88Editors in UnixEditors in Unix C H A P T E R
After studying this chapter, the reader will be conversant with the following:
• Stream editor (sed) used for fi ltering out the desired data from the specifi ed fi le• Sed commands for inserting lines, deleting lines, saving fi ltered content
into another fi le, loading content of another fi le into the current fi le, and searching content that match specifi c patterns
• Visual editor, vi, for creating and editing fi les• Different commands for searching through text, replacing text, saving
content, navigating to different parts of the fi le, deleting text, copying and pasting text, among others
• Modeless editor, emacs, for creating and editing fi les• Functioning of different emacs editor commands used in cursor movement,
dealing with buffers, cutting and pasting content, and searching for and replacing content, among others.

Editors in Unix 259
the editor buffer. The characters ‘a’ (append), ‘i’ (insert), or ‘c’ (change) when pressed, make the ed editor switch to the input mode. The input mode is particularly used to add text to a fi le.
ex It is a line editor that is a more friendly version of ed, but is a bit more complicated to operate than the screen-based visual editor, vi. Initially, computers used printing terminals instead of CRTs and line numbers were used to identify regions of the fi le. To edit a region of the fi le, the programmer used to print a line via its line number on the printing terminal and give the editing command to correct or edit the line. The ex editor is still popular even though the vi editor is more comfortable to work with. The ex editor can be invoked from the vi editor and we can switch to the vi editor from the ex editor too.
vi It is a visual editor that was originally written by Bill Joy in 1976. It is popularly used for creating and editing fi les. It is available on almost all Unix systems. It has no menus and for performing operations, a combination of keystrokes are used. Remembering commands might be a cumbersome task, but otherwise it is a fast and powerful editor. It operates in two modes: command mode and insert mode. To switch to the insert mode, the characters ‘i’ (input) or ‘a’ (append) are used. To switch to the command mode, the Esc key is pressed. Another editor that is distributed with most Unix systems and is an enhanced version of vi is the vim editor. It is a highly confi gurable text editor written by Bram Moolenaar. It provides both the command line as well as the graphical user interface. The enhanced features in vim that give it an edge over vi include multiple windows and buffers, multi-level undo, syntax highlighting, fi lename completion, and visual selection.
sed It is a non-interactive stream editor that is popularly used for fi ltering out the desired data from the specifi ed fi le. It reads input sequentially, applies the operations specifi ed via the command line (or a sed script), and directs the processed data to the standard output. Many of the commands in sed are derived from the ed line editor.
emacs It is a popular and powerful screen editor that is simpler to use when compared to the vi editor. It supports spell checking and enables us to edit and view multiple fi les simultaneously. Most emacs commands use either the Ctrl key or the Esc key.
pico It stands for pine composer and is a fi le editor that was designed to be used with the pine mail system. It is a simple editor and is very easy to use. To create or edit a fi le using pico, execute the command in the following syntax:
pico fi lename
Here, fi lename is the fi le that we wish to create or edit through pico. On using this command, we get a screen to create or edit the fi le. The commands for editing in pico are invoked using the Ctrl key sequences. At the bottom of the screen, the status lines are displayed to indicate the commands that are currently active. To save the fi le and exit pico, the ̂ X command is used.
In this chapter, we will learn about the three editors: sed, vi, and emacs. We will now discuss each of these in detail.
8.2 STREAM EDITOR
The stream editor or sed is a tool that scans the specifi ed fi le and fi lters out the desired data for us. The tool was designed by Lee McMohan and is derived from the ed line editor, the

260 Unix and Shell Programming
original editor of Unix. For fi ltering through sed, we have to supply a data stream (input data) and instructions that contain the criteria for fi ltering the desired data from the data stream. The instruction can be written either in the command line (if it is small) or separately in a script fi le.
The instruction is a combination of two components, an address and a command, where the address contains the fi lter condition that is applied on the data stream to extract the desired data. The command (containing action) is applied on the desired data for processing.
Syntax sed options 'address action' fi le(s)
The different options that are used with the sed editor are briefl y described in Table 8.1.The address in a syntax refers to the
range of data of the fi le(s) on which we wish to apply the desired action.
The sed has two ways of addressing lines:
1. By line number2. By specifying a pattern that occurs in
a line
The address can be either a one line number to select a single line or a set of two to select a group of contiguous lines. In the absence of an address, sed acts on all lines of the specifi ed fi le(s). The action results in the fi ltering of data and also performs insertion, deletion, or substitution of text.
8.2.1 Actions with SedThe list of actions that can be performed using sed is shown in Table 8.2.
Examples
(a) To understand the working of sed, let us consider the fi le bank.lst with the following lines.
101 Aditya 0 14/11/2012 current102 Anil 10000 20/05/2011 saving 103 Naman 0 20/08/2009 current104 Rama 10000 15/08/2010 saving 105 Jyotsna 5000 16/06/2012 saving 106 Mukesh 14000 20/12/2009 Current 107 Yashasvi 14500 30/11/2011 saving 108 Chirag 0 15/12/2012 current 109 Arya 16000 14/12/2010 Current 110 Puneet 130 16/11/2009 saving
We assume that the columns of the aforementioned bank.lst fi le represent the account number, customer’s name, balance, date of opening of account, and type of account, respectively. We give the following command.
Table 8.1 Brief description of options used with the sed editor
Option Description
-n Suppresses duplicate line printing
-f Reads instructions from a fi le
-e Interprets the next string as an instruction or a set of instructions (for a single instruction, -e is optional)
Table 8.2 List of actions performed while using sed
Command Description
i\ Inserts text before the current line
a\ Appends text below the current line
c\ Changes text in the current line with the new text
d Deletes line(s)
p Prints line(s) on a standard output
q Quits after reading up to the addressed line
= Prints the line number addressed
s/s1/s2/ Substitutes string s1 with string s2
r fi lename Places the contents of the fi le fi lename after line
w fi lename Writes the addressed lines to the fi le, fi lename

Editors in Unix 261
$ sed '3q' bank.lst
Output
101 Aditya 0 14/11/2012 current 102 Anil 10000 20/05/2011 saving 103 Naman 0 20/08/2009 current
We can see that q means quit. Hence, the aforementioned command quits after the third line and we get the fi rst three lines as the output.
(b) $ sed '1,2p' bank.lst This command prints the second line of the fi le twice. 101 Aditya 0 14/11/2012 current 101 Aditya 0 14/11/2012 current 102 Anil 10000 20/05/2011 saving 102 Anil 10000 20/05/2011 saving 103 Naman 0 20/08/2009 current 104 Rama 10000 15/08/2010 saving 105 Jyotsna 5000 16/06/2012 saving 106 Mukesh 14000 20/12/2009 Current 107 Yashasvi 14500 30/11/2011 saving 108 Chirag 0 15/12/2012 current 109 Arya 16000 14/12/2010 Current 110 Puneet 130 16/11/2009 saving
Note: By default, sed prints all lines on the standard output. Now, when we use the p command (which means print), the addressed lines will be printed twice.
-n option It suppresses duplicate line printing.
Example $ sed -n '1,2p' bank.lst
101 Aditya 0 14/11/2012 current102 Anil 10000 20/05/2011 saving
This command prints only the fi rst two lines of the fi le, bank.lst.
$ sign This selects the last line of the fi le.
Example $ sed -n '$p' bank.lst
110 Puneet 130 16/11/2009 saving
Negation operator (!) The sed also has a negation operator (!), which can be used with any action. For instance, selecting the fi rst two lines is the same as not selecting line 3 through the end.
Examples
(a) $ sed -n '3,$!p' bnk.lst This command does not print from the third line till the end of the fi le, that is, it prints the
fi rst two lines.

262 Unix and Shell Programming
101 Aditya 0 14/11/2012 current 102 Anil 10000 20/05/2011 saving (b) $ sed -n '3,$p' bank.lst This command prints from the third line till the end of the fi le. 103 Naman 0 20/08/2009 current 104 Rama 10000 15/08/2010 saving 105 Jyotsna 5000 16/06/2012 saving 106 Mukesh 14000 20/12/2009 Current 107 Yashasvi 14500 30/11/2011 saving 108 Chirag 0 15/12/2012 current 109 Arya 16000 14/12/2010 Current 110 Puneet 130 16/11/2009 saving (c) $ sed -n '$!p' bank.lst This command prints all the lines except the last line. 101 Aditya 0 14/11/2012 current 102 Anil 10000 20/05/2011 saving 103 Naman 0 20/08/2009 current 104 Rama 10000 15/08/2010 saving 105 Jyotsna 5000 16/06/2012 saving 106 Mukesh 14000 20/12/2009 Current 107 Yashasvi 14500 30/11/2011 saving 108 Chirag 0 15/12/2012 current 109 Arya 16000 14/12/2010 Current (d) $ sed -n '5,7p' bank.lst This command prints from the fi fth line to the seventh line. 105 Jyotsna 5000 16/06/2012 saving 106 Mukesh 14000 20/12/2009 Current 107 Yashasvi 14500 30/11/2011 saving (e) $ sed -n '5,7!p' bank.lst This command prints all the lines except the fi fth to seventh lines. 101 Aditya 0 14/11/2012 current 102 Anil 10000 20/05/2011 saving 103 Naman 0 20/08/2009 current 104 Rama 10000 15/08/2010 saving 108 Chirag 0 15/12/2012 current 109 Arya 16000 14/12/2010 Current 110 Puneet 130 16/11/2009 saving (f) $ sed -n -e '1,2p' -e '7,9p' bank.lst This command prints from the fi rst to second and the seventh to ninth lines. 101 Aditya 0 14/11/2012 current 102 Anil 10000 20/05/2011 saving 107 Yashasvi 14500 30/11/2011 saving 108 Chirag 0 15/12/2012 current 109 Arya 16000 14/12/2010 Current

Editors in Unix 263
Adding textThe instruction $a is used for adding text to the existing fi le. Enter the instruction $a followed by a backslash (\) and press the Enter key. We can add as many lines as we want. Each line except the last will be terminated by the backslash (\). The backslash (\) is considered a line continuation character. On the other hand, sed identifi es the line without the \ as the last line of input.
Syntax sed 'a\
... /* lines to be appended */
... /* lines to be appended */
... 'fi le
Here, a\ represents the append command, which is then followed by the lines to be appended to the specifi ed fi le.
Example $ sed 'a\
117 vinay 4500 11/08/2011 current\118 hitesh 3300 15/09/2012 saving'bank.lstOutput101 Aditya 0 14/11/2012 current102 Anil 10000 20/05/2011 saving103 Naman 0 20/08/2009 current104 Rama 10000 15/08/2010 saving105 Jyotsna 5000 16/06/2012 saving106 Mukesh 14000 20/12/2009 Current107 Yashasvi 14500 30/11/2011 saving108 Chirag 0 15/12/2012 current109 Arya 16000 14/12/2010 Current110 Puneet 130 16/11/2009 saving117 vinay 4500 11/08/2011 current118 hitesh 3300 15/09/2012 saving
Similarly, i\ is used for inserting text before every line of the fi le.
Examples
(a) $ sed 'i\
this is bank fi le
'bank.lst This command will print the text, this is bank fi le, before each line of the fi le. this is bank fi le 101 Aditya 0 14/11/2012 current this is bank fi le 102 Anil 10000 20/05/2011 saving this is bank fi le 103 Naman 0 20/08/2009 current

264 Unix and Shell Programming
this is bank fi le 104 Rama 10000 15/08/2010 saving : : : : : : : : : : : : : : :(b) Similarly, the following command inserts a blank line before every line of the fi le. $ sed 'i\ 'bank.lst 101 Aditya 0 14/11/2012 current
102 Anil 10000 20/05/2011 saving
103 Naman 0 20/08/2009 current
104 Rama 10000 15/08/2010 saving : : : : : : : : : : : : : : :
(c) $ sed -n '/current/p' bank.lst This command shows all the lines having the pattern current in it. 101 Aditya 0 14/11/2012 current 103 Naman 0 20/08/2009 current 108 Chirag 0 15/12/2012 current
(d) $ sed -n '/[Cc]urrent/p' bank.lst This command shows all the lines having the pattern current or Current in it. 101 Aditya 0 14/11/2012 current 103 Naman 0 20/08/2009 current 106 Mukesh 14000 20/12/2009 Current 108 Chirag 0 15/12/2012 current 109 Arya 16000 14/12/2010 Current
w (write) This command helps in writing the selected lines in a separate fi le.Examples
(a) $ sed -n '/current/w bkk.lst' bank.lst This command will write all records with pattern current into the fi le bkk.lst. Hence,
bkk.lst will have the following data. $ cat bkk.lst 101 Aditya 0 14/11/2012 current 103 Naman 0 20/08/2009 current 108 Chirag 0 15/12/2012 current
(b) $ sed -n -e '/current/w bkk.lst' -e '/saving/w bkw.lst' bank.lst This command will write all the records with pattern current into the fi le bkk.lst and all
the records having pattern saving into the fi le bkw.lst. $ cat bkw.lst 102 Anil 10000 20/05/2011 saving 104 Rama 10000 15/08/2010 saving

Editors in Unix 265
105 Jyotsna 5000 16/06/2012 saving 107 Yashasvi 14500 30/11/2011 saving 110 Puneet 130 16/11/2009 savingHence, bkk.lst will have all the records with pattern current and bkw.lst will have all the records with pattern saving as the output.
-f option When there are numerous editing instructions to be performed, it is better to use the -f option to accept an instruction from a fi le.
For example, the previous instructions could have been stored in a fi le, say, chirag.fi l.
/current/w cfi le/saving/w sfi le
sed is used with the -f fi lename option:
$ sed -n -f chirag.fi l bank.lst
The aforementioned statement reads the sed commands from the fi le, chirag.fi l, and applies them to the fi le bank.lst.
SubstitutionThe strongest feature of sed is substitution. It allows us to replace a pattern in its input with some other pattern.
Syntax sed [address]s/string1/string2/
Here, string1 will be replaced by string2 in all the lines specifi ed by the address. If the address is not specifi ed, the substitution will be performed for all the lines containing string1.
Examples
(a) $ sed '1,5s/current/cur/' bank.lst This command will replace the word current by cur in the fi rst fi ve lines of bank.lst. 101 Aditya 0 14/11/2012 cur 102 Anil 10000 20/05/2011 saving 103 Naman 0 20/08/2009 cur 104 Rama 10000 15/08/2010 saving 105 Jyotsna 5000 16/06/2012 saving
(b) $ sed -n 's/current/fi xed/p' bank.lst It will display only the lines where the current pattern is replaced by the fi xed pattern. 101 Aditya 0 14/11/2012 fi xed 103 Naman 0 20/08/2009 fi xed 108 Chirag 0 15/12/2012 fi xed(c) $ sed 's/current/fi xed/' bank.lst This command will display all the lines of the fi le along with the lines where current is
replaced by fi xed. 101 Aditya 0 14/11/2012 fi xed 102 Anil 10000 20/05/2011 saving 103 Naman 0 20/08/2009 fi xed 104 Rama 10000 15/08/2010 saving

266 Unix and Shell Programming
105 Jyotsna 5000 16/06/2012 saving 106 Mukesh 14000 20/12/2009 Current 107 Yashasvi 14500 30/11/2011 saving 108 Chirag 0 15/12/2012 fi xed 109 Arya 16000 14/12/2010 Current 110 Puneet 130 16/11/2009 saving
(d) $ sed 's/current/fi xed/w bkk.lst' bank.lst This command displays all the lines but copies into bkk.lst only those lines of the
current account replaced by fi xed. The following output will be displayed on the screen. 101 Aditya 0 14/11/2012 fi xed 102 Anil 10000 20/05/2011 saving 103 Naman 0 20/08/2009 fi xed 104 Rama 10000 15/08/2010 saving 105 Jyotsna 5000 16/06/2012 saving 106 Mukesh 14000 20/12/2009 Current 107 Yashasvi 14500 30/11/2011 saving 108 Chirag 0 15/12/2012 fi xed 109 Arya 16000 14/12/2010 Current 110 Puneet 130 16/11/2009 saving
The fi le bkk.lst will have the following records: 101 Aditya 0 14/11/2012 fi xed 103 Naman 0 20/08/2009 fi xed 108 Chirag 0 15/12/2012 fi xed
(e) $ sed = bank.lst This command prints line numbers as well as fi le contents on separate lines. 1 101 Aditya 0 14/11/2012 current 2 102 Anil 10000 20/05/2011 saving 3 103 Naman 0 20/08/2009 current 4 104 Rama 10000 15/08/2010 saving : : : : : : : : : : : : : : :
(f) $ sed -n 'p' bank.lst -r bkk.lst It prints the contents of the fi le bkk.lst after the contents of the fi le bank.lst. 101 Aditya 0 14/11/2012 current 102 Anil 10000 20/05/2011 saving 103 Naman 0 20/08/2009 current 104 Rama 10000 15/08/2010 saving 105 Jyotsna 5000 16/06/2012 saving

Editors in Unix 267
106 Mukesh 14000 20/12/2009 Current 107 Yashasvi 14500 30/11/2011 saving 108 Chirag 0 15/12/2012 current 109 Arya 16000 14/12/2010 Current 110 Puneet 130 16/11/2009 saving 101 Aditya 0 14/11/2012 fi xed 103 Naman 0 20/08/2009 fi xed 108 Chirag 0 15/12/2012 fi xed(g) $ sed '1,2 d' bank.lst It will display all lines of the fi le except the fi rst two. 103 Naman 0 20/08/2009 current 104 Rama 10000 15/08/2010 saving 105 Jyotsna 5000 16/06/2012 saving 106 Mukesh 14000 20/12/2009 Current 107 Yashasvi 14500 30/11/2011 saving 108 Chirag 0 15/12/2012 current 109 Arya 16000 14/12/2010 Current 110 Puneet 130 16/11/2009 saving
Notes:
1. To affect all lines, we may either use the global address 1,$, or simply drop the address altogether. In the absence of an address, sed acts on all lines.
2. Remember that in the absence of the -n option and print (p) command, all lines will be displayed, irrespective of whether a substitution has been performed or not.
Context addressingContext addressing is a mechanism in which we cannot directly address the lines on which we wish to apply the sed command. Instead, a regular expression is included, which is enclosed within slashes (/). The command mentioned in the sed will be applied only to the lines that match the supplied regular expression in the following syntax:
Syntax sed "/regular_expression/command" fi lename
Here, the regular_expression is evaluated to fi nd the address(s) of the fi lename onto which the command has to be applied.
Example sed -n "/$1/p" 'bank.lst'
This script uses the shell parameter, $1 as a context address for searching through the fi le, bank.lst. The data supplied by the user is assigned to the shell parameter $1, which is then searched in the fi le bank.lst and displayed on the screen.
Regular expressionThe regular expressions (also known as regexp in short) are used for pattern matching. It provides an effi cient mechanism to search for the desired content in a given fi le. Regular expressions are built making use of certain special characters known as meta characters. A brief list of meta characters used in regular expressions is given in Table 8.3.

268 Unix and Shell Programming
The following points should be taken into account when using a regular expression:
1. A caret (^) at the beginning of a regular expression matches the null character at the beginning of a line.
2. A dollar sign ($) at the end of a regular expression matches the null character at the end of a line.
3. The characters (\n) match an embedded newline character.4. A period (.) matches any character.5. A regular expression followed by a star (*) matches any number of strings matching the
regular expression.6. A string of characters within square brackets ([ ]) matches any character in the string. If
the fi rst character of the string is a caret (^), the regular expression matches any character except the characters in the string.
7. To group regular expressions, they can be enclosed in sequences, ‘\(’ and ‘\)’.
Examples
(a) $ sed -n '/th/' bank.lst This matches the lines that contain the pattern ‘th’.
Table 8.3 Brief description of meta characters used in building regular expressions
Meta character Description
[ ] This matches anything inside the square brackets. For example, [ab] checks matches for a or b.
– This is used to defi ne a range. For example, [a-d] checks matches for the characters from a to d (inclusive).
^ The ^ (caret) within square brackets negates the expression. For example, [^a] matches anything except a. Similarly, [^ab] matches anything except a and b and [^a–d] matches everything except a to d.
? This matches the preceding character 0 or 1 time. For example, an?d will check matches for ad and and.
* This matches the preceding character 0 or more times. For example, an*d will check matches for ad, and, annd, among others.
+ This matches the previous character 1 or more time. For example, an+d will check matches for and and annd, among others.
{n} This matches the preceding character(s) n number of times. For example,[0-9]{3} checks matches for any three-digit integer, such as 123 and 329.
{n,m} This matches the preceding character at least n times but not more than m times. For example, [0-9]{3,5} will check matches for integers consisting of three to fi ve digits, such as 123, 1234, and 29056, among others.
{n,} This matches the preceding character n or more times. For example, [0-9]{3, } will check matches for integers consisting of three or more digits, such as 123, 1234, 12345, and 123456.
.(dot) This matches any character. For example, a.b will match for a1b, abb, axb, and a b. Similarly, 1.2 will match for 112, 1 2, 1a2, 1x2, and so on. To fi nd a fl oating value, we need to use the escape key, i.e., prefi x dot (.) with a ‘\’ backslash. For example, 1\.2 will match for 1.2.
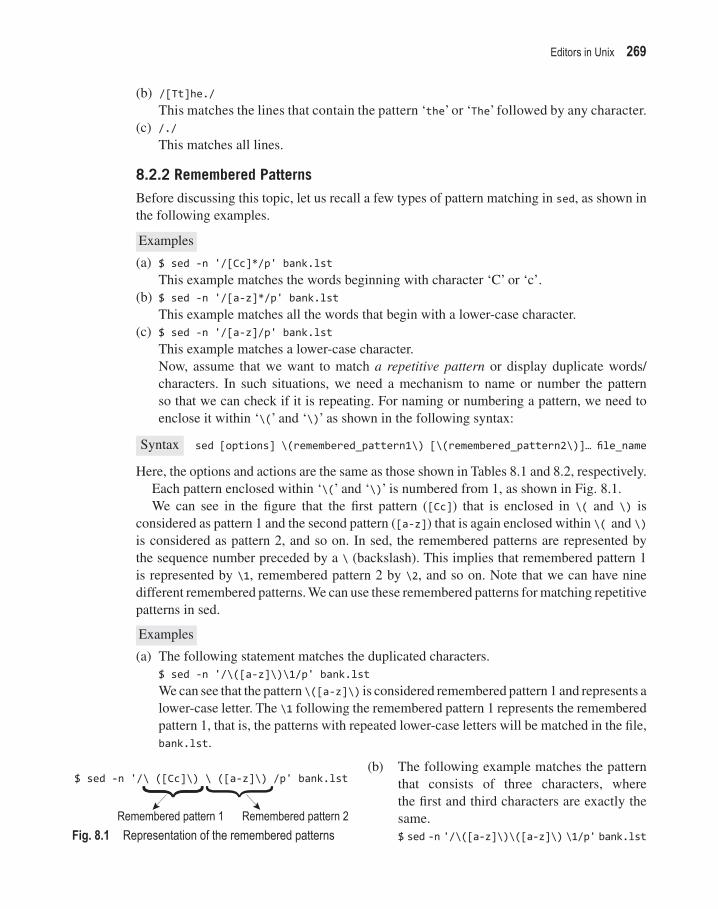
Editors in Unix 269
(b) /[Tt]he./ This matches the lines that contain the pattern ‘the’ or ‘The’ followed by any character.(c) /./ This matches all lines.
8.2.2 Remembered PatternsBefore discussing this topic, let us recall a few types of pattern matching in sed, as shown in the following examples.
Examples
(a) $ sed -n '/[Cc]*/p' bank.lst This example matches the words beginning with character ‘C’ or ‘c’.(b) $ sed -n '/[a-z]*/p' bank.lst This example matches all the words that begin with a lower-case character.(c) $ sed -n '/[a-z]/p' bank.lst This example matches a lower-case character. Now, assume that we want to match a repetitive pattern or display duplicate words/
characters. In such situations, we need a mechanism to name or number the pattern so that we can check if it is repeating. For naming or numbering a pattern, we need to enclose it within ‘\(’ and ‘\)’ as shown in the following syntax:
Syntax sed [options] \(remembered_pattern1\) [\(remembered_pattern2\)]… fi le_name
Here, the options and actions are the same as those shown in Tables 8.1 and 8.2, respectively.Each pattern enclosed within ‘\(’ and ‘\)’ is numbered from 1, as shown in Fig. 8.1.We can see in the fi gure that the fi rst pattern ([Cc]) that is enclosed in \( and \) is
considered as pattern 1 and the second pattern ([a-z]) that is again enclosed within \( and \) is considered as pattern 2, and so on. In sed, the remembered patterns are represented by the sequence number preceded by a \ (backslash). This implies that remembered pattern 1 is represented by \1, remembered pattern 2 by \2, and so on. Note that we can have nine different remembered patterns. We can use these remembered patterns for matching repetitive patterns in sed.
Examples
(a) The following statement matches the duplicated characters. $ sed -n '/\([a-z]\)\1/p' bank.lst We can see that the pattern \([a-z]\) is considered remembered pattern 1 and represents a
lower-case letter. The \1 following the remembered pattern 1 represents the remembered pattern 1, that is, the patterns with repeated lower-case letters will be matched in the fi le, bank.lst.
(b) The following example matches the pattern that consists of three characters, where the fi rst and third characters are exactly the same.
$ sed -n '/\([a-z]\)\([a-z]\) \1/p' bank.lstFig. 8.1 Representation of the remembered patterns
$ sed -n '/\ ([Cc]\) \ ([a-z]\) /p' bank.lst
Remembered pattern 1 Remembered pattern 2

270 Unix and Shell Programming
By using these statements all the three characters in the fi le bank.lst are displayed in which the fi rst and the third characters are the same (e.g., aba, bab, kmk).
(c) Similarly, the following example matches the pattern that consists of three characters and where the second and the third characters are exactly the same.
$ sed -n '/\([a-z]\)\([a-z]\) \2/p' bank.lst By using these statements, all the three characters in the fi le bank.lst are displayed in
which the second and the third characters are the same (e.g., abb, baa, kmm).(d) The following example matches the duplicate words in the fi le bank.lst. $ sed -n '/\([a-z][a-z]*\) \1/p' bank.lst
8.3 VISUAL EDITOR
Visual editor (vi editor), is a powerful and sophisticated tool for creating and editing fi les. The vi editor is basically a text editor that works on any type of terminal. It displays one full screen of text and allows us to enter text, edit text, search for desired content, navigate or scroll to any part of the text, and much more. The batch fi le named .exrc is executed from our home directory every time we load vi. The .exrc fi le can be used for customizing vi sessions.
The three common ways of starting a vi session are shown in Table 8.4.
Table 8.4 Brief description of the ways to start vi
Method Description
vi fi lename Opens the specifi ed fi lename for editing
vi + n fi lename Opens the fi lename at line n for editing
vi +/ pattern fi lename Opens the fi lename where the specifi ed pattern appears in the fi lename
Examples
(a) $ vi a.txt This statement opens the fi le a.txt for editing. If a.txt is a new fi le, we get a blank
screen where each blank line is marked by tilde characters (~).(b) $ vi +10 a.txt This statement opens the fi le a.txt at line 10 for editing.(c) $ vi +/saving a.txt This statement opens the fi le a.txt where the pattern, saving appears for the fi rst time in
the fi le.
Modes of operationThe vi editor has three modes of operation.
Command mode Every key pressed in this mode is treated as a command.
Insert mode Every key pressed in this mode will show up as text in the fi le.
Line editor mode The line editor mode is also called the ex mode. It invokes the line editor ex and we can issue any ex command from within the vi editor.

Editors in Unix 271
When we invoke vi, we will be in the command mode. One can move into insert mode by pressing the a, I, A, or O keys and start inserting or appending text to the fi le. To get back to the command mode from insert mode, press the Esc key. To switch to line editor mode, type : (colon) from the command mode. The : (colon) will appear at the bottom of the screen and we can give any ex command. To exit from the line editor mode, we need to press either the Enter key or the Esc key.
We will now discuss the various categories of functions and commands under the vi editor.
8.3.1 Creating and Editing FilesTo create a new fi le or edit an existing fi le, we use the following syntax:
Syntax $ vi {fi lename}
Here, fi lename is the name by which we wish to open a fi le.If the fi lename already exists, a copy of it is opened in a temporary buffer space. If the
fi lename does not exist, a blank buffer is opened for it. We add content, edit it, and perform all the tasks on the content in the buffer. On giving the save command, this content is physically written onto the fi le on the disk.
Example $ vi a.txt
By using this statement, the fi le a.txt will be created and we will get a blank screen (buffer) to create its content. A screen, shown in Fig. 8.2, will be displayed, where each blank line begins with a tilde. At the bottom of the screen, the name and status of the fi le is displayed.
The vi editor always begins in the command mode. To switch to insert mode, we press the a, I, A, or O keys. To return to the command mode, we need to press the Esc key. To edit the content of the fi le, we need to be in the command mode only. There are a set of key combinations for editing content in a fi le: to insert text, delete text, search and replace text, navigate to a desired location in the fi le, etc. We just need to use the specifi ed key combinations for applying the
desired editing to the fi les. For each editing task, a set of key combinations are described in the tables that follow.
8.3.2 Inserting and Appending TextAs mentioned in Section 8.3, vi has two modes: the command mode and the insert mode. In the command mode, any key we press will be interpreted as commands. In the insert mode,
Fig. 8.2 Blank screen while creating a new fi le through vi

272 Unix and Shell Programming
the keys pressed will form the content of the fi le. The keys used to insert or append text are shown in Table 8.5.
Example Suppose the fi le a.txt in the vi editor appears as follows.
This is MCE Microchip Computer Education Ajmer. We are working on vi editor.
It appears to be very interesting.~~~~~"a.txt" [New fi le]
Let us assume that the cursor is positioned at M (of MCE). On pressing i, the vi editor switches to the insert mode and any character we type will be inserted to the left of the cursor, that is, to the left of M. Similarly, on pressing a, the text typed will appear to the right of the cursor, that is, after M. On pressing I, the typed text will appear at the beginning of the line, that is, before the character T of This. On pressing A, the entered text will appear at the end of the line, that is, after the character n of Education.
8.3.3 Replacing TextIt is very common to commit mistakes while creating the content for a fi le. To correct these, the keys that we might require to replace and substitute content are shown in Table 8.6.
Table 8.5 List of commands to insert and append text
Command Action
i Inserts text to the left of the cursor
a Appends text to the right of the cursor
I Inserts text at the beginning of the line
A Appends text to the end of the line
Table 8.6 List of commands to replace or substitute text
Command Action
r This replaces the character under the cursor.
R This replaces the characters beginning with the character under the cursor until the Esc key is pressed, i.e., the overwrite mode remains on until the Esc key is pressed.
s This substitutes one character under the cursor and goes into the insert mode. We can also specify the count of the number of characters to substitute.
S This replaces the text with a blank line. We can insert new text.
Example Consider the fi le a.txt (used in the example in Section 8.2.1) in the vi editor with the following initial content.
This is MCE Microchip Computer EducationAjmer. We are working on vi editor.It appears to be very interesting.~~~

Editors in Unix 273
~~"a.txt" [New fi le]
Let us assume that the cursor is positioned at M (of MCE). On pressing r, whatever character we type will replace the character M. Similarly, on pressing R, the overwrite mode will become active and the text typed will replace the text beginning from character M of MCE until we press the Esc key. On pressing s, character M is replaced with the newly typed character and vi switches to the insert mode. On pressing S, a blank line is inserted at the position of character M so that we can type new text.
8.3.4 Inserting and Joining LinesIf we miss certain lines in the content and wish to insert lines below or above the current line or wish to join lines, we will require the keys shown in Table 8.7.
Table 8.7 List of commands to insert and join lines
Command Action
o It inserts a blank line below the current line.
O It inserts a blank line above the current line.
J It joins the current line with the line below. Position the cursor anywhere on the line to merge the lines, and press J to join the line below to the current line.
Example Let us consider a.txt in the vi editor, which has the following content.
This is MCE Microchip Computer EducationAjmer. We are working on vi editor.It appears to be very interesting.~~~~~~~"a.txt" [New fi le]
Let us assume that the cursor is positioned at M (of MCE). On pressing o, a blank line will be inserted below the fi rst line. On pressing O, a blank line will be inserted above the fi rst line. On pressing J, the second line will be merged with the current fi rst line.
8.3.5 Exiting and Writing to FilesThe vi editor provides us with the facility to exit from it with or without saving the content. It also enables us to write to the fi le and continue entering or editing text.
In order to save the fi le, save and exit from the vi editor; to exit without saving or to perform similar kinds of operations, refer to the keys shown in Table 8.8.

274 Unix and Shell Programming
Note: When we type the colon commands, the colon and the command appear in the lower left corner of our screen. On pressing the Enter key, the command is executed.
Example Let us consider the fi le a.txt in the vi editor, which has the following content.
This is MCE Microchip Computer EducationAjmer. We are working on vi editor.It appears to be very interesting.~~~~~"a.txt" [New fi le]
On pressing Esc (if we are in the insert mode) followed by :wq, the content in the fi le will be saved and we can continue with our editing task. On pressing :q, we will exit from the vi editor if the fi le is the same as what was last saved and has not yet been modifi ed. On pressing :x, :wq, or ZZ, the content in the fi le will be saved and we can quit from the vi editor. If we wish to exit from the vi editor without saving the content, we press :q!.
8.3.6 Navigating—Line Positioning and Cursor PositioningFor applying changes or adding content at the desired location in the fi le, we need to position the cursor at the desired location. The vi editor provides several commands to
quickly navigate to the desired location in a line.
Though we can use arrow keys (in command mode) to navigate among the lines in a fi le, Table 8.9 shows the keys that we can use to quickly navigate to a desired location in the line.
Example Assume that we are editing a fi le, a.txt, through the vi editor and has the following content.
Table 8.9 Brief description of line positioning and cursor commands
Command Action
h Moves the cursor one character to the leftj Moves the cursor one line downk Moves the cursor one line upl Moves the cursor one character to the rightSpace bar Moves the cursor one character to the rightBackspace Moves the cursor one character to the left$ Moves the cursor to the last character of the line0 (zero) Moves the cursor to the fi rst character of the line^ Moves the cursor to the fi rst non-blank character of the line
Table 8.8 Commands to save the fi le and quit the vi editor
Command Action
:w Writes or saves the content to the fi le and continues editing, i.e., it does not quit vi:q Quits vi if the fi le is not modifi ed:x Saves and quits fi le:wq Writes to the fi le and also quits viZZ Writes to the fi le and also quits vi:q! Quits vi without saving changes

Editors in Unix 275
This is MCE Microchip Computer EducationAjmer. We are working on vi editor.It appears to be very interesting.
If the cursor is at the fi rst character of the fi le, T, on pressing command j, we will be navigated to the next line, that is, to character A (of Ajmer). On pressing command k, we will be taken one line up, that is, to the character T (of This). On pressing command l or the space bar, we will be navigated one character to the right, that is, to character h (of This). On pressing command h or backspace, we will be navigated one character to the left, that is, to character T (of This). On pressing $, we will be navigated to the last character of the line, that is, to character n (of Education). On pressing 0, we will be navigated to the fi rst character of the line, that is, to T (of This). If the cursor is at a blank space after This and we press ̂ , we will be navigated to the fi rst non-blank character of the line, that is, to the character i of is.
8.3.7 Positioning Cursor on WordsAgain, though we can use the arrow keys to navigate a fi le, Table 8.10 shows the keys that we can use to quickly position our cursor on the desired word in a fi le.
Example Assume the cursor is at the fi rst character in the fi le a.txt, whose initial content is as follows.
This is MCE Microchip Computer EducationAjmer. We are working on vi editor.It appears to be very interesting.
On pressing command w, the cursor will move to the fi rst character of the next word, that is, to character i
(of is). On pressing command b, the cursor will move to the fi rst character of the previous word, that is, to character T of This. On pressing command e, the cursor will be navigated to the last character of the next word, that is, to character s of is.
8.3.8 Positioning Cursor on SentencesThe vi editor provides commands to quickly locate the cursor on the desired sentence. A sentence is assumed to end with !, . (period), or ?. Table 8.11 shows the keys for positioning the cursor among sentences.
Example Assuming the cursor is at the fi rst character in the fi le a.txt, that is, at character T of This, if we press the ) command, it will be navigated to the beginning of the next sentence, that is, to character W of We. If the cursor is anywhere on the fi rst sentence, say on character C of Computer, then on pressing the ( command, it will be navigated to the beginning of the current sentence, that is, to character T of This.
Table 8.10 Brief description of commands used for positioning the cursor on words
Command Action
w Moves the cursor to the fi rst character of the next word
b Moves the cursor to the fi rst character of the previous word
e Moves the cursor to the last character of the next word
Table 8.11 Brief description of commands used for positioning the cursor on sentences
Command Description
( Moves the cursor to the beginning of the current sentence
) Moves the cursor to the beginning of the next sentence

276 Unix and Shell Programming
8.3.9 Positioning Cursor on ParagraphsParagraphs are recognized by vi if they begin after a blank line. Make sure that each paragraph begins after a blank line. Table 8.12 shows the keys that we can use to navigate between paragraphs.
Example Consider a fi le, a.txt which consists of the following two paragraphs.
This is MCE Microchip Computer Education Ajmer. We are working on vi editor. It appears to be very interesting.
Ajmer is a nice place to stay. FIRST it is quite and calm. Secondly the distances are small. Everything is in approach.
The fi rst paragraph begins from the word This and ends with the word interesting. The second paragraph begins from the word Ajmer and ends at the word approach. If the cursor is at any word of the fi rst paragraph say, character a of the word, are, then on pressing the } command, it will be navigated to the beginning of the next paragraph, that is, A of Ajmer. If the cursor is at any word of the fi rst paragraph, say, at character w of working, then on pressing the { command, it will be navigated to the beginning of the current paragraph, that is, to character T of This.
8.3.10 Scrolling through TextFor faster navigation to the desired location in a fi le, we popularly use scrolling commands. Table 8.13 shows the keys that we can use to scroll to the next half screen, full screen, move to the previous half screen, full screen, and other similar operations.
8.3.11 Marking Text If there are particular locations in a fi le that we wish to navigate frequently, vi enables us to mark those locations and we can directly navigate to those marked locations by using certain keys. Table 8.14 shows the commands we can use to mark locations and navigate to marked locations in a fi le.
Table 8.12 Brief description of commands used for positioning the cursor on paragraphs
Command Description
{ Moves the cursor to the beginning of the current paragraph
} Moves the cursor to the beginning of the next paragraph
Table 8.13 List of commands to scroll through a fi le
Command Action
^u Scrolls up half a page
^d Scrolls down one full page
^b Scrolls up one full page
^f Scrolls down one full page
^e Scrolls forward a line
^y Scrolls backward a line
Table 8.14 List of commands for marking text
Command Description
mk Marks the current location as mark k
`k Moves the cursor to the character marked by k
'k Moves the cursor to the fi rst character of the line marked k
`` Returns to the previous mark
" Returns to the beginning of the line containing the previous mark

Editors in Unix 277
Example Suppose a fi le, a.txt, consists of the following two paragraphs.
This is MCE Microchip Computer Education Ajmer. We are working on vi editor. It appears to be very interesting.Ajmer is a nice place to stay. FIRST it is quite and calm. Secondly the distances are small. Everything is in approach.
Let us assume that we frequently need to visit the fi rst and second paragraphs. For quicker navigation between paragraphs, we will mark the word MCE (any word) in the fi rst paragraph and the word Ajmer in the second paragraph. We will position the cursor at character M of MCE and press mm to mark the location as m. Similarly, we will position the cursor to character A of Ajmer and press ma to mark the location as a. After marking the locations, we can navigate to the fi rst paragraph at character M of MCE by pressing 'm. Similarly, we can move to the second paragraph to character A of Ajmer by pressing `a. On pressing 'm, the cursor will move to the fi rst character of the line marked m, that is, to character T of This. If the cursor is at mark m, that is, at M of MCE, we can press `` to move to the previous mark, that is, to the mark a (to character A of Ajmer in the second paragraph). If the cursor is at mark a, that is, at character A of Ajmer, then on pressing ``, the cursor moves to the beginning of the line containing the previous mark, that is, to character T of This in the fi rst paragraph.
8.3.12 Deleting and Undoing TextWhen we commit mistakes while writing content in a fi le, we can correct them by deleting the undesired content. Table 8.15 shows the keys we can press to quickly delete content and also undo the changes, if required.
Table 8.15 Brief description of commands to delete and undo delete
Command Action
x Deletes the character at the cursor position
nx Deletes n number of characters from the current cursor position
X Deletes the character before the cursor position
dw Deletes the current word
dd Deletes the line where the cursor is
ndd Deletes n number of lines
D or d$ Deletes a line from the cursor position till the end of the line
d^ Deletes a line from the cursor position to the beginning of the line
u Undoes the last change and typing u again will redo the change
U Undoes all changes to the current line
Example Suppose a fi le, a.txt, consists of the following content.
This is MCE Microchip Computer Education Ajmer. We are working on vi editor. It appears to be very interesting.
If the cursor is at character T of This, then the command x will delete character T of This. Pressing x thrice will delete three characters from the cursor position, that is, Thi of This will
278 Unix and Shell Programming
be deleted. If our cursor is at character h of This, then on pressing X, the character before the cursor position will be deleted, that is, character T will be deleted. On pressing dw the current word, This, will be deleted. On pressing dd, the current line, that is, the fi rst line of the fi rst paragraph will be deleted. On pressing 2dd, two lines, that is, the fi rst two lines will be deleted. If the cursor is positioned at character C of Computer, then pressing D or d$ will delete the line from the cursor position till the end of the line, that is, the words Computer Education will be deleted. On pressing d^, the line from the cursor position till the beginning of the line is deleted, that is, This is MCE, will be deleted. On pressing u, the last delete command will be undone, that is, the words, This is MCE, will appear again. On pressing the U command again, the action will be redone, that is, the words This is MCE will be deleted again. On pressing the U command, the changes made in the current line will be undone.
8.3.13 Repeating Previous CommandsFor repetitive editing, we might need to execute the same command several times. For such cases, the vi editor provides us a . (dot) command to repeat the last command. Similarly, if we have deleted a line by executing the dd command, we can delete another line by pressing. (dot). We can delete several lines by pressing .(dot) a few times.
Example Assume that a fi le, a.txt, consists of the following content.
This is MCE Microchip Computer Education Ajmer. We are working on vi editor. It appears to be very interesting.
If the cursor is at the fi rst line and we delete it using the dd command, then on pressing . (dot), the delete command will be repeated, that is, the second line will also be deleted. We can press . (dot) as many times as we want to delete more lines. Apart from delete, the . (dot) command can be used for repeating any previous command.
8.3.14 Going to Specifi ed LinesThe vi editor provides us with the facility to directly go to any line of the fi le from our current location in the fi le. Table 8.16 shows the keys we can use to navigate to the required line of the fi le.
Assume that the fi le a.txt consists of the following content.
This is MCE Microchip Computer EducationAjmer. We are working on vi editor.It appears to be very interesting.
If the cursor is at the fi rst line and we press G, the cursor will be navigated to the last line of the fi le, that is, to the third line. On pressing 2G, the cursor will move to the second line of the fi le.
8.3.15 Searching for and Repeating Search PatternsWe can always search for the desired pattern in the given fi le. Not only can we search for a pattern, but also continue the search in either the forward or backward direction in the fi le. The continuation of the previous given search command in the forward or backward direction
Table 8.16 Brief description of commands for navigating to a specifi ed line
Command Description
G Goes to the last line of the fi le
nG Goes to the nth line of the fi le

Editors in Unix 279
is considered repeating the search pattern. Table 8.17 shows the keys for searching for a specifi ed pattern in the fi le.
Example Assume that a fi le, a.txt, consists of the following content.
This is MCE Microchip Computer Education
Ajmer. We are working on vi editor. It is a fast editor.
It appears to be very interesting. Commands are hard to remember
The cursor is positioned at the fi rst character of the fi le, that is, at T of This. To search for the word, are, we press the /are command. The cursor will be positioned at the fi rst occurrence of the word, are, that is, on the second line. On pressing the n command, the search command will be repeated in the forward direction, moving the cursor to the next occurrence of the word are, that is, on the third line. On pressing character N, the search is repeated in the opposite direction, that is, towards the beginning of the fi le. The cursor will be positioned at the fi rst occurrence of the word are, that is, on the second line. With the cursor on the second line, if we wish to search for the word is towards the beginning of the fi le from the current cursor position, press ?is. The cursor will be positioned at the word is that exists in the fi rst line in the fi le.
8.3.16 Searching for CharactersBesides positioning the cursor at the desired word or pattern in the fi le, the vi editor also provides us with the facility to position the cursor at the desired character.
Table 8.18 lists the keys to search for a desired character in the fi le in the forward as well as in the backward direction.
Table 8.17 List of commands to search for and repeat desired patterns
Command Description
/pattern Searches for the specifi ed pattern in the forward direction from the cursor position
?pattern Searches for the specifi ed pattern in the reverse direction from the cursor position
n Repeats the last search command in the forward direction
N Repeats the last search command in the opposite direction
Table 8.18 List of commands to search for a character
Command Description
fx Moves the cursor to the specifi ed character, x, in the forward directionFx Moves the cursor to the specifi ed character, x, in the backward directiontx Moves the cursor just before the specifi ed character, x, in the forward directionTx Moves the cursor just after the specifi ed character, x, in the backward direction; Continues the search specifi ed in the command in the same direction and is used after the fx
command, Continues the search specifi ed in the command in the opposite direction and also works after
the fx command
Assume that a fi le, a.txt, consists of the following content.This is MCE Microchip Computer EducationAjmer. We are working on vi editor. It is a fast editor.

280 Unix and Shell Programming
It appears to be very interesting. Commands are hard to remember
If the cursor is positioned at the fi rst character of the fi le, that is, at T of This and we wish the cursor to be positioned at character r (of Microchip), we press the fr command. On pressing tr, the cursor will be positioned just before character r, that is, under character c of Microchip. On pressing ; (semi colon), the search will continue in the forward direction and the cursor will move to the next character, r, that is, below character r of the word, Computer. If the cursor is positioned at the end of the fi rst line and we press Fi, the cursor will search for character i in the reverse direction; hence, the cursor will be positioned to character i of the word Education. The command , (comma) continues the search in the opposite direction, that is, the cursor will be positioned below character ‘i’ of Microchip. The command Ti will continue the search in the reverse direction and positions the cursor after the character i, that is, under character c of Microchip.
8.3.17 Copying, Changing, Pasting, and Filtering CommandsWhile creating or editing content, we need to copy (or yank) and paste repetitive content. In addition, we need to cut and paste to move content from one location to another. The commands to copy the specifi ed lines and paste them at the desired location are as follows (Table 8.19).
Example Let us once again open the fi le, a.txt, which contains the following initial content.
This is MCE Microchip Computer EducationAjmer. We are working on vi editor. It is a fast editor. It appears to be very interesting. Commands are hard to remember
Let us assume that the cursor is positioned at the fi rst character of the fi le, that is, at T of This. The command yy will copy the entire fi rst line into the memory. The command 3yy will copy all the three lines into the memory. The command yw will copy the word This into the memory. The command p will paste the copied content
after the cursor, that is, after the character T of This command whereas the command P will paste the copied content before the cursor, that is, before character T of This. The command cc makes the entire line blank. The command C or c$ will switch the vi editor into the overwrite mode where any text typed will overwrite the existing content until the Esc key is pressed.
8.3.18 Set CommandsThe escape colon commands enable us to set several confi gurations in the vi editor. Similarly, using these commands we can display line numbers, set the auto indent feature, display tabs and carriage returns, etc.
Table 8.19 Brief description of commands used to copy and paste lines
Command Description
yy Copies the current line
Nyy Copies n number of lines
yw Copies the current word
p Pastes the copied text after the cursor
p Pastes the copied text before the cursor
cc Blanks out the entire line
C or c$ Overwrites the content from the place of the cursor until the Esc key is pressed
! Executes commands external to vi for the purpose of fi ltering text
II Edits the current paragraph
tr Deletes or translate the fi ltered text

Editors in Unix 281
Table 8.20 shows the different commands that can be used to customize the vi editor.
On giving the :set nu command, all the lines in the fi le a.txt will be numbered. The fi rst line is numbered 1, the second line is numbered 2, and so on, as shown in Fig. 8.3.
By default, the search operation in the vi editor is case sensitive. For example, if we give /Are command to search for the pattern ‘are’, the vi editor will respond displaying ‘Pattern not found’ on the screen, as shown in Fig. 8.4.
This is because the search is case sensitive; there are several ‘are’ but not a single pattern ‘Are’. In order to compel the search command to ignore case, we give the command :set ic. With the :set ic command, the search command will perform case insensitive search. If we now
search for pattern ‘Are’ by giving /Are command, the cursor will reach the fi rst occurrence of the pattern, ‘are’ in the fi le, as shown in Fig. 8.5.
Table 8.20 Brief description of the commands to customize the vi session
Command Action
:set nu Numbers all the lines in the fi le, beginning from 1
:set nonu Turns off line numbering
:set ai Sets the auto indent feature
:set noai Unsets the auto indent feature
:set ic Ignores case when searching
:set ro Changes the fi le type to read only
:set list Displays the tabs and carriage returns
:set nolist Turns off the list option
:set wrapmargin=n Turns on word wrap n spaces from the right margin
:25 Moves to the 25th line of the fi le
:5,10d Deletes lines starting from the 5th line to the 10th line
Fig. 8.3 File content numbered using: set nu
Fig. 8.4 ‘Pattern not found’ displayed as search is case sensitive

282 Unix and Shell Programming
We can also make a fi le read only by giving the :set ro command. On giving the save command (after modifying a fi le) on a read only fi le, that is, on giving the :wq command, the fi le will not be saved and the following message will be displayed on the status bar (Fig. 8.6): File is read only.
We can exit from the read only fi le by giving the exit without save command, that is, the :q! command. In order to see the hidden characters such as carriage returns and tabs in our fi le, we use the :set list command. Since the fi le does not contain tab characters but carriage returns, they are displayed (in the form of $) as shown in Fig. 8.7.
Fig. 8.5 Pattern found through case insensitive search
Fig. 8.6 Message displayed when we try to save a ‘Read only’ fi le
Fig. 8.7 Hidden characters displayed through :set list command

Editors in Unix 283
The right margin of the fi le can be set by the :set wrapmargin command. The content will wrap on to the next line when the cursor reaches the specifi ed right margin. On setting the right margin to 30 spaces using :set wrapmargin=30, the cursor will wrap to the next line when the cursor reaches the right margin limit shown in Fig. 8.8.
8.3.19 Reading and Writing across FilesThe vi editor provides us with the facility to share content among fi les, that is, we can paste content from other fi les into the current fi les and also write the selected content from the
current fi le into a separate fi le. Apart from this, the output of an external command can also be pasted in the currently opened fi le. Table 8.21 briefl y describes the commands to read and write content from the other fi le to the current fi le and vice versa.
We already have a fi le, a.txt, with the aforementioned content. To see how the content can be shared between two fi les, we will create another fi le, b.txt, containing a single line of text:
This is a test fi le
Open the fi le, a.txt in the vi editor. Assuming the cursor is at the beginning of the fi le when we give the command :r b.txt, the content in the fi le, b.txt will be added in the current fi le below the current line. We can see that in Fig. 8.9, the text in the fi le b.txt is added to the fi le a.txt below the fi rst line.
On giving the :3r b.txt command, the content of the fi le b.txt will be added after the third line in the current fi le a.txt, shown in Fig. 8.10.
Fig. 8.8 Right margin set through the :set wrapmargin command
Table 8.21 Brief description of the commands to read and write across fi les
Command Description
:r fi lename Places the text from the named fi le after the current line
:nr fi lename Places the text after the line n from the fi le
:r!command Places the output of the named command below the current line
:n1, n2w newfi le Writes lines starting from n1 up to n2 to the newfi le

284 Unix and Shell Programming
The vi editor provides us with the facility to run an external command within the vi editor and paste the output of that command below the current line in the opened fi le. Assuming that the cursor is on the fourth line in the fi le, a.txt, the command :r!cat b.txt pastes the content of the fi le b.txt below the fourth line in the current fi le a.txt, shown in Fig. 8.11.
We can also copy the desired content from the currently open fi le into a new fi le. We give the command :2,3w c.txt to copy the second and third line from the current fi le, a.txt. The status bar shows the message—c.txt' [New fi le] 2 lines—to indicate that a new fi le, c.txt, is created with the two lines from the current fi le shown in Fig. 8.12.
We can confi rm if the new fi le, c.txt is created with the content from the a.txt fi le. Figure 8.13 shows the second and third lines copied into the fi le, c.txt.
Fig. 8.9 Content of b.txt pasted in a.txt through the :r command
Fig. 8.10 Content of b.txt pasted into a.txt after the third line through the :3r command
Fig. 8.11 Content of the b.txt fi le pasted after the current line, in the current fi le, a.txt, on executing the cat command

Editors in Unix 285
8.3.20 Global Substitution—Find and ReplaceWe have seen the commands provided by the vi editor to search for different patterns in a fi le. In this section, we will see the manner in which the selected pattern can be replaced by the desired pattern. Table 8.22 shows a brief description of the commands to fi nd and replace the desired patterns in a given fi le.
Fig. 8.12 Message displayed in the status bar on copying two lines from the current fi le into a new fi le, c.txt
Fig. 8.13 Content copied into the fi le c.txt
Table 8.22 Brief description of the commands to fi nd and replace patterns
Command Action
:s/pattern1/pattern2 Substitutes the fi rst occurrence of pattern1 with pattern2 in the current line
:s/pattern1/pattern2/g Substitutes all occurrences of pattern1 with pattern2 in the current line
:1,5s/pattern1/pattern2/g Substitutes all occurrences of pattern1 from line 1 to line 5 with pattern2
:%s/pattern1/pattern2/g Substitutes all occurrences of pattern1 with pattern2 in the fi le globally
We can now open the a.txt fi le in the vi editor to enter the commands for fi nding and replacing patterns in a fi le. The initial content in the fi le a.txt. is assumed to be as given in Fig. 8.14.
On navigating the cursor to the fourth line in the fi le we see that it contains two occurrences of the pattern ‘is’. The command :s/is/was replaces the fi rst occurrence of the pattern ‘is’ with the pattern ‘was’ shown in Fig. 8.15.

286 Unix and Shell Programming
The command :s/is/was/g replaces all occurrence of the pattern ‘is’ in the current line with pattern ‘was’. Both occurrences of the pattern ‘is’ in the fourth line will be converted to pattern ‘was’ as shown in Fig. 8.16.
Fig. 8.14 Original content in the fi le a.txt
Fig. 8.15 First occurrence of the pattern ‘is’ replaced with ‘was’ in the current line
Fig. 8.16 All occurrence of the pattern ‘is’ replaced with the pattern ‘was’ in the current line

Editors in Unix 287
The vi editor provides us with a facility to change patterns in specifi c lines only. The command :2,3s/are/were/g replaces the pattern ‘are’ with ‘were’ in the second and third line, as shown in Fig. 8.17.
The command %s/is/was/g replaces all the occurrence of the pattern ‘is’ with the pattern ‘was’ in the entire fi le even if it is a part of a word, as shown in Fig. 8.18.
8.3.21 Ex Mode—Line Editor ModeEx is a line editor that is commonly used for working with multiple fi les simultaneously. It helps in performing several operations including editing, copying, moving content from one fi le to another, switching from one fi le to another, and other similar actions.
This editor can be independently invoked from the command line as well as from the vi editor. To switch to ex (line editor) mode from within vi, type : (colon) from the command mode. The : (colon) will appear at the bottom of the screen and any ex command can be given. To exit from the ex mode, press either the Enter key or the Esc key. The following is the syntax to invoke the ex editor from the command line:
Syntax ex fi le_name1 [fi le_name2] [fi le_name3]
In this section, we will assume that there exists three fi les, a.txt, b.txt, and c.txt, in our current directory with the content shown in Fig. 8.19.
Fig. 8.17 All occurrence of the pattern ‘are’ replaced with the pattern ‘were’ in the second and third lines
Fig. 8.18 All occurrence of the pattern ‘is’ replaced with the pattern ‘was’ in the entire fi le

288 Unix and Shell Programming
Example $ ex a.txt b.txt c.txt
This command will simultaneously open the three fi les (a.txt, b.txt, and c.txt) in edit mode in the ex editor, as shown in Fig. 8.19.
We can open more than one fi le in the edit mode in the vi editor with the following syntax:
Syntax vi [fi lename1] [fi lename2][fi lename3]...
Example vi a.txt b.txt c.txt
This command (refer to Fig. 8.20a) will open all the three fi les (a.txt, b.txt, and c.txt) in command mode by default, with the fi rst fi le, a.txt, as the current fi le. In order to switch to the ex-mode, we need to press colon (:), as shown in Fig. 8.20(b). The commands given in Table 8.23. are used while editing fi le(s) in the ex mode.
Fig. 8.19 Content of the three fi les, a.txt, b.txt, and c.txt
$ cat a.txtThis is MCE Microchip Computer EducationAjmer. We are working on vi editor. It is a fast editor.It appears to be very interesting. Commands are hard to rememberAjmer is a nice place to stay. First it is quite and calm.Secondly the distances are small. Everything is in approach.
$ cat b.txtThis is b.txt file opened through exThe b.txt file is the second file
$ cat c.txtThis is c.txt file opened through exThe c.txt file is the third file
Fig. 8.20 Simultaneously opened fi les (a) ex line editor (b) vi editor
$ ex a.txt b.txt c.txt3 files to edit
a.txt 5 lines, 283 characters:
$ vi a.txt b.txt c.txtThis is MCE Microchip Computer EducationAjmer. We are workig on vi editor. It is a fasteditor It appears to be very interesting. Commandsare hard to remember Ajmer is a nice place tostay. First it is quite and calm. Secondly thedistances are small. Everything is in approach.~~~~~~~~:
(a) (b)

Editors in Unix 289
We assume that the three fi les, a.txt, b.txt, and c.txt, are simultaneously opened in the edit mode with the fi rst fi le, a.txt as the current fi le. We know that a usual ex command consists of a line number followed by a command and ends with a carriage return.
Examples
(a) : 1p
This command will display the fi rst line of the current fi le. The character p is the default, that is, the default action is printing the line. For example, the following command will display the 5th line of the current fi le.
:5
Table 8.23 Brief description of the commands used in ex mode
Command Description
:k1 [, k2][p] This displays line k1 of the current fi le on the screen. If k2 is also supplied, it displays lines in the range k1 to k2 on the screen. The default character, p, stands for printing on the screen. Writing ‘p’ alone will display the current line.
:[+] [-] k +k will move k number of lines forward and display it. On the other hand, −k will move back k lines and display that.
:s/pattern1/pattern2/[g]
This substitutes (replaces) the fi rst pattern1 found in the current line with pattern2. For substituting all pattern1 with pattern2 globally in the current line, use the ‘g’ option.
:r fi lename This reads the specifi ed fi le and appends its content below the current line in the current fi le.
:w fi lename This writes the edit buffer into the specifi ed fi le, i.e., content of the currently open fi le will be written into the specifi ed fi le.
:n [!] This moves to the next fi le in the list and makes it the current fi le. The command is discarded if the current fi le is modifi ed and not saved. The ‘!’ command discards any changes made to the current fi le and moves on to the next fi le.
: kn This advances k number of fi les in the list and makes it the current fi le
:rew [!] This rewinds and opens the fi rst fi le in the list. The command will be ignored and a warning message will be displayed if the current fi le is modifi ed and is not yet saved. The ‘!’ mark, when used, discards the changes made to the current fi le and moves on to the fi rst fi le in the list.
:ar This lists the currently open fi lenames.
:e [!] [+n] fi lename
This opens the specifi ed fi le for editing. If the current buffer is modifi ed and is not saved, a warning message will be displayed and the command is ignored. The ‘!’ character will discard the changes made in the edit buffer and opens the specifi ed fi le for editing. If +n is specifi ed, the nth line is set as the current line.
:r !commandname This runs the specifi ed command and appends its output to the currently open fi le.
:w This saves the currently open fi le.
:q This quits editing.
:q! This quits forcefully, discarding the changes

290 Unix and Shell Programming
(b) To print more than one line, we can specify a range of line numbers separated by a comma. For example, the following command displays lines one to three.
:1,3
When we try to specify the line number beyond the length of the fi le, we get the following error message: Not that many lines in buffer.
(c) (i) A command without a line number is assumed to affect the current line. The following command will substitute the pattern ‘is’ with ‘was’ in the current line. The changed line will be reprinted.
:s/is/was/
(c) (ii) If the asked pattern is not found, the following message is displayed: Substitute pattern match failed. We can also specify the line where we need to apply substitution. For example, the following command substitutes the pattern ‘is’ with ‘was’ in the fi rst line of the current fi le.
:1s/is/was/
(c) (iii) With the aforementioned command, only the fi rst occurrence of the pattern ‘is’ in the fi rst line will be replaced by ‘was’. In order to replace all the ‘is’ patterns globally in the current line, we have to append ‘g’ to the command as follows.
:1s/is/was/g
(c) (iv) To substitute a pattern in a range of lines, we use the following command.
:1,5s/is/was/g
This command will replace all the patterns, ‘is’ found in lines one to fi ve with the pattern, ‘was’. If we do not use ‘g’, only the fi rst occurrence of the pattern will be substituted. To apply substitution to the entire fi le, we use ‘$’ that represents the last line in the edit buffer.
(c) (v) The following command substitutes the pattern, ‘is’ with ‘was’ in the entire fi le.
:1,$s/is/was/g
(d) The following command reads the specifi ed fi le, matter.txt, and appends its contents after the current line.
:r matter.txt
(e) The following command writes the content in the edit buffer into the specifi ed fi le tmp.txt.
:w tmp.txt
(f) We can also specify the range to write into the fi le. For example, the following command writes lines, from the fi rst to the current one, of the edit buffer into the fi le tmp2.txt.
:1,.w tmp2.txt
In this command, . (dot) represents the current line.
(g) The following command moves forward four lines and displays it.
:+4

Editors in Unix 291
If there are not enough lines in the edit buffer, we get the following error message: Not that many lines in buffer.
(h) The following command moves two lines backward and displays it.
:-2
(i) We can move to the line containing the desired pattern. For example, the following command moves to the line containing the pattern, editor.
:/editor
(j) We can also mark any line with a specifi c term. The command used to mark any line is :k. For example, the following command marks the current line as ‘a’.
:ka
(k) Now, we can refer to the current line as ‘a’. To replace all the ‘is’ patterns by ‘was’ patterns globally in the line, ‘a’, we will give the following command.
:as/is/was/g
(l) The following command switches to the next fi le in the command line arguments list. The command is discarded and a warning message is displayed if the current fi le is modifi ed and is not yet saved.
:n
(m) To discard the changes made to the current fi le and move on to the next fi le in sequence, use the ! mark after the n command as follows.
:n!
(n) To rewind and open the fi rst fi le in the arguments list, we use the :rew command.
:rew
(o) This command will be ignored and a warning message will be displayed if the current fi le is modifi ed and is not yet saved. The following command discards the modifi cations made to the current fi le and moves on to the fi rst fi le in the arguments list.
:rew!
(p) The following command opens the fi le matter.txt for editing.
:e matter.txt
(q) If the current edit buffer is modifi ed and not saved, a warning message will be displayed and the following command will be ignored. The ! character will discard the changes made in the edit buffer and open the specifi ed fi le, matter.txt, for editing.
:e! matter.txt
(r) The following command opens the fi le matter.txt and sets the third line as the current line.
:e! +3 matter.txt
(s) To see the list of currently opened fi les, we use the following command.
:ar

292 Unix and Shell Programming
This command shows the list of fi lenames that are being edited. The current fi le will be enclosed in square brackets.
(t) The following command reads the specifi ed fi le, matter.txt, and places it after the third line in the current fi le.
:3 r matter.txt
(u) The following command executes the specifi ed command and the output of the command is appended to the current fi le.
:r !ls
This command will append the list of fi les and directory names to the current fi le.(v) To save the current open fi le, we use the following command.
:w
This command saves the current fi le and a message is displayed indicating the same.(w) The following command is used to quit the vi or ex editor.
:q
This command will be discarded if the edit buffer is modifi ed and the content is not yet saved. When it succeeds, the command quits the current fi le and indicates the number of fi les that are still open in the edit buffer.
(x) The following command is used to force quit from the vi or ex editor without saving the content.
:q!
These examples are represented in Fig. 8.21.
: 1pThis is MCE Microchip Computer Education
:3pIt appears to be very interesting. Commands are hard to remember
:1,3This is MCE Microchip Computer EducationAjmer. We are working on vi editor. It is a fast editorIt appears to be very interesting. Commands are hard to remember
:6Not that many lines in buffer
:5Secondly the distances are small. Everything is in approach.
:s/is/wasSubstitute pattern match failed:Is is wasThwas is MCE Microchip Computer Education
(Contd)Fig. 8.21 Representation of the commands given in ex mode

Editors in Unix 293
:rew3 files to edita.txt 5 lines, 283 characters
:1This is MCE Microchip Computer Education
:e matter.txtmatter.txt 3 lines, 132 characters
:ar[a.txt] b.txt c.txt
:r matter.txtmatter.txt 3 lines, 132 characters
:1,5s/is/wasSecondly the dwastances are small. Everything is in approach.
:1,$s/is/wasSecondly the dwastances are small. Everything is in approach.
:r matter.txtmatter.txt 3 lines, 132 characters
:w tmp.txttmp.txt [New file] 8 lines, 422 characters
:1,.w tmp2.txttmp2.txt [New file] 8 lines, 422 characters
:+4Not that many lines in buffer
:pIt is going to rain today
:-2Hello this is testing of interrupted system call command
:nb.txt 2 lines, 73 characters
:1This is b.txt file opened through ex
:nc.txt 2 lines, 72 characters
:2The c.txt file is the third file
Fig. 8.21 (Contd)

294 Unix and Shell Programming
8.3.22 Abbreviating Text InputFor long text, we can defi ne abbreviations that can be expanded to the text they represent. Abbreviations are like shortcuts for the frequently used long text and they help save typing time. To defi ne an abbreviation, we use the following ex command.
Syntax :ab abbr text
Here, abbr is a shortcut or an abbreviation for the specifi ed text. In the insert mode, abbr (if it is a whole word and not a part of the word) will be expanded to the specifi ed text.
Example :ab mce Microchip Computer Education
This abbreviates the text Microchip Computer Education to the abbreviation mce. Now whenever we type mce in the insert mode, it will be expanded to the text, Microchip Computer Education. Expansion will occur when we press a non-alphanumeric character, a space, a carriage return, or the Esc key.
To disable an abbreviation, the command with the following syntax is used.
:unab abbr
Here, abbr represent the abbreviation that we wish to disable.To display the list of defi ned abbreviations, the following command is used.
:ab
:r !ls!22 more lines in file after readtransact.txt
:r !cat matter.txt!It is going to rain today
:wa.txt 33 lines, 777 characters
:q2 more files to edit:q
$ cat rmp.txtThwas was MCE Microchip Computer EducationAjmer. We are working on vi editor. It was a fast editor.It appears to be very interesting. Commands are hard to rememberAjmer was a nice place to stay. First it was quite and calm.Secondly the dwastances are small. Everything was in approach.Hello this is testing of interrupted system call commandI think it is working as per the expected resultIt is going to rain today
Fig. 8.21 (Contd)

Editors in Unix 295
8.3.23 Mapping Keys of KeyboardMapping keys refer to the mechanism of mapping a complex command to a particular keystroke or sequence of keystrokes. Frequently used editing commands can be mapped to certain keys for convenience. Mapping can be done in modes such as the normal mode and insert mode. In normal mode, the following syntax is used for mapping:
Syntax :map key_to_map command_to_execute
In insert mode, the mapping is done with the map! command as follows:
Syntax :map! key_to_map command_to_execute
Example :map <F2>Microchip Computer Education <CR>
In this normal mode map command, the <F2> key is mapped to the text, Microchip Computer Education. On pressing the F2 key, the text Microchip Computer Education will be displayed along with a carriage return.
To view the list of defi ned maps, simply type :map or :map!, followed by the Enter key. All the defi ned maps will be displayed in the ‘status bar.’ To make maps permanent, add them to the .vimrc fi le.
Let us now understand how mapping is done in the insert mode.
Example :map! m1Microchip Computer Education <CR>
This command maps m1 to the text, Microchip Computer Education, followed by carriage return <CR>. This map executes in the insert mode.
To unmap a mapped key, use the command with the following syntax.
Syntax :unmap key
Example :unmap <F2>
This statement unmaps the F2 key.
The list of commands used in mapping are given in Table 8.24.
8.3.24 Customizing vi SessionYou may recall that the batch fi le named .exrc is executed every time vi is loaded. To customize the vi session, we open this fi le and write the desired statements in it.
For example, you can have the following features enabled in the fi le that you open or create through vi:
1. Lines are auto numbered2. Auto indentation is enabled3. Case is ignored while searching for content
For enabling these features in vi, we open the .exrc fi le in our home directory and write the following three lines and save it:
Table 8.24 Brief description of the commands used in mapping in vi
Command Description
:map key command_sequence
Defi nes the key as a sequence of editing commands
:unmap key Disables the sequence of editing commands defi ned for a key
:map Lists the keys that are currently mapped

296 Unix and Shell Programming
set nuset aiset ic
The next time we open or create any fi le, it will have the aforementioned three features enabled. We can write any number of set commands (refer to Section 8.3.18) in the .exrc fi le to suit our needs.
Advantages of vi The following are the advantages of using the vi editor:
1. The vi editor is available on all Unix systems.2. It is a bug-free editor.3. Being a small program, it occupies less memory.4. The vi editor is not column oriented, that is, we cannot modify the content of specifi c columns.5. The vi editor can work with any kind of terminal.
The biggest disadvantage of the vi editor is that it uses many different commands, which are hard to remember.
After having learnt about the vi editor, let us take a look at another editor, that is, the emacs editor.
8.4 EMACS EDITOR
Emacs is one of the most popular screen editors in Unix. Again, like vi, emacs is also a text editor. Broadly, the following are the two differences between the vi and emacs editors:
1. Vi is a modal editor whereas emacs is a modeless editor. By modal editor we mean that the user has to switch between modes to enter/edit text and give commands. One mode is dedicated for adding or editing content in the editor and the other is for giving commands to the editor. Modeless editors, on the other hand, are those that when opened allow the user to enter text straight away by default. For giving editor commands in modeless editors, certain special keys such as Ctrl and Esc are designated. On pressing the special keys, the editor recognizes that the following text is not part of the content, but commands. Most of the editors today are of the modeless type.
2. The second difference between vi and emacs editors is size. The vi editor being small in size gets opened quickly, whereas it takes a comparatively longer time for the emacs editor to load.
The command to create a new fi le or edit an existing fi le through emacs has the following syntax:
Syntax emacs fi le_to_create/edit
Emacs will run and open the specifi ed fi le. When a fi le is loaded into emacs, it is initially loaded into a buffer. All the editing/insertions and changes are performed in the content that is in buffer. To update the actual fi le, the buffer must be saved.

Editors in Unix 297
We will now discuss the different commands used in emacs that include cursor movement, dealing with buffers, cutting and copying text, etc., in the subsequent sections. These commands are categorized on the basis of the tasks they perform.
The notation that is used while displaying the different commands is as follows:
1. C-x means to hold down the Ctrl key and press the x key.2. Esc-x means to hold down the Esc key and press the x key.
8.4.1 Cursor MovementsWhile editing, we need to move the cursor to the desired location in the fi le. The syntax for this is as follows:
Syntax C-x/Esc-x
Here, x is the character that designates the action to be taken.The commands used in cursor movement are given in Table 8.25.
Table 8.25 Brief description of commands related to cursor movement
Commands Description
C-p Moves the cursor one line up
C-n Moves the cursor one line down
C-f Moves the cursor one character right
C-b Moves the cursor one character back
C-a Moves the cursor to the beginning of the line
C-e Moves the cursor to the end of the line
C-v Moves the cursor down a screen
Esc-v Moves the cursor up a screen
Esc-< Moves the cursor to the beginning of the buffer
Esc-> Moves the cursor to the end of the buffer
Esc-f Moves the cursor one word forward
Esc-b Moves the cursor one word backward
Esc-a Moves the cursor back to the beginning of the sentence
Esc-e Moves the cursor forward to the end of the sentence
Esc-] Moves the cursor one paragraph forward
Esc-[ Moves the cursor one paragraph backward
8.4.2 Quitting EmacsThe command used to quit/terminate the emacs process is as follows:
Syntax C-x C-c
The user will be asked to save any modifi ed buffers. Emacs maintains a backup fi le when a fi le is saved. The name of the backup fi le is the original fi lename with a tilde (~) appended to the end.

298 Unix and Shell Programming
8.4.4 Cutting and PastingBefore moving or copying text, it must be marked. The C-@ or C-Spacebar commands are used to mark the region for copying or moving. C-w cuts the region and Esc-w keys copy the region. Move the cursor to the position we want to move or copy the text and press C-y to paste the selected text.
The commands for deleting, cutting, and pasting the content are given in Table 8.27.
8.4.3 Dealing with BuffersEmacs supports multiple buffers. The user may load fi les into the buffers, switch between them, and copy text from one buffer to another.
The list of commands is given in Table 8.26.
Table 8.26 Brief description of commands dealing with buffer
Command Description
C-x C-s Saves the buffer into the fi le
C-x C-w Writes the content of the buffer into a new fi lename and prompts the user for the new fi lename
C-x C-f Reads a fi le into a buffer
C-x i Inserts contents of a fi le into the current buffer
C-x b Selects another buffer
C-x C-b Lists all buffers that are currently active in emacs
C-x 2 Splits the screen to show two buffers
C-x 1 Goes back to one buffer on screen
C-x o Switches the cursor to the other buffer
Table 8.27 Brief description of the commands for cutting and pasting
Command Description
C-d Deletes the character at the cursor
Esc-d Deletes from the cursor till the end of the word
C-k Erases till the end of the line
Esc-k Erases till the end of the current sentence
C-@ Marks the beginning of the text to cut or copy
C-w Cuts the text between the mark and current cursor position
Esc-w Copies the text between the mark and current cursor position
C-y Pastes the cut or copied content at the cursor position
8.4.5 Searching and ReplacingThe emacs editor provides commands to search for the desired pattern in a file. We can not only search for the desired pattern but also replace it with the new pattern.

Editors in Unix 299
For searching and replacing the content in a file, we use the commands given in Table 8.28.
While using the commands for searching and replacing, a prompt will appear at the bottom where the user can type in the text to search or replace. Searching begins immediately as the user types the characters. As the characters are typed emacs begins its search procedure. Similarly, to search for the word an, on typing character, a, emacs will move to the fi rst occurrence of the character a. On typing the next character, n, the emacs will move to the fi rst occurrence of the word an, and so on. To stop a search, press the Esc key.
8.4.6 Miscellaneous CommandsSome miscellaneous commands in emacs are listed in Table 8.29.
Table 8.28 Brief description of commands for searching and replacing text
Command Description
C-s Searches for the given string from the current cursor position in the forward direction in the buffer
C-r Searches for the given string from the current cursor position in the backward direction
Esc-% Prompts the user for the string to be replaced and the string to replace it with. Before replacing the string, the user will be asked for confi rmation and the user can select any of the following keys in response to confi rmation:
1. Space bar: Replaces the string and moves on to the next match
2. Delete key: Skips without replacing and moves on to the next match
3. !: Replaces all the remaining matches
4. Esc key: Stops replacing
Table 8.29 Brief description of the miscellaneous commands in emacs
Command Description
C-g Aborts a partially typed command
C-x u Undoes the last change to the buffer
C-l Redraws the screen
C-h Starts the emacs online help
Esc-$ Checks the spelling of the word at that point
Thus, we have dis cussed the three impo rtant editors in Unix— sed, vi, and emacs—in this chapter. We have seen the commands required in writing, deleting, and modifying content, as well as navigating to the desired content, searching and replacing content, cutting, copying, and pasting content, and so on.

300 Unix and Shell Programming
■ SUMMARY ■
1. Ed is a line-oriented text editor for the Unix operating system written by Ken Thompson in 1971. Editing in the ed editor is done through the command and input modes.
2. Ex is a line editor that is a friendlier version of ed but is a bit more complex to operate when compared to the screen-based visual editor, vi. The ex editor can be invoked from the vi editor and can be switched to the vi editor from the ex editor too.
3. Vi is a visual editor that was originally written by Bill Joy in 1976. It operates in the command and insert modes. To switch to the insert mode from the command mode in the vi editor, characters ‘i’ (input) or ‘a’ (append) are pressed. To switch to the command mode from the insert mode in the vi editor, press the Esc key.
4. Letters typed in the command mode in vi are treated as commands.
5. Another editor that is distributed with most Unix systems and is an enhanced version of vi is the vim editor. The vim editor is a highly confi gurable text editor written by Bram Moolenaar.
6. The stream editor :sed is popularly used for fi ltering out the desired data from the specifi ed fi le. The stream editor, sed was designed by Lee McMohan and is derived from the ed line editor.
7. For fi ltering through sed, we have to supply a data stream (input data) and instructions that contain criteria for fi ltering the desired data from the data stream.
8. Emacs is a popular and powerful screen editor that is simpler to use than the vi editor. Most of the emacs commands use either the Ctrl key or the Esc key.
9. Pico stands for pine composer and is a fi le editor that was designed to be used with the pine mail system. The commands for editing in pico are invoked by Ctrl key sequences. To save a fi le and exit pico, the ^X command is used.
10. The -n option in sed suppresses duplicate line printing.
11. In sed, the -f option is used to accept instructions from a fi le. The fi le should have a .fi l extension.
12. The instruction $a in sed is used for adding text to the existing fi le.
13. The backslash (\) in sed is considered a line continuation character.
14. The instruction i\ in sed is used for inserting text before every line of the fi le.
15. The w (write) command helps in writing the selected lines in a separate fi le.
16. The $ sign in sed represents the last line of the fi le.17. The negation operator (!) can be in sed’s action.18. The p command in sed is for printing the result of the
fi ltering of data. It is the default action.19. The s command in sed is for substituting a string by
another string in a fi le.20. The vi editor can be customized with the help of the
.exrc fi le, which is executed every time vi is loaded.21. When a fi le is loaded into emacs, it is initially loaded
into a buffer. All the editing/insertions and changes are performed in the content that is in the buffer.
22. Context addressing is a mechanism where we cannot directly address the lines on which we wish to apply the sed command. Instead, a regular expression is included, enclosed within slashes (/).
23. The regular expressions, also known as regexp in short, is used for pattern matching.
24. Regular expressions are built making use of certain special characters known as meta characters.
25. A caret (^) at the beginning of a regular expression matches the null character at the beginning of a line.
26. A string of characters in square brackets ([ ]) in a regular expression matches any character in the string.
27. In remembered patterns, we use a mechanism to name or number the pattern so that it can be checked for repetition.
28. For naming or numbering a pattern, we need to enclose it within ‘\(’ and ‘\)’.
29. In the vi editor, the x command deletes the character at the cursor position.
30. In the vi editor, the dd command deletes the line where the cursor is.
31. In the vi editor, the yy command copies the current line.
32. In the vi editor, the p command pastes the copied text after the cursor.
33. In the vi editor, the :r fi lename command places the text from the named fi le after the current line.
34. The :ab command is used for defi ning abbreviations.35. The :unab command is used to disable abbreviations.

Editors in Unix 301
Objective-type QuestionsState True or False
8.1 The print option is always on by default with sed. 8.2 To select the last line of the fi le, we use the ̂ option. 8.3 The option q with sed is for quitting after
displaying the addressed line. 8.4 The w command is used for writing the selected
lines in a separate fi le. 8.5 We cannot print the contents of a fi le followed by
the contents of another fi le in sed. 8.6 The l option is for printing line numbers along
with the fi le contents. 8.7 The vi editor has two modes of operation. 8.8 We can switch to the insert mode from the command
mode in the vi editor by pressing character e or E. 8.9 The :w command is for writing into the fi le and
continuing editing.8.10 The $ command in vi is for moving the cursor to
the last character of the line.
8.11 The Fx command in vi moves the cursor to the specifi ed character, x, in the forward direction.
8.12 The { command in vi moves the cursor to the beginning of the current sentence.
8.13 To delete a line in vi, the dd command is used.8.14 The :set nu command is for removing line
numbering while displaying the fi le contents.8.15 When a fi le is loaded into emacs, it is initially
loaded into a buffer.8.16 Emacs supports multiple buffers but the user
cannot switch between them.8.17 In emacs, a string can be searched for in the
forward as well as in the backward direction.8.18 Emacs supports spell checking too.8.19 The command to quit from emacs is C-x C-c.8.20 Emacs is a graphic editor like vi.
Fill in the Blanks
8.1 The option is used for suppressing duplicate line printing in sed.
8.2 The command to print the fi rst line of the fi le, bank.lst is .
8.3 The option is used in sed to accept instructions from a fi le.
8.4 In sed, for adding text to the existing fi le is used.
8.5 In sed, for inserting text before every line of the fi le, the option is used.
8.6 The command is used in vi to delete a line from the cursor position to the beginning of the line.
8.7 To go back to the command mode from the insert
mode in the vi editor, we press . 8.8 The command in vi moves
the cursor to the fi rst character of the previous word.
8.9 To scroll down one full page, the command is used in vi.
8.10 To go to the nth line of a fi le, the command is used in vi.
8.11 To repeat the last search command in the opposite direction, is used in vi.
8.12 The command in emacs displays online help.
8.13 In emacs, the command is used for pasting content at the position of the cursor.
■ EXERCISES ■
36. Mapping keys refer to a mechanism of mapping a complex command to a particular keystroke or sequence of keystrokes.
37. The :map command is used for mapping keys.38. The :unmap command is used for unmapping keys.39. While vi is a modal editor, emacs is a modeless
editor.40. The vi editor is smaller in size than the emacs editor.
41. The C-x C-c command is used to quit/terminate the emacs process.
42. The ex is a line editor that is commonly used for working with multiple fi les simultaneously.
43. The ex editor can be independently invoked from the command line as well as from the vi editor.
44. To switch to the ex (line editor) mode from within vi, type : (colon) from the command mode.

302 Unix and Shell Programming
8.14 To see the list of all currently active buffers in emacs, the command is used.
8.15 The command Esc-] in emacs is used for moving the cursor one paragraph.
Multiple-choice Questions
8.1 sed stands for (a) solid editor (c) stream editor (b) searching editor (d) sleeping editor 8.2 Editing in ed editor is done in (a) two modes (c) a single mode (b) three modes (d) four modes 8.3 The option used with the sed editor to read
instructions from a fi le is (a) -fi le (b) -o (c) -l (d) -f 8.4 The sed editor is derived from (a) vi editor (c) vim editor (b) ed editor (d) emacs editor 8.5 The pattern is enclosed in ‘\(’ and ‘\)’ to match for (a) deleted pattern (c) fi ltered pattern (b) printed pattern (d) repetitive pattern 8.6 The .exrc fi le is executed every time the (a) line is appended to sed (b) vi editor is loaded
(c) pico editor is loaded (d) sed editor is loaded 8.7 In the vi editor, when : (colon) is pressed in the
command mode, it switches to (a) ex mode (c) nothing will happen (b) insert mode (d) print mode 8.8 The command used to number all the lines in the
vi editor is (a) :set list (c) :set ro (b) :set ai (d) :set nu 8.9 The command C-a in the emacs editor will (a) move the cursor down one screen (b) move the cursor to the beginning of a line (c) move the cursor one paragraph forward (d) move the cursor one line up8.10 The command to delete the character at the
cursor in the emacs editor is (a) C-d (b) C-k (c) C-w (d) C-y
Programming Exercises
8.1 Write the commands for performing the following tasks in sed:
(a) To print all the lines of the fi le bank.lst except lines three to six
(b) To display the fi rst four lines and the eighth line to the eleventh line of the fi le bank.lst
(c) To display all the lines from the fi le letter.txt where the word Charles has occurred
(d) To replace the word Charles by Peters in the fi le letter.txt
(e) To replace the word Charles by Peters in the fi le letter.txt and copy the lines where replacement occurs into the fi le latest.txt
(f) To display the last line of the fi le letter.txt 8.2 Write the commands for performing the fol-
lowing tasks in the vi editor: (a) To write to the fi le and quit the vi editor (b) To move the cursor to the fi rst character of
the line (c) To move the cursor to the beginning of the
current paragraph (d) To search for the word Charles in the forward
direction from the cursor position (e) To move to the tenth line of the fi le
(f) To copy n number of lines 8.3 Write the commands for performing the fol-
lowing tasks in the emacs editor: (a) To check the spelling of the word at a par-
ticular point (b) To search for the given string in the backward
direction from the current cursor position. (c) To mark the beginning of the text to cut or
copy (d) To split the screen to show two buffers (e) To move the cursor to the beginning of the
line (f) To undo the last change made to the buffer 8.4 Consider a fi le, school.txt, with the following
content: A101 John XI 80 A102 Caroline XI 75 A103 Susan XI 92 A104 David XII 82 A105 Kelly XII 84 A106 Candace XII 90 (a) What will the output of the following
commands be? (i) $ sed -n '2,$!p' school.txt

Editors in Unix 303
Review Questions
8.1 (a) Explain any two options that are used while using the sed editor.
(b) Explain the following commands of sed with examples:
(i) To substitute string s1 with s2 (ii) Write an address line to another fi le (iii) Change text in the current line with new text 8.2 Write short notes on the following: (a) Context addressing (b) Remembered pattern 8.3 (a) Explain any two common ways of starting a
vi session. (b) What are the two modes of operation in the
vi editor and what are the keys pressed to switch between the two modes?
(c) Write down the commands for the following in the vi editor:
(i) Cut and copy text (ii) Delete and undo delete operation (iii) Search for a desired pattern in the fi le
(iv) Substitute a pattern with another pattern globally
8.4 Can we deal with multiple fi les in vi? If yes, write the commands for the same.
8.5 (a) Explain what you mean by mapping keys. (b) Explain how abbreviations are created in vi. 8.6 (a) Explain two differences between the vi and
emacs editors. (b) Does emacs supports multiple buffers? If
yes, write the commands that deal with buffers.
8.7 What is a regular expression? Explain the con-cept including a few meta characters used in creating a regular expression.
8.8 Explain the commands that are used in the vi editor for copying content from the current fi le to a new fi le and for pasting content from another fi le.
8.9 Explain the set commands that can be used for confi guring the vi session.
Brain Teasers 8.1 What is the error in the following command to
print the last line of the fi le, school.txt? $ sed -n '^p' school.txt 8.2 Correct the mistake in the following command to
print only the fi rst three lines of the fi le, school.txt.
$ sed '1,3p' school.txt 8.3 Correct the mistake in the following command
to write all records with pattern XI from the fi le school.txt into the fi le eleventh.lst.
$ sed -n '/XI/p eleventh.lst' school.txt 8.4 Remove the mistake from the following
command to substitute the pattern ‘XI’ in the fi le
school.txt with the pattern ‘Class XI’. $ sed 'd/XI/Class XI/' school.txt 8.5 I am trying to read the content of the fi le
accounts.txt and place it after the current line in vi through the following command:
:r! accounts.txt However, the command is not working. Identify
and correct the mistake. 8.6 The following command for ignoring case while
searching is not working in vi. Find the error. :set ignorecase 8.7 Correct the error in the following command to
move the cursor to character ‘z’ in the forward
(ii) $ sed -n '1,3p' school.txt (iii) $ sed -n '3,6p' school.txt (iv) $ sed -n -e '1,2p' -e '4,6p'
school.txt (v) $ sed -n '/[Xx]I/p' school.txt (vi) $ sed '3,5 d' school.txt (b) What tasks will the following commands
perform in the vi editor? (i) Tx (ii) j (iii) d$
(iv) :set noai (v) : s/Charles/Peters/g (vi) :5,10 w a.txt (c) What tasks will the following commands
perform in the emacs editor? (i) Esc-k (ii) C-x C-f (iii) Esc-> (iv) Esc-w (v) C-k (vi) Esc-e

304 Unix and Shell Programming
direction in vi. Fz 8.8 What is the mistake in unmapping a key, F3 in
vi? :umap <F3> 8.9 Correct the error in the following command to
move the cursor down one screen in the emacs editor:
Esc-v8.10 Correct the mistake in the following command to
list all the currently active buffers in emacs. C-x b
State True or False
8.1 True 8.2 False 8.3 True 8.4 True 8.5 False 8.6 False 8.7 True 8.8 False 8.9 True8.10 True8.11 False8.12 False8.13 True8.14 False
8.15 True8.16 False8.17 True8.18 True8.19 True8.20 False
Fill in the Blanks
8.1 -n 8.2 $ sed -n '1p'
bank.lst 8.3 -f 8.4 $a\ 8.5 i\ 8.6 d^
8.7 the Esc key 8.8 b 8.9 ^f8.10 nG8.11 N8.12 C–h8.13 C–y8.14 C–x C–b8.15 forward
Multiple-choice Questions
8.1 stream editor 8.2 two modes 8.3 -f
8.4 ed editor 8.5 repetitive
pattern 8.6 vi editor is
loaded 8.7 ex mode 8.8 :set nu 8.9 Moves cursor
to beginning of the line
8.10 C–d
■ ANSWERS TO OBJECTIVE-TYPE QUESTIONS ■

9.1 AWK COMMAND
The AWK command is a programming language that is executed by the AWK interpreter. It is a commonly used text processing tool and a powerful text fi ltering tool designed for processing structured data records. It divides the input into different records on the basis of the record separator encountered. By default, the record separator is a newline character. The individual records are then divided into fi elds on the basis of the fi eld separators. Based on the patterns specifi ed, AWK applies the desired modifi cations to the records and displays the report if desired. AWK is found on all Unix systems and is very fast, easy to learn, and extremely fl exible. The name AWK comes from the last names of its creators Alfred Aho, Peter Weinberger, and Brian Kernighan.
9.1.1 VersionsThere are, in all, three versions of AWK, the original AWK, NAWK, and GAWK. The following is a brief description of the three versions:
AWK It is a powerful language to manipulate and process text fi les. It is also very helpful in fi ltering out desired information from a fi le in record format. Besides fi ltering, even
99AWK ScriptAWK Script C H A P T E R
After studying this chapter, the reader will be conversant with the following:
• Role of the AWK command in fi ltering and processing content• Different functions used in AWK for printing results, formatting output, and searching
for desired patterns• Different operators that include comparison operators, logical operators, arithmetic
operators, string functions, arithmetic functions, and search and substitute functions• Built-in variables to perform desired operations quickly and with the least effort• Different loops to perform repetitive tasks, taking input from the user to perform
operation on the desired content

306 Unix and Shell Programming
computation can be applied to the fi ltered out records. AWK is the original version that was written by Alfred Aho, Peter Weinberger, and Brian Kernighan in 1977.
NAWK The original AWK was enhanced by its original authors to create its enhanced version known as NAWK, ‘new awk’.
GAWK It is an AWK version that was released by the free software foundation under the GNU. All Linux distributions come with GAWK. It is fully compatible with AWK and NAWK.
Note: All the features and functions are not available in the original AWK. They are available in NAWK and/or GAWK. For example, the most popular functions, such as gsub(), getline, and system(), are supported in NAWK but not in AWK.
9.1.2 Advantages and Disadvantages of Using AWK FiltersThe following are the advantages of using an AWK fi lter:
1. It uses very simple patterns and actions that are easy to learn.2. It is quite small in size.3. It is an interpreted language, hence it consumes fewer resources.4. It accomplishes complex fi ltering tasks with minimum instructions.5. It considers text fi les as records and fi elds.6. It applies the desired fi ltering and processing operations on the fi elds and generates
formatted reports.
The following are the disadvantages of using AWK fi lters:
1. It processes the fi le sequentially, hence consumes much time in fi ltering.2. It is not suitable for fi ltering large volume of data.
To summarize, AWK has features for fi ltering, text processing, and writing reports. It operates at the fi eld level and can easily access, transform, and format individual fi elds in a record.
The syntax for using the AWK command is as follows:
Syntax awk '/pattern/ {action}' fi le(s)
Here, pattern is a regular expression that defi nes the address on which action has to be applied, and action is one or more commands that we want to apply on the matching patterns. If pattern is omitted, AWK performs the specifi ed actions for each input line of the fi le(s).
Note: If the address is missing, the action applies to all lines of the fi le. If the action is missing, the entire line will be printed. Either the address or the action is necessary but both must be enclosed within a pair of single quotes.
Example Consider a fi le bank.lst, with the following content.
101 Aditya 0 14/11/2012 current102 Anil 10000 20/05/2011 saving103 Naman 0 20/08/2009 current104 Rama 10000 15/08/2010 saving105 Jyotsna 5000 16/06/2012 saving

AWK Script 307
106 Mukesh 14000 20/12/2009 current107 Yashasvi 14500 30/11/2011 saving108 Chirag 0 15/12/2012 current109 Arya 16000 14/12/2010 current110 Puneet 130 16/11/2009 saving
$ awk '{ print }' bank.lst
This command will print all the records of the fi le bank.lst. It is because we have not specifi ed any criteria or fi lter condition. The print command in AWK displays the fi ltered records. We will now learn more about this command.
9.2 print: PRINTING RESULTS
The print command is used for displaying messages, fi elds, variables, etc. AWK auto-matically divides input lines into fi elds on the basis of the fi eld separators. A fi eld is a set of characters that are separated by one or more fi eld separators. The default fi eld separators are tab and space. On reading a line, its parsed fi elds are assigned individual numbers to access them. This implies that the fi rst fi eld is accessed as $1, the second fi eld as $2, and so on. In the aforementioned fi le bank.lst, the fi rst column, that is, account numbers, is represented by $1, customer names by $2, balance by $3, and so on. $1, $2, etc., are also known as special variables. One of the special variables, $0, represents the whole line.
Syntax print [special variables]
Here, special variables represent the comma separated special variables, $1, $2, etc.If print statement is used without any special variable, it prints the entire line.
Example The following example displays selected fi elds of the input fi le.
$ awk '{ print $1,$2,$3 }' bank.lst
This command will print only the fi rst three fi elds of each record of the fi le bank.lst. The fi elds are delimited by either space or tab. The parameters $1, $2, $3, etc., represent the fi elds separated by spaces or tabs. A contiguous sequence of spaces or tabs can be considered a delimiter.
101 Aditya 0102 Anil 10000103 Naman 0104 Rama 10000105 Jyotsna 5000106 Mukesh 14000107 Yashasvi 14500108 Chirag 0109 Arya 16000110 Puneet 130
Note: AWK uses the special variable $0 to indicate the entire line.

308 Unix and Shell Programming
9.3 printf: FORMATTING OUTPUT
We can format the output of the AWK command using the printf command instead of the print command. printf is a statement used for displaying formatted data (similar to the printf statement of the C language).
Syntax printf "format string", special_variable1, special_variable2, ...
Here, the format string consists of format specifi ers that defi ne the format in which we wish to display the special variables. The format specifi ers are specifi ed for each special variable being displayed and usually specify the data type and width or space assigned to each.
The list of format specifi ers that are most commonly used in the printf statement is as follows:
Format specifi er What is displayed%d Integers%f Float%s Strings%c Character%e Number in scientifi c (exponential) notation
Note: The printf statement does not automatically append a newline to its output. It only displays the content specifi ed in the format string. To append a new line, we need to add a newline character ‘\n’ at the end in the format string.
Example The following example displays the bank.lst fi le in a formatted pattern.
$ awk '{ printf "%6d %-20s %7d \n",$1,$2,$3 }' bank.lst
This command will print the fi rst fi eld in the fi eld width of six digits (if the fi eld has only a few digits, it is padded with white spaces), the second fi eld is displayed in the fi eld width of 20 characters. The − (minus) sign in %−20s is for left alignment. The last fi eld is displayed in the fi eld width of seven digits. The output of the aforementioned command is as follows:
101 Aditya 0102 Anil 10000103 Naman 0104 Rama 10000105 Jyotsna 5000106 Mukesh 14000107 Yashasvi 14500108 Chirag 0109 Arya 16000110 Puneet 130
9.4 DISPLAYING CONTENT OF SPECIFIED PATTERNS
Instead of displaying all lines, we can also display only those lines from the input fi le that have the given specifi c pattern. For doing this, we will follow the given syntax:

AWK Script 309
Syntax awk '/pattern/ {action}' fi le(s)
Example The following example displays only the lines that have the given pattern.
$ awk '/current/ { print }' bank.lst
This command selects all customers having current account in bank.lst, that is, all lines/records having the pattern current are displayed.
101 Aditya 0 14/11/2012 current 103 Naman 0 20/08/2009 current 108 Chirag 0 15/12/2012 current
Printing is the default action of AWK. We can omit it as given here:
$ awk '/current/' bank.lst
It gives the same output as the aforementioned command.The single quotes around the pattern are optional. We can also omit it as shown in the
following syntax:
$ awk /current/ bank.lst
Again, it gives the same output as the aforementioned command, that is, all the lines with the pattern current are displayed. We can omit the single quotes; however, it is good practice to place the pattern and action within the quotes.
You may recall that a single complete line of the input fi le is represented by $0. Let us apply it to the fi le, bank.lst:
$ awk '/current/' { print $0 }' bank.lst
$0 refers to the complete record. Hence, this command will print all the lines/records from the bank.lst fi le that have the pattern current in it.
The following example displays specifi c fi elds of the fi le that match the given pattern.
$ awk '/saving/ { print $2,$3,$4 }' bank.lst
Only the second, third, and fourth fi elds of the fi le bank.lst that have the pattern saving are displayed. The , (comma) is used to delimit the fi eld specifi cations. This ensures that each fi eld is separated from the other by a space. If we do not place a comma, the fi elds will be displayed without any space in between.
Output
Anil 10000 20/05/2011Rama 10000 15/08/2010 Jyotsna 5000 16/06/2012Yashasvi 14500 30/11/2011 Puneet 130 16/11/2009
9.5 COMPARISON OPERATORS
For comparing values in the fi elds, we require comparison operators. The fi elds combine with comparison operators to make expressions. Only the fi elds that match the given expressions are displayed. The operators used for comparison are shown in Table 9.1.

310 Unix and Shell Programming
Note: While comparing operands with comparison operators, if both the operands are numeric, a numeric comparison is made, otherwise the operands are compared as strings.
Examples
(a) $2 <= 500 It returns true if the value of the second fi eld is
less than or equal to 500. $1 ~ /saving/ It returns true if the value of the fi rst fi eld
matches the pattern saving. $1 !~ /saving/ It returns true if the value of the fi rst fi eld does
not match the pattern saving.(b) The following example has become more precise with the application of comparison op-
erators. Instead of searching for the pattern current anywhere in the input line, the following example checks for the existence of the pattern current in the fi fth fi eld.
$ awk '$5 == "current" ' bank.lst
Only the records/lines having the pattern current in the fi fth fi eld will be displayed. Here, == is the ‘equal to’ operator.
(c) The following example gives the inverse output of the preceding example.
$ awk '$5 != "current" ' bank.lst
The records/lines not having (!= stands for not equal to) the pattern current in the fi fth fi eld will be displayed as follows:102 Anil 10000 20/05/2011 saving 104 Rama 10000 15/08/2010 saving 105 Jyotsna 5000 16/06/2012 saving 107 Yashasvi 14500 30/11/2011 saving 110 Puneet 130 16/11/2009 saving
(d) $ awk '$3 > 10000' bank.lstThe records having the balance >10000 will be displayed as follows:106 Mukesh 14000 20/12/2009 current 107 Yashasvi 14500 30/11/2011 saving 109 Arya 16000 14/12/2010 current
9.5.1 ~ and !~: Matching Regular ExpressionsA regular expression is a way of expressing strings or patterns that we are searching for. A regular expression is formed by writing a pattern along with a couple of operators enclosed by slashes (/). The ~ and !~ are the two operators that are used while comparing regular expressions. The meaning of ~ is that it matches and that of !~ is that it does not match.
Table 9.1 Brief description of the expressions made by comparison operators
Operator Description
x < y Returns true if x is less than y
x <= y Returns true if x is less than or equal to y
x == y Returns true if x is equal to y
x > y Returns true if x is greater than y
x >= y Returns true if x is greater than or equal to y
x != y Returns true if x is not equal to y
x ~ y Returns true if string x matches the regular expression represented by y
x !~ y Returns true if string x does not match the regular expression represented by y

AWK Script 311
Examples
(a) The following example shows all the records from the fi le bank.lst that have the pattern current in the fi fth fi eld.$ awk '$5 ~/current/' bank.lst
(b) The following example shows all the records from the fi le bank.lst that do not have the pattern current in the fi fth fi eld.$ awk '$5 !~ /current/' bank.lst
While matching the expressions, the two meta characters that are frequently used are ^ (which means matches at the beginning) and $ (which means matches at the end).
Examples
(a) The following example shows all the records from the fi le bank.lst in which the fi fth fi eld ends with the character t.$ awk '$5 ~/t$/' bank.lst
(b) The following example shows all the records from the fi le bank.lst in which the fi fth fi eld begins with character t.$ awk '$5 ~/^t/' bank.lst
(c) $ awk '/[Cc]urrent/' bank.lstIt displays all the lines having the pattern current or Current in them.
101 Aditya 0 14/11/2012 current 103 Naman 0 20/08/2009 current 106 Mukesh 14000 20/12/2009 current 108 Chirag 0 15/12/2012 current 109 Arya 16000 14/12/2010 current
For matching an expression given anywhere in a fi eld, AWK offers the ~ and !~ operators to match and not match, respectively. The expression must be enclosed in // (slashes).
Examples
(a) $ awk '$5 ~/saving/' bank.lstIt prints all the records having the pattern saving in the fi fth fi eld in the fi le bank.lst.102 Anil 10000 20/05/2011 saving 104 Rama 10000 15/08/2010 saving 105 Jyotsna 5000 16/06/2012 saving 107 Yashasvi 14500 30/11/2011 saving 110 Puneet 130 16/11/2009 saving
(b) $ awk '$5 ~/[cC]urrent/' bank.lstIt prints all the records having the pattern current or Current in the fi fth fi eld in the fi le bank.lst.101 Aditya 0 14/11/2012 current 103 Naman 0 20/08/2009 current 106 Mukesh 14000 20/12/2009 current

312 Unix and Shell Programming
108 Chirag 0 15/12/2012 current 109 Arya 16000 14/12/2010 current
(c) $ awk '$5 ~ "current" ' bank.lstIt prints all the records having the current pattern in their fi fth fi eld.101 Aditya 0 14/11/2012 current 103 Naman 0 20/08/2009 current 106 Mukesh 14000 20/12/2009 current 108 Chirag 0 15/12/2012 current 109 Arya 16000 14/12/2010 current
(d) $ awk '$5 ~/t$/' bank.lstIt displays all the records having t as the last character in the fi fth fi eld. The $ symbol represents the end of the fi eld.101 Aditya 0 14/11/2012 current 103 Naman 0 20/08/2009 current 106 Mukesh 14000 20/12/2009 current 108 Chirag 0 15/12/2012 current 109 Arya 16000 14/12/2010 current While pattern matching, we can also replace slashes (//) with double quotes as follows:$ awk '$5 ~ "t$" ' bank.lstIt gives the same result as the aforementioned command.
(e) $ awk '$5 !~ "t$" ' bank.lstIt displays all the records not having t as the ending character in the fi fth fi eld in the fi le bank.lst.102 Anil 10000 20/05/2011 saving 104 Rama 10000 15/08/2010 saving 105 Jyotsna 5000 16/06/2012 saving 107 Yashasvi 14500 30/11/2011 saving 110 Puneet 130 16/11/2009 saving
(f) $ nawk '$2 ~ "^A" ' bank.lstIt displays all the records that start with the character A in the second fi eld. ^ stands for the beginning of the fi eld.101 Aditya 0 14/11/2012 current 102 Anil 10000 20/05/2011 saving 109 Arya 16000 14/12/2010 current
Note: To match a string at the beginning of the fi eld, precede the search pattern by ^. Similarly, use $ for matching a pattern at the end of a fi eld.
9.6 COMPOUND EXPRESSIONS
When two or more expressions are combined to check for a particular condition, they are termed compound expressions. Compound expressions are constructed using the compound operators (also known as logical operators) shown in Table 9.2.

AWK Script 313
Examples
(a) $ awk 'NR >= 3 && NR <= 7 { print NR,$0 }' bank.lst
It prints all the records/lines from record number 3 to record number 7, along with their record number.
3 103 Naman 0 20/08/2009 current 4 104 Rama 10000 15/08/2010 saving 5 105 Jyotsna 5000 16/06/2012 saving 6 106 Mukesh 14000 20/12/2009 current 7 107 Yashasvi 14500 30/11/2011 saving
(b) $ awk 'NR == 3, NR == 5 { print NR,$0 }' bank.lstIt prints records from the third till the fi fth, with their record number. The , (comma) specifi es the range of records.
Output
3 103 Naman 0 20/08/2009 current 4 104 Rama 10000 15/08/2010 saving 5 105 Jyotsna 5000 16/06/2012 saving
(c) $ awk 'NR == 3 || NR ==5 { print NR,$0 }' bank.lstIt prints the records/lines having record number 3 or record number 5, along with their record number.
Output
3 103 Naman 0 20/08/2009 current 5 105 Jyotsna 5000 16/06/2012 saving
(d) $ awk 'NR<2 || NR>4 { print NR,$0 }' bank.lstIt prints all the records /lines having a record number less than 2 or greater than 4, along with their record number.
Output
1 101 Aditya 0 14/11/2012 current 5 105 Jyotsna 5000 16/06/2012 saving 6 106 Mukesh 14000 20/12/2009 current 7 107 Yashasvi 14500 30/11/2011 saving 8 108 Chirag 0 15/12/2012 current 9 109 Arya 16000 14/12/2010 current 10 110 Puneet 130 16/11/2009 saving
(e) $ awk '! NR >= 3 { print NR,$0 }' bank.lstIt prints all the records/lines whose record number is less than 3, along with their record number.101 Aditya 0 14/11/2012 current 102 Anil 10000 20/05/2011 saving
Table 9.2 Brief description of logical operators
Symbol Operator Description
&& And Results true when all the expressions are true
|| Or Results true when any of the expressions is true
! Not Reverses (negates) the logical expression

314 Unix and Shell Programming
(f) Consider a fi le text.lst, having the following content.This is Solaris Unix Operating SystemAjmer. We are working on awk scriptsIt appears to be very interesting$ awk '{ print NF }' text.lst
It counts the number of fi elds in each line/record of the fi le text.lst and displays them. NF refers to the number of fi elds.
Output
676
(g) $ awk '{ print $NF }' text.lstIt prints the last fi eld (word) of each record/line of the fi le text.lst. $NF refers to the last fi eld.Systemscriptsinteresting
(h) $ awk '$2 ~ "^A" && $5 ~ "t$" ' bank.lstIt displays all records having A as the starting character in the second fi eld, as well as t as the ending character in the fi fth fi eld. Only records that satisfy both the conditions are displayed because of the and operator (&&).101 Aditya 0 14/11/2012 current 109 Arya 16000 14/12/2010 Current
(h) (i) $ awk '$2 ~ "^A" || $5 ~ "t$" ' bank.lstIt displays all the records having A as the starting character in the second fi eld or t as the ending character in the fi fth fi eld. The records satisfying either of the conditions are displayed.101 Aditya 0 14/11/2012 current 102 Anil 10000 20/05/2011 saving 103 Naman 0 20/08/2009 current 106 Mukesh 14000 20/12/2009 current 108 Chirag 0 15/12/2012 current 109 Arya 16000 14/12/2010 current
(j) $ awk '$5 ~/saving/ || $5 ~/current/' bank.lstIt displays all the records having the pattern saving or current in the fi fth fi eld. 101 Aditya 0 14/11/2012 current 102 Anil 10000 20/05/2011 saving 103 Naman 0 20/08/2009 current 104 Rama 10000 15/08/2010 saving 105 Jyotsna 5000 16/06/2012 saving 107 Yashasvi 14500 30/11/2011 saving 108 Chirag 0 15/12/2012 current 110 Puneet 130 16/11/2009 saving

AWK Script 315
(k) $ awk '$4 ~ /^20.*09$/' bank.lstIt displays all the records having 20 as the starting digit and 09 as the ending digit in the fourth fi eld of the fi le bank.lst.103 Naman 0 20/08/2009 current 106 Mukesh 14000 20/12/2009 current
(l) $ awk '$4 ~/^20.*09$/ && $2 ~/^N/' bank.lstIt displays all the records having 20 as the starting digit and 09 as the ending digit in the fourth fi eld of the fi le bank.lst and N as the starting character in the second fi eld of the same fi le.103 Naman 0 20/08/2009 current
9.7 ARITHMETIC OPERATORS
Arithmetic operators are used to perform arithmetic operations. The list of arithmetic operators that can be used in AWK is shown in Table 9.3.
AWK can perform computation on numbers using the arithmetic operators +, —, *, /, and % (modules).
Example $ awk '$3 == "saving" {> printf "%20s %d %20s %f\n", $2,$3,$4,$3*0.05}' bank.lst
This command will print the customer name, balance, date, and interest (5% of balance) as follows:
Anil 10000 20/05/2011 500.00 Rama 10000 15/08/2010 500.00 Jyotsna 5000 16/06/2012 250.00 Yashasvi 14500 30/11/2011 725.00 Puneet 130 16/11/2009 65.00
You will fi nd more examples of arithmetic operators in the following sections.
9.8 BEGIN AND END SECTIONS
When we have to print something before processing the fi rst line, we use the Begin section. Similarly, the End section is useful in printing the total values after the processing is fi nished. The middle portion will be applied to all the lines/records of the fi le. In other words, the Begin and End sections are executed only once but the middle portion is executed for every line/record.
The syntax of the AWK command for using Begin and End sections is as follows:
awk 'BEGIN { actions } /pattern/ { actions }/pattern/ { actions }END { actions }' fi les
Table 9.3 Brief description of arithmetic operators used in AWK
Operator Description
* Multiply
/ Divide
% Mod (returns remainder)
+ Add
− Subtract
++ Increments value by 1
−− Decrements value by 1
+= Adds the value

316 Unix and Shell Programming
Note: The Begin and End sections are optional.
Example
$ awk BEGIN{ printf "Records in the bank.lst fi le are :\n"}{ print $1, $2, $3 }' bank.lst
This example prints the fi rst, second, and third fi elds of the fi le bank.lst. At the top, the following header will be displayed along with the line feed: Records in the bank.lst fi le are.
9.9 USER-DEFINED VARIABLES
The user-defi ned variables in AWK are similar to the variables that we use in a traditional programming language. They are meant for holding intermediate as well as fi nal results of computation in the script.
Syntax variable_name=value
Here, variable_name is the name of the variable and value is the value assigned to it. A variable_name can consist of only letters, numbers, and underscores and cannot begin with a number.
Example
total=0account="saving"
These examples create the two variables total and account, respectively. The total variable is initialized to value 0 and the account variable is initialized to saving.
Note: No type declaration is required for defi ning variables in AWK. By default, variables are initialized to zero or a null string.
Example The following is the fi le bank.lst, which we created in Section 9.1.
101 Aditya 0 14/11/2012 current 102 Anil 10000 20/05/2011 saving 103 Naman 0 20/08/2009 current 104 Rama 10000 15/08/2010 saving 105 Jyotsna 5000 16/06/2012 saving 106 Mukesh 14000 20/12/2009 current 107 Yashasvi 14500 30/11/2011 saving 108 Chirag 0 15/12/2012 current 109 Arya 16000 14/12/2010 current 110 Puneet 130 16/11/2009 saving
The following script adds the contents of the third fi eld of the fi le bank.lst into the variable total. At the end, the total is displayed.

AWK Script 317
totalbal.awk{total+=$3}END{print "Total Amount In Bank Is " ,total}$ awk -f totalbal.awk bank.lst
Output
Total Amount In Bank Is 69630
The following script displays all the records of the fi le bank.lst, counts the number of records, and also prints the average balance.countrecs.awkBEGIN{ printf "Records are :\n\n"}{ printf"%5d %-20s %d %15s %10s\n",$1,$2,$3,$4,$5 c++; tot+=$3}END{ printf"\n\t The Number Of Records Are %d\n",c printf"\n\t The Average Balance Is %.2f\n",tot/c}
$ awk -f countrecs.awk bank.lst
Output
Records are :101 Aditya 0 14/11/2012 current102 Anil 10000 20/05/2011 saving103 Naman 0 20/08/2009 current104 Rama 10000 15/08/2010 saving105 Jyotsna 5000 16/06/2012 saving106 Mukesh 14000 20/12/2009 current107 Yashasvi 14500 30/11/2011 saving108 Chirag 0 15/12/2012 current109 Arya 16000 14/12/2010 current110 Puneet 130 16/11/2009 savingThe Number Of Records Are 10The Average Balance Is 6963.00
The following script adds the third fi eld of the fi le bank.lst and if the third fi eld is 0, skips to the next record. In other words, only the contents of the third fi eld that are non-zero are added into the total variable. Besides this, counting is also done for the number of customers with non-zero balance and the average balance is computed.
addnonzero.awk$3==0{next}

318 Unix and Shell Programming
{ total +=$3 count++}END {avrg = total/count printf "Total Amount :%d\n",total printf "Number Of Customer :%d\n ",count printf "Average Amount In Bank :%9.2f\n",avrg}
$ awk -f addnonzero.awk bank.lst
Output
Total Amount :69630Number Of Customer :7Average Amount In Bank: 9947.14
9.10 if else STATEMENT
During programming we may come across a situation where we wish to apply conditional branching, that is, we wish to apply specifi c processing on columns that satisfy given criteria. The if else statement is used to implement such criteria.
An if else statement is a conditional statement that is used for choosing one set of statements out of the two depending on the validity of the logical expression included.
if (logical expression){ ... ...}else{ ... ...}
If the logical expression is true, then the statement in if block will execute, otherwise the statements of else block will be executed.
Examples
(a) $ awk '{ if($3 > 10000) print "interest =" $3*.05; else print "interest=" $3*.06 }' bank.lstIt prints the interest as 5% of the balance if the balance is more than 10,000, otherwise it prints the interest as 6% of the balance, from the fi le bank.lst.interest=0interest=600

AWK Script 319
interest=0interest=600interest=300interest=700interest=725interest=0interest=800interest=7.8The script calculates the average balance in the saving account of the fi le bank.lst. This is to say that the total balance of all the customers with saving account is computed and the total is divided by the number of customers with saving account. If the average balance is more than 100,000, the following message is displayed: Quite Good. Otherwise the following message is displayed: below Average.avgbalance.awk{ if ($5 == "saving") { bal +=$3 c++ }}END{ avg=bal/c if(avg > 100000) print "Average balance in saving accounts is Quite Good",avg else print "Average balance in saving account is below Average",avg}$ awk -f avgbalance.awk bank.lst
Output
Average balance in saving account is below Average 7926The script displays the records of the fi le bank.lst having a balance >= 15,000 and also having the pattern current in the fi fth fi eld.
currentbal.awk{ if($3 >= 15000 && $5=="current") print $0}$ awk -f currentbal.awk bank.lst
Output
109 Arya 16000 14/12/2010 current

320 Unix and Shell Programming
(b) This script fi nds the maximum and minimum balance in the bank.lst fi le.maxminbal.awk{ if (NR==1) { min=$3 } if (max < $3) { max=$3 } if (min > $3) { min=$3 }}END{ print "Maximum balance is ", max print "Minimum balance is ", min}$ awk -f maxminbal.awk bank.lst
Output
Maximum balance is 16000Minimum balance is 0
(c) The following script removes the fi rst four lines from the fi le bank.lst and stores the rest of the lines in the fi le passed as the command line argument. If we enter the same fi le name as source fi le # in the command line argument, it will remove the fi rst four lines from the fi le source fi le.removefour.awkawk 'NR >4{ print $0 > "'$1'"}' bank.lst $./removefour.awk bkk.lstAll the lines from the fi le bank.lst will be copied into the fi le bkk.lst except the fi rst four lines. When we see the contents of the fi le bkk.lst, its contents will be as given here:
Output
$ cat bkk.lst105 Jyotsna 5000 16/06/2012 saving 106 Mukesh 14000 20/12/2009 current 107 Yashasvi 14500 30/11/2011 saving 108 Chirag 0 15/12/2012 current

AWK Script 321
109 Arya 16000 14/12/2010 current 110 Puneet 130 16/11/2009 saving
9.11 BUILT-IN VARIABLES
In addition to the variables that we can defi ne, AWK provides several built-in variables that are predefi ned and ready-to-use. The complete list of these variables is given in Table 9.4.
Examples
(a) $ awk 'NR >0' bank.lstThis statement prints all the records of the fi le having record number >0. Since the record number begins from 1, all the records of the fi le bank.lst are displayed.101 Aditya 0 14/11/2012 current 102 Anil 10000 20/05/2011 saving 103 Naman 0 20/08/2009 current 104 Rama 10000 15/08/2010 saving 105 Jyotsna 5000 16/06/2012 saving 106 Mukesh 14000 20/12/2009 current 107 Yashasvi 14500 30/11/2011 saving 108 Chirag 0 15/12/2012 current 109 Arya 16000 14/12/2010 current 110 Puneet 130 16/11/2009 saving
(b) $ awk 'NR >0 { print NR,$0 }' bank.lstThis statement prints all the records of the fi le bank.lst along with their record number (line number). The built-in variable, NR, represents the row or record number and $0 represents the complete input line.
Output
1 101 Aditya 0 14/11/2012 current 2 102 Anil 10000 20/05/2011 saving 3 103 Naman 0 20/08/2009 current
Table 9.4 Built-in variables in AWK
Variable Description Variable Description
FS Input fi eld separator
RS Input record separator
OFS Output fi eld separator
ORS Output record separator
NF Number of non-empty fi elds in current record
NR Number of records read from all fi les
FILENAME Name of the current fi le
ARGC Number of command-line arguments
ARGV Command-line argument array
RLENGTH Length of string matched by a built-in string function
RSTART Start of string matched by a built-in string function

322 Unix and Shell Programming
4 104 Rama 10000 15/08/2010 saving 5 105 Jyotsna 5000 16/06/2012 saving 6 106 Mukesh 14000 20/12/2009 current 7 107 Yashasvi 14500 30/11/2011 saving 8 108 Chirag 0 15/12/2012 current 9 109 Arya 16000 14/12/2010 current 10 110 Puneet 130 16/11/2009 saving
(c) $ awk 'NR ==3 { print NR,$0 }' bank.lstIt prints only the third record, that is, record number 3 will be displayed.
Output
3 103 Naman 0 20/08/2009 currentIt is now time to understand fi eld separators.
A record in AWK is split into fi elds on the basis of the fi eld separator. By default, the fi eld separator is a blank space or a tab space. In order to specify our own fi eld separator, the two built-in variables that are popularly used are FS and OFS.
9.11.1 fs: Field Separator It represents the input fi eld separator, that is, it splits an input record into fi elds on the basis of this separator. The FS may be in the form of a single character or a regular expression. The default value of the fi eld separator is a single space.
Examples
(a) FS = ","This example describes input fi eld separator as , (comma), which means that each occurrence of a , in the input record separates two fi elds.
(b) FS = "\t"This example describes the input fi eld separator as a tab space, which means that the input record is separated into fi elds on each occurrence of a tab character.
9.11.2 OFS: Output Field Separator It represents the output fi eld separator, that is, it is an output equivalent of the AWK FS variable. It determines the fi eld separator used while displaying fi elds via the print statement. By default, AWK OFS is a single space. We set the OFS character to a comma (,) as follows:
OFS=","
Then the following print statement displays the fi elds of the fi le bank.lst separated by a , (comma):
print $1, $2, $3 } bank.lst
Similarly, the following value of the OFS will separate the fi elds by a tab space when printed:
OFS="\t"
Example $ awk 'BEGIN { OFS = "\t" } { print $1, $2, $3 }' bank.lst

AWK Script 323
It prints the fi rst, second, and third fi elds of the fi le bank.lst. The fi elds will be separated by a tab space. OFS stands for output fi eld separator. In the absence of the OFS, the default output fi eld separator is a white space.
9.12 CHANGING INPUT FIELD SEPARATOR
The input fi eld separator, FS, helps in specifying how and where an input line be split into fi elds. The default value for FS is space and tab. We can manually set FS to any other character depend-ing on our requirement. To change FS, we either specify it through the -F option or in a BEGIN pattern.
Note: We can even store AWK commands in fi les and then use it at run time. The extension of the fi le is .awk.
Examples
(a) Let us store the following commands in the fi le dispjustify.awk.BEGIN{FS="|"}{ printf"%20s %d %-20s\n",$1,$2,$3 # by %20s the string will be right justifi ed and by %-20s, the string will be left justifi ed}
Note: No quotes are used to enclose the AWK program.
(b) Consider the fi le bnk.lst.Aditya|5000|current|14/11/2012Anil|13000|current|15/12/1987Naman|15000|saving|16/10/1982Rama|10000|saving|19/09/1982Jyotsna|15000|current|20/10/1956Mukesh|14000|saving|21/05/1985Yashasvi|14500|current|21/11/1982Chirag|12500|saving|12/11/1984Arya|16000|current|16/01/1973Puneet|13000|saving|20/02/1970
The AWK commands that are stored in a fi le can be accessed with the -f fi lename option.$ awk –f dispjustify.awk bnk.lstWhere −f is the option in AWK that is used to execute the AWK script stored in the fi le.In this script, we have set FS, that is, input fi eld separator to ‘|’. This means the fi le on which this script will be applied must have fi elds separated by a ‘|’.The following will be the output.Aditya 5000 currentAnil 13000 currentNaman 15000 savingRama 10000 saving

324 Unix and Shell Programming
Jyotsna 15000 currentMukesh 14000 savingYashasvi 14500 currentChirag 12500 savingArya 16000 currentPuneet 13000 saving
(c) Consider a fi le comp.lst.PC XT 1986 100 150000PC AT 1990 200 125000PC P1 1995 125 100000PC PII 1996 100 80000PC PIII 1999 150 70000PC PIII 2000 25 60000The following script prints the total number of computers, as well as the total number of computers, made after 1998.totalcomp.awkBEGIN{ FS="\t"}{ print $0 totno +=$3 if ($2 >1998) tot +=$3}END{ print "Total number of computers ", totno print "Total number of computers made after 1998 are ", tot}$ awk -f totalcomp.awk comp.lst
Output
PC XT 1986 100 150000PC AT 1990 200 125000PC P1 1995 125 100000PC PII 1996 100 80000PC PIII 1999 150 70000PC PIII 2000 25 60000Total number of computers 700Total number of computers made after 1998 are 175
9.13 FUNCTIONS
Functions are small modules/subroutines, which, once written, can be called as many times as we want, hence avoiding repetition of statements. Functions also make a program clear and systematic.

AWK Script 325
Example Consider a fi le data.lst.
45 91kamal sunil82 1531 44manish anilRama ravi
The following script prints the larger value fi rst followed by the smaller value out of the two values (of each line/record) in the given fi le (using functions).largersmaller.awk{ printf "%15s %15s \n", larger($1,$2), smaller($1,$2)}function larger(m,n){ return m > n ? m:n}function smaller(m,n){ return m < n ? m : n}
Output
$ cat data.lst45 91kamal sunil82 1531 44manish anilRama ravi$ nawk -f largersmaller.awk data.lst 91 45 sunil kamal 82 15 44 31 manish anil ravi Rama
AWK also has several built-in functions, performing both arithmetic and string operations.
9.13.1 String Functions AWK includes numerous string functions that can be used to determine the length of a string, extract a part of a string, split a string into an array, and much more. A few of the built-in string functions are listed in Table 9.5.

326 Unix and Shell Programming
Table 9.5 Built-in string functions in AWK
Function Description
length(x) It returns the length of the argument x. If the argument is not supplied, it fi nds out the length of the entire line.
substr(s1,s2,s3) It returns a portion of the string of length s3, starting from position s2 in the string s1.
Index(s1,s2) It returns the position of the string s2 in the string s1. It returns 0 if t is not present.
Split(s,a) It splits the string s into an array a and optionally returns the number of fi elds. The fi eld separator is specifi ed by FS.
system("cmd") It runs the Unix command, cmd, and returns its exit status.
The string functions will now be discussed in detail.
length() The length() function determines the length of its arguments, and if no arguments are present, Table 9.5 it assumes the entire line as its argument.
Syntax length [(argument)]
Here, argument, if supplied, makes the length function return its length.
Examples
(a) Consider the fi le text.lst.This is Solaris Unix Operating SystemAjmer. We are working on awk scriptsIt appears to be very interesting
(a) (i) $ awk '{ print length }' text.lstIt displays the length (the number of characters) of each line/record of the fi le text.lst.
Output
373633
(a) (ii) $ awk 'length ($2) >4' bank.lstIt displays all the records where the second fi eld is more than four characters long.
Output
101 Aditya 0 14/11/2012 current 103 Naman 0 20/08/2009 current 105 Jyotsna 5000 16/06/2012 saving 106 Mukesh 14000 20/12/2009 current 107 Yashasvi 14500 30/11/2011 saving 108 Chirag 0 15/12/2012 current 110 Puneet 130 16/11/2009 saving

AWK Script 327
(b) Consider a fi le text.lst.This is Solaris Unix Operating SystemAjmer. We are working on awk scriptsIt appears to be very interesting
(b) (i) The following script prints the complete line, as well as the number of characters in each line of the fi le text.lst.linechars.awk{ print $0, "\t", n=length($0) c +=n}END {print "Total characters in ",FILENAME, "are", c}# FILENAME is the reserved word which designates the script fi le name$ awk -f linechars.awk text.lst
Output
This is Solaris Unix Operating System 37Ajmer. We are working on awk scripts 36It appears to be very interesting 33Total characters in text.lst are 106
(b) (ii) The following script counts the number of lines and the words in each line and at the end prints the total number of lines and words in the fi le.counttotlw.awkBEGIN{print "Line No\t Words \t Line"}{ print NR,"\t",NF,"\t" $0 w+=NF}END{ print "\nTotals:" print "Words: \t" w print "Lines:\t" NR}In this script, NF, that is, the number of fi elds (number of words) are added to the variable, w (for every line).$ awk -f counttotlw.awk text.lst
Output
Line No Words Line1 6 This is Solaris Unix Operating System2 7 Ajmer. We are working on awk scripts3 6 It appears to be very interesting

328 Unix and Shell Programming
Total:Words: 19Lines: 3
(b) (iii) The following script prints the average number of words per line. First, it computes the total number of lines and the total number of words in the fi le and then prints the average.avgwords.awk{ totw +=NF l++ print $0}END{ print "Total number of words in ",FILENAME, "are", totw print "Total number of lines are ",l printf "Average number of words per line is %d\n", totw/l}$ awk -f avgwords.awk text.lst
Output
This is Solaris Unix Operating SystemAjmer. We are working on awk scriptsIt appears to be very interestingTotal number of words in text.lst are 19Total number of lines are 3Average number of words per line is 6
index() The index() function determines the position of a string within a larger string.
Syntax index(main_string, string_to_search)
Here, main_string is the string in which string_to_search has to be searched for. If the string_to_search is found in the main_string, its index location will be returned, otherwise 0 will be returned. (a) x = index("abcde", "b")
This returns the value 2.(b) The following script counts the number of customers with current account.
countcurrent.awk# Counting the number of customers with current account{ n=index($0, "current") if (n>0) { c++ }}END{

AWK Script 329
print "The number of customers with current account is ", c}$ awk -f countcurrent.awk bank.lst
Output
The number of customers with current account is fi ve.The script checks if the desired pattern exists in the string fed by the user.checkpattern.awkBEGIN{print "Enter a string followed by Enter key. To quit, press ^d"}{ n=index($0,"M") print "'M' is found at location ",n," in word ",$0 n=index($0,"ic") print "'ic' is found at location ",n," in word ",$0 n=index($0,"chip") print "'chip' is found at location ",n," in word ",$0}
Output
$ awk -f checkpattern.awkEnter a string followed by Enter key. To quit, press ^dMicrochip'M' is found at location 1 in word Microchip'ic' is found at location 2 in word Microchip'chip' is found at location 6 in word Microchip
Silicon chips'M' is found at location 0 in word Silicon chips'ic' is found at location 4 in word Silicon chips'chip' is found at location 9 in word Silicon chips
(c) Consider a fi le matter.lst.We are trying an awk scriptAjmer is a nice place to stayFIRST it is quiet and calmSecondly the distances are smallEverything is in approachMany visiting places ENDEven Mayo college is in AjmerAlways work hardWho knows when the talent is requiredIndia is supposed to be super powerIndians are very hard workingWASHINGTON D C is in AmericaNew Delhi is in IndiaSydney is in Australia

330 Unix and Shell Programming
(c) (i) The script prints all the lines from the given fi le, from the line starting with the word FIRST, till the line that ends with the word, END.beginfi rst.awk{ if($1=="FIRST") start=NR if ($NF=="END") { print $0 exit } if (NR >= start && start != 0) print $0}In this script, the line where the fi rst word is ‘FIRST’ is found, and the variable start is set equal to that line number. Then, until and unless the line where the last word is ‘END’ occurs, all the lines in between are printed. However, if the line where the fi rst word is ‘FIRST’ does not exist, the value of the variable start is set to 0 and nothing will be displayed.$ awk -f beginfi rst.awk matter.lst
Output
FIRST it is quiet and calmSecondly the distances are smallEverything is in approachMany visiting places END
(c) (ii) The following script prints all the lines from the given fi le, starting from line number 7 till the line that starts with the word WASHINGTON DC.fromline7.awk{ start=7 n=index($0,"WASHINGTON DC") if (n>0) { print $0 exit } if (NR >= start) print $0}$ awk -f fromline7.awk matter.lst
Output
Even Mayo college is in AjmerAlways work hardWho knows when the talent is required

AWK Script 331
India is supposed to be super powerIndians are very hard workingWASHINGTON D C is in America
substr() The substr() function is used for extracting a part of a string. It takes three arguments as follows:
Syntax substr(stg,s,n)
The fi rst argument, stg, represents the string to be used for extraction, s represents the starting point of extraction, and n indicates the number of characters to be extracted.
Examples
(a) substr($1,3,1)It extracts the third character of the fi rst fi eld.
(b) substr($1,1,4)It extracts the fi rst four characters of the fi rst fi eld
(c) substr($1,2,3)It extracts three characters from the second position of the fi rst fi eld
(d) $ awk 'substr($2,1,1) == "A" && substr($5,1,3) == "cur" ' bank.lstIt displays all the records having A as the fi rst character in the second fi eld and cur as the fi rst three characters in the fi fth fi eld of the fi le bank.lst.101 Aditya 0 14/11/2012 current 109 Arya 16000 14/12/2010 current
(e) $ awk 'substr($4,9,2) == "09" ' bank.lstIt displays all the records having 82 as the last two digits in the fourth fi eld of the fi le bank.lst.103 Naman 0 20/08/2009 current 106 Mukesh 14000 20/12/2009 current 110 Puneet 130 16/11/2009 saving
(e) (i) The following script prints records having the pattern Saving or saving in it.dispsaving.awkBEGIN{OFS="\t"}{ n=substr($5,1,1) if(n=="S" || n=="s") { print $0 }}$ awk -f dispsaving.awk bank.lst
Output
102 Anil 10000 20/05/2011 saving104 Rama 10000 15/08/2010 saving105 Jyotsna 5000 16/06/2012 saving

332 Unix and Shell Programming
107 Yashasvi 14500 30/11/2011 saving 110 Puneet 130 16/11/2009 saving
(e) (ii) The following script takes the fi rst name and surname as input and prints them after interchanging the two names.interchange.awkBEGIN{print "Enter fi rst name and sur name. To quit press ^d"}{ n=index($0," ") s=substr($0,n) f=substr($0,1,n-1) print "Name after interchanging fi rst and sur name is ",s,f}
Output
$ awk -f interchange.awkEnter fi rst name and sur name. To quit press ^dAnil SharmaName after interchainging fi rst and sur name is Sharma AnilSunil AroraName after interchainging fi rst and sur name is Arora Sunil
split() The split() function splits a string on the basis of a given delimiter and stores the split elements in an array. It takes three arguments, a string to be split (fi rst argument), an array (second argument), and the delimiter, which is used as the third argument.
Syntax split(stg,array_name,"pattern")
Here, stg represents the string that we wish to split, where the given pattern (delimiter) occurs in the string. The split string is stored in the given array_name.
Examples
(a) split ($1,k, " ")It will split fi eld1 into different components wherever space occurs. The components are then stored in the array k. This implies that if the $1 fi eld has Manoj Kumar Sharma, then Manoj will be stored in k[1], Kumar will be stored in k[2], and Sharma will be stored in k[3].
(b) Consider the fi le salary.lst.Anil,Sharma 5000Sunil,Arora 4500Charles,Peters 5300$ nawk 'split($1, p, ",") { print p[2] " " p[1] }' salary.lstIt will split the fi rst fi eld ($1) into parts wherever the delimiter comma (,) appears and stores those parts in the array p (p[1] containing the fi rst part, p[2] containing the second part, and so on). After splitting, the array p[2], containing the surname is displayed, followed by a blank space, which is then followed by the array p[1]. The

AWK Script 333
names are displayed from the fi le salary.lst after interchanging the fi rst name and the surname.
Output
Sharma AnilArora SunilPeters Charles
(c) Consider a fi le salary.lst.Anil,Sharma 5000Sunil,Arora 4500Charles,Peters 5300
(c) (i) The script prints the salary and then the name of the person, interchanging the fi rst name and surname after removing the , (comma) from the name.salintchange.awkBEGIN{FS="\t"}{ split($0,n) split(n[1],lnm,",") print n[2],lnm[2],lnm[1]}$ awk -f salintchange.awk salary.lst
Output
5000 Sharma Anil4500 Arora Sunil5300 Peters Charles
Note: The split() function is supported by NAWK but not AWK.
system() The system() function accepts any Unix command within double quotes as an argument, and executes the command. System commands or utilities are used in the AWK script using a pipe. This implies that the system command is written as a string within double quotes and the result of the system command is piped into the script through pipe line (|). The piped result is read into the script with a getline command.
Examples
(a) system("tput clear")system("date")The command returns 0 (success) or 1 (failure), which can then be used in the script.
(b) The following script demonstrates execution of the date system command and displays the fi rst and fourth fi elds of the command output.demogetline.awkBEGIN{ "date" | getline print($1,$4)}

334 Unix and Shell Programming
Output
$ dateTuesday 6 March 2012 10:47:10 PM IST$ nawk -f demogetline.awkTuesday 2012
(c) When there are multiple lines of output from the system command, they must be read with a loop, as shown in the following script.demogetline2.awkBEGIN{ "date" | getline print($1,$4) while("who" | getline) print($1,$2)}
Output
$ dateTuesday 6 March 2012 11:03:58 PM IST$ whoroot console Mar 6 22:33 (:0)root pts/3 Mar 6 22:34 (:0.0)$ nawk -f demogetline2.awkTuesday 2012root consoleroot pts/3
9.13.2 Arithmetic Functions Commonly used arithmetic operations such as computing square root, sine, and cosine can be easily performed in AWK as it provides the respective arithmetic functions for the same. The list of arithmetic functions is given in Table 9.6.
Table 9.6 Brief description of commonly used arithmetic functions in AWK
Function Description
Int It truncates fl oating-point value to integer.
rand() It returns a random number between 0 and 1.
Srand(x) It sets the seed or starting point for random numbers to be generated. If called without an argument, it uses the time of the day to generate the seed. If we do not provide or set a seed, the rand() function will return the same values every time it is run.
cos(x) It returns the cosine of x.
exp(x) It returns the exponent.
log(x) It returns the natural logarithm (base e) of x.
sin(x) It returns the sine of x.
sqrt(x) It returns the square root of x.

AWK Script 335
Examples
(a) BEGIN {print sin(90*p/180)} This example will print the output 1 as sin(p/2) is 1.
(b) BEGIN {print exp(1)} This example will return an exponent of 1 (e1), that is, 2.71828.
(c) BEGIN {print 10/3} This example will print the result 3.333.
(d) BEGIN {print int(10/3)} This example will print the result 3 as int() truncates the decimals from the result.
(e) BEGIN {print rand()}As mentioned in Table 9.6, the rand() function generates a random fl oating-point number between 0 and 1. Hence, this example might display the output as 0.231072.
(f) BEGIN {print rand()srand()print rand()}This example might display the following output.0.231072.0.639201We get a result that is the same as the one obtained in Example (e) because when the rand() function is called without calling the srand() function, AWK acts as if the srand() is called with a constant argument causing the rand() function to begin from the same starting point every time the program is run. On calling the srand() function, it generates a seed on the basis of the time of the day making the rand() function generate a new value.
(g) $ awk '{ print sqrt($3) }' bank.lstIt prints the square root of the balance of the fi le bank.lst.
(h) $ awk '{ print sin(3.1414/2) }' bank.lstIt prints 1 (because sin π/2 =1) 10 times because there are 10 records/lines in the fi le bank.lst.
(i) $ awk '{ if($3 <10000) print }' bank.lstIt prints only the records with a balance (third fi eld) less than 10,000 in the fi le bank.lst.

336 Unix and Shell Programming
101 Aditya 0 14/11/2012 current 103 Naman 0 20/08/2009 current 105 Jyotsna 5000 16/06/2012 saving 108 Chirag 0 15/12/2012 current 110 Puneet 130 16/11/2009 saving
(j) $ awk '{ if ($3 > 10000) print "good"; else print "bad" }' bank.lstIt prints a message, good, if the balance is greater than 10,000 and otherwise prints bad (only the message, good or bad, will be displayed with no records).badbadbadbadbadgoodgoodbadgoodbad
(k) Consider a fi le, bnk.lst, in which the delimiter used between fi elds is | instead of spaces or tabs.Aditya|5000|current|14/11/2012Anil|13000|current|15/12/1987Naman|15000|saving|16/10/1982Rama|10000|saving|19/09/1982Jyotsna|15000|current|20/10/1956Mukesh|14000|saving|21/05/1985Yashasvi|14500|current|21/11/1982Chirag|12500|saving|12/11/1984Arya|16000|current|16/01/1973Puneet|13000|saving|20/02/1970
(k) (i) $ awk '$0 ~/^A.*7$/' bnk.lstThis displays all the records having A as the starting character and 7 as the ending character in the fi le bnk.lst.
Output
Anil|13000|current|15/12/1987
(k) (ii) $ awk '$0 ~/^[A-W]/' bnk.lstIt displays all the records starting from any character in the range A to W in the fi le bnk.lst.
Output
Aditya|5000|current|14/11/2012Anil|13000|current|15/12/1987Naman|15000|saving|16/10/1982

AWK Script 337
Rama|10000|saving|19/09/1982Jyotsna|15000|current|20/10/1956Mukesh|14000|saving|21/05/1985Chirag|12500|saving|12/11/1984Arya|16000|current|16/01/1973Puneet|13000|saving|20/02/1970
(k) (iii) $ awk '$0 !~/^[A-W]/' bnk.lstIt displays all the records not starting from any character in the range A to W in the fi le bnk.lst.
Output
Yashasvi|14500|current|21/11/1982
9.14 LOOPS
Loops are used for executing a set of commands on the given input a specifi ed number of times or until the specifi ed logical expression is true. We are going to study three loops.
9.14.1 for LoopThe for loop is used for repeating a set of statements.
Syntax for(variable=initial value; fi nal condition; increment/decrement)
{ ... ... ... }A variable will be assigned an initial value. Until the variable reaches the fi nal condition, the body of the loop is executed, and the value of the variable increases/decreases with every execution.
Examples
(a) $ awk '{ for (k=1;k<=2;k++) printf "%s\n", $0 }' bank.lstIt displays each record of the fi le bank.lst two times.101 Aditya 0 14/11/2012 current 101 Aditya 0 14/11/2012 current 102 Anil 10000 20/05/2011 saving 102 Anil 10000 20/05/2011 saving 103 Naman 0 20/08/2009 current 103 Naman 0 20/08/2009 current 104 Rama 10000 15/08/2010 saving 104 Rama 10000 15/08/2010 saving 105 Jyotsna 5000 16/06/2012 saving 105 Jyotsna 5000 16/06/2012 saving 106 Mukesh 14000 20/12/2009 current

338 Unix and Shell Programming
106 Mukesh 14000 20/12/2009 current107 Yashasvi 14500 30/11/2011 saving 107 Yashasvi 14500 30/11/2011 saving 108 Chirag 0 15/12/2012 current 108 Chirag 0 15/12/2012 current 109 Arya 16000 14/12/2010 current 109 Arya 16000 14/12/2010 current110 Puneet 130 16/11/2009 saving 110 Puneet 130 16/11/2009 saving This command can also be written in two or more lines as shown.$ awk '{ for (k=1;k<=2;k++) printf "%s\n", $0 }' bank.lst
(b) The following script prints the total of all the columns of each record.totalcols.awkBEGIN{ FS="\t" OFS="\t"}{ tot=0 for (i=1;i<=NF;i++) tot+=$i print $0,tot}
$ awk -f totalcols.awk data.datThe contents of the fi le data.dat are as follows.10 20 30 40 11 21 31 41 12 22 32 42 The output will be as follows.10 20 30 40 10011 21 31 41 10412 22 32 42 108
(c) Consider a fi le school.lst.101 anil 45 66 78102 kamal 79 43 76103 ajay 87 41 65
(c) (i) The following script prints the record of each school student and also prints the total marks.totalmarks.awkBEGIN{print "Print Total"}

AWK Script 339
{total=$3+$4+$5}{print $1,$2,$3"+"$4"+"$5"="total}$ awk -f totalmarks.awk school.lst
OutputPrint Total101 anil 45+66+78=189102 kamal 79+43+76=198103 ajay 87+41+65=193
(c) (ii) The following script prints the roll number, name, and the average marks acquired by each student. avgmarks.awk{ total=0 count=0 for (i=3;i<=NF;i++) { total +=$i count++ } if (count > 0){ avrg=total/count print ($1,$2,avrg) }}$ awk -f avgmarks.awk school.lst
Output
101 anil 63102 kamal 66103 ajay 64.3333
(d) Consider a fi le txt.lst.This is Solaris Unix Operating SystemAjmer. We are working on awk scriptsIt appears to be very interesting
Note: There are two blank lines in this fi le.
(d) (i) The following script prints all the lines after the blank line. followblank.awkn == 1 {print $0;n = 0}$0 ~/^$/ {n=1}# If the line is blank (i.e. start and end ^- start, $-end are same), above line will set the value # of n=1. So, this script prints all the lines following the blank line $ awk -f followblank.awk txt.lst

340 Unix and Shell Programming
Output
Ajmer. We are working on awk scriptsIt appears to be very interesting
(d) (ii) The following script prints the lines before the blank line. beforeblank.awk$0 ~/^$/ && NR !=1 {print k}{k=$0}# This script prints the lines before the blank line. The line is fi rst saved in the variable k$ awk -f beforeblank.awk txt.lst
Output
This is Solaris Unix Operating SystemAjmer. We are working on awk scripts
(d) (iii) The following script counts the number of blank lines in a fi le.countblank.awk# Counting the number of blank lines$0 ~/^$/ {n=n+1}END{ print "The number of blank lines are ",n}
$ awk -f countblank.awk txt.lst
Output
The number of blank lines is 2.
(d) (iv) The following script inserts the two lines in between the fi le.inserttwo.awk# It inserts two lines :# Hello World !# Thank you# after second line in the given fi leNR !=3 {print $0}NR == 3{print "Hello World!"; print "Thank you" ;print $0}$ awk -f inserttwo.awk text.lst
Output
This is Solaris Unix Operating SystemAjmer. We are working on awk scriptsHello World!Thank youIt appears to be very interesting

AWK Script 341
(d) (v) The following script prints the matter from the fi le 10 characters at a time.tenchar.awk# This script prints the matter from the fi le 10 characters at a time.{ n=length($0) if (n<=10) print $0 else { for (i=1;n>10;i+=10) { print substr($0,i,10) n-=10 } print substr($0,i) }}$ awk -f tenchar.awk text.lst
Output
This is Solaris Unix Operating System Ajmer. We are working on awk scripts It appears to be very interesting
9.14.2 do while LoopIt is the loop used for repeating a set of statements.
Syntax do
{ ... ... ... ... }while(logical expression)
As we can see from the syntax in the ‘do while’ loop, the logical expression is checked at the end of the loop, so the loop will execute at least once, even if the logical expression is false.
Example The following script prints the roll number, name, and average marks acquired by each student (IInd method).
avgmarks2.awk{ FS="\t" OFS="\t" total =0

342 Unix and Shell Programming
count =0 i = 3}NF > 1{ do { total +=$i count++ i++ }while(i <=NF) avrg=total/count print($1,$2,avrg)}
Output
$ nawk -f avgmarks2.awk school.lst101 anil 63102 kamal 66103 ajay 64.3333
9.14.3 while LoopIn the while loop, the logical expression is validated only in the beginning, so the loop will not execute at all if the logical expression is false.
Syntax while (logical expression)
{ ... ... ... ... }
Example The following script prints the roll number, name, and average marks acquired by each student (IIIrd method).
avgmarks3.awk{ tot = 0 c = 0 i = 3 while(i <= NF) { tot +=$i c++ i++

AWK Script 343
} if(c > 0) { avg = tot/c print ($1,$2,avg) }}$ awk -f avgmarks3.awk school.lst
Output
101 anil 63102 kamal 66103 ajay 64.3333
9.15 GETTING INPUT FROM USER
In order to enhance user interaction, we require the user to input a value (or values) in the script. The command used for doing so is getline.
9.15.1 getline Command: Reading Input The getline command is used for reading a line (record). Data can be fed using the keyboard or from the fi le.
Syntax getline variable < fi le
If we write /dev/tty instead of fi le, then the data will be read from the terminal (keyboard).
Examples
(a) The following script displays the records of the customers having an account number greater than the value entered by the user.
desiredact.awk BEGIN{ printf "Enter the a/c no: " getline act < "/dev/tty" printf "Records of customers are:\n\n" } $1 > act {printf "%-20s %.2f %20s %20s\n",$2,$3,$4,$5}
If the value of $1 (account no.) is greater than the value entered by the user in the variable act, then the record is displayed. By %-20s, the string is left aligned and by %20s, the string is right aligned
Output
$ nawk -f desiredact.awk bank.lstEnter the a/c no: 105

344 Unix and Shell Programming
Records of customers are:Mukesh 14000.00 20/12/2009 currentYashasvi 14500.00 30/11/2011 savingChirag 0.00 15/12/2012 currentArya 16000.00 14/12/2010 currentPuneet 130.00 16/11/2009 saving
Note: You may recall that some functions such as getline, gsub(), and system() are supported in NAWK but not AWK.
(b) The following script displays the records of the customers having an account number and balance greater than the values entered by the user.
actbal.awk BEGIN{ printf "Enter account number: " getline acc <"/dev/tty" printf "Enter balance: " getline bal <"/dev/tty" print "Records are: " } $1 > acc && $3 > bal{printf "%5d %-20s %d\n",$1,$2,$3}
Output
$ nawk -f actbal.awk bank.lstEnter account number: 105Enter balance: 10000Records are:106 Mukesh 14000107 Yashasvi 14500109 Arya 16000
(c) Consider the fi le address.lst. Anil Sharma 22/1 Sri Nagar Road Ajmer
Sunil Arora 43/19 Vaishali Nagar Jaipur
Chirag Harwani 15, Chirag Enclave New Delhi
The following script prints the fi rst and last fi elds of the record of the fi le address.lst. lastfi eld.awk BEGIN{FS="\n"; RS=""} {

AWK Script 345
print($1,"\t", $NF)}#$NF prints the last fi eld contents$ awk -f lastfi eld.awk address.lst
Output
Anil Sharma AjmerSunil Arora JaipurChirag Harwani New Delhi
9.16 SEARCH AND SUBSTITUTE FUNCTIONS
Searching for a pattern is the most preferred operation with AWK scripts. In addition, we come across situations where we wish to search for a pattern and substitute it with some other pattern. By substitute, we mean replacing a regular expression found in a string with another string. The substitution can be done for the fi rst occurrence or for the global occurrence of the regular expression. The list of commonly used search and substitute functions is as given in Table 9.7.
Table 9.7 Brief description of commonly used search and substitute functions in AWK
Function Description
Delete array [element] This deletes the specifi ed element of the array.
Sub(r, s [,t]) This substitutes the fi rst occurrence of the regular expression r by s in the string t. If the string t is not supplied, $0 (entire line/record) is considered. The function returns 1 if successful and 0 otherwise.
Gsub(r,s) This substitutes s in place of r globally in $0 (entire line/record) and returns the number of substitution made.
Gsub(r,s,t) This substitutes s in place of r globally in the string t and returns the number of substitutions made.
match(s,r) This searches the string s for a substring r. The index of r is returned or zero is returned.
Toupper(str) This converts the given string into upper case.
Tolower(str) This converts the given string into lower case.
Through the AWK script we can replace a pattern or content in a given fi le with the desired content. We will use two functions, sub() and gsub(), for substituting fi le content. Let us see how.
9.16.1 sub() Substitution function replaces a pattern with another pattern in a given string.
Syntax sub (pattern to be replaced, new pattern, string in which pattern is to be replaced)

346 Unix and Shell Programming
The function replaces the pattern to be replaced with the new pattern in the string, String in which pattern is to be replaced. If the string in which pattern is to be replaced is not supplied, $0, that is, the entire line is considered.
This function returns 1 (true) if the substitution is successful and 0 (false) if the target string could not be found and the substitution could not be made.
Example Consider the fi le shp.lst.
101 Tea 50 102 Coffee 32103 Sugar 55102 Coffee 65101 Tea 69101 Tea 35102 Coffee 69103 Sugar 97103 Sugar 36102 Coffee 35
(a) The following script replaces the word Tea with the word Brooke Bond in a given fi le and displays those lines where the replacement is performed.
replacewrd.awk
{ t = sub(/Tea/,"Brooke Bond",$0)}{ if(t > 0) print NR,$0}
Output
$ nawk -f replacewrd.awk shp.lst1 101 Brooke Bond 505 101 Brooke Bond 696 101 Brooke Bond 35
(b) The following script replaces a string with another string of a particular record/line only.
replacestr.awk{ if(NR == 5) sub (/Tea/,"Brooke Bond") print $0}

AWK Script 347
Output
$ cat shp.lst101 Tea 50102 Coffee 32103 Sugar 55102 Coffee 65101 Tea 69101 Tea 35102 Coffee 69103 Sugar 97103 Sugar 36102 Coffee 35$ nawk -f replacestr.awk shp.lst101 Tea 50102 Coffee 32103 Sugar 55102 Coffee 65101 Brooke Bond 69101 Tea 35102 Coffee 69103 Sugar 97103 Sugar 36102 Coffee 35
9.16.2 gsub()The global substitution function changes all occurrences of a value by another value. The format for the global substitution function is identical to sub. The only difference is that it replaces all occurrences of the matching text.
Syntax There are two syntaxes for using the gsub() command.
gsub(r,s)
Here, r is the expression or pattern that is substituted by s globally in $0 (entire line/record). The function returns the number of substitutions made.
gsub(r,s,t)
Here, r is the expression or pattern that is substituted by s globally in the string t. The function returns the number of substitutions made.
Example The following script replaces the string Tea with Brooke Bond in the whole fi le.
repstrglob.awk{ gsub (/Tea/,"Brooke Bond",$0)}

348 Unix and Shell Programming
{ if(index($0,"Brooke Bond")) print NR,$0}
Output
$ cat shp.lst101 Tea 50102 Coffee 32103 Sugar 55102 Coffee 65101 Tea 69101 Tea 35102 Coffee 69103 Sugar 97103 Sugar 36102 Coffee 35$ nawk -f repstrglob.awk shp.lst1 101 Brooke Bond 505 101 Brooke Bond 696 101 Brooke Bond 35
9.16.3 match()The match string function returns the starting position of the matching expression in the line. If there is no matching string, it returns 0. In addition, it sets two system variables—RSTART to the starting position and RLENGTH to the length of the matching text string.
Syntax position = match (string in which to search, pattern to search)
Examples
(a) {if (match($0, /^.*,/) > 0)print NR, substr ($0 , RSTART, RLENGTH)}This example prints lines that start with any character but end with a , (comma).The following is a detailed example that demonstrates the use of the match() function.
(b) Consider a fi le bank1.lst, with the content as provided.101 Aditya 0 14/11/2012 current 102 Anil 10000 20/05/2011 saving 103 Naman 0 20/08/2009 Current 104 Rama 10000 15/08/2010 saving 105 Jyotsna 5000 16/06/2012 saving 106 Mukesh 14000 20/12/2009 current 107 Yashasvi 14500 30/11/2011 saving 108 Chirag 0 15/12/2012 Current

AWK Script 349
109 Arya 16000 14/12/2010 Current 110 Puneet 130 16/11/2009 saving
The following script counts the number of customers with current or Current accounts.countcurrent2.awk# Counting the number of customers with current or Current account{ match($0, /[Cc]urrent/) if (RSTART>0) { c++ }}END{ print "The number of customers with current account is ", c}
Output
$ cat bank1.lst101 Aditya 0 14/11/2012 current102 Anil 10000 20/05/2011 saving103 Naman 0 20/08/2009 Current104 Rama 10000 15/08/2010 saving105 Jyotsna 5000 16/06/2012 saving106 Mukesh 14000 20/12/2009 current107 Yashasvi 14500 30/11/2011 saving108 Chirag 0 15/12/2012 Current109 Arya 16000 14/12/2010 Current110 Puneet 130 16/11/2009 saving$ nawk -f councurrent2.awk bank1.lstThe number of customers with current account is 5
9.16.4 toupper()The toupper() function converts lower-case characters in a string into upper case. Characters that are not in lower case are left unchanged.
Syntax toupper(str)
Here, str represents the string that will be converted into upper case.
9.16.5 tolower()The tolower() function converts upper-case characters into lower case without disturbing characters that are not in upper case.
Syntax tolower(str)
Here, str represents the string that will be converted into lower case.
350 Unix and Shell Programming
Examples
(a) The following script replaces all the occurrences of the pattern tea or Tea with its upper case format, that is, TEA, in the given fi le.repupper.awk{ match($0,/[Tt]ea/) t=toupper(substr($0,RSTART,RLENGTH)) gsub(/[Tt]ea/,t) print $0}
Output
$ cat shp.lst101 Tea 50102 Coffee 32103 Sugar 55102 Coffee 65101 Tea 69101 Tea 35102 Coffee 69103 Sugar 97103 Sugar 36102 Coffee 35
$ nawk -f repupper.awk shp.lst101 Tea 50102 Coffee 32103 Sugar 55102 Coffee 65101 Tea 69101 Tea 35102 Coffee 69103 Sugar 97103 Sugar 36102 Coffee 35
(b) Consider a fi le, letter.lst, with the following content.teacoffeeteasugarcoffeecoffeesugartea

AWK Script 351
The following script displays all the lines from the given fi le starting with the specifi ed character.linesfromchar.awkBEGIN{ print "Enter a character: " getline c <"/dev/tty"}{ n=substr($0,1,1) n=toupper(n) c=toupper(c) if (n==c) { print $0 }}
Output
$ cat letter.lstteacoffeeteasugarcoffeecoffeesugartea$ nawk -f linesfromchar.awk letter.lstEnter a character: tteateatea
(c) Consider a fi le, matter.lst, with the following content.We are trying an awk scriptAjmer is a nice place to stayFIRST it is quiet and calmSecondly the distances are smallEverything is in approachMany visiting places ENDEven Mayo college is in AjmerAlways work hardWho knows when the talent is requiredIndia is supposed to be super powerIndians are very hard working

352 Unix and Shell Programming
WASHINGTON DC is in AmericaNew Delhi is in IndiaSydney is in Australia
The following script searches for a word in any case (lower case or upper case) in the fi le and displays the matching lines.searchword.awkBEGIN{ print "Enter the word" getline c <"/dev/tty" }{ n=toupper($0) c=toupper(c) k=index(n,c) if (k>0) { print $0 }}$ nawk -f searchword.awk matter.lst
Output
Enter the word indiaIndia is supposed to be super powerIndians are very hard workingNew Delhi is in India
(d) Consider a fi le, text.lst, with the following content.This is Solaris Unix Operating SystemAjmer. We are working on awk scriptsIt appears to be very interesting
(d) (i) The following script changes the case of the words in the fi le. The words starting with lower case are converted to upper case and the words starting with upper case characters are converted to lower case.changecase.awk{ for(i=1;i<=NF;i++) {
h=substr($i,1,1) if( h>="a" && h<="z") printf "%s", toupper($i) else if (h>="A" && h<="Z")

AWK Script 353
printf "%s", tolower($i) else printf "%s", $i } printf "\n"
}
Output
$ cat text.lstThis is Solaris Unix Operating SystemAjmer. We are working on awk scriptsIt appears to be very interesting
$ nawk -f changecase.awk text.lstthis IS solaris unix operating systemajmer. we ARE WORKING ON AWK SCRIPTSit APPEARS TO BE VERY INTERESTING
(d) (ii) The following script changes the case of the words in the fi le into lower case.intolower.awk{print tolower($0)
}
Output
$ cat text.lstThis is Solaris Unix Operating SystemAjmer. We are working on awk scriptsIt appears to be very interesting
$ nawk -f intolower.awk text.lstthis is solaris unix operating systemajmer. we are working on awk scriptsit appears to be very interesting
(d) (iii) The following script changes the case of the words in the fi le into upper case.convupper.awk{print toupper($0)}
Output
$ cat text.lstThis is Solaris Unix Operating SystemAjmer. We are working on awk scriptsIt appears to be very interesting

354 Unix and Shell Programming
$ nawk -f convupper.awk text.lstTHIS IS SOLARIS UNIX OPERATING SYSTEMAJMER. WE ARE WORKING ON AWK SCRIPTSIT APPEARS TO BE VERY INTERESTING
(d) (iv) The following script toggles the case of each character in the fi le, that is, the characters in lower case are converted into upper case and characters in upper case are converted into lower case.togglecase.awk{
for(i=1;i<=NF;i++){
n=length($i)for(j=1;j<=n;j++){ h=substr($i,j,1) if( h>="a" && h<="z") printf "%c",toupper(h) else if (h>="A" && h<="Z") printf "%c",tolower(h) else printf "%c",h
}printf " "
}printf "\n"
}
Output
$ cat text.lstThis is Solaris Unix Operating SystemAjmer. We are working on awk scriptsIt appears to be very interesting
$ nawk -f convupper.awk text.lsttHIS IS sOLARIS uNIX oPERATING sYSTEMaJMER. wE ARE WORKING ON AWK SCRIPTSiT APPEARS TO BE VERY INTERESTING
(e) This example shows how to access each word of the fi le followed by extracting each character of the word and converting its case as desired. In the following example, we will extend the same concept, but this time, we will learn to access the desired number of columns and use them in computation.

AWK Script 355
Consider a fi le, data.dat, with the initial content as follows.
10 20 30 4011 21 31 4112 22 32 42
(e) (i) The following script adds the given number of columns from the given fi le. The number of columns to be added is passed as a command line argument.addcols.awkawk 'BEGIN{ OFS="\t" print "Total of",'$1', "columns"}{
tot=0;for(i=1;i<='$1';i++) tot +=$igtot=gtot+totprint $0,tot
}END{
print "Grand Total",gtot}' data.dat$./addcols.awk 2
Note: This AWK script is executed the way a shell script is executed, that is, ./ followed by the script name, which is then followed by the command line arguments.
Output
Total of 2 columns10 20 30 40 3011 21 31 41 3212 22 32 42 34Grand Total 96$./addcols.awk 3
Output
Total of 3 columns10 20 30 40 6011 21 31 41 6312 22 32 42 66Grand Total 189
Examples (a) The following example focuses on the input and output fi eld separators, displaying content of columns that satisfy given criteria, displaying desired rows of the fi le,

356 Unix and Shell Programming
performing computation on the specifi ed column content, and applying string functions on specifi c columns of the fi le.
Consider a fi le cont.lst.CIS 8650 262 AsiaCanada 3852 24 North AmericaChina 3692 866 AsiaUSA 3615 219 North AmericaBrazil 3286 116 South AmericaAustralia 2968 14 AustraliaIndia 1269 637 AsiaArgentina 1072 26 South AmericaSudan 968 19 AfricaAlgeria 920 8 Africa
In this fi le, the columns specify the country, its area, population (in millions), and the continent to which it belongs.(a) (i) The following script displays the countries of the Asian continent that have a
population of more than 500 million.
popasia.awkBEGIN{
IFS="\t" OFS="\t" print "Country\tArea\tPOP\tContinents"}{
if($4 == "Asia" && $3 >= 500) print $1,$2,$3,$4}$ awk -f popasia.awk cont.lst
Output
Country Area POP ContinentsChina 3692 866 AsiaIndia 1269 637 Asia
(a) (ii) The following script prints the fi rst fi ve records of the fi le cont.lst.fi rstfi ve.awk
BEGIN{ FS="\t" OFS="\t" print "Country\tArea\tPOP\tContinents"}{ if(NR <=5)

AWK Script 357
print $1,$2,$3,$4}$ awk -f fi rstfi ve.awk cont.lst
Output
Country Area POP ContinentsCIS 8650 262 AsiaCanada 3852 24 North AmericaChina 3692 866 AsiaUSA 3615 219 North AmericaBrazil 3286 116 South America
(a) (iii) The following script prints each record preceded by its record number and a colon, with no extra blanks from the fi le cont.lst.
recnumcolon.awkBEGIN{ FS="\t" print "Country Area POP Continents"}{ print NR,":",$1,$2,$3,$4}$ awk -f recnumcolon.awk cont.lst
Output
Country Area POP Continents1 : CIS 8650 262 Asia2 : Canada 3852 24 North America3 : China 3692 866 Asia4 : USA 3615 219 North America5 : Brazil 3286 116 South America6 : Australia 2968 14 Australia7 : India 1269 637 Asia8 : Argentina 1072 26 South America9 : Sudan 968 19 Africa10 : Algeria 920 18 Africa
(a) (iv) The following script prints those records whose country name begins with the letters S through Z from the fi le cont.lst.countrysz.awkBEGIN{ FS="\t" OFS="\t" print "Country\tArea\tPOP\tContinents"}

358 Unix and Shell Programming
{ h=substr ($1,1,1)
if ((h>="S" && h<="Z") || (h>="s" && h<="z")) print $1,$2,$3,$4}$ awk -f countrysz.awk cont.lst
Output
Country Area POP ContinentsUSA 3615 219 North AmericaSudan 968 19 Africa
(a) (v) The following script is used to display all the records of the fi le cont.lst and at the end print the total area and total population.
totareapop.awkBEGIN{ FS="\t" print"COUNTRY""\t\t""AREA""\t""POP""\t""CONTINENT"}{ printf "%-15s %d\t%d\t%-20s\n", $1,$2,$3,$4 tot +=$2 total +=$3}END{ print "=============================================" print "Total" "\t\t" tot "\t" total print "============================================="}$ awk -f totareapop.awk cont.lst
Output
COUNTRY AREA POP CONTINENTCIS 8650 262 AsiaCanada 3852 24 North AmericaChina 3692 866 AsiaUSA 3615 219 North AmericaBrazil 3286 116 South AmericaAustralia 2968 14 AustraliaIndia 1269 637 AsiaArgentina 1072 26 South AmericaSudan 968 19 Africa Algeria 920 18 Africa =============================================Total 30292 2201=============================================

AWK Script 359
(a) (vi) The following script prints the contents of the fi le countries abbreviating the country names to their fi rst three characters from the fi le cont.lst.abbrthree.awkBEGIN{ FS="\t" OFS="\t" print "Country\tArea\tPOP\tContinents"}{ h=substr($1,1,3) print h,$2,$3,$4}$ awk -f abbrthree.awk cont.lst
Output
Country Area POP ContinentsCIS 8650 262 AsiaCan 3852 24 North AmericaChi 3692 866 AsiaUSA 3615 219 North AmericaBra 3286 116 South AmericaAus 2968 14 AustraliaInd 1269 637 AsiaArg 1072 26 South AmericaSud 968 19 AfricaAlg 920 18 Africa
(a) (vii) The following script displays the total area and population in each of the continents from the fi le cont.lst. Continent name is the fi rst column, total population is the second column, and the total area is the third column.
popareacont.awkBEGIN{ FS="\t" print "Continent\tTotal Pop\tTotal Area"}{ totp[$4]+=$3 tota[$4]+=$2}END{ for(i in totp) {

360 Unix and Shell Programming
printf "%-15s %d\t\t%d\n",i,totp[i],tota[i] }}$ awk -f popareacont.awk cont.lst
Output
Continent Total Pop Total AreaSouth America 142 4358Africa 37 1888Asia 1765 13611Australia 14 2968North America 243 7467
(b) The following example demonstrates the usage of fi eld separators (FS and OFS) and number of fi elds (NF).
Consider a fi le, text.lst, having the following content.This is Solaris Unix Operating SystemAjmer. We are working on awk scriptsIt appears to be very interesting
The following script prints each line of the fi le in reverse order. Reverse, here, does not mean upside down; instead, it means that the fi rst word of the line is printed last, the second word is printed second last, and so on.
reversefi le.awkBEGIN{
FS=" " OFS=" "
}{
for(i=NF;i>=1;i−−) { printf "%s ",$i } printf"\n"
}$ awk -f reversefi le.awk text.lst
Output
System Operating Unix Solaris is This scripts awk on working are We Ajmer. interesting very be to appears It

AWK Script 361
9.17 COPYING RESULTS INTO ANOTHER FILE
Till now, we have used AWK scripts for displaying fi ltered content, applying desired processing on the fi ltered content, and displaying the results in the form of a report on the screen. We will now learn how to store the fi ltered and processed report in another fi le through a few examples.
Examples
Consider the fi le bank.lst, which we have been using. The following are its contents for reference.
101 Aditya 0 14/11/2012 current102 Anil 10000 20/05/2011 saving103 Naman 0 20/08/2009 current104 Rama 10000 15/08/2010 saving105 Jyotsna 5000 16/06/2012 saving106 Mukesh 14000 20/12/2009 current107 Yashasvi 14500 30/11/2011 saving108 Chirag 0 15/12/2012 current109 Arya 16000 14/12/2010 current110 Puneet 130 16/11/2009 saving
(a) The following script will copy all the lines (records) of the fi le bank.lst and store them in another fi le bkw.lst.copylines.awkBEGIN{ while (( getline f < "bank.lst")>0) { print f > "bkw.lst" }}
Output
S cat bkw.lstcat: cannot open bkw,lst$ nawk -f copylines.awk
$ cat bkw1.lst101 Aditya 0 14/11/2012 current102 Anil 10000 20/05/2011 saving103 Naman 0 20/08/2009 current104 Rama 10000 15/08/2010 saving105 Jyotsna 5000 16/06/2012 saving106 Mukesh 14000 20/12/2009 current107 Yashasvi 14500 30/11/2011 saving108 Chirag 0 15/12/2012 current

362 Unix and Shell Programming
109 Arya 16000 14/12/2010 current110 Puneet 130 16/11/2009 saving
(b) The following script will copy all the lines (records) of one fi le and store them in another fi le. The fi lenames will be passed as command line arguments.copylines2.awknawk 'BEGIN{
while (( getline f < "'$1'")>0) { print f > "'$2'" }
}'
Output
S cat bb.lstcat: cannot open bb,lst$ ./copylines2.awk bank.lst bb.lst$ cat bb.lst
101 Aditya 0 14/11/2012 current102 Anil 10000 20/05/2011 saving103 Naman 0 20/08/2009 current104 Rama 10000 15/08/2010 saving105 Jyotsna 5000 16/06/2012 saving106 Mukesh 14000 20/12/2009 current107 Yashasvi 14500 30/11/2011 saving108 Chirag 0 15/12/2012 current109 Arya 16000 14/12/2010 current110 Puneet 130 16/11/2009 saving
The contents of the fi le bank.lst are copied into another fi le bb.lst.
(c) The following script will copy all the records having the specifi ed pattern from a given fi le into another fi le. The fi lename is passed as a command line argument.copypattern.awkawk '/current/{print $0 > "'$1'"}' bank.lst $./copypattern.awk bnkcur.lst
All records from bank.lst with pattern ‘current’ are copied into the fi le bnkcur.lst. The following content in the fi le bnkcur.lst confi rms this.
cat bnkcur.lst101 Aditya 0 14/11/2012 current 103 Naman 0 20/08/2009 current 106 Mukesh 14000 20/12/2009 current108 Chirag 0 15/12/2012 current 109 Arya 16000 14/12/2010 current

AWK Script 363
9.18 DELETING CONTENT FROM FILES
Not only can we fi lter the desired content from a fi le but also delete it if desired. We will now see the procedure for deleting content from a fi le that satisfi es a given criteria.
Examples
(a) The following script deletes the lines from a given fi le that does not have the specifi ed pattern.delnotpattern.awknawk 'BEGIN{ printf "Enter a word: " getline w < "/dev/tty" while (( getline k < "'$1'")>0) { n=index (k, w) if (n >0) print k > "'$1'" }}'
Output
$ cat bank.lst101 Aditya 0 14/11/2012 current102 Anil 10000 20/05/2011 saving103 Naman 0 20/08/2009 current104 Rama 10000 15/08/2010 saving105 Jyotsna 5000 16/06/2012 saving106 Mukesh 14000 20/12/2009 current107 Yashasvi 14500 30/11/2011 saving108 Chirag 0 15/12/2012 current109 Arya 16000 14/12/2010 current110 Puneet 130 16/11/2009 saving$ ./delnotpattern.awk bank.lstEnter a word: current$ cat bank.lst101 Aditya 0 14/11/2012 current103 Naman 0 20/08/2009 current106 Mukesh 14000 20/12/2009 current108 Chirag 0 15/12/2012 current109 Arya 16000 14/12/2010 current
We can see that all the lines in the fi le bank.lst are erased except the lines/records having the pattern current in it.
(b) The following script removes lines with the specifi ed pattern in the fi le. removepattern.awk# This script removes the lines with the specifi ed pattern in fi le

364 Unix and Shell Programming
nawk 'BEGIN{ printf "Enter a word: " getline w < "/dev/tty" while (( getline k < "'$1'")>0) { n=index (k, w) if (n ==0) print k > "'$1'" }}'
Output
$ cat bank.lst101 Aditya 0 14/11/2012 current102 Anil 10000 20/05/2011 saving103 Naman 0 20/08/2009 current104 Rama 10000 15/08/2010 saving105 Jyotsna 5000 16/06/2012 saving106 Mukesh 14000 20/12/2009 current107 Yashasvi 14500 30/11/2011 saving108 Chirag 0 15/12/2012 current109 Arya 16000 14/12/2010 current110 Puneet 130 16/11/2009 saving
$ ./removepattern.awk bank.lstEnter a word: current
$ cat bank.lst102 Anil 10000 20/05/2011 saving104 Rama 10000 15/08/2010 saving105 Jyotsna 5000 16/06/2012 saving107 Yashasvi 14500 30/11/2011 saving110 Puneet 130 16/11/2009 savingWe can see in the output that all the lines in the fi le bank.lst with the pattern current are erased.
9.19 ARRAYS
As the name suggests, the term array refers to a sequential set of allocated memory. In other words, when a set of sequential memory is assigned to a variable, it is commonly known as array. The content to the allocated memory is assigned as well as referenced via indices. The index value begins from 1 (instead of 0 as in traditional programming languages).
Examples
(a) The following example assigns the value 10 to the index 4 of the array p:p[4]=10

AWK Script 365
(b) The following examples access the value stored in the index 4 of the array p:print p[4]p[4]=[4]-2
(c) Consider the fi le bank.lst that we have been using. The following is its content for reference.101 Aditya 0 14/11/2012 current 102 Anil 10000 20/05/2011 saving 103 Naman 0 20/08/2009 current 104 Rama 10000 15/08/2010 saving 105 Jyotsna 5000 16/06/2012 saving 106 Mukesh 14000 20/12/2009 current 107 Yashasvi 14500 30/11/2011 saving 108 Chirag 0 15/12/2012 current 109 Arya 16000 14/12/2010 current 110 Puneet 130 16/11/2009 saving
The following script prints all the records of the fi le bank.lst in reverse order.
reverserec.awk{lines [NR] = $0}END{ for(i=NR;i>0;i—) print lines[i]}
All the lines will be stored in array lines using the lines[NR]=$0 command, that is, the fi rst line of the fi le will be stored in lines[1], the second line in lines[2], and so on. NR is set to the total number of records. The for loop is executed in reverse order to print the fi le in reverse.
$ awk -f reverserec.awk bank.lst
Output
110 Puneet 130 16/11/2009 saving109 Arya 16000 14/12/2010 current108 Chirag 0 15/12/2012 current107 Yashasvi 14500 30/11/2011 saving106 Mukesh 14000 20/12/2009 current105 Jyotsna 5000 16/06/2012 saving104 Rama 10000 15/08/2010 saving103 Naman 0 20/08/2009 current102 Anil 10000 20/05/2011 saving101 Aditya 0 14/11/2012 current
(d) Consider a fi le shop.lst.101 sales Sugar 50 16102 sales Tea 55 10

366 Unix and Shell Programming
103 purchase Coffee 60 15101 sales Sugar 65 52102 purchase Tea 04 50103 purchase Coffee 15 40103 sales Coffee 40 10102 purchase Tea 18 52101 sales Sugar 56 58103 sales Coffee 98 90
The following script prints the average quantity and average sales price, that is, the quantities and prices of sold items are added and then divided by the number of records added.avgqtysp.awkBEGIN{ FS="\t" printf "Code A/c Name Qty Sp\n"}/sales/{ c=c+1; tot[1]+=$4; tot[2]+=$5;}END{ printf "Average Quantity is %.3f And Average Selling Price is %.3f \n",tot[1]/c,tot[2]/c}$ awk -f avgqtysp.awk shop.lst
Output
Code A/c Name Qty Sp101 sales Sugar 50 16102 sales Tea 55 10101 sales Sugar 65 52103 sales Coffee 40 10101 sales Sugar 56 58103 sales Coffee 98 90Average Quantity is 46.100 And Average Selling Price is 39.300
We can see that in this AWK script, the contents of the fourth fi eld and the fi fth fi eld of the fi le shop.lst are added to the tot[1] and tot[2] array, respectively.
9.20 ASSOCIATIVE ARRAYS
Associative arrays are those arrays in which we can use any string as an index of the array instead of using the traditional indices, 1, 2,…, etc. Besides strings, we can use any expression at the place of the index in an associative array.

AWK Script 367
Examples
(a) k[tea]=50; p[anil]=10; The strings tea and anil are the indices or keys of the associative arrays k and p respectively.
The numbers 50 and 10 are the values of the respective keys of the associative arrays.
(b) Consider a fi le letter.lst.teacoffeeteasugarcoffeecoffeesugartea The following script counts the frequency of every word in the fi le letter.lst.countfreq.awk{k[$0]++}END{ for(i in k) print(i,"\t", k[i])}$ awk -f countfreq.awk letter.lst
Output
tea 3coffee 3sugar 2In this script, using k[$0]++, the array with subscripts tea, coffee, or sugar will be made, (i.e., k[tea], k[coffee], k[sugar] will be made and its value will be set equal to the number of times that item has occurred). This implies that the value of k[tea] will be 3 (because the item tea has occurred three times). Similarly, the value of k[coffee] will be 3 and k[sugar] will be 2.
(c) Consider the fi le shp.lst.101 Tea 50102 Coffee 32103 Sugar 55102 Coffee 65101 Tea 69101 Tea 35102 Coffee 69103 Sugar 97103 Sugar 36102 Coffee 35
368 Unix and Shell Programming
The following script displays the total quantity of each item sold and in the end it also displays the grand total.
soldqty.awk{sumqty [$2]+=$3}END{
for(i in sumqty) { print i,":",sumqty[i] gqty += sumqty[i] } print "Grand Total Of Quantity ",":",gqty
}$ awk -f soldqty.awk shp.lstOutputSugar : 188Tea : 154Coffee : 201Grand Total Of Quantity : 543In this script, by using the sumqty[$2] command, an array with subscript having the names of the 2nd fi eld ($2), that is, Tea, Coffee, Sugar will be made, that is, sumqty[Tea], sumqty[Coffee], sumqty[Sugar] will be made and in this array, the total of the 3rd fi eld ($3), that is, quantity will be stored.
(d) Consider a fi le sales.lst.Anil 4Sunil 3Kamal 8Anil 2Sunil 9Kamal 1Anil 5Sunil 4Kamal 7
(d) (i) The following script displays the total quantity of items sold by each salesman and, in the end, displays the grand total of sold quantities.soldsales.awkBEGIN{ print "Sales man Name\t Sales made"}{sales[$1]+=$2}END{ for(i in sales) { print i,"\t\t",sales[i] gtot += sales[i]

AWK Script 369
} print "Grand Total Of Sales ",gtot
}$ awk -f soldsales.awk sales.lstOutputSales man Name Sales madeSunil 16Anil 11Kamal 16Grand Total Of Sales 43
(d) (ii) The following script demonstrates how an item can be deleted from an array. First the total quantity of each item is computed and stored in an array, and then an element is deleted from an array.delarray.awkBEGIN{OFS = "\t"}{sumqty[$2]+=$3}END{ print "Deleting sugar index entry" delete sumqty["Sugar"] for(i in sumqty) { print i,":",sumqty[i] gqty +=sumqty[i] } print "Grand total of quantity",":",gqty}
Output
$ cat shp.lst101 Tea 50102 Coffee 32103 Sugar 55102 Coffee 65101 Tea 69101 Tea 35102 Coffee 69103 Sugar 97103 Sugar 36102 Coffee 35$ nawk -f delarray.awk shp.lstDeleting sugar idex entryTea: 154Coffee: 201Crand total of quantity: 355

370 Unix and Shell Programming
(e) The following script prints all the words that are four characters long and which have occurred fi ve or more times.Consider a fi le mat.lst.must have are is and were have and is must must is and were have must were must and is were is and were mustwordsoccur.awkBEGIN{ FS=" "}{ split($0,k) # all the words are stored in the array k for(i in k) j[k[i]]++ # Counting the frequency of each word and storing in the array j}END{ for(i in j) { if (length(i) ==4 && j[i] >=5) print(i, "\t", j[i]) }}$ awk -f wordsoccur.awk mat.lst
Output
must 6were 5
(f) The script merges the two fi les, bank.lst and shp.lst, horizontally, that is, the lines of bank.lst and shp.lst will be displayed adjacent to each other. Once one fi le is completed, the second fi le is displayed at the bottom.The content of the two fi les, bank.lst and shp.lst, which will be merged is as follows.bank.lst101 Aditya 0 14/11/2012 current 102 Anil 10000 20/05/2011 saving 103 Naman 0 20/08/2009 current 104 Rama 10000 15/08/2010 saving 105 Jyotsna 5000 16/06/2012 saving 106 Mukesh 14000 20/12/2009 current 107 Yashasvi 14500 30/11/2011 saving 108 Chirag 0 15/12/2012 current 109 Arya 16000 14/12/2010 current 110 Puneet 130 16/11/2009 saving

AWK Script 371
shp.lst101 Tea 50 102 Coffee 32103 Sugar 55102 Coffee 65101 Tea 69101 Tea 35102 Coffee 69103 Sugar 97103 Sugar 36102 Coffee 35The AWK script that merges the content of two fi les, bank.lst and shp.lst, horizontally is as follows.mergefi les.awkBEGIN{while ((getline f < "bank.lst")>0\ && (getline s < "shp.lst")>0){ print f,s }while ((getline f < "bank.lst")>0) {print f}while ((getline fi rst < "shp.lst")>0) {print s}}# Above script will merge the two fi les horizontally
Output
$ cat bank1.lst101 Aditya 0 14/11/2012 current102 Anil 10000 20/05/2011 saving103 Naman 0 20/08/2009 current104 Rama 10000 15/08/2010 saving105 Jyotsna 5000 16/06/2012 saving106 Mukesh 14000 20/12/2009 current107 Yashasvi 14500 30/11/2011 saving108 Chirag 0 15/12/2012 current109 Arya 16000 14/12/2010 current110 Puneet 130 16/11/2009 saving$ cat shp.lst101 Tea 50102 Coffee 32103 Sugar 55102 Coffee 65

372 Unix and Shell Programming
101 Tea 69101 Tea 35102 Coffee 69103 Sugar 97103 Sugar 36102 Coffee 35
$ nawk -f mergefi les.awk101 Aditya 0 14/11/2012 current 101 Tea 50102 Anil 10000 20/05/2011 saving 102 Coffee 32103 Naman 0 20/08/2009 current 103 Sugar 55104 Rama 10000 15/08/2010 saving 102 Coffee 65105 Jyotsna 5000 16/06/2012 saving 101 Tea 69106 Mukesh 14000 20/12/2009 current 101 Tea 35107 Yashasvi 14500 30/11/2011 saving 102 Coffee 69108 Chirag 0 15/12/2012 current 103 Sugar 97109 Arya 16000 14/12/2010 current 103 Sugar 36110 Puneet 130 16/11/2009 saving 102 Coffee 35
In this chapter, we learnt the different patterns and actions that are used in AWK fi lters to search for desired content from a fi le and display results in the form of a report. We discussed how to display formatted output, use different operators, built-in variables, and the functions to perform desired processing on the fi ltered records. We also explained how to copy content from one fi le that matches the given pattern, into another fi le. We also understood how to make use of conditional statements and loops for performing repetitive tasks. Finally, we talked about geting input from the user and using arrays in AWK scripts.
■ SUMMARY ■
1. The AWK command is a programming language that is executed by the AWK interpreter.
2. AWK is a commonly used text processing tool and a powerful text fi ltering tool designed for processing structured data records.
3. AWK operates at the fi eld level and can easily access, transform, and format individual fi elds in a record.
4. The print command in AWK is used for displaying messages, fi elds, variables, etc. If fi eld specifi ers are not specifi ed, it prints the entire line.
5. AWK automatically divides input lines into fi elds on the basis of the fi eld separators. Each fi eld is assigned an individual number to access them. For instance, the fi rst fi eld is accessed as $1, second fi eld as $2, and so on.
6. When two or more expressions are combined to
check for a particular condition, they are termed as a compound expression.
7. Compound expressions are constructed using com-pound operators, also known as logical operators (&& (AND), || (OR), and ! (NOT) operator).
8. For matching anywhere in a fi eld, AWK offers the ~ and !~ operators to match and not match, respectively. The ^ symbol represents the beginning of the fi eld. The $ symbol represents the end of the fi eld.
9. The length() function determines the length of its arguments, and if no arguments are present, it assumes the entire line as its argument.
10. The index() function determines the position of a string within a larger string.
11. This substr() function is used for extracting a part of a string.

AWK Script 373
■ EXERCISES ■
Objective-type QuestionsState True or False
9.1 The AWK command is a programming language that is executed by the AWK interpreter.
9.2 AWK is a commonly used stream editor 9.3 AWK divides the input into different records on
12. The system() function accepts any Unix com-mand within double quotes as an argument, and executes the command.
13. The split() function splits a string on the basis of a given delimiter and stores the split elements in an array.
14. An ‘if else’ statement is a conditional statement that is used for choosing one set of statements out of two depending on the validity of the logical expression included.
15. To print something before processing the fi rst line in the output, the Begin section is used in AWK.
16. The End section in AWK is used for printing ending remarks, totals, summaries, etc., after the processing is over.
17. OFS stands for output fi eld separator. The default output fi eld separator is a white space.
18. The input fi eld separator, FS, helps in specifying how and where to split an input line into fi elds.
19. AWK commands can be stored in fi les and can be used at run time. The extension of the fi le is .awk.
20. This −f option is used in AWK to execute the AWK script stored in the fi le.
21. The user-defi ned variables in AWK are similar to the variables used in traditional programming languages and are used for holding intermediate as well as fi nal results of computation in the script.
22. No type declaration is required for defi ning variables in AWK. By default, variables are initialized to zero or a null string.
23. The getline command is used for reading a line (record). Data can be fed in using the keyboard or from the fi le.
24. For reading input from the terminal (key-board), /dev/tty is used with the getline command.
25. The $NF variable represents the last fi eld of the line/record.
26. The value of the NR variable is automatically set to the total number of records.
27. In the ‘do while’ loop, the logical expression is validated at the end of the loop, hence the loop will execute at least once, even if the logical expression is false.
28. In the while loop, the logical expression is validated only in the beginning, hence the loop will not execute at all if the logical expression is false.
29. Substitution function sub() replaces a pattern with another pattern in a given string.
30. Global substitution function gsub() replaces all occurrences of a value with another value.
31. The match string function returns the start-ing position of the matching expression in the line. If there is no matching string, it returns 0.
32. The match string function sets two system variables: RSTART to the starting position and RLENGTH to the length of the matching text string.
33. The toupper() function converts lower-case characters in a string to their upper-case values. Any characters that are not lower case are left unchanged.
34. The tolower() function converts upper-case characters to their corresponding lower-case values without disturbing characters that are not upper case.
35. Functions are small modules/subroutines, which, once written, can be called as many times as we want, hence avoiding repetition of statements. Functions make a program clear and systematic.

374 Unix and Shell Programming
Fill in the Blanks
9.1 In AWK, the record separator by default is a .
9.2 The records in AWK are divided into on the basis of the .
9.3 The name AWK comes from the last names of its creators , , and
. 9.4 The statement is used for displaying
data in the formatted way. 9.5 The built-in variable represents the
row or record number. 9.6 When two or more expressions are combined to
check for a particular condition, they are termed .
9.7 The symbol represents the beginning of the fi eld in AWK.
9.8 The function determines the position of a string within a larger string.
9.9 The function splits a string on the basis of a given delimiter and stores the split elements in an array.
9.10 OFS stands for .9.11 The option is used in AWK to
execute the awk script stored in the fi le.9.12 The command is used for reading
input from the keyboard or from the fi le.9.13 The function replaces a pattern with
another pattern in a given string.9.14 The function returns the starting
position of the matching expression in the line.9.15 The function converts lower-case
characters in a string to their upper-case values.
Multiple-choice Questions
9.1 To represent the entire line, the special variable used is
(a) $0 (c) $10 (b) $1 (d) $v 9.2 The $NF variable represents the (a) fi rst fi eld (c) last fi eld (b) second fi eld (d) second last fi eld 9.3 AWK commands can be stored in a fi le with the
extension (a) .a (c) .k (b) .awk (d) .aw 9.4 The /dev/tty is used with the getline
command to (a) get device information (b) read device confi guration from disk
(c) display terminal information (d) read input from the keyboard 9.5 If the match string function fi nds no matching
string, it returns (a) −1 (c) infi nite (b) 0 (d) 1 9.6 The %f in printf is used for displaying (a) fl oat value (c) fi lename (b) string (d) integer value 9.7 The built-in variable that represents the name of
the current fi le is (a) FILE (b) CURRENT (c) NAME (d) FILENAME
the basis of the record separator encountered. 9.4 The default fi eld separators are newline character
and . (period). 9.5 Each fi eld in AWK is assigned an individual
number to access them. For instance, the fi rst fi eld is accessed as $1 and second fi eld as $2.
9.6 The special variable, $10, represents the entire line. 9.7 Compound expressions are not possible while
working with AWK. 9.8 The ~ operator in AWK is used for matching
patterns anywhere in the fi eld. 9.9 The !~ symbol represents the end of the fi eld.9.10 The length() function, if no arguments are
specifi ed, assumes the entire line as its argument. 9.11 This substr() function is used for substituting a
given string with another string.9.12 The system() function is used for checking the
computer system for any virus. 9.13 To print something before processing the fi rst
line in output, the Begin section is used in AWK. 9.14 The End section in AWK is used for printing
ending remarks, totals, summaries, etc., after the processing is completed.
9.15 The Begin and End sections are executed for every line/record but the code between the Begin and End section is executed only once.

AWK Script 375
Programming Exercises
9.1 Consider a fi le, stock.lst, which contains the product code, product name, price, quantity, and category of product as follows.
101 Jeans 1000 10 garments 102 Camera 5000 3 electronics 103 Trousers 1200 5 garments 104 Laptop 40000 15 electronics 105 CellPhone 8000 8 electronics With respect to this fi le, stock.lst, what will
the output of the following commands be? (a) $ awk '/garment/' stock.lst (b) $ awk '/electronics/ { print $2,$4 }'
stock.lst (c) $ awk '$4 < 10' stock.lst (d) $ awk 'NR >0 { print NR,$0 }' stock.lst (e) $ awk 'NR == 2, NR == 4 { print NR,$0 }'
stock.lst (f) $ awk '{ print NF }' stock.lst (g) $ awk '{ print $NF }' stock.lst (h) $ awk '$5 ~/s$/' stock.lst (i) $ awk '$2 ~ "^C" ' stock.lst (j) $ awk '$2 ~ "^C" && $4 < 5 ' stock.lst 9.2 Considering the fi le stock.list as the input
fi le, write the commands for performing the following tasks.
(a) To print only the code of the electronics products
(b) To print the information of the products whose price is in the range 5000–10,000
(c) To print all the products except jeans (d) To print the third record in the fi le (e) To print the product whose code is 102 (f) To print the products whose product names
begin from any character between a to d (g) To print all the products whose product name
is more than six characters long. (h) To print all the products whose quantity is
less than 10 (i) To print all the products whose product name
is laptop (j) To print the product name and price of all the
garment product whose code is less than 103 and whose price is more than 800
(k) To print only the product names of the products whose quantity is between 10 and 15.
(l) To print all the products whose product name begins with the character ‘C’
9.3 Consider a fi le, school.lst, with the following content.
101 Anil science 45 60 105 102 Rama commerce 55 30 85 103 Sunil science 35 20 55 104 Peter commerce 75 70 145 105 Sanjay science 95 80 175 Write the AWK scripts to do the following: (a) Count the number of students with roll
>= 105 (b) Count the number of commerce students (c) Count the number of science students whose
roll <= 103 (d) Count the number of students having total >=
100 9.4 Consider a fi le, data.lst, with the following
content. Anil Sharma Vaishali Nagar science 45 67 Manoj Gupta Sri Nagar Road commerce 66 89 Kamal Sharma Shastri Nagar commerce 81 32 Rama Sharma Vaishali Nagar commerce 45 91 Chirag Harwani Vaishali Nagar science 34 63 Write the AWK script for the following: (a) Show all the lines/records between the
specifi ed range, to be entered by the user (b) Show all the records having the pattern
Vaishali Nagar in it (c) Replace the pattern science with commerce (d) Print all the contents of this fi le along with
the total of two subjects of each student (e) Show all the records with surname ‘Sharma’
9.8 To negate or reverse the logical expression, the operator used is
(a) % (c) ! (b) / (d) || 9.9 The built-in variable for the output record sep-
arator is (a) ORS (b) ORSP
(c) OFS (d) RS9.10 The arithmetic function used to fi nd the square
root of a value is (a) root() (b) sroot() (c) sqroot() (d) sqrt()

376 Unix and Shell Programming
Brain Teasers
9.1 The following code for displaying the fi rst four columns of the fi le bank.lst is not working correctly. Correct the code
$ awk '{ printf $1,$2,$3 }' bank.lst
9.2 What is wrong in the following code for dis-playing the fi rst fi ve rows of the fi le bank.lst?
$ awk '$NR <=5 { print $0 }' bank.lst
9.3 Find out the error in the following code to show the records where the second column begins with ‘A’ and ends with ‘Z’.
$ awk '$2 ~ "^A" || $2 == "$Z" ' bank.lst
9.4 What is wrong in the following code for adding the content of the third column of the given fi le and printing the total at the end?
BEGIN{tot=0 tot+=$3}END{ printf "\The total sum is %d\n", tot}
9.5 The following code is for replacing the text sun
with moon in a text fi le and displaying the lines where substitution occurs. Find out why the code is not working.
{ t = sub(/sun/,"moon",$1)}{ if(t ==0) print $0}
9.6 Correct the error in the following code that asks the user to enter a string and displays that entire line in lower case, where the string is found.
BEGIN{ print "Enter the word " getline c >"/dev/tty"}{ n=toupper($0) c=tolower(c) k=index(n,c) if (k<0) {
Review Questions
9.1 Explain the meaning of the following statements with examples:
(a) printf (b) gsub (c) getline 9.2 Explain how arrays and associative arrays are
used in AWK. 9.3 Considering the aforementioned fi le, stock.lst,
write the complete AWK scripts for the following: (a) Print the fi rst, second, and fi fth fi elds of the
fi le stock.lst separated by a tab space (b) Print all the rows of the products with the
total quantity, that is, the fourth column at the end
(c) Print all the rows of the products along with the count of the products whose quantity is less than 10, and the total of the prices of all products
(d) Print all the rows of the products along with the count of the products that belong to the electronics category, and whose quantity is less than 10
(e) Print all the rows of the products having code
equal to the value entered by the user. 9.4 Explain the purpose of the following: (a) Begin and End sections (c) For loop (b) If else statement (d) Match 9.5 Explain the purpose of the following string
functions with examples: (a) index() (b) substr() (c) split(0 9.6 Does AWK support arithmetic functions? If
yes, then write the commands for the following tasks:
(a) Print the sine of 180° (b) Print three random numbers (c) Print the square root of the number entered
by the user 9.7 Explain with examples the use of the following
built-in variables: (a) NF (b) OFS (c) NR (d) RSTART (e) FILENAME

AWK Script 377
print tolower($0) }}
9.7 Find out the error in the following code for displaying the total number of words and lines in a fi le
{ w+=$NF}END{ print "Words: " w print "Lines:" NF}
9.8 Correct the error in the following code that displays a fi le in reverse order.
{ lines [NF] = $1 }END{ for(i=NR;i>=0;i--)
print lines[0]}
9.9 Correct the following code that searches for the line that begins with the word Sun and displays all the lines of the fi le from that line onwards till the end of the fi le.
{ if($1=="Sun") start=$NF if (NR >= start ) print $1}
9.10 Correct the following program that displays the current month and year
BEGIN{ "date" | getty print($1,$4) }
State True or False
9.1 True 9.2 False 9.3 True 9.4 False 9.5 True 9.6 False 9.7 False 9.8 True 9.9 False9.10 True9.11 False
9.12 False9.13 True9.14 True9.15 False
Fill in the Blanks
9.1 newline character 9.2 fi elds, fi eld separators 9.3 Alfred Aho, Peter
Weinberger, and Brian Kernighan
9.4 printf
9.5 NR 9.6 compound
expression 9.7 ^ 9.8 index() 9.9 split()9.10 output fi eld
separator9.11 -f9.12 getline9.13 sub()9.14 match9.15 toupper()
Multiple-choice Questions
9.1 (a) 9.2 (c) 9.3 (b) 9.4 (d) 9.5 (b) 9.6 (a) 9.7 (d) 9.8 (c) 9.9 (a)9.10 (d)
■ ANSWERS TO OBJECTIVE-TYPE QUESTIONS ■

10.1 INTRODUCTION
Bourne shell was one of the major shells used in the early versions of the Unix operating system. It was written by Stephen Bourne at Bell Labs. Often known as the command interpreter, the Bourne shell provides a user interface to the rich set of Unix utilities. It reads the commands from the terminal or fi le and executes them. It is represented by the dollar ‘$’ command line prompt.
The Bourne shell provides variables, fl ow control constructs, and functions to write user-friendly and interactive shell scripts. Apart from this, it provides interactive features that include job control, command line editing, history, and aliases. In addition, it supports ‘quoting’ to remove the special meaning of certain meta characters.
Note: Bourne again shell (Bash) is similar to the Bourne shell; however it has additional features like command line editing.
1010Bourne Shell Bourne Shell ProgrammingProgramming
C H A P T E R
After studying this chapter, the reader will be conversant with the following:
• Creating and running simple Bourne shell scripts• Using command line parameters in the shell scripts• Using conditional statements and loops to make the desired commands
execute a specifi ed number of times• Reading input, displaying output, testing data, translating content, and
searching for patterns in fi les using different commands• Displaying the exit status of the commands, applying command substitution,
and sending and receiving messages with other users• Creating and using functions, setting and displaying terminal confi gurations,
managing positional parameters, and using fetch options in the command line

Bourne Shell Programming 379
Features of Bourne shellAs discussed, the Bourne shell is the original Unix shell that was developed at Bell Labs by Stephen Bourne. Being a shell, it provides user interface, interprets commands, and provides an environment to work on the Unix system. Bourne shell provides several features. A few of them are listed here:
1. Allows execution of commands and scripts2. Provides a set of built-in commands and utilities3. Enables execution of commands in the background4. Provides input/output redirection, pipes, and fi lters5. Enables command substitution by using back quotes6. Provides commands for loops and conditional branching7. Supports pattern matching operators (?, *)
We can make the Bourne shell execute desired tasks through scripting. We will now learn the procedure of writing and executing shell scripts.
10.2 BEGINNING BOURNE SHELL SCRIPTING
A shell program (also known as a shell script) is a collection of a series of commands for a Unix shell, such as the Bourne shell, Korn shell, and C shell. No separate compiler is required to execute these shell scripts as the shell itself interprets and executes them. The shell scripts include both Unix commands as well as built-in functions in the shell. Each shell has a different mechanism for executing the commands in the shell script and hence the shell script of one shell may not execute on another shell. Most shell scripts are written for the Bourne shell, as this is the most commonly used shell.
This chapter focuses on understanding how to write scripts for the Bourne shell and its enhanced version, Bourne again shell. Before beginning with shell scripting, we will discuss some of the frequently used commands in shell scripts. These commands here are explained with respect to the Bourne shell. The relevant useful commands are repeated in Chapters 11 and 12 with respect to Korn and C shells, respectively.
10.2.1 echo: Displaying Messages and ValuesYou may recall we have already discussed this command in Chapter 3. The echo command is used for displaying messages or values of the variables/expression.
Syntax echo "Messages/$Variables"
Notes: 1. Quotation marks are optional in the echo command. If quotations are not used in the echo command, extra
white spaces are automatically removed on the display.2. All variables in the echo command have to be preceded by a $ sign.
Example echo "Welcome to MCE"

380 Unix and Shell Programming
OutputWelcome to MCE
Example n=15
echo "The value of n is $n"
Output
The value of n is 15
The character n used in the output is a variable. Variables are explained in detail in the following section.
10.2.2 VariablesWe can use variables in our shell scripts, and assign values to them using the following syntax:
Syntax Variable = value
To retrieve the value of a variable, place a dollar sign ($) in front of the variable name.
Note: Do not introduce any spaces on either side of the equal to sign (=). Variable names must begin with a letter or an underscore character (_). We can also use letters, underscores, or numbers for naming variables.
10.2.3 expr: Evaluating ExpressionsThe expr command is used to evaluate a specifi ed expression.
Syntax expr arg1 operator arg2 ...
Here, arg1, arg2, ... represent the arguments that combine with operators to form the expression to be evaluated.
Examples
(a) $ x=3(b) $ y=5
Outputexpr $x + $y8
The aforementioned example adds the values of variables x and y. Similarly, the following example displays the value of the addition of the values of variables x and y assigned to variable z.
z=`expr $x+ $y`$ echo $z8
The following example adds constants 3 and 5.
$ expr 3 + 58
The following example multiplies values 3 and 2. $ expr 3 \* 26

Bourne Shell Programming 381
The * (asterisk) is escaped by a \ (backslash) to be treated as the multiplication symbol, hence multiplying 3 by 2.
Note: Asterisk (*) refers to all fi les in the current directory. Hence \ (backslash) is used to escape it, that is, \* is treated as the multiplication symbol.
10.2.4 let: Assigning and Evaluating ExpressionsThe let command is used for assigning values to the variables as well as for evaluating the expression. It is the same as the expr command but it does not require the $ (dollar sign) with the variables.
Syntax let variable1=value/expression [variable2=value/expression]...
Examples
(a) $ let x=15+10 $ echo $x 25(b) $((15*10)) 25
Note: A set of double parentheses, ‘((’ and ‘))’ may be used instead of the let command.
(c) $ x=22 y=28 z=5 $((z=x+y+z)) $ echo $z 55
10.2.5 bc: Base ConversionThe bc command has already been discussed in Chapter 2. The calculator (or base conversion) mode is invoked by typing the bc command at the shell prompt and thereafter the $ prompt disappears. The input to the calculator is taken line by line. We need to fi rst enter an expression, after which the Unix command produces the result.
Examples
(a) $ bc 10/2*2 10 2.5*2.5+2 8.25 quit On typing quit, the bc command ends.
Note: In order to get precise answers while working with a fl oating point number, we set the variable scale to a value equal to the number of digits after the decimal point.
(b) $ bc scale=1 25/2 12.50

382 Unix and Shell Programming
After setting the scale variable, if the answer of an expression is more than the value of the scale set, then the scale value is ignored and the correct answer is displayed.
Another useful feature of bc is base conversion. (c) $ bc ibase = 2 obase = 16 1010 A quit By setting the variables, ibase to 2 and obase to 16, all the input values are taken as
binary numbers while all the output values are displayed in hexadecimal format.bc also supports functions such as sqrt, cosine, sine, and tangent. sqrt() is an
in-built function whereas s() and c(), which stand for sine and cosine respectively, would work only when bc is invoked with the –l option.
(d) $ bc sqrt(49) 7(e) $ bc –l scale =2 s(3.14) 0 bc also allows setting up of variables. These variables can be used in programs.(f) $ bc for (i=1; i<=5; i=i+1) i 1 2 3 4 5 quit
Note: expr is capable of carrying out only integer arithmetic. To carry out arithmetic on real numbers the bc command is used.
(g) a=81.3 b=15.7 c=`echo $a + $b | bc` d=`echo $a \* $b | bc` echo $c $d
Output
97.0 1276.41
10.2.6 factor: Factorizing NumbersThe factor command is used to factorize the given number and print its prime factors. When factor is invoked without an argument, it waits for a number to be typed and prints the

Bourne Shell Programming 383
factors of the number entered. It then waits for another number and exits if it encounters a zero or any non-numerical character.
Syntax factor [number]
Example $ factor
15 3 528 2 2 7q$
10.2.7 units: Scale ConversionThe units command converts quantities expressed in various standard scales to their equivalents in other scales.
$ unitsyou have : inchyou want : cm*2.540000e+00/3.937008e–01
This output means that to convert inches into centimeters, we need to multiply the inches with 2.54 or divide inches by 0.3937008.
The units command understands distance through units such as cms, metres, kms, inches, feet, miles, nautical miles, and yards and the quantity of liquids in litres, quarts, and gallons.
10.3 WRITING SHELL SCRIPTS
The following points should be taken into account while writing a shell script:
1. Comments should be preceded with a #. A comment split over multiple lines must have a # at the beginning of each line.
2. More than one assignment can be done in a single statement. 3. Multiplication symbol * must always be preceded by a \, otherwise the shell will treat
it as a wild-card character. The wild character (*) usually represents any number of characters or numbers. You may recall that ls * displays all fi lenames in the current directory comprising any number of characters or numerals.
To type a script, we open the vi editor with the following command:
$ vi dispmessage

384 Unix and Shell Programming
In the fi le dispmessage, enter the following text:
#!/bin/bashecho –n "Hello! "echo "You are Welcome"echo "We are working in directory `pwd`" echo "Todays date is `date`"
Save the fi le by pressing Esc:wq, that is, fi rst press the Esc key and then press :wq where w is for saving the fi le and q is for quitting from the vi editor. To execute the aforementioned shell program, we type the following:
$ ./dispmessage
OutputHello! You are WelcomeWe are working in directory /UnixcodeTodays date is Saturday 3 March 2012 09:54:44 PM IST
The # symbol, as mentioned, is for writing comments.echo prints all messages on the screen. We can write messages in double quotes.If we pass the –n command line parameter to echo, then it would not end its output with
a newline. Hence, the following echo command output will also appear on the same line. Therefore,
the following two lines will give the output on the same line:
echo –n "Hello! "echo "You are Welcome"
Output
Hello! You are Welcomeecho "We are working in directory `pwd` "
The accent marks (back quotes) surrounding the pwd command imply that the shell should execute the command between the accent marks and then substitute the output of the command in the string passed to the echo command.
We can print the date and time with the date command:
$ dateSaturday 3 March 2012 09:54:44 PM IST
Before executing a shell script, it must be made executable by the chmod command as shown:
$ chmod 700 dispmessage
Here, 7 is for owner and is assigned read (4), write (2), and execute (1) permissions. Group and others are assigned 0 permissions, that is, others and group members would not be able to read, write, or execute the fi le.
Predefined variable Predefi ned variables can be divided into two categories— shell variables and environment variables. Shell variables are used to customize the shell itself. Environmental variables control the user environment and can be exported to subshells.
Bourne Shell Programming 385
10.4 COMMAND LINE PARAMETERS
Shell scripts can read up to nine command line parameters or arguments into special variables. These command line parameters appear as specially named shell script variables. The command line parameters are named $1, $2, $3, up to $9.
The name of the executable script is stored in $0.The fi rst argument is read by the shell into the parameter $1, the second argument into $2,
and so on.$# is the count of the number of arguments and $* represents all command line arguments.
Example Consider the following example that demonstrates the usage of command line parameters in a shell script.$ vi commandparam#!/bin/bashecho "The number of parameters are $#" echo "The parameters are $*" echo "The parameters are $1 $2 $3" echo "The shell script command is $0"
If we execute the aforementioned shell script in the following way,
$ ./commandparam a.txt 10 b.txt 25./commandparam will be stored in $0.a.txt will be assigned to $1.10 will be assigned to $2.b.txt will be assigned to $3.25 will be assigned to $4.a.txt 10 b.txt 25 will be collectively stored in $*.$# will be assigned the counting of arguments, that is, 4
Output$ ./commandparam a.txt 10 b.txt 25The number of parameters are 4The parameters are a.txt 10 b.txt 25The parameters are a.txt 10 b.txtThe shell script command is ./commandparam
Note: If we pass less than nine command line parameters, the extra variables have a null value.
10.5 read: READING INPUT FROM USERS
The read command is used to read the input typed by the user into shell variables.
Syntax read variable_name
Examples
(a) The following script prompts the user to enter his/her fi rst and last names. It then displays the name as well as that particular day’s date and time on the screen.

386 Unix and Shell Programming
demoread #!/bin/bash echo –n "Enter your fi rst name " read f echo –n "Enter your last name " read l echo "Your name is $f $l" $. /demoread
Output
Enter your fi rst name arun Enter your last name sharma Your name is arun sharma
(b) The following script prints that particular day’s date only. printdate #!/bin/bash m=`date +%d/%m/%Y` echo "Current system date is $m"
Output
Current system date is 26/02/2012
Note: To execute any Unix command from a shell script, it has to be enclosed in back quotes. It is for this reason that the date command is enclosed in back quotes.
(c) The following script only prints the system time. printtime #!/bin/bash echo "The system time is `date +%H:%M:%S`"
Output
The system time is 10:14:59
10.6 for LOOP
Loops are used for executing a command or a set of commands for each value of the given set.
Syntax for variable
in list_of_valuesdo command 1 command 1 ... ...done

Bourne Shell Programming 387
The variable in this syntax will be assigned one of the values from the list_of_values and the commands between do and done will be executed on that variable. This is repeated till all the commands between do and done are executed for each value assigned to the variables.
Examples
(a) The following script prints the sequence of numbers from 1 to 5. dispsequence #!/bin/bash for x in 1 2 3 4 5 do echo "The value of x is $x" done
Output
The value of x is 1 The value of x is 2 The value of x is 3 The value of x is 4 The value of x is 5
As we can see in this output, the variable x will fi rst be assigned a value 1, following which the body of the loop is executed, that is, the echo command is executed. Thereafter, the variable, x, will get another value, 2, and the body is executed. This is repeated till the loop is executed for each value assigned to the variables.
(b) The following script prints all the fi lenames in the current directory that begin with the character b.
fi lescurdirectory #!/bin/bash for k in b* do echo "File name is $k" done $./fi lescurdirectory
Note: The * is considered a wild-card character that represents any number of alphanumerals.
In the aforementioned script, variable k will be assigned a fi le (if it exists) from the hard disk having the fi rst character as b, followed by any number of characters or numerals. The fi lenames will be assigned to variable k one by one.
Output
File name is b.lst File name is bank.lst
(c) The following script shows the contents of all the fi les in the current directory starting with the character b.
fi lesbeginb #!/bin/bash

388 Unix and Shell Programming
for f in b* do cat $f done
Output
This is a test fi le 1001 Charles 15000 saving 1002 Kiran 10000 current 1003 Anushka 12000 current 1004 John 8000 saving 1005 Enna 11000 current
Assuming that there are two fi les, b.lst and bank.lst, which begin with the character b in the current directory, the aforementioned output shows the content of the two fi les.
Note: ? is a wild-card character that represents a single alphanumeral (character, numeral, or symbol). The * is a wild-card character and represents any number of alphanumerals.
(d) The following script prints the command line arguments sent while executing the script. dispcommandargs #!/bin/bash for arg in $* do echo $arg done
Note: $* will be assigned all the parameters sent from the command line. The variable arg will be assigned one parameter at a time and then displayed.
Output
$ ./dispcommandargs xyz.txt bank.lst school.xt xyz.txt bank.lst school.txt
(e) The following script copies the contents of all the fi les starting with character b and which have the extension .lst in the specifi ed directory, specifi ed by the user, into the fi le mce.dat.
copyfi lescontent #!/bin/bash echo –n "Enter name of directory: " read a for fi lename in b*.lst do

Bourne Shell Programming 389
cat $fi lename >> $a/merge.dat done
Output
$ ls b*.lst b.lst bank.lst $ cat b.lst This is a test fi le $ cat bank.lst 1001 Charles 15000 saving 1002 Kiran 10000 current 1003 Anushka 12000 current 1004 John 8000 saving 1005 Enna 11000 current $ ./copyfi lescontent Enter name of directory: accounts $ cd accounts $ cat merge.dat This is a test fi le 1001 Charles 15000 saving 1002 Kiran 10000 current 1003 Anushka 12000 current 1004 John 8000 saving 1005 Enna 11000 current
(f) The following script does not display anything on the screen though the fi lenames beginning with character b and with extension .lst, and their fi le contents will be stored in the fi le hh.bat.
copyfi lescontent2 #!/bin/bash for f in b*.lst do echo $f cat $f done > hh.bat
Output
$ ls b*.lst b.lst bank.lst $ cat b.lst This is a test fi le $ cat bank.lst 1001 Charles 15000 saving 1002 Kiran 10000 current 1003 Anushka 12000 current

390 Unix and Shell Programming
1004 John 8000 saving 1005 Enna 11000 current $ ./copyfi lescontent2 $ cat hh.bat b.lst This is a test fi le bank.lst 1001 Charles 15000 saving 1002 Kiran 10000 current 1003 Anushka 12000 current 1004 John 8000 saving 1005 Enna 11000 current
(g) The following script prints the contents of the fi le with one word on each line. The fi lename will be passed as a command line argument.
fi leoneword #!/bin/bash for k in `cat $1` dos echo $k done
Output
$ cat xyz.txt Ths is a test fi le $ ./fi leoneword xyz.txt Ths is a test fi le
10.7 while LOOP
The while loop is used for repeating a set of statements for the time the specifi ed logical expression is true.
Syntax while [ logical expression ]
do ... ... ... done
Examples
(a) The following script displays the sequence of numbers from 1 to 10. #!/bin/bash n=1

Bourne Shell Programming 391
while [ $n –le 10 ] do echo $n (( n++ )) done
Removing extra spaces Extra spaces can easily be removed using the echo command. If the echo’s argument is quoted, it prints its argument as such, that is, with tabs or multiple spaces in between. However, if the argument is used without quotes in the echo command, then the extra spaces are automatically removed from the arguments.(b) The following script removes the extra spaces in the lines of the fi le and displays them
on the screen. The fi lename is passed as a command line argument. removeextra #!/bin/bash cat $1 | while read k do echo $k done
Output
$ cat school.txt 101 Anil 75 102 Chirag 82 103 Kanika 70 104 Naman 88 105 Suman 68 106 John 83 $ ./removeextra school.txt 101 Anil 75 102 Chirag 82 103 Kanika 70 104 Naman 88 105 Suman 68 106 John 83
The lines of the fi le school.tst will be assigned to the variable k through the while loop one by one, and then echoed on the screen.
(c) The following script displays the contents of the fi le phone.lst on the screen after removing extra blank spaces.
removeextra2 #!/bin/bash while read k do echo $k

392 Unix and Shell Programming
done < school.txt $./removeextra2
Output
101 Anil 75 102 Chirag 82 103 kanika 70 104 Naman 88 105 Suman 68 106 John 83
(d) The following script will read line by line from one fi le and store it in another fi le after removing the extra spaces. The fi lenames are passed as command line arguments.
removeextrastore #!/bin/bash cat $1 | while read k do echo $k done > $2
Output
$ ./removeextrastore school.txt sch.txt $ cat school.txt 101 Anil 75 102 Chirag 82 103 kanika 70 104 Naman 88 105 Suman 68 106 John 83 $ cat sch.txt 101 Anil 75 102 Chirag 82 103 Kanika 70 104 Naman 88 105 Suman 68 106 John 83
It can be observed that in the output, each line of the fi le school.txt will be assigned to the variable k through the while loop and its contents will be directed to the fi le sch.txt.
10.8 until LOOP
The until loop is used for repeating a set of statements for the time the specifi ed logical expression is false. The moment the logical expression becomes true, the control will come out of the loop.

Bourne Shell Programming 393
Syntax until logical expression
do ... ... ...done
Example The following script stores the sequence of numbers from 1 to 100 in the fi le d.bat.
storeseqinfi le#!/bin/bashn=1until test $n –gt 10do echo $n >> d.bat ((n=n+1))done
Output
$ ./storeseqinfi le$ cat d.bat12345678910
Note: The redirection symbol >> is used for appending the contents in the fi le (without affecting the earlier data). The redirection symbol > creates the new fi le (the previous data, if any, will be erased).
10.9 if STATEMENT
The if statement is used for selecting a set of statements out of the two sets depending on the validity of the logical expression included.
Syntax if (logical expression) then
command1command2...elsecommand1

394 Unix and Shell Programming
command2...
fi
The if statement ends with the fi command. The shell executes the code of the then statement if the logical expression is true, otherwise the code of the else statement is executed.
Note: The else part of the statement is optional.
Examples
(a) The following script compares the value in a variable, n, and prints the message accordingly.
#!/bin/bash n=10 if [ $n –eq 10 ] then echo "The number is equal to 10" else echo "The number is not equal to 10" fi
Output The number is equal to 10
(b) The following script compares marks and prints First Division if the marks are >=60, and otherwise prints Second Division.
#!/bin/bash m=60 if [ $m –ge 60 ] then echo "First Division" else echo "Second Division" fi
Output First Division
10.10 BOURNE SHELL COMMANDS
Bourne shell commands are built-in compiled and executable programs or scripts located in their respective directories on the Unix system. Shell, as we know, is a command interpreter and when we type a command, the command interpreter searches for it in the local directory as well as in the directories listed in the PATH variable. If the command is found, it is executed and its output is displayed on the screen. In case the command is not found, the following error message is displayed: command not found.
Flow control is an essential requirement in scripting. Testing of expressions and their output plays a major role in the fl ow control of a script. We will now learn how testing of expressions is performed.

Bourne Shell Programming 395
10.10.1 test: Testing Expressions for Validity To gain more fl exibility with if statements, we use the Bourne shell’s test command. The test command returns true if the expression included is valid and otherwise returns false.
The test command can be used to test various fi le attributes, that is, we can test if a fi le has the necessary read, write, or executable permissions. The options that are used with the test command are briefl y explained in Table 10.1.
All the aforementioned options for test return false if the named fi le does not exist. While working with numerals, we need certain operators for numeric comparison. Table 10.2 shows the list of operators that can be used for com-paring numerals in the test command.
Besides numbers, we might also need to compare strings. The list of oper ators used for string com pari son with the test command is shown in Table 10.3.
Examples
(a) The following shell script checks whether the two strings sent as command line arguments are the same.
comparestrings #!/bin/bash if test $1 = $2 then echo "Both strings are same" else echo "Strings are not same" fi
Output
$ ./comparestrings hello hi Strings are not same $ ./comparestrings hello Hello Strings are not same $ ./comparestrings hello hello Both strings are same
Table 10.3 Brief description of the operators used for string comparison in the test command
Operator Description
-n str Returns true if the string str is not a null string
-z str Returns true if the string str is a null string
s1=s2 Returns true if the string s1 is equal to s2
s1!=s2 Returns true if the string s1 is not equal to s2
Table 10.1 Brief description of the options used with the test command
Option Description
–a fi le Returns true if the fi le has at least one character
–e fi le Returns true if the fi le exists
–f fi le Returns true if the fi le exists and is a regular fi le
–r fi le Returns true if the fi le exists and is readable
–w fi le Returns true if the fi le exists and is writeable
–x fi le Returns true if the fi le exists and is executable
–d fi le Returns true if the fi le exists and is a directory
–s fi le Returns true if the fi le exists and has a size greater than zero
Table 10.2 Brief description of the operators used for numeric comparison in the test command
Operator Description
-eq Equal to
-ne Not equal to
-gt Greater than
-ge Greater than or equal to
-lt Less than
-le Less than or equal to
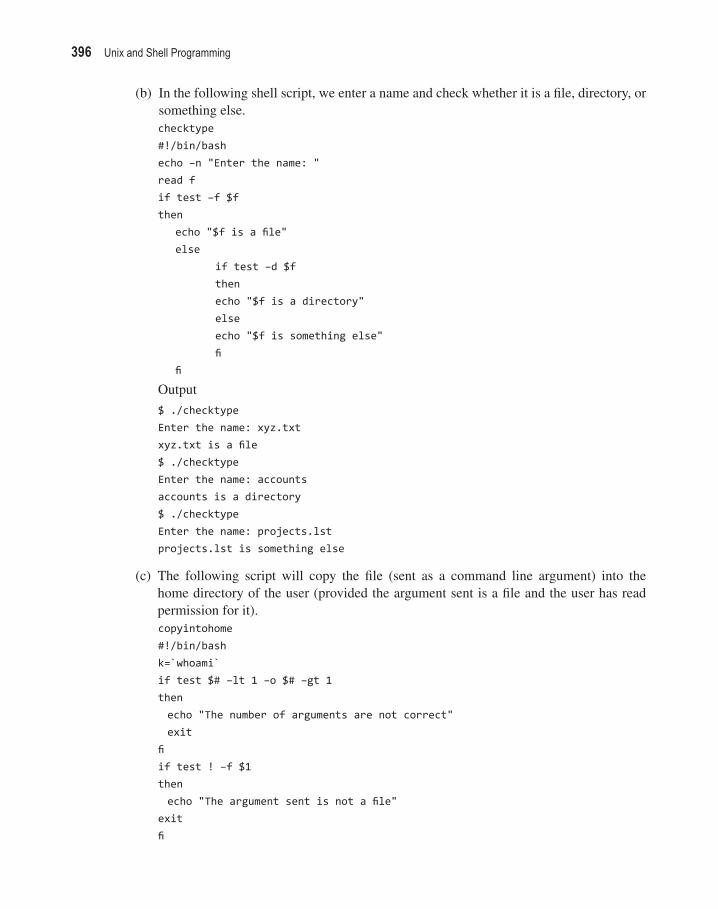
396 Unix and Shell Programming
(b) In the following shell script, we enter a name and check whether it is a fi le, directory, or something else.
checktype #!/bin/bash echo –n "Enter the name: " read f if test –f $f then echo "$f is a fi le" else if test –d $f then echo "$f is a directory" else echo "$f is something else" fi fi
Output
$ ./checktype Enter the name: xyz.txt xyz.txt is a fi le $ ./checktype Enter the name: accounts accounts is a directory $ ./checktype Enter the name: projects.lst projects.lst is something else
(c) The following script will copy the fi le (sent as a command line argument) into the home directory of the user (provided the argument sent is a fi le and the user has read permission for it).
copyintohome #!/bin/bash k=`whoami` if test $# –lt 1 –o $# –gt 1 then echo "The number of arguments are not correct" exit fi if test ! –f $1 then echo "The argument sent is not a fi le" exit fi

Bourne Shell Programming 397
if test ! –r $1 then echo "You don't have the permission to copy the fi le" exit fi cp $1 /usr/$k
Output
$ ./copyintohome The number of arguments are not correct $ ./copyintohome accounts The argument sent is not a fi le $ ./copyintohome xyz.txt $ ls /usr/root xyz.txt
Note: -o is the logical or operator used to connect two or more expressions/statements. Or operator returns true if either of the statements is true.
10.10.2 [ ]: Test CommandSince test is a frequently used command, there exists a shorthand method of writing it. A pair of rectangular brackets enclosing the expression can replace the test command, that is, test $x –eq $y can be written as [ $x –eq $y].
Examples
(a) The following script displays the sequence of numbers from 1 to 10. demowhile #!/bin/bash i=1 while [ $i –le 10 ] do echo $i ((i = i+1)) done
Output
1 2 3 4 5 6 7 8 9 10

398 Unix and Shell Programming
The counter is set to 1 and the while loop is executed for the time the counter is le (less than or equal to) 10
(b) The following script is used to enter a few numbers and print their sum. printsum #!/bin/bash echo "Enter few numbers and press ^d to see the total" s=0 while read k; do let s=s+k done echo "Sum is $s"
Output
Enter few numbers and press ^d to see the total 5 8 2 ^d Sum is 15
In the aforementioned script the while read k statement makes an infi nite loop that continuously prompts for the values of variable k. The contents of this variable will then be added to the variable s. The control releases from the infi nite loop when the user presses Ctrl-d and the sum stored in the variable s will be displayed on the screen.
(c) The following script prints the sum of a few numbers entered by the user. In order to quit, we can enter −1.
sumoffewnum #!/bin/bash # The script computes the sum of few entered numbers echo "Enter the numbers to be added, enter –1 to quit" s=0 read h while test $h != –1 do s=`expr $s + $h` read h done echo "The sum is $s"
Output
Enter the numbers to be added, enter –1 to quit 9 2 6

Bourne Shell Programming 399
0 4 –1 The sum is 21
(d) The following script computes the sum of n numbers entered by the user. sumofn #!/bin/bash echo –n "How many numbers are there? " read n s=0 x=1 while test $x –le $n do echo –n "Enter a number: " read h s=`expr $s + $h` ((x=x+1)) done echo "The sum is $s"
Output
$ ./sumofn How many numbers are there? 4 Enter a number: 8 Enter a number: 0 Enter a number: 4 Enter a number: 1 The sum is 13
(e) The following script checks if the given fi lename has come into existence. The script will keep checking after every minute if the fi lename that is passed through the command line argument exists or not. The loop continues to execute until the fi le comes into existence.
checkfi leexist #!/bin/bash while test ! –s $1 do sleep 60 done echo "$1 exists now"
Output
$./checkfi leexist bank.lst bank.lst exists now

400 Unix and Shell Programming
10.10.3 tr: Applying TranslationThe tr command is used for translating a set of strings with another, that is, we specify two sets of strings and each character in the fi rst set of characters is replaced with a corresponding character in the second specifi ed set. The fi rst character in the fi rst set is replaced by the fi rst character in the second set; the second character in the fi rst set is replaced by the second character in the second set, and so on. The strings are specifi ed using quotes.
Syntax tr [ options ] [ set1 [ set2 ] ]
The characters specifi ed in set1 are mapped to the corresponding characters in set2. The various options used in the tr command are described in Table 10.4.
Examples
(a) $ tr "aeiou" "AEIOU" After giving this com mand,
all the vowels in the sentences we type will be converted into upper case as shown:
it is very easy to use It Is vEry EAsy tO UsE We can type as many lines as we wish. After completing the entry of data, we must key an end of fi le (Ctrl-d, also designated as ^d). Unix translates one line at a time, changing the specifi ed characters
until it fi nds the end of the fi le.When the translated strings are of different lengths, the result depends on which
string is shorter. If string 2 is shorter, the unmatched characters will all be changed to the last character in string 2. On the other hand, if string 1 is shorter, the extra characters in string 2 are ignored.
$ tr "aeiou" "AE?" It is very easy to use It ?s vEry EAsy t? ?sE $ tr "aei" "AEIOU" It is very easy to use It is vEry EAsy to usE
Deleting matching charactersTo delete matching characters in the translation, we use the delete option (–d). (b) $ tr –d "aeiouAEIOU" It is very easy to use t s vry sy t s This command will remove the upper as well as the lower-case vowels.(c) tr –d "a–z" HALLOW hallow
Table 10.4 Brief description of the options used in the tr command
Option Description
-d Deletes specifi ed characters in set1 from the input supplied
-s Squeezes repeated characters specifi ed in set1 into a single character
-c Applies translation on the complement of the characters mentioned in set1, that is, on the characters that are not specifi ed in set1

Bourne Shell Programming 401
HALLOW This command removes lower-case letters.
We can also specify the range of characters to translate. (d) To change all the lower-case characters to upper case, the following command is used.
$ tr '[a–z]' '[A–Z]' < school
–s option This substitutes all the specifi ed characters with another specifi ed character and displays the results.
(e) The following example substitutes all A’s with character B in the fi le school.txt.
$ tr –s AB < school.txt
Note: Substitution is a default option.
–d option This deletes specifi ed characters from the given input and displays the result.
(f) The following example deletes all occurrences of the character B from the fi le school.txt and displays the result.
$ tr –d B < school.txt
–c option This tells tr not to match the specifi ed characters.
(g) The following example deletes all characters except character B from the fi le school.txt and displays the result.
$ tr –cd B < school.txt
Squeeze option This deletes consecutive occurrences of the same character in the output.
For example, if after the translation of the letter ‘i’ to the letter ‘s’, the output contains a string of consecutive occurrences of ‘s’, then only one character ‘s’ is displayed and the remaining occurrences of ‘s’ are deleted.(h) $ tr –s "i" "s" It will replace all i’s by s and consecutive occurrences of s will be replaced by a single
s. this is my stick ths s my stsck(i) The following script accepts the word ‘oak’ as an answer, regardless of whether upper-
case or lower-case letters are used anywhere in the word, to the question asked, ‘What kind of tree bears acorns?’
acceptans echo "What kind of tree bears acorns?" read ans ans=`echo $ans | tr a–z A–Z' if [ $ans == "OAK" ] then echo "Correct Answer" else echo "Sorry the answer is wrong" fi

402 Unix and Shell Programming
Output
$./acceptans What kind of tree bears acorns? banana Sorry the answer is wrong $./acceptans What kind of tree bears acorns? Oak Correct Answer
We fi rst ask the user to enter the answer, which is then stored in the variable ans. The answer is then translated into upper case by the tr command and then compared with the actual answer (which is already in upper case).
(j) The following script changes the case of the string entered through the keyboard (upper case is converted to lower case and vice versa). To exit from the script, press Ctrl-d.
changecase #!/bin/bash echo "Enter a string" read k echo $k | tr '[a–z][A–Z]' '[A–Z][a–z]'
Output
Enter a string Hello hELLO
(k) The following script changes the case of the fi le and stores it in another fi le. The fi le names are sent as command line arguments.
changecaseinfi le #!/bin/bash cat $1 | tr '[a–z][A–Z]' '[A–Z][a–z]' > $2
Output
$ cat xyz.txt This is a test fi le $ cat pqr.txt cat: cannot open pqr.txt $ ./changecaseinfi le xyz.txt pqr.txt $ cat xyz.txt This is a test fi le $ cat pqr.txt tHIS IS A TEST FILE
(l) The following script will copy the contents of the fi le a.bat and b.bat, one after the other, into the fi le c.bat. The fi lenames are sent through command line arguments.

Bourne Shell Programming 403
copyfi lecontent3 #!/bin/bash if test $# –ne 3 then echo The number of arguments passed are less than 3 exit else cat $2 > $1 cat $3 >> $1 echo The fi le after merging the two fi les $2 and $3 are cat $1 fi
Output
$ cat a.txt Today is Sunday. It may rain. I am tired. $ cat b.txt This is a test fi le $ ./copyfi lecontent3 merge.txt a.txt b.txt The fi le after merging the two fi les a.txt and b.txt are Today is Sunday. It may rain. I am tired. This is a test fi le
10.10.4 wc: Counting Lines, Words, and CharactersThe wc command is used to fi nd the number of source code lines in any application program developed in the Unix environment. By default, it gives all the three counts—characters, words, and lines—of any given fi le.
Syntax wc [options] fi lename
The options and arguments used in the wc command are briefl y explained in Table 10.5.
Examples
(a) $ wc phone.lst It will display the number of lines,
words, and characters in this fi le. We can use the –l, –w, and –c option along with the wc command if we wish to view only the number of lines, words, or characters in the fi le respectively.
$ wc –l phone.lst
Table 10.5 Brief description of the options used in the wc command
Option Description
–l It returns the total number of lines in a fi le.
–w It returns the total number of words in a fi le.
–c It returns the total number of characters in a fi le.
fi lename It is the name of the fi le whose number of characters, words, or lines we wish to know.

404 Unix and Shell Programming
It will give the number of lines in the fi le. Similarly, the –w option will give the total number of words in a fi le and the –c option will give the total number of characters in a fi le.
(b) The following script merges the three fi les, chapter 1, chapter 2, and chapter 3, into the fi le book and counts the number of lines in it.
mergefi les #!/bin/bash cat school.txt > book cat course.txt >> book cat xyz.txt >> book n=`cat book | wc –l' echo "There are $n number of lines in the fi le book" $./mergefi les
Output
There are 13 number of lines in the fi le book
Note: wc -l counts the number of lines in the output of the cat book command (contents of book fi le). The output is then stored in the variable n.
(c) The following script counts the number of persons logged in. countlogged #!/bin/bash n=`who | wc –l' echo "There are $n users logged onto the system"
Output
There are 3 users logged onto the system
10.10.5 grep: Searching Patternsgrep is a utility program that searches the fi le(s) for lines with a matching pattern. Lines that match the pattern are printed on the standard output.
To fi nd all the lines containing the string mce in the fi le a.bat, we use the following command:
$ grep mce a.bat
The aforementioned command will search all the lines in the fi le a.bat containing the string mce and display all those lines on standard output along with the line number where the pattern was located. If a pattern containing more than a single word is searched for, it can be enclosed in quotes.
Syntax grep option pattern fi lenames
The options used with the grep command are briefl y explained in Table 10.6.
Table 10.6 Brief description of the options used in the grep command
Option Description
-c Displays the count of the number of occurrences
-l Displays the list of fi lenames only
-n Displays line numbers along with lines
-v Displays all the lines except those matching the expression
-I Ignores case for matching
-h Omits fi lenames when handling multiple fi les

Bourne Shell Programming 405
The pattern refers to the regular expression, that is, the character(s) or string we wish to search for in the specifi ed fi le(s). If the pattern consists of characters, then the expressions that can be formed using characters are shown in Table 10.7.
Table 10.8 Brief description of the expressions that can be formed using strings
Pattern Description
Pat Matches the given pattern
? Matches zero or one single character
* Repeats the pattern zero or more times
^pat Matches the pattern pat at the beginning of the line
pat$ Matches the pattern pat at the end of the line
? (pat1|pat2|...) Matches zero or one of any of the patterns
@(pat1|pat2|...) Matches exactly one of the patterns
*(pat1|pat2|...) Matches zero or more of the patterns
+(pat1|pat2|...) Matches one or more of the patterns
!(pat1|pat2|...) Matches anything except any of the patterns
Table 10.7 Brief description of the expressions that can be formed using characters
Expression Description
* Matches zero or more occurrences of previous characters
[pqr] Matches a single character, p, q, or r
[c1 - c2] Matches the range between c1 and c2
[^pqr] Matches a single character which may be p, q, or r at the beginning of the line
Consider the fi le bank.lst with the following content.101 Aditya 0 14/11/2012 current102 Anil 10000 20/05/2011 saving103 Naman 0 20/08/2009 Current104 Rama 10000 15/08/2010 saving105 Jyotsna 5000 16/06/2012 saving106 Mukesh 14000 20/12/2009 current107 Yashasvi 14500 30/11/2011 saving108 Chirag 0 15/12/2012 Current109 Arya 16000 14/12/2010 Current110 Puneet 130 16/11/2009 saving
Examples
(a) $ grep "[mM]ic*[rR]ochip bank.lst
While writing patterns consisting of strings, different expressions can be formed. The expressions that can be formed using strings are shown in Table 10.8.

406 Unix and Shell Programming
This example searches a line having the pattern mic/Mic with any number of occurrences of the character c, then r/R, and then chip in the fi le bank.lst. Since the fi le bank.lst shown in the command does not have the pattern Microchip, nothing will appear in the output.
While writing patterns, different characters or string expressions can be made. Table 10.9 shows the examples of the patterns that can be built using different character and string expressions.
Table 10.9 Different examples of the expressions that can be formed using characters and strings
Pattern Matches
?(Mce) ‘Mce’ or nothing
?(Mce|MCE) ‘Mce’, ‘MCE’, or nothing
@(Mce|MCE) ‘Mce’ or ‘MCE’
Mce Matches only Mce and nothing else
[Hh]* Matches any word beginning with upper- or lower-case H
[Hh]? Matches any two characters beginning with upper- or lower-case H
*[Hh]* Matches any word containing an upper- or lower-case H
H|h Matches only one character, upper- or lower-case H
[aeiouAEIOU] Matches only one character and it must be a vowel (a, e, i, o, or u)
[0-9] Matches one digit in the range 0–9
[a-z A-Z] Matches an alphabetic character
(b) $ grep current bank.lst
Output
101 Aditya 0 14/11/2012 current 106 Mukesh 14000 20/12/2009 current
Note: Quotation is not desired here because it is required only when the search string consists of more than one word.
(c) $ grep current bank.lst bnk.lst The string current is searched in both the fi les, bank.lst and bnk.lst, and the fi lenames
are also displayed on the left side of the result.(d) $ grep 'Chirag' bank.lst It will search for the name Chirag in the fi le bank.lst.
Output
108 Chirag 0 15/12/2012 Current
(e) $ grep –c current bank.lst –c counts the number of times the pattern current has occurred in the fi le bank.lst.(f) $ grep –n current bank.lst –n is used to display the line number containing the pattern along with the line.

Bourne Shell Programming 407
(g) $ grep –v current bank.lst –v is inverse, that is, it selects all the lines not containing the pattern current.
Output
102 Anil 10000 20/05/2011 saving 103 Naman 0 20/08/2009 Current 104 Rama 10000 15/08/2010 saving 105 Jyotsna 5000 16/06/2012 saving 107 Yashasvi 14500 30/11/2011 saving 108 Chirag 0 15/12/2012 Current 109 Arya 16000 14/12/2010 Current 110 Puneet 130 16/11/2009 saving
(h) $ grep –l current *.lst –l lists only the fi lenames containing the pattern.
(i) $ grep –i current bank.lst –i ignores case while searching for the pattern, that is, it shows records having current
or Current, that is, current in any case (lower case/upper case).
Output
101 Aditya 0 14/11/2012 current 103 Naman 0 20/08/2009 Current 106 Mukesh 14000 20/12/2009 current 108 Chirag 0 15/12/2012 Current 109 Arya 16000 14/12/2010 Current
(j) $ grep –e current –e Current bank.lst This shows records having the pattern current or Current. –e stands for the or operator.
The output will be the same as in the aforementioned example.(k) $ grep –2 –i Jyotsna bank.lst This shows two lines above and below the line containing the pattern Jyotsna.(l) $ grep "r" bank.lst This shows all records having the character r in them anywhere.
Output
101 Aditya 0 14/11/2012 current 103 Naman 0 20/08/2009 Current 106 Mukesh 14000 20/12/2009 current 108 Chirag 0 15/12/2012 Current 109 Arya 16000 14/12/2010 Current
(m) $ grep "r*" bank.lst It means that r can appear any number of times including zero. It displays all the records
that have or do not have this character.
(n) $ grep "^1" bank.lst All lines starting with 1 are shown.

408 Unix and Shell Programming
Output
101 Aditya 0 14/11/2012 current 102 Anil 10000 20/05/2011 saving 103 Naman 0 20/08/2009 Current 104 Rama 10000 15/08/2010 saving 105 Jyotsna 5000 16/06/2012 saving 106 Mukesh 14000 20/12/2009 current 107 Yashasvi 14500 30/11/2011 saving 108 Chirag 0 15/12/2012 Current 109 Arya 16000 14/12/2010 Current 110 Puneet 130 16/11/2009 saving
Note: ^ means the pattern is matched at the beginning of the line. $ signifi es that the pattern is at the end of the line.
(o) $ grep "^11" bank.lst It will print all the lines starting with 11.
Output
110 Puneet 130 16/11/2009 saving
(p) $ grep [Cc]urrent bank.lst It displays records having the pattern current or Current.
Output
101 Aditya 0 14/11/2012 current 103 Naman 0 20/08/2009 Current 106 Mukesh 14000 20/12/2009 current 108 Chirag 0 15/12/2012 Current 109 Arya 16000 14/12/2010 Current
(q) grep –h "current" *.lst It displays all the lines having the pattern current without the fi lenames on its left.
(r) grep ".....nt" bank.lst It displays all records having the pattern current or Current. Five dots (.....) implies
that any fi ve characters having nt at the end are displayed.
Output
101 Aditya 0 14/11/2012 current 103 Naman 0 20/08/2009 Current 106 Mukesh 14000 20/12/2009 current 108 Chirag 0 15/12/2012 Current 109 Arya 16000 14/12/2010 Current
(s) grep "cu...nt" bank.lst It displays all records having the pattern current in the fi le bank.lst.

Bourne Shell Programming 409
Output
101 Aditya 0 14/11/2012 current 106 Mukesh 14000 20/12/2009 current
(t) grep "t$" bank.lst It displays all records having character t at the end, that is, all records having the pattern
current or Current at the end of the line are displayed.
Output
101 Aditya 0 14/11/2012 current 103 Naman 0 20/08/2009 Current 106 Mukesh 14000 20/12/2009 current 108 Chirag 0 15/12/2012 Current 109 Arya 16000 14/12/2010 Current
10.10.6 egrep: Searching Extended Regular ExpressionsExtending grep (egrep) extends the pattern matching capabilities of grep. By pattern matching, we mean searching extended regular expressions. It offers all the options of grep but its most useful feature is the facility to specify more than one pattern for search.
Syntax egrep [options] [regular_expression] [fi les]
The options of egrep are the same as that of grep. regular_expression refers to the pattern that we wish to search for in the given fi les.
More than one pattern (separated by pipelines) can be searched for. The expressions used by egrep are shown in Table 10.10.
Notes: 1. + matches one or more instances of the
previous character.2. ? matches zero or one occurrence of
the previous character.
Examples
(a) $ egrep "r" bank.lst(b) $ egrep "r+" bank.lst It matches one or more occu-
rrences of character r.(c) $ egrep "r?" bank.lst It matches zero or one occurrence of character r, that is, it shows all records.(d) $ egrep '^[A–D].*f$' bank.lst It displays all records beginning with any char acter from A to D and ending with character g.
Note: The pattern can also be saved in a fi le.
Consider the fi le chirag.lst with the following syntax. current|saving
Table 10.10 Brief description of the expressions used by the egrep command
Expression Description
ch+ Matches one or more occurrences of the character ch
ch? Matches zero or one occurrence of the character ch
exp1 | exp2 Matches the expressions exp1 or exp2
(x1 | x2) x3 Matches the expressions x1x3 or x2x3

410 Unix and Shell Programming
(e) $ egrep –f chirag.lst bank.lst It displays all the records having the pattern current or saving in it.
(f) The following script lists all the ordinary fi les with names starting with a vowel. fi lesbeginvowel #!/bin/bash for f in * do if test –f $f then echo $f >> tmp.lst fi done grep "^[aeiou]" tmp.lst $./fi lesbeginvowel
Output
acceptans accountslist accountswithr usrnme
(g) The following script counts the number of blank lines in the fi le named c.txt. countblank #!/bin/bash n=`grep ^$ c.txt | wc –l' echo There are $n lines blank in the fi le, c.txt
Output
$ cat c.txt Today is Sunday. It may rain. I am tired. This is a test fi le $ ./countblank There are 3 lines blank in the fi le, c.txt
Note: ^ is used for start (beginning) and $ is for end. When ^$ are the same, that is, if the beginning and end of the line are the same, it means the line is blank
(h) The following script counts the number of links in the fi le. The fi lename is sent as a command line argument.
countlinks #!/bin/bash n=`ls –i $1' # Storing the inode number of the fi le sent as command line argument in the
variable n ls –ilR > tmp.lst

Bourne Shell Programming 411
k=`grep $n tmp.lst | wc –l' echo "There are $k links of $1 fi le"
Output
$ ./countlinks xyz.txt There are 1 links of xyz.txt fi le $ ln xyz.txt x.txt $./countlinks xyz.txt There are 2 links of xyz.txt fi le
Note: In the aforementioned script, ls -ilR command options perform the following functions:i is to display the inode numberl is to display the long listingR is for recursive display, that is, subdirectories are also included
10.10.7 Command Substitution
We can execute a command by enclosing it within two grave accent marks, also called backquotes (`). The shell replaces the command and the grave marks with the output from the command.
Examples
(a) workingdir='pwd' echo 'The present working directory is $workingdir' In this example, the pwd command is executed and its output is then assigned to the
variable workingdir.
We can also write this example as follows: echo 'The present working directory is' `pwd' The normal output obtained by executing the date command is as follows: $date Thu Dec 10 13:10:05 MDT 2012
(b) The following script demonstrates the use of the set command. It displays the current weekday, month, day, time, and year.
demoset #!/bin/bash set `date' echo $* echo echo 'Week day:' $1 echo 'Month:' $3 echo 'Day:' $2 echo 'Time:' $5 $6 echo 'Year:' $4

412 Unix and Shell Programming
Output Saturday 25 February 2012 02:45:40 PM IST Week day: Saturday Month: February Day: 25 Time: 02:45:40 PM Year: 2012
The fi rst command of the aforementioned script uses the grave accent marks to set the command line argument variables to the output of the date command. Remember, the entire string between grave accents (`...’) is taken as the command to be executed and is replaced with the output from the command.
(c) The following script demonstrates the execution of the commands through the grave accent marks. The system date and current working directory path are displayed through the script.
demograve #!/bin/bash directory='pwd' todaydate='date' echo "Present working directory is $directory" echo "Today date is $todaydate"
Output
Present working directory is /UnixCode Today date is Saturday 25 February 2012 02:16:54 PM IST
10.10.8 cut: Slicing InputThe cut command is used for slicing (cutting) a fi le vertically. It identifi es both the fi elds and the columns.
Syntax cut [options] fi lename
The options that can be used with the cut command are shown in Table 10.11.
Example
(a) $ cut –c 6–22,30–35 bnk.lst This retrieves characters 6–22 and
30–35 columns (characters) from the fi le bnk.lst.
(b) $ cut –f2 bank.lst We get fi eld number 2 of the fi le bank.
lst provided the fi elds are separated by tab space.
Files usually do not contain fi xed length records and the fi elds may be delimited by some other character other than tab such as ‘,’ and ‘|’. Hence, we use –d (delimiter) to specify the fi eld delimiter.
Table 10.11 Brief description of the options used in the cut command
Option Description
-c This is used for cutting columns.
-f This is used for cutting fi elds. The fi elds are assumed to be separated by tab space.
fi lename This represents the fi le from which we wish to cut the desired columns or fi elds.

Bourne Shell Programming 413
(c) $ cut –f2,3 –d "," txt.lst It will show the second and third fi elds of the fi le txt.lst. Each word of the fi le txt.lst
is delimited by a , (comma). Text fi les can be handled as textual databases by Unix with each word in the fi le being
taken as a fi eld. To understand cutting and pasting better, let us create two fi les with the following names—Names and Telephone.
The Names fi le may have the following contents. 101 Anil 102 Ravi 103 Sunil 104 Chirag 105 Raju The Telephone fi le may have the following content. 101 2429193 102 2627312 103 2456789 104 2646189 105 2547856
Note: Here each word is separated by a 'tab' character.
(d) Now if we wish to cut out only the second word (fi eld) from the fi le Names, we give the following command.
$ cut –f2 Names We get the following output on the screen. Anil Ravi Sunil Chirag Raju
(e) $ cut –f2 Telephone 2429193 2627312 2456789 2646189 2547856 We can save the output by redirecting standard output to a fi le.(f) $ cut –f2 Name > nn(g) $ cut –f2 Telephone > tt The names and telephone numbers will be saved in two fi les, nn and tt respectively.
10.10.9 paste: Pasting ContentThe paste command is used to join textual data together. It is very useful to put together textual information located in various fi les.

414 Unix and Shell Programming
Syntax paste [–d delimiter] [fi les]
Here, delimiter specifi es the character(s) to be used while pasting or joining content.
Examples
(a) $ paste nn tt
The output will be as follows.
Anil 2429193Ravi 2627312Sunil 2456789Chirag 2646189Raju 2547856
Note: By default, paste uses the tab character for pasting fi les but we can specify a delimiter of our choice with the -d option.
(b) $ paste –d"|" school.lst merit.lstIt will join the two fi les with the help of the | delimiter and not tab.
$ cut –d"|" –f1,4– p.lst | paste –d"|" – q.lst
It will cut the fi rst, fourth, and all fi elds after the fourth fi eld from p.lst and paste them before all the fi elds of q.lst (– sign is used before q.lst). If – (hyphen) is used after q.lst, it would have pasted the fi elds after fi elds of q.lst.
(c) The following script prints any one of these messages.Good Morning if the time is between 00:00 to 11:59.Good Evening if the time is between 12:00 to 17:59 (between 12 to 5:59 p.m.).Good Night at all other times.wishme#!/bin/bashh=`date +"%T" | cut –c1–2`if test $h –lt 12then echo "Good Morning"else if test $h –lt 18 then echo "Good Evening" else echo "Good Night" fi fi
Output
Good Morning

Bourne Shell Programming 415
10.10.10 sort: Sorting InputThe sort command is used for sorting and merging fi les. We can sort even on the fi elds of a fi le where fi elds can be separated by a white space, tab, or special symbol.
Syntax sort fi lename
All lines in the fi lename are ordered by treating the entire line as the key fi eld.
sort +p1 – p2 fi lename
This limits the sort to a key fi eld beginning with p1 and ending with fi eld p2, where p1 and p2 are fi eld numbers. If p2 is omitted, the key fi eld extends from p1 to the end of the line.
We can sort the numerals as well as text in upper and lower case. In addition, we can eliminate duplicate lines while sorting. Table 10.12 shows the options applicable to the sort command.
Table 10.12 Brief description of the options used in the sort command
Option Description
-n Sorts numerical values instead of ASCII, ignoring blanks and tabs
-r Sorts in reverse order
-f Sorts upper and lower case together, that is, ignores differences in case.
-u Displays unique lines, that is, eliminates duplicate lines in the output
-b Ignores leading spaces while sorting
fi lename Represents the fi le to be sorted
Examples
(a) sort +2 –4 bnk.lst It skips the fi rst two fi elds and uses the third and fourth fi elds for sorting the fi le bnk.lst.(b) sort +3 –4 bnk.lst It skips the fi rst three fi elds and uses the fourth fi eld for sorting the fi le bnk.lst.(c) sort +2 bnk.lst It skips the fi rst two fi elds and uses the third fi eld and rest of the fi elds up till the end of
the line for sorting the fi le bnk.lst.(d) sort bnk.lst –o bank.lst It sorts bnk.lst and stores the result in bank.lst.(e) sort +0–1 bnk.lst It sorts the fi rst fi eld.(f) sort +1 –4 bnk.lst It sorts fi elds from the second to the fourth.(g) sort +2b bnk.lst It sorts the third fi eld, ignoring leading blank spaces.(h) sort +2bf bnk.lst f is used to ignore the upper and lower case distinction. It sorts the third fi eld, ignoring leading blank spaces and sorts upper and lower case data
together.

416 Unix and Shell Programming
(i) sort –n +2 –3 a.bat The –n option is used for sorting the fi le on numerical values rather than ASCII values. It sorts the fi le a.bat on the third fi eld, considering it to be a numerical fi eld.
(j) sort –r link.lst It sorts in reverse order.
(k) sort –nu +2 –3 a.bat –u eliminates duplicate lines in the sorted output. It sorts the fi le a.bat on the third fi eld after eliminating duplicate lines.
(l) Suppose fi le1 contains records having the roll number, name, and marks of the students and fi le2 contains records with the roll number and two subject names chosen by the student. To create a fi le, fi le3 from fi le1 and fi le2 with records of the roll number, name, and two subjects of the student, the fi le must be sorted on roll number.
fi le1 101 Anil 75 102 Chirag 82 103 kanika 70 104 Naman 88 105 Suman 68 106 John 83
fi le2 101 Science Maths 102 Arts English 103 Science Computer 104 Arts Sanskrit 105 Arts Politics 106 Science Biology
The following script demonstrates the usage of sort, cut, and paste commands.
cutpastesort #!/bin/bash sort fi le1 –o fi le1 sort fi le2 –o fi le2 cut –f1 fi le1 > rollnum cut –f2 fi le1 > name cut –f2 fi le2 > sub1 cut –f3 fi le2 > sub2 paste rollnum name sub1 sub2 > fi le3 sort fi le3 –o fi le3
Output
$ cat fi le1 101 Anil 75 102 Chirag 82

Bourne Shell Programming 417
103 kanika 70 104 Naman 88 105 Suman 68 106 John 83 $ cat fi le2 101 Science Maths 102 Arts English 103 Science Computer 104 Arts Sanskrit 105 Arts Politics 106 Science Biology $ ./cutpastesort $ cat fi le3 101 Anil Science Maths 102 Chirag Arts English 103 Kanika Science Computer 104 Naman Arts Sanskrit 105 Suman Arts Politics 106 John Science Biology
Two fi les, fi le1 and fi le2, are sorted fi rst. Thereafter, fi eld 1, that is, roll numbers from fi le1 are extracted and stored in the fi le rollnum. Field 2, that is, name from fi le1 is extracted and stored in the fi le name. Field 2, that is, subject 1 from fi le2 is extracted and stored in fi le sub1. Field 3, that is, subject 2 from fi le2 is extracted and stored in fi le sub2. At the end, the contents from the fi les, rollnum, name, sub1, and sub2 are pasted onto the fi le fi le3. Finally, fi le3 is sorted.
(m) The following script sorts a fi le on a given fi eld and stores the sorted content in another fi le. The fi le school.txt is sorted on the basis of its third fi eld, marks, and the sorted rows are stored in the fi le skk.txt.
sortandstore #!/bin/bash sort –n +2 –3 school.txt > skk.txt
Output
$ cat school.txt 101 Anil 75 102 Chirag 82 103 Kanika 70 104 Naman 88 105 Suman 68 106 John 83 $ ./sortandstore $ cat skk.txt

418 Unix and Shell Programming
105 Suman 68 103 kanika 70 101 Anil 75 102 Chirag 82 106 John 83 104 Naman 88
We can see that skk.txt contains the rows sorted on the marks fi eld. In the aforementioned script, options used in the sort command are described as follows:
–n is used for numerical comparison. +2 skips two fi elds to reach the beginning of the sort fi eld. −3 means that we have to include everything up till the third fi eld for sorting (−4 implies
that we have to consider the third as well as the fourth fi elds for sorting).
(n) The following script will print the names of all the fi les in the given directory having the specifi ed heading (the fi rst line) in them. The directory name and the heading, that is, the text is passed as a command line argument.
fi leswithhead #!/bin/bash cd $1 for f in * do k=`head –1 $f` if $k == $2 then echo $f fi done $./fi leswithhead accounts Employees Report First, we go into the directory, accounts, using the cd command. Then, we search each
fi le in that directory. Extract the fi rst line of every fi le using the head command, and match that fi rst line extracted with the pattern (employees report) that we are looking for. The names of the fi les having the same fi rst line as that of the pattern are then displayed.
Output
Report.txt emp.txt
(o) The following script extracts the specifi ed range of lines from a given fi le and stores them in another fi le.
copyrangeinfi le #!/bin/bash # extracts $2–$3 lines from $1 and place then in $4 head –$3 $1 | tail +$2 > $4

Bourne Shell Programming 419
Output
$ ./copyrangeinfi le school.txt 2 4 range.txt $ cat school.txt 101 Anil 75 102 Chirag 82 103 Kanika 70 104 Naman 88 105 Suman 68 106 John 83 $ cat range.txt 102 Chirag 82 103 Kanika 70 104 Naman 88
The aforementioned script extracts lines, from the second till the fourth, from the fi le, school.txt and stores them in the fi le range.txt.
Initially, the fi rst four lines are extracted from the fi le school.txt. From these fi rst four lines, the fi rst two are skipped and lines from the third till the end, that is, the fourth line will be stored in the fi le range.txt.
Note: Tail +n skips n-1 lines and extracts from the nth line till the end of the fi le.
(p) The following script displays the last 10 fi les present in the current directory. lastten #!/bin/bash ls > tmp tail –10 tmp
Output
bank.lst school.txt temp.lst tmp.lst usrnme wishme wishme2 x.txt xyz.txt yy.txt
(q) The following script looks for the fi lenames in the given directory having the specifi ed heading (the fi rst line) in them. Then, the number of lines in the fi les is counted and a message is displayed on the following basis.
The fi le is small-sized if the number of lines in the fi le is less than 50. The fi le is medium-sized if the number of lines in the fi le is less than 100. The fi le is large-sized otherwise.
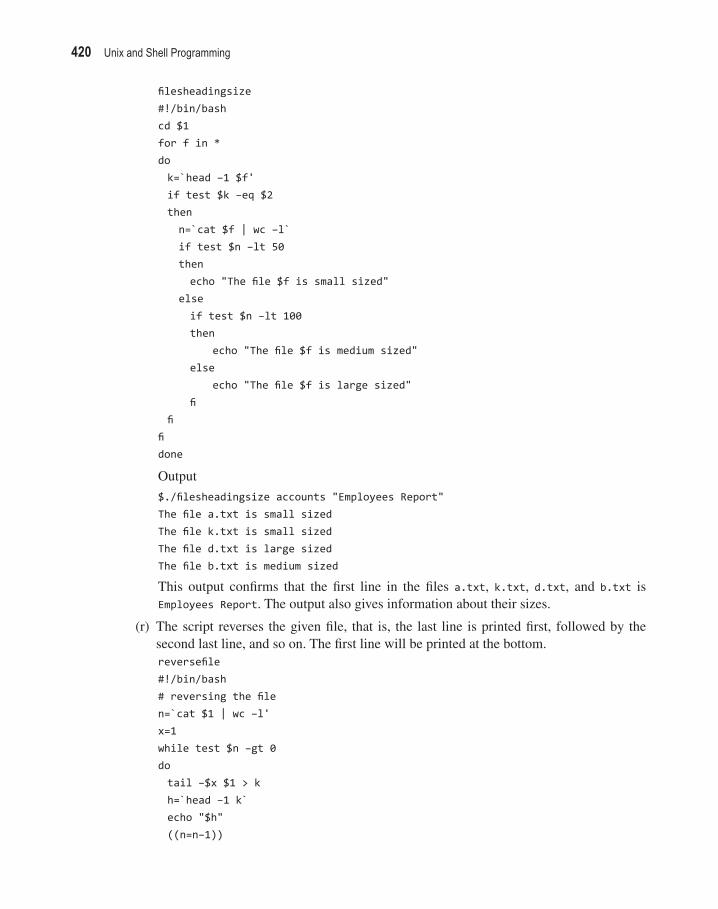
420 Unix and Shell Programming
fi lesheadingsize #!/bin/bash cd $1 for f in * do k=`head –1 $f' if test $k –eq $2 then n=`cat $f | wc –l` if test $n –lt 50 then echo "The fi le $f is small sized" else if test $n –lt 100 then echo "The fi le $f is medium sized" else echo "The fi le $f is large sized" fi fi fi done
Output
$./fi lesheadingsize accounts "Employees Report" The fi le a.txt is small sized The fi le k.txt is small sized The fi le d.txt is large sized The fi le b.txt is medium sized
This output confi rms that the fi rst line in the fi les a.txt, k.txt, d.txt, and b.txt is Employees Report. The output also gives information about their sizes.
(r) The script reverses the given fi le, that is, the last line is printed fi rst, followed by the second last line, and so on. The fi rst line will be printed at the bottom.
reversefi le #!/bin/bash # reversing the fi le n=`cat $1 | wc –l' x=1 while test $n –gt 0 do tail –$x $1 > k h=`head –1 k` echo "$h" ((n=n–1))

Bourne Shell Programming 421
((x=x+1)) done
Output
$ cat school.txt 101 Anil 75 102 Chirag 82 103 kanika 70 104 Naman 88 105 Suman 68 106 John 83 $ ./reversefi le school.txt 106 John 83 105 Suman 68 104 Naman 88 103 Kanika 70 102 Chirag 82 101 Anil 75First, we count the number of lines in the fi le. Then the last line of the fi le is extracted and stored in a temporary fi le k. After that, the fi rst line of fi le k is displayed (i.e., the last line is displayed). Thereafter, the last two lines of the fi le are extracted and stored in the fi le k and again the fi rst line of this fi le, that is, the second last line will be displayed, and so on.
10.10.11 uniq: Eliminating and Displaying Duplicate LinesThe uniq command deletes duplicate lines (only one line is kept and the rest are deleted) in the output. Only adjacent duplicate lines are deleted. To delete non-adjacent lines, the fi le must be sorted.
Syntax uniq [options] fi lename
The options shown in this syntax are briefl y described in Table 10.13.
Table 10.13 Brief description of the options used with the uniq command
Option Description
-u Displays only unique lines-d Displays only duplicate lines-c Displays all lines with duplicate count-f Skips leading fi elds before checking for duplicate text-s Skips leading characters before checking for duplicate text
Note: Until and unless the –f option is used, the whole line is used for comparison.
Examples
(a) $ uniq mce.txt It prints all the non-duplicated lines of the fi le mce.txt. Only one line of the duplicated lines
is displayed.

422 Unix and Shell Programming
(b) $ uniq –u mce.txt It suppresses the output of the duplicated lines and lists only the unique lines in the fi le
mce.txt (the duplicated lines are not displayed even once).(c) $ uniq –d mce.txt It displays the duplicated lines only once.(d) $ uniq –c mce.txt All lines are preceded by a number showing the number of times the line has occurred
in the fi le.(e) While the default compares the whole line to determine if two lines are duplicate, we can
also specify where the comparison is to begin. The skip duplicate fi elds option (–f) skips the number of fi elds specifi ed starting at the beginning of the line.
$ uniq –d –f 2 mce.txt It will skip the fi rst two fi elds and start comparing from the third fi eld onwards till the end of
the line and displays that line once, if found similar.(f) We can also specify the number of characters that are to be skipped before starting the
comparison using the –s option. $ uniq –d –s 5 mce.txt
10.10.12 /dev/null: Suppressing EchoThe /dev/null is used when we do not want to echo the output of any command on the screen. In order to suppress the output of certain commands, we divert the standard output (STDOUT) to the /dev/null directory instead of the screen. The three streams that we come across while scripting are as follows:
STDIN—Standard input stream It is used for entering data. Its fi le descriptor is 0.
STDOUT—Standard output stream It is used for displaying output on the screen. Its fi le descriptor is 1.
STDERR—Standard error stream It deals with errors. Its fi le descriptor is 2.
Syntax command > /dev/null [ 2>&1]
In the aforementioned syntax, we can see that the output of the command, which was supposed to be sent to the standard output (STDOUT), is suppressed by sending it to the /dev/null directory. The 2>&1, if used, redirects the standard error stream, 2 (STDERR) to the same place where 1 that is, STDOUT is being sent, /dev/null. Hence, the errors will also not appear on the screen.
To understand the concept more clearly, observe the following situations:
command > fi le The stdout is redirected to the fi le, overwriting it if the fi le exists.
command > /dev/null The stdout is redirected to /dev/null, suppressing the output on the screen.
command < fi le The command takes input from the fi le instead of the standard input device.
2 > fi le The stderr is redirected to the fi le, overwriting it if fi le exists
2>&1 The stderr is redirected to the same location where stdout is being redirected.

Bourne Shell Programming 423
Examples
(a) The following shell script is used to fi nd whether the given fi le exists in the current directory or not.
checkincurdir #!/bin/bash echo –n "Enter the fi le name to search: " read f ls –R > tmp.lst if grep $f tmp.lst >/dev/null then echo "$f exists in the current directory" else echo "$f does not exist in the current directory" fi
Output
$ ./checkincurdir Enter the fi le name to search: xyz.txt xyz.txt exists in the current directory $ ./checkincurdir Enter the fi le name to search: letter.txt letter.txt does not exist in the current directory
Usually, the output of grep is displayed on the screen, that is, the lines having the fi le name (stored in variable $f) in tmp.lst fi le are displayed on the screen. However, since we do not want to see those lines on the screen but just want to know if the statement results in true or not, we suppress the output by redirecting it to the /dev/null directory.
(b) The following script searches for a pattern in the fi les of the current directory and prints the line containing the pattern as well as the names of the fi les containing the pattern.
searchpatinfi les #!/bin/bash echo –n "Enter the pattern to search: " read k for f in * do if grep $k $f then echo The fi le, $f contains the pattern, $k fi done
Output
Enter the pattern to search: Chirag Chirag|11, Amrapali Circle Jaipur

424 Unix and Shell Programming
The fi le, address.lst contains the pattern, Chirag 102 Chirag 82 The fi le, bank.txt contains the pattern, Chirag
(c) The following script searches for the pattern in the fi les of the current directory and prints only the names of the fi les containing the pattern.
searchpatinfi les2 #!/bin/bash echo –n "Enter the pattern to search: " read k for f in * do if grep $k $f >/dev/null then echo The fi le, $f contains the pattern, $k fi done
Output
Enter the pattern to search: Chirag The fi le, address.lst contains the pattern, Chirag The fi le, bank.txt contains the pattern, Chirag
(d) The following script prompts for the username and indicates (via a display) if the user has a login account in the system or not (i.e., the username is searched for in the fi le named passwd (in the etc directory). The user has the login account on the system only if the passwd fi le contains the username.
checkifl ogged #!/bin/bash echo –n "Enter the user name to search: " read n if grep "$n" /etc/passwd > /dev/null then echo "User exists" else echo "Sorry! User does not exist" fi
Output
$ ./checkifl ogged Enter the user name to search: chirag User exists $ ./checkifl ogged Enter the user name to search: john Sorry! User does not exist

Bourne Shell Programming 425
(e) The following shell script is used to read a name and indicate (via a display if that person is authorized to use the system or not). If the person is authorized, it displays whether that person is currently logged in or not.
checkauthoriz #!/bin/bash echo –n "Enter the name of the person: " read u cut –f1,5 –d":" /etc/passwd > tmp if grep $u tmp > /dev/null then if who |grep $u > /dev/null then echo "$u is the authorized person and is currently logged in" else echo "$u is the authorized person but is not logged in" fi else echo "$u is not the authorized person to use this system" fi
Output
$ ./checkauthoriz Enter the name of the person: john john is not the authorized person to use this system
$ ./checkauthoriz Enter the name of the person: chirag chirag is the authorized person but is not logged in
$ ./checkauthoriz Enter the name of the person: root root is the authorized person and is currently logged in
The person who has a login account (i.e. his/her name is in the /etc/passwd fi le) is the authorized person to use the system. Hence, we fi rst check whether the login name exists in the passwd fi le and after that we check whether the user is currently logged in or not, through the who command.
(f) The following script displays the usernames having a login account in the machine. accountslist cut –f1,5 –d: /etc/passwd $./accountlist
The following are the contents of the passwd fi le.
root:x:0:0:root:/root:/bin/bash bin:x:1:1:bin:/bin:/sbin/nologin daemon:x:2:2:daemon:/sbin:/sbin/nologin

426 Unix and Shell Programming
adm:x:3:4:adm:/var/adm:/sbin/nologin kanika:x:500:500:kanika:/home/kanika:/bin/bash vikash:x:501:501:vikash:/home/vikash:/bin/bash jyotika:x:502:512:jyotika:/home/jyotika:/bin/bash neeraj:x:503:503:neeraj:/home/neeraj:/bin/bash archana:x:504:504:archana:/home/archana:/bin/bash geeta:x:505:505:geeta:/home/geeta:/bin/bash fateh:x:506:506:fateh singh:/home/fateh:/bin/bash anil:x:507:507::/home/anil:/bin/bash
We need to display the fi eld numbers 1 and 5 to display the existing login names in the passwd fi le. Since the fi elds are delimited by : (colon), we use the –d option with the cut command.
The following is the output of the aforementioned script. root:root bin:bin daemon:daemon adm:adm kanika:kanika vikash:vikash jyotika:jyotika neeraj:neeraj archana:archana geeta:geeta fateh:fateh singh anil:(g) This script prints the names of the users beginning with character r and having a login
account (whether logged in or not). accountswithr cut –f1 –d":" /etc/passwd > usrnme grep "^r" usrnme $./accountswithr
All the usernames in the /etc/passwd fi le are fi rst stored in the fi le usrnme. From that fi le, the names (lines) beginning with character r are displayed.
Output
ravi rahul root
10.10.13 Logical OperatorsThe following are the three logical operators:
1. && (And operator)2. || (Or operator)3. ! (Not operator)

Bourne Shell Programming 427
&&—And operatorWhen we use && to connect two statements, the second statement is executed only when the fi rst succeeds.
Examples
$ grep "mce" a.lst && echo "record exists"Now, the message record exists will appear only when the string mce is found in the fi le a.lst.
||—Or operatorIt is used to execute the command following it only when the previous command fails.
Examples
(a) $ grep 'mce' a.lst || echo "record not found" It will display the message record not found only when the word mce is not found.
(b) The following script checks if a pattern occurs in the specifi ed fi le or not. The pattern and the fi les are sent as command line arguments.checkpattern#!/bin/bashgrep $1 $2 || exitecho "Record is found"
Output
$ ./checkpattern test xyz.txtThis is a test fi leRecord is found$ ./checkpattern hello xyz.txt$
If the grep command succeeds (i.e., the pattern is found) then the next half (after the || operator), that is, the exit command, will not execute and the message Record is found will be displayed on the screen. On the other hand, if the grep command does not succeed, that is, the test string is not found in the fi le names.lst, then the command exit will be executed, which takes the control to the shell prompt. In that case, the message Record is found is not displayed on the screen.The aforementioned script can also be written as follows:
checkpattern2
#!/bin/bashif grep $1 $2 > /dev/nullthen echo "$1 is found in fi le $2"else echo "$1 is not found in fi le $2"fi
!—Not operatorThe not operator performs negation, that is, it reverses the meaning of the logical expression. The following examples use the not operator to search for fi les and eliminates directories from the search.

428 Unix and Shell Programming
Examples
(a) The following script displays the fi rst fi ve executable fi les of the given directory. The directory name will be specifi ed through the command line argument.
fi veexec #!/bin/bash cd $1 x=1 for fi lename in * do if test ! –d $fi lename –a –x $fi lename –a $x –le 5 then echo $fi lename ((x=x+1)) fi done
Output $ ./fi veexec accounts bank.lst bk.lst pqr.txt range.txt ravi.txt text.lst
Note: –a is the logical and operator that is used to connect two or more commands/expressions. This operator returns true if all the expressions connected with this operator are true.
Using the cd command, we fi rst go into the specifi ed directory. Then, through the test command, we check each fi le of the specifi ed directory and test the following conditions:
1. It should not be a directory2. It should be executable 3. The counter (x) should be less than fi ve.
If all the conditions are true, the fi lename is displayed and the counter (x) is incremented by one.(b) The following script displays all the fi lenames in the current directory having the fi rst
character as an alphabet from a to b and the second character as a numeral. fi ndfi leab #!/bin/bash ls * >tmp.lst grep "^[a–b][0–9]" tmp.lst
Output
a1.lst b7.txt

Bourne Shell Programming 429
Note: The symbol ^ means beginning with.
All the fi lenames are fi rst stored in the temporary fi le tmp.lst. Thereafter, all the lines in the fi le tmp.lst are searched and the lines beginning with a or b followed by any numeral from 0 to 9 are displayed on the screen.
(c) The following script prints the names of the users who are currently logged in and whose names begin with character r.
loggednames #!/bin/bash who | cut –f1 –d":" > usrnme grep "^r" usrnme
Output
root console Feb 26 07 root pts/3 Feb 26 07 ravi pts/4 Feb 26 07 rahul pts/5 Feb 26 07
(d) The following script counts the number of directories in the current directory. countdir #!/bin/bash n=0 for f in * do if test –d $f then ((n++)) fi done echo "The number of directories are $n"
Output
The number of directories are 1
10.10.14 exec: Execute CommandThe exec command is used to open and close fi les in the script. There are several options to open a fi le. Table 10.14 gives a brief description of the options available to open a fi le with the exec command.
1. A fi le stream descriptor is created to represent each fi le. For standard fi les, the fi le descriptors are 0 (standard input), 1 (standard output), and 2 (standard error).
2. To designate that a fi le is for input, we use an input redirection token (<).
Table 10.14 Brief description of the options used to open a fi le with the exec command
Option Description
exec 0< fi lename File is opened for input
exec 1> fi lename File is opened for output
exec 2> fi lename File is opened for writing errors

430 Unix and Shell Programming
3. To designate that a fi le is for output or for error, we use an output redirection token (>).
When we open a fi le as input, we redirect it to standard input (0). Once opened, we can use the read command in a loop to read the specifi ed fi le one line at a time. Similarly, when we open a fi le as output, we can redirect the standard output to it.
Closing fi lesThe end of the script automatically closes all open fi les but we can also close them explicitly.The following is the command to close an input fi le:
exec 0<&–
The following is the command to close an output fi le:
exec 1>&–
To close an output fi le and then open it as input, we use the redirection substitution operators to fi rst close the output (4>&–) and then open it as input (4<&). The number indicates which stream descriptor is being closed.
Examples
(a) The following script reverses the sentences of the fi le sent as an argument.sentreversfi le#!/bin/bashexec 0< $1while read kdo
n=${#k} while (( $n >0))
do h=$(expr "$k" : ".*\(.\)") echo –n "$h" k=$(expr "$k" : '\(.*\).') ((n=n–1))
done echo
doneexec 0<&–
Output
$ cat a.txt Today is Sunday. It may rain. I am tired. $ ./sentreversfi le a.txt

Bourne Shell Programming 431
.niar ya tI .yadnuS si yadoT .derit ma I
The fi le a.txt is opened for input. Thereafter, by using the while loop, each line of the fi le is assigned to the variable k one by one. The length of each line is calculated and the last character of that line is displayed. This last character is then removed from that line and again the last character of the modifi ed line is displayed. This process is repeated for the whole line and for all the lines of the fi le. In the end, the respective fi le is closed.
(b) The following script reverses the sentences of the fi le and stores it in another fi le sent as a command line argument.
sentreverstore #!/bin/bash exec 0< $1 exec 1> $2 while read k do n=${#k} while (( $n >0)) do h=$(expr "$k" : '.*\(.\)') echo –n "$h" k=$(expr "$k" : '\(.*\).') ((n=n–1)) done echo done
Output
$ cat a.txt Today is Sunday. It may rain. I am tired. $ ./sentreverstore a.txt b.txt $ cat b.txt .niar yam tI .yadnuS si yadoT .derit ma I
(c) The following script is used for copying alternate lines from one fi le into another fi le and the fi lenames are sent as command line arguments.
copyalternate #!/bin/bash exec 0< $1 exec 3> $2 x=1 while read k do

432 Unix and Shell Programming
(( m = x % 2 )) if [ $m != 0 ] then echo $k 1>&3 fi ((x=x+1)) done exec 0<&– exec 3>&–
Output
$ cat school.txt 101 Anil 75 102 Chirag 82 103 kanika 70 104 Naman 88 105 Suman 68 106 John 83 $ ./copyalternate school.txt sch.txt $ cat sch.txt 101 Anil 75 103 kanika 70 105 Suman 68
The fi le school.txt is opened in the input mode (its fi le descriptor is set to 0) and the fi le sch.txt is opened in the output mode (its fi le descriptor is set to 3). A variable x is used and its initial value is set to 1. The value of the variable x is incremented by 1 after every line is read. Using the while loop, each line of the fi le is assigned to the variable k one by one. If the value of the variable x is odd, only those lines are written into the fi le sch.txt (the % operator returns the remainder—the lines that have 0 as the remainder are even lines and the lines that have a remainder that is non-zero are odd lines). At the end, the respective fi les are closed.
(d) The following script demonstrates the exec command. Three fi le names will be supplied to this script, bnk.lst, current.lst, and saving.lst. The fi le bnk.lst will be split into two fi les, current.lst and saving.lst, where the current.lst fi le will store the lines having the pattern ‘current’ whereas saving.lst will have the pattern ‘saving’.
splitfi le #!/bin/bash # Splitting the bank fi le into two fi les : one having the pattern current account
and other # having the pattern saving account. The fi le names are sent as command line
arguments exec 0<$1 exec 3>$2

Bourne Shell Programming 433
exec 4>$3 while read k do echo "$k" | egrep 'current' 1>&3 echo "$k" | egrep 'saving' 1>&4 done exec 0<&– exec 3>&– exec 4>&–
Output
$ cat bnk.lst 1001 Charles 15000 saving 1002 Kiran 10000 current 1003 Anushka 12000 current 1004 John 8000 saving 1005 Enna 11000 current $ ./splitfi le bnk.lst current.lst saving.lst $ cat current.lst 1002 Kiran 10000 current 1003 Anushka 12000 current 1005 Enna 11000 current $ cat saving.lst 1001 Charles 15000 saving 1004 John 8000 saving
The fi le bnk.lst is opened in the input mode (its fi le descriptor is set to 0), the fi le current.lst is opened in the output mode (its fi le descriptor is set to 3), and the fi le saving.lst is opened in the output mode (its fi le descriptor is set to 4). Using the while loop, each line of the fi le is assigned to the variable k one by one. If variable k has the pattern current, then it is stored in the fi le current.lst (fi le descriptor 3) and if the line has the pattern saving, it is stored in the fi le saving.lst (fi le descriptor 4). In the end, the respective fi les are closed.
(e) The following shell script displays the fi le type, number of links, the permissions, the owner name, and the group name of the specifi ed fi le.
fi leinfo #!/bin/bash ls –l >tmp echo –n "Enter the fi le name whose details are required: " read k exec 0< tmp while read f do if echo "$f" | egrep $k >/dev/null

434 Unix and Shell Programming
then fl t=`echo "$f" | cut –c1' perm=`echo "$f" | cut –c2–10' lnk=`echo "$f" | cut –c14` own=`echo "$f" | cut –c16–23` grp=`echo "$f" | cut –c25–32` echo "The fi le type is $fl t" echo "The permissions of fi le are $perm" echo "The number of links are $lnk" echo "The owner of the fi le is $own" echo "The group is $grp" fi done
Output
$ ls –al bank.lst -rw-r--r-- 2 root it 124 Feb 26 12:54 bank.lst $ ./fi leinfo Enter the fi le name whose details are required: bank.lst The fi le type is – The permissions of fi le are rw-r--r-- The number of links are 2 The owner of the fi le is root The group is it
The long listing of the current directory is fi rst stored in a temporary fi le tmp. After storing the long listing in the tmp fi le, through the while loop, each line of the fi le is assigned to variable f one by one. Then, through the cut command we extract the desired parameters, permissions, links, etc., of the line having the specifi ed fi lename.
10.10.15 sleep: Suspending ExecutionThe sleep command is used for inserting some delay, that is, to temporarily suspend the execution of a program for some seconds.
Syntax sleep t
Here, t is the time in seconds.
Examples
(a) $ sleep 100This statement waits for 100 seconds.
The sleep command requires one argument, the number of seconds to pause (sleep). The shell suspends script execution for the specifi ed duration when the sleep command is executed. It is often executed in a background script.
(b) The following script waits in an infi nite loop until the fi le bk.lst is made executable. In other words, the script will check whether the fi le bk.lst has the execute permission or not.

Bourne Shell Programming 435
If it has, the script exits onto the prompt. However, if the fi le bk.lst does not have execute permission, the script waits for a minute and rechecks for execute permission. In this way, the script checks whether the fi le bk.lst has execute permission after every minute.
checkexec#!/bin/bashwhile [ ! –x bank.lst]do sleep 60done
In the aforementioned script, the while loop will execute when the bank.lst fi le is not made an executable fi le. There will be no output or message displayed on the screen.
10.10.16 exit: Terminating ProgramsThe exit command prematurely terminates a program. When the exit statement is encountered in a script, execution is halted and control is returned to the calling program.
Syntax exit
% operator It returns the remainder. The following are examples:
Examples
(a) 14 % 2 will return 0
(b) 13 % 2 will return 1
(c) The following script is used to enter a number and print if it is a prime number or not.
fi ndprime
#!/bin/bashecho –n "Enter a number: "read ni=2while [[ i –lt n ]]do ((m = n % i)) if test $m –eq 0 then echo "The number, $n is not prime number" exit fi ((i=i+1))doneecho "The number, $n is a prime number"
Output
Enter a number: 9The number, 9 is not prime number

436 Unix and Shell Programming
Enter a number: 17The number, 17 is a prime number
A number n is a prime number if it is not divisible by any number between 2 and n−1. In this shell script, we start dividing the variable n by number 2 and above. If the number is divided by any number between 2 and n−1 (the remainder returned is 0), we exit from the loop, and indicate that the number is not prime.
10.10.17 $?: Observing Exit StatusThe $? symbol stores the exit status of the last command. It has a value 0 if the command succeeds and a non-zero value if the command fails. To fi nd out if a command executes successfully or not, simply echo $? after the command is used. Table 10.15 shows the possible values of the exit status.
Examples
(a) If the command executes successfully, the exit status is 0, as shown in the following example.$ grep Chirag bank.lst 108 Chirag 0 15/12/2012 Current$ echo $?0
(b) If the command is not successful, a non-zero value is returned, as shown in the following example.
$ grep Bintu bank.lst $ echo $? 1
(c) If the command being run does not exist, the exit status returned is 127, as shown here. $ greep Chirag bank.lst –bash: greep: command not found $ echo $? 127
(d) The following script copies all the lines from one fi le having the specifi ed pattern into another fi le. The fi lenames will be passed as command line arguments.copypattern#!/bin/bashif test $# –ne 3then echo "You have not entered 3 arguments"exit 3else if grep $1 $2 > $3
Table 10.15 Brief description of a few of the exit statuses
Exit value Exit status
0 Success
Non Zero Failure
2 Incorrect usage
126 Not executable
127 Command not found

Bourne Shell Programming 437
then echo "$1 pattern found in fi le, $2. File by name $3 is created containing
the pattern" else echo "$1 pattern not found in fi le, $2" fi fi
Output $./copypattern saving bank.lst You have not entered 3 arguments $ echo $? 3
The aforementioned value, 3, has come from the exit argument.
$./copypattern saving bank.lst savingrec.out $ cat savingrec.out 102 Anil 10000 20/05/2011 saving 104 Rama 10000 15/08/2010 saving 105 Jyoti 5000 16/06/2012 saving 107 Yashasvi 14500 30/11/2011 saving 110 Puneet 130 16/11/2009 saving
We can see that the fi le savingrec.out will have all the lines with the pattern saving in it.(e) The following script emails the user when he/she logs in, indicating by how many
minutes he/she is late. mailtologged #!/bin/bash m=0 while true do who | grep $1 > /dev/null if test $? –eq 0 then echo "You have logged $m minutes late | mail $1" break else sleep 60 ((m=m+1)) fi done
Output
$./mailtologged ravi
This script will go into an infi nite loop waiting for the user, ravi, to log in. When ravi logs in, a mail will be sent to him indicating how many minutes late he is.

438 Unix and Shell Programming
(f) (i) The following script searches for a given string in the specifi ed fi le. searchstrinfi le #!/bin/bash echo –n "Enter the string to search: " read s if [ –z $s ] then echo "You have not entered the string" exit 1 else echo –n "Enter the fi le to be used: " read f if [ –z $f ] then echo "You have not entered the fi le name" exit 2 else grep $s $f || echo "Pattern not found" fi fi
Output
$ ./searchstrinfi le Enter the string to search: You have not entered the string $ ./searchstrinfi le Enter the string to search: Vinay Enter the fi le to be used: You have not entered the fi le name $ ./searchstrinfi le Enter the string to search: Vinay Enter the fi le to be used: bank.lst Pattern not found $ ./searchstrinfi le Enter the string to search: John Enter the fi le to be used: bank.lst 1004 John 8000 saving –n returns true if string is not a null string. –z returns true if string is a null string.
Note: -z is same as !-n.
The command after the || operator will be executed if the command before the || operator, that is, the grep command does not succeed (i.e., it returns false).

Bourne Shell Programming 439
Note: Test also permits the checking of more than one conditions in the same line using -a (and) and -o (or) operators.
(f) (ii) The following script searches for a given string in the specifi ed fi le (second method). searchstrinfi le2 #!/bin/bash echo –n "Enter the string to search and the fi lename: " read s f if [ –n "$s" –a –n "$f" ] then grep "$s" $f || echo "Pattern not found" else echo "At least one input is a null string" exit 1 fi
Output
$ ./searchstrinfi le2 Enter the string to search and the fi lename: vinay At least one input is a null string $ ./searchstrinfi le2 Enter the string to search and the fi lename: bank.lst At least one input is a null string $ ./searchstrinfi le2 Enter the string to search and the fi lename: vinay bank.lst Pattern not found $ ./searchsrinfi le2 Enter the string to search and the fi lename: John bank.lst 1004 John 8000 saving
(g) The script continuously checks whether the user root (any user) is logged in to the machine or not after every minute. The script goes into an infi nite loop and exits only when the user root logs in to the machine.
checkifl ogged2 #!/bin/bash until who | grep root do sleep 60 done
Output
root console Mar 2 16:40 (:0)
(h) The script displays the contents of the specifi ed fi le and if the fi le is not available, it waits for the fi le to be available and checks if the fi le is available or not (i.e., created or copied) after every fi ve seconds. The moment the fi le is available, its contents are displayed on the screen.

440 Unix and Shell Programming
checkifavail #!/bin/bash if [ –r $1 ] then cat $1 else until [ –r $1 ] do echo "File, $1 is not available .. waiting" sleep 5 done echo "File, $1 is available, its content is as given below:" cat $1 fi
Output
$ ./checkifavail xyz.txt File, xyz.txt is not available .. waiting File, xyz.txt is not available .. waiting File, xyz.txt is not available .. waiting File, xyz.txt is available, its content is as given below: This is a test fi le
The shell script waits in an infi nite loop until the fi le xyz.lst does not become available. The script fi rst checks whether the fi le exists or not. If it exists, its contents will be displayed on the screen, otherwise the control remains in an infi nite loop and checks every fi ve seconds to see if the fi le has come into existence or not.
(i) The following shell script waits in an infi nite loop as long as the fi le bank.lst is made readable. If the fi le is created and is readable, the loop is terminated and the shell script change case is executed.
checkifreadable #!/bin/bash while [ ! –r bank.lst ] do sleep 60 done ./changecase
Output
$ ./checkifreadable Enter a string hello HELLO The aforementioned script waits in an infi nite loop until the fi le bank.lst is made readable.
On making the fi le, bank.lst, readable, the loop breaks and the script, changecase will be

Bourne Shell Programming 441
executed. The message Enter a string in the output appears from the execution of the changecase script.
(j) The following script waits for the specifi ed user to log in. If the user is not currently logged in, it checks after every minute to fi nd out if the user is logged in or not.
checkifl ogged3 #!/bin/bash echo –n "Enter the name of the person: " read n until who | grep $n do echo "Waiting for $n to log in" sleep 60 done echo "$n is logged in" $./checkifl ogged3
Output
Enter the name of the person: root root console Mar 2 16:40 (:0) root pts/3 Mar 2 17:41 (:0.0) root is logged in
(k) The following script waits for the specifi ed user to log in. If the user is not currently logged in, it checks after every minute to ascertain if the user is logged in or not and also prints the time at which the user logged in.
loggedintime #!/bin/bash until who | grep $1 do echo "waiting for $1 to log in" sleep 60 done echo "$1 is logged in at `date +%H:%M:%S` time" $ ./loggedintime root
Output
waiting for root to log in waiting for root to log in root console Feb 26 07:41 (:0) root is logged in at 07:41:00 time
10.10.18 tty: Terminal CommandThe tty utility is used to show the name of the terminal we are using. Unix treats each terminal as a fi le, which means that the name of our terminal is actually the name of a fi le.

442 Unix and Shell Programming
Syntax tty [–s]
Here, –s means silent mode. It will not print anything on the screen and returns only the exit status.
Example $ tty /dev/tty2
The output shows that the name of the terminal is /dev/tty2 or, more simply, tty2. In Unix, the name of a terminal usually has the prefi x tty.
10.10.19 write: Sending and Receiving MessagesWith the write command, messages are sent one line at a time, that is, the text is collected until we press Enter. We can type as many lines as we need to complete our message; we terminate the message with either an end of fi le (Ctrl-d) or a cancel command (Ctrl-c). When we terminate the message, the recipient receives the last line and the end of transmission (<EOT>) to indicate that the transmission is complete.
Syntax write options user_id terminal
Example The following command sends a message to ravi on /dev/tty3.
$ write ravi tty3Happy DiwaliComing home today ?
When we are done typing, enter Ctrl-d (it is the ASCII character of EOF (end of fi le). If we want to get the attention of the person at the other end, we can type Ctrl-g, which is the ASCII character, BEL (bell).
On the receiver’s terminal, complete information is displayed, such as the name of sender, the system the message is coming from, the sender’s terminal ID, and the date and time when the message was sent.
The following message will appear on Ravi’s terminal.
Message from chirag on tty2 [Sun Nov 16 21:21:25]Happy DiwaliComing home today ?Eof
The receiver can turn our message off by typing the mesg n command. If we send a message to the user who has turned off the messages, we get the following error.
Can no longer write to /dev/tty3
On sending a message to a user who is not logged on, we get the following error message.Ravi is not logged on.

Bourne Shell Programming 443
v
Notes:
1. To allow write messages, use the mesg y command.
2. To prevent write messages, use the mesg n command.
10.10.20 mesg: Controlling Delivery of MessagesIt is in our control to allow or disallow user(s) from sending messages to our terminal. To determine whether incoming messages are allowed on our terminal or not, use the tty command:
$ tty /dev/tty04
We have to then use the ls –l command to see the permissions:
$ ls –l /dev/tty04crw--w----1 chirag tty 136, 1 dec 4 13:47 /dev/tty04
The permission fl ags on this terminal show that the person is logged in and has read and write permissions and the group member has write permission. If the group has write permission, the terminal can receive messages from other users, we can use the mesg command to change the permissions setting that controls the receipts of messages. We can turn messaging off our terminal by giving the following command:
$ mesg n$ ls –l /dev/tty04cr---w----1 chirag tty 136, 1 dec 4 13:47 /dev/tty04
The n option turns off the device node’s permission bit that allows other users to write to our terminal. To turn on messaging, enter the following command:
$ mesg y
Instead of using ls to look at how the access bits are set, we can run mesg without an argument to determine whether the setting is y or n.
$ mesg
If we get the output, y, it means the mesg is set to y and otherwise it is set to n.
Example The script waits for the user to log in. If the user is not logged in, it checks every minute to ascertain if the user is logged in or not. The moment he logs in, a message is sent to him.
msgtologged#!/bin/bashuntil who | grep $1 >/dev/nulldo sleep 60

444 Unix and Shell Programming
donewrite $1 << MSGHello how are youlate today?MSG
Output
$ ./msgtologged rootroot is logged on more than one place.You are connected to "console".Other locations are:pts/3Hello how are youlate today?
10.10.21 wall: Broadcasting MessageSimilar to the write command, the wall utility is also used for sending messages. There are two differences between the wall and write commands. Firstly, we can type as many lines of text as we want (by pressing Ctrl-d after the lines). Secondly, instead of sending the message to a person specifi ed on the command line, wall sends the message to everybody who is logged in. The wall is an abbreviation of write to all.
Syntax wall [ message ]
Example The following example broadcasts a message to all the currently logged in users, directing them to shutdown their machines.
$ wallPlease shut down your machinesGoing for lunchCtrl d
Output
Broadcast message from root (pts/1) (Wed Nov 15 20:30:05 2012): Please shut down your machinesGoing for lunch
10.10.22 stty: Setting and Confi guring TerminalsThe stty command is used to set and display the confi guration of a terminal. We can confi gure terminal parameters, such as turning on or off screen echo and setting the erase characters. The stty command is commonly used for setting different functions to the appropriate key on our terminal. The different functions that can be assigned to the respective control characters are listed in Table 10.16.

Bourne Shell Programming 445
We can use the stty command to change control characters. The syntax for changing control characters is as follows.
Syntax stty function control_character
Here, function is one of the functions—erase, kill, or terminate—that we want to reassign to the given control_character. The control characters are represented through a two-character combination; the fi rst is a caret (^) that represents the Ctrl key and a character. We may need to assign a \ before the character to prevent the shell from interpreting it as a wild card and a \ before the ^ to prevent some Bourne shells from interpreting it as a pipe. Otherwise, we may also include the quotes around the control characters to avoid incorrect interpretation.
Note: No two tasks can be assigned the same control character.
Examples
(a) stty erase \^z.Ctrl-z keys will be treated as delete.
(b) stty kill '^y' The entire line will now be deleted using the Ctrl-y keys.
(c) stty eof \^eThe eof, which was Ctrl-d, is changed to Ctrl-e.
(d) stty erase ^hFor erasing characters, we use the Ctrl-h keys instead of the delete key.
As mentioned in this section, the stty command can also be used for setting terminal confi guration. The most common options used with the stty command for the confi guration of terminal settings is as follows:
Syntax stty [–a][–g] [echo][sane][olcuc][iuclc][icanon][isig]
The options and arguments shown in the aforementioned syntax are briefl y described in Table 10.17.
Table 10.16 Brief description of the functions and control characters that stty can change
Function Description Control characters
eof End of fi le character—Exits from a program ^d (Ctrl-d)
erase Erases the previous character ^\? (DELETE)
kill Erases the entire line ^u (Ctrl-u)
werase Erases the previous word ^w (Ctrl-w)
intr Interrupts the current job ^c (Ctrl-c)
quit Terminates the current job, creates a core fi le ^\\ (Ctrl-\)
susp Pauses the current job and puts it in the background ^z (Ctrl-z)
rprnt Redisplays the current line ^r (Ctr-r)

446 Unix and Shell Programming
If any of the options listed is prefi xed by a - (hyphen) their action will be reversed.
If we use the stty command without any options or arguments, it shows the current common setting of our terminal such as baud rate and delete key settings.
Examples
(a) The following script is used for reading the password.
readingpass #!/bin/bash printf "Enter password: " stty –echo read password stty echo printf "The password entered is
$password\n"
Output
Enter password: The password entered is gold
Note: The password that we type does not appear on the screen.
(b) The following script is used for reading one character at a time without pressing the Enter key. The shell exits on pressing #.
readchars #!/bin/bash old_tty_settings=$(stty –g) # Saving old settings stty –icanon min 0 time 0# min n – indicates the number of characters accepted# time t – indicates the time allowed between each characterkey=""while [ "$key" != "#" ]do printf "Type a key: " key="" while [ "$key" = "" ] do read key done printf "\nThe key typed is $key\n"donestty icanonstty "$old_tty_settings" # Restoring old settings.
Table 10.17 Brief description of the options used with the stty command
Option Description
–a Displays all the settings for the terminal
–g Displays the current settings in the stty-readable form—the format that can be used as an argument to another stty command
stty echo Restores screen echo
stty sane Sets the terminal confi guration to a setting that can be used with a majority of the terminals, that is, default setting
stty olcuc Maps lower case to upper case on output
stty iuclc Maps upper case to lower case on input
stty icanon Turns on the canonical mode and requires Enter key to read
stty isig Enables interrupt, quit, and suspend special characters (INTR, QUIT, SWTCH, and SUSP).

Bourne Shell Programming 447
Output
$ ./readcharsType a key: tThe key typed is tType a key: 2The key typed is 2Type a key: @The key typed is @Type a key: #The key typed is #
(c) The following shell script is used to implement terminal locking. The shell script locks the terminal until the correct password (‘hello’) is entered. The user cannot terminate the script using Ctrl-c, Ctrl-\, Ctrl-z, or Ctrl-d. lockterminal#!/bin/bashecho "Enter password"stty –echoread pswdstty echoif [ $pswd = "mce" ];then echo "You are Welcome"exitelseecho "The terminal is locked"stty –echostty –isig while [ "$pswd" != "mce" ]do echo "Enter the password again" read pswddonestty isigstty echoecho "The terminal is unlocked" fi
Output
$ ./lockterminal Enter password The terminal is locked Enter the password again Enter the password again The terminal is unlocked

448 Unix and Shell Programming
(d) The following script keeps asking for the password till the user enters the correct password mce. In addition, while typing the password, it will not echo on the screen.checkpasswd#!/bin/bashwhile truedo echo "Enter password" stty –echo read h stty sane if [ $h = "mce" ] then echo "Welcome" break else echo "Wrong password try again" fi done
Output
Enter passwordWrong password try againEnter passwordWrong password try againEnter passwordWelcomeWe will keep getting the message Wrong password try again until we enter the correct password mce.
Note: The password we type will not echo on the screen.
(e) The following shell scripts prompt the user to enter the login name. If the name is not in the LOGFILE, it displays Sorry! You cannot work, otherwise it asks for the password. The password fi le is not echoed. It checks the password with fi le PASSWORD and if it does not match, displays ACCESS DENIED. The LOGFILE and PASSWORD are not actual system fi les but user generated fi les.logincheck#!/bin/bashecho –n "Enter login name: "read nif grep $n LOGFILE >/dev/nullthen echo –n "Enter password: " stty –echo read p

Bourne Shell Programming 449
stty sane if grep $p PASSWORD >/dev/null then echo "Welcome" else echo "Access Denied" fi elseecho "Sorry! You cannot work"fi
Output
$./logincheckEnter login name: namanSorry! You cannot work$./logincheckEnter login name: chiragEnter password:Access Denied$./logincheckEnter login name: chiragEnter password:Welcome
10.10.23 w ; who: Activities of Logged in UserThe w;who command is used to obtain information related to the activities of users who are logged in users. These include the users’ logging time and terminals on which they are logged.
Syntax w;who
OutputUSER TTY FROM LOGIN@ IDLEroot pts/0 - Feb 19 11:06 (:0)ravi pts/1 - Feb 17 11:23 2daysajay pts/2 - Feb 19 12:10 (0.15s)
10.10.24 last: Listing Last LoggedThe last command indicates all those who have logged in and out, when, from where, and also the time during which they have been connected.
Syntax last
Output
root pts/3 :0.0 Sat Mar 3 23:45 still logged inroot console :0 Sat Mar 3 23:44 still logged inravi pts/3 :0.0 Sat Mar 3 23:14 - 23:32 (00:17)

450 Unix and Shell Programming
chirag pts/4 :0.0 Sat Mar 3 23:01 - 23:14 (00:13)rahul pts/5 :0.0 Sat Mar 3 21:51 - 22:19 (00:28)root console :0 Sat Mar 3 21:50 - down (01:08)reboot system boot Sat Mar 3 21:49 reboot system down Sat Mar 3 21:48 wtmp begins Mon Feb 20 23:30
Example The following script displays the login names of all users who have logged off in the last 10 minutes.
loggedoffl ast#!/bin/bashdd=`date +%d`hh=`date +%H`mm=`date +%M`last >tmpnum=`cat tmp | wc –l`((num=num–1))head –$num tmp > ttmpexec 0< ttmpwhile read fdo n=`echo "$f" | cut –c1–9` d=`echo "$f" | cut –c49–50` h=`echo "$f" | cut –c52–53` m=`echo "$f" | cut –c55–56` ((difm = mm – m)) ((difh = hh–h)) ((mint = difm + difh * 60))echo $difmecho $difhecho $mint if test $d –eq $dd then if test $mint –le 10 then echo $n fi fi done
Output
./loggedoffl astchiragravi

Bourne Shell Programming 451
First, we extract the current day, hour, and minute from the date command and store them in the variables dd, hh, and mm respectively. Then, the output of the last command is stored in a temporary fi le tmp. The last command contains all the details of the users, their terminals, the time spent by them, whether they are currently working or logged out, etc. Using the while loop, each line of the tmp fi le is assigned to variable f one by one. From the variable, f, we cut the username, the day, hour, and minute the user logged in and store them in the variables n, d, h, and m respectively. Thereafter, we fi nd the difference in the minutes and hours, that is, the hour the user logged in is subtracted from the current hour and the minute the user logged in is subtracted from the current minute. The difference of time is computed in minutes (hour difference is multiplied by 60). Then, if the current day and the login day of the user is the same and the difference between the minutes is <=10, then the username is displayed.
10.10.25 case StatementThe case statement helps in choosing one out of several sets of statements depending on the value of the specifi ed expression. At instances where several ‘if else’ statements are desired, it is better to use the case statement.
Syntax case variable in
value1) command1 command2 ... ...;;value2) command1 command2 ... ...;; command1 command2 ... ...;;
esac
Examples
(a) In the following script, when we enter any number between 0 and 9, it is displayed in words.numinwords#!/bin/bashecho –n "Enter a digit between 0 to 9: "read necho –n "You have entered $n. In words, it is "case $n in
0) echo "zero";;
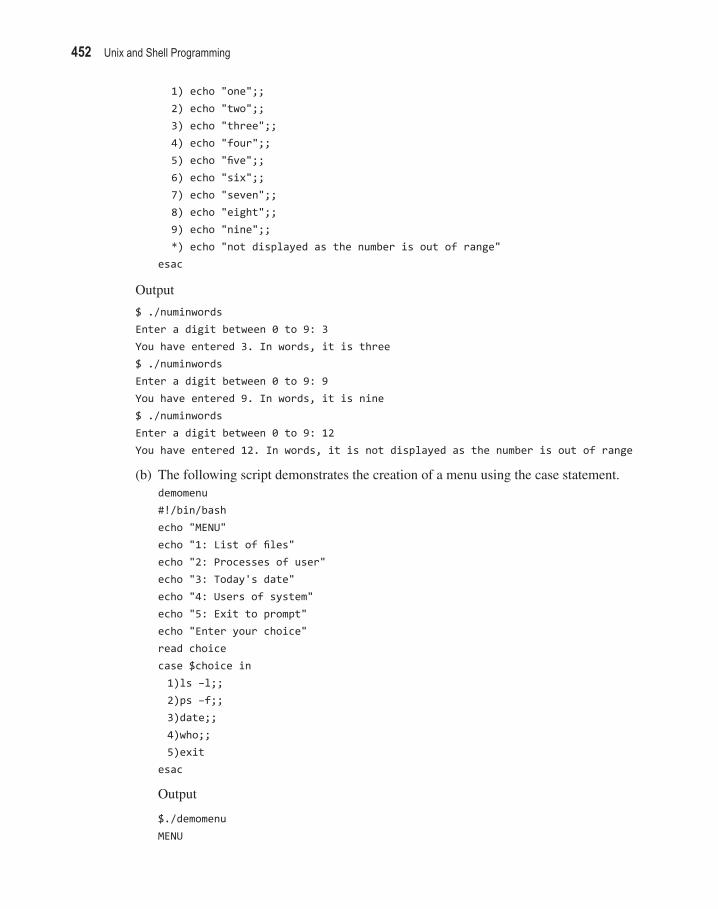
452 Unix and Shell Programming
1) echo "one";; 2) echo "two";; 3) echo "three";; 4) echo "four";; 5) echo "fi ve";; 6) echo "six";; 7) echo "seven";; 8) echo "eight";; 9) echo "nine";; *) echo "not displayed as the number is out of range"
esac
Output
$ ./numinwordsEnter a digit between 0 to 9: 3 You have entered 3. In words, it is three$ ./numinwordsEnter a digit between 0 to 9: 9You have entered 9. In words, it is nine$ ./numinwordsEnter a digit between 0 to 9: 12You have entered 12. In words, it is not displayed as the number is out of range
(b) The following script demonstrates the creation of a menu using the case statement.demomenu#!/bin/bashecho "MENU"echo "1: List of fi les"echo "2: Processes of user"echo "3: Today's date"echo "4: Users of system"echo "5: Exit to prompt"echo "Enter your choice"read choicecase $choice in 1)ls –l;; 2)ps –f;; 3)date;; 4)who;; 5)exitesac
Output
$./demomenuMENU

Bourne Shell Programming 453
1: List of fi les2: Processes of user3: Today's date4: Users of system5: Exit to promptEnter your choice1total 8-rw-r--r-- 1 root root 20 Feb 10 2006 b.lst-rwxr-xr-x 1 root root 124 Feb 10 2006 bank.lst-rw-r--r-- 1 root root 20 Feb 25 18:07 c.txt-rw-r--r-- 1 root root 112 Feb 25 18:07 course.txt-rw-r--r-- 1 root root 20 Feb 25 18:07 xyz.txt./demomenuMENU1: List of fi les2: Processes of user3: Today's date4: Users of system5: Exit to promptEnter your choice2 UID PID PPID C STIME TTY TIME CMD root 1347 1346 0 10:28:18 syscon 0:00 ps –f root 1346 1321 0 10:28:17 syscon 0:00 /bin/bash ./demomenu root 1321 1318 0 10:23:00 syscon 0:00 sh./demomenuMENU1: List of fi les2: Processes of user3: Today's date4: Users of system5: Exit to promptEnter your choice3Saturday 3 March 2012 10:29:08 AM IST./demomenuMENU1: List of fi les2: Processes of user3: Today's date4: Users of system5: Exit to prompt

454 Unix and Shell Programming
Enter your choice4root console Mar 3 10:18 (:0)root pts/3 Mar 3 10:22 (:0.0)./demomenuMENU1: List of fi les2: Processes of user3: Today's date4: Users of system5: Exit to promptEnter your choice5#
(c) The following script will prompt the user to enter a few pairs of names and addresses and store them in the fi le address.lst.nameaddstore#!/bin/bashk=ywhile [ "$k" = "y" ]do echo –n "Enter the name and the address: " read n a echo "$n|$a" >> address.lst echo –n "Want to enter more(y/n)? " read h case $h in y*|Y*) k=y;; n*|N*) k=n;; *) k=y;; esacdone
Output
$ ./nameaddstoreEnter the name and the address: John 20, Hill View Street AjmerWant to enter more(y/n)? yEnter the name and the address: Chirag 11, Amrapali Circle JaipurWant to enter more(y/n)? n$ cat address.lstJohn|20, Hill View Street AjmerChirag|11, Amrapali Circle Jaipur
(d) The following script will print any one of these messages.Good Morning if the time is between 00:00 to 09:59 or 10:00 to 11:59.

Bourne Shell Programming 455
Good Afternoon if the time is between 12:00 to 17:59.Good Evening if the time is between 18:00 to 19:59.Good Night at all other timeswishme2#/bin/bashh=`date +"%T" | cut –c1–2`case $h in 0?:?? | 1[01]:??) echo "Good Morning";; 1[2–7]:??) echo "Good Afternoon";; 1[89]:??) echo "Good Evening";; *) echo "Good Night"esac
Output
Good NightThe aforementioned script will extract the fi rst and second characters, that is, hour along with minutes from the date +‘%T’ output and store it in the variable, h. Then, if the value in variable h is between 00:00 to 11:59, the message Good Morning is displayed. If the value in variable h is between 12:00 to 17:59, the message Good Afternoon is displayed. If the value in variable h is between 18:00 to 19:59, the message Good Evening is displayed. In all other cases, the message Good Night is displayed.
10.10.26 FunctionsFunctions are small modules, which, once written, can be called as many times as desired, hence avoiding repetition of statements.function_name ()
{ statement statement . .statement return value }
Examples
(a) The following script prints the sum of sequence numbers. The limit is entered through the command line arguments (using functions).demofunc#!/bin/bashsum(){ s=0 x=1

456 Unix and Shell Programming
while test $x –le $1 do ((s=s+x)) ((x=x+1)) done return $s}sum $1echo "The sum of $1 sequence number is $?"
Output
$ ./demofunc 5The sum of 5 sequence number is 15$ ./demofunc 10The sum of 10 sequence number is 55
Note: The output, that is, the value returned by the function is displayed with the help of $?.
(b) The following script checks whether the command line argument sent is a numeral or non-numeral (using functions).checkargtype#!/bin/bashcheck(){ ((x=$1+1)) > /dev/null 2>&1 if [ $? != 0 ] then echo "The number is not numeric" else echo "The number is numeric" fi }check $1
Output
$ ./checkargtype 5The number is numeric$ ./checkargtype xyz.txtThe number is not numeric
Note: We can redirect output to /dev/null for suppressing echo on the screen. To redirect the output of a standard error (with fi le descriptor 2) to /dev/null, we use the following syntax:
command >/dev/null 2>&1.
(c) The following script compares the two strings passed as command line arguments and indicates if the fi rst string is smaller or larger than the other string.

Bourne Shell Programming 457
strcmpfunc#!/bin/bashstrcmp(){ if [ $1 = $2 ] then echo "$1 is same as $2" else echo $1 > tmp.lst echo $2 >> tmp.lst sm=`sort tmp.lst | head –1` if [ $sm = $1 ] then echo "$1 is smaller then $2" else echo "$1 is larger then $2" fi fi }strcmp $1 $2
Output
$ ./strcmpfunc sanjay sandeepsanjay is larger then sandeep$ ./strcmpfunc kelly sandraKelly is smaller then sandra
10.10.27 select: Creating MenusThe select loop is a special loop designed to create menus. A menu is a list of options displayed on the monitor.
Syntax select variable in menu_opt1 menu_opt2...menu_optn
do case $variable in menu_opt1) command1;; menu_opt2) command2;; menu_optn) commandn;; esacdone
Here, menu_opt1, menu_opt2, ..., menu_optn represents menu options, and command1, command2, ..., commandn represents the commands we wish to execute when the corresponding menu option is selected.

458 Unix and Shell Programming
(a) demomenu2#!/bin/bashselect k in month year quitdo case $k in month)cal;; year) yr=`date +%Y` cal $yr;; quit) echo Bye Bye exit;; *)echo Please try again esacdone
Output
$./demomenu21) month2) year3) quit#? 1
March 2012 S M Tu W Th F S 1 2 3 4 5 6 7 8 9 1011 12 13 14 15 16 1718 19 20 21 22 23 2425 26 27 28 29 30 31#? 2
2012 Jan Feb Mar S M Tu W Th F S S M Tu W Th F S S M Tu W Th F S 1 2 3 4 5 6 7 1 2 3 4 1 2 3 8 9 10 11 12 13 14 5 6 7 8 9 10 11 4 5 6 7 8 9 1015 16 17 18 19 20 21 12 13 14 15 16 17 18 11 12 13 14 15 16 1722 23 24 25 26 27 28 19 20 21 22 23 24 25 18 19 20 21 22 23 2429 30 31 26 27 28 29 25 26 27 28 29 30 31
Apr May Jun S M Tu W Th F S S M Tu W Th F S S M Tu W Th F S 1 2 3 4 5 6 7 1 2 3 4 5 1 2 8 9 10 11 12 13 14 6 7 8 9 10 11 12 3 4 5 6 7 8 915 16 17 18 19 20 21 13 14 15 16 17 18 19 10 11 12 13 14 15 1622 23 24 25 26 27 28 20 21 22 23 24 25 26 17 18 19 20 21 22 2329 30 27 28 29 30 31 24 25 26 27 28 29 30
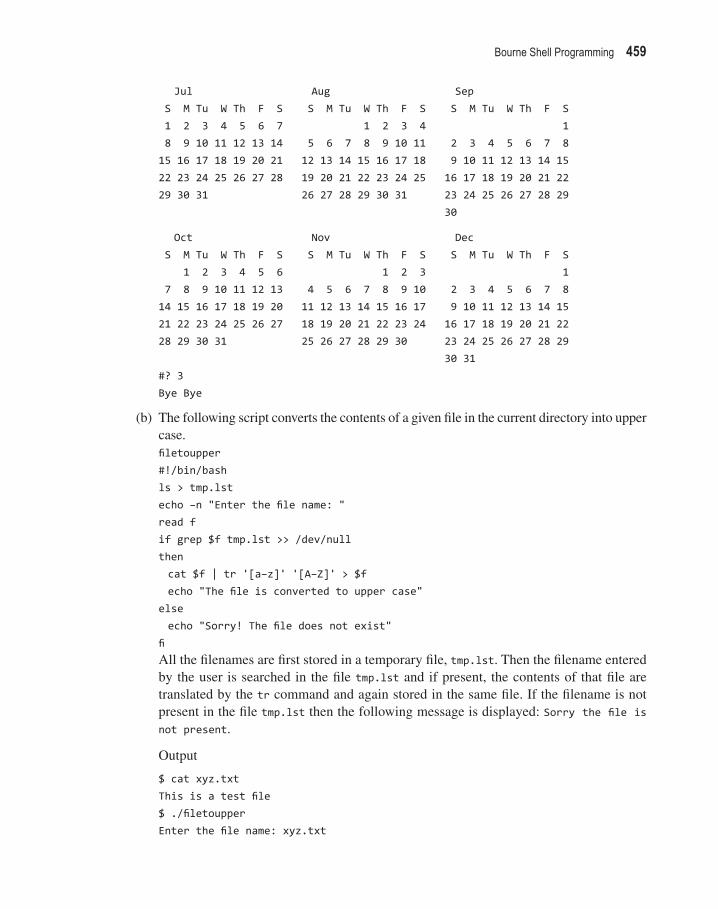
Bourne Shell Programming 459
Jul Aug Sep S M Tu W Th F S S M Tu W Th F S S M Tu W Th F S 1 2 3 4 5 6 7 1 2 3 4 1 8 9 10 11 12 13 14 5 6 7 8 9 10 11 2 3 4 5 6 7 815 16 17 18 19 20 21 12 13 14 15 16 17 18 9 10 11 12 13 14 1522 23 24 25 26 27 28 19 20 21 22 23 24 25 16 17 18 19 20 21 2229 30 31 26 27 28 29 30 31 23 24 25 26 27 28 29 30
Oct Nov Dec S M Tu W Th F S S M Tu W Th F S S M Tu W Th F S 1 2 3 4 5 6 1 2 3 1 7 8 9 10 11 12 13 4 5 6 7 8 9 10 2 3 4 5 6 7 814 15 16 17 18 19 20 11 12 13 14 15 16 17 9 10 11 12 13 14 1521 22 23 24 25 26 27 18 19 20 21 22 23 24 16 17 18 19 20 21 2228 29 30 31 25 26 27 28 29 30 23 24 25 26 27 28 29 30 31#? 3Bye Bye
(b) The following script converts the contents of a given fi le in the current directory into upper case.fi letoupper#!/bin/bashls > tmp.lstecho –n "Enter the fi le name: "read fif grep $f tmp.lst >> /dev/nullthen cat $f | tr '[a–z]' '[A–Z]' > $f echo "The fi le is converted to upper case"else echo "Sorry! The fi le does not exist"fi All the fi lenames are fi rst stored in a temporary fi le, tmp.lst. Then the fi lename entered by the user is searched in the fi le tmp.lst and if present, the contents of that fi le are translated by the tr command and again stored in the same fi le. If the fi lename is not present in the fi le tmp.lst then the following message is displayed: Sorry the fi le is not present.
Output
$ cat xyz.txtThis is a test fi le$ ./fi letoupperEnter the fi le name: xyz.txt

460 Unix and Shell Programming
The fi le is converted to upper case$ cat xyz.txtTHIS IS A TEST FILE
(c) The following script prompts the user to enter the distance between two cities in kilo-metres and converts it into metres and centimetres.kmintomtr#!/bin/bashecho –n "Enter the distance between two cities in km: "read km=`expr $k \* 1000`cm=`expr $m \* 100`echo "Distance in meters is $m"echo "The distance in centimeters is $cm"
Output
$./kmintomtrEnter the distance between two cities in km: 15Distance in meters is 15000The distance in centimeters is 1500000
10.10.28 basename: Extracting Base FilenameThe basename command extracts the base fi lename from an absolute path name.
Syntax basename string [extension]
Here, string refers to the fi lename along with its path. If extension is not provided, only the fi lename (after stripping the path) is returned. If extension is supplied, the fi lename is returned after deleting its extension (and path).
Examples
(a) The following syntax displays a.txt on the screen.$ basename /mce/project/a.txtWhen basename is used with the second argument, it strips off the string from the fi rst argument as shown:$ basename ajmer.txt txtajmer is returned.
(b) The following script renames the fi les with a secondary name.doc to one having a .bat extension.renameext#!/bin/bashfor k in *.datdo p=`basename $k dat` mv $k ${p}batdone

Bourne Shell Programming 461
Output
$ ls *.datb.dat tmp.dat$ ./renameext$ ls *.dat*.dat: No such fi le or directory$ ls *.batb.bat tmp.bat
(c) The following script copies the lines from one fi le into another after replacing a given pattern by another pattern.copyafterreplace# Replacing a pattern in one fi le and copying into another fi le#!/bin/bashsed s/were/are/g $1 > $2$ cat temp.lstWe were tiredIt was rainingWe were hungry$ ./copyafterreplace temp.lst tt.lst$ cat tt.lstWe are tiredIt was rainingWe are hungryWe can see that all the words ‘were’ from the fi le temp.lst are replaced by ‘are’ and written into the fi le tt.lst.
(d) The following script demonstrates the procedure for replacing a pattern from a fi le and copying it into another fi le.copyafterreplace2#!/bin/bash# Replacing a pattern in one fi le and copying into another fi le (II nd method)echo Enter the pattern to replaceread kecho Enter the new patternread hsed s/$k/$h/g $1 > $2
Output
$ ./copyafterreplace2 temp.lst tmp.lstEnter the pattern to replacewereEnter the new patternare$ cat temp.lst

462 Unix and Shell Programming
We were tiredIt was rainingWe were hungry$ cat tmp.lstWe are tiredIt was rainingWe are hungry
(e) The following script prompts for a string and prints its length (counts the number of characters in it).stringlength#!/bin/bashecho –n "Enter a string: "read kn=${#k}echo "The length of the string, $k is $n"
Note: ${#stg} calculates the length of the string stg.
Output$./stringlengthEnter a string: chiragThe length of the string, chirag is 6
10.10.29 expr—Advanced FeaturesThe expr command is also used for extracting a part of a string. The different expressions that can be formed with the expr command are shown in Table 10.18.
Table 10.18 Brief description of the expressions formed with the expr command
Expression Description
Expr "stg" : '\(.\)' Extracts the fi rst character from the string stgexpr "stg" : '\(..\)' Extracts the fi rst two characters from the string stgexpr "stg" : '\(...\)' Extracts the fi rst three characters from the string stgexpr "stg" : '.*\(.\)' Extracts the last character from the string stgexpr "stg" : '.*\(..\)' Extracts the last two characters from the string stgexpr "stg" : '.*\(....\)' Extracts the last four characters from the string stgexpr "stg" : '\(.*\).' Extracts all the characters except the last character from the string stg expr "stg" : '\(.*\)...' Extracts all the characters from the string stg leaving the last three
charactersexpr "stg" : '...\(..\)' Extracts the fourth and fi fth characters from the string stgexpr "stg" : '..\(....\)' Extracts characters from the third to the sixth, from the string stg
Examples
(a) The following script reverses a string entered by the keyboard. Blank spaces between the words, if any, are removed.

Bourne Shell Programming 463
stringreverse#!/bin/bashecho –n "Enter a string: "read kn=${#k}while (( $n >0))do h=$(expr "$k" : '.*\(.\)') echo –n $h k=$(expr "$k" : '\(.*\).') ((n=n–1))doneecho
Output
$ ./stringreverseEnter a string: educationnoitacude$ ./stringreverseEnter a string: Hello World!!dlroWolleHIt extracts the last character from the string, k, and stores it in the variable, h. The contents of the variable h are displayed on the screen. Thereafter, the last character is removed from the string, k, and the process is repeated.
(b) The following script reverses a sentence entered by the keyboard. The extra blank spaces between the words are kept as such.sentencereverse#!/bin/bashecho –n "Enter a sentence: "read kn=${#k}while (( $n >0))do h=$(expr "$k" : '.*\(.\)') echo –n "$h" k=$(expr "$k" : '\(.*\).') ((n=n–1))doneecho
Output
Enter a sentence: It may rainniar yam tI

464 Unix and Shell Programming
Note: When a variable in the echo command is enclosed in double quotes, the extra blank spaces in the contents of that variable are retained, otherwise they are removed.
10.10.30 getopts: Handling Options in Command LineThe getopts command reads the command line and if there are options, takes each option one by one, validates it, and then handles it.
Options with no valuesThe simplest case is when we allow only options without any value.
Examples
(a) ls –l Options with no values are defi ned by a minus sign and a letter. The option can be
separated or combined with each other.
Syntax getopts xyz variable
The user can use −x, −y, −z, −xy, −xz, or −xyz options. Whenever an option is used, it will be assigned to the specifi ed variable.
Each use of the getopts command gets the next option from the command line and stores the option (without the minus sign) in its variable. If we want to get all the options, we need to use a loop.
Notes: 1. The getopts exit status is true when there are more options; it is false when all options have been
processed.
2. The getopts command stores a question mark (?) in its variable if the option is not in the list of valid options. We can use this value to detect invalid options and exit if the user enters a wrong option.
(b) The following script demonstrates handling of options in a command line. It checks if the option passed in the command line is an a or c and displays a message accordingly.demoopt#!/bin/bashwhile getopts ac variable#above command means, a and c are the allowed optionsdocase $variable in a) echo "a option will be processed";; c) echo "c option will be processed";;esacdoneThe option (beginning with a hyphen, -) we enter will be assigned to a variable and the case statement will execute accordingly.

Bourne Shell Programming 465
Output
$./demoopt –aa option will be processed$./demoopt –cc option will be processed$./demoopt –aca option will be processedc option will be processed$./demoopt –a –ca option will be processedc option will be processed
Options with valuesIn the getopts command, there is a pre-defi ned variable called OPTARG, which holds the value for the option.
Syntax getopts x:y: variable # x, y are the allowed options with values
Note: If an option needs a value, it must be followed by a colon (:).
(c) The following script converts the distance entered in kilometres into metres, decimetres, and centimetres depending on the option passed to the script.demoopt2#!/bin/bashgetopts d:c: opcase $op in d) k=$OPTARG ans=`expr $k \* 10000` echo "The $k km is converted to $ans decimetre";; c) k=$OPTARG ans=`expr $k \* 100000` echo "The $k km is converted to $ans centimetre";; \?)k=$1; ans=`expr $k \* 1000` echo "The $1 km is converted to $ans metre";;esac
Output
$ ./demoopt2 10The 10 km is converted to 10000 metre$ ./demoopt2 –d 10The 10 km is converted to 100000 decimetre$ ./demoopt2 –c 10The 10 km is converted to 1000000 centimetre

466 Unix and Shell Programming
There is another built-in variable, OPTIND, which provides the number of arguments after the options in the command line. It can be used to shift the options out of the positional parameters so that the fi rst parameter ($1) holds the fi rst actual argument.
(d) The following script demonstrates the use of the shift command. It displays the option used while running the script and displays the command line parameter after shifting it once.demoopt3#!/bin/bash#demonstrating getopts commandwhile getopts a:b: kdo case $k in a) echo You have entered a option ;; b) echo You have entered b option ;; esacdoneshift `expr $OPTIND – 1`echo The command line argument sent is $1
Output
$ ./demoopt3 –a 10 20You have entered a optionThe command line argument sent is 20$ ./demoopt3 –b 10 20 30You have entered b optionThe command line argument sent is 20$ ./demoopt3 –a 10 –b 20 30You have entered a optionYou have entered b optionThe command line argument sent is 30
In the fi rst execution of the script, the value of the OPTIND variable will be set to 2. Then, using the shift command, 20 will be stored in $1.
In the second execution of the aforementioned script, the value of the OPTIND variable will be set to 3. Then, with the shift command, 20 will be stored in $1 and 30 will be stored in $2.
In the third execution of the script, there are two options, a and b. The value of the OPTIND variable will be set to 2. After this, using the shift command, 30 will be stored in $1, which is then displayed.
(e) The following script displays the options sent to the script and the arguments sent with each option.demoopt4#!/bin/bash#demonstrating getopts command

Bourne Shell Programming 467
while getopts a:b: kdo case $k in a) echo You have entered a option, the argument with a is $OPTARG ;; b) echo You have entered b option, the argument with b is $OPTARG ;; esacdoneshift `expr $OPTIND – 1`echo The command line argument sent is $1
Output
$ ./demoopt4 –a 10 20You have entered a option, the argument with a is 10The command line argument sent is 20$ ./demoopt4 –b 10 20 30You have entered b option, the argument with b is 10The command line argument sent is 20$ ./demoopt4 –a 10 –b 20 30You have entered a option, the argument with a is 10You have entered b option, the argument with b is 20The command line argument sent is 30
In the fi rst example, the value of the OPTIND variable will be set to 2. Then, using the shift command, 20 will be stored in $1. In the second example, the value of the OPTIND variable will be set to 3. And then, using the shift command, 20 will be stored in $1 and 30 will be stored in $2.
10.10.31 set: Setting Positional ParametersThe set command parses an input string and places each separate part of the string into a different positional parameter. We can set the IFS to any desired token and use set to parse the data accordingly.
Syntax set input_data/command
Examples
(a) The following script demonstrates the usage of the set command to assign values to the positional parameters.demoset2#!/bin/bashset $(date)echo Date is $*k="$2 $3 $4"echo Today is $k

468 Unix and Shell Programming
Output
Date is Saturday 3 March 2012 11:27:03 AM ISTToday is 3 March 2012
As we can see in the output, the date command is split and assigned to parameters $1, $2, $3, and so on by the set command and we display the desired parameter.
(b) The following script demonstrates the setting values of the positional parameters through the set command.
demoset3#!/bin/bashecho The fi rst parameter is $1echo The second parameter is $2set helloecho After set operation, there are $# parametersecho The fi rst parameter is $1echo The second parameter is $2set 1 2echo After set operation, there are $# parametersecho The fi rst parameter is $1echo The second parameter is $2
Output
$ ./demoset3 xyz.txt pqr.txtThe fi rst parameter is xyz.txtThe second parameter is pqr.txtAfter set operation,there are 1 parametersThe fi rst parameter is helloThe seond parameter isAfter set operation, there are 2 parametersThe fi rst parameter is 1The second parameter is 2
We can see in the aforementioned output that by using the set command, we can change the values of the command line arguments while executing the script.
10.10.32 shift: Shifting Command Line ArgumentsThe shift command moves the values in the parameters towards the beginning of the parameter list.
Syntax shift [n]
Here, n is an integer that determines the number of command line arguments to be shifted to the left. If n is not used, then with every shift command execution, the command line arguments are shifted to the left, that is, $2 shifts to $1, $3 shifts to $2, and so on. If the integer

Bourne Shell Programming 469
n specifi ed is 2, then the command line arguments will shift two places to the left, that is, $3 will shift into $1, and $4 will shift into $2, and so on.
Example The following script demonstrates the parameter passing to the script.
demoshift#/bin/bashecho There are $# parameterswhile [ $# –gt 0 ]do echo $1shiftdone
Output
$ ./demoshift xyz.txt 15 bank.lst 9 school.txtThere are 5 parametersxyz.txt15bank.lst9school.txt
10.10.33 at: Scheduling ExecutionBy using the at command, we can schedule the execution of command(s) or program at some particular time.
Syntax at time [date]
Examples
(a) The following example schedules to list the content of the working directory. It changes the current directory to ajmer and lists its contents at 1:20 p.m.$ at 1320lscd ajmerlsCtrl-d$
(b) The following example schedules to execute the script chirag.sh at 2 p.m.$ at 14chirag
(c) The following example schedules to execute the commands written in fi le.sh at 3 a.m.$ at 3am <fi le$Time can be expressed in the 24-hour system (e.g., 2130) or in the 12-hour system (e.g., 9:30 p.m.).

470 Unix and Shell Programming
(d) The following script demonstrates the list of users logged in between 10:00 a.m. and 10:59 a.m.listlogged#!/bin/bashwho –u | cut –c1–9,30–34 > tmp.lstcat tmp.lst | while read fdo
set $f echo $2 > tmp2.lst hr='cat tmp2.lst | cut –f1 –d":"' mn='cat tmp2.lst | cut –f2 –d":"' if test $hr –ge 10 –a $mn –ge 00 –a $hr –le 10 –a $hr –le 59 then echo $f fi
done
10.11 TRAPPING SIGNALS
In the following shell scripts, we will learn to perform certain actions in response to a signal. We will create a function and through the trap command, we will bind the function to the signal so that on the occurrence of the signal, the function is executed.
Examples
(a) The following shell script executes a function on the occurrence of the hangup signal.demotrap#!/bin/bashhangupfunc(){ echo "Received Hangup (SIGHUP) signal"}trap hangupfunc SIGHUPwhile true ; do sleep 1doneexit 0While executing the aforementioned shell script, we send the HUP signal to the process ID to see if the associated function, hangupfunc, executes.
(b) In the following shell script, a specifi c function is executed on exit of the script.demotrap2#!/bin/bashfunction exitfunc(){ echo " Received EXIT signal"

Bourne Shell Programming 471
}trap exitfunc EXITwhile true ; do sleep 1doneexit 0
Output
^C Received EXIT signalWhile executing the aforementioned shell script, we break the script to see if the associated function, exitfunc, executes.
trap commandThe trap command is used to execute a command when a signal is received by our script.
Syntax trap cmd signals
Here, signals is a list of signals to interrupt and cmd is a command to execute when one of the signals is received. If cmd is missing then nothing will happen on receiving the signal.
Note: Two signals SIGKILL and SIGSTOP cannot be trapped.
Examples
(a) trap "ls" 1 2 3 15(b) trap "ls" SIGHUP SIGINT SIGQUIT SIGTERM
These examples will display the listing of the directory on the occurrence of the given signals. We can also use signal names in place of signal numbers.
In this chapter, we learnt how to create and execute Bourne shell scripts. We also learnt to pass command line parameters in the shell scripts, use conditional statements and loops to execute the desired commands a specifi ed number of times. We learnt to read user input, test different conditions, search patterns, translate content, and observe the exit status of the commands. We learnt to apply command substitution, send and receive messages to other users, create and use functions, set and display terminal confi gurations, and manage positional parameters.
■ SUMMARY ■
1. Shell program (also known as shell scripts) is a collection of a series of commands for a Unix shell, such as the Bourne shell, sh, or C shell csh.
2. Shell scripts include both Unix commands as well as built-in functions in the shell.
3. The echo command is used for displaying messages or values of the variables/expression.
4. All variables in the echo command have to be preceded by a $ sign.
5. Quotation marks are optional in the echo command. If quotations are not used in the echo command, then extra white spaces are automatically removed on display.
6. The expr command is used to perform arithmetical

472 Unix and Shell Programming
operations on integers.7. For multiplication, the asterisk (*) is escaped by \
(backslash), that is, \* is treated as a multiplication symbol.
8. The let statement is used for assigning the values to variables as well as for evaluating the expression.
9. The let command is the same as the expr command but it does not requires the $ (dollar sign) with the variables.
10. A set of double parentheses, ‘((’ and ‘))’ may be used to represent the let command.
11. The calculator called bc (base conversion) is invoked by typing bc at the shell prompt. Typing quit ends the bc command.
12. The expr command is capable of carrying out only integer arithmetic. To carry out arithmetical operations on real numbers, the bc command is used.
13. The factor command factorizes the number and prints its prime factors.
14. The units command converts quantities expressed in various standard scales to their equivalents in other scales.
15. Comments should be preceded with a #.16. If we pass the –n command line parameter to echo,
then it will not end its output with a newline.17. Shell scripts can read up to nine command line
parameters. The fi rst argument is read by the shell into the parameter $1, the second argument into $2, and so on.
18. $# stores the count of the number of command line arguments.
19. All command line arguments passed are stored in $*.20. Variable names must begin with a letter or an
underscore character (_). 21. To retrieve the value of a variable, place a dollar sign
($) in front of the variable name. 22. The read command is used to read the input typed
by the user into shell variables. 23. Loops are used for executing a command or a set of
commands for each value of the given set.24. Asterisk (*) is a wild-card character and it refers to
any number of characters.25. The ? is considered a wild-card character that
represents a single alphanumeral.26. The if command is used for selecting a set of
statements out of two sets depending on the validity of the logical expression included.
27. The test command returns true if the expression included is valid and false otherwise.
28. The tr command is used for translating a set of strings with the other.
29. The wc command is used to fi nd the counts of characters, words, and lines in a given fi le.
30. grep is a utility program that searches fi le(s) for lines that contain a matching pattern.
31. egrep extends the pattern matching capabilities of grep.
32. The cut command is used for slicing (cutting) a fi le vertically. It identifi es both the fi elds and columns.
33. The paste command is used to join textual data together.
34. A pair of rectangular brackets enclosing the expression can be used for the test command.
35. The exit command prematurely terminates a program.
36. The until loop is used for repeating a set of statements for the time the specified logical expression is false.
37. If echo’s argument is used without quotes, the extra spaces are automatically removed from the arguments.
38. The sleep command is used for inserting some delay, that is, to temporarily suspend the execution of a program for some seconds.
39. The $? symbol stores the exit status of the last command.
40. The $? symbol gets the value 0 if the command succeeds and a non-zero value if the command fails.
41. /dev/null is used to suppress the output of certain commands and not display them on the screen.
42. We can execute a command by enclosing it within two grave accent marks also called backquotes (`).
43. The tty utility is used to show the name of the terminal we are using.
44. We can send messages to other users sitting on other terminals and can receive messages through the write command.
45. We can turn off messaging at our terminal using the mesg n command.
46. With the write command, messages are sent one line at a time, that is, the text is collected until we press Enter.
47. The wall command sends the message to all those who are logged in.

Bourne Shell Programming 473
■ EXERCISES ■
Objective-type QuestionsState True or False
10.1 The shell script is a collection of Unix commands and certain built-in functions.
10.2 The expr command can perform arithmetical operations on integers.
10.3 Using the bc command, we enter the calculator mode.
10.4 The units command is used for converting values in one standard scale to another scale.
10.5 We cannot perform more than one assignment in a single statement.
10.6 $* represents the count of the number of command line arguments.
10.7 With the tr command, we can not only translate characters but also delete matching characters.
10.8 We can specify more than one pattern for searching with the egrep utility.
10.9 We cannot use logical operators in shell scripts.10.10 When pattern matching, ‘^’ designates the
beginning and ‘$’ designates the ending.10.11 -a is the logical OR operator used to connect
two or more commands/expressions. 10.12 The cut command is used for slicing (cutting) a
fi le vertically. 10.13 The –f option in the cut command is used for
cutting fi les. 10.14 By default, the paste command uses the tab
character for pasting fi les. 10.15 The test command can be represented by a
pair of rectangular brackets.
48. The useradd command is used to add new users to the system.
49. The usermod command is used for modifying some of the parameters of the newly added user.
50. The userdel command is used to remove users. 51. The sort command is used for sorting and merging
fi les. 52. The case statement helps in choosing one set
of statements out of several set of statements depending on the value of the specifi ed expression.
53. The select loop is a special loop designed to create menus.
54. The basename command extracts the base fi lename from an absolute path name.
55. The exec command is used to open and close fi les in the script.
56. To close an input fi le, the exec 0<&– command is used.
57. To close an output fi le, the exec 1>&– command is used.
58. The w;who command is used to get information related to the activities of the users who are logged in, such as their logging time and terminals on which they are logged.
59. The last command tells us who have logged in and out, when, from where and also the time they have
been connected.60. The getopts command reads the command line
and if there are options, takes each option one by one, validates it, and then handles it.
61. The OPTIND is a built-in variable that provides the number of arguments after the options in the command line.
62. The set command parses an input string and places each separate part of the string into a different positional parameter.
63. The shift command moves the values in the parameters towards the beginning of the parameter list.
64. Functions are small modules, which, once written can be called as many times as desired, hence avoiding repetition of statements.
65. The stty command is used to set and display a terminal’s confi guration.
66. The uniq command deletes duplicate lines (only one line is kept and the rest are deleted) in the output.
67. With the at command, we can schedule the execution of command(s) or programs at some particular time.
68. The trap command is used to execute a command when a signal is received by our script.

474 Unix and Shell Programming
10.16 The until loop is used for repeating a set of statements for the time the logical expression included is true.
10.17 $? gains a non zero value if the command succeeds and a 0 value if the command fails.
10.18 The /dev/null is used when we do not want to echo the output of any command on the screen.
10.19 If two commands are connected through the logical OR operator (||), the command on the right of the || operator will be executed only if the command on the left of the || operator does not succeed.
10.20 The –n option in the test command returns true for a null string.
10.21 We can execute a command by enclosing it within two grave accent marks also called back quotes (`).
10.22 Unix treats each terminal as a hardware peripheral.
10.23 We can send and receive messages with the users sitting on other terminals through the echo command.
10.24 With the write command, messages are written onto the printer.
10.25 The wall command is used for sending a message to all those who are logged in.
10.26 The userdel command is used to remove users. 10.27 The tail+n command skips n−1 lines and
extracts from the nth line up till the end of the fi le.10.28 For sorting numerical values, the -n option is
used with the sort command.
10.29 The case statement helps in changing the case of the letters, that is, to convert lower-case letters to upper case and vice versa.
10.30 The select loop is a special loop designed to create menus.
10.31 In the exec command, to designate that a fi le is for input, we use an input redirection token(<).
10.32 The w;who command is used to get the information related to the activities of the deleted users.
10.33 The last command tells us who have logged in and out, when, and from where they have logged in.
10.34 The exit status of getopts returns false when all options are processed.
10.35 Functions are small modules, which, once written can be called as many times as desired, hence avoiding repetition of statements.
10.36 The stty sane command displays all the settings of the terminal.
10.37 The shift command moves the values in the parameters towards the end of the parameter list.
10.38 The trap command is used to trap a set of commands in a loop from where they cannot come out.
10.39 The command duplicate –c is used to count the duplicate lines in a fi le.
10.40 The two signals SIGKILL and SIGSTOP cannot be trapped.
Fill in the Blanks
10.1 The variables in shell script have to be preceded by .
10.2 The comments in shell script are preceded by the symbol.
10.3 The let command can be replaced by .
10.4 To come out of calculator mode, we use the command.
10.5 The command used to factorize a number is .
10.6 The multiplication sign in shell script must be preceded by a otherwise it will be treated as a wild-card character.
10.7 The option used with the echo command to avoid outputting a new line character is .
10.8 Predefi ned variables are of two categories: and .
10.9 The command used to count the number of lines, word, and characters in a fi le is
.10.10 The utility program used to search for the
string with the specifi ed pattern in a fi le(s) is .
10.11 The and operator evaluates to if any of the expressions connected with this operator is false.
10.12 The option in the cut command is used for cutting columns.
10.13 The option is used to specify our own delimiter in the paste command.

Bourne Shell Programming 475
10.14 The command is used for tem-porarily suspending the execution of a program for some seconds.
10.15 The symbol stores the exit status of the last command.
10.16 The –z option when used with the test command returns if string is a null string.
10.17 The names of the users who have a login account is present in the fi le.
10.18 The redirection symbol, , when diverting output to a fi le, overwrites its existing content if any.
10.19 To exit from an infi nite loop, can be pressed.
10.20 In a test statement, the and operator is rep-resented by .
10.21 The utility is used to show the name of the terminal we are using.
10.22 The command can be used to change the permissions setting that controls the receipt of messages.
10.23 The command is used for sending and receiving messages.
10.24 The keys can be used to cancel the write command.
10.25 The command is used to add new users to the system.
10.26 The option in the sort command is used to remove duplicate lines.
10.27 The option in the case statement represents the default condition.
10.28 To extract the base filename from an abso-lute path name, the command is used.
10.29 To modify the parameters of an existing user, the command is used.
10.30 To sort a fi le in the reverse order, the option is used with the sort command.
10.31 Using the exec 0< fi lename command, the fi le is opened for .
10.32 To close an input fi le, the command used in exec is .
10.33 The command is used for reading the command line and validating the options in it.
10.34 In the getopts command, the predefi ned variable that holds the values for the options is
. 10.35 The built-in variable provides the
number of arguments after the options in the command line.
10.36 The command is used to set and display a terminal’s confi guration.
10.37 The command parses an input string and places each separate part of the string into a different positional parameter.
10.38 The command deletes duplicate lines in the output.
10.39 The value returned by a function is displayed with the help of .
10.40 The option of the stty command that is used to map lower case to upper case in the output is
.
Programming Exercises
10.1 What will the following commands do? (a) expr 10 \* 3 (b) $ bc scale=2 17/3 (c) for x in 2 4 9 12 do echo "$x" done (d) for fi lename in $* do cat $fi lename done (e) for f in a*
do cat $f >> allfi les.txt done (f) ls * >tmp.lst grep "^[aeiou]" tmp.lst (g) x=1 for k in * do if test –d $k –a $x –le 3 then echo $k ((x=x+1)) fi done

476 Unix and Shell Programming
(h) $ cut –f1,4 school.txt (i) $ paste –d"," a.txt b.txt (j) i=5 while [ $i –ge 1 ] do echo $i ((i--)) done (k) if [ –r a.txt ] then cat a.txt fi (l) echo "'date +%H:%M:%S' time" (m) set 'date' echo $1, $6 (n) $ write bintu tty5 Merry Christmas!! (o) # useradd –u 105 –g accounts –c
"Bintu" (p) sort +1 –3 school.txt 10.2 Write a shell script to add four numerals sent
through a command line argument. 10.3 Write a shell script to enter the name and three
subject marks of a student and calculate the total and percentage (considering MM marks = 100) and print
(a) First division if percentage >= 60 (b) Second division if percentage >= 45 and
< 60 (c) Third division in other cases 10.4 Write a shell script to read the lines from one fi le
and store them into another fi le after converting all the vowels from the fi rst fi le into upper case. The fi lenames will be sent as command line arguments.
10.5 Write a shell script to show all the fi les in the current directory whose name begins and ends with a vowel.
10.6 Write a shell script to count the number of non blank lines in a fi le.
10.7 Write a shell script to print the average of n
numerals. 10.8 Write a shell script to print the specifi ed range
of lines from a given fi le. 10.9 Write a shell script to count the number of fi les in
the current directory having the specifi ed pattern.10.10 Write a shell script that takes the fi rst 10
lines from one fi le and the last 10 lines from the second fi le and stores them in a third fi le. The fi lenames will be sent as command line arguments.
10.11 Write a shell script to count the number of fi les in the current directory beginning with the specifi ed character.
10.12 Consider a fi le school.dat with the following fi elds: Roll, Name, and Marks. Write a shell script to sort the fi le in descending order of marks.
10.13 Show the names of the last fi ve subdirectories in the current directory.
10.14 Show the names of all the fi les having less than fi ve lines in them.
10.15 Write a shell script to count the number of persons currently logged in to the system. The script should stay in an infi nite loop and keep counting the logged in users after every one minute. The script should terminate when the number of persons logged in is more than fi ve.
10.16 Write a shell script that accepts the name of a user, and prints the entered name in reverse and also prints the length of the entered name.
10.17 Consider a fi le, school.txt, containing records of the eleventh and twelfth grade students. The eleventh grade and twelfth grade is represented as XI and XII respectively. Write a shell script to copy the records of the eleventh grade students into the fi le eleventh.txt.
10.18 Write a shell script that displays the login names of all users who have logged off in the last one hour.
10.19 Write a shell script that prints the sum of n even numbers. The limit is entered through the command line arguments (using functions).
Review Questions
10.1 Explain the following commands with syntax and examples:
(a) echo (b) wall (c) set (d) let (e) paste
10.2 Explain the concept of command line parameters with a running script.
10.3 Explain the different loops that can be used in Bourne shell scripts with examples.
10.4 Explain the use of the tr command in translating

Bourne Shell Programming 477
Brain Teasers
10.1 The following code is not displaying today’s date. Correct the code.
echo "Today's date is date "
10.2 The following code is not displaying the count of the number of command line arguments passed. Correct the code.
echo –n "The number of parameters are $*"
10.3 The following code for displaying words of the fi le a.txt one below the other is not working. Find the error in the code.
for k in cat a.txt do echo $k done
10.4 Find out the error in the following code for displaying the names of all the fi les that begin with the character a and for which we have read permission.
for f in a* do if test –d $f –a test ! –r $f then echo $f fi done
10.5 The following code for deleting all the upper-case letters in the input is not working. Find out the error.
$ tr –s "A–Z"
10.6 Correct the error in the following code for converting a string entered in the variable t into upper case.
echo "Enter a string" read $t t=`echo $t | tr A–Za–z`
10.7 Find out the error in the following code for
fi nding out the total number of upper-case characters in the fi les a.txt and b.txt:
cat a.txt | tr –s "a–z" > kk cat b.txt | tr –s "a–z" > kk n='cat kk | wc –c' echo "The total number of characters
that are in upper case in fi les a.txt and b.txt are $n"
10.8 The following code for displaying the count of the lines ending with character t in the fi le a.txt is not working. Find out the error.
n='grep ^t a.txt | wc –l' echo "There are $n lines that end with
character t in the fi le a.txt"
10.9 Find out the error in the following code for printing the count of the number of sub directories in the current directory.
for k in a* do if test –r $k then echo $k >aa fi done n='cat aa | wc –c' echo "There are $n number of
subdirectories in the current directory that begins with character a "
10.10 Correct the following program that prompts the user to enter two names and indicates if the two names entered are the same or not.
echo "Enter fi rst name " read $a echo "Enter second name " read $b if grep $a = $b then echo "Both names are same"
the contents of a fi le. 10.5 Explain in detail the use of the grep command.
How does it differ from the egrep command? 10.6 Explain what the shift command does to the
positional parameters with a running script. 10.7 Explain how positional parameters are set with
the set command. 10.8 Explain how the options and command line
arguments that are passed to a script with a running script, can be read.
10.9 What is the role of the expr command with relation to strings?

478 Unix and Shell Programming
else echo "The two names are different" done
10.11 The following code is not extracting ‘hour’ from the date correctly. Correct the code.
h=`date | cut –c10–11` echo $h
10.12 The following code is not displaying the sum of the fi rst fi ve sequence numbers correctly. Find the error.
s=0 k=1 while [$k –ge 5] do ((s=s+k)) [k=k+1] endwhile echo "Sum of fi rst fi ve sequence numbers
is $s"
10.13 Find out the error in the following code that runs infi nitely asking the user to enter a fi lename. The code will keep asking for the fi lename until a valid fi lename is entered.
echo –n "Enter a fi le name" read t while test –f $f do echo "$f is not a fi le. Try again" wait 60 done
10.14 What is wrong in the following code for displaying all the fi lenames that end with a numerical digit?
ls * >tmp.lst grep "^[0–9]" tmp.lst
10.15 The following code for fi nding whether the entered number is even or odd is not working. Find the errors.
echo "Enter a number" read n ((m = n / 2)) if test m –eq 0 then echo "The number is an even number" else echo "The number is an odd number"
fi
10.16 Correct the error in the following code for counting the number of fi les and directories in the current directory.
x=0 y=0 for k in * do if test –f $z then ((x=x+1)) fi if test –d $z then [[y=y+1]] fi done echo "The number of fi les are $x and
directories are $y"
10.17 Find out the error in the following code for reading the content of one fi le and storing it in another fi le after converting into upper case. The two fi lenames are passed as command line arguments.
if test $# –ne 4 then echo "You have not entered 2 arguments" exit else cat $1 | tr A–Za–z > $2 fi
10.18 Correct the error in the following code that prompts the user for a fi lename and indicates if the fi le exists in the current directory or not.
echo "Enter the fi le name to search" read n ls * >tmp.lst if grep "n" tmp.lst > /device/null then echo "Sorry, the fi le does not exists
" else echo "The fi le exists in the current
directory" fi
10.19 Find out the error in the following code for

Bourne Shell Programming 479
fi nding specifi ed pattern in the fi les that begins with a vowel.
echo "Enter the pattern to search" read k ls * >tmp.lst grep "^[aeiou]" tmp.lst> fi les.lst
grep "k" fi les.txt
10.20 Correct the following program that displays the list of users who are logged in and whose names begin with characters a to d.
who > usrnme tr "$[a–d]" usrnme
■ ANSWERS TO OBJECTIVE-TYPE QUESTIONS ■
State True or False
10.1 True 10.2 True 10.3 True 10.4 True 10.5 False 10.6 False 10.7 True 10.8 True 10.9 False10.10 True10.11 False10.12 True10.13 False 10.14 True10.15 True10.16 False10.17 False10.18 True10.19 True10.20 False10.21 True
10.22 False10.23 False10.24 False10.25 True10.26 True10.27 True10.28 True10.29 False10.30 True 10.31 True10.32 False10.33 True10.34 True10.35 True10.36 False10.37 False10.38 False10.39 False10.40 True
Fill in the Blanks
10.1 $
10.2 # 10.3 (()) 10.4 quit 10.5 factor 10.6 \ 10.7 –n 10.8 shell variables,
environment variables
10.9 wc10.10 grep10.11 false10.12 –c10.13 –d10.14 sleep10.15 $?10.16 true10.17 /etc/passwd10.18 >10.19 Ctrl-d10.20 –a10.21 tty
10.22 mesg10.23 write10.24 Ctrl-c10.25 useradd 10.26 –u10.27 *)10.28 basename10.29 usermod10.30 –r10.31 input10.32 exec 0<&–10.33 getopts10.34 OPTARG10.35 OPTIND10.36 stty10.37 set10.38 uniq10.39 $?10.40 olcuc

11.1 INTRODUCTION
The Korn shell or ksh is a command and scripting language created by David Korn of Bell Labs. The fi rst version of ksh was released in 1983. Its next version came out in 1988, which was adopted by system V Release 4 Unix. The latest version, the 1993 version, is a major rewrite of the 1988 version. The Korn shell is almost entirely backward compatible with the Bourne shell, which means that Bourne shell users can use it right away.
11.2 FEATURES
In addition to its Bourne shell compatibility, the Korn shell includes the best features of C shell, besides having several advantages of its own. The important features of Korn shell include the following:
1111Korn Shell Korn Shell ProgrammingProgramming
C H A P T E R
After studying this chapter, the reader will be conversant with the following:
• Introduction to and features of Korn shell• Command line editing, fi lename completion, command name aliasing,
command history substitution, Korn shell meta characters• Operators—arithmetic, logical, and relational operators• Creating shell variables and setting shell prompts• Defi ning variables, environment variables, and DISPLAY environment variable• Basic input/output (I/O) commands• Command line arguments• If else and case statements• Testing strings and fi les• Loops—while, until, and for• Arrays—indexed and associative arrays• Functions, passing arguments to functions, returning values, local and
global variables, recursion• I/O redirection

Korn Shell Programming 481
Command-line editing This allows using vi or emacs style editing commands on the command lines.
Control structures This supports popular control structures such as loops, conditional statements, and select statements.
Filename completion This supports the fi lename feature, that is, on entering a few beginning characters of a fi le, its complete name and possible suggestions are displayed automatically.
Command history This supports command history that helps in recalling and reusing previously given commands.
Command aliases This supports a command aliases feature, which helps in assigning smaller names to long and frequently used commands.
Debugging This supports a debugging feature that helps in debugging shell codes.
Regular expressions This supports applications of regular expressions that are popularly used in utilities such as grep and egrep for enhanced searching.
Monitoring jobs This provides the facility to monitor background and foreground jobs.
We will now discuss some of the features of the Korn shell in detail.
11.2.1 Command Line EditingThe Korn shell has editing modes that allow us to edit command lines with editing commands similar to those of the two most popular Unix editors, vi and emacs. There are two ways of entering the editing mode. First, we can set our editing mode by using the environment variable VISUAL. The Korn shell checks to see if this variable defi nes either vi or emacs. We can also set VISUAL by putting the following line in our .profi le or environment fi le:
VISUAL=$(whence emacs)orVISUAL=$(whence vi)
Using the command whence, the complete path name of the specifi ed editor is searched and stored in the environment variable VISUAL.
The second way of selecting an editing mode is to set the option explicitly with the set -o command:
$ set -o emacsor$ set -o vi
These two commands help in setting a default editing mode similar to emacs and vi editors, respectively.
Though we have studied vi and emacs editors in detail in Chapter 8, let us take a small recap here.
Using viThere are several vi commands for moving around the command lines and editing them. We know that the vi editor operates in two main modes, the command and insert modes. In the

482 Unix and Shell Programming
command mode, single keys move the cursor, delete characters, and perform other actions. In the insert mode, single keys are typed into the command line. The list of keys used in cursor movement is shown in Table 11.1.
The keys, l, h, w, f, and b, can be preceded by a number. For instance, 5l moves the cursor forward by fi ve characters. Similarly, 2w will move the cursor forward by two words; 2fa fi nds the second occurrence of character a in the line. The list of keys used in performing editing tasks is shown in Table 11.2.
To enter the insert mode, press a, A, i, or I. To exit to the command mode, press the Esc key.On pressing the Enter key, the command that appears on the command line will be
executed. After having learnt about the editing mode in vi, let us take a look at the keys required for editing in emacs mode.
Note: Students are advised to refer to Chapter 8 for an explanation on the vi editor.
Using emacsThe keys for cursor movement in the emacs editor are different from that used in the vi mode. The list of keys used in cursor movement in the emacs mode is shown in Table 11.3.To edit commands, the key pairs shown in Table 11.4 are used.
Do remember that command line editing applies to the current command being typed or retrieved from history.
Note: Students are advised to refer to Chapter 8 for an explanation on the emacs editor.
Table 11.1 Keys for cursor movement in command mode in vi
Key Description
l Moves the cursor one character forward
h Moves the cursor one character back
w Moves the cursor one word forward
b Moves the cursor one word back
fx Finds the character x in the line
0 Moves the cursor to the start of the line
$ Moves the cursor to the end of the line
Table 11.2 Keys for performing editing tasks in the command mode in vi
Key Description
x It deletes the character at the position of the cursor. It can be preceded by a number.
X It deletes the character behind the cursor. It can be preceded by a number.
~ It changes the case of the character at the position of the cursor. It can be preceded by a number.
u It undoes the last change made to the line.
U It undoes all changes made to the line.
Table 11.3 Key pairs for cursor movement in emacs
Key pair Description
Ctrl-f Moves the cursor one character forward
Ctrl-b Moves the cursor one character back
Esc-f Moves the cursor one word forward
Esc-b Moves the cursor one word back
Ctrl-a Moves the cursor to the beginning of the line
Ctrl-e Moves the cursor to the end of the line
Table 11.4 Key pairs for editing in emacs
Key pair Description
Ctrl-d Deletes the character at the cursor
Esc-d Deletes the current word
Ctrl-c~ Capitalizes the current character
Esc-l Converts the current character to lower case

Korn Shell Programming 483
11.2.2 Filename CompletionBy fi lename completion, we mean that when we type in a partial name of a fi le, and press certain specifi c keys, the shell will automatically complete the name of the fi le for us. We will now discuss fi lename completion in the vi as well as the emacs modes.
In the vi mode, backslash (\) is the command that tells the Korn shell to perform fi lename completion.
If we type in a word, press the Esc key to enter the control mode, and then press the \ (back slash) key, the complete fi lename matching the typed word will appear. If no fi lename matches the typed characters, we get a beep sound, and no fi lename will appear.
If more than one fi le begins with the characters typed, the shell will complete the name up to the point where the names differ. To be more specifi c, we need to type more characters and reuse the Esc key if desired. If there is exactly one fi le that begins with the characters typed and that is a regular fi le, the shell will type the rest of the fi lename. If there is no fi le but a directory that begins with the characters typed, the shell will complete the fi lename, followed by a slash.
After the Esc key, we can either press = to get the numbered list of matching fi lenames to select the fi lename that we desire, or press * to expand the fi lename and replace it with the list of matching fi lenames.
In the emacs mode, we need to press the Esc key twice to complete the fi lename. For instance, in the vi mode, we can press the = key after the Esc key to expand the fi lename and display the numbered list of matching fi lenames to select from. In addition, we can press * after the Esc key to expand the fi lename and replace it with the list of matching fi lenames.
Let us now discuss the ways by which the Korn shell relieves us from typing lengthy commands.
11.2.3 Command Name AliasingBoth ksh and csh provide command name aliasing that not only allows us to rename commands but also saves a lot of keystrokes while typing frequently used lengthy commands.
Syntax alias alias_name=command
Here, alias_name is the alias that we want to use for the specifi ed command.
Examples
(a) To alias the cat inventory.txt command to ci, use the following command in the Korn shell.
alias ci='cat inventory.txt'
On creating the alias, ci, whenever we type the command ci, the shell will substitute it with the string cat inventory.txt before executing it.
(b) alias changedir= 'set dirname=projects; cd $dirname; unset dirname'
This command creates an alias by the name changedir that sets the value of the shell variable dirname to the directory, projects, changes the directory to projects, and removes the shell variable dirname from the environment by unsetting it.
Note: Enclosing the alias string within single quotes (‘) will prevent the shell from interpreting special characters.

484 Unix and Shell Programming
(c) To remove an alias, the unalias command is used. The following command will remove the changedir alias that we just created.
unalias changedir
The alias changedir will be removed.
11.2.4 Command History SubstitutionThe Korn shell keeps an ordered list of the commands that we give in the command line, allowing us to retrieve them when desired. We can reuse all or part of the previously entered commands depending on our requirement. Each command in the list is given a command number depending on the sequence it was issued. To view the command history list, we type the following:
history
Retrieving commands from command history in Korn shell When using the Korn shell, the number of commands stored by the shell is controlled by the HISTSIZE environment variable.
Syntax HISTSIZE=number_of_lines_to_store_in_command_history
Example To set the length of the history list to 80 lines, use the following command.
HISTSIZE=80;export HISTSIZE
By default, the history size is set to 128 lines.In the emacs editing mode, the key pairs, Ctrl-p and Ctrl-n, are used to display earlier
commands and forward command in the command history respectively. After editing the command line, if desired, press the return key to issue the command to the shell.
In the vi editor, we use _ (underscore) in the control mode to get the last argument of the previous command, or n_ to get the nth argument of the previous command. In case of the emacs editor, we can use Esc_ for the same purpose.
Whether it is searching for text in a fi le or searching a fi le or directory, or representing some unknown text, we need to make use of meta characters. This is discussed in the following section.
11.3 KORN SHELL META CHARACTERS
Meta characters are characters that render a special meaning to the shell. The list of Korn shell meta characters is given in Table 11.5.
Table 11.5 List of Korn shell meta characters
Character Meaning
\ This is the escape character. It disables the special meaning of the character that it precedes.
* This is the wild card match for zero or more characters.
? This is the wild card match for one character.
(Contd)

Korn Shell Programming 485
Table 11.6 Arithmetic and logical operators
Operator Description Operator Description Operator Description Operator Description
+ Unary plus + Add != Comparison for non-equality
&& Logical ‘AND’
- Unary minus - Subtract =~ Pattern matching || Logical ‘OR’
Table 11.5 (Contd)
Character Meaning
[abc] This matches one character specifi ed within the brackets, a, b, or c.
[!abc] This matches one character not specifi ed within the brackets, a, b, or c.
[a-z] This matches one character in the range between a and z.
< This redirects the standard input. The input comes from the specifi ed fi le instead of the terminal.
> This redirects the standard output. The output is sent to the specifi ed fi le instead of the terminal.
>> This appends the standard output to the end of a specifi ed fi le.
| The pipe character connects the standard output of one command to the standard input of another command.
& When appended to a command, it makes the process run in the background.
~ It represents the path of a user’s home directory.
. It represents the current directory.
.. It represents the parent to the current directory.
/ It represents the root directory.
' It represents a string with variable substitution.
" It represents a string with variable substitution. It also preserves the embedded spaces and new lines if any.
` Back quotes around a command string tell the shell to run the command and use the output in place of the string.
( ) It groups commands together for execution.
; It separates commands on a command line.
We have been using these meta characters in different commands such as in ls, grep, and expressions. We will further be using them in the Korn shell scripts in this chapter.
11.4 OPERATORS
Korn shell supports several operators such as arithmetic and logical, relational, string, and fi le test operators. We will learn about these operators as we proceed further in this chapter.
11.4.1 Arithmetic and Logical OperatorsArithmetical operators are used for different computing tasks while logical help in creating logical conditions or expressions used in conditional statements and loops.
The list of arithmetic and logic operators is as shown in Table 11.6.
(Contd)

486 Unix and Shell Programming
We can see that these operators include arithmetic operators such as +, -, and * for writing arithmetical expressions, bitwise operators (<<, >>, &) to operate on bits of the specifi ed integers, and logical operators (AND, OR) to combine logical expressions.
11.4.2 Relational OperatorsThe relational operators are mainly used for comparing objects. If two numerals are being compared, the operators listed in Table 11.7 can be used.
We will learn about other operators as we proceed in this chapter. After understanding operators, we need to understand the types of variables as they play a major role in shell scripts.
11.5 VARIABLES
Variables, as we know, are used for holding and passing information. Variables in Unix are of two categories, shell variables and environment variables.
11.5.1 Shell VariablesAs the name suggests, shell variables belong to the shell and contain values that are visible and applicable only to the current instance of the shell. We can set values for the shell variables, print them, and use them in expressions but their scope is limited to the current instance of the shell. It is for this reason that shell variables are also termed as local variables. By convention, shell variables are written in lower case.
Creating shell variablesVariable names can be a single character, a collection of characters, or digits. They can also include underscores but cannot begin with a digit.
The following are examples of a few valid variable names:
aradius
Table 11.6 (Contd)
Operator Description Operator Description Operator Description Operator Description
!~ Binary inversion (one’s complement)
<< Left shift & Bitwise ‘and’ ++ Increment
* Multiply >> Right shift ^ Bitwise ‘exclusive or’
-- Decrement
/ Divide == Comparison for equality
| Bitwise ‘inclusive or’
= Assignment
% Modulo
Table 11.7 Relational operators
Operator Description
-eq equal to
-ne not equal to
-lt less than
-gt greater than
-le less than or equal to
-ge greater than or equal to

Korn Shell Programming 487
volume2
area_rectangle
These are a few valid variable names. We cannot begin a variable name with a digit. For instance, 2volume is an invalid variable name.
Assigning values to shell variablesTo assign a value to a variable, we use the following format:
variable=value
An equal to sign is used between the variable and the value without any space—neither before nor after the equal sign. If a space has to be used in the value, the value must be placed within quotes.
Example message="Are you sure?"
radius=5
Exporting variablesThe shell variables discussed here are only available to the current shell. As previously mentioned, these are local variables and the child processes of the current shell will not be able to access them. Hence, in order to pass the shell variables to a subshell, we need to export them using the export command. Variables that are exported are referred to as environment variables.
An environment variable is a shell variable that is exported or published to the environment so that it is accessible to the child processes of the current shell too. To set the values of the environment variables, we use either of the following formats:
$ VARNAME=new value
$ export VARNAME
or$ export VARNAME=new value
The second format assigns as well as exports the variable.
Example PS1=':${PWD#HOME/}:!$'
PATH="$PATH:/usr/John/bin"
export PS1 PATH
The export command makes the value of the variable available to other processes too. Usually when we declare, initialize, read, and modify variables, they are local to that process. When a process forks a child process, the parent process does not automatically pass the value of the variable to the child process. To pass the value of the variable to the child process, we use the export command. It is a one-way transition; we can export variables from the parent to the child process but vice versa is not possible.
11.5.2 Environment VariablesEnvironment variables, also known as global variables, are available to all the shells. Whenever a new shell is created, it inherits all of its parent’s environment variables but it does not inherit any shell variable. This implies that the environment variables are accessible

488 Unix and Shell Programming
(Contd)
Table 11.8 List of environment variables
Environment variable
Description
EDITOR It is used to decide the editor the user wishes to use.
Examples:
EDITOR=vi
EDITOR=emacs
VISUAL It is used to specify a default visual editor, overriding the EDITOR variable.
Example: VISUAL=vi
The Korn shell fi rst checks the value of the VISUAL environment variable. If it is defi ned, it uses the specifi ed command line editor. If the VISUAL environment variable is undefi ned, the Korn Shell checks the value of the EDITOR environment variable and uses the editor specifi ed in it, if defi ned.
HOME It is the home directory of the user. We can set this variable to override the setting in /etc/passwd that represents the home directory. The tilde symbol ~ refers to the home directory.
Example: HOME=/home/john
ENV Besides the .profi le fi le (if it exists), the Korn shell uses the start-up fi le specifi ed by this variable.
Example: ENV=$HOME/.kshrc
Basically the start-up fi le can be any fi lename with any extension, not necessarily, .kshrc. The .profi le fi le is read once on logging in, whereas the fi le specifi ed through the ENV environment variable is read every time the Korn shell is invoked.
LOGNAME It specifi es the name of the user.
Example: LOGNAME=john
HOSTNAME This variable is used by several commands to identify the current host. Hence, the name of the current system is assigned to this variable.
Example: HOSTNAME=$(uname -n)
Here, the variable uname is meant for displaying the system’s confi guration information. The option -n is used for displaying the name of the machine.
PWD It contains the absolute path name of the current working directory. Its value is automatically set by the cd command.
MAIL This indicates the location of the incoming local e-mail. The mail reader uses this variable to fi nd the mailbox. If not set, the default location where mails are dropped is /var/mail/username.
MAILCHECK The MAILCHECK variable specifi es the time interval in which the shell will check for new mail. If not set or set to zero, new mail is checked before each new prompt is displayed. The default value of this environment variable is 600 seconds, that is, 10 minutes.
to any child process of the current shell and hence have a great impact on the working of the new shell too, but the same is not true for local variables. By convention, environment variables have upper case names. Some of the important environment variables are listed in Table 11.8.

Korn Shell Programming 489
Table 11.8 (Contd)
Environment variable
Description
MAILPATH This environment variable is used when we have multiple mailboxes. It contains a colon-separated list of mailbox fi les to check for the new mails. If set, the environment variable overrides the MAIL variable.
If MAILPATH is not set, there is no default.
Example: MAILPATH=/home/john/mbox:/news/mbox.
On getting a new mail, the Korn shell displays this message on our terminal just before the prompt:
you have mail in the mailbox fi le.
To modify the mail notifi cation message, append a ? to the path specifi ed in the MAILPATH environment variable followed by the custom message that we wish to display on getting a new mail:
MAILPATH=/home/john/mbox? ' New mail has arrived. Please check $_'
Here, _ (underscore) is substituted for the name of the mailbox fi le.
PAGER This message indicates if there is more information to be viewed. It is used by programs created for viewing a fi le.
Examples:
PAGER=less
PAGER=more
CDPATH It defi nes a list of colon-separated directories that the shell checks when a full path name is not given to the cd command. It makes the directory navigation easier as each directory in CDPATH is searched from left to right for a directory that matches the cd argument. Let us assume that our CDPATH is set as follows:
CDPATH=:/home/john:/etc:/var
The CDPATH environment variable indicates the shell to check the current directory fi rst, /home/john: /etc, and then /var when the cd command is issued without a full path name.
Note: The colon (:) alone in CDPATH stands for the current directory.
Assume that we give the following cd command:
cd progs
The shell will search for the progs directory in the current directory followed by the /home/john directory and then the /etc and /var directories. Assuming the progs directory exists in the /home/john directory, our directory will change to the /home/john/progs directory.
There is no default value for the CDPATH environment variable and hence this feature is disabled if the environment variable is not set.
PATH It contains a list of colon separated directories to search for the fi le of the issued command. Each directory in PATH is searched from left to right. The command is executed only if the fi le is found, otherwise an error message is displayed.
Example: PATH=:/bin:/usr/bin
Here, : (colon) alone represents the current directory.
(Contd)
490 Unix and Shell Programming
Table 11.8 (Contd)
Environment variable
Description
The value in the PATH environment variable asks the shell to check the current directory, the /bin directory, then /usr/bin for the issued command.
If not set, the default value for PATH is /bin:/usr/bin.
PS1 It controls the appearance of the primary prompt. It uses several escape characters to display the desired information in the prompt.
PS2 It is the secondary prompt and is usually displayed when we break a long Unix command on multiple lines by pressing the Enter key, mid-command. The PS2 prompt by default appears as >, which means that Unix is waiting for the rest of the command. By setting the PS2 environment variable, we can modify the default PS2 prompt > to display the desired information.
PS3 It defi nes the prompt for selecting an option in an interactive menu created through the select command. Default prompt is #?.
PS4 It defi nes the execution trace prompt that precedes each line of an execution trace. The default execution trace prompt is + (plus).
HISTFILE It is used to specify the path name of the fi le where the list of commands, that is, command history is saved. By default, the history fi le for bash is .bash_history and that for the Korn shell is .sh_history. We need to delete the commands from the history fi le each time we log in or else the number of commands stored in it becomes quite large. We can also issue a command in the .profi le fi le to delete the history fi le:
rm .sh_history
By implementing this command, the earlier commands will be deleted each time we log in to the computer.
HISTSIZE The value specified through this environment variable decides the number of commands that are kept in the history file. You may recall that the history file makes the previously entered commands accessible by the shell. By default, 512 commands are stored for the root user and 128 commands for other users.
USER The username is stored here.
The values of most of the aforementioned environment variables automatically change on the basis of user actions. For example, the environment variable, PWD, stands for present working directory and its value is the directory where the user is currently working. If the user changes the directory, then the new directory where the user has moved to is assigned to the PWD variable.
A sample start-up fi le, .profi le, containing different shell and environment variables may appear as follows:
.profi le fi leset -o allexportTERM=vt102LOGNAME=johnHOSTNAME=$(uname -n)

Korn Shell Programming 491
HISTSIZE=50EDITOR=viMAIL=/usr/spool/mail/$LOGNAMEHOME=/home/johnSHELL=/bin/kshENV=$HOME/doit.kshrcPWD=$(pwd)PATH=$HOME/bin:/usr/bin:/usr/local:/etc:/bin:/home/john/bin:/usr/local/bin:.PS1="$HOSTNAME ! $"PS2="Continue….>"stty erase \^H intr \^C susp \^Z quit \^\\set +o allexport
The set -o allexport statement in the aforementioned sample start-up fi le sets the allexport option, hence all variables defi ned in the script will automatically be exported making it available to subshells. The last statement of the start-up fi le set +o allexport switches off the allexport statement and stops the export of variables.
Besides the .profi le fi le, the Korn shell uses the start-up fi le specifi ed by the ENV variable. In the sample .profi le fi le, the ENV variable refers to the start-up fi le doit.kshrc.
A sample .kshrc fi le may appear as follows:
doit.kshrcif [ -z "$VISUAL" -a -z "$EDITOR" ]; then
set -o vifi set -o ignoreeofset -o noclobber
This start-up fi le shows that if the VISUAL and the EDITOR variables are not set, then vi is set as the default editor while editing a command line. It also disables ^D from logging out. Thus, the exit command can only be used to exit the shell. In addition, it will not allow a user to overwrite a fi le with the same fi lename.
To display all environment variables and their values, we can use any of the following commands:
$ set or$ printenv or$ env
Let us understand the role of environment variables in controlling the appearance of our shell prompt.
11.6 SETTING SHELL PROMPTS
A default shell prompt displays the host name and current working directory. We can customize our prompt to display desired information. The appearance of shell prompt is controlled through the special shell variables PS1, PS2, PS3, and PS4.

492 Unix and Shell Programming
11.6.1 PS1 VariableOut of these special shell variables, the one that controls the appearance of the primary prompt is PS1. To display the current prompt setting, we can echo the PS1 variable:
$ echo $PS1
Let us learn more about the procedure of changing the appearance of the primary prompt. To modify the prompt, we can assign the backslash escaped special characters to PS1 as shown in Table 11.9. After assigning the escape characters to the PS1 variable, press the Enter key.
Table 11.9 Escape characters to be used with the PS1 variable
Escape character Displays
\d Date in Weekday Month Date format (Example, “Fri Dec 15”)
\H Host name
\n Newline
\r Carriage return
\s Name of the shell
\t Current time in 24-hour HH:MM:SS format
\T Current time in 12-hour HH:MM:SS format
\@ Current time in 12-hour a.m./p.m. format
\A Current time in 24-hour HH:MM format
\u Username of the current user
\v Version of bash
\w Current working directory
\nnn Character corresponding to the octal number nnn
\\ Backslash
\[ Begins a sequence of non-printing characters
\] Ends a sequence of non-printing characters
Examples
(a) Let us try to set the prompt so that it can display today’s date.
$PS1="\d $"
The prompt will change in this way.
Fri Dec 15 $
(b) Now we will set the prompt to display time, username, and current directory.
Fri Dec 15 $ PS1="[\t\u\w] $"
The prompt will change in this way.
[18:30:15 John~] $

Korn Shell Programming 493
11.6.2 PS2 VariableThe PS2 variable defi nes the secondary prompt that is displayed when a Unix script extends to multiple lines. The default PS2 prompt appears as >.
Example echo "Number of argument > are $#"
We can see that the prompt ‘>’ appears when the echo command is extended to the next line asking for the rest of the statement. The ‘>’ prompt is the default output of the PS2 variable. Let us modify it in this way.
PS2="Continue….>"
Now, the shell will prompt for the rest of the statement through the following prompt.
echo "Number of argument Continue….> are $#"
11.6.3 PS3 VariableThe PS3 variable defi nes the select prompt, which is used in selecting an option from an interactive menu. The default prompt is #?. Before we understand more about the PS3 prompt, let us learn about the select command.
select commandThe select command is used for creating an interactive menu. The syntax for using the select command is as follows:
Syntax select variable in option1 option2...optionN
do case $variable in option1) command1;; option2) command2;; optionN) commandN;; esac done
Here, option1, option2, …, optionN represents valid menu options, and command1, command2, …, commandN represents the commands that will be executed when the corresponding menu option is selected by the user.
Example The following shell script demonstrates how an interactive menu is created using the select command and its default prompt.
interactmenu.ksh
#!/bin/ksh select i in Date Listing Users Exitdo case $i in Date) date;;

494 Unix and Shell Programming
Listing) ls;; Users) who;; Exit) exit;; esacdone
We can see that four menu options are provided through the select command. The respective actions to be taken on the selection of any command are shown via case statements. On execution of the aforementioned shell script, we will have the following output.
$ ./interactmentu.ksh1) Data2) Listing3) Users4) Exit#? 1Monday 27 February 2012 10:32:50 AM IST#? 2checkargs.ksh checkextexec.ksh dispfi letypeoutput projectcheckexec.ksh dispfi letype.ksh interactmenu.ksh#? 3root console Feb 27 09:09 (:0)root pts/3 Feb 27 09:09 (:0.0)root pts/4 Feb 27 09:10 (:0.0)#? 4$
We can see that the default prompt displayed for the select command prompt is ‘#?’, which is not very user-friendly. Let us now change the default prompt using the following PS3 command.
PS3="Select an option(1-4): "
Next, we will modify the select prompt by applying the aforementioned PS3 prompt in the shell script.
modiprompt.ksh
#!/bin/ksh PS3="Select an option(1-4): "select i in Date Listing Users Exitdo case $i in Date) date;; Listing) ls;; Users) who;; Exit) exit;; esac

Korn Shell Programming 495
done
The output will now display the following modifi ed PS3 prompt.
$ ./modiprompt.ksh1) Data2) Listing3) Users4) Exit
Select an option(1-4): 1Monday 27 February 2012 10:59:56 AM ISTSelect an option(1-4): 2checkargs.ksh interactmenu.ksh listfi lesdiroutputcheckexec.ksh interactmenuoutput.png modiprompt.kshcheckextexec.ksh listfi lesdir.ksh projectdispfi letype.ksh listfi lesdir2.kshdispfi letypeoutput listfi lesdir2output
Select an option(1-4): 3root console Feb 27 09:09 ( :0)root pts/3 Feb 27 09:09 ( :0.0)root pts/4 Feb 27 09:10 ( :0.0)
Select an option(1-4): 4$
In this output, we can see that the prompt for the select command is changed to Select an option (1-4): through the PS3 prompt.
11.6.4 PS4 VariableThe PS4 variable is used for changing the execution trace prompt. The default execution trace prompt is + (the plus sign). The execution trace is a great tool for debugging shell scripts. It lists each command before the shell runs it. To enable the execution trace for a shell script, we need to add the set -x statement at the beginning.
Example The following script demonstrates how to enable execution trace prompt.
demoset.ksh#!/bin/kshset -xfor i in 1 2 3do echo $idoneexit
Output+ echo 1

496 Unix and Shell Programming
1+ echo 22+ echo 33+ exit
We can see that the trace lines displaying the output of the script appear in the default prompt, along with a + (plus) sign.
To display the shell script name along with the line numbers of the commands in the script, we make use of the LINENO variable to set the PS4 prompt in the following way.
PS4='$0.$LINENO+ '
To display the line numbers only in square brackets along with the trace line, enclose the LINENO variable in square brackets in the PS4 prompt in the following way.
PS4='[${LINENO}]+'
On executing the set PS4 variable, the output of this script displays the line numbers along with the trace line.
Output[5]+echo 11[5]+echo 22[5]+echo 33[7]+exit
The numbers in the square brackets are the line numbers in the scripts that display the output.We will now see how the environment variables control the display and terminal.
11.7 SETTING DISPLAY ENVIRONMENT VARIABLE
For running certain applications, the DISPLAY environment variable must be set correctly as it plays a major role in the X Window System. X Windows is a client/server model, where the communication is performed using the X protocol. In this model, the output of the program that is run on a remote Unix system can be seen on our local display. This implies that the program and the user interface can be on different machines. The client’s machine is known as the workstation or the X terminal.
11.7.1 TerminalA terminal might be a text-based teletype terminal (tty) or a graphics-based terminal. Before being used, a terminal needs to be confi gured and for that we need to defi ne the environment variable, TERM, with an appropriate value that best describes the terminal. The most common values assigned to the TERM environment variables for confi guring the terminals are vt100 and xterm and they work for almost all types of terminals.

Korn Shell Programming 497
Note: The terminal can always be confi gured manually using the stty command.
To display some content on the client’s screen, the client asks a server on the specifi ed host to draw windows for it.
11.7.2 DisplayA display is a virtual screen that is created by the X server on a particular host. When an X client program wants to open a window, it looks in the Unix environment variable DISPLAY for the IP address of a host, which has an X server it can contact. Each display on a machine is assigned a display number (beginning at 0) when the X server for that display is started. Each display has a set of windows where each screen is assigned a screen number (beginning at 0). If the screen number is not given, screen 0 will be used.
Every X server has a display name in the following format:
hostname:displaynumber.screennumber
Here, hostname specifi es the name of the machine to which the display is physically connected. The displaynumber refers to the display or monitor number and screennumber refers to the screen or window on a monitor. The following is an example:
DISPLAY="hostname:0"export DISPLAY
The client will try to contact the X server on ‘host name’ and ask for a window on display number zero.
11.8 STEPS TO CREATE AND RUN KORN SHELL SCRIPTS
The following are the steps for creating and running a Korn shell script:
1. Create a script with extension .ksh using any editor. For instance, to create a script by the name kornsh1.ksh through the vi editor, open the vi editor as follows:
vi kornsh1.ksh
2. Type the script content, save it, and exit from the editor.3. Before executing a shell script, it must be assigned execute permissions. To assign these
permissions, run the following command:
chmod +x kornsh1.ksh
4. To run the Korn shell script, give the following command:
$./kornsh1.ksh
Here, . (dot) represents the current directory. In order to execute scripts by typing its name alone, the current directory containing the
shell script must be defi ned in the PATH variable. On specifying the current directory in the PATH variable, we can run scripts without using . (dot) in the command as follows:
$ kornsh1.ksh

498 Unix and Shell Programming
We will fi rst create the code for the Korn shell script using the aforementioned steps through the following example.
Example The following script demonstrates how computation is performed and the result is displayed in a Korn script.
arearect.ksh
#!/bin/ksh l=5 b=6 ((a=l*b))echo "Area of rectangle is $a"
OutputArea of rectangle is 30
Let us understand the usage of the fi rst line of the script that begins with the following statement.
#!/bin/ksh
On executing a shell script, the commands are passed to an interpreter for processing and running it. Since many shells exist, we need to inform the current running shell program that the script being executed is a Korn Shell script, and hence has to be interpreted by the ksh interpreter and not by csh, sh, bash, tcsh, or any other interpreter. The fi rst line of the script does the job of indicating which interpreter has to be used for executing the shell. The line contains special characters beginning with ‘#!’.
Normally a hash sign (#) represents a comment line; hence, a line beginning with # is not interpreted by the shell. In the case where the hash sign is immediately followed by an exclamation mark (!), and is in the fi rst line of the script, the characters after the exclamation mark are considered as the program name to be used for running and interpreting the rest of the script. Hence, the fi rst line of the script, #!/bin/ksh, invokes the Korn shell interpreter to execute the script.
While assigning a value to a shell variable, we do not need to use a dollar sign. While accessing the value of the variable, it needs to be prefi xed by the $ sign. If the variable name is immediately followed by some other content, then for readability and clear separation, it must be enclosed in curly braces ({ }).
Since we will require variables in shell scripts for storing data and results, let us recall the syntax for creating shell variables.
Syntax variable=value
It is to be remembered that no spaces are allowed around the = (equal to) sign. The value can be numerical, a string, or an expression and can be enclosed in double or single quotes if desired.
Examples p="Hello World!"
q=10 r=

Korn Shell Programming 499
These examples assign the string Hello World! to the variable p, value 10 is assigned to the variable q, whereas the variable r is not set. You may recall that if a shell variable is not set, then the null string is substituted for it, which means that nothing will appear on the screen when printed.
Note: The value of a variable is accessed by preceding its name with a dollar sign ($).
11.9 BASIC INPUT/OUTPUT COMMANDS
In this section, we are going to learn about the basic input/output (I/O) commands that are required in almost all shell scripts. The basic commands include the commands to accept input from the user and to display messages and results.
11.9.1 echoThe echo statement displays messages, arguments, variables, etc., terminated by a newline, to the screen. In order to keep the extra white spaces within the data being displayed, it needs to be enclosed in quotes. Escape characters that can be used in the echo command are given in Table 11.10.
Table 11.10 List of escape characters to be used with echo and printf commands
Escape character
Usage Escape character
Usage
\b Backspace \t Tab
\c Print line without newline (works in some versions)
\v Vertical tab
\\ Single backslash
\f Form-feed \0n ASCII character with octal (base-8) value n, where n is 1 to 3 digits\n Newline
\r Carriage return
A common option used with the echo command is -n, which suppresses the newline making the cursor remain on the same line after displaying the output so that the successive read or write begins from there.
Examples
(a) This example displays the text message "The fi les in the directory are".
echo "The fi les in the directory are"
(b) This example displays the value in the variable x.
echo $x
(c) This example displays the message Thanks and Bye on two separate lines.
echo "Thanks\nBye"

500 Unix and Shell Programming
After displaying the text, Thanks, the newline character, \n makes the cursor move on to the next line.
Note: We need to use a double backslash while using escape sequences if the string that contains them is not enclosed in quotes.
11.9.2 printIt is the most popularly used command in Korn shell for displaying messages and results on the screen. The output displayed via the print statement is terminated by a newline. It uses the same escape conventions that we discussed in the echo command. The two common options used with the print command are -n and -r:
1. -n suppress newline.2. -r raw mode ignores the escape sequences.
Examples
(a) The following example prints the text Hello World! on the screen.
print "Hello World! "
(b) This example prints the values in the variables x and y.
print $x $y
(c) This example prints the text messages Thanks and Bye on the same line.
print -n "Thanks"print "Bye"
Though Thanks and Bye are printed through two different print statements, the option -n used with the fi rst print statement suppresses the newline character after printing the text Thanks and hence prints the text Bye also on the same line.
11.9.3 readThe read command is used for reading values from the keyboard into the shell variables.
Syntax read var1 var2 ...
This statement takes a line from the standard input and breaks it into words on the basis of the delimiter specifi ed in the variable IFS. The default delimiters are space, TAB, and newline. The words are then assigned to the variables var1, var2, etc.
Example The following script prompts the user to enter a name and print its name back along with a hello message.
readinput.ksh
#!/bin/kshprint -n "Enter your Name: "read nameprint Hello $name

Korn Shell Programming 501
OutputEnter your Name: JohnHello John
11.9.4 printfThe printf command is used for displaying formatted output. It does not include a newline character in its output and hence the escape sequence \n is explicitly used for getting a newline in the printf statement.
Syntax printf "Message format specifi ers" argument list
Here, Message is the text content that we want to display and format specifi ers are for formatting the arguments supplied in the argument list to display the output in the desired format. The list of format specifi ers used in the printf command is given in Table 11.11.
Along with the format specifi ers, we can use certain fl ags too in the printf statement that helps in aligning, padding, or prefi xing the content. The syntax for using the fl ags is as follows:
Syntax %fl ags width format-specifi er
Here, the width is a numeric value to specify the width assigned to an argument. The list of fl ags is given in Table 11.12.
Note: If printf cannot perform a format conversion, it returns a non-zero exit status.
By default, the contents are right justifi ed. By using fl ags, we can change the justifi cation.
Examples
(a) printf "%20s \n" Hello
The string, Hello, will be displayed right justifi ed in the allowable width of 20 characters.
(b) printf "%-20s \n" Hello
The string, Hello, will be displayed left justifi ed in the allowable width of 20 characters.
(c) printf "%+d %+d" 10 -20
Table 11.11 List of format specifi ers to be used in the printf command
Format specifi er Description
%c Prints a character
%d Prints a decimal integer
%i Prints a decimal integer
%o Displays unsigned octal number
%s Displays a string
%u Displays unsigned decimal value
%x Displays unsigned hexadecimal number and a to f in lower case for numbers 10 to 15
%X Displays unsigned hexadecimal number and a to f in upper case for numbers 10 to 15
%f Displays fl oating-point number
Table 11.12 List of fl ags to be used in the printf command
Flags Description
- Left justifi es the formatted value within the fi eld
space Prefi xes positive values with a space and negative values with a minus sign
+ Prefi xes every numeric value with a sign, plus sign for positive and minus sign for negative values
0 Pads the output with zeros and not spaces, applies only to numeric formats

502 Unix and Shell Programming
The numerals will be displayed along with the sign prefi x. The output will be +10 -20.
(d) printf "%08d " 10
The numeral 10 will be displayed in the allowable width of eight digits padded with 0s on the left side.
11.9.5 typesetThe typeset command is used to defi ne variables. The following is the syntax for using the typeset command:
Syntax typeset [+-attributes] [name[=value]]
The list of attributes used in this command is shown in Table 11.13.
Examples
(a) $typeset -i x=500
This command will defi ne the variable x as an integer and assign the value 500 to it.
(b) $typeset -i8 y=15
This command will defi ne the variable y as an octal integer and assign the value 15 to it. A valid base is between base 2 and base 36.
(c) If we want the variable to always contain a hexadecimal number, then the following command is used.
typeset -i16 hexvalue
After the hexvalue variable is typeset to base 16, any value assigned to it will be automatically converted to hexadecimal. We can also typeset a variable after a number is assigned to it.
(d) In order to quickly convert any base number (base 2 through base 36) to base 10, the following syntax is used:
echo $((base#number))
(e) The following command converts the base-16 number, ae09f, to its base-10 equivalent.
$ echo $((16#ae09f)) 16652452
Using both these techniques, we can convert bases of any number.(f) The following command converts base 10 to base 16.
$ typeset -i16 hexvalue $ hexvalue=2091 $ echo $hexvalue16#3487
Table 11.13 List of attributes used in the typeset command
Attribute Meaning
- Used to set attributes after setting values
+ Used to unset attributes after setting values
-A arr Defi nes the associative array arr
-E n Defi nes the exponential number n that specifi es the signifi cant digits
-F n Defi nes fl oating-point number n that specifi es the number of decimal places
-I n Defi nes the integer of base n
-l Converts upper-case characters to lower case
-r Marks the variable as read-only
-u Converts lower-case characters to upper case

Korn Shell Programming 503
(g) The following command converts base 8, octal, to base 16, hexadecimal.
$ typeset -i16 hexvalue $ hexvalue=8#2075 $ echo $hexvalue16#3487
In the aforementioned example, we assigned the octal number, 2075, to the hexvalue variable by specifying the number base followed by the base-8 number, hexvalue=8#2075. When this base-8 number is assigned to the hexvalue variable, it is automatically converted to base 16.
We can also use the printf command to convert number bases. The printf command accepts base-10 integer values and converts the number to the specifi ed number base. The following options are available:
1. o: It accepts a base-10 integer and prints the number in octal.2. x: It accepts a base-10 integer and prints the number in hexadecimal
11.9.6 Converting Base 10 to Octal$ printf %o 6541$ printf %x 6541
The added percent sign (%) before the printf command option tells the printf command that the following lower-case letter specifi es the base conversion. If the following letter is o, it means the number needs to be converted to octal and the letter x indicates that the number needs to be converted into hexa.
To get a list of exported objects available to the current environment, the following commands may be used:
$ typeset -x # list of exported variables$ typeset -fx # list of exported functions$ typeset -r radius=10 # defi nes a read only variable$ typeset -i2 x # declares x as binary integer$ typeset -i8 y # declares y as octal integer
Examples
(a) The following example takes an input value of base 10 and coverts it into base 16, 8, and 2 respectively.convbase.ksh
#!/bin/ksh print -n "Enter a value "read ninteger -i10 value=$n print "Original value is $value" typeset -i16 value print "Value in hexa form is $value" typeset -i8 value

504 Unix and Shell Programming
print "Value in octal form is $value" typeset -i2 value print "Value in binary form is $value"
Output$ ./convbase.kshEnter a value 32Original value is 32Value in hexa form is 16#20Value in octal form is 8#40Value in binary form is 2#100000
$ ./convbase.kshEnter a value 100Original value is 100Value in hexa form is 16#64Value in octal form is 8#144Value in binary form is 2#1100100
(b) The following shell script takes a string from the user and prints it along with its upper-case and lower-case versions.
changecase.ksh
#!/bin/kshprint -n "Enter a string: "read strprint "The original string is $str"typeset -u str print "The string in upper case is $str"typeset -l str print "The string in lower case is $str"
OutputEnter a string: HelloThe original string is HelloThe string in upper case is HELLOThe string in lower case is hello
11.9.7 unsetFor removing a variable or function from our shell environment, the unset command is used.
Syntax unset [-fv] name(s)
Here, the option -f removes the defi nition of the given function name. -v removes the attribute and the value of the given variable name(s). This option is default.
Note: The variables that are set for read only cannot be removed.

Korn Shell Programming 505
Examples
(a) $ unset x(b) $ unset factorial(c) The following script demonstrates the setting and unsetting of variables.
export radius=10 echo $radius unset $radius echo $radius
The aforementioned script will fi rst display 10 as the value of the variable radius. Next it will display nothing, that is, a null character, because the variable radius is unset. The unset variable does not display anything.
11.10 VARIABLE SUBSTITUTION
After a value is assigned to a variable, it needs to be substituted by its value in a script. A variable name can be substituted by its respective value. Table 11.14 lists the formats
in which the variables in the script will be substituted by their respective value.If a shell variable is not set then the null string is substituted for it. For example, if the variable d is not set then the following statements will not echo anything:
echo $d or echo ${d}
Note: The colon (:) shown in the aforementioned format is optional. If it is included, the var must be set and not be null.
The following examples demonstrate variable substitution:
p=Hello q=World r=
Assuming that the value for the variable r is not set and the values of the variables p and q are Hello and World respectively, the following are the examples and their output on variable substitution:
$ echo ${p}World!
We can see that braces are needed for separation. The aforementioned example displays HelloWorld!.
Table 11.14 List of formats of variable substitution
Format Description
${ var } Uses the value of var
${ var1 :- var2 } Uses var1 if set, otherwise uses var2
${ var1 := var2 } Uses var1 if set otherwise uses var2 and assigns its value to var1
${ var1 :? var2 } Uses var1 if set, otherwise prints var2 and exits, and if var2 is not supplied, it prints the message ‘parameter null or not set’
${ var1 :+ var2 } Uses var2 if var1 is set, otherwise uses no variable

506 Unix and Shell Programming
$ echo ${p-$q}
This will display the value of p or q; since p is set, the following message will be displayed:
Hello $ echo ${r-`date`}
If r is not set, the date command is executed. We get the following output:
Sat Mar 15 18:13:25 EST 2012 $ echo ${r="Great"}
The variable r will be assigned the string Great, which is also displayed on the screen.
$ echo ${r:="Work"}
Since r is already set, it will print its value as follows:
Great$ echo ${r?Work}
It will display the string already assigned to r:
Great
11.11 COMMAND LINE ARGUMENTS
While executing a script, we can pass the data to it for processing in the form of command line arguments. The data typed beyond the script name is treated as command line arguments. These command line arguments can be accessed in the shell script through positional parameters that are represented in the $n format. For instance, the positional parameter $0 represents the command line script, $1 represents the fi rst argument, and $2 represents the second argument. The list of positional parameters is given in Table 11.15.
Table 11.15 List of positional parameters
Variable Description
$0 It represents the name of the command or script being executed.
$n It represents the positional parameter passed to the script, where n is a number between 1 and 9 indicating the position of the argument from the script. For instance, $1 represents the fi rst argument that follows the command script and $2 represents the second argument from the command script. The arguments exceeding the 9th position need to be enclosed in curly braces. For example, the 10th argument has to be used as ${10}.
$# It represents the count of the number of positional parameters passed to the script.
$* It represents a list of all command line arguments.
$@ It represents an individually double-quoted list of all command line arguments.
$! It represents the PID (process ID) number of the last background command.
$$ It represents the PID (process ID) number of the current process.
$? It represents a numerical value indicating the exit status of the last executed command.

Korn Shell Programming 507
The # variable is used for ascertaining the length or count of the positional parameters. If followed by a variable or expression, it determines the length or count of the given variable or expression also. The following three formats explain the same:
${# var} This displays the length of var.
${#*} This displays the number of positional parameters.
${#@} Like ${#*}, this also displays the number of positional parameters.
Examples
(a) The following shell script demonstrates how command line arguments are displayed using different positional parameters. The script prints the command line arguments, their count, command script, etc.
positionparm.ksh
#!/bin/kshprint "Number of argument are $#"print "The command line arguments passed are $*"print "Number of argument are ${#*}"print "Number of argument are ${#@}"print "The shell script name is $0"print "The fi rst argument is $1"print "The second argument is $2"print "The above print command returned $?"
Assume we execute this shell script by passing the following command line arguments.
$ ./positionparm.ksh xyz.txt 10 4 bank.lstNumber of argument are 4The command line arguments passed are xyz.txt 10 4 bank.lstNumber of argument are 4Number of argument are 4The shell script name is ./positionparm.kshThe fi rst argument is xyz.txtThe second argument is 10The above print command returned 0
The command line arguments can be accessed using $1, $2, till $9. We cannot use the same notation for command line arguments greater than nine. We need to use curly braces for arguments ${10}, ${11}, and so on. Let us look at the following two examples.
echo "The 10th argument is : $10"
It will print the content of $1 followed by 0.
echo "The 10th argument is : ${10}"
It will print the content of the tenth argument $10.

508 Unix and Shell Programming
(b) The following script concatenates two strings. Besides demonstrating string concatenation, the script displays the length of the individual strings along with the concatenated string using the ${# var } format.
strconcat.ksh
#!/bin/kshprint -n "Enter two strings: "read str1read str2print "The two strings entered are $str1 and $str2"print "The length of the fi rst string is ${#str1} and of second string is ${#str2}"str3="$str1$str2"print "The concatenated string is $str3"print "The length of the concatenated string is ${#str3}"
OutputEnter two strings: birdsfl yThe two strings entered are birds and fl yThe length of the fi rst string is 5 and of second string is 3The concatenated string is birdsfl yThe length of the concatenated string is 8
11.11.1 shift: Shifting Positional ParametersThe shift command shifts or renames the positional parameters, $1, $2, etc., which was discussed in Chapter 10.
Syntax shift [n]
On giving the command shift n, the (n+1)th positional parameter becomes the positional parameter $1; the (n+2)th positional parameter becomes the positional parameter $2, and so on. The value of n supplied must be between zero and the count of positional parameters. The command fails to supply a negative value or value greater than the count of positional parameters. The default value for the shift command is 1. The value of $# that represents the count of the positional parameters will be automatically updated on the execution of the shift command. The command returns 0 on successful execution and 1 on failure.
Example The following script demonstrates the impact of the shift command.
demoshift.ksh
#!/bin/kshprint "Number of argument are $#"print "The command line arguments passed are $*"print "The fi rst argument is $1"print "The second argument is $2"shift 2print "Number of argument are $#"

Korn Shell Programming 509
print "The command line arguments passed are $*"print "The fi rst argument is $1"print "The second argument is $2"
Assume we execute this shell script by passing the following command line arguments.
$ ./demoshift.ksh xyz.txt 10 4 bank.lstNumber of argument are 4The command line arguments passed are xyz.txt 10 4 bank.lstThe fi rst argument is xyz.txtThe second argument is 10Number of argument are 2The command line arguments passed are 4 bank.lstThe fi rst argument is 4The second argument is bank.lst
Through the output, we realize that the shift 2 command shifts the positional parameter $3 to $1 and parameter $4 to $2, and also updates the value of the parameter $# to 2.
11.11.2 set: Handling Positional Parameters The set command is used for changing the positional parameters. The positional parameters cannot be set through the assignment statement and we have already seen how to set them through command line arguments. We can set or change them via the set command. The command replaces the values of the positional parameters with the new values if they are already set. The positional parameter $# will be automatically updated to display the count of the currently set positional parameters.
Syntax set [data list][`executable command`]
Here, data list can be any text or numerical content delimited by a space. The fi rst word will be assigned to the positional parameter $1, the second word to positional parameter $2, and so on. Similarly, if the output of the executable command has more than one item, which can be a word, character, or number, they will be assigned to the corresponding positional parameters, that is, the fi rst item will be assigned to positional parameter $1, second item to positional parameter $2, and so on.
Example The following script demonstrates how the positional parameters are set and changed via the set command.
setposparm.ksh
#!/bin/kshset a b c print "Number of argument are $#"print "The command line arguments passed are $*"print "The fi rst argument is $1"print "The second argument is $2"

510 Unix and Shell Programming
set one twoprint "Number of argument are $#"print "The command line arguments passed are $*"print "The fi rst argument is $1"print "The second argument is $2"set `date`print "Number of argument are $#"print "The command line arguments passed are $*"print "The fi rst argument is $1"print "The second argument is $2"
We will get the following output../setposparm.kshNumber of argument are 3The command line arguments passed are a b cThe fi rst argument is aThe second argument is bNumber of argument are 2The command line arguments passed are one twoThe fi rst argument is oneThe second argument is twoNumber of argument are 7The command line arguments passed are Monday 27 February 2012 02:59:50 PM ISTThe fi rst argument is MondayThe second argument is 27
We can see that the command set a b c assigns a, b, and c to the positional parameters $1, $2, and $3 respectively. Similarly, the command set one two will assign the words one and two to the positional parameters $1 and $2 respectively. The fi nal command set `date` substitutes the output of the date command, hence assigning the output Monday 27 February 2012 02:59:50 PM IST to the positional parameters $1, $2, $3, $4, $5, $6, and $7, respectively.
11.11.3 test CommandWe have learnt about the test command in detail in Chapter 10. We may recall that the test command is used for checking or comparing expressions where the expression is a boolean expression resulting in true or false values. The test command includes several operators that help in checking properties of fi les, strings, and integers. The test command can also be represented by a square bracket. The expression within the bracket can have leading and trailing blanks for separation.
Syntax [[ boolean expression ]]
Examples
(a) The following example tests whether the number of command line arguments is 0. [[ $# -eq 0 ]]

Korn Shell Programming 511
(b) The following example tests whether the length of the string name is zero. [[ -z $name ]](c) The following example tests whether the fi lename specifi ed through variable $fi le is a fi le. [[ -f $fi le ]]
In a Korn shell, apart from single brackets, we can also use double brackets. There is no difference between the two, as both represent the test command. We will learn about different test operators as we proceed in the chapter.
11.12 PATTERN-MATCHING OPERATORS
The Korn shell provides several pattern-matching operators, as given in Table 11.16, which we can use to strip off or remove the desired pattern from the given variable or string.
Table 11.16 List of pattern matching operators
Operator Description
${ var # pattern } Displays the value of var after removing the shortest matching pattern from the left
${ var ## pattern } Same as the pattern #, but removes the longest matching pattern from the left
${ var % pattern } Displays the value of var after removing the pattern from the right
${ var %% pattern } Same as the pattern %, but removes the longest matching pattern
Example The following shell script deletes characters from the beginning as well as from the end of a given string using pattern matching operators.
delchars.ksh
#!/bin/kshprint -n "Enter a string: "read strprint "The original string is $str"print "The string after deleting fi rst 2 characters is ${str#??}"print "The string after deleting the last 2 characters is ${str%??}"
OutputEnter a string: educationThe original string is educationThe string after deleting fi rst 2 characters is ucationThe string after deleting the last 2 characters is educati
11.12.1 If Else StatementThe if else statement is a fl ow control construct that result in conditional jumping. Through this statement, we can make the shell script branch to the desired block of statement(s) depending on the basis of the logical expression included. The logical expression can be

512 Unix and Shell Programming
built with the help of the test command combined with different operators. The if else statement has the following syntax:
Syntax if condition
then block of statements
[elif condition then
block of statements ...] [else
block of statements ] fi
Here, condition refers to the logical expression that is built either using relational operators or the test command with its different operators. The simplest form of the if statement consists of only the if clause and its statements execute only when the logical expression is true. If the else clause is included, its statements will execute if the logical expression is false. We can also use the elif clause, which is the combination of ‘else if’ clauses in case we have more conditions to check.
Examples
(a) The following shell script uses the test command to check if the command line arguments are passed to the script or not.
checkargs.ksh
#!/bin/kshif [[ $# -eq 0 ]]then print "No command line arguments are passed"fi
Output$ ./checkargs.kshNo command line arguments are passed$ ./checkargs.ksh a.txt$
The parameter $# is compared with the relation operator -eq to see if any command line argument is passed to the script. If none of the command line arguments are passed to the shell script, its value will be 0, hence displaying the message, No command line arguments are passed.
(b) The following script checks if the two words exist in the given fi le where the words and the fi le will be supplied as command line arguments.
checkwords.ksh
#!/bin/kshif grep $2 $1 || grep $3 $1

Korn Shell Programming 513
then print "The words $2 or $3 exists in the fi le $1"fi
Output$ cat school.txt101 Anil 75102 Chirag 82103 Kanika 70104 Naman 88105 Suman 68106 John 83$ ./checkwords.ksh school.txt chirag Naman102 Chirag 82The words Chirag or Naman exists in the fi le school.txt
While using the logical expressions consisting of commands connected with the logical AND operator (&&) or the logical OR operator (||), we need to remember the following two points:
1. If the two commands are connected through the logical AND operator, the shell executes the second command only if the fi rst command results in a true value.
2. If the two commands are connected through the logical OR operator, the shell executes the second command only if the fi rst command results in a false value.
The conditional statement, if else, which we have discussed here, is combined with certain testing operators to implement string and fi le-related conditions. Let us see how.
11.13 TESTING STRINGS
Korn shell provides several test operators that we can use for manipulating strings. We can use these test operators for performing several tasks including comparing and handling
strings. For instance, we can test whether the given string is empty, the given fi le contains the specifi ed characters, two strings are equal, and a string is alphabetically smaller than the other string. The list of string operators used in testing strings is shown in Table 11.17.
Examples
(a) The following shell script asks for the username. If a username is entered, a welcome message is displayed and if an empty string is entered, the following message is displayed: You have entered a zero length string. The test operator, –z, is used to check whether a zero length string is entered.
Table 11.17 List of Korn shell string operators
Operator True if
-n string The string is of non zero length
-z string The string is of zero length
string1=string2 The two strings are equal
string1!=string2 The two strings are not equal
string=pattern The pattern matches the string
string!=pattern The pattern does not match the string
string1<string2 string1 is less than string2 alphabetically
string1>string2 string1 is greater than string2 alphabetically

514 Unix and Shell Programming
welcomemsg.ksh
#!/bin/kshprint -n "Enter your Name: "read nameif [[ -z $name ]];then print "You have entered a zero length string "else print "Welcome! $name"fi
Output$ ./welcomemsg.kshEnter your Name:You have entered a zero length string$ ./welcomemsg.kshEnter your Name: JohnWelcome! John
We can also use the –n test operator for the aforementioned shell script as shown in the following code.
welcomemsg2.ksh
#!/bin/kshprint -n "Enter your Name "read nameif [[ -n $name ]];then
print "Welcome! $name"else
print "You have entered a zero length string "fi
Output$ ./welcomemsg2.kshEnter your Name:You have entered a zero length string
$ ./welcomemsg2.kshEnter your Name: JohnWelcome! John
The aforementioned shell script checks if the string of non-zero length is entered and displays either a welcome message or the following message: You have entered a zero length string.
(b) The following shell script checks if the user has entered an authorized username or not.
authorize.ksh
#!/bin/kshprint -n "Enter your Name "

Korn Shell Programming 515
read nameif [[ $name = "John" ]];then print "Welcome, ${name}!"else print "Sorry! You are not authorized"fi
Output
$ ./authorize.kshEnter your Name ChiragSorry! You are not authorized$ ./authorize.kshEnter your Name JohnWelcome, John!
(c) The following shell script concatenates the two strings.strconcat2.ksh
#!/bin/kshprint -n "Enter two strings: "read str1 str2str="$str1$str2"print "The two strings are $str1 and $str2 and their concatenation is $str"
Output
Enter two strings: birds fl yThe two strings are birds and fl y and their concatenation is birdsfl y
This shell script asks the user to enter two strings. The two strings entered are assigned to the variables str1 and str2 respectively. The two strings are concatenated and assigned to string str. The individual strings are displayed along with the concatenated string.
(d) The following script prompts the user to enter marks. If the marks entered are greater than or equal to 60, the following message is displayed: First Division. Otherwise the message Second Division will be displayed.
demoifelse.ksh
#!/bin/ksh print -n "Enter marks: "read mif ((m >= 60 )) then print "First Division"else print "Second Division"fi

516 Unix and Shell Programming
Output$ ./demoifelse.kshEnter marks: 80First Division
$ ./demoifelse.kshEnter marks: 50Second Division
In this shell script, we can see that (( )) are used along with the relational operator >= to check if the marks entered by the user in the variable m is greater than or equal to 60. If the marks in the variable m are greater than or equal to 60, a message, First Division, is displayed or else, the message Second Division is displayed. We can replace the (( )) with double square brackets as follows:
demoifelse2.ksh
#!/bin/ksh print -n "Enter marks: "read mif [[ $m -ge 60 ]]then print "First Division"else print "Second Division"fi
OutputThe output of this script will be the same as that of the demoifelse.ksh script$ ./demoifelse2.kshEnter marks: 70First Division
$ ./demoifelse2.kshEnter marks: 50Second Division
(e) The following script prompts the user to enter marks. If the marks entered are greater than or equal to 60, the following message is displayed: First Division. If the marks are greater than or equal to 45 but less than 60, the following message is displayed: Second Division. In other cases, the following message will be displayed: Third Division.
In this script, we will use the nested if else statements. Nested if else statement means using another if else statement within the if or else block of the existing if else statement. In the following script, within the else block of the if else statement, we will make use of another if else statement.
nestedif.ksh
#!/bin/ksh print -n "Enter marks: "

Korn Shell Programming 517
read mif [[ $m -ge 60 ]]then print "First Division"else if [[ $m -ge 45 ]] then print "Second Division" else print "Third Division" fi fi
Output$ ./nestedif.kshEnter marks: 70First Division
$ ./nestedif.kshEnter marks: 50Second Division
$ ./nestedif.kshEnter marks: 40Third Division
We can see that if the marks entered in the variable m are greater than 60, then the message First Division will be displayed. If the marks entered are less than 60, the else block will be executed. Within the else block, the logical expression of the nested if else statement is evaluated. If the marks in the variable m are greater than or equal to 45, the if block will be executed, displaying the message Second Division on the screen. If the marks in variable m are less than 45, then the else block will be executed, displaying the message Third Division on the screen.
We can also make use of the elif block in the if else statement instead of a nested if else statement. The aforementioned shell script is rewritten using the elif block of the if else statement for checking the following condition: If marks are greater than or equal to 45 but less than 60.
The shell script has the following code.
demoelif.ksh
#!/bin/ksh print -n "Enter marks: "read mif [[ $m -ge 60 ]]then print "First Division"elif [[ $m -ge 45 ]]

518 Unix and Shell Programming
then print "Second Division"else print "Third Division"fi
Output$ ./demoelif.kshEnter marks: 70First Division
$ ./demoelif.kshEnter marks: 50Second Division
$ ./demoelif.kshEnter marks: 40Third Division
Basically, the else and if blocks are merged in the elif block. The elif block is preferred over a nested if else statement as it is more readable and requires only a single fi statement to close the if else statement. This relieves the programmer from keeping a record of the number of if statements and ending each of them through their corresponding fi statements.
(f) The following script asks the user to enter marks and displays the messages on the following basis.
1. Displays the message First Division if the marks entered are >= 602. Displays the message Second Division if the marks entered are >= 45 and < 603. Displays the message Third Division if the marks entered are >=36 and <454. Displays the message Fail for other conditions
Let us rewrite the aforementioned shell script, nestedif.ksh, using the logical and operator. The code of the shell script connecting conditions through the and operator is as follows:
demoand.ksh
#!/bin/ksh print -n "Enter marks: "read mif [[ $m -ge 60 ]]then print "First Division"fi if [[ $m -ge 45 && $m -lt 60 ]] then print "Second Division"fi if [[ $m -ge 36 && $m -lt 45 ]] then print "Third Division"

Korn Shell Programming 519
fi if [[ $m -lt 36 ]] then print "Fail"fi
Output$ ./demoand.kshEnter marks: 80First Division
$ ./demoand.kshEnter marks: 50Second Division
$ ./demoand.kshEnter marks: 40Third Division
$ ./demoand.kshEnter marks: 30Fail
Testing fi lesKorn shell provides several test operators to test various properties associated with a Unix fi le. The test operators for testing fi le properties are listed in Table 11.18.
Examples
(a) The following shell script checks if the fi lename supplied through the command line argument is a regular fi le or not. If it is a regular fi le, then the script checks whether the fi le is executable or not.
checkexec.ksh #!/bin/ksh if [[ -f $1 ]] then if [[ -x $1 ]] then print "$1 is an executable fi le" else
print "$1 is a non executable fi le"fi else print "$1 is not a regular fi le"fi
Table 11.18 List of fi le testing operators
Operator True if
-d fi lename Filename exists and is a directory
-e fi lename Filename exists
-f fi lename Filename is a text fi le
-r fi lename Filename is readable
-w fi lename Filename is writable
-x fi lename Filename is executable
-s fi lename Filename is not empty
–l fi lename Filename exists and is a symbolic link
–o fi lename User is the owner of the fi lename
–g fi lename Group ID of the user is the same as that of the fi lename

520 Unix and Shell Programming
Output$ ls -al xyz.txt-rw-r--r-- 1 root root 20 Feb 26 15:48 xyz.txt$ ./checkexec.ksh xyz.txtxyz.txt is a non executable fi le$ chmod 755 xyz.txt$ ls -al xyz.txt-rwxr-xr-x 1 root root 20 Feb 26 15:48 xyz.txt$ ./checkexec.ksh xyz.txtxyz.txt is an executable fi le$ ./checkexec.ksh accountsaccounts is not a regular fi le
In the aforementioned script, we see that the –f test operator checks if the fi lename passed through the command line argument is a regular fi le or not. If it is not a regular fi le, the else statement will be executed displaying the message the fi le is not a regular fi le. If the fi lename is a regular fi le, the –x test operator is used to check if it is executable or not and hence the messages are displayed accordingly.
(b) The following shell script checks several things, including whether any fi le exists by the name supplied as the command line argument and whether the fi lename supplied is a directory, a regular fi le, or a special fi le.
fi ndfi letype.ksh#!/bin/kshif [[ ! -e $1 ]]; then print "fi le $1 does not exist." elif [[ -d $1 ]]; then print "$1 is a directory " elif [[ -f $1 ]]; then print "$1 is a regular fi le." else print "$1 is a special type of fi le."fi
Output$ ./fi ndfi letype.ksh school.txtschool.txt is a regular fi le.
$ ./fi ndfi letype.ksh accountsaccounts is a directory
$ ./fi ndfi letype.ksh course.lstfi le course.lst does not exist.
We can see that this script uses the -e test operator to check whether the fi lename supplied as command line argument exists or not. Through the test operators -d and –f, the script checks if the fi lename is a directory or a regular fi le. If the fi le is none of these, it is declared as a special type of fi le.

Korn Shell Programming 521
(c) The following shell script asks the user to enter a value between 1 and 4 and prints it in the text form. This implies that if the user enters 1, the script will display it in text, that is, One. If the user enters a value 2, it will be displayed as Two, and so on. numintoword.ksh#!/bin/ksh print –n "Enter a value between 1 and 4: "read nif [[ $n -eq 1 ]]then print Oneelif [[ $n -eq 2 ]] then print Twoelif [[ $n -eq 3 ]] then print Threeelse print Fourfi
Output$ ./numintoword.kshEnter a value between 1 and 4: 1One
$ ./numintoword.kshEnter a value between 1 and 4: 2Two
$ ./numintoword.kshEnter a value between 1 and 4: 3Three
$ ./numintoword.kshEnter a value between 1 and 4: 4Four
We can see in this script that the –eq relation operator is used to check if the value entered is 1, 2, 3, or 4 and it is accordingly displayed in the text form.
When there are many conditions to check for, then instead of using the if else statement combined with many elif statements, it is always more advisable to use the case...esac statement, which is discussed in the following section.
11.14 case...esac STATEMENT
The case statement is a multi-conditional statement that helps in selecting and executing a desired block of statements out of several blocks depending on the included condition. The case statement begins with the word case and ends with the reverse, esac.

522 Unix and Shell Programming
In addition to characters and integers, we can also test strings using the case statement. The string pattern may contain wild-card characters.
Syntax case expression in
pattern1 ) statements ;; pattern2 ) statements ;; * ) statements
esac
The expression in case statement is matched with the patterns included. The patterns can include wild cards and several patterns can be combined by using pipe characters (|). The pipe character when used for combining patterns, acts as the logical OR operator. If the expression matches any one of the patterns, its corresponding statements are executed. When several patterns are combined through pipe characters, if the expression matches any of the combined patterns, the statements following the pattern are executed. Each set of statements is terminated by double semicolons to represent the end of the block of statements. If no matching pattern is found, the statement following the * pattern that represents the default condition is executed until the double semicolons or esac is reached.
Examples
(a) The following script demonstrates the use of the case…esac statement. It prints the number entered (between 1 and 4) in words.
numintoword2.ksh#!/bin/ksh print –n "Enter a value between 1 and 4: "read ncase $n in 1) print "One" ;; 2) print "Two" ;; 3) print "Three" ;; 4) print "Four" ;; *) print "The number is out of range" ;;esac
The output of this script is the same as that of numintoword.ksh as given here.$ ./numintoword2.kshEnter a valur between 1 and 4: 1One

Korn Shell Programming 523
$ ./numintoword2.kshEnter a value between 1 and 4: 2Two
$ ./numintoword2.kshEnter a value between 1 and 4: 3Three
$ ./numintoword2.kshEnter a value between 1 and 4: 4Four$ ./numintoword2.kshEnter a value between 1 and 4: 5The number is out of range
(b) The following shell script requests the user for the fi lename to delete. The provided name is checked to see if it is a fi le and is then deleted after confi rmation from the user.
delfi le.ksh
#!/bin/ksh print –n "Enter fi le name to delete: "read fi lenameif [[ -f $fi lename ]]then print –n "Sure want to delete this fi le yes/no? " read ans case $ans in y*) rm ${fi lename} print "The fi le is deleted" ;; n*) print "The fi le is not deleted" ;; *) print "Please enter either yes or no" esacelse print "$fi lename is not a fi le"fi
Output$ ./delfi le.kshEnter fi le name to delete: accountsaccounts is not a fi le
$ ./delfi le.kshEnter fi le name to delete: abc.txtSure want to delete this fi le yes/no? noThe fi le is not deleted

524 Unix and Shell Programming
$ ls abc.txtabc.txt
$ ./delfi le.kshEnter fi le name to delete: abc.txtSure want to delete this fi le yes/no? yesThe fi le is deleted
$ ls abc.txtabc.txt: No such fi le or directory
The fi lename entered by the user is assigned to the variable fi lename. Through the –f test operator, it is checked to see whether the supplied fi lename is a fi le. When it is confi rmed that the supplied name is of a fi le, the user is asked for confi rmation to delete the fi le. The response from the user is assigned to the variable ans. The case statement checks the user’s response. If the user has entered yes, the fi le is deleted and a confi rmation message is displayed. If the user has entered no, the fi le is not deleted and the user is informed about the same. If anything else besides yes or no is entered, the following message is displayed: Please enter either yes or no.
Sometimes, we need to repeat or execute a set of statements several times. For such kinds of repetitive tasks, we make use of loops. The Korn shell provides three looping constructs, while, until, and for. Let us start with the fi rst looping construct, the while loop.
11.15 while LOOP
The while loop is used for executing a block of statements until the included logical expression holds true.
Syntax while [[ logical expression ]] ; do
statementsdone
The logical expression is evaluated and only when it returns a boolean value, true, are the statements within the while loop executed. The statements of the while loop are enclosed between the keywords, do and done.
Examples
(a) The following shell script displays all the command line arguments passed to the script.
demowhile.ksh
#!/bin/kshwhile [[ $# -ne 0 ]]; do print $1 shift done
Assume we execute the aforementioned shell script by passing the following command line arguments.

Korn Shell Programming 525
$ ./demowhile.ksh xyz.txt 10 4 bank.lstxyz.txt104bank.lst
We can see that with every shift command, the positional parameter $2 will become $1, $3 will become $2 and so on, hence printing the next successive positional parameter via the $1 parameter.
(b) The following shell script displays the sequence of numbers from 1 to 10.
dispsequence.ksh#!/bin/kshx=1 y=10while [ $x -le $y ]; do
echo $x ((x=x+1))
done
Output12345678910
The two variables x and y are initialized to values 1 and 10 respectively. A test condition is applied in the while loop to execute the loop for the time the value of variable x is less than or equal to the value of the variable y. In the while loop, the value of variable x is displayed, that is, 1. After that, the value of the variable x is incremented by 1 making it 2. Again the while loop will execute as value of variable x, that is, 2 is still less than the value of variable y, that is, 10. Thus, value 2 will be displayed on the screen following which the value of the variable x will be incremented and so on.
(c) The following shell script displays the sequence of numbers from 10 to 1.
seqreverse.ksh#!/bin/kshn=10while [[ $n -gt 0 ]]; do print "$n"

526 Unix and Shell Programming
let n=n-1done
Output10987654321
The value of the variable n is initialized to 10. The logical expression in the while loop will make it execute while the value of the variable n is greater than 0. In the while loop, the value of the variable n is displayed, that is, 10, following which its value is decremented by 1, making it 9. Since the logical expression in the while loop is still true, the while loop will execute displaying the value of the variable n, 9, followed by another decrementation of its value by 1. The while loop will execute until the value of the variable n reduces to 0.
11.16 break: BREAKING OUT OF LOOPS
The break statement terminates a loop and exits from it.
Syntax Break
Example The following shell script displays numerical values from 1 to 10 using the infi nite while loop. The script uses break statement to exit from the loop.
demobreak.ksh
#!/bin/kshn=1while :do print "$n" let n=n+1 if [[ n -gt 10 ]] then break fi done
Output12

Korn Shell Programming 527
345678910
In this script, we can see that the variable n is initialized to value 1. Since there is no logical expression in the while loop, it will never terminate and is hence considered an infi nite loop. In the while loop, the value of the variable n is displayed, that is, value 1 will appear on the screen. Thereafter, the value of the variable n is incremented by 1 making its value 2. In the while loop, through the if statement, the value of the variable n is checked to see if it is greater than 10. If the value of variable n is greater than 10, the break statement will terminate the while loop. If the value of the variable n is less than or equal to 10, the while loop will execute and display its value and then increment it by 1. The process continues until the while loop terminates through the break statement when value of the variable n exceeds value 10.
11.17 continue: SKIPPING STATEMENTS IN LOOPS
The continue statement skips or bypasses the body of the loop and executes the loop with the next iteration.
Syntax continue
Examples
(a) The following shell script displays the sequence of numbers from 1 to 10 except value 7.democontinue.ksh
#!/bin/kshn=0while [[ $n -le 10 ]]; do let n=n+1 if [[ n -eq 7 ]] then continue fi print "$n"done
Output12345

528 Unix and Shell Programming
6891011
The variable n is initialized to value 0. The while loop is set to execute if the value of variable n is less than or equal to 10. In the while loop, the value of the variable n is incremented by 1. In addition, the value of variable n is checked to determine whether it is equal to 7. When the value of the variable n is equal to 7, through the continue statement, the body of the while loop is skipped bypassing the print statement to execute the loop with the next iteration. Following the if statement is the print statement to display the value of the variable n. All the sequence numbers will be displayed from 1 to 10 except the value 7 for the simple reason that through the continue statement, the print statement is bypassed and the value of the variable n is incremented to move ahead with the next successive value.
(b) The following shell script keeps asking for a numerical value until no is entered. The script displays the square of the numerical value entered.
squrenum.ksh
#!/bin/ksh wantmore="yes"while [[ $wantmore == "yes" ]]; do print -n "Enter a value: " read m let n=m*m print "Entered value is $m and its square is $n" print -n "Want to try more yes/no: " read wantmoredone
Output$ ./squarenum.kshEnter a value: 4Entered value is 4 and its square is 16Want to try more yes/no: yesEnter a value: 9Entered value is 9 and its square is 81Want to try more yes/no: no
A string yes is assigned to a variable, wantmore. The while loop is set to execute if the value of the variable wantmore is yes. In the while loop the user is asked to enter a value that is assigned to the variable m. The entered value and its square are then displayed. The user is asked if there are more numerical values whose squares are required. If user enters yes, that will be assigned to the variable wantmore and hence result in the execution of the while loop. The user can exit from the loop by entering no when prompted.

Korn Shell Programming 529
11.18 until LOOP
Unlike the while loop where the block of statements execute as long as the boolean expression evaluates to true, the until loop executes as long as the logical expression evaluates to false.
Syntax until [[logical expression]] ; do
statementsdone
If the logical expression results in a boolean value false, the statements in the until loop that are enclosed within the do and done keywords are executed.
Examples
(a) The following shell script will display the sequence of numbers from 1 to 5.
dispsequence2.ksh
#!/bin/kshi=1until ((i>5)); do print "$i" let i=i+1done
Output12345
The value of the variable i is set to 1. The until loop executes as long as the included logical expression evaluates to false. The logical expression in the until loop will return true only when the value of the variable i becomes greater than fi ve and hence, will only display the fi rst fi ve sequence of numbers on the screen.
(b) The following shell scripts keeps checking for the given user to log in to the system every 60 seconds. The script terminates only when the specifi ed user logs in. The name of the user will be passed as a command line argument.
checklogin.ksh
#!/bin/kshuntil who | egrep $1; do sleep 60done
Output
$ ./checklogin.ksh rootroot console Feb 26 15:27 (:0)root pts/3 Feb 26 15:28 (:0.0)

530 Unix and Shell Programming
In this example, the who command displays the list of users that are currently logged in. Until the name of the user supplied through the command line argument appears in the users list produced by the who command, the script will fi rst wait for 60 seconds. The until loop is executed again to check if the username appears in the who command.
(c) The following script displays the square of the number entered by the user. The script keeps asking for the number and hence displays its square value until the user wishes to exit. We have already created the script using the while loop. Let us rewrite it through the until loop.squarenum2.ksh
#!/bin/ksh
until [[ $wantmore = "no" ]]; do print -n "Enter a value: " read m let n=m*m print "Entered value is $m and its square is $n" print -n "Want to try more, yes/no: " read wantmoredone
Output$ ./squarenum2.kshEnter a value: 4Entered value is 4 and its square is 16Want to try more, yes/no: yesEnter a value: 9Entered value is 9 and its square is 81Want to try more, yes/no: no
The until loop keeps executing until the value of the variable wantmore is set to no. The script prompts the user to enter a number and then displays it along with its square value. Thereafter, the user is prompted if he wishes to input more numerals. The choice entered by the user is assigned to the variable wantmore. The until loop will execute for any text assigned to the variable wantmore except the text ‘no’, which results in the termination of the until loop.
11.19 for LOOP
The for loop is used for applying a set of statements on all the elements of a given set of values. There are two formats of using the for loop. The fi rst format is as follows:
Syntax for variable in set_of_values
do statements
done
The variable is assigned a value from the set_of_values and the body of the loop is executed, that is, the statements enclosed within the do and done keywords are executed.

Korn Shell Programming 531
After an iteration, the second value from the set_of_values is assigned to the variable and again the statements in the body of the for loop are executed. The procedure continues until all the values in the set_of_values are assigned to the variable.
The following is the second format of using the for loop:
for (( [expr1]; [expr2]; [expr3] ))do statementsdone
The arithmetic expression expr1 is evaluated fi rst. Usually it consists of initialization of a variable. The expression expr2 is always evaluated before executing the body of the loop. The expression expr2 must return a non-zero or true value for executing the statements enclosed within the do and done keywords. The arithmetic expression expr3 is evaluated after the execution of the for loop and usually results in incrementing or decrementing the variable used in the expression expr1.
Examples
(a) The following shell script displays the list of fi les and directories in the current directory.
listfi lesdir.ksh
#!/bin/kshfor i in * do print $idone
Outputbankcheckargs.kshcheckexec.kshdispfi letype.kshinteractmenu.kshlistfi lesdir.kshprod
Asterisk is a wild card that matches for zero or more of any character in a fi lename. Hence, all the fi lenames in the current directory are assigned to the variable i one by one. The body of the for loop will execute with every fi lename assignment. Using the for loop, each fi lename is displayed on the screen. The aforementioned shell script can also be rewritten in the following way.
listfi lesdir2.ksh#!/bin/kshfor i in $(ls) do print $idone

532 Unix and Shell Programming
Outputbankcheckargs.kshcheckexec.kshdispfi letype.kshinteractmenu.kshlistfi lesdir.kshprod
The ls command is executed and its output, that is, the list of fi les and directories will be assigned to the variable i. The variable i will be assigned the names of fi les and directories one by one and they will be displayed on the screen through the for loop.
(b) The following shell script prints fi lenames that consists of four characters.
fi lesfourchar.ksh#!/bin/kshfor i in ????do print $1done
Outputbankprod
‘?’ is a wild card that matches exactly one character in a fi lename. Hence, all the fi lenames in the current directory that consist of exactly four characters are assigned to variable i one by one. On using the for loop, each fi lename assigned to variable i is displayed on the screen.
(c) The following script displays the words in the fi le letter.txt one by one.dispwords.ksh
#!/bin/kshfor k in $(cat xyz.txt)do print "$k"done
OutputThisisatestfi le
Through the cat command, the complete content of the fi le letter.txt will be assigned to the variable k, one word at a time. Each of the words assigned to the variable k is then displayed on the screen.

Korn Shell Programming 533
(d) The following shell script checks all the users provided in the variable userslist to see if any of them is logged in.
checklogin2.ksh
#!/bin/kshuserslist="chirag root john"for person in $userslist do fi nger $person printdone
OutputLogin name: chirag Directory: /home/chirag Shell: /bin/shLast login Sat Feb 25 12:47 on pts4No unread mailNo Plan.
Login name: root In real life: Super-UserDirectory: / Shell: /sbin/shOn since Feb 26 15:27:53 on console from :0Mail last read Sun Feb 26 08:17:49 2012No Plan.
Login name: johnDirectory: /home/john Shell: /bin/shOn since Feb 26 15:28:52 on pts/3 from :0.029 seconds Idle Time
The names of the users whose login status we need to know are stored in the variable userslist. Using the for loop, each name is fetched one at a time through the fi nger command, and tested to see whether the user is logged in.
(e) The following shell script displays the names of the users from the password fi le.
disppasswd.ksh
#!/bin/kshfor username in $(cat /etc/passwd | cut -f1 -d":")doprint $usernamedone
Outputrootdaemonbinsys

534 Unix and Shell Programming
admlpuucpnuucpsmmsplistengdmwebservdpostgresravirahulchirag
This shell script retrieves the names of the users from the passwd fi le by using the cut command. The passwd fi le is assumed to be located in the etc folder and the fi rst fi eld in it delimited by : (colon) consists of the usernames. These usernames are assigned to the variable username one by one and are then displayed on the screen.
(f) The following shell script displays the sequence of numbers from 1 to 10.
dispsequence3.ksh
#!/bin/kshfor i in 1 2 3 4 5do print "$i"done
Output12345
We can see in the aforementioned script that a set is defi ned as comprising values 1, 2, 3, 4, and 5. The variable i will be assigned one value from the set with every iteration that also gets displayed on the screen.
(g) The following script displays the text message Hello World! fi ve times.
disphello5.ksh
#!/bin/kshfor i in {1..5}do echo "Hello World"done

Korn Shell Programming 535
OutputHello WorldHello WorldHello WorldHello WorldHello World
The variable i in the for loop is assigned a range of sequence numbers from 1 to 5 one by one. With every new value assigned, the for loop is executed to print the text Hello World!
(h) The following script prints the sequence of numbers from 1 to 10. dispsequence4.ksh
#!/bin/kshfor i in 1 2 3 4 5do print $idone
Output12345
In the for loop, the variable i is initialized to value 1, its increment step is set to plus 1 and the logical expression is set to execute the loop as long as the value of the variable i is less than or equal to 10. Therefore, the for loop is set to execute 10 times by assigning values from 1 to 10 to variable i. In the for loop, the value of the variable i is displayed.
(i) The following script displays the names of the fi les and directories in the current directory and also indicates if it is a fi le or a directory.
dispfi letype.ksh#!/bin/kshfor fi le in $(ls);do if [[ -d $fi le ]];then print "$fi le is a directory" else print "$fi le is not a directory" fi done
Outputcheckargs.ksh is not a directorycheckexec.ksh is not a directory

536 Unix and Shell Programming
checkextexec.ksh is not a directorydispfi letype.ksh is not a directoryproject is a directory
The ls command is executed retrieving the names of fi les and directories in the current directory. The retrieved list of fi les and directories is assigned to the variable fi le one by one. The fi lename assigned to the variable fi le is tested through the –d operator to know if it is a directory or not and a message is accordingly displayed on the screen.
(j) The following script searches for the fi les with extension .sh in the current directory and checks if it is executable or not. The executable shell scripts are executed one by one.
checkextexec.ksh#!/bin/kshfor i in *.ksh do if [ -x $i ]; then ./$i fi done unset i
OutputThe output of this script comprises the output of the execution of all the executable shell scripts in the current directory as follows.
$ ./checkextexec.kshThe array elements are1591226The sum is 15Area of rectangle is 30Enter your Name ChiragSorry! You are not authorizedHello World!Hello World!Hello World!The value of x in function is 10The value returned by the function is 15Enter a string: educationThe original string is educationThe string in upper case is EDUCATIONThe string in lower case is education

Korn Shell Programming 537
Note: The execution of this shell script will stop if any of the executed shell script contains an error.
The aforementioned code sets up a variable i containing the names of all the fi les in the current directory whose fi lenames ends in .sh. It then checks each of the fi les to see if it is executable. The executable fi le is then run in the context of the current shell using the dot command (. $i). After all the fi les in the current directory are checked, the variable i is unset, that is, removed from memory.
(k) The following script moves the fi les with extension .lst and .txt to user’s data directory and the fi les with extension .c and .o to the programs directory. The fi lenames will be passed as command line arguments.
movefi les.ksh
#!/bin/kshfor fi le in $*; do case $fi le in *.lst|*.txt) mv $fi le ${HOME}/data ;; *.[co]) mv $fi le ${HOME}/programs;; *) print $fi le not moved ;; esacdone
Output$ ls /data$ ls /programs
$ ./movefi les.ksh pqr.lst xyz.txt a.dat arearect.ca.dat not moved$ ls /datapqr.lst xyz.txt
$ ls /programsarearect.c
The fi les pqr.lst and xyz.txt will be moved to the data directory present in the user’s home directory and the fi le arearect.c will be moved to the programs directory in the user’s home directory. The fi le a.dat will not be moved as it does not match any of the specifi ed patterns.
11.20 ARRAYS
An array is a variable that can store one or more values. In general, there are two kinds of arrays, one-dimensional and two-dimensional where one dimensional array consists of either rows or columns, whereas two dimensional arrays consist of both rows as well as columns. Korn shell supports one-dimensional array. The Korn shell has two types of arrays: indexed and associative.

538 Unix and Shell Programming
11.20.1 Indexed ArrayIn an indexed array, each element of the array is indexed by a value. The lowest value of an index is 0 and the upper range is at least 4,095. It is through the help of an index that the elements in an array can be accessed randomly. To specify the maximum size of an indexed array, use the following format:
Syntax typeset -u variable[n] command
Here, n is the upper bound of the array and variable is the name of the array.
Examples
(a) typeset -u p[10]
This example declares an indexed array p that can contain a maximum of 10 values.To assign values to the array, we make use of their indexes:
p[0]=15p[1]=9p[2]=12
In the aforementioned examples, the values 0, 1, and 2 in square brackets are known as indexes. Indexes begin with 0 value, that is, the fi rst value of an array is located at index 0, the second value is located at index 1, and so on. Hence, the values 15, 9, and 12 will be assigned to array p at index locations 0, 1, and 2 respectively. If we do not specify an index location while using an array, the default index location 0 is considered. Consider the following example:
p=25
This example will assign value 25 to the array at index location 0.To assign multiple values to an array, we use the following syntax:
set -A array_name value1 value2 ... valuen
(b) $ set -A p 15 9 12$ set -A names Ajay Manish Bharat Gunjan Omy
The fi rst example creates an indexed array consisting of three elements 15, 9, and 12 assigned to the index locations 0, 1, and 2 respectively. Similarly, the second example will create an indexed array consisting of fi ve elements, Ajay, Manish, Bharat, Gunjan, and Omy, assigned to index locations 0, 1, 2, 3, and 4.
Note: We can also use an arithmetic expression for the index. The only point to remember is that it must be a positive integer, that is, it cannot be negative, nor can it have a decimal point.
Indexes are very helpful in accessing an array element randomly. To access an array element, we use the following syntax:
${array_name[index]}

Korn Shell Programming 539
The following example accesses the second value, that is, the element at index location 1 in array p.
$ echo ${p[1]}
The output will be 9.We can also access more than one value at a time from an array, as shown in the
following examples:
$ echo ${p[*]}$ echo ${p[@]}
Both these examples will display all the elements of the array p. Sometimes, we need to display indexes instead of elements at particular index
locations. To display index locations, we use the following syntax:
Syntax ${!array_name[index]}
Examples
(a) $echo ${!p[2]}It will display the index value 2 instead of 12, which is the value stored at index location 2 in the array p.
(b) $echo ${!p[*]} (c) $echo {!p[@]}
These two examples will list all indexes in the array p.Let us now take a look at the second type of arrays, associative array.
11.20.2 Associative ArrayIn an associative array, the index can be an arbitrary string. The indexes are usually considered keys and the array elements are considered values; hence, associative arrays are commonly termed key/value pairs. The value of any key from an associate array can be accessed by referring to it as the index in the array.
Associative arrays must be declared with typeset -A:
$ typeset –Ai names
The array names is declared as an associative array that can store integer values. The subscript of the associative array can be strings. We can defi ne the following three elements for the associative array names:
$ names["ajay"]=10$ names["manish"]=15$ names["bharat"]=7
We can see that the fi rst element has a key, ajay and its value is 10. Similarly, the second and third elements consist of keys, manish and bharat and values 15 and 7, respectively.
To assign multiple values to an associative array, we can write as follows:
$ names=([ajay]=10 [manish]=15 [bharat]=7)

540 Unix and Shell Programming
The procedure for accessing elements from an associative array is the same as in an indexed array, that is, via referring to their index.
print "Marks of ajay is ${names[ajay])"
Marks of ajay is 10The following is the command to print the entire array.
print ${names[@]}10 15 7
Example The following script creates an indexed array p of fi ve elements and displays its elements through the while loop.
indexedarr.ksh#! /bin/ksh set -A p 15 9 12 2 6echo "The array elements are "x=0while [ $x -lt ${#p[@]} ]; do echo "${p[$x]}" let x=x+1done
OutputThe array elements are 1591226
An indexed array p is initialized with values 15, 9, 12, 2, and 6 respectively. A variable x is initialized to value 0. A while loop is executed till the length of the array. In the while loop, after displaying an array element of the index location designated by variable x, the value of variable x is incremented by 1 to access the next array element in sequence.
11.21 FUNCTIONS
Functions are small modules or subprograms that are created to perform some task. A function once created can be called several times, hence helping in avoiding repetition of statements. Functions help in dividing a large shell script into small manageable chunks. Functions also increase readability of shell scripts. Similar to built-in commands, a function can be simply called by entering its name. A function must be defi ned before it is called, hence a function needs to be defi ned at the beginning of the script.
Defi ning functionsFunctions are defi ned with the keyword function followed by the function name. The function name is followed by curly braces, which in turn is followed by the body of the function.

Korn Shell Programming 541
Syntax function function_name {
statements}
The statements within the curly braces form the body of the function.
Examples
(a) The following script demonstrates creating and calling a function. It displays the message Hello World!demofunc.ksh#!/bin/kshfunction disp { echo "Hello World!"}disp
OutputHello World!
(b) Once a function is created, it can be called several times, as shown in the following shell script. This script demonstrates calling a function several times in a loop. It displays the message Hello World! thrice.callfunc.ksh#!/bin/kshfunction disp { echo "Hello World!"}i=1 while ((i<=3)) do disp let i=i+1 done
OutputHello World!Hello World!Hello World!The arguments passed to a function are accessible via the standard positional parameter mechanism.
11.21.1 return CommandThe return command returns the fl ow of control from the function back to the caller. It might also carry the value to be returned to the caller. The following is the syntax for using the return statement:
Syntax return [value]

542 Unix and Shell Programming
The value returned by the return statement is assigned to the exit code, that is, the exit status is set equal to the value returned by the function. The exit code or status is then accessed from the caller via the $? variable. When return is used without an argument, the function call returns with the exit code of the last command in the function.
11.21.2 Passing Arguments to FunctionsArguments can be passed to a function while calling it. While calling a function, the function name can be followed by the argument that we want to pass to it. The arguments passed to the function are accessible inside the function through positional parameters.
Syntax function_name arg1 arg2...
The arguments arg1, arg2, etc., can be accessed inside the function through positional parameters. For instance, arg1 can be accessed through positional parameter $1 and arg2 can be accessed through positional parameter $2.
Examples
(a) The following script adds two numbers by passing them as arguments to a function.addnumfunc.ksh#!/bin/kshfunction sum { ((sum=$1+$2)) return $sum}sum 10 5print The sum is $?
Output
The sum is 15
By default, the variables used in a function are global in nature, that is, any changes made to the variables inside the function will also be visible outside the function.
(b) The following script demonstrates global variables.demoglobal.ksh#!/bin/kshdispval() { print "The value of x in function is $x" ((x=x+5)) return $x}x=2dispvalprint "The value of x outside the function is $x"
Output
The value of x in function is 2The value of x outside the function is 7

Korn Shell Programming 543
The variable x in the aforementioned script is acting as a global variable. It is initialized to value 2. The value of variable x is accessed, used in the function, and displayed on the screen. The shell script displays its value as follows:
The value of x in function is 2
After displaying the value of variable x, its value is incremented by fi ve in the function, making its value 7. On returning to the main body from the function, when we display the value of x, it prints the modifi ed value of x:
The value of x outside the function is 7
This confi rms that the value of variable x is not local to the function but is acting as a global variable.
11.21.3 Creating Local VariablesThe typeset command helps in creation of local variables, that is, variables created using the typeset command is limited to the scope of the function in which it is created. The variable will not be visible outside the body of the function and will appear undefi ned. The variable’s scope is limited to the function in which it is defi ned and in all the functions that are called by it.
If a variable of the same name already exists, it will resume its original value when the function returns.
Example The following script demonstrates a local variable.
demolocal.ksh#!/bin/kshx=2dispval() { typeset x x=$1 print "The value of x in function is $x" x=x+5 return $x}dispval 10print "The value of x outside the function is $x"
Output
The value of x in function is 10The value of x outside the function is 2
The shell script defi nes variable x in the main body of the shell script and initializes it to value 2. The variable x in the function dispval is different from the variable in the main body and is a local variable to the function, that is, its scope is limited within the body of the function. The argument 10 passed to it will be assigned to the variable x in the function. On printing the value of variable x, the shell script displays its value as follows:
The value of x in function is 10

544 Unix and Shell Programming
After displaying the value of variable x, its value is incremented by 5 in the function, making its value 15. On returning to the main body from the function, the variable x of the function is lost and that of the main body becomes active. On displaying the value of x in the main body, it prints its original value:
The value of x outside the function is 2This confi rms that the variable x defi ned in the function is local to the function and it loses
its defi nition when it exits from the function.
11.21.4 RecursionRecursion is a procedure when a function calls itself. In recursive functions, since a function call statement appears inside the body of the function, we need to take special care in defi ning the exit condition from the function, else the function will keep calling itself infi nitely.
Examples
(a) The following shell script displays the text Hello World! three times using recursion.
recursion.ksh
#!/bin/ksh function disp { if (($1<=0)) then return else typeset x echo "Hello World!" ((x=$1-1)) disp $x fi }disp 3
OutputHello World!Hello World!Hello World!
The function disp is called with argument 3. Argument 3 is accessed in the disp function through the positional parameter $1. The exit condition is checked to see if the value of the positional parameter is less than or equal to 0. The function is supposed to exit when the value of the positional parameter becomes 0. The text Hello World! is displayed and after every display, the value of the positional parameter $1 is decremented by 1 and assigned to the local variable x. Thereafter, recursive call to the disp function is made with the decremented value of x and the procedure is repeated until the value of the positional parameter reaches value 0 and the function exits.

Korn Shell Programming 545
(b) The following shell script calculates and displays the factorial of a number entered through recursive function call.
factorial.ksh
#!/bin/ksh function factorial { if (( $1 <= 1 )) then return 1 else typeset x typeset result (( x = $1 - 1 )) factorial $x (( result = $? * $1)) return $result fi } print -n "Enter a value: "read mfactorial $mecho The factorial of $m is $?
OutputEnter a value: 5The factorial of 5 is 120
The user is asked to enter a value whose factorial is desired and is assigned to variable m. The value in variable m is passed to the factorial function. In the function, two local variables, x and result are used, where the variable x is meant to control the execution of the function and the variable result is meant to store the factorial of the number. The value passed to the function is decremented by 1 and a recursive call to the factorial function is made with the decremented value and the procedure is repeated until the value of the positional parameter reaches 1 and the function exits by returning value 1. The factorial of the number in variable result is returned and displayed. We can have a list of currently available functions using the following command.
$ typeset -f
By default, a function is not available to subshells. To make it available to subshells, we need to export it using the following command.
typeset –fx function-name
To list the exported functions, we need to use the following command.
typeset -fx

546 Unix and Shell Programming
We can remove function defi nitions by using the unset –f command.
$ unset -f function_name
We can supply multiple function names to the unset –f command.After understanding creation and execution of functions recursively, we will now see how a script can be terminated abruptly if desired and how its return status can be observed.
11.22 exit()
The exit() function terminates a script and returns the status to the parent process. The returned status can be used in analysing the execution of a script. Basically, successful execution of a script returns a value 0, whereas an unsuccessful one returns a non-zero value, which can then be used to analyse where the error occurred. The exit function may return a value in the 0–255 range.
Example exit 0
This sets the return status of the shell to 0. This return status can be used to determine the status of an executed shell script.
Note: When a script ends with an exit that has no parameter, the exit status of the script will be set to the exit status of the last command executed in the script.
11.23 $?
It reads the exit status of the last command executed. We can also use it after a function call to ascertain the status of the execution of the function.
Example The following script compares two fi les and if no differences are found, removes the second fi le.comparefi les.ksh#!/bin/kshif [[ $# -ne 2 ]]; then print "Insuffi cient number of command line arguments" exit 1fi diff $1 $2 > /dev/nullif [[ $? -eq 0 ]]; then rm $2 print "Both fi les are exactly same, hence $2 removed"else print "The two fi les, $1 and $2 differ"fi
Output$ cat xyz.txtThis is a test fi le
$ cat abc.txtThis is a test fi le

Korn Shell Programming 547
$ cat pqr.txtHello! how are you doing?
$ ./comparefi les.ksh xyz.txt abc.txtBoth fi les are exactly same, hence abc.txt removed
$ cat abc.txtcat: cannot open abc.txt
$ ./comparefi les.ksh xyz.txt pqr.txtThe two fi les, xyz.txt and pqr.txt differ
The script terminates and exits in the middle setting the exit status as 1 if the user does not provides two fi lenames to compare via command line arguments. If two command line arguments are supplied, through the diff command, it is checked to see if there is any difference between the two. The value of $? is checked to ascertain if the diff command is successful. Recall $? represents the exit status of the last command. If the two fi les are found to be exactly the same, that is, if the diff command is successful, its exit status will be 0. The script, on fi nding the value of $? equal to 0, will remove the second fi le and display a message confi rming the same. If the two fi les differ, the exit status will not be zero and hence no fi le will be deleted.
11.24 INPUT/OUTPUT REDIRECTION
A program usually needs some input to perform some processing and displays some output in response. It might also display errors, if any. In other words, a program deals with three streams, standard input, standard output, and standard error:
Standard input The default input is taken from the standard input device, that is, keyboard It is also known as stdin.
Standard output The default output goes to the user terminal. It is also known as stdout.
Standard error The default output goes to the user terminal. It is also known as stderr.
A fi le stream descriptor is assigned to each of the aforementioned standard streams. Standard input has a fi le descriptor of 0, standard output uses 1, and the number 2 is used by standard error. File descriptors, as we know, are the numbers that are associated with a fi le and help in identifying the fi le.
Usually, stdin gets its input from the standard input device and both stdout and stderr direct output to the terminal by default. Unix, through I/O redirection, provides us with a capability to change the location from where standard input comes or where output goes. This is to say that we can modify the default and set the input to come from a fi le and the output to be directed to some other fi le or be passed as input to another command. The I/O redirection is accomplished using redirection operators. There are two types of redirection operators:
Output redirection operator The output redirection operator is represented by the > (greater than) symbol.
Syntax command > output_fi le
It directs the output of the command to the output_fi le.

548 Unix and Shell Programming
Input redirection operator The input redirection operator is represented by the < (less than) symbol.
Syntax command < input_fi le
It provides the input to the command from the input_fi le.To designate that a fi le is for input, we use an input redirection operator (<). To designate
that a fi le is for output or error, we use an output redirection operator (>). Knowing the fi le descriptor numbers of the standard streams and input and output redirection operators, we can represent the standard input redirection operator as 0<, the standard output redirection operator as 1>, and the standard error redirection operator as 2>.
Examples
(a) exec 0< tmp
Instead of from the standard input device, the input will be taken from the fi le tmp.
(b) exec 1 > temp
Instead of the terminal, the standard output will be sent to the fi le temp.
(c) exec 2> tmpdata
Instead of the terminal, the error stream will be sent to the fi le tmpdata.
(d) $ ls > tmp
The list of fi les and directories will be sent to the fi le tmp, overwriting its earlier contents.
(e) ls > /dev/null
The list of fi les and directories will not appear on the standard output and will be sent to the special fi le /dev/null also referred to as the ‘bit bucket’. The /dev/null fi le discards all data written to it. It is usually used to suppress the output on the screen.
(f) 1>&3 -
It informs the shell to redirect the output of the standard output stdout to the same place where output of the fi le descriptor 3 is sent.
(g) 2>&1
It informs the shell to redirect the output of standard error 2 to the same place where output of the standard output stdout is sent.
(h) ls > /dev/null 2>&1
The list of fi les and directories is sent to the special fi le /dev/null and the 2>&1 indicates that the output of error channel 2 will also be redirected to the standard output stdout, thus no output will be sent to the terminal but instead sent to the /dev/null fi le.
(i) ls > tmp 2>&1
The list of fi les and directories is sent to the fi le tmp overwriting its earlier content and the 2>&1 indicates that the output of error channel 2 will also be redirected to the same place where standard output stdout is sent, that is, to the fi le tmp.

Korn Shell Programming 549
(j) To close an input fi le, the following command is used.
exec 0<&-
(k) To close an output fi le, the following command is used.
exec 1>&-
(l) To close an output fi le with fi le descriptor 3, the following command is used.
exec 3>&-
(m) To close an input fi le with fi le descriptor 3, the following command is used.
exec 3<&-
(n) The following shell script checks if the fi lename passed as a command line argument exists or not.
checkfi leexist.ksh#!/bin/kshls -l $1 > /dev/null 2>&1 if [[ $? != 0 ]]; then print "The fi le, $1 does not exists" exitelse print "The fi le, $1 exists"fi
Output$ ./checkfi leexist.ksh xyz.txtThe fi le, xyz.txt exists$ ./checkfi leexist.ksh bank.lstThe fi le, bank.lst does not exists
We can see that the ls command with its long list option (-l) is executed with the fi lename passed as a command line argument. The list of fi les and directories matching the command line argument is sent to the special fi le /dev/null and 2>&1, that is, output of error channel. Hence, no output will appear on the screen but will be sent to the /dev/null fi le. The status of $? is checked to ascertain the exit status of the last executed command. Students may recall that successful execution of a command or script returns an exit status 0, whereas an unsuccessful one returns a non-zero value. If the value of $? is 0, it means the execution of the ls command was successful and hence the fi lename passed as a command line argument exists in the current directory. A non-zero value in $? means the ls command was not successful and the given fi le does not exist.
(o) The following script demonstrates redirecting of the standard output and standard error.
redirect.ksh#!/bin/kshls > tmpfi le 2>&1

550 Unix and Shell Programming
if [[ $? = 0 ]]; then print "The list of fi les and directories is saved in tmpfi le"else print "The redirection failed and list of fi les and directories is not saved in the tmpfi le"fi
Output$ ./redirect.kshThe list of fi les and directories is saved in tmpfi le
$ cat tmpfi learearect.ccheckargs.kshcheckexec.kshcheckextexec.kshdispfi letype.ksh
The list of fi les and directories is sent to the fi le tmpfi le overwriting its earlier content. In addition, the output of error channel 2 will also be redirected to the same place where standard output stdout is sent, that is, to the fi le tmpfi le. By observing the status of $?, the script indicates whether the redirection of the list of fi les and directories was successful or not. It may be recalled at this point that if the last command is successful, the status of the exit command is 0.
(p) The following script demonstrates redirection by concatenating the content of the two fi les into a third fi le. The fi lenames will be passed as command line arguments.concatfi les.ksh#!/bin/kshif [[ (-f $1) && (-f $2) && (-r $1) && (-r $2) ]]then exec 3< $1 exec 4< $2 exec 5> $3else print "Sorry, fi les are not readable regular fi les" exit 2fi while read -u3 line; do print -u5 "$line"donewhile read -u4 line; do print -u5 "$line"doneexec 3<&-exec 4<&-exec 5>&-

Korn Shell Programming 551
Output$ cat pqr.txtHello! how are you doing?
$ cat xyz.txtThis is a test fi le
$ ./concatfi les.kshSorry, fi les are not readable regular fi les
$ ./concatfi les.ksh accountsSorry, fi les are not readable regular fi les
$ ./concatfi les.ksh pqr.txt xyz.txt aaa.txt$ cat aaa.txt
Hello! how are you doing?This is a test fi le
The fi lenames passed as the fi rst and second command line arguments are opened for input and the fi lename passed as the third command line argument is opened for output. The script fi rst checks if the fi rst two fi lenames passed as command line arguments are regular fi les and we have the read permission to access their content. If either of the fi les is not a regular fi le or we do not have the read permission for the same, an error message is displayed and we exit from the application setting the exit status to value 2. If the fi les are readable regular fi les, every line of the fi rst fi le is read and written into the third fi le. After copying all the content from the fi rst fi le, all the lines from the second fi le are read and written into the third fi le. Finally, the three fi les are closed.
This chapter focuses on understanding the Korn Shell scripting stepwise. We have seen different features of the Korn Shell programming including command line editing, fi le name completion, command name aliasing, and command history substitution. We got an overview of Korn shell meta characters, arithmetic operators, logical operators, and relational operators. In addition, we have seen the usage of shell variables and environment variables. We will learn to use command line arguments, if else statements, case statements, loops, and arrays. Finally, we also touched upon using functions, passing arguments to a function, returning values, local and global variables, recursion, and applying I/O redirection.
■ SUMMARY ■
1. The Korn shell or ksh is a command and scripting language created by David Korn of Bell Labs. It supports several features such as command-line editing, fi lename completion, command history, command aliases, and monitoring background and foreground jobs.
2. Korn shell allows us to edit command lines with editing commands similar to the two Unix editors vi and emacs.
3. In fi lename completion, we type some initial characters of the fi le and the rest of the fi lename is completed by the shell.
4. Command name aliasing helps rename commands and also saves a lot of keystrokes for frequently used lengthy commands.
5. Command history helps in fi nding out the commands we issued earlier.

552 Unix and Shell Programming
6. The number of commands stored by the shell is controlled by the HISTSIZE environment variable.
7. Broadly, there are two types of variables, shell variables and environment variables. Shell variables are local variables and are visible and applicable only to the current instance of the shell, whereas environment variables are global variables and are available to all the shells.
8. The VISUAL and EDITOR variables are used to specify a default visual editor.
9. The symbol ~ (tilde) represents the user’s home directory.
10. The ENV variable specifi es the start-up fi le besides the .profi le fi le.
11. The LOGNAME and USER variables represent the user’s name.
12. The HOSTNAME variable is used to identify the current host.
13. The MAIL variable specifi es the location of the incoming local e-mail.
14. The MAILCHECK variable specifi es the time interval in which the shell will check for new mail.
15. The MAILPATH variable is used to specify the colon separated list of mailboxes.
16. The PAGER variable is used to represent the text that appears when the entire output of a command cannot be displayed on the current screen and the shell needs to indicate that there is more information to be viewed.
17. The CDPATH variable defi nes a list of colon-separated directories that the shell checks when a full path name is not provided in the cd command.
18. The PATH variable contains a list of colon separated directories to search for a fi le for the issued command.
19. The variable PS1 controls the appearance of the primary prompt.
20. The variable PS2 controls the appearance of the secondary prompt that is displayed when a long Unix command is split on multiple lines by pressing the Enter key in the middle of the command. The default prompt is >.
21. The PS3 prompt controls the appearance of the prompt used for selecting an option in an interactive menu created through the select command. The default prompt is #?.
22. The PS4 prompt defi nes the prompt that precedes each line of an execution trace. The default execution
trace prompt is + (plus).23. The HISTFILE variable is used to specify the path
name of the fi le where the list of previous commands, that is, command history, is saved. By default, the history fi le for the Korn shell is .sh_history.
24. The HISTSIZE variable decides the number of commands that are kept in the history fi le.
25. The TERM environment variable is used for confi guring the terminals.
26. A display is a virtual screen that is created by the X server on a particular host.
27. The unset command is used to remove a variable or function from the shell environment.
28. The fi rst line in the Korn shell script, #!/bin/ksh, informs the shell that the script is a Korn shell script and hence has to be interpreted by the ksh interpreter.
29. A line beginning with # is treated as a comment line and hence not interpreted by the shell.
30. If the variable name is followed immediately by some other content, then for readability and clear separation, it must be enclosed in curly braces ({ }).
31. The echo statement displays messages, arguments, variables etc., terminated by a newline, to the screen. To suppress newline in the echo command, it must be used with -n option.
32. The print command is the most popularly used command in Korn shell for displaying messages and results on the screen. The output displayed via the print statement is terminated by a newline.
33. The read command is used for reading values from the keyboard into the shell variables.
34. The printf command is used for displaying formatted output. It uses format specifi ers for formatting the content being displayed in the desired format.
35. The typeset command is used to defi ne variables.36. The format specifi er %o and %x used in the printf
command converts the given numbers to octal and hexa respectively.
37. The parameter $# represents the count of the number of positional parameters passed to the script; $* represents a list of all command line arguments; and $? represents the exit status of the last executed command.
38. The shift command shifts or renames the positional parameters $1, $2, etc.
39. The test command is used for checking or comparing expressions resulting in true or false values. It

Korn Shell Programming 553
■ EXERCISES ■
Objective-type QuestionsState True or False
11.1 The Korn shell was developed by David Korn. 11.2 The Korn shell is not compatible with the
Bourne shell. 11.3 The Korn shell does not support the feature to
monitor background and foreground jobs. 11.4 Command name aliasing helps in renaming
commands and saves keystrokes for lengthy commands.
11.5 The meta character ~ represents the user’s
current directory. 11.6 The scope of the shell variables is limited to the
current instance of the shell. 11.7 A shell variable name can begin with a digit. 11.8 The environment variable PS2 controls the
appearance of the prompt that appears when a long command is split by pressing the Enter key in the middle.
11.9 The ENV variable defi nes the path of the
includes several operators for checking properties of fi les, strings, and integers.
40. The test command can also be represented by a square bracket.
41. While using the if else statement, we can also use the elif clause, which is a combination of ‘else if’ clauses when we have more conditions to check.
42. If two commands are connected through the logical AND operator, the shell executes the second command only if the fi rst command results in a true value. If two commands are connected through the logical OR operator, the shell executes the second command only if the fi rst command results in a false value.
43. The exit() function terminates a script and returns the status to the parent process. The exit status of a successfully executed command or script is 0 and a non-zero value refers to an unsuccessful execution. The exit function may return a value in the 0–255 range.
44. Pattern-matching operators can be used to strip off or remove the desired pattern from the given variable or string.
45. String test operators can be used for comparing strings, knowing if a string is empty, of non-zero length, or contains desired characters.
46. File test operators are used for testing various attributes of a fi le such as whether it is a fi le or directory, whether it exists or not, and whether it is readable, executable, or writable.
47. The while loop is for executing a set of statements as long as the included logical expression is true.
48. The until loop executes as long as the included logical expression evaluates to false.
49. The for loop is used for applying a set of statements on all the elements of a given set of values.
50. An array is a variable that can store one or more values. Arrays are of two types, indexed and associative.
51. In an indexed array, each element of the array is indexed by a value. The lowest value of an index is 0 and the upper value is at least 4095.
52. An associative array consists of key/value pairs.53. Functions are the small modules or subprograms that
are created to perform some task. 54. The return command returns the fl ow of control from
the function back to the caller.55. While calling a function, the function name can be
followed by the argument to be passed to it. 56. The arguments passed to a function are accessed
through the positional parameters.57. The typeset command helps in the creation of local
variables of a function.58. The value returned by the return statement is accessed
through the exit status, that is, through the $? variable.59. Recursion is a procedure wherein a function calls
itself. 60. To make the functions available to subshells, export
them using the following command: typeset –fx function-name 61. A program deals with three streams, standard input,
standard output, and standard error.62. The fi le descriptor for standard input is 0, standard
output is 1, and that of standard error is 2. 63. To suppress the output from getting displayed on the
screen, it is directed to the special fi le /dev/null also referred to as the ‘bit bucket’.
554 Unix and Shell Programming
.profi le fi le. 11.10 In emacs editing mode, the key pair Ctrl-p is
used to display previous commands in the command history.
11.11 The . (dot) in the command line represents the current directory.
11.12 To avoid default newline in the echo command, it is used with the -n option.
11.13 The printf command is not terminated by newline by default.
11.14 The fl ag - (hyphen) in the printf command right justifi es the content being displayed.
11.15 We cannot declare an octal integer with the typeset command.
11.16 The positional parameter $1 represents the shell script to which the command line arguments are passed.
11.17 The ${# var } format represents the length of the variable.
11.18 The shift command, besides renaming the positional parameters, also changes the value of the $# parameter.
11.19 The values of positional parameters can be changed only using the command line arguments.
11.20 If the two commands are connected through the logical AND operator, the shell executes the second command only if the fi rst command
results in a false value. 11.21 The exit function may return a value in the
0–255 range.11.22 The test operator –z is used to check whether a
zero length string is entered.11.23 We cannot use wild-card characters in the
pattern of case statements.11.24 The while loop executes as long as the included
logical expression evaluates to true.11.25 The break statement terminates the application.11.26 The continue statement skips the body of the
loop and begins with the next iteration. 11.27 Similar to the while loop, the until loop also
executes as long as the included logical expres-sion evaluates to true.
11.28 The for loop is used for applying a set of statements on all the elements of a given set of values.
11.29 In an indexed array, the lowest index value is 1.11.30 An index in an associative array can be a string.11.31 Functions help in dividing a large application in-
to small modules, hence making it manageable.11.32 The arguments passed to a function are accessed
through positional parameters.11.33 A function cannot return a value.11.34 The typeset command can be used to defi ne
read only variables.11.35 A function can make a recursive call to itself.
Fill in the Blanks
11.1 The Korn shell was developed at . 11.2 The feature that helps in recalling and reusing
previously given commands is known as .
11.3 Korn shell allow us to edit command lines with editing commands similar to the Unix editors,
and . 11.4 The vi editor operates in two main modes,
and . 11.5 The variable is used to set the
history size. 11.6 The shell variables are also known as
. 11.7 To make the shell variables accessible to
subshells, we need to them. 11.8 The two environment variables used for
defi ning the default editor are and .
11.9 The environment variable defi nes
a list of directories that the shell checks when the full path name is not given in the cd command.
11.10 The PS4 variable is for changing the prompt.
11.11 The fi rst line of the Korn shell script must be to inform the shell that the script
needs to be interpreted by the ksh interpreter.11.12 The data that is passed to the shell script while
executing it through command line is known as .
11.13 The exit status of the last executed command or script is represented by .
11.14 To check if the fi le is readable, the option is used with the test command.
11.15 A script that is successfully executed, returns a value , and value in case of any failure.
11.16 The clause indicates the end of an

Korn Shell Programming 555
if else statement.11.17 If in a script, branching is required, then instead
of using several if else statements, it is better to use the command.
11.18 A block of statements in a case statement is terminated by .
11.19 The default pattern in a case statement is represented by .
11.20 The fi le test operator to know if the fi le is an executable fi le is .
11.21 The statement is used to terminate and exit from a loop.
11.22 The loop is commonly used for applying a set of statements on all elements of a
given set of values.11.23 Arrays are of two types: and
.11.24 Associative arrays are declared by the
command.11.25 statement is used to return from
the function back to the caller.11.26 The value returned from a function is accessed
through .11.27 A program deals with three streams,
, , and .11.28 The fi le descriptor for standard input is
, standard output is , and standard error is .
Programming Exercises
11.1 Write the commands to do the following: (a) Convert a number of base 10 to a number of
base 8 (b) Convert a string to lower case (c) Print all the command line arguments
passed to the shell script (d) Set the length of the history list to 50 lines (e) Check if the string str is of non-zero length (f) Check if the fi le by name fi lename exists or not11.2 What will the following commands do? (a) $ set -o emacs (b) printf "%-20s \n" str
(c) $ typeset -i8 value (d) typeset -l str (e) print "${#str}"11.3 Write the commands to do the following: (a) Create an indexed array of fi ve elements (b) Display all the elements in the array p (c) Send the list of fi les and directories to a
special fi le /dev/null (d) Redirect the output of standard error 2 to
the same place where output of the standard output stdout is sent
(e) Close an output fi le
Review Questions
11.1 Write short notes on the following: (a) Command name aliasing (b) DISPLAY environment variable (c) MAILPATH variable (d) Meta characters (e) Command line editing11.2 Explain the fi lename completion feature in
detail.11.3 How can the PS3 variable be used to change the
prompt of an interactive menu? Explain with an example.
11.4 What are shell variables? How are they set and unset? Is there any way to make them global? If yes, how?
11.5 Explain the following commands with syntax and examples:
(a) typeset (b) if else
(c) case (d) printf (e) exit11.6 Write Korn shell scripts for the following: (a) Ask the user to enter his/her name, address,
and e-mail address and display the entered information
(b) Concatenate two strings and convert it into upper case
(c) Print the average of three numerical values passed as command line arguments
(d) Enter a string and a pattern and display the string after removing the given pattern from it
(e) Display the names of all the executable fi les in the current directory
(f) Ask the user to enter two numerical values and print their addition, subtraction, multi-

556 Unix and Shell Programming
plication, and division depending on the users’ choice. The user may enter character a, s, m, or d to indicate whether he/she wishes to view addition, subtraction, multiplication, or division. Use the case statement for this script.
11.7 Explain variable substitution in detail. 11.8 How is data passed to a shell script using com-
mand line arguments? 11.9 What is the impact of shift and set commands
on the positional parameters? Explain.11.10 Explain different string and fi le test operators
with examples.11.11 Explain the following with syntax and examples: (a) while (c) for (e) exit (b) until (d) indexed array
11.12 Write Korn shell scripts for the following: (a) Print the table of 9 up till 90 (b) Print the sequence of numbers between the
two entered values (c) Print the average of the values: 18, 2, 91, 25,
and 10 (d) Print the names of all readable fi les in the
current directory (e) Print the sum of three values passed to a
function named addo11.13 Explain recursion in detail with an example.11.14 What is I/O redirection? Explain.11.15 How is an associate array different from an
indexed array?11.16 How are arguments passed to a function and
how is a value returned by it?
Brain Teasers
11.1 The following code is not displaying the value of the tenth command line argument. Correct the code.
echo "The 10th argument is : $10"11.2 The following code is not deleting the fi rst two
characters of the supplied string. Find the error.
print "${str%??}"11.3 The following code for displaying the supplied
command line arguments is not working. Correct the code.
#!/bin/ksh while [[ $@ -ne 0 ]]; do print $1 shift -1 done11.4 Find the error in the following code for as-
certaining if the supplied argument is a readable directory.
#!/bin/ksh if [[ -e $1 ]] then if [[ -g $1 ]] then print "$1 is a readable directory" fi fi 11.5 Correct the following code for printing the
sequence of numbers from 1 to 10.
#!/bin/ksh
i=1 until ((i<=10)); do print "i" (( i=i+1)) done
11.6 Correct the error in the following code for counting the number of fi les and directories in the current directory.
#!/bin/ksh n=0 for i in cat ls do [[n=n+1]] done print $n
11.7 Find the error in the following code for dis-playing the elements of an array in reverse order.
#! /bin/ksh set -A p 10 3 8 1 5 echo "The array elements in reverse
order are " let x=${p[@]} -1 while [ $x -ge 0 ]; do echo "{p[x]}" let x=x-1 done
11.8 The following code for displaying the text Hello World thrice does not work. Find the error.
#!/bin/ksh

Korn Shell Programming 557
for i in [1..3] do print "Hello World" did
11.9 I wish to send a list of fi les and directories to a fi le tmp.lst and also to the output of the standard error channel. Find the error in the following code for doing so.
ls > tmp.lst 3>&2
11.10 Correct the following program that computes multiplication of two values through a function.
#!/bin/ksh function mult { ((x=$1*$2)) return x } multiply 2 6 print The multiplication is $*
■ ANSWERS TO OBJECTIVE-TYPE QUESTIONS ■
State True or False
11.1 True 11.2 False 11.3 False 11.4 True 11.5 False 11.6 True 11.7 False 11.8 True 11.9 False11.10 True11.11 True11.12 True11.13 True11.14 False11.15 False11.16 False11.17 True11.18 True11.19 False
11.20 False11.21 True11.22 True11.23 False11.24 True11.25 False11.26 True11.27 False11.28 True11.29 False11.30 True11.31 True11.32 True11.33 False11.34 True11.35 True
Fill in the Blanks
11.1 Bell Labs 11.2 Command history
11.3 vi, emacs 11.4 command
mode, insert mode
11.5 HISTSIZE 11.6 local
variables 11.7 export 11.8 EDITOR,
VISUAL 11.9 CDPATH11.10 execution
trace11.11 #!/bin/ksh 11.12 command
line arguments
11.13 $?11.14 -r11.15 0, non-zero
11.16 fi 11.17 case11.18 ;;11.19 *)11.20 -x11.21 break11.22 for11.23 Indexed
array, Asso-ciative Array
11.24 typeset -A 11.25 return11.26 $?11.27 standard
input, standard out put, and standard error
11.28 0, 1, 2

12.1 C SHELL
The C shell is a shell developed by Bill Joy at the University of California at Berkeley. Bill Joy is also the author of the vi text editor. It uses C programming language as a syntax model and has powerful interactive features.
12.1.1 FeaturesThe most important features of the C shell include the commands, constructs, and arrays, which are syntactically similar to C language. You may recall that the Unix system is written in C language, so the C shell’s fi rst objective was to provide a C-like platform to the users. The following are the other major features provided by the C shell:
Command history Allows the user to recall and reuse previously given commands.
Command substitution Substitutes the output of the command at the place of command.
1212C Shell C Shell ProgrammingProgramming
C H A P T E R
After studying this chapter, the reader will be conversant with the following:
• C shell and its different features• Using command history to retrieve commands from the history fi le• Command substitution and fi lename substitution (globbing)• Filename completion and aliases • Job control, running jobs in background, and suspending, resuming, and
killing jobs• Environment variables, shell variables, and built-in shell variables• Customizing the shell• Using C shell operators• Understanding, creating, and running simple C shell scripts• Different fl ow control statements in C shell scripts• Loops, arrays, and display errors

C Shell Programming 559
Filename substitution—Globbing Searches and replaces the pattern consisting of wild-card characters with the fi le(s) matching the given pattern.
Filename completion Displays and suggests the complete name(s) of the fi les on the basis of the initial characters typed by us.
Aliases Helps in assigning shortcuts to long and frequently used commands, renaming commands, and assigning user defi ned names for a sequence of commands.
Job control Helps in monitoring background and foreground jobs.
We will discuss the aforementioned features in detail in the subsequent sections.
12.1.2 Command HistoryIn the command history feature, the list of commands implemented in the C shell is saved for future use. The commands can be retrieved from the history either fully or partially. By retrieving commands from the history, we can recall the commands we had given earlier and also reuse them without typing them again.
Syntax history [ -r ] [-h]
The -r option is used to print history lines in reverse order, from the most recent to the oldest.The -h option prints history lines without line numbers. To display all the lines that are stored in the history, simply use the history command
without any option:
%history
We will get a list of commands in the history list preceded by a line number.The number of lines stored in the history list is determined by the amount of memory
available to the shell. We can also specify the number of lines that we want stored in the history of the start-up fi le .cshrc (which will be discussed in Section 12.2.1). The following command is an example:
set history=80
This command will enable the C shell to store 80 commands.
Retrieving commands from historyIn order to retrieve commands from the history list, the exclamation point (!) character, also known as the ‘bang operator’, is used. We can be more specifi c in retrieving the desired previous command by giving the line numbers or text patterns with the bang character.
Note: The exclamation point will be treated as the bang operator, that is, the history-substitution character even if it is quoted. We must precede it with \ (backslash) to remove its special meaning.
The bang operator can be used in two formats, !! and !number. The !! symbol is replaced with the previous command line. The !n symbol is replaced with the command in the history list represented by the line number n. The different formats for referring to command history are given in Table 12.1.

560 Unix and Shell Programming
Examples
(a) !!This retrieves the last command.
(b) !8 This retrieves command number 8 from the history list.
(c) !-4 This retrieves the fourth most recent command.
(d) !cd This retrieves the last command that begins with the letters cd.
A colon (:) is used to create a new command from the previous command. Each argument in the command is referenced through its position. The command name itself is numbered zero. The list of expressions used in selecting arguments from the command history is given in Table 12.2.
Table 12.1 List of formats used to refer to previous commands in the command history
Format Replaced with
!! The last command in the history
!n The command represented by the specifi ed line number n in the command history.
!-n The command with the line number n from the most recent command
!string The last command that begins with string
!?string? The last command that contains string anywhere in the command line
Table 12.2 List of argument selectors from the command history
Expression Specifi cation
0 First word of the command, that is, the command name
n The nth argument of the command, 0 refers to the command name and its arguments are numbered from 1
^ First argument of the command
$ Last argument of the command
% Argument matching the specifi ed string
m-n Substitutes arguments from m through n of the history line
m- Argument from the mth location till the second last argument
-n The fi rst argument of the history line through to the nth argument, it is the same as 0-n
M* Arguments beginning with the mth word through to the last argument of the line, it is the same as m-$
* All arguments of the command line
Examples
(a) !:3This recalls the third argument from the last command.

C Shell Programming 561
(b) !:* This recalls all the arguments from the last command.(c) md !10:2 This performs an md on the second argument from the command number 10.(d) md !10:$ This performs an md on the last item from the command number 10.(e) !cd:^ This retrieves the fi rst argument of the last command that started with cd.(f) !cd:1 This is same as the preceding example. It retrieves the fi rst argument of the last command
that started with cd.(g) !cd:$ This retrieves the last argument of the last command that started with cd.(h) !$
This retrieves the last argument of the last command.
12.1.3 Command SubstitutionCommand substitution implies that the output of the command is substituted in the place of the command. To be substituted, the command has to be enclosed in `. The output from such a command is split into separate words at the occurrence of blanks, tabs, and newlines. The output then replaces the command.
Example d=`date`
The variable d is assigned the output of the date command. The date command, as we know, displays the current system date as follows:
Sat and the year is 2011
Wherever the variable d is used in the script, it will be replaced with the system date as shown here.
12.1.4 Filename Substitution— GlobbingAs the name suggests, fi lename substitution refers to the process of fi nding the fi le(s) beginning with the characters typed by us. The characters typed by the user will be replaced by the fi le name matching the typed characters. The procedure of fi lename substitution is also known as globbing. For fi lename substitution, the characters or the words that we type must contain any of the following characters: *, ?, [, {, -, or ~. The word carrying any of the said characters will then be used for retrieving an alphabetically sorted list of fi lenames that match its characters.
We will now discuss the role of characters *, ?, -, or ~ in fi nding a given fi le.
1. The character * matches any string of characters, including the null string. 2. The character ? matches any single character. 3. A pair of characters separated by a hyphen (-) matches any character between the two
(inclusive).

562 Unix and Shell Programming
4. The character ~ at the beginning of a fi lename refers to home directories. The user’s home directory is substituted in the place of ~.
Note: The character ~ will only be replaced by the home directory of the user if it appears at the beginning of the word and is followed by a character or /; it will otherwise be treated as a simple symbol.
Examples
(a) ls a{b,c,d}e This statement will show the fi lenames that consist of three characters and which begin and end with characters a and e respectively (e.g., abe ace ade).
(b) ls *.txt This statement will show the list of fi lenames that have the extension .tx.
(c) ls [abc]* This statement will show the list of fi lenames that begin with a, b, or c.
(d) ls [a-d]* This statement will show the list of fi lenames that begin with any character from a to d.
(e) ls a???.txtThis statement will show the list of fi lenames that consist of four characters and which begin with character a and have the extension .txt.
(f) cd ~johnThis statement will change the directory to the home directory of the user, john, that is, to /usr/john directory.
(g) ls ~john/progs/{try1,try2 try3}.c This statement will display the fi les /usr/john/progs/try1.c, /usr/john/progs/try2.c, and /usr/john/try3.c.To turn off the fi lename substitution feature, set the noglob variable through the following command.set noglob
12.1.5 Filename CompletionAs the name suggests, fi lename completion means that the shell will guide the user by displaying or completing the fi lename on the basis of the initial characters typed. It can also suggest expected fi lenames by searching the directory that matches the initial characters typed by the user.
To turn on fi lename completion, we need to set the C shell variable, fi lec, through the following command:
set fi lec
We have to add this command in the C shell start-up fi le .cshrc.To complete a fi le or directory name, we only need to type few of its starting characters
and press the Esc key. On pressing the Esc key, the shell completes the fi lename if it is uniquely identifi ed or stops with a beep sound after typing a few characters, asking the user to type a few more characters to distinguish the fi le. In this case, we need to type a few more characters and press the Esc key again to initiate fi le completion.

C Shell Programming 563
In order to list all the possible fi lenames or directories on the basis of the typed characters, press Ctrl-d. The directories will appear with the trailing / character.
Examples
Let us assume that our current directory contains the following fi les and directories.
project.txt progs/ program1.c programs2.c
Observe the following fi le completion commands:(a) %ls prEsc
This command will display pro and then the terminal will beep as there are multiple matches beginning with the word pro.
(b) %ls projEscIt will uniquely identify and display the fi lename project.txt.
(c) ls prog^DIt will display the fi les and directories that begin with the word prog.
(d) progs/ program1.c programs2.cFor making the task of typing long commands easier, the C shell supports the concept of aliases, which is discussed in the next section.
12.1.6 AliasesAliases can be used to rename the existing commands, create a short cut for longer commands and defi ne new commands that may be a combination of a sequence of commands. The syntax for creating an alias is as follows:
Syntax alias name text
The name will become the alias of the command(s) represented by text. Now, whenever we use this name, the C shell will replace it with the sequence of commands specifi ed in the text.
Examples
(a) alias pri printenvIn this example, pri will act as an alias of the printenv command. Now if we type pri on the command line, it will be replaced by the printenv command before executing.
(b) alias h history -r This statement will declare letter h as an alias of the history -r command. Hence, h will be replaced by the history -r command before being executed.
(c) To view all current aliases, just write alias on the command line without any argument: alias (d) To remove a previously defi ned alias, specify its name in the unalias command: unalias alias_name
C shell also supports the feature of job control. For example, we can suspend and resume jobs, switch background jobs to foreground and vice versa, and kill jobs. We will now learn about this feature in detail.

564 Unix and Shell Programming
12.1.7 Job ControlThe C shell supports a job control feature that allows us to do the following tasks:
1. Run processes in the background2. Bring background jobs to the foreground when required 3. Suspend current jobs4. Resume suspended jobs5. Kill jobs
A process can be set to execute in the background by following its command with an ampersand (&) symbol.
Syntax command&
Therefore, any command can be set to run in the background by suffi xing an ampersand (&) symbol to the command.
On executing a job in the background, its information appears on the screen, which may be as follows:
$ lp a.txt&[3] 20971
This statement indicates that the print command is placed in the background, and its job ID is 3 and process ID is 20971. To bring a job to the foreground, the fg command is used. Similarly, in order to bring the aforementioned background job with ID 3 to the foreground, we use the following command:
fg 3
Note: The jobs that do not require terminal input and have no time constraints can be run in the background.
We can also suspend or stop a running job by pressing ^Z, which sends a STOP signal to the current job. The suspended jobs do not execute but they consume system memory. The sus-pended job can be put in the background with the bg command or can be resumed in the foreground with the fg command. To get the list of jobs, we give the command jobs without any argument, as follows:
jobs -l
This command displays the list of jobs along with their IDs. We can use the job IDs to control specifi c jobs. For referring to a job, the % character is used. The following examples will make things more clear.
Examples
(a) %1This brings the job with ID 1 to the foreground.
(b) %1 &This takes the job with ID 1 to the background.
(c) %+ or %%This refers to the current job.

C Shell Programming 565
(d) %-This refers to the previous job.
Syntax To terminate a job, we can use the Ctrl-c interrupt or the kill command with the following syntax:
kill job_id
Example The following statement is an example.
kill 3
This will terminate the job with ID 3. The kill command can also be used to suspend a background job with the following
syntax:
Syntax kill - STOP job_id
The following statement is an example:
Example kill -STOP 3
This will suspend the background job with ID 3.The summary of all the aforementioned commands used in controlling jobs is given in Table 12.3.
Table 12.3 Summary of commands used to control jobs
Command Function
bg [job_id] Executes a job with a given ID in the background (default is current job)
fg [job_id] Executes a job of the given ID in the foreground
kill [signal] [job_id] Terminates a process or sends a signal where the signal usually used is the STOP signal
jobs [-l] Lists the foreground and background jobs with their process IDs
Ctrl-c Terminates the foreground job
Ctrl-z Suspends the foreground job
After looking at the features of the C shell, we will discuss the different start-up fi les that the C shell uses when invoked.
12.2 START-UP FILES
When we log in to a Unix system, if we get the per cent sign (%) as the command line prompt, then our logon shell is the C shell. If we do not get the % sign prompt, it implies that our logon shell is either the Bourne shell or Korn shell. We can interactively invoke the C shell from the command line by using the following command:
$ csh%

566 Unix and Shell Programming
The C shell executes three fi les, .cshrc, .login, and .logout, which are located in the user’s home directory and indicated by the HOME environment variable. These fi les can be used for customizing the C shell environment. Let us learn about the fi les in detail.
12.2.1 .cshrc FileThe .cshrc fi le is executed every time one of the following occurs:
1. The C shell is invoked2. We log in to the system3. A C shell script is executed4. A new process is forked
It is executed before the .login fi le and contains instructions to defi ne or customize the C shell environment. We can use this fi le to set variables and parameters that are local to a shell. The instructions that are commonly stored in this fi le include directory paths, shell variables, and aliases.
The following is a sample .cshrc fi le:
#!/bin/csh# Sample .cshrc fi leset history=50set savehist=50set ignoreeof noclobberif ($?prompt) then set prompt=$user ">"endifalias h history alias lo logout
The .cshrc fi le declares to store or remember 50 lines of history, that is, previous commands and also declares to save 50 commands in a login session. Besides this, it will prevent the user from logging out of the shell on pressing Ctrl-d by accident. The fi le also defi nes the primary shell prompt as well as h and lo as alias (shortcuts) for the commands history and logout respectively.
12.2.2 .login FileThe .login fi le is executed when we log in to the system. The .login fi le is read only once when we log in and hence contains the commands that we want to execute only once, that is, at the beginning of each session. The fi le usually contains instructions to set up terminal settings and environment variables.
The following is a sample .login fi le:
#!/bin/csh# Sample .login fi lestty erase ^H intr ^C susp ^Z quit ^\\echo "You are Welcome"

C Shell Programming 567
This .login fi le displays a welcome message to the user. Besides this, the fi le also confi gures the terminal through the stty command. The stty command assigns some functions to certain keys pairs as follows:
1. Ctrl-h key pairs will be used to delete or erase the previous character.2. Ctrl-c key pairs will be used to interrupt the current job. 3. Ctrl-z key pairs will be used to suspend or pause the current job. 4. Ctrl-\ key pairs will used to terminate the current job.
12.2.3 .logout File The .logout fi le contains commands that are run when the user logs out of the system. Usually, it contains the commands that we wish to execute before the user exits.
Example The following sample .logout fi le indicates that the user has logged out of the system and displays the current system date.
#!/bin/cshecho -n "Logged out of the system "date
In the preceding start-up fi les, we observed that different variables are defi ned and set in order to confi gure or customize the shell. Let us learn about these variables in detail.
12.3 VARIABLES
Variables are used for holding and passing information. In this section, we will discuss the several types of variables such as environment variables, shell variables, and built-in shell variables that play a major role in confi guring a shell and have a great impact on its working. Let us begin with environment variables.
12.3.1 Environment VariablesEnvironment variables are variables that are defi ned in our start-up fi les to inform the shell about our environment. Whenever we start a new shell, these variables are passed to the invoked shell. In addition, these variables are passed to all processes that are run from the current shell and hence these variables are also known as global variables. The environment variables have a great impact on the working of a shell. For example, an environment vari-able, PATH, specifi es the list of directories where the shell can fi nd the executable programs. Now, when the user types a command, the shell searches through the directories listed in the PATH environment variable for the executable program that matches the command typed by the user. The command will not execute if the shell is unable to fi nd the executable program of the command in the directories listed in the PATH environment variable. The environment variables usually appear in upper case. Some of the most commonly used environment variables are shown in Table 12.4.

568 Unix and Shell Programming
To change or assign a value to an environment variable, we use the following syntax:
Syntax setenv environment_variable value
Example setenv TERM vt100
Note: The setenv command does not use the = operator.
The changes will remain in effect until we log out or invoke a new shell. To change an environment variable permanently, we need to defi ne it in the fi le .cshrc. The changes will come into effect the next time we log in or invoke an instance of the shell. To make the changes come into effect immediately, we give the following command:
source .cshrc
To append a value at the end of an environment variable, we use the following syntax:
Syntax setenv VARIABLE ${VARIABLE}:value_to_append
This will append the value, value_to_append, to the end of the current value of the variable. To remove an environment variable, we use the unsetenv command.
Examples
(a) To remove the environment variable, TERM, we can use the following command.
% unsetenv TERM
(b) To display the list of all currently set environment variables, the printenv command is used.
% printenvHOME=/home/john
Table 12.4 List of a few environment variables
Environment variable
Description
PATH This is a list of directories in which the shell searches for commands and programs. If a program is in a directory that is not in the path, the shell will not be able to fi nd it.
EDITOR This variable is used to decide the editor the user wishes to use.
SHELL This variable displays the name of the shell.
HOME This variable points to the user’s home directory.
TERM This variable informs us of the type of the user’s terminal. The C shell uses the terminal defi nitions given in the termcap fi le. Typical terminal types are vt100 or xterm.
TERMCAP This variable specifi es the fi le containing terminal defi nitions.
DISPLAY This environment variable is set while using an X device and is used to keep track of the display the graphics should be created on.
PRINTER This variable defi nes the name of the default printer.

C Shell Programming 569
SHELL=/bin/cshPATH=(/home/john/bin /bin /usr/bin /usr/local/bin)USER=johnTERM=vt100EDITOR=emacs
This list of currently set environment variables gives information about the home directory, shell, path directories, username, terminal, and default editor of the user.
12.3.2 Shell VariablesUnlike environment variables, shell variables are local variables as they contain values that are visible and applicable only to the current instance of the shell. In other words, the scope of shell variables is limited to the current instance of the shell. The C shell automatically sets values to a few shell variables such as argv, cwd, home, path, prompt, shell, status, term, and user. The shell variables usually appear in lower case. The list of pre-defi ned shell variables is given in Table 12.5.
Table 12.5 List of predefi ned shell variables
Predefi ned variable
Description
argv The list of arguments passed to the current command is assigned to it.
cwd It contains the full path name of the current directory.
home It is the home directory of the user, initialized from the HOME environment variable.
path It is the list of directories that the shell is supposed to search in, for the commands to execute. It is initialized from the PATH environment variable.
prompt It is a string that represents the shell prompt for an interactive input. The default prompt for the C shell is %.
shell The path name of the shell program currently in use is assigned to it. The default path name for the C shell is /bin/csh.
status The exit status of the last command is assigned to this variable. Usually, successful commands return value 0, and failure or unsuccessful commands return a value of 1.
term The name of the terminal type is assigned to it. It gets a value from the TERM environment variable. The default value is /etc/ttytype.
user The login name of the user is assigned to it. It gets a value from the USER environment variable
Note: When a C shell is started, it will set the value of shell variables (home, path, term, and user) same as the environment variables (HOME, PATH, TERM, and USER).
12.3.3 Built-in Shell VariablesBesides the aforementioned predefi ned shell variables, there are several built-in shell variables that have special functions. The list of the built-in shell variables that have special meanings is shown in Table 12.6.

570 Unix and Shell Programming
Table 12.6 List of built-in shell variables
Variables Description
autologout Contains the number of minutes the shell can be idle before it automatically logs out
Cdpath Specifi es a list of directories to be searched by the chdir or cd command to fi nd subdirectories
Echo When set, causes each command and its arguments to echo before it is executed
history Sets the number of lines of history (previous commands) to be remembered
histchars Changes the history substitution characters, ‘!’ and ‘^’
ignoreeof Prevents logging out of the shell with Ctrl-d
mail Specifi es the fi les where the shell checks for mail
noglob Avoids fi lename expansion
notify When set, the shell sends asynchronous notifi cation of changes in the job status
noclobber Prevents overwriting of fi les when using redirection
savehist Defi nes the number of history commands to save from one login session to the next
time If set, displays the statistical lines showing the resources used by the command that takes more than the specifi ed CPU time in execution
verbose Causes the words of each command to display after history substitution
A list of the current shell variables using the set command is as follows:
% set
We may get the following output.
argv()ignoreofhistory 40home /home/johnpath (/home/john/bin /bin /usr/bin /usr/local/bin)noclobbershell /bin/csh
This list of shell variables, besides displaying the information of home, path, and shell of the user, also informs that the command line argument’s array is currently empty, accidental logging out of the shell by pressing Ctrl-d is not allowed, 40 lines will be stored in the history to remember, and the existing fi les will not be overwritten while using redirection.
To assign value to a shell variable, the set command is used.
Syntax set shell_variable=value
Example set history=50
This example will set the history to store 50 lines.
12.3.4 Unsetting VariableTo delete or unset a shell variable, we use the unset command.

C Shell Programming 571
Syntax % unset variable_name
The unset command completely removes the variable from memory. The command to remove the shell variable, history, which we just created, is as follows:
% unset history
We will now see the practical aspects of the variables that we discussed here. Let us use some of these variables to customize the shell as per our requirement.
12.4 CUSTOMIZING SHELLS
In Section 12.3, we learnt about the different types of variables and their usages. Now we will learn about the various roles (e.g., how they can be used in changing the appearance of a primary prompt, changing the special characters used in retrieving previous commands from history, and defi ning the location of mailbox fi les) played by the three variables, that is, prompt, histchars, and mail variables, in the working of a shell.
12.4.1 Setting Primary PromptWe can set the appearance of the primary prompt using the set command. We can make the user’s name, time, current working directory, history number, etc., appear in the primary prompt. The list of different symbols that we can use to customize the primary prompt is shown in Table 12.7.
Table 12.7 List of symbols used in customizing primary prompt
Symbol Displays
$cwd Current working directory$cwd:t Current working directory with the user’s home directory represented by ‘~’'uname -n' Full host name`hostname -s` Host name up to the fi rst ‘.’
%B or %b Start/Stop boldfacing mode
%U or %u Start/Stop underline mode`whoami` Username%h Current history number%t Time of day in the 12-hour system, hh:mm a.m./p.m.%T Time of day in the 24-hour system, hh:mm%p Time of day in the 12-hour system with seconds hh:mm:ss a.m./p.m.%P Time of day in the 24-hour system with seconds hh:mm:ss%D The day in two digits, ‘dd’ format%w The month in three character format, ‘Jan’%W The month in two digits, ‘nn’ format%y The year in two digits, ‘yy’ format%Y The year in four digits, ‘yyyy’ format%d The weekday in three characters, ‘Mon’ format

572 Unix and Shell Programming
We can use these symbols to get the desired information to appear in the primary prompt. Let us look at the following examples.
Examples
(a) set prompt="${cwd} >"It sets the prompt to the current working directory./usr/john>
(b) set prompt = $user " > "It sets the prompt to the user’s name.john>
(c) set prompt = "\! $user > "It sets the prompt to the number of the current history event followed by the user’s name and > character.209john>
12.4.2 Changing History Characters We have already discussed in Section 12.1.2 that while retrieving previously issued commands from the command history, special characters, such as ! (exclamation point) and ^ (caret), are commonly used. By using the histchars variable, we can replace or change these two special history characters, ! and ^ with any characters of our choice that do not have special meaning or the ones that are not frequently used. The syntax for replacing the two characters is as follows:
Syntax set histchars="char1char2"
Here, char1 replaces the ! character and char2 replaces the ^ character.
Example % set histchars='@#'
Using this statement, the history characters are changed. This implies that while accessing the history command, in the place of ! and ^, we will now use @ and # respectively. It also means that instead of using the !! command that was earlier used for accessing the last command from the history, we need to now use the @@ command. Similarly, instead of using the command !:^, which was earlier used to retrieve the fi rst argument of the last command, we now need to use the @:# command.
12.4.3 Setting mail VariableThe mail variable is used to inform the shell about the fi le to check for incoming mail.
Syntax set mail = (time_interval fi le_to_check)
This syntax will make the shell check fi le_to_check periodically for mails in the specifi ed time_interval. If time_interval is not specifi ed, a default of fi ve minutes is considered.

C Shell Programming 573
Examples
(a) In the following fi le, we set the mail variable.set mail=(/usr/spool/mail/john)By assigning this fi le to the mail variable, we are asking the shell to check this fi le after fi ve minutes to see if any mail has arrived there. The shell will notify us in case any new mail arrives in the fi le. We can also change the time interval for checking the mail from fi ve minutes to any desired time. The following example does the same.
(b) set mail=(60 /usr/spool/mail/john)This statement asks the shell to check the mailbox of the user, john, every 60 seconds. It is to be remembered that if the fi rst word of the value of the mail variable is a numeric, it specifi es a time interval in seconds for the shell. If we specify multiple mail fi les, the shell displays the message along with the name of the fi le where the mail has arrived.
Sending mailLet us quickly take a look at the command that is used to send mail. To send mail to a user, we use the mail program. The following is the syntax for sending mail:
mail username_to_receive_mailmessage...message...EOT
Example mail john
This is a test for checking if the mailprogram is workingEOT
The fi rst line, mail john will execute the mail program that is used to send messages. Here, john is the argument that indicates the name of the user to whom the mail is to be sent. Thereafter, we can type the message or text that we want to send to the user, john. We end the message with ^D, which sends an end of fi le marker to the mail program. On receiving the ^D command, the mail program echoes the characters EOT and transmits our message to the specifi ed user.
Before we begin with the creation of C shell scripts, it is essential to have basic knowledge of C shell operators. Hence, let us take a quick look at the different C shell operators.
12.5 C SHELL OPERATORS
Almost all basic expressions in a shell script require the usage of arithmetical operators. The arithmetical operators include not only the basic addition, subtraction, multiplication, and division operators but much more. A list of different arithmetical operators is shown in Table 12.8.

574 Unix and Shell Programming
Examples
The following examples will help in understanding the purpose of these operators better.(a) @c=$a+$b
This adds the values of variables a and b and assigns the addition to variable c. (b) @d=($a+$b) * $c
This adds the values of variables a and b and the total is multiplied with the value of variable c and fi nally the result is stored in variable d. It is because of the parentheses that addition operator is performed before multiplication.
(c) @c=$a % 5 This applies the modulo operator to the value of variable a. Modulo operation here divides the value of variable a by fi ve and the remainder will be stored in variable c.
(d) @d=$a<<1 This left shifts the value in variable a by 1 bit. Every left shift operation multiplies the value by two and a right shift divides the value by 2. Hence, the value in variable a is multiplied by two and the result is assigned to variable d.
(e) @e=$a&$b The bitwise AND operation is applied on the bits of values of variables a and b and the result is stored in variable e. While using bitwise operators, the operation is applied on the bit structure of the number. In a bitwise AND operation, the resulting bit is 1, only when both the bits being compared are 1.
(f) @f=$a^$b The bitwise exclusive OR operation is applied on the values of variables a and b and the result is assigned to variable f. In a bitwise OR (exclusive) operation, the resulting bit is set to 1 only when either of the bits being compared is 1. This implies that it will result in 0 if both the compared bits are 1.
(g) @g=$a|$b The bitwise inclusive OR operation is applied to the values of variables a and b, and the result is assigned to variable g. In a bitwise OR (inclusive) operation, the resulting bit is set to 1 when either or both the bits being compared are 1.
After arithmetical operators, let us take a look at the assignment operators. The assign-ment operators include the operators that perform certain operations on the data before being assigned to the specifi c variable. Table 12.9 provides a list of assignment operators.
Table 12.8 List of arithmetical operators
Operator Description Operator Description
( ) Grouping and changing precedence
- Subtract
<< Left shift
~ Complement of 1 >> Right shift
* Multiply & Bitwise ‘AND’
/ Divide ^ Bitwise ‘exclusive OR’
% Modulo | Bitwise ‘inclusive OR’
+ Add

C Shell Programming 575
The following examples will make the concept of these assignment operators more clear.(a) @a++
The value in variable a will be incremented by 1.(b) @b=$a
The value in variable a will be assigned to variable b.(c) @c+=$a
The values in variables c and a will be added and the sum will be stored in variable c.
(d) @c/=$a The value in variable c will be divided by the value in variable a and the result will be stored in variable c.
Whether it is a logical expression in a loop or a criterion in a branching statement, conditional operators are used in almost all logical expressions. Table 12.10 shows the list of comparison operators.
Examples
The following examples will help us understand the purpose of the preceding operators in a better way.(a) ($a==5)
This returns true if the value in variable a is equal to 5(b) ($a !=5)
This returns true if the value in variable a is not equal to 5(c) ($a <=10)
This returns true if the value in variable a is less than or equal to 10(d) (!$a==5)
The result of the logical expression is reversed. This implies that if the value in variable a is equal to 5, then the resulting Boolean value that is true will be reversed to false and vice versa.
(e) ($a > 2 && $b < 1)
Table 12.9 List of assignment operators
Operator Description
++ Increments
-- Decrements
= Assigns
*= Multiplies the left side value by the right side value and updates the left side
/= Divides the left side value by the right side value and updates the left side
+= Adds the left side value to the right side value and updates the left side
-= Subtracts the left side value from the right side value and updates the left side
Table 12.10 List of comparison operators
Operator Meaning
== Equal to
!= Not equal
> Greater than
< Less than
>= Greater or equal to
<= Less than or equal to
! Logical NOT
&& Logical AND
|| Logical OR

576 Unix and Shell Programming
Since the two logical expressions are connected through the logical AND operator, the combination evaluates to true only when both the individual logical expressions are true, that is, when variable a is greater than 2 and variable b is less than 1.
Now, we will discuss how to create and execute some C shell scripts.
12.6 WRITING AND EXECUTING FIRST C SHELL SCRIPT
We can use any editor to write a C shell script. We will now create a fi le by the name removearg.csh and type the following content in it:
removearg.csh#!/bin/csh rm $argv[1]
The fi rst line, #!/bin/csh, specifi es that the shell to be executed is the C shell, csh. The second line removes the fi le whose name is passed through the command line argument. Assume that the aforementioned shell script is executed as follows:
% removearg.csh inventory.txt
The script will delete the fi lename assigned to the $argv[1] array. The script name removearg.csh will be assigned to $argv[0] and the fi lename inventory.txt will be assigned to the $argv[1] array. The fi le inventory.txt is hence deleted.
We can execute C shell scripts using the source command. This command makes the C shell read commands from a fi le.
Syntax source scriptname
When debugging C shell scripts, it is best to use the csh command.
Syntax csh -x scriptname
The -x option sets the echo variable so that commands are echoed to standard error.In the aforementioned shell script, we have used command line arguments. The command
line arguments and related variables are treated as special shell variables. Table 12.11 shows the list of special shell variables.
Table 12.11 List of special shell variables
Variable Meaning
${0} The name of the script being run
$?variable_name Returns true if the variable name is defi ned and otherwise returns false
$n The value of the nth positional parameter passed to the script
$argv[n] The value of the nth argument passed to the script
$#argv The number of arguments passed to the script
$argv[*] All the arguments supplied to the script
$argv[x-y] The arguments from x to y passed to the script, that is, the arguments in the argv array between index locations, x and y are returned
$$ Process identifi cation number of the current process

C Shell Programming 577
Let us understand these special shell variables through a running example.
Example Let us create another shell script by the name commandargs.csh and write the following code to demonstrate how command line arguments are passed and accessed in a C shell script.
commandargs.csh
#! /bin/csh echo "The script name is: ${0}"echo "Number of arguments are: $#argv" echo "First argument is $argv[1] and second argument is $argv[2]"echo "All of the arguments are: $argv[*]"echo "Second and third arguments are: $argv [2-3]" echo "All arguments except the fi rst are: $argv[2-$#argv]"
Let us pass the following command line arguments to the preceding shell while executing it.
$ ./commandargs.csh xyz.txt 10 4 bank.lstThe script name is: ./commandargs.cshNumberv of arguments are: 4First argument is xyz.txt and second argument is 10All of the argument are: xyz.txt 10 4 bank. lstSecond and third arguments are: 10 4All arguments except the fi rst are: 10 4 bank.Lst
The command line arguments xyz.txt, 10, 4, and bank.lst will be assigned to the command line argument array, argv, and will be stored at index locations argv[1], argv[2], argv[3], and argv[4] respectively.
We can see that the predefi ned shell variable, argv, plays a major role in passing data to the shell script. The C shell borrowed the concept of using the argv array from the C programming language. The name of the shell script is assigned to the element argv[0]. The element $argv[1] is equivalent to $1, that is, the fi rst positional parameter that is assigned the value of the command line argument that follows immediately after the name of the shell script. The second and the following command line arguments are assigned to the elements argv[2], argv[3], etc. The fi rst echo statement in the aforementioned script displays the script name commandargs.csh. The second echo statement displays the count or the number of command line arguments passed to the script. Since four command line arguments are passed to the script, the echo statement displays value 4. The third echo statement displays the values in the elements argv[1] and argv[2] of the command line arguments array, hence xyz.txt and 10 are displayed. The fourth echo statement displays all the command line arguments passed to the script. The fi fth echo statement displays the second and third command line arguments and the last echo statement displays all the command line arguments except the fi rst command line argument.
We observed in the preceding two scripts that only one command is written in a single line. However, we can also write more than one command in a single line as discussed in the following section.

578 Unix and Shell Programming
Writing multiple commands on lines Usually, the shell assumes a single command on a line considering the fi rst word in the line to be the command name and the following words as arguments to that command. To write multiple commands on a single line, we use a semicolon (;) at the end of the command. On fi nding a semicolon (;), the shell interprets the word following it as a new command, with the rest of the words as arguments to the new command.
For example, the following command line is basically three commands in one line:
@x=10; echo "Hello World!"; set name="Ajay"
What happens if we come across a command that is too long to fi t in a single line? In such a case, we split the command as discussed in the following section.
Splitting commands in more than one line The shell usually assumes the end of command on fi nding a newline character. In order to continue a long command onto the new line, we need to escape the newline character. On ending a line with a backslash (\), the newline character is escaped and the shell does not interpret it as the end of the command.
Besides using command line arguments, data can also be passed to the shell script by interactively asking the user for the same.
For creating interactive shell scripts, we need to add the statement that enables users to enter data so that the shell scripts take action on the basis of the entered data. Hence, the next thing is to understand how to read data from the user.
12.6.1 Reading DataFor reading data from the keyboard and assigning it to a variable(s), we initialize it to hold the special parameter $<. The parameter $< prompts the user to enter some data. The entered data is then assigned to the desired variable.
Syntax set variable_name = $<
The data typed by the user up till the Enter key is assigned to variable_name.
Examples
(a) set fi lename = $<Using this statement, everything typed by the user will be assigned to the variable fi lename till the Enter key is pressed. In other words, $< substitutes a line from the standard input device—the keyboard.
(b) The following shell script asks the user to enter a fi lename. The entered fi lename is then displayed.readinput.csh#!/bin/csh echo -n "Enter a fi le name: "set fi lename = $<echo The fi le name entered is $fi lename
OutputEnter a fi le name: xyz.txtThe fi le name entered is xyz.txt

C Shell Programming 579
The option -n that is used with the echo command suppresses the newline character so that the next output or input occurs on the line of the output of the previous echo command.
The aforementioned shell script asks the user to enter a fi lename that is assigned to the variable fi lename, which is then displayed on the screen. A shell variable used in a command is prefi xed with a dollar sign ($). $ tells the command interpreter that the user wants the variable’s value and not its name. We can also use curly braces ${fi lename} if the variable is immediately followed by some text. The curly braces help in separating variable from the attached text, if any.
fi lename used in the aforementioned shell script is a user defi ned shell variable. We will now learn more about user defi ned shell variables.
12.6.2 User-defi ned Shell VariablesWe have discussed predefi ned shell and built-in shell variables that play a major role in the working of a shell. Now we will discuss the variables used to hold data and results in shell scripts. These variables are called user defi ned variables.
The commands for defi ning and removing shell variables is the same for all types—the set command is used to defi ne variables and the unset command to delete variables. To defi ne a new variable or modify the value of an existing variable, we use the following syntax:
Syntax set variable_name=value
Here, variable_name is the name of the variable that can be up to 20 letters or digits long and can include underscores but not begin with a number. value is the data that we want to assign to the variable.
Example set str="Hello World!"
Using this statement, a string variable, str, is initialized to the string Hello World!To initialize integer variables, we use the following syntax:
Syntax @ variable=value
Example @l=10
Note: There must be a space between the @ command and the variable name. We can see that for integers, the declaration begins with the @ character instead of set.
To assign a null value to a variable, don’t assign any value to it.
set area
This example will assign a null value to the variable area.To assign a list of values to the variable, enclose them in parentheses.
set variable_name=(value1 value2 value3)
Example set studentnames = (Ajay Omy Manish Bharat)

580 Unix and Shell Programming
This example will assign the strings Ajay, Omy, Manish, and Bharat to the variable studentnames. Now, studentnames is not a simple variable but an array. To assign value to the nth word in the variable, we use the index to specify the location as shown in the following syntax:
Syntax set variable_name[n]=value
Example To assign a string, Gunjan, to the second index location in the array studentnames, the following command is used.
set studentnames[2]="Gunjan"
The set command issued without arguments will display all the shell variables. To prepend a value to an existing shell variable, we use the following syntax:
Syntax set name=prepend_value${name}
Example set new_list=Sanjay${studentnames}
This example will prepend the string, Sanjay, to the existing strings in the studentnames array and assign them to the array new_list.
A similar syntax can be used to append a value to an existing shell variable.
Syntax set name=${name}append_value
Example set new_list=${studentnames}Puneet
This example will append the string, Puneet, to the existing strings in the studentnames array and assign them to the array new_list.
To fi nd the length of a variable, that is, to fi nd the number of characters in a string or the numbers of words or numerals in an array, the following syntax is used:
Syntax $#variable_name
This syntax will return zero if the variable is assigned a null value and an error if the variable is not set.
Examples
(a) str="Hello"echo $#strThis example will display the length of the string, str, that is, it will display value 5:
(b) echo $#studentnamesThis example displays the count of the elements in the array, studentnames.
(c) The following shell script demonstrates the assignment of strings and numerical to different variables.demovariables.csh
#!/bin/csh set fi rstfi le=xyz.txtset secondfi le=uvw.txt

C Shell Programming 581
cp $fi rstfi le $secondfi le@ length = 8@ breadth = 5@ area = $length * $breadthecho Area of rectangle is $areaunset $area
OutputArea of rectangle is 40
The two fi lenames, xyz.txt and uvw.txt, are assigned to the two variables, fi rstfi le and secondfi le, respectively and a copy of the fi le xyz.txt is made in the name uvw.txt. Sim-ilarly, numerical values, 8 and 5, are assigned to the two variables, length and breadth respectively and their values are multiplied and stored in the area variable, which is then displayed. Finally, the variable area is removed from memory through the unset command.
(d) The following shell demonstrates how to perform fl oating point operations in C shell.
fl oatoperat.csh
#!/bin/cshset a = 1234.56set b = 99.99set c = `echo $a + $b | bc`set d = `echo $a \* $b | bc`echo Sum of fl oating point numbers is $cecho Multiplication of fl oating point numbers is $d
OutputSum of fl oating point numbers is 1334.55Multiplication of fl oating point numbers is 123443.65
C shell cannot do fl oating point arithmetic; hence the bc calculator program is used in the shell script to perform fl oating point arithmetic. We can see that two fl oating point values are assigned to the two variables, a and b, respectively. The two values are added and multiplied using the bc calculator, assigned to the two variables c and d respectively, and hence displayed.
The C shell does not provide a way to read multiple values in a single command.
(e) The following shell script allows the user to enter two values simultaneously. The two values are then separated through the cut command.
readmultiple.csh#!/bin/csh printf "Enter two values "set numbers = "$<"@ a = `echo "$numbers" | cut -f1 -d " "` @ b = `echo "$numbers" | cut -f2 -d " "` @ sum = $a + $becho The two numbers are $a and $b and their sum is $sum

582 Unix and Shell Programming
Output
Enter two values 10 20The two numbers are 10 and 20 and their sum is 30
The two values entered by the user are assigned to the variable numbers. Assume that the user entered two values, 10 20, which will be assigned to this variable. On the basis of the space delimiter, the two values are cut or separated and assigned to the variables, a and b, respectively. The two values and their sum are then displayed.
Usually, the script executes statements in sequence, but sometimes we need to control this sequence of fl ow on the basis of certain conditions. We will now learn about the different fl ow control statements used in shell scripting.
12.7 FLOW CONTROLLING STATEMENTS
The C shell supports changing the fl ow of the script conditionally, that is, on the basis of certain conditions, the script can be set to execute a desired set of statements. The if-then-else statement is one of the commands that is popularly used in directing the fl ow of the script.
12.7.1 if-then-else StatementsThe if-then-else statement is used in conditional branching, that is, we can make it execute a set of statements out of two depending on the validity of the logical expression included. The syntax for using the if-then-else statement is as follows:
if (logical expression) then statements[else if (logical expression) then statements ][else statements]endif
The logical expression in parentheses is evaluated, returning a Boolean value, true (1) or false (1). The statements in the if block will be executed when the logical expression evaluates to true, otherwise the statements in the optional else block will be executed. An if-else statement is terminated by the endif keyword.
While dealing with fi les, we need to know their attributes, such as whether it is a fi le or directory, if it exists or not, and whether it has desired permissions. To know fi le attributes, fi le testing operators are used. Let us understand how they are used.
File testing operators C shell provides several test operators to know the status of a fi le. The complete list of fi le testing operators used to test the different attributes of the fi les is shown in Table 12.12.

C Shell Programming 583
Examples
(a) The following script checks if the fi lename supplied as a command line argument exists or not. If the fi le exists, it is deleted.checkexist.csh#!/bin/csh if ( -e $argv[1] ) thenrm $1endif
Output$ ls -l xyz.txt-rw-r--r-- 1 root root 20 Mar 10 22:33 xyz.txt
$ ./checkexist.cshSubscript out of range
$ ./checkexist.csh xyz.txt
$ ls -l xyz.txtxyz.txt: No such fi le or directory
-e is one of the fi le operators that checks if the fi le exists. If the fi le exists, it is deleted using the rm command.
(b) The following shell script deletes the two fi les whose names are supplied as command line arguments.delfi les.csh#!/bin/csh if ( -e $argv[1] && -e $argv[2]) then
rm $argv[1] $argv[2]endif
Output$ ls x*.txtx.txt xyz.txt
$ ./delfi les.cshSubscript out of range
$ ./delfi les.csh abc.txtSubscript out of range$ ./delfi les.csh x.txt abc.txt
$ ls x*.txtx.txt xyz.txt
$ ./delfi les.csh x. txt xyz.txt
$ ls x*.txtx*.txt: No such fi le or directory
Table 12.12 List of fi le testing operators
Operator Returns true if
-d File is a directory
-e File exists
-f File is a plain fi le
-o User owns fi le
-r User has read permission
-w User has write permission
-x User has execute permission
-z File has a length of zero

584 Unix and Shell Programming
Through the –e fi le operators, it is checked if both the fi les exist. They are deleted only if both the fi les exist. Assume that the two fi lenames that are supplied through command line arguments to the shell script are x.txt and xyz.txt. Now, only if both the fi les, x.txt and xyz.txt, exist, will the two fi les be deleted, otherwise nothing will happen.
The only limitation that we might observe in the aforementioned shell script is that if either fi le exists, nothing will happen and the script simply terminates without any message to the user. What if we want the user to be informed that no action has taken place as neither of the fi les exist? Let us modify the script to inform the user.delfi les2.csh#!/bin/csh if ( -e $argv[1] && -e $argv[2]) then rm $argv[1] $argv[2] echo "Both fi les, argv[1] and argv[2] are deleted"else echo "Either of the fi le does not exists, no fi le will be deletedendif
Output$ ls x*.txtx.txt xyz.txt
$ ./delfi les2.cshSubscript out of range
$ ./delfi les2.csh x.txt abc.txtEither of the fi le does not exists, no fi le will be deleted
$ ls x*.txtx.txt xyz.txt
$ ./delfi les2.csh x.txt xyz.txtBoth fi les, x.txt and xyz.txt are deleted
$ ls x*.txtx*.txt: No such fi le or directory
In the aforementioned shell script, if both the fi lenames passed through command line arguments exist, then the if block of the if else statement will be executed deleting both the fi les. If either of the fi les does not exist, the else block of the if else statement does not delete any fi le and simply displays the message Either of the fi les does not exist, no fi le will be deleted.
After executing a command, it is quite natural that we become curious to know whether it was successfully executed or not. To know the status of the last command or script we make use of the $? variable. Let us learn more about this.
$? VariableIt reads the exit status of the last command executed. We can also use it after a function call to know the status of the execution of the function. It returns 0 if the last command or script was successfully executed and otherwise returns a non-zero value.

C Shell Programming 585
Examples
(a) The following shell script checks if the given text exists in the given fi le. Both the text and fi lename will be supplied through command line arguments.
checkpattern.csh
#!/bin/csh if ( { grep $argv[1] $argv[2] } ) then echo The text, $argv[1] found in the fi le, $argv[2]else echo The text, $argv[1] not found in the fi le, $argv[2]endif
Output$ cat school.txt101 Anil 75102 Chirag 82103 Kanika 70104 Naman 88105 Suman 68106 John 83
$ ./checkpattern.csh Chirag school.txt102 Chirag 82The text, Chirag found in the fi le, school.txt
$ ./checkpattern.csh Sanjay school.txtThe text, Sanjay not found in the fi le, school.txt
In the output, we fi rst check if the word Chirag exists in the fi le school.txt. The script uses the grep command to fi nd out if the text Chirag appears in the fi le school.txt. After the grep command, its exit status, that is, $? is tested. You may recall that if the last command is successful, its exit status, that is, $? is 0, otherwise it is non-zero. Through the if else statement, the exit status is checked and if it is 0 implying that the text, Chirag, is found in the given fi le school.txt, a message informing the same is displayed. If the exit status is non-zero, it implies that the text, Chirag does not exist in the school.txt fi le and hence a message informing the same is displayed.
(b) In the following script, we implement a validity check to see if the user has supplied the command line arguments or not.
checkargs.csh
#!/bin/csh if ( $#argv == 0 ) then echo No fi le name passed as command line argumentelse if ( -e $argv[1] && -e $argv[2]) then rm $argv[1] $argv[2]endif

586 Unix and Shell Programming
Output$ ls *.txtpqr.txt xyz.txt
$ ./checkargs.cshNo fi le name passed as command line argumentSubscript out of range
$ ./checkargs.csh xyz.txt pqr.txt
$ ls *.txt*.txt: No such fi le or directory
$#argv counts the number of command line arguments passed to the shell script and its value is 0 if no command line argument is passed to the shell script. The shell script checks if the value of $#argv parameter is equal to 0 in which case, a message, No fi le name passed as command line argument, is displayed on the screen. The script checks if both the fi les exist through the -e operators. Only if both the fi les exist are the two fi les deleted.
(c) The following scripts take action on the basis of the number of command line arguments passed to the shell script. If two or more command line arguments are passed, the second command line argument will be displayed. If one command line argument is passed, it is displayed and if no command line argument is passed, a message, No command line argument supplied, is displayed.
dispargs.csh
#!/bin/csh if ( $#argv >= 2 ) then echo $argv[2] else if ( $#argv == 1 ) then echo $argv[1]else echo No command line argument suppliedendif
Output$ ./dispargs.cshNo command line argument supplied
$ ./dispargs.csh school.txtschool.txt
$ ./dispargs.csh school.txt 1010
$ ./dispargs.csh school.txt 10 bank.lst10
(d) The following script makes a copy of a fi le. Both the source and target fi lenames will be provided as command line arguments to the shell script. Before applying the copy command, cp, the shell script performs some validations.

C Shell Programming 587
copyfi le.csh
#!/bin/csh if ( ! -e $argv[1] ) then echo The source fi le, $1 fi le does not existselse if ( -e $argv[2] ) then echo A fi le by name $2 already exists else cp $argv[1] $argv[2] endifendif
Output$ ./copyfi le.cshSubscript out of range
$ ./copyfi le.csh abc.txtThe source fi le, abc.txt fi le does not exists
$ ./copyfi le.csh xyz.txt pqr.txtA fi le by name pqr.txt already exists
$ ./copyfi le.csh xyz.txt uvw.txt
$ cat xyz.txtThis is a test fi le
$ cat uvw.txtThis is a test fi le
The aforementioned shell script fi rst checks if the source fi le whose copy is to be made exists or not. If not, an error message source fi le does not exist is displayed. Thereafter the shell script checks whether the target fi le, that is, the fi le to be created through the copy command, exists. If a fi le already exists in the target fi lename, again an error message is displayed stating the fi le already exists by this name. In the case where the two errors do not occur, a copy of the source fi le is made in the target fi lename.
(e) The following shell script demonstrates string comparison. The user is asked to enter either yes or no. On entering yes, the list of fi les and directories is displayed. stringcompare.csh
#!/bin/cshecho -n "Want to see list of fi les and directories yes/no? "set ans = $<if ($ans == "yes") then lsendif
Output$ ./stringcompare.cshWant to see list of fi les and directories yes/no? no

588 Unix and Shell Programming
$ ./stringcompare.cshWant to see list of fi les and directories yes/no? yesaddext.csh checkexistoutput.png delfi ledir.cshaddextoutput.png convlower.csh. delfi lediroutput.pngBANK.TXT convloweroutput.png fi leslower.csh
(f) The aforementioned shell script will display the list of fi les and directories when the user enters yes but will not display anything if the user enters the string no. Let us modify the script to inform the user that he has responded by entering no.
stringcompare2.csh#!/bin/cshecho -n "Want to see list of fi les and directories yes/no? "set ans = $<if ($ans == "yes") then
lselse
echo "You have entered No"endif
Output$ ./stringcompare2.cshWant to see list of fi les and directories yes/no? noYou have entered No
$ ./stringcompare2.cshWant to see list of fi les and directories yes/no? yesaddext.csh checkexistoutput.png delfi ledir.cshaddextoutput.png convlower.csh. delfi lediroutput.pngBANK.TXT convloweroutput.png fi leslower.csh
(g) The only limitation that we can see in the preceding script is that even when the user enters something other than yes or no, the output of the script will be You have entered No. The preceding script can be made more precise as given here.
stringcompare3.csh#!/bin/cshecho -n "Want to see list of fi les and directories yes/no? "set ans = $<if ($ans == "yes") then
lselse if ($ans == "no") then
echo "You have entered No" else echo "You have entered something other than yes or no"
endif

C Shell Programming 589
Output$ ./stringcompare3.cshWant to see list of fi les and directories yes/no? noYou have entered No
$ ./stringcompare3.cshWant to see list of fi les and directories yes/no? yYou have entered something other than yes or no
$ ./stringcompare3.cshWant to see list of fi les and directories yes/no? yesaddext.csh checkexistoutput.png delfi ledir.cshaddextoutput.png convlower.csh. delfi lediroutput.pngBANK.TXT convloweroutput.png fi leslower.csh
We can see that the response entered by the user is assigned to variable ans. If the variable, ans, is assigned yes, then the ls command is executed to display the names of fi les and directories in the current directory. If the variable, ans, is not assigned the text, yes, then the else if statement checks if it is assigned no. If the ans variable contains no, then the message You have entered no is displayed. In case the ans variable is assigned neither yes nor no, a message, You have entered something other than yes or no is displayed.
(h) The following shell script moves the fi lename entered by the user to a directory named projects. The directory projects does not exist and is created by the shell script.movefi les.csh
#!/bin/csh echo -n "Enter a fi le name "set fi lename = $<if (-e $fi lename) then if (! -d ~/projects) then mkdir ~/projects endif mv $fi lename ~/projectselse echo The fi le $fi lename does not exist exitendif
Output$ ls xyz.txtxyz.txt
$ ls /projects/projects: No such fi le or directory
$ ./movefi les.cshEnter a fi le name bank.lstThe fi le bank.lst does not exist

590 Unix and Shell Programming
$ ./movefi les.cshEnter a fi le name xyz.txt
$ ls xyz.txtxyz.txt: No such fi le or directory
$ ls /projectsxyz.txt
The fi lename entered by the user is assigned to fi lename. Through the -e operator, a test is carried out to check if a fi le in that name exists. If no fi le exists by that name, an error message stating fi lename does not exist is displayed. Once it is confi rmed that a fi le exists in the given fi lename, the shell scripts test if the projects directory exists or not. If the projects directory does not exist, it is created and fi nally the fi le is moved into that directory.
(i) The following shell script demonstrates the use of the if else statements in performing several types of conditional branching. The script asks the user to enter a student name and displays its marks. For instance, if the name entered is ajay, its assumed marks is displayed. Similarly, the marks of other studentnames are also displayed.demoifelse.csh
#!/bin/csh echo -n "Enter a name: "set name = $<if ( $name == "ajay" ) then echo Marks of $name is 50else if ( $name == "manish" ) then echo Marks of $name is 70else if ( $name == "omy" ) then echo Marks of $name is 80else echo Marks of $name is 85endif
Output$ ./demoifelse.cshEnter a name: ajayMarks of ajay is 50
$ ./demoifelse.cshEnter a name: manishMarks of manish is 70
$ ./demoifelse.cshEnter a name: omyMarks of omy is 80
$ ./demoifelse.cshEnter a name: bharatMarks of bharat is 85

C Shell Programming 591
The script asks the user to enter the name of the student, which is assigned to the variable, name. Thereafter string comparison is done to see if the entered name is ajay, manish, omy, or something else and the corresponding marks of the name is displayed.
Can we jump to any desired statement in a shell script? Yes, C shell supports branching to any statement using the goto statement.
12.7.2 Branching with gotoIn general, commands in a shell script are executed one after another in succession. Using the goto command, we can change the fl ow of the program in a desired manner.
Syntax goto label
The shell will search for the statement that begins with the specifi ed label followed by a colon (:). On fi nding the given label, the execution resumes with the statement following the label. If the given label is not found, then an error message is displayed followed by the termination of the script.
Examples
(a) The following shell script displays the sequence of numbers from 1 to 10.dispsequence.csh
#!/bin/csh@ count = 1dispvalue:echo $count@ count++if ($count <=10) goto dispvalue
Output12345678910
A variable, count, is initialized to value 1. The value of this variable is displayed, printing 1 on the screen. The value of the count variable is then incremented by 1 followed by comparing it with the fi nal value 10. If the value of the count variable is less than 10, a branch or jump will take place at the top in the script where the label dispvalue occurs, hence displaying the incremented value of the variable. This is followed by another increment of the value of the variable. In other words, the script will keep branching

592 Unix and Shell Programming
or jumping to the top statement in the script, repeatedly executing the statements in between until the value of this variable exceeds the value 10.
(b) The following shell script asks the user to enter a number and prints the message indicating whether the entered number is even or odd. The script will continue to execute a desired number of times. evenodd.csh
#!/bin/cshmorevalue:echo -n "Enter a number: "set n = $<if ($n % 2 == 0) then echo "The number is even"else echo "The number is odd"endifecho -n "More numerical yes/no? "set ans = $<if ($ans == "yes") goto morevalue
Output$ ./evenodd.cshEnter a number: 20The number is evenMore numerical yes/no? yesEnter a number: 5The number is oddMore numerical yes/no? yesEnter a number: 10The number is evenMore numerical yes/no? no
The user is prompted to enter a value, which is assigned to the variable n. The mod operator is applied to the value in this variable and the resulting remainder is tested. The modulo 2 operation results in 0 for even values and 1 for odd values. Hence, an appropriate message indicating whether the entered number is even or odd is displayed, depending on the result of the mod operation. The user is then asked if there are more numerals to be tested. If the user enters yes, the script will branch or jump to the top where the label, morevalue occurs, hence repeating the procedure of asking another numerical value and testing it for even or odd. The script continues to execute until the user enters no.
(c) The following shell script asks the user to enter a number between 1 and 4 and prints it in words. The user is asked to re-enter a value if a value outside the range is entered.
numinwords.csh#!/bin/csh

C Shell Programming 593
entervalue:echo -n "Enter a number between 1 and 4: "set numb = $<if ($numb == 1) then echo "One"else if ($numb == 2) then echo "Two"else if ($numb == 3) then echo "Three"else if ($numb == 4) then echo "Four"else echo "Invalid value. Please try again" goto entervalueendif
Output$ ./numinwords.cshEnter a number between 1 and 4: 2Two
$ ./numinwords.cshEnter a number between 1 and 4: 4Four$ ./numinwords.cshEnter a number between 1 and 4: 9Invalid value. Please try againEnter a number between 1 and 4: 5Invalid value. Please try againEnter a number between 1 and 4: 1One
The value entered by the user is assigned to the variable numb. Through the series of checks via the if else statement, the value in this variable is tested and accordingly its value in text form is displayed. If the value in the variable does not fall within the range 1–4, the script will branch or jump to the top of the label, entervalue, asking the user to re-enter a value within the range 1–4. The script will keep jumping to the top and asking the user for a new value until a value within the range is entered.
The exit status of the script or the last command is heavily used for determining whether their execution was a success or a failure. Let us learn more about the exit command.
12.7.3 exit CommandThe exit command terminates a script and returns the status to the parent process. The returned status can be used in analysing the execution of a script. Successful execution of a script returns a value 0, whereas an unsuccessful one returns a non-zero value. This can

594 Unix and Shell Programming
then be used to analyse and debug the script. The exit command may return a value in the 0–255 range.
Syntax exit [n]
Here, n is the exit status returned to the parent process.
Examples
(a) exit 0The aforementioned command sets the return status of the shell to 0. This return status can be used to determine the status of an executed shell script.
Note: When a script ends with an exit that has no parameter, the exit status of the script will be set to the exit status of the last command executed in the script.
(b) The following script asks the user to enter a number and checks if the entered number is even or odd and hence sets the exit status accordingly. evenodd2.csh
#!/bin/cshecho -n "Enter a number: "set n = $<if ( $n % 2 == 0) then exit 1else exit 2endif
Output$ ./evenodd2.cshEnter a number: 10
$ echo $?1
$ ./evenodd2.cshEnter a number: 7
$ echo $?2
In this example, if the value entered by the user is an even value, the execution of the mod operator on it will result in the value 0 and hence will set the return status of the script to 1. Similarly, if the value entered by the user is an odd value, the return status of the script will be set to 2.
After execution of the script, we can echo $? to ascertain the exit status of the script. On the basis of the output displayed by $? we can know the location where the script terminated. Not only can we use $? to know the exit points of the script, but also to debug it. In addition, we can put the aforementioned code in a function, and in the statement following the function call, we can use $? to ascertain the return status of the function and accordingly take further action.
C Shell Programming 595
Sometimes, we come across a situation where we have to check several conditions and hence, we have to use a bunch of if else statements. Instead, we can also substitute the if else statements with the switch statement (discussed in detail in the following section), which is easier to use and more readable.
12.7.4 switch, case, breaksw, and endsw StatementsThe switch statement is a substitute for several if else statements. This implies that when we need several branchings to occur in a shell script, the switch statement is preferred as it is more readable when compared to a cluster of if else statements. In the switch statement, an expression is supplied to be evaluated followed by a series of case statements. Each case statement carries a pattern followed by statement(s). If the pattern associated with the case statement matches with the expression of the switch statement, the statements of that case will be executed. The block of statements of each case statement is terminated by the breaksw keyword. The breaksw statement is used to exit from the switch statement. In case the expression of the switch statement doesn’t match any value of the case statement, the statements associated with the default statement will be executed. The switch statement ends with the endsw keyword.
Syntax switch (expression)
case pattern1: statements breaksw case pattern2: statements breaksw : : : : : : default: statements breaksw endsw
Examples
(a) The following shell script prompts the user to enter the fi lename to delete. The entered fi lename is deleted after confi rmation.delfi le.csh
#!/bin/cshecho -n "Enter fi le name to delete: "set fi lename = $<echo -n "Sure, want to delete this fi le yes/no? "set reply=$<switch ($reply) case [Yy]*: rm $fi lename

596 Unix and Shell Programming
echo "File $fi lename is deleted" breaksw default: echo "File not deleted" breakswendsw
Output$ ls -l sch.txt-rw-r--r-- 1 root root 6 Mar 10 23:17 sch.txt
$ ./delfi le.cshEnter fi le name to delete: sch.txtSure, want to delete this fi le yes/no? noFile not deleted
$ ls -l sch.txt-rw-r--r-- 1 root root 6 Mar 10 23:17 sch.txt
$ ./delfi le.cshEnter fi le name to delete: sch.txtSure, want to delete this fi le yes/no? yesFile sch.txt is deleted
$ ls -l sch.txtsch.txt: No such fi le or directoryThe entered fi lename is assigned to the variable fi lename. The user is then asked for confi rmation before deleting the fi le. If the user enters Yes or yes, the fi le is deleted. The pattern [Yy]* fi nds a match for any word that begins with the letter y, be it in upper or lower case. If the user enters something else, the fi le is not deleted and a message informing the same is displayed.
(b) The following shell script checks the command line argument passed to it and accordingly displays a message.checkargs2.csh
#!/bin/csh switch ($1) case ajay: echo "The argument passed is ajay" breaksw case a?: echo "The argument passed is two letter word beginning with letter a" breaksw case a*: echo "The argument passed is a word beginning with letter a " breaksw

C Shell Programming 597
default: echo "The argument passed is something else" breakswendsw
Output$ ./checkargs2.csh ajayThe argument passed is ajay
$ ./checkargs2.csh anThe argument passed is two letter word beginning with letter a
$ ./checkargs2.csh abilityThe argument passed is a word beginning with letter a
$ ./checkargs2.csh chiragThe argument passed is something elseIn the aforementioned script, the student name passed as a command line argument is checked through the switch command for the following things:1. If it is the word, ajay2. If it is the word consisting of two characters beginning with character a3. If it is a word of any number of characters or digits beginning with character a4. If it is some other textAn appropriate message is displayed depending on the command line argument passed to the script.
(c) The following script asks the user to enter a student name. If the student name entered is ajay, manish, or omy, then their respective assumed marks 50, 70, and 80 are displayed. If a student name other than these three is entered, a default mark of 85 is displayed and the exit status is set to 1 before exiting the script.demoswitch.csh
#!/bin/cshecho -n "Please enter a name: "set name = $<switch ( $name ) case [Aa]jay: echo Marks of $name is 50 breaksw case [Mm]anish: echo Marks of $name is 70 breaksw case [Oo]my: echo Marks of $name is 80 breaksw default: echo Marks of $name is 85 exit 1endsw

598 Unix and Shell Programming
Output$ ./demoswitch.cshPlease enter a name: ajayMarks of ajay is 50
$ ./demoswitch.cshPlease enter a name: ManishMarks of Manish is 70
$ ./demoswitch.cshPlease enter a name: omyMarks of omy is 80
$ ./demoswitch.cshPlease enter a name: bharatMarks of bharat is 85
(d) The following script asks the user to enter a fi lename to delete. If the entered name is not of a fi le, the script ends by displaying a message stating that the entered name is not a fi le. If the entered name is of a fi le, the user is asked for confi rmation to delete the fi le. The response entered by the user is assigned to the variable ans. If the user responds by entering yes, the fi le is deleted. If the user types no, the fi le is not deleted. A message, Please enter either yes or no, is displayed if the user types a text other than yes or no.delfi le2.csh#!/bin/cshecho -n "Enter fi le name to delete: "set fi lename = $<if (-f $fi lename) then echo -n "Sure want to delete this fi le yes/no: " set ans = $< switch ($ans) case [yY][eE][sS]: rm ${fi lename} echo "The fi le is deleted" breaksw case [nN][oO]: echo "The fi le is not deleted" breaksw default: echo "Please enter either yes or no" breaksw endswelse echo "$fi lename is not a fi le"endif
Output$ ./delfi le2.csh

C Shell Programming 599
Enter fi le name to delete: accountsaccounts is not a fi le
$ ./delfi le2.cshEnter fi le name to delete: xyz.txtSure want to delete this fi le yes/no: nPlease enter either yes or no
$ ./delfi le2.cshEnter fi le name to delete: xyz.txtSure want to delete this fi le yes/no: yPlease enter either yes or no
$ ./delfi le2.cshEnter fi le name to delete: xyz.txtSure want to delete this fi le yes/no: noThe fi le is not deleted
$ ./delfi le2.cshEnter fi le name to delete: xyz.txtSure want to delete this fi le yes/no: yesThe fi le is deleted
$ ls xyz.txtxyz.txt: No such fi le or directory
Sometimes we need to execute a few statements several times. We can do so with the help of loops. Let us begin with the study of loops.
12.8 LOOPS
As the name suggests, loops refer to an enclosed set of statements tied with a logical expression. The loop will execute as long as the logical expression is true, that is, all the enclosed statements will keep executing until the knot of the loop opens. The knot of the loop opens when the included logical expression evaluates to false. Let us begin by learning about the while loop.
12.8.1 while end LoopA loop, as we know, is used for repeating a set of statements a specifi ed number of times. The while loop allows us to execute a set of statements as long as the specifi ed logical expression is true.
Syntax while (logical expression)
statements end
If the logical expression evaluates to the Boolean value, true, the statements in the body of the while loop are executed. After an iteration, on reaching the end statement of the while loop, again the logical expression is evaluated. If the logical expression again evaluates to true, the body of the while loop is executed, otherwise the loop exits and the execution of

600 Unix and Shell Programming
the shell script continues from the statement following the end statement. The statements in the body of the while loop will keep executing as long as the logical expression evaluates to true.
Example The following script displays the sequence of numbers from 1 to 10.
dispseq.csh
#!/bin/csh@count = 1while ($count <= 10) echo $count set count = `expr $count +1`end
Output12345678910
The variable count is initialized to value 1. In the while loop, the value of this variable is displayed, following which its value is incremented by 1. The loop will execute until the value of the count variable becomes more than 10. In the preceding script we observe that the value of the count variable is incremented via the expr command.
Let us modify the script to increment the value of the count variable through the increment operator ++.
dispseq2.csh
@ count = 1@ limit=10while ( $count <= $limit ) echo $count @ count++end
Output12345

C Shell Programming 601
678910
The variables count and limit are set to values 1 and 10 respectively. The while loop is set to execute as long as the value of the count variable is less than the limit variable. In the while loop, the value of this variable is displayed following which its value is incremented by one.
Examples
(a) The following script displays the sequence of numbers from 10 to 1.seqreverse.csh
#!/bin/csh@ n = 10while ($n) echo $n @ n--end
Output10987654321The variable n is set to value 10. The while loop will execute until its logical expression evaluates to false. Any value other than 0 is considered true and the value 0 is considered false. It means that the while loop will execute until the value of this variable becomes 0. In the while loop, the value of the variable is displayed following which its value is decremented by one. Hence, the loop will display values from 10 to 1.
(b) The following shell script displays the multiplication table of 5 from 5 till 50, that is, the output will be 5, 10, 15, …, 50.table5.csh
#!/bin/csh@count = 1while ($count <= 10) set $num=`expr $count \* 5` echo $num set count = `expr $count +1`end

602 Unix and Shell Programming
Output5101520253035404550We can see that a variable, count, is initialized to value 1. A while loop is made to execute until the value of the count variable becomes greater than 10. The value of this variable is multiplied by fi ve to print the table.
(c) The following script displays the message Hello World! fi ve times.disphello.csh#!/bin/csh@ n = 1while ($n <=5) echo Hello World @ n++end
OutputHello WorldHello WorldHello WorldHello WorldHello WorldWe can see that n is initialized to value 1 and the while loop is set to execute fi ve times, that is, until the value of n exceeds 5. In the while loop, the message Hello World is displayed and the value of variable n is incremented by 1. This implies that the while loop will execute fi ve times, displaying the message, Hello World, in each iteration.
12.8.2 repeat Command The repeat command is used for repeatedly executing a command a specifi ed number of times.
Syntax repeat count command
Here, count is an integer value representing the times of repetition. A zero value for count suppresses the execution of the command.
Examples
(a) repeat 5 echo Hello WorldThis statement displays the text Hello World fi ve times.

C Shell Programming 603
(b) repeat 5 echo Hello World! >xyz.txtFive lines of the text Hello World! will be written in the fi le xyz.txt.
(c) The following script displays all the command line arguments that are passed to the shell script.dispallargs.csh
#!/bin/csh while ($#argv != 0 ) echo $argv[1] shiftend
Output$ ./dispallargs.csh school.txt 10 4 bank.lstschool.txt104bank.lst
You may recall that the shift command shifts or renames the elements in the command line arguments array $argv[1], $argv[2], etc. On giving the command without the parameters, the default value 1 is considered and hence the element in $argv[2] is assigned to the $argv[1] element, the value of $argv[3] element is assigned to the $argv[2] element, and so on. In addition, the value of $#argv that represents the count of the command line arguments is also automatically reduced by one on execution of the shift command.
In the aforementioned script the command line arguments school.txt, 10, 4, and bank.lst will be assigned to the positional parameters $argv[1], $argv[2], $argv[3], and $argv[4] respectively. On displaying the value argv[1], the value in this positional parameter, school.txt, is displayed. In the while loop, on executing the shift command, the positional parameter, $argv[2], is renamed $argv[1], $argv[3] is renamed $argv[2], $argv[4] is renamed $argv[3], and $#argv is decremented to 3. Again, the while loop executes, displaying the value in the positional parameter, $argv[1], which was earlier $argv[2] (10). The loop continues until the count of the argument $#argv becomes 0. The count of the command line arguments, $#argv, becomes 0 when all the arguments are shifted or renamed.
(d) The following shell script checks the status of all the command line arguments. If the command line arguments include the name of any fi le, then the count of the number of lines in it is displayed. For other command line arguments, the message, The fi le is not a regular fi le, is displayed.countlines.cshwhile ($#argv) if (-f $argv[1]) wc -l $argv[1] else echo "$argv[1] is not a regular fi le"

604 Unix and Shell Programming
endif shift end
Output$ ./countlines.csh school.txt xyz.txt merge.txt 6 school.txt 1 xyz.txt 2 merge.txt
The next loop that we are going to discuss is the one that is commonly used to apply a set of statements or a desired processing on a set of values. The name of the loop is foreach end loop. We will now learn more about it.
12.8.3 foreach end LoopThe foreach loop is used for iterating through the values provided in the given list.
Syntax foreach var (list) statements; end
The variable var will be assigned the values given in the list one by one. The list may contain strings, numerals, and even wild-card expressions. The statements between foreach and end keywords are executed once for each item in the list. This implies that var is assigned the fi rst value from the list and the body of the loop is executed. Then, the second value from the list is assigned to the variable, var, and again the loop is executed. The procedure is repeated for all the values in the list. The current value from the set can be accessed with the variable $var.
Example The following shell script displays the sequence of numbers from 1 to 10.
dispsequence2.csh
#!/bin/cshforeach i ( 1 2 3 4 5 6 7 8 9 10 ) echo $iend
Output12345678910
The variable, i, is assigned a value from the set and the loop is executed. After an iteration, the next value in the set is picked up, assigned to this variable, and the loop is executed again.

C Shell Programming 605
The procedure continues and all the values in the set are assigned to the variable i.The next statement will help us in skipping the body of a loop.
continue statement The continue command takes no arguments and is used to skip the following statements in the loop and re-invoke the loop with the next iteration. This implies that the execution resumes from the fi rst statement in the loop with the next iterative value after skipping the statements following the continue command.
Example The following shell script displays all the even values between 1 and 10.
dispeven.csh
#!/bin/cshforeach i ( 1 2 3 4 5 6 7 8 9 10 ) if ( $i % 2 == 1 ) then continue endif echo $iend
Output246810
The variable i is assigned a value from the set of given values, one by one. The mod operator is applied to each value assigned to this variable. If the result of the mod operator is 1, meaning the value in the variable, i is odd, as a consequence, the continue statement is executed resulting in the skipping of the body of the foreach loop. Not only is the body of the foreach loop skipped but the next value in the set is picked up by this variable. If the result of the mod operator is 0, meaning the value in the variable i is even, its value is displayed on the screen.
In case we want to break and exit from the loop, we generally use the break statement, which is discussed in the subsequent section.
break statementThe break command terminates the current loop and exits from it. The command can be used with both the loops, foreach and while. The script resumes execution from the statement following the end statement of the loop.
Note: In case of nested loops, the break statement terminates the current loop and not the outer loop.
Examples
(a) The shell script displays the fi rst 10 numbers in sequence.dispsequence3.csh#!/bin/csh

606 Unix and Shell Programming
foreach i ( 1 2 3 4 5 6 7 8 9 10 11 12) if ( $i == 11 ) then break endif echo $iend
Output12345678910The variable i will be assigned the values specifi ed in the given set one by one. For every value assigned to the variable, the body of the foreach loop is executed printing the value in the variable i. In this loop, a check is made to see if the value of the variable is equal to 11 in which case the loop is terminated. The script displays all the values specifi ed in the set until it comes across the value 11.
(b) The following shell script adds a few numerical values specifi ed in the set.addfewset.csh
#!/bin/csh@ s=0foreach i ( 5 8 6 9 2 ) @ s +=$iendecho "The sum of values is $s"
OutputThe sum of values is 30Variable i is assigned the values given in the set one by one. With every value assigned to the variable, the body of the foreach loop is executed where the value in variable i is added to variable s. When all the values in the set are processed, their addition stored in variable s is displayed.
(c) The following shell script displays values in a given set one by one.dispvalset.csh
#!/bin/cshecho The names of students are foreach studentnames(ajay manish omy bharat gunjan) echo $studentnames end

C Shell Programming 607
OutputThe names of students are ajay manish omy bharat gunjan
The variable studentnames is assigned values from the given set one by one. With every value assigned to this variable, the body of the foreach loop is executed to display the value assigned to it. Firstly, the studentnames variable will be assigned the text, ajay, and the loop is executed. In the foreach loop, the value assigned to the studentnames vari-able, that is, ajay, is displayed. After the fi rst iteration, the next value in the set, manish, will be assigned to the studentnames variable, and again the loop is executed to display the text manish assigned to it. The loop continues to execute until all the text in the set are displayed via the studentnames variable.
(d) The following shell script displays all the names of the fi les and directories in the current directory after converting them to lower case.fi leslower.csh
#!/bin/cshforeach fi le (`ls`) echo $fi le | tr '[A-Z]' '[a-z]' end
Output$ lsBANK.TXT fi leslower.csh school.txt xyz.txt
$ ./fi leslower.cshbank.txtfi leslower.cshschool.txtxyz.txt
The ls command is executed and the resulting names of all the fi les and directories in the current directory are assigned to the variable fi le one by one. Through the foreach loop, each name assigned to the fi le variable is displayed on the screen after translating the upper-case characters in the fi lename, if any, to lower case. Hence, all the names of the fi les and directories are displayed in lower-case letters.
(e) The following shell script displays all the names of the fi les and directories in the current directory that have the extension .png. disppng.csh
#!/bin/cshforeach i ( *.png ) echo ${i} end

608 Unix and Shell Programming
Outputaddextoutput.pngcheckargs2output.pngcheckargsoutput.pngcountlinesoutput.pngdelfi le2output.pngdelfi lediroutput.pngdispargsoutput.pngdispexistoutput.pngThe names of the fi les and directories in the current directory that have the extension .png are assigned to variable i one by one. Through the foreach loop, all the names assigned to the variable are displayed on the screen.
(f) The following shell script accesses every command line argument passed to it. If the command line argument includes the name of an existing fi le, its name is displayed.dispexist.csh
#!/bin/csh foreach fi le ($argv[*]) if (-e $fi le) then echo $fi le endif end
Output$ ./dispexist.csh school.txt abc.txt bank.lst xyz.txtschool.txtxyz.txtThe $argv[*] parameter represents the list of command line arguments passed to the script. Through the foreach loop, each command line argument is accessed from the $argv[*] parameter and assigned to the variable fi le. The fi le test operator -e checks if any fi le exists in the current directory by the name assigned to the fi le variable. If the name in the fi le variable matches with an existing fi le, that fi lename is displayed.
(g) The following shell script displays the names of all the directories in the current directory.alldirs.csh#!/bin/cshforeach fi le ( `ls` ) if ( ! -f $fi le ) then echo $fi le endifend
Output$ ./alldirsaccountsThe ls command is executed and the resulting names of all the fi les and directories in the current directory are assigned to variable fi le one by one. Through the foreach loop, each

C Shell Programming 609
name assigned to fi le is tested through the fi le test operator, -f, to know if it belongs to a fi le. If the name in variable fi le is not of a fi le (i.e., it represents a directory), the name is displayed. The procedure is repeated for all the directory names in the current directory.
(h) The following shell script adds an extension .new to all the names of the fi les that are in upper case in the current directory.addext.csh#!/bin/cshforeach i ([A-Z]*) mv $i $i.new end
Output$ ls B*.*BANK.TXT$ ls S*.*School.lst School.txt
$ ./addext.csh
$ ls B*.*BANK.TXT.new
$ ls S*.*School.lst.new School.txt.new
All the names of the fi les and directories beginning with upper-case letters in the current directory are assigned to variable i one by one. Through the foreach loop, each fi lename in the variable is moved or renamed by adding an extension .new to it. For instance, if the fi lename is BANK.TXT, it will be renamed BANK.TXT.new.
(i) The following shell script makes copies of all the fi les in the current directory having the extension .txt with the extension .dat.copydiffext.csh
#!/bin/csh foreach fi le (*.txt) set newfi le = `basename $fi le .txt` cp $fi le $newfi le.datend
Output$ ls *.txtbank.txt school.txt
$ ls *.dat*.dat: No such fi le or directory
$ ./copydiffext.csh
$ ls *.txtbank.txt school.txt
$ ls *.datbank.dat school.dat

610 Unix and Shell Programming
All the names of fi les with the extension .txt in the current directory are assigned to variable fi le one by one. The basename, that is, primary name of the fi le is extracted from the fi lename after removing its extension, .txt, and assigned to the variable newfi le. Thereafter, a copy of the fi le is made by adding the extension .dat to the extracted primary name.
(j) The following shell script converts all the fi les and directory names in the current directory to lower case.convlower.csh
#!/bin/cshforeach fi le (`ls`) set newfi le = `echo $fi le | tr '[A-Z]' '[a-z]'` if ($newfi le == $fi le) then continue endif mv $fi le $newfi le end
Output$ ls B*.*BANK.TXT$ ls S*.*School.lst School.txt$ ./convlower.csh$ ls B*.*B*.*: No such fi le or directory$ ls b*.*bank.txt$ ls S*.*S*.*: No Such fi le or directory$ ls s*.*school.lst stringcompare2output.png.newschool.txt stringcompare3.csh.new
The ls command is executed to assign all the names of fi les and directories in the current directory to the fi le variable one by one. Through the foreach loop, every name assigned to variable fi le is translated to lower-case letters and assigned to variable newfi le. A check is made to ascertain if the fi le or directory name is already in lower case. If this is the case, no action is taken and the next fi le in the sequence is picked up. If the fi le or directory name is not in lower case, it is renamed in its lower-case form that is stored in the variable newfi le.
(k) The following shell script checks each of the command line arguments passed to the script and informs which of them are options and which are fi lenames.checkargs3.csh
#!/bin/cshforeach arg ($argv)

C Shell Programming 611
if ( $arg =~ -* ) then echo $arg Argument is an option else echo $arg Argument is a fi lename endifend
Output$ ./checkargs3.csh -a-a Argument is an option
$ ./checkargs3.csh xyz.txtxyz.txt Argument is a fi lename
As we know, all the command line arguments passed to the shell script are assigned to the array $argv. Using the foreach loop, each command line argument in the $argv array is picked and assigned to variable arg one by one. The argument assigned to the arg variable is checked to see if it begins with a - (hyphen). If the arg variable begins with a hyphen, it means it is an option, otherwise it is a fi lename and a message is displayed on the screen accordingly.
(l) The following shell script retrieves the names of fi les and directories in the current directory and assigns each name to variable fi le. Each name assigned to this variable is checked to ascertain if it is a fi le or directory and accordingly a message is displayed asking if the given fi le or directory has to be deleted. If the user enters yes, the specifi ed fi le or directory is deleted.delfi ledir.csh
#! /bin/csh foreach fi le (`ls`) if ( -f $fi le ) then echo -n "Delete the fi le ${fi le} (y/n)?" else echo -n "Delete this directory ${fi le} (y/n)? " endif set ans = $< switch ($ans) case n: breaksw case y: rm -r $fi le breaksw endswend
Output$ ./delfi ledir.cshDelete the fi le a.dat (y/n)?yDelete the fi le a.txt (y/n)?n

612 Unix and Shell Programming
Delete the fi le bank.dat (y/n)?yDelete the fi le bank.txt (y/n)?nDelete the fi le checkexist.csh (y/n)?nDelete the fi le convlower.csh (y/n)?nDelete this directory projects (y/n)? y
The ls command is executed and all the names of the fi les and directories are assigned to variable fi le one by one. Each name assigned to this variable is tested using the -f operator to fi nd out if it is a fi le or directory. If the name assigned to the fi le variable is of a fi le, the message, Delete the fi le fi le_name (y/n)? is displayed, otherwise, a message, Delete this directory directory_name (y/n)? is displayed. The response typed by the user is assigned to the variable, ans. If the user types the character n, indicating that no fi le or directory be deleted, the script exits from the switch statement without doing anything to the said fi le or directory. If the user types character y, confi rming the said fi le or directory be deleted, then through rm -r, the said fi le or directory is recursively deleted. The procedure is repeated for every fi le or directory assigned to the fi le variable. We will now learn how to deal with a collection of values through arrays.
12.9 ARRAYS
Arrays are a set of consecutive memory locations where each memory location stores an item. Each item in an array is accessed through subscripts beginning from 1. An array is created by enclosing some data in parentheses.
Syntax array_name(data1 data2 data3...)
The data within the parentheses is separated by a space. The data can be enclosed in single quotes, back quotes, or double quotes as desired.
Examples
(a) set countries=(U.S.A U.K. India Australia)This example creates an array, countries, consisting of four elements, U.S.A, U.K., India, and Australia. These array elements can be accessed using the subscripts 1, 2, 3, and 4. Observe the following examples:
(i) echo countries[2]This displays the second array element U.K.
(ii) echo countries[4]This displays the fourth array element Australia.
(iii) echo countries[2-3]This displays the second and third array elements U.K. and India.
(iv) echo countries[3-]This displays elements from the third array till the end, that is, India Australia.
(v) echo $#countriesThis displays the length of the array countries.
(vi) set places=($countries)This creates an array places and assigns all the array elements of countries to it.

C Shell Programming 613
(vii) set countries=($countries Japan)This adds an element Japan to the end of an existing array.
(viii) set countries=(China $countries)This adds an element China to the beginning of an existing array.
(ix) set countries=()This makes the countries array empty.
(x) unset countriesThis removes the defi nition of the array countries.
(b) The following shell script demonstrates how an array is defi ned and how its elements are accessed.
demoarray.csh
#! /bin/csh set studentnames = (ajay manish omy bharat gunjan) echo "The list of student names is $studentnames "echo "The list of student names is shown below:"foreach name($studentnames) echo "$name"end
OutputThe list of student names is ajay manish omy bharat gunjanThe list of student names is shown below:ajay manish omy bharat gunjan
An array, studentnames, is defi ned consisting of fi ve elements, ajay, manish, omy, bharat, and gunjan. The fi rst echo statement displays the complete array with all its elements in a row. Thereafter, using foreach, all the array elements of the studentnames array are accessed and assigned to variable name one by one and displayed on the screen.
(c) The following shell script displays the length of an array and accesses its element using the subscripts.
arrayaccess.csh
#!/bin/cshset studentnames = (ajay manish omy bharat gunjan) echo Number of student names are $#studentnamesecho The fi rst name is $studentnames[1]echo The second name is $studentnames[2]echo The last name is $studentnames[$#studentnames]
OutputNumber of student names are 5The fi rst name is ajay

614 Unix and Shell Programming
The second name is manishThe last name is gunjan
The fi rst echo statement displays the length of studentnames. Knowing that the fi rst array element is found at subscript 1, the next two echo statements will print the fi rst and second elements of the name array respectively. Since $#studentnames returns the length of the array, that is, 5, the third echo statement will display the array element at subscript location 5, that is, the last element of the array.
(d) The following shell script displays all the elements of the studentnames array.disparray.csh#!/bin/csh set studentnames = (Ajay Bharat Omy Manish Gunjan) @ i = 1 while( $i <= $#studentnames ) echo "$studentnames[$i]" @ i++ end
OutputAjay Bharat Omy Manish Gunjan
In order to access array elements using the subscript, variable i is initialized to value 1, as an array begins from the subscript location 1. A while loop is executed up till the length of the array accessing each array element using variable i as its subscript. After displaying each array element, the value of i is incremented by 1 to access the next element. The loop executes until the value of the variable exceeds the length of the array.
(e) The following shell script displays all the elements of the studentnames array using the shift command.disparray2.csh#!/bin/cshset studentnames = (ajay manish omy bharat gunjan) while ( $#studentnames > 0 ) echo "$studentnames[1]" shift studentnamesend
Outputajay manish omy bharat gunjan

C Shell Programming 615
A while loop is executed as long as the length of the studentnames array is greater than or equal to 1. Within the loop, the fi rst array element is displayed. After displaying the fi rst element, the array is shifted. The shift command shifts the second array element to the fi rst subscript location, third array element to the second subscript location, and so on, hence reducing the size of the array by one. In other words, the value of the studentnames[2] element will be assigned to studentnames[1], studentnames[3] element will be assigned to studentnames[2], and so on. After every shift command, the loop executes to display the studentnames[1] element, which is nothing but the next element in sequence. This implies that the shift command is executed in a loop to left shift the array elements to the location, studentnames[1], one by one. The procedure is repeated until the array size reduces to 0.
Note: The shift command when used with an array not only reduces the size of the array by 1 but also shifts the array elements towards the fi rst subscript location.
(f) The following shell script determines if the student name passed as the command line argument to the shell script exists in the given array or not.searcharray.csh
#!/bin/cshset studentnames = (ajay bharat manish gunjan omy) while ($argv[1] != $studentnames[1]) shift studentnames if ($#studentnames == 0) then echo "$argv[1] is not present in the list of student names" exit 1 endif endecho "$argv[1] is present in the list of student names"
Output$ ./searcharray.cshSubscript out of range
$ ./searcharray.csh ajayajay is present in the list of student names
$ ./searcharray.csh omyomy is present in the list of student names
$ ./searcharray.csh sanjaysanjay is not present in the list of student names
The studentnames array is made up of fi ve elements, ajay, bharat, manish, gunjan, and omy. A while loop is used to check if the student name sent as a command line argument matches with the fi rst array element, name[1]. If they match, then a message is displayed indicating that the supplied student name is present in the list of student names. If they do not match, the studentnames array is shifted through the shift command. You may recall that the shift command left shifts the array element, that is, the studentnames[2]

616 Unix and Shell Programming
element will shift to the studentnames[1] location, studentnames[3] will shift to the studentnames[2] location, and so on reducing the size of the array by 1. This loop is used again to check if the student name sent through the command line argument matches with the array element studentnames[1]. The studentnames[1] element is basically the second array element shifted to the studentnames[1] location. The while loop continues to execute till either the array size is reduced to zero or a match is found. If the array size reduces to 0, a message is displayed informing us that the supplied student name is not present in the list of student names, and the script is terminated setting the exit status to value 1.
(g) The following shell script creates an array from the date command and displays the desired information from it.arrfromdate.csh#!/bin/cshecho Date is `date`set today=`date`echo Today is $today[1] and the year is $today[4]
OutputDate is Monday 27 February 2012 03:45:06 PM ISTToday is Monday and the year is 2012
The fi rst echo command displays the system date. The system date is then assigned to the variable today. This variable will then act as an array consisting of six elements. The fi rst and sixth elements of the array that represent the week, day, and year are displayed.
C shell also supports associative arrays. Associative arrays take subscripts, like ordinary arrays do, but here the subscripts are arbitrary strings (or keys) associated with the value stored in the element of the array. We need to use typeset -A to create an associative array.
Syntax typeset –A assoc_array_name
Here, assoc_array_name represents the associative array.
Example typeset -A capitals capitals=(India Delhi Australia Sydney UK London )
The two preceding statements defi ne an associative array by the name capitals consisting of three countries and their respective capitals. The countries India, Australia, and UK are the keys of the associative array and the capitals of these countries, Delhi, Sydney, and London, are the values of the respective keys.
The following example prints the value of the key Australia from the associative array, capitals.
print ${capitals['Australia']}
While writing scripts it is quite natural to come across certain errors. Let us see how errors that might occur in a script are displayed.

C Shell Programming 617
12.10 DISPLAYING ERRORS
When we expect some error to occur in a procedure or script, we pass it to the perror() function. If an error occurs in the procedure or script that is passed to the perror() function, the error message is sent to the standard error fi le descriptor stderr and also the value of the global variable errno is set. We can also display the description of the error by passing the errno variable to the strerror() function. To display all the error messages that are defi ned in a global error list array sys_errlist[], we can make use of a for loop to display its array elements from 0 to one less than sys_nerr, where sys_nerr is the number of error messages defi ned in the sys_errlist array. The list of terms that we use to display errors is given in Table 12.13.
Table 12.13 List of terms used to display errors
Term Description
sys_nerr It represents the number of error messages defi ned in sys_errlist.
sys_errlist[] It is the global error list used to access and display error messages. The respective error messages are retrieved using errno as index in the sys_errlist.
strerror() function It returns a string that describes the error of the code passed to it in the argument, errnum, as follows:
char *strerror(int errnum);
strerror_r() function It is similar to strerror() and returns the string that describes the error of the error code passed to it in the argument errnum. However, the string is returned in the supplied buffer buf of length n. The function returns 0 on success and -1 on failure as follows:
int strerror_r(int errnum, char *buf, size_t n);
perror() function It displays the error message corresponding to the current value of the global variable errno and writes it, followed by a newline, to the standard error fi le descriptor stderr. In other words, this function converts the error code into human readable form. The variable errno is set when errors occur during a call to a system or library function. The name of the program where error may occur or the fi le on which system calls are applied is passed to the perror() function as an argument.
public static void perror(String s)
Here, s is the program or fi lename.
Note: When a system call fails, it usually returns -1 and sets the variable errno to a value describing the error.
Example The following shell script uses the strerror() function to print all the error messages.
printerrors.c# include <stdio.h>

618 Unix and Shell Programming
int main () { int i; extern int sys_nerr printf ("Total number of errors are: %d\n", sys_nerr); for (i =0; i < sys_nerr; i++) printf ("%d: %s\n", i, strerror (i) ); exit (0);}
Assume there are certain errors in the system and their details are available in the array sys_errlist. The length of the sys_errlist array, that is, the number of errors, is accessed through the sys_nerr integer. With the help of a for loop, the error codes are passed to the strerror() function and the text messages describing the errors returned by it are displayed.
onintr commandThe onintr command is used to specify the action to be taken when the shell receives a signal. The command can be used in the command line as well as in the shell script. When used within a shell script, the command causes most signals to terminate the shell script. When used in the command line, the command resets earlier signal handling applied by the earlier onintr commands and restores the normal default signal actions for all the signals. Not only can the onintr command be used to specify the action to initiate on the occurrence of a signal but also be used to disable and ignore all signals.
Syntax onintr label
Here, label is the statement that the script will jump to on the occurrence of a signal. This implies that when the user presses the interrupt key, often confi gured to be Ctrl-c, the script will jump to the statement label to do the desired task.
Note: We can use the stty -a command to display all the settings for the terminal.
Example The following shell script will ask the user to enter a number and will indicate if the entered number is even or odd. The script will keep executing in an infi nite loop until the user interrupts the script by pressing the Ctrl-c command.
evenodd3.csh
#!/bin/cshonintr closewhile (1) echo -n "Enter a number: " set n = $< if ($n % 2 == 0) then echo The number, $n is even else echo The number, $n is odd endifend

C Shell Programming 619
close:echo Script ends
Output$ ./evenodd3.cshEnter a number: 20The number, 20 is evenEnter a number: 7The number, 7 is oddEnter a number: 4The number, 4 is evenEnter a number: ˆCScript ends
On occurrence of the interrupt, the script will jump to the label, close, which exits from the infi nite while loop and hence terminates the script. Until the interrupt key is pressed, the user is asked for a number and the script will display whether the entered number is even or odd.
In this chapter, we learnt about C shell and its different features. We saw how to use command history to retrieve commands from the history fi le, apply command substitution, fi lename substitution, fi lename completion, and aliases to rename existing commands. We also discussed how to control jobs, run them in the background, and suspend, resume, and kill them. We then dealt with the purpose of environment variables, shell variables, and built-in shell variables. We discussed the use of C shell operators, creation and running of simple C shell scripts, use of different fl ow controlling statements, loops, arrays, and display of errors.
■ SUMMARY ■
1. The C shell was developed by Bill Joy at the University of California at Berkeley.
2. The C shell has a syntax similar to the C programming language.
3. C shell supports features such as command history, command substitution, fi lename substitution, fi lename completion, aliases, and job control.
4. The history command without any options displays all the lines that are stored in the history.
5. The !! symbol is replaced with the previous command line; the !n symbol is replaced with the command in the history list represented by the line number n.
6. The fi lename substitution also known as globbing uses the characters typed by us to fi nd the fi le(s) beginning with those characters and replaces the characters typed by us.
7. While using fi lename substitution, the character ~ (tilde), if it appears at the beginning of the word and is followed by a character or /, will be replaced by the
home directory of the user. 8. Filename completion makes the shell display or
complete the fi lename on the basis of the initial characters typed by the user.
9. Aliases can be used for renaming existing commands, creating shorthand for longer commands, and to defi ne new commands that may be a combination of a sequence of commands.
10. The unalias command is used to remove a previously defi ned alias.
11. A process can be set to execute in the background by following its command with an ampersand (&) symbol.
12. To bring a job to the foreground, the fg command is used.
13. The command jobs -l displays the list of jobs along with their IDs.
14. Ctrl-z can be used to suspend or stop a running job.15. The C shell, when invoked, executes three fi les
lo cated in the user’s home directory: .cshrc, .login,

620 Unix and Shell Programming
and .logout. 16. The .login fi le is read only once when we log in and
hence contains the commands that we want to execute only once, that is, at the beginning of each session.
17. The .cshrc fi le usually contains instructions that include directory paths, shell variables, and aliases and the .login fi le contains set-up terminal settings and environment variables.
18. The .logout fi le contains commands that are run when the user logs out of the system.
19. The environment variables are also known as global variables as these variables are passed to the newly started shell. In addition, these variables are passed to all processes run from the current shell. Usually, these variables are written in upper case.
20. The setenv command is used to change or assign a value to an environment variable.
21. The unsetenv command is used to remove an environment variable.
22. The printenv command is used to display the list of all currently set environment variables.
23. Shell variables are local variables as they belong to a shell and contain values that are visible and applicable only to the current instance of the shell.
24. The set command is used to assign a value to a shell variable.
25. To delete or remove a shell variable, the unset command is used.
26. By setting the prompt variable, we can control the appearance of the primary prompt.
27. By setting the histchars variable, we can change the special history characters, ! (exclamation point) and ^ (caret).
28. By setting the mail variable, we can specify the file that the shell needs to check for mail. In addition, we can specify the interval in which the shell should check for incoming mail. The default time interval in which the shell looks for the mail is five minutes.
29. The command line arguments passed to a script are stored in the argv[] array.
30. $#argv refers to the number of arguments passed to the script.
31. To write multiple commands on a single line, we need to separate them with semicolon (;).
32. In order to continue a long command onto a new line, end the line with a backslash (\).
33. For reading data from the keyboard into a variable, we initialize it to hold the special parameter $<. The $<
substitutes a line from the standard input device—the keyboard.
34. The @ symbol is used instead of set command to initialize integer variables.
35. To assign a list of values to the variable, enclose them in parentheses.
36. To fi nd the length of a variable, prefi x the variable by $#. This implies that $#variable_name fi nds out the length of variable_name.
37. The C shell cannot do fl oating point arithmetic; hence the bc calculator program is used in the shell script to perform fl oating point arithmetic.
38. The if-then-else statement is used in conditional branching, that is, it usually contains two sets of statements and a logical expression. If the logical expression is true, the set of statements associated with ‘if’ is executed, otherwise the set of statements associated with ‘else’ is executed.
39. There are several fi le testing operators that are used in testing different attributes of the fi les.
40. The $? parameter indicates the exit status of the last command executed.
41. The exit status of the last command is 0 if it is successfully executed, otherwise it returns a non -zero value.
42. Through the goto command, we can change the fl ow of the program in a desired manner.
43. The exit command terminates a script and returns the status to the parent process.
44. The repeat command is used for repeatedly executing a command a specifi ed number of times.
45. The goto command jumps to the statement in the script that is prefi xed by a given label. The label must be followed by a colon (:).
46. The exit command terminates a script and returns the status to the parent process.
47. The switch statement is a substitute to several if else statements.
48. The while loop executes a set of statements as long as the specifi ed logical expression is true.
49. The repeat command is used for repeatedly executing a command a specifi ed number of times.
50. The foreach loop is used for iterating through the values provided in the given list.
51. The continue command skips the following statements in the loop and re-invokes the loop with the next iteration.
52. The break command terminates the current loop and exits from it.

C Shell Programming 621
Objective-type QuestionsState True or False
12.1 The exclamation point (!) character also known as bang operator is used to retrieve commands from the history list.
12.2 While accessing arguments of the earlier commands, the $ and ^ symbols represent the fi rst and last arguments respectively.
12.3 The Boolean value false is also numerically represented as 0.
12.4 The exit status of the last command or script is automatically set to a non-zero value if it is successfully executed.
12.5 When the count in the repeat command is 0, the repeat command will not execute at all.
12.6 The shift command when used with an array does not reduce the size of the array.
12.7 The break command terminates the current loop and exits from it.
12.8 The foreach loop is used for iterating through the values provided in the given list.
12.9 Procedures are small modules that are created to do a specifi c task or processing.
12.10 For reading data from the keyboard and assigning to a variable (pr variables), we ini-tialize it to hold the special parameter $<.
12.11 The continue command can only be used in loops.
12.12 We can write multiple commands on a single line if they are separated by a semicolon (;).
12.13 By setting the mail variable, we can set the time interval for the shell to check for incoming mail.
12.14 The unalias command can be used to remove previously defi ned aliases.
12.15 On pressing ^Z, the background job will switch to the foreground.
■ EXERCISES ■
53. An array is a set of consecutive memory locations where each memory location stores an item. Each item in an array is accessed through the subscript, where subscripts begin from one.
54. An array is created by enclosing data in parentheses.
55. Procedures are small modules that are created to perform some specifi c task or processing.
56. A procedure is defi ned by the proc statement. In addition, a procedure may or may not include a return statement. The procedure body ends with the end statement.
57. The unproc statement is used to discard procedures.
58. By default, the variables used in a procedure are global in nature.
Fill in the Blanks
12.1 When invoked, the C shell executes three fi les in the user’s home directory, ,
, and . 12.2 The is used to access arguments of
the earlier commands. 12.3 In fi lename substitution, the is
replaced by the home directory of the user. 12.4 To turn on fi lename completion, we need to set
the variable. 12.5 By following a command with an , the process will execute in the background. 12.6 While using the fi lename completion feature,
press to list all the possible fi lenames or directories on the basis of the typed characters.
12.7 The command displays the list of jobs along with their IDs.
12.8 The fi le test operator, , is used for testing the read permission of the fi le.
12.9 To know the exit status of the last executed command, is used.
12.10 On using the goto statement, the shell searches for the given label that is followed by a .
12.11 The sys_nerr represents the number of errors messages defi ned in .
12.12 To continue a long command onto the new line, we need to end the line with
.12.13 Through the histchars variable, we can change

622 Unix and Shell Programming
Programming Exercises
12.1 What will these commands do? (a) set history=80 (b) !-4 (c) !$ (d) jobs -l (e) alias h history 12.2 Write the commands with examples for doing
the following tasks. (a) Display the username and current working
directory in primary prompt (b) Retrieve the last command that begins with gr (c) Show the list of fi les and directories that
consists of four characters, and begins with characters from a to d and ends with any numeral
(d) Create an alias by the name fi for fi nger command
(e) Exit from the script with status 4 12.3 Write shell scripts for the following: (a) Display all the names of fi les that carry the
text hello (b) Move all the fi les in the current directory
to the directory that is supplied through the command line argument
(c) Check the size of the fi lenames passed through command line arguments to the script and print their names with the prefi x small fi le and large fi le depending on whether their size is less than or greater than 100 KB.
(d) Display the elements of an array in reverse order
(e) Ask the user to enter a single key and display whether the entered key is a numeral, character, or something else
Review Questions
12.1 Write short notes on the following: (a) Filename substitution (b) Filename completion (c) Aliases (d) Command history (e) Repeat command 12.2 Explain the three start-up fi les .cshrc, .login,
and .logout along with their sample content. 12.3 Explain how the strerror() function is used to
display error messages. 12.4 How are arrays created and used in C shell
scripts? Explain with a running script. 12.5 Explains the different loops used in C shell
scripts. 12.6 What is the role of break and continue com-
mands in loops? Explain with running examples. 12.7 How can $? be used to read the exit status?
Explain with a running script. 12.8 How are history characters changed? Explain. 12.9 Explain a few shell variables.12.10 What is the role of environment variables?
Brain Teasers
12.1 What is wrong in the following code to set the Ctrl-h key pair to erase the previous character and the Ctrl-c key pair to interrupt the current job?
stty erase intr ^C ^H
12.2 Correct the following code for displaying all arguments except the fi rst.
echo "All arguments except the fi rst are: $argc[2-${0}]"
12.3 Correct the following code to multiply two values.
#!/bin/csh @ x = 8 @ y = 5 m = x* y echo Multiplication is m
12.4 Find the error in the following code.
#!/bin/csh
the history substitution characters and .
12.14 To terminate a job, we use the
command. 12.15 The subscript in an array begins with the value,
.

C Shell Programming 623
echo -n "Enter either y or n " set x = $> if ( x = "y" ) then echo You have entered yes else echo You have entered no endif
12.5 Correct the following code to print 'Hello' three times.
#!/bin/csh @ x = 1 dispmsg: echo "Hello" x++ if (x <=3) goto dispmsg
12.6 Correct the error in the following code asking the user to enter y or n and displaying what option has been entered.
#!/bin/csh echo -n "Please either y or n " x = $< switch ( x ) case [yY]: echo You have entered Yes breaksw case [nN]: echo You have entered No breaksw defaulter: echo Please enter either y or n endsw
12.7 Find the error in the following while loop to print the multiplication table of 9 till 90.
#!/bin/csh @x = 9 while (x <= 90) echo $x x = expr $x +9 end
12.8 The following code for displaying all the com-mand line arguments is not working. Correct the error.
#!/bin/csh while ($#argv != 0 ) echo $argv[0] argv++ end
12.9 Correct the following code for displaying the fi rst fi ve numbers in a sequence.
#!/bin/csh foreach i ( 1 2 3 4 5 ) if ( $i == 1 ) then continue else break endif echo $i end
12.10 What is wrong in the following code for disp-laying the elements of a set? Correct the code.
#!/bin/csh echo The names of students are while student(john, manisha, chirag,
suman, naman) echo student end
■ ANSWERS TO OBJECTIVE-TYPE QUESTIONS ■
State True or False
12.1 True 12.2 False 12.3 True 12.4 False 12.5 True 12.6 False 12.7 True
12.8 True 12.9 True12.10 True12.11 True12.12 True12.13 True12.14 True12.15 False
Fill in the Blanks
12.1 .cshrc, .login, and .logout
12.2 !: 12.3 ~ 12.4 fi lec 12.5 & 12.6 Ctrl-d
12.7 jobs-l 12.8 -r 12.9 $?12.10 : (colon)12.11 sys_errlist12.12 \12.13 !, ^12.14 kill12.15 1

13.1 LANGUAGE DEVELOPMENT TOOLS—YACC, LEX, AND M4
In this section, we are going to learn about the tools that analyse text in the given fi le(s). After having observed and matched them with the laid standards, such tools produce an output, which can be used in further language development of the fi le(s). The language development tools that we are going to learn are as follows:
Yacc This compiler reads the grammar specifi cations and accordingly generates parsing tables and driver routines.
Lex It searches for the required regular expressions in a fi le, takes appropriate actions against them, and produces programs that are used in a simple lexical analysis of the text.
M4 It is a macro processor that reads the given m4 template as well as expands and processes macros in the input fi le to produce an output.
13.1.1 Yet Another Compiler–CompilerYet another compiler–compiler (yacc) is a compiler that reads the grammar specifi cations in the specifi ed fi le and generates parsing tables and driver routines to the fi le y.tab.c.
Syntax yacc [ -b fi le_prefi x ] [-d] [-l] [-v] [ -Q [y | n ] ] [ -p sym_prefi x ] fi le
A brief description of the options used in the yacc command is given in Table 13.1.
1313Different Tools Different Tools and Debuggersand Debuggers
C H A P T E R
After studying this chapter, the reader will be conversant with the following:
• Language development tools, Yacc, Lex, and M4• Text-formatting tools, troff and nroff• Preprocessors for nroff and troff—tbl, eqn, and pic• Debugger tools, dbx, adb, and sdb• Strip—discarding symbols from object fi les• Version control systems

Different Tools and Debuggers 625
13.1.2 Lexical AnalyserLexical analyser ( lex) takes an input stream and generates programs that can be used in a simple lexical analysis of the text. The input fi le contains regular expressions and the actions that are to be executed when expressions are found in the input stream. For example, the following command produces the C source by the name lex.yy.c for the lexical analyser:
lex a.l
Syntax lex [-n] [-t] [-v] fi le
A brief description of the options used in the lex command is given in Table 13.2.The generated C source can be compiled as
shown here:
% cc lex.yy.c -ll
This command executes the associated C action for each identifi ed regular expression.
The following lex program converts upper case to lower case, removes blanks at the end of lines, and replaces multiple blanks with single blanks:
%%[A-Z] putchar(yytext[0]+'a'-'A');
Table 13.1 Brief description of options used in the yacc command
Option Description
-b fi le_prefi x It uses the given fi le_prefi x as the prefi x for all output fi les. By default, the prefi x for all output fi les is y. By using this parameter, the code fi le, y.tab.c, the header fi le, y.tab.h, and the description fi le, y.output, will be changed to fi le_prefi x.tab.c, fi le_prefi x.tab.h, and fi le_prefi x.output, respectively.
-d It generates the fi le y.tab.h with the #defi ne statements that associate the yacc’s token codes with the user-declared token names.
-l The code produced in y.tab.c will not contain any #line directives. The #line directives help the C compiler in relating errors in the generated code with the original code. Hence, the -l option is used when debugging is complete.
-v It generates the fi le y.output, which contains a description of the parsing tables and other diagnosed information.
-Q [y|n] -Qy writes the version information about yacc in y.tab.c. The -Qn option (default) writes no version information.
-p sym_prefi x It changes the prefi x prepended to yacc-generated symbols to the string represented by sym_prefi x. The default prefi x is the string yy.
File It represents the fi lename with the complete path for which parsing tables and driver routines should be created.
Table 13.2 Brief description of options used in the lex command
Option Description
-t It sends the lex’s output to the standard output rather than to the fi le lex.yy.c.
-v It prints a one-line summary of the statistics of the generated analyser.
-n It suppresses the summary of the statistics written with the -v option (default).
fi le It represents the input fi lename.

626 Unix and Shell Programming
[ ]+$[ ]+ putchar(' ');
Example Assume the C program is as follows.
{ int a=10; printf("%d\n",a);}
The lexical analyser will break the input stream into a series of tokens as described here.
{inta=10;printf("%d\n",a);}
13.1.3 m4m4 is a Unix macro processor. It considers an m4 template as input and after having expanded and processed the macros, it produces output on the standard output. Macros can be either built-in or user defi ned, and can take any number of arguments. The m4 has built-
in functions that are used for including fi les, running commands, managing text, performing computation, and so on.
Syntax m4 [-e] [-s] [ -Dname [=val]] [-U name] [fi lename]
A brief description of the options used in the m4 command is given in Table 13.3.
Note: m4 cannot include more than nine nested fi les.
Creating macrosMacros can be created with the following syntax:
name(arg1,arg2, ..., argn)
The opening parenthesis, ‘(’, should immedi-ately follow the name of the macro. If this is
Table 13.3 Brief description of options used in the m4 command
Option Description
-e It operates interactively. Interrupts are ignored and the output is unbuffered.
-D name[=val]
It defi nes the given names to the specifi ed val. If the val is not specifi ed, the names are defi ned to NULL.
-U name It undefi nes, i.e., deletes the defi ned names.
-s It enables line sync output for the C preprocessor.
Filename It represents the text fi le that is to be processed. If no fi lename is given, the standard input is read.

Different Tools and Debuggers 627
not the case, then it is considered a macro call. A macro name can consist of alphanumeric characters as well as underscores beginning with a character.
The m4 comes with an initial set of built-in macros. In order to create new macros, the defi ne() macro is used. The following statement shows how a macro is created:
defi ne(USA, United States of America)
In the aforementioned defi ne() macro described, we fi nd two parameters, USA and the United States of America. In the input, wherever the term USA appears, it will be expanded as United States of America. There should not be any white space between the macro name and the opening parenthesis. Any white space before the parameters is ignored. By default, the newline character is also echoed in the output. To suppress this newline character, we use the ‘delete to newline’ (dnl) macro shown here:
defi ne(USA, United States of America)dnl
This macro will replace the term USA in the input stream with United States of America without the following newline character. There should not be any space between the end of the macro and the dnl.
Assume the following input is provided to m4:
defi ne(USA, United States of America)I live in USA'USA' stands for USA
It will then give the following output:
I live in United States of America'USA' stands for United States of America
When a string is quoted, it is not expanded.In order to give defi nitions on the command line, the -D option is used in the following
example:
m4 –D USA="United States of America" a.m4
The hash character (#) is used for comments; the comments are echoed to the output.Quoted strings are also used in defi ning macros.
defi ne(USA, 'United States of America')
While expanding the macros, the quotes will be stripped off. The quoted strings can also include newline characters:
defi ne(USA, 'United States of America')
Assume the following input is provided to m4:
I live in USA
The term USA will then be expanded as follows:
I live in United States

628 Unix and Shell Programming
ofAmerica
13.2 TEXT-FORMATTING TOOLS
In this section, we are going to learn about the different text-formatting tools that format a given document and, hence, its appearance. The tools enable the formatted document to appear similar to a typeset document, manual pages, etc. The two most popular tools that we are going to discuss here are as follows:
troff It formats the given document such that it appears similar to a typeset document.
nroff It produces output for terminal windows, line printers, and typewriter-like devices.
13.2.1 trofftroff (pronounced ‘tee-roff’) is a text-formatting tool that formats the document such that it appears similar to a typeset document.
Syntax troff [ -a ] [ -F directory_name ] [-i] [ -T name ] fi lename
A brief description of the options used in the troff command is given in Table 13.4.The most common formatting commands that are used with the troff command are
provided in Table 13.5.The default vertical spacing is dependent on the text processor. In nroff, the default
vertical spacing is 1/6" and for troff, it is 12 points.
Table 13.4 Brief description of options used in the troff command
Option Description
-a It generates an ASCII version of the formatted output.
-F directory_name
It searches the given directory, directory_name for font width, or terminal tables. If the directory_name is not specifi ed, the system default directory is used.
-i It reads the standard input after all the specifi ed input fi les are read.
-T name It prepares the output for the specifi ed device instead of the default PostScript printer.
fi lename It represents the fi le that is to be processed.
Table 13.5 Brief description of formatting commands used with troff command
Formatting command
Description
.fi This fi lls the text with input (default setting).
.nf This does not fi ll the text. The right margin appears ragged.
.br This breaks the fi lling and starts a new block of text. The same action can be done by starting a line of text with a space.
.ad This controls adjustment. Valid arguments are as follows:
l: Adjusts only the left margin
r: Adjusts only the right margin
c: Centres each line
b or n: Adjusts both margins
.ce n: Centres the next n lines without fi lling the text

Different Tools and Debuggers 629
The units used for troff space measurement are provided in Table 13.6.
Example $ troff a.txt
This statement runs troff on the fi le a.txt.The output produced by troff is device independent
and requires to be post-processed before it can be accepted by most printers. The syntax for post-processing the input fi le is as follows:
Syntax troff fi lename | postprocessor
Example To post-process the troff output for the hp laser jet printer, the subsequent statement is used.
troff fi lename | hplj
In order to use troff, we need to specify the command that indicates how we want to format the text. The command is usually placed on a new line beginning with a period. For example, the following command changes the point size of the text on the subsequent lines to 20 points.
.ps 20Hello
The text Hello will appear in 20-point size.
Note: One point is 1/72 inch.
If the specifi ed point size is not of the legal size, it is rounded up to the next valid value, with a maximum of 36. If no point size is specifi ed, the previous size is considered. The default point size is 10.
The backslash character (\) is used for applying troff commands and for inserting special characters in the text. For example, the following statement will make the text appear in 20-point size:
\s20Hello
This statement will make the text Hello appear in 20-point size.The set point size is considered in the following command. For example, the following
text will make the text World appear in 25-point size and the text Bye to appear in 15-point size:
\s+5World\s-5Bye
We can see that the point size is specifi ed in terms of the previously set point size.
Note: The \s0 command will consider the previous point size value.
13.2.2 nroffnroff (or new roff) is a text-formatting tool that produces output for terminal windows, line printers, and typewriter-like devices. It is mostly used to format manual pages or help fi les.
Table 13.6 Brief description of units used in space measurement in the troff command
Option Description
I inch
c centimetre
p pica
m em
n en
p point
u unit
v vertical space

630 Unix and Shell Programming
Syntax nroff [-o pages] [-h] [-i] [-T name] [fi lename]
A brief description of the options used in the nroff command is given in Table 13.7.
Table 13.7 Brief description of options used in the nroff command
Option Description
-o pages It displays only the specifi ed pages. The page numbers can be comma separated and a hyphen can be used to represent a range of pages.
-h It uses TAB characters for horizontal spacing.
-i It reads the standard input after the input fi les are read.
-T name It prepares output for a device of the specifi ed name. Valid options are as follows:
ascii, ascii8, latin1, utf8, nippon, and cp1047
fi lename It represents the document that needs to be formatted for display. If no fi lename argument is present, nroff reads from the standard input.
Example nroff a.txt
This statement formats the fi le a.txt.An nroff command is written just above the line of the text to which we wish to apply
it. The command begins with a period, followed by two letters that represent the command, which is again optionally followed by a number that represents the number of spaces, lines, or tabs.
Example .in 5
This statement indents the following text by fi ve spaces.
13.3 PREPROCESSORS FOR nroff AND troff
In this section, we are going to discuss the preprocessor tools that format tables, mathematical equations, pictures, etc., into commands that are understandable by the text-formatting tools troff and nroff. The preprocessors that we are going to discuss are as follows:
tbl It formats tables into commands and escape sequences that nroff/troff can understand.
eqn It typesets mathematical equations and compiles descriptions of equations embedded within troff input fi les into commands that are understandable by troff.
pic It is a graphics language preprocessor that compiles pictures embedded within troff input fi les into commands that are understandable by troff.
Each of these preprocessors translates codes into nroff/troff requests.
13.3.1 tbltbl is a preprocessor that formats tables for nroff/troff. It compiles descriptions of tables embedded within troff input fi les into commands and escape sequences that nroff/troff can understand.

Different Tools and Debuggers 631
Syntax tbl [options] [fi lename]
Here, fi lename represents the input fi le that is to be processed. If instead of an input fi le we want to read from the standard input device, a hyphen (-) is substituted for the fi lename.
Example $ tbl fi le
As evident from this statement, the commands between each .TS/.TE macro pair (in the fi le) are converted into a printable table. The remaining commands are passed through, unchanged.
An input fi le may exhibit coding in the following format.
.TS Hoptions;format1format2.Column Titles.THItem1 Item2 Item3Item1 Item2 Item3 ....TE
We can see that a table defi nition begins with a .TS macro (or a .TS H macro if the table is long enough to cross a page boundary) followed by options and one or more format lines. The column titles are represented by the .TH macro. The data in the table columns are
separated by a tab or the designated tab symbol. The table defi nition ends with a .TE macro. The meaning of the most commonly used tbl macros is briefl y described in Table 13.8.
Options used with tblOptions help in controlling the appearance of the entire table. They are either comma-separated or separated by spaces, and the line ends with a semicolon. Table 13.9 displays the commonly used options for defi ning table(s).
Table 13.8 Brief description of macros used in the tbl command
Macro Description
.TS It starts a table.
.TE It ends a table.
.TS H It is used when the table extends to more than one page.
.TH It is used after column titles to separate them from other data.
Table 13.9 Brief description of options used in the tbl command
Option Description
center It centres the table. By default, the table is left justifi ed.
expand It expands the table to full page width.
box It encloses the table in a box.
double box It encloses the table in a double box.
allbox It encloses each item of the table in a box.
tab(x) It separates the items in the input data by the specifi ed character ‘x’ instead of a tab.
linesize(n) It sets the lines to n point size.

632 Unix and Shell Programming
Formats used with tblThe formats help in laying out the individual columns and rows of the table. Each line contains a key letter for each column of the table. The column entries should be separated by spaces, and the format section should end with a period. Each line of the format corresponds to one line of the table. The key letters used in the line are given in Table 13.10.
Table 13.10 Brief description of the key letters used in laying columns and rows in the tbl command
Keys Description
c,C It centres data within the column.
r,R It right justifi es data within the column.
l,L It left justifi es data within the column.
n,N It aligns numerical data in the column, i.e., hundredth value will appear below the hundred’s place, tenth value will appear below the ten’s place, unit value will appear below the ones’s place, and so on.
s,S It horizontally spans the previous column data into the current column.
a,A It aligns text data in the column.
^ It vertically spans data from the previous row into the current row.
_,- It replaces the current data with a horizontal line.
= It replaces the current data with a double horizontal line.
| It displays a vertical bar. It can be used to display a line at the edge of the table.
|| It displays a double vertical bar. It can be used to display a double line at the edge of the table.
Table 13.11 Brief description of the key specifi ers used after key letters while laying columns and rows in the tbl command
Key specifi ers Description
b It makes the data bold.
i It makes the data italic.
fx It applies the font x.
p n It changes the point size to n units.
v n It sets the vertical line spacing to n points.
t It begins or pushes the vertically spanned data to the top row of range.
e It ensures that all columns are of equal width.
w(n) It sets a minimum column width to n size, where n can be in any of the troff units. If no unit is given, en units are used.
n It sets the amount of separation (in ens) between columns. The default separation is 3 en.
The key letters that are used to lay columns and rows in the tbl command are followed by key specifi ers. The list of key specifi ers is given in Table 13.11.
While writing the code for the tbl fi le, we should consider the following points:
1. Long commands can be continued onto the next line by placing backlash (\) as the last character on the line.

Different Tools and Debuggers 633
2. If a line consists of ‘_’ or ‘=’, a single or double horizontal line will be drawn across the full width of the table.
3. If the data consists of only ‘\$_’ or ‘\$=’, a single or double horizontal line will be drawn across the full width of the column.
4. If the data consists of only ‘\_’ or ‘\=’, a single or double line will be drawn equal to the fi eld width.
5. A data item consisting of only ‘\Rx’ fi lls the column width by repeating the character ‘x’.
6. A long block of text can be treated as a single table entry if it begins with ‘tab T {‘and ends with ‘T} tab’.
13.3.2 eqneqn is a preprocessor that is used for typesetting mathematical equations for troff. It compiles descriptions of equations embedded within troff input fi les into commands that are understandable by troff. Thereafter, the output of eqn is processed with troff.
Syntax eqn [ -d xy ] [ -s n ] [ -p n ] [ -m n ] [ fi lename]
A brief description of the options used in the eqn command is given in Table 13.12.
Table 13.12 Brief description of options used in the eqn command
Option Description
-d xy It uses x and y as delimiters for the left and right end, respectively, of the input line.
-p n It reduces the size of superscripts and subscripts by n points. The default reduction in size is of 3 points. The subscripts and superscripts are 70% of the size of the surrounding text.
-s n It reduces the point size by n points.
-m n It sets the minimum point size to n. The eqn will not reduce the size of subscripts or superscripts to a size smaller than n.
fi lename It represents the troff input fi le. If the fi lename is not provided or a hyphen (-) is used instead of the fi lename, the data will be read from the standard input.
Several macros are used in eqn. The macros refer to very small functions. They carry the keywords to write the desired mathematics. A macro may contain parameters in the form of $n, where n is between 1 and 9. The parameter(s) are replaced by the respective arguments that are passed while calling the macro. A macro is called by specifying its name (by which it is defi ned through the defi ne command) followed by a left parenthesis, which, in turn, is followed by the arguments that we wish to pass to the macro. The arguments are separated by a comma (,). The argument list is followed by a right parenthesis.
The following macros are used in eqn:
.EQ It starts typesetting mathematics.
.EN It ends typesetting mathematics.

634 Unix and Shell Programming
Table 13.13 Brief description of the keywords used in the eqn command
Keyword Description
back n It moves backward horizontally by n units, where n is 1/100th of an em.
bold It applies bold style.
ccol It centre aligns a column of a matrix.
cpile It makes a centrally aligned pile.
defi ne It creates a macro or a short name for a frequently used long text.
delim xy It defi nes the characters to mark the left and right ends of an eqn equation. The delimiters can be turned off through delim off statement.
down n It moves down n units, where n is 1/100th of an em.
fat It widens the current font.
font x It switches to the specifi ed font.
from It represents the lower limit in summations, integrals, etc.
fwd n It moves forward horizontally by n units, where n is 1/100th of an em.
gfont x It sets the specifi ed global font for all equations.
gsize n It sets the specifi ed global size for all equations.
italic It changes style to italic.
lcol It left justifi es a column of a matrix.
left It creates big brackets, big braces, big bars, etc.
lineup It lines up marks in equations on different lines.
lpile It left justifi es the elements of a pile.
mark It remembers the horizontal position in an equation. It is used with lineup.
matrix It creates a matrix.
over It makes a fraction.
pile It makes a vertical pile with elements centred above each other.
rcol It right justifi es a column of a matrix.
right It creates big brackets, big braces, big bars, etc. It should have a matching left.
roman It sets the following constant in roman.
rpile It right justifi es the elements of a pile.
size n It changes the size of the font to n units.
sqrt It takes the square root of the following equation.
Besides macros, eqn also uses fonts. The eqn uses at least two fonts to set an equation, an italic font for letters and a roman font for other components of the equation. The italic keyword uses the current italic font, whereas the roman keyword uses the current roman font.
Keywords recognized by eqnThe following keywords, given in Table 13.13, are used in eqn.
(Contd)

Different Tools and Debuggers 635
13.3.3 pic pic compiles pictures embedded within troff input fi les into commands to make them understandable by these text-formatting tools.
Syntax pic [ options] [ fi lename]
Here, fi lename represents the input fi le that will be processed to produce a desired picture. If the fi lename is not provided or a hyphen (-) is supplied for the fi lename, the data will be read from the standard input.
pic macrosEach picture starts with a line beginning with the .PS macro and ends with a line beginning with the .PE macro. The .PS and .PE macros, respectively, are used to turn the preprocessor on and off. Table 13.14 describes the macros used in pic.
Table 13.14 Brief description of the macros used in the pic command
Macro Description
.PS [height [width]]
It begins the pic description. The height and width are optional parameters that specify the desired height and width of the picture.
.PS < fi lename Commands will be read from the specifi ed fi lename and will be placed in the current statement.
.PE It ends the pic description.
Table 13.13 (Contd)
Keyword Description
sub It starts a subscript.
sup It starts a superscript.
tdefi ne It makes a defi nition for the eqn.
to It represents the upper limit that is used in summations, integrals, etc.
up n It moves up n units, where n represents 1/100th of an em.
~ It inserts an extra space into the output.
^ It inserts a space that is equal to one half of the size of the space applied by ~.
{ } It is used to combine elements into a unit.
We can also defi ne a scale for a pic description. By default, the scale is 1 to 1, that is, 1 unit is equal to 1" (by default). We use the following statement to declare a different scale:
scale = n
This statement declares that 1 unit is equal to one- nth of an inch.For drawing basic objects, such as boxes, circles, ellipses, lines, arrows, arcs, spline curves,
and text, via pic, there are appropriate commands for each. The command may be followed by the respective options that are explained in Table 13.15.

636 Unix and Shell Programming
OptionsThe commands for drawing objects such as arcs, arrows, boxes, etc., can use the options listed in Table 13.16.
Table 13.15 Brief description of the commands used in the pic command
Command Description
arc [clk] [options] ["text"] It draws an arc that is 1/4th of a circle. By default, a counter-clockwise arc is drawn. The clk option is used for drawing a clockwise arc.
arrow [options] ["text"] It draws an arrow.
box [options] ["text"] It draws a box.
circle [options] ["text"] It draws a circle.
ellipse [options] ["text"] It draws an ellipse.
line [options] ["text"] It draws a line.
move [options] ["text"] It moves the position in the drawing.
spline [options] ["text"] It draws a line with a slope.
"text" It displays text centred at the current point.
Table 13.16 Brief description of the options used in the commands of pic command
Option Description
right [n] It moves towards the right by n units.
left [n] It moves towards the left by n units.
up [n] It moves upwards by n units.
down [n] It moves downwards by n units. To move diagonally, two directions are used.
rad n It creates the primitive (circle, arc, ellipse, etc.) of radius n units.
diam n It creates the primitive (circle, arc, ellipse, etc.) of diameter n units.
ht n It creates the primitive of height n units.
wid n It creates the primitive of width n units. For an arrow, height and width represent the arrowhead size.
same It creates the primitive using the same dimensions used in the recent matching primitive.
at point It centres the primitive at the specifi ed point.
from point1 to point2
It draws the primitive from point1 to point2.
-> It directs the arrowhead forward.
<- It directs the arrowhead backward.
<-> It directs the arrowhead in both directions.
chop n m It chops off n units from the beginning and m units from the end of the primitive. Only one argument is used to chop equal units from both ends.
dotted It draws the primitive using dotted lines.
(Contd)

Different Tools and Debuggers 637
By default, each object begins at the point where the last object left off. If a sequence of commands is provided enclosed in curly braces ({ }), then pic returns to the position before the fi rst brace.
Note: The points may be expressed as either absolute cartesian coordinates or in relation to the existing objects.
The objects can be referred to by their position shown in the following examples:2nd circle: It refers to the second circle.1st box: It refers to the fi rst box.3rd line: It refers to the third line.last ellipse: It refers to the last ellipse.
The objects drawn can also be given unique names by declaring their names in initial caps as shown in the following example:
Circle1: circle rad 2 right from last arc.ne
This statement defi nes a circle by name Circle1 that is of radius 2 units and is drawn on the right of the last arc in its north-east direction. Valid corners of the object can be specifi ed by any of the following constants shown in Table 13.17.
Table 13.17 Brief description of the corners of the objects created in the pic command
Corner Represents Corner Represents
n North se South-east
s South sw South-west
e East t Top (same as n)
w West b Bottom (same as s)
ne North-east r Right (same as e)
nw North-west l Left (same as w)
Table 13.16 (Contd)
Option Description
dashed It draws the primitive using dashed lines.
invis It draws the primitive using invisible lines. The default is a solid line.
then It continues the given primitive in a new direction. It is used only with lines, splines, moves, and arrows.
Text It displays the text. The text should be enclosed within quotes. By default, the text is always displayed at the centre within the object. The following options can be used to align the text:
Ljust It left justifi es the text. The text appears vertically centered.
Rjust It right justifi es the text. The text appears vertically centered.
Above It displays the text above the centre of the object.
Below It displays the text below the cenre of the object.

638 Unix and Shell Programming
The objects’ physical attributes are referred to in Table 13.18.
The following sections discuss loops, conditional statements, and other commands frequently used in pic.
13.3.4 Commands Used in picTo compile pictures, we need to understand the different types of commands. Examples include the loops to repeat a set of statements, conditional statements to choose a set of statements out of two, reading content from specific files, and resetting variables. Let us start with loops.
Loops: Repeating sets of commandsThe for loop is used for repeating a set of commands a specifi ed number of times.
Syntax for variable = expr1 to expr2 [by [*]expr3]
do { body }
The variable is initialized to expr1, and the loop will continue to execute until the value of the variable becomes more than expr2. After each execution of the loop, the value in variable is incremented by expr3. If by is not used, the default value by which variable is incremented is 1. If expr3 is prefi xed by *, the value of expr3 is not added to the variable but is multiplied.
Conditional statementThe if statement is used for conditional branching, that is, depending on the value of the logical expression, one set of statements out of the two is chosen to be executed.
Syntax if expr then
statement(s) else
statement(s)
Depending on the value of the logical expression, expr, either the if or else statement(s) will be executed.
Including contents from specifi ed fi lesWe can include content or code from another fi le at the current point in the fi le.
Syntax copy "fi lename"
Table 13.18 Brief description of the attributes of the objects created in the pic command
Attribute Description
.x It refers to the x-coordinate of the object.
.y It refers to the y-coordinate of the object.
.ht It refers to the height of the object.
.wid It refers to the width of the object.
.rad It refers to the radius of the object.

Different Tools and Debuggers 639
This syntax will include the code or content of the entire fi lename at the current point in the fi le. The following syntax is used for including only the desired content from another fi le:
Syntax copy ["fi lename"] thru
{ body
} [until "exit_cond"]
Orcopy ["fi lename"] thru macro [until "exit_cond"]
These syntaxes execute the body of the loop once for every line of the fi lename. If the fi lename is not given, lines are taken from the current input to the .PE macro. If an until clause is specifi ed, lines will be read until the line with the fi rst word exit_cond appears.
Example
.PScopy thru % circle at ($1,$2) % until "END"1 23 45 6ENDbox.PE
This is equivalent to the following..PScircle at (1,2)circle at (3,4)circle at (5,6)box.PE
Resetting variablesThe reset command is used to reset or re-initialize the given set of variables to their default values.
Syntax reset variable1, variable2, ...
This syntax resets pre-defi ned variables, variable1, variable2, ..., etc., to their default values. If no arguments are given, all pre-defi ned variables will be reset to their default values.
13.4 DEBUGGER TOOLS
When a program crashes, displays errors, or does not give the expected results, we say that it carries a bug. The process of removing the error and making the program yield the expected results is known as debugging. The traditional way of debugging is to display the

640 Unix and Shell Programming
intermediate results so as to isolate the bug statement or module. The echo command is inserted at several places in these program to display these intermediate results.
A debugger is a software that makes the job of debugging a program easier for us. It runs the program in the debugging mode instead of in the normal mode and does the following tasks:
1. It enables us to suspend execution of the program at desired places.2. It executes various commands in the suspended mode in order to know the state of the
intermediate results.3. It displays the values of the variables as the program progresses.4. It resumes execution of the program.
13.4.1 dbxdbx is an interactive, command-line debugging tool. It can be used to ascertain the location of the bug in our program, the fl ow of execution, memory consumption by different parts of the program, etc.
Syntax dbx [ options ] [ object_fi le [ core_fi le ]]
A brief description of the options used in the dbx command is given in Table 13.19.
Examples
(a) $ dbx a.out core
This statement debugs the object fi le a.out and the core fi le. We
can identify the location of error in our program or the reason for not getting the correct results along with the memory status by examining the core fi le.
(b) $ dbx - 1201
This statement debugs the running program whose process identifi er (PID) is 1201.In order to debug a program, fi rst compile it with the -g fl ag and then invoke the
debugger with the following syntax:
dbx object_fi lename
At the dbx prompt, execute the run command:
dbx> run
In order to pass arguments or redirect the input or output of our program, we use the following syntax:
dbx> run [arguments][ >output_fi le ][ <input_fi le ]
Here, output_fi le and input_fi le are meant for providing desired redirections to the dbx tool.
Table 13.19 Brief description of the options used in the dbx command
Option Description
-c cmd It runs dbx command after initialization.
- pid It debugs a currently running program by specifying its process ID.
-r It executes the specifi ed object_fi le and waits for the user’s response from the keyboard.
-s fi le It reads initialization commands from the start-up fi le dbxinit.

Different Tools and Debuggers 641
Setting breakpointsBreakpoints are locations in the program at which we wish to suspend program execution. When the program is suspended at a breakpoint, we can examine the state of the program and the values of variables to see whether the program is running as expected up till the breakpoint. Several types of breakpoints can be set. The simplest type of breakpoint is a stop breakpoint. We can set this in a function or in any statement.
Example dbx> stop in calculate
This statement places a breakpoint in the function calculate.
dbx> stop at "area.c":10
This statement places a breakpoint at line 10 in the source fi le area.c.In order to continue execution of the program after it has stopped at a breakpoint, the
cont command is used. In order to get a list of all current breakpoints, the status command is used. The step and next commands are used to step through the program one statement at a time. Both commands execute one statement of a program and then stop. In case of functions, the step command steps into the function, whereas the next command steps over the function. Another command, step up, continues execution until the current function returns control to the caller function.
Viewing call stacksThe call stack represents all the currently active functions. In a stack structure, the functions and their arguments are kept in the order in which they were called. A stack trace helps in knowing when a function was called and when it returned. In order to display a stack trace, the where command is used.
To see the intermediate results, we usually display the values of the variables or expressions at a breakpoint using the print command:
dbx> stop at "area.c":10dbx> rundbx> where[1] printf(0x10938, 0x20a84, 0x0, 0x0, 0x0, 0x0), at 0xef763418=>[2] printf(msg = 0x20a84 "welcome\n"), line 6 in "area.c"[3] main(argc = 1, argv = 0xefffe93c), line 10 in "area.c"dbx> print a
These statements place a breakpoint at line 10 in the source fi le area.c. The source fi le is run until the breakpoint, the stack trace is displayed at the breakpoint, and the value of the variable, a, is displayed at the breakpoint.
13.4.2 adbadb is a general-purpose debugger. It enables us to view the core fi les resulting from aborted programs and to display output at the given addresses in order to isolate the statements resulting in an error. adb is invoked through the following syntax:
adb object_fi le corefi le
Here, object_fi le is an executable Unix fi le, and corefi le is a core image fi le.

642 Unix and Shell Programming
Table 13.21 Brief description of the options used in the sdb command
Options Description
-e It ignores symbolic data.
-w It makes the specifi ed object_fi le and core_fi le writable.
-W It suppresses warning messages for older fi les.
Example $ adb a.out core
A hyphen (-) is used to ignore a fi lename. The following statement is used to specify only the core image fi le.
$ adb - core
We can examine locations in both the fi les:?: It is used to examine the contents of the object_fi le./: It is used to examine the corefi le.
Syntax address [?][/] format
adb maintains a current address called dot. Different formats are used to specify the type of data that we wish to display. The characters that represent the format of display are given in Table 13.20.
Examples
(a) 0193?iIt sets a dot (current address) to octal 193 and prints the instruc-tion at that address.
(b) .,5/bIt prints fi ve bytes starting at the dot.
(c) .,2/dIt prints two decimal numbers starting at the dot. When used with the ? or / requests, the current address can be advanced further by typing a newline, and it can be decre-mented by typing ˆ.
13.4.3 sdbThe symbolic debugger (sdb) is used for examining core images of programs and for fi nding and removing bugs from them. When debugging a core image, sdb indicates the line(s) that are responsible for the error in the program, and enables us to access all the variables symbolically and check their status to isolate what went wrong.
Syntax sdb [ options ] [ object_fi le [ core_fi le [ dir ]]]
In order to ignore the core image fi le, a hyphen (-) is substituted at its place. A brief description of the options used in the sdb command is given in Table 13.21 and the commands that are avail-able for sdb are given in Table 13.22.
Table 13.20 Brief description of the characters representing the display format in the adb command
Character Description
b It represents a byte.c It represents a character.o It represents an octal.d It represents a decimal.f It represents a fl oating point.i It represents an instruction.s It represents a null-terminated character string.a It represents the value of a dot.u It represents an unsigned integer.n It represents a newline.r It represents a blank space.

Different Tools and Debuggers 643
Table 13.22 Brief description of the commands used in the sdb command
Command Description
t It displays the stack trace of the suspended program.T It displays the top line of the stack trace.variable/ It displays the value of the specifi ed variable.address/ and address:? It displays content beginning at the specifi ed address.line? It displays machine instruction corresponding to the given line.variable= It displays the address of the specifi ed variable.variable!value It assigns value to the specifi ed variable.x It displays the machine registers and the machine instructions.X It displays the current machine instruction.e fi lename It changes the current source fi le to the specifi ed fi lename./regular expression// and ?regular expression??
It searches for instances of the specifi ed regular expression in source fi les.
p It displays the current line.z It displays 10 lines starting at the current line. It also advances the current line by 10.w It displays 10 lines around the current line.number It sets the current line to the specifi ed line number.count+ It advances the current line by the specifi ed count. It also displays the new current line.count- It takes the current line back by the specifi ed count. It also displays the new current line.r arguments It runs the program with the given arguments.R It runs the program with no arguments.c It continues the execution of a stopped program.C It continues the execution of a stopped program and passes the signal to the program
that stopped the program.line g It resumes execution of the stopped program at the specifi ed line.s It runs the program for a single statement.S It runs the program for a single statement but does not stop within the called functions.i It runs the program for one machine instruction and ignores the signal that stopped the
program.I It runs the program for one machine instruction and passes the signal to the program
that stopped the program.k It kills the program that is being debugged.func(arg1,arg2,...) It calls the function with specifi ed arguments.b It sets a breakpoint.B It displays a list of the current breakpoints.line d It deletes a breakpoint at the given line.D It deletes all breakpoints.l It displays the last executed statement.!command The specifi ed command is interpreted by the shell.q It exits the sdb debugger.

644 Unix and Shell Programming
For debugging, breakpoints can be inserted at various places in a program to temporarily suspend program execution and display the values of the variables and expressions to check whether the intermediate results are as expected. After inserting breakpoints, the debugging of the program is started using the sdb command. The program is executed normally and stops when it encounters the fi rst breakpoint. At the breakpoint, the sdb commands may be used to display the trace of function calls and the values of variables. Thereafter, program execution may be continued from the point where it had stopped.
We can also run a program in a single step at a time, that is, sdb will execute the next line of the program and then stop. If an attempt is made to single-step through a function that has not been compiled with the -g option, execution proceeds until a statement in a function compiled with the -g option is reached.
In order to use sdb, we need to compile the source program with the -g option. This enables the compiler to generate additional information about the variables and statements of the compiled program. The sdb debugger can then be used to obtain a trace of the executed code, called functions, and to display the values of the variables when the program crashes.
The following commands are used for debugging a core image:
$ cc -g prog.c -o progprogBus error - core dumpedsdb progmain:10: printf("area is ,a); *
From this statement, we can see that the program prog.c is compiled with the -g option and then executed. An error occurs, causing a core dump. The sdb program is then invoked to examine the core dump and to understand the reason for the error. The output informs that the Bus error occurred in the main function at line 10 and also displays the statement that caused the error. The sdb program then prompts the user with an * to enter a command.
The sdb takes three arguments on the command line:
1. The fi rst argument is the name of the executable fi le that is to be debugged. If this argument is not specifi ed, the default executable fi le, a.out, is considered.
2. The second argument is the name of the core fi le. The default is core.3. The third argument is the list of the colon-separated directories containing the source of
the program that is being debugged. The default is the current working directory.
Printing stack tracesIn order to display a list of the function calls that resulted in an error, we use the following t command:
*t compute(a=5,b=10) [prog.c:10] calculate(i=16012) [prog.c:50] main(argc=1,argv=0x7fffff54,envp=0x7fffff5c)[prog.c:7]

Different Tools and Debuggers 645
This output indicates that the program was stopped within the compute function at line 10 in the fi le prog.c. The compute function was called with the arguments a=5 and b=10 from the calculate function at line 50. The calculate function was called from the main function at line 7. The main function is always called by a start-up routine with three arguments, which are often referred to as argc, argv, and envp.
In order to display any variable in the stopped program, we type its name followed by a slash. The following example displays the value of the variable area:
*area/
Through this statement, the value of this variable that exists in the current function is displayed. In order to display a variable k from another function, say, compute, we
need to prefix the function name shown in the following command:
*compute:k/
Wild-card characters can be used for finding variables. Sim-ilarly, * can be used to match any number of characters, and ? can be used to match any single character. Let us con -sider the commands shown in Table 13.23.
Setting and deleting breakpointsBreakpoints can be set at any line in a program that is compiled with the -g option. The following methods are used for setting breakpoints:
*10b It sets a breakpoint at line 10 in the current program.
*compute:b It sets a breakpoint at line 1 of the compute function.
*b It sets a breakpoint at the current line.
Here, character ‘b’ is used for placing breakpoints.
Ways of deleting breakpointsFor deleting breakpoints, character ‘d’ is used.
Examples
(a) *10d—It deletes the breakpoint at line 10 in the current program.(b) *compute d—It deletes the breakpoint from the compute function. In order to delete breakpoints in an interactive manner, character ‘d’ is used alone without
any line number. Each breakpoint location will be displayed, and the user will be asked
Table 13.23 Brief description of the commands used in the sdb command
Command Description
*a*/ It displays all variables beginning with the character ‘a’.
*a??/ It displays variables that consist of three characters and which begin with ‘a’.
**/ It displays all variables.
*compute:a*/ It displays all variables in the compute function that begin with the character ‘a’.
**.*/ It displays all the variables of each function.

646 Unix and Shell Programming
for confi rmation. If the user enters y or d, the displayed breakpoint will be deleted. The B command prints a list of the current breakpoints, and the D command deletes all the breakpoints.
Running programsThe r command is used to run a program with the specifi ed arguments.
Syntax *r arguments
If no arguments are specifi ed in this statement, the arguments from the last execution are used. In order to run a program with no arguments, the R command is used. Execution may be resumed at a specifi ed line with the g command. For example, the following statement resumes the execution at line 10:
*10g
The s command is used to run the program for a single statement. The S command is similar to the s command, but it does not stop within the called functions, that is, the S command excludes called functions from debugging and debugs only the calling routines.
In order to test function(s), it can be called with different arguments. The following statement calls the compute function with the three arguments p, q, and r:
*compute(p,q,r)*compute(p,q,r)/m
In both these statements, the compute function is called with the supplied arguments, and the value returned by it is displayed. The only difference between both these statements is that the
second statement displays the value returned by the function in the format m, where m can be octal, hexadecimal, character, etc. When format m is not specifi ed, the value returned is in the decimal format (default). The characters that decide the format of the result returned by the compute function are shown in Table 13.24.
In order to display the machine instructions associated with line 10 in the main function, the following command is used:*main:10?
Absolute addresses may be specifi ed instead of statement numbers by appending a colon (:) to them. Similarly, the following statement displays the contents of address 0x5038:
*0x5038:?
In order to set a breakpoint at the given address, say 0x5038, the following command is given:
*0x5038:b
In order to exit sdb, the q command is used.
Table 13.24 Brief description of the characters that decide the format of the result of the compute function
Format character
Description
c Character
d Decimal
u Unsigned decimal
o Octal
x Hexadecimal
f 32-bit single-precision fl oating point
g 64-bit double-precision fl oating point

Different Tools and Debuggers 647
The ! command can be used to execute a given command. ! can also be used to assign values to the variables in the stopped program. The following example assigns a value to the given variable:
*variable!value
Besides placing a breakpoint, sdb also automatically performs a sequence of commands at a breakpoint and continues with its execution. The following syntax is used for doing so:
[line] b [command;command;...],
Here, a breakpoint is placed at the specifi ed line. The command(s) are executed when the breakpoint is encountered, and execution continues. For example, the following statement places a breakpoint at statement 10, prints the stack trace and the value of the variable area:
*10b t;area/
13.5 strip: DISCARDING SYMBOLS FROM OBJECT FILES
The strip command discards all symbols from the specifi ed object fi les(s).
Syntax strip [-R sectionname |--remove-section=sectionname] [-s|--strip-all] [--strip-debug] [-K symbolname |--keep-symbol=symbolname] [-N symbolname |--strip-symbol=symbolname] [-o fi lename] [-p|--preserve-dates] [-w|--wildcard] object_fi lename
A brief description of the options used in the strip command is given in Table 13.25.
Table 13.25 Brief description of the options used in the strip command
Option Description
-R section_name | --remove-section=section_name
It removes the specifi ed section_name from the output fi le. This option can be used several times to remove more sections.
-s | --strip-all It removes all symbols.
--strip-debug It removes only debugging symbols.
-K symbol_name | --keep-symbol=symbol_name
It keeps only the specifi ed symbol_name from the source fi le. This option can also be used as many times as needed if we want to keep more symbols.
-N symbol_name | --strip-symbol=symbol_name
It removes the specifi ed symbol_name from the source fi le. This option can also be used more than once.
-o fi lename It puts the stripped output in the specifi ed fi lename, rather than replacing the original fi le.
-p| --preserve-dates It preserves the access and modifi cation dates of the fi le.
-w | --wildcard It enables us to use wild-card characters in specifying symbol names. The characters ?, *, \, and [ ] can be used while specifying symbol names. The ! (negation symbol) can be used to reverse the meaning.
object_fi lename It represents the object fi le from which we want to remove symbols.

648 Unix and Shell Programming
13.6 VERSION-CONTROL SYSTEMS
The development of codes is an evolving process. A code is developed and tested; its output is compared with the expected results; modifi cations are made to meet the standards; again, the code is tested. The code goes through multiple cycles of modifi cations, debugging, running, and testing before it is delivered. The process of code evolution does not stop even when the code is delivered for production. It is considered as version 1.0; research and development continues to meet the growing demands of customers, to add new features, to scale applications, etc. In other words, the code has multiple versions, where the later version is an enhancement or an improved form of the existing version.
However, several problems creep up while evolving codes. Similarly, after having made some changes in the code, if it is found that the changes are imperfect, how will we revert to the last version, which was working perfectly well? Hence, we need a mechanism that keeps track of all the working versions and which will enable us to revert to the desired previous version in case the current changes to the code are not up to the mark.
In short, while evolving codes, the following points should be implemented:
1. Keep a track of the changes that have been made since the last known working version.2. Keep a track of the bugs that appear during the evolution of codes so that they can be
removed.3. Keep a history of the code, which is well annotated with comments that explain why
certain changes have been applied to the code to recall earlier changes.
13.6.1 Manual Version ControlIn this method, the developer manually keeps track of the changes made to the code, that is, a snapshot of the code is periodically stored and a backup is taken. Comments are inserted at the place of changes, hence informing other developers on the same project (if any) about the modifi cations applied. The idea of keeping a track of all the changes is to get back to the last working version by undoing the changes applied. However, in spite of keeping a record of all modifi cations, it is still very time-consuming to revert to the last working version when the code crashes. Not only is it time-consuming (requiring patience) but also very error prone. Some new bugs may be introduced in the code.
Manual controlling of versions is not very popular, as developers may forget the order of changes, the purpose of making changes, and so on; hence, reverting to the last working version is very tedious and complicated. In order to avoid the problems faced in manual version control, automated version control is preferred.
13.6.2 Automated Version ControlIn order to keep a track of the code versions automatically, the version-control system (VCS) is preferred. The VCS is a collection of programs that automatically keeps track of the modifi cations applied to the code, hence relieving us from taking snapshots of all the modifi cations applied. We indicate VCS to start the archiving of fi les, to describe their change histories.

Different Tools and Debuggers 649
Whenever we want to edit a fi le, we have to fi rst assert an exclusive lock on it. When editing is done, we check the fi le, add changes to the archive, release the lock, and enter a comment specifying why a particular edit was carried out. All version-control systems enable us to maintain a tree of variant versions with tools for merging into the original version. If there are multiple variants of the code, these systems should be used very carefully, because if there is any bug error, merging back to the original version will be quite diffi cult.
A VCS keeps track of the basic operations applied to the code and includes tools that enable us to view the differences between the two versions, or to group a given set of versions of fi les as a named release that can be examined or reverted to at any time without losing the later changes. Maintaining different versions of an application is quite tedious, and VCS makes this task quite easy and effi cient. In a way, VCS helps in increasing the effi ciency of developers, as they do not have to worry about making changes or editing applications, because they can always go back to the earlier working version of the application.
Such systems also have certain drawbacks. For example, using a VCS involves an overhead to edit a fi le, that is, it requires us to add steps that help in reversion. In addition, a problem might occur in reverting to the original fi le if any of the fi les in the application is renamed. The following Unix tools are used for version control:
Source code control system The fi rst is the original source code control system (SCCS), which was developed by Bell Labs around 1980 and featured in System III Unix. The SCCS used a unifi ed source-code management system that is still used in a few version-control systems.
Revision control system Revision control system (RCS) was developed at Purdue University and is logically similar to SCCS. It is the most popular version-control system that is comparatively more user-friendly and has a better command interface. For categorization, we can group project releases by symbolic names through RCS.
Concurrent version system Concurrent version system (CVS) is a sophisticated version-control system that requires more disk space when compared to SCCS and RCS. It is suitable for large software applications that are distributed across several development sites through the Internet. The versions of the applications can be stored in a repository that is located on a different host, enabling anybody with access rights to manage versions remotely.
■ SUMMARY ■
1. Yacc stands for yet another compiler–compiler. 2. Yacc is a compiler that reads the grammar
specifi cations in the specifi ed fi le and generates parsing tables and driver routines to the fi le y.tab.c.
3. Lex takes an input stream and generates programs that are used in a simple lexical analysis of the text.
4. m4 is a Unix macro processor. 5. m4 takes an m4 template as input and after having

650 Unix and Shell Programming
expanded and processed the macros, it produces output on the standard output.
6. In order to create new macros in m4, the defi ne() macro is used.
7. troff (pronounced ‘tee-roff’) is a text-formatting tool that formats the document to appear similar to a typeset document.
8. nroff (or new roff) is a text-formatting program that produces the output for terminal windows, line printers, and typewriter-like devices.
9. In nroff, the default vertical spacing is 1/6" and for troff, it is 12 points.
10. The output produced by troff is device independent and requires being post-processed before it can be accepted by most printers.
11. One point is 1/72th of an inch.12. tbl is a preprocessor that formats tables for nroff/
troff.13. tbl compiles descriptions of tables embedded
within troff input fi les into commands and escape sequences that nroff/troff can understand.
14. On using tbl, the commands between each .TS/.TE macro pair in the specifi ed fi le are converted into a printable table.
15. In tbl, the column titles are represented by the .TH macro.
16. eqn is a preprocessor that is used for typesetting mathematical equations for troff.
17. eqn compiles descriptions of equations embedded within troff input fi les into commands under-standable by troff. The output of eqn is processed with troff.
18. In eqn, the .EQ and .EN macros are used to start and end typesetting mathematics, respectively.
19. eqn uses two fonts to set an equation: an italic font for letters and a roman font for other components of the equation.
20. The pic compiles pictures embedded within troff input fi les into commands to make them understandable by these text-formatting tools.
21. In pic, each picture starts with a line beginning with the .PS macro and ends with a line beginning with the .PE macro.
22. The .PS and .PE macros, respectively, in pic, are used to turn the preprocessor on and off.
23. In pic, the scale by default is 1 to 1, that is, 1 unit is equal to 1".
24. The process of removing the error and enabling the program to yield expected results is known as debugging.
25. The debugger enables us to suspend the execution of the program at desired places.
26. A debugger enables us to execute various commands in the suspended mode to ascertain the state of the intermediate results in a program.
27. dbx is an interactive, command-line debugging tool.28. Breakpoints are locations in the program at which we
wish to suspend program execution.29. The simplest type of breakpoint using the dbx
debugger is a stop breakpoint.30. In dbx, in order to continue execution of the program
after it has stopped at a breakpoint, the cont command is used.
31. In order to get a list of all breakpoints while using the dbx debugger, the status command is used.
32. In order to step through the program one statement at a time in dbx, the step and next commands are used.
33. In case of functions, the step command in dbx steps into the function, whereas the next command steps over the function.
34. A stack trace helps in identifying when a function was called and when it returned.
35. In order to display a stack trace in dbx, the where command is used.
36. adb is a general-purpose debugger. It enables us to view the core fi les resulting from aborted programs and display output at the given addresses to isolate the statements that result in an error.
37. In adb, ? is used to examine the contents of object_fi le, and / (backslash) is used to examine the core fi le.
38. In adb, the character ‘i’ is used to print the instruction at an address.
39. The symbolic debugger (sdb) is used for examining core images of the programs and for fi nding and removing bugs from them.
40. The command line? in sdb displays machine in-structions corresponding to the given line.
41. The command X in sdb displays the current machine instruction.
42. The command line g in sdb resumes execution of the stopped program at the specifi ed line.
43. The command b in sdb sets a breakpoint.

Different Tools and Debuggers 651
44. The command line d in sdb deletes a breakpoint at a given line.
45. The command D in sdb deletes all breakpoints.46. The command q exits from the sdb debugger.47. The command t in sdb displays the stack trace of the
suspended program.48. The strip command discards all symbols from the
specifi ed object fi le(s).49. The option -s and --strip-all in strip command removes
all symbols.
■ EXERCISES ■
Objective-type QuestionsState True or False
13.1 tbl is one of the troff preprocessors. 13.2 A table defi nition begins with a .TE macro. 13.3 The default code fi le in yacc is named y.
output. 13.4 Yacc can generate parsing tables. 13.5 m4 is a text-formatting tool. 13.6 In nroff the default vertical spacing is 1/6” and
for troff it is 12 points. 13.7 The output produced by troff is device dep-
endent, and there is no need to post-process it.
13.8 In tbl, the column titles are represented by the .TE macro.
13.9 eqn is a preprocessor that is used for typesetting mathematical equations for troff.
13.10 The output of eqn is processed with troff.13.11 troff is a text-formatting tool that formats the
document to appear similar to a typeset document.13.12 pic compiles pictures embedded within troff
input fi les.13.13 In pic, the scale by default is 1 to 1, that is,
1 unit is equal to 1 foot.13.14 The strip command enables us to sus pend
execution of the program at desired places.13.15 dbx is an interactive, command-line debugging
tool.
Fill in the Blanks
13.1 In eqn, the and mac-ros are used to start and end typesetting mathematics, respectively.
13.2 The is a Unix macro processor. 13.3 is a preprocessor that formats
tables for nroff/troff. 13.4 The .PS and .PE macros, respectively, in
are used to turn the preprocessor on and off.
13.5 The process of removing error and enabling a program to yield expected results is known as
. 13.6 are the locations in the
program where we wish to suspend program execution.
13.7 The simplest type of breakpoint in debugger is a stop breakpoint.
13.8 A helps in identifying when a function was called and when it returned.
13.9 In adb, is used to examine the contents of object_fi le, and is used to examine the core fi le.
13.10 In order to get a list of all breakpoints while using the dbx debugger, the command is used.
13.11 The command in sdb deletes all breakpoints.
13.12 eqn uses two fonts to set an equation: font for letters and a
font for other components of the equation.13.13 takes an input stream and
generates programs that are used in a simple lexical analysis of the text.
13.14 In order to discard all symbols from the specifi ed object fi le(s), command is used.
13.15 The command is used to exit from the sdb debugger.

652 Unix and Shell Programming
Review Questions 13.1 Write short notes on the following language
development tools: (a) yacc (b)_lex (c) m4 13.2 What do you mean by a version-control system?
Explain the ways by which version controlling is done.
13.3 Explain in detail how macros are created. 13.4 How does troff format a document to appear
similar to a typeset document? Explain the options that can be used with troff.
13.5 What are the macros that are used in the tbl preprocessor to format a table? Explain the commands and keys that are used in tbl.
13.6 Give a list of all the keywords that can be used with the eqn preprocessor for typesetting mathematical equations.
■ ANSWERS TO OBJECTIVE-TYPE QUESTIONS ■
State True or False
13.1 True 13.2 False 13.3 False 13.4 True 13.5 False 13.6 True 13.7 False
13.8 False 13.9 True13.10 True13.11 True13.12 True13.13 False13.14 False13.15 True
Fill in the Blanks
13.1 .EQ, .EN 13.2 m4 13.3 tbl 13.4 pic 13.5 debugging 13.6 Breakpoints 13.7 dbx
13.8 stack trace 13.9 ?, /13.10 status13.11 D13.12 italic, roman13.13 lex13.14 strip13.15 q

14.1 INTERPROCESS COMMUNICATION
In multiprocessing and multitasking operating systems, several applications are executed in parallel and they share data among themselves. The mechanism used for communicating and sharing data between applications is known as interprocess communication (IPC).
Interprocess communication includes thread synchronization and data exchange between threads. If threads belong to the same process, they are executed in the same address space, that is, they can access global (static) data or heap directly, without the help of the operating system. However, if threads belong to different processes, they cannot access each other’s address spaces without the help of the operating system.
There are two fundamentally different approaches in IPC:
1. Processes that reside on the same computer2. Processes that reside on different computers
The fi rst case is easier to implement, because processes can share memory in either the user space or the system space. In the second case, the computers do not share physical memory; they are connected via input/output (I/O) devices. Therefore, the processes residing in different computers cannot use the memory as a means of communication.
Interprocess Interprocess CommunicationCommunication
C H A P T E R
After studying this chapter, the reader will be conversant with the following:
• Interprocess communication• Pipes• Messages• Accessing, attaching, reading, writing, and detaching the shared memory
segment• Sockets—stream socket and datagram socket• Input/Output (I/O) multiplexing• Filters• Semaphores—initializing, managing, and performing operations
1414

654 Unix and Shell Programming
Most of this chapter is focused on IPC on a single computer system, including four general approaches:
1. Pipes 2. Messages 3. Sockets 4. Shared memory
14.1.1 PipesA pipe is a buffer that implements communication between two processes, one of which is considered a producer process, and the other a consumer process. It is a sort of FIFO queue in which the content placed by one process in the pipe is read or used by another process. When a producer process wishes to write into the pipe, depending on the available space in the pipe, either the write request is immediately executed or the process is blocked until space becomes available in the pipe. Similarly, if there are enough bytes in the pipe, the read request of the consumer process is either executed or blocked until enough data appears in the pipe. To enable only one process to access the pipe at a time, mutual exclusion is implemented by the operating system.
14.1.2 MessagesFor establishing communication among processes, each process in the Unix operating system has an associated message queue. The messages are sent and received via the msgsnd and msgrcv system calls. The process checks for space in the message queue before sending the message. If there is not enough space, the process is blocked until enough space appears in the message queue. When the message queue has enough space, the sending process writes the message in the message queue along with its type. The receiving process observes the message type and retrieves the message from the message queue. If there is no message, the reader process is blocked until a message appears in the message queue.
14.1.3 SocketsSockets provide point-to-point, two-way communication between two processes. Processes communicate only between the sockets of the same type and with the ones that are in the same address domain. Each of the two communication processes needs to establish its own socket. While creating sockets, we need to remember two points—the socket type and the address domain. There are two widely used address domains.
Unix domain In this address domain, the two processes that share a common fi le system communicate with each other. The address of a socket in this domain is a character string that acts as an entry into the fi le system.
Internet domain In this address domain, the two processes running on any two hosts on the Internet communicate with each other. The address of a socket in this domain consists of an IP address of the host machine and a port number.
The following are the two widely used socket types:
Stream socket The stream socket is a connection-oriented socket that provides a two-way reliable fl ow of data. Data is communicated as a continuous stream of characters that are transmitted in a sequence. Before beginning data transmission, a connection is formally established between the two processes. The stream socket type is represented by SOCK_STREAM

Interprocess Communication 655
constant. It uses transmission control protocol (TCP), which is a reliable stream-oriented protocol.
Datagram socket The datagram socket is a message-oriented socket that supports a two-way fl ow of messages. The messages sent by a process may not be received in the same order by another process. The datagram socket type is represented by the SOCK_DGRAM constant. It uses Unix datagram protocol (UDP), which is unreliable and message oriented.
As mentioned, each of the two communication processes needs to establish its own socket. Assuming the two processes are client and server, let us understand the steps involved in establishing a socket on the client side as well as on the server side.The steps involved in establishing a socket on the client side are as follows:
1. Create a socket with the socket() system call.2. Connect the socket to the address of the server using the connect() system call.3. Send and receive data using the read() and write() system calls.
The steps involved in establishing a socket on the server side are as follows:
1. Create a socket with the socket() system call.2. Bind the socket to an address using the bind() system call. For a server socket on the
Internet, an address consists of a port number on the host machine.3. Listen for connections with the listen() system call.4. Accept a connection with the accept() system call. This call typically blocks until a client
connects with the server.5. Send and receive data.
Creating socketsIn order to create a new socket in the specifi ed domain and of the specifi ed type, the socket() function is used.
Syntax int socket(int domain, int type, int protocol);
A brief description of the parameters used in the socket() function is given in Table 14.1.
Table 14.1 Brief description of the parameters used in the socket() function
Parameter Description
domain It represents the address domain of the socket, i.e., whether the socket belongs to the Unix domain or the Internet domain. The Unix domain is used for the two processes that share a common fi le system, and is represented by the constant AF_UNIX. The Internet domain is used for any two hosts on the Internet, and is represented by the symbol constant AF_INET.
type It represents the socket type. The socket can be a stream socket in which characters are read in a continuous stream (represented by the symbolic constant SOCK_STREAM) or a datagram socket in which data is transmitted in the form of a block of messages (represented by the symbolic constant SOCK_DGRAM).
protocol It represents the protocol used by the socket, i.e., whether it uses the TCP or UDP protocol. The stream socket uses TCP protocol, and the datagram socket uses UDP protocol. If a protocol is not specifi ed, the default protocol that supports the specifi ed socket type is considered.

656 Unix and Shell Programming
On its success, the socket() function call returns a socket handle or socket descriptor, which is then used for managing the socket.
Example The following statement creates a new datagram socket for the Internet domain address.
sockhandle = socket(AF_INET, SOCK_DGRAM, 0);if (sockhandle < 0) perror("Error: Socket could not be created");
Binding sockets to addressesIn order to bind a socket to an address, the bind() function is used. This function is used only by the servers.
Syntax int bind(int s, const struct sockaddr *saddr, int saddrlen)
A brief description of the parameters used in the bind() function is given in Table 14.2.
Table 14.2 Brief description of the parameters used in the bind() function
Parameter Description
s It represents the socket descriptor.
saddr It represents the pointer to the socket data structure, sockaddr. sockaddr refers to the address to which the socket is to be bound. Besides sockaddr, sockaddr_in structure can also be used. sockaddr_in is a structure that contains an Internet address.
saddrlen It represents the size of the socket address, sockaddr.
The following is a sample socket data structure, sockaddr:
struct sockaddr {u_char sadd_len; /* total length of the socket address */sa_family_t sadd_family; /* address family */char sadd_data[20]; /* actual address bytes are stored here */};
The socket data structure that is used for keeping the Internet address sockaddr_in may appear in the following manner:
struct sockaddr_in{ short sin_family; /* must be AF_INET to represent internet domain address */ struct in_addr sin_addr; u_short sin_port; char sin_zero[8]; };
Listening for connectionsFor listening on the sockets for the connections, the listen() system call is used.
Syntax int listen(int s, int backlog);

Interprocess Communication 657
Here, s represents a stream socket descriptor and backlog represents the size of the backlog queue, that is, the number of incoming requests that are waiting for the connections. The maximum permissible size for this queue is fi ve.
Accepting connectionsThe system call that is used for accepting socket connections is accept.
Syntax int accept(int s, struct sockaddr *saddr, int *saddrlen);
A brief description of the parameters used in the accept() function is given in Table 14.3.
On success, the accept() system call returns the socket descriptor that is valid for the particular connection and on failure, it returns −1.
Note: A server can have multiple SOCK_STREAM connections that are active at the same time.
Connecting to socketsThe system call that is used for connecting to the socket is connect().
Syntax int connect(int s, const struct sockaddr *srvr, int saddrlen);
A brief description of the parameters used in the connect() function is given in Table 14.4.
When successful, the connect() system call returns 0 and establishes a socket connection that is ready for performing reading and writing functions. On its failure, the system call returns −1.
14.1.4 Shared MemoryThe shared memory is the fastest way of interprocess communication. In this mechanism, a block of virtual memory is shared among multiple processes. Processes read and write into the shared memory through their respective instructions.
Processes are executed in separate address spaces. A shared memory segment is a piece of memory that can be allocated and attached to an address space. The processes to which the memory segment is attached can access it and perform read and write operations on it. Shared memory is hence an effi cient way of sharing data among programs. More than one process can access a single block of memory, and the changes made in the data by one process can be seen by another process. In order to avoid inconsistency and to maintain data integrity, a semaphore is used, which prevents more than one process from modifying
Table 14.3 Brief description of the parameters used in the accept() function
Parameter Description
s It represents the socket descriptor.
saddr It represents the pointer to the socket data structure sockaddr. It refers to the address to which the socket is to be bound.
saddrlen It represents the size of the address.
Table 14.4 Brief description of the parameters used in the connect() function
Parameter Description
s It represents the stream socket descriptor.
srvr It represents the pointer to the sockaddr data structure. It refers to the address to which the socket is to be bound.
saddrlen It represents the size of the address.

658 Unix and Shell Programming
the same block simultaneously. The functions used in implementing shared memory are as follows:
mmap() It implements the shared memory.
shmget() It accesses a shared memory segment.
shmctl() It assigns ownership of the shared memory segment to the specifi ed user. It can also be used to change the permissions and other characteristics of the shared memory segment. This function can even be used to destroy the memory segment.
shmat() It attaches a shared segment to a process address space. Depending on the permissions, the attached process can access, read, and write to the attached segment.
shmdt() It detaches a shared segment from the process address space.
A shared memory segment is described by a control structure with a unique ID that points to an area of physical memory.
Accessing shared memory segmentsThe function shmget() is used to access a shared memory segment.
Syntax int shmget(key_t key, size_t size, int shmemfl g);
A brief description of the parameters used in the shmget() function is given in Table 14.5.
On success, the shmget() function returns the shared memory segment ID.
Example The function call to access a 1K segment with 755 permissions is as follows:
key_t key;int shmemid;key = ftok("/home/bintu/a.txt", 'R');shmemid = shmget(key, 1024, 0755 | IPC_CREAT);
Based on these statements, a block of 1K of the shared memory segment is created, and the ID of the memory segment is assigned to the variable shmemid.
The next step is to attach the created memory segment to the process address space. For this, we make use of the shmat() function.
Attaching segments to address spaceIn order to work with the shared memory segment, we need to attach it to a process address space. On attaching it to the process address space, we get a pointer to the shared memory segment, which can be used to access, read, and write to it. To attach a memory segment with a given ID to the process address space, the shmat() function is used.
Table 14.5 Brief description of the parameters used in the shmget() function
Parameter Description
key It represents the access value associated with the semaphore ID.
size It represents the size of the requested memory segment in bytes.
shmemfl g It represents the initial access permissions and creation control fl ags.

Interprocess Communication 659
Syntax void *shmat(int shmemid, void *shmaddrspc, int shmemfl g);
A brief description of the parameters used in the shmat() function is given in Table 14.6.
On success, the shmat() function returns the pointer to the shared memory segment; otherwise, it returns −1.
Example The following code is used to get a pointer to a shared memory segment.
key_t key;int shmemid;char *ptrmemseg;key = ftok("/home/bintu/a.txt", 'R');
shmemid = shmget(key, 1024, 0755 | IPC_CREAT);ptrmemseg = shmat(shmemid, (void *)0, 0);if (ptrmemseg == (char *)(-1)) perror("Error: Address space could not be attached to the memory segment");
Based on the aforementioned statements, the shared memory segment with ID shmemid is attached to a process address space. If the shmat() function is successful, we get a pointer to the shared memory segment and is assigned to the pointer ptrmemseg. In case of any error, the function shmat() returns a −1 value, and an error message is displayed.
Note: The shmat() function returns a void pointer and is cast to the char pointer before comparing it in the if statement.
Reading and writing into shared memory segmentsAfter getting a pointer to the shared memory segment, it can be used not only to access the memory segment but also to read and write into it. For example, the following statement shows how to read the content from the shared memory segment that is indicated by the pointer ptrmemseg:
printf("Content in shared memory segment: %s\n", ptrmemseg);
We use the following statement to write into the shared memory segment:
printf("Enter your name ");gets(ptrmemseg);
Based on the aforementioned statements, the data entered by the user will be written into the shared memory segment. Besides character data, data of the desired data type can be written into the memory segment by casting its pointer accordingly.
Detaching segments from address spaceWhen the task of accessing the memory segment, and reading and writing data to the memory segment is complete, we can detach the data from the process address space by using the shmdt() call.
Table 14.6 Brief description of the parameters used in the shmat() function
Parameter Description
shmemid It represents the shared memory ID.
shmaddrspc It represents the address space. It is better to keep the value of this argument as 0 and to let the operating system fi nd the address space.
shmemfl g It represents the type of access desired on the address space. For read-only access, the value of this fl ag is set to SHM_RDONLY; otherwise, a value of 0 is assigned to this parameter.

660 Unix and Shell Programming
Syntax int shmdt(void *shmaddrspc);
Here, shmaddrspc represents the address space with which the memory segment was attached and the one that we got by calling the shmat() function. On success, the shmdt() function returns 0; otherwise, it returns −1.
Let us now understand the process of altering permissions of the memory segment.
Altering permissions of memory segmentsIn order to alter the permissions and other characteristics of the shared memory segment, the shmctl() function is used.
Syntax int shmctl(int shmemid, int cmd, struct shmemid_ds *buf);
A brief description of the parameters used in the shmctl() function is given in Table 14.7.
In the following code snippet, we create a memory segment, attach it to the process address space, write some content into the memory segment, and fi nally, destroy it:
#include <sys/types.h>#include <sys/ipc.h>#include <sys/shm.h>key_t key;int shmemid;char *ptrmemseg;int cmd;struct shmid_ds shmid_ds;int returnfl ag;key = ftok("/home/bintu/a.txt", 'R');shmemid = shmget(key, 1024, 0755 | IPC_CREAT);
ptrmemseg = shmat(shmemid, (void *)0, 0);if (ptrmemseg == (char *)(-1)) perror("Error: Address space could not be attached to the memory segment");printf("Enter your name ");gets(ptrmemseg);cmd=IPC_RMID;if ((returnfl ag = shmctl(shmemid, cmd, shmid_ds)) == -1) { perror("The shared memory segment could not be removed"); exit(1); }
Table 14.7 Brief description of the parameters used in the shmctl() function
Parameter Description
shmemid It represents the ID of the shared memory segment.
cmd It represents the command that we wish to apply to the memory segment.
SHM_LOCK It locks the specifi ed shared memory segment.
SHM_UNLOCK It unlocks the shared memory segment.
IPC_STAT It returns the status information contained in the control structure and places it in the buffer pointed to by buf.
IPC_SET It sets the user ID, group ID, and access permissions.
IPC_RMID It removes or destroys the shared memory segment.
buf It represents a structure of the type struct shmid_ds.

Interprocess Communication 661
14.2 SYNCHRONIZATION
In a multithreaded environment, threads may need to share data between them and also perform various actions. These operations require a mechanism to synchronize the activity of the threads. These synchronization techniques are used to avoid race conditions and to wait for signals when resources are available. The following are the two popular synchronization primitives:
1. Mutexes2. Semaphores
For synchronization, two lock operations are performed: lock and unlock.
Note: There is no mechanism in the kernel or the threads to enforce mutual exclusion or to prevent deadlock.
14.2.1 Mutual Exclusion LocksA mutex is used to ensure that only one thread at a time can access the resource protected by the mutex. The thread that locks the mutex should be the one that also unlocks it. A thread attempts to acquire a mutex lock by executing the mutex_enter instruction. If a resource is already locked by another thread, the thread that is attempting to acquire the resource is blocked. A blocked thread keeps on polling the status of the lock and waiting for the resource to get unlocked.
The operations on a mutex lock are as follows:
mutex_enter() It acquires the lock.
mutex_exit() It releases the lock. This action results in unblocking a waiting thread.
mutex_tryenter() It acquires the lock if it is not already held.
The mutex_tryenter() operation is considered a better way of performing the mutual exclusion, as it avoids blocking the entire process.
14.2.2 SemaphoresThe semaphore is an IPC method in Unix that was designed by E.W. Dijkstra in the 1960s. It is not only used to synchronize the processes but also to implement concurrent processing. It compels a process to wait when a block of data is being modifi ed by another process. Only when the fi rst process is complete with its job, the waiting process is allowed to proceed.
The semaphore is a programming structure that consists of an integer value. In order to implement process synchronization, the semaphore uses the test and set pattern.
The test and set pattern means that the semaphore permits processes to test and set the integer value in a single atomic operation. The process that tests the value of a semaphore and sets it to a different value ensures that no other process interferes with the operation.
In order to make it more clear, the integer value in the semaphore is initially set to 0. When a process proceeds with modifying the critical section (the region of data that two or more processes wish to access and modify simultaneously), it increments the value of the semaphore integer by 1. All the processes that wish to access the critical section wait

662 Unix and Shell Programming
until the integer value becomes 0. When the process that works with the critical section has completed its task, it decrements the value of the semaphore integer by 1 (making it 0). The value 0 of the semaphore informs the waiting process that it can now proceed with its processing (or modifying content) in the critical section.
Test and set here means that a process can either set the semaphore (increment its value) after checking it or wait until it clears (value of semaphore again becomes 0) and then set it. Hence, process synchronization is implemented through testing and setting the integer value of the semaphore in a single atomic operation. The process that tests the value of a semaphore and sets it to a different value (incrementing it by 1) ensures that no other process will be able to simultaneously modify the same content. The two types of operations possible on a semaphore are the wait operation and the signal operation.
The aforementioned discussion indicates that the two operations that are possible with the semaphore are as follows:
wait It waits for the semaphore integer to become 0.
signal It increments the semaphore integer to 1 and accesses the critical section.
In Unix, operations involving semaphores are achieved by the following three system calls:
semget() It initializes the semaphore set.
semctl() It manages features of semaphores and their permissions.
semop() It performs operations on semaphores.
Initializing semaphoresSemaphores are initialized by using the semget() system call.
Syntax int semget(key_t key, int nsems, int semfl g);
A brief description of the parameters used in the semget() function is given in Table 14.8.
Table 14.8 Brief description of the parameters used in the semget() function
Parameter Description
key It represents the access value associated with the semaphore ID.
nsems It represents the numbers of elements stored in a semaphore array. A value 0 is passed for this argument if the exact size of the array is unknown.
semfl g It represents the initial access permissions and creation of control fl ags.
When successful, the function returns the value of the semaphore ID, semid.
Managing semaphoresIn order to manage the features of semaphores and their permissions, the semctl() system call is used.
Syntax int semctl(int semid, int semnum, int cmd, union semnum arg);
A brief description of the parameters used in the semctl() function is given in Table 14.9.

Interprocess Communication 663
Table 14.9 Brief description of the parameters used in the semctl() function
Parameter Description
Semid It represents the semaphore ID.Semnum It represents a number to designate the semaphore in an array of semaphores.Cmd It represents the command that we wish to execute on the selected semaphore. The list of valid commands is
as follows:GETVAL It returns the value of a single semaphore.SETVAL It sets the value of a single semaphore.GETPID It returns the PID of the process that is operated on the semaphore.GETNCNT It returns the number of the processes that are waiting for the semaphore value to become 1.GETALL It returns the values for all the semaphores in a set.SETALL It sets the values for all the semaphores in a set.IPC_STAT It returns the status of the semaphore set.IPC_SET It sets the user ID, group ID, and permissions.IPC_RMID It removes the specifi ed semaphore set.
semnum It indicates an optional argument that represents a union on the requested operation. The semnum union may appear in the following manner:union semnum{ int val; struct semid_ds *buf; ushort *array;} smnm;
When successful, the semctl() system call executes the given command on the specifi ed semaphore; otherwise, it returns −1.
Performing operations on semaphoresA Unix semaphore is an array of semaphores that is opened simultaneously and atomically by an array of operations specifi ed in the semop() system call. The syntax of this function, which is used to obtain or release a semaphore, is as follows:
Syntax int semop(int semid, struct sembuf *sops, size_t nsops);
A brief description of the parameters used in the semop() function is given in Table 14.10.
Table 14.10 Brief description of the parameters used in the semop() function
Parameter Description
Semid It represents the semaphore ID returned by the semget() call.sops It is a pointer to an array of semaphore operation structures. Each semaphore operation structure, sembuf,
stores the operation that is to be performed on semaphores:struct sembuf{ ushort_t sem_num; /* semaphore number */
(Contd)

664 Unix and Shell Programming
14.3 INPUT/OUTPUT MULTIPLEXING
In order to understand I/O multiplexing, let us assume a socket server has several working threads in its thread pool that perform I/O processing on fi le descriptors. When a worker thread processes I/O from one fi le descriptor, it might be compelled to wait until that fi le descriptor completes its transaction, that is, the worker thread waits for the I/O to be completed from one fi le descriptor before initiating its processing. The waiting time of the worker thread goes waste, and it could have been utilized for performing the I/O processing of the client that has completed its I/O. The concept of waiting of the worker thread limits the number of concurrent connections that a socket server can handle.
In I/O multiplexing, the task of I/O processing can be overlapped with I/O completion. As a result, the worker thread need not wait for the I/O processing to be completed on a client; instead, it can perform I/O processing on other clients, and in the meanwhile, the current client completes its I/O. This utilization of the worker thread for performing I/O processing of multiple clients when any client gets busy in completing I/O not only increases the performance of the application but also reduces the requirement of the number of worker threads that are used to process I/O.
The system calls that are used to implement I/O multiplexing are select() and pselect(). Let us begin with the select() system call.
14.3.1 select() System CallThe select() system call enables a program to monitor multiple fi le descriptors (sockets), waiting until one or more of the fi le descriptors becomes ready for any I/O operation, such as reading or writing. The following is the syntax for using the select() system call.
Syntax int select(int numfds, fd_set *readfds, fd_set *writefds, fd_set *errfds, struct timeval *timeout);
A brief description of the parameters used in the select() function is given in Table 14.11.
Table 14.10 (Contd)
Parameter Description
short sem_op; /* semaphore operation */ short sem_fl g; /* operation fl ags */}; We can see that the structure includes the following:1. The semaphore number, sem_num2. A signed integer, sem_op, containing the operation that is to be performed on the semaphore3. The operation fl ags, sem_fl g. The two most commonly used operation fl ags are IPC_NOWAIT and
SEM_UNDO. The IPC_NOWAIT fl ag is used to immediately return the function without changing the semaphore value. The SEM_UNDO fl ag is used to undo the semaphore operation if the process exits prematurely.
nsops It represents the length of the array and indicates the maximum number of operations that are allowed in a semop() system call. Its default value is 10.

Interprocess Communication 665
We can see that all the three arguments, readfds, writefds, and errfds, are of type fd_set. In order to manipulate these three sets, we use the following macros shown in Table 14.12.
The timeval struct is used to specify a time period during which the select() function will wait for a fi le descriptor to get ready for the operation. If none of the fi le descriptors is found ready in the specifi ed time period, then, instead of waiting infi nitely, the select() function will return to continue processing.
struct timeval consists of the following fi elds:
struct timeval { int tv_sec; // seconds int tv_usec; // microseconds};
When successful, the select() system call modifi es the objects pointed to by the readfds, writefds, and errfds arguments to indicate which fi le descriptors are ready for reading, ready for writing, or have an error condition pending, respectively, and returns the total number of ready descriptors in all the output sets. For each fi le descriptor less than numfds, the corresponding bit is set on successful completion if it was set on input, and the associated condition is true for that fi le descriptor.
If none of the selected descriptors is ready for the requested operation, the select() system call will block until at least one of the requested operations becomes ready, until the timeout occurs, or until interrupted by a signal.
Table 14.11 Brief description of the parameters used in the select() function
Parameter Description
numfds It represents the number of fi le descriptors to be monitored. The fi le descriptors from zero through numfds-1 in the descriptor sets will be monitored.
readfds The pointer that points to an object of type fd_set on input specifi es the fi le descriptors to be checked for being ready to read, and on output indicates which fi le descriptors are ready to read.
writefds The pointer that points to an object of type fd_set on input specifi es the fi le descriptors to be checked for being ready to write, and on output indicates which fi le descriptors are ready to write.
errfds The pointer that points to an object of type fd_set on input specifi es the fi le descriptors to be checked for error conditions pending, and on output indicates which fi le descriptors have error conditions pending.
Timeout It defi nes the time that the select() system call can take before timing out. If the timeout parameter is not a null pointer, it specifi es a maximum interval to wait for the select() to be completed. If the specifi ed time interval expires and no fi le descriptor is found to be ready, the systems call returns. If the timeout parameter is a null pointer, the call to select() will block indefi nitely until at least one descriptor is ready for the desired operation.
Table 14.12 Brief description of the macros used in the select() function
Macro Description
FD_SET(int fd, fd_set *set);
It adds the given fd to the specifi ed set.
FD_CLR(int fd, fd_set *set);
It removes the given fd from the specifi ed set.
FD_ISSET(int fd, fd_set *set);
It returns true if the fd is in the specifi ed set.
FD_ZERO(fd_set *set); It clears all entries from the specifi ed set.

666 Unix and Shell Programming
14.3.2 pselect() System CallAnother system call that is similar to the select() system call and which helps in I/O multiplexing is the pselect() system call.
Syntax int pselect(int numfds, fd_set *readfds, fd_set *writefds, fd_set *errfds, const struct timespec *timeout, const sigset_t *sigmask);
The difference between the select() and pselect() system calls is that in the select() system call, the timeout period is given in seconds and microseconds in an argument of type struct timeval, whereas in the pselect() system call, the timeout period is given in seconds and nanoseconds in an argument of type struct timespec. Moreover, the select() system call does not have a sigmask argument.
If sigmask is not a null pointer, the pselect() call replaces the signal mask of the caller with the set of signals pointed to by sigmask before examining the descriptors, and will restore the signal mask of the calling thread before returning. The following example waits for 5.5 seconds for the user to press a key.
Example
#include <stdio.h>#include <sys/time.h>#include <sys/types.h>#include <unistd.h>void main(void){ struct timeval tv; fd_set readfds; tv.tv_sec = 5; tv.tv_usec = 500000; FD_ZERO(&readfds); FD_SET(0, &readfds); select(1, &readfds, NULL, NULL, &tv); if (FD_ISSET(0, &readfds)) printf("A key is pressed!\n"); else printf("Time expired\n");}
14.4 FILTERS
A fi lter in Unix refers to a small, specialized program that searches for desired information from the specifi ed data on the basis of the supplied criteria and displays it in an arranged format.
Filters may read data from either the given fi le or the standard input. Similarly, the output of the fi lter can be sent either to the standard output or to a fi le to be saved for future reference

Interprocess Communication 667
or processing. The following are a few of the fi lters that are available in the Unix system: awk, cat, comm, cut, diff, grep, head, join, less, more, paste, sed, sort, spell, tail, tr, uniq, and wc.
Note: Filters may be used anywhere in a pipeline.
14.4.1 more FilterThe more fi lter displays output on a terminal one screen at a time. On pressing spacebar, the next screen will be displayed. On pressing q, we exit out of this fi lter.
Syntax more fi lename(s),
Here, fi lename represents one or more fi les that we wish to view screen by screen.
14.4.2 less FilterThe less fi lter displays the output on a terminal one screen at a time. Besides forward navigation, the less fi lter supports backward navigation as well. In addition, we can move a specifi ed number of lines instead of the entire page. The less fi lter is faster, as it starts without reading the entire fi le into the memory.
Syntax less fi lename(s),
Here, fi lename represents one or more fi les that we wish to see page-wise.The commands that are used with the less fi lter are shown in Table 14.13.
Table 14.13 Brief description of the commands used with the less fi lter
Command Description
n j It navigates forward n number of lines.
n k It navigates backward n number of lines.
G It takes the cursor to the end of the fi le.
g It takes the cursor to the start of the fi le.
q or ZZ It exits the less fi lter.
/pattern It searches for the given pattern in the forward direction. The following are examples:
(a) /project: It searches for the pattern project in the text.
(b) /\/project\/: It searches for the pattern /project/ in the text. The backslashes (\) are used as escapes.
?pattern It searches for the given pattern in the backward direction. The following are examples:
(a) ? project: It searches for the pattern project in the text in the backward direction.
(b) ?/project/: It searches for the pattern project in the backward direction.
n It searches for the next match of the specifi ed pattern in the backward direction.
N It searches for the next match of the specifi ed pattern in the forward direction.

668 Unix and Shell Programming
Note: We can also open multiple fi les with the less fi lter.
Example $ less fi le1 fi le2
This statement will open two fi les, fi le1 and fi le2.
:e fi lename It opens the specifi ed fi le while viewing the current fi le.
:n It switches to the next fi le.
:p It switches to the previous fi le.
14.4.3 tee CommandThe tee command is used for reading data from an input and for writing to a standard output as well as to a fi le, that is, it performs both the tasks of storing as well as displaying the output of the specifi ed command.
Syntax tee [-a | --append ][-i] [fi lenames]
A brief description of the parameters used in the tee command is given in Table 14.14.
Examples The following statement displays the list of fi les and directories on the screen as well as saves them in the fi le listfi les.txt.
(a) $ ls | tee listfi les.txt By default, the tee command overwrites the fi le listfi les.txt. If there were any
earlier contents in the fi le, they will be deleted before the list of fi les and directories is saved in it.
(b) In order to append content to a fi le, the -a option is used as shown in the following example.
$ ls | tee –a listfi les.txt
The earlier content in the fi le listfi les.txt will be preserved, and the list of fi les and directories will be appended to the fi le. We can also write the output to multiple fi les in the following manner, where the list of fi les and directories is stored in the three fi les, a.txt, b.txt, and c.txt:
(c) $ ls | tee a.txt b.txt c.txt We can also use the tee command to store the output of a command to a fi le and to
redirect the same output as an input to another command.
(d) The following example counts the number of lines in the fi le letter.txt. The count of the lines will be displayed on the screen as well as saved to the fi le lines.txt.
$ cat letter.txt | wc -l | tee lines.txt
We can see that the output of the command is passed as an input to the wc command. The output from the wc command is then displayed on the screen as well as saved to the fi le lines.txt through the tee command.
Table 14.14 Brief description of the parameters used in the tee command
Parameter Description
-a | --append It appends to the specifi ed fi les.
-i It ignores interrupted signals.
fi lename It represents one or more fi les in which the output of the command has to be stored.
Interprocess Communication 669
■ SUMMARY ■
1. The mechanism that is used for communicating and sharing data between applications is known as interprocess communication (IPC). The IPC mechanisms used in Unix are shared memory, pipes, message queues, and sockets.
2. Interprocess communication (IPC) includes thread synchronization and data exchange between threads beyond the process boundaries.
3. A pipe is a buffer that implements communication between two processes, one of which is considered a producer process and the other, a consumer process. There are two types of pipes: named pipe and unnamed pipe.
4. For establishing communication among processes, each process in the Unix operating system has an associated message queue. The messages in the message queue are sent and received via the msgsnd and msgrcv system calls.
5. A fi lter in Unix refers to a small, specialized program that searches for desired information from the specifi ed data on the basis of the supplied criteria and which displays it in an arranged format. A few of the fi lters in Unix systems are awk, cat, comm, cut, diff, grep, head, join, less, more, paste, sed, sort, tail, tr, uniq, and wc.
6. The tee command is used for reading data from an input and writing to a standard output as well as to a fi le.
7. By default, the tee command overwrites the fi le that sends the data. In order to append content to a fi le, the -a option is used.
8. We can also use the tee command to store the output of a command to a fi le and to redirect the same output as an input to another command.
9. The semaphore is an IPC method in Unix that was designed by E.W. Dijkstra in the 1960s. It is not only used to synchronize the processes but also to implement concurrent processing.
10. The semaphore compels a process to wait when a block of data is being modifi ed by another process. It is a programming structure that consists of an integer value.
11. In order to implement process synchronization, the semaphore uses a test and set pattern.
12. A test and set pattern means that the semaphore permits processes to test and set the integer value in a single atomic operation.
13. The system call semget() is used to initialize the semaphore set. The system call semctl() is used to manage the features of semaphores and their permissions. The system call semop() is used to perform operations on semaphores.
14. The GETVAL command returns the value of a single semaphore.
15. The IPC_STAT command returns the status for the semaphore set.
16. The GETNCNT command returns the number of pro-cesses waiting for the semaphore value to become 1.
17. When successful, the semctl() system call executes the given command on the specifi ed semaphore and otherwise returns –1.
18. The two most commonly used operation fl ags on semaphores are IPC_NOWAIT and SEM_UNDO fl ag. The IPC_NOWAIT fl ag is used to return the function immediately without changing the semaphore value, and the SEM_UNDO fl ag is used to undo the semaphore operation if the process exits prematurely.
19. Sockets provide point-to-point, two-way communication between two processes.
20. Processes communicate only between the sockets of the same type and with the ones that are in the same address domain.
21. There are two address domains for the sockets: Unix domain and Internet domain.
22. In the Unix address domain, the two processes that share a common fi le system communicate with each other.
23. In the Internet domain, the two processes running on any two hosts on the Internet communicate with each other.
24. The two most widely used socket types are stream and datagram sockets. The stream socket is a connection-oriented socket that provides a two-way, reliable fl ow of data; the datagram socket is a message-oriented socket, which supports a two-way fl ow of messages.
25. In order to create a new socket in the specifi ed domain and of the specifi ed type, the socket() function is used.
26. In order to bind an address to a socket, the bind() function is used.
27. The socket data structure sockaddr refers to the address to which the socket is to be bound.

670 Unix and Shell Programming
■ EXERCISES ■
Objective-type QuestionsState True or False
14.1 The mechanism that is used for communi-cating and sharing data between applica-tions is known as interprocess communication (IPC).
14.2 Pipes are only of one type—named pipe. 14.3 The more fi lter is used for sending more pages
to the printer for printing. 14.4 The n j command in the less fi lter navigates
backward n number of lines. 14.5 The tee command is used for reading data
from an input and writing to a standard output as well as to a fi le.
14.6 The semaphore is an IPC method in Unix that was designed by E.W. Dijkstra.
14.7 The semaphore is a programming structure that consists of a character value.
14.8 In order to implement process synchronization,
the semaphore uses a test and set pattern. 14.9 The system call semop() is used to initialize
the semaphore set.14.10 The IPC_STAT command returns the value of a
single semaphore.14.11 When successful, the semctl() system call
returns −1.14.12 Sockets provide point-to-point, two-way com-
munication between two processes.14.13 Processes can communicate between the
sockets of different types.14.14 In the Internet address domain, the two
processes that share a common fi le system communicate with each other.
14.15 The stream socket is a connection-oriented socket that provides a two-way, reliable fl ow of data.
Fill in the Blanks
14.1 The IPC mechanisms that are used in Unix are , , , and .
14.2 A pipe is a buffer that implements com-munication between two processes, one of which is considered a and the other, a .
14.3 The messages in the message queue are sent and received via and system calls.
14.4 Besides forward navigation, the fi lter supports backward navigation as well.
14.5 In order to exit from the less fi lter, or commands are used.
28. Shared memory is the fastest way of interprocess communication. In the shared memory mechanism, a block of virtual memory is shared among multiple processes.
29. We can write data of any type into the memory segment by casting the pointer to the memory segment.
30. The IPC_RMID command removes or destroys the shared memory segment.
31. When a worker thread processes input/output (I/O) from one fi le descriptor, it might be compelled to wait until that fi le descriptor completes its transaction.
32. In I/O multiplexing, the task of I/O processing can be overlapped with I/O completion.
33. In I/O multiplexing, the worker thread need not wait for the I/O processing to be completed on a client; instead, it can perform I/O processing on other clients, and in the meanwhile, the current client completes its I/O.
34. The system calls that are used to implement I/O multiplexing are select() and pselect().
35. The difference between the select() and pselect() system calls is that in the select() system call, the timeout period is given in seconds and microseconds in an argument of type struct timeval, whereas in the pselect() system call, the timeout period is given in seconds and nanoseconds in an argument of type struct timespec.

Interprocess Communication 671
14.6 In order to append content to a fi le, while using the tee command, option is used.
14.7 The semaphore compels a process to when a block of data is being
modifi ed by another process. 14.8 The value in the semaphore is
initially set to . 14.9 The system call is used to
manage the features of semaphores and their permissions.
14.10 The two most commonly used operation fl ags on semaphores are and
.
14.11 There are two address domains for the sockets: domain and domain.
14.12 The two most widely used socket types are socket and socket.
14.13 The socket type is represented by the SOCK_STREAM constant.
14.14 The socket type uses Unix data-gram protocol (UDP), which is unreliable and is message oriented.
14.15 In order to create a new socket in the specifi ed domain and of the specifi ed type, function is used.
Review Questions
14.1 Write short notes on the following fi lters: (a) more (b) less (c) tee 14.2 What is a semaphore and what is its role in the
Unix operating system? 14.3 Explain the different system calls along with
the syntax that is used to initialize, manage, and perform operations on semaphores.
14.4 What do you mean by sockets? Explain the various types of sockets.
14.5 Explain the following system calls: (a) socket() (c) listen() (b) bind() (d) connect() 14.6 What is shared memory and what are the
functions that are used in implementing it? 14.7 How does I/O multiplexing increase the per-
formance of the Unix operating system? In addition, explain the system calls that are used in performing I/O multiplexing.
■ ANSWERS TO OBJECTIVE-TYPE QUESTIONS ■
State True or False
14.1 True 14.2 False 14.3 False 14.4 False 14.5 True 14.6 True 14.7 False 14.8 True 14.9 False14.10 False
14.11 False14.12 True14.13 False14.14 False14.15 True
Fill in the Blanks
14.1 shared memory, pipes, message queues, sockets
14.2 producer process, consumer process
14.3 msgsnd, msgrcv
14.4 less 14.5 q, ZZ 14.6 -a 14.7 wait 14.8 integer, 0
14.9 semctl()14.10 IPC_
NOWAIT, SEM_UNDO
14.11 Unix, Internet
14.12 stream, datagram
14.13 stream14.14 datagram14.15 socket()

15.1 UNIX BOOTING PROCEDURE
The process of starting a computer is known as bootstrapping. During the bootstrapping process the computer runs a self test and loads a boot program into the memory from the boot device. The boot program loads the kernel and passes the control to the kernel, which, in turn, confi gures the devices, performs hardware status verifi cation, detects new hardware, initializes the existing devices, and initiates the system processes. The kernel identifi es the root, swaps and dumps devices, and does several tasks such as scheduling processes and managing physical memory, virtual memory, and hardware diagnostics. After having performed all these initial activities, the kernel creates another process that will run the init program as the process with PID 1. The process 0 is a part of the kernel itself and is basically a scheduler that decides which process to execute next. It also does the job of swapping, that is, moving in and out the memory pages. The init process runs as process 1 and always remains in the background when the system is running. It places the system in a single-user mode, which is basically a minimal system startup.
15.1.1 Single-user ModeA single-user mode is designed for administrative and maintenance activities. In order to initiate the single-user mode, init forks to create a new process, which then executes the default shell, that is, Bourne shell as user root. We get a # prompt, indicating that we have
1515Unix System Unix System Administration Administration and Networkingand Networking
C H A P T E R
After studying this chapter, the reader will be conversant with the following:
• Unix booting procedure• Mounting Unix fi le system• Unmounting Unix fi le system• Managing user accounts in Unix• Unix network security• Backup and restore

Unix System Administration and Networking 673
root privileges and can carry out administrative tasks. We can set the date, check fi le systems, etc. In the single-user mode, no daemons are running, and the system is not connected to the network. The root partition is automatically mounted, and other fi le systems can be mounted manually as and when required.
15.1.2 Multi-user ModeThe init is the ancestor of all the subsequent Unix processes and the parent of user login shells. It prepares the system for users and verifi es the integrity of the local fi le systems, beginning with the root and other essential fi le systems. The following tasks are performed by init:
1. Checking the integrity of the fi le systems2. Mounting local disks3. Starting daemons to enable printing, mail, logging, cron, and so on4. Enabling user logins
These activities are specifi ed and carried out by the system initialization scripts. After these tasks are performed, we can say that the Unix booting process is complete and the system is in the multi-user mode. As a result, users may log into the system.
15.2 MOUNTING UNIX FILE SYSTEM
A fi le system is a hierarchy of directories in the form of a tree-like structure with / (forward slash) as root and /usr, /tmp, /etc, /bin, etc., directories as its branches. The directories, in turn, have their own sub directories. In order to access a fi le or fi le system that is on a storage device, the storage device should be mounted on the accessible fi le system, that is, it should be mounted on a mount point. The mount point is usually an empty directory to which the additional fi le system (of the storage device) is mounted. The empty directory will become the root directory of the added fi le system.
Note: The original contents of the directory that is used as a mount point becomes invisible and will not be accessible until the mounted fi le system is unmounted.
The fi le system of any device, regardless of whether it is a partition of a hard disk drive, a CDROM, a pen drive, etc., can be mounted on a mount point to access it. On mounting a CDROM on a directory, we make the fi le system on the CDROM appear in that directory.
Note: Mounting and unmounting can be done only by the root user.
Syntax mount {device/directory to be mounted} {mount directory} options
Here device/directory to be mounted refers to the fi le system that we want to mount; mount directory is the directory in the existing hierarchy in which the fi le system will be mounted; and options help in deciding the properties of the mounted fi le system.
The two frequently used mount options are as follows:
-r It mounts the fi le system read-only.
-w It mounts the fi le system read-write.

674 Unix and Shell Programming
Examples
(a) # mount /dev/cdrom /mnt(b) # mount /dev/hda3 /framework
The fi rst example mounts cdrom on the /mnt directory. If we change directory to the /mnt directory (cd/mnt) and execute the ls command, we will be able to see the fi les that are on the cdrom. The second example mounts the hard disk partition hda3 on the directory /framework. Again, if we change the directory to /framework, we will be able to access the fi les of the hard disk patron.
15.3 UNMOUNTING UNIX FILE SYSTEM
Unmounting the fi le system means removing the mounted fi le system from the mounted directory. By unmounting the fi le system, it will become inaccessible. Unmounting is per-formed through the umount command.
Syntax umount {fi le system to unmounted} {mount directory} {options}
The frequently used options are as follows:
-a It unmounts all the mounted fi le systems.
-f It forcibly unmounts the fi le system.
Forcibly unmounting a fi le system is not recommended, as it may corrupt data on the fi le system.
Examples
(a) # umount /dev/cdrom /mnt(b) # umount /dev/hda3 /framework
The fi rst example unmounts cdrom from the mount directory /mnt. Similarly, the second example unmounts the hard disk partition hda3 from the mount directory /framework.
We can confi gure our Unix system to automatically mount the storage devices on insertion. However, this may cause security problems and should not be applied in networked systems.
15.4 MANAGING USER ACCOUNTS
In this section, we will learn to create user accounts, change their passwords, and modify and delete accounts. Let us begin with the creation of user accounts.
15.4.1 Creating User AccountsWe use the useradd command to create a new user account. While creating a new user account, we can specify its home directory, group name, shell, and username.
Syntax useradd -d homedirectory -g groupname -s shell userid

Unix System Administration and Networking 675
The terms of the syntax represent the following:
-d homedirectory It refers to the home directory for the new account.
-g groupname It refers to the group name or ID (GID) to which the new user will belong.
-s shell It refers to the default shell for the new account.
userid It refers to the unique user ID (UID) of the new user.
Examples
(a) # useradd -d /home/john -g it -s /bin/sh johny123This command creates a user with user ID johny123 belonging to the group it. The home directory created for the user is /home/john. The user will use Bourne shell by default.
All user IDs should be unique. If we try to create a user with an existing user ID, we will get an error saying the user already exists.
Note: The group name should already exist before its use in the earlier command.
(b) # useradd -u 200 -g bank -c "Microchip" -d /home/mce -s /bin/ksh -m mceThis command creates the user mce with a UID of 200 and the group name bank. The home directory is /home/mce, and the user will use the Korn shell. The -m option ensures that the home directory is created if it does not already exist, and it copies a sample, .profi le and .kshrc to the user’s home directory. It also creates the following line in the /etc/passwd fi le:
mce:x:200:100:Microchip:/home/mce:/bin/ksh
The fi rst fi eld mce is the username. The second fi eld(x) no longer stores the password encryption here. The third (200) and fourth (100) fi elds store the UID and ID, respectively. The fi fth fi eld (Microchip) is used to store details of the user, for example, name and address. The sixth fi eld (/home/mce) shows the home directory, and the last fi eld (/bin/ksh) determines that user’s shell.
We have to set the new user’s password. This is easily done with the command passwd mce. After this, the user mce account is ready to use.
All user information except the password encryption is now stored in /etc/passwd. The encryption, that is, the encrypted password is stored in /etc/shadow. This control fi le is used by passwd to confi rm the authenticity of the user’s password.
Note: The last fi eld in /etc/passwd is actually the command that has to be executed when a user logs in.
(c) The following example adds a user with user ID 250, the group ID 100, and the name as manish.
useradd -u 250 -g 100 manish
Once an account is created, we can set its password using the passwd command. The following syntax is used for changing the password of a given user:
Syntax passwd userid
This command will prompt us to enter the password of the specifi ed user ID.

676 Unix and Shell Programming
Example # passwd john Changing password for user john. New UNIX password: Retype new UNIX password: passwd: all authentication tokens updated successfully.
Note: The two passwords entered should be exactly the same so that the password of the user can be set successfully.
15.4.2 Modifying User AccountsWe use the usermod command to modify the user account. Through this command, we can change the user ID, home directory, shell, and group name.
Syntax usermod -d homedirectory -g groupname -s shell -l userid
The syntax can be explained as follows:
homedirectory It refers to the new home directory that we want to assign to the account.
groupname It refers to the new group name to which we want the account to belong.
shell It refers to the new shell that we want to assign to the account.
userid It refers to the new user ID that we want to assign to the user.
-l The argument enables us to change the userid.
Examples
(a) To change the user ID from johny123 to johny777 and to change its home directory from /home/john to /home/johny, we will give the following command.
# usermod -d /home/johny -l johny123 johny777
(b) The following command line sets the C shell as the login shell for the user johny123.
# usermod -s /bin/csh johny123
15.4.3 Deleting User AccountsWe use the userdel command to delete an existing user account:
Syntax userdel [-r] userid
Here, the -r option is used for deleting a user’s home directory.
Example To remove the userid, johny777, we will give the following command.
$ userdel -r johny777
Here, the -r option is used to remove the user’s home directory as well.

Unix System Administration and Networking 677
15.4.4 Creating GroupsGroups help in categorizing user accounts, and also serve as a convenient way of assigning specifi c permission to a collection of people with similar interests. We use the groupadd command to create a new group account:
Syntax groupadd [-g groupid] [-o] [-f] groupname
The syntax can be explained as follows:
groupid It is the numerical value representing the group’s ID. The -g option will create a group with some other ID if the specifi ed groupid already exists.
-o It indicates to add the group with a non-unique groupid.
-f It indicates to cancel the command if a group with the specifi ed groupid already exists.
groupname It is the name of the new group.
Examples
(a) $ groupadd -g 21 it
(b) $ groupadd experts
The fi rst example will create a group with name it and group ID as 21. The second example will create a group by name experts. Unix will automatically assign it a unique group ID.
15.4.5 Modifying GroupsWe use the groupmod command to modify a group. Through this command, we can change the group name as well as the group id.
Syntax $ groupmod [-n] [-g] newgroupname oldgroupname
Here, the -n option is used for changing the group name, whereas the -g option is used for changing the groupid.
Examples
(a) $ groupmod -n programmers professionalsThis example changes the name of the group from programmers to professionals.
(b) $ groupmod -g 58 professionalsThis example will change the group ID of the group professionals to 58.
15.4.6 Deleting GroupsWe use the groupdel command to delete an existing group.
Syntax groupdel groupname
Example # groupdel professionals
This command will delete the group professionals.

678 Unix and Shell Programming
The user’s account information is maintained in the following three fi les:
/etc/passwd It contains the user account and password information.
/etc/shadow It contains the encrypted password of the corresponding account.
/etc/group It contains the group information for each account.
15.5 NETWORKING TOOLS
Several utilities are used to communicate with remote users and to enable us to access remote Unix machines.
15.5.1 pingThe ping command is used for checking whether the remote host is responding or not. We can use this command for doing the following tasks:
1. Tracking networking problems2. Determining the status of the remote hosts3. Testing and managing networks
We send an echo request to the host to determine its status.
Syntax $ ping host_name/ip-address
This command will display a response after every second. In order to cancel the command, we need to press Ctrl-c keys.
Example
$ ping google.comPING google.com (74.125.67.100) 56(84) bytes of data.64 bytes from 74.125.67.100: icmp_seq=1 ttl=54 time=39.4 ms64 bytes from 74.125.67.100: icmp_seq=2 ttl=54 time=39.9 ms64 bytes from 74.125.67.100: icmp_seq=3 ttl=54 time=39.3 ms64 bytes from 74.125.67.100: icmp_seq=4 ttl=54 time=39.1 ms64 bytes from 74.125.67.100: icmp_seq=5 ttl=54 time=38.8 ms--- google.com ping statistics ---22 packets transmitted, 22 received, 0% packet loss, time 10925msrtt min/avg/max/mdev = 27.891/27.334/30.527/0.429 ms
If a host does not exist, we get the following message: unknown host name.
$ ping example.comping: unknown host example.com
15.5.2 nslookupnslookup maps the name servers to the IP addresses and vice versa. The default name server for a machine can be found in the /etc/resolv.conf fi le.
Syntax nslookup <machine name>

Unix System Administration and Networking 679
Examples
(a) % nslookup bmharwani.com Server: abc.example.com Address: 165.53.12.7 Name: bintu.example.com Address: 165.53.142.3,
Here, the fi rst two lines refer to the name and IP address of the queried name server, and the last two lines refer to the name and IP address of the machine.
We can also perform reverse lookup, that is, map the IP address to the name servers as shown in the following example:
(b) % nslookup 185.66.15.2 Server: abc.example.com Address: 165.53.12.7 Name: bintu.example.com Address: 165.53.142.3
In this example, we provide the IP address of the site and information related to the queried name server and that of the machine is displayed.
15.5.3 telnettelnet is a utility that is used to connect to and work on a remote Unix machine. It enables users to log in and work on a remote computer. The client program for telnet is telnet, whereas its server program is telnetd.
Example $ telnet bmharwani.com
Trying...
Connected to bmharwani.com. Escape character is ‘^]’. login: bmharwani password: *************************************************** * * * * * Welcome to bmharwani.com * * * * * *************************************************** Last login: Mon Dec 10 10:30:15 IST 2012 on pts/1 $ logout Connection closed.
Telnet can pose a greater security risk to a network. All the computers in a network can see the packets fl owing into the network. These packets can be sniffed by any computer

680 Unix and Shell Programming
in the network; hence, username and password can be easily captured. Therefore, special measures such as using one-time passwords and encryption can be used to avoid packet sniffi ng.
Besides packet sniffi ng, another problem with telnet is that its session can be hijacked, that is, once a valid userid and password are entered, the session can be hijacked by a hacker, and any malicious command can be executed. Again, encryption needs to be implemented to avoid session hijacking.
15.5.4 arpThe arp utility displays and modifi es the Internet-to-Ethernet address translation tables that are used by the address resolution protocol (ARP).
Syntax arp [-n] [ -a] [-d hostname [ pub]] [-s hostname ethernet_addr [ temp] [ blackhole | reject] [ pub [ only]]] [ -S hostname ethernet_addr] [-f fi lename]
The arp command with no options displays the current ARP entry for the specifi ed hostname, as shown in Table 15.1.
Table 15.1 Different options of arp and their description
Option Description
-a It displays all the current ARP entries.
-d hostname [pub] It deletes an entry for the specifi ed hostname. If the pub keyword is specifi ed, only the ‘published’ ARP entry for the given hostname will be deleted. This option can be combined with the the -a option to delete all entries.
-n It depicts network addresses as numbers. By default, arp displays the addresses symbolically.
-s hostname ethernet_addr [ temp] [ blackhole | reject] [ pub [ only]]
It creates an ARP entry for the specifi ed hostname with the given Ethernet address ethernet_addr.
temp The newly created ARP entry will be temporary in nature. If this option is not used, the entry will be permanent.
pub The newly created ARP entry will be ‘published’, i.e., this system will act as an ARP server.
only It creates a published (proxy only) entry—the entry that is created automatically if a routing table entry for the hostname already exists.
reject It discards the traffi c to the host, and the sender will be notifi ed that the host is unreachable.
blackhole It discards the traffi c to the host but the sender is not notifi ed.
-S hostname ethernet_addr This is similar to the -s option with a difference that any existing ARP entry for this host will be deleted fi rst.
-f fi lename The information in the fi le is used for setting multiple entries in the ARP tables.

Unix System Administration and Networking 681
15.5.5 netstatThe netstat utility displays network connections, routing tables, and interface statistics.
The following command is used for displaying network connections:
% netstat -a | more
The following command is used for displaying routing tables:
% netstat -r
The following command is used for displaying interface statistics:
% netstat -i
15.5.6 routeThe route utility shows as well as manipulates the IP routing table.
Showing the routing table:
% route
Tracing the route to the machine on the same subnet:
% traceroute bintuPC
Manipulating the routing table:
% route add -host bintuPC
Showing the updated routing table:
$ route
15.5.7 ftpThe term FTP stands for fi le transfer protocol and is used for uploading and downloading fi les from one computer to another. Through the ftp utility, we can do the following tasks:
1. Connect to a remote host either anonymously or through a valid userid and password2. Navigate directories on the host for which we have access permissions3. View fi les and their content4. Download and upload fi les to the accessible directories on the remote host
For FTP, we need two programs: client FTP and server FTP. The client FTP program is ftp, and the server FTP program is ftpd. TCP port 21 is used for sending commands; port 20 is used for the data stream.
Syntax $ ftp host_name/ip-address
This command will prompt us for the user ID and password. On logging in, we will be navigated to the directory where we can upload our data and even download to our local machine. In order to use anonymous FTP, ftp is entered as the username, and email address is entered as the password.
The commands that are used to perform FTP operations are given in Table 15.2.

682 Unix and Shell Programming
Example
The following example shows a few commands.
$ ftp bintuharwani.com
Connected to bmharwani.com.220 bmharwani.com FTP server (Ver 4.0 Thu Dec 2 20:35:10 IST 2012)Name (bmharwani.com:bmharwani): bmharwani325 Password required for bmharwani.Password:121 User bmharwani logged in.
ftp> dir
200 PORT command successful.150 Opening data connection for /bin/ls.total 1357drwxr-sr-x 2 bmharwani group 1024 Mar 11 20:04 httpdrwxr-sr-x 2 bmharwani group 1536 Mar 3 18:07 https148 Transfer complete.
ftp> cd http
103 CWD command successful.
ftp> put index.html
200 PORT command successful.150 Opening data connection for index.html (3021 bytes).226 Transfer complete.
ftp> quit
103 Goodbye.
Table 15.2 Commands used for performing FTP operations
Command Description
put fi lename It uploads fi lename from a local machine to the remote host.
get fi lename It downloads fi lename from the remote host to a local machine.
mput fi le list It uploads more than one fi le from a local machine to the remote host.
mget fi le list It downloads more than one fi le from the remote host to a local machine.
prompt off It turns off the prompts that are displayed while uploading or downloading movies using the mput or mget commands.
prompt on It turns on prompt.
dir It lists the fi les in the current directory of the remote host.
cd directory_name It changes directory to the specifi ed directory_name on the remote host.
lcd directory_name It changes directory to the specifi ed directory_name on the local machine.
quit It logs out from the remote host.

Unix System Administration and Networking 683
15.5.8 Trivial File Transfer ProtocolThe trivial fi le transfer protocol ( TFTP) is a UDP-based fi le-transfer program. Again, we can use it to download and upload programs to the remote server, but this time with no security. The TFTP is confi gured to transmit a set of fi les from our computer, and they will be transmitted to any user who demands them. The TFTP has no security, whereas tftpd, the TFTP daemon, is usually restricted so that it can transfer fi les only to or from a certain directory.
% tftp localhost tftp> get /http/products.html% tftp> quit
15.5.9 fi ngerThe fi nger program can be used to display detailed information, that is, username, full name, location, login time, and offi ce telephone number of every user currently logged in to a system. This command can be used to fi nd users on a local machine as well as on a remote machine.
% fi nger @bmharwani.com
This statement will show all the people logged on to the server bmharwani.com.In order to look at the information of a particular user, we can specify its name on a given
server in the following manner:
% fi nger [email protected]
Through the fi nger program, anybody can get the personal information of any user on a server. No personal information should be kept in the user’s account information. For safety purpose, the fi nger is usually disabled on the server. In order to disable the fi nger program, it is commented on in the fi le /etc/inetd.conf . This change will cause people who are trying to fi nger your site to receive a Connection refused error.
15.5.10 rloginrlogin stands for remote login and is used to establish a remote connection between our terminal and the remote machine. Once logged in to the remote host, we can perform all the permissible tasks on the remote host. The various options available with this command are explained in Table 15.3, followed by the syntax.
Table 15.3 Different options available with the rlogin command
Option Description
-8 It passes eight-bit data across the net instead of seven-bit data.
-e char It enables us to specify a different escape character, which is ‘~’ by default. The escape character can be defi ned either as a literal character or as an octal value in the form \nnn.
-l username It is used to specify a different username for the remote host; otherwise, the local username is used at the remote host.
-E It stops any character from being recognized as an escape character.
hostname It represents the remote machine to which the connection has to established.

684 Unix and Shell Programming
Syntax rlogin [-8] [-e char ] [-l username][-E] hostname
Each remote host has a fi le named /etc/hosts.equiv, which contains a list of trusted hostnames with which it shares usernames. Users with the same username on both the local and remote machine may rlogin from the machines listed in the remote machine’s /etc/hosts.equiv fi le without supplying a password.
Users can also set the .rhosts fi le in their home directories. Each line in this fi le contains two names: a host name and a username that are separated by a space. An entry in a remote user’s .rhosts fi le permits the user named username who is logged in to the hostname to log in to the remote machine without supplying a password. If the name of the local host is not found in the /etc/hosts.equiv fi le on the remote machine, and the local username and hostname are not found in the remote user’s .rhosts fi le, the remote machine will prompt for a password. The following are a few more network-related commands:
systat It provides status information about our computer to other computers on the network.
Ifconfi g It confi gures and displays interface confi guration.
% ifconfi g -a
traceroute It prints the route that the packets take to the network host.
% traceroute www.google.com
15.5.11 Unix Network SecuritySecurity is the ability of a system to prevent unauthorized access to information and resources of the system. For ensuring Unix security, we have to implement the following features:
Confidentiality Ensuring that no unauthorized access to the system information is possible
Integrity Ensuring that no information is altered or destroyed by unauthorized people
Authentication Ensuring that no unauthorized person is able to log in to the system
We should adopt the following checklist for implementing security on our Unix system:
1. Implement password ageing2. Eliminate unused accounts3. Restrict guest accounts4. Password-protect all relevant accounts and delete those accounts that are not needed any
more5. Set the default fi le protections for new fi les using umask to prevent read/write access to
groups6. Write-protect the root account’s start-up fi les and home directory7. Minimize the number of users with super user privileges

Unix System Administration and Networking 685
15.6 mail COMMAND
The mail command is a mail processing system that is used to send and receive mails. Table 15.4 explains the various options available with this command whose syntax is as follows.
Syntax mail [-v][-s subject] [-c users_address] [-b users_address] [-f fi lename]
Table 15.4 Different options available with the mail command
Option Description
-v It represents the verbose mode. The information related to e-mail delivery is displayed on the screen.
-s subject It is used to specify the subject of the mail. If the subject consists of more than one word, it should be enclosed in quotes.
-c users_address It is used to send carbon copies to the list of users. User IDs should be comma separated.
-b users_address It is used to send blind carbon copies to the list of users.
-f fi lename It reads the contents of our mail box or the specifi ed fi lename for processing. On quitting the mail command, the undeleted messages are written back to the fi le.
15.6.1 Sending E-mailsThe following steps are carried out to send mails:
1. The fi rst step to send an e-mail message to a user is to give a command using the following command syntax:
mail userid
Here, userid is the login ID of the user to whom we wish to send a mail.
Example $ mail chirag
We can also send the same mail to several users by providing more than one user ID in the mail command separated by a space.
2. On the next line, type the subject of the message and press the Enter key.3. Type in the mail message.4. To send a message, press the Enter key after the last line of the message and press
Ctrl-d.5. To cancel the message, press Ctrl-c twice.
We can also specify the subject along with the user ID as shown in the following example.
$ mail -s "Invitation to Birthday Party" chirag
This command is for sending a mail to the user with ID, chirag and with the subject, Invitation to Birthday Party. On the next line, we type in our message and press Ctrl-d to send the mail. To send the content from a fi le, use the following example.
$ mail -s "Invitation to Birthday Party" chirag < partyinfo.txt

686 Unix and Shell Programming
Another way of mailing the content of a fi le is as follows.
$ cat partyinfo.txt | mail -s "Invitation to Birthday Party" chirag
Note: We can send mails to more than one user by providing comma-separated user IDs.
15.6.2 Reading MailsIn order to check incoming e-mail, simply type mail at the shell prompt.
Example $mail
If we have no mails, a message, ‘No mail for login ID’, is displayed where the login ID is replaced by the user ID. If there are any messages in our mail box, they are read and a line header for each message is displayed as shown in the following example.
>U 1 ravi Tue Oct 10 07:15 5/220 Going on Tour N 2 naman Tue Oct 9 10:43 10/358 Inventory report
This output indicates that there are two mails in our mailbox, the fi rst one is sent by the user ravi, and the second one is sent by the user naman. The character used in the fi rst column of the line header may be one of the following:
U It indicates that the mail is unread.
N It indicates that the mail is new.
Blank It indicates that the mail is already read.
The second column in the line header indicates the message number followed by the mail address of the sender in the third column. The next column shows the date and time the message was sent, which is followed by the size of the message. The size is shown in the lines/characters format, that is, 5/220 indicates that the message size consists of fi ve lines and 220 characters. The last column shows the subject of the mail. The fi rst 25 characters of the subject will be displayed. The current message is marked by >. The mail system prompt displayed is & (ampersand) where we can give commands. In order to read any message, we just need to type the message number at the & (mail prompt) followed by pressing the Enter key. For example, in order to read the second message, we type 2 at the & prompt followed by the Enter key, and the message will be displayed on the screen.
& 2The inventory report of the year 2012 till 2013 is readynaman&
Note: If a message is very long to accommodate on a single screen, press Space bar to display the next screen page.
We can see that the message of the designated number is displayed and after the message, the mail prompt & appears again so that we can give another mail command. We can also use ‘+’ and ‘-’ to move backward and forward, respectively, among the messages.

Unix System Administration and Networking 687
Table 15.5 List of mail commands
Command Description
t [message_list] It types or displays messages.
n It displays the next message.
e [message_list] It edits messages.
f [message_list] It displays line headers of messages.
d [message_list] It deletes messages.
s [message_list] fi lename
It appends messages to the specifi ed fi lename.
u [message_list] It undeletes the messages.
r [message_list] It replies to the messages by the sender as well as to other recipients.
R [message_list] It replies to the messages by the sender only.
m [user_list] It mails the specifi ed users. The user IDs should be comma separated.
q It quits the mail command, deleting all the marked messages forever.
x It quits the mail command and returns all our mail messages to our mailbox, without deleting any messages.
h It prints the active message headers.
ch [directory] It changes to the specifi ed directory. If the directory is not specifi ed, by default, we will be taken to the home directory.
15.6.3 Sending RepliesIn order to send a reply to a mail, type the R command on the mail prompt. We do not have to specify the receiver’s mail ID or subject, as this header information will be automatically supplied by the mail command. However, we can optionally specify Subject if we want it to be different from the subject mentioned in the received mail. Next, we type our message and press Ctrl-d key to send it.
Note: The r command sends a reply to everyone who received the original message, not just the sender.
Example & R
Subject: Regarding Inventory report Please send me the report Thanks ...harwani ^d &
Besides r and R, there are several other mail commands as well. Let us have a look.
15.6.4 Mail CommandsTable 15.5 gives the list of mail commands that we can run on the & prompt.
Note: In the following commands, message_list refers to the integers or a range of integers representing the message numbers. If message_list is not specifi ed, the last message is considered.

688 Unix and Shell Programming
While composing messages, we can issue several commands that begin with the character ‘~’ (tilde). The list of commands is as given in Table 15.6.
Table 15.6 List of mail commands for composing messages
Command Description
~? It displays the list of all tilde (~) commands.
~p It lists the text of the message.
~s subject It sets or changes the current subject to the specifi ed subject.
~t email_nameslist It adds the e-mail names in the specifi ed email_nameslist to the current list of e-mail names.
~h It lists and modifi es the subject and e-mail name list.
~! cmd It executes the specifi ed Unix command cmd.
~r fi lename It reads the specifi ed fi lename into the message at the current position.
~v It invokes the vi editor to edit the message text.
~q It quits the mail command and saves the current message in the fi le named dead.letter in our home directory.
Note: After typing this command, press the Enter key to execute the command.
15.6.5 Saving MessagesIn order to save a mail message in a separate fi le, give the s command at the mail & prompt with the following syntax:
& s message_number fi lename
Examples The following examples save message number 3 in the fi le letters.txt.
(a) & s 3 letters.txt(b) & s 3 projects/letters.txt
The fi rst example indicates that if the path name is not provided with the fi lename, it will be created in the current directory.
15.6.6 Deleting MessagesIn order to mark the e-mail messages for deleting, we give the d command at the & prompt with the following syntax:
& d [message_number] [message_number].....
If there is more than one message number, they are separated by spaces. If the d command is given without any message number, the current message (the message marked by the > in the message headers list) is marked for deletion. The messages are actually deleted when we quit from the mail command by typing q.

Unix System Administration and Networking 689
Examples
(a) & d 1 This command marks the fi rst message for deletion.(b) & d 1 5 6 This command marks the fi rst, fi fth, and sixth messages for deletion.(c) & d 1-3 This command marks the fi rst three messages for deletion.(d) & d * This command marks all the messages for deletion.(e) & d $ This command marks the last message for deletion.
Note: Once we quit the mail command, all the messages that were marked for deletion are permanently deleted, and there is no way to recover deleted mails.
15.6.7 Undeleting MessagesIf we have not yet quit the mail command, we can unmark the e-mail messages that are marked for deletion. In order to unmark the messages, we give the u command at the & prompt with the following syntax:
& u [message_number] [message_number]...
If we type u and no message number, the last message that was marked for deletion is unmarked. In order to unmark all the e-mail messages, the x command is used. The x command exits the mail command and returns all our mail messages to our mailbox.
15.6.8 Quitting Mail CommandWe can quit the mail command by typing the q command.
15.7 DISTRIBUTED FILE SYSTEM
As the name suggests, the distributed fi le system keeps its fi les distributed on multiple servers. It not only stores the fi les but also manages them and keeps them integrated. Files are accessible to users by a fi lename without regard to the physical location of the fi le. A distributed fi le system maintains a directory of what fi les are kept on which server. This directory is invisible to the user. For the user, it appears as if the fi les are kept on a single server. Distributed fi le systems automatically replicate fi les to multiple servers (mirror servers) so that users can access fi les on servers which are closer to them, hence minimizing traffi c. The following are the features of a distributed fi le system:1. It provides a ‘single sign in’ facility, which means that once the user is logged in to a
server, he/she does not have to be authenticated again when data is internally accessed from another server.
2. It supports encryption facility for secure transmission.

690 Unix and Shell Programming
3. Since several clients might access a fi le simultaneously, a distributed fi le system should support concurrency control. By concurrency control mechanism, multiple users not only access the fi les simultaneously but also keep them integrated and consistent. The following locking mechanism is used for implementing concurrency control:
Read lock It is a shareable lock that enables multiple clients to read the same fi le simultaneously but cannot modify it.
Write lock It is an exclusive lock, that is, only one client can update the fi le at a time. The other client waits until the write lock is released.
15.7.1 Andrew File SystemThe Andrew fi le system (AFS) was fi rst developed in Carnegie Mellon University in 1984. It is a distributed fi le system that was developed to work effi ciently over a low-bandwidth college network. The fi les in this distributed system are kept in different AFS servers and are managed in such a way that they appear as if they are present on a local machine. To the user, the AFS appears as a big directory consisting of several subdirectories.
FeaturesThe following are the features of AFS:
1. It has a global fi le system and implements the location-independent naming scheme. It has a single root node '/afs' from which all other AFS servers (or cells) are given subdirectories. An AFS cell is a collection of servers. A cell is accessed as /afs/cell_name. This concept of directories and subdirectories makes the AFS a location-transparent fi le system. Users can use simple Unix commands to access fi les, create subdirectories, change to desired subdirectories, and so on. In short, the basic unit of storage in AFS is the volume, a logical unit corresponding to a directory in the fi le system.
2. It uses Kerberos authentication. Any authenticated user can log in to any machine through the valid userid and password. Moreover, the passwords are not transferred in the form of plain text in this authentication system, making it more secure.
3. For scalability and reliability, the data is replicated to different servers, and all act as a single logical server.
4. For quick fi le access, AFS uses a high disk caching technique. The fi les are cached locally on the clients. When a fi le is accessed by the user, the cache manager checks whether the fi le is present in the local disk cache. If it is, the cache manager confi rms whether the fi le is up to date and has not yet been modifi ed since its last access. If the fi le in the cache is found to be up to date, the cache manager fetches the fi le from the local disk cache rather than from the server. This procedure for accessing the fi les from the local disk cache highly reduces the network traffi c.
5. In order to know whether the fi le in the local disk cache is up to date or is an older one, a mechanism known as a callback mechanism is used. When a fi le is accessed by a client, the fi le and a fl ag known as callback promise are sent to the client. The fl ag is kept on the client, and the accessed fi le is kept in the local disk cache. The callback promise is

Unix System Administration and Networking 691
marked as valid. If a client updates the fi le on the server, the server sends a callback to the cache manager, which marks the callback promise as cancelled. The cancelled callback promise is an indication to the cache manager that the fi le on the local disk cache of the client is no longer up to date, and if an application asks for the fi le, it needs to be fetched from the server. On fetching the fi le from the server, again the callback promise is marked as valid for the time during which it is not updated by any client.
For user access control, AFS provides three system-defi ned protection groups:
system:anyuser Any client within the AFS cell can access a fi le under this directory.
system:authuser It is the same as anyuser, but a client should have a token with the owner’s cell. The token is provided through Kerberos authentication to the authenticated users.
system:administrators These are the users with some administrator privileges.
AFS supports access control lists (ACLs). The ACL contains a list of groups and users authorized to this directory. It works at the directory level.
DrawbacksAFS has the following drawbacks:
1. It does not support concurrent updates. If multiple clients simultaneously access and modify a fi le, the content of the client who saves the fi le last will be preserved; the remaining is lost.
2. It uses advisory fi le locking. In AFS, the complete fi le is locked (for maintaining consistency), and it does not support region locking, making it unsuitable for practical applications.
3. The AFS is complex to install and administer.
15.8 FIREWALLS
Firewalls are one of the best techniques used to protect Unix hosts from a hostile network. A fi rewall basically provides an isolation between the internal and external networks. It also helps in controlling the quantum and kind of traffi c between the external and internal networks, hence saving our computers from the damage that an intruder may infl ict on our content.
A fi rewall tries to restrict the fl ow of information between the organization’s internal network and the Internet so that a malicious user cannot easily gain control to the computers in the organization’s internal network. While setting up a fi rewall, we defi ne a fi rewall policy, which is nothing but defi ning the kind of data that we feel is safe and can pass into our network and the kind of data that we feel is dangerous and wish to block. The following two basic strategies are used for defi ning a fi rewall policy:
Default permit In this policy, we defi ne the hosts and protocols that we wish to block, that is, only the conditions that result in the blocking of certain servers are mentioned in this policy. All other hosts and protocols that are not mentioned in this policy will pass through

692 Unix and Shell Programming
the fi rewall by default. A fi rewall with the default permit policy is easier to confi gure. All we need is to block out the protocols that are dangerous, as they may cause harm to our computer and content.
Default deny In this policy, we defi ne the specifi c hosts and protocols that we wish to pass through the fi rewall, that is, only the conditions that result in permitting certain servers through the fi rewall are mentioned in this policy. All other hosts and protocols that are not mentioned in this policy are denied by default. In this policy, we enable protocols as and when they are required while keeping all other protocols blocked by default.
15.8.1 AdvantagesA fi rewall applies a layer of protection between our machines and malicious intruders.
We can block access to particular sites as well as to certain protocols on our network. We can implement fi lters to enable only safe packets to enter our network. We can also monitor communications between our internal and external networks, that is, we can maintain a log of the data transferred and the list of commands that are executed for communication between the two networks. The log can be used to check for any penetrations in our network. There are two types of fi rewalls:
Filtering firewalls As the name suggests, the fi ltering fi rewall scans both types of packets: the ones that fl ow out of our network as well as the ones that arrive in our network. The type, source address, destination address, and port information contained in each packet is analysed and are only allowed to pass if the fi rewall rules permit them to do so.
Proxy servers A proxy server acts as a security gate between the client and the actual server. It controls and monitors the traffi c between the client and the actual server. For communication, the client machine does not connect directly to the server; instead, the request from the client is fi rst passed to the proxy, which, in turn, passes the request to the server. The proxy server shields the client, that is, it blocks viruses and malicious intruders from accessing the client’s system. The application proxy does not allow everybody to access the server; only authenticated users can access the server for communication.
15.8.2 Building Simple FirewallsA simple fi rewall can be built from a single choke—a component that blocks certain specifi c types of packets while allowing others to fl ow through the network. The choke can be programmed to block packets from a specifi c IP source and also packets from services that are not being used. By ensuring that only the packets from certain known network servers fl ow into our network, it shields them from external threats. The concept of building a fi rewall through packet fi ltering is fl exible, simple, and economical to implement.
15.9 BACKUP AND RESTORE
Several commands such as dd, cpio, and tar are used to backup the Unix system. These commands are explained in this section.

Unix System Administration and Networking 693
■ SUMMARY ■
1. The ping command is used for checking whether the remote host is responding or not. It displays a response from the specifi ed server after every second. To cancel the command, Ctrl-c keys are pressed.
2. While pinging, if a host does not exist, the message ‘unknown host name’ is displayed.
3. The nslookup command maps the name servers to the IP addresses and vice versa.
4. The systat command provides status information about our computer to other computers on the network.
5. ifconfi g confi gures and displays interface confi guration. 6. The traceroute prints the route that the packets
take to the network host. 7. telnet is a utility that is used to connect and work to
a remote Unix machine.
8. The client program for the telnet is telnet, whereas its server program is telnetd.
9. Packet sniffi ng and session hijacking are the two major problems with telnet.
10. The arp utility displays and modifi es the Internet-to-Ethernet address translation tables that is used by the address resolution protocol (ARP).
11. The netstat utility displays network connections, routing tables, and interface statistics.
12. The route utility displays as well as manipulates the IP routing table.
13. The term FTP stands for fi le transfer protocol. It is used for uploading and downloading fi les from one computer to another computer.
14. The mail command is a mail processing system that
15.9.1 tartar stands for ‘tape archive’. This command was originally used to backup data to tape. Nowadays, it is used for copying a large number of fi les into one larger fi le for the purpose of backup. When required, the original fi les can be extracted from the library.
15.9.2 cpiocpio stands for ‘copy input output’. This command copies the desired fi les from one device to another. Since the cpio command is not able to fi nd fi les, it is usually used along with the fi nd command.
15.9.3 dddd is a very low-level command that is used for copying data from one disk to another. The following command is used to backup a hard drive named /dev/hda to another hard drive named /dev/hdb:
dd if=/dev/hda of=/dev/hdb
15.10 SHUT DOWN AND RESTART
Shutting or restarting of the Unix system can be done by the administrator. Hence, one should log in as a root or a similarly privileged user before shutting down the system.
Syntax shutdown [-h] [-r]
Here the -h option is used for a complete shutdown, and the -r option is used to restart the system. We can also use the halt and power off Unix command line utilities for the same purpose.

694 Unix and Shell Programming
■ EXERCISES ■
Objective-type QuestionsState True or False
15.1 The boot program loads the kernel into the memory.15.2 The init process places the system in the multi-
user mode.15.3 In the single-user mode, all daemons are in the
running mode.15.4 All user IDs should be unique in the Unix system.15.5 We cannot modify the home directory of the user
once it is created.15.6 A group should already exist before any user is
assigned to that group.15.7 Authentication is a process of ensuring that no
unauthorized person is able to log in to a system.
15.8 The process 0 is a part of the kernel itself. 15.9 We cannot perform administrative and
maintenance activities in the single-user mode.15.10 Mounting and unmounting commands can be
given by any user.15.11 We cannot supply a password while creating a
new user.15.12 We can change the group ID of any group
through the groupmod command.
is used to send and receive mail.15. The command mail userid is used for sending an
e-mail message to the user with the given user ID.16. The process of starting a computer is known as
bootstrapping.17. A single-user mode is designed for administrative
and maintenance activities.18. A fi le system is a hierarchy of directories in the form
of a tree-like structure with / as root.19. In order to access a fi le system on a storage device,
the storage device should be mounted on the accessible fi le system.
20. Unmounting the fi le system means removing the mounted fi le system from the mounted directory. Unmounting is performed through the umount command.
21. The useradd command is used to create a new user account.
22. The passwd command is used to change the password of a given user.
23. The usermod command is used to modify the user account. The userdel command is used to delete an existing user account.
24. The groupadd command is used to create a new group account.
25. The groupmod command is used to modify a group.26. The groupdel command is used to delete an
existing group.27. The fi nger program displays detailed information
about every user currently logged in to the system.28. rlogin stands for remote login and is used to
establish a remote connection between a terminal and a remote machine.
29. Distributed fi le systems keep their fi les distributed on multiple servers.
30. A distributed fi le system maintains a directory for keeping the information of the fi les kept on multiple servers.
31. Locking mechanism is used for implementing concurrency control in a distributed fi le system.
32. The Andrew fi le system (AFS) was developed to work effi ciently over a low bandwidth college network. It has a global fi le system and implements the location-independent naming scheme.
33. Firewalls are one of the best techniques used to protect Unix hosts from a hostile network.
34. A fi rewall tries to restrict the fl ow of information between an organization’s internal network and the Internet. There are two types of fi rewalls: fi ltering fi rewalls and proxy servers.
Fill in the Blanks
15.1 The process of starting a computer is known as .
15.2 The PID of the init process is .
15.3 In order to create a user account, the command is used.
15.4 The encrypted password of the user accounts is

Unix System Administration and Networking 695
placed in the fi le.15.5 In order to make a fi le system accessible, we
it on an empty directory.15.6 The command is used for deleting a
group.15.7 The option is used with the
shutdown command to restart the Unix system.15.8 The default shell in a single-user mode is .
15.9 The option used in the usermod command to change the user ID is .
15.10 The option used in the groupadd command to create a group with a non-unique group ID is
.15.11 The command used to delete a user is
.15.12 The command used to add a new group is
.
Programming Exercises
15.1 What actions do the following commands perform?
(a) $ mount /dev/cdrom /mnt (b) $ umount /dev/hda2 /prog (c) $ userdel johny123 (d) $ groupadd -g 101 engineers (e) $ groupmod -g 122 engineers (f) $ shutdown -r
15.2 Write the commands for doing the following tasks: (a) Mount the disk partition hda3 on the
directory /workload (b) Create a new user account with user the ID
kelly, home directory as /home/kelly, Bourne shell, and groupname developers
(c) Assign the password to the new user, kelly (d) Delete the group developers (e) Completely shut down the Unix system
Review Questions
15.1 Explain the following commands with examples: (a) usermod (b) groupadd (c) umount
(d) userdel (e) shutdown
■ ANSWERS TO OBJECTIVE-TYPE QUESTIONS ■
State True or False
15.1 True 15.2 False 15.3 False 15.4 True 15.5 False
15.6 True 15.7 True 15.8 True 15.9 False15.10 False15.11 True15.12 True
Fill in the Blanks
15.1 bootstrapping 15.2 1 15.3 useradd 15.4 /etc/shadow 15.5 mount 15.6 groupdel
15.7 -r 15.8 Bourne shell 15.9 -l15.10 -o15.11 userdel15.12 groupadd

Features of the BookFeatures of the Book
Comprehensive CoverageThe book provides comprehensive coverage of all aspects of the Unix operating system, its associated shells, and the scripting language. Dedicated chapters on AWK scripting, tools and debuggers, and system administration and networking are also provided.
Lucid Representation of CommandsEach command in the book is represented by its syntax, followed by one or more examples with all possible options, and a description of the examples for ease of understanding.
Exclusive Coverage of ShellsDedicated chapters on all the three shells—C, Bourne, and Korn—are provided in the book.
Complete Scripts with their OutputsThe book gives the complete scripts along with their outputs. This will help students implement
the concepts learnt in an easy manner.
The following script prints that particular day’s date only.printdate#!/bin/bashm=`date +%d/%m/%Y`echo "Current system date is $m"
Output
Current system date is 26/02/2012
4.2.5 : Displaying Group MembershipThe groups command is used for finding the group to which
Syntax groups username1 [ username2 [username3 …]]
Example
(a) % groups chirag mba This example asks the group name of the user, chirag. T

Tabular Representation of Extensive InformationSeveral tables are provided in the book in support of the text for representing several command options and descriptions.
Objective-type QuestionsObjective-type questions put to test a reader’s theoretical knowledge gained after reading the chapter. These include State True or False, Fill in the Blanks, and Multiple-choice Questions. Answers to these questions are provided at the end of every chapter.
NotesNumerous notes are interspersed with the text
for providing extra, yet relevant, information.
Brain TeasersApart from various review questions and
programming exercises, several brain teasers have been provided at the end of each chapter
to promote analytical thinking of the readers. This will also help them think outside the box.
Table 4.3the chmod
Mode Descriptionr or 4 Represents w or 2 Represents x or 1 Represents
5.1 In long listing command ls –l, if you find a file with mode field set to l, what does it mean?
5.2 Correct the following command to backup a hard disk to a file.
Brain Teasers
Command Functionchmodumask
chown
transferred to another user, one cannot
■ FUNCTION SPECIFICATION ■
Note: If a directory does not have an execute permission we will never be able to enter data into it.
Note: The output from dd can be a new fi le or another storage device.
5.1 All devices are considered as files in Unix. 5.2 All device files are stored in /etc or in its
subdirectories. 5.3 CD-ROM is a character device.
State True or False
Objective Type Questions
Multiple-choice Questions
5.1 The fdisk command is used to (a) format a disk (b) remove bad sectors from a disk (c) create partitions (d) repair a file system 5.2 The gzip command compresses the file with the
extension
Fill in the Blanks
14.1 The IPC mechanisms that are used in Unix are , , , and .
14.2 A pipe is a buffer that implements com-munication between two processes, one of which is considered a and the other, a .
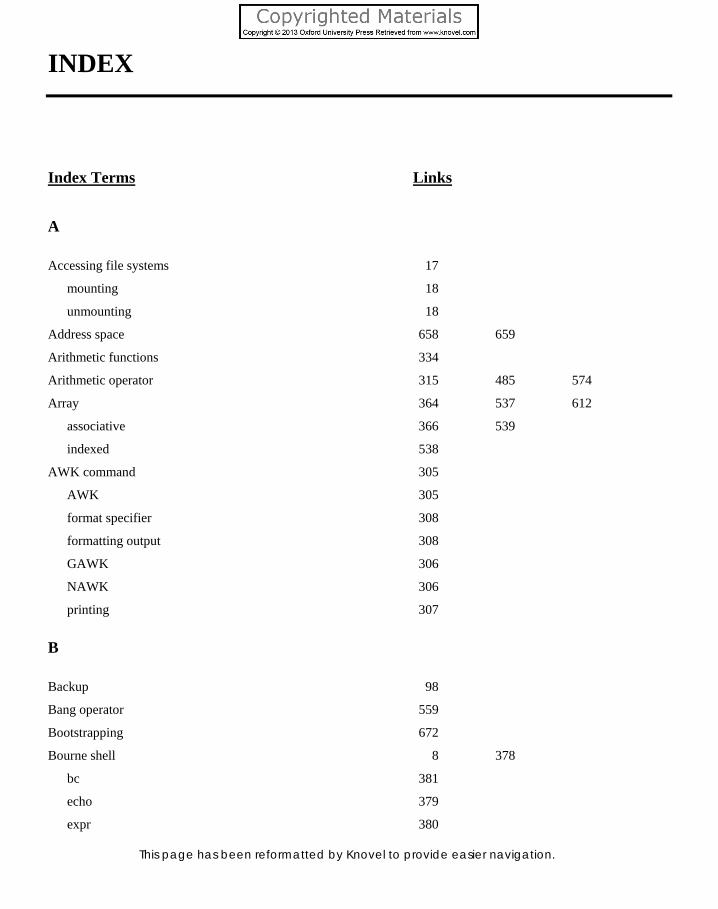
This page has been reformatted by Knovel to provide easier navigation.
INDEX
Index Terms Links
A
Accessing file systems 17
mounting 18
unmounting 18
Address space 658 659
Arithmetic functions 334
Arithmetic operator 315 485 574
Array 364 537 612
associative 366 539
indexed 538
AWK command 305
AWK 305
format specifier 308
formatting output 308
GAWK 306
NAWK 306
printing 307
B
Backup 98
Bang operator 559
Bootstrapping 672
Bourne shell 8 378
bc 381
echo 379
expr 380

Index Terms Links
This page has been reformatted by Knovel to provide easier navigation.
Bourne shell (Cont.)
factor 382
features 379
functions 455
let 381
units 383
Bourne shell commands 394
at 469
basename 460
case statement 451
command substitution 411
cut 412
/dev/null 422
egrep 409
exec 429
exit 435
expr 462
getopts 464
grep 404
last 449
logical operators 426 485
mesg 443
observing exit status 436
paste 413
select 457
set 467
shift 468
sleep 434
sort 415
stty 444
test 395
tr 400

Index Terms Links
This page has been reformatted by Knovel to provide easier navigation.
Bourne shell commands (Cont.)
tty 441
uniq 421
wall 444
wc 403
write 442
w; who 449
Built-in variables 321
fs 322
ofs 322
C
case...esac statement 521
C library functions 230 231
fclose() 234
fflush() 234
fgetc() 235
fgets() 236
file input/output 231
fopen() 232
fread() 233
fseek() 234
fwrite() 232
getc() 235
getchar() 235
gets() 236
streams 231
Command line parameters 385
Commands 28
bc 49
date 48
echo 49

Index Terms Links
This page has been reformatted by Knovel to provide easier navigation.
Commands (Cont.)
exit 54
external 29
finger 46
internal 29
structure 29
Comparison operator 309
matching regular expression 310
Compiling C program 178
Compound expression 312
Compressing and uncompressing files 105
7-zip 119
bunzip2 119
bzip2 117
compress 111
gunzip 107
gzip 105
pack 115
uncompress 114
unpack 115
unzip 111
zip 109
Conversions 86
from DOS 86
from Unix 86
C Shell 558
features 558
Customizing shell 571
D
Dealing with files 123
checking file systems 130

Index Terms Links
This page has been reformatted by Knovel to provide easier navigation.
Dealing with files (Cont.)
determining file type 124
finding locations of programs or utilities 130
locating files 124
searching for files 129
Debugger tools 639
adb 641
dbx 640
sdb 642
viewing call stacks 641
Device driver 96
Device file 96
block device 97
block special file 97
character device 98
character special file 97
inode 96
major device number 98
minor device number 98
Directories 30
absolute path 33
changing 34
listing 30
making 32
parent 34
print working directory 35
relative path 33
removing 35
wild-card characters 30

Index Terms Links
This page has been reformatted by Knovel to provide easier navigation.
Directory handling system calls 213
chdir() 215
closedir() 222
getcwd() 216
mkdir() 214
opendir() 217
readdir() 217
rewinddir() 220
rmdir() 214
seekdir() 220
telldir() 220
Disk-related commands 98
dd 99
df 101
dfspace 103
du 99
fdisk 103
Displaying manual 87
Dynamic memory management 242
calloc() 243
free() 243
malloc() 242
realloc() 243
E
Emacs 259 296
Environment variable 384 487
DISPLAY 496
Error 617
onintr 618

Index Terms Links
This page has been reformatted by Knovel to provide easier navigation.
Error handling 238
perror() 239
stream errors 241
strerror() 239
F
File access permissions 60
chgrp 65
chmod 61
chown 64
groups 66
long listing command 60
sharing files 66
special files 60
umask 62
File locking 245
competing locks 249
deadlock 252
lock file 245
record locking 247
region locking 247
types of locks 248
File management 7 94
File-related system calls 194
access() 207
chmod() 210
chown() 208
close() 200
create() 196
dup() 202
dup2() 202
fchmod() 210

Index Terms Links
This page has been reformatted by Knovel to provide easier navigation.
File-related system calls (Cont.)
fchown() 208
fstat() 205
ioctl() 212
lchown() 208
link() 203
lseek() 199
lstat() 205
mknod() 201
open() 195
read() 196
stat() 205
symlink() 203
umask() 211
unlink() 205
utime() 211
write() 197
Files 13 30 68
anonymous pipe 16
block device 15
calendar 85
changing time stamp 37
character device 14
cmp 77
comm 79
concatenating 37
copying 39
creating 37
cut 68
device 14
diff 75
directory 14

Index Terms Links
This page has been reformatted by Knovel to provide easier navigation.
Files (Cont.)
head 74
lp 82
named pipe 16
ordinary 13
paste 71
pipe 15
.profile 84
removing 41
renaming 40
showing 37
socket 16
sort 73
split 71
symbolic link 15
tail 75
uniq 78
wc 73
File system 673
distributed 689
distributed file system 690
mounting 673
unmounting 674
user accounts 676
Filter 666
less 667
more 667
tee 668
Firewall 691
advantages 692

Index Terms Links
This page has been reformatted by Knovel to provide easier navigation.
Flow controlling statements 582
breaksw 595
case 595
endsw 595
exit 593
goto 591
if-then-else 582
switch 595
Functions 181 540
abort 181
alarm() 181
argument 542
local variable 543
pause() 181
recursion 544
return 541
sleep 181
G
Global substitution 285
Globbing 31 52 561
I
if statement 393
Input field separator 323
Input/Output commands 499
echo 499
print 500
printf 501
read 500
typeset 502

Index Terms Links
This page has been reformatted by Knovel to provide easier navigation.
Input/Output commands (Cont.)
unset 504
Interprocess communication 653
message 654
pipe 654
shared memory 657
socket 654
I/O functions 194
high-level 194
low-level 194
I/O multiplexing 664
J
Jobs 161
background 162 164
currency flag 164
default 165
foreground 162 164
K
Kernel 7 152
file table 152
inode 152
paging system 7
pregion 153
process management 7
region table 153
resource management 7
swap device 7
swapping system 7
user file descriptor table 153

Index Terms Links
This page has been reformatted by Knovel to provide easier navigation.
Korn shell 8 480
command line arguments 506
exit() 546
features 480
meta characters 484
L
Language development tools 624
lex 625
m4 626
yacc 624
Link count 133
Linking files 42
alias 42
hard link 43 204
link count 42
symbolic link 15 44 96 204
Linking to files 203
login 27
changing password 29
password 27
Long listing command 95
directory 96
named pipe 96
regular 96
socket 96
special device file 96
types of files 95
Loop 337 386 524 599
break 526 605
continue 527 605
do while 341

Index Terms Links
This page has been reformatted by Knovel to provide easier navigation.
Loop (Cont.)
for 337 386 530
foreach end 604
repeat 602
until 392 529
while 342 390 524
while end 599
Loopback address 137
M
Magic number 124
Mail processing system 685
mail command 685
Memory-mapped input/output 187
mode 61
execute permission 62
read permission 62
write permission 62
N
Navigating 274
Networking tools 678
arp 680
finger 683
ftp 681
netstat 681
nslookup 678
ping 678
rlogin 683
route 681
telnet 679

Index Terms Links
This page has been reformatted by Knovel to provide easier navigation.
Networking tools (Cont.)
TFTP 683
Network security 684
O
Operating system 1
functions 2
swapping 2
Operation modes 192
kernel mode 193
user mode 193
Operators 67 485 573
increment operator 600
input redirection 68 547
output redirection 67 547
pattern-matching 511
pipe 68
relational 486
test 513
Organization of file system 16
Orphan process 157
P
Partition 103
extended 103
primary 103
Predefined variable 384
Preprocessor tools 630
eqn 633
pic 635
tbl 630
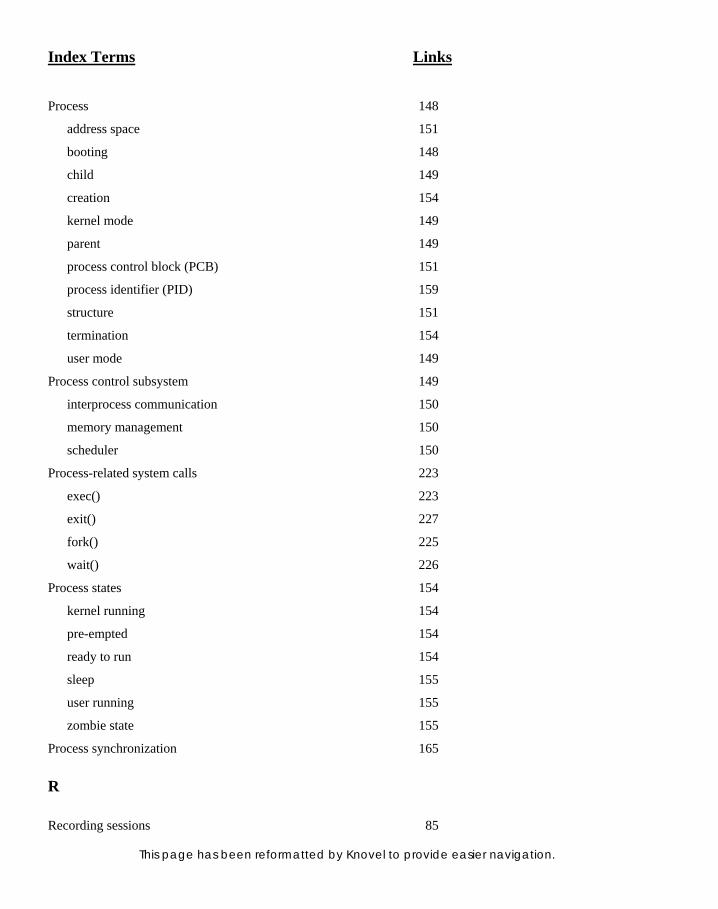
Index Terms Links
This page has been reformatted by Knovel to provide easier navigation.
Process 148
address space 151
booting 148
child 149
creation 154
kernel mode 149
parent 149
process control block (PCB) 151
process identifier (PID) 159
structure 151
termination 154
user mode 149
Process control subsystem 149
interprocess communication 150
memory management 150
scheduler 150
Process-related system calls 223
exec() 223
exit() 227
fork() 225
wait() 226
Process states 154
kernel running 154
pre-empted 154
ready to run 154
sleep 155
user running 155
zombie state 155
Process synchronization 165
R
Recording sessions 85

Index Terms Links
This page has been reformatted by Knovel to provide easier navigation.
Redirection symbol 393
Regular expression 405
Remembered pattern 269
S
Scheduling of process 165
at 167
batch 170
cron 166
crontab 166
kill 172
nice 171
nohup 170
Sections 315
begin 315
end 315
Shell 8
bourne-again 8
C 8
korn 8
tcsh 9
Shell script 379
writing 383
Shell variable 138 384 486 569
CDPATH 139
DISPLAY 496
export 141
HOME 140
PATH 140
primary prompt 140
PS1 492
PS2 493

Index Terms Links
This page has been reformatted by Knovel to provide easier navigation.
Shell variable (Cont.)
PS3 493
PS4 495
read 385
setting/unsetting system shell variables 141
SHELL 141
System 138
TERM 141
user-created 138
Signal 173
asynchronous 175
default action 175
kill() 176
raise() 176
reliable 175
synchronous 174
unreliable 176
Signal handling 177
address 177
SIG_DFL 177
SIG_IGN 177
Start-up files 565
Status of process 159
daemons 161
lightweight process 161
Stream editor 259
adding text 263
context addressing 267
ex 259
pico 259
regular expression 267
sed 259

Index Terms Links
This page has been reformatted by Knovel to provide easier navigation.
Stream editor (Cont.)
substitution 265
vi 259
String functions 325
index() 328
length() 326
split() 332
substr() 331
system() 333
Structure of file system 20
boot block 20
data block 24
double indirect indexing 22
inode block 21
single indirect indexing 22
super block 20
triple indirect indexing 22
Substitute function 345
gsub() 347
match() 348
sub() 345
tolower() 349
toupper() 349
Swap file system 17
page 17
segment 17
swapping 17
Synchronization 661
mutex 661
semaphore 661 663
semaphores 662

Index Terms Links
This page has been reformatted by Knovel to provide easier navigation.
System calls 192 230 664
interrupted 228
pselect() 666
select() 664
slow 228
System users 60
group 60
other 60
user 60
T
Text editor 258
ed 258
Text-formatting tool 628
nroff 629 630
troff 628 630
Thread 158
blocked 158
multiple 158
ready 158
running 158
single 158
Time 81
real 81
sys 81
user 81
Trapping signals 470
trap command 471

Index Terms Links
This page has been reformatted by Knovel to provide easier navigation.
U
Unix environment 9
client–server 10
stand-alone personal 10
time-sharing 10
Unix system 4
features 4
job control 5
multitasking 4
multi-user 5
portability 5
security 6
structure 6
tools and utilities 5
Unix system files 135
/etc/hosts 136
/etc/hosts.allow 137
/etc/hosts.deny 137
/etc/passwd 135
/etc/shadow 136
User accounts 674 676
User area 152
User-defined variable 316
V
Variables 380 486 567
built-in shell variable 569
environment variable 567
substitution 505
unsetting variable 570

Index Terms Links
This page has been reformatted by Knovel to provide easier navigation.
Version-control systems 648
automated 648
concurrent 649
manual 648
revision 649
source code 649
Virtual memory 17 183
anticipatory paging 184
demand paging 184
page map table 184
paging 184
segmentation 186
swap area 183
Visual editor 270
advantages 296
modes of operation 270
W
Who 45
idle time 46
Z
Zombie Process 156
kill 157
ps 156