university of kentucky – physical plant custodial master ... · university of kentucky –...
TRANSCRIPT
University of Kentucky – Physical Plant Custodial Master Plan
PART A
Last Updated: August 23, 2012

2
OVERVIEW Core Management Services has been selected as a strategic partner by the University of Kentucky Physical Plant custodial organization.
The strategic role of Core Management Services is to design and implement a program to increase the effectiveness of the housekeeping organization throughout the campus.
This Master Plan represents the program designed specifically for the University of Kentucky Physical Plant custodial organization.
It began with the standard Core Management design plan, which is based on professional production rates, standardized cleaning procedures, continuous improvement techniques and work-place ergonomics. The standard Core Management design plan also includes the best features of both area cleaning and team cleaning methodologies. Most importantly, it redirects cleaning efforts from “general” areas – non-critical areas with less than daily cleaning needs, to “primary” areas – critical areas in need of full daily cleaning, to maximize department resources.
This particular Master Plan has evolved into its current version as the academic needs of the University of Kentucky have been identified and addressed. PART A Section 1 contains a set of specifications designed to standardize the processes throughout the campus while meeting the specific needs of each area. Section 2 contains daily, interim and restorative professional cleaning procedures designed to standardize techniques, enhance productivity and increase safety awareness. Section 3 includes a quality audit sample. It is included in the Master Plan to set a consistent expectation level and to provide a tool for future continuous improvement. PART B Part B outlines the Physical Plant organizational structure as it relates to the new program design. It is intended to develop an awareness of the overall structure and to demonstrate equity among the job assignments. It also includes a detailing of the individual job assignments within the Physical Plant organization. It includes important information about when, where and how to fulfill the requirements of the various assignments. This Master Plan is by no means the “final” version. It is hoped that everyone involved will work to make it a continuously improving document.
3
Table of Contents PART A
Section 1 - Campus-wide Cleaning Specifications ..........................................................4 Section 2 - Campus-wide Cleaning Procedures ............................................................18
Routine (Daily) Cleaning Procedures ........................ Error! Bookmark not defined. Interim Cleaning Procedures ...................................... Error! Bookmark not defined. Project (Restorative) Cleaning Procedures ................ Error! Bookmark not defined.
Section 3 – Quality Assurance Program .......................................................................51 Glossary of Terms ......................................................................................................54

4
Section 1 - Campus-wide Cleaning Specifications

5
Physical Plant Cleaning Specifications
Annual Frequency Key Daily, five days per week .......................................................................................................................250 Four times per week ...............................................................................................................................200 Three times per week..............................................................................................................................150 Two times per week ...............................................................................................................................100 Weekly .....................................................................................................................................................50 Every other week ......................................................................................................................................25 Once per month .......................................................................................................................................12 Once per quarter ........................................................................................................................................4 Once per year ............................................................................................................................................1

6
Tasks and Frequencies
Administrative / Conference Annual Task Description Frequency Empty general and recyclable trash, replace liners when soiled or torn. Spot clean as 250 required. Remove trash to designated area. Dust furniture and spot clean all horizontal and vertical surfaces. 250 Spot clean interior partition and door glass. 250 Dust mop floors with a water-based chemically treated dust mop. 250 Spot clean carpet using approved carpet spotting equipment and supplies. 250 Spot mop floors to remove visible dirt and spills. 200 Vacuum carpeted traffic lanes and spot vacuum personal work spaces. 200 Spot clean telephones and sanitize receivers. 50 Damp mop floors to remove dirt and spills. 50 Fully vacuum all carpeted areas from wall to wall. 50 Dust areas above shoulder level and below knee level. 25 Burnish finished floor using electric burnisher. Restore as required. 12 Vacuum under furniture, along edges and in corners with canister or backpack vacuum. 12 Dust window treatments including horizontal and vertical blinds. 4 Dust or vacuum air vents to remove loose dust, soil and cobwebs. 4 Vacuum fabric furniture. 4 Dust light fixtures to remove exterior dust and cobwebs. 1 Damp wipe trash containers to remove soil and stains. 1 Machine scrub hard surface floors. 1 Shampoo fabric furniture to remove soil and stains. 1 Completely strip and refinish floors, apply three coats of approved floor finish and buff. 1 Hot water extract carpets using truck mounted system. 1
Auditorium/Gallery/Planetarium Annual Task Description Frequency Empty general and recyclable trash, replace liners when soiled or torn. Spot clean as 250 required. Remove trash to designated area. Spot clean chairs to remove obvious spills and debris. 250 Spot clean carpet using approved carpet spotting equipment and supplies. 250 Using a backpack, spot vacuum carpets to remove visible dirt, dust and debris. 200 Police hard floors to remove obvious litter and debris. 200 Spot mop floors to remove visible dirt and spills. 200 Dust furniture and spot clean all horizontal and vertical surfaces. 50 Fully vacuum all carpeted areas from wall to wall. 50

7
Damp mop floors to remove dirt and spills. 50 Dust mop floors with a water-based chemically treated dust mop. 50 Apply restorer and burnish tile floors with electric-powered burnisher. 25 Dust areas above shoulder level and below knee level. 12 Vacuum under furniture, along edges and in corners with canister or backpack vacuum. 12 Dust window treatments including horizontal and vertical blinds. 4 Dust or vacuum air vents to remove loose dust, soil and cobwebs. 4 Dust light fixtures to remove exterior dust and cobwebs. 1 Damp wipe trash containers to remove soil and stains. 1 Hot water extract carpets using truck mounted system. 1 Machine scrub hard surface floors. 1 Completely strip and refinish floors, apply three coats of approved floor finish and buff. 1
Break/Vending/Kitchenette Annual Task Description Frequency Empty break room trash, replace liners and tie-off at corners, clean obvious food and spills 250 from exterior of trash container. Dust and damp wipe horizontal and vertical break room surfaces including appliances and 250 furniture. Spot clean carpet using approved carpet spotting equipment and supplies. 250 Dust mop floors with a water-based chemically treated dust mop. 250 Using a backpack, spot vacuum carpets to remove visible dirt, dust and debris. 200 Spot mop floors to remove visible dirt and spills. 200 Fully vacuum all carpeted areas from wall to wall. 50 Damp mop floors to remove dirt and spills. 50 Dust areas above shoulder level and below knee level. 25 Vacuum under furniture, along edges and in corners with canister or backpack vacuum. 12 Burnish finished floor using electric burnisher. Restore as required. 12 Dust or vacuum air vents to remove loose dust, soil and cobwebs. 4 Dust window treatments including horizontal and vertical blinds. 4 Vacuum fabric furniture. 4 Machine scrub hard surface floors. 1 Hot water extract carpets using truck mounted system. 1 Completely strip and refinish floors, apply three coats of approved floor finish and buff. 1

8
Classrooms / Labs Annual Task Description Frequency Empty general, replace liners when soiled or torn. Spot clean as required. Remove trash to 250 designated area. Dust mop floors with a water-based chemically treated dust mop. 250 Clean dry eraser board. 250 Erase chalk board and wash. 250 Using a backpack, spot vacuum carpets to remove visible dirt, dust and debris. 200 Spot mop floors to remove visible dirt and spills. 200 Empty pencil sharpeners and return. 50 Clean erasers using approved equipment. 50 Dust furniture and spot clean all horizontal and vertical surfaces. 50 Fully vacuum all carpeted areas from wall to wall. 50 Spot clean carpet using approved carpet spotting equipment and supplies. 50 Damp mop floors to remove dirt and spills. 50 Dust areas above shoulder level and below knee level. 25 Vacuum under furniture, along edges and in corners with canister or backpack vacuum. 12 Dust or vacuum air vents to remove loose dust, soil and cobwebs. 4 Damp wipe trash containers to remove soil and stains. 4 Dust window treatments including horizontal and vertical blinds. 2 Damp wipe light fixture exteriors to remove stains, dust and cobwebs. 1 Wash non-fabric furniture. 1 Hot water extract carpets using truck mounted system. 1 Machine scrub hard surface floors. 1 Completely strip 50% of finished floors, apply three coats of approved floor finish and buff. 1 Machine scrub and recoat 50% of finished floors with two coats of approved floor finish. 1
Computer Room Annual Task Description Frequency Empty general and recyclable trash, replace liners when soiled or torn. Spot clean as 250 required. Remove trash to designated area. Spot clean carpet using approved carpet spotting equipment and supplies. 250 Using a backpack, spot vacuum carpets to remove visible dirt, dust and debris. 200 Spot mop floors to remove visible dirt and spills. 200 Fully vacuum all carpeted areas from wall to wall. 50 Damp mop floors to remove dirt and spills. 50 Dust mop floors with a water-based chemically treated dust mop. 50 Vacuum under furniture, along edges and in corners with canister or backpack vacuum. 12 Dust or vacuum air vents to remove loose dust, soil and cobwebs. 4 Dust light fixtures to remove exterior dust and cobwebs. 1 Damp wipe trash containers to remove soil and stains. 1

9
Hot water extract carpets using truck mounted system. 1 Dry strip floor using approved dry strip method. 1
Corridors Annual Task Description Frequency Clean and polish drinking fountains. 250 Dust corridor furniture, spot clean all horizontal and vertical surfaces including interior and 250 door glass. Empty general and recyclable trash, replace liners when soiled or torn. Spot clean as 250 required. Remove trash to designated area. Spot clean carpet using approved carpet spotting equipment and supplies. 250 Dust mop corridor or open areas with treated dust mop. 250 Using a backpack, spot vacuum carpets to remove visible dirt, dust and debris. 200 Spot mop floors to remove visible dirt and spills. 200 Dust areas above shoulder level and below knee level. 50 Vacuum corridor carpets using wide area vacuum. 50 Damp mop or autoscrub to remove soils. 50 Damp wipe trash containers to remove soil and stains. 12 Vacuum under furniture, along edges and in corners with canister or backpack vacuum. 12 Burnish finished floor using electric burnisher. Restore as required. 12 Dust or vacuum air vents to remove loose dust, soil and cobwebs. 4 Dust window treatments including horizontal and vertical blinds. 4 Damp wipe light fixture exteriors to remove stains, dust and cobwebs. 1 Hot-water extract using walk-behind unit. 1 Completely strip 50% of finished floors, apply three coats of approved floor finish and buff. 1 Machine scrub and recoat 50% of finished floors using approved floor finish. 1
Courts / Track / Deck Annual Task Description Frequency Remove dust and debris from hard pool deck, track, and wood court floors. 250 Empty general and recyclable trash, replace liners when soiled or torn. Spot clean as 250 required. Remove trash to designated area. Using an approved disinfectant, damp mop pool deck floors. 250 Spot mop court floors to remove visible dirt and spills. 200 Dust furniture and spot clean all horizontal and vertical surfaces. 50 Damp mop or autoscrub hard surface courts to remove soils. 50 Dust areas above shoulder level and below knee level. 25 Damp wipe trash containers to remove soil and stains. 12 Machine scrub with approved disinfectant hard surface pool deck floors. 12
10
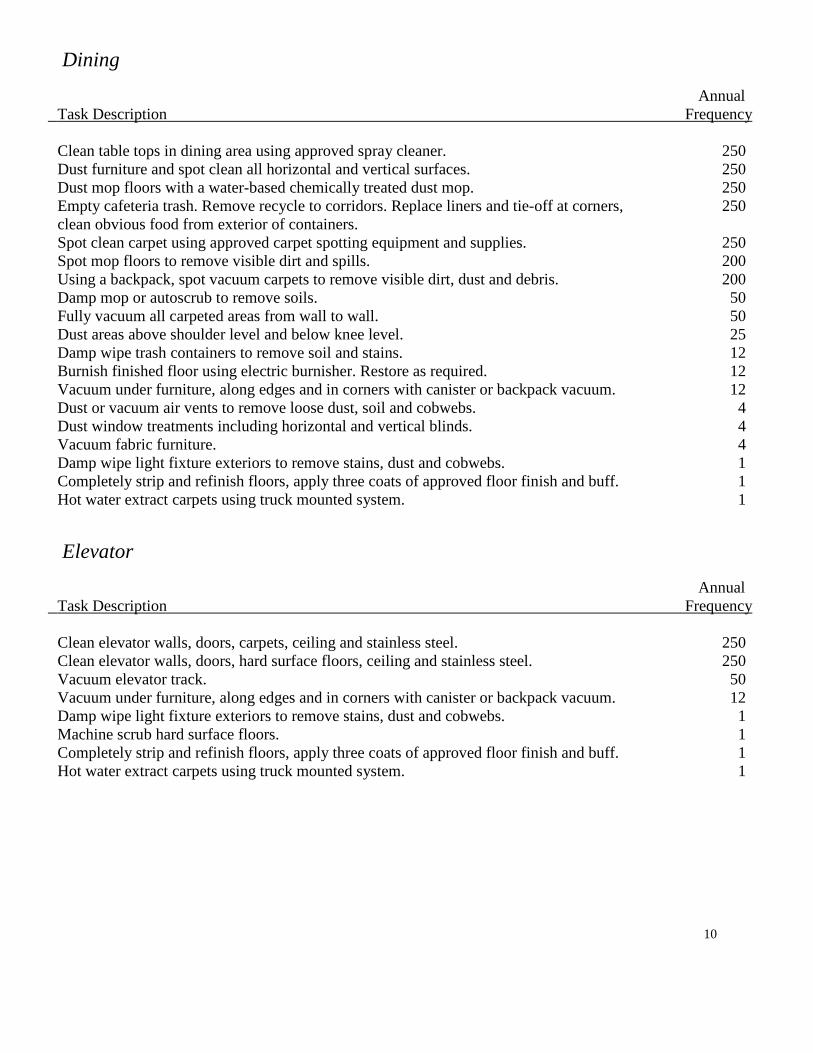
Dining Annual Task Description Frequency Clean table tops in dining area using approved spray cleaner. 250 Dust furniture and spot clean all horizontal and vertical surfaces. 250 Dust mop floors with a water-based chemically treated dust mop. 250 Empty cafeteria trash. Remove recycle to corridors. Replace liners and tie-off at corners, 250 clean obvious food from exterior of containers. Spot clean carpet using approved carpet spotting equipment and supplies. 250 Spot mop floors to remove visible dirt and spills. 200 Using a backpack, spot vacuum carpets to remove visible dirt, dust and debris. 200 Damp mop or autoscrub to remove soils. 50 Fully vacuum all carpeted areas from wall to wall. 50 Dust areas above shoulder level and below knee level. 25 Damp wipe trash containers to remove soil and stains. 12 Burnish finished floor using electric burnisher. Restore as required. 12 Vacuum under furniture, along edges and in corners with canister or backpack vacuum. 12 Dust or vacuum air vents to remove loose dust, soil and cobwebs. 4 Dust window treatments including horizontal and vertical blinds. 4 Vacuum fabric furniture. 4 Damp wipe light fixture exteriors to remove stains, dust and cobwebs. 1 Completely strip and refinish floors, apply three coats of approved floor finish and buff. 1 Hot water extract carpets using truck mounted system. 1
Elevator Annual Task Description Frequency Clean elevator walls, doors, carpets, ceiling and stainless steel. 250 Clean elevator walls, doors, hard surface floors, ceiling and stainless steel. 250 Vacuum elevator track. 50 Vacuum under furniture, along edges and in corners with canister or backpack vacuum. 12 Damp wipe light fixture exteriors to remove stains, dust and cobwebs. 1 Machine scrub hard surface floors. 1 Completely strip and refinish floors, apply three coats of approved floor finish and buff. 1 Hot water extract carpets using truck mounted system. 1

11
Entrances & Lobbies Annual Task Description Frequency Empty general and recyclable trash, replace liners when soiled or torn. Spot clean as 250 required. Remove trash to designated area. Clean door glass and other adjacent glass areas. 250 Dust furniture and spot clean all horizontal and vertical surfaces. 250 Spot clean carpet using approved carpet spotting equipment and supplies. 250 Dust mop floors with a water-based chemically treated dust mop. 250 Vacuum carpeted matting at or near entrance doors. 250 Using a backpack, spot vacuum carpets to remove visible dirt, dust and debris. 150 Spot mop floors to remove visible dirt and spills. 150 Fully vacuum all carpeted areas from wall to wall including edges. 100 Damp mop floors to remove dirt and spills. 100 Dust areas above shoulder level and below knee level. 50 Vacuum under furniture, along edges and in corners with canister or backpack vacuum. 12 Burnish finished floor using electric burnisher. Restore as required. 12 Dust or vacuum air vents to remove loose dust, soil and cobwebs. 4 Dust window treatments including horizontal and vertical blinds. 4 Vacuum fabric furniture. 4 Damp wipe light fixture exteriors to remove stains, dust and cobwebs. 1 Damp wipe trash containers to remove soil and stains. 1 Hot water extract carpets using truck mounted system. 1 Completely strip and refinish floors, apply three coats of approved floor finish and buff. 1 Machine scrub hard surface floors. 1
Fitness / Weight Room Annual Task Description Frequency Empty general and recyclable trash, replace liners when soiled or torn. Spot clean as 250 required. Remove trash to designated area. Spot clean mirrors to remove fingerprints and smudges. 250 Apply approved disinfectant to exercise equipment contact surfaces, wipe dry. 250 Spot clean carpet using approved carpet spotting equipment and supplies. 250 Remove dust and debris from hard floors. 250 Using a backpack, spot vacuum carpets to remove visible dirt, dust and debris. 200 Spot mop floors with disinfectant to remove visible dirt and spills. 200 Dust exercise equipment. 50 Fully vacuum all carpeted areas from wall to wall. 50 Using an approved disinfectant, damp mop floors. 50 Damp wipe trash containers to remove soil and stains. 12 Vacuum under furniture, along edges and in corners with canister or backpack vacuum. 12 Dust or vacuum air vents to remove loose dust, soil and cobwebs. 4
12
Apply restorer and burnish tile floors with electric-powered burnisher. 4 Dust light fixtures to remove exterior dust and cobwebs. 1 Hot water extract carpets using truck mounted system. 1 Completely strip and refinish floors, apply three coats of approved floor finish and buff. 1 Machine scrub hard surface floors. 1
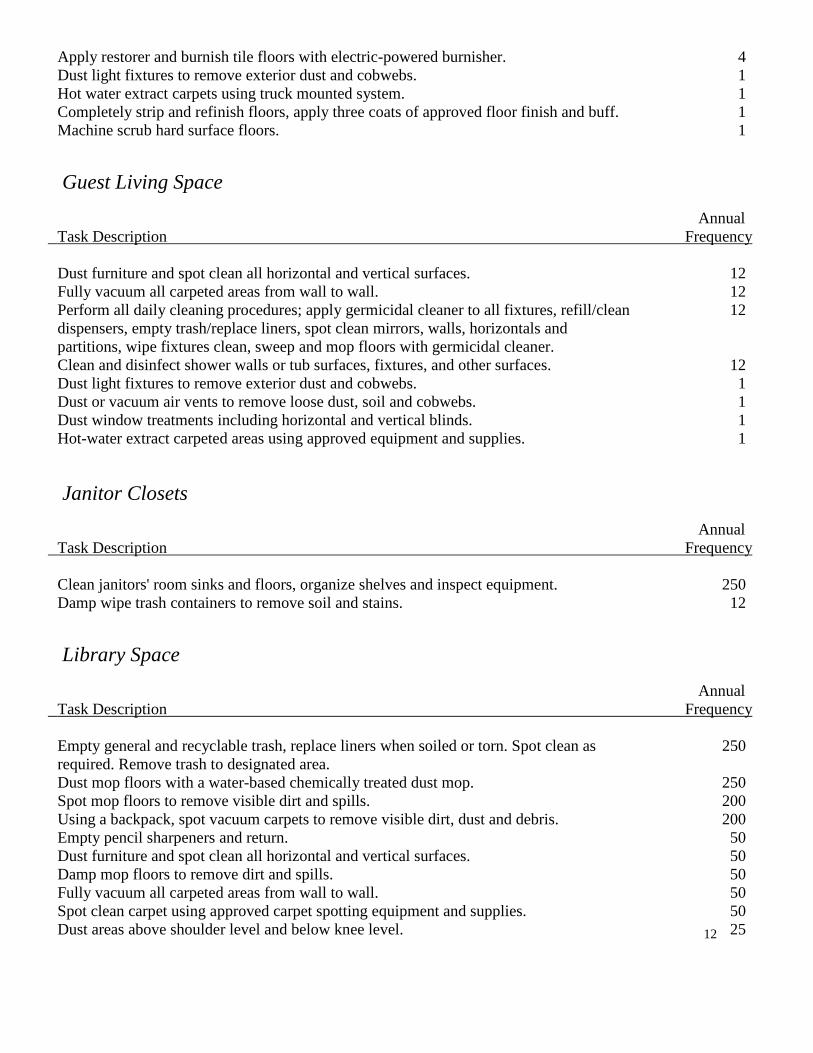
Guest Living Space Annual Task Description Frequency Dust furniture and spot clean all horizontal and vertical surfaces. 12 Fully vacuum all carpeted areas from wall to wall. 12 Perform all daily cleaning procedures; apply germicidal cleaner to all fixtures, refill/clean 12 dispensers, empty trash/replace liners, spot clean mirrors, walls, horizontals and partitions, wipe fixtures clean, sweep and mop floors with germicidal cleaner. Clean and disinfect shower walls or tub surfaces, fixtures, and other surfaces. 12 Dust light fixtures to remove exterior dust and cobwebs. 1 Dust or vacuum air vents to remove loose dust, soil and cobwebs. 1 Dust window treatments including horizontal and vertical blinds. 1 Hot-water extract carpeted areas using approved equipment and supplies. 1
Janitor Closets Annual Task Description Frequency Clean janitors' room sinks and floors, organize shelves and inspect equipment. 250 Damp wipe trash containers to remove soil and stains. 12
Library Space Annual Task Description Frequency Empty general and recyclable trash, replace liners when soiled or torn. Spot clean as 250 required. Remove trash to designated area. Dust mop floors with a water-based chemically treated dust mop. 250 Spot mop floors to remove visible dirt and spills. 200 Using a backpack, spot vacuum carpets to remove visible dirt, dust and debris. 200 Empty pencil sharpeners and return. 50 Dust furniture and spot clean all horizontal and vertical surfaces. 50 Damp mop floors to remove dirt and spills. 50 Fully vacuum all carpeted areas from wall to wall. 50 Spot clean carpet using approved carpet spotting equipment and supplies. 50 Dust areas above shoulder level and below knee level. 25

13
Vacuum under furniture, along edges and in corners with canister or backpack vacuum. 12 Dust or vacuum air vents to remove loose dust, soil and cobwebs. 4 Damp wipe trash containers to remove soil and stains. 4 Damp wipe light fixture exteriors to remove stains, dust and cobwebs. 1 Hot water extract carpets using truck mounted system. 1 Machine scrub hard surface floors. 1 Completely strip and refinish floors, apply three coats of approved floor finish and buff. 1
Loading Dock Annual Task Description Frequency Empty general and recyclable trash, replace liners when soiled or torn. Spot clean as 250 required. Remove trash to designated area. Dust mop or sweep hard-surface floors. 250 Spot mop floors to remove visible dirt and spills. 200 Damp mop or autoscrub to remove soils. 50 Wash trash collection bins to remove soil and buildup. 4
Lounge / Game Annual Task Description Frequency Empty break room trash, replace liners and tie-off at corners, clean obvious food and spills 250 from exterior of trash container. Dust and damp wipe horizontal and vertical break room surfaces including appliances and 250 furniture. Spot clean carpet using approved carpet spotting equipment and supplies. 250 Dust mop floors with a water-based chemically treated dust mop. 250 Using a backpack, spot vacuum carpets to remove visible dirt, dust and debris. 208 Spot mop floors to remove visible dirt and spills. 200 Fully vacuum all carpeted areas from wall to wall. 50 Damp mop floors to remove dirt and spills. 50 Dust areas above shoulder level and below knee level. 25 Burnish finished floor using electric burnisher. Restore as required. 12 Vacuum under furniture, along edges and in corners with canister or backpack vacuum. 12 Dust or vacuum air vents to remove loose dust, soil and cobwebs. 4 Dust window treatments including horizontal and vertical blinds. 4 Vacuum fabric furniture. 4 Shampoo fabric furniture to remove soil and stains. 1 Completely strip and refinish floors, apply three coats of approved floor finish and buff. 1 Hot water extract carpets using truck mounted system. 1 Machine scrub hard surface floors. 1

14
Medical / Training / Day Care Annual Task Description Frequency Dust furniture and spot clean with disinfectant all horizontal and vertical surfaces 250 Empty general and recyclable trash, replace liners when soiled or torn. Spot clean as 250 required. Remove trash to designated area. Spot clean carpet using approved carpet spotting equipment and supplies. 250 Using an approved disinfectant, damp mop floors. 250 Dust mop floors with a water-based chemically treated dust mop. 250 Clean stainless steel sink using approved cleaner. 250 Vacuum carpeted traffic lanes and spot vacuum personal work spaces. 200 Fully vacuum all carpeted areas from wall to wall. 50 Damp wipe trash containers to remove soil and stains. 12 Dust areas above shoulder level and below knee level. 12 Apply restorer and burnish tile floors with electric-powered burnisher. 12 Dust or vacuum air vents to remove loose dust, soil and cobwebs. 4 Dust light fixtures to remove exterior dust and cobwebs. 1 Completely strip and refinish floors, apply three coats of approved floor finish and buff. 1 Hot water extract carpets using truck mounted system. 1 Machine scrub hard surface floors. 1
Offices, General Annual Task Description Frequency Spot clean telephones and sanitize receivers. 50 Empty general and recyclable trash, replace liners when soiled or torn. Spot clean as 50 required. Remove trash to designated area. Spot clean carpet using approved carpet spotting equipment and supplies. 50 Dust mop floors with a water-based chemically treated dust mop. 50 Dust furniture and spot clean all horizontal and vertical surfaces. 25 Fully vacuum all carpeted areas from wall to wall. 25 Vacuum carpeted traffic lanes and spot vacuum personal work spaces. 25 Spot mop floors to remove visible dirt and spills. 25 Damp mop floors to remove dirt and spills. 25 Dust areas above shoulder level and below knee level. 12 Dust or vacuum air vents to remove loose dust, soil and cobwebs. 4 Dust window treatments including horizontal and vertical blinds. 4 Vacuum fabric furniture. 4 Dust light fixtures to remove exterior dust and cobwebs. 1 Shampoo fabric furniture to remove soil and stains. 1 Damp wipe trash containers to remove soil and stains. 1 Machine scrub hard surface floors. 1 Completely strip and refinish floors, apply three coats of approved floor finish and buff. 1 Hot water extract carpets using truck mounted system. 1

15
Outside Area Annual Task Description Frequency Empty exterior trash, replace liners and tie-off at corners, clean obvious food from exterior 250 of containers. Dust mop or sweep hard surface floors. 50
Restrooms Annual Task Description Frequency Spot clean carpet using approved carpet spotting equipment and supplies. 250 Clean and sanitize bradley sink and related fixtures. Replenish soap dispenser. 250 Perform all daily cleaning procedures; apply germicidal cleaner to all fixtures, refill/clean 250 dispensers, empty trash/replace liners, spot clean mirrors, walls, horizontals and partitions, wipe fixtures clean, sweep and mop floors with germicidal cleaner. With a germicidal cleaner, completely damp wipe restroom partitions including high/low 50 areas. Damp wipe trash containers to remove soil and stains. 12 Wash restroom walls with germicidal cleaner. 12 Dust or vacuum air vents to remove loose dust, soil and cobwebs. 12 Machine scrub restroom floors with germicidal cleaner. 12 Damp wipe light fixture exteriors to remove stains, dust and cobwebs. 1 Hot-water extract carpeted areas using approved equipment and supplies. 1 Completely strip and refinish floors, apply three coats of approved floor finish and buff. 1
Shop / Garage Areas Annual Task Description Frequency Empty shop trash containers and remove to designated location. 250 Dust mop floors with a water-based chemically treated dust mop. 50 Damp mop or autoscrub to remove soils. 50 Damp wipe trash containers to remove soil and stains. 1 Completely strip and refinish floors, apply three coats of approved floor finish and buff. 1

16
Showers / Lockers / Laundry Annual Task Description Frequency Spot clean mirrors to remove fingerprints and smudges. 250 Dust furniture and spot clean all horizontal and vertical surfaces. 250 Empty general trash, replace liners when soiled or torn. 250 Dust mop or sweep hard-surface floors. 250 Using an approved disinfectant, damp mop floors. 250 Clean and disinfect shower walls, fixtures, and other surfaces. 250 Using a backpack, spot vacuum carpets to remove visible dirt, dust and debris. 200 Dust and spot clean exterior of lockers. 50 Spot clean carpet using approved carpet spotting equipment and supplies. 50 Fully vacuum all carpeted areas from wall to wall. 50 Damp wipe trash containers to remove soil and stains. 12 Machine scrub hard surface floors. 12 Damp wipe air vents to remove dust, soil and cobwebs. 4 Wash locker exteriors only. 4 Apply restorer and burnish tile floors with electric-powered burnisher. 4 Damp wipe light fixture exteriors to remove stains, dust and cobwebs. 1 Wash locker interiors using germicidal cleaner. 1 Completely strip and refinish floors, apply three coats of approved floor finish and buff. 1 Hot water extract carpets using truck mounted system. 1
Stairwells Annual Task Description Frequency Police stairs for litter. 225 Spot clean carpeted stairs using approved carpet spotting equipment and supplies. 50 Vacuum stairways, dust vertical and horizontal surfaces and spot clean. 25 Sweep and damp mop stairways, dust vertical and horizontal surfaces and spot clean. 25 Using a hot-water extraction system, fully clean carpeted stairs. 1 Strip and refinish stairways. 1
Storage Annual Task Description Frequency Dust or vacuum air vents to remove loose dust, soil and cobwebs. 4 Dust furniture and spot clean all horizontal and vertical surfaces. 4 Damp mop or autoscrub to remove soils. 4 Dust mop or sweep hard-surface floors. 4 Fully vacuum all carpeted areas from wall to wall. 4 Completely strip and refinish floors, apply three coats of approved floor finish and buff. 1 Hot-water extract carpeted areas using approved equipment and supplies.

17
Weekend Services Annual Task Description Frequency Provide cleaning, trash removal, and policing services as required. 100

18
Section 2 - Site-wide Cleaning Procedures

19
University of Kentucky – Physical Plant Standard Cleaning Procedures Set
Procedure # Routine (Daily) Procedure Title
R1 Trash Collection Cleaning Procedure R2 Restroom Cleaning Procedure R3 Detail Dusting and Spot Cleaning Procedure R4 Detail Vacuuming and Carpet Spotting Cleaning Procedure R5 Detail Floor Care Cleaning Procedure R6 General Area Dusting and Spot Cleaning Procedure R7 General Area Vacuuming Cleaning Procedure R8 General Area Floor Care Cleaning Procedure R9 Entrance and Lobby Cleaning Procedure R10 Cafeteria, Kitchenette, and Break Area Cleaning Procedure R11 Carpeted Corridor Vacuuming and Carpet Spotting Cleaning Procedure R12 Hard Surface Corridor Floor Care Cleaning Procedure R13 Classroom and Laboratory Area Dusting and Spot Cleaning Procedure R14 Classroom and Laboratory Area Hard Surface Floor Care Cleaning Procedure R15 Classroom and Laboratory Area Carpet Floor Care Cleaning Procedure R16 Stairway and Stairwell Cleaning Procedure – Hard Surface R17 Stairway and Stairwell Cleaning Procedure – Carpet R18 Janitorial Area Cleaning Procedure R19 Storage and Utility Area Cleaning Procedure R20 Miscellaneous Area Cleaning Procedure
Procedure # Interim Procedure Titles
I1 Carpet Traffic Lane Bonnet Cleaning Procedure I2 Tile Floors Auto-scrubbing Cleaning Procedure I3 Tile Floor Restoring and Buffing Cleaning Procedure I4 Rest Room Floor Scrubbing and Disinfecting Procedure
Procedure # Project (Restorative) Procedure Titles
P1 Carpet Traffic Lane Shampooing Procedure P2 Carpet Hot-water Extraction Cleaning Procedure P3 Tile Floor Deep Scrubbing and Recoating Cleaning Procedure P4 Tile Floor Stripping and Refinishing Procedure

20
Routine (Daily) Cleaning Procedures

21
CLEANING PROCEDURE R1 TITLE: TRASH COLLECTION GENERAL DESCRIPTION: Trash and recyclable collection and removal. SUPPLIES/EQUIPMENT: Two small trash barrels w/wheels, two 1-yard trash collection
bins w/wheels, large and small trash liners. SAFETY EQUIPMENT: Approved safety gloves and back support is recommended. SERVICE PROCEDURE: • At the beginning of your shift, inspect your equipment and report observed safety hazards at once. • Bring replacement liners, two small trash barrels and two 1-yard trash bins to farthest point from
compactor area. • Begin collecting trash and recyclables by dumping waste cans into appropriate small barrels (one
for regular trash and one for recycle trash). • Replace soiled or torn liners as necessary. • Return emptied can to its proper location. • Empty small barrels into 1-yard trash bins while barrel weights are still manageable. Never reach
into a trash container. • Work towards compactor or storage area. Removal distance will be reduced as shift progresses. • Upon completion of your tasks in each area, be sure to self-inspect before moving on to the next
area. Even the best cleaners occasionally miss a cleaning opportunity. SAFETY PRECAUTIONS: • At the beginning of your shift, inspect your equipment and report observed safety hazards at once. • It is recommended that you wear protective eyewear while handling trash. • Recommend wearing safety gloves and back support while collecting trash. • Never reach into a trash container. There may be sharp protruding objects. • At the end of your shift, inspect and clean your equipment, report any safety hazards to your
supervisor.

22
CLEANING PROCEDURE R2 TITLE: RESTROOM CLEANING GENERAL DESCRIPTION: Daily restroom cleaning and restocking of consumable restroom
supplies. SUPPLIES/EQUIPMENT: Janitor cart, bowl cleaner, general disinfectant, window cleaner,
stainless steel cleaner, abrasive cleanser, miscellaneous supplies. SAFETY EQUIPMENT: Approved protective eyewear and approved safety gloves is
recommended. Non-slip shoes and wet floor signs are required. SERVICE PROCEDURE: • Sweep floor area. Pay close attention to corners, edges and hard-to-get areas. • Apply disinfectant cleaner to insides of toilets and urinals and occasionally showers, liberally swab
all contact areas of toilet, leave cleaner on surface. • Apply general disinfectant (abrasive cleaner periodically) to all sinks, leave cleaner on surface. • Perform all required dusting and spot clean partitions, mirrors and walls. • Restock all toilet paper, paper towels, hand soap and feminine napkins if required. • Return to fixtures (sinks, toilets, urinals, showers), wipe clean all fixture surfaces and flush toilets
and urinals. • Inspect all areas; perform any necessary non-daily procedures as specified. • Upon completion of your tasks in each area, be sure to self-inspect before moving on to the next
area. Even the best cleaners occasionally miss a cleaning opportunity. • Mop floors with a disinfectant cleaner as you back out of the room. SAFETY PRECAUTIONS: • At the beginning of your shift, inspect your equipment and report observed safety hazards at once. • It is recommended that you wear protective eyewear when using chemicals calling for eye
protection while cleaning restrooms. • Safety gloves is recommended while cleaning restrooms. • Wet floor signs and non-slip shoes are required for all wet floor work. • Never reach into a trash container. There may be sharp protruding objects. • Never mix chemicals and never bring unauthorized chemicals to the job site. • Make sure you always have proper ventilation while using cleaning chemicals. • At the end of your shift, inspect and clean your equipment and report safety hazards to your
supervisor.

23
CLEANING PROCEDURE R3 TITLE: DETAIL DUSTING AND SPOT CLEANING GENERAL DESCRIPTION: Thorough furniture cleaning, horizontal surface cleaning and
vertical surface cleaning of all daily primary areas and scheduled general office areas.
SUPPLIES/EQUIPMENT: Dust cloth(s), spot cleaning solution, window cleaner, furniture polish, hi-dust wand.
SAFETY EQUIPMENT: Approved protective eyewear, dust mask and gloves is recommended. Approved safety gloves may be necessary with the use of treated dust cloths.
SERVICE PROCEDURE: • Bring supplies to primary and scheduled general areas to begin service procedure. If you are right
handed, it is recommended that you work from right-to-left. If you are left handed, it is recommended that you work from left-to-right.
• Perform dusting and spot cleaning in high areas, daily areas and low areas systematically as you move through your scheduled areas.
• High area dusting is performed with an extended lamb’s wool or synthetic dust tool. Keeping a safe distance, brush the high areas with your extension duster until clean.
• Daily area dusting and spot cleaning require a treated dust cloth, a spray bottle filled with a general cleaner, and supply of disposable wipes. Working in a pattern (see suggestions above), you first remove all dust with the treated dust cloth, then remove any spots, smudges, spills or pen marks and wipe dry.
• Low dusting can be performed with either the extension duster or the treated dust cloths. Be especially careful as you bend.
• Upon completion of your tasks in each area, be sure to self-inspect before moving on to the next area. Even the best cleaners occasionally miss a cleaning opportunity.
SAFETY PRECAUTIONS: • At the beginning of your shift, inspect your equipment and report observed safety hazards at once. • Never reach into a trash container. There may be sharp protruding objects. • Protective eyewear, dust mask and gloves is recommended. • Dust mask may be necessary when high dusting. • At the end of your shift, inspect and clean your equipment, report any safety hazards to your
supervisor.

24
CLEANING PROCEDURE R4 TITLE: DETAIL VACUUMING AND SPOT CLEANING GENERAL DESCRIPTION: Daily vacuuming of all daily primary areas and scheduled
general office areas. SUPPLIES/EQUIPMENT: Upright vacuum with edging tool and attached magnet. SAFETY EQUIPMENT: Approved protective eyewear and hear protection is
recommended. Dust masks recommended when emptying vacuum.
SERVICE PROCEDURE: • Bring supplies to primary and scheduled general areas to begin service procedure. • Perform thorough vacuuming of all daily areas and scheduled areas. • Daily area vacuuming requires an upright vacuum with a beater brush and an attached magnet.
Working in a pattern, you first remove all large items such as paper clips and staples. Then vacuum with the upright vacuum cleaner, moving the vacuum in a forward and backward motion.
• Using the attachment, vacuum all scheduled or hard to reach areas that have observable dust. • Clean carpet spots using approved carpet spot cleaning equipment. • Report stains or hard to clean spots to supervisor. • Upon completion of your tasks in each area, be sure to self-inspect before moving on to the next
area. Even the best cleaners occasionally miss a cleaning opportunity. SAFETY PRECAUTIONS: • At the beginning of your shift, inspect your equipment and report observed safety hazards at once. • Always unplug your machinery before performing even the most simple equipment maintenance
tasks. • It is recommended that you wear protective eyewear and hear protection while emptying vacuum. • It is also recommended that you wear a dust mask while emptying vacuum. • At the end of your shift, inspect and clean your equipment, report any safety hazards to your
supervisor.

25
CLEANING PROCEDURE R5 TITLE: DETAIL FLOOR CARE CLEANING GENERAL DESCRIPTION: Daily care of hard surface floors in primary and scheduled
general office areas. SUPPLIES/EQUIPMENT: Dust mop treated with water-based formula, mop, bucket,
wringer, broom, dustpan, putty knife, small trash receptacle or high-density liner, wet floor signs.
SAFETY EQUIPMENT: Approved protective eyewear is recommended. Wet floor signs and non-slip shoes are required.
SERVICE PROCEDURE: • Bring supplies to primary and scheduled general areas to begin service procedure. • Perform thorough dust mopping of all daily areas and scheduled areas. • Working in a pattern, begin dust mopping along the perimeter of each room and work toward the
center; always overlap. Be very careful around office furniture and equipment. Move light equipment and furniture, dust mop area, then replace equipment in its proper position.
• Keep dust mop on the floor as much as possible. Lifting dust mop will cause dirt and dust to be released into the air. When dirt must be unloaded, shake mop as close to the floor as possible.
• Remove any gum or other debris with a putty knife. • With dustpan, collect all dust, dirt and debris and place into trash receptacle. • Upon completion of dust mopping, set up wet floor signs and begin damp mopping all areas. • Dip mop into approved solution. Wring your mop out but leave it somewhat damp. Mop along
baseboards first, then work in a “figure 8” pattern to complete the mopping of all areas. Rinse mop and wring out until it is as dry as possible, mop up water and baseboards. Work your way backwards out of each room and toward the water source.
• Upon completion of your tasks in each area, be sure to self-inspect before moving on to the next area. Even the best cleaners occasionally miss a cleaning opportunity.
SAFETY PRECAUTIONS: • At the beginning of your shift, inspect your equipment and report observed safety hazards at once. • Protective eyewear is recommended. • Wet floor signs and non-slip shoes are required for all wet floor work. • At the end of your shift, inspect and clean your equipment, report any safety hazards to your
supervisor.

26
CLEANING PROCEDURE R6 TITLE: GENERAL AREA DUSTING AND SPOT CLEANING GENERAL DESCRIPTION: Light furniture cleaning, light horizontal surface cleaning and
vertical surface cleaning of all general, non-primary areas. SUPPLIES/EQUIPMENT: Dust cloth(s), spot cleaning solution, window cleaner. SAFETY EQUIPMENT: Approved protective eyewear is recommended. Gloves and
dust mask is recommended.
SERVICE PROCEDURE: • Bring supplies to scheduled general areas to begin service procedure. If you are right handed, it is
recommended that you work from right-to-left. If you are left handed, it is recommended that you work from left-to-right.
• Perform very light dusting and spot cleaning in daily use areas systematically as you move through your scheduled areas.
• General area dusting and spot cleaning requires a treated dust cloth, a spray bottle filled with a general cleaner and supply of disposable wipes. Working in a pattern (see suggestions above), you first remove all obvious dust with the treated dust cloth, then remove any spots, smudges, spills or pen marks and wipe dry.
• Upon completion of your tasks in each area, be sure to self-inspect before moving on to the next area. Even the best cleaners occasionally miss a cleaning opportunity.
SAFETY PRECAUTIONS: • At the beginning of your shift, inspect your equipment and report observed safety hazards at once. • Protective eyewear is recommended with the use of trigger sprayers. • Gloves are recommended with the use of treated dust cloths. • Never reach into a trash container. There may be sharp protruding objects. • At the end of your shift, inspect and clean your equipment, report any safety hazards to your
supervisor.

27
CLEANING PROCEDURE R7 TITLE: GENERAL AREA VACUUMING AND SPOT CLEANING GENERAL DESCRIPTION: Light vacuuming of all scheduled general, non-primary office
areas. SUPPLIES/EQUIPMENT: Backpack vacuum with wand. SAFETY EQUIPMENT: Approved protective eyewear is recommended. Wet floor signs
required when using extension cords. Dust masks recommended when emptying vacuum. Hearing protection is recommended
SERVICE PROCEDURE: • Bring supplies to scheduled general areas to begin service procedure. • Perform light vacuuming of all daily use and traffic areas. • Light vacuuming requires a backpack vacuum with a hand-held wand. Working in a pattern, you
vacuum all traffic patterns and heavy use areas. Also, you vacuum all personal workspaces to remove obvious dirt and debris.
• Using the wand, vacuum all scheduled or hard to reach areas that have observable dust. • Clean carpet spots using approved carpet spot cleaning equipment. • Report stains or hard to clean spots to supervisor. • Upon completion of your tasks in each area, be sure to self-inspect before moving on to the next
area. Even the best cleaners occasionally miss a cleaning opportunity. SAFETY PRECAUTIONS: • At the beginning of your shift, inspect your equipment and report observed safety hazards at once. • Always unplug your machinery and tag-out before performing even the most simple equipment
maintenance tasks. • It is recommended that you wear protective eyewear while emptying vacuum. • It is also recommended that you wear a dust mask while emptying vacuum. • Safety cones are required when using extension cords. • At the end of your shift, inspect and clean your equipment, report any safety hazards to your
supervisor.

28
CLEANING PROCEDURE R8 TITLE: GENERAL AREA FLOOR CARE CLEANING GENERAL DESCRIPTION: General care of hard surface floors in scheduled general, non-
primary office areas. SUPPLIES/EQUIPMENT: Dust mop treated with water-based formula, mop, bucket,
wringer, broom, dustpan, putty knife, small trash receptacle or high-density liner, wet floor signs.
SAFETY EQUIPMENT: Approved protective eyewear is recommended and non-slip shoes are required. Wet floor signs are required.
SERVICE PROCEDURE: • Bring supplies to scheduled general areas to begin service procedure. • Perform very light dust mopping of all scheduled areas removing obvious dust and dirt. • Working in a pattern, begin dust mopping along the perimeter of each room and work toward the
center; always overlap. Be very careful around office furniture and equipment. Move light equipment and furniture, dust mop area, then replace equipment in its proper position.
• Keep dust mop on the floor as much as possible. Lifting dust mop will cause dirt and dust to be released into the air. When dirt must be unloaded, shake mop as close to the floor as possible.
• Remove any gum or other debris with a putty knife. • With dustpan, collect all dust, dirt and debris and place into trash receptacle. • Upon completion of dust mopping, set up wet floor signs and begin spot mopping only heavy
use areas and obvious spills and spots. • Dip mop into approved solution. Wring your mop out but leave it somewhat damp. Mop only
heavy use areas and obvious spills in a “figure 8” pattern. Rinse mop and wring out until it is as dry as possible, mop up water. Work your way backwards out of each room and towards the water source.
• Upon completion of your tasks in each area, be sure to self-inspect before moving on to the next area. Even the best cleaners occasionally miss a cleaning opportunity.
SAFETY PRECAUTIONS: • At the beginning of your shift, inspect your equipment and report observed safety hazards at
once. • Wet floor signs and non-slip shoes are required for all wet floor work. • At the end of your shift, inspect and clean your equipment, report any safety hazards to your
supervisor.
29
CLEANING PROCEDURE R9 TITLE: ENTRANCE AND LOBBY CLEANING GENERAL DESCRIPTION: Daily cleaning of high visibility areas with an emphasis on
continuous recovery. SUPPLIES/EQUIPMENT: Dusting and spot cleaning equipment, vacuum, mopping
equipment. SAFETY EQUIPMENT: Approved protective eyewear is recommended and non-slip
shoes are required. Wet floor signs are required.
SERVICE PROCEDURE: • Bring supplies to scheduled general areas to begin service procedure. • Perform dusting and spot cleaning in high areas, daily areas and low areas systematically as you
move through the entrance areas. • High area dusting is performed with an extended lamb’s wool or synthetic dust tool. Keeping a
safe distance, brush the high areas with your extension duster until clean. • Daily area dusting and spot cleaning require a treated dust cloth, a spray bottle filled with a
general cleaner and supply of disposable wipes. Working in a pattern (see suggestions above), you first remove all dust with the treated dust cloth, then remove any spots, smudges, spills or pen marks and wipe dry. Pay special attention to all door and window glass, as they are very noticeable.
• Low dusting can be performed with either the extension duster or the treated dust cloths. Be especially careful as you bend.
• After completion of all spotting and dusting, sweep and damp mop floor (if applicable) before vacuuming. Follow Primary Area procedures for floor care and vacuuming.
• An entrance and lobby floor program requires more care in and around the corners and edges because of the amount of full-length glass commonly found in entrance areas.
• Entrance and lobby vacuuming requires more thorough vacuuming as you are cleaning not only for appearance but to keep the dirt out of the rest of the building. When vacuuming all entrance mats, first vacuum in an east-west direction, then vacuum in a north-south direction.
• Upon completion of your tasks in each area, be sure to self-inspect before moving on to the next area. Even the best cleaners occasionally miss a cleaning opportunity.
SAFETY PRECAUTIONS: • Follow all safety precautions listed in procedure numbers 1, 3, 4 and 5. • Be aware of people entering and exiting the building. Be careful not to create any hazards
for yourself or them. Use wet floor signs and wear non-slip shoes when performing wet process. Protective eyewear is recommended.
• At the end of your shift, inspect and clean your equipment, report any safety hazards to your supervisor.
30
CLEANING PROCEDURE R10 TITLE: CAFETERIA, PANTRY AND BREAK AREA CLEANING GENERAL DESCRIPTION: Daily cleaning of all cafeterias, pantry and break areas. SUPPLIES/EQUIPMENT: Dusting and spot cleaning equipment, vacuum, damp mopping
equipment. SAFETY EQUIPMENT: Approved protective eyewear and gloves is recommended and
non-slip shoes are required. Wet floor signs are required. SERVICE PROCEDURE:
• Perform dusting and spot cleaning in high areas, daily areas and low areas systematically as you move through the areas.
• High area dusting is performed with an extended lamb’s wool or synthetic dust tool. Keeping a safe distance, brush the high areas with your extension duster until clean.
• Daily area dusting and spot cleaning require a treated dust cloth, a spray bottle filled with a general cleaner and supply of disposable wipes. Working in a pattern (see suggestions above), you first remove all dust with the treated dust cloth, then remove any spots, smudges, spills or pen marks and wipe dry. Pay special attention to all door and window glass, as they are very noticeable.
• Low dusting can be performed with either the extension duster or the treated dust cloths. Be especially careful as you bend.
• After completion of all spotting and dusting, sweep and damp mop floor (if applicable) before vacuuming. Follow Primary Area procedures for floor care and vacuuming.
• Upon completion of your tasks in each area, be sure to self-inspect before moving on to the next area. Even the best cleaners occasionally miss a cleaning opportunity. SAFETY PRECAUTIONS:
• At the beginning of your shift, inspect your equipment and report observed safety hazards at once. • Never reach into a trash container. There may be sharp protruding objects. • Protective eyewear is recommended with the use of trigger sprayers. • Wet floor signs and non-slip shoes are required for all wet floor work. • Always unplug your machinery before performing even the most simple equipment maintenance
tasks. • At the end of your shift, inspect and clean your equipment, report any safety hazards to your
supervisor.

31
CLEANING PROCEDURE R11 TITLE: CARPETED CORRIDOR VACUUMING GENERAL DESCRIPTION: Daily vacuuming of all main carpeted corridors. SUPPLIES/EQUIPMENT: Wide area vacuum SAFETY EQUIPMENT: Approved protective eyewear is recommended. Wet floor signs
are recommended for cord models and the use of extension cords. Dust masks recommended when emptying vacuum.
SERVICE PROCEDURE: • Bring wide area vacuum to scheduled corridor to begin service procedure. • Perform wide area vacuuming of all daily use and high-traffic corridors. • Efficient corridor vacuuming requires a wide area vacuum with or without a cord. Working in a
pattern, overlap as you walk up and down each corridor in a straight line. Pay special attention to heavy traffic patterns and heavy use areas.
• Make note of all carpet spots and report to supervisor. • Upon completion of your tasks in each area, be sure to self-inspect before moving on to the next
area. Even the best cleaners occasionally miss a cleaning opportunity. SAFETY PRECAUTIONS: • At the beginning of your shift, inspect your equipment and report observed safety hazards at once. • It is recommended that you wear protective eyewear while emptying vacuum. • It is also recommended that you wear a dust mask while emptying vacuum. • Wet floor signs are recommended for cord models (or the use of extension cords). • Always unplug your machinery before performing even the most simple equipment maintenance
tasks. • At the end of your shift, inspect and clean your equipment, report any safety hazards to your
supervisor.

32
CLEANING PROCEDURE R12 TITLE: HARD SURFACE AND TILE CORRIDOR FLOOR CARE GENERAL DESCRIPTION: Tile and hard surface maintenance of heavy use corridors. SUPPLIES/EQUIPMENT: 32” auto-scrubber, dust mop treated with water-based formula,
mop, bucket, wringer, broom, dustpan, putty knife, small trash receptacle or high-density liner, wet floor signs.
SAFETY EQUIPMENT: Approved protective eyewear is recommended and non-slip shoes are required. Wet floor signs are required.
SERVICE PROCEDURE: • Bring supplies and equipment to assigned areas to begin service procedure. • Perform thorough dust mopping of all areas. • Walking in a straight-ahead pattern, begin dust mopping along the perimeter of each corridor and
work toward the center; always overlap. Move light furniture, dust mop area, then replace furniture in its proper position.
• Keep dust mop on the floor as much as possible. Lifting dust mop will cause dirt and dust to be released into the air. When dirt must be unloaded, shake mop as close to the floor as possible.
• Remove any gum or other debris with a putty knife. • With dustpan, collect all dust, dirt and debris and place into trash receptacle. • Upon completion of dust mopping, set up wet floor signs and begin damp mopping or auto-
scrubbing all areas. • To damp mop, dip mop into approved solution. Wring your mop out but leave it somewhat
damp. Mop along baseboards first, then work in a “figure 8” pattern to complete the mopping of all areas. Rinse mop and wring out until it is as dry as possible, mop up water and baseboards. Work your way backwards down each corridor and towards the water source.
• Before attempting any auto-scrubbing, you must receive thorough one-on-one training on machine.
• Upon completion of your tasks in each area, be sure to self-inspect before moving on to the next area. Even the best cleaners occasionally miss a cleaning opportunity.
SAFETY PRECAUTIONS: • At the beginning of your shift, inspect your equipment and report observed safety hazards at
once. • Protective eyewear is recommended when working with airborne dirt and dust. • Wet floor signs and non-slip shoes are required for all wet floor work • At the end of your shift, inspect and clean your equipment, report any safety hazards to your
supervisor.

33
CLEANING PROCEDURE R13 TITLE: CLASSROOM, LABORATORY DUSTING/ SPOT
CLEANING GENERAL DESCRIPTION: Horizontal and vertical surface cleaning of all scheduled
classroom and laboratory areas. SUPPLIES/EQUIPMENT: Dust cloth(s), spot cleaning solution, window cleaner. SAFETY EQUIPMENT: Approved protective eyewear is recommended. Gloves and
dust mask is recommended. SERVICE PROCEDURE: • Bring supplies to scheduled classroom and laboratory areas to begin service procedure. If you
are right handed, it is recommended that you work from right-to-left. If you are left handed, it is recommended that you work from left-to-right.
• Perform dusting and spot cleaning systematically as you move through your scheduled areas. Be very careful to avoid any areas with laboratory work in progress. If you are not sure of your role in an area, ask a supervisor at once.
• Classroom and laboratory area dusting and spot cleaning requires a treated dust cloth, a spray bottle filled with a general cleaner and supply of disposable wipes. Working in a pattern (see suggestions above), you first remove all obvious dust with the treated dust cloth, then remove any spots, smudges, spills or pen marks and wipe dry.
• Upon completion of your tasks in each area, be sure to self-inspect before moving on to the next area. Even the best cleaners occasionally miss a cleaning opportunity.
SAFETY PRECAUTIONS: • At the beginning of your shift, inspect your equipment and report observed safety hazards at
once. • When working in a laboratory area, be sure to be aware of special safety requirements. • Protective eyewear is recommended with the use of trigger sprayers. • Gloves and dust mask is recommended when using treated dust cloths. • Never reach into a trash container. There may be sharp protruding objects. • At the end of your shift, inspect and clean your equipment, report any safety hazards to your
supervisor.

34
CLEANING PROCEDURE R14 TITLE: CLASSROOM AND LABORATORY - HARD SURFACE
FLOOR CARE GENERAL DESCRIPTION: General care of hard surface floors in scheduled classrooms
and laboratories. SUPPLIES/EQUIPMENT: Dust mop treated with water-based formula, mop, bucket,
wringer, broom, dustpan, putty knife, small trash receptacle or high-density liner, wet floor signs.
SAFETY EQUIPMENT: Approved protective eyewear is recommended and non-slip shoes are required. Wet floor signs are required.
SERVICE PROCEDURE: • Bring supplies to scheduled classrooms and laboratory areas to begin service procedure. • Perform dust mopping of all scheduled areas removing obvious dust and dirt. • Working in a pattern, begin dust mopping along the perimeter of each room and work toward the
center; always overlap. Be very careful around laboratory work in progress, office furniture and equipment. Move light equipment and furniture, dust mop area, then replace equipment in its proper position.
• Keep dust mop on the floor as much as possible. Lifting dust mop will cause dirt and dust to be released into the air. When dirt must be unloaded, shake mop as close to the floor as possible.
• Remove any gum or other debris with a putty knife. • With dustpan, collect all dust, dirt and debris and place into trash receptacle. • Upon completion of dust mopping, set up wet floor signs and begin spot mopping or damp
mopping. • Dip mop into approved solution. Wring your mop out but leave it somewhat damp. Mop areas
using a “figure 8” pattern. Rinse mop and wring out until it is as dry as possible, mop up water. Work your way backwards out of each room and towards the water source.
• Upon completion of your tasks in each area, be sure to self-inspect before moving on to the next area. Even the best cleaners occasionally miss a cleaning opportunity.
SAFETY PRECAUTIONS: • At the beginning of your shift, inspect your equipment and report observed safety hazards at once. • Approved protective eyewear is recommended. • When working in a laboratory area, be sure to be aware of special safety requirements. • Wet floor signs and non-slip shoes are required for all wet floor work. • At the end of your shift, inspect and clean your equipment, report any safety hazards to your
supervisor.

35
CLEANINGPROCEDURE R15 TITLE: CLASSROOM AND LABORATORY - CARPET
FLOOR CARE GENERAL DESCRIPTION: General care of carpeted surface floors in scheduled
classrooms and laboratories. SUPPLIES/EQUIPMENT: Upright vacuum with edging tool and attached magnet. SAFETY EQUIPMENT: Approved protective eyewear is recommended. Dust masks
recommended when emptying vacuum. Wet floor signs are required with the use of extension cords.
SERVICE PROCEDURE: • Bring supplies to primary and scheduled general areas to begin service procedure. • Perform thorough vacuuming of all daily areas and scheduled areas. • Daily area vacuuming requires an upright vacuum with a beater brush and an attached magnet.
Working in a pattern, you first remove all large items such as paper clips and staples. Then vacuum with the upright vacuum cleaner, moving the vacuum in a forward and backward motion.
• Using the attachment, vacuum all scheduled or hard to reach areas that have observable dust. • Make note of all carpet spots and report to supervisor. • Upon completion of your tasks in each area, be sure to self-inspect before moving on to the
next area. Even the best cleaners occasionally miss a cleaning opportunity. SAFETY PRECAUTIONS: • At the beginning of your shift, inspect your equipment and report observed safety hazards at
once. • Always unplug your machinery before performing even the most simple equipment
maintenance tasks. • It is recommended that you wear protective eyewear while emptying vacuum. • It is also recommended that you wear a dust mask while emptying vacuum. • Wet floor signs are required with the use of extension cords. • At the end of your shift, inspect and clean your equipment, report any safety hazards to your
supervisor.

36
CLEANING PROCEDURE R16 TITLE: STAIRWAY AND STAIRWELL CLEANING – HARD
SURFACE GENERAL DESCRIPTION: Cleaning of all stairs, railings and associated areas. SUPPLIES/EQUIPMENT: Dust mop, broom, wet mop, bucket, wringer, dust cloth, spot
cleaner, dustpan, dust wand with extension. SAFETY EQUIPMENT: Approved protective eyewear is recommended and non-slip
shoes and dust mask are required. Wet floor signs are required. SERVICE PROCEDURE: • Bring supplies and equipment to scheduled general areas to begin service procedure. • Perform dust mopping of all scheduled areas removing obvious dust and dirt. • Working in a pattern, begin dust mopping at the top of the stairs and in the side areas of each stair
tread and work toward the center, knock dirt down to the next lower stair tread. • Keep dust mop on the floor as much as possible. Lifting dust mop will cause dirt and dust to be
released into the air. When dirt must be unloaded, shake mop as close to the floor as possible. • Dust railings and spot clean walls as you work from top to bottom. • Remove any gum or other debris with a putty knife. • With dustpan, collect all dust, dirt and debris and place into trash receptacle. • Upon completion of dust mopping, set up wet floor signs and begin spot mopping only heavy
use areas and obvious spills and spots. • Dip mop into approved solution. Wring your mop out but leave it somewhat damp. Mop only
heavy use areas and obvious spills in a “figure 8” pattern. Rinse mop and wring out until it is as dry as possible, mop up water. Work your way backwards down the stairs and towards the water source.
• Upon completion of your tasks in each area, be sure to self-inspect before moving on to the next area. Even the best cleaners occasionally miss a cleaning opportunity.
SAFETY PRECAUTIONS: • At the beginning of your shift, inspect your equipment and report observed safety hazards at once. • Approved protective eyewear is recommended. • Wet floor signs, dust mask and non-slip shoes are required for all wet floor work. • At the end of your shift, inspect and clean your equipment, report any safety hazards to your
supervisor.

37
CLEANING PROCEDURE R17
TITLE: STAIRWAY AND STAIRWELL CLEANING –CARPET GENERAL DESCRIPTION: Cleaning of all stairs, railings and associated areas. SUPPLIES/EQUIPMENT: Backpack vacuum with wand, dust cloth, carpet spot
cleaning equipment, dust wand with extension. SAFETY EQUIPMENT: Approved protective eyewear is recommended. Dust
masks recommended when emptying vacuum. Wet floor signs are required with the use of extension cords.
SERVICE PROCEDURE: • Bring supplies to scheduled general areas to begin service procedure. • Perform vacuuming of all daily use and traffic areas. • Stairway vacuuming requires a backpack vacuum with a hand-held wand. Working top to bottom,
vacuum all traffic patterns and heavy use areas. • Dust railings, and spot clean walls as you work from top to bottom. Using the wand, vacuum all
scheduled or hard to reach areas that have observable dust. • Clean all carpet spots with approved spot cleaning equipment. • Upon completion of your tasks in each area, be sure to self-inspect before moving on to the next area.
Even the best cleaners occasionally miss a cleaning opportunity.
SAFETY PRECAUTIONS: • At the beginning of your shift, inspect your equipment and report observed safety hazards at once. • Always unplug your machinery before performing even the most simple equipment maintenance tasks. • It is recommended that you wear protective eyewear while emptying vacuum. • It is also recommended that you wear a dust mask while emptying vacuum. • Wet floor signs are required with the use of extension cords. • At the end of your shift, inspect and clean your equipment, report any safety hazards to your supervisor.

38
CLEANING PROCEDURE R18 TITLE: JANITORIAL CLOSET CLEANING GENERAL DESCRIPTION: Cleaning, restocking and organizing of janitorial closet area. SUPPLIES/EQUIPMENT: Dust cloth, all-purpose cleaner, broom, dustpan, mop, bucket,
wringer and extension duster. SAFETY EQUIPMENT: Approved protective eyewear is recommended and non-slip shoes
are required. Wet floor signs are required in traffic areas. SERVICE PROCEDURE: • Perform dusting on all exposed horizontal and vertical surfaces. • Check supply levels and restock. Inform your supervisor of any supply needs before you run out. • Perform sweeping or dust mopping of all exposed areas removing obvious dust and dirt. • Work from the most interior wall as you back out of the room. • Keep dust mop on the floor as much as possible. Lifting dust mop will cause dirt and dust to be
released into the air. When dirt must be unloaded, shake mop as close to the floor as possible. • Remove any gum or other debris with a putty knife. • With dustpan, collect all dust, dirt and debris and place into trash receptacle. • Upon completion of sweeping, set up wet floor sign and begin damp mopping only exposed heavy
use areas and obvious spills and spots. • Dip mop into approved solution. Wring your mop out but leave it quite damp. Mop only heavy use
areas and obvious spills in a “figure 8” pattern. Rinse mop and wring out until it is as dry as possible, mop up water. Work your way backwards towards the door.
• Upon completion of your tasks in each closet, be sure to self-inspect before moving on to the next closet. Even the best cleaners occasionally miss a cleaning opportunity.
SAFETY PRECAUTIONS: • At the beginning of your shift, inspect your equipment and report observed safety hazards at once. • Protective eyewear and gloves are recommended. • Wet floor signs in traffic areas and non-slip shoes are required for all wet floor work. • At the end of your shift, inspect and clean your equipment, report any safety hazards to your
supervisor.
39
CLEANING PROCEDURE R19 TITLE: STORAGE AND UTILITY AREA CLEANING GENERAL DESCRIPTION: General cleaning of seldom used, low traffic areas. SUPPLIES/EQUIPMENT: Push broom, dust mop, dustpan, small trash receptacle, mop,
bucket and wringer, extension duster, treated dust cloths, all-purpose cleaner.
SAFETY EQUIPMENT: Approved protective eyewear is recommended and non-slip shoes are required. Gloves are recommended. Wet floor signs are required.
SERVICE PROCEDURE: • Bring supplies to scheduled areas to begin service procedure. • Perform sweeping or dust mopping of all scheduled areas removing obvious dust and dirt. • Working in a pattern, begin dust mopping along the perimeter of each room and work toward the
center; always overlap. Be very careful around furniture and equipment. Move light equipment and furniture, dust mop area, then replace equipment in its proper position.
• Keep dust mop on the floor as much as possible. Lifting dust mop will cause dirt and dust to be released into the air. When dirt must be unloaded, shake mop as close to the floor as possible.
• Dust all horizontal, high areas and low areas. • Remove any gum or other debris with a putty knife. • With dustpan, collect all dust, dirt and debris and place into trash receptacle. • Upon completion of dust mopping, set up wet floor signs and begin spot mopping only heavy use
areas and obvious spills and spots. • Dip mop into approved solution. Wring your mop out but leave it somewhat damp. Mop only heavy
use areas and obvious spills in a “figure 8” pattern. Rinse mop and wring out until it is as dry as possible, mop up water. Work your way backwards out of each room and towards the water source.
• Upon completion of your tasks in each area, be sure to self-inspect before moving on to the next area. Even the best cleaners occasionally miss a cleaning opportunity.
SAFETY PRECAUTIONS: • At the beginning of your shift, inspect your equipment and report observed safety hazards at once. • Protective eyewear and gloves are recommended. • Wet floor signs and non-slip shoes are required for all wet floor work. • At the end of your shift, inspect and clean your equipment, report any safety hazards to your
supervisor.

40
CLEANING PROCEDURE R20
TITLE: MISCELLANEOUS AREA CLEANING GENERAL DESCRIPTION: Generalized cleaning of all undefined, low-use areas. SUPPLIES/EQUIPMENT: Push broom, dust mop, dustpan, small trash receptacle, mop,
bucket and wringer, vacuum cleaner, extension duster, treated dust cloths, all-purpose cleaner.
SAFETY EQUIPMENT: Approved protective eyewear is recommended and non-slip shoes are required. Gloves are recommended. Wet floor signs are required.
SERVICE PROCEDURE: • Bring supplies to scheduled areas to begin service procedure. • Perform sweeping or dust mopping of all scheduled areas removing obvious dust and dirt. • Working in a pattern, begin dust mopping along the perimeter of each room and work toward the
center; always overlap. Be very careful around furniture and equipment. Move light equipment and furniture, dust mop area, then replace equipment in its proper position.
• Keep dust mop on the floor as much as possible. Lifting dust mop will cause dirt and dust to be released into the air. When dirt must be unloaded, shake mop as close to the floor as possible.
• Dust all horizontal, high areas and low areas. • Remove any gum or other debris with a putty knife. • With dustpan, collect all dust, dirt and debris and place into trash receptacle. • Upon completion of dust mopping, set up wet floor signs and begin spot mopping only heavy use
areas and obvious spills and spots. • Dip mop into approved solution. Wring your mop out but leave it somewhat damp. Mop only heavy
use areas and obvious spills in a “figure 8” pattern. Rinse mop and wring out until it is as dry as possible, mop up water. Work your way backwards out of each room and towards the water source.
• Vacuum all carpeted areas and report spills and stains to your supervisor. • Upon completion of your tasks in each area, be sure to self-inspect before moving on to the next
area. Even the best cleaners occasionally miss a cleaning opportunity. SAFETY PRECAUTIONS: • At the beginning of your shift, inspect your equipment and report observed safety hazards at once. • Protective eyewear and gloves are recommended. • Wet floor signs and non-slip shoes are required for all wet floor work. • At the end of your shift, inspect and clean your equipment, report any safety hazards to your
supervisor.

41
Interim Cleaning Procedures

42
CLEANING PROCEDURE I1 TITLE: CARPET TRAFFIC LANE BONNET CLEANING GENERAL DESCRIPTION: Interim carpet cleaning to provide surface clean. SUPPLIES/EQUIPMENT: Wide area vacuum, single disc floor machine, “Bonnet” pad,
bucket, utility brush, pump-up sprayer, measuring device, approved bonnet cleaning solution and funnel.
SAFETY EQUIPMENT: Approved protective eyewear, gloves and non-slip shoes are recommended. Wet floor signs are required.
SERVICE PROCEDURE: • Using the pump-up sprayer and measuring device, prepare shampoo solution following directions on
the container. Prepare a mop bucket using clean, warm water for rinsing. • Bring equipment to scheduled area. Remove all light furniture. • Perform thorough vacuuming and edge cleaning of carpeting. • Select a small area, about 100-sq. ft., for bonnet cleaning. Spray solution on spots and then work the
solution in with a utility brush. • Thoroughly wet the bonnet pad by dipping it in the mop bucket and wring as dry as possible. • Note: ensure that only clean shoes or rubber overshoes are worn while performing bonnet
cleaning. • Use the pump-up sprayer and apply a light mist of shampoo solution over the entire area. • With the bonnet pad on the floor machine, pass over the area several times. The spinning bonnet
will both scrub and almost dry the carpet. Occasionally change or clean the bonnet, the dirty bonnet should be rinsed in the bucket and wrung out, ready for use at the next change.
• After the floor has dried completely, vacuum thoroughly. Carpet should be completely dry before allowing traffic to pass-through. Downtime should be less than one hour.
• Upon completion of tasks in each area, be sure to self-inspect before moving on to the next area. Even the best cleaners occasionally miss a cleaning opportunity.
SAFETY PRECAUTIONS: • At the beginning of your shift, inspect your equipment and report observed safety hazards at once. • Protective eyewear, gloves and non-slip shoes are recommended. • Always unplug machinery before performing even the most simple equipment maintenance tasks. • Safety cones/wet floor signs must be deployed in key areas before beginning bonnet cleaning
(required). • At the end of your shift, inspect and clean your equipment, report any safety hazards to your
supervisor.

43
CLEANING PROCEDURE I2 TITLE: TILE FLOOR AUTO-SCRUBBING PROCEDURE GENERAL DESCRIPTION: Deep scrubbing of hard surface floors SUPPLIES/EQUIPMENT: Auto-scrubber, mop, bucket, wringer, wet floor signs, putty knife, green scrub pad, measuring device, neutral cleaning solution SAFETY EQUIPMENT: Approved protective eyewear and gloves are recommended and
non-slip shoes are required. Wet floor signs are required. SERVICE PROCEDURE: • Fill auto-scrubber tank with hot water. Add proper amount of detergent to the solution tank. (pour
water into tank before solution) • Bring equipment to specified area. Keep brushes and squeegee in upright position while moving
equipment. Remove all moveable furniture. • Sweep or dust mop area before auto-scrubbing. • Place wet floor signs at key locations. • Select a pattern that allows the longest run with the fewest turns, keep from touching walls. • Lower brushes and squeegee, turn the solution and vacuum on and begin scrubbing along a wall or
edge keeping as close to wall as possible (without making contact). • Continue scrubbing in a straight line as long as possible (always turn off solution about six feet
before making any necessary turns). Turn the machine as quickly as possible and immediately turn on the solution. Continue to scrub in a parallel pattern, overlapping by at least three inches. Continue until the open area is entirely scrubbed.
• After scrubbing, pick up excess water trails and spots with mop and bucket. • Empty the recovery tank often and at the end of each shift. • Upon completion of tasks in each area, be sure to self-inspect before moving on to the next area.
Even the best cleaners occasionally miss a cleaning opportunity. SAFETY PRECAUTIONS: • At the beginning of your shift, inspect your equipment and report observed safety hazards at once. • Protective eyewear and gloves are recommended. • Wet floor signs and non-slip shoes are required. • Do not remove wet floor signs until floor is completely dry. • Always unplug machinery before performing even the most simple equipment maintenance tasks. • At the end of your shift, inspect and clean your equipment, report any safety hazards to your
supervisor.

44
CLEANING PROCEDURE I3 TITLE: TILE FLOOR RESTORING AND BURNISHING PROCEDURE GENERAL DESCRIPTION: Floor finish restoring and burnishing (high-speed buffing)
procedure SUPPLIES/EQUIPMENT: Single-disc high-speed floor machine, wet floor signs, buffing pad, drive block or pad holder, restorer, neutral detergent, spray
bottle, hand scouring pad, putty knife SAFETY EQUIPMENT: Approved protective eyewear and gloves are recommended and
non-slip shoes are required. Wet floor signs are required. SERVICE PROCEDURE: • Bring one mop and bucket with neutral cleaner solution, one mop and bucket with restorer solution,
possibly an auto-scrubber, a burnishing machine and miscellaneous supplies to scheduled area. • Place wet floor signs at key locations. • Remove gross soil such as heavy tar, paper, gum, etc., with putty knife. • Dust mop, spot mop, damp mop or auto-scrub before applying restorer.* • Mop-on finish restorer following dilution instructions on product package; let dry.* • Using a high-speed buffer, burnish floors in a straight-line pattern. • Flip or change burnishing pad as necessary. • After burnishing is completed, dust mop floor to remove loose dirt and dust generated during the
burnishing procedure. • Upon completion of tasks in each area, be sure to self-inspect before moving on to the next area.
Even the best cleaners occasionally miss a cleaning opportunity. * Restorer may be applied through the auto-scrubber solution tank. SAFETY PRECAUTIONS: • At the beginning of your shift, inspect your equipment and report observed safety hazards at once. • Protective eyewear and gloves are recommended. • Non-slip shoes and wet floor signs are required. • Do not remove wet floor signs until floor is completely dry. • Always unplug machinery before performing even the most simple equipment maintenance tasks. • At the end of your shift, inspect and clean your equipment, report any safety hazards to your
supervisor.
45
CLEANING PROCEDURE I4 TITLE: RESTROOM FLOOR SCRUBBING AND DISINFECTING GENERAL DESCRIPTION: Machine scrubbing to deep clean and disinfect. SUPPLIES/EQUIPMENT: Two mops, two buckets and wringers, broom, dustpan, wet floor signs, putty knife, scouring pad, measuring device, single-disc
floor machine, stripping pad or brush, wet vacuum machine and approved disinfectant detergent.
SAFETY EQUIPMENT: Approved protective eyewear and gloves are recommended and non-slip shoes are required. Wet floor signs are required.
SERVICE PROCEDURE: • Fill one bucket with disinfectant detergent and one bucket with a rinse solution. • Bring equipment to scheduled area. • Place wet floor signs or safety cones at key locations. • Attach the drive block and the scrub brush or scrubbing pad to the floor machine. • Remove all light moveable objects. • Sweep or dust mop floors to remove all loose debris. • Dip mop into disinfectant solution and agitate. • Pull mop slowly along edges of walls and baseboards. Use a figure eight stroke to apply the solution
to the open areas. Apply solution very liberally. Turn mop about every four or five strokes. • Allow solution to set for eight to ten minute. • Use edging tool to thoroughly scrub edges and hard to get areas. • Begin with the floor machine; scrub all open areas, allowing for half width overlap. • After scrubbing, use the wet vacuum to absorb the solution. • Upon completion of disinfecting process, rinse floor with clean rinse solution. • Upon completion of tasks in each area, be sure to self-inspect before moving on to the next area.
Even the best cleaners occasionally miss a cleaning opportunity. SAFETY PRECAUTIONS: • At the beginning of your shift, inspect your equipment and report observed safety hazards at once. • Protective eyewear and gloves are recommended. • Non-slip shoes and wet floor signs are required. • Do not remove wet floor signs until floor is completely dry. • Always unplug machinery before performing even the most simple equipment maintenance tasks. • At the end of your shift, inspect and clean your equipment, report any safety hazards to your
supervisor.

46
Project Cleaning Procedures

47
CLEANING PROCEDURE P1 TITLE: CARPET TRAFFIC LANE SHAMPOOING PROCEDURE GENERAL DESCRIPTION: Carpet shampooing in heavily soiled areas. SUPPLIES/EQUIPMENT: Upright vacuum with beater brush, single disk swing machine
equipped with shampooing accessories, wet floor signs, floor fans. SAFETY EQUIPMENT: Approved protective eyewear and gloves are recommended and
non-slip shoes are required. Wet floor signs are required. SERVICE PROCEDURE: • Bring equipment to scheduled area. Remove all light furniture. • Place wet floor signs or safety cones at key locations. • Perform thorough vacuuming and edge cleaning of carpeting. • Using the measuring device, prepare shampoo solution following directions on the container. Fill
the solution tank but leave approximately 15% empty to prevent splashing. • Select a small area, about 100-sq. ft., for shampooing. Spray solution on spots and then work the
solution in with a utility brush. • While scrubbing with shampoo brush, squeeze handle to release only enough shampoo solution to
produce a workable lather. Note: ensure that only clean shoes or rubber overshoes are worn while performing shampooing.
• Working backwards with the floor machine, pass over the area several times. The spinning brush will both agitate and clean the carpet. Do not over-wet.
• Continue this procedure throughout all exposed, heavy traffic areas. Do not walk on freshly cleaned areas.
• Deploy floor fans in key positions to promote maximum airflow for rapid drying. • After the floor has dried completely, vacuum thoroughly. Carpet should be completely dry before
allowing traffic to pass-through. Downtime should be less than six hours. • Upon completion of tasks in each area, be sure to self-inspect before moving on to the next area.
Even the best cleaners occasionally miss a cleaning opportunity. SAFETY PRECAUTIONS: • At the beginning of your shift, inspect your equipment and report observed safety hazards at once. • Protective eyewear and gloves are recommended. • Approved safety shoes and wet floor signs are required. • Do not remove wet floor signs until floor is completely dry. • Always unplug machinery before performing even the most simple equipment maintenance tasks. • At the end of your shift, inspect and clean your equipment, report any safety hazards to your
supervisor.

48
CLEANING PROCEDURE P2 TITLE: CARPET HOT WATER-EXTRACTION PROCEDURE GENERAL DESCRIPTION: Deep cleaning procedure for all carpeted areas. SUPPLIES/EQUIPMENT: Upright vacuum with beater brush and edging tool, carpet
extractor, floor fans, extraction solution. SAFETY EQUIPMENT: Approved protective eyewear and gloves are recommended and
non-slip shoes are required. Wet floor signs are required. SERVICE PROCEDURE: • Bring equipment to scheduled area. Remove all light furniture. Place floor cones at key locations. • Perform thorough vacuuming and edge cleaning of carpeting. Spot clean any isolated stains. • Assemble carpet extractor in accordance with manufacturer’s directions. Fill solution tank with
cool-tepid water only. It will provide for adequate cleaning while avoiding the risk of shrinkage, color bleeding, or damage the carpet backing.
• Add proper amount of carpet cleaner to the solution tank only if carpet has never or seldom been shampooed. If the carpet has been previously cleaned three or more times, there will be sufficient residue in the carpet for cleaning. Add the appropriate amount of anti-foam emulsion to the recovery tank and follow any specific manufacturer’s directions.
• Begin in a corner. Initiate water extraction cleaning by activating the solution spray system while pulling the carpet cleaning tool away from wall in a straight line. Make two passes over each area. On the second pass, do not activate the spray system.
• Overlap several inches while repeating this process. Work backwards and towards the water source when possible. Do not over-wet.
• Empty the recovery tank often and upon completion of work. • Continue this procedure throughout all areas. Do not walk on freshly cleaned areas. • Deploy floor fans in key positions to promote maximum airflow for rapid drying. • After the floor has dried completely, vacuum thoroughly. Carpet should be completely dry before
allowing traffic to pass-through. Downtime should be less than eight hours. • Upon completion of tasks in each area, be sure to self-inspect before moving on to the next area.
Even the best cleaners occasionally miss a cleaning opportunity.
SAFETY PRECAUTIONS: • At the beginning of your shift, inspect your equipment and report observed safety hazards at once. • Protective eyewear and gloves are recommended. • Non-slip shoes and wet floor signs are required. • Do not remove wet floor signs until floor is completely dry. • Always unplug machinery before performing even the most simple equipment maintenance tasks. • At the end of your shift, inspect and clean your equipment, report any safety hazards to your
supervisor.

49
CLEANING PROCEDURE P3 TITLE: TILE FLOOR DEEP SCRUBBING & RECOATING PROCEDURE GENERAL DESCRIPTION: Deep scrubbing and re-coating of hard surface floors. SUPPLIES/EQUIPMENT: Auto-scrubber or single disk machine, mops, buckets, wringers,
wet floor signs, putty knife, green scrub pad, measuring device, approved floor finish and neutral cleaning solution
SAFETY EQUIPMENT: Approved protective eyewear and gloves are recommended and non-slip shoes are required. Wet floor signs are required.
SERVICE PROCEDURE: • Fill auto-scrubber tank with hot water. Add proper amount of detergent to the solution tank. (pour
water into tank before solution). • Bring equipment to specified area. Keep brushes and squeegee in upright position while moving
equipment. Remove all light furniture. • Sweep or dust mop area before auto-scrubbing. • Place wet floor signs at key locations. • Select a pattern that allows the longest run with the fewest turns, keep from touching walls. Lower
brushes and squeegee, turn the solution and vacuum on and begin scrubbing along a wall or edge keeping as close to wall as possible (without making contact).
• Continue scrubbing in a straight line as long as possible (always turn off solution about six feet before making any necessary turns). Turn the machine as quickly as possible and immediately turn on the solution.
• Continue to scrub in a parallel pattern, overlapping by at least three inches. Continue until the open area is entirely scrubbed.
• After scrubbing, pick up excess water trails and spots with mop and bucket. • Empty the recovery tank often and at the end of each shift. • Apply one to two coats of approved floor finish, let dry. • Upon completion of tasks in each area, be sure to self-inspect before moving on to the next area.
Even the best cleaners occasionally miss a cleaning opportunity. SAFETY PRECAUTIONS: • At the beginning of your shift, inspect your equipment and report observed safety hazards at once. • Protective eyewear and gloves are recommended. • Non-slip shoes and wet floor signs are required. • Do not walk on freshly refinished floors and do not remove wet floor signs until floor is dry. • Always unplug machinery before performing even the most simple equipment maintenance tasks. • At the end of your shift, inspect and clean your equipment, report any safety hazards to your
supervisor.

50
CLEANING PROCEDURE P4 TITLE: TILE FLOOR STRIPPING AND REFINISHING PROCEDURE GENERAL DESCRIPTION: Stripping and re-coating of hard surface floors. SUPPLIES/EQUIPMENT: Auto-scrubber & single disk machine, mops, buckets, wringers,
wet floor signs, knife, black strip pad, measuring device, stripper, finish.
SAFETY EQUIPMENT: Approved protective eyewear, dust mask and gloves is recommended and non-slip shoes are required. Wet floor signs are required.
SERVICE PROCEDURE: • Fill auto-scrubber, prepare stripper solution bucket and rinse bucket/wringer. • Bring equipment to specified area. Keep brushes and squeegee in upright position while moving
equipment. Remove all light furniture. • Place wet floor signs at key locations. • Sweep or dust mop area before beginning stripping process. • Apply stripping solution liberally with a mop; let solution dwell for several minutes before
beginning. • Do not put stripping solution into auto-scrubber solution tank. • Strip floor using single disk machine. Remove stripping solution using wet-vac or auto scrubber. • Rinse floor with neutral cleaner in auto scrubber or wet mop solution, let dry. • Apply three to five coats of approved floor finish or two coats of sealer and three coats of floor
finish, let dry. • Replace furniture only when floor finish is completely dry and non-tacky. • After 24 hours have elapsed, high-speed burnish floors. • Upon completion of tasks in each area, be sure to self-inspect before moving on to the next area.
Even the best cleaners occasionally miss a cleaning opportunity. SAFETY PRECAUTIONS: • At the beginning of your shift, inspect your equipment and report observed safety hazards at once. • Protective eyewear, dust mask and gloves is recommended. • Non-slip shoes and wet floor signs are required. • Do not walk on freshly refinished floors and do not remove wet floor signs until floor is dry. • Always unplug machinery before performing even the most simple equipment maintenance tasks. • At the end of your shift, inspect and clean your equipment, report any safety hazards to your
supervisor.
51
Section 3 – Quality Assurance Program

52
Quality Inspection Goals The University of Kentucky Physical Plant Custodial Organization has established the following targets for its quality inspection scores:
• Overall QSP of at 85% for each building
o Supervisors in buildings that score below 80% need to submit a quality improvement plan within two weeks of the inspection
o Buildings scoring above 90% will be recognized for their excellent, or “world-class” level of cleanliness
Smart Inspect QSP Score Translations The Smart Inspect™ QSP (Quality Success Percentage) score is a percentage that shows the number of items found to be deficient-free (passing, or “clean”) relative to the items inspected. For example, if ten items were inspected in a given area type and eight out of the ten items were found to be “clean”, then that area type would receive a QSP score of 80%. Shown below is a translation of the various score ranges: 90% - 100%: Excellent 82% - 89%: Good 75% - 81%: Fair 65% - 74%: Poor 64% and below: Fail Excellent: Represents a world-class cleaning program that has limited opportunities for improvement. Extremely high customer satisfaction. Good: Meets or exceeds general requirements and specifications. Cleaning program includes many industry best-practices but also needs specific improvements and more consistency. Good to high customer satisfaction, although some action is needed to correct prominent deficiencies. Fair: Many requirements and specifications are met. Lacks consistency and best-practices. Quality is in danger of quickly moving into the “Poor” or “Fail” range if corrective actions are not taken. Much improvement is needed and desired. A blend of satisfied and unsatisfied customers. Poor: Cleaning requirements and specifications are not generally being met. Quality issues are widespread and systemic. Issues are prevalent at both the routine and the restorative levels. Many area types need major improvement in cleanliness. Many customers are unsatisfied. Fail: A complete failure to meet cleaning requirements. A restructuring of the cleaning program is needed. Customers agree that cleaning is unsatisfactory and major changes are necessary.
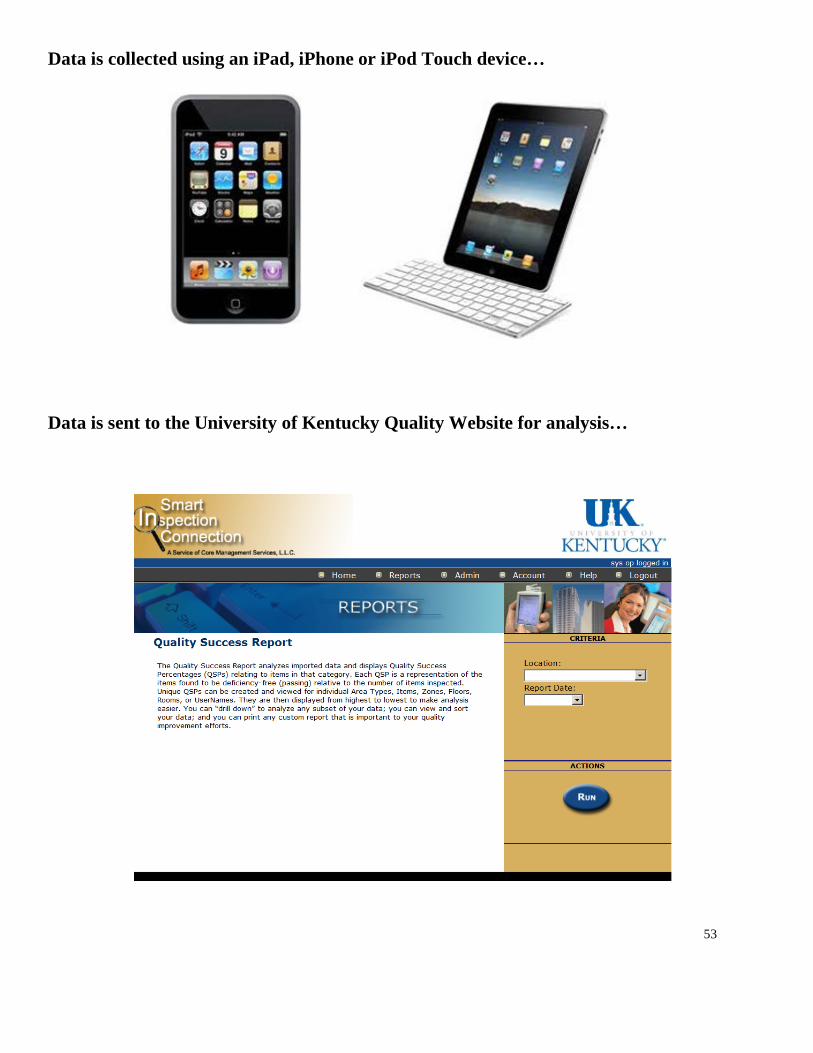
53
Data is collected using an iPad, iPhone or iPod Touch device…
Data is sent to the University of Kentucky Quality Website for analysis…

54
Glossary of Terms Item Category For inspection purposes, the term “item” may include such structural elements as walls or floors within a defined space (such as a room), as well as the objects within that space. Below is a list of the items to be inspected, along with their associated definitions. Appliance: includes any kitchen appliance such as a refrigerator, microwave, conventional oven, stove, toaster and dishwasher; also any other electrical appliance such as a washer, dryer, radio or television Ashtray/Urn: any receptacle for cigarettes and cigarette butts Baseboard: any molding covering the joint between a wall and floor Board, Display: any display case, blackboard or whiteboard Ceiling: any overhead physical boundary of a room or space Container, Recyclable: any receptacle for the collection or transportation of recyclable materials Container, Trash: any receptacle for the collection or transportation of non-recyclable waste material Countertop: any flat working surface Cupboard: any closet with shelves attached to a wall Dispenser: any mechanical dispenser of toilet paper, paper towels, feminine products, hand soap or cleaning chemicals Door: any door, including the doorjambs, frame and the associated hardware such as the hinges, door closer or doorknob; also any turnstile Drain, Floor: any type of floor drain, its associated cover and trap Equipment: any program-defined copiers, computers, printers, calculators, calculators, fitness machines, medical and other miscellaneous equipment not used in connection with the operation of the building Escalator: any set of power-driven stairs, the associated handrails, glass and stainless steel floor plates Fixture, Restroom: any toilets, urinals, restroom sinks and associated hardware

55
Floor, Carpeted: any floor with carpeting or with room-size rugs Floor, Hard Surface: any terrazzo, concrete, epoxy, marble, stone, ceramic or quarry tile floors Floor, Other: any floor types not incorporated in “Carpeted”, “Hard Surface,” “Sub” or “VCT” floor designations Floor, Sub: any serviceable area underneath a raised floor Floor, VCT: any floor consisting of vinyl composition tile or vinyl sheet goods Fountain, Drinking: includes stainless steel top, fixture and body Furniture: any desks, chairs, tables, floor lamps, couches, filing cabinets, modular furniture and other general objects found within a defined space Glass, Exterior: any outside surface of window glass Glass, Interior: any inside non-perimeter glass Glass, Perimeter: any inside surface of outside window glass Grout: any mortar-type substance used to fill the spaces between floor, wall or ceiling tiles Handrail: includes main rail and associated framework Hanging, Wall: includes any hanging pictures, artwork and signage HVAC: includes any ductwork associated with the heating, ventilation and air conditioning systems Item, Hanging: any artwork or signage hanging from the ceiling Ledge: any narrow shelf-like surface Lighting: any electrical fixture affixed to or embedded in a ceiling or wall Liner, Can: any plastic liner used to line the inside of a trash container Locker: any storage compartment, usually found in groups, rows or sections Matting: any piece of material placed on a floor specifically to aid in the removal of soil from shoe soles Mechanical: any affixed equipment used in the operation of the building Mirror: any mirror affixed to a wall or column Pad, Chair: any plastic or other hard surface pad used to protect the floor from the damage caused by chairs

56
Partition: any piece of furniture designed to separate personal spaces Plate, Kick: a metal protection plate generally found on the bottom of a door Shelving: any open multi-level storage rack or shelving unit Shower: includes showerhead, handles, walls, ceiling, floor and drain Sill, Window: any horizontal ledge along the bottom of a window Sink: any non-restroom sink including faucet, handles and stainless steel molding Stair: includes risers, treads and stringers Switch, Light: includes electrical fixture and contact area immediately adjacent Telephone: includes phone and handset Threshold: any transition area between rooms or defined spaces Treatment, Window: includes any vertical or horizontal blinds, curtains or shades Vent, Air: any air handling intake or exhaust fixture Wall: a vertical physical boundary

57
Attribute Category Buildup: any accumulation of soil, cleaning agents or floor finish, necessitating interim or restorative cleaning procedures Cobweb: any spider web or web-like structure containing dust or other organic material Debris: any litter, garbage, rubbish, rubble, loose food, leaves, trash or waste Disorganized: messy, not arranged in an orderly manner Dull: lacking a shine or luster Dust: any loose extra-fine particles of dust, dirt, or sand Filled, Over: accumulation beyond acceptable levels Filled, Under: depletion beyond acceptable levels Fingerprints: recognizable human fingerprints Non-operational: not currently operating as intended Malodor: odor identified as unpleasant Scuff: removable nicks, scuffs, black marks and heel marks Soil: any removable dirt, film, grime, mud, grease, oil, food, sand, smears and smudges Spot: any localized or singularly occurring removable spill, dirt, grime, mud, grease, oil, food, smears and smudges Streak: observable striation caused by a cleaning procedure