underly art of beef cutting sample chapter
DESCRIPTION
Underly Art of Beef Cutting Sample ChapterTRANSCRIPT

A MEAT PROFESSIONAL’S GUIDE TO BUTCHERING AND MERCHANDISING
Kari Underly______________
THE ART OF
BEEFCUTTING
Sample Chapter


PRAISE FOR THE ART OF BEEF CUTTING
“ Kari Underly and The Art of Beef Cutting throw open the door to a world that has been closed to all but a few. This book is an invaluable addition to any cook’s library and offers something for everyone from professional chefs to consumers. It is detailed and thorough and brings me much joy to know that anyone can share Kari’s wisdom and experience with this amazing resource!”
— David Varley, Corporate Chef, Michael Mina Group
“ The Art of Beef Cutting by Kari Underly is a signifi cant contribution to beef butchery where there is currently almost no complete guide for chefs, meat cutters, or culinary students to use as a resource. Even though my knowledge is beyond the average chef and food writer, I have had diffi culty learning where specifi c beef cuts came from and how to produce them myself. This book will be invaluable for me and anyone else with similar inclination.”
— Bruce Aidells, Coauthor, The Complete Meat Cookbook
“ Kari Underly has created a book to showcase the art and craft of beef cutting. What a rich treasure of clear photos, easy instructions, and creative tips. This book will be a superb resource for meat enthusiasts of all abilities. It’s like having an entire college course at your fi ngertips!” — Chris R. Calkins, PhD, Nebraska Beef Industry Professor of Animal Science
“ A subject near and dear to my heart, The Art of Beef Cutting beautifully shows the passion and fi nesse behind something that is so often over-looked in our modern world. Not only is this book informative, it also inspires anyone who reads it to become his or her own butcher.” — Kevin Gillespie, Executive Chef and Co-owner, Woodfi re Grill
“ A straightforward, comprehensive manual suitable for amateurs and professionals alike. Kari’s style is easy to read and extremely instructive.” — Michael Strauss, Past President, North American Meat Processors Association
“ Well organized and packed with helpful photos, this book takes the mystery out of beef cutting. Kari’s expertise and gift for teaching make this a book that all culinary students and professionals should add to their libraries.”
— Christopher Koetke,Vice President, Laureate International Universities Center of
Excellence in Culinary Arts; Executive Director, School of Culinary Arts, Kendall College
“ Kari Underly’s The Art of Beef Cutting should be mandatory reading in all professional cooking schools. It is very clear, simple, and organized—a must for any chef or butcher who wants to fully utilize primal cuts of beef and maximize food cost.”
— Ariane Daguin, Owner, D’Artagnan
“ A very encompassing, well written, in-depth training tool for food-service, culinary arts, and retail application. The inclusion of numerous detailed illustrations will prove to be indispensable for the novice student.”
— Phil Plummer, Director of Meat and Seafood, Martin’s Super Markets
01_9781118029572-ffirs.indd ii 4/6/11 3:50 PM

vii FOREWORD
1 INTRODUCTION
5 CHAPTER ONE: BEEF BASICS: FACTS AND FUNDAMENTALS
19 CHAPTER TWO: UNDERSTANDING YOUR TOOLS
27 CHAPTER THREE: MASTERING CUTTING TECHNIQUES
49 CHAPTER FOUR: BEEF CUTTING — BASICS AND BEYOND
53 CHUCK
71 RIB
83 LOIN
99 SIRLOIN
113 ROUND
131 BRISKET, SHANK, PLATE, AND FLANK
147 CHAPTER FIVE: EXPLORING GROUND BEEF
157 CHAPTER SIX: CUTTING FOR PROFIT
169 CHAPTER SEVEN: FLAVOR OVERVIEW, COOKING TIPS, AND SAFE HANDLING
181 CHAPTER EIGHT: INJURY PREVENTION STRATEGIES
191 APPENDIX, SOURCES AND CREDITS, ACKNOWLEDGMENTS
217 GENERAL INDEX
230 PRIMAL, SUBPRIMAL, CUTS INDEX
CONTENTS
02_9781118029572-ftoc.indd v 4/6/11 3:59 PM
INTRODUCTION
1
Once, meat-cutting artistry was passed directly from a master to an apprentice. But as the
industry evolved from hanging beef in the ’60s, to boxed beef in the ’70s, to today’s labor-
friendly offerings, the availability of highly skilled butchers greatly diminished. So did the
art of beef cutting.
Unfortunately today, there are no offi cial meat-training schools in operation, no apprenticeship
programs (unless you are lucky enough to enjoy a company-sponsored program), no offi cial
industry beef merchandising program, no product knowledge—you get the idea. Plus, many
businesses do not have the time or money to invest in the complexities of beef cutting and
merchandising. This book was designed to fi ll the gap with step-by-step instructions,
quick reference charts, insightful merchandising help, and fl avorful commentary.
How you use this tool depends on where you are at this stage of your career. This book can
serve as a great reference and training aide for new employees; butcher apprentices; grocery
store executives; culinary, animal, or meat science students; chefs; club store junkies; and
even proactive consumers and foodies.
CULINARY STUDENTS
Few colleges and universities offer a complete course in beef cutting, although a thorough
understanding of it helps in many career paths. As a student majoring in culinary arts,
The Art of Beef Cutting is an excellent textbook or supplement to any program of study.
Not only will this book give you the “big picture” of cutting beef, it also provides valu-
able detailed information on cattle anatomy and muscle characteristics to help future
chefs understand where fi nal cuts of beef originate and how to marry cuts with the best
cooking methods. See Mastering Cutting Techniques, Beef Cutting—Basics and Beyond,
04_9781118029572-intro.indd 1 4/7/11 9:30 AM
2 TH E ART OF B E E F CUTTI NG
and the Flavor Overview sections to add new depth to your curriculum or to discover
fresh ingredients and cooking methods for beef.
MEAT DEPARTMENT AND PRACTICAL GUIDE
Employee turnover is the number one reason we have lost talented meat craftsmen in the
meat departments of local and national grocery stores. Keep this guide in your department
and use it as a training tool for new hires and as a building block to help your staff gain more
confi dence in beef knowledge.
Along with few industry training options, there is a lack of industry-supported meat mer-
chandising certifi cation programs. With its helpful charts and merchandising information,
this book can build your staff’s knowledge. Once you navigate around the anatomical
nomenclature, learn the subprimal names, and understand the labor costs and cut-specifi c
promotions, you’ll be well versed in the art of meat cutting and have a clear understanding
of the primals and subprimals.
Take the initiative and create a training class with new hires to demonstrate everyday
cutting techniques and introduce specialty cuts. Test your staff on cut knowledge, where
the cut originates, and how to add value with specialty cut techniques. Help your cutters
become masters at their art, as well as leaders in customer service. Then when employees are
approached by customers about a certain cut, your cutters will have the expertise to answer
those questions, build confi dence with customers, and retain key patronage.
04_9781118029572-intro.indd 2 4/7/11 9:30 AM
3INTRODUCTION
Specialty Cut
To challenge your skills and add excitement to your menu (or meat case), try Kari’s specialty cutting techniques found in Chapter Four: Beef Cutting.
MEAT CATEGORY BUYER
Ready to take your meat knowledge to the next level? Move beyond cuts and into the subprimal
level with this book. The Art of Beef Cutting can help you identify subprimals to purchase
during key peak seasons, calculate labor costs, and what cuts you will generate from each sub-
primal. Armed with this in-depth knowledge you’ll be on your way to saving your department
money, improving effi ciency, and bringing your customers a superior selection.
FOODSERVICE OPERATORS’ REFERENCE
For small foodservice operators, this tool can help maximize the purchasing investment at the
local club store or distributor. You’ll see how to add new items to the menu to attract new
customers, fi nd new uses for everyday subprimals, add shelf life to cuts, and increase your
profi ts. The Art of Beef Cutting is a one-stop business course in meat merchandising. For chefs
and restaurant owners, one of the most mysterious categories is fresh beef. This tool will
help answer questions and provide valuable information. When you learn more about beef,
you’ll know the right cut for the job and increase profi ts.
CLUB STORE SHOPPER
Large families, regular consumers, at-home meat connoisseurs, and even small foodservice
operators enjoy the club store experience. Who doesn’t like a super-sized good deal? At these
stores, customers can now purchase many steak-ready subprimals, but what’s the next step?
This book will show you with simple cut instructions how to save money on your food
bill or feed a large family.
FOOD ENTHUSIASTS
Want to bring a professional fl air to your home chef skills? This book adds the perfect ingredi-
ent. Explore the Flavor Overview chapter for interesting beef pairings and cooking methods,
or challenge your skills by following the how-to steps in Beef Cutting—Basics and Beyond and
generate restaurant-styles cuts at home for a lot less money.
Kari’s Quick TipsLook for Kari’s insightful advice and shortcuts through-out this book.
Did you know…Kari includes interesting facts to help you deepen your beef-cutting and merchandising knowledge.
Look for these icons throughout the book to expand your beef-cutting knowledge even further with Kari’s insider tips and tricks.
04_9781118029572-intro.indd 3 4/7/11 9:30 AM

14 TH E ART OF B E E F CUTTI NG
CHUCK RIBLOIN
SIRLOINROUND
BRISKETPLATE
FLANK
FORESHANK
HIND SHANK
FOREQUARTER HINDQUARTER
FROM CARCASS TO CUT
To fully understand and appreciate where beef comes from, you have to start with a whole carcass. A carcass is two matched sides containing the forequarter and hindquarter. A side of beef is simply half a carcass, split down the back.
A side of beef is sometimes sold in a forequarter or hindquarter format. This just means that a side of beef has been cut into two sections, separated between the 12th and 13th ribs. You can order sides already split from local meat lockers and specialty processors and enjoy a nice quality beef.
●➊●➋
●➌ ●➍ ●➎ ●➏ ●➐●➒
●➓
05_9781118029572-ch01.indd 14 4/6/11 4:03 PM

Anterior Toward the head; some-times known as “cranial.”
Posterior Toward the tail; also referred to as “caudal.”
Ventral Toward the plane of support—the “bottom side”; sometimes referred to as “inferior.”
Dorsal Away from the plane of support—the “top side.” Often known as “superior.”
DEFINITION OF COMMON TERMS
D
E
G
HC
A
B
A Femur bone
B Tibia
C Pelvic bone (aitch)
D Ball of femur
E Humerus (arm bone)
F Ulna, radius (for shank bones)
G Ulna (elbow)
H Chine bones
1–7 Cervical vertebrae (neck bones)
1–13 Thoracic vertebrae (back bones)
1–6 Lumbar vertebrae (loin bones)
1–5 Sacral vertebrae
1–2 Caudal vertebrae (tail bones, 2 bones)
1–7 1–13 1–6 1–5 1–2
INSIDE A BOVINE
To be a master cutter, you need an in-depth understanding of the bovine bone structure and how it relates to what you are processing. This diagram will help you better comprehend the anatomy and structure of a bovine and add to your personal knowledge base. The bone/skeletal structure will be your guide to separating the carcass into quarters and primals.
F
15BEEF BASICS: FACTS AND FUNDAMENTALS
➊ – Rib bones
●➊●➋
●➌ ●➍ ●➎ ●➏ ●➐●➒
●➓
05_9781118029572-ch01.indd 15 4/6/11 4:03 PM

16 TH E ART OF B E E F CUTTI NG
1. To separate the forequarter into primals, start by locating the ribs on the internal surface of the quarter. Count fi ve ribs from the front end—this is the separation point. Make a straight cut with your knife all the way through. Use a handsaw to completely separate the quarter into two large sections: Chuck and brisket are one, and the rib and plate are the other.
2. Remove the brisket from the chuck by locating the arm or shank, and make a straight cut just above the elbow joint and through the cartilage at the fi rst rib.
3. To separate the plate primal from the rib, use a saw to cut a straight line through ribs 6–12, approximately 10 inches from the backbone.
4. Cut the chuck into two sections; the blade half and the arm half. Use a handsaw to make a straight cut through the head of the humerus bone, just below the ridge or socket of the scapula.
PRIMAL SEPARATION
What is a primal? A side of beef is separated or divided into seven somewhat more manageable sections called primals. These primals are still quite heavy and large.
There are seven primals: chuck, rib, loin, round, brisket, plate, and fl ank. The primal designations are key to understanding how the cow is processed. Consider this your road map.
The following information is for illustration purposes, and I do not recommend that you try breaking down a carcass on your own unless you are supervised by an experienced meat cutter or professional with the proper processing and safety equipment.
A side of beef is made up of a forequarter and a hindquarter. The forequarter is separated from the hindquarter between the 12th and 13th ribs.
The forequarter is processed into four major primals: chuck, rib, brisket, and plate. The key to processing a quarter is knowing the importance of counting ribs. The front quarter should be fl at on a cutting table with the internal surface facing up or fat side down, or it should be hanging on a rail.
05_9781118029572-ch01.indd 16 4/6/11 4:03 PM

The hindquarter is processed into three major primals: loin (sirloin), round, and fl ank. The hindquarter should be fl at on a cutting table with the internal surface facing up or fat side down, or it should be hanging on a rail.
1. The hindquarter is separated from the forequarter between the 12th and 13th ribs. Remove any heavy cod or kidney fat, being careful not to score the lean muscle.
2. To separate the fl ank, measure and mark the desired length of the loin tail from the loin eye with a knife cut, typically 2 to 3 inches from the edge of the loin eye. Locate the heavy cod fat, and cut around the round up toward, or ventral, to the head of the femur bone.
3. Continue cutting the fl ank by following the natural seam toward the 13th rib or your knife mark. Pull the fl ank and bottom sirloin from the fat and carefully trim them.
4. To remove the sirloin tip or knuckle from the round, fi rst locate the knee joint. Cut slightly above until you hit the femur bone. Run the knife up until you feel the aitch or pelvic bone. Angle your knife out to complete the separation.
5. In order to remove the round from the loin, you must identify the fi fth sacral vertebra. Start at the tailbone and count two vertebrae; the next six vertebrae are the sacral. Use a saw to separate the round from the loin between the fourth and fi fth sacral vertebrae. It’s OK if
you clip part of the head of the femur joint—that means you nailed it!
6. Next, remove the aitch or pelvic bone.
7. Finish by removing the shank at the knee joint.
Purchasing primals is not recommended for today’s typical retail and foodservice operators. They are large, offer lower yield, and cannot be cooked properly.
Subprimals
Primals that are further processed into more manageable parts are called subprimals. Subprimals are smaller and more cost-effective to transport and handle. Almost all grocery stores and restaurants and steak processors purchase subprimals. Subprimals cost more than primals because more waste has been removed and more labor has gone into fabricating the meat into usable form. See Chapter Four for information on specifi c subprimals.
Block or tray-ready subprimals
Block or tray-ready subprimals are further processed subprimals. These cost more than the regular subprimals because almost all the fat and trim has been removed. Simply open the bag, cut it, and tray it. Today many subprimals can be purchased in a single muscle format.
Congratulations! You have completed your basic beef instruction. Read on to learn more specifi c information on cutting techniques, merchandising, and more.
17BEEF BASICS: FACTS AND FUNDAMENTALS
05_9781118029572-ch01.indd 17 4/6/11 4:03 PM

22 TH E ART OF B E E F CUTTI NG
SHARPENING YOUR EDGE: STEELS AND STONES
As you develop your knife skills, you’ll start to have a “feel” for how much pressure to apply. With use, the edge of a knife blade develops nicks and begins to fold over. When you begin to feel like you are pushing your knife, this is a sign that your knife has become dull. If after using a steel to align your blade it doesn’t seem to be work-ing, it is time to grind your blade on a knife stone.
The most important tool you can own (second only to the cut-resistant glove) is a steel. A steel helps keep the edge of your knife’s blade straight, reduces the risk of injury, and prolongs the life of the knife. It should be used frequently throughout your day. The art of steeling a knife can be mastered within a few weeks. Steels typically come in three surfaces:
Coarse steel: Has deep grooves in the rod of the steel. Use this steel when you see visual signs of dents and divots.
Medium steel (not shown): Has medium coarse grooves and is used to grind the edge of your knife.
Fine steel: Features a smooth, shiny surface and is used to fi nish the edge of your knife with a fi ne edge.
Not all three surfaces are needed to realign your knife; it depends on the condition of the edge of your blade. Always start with the coarsest steel, and fi nish your knife on a fi ne steel.
Coarse and fi ne steels
06_9781118029572-ch02.indd 22 4/6/11 4:06 PM

Option 1: For Chefs, Students, and Beginners
The easiest way to learn how to steel your knife is to place the point of the steel on the cutting table. Since it does not move, you’ll be able to focus on the angle and the pressure on the knife.
If your steel no longer does the trick at keeping your knife sharp, move on to a knife stone (see page 24).
Option 2: Typical Approach Used by Meat Cutters and Butchers
Always keep your fi ngers behind the guard of the steel, and watch what you are doing. This option requires movement and coordination of both hands. Hold the knife in your dominant hand and hold the steel in your opposite hand. Remember to hold the steel out in front of you, away from your body, other people, and objects.
23UNDERSTANDING YOUR TOOLS
STEP 1 Start by placing the lower part of the knife blade on the steel at a 20° angle. Begin drawing the knife down the shaft of the steel.
STEP 2 Maintain the blade angle with moderate pressure as you draw the length of the edge down the length of the steel.
STEP 3 Finish by running the knife all the way to the point down the steel shaft. Repeat the steps for the opposite side of the knife blade.
STEP 1 Place the point of the steel directly on the surface. Start by placing the lower part of the knife blade on the steel at a 20° angle. Begin drawing the knife down the shaft of the steel.
STEP 2 Maintain the blade angle with moderate pressure as you draw the length of the edge down the length of the steel.
STEP 3 Finish by running the knife all the way to the point down the steel shaft. Repeat the steps for the opposite side of the knife blade.
HOW TO STEEL YOUR KNIFE
06_9781118029572-ch02.indd 23 4/6/11 4:06 PM

28 TH E ART OF B E E F CUTTI NG
STEP 1Remove all visible fat to expose the connective tissue that lies beneath.
STEP 2Slide the knife under the connective tissue. Fillet knife shown here; bon-ing knife also recommended.
STEP 3Angle the knife upward at a 20° angle.
STEP 4Use your free hand to anchor the muscle. Then gently push the knife, maintaining the angle, and slide just underneath the connective tissue. The goal is to leave as much lean meat on the muscle as possible.
STEP 5Continue the process until the connective tissue is loosened.
STEP 6Separate the connective tissue. Chefs can add it to soup stock.
DENUDINGA common term used in this book is “denude.” In this context, to denude means to remove any heavy white or opaque connective tissue from lean subprimals. This will improve tenderness and taste satisfaction for your customers. By removing the heavy connective tissue, you are creating a product that once was undervalued and transforming it into a product that meets consumer expectations: lean, moder-ately tender, and sold at an affordable price.
The tissue must be removed when selecting a cut for a dry-heat cooking method such as oven roasting or grilling. The intense heat source will not break down the connec-tive tissue as it would in a moist-cooking method such as braising.
The following step-by-step denuding demonstration uses a BEEF SHOULDER CENTER (TRICEPS BRACHII).
Kari’s Quick TipsThe Shoulder Center makes excellent steak, especially when cooked over wood chips.
07_9781118029572-ch03.indd 28 4/6/11 4:08 PM

29MASTERING CUTTING TECHNIQUES
DENUDING A BEEF TENDERLOINThe tenderloin is the most tender cut of beef. Since it is expensive, removing any lean is costly. Yet it is essential to denude, since the strong connective tissue, known as “silver skin,” is tough and does not cook down during dry-heat cook-ing or grilling. If left attached, the skin will shrink awkwardly when the meat is cooked. By mastering this technique, you can guarantee your high-end customer a beautiful tenderloin that deserves the premium it commands.
The following step-by-step denuding demonstration uses a BEEF TENDERLOIN (PSOAS MAJOR).
STEP 1Remove the fat and the tenderloin tail (optional) from the loin.
STEP 2Starting at the small end of the loin, slide the fi llet knife under the connective tissue or silver skin, and place your free hand just behind the knife to hold the loin in place.
STEP 3If you start at the large end, you will get slight tears in the tender muscle fi bers. Angle the knife at approxi-mately 20°.
STEP 4Gently slide the knife up toward the silver skin as you move it toward the larger end of the loin.
STEP 5Continue to slide the knife through the end of the loin.
STEP 6Remove the silver skin and repeat until the loin is completely denuded.Kari’s Quick Tips
Start at the small end and use a very sharp knife. This will help you avoid tearing the tenderloin and help you slide along the silver skin, preserving as much lean as possible.
07_9781118029572-ch03.indd 29 4/6/11 4:08 PM
08_9781118029572-ch04a.indd 52 4/7/11 10:35 AM
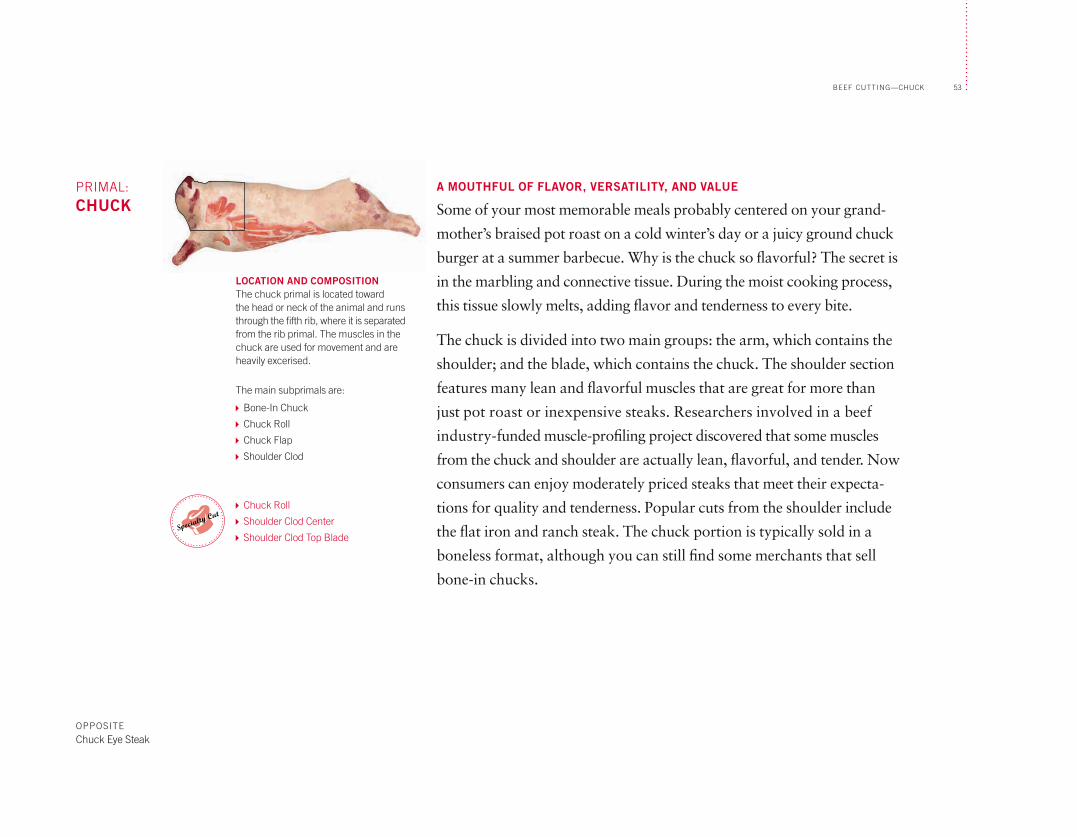
53BEEF CUTTING—CHUCK
PRIMAL:
CHUCKA MOUTHFUL OF FLAVOR, VERSATILITY, AND VALUE
Some of your most memorable meals probably centered on your grand-
mother’s braised pot roast on a cold winter’s day or a juicy ground chuck
burger at a summer barbecue. Why is the chuck so fl avorful? The secret is
in the marbling and connective tissue. During the moist cooking process,
this tissue slowly melts, adding fl avor and tenderness to every bite.
The chuck is divided into two main groups: the arm, which contains the
shoulder; and the blade, which contains the chuck. The shoulder section
features many lean and fl avorful muscles that are great for more than
just pot roast or inexpensive steaks. Researchers involved in a beef
industry-funded muscle-profi ling project discovered that some muscles
from the chuck and shoulder are actually lean, fl avorful, and tender. Now
consumers can enjoy moderately priced steaks that meet their expecta-
tions for quality and tenderness. Popular cuts from the shoulder include
the fl at iron and ranch steak. The chuck portion is typically sold in a
boneless format, although you can still fi nd some merchants that sell
bone-in chucks.
OPPOSITE
Chuck Eye Steak
LOCATION AND COMPOSITIONThe chuck primal is located toward the head or neck of the animal and runs through the fi fth rib, where it is separated from the rib primal. The muscles in the chuck are used for movement and are heavily excerised.
The main subprimals are:
Bone-In Chuck
Chuck Roll
Chuck Flap
Shoulder Clod
Chuck Roll
Shoulder Clod Center
Shoulder Clod Top BladeSpecialty Cut
08_9781118029572-ch04a.indd 53 4/7/11 10:35 AM
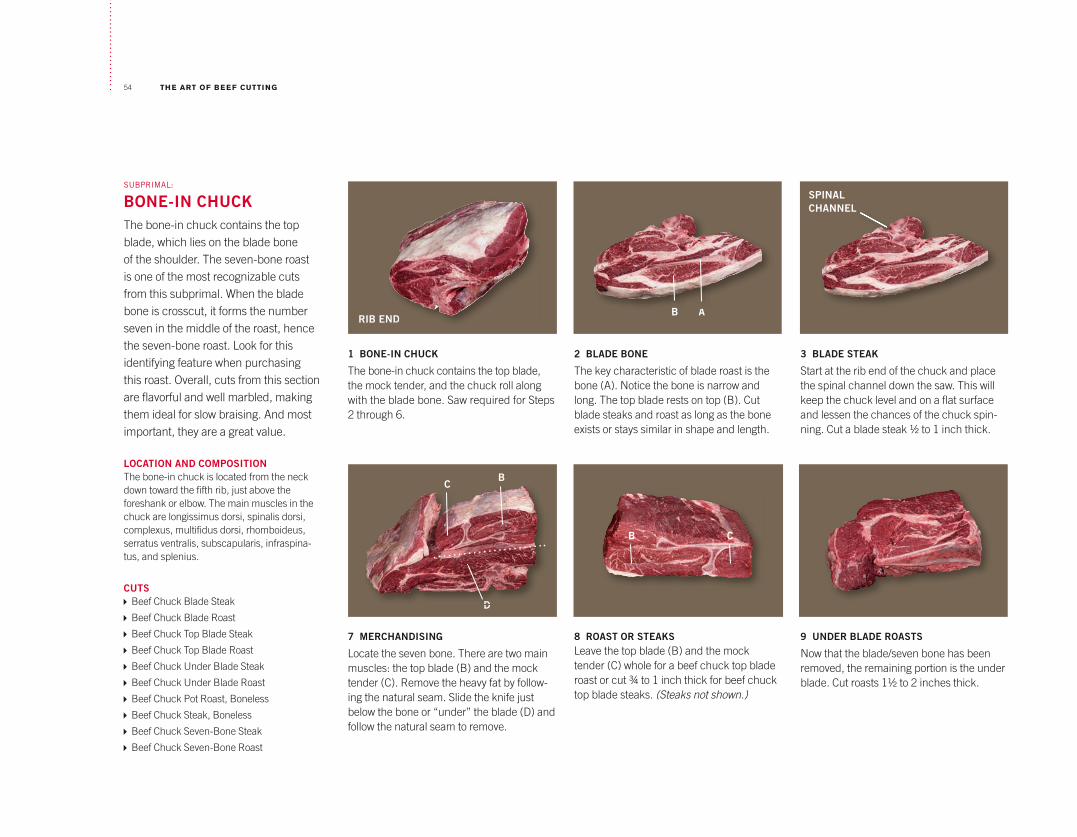
54 TH E ART OF B E E F CUTTI NG
1 BONE-IN CHUCK
The bone-in chuck contains the top blade, the mock tender, and the chuck roll along with the blade bone. Saw required for Steps 2 through 6.
2 BLADE BONE
The key characteristic of blade roast is the bone (A). Notice the bone is narrow and long. The top blade rests on top (B). Cut blade steaks and roast as long as the bone exists or stays similar in shape and length.
3 BLADE STEAK
Start at the rib end of the chuck and place the spinal channel down the saw. This will keep the chuck level and on a fl at surface and lessen the chances of the chuck spin-ning. Cut a blade steak ½ to 1 inch thick.
7 MERCHANDISING
Locate the seven bone. There are two main muscles: the top blade (B) and the mock tender (C). Remove the heavy fat by follow-ing the natural seam. Slide the knife just below the bone or “under” the blade (D) and follow the natural seam to remove.
8 ROAST OR STEAKS Leave the top blade (B) and the mock tender (C) whole for a beef chuck top blade roast or cut ¾ to 1 inch thick for beef chuck top blade steaks. (Steaks not shown.)
9 UNDER BLADE ROASTS
Now that the blade/seven bone has been removed, the remaining portion is the under blade. Cut roasts 1½ to 2 inches thick.
SUBPRIMAL:
BONE-IN CHUCK The bone-in chuck contains the top blade, which lies on the blade bone of the shoulder. The seven-bone roast is one of the most recognizable cuts from this subprimal. When the blade bone is crosscut, it forms the number seven in the middle of the roast, hence the seven-bone roast. Look for this identifying feature when purchasing this roast. Overall, cuts from this section are fl avorful and well marbled, making them ideal for slow braising. And most important, they are a great value.
LOCATION AND COMPOSITIONThe bone-in chuck is located from the neck down toward the fi fth rib, just above the foreshank or elbow. The main muscles in the chuck are longissimus dorsi, spinalis dorsi, complexus, multifi dus dorsi, rhomboideus, serratus ventralis, subscapularis, infraspina-tus, and splenius.
CUTS Beef Chuck Blade Steak
Beef Chuck Blade Roast
Beef Chuck Top Blade Steak
Beef Chuck Top Blade Roast
Beef Chuck Under Blade Steak
Beef Chuck Under Blade Roast
Beef Chuck Pot Roast, Boneless
Beef Chuck Steak, Boneless
Beef Chuck Seven-Bone Steak
Beef Chuck Seven-Bone Roast
RIB END
SPINAL CHANNEL
NDAAB
B
D
C
DDD
B C
08_9781118029572-ch04a.indd 54 4/7/11 3:18 PM

55BEEF CUTTING—CHUCK
4 BLADE ROAST
Cut a blade roast 1½ to 2 inches thick.
5 SEVEN-BONE STEAK Continue cutting the chuck into seven-bone steaks ½ to 1 inch thick. As you cut toward the neck, the blade bone will start to resemble the number seven, hence the name seven bone.
6 SEVEN-BONE ROAST
Continue cutting the chuck into seven-bone roasts 1½ to 2 inches thick.
10 UNDER BLADE STEAK
Cut the remaining under blade portion into steaks ¾ to 1 inch thick.
11 CHUCK POT ROAST
Remove any remaining bones and cut steaks ¾ to 1 inch thick and roasts ½ to 1¾ inches thick. Bone the remaining portion for stew or ground chuck trim. You can continue to cut the neck cuts, but they make better tasting ground chuck than a roast. (Steaks not shown.)
Did you know…The blade or seven bone is actually the scapula bone in the shoulder.
08_9781118029572-ch04a.indd 55 4/7/11 10:35 AM

56 TH E ART OF B E E F CUTTI NG
1 WHOLE CHUCK ROLL
Start with a whole chuck roll. Place the chuck fl at side down. Remove any visible, heavy, thick tissue from the top of the chuck.
2 CHUCK ROLL SECTIONS
A chuck roll contains three parts: the chuck eye (A), chuck (B), and neck (C) sections. Remove the chuck eye (A) section with a straight cut 3 to 4 inches from the rib end.
5 CHUCK POT ROAST
Cut roasts 1½ to 2 inches thick.
6 CHUCK STEAKS
Or cut chuck into steaks ½ to ¾ inch thick.
SUBPRIMAL:
CHUCK ROLLThe boneless version of the bone-in chuck is the chuck roll. The chuck roll is located underneath the blade bone. The blade bone and the top blade have been removed, along with other remain-ing bones and cartilage. This friendlier version is easier to handle and smaller in size, plus the unwanted bones have already been removed. It is typically sold and merchandised as a retail item and is great for promotion and sales building. Foodservice associates will fi nd the chuck roll very appealing—it’s versatile, easy to prepare, and loaded with value and fl avor.
LOCATION AND COMPOSITIONThe boneless chuck roll is located from the neck down toward the fi fth rib, just above the foreshank or elbow. The main muscles in the chuck roll are longissimus dorsi, spinalis dorsi, complexus, multifi dus dorsi, rhomboideus, serratus ventralis, subscapularis, and splenius.
CUTS Beef Chuck Eye Steak, Boneless
Beef Chuck Steak, Boneless
Beef Chuck Pot Roast, Boneless
Beef Chuck Short Rib
ETHNIC CUTS Chuleta de Diezmillo
Barbacoa
Trozo para Barbacoa
NECK END
RIB END
C
B
ARIB END
C
B
A
08_9781118029572-ch04a.indd 56 4/7/11 10:35 AM

57BEEF CUTTING—CHUCK
3 REMOVE CHUCK EYE
Separate the chuck eye by locating the heavy thick seam. Use the pull and seam method to separate the chuck eye from the bottom portion.
4 CHUCK EYE STEAKS
Trim fat to specifi cation, and cut the chuck eye portion into steaks ¾ to 1 inch thick.
7 CHUCK POT ROAST Cut chuck into a roast at least 2 to 2½ inches thick.
8 CHUCK SHORT RIBS Use any remaining lean and cut it 2 inches thick into chuck short ribs.
ETHNIC CUTS
Follow Steps 1– 4. Slice the chuck roll into larger pieces or chunks for:
BARBACOA
TROZO PARA BARBACOA
Kari’s Quick TipsCut Chuck Eye Steaks 1½ inches thick and tie to maintain shape. Use the two-step cook method.
HISPANIC
Follow Steps 1– 4. Slice ¼ to ½ inch thick for:
CHULETA DE DIEZMILLO
BOTTOMPORTION
CHUCK EYEPORTION
HISPANIC
Follow Steps 1– 4.
08_9781118029572-ch04a.indd 57 4/7/11 10:35 AM
58 TH E ART OF B E E F CUTTI NG
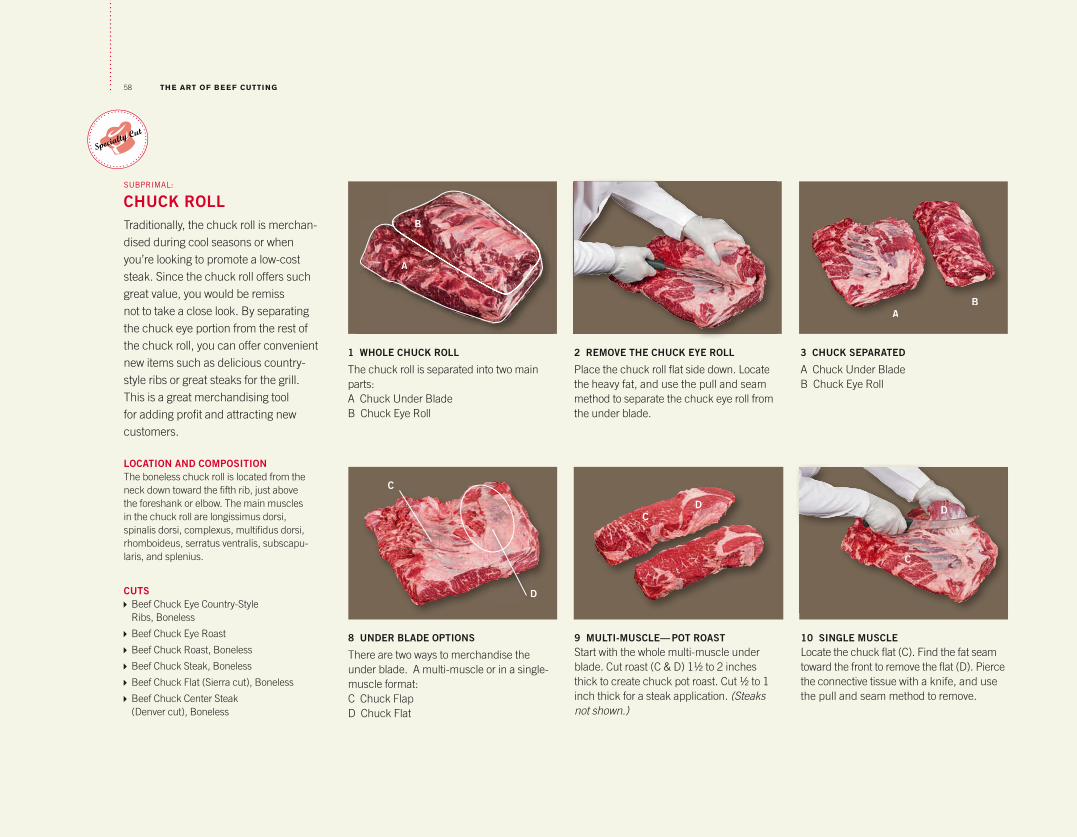
1 WHOLE CHUCK ROLL
The chuck roll is separated into two main parts:A Chuck Under Blade B Chuck Eye Roll
2 REMOVE THE CHUCK EYE ROLL
Place the chuck roll fl at side down. Locate the heavy fat, and use the pull and seam method to separate the chuck eye roll from the under blade.
3 CHUCK SEPARATED
A Chuck Under Blade B Chuck Eye Roll
SUBPRIMAL:
CHUCK ROLL Traditionally, the chuck roll is merchan-dised during cool seasons or when you’re looking to promote a low-cost steak. Since the chuck roll offers such great value, you would be remiss not to take a close look. By separatingthe chuck eye portion from the rest of the chuck roll, you can offer convenient new items such as delicious country-style ribs or great steaks for the grill. This is a great merchandising tool for adding profi t and attracting new customers.
LOCATION AND COMPOSITIONThe boneless chuck roll is located from the neck down toward the fi fth rib, just above the foreshank or elbow. The main muscles in the chuck roll are longissimus dorsi, spinalis dorsi, complexus, multifi dus dorsi, rhomboideus, serratus ventralis, subscapu-laris, and splenius.
CUTS Beef Chuck Eye Country-Style Ribs, Boneless
Beef Chuck Eye Roast
Beef Chuck Roast, Boneless
Beef Chuck Steak, Boneless
Beef Chuck Flat (Sierra cut), Boneless
Beef Chuck Center Steak (Denver cut), Boneless
8 UNDER BLADE OPTIONS
There are two ways to merchandise the under blade. A multi-muscle or in a single-muscle format: C Chuck Flap D Chuck Flat
9 MULTI-MUSCLE— POT ROASTStart with the whole multi-muscle under blade. Cut roast (C & D) 1½ to 2 inches thick to create chuck pot roast. Cut ½ to 1 inch thick for a steak application. (Steaks not shown.)
10 SINGLE MUSCLE Locate the chuck fl at (C). Find the fat seam toward the front to remove the fl at (D). Pierce the connective tissue with a knife, and use the pull and seam method to remove.
AB
Specialty Cut
A
BB
A
B
AB
C
DD
DDC
C
08_9781118029572-ch04a.indd 58 4/7/11 10:35 AM

59BEEF CUTTING—CHUCK
4 CHUCK EYE ROLL
Any portion of the chuck eye roll can be used to generate country-style ribs or a chuck eye roast. This item can also be used to generate chuck eye steaks. (See the chuck roll section cut Steps 3 and 4 on page 57.)
5 COUNTRY-STYLE RIBS In this two-step process, fi rst cut sections 1½ to 2 inches thick. (See page 36 in Chapter Three: Mastering Cutting Techniques.)
6 COUNTRY-STYLE RIBS
Second, lay each section fl at and cut through the lean portion to cut it in half. HINT: Do not cut through the seam fat. By doing so, the face will appear to be all fat.
7 CHUCK EYE ROAST
Or to create a roast, remove any heavy fat and portion into a 3- to 4-pound roast. Tie or net the roast, which will help the roast keep a uniform shape during cooking.
11 CHUCK FLAT— SIERRA CUT
Remove the fat and thin connective tissue.
12 PROCESS UNDER BLADE Remove the neck portion (E), and use it for ground beef or chuck. Next, remove the large cylinder-shaped muscle by following the natural seam (F), and use it for stew. The chuck center remains.
13 CHUCK CENTER Remove all heavy fat and connective tissue for grilling as steaks. If merchandising this item whole as a roast, you can leave the con-nective tissue and fat intact. Cut the muscle into two sections following the 90° rule.
14 CHUCK CENTER STEAKSUse the 90° rule and cut the center into steaks ½ to ¾ inch thick. HINT: See fi llet method on page 32 to add more value.
E
F
E
F
08_9781118029572-ch04a.indd 59 4/7/11 10:35 AM

BEGINNING WITH THE BASICS
The quickest way to lose money in the meat case is by not having a true understanding of your costs. This is a challenge because you do not always sell what you cut, either because of loss in markdowns or because of generating trim or unfavorable cuts. If you are a retailer or foodservice operator, you must understand the cost of what you cut.
First things fi rst. To thoroughly grasp this chapter, being familiar with the fi nancial, yield, and cost terms is absolutely necessary.
Labor: Any time involved to get the meat to its fi nal stage. Example: trimming, cutting, and wrapping.
Regular Cost: The price per pound directly from the invoice.
Saleable Yield: Available product for sale expressed as a percentage.
Yielded Cost: Cost that accounts for unusable trim, fat, and bone.
Yield Test: The process of tracking yields, costs, and revenues related to the conversion of a subprimal to fi nal products for sale in the marketplace.
UNDERSTANDING THE CUT TEST
A cut test is simply a yield test. In other words, any meat that can be sold must be captured in a yield or cut test. The remaining unusable portion must be captured as a loss. Knowing your yield percentage is one of the keys to unlocking your profi t potential.
Once you perform cut tests on subprimals you regularly use, you can keep using those numbers for your calculations. But I do recommend conducting your own cut test quarterly. Seasonality, specifi cation changes, feeding, and breeds all affect the yield percentage of a cut test, so regular review is essential. When performing a cut test, make sure you clearly indicate which merchandising method the cutter should use. Do not overtrim or undertrim your tests; keep them realistic. If you don’t, you are only cheating yourself.
Items needed to perform a cut test:
Scale
Cut test form
Pencil
Knife
Cutting board
Subprimal
Stopwatch (Use a stopwatch if you are collecting time and motion data; for instance, how long it takes to cut the desired subprimal.)
Labor rate
Marketing percentage
158 TH E ART OF B E E F CUTTI NG
Disclaimer: All the numbers used in the following calculations are for illustration purposes and should not be used to plan your business. You must conduct your own cut test and profi t analysis for accuracy.
15_9781118029572-ch06.indd 158 4/7/11 8:50 AM

159CUTTING FOR PROFIT
CUT TEST: TOP LOIN FOR STEAKS
Date Today Total Gross Net
Retail ($) $1,222.48 $1,222.48
Description Top Loin (IMPS/NAMP 180) Marketing Cost (minus retail) $61.12
Total Net Retail ($) $1,161.36
Grade Choice Subprimal Yielded Cost $600.00 $705.88
Start Weight 39.0 pounds Labor Cost ($) $29.95
Total Cost ($) $735.84
Bag Weight 0.03 pounds Margin ($) $622.48 $425.52 Purge 0.15 pounds Margin (%) 50.92% 36.64%
Naked Weight 38.82 pounds
Cut Loss 5.67 pounds
Total Saleable Weight 33.15 pounds
Subprimal Cost $6.00 per pound Marketing Percentage Rate 5%
Labor Rate $21.00 per hour
Labor Cost Per Second (D 3) 0.006 units
(Labor Cost x Total Time) 9.9295 units
Minutes Seconds
Cut Time 18.87 1132.200
Wrap/Storage Time 9.5 570.00
Saleable Yield Percentage 85.00%
Description of Cuts Section Item Weight Item Yield Retail/Portion Marketing Net Retail/ Total Retail Yield Cost Net Margin
Top Loin Steak (IMPS/NAMP 1180) 31.00 79.49% $14.99 $0.75 $14.24 $1,191.51 $7.06 50.43%
Top Loin for Stir-Fry 0.70 1.79% $8.99 $0.45 $8.54 $16.14 $7.06 17.35%
Beef Trimmings 1.45 3.72% $3.99 $0.20 $3.79 $14.83 $7.06 -86.22%
Fat 3.50
Total Retail ($) $1,222.48
Contribution Price Cost Portion Price Yield Value Per Pound Per Cut
All data is based on CTWT (per hundred weight)
This is an example of a fully completed cut test form. The instructions on pages 160–163 show how to use the cut test form and how to calculate your profi ts.
15_9781118029572-ch06.indd 159 4/7/11 8:50 AM
Broiling: Broiling is similar to grilling, except broiling is usually performed in an oven with the heat source above the beef.
Kalbi or Galbi: This is a very popular Korean method of cooking that involves grilling thin cuts, often short ribs, over charcoal. Live coals are ideal. Hardwood charcoal is even better.
Roasting: Roasting is a particularly British way of cooking meat that produces the well-known British dish, roast beef. This technique cooks food in the hot, dry air of an oven. Little if any liquid is added.The liquid produced during cooking is decanted from the fat and is usually made into a gravy or juice to serve with the sliced beef.
Sautéing: This is a French word, meaning “to jump.” Sautéing uses high heat to quickly brown and sear beef in a small amount of oil. A fl avorful caramelized crust will form on the meat, locking in the natural juices. This cooking process is ideal for thin, tender cuts of beef that cook quickly, such as tenderloin, or cuts that have been pounded and tenderized.
Stir-Fry: This is mainly a Chinese way of cooking quickly in a wok over high heat. Often garlic, ginger, and onions are added to the cooking oil along with slices of beef (or any other type of meat) and mixed vegetables.
Deep Frying: You may not think deep frying is a dry-heat cooking method, but it is. Deep frying is done in fat, which initially is a solid, although it can take on a liquid form. Another clue is the golden brown color achieved with deep frying, which is only possible with dry-heat cooking methods. To properly deep fry beef, the oil tem-perature should stay between 325°F (163°C) and 400°F (204°C).
Barbecuing: From how it’s spelled to how it’s defi ned, barbecuing is complex. I talk about barbecue as a method of cooking meat at low temperatures for long periods of time. Your own defi nition could vary. It is different from grilling in that authentic barbecue can take several hours or even all day to fully cook because of the low-level heat and larger cuts of meat (sometimes whole animals) used. These longer cooking times allow the fl avor to fully develop. You can barbecue almost anything: beef, chicken, pork, fi sh, and vegetables. Here, I will focus on barbecuing beef.
People have been cooking meat over a fi re since the Stone Ages, but American barbecue seems to date back to Colonial times in Alexandria, Virginia, in the 1700s. As the country expanded westward, so did barbecue. People all over the world have their own barbecue traditions and techniques. I have found marvelous beef barbecue in Texas, Memphis, Kansas City, and California.
Everything is big in Texas; and barbecue is no exception. Texas barbecue is most often beef, with brisket being the hands-down favorite. Pit masters there combine unique spices and rub it on the beef before it is barbecued and topped with a sweet and spicy tomato-based sauce that is thick and delicious.
While pork is popular in Kansas City, beef brisket does have a following. With barbecue restaurants around every corner, this city loves barbecue—and the secret is the sauce. After the meat is smoked with a dry rub, it is topped with a thick, sweet sauce with a tomato and molasses base. Usually there is more sauce available for dipping at the table.
Another great place to take a dip is Memphis. Like Kansas City, Memphis is known for its barbecue sauce, which has a thin con-sistency and is usually used for dipping. This sauce is commonly made with tomatoes, vinegar, and a combination of spices for a tangy fl avor with a bit of sweetness.
A standout in tri-tip beef barbecue is Santa Maria, California. Here, this roast is covered in a mixture of salt, pepper, and garlic salt then grilled over a fi re of red oak from the California coast. The people of Santa Maria claim this coastal wood makes all the difference.
There are many regions known for barbecue and many fl avors to explore. I hope you get a chance to enjoy them all.
174 TH E ART OF B E E F CUTTI NG
16_9781118029572-ch07.indd 174 4/7/11 8:52 AM
Smoking: This is a process of cooking or preserving beef by exposing it to smoke created by burning wood. You will need a meat smoker or charcoal grill to properly smoke your beef. A larger, less tender cut of beef, such as a brisket, responds well to smoking. The motto for smoking is “low and slow.” Use a low temperature 225°F (107°C), and smoke meat between 60 and 75 minutes per pound. For added fl avor, try various woods, including hickory, mesquite, oak, maple, and even fruit-tree woods such as apple and cherry.
Sear and Roast: In this quick cooking method, the beef is fi rst seared or browned in a medium-hot pan, then fi nishes cooking in the oven at 350ºF (177°C) to 375ºF (190°).
Asador: Spanish, meaning “spit” or “rotisserie,” asador is the method used when grilling a whole animal or large sections of beef over wood coals. The meat is attached to iron stakes laid out like a cross attached with wire. Spread the coals around to control the rate of the cooking speed.
A la Parilla or a la Brasa: These are common Hispanic terms for char-coal grilling. In Spanish, la parrilla means “cast iron barbecue grate,” like a kettle grill, that is set over approximately 4 to 5 inches above the hot coals. A la brasa means “to grill on or over live coals.”
A la Plancha/Chapa: Common in Hispanic restaurants, a la plancha means grilled on a metal plate or plank. You can also heat your cast iron skillet until very hot, season your favorite steaks, and grill on the plank or fl at cast iron surface over hot coals.
Al Horno: Cooking something al horno means you are using your oven to cook it. Al horno dishes are common in authentic Mexican restaurants.
MOIST-HEAT COOKING METHODS This means cooking food with, or in, any type of liquid—whether it is water, stock, wine, or another liquid. Moist-heat cooking uses lower temperatures; remember slow and low. Larger, tougher multi-muscle cuts of beef from the round, brisket, shank, and chuck are best cooked by moist-heat cooking methods, such as braising, pot roast-ing, and stewing.
Braising: Meats for stews or pot roasts are often braised. This tech-nique starts by fi rst searing (browning) the meat to enhance fl avors. Transfer the meat to your stock pot or Dutch oven with a variable amount of liquid depending upon the recipe (the liquid should not cover the meat). Keep the temperature around 250°F (121°F), and heat the food until the meat is fork tender.
Stewing: Stewing involves immersing the entire cut of beef in a liquid and cooking slowly. Beef is typically dusted in seasoned fl ourand browned in a small amount of oil before the liquid is added. Often vegetables are added, and all ingredients are served in the resulting gravy.
Maintaining this range will prevent the oil from seeping into the beef and making it greasy. While beef isn’t often fried, try deep frying bat-tered fl ank steak and prepare a crispy, spicy ginger dish.
INTERNAL DEGREE OF DONENESS GUIDELINES
Very rare 115–125°F (46–52°C) Blood-red meat, soft, very juicy
Rare 125–130°F (52–54°C) Red center, gray surface, soft, juicy
Medium rare 130–140°F (54–60°C) Pink center, gray-brown surface, often remains juicy
Medium 140–150°F (60–66°C) Pink throughout, becomes gray-brown toward surface
Medium well 150–160°F (66–71°C) Thin line of pink, fi rm texture
Well done >160°F (>71°C) Gray-brown throughout, tough texture
COOKED TEMPERATURE DESCRIPTION
Note that these temperatures are different from USDA guldelines.
175FLAVOR OVERVIEW, COOKING TIPS, AND SAFE HANDLING
16_9781118029572-ch07.indd 175 4/7/11 8:52 AM

192 TH E ART OF B E E F CUTTI NG
URMIS DESCRIPTION MEAT BUYER’S MEAT BUYER’S GUIDE URMIS UPC URMIS UPC MAIN MUSCLE(S)*** PAGE GUIDE (IMPS/NAMP)* (IMPS/NAMP) PORTION CONTROL* CAT. A** CAT. B** Chuck Beef Chuck Blade Roast 113 Chuck, 1064 1879 Serratus ventralis, Infraspinatus, Complexus, Longissimus 55
Square-Cut dorsi, Multifi dus/Spinalis dorsi, Subscapularis, Rhomboideus
Beef Chuck Blade Steak 113 Chuck, 1066 1881 Serratus ventralis, Infraspinatus, Complexus, Longissimus 54 Square-Cut dorsi, Multifi dus/Spinalis dorsi, Subscapularis, Rhomboideus
Beef Chuck Center 116E Chuck, 1098 1913 Serratus ventralis 59Steak (Denver Cut), Boneless Under Blade Roast
Beef Chuck Eye Country- 116D Chuck, 1096 1911 Complexus, Longissimus dorsi, Multifi dus/Spinalis dorsi 59Style Ribs, Boneless Chuck Eye Roll
Beef Chuck Eye 116D Chuck, 1095 1910 Complexus, Longissimus dorsi, Multifi dus/Spinalis dorsi 59Roast, Boneless Chuck Eye Roll
Beef Chuck Eye 116D Chuck, 1116D Chuck, 1102 1917 Complexus, Longissimus dorsi, Multifi dus/Spinalis dorsi 57 Steak, Boneless Chuck Eye Roll Chuck Eye Steak, Boneless Beef Chuck Flat 116E Chuck, 1097 1912 Splenius 59 (Sierra Cut), Boneless Under Blade Roast Beef Chuck 121 Plate, 1123 Beef Short Rib, 1107 1922 Serratus ventralis 61 Flanken-Style Ribs Short Plate Bone-In
Beef Chuck 121 Plate, 1123 Beef Short Rib, 1108 1923 Serratus ventralis 61 Flanken-Style Steaks Short Plate Bone-In Beef Chuck Pot Roast 113 Chuck, 1065 1880 Serratus ventralis, Infraspinatus, Complexus, Longissimus 55, 56, 57 Square-Cut dorsi, Multifi dus/Spinalis dorsi, Splenius, Subscapularis, Rhomboideus
Beef Chuck Roast, 116A Chuck, 1151 1966 Serratus ventralis, Complexus, Longissimus dorsi, Multifi dus/ 58 Boneless Chuck Roll Spinalis dorsi, Splenius, Subscapularis, Rhomboideus Beef Chuck 113 Chuck, 1033 1848 Serratus ventralis, Infraspinatus, Supraspinatus, Complexus, 55 Seven-Bone Roast Square-Cut Longissimus dorsi, Multifi dus/Spinalis dorsi, Splenius, Subscapularis, Rhomboideus Beef Chuck 113 Chuck, 1035 1850 Serratus ventralis, Infraspinatus, Supraspinatus, Complexus, 55 Seven-Bone Steak Square-Cut Longissimus dorsi, Multifi dus/Spinalis dorsi, Splenius, Subscapularis, Rhomboideus Beef Chuck Short Ribs 121 Plate, Short Plate 1127 1942 Serratus ventralis 57, 61 123 Short Ribs
Beef Chuck Short Ribs, 121 Plate, Short Plate Serratus ventralis 137 Frenched
Beef Chuck Top Blade 113 Chuck, 1136 1951 Infraspinatus 54 Roast, Bone-In Square-Cut
Beef Chuck Under Blade Roast 113 Chuck, 1150 1965 Serratus ventralis, Complexus, Longissimus dorsi, Multifi dus/ 54 Square-Cut Spinalis dorsi, Splenius, Subscapularis, Rhomboideus
Beef Chuck Under Blade Steak 113 Chuck, 1152 1967 Serratus ventralis, Complexus, Longissimus dorsi, Multifi dus/ 55 Square-Cut Spinalis dorsi, Splenius, Subscapularis, Rhomboideus
MEAT PURCHASE SPECIFICATIONS
18_9781118029572-bapp01.indd 192 4/7/11 8:58 AM

193APPENDIX
URMIS DESCRIPTION MEAT BUYER’S MEAT BUYER’S GUIDE URMIS UPC URMIS UPC MAIN MUSCLE(S)*** PAGEGUIDE (IMPS/NAMP)* (IMPS/NAMP) PORTION CONTROL* CAT. A** CAT. B**
Chuck Beef Shoulder 114 Chuck, Shoulder (Clod) 1810 2625 Triceps brachii, Infraspinatus, Teres major 63Shoulder London Broil, Boneless
Beef Shoulder 114 Chuck, Shoulder (Clod) Triceps brachii, Infraspinatus, Teres major 63 Country-Style Ribs
Beef Shoulder 114 Chuck, Shoulder (Clod) 1132 1947 Triceps brachii, Infraspinatus, Teres major 63 Roast, Boneless
Beef Shoulder Steak, Boneless 114 Chuck, Shoulder (Clod) 1133 1948 Triceps brachii, Infraspinatus, Teres major 63
Beef Shoulder Top Blade (Cross-Cut) 114 Chuck, Shoulder (Clod), 1114D Shoulder, 1144 1959 Infraspinatus 63Steak, Boneless 114D Chuck, Shoulder (Clod), Top Blade Steak (IM)
Top Blade
Beef Shoulder Center 114 Chuck, Shoulder (Clod), 1114E Shoulder, 1162 1977 Triceps brachii 65 (Ranch) Steak, Boneless 114E Chuck, Shoulder (Clod), Arm Steak—PSO:1 Arm Roast Beef Shoulder Center 114 Chuck, Shoulder (Clod), 1114E Shoulder, Triceps brachii 65 (Ranch) Steak Thin, Boneless 114E Chuck, Shoulder (Clod), Arm Steak—PSO:1 Arm Roast
Beef Shoulder Center 114 Chuck, Shoulder (Clod), 1114E Shoulder, Triceps brachii 65 Pepper Steak, Boneless 114E Chuck, Shoulder (Clod), Arm Steak—PSO:1 Arm Roast
Beef Shoulder 114 Chuck, Shoulder (Clod), 1114D Shoulder, 1166 1981 Infraspinatus 67 Top Blade (Flat Iron) 114D Chuck, Shoulder (Clod), Top Blade Steak Steak, Boneless Top Blade (IM)—PSO:1
Rib Beef Back Ribs Split 124 Rib, Back Ribs 1183 1998 Rib bone, Intercostal 80
Beef Back Short-Rib Style 124 Rib, Back Ribs Rib bone, Intercostal 80
Beef Back Ribs Full Cut 124 Rib, Back Ribs 1180 1995 Rib bone, Intercostal 80
Beef Rib Standing Rib Roast 110 Rib, Roast-Ready, Boneless 1103B Rib, Rib Steak, 1193 2008 Longissimus dorsi, Spinalis dorsi 73 Bone-In, Frenched—PSO:1
Beef Rib Steak 110 Rib, Roast-Ready, Boneless 1103 Rib, Rib Steak, 1197 2012 Longissimus dorsi, Spinalis dorsi 73 Bone-In
Beef Rib Cowboy Steak 110 Rib, Roast-Ready, Boneless 1103B Rib, Rib Steak, Longissimus dorsi, Spinalis dorsi 73 Bone-In, Frenched
Beef Ribeye Fillet, Boneless 112 Rib, Ribeye Roll, 1112 Rib, Ribeye 1253 2068 Longissimus dorsi, Spinalis dorsi 77 112C Rib, Ribeye (IM) Roll Steak, Boneless, 1112C Rib, Ribeye (IM)
Beef Ribeye Fillet Roast, Boneless 112C Rib, Ribeye (IM) 1112C Rib, Ribeye (IM) 1250 2065 Longissimus dorsi, Spinalis dorsi 77 Beef Ribeye Roast 112 Rib, Ribeye Roll, 1112 Rib, Ribeye Longissimus dorsi, Spinalis dorsi 79 Extra Trim, Boneless 112C Rib, Ribeye (IM) Roll Steak, Boneless
18_9781118029572-bapp01.indd 193 4/7/11 8:58 AM

198 TH E ART OF B E E F CUTTI NG
TENDERNESS FLAVOR COST OVEN POT ROAST FAMILY ASIAN HISPANIC DESCRIPTION (★–★★★★) (★–★★★★) ($–$ $ $ $) MARINATE GRILL/BROIL STIR-FRY KABOBS ROAST BRAISE/STEW STYLE GRILL GRILL SOUP PAGE Chuck Beef Chuck Blade Roast ★★ ★★★ $ ■ ■ 54
Beef Chuck Blade Steak ★★ ★★★ $ ■ ■ ■ ■ ■ 55
Beef Chuck Center Steak (Denver Cut), ★★★ ★★★ $ $ ■ ■ ■ 59 Boneless
Beef Chuck Eye Country-Style ★★ ★★★ $ $ ■ ■ ■ 59 Ribs, Boneless
Beef Chuck Eye Roast, Boneless ★★ ★★★ $ $ ■ 59
Beef Chuck Eye Steak, Boneless ★★ ★★★ $ ■ ■ 57 Beef Chuck Flat (Sierra Cut), Boneless ★ ★★ $ $ ■ ■ ■ 59
Beef Chuck Flanken-Style Ribs ★★ ★★★★ $ $ ■ ■ ■ ■ 61
Beef Chuck Flanken-Style Steaks ★★★ ★★★ $ $ ■ ■ ■ ■ 61 Beef Chuck Pot Roast ★★ ★★★ $ ■ ■ 55,56,57
Beef Chuck Roast, Boneless ★★ ★★★ $ ■ ■ 58
Beef Chuck Steak, Boneless ★★ ★★★ $ ■ ■ ■ ■ ■ 55,56,58
Beef Chuck Seven-Bone Roast ★★ ★★★ $ ■ ■ ■ 55
Beef Chuck Seven-Bone Steak ★★ ★★★ $ ■ ■ ■ 55 Beef Chuck Short Ribs ★★★ ★★★ $ $ ■ ■ ■ 61
Beef Chuck Short Ribs ★★ ★★★★ $ $ ■ 57
Beef Chuck Under Blade Roast ★★ ★★★ $ ■ ■ 54
Beef Chuck Under Blade Steak ★★ ★★★ $ ■ ■ ■ ■ 55
Beef Chuck Top Blade Roast ★★★ ★★★ $ ■ ■ 54
Beef Chuck Top Blade (Cross-Cut) Steak ★★★ ★★★ $ ■ ■ 54
Chuck Beef Shoulder London Broil, ★★ ★★★ $ ■ ■ ■ ■ 63Shoulder Boneless
Beef Shoulder Country-Style Ribs ★★★ ★★★ $ $ ■ ■ ■ ■ 63
Beef Shoulder Roast, Boneless ★★★ ★★★ $ ■ ■ ■ 63
Beef Shoulder Steak, Boneless ★★★ ★★★ $ ■ ■ ■ 63
Beef Shoulder Top Blade Steak, ★★★ ★★★ $ $ ■ ■ ■ 63 (Cross-Cut) Boneless Beef Shoulder Center (Ranch) ★★★ ★★★ $ $ ■ ■ 65 Steak, Boneless
Beef Shoulder Center (Ranch) ★★★ ★★★ $ $ ■ ■ ■ 65 Steak Thin, Boneless
COOKING METHODS AND STYLES
18_9781118029572-bapp01.indd 198 4/7/11 8:58 AM

199APPENDIX
TENDERNESS FLAVOR COST OVEN POT ROAST FAMILY ASIAN HISPANIC DESCRIPTION (★–★★★★) (★–★★★★) ($–$ $ $ $) MARINATE GRILL/BROIL STIR-FRY KABOBS ROAST BRAISE/STEW STYLE GRILL GRILL SOUP PAGE Beef Shoulder Center ★★★ ★★★ $ $ ■ ■ ■ 65 Pepper Steak, Bonelesscont. Beef Shoulder Top Blade ★★★ ★★★ $ $ $ ■ ■ ■ ■ 67 (Flat Iron) Steak, Boneless
Rib Beef Back Ribs Full Cut ★★ ★★★ $ ■ ■ ■ ■ ■ 80
Beef Back Ribs Split ★★ ★★★ $ ■ ■ ■ ■ ■ 80
Beef Back Short-Rib Style ★★ ★★★ $ ■ ■ ■ ■ 80
Beef Rib Easy-Carve Roast ★★ ★★★★ $ $ $ ■ ■ 73
Beef Rib Standing Rib Roast ★★★ ★★★★ $ $ $ ■ ■ 73
Beef Rib Steak ★★★ ★★★★ $ $ $ ■ ■ ■ 73
Beef Rib Cowboy Steak ★★★ ★★★★ $ ■ ■ 73
Beef Ribeye Fillet, Boneless ★★★ ★★★★ $ $ $ $ ■ ■ ■ ■ 77
Beef Ribeye Fillet Roast, Boneless ★★★ ★★★★ $ $ $ ■ ■ 77
Beef Ribeye Roast (Extra Trim), ★★★ ★★★ $ $ $ $ ■ ■ ■ ■ 79 Boneless
Beef Ribeye Roast, Boneless ★★★ ★★★★ $ $ $ ■ ■ ■ 75
Beef Ribeye Steak, Boneless ★★★ ★★★★ $ $ $ ■ ■ ■ 72,75 Beef Ribeye Steak Thin, Boneless ★★★ ★★★★ $ $ $ ■ ■ ■ ■ ■ 75
Beef Ribeye Steaks (Extra Trim), ★★★ ★★★ $ $ $ $ ■ ■ ■ 79 Boneless
Beef Ribeye Sweetheart Steak, ★★★ ★★★★ $ $ $ ■ 75 Boneless
Beef Ribeye Cap Steak, Boneless ★★★ ★★★★ $ $ $ $ ■ ■ ■ ■ 77
Loin Beef Loin Bones for Soup ★★ ★★★ $ $ $ ■ 85,89
Beef Top Loin Steak, Boneless ★★★ ★★★ $ $ $ ■ ■ ■ ■ ■ 85,89,93
Beef Loin Porterhouse Steak ★★★ ★★★ $ $ $ ■ 85
Beef Loin T-Bone Steak ★★★ ★★★ $ $ $ ■ 84
Beef Loin Tenderloin ★★★★ ★ $ $ $ $ ■ 87 Double Roast, Boneless
Beef Loin Tenderloin ★★★★ ★ $ $ $ $ ■ ■ ■ ■ ■ 87 Double Steak, Boneless
Beef Loin Tenderloin for Fondue ★★★★ ★ $ $ $ $ ■ ■ ■ 87
Beef Loin Tenderloin for Taco Meat ★★★★ ★ $ $ $ $ ■ ■ 87
Beef Loin Tenderloin Roast ★★★★ ★ $ $ $ $ ■ 87 (Chateaubriand)
Chuck Shoulder
18_9781118029572-bapp01.indd 199 4/7/11 8:58 AM