travellers sports football coaching · pdf filefootball coaching manual – page 1 of 18:...
TRANSCRIPT
FFoooottbbaallll CCooaacchhiinngg MMaannuuaall –– ppaaggee 11 ooff 1188::
TRAVELLERS SPORTS
FOOTBALL COACHING MANUAL
CHANGE HISTORY
Issue Date of Issue
CR/DR Numbers
No. of Pages
Pages Changed and Reasons for Change
1 24-Feb-06 18
(c) 2005 TravelQuest Ltd t/a Travellers
FFoooottbbaallll CCooaacchhiinngg MMaannuuaall –– ppaaggee 22 ooff 1188::
Contents Page INTRODUCTION .............................................................................................................................................................. 3 DIMENSION OF THE PITCH ......................................................................................................................................... 3 POSITIONS ON THE PITCH........................................................................................................................................... 4 WARM UP .......................................................................................................................................................................... 4 WARM UP GAMES........................................................................................................................................................... 4
TAG .................................................................................................................................................................................. 5 FOLLOW THE LEADER....................................................................................................................................................... 5 STUCK IN THE MUD .......................................................................................................................................................... 5 SHARKS AND MINNOWS.................................................................................................................................................... 5
WARM UP DRILLS........................................................................................................................................................... 5 PASS AND FOLLOW ........................................................................................................................................................... 5 PASS AND CHASE.............................................................................................................................................................. 5 KEEP AWAY...................................................................................................................................................................... 6
COOL DOWN..................................................................................................................................................................... 6 PASSING............................................................................................................................................................................. 6
INSIDE OF THE FOOT.......................................................................................................................................................... 6 OUTSIDE OF THE FOOT ...................................................................................................................................................... 6 LONG PASSES ................................................................................................................................................................... 7
PASSING DRILLS ............................................................................................................................................................. 7 CIRCULAR PASSING .......................................................................................................................................................... 7 PASSING COMMUNICATION DRILL .................................................................................................................................... 7 GAP PASSING DRILL .......................................................................................................................................................... 8
DRIBBLING ....................................................................................................................................................................... 8 DRIBBLING DRILLS........................................................................................................................................................ 8
FREEZE TAG ..................................................................................................................................................................... 8 TRUCK AND TRAILER........................................................................................................................................................ 9
CONTROLLING THE BALL........................................................................................................................................... 9 CONTROLLING DRILLS ................................................................................................................................................ 9
VARIED BALL CONTROL DRILL.......................................................................................................................................... 9 MARKING ........................................................................................................................................................................ 10
MAN-MARKING GAME ................................................................................................................................................... 10 SHOOTING ...................................................................................................................................................................... 10 SHOOTING DRILLS....................................................................................................................................................... 10
PASS, RECEIVE & SHOOT................................................................................................................................................ 10 CROSS FIRE..................................................................................................................................................................... 11 PRESSURED SHOOTING ................................................................................................................................................... 11
CROSSING & CORNERS............................................................................................................................................... 11 END-TO-END HEADING................................................................................................................................................... 11 CLEAR THE DECKS.......................................................................................................................................................... 12
HEADERS......................................................................................................................................................................... 12 HEADING DRILLS ......................................................................................................................................................... 12 TACKLING ...................................................................................................................................................................... 13
THE FRONT BLOCK TACKLE............................................................................................................................................. 13 THE SIDE BLOCK TACKLE ................................................................................................................................................ 13 THE GROUND BLOCK TACKLE ......................................................................................................................................... 13 THE SLIDING TACKLE...................................................................................................................................................... 14
GOAL KEEPING ............................................................................................................................................................. 14 GOAL KEEPING DRILLS ............................................................................................................................................. 14
TURN AND FACE ............................................................................................................................................................. 14 NEAR POST DEFENCE ...................................................................................................................................................... 14
THROW-INS .................................................................................................................................................................... 14 THROW IN DRILLS ....................................................................................................................................................... 14
GRENADES...................................................................................................................................................................... 14 FITNESS............................................................................................................................................................................ 15
FITNESS – SPRINTING...................................................................................................................................................... 15 UP AND DOWNS .............................................................................................................................................................. 15 PYRAMIDS ...................................................................................................................................................................... 15
FITNESS DRILLS............................................................................................................................................................ 15 AGILITY DRILLS ........................................................................................................................................................... 15
ILLINOIS AGILITY TEST................................................................................................................................................... 15 SIDEWAYS, BACKWARDS AND FORWARDS ...................................................................................................................... 16
DEFENDING DRILLS..................................................................................................................................................... 16 DEFENDING DRILL 1........................................................................................................................................................ 16
(c) 2005 TravelQuest Ltd t/a Travellers
FFoooottbbaallll CCooaacchhiinngg MMaannuuaall –– ppaaggee 33 ooff 1188::
DEFENDING DRILL 2........................................................................................................................................................ 16 ATTACKING DRILLS.................................................................................................................................................... 16
3 V 2 ............................................................................................................................................................................... 16 3 V 2 ............................................................................................................................................................................... 16
GAMES.............................................................................................................................................................................. 17 4 GOALS GAME................................................................................................................................................................ 17 7 V 7 HALF FIELD, MULTI – GOAL.................................................................................................................................... 17
TIPS TO BECOME A SUCCESSFUL COACH............................................................................................................ 17 REFERENCES ................................................................................................................................................................. 18 INTRODUCTION Football is, without doubt, the most popular sport in the world. It is played worldwide and the passion for the game is immense. As a Travellers Football Coach you have the opportunity to coach and develop the game of football and share your skills with people who may never have been coached before. You will be giving them the opportunity to learn the game in a structured and organised manner with maximum benefits to their learning. Your placement will make a huge difference to those people you will be coaching and will have further positive impacts on their lives than you may be aware.
This coaching manual has been specifically designed for your football placement incorporating the skills that you will need to have when on your placement.
This manual has been designed for the coaching of 6 – 18 year olds in mind where by each drill can vary difficulty depending on age and ability of the group. As a coach it is up to you how you want to adapt these drills and you may want to add your own drills into the session.
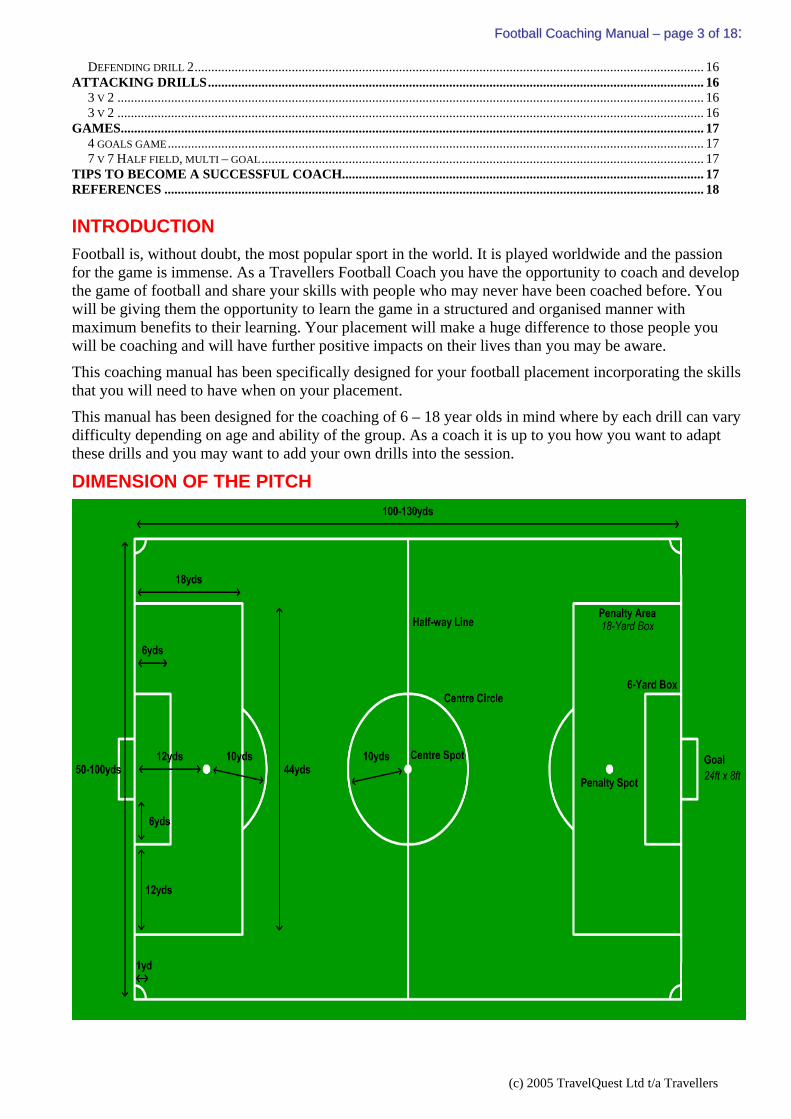
DIMENSION OF THE PITCH
(c) 2005 TravelQuest Ltd t/a Travellers
FFoooottbbaallll CCooaacchhiinngg MMaannuuaall –– ppaaggee 44 ooff 1188::
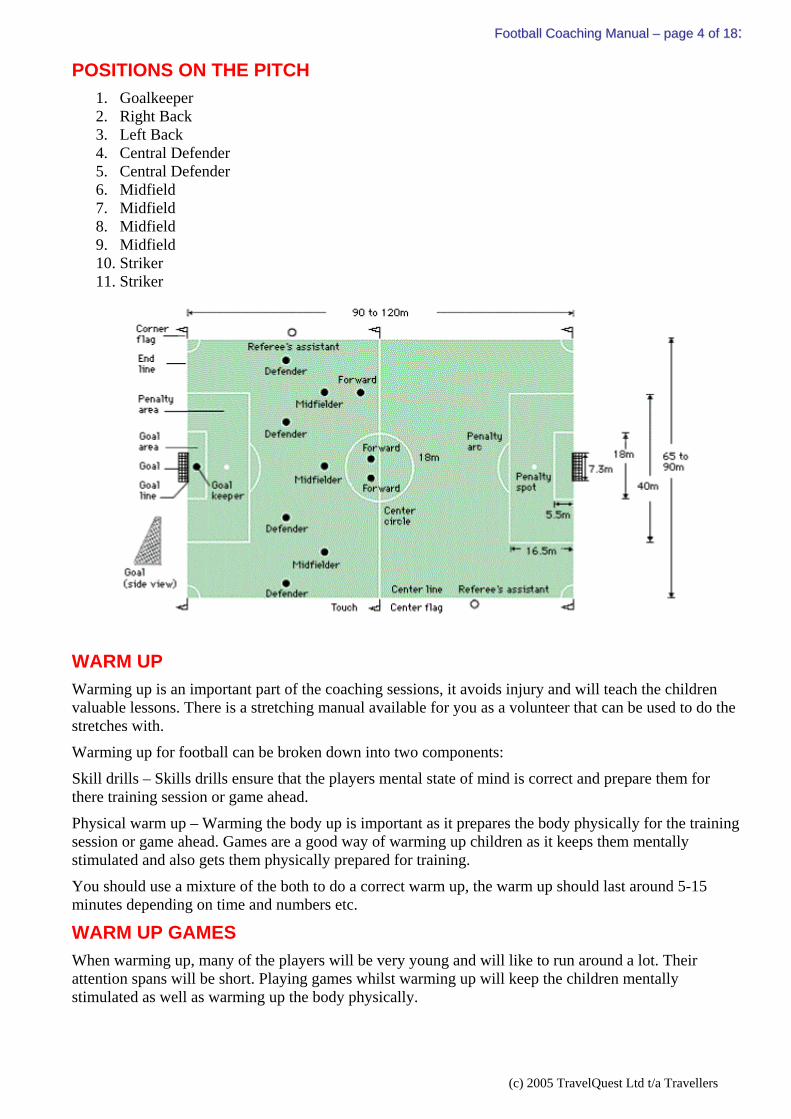
POSITIONS ON THE PITCH 1. Goalkeeper 2. Right Back 3. Left Back 4. Central Defender 5. Central Defender 6. Midfield 7. Midfield 8. Midfield 9. Midfield 10. Striker 11. Striker
WARM UP Warming up is an important part of the coaching sessions, it avoids injury and will teach the children valuable lessons. There is a stretching manual available for you as a volunteer that can be used to do the stretches with.
Warming up for football can be broken down into two components:
Skill drills – Skills drills ensure that the players mental state of mind is correct and prepare them for there training session or game ahead.
Physical warm up – Warming the body up is important as it prepares the body physically for the training session or game ahead. Games are a good way of warming up children as it keeps them mentally stimulated and also gets them physically prepared for training.
You should use a mixture of the both to do a correct warm up, the warm up should last around 5-15 minutes depending on time and numbers etc.
WARM UP GAMES When warming up, many of the players will be very young and will like to run around a lot. Their attention spans will be short. Playing games whilst warming up will keep the children mentally stimulated as well as warming up the body physically.
(c) 2005 TravelQuest Ltd t/a Travellers

FFoooottbbaallll CCooaacchhiinngg MMaannuuaall –– ppaaggee 55 ooff 1188::
Tag This game is very simple and surprisingly effective. Mark off a grid or circle. Everybody has a ball. Whoever is "it" must dribble to another player and tag her. The other players avoid being tagged by dribbling away from "it." If the player being chased loses her ball outside the grid, dribbles out of the grid, or is tagged, he is "it" and the game continues.
Follow the Leader Pick a leader and have them dribble anywhere on the field, encouraging them to make lots of turns, changing speed, etc. All other players have to follow the leader and do whatever that player does. Switch leaders often.
Stuck in the Mud Stuck in the mud is aimed for younger players typically of infant or junior school age and allows them to burn that hyperactive energy at the beginning of the session.
Set a square (size will depend on numbers). Allocate one player to be on. He or she has to tag as many people as possible in the square. Once a player has been tagged he or she has to raise their arms in line with their shoulders so that other players can cross under them to release them from the mud. The game should go on for about 5 minutes and change the person who is on at regular intervals.
Sharks and Minnows Play in a large grid. The attacking players have balls and are the Minnows. A defending player does not have a ball and is a Shark. The Minnows start at one end of the grid. The Shark stands on the opposite line. The Minnows must try to cross the Shark's line without losing possession of their ball. The Shark defends his or her line, trying to kick the Minnows' balls out of the defined area. Minnow who successfully dribble across the Shark's line go back for round two. Each Minnow who loses their ball join the Sharks. The last Minnow left in is the winner.
WARM UP DRILLS Pass and Follow
1. Divide the players in to a circle with 1 player in the centre. 2. The player in the centre of the circle passes to a player standing on the outside of the circle. 3. He or she follows their pass and exchanges places with the player they passed to. 4. That player then dribbles into the centre of the circle and passes to another player on the outside.
As the players improve, put another ball into play and/or impose restrictions (one-touch play, alternate side-of-the-foot and lofted passes, etc).
Pass and Chase 1. Groups of 6 in circles, each circle with one ball. 2. Player with ball passes the ball to another player 3. The player then chases his or her pass to pressure the next passer into one or two touch pass. 4. The player then who has just passed puts pressure on the receiving player to make a pass before
they intercept, play continuously.
(c) 2005 TravelQuest Ltd t/a Travellers

FFoooottbbaallll CCooaacchhiinngg MMaannuuaall –– ppaaggee 66 ooff 1188::
Keep Away
1. Groups of 4, playing 3 v 1 possession with 1 ball in 10 yard grid. 2. There are a number of ways you can alter the drill:
A. Reduce the space B. Add players without increasing the space C. Level the sides to make it more even D. Eliminate restrictions on opponents...for example with passers outside a grid and
defenders inside trying to win the ball, allow the defenders to go outside the grid E. Add psychological pressure by adding a goal - like 10 passes to win F. Challenge the team with the ball to keep it against pressure for a set period of time -
count down out loud as the time nears G. Add restrictions - for example - if one player uses two touches, the next may only use one
touch H. Increase the number of balls in play to force thinking and vision
COOL DOWN Ensuring that players are properly cooled down and stretched is of vital importance. For a warm down let the players go for a slow jog around the pitch and then stretch down properly once they have completed a lap. It is essential that they stretch to prevent cramping of the muscles which could cause an injury.
PASSING Passing is an essential part of the game. Every player from the goalkeeper to the striker needs to be able to pass the ball. There are a number of passes you need to coach:
Inside of the foot This is the most useful part of the foot to use when passing the ball, the part of your foot with the most surface area, thus giving you the most control and accuracy.
CCooaacchhiinngg PPooiinnttss
1. The kicking foot is turned outward so that the inside of the foot makes contact with the middle of the ball.
2. Look down at the ball and keep the head steady. 3. Follow through with the kicking foot in the direction you want the ball to go. 4. Non kicking foot alongside the ball. 5. Use arms to balance.
Outside of the foot This kind of pass is used when you want to bend the ball into a team-mate or into an area. Often your body is in a position where you can't make a simple pass. Try to strike through the ball. Follow through with the upper portion of the outside of your foot.
CCooaacchhiinngg PPooiinnttss
1. Use the outside of the boot to kick the ball where by the little toe will make contact with the middle of the ball.
2. Look down at the ball and keep the head steady. 3. Follow through with the kicking foot in the direction you want the ball to go. 4. Non kicking foot alongside the ball. 5. Use arms to balance.
(c) 2005 TravelQuest Ltd t/a Travellers
FFoooottbbaallll CCooaacchhiinngg MMaannuuaall –– ppaaggee 77 ooff 1188::
Long Passes If you are picking a player out you don't need to follow through the ball but instead, strike the ball sharply and stop your follow through just after hitting the ball.
CCooaacchhiinngg PPooiinnttss
1. Look up at the person you wish to pass to. 2. Strike the ball with the front part of your boot making contact with the middle of the ball. 3. Look down at the ball and keep the head steady. 4. Follow through with the kicking foot in the direction you want the ball to go. 5. Non kicking foot alongside the ball. 6. Use arms to balance.
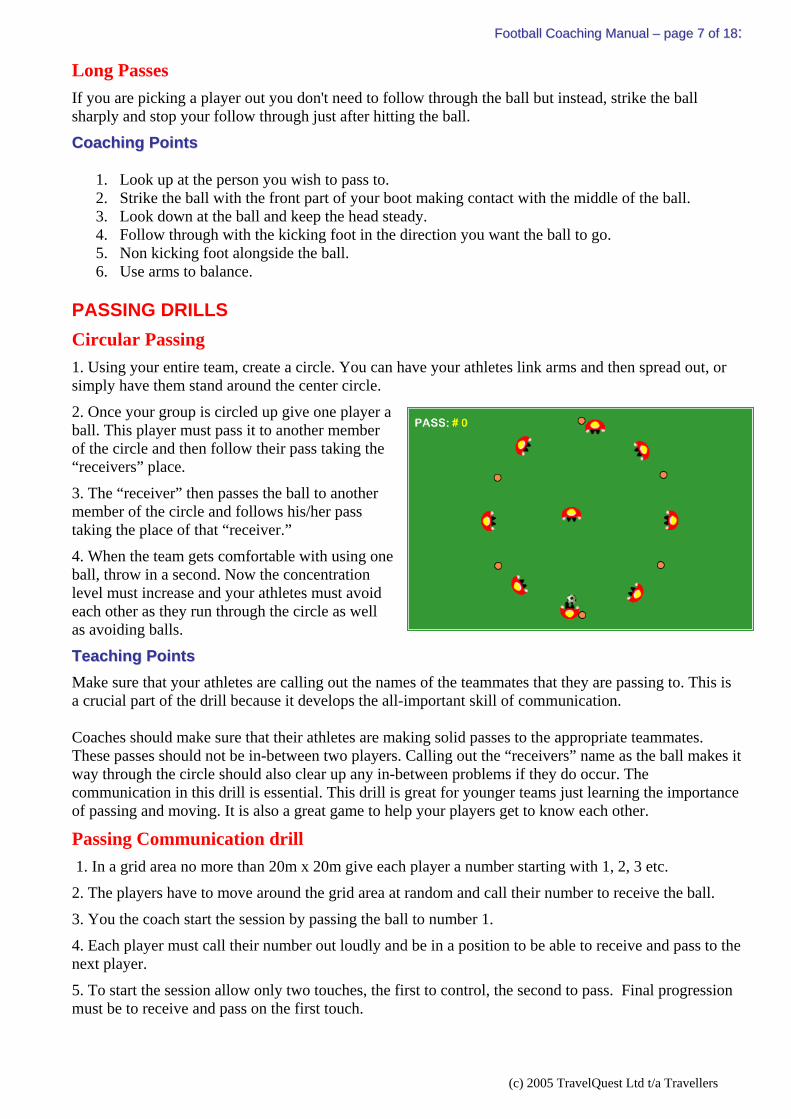
PASSING DRILLS Circular Passing 1. Using your entire team, create a circle. You can have your athletes link arms and then spread out, or simply have them stand around the center circle.
2. Once your group is circled up give one player a ball. This player must pass it to another member of the circle and then follow their pass taking the “receivers” place.
3. The “receiver” then passes the ball to another member of the circle and follows his/her pass taking the place of that “receiver.”
4. When the team gets comfortable with using one ball, throw in a second. Now the concentration level must increase and your athletes must avoid each other as they run through the circle as well as avoiding balls.
TTeeaacchhiinngg PPooiinnttss Make sure that your athletes are calling out the names of the teammates that they are passing to. This is a crucial part of the drill because it develops the all-important skill of communication. Coaches should make sure that their athletes are making solid passes to the appropriate teammates. These passes should not be in-between two players. Calling out the “receivers” name as the ball makes it way through the circle should also clear up any in-between problems if they do occur. The communication in this drill is essential. This drill is great for younger teams just learning the importance of passing and moving. It is also a great game to help your players get to know each other.
Passing Communication drill 1. In a grid area no more than 20m x 20m give each player a number starting with 1, 2, 3 etc.
2. The players have to move around the grid area at random and call their number to receive the ball.
3. You the coach start the session by passing the ball to number 1.
4. Each player must call their number out loudly and be in a position to be able to receive and pass to the next player.
5. To start the session allow only two touches, the first to control, the second to pass. Final progression must be to receive and pass on the first touch.
(c) 2005 TravelQuest Ltd t/a Travellers
FFoooottbbaallll CCooaacchhiinngg MMaannuuaall –– ppaaggee 88 ooff 1188::
TTeeaacchhiinngg PPooiinnttss All passes must be played on the ground. Stress to the players the need to shout their number early as the ball is passed. This will allow the receiving player to look up and see where to pass.
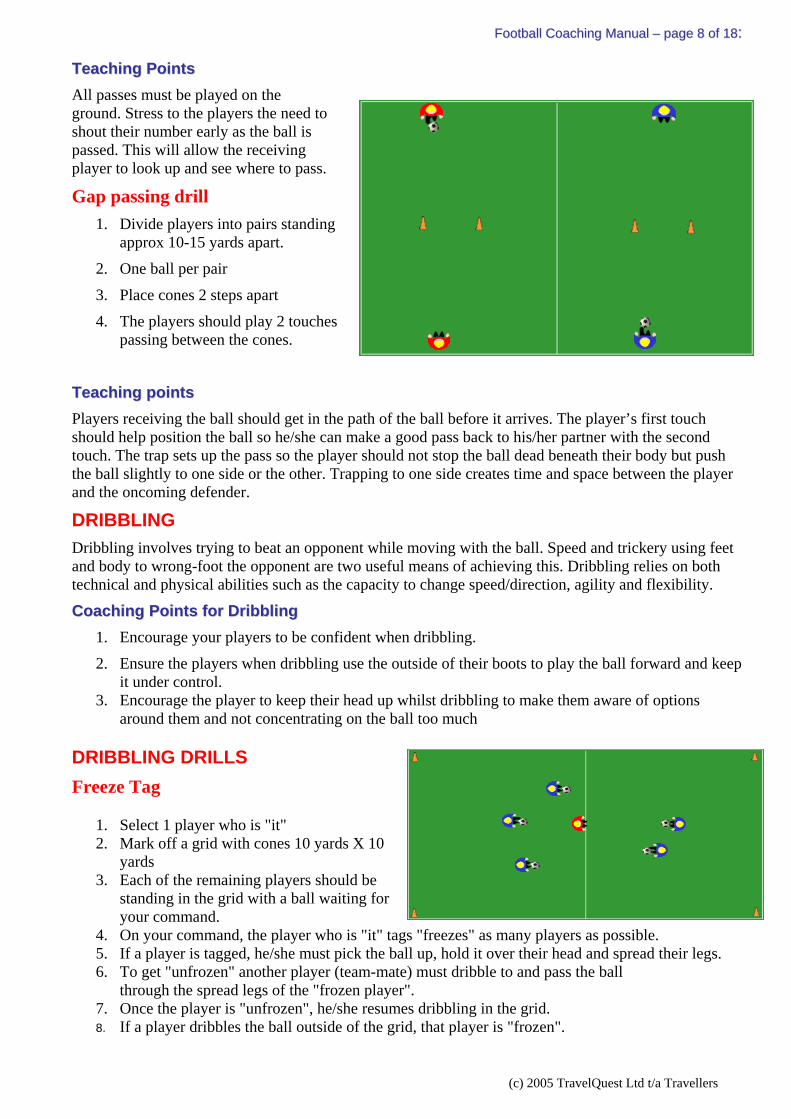
Gap passing drill 1. Divide players into pairs standing
approx 10-15 yards apart.
2. One ball per pair
3. Place cones 2 steps apart
4. The players should play 2 touches passing between the cones.
TTeeaacchhiinngg ppooiinnttss Players receiving the ball should get in the path of the ball before it arrives. The player’s first touch should help position the ball so he/she can make a good pass back to his/her partner with the second touch. The trap sets up the pass so the player should not stop the ball dead beneath their body but push the ball slightly to one side or the other. Trapping to one side creates time and space between the player and the oncoming defender.
DRIBBLING Dribbling involves trying to beat an opponent while moving with the ball. Speed and trickery using feet and body to wrong-foot the opponent are two useful means of achieving this. Dribbling relies on both technical and physical abilities such as the capacity to change speed/direction, agility and flexibility. CCooaacchhiinngg PPooiinnttss ffoorr DDrriibbbblliinngg
1. Encourage your players to be confident when dribbling.
2. Ensure the players when dribbling use the outside of their boots to play the ball forward and keep it under control.
3. Encourage the player to keep their head up whilst dribbling to make them aware of options around them and not concentrating on the ball too much
DRIBBLING DRILLS Freeze Tag
1. Select 1 player who is "it" 2. Mark off a grid with cones 10 yards X 10
yards 3. Each of the remaining players should be
standing in the grid with a ball waiting for your command.
4. On your command, the player who is "it" tags "freezes" as many players as possible. 5. If a player is tagged, he/she must pick the ball up, hold it over their head and spread their legs. 6. To get "unfrozen" another player (team-mate) must dribble to and pass the ball
through the spread legs of the "frozen player". 7. Once the player is "unfrozen", he/she resumes dribbling in the grid. 8. If a player dribbles the ball outside of the grid, that player is "frozen".
(c) 2005 TravelQuest Ltd t/a Travellers
FFoooottbbaallll CCooaacchhiinngg MMaannuuaall –– ppaaggee 99 ooff 1188::
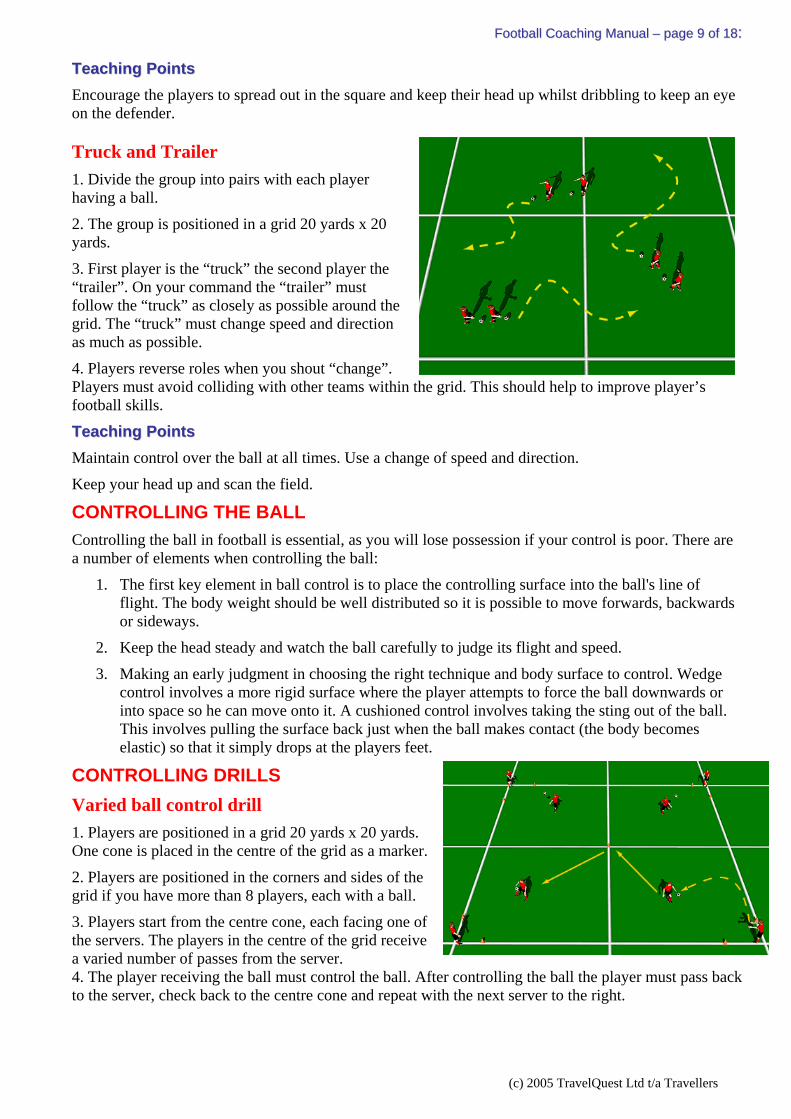
TTeeaacchhiinngg PPooiinnttss Encourage the players to spread out in the square and keep their head up whilst dribbling to keep an eye on the defender. Truck and Trailer 1. Divide the group into pairs with each player having a ball.
2. The group is positioned in a grid 20 yards x 20 yards.
3. First player is the “truck” the second player the “trailer”. On your command the “trailer” must follow the “truck” as closely as possible around the grid. The “truck” must change speed and direction as much as possible.
4. Players reverse roles when you shout “change”. Players must avoid colliding with other teams within the grid. This should help to improve player’s football skills.
TTeeaacchhiinngg PPooiinnttss Maintain control over the ball at all times. Use a change of speed and direction.
Keep your head up and scan the field.
CONTROLLING THE BALL Controlling the ball in football is essential, as you will lose possession if your control is poor. There are a number of elements when controlling the ball:
1. The first key element in ball control is to place the controlling surface into the ball's line of flight. The body weight should be well distributed so it is possible to move forwards, backwards or sideways.
2. Keep the head steady and watch the ball carefully to judge its flight and speed.
3. Making an early judgment in choosing the right technique and body surface to control. Wedge control involves a more rigid surface where the player attempts to force the ball downwards or into space so he can move onto it. A cushioned control involves taking the sting out of the ball. This involves pulling the surface back just when the ball makes contact (the body becomes elastic) so that it simply drops at the players feet.
CONTROLLING DRILLS Varied ball control drill 1. Players are positioned in a grid 20 yards x 20 yards. One cone is placed in the centre of the grid as a marker.
2. Players are positioned in the corners and sides of the grid if you have more than 8 players, each with a ball.
3. Players start from the centre cone, each facing one of the servers. The players in the centre of the grid receive a varied number of passes from the server. 4. The player receiving the ball must control the ball. After controlling the ball the player must pass back to the server, check back to the centre cone and repeat with the next server to the right.
(c) 2005 TravelQuest Ltd t/a Travellers
FFoooottbbaallll CCooaacchhiinngg MMaannuuaall –– ppaaggee 1100 ooff 1188::
TTeeaacchhiinngg PPooiinnttss Emphasis should be placed on quality control. The pass should be played back at the correct pace so the receiver can control the ball with ease. It is advised to have an extra ball at each cone to keep the tempo of the practice constant.
MARKING Marking within football is a very important aspect; if you lose the player that you are marking it allows him to have more of a chance to score. Here is a marking drill that you can use to help the players marking skills:
Man-Marking Game1. The teams play in a squared area with the condition that each player in each team is responsible
for marking and tackling his own particular opponent.
2. If any player marks or tackles somebody other than the man he is delegated to watch, then a free-kick will be awarded against him.
3. Each team has a 'free-man' or 'sweeper' who is restricted being the play maker making passes and receiving them using only two- or one-touches.
The aim of the game is to keep the ball between your team for as long as possible marking your player closely.
SHOOTING Shooting in football is an important aspect of the game; in today’s game every player on the pitch needs to be able to shoot well as goals are coming from a variety of players in different positions. There is a number of teaching points when coaching shooting:
1. Strike through the middle or top half of the ball 2. Head over the ball and eyes on the ball, non-kicking foot next to the ball 3. Ensure you follow through with the shooting foot
SHOOTING DRILLS Pass, Receive & Shoot
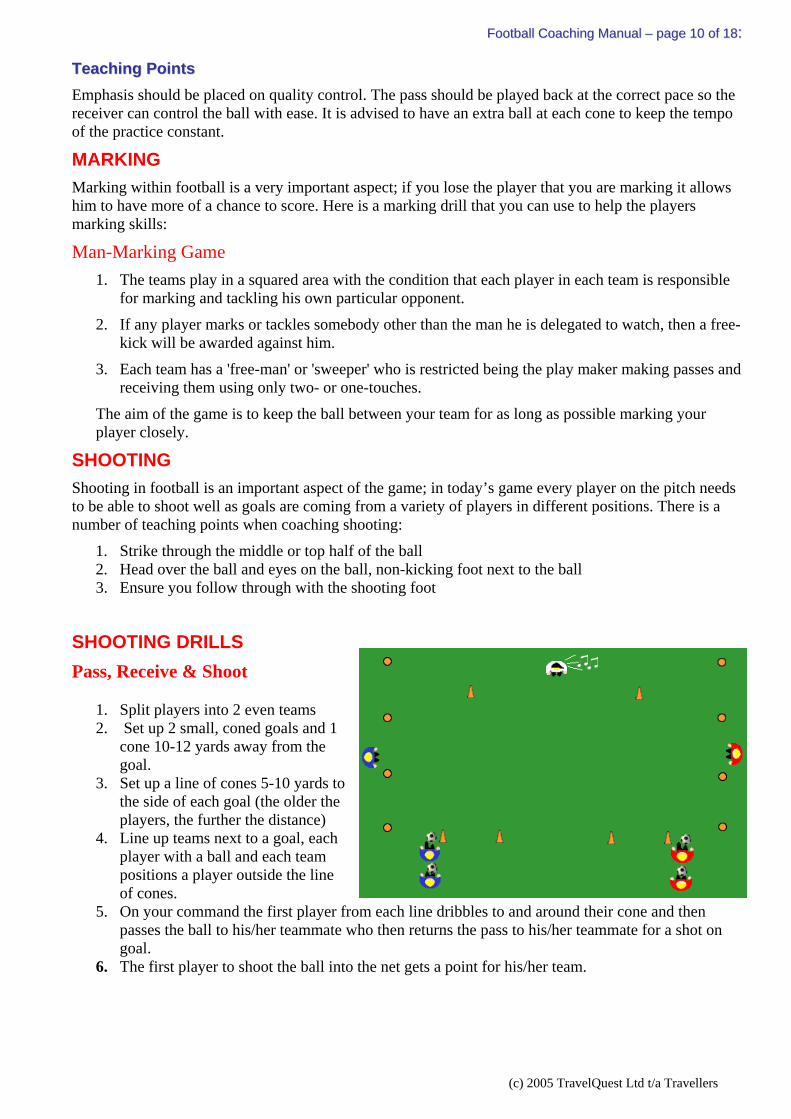
1. Split players into 2 even teams 2. Set up 2 small, coned goals and 1
cone 10-12 yards away from the goal.
3. Set up a line of cones 5-10 yards to the side of each goal (the older the players, the further the distance)
4. Line up teams next to a goal, each player with a ball and each team positions a player outside the line of cones.
5. On your command the first player from each line dribbles to and around their cone and then passes the ball to his/her teammate who then returns the pass to his/her teammate for a shot on goal.
6. The first player to shoot the ball into the net gets a point for his/her team.
(c) 2005 TravelQuest Ltd t/a Travellers
FFoooottbbaallll CCooaacchhiinngg MMaannuuaall –– ppaaggee 1111 ooff 1188::
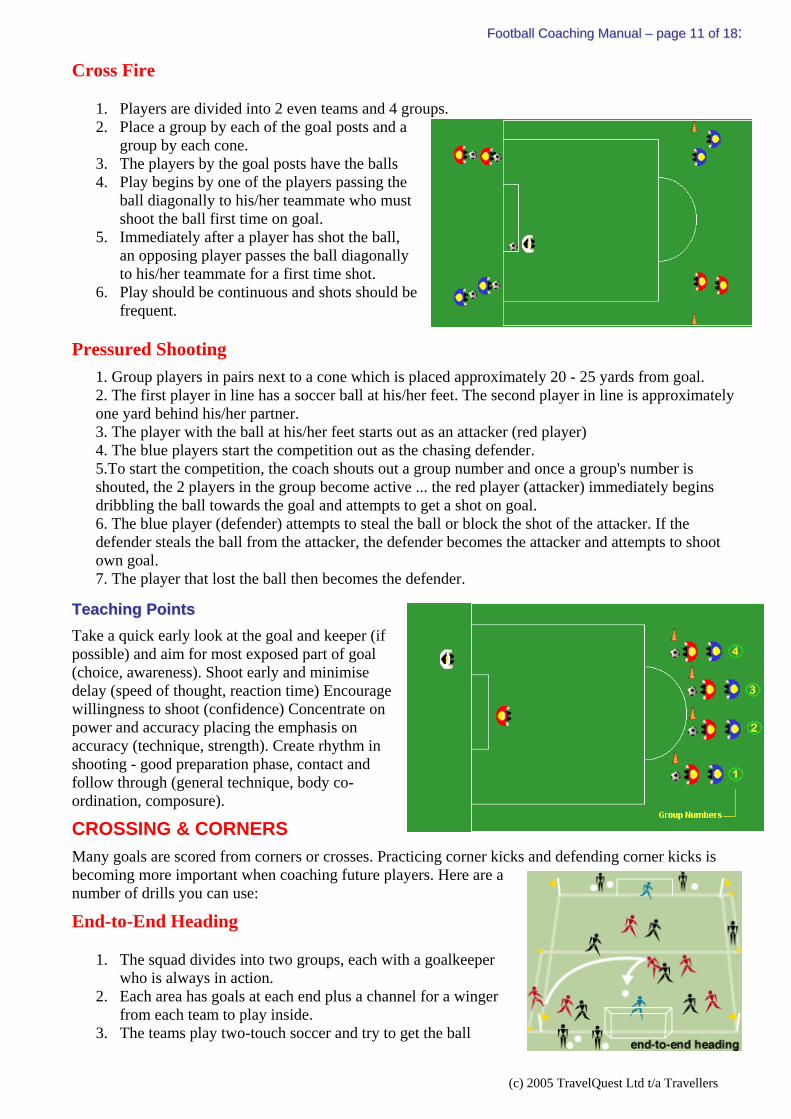
Cross Fire
1. Players are divided into 2 even teams and 4 groups. 2. Place a group by each of the goal posts and a
group by each cone. 3. The players by the goal posts have the balls 4. Play begins by one of the players passing the
ball diagonally to his/her teammate who must shoot the ball first time on goal.
5. Immediately after a player has shot the ball, an opposing player passes the ball diagonally to his/her teammate for a first time shot.
6. Play should be continuous and shots should be frequent.
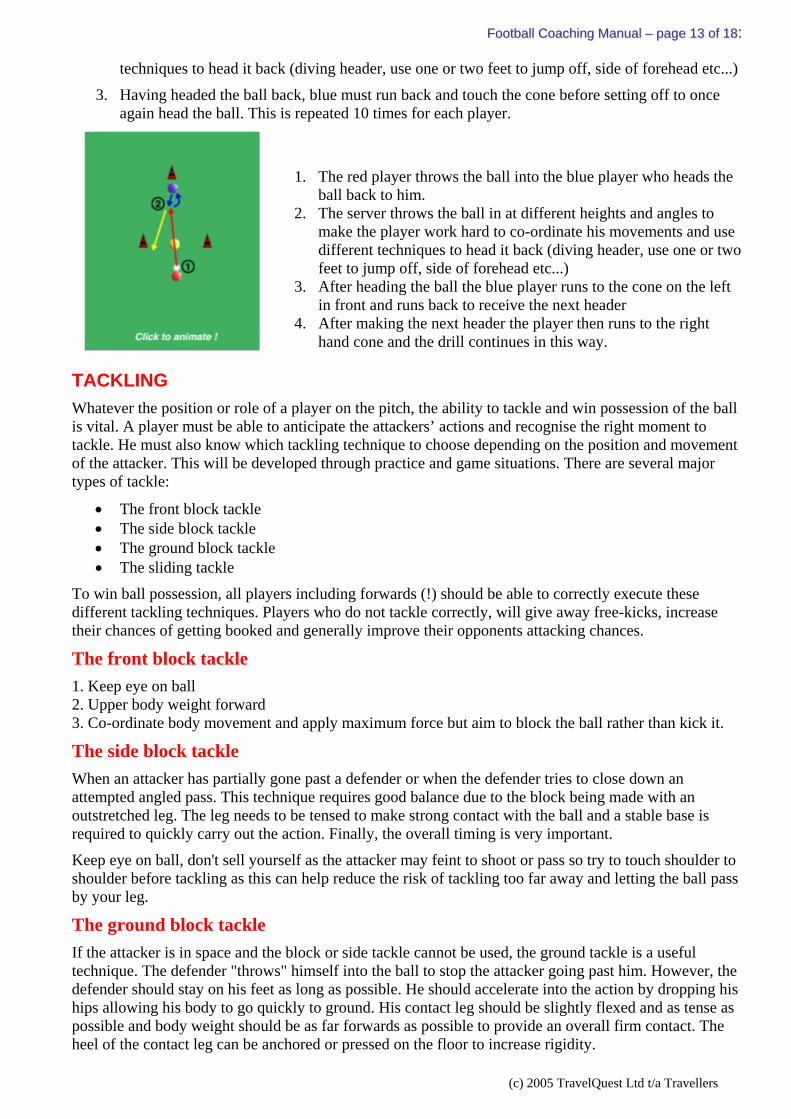
Pressured Shooting 1. Group players in pairs next to a cone which is placed approximately 20 - 25 yards from goal. 2. The first player in line has a soccer ball at his/her feet. The second player in line is approximately one yard behind his/her partner. 3. The player with the ball at his/her feet starts out as an attacker (red player) 4. The blue players start the competition out as the chasing defender. 5.To start the competition, the coach shouts out a group number and once a group's number is shouted, the 2 players in the group become active ... the red player (attacker) immediately begins dribbling the ball towards the goal and attempts to get a shot on goal. 6. The blue player (defender) attempts to steal the ball or block the shot of the attacker. If the defender steals the ball from the attacker, the defender becomes the attacker and attempts to shoot own goal. 7. The player that lost the ball then becomes the defender.
TTeeaacchhiinngg PPooiinnttss Take a quick early look at the goal and keeper (if possible) and aim for most exposed part of goal (choice, awareness). Shoot early and minimise delay (speed of thought, reaction time) Encourage willingness to shoot (confidence) Concentrate on power and accuracy placing the emphasis on accuracy (technique, strength). Create rhythm in shooting - good preparation phase, contact and follow through (general technique, body co-ordination, composure).
CROSSING & CORNERS Many goals are scored from corners or crosses. Practicing corner kicks and defending corner kicks is becoming more important when coaching future players. Here are a number of drills you can use:
End-to-End Heading
1. The squad divides into two groups, each with a goalkeeper who is always in action.
2. Each area has goals at each end plus a channel for a winger from each team to play inside.
3. The teams play two-touch soccer and try to get the ball
(c) 2005 TravelQuest Ltd t/a Travellers

FFoooottbbaallll CCooaacchhiinngg MMaannuuaall –– ppaaggee 1122 ooff 1188::
quickly to their own winger, who is restricted to the attacking half of the field and cannot be tackled in his channel.
4. The winger crosses the ball for attackers to attempt to score with headers while being challenged by defenders.
5. At the conclusion of every attack the goalkeeper rolls the ball to one of his team-mates who has just been defending and their team try to get the ball to their winger so that they can attack the other goal..
Clear the Decks 1. The squad splits into three groups of players.
2. One group act as ball retrievers, another as defenders and the last group have two players as attackers and two as crossers.
3. The wingers, who have a good supply of balls, each cross a ball in turn into the penalty area, but not into the goal area which is 'no-man's-land'.
4. The four defenders, lacking a goalkeeper, try to head the ball out of the marked out area while the two attackers attempt to score with headers or challenge for the ball.
5. If the defenders fail to use sufficient power to ' clear the decks' so that the ball lands past the penalty area line, then the two attackers who are positioned outside the penalty area can combine with the attackers who are positioned and try to score while the four defenders come out quickly to block the shot.
6. If the ball is cleared by a header which lands past the line, then the ball is returned to the wingers who cross alternately.
HEADERS When heading the ball there are a number of teaching points that players must be aware of and you as a coach must encourage:
Contact with the ball should always be made with the forehead area. From time to time, a player may use the top of their head to flick the ball on from a long flighted pass or throw-in. The eyes should always be open (at least until impact) and fixed on the ball and the body positioned in line. To direct the ball downwards, the forehead must make contact with the top-half of the ball. The side of the forehead can be used to glance headers on and the middle for more direct power headers. In a stationary position, the power comes from the legs, back and neck. The player "rocks" backward and pushes his body forward to meet the ball.
When attacking the ball to gain power, a player can run and jump off one leg to meet the ball. This requires good timing of the run as well as anticipation of where the ball will be placed. After take off, the upper body arches backwards and this momentum produces a snapping action where the body is propelled forward. At the same time the neck is extended then snapped forward in synchronisation with the body to strike the ball with maximum power. The ball must be struck at the top of the jump, if the player jumps too early, he will touch the ball on the way down and lose all power.
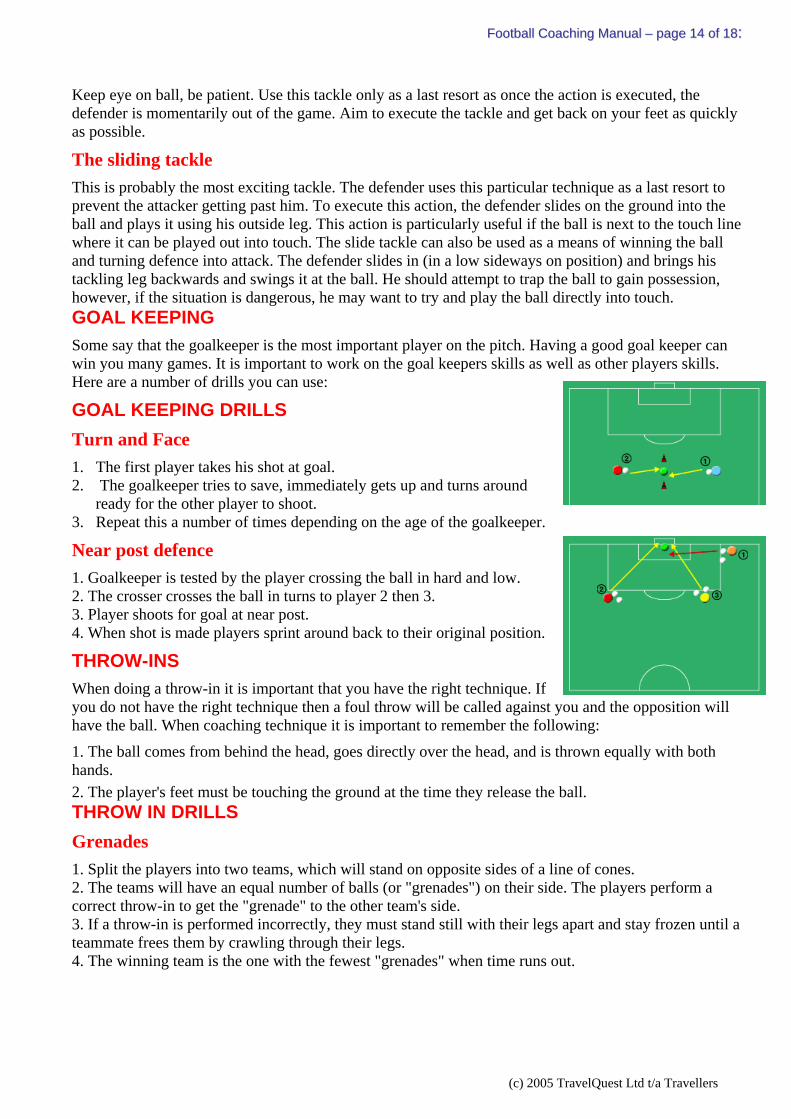
HEADING DRILLS 1. The red server throws the ball in and the blue player heads the ball back
to him.
2. The server throws the ball in at different heights and angles to make the player work hard to co-ordinate his movements and use different
(c) 2005 TravelQuest Ltd t/a Travellers
FFoooottbbaallll CCooaacchhiinngg MMaannuuaall –– ppaaggee 1133 ooff 1188::
techniques to head it back (diving header, use one or two feet to jump off, side of forehead etc...)
3. Having headed the ball back, blue must run back and touch the cone before setting off to once again head the ball. This is repeated 10 times for each player.
1. The red player throws the ball into the blue player who heads the ball back to him.
2. The server throws the ball in at different heights and angles to make the player work hard to co-ordinate his movements and use different techniques to head it back (diving header, use one or two feet to jump off, side of forehead etc...)
3. After heading the ball the blue player runs to the cone on the left in front and runs back to receive the next header
4. After making the next header the player then runs to the right hand cone and the drill continues in this way.
TACKLING Whatever the position or role of a player on the pitch, the ability to tackle and win possession of the ball is vital. A player must be able to anticipate the attackers’ actions and recognise the right moment to tackle. He must also know which tackling technique to choose depending on the position and movement of the attacker. This will be developed through practice and game situations. There are several major types of tackle:
• The front block tackle • The side block tackle • The ground block tackle • The sliding tackle
To win ball possession, all players including forwards (!) should be able to correctly execute these different tackling techniques. Players who do not tackle correctly, will give away free-kicks, increase their chances of getting booked and generally improve their opponents attacking chances.
The front block tackle 1. Keep eye on ball 2. Upper body weight forward 3. Co-ordinate body movement and apply maximum force but aim to block the ball rather than kick it.
The side block tackle When an attacker has partially gone past a defender or when the defender tries to close down an attempted angled pass. This technique requires good balance due to the block being made with an outstretched leg. The leg needs to be tensed to make strong contact with the ball and a stable base is required to quickly carry out the action. Finally, the overall timing is very important.
Keep eye on ball, don't sell yourself as the attacker may feint to shoot or pass so try to touch shoulder to shoulder before tackling as this can help reduce the risk of tackling too far away and letting the ball pass by your leg.
The ground block tackle If the attacker is in space and the block or side tackle cannot be used, the ground tackle is a useful technique. The defender "throws" himself into the ball to stop the attacker going past him. However, the defender should stay on his feet as long as possible. He should accelerate into the action by dropping his hips allowing his body to go quickly to ground. His contact leg should be slightly flexed and as tense as possible and body weight should be as far forwards as possible to provide an overall firm contact. The heel of the contact leg can be anchored or pressed on the floor to increase rigidity.
(c) 2005 TravelQuest Ltd t/a Travellers
FFoooottbbaallll CCooaacchhiinngg MMaannuuaall –– ppaaggee 1144 ooff 1188::
Keep eye on ball, be patient. Use this tackle only as a last resort as once the action is executed, the defender is momentarily out of the game. Aim to execute the tackle and get back on your feet as quickly as possible.
The sliding tackle This is probably the most exciting tackle. The defender uses this particular technique as a last resort to prevent the attacker getting past him. To execute this action, the defender slides on the ground into the ball and plays it using his outside leg. This action is particularly useful if the ball is next to the touch line where it can be played out into touch. The slide tackle can also be used as a means of winning the ball and turning defence into attack. The defender slides in (in a low sideways on position) and brings his tackling leg backwards and swings it at the ball. He should attempt to trap the ball to gain possession, however, if the situation is dangerous, he may want to try and play the ball directly into touch. GOAL KEEPING Some say that the goalkeeper is the most important player on the pitch. Having a good goal keeper can win you many games. It is important to work on the goal keepers skills as well as other players skills. Here are a number of drills you can use:
GOAL KEEPING DRILLS Turn and Face 1. The first player takes his shot at goal. 2. The goalkeeper tries to save, immediately gets up and turns around
ready for the other player to shoot. 3. Repeat this a number of times depending on the age of the goalkeeper.
Near post defence 1. Goalkeeper is tested by the player crossing the ball in hard and low. 2. The crosser crosses the ball in turns to player 2 then 3. 3. Player shoots for goal at near post. 4. When shot is made players sprint around back to their original position.
THROW-INS When doing a throw-in it is important that you have the right technique. If you do not have the right technique then a foul throw will be called against you and the opposition will have the ball. When coaching technique it is important to remember the following:
1. The ball comes from behind the head, goes directly over the head, and is thrown equally with both hands. 2. The player's feet must be touching the ground at the time they release the ball.THROW IN DRILLS Grenades 1. Split the players into two teams, which will stand on opposite sides of a line of cones. 2. The teams will have an equal number of balls (or "grenades") on their side. The players perform a correct throw-in to get the "grenade" to the other team's side. 3. If a throw-in is performed incorrectly, they must stand still with their legs apart and stay frozen until a teammate frees them by crawling through their legs. 4. The winning team is the one with the fewest "grenades" when time runs out.
(c) 2005 TravelQuest Ltd t/a Travellers
FFoooottbbaallll CCooaacchhiinngg MMaannuuaall –– ppaaggee 1155 ooff 1188::
FITNESS Fitness – Sprinting
4 x 10 meters 20 seconds rest walking back to the start line 3 x 20 meters 30 seconds rest walking back to the start line 2 x 30 meters 40 seconds rest walking back to the start line 1 x 50 meters 1 minutes rest walking back to the start line
This drill can be changed in distances and rest time depending on the age of the participants.
Up and Downs This drill is aimed to improve fitness as well as improving turning on the mark. Ensure players touch the line with their foot, if they do not then make them go back until they have. Mark out a grid with cones spread 5 meters apart. The number of cones and distances used will depend on the age of the players.
1. Players run from the starting cone to the 1st cone, touch it, turn around and run back to the starting cone.
2. Players then run from the starting cone to the 2nd cone touch it, turn around and run back to the starting cone
3. Players then run from the starting cone to the 3rd cone touch it, turn around and run back to the starting cone
4. The drill continues with a number of cones depending on what you feel suits the level of fitness.
Repeat the drill a number of times depending on the age of the children and the heat etc. Allow 5 minutes rest in-between each set.
Pyramids Set 5 cones in a line 5 meters from each other. Get the players into partners. The players in turns must go out to each cone and do the following:
1st cone: 10 press ups 2nd cone; 10 sit ups 3rd cone: 10 star jumps 4th cone: 10 burpes 5th cone: 10 press ups
When one player is exercising the other must lie on their stomach by the starter cone on their chest. Once their partner returns they must get up quickly using their hands to push off the ground with. Repeat this exercise a number of times depending on age, weather etc.
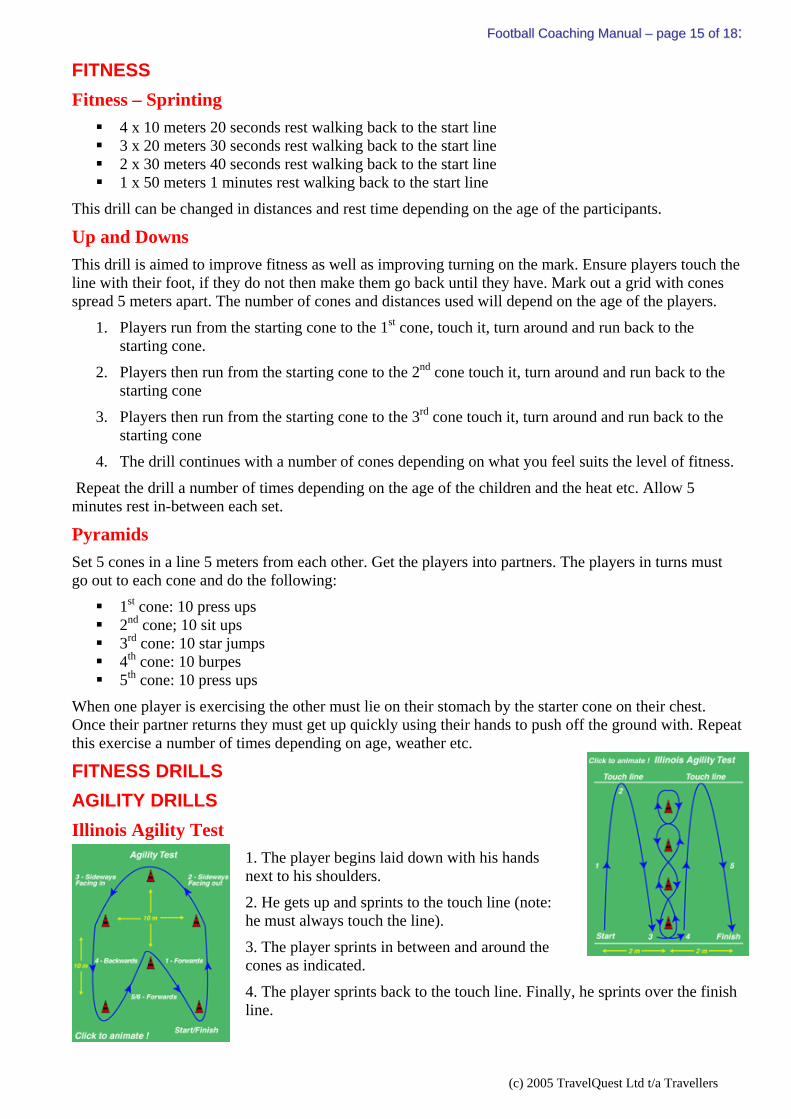
FITNESS DRILLS AGILITY DRILLS Illinois Agility Test
1. The player begins laid down with his hands next to his shoulders.
2. He gets up and sprints to the touch line (note: he must always touch the line).
3. The player sprints in between and around the cones as indicated.
4. The player sprints back to the touch line. Finally, he sprints over the finish line.
(c) 2005 TravelQuest Ltd t/a Travellers
FFoooottbbaallll CCooaacchhiinngg MMaannuuaall –– ppaaggee 1166 ooff 1188::
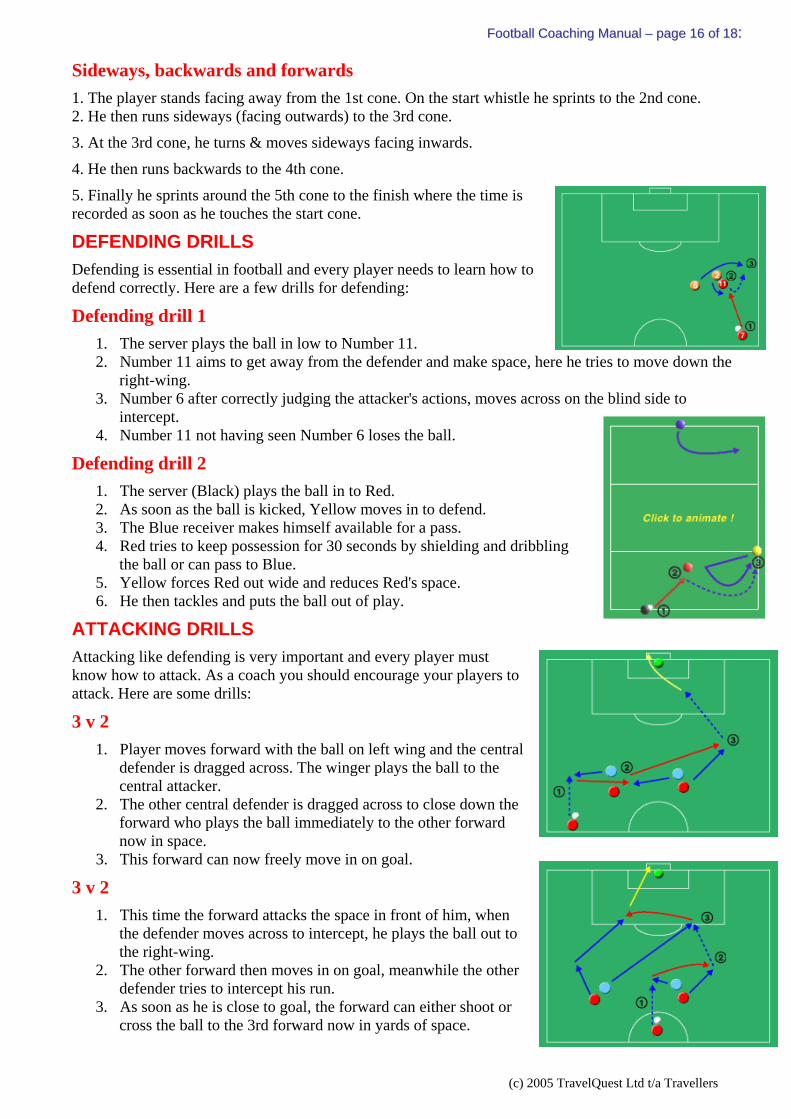
Sideways, backwards and forwards 1. The player stands facing away from the 1st cone. On the start whistle he sprints to the 2nd cone. 2. He then runs sideways (facing outwards) to the 3rd cone.
3. At the 3rd cone, he turns & moves sideways facing inwards.
4. He then runs backwards to the 4th cone.
5. Finally he sprints around the 5th cone to the finish where the time is recorded as soon as he touches the start cone.
DEFENDING DRILLS Defending is essential in football and every player needs to learn how to defend correctly. Here are a few drills for defending:
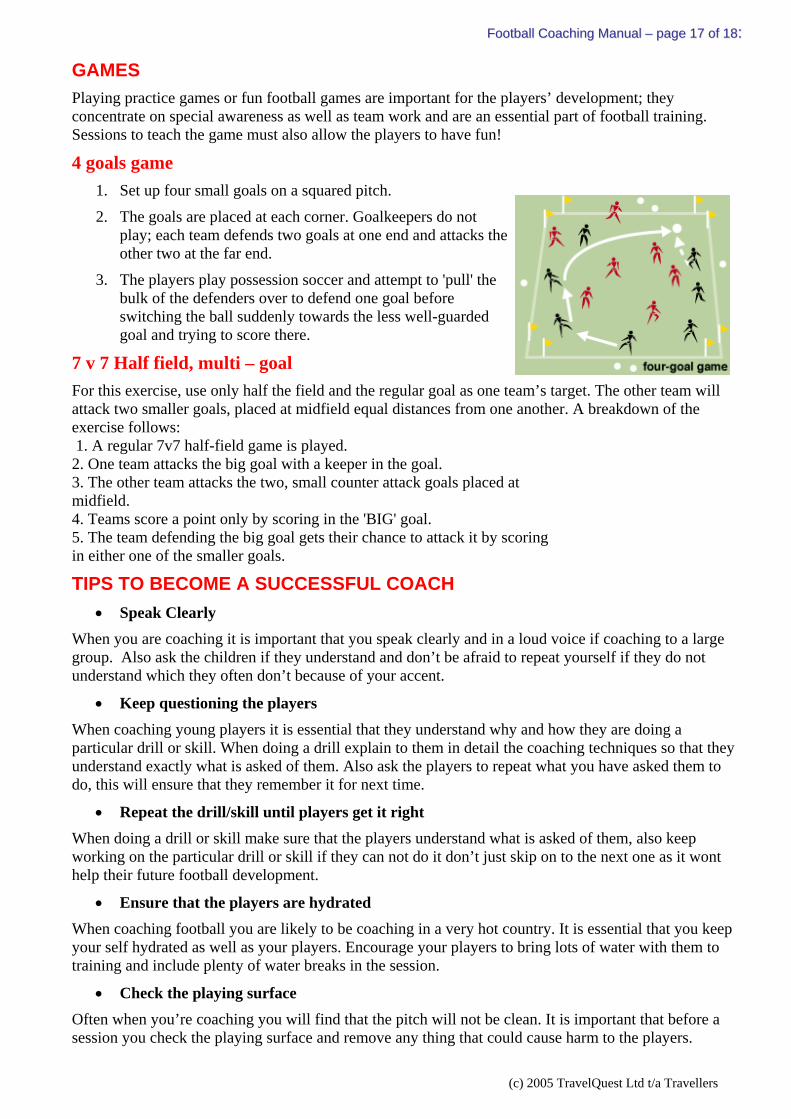
Defending drill 1 1. The server plays the ball in low to Number 11. 2. Number 11 aims to get away from the defender and make space, here he tries to move down the
right-wing. 3. Number 6 after correctly judging the attacker's actions, moves across on the blind side to
intercept. 4. Number 11 not having seen Number 6 loses the ball.
Defending drill 2 1. The server (Black) plays the ball in to Red. 2. As soon as the ball is kicked, Yellow moves in to defend. 3. The Blue receiver makes himself available for a pass. 4. Red tries to keep possession for 30 seconds by shielding and dribbling
the ball or can pass to Blue. 5. Yellow forces Red out wide and reduces Red's space. 6. He then tackles and puts the ball out of play.
ATTACKING DRILLS Attacking like defending is very important and every player must know how to attack. As a coach you should encourage your players to attack. Here are some drills:
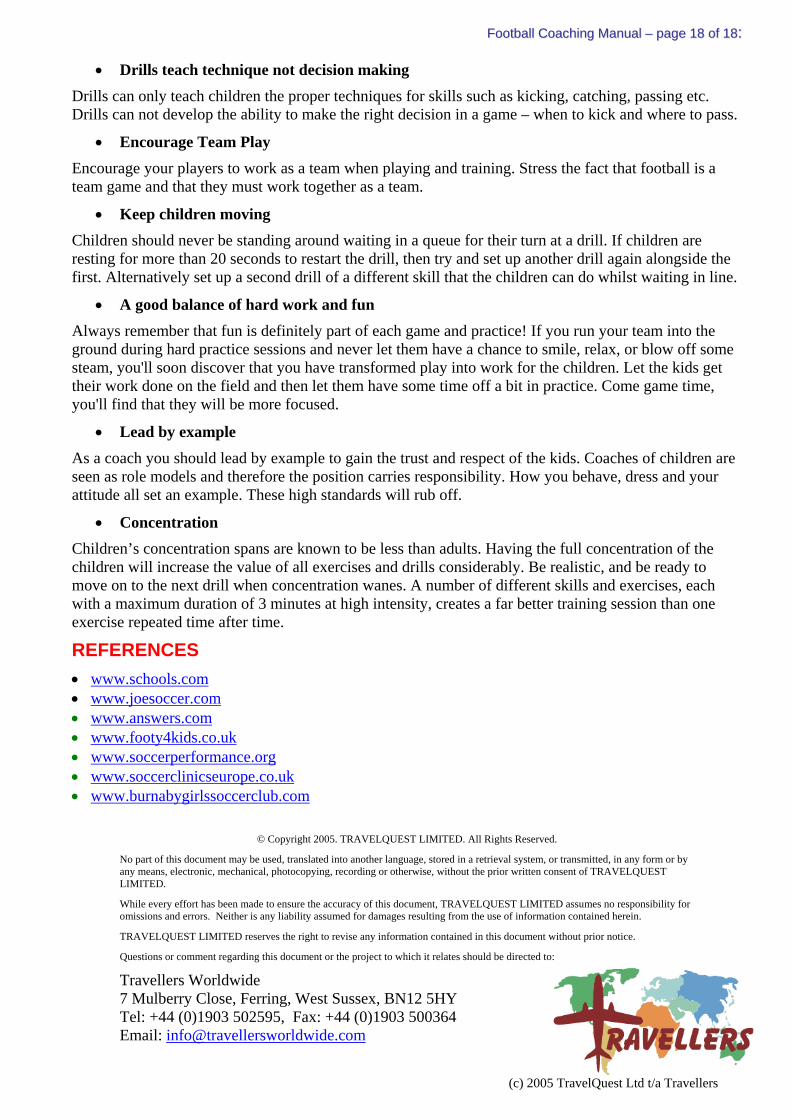
3 v 2 1. Player moves forward with the ball on left wing and the central
defender is dragged across. The winger plays the ball to the central attacker.
2. The other central defender is dragged across to close down the forward who plays the ball immediately to the other forward now in space.
3. This forward can now freely move in on goal.
3 v 2 1. This time the forward attacks the space in front of him, when
the defender moves across to intercept, he plays the ball out to the right-wing.
2. The other forward then moves in on goal, meanwhile the other defender tries to intercept his run.
3. As soon as he is close to goal, the forward can either shoot or cross the ball to the 3rd forward now in yards of space.
(c) 2005 TravelQuest Ltd t/a Travellers
FFoooottbbaallll CCooaacchhiinngg MMaannuuaall –– ppaaggee 1177 ooff 1188::
GAMES Playing practice games or fun football games are important for the players’ development; they concentrate on special awareness as well as team work and are an essential part of football training. Sessions to teach the game must also allow the players to have fun!
4 goals game 1. Set up four small goals on a squared pitch.
2. The goals are placed at each corner. Goalkeepers do not play; each team defends two goals at one end and attacks the other two at the far end.
3. The players play possession soccer and attempt to 'pull' the bulk of the defenders over to defend one goal before switching the ball suddenly towards the less well-guarded goal and trying to score there.
7 v 7 Half field, multi – goal For this exercise, use only half the field and the regular goal as one team’s target. The other team will attack two smaller goals, placed at midfield equal distances from one another. A breakdown of the exercise follows: 1. A regular 7v7 half-field game is played. 2. One team attacks the big goal with a keeper in the goal. 3. The other team attacks the two, small counter attack goals placed at midfield. 4. Teams score a point only by scoring in the 'BIG' goal. 5. The team defending the big goal gets their chance to attack it by scoring in either one of the smaller goals.
TIPS TO BECOME A SUCCESSFUL COACH • Speak Clearly
When you are coaching it is important that you speak clearly and in a loud voice if coaching to a large group. Also ask the children if they understand and don’t be afraid to repeat yourself if they do not understand which they often don’t because of your accent.
• Keep questioning the players When coaching young players it is essential that they understand why and how they are doing a particular drill or skill. When doing a drill explain to them in detail the coaching techniques so that they understand exactly what is asked of them. Also ask the players to repeat what you have asked them to do, this will ensure that they remember it for next time.
• Repeat the drill/skill until players get it right When doing a drill or skill make sure that the players understand what is asked of them, also keep working on the particular drill or skill if they can not do it don’t just skip on to the next one as it wont help their future football development.
• Ensure that the players are hydrated When coaching football you are likely to be coaching in a very hot country. It is essential that you keep your self hydrated as well as your players. Encourage your players to bring lots of water with them to training and include plenty of water breaks in the session.
• Check the playing surface Often when you’re coaching you will find that the pitch will not be clean. It is important that before a session you check the playing surface and remove any thing that could cause harm to the players.
(c) 2005 TravelQuest Ltd t/a Travellers
FFoooottbbaallll CCooaacchhiinngg MMaannuuaall –– ppaaggee 1188 ooff 1188::
• Drills teach technique not decision making Drills can only teach children the proper techniques for skills such as kicking, catching, passing etc. Drills can not develop the ability to make the right decision in a game – when to kick and where to pass.
• Encourage Team Play Encourage your players to work as a team when playing and training. Stress the fact that football is a team game and that they must work together as a team.
• Keep children moving Children should never be standing around waiting in a queue for their turn at a drill. If children are resting for more than 20 seconds to restart the drill, then try and set up another drill again alongside the first. Alternatively set up a second drill of a different skill that the children can do whilst waiting in line.
• A good balance of hard work and fun Always remember that fun is definitely part of each game and practice! If you run your team into the ground during hard practice sessions and never let them have a chance to smile, relax, or blow off some steam, you'll soon discover that you have transformed play into work for the children. Let the kids get their work done on the field and then let them have some time off a bit in practice. Come game time, you'll find that they will be more focused.
• Lead by example As a coach you should lead by example to gain the trust and respect of the kids. Coaches of children are seen as role models and therefore the position carries responsibility. How you behave, dress and your attitude all set an example. These high standards will rub off.
• Concentration Children’s concentration spans are known to be less than adults. Having the full concentration of the children will increase the value of all exercises and drills considerably. Be realistic, and be ready to move on to the next drill when concentration wanes. A number of different skills and exercises, each with a maximum duration of 3 minutes at high intensity, creates a far better training session than one exercise repeated time after time.
REFERENCES • www.schools.com • www.joesoccer.com • www.answers.com • www.footy4kids.co.uk • www.soccerperformance.org • www.soccerclinicseurope.co.uk • www.burnabygirlssoccerclub.com
© Copyright 2005. TRAVELQUEST LIMITED. All Rights Reserved.
No part of this document may be used, translated into another language, stored in a retrieval system, or transmitted, in any form or by any means, electronic, mechanical, photocopying, recording or otherwise, without the prior written consent of TRAVELQUEST LIMITED.
While every effort has been made to ensure the accuracy of this document, TRAVELQUEST LIMITED assumes no responsibility for omissions and errors. Neither is any liability assumed for damages resulting from the use of information contained herein.
TRAVELQUEST LIMITED reserves the right to revise any information contained in this document without prior notice.
Questions or comment regarding this document or the project to which it relates should be directed to:
Travellers Worldwide 7 Mulberry Close, Ferring, West Sussex, BN12 5HY Tel: +44 (0)1903 502595, Fax: +44 (0)1903 500364 Email: [email protected]
(c) 2005 TravelQuest Ltd t/a Travellers