training program for medium...
TRANSCRIPT
TC 21-305-8
TRAINING PROGRAM FOR MEDIUM VEHICLES
DISTRIBUTION RESTRICTION: Approved for public release; distribution is unlimited
HEADQUARTERS, DEPARTMENT OF THE ARMY

TC 21-305-8
i
Training Circular No. 21-305-8
Headquarters, Department of the Army
Washington, DC, 16 September 1992
TRAINING PROGRAM FOR MEDIUM VEHICLES
TABLE OF CONTENTS
Page
PREFACE ……………………………………………………………………………… ii
CHAPTER 1 RISK MANAGEMENT…………………………...…………….……..… 1-1
CHAPTER 2 INSTRUCTIONAL AIDS………………………………………………… 2-1
CHAPTER 3 SAMPLE TRAINING SCHEDULE……………………....…………….. 3-1
CHAPTER 4 LESSON OUTLINES………………………………………………..…… 4-1
Use Technical Manuals (TMs) and Lubrication Orders (LOs) and Make Entries on DA Form 2404…………………………………………………..
4-1
Know Safety Rules and Procedures for Driving Under Adverse Road Conditions…………………………………………………………………..
4-8
Identify Controls: Instruments, Indicators, and Equipment…………..….... 4-14 Perform Operator Preventive Maintenance Checks and Services (PMCS)... 4-17 Prepare DD Form 1970 (Motor Equipment Utilization Record……….…... 4-19 Report an Accident (Make Required Entries on DD Form 518 and SF 91).. 4-24 Drive Vehicle with Manual Transmission………………………………..... 4-33 Drive Vehicle with Automatic Transmission……………………..………... 4-37 Drive Vehicle on the Road (Primary and Secondary)...………….……..…. 4-41 Back and Park a Vehicle……….……………………………………..……. 4-51 Drive Vehicle at Night………………….…………………….…………..... 4-55
CHAPTER 5 SAMPLE TRAINING AREAS…………………………………..………. 5-1
CHAPTER 6 END OF COURSE COMPREHENSIVE TEST (EOCCT)……...…….. 6-1
CHAPTER 7 TRUCK TRANSPORT OF PASSENGERS…………………………….. 7-1
Section I – Training….………………….…………………….…………..... 7-1 Section II – Testing….………………….…………………….…………..... 7-6
CHAPTER 8 BUS TRANSPORT OF PASSENGERS……...………………………….. 8-1
Section I – Training….………………….…………………….…………..... 8-1 Section II – Testing….………………….…………………….…………..... 8-7 DISTRIBUTION RESTRICTION: Approved for public release; distribution is unlimited.
TC 21-305-8
ii
CHAPTER 9 ADDITIONAL SUBJECTS – LESSON OUTLINES………………..…. 9-1
Perform Vehicle Preventive Maintenance Checks and Services (PMCS) on Trailers……………………………………………………...….…………...
9-1
Drive a Vehicle with Balanced (Pintle-Connected) Trailer...….…………... 9-3 Drive a Wheeled Vehicle in a Convoy……………………………………... 9-8 Drive a Wheeled Vehicle in a Convoy Under Blackout Conditions……..… 9-12
APPENDIX GROUND GUIDE SAFETY PROCEDURES…………………………... A-1
GLOSSARY ………………………………………………………………………...…..Glossary-1
REFERENCES …………………………………………………………………………..References-1
TC 21-305-8
iii
PREFACE
This training circular (TC) provides a training program for the wheeled vehicle operator of medium vehicles (straight vehicles, 5 ton and greater), in accordance with Army Regulation (AR) 600-55. It can be used to train drivers of tactical or commercially- designed vehicles. Instructions in this TC are written in general terms because they include driver tasks for several vehicles. Therefore, use the appropriate vehicle operator's manual in conjunction with this TC. While developing this TC, each driver candidate was assumed to have a state driver's license and some past driving experience. Less experienced soldiers will need additional subjects and time to train to the standard. This TC provides standardized training and testing in the operation, maintenance, and safety of medium wheeled vehicles. It stresses hands-on training with minimal classroom instruction. It does not include any theater-unique requirements. To provide effective training, each instructor should ensure his operators are trained and tested to the standards in this TC. Any deviation from successfully completing these basic standards will only decrease the soldiers' overall driving effectiveness. This training program offers commanders some alternatives. Chapter 7 contains training and testing for drivers transporting personnel in trucks; Chapter 8, for drivers transporting personnel in buses. For safety reasons, all drivers should be tested on the End Of Course Comprehensive Test (EOCCT) (Chapter 6) before proceeding to Chapters 7 or 8. Also, Chapter 9 includes additional subjects that can be added at the commander's discretion based on the unit's mission. Graduates (licensed drivers) of this training program should be supervised until they have gained the experience to operate safely. They should not be placed in situations that may be above their skill level. Periodically, the supervisor should ride with each driver to observe safe operating procedures and to determine the need for more training. The proponent of this publication is the US Army Transportation School. Submit changes for improving this publication on DA Form 2028 (Recommended Changes to Publications and Blank Forms) and forward it to Commandant, US Army Transportation School, ATSP-TDX, Fort Eustis, Virginia 23604-5001. Unless this publication states otherwise, masculine nouns and pronouns do not refer exclusively to men.
TC 21-305-8
1-1
CHAPTER 1
RISK MANAGEMENT 1-1. BACKGROUND. Leaders must develop techniques that will save resources. Because the Army must be prepared to operate worldwide, the training mission has become increasingly demanding and so have the risks inherent in that mission. This increase in risks requires leaders to minimize or balance risks with essential mission needs. 1-2. DEFINITION. Risk is the possibility of a loss. The loss can be death, injury, property damage, or mission failure. Risk management identifies risks associated with a particular operation and weighs these risks against the overall training value to be gained. The three risk management basics are to--
a. Accept no unnecessary risk. b. Accept necessary risks that produce a net Army benefit. c. Make risk decisions at the proper command level.
1-3. RISK MANAGEMENT PROCESS. The risk management process uses the following approach:
a. Detect hazards and associated risks. Look for risks in each phase of the training or operation. b. Assess the risk. Ask these questions:
• What is the chance of a mishap?
• What degree of injury or equipment damage is possible?
NOTE: A low chance of a mishap and a high probability of minor injury equals low risk. A low chance of a mishap and a high probability of a fatality equals high risk.
c. Develop risk control alternates and make risk decisions. Develop risk control alternatives and make risk decisions. If you cannot eliminate the risk, then you must control it without sacrificing essential mission requirements. You can control some risks by modifying task standards, operational procedures, training requirements, and maintenance standards. Decisions take several forms:
• Selecting from available controls.
• Trading off mission elements against risk controls.
• Determining if controls reduce the risk to an acceptable level considering the mission benefits.
TC 21-305-8
1-2
d. Implement the risk control measures. You must integrate procedures to control risks into plans, orders, standing operating procedures (SOPs), and training. You must also integrate them into other means to ensure that the risk reduction measures will be used during actual operations. e. Supervise the operations. Leaders use the same supervision techniques such as on-the-scene spot-checks and performance indicators to monitor risk controls that they use to monitor overall operations. f. Evaluate the results. Include the effectiveness of risk management controls when you assess the operational results.
1-4. RISK ASSESSMENT ELEMENTS. Assessing risks has no hard and fast rules. Different training tasks involve different elements that can affect training safety. However, seven elements are central to the safe completion of most driver training tasks:
• Soldier qualification
• Vehicle type
• Weather
• Terrain
• Supervision
• Equipment
• Time of day Using matrices that assign a numerical value to each of the elements is one way to quickly appreciation the overall risks. The following matrices are examples of risk assessments for the seven elements common to driver training missions.
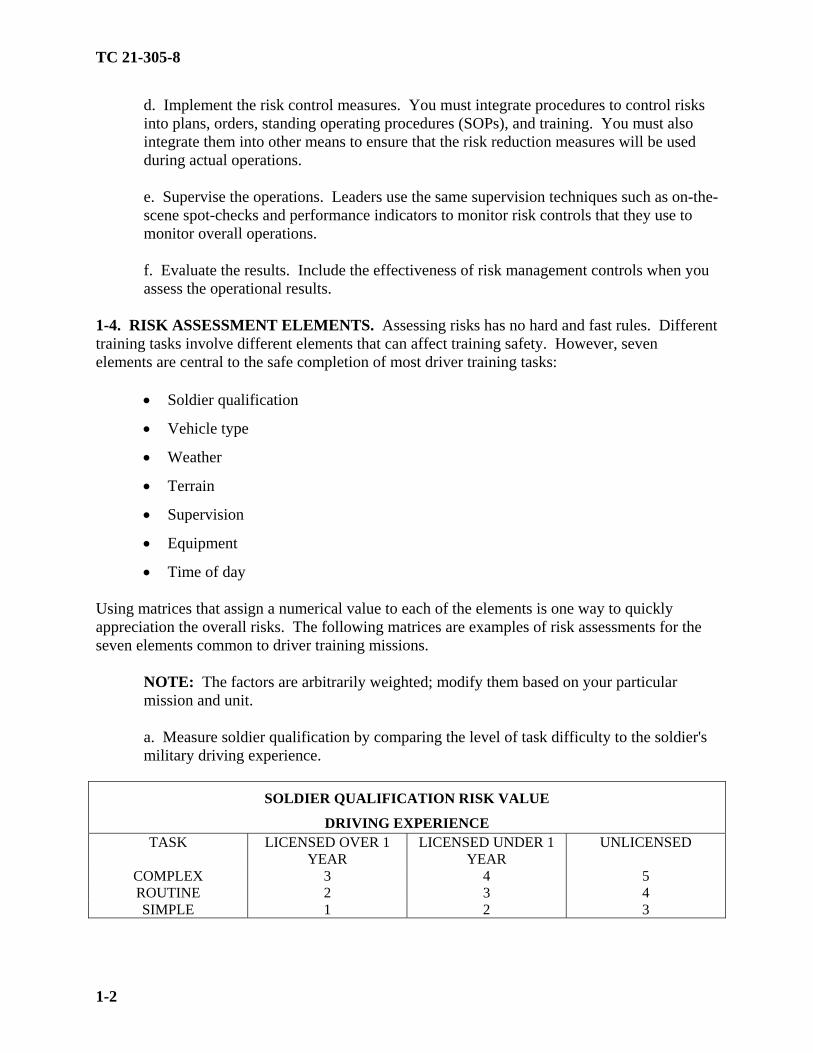
NOTE: The factors are arbitrarily weighted; modify them based on your particular mission and unit. a. Measure soldier qualification by comparing the level of task difficulty to the soldier's military driving experience.
SOLDIER QUALIFICATION RISK VALUE
DRIVING EXPERIENCE TASK LICENSED OVER 1
YEAR LICENSED UNDER 1
YEAR UNLICENSED
COMPLEX 3 4 5 ROUTINE 2 3 4 SIMPLE 1 2 3

TC 21-305-8
1-3
EXAMPLE: Unlicensed drivers learning to drive a five-speed manual transmission in an M813 would have a risk value of 5.
b. Measure vehicle type by comparing the vehicle configuration to the location of the training tasks.
VEHICLE TYPE RISK VALUE
VEHICLE CONFIGURATION LOCATION OF
TRAINING LIGHT
TRUCKS MEDIUM TRUCKS
TRACTOR/ SEMITRAILERS
ROAD 3 4 5 TRAINING AREA 2 3 4
MOTOR POOL 1 1 1 EXAMPLE: Driving a 44-passenger bus over the road would have a risk value of 4 (the same as a medium truck).
c. Measure weather by comparing temperature with moisture/ visibility conditions.
WEATHER RISK VALUE
VISIBILITY/MOISTURE TEMPERATURE
FAHRENHEIT CLEAR
DRY FOG/HUMID/
DRIZZLE DUST/RAIN/ SNOW/ICE
0-31˚ or 90˚+ 3 4 5 32˚-59˚ 2 3 5 60˚-89˚ 1 3 5
EXAMPLE: A task conducted outdoors at a temperature of 20˚F with snow or ice would have a risk value of 5.
d. Measure terrain by comparing the physical features of the land with the road network that exists in the area.
TERRAIN RISK VALUE
TRAFFICABILITY TYPE OF TERRAIN
STREETS/ HIGHWAYS
CONGESTED STREETS/HIGHWAYS
TRAILS CROSS-COUNTRY
JUNGLE/MOUNTAINS/ DESERTS
3 4 5
HILLS 2 4 4 FLAT/ROLLING 1 3 3
EXAMPLE: Driver training conducted at Fort Bragg over trails would have a risk value of 3.
TC 21-305-8
1-4
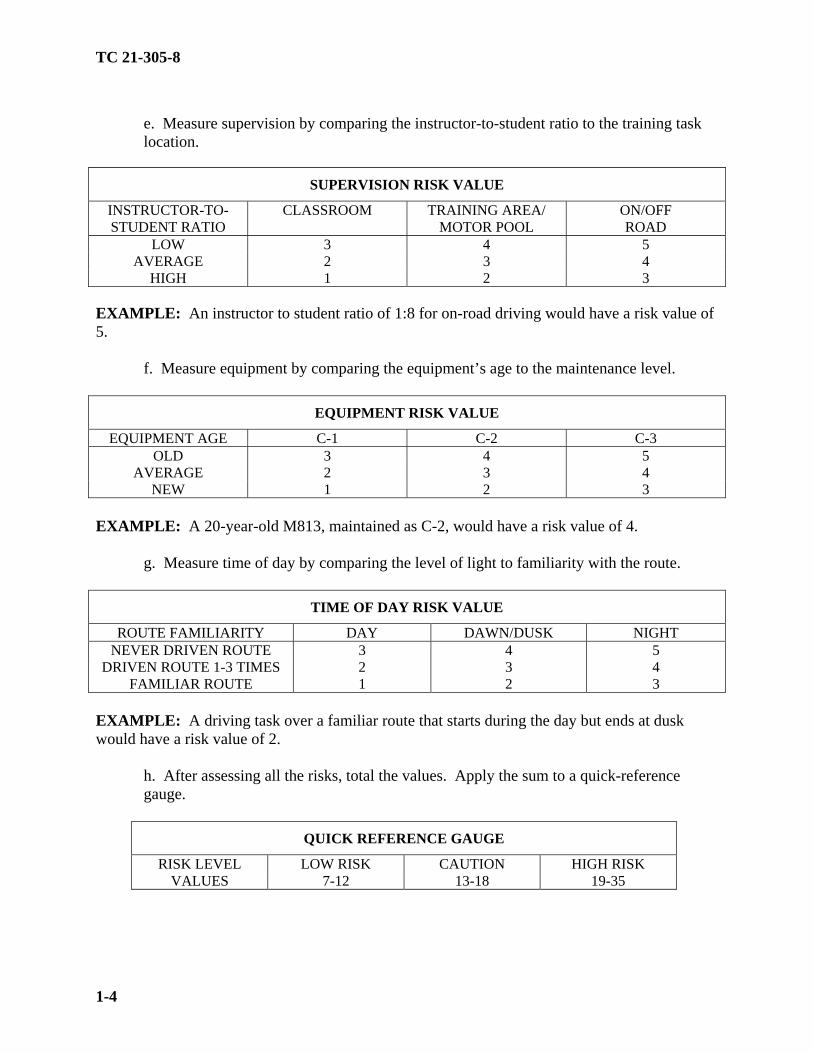
e. Measure supervision by comparing the instructor-to-student ratio to the training task location.
SUPERVISION RISK VALUE
INSTRUCTOR-TO-STUDENT RATIO
CLASSROOM TRAINING AREA/ MOTOR POOL
ON/OFF ROAD
LOW 3 4 5 AVERAGE 2 3 4
HIGH 1 2 3 EXAMPLE: An instructor to student ratio of 1:8 for on-road driving would have a risk value of 5.
f. Measure equipment by comparing the equipment’s age to the maintenance level.
EQUIPMENT RISK VALUE
EQUIPMENT AGE C-1 C-2 C-3 OLD 3 4 5
AVERAGE 2 3 4 NEW 1 2 3
EXAMPLE: A 20-year-old M813, maintained as C-2, would have a risk value of 4.
g. Measure time of day by comparing the level of light to familiarity with the route.
TIME OF DAY RISK VALUE
ROUTE FAMILIARITY DAY DAWN/DUSK NIGHT NEVER DRIVEN ROUTE 3 4 5
DRIVEN ROUTE 1-3 TIMES 2 3 4 FAMILIAR ROUTE 1 2 3
EXAMPLE: A driving task over a familiar route that starts during the day but ends at dusk would have a risk value of 2.
h. After assessing all the risks, total the values. Apply the sum to a quick-reference gauge.
QUICK REFERENCE GAUGE
RISK LEVEL LOW RISK CAUTION HIGH RISK VALUES 7-12 13-18 19-35
TC 21-305-8
1-5
When two or more elements have a risk value of 5, consider the overall rating as high risk. (A risk value of 5 signifies hazards inherent in that task. Analyzed the task for ways to reduce or eliminate the danger.) 1-5. DECISION AID. The level of the decision maker should correspond to the level of the risk. The greater the risk, the more senior the final decision maker should be. This matrix is a proposed decision aid to assist in determining the leadership decision-making level.
DECISION AID
RISK POINTS DECISION LEVEL LOW 7-12 SENIOR INSTRUCTOR
CAUTION 13-18 COMPANY COMMANDER HIGH 19-35 BATTALION COMMANDER
a. Operations with a value of 7 to 12 are low risk, and normal SOPs apply. b. A value of 13 to 18 is a caution area that warrants complete unit command involvement. Give a caution rating special consideration if one or two elements have significantly raised the overall risk level. For example, a risk value of 4 in the weather element category indicates the soldiers are more susceptible to cold injuries and require closer supervision. If you cannot lower the risk level, the company commander must approve the training mission. c. Operations with a value of 19 to 35 or that have two or more areas with a risk value of 5 are high risk. Procedures in paragraph 1-5b apply. If you cannot lower the risk level, the battalion commander must approve the mission.
1-6. RISK CONTROL ALTERNATIVES. The following options can help control risk:
a. Eliminate the hazard totally, if possible, or substitute a less hazardous alternative. b. Reduce the magnitude of the hazard or provide barriers to control the hazard. c. Modify operational procedures to minimize risk exposure consistent with mission needs. d. Train and motivate personnel to act effectively to avoid hazards.
1-7. RISK CONTROL MEASURES. Leaders must monitor the training to ensure risk control measures are followed. Never underestimate subordinates’ ability to sidetrack a decision they do not understand or support. You must also monitor the impact of risk reduction procedures when they are implemented to see that they really work. This is especially true of new and untested procedures.

TC 21-305-8
1-6
1-8. PAYOFFS. Risk management lets you use realistic training scenarios without a high potential cost in accidents. It also minimizes personnel and materiel losses in day-to-day training activities.

TC 21-305-8
1-7
SAMPLE RISK ASSESSMENT WORK SHEET TRAINING TASK: _________________________________________________________ POINTS: __________1. SOLDIER QUALIFICATION
TASK LICENSED OVER 1 YEAR
LICENSED UNDER 1 YEAR
UNLICENSED
COMPLEX 3 4 5 ROUTINE 2 3 4 SIMPLE 1 2 3
__________2. VEHICLE TYPE
LOCATION OF TRAINING
LIGHT TRUCKS
MEDIUM TRUCKS
TRACTOR/ SEMITRAILERS
ROAD 3 4 5 TRAINING AREA 2 3 4
MOTOR POOL 1 1 1 __________3. WEATHER
TEMPERATURE FAHRENHEIT
CLEAR/ DRY
FOG/HUMID/ DRIZZLE
DUST/RAIN/ SNOW/ICE
0-31˚ OR 90˚+ 3 4 5 32˚-59˚ 2 3 5 60˚-89˚ 1 3 5
________4. TERRAIN
TYPE OF TERRAIN
STREETS/ HIGHWAYS
CONGESTED STREETS/HIGHWAYS
TRAILS/ CROSS-COUNTRY
JUNGLE/MOUNTAINS/ DESERTS
3 4 5
HILLS 2 4 4 FLAT/ROLLING 1 3 3

TC 21-305-8
1-8
__________5. SUPERVISION
INSTRUCTOR-TO-STUDENT RATIO
CLASSROOM TRAINING AREA/ MOTOR POOL
ON/OFF ROAD
LOW 3 4 5 AVERAGE 2 3 4
HIGH 1 2 3 __________6. EQUIPMENT
EQUIPMENT AGE C-1 C-2 C-3 OLD 3 4 5
AVERAGE 2 3 4 NEW 1 2 3
__________7. TIME OF DAY
ROUTE FAMILIARITY DAY DAWN/DUSK NIGHT NEVER DRIVEN ROUTE 3 4 5
DRIVEN ROUTE 1-3 TIMES 2 3 4 FAMILIAR ROUTE 1 2 3
__________ TOTAL POINTS
QUICK REFERENCE GAUGE
RISK LEVEL LOW RISK CAUTION HIGH RISK VALUES 7-12 13-18 19-35
DECISION AID
RISK POINTS DECISION LEVEL LOW 7-12 SENIOR INSTRUCTOR
CAUTION 13-18 COMPANY COMMANDER HIGH 19-35 BATTALION COMMANDER
APPROVED BY: ______________________________________ DATE: ______________
TC 21-305-8
2-1
CHAPTER 2
INSTRUCTIONAL AIDS
1. Student Requirements:
a. Vehicles per student: One wheeled vehicle for every three students. b. Forms per student:
SF 91.
DD Form 518.
DD Form 1970.
DA Form 2404.
DA Form 2408-14.
c. Publications per student:
Appropriate vehicle operator's manual.
Appropriate vehicle lubrication order (LO).
Appropriate trailer operator's manual.
d. Nonstandard items: 40 empty petroleum, oils, and lubricants (POL) drums, traffic cones, or locally fabricated standards.
2. Instructor Requirements:
One each of the above forms.
One each of the above publications.
AR 600-55.
DA Pamphlet 738-750.
FM 21-60.
FM 21-305.
FM 55-312.
All host-nation or local directives and regulations.
TC 21-305-8
2-2
3. Training Facilities:
Classroom.
Motor pool.
Training area(s).
Suitable roadnet for driver training.
4. Training Aids and Devices:
Overhead projector.
Projection screen.
5. Optional Training Aids and Devices:
Television monitor.
Videocassette player.
AFV 20-1, PIN: 707998DA, "Failure to Buckle Up."
AFV 20-4, PIN: 708407DA, "Death Sleep."
AFV 20-5, PIN: 708402DA, "Unlicensed, Untrained Drivers."

TC 21-305-8
3-1
CHAPTER 3
SAMPLE TRAINING SCHEDULE
WHEN
WHAT
WHERE
TASK NUMBER
DAY 1 0730-0830 Use Technical Manuals and
Lubrication Orders and Make Entries on DA Form 2404
Classroom 551-721-1352
0830-0930 Prepare DD Form 1970 Classroom 551-721-1352 0930-1130 Report an Accident Classroom 551-721-1388 1130-1230 Lunch 1230-1330 Know Safety Rules and Procedures for
Driving Under Adverse Road Conditions
Classroom 551-721-1361
1330-1430 Identify Controls; Instruments, Indicators, and Equipment
Motor Pool 551-721-1352
1430-1630 Perform Operator PMCS Motor Pool 551-721-1352 551-721-1353
DAY 2 0730-0830 Drive Vehicle with Manual or
Automatic Transmission Motor Pool 551-721-1365
or 551-721-1366
0830-0900 Perform Before-Operation PMCS Motor Pool 551-721-1352 0900-1130 Drive Vehicle with Automatic or
Manual Transmission Training Area 551-721-1365
551-721-1366 1130-1230 Lunch 1230-1600 Drive Vehicle with Manual or
Automatic Transmission Training Area/ Driver Training Route
551-721-1365 or 551-721-1366
1600-1630 Perform After-Operation PMCS Motor Pool 551-721-1352 DAY 3 0730-0800 Perform Before-Operation PMCS Motor Pool 551-721-1352 0800-1130 Drive Vehicle with Manual or
Automatic Transmission Training Area/ Driver Training Route
551-721-1365 or 551-721-1366
1130-1230 Lunch 1230-1330 Drive Vehicle on the Road Classroom 551-721-1365
551-721-1366 1330-1600 Drive Vehicle on the Road Driver Training Route 551-721-1365
551-721-1366
TC 21-305-8
3-2
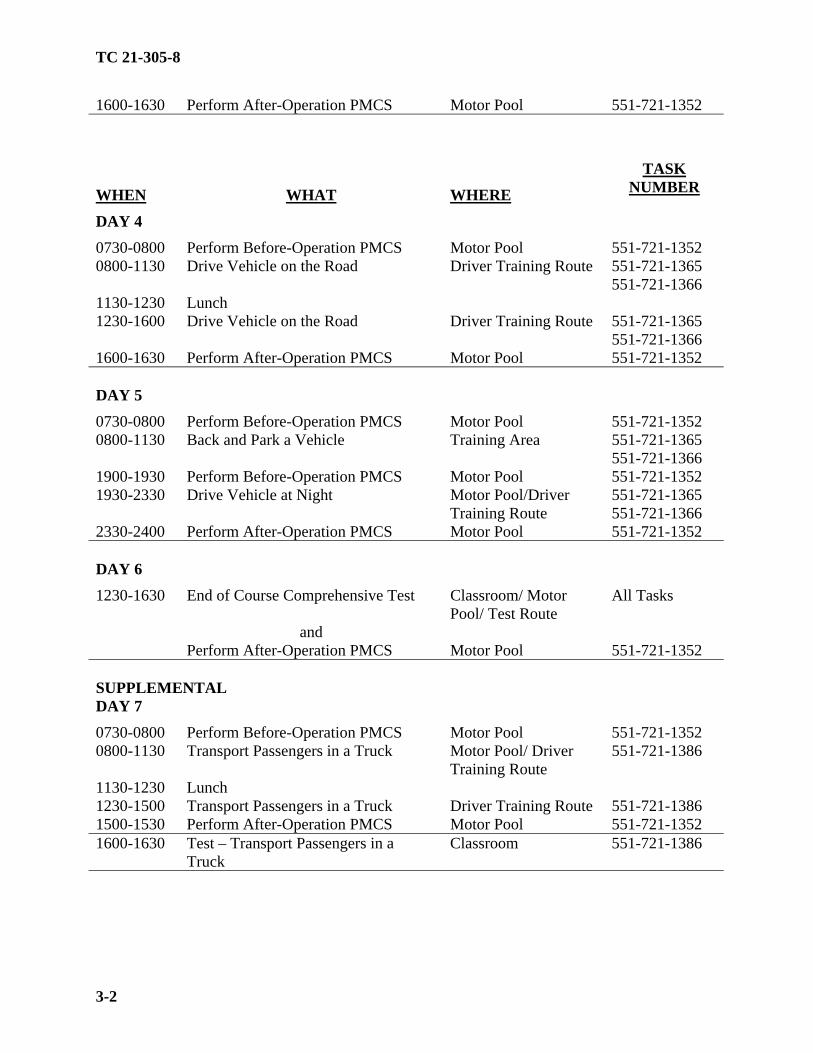
1600-1630 Perform After-Operation PMCS Motor Pool 551-721-1352
WHEN
WHAT
WHERE
TASK NUMBER
DAY 4 0730-0800 Perform Before-Operation PMCS Motor Pool 551-721-1352 0800-1130 Drive Vehicle on the Road Driver Training Route 551-721-1365
551-721-1366 1130-1230 Lunch 1230-1600 Drive Vehicle on the Road Driver Training Route 551-721-1365
551-721-1366 1600-1630 Perform After-Operation PMCS Motor Pool 551-721-1352 DAY 5 0730-0800 Perform Before-Operation PMCS Motor Pool 551-721-1352 0800-1130 Back and Park a Vehicle Training Area 551-721-1365
551-721-1366 1900-1930 Perform Before-Operation PMCS Motor Pool 551-721-1352 1930-2330 Drive Vehicle at Night Motor Pool/Driver
Training Route 551-721-1365 551-721-1366
2330-2400 Perform After-Operation PMCS Motor Pool 551-721-1352 DAY 6 1230-1630 End of Course Comprehensive Test Classroom/ Motor
Pool/ Test Route All Tasks
and Perform After-Operation PMCS Motor Pool 551-721-1352 SUPPLEMENTAL DAY 7 0730-0800 Perform Before-Operation PMCS Motor Pool 551-721-1352 0800-1130 Transport Passengers in a Truck Motor Pool/ Driver
Training Route 551-721-1386
1130-1230 Lunch 1230-1500 Transport Passengers in a Truck Driver Training Route 551-721-1386 1500-1530 Perform After-Operation PMCS Motor Pool 551-721-1352 1600-1630 Test – Transport Passengers in a
Truck Classroom 551-721-1386
TC 21-305-8
3-3
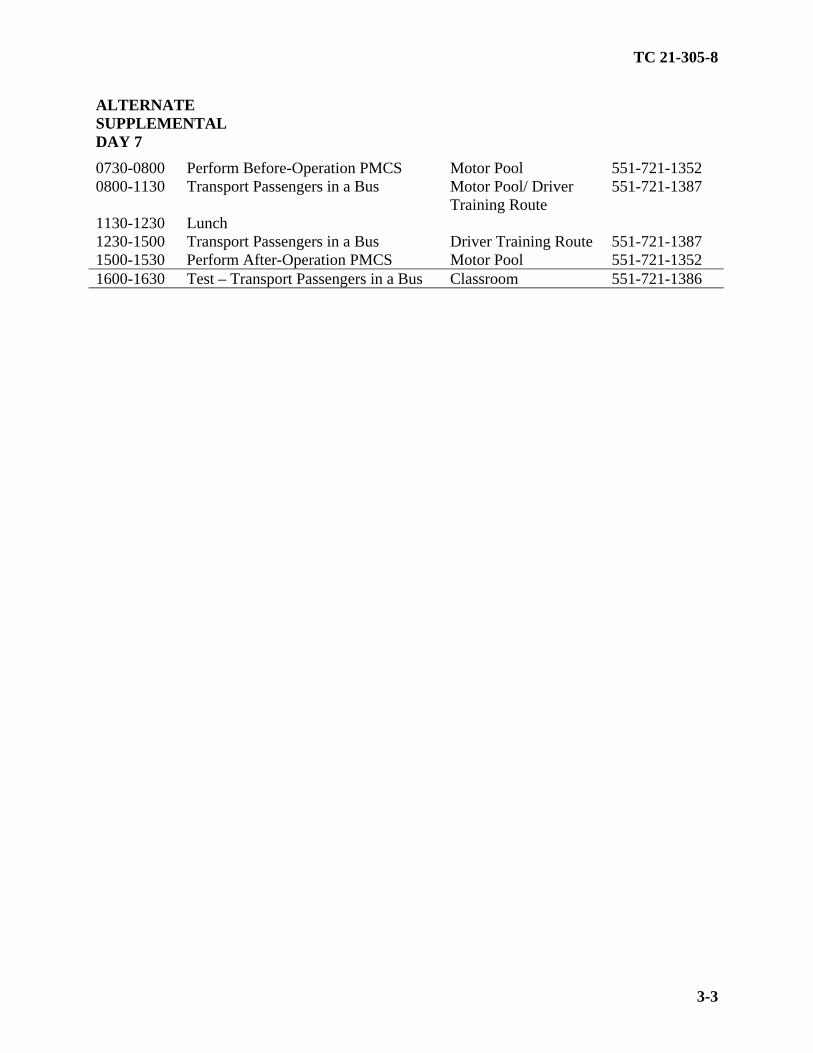
ALTERNATE SUPPLEMENTAL DAY 7 0730-0800 Perform Before-Operation PMCS Motor Pool 551-721-1352 0800-1130 Transport Passengers in a Bus Motor Pool/ Driver
Training Route 551-721-1387
1130-1230 Lunch 1230-1500 Transport Passengers in a Bus Driver Training Route 551-721-1387 1500-1530 Perform After-Operation PMCS Motor Pool 551-721-1352 1600-1630 Test – Transport Passengers in a Bus Classroom 551-721-1386
TC 21-305-8
4-1
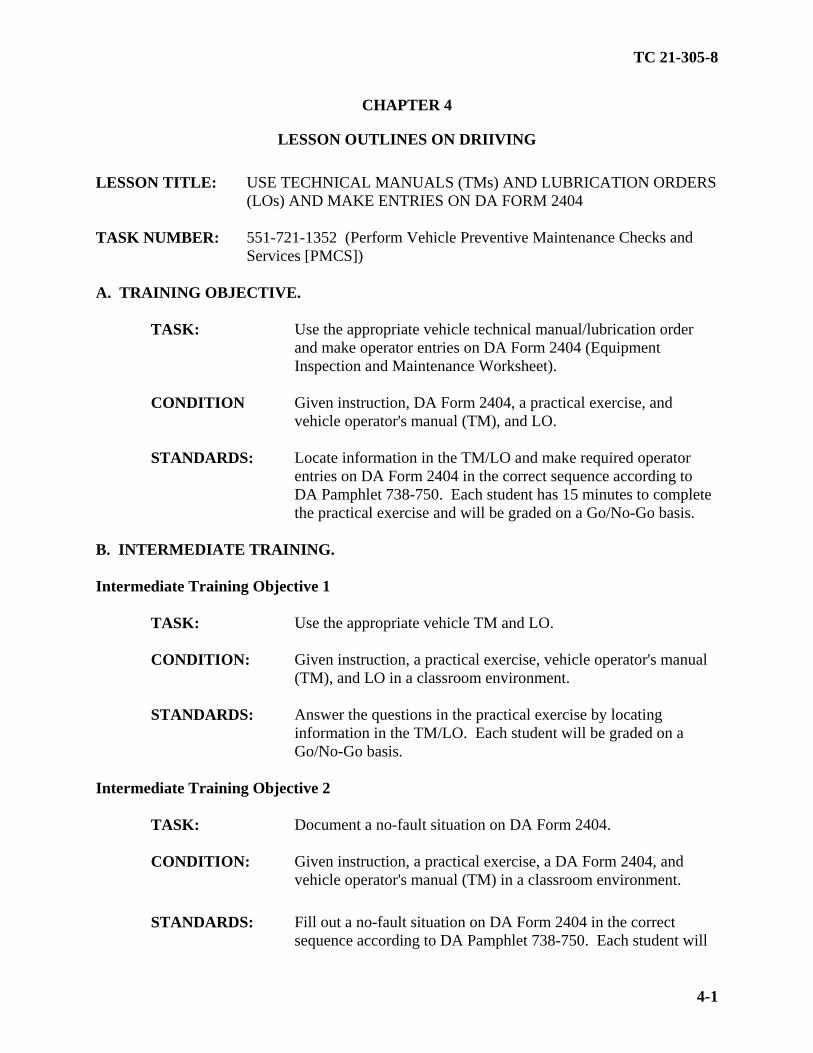
CHAPTER 4
LESSON OUTLINES ON DRIIVING
LESSON TITLE: USE TECHNICAL MANUALS (TMs) AND LUBRICATION ORDERS (LOs) AND MAKE ENTRIES ON DA FORM 2404
TASK NUMBER: 551-721-1352 (Perform Vehicle Preventive Maintenance Checks and
Services [PMCS]) A. TRAINING OBJECTIVE. TASK: Use the appropriate vehicle technical manual/lubrication order
and make operator entries on DA Form 2404 (Equipment Inspection and Maintenance Worksheet).
CONDITION Given instruction, DA Form 2404, a practical exercise, and
vehicle operator's manual (TM), and LO. STANDARDS: Locate information in the TM/LO and make required operator
entries on DA Form 2404 in the correct sequence according to DA Pamphlet 738-750. Each student has 15 minutes to complete the practical exercise and will be graded on a Go/No-Go basis.
B. INTERMEDIATE TRAINING. Intermediate Training Objective 1 TASK: Use the appropriate vehicle TM and LO. CONDITION: Given instruction, a practical exercise, vehicle operator's manual
(TM), and LO in a classroom environment. STANDARDS: Answer the questions in the practical exercise by locating
information in the TM/LO. Each student will be graded on a Go/No-Go basis.
Intermediate Training Objective 2 TASK: Document a no-fault situation on DA Form 2404. CONDITION: Given instruction, a practical exercise, a DA Form 2404, and
vehicle operator's manual (TM) in a classroom environment. STANDARDS: Fill out a no-fault situation on DA Form 2404 in the correct
sequence according to DA Pamphlet 738-750. Each student will
TC 21-305-8
4-2
be graded on a Go/No-Go basis. Intermediate Training Objective 3 TASK: Document a fault situation on DA Form 2404. CONDITION: Given instruction, a practical exercise, a DA Form 2404, and
vehicle operator's manual (TM) in a classroom environment. STANDARDS: Fill out a fault situation on DA Form 2404 in the correct sequence
according to DA Pamphlet 738-750. Each student will be graded on a Go/No-Go basis.
C. ADMINISTRATIVE INSTRUCTIONS.
1. Training time: As scheduled. 2. Training location: Scheduled classroom. 3. Training type: Conference and practical exercise. 4. Students: Scheduled personnel. 5. Principal and assistant instructors required: One primary instructor for the conference
and one assistant instructor for every 20 students for the practical exercise. 6. Training aids and equipment: Overhead projector, transparency (DA Forms 2404 and
2408-14), screen, appropriate vehicle operator's manual (TM) (one per student), appropriate vehicle LO (one per student), DA Form 2404 (four per student), and a practical exercise situation sheet (one per student).
7. References: DA Pamphlet 738-750, appropriate vehicle operator's manual, and LO.
D. SEQUENCE OF ACTIVITY. NOTE: Prior to class arrival, ensure each student desk or table has an operator's manual (TM),
LO, and two DA Forms 2404.
1. Introduction:
a. Interest device. b. Tie-in. c. Lesson objective (paragraph A).

TC 21-305-8
4-3
d. Procedures: (1) Explanation. (2) Summary. (3) Practical exercise.
2. Explanation and demonstration:
a. Proper technique for using the operator's manual (TM):
(1) Front cover, table of contents, and thumb-tab subject index, if applicable. (2) Warning summary. (3) Table of contents (chapters and appendixes) (if applicable). (4) Operating instructions to include PMCS tables. (5) Alphabetical index.
b. Use of the LO:
(1) Tables and notes. (2) Level of maintenance codes. (3) Lubrication after shallow or deepwater fording.
(4) Lubricant abbreviations and intervals.
c. DA Form 2404 no-fault situation:
(1) Organization. (2) Nomenclature and model. (3) Registration/serial number/NSN. (4) Type of inspection (PMCS). (5) TM number and TM date. (6) Date of inspection (column c).

TC 21-305-8
4-4
(7) Type of inspection (entered in column d when used for concurrent inspections). (8) Disposition of DA Form 2404.
d. DA Form 2404 fault situation:
(1) Deferred maintenance. Check DA Form 2408-14 (Uncorrected Fault Record) for any deferred maintenance before listing any faults on DA Form 2404. Do not list faults that are already listed on DA Form 2404 or DA Form 2408-14.
NOTE: Explain to the students that when a DA Form 2404 has previous no-fault daily
annotations and a fault is found, a new form would not be initiated. The same form would be used and some of the steps listed below would already be completed.
(2) Organization. (3) Nomenclature and model. (4) Registration/serial number/NSN. (5) Miles. Round to the nearest mile or kilometer. Before the number put the letter M if the reading is miles; the letter K, if the reading is kilometers. (6) Hours. (7) Date. (8) Type of inspection (PMCS). (9) TM number and TM date. (10) Signature and rank in block 8a. (11) TM item number entered in column a. Circle item number if the fault makes the equipment not mission capable (NMC). (12) Status symbol entered in column b. (13) Deficiencies or shortcomings entered in column c. (14) Disposition of DA Form 2404.
TC 21-305-8
4-5
3. Practical exercise: Hand out one practical exercise and two DA Forms 2404 to each student. Students will complete the practical exercise as outlined in paragraph 2 above within 15 minutes.
4. Evaluation: Check each student's practical exercise. 5. Summary:
a. Recap main points. b. Allow for questions. c. Clarify questions. d. Give closing statement.
6. Retraining: No-Gos will be retrained and retested after normal duty hours.
E. SAFETY RESTRICTIONS. None. F. ADDITIONAL COMMENTS AND INFORMATION. Recommended instructional time is 1 hour (.5 conference and .5 practical exercise).

TC 21-305-8
4-6
NOTE: This is a sample DA Form 2404 used for operator/crew PMCS when no faults are found. Complete all entries in pencil. This sample can be used to make a transparency for an overhead projection system.

TC 21-305-8
4-7
NOTE: This is a sample DA Form 2404 used for operator/crew PMCS when faults are found. Complete all entries in pencil. This sample can be used to make a transparency for an overhead projection system.
TC 21-305-8
4-8
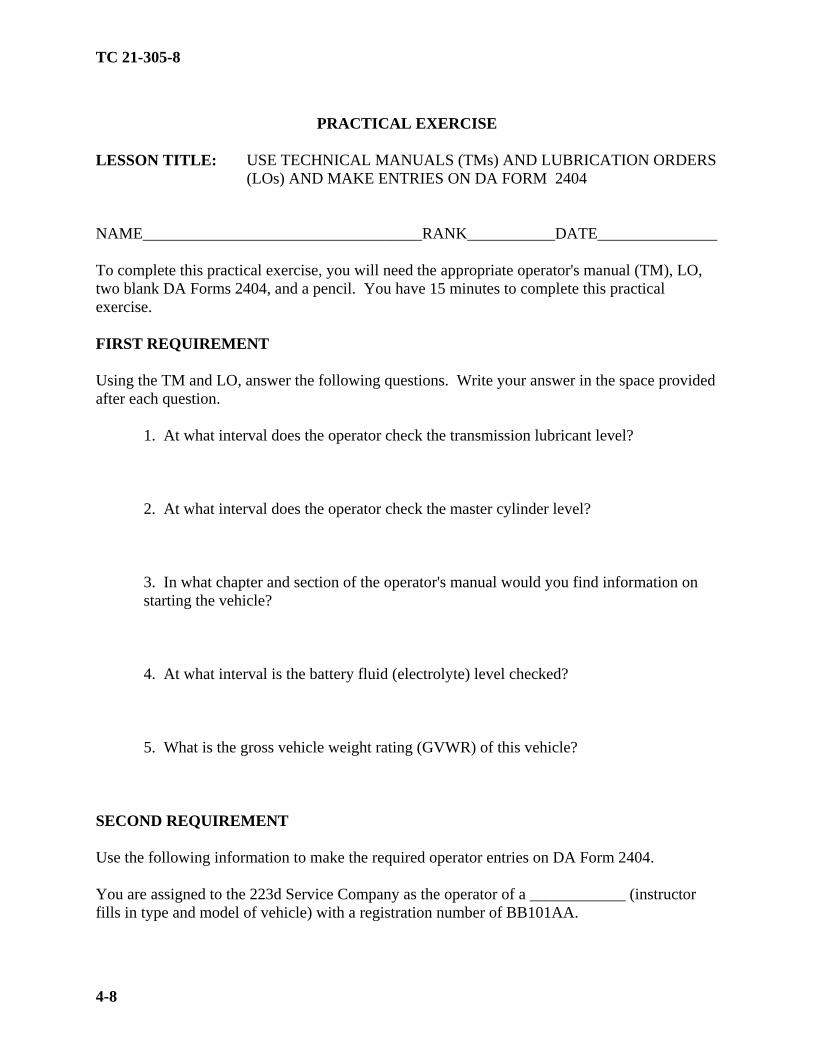
PRACTICAL EXERCISE
LESSON TITLE: USE TECHNICAL MANUALS (TMs) AND LUBRICATION ORDERS
(LOs) AND MAKE ENTRIES ON DA FORM 2404 NAME___________________________________RANK___________DATE_______________ To complete this practical exercise, you will need the appropriate operator's manual (TM), LO, two blank DA Forms 2404, and a pencil. You have 15 minutes to complete this practical exercise. FIRST REQUIREMENT Using the TM and LO, answer the following questions. Write your answer in the space provided after each question.
1. At what interval does the operator check the transmission lubricant level? 2. At what interval does the operator check the master cylinder level? 3. In what chapter and section of the operator's manual would you find information on starting the vehicle? 4. At what interval is the battery fluid (electrolyte) level checked? 5. What is the gross vehicle weight rating (GVWR) of this vehicle?
SECOND REQUIREMENT Use the following information to make the required operator entries on DA Form 2404. You are assigned to the 223d Service Company as the operator of a ____________ (instructor fills in type and model of vehicle) with a registration number of BB101AA.

TC 21-305-8
4-9
a. On 16 March 1992, you perform a daily PMCS and find no faults. b. On 17 March 1992, you perform a daily PMCS and again find no faults. c. On 18 March 1992, you perform a daily PMCS. While checking your vehicle, you
find that the air warning alarm or buzzer does not come on. Your odometer reading is 17,250 miles.
d. On 19 March 1992, you perform a daily PMCS. You find the air warning alarm or
buzzer has been repaired. No other faults are discovered. e. On 20 March 1992, you perform a weekly and monthly PMCS and find no faults.

TC 21-305-8
4-10
LESSON TITLE: KNOW SAFETY RULES AND PROCEDURES FOR DRIVING
UNDER ADVERSE ROAD CONDITIONS TASK NUMBER: 551-721-1361 (Drive Cargo Vehicle on Snow/Ice)
A. TRAINING OBJECTIVE. TASK: Demonstrate knowledge of procedures for driving under adverse
conditions (snow, ice, fog, rain, and bleeding tar). CONDITION: Given instruction, pen or pencil, and practical exercise. STANDARDS: Answer 7 of 10 questions correctly on the practical exercise
within 10 minutes. B. INTERMEDIATE TRAINING. None. C. ADMINISTRATIVE INSTRUCTIONS.
1. Training time: As scheduled. 2. Training location: Scheduled classroom. 3. Training type: Conference and practical exercise. 4. Students: Scheduled personnel. 5. Principal and assistant instructors required: One primary instructor for the conference
and one assistant instructor for every 20 students for the practical exercise. 6. Training aids and equipment: Overhead projector, transparency, screen, and a
practical exercise (one per student). 7. References: FM 21-305 and appropriate vehicle operator's manual.
D. SEQUENCE OF ACTIVITY.
1. Introduction: a. Interest device. b. Tie-in. c. Lesson objective (paragraph A).

TC 21-305-8
4-11
d. Procedures:
(1) Explanation. (2) Practical exercise. (3) Summary.
2. Explanation: Two major hazards associated with driving during adverse weather
conditions are reduced visibility and reduced traction.
a. Countermeasures for driving during periods of reduced visibility:
(1) Travel at reduced speeds. Be prepared to meet sudden changes in road conditions. (2) Do not use high beams. Switch to low beams if on high beams. (3) Look to the right if blinded by oncoming vehicles. (4) Do not overrun the headlights. Stay twice the normal distance from the vehicle ahead. (5) Use turn signals sooner. (6) Apply brakes sooner and press the brake pedal lightly to warn early that the vehicle will slow or stop. (7) Use defrosters and wipers to help keep the windshield clear. (8) Keep the windshield, windows, mirrors, headlights, brake lights, reflectors, and the area around the air cleaner intake free of snow and ice. Snow and ice may melt, refreeze, and restrict air intake systems of some vehicles. (9) Watch for pedestrians and vehicles pulled over to the side of the road. (10) Use caution when weather reduces visibility to near zero. This is particularly true at night in heavy snow, a downpour of rain, or dense fog. When this happens, it is unsafe to drive.
(a) Exit the highway. Stop. Wait until visibility improves before continuing.
TC 21-305-8
4-12
(b) Do not stop on the shoulder with your flashers on. Stopping on shoulders may induce a rear end collision chain reaction.
b. Reduced traction countermeasures:
(1) Install tire chains if needed for snow or ice. (2) Pump the brakes gradually when stopping the vehicle on snow and ice. (Pumping air brake vehicles may be dangerous. Do not pump the brakes more than 3 to 4 times. Let the air pressure build back up before reapplying the brakes.) Sudden braking will cause the wheels to lock and the vehicle to slide out of control. (3) Place the transmission shift lever and transfer case shift lever (if equipped) in the appropriate driving range to descend or climb steep hills. (4) Slowly place the vehicle in motion to prevent the wheels from spinning. (5) Slowly press the accelerator pedal when changing speed. (6) Keep the accelerator pedal steady after the vehicle reaches the desired speed. (7) Turn the vehicle slowly. Make gradual steering adjustments when on slippery surfaces. (8) Steer the vehicle away from ruts and large snow banks. (9) Steer the vehicle straight up and down hills if possible. (10) Check for black ice. Black ice is clear. The road surface is visible through the ice. The ice becomes invisible to the driver. Black ice usually occurs on bridges, beneath underpasses, in dips in the road, in shaded areas, and on lower sides of banked curves.
(a) When driving in rain or near-freezing temperature, check for ice along the front of a mirror. If ice is there, it may also be on the road surface. (b) When in doubt, test surface traction. Check to see that nothing is following your vehicle. Slow. Then apply the brakes gently to see if the vehicle skids.

TC 21-305-8
4-13
(11) Use the following procedures if the vehicle rear skids. Sudden changes in speed or direction result from over acceleration, over braking and over steering. These changes result in skidding and jackknifing.
(a) Let up on the accelerator pedal. (b) Steer in the same direction in which the rear of the vehicle is skidding. (c) When the vehicle is under control, press the brake pedal lightly. (d) Steer the vehicle on a straight course. Slowly press the accelerator pedal.
(12) If the vehicle starts to slide while climbing a hill, do the following: (a) Let up on the accelerator pedal. (b) Steer the vehicle in the direction of the slide until it stops sliding. (c) Slowly press the accelerator pedal. Steer the vehicle on a straight course.
(13) The best advice concerning a stuck vehicle is avoid getting stuck. However, if the vehicle does get stuck, do the following:
(a) Shovel a clear path ahead of each wheel. Put boards, brush, sand, gravel, or similar material in the cleared paths to get better traction. (b) If additional power is needed to extract the vehicle when mired in snow, place the transmission in the lowest forward-gear range and the transfer case (if equipped) in low range. Do not rock the vehicle or spin the wheels. (c) If the vehicle stays stuck, use a wrecker or another vehicle equipped with a winch to tow or winch the stuck vehicle. (d) If the vehicle is equipped with a self-recovery winch, use it to help free the vehicle.
(14) Drive slowly and test the brakes after driving through slush or water. If the brakes slip, do the following:

TC 21-305-8
4-14
(a) Continue to drive slowly. (b) Apply moderate pressure on the brake pedal to cause slight brake drag. (c) When the brakes are dry, no longer slip, or cease uneven braking, let up on the brake pedal. (d) Resume normal driving speed.
(15) When driving during hot weather, adjust your driving for bleeding tar conditions on the roadway. To drive under these conditions--
(a) Frequently scan the roadway ahead. (b) Identify a black tar area ahead. (c) Maintain a steady speed. (d) Do not make sudden steering maneuvers. (e) Do not make sudden braking maneuvers. (f) If braking is required, ensure all wheels are on a similar surface.
3. Practical exercise: Hand out one practical exercise to each student. Students will
complete the practical exercise within 10 minutes. 4. Evaluation: Check each student's practical exercise. 5. Summary:
a. Recap main points. b. Allow for questions. c. Clarify questions. d. Give closing statement.
6. Retraining: No-Gos will be retrained and retested after normal duty hours. E. SAFETY RESTRICTIONS. None.

TC 21-305-8
4-15
F. ADDITIONAL COMMENTS AND INFORMATION. Recommended instructional time is 1 hour (.5 conference and .5 practical exercise).

TC 21-305-8
4-16
PRACTICAL EXERCISE
LESSON TITLE: KNOW SAFETY RULES AND PROCEDURES FOR DRIVING
UNDER ADVERSE ROAD CONDITIONS NAME___________________________________RANK___________DATE_______________ To complete this practical exercise you will need a pen or pencil. You have 10 minutes to complete this practical exercise. To pass this practical exercise, you must correctly answer 7 of the 10 questions. SECTION I. True/false questions: Read each question carefully. Place a T or F on the blank line to the left of each question. _______ 1. Even after weather clears, ice, snow, mud, salt, or dirt on your light lenses and
reflectors can affect your vision and how well others can see you. _______ 2. The only major hazard of driving in adverse weather conditions is reduced traction. _______ 3. Releasing the accelerator quickly can cause a skid. _______ 4. The area around the air cleaner intake must be kept free of snow and ice. _______ 5 Sudden changes in speed or direction cause skidding and jackknifing. _______ 6. The best advice concerning a stuck vehicle is to avoid getting stuck. SECTION II. Multiple choice: Read each question carefully and write the answer which is most correct on the blank line to the left of each question. _______ 7. If the vehicle starts to slide while climbing a hill, you would--
a. Let up on the accelerator pedal. b. Steer the vehicle in the direction of the slide until the vehicle stops. c. Slowly press the accelerator pedal and steer the vehicle on a straight course. d. Do all of the above.

TC 21-305-8
4-17
_______ 8. How should you dry wet brake linings?
a. Continue to drive at a slow speed with enough pressure on the brake pedal to cause a slight drag on the brakes. b. Pump the brake pedal. c. Pull over and wait 25 to 30 minutes to allow the brakes to dry out. d. Increase speed to allow more air to flow through the brakes.
_______ 9. For increased traction when driving in snow or on ice, you should-- a. Steer the vehicle diagonally up hills. b. Install tire chains (all driven wheels). c. Install tire chains (all non-driven wheels). d. Turn the vehicle quickly when on slippery surfaces.
_______ 10. If your vehicle starts to skid, which should you do?
a. Step on the brakes and hold the steering wheel straight. b. Nothing. c. Release the accelerator pedal and steer in the direction of the skid. d. Release the gas pedal and steer in the opposite direction of the skid.

TC 21-305-8
4-18
LESSON TITLE: IDENTIFY CONTROLS: INSTRUMENTS, INDICATORS, AND
EQUIPMENT TASK NUMBER: 551-721-1352 (Perform Vehicle Preventive Maintenance Checks and
Services [PMCS]) A. TRAINING OBJECTIVE. TASK: Identify controls: instruments, indicators, and equipment. CONDITION: Given instruction on the vehicle. STANDARDS: Correctly identify and explain the function of the controls:
instruments, indicators, and equipment B. INTERMEDIATE TRAINING. None. C. ADMINISTRATIVE INSTRUCTIONS.
1. Training time: As scheduled. 2. Training location: Motor pool. 3. Training type: Conference. 4. Students: Scheduled personnel. 5. Principal and assistant instructors required: One primary instructor for the conference
and one assistant instructor for every three students. 6. Training aids and equipment: One vehicle for every three students. If the class is
large, the primary instructor may need a public address (PA) system. 7. References: Appropriate vehicle operator's manual.
D. SEQUENCE OF ACTIVITY.
1. Introduction:
a. Interest device. b. Tie-in. c. Lesson objective (paragraph A).

TC 21-305-8
4-19
d. Procedures: (1) Explanation. (2) Summary.
NOTE: At this time, separate the class into groups of three. Assign each group to a vehicle.
Ensure each group has an assistant instructor. As the instructor explains each item, the assistant instructor will identify and demonstrate its use to his group of students.
2. Explanation and demonstration: Location, description, and use of the controls
(instruments, indicators, and equipment). In the operator's manual and during this class, left indicates the driver's side of the vehicle; right, the passenger's side. There are basically three groups of controls: engine, primary vehicle, and secondary vehicle. Vehicle instruments tell the driver about the condition of the vehicle and its accessories.
a. Engine controls. These controls start and shut down the engine. Engine controls are similar in most vehicles; however, there are some variations depending on the type of engine, manufacturer, and the type of starter.
(1) Engine control switch (battery or ignition switch). This switch provides electrical energy to start the engine. In some vehicles, it is also used to stop the engine. (2) Starter button. This switch activates the starter. In most newer vehicles this switch is part of the ignition switch. (3) Engine stop control knob. On some diesel and multifuel engines, the knob shuts off the engine. The knob or handle is pulled out and held until the engine stops.
b. Primary vehicle controls. These controls are used to make the vehicle do what the driver wants it to do.
(1) Clutch pedal. On vehicles equipped with a manual transmission, the clutch connects the engine to the drive train. It has three basic positions: engaged, disengaged, and free play. (2) Transmission controls. These vary with the different types of transmissions: automatic, semiautomatic, and manual. Explain shift pattern and operating range. (3) Accelerator pedal. This controls the vehicle's road speed. Push down to increase speed and ease off to reduce speed.
TC 21-305-8
4-20
(4) Steering wheel. This is used to direct the vehicle. Grasp the steering wheel at the three o'clock and nine o'clock positions with your palms facing inward. (5) Brake controls:
(a) The foot brake operates the service brakes on the vehicle and some trailers (if the trailer has hydraulic or air brakes). (b) The parking brake control may be a flip switch, a push-pull knob, or a lever. Apply it only after the vehicle has been stopped.
(6) Traction control devices. Some vehicles have devices to allow the operator to gain traction. This can be an interaxle differential lock control, a transfer case sprag unit, or front-wheel drive. Switches or levers control most of them.
c. Secondary vehicle controls. These controls do not affect vehicle movement or power. The number and function of the secondary controls vary with design and available equipment options.
(1) Vision:
(a) Lights. (b) Windshield wipers. (c) Defrosters. (d) Mirrors.
(2) Communication:
(a) Horns. (b) Radios. (c) Lights (headlights, brake lights, turn signals, and four-way flashers).
(3) Comfort: (a) Seat position. (b) Air vents.
TC 21-305-8
4-21
(c) Air conditioner. (d) Window-operating mechanisms. (e) Heater.
(4) Safety: (a) Seat belts. (b) Door locks.
d. Vehicle instruments. Gauges and indicators tell the driver about the condition of the vehicle and its accessories. Vehicles also have warning lights or buzzers to indicate when something has reached a danger point. Monitoring these will warn the driver of impending problems.
(1) Basic instruments such as fuel gauge, speedometer, voltmeter, and odometer. (2) Pressure gauges such as oil and air. (3) Temperature gauges such as water and transmission. (4) Tachometer or tachograph (if so equipped). (5) Warning devices such as low air pressure alarm and transmission temperature alarm.
e. Basic issue items (BII) and troop installed items: (1) Fire extinguishers. (2) First aid kit. (3) Highway warning kit or flares. (4) Tire chains (if required). (5) Jack, lug wrench, tools, and spare tire.
3. Practical exercise: None. 4. Evaluation: Students are evaluated daily during driving tasks. They are tested during
the end of course comprehensive test (EOCCT).

TC 21-305-8
4-22
5. Summary: a. Recap main points. b. Allow for questions. c. Clarify questions. d. Give closing statement.
6. Retraining: Training is reinforced during daily driving tasks. E. SAFETY RESTRICTIONS. None. F. ADDITIONAL COMMENTS AND INFORMATION. Recommended instructional time is 1 hour (conference).

TC 21-305-8
4-23
LESSON TITLE: PERFORM OPERATOR PREVENTIVE MAINTENANCE CHECKS
AND SERVICES (PMCS) TASK NUMBER: 551-721-1352 (Perform Vehicle Preventive Maintenance Checks and
Services [PMCS]) A. TRAINING OBJECTIVE. TASK: Perform operator preventive maintenance checks and services on
wheeled vehicles. CONDITIONS: Given instruction, a DA Form 2404, a pencil, appropriate vehicle
operator's manual, equipment records folder, rags, lubricants, coolant, and a wheeled vehicle with BII.
STANDARD: Inspect the vehicle according to the PMCS tables listed in the
operator's manual. Correct all faults within the operator's level of maintenance. Record all others on DA Form 2404 legibly. If no faults are found, make necessary entries on DA Form 2404.
B. INTERMEDIATE TRAINING. None. C. ADMINISTRATIVE INSTRUCTIONS.
1. Training time: As scheduled. 2. Training location: Motor pool. 3. Training type: Demonstration and practical exercise. 4. Students: Scheduled personnel. 5. Principal and assistant instructors required: One primary instructor, one assistant
instructor for every three students for the demonstration and practical exercise. 6. Training aids and equipment: Rags, lubricants, coolant, DA Form 2404, pencils,
appropriate vehicle operator's manual, equipment records folder, and a wheeled vehicle with BII for every three students.
7. References: Appropriate vehicle operator's manual and DA Pamphlet 738-750.
D. SEQUENCE OF ACTIVITY.
1. Introduction:

TC 21-305-8
4-24
a. Interest device. b. Tie-in. c. Lesson objective (paragraph A). d. Procedures:
(1) Explanation. (2) Practical exercise. (3) Summary.
2. Explanation and demonstration: Demonstrate before-, during-, after-operation, weekly, and monthly PMCS to the students.
3. Practical exercise:
a. Assign students to vehicles. Issue vehicle operator’s manual, pencils, DA Form 2404, and equipment records folder. Tell students the location of rags, lubricants, and coolant. b. Students perform PMCS.
4. Evaluation: Check each student's performance of PMCS. 5. Summary:
a. Recap main points. b. Allow for questions. c. Clarify questions. d. Give closing statement.
6. Retraining: Retrain No-Gos and slow learners. PMCS is conducted daily in conjunction with driving tasks and reinforced throughout the course. Students are tested on the EOCCT.
E. SAFETY RESTRICTIONS.
1. Ensure all chock blocks (if required) are in place when vehicles are parked.

TC 21-305-8
4-25
2. Ensure students remove all jewelry and identification (ID) tags before performing PMCS.
3. Ensure students pay particular attention to the cautions and warnings listed in the
operator's manual. 4. Ensure the transmission is always placed in neutral (some automatics are placed in
park); the parking brake is set; the engine is shut off; and the ignition key is removed (if equipped) before leaving the vehicle.
F. ADDITIONAL COMMENTS AND INFORMATION. Recommended instructional time is 2 hours (1.0 demonstration and 1.0 practical exercise). The remaining PMCS is performed throughout the course in conjunction with driving tasks.
TC 21-305-8
4-26
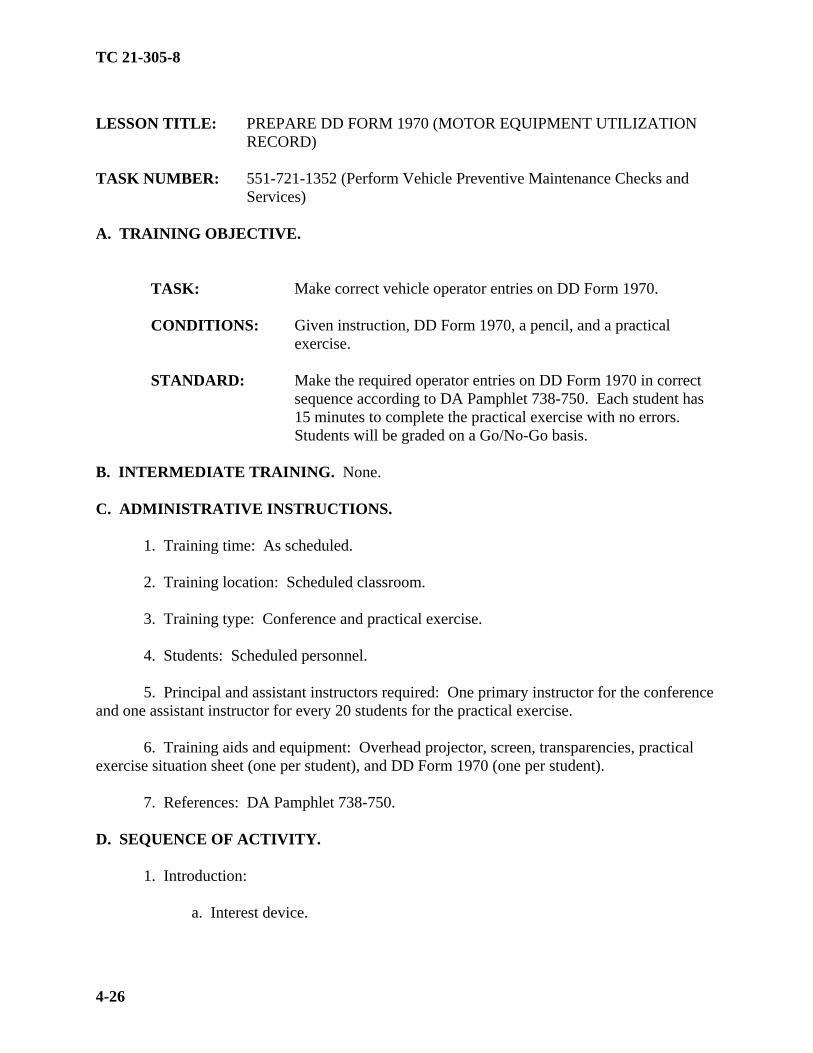
LESSON TITLE: PREPARE DD FORM 1970 (MOTOR EQUIPMENT UTILIZATION
RECORD) TASK NUMBER: 551-721-1352 (Perform Vehicle Preventive Maintenance Checks and
Services) A. TRAINING OBJECTIVE. TASK: Make correct vehicle operator entries on DD Form 1970. CONDITIONS: Given instruction, DD Form 1970, a pencil, and a practical
exercise. STANDARD: Make the required operator entries on DD Form 1970 in correct
sequence according to DA Pamphlet 738-750. Each student has 15 minutes to complete the practical exercise with no errors. Students will be graded on a Go/No-Go basis.
B. INTERMEDIATE TRAINING. None. C. ADMINISTRATIVE INSTRUCTIONS.
1. Training time: As scheduled. 2. Training location: Scheduled classroom. 3. Training type: Conference and practical exercise. 4. Students: Scheduled personnel. 5. Principal and assistant instructors required: One primary instructor for the conference
and one assistant instructor for every 20 students for the practical exercise. 6. Training aids and equipment: Overhead projector, screen, transparencies, practical
exercise situation sheet (one per student), and DD Form 1970 (one per student). 7. References: DA Pamphlet 738-750.
D. SEQUENCE OF ACTIVITY.
1. Introduction: a. Interest device.

TC 21-305-8
4-27
b. Tie-in. c. Lesson objective (paragraph A). d. Procedures:
(1) Explanation. (2) Practical exercise. (3) Summary.
2. Explanation and demonstration: a. Explain the purpose and use of DD Form 1970. Also explain the dispatcher entries entered on the form. b. Explain the operator entries that must be entered on DD Form 1970.
3. Practical exercise: Hand out one practical exercise and one DD Form 1970 to each student. Students will complete the practical exercise within 15 minutes.
4. Evaluation: Check each student's practical exercise. 5. Summary:
a. Recap main points. b. Allow for questions. c. Clarify questions. d. Give closing statement.
6. Retraining: Retrain and retest No-Gos. No-Gos will be retrained and retested after normal duty hours. E. SAFETY RESTRICTIONS. None. F. ADDITIONAL COMMENTS AND INFORMATION. Recommended instructional time is 1 hour (.5 conference and .5 practical exercise).

TC 21-305-8
4-28
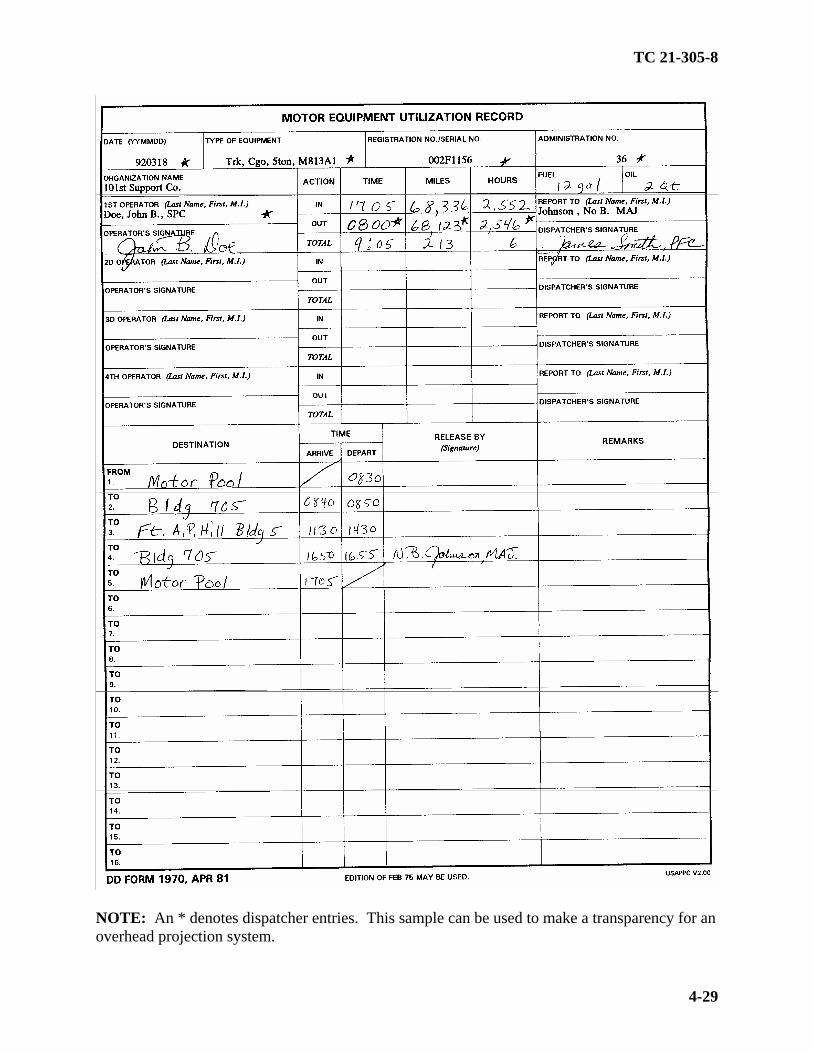
NOTE: An * denotes dispatcher entries. This sample can be used to make a transparency for an overhead projection system.
TC 21-305-8
4-29
NOTE: An * denotes dispatcher entries. This sample can be used to make a transparency for an overhead projection system.
TC 21-305-8
4-30
PRACTICAL EXERCISE
LESSON TITLE: PREPARE DD FORM 1970 (MOTOR EQUIPMENT UTILIZATION
RECORD) NAME___________________________________RANK___________DATE_______________ To complete this practical exercise, you will need one DD Form 1970 with dispatcher entries made and a pen or pencil. You have 15 minutes to complete this practical exercise. Use the information provided in the situation below to make all required operator entries on DD Form 1970 in the proper sequence and in the prescribed time limit. 1. SITUATION:
a. You left the motor pool in an M813, 5-ton cargo truck. Your run included stops at the following areas:
Motor Pool - departed 0715. Building 661 - arrived 0730, departed 0750. Building 705 - arrived 0800, departed 0830.
Training area TA102 - arrived 0920, departed 1050. Dining facility Building 663 - arrived 1120, departed 1230.
Training area TA191 - arrived 1300, departed 1530. Motor pool - arrived 1600.
b. The NCOIC was SSG Smith. He released you when you departed TA191 at 1530
hours. c. When you returned to the motor pool, your odometer reading was 8202 and your hour
meter reading was 503. You also noted that you filled the vehicle with five gallons of diesel and no oil was added. 2. REQUIREMENT:
a. Complete the attached DD Form 1970. b. Be sure your entries are legible (other people can read your handwriting) and accurate
(the entries agree with the details of the information in the situation).
TC 21-305-8
4-31
LESSON TITLE: REPORT AN ACCIDENT (MAKE REQUIRED ENTRIES ON DD
FORM 518 AND SF 91) TASK NUMBER: 551-721-1388 (Complete DD Form 518 and SF 91)
A. TRAINING OBJECTIVE. TASK: Make required entries on DD Form 518 (Accident Identification
Card) and SF 91 (Operator's Report of Motor Vehicle Accident). CONDITION: Given instruction, DD Form 518, SF 91, a pencil, and a practical
exercise. STANDARDS: Make the required entries on DD Form 518 and SF 91 accurately,
legibly, and completely according to FM 21-305. Each student has 45 minutes to complete the practical exercise with no errors. Students will be graded on a Go/No-Go basis.
B. INTERMEDIATE TRAINING. None. C. ADMINISTRATIVE INSTRUCTIONS.
1. Training time: As scheduled. 2. Training location: Scheduled classroom. 3. Training type: Conference and practical exercise. 4. Students: Scheduled personnel. 5. Principal and assistant instructors required: One primary instructor for the conference
and one assistant instructor for every 20 students for the practical exercise. 6. Training aids and equipment: Overhead projector, screen, transparencies, practical
exercise situation sheet (one per student), pencils, DD Form 518 (one per student), and SF 91 (one per student).
7. References: FM 21-305.
D. SEQUENCE OF ACTIVITY.
1. Introduction:
a. Interest device.
TC 21-305-8
4-32
b. Tie-in. c. Lesson objective (paragraph A). d. Procedures:
(1) Explanation. (2) Practical exercise. (3) Summary.
2. Explanation and demonstration:
a. Precautions and procedures. The following is not necessarily in the correct order. Each accident must be assessed to determine what should be done and in what order.
(1) Take precautions to prevent further accidents or injuries by using road guards, highway warning devices, and flares. (2) Render first aid to the injured. (3) If fire breaks out, use an extinguisher or sand. Notify the fire department. Take precautions to prevent fire; for example, shut off engines and prohibit smoking. (4) Notify authorities (civil or military depending on who has jurisdiction) for emergency services (police, ambulance, rescue, or fire fighting. (5) Follow the rules or regulations of the state or area where the accident took place when moving the vehicle from the scene of the accident.
b. Driver's responsibilities.
(1) When involved in an accident, always stop and investigate it. (2) Secure hard-to-get facts first (names and addresses of people involved and witnesses, condition of the road, position of the vehicles, and an estimate of the amount of damage). (3) Be exact. (Spell names correctly. Give street addresses by number. State visible damage. Show exactly where vehicles were before and after the accident and what obstacles blocked the driver's view.)

TC 21-305-8
4-33
(4) Give no opinion about who was at fault. Be polite. Try to get all the necessary information.
c. Instructions for filling out DD Form 518 (Accident Identification Card).
(1) Explain the purpose and use of DD Form 518. (2) Explain how to fill out this form block by block. Ensure zip codes are included and the students know that disclosure of the social security number is voluntary. (3) Explain the disposition of the form. Give it to the person directly involved in the accident. Or, if a parked vehicle, place it in or on the parked vehicle in a conspicuous and secure location, such as under the windshield wiper.
d. Instructions for filling out SF 91 (Operator's Report of Motor Vehicle Accident).
(1) Explain the purpose and use of SF 91. (2) Explain how to fill out this form block by block. No blocks should be left completely blank. If there is no information to put in a certain block, write None, Unknown, or NA.
3. Practical exercise: Hand out one practical exercise, SF 91, and DD Form 518 to each student. Students will complete the practical exercise within 45 minutes.
4. Evaluation: Check each student's practical exercise. 5. Summary:
a. Recap main points. b. Allow for questions. c. Clarify questions. d. Give closing statement.
6. Retraining: Retrain and retest No-Gos. No-Gos will be retrained and retested after normal duty hours. E. SAFETY RESTRICTIONS. None.

TC 21-305-8
4-34
F. ADDITIONAL COMMENTS AND INFORMATION. Recommended instructional time is 2 hours (1.0 conference and 1.0 practical exercise).

TC 21-305-8
4-35
NOTE: This is a sample DD Form 518. It can be used to make a transparency for an overhead projection system.

TC 21-305-8
4-36
NOTE: This is a sample of SF 91, page 1. It can be used to make a transparency for an overhead projection system.

TC 21-305-8
4-37
NOTE: This is a sample of SF 91, page 2. It can be used to make a transparency for an overhead projection system.

TC 21-305-8
4-38
NOTE: This is a sample of SF 91, page 3. It can be used to make a transparency for an overhead projection system.
TC 21-305-8
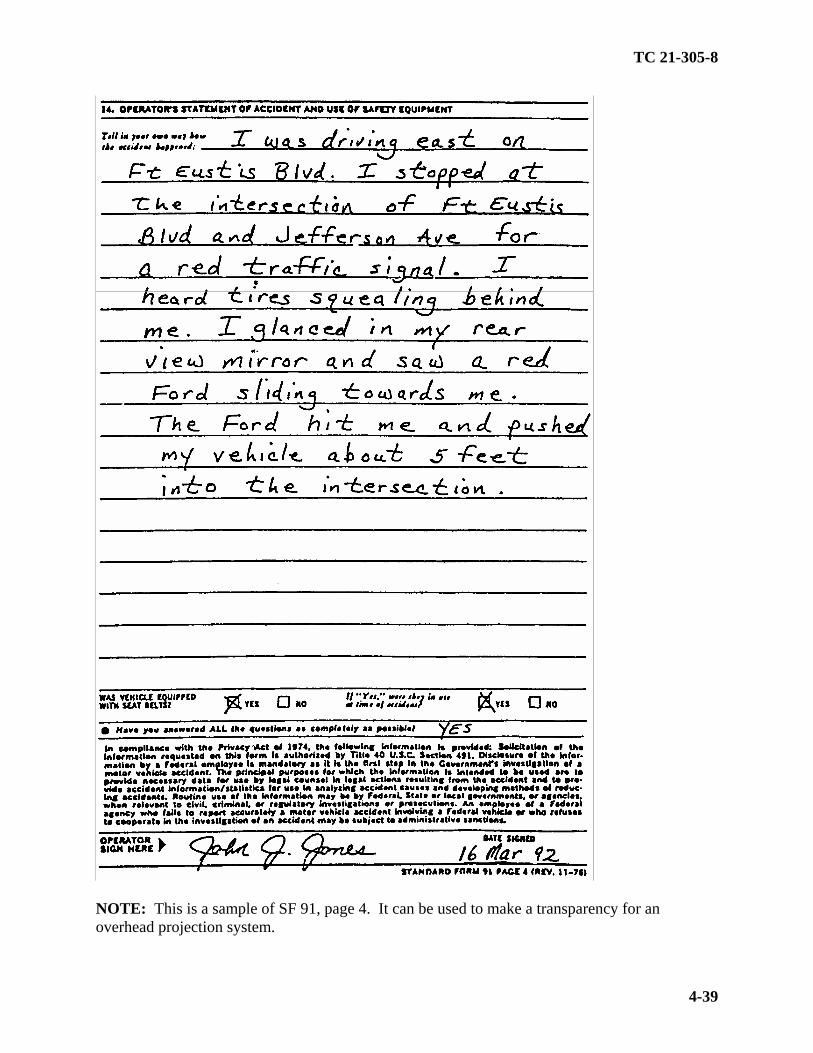
4-39
NOTE: This is a sample of SF 91, page 4. It can be used to make a transparency for an overhead projection system.
TC 21-305-8
4-40
PRACTICAL EXERCISE LESSON TITLE: REPORT AN ACCIDENT (MAKE REQUIRED ENTRIES ON DD
FORM 518 AND SF 91) To complete this practical exercise, you will need one DD Form 518, one SF 91, and a pen or pencil. You have 45 minutes to complete this practical exercise. 1. SITUATION: On Friday, 20 March 1992 at 0800 hours, you left the motor pool in an M813, 5-ton cargo truck (registration number AA101BB) that had been dispatched to you. Your destination was the orderly room, Company A, 225th Infantry Battalion, Fort Walk, NY 09111-5000. You were to report to your first sergeant. Approximately 10 minutes later, you were driving east on MacArthur Boulevard (a four-lane street) in the right lane at 20 miles per hour (mph). A civilian vehicle driving north on Pershing Street made a right turn (east) onto MacArthur Boulevard. You applied your brakes but hit the civilian's truck on the left rear fender. The civilian was in the right lane traveling 5 to 10 mph when you hit him. His truck moved 20 to 30 feet ahead after the collision and stopped by the right curb. Your vehicle also moved another 20 to 30 feet and ended up in the left lane. The weather was clear. The concrete roadway was dry. You stopped your vehicle, jumped out, and ran to the civilian's vehicle. Luckily, he was not hurt. Since there were no other occupants in either vehicle or no threat of fire or explosion, there was no need to call the Fire Company or an ambulance. You and the civilian driver exchanged information. You wrote down the following information from his driver's license and registration:
Operator's name: John P. Jones. Operator's home address: 121 Buffalo Street, Indian, Montana 54321-1000.
Operator's state permit number and state:
111-00-1000, Montana.
Make of vehicle: Dodge. Type: Dakota pickup. Year: 1990.
Vehicle license number and state: 123-ABC, Montana. Vehicle owned by: John P. Jones.
Owner's address: 121 Buffalo Street, Indian, Montana 54321-1000. If you have any reason to doubt the information you were given, you note it on your form. Record the estimates of damage to each vehicle. You looked at the civilian's truck. His left rear fender was dented, taillight broken, and the tailgate was bent. He estimated the amount of damage at $1,000. Then you looked at your vehicle. Your front bumper was scratched and bent; you approximate the amount of damage as $200.
TC 21-305-8
4-41
After estimating the damage, you went to a phone across the street and called the military police (MP). Within minutes MP officer SPC Joe Smith, Badge Number 321, Company B, 123d MP Battalion, arrived. He recorded yours and the civilian's comments. There were no other witnesses to the accident. The officer did record that there is a traffic light with a turn-on-red signal at the southeast corner of Pershing Street, that your vehicle was equipped with seat belts, and you were using the seat belt at the time of the accident. Since you had recorded the information and given the other driver a copy of DD Form 518, you drove back to the motor pool. 2. REQUIREMENT:
a. Complete the attached DD Form 518 and SF 91. b. Be sure your entries are legible (other people can read your handwriting) and accurate (the entries agree with the details of the information in the situation). Use your name, rank, social security number, and present age to complete these forms. Your military driver's license number is R-1456. You live in the A Company barracks. The barracks phone number is 555-9999.

TC 21-305-8
4-42
LESSON TITLE: DRIVE VEHICLE WITH MANUAL TRANSMISSION TASK NUMBER: 551-721-1365 (Drive Vehicle with Manual Transmission)
A. TRAINING OBJECTIVE. TASK: Drive vehicle with manual transmission. CONDITION: Given instruction, DD Form 1970, DA Form 2404, a pencil,
appropriate vehicle operator's manual, equipment records folder, rags, lubricants, coolant, a suitable training area, improved surfaced roads, and a manual transmission vehicle with BII.
STANDARDS: Without accident or injury, operate the vehicle. Start the vehicle.
Put the vehicle in motion. Read gauges. Upshift and downshift the transmission smoothly through all gear ranges. Manipulate the controls. Use correct braking procedures. Perform basic driving maneuvers. Shut down the engine.
B. INTERMEDIATE TRAINING. None. C. ADMINISTRATIVE INSTRUCTIONS.
1. Training time: As scheduled. 2. Training location: Motor pool, training area, and driver training route as scheduled. 3. Training type: Conference, demonstration, and practical exercise. 4. Students: Scheduled personnel. 5. Principal and assistant instructors required: One primary instructor for the conference,
one assistant instructor for every three students for the demonstration and practical exercise. 6. Training aids and equipment: Rags, lubricants, coolant, 40 traffic cones or empty
POL drums, DA Form 2404, DD Form 1970, pencils, appropriate vehicle operator's manual, equipment records folder, and a wheeled vehicle with BII for every three students.
7. References: Appropriate vehicle operator's manual and FM 21-305.
D. SEQUENCE OF ACTIVITY.
1. Introduction:

TC 21-305-8
4-43
a. Interest device. b. Tie-in. c. Lesson objective (paragraph A). d. Procedures:
(1) Explanation and demonstration. (2) Practical exercise. (3) Summary.
2. Explanation and demonstration:
a. Starting the engine. (1) Fuel-efficient starting. (2) Cold weather starting procedures. (3) Engine warm-up. (4) Excessive idling.
b. Putting the vehicle in motion. (1) Explain the gearshift pattern. (2) Depress the clutch pedal fully and shift to the lowest forward gear. (3) Increase the engine revolutions per minute (RPM) slightly (gas engines only). (4) Release the clutch to the friction point. (5) Release the parking brake and gradually release the clutch until it is fully engaged. (6) When the vehicle starts to move, gradually increase engine RPM to increase the vehicle speed. (7) When the vehicle is in motion with the clutch fully engaged, remove your foot from the clutch. Be ready to shift to another gear or stop.
TC 21-305-8
4-44
(8) Fully engage the clutch as soon as possible without stalling the engine to avoid excessive clutch slippage.
c. Double clutching (must be used in some vehicles).
(1) Basic upshifting method.
(a) Release the accelerator, push in the clutch, and shift to neutral at the same time. (b) Release the clutch. (c) Let the engine and gears slow down to the RPM required for the next higher gear. (d) Push in the clutch and shift to the higher gear at the same time. (e) Release the clutch and press the accelerator at the same time.
(2) Basic downshifting method. (a) Release the accelerator, push in the clutch, and shift to neutral at the same time. (b) Release the clutch. (c) Press the accelerator to increase the engine and gear speed to the RPM required in the lower gear. (d) Push in the clutch and shift to the lower gear at the same time. (e) Release the clutch and press the accelerator at the same time.
d. Upshifting the transmission. (1) Explain the use of the clutch. (2) Explain the speed at which to upshift (models differ). (3) Continue shifting until the desired road speed is reached.
e. Downshifting the transmission. (1) Explain the use of the clutch. (2) Downshift only within the operating range of the engine (RPM).

TC 21-305-8
4-45
(3) Describe road conditions requiring downshifting such as before starting down a grade and entering a curve, rough roads, snow, rain, restricted speed limits, and built-up areas.
f. Turning the vehicle.
(1) Basic rules. (2) Off-tracking. (3) Right turns. (4) Left turns. (5) Right and left curves.
g. Stopping the vehicle. The heavier the vehicle, the more work the brakes must do to stop it, and the more heat they absorb. The brakes, tires, springs, and shock absorbers on heavy vehicles are designed to work best when the vehicle is fully loaded. An empty truck requires greater stopping distance because it has less traction. It can bounce and lock up its wheels, giving poorer braking. (This is not usually true for buses.) Follow these general procedures for braking:
(1) Release the accelerator pedal. (2) Downshift within the operating range of the engine (RPM). (3) Depress the brake pedal. (4) As the vehicle begins to reduce speed, decrease brake pedal pressure. (5) Stop smoothly by releasing brake pressure gradually as the stopping rate increases. (6) As the vehicle halts, push in the clutch pedal and release the brake pedal. (7) After stopping, shift to neutral and reapply the brake just enough to keep the vehicle stopped. Now release the clutch pedal.
h. Shutting down the engine. Shut down procedures varies from vehicle to vehicle. Refer to the vehicle operator’s manual for specific procedures. i. Demonstrate driving within the training area.

TC 21-305-8
4-46
3. Practical exercise: a. Assign students to vehicles. Issue vehicle operator's manuals, pencils, DA Form 2404, DD Form 1970, and equipment records folder. Tell students the location of rags, lubricants, and coolant. b. Students perform before-operation PMCS on their assigned vehicle. c. Students practice maneuvering the vehicle through the courses laid out in the training areas. Sample training areas are in Chapter 5 (Figures 5-1, 5-2, 5-3, 5-5, and 5-8). Students also conduct during-operation PMCS at this time.
NOTE: As each student practices driving, an assistant instructor rides in the front seat next to
the driver. The other two students ride in passenger seats or troop seats and rotate driving duties. The assistant instructor explains driving techniques, ensures the driver is aware of driving situations, and conducts after-action reviews with each driver. Now is the time to pass on valuable experience and correct any bad driving habits.
d. After students have mastered driving the vehicle in the training area, they will practice driving on the road. e. Students perform after-operation PMCS and ensure all operator entries required on DA Form 2404 and DD Form 1970 are accurate, complete, and legible.
4. Evaluation: Check each student's performance of PMCS and driving. 5. Summary:
a. Recap main points. b. Allow for questions. c. Clarify questions. d. Give closing statement.
6. Retraining: Retrain No-Gos and slow learners. Students perform driving tasks daily and are tested on the EOCCT. E. SAFETY RESTRICTIONS.
1. Ensure all chock blocks (if required) are in place when vehicles are parked. 2. Ensure students remove all jewelry and ID tags before performing PMCS.

TC 21-305-8
4-47
3. Ensure students pay particular attention to the cautions and warnings listed in the operator's manual.
4. Ensure the transmission is always placed in neutral; the parking brake is set; the
engine is shut off; and the ignition key is removed (if equipped) before leaving the vehicle. 5. Ensure a safe following distance and speeds (as determined by the local command) are
maintained when driving in the training area and driver training route. 6. Ensure all occupants wear seat belts (if equipped) while the vehicle is in operation.
F. ADDITIONAL COMMENTS AND INFORMATION. Recommended instructional time is 12 hours (1.0 conference, 1.0 demonstration, and 10.0 practical exercise, including 1.5 PMCS).

TC 21-305-8
4-48
LESSON TITLE: DRIVE VEHICLE WITH AUTOMATIC TRANSMISSION TASK NUMBER: 551-721-1366 (Drive Vehicle with Automatic Transmission)
A. TRAINING OBJECTIVE. TASK: Drive vehicle with automatic transmission. CONDITION: Given instruction, DD Form 1970, DA Form 2404, a pencil,
appropriate vehicle operator's manual, equipment records folder, rags, lubricants, coolant, a suitable training area, improved surfaced roads, and an automatic transmission vehicle with BII.
STANDARDS: Without accident or injury operate the vehicle. Start the vehicle.
Put the vehicle in motion. Read gauges. Upshift and downshift the transmission smoothly through all gear ranges. Manipulate the controls. Use correct braking procedures. Perform basic driving maneuvers. Shut down the engine.
B. INTERMEDIATE TRAINING. None. C. ADMINISTRATIVE INSTRUCTIONS.
1. Training time: As scheduled. 2. Training location: Motor pool, training area, and driver training route as scheduled. 3. Training type: Conference, demonstration, and practical exercise. 4. Students: Scheduled personnel. 5. Principal and assistant instructors required: One primary instructor for the conference,
one assistant instructor for every three students for the demonstration and practical exercise. 6. Training aids and equipment: Rags, lubricants, coolant, 40 traffic cones or empty
POL drums, DA Form 2404, DD Form 1970, pencils, appropriate vehicle operator's manual, equipment records folder, and a wheeled vehicle with BII for every three students.
7. References: Appropriate vehicle operator's manual and FM 21-305.
D. SEQUENCE OF ACTIVITY.
1. Introduction:

TC 21-305-8
4-49
a. Interest device. b. Tie-in. c. Lesson objective (paragraph A). d. Procedures:
(1) Explanation and demonstration. (2) Practical exercise. (3) Summary.
2. Explanation and demonstration:
a. Starting the engine. (1) Fuel-efficient starting. (2) Cold weather starting procedures. (3) Engine warm-up. (4) Excessive idling.
b. Explain the gear shift patterns. They differ somewhat on the various models of vehicles equipped with automatic transmissions. Vehicles may have more forward and reverse driving ranges. The following is a typical pattern:
(1) P (Park). The transmission is locked. The vehicle will not move. This selection is also used for starting. Some vehicles do not have a P selection; in these vehicles, N (neutral) takes the place of P for starting and parking. (2) R (Reverse). This puts the vehicle in reverse for normal backing operations. (3) N (Neutral). The transmission mechanism is disengaged. The truck wheels can move by coasting, but the truck is not in gear. This selection is used for parking and starting if the transmission does not have a P (Park) selection. (4) D (Drive). This is for normal driving with light to moderate loads. The vehicle automatically downshifts and upshifts based on vehicle speed.
TC 21-305-8
4-50
Forced downshift occurs at slower speeds by depressing the accelerator pedal all the way to the floor. (5) 2 (Second). This is for hill climbing or engine braking to slow the truck when going down a steep hill. The gearshift lever may be shifted from D to 2 and from 2 to D under most driving conditions. (6) 1 (First). This is for maximum engine braking when driving down very steep hills or when maximum performance is required to climb a very steep hill or to drive through deep snow or mud.
c. Describe driving tips for automatic transmission vehicles.
(1) Do not coast downhill in N (Neutral). (2) Do not shift the transmission gearshift lever to P (Park) or N (Neutral) while the truck is in motion. (3) Do not race or accelerate the engine when shifting from P (Park) or N (Neutral) into another gear range. (4) Do not shift the transmission between forward gear ranges and R (Reverse) while operating the engine at high speed or heavy throttle. (5) Do not force the transmission gearshift lever. (6) Do not shift the transmission gearshift lever to P (Park) on a hill before setting the parking brake. This puts force on the transmission and makes it difficult to shift the transmission gearshift lever out of P (Park). (7) When preparing to drive, do not release the parking brake until the transmission gearshift lever is shifted out of the P (Park) or N (Neutral) positions.
d. Putting the vehicle in motion. (1) Start the vehicle. Let the engine warm up according to the operator's manual. (2) Shift the transmission gearshift lever to D (Drive) for normal driving conditions. (3) Apply pressure to the service brake. Release the parking brake. (4) Release the service brake. Accelerate as needed for road, weather, and traffic conditions.
TC 21-305-8
4-51
e. Turning the vehicle.
(1) Basic rules. (2) Off-tracking. (3) Right turns. (4) Left turns. (5) Right and left curves.
f. Stopping the vehicle. The heavier the vehicle, the more work the brakes must do to stop it, and the more heat they absorb. The brakes, tires, springs, and shock absorbers on heavy vehicles are designed to work best when the vehicle is fully loaded. An empty truck requires greater stopping distance because it has less traction. It can bounce and lock up its wheels, giving poorer braking. (This is not usually true for buses.) Follow these general procedures for braking:
(1) Release the accelerator pedal. (2) Depress the brake pedal. (3) As the vehicle begins to reduce speed, decrease brake pedal pressure. (4) Stop smoothly by releasing the brake pressure gradually as the stopping rate increases. (5) After stopping, apply the brake just enough to keep the vehicle stopped.
g. Shutting down the engine. Shut down procedures varies from vehicle to vehicle. Refer to the vehicle operator's manual for specific procedures. h. Demonstrate driving within the training area.
3. Practical exercise. a. Assign students to vehicles. Issue vehicle operator’s manuals, pencils, DA Form 2404, DD Form 1970, and equipment records folder. Tell students the location of rags, lubricants, and coolant. b. Students perform before-operation PMCS on their assigned vehicle.
TC 21-305-8
4-52
c. Students practice maneuvering the vehicle through the courses laid out in the training area(s). Sample training areas are in Chapter 5 (Figures 5-1, 5-2, 5-3, 5-5, and 5-8). During-operation PMCS is also conducted at this time.
NOTE: As each student practices driving, an assistant instructor rides in the front seat next to
the driver. The other two students ride in the passenger seats or troop seats and rotate driving duties. The assistant instructor explains driving techniques, ensures the driver is aware of driving situations, and conducts after-action reviews with each driver. Now is the time to pass on valuable experience and correct any bad driving habits.
d. After students have mastered driving the vehicle in the training area, they will practice driving on the road. e. Students perform after-operation PMCS and ensure all operator entries required on DA Form 2404 and DD Form 1970 are accurate, complete, and legible.
4. Evaluation: Check each student's performance of PMCS and driving. 5. Summary:
a. Recap main points. b. Allow for questions. c. Clarify questions. d. Give closing statement.
6. Retraining: Retrain No-Gos and slow learners. Students perform driving tasks daily
and are tested on the EOCCT. E. SAFETY RESTRICTIONS.
1. Ensure all chock blocks (if required) are in place when vehicles are parked. 2. Ensure students remove all jewelry and ID tags before performing PMCS. 3. Ensure students pay particular attention to the cautions and warnings listed in the
operator's manual. 4. Ensure the transmission is always placed in neutral (some automatics are placed in
park); the parking brake is set; the engine is shut off; and the ignition key is removed (if equipped) before leaving the vehicle.

TC 21-305-8
4-53
5. Ensure a safe following distance and speeds (as determined by the local command) are maintained when driving in the training area and driver training route.
6. Ensure all occupants wear seat belts (if equipped) while the vehicle is in operation.
F. ADDITIONAL COMMENTS AND INFORMATION. Recommended instructional time is 12 hours (1.0 conference, 1.0 demonstration, and 10.0 practical exercise, including 1.5 PMCS).
TC 21-305-8
4-54
LESSON TITLE: DRIVE VEHICLE ON THE ROAD (PRIMARY AND SECONDARY) TASK NUMBER: 551-721-1365 (Drive Vehicle with Manual Transmission) and 551-721-
1366 (Drive Vehicle with Automatic Transmission) A. TRAINING OBJECTIVE. TASK: Drive vehicle on the road (primary and secondary). CONDITION: Given instruction, DD Form 1970, DA Form 2404, a pencil,
vehicle operator's manual, equipment records folder, rags, lubricants, coolant, improved surfaced roads, secondary roads, and a wheeled vehicle with BII.
STANDARDS: Without accident or injury, operate the vehicle. Conduct a visual
search. Communicate intentions. Manage space and speed. Monitor for hazards. Maneuver in emergencies. Conduct skid control and recovery.
B. INTERMEDIATE TRAINING. None. C. ADMINISTRATIVE INSTRUCTIONS.
1. Training time: As scheduled. 2. Training location: Classroom, motor pool, and driver training route (built-up and rural
areas) as scheduled. 3. Training type: Conference and practical exercise. 4. Students: Scheduled personnel. 5. Principal and assistant instructors required: One primary instructor for the conference
and one assistant instructor for every three students for the practical exercise. 6. Training aids and equipment: Rags, lubricants, coolant, 40 traffic cones or empty
POL drums, DA Form 2404, DD Form 1970, pencils, vehicle operator's manual, equipment records folder, and a wheeled vehicle with BII for every three students.
7. References: FM 21-305 and appropriate vehicle operator's manual.
D. SEQUENCE OF ACTIVITY.
1. Introduction:
TC 21-305-8
4-55
a. Interest device. b. Tie-in. c. Lesson objective (paragraph A). d. Procedures:
(1) Explanation. (2) Practical exercise. (3) Summary.
2. Explanation and demonstration:
a. Visual search. (1) Seeing ahead and to the sides.
(a) Importance of seeing properly. Get a clear, complete, and accurate picture of the traffic scene. Look back and forth, near and far. (b) Distance scanning. Look 12 to 15 seconds ahead. In city driving, this equals about one block; on the open highway, about one-quarter mile (a much greater distance). (c) Scanning to the sides. • Look for anything that could affect your travel path such as
pedestrians, bicycles, intersections, merging lanes, road shoulders, and parked or stalled vehicles.
• Continually look for bailout areas (spaces that might be used to avoid a collision).
(d) Procedures at intersections.
• Look in the correct sequence: left, right, then left again.
• Be aware of blind spots created by mirrors and corner posts of the cab.
(2) Use of mirrors.

TC 21-305-8
4-56
(a) Importance of mirrors. Mostly, the scene behind can only be seen through the left and right side mirrors. (b) Two types of side mirrors.
• Plain (flat) mirrors give the best view of the rear of the vehicle
and the roadway behind, but they do not give a wide view. They can leave blind areas alongside most of the length of the vehicle.
• Convex mirrors are curved to give a wide-angle view. They are best used for side close-ups. Convex mirrors eliminate most, but not all, of the blind area created by the plain mirror. The images you see, however, are distorted.
(c) Taking care of mirrors. Clean, tighten, and adjust mirrors to get the maximum view of conditions to the sides and rear of the vehicle.
(3) Seeing to the rear.
(a) Using mirrors to monitor the rear. Monitor the mirrors every six to eight seconds. Take care to not take your eyes off the road ahead for more than one second. Use the mirrors to monitor--
• load and cargo security.
• loose or falling cargo.
• tire fires.
• any potential hazards on the sides of the vehicle.
• what is beside or behind the vehicle that a sudden or
emergency move might affect.
(b) Use mirrors to check the rear when changing speed, position, or direction:
• Speed. Monitor the roadway behind for position of other
traffic. Be prepared to alert vehicles behind when forced to change speed quickly or unexpectedly.
• Changing lanes. Use all mirrors when changing your path of
travel to the left or right. Be aware that blind spots exist behind and to the sides of the vehicle.
TC 21-305-8
4-57
• Turning corners. Check the side view mirrors before reducing
speed and while negotiating the turn. When turning, check the mirrors to keep the vehicle from damaging any object or person.
b. Communicate intentions.
(1) Communicate intention to turn.
(a) Downshift or brake to slow the vehicle. (b) Initiate your turn signal as early as possible. (c) After completing the turn, cancel the turn signal.
(2) Communicate intention to back the vehicle. (a) Exit the vehicle to check for possible obstacles. (b) Station someone in the rear as a ground guide and to block traffic, if necessary. (c) Turn on the flashers. Sound your horn (when legal to do so). (d) Align your vehicle to gain the best possible angle of approach. (e) Use the mirror to help view the vehicle's sides and rear.
(3) Communicate intent to other drivers. (a) Signal when changing lanes. (b) Signal when turning. (c) Signal when passing another vehicle. (d) Signal when merging into traffic. (e) Signal when approaching a parallel parking place. (f) Signal when leaving a curb. (g) Use four-way flashers when making emergency stops or slowing your vehicle.

TC 21-305-8
4-58
(4) Communicate presence to other drivers in the area. (a) Use the horn (when legal to do so) to get other drivers' attention. (b) Establish eye contact, once attention is obtained. (c) Use the horn early to prevent inappropriate action. (d) Use a long blast only in an emergency. (e) Use headlights to get other drivers' attention. (f) Flash headlights to communicate a hazard. (g) Turn lights on when weather conditions and/or visibility are poor. (h) Use four-way flashers when unloading, at an accident scene, or when traveling slowly (below the posted minimum limit or well below the posted maximum limit).
c. Manage space.
(1) Maintain adequate clearance to the sides of the vehicle.
(a) Keep the vehicle centered in the lane. (b) Do not travel alongside other vehicles. Doing so increases the chance of collision if either vehicle sways or drifts. (c) Maintain adequate clearance between surrounding vehicles. (d) Keep a firm grip on the wheel. Make minor corrections for winds. (e) Be prepared for drafting effects of surrounding vehicles.
(2) Deal with tailgaters. (a) Do not tap the brake pedal. (b) Do not turn on the headlights. (c) Stay in or move into the right lane.
TC 21-305-8
4-59
(d) Keep adequate space between your vehicle and the vehicle ahead regardless of the tailgater. (e) Open up room in front to allow clearance for passing.
(3) Manage overhead space. (a) Understand that the vehicle's clearance can change with the load. (b) See the posted overhead clearance. (c) Choose the lane that may afford more clearance. (d) If unsure, approach slowly. (e) Be careful if snow or ice is on the road (decreased clearance). (f) If clearance is marginal, take an alternate route. If there is no alternate route, stop and measure the clearance before proceeding.
(4) Monitor the space below the vehicle for obstructions.
(a) Be aware of railroad tracks. (b) Be especially careful on unpaved roads. (c) Check for drainage channels across roads. (d) Cross potential obstacles at an angle. (e) Heavy loads may require more caution. (f) Be careful of hills and small rises in the road. (g) Low-slung trailers (pintle-connected) can become lodged on rises in the road.
(5) Ensure there is adequate space for a right turn. (a) Initiate your turn signal. (b) Keep the vehicle's rear close to the curb. (c) Pull far forward into the intersection; turn right hard.
TC 21-305-8
4-60
(d) Watch oncoming cars if swinging wide into the left or oncoming lane. (e) Steer the vehicle into the desired lane. (f) Cancel the signal.
(6) Ensure there is adequate space for a left turn. (a) Initiate your turn signal. (b) If there are two turn lanes, take the right-hand lane. (c) Do not turn until you are in the center of the intersection. (d) Ensure there is an adequate gap to turn in front of traffic. (e) If applicable, watch for oncoming traffic. (f) Cancel signal.
d. Manage speed.
(1) Control speed on slippery surfaces. (a) Decrease speed. (b) Downshift or decelerate. (c) Reach a speed approximately one third less than posted limits. (d) On snow, reduce speed by approximately half of posted speed limit. (e) Make slight, gradual steering motions. (f) When braking, do not lock the wheels. (g) Keep adequate following distance for weather conditions.
(2) Control speed when exiting an interstate highway. (a) Signal your intention to exit well in advance.
TC 21-305-8
4-61
(b) Slow to the appropriate speed for exiting the highway. (The posted speed is for cars. Heavier vehicles generally must slow 10-15 mph less than the posted speed.) (c) Downshift or brake to decelerate. (d) Steer gradually toward the exit ramp. (e) Follow the curves outside. (f) Adjust steering gradually. (g) Prepare to stop at the bottom of the exit.
(3) Control speed when descending an incline. (a) Shift the transmission into a lower gear before starting the downgrade. (b) Check the brakes before starting the downgrade. (c) Pay attention to signs that indicate the location of escape ramps. (d) Use steady, light, continuous pressure on the brake pedal. (e) Use the pull-off if braking power diminishes. Let the brakes cool.
(4) Control speed in heavy traffic. (a) Maintain a proper following distance. (b) Stay within legal speed limits. (c) Try to keep the same speed as the surrounding traffic. (d) If following distances decrease, back off to allow the gap to increase. (e) Stay to the right if necessary.
e. Monitor for hazards.
(1) Monitor the roadway to detect hazards.

TC 21-305-8
4-62
(a) Scan 12-15 seconds ahead frequently. Anticipate problems. (b) Be aware of work zones. (c) Be aware of uneven pavement and pavement drop-offs. (d) Be aware of foreign objects in the road such as mufflers and debris. (e) Monitor activities alongside the road such as stores, shopping areas, and stopped or disabled vehicles. (f) Be aware of vehicles ahead braking inappropriately (brakes locked or continuously riding the brakes). (g) Be aware of vehicles ahead suddenly swerving: • Reduce your speed.
• Maintain a firm grip on the steering wheel.
• Take evasive action. Steer left or right, countersteer, or brake.
(2) Observe if the driver of the vehicle ahead is confused or not paying full attention.
(a) Slow down. (b) Try to pass if possible. Initiate your turn signal. Check your mirrors. (c) Steer gradually to the passing lane. (d) Pass as quickly as possible. Maintain extra distance from the vehicle. (e) Initiate your turn signal. Check your mirrors. (f) Steer gradually to the original lane. (g) Cancel your turn signal. (h) If unable to pass, back off and stay far behind.
(3) Observe shoppers/pedestrians in the area.
TC 21-305-8
4-63
(a) Increase visual scanning. Check your mirrors. (b) Slow down. (c) Be prepared to stop suddenly. (d) Distance the vehicle from curbs. (e) Be aware of pedestrians emerging from between parked cars.
(4) Observe slow drivers ahead. (a) Apply your brakes or downshift. (b) Initiate your turn signals. Check your mirrors. (c) Pass the vehicle if possible. (d) If unable to pass, maintain adequate following distance. Back off. Stay far behind.
(5) Detect roadway obstructions (posted). (a) Frequently scan the roadway ahead. (b) Cue in on signs that indicate detours or work zones. (c) Check posted load/speed limit for tunnels and bridges. (d) Check for overhead clearance indications. (e) Slow your vehicle to an appropriate speed. (f) Check your mirrors for vehicles alongside or behind. (g) Steer towards the center of the lane if clear. (h) Keep an adequate clearance distance from other vehicles.
(6) Observe a vehicle on the shoulder with the hood up. (a) Scan the area for pedestrians. (b) Scan inside the vehicle to determine the occupants' status. (c) Initiate your signal.
TC 21-305-8
4-64
(d) Check your mirrors for passing vehicles or vehicles alongside. (e) Decelerate, downshift, or brake to reduce speed. (f) Steer gradually into the left lane. On two-lane roads, steer to the left side of the occupied lane.
f. Maneuver in emergencies.
(1) Observe an oncoming car encroaching into your lane. (a) Sound your horn or flash your lights to alert the oncoming vehicle. (b) Move to the right if possible (two-lane road). (c) Check your mirrors for vehicles to the side and approaching from the rear. If possible or necessary, steer to the right (four-lane road). (d) Do not brake while turning but lift your foot from the accelerator pedal. (e) If you must leave the road, follow these steps: • Avoid braking. If you must brake, brake gently to avoid
skidding.
• Keep one set of wheels on the pavement.
• Stay on the shoulder if possible.
• Turn sharply enough to get back on the road safely.
(2) Notice an animal walking in the road at night. (a) Immediately slow your vehicle. (b) Brake or downshift. (c) Flash your lights. (d) Sound your horn.

TC 21-305-8
4-65
(e) Turn your lights off momentarily if the animal is fixated on your headlights. (f) Move away from the lane the animal was/is in if possible. (g) Stop your vehicle if necessary. (h) If all these actions fail, assess your options:
• Leave the road.
• Hit animal.
• Hit another vehicle.
(3) Vehicle has a tire blowout while operating at highway speeds.
(a) Grasp the steering wheel firmly. (b) Accelerate immediately to keep the momentum of the vehicle in a straight line. (c) Check your mirrors for vehicles to the sides and rear. (d) Initiate your signal. (e) Decelerate and progressively downshift the transmission to slow the vehicle. (f) Gradually steer the vehicle to the shoulder. (g) Avoid braking; brake very gently if necessary. (h) Pull the vehicle onto the shoulder as far from traffic as possible. (i) Set four-way flashers. (j) Set out warning reflectors. Change the tire.
g. Conduct skid control and recovery.
(1) If you start skidding as a result of overacceleration-- (a) detect if the rear of the vehicle is sliding.

TC 21-305-8
4-66
(b) remove your foot from the accelerator. (c) steer the vehicle gently in the direction the rear of the vehicle is skidding. (d) use intermittent controlled braking to slow the vehicle when the vehicle has straightened.
(2) If you start skidding as a result of overbraking-- (a) release brake pedal pressure to release the locked brakes. (b) use controlled braking to reduce speed when vehicle wheels are rolling. (c) steer in the intended direction of travel.
(3) If you start skidding as a result of oversteering-- (a) remove your foot from the accelerator. (b) countersteer. (c) steer in the intended direction of travel once control is gained.
h. Explain to the students that they must perform before-, during-, and after-operation PMCS on their assigned vehicle. i. Demonstrate hand and arm signals required for this exercise. j. Explain ground guide safety precautions for backing the vehicle.
3. Practical exercise:
a. Assign students to vehicles. Issue vehicle operator's manuals, pencils, DA Form 2404, DD Form 1970, and equipment records folder. Tell students the location of rags, lubricants, and coolant. b. Students perform before-operation PMCS. c. Students practice driving the vehicle on the road (primary and secondary) and during-operation PMCS.
NOTE: As each student practices driving, an assistant instructor rides in the right front seat. The other two students ride in the passenger seats or troop seats and rotate driving duties. The assistant instructor explains driving techniques, ensures the driver is aware
TC 21-305-8
4-67
of driving situations, and conducts after-action reviews with each driver. Now is the time to pass on valuable experience and correct any bad driving habits.
d. Students perform after-operation PMCS and ensure all operator entries required on DA Form 2404 and DD Form 1970 are accurate, complete, and legible.
4. Evaluation: Check each student's performance of PMCS and driving.
5. Summary:
a. Recap main points. b. Allow for questions. c. Clarify questions. d. Give closing statement.
6. Retraining: Retrain No-Gos and slow learners. Students perform driving tasks daily and are tested on the EOCCT. E. SAFETY RESTRICTIONS.
1. Ensure all chock blocks (if required) are in place when vehicles are parked. 2. Ensure students remove all jewelry and ID tags before performing PMCS. 3. Ensure students pay particular attention to the cautions and warnings listed in the
operator's manual. 4. Ensure the transmission is always placed in neutral (some automatics are placed in
park); the parking brake is set; the engine is shut off; and the ignition key is removed (if equipped) before leaving the vehicle.
5. Ensure a safe following distance and speeds (as determined by the local command) are
maintained when driving in the training area. 6. Ensure all occupants wear seat belts (if equipped) while the vehicle is in operation.
7. Ensure ground guides are used when backing vehicles.
F. ADDITIONAL COMMENTS AND INFORMATION. Recommended instructional time is 12 hours (1.0 conference and 11.0 practical exercise, including 1.5 PMCS).
TC 21-305-8
4-68
LESSON TITLE: BACK AND PARK A VEHICLE TASK NUMBER: 551-721-1365 (Drive Vehicle with Manual Transmission) and 551-721-
1366 (Drive Vehicle with Automatic Transmission) A. TRAINING OBJECTIVE. TASK: Back and park a vehicle. CONDITION: Given DD Form 1970, DA Form 2404, a pencil, appropriate
operator's manual, equipment records folder, rags, lubricants, coolant, suitable training area, a wheeled vehicle with BII, and ground guides.
STANDARDS: Without damaging the vehicle or physical surroundings or
injuring personnel, back and park a vehicle. B. INTERMEDIATE TRAINING. None. C. ADMINISTRATIVE INSTRUCTIONS.
1. Training time: As scheduled. 2. Training location: Motor pool and training area as scheduled. 3. Training type: Demonstration and practical exercise. 4. Students: Personnel as scheduled. 5. Principal and assistant instructors required: One primary instructor, one assistant
instructor for every three students for the demonstration and practical exercise. 6. Training aids and equipment: Rags, lubricants, coolant, 40 traffic cones or empty
POL drums, DA Form 2404, DD Form 1970, pencils, appropriate vehicle operator's manual, equipment records folder, and a wheeled vehicle with BII for every three students.
7. References: Appropriate vehicle operator's manual, FM 21-60, and FM 21-305.
D. SEQUENCE OF ACTIVITY.
1. Introduction:
a. Interest device. b. Tie-in.
TC 21-305-8
4-69
c. Lesson objective (paragraph A). d. Procedures:
(1) Explanation. (2) Practical exercise. (3) Summary.
2. Explanation and demonstration:
a. General rules for backing safely. Since the driver cannot see directly behind his vehicle, backing is always dangerous. Common sense therefore dictates that you avoid backing whenever possible. For example, if the vehicle must be parked, the driver parks so that he can pull forward when leaving. Even though planning ahead can reduce the need to back, almost everyone who drives will have to back on occasion. These four simple rules will help you back safely:
• Inspect your intended path.
• Back and turn toward the driver's side.
• Use your four-way flashers and the horn.
• Use ground guides.
(1) Inspect your path. Whether backing in a straight line or backing and turning, inspect the line of travel before starting. Get out and walk around the vehicle. Check the clearance in or near the path the vehicle will take. Also, be sure the road, parking, or docking area can support the vehicle. (2) Back and turn toward the driver's (sight) side. You will have a better view of what you are doing and will avoid the dangers from backing to the passenger (blind) side. If you back toward your side, you can watch the rear of the vehicle by looking out the side window and using the left mirror. You cannot see as much in the right side mirror because you are farther away from it. (3) Use your four-way flashers and the horn. Always turn on the four-way flashers before backing. If the vehicle does not have a back-up alarm, periodically tap the electric horn gently (if it is safe and legal to do so). (4) Use ground guides. It is always best to use a ground guide or guides to help back because the driver cannot see behind the vehicle and other blind spots in the mirrors. A ground guide is essential for blind side backing, but

TC 21-305-8
4-70
the driver is still responsible. The appendix has ground guide safety procedures. FM 21-305 explains detailed ground guide instructions. Before backing, the driver and ground guides must know, correct arm and hand signals (see FM 21-60 or FM 21-305).
WARNING When backing up or going forward, ground guides should never stand directly in the path of the vehicle. Keep 10 yards between the vehicle and ground guides at the front or rear and at the corners of the vehicle (never directly behind the vehicle). Ground guides must not position themselves between the vehicle being guided and another object where an inadvertent engine surge or momentary loss of vehicle control could cause injury. Vehicle drivers will immediately stop their vehicles if they lose sight of ground guides or note that the guide is dangerously positioned between the vehicle and another object. Vehicle drivers in such cases will secure their vehicle, dismount, and make on-the-spot corrections before proceeding.
b. General backing procedures. The four general procedures to follow in backing are to--
• start in the proper position.
• back slowly.
• constantly check behind the vehicle.
• start over when necessary.
(1) Start in the right position. Position the vehicle properly before trying a backing maneuver. Starting from a wrong spot makes the task more difficult or even impossible. Move the vehicle forward to reach the proper position. When the vehicle is in the right position, stop and secure it. Get out. Check the position from all angles. (2) Back slowly. Use the lowest reverse gear and back slowly. Be patient. If possible, do not use the accelerator; move in idle speed. Do not ride the clutch (manual transmissions). (3) Constantly check behind the vehicle. Use mirrors and ground guides. If necessary, periodically get out of the vehicle and check the vehicle path. (4) Start over when necessary. If the vehicle gets out of position, pull forward and realign it with the desired path of travel. It is better to pull forward in these situations than to continue to back.
TC 21-305-8
4-71
c. Arm and hand signals. Demonstrate arm and hand signals required for this exercise. d. Ground guide safety precautions. Explain ground guide safety precautions for backing. e. Demonstration. Demonstrate backing and parking:
• Straight line.
• Parallel parking (sight side and blind side).
3. Practical exercise:
a. Assign students to vehicles. Issue vehicle operator's manual, pencils, DA Form 2404, DD Form 1970, and equipment records folder. Tell students the location of rags, lubricants, and coolant. b. Students perform before-operation PMCS. c. Students practice backing and parking the vehicle through the courses laid out in the training areas. Sample training areas are in Chapter 5 (Figures 5-4, 5-6, and 5-7). Students also conduct during-operation PMCS at this time.
NOTE: The success of the driver-training program depends on the instructors' ability to get in
the vehicle with the student and pass on valuable experience and techniques. Now is the time to correct any bad driving habits.
d. Students perform after-operation PMCS and ensure all operator entries required on DA Form 2404 and DD Form 1970 are accurate, complete, and legible.
4. Evaluation: Check each student's performance of PMCS, backing, and parking. 5. Summary:
a. Recap main points. b. Allow for questions. c. Clarify questions. d. Give closing statement.
6. Retraining: Retrain No-Gos and slow learners.
TC 21-305-8
4-72
E. SAFETY RESTRICTIONS.
1. Ensure all chock blocks (if required) are in place when vehicles are parked. 2. Ensure students remove all jewelry and ID tags before performing PMCS. 3. Ensure students pay particular attention to the cautions and warnings listed in the
operator's manual. 4. Ensure the transmission is always placed in neutral (some automatics are placed in
park); the parking brake is set; the engine is shut off; and the ignition key is removed (if equipped) before leaving the vehicle.
5. Ensure a safe following distance and speeds (as determined by the local command) are
maintained when driving in the training area. 6. Ensure all occupants wear seat belts (if equipped) while the vehicle is in operation. 7. Ensure ground guides are used when backing vehicles.
F. ADDITIONAL COMMENTS AND INFORMATION. Recommended instructional time is 4 hours (.5 demonstration and 3.5 practical exercise, including .5 PMCS).
TC 21-305-8
4-73
LESSON TITLE: DRIVE VEHICLE AT NIGHT TASK NUMBER: 551-721-1365 (Drive Vehicle with Manual Transmission) and 551-721-
1366 (Drive Vehicle with Automatic Transmission) A. TRAINING OBJECTIVE. TASK: Drive vehicle at night. CONDITIONS Given instruction, DA Form 2404, DD Form 1970, pencil,
appropriate vehicle operator's manual, equipment records folder, rags, lubricants, coolant, improved road surfaces, and a wheeled vehicle with BII.
STANDARD: Without accident or injury, drive the designated route at night
with headlights: use defensive driving (accident avoidance) methods, operate the light switch, read gauges, upshift and downshift the transmission, manipulate the controls, use correct braking procedures, and perform basic driving maneuvers.
B. INTERMEDIATE TRAINING. None. C. ADMINISTRATIVE INSTRUCTIONS.
1. Training time: As scheduled. 2. Training location: Motor pool and driver training route (built-up and rural areas) as
scheduled. 3. Training type: Conference and practical exercise. 4. Students: Scheduled personnel. 5. Principal and assistant instructors required: One primary instructor for the conference
and one assistant instructor for each three students for the practical exercise. 6. Training aids and equipment: Rags, lubricants, coolant, DA Form 2404, DD Form
1970, pen or pencil, appropriate vehicle operator's manual, equipment records folder, and a wheeled vehicle with BII for each three students.
7. References: FM 21-305 and appropriate vehicle operator's manual.
D. SEQUENCE OF ACTIVITY.
1. Introduction:
TC 21-305-8
4-74
a. Interest device. b. Tie-in. c. Lesson objective (paragraph A). d. Procedures:
(1) Explanation. (2) Practical exercise. (3) Summary.
2. Explanation and demonstration:
a. Night driving factors.
(1) Driver factors:
(a) Vision. The driver has limited vision at night because-- • Eyes need time to adjust to the change between light and
darkness.
• Drivers cannot see as sharply at night.
• Drivers cannot see to the sides as well at night. (b) Glare. Temporary blindness is caused by glare, normally from oncoming headlights but sometimes from other lights. (c) Fatigue. Fatigue reduces the ability to see clearly. The driver becomes less alert and slower to see hazards and therefore does not react as promptly. (d) Driver inexperience. Newness to driving, coupled with the problems of reduced vision, glare, and fatigue account for the fact new drivers have higher nighttime accident rates than more experienced drivers.
(2) Roadway factors:
(a) Low illumination. Illumination provided by streetlights is often only fair to poor. On most roads, the only illumination is
TC 21-305-8
4-75
from the driver's headlights. Headlights are useful for a relatively short and narrow path directly ahead of the vehicle. However, headlights do not bend around corners.
(b) Variation in illumination. The driver must constantly adjust his eyes to different types and degrees of lighting. Flashing lights distract as much as they illuminate. Traffic signs are hard to see against the background of other lights, especially in towns and cities. (c) Familiarity with roads. The driver needs to be particularly alert on roads that he has never driven during the day. Also, on familiar roads, drivers tend to be overconfident. This is dangerous because-- • The view of the roadway is not the same.
• Situations on some stretches will change. (d) Other road users. The driver must adjust his driving to hazards such as pedestrians, joggers, bicyclists, and animals.
(e) Drinking drivers. The likelihood of encountering drunken drivers increases after sundown. Be especially alert when driving near roadside taverns and similar attractions.
(3) Vehicle factors:
(a) Headlights. Sight distance is limited to the range of the headlights. Therefore, the driver must drive at a speed that allows him to stop within his sight distance. (b) Auxiliary lights. Other drivers better see trucks at night when reflectors, marker lights, clearance lights, taillights, and brake lights are clean and working properly. (c) Turn signals. The ability to communicate with other drivers depends on turn signals. Nonfunctional or dirty turn signal lights greatly increase the risk of an accident. (d) Windshields and wipers. A clean windshield and properly working wipers are necessary for safe driving. (e) Mirrors. Mirrors help the driver see what is going on around him. Keep them clean and properly adjusted.
TC 21-305-8
4-76
b. Night driving procedures.
(1) Preparing to drive at night:
(a) Get yourself ready. • If you wear glasses, be sure they are clean.
• Remove sunglasses.
• Be well rested. (b) Plan your route. • Know the location of rest stops.
• Plan for hazards, such as unlighted areas, exit ramps,
construction areas, and other changes in the highway environment.
(c) Get the vehicle ready. • Ensure windshield, mirrors, lights, and reflectors are clean.
• Ensure all lights are operational.
(2) Driving at night:
(a) Avoid blinding others: • Dim high beams when oncoming vehicles are less than 500 feet
away.
• Do not use high beams to retaliate against other drivers. (b) Avoid glare: • Set interior panel lights at the lowest setting to reduce glare.
• Look to the right when oncoming vehicles are using high
beams. (c) Maximize visibility: • Use low beams when desired visual range is about 250 feet.
TC 21-305-8
4-77
• Use high beams when there are no oncoming vehicles and desired visual range is 350 to 500 feet.
(d) Adjust basic driving techniques: • Exercise additional caution because of reduced vision.
• Signal earlier than during daylight to give other drivers more
time to react.
3. Practical exercise:
a. Assign students to vehicles and issue vehicle operator's manual, pencil, DA Form 2404, DD Form 1970, and equipment records folder. Instruct students on the location of rags, lubricants, and coolant. b. Students perform before-operation PMCS to include the operation and cleanliness of all lights. c. Students drive the designated route. During-operation PMCS is conducted at this time.
NOTE: As each student practices driving, an assistant instructor rides in the right front seat. The other two students will ride in the rear seats or troop seats and rotate driving duties. The assistant instructor explains driving techniques, ensures the driver is aware of driving situations, and conducts after-action reviews with each driver. Now is the time to pass on valuable experience and correct any bad driving habits.
d. Students perform after-operation PMCS and ensure all operator entries required on DA Form 2404 and DD Form 1970 are accurate, complete, and legible.
4. Evaluation: Check each student's performance of PMCS and night driving. 5. Summary:
a. Recap main points. b. Allow for questions. c. Clarify questions. d. Give closing statement.
6. Retraining: Retrain No-Gos and slow learners.
TC 21-305-8
4-78
E. SAFETY RESTRICTIONS.
1. Ensure all chock blocks (if required) are in place when vehicles are parked. 2. Ensure students remove all jewelry and identification tags before performing PMCS. 3. Ensure students pay particular attention to the cautions and warnings listed in the
operator's manual. 4. Ensure the transmission is always placed in neutral (some automatics are placed in
park), the parking brake is set, the engine is shut off, and the ignition key is removed (if equipped) before leaving the vehicle.
5. Ensure a safe following distance and speeds are maintained when driving on the
designated route (as determined by the local command). 6. Ensure all occupants wear seat belts (if equipped) while vehicle is in operation. 7. Ensure ground guide(s) is used when backing vehicles during training.
F. ADDITIONAL COMMENTS AND INFORMATION. Recommended instructional time is 5 hours (.5 conference and 4.5 practical exercise, including 1.0 PMCS).
TC 21-305-8
5-1
CHAPTER 5
SAMPLE TRAINING AREAS
This chapter shows the sample training areas for light vehicles. The figures in this chapter depict light vehicles as follows: • Figure 5-1. Medium Vehicle Serpentine Course.
• Figure 5-2. Medium Vehicle Stopping within Prescribed Limit.
• Figure 5-3. Medium Vehicle Offset Alley.
• Figure 5-4. Medium Vehicle Straight Line Backing.
• Figure 5-5. Medium Vehicle Diminishing Clearance.
• Figure 5-6. Medium Vehicle Parallel Parking (Blind Side).
• Figure 5-7. Medium Vehicle Parallel Parking (Sight Side).
• Figure 5-8. Medium Vehicle Left and Right Turns.
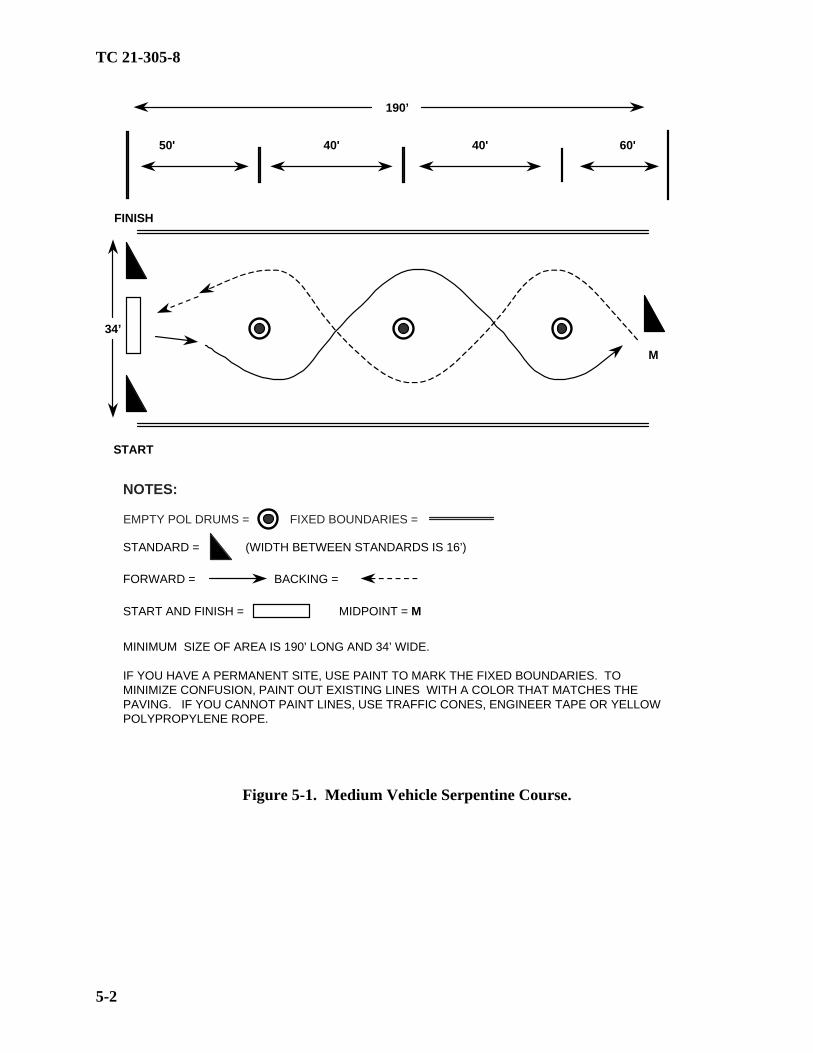
TC 21-305-8
5-2
Figure 5-1. Medium Vehicle Serpentine Course.
M
START
FINISH
50' 40' 40' 60'
NOTES:
MINIMUM SIZE OF AREA IS 190’ LONG AND 34’ WIDE.
IF YOU HAVE A PERMANENT SITE, USE PAINT TO MARK THE FIXED BOUNDARIES. TO MINIMIZE CONFUSION, PAINT OUT EXISTING LINES WITH A COLOR THAT MATCHES THEPAVING. IF YOU CANNOT PAINT LINES, USE TRAFFIC CONES, ENGINEER TAPE OR YELLOWPOLYPROPYLENE ROPE.
EMPTY POL DRUMS = FIXED BOUNDARIES =
STANDARD = (WIDTH BETWEEN STANDARDS IS 16’)
FORWARD = BACKING =
START AND FINISH = MIDPOINT = M
190’
34’
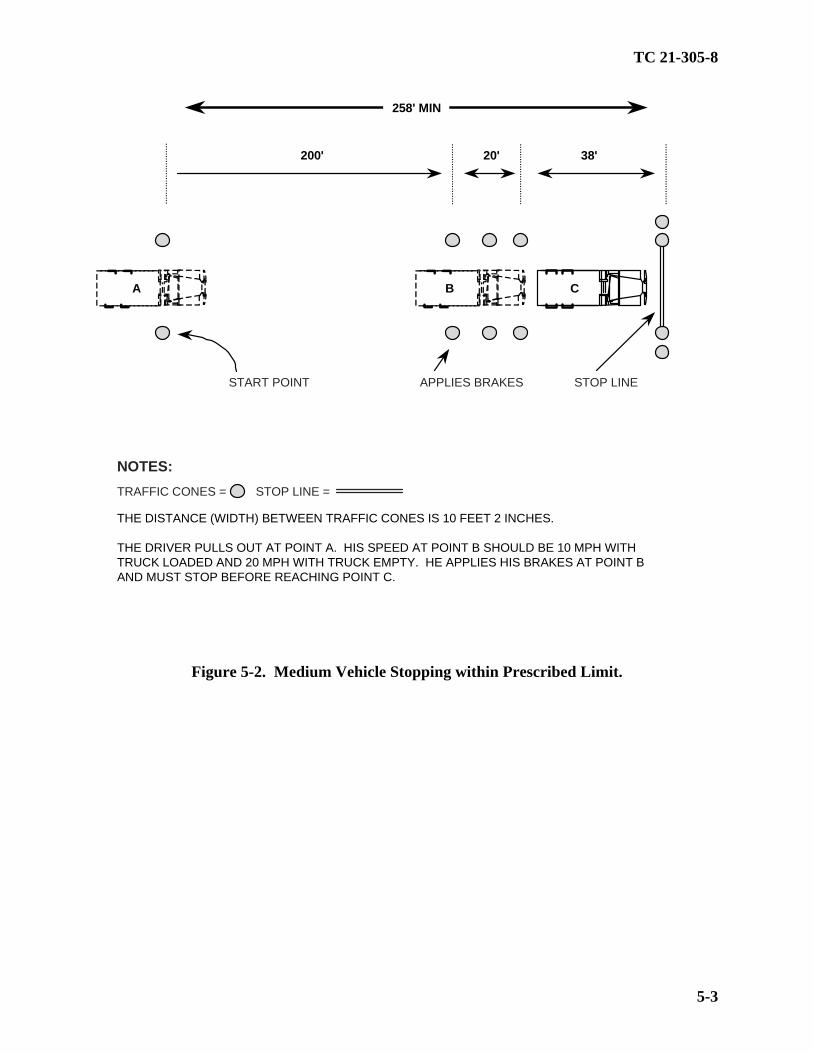
TC 21-305-8
5-3
Figure 5-2. Medium Vehicle Stopping within Prescribed Limit.
A B C
258' MIN
200' 20' 38'
NOTES:
THE DISTANCE (WIDTH) BETWEEN TRAFFIC CONES IS 10 FEET 2 INCHES.
THE DRIVER PULLS OUT AT POINT A. HIS SPEED AT POINT B SHOULD BE 10 MPH WITH TRUCK LOADED AND 20 MPH WITH TRUCK EMPTY. HE APPLIES HIS BRAKES AT POINT B AND MUST STOP BEFORE REACHING POINT C.
TRAFFIC CONES = STOP LINE =
START POINT APPLIES BRAKES STOP LINE
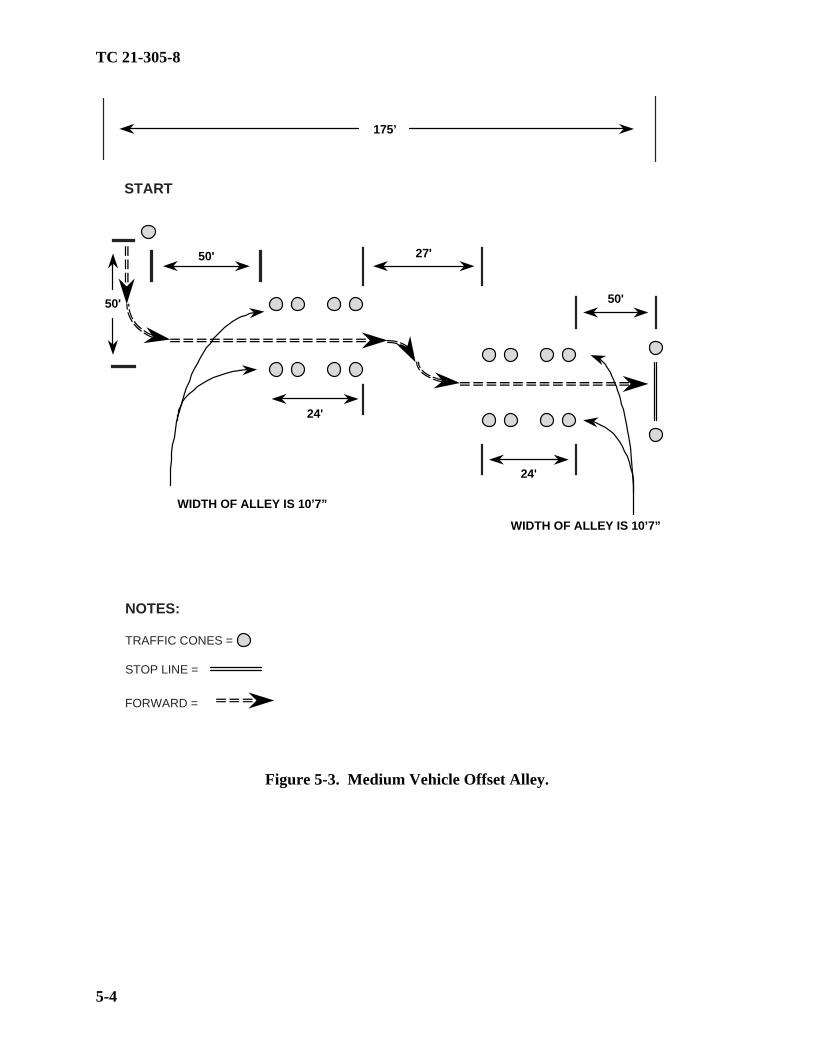
TC 21-305-8
5-4
Figure 5-3. Medium Vehicle Offset Alley.
START
27'
24'
50'
24'
50'
50'
175’
FORWARD =
NOTES:
TRAFFIC CONES =
STOP LINE =
WIDTH OF ALLEY IS 10’7”
WIDTH OF ALLEY IS 10’7”
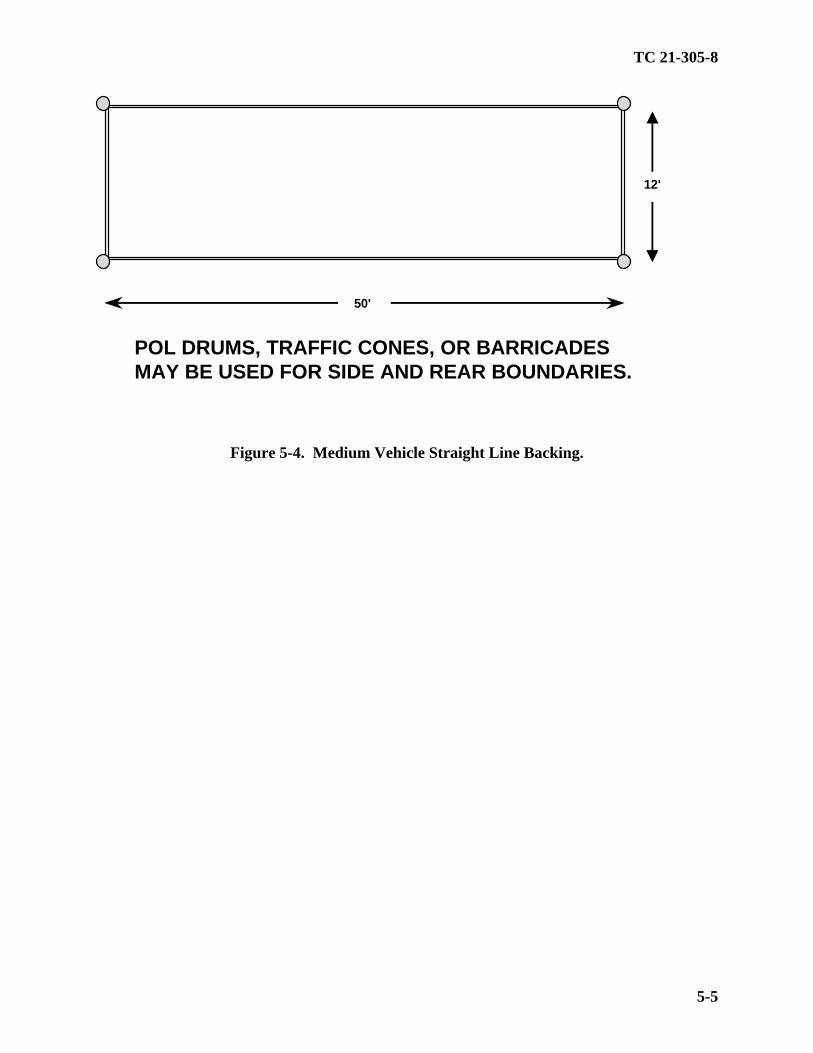
TC 21-305-8
5-5
Figure 5-4. Medium Vehicle Straight Line Backing.
50'
12'
POL DRUMS, TRAFFIC CONES, OR BARRICADES MAY BE USED FOR SIDE AND REAR BOUNDARIES.

TC 21-305-8
5-6
Figure 5-5. Medium Vehicle Diminishing Clearance.
FORWARD =
NOTES:
TRAFFIC CONES =
STOP LINE =
175’
START
FINISH
ABCDE
25' 25' 25' 25' 25'
25'
25'
8'6" 8'8" 8'10" 9' 9’2"
10'
50'
100’
MINIMUM LENGTH IS 200’ AND MINIMUM WIDTH IS 175’

TC 21-305-8
5-7
Figure 5-6. Medium Vehicle Parallel Parking (Blind Side).
15'10'10'
15'
41'
KEY
BACKING
FORWARD
BARRICADE
START

TC 21-305-8
5-8
Figure 5-7. Medium Vehicle Parallel Parking (Sight Side).
15'10'10'
15'
41'
KEY
BACKING
FORWARD
BARRICADE
START
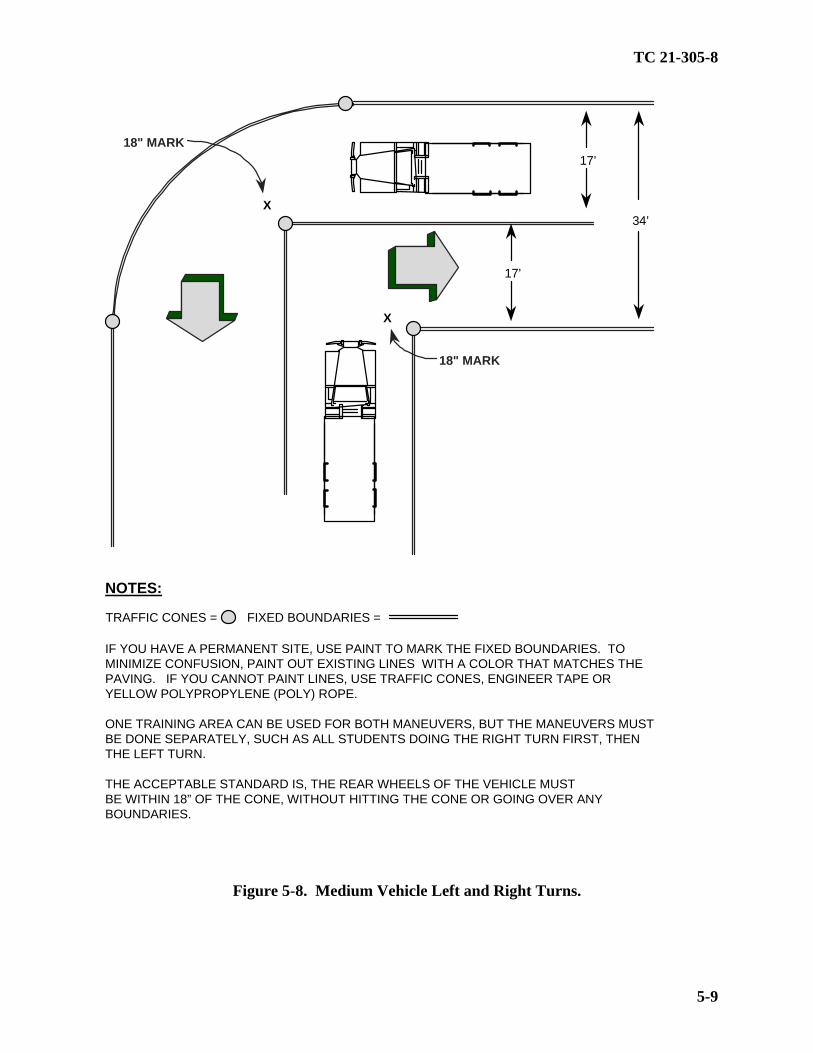
TC 21-305-8
5-9
Figure 5-8. Medium Vehicle Left and Right Turns.
18" MARK
X
X
18" MARK
34’
17’
17’
IF YOU HAVE A PERMANENT SITE, USE PAINT TO MARK THE FIXED BOUNDARIES. TO MINIMIZE CONFUSION, PAINT OUT EXISTING LINES WITH A COLOR THAT MATCHES THEPAVING. IF YOU CANNOT PAINT LINES, USE TRAFFIC CONES, ENGINEER TAPE OR YELLOW POLYPROPYLENE (POLY) ROPE.
ONE TRAINING AREA CAN BE USED FOR BOTH MANEUVERS, BUT THE MANEUVERS MUSTBE DONE SEPARATELY, SUCH AS ALL STUDENTS DOING THE RIGHT TURN FIRST, THEN THE LEFT TURN.
THE ACCEPTABLE STANDARD IS, THE REAR WHEELS OF THE VEHICLE MUSTBE WITHIN 18” OF THE CONE, WITHOUT HITTING THE CONE OR GOING OVER ANYBOUNDARIES.
NOTES:
TRAFFIC CONES = FIXED BOUNDARIES =
TC 21-305-8
6-1
CHAPTER 6
END OF COURSE COMPREHENSIVE TEST (EOCCT)
LESSON TITLE: END OF COURSE COMPREHENSIVE TEST (EOCCT) TASK NUMBER: All previously taught tasks.
A. TRAINING OBJECTIVE. TASK: Pass the end of course comprehensive test (EOCCT). CONDITIONS Given an examination booklet, DD Form 1970, DA Form 2404, a
pencil, vehicle operator's manual, equipment records folder, rags, lubricants, coolant, suitable training area, and a wheeled vehicle with BII.
STANDARD: Answer correctly 21 of 30 questions on the written examination
and pass the driver's road test with a score of 70 or higher. B. INTERMEDIATE TRAINING. Intermediate Training Objective 1 TASK: Pass a written examination. CONDITION: Given an examination booklet and a pencil. STANDARDS: Answer correctly 21 of 30 questions within 30 minutes. Use
either the primary written test or the alternate written test. Intermediate Training Objective 2 TASK: Pass the driver's road test. CONDITION: Given a DD Form 1970, a DA Form 2404, a pencil, vehicle
operator's manual, equipment records folder, rags, lubricants, coolant, road test route, and a wheeled vehicle with BII.
STANDARDS: Achieve a score of 70 or higher. Use the driver's performance test
(road test) instructions and the driver's checklist.
TC 21-305-8
6-2
C. ADMINISTRATIVE INSTRUCTIONS.
1. Training time: As scheduled. 2. Training location: Classroom, motor pool, road test route, and training area as
scheduled. 3. Training type: Performance evaluation. 4. Students: Personnel as scheduled. 5. Principal and assistant instructors required: One primary instructor for the class for
the written test, and one assistant instructor for every student for the performance test. 6. Training aids and equipment: Examination booklet, DD Form 1970, DA Form 2404,
a pencil, vehicle operator's manual, equipment records folder, rags, lubricants, coolant, and a wheeled vehicle with BII.
7. References: DA Pamphlet 738-750, FM 21-305, and appropriate vehicle operator's
manual.
D. SEQUENCE OF ACTIVITY.
1. Introduction: a. Interest device. b. Tie-in. c. Lesson objective (paragraph A). d. Procedures:
(1) Explanation. (2) Practical exercise. (3) Summary.
2. Explanation and demonstration: a. Administer written examination. b. Administer driver's road tests.
3. Evaluation: Check driver's road test checklists and written test results.

TC 21-305-8
6-3
NOTE: Students must successfully pass all phases of the EOCCT before receiving any training
contained in Chapters 7 and 8.
4. Summary: a. Recap main points. b. Allow for questions. c. Clarify questions. d. Give closing statement.
5. Retraining: Retrain and retest No-Gos. E. SAFETY RESTRICTIONS.
1. Ensure all chock blocks (if required) are in place when vehicles are parked. 2. Ensure that the transmission is always placed in neutral (some automatics must be in
park); the parking brake is set; the engine is shut off; and the ignition key is removed (if equipped) before leaving the vehicle.
3. Ensure students remove all jewelry and ID tags before performing PMCS. 4. Ensure students pay particular attention to the cautions and warnings listed in the
operator's manual. 5. Ensure ground guides are used when backing the vehicle during training (some light
vehicles do not normally require ground guides). 6. Ensure a safe following distance and speed (as determined by the local command and
traffic control devices) are maintained when driving on the road test route. 7. Ensure all occupants wear hearing protection (if required) when working in or around
a running vehicle. 8. Ensure all occupants wear seat belts (if equipped) while the vehicle is in operation.
F. ADDITIONAL COMMENTS AND INFORMATION. Recommended testing time is 4.0 hours (1.0 for the written test, 3.0 for the road test).

TC 21-305-8
6-4
INTERMEDIATE TRAINING OBJECTIVE 1
WRITTEN TEST (PRIMARY)
NAME RANK DATE
SECTION I. True/false questions: Read each question carefully and place a T or F on the blank line to the left.
______ 1. When driving during periods of reduced visibility, you should stay at least twice the normal distance from the vehicle ahead.
______ 2. Black ice usually occurs on bridges, beneath underpasses, in dips in the road, and in shaded areas.
______ 3. When braking is required for bleeding tar conditions on the roadway, ensure that at least one wheel is on a nonslippery surface.
______ 4. The correct driver action to take for bleeding tar conditions on the roadway is to maintain a steady speed and make no sudden steering or braking maneuvers.
______ 5. Sudden changes in speed or direction cause skidding and jackknifing.
______ 6. Installing tire chains on all driven wheels will increase traction when driving in snow or on ice.
______ 7. Engine controls start and shut down the engine.
______ 8. Secondary vehicle controls affect vehicle movement or power.
SECTION II. Multiple choice: Read each question carefully and write the answer which is most correct on the blank line to the left.
______ 9. When looking ahead of your vehicle while driving, you should look-- a. Straight-ahead. b. To the right side of the road. c. To the left side of the road. d. Back and forth, near and far.
______ 10. You are testing the stopping action of service brakes on a hydraulic system. Which of these can mean there is a problem? a. The vehicle stops in a straight line when the brake pedal is pressed. b. Stopping action is normal. c. The brake pedal feels spongy. d. Brake pedal free travel is within tolerances.
TC 21-305-8
6-5
______ 11. Which of these is a good rule for driving through work zones? a. Drive slowly and activate your four-way flashers. b. Drive at the posted speed. c. Slam on your brakes to get even with tailgaters. d. Decrease the following distance between your vehicle and the vehicle ahead.
______ 12. 12. If you are being tailgated, you should-- a. Flash your brake lights. b. Speed up. c. Signal the tailgater when it is safe to pass you. d. Increase the space in front of your vehicle.
______ 13. Which of these is the proper use of vehicle lights and flashers? a. Flashing your headlights to warn oncoming traffic that a state police vehicle has radar in place ahead. b. Flashing your brake lights to warn someone behind you of a hazard that will require slowing down. c. Driving at 55 mph with your four-way flashers on. d. Activating your left turn signal to keep drivers from passing you on the left, then making a right turn.
______ 14. You are driving on a straight, level highway at 50 mph. No vehicles are in front of you. Suddenly a tire blows out on your vehicle. What should you do first? a. Stay off the brake until the vehicle slows on its own. b. Quickly steer onto the shoulder. c. Begin light braking. d. Begin stab braking.
______ 15. You should use your mirrors to check-- a. The condition of your tires and cargo. b. Where the rear of your vehicle is while you turn. c. Traffic gaps before you merge. d. All of the above.
______ 16. You are driving a 5-ton cargo truck. You must exit a highway using an off ramp that curves downhill. You should-- a. Slow down to a safe speed before the turn. b. Slow to the posted speed limit for the off ramp. c. Come to a full stop at the top of the ramp. d. Wait until you are in the curve before downshifting.
TC 21-305-8
6-6
______ 17. You are driving on a two-lane road. An oncoming driver drifts into your lane and is headed straight for you. Which of these is generally the best action to take? a. Brake hard. b. Steer into the oncoming lane. c. Steer onto the left shoulder. d. Steer to the right
______ 18. You are driving a 5-ton cargo vehicle with a manual transmission. You must stop the vehicle on the shoulder while driving on an uphill grade. Which of these is a good rule to follow when putting it back in motion up the grade? a. Keep the clutch slipping while slowly accelerating. b. Use the parking brake to hold the vehicle until the clutch engages. c. Let the vehicle roll straight backwards a few feet before you engage the clutch. d. Let the vehicle roll backwards a few feet before you engage the clutch, but turn the wheel so that the back moves away from the roadway.
______ 19. Which of these is a good rule to follow when steering to avoid a crash? a. Apply the brakes while turning. b. Steer with one hand so that you can turn the wheel more quickly. c. Do not turn any more than needed to clear what is in your way. d. Avoid countersteering.
______ 20. Some traffic emergencies may require you to leave the road. Which of these is a good rule to remember? a. If you must leave the road, try to get all wheels off the pavement. b. Brake gently to avoid skidding. c. Use hard braking if you are moving at a speed greater than 20 mph. d. Most shoulders are soft and will not support a vehicle.
______ 21. You should avoid driving through deep puddles or flowing water. But if you must, which of these steps can help keep your brakes working? a. Drive through quickly. b. Apply hard pressure on both the brake pedal and accelerator while driving through the water. c. Turn on your brake heaters. d. After coming out of the water, continue to drive at a slow speed with enough pressure on the brake pedal to cause a drag on the brakes.
TC 21-305-8
6-7
______ 22. You must drive on a slippery road. Which of these is a good step to do in such a situation? a. Use a smaller following distance. b. Apply the brakes during turns. c. Slow gradually. d. Maintain the maximum posted speed limit.
______ 23. Which of these statements about downshifting is true? a. When you downshift for a curve, do so before you enter the curve. b. When you downshift for a hill going down, do so before you crest the top of the hill. c. When double clutching, you should let the RPM decrease while the clutch is disengaged and the shift lever is in neutral. d. You do not need to downshift a manual transmission.
______ 24. Which of these is a good rule to follow when driving at night? a. Wear sunglasses. b. Look directly at oncoming headlights only briefly. c. Keep your speed slow enough that you can stop within the range of your headlights. d. Keep your instrument lights bright.
______ 25. Which of these statements about backing a heavy vehicle is true? a. Backing is always dangerous. b. You should back and turn toward the driver's side whenever possible. c. You should use ground guides and communicate with hand signals. d. All of the above are true.
______ 26. When should you wear seat belts? a. Any time you are in a moving vehicle. b. Only in states where it is required by law. c. Only when traveling on a highway. d. Only when traveling on an interstate highway.
______ 27. How do you correct a rear-wheel acceleration skid? a. Apply more power to the wheels. b. Stop accelerating. c. Apply the brake. d. Downshift.

TC 21-305-8
6-8
______ 28. The most common cause of serious vehicle skids is-- a. Driving too fast for road conditions. b. Poorly adjusted brakes. c. Bad tires. d. Poorly designed roads.
______ 29. How far should a driver look ahead of the vehicle while driving? a. 6-9 seconds. b. 9-12 seconds. c. 12-15 seconds. d. 18-21 seconds.
______ 30. Which of these statements about overhead clearance is true? a. Assume posted clearance signs are correct. b. Clearance of a vehicle can change with the load carried. c. If the road surface causes your vehicle to tilt toward objects at the edge of the road, drive close to the shoulder. d. Extra speed will cause air to push your vehicle down for extra clearance.

TC 21-305-8
6-9
INTERMEDIATE TRAINING OBJECTIVE 1
WRITTEN TEST ANSWER SHEET (PRIMARY)
1. T 11. A 21. D 2. T 12. D 22. C 3. F 13. B 23. A 4. T 14. A 24. C 5. T 15. D 25. D 6. T 16. A 26. A 7. T 17. D 27. B 8. F 18. B 28. A 9 D 19. C 29. C 10. C 20. B 30. B

TC 21-305-8
6-10
INTERMEDIATE TRAINING OBJECTIVE 1
WRITTEN TEST (ALTERNATE)
NAME RANK DATE
SECTION I. True/false questions: Read each question carefully and place a T or F on the blank line to the left.
______ 1. Sudden changes in speed or direction cause skidding or jackknifing.
______ 2. Installing tire chains on nondiven wheels only will increase traction when driving in snow or on ice.
______ 3. Engine controls start and shut down the engine.
______ 4. Black ice usually occurs on bridges, beneath underpasses, in dips in the road, and in shaded areas.
______ 5. When braking is required for bleeding tar conditions on the roadway, ensure that at least one wheel is on a nonslippery surface.
______ 6. Primary vehicle controls affect vehicle movement or power.
______ 7. When driving during periods of reduced visibility, you must stay at least twice the normal distance from the vehicle ahead.
______ 8. The correct driver action to take for bleeding tar conditions on the roadway is to maintain a steady speed and make no sudden steering or braking maneuvers.
SECTION II. Multiple choice: Read each question carefully and write the answer which is most correct on the blank line to the left.
______ 9. How far should a driver look ahead of the vehicle while driving? a. 6-9 seconds. b. 9-12 seconds. c. 12-15 seconds. d. 18-21 seconds.
______ 10. Which of these statements about overhead clearance is true? a. Assume posted clearance signs are correct. b. Clearance of a vehicle can change with the load carried. c. If the road surface causes your vehicle to tilt toward objects at the edge of the road, drive close to the shoulder. d. Extra speed will cause air to push your vehicle down for extra clearance.
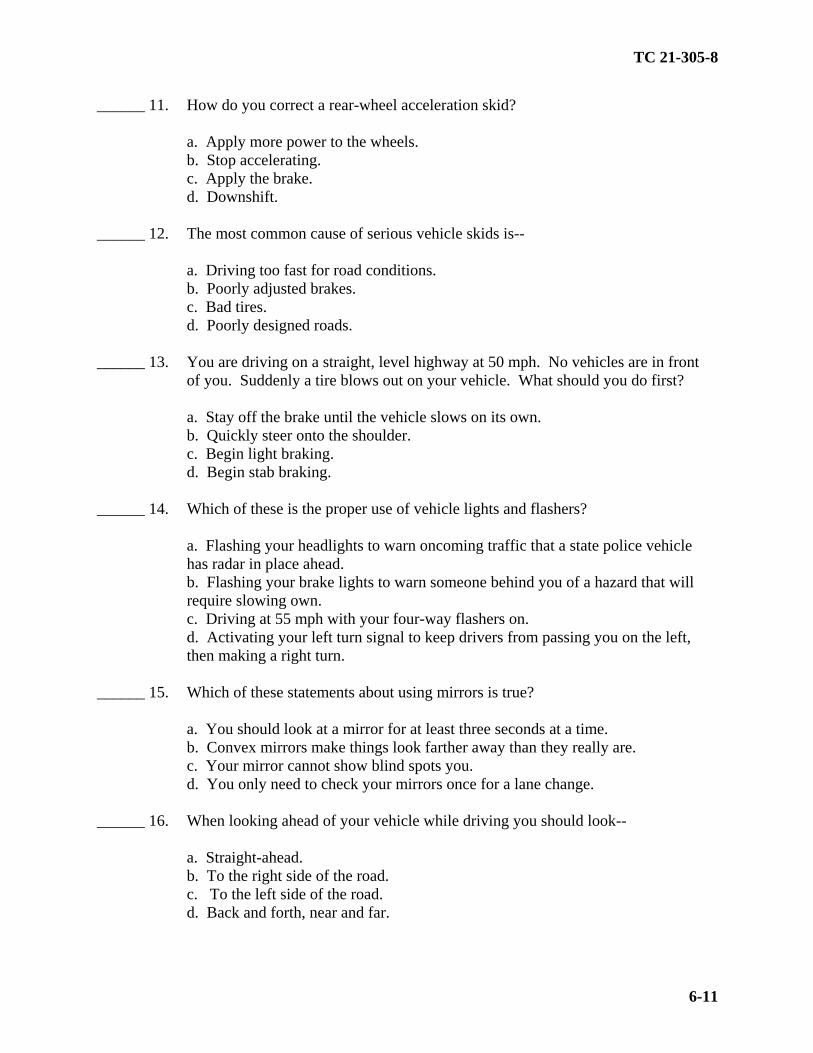
TC 21-305-8
6-11
______ 11. How do you correct a rear-wheel acceleration skid? a. Apply more power to the wheels. b. Stop accelerating. c. Apply the brake. d. Downshift.
______ 12. The most common cause of serious vehicle skids is-- a. Driving too fast for road conditions. b. Poorly adjusted brakes. c. Bad tires. d. Poorly designed roads.
______ 13. You are driving on a straight, level highway at 50 mph. No vehicles are in front of you. Suddenly a tire blows out on your vehicle. What should you do first? a. Stay off the brake until the vehicle slows on its own. b. Quickly steer onto the shoulder. c. Begin light braking. d. Begin stab braking.
______ 14. Which of these is the proper use of vehicle lights and flashers? a. Flashing your headlights to warn oncoming traffic that a state police vehicle has radar in place ahead. b. Flashing your brake lights to warn someone behind you of a hazard that will require slowing own. c. Driving at 55 mph with your four-way flashers on. d. Activating your left turn signal to keep drivers from passing you on the left, then making a right turn.
______ 15. Which of these statements about using mirrors is true? a. You should look at a mirror for at least three seconds at a time. b. Convex mirrors make things look farther away than they really are. c. Your mirror cannot show blind spots you. d. You only need to check your mirrors once for a lane change.
______ 16. When looking ahead of your vehicle while driving you should look-- a. Straight-ahead. b. To the right side of the road. c. To the left side of the road. d. Back and forth, near and far.

TC 21-305-8
6-12
______ 17. Which of these is a good rule for driving through work zones? a. Drive slowly and activate your four-way flashers. b. Drive at the posted speed. c. Slam on your brakes to get even with tailgaters. d. Decrease the following distance between your vehicle and the vehicle ahead.
______ 18. If you are being tailgated, you should-- a. Flash your brake lights. b. Speed up. c. Signal the tailgater when it is safe to pass you. d. Increase the space in front of your vehicle.
______ 19. You are testing the stopping action of service brakes on a hydraulic system. Which of these can mean there is a problem? a. The vehicle stops in a straight line when the brake pedal is pressed. b. Stopping action is normal. c. The brake pedal feels spongy. d. Brake pedal free travel is within tolerances.
______ 20. You are driving a 5-ton cargo vehicle with a manual transmission. You must stop the vehicle on the shoulder while driving on an uphill grade. Which of these is a good rule to follow when putting it back in motion up the grade? a. Keep the clutch slipping while slowly accelerating. b. Use the parking brake to hold the vehicle until the clutch engages. c. Let the vehicle roll straight backwards a few feet before you engage the clutch. d. Let the vehicle roll backwards a few feet before you engage the clutch, but turn the wheel so that the back moves away from the roadway.
______ 21. You are driving on a two-lane road. An oncoming driver drifts into your lane and is headed straight for you. Which of these is generally the best action to take? a. Brake hard. b. Steer into the oncoming lane. c. Steer onto the left shoulder. d. Steer to the right.
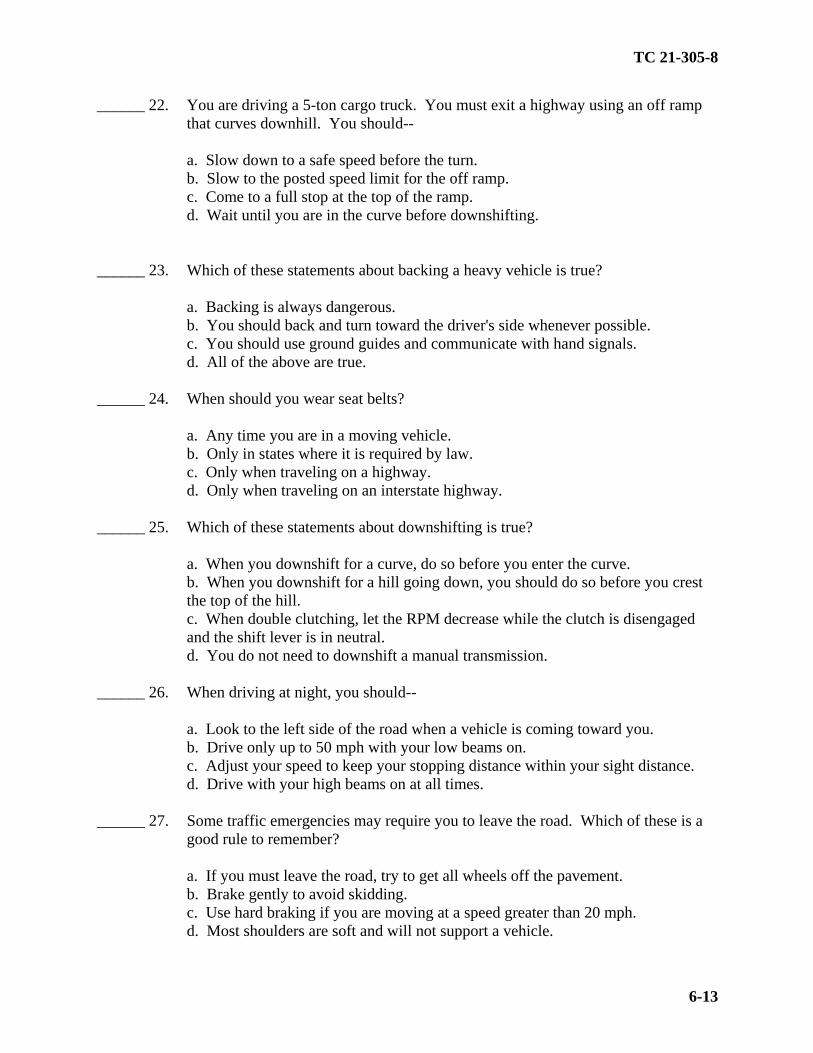
TC 21-305-8
6-13
______ 22. You are driving a 5-ton cargo truck. You must exit a highway using an off ramp that curves downhill. You should-- a. Slow down to a safe speed before the turn. b. Slow to the posted speed limit for the off ramp. c. Come to a full stop at the top of the ramp. d. Wait until you are in the curve before downshifting.
______ 23. Which of these statements about backing a heavy vehicle is true? a. Backing is always dangerous. b. You should back and turn toward the driver's side whenever possible. c. You should use ground guides and communicate with hand signals. d. All of the above are true.
______ 24. When should you wear seat belts? a. Any time you are in a moving vehicle. b. Only in states where it is required by law. c. Only when traveling on a highway. d. Only when traveling on an interstate highway.
______ 25. Which of these statements about downshifting is true? a. When you downshift for a curve, do so before you enter the curve. b. When you downshift for a hill going down, you should do so before you crest the top of the hill. c. When double clutching, let the RPM decrease while the clutch is disengaged and the shift lever is in neutral. d. You do not need to downshift a manual transmission.
______ 26. When driving at night, you should-- a. Look to the left side of the road when a vehicle is coming toward you. b. Drive only up to 50 mph with your low beams on. c. Adjust your speed to keep your stopping distance within your sight distance. d. Drive with your high beams on at all times.
______ 27. Some traffic emergencies may require you to leave the road. Which of these is a good rule to remember? a. If you must leave the road, try to get all wheels off the pavement. b. Brake gently to avoid skidding. c. Use hard braking if you are moving at a speed greater than 20 mph. d. Most shoulders are soft and will not support a vehicle.
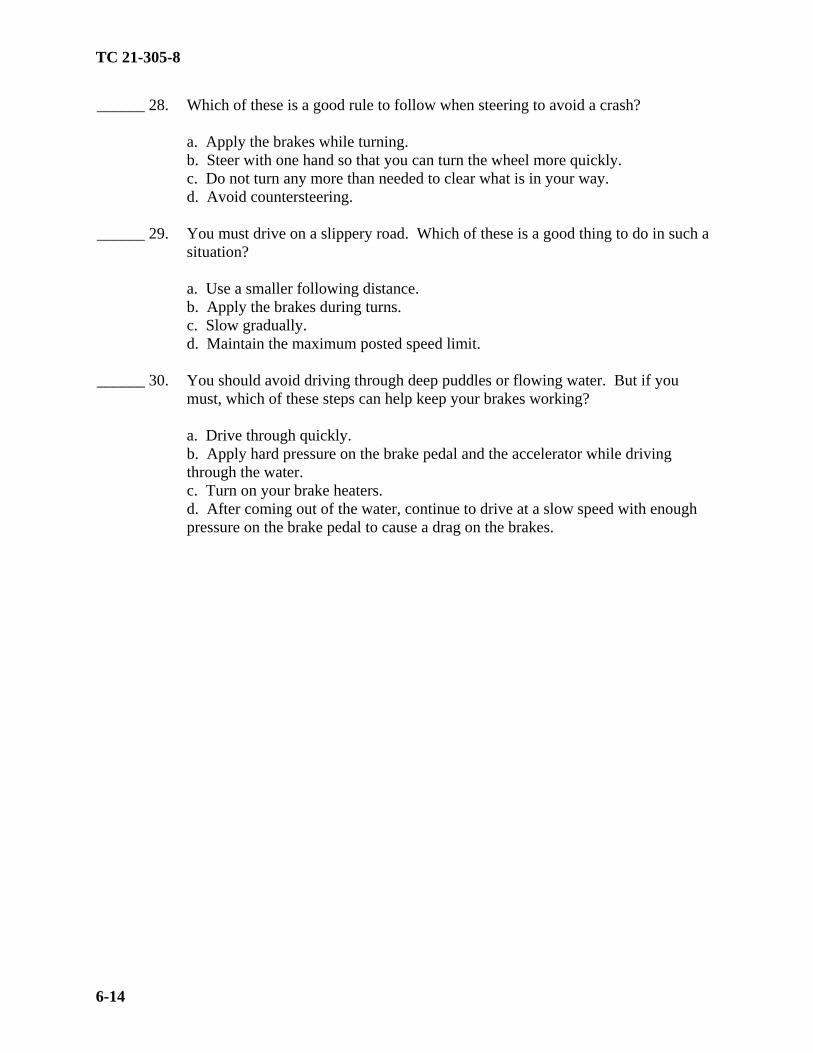
TC 21-305-8
6-14
______ 28. Which of these is a good rule to follow when steering to avoid a crash? a. Apply the brakes while turning. b. Steer with one hand so that you can turn the wheel more quickly. c. Do not turn any more than needed to clear what is in your way. d. Avoid countersteering.
______ 29. You must drive on a slippery road. Which of these is a good thing to do in such a situation? a. Use a smaller following distance. b. Apply the brakes during turns. c. Slow gradually. d. Maintain the maximum posted speed limit.
______ 30. You should avoid driving through deep puddles or flowing water. But if you must, which of these steps can help keep your brakes working? a. Drive through quickly. b. Apply hard pressure on the brake pedal and the accelerator while driving through the water. c. Turn on your brake heaters. d. After coming out of the water, continue to drive at a slow speed with enough pressure on the brake pedal to cause a drag on the brakes.
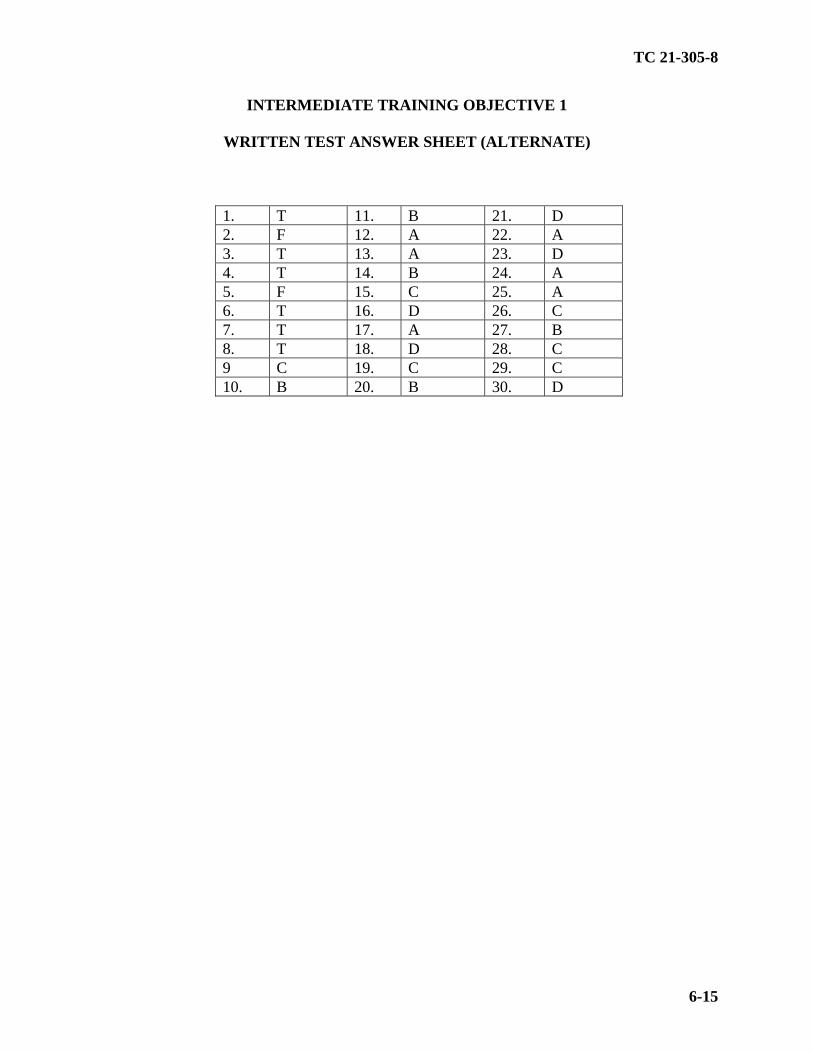
TC 21-305-8
6-15
INTERMEDIATE TRAINING OBJECTIVE 1
WRITTEN TEST ANSWER SHEET (ALTERNATE)
1. T 11. B 21. D 2. F 12. A 22. A 3. T 13. A 23. D 4. T 14. B 24. A 5. F 15. C 25. A 6. T 16. D 26. C 7. T 17. A 27. B 8. T 18. D 28. C 9 C 19. C 29. C 10. B 20. B 30. D

TC 21-305-8
6-16
INTERMEDIATE TRAINING OBJECTIVE 2
DRIVER'S PERFORMANCE TEST (ROAD TEST) INSTRUCTIONS 1. GENERAL
a. The driver's performance test determines whether an individual can operate a motor vehicle properly and safely under traffic conditions and on terrain where he is expected to drive. It serves as a basis for issuing an operator's permit. It also provides a means for instructional reinforcement and counseling. Driving weaknesses that may show up as the result of the test can be called to the examinee's attention, and specific steps can be taken to eliminate them.
b. Final evaluations are recorded on DA Form 348 or on an equivalent official form. c. The examiner will be a qualified wheeled vehicle operator licensed on the vehicle used
for testing. He will be familiar with the road test route and the testing procedures. Before testing any examinees, he must practice testing a regular licensed driver qualified on that type of vehicle. This practice will help acquaint him with the test route and testing procedures.
2. TESTING METHOD
a. The specific directions for this test must be followed without deviation. No omissions or changes in the wording of these directions are permitted.
b. The instructions that are indented and printed in large type are read or spoken aloud to
the examinees. When giving instructions aloud, give them slowly and distinctly. Make sure the examinees understand. The directions in regular type, including those in parentheses, are to inform the examiner only and are not given aloud. 3. DIRECTIONS FOR ADMINISTERING THE ROAD TEST
a. Setting standards. The standard road test is five miles long with traffic and terrain that represent those areas in which the examinee is expected to drive. Approximately two miles of this route is in a more congested traffic area. Approximately one mile of the test route will be devoted to secondary road driving. Once a route is established in a given locality, use it for all examinees that are to be tested. If you must vary the route, take care that the different kinds of route requirements and the number of requirements remain the same. Every road test will meet the following requirements (as much as possible):
(1) Five right turns. (2) Five left turns. (3) Two intersections. (4) Two traffic lights or stop signs.
TC 21-305-8
6-17
(5) Two slow zones. (6) One railroad crossing. (7) Two steep upgrades and downgrades. (8) One parallel parking space. (9) One 50-foot backing area with a clearly marked line that extends the whole length of the 50 feet.
b. Giving road tests. The road test consists of a series of operations that the examinee
must perform. The Driver's Road Test Checklist lists these operations and must be used to give this test. Typical operations are starting the motor, pulling out, and parking.
c. Giving instructions. Give instructions to perform an operation well in advance, so the
driver has sufficient time to conform. When giving instructions, first tell the examinee where to perform the operation. Then tell him what to do. For example, "At the corner two blocks from here, turn right." Notice that the location was given in terms of landmarks. This must always be done.
CAUTION The driver must never be urged to do something which is unsafe or which he does not want to do. Such urging may lead to an accident.
d. Preventing accidents
(1) Road tests should not normally be given if road conditions present a hazard such as ice or rain. The exception is when testing is specifically for driving under such conditions. (2) You must be prepared to take control of the vehicle at a moment's notice. You must always watch traffic conditions and warn the examinee of dangers that you think he does not see. If the driver becomes involved in a dangerous or unlawful moving traffic incident or an accident, cancel the test immediately. The examiner will drive the vehicle back to the start point once on-scene responsibilities are fulfilled.
e. Beginning the road test
(1) On the Driver's Road Test Checklist, enter the date in the appropriate place. Then say to the examinee-- WHAT IS YOUR NAME? SPELL YOUR LAST NAME FIRST. (2) Fill in the examinee's name after the word name. Then say--

TC 21-305-8
6-18
WHAT IS YOUR RANK? (3) Enter the individual's rank after the word rank. Then say-- WHAT IS YOUR ORGANIZATION? (4) Enter the name of the organization after the word organization. Enter your name after the word examiner (last name first). After the word vehicle, enter the model or type of vehicle used in the road test. Then say-- THERE WILL BE NO TRICK ORDERS. YOU WILL NOT BE ASKED TO DO ANYTHING THAT VIOLATES THE LAW OR GOOD DRIVING PRACTICES. YOUR SCORED TEST BEGINS WITH BEFORE-OPERATION PMCS. (The examiner may stop the PMCS process when he is sure the examinee knows the PMCS procedures.) FOLLOW MY INSTRUCTIONS. DRIVE PROPERLY AND SAFELY. ARE THERE ANY QUESTIONS? (5) Answer all questions except those pertaining to the scoring procedures. Then say-- DURING THE TEST, I WILL MAKE SOME OBSERVATIONS AND KEEP NOTES; DO NOT BE CONCERNED. YOUR SCORED ROAD TEST STARTS NOW. START YOUR MOTOR. (6) Give directions for each operation, such as "next block, turn left," one at a time in their proper sequence, as set up by the test route and according to paragraph 3a above. 4. SCORING THE ROAD TEST
a. How to score the test. Within each of the operations that the examinee must perform, there is a list of errors on the Driver's Road Test Checklist. Every time the examinee makes one of these errors under the specific operation, place a tally mark next to the error under that operation. For example, if the examinee fails to signal when leaving the curb, place a tally mark next to "fails to give proper signal" under the operation "pulling out." Place the tally mark in the space to the left of the specific error. Since an individual must repeat some of the operations, such as right turns, a number of times, more than one tally mark can be placed next to the same error under a given operation. Some test routes do not lend themselves to all operations indicated on the checklist. In these cases, score only the operations that apply.
TC 21-305-8
6-19
b. The examinee's score. At the completion of the test, count the number of tally marks. Subtract this number from 100 to find the examinee's score. Record the score in the space provided on the checklist.
c. A passing score. The lowest passing score is 70. If the examinee does not achieve 70
or above, indicate the reason for failure in the space provided under "remarks;" for example, "Examinee did not obtain minimum passing score" or "Examinee exhibited undue nervousness."
d. Automatic failures
(1) In addition to not achieving a minimum passing score, an examinee may fail if he--
(a) Performs any unsafe driving act. (b) Fails to properly perform PMCS. (c) Does not know the location and function of gauges and controls. (d) Exhibits undue nervousness.
(2) If an individual scores 70 or higher on the road test but, in the opinion/judgment of the test examiner, needs additional training, the examiner has the right not to issue a license.
5. AFTER-ACTION REVIEW (AAR). Bring weaknesses the examinee exhibited in the test to his attention. Advise him on what areas he needs further practice or training. Counsel him whether the examinee passes or fails the road test. After the examinee has received additional training, retest him. An examinee that fails the road test must retake the entire road test.

TC 21-305-8
6-20
INTERMEDIATE TRAINING OBJECTIVE 2
DRIVER'S ROAD TEST CHECKLIST
NAME___________________ RANK_______ DATE_________ VEHICLE_________
ORGANIZATION________________________ EXAMINER_______________________
BEFORE STARTING ENGINE
FAILS TO --
_______ Ensure vehicle is properly dispatched _______ Sign DD Form 1970 and/or other forms as required. _______ Perform before-operations maintenance checks and services (PMCS) using
appropriate -10 manual. _______ Unchock wheels and stow chock blocks (as required). _______ Adjust all mirrors. _______ Adjust seat. _______ Fasten seat belt/safety restraint.
STARTING ENGINE
FAILS TO --
_______ Ensure proper gear selection such as neutral. _______ Warm engine properly. _______ Check to ensure all gauges are functioning properly. _______ Ensure there is adequate air pressure (as required).
PULLING OUT
FAILS TO --
_______ Select proper gear. _______ Release parking brakes. _______ Look back and check traffic (use mirrors and windows). _______ Give proper signal. _______ Allow traffic to pass. _______ Make a smooth start. _______ Check all gauges periodically. _______ Maintain adequate air pressure (as required). _______ Check mirrors periodically. _______ Keep both hands on steering wheel (except as required by driving needs).

TC 21-305-8
6-21
DRIVING IN TRAFFIC (SPEED)
FAILS TO --
_______ Stay within the speed limits. _______ Reduce speed when required by road conditions. _______ Maintain adequate speed (drives too slow). _______ Maintain constant speed as much as possible (feeds gas erratically). _______ Maintain proper speed for gear selection. _______ Reduce speed when required by traffic conditions. _______ Check all gauges periodically. _______ Maintain adequate air pressure (as required). _______ Check mirrors periodically. _______ Keep both hands on steering wheel (except as required by driving needs).
DRIVING IN TRAFFIC (ATTENTION, ATTITUDE)
FAILS TO --
_______ Stay in proper lane. _______ Maintain proper following distance from vehicle ahead in traffic (twice the
speedometer reading in feet). _______ Maintain proper following distance at high speeds (40 mph or over) from vehicle
ahead on open highways (two times the speedometer reading in yards). _______ Anticipate action of other drivers and pedestrians. _______ Observe and obey signs, signals, and/or police officers. _______ Give necessary warning (sound horn). _______ Yield right-of-way to other vehicles. _______ Yield right-of-way to pedestrians. _______ Be courteous toward other drivers. _______ Slow when approaching railroad grade crossings. _______ Stop, look, and listen both ways before entering railroad grade crossings (for
vehicles transporting passengers and hazardous materials only). _______ Prevent creeping or drifting when stopped. _______ Perform during-operations maintenance. _______ Check all gauges periodically. _______ Check mirrors periodically. _______ Maintain adequate air pressure (as required). _______ Keep both hands on steering wheel (except as required by driving needs).

TC 21-305-8
6-22
LEFT TURN
FAILS TO --
_______ Give proper signal in advance. _______ Turn from proper lane (usually adjacent to centerline). _______ Turn into proper lane (usually immediately to the right of the centerline). _______ Avoid cutting corners. _______ Maintain safe speed. _______ Straighten out properly. _______ Check mirrors periodically (for traffic and off tracking). _______ Maintain adequate air pressure (as required). _______ Keep both hands on steering wheel (except as required by driving needs).
RIGHT TURN
FAILS TO --
_______ Give proper signal in advance. _______ Turn from proper lane (usually the right lane). _______ Turn into proper lane (usually the right lane). _______ Avoid swinging too wide. _______ Maintain safe speed. _______ Avoid cutting corners. _______ Straighten out properly. _______ Check mirrors periodically (for traffic and off tracking). _______ Maintain adequate air pressure (as required). _______ Keep both hands on steering wheel (except as required by driving needs).
USE OF CONTROLS
FAILS TO --
_______ Use proper shifting patterns (upshifting and downshifting). _______ Avoid racing engine. _______ Start on hill without rolling back. _______ Keep both hands on steering wheel (except as required by driving needs). _______ Check all gauges periodically. _______ Maintain constant engine speed.

TC 21-305-8
6-23
SLOWING OR STOPPING
FAILS TO --
_______ Signal intent in advance. _______ Observe traffic to the rear, using mirrors and windows. _______ Brake smoothly. _______ Use engine as a brake by downshifting the transmission (manual transmissions
only). _______ Maintain adequate air pressure (as required). _______ Keep both hands on steering wheel (except as required by driving needs).
OVERTAKING AND PASSING
FAILS TO --
_______ Check for other traffic (use mirrors and windows). _______ Signal in advance. _______ Maintain proper following distance before passing. _______ Pass in proper lane. _______ Change lane gradually in passing. _______ Return to proper lane only after signaling intent and ensuring the lane is clear. _______ Obey no passing signs, rules, or regulations (such as hills, curves, and
intersections). _______ Check mirrors periodically. _______ Maintain adequate air pressure (as required). _______ Check all gauges periodically. _______ Keep both hands on steering wheel (except as required by driving needs).
BACKING
FAILS TO --
_______ Look behind vehicle before backing. _______ Sound horn. _______ Back slowly. _______ Back smoothly. _______ Back in a straight line using mirrors and ground guide (50 feet within six inches of
line laterally). _______ Maintain adequate air pressure (as required). _______ Keep both hands on steering wheel (except as required by driving needs).

TC 21-305-8
6-24
PARKING
FAILS TO --
_______ Check for other traffic. _______ Give proper signal for traffic to pass. _______ Park within two attempts. _______ Park without bumping or scraping curb. _______ Park in space three feet wider than test vehicle (parallel parking). _______ Set parking brakes. _______ Chock wheels (as required). _______ Maintain adequate air pressure (as required). _______ Perform after-operation PMCS. _______ Keep both hands on steering wheel (except as required by driving needs). ROAD TEST SCORE 100 NUMBER OF TALLY MARKS (SUBTRACT) _____ ROAD TEST SCORE _____ REMARKS:
TC 21-305-8
7-1
CHAPTER 7
TRUCK TRANSPORT OF PASSENGERS
SECTION I - TRAINING
LESSON TITLE: TRANSPORT PASSENGERS IN A TRUCK TASK NUMBER: 551-721-1386 (Transport Passengers in a Truck) A. TRAINING OBJECTIVE. TASK: Transport passengers in a truck. CONDITION: Given instruction, DD Form 1970, DA Form 2404, a pencil,
vehicle operator's manual, equipment records folder, rags, lubricants, coolant, motor pool, driver training route, passengers, and a passenger-carrying wheeled vehicle with BII.
STANDARDS: Without injury to passengers or damage to equipment, arrive at
the destination. Observe all safety procedures and local traffic laws. Ensure the vehicle's passenger-carrying capacity is not exceeded.
B. INTERMEDIATE TRAINING. None. C. ADMINISTRATIVE INSTRUCTIONS.
1. Training time: As scheduled. 2. Training location: Motor pool and driver training route as scheduled. 3. Training type: Conference, demonstration, and practical exercise. 4. Students: Scheduled personnel. 5. Principal and assistant instructors required: One primary instructor for the conference
and one assistant instructor for every three students for the demonstration and practical exercise. 6. Training aids and equipment: Rags, lubricants, coolant, DA Form 2404, DD Form
1970, a pencil, vehicle operator's manual, equipment records folder, and a passenger-carrying wheeled vehicle with BII for every three students.
7. References: AR 385-55, FM 21-305, and appropriate vehicle operator's manual.

TC 21-305-8
7-2
D. SEQUENCE OF ACTIVITY. NOTE: Before attending this training, students must have successfully passed the EOCCT at
Chapter 6.
1. Introduction: a. Interest device. b. Tie-in. c. Lesson objective (paragraph A). d. Procedures:
(1) Explanation. (2) Practical exercise. (3) Summary.
2. Explanation and demonstration:
a. Safety precautions: (1) Do not transport personnel in balanced (pintle-connected) trailers. (2) When transporting personnel in convoys, do not use the last vehicle in the convoy to transport passengers. (3) When more than one person (besides the driver) is transported in a cargo truck, there must be adequate fixed seating. (4) When the vehicle is in motion, all occupants must be seated. (5) The number of passengers transported in cargo vehicles in over-the-road service is restricted to the designated seating capacity. (6) Riding on loads or partial loads of non-hazardous material is permitted only when it would be dangerous to ride in the cab or front seat or when guards or servicing personnel are required. Personnel will ride on loads only when--
(a) loads are adequately secured.

TC 21-305-8
7-3
(b) passengers have enough room to keep their bodies entirely within the top and sides of the vehicle.
b. Vehicle systems. Before driving the vehicle, be sure it is safe. Do a thorough PMCS. Pay particular attention that the following items are in good working order:
(1) Service brakes. (2) Parking brake. (3) Steering mechanism. (4) Lights and reflectors. (5) All tires (front wheels must not have recapped or regrooved tires). (6) Wheels and rims. (7) Horn. (8) Windshield wipers. (9) Rearview mirrors. (10) Seats. The seats must be safe for passengers and must be securely fastened to the truck. (11) Cargo cover and end curtains. (12) Troop safety strap. (13) Tailgate. (14) Emergency equipment. Each vehicle must have a fire extinguisher and a highway warning kit (three emergency reflectors or three warning triangles).
c. Driver procedures: (1) Before loading passengers, ensure the transmission is placed in neutral (some automatics are placed in park); the parking brake is set; chock blocks (if required) are in place; the engine is shut off; and the ignition key is removed (if equipped). (2) Brief passengers on safety requirements.
TC 21-305-8
7-4
(a) Caution all passengers about unsafe positions. (An unsafe position could be standing; attempting to ride between the cab and body; hanging on sides, running boards, or fenders; sitting on tailgates or sides of the truck; or extending arms or legs.) (b) Warn passengers not to jump from cargo beds and, after dismounting, to move away from traveled portions of the roadway.
(3) Lower the tailgate. (4) Release the safety strap. (5) Help the passengers loading. (6) Be sure all passengers are seated. (7) Adjust the vehicle tarpaulin according to weather conditions.
CAUTION
Always be sure there is adequate ventilation to prevent the accumulation of exhaust gases in the cargo compartment.
(8) Secure the safety strap. (9) Secure the tailgate. (10) Drive to the destination, adhering to local traffic laws. Because the load that is carried involves human lives, you must make driver adjustments to safeguard passengers. This involves being extra careful. Driving tips peculiar to transporting passengers follow.
(a) Speed.
• Crashes result from excessive speed, often when rain or snow
has made the road slippery.
• Every banked curve has a safe design speed. In good weather, the posted speed is safe for cars, but it may be too high for many heavy vehicles.
• On a road with good traction, the vehicle may roll over if traveling too fast around a curve.
• On a road with poor traction, traveling too fast around a curve might cause the vehicle to slide off the curve.
TC 21-305-8
7-5
• Reduce the vehicle speed for curves. If the vehicle leans
toward the outside on a banked curve, it is going too fast.
(b) Railroad crossings.
• Stop the vehicle between 15 and 50 feet before railroad crossings.
• Listen and look in both directions for trains.
• After a train has passed and before crossing, be sure another train is not coming in the other direction on other tracks.
• If the vehicle has a manual transmission, do not change gears while crossing the tracks.
(c) Other types of road crossings. Slow down and carefully check for other vehicles at the following locations:
• Streetcar crossings.
• Railroad tracks used only for industrial switching within a
business district.
• Locations where a policeman or flagman is directing traffic.
• A traffic signal showing green.
• Crossings marked exempt crossing.
(c) Drawbridges.
• Stop at drawbridges that do not have a signal light or traffic control attendant. Stop at least 50 feet before the draw of the bridge.
• Look to be sure the draw is completely closed before crossing.
• Slow down. Be sure it is safe to cross when-- – a traffic light shows green. – the bridge has an attendant or traffic officer that controls traffic whenever the bridge opens.
TC 21-305-8
7-6
(11) Lower the tailgate. (12) Release the safety strap. (13) Help passengers unloading. (14) Secure the safety strap and tailgate.
d. Prohibited practices. (1) Avoid fueling a vehicle with passengers on board. Never refuel in a closed building with passengers on board. (2) Do not talk with passengers or engage in any other distracting activity while driving. (3) Do not tow or push a disabled vehicle with passengers aboard either vehicle, unless getting off would be unsafe. Only tow the vehicle to the nearest safe spot to discharge passengers.
e. Demonstrate loading procedures to the students.
3. Practical exercise:
a. Assign students to vehicles. Issue vehicle operator's manuals, pencils, DA Form 2404, DD Form 1970, passengers, and equipment records folder. Tell students the location of rags, lubricants, and coolant. b. Students perform before-operation PMCS. c. Students practice transporting personnel from origin to destination. During-operation PMCS is also conducted at this time.
NOTE: As each student practices driving, an assistant instructor rides in the front seat next to
the driver. The other two students ride in the troop seats as passengers and rotate driving duties. The assistant instructor explains driving techniques, ensures the driver is aware of driving situations, and conducts after-action reviews with each driver. Now is the time to pass on valuable experience and correct any bad driving habits.
d. Students perform after-operation PMCS and ensure all operator entries required on DA Form 2404 and DD Form 1970 are accurate, complete, and legible.
4. Evaluation: Check each student's performance of PMCS and transporting personnel. 5. Summary:
TC 21-305-8
7-7
a. Recap main points. b. Allow for questions. c. Clarify questions. d. Give closing statement.
6. Retraining: Retrain No-Gos and slow learners.
E. SAFETY RESTRICTIONS.
1. Before loading or unloading passengers, ensure the transmission is placed in neutral (some automatics are placed in park); the parking brake is set; chock blocks (if required) are in place; the engine is shut off; and the ignition key is removed (if equipped).
2. Ensure students remove all jewelry and ID tags before performing PMCS. 3. Ensure students pay particular attention to the cautions and warnings listed in the
operator's manual. 4. Ensure ground guides are used when backing the vehicle. 5. Ensure a safe following distance and speeds (as determined by the local command) are
maintained when driving on the driver-training route. 6. Ensure all occupants wear seat belts (if equipped) while vehicle is in operation. 7. Ensure all occupants use hearing protection when required.
F. ADDITIONAL COMMENTS AND INFORMATION. Recommended instructional time is 7 hours (.5 conference, .5 demonstration, and 6.0 practical exercise, including 1.0 PMCS).

TC 21-305-8
7-8
SECTION II - TESTING
LESSON TITLE: TRANSPORT PASSENGERS IN A TRUCK TASK NUMBER: 551-721-1386 (Transport Passengers in a Truck) A. TRAINING OBJECTIVE. TASK: Pass the written test. CONDITION: In a classroom, given an examination booklet and a pencil. STANDARDS: Answer correctly 14 of 20 questions within 30 minutes. Use
either the primary written test or the alternate written test. B. INTERMEDIATE TRAINING. None. C. ADMINISTRATIVE INSTRUCTIONS.
1. Training time: As scheduled. 2. Training location: Classroom as scheduled. 3. Training type: Test evaluation. 4. Students: Personnel as scheduled. 5. Principal and assistant instructors required: One instructor for every 20 students. 6. Training aids and equipment: Examination booklet and pencil. 7. References: AR 385-55, FM 21-305, and appropriate vehicle operator's manual.
D. SEQUENCE OF ACTIVITY.
1. Introduction:
a. Interest device. b. Tie-in. c. Lesson objective (paragraph A). d. Procedures:
TC 21-305-8
7-9
(1) Explanation. (2) Test evaluation. (3) Summary.
2. Explanation and demonstration: Administer written examination. Use either the primary or alternate test.
3. Evaluation: Check written test results. 4. Summary:
a. Recap main points. b. Allow for questions. c. Clarify questions. d. Give closing statement.
5. Retraining: Retrain and retest No-Gos.
NOTE: Those students who passed this training and who must transport personnel in a bus must
successfully complete the training in Chapter 8. E. SAFETY RESTRICTIONS. None. F. ADDITIONAL COMMENTS AND INFORMATION. Recommended testing time is 1 hour.
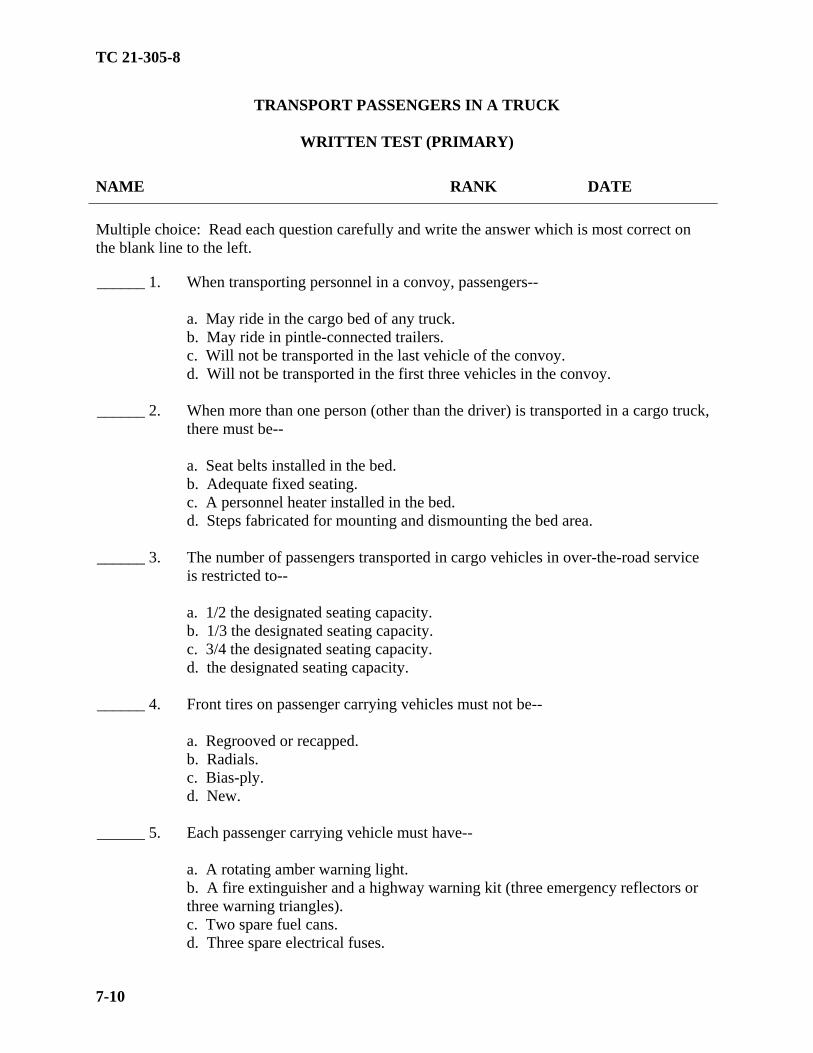
TC 21-305-8
7-10
TRANSPORT PASSENGERS IN A TRUCK
WRITTEN TEST (PRIMARY)
NAME RANK DATE
Multiple choice: Read each question carefully and write the answer which is most correct on the blank line to the left.
______ 1. When transporting personnel in a convoy, passengers-- a. May ride in the cargo bed of any truck. b. May ride in pintle-connected trailers. c. Will not be transported in the last vehicle of the convoy. d. Will not be transported in the first three vehicles in the convoy.
______ 2. When more than one person (other than the driver) is transported in a cargo truck, there must be-- a. Seat belts installed in the bed. b. Adequate fixed seating. c. A personnel heater installed in the bed. d. Steps fabricated for mounting and dismounting the bed area.
______ 3. The number of passengers transported in cargo vehicles in over-the-road service is restricted to-- a. 1/2 the designated seating capacity. b. 1/3 the designated seating capacity. c. 3/4 the designated seating capacity. d. the designated seating capacity.
______ 4. Front tires on passenger carrying vehicles must not be-- a. Regrooved or recapped. b. Radials. c. Bias-ply. d. New.
______ 5. Each passenger carrying vehicle must have-- a. A rotating amber warning light. b. A fire extinguisher and a highway warning kit (three emergency reflectors or three warning triangles). c. Two spare fuel cans. d. Three spare electrical fuses.

TC 21-305-8
7-11
______ 6. A thorough before-operation PMCS of a passenger- carrying vehicle includes-- a. Ensuring all safety items are in good working order. b. Lubricating the vehicle. c. Washing the vehicle undercarriage to remove accumulated mud and grease. d. Draining the fuel filter.
______ 7. After loading passengers and before moving the vehicle, you should-- a. Release the safety strap. b. Lower the tailgate. c. Be sure there is adequate ventilation to prevent accumulation of exhaust gases in the cargo bed. d. All of the above.
______ 8. Troop seats must be-- a. Used in conjunction with seat belts. b. Folded when not in use. c. Made of rigid steel. d. Securely fastened to the truck.
______ 9. A passenger safety briefing includes-- a. Instructions on the use of cargo heaters. b. Instructions on the use of emergency flares. c. Warnings for passengers not to jump from cargo beds. d. Instructions on the use of seat belts installed in the cargo bed.
______ 10. When loading passengers, you should-- a. Lower the tailgate. b. Release the safety strap. c. Help the passengers loading. d. All of the above.
______ 11. On a road with poor traction, traveling too fast around a curve might cause-- a. The vehicle to slide off the curve. b. The vehicle to coast. c. The vehicle to stop abruptly. d. Nothing.

TC 21-305-8
7-12
______ 12. Speed limits on curves are standardized for-- a. Buses. b. Cars. c. Tractor-trailers. d. Small, straight trucks.
______ 13. When stopping at a railroad crossing, you must stop-- a. No closer than 5 feet and no farther than 30 feet from the nearest track. b. No closer than 10 feet and no farther than 40 feet from the nearest track. c. No closer than 15 feet and no farther than 50 feet from the nearest track. d. No closer than 60 feet and no farther than 90 feet from the nearest track.
______ 14. You are approaching a drawbridge. No signal device or attendant is present. You must-- a. Stop at least 50 feet before the draw of the bridge. b. Stop no closer than 75 feet before the draw of the bridge. c. Not stop as that might cause an accident. d. Speed up and cross quickly before the bridge is opened.
______ 15. When is it best to wear your seat belt? a. Only when you will be driving over 35 mph. b. Only if the truck transports more than 16 people. c. Only when driving off post. d. Anytime the vehicle is in motion.
______ 16. With passengers loaded, you must never refuel your truck-- a. With a higher grade of fuel. b. In a closed building. c. Without a static chain. d. With any door open.
______ 17. On a road with good traction, traveling too fast around a curve may cause-- a. The vehicle to coast. b. The vehicle to stop abruptly. c. The vehicle to roll over. d. The vehicle to hydroplane.
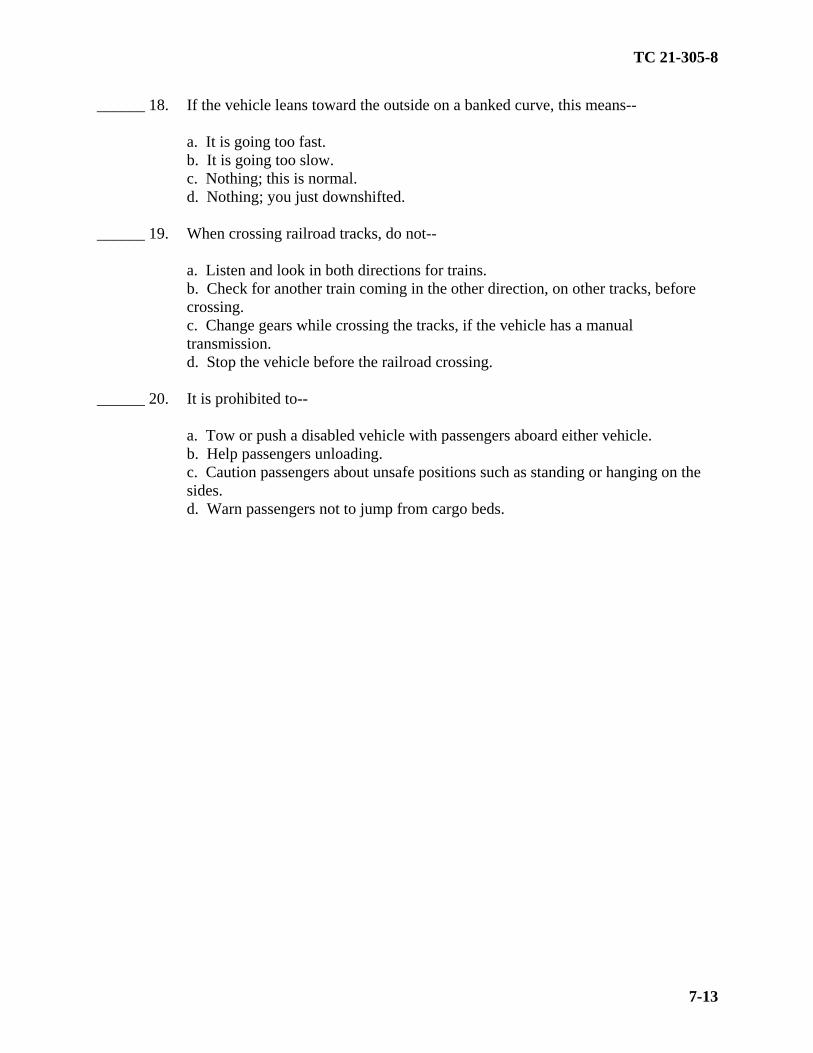
TC 21-305-8
7-13
______ 18. If the vehicle leans toward the outside on a banked curve, this means-- a. It is going too fast. b. It is going too slow. c. Nothing; this is normal. d. Nothing; you just downshifted.
______ 19. When crossing railroad tracks, do not-- a. Listen and look in both directions for trains. b. Check for another train coming in the other direction, on other tracks, before crossing. c. Change gears while crossing the tracks, if the vehicle has a manual transmission. d. Stop the vehicle before the railroad crossing.
______ 20. It is prohibited to-- a. Tow or push a disabled vehicle with passengers aboard either vehicle. b. Help passengers unloading. c. Caution passengers about unsafe positions such as standing or hanging on the sides. d. Warn passengers not to jump from cargo beds.

TC 21-305-8
7-14
TRANSPORTING PASSENGERS IN A TRUCK
WRITTEN TEST ANSWER SHEET (PRIMARY)
1. C 11. A 2. B 12. B 3. D 13. C 4. A 14. A 5. B 15. D 6. A 16. B 7. C 17. C 8. D 18. A 9 C 19. C 10. D 20. A
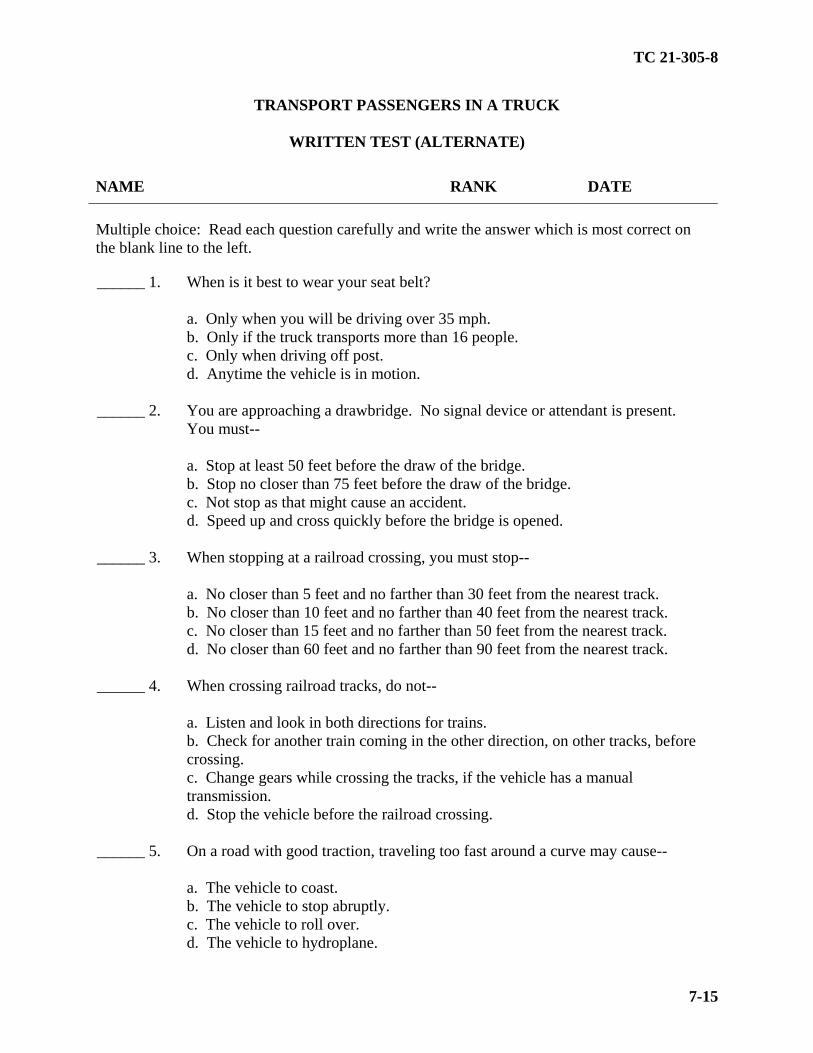
TC 21-305-8
7-15
TRANSPORT PASSENGERS IN A TRUCK
WRITTEN TEST (ALTERNATE)
NAME RANK DATE
Multiple choice: Read each question carefully and write the answer which is most correct on the blank line to the left.
______ 1. When is it best to wear your seat belt? a. Only when you will be driving over 35 mph. b. Only if the truck transports more than 16 people. c. Only when driving off post. d. Anytime the vehicle is in motion.
______ 2. You are approaching a drawbridge. No signal device or attendant is present. You must-- a. Stop at least 50 feet before the draw of the bridge. b. Stop no closer than 75 feet before the draw of the bridge. c. Not stop as that might cause an accident. d. Speed up and cross quickly before the bridge is opened.
______ 3. When stopping at a railroad crossing, you must stop-- a. No closer than 5 feet and no farther than 30 feet from the nearest track. b. No closer than 10 feet and no farther than 40 feet from the nearest track. c. No closer than 15 feet and no farther than 50 feet from the nearest track. d. No closer than 60 feet and no farther than 90 feet from the nearest track.
______ 4. When crossing railroad tracks, do not-- a. Listen and look in both directions for trains. b. Check for another train coming in the other direction, on other tracks, before crossing. c. Change gears while crossing the tracks, if the vehicle has a manual transmission. d. Stop the vehicle before the railroad crossing.
______ 5. On a road with good traction, traveling too fast around a curve may cause-- a. The vehicle to coast. b. The vehicle to stop abruptly. c. The vehicle to roll over. d. The vehicle to hydroplane.

TC 21-305-8
7-16
______ 6. It is prohibited to-- a. Tow or push a disabled vehicle with passengers aboard either vehicle. b. Help passengers unloading. c. Caution passengers about unsafe positions such as standing or hanging on the sides. d. Warn passengers not to jump from cargo beds.
______ 7. If the vehicle leans toward the outside on a banked curve, this means-- a. It is going too fast. b. It is going too slow. c. Nothing; this is normal. d. Nothing; you just downshifted.
______ 8. On a road with poor traction, traveling too fast around a curve might cause-- a. The vehicle to slide off the curve. b. The vehicle to coast. c. The vehicle to stop abruptly. d. Nothing.
______ 9. A passenger safety briefing includes-- a. Instructions on the use of cargo heaters. b. Instructions on the use of emergency flares. c. Warnings for passengers not to jump from cargo beds. d. Instructions on the use of seat belts installed in the cargo bed.
______ 10. When loading passengers, you should-- a. Lower the tailgate. b. Release the safety strap. c. Help the passengers loading. d. All of the above.
______ 11. Troop seats must be-- a. Used in conjunction with seat belts. b. Folded when not in use. c. Made of rigid steel. d. Securely fastened to the truck.
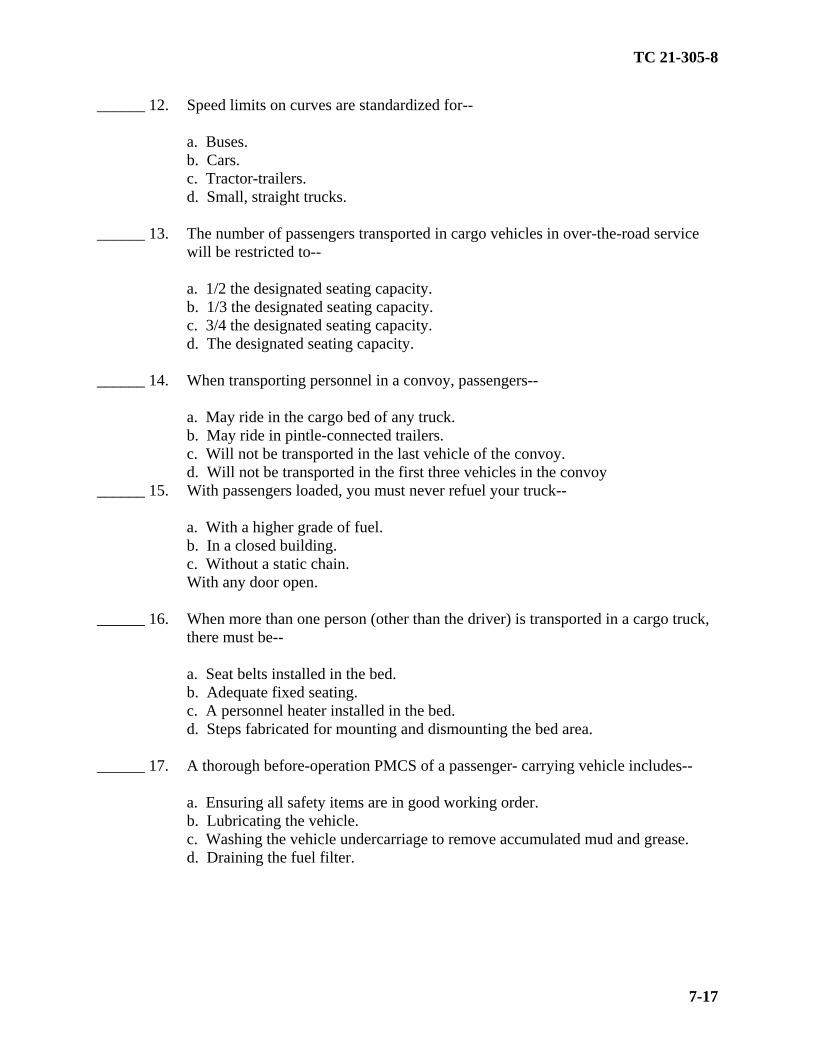
TC 21-305-8
7-17
______ 12. Speed limits on curves are standardized for-- a. Buses. b. Cars. c. Tractor-trailers. d. Small, straight trucks.
______ 13. The number of passengers transported in cargo vehicles in over-the-road service will be restricted to-- a. 1/2 the designated seating capacity. b. 1/3 the designated seating capacity. c. 3/4 the designated seating capacity. d. The designated seating capacity.
______ 14. When transporting personnel in a convoy, passengers-- a. May ride in the cargo bed of any truck. b. May ride in pintle-connected trailers. c. Will not be transported in the last vehicle of the convoy. d. Will not be transported in the first three vehicles in the convoy
______ 15. With passengers loaded, you must never refuel your truck-- a. With a higher grade of fuel. b. In a closed building. c. Without a static chain. With any door open.
______ 16. When more than one person (other than the driver) is transported in a cargo truck, there must be-- a. Seat belts installed in the bed. b. Adequate fixed seating. c. A personnel heater installed in the bed. d. Steps fabricated for mounting and dismounting the bed area.
______ 17. A thorough before-operation PMCS of a passenger- carrying vehicle includes-- a. Ensuring all safety items are in good working order. b. Lubricating the vehicle. c. Washing the vehicle undercarriage to remove accumulated mud and grease. d. Draining the fuel filter.
TC 21-305-8
7-18
______ 18. Front tires on passenger carrying vehicles must not be-- a. Regrooved or recapped. b. Radials. c. Bias-ply. d. New.
______ 19. After loading passengers and before moving the vehicle, you should-- a. Release the safety strap. b. Lower the tailgate. c. Be sure there is adequate ventilation to prevent accumulation of exhaust gases in the cargo bed. d. All of the above.
______ 20. Each passenger carrying vehicle must have-- a. A rotating amber warning light. b. A fire extinguisher and a highway warning kit (three emergency reflectors or three warning triangles). c. Two spare fuel cans. d. Three spare electrical fuses.

TC 21-305-8
7-19
TRANSPORTING PASSENGERS IN A TRUCK
WRITTEN TEST ANSWER SHEET (ALTERNATE)
1. D 11. D 2. A 12. B 3. C 13. D 4. C 14. C 5. C 15. B 6. A 16. B 7. A 17. A 8. A 18. A 9 C 19. C 10. D 20. B

TC 21-305-8
8-1
CHAPTER 8
BUS TRANSPORT OF PASSENGERS
SECTION I - TRAINING
LESSON TITLE: TRANSPORT PASSENGERS IN A BUS TASK NUMBER: 551-721-1387 (Transport Passengers in a Bus) A. TRAINING OBJECTIVE. TASK: Transport passengers in a bus. CONDITION: Given instruction, DD Form 1970, DA Form 2404, a pencil,
vehicle operator's manual, equipment records folder, rags, lubricants, coolant, motor pool, driver training route, passengers, and a bus with BII.
STANDARDS: Without injury to passengers or damage to equipment, arrive at
the destination. Observe all safety procedures and local traffic laws. Ensure the vehicle passenger carrying capacity is not exceeded.
B. INTERMEDIATE TRAINING. None. C. ADMINISTRATIVE INSTRUCTIONS.
1. Training time: As scheduled. 2. Training location: Motor pool and driver training route as scheduled. 3. Training type: Conference, demonstration, and practical exercise. 4. Students: Scheduled personnel. 5. Principal and assistant instructors required: One primary instructor for the conference
and one assistant instructor for every three students for the demonstration and practical exercise. 6. Training aids and equipment: Training aids and equipment: Rags, lubricants, coolant,
DA Form 2404, DD Form 1970, pencils, vehicle operator's manual, equipment records folder, and a bus with BII for every three students.
7. References: AR 385-55, FM 21-305, and appropriate vehicle operator's manual.
D. SEQUENCE OF ACTIVITY.
TC 21-305-8
8-2
NOTE: Before attending this training, students must have successfully passed the EOCCT at
Chapter 6.
1. Introduction: a. Interest device. b. Tie-in. c. Lesson objective (paragraph A). d. Procedures:
(1) Explanation. (2) Practical exercise. (3) Summary.
2. Explanation and demonstration:
a. Vehicle systems. Before driving the vehicle, be sure it is safe. Do a thorough before-operation PMCS. Pay particular attention that the following items are in good working order:
(1) Service brakes. (2) Parking brake. (3) Steering mechanism. (4) Lights and reflectors. (5) All tires (front wheels must not have recapped or re-grooved tires). (6) Wheels and rims. (7) Horn. (8) Windshield wipers. (9) Rearview mirrors. (10) Seats. The seats must be safe for passengers and must be securely fastened to the bus.
TC 21-305-8
8-3
(11) Emergency equipment. Each vehicle must have a fire extinguisher and a highway warning kit (three emergency reflectors or three warning triangles). The bus must also have spare electrical fuses unless equipped with circuit breakers. (12) Access doors and panels. As you check the outside of the bus, close any open emergency exits. Also close any open access panels (for baggage, rest room service, or engine) before driving. (13) Bus interior. People sometimes damage unattended buses. Always check the bus interior before driving to ensure rider safety. Aisles and stairwells must always be clear. The following parts of your bus must be in safe working condition:
(a) Each handhold and railing. (b) Floor covering. (c) Signaling devices, including the rest room emergency buzzer, if the bus has a rest room. (d) Emergency exit handles.
(14) Emergency exits. Never drive with an open emergency exit door or window. The emergency exit sign on an emergency door must be clearly visible. If there is a red emergency door light, it must work. Turn it on at night or any time you use your outside lights. (15) Roof hatches. You may lock some emergency roof hatches in a partly open position for fresh air. Do not leave them open as a regular practice. Keep in mind the bus has higher clearance while driving with them open.
b. Ensure passengers are properly loaded at the start of a trip. (1) Ensure the parking brake is set. (2) Stand at the entrance of the bus. (3) Caution passengers to board the bus cautiously. (4) Help those that need help negotiating the stairs. (5) Regulate the flow of passengers onto stairs to prevent overcrowding.

TC 21-305-8
8-4
(6) Follow the last passenger onto the bus.
c. Ensure passengers are properly seated and luggage is properly stowed. Baggage must be stowed to protect passengers from injury and to allow the driver to move freely and easily.
(1) Walk the length of the aisle. Check for obstructions. (2) Check the overhead luggage rack for stacked or loose items. (3) Check for proper placement of any odd-shaped baggage. (4) Check and secure with strapping any heavy objects. (5) Ensure riders can exit by any window or door in an emergency.
d. Make pre-departure announcement to the passengers. (1) State your name. (2) Announce the final destination and stops along the way. (3) Remind passengers that it is safer to remain seated when traveling. (4) Inform passengers that the bus will stop for those departing. (5) Check that passengers are seated before moving the bus. (6) Check that standing passengers are behind the white line (in buses designed to allow standing).
e. Cite the rules which passengers must follow in order to provide a safe comfortable environment.
(1) Explain rules on smoking, eating, and drinking on board. (2) Explain rules on consumption of alcoholic beverages. (3) Explain rules on the use of radios and tape players. (4) Explain rules on keeping arms and heads inside the bus especially when the vehicle is moving.
f. Pick up and discharge passengers en route to the final destination.
(1) Activate turn signals and brake lights before stopping.
TC 21-305-8
8-5
(2) Announce the location and reason for stopping. (3) Request all passengers to remain seated until the bus has stopped. (4) Steer gradually and bring the bus to a smooth stop. (5) Open exit doors only after the bus has completely stopped. (6) Get out of the bus to help passengers who need help. (7) After reentering the bus, check to see if the departing passengers are clear of the bus before moving it.
g. Discharge an unruly passenger from the bus.
(1) Inform the passenger that he is not behaving properly. (2) Inform the passenger a second time. Indicate that ejection is next. (3) Look for an appropriate location (safe and well lighted) to discharge the passenger.
(a) On post. Exchange complex or any other built-up area that has a telephone. (b) Off post.
• A bus terminal would be optimum.
• A rest area or service station would be adequate.
(4) The bottom line is that the driver must ensure the safety of all passengers.
h. Driving tips. Drive to the destination, adhering to local traffic laws. Some driving tips peculiar to transporting passengers follow.
(1) Intersections.
(a) Bus crashes most often happen at intersections. Use caution, even if a signal or stop sign controls other traffic. (b) School and mass transit buses sometimes scrape off mirrors or hit passing vehicles when pulling out from a bus stop. Remember

TC 21-305-8
8-6
the clearance your bus needs and watch for poles and tree limbs at stops. (c) Know the size of the gap the bus needs to accelerate and merge with traffic. Wait for the gap to open before leaving the stop. Never assume other drivers will brake to give you room when you signal or start to pull out.
(2) Speed on curves.
(a) Crashes result from excessive speed, often when rain or snow has made the road slippery. (b) Every banked curve has a safe design speed. In good weather, the posted speed is safe for cars, but it may be too high for many buses. (c) On a road with good traction, the bus may roll over if traveling too fast around a curve. (d) On a road with poor traction, traveling too fast around a curve might cause the bus to slide off the curve. (e) Reduce speed for curves. If the bus leans toward the outside on a banked curve, it is going too fast.
(3) Railroad crossings.
(a) Stop the bus between 15 and 50 feet before railroad crossings. (b) Listen and look in both directions for trains. Open the forward door if it would improve your ability to hear or see an approaching train. (c) After a train has passed and before crossing, make sure another train is not coming in the other direction on other tracks. (d) If the bus has a manual transmission, do not change gears while crossing the tracks.
(4) Other types of road crossings. Slow down and carefully check for other vehicles at the following locations:
(a) Streetcar crossings.
TC 21-305-8
8-7
(b) Railroad tracks used only for industrial switching within a business district. (c) Locations where a policeman or flagman is directing traffic. (d) Traffic signals showing green. (e) Crossings marked exempt crossing.
(5) Drawbridges.
(a) Stop at drawbridges that do not have a signal light or traffic control attendant. Stop at least 50 feet before the draw of the bridge. (b) Look to be sure the draw is completely closed before crossing. (c) Slow down. Be sure it is safe to cross when-- • there is a traffic light showing green.
• the bridge has an attendant or traffic officer that controls traffic
whenever the bridge opens.
i. Prohibited practices.
(1) Avoid fueling a vehicle with passengers on board. Never refuel in a closed building with passengers on board. (2) Do not talk with passengers or engage in any other distracting activity while driving. (3) Do not let hazardous materials on the bus. (4) Do not tow or push a disabled vehicle with passengers aboard either vehicle, unless getting off would be more risky for the passengers. Only tow the vehicle to the nearest safe spot to discharge passengers.
j. Demonstrate loading procedures to the students.
3. Practical exercise:
a. Assign students to vehicles. Issue vehicle operator's manuals, pencils, DA Form 2404, DD Form 1970, passengers, and equipment records folder. Tell students the location of rags, lubricants, and coolant.
TC 21-305-8
8-8
b. Students perform before-operation PMCS. c. Students practice transporting personnel from origin to destination. During-operation PMCS is also conducted at this time.
NOTE: As each student practices driving, an assistant instructor rides in a front seat as close to
the driver as possible. The other two students ride as passengers and rotate driving duties. The assistant instructor explains driving techniques, ensures the driver is aware of driving situations, and conducts after-action reviews with each driver. Now is the time to pass on valuable experience and correct any bad driving habits.
d. Students perform after-operation PMCS and ensure all operator entries required on DA Form 2404 and DD Form 1970 are accurate, complete, and legible.
4. Evaluation: Check each student's performance of PMCS and transporting personnel. 5. Summary:
a. Recap main points. b. Allow for questions. c. Clarify questions. d. Give closing statement.
6. Retraining: Retrain No-Gos and slow learners. E. SAFETY RESTRICTIONS.
1. When the vehicle is in motion, all occupants must be seated. 2. The number of passengers transported in buses in over-the-road service will be
restricted to the designated seating capacity. 3. Before loading or unloading passengers, ensure the transmission is placed in neutral
(some automatics are placed in park); the parking brake is set; the engine is shut off; and the ignition key is removed.
4. Ensure students remove all jewelry and ID tags before performing PMCS. 5. Ensure students pay particular attention to the cautions and warnings listed in the
operator's manual.

TC 21-305-8
8-9
6. Ensure ground guides are used when backing the vehicle. 7. Ensure a safe following distance and speeds (as determined by the local command) are
maintained when driving on the driver-training route.
8. Ensure all drivers wear seat belts while vehicle is in operation. F. ADDITIONAL COMMENTS AND INFORMATION. Recommended instructional time is 7 hours (.5 conference, .5 demonstration, and 6.0 practical exercise, including 1.0 PMCS).

TC 21-305-8
8-10
SECTION II - TESTING
LESSON TITLE: TRANSPORT PASSENGERS IN A BUS TASK NUMBER: 551-721-1387 (Transport Passengers in a Bus) A. TRAINING OBJECTIVE. TASK: Pass the written test. CONDITION: In a classroom, given an examination booklet and pencil. STANDARDS: Answer correctly 14 of 20 questions within 30 minutes. Use
either the primary written test or the alternate written test. B. INTERMEDIATE TRAINING. None. C. ADMINISTRATIVE INSTRUCTIONS.
1. Training time: As scheduled. 2. Training location: Classroom as scheduled. 3. Training type: Test evaluation. 4. Students: Personnel as scheduled. 5. Principal and assistant instructors required: One instructor for every 20 students. 6. Training aids and equipment: Examination booklet and pencil. 7. References: AR 385-55, FM 21-305, and appropriate vehicle operator's manual.
D. SEQUENCE OF ACTIVITY.
1. Introduction:
a. Interest device. b. Tie-in. c. Lesson objective (paragraph A). d. Procedures:
TC 21-305-8
8-11
(1) Explanation. (2) Test evaluation. (3) Summary.
2. Explanation and demonstration: Administer written examination. Use either the
primary or alternate test. 3. Evaluation: Check written test results. 4. Summary:
a. Recap main points. b. Allow for questions. c. Clarify questions. d. Give closing statement.
5. Retraining: Retrain and retest No-Gos.
E. SAFETY RESTRICTIONS. None. F. ADDITIONAL COMMENTS AND INFORMATION. Recommended testing time is 1 hour.

TC 21-305-8
8-12
TRANSPORT PASSENGERS IN A BUS
WRITTEN TEST (PRIMARY)
NAME RANK DATE
Multiple choice: Read each question carefully and write the answer which is most correct on the blank line to the left.
______ 1. When is it recommended that you wear a seat belt? a. Never. b. Only at speeds in excess of 25 mph. c. Always. d. Only when traveling on the interstate highways or turnpikes.
______ 2. Recapped tires are permitted on the steering axle provided-- a. They have at least 4/32-inch tread depth. b. They have at least 2/32-inch tread depth. c. They have passed a safety inspection. d. Never.
______ 3. All of the following are required during your pre-trip inspection except-- a. Checking handholds and railings to see if secure. b. Checking cylinder wall thickness. c. Ensuring emergency exit handles are secure. d. Checking to see if turn signals and brake lights are operating properly.
______ 4. When stopping at a railroad crossing, you must stop-- a. No closer than 15 feet and no farther than 50 feet. b. No closer than 20 feet and no farther than 60 feet. c. No closer than 25 feet and no farther than 50 feet. d. No closer than 10 feet and no farther than 15 feet.
______ 5. Which of the following is true about refueling your bus? a. You must refuel with all windows opened fully. b. Never refuel with passengers aboard. c. Always use a static cable. d. Never refuel with passengers aboard when in a closed building.

TC 21-305-8
8-13
______ 6. You are approaching a drawbridge. No signal device or attendant is present. You must-- a. Stop at least 50 feet before the draw of the bridge. b. Stop no closer than 75 feet before the draw of the bridge. c. Not stop as that might cause an accident. d. Speed up and cross quickly before the bridge is raised.
______ 7. If you must discharge an unruly or disruptive passenger, you should-- a. Stop immediately and discharge the passenger. b. Try to counsel to him before discharging him from the bus. c. Choose a location that is most inconvenient to him. d. Choose a location that is safe and well lighted.
______ 8. Which of the following emergency equipment is required on your bus? a. First aid kit, tire chains, and tire-changing equipment. b. Fire extinguisher, tire chains, and first aid equipment. c. Fire extinguisher, a highway warning kit (3 reflective triangles or 3 emergency reflectors), and spare electric fuses, unless bus is equipped with circuit breakers. d. Fire extinguisher, accident reporting kit, and a highway warning kit (3 reflective triangles or 3 emergency reflectors).
______ 9. Speed limits on curves are standardized for-- a. Automobiles. b. Buses. c. Tractor-trailers. d. Small straight trucks.
______ 10. Buses may have recapped or re-grooved tires-- a. On any or all of the wheels. b. Only when the average speed will be less than 40 mph. c. Only on the front wheels. d. Anywhere except the front wheels.
______ 11. Your bus is disabled. The bus, with passengers aboard, may be towed or pushed to a safe place only-- a. By another bus with its four-way flashers on. b. By a 27,000 GVWR or larger tow truck. c. If the distance is less than 500 yards. d. If getting off the bus would be more risky for the passengers.

TC 21-305-8
8-14
______ 12. When inspecting your bus, you must be sure that-- a. Every handhold and railing is secure. b. Passenger signaling devices are working. c. Emergency exit handles are secure. d. All of the above.
______ 13. If your bus is equipped with an emergency exit door, it must-- a. Be secured when the bus is being driven. b. Always have a red door light turned on. c. Not have any signs, stickers or markings near it. d. All of the above
______ 14. Baggage and freight must be secured to-- a. Allow the driver to move freely and easily. b. Protect passengers from injury if carry-on items shift or fall. c. Allow passengers to exit by any door or window in an emergency. d. All of the above.
______ 15. Never drive with-- a. Your seat belt securely fastened. b. An emergency exit door or window open. c. Recapped tires on the non-steering axles. d. Baggage doors latched.
______ 16. Bus crashes most often happen-- a. At railroad crossings. b. On expressways. c. At intersections. d. At school zones.
______ 17. On a road with poor traction, traveling too fast around a curve might cause the bus to-- a. Slide off the curve. b. Coast. c. Stop abruptly. d. Do nothing.
TC 21-305-8
8-15
______ 18. On a road with good traction, traveling too fast around a curve may cause the bus to-- a. Coast. b. Stop abruptly. c. Roll over. d. Hydroplane.
______ 19. If the bus leans toward the outside on a banked curve, this means-- a. It is going too fast. b. It is going too slow. c. Nothing; this is normal. d. Nothing; you just downshifted.
______ 20. When crossing railroad tracks, do not-- a. Listen and look in both directions for trains. b. Check for another train coming in the other direction, on other tracks, before crossing. c. Change gears while crossing the tracks, if the bus has a manual transmission. d. Stop the bus before the railroad crossing.

TC 21-305-8
8-16
TRANSPORTING PASSENGERS IN A BUS
WRITTEN TEST ANSWER SHEET (PRIMARY)
1. C 11. D 2. D 12. D 3. B 13. A 4. A 14. D 5. D 15. B 6. A 16. C 7. D 17. A 8. C 18. D 9 A 19. A 10. D 20. C

TC 21-305-8
8-17
TRANSPORT PASSENGERS IN A BUS
WRITTEN TEST (ALTERNATE)
NAME RANK DATE
Multiple choice: Read each question carefully and write the answer which is most correct on the blank line to the left.
______ 1. If the bus leans toward the outside on a banked curve, this means-- a. It is going too fast. b. It is going too slow. c. Nothing; this is normal. d. Nothing; you just downshifted.
______ 2. On a road with good traction, traveling too fast around a curve may cause the bus to-- a. Coast. b. Stop abruptly. c. Roll over. d. Hydroplane.
______ 3. On a road with poor traction, traveling too fast around a curve might cause the bus to-- a. Slide off the curve. b. Coast. c. Stop abruptly. d. Do nothing.
______ 4. Your bus is disabled. The bus, with passengers aboard, may be towed or pushed to a safe place only-- a. By another bus with its four-way flashers on. b. By a 27,000 GVWR or larger tow truck. c. If the distance is less than 500 yards. d. If getting off the bus would be more risky for the passengers.
______ 5. Buses may have recapped or re-grooved tires-- a. On any or all of the wheels. b. Only when the average speed will be less than 40 mph. c. Only on the front wheels. d. Anywhere except the front wheels.

TC 21-305-8
8-18
______ 6. Speed limits on curves are standardized for-- a. Automobiles. b. Buses. c. Tractor-trailers. d. Small, straight trucks.
______ 7. 7. Which of the following emergency equipment is required on your bus? a. First aid kit, tire chains, and tire-changing equipment. b. Fire extinguisher, tire chains, and first aid equipment. c. Fire extinguisher, a highway warning kit (3 reflective triangles or 3 emergency reflectors), and spare electric fuses, unless the bus is equipped with circuit breakers. d. Fire extinguisher, accident reporting kit, and a highway warning kit (3 reflective triangles or 3 emergency reflectors).
______ 8. If your bus is equipped with an emergency exit door, it must-- a. Be secured when the bus is being driven. b. Always have a red door light turned on. c. Not have any signs, stickers, or markings near it. d. All of the above.
______ 9. 9. You are approaching a drawbridge. No signal device or attendant is present. You must-- a. Stop at least 50 feet before the draw of the bridge. b. Stop no closer than 75 feet before the draw of the bridge. c. Not stop as that might cause an accident. d. Speed up and cross quickly before the bridge is raised.
______ 10. Baggage and freight must be secured to-- a. Allow the driver to move freely and easily. b. Protect passengers from injury if carry-on items shift or fall. c. Allow passengers to exit by any door or window in an emergency. d. All of the above.
______ 11. If you must discharge an unruly or disruptive passenger, you should-- a. Stop immediately and discharge the passenger. b. Try to counsel to him before discharging him from the bus. c. Choose a location that is most inconvenient to him. d. Choose a location that is safe and well lighted.
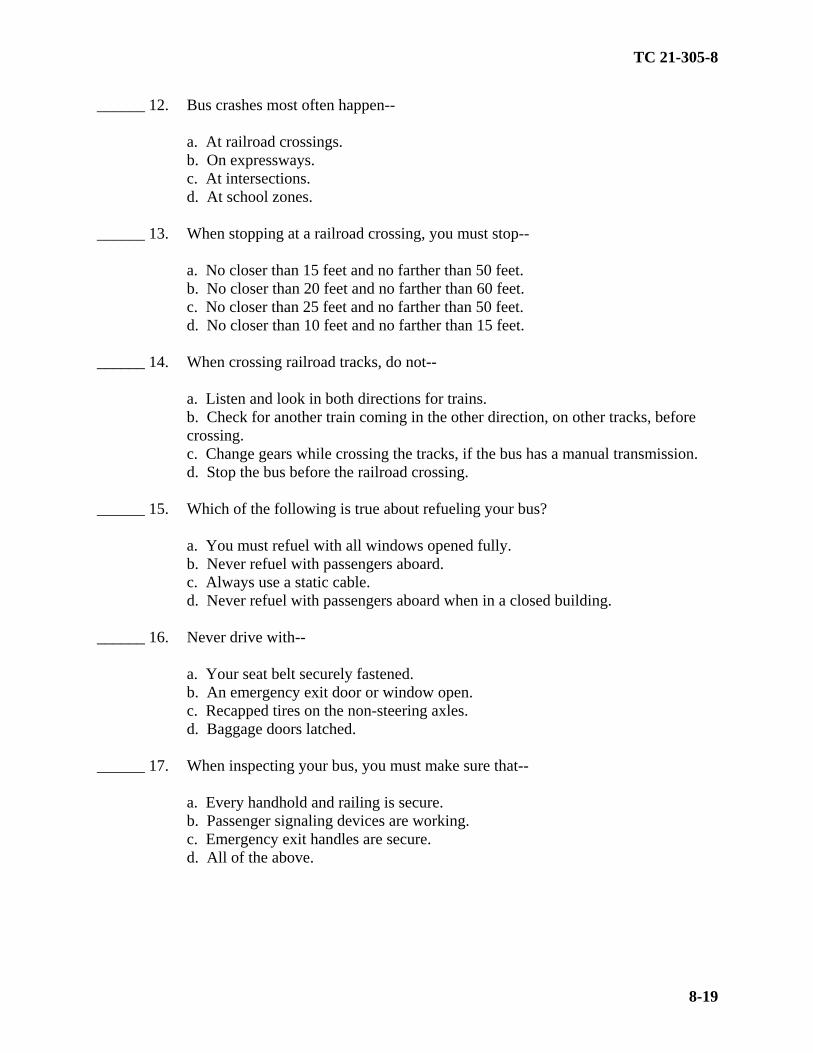
TC 21-305-8
8-19
______ 12. Bus crashes most often happen-- a. At railroad crossings. b. On expressways. c. At intersections. d. At school zones.
______ 13. When stopping at a railroad crossing, you must stop-- a. No closer than 15 feet and no farther than 50 feet. b. No closer than 20 feet and no farther than 60 feet. c. No closer than 25 feet and no farther than 50 feet. d. No closer than 10 feet and no farther than 15 feet.
______ 14. When crossing railroad tracks, do not-- a. Listen and look in both directions for trains. b. Check for another train coming in the other direction, on other tracks, before crossing. c. Change gears while crossing the tracks, if the bus has a manual transmission. d. Stop the bus before the railroad crossing.
______ 15. Which of the following is true about refueling your bus? a. You must refuel with all windows opened fully. b. Never refuel with passengers aboard. c. Always use a static cable. d. Never refuel with passengers aboard when in a closed building.
______ 16. Never drive with-- a. Your seat belt securely fastened. b. An emergency exit door or window open. c. Recapped tires on the non-steering axles. d. Baggage doors latched.
______ 17. When inspecting your bus, you must make sure that-- a. Every handhold and railing is secure. b. Passenger signaling devices are working. c. Emergency exit handles are secure. d. All of the above.
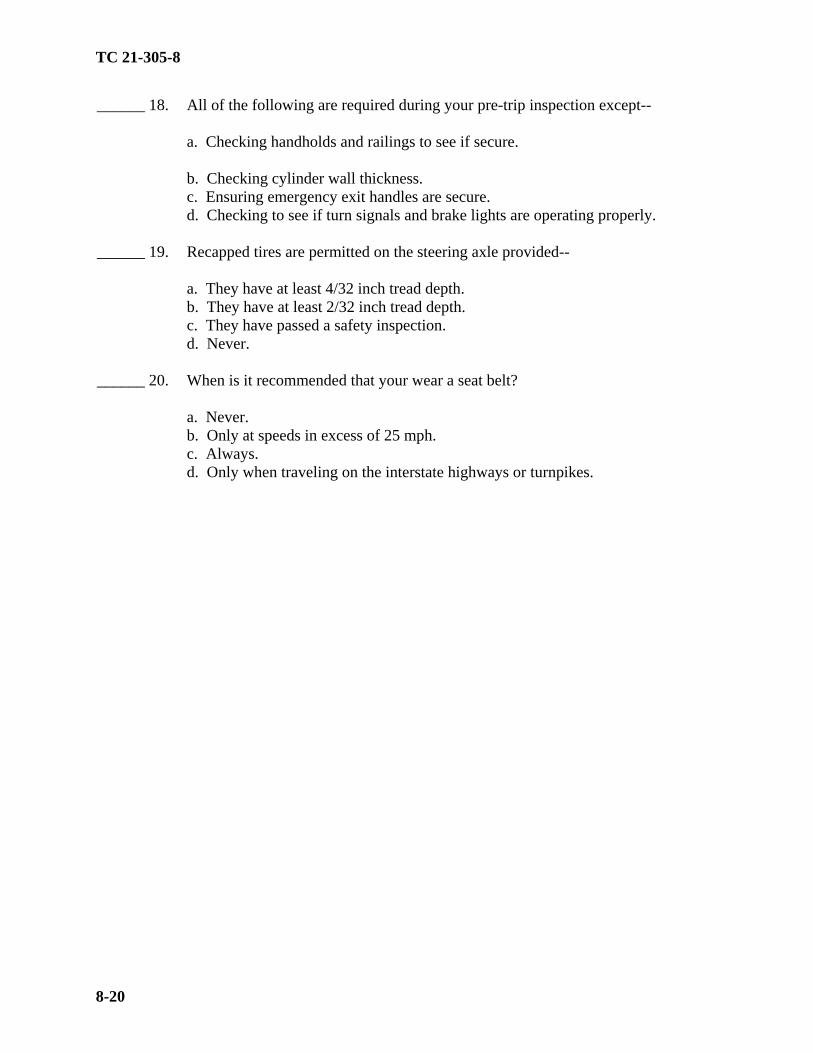
TC 21-305-8
8-20
______ 18. All of the following are required during your pre-trip inspection except-- a. Checking handholds and railings to see if secure. b. Checking cylinder wall thickness. c. Ensuring emergency exit handles are secure. d. Checking to see if turn signals and brake lights are operating properly.
______ 19. Recapped tires are permitted on the steering axle provided-- a. They have at least 4/32 inch tread depth. b. They have at least 2/32 inch tread depth. c. They have passed a safety inspection. d. Never.
______ 20. When is it recommended that your wear a seat belt? a. Never. b. Only at speeds in excess of 25 mph. c. Always. d. Only when traveling on the interstate highways or turnpikes.
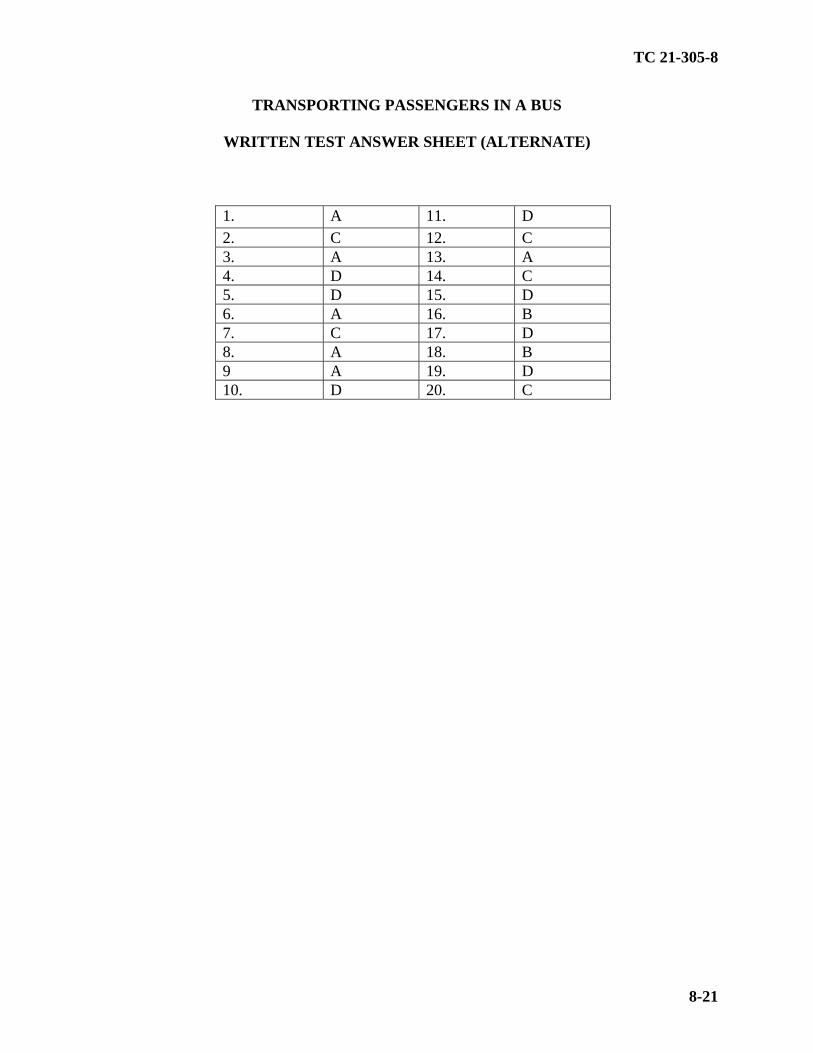
TC 21-305-8
8-21
TRANSPORTING PASSENGERS IN A BUS
WRITTEN TEST ANSWER SHEET (ALTERNATE)
1. A 11. D 2. C 12. C 3. A 13. A 4. D 14. C 5. D 15. D 6. A 16. B 7. C 17. D 8. A 18. B 9 A 19. D 10. D 20. C
TC 21-305-8
9-1
CHAPTER 9
LESSON OUTLINES ON ADDITIONAL SUBJECTS
LESSON TITLE: PERFORM PREVENTIVE MAINTENANCE CHECKS AND SERVICES (PMCS) ON TRAILERS
TASK NUMBER: 551-721-1353 (Perform Preventive Maintenance Checks and Services
[PMCS] on Trailers) A. TRAINING OBJECTIVE. TASK: Perform preventive maintenance checks and services on a trailer. CONDITION: Given instruction, DA Form 2404, pencils, appropriate trailer
operator's manual, equipment records folder, rags, lubricants, and a trailer.
STANDARDS: Inspect the trailer according to the PMCS tables listed in the
appropriate trailer operator's manual. Correct all faults within the operator's level of maintenance and record all others on DA Form 2404 legibly. If no faults are found, make necessary entries on DA Form 2404.
B. INTERMEDIATE TRAINING. None. C. ADMINISTRATIVE INSTRUCTIONS.
1. Training time: As scheduled. 2. Training location: Motor pool as scheduled. 3. Training type: Demonstration and practical exercise. 4. Students: Scheduled personnel. 5. Principal and assistant instructors required: One primary instructor and one assistant
instructor for every three students for the demonstration and practical exercise. 6. Training aids and equipment: Rags, lubricants, DA Form 2404, pencils, appropriate
trailer operator's manual, equipment records folder, and a trailer for every three students. 7. References: Appropriate trailer operator's manual and DA Pamphlet 738-750.
D. SEQUENCE OF ACTIVITY.

TC 21-305-8
9-2
1. Introduction:
a. Interest device. b. Tie-in. c. Lesson objective (paragraph A). d. Procedures:
(1) Explanation. (2) Practical exercise. (3) Summary.
2. Explanation and demonstration: Demonstrate before-, during-, and after-operational,
and weekly and monthly PMCS to the students. 3. Practical exercise:
a. Assign students to vehicles/trailers. Issue trailer operator's manual, pencils, DA Form 2404, and equipment records folder. Tell students the location of rags, lubricants, and coolant. b. Students perform PMCS.
4. Evaluation: Check each student's performance of PMCS. 5. Summary:
a. Recap main points. b. Allow for questions. c. Clarify questions. d. Give closing statement.
6. Retraining: Retrain No-Gos and slow learners. E. SAFETY RESTRICTIONS.
1. Ensure that all chock blocks (if required) are in place when vehicle and trailer are parked.
TC 21-305-8
9-3
2. Ensure students remove all jewelry and ID tags before performing PMCS. 3. Ensure students pay particular attention to the cautions and warnings listed in the
operator's manual. 4. Ensure the transmission is always placed in neutral (some automatics are placed in
park); parking brake is set; the engine is shut off; and the ignition key is removed (if equipped) before leaving the vehicle. F. ADDITIONAL COMMENTS AND INFORMATION. Recommended instructional time is 1.5 hours (.75 demonstration and .75 practical exercise).
TC 21-305-8
9-4
LESSON TITLE: DRIVE A VEHICLE WITH BALANCED (PINTLE-CONNECTED)
TRAILER TASK NUMBER: 551-721-1380 (Transport General Cargo in Trailer) and 551-721-1385
(Couple/Uncouple Pintle-Connected Trailer) A. TRAINING OBJECTIVE. TASK: Drive a vehicle with balanced (pintle-connected) trailer. CONDITION: Given instruction, DD Form 1970, DA Form 2404, a pencil,
vehicle operator's manual, trailer operator's manual, equipment records folder, rags, lubricants, coolant, a suitable training area, a trailer, and a wheeled vehicle with BII.
STANDARDS: Without accident or injury, drive the designated route. Connect
and disconnect the trailer. Back the trailer in a straight line and perform basic driving maneuvers.
B. INTERMEDIATE TRAINING. None. C. ADMINISTRATIVE INSTRUCTIONS.
1. Training time: As scheduled. 2. Training location: Motor pool, training area, and driver training route as scheduled. 3. Training type: Conference, demonstration, and practical exercise. 4. Students: Scheduled personnel. 5. Principal and assistant instructors required: One primary instructor for the conference
and one assistant instructor for every three students for the demonstration and practical exercise. 6. Training aids and equipment: Rags, lubricants, coolant, DA Form 2404, DD Form
1970, pencils, 40 traffic cones or empty POL drums, vehicle operator's manual, trailer operator's manual, equipment records folder, a trailer, and a wheeled vehicle with BII for every three students.
7. References: FM 21-305, trailer operator's manual, and vehicle operator's manual.
D. SEQUENCE OF ACTIVITY.
1. Introduction:

TC 21-305-8
9-5
a. Interest device. b. Tie-in. c. Lesson objective (paragraph A). d. Procedures:
(1) Explanation. (2) Practical exercise. (3) Summary.
2. Explanation and demonstration: NOTE: The instructions contained in this lesson outline for a balanced (pintle-connected) trailer
are in general terms because this lesson covers a variety of trailers. Although procedures for these types of trailers are similar, the instructor should consult the specific trailer operator's manual for detailed instructions.
a. Connect the trailer to the vehicle.
(1) Sound the horn before backing. Using ground guides, back the vehicle to the trailer. Be sure no one stands between the vehicle and trailer. (2) Stop the vehicle. Engage the parking brake. Shut off the engine. Get out of the vehicle to connect the trailer. (3) Lift the trailer. (Some trailers are light and can be lifted by one person, while others will require several people, and still others have a mechanical lift.) Secure the trailer lunette in the pintle of the towing vehicle. Secure the pintle. Install the pintle safety cotter pin in the pintle. (4) Hook the two safety chains from the trailer to the rear lifting shackles of the towing vehicle. (5) Release the trailer hand brake lever. (6) Raise the retractable support (landing leg). (7) Connect the intervehicular brake hoses to the towing vehicle. Turn on the air supply. (8) Connect the intervehicular electrical cable to the towing vehicle.
TC 21-305-8
9-6
(9) Operate the controls in the towing vehicle to check brake action and operation of all lights.
b. Disconnect the trailer from the vehicle.
(1) Position the trailer on level ground if possible. (2) Apply the trailer hand brake or chock wheels to prevent trailer movement. (3) Disconnect the intervehicular brake hoses. Stow them on the bracket provided on the trailer. (4) Lower the retractable support (landing leg). (5) Unhook the safety chains and lunette from the towing vehicle. (6) Secure the pintle. Reinstall the pintle safety cotter pin in the pintle. (7) Level the trailer if required.
c. Driving. When driving the towing vehicle and trailer, keep the overall length of the unit in mind when passing other vehicles and turning. Backing is also affected because the unit is hinged in the middle.
(1) Safely towing a trailer requires increased concentration, alertness, and strict compliance with towing speeds. (2) Trailers have a tendency to fishtail or swerve very easily when the driver makes an erratic movement of any magnitude. This can be caused by--
(a) Speed. (b) A slight swerve to miss a pothole. (c) A quick lane change. (d) A slip of the hand on the steering wheel. (e) Rough or uneven road.
(3) To prevent trailer fishtail or swerve--
TC 21-305-8
9-7
(a) Never exceed the recommended speed for the trailer that you are towing. (b) Never exceed the trailer's maximum recommended weight capacity. (c) Always slow down for curves, wet or rough roads, or downgrades. (d) Anticipate all stops to take longer as a result of the added weight. Brake early and gently. Do not slam on the brakes. (e) On downgrades, slow down before starting downhill. Use a lower gear. Let the engine compression help slow the vehicle.
(4) To correct trailer fishtail or swerve--
(a) Steer straight ahead. (b) Gradually decelerate. (c) Do not brake until both the towing vehicle and trailer have stabilized.
(5) When turning corners, allow for the fact that the trailer wheels turn inside the turning radius of the towing vehicle.
(a) To make a right turn--
• Check traffic ahead, to the rear, and to the right side.
• If not in the right-hand lane, be sure that lane is clear, signal, and move into the lane well in advance of the turn.
• Signal for the turn at least 150 feet in advance and reduce speed.
• Check other traffic that is in, at, or approaching the intersection. (Be sure on bicycle or motorcycle is to the right. Be especially alert for pedestrians.)
• Take a position farther from the curb or edge of the pavement than the driver would if driving a straight truck.
TC 21-305-8
9-8
• Drive the towing vehicle approximately halfway into the intersection. Then cut sharply to the right. This will keep the trailer wheels off the curb.
• Keep the vehicle close enough to the edge of the road to
prevent following vehicles from trying to pass on the right.
• If swinging wide to the left or oncoming lane, watch oncoming vehicles.
• During the turn, monitor the mirrors for off-tracking.
• Do not shift gears during the turn. Keep both hands on the steering wheel.
• If unable to complete the turn, do not back up.
• After completing the turn, cancel the signal.
• When it is safe to do so, steer the vehicle into the desired lane (four-lane roads).
(b) To make a left turn--
• Check traffic ahead, to the rear, and to both sides.
• Signal for the turn at least 150 feet in advance and reduce
speed.
• Check other traffic that is in, at, or approaching the intersection.
• Ensure there is an adequate gap to make a turn in front of traffic.
• Before turning, drive the towing vehicle into the center of the intersection to allow for the trailer.
• Turn hard to the left. Watch for oncoming traffic, if applicable.
• During the turn, monitor the mirrors for off-tracking.
• Do not shift gears during the turn. Keep both hands on the steering wheel.

TC 21-305-8
9-9
• After completing the turn, cancel the signal.
• When it is safe to do so, steer the vehicle into the desired lane (four-lane roads).
(6) Stopping requires more distance when pulling a trailer. Apply brakes gradually and smoothly. Stepping on the brake pedal will stop both the towing vehicle and trailer.
d. Backing the trailer in a straight line. Since the driver cannot see directly behind the vehicle, backing is always dangerous. Avoid backing whenever possible, even if you must go around the block to do so. When backing follow these rules.
(1) Get out of the vehicle. Check the area to the sides, rear, and overhead for obstructions. (2) Use ground guides to direct while backing. (3) Adjust the rearview mirrors before backing. (4) Sound the horn before backing, where it is legal to do so. (5) Remember, when backing, the trailer's rear will move in the opposite direction from which the front towing vehicle wheels are turned.
(a) If the wheels are turned to the right, the trailer will go left. (b) If the wheels are turned to the left, the trailer will go right.
(6) Make gradual steering corrections in relation to trailer alignment. (7) Pull up if necessary to improve the trailer's alignment. (8) Stop the vehicle when the desired position is reached.
e. Explain to the students that they must perform before-, during-, and after-operation PMCS on their assigned vehicle. f. Demonstrate hand and arm signals required for this exercise. g. Demonstrate driving through each maneuver.
3. Practical exercise:

TC 21-305-8
9-10
a. Assign students to vehicles/trailers. Issue vehicle operator's manuals, trailer operator's manuals, pencils, DA Form 2404, DD Form 1970, and equipment records folder. Tell students the location of rags, lubricants, and coolant. b. Students perform before-operation PMCS. c. Students practice maneuvering the vehicle through the courses laid out in the training areas. Sample training areas are in Chapter 5 (Figures 5-2 through 5-5 and 5-8). They also conduct during-operation PMCS at this time. d. After the students have mastered driving the vehicle in the training area, they will practice driving on the road.
NOTE: As each student practices driving, an assistant instructor rides in the front seat next to
the driver. The other two students ride in the passenger seats or troop seats and rotate driving duties. The assistant instructor explains driving techniques, ensures the driver is aware of driving situations, and conducts after-action reviews with each driver. Now is the time to pass on valuable experience and correct any bad driving habits.
e. Students perform after-operation PMCS and ensure all operator entries required on DA Form 2404 and DD Form 1970 are accurate, complete, and legible.
4. Evaluation: Check each student's performance of PMCS and driving. 5. Summary:
a. Recap main points. b. Allow for questions. c. Clarify questions. d. Give closing statement.
6. Retraining: Retrain No-Gos and slow learners.
E. SAFETY RESTRICTIONS.
1. Ensure all chock blocks (if required) are in place when vehicles are parked. 2. Ensure the transmission is always placed in neutral (some automatics are placed in
park); the parking brake is set; the engine is shut off; and the ignition key is removed (if equipped) before leaving the vehicle.
3. Ensure students remove all jewelry and ID tags before performing PMCS.

TC 21-305-8
9-11
4. Ensure students pay particular attention to the cautions and warnings listed in the
operators manual. 5. Ensure ground guides are used when backing the vehicle or trailer. 6. Ensure a safe following distance and speeds (as determined by the local command) are
maintained when driving in the training area and the driver-training route. 7. Ensure all occupants wear seat belts (if equipped) while vehicle is in operation.
F. ADDITIONAL COMMENTS AND INFORMATION. Recommended instructional time is 8 hours (.5 conference, .5 demonstration, and 7.0 practical exercise, including 1.0 PMCS).

TC 21-305-8
9-12
LESSON TITLE: DRIVE A WHEELED VEHICLE IN A CONVOY TASK NUMBER: 551-721-1359 (Drive Vehicle in a Convoy) A. TRAINING OBJECTIVE. TASK: Drive a wheeled vehicle in a convoy. CONDITIONS Given instruction, a DD Form 1970, a DA Form 2404, a pencil,
vehicle operator's manual, equipment records folder, rags, lubricants, coolant, a suitable training area, and a wheeled vehicle with BII.
STANDARD: Operate the vehicle in accordance with specific instructions of the
march unit commander. Using defensive driving (accident avoidance) methods; maintain vehicle interval, obey highway warning and regulatory signs, interpret and relay all mechanical/ hand signals correctly, and use correct braking procedures without accident or injury.
B. INTERMEDIATE TRAINING. None. C. ADMINISTRATIVE INSTRUCTIONS.
1. Training time: As scheduled. 2. Training location: Motor pool and convoy route. 3. Training type: Conference and practical exercise. 4. Students: Scheduled personnel. 5. Principal and assistant instructors required: One primary instructor for the conference
and one assistant instructor for each three students for the practical exercise. 6. Training aids and equipment: Rags, lubricants, and coolant, DA Form 2404, DD
Form 1970, pencil, vehicle operator's manual, equipment records folder, convoy strip map, a wheeled vehicle with BII for each three students, convoy signs ("CONVOY AHEAD" and "CONVOY FOLLOWS"), convoy flags (blue, green, and black/white), and convoy control vehicles (minimum of two vehicles required). A communication system for the control vehicles is recommended.
7. References: FM 55-312, FM 21-305, and appropriate vehicle operator's manual.

TC 21-305-8
9-13
D. SEQUENCE OF ACTIVITY.
1. Introduction:
a. Interest device. b. Tie-in. c. Lesson objective (paragraph A). d. Procedures:
(1) Explanation. (2) Practical exercise. (3) Summary.
2. Explanation and demonstration: a. Give convoy safety briefing (see attached sample convoy commander's briefing). b. The students will be required to perform before-, during-, and after-operation PMCS on their assigned vehicle.
c. Demonstrate hand and arm signals required for this exercise.
3. Practical exercise: a. Assign students to vehicles and issue vehicle operator's manuals, pencils, DA Form 2404, DD Form 1970, convoy strip map, and equipment records folder. Instruct students on the location of rags, lubricants, and coolant. b. Students perform before-operation PMCS. c. Students practice driving the vehicle on assigned convoy route. During-operation PMCS is conducted at this time.
NOTE: As each student practices driving, an assistant instructor rides in the right front seat.
The other two students will ride in the rear seats or troop seats and rotate driving duties. The assistant instructor explains driving techniques, ensures the driver is aware of driving situations, and conducts after-action reviews with each driver. Now is the time to pass on valuable experience and correct any bad driving habits.
TC 21-305-8
9-14
d. Students perform after-operation PMCS and ensure all operator entries required on DA Form 2404 and DD Form 1970 are accurate, complete, and legible.
4. Evaluation: Check each student's performance of PMCS and driving the vehicle in convoy.
5. Summary:
a. Recap main points. b. Allow for questions. c. Clarify questions. d. Give closing statement.
6. Retraining: Retrain No-Gos and slow learners.
E. SAFETY RESTRICTIONS.
1. Ensure all chock blocks (if required) are in place when vehicles are parked. 2. Ensure the transmission is always placed in neutral (some automatics are placed in
park), the parking brake is set, the engine is shut off, and the ignition key is removed (if equipped) before leaving the vehicle.
3. Ensure students remove all jewelry and identification tags before performing PMCS. 4. Ensure students pay particular attention to the cautions and warnings listed in the
operators manual. 5. Ensure ground guide(s) is used when backing the vehicle during training. 6. Ensure a safe following distance and speeds are maintained when driving on the
convoy route (as determined by the local command). 7. Ensure all occupants wear seat belts (if equipped) while the vehicle is in operation. 8. Ensure no one walks between vehicles parked in a column.
F. ADDITIONAL COMMENTS AND INFORMATION. Recommended instructional time is 5 hours (.5 conference and 4.5 practical exercise, including 1.0 PMCS).

TC 21-305-8
9-15
SAMPLE CONVOY COMMANDER'S BRIEFING 1. Always follow civilian and military police instructions when given.
2. Use only truck parking areas on controlled access highways.
3. Make only emergency halts on the roadside of controlled access highways.
4. Do not stand on the traffic side of a convoy during halts on conventional highways.
5. Perform vehicle operation maintenance and check cargo security at every halt.
6. Move vehicles off of the highway before beginning maintenance.
7. Have reflectors and warning devices in place before beginning maintenance.
8. Use warning lights during periods of darkness or reduced visibility.
9. Begin convoy movement only at the convoy commander's signal.
10. Vehicle speed restrictions: as determined by the local commander.
11. Vehicle intervals (minimums):
a. Controlled access highway - 200 yards.
b. Rural conventional highway - 150 yards.
c. Urban conventional highway - 50 yards.
12. Maintain a close interval until reaching main convoy route.
13. Use the acceleration lane, when available, to reach convoy speed.
14. Gradually attain the proper vehicle interval once on the main convoy route.
15. In the case of an accident, the main column does not stop to provide assistance. The next
following vehicle provides immediate assistance to the accident vehicle.
16. If an accident occurs to a vehicle ahead, make the maximum effort to clear traffic lanes.
17. Operate all vehicles with headlights on at all times.
18. Use warning devices correctly.
19. Add any additional comments as local conditions warrant.

TC 21-305-8
9-16
LESSON TITLE: DRIVE A WHEELED VEHICLE IN A CONVOY UNDER BLACKOUT CONDITIONS
TASK NUMBER: 551-721-1363 (Drive Vehicle in Blackout Conditions) A. TRAINING OBJECTIVE. TASK: Drive a wheeled vehicle in a convoy under blackout conditions. CONDITIONS Given instruction, DD Form 1970, DA Form 2404, pencil, vehicle
operator's manual, equipment records folder, rags, lubricants, coolant, a suitable training area, and a wheeled vehicle with BII.
STANDARD: Operate the vehicle in accordance with specific instructions of the
march unit commander. Drive the designated convoy route at night using defensive driving (accident avoidance) methods, maintain vehicle interval, and operate the tactical light switch, including headlights and blackout drive without accident or injury.
B. INTERMEDIATE TRAINING. None. C. ADMINISTRATIVE INSTRUCTIONS.
1. Training time: As scheduled. 2. Training location: Motor pool and convoy route. 3. Training type: Conference and practical exercise. 4. Students: Scheduled personnel. 5. Principal and assistant instructors required: One primary instructor for the conference
and one assistant instructor for each three students for the practical exercise. 6. Training aids and equipment: Rags, lubricants, and coolant, DA Form 2404, DD
Form 1970, pencil, vehicle operator's manual, equipment records folder, convoy strip map, a wheeled vehicle with BII for each three students, convoy signs ("CONVOY AHEAD" and "CONVOY FOLLOWS"), convoy flags (blue, green, and black/white), and convoy control vehicles (minimum of two vehicles required). A communication system for the control vehicles is recommended.
7. References: FM 55-312, FM 21-305, and appropriate vehicle operator's manual.
TC 21-305-8
9-17
D. SEQUENCE OF ACTIVITY.
1. Introduction: a. Interest device. b. Tie-in. c. Lesson objective (paragraph A). d. Procedures:
(1) Explanation. (2) Practical exercise. (3) Summary.
2. Explanation and demonstration:
a. Demonstrate night convoy control signals, as listed in FM 21-305. b. Demonstrate the operation of the tactical light switch for turning on/off headlights, blackout drive lights, and blackout marker lights. c. Have three vehicles positioned with blackout drive lights on so the students can see the rear blackout marker and stop light at different distances:
(1) Too far - more than 180 feet. (2) Proper distance - between 60 and 180 feet. (3) Too close - less than 60 feet.
d. Give convoy safety briefing (see attached sample convoy commander's briefing).
3. Practical exercise: a. Assign students to vehicles and issue vehicle operator's manual, pencils, DA Form 2404, DD Form 1970, convoy strip map, and equipment records folder. Instruct students on the location of rags, lubricants, and coolant. b. Students perform before-operation PMCS to include the operation and cleaning of all lights.

TC 21-305-8
9-18
c. Students practice driving the vehicle first with headlights on and then under blackout conditions on the assigned convoy route. During-operation PMCS is conducted at this time. NOTE: As each student practices driving, an assistant instructor rides in the right front seat.
The other two students will ride in the rear seats or troop seats and rotate driving duties. The assistant instructor explains driving techniques, ensures the driver is aware of driving situations, and conducts after-action reviews with each driver. Now is the time to pass on valuable experience and correct any bad driving habits.
d. Students perform after-operation PMCS and ensure all operator entries required on
DA Form 2404 and DD Form 1970 are accurate, complete, and legible. 4. Evaluation: Check each student's performance of night driving both with headlights
and blackout drive. 5. Summary:
a. Recap main points. b. Allow for questions. c. Clarify questions. d. Give closing statement.
6. Retraining: Retrain No-Gos and slow learners.
E. SAFETY RESTRICTIONS.
1. Ensure all chock blocks (if required) are in place when vehicles are parked. 2. Ensure the transmission is always placed in neutral (some automatics are placed in
park), the parking brake is set, the engine is shut off, and the ignition key is removed (if equipped) before leaving the vehicle.
3. Ensure students remove all jewelry and identification tags before performing PMCS. 4. Ensure students pay particular attention to the cautions and warnings listed in the
operator's manual. 5. Ensure ground guide(s) is used when backing the vehicle during training.
6. Ensure a safe following distance and speeds are maintained when driving on the
convoy route (as determined by the local command).
7. Ensure all occupants wear seat belts (if equipped) while vehicle is in operation.

TC 21-305-8
9-19
8. Ensure no one walks between vehicles parked in a column. 9. Ensure ground guides and road guides wear reflective vests and carry filtered
flashlights at night. F. ADDITIONAL COMMENTS AND INFORMATION. Recommended instructional time is 5 hours (.5 conference and 4.5 practical exercise, including 1.0 PMCS).
TC 21-305-8
9-20
SAMPLE CONVOY COMMANDER'S BRIEFING 1. Always follow civilian and military police instructions when given.
2. Use only truck parking areas on controlled access highways.
3. Make only emergency halts on the roadside of controlled access highways.
4. Do not stand on the traffic side of a convoy during halts on conventional highways.
5. Perform vehicle operation maintenance and check cargo security at every halt.
6. Move vehicles off of the highway before beginning maintenance.
7. Have reflectors and warning devices in place before beginning maintenance.
8. Use warning lights during periods of darkness or reduced visibility.
9. Begin convoy movement only at the convoy commander's signal.
10. Vehicle speed restrictions: as determined by the local commander.
11. Vehicle intervals (minimums):
a. Controlled access highway - 200 yards.
b. Rural conventional highway - 150 yards.
c. Urban conventional highway - 50 yards.
d. Blackout conditions - 60 to 180 feet.
12. Maintain close interval until reaching the main convoy route.
13. Use the acceleration lane, when available to reach convoy speed.
14. Gradually attain proper vehicle interval once on the main convoy route.
15. In case of an accident, the main column does not stop to provide assistance. The next
following vehicle provides immediate assistance to the accident vehicle.
16. If an accident occurs to a vehicle ahead, make the maximum effort to clear traffic lanes.
17. Operate all vehicles with headlights on at all times (except during blackout conditions).
18. Use warning devices correctly.
19. Add any additional comments as local conditions warrant.
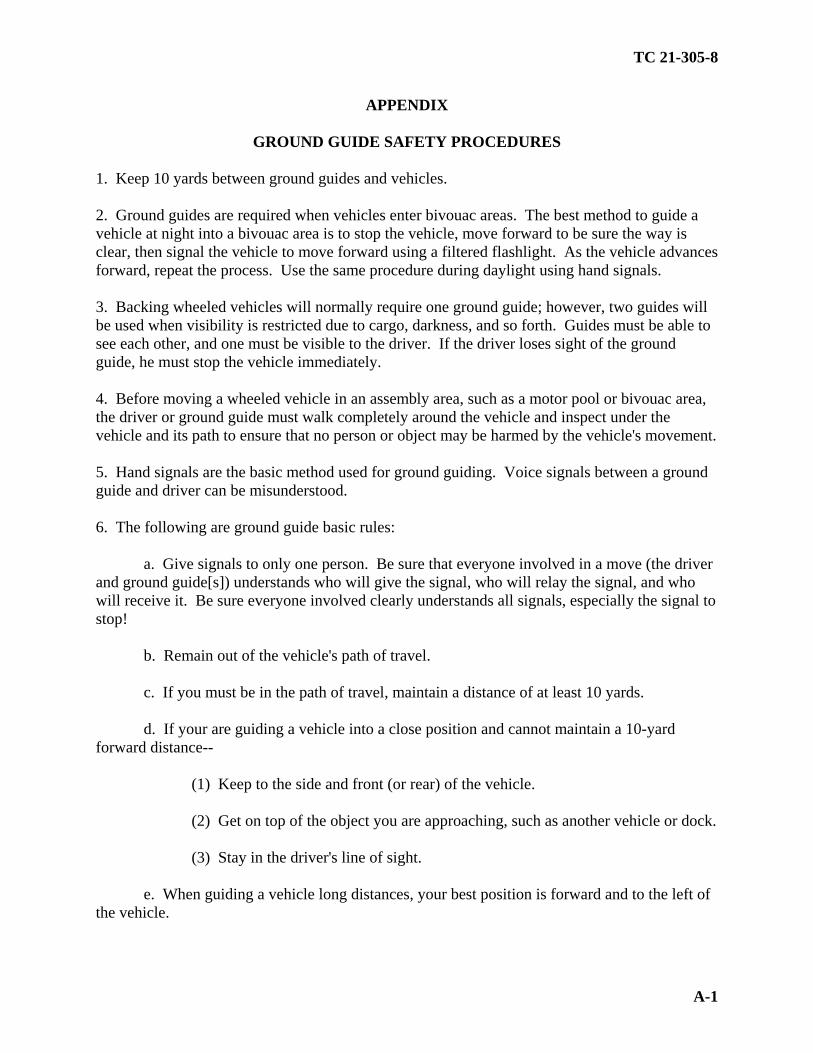
TC 21-305-8
A-1
APPENDIX
GROUND GUIDE SAFETY PROCEDURES 1. Keep 10 yards between ground guides and vehicles. 2. Ground guides are required when vehicles enter bivouac areas. The best method to guide a vehicle at night into a bivouac area is to stop the vehicle, move forward to be sure the way is clear, then signal the vehicle to move forward using a filtered flashlight. As the vehicle advances forward, repeat the process. Use the same procedure during daylight using hand signals. 3. Backing wheeled vehicles will normally require one ground guide; however, two guides will be used when visibility is restricted due to cargo, darkness, and so forth. Guides must be able to see each other, and one must be visible to the driver. If the driver loses sight of the ground guide, he must stop the vehicle immediately. 4. Before moving a wheeled vehicle in an assembly area, such as a motor pool or bivouac area, the driver or ground guide must walk completely around the vehicle and inspect under the vehicle and its path to ensure that no person or object may be harmed by the vehicle's movement. 5. Hand signals are the basic method used for ground guiding. Voice signals between a ground guide and driver can be misunderstood. 6. The following are ground guide basic rules:
a. Give signals to only one person. Be sure that everyone involved in a move (the driver and ground guide[s]) understands who will give the signal, who will relay the signal, and who will receive it. Be sure everyone involved clearly understands all signals, especially the signal to stop!
b. Remain out of the vehicle's path of travel. c. If you must be in the path of travel, maintain a distance of at least 10 yards. d. If your are guiding a vehicle into a close position and cannot maintain a 10-yard
forward distance--
(1) Keep to the side and front (or rear) of the vehicle. (2) Get on top of the object you are approaching, such as another vehicle or dock. (3) Stay in the driver's line of sight.
e. When guiding a vehicle long distances, your best position is forward and to the left of the vehicle.

TC 21-305-8
A-2
f. Never walk backwards to guide a vehicle. Instead, locate yourself 10 to 20 yards behind the vehicle and face the vehicle and ground guide located in front of the vehicle. Once the vehicle backs to your initial location then halt the vehicle, turn around and walk forward another 10 to 20 yards. Turn around, face the vehicle and front ground guide, and continue guiding the vehicle in this manner until the vehicle is in position.
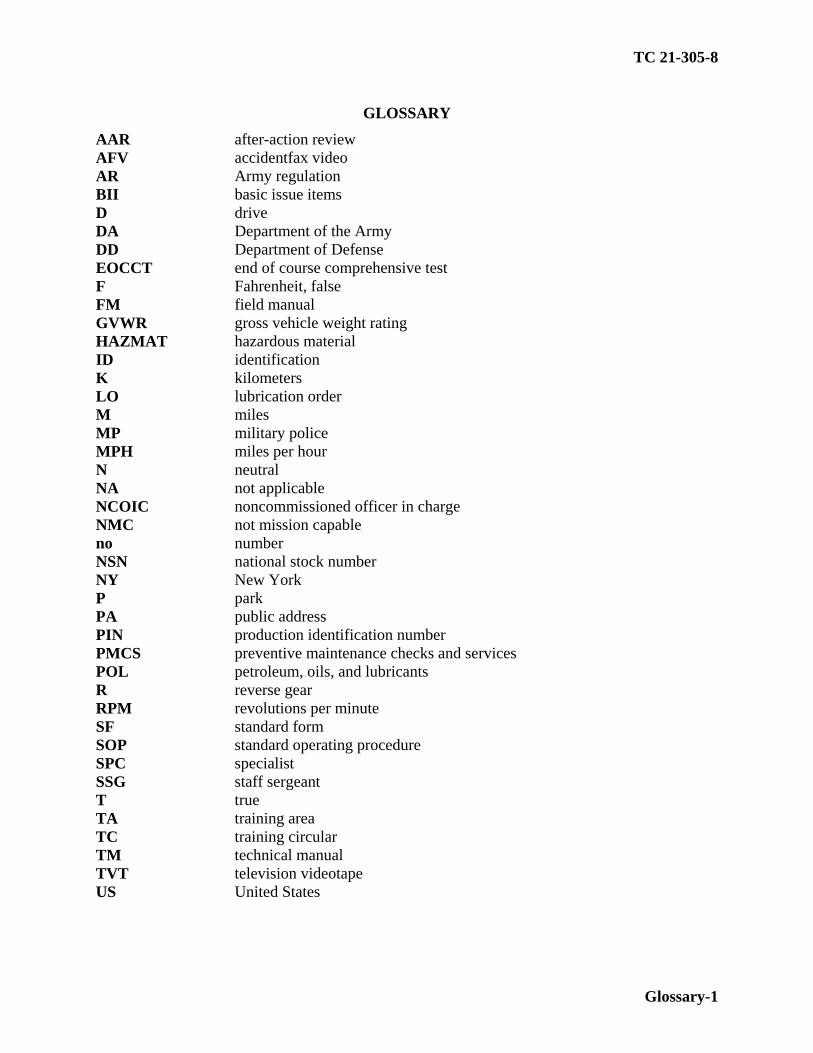
TC 21-305-8
Glossary-1
GLOSSARY
AAR after-action review AFV accidentfax video AR Army regulation BII basic issue items D drive DA Department of the Army DD Department of Defense EOCCT end of course comprehensive test F Fahrenheit, false FM field manual GVWR gross vehicle weight rating HAZMAT hazardous material ID identification K kilometers LO lubrication order M miles MP military police MPH miles per hour N neutral NA not applicable NCOIC noncommissioned officer in charge NMC not mission capable no number NSN national stock number NY New York P park PA public address PIN production identification number PMCS preventive maintenance checks and services POL petroleum, oils, and lubricants R reverse gear RPM revolutions per minute SF standard form SOP standard operating procedure SPC specialist SSG staff sergeant T true TA training area TC training circular TM technical manual TVT television videotape US United States
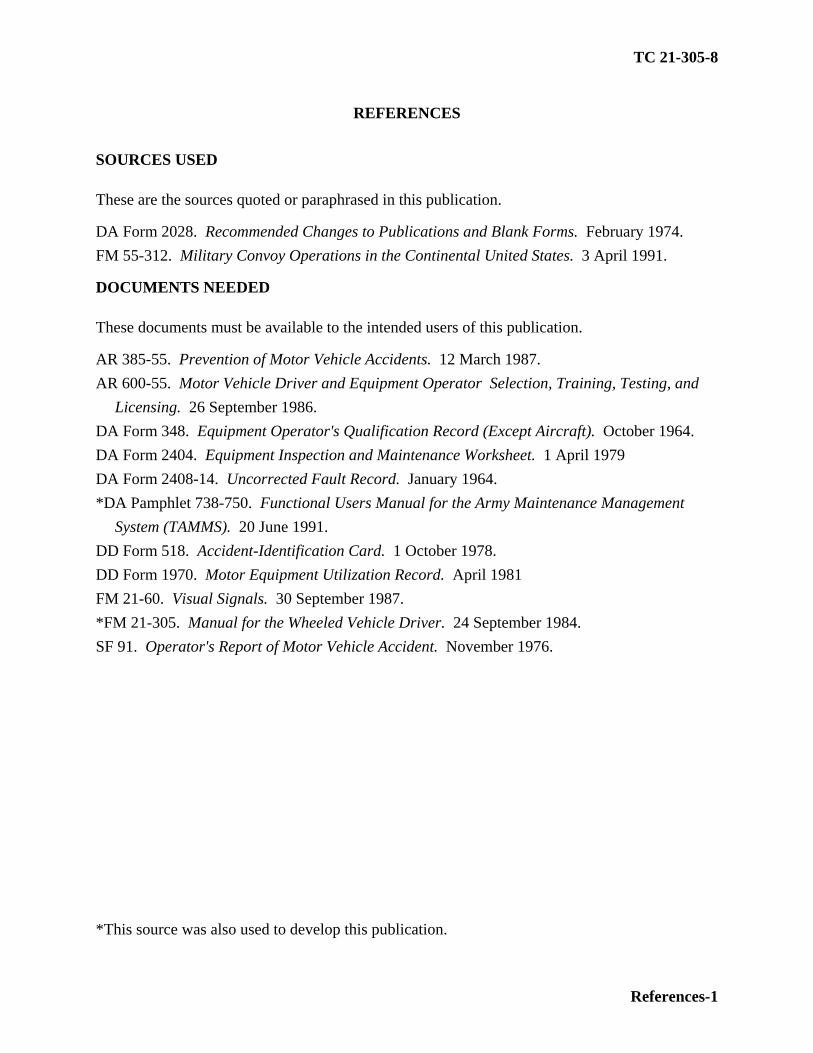
TC 21-305-8
References-1
REFERENCES
SOURCES USED
These are the sources quoted or paraphrased in this publication.
DA Form 2028. Recommended Changes to Publications and Blank Forms. February 1974. FM 55-312. Military Convoy Operations in the Continental United States. 3 April 1991.
DOCUMENTS NEEDED
These documents must be available to the intended users of this publication.
AR 385-55. Prevention of Motor Vehicle Accidents. 12 March 1987. AR 600-55. Motor Vehicle Driver and Equipment Operator Selection, Training, Testing, and
Licensing. 26 September 1986. DA Form 348. Equipment Operator's Qualification Record (Except Aircraft). October 1964. DA Form 2404. Equipment Inspection and Maintenance Worksheet. 1 April 1979 DA Form 2408-14. Uncorrected Fault Record. January 1964. *DA Pamphlet 738-750. Functional Users Manual for the Army Maintenance Management
System (TAMMS). 20 June 1991. DD Form 518. Accident-Identification Card. 1 October 1978. DD Form 1970. Motor Equipment Utilization Record. April 1981 FM 21-60. Visual Signals. 30 September 1987. *FM 21-305. Manual for the Wheeled Vehicle Driver. 24 September 1984. SF 91. Operator's Report of Motor Vehicle Accident. November 1976.
*This source was also used to develop this publication.

PIN: 070313-000