top 10 angular js recommendations
TRANSCRIPT

2012 – © - All Rights Reserved
A Training Division Presentation
Top 10 AngularJS Recommendations
By Rich Franzmeier

AngularJS is a popular framework for building web applications. When I created my first AngularJS site, I got advice from a colleague at work who had experience on how to set everything up. That helped me tremendously because I didn’t have to guess at best practices. In this article, I’d like to pay it forward with 10 AngularJS recommendations you should consider early on in the project. Of course, not all will apply to your project so pick and choose the ones that interest you.

It is important to properly organize your AngularJS code early so that you don’t have to reorganize it later. If you search the web, you’ll find that there are many ideas on how to organize an AngularJS project. The Angular Seed Project is a good place to start looking at this.
1. Determine How to Organize the Code
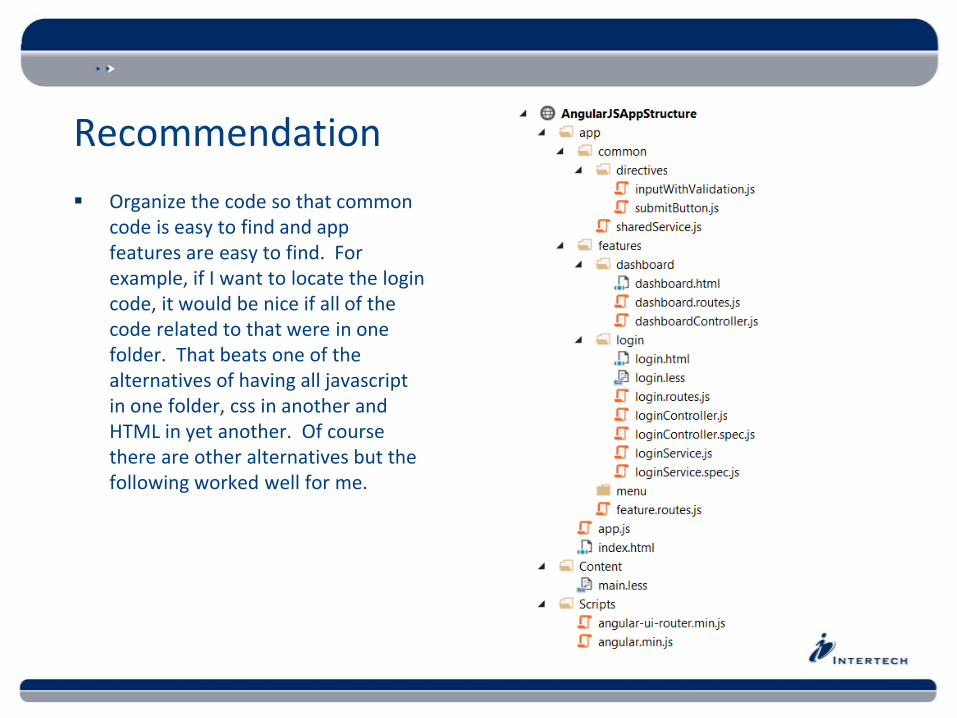
Organize the code so that common code is easy to find and app features are easy to find. For example, if I want to locate the login code, it would be nice if all of the code related to that were in one folder. That beats one of the alternatives of having all javascriptin one folder, css in another and HTML in yet another. Of course there are other alternatives but the following worked well for me.
Recommendation

Put all your AngularJS code under the ‘app’ folder
Put anything you share under the app/common folder (further organize into sub-folders if necessary – see ‘directives’ folder)
I chose ‘common’ instead of ‘components’ because ‘common’ I think is easier to understand (components is the recommendation of the seed project, see link below)
I put all directives under one folder so they are easy to find by other developers – of course the test spec should live in this folder as well
Put app ‘features’ under the ‘features’ folder. An example of a feature is an Auto search. As part of that, you may have an Auto details page, controllers for both, services for one or both, less/css for the pages, Jasmine spec files for both, etc.
See recommendation 4 for explanation of the *.routes.js files
Put app.js (the module definition for the app) and the index.html page under the ‘app’ folder
Put site-wide less/css in the Content folder. This may include your own and third party less/css.
I could be persuaded to move main.less (your site-wide styles) above to the app folder as the seed project does.
Put third party javascript in the Scripts folder
Notes

Angular Seed Project on GitHub
Code Organization in Large AngularJS and JavaScript Applications
AngularJS Best Practices: Directory Structure
For Further Study

This one is for Visual Studio (VS) users only.
Recommendation
If you’d like a way for your developers to use a consistent pattern for directives, factories, services, controllers and Jasmine spec files, then please install the SideWaffle VS extension. It is largely based on John Papa’s AngularJS style guide.
Install from here: http://sidewaffle.com/
After installation, restart VS and you will have new “Add > Add New Item…” options available when you right-click on a folder/website in Solution Explorer. It should look like this:
2. Install the Sidewaffle Extension

Notes
I always create a controller with $scope
Make sure the Name is good as it will use it in the creation of the code (e.g. loginController)
The routing mechanism that comes out of the box with AngularJS (ngRoute) is less than ideal. Many say that beyond a simple AngularJS website, ngRoute becomes unusable. Thankfully, some developers built AngularUI Router.
This is what you get with AngularUI Router:
Based on state instead of URL
Nested hierarchy instead of flat (cars, cars.view, cars.view.edit, etc.)
Names for routes instead of URLs (makes it easy to change URLs)
Multiple views instead of single (the state can contain multiple views)
State populates ‘parts’ instead of directives (html page ‘parts’ loaded via state)
…and much more
3. Use Angular UI Router

Use AngularUI Router over ngRoute.
Get the code here: https://github.com/angular-ui/ui-router
For Further Study
API Reference
WIKI – More in depth documentation
Stack Overflow on the differences
Recommendation

Now that you are using AngularUI Router, it is helpful to create a route in a separate JavaScript file so that it can be bundled with its other feature assets. Typically, config work is done in the app.js file along with the creation of the ‘app’ module. But where possible, it is best to separate this.
4. Create Routes in Separate JS Files

Create one route file for each feature as a unique module so that the routes can be defined in the config method of the module.
So how is it done? We’ll take a look at an example: the dashboard feature (see the above recommendation 1).
This is the code that is in the dashboard.routes.js file:
Recommendation

Create a new module (‘dashboard.routes’) so that we can call .config on it
Add all of the routes for the feature
Since we created a new module, it will have to be added to the ‘app’ module as a dependency. However, since it is not ideal to add route after route to the app module, I recommend creating a feature.routes.js file that contains the route modules for all of the features. Something like this:
Now, all that needs to be added to the app module dependency list is ‘feature.routes’. Simply add new routes to the feature.routes modules dependency list. Store the feature.routes.js file under the features directory.
For Further Study FAQ Answer for Separating Routes
Notes

If you come from a jQuery background (and what web developer doesn’t?), you will be tempted to manipulate the DOM using jQuery in a controller or service. This is never a good idea in AngularJS.
5. Use Directives to Manipulate the DOM
Do all DOM manipulation in AngularJS directives. That is their purpose. There are plenty of sources for help on creating directives so see the “For Further Study” section below for help with that.
For Further Study
Best Practice – Dom Manipulations
AngularJS Docs on Directives
Dan Wahlin Series on Creating Directives
Understanding Compile and Link
Recommendation

It is tempting to do too much work in the AngularJS controller. After all, the controller is where the view first has access to JavaScript via $scope functions. However, doing this will cause you to miss out on code sharing across the site and is not recommended by AngularJSdocumentation.
According to the AngularJS docs, controllers should do the following:
Set up the initial state of the $scope object
Add behavior to the $scope object
6. Use Angular Service for Shared Code

Put all $http calls and share-able code in an AngularJS service so that it can be used across the site. Let AngularJS inject the service in the controller to get access to the shared code.
Even if you put a service in your feature directory, it can be used across the site. You may move a service to the ‘common’ or ‘component’ directory if it’s used more than a few times.
For Further Study
AngularJS Controller Documentation
AngularJS Service Documentation
Recommendation

It can be very helpful in your code to know when the first $http call is made and when all $http calls (ajax calls) have completed. For example, you want to turn on a progress bar when the first $http call starts and turn it off when all $http calls complete.
Recommendation
This can be done quite easily by adding an interceptor to the httpProvider.
7. Broadcast When $HTTP Calls Start or Finish

To listen for the broadcast, add the following to $rootScope:
Thanks to karaxuna on this Stack Overflow post (I mercilessly stole your code!)

The last three recommendations will focus on simplifying life for the AngularJS developer and will require a tool like gulp or grunt. Since I’ve used gulp, that’s what I will use in these examples.
When I was developing my first AngularJS application, it quickly became apparent to me that I was going to continually forget to add references to my new JavaScript files to the index.html page. Also, since I was unit testing with a Jasmine Spec Runner page, I had the joy of forgetting to add references to the file(s) on that page as well. There has to be a better way!
8. Combine JavaScript Files

Combine all of your JavaScript files (sans *.spec.js files) into one so that it is referenced on the index.html and SpecRunner.html pages. Jeff Dickey wrote an excellent article on how to do this so I will defer the implementation to him. He also explains the alternatives, which are not pretty.
Also, since *.spec.js files are in multiple features in the application, it also becomes a pain to keep adding references to them to the SpecRunner.html page. Therefore, combine all of your Jasmine spec files into one js file so that only it is referenced on the SpecRunner.html page. The name of the combined output file should end with “-specs.js”.
Recommendation
In my experience:
The path (for the gulp task) to get app js files without *.spec.js files is this:‘./app/**/!(*.spec)*.js’
The path (for the gulp task) to get *.spec.js files is this:‘./app/**/*.spec.js’
I didn’t uglify the code until I released it for ease in debugging
The gulp watcher that Jeff creates doesn’t recognize when you add or delete a file so you should restart it so it picks up the new/deleted file and recreates the single file
I added gulp-plumber to the gulp task so that if an error occurred while combining the files, it would report it but not stop the watcher
Since the combined js file is generated, don’t check it into source control

AngularJS provides a $templateCache service so that you can store your HTML by key in JavaScript. This has the following benefits to your application:
HTML pages are cached
HTML pages are accessed by its key, not relative URL
Directives don’t need their HTML inline to make unit testing work
If you reference an HTML template in a directive, it takes a lot of monkeying around to get it to work in a unit test since it can’t download the HTML out of the box
Using the template cache bypasses this problem since the HTML is in JavaScript
9. Put HTML Into Template Cache

Combine all of your HTML pages into a single JavaScript file using gulp.
It should output something that looks like this:
Recommendation

In my experience:
Do this for development as well as release and set it up in a watch just like with the JavaScript above
Don’t check this file into source control since it is generated
Include the templateModule as a dependency for your ‘app’ module
angular.module(‘app’, [‘templateModule’]);
Include a reference to the file that templateModule lives in to index.html
<script src=”../temp/templates.js”></script>
For Further Study
Egghead video tutorial

According to lesscss.org, this is how Less is defined:
Less is a CSS pre-processor, meaning that it extends the CSS language, adding features that allow variables, mixins, functions and many other techniques that allow you to make CSS that is more maintainable, themable and extendable.
In my experience, I have found that it is nice to use Less for defining responsive Bootstrap tables for organizing a pages content.
Recommendation
Use Less to define your sites style and compile it into a CSS file. Remember, you may have multiple Less files since they are created for each feature.
It’s nice to have the Bootstrap 3 Less files so that you can reference them in your own Less files. If you are using Bootstrap 3 and Visual Studio, you can use NuGet to get the bootstrap Less files by issuing this command in the package manager console:
Install-Package Twitter.Bootstrap.Less
10. Use Less and Compile It Into CSS

So what did I mean earlier by “defining responsive Bootstrap tables”? Consider this example page:
Notes:
This is saying that we want 2 columns for a small screen size and 3 for a medium screen size
Formatting of a page should be confined to the stylesheet when possible
If I want to change anything here, I have to do it potentially on 4 divs
It is much better to define this in a Less file using a media query:
Notes:
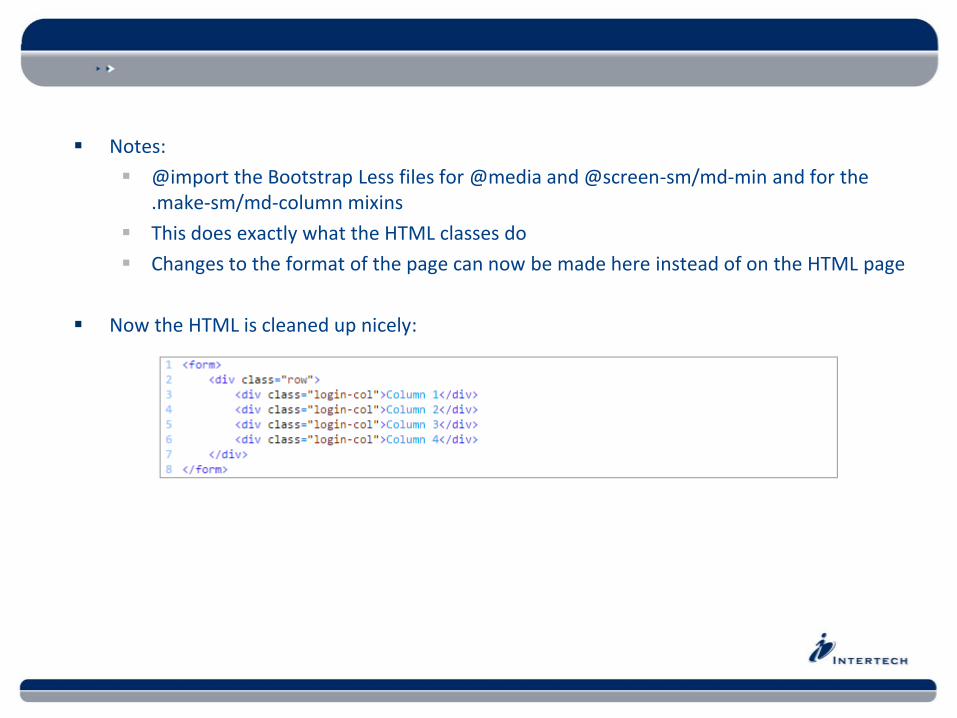
@import the Bootstrap Less files for @media and @screen-sm/md-min and for the .make-sm/md-column mixins
This does exactly what the HTML classes do
Changes to the format of the page can now be made here instead of on the HTML page
Now the HTML is cleaned up nicely:

I still haven’t explained how to compile the Less into CSS. As in the previous 3 recommendations, we will use gulp to accomplish this.
This is the gulp task I use:
Combining Less and Compiling Into CSS

Notes:
event-stream (es) – do two or more actions in one task by using the concat function
gulp-plumber (plumber) – handles errors…otherwise the watcher fails and you have to start again
gulp-less (less) – compiles the Less into CSS
gulp-cssjoin (cssjoin) – handles @import statements by including the code in your output
gulp-css-rebase-urls (rebaseUrls) – Rebase relative image URLs
gulp-concat (concat) – concatenate all css files as a result of compiling them all in features
Make sure to add this to your gulp watcher so that the less task is called when any of them change

Starting an AngularJS project can be daunting, but with the 10 AngularJS recommendations in this article, hopefully you will have a nice head start. Of course some of the recommendations may not apply to your project so think of it as a buffet and take what you want.
Interested in learning more? Intertech’s AngularJS Consulting practice works with customers on using AngularJS and implementing best practices. Our AngularJS Training offers students the chance to learn the framework from the ground up.
Conclusion