tibco® fulfillment catalog user's guidetibco® fulfillment catalog user's guide software...
TRANSCRIPT

TIBCO® Fulfillment CatalogUser's GuideSoftware Release 3.1March 2017
Two-Second Advantage®

Important Information
SOME TIBCO SOFTWARE EMBEDS OR BUNDLES OTHER TIBCO SOFTWARE. USE OF SUCHEMBEDDED OR BUNDLED TIBCO SOFTWARE IS SOLELY TO ENABLE THE FUNCTIONALITY (ORPROVIDE LIMITED ADD-ON FUNCTIONALITY) OF THE LICENSED TIBCO SOFTWARE. THEEMBEDDED OR BUNDLED SOFTWARE IS NOT LICENSED TO BE USED OR ACCESSED BY ANYOTHER TIBCO SOFTWARE OR FOR ANY OTHER PURPOSE.
USE OF TIBCO SOFTWARE AND THIS DOCUMENT IS SUBJECT TO THE TERMS ANDCONDITIONS OF A LICENSE AGREEMENT FOUND IN EITHER A SEPARATELY EXECUTEDSOFTWARE LICENSE AGREEMENT, OR, IF THERE IS NO SUCH SEPARATE AGREEMENT, THECLICKWRAP END USER LICENSE AGREEMENT WHICH IS DISPLAYED DURING DOWNLOADOR INSTALLATION OF THE SOFTWARE (AND WHICH IS DUPLICATED IN THE LICENSE FILE)OR IF THERE IS NO SUCH SOFTWARE LICENSE AGREEMENT OR CLICKWRAP END USERLICENSE AGREEMENT, THE LICENSE(S) LOCATED IN THE “LICENSE” FILE(S) OF THESOFTWARE. USE OF THIS DOCUMENT IS SUBJECT TO THOSE TERMS AND CONDITIONS, ANDYOUR USE HEREOF SHALL CONSTITUTE ACCEPTANCE OF AND AN AGREEMENT TO BEBOUND BY THE SAME.
This document contains confidential information that is subject to U.S. and international copyright lawsand treaties. No part of this document may be reproduced in any form without the writtenauthorization of TIBCO Software Inc.
TIBCO, Two-Second Advantage, TIBCO ActiveMatrix BusinessWorks, TIBCO Runtime Agent, TIBCOAdministrator, TIBCO Enterprise Message Service, and TIBCO BusinessEvents are either registeredtrademarks or trademarks of TIBCO Software Inc. in the United States and/or other countries.
Enterprise Java Beans (EJB), Java Platform Enterprise Edition (Java EE), Java 2 Platform EnterpriseEdition (J2EE), and all Java-based trademarks and logos are trademarks or registered trademarks ofOracle Corporation in the U.S. and other countries.
All other product and company names and marks mentioned in this document are the property of theirrespective owners and are mentioned for identification purposes only.
THIS SOFTWARE MAY BE AVAILABLE ON MULTIPLE OPERATING SYSTEMS. HOWEVER, NOTALL OPERATING SYSTEM PLATFORMS FOR A SPECIFIC SOFTWARE VERSION ARE RELEASEDAT THE SAME TIME. SEE THE README FILE FOR THE AVAILABILITY OF THIS SOFTWAREVERSION ON A SPECIFIC OPERATING SYSTEM PLATFORM.
THIS DOCUMENT IS PROVIDED “AS IS” WITHOUT WARRANTY OF ANY KIND, EITHER EXPRESSOR IMPLIED, INCLUDING, BUT NOT LIMITED TO, THE IMPLIED WARRANTIES OFMERCHANTABILITY, FITNESS FOR A PARTICULAR PURPOSE, OR NON-INFRINGEMENT.
THIS DOCUMENT COULD INCLUDE TECHNICAL INACCURACIES OR TYPOGRAPHICALERRORS. CHANGES ARE PERIODICALLY ADDED TO THE INFORMATION HEREIN; THESECHANGES WILL BE INCORPORATED IN NEW EDITIONS OF THIS DOCUMENT. TIBCOSOFTWARE INC. MAY MAKE IMPROVEMENTS AND/OR CHANGES IN THE PRODUCT(S)AND/OR THE PROGRAM(S) DESCRIBED IN THIS DOCUMENT AT ANY TIME.
THE CONTENTS OF THIS DOCUMENT MAY BE MODIFIED AND/OR QUALIFIED, DIRECTLY ORINDIRECTLY, BY OTHER DOCUMENTATION WHICH ACCOMPANIES THIS SOFTWARE,INCLUDING BUT NOT LIMITED TO ANY RELEASE NOTES AND "READ ME" FILES.
Copyright © 2010-2017 TIBCO Software Inc. All rights reserved.
TIBCO Software Inc. Confidential Information
2
TIBCO® Fulfillment Catalog User's Guide

Contents
Figures . . . . . . . . . . . . . . . . . . . . . . . . . . . . . . . . . . . . . . . . . . . . . . . . . . . . . . . . . . . . . . . . . . . . . . . . . . . . . . . . . . . . . . . . . . . . 7
TIBCO Documentation and Support Services . . . . . . . . . . . . . . . . . . . . . . . . . . . . . . . . . . . . . . . . . . . . . . . . . . . . . . . 10
TIBCO Fulfillment Catalog Overview . . . . . . . . . . . . . . . . . . . . . . . . . . . . . . . . . . . . . . . . . . . . . . . . . . . . . . . . . . . . . . . .11
PRODUCT Association with PLANFRAGMENT . . . . . . . . . . . . . . . . . . . . . . . . . . . . . . . . . . . . . . . . . . . . . . . . . . . . . . . . . . . . . . . . . . . . . . . 11
Modeling the MILESTONE and PLANFRAGMENT in Fulfillment Catalog . . . . . . . . . . . . . . . . . . . . . . . . . . . . . . . . . . . . . . . . . . . . . . .11
Modeling the PLANFRAGMENT and PRODUCT in Fulfillment Catalog . . . . . . . . . . . . . . . . . . . . . . . . . . . . . . . . . . . . . . . . . . . . . . . . 12
ProductHasCustomPlanfragment Relationship . . . . . . . . . . . . . . . . . . . . . . . . . . . . . . . . . . . . . . . . . . . . . . . . . . . . . . . . . . . . . . . . . . . . . . . . 13
Hierarchy Management . . . . . . . . . . . . . . . . . . . . . . . . . . . . . . . . . . . . . . . . . . . . . . . . . . . . . . . . . . . . . . . . . . . . . . . . . . . . . . . . . . . . . . . . . . . . . . . 13
Changes in Hierarchy Management . . . . . . . . . . . . . . . . . . . . . . . . . . . . . . . . . . . . . . . . . . . . . . . . . . . . . . . . . . . . . . . . . . . . . . . . . . . . . . 13
Structure of Classification Tree Panel . . . . . . . . . . . . . . . . . . . . . . . . . . . . . . . . . . . . . . . . . . . . . . . . . . . . . . . . . . . . . . . . . . . . . . . . . . . . .14
Creating a New Record . . . . . . . . . . . . . . . . . . . . . . . . . . . . . . . . . . . . . . . . . . . . . . . . . . . . . . . . . . . . . . . . . . . . . . . . . . . . . . . . . . . . . . . . . . 16
Canvas Toolbar . . . . . . . . . . . . . . . . . . . . . . . . . . . . . . . . . . . . . . . . . . . . . . . . . . . . . . . . . . . . . . . . . . . . . . . . . . . . . . . . . . . . . . . . . . . . . . . . . . 17
Canvas Panel . . . . . . . . . . . . . . . . . . . . . . . . . . . . . . . . . . . . . . . . . . . . . . . . . . . . . . . . . . . . . . . . . . . . . . . . . . . . . . . . . . . . . . . . . . . . . . . . . . . .17
Dynamic Context Menu . . . . . . . . . . . . . . . . . . . . . . . . . . . . . . . . . . . . . . . . . . . . . . . . . . . . . . . . . . . . . . . . . . . . . . . . . . . . . . . . . . . . . . . . . . 18
Properties Panel . . . . . . . . . . . . . . . . . . . . . . . . . . . . . . . . . . . . . . . . . . . . . . . . . . . . . . . . . . . . . . . . . . . . . . . . . . . . . . . . . . . . . . . . . . . . . . . . . 19
Publish Catalog . . . . . . . . . . . . . . . . . . . . . . . . . . . . . . . . . . . . . . . . . . . . . . . . . . . . . . . . . . . . . . . . . . . . . . . . . . . . . . . . . . . . . . . . . . . . . . . . . . . . . . 21
Workflow Definition . . . . . . . . . . . . . . . . . . . . . . . . . . . . . . . . . . . . . . . . . . . . . . . . . . . . . . . . . . . . . . . . . . . . . . . . . . . . . . . . . . . . . . . . . . . . . . 21
Publish Catalog Showing CatalogUse Options and Behavior . . . . . . . . . . . . . . . . . . . . . . . . . . . . . . . . . . . . . . . . . . . . . . . . . . . . . . 30
Accessing and Performing Full Data Publish . . . . . . . . . . . . . . . . . . . . . . . . . . . . . . . . . . . . . . . . . . . . . . . . . . . . . . . . . . . . . . . . . . . . . . 32
Delta Publish Overview . . . . . . . . . . . . . . . . . . . . . . . . . . . . . . . . . . . . . . . . . . . . . . . . . . . . . . . . . . . . . . . . . . . . . . . . . . . . . . . . . . . . . . . . . . 34
Accessing and Performing Delta Publish . . . . . . . . . . . . . . . . . . . . . . . . . . . . . . . . . . . . . . . . . . . . . . . . . . . . . . . . . . . . . . . . . . . . . 35
Relationship Record Filter for Delta Publish . . . . . . . . . . . . . . . . . . . . . . . . . . . . . . . . . . . . . . . . . . . . . . . . . . . . . . . . . . . . . . . . . . 38
Customization of Publish Catalog Workflow . . . . . . . . . . . . . . . . . . . . . . . . . . . . . . . . . . . . . . . . . . . . . . . . . . . . . . . . . . . . . . . . . . . . . . .38
Publishing Catalog to XML Files . . . . . . . . . . . . . . . . . . . . . . . . . . . . . . . . . . . . . . . . . . . . . . . . . . . . . . . . . . . . . . . . . . . . . . . . . . . . . 38
Publishing Catalog to a JMS Channel . . . . . . . . . . . . . . . . . . . . . . . . . . . . . . . . . . . . . . . . . . . . . . . . . . . . . . . . . . . . . . . . . . . . . . . . 39
Publishing Catalog to JMS and XML Channel . . . . . . . . . . . . . . . . . . . . . . . . . . . . . . . . . . . . . . . . . . . . . . . . . . . . . . . . . . . . . . . . 39
Publishing Catalog at a Fixed Location . . . . . . . . . . . . . . . . . . . . . . . . . . . . . . . . . . . . . . . . . . . . . . . . . . . . . . . . . . . . . . . . . . . . . . . 39
Verifying Input Parameters . . . . . . . . . . . . . . . . . . . . . . . . . . . . . . . . . . . . . . . . . . . . . . . . . . . . . . . . . . . . . . . . . . . . . . . . . . . . . . . . . . . . . . . 40
Product Model Extension . . . . . . . . . . . . . . . . . . . . . . . . . . . . . . . . . . . . . . . . . . . . . . . . . . . . . . . . . . . . . . . . . . . . . . . . . . . . . . . . . . . . . . . . . . . . . 40
Product Model Extension For Additional Attribute . . . . . . . . . . . . . . . . . . . . . . . . . . . . . . . . . . . . . . . . . . . . . . . . . . . . . . . . . . . . . . . . . 40
Performing Product Model Extension . . . . . . . . . . . . . . . . . . . . . . . . . . . . . . . . . . . . . . . . . . . . . . . . . . . . . . . . . . . . . . . . . . . . . . . . .40
Publish Data of Product Model with Hierarchy More Than One Level . . . . . . . . . . . . . . . . . . . . . . . . . . . . . . . . . . . . . . . . . . . . . . 41
Customizing the Product Model Map to Publish the Data with Hierarchy More Than One Level . . . . . . . . . . . . . . . . 42
Adding New Repository and Creating Relationship . . . . . . . . . . . . . . . . . . . . . . . . . . . . . . . . . . . . . . . . . . . . . . . . . . . . . . . . . . . . . . . .42
Modification of Rule Base . . . . . . . . . . . . . . . . . . . . . . . . . . . . . . . . . . . . . . . . . . . . . . . . . . . . . . . . . . . . . . . . . . . . . . . . . . . . . . . . . . . . . . . . 43
Removing Mandatory Plan Fragment Attributes . . . . . . . . . . . . . . . . . . . . . . . . . . . . . . . . . . . . . . . . . . . . . . . . . . . . . . . . . . . . . . 44
3
TIBCO® Fulfillment Catalog User's Guide

Removing Non-mandatory Plan Fragment Attributes . . . . . . . . . . . . . . . . . . . . . . . . . . . . . . . . . . . . . . . . . . . . . . . . . . . . . . . . . 44
Disabling Mandatory Plan Fragment Rules . . . . . . . . . . . . . . . . . . . . . . . . . . . . . . . . . . . . . . . . . . . . . . . . . . . . . . . . . . . . . . . . . . . 45
Data Modeling . . . . . . . . . . . . . . . . . . . . . . . . . . . . . . . . . . . . . . . . . . . . . . . . . . . . . . . . . . . . . . . . . . . . . . . . . . . . . . . . . . . . . . . . . . . . . . . . . . . . . . . .46
Action-based Modeling . . . . . . . . . . . . . . . . . . . . . . . . . . . . . . . . . . . . . . . . . . . . . . . . . . . . . . . . . . . . . . . . . . . . . . . . . . . . . . . . . . . . . . . . . . .46
Modeling Action-based Data . . . . . . . . . . . . . . . . . . . . . . . . . . . . . . . . . . . . . . . . . . . . . . . . . . . . . . . . . . . . . . . . . . . . . . . . . . . . . . . . . 46
Conditional Affinity . . . . . . . . . . . . . . . . . . . . . . . . . . . . . . . . . . . . . . . . . . . . . . . . . . . . . . . . . . . . . . . . . . . . . . . . . . . . . . . . . . . . . . . . . . . . . . . 47
ProductDependsOn and ProductRequiredFor Relationships . . . . . . . . . . . . . . . . . . . . . . . . . . . . . . . . . . . . . . . . . . . . . . . . . . . . . . .50
Source and Target Attribute Values . . . . . . . . . . . . . . . . . . . . . . . . . . . . . . . . . . . . . . . . . . . . . . . . . . . . . . . . . . . . . . . . . . . . . . . . . . 51
Product Specification Field Decomposition . . . . . . . . . . . . . . . . . . . . . . . . . . . . . . . . . . . . . . . . . . . . . . . . . . . . . . . . . . . . . . . . . . . . . . . 53
Custom Action based Product Decomposition and Characteristic Inclusion . . . . . . . . . . . . . . . . . . . . . . . . . . . . . . . . . . . .53
Scenario for the Custom Action Based Product Decomposition . . . . . . . . . . . . . . . . . . . . . . . . . . . . . . . . . . . . . . . . . . . . . . . 54
Group Record Modeling . . . . . . . . . . . . . . . . . . . . . . . . . . . . . . . . . . . . . . . . . . . . . . . . . . . . . . . . . . . . . . . . . . . . . . . . . . . . . . . . . . . . . . . . . .54
Record Status Attribute . . . . . . . . . . . . . . . . . . . . . . . . . . . . . . . . . . . . . . . . . . . . . . . . . . . . . . . . . . . . . . . . . . . . . . . . . . . . . . . . . . . . . . . . . . . . . . . 55
Workflow Changes . . . . . . . . . . . . . . . . . . . . . . . . . . . . . . . . . . . . . . . . . . . . . . . . . . . . . . . . . . . . . . . . . . . . . . . . . . . . . . . . . . . . . . . . . . . . . . .55
Customization on wfin26productaddapprovalv3.xml Workflow . . . . . . . . . . . . . . . . . . . . . . . . . . . . . . . . . . . . . . . . . . . . . . . . .55
Customization on wfin26producteditapprovalv3.xml Workflow . . . . . . . . . . . . . . . . . . . . . . . . . . . . . . . . . . . . . . . . . . . . . . . . .56
Uneditable Record Status . . . . . . . . . . . . . . . . . . . . . . . . . . . . . . . . . . . . . . . . . . . . . . . . . . . . . . . . . . . . . . . . . . . . . . . . . . . . . . . . . . . . . . . . 57
Assign ACTIVE to Confirmed Record . . . . . . . . . . . . . . . . . . . . . . . . . . . . . . . . . . . . . . . . . . . . . . . . . . . . . . . . . . . . . . . . . . . . . . . . . . . . .57
Assign INACTIVE to a Deleted Record . . . . . . . . . . . . . . . . . . . . . . . . . . . . . . . . . . . . . . . . . . . . . . . . . . . . . . . . . . . . . . . . . . . . . . . . . . . 58
Assign TESTING to a Creating Record or Unconfirmed Record . . . . . . . . . . . . . . . . . . . . . . . . . . . . . . . . . . . . . . . . . . . . . . . . . . . 58
Record Status Value Transitions in Normal Use Cases . . . . . . . . . . . . . . . . . . . . . . . . . . . . . . . . . . . . . . . . . . . . . . . . . . . . . . . . . . . . 59
Metadata Repositories Holding the Record Status Attribute . . . . . . . . . . . . . . . . . . . . . . . . . . . . . . . . . . . . . . . . . . . . . . . . . . . . . . . 59
Building Blocks . . . . . . . . . . . . . . . . . . . . . . . . . . . . . . . . . . . . . . . . . . . . . . . . . . . . . . . . . . . . . . . . . . . . . . . . . . . . . . . . . . . . . . . . . . . . . . . . . . . . . . . 60
Use Case for Building Blocks . . . . . . . . . . . . . . . . . . . . . . . . . . . . . . . . . . . . . . . . . . . . . . . . . . . . . . . . . . . . . . . . . . . . . . . . . . . . . . . . . . . . .60
Template-based Product Model . . . . . . . . . . . . . . . . . . . . . . . . . . . . . . . . . . . . . . . . . . . . . . . . . . . . . . . . . . . . . . . . . . . . . . . . . . . . . . . . . . . . . . . 61
Difference between Template and Non-template Record . . . . . . . . . . . . . . . . . . . . . . . . . . . . . . . . . . . . . . . . . . . . . . . . . . . . . . . . . . 61
Validation Rules for Template Record . . . . . . . . . . . . . . . . . . . . . . . . . . . . . . . . . . . . . . . . . . . . . . . . . . . . . . . . . . . . . . . . . . . . . . . . . . . . .61
Template Filter during Publish Catalog . . . . . . . . . . . . . . . . . . . . . . . . . . . . . . . . . . . . . . . . . . . . . . . . . . . . . . . . . . . . . . . . . . . . . . . . . . . .62
Use Cases for Template Instances . . . . . . . . . . . . . . . . . . . . . . . . . . . . . . . . . . . . . . . . . . . . . . . . . . . . . . . . . . . . . . . . . . . . . . . . . . . . . . . 62
Simple Template with No Relationships . . . . . . . . . . . . . . . . . . . . . . . . . . . . . . . . . . . . . . . . . . . . . . . . . . . . . . . . . . . . . . . . . . . . . . 63
Template with Relationships . . . . . . . . . . . . . . . . . . . . . . . . . . . . . . . . . . . . . . . . . . . . . . . . . . . . . . . . . . . . . . . . . . . . . . . . . . . . . . . . . 63
Update/Resolve Relationship Tag . . . . . . . . . . . . . . . . . . . . . . . . . . . . . . . . . . . . . . . . . . . . . . . . . . . . . . . . . . . . . . . . . . . . . . . . . . . . . . . . . . . . . 64
Administrator Options . . . . . . . . . . . . . . . . . . . . . . . . . . . . . . . . . . . . . . . . . . . . . . . . . . . . . . . . . . . . . . . . . . . . . . . . . . . . .67
Creating Users for Offer and Price Designer . . . . . . . . . . . . . . . . . . . . . . . . . . . . . . . . . . . . . . . . . . . . . . . . . . . . . . . . . . . . . . . . . . . . . . . . . . .67
User Role Matrix . . . . . . . . . . . . . . . . . . . . . . . . . . . . . . . . . . . . . . . . . . . . . . . . . . . . . . . . . . . . . . . . . . . . . . . . . . . . . . . . . . . . . . . . . . . . . . . . . . . . . 68
Import from TIBCO Provisioning . . . . . . . . . . . . . . . . . . . . . . . . . . . . . . . . . . . . . . . . . . . . . . . . . . . . . . . . . . . . . . . . . . . . . . . . . . . . . . . . . . . . . . 69
Configurations Before Starting the Fulfillment Provisioning Catalog Synchronization . . . . . . . . . . . . . . . . . . . . . . . . . . . . . . . 70
Integration Between Fulfillment Catalog and Fulfillment Provisioning . . . . . . . . . . . . . . . . . . . . . . . . . . . . . . . . . . . . . . . . . . 70
Synchronizing Fulfillment Provisioning Catalog . . . . . . . . . . . . . . . . . . . . . . . . . . . . . . . . . . . . . . . . . . . . . . . . . . . . . . . . . . . . . . . . . . . 71
4
TIBCO® Fulfillment Catalog User's Guide

Cases When Fulfillment Provisioning Synchronization Fails . . . . . . . . . . . . . . . . . . . . . . . . . . . . . . . . . . . . . . . . . . . . . . . . . . . . . . . 72
Data to Synchronize . . . . . . . . . . . . . . . . . . . . . . . . . . . . . . . . . . . . . . . . . . . . . . . . . . . . . . . . . . . . . . . . . . . . . . . . . . . . . . . . . . . . . . . . . . . . . 72
ACTION Repository Data . . . . . . . . . . . . . . . . . . . . . . . . . . . . . . . . . . . . . . . . . . . . . . . . . . . . . . . . . . . . . . . . . . . . . . . . . . . . . . . . . . . . 72
PRODUCT Repository Data . . . . . . . . . . . . . . . . . . . . . . . . . . . . . . . . . . . . . . . . . . . . . . . . . . . . . . . . . . . . . . . . . . . . . . . . . . . . . . . . . 72
Message Logs . . . . . . . . . . . . . . . . . . . . . . . . . . . . . . . . . . . . . . . . . . . . . . . . . . . . . . . . . . . . . . . . . . . . . . . . . . . . . . . . . . . . . . . . . . . . . . . . . . . 73
Export of Fulfillment Catalog Data . . . . . . . . . . . . . . . . . . . . . . . . . . . . . . . . . . . . . . . . . . . . . . . . . . . . . . . . . . . . . . . . . . . . . . . . . . . . . . . . . . . . 73
Export of Blank Template . . . . . . . . . . . . . . . . . . . . . . . . . . . . . . . . . . . . . . . . . . . . . . . . . . . . . . . . . . . . . . . . . . . . . . . . . . . . . . . . . . . . . . . . .73
Accessing User Interface to Export a Blank Template . . . . . . . . . . . . . . . . . . . . . . . . . . . . . . . . . . . . . . . . . . . . . . . . . . . . . . . . .73
Types of Export of Fulfillment Catalog Data . . . . . . . . . . . . . . . . . . . . . . . . . . . . . . . . . . . . . . . . . . . . . . . . . . . . . . . . . . . . . . . . . . . . . . . 74
Full Export of Fulfillment Catalog Data . . . . . . . . . . . . . . . . . . . . . . . . . . . . . . . . . . . . . . . . . . . . . . . . . . . . . . . . . . . . . . . . . . . . . . . 74
Accessing User Interface for Full Export of Fulfillment Catalog Data . . . . . . . . . . . . . . . . . . . . . . . . . . . . . . . . . . . . . . 74
Partial Export of Fulfillment Catalog Data . . . . . . . . . . . . . . . . . . . . . . . . . . . . . . . . . . . . . . . . . . . . . . . . . . . . . . . . . . . . . . . . . . . . 76
Accessing User Interface for Partial Export of Fulfillment Catalog Data . . . . . . . . . . . . . . . . . . . . . . . . . . . . . . . . . . . 76
Partial Export of Fulfillment Catalog Data - Use Case 1 . . . . . . . . . . . . . . . . . . . . . . . . . . . . . . . . . . . . . . . . . . . . . . . . . . 78
Partial Export of Fulfillment Catalog Data - Use Case 2 . . . . . . . . . . . . . . . . . . . . . . . . . . . . . . . . . . . . . . . . . . . . . . . . . . 79
Enterprise Delta Export of Fulfillment Catalog Data . . . . . . . . . . . . . . . . . . . . . . . . . . . . . . . . . . . . . . . . . . . . . . . . . . . . . . . . . . .80
Accessing User Interface to Perform Enterprise Delta Export . . . . . . . . . . . . . . . . . . . . . . . . . . . . . . . . . . . . . . . . . . . . .81
Customization Workflow for Export . . . . . . . . . . . . . . . . . . . . . . . . . . . . . . . . . . . . . . . . . . . . . . . . . . . . . . . . . . . . . . . . . . . . . . . . . . . . . . . 82
Customizing Workflow for a New Repository for Full Export and Partial Export . . . . . . . . . . . . . . . . . . . . . . . . . . . . . . . . 82
Customizing Workflow for a New Repository for Delta Export . . . . . . . . . . . . . . . . . . . . . . . . . . . . . . . . . . . . . . . . . . . . . . . . . 83
Customizing Workflow for a New Relationship . . . . . . . . . . . . . . . . . . . . . . . . . . . . . . . . . . . . . . . . . . . . . . . . . . . . . . . . . . . . . . . .84
Customizing Workflow for a New Attribute . . . . . . . . . . . . . . . . . . . . . . . . . . . . . . . . . . . . . . . . . . . . . . . . . . . . . . . . . . . . . . . . . . . .84
Import of Fulfillment Catalog . . . . . . . . . . . . . . . . . . . . . . . . . . . . . . . . . . . . . . . . . . . . . . . . . . . . . . . . . . . . . . . . . . . . . . . . . . . . . . . . . . . . . . . . . . 84
Types of Import of Fulfillment Catalog Data . . . . . . . . . . . . . . . . . . . . . . . . . . . . . . . . . . . . . . . . . . . . . . . . . . . . . . . . . . . . . . . . . . . . . . . 84
Full Import of Fulfillment Catalog Data . . . . . . . . . . . . . . . . . . . . . . . . . . . . . . . . . . . . . . . . . . . . . . . . . . . . . . . . . . . . . . . . . . . . . . . 84
Accessing the User Interface to Fully Import Fulfillment Catalog Data . . . . . . . . . . . . . . . . . . . . . . . . . . . . . . . . . . . . 85
Backward Compatibility . . . . . . . . . . . . . . . . . . . . . . . . . . . . . . . . . . . . . . . . . . . . . . . . . . . . . . . . . . . . . . . . . . . . . . . . . . . . . . . . . 86
Partial Import of Fulfillment Catalog Data . . . . . . . . . . . . . . . . . . . . . . . . . . . . . . . . . . . . . . . . . . . . . . . . . . . . . . . . . . . . . . . . . . . . .86
Accessing the User Interface to Partially Import Fulfillment Catalog Data . . . . . . . . . . . . . . . . . . . . . . . . . . . . . . . . . 86
Use Cases for Partial Import of Fulfillment Catalog Data . . . . . . . . . . . . . . . . . . . . . . . . . . . . . . . . . . . . . . . . . . . . . . . . . 87
Partial Import of Fulfillment Catalog Data - Use Case 1 . . . . . . . . . . . . . . . . . . . . . . . . . . . . . . . . . . . . . . . . . . . . . .88
Partial Import of Fulfillment Catalog Data - Use Case 2 . . . . . . . . . . . . . . . . . . . . . . . . . . . . . . . . . . . . . . . . . . . . . .89
Partial Import of Fulfillment Catalog Data - Use Case 3 . . . . . . . . . . . . . . . . . . . . . . . . . . . . . . . . . . . . . . . . . . . . . .89
Partial Import of Fulfillment Catalog Data - Use Case 4 . . . . . . . . . . . . . . . . . . . . . . . . . . . . . . . . . . . . . . . . . . . . . .90
Partial Import of Fulfillment Catalog Data - Use Case 5 . . . . . . . . . . . . . . . . . . . . . . . . . . . . . . . . . . . . . . . . . . . . . .91
Partial Import of Fulfillment Catalog Data - Use Case 6 . . . . . . . . . . . . . . . . . . . . . . . . . . . . . . . . . . . . . . . . . . . . . .92
Partial Import of Fulfillment Catalog Data - Use Case 7 . . . . . . . . . . . . . . . . . . . . . . . . . . . . . . . . . . . . . . . . . . . . . .93
Partial Import of Fulfillment Catalog Data - Use Case 8 . . . . . . . . . . . . . . . . . . . . . . . . . . . . . . . . . . . . . . . . . . . . . .94
Partial Import of Fulfillment Catalog Data - Use Case 9 . . . . . . . . . . . . . . . . . . . . . . . . . . . . . . . . . . . . . . . . . . . . . .95
5
TIBCO® Fulfillment Catalog User's Guide
Partial Import of Fulfillment Catalog Data - Use Case 10 . . . . . . . . . . . . . . . . . . . . . . . . . . . . . . . . . . . . . . . . . . . . .96
Customization Workflow for Import . . . . . . . . . . . . . . . . . . . . . . . . . . . . . . . . . . . . . . . . . . . . . . . . . . . . . . . . . . . . . . . . . . . . . . . . . . . . . . . 96
Customizing Workflow for a New Repository . . . . . . . . . . . . . . . . . . . . . . . . . . . . . . . . . . . . . . . . . . . . . . . . . . . . . . . . . . . . . . . . . 97
Customizing Workflow for a Newly Added Relationship . . . . . . . . . . . . . . . . . . . . . . . . . . . . . . . . . . . . . . . . . . . . . . . . . . . . . . . 98
Customizing Workflow for a Newly Added Attribute to Existing Repository . . . . . . . . . . . . . . . . . . . . . . . . . . . . . . . . . . . . .98
Customizing Workflow for Newly Added Relationship Attribute to Existing Relationship . . . . . . . . . . . . . . . . . . . . . . . . 99
Frequently Asked Questions . . . . . . . . . . . . . . . . . . . . . . . . . . . . . . . . . . . . . . . . . . . . . . . . . . . . . . . . . . . . . . . . . . . . . . 100
Question 1 . . . . . . . . . . . . . . . . . . . . . . . . . . . . . . . . . . . . . . . . . . . . . . . . . . . . . . . . . . . . . . . . . . . . . . . . . . . . . . . . . . . . . . . . . . . . . . . . . . . . . . . . . . 100
Question 2 . . . . . . . . . . . . . . . . . . . . . . . . . . . . . . . . . . . . . . . . . . . . . . . . . . . . . . . . . . . . . . . . . . . . . . . . . . . . . . . . . . . . . . . . . . . . . . . . . . . . . . . . . . 101
Question 3 . . . . . . . . . . . . . . . . . . . . . . . . . . . . . . . . . . . . . . . . . . . . . . . . . . . . . . . . . . . . . . . . . . . . . . . . . . . . . . . . . . . . . . . . . . . . . . . . . . . . . . . . . . 102
Samples . . . . . . . . . . . . . . . . . . . . . . . . . . . . . . . . . . . . . . . . . . . . . . . . . . . . . . . . . . . . . . . . . . . . . . . . . . . . . . . . . . . . . . . . .103
Conditional Affinity Sample . . . . . . . . . . . . . . . . . . . . . . . . . . . . . . . . . . . . . . . . . . . . . . . . . . . . . . . . . . . . . . . . . . . . . . . . . . . . . . . . . . . . . . . . . . 103
Sample Order XML . . . . . . . . . . . . . . . . . . . . . . . . . . . . . . . . . . . . . . . . . . . . . . . . . . . . . . . . . . . . . . . . . . . . . . . . . . . . . . . . . . . . . . . . . . . . . . . . . .104
Sample Plan Item XML . . . . . . . . . . . . . . . . . . . . . . . . . . . . . . . . . . . . . . . . . . . . . . . . . . . . . . . . . . . . . . . . . . . . . . . . . . . . . . . . . . . . . . . . . . . . . . 105
Sample XPATHs . . . . . . . . . . . . . . . . . . . . . . . . . . . . . . . . . . . . . . . . . . . . . . . . . . . . . . . . . . . . . . . . . . . . . . . . . . . . . . . . . . . . . . . . . . . . . . . . . . . . .106
6
TIBCO® Fulfillment Catalog User's Guide

Figures
Update/Resolve Relationship Tag Button . . . . . . . . . . . . . . . . . . . . . . . . . . . . . . . . . . . . . . . . . . . . . . . . . . . . . . . . . . . . . . . . . . . . . . . . . . . . . . 13
Hierarchy Management Menu Item . . . . . . . . . . . . . . . . . . . . . . . . . . . . . . . . . . . . . . . . . . . . . . . . . . . . . . . . . . . . . . . . . . . . . . . . . . . . . . . . . . . . 14
Hierarchy Management Repository Dropdown Menu . . . . . . . . . . . . . . . . . . . . . . . . . . . . . . . . . . . . . . . . . . . . . . . . . . . . . . . . . . . . . . . . . 15
Hierarchy Management Add New Record . . . . . . . . . . . . . . . . . . . . . . . . . . . . . . . . . . . . . . . . . . . . . . . . . . . . . . . . . . . . . . . . . . . . . . . . . . . . . 16
Hierarchy Management Record Attributes . . . . . . . . . . . . . . . . . . . . . . . . . . . . . . . . . . . . . . . . . . . . . . . . . . . . . . . . . . . . . . . . . . . . . . . . . . . . . 16
Hierarchy Management Root Record and Child Records . . . . . . . . . . . . . . . . . . . . . . . . . . . . . . . . . . . . . . . . . . . . . . . . . . . . . . . . . . . . . 17
Hierarchy Management Dynamic Popup Menu . . . . . . . . . . . . . . . . . . . . . . . . . . . . . . . . . . . . . . . . . . . . . . . . . . . . . . . . . . . . . . . . . . . . . . . .18
Hierarchy Load All Relationships Part 1 . . . . . . . . . . . . . . . . . . . . . . . . . . . . . . . . . . . . . . . . . . . . . . . . . . . . . . . . . . . . . . . . . . . . . . . . . . . . . . . 19
Hierarchy Load All Relationships Part 2 . . . . . . . . . . . . . . . . . . . . . . . . . . . . . . . . . . . . . . . . . . . . . . . . . . . . . . . . . . . . . . . . . . . . . . . . . . . . . . . 19
Properties Panel for the PRODUCT Repository . . . . . . . . . . . . . . . . . . . . . . . . . . . . . . . . . . . . . . . . . . . . . . . . . . . . . . . . . . . . . . . . . . . . . . . 20
Properties Panel with Details for the PRODUCT Repository . . . . . . . . . . . . . . . . . . . . . . . . . . . . . . . . . . . . . . . . . . . . . . . . . . . . . . . . . 20
Properties Panel with Details for Other Repositories . . . . . . . . . . . . . . . . . . . . . . . . . . . . . . . . . . . . . . . . . . . . . . . . . . . . . . . . . . . . . . . . . .21
Accessing Publish Catalog from the Fulfillment Catalog Interface . . . . . . . . . . . . . . . . . . . . . . . . . . . . . . . . . . . . . . . . . . . . . . . . . . . .32
Bulk Model Publishing . . . . . . . . . . . . . . . . . . . . . . . . . . . . . . . . . . . . . . . . . . . . . . . . . . . . . . . . . . . . . . . . . . . . . . . . . . . . . . . . . . . . . . . . . . . . . . . . . . 33
Event Log and Download Option of the Published Catalog . . . . . . . . . . . . . . . . . . . . . . . . . . . . . . . . . . . . . . . . . . . . . . . . . . . . . . . . . . . 34
Pictorial Representation of Delta Publish . . . . . . . . . . . . . . . . . . . . . . . . . . . . . . . . . . . . . . . . . . . . . . . . . . . . . . . . . . . . . . . . . . . . . . . . . . . . . . 35
Accessing Publish Catalog from the Fulfillment Catalog Interface . . . . . . . . . . . . . . . . . . . . . . . . . . . . . . . . . . . . . . . . . . . . . . . . . . . .35
Bulk Model Publish Options . . . . . . . . . . . . . . . . . . . . . . . . . . . . . . . . . . . . . . . . . . . . . . . . . . . . . . . . . . . . . . . . . . . . . . . . . . . . . . . . . . . . . . . . . . . . 36
Selecting the PRODUCT Repository for Delta Publish . . . . . . . . . . . . . . . . . . . . . . . . . . . . . . . . . . . . . . . . . . . . . . . . . . . . . . . . . . . . . . . .36
Results for the PRODUCT Repository of Delta Publish . . . . . . . . . . . . . . . . . . . . . . . . . . . . . . . . . . . . . . . . . . . . . . . . . . . . . . . . . . . . . . . 36
Delta Publishing the Results for the PRODUCT Repository . . . . . . . . . . . . . . . . . . . . . . . . . . . . . . . . . . . . . . . . . . . . . . . . . . . . . . . . . . 37
Confirmation Box for Delta Publish . . . . . . . . . . . . . . . . . . . . . . . . . . . . . . . . . . . . . . . . . . . . . . . . . . . . . . . . . . . . . . . . . . . . . . . . . . . . . . . . . . . . .37
Bulk Model Publish Status for Delta Publish . . . . . . . . . . . . . . . . . . . . . . . . . . . . . . . . . . . . . . . . . . . . . . . . . . . . . . . . . . . . . . . . . . . . . . . . . . . 37
Event Details for Delta Publish . . . . . . . . . . . . . . . . . . . . . . . . . . . . . . . . . . . . . . . . . . . . . . . . . . . . . . . . . . . . . . . . . . . . . . . . . . . . . . . . . . . . . . . . . 37
Downloading Delta Publish Output . . . . . . . . . . . . . . . . . . . . . . . . . . . . . . . . . . . . . . . . . . . . . . . . . . . . . . . . . . . . . . . . . . . . . . . . . . . . . . . . . . . . .38
Sample Product Model Attribute Properties 1 . . . . . . . . . . . . . . . . . . . . . . . . . . . . . . . . . . . . . . . . . . . . . . . . . . . . . . . . . . . . . . . . . . . . . . . . . 41
Sample Product Model Attribute Properties 2 . . . . . . . . . . . . . . . . . . . . . . . . . . . . . . . . . . . . . . . . . . . . . . . . . . . . . . . . . . . . . . . . . . . . . . . . . 43
SetRulebaseFilePath Activity for wfin26productaddapprovalv3.xml Workflow . . . . . . . . . . . . . . . . . . . . . . . . . . . . . . . . . . . . . . . 55
EvaluateRulebase Activity for wfin26productaddapprovalv3.xml Workflow . . . . . . . . . . . . . . . . . . . . . . . . . . . . . . . . . . . . . . . . . . 56
SetRulebaseFilePath Activity for wfin26producteditapprovalv3.xml Workflow . . . . . . . . . . . . . . . . . . . . . . . . . . . . . . . . . . . . . . . 56
EvaluateRulebase Activity for wfin26producteditapprovalv3.xml Workflow . . . . . . . . . . . . . . . . . . . . . . . . . . . . . . . . . . . . . . . . . . .56
Uneditable Record Status . . . . . . . . . . . . . . . . . . . . . . . . . . . . . . . . . . . . . . . . . . . . . . . . . . . . . . . . . . . . . . . . . . . . . . . . . . . . . . . . . . . . . . . . . . . . . . 57
Assign ACTIVE to Confirmed Record . . . . . . . . . . . . . . . . . . . . . . . . . . . . . . . . . . . . . . . . . . . . . . . . . . . . . . . . . . . . . . . . . . . . . . . . . . . . . . . . . .57
Assign INACTIVE to a Deleted Record . . . . . . . . . . . . . . . . . . . . . . . . . . . . . . . . . . . . . . . . . . . . . . . . . . . . . . . . . . . . . . . . . . . . . . . . . . . . . . . . 58
Assign TESTING to a Creating Record or Unconfirmed Record . . . . . . . . . . . . . . . . . . . . . . . . . . . . . . . . . . . . . . . . . . . . . . . . . . . . . 58
Record Status Value Transitions in Normal Use Cases . . . . . . . . . . . . . . . . . . . . . . . . . . . . . . . . . . . . . . . . . . . . . . . . . . . . . . . . . . . . . . . 59
Building Blocks Example using Templates . . . . . . . . . . . . . . . . . . . . . . . . . . . . . . . . . . . . . . . . . . . . . . . . . . . . . . . . . . . . . . . . . . . . . . . . . . . . .60
Template Instance for Building Blocks - Group 1 . . . . . . . . . . . . . . . . . . . . . . . . . . . . . . . . . . . . . . . . . . . . . . . . . . . . . . . . . . . . . . . . . . . . . . 60
7
TIBCO® Fulfillment Catalog User's Guide

Template Instance for Building Blocks - Group 2 . . . . . . . . . . . . . . . . . . . . . . . . . . . . . . . . . . . . . . . . . . . . . . . . . . . . . . . . . . . . . . . . . . . . . . 61
Simple Template with No Relationships . . . . . . . . . . . . . . . . . . . . . . . . . . . . . . . . . . . . . . . . . . . . . . . . . . . . . . . . . . . . . . . . . . . . . . . . . . . . . . . .63
Template with Relationships . . . . . . . . . . . . . . . . . . . . . . . . . . . . . . . . . . . . . . . . . . . . . . . . . . . . . . . . . . . . . . . . . . . . . . . . . . . . . . . . . . . . . . . . . . . . 63
Template with Relationship when Template is Instantiated . . . . . . . . . . . . . . . . . . . . . . . . . . . . . . . . . . . . . . . . . . . . . . . . . . . . . . . . . . . 63
Template with Relationship when Template is Instantiated Twice . . . . . . . . . . . . . . . . . . . . . . . . . . . . . . . . . . . . . . . . . . . . . . . . . . . . .64
Update/Resolve Relationship Tag Button . . . . . . . . . . . . . . . . . . . . . . . . . . . . . . . . . . . . . . . . . . . . . . . . . . . . . . . . . . . . . . . . . . . . . . . . . . . . . . 64
Update/Resolve Relationship Tag - Alert Popup . . . . . . . . . . . . . . . . . . . . . . . . . . . . . . . . . . . . . . . . . . . . . . . . . . . . . . . . . . . . . . . . . . . . . . .64
Update/Resolve Relationship Tag - In Progress . . . . . . . . . . . . . . . . . . . . . . . . . . . . . . . . . . . . . . . . . . . . . . . . . . . . . . . . . . . . . . . . . . . . . . . 64
Update/Resolve Relationship Tag - Success . . . . . . . . . . . . . . . . . . . . . . . . . . . . . . . . . . . . . . . . . . . . . . . . . . . . . . . . . . . . . . . . . . . . . . . . . . 64
Update/Resolve Relationship Tag - Flow . . . . . . . . . . . . . . . . . . . . . . . . . . . . . . . . . . . . . . . . . . . . . . . . . . . . . . . . . . . . . . . . . . . . . . . . . . . . . . 65
Before Update/Resolve Relationship Tag . . . . . . . . . . . . . . . . . . . . . . . . . . . . . . . . . . . . . . . . . . . . . . . . . . . . . . . . . . . . . . . . . . . . . . . . . . . . . . 66
After Update/Resolve Relationship Tag . . . . . . . . . . . . . . . . . . . . . . . . . . . . . . . . . . . . . . . . . . . . . . . . . . . . . . . . . . . . . . . . . . . . . . . . . . . . . . . . 66
Catalog Synchronization . . . . . . . . . . . . . . . . . . . . . . . . . . . . . . . . . . . . . . . . . . . . . . . . . . . . . . . . . . . . . . . . . . . . . . . . . . . . . . . . . . . . . . . . . . . . . . . .71
Catalog Synchronization Status . . . . . . . . . . . . . . . . . . . . . . . . . . . . . . . . . . . . . . . . . . . . . . . . . . . . . . . . . . . . . . . . . . . . . . . . . . . . . . . . . . . . . . . . 72
Accessing Export FC Data . . . . . . . . . . . . . . . . . . . . . . . . . . . . . . . . . . . . . . . . . . . . . . . . . . . . . . . . . . . . . . . . . . . . . . . . . . . . . . . . . . . . . . . . . . . . . 74
Accessing Export FC Data . . . . . . . . . . . . . . . . . . . . . . . . . . . . . . . . . . . . . . . . . . . . . . . . . . . . . . . . . . . . . . . . . . . . . . . . . . . . . . . . . . . . . . . . . . . . . 75
Enterprise Data Export Status . . . . . . . . . . . . . . . . . . . . . . . . . . . . . . . . . . . . . . . . . . . . . . . . . . . . . . . . . . . . . . . . . . . . . . . . . . . . . . . . . . . . . . . . . .75
Export Fulfillment Catalog Data Download . . . . . . . . . . . . . . . . . . . . . . . . . . . . . . . . . . . . . . . . . . . . . . . . . . . . . . . . . . . . . . . . . . . . . . . . . . . . 76
Accessing Export FC Data . . . . . . . . . . . . . . . . . . . . . . . . . . . . . . . . . . . . . . . . . . . . . . . . . . . . . . . . . . . . . . . . . . . . . . . . . . . . . . . . . . . . . . . . . . . . . 76
Export FC Data Options . . . . . . . . . . . . . . . . . . . . . . . . . . . . . . . . . . . . . . . . . . . . . . . . . . . . . . . . . . . . . . . . . . . . . . . . . . . . . . . . . . . . . . . . . . . . . . . . 77
Multi-value Attribute Details Dialog Box . . . . . . . . . . . . . . . . . . . . . . . . . . . . . . . . . . . . . . . . . . . . . . . . . . . . . . . . . . . . . . . . . . . . . . . . . . . . . . . .77
Link to Output Export File . . . . . . . . . . . . . . . . . . . . . . . . . . . . . . . . . . . . . . . . . . . . . . . . . . . . . . . . . . . . . . . . . . . . . . . . . . . . . . . . . . . . . . . . . . . . . . 77
Partial Export of Fulfillment Catalog Data - Control Flow . . . . . . . . . . . . . . . . . . . . . . . . . . . . . . . . . . . . . . . . . . . . . . . . . . . . . . . . . . . . . 78
Delta Export Flow . . . . . . . . . . . . . . . . . . . . . . . . . . . . . . . . . . . . . . . . . . . . . . . . . . . . . . . . . . . . . . . . . . . . . . . . . . . . . . . . . . . . . . . . . . . . . . . . . . . . . . . 80
Accessing Export FC Data . . . . . . . . . . . . . . . . . . . . . . . . . . . . . . . . . . . . . . . . . . . . . . . . . . . . . . . . . . . . . . . . . . . . . . . . . . . . . . . . . . . . . . . . . . . . . 81
Enterprise Delta Export Option Selection . . . . . . . . . . . . . . . . . . . . . . . . . . . . . . . . . . . . . . . . . . . . . . . . . . . . . . . . . . . . . . . . . . . . . . . . . . . . . .81
Enterprise Delta Export - Show Results . . . . . . . . . . . . . . . . . . . . . . . . . . . . . . . . . . . . . . . . . . . . . . . . . . . . . . . . . . . . . . . . . . . . . . . . . . . . . . . 82
Enterprise Delta Export Status . . . . . . . . . . . . . . . . . . . . . . . . . . . . . . . . . . . . . . . . . . . . . . . . . . . . . . . . . . . . . . . . . . . . . . . . . . . . . . . . . . . . . . . . . 82
Accessing Import FC Data . . . . . . . . . . . . . . . . . . . . . . . . . . . . . . . . . . . . . . . . . . . . . . . . . . . . . . . . . . . . . . . . . . . . . . . . . . . . . . . . . . . . . . . . . . . . . .85
Import FC Data Options . . . . . . . . . . . . . . . . . . . . . . . . . . . . . . . . . . . . . . . . . . . . . . . . . . . . . . . . . . . . . . . . . . . . . . . . . . . . . . . . . . . . . . . . . . . . . . . . 85
Full Import FC Data Status . . . . . . . . . . . . . . . . . . . . . . . . . . . . . . . . . . . . . . . . . . . . . . . . . . . . . . . . . . . . . . . . . . . . . . . . . . . . . . . . . . . . . . . . . . . . . 86
Accessing Import FC Data . . . . . . . . . . . . . . . . . . . . . . . . . . . . . . . . . . . . . . . . . . . . . . . . . . . . . . . . . . . . . . . . . . . . . . . . . . . . . . . . . . . . . . . . . . . . . .87
Import FC Data Page - Partial Upload Selected . . . . . . . . . . . . . . . . . . . . . . . . . . . . . . . . . . . . . . . . . . . . . . . . . . . . . . . . . . . . . . . . . . . . . . . 87
Partial Import of Fulfillment Catalog Data - Use Case 1 Step 1 . . . . . . . . . . . . . . . . . . . . . . . . . . . . . . . . . . . . . . . . . . . . . . . . . . . . . . 88
Partial Import of Fulfillment Catalog Data - Use Case 1 Step 2 . . . . . . . . . . . . . . . . . . . . . . . . . . . . . . . . . . . . . . . . . . . . . . . . . . . . . . 89
Partial Import of Fulfillment Catalog Data - Use Case 2 Step 1 . . . . . . . . . . . . . . . . . . . . . . . . . . . . . . . . . . . . . . . . . . . . . . . . . . . . . . 89
Partial Import of Fulfillment Catalog Data - Use Case 3 Step 1 . . . . . . . . . . . . . . . . . . . . . . . . . . . . . . . . . . . . . . . . . . . . . . . . . . . . . . 90
Partial Import of Fulfillment Catalog Data - Use Case 4 Step 1 . . . . . . . . . . . . . . . . . . . . . . . . . . . . . . . . . . . . . . . . . . . . . . . . . . . . . . 90
Partial Import of Fulfillment Catalog Data - Use Case 4 Step 2 . . . . . . . . . . . . . . . . . . . . . . . . . . . . . . . . . . . . . . . . . . . . . . . . . . . . . . 91
Partial Import of Fulfillment Catalog Data - Use Case 4 Step 3 . . . . . . . . . . . . . . . . . . . . . . . . . . . . . . . . . . . . . . . . . . . . . . . . . . . . . . 91
8
TIBCO® Fulfillment Catalog User's Guide

Partial Import of Fulfillment Catalog Data - Use Case 5 Step 1 . . . . . . . . . . . . . . . . . . . . . . . . . . . . . . . . . . . . . . . . . . . . . . . . . . . . . . 92
Partial Import of Fulfillment Catalog Data - Use Case 5 Step 2 . . . . . . . . . . . . . . . . . . . . . . . . . . . . . . . . . . . . . . . . . . . . . . . . . . . . . . 92
Partial Import of Fulfillment Catalog Data - Use Case 6 Step 1 . . . . . . . . . . . . . . . . . . . . . . . . . . . . . . . . . . . . . . . . . . . . . . . . . . . . . . 92
Partial Import of Fulfillment Catalog Data - Use Case 6 Step 2 . . . . . . . . . . . . . . . . . . . . . . . . . . . . . . . . . . . . . . . . . . . . . . . . . . . . . . 93
Partial Import of Fulfillment Catalog Data - Use Case 7 Step 1 . . . . . . . . . . . . . . . . . . . . . . . . . . . . . . . . . . . . . . . . . . . . . . . . . . . . . . 93
Partial Import of Fulfillment Catalog Data - Use Case 7 Step 2 . . . . . . . . . . . . . . . . . . . . . . . . . . . . . . . . . . . . . . . . . . . . . . . . . . . . . . 94
Partial Import of Fulfillment Catalog Data - Use Case 8 Step 1 . . . . . . . . . . . . . . . . . . . . . . . . . . . . . . . . . . . . . . . . . . . . . . . . . . . . . . 94
Partial Import of Fulfillment Catalog Data - Use Case 8 Step 2 . . . . . . . . . . . . . . . . . . . . . . . . . . . . . . . . . . . . . . . . . . . . . . . . . . . . . . 94
Partial Import of Fulfillment Catalog Data - Use Case 9 Step 1 . . . . . . . . . . . . . . . . . . . . . . . . . . . . . . . . . . . . . . . . . . . . . . . . . . . . . . 95
Partial Import of Fulfillment Catalog Data - Use Case 9 Step 2 . . . . . . . . . . . . . . . . . . . . . . . . . . . . . . . . . . . . . . . . . . . . . . . . . . . . . . 95
Partial Import of Fulfillment Catalog Data - Use Case 10 Step 1 . . . . . . . . . . . . . . . . . . . . . . . . . . . . . . . . . . . . . . . . . . . . . . . . . . . . . 96
Partial Import of Fulfillment Catalog Data - Use Case 10 Step 2 . . . . . . . . . . . . . . . . . . . . . . . . . . . . . . . . . . . . . . . . . . . . . . . . . . . . . 96
Enforcement of RecordStatus . . . . . . . . . . . . . . . . . . . . . . . . . . . . . . . . . . . . . . . . . . . . . . . . . . . . . . . . . . . . . . . . . . . . . . . . . . . . . . . . . . . . . . . . . . 99
Import Event Error during Partial Import "This Product has been Modified by Another User" . . . . . . . . . . . . . . . . . . . . . 101
Import Event Error during Partial Import "SEC-5503: Attempt to execute 'Edit when record is inworkflow' denied on <Repository> RECORD" . . . . . . . . . . . . . . . . . . . . . . . . . . . . . . . . . . . . . . . . . . . . . . . . . . . . . . . . . . . . . . . . . .102
Conditional Affinity . . . . . . . . . . . . . . . . . . . . . . . . . . . . . . . . . . . . . . . . . . . . . . . . . . . . . . . . . . . . . . . . . . . . . . . . . . . . . . . . . . . . . . . . . . . . . . . . . . . . . 103
9
TIBCO® Fulfillment Catalog User's Guide

TIBCO Documentation and Support Services
Documentation for this and other TIBCO products is available on the TIBCO Documentation site. Thissite is updated more frequently than any documentation that might be included with the product. Toensure that you are accessing the latest available help topics, visit:
https://docs.tibco.com
Product-Specific Documentation
The following documents for this product can be found on the TIBCO Documentation site:
● TIBCO Fulfillment Catalog Installation Guide
● TIBCO Fulfillment Catalog Product Catalog Guide
● TIBCO Fulfillment Catalog User's Guide
● TIBCO Fulfillment Catalog Web Services Guide
● TIBCO Fulfillment Catalog Offer and Price Designer User's Guide
● TIBCO Fulfillment Catalog Release Notes
How to Contact TIBCO Support
For comments or problems with this manual or the software it addresses, contact TIBCO Support:
● For an overview of TIBCO Support, and information about getting started with TIBCO Support,visit this site:
http://www.tibco.com/services/support
● If you already have a valid maintenance or support contract, visit this site:
https://support.tibco.com
Entry to this site requires a user name and password. If you do not have a user name, you canrequest one.
How to Join TIBCOmmunity
TIBCOmmunity is an online destination for TIBCO customers, partners, and resident experts. It is aplace to share and access the collective experience of the TIBCO community. TIBCOmmunity offersforums, blogs, and access to a variety of resources. To register, go to the following web address:
https://www.tibcommunity.com
10
TIBCO® Fulfillment Catalog User's Guide

TIBCO Fulfillment Catalog Overview
TIBCO® Fulfillment Catalog is a plug-in for TIBCO MDM that enables you to easily manage andmaintain complex Product Offerings.
The Product Offerings, Services and Rules for Pricing, Provisioning and Eligibility are activelymaintained within the TIBCO® Fulfillment Catalog's Data Repository. For details on the product catalogand data models, see the Product Catalog documentation.
A complete hierarchical interface allows you to create, edit, search, and maintain data. User access,responsibilities, and lifecycle workflow can be configured for the ongoing management of thisinformation. The complete data model for your product offerings and their components can beexported to the downstream order provisioning systems, such as TIBCO® Fulfillment OrderManagement.
This document describes the features of TIBCO® Fulfillment Catalog. For detailed information aboutUser Management and Basic Record Management, see TIBCO MDM User's Guide.
PRODUCT Association with PLANFRAGMENTA product can be associated with Plan Fragments for different actions using the followingrelationships:
● ProductHasProvidePlanFragment
● ProductHasUpdatePlanFragment
● ProductHasCeasePlanFragment
● ProductHasCancelPlanFragment
● ProductHasCustomPlanfragment
Modeling the MILESTONE and PLANFRAGMENT in Fulfillment CatalogPerform the following steps to model the Products, PlanFragments, or Milestones:
Procedure
Creation of milestones are not mandatory for the creation of a plan fragment from FC 3.0.0onwards. To create plan fragments without milestones, see Modeling the PLANFRAGMENTand PRODUCT in Fulfillment Catalog. The creation of milestones is relevant only ifintermediate milestones need to be created for a plan fragment.
1. Create the Milestone records.
Create separate Milestones with Milestone names as START and END respectively, inaddition to any intermediate milestones for association with a plan fragment. Whilecreating the START milestone, create the END milestone using MilestoneToMilestonerelationship.
There is no fixed nomenclature for Milestone ID but Milestone names must be START andEND.
2. Create the PlanFragment records and associate the Milestones created earlier using thePlanFragmentHasMilestone relationship appropriately.
3. Decide the sequence of milestones in a plan fragment by creating the MilestoneToMilestonerelationship between the associated milestones in a plan fragment. MilestoneToMilestonerelationship can only be created between the milestones associated with the same plan fragment.
11
TIBCO® Fulfillment Catalog User's Guide

The MilestoneToMilestone relationship must be modeled between all possiblecombinations of milestone pairs that may appear in the plan item in the execution plangenerated by AOPD. Although the product model can have any number of milestonesdefined, the actual plan item may contain only the subset of these milestones due to thedependency modeling and the products being ordered.
Assume that PF_PROVIDE is a plan fragment associated to a product P1 for PROVIDEaction in the product model. Also, it contains four milestones namely START, M1, M2, andEND. Now, based on the dependencies modeled and the products ordered, one of thethree milestone combinations given below can come into the plan item generated forfulfillment of P1.● START, M1, END
● START, M2, END
● START, M1, M2, END
In order to support any of the three milestone combinations mentioned above, theMilestoneToMilestone relationships must be modeled for the following milestone pairs soas to have the corresponding sections in the plan fragment model.● START->M1
● START-M2
● M1->M2
● M1->END
● M2->END
While processing this plan item in the execution plan reply, Orchestrator will try to findthe required plan fragment sections in order to sort the milestones in a proper sequencebased on the typical duration value. This is done so that the plan item can be properlyrepresented on OMS UI Gantt chart. If any of the required section is missing in the planfragment, Orchestrator will fail with an exception to process the execution plan.
For example, in the case of the START-M1-M2-END combination, the sequence of M1 andM2 after START is decided on the basis of the typical durations for START->M1 andSTART->M2. If START->M1 is 2000 ms and START->M2 is 1000 ms, milestone M1 will besequenced after M2. So the sequence will be START->M2->M1->END.
4. Decide the dependencies between the milestones of two separate plan fragments by creating theMilestoneDependsOn relationship between the associated milestones in the plan fragments.MilestoneDependsOn relationship can only be created between the milestones associated withdifferent plan fragments.
5. Create the Product record and associate the plan fragments for four actions using four differentProductHas[*Action*]PlanFragment relationships. For instance,ProductHasProvidePlanFragment.
6. You can also associate the newly created plan fragments to the existing products by using therelationships explained in point 5. However, you will have to remove the plan fragment attributesspecified in INTERNAL and AFFINITY tabs.
Modeling the PLANFRAGMENT and PRODUCT in Fulfillment CatalogIn the new version of Fulfillment Catalog, you can model a plan fragment and link it to a productwithout creating milestones. Perform the following steps to model the products/plan fragments:
Procedure
1. Create the PlanFragment records.
12
TIBCO® Fulfillment Catalog User's Guide

2. Enter the values for the fields Typical Duration and Maximum Duration in the SLA tab duringPlan Fragment creation. This will allow you to create a Plan Fragment without the necessity ofcreating associated milestones.
Although you can skip the step of creation of milestones using the fields Typical Durationand Maximum Duration in the SLA tab, but during publishing the products the STARTand END milestones will be automatically added.
3. Create the Product record and associate the plan fragments.
4. You can also associate the newly created plan fragments to the existing products by using therelationships. However, you will have to remove the plan fragment attributes specified inINTERNAL and AFFINITY tabs.
ProductHasCustomPlanfragment RelationshipThe ProductHasCustomPlanfragment is a new relationship added in the PRODUCT repository tomodel the products having custom actions defined in the PLANFRAGMENT repository, other than thePROVIDE, CEASE, UPDATE, and CANCEL actions
The ProductHasCustomPlanFragment relationship is associated with the PRODUCT repository havingtarget repository as PLANFRAGMENT. The ActionIDs must be selected from the ACTIONrepositories.
Hierarchy ManagementYou can use the Hierarchy Management utility to:
● View existing data for each repository.
● View existing relationship model for a given record in any repository. You can drill down till the lastlevel of relationship.
● Manipulate multiple relationship tree by selecting from dropdown and then save them all at one.
● Modify record attribute or attributes of existing record.
● Modify relationship attribute or attributes of existing relationship.
● Delete existing relationship.
● Add new relationship between two records (same repository or different repositories).
● Create a new record and use it on the canvas.
● View record details on the right pane.
● Cache data at client side, which results in improved performance of the overall utility.
Changes in Hierarchy ManagementIn the earlier version of Fulfillment Catalog the Hierarchy Management module could be accessedusing the options Hierarchy View and Hierarchy Edit which were available on the Browse and Searchscreen. If you did not have modify record or relationship permission you could still get into theHierarchy Management through the Hierarchy View option and then toggle to Edit mode and gainaccess to modify record or relationship attributes.
Hierarchy Management screens were available only for the PRODUCT repository. This meant that onlya limited set of data could be managed through the screens.
The two menu options Hierarchy View and Hierarchy Edit have been consolidated into one HierarchyManagement, which is available on the Browse and Search screen and also for all the repositories.
Update/Resolve Relationship Tag Button
13
TIBCO® Fulfillment Catalog User's Guide

The idea of merging them into one is to provide an entry to the screens and then control thepermissions for various actions as per the permissions available to the logged-in user. For example, ifthe user has the permission to modify the record, the menu would be Modify Record Attribute.However, if the user does not have the permission to modify the record, the same menu changes toView Record Attribute.
The Hierarchy Management screens can be accessed through Hierarchy Management submenuavailable within the menu FulfillmentCatalog Operation.
Hierarchy Management Menu Item
Structure of Classification Tree PanelThe classification panel contains three sections:
Repository Dropdown
It contains a list of all the repositories that are present. You can select a repository for which you wantsto see the records. Repository Dropdown will be enabled only when canvas is blank.
14
TIBCO® Fulfillment Catalog User's Guide

Hierarchy Management Repository Dropdown Menu
Search Option
It will help you search for a specific record using a record ID in the classification tree. You get thefollowing choices for searching a record:
● Exact Search: Searches all records with record ID exactly matching to a search text.
● Similar Search: Searches all records with record ID containing a search text. Similar Search isdefault search option.
Classification Tree
Gives a tree representation of records for a repository selected in the repository dropdown. Records areclassified based on the classification scheme defined for that repository.
15
TIBCO® Fulfillment Catalog User's Guide

Creating a New RecordFor creating a new record, a context menu is provided. This option can be seen when you right clickeither the classification scheme node or the classification code node in the classification tree.
Procedure
If you have the permission to create a record, the context menu will be enabled, otherwise it would bedisabled.
1. Click Add New Record menu. A record attribute panel will be opened to create a new record.
Hierarchy Management Add New Record
2. After adding record attributes and applying the changes, the record will be created and theclassification tree will get updated with the new record. After the necessary information is addedclick the Apply button.
Hierarchy Management Record Attributes
The record is added in the classification tree under a specific classification code as defined by Classattribute. If no classification code defined, the record is added under unclassified.
16
TIBCO® Fulfillment Catalog User's Guide

The new record is not saved into the database yet. It is only for the purpose of using it onthe canvas.
3. To save a newly created record in database, you will have to drag an drop the record on the canvasand then click the Save and Process button.
Canvas ToolbarCanvas toolbar contains few options to control the behavior and data on the canvas. The CanvasToolbar contains following options:
● Zoom In, Out or Reset buttons: Used to enlarge or reduce the size of boxes on the canvas for easynavigation through the hierarchy. Zoom panel also contains an extra button Reset Zoom, which setsthe zoom to its original level.
● Clear Button: The Clear button will help to clear the data on canvas. After clearing the canvas, therepository dropdown from classification tree panel will be enabled and the user will be able to selecta record of specific repository. This could be used when you want to change the root record.
● Relationship Dropdown: The list of relationships in the dropdown consists of Forward as well asReverse relationship(s), for a given repository. Additionally the list is controlled through acorresponding configurable property com.tibco.fc.hm.<repository_name>.relationships inthe ConfigValues.xml file. For example, the property name for the PRODUCT repository will becom.tibco.fc.hm.product.relationships. Through this property, the Relationship dropdowncan also be controlled to show none, some, or all of the Forward and Reverse relationships. Thefollowing are the scenarios:
— If the com.tibco.fc.hm.<repository_name>.relationships property is missing for arepository, then the dropdown will have all the forward relationships as well as all the reverserelationships.
— If the com.tibco.fc.hm.<repository_name>.relationships property exists, then thementioned valid relationships (comma separated, forward and/or reverse) in thecom.tibco.fc.hm.<repository_name>.relationships property will be displayed in thedropdown.
Even the default relationship for which the canvas will be created, when a record is dragged anddropped onto the canvas, can be controlled using the propertycom.tibco.fc.hm.<REPOSITORY_NAME>.defaultrelationship in ConfigValues.xml. You canselect any relationship for which you want to see the related records of root record.
The following diagram gives a graphical representation of a root record and its child records, which arerelated through relationship selected in relationship dropdown i.e. PlanFragmentHasMilestone:
Hierarchy Management Root Record and Child Records
Canvas PanelCanvas contains a graphical representation of a record.
The functioning of the Canvas has changed. See Dynamic Context Menu topic for more details.
17
TIBCO® Fulfillment Catalog User's Guide

Dynamic Context MenuThe context menu on any node in canvas changes according to the privileges given to the logged-inuser.
The following image shows how a menu changes if user lacks the necessary privileges:
Hierarchy Management Dynamic Popup Menu
If the user does not have the necessary privileges, the Delete Relationship Menu will be disabled.
Collapse Using this menu, collapses all the children of the node forwhich the context menu was used.
Modify Record Attributes This menu is used to open the record detail screen in editmode to modify one or more attributes.
Clicking Apply button only saves the changes inmemory and not in the database. The changeswould reflect in database upon successfulexecution of Save and Process.
Delete Relationship This is used to delete the relationship for the selected childfrom its parent.
Modify Relationship Attributes This menu is used to open the relationship attribute detailscreen in edit mode to modify one or more attributes.
Clicking Apply button only saves the changes inmemory and not in the database. The changeswould reflect in database upon successfulexecution of Save and Process.
Load All Relationships This menu is used to drill down relationships of the selectednode. Example: In a hierarchy ofProductHasProvidePlanFragment, you can viewrelationships of the planfragment record by clicking Load AllRelationships for the planfragment node.
18
TIBCO® Fulfillment Catalog User's Guide
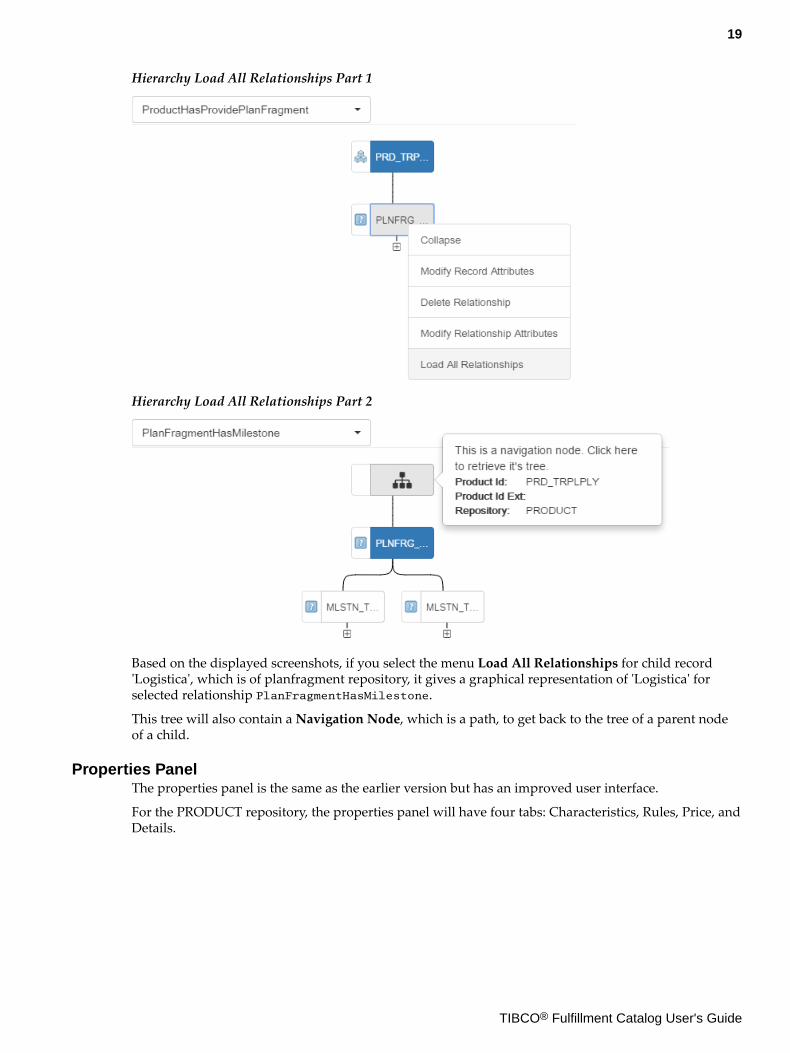
Hierarchy Load All Relationships Part 1
Hierarchy Load All Relationships Part 2
Based on the displayed screenshots, if you select the menu Load All Relationships for child record'Logistica', which is of planfragment repository, it gives a graphical representation of 'Logistica' forselected relationship PlanFragmentHasMilestone.
This tree will also contain a Navigation Node, which is a path, to get back to the tree of a parent nodeof a child.
Properties PanelThe properties panel is the same as the earlier version but has an improved user interface.
For the PRODUCT repository, the properties panel will have four tabs: Characteristics, Rules, Price, andDetails.
19
TIBCO® Fulfillment Catalog User's Guide

Properties Panel for the PRODUCT Repository
Properties Panel with Details for the PRODUCT Repository
20
TIBCO® Fulfillment Catalog User's Guide

For all other repositories, the properties panel will have a single tab called Details which gives therecord attributes details.
Properties Panel with Details for Other Repositories
Publish CatalogTIBCO® Fulfillment Catalog Model Publisher allows you to publish a full model, or an incrementalmodel, to a predefined TIBCO Enterprise Message ServiceTM topic, or to a file based on the appropriateconfiguration.
The model publish feature is available through GUI as well as through webservice. To use webservice,you must send a web service request which are different for different operations. See Model PublishOperation topic in the TIBCO Fulfillment Catalog Web Services Guide for more details.
The Publish Catalog feature uses a workflow in order to make it customizable in case of differentbehavior requirement. The workflow is detailed in next section.
The schemas are located in the $AC_HOME/schema directory. The XML samples for invoking the publishoperation are located in the $AC_HOME/samples/wsrequests/ModelPublish directory.
Workflow DefinitionThe new wfin26bulkmodelpublisherv1.xml workflow definition is created in the TIBCO FulfillmentCatalog to publish the PRODUCT, CUSTOMER, SEGMENT, PLANFRAGMENT, DISCOUNT, PRICE,and ACTION models. The workflow gets invoked for the full publish and also for the delta publish.The workflow executes the standard EvaluateSubset activity and returns the record list.
21
TIBCO® Fulfillment Catalog User's Guide

Based on the repository name, the Process<reponame>SubsetData activity processes the record listand publishes the data model according to the channel name configured in the workflow. The channelname can be JMS, FILE, or BOTH.
Where: reponame is the actual repository name with respect to the data model, for example, PRODUCT,PARTY (CUSTOMER), SEGMENT, PLANFRAGMENT, DISCOUNT, PRICE, and ACTION.
The following table lists the custom activity parameters and their description.
ProcessProductSubsetData Parameter
Activity : ProcessProductSubsetData
Parameter Description
InRecordList Record list received from the EvaluateSubset activity.
recordCount Record processed by the EvaluateSubset activity.
ProductModelMap Product model XSL file location.
ProductModelBatchSize Complete product model published in batch based on the specifiedbatch size.
ProductModelCatName Logical topic name mapped to the actual topic name in theConfigValues.xml file.
connShareMode Connection share mode value to connect to the TIBCO EnterpriseMessage Service server.
transacted Boolean value.
MasterCatalog Based on this parameter, creates the model for product, customer, orsegment.
RelationshipName# Refers to the relationship name.
publishAction Refers to the parameter value related to header action such as Bulk(for bulk model).
Channel Valid value is either JMS, FILE, or BOTH. JMS is used for the Onlinecatalog publication and FILE is used for the Offline Catalogpublication. For more information on the Offline Catalog, see Customization of Publish Catalog Workflow. When you set BOTH, thedata is published and the files are created at the same time.
Metadata Required This parameter should be commented if publish model is triggeredthrough a process and not through UI.
folderLocation Actual file location.
This is applicable when FILE or BOTH value is used for theChannel parameter.
22
TIBCO® Fulfillment Catalog User's Guide

Activity : ProcessProductSubsetData
Parameter Description
logRawModel A boolean flag to log raw product model into the elink.log file. Rawmodel XML is generated by process activity before applyingstylesheet.
Value should be set to false, if model is configured for alarge number of relationships (for instance,ProductComprisedOf) to avoid out of memory error.
CatalogUseForFilter Refers to the catalog that should be published. It can be All,Commercial, or Technical.
TypeOfPublish Refers to the publish type. It can be full publish or delta publish.
Tenant Refers to the TenantId in the header of published model. By defaultthe "enterprise name" appears as the TenantId in the published model.It is not recommended to directly assign the value for this parameterin the workflow as it affects all Model Publish activities for theenterprise.
ProcessCustomerSubsetData Parameter
Activity: ProcessCustomerSubsetData
Parameter Description
InRecordList Record list received from the EvaluateSubset activity.
recordCount Record processed by the EvaluateSubset activity.
CustomerModelMap Customer model XSL file location.
CustomerModelBatchSize Complete customer model published in batch based on thespecified batch size.
CustomerModelCatName Logical topic name mapped to the actual topic name in theConfigValues.xml file.
connShareMode Connection share mode value to connect to the TIBCO EnterpriseMessage Service server.
transacted Boolean value.
MasterCatalog Based on this parameter, creates the model for product, customer,or segment.
RelationshipName# Refers to the relationship name.
publishAction Refers to the parameter value related to header action such as Bulk(for bulk model).
23
TIBCO® Fulfillment Catalog User's Guide

Activity: ProcessCustomerSubsetData
Parameter Description
Channel Valid value is either JMS, FILE, or BOTH. JMS is used for the Onlinecatalog publication and FILE is used for the Offline Catalogpublication. For more information on the Offline Catalog, see Customization of Publish Catalog Workflow. When you set BOTH,the data is published and the files are created at the same time.
Metadata Required This parameter should be commented if publish model is triggeredthrough a process and not through UI.
folderLocation Actual file location.
This is applicable when FILE or BOTH value is used forthe Channel parameter.
logRawModel A boolean flag to log raw customer model into the elink.log file.Raw model XML is generated by process activity before applyingstylesheet.
Value should be set to false, if model is configured for alarge number of relationships (for instance,ProductComprisedOf) to avoid out of memory error.
TypeOfPublish Refers to the publish type. It can be full publish or delta publish.
Tenant Refers to the TenantId in the header of published model. By defaultthe "enterprise name" appears as the TenantId in the publishedmodel. It is not recommended to directly assign the value for thisparameter in the workflow as it affects all Model Publish activitiesfor the enterprise.
ProcessSegmentSubsetData Parameter
Activity: ProcessSegmentSubsetData
Parameter Description
InRecordList Record list received from the EvaluateSubset activity.
recordCount Record processed by the EvaluateSubset activity.
SegmentModelMap Segment model XSL file location.
SegmentModelBatchSize Complete segment model published in batch based on the specifiedbatch size.
SegmentModelCatName Logical topic name mapped to the actual topic name in theConfigValues.xml file.
connShareMode Connection share mode value to connect to the TIBCO EnterpriseMessage Service server.
24
TIBCO® Fulfillment Catalog User's Guide

Activity: ProcessSegmentSubsetData
Parameter Description
transacted Boolean value.
MasterCatalog Based on this parameter, creates the model for product, customer,or segment.
publishAction Refers to the parameter value related to header action such as Bulk(for bulk model).
Channel Valid value is either JMS, FILE, or BOTH. JMS is used for the Onlinecatalog publication and FILE is used for the Offline Catalogpublication. For more information on the Offline Catalog, see Customization of Publish Catalog Workflow. When you set BOTH,the data is published and the files are created at the same time.
Metadata Required This parameter should be commented if publish model is triggeredthrough a process and not through UI.
folderLocation Actual file location.
This is applicable when FILE or BOTH value is used forthe Channel parameter.
logRawModel A boolean flag to log raw segment model into elink.log. Rawmodel XML is generated by process activity before applyingstylesheet.
Value should be set to false, if model is configured for alarge number of relationships (for instance,ProductComprisedOf) to avoid out of memory error.
TypeOfPublish Refers to the publish type. It can be full publish or delta publish.
Tenant Refers to the TenantId in the header of published model. By defaultthe "enterprise name" appears as the TenantId in the publishedmodel. It is not recommended to directly assign the value for thisparameter in the workflow as it affects all Model Publish activitiesfor the enterprise.
ProcessPlanFragmentSubsetData Parameter
Activity: ProcessPlanFragmentSubsetData
Parameter Description
InRecordList Record list received from the EvaluateSubset activity.
recordCount Record processed by the EvaluateSubset activity.
PlanFragmentModelMap Plan Fragment model XSL file location.
25
TIBCO® Fulfillment Catalog User's Guide

Activity: ProcessPlanFragmentSubsetData
Parameter Description
PlanFragmentModelBatchSize Complete planfragment model published in batchbased on the specified batch size.
PlanFragmentModelCatName Logical topic name mapped to the actual topic name inthe ConfigValues.xml file.
connShareMode Connection share mode value to connect to the TIBCOEnterprise Message Service server.
transacted Boolean value.
publishAction Refers to the parameter value related to header actionsuch as Bulk (for bulk model).
Channel Valid value is either JMS, FILE, or BOTH. JMS is used forthe Online catalog publication and FILE is used for theOffline Catalog publication. For more information onthe Offline Catalog, see Customization of PublishCatalog Workflow. When you set BOTH, the data ispublished and the files are created at the same time.
Metadata Required This parameter should be commented if publish modelis triggered through a process and not through UI.
folderLocation Actual file location.
This is applicable when FILE or BOTH value isused for the Channel parameter.
logRawModel A boolean flag to log raw plan fragment model into theelink.log file. Raw model XML is generated byprocess activity before applying stylesheet.
Value should be set to false, if model isconfigured for a large number ofrelationships (for instance,ProductComprisedOf) to avoid out ofmemory error.
TypeOfPublish Refers to the publish type. It can be full publish or deltapublish.
Tenant Refers to the TenantId in the header of publishedmodel. By default the "enterprise name" appears as theTenantId in the published model. It is notrecommended to directly assign the value for thisparameter in the workflow as it affects all ModelPublish activities for the enterprise.
26
TIBCO® Fulfillment Catalog User's Guide

ProcessActionSubsetData Parameter
Activity: ProcessActionSubsetData
Parameter Description
InRecordList Record list received from the EvaluateSubset activity.
recordCount Record processed by the EvaluateSubset activity.
ActionModelMap Action model XSL file location.
ActionModelBatchSize Complete Action model published in batch based onthe specified batch size.
ActionModelCatName Logical topic name mapped to the actual topic name inthe ConfigValues.xml file.
connShareMode Connection share mode value to connect to the TIBCOEnterprise Message Service server.
transacted Boolean value.
publishAction Refers to the parameter value related to header actionsuch as Bulk (for bulk model).
Channel Valid value is either JMS, FILE, or BOTH. JMS is used forthe Online catalog publication and FILE is used for theOffline Catalog publication. For more information onthe Offline Catalog, see Customization of PublishCatalog Workflow. When you set BOTH, the data ispublished and the files are created at the same time.
Metadata Required This parameter should be commented if publish modelis triggered through a process and not through UI.
folderLocation Actual file location.
This is applicable when FILE or BOTH value isused for the Channel parameter.
logRawModel A boolean flag to log raw Action model into theelink.log file. Raw model XML is generated byprocess activity before applying stylesheet.
Value must be set to false, if model isconfigured for a large number ofrelationships (for instance,ProductComprisedOf) to avoid out ofmemory error.
TypeOfPublish Refers to the publish type. It can be full publish or deltapublish.
27
TIBCO® Fulfillment Catalog User's Guide

Activity: ProcessActionSubsetData
Parameter Description
Tenant Refers to the TenantId in the header of publishedmodel. By default the "enterprise name" appears as theTenantId in the published model. It is notrecommended to directly assign the value for thisparameter in the workflow as it affects all ModelPublish activities for the enterprise.
ProcessPriceSubsetData Parameter
Activity: ProcessPriceSubsetData
Parameter Description
InRecordList Record list received from the EvaluateSubset activity.
recordCount Record processed by the EvaluateSubset activity.
PriceModelMap Price model XSL file location.
PriceModelBatchSize Complete Price model published in batch based on thespecified batch size.
PriceModelCatName Logical topic name mapped to the actual topic name inthe ConfigValues.xml file.
connShareMode Connection share mode value to connect to the TIBCOEnterprise Message Service server.
transacted Boolean value.
publishAction Refers to the parameter value related to header actionsuch as Bulk (for bulk model).
Channel Valid value is either JMS, FILE, or BOTH. JMS is used forthe Online catalog publication and FILE is used for theOffline Catalog publication. For more information onthe Offline Catalog, see Customization of PublishCatalog Workflow. When you set BOTH, the data ispublished and the files are created at the same time.
CatalogUseForFilter The value of CatalogUse selected from the UI BulkModel Publish screen.
MetadataRequired This parameter should be commented if publish modelis triggered through a process and not through UI.
folderLocation Temporary folder location. This is applicable whenFILE or BOTH value is used for the Channel parameter.
28
TIBCO® Fulfillment Catalog User's Guide

Activity: ProcessPriceSubsetData
Parameter Description
logRawModel A boolean flag to log raw Action model into theelink.log file. Raw model XML is generated byprocess activity before applying stylesheet.
Value must be set to false, if model isconfigured for a large number ofrelationships (for instance,ProductComprisedOf) to avoid out ofmemory error.
TypeOfPublish Refers to the publish type. It can be full publish or deltapublish.
Tenant Refers to the TenantId in the header of publishedmodel. By default the "enterprise name" appears as theTenantId in the published model. It is notrecommended to directly assign the value for thisparameter in the workflow as it affects all ModelPublish activities for the enterprise.
ProcessDiscountSubsetData Parameter
Activity: ProcessDiscountSubsetData
Parameter Description
InRecordList Record list received from the EvaluateSubset activity.
recordCount Record processed by the EvaluateSubset activity.
DiscountModelMap Discount model XSL file location.
DisModelBatchSize Complete Discount model published in batch based onthe specified batch size.
DiscountModelCatName Logical topic name mapped to the actual topic name inthe ConfigValues.xml file.
connShareMode Connection share mode value to connect to the TIBCOEnterprise Message Service server.
transacted Boolean value.
publishAction Refers to the parameter value related to header actionsuch as Bulk (for bulk model).
29
TIBCO® Fulfillment Catalog User's Guide

Activity: ProcessDiscountSubsetData
Parameter Description
Channel Valid value is either JMS, FILE, or BOTH. JMS is used forthe Online catalog publication and FILE is used for theOffline Catalog publication. For more information onthe Offline Catalog, see Customization of PublishCatalog Workflow. When you set BOTH, the data ispublished and the files are created at the same time.
CatalogUseForFilter The value of CatalogUse selected from the UI BulkModel Publish screen.
MetadataRequired This parameter should be commented if publish modelis triggered through a process and not through UI.
folderLocation Temporary folder location. This is applicable whenFILE or BOTH value is used for the Channel parameter.
logRawModel A boolean flag to log raw Action model into theelink.log file. Raw model XML is generated byprocess activity before applying stylesheet.
Value must be set to false, if model isconfigured for a large number ofrelationships (for instance,ProductComprisedOf) to avoid out ofmemory error.
TypeOfPublish Refers to the publish type. It can be full publish or deltapublish.
Tenant Refers to the TenantId in the header of publishedmodel. By default the "enterprise name" appears as theTenantId in the published model. It is notrecommended to directly assign the value for thisparameter in the workflow as it affects all ModelPublish activities for the enterprise.
Publish Catalog Showing CatalogUse Options and BehaviorThe following table shows the behavior of product records with their child records when publishcatalog is used with or without CatalogUse option.
ProductA is the parent record and ProductB, ProductC, and ProductD are the child records ofProductA with PCO relationship.
30
TIBCO® Fulfillment Catalog User's Guide

PRODUCT RECORDShierarchy in FulfillmentCatalog repository
Selected CatalogUse inPublishCatalog screen
Published product xml filesin Zip file or JMS
ProductA (All)
ProductB (All)
ProductC (Technical)
ProductD (Commercial)
All (Default) ProductA (All)
ProductB (All)
ProductC (Technical)
ProductD (Commercial)
ProductA (All)
ProductB (All)
ProductC (Technical)
ProductD (Commercial)
Commercial ProductA (All)
ProductB (All)
ProductD (Commercial)
ProductA (All)
ProductB (All)
ProductC (Technical)
ProductD (Commercial)
Technical ProductA (All)
ProductB (All)
ProductC (Technical)
ProductA (Commercial)
ProductB (All)
ProductC (Technical)
ProductD (Commercial)
Commercial ProductA (Commercial)
ProductB (All)
ProductD (Commercial)
ProductA (Commercial)
ProductB (All)
ProductC (Technical)
ProductD (Commercial)
All (Default) ProductA (Commercial)
ProductB (All)
ProductC (Technical)
ProductD (Commercial)
ProductA (Commercial)
ProductB (All)
ProductC (Technical)
ProductD (Commercial)
Technical ProductB (All)
ProductC (Technical)
ProductA (Technical)
ProductB (All)
ProductC (Technical)
Technical ProductA (Technical)
ProductB (All)
ProductC (Technical)
ProductA (Technical)
ProductB (All)
ProductC (Technical)
Commercial ProductB (All)
31
TIBCO® Fulfillment Catalog User's Guide

PRODUCT RECORDShierarchy in FulfillmentCatalog repository
Selected CatalogUse inPublishCatalog screen
Published product xml filesin Zip file or JMS
ProductA (Technical)
ProductB (All)
ProductC (Technical)
All (Default) ProductA (Technical)
ProductB (All)
ProductC (Technical)
Accessing and Performing Full Data PublishWhen performing Full Publish of Catalog, all the records for a selected model, in an enterprise, arepublished. In case of PRODUCT repository, if there are any changes to the offerID, theOfferIdMappings.xml file will also be published. To fully publish the catalog using the FulfillmentCatalog graphical user interface, perform the following steps:
Procedure
1. Log in to Fulfillment Catalog.
2. Click FulfillmentCatalog Operation > Publish Catalog.
Accessing Publish Catalog from the Fulfillment Catalog Interface
3. Select the Publish Mode from the CSVs and JMS / XML options.
● CSVs: Exports repository record and generates CSV files. Set of exported data (or a zipfile) can be downloaded from the event log.
● JMS / XML: Triggers the publish bulk model workflow(wfin26bulkmodelpublisherv1.xml). Publish type JMS / XML signifies that it readschannel parameter set in the workflow and published messages on JMS or creates thedata files, or both at the same time.
4. Select Full Data Publish for the Select Publish Type field.
32
TIBCO® Fulfillment Catalog User's Guide

Bulk Model Publishing
5. Select the data model to publish.
6. Include Metadata: In the previous version of Fulfillment Catalog, when publishing the model, onlythe record values were being exported to JMS / XML. Although only the record value was sufficientfor the OMS, the new engine, OCS (Order Capturing System), required the metadata of the recordas well. The metadata is only needed when the data is written to offline files, and not when the datais sent to JMS. The provision of a checkbox lets the user to enable the system to create a separate filefor metadata. Since, records belonging to a repository have similar metadata, there is only a singlefile written for it.
If Include Metadata checkbox is selected when the Channel parameter in workflow is setto JMS, the checkbox value is discarded.
7. Catalog Use: There is a new attribute introduced in PRODUCT repository called Records.
The select option enables the user to select the records that need to be exported. This option isapplicable for exporting data to JMS as well as exporting data to XML files. The provided values areAll, Technical, and Commercial. The impact of the selection is described as follows:
● All: Fulfillment Catalog will export all the (Confirmed if VersionOption=”CONFIRMED” orLatest if VersionOption=”LATEST”) data irrespective of the value of RecordUse attribute forindividual record.
● Technical: Records having RecordUse attribute value as All or Technical, and also conformingto the VersionOption criteria, are exported.
● Commercial: Records having RecordUse attribute value as All or Commercial, and alsoconforming to the VersionOption criteria, are exported.
8. Click Publish to start the workflow.
9. The Success page with the published model data status is displayed.
The JMS / XML option signifies that it reads the channel parameter set in the workflowand published messages on JMS or creates the data files, or both at the same time. Also,respective text data - ProductID, ProductIDExt (only if it exists) must be provided, asapplicable.
If the Channel parameter in workflow is set to FILE or BOTH, then the published catalog ZIP filewill be available for download from the Event log, only if the publish event is successful.
33
TIBCO® Fulfillment Catalog User's Guide

Event Log and Download Option of the Published Catalog
When the event is successful a ZIP file is generated which contains XMLs for models present in therespective repositories.
For the PRODUCT model an additional XML is generated, which contains the offerID,used in the product models, along with a mapping key. This mapping key is then used inthe actual XML models instead of the offerID value to reduce the size of the individualXMLs.
Delta Publish OverviewThe Delta Publish of catalog can also be referred to as incremental publish. When you have anenvironment with a considerable amount of repository data, and if you make minor changes to thedata, publishing all the data for a small increment takes a lot of time because the entire data set getspublished.
The Delta Publish feature addresses the issue by publishing only what has been changed. You can selectthe date and time and upon selection only those records will be published which are created ormodified after selected date and time.
Delta Publish publishes records based on the last modified date of the record. The last modified date ofthe record is modified when the record attribute and the relationship attribute is modified.
● In case of PRODUCT repository, if there are any changes to the offerID, the OfferIdMappings.xmlfile will also be published.
● If you invoke Delta Publish for the first time on an enterprise, the entire data in the repository willbe published.
The timestamp is recorded after each Delta Publish.
34
TIBCO® Fulfillment Catalog User's Guide
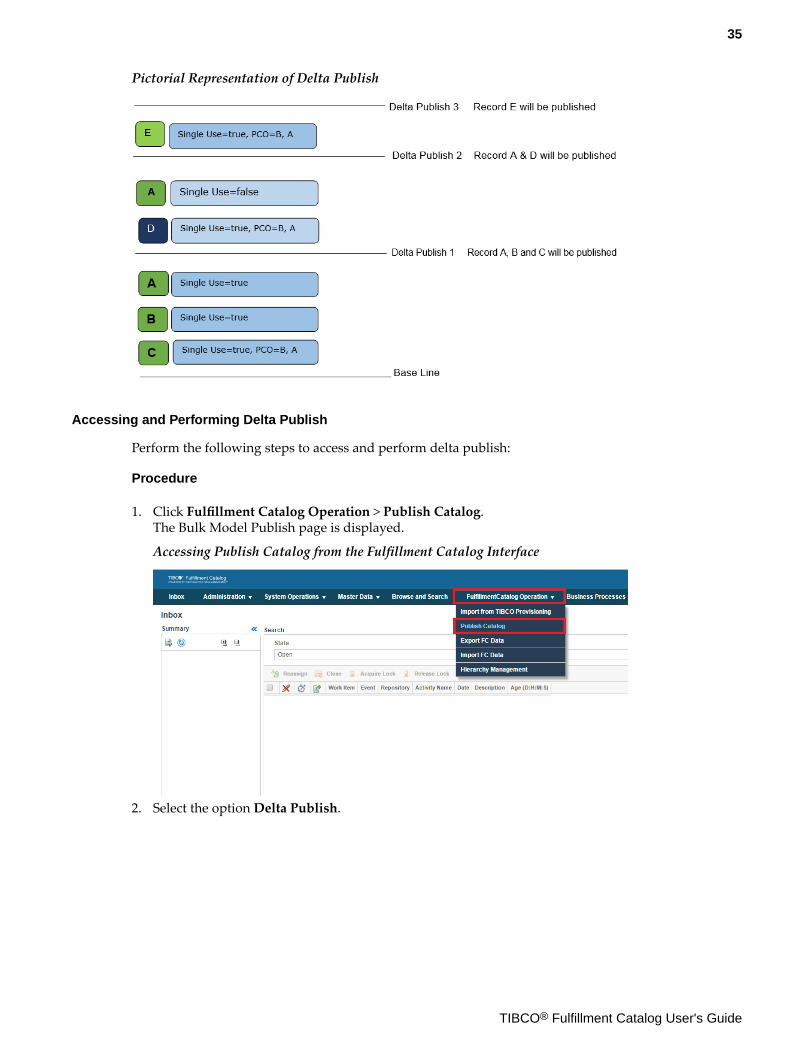
Pictorial Representation of Delta Publish
Accessing and Performing Delta Publish
Perform the following steps to access and perform delta publish:
Procedure
1. Click Fulfillment Catalog Operation > Publish Catalog.The Bulk Model Publish page is displayed.
Accessing Publish Catalog from the Fulfillment Catalog Interface
2. Select the option Delta Publish.
35
TIBCO® Fulfillment Catalog User's Guide

Bulk Model Publish Options
3. Select the required model name and provide values for the following fields:
● Include Metadata? (the default value is No)● Last Published On (value only applicable for Delta Publish)● Catalog Use (the default value is All)Selecting the PRODUCT Repository for Delta Publish
4. Click the Show Results button.The delta publish results are displayed in a new window.
Results for the PRODUCT Repository of Delta Publish
5. Click the X to close the window.The Bulk Model Publish page is displayed.
36
TIBCO® Fulfillment Catalog User's Guide

Delta Publishing the Results for the PRODUCT Repository
6. Click the Publish button.A dialog box pops up indicating that you have selected delta publish.
Confirmation Box for Delta Publish
7. Click OK to continue.The Bulk Model Publish Status page is displayed.
Bulk Model Publish Status for Delta Publish
8. Click Check Progress link to see the status of the delta publish.The Event Details page is displayed and the status of the delta publish is displayed.
Event Details for Delta Publish
37
TIBCO® Fulfillment Catalog User's Guide

9. Click the arrow preceding Additional Data to expand the details.Click the Download link following the Output Jar File field to download the published file. Click theDownload link following the Error File field to download the error file to check for any errors, ifany.
Downloading Delta Publish Output
Relationship Record Filter for Delta Publish
If there is a product record named "Modem" having two characteristics "Speed" and "Color" and if youwant to publish only the "Speed" characteristic and skip the "Color" characteristic during the publish,you have to specify the name of the relationship "characteristic" and the value of the Name attribute ofthe "Color" characteristic in the $AC_HOME/samples/DeltaPublishRelationshipRecordFilter.csvfile. You will then have to upload the file in REL_RECORD_FILTER_DS data source.
You can also mention the above filter details in the $AC_HOME/samples/DeltaPublishRelationshipRecordFilter.properties file.
When executing delta publish, if you want to skip multiple relationship records, of the samerelationship, you will have to specify the comma separated values of the name attribute of therelationship records.
Customization of Publish Catalog WorkflowThe Workflow wfin26bulkmodelpublisherv1.xml can be modified to change the behavior infollowing ways:
● Publishing Catalog to XML Files
● Publishing Catalog to a JMS Channel
● Publishing Catalog to JMS and XML Channel
● Publishing Catalog at a Fixed Location
Publishing Catalog to XML Files
A parameter needs to be changed for the Process<<Product/Customer/Segment/PlanFragment/Action/Price/ Discount>>SubsetData activity in the wfin26bulkmodelpublisherv1.xml file. Theworkflow activity name will be dependent on the model name that will be published. For example, ifthe model being published is PRODUCT then the activity name will be ProcessProductSubsetData.
38
TIBCO® Fulfillment Catalog User's Guide

Any existing definition of above parameters may be commented if their definition does not match asdefined above.
The published catalog ZIP file will be available for download, from the Event log, only if the publishevent is successful.<Parameter direction="in" name="Channel" type="string" eval="constant">FILE</Parameter>
Publishing Catalog to a JMS Channel
A parameter needs to be changed for the Process<<Product/Customer/Segment/PlanFragment/Action/Price/ Discount>>SubsetData activity in the wfin26bulkmodelpublisherv1.xml file. Theworkflow activity name will be dependent on the model name that will be published. For example, ifthe model being published is PRODUCT then the activity name will be ProcessProductSubsetData.<Parameter direction="in" name="Channel" type="string" eval="constant">JMS</Parameter>
Publishing Catalog to JMS and XML Channel
A parameter needs to be changed for the Process<<Product/Customer/Segment/PlanFragment/Action/Price/ Discount>>SubsetData activity in the wfin26bulkmodelpublisherv1.xml file. Theworkflow activity name will be dependent on the model name that will be published. For example, ifthe model being published is PRODUCT then the activity name will be ProcessProductSubsetData.<Parameter direction="in" name="Channel" type="string" eval="constant">BOTH</Parameter>
The published catalog ZIP file will be available for download, from the Event log, only if the publishevent is successful.
Publishing Catalog at a Fixed Location
1. Two parameters need to be changed for the Process<<Product/Customer/Segment/PlanFragment/Action/Price/ Discount>>SubsetData activity in thewfin26bulkmodelpublisherv1.xml file. The workflow activity name will be dependent on themodel name that will be published. For example, if the model being published is PRODUCT thenthe activity name will be ProcessProductSubsetData.
a. Confirm that the value of Channel parameter is FILE as shown in the following example:<Parameter direction="in" name="Channel" type="string" eval="constant">FILE</Parameter>
b. Confirm that the value of FolderLocation parameter is <absolute path location> and its eval isconstant as shown in the following example:<Parameter direction="in" name="FolderLocation" type="string" eval="constant"><absolute path></Parameter>
2. One parameter to change under CreateAndDownloadZip activity inwfin26bulkmodelpublisherv1.xml file:
a. Confirm that the value for DeleteSourceDir parameter is FALSE as shown in the followingexample:<Parameter direction="in" name="DeleteSourceDir" type="boolean" eval="variable">FALSE</Parameter>
39
TIBCO® Fulfillment Catalog User's Guide

Verifying Input ParametersVerify the validity of the input parameters as described in the following table:
Procedure
1. Set input parameter Channel = FILE in the ACModelPublish activity.
2. Specify the folderLocation with value as valid file path/directory which has a write access.File is created at the specified location and no message is published on the JMS topic.
3. Set input parameter Channel = JMS in the ACModelPublish activity.Message is published on the JMS topic.
4. Set input parameter Channel something other than the JMS or FILE.Activity throws an error as an invalid input for the input parameter Channel.
5. Set input parameter Channel = BOTH in the ACModelPublish activity.File is created at the specified location and message is published on the JMS topic.
Product Model ExtensionYou can execute the product model extension in the following two ways:
1. If new attribute is added in the product repository, and needs to be published in the product model.For details, see Product Model Extension for Additional Attribute.
2. If product model with more than one level of hierarchy needs to be published. For details, see Publish Data of Product Model with Hierarchy More Than One Level.
Attribute name should be preceded by "C". For example, to create an attribute "TEST", column nameshould be "CTEST", and the same should be specified in the productmodelattribute.properties file.
Product Model Extension For Additional AttributeIf a new attribute is added in the product repository, the following components are responsible tomodify product model:
● productmodelattibute.properties: It has the list of all attribute names (column) required togenerate product model. It is located at <JBOSS_HOME>/modules/com/tibco/fulfillmentcatalog/main/acprop.jar.
● mpfromcatalogitemtobulkproductmodelv1.xsl: This is a stylesheet file, which generates productmodel as per required structure. It is located at MQ_COMMON_DIR/<ENT_NAME>/maps directory.
Performing Product Model Extension
The steps to perform product model extension are as follows:
Procedure
1. Go to the <JBOSS_HOME>/modules/com/tibco/fulfillmentcatalog/main/ directory.
2. Extract acprop.jar.
3. Open productmodelattibute.properties file.
4. Add column name for attribute, which needs to be added. For instance, CPRODUCTCOUNT.
5. Create jar once again.
6. Modify map (.XSL) file to publish CPRODUCTCOUNT value in product model.
7. Start JBOSS server.
40
TIBCO® Fulfillment Catalog User's Guide

8. Publish product model.
When adding any attribute in the PRODUCT repository, do not provide column namebecause TIBCO MDM generates it.
Example for Product Model Extension
If you want to add a new attribute in the product model, for example, PRODUCTCOUNT in theproduct repository, perform the following steps:
1. Open the productmodelattibute.properties file located at <JBOSS_HOME>/modules/com/tibco/fulfillmentcatalog/main/acprop.jar.
2. Add column name in the end, for example, CPRODUCTCOUNT in the existing attribute list.
Sample Product Model Attribute Properties 1
3. Modify the map file mpfromcatalogitemtobulkproductmodelv1.xsl to add mapping forthe newly added attribute. The following snippet shows the sample map file.
<ns0:characteristics> <ns0:name>PRODUCTCOUNT</ns0:name> <ns0:value> <ns0:type> <xsl:value-of select=""Feature""/> </ns0:type> <xsl:choose> <xsl:when test="count(./CPRODUCTCOUNT)>0 and string-length(./CPRODUCTCOUNT) > 0"> <ns0:discreteValue> <xsl:value-of select="./CPRODUCTCOUNT"/> </ns0:discreteValue> </xsl:when> <xsl:otherwise> <ns0:discreteValue> <xsl:value-of select=""NULL""/> </ns0:discreteValue> </xsl:otherwise> </xsl:choose> </ns0:value> <ns0:simpleRule> <ns0:name> <xsl:value-of select=""RULE""/> </ns0:name> <ns0:ruleSetOutcome> <xsl:value-of select="./CPRODUCTCOUNT"/> </ns0:ruleSetOutcome> </ns0:simpleRule></ns0:characteristics>
Publish Data of Product Model with Hierarchy More Than One LevelThis feature provides the flexibility to publish the product model with more than one level hierarchy ondemand.
You need to customize the product model map, and workflow file to publish product model with morethan one level.
The following example explains how to publish product model with more than one level hierarchies.
Scenario: Record A at PRODUCT having relationship ProductPricedBy with record B at PRICE, whichin turn has a relationship PriceAlteredByDiscount with record C at DISCOUNT and then record Chas DiscountRequiresProduct with record D at PRODUCT.
41
TIBCO® Fulfillment Catalog User's Guide
In product model of record A, data related to record B will be published in the characteristic node.Similarly, data related to record C and D will be published same as B. Record B will have reference ofrecord C, and record C will have reference of record D in its own simple rule.
Customizing the Product Model Map to Publish the Data with Hierarchy More Than One Level
The steps to customize the product model map to publish the data with hierarchy more than one levelare as follows
Procedure
1. Pass all the relationship names explained in the scenario to activities mentioned as per the followingtable:
Workflow Name Activity Name
wfin26bulkmodelpublisherv1.xml
ProductModelSubset
2. Modify product model map file to publish more than one level data in product model.
Sample workflow and map file is available in the sample folder AC_HOME/samples/ProductModelCustomization for above example. More than one level is supported otherthan ProductComprisedOf relationship.
TIBCO Fulfillment Catalog Relationships allow the definition of relationship types within andbetween Fulfillment Catalog repositories, conforming to SID entity relationship modeling.
Adding New Repository and Creating RelationshipYou can extend the data model, for example, PRODUCT by adding a new repository, and creating arelationship between PRODUCT and the repository.
You can extend the data model, for example, PRODUCT by adding a new repository, and creating arelationship between PRODUCT and the repository.
To extend the Fulfillment Catalog data model, modify the following files:
File Name Location Description
Productmodelattribute.properti
es
<JBOSS_HOME> / modules /
com / tibco /
fulfillmentcatalog / main /
acprop.jar
This file contains thelist of all attributenames (column)required to generateproduct model.
mpfromcatalogitemtobulkproduct
modelv1.xsl
MQ_COMMON_DIR/
<ENTNAME>/maps
This is a stylesheetfile, which generatesproduct modelaccording to therequired structure.
wfin26bulkmodelpublisherv1.xml MQ_COMMON_DIR/
<ENTNAME>/workflow
Edit this file to addrelationship name.
To extend the Fulfillment Catalog data model and add new repository, perform the following steps:
42
TIBCO® Fulfillment Catalog User's Guide

Procedure
1. Create the new EXTENSION repository.
2. Create an attribute for it, for instance, EXTENSIONID and EXTENSIONDESC. To add a newattribute in the product model, in the product repository, perform the following steps:a) Go to the <JBOSS_HOME>/modules/com/tibco/fulfillmentcatalog/main/ directory.b) Extract acprop.jar.c) Using any text editor, open the productmodelattibute.properties file located at
<JBOSS_HOME>/modules/com/tibco/fulfillmentcatalog/main/acprop.jar.d) Create relationship between PRODUCT and EXTENSION, for instance, ProductHasExtension.e) At the end of the productmodelattibute.properties file, add column name, EXTESIONID in
the existing attribute list.
Shut down the sever before you save the file.
Sample Product Model Attribute Properties 2
3. Create the jar file, acprop.jar once again.
4. Add relationship name, ProductHasExtension in the wfin26bulkmodelpublisherv1.xml file for thefollowing activities:a) ProductModelSubsetb) ProcessProductSubsetData
5. Modify the map file mpfromcatalogitemtobulkproductmodelv1.xsl to include the new attributein the product model. The following snippet shows the sample map file.<xsl:for-each select="./ChildItems/ChildItem[REL_NAME ='ProductHasExtension']"> <ns0:characteristics> <ns0:name> <xsl:value-of select="./CEXTESIONID"/> </ns0:name> <ns0:description> <xsl:value-of select="./CEXTESIONDESC"/> </ns0:description> </ns0:characteristics> </xsl:for-each>
6. Create a record in PRODUCT and EXTENSION repositories with relationship between them.
7. Start JBOSS server.
8. Publish Product model.
Modification of Rule BaseYou can modify an existing rule-base according to your requirements using a text editor.
● Removing Mandatory Plan Fragment Attributes
● Removing Non-mandatory Plan Fragment Attributes
● Disabling Mandatory Plan Fragment Rules
43
TIBCO® Fulfillment Catalog User's Guide

Removing Mandatory Plan Fragment Attributes
To remove the mandatory Plan Fragment attributes, perform the following steps:
While creating the Plan Fragment record, the following are the mandatory values:
● Plan Fragment ID
● Plan Fragment Name
● Plan Fragment Version
● Description
Procedure
1. Go to $MQ_COMMON_DIR/<enterprise>/catalog/master/<Catalog_ID_PLANFRAGMENT>. Where:a) enterprise is the actual enterprise name for which the rule can be disabled.b) Catalog_ID_PLANFRAGMENT is the actual PLANFRAGMENT repository ID. It can be seen from
the UI in the repository list.
2. Open the catalogvalidation.xml file with a text editor.
3. Change the given constraint and remove the mandatory attribute according to your requirement.<constraint><name>Mandatory</name><description>Mandatory attributes</description><usefor> <var>PLANFRAGMENTNAME</var> <var>PLANFRAGMENTVERSION</var> <var>SHORTDESC</var></usefor><action><check> <explanation> Plan Fragment Name, Plan Fragment Version and Plan Fragment Type, Plan Fragment Description are mandatory attributes</explanation> <defined> <var/> </defined></check></action></constraint>
Removing Non-mandatory Plan Fragment Attributes
You can modify the rule-base to remove the non-mandatory Plan Fragment attributes from the drop-down displayed on PRODUCT edit on TIBCO MDM native UI, or the Graphical Edit screen.
You can modify the rule-base to remove the non-mandatory Plan Fragment attributes from the drop-down displayed on PRODUCT edit on TIBCO MDM native UI, or the Graphical Edit screen.
By default, Plan Fragments drop-down shows a combination of the following attributes:
● Plan Fragment Name
● Plan Fragment Version
● Plan Fragment Type
To select the attributes to display on drop-down, perform the following steps:
Procedure
1. Go to $MQ_COMMON_DIR/<enterprise>/catalog/master/<Catalog_ID_PRODUCT>. Where:
44
TIBCO® Fulfillment Catalog User's Guide

a) enterprise is the actual enterprise name for which the rule can be disabled.b) Catalog_ID_PRODUCT is the actual PRODUCT repository ID. It can be seen from the UI in the
repository list.
2. Open the catalogvalidation.xml file with a text editor.
3. Change the given constraint to remove the values, which are not required.<constraint><name>PlanFragments</name><description>Displays available PlanFragments for selection</description><usefor><var>PROVIDEPLAN</var> <var>CEASEPLAN</var> <var>UPDATEPLAN</var> <var>CANCELPLAN</var> <var>AFFINITYPROVIDE</var> <var>AFFINITYCEASE</var> <var>AFFINITYUPDATE</var> <var>AFFINITYCANCEL</var></usefor><action><select novalue="default" showoninput="2,3,4"> <!-- 2nd, 3rd and 4th below will be displayed on UI dropdown --><table source="sql"> <literal>PLANFRAGMENT/PRODUCTID</literal> <literal>PLANFRAGMENT/PLANFRAGMENTNAME</literal><!-- This is 2 --> <literal>PLANFRAGMENT/PLANFRAGMENTVERSION</literal><!-- This is 3 --> <literal>PLANFRAGMENT/PLANFRAGMENTTYPE</literal><!-- This is 4 --> <where type="SQL"> <sql> <neq> <literal>PLANFRAGMENT/PLANFRAGMENTNAME</literal> <const type="string">NO_RECIPROCAL_ACTION</const> </neq> </sql></where></table> </select></action></constraint>
Disabling Mandatory Plan Fragment Rules
To disable mandatory Plan Fragment rules, perform the following steps:
Procedure
1. Go to $MQ_COMMON_DIR/<enterprise>/catalog/master/<Catalog_ID_PLANFRAGMENT>. Where:a) enterprise is the actual enterprise name for which the rule can be disabled.b) Catalog_ID_PLANFRAGMENT is the actual PLANFRAGMENT repository ID. It can be seen from
the UI in the repository list.
2. Take the back up of the catalogvalidation.xml file.
3. Open the catalogvalidation.xml file with a text editor.
4. Search for the NoPlan constraint.
5. Comment the constraint to disable mandatory Plan Fragment for the Product record.
45
TIBCO® Fulfillment Catalog User's Guide

Data ModelingData Modeling describes the ways that TIBCO Fulfillment Catalog allows you to define, model anddesign products through action-based modeling, new affinity types, relationships, and group record.
Data Modeling also covers the following topics:
● Action-based Modeling
● Conditional Affinity
● ProductDependsOn and ProductRequiredFor Relationships
● Product Specification Field Decomposition
● Group Record Modeling
Action-based ModelingTIBCO Fulfillment Catalog 3.0.0 allows you to define the set of actions, maintained in the ACTIONrepository. You can now define any number of unique fulfillment actions. Until this release, only fourset of actions were supported.
The data modeled in the ACTION repository is published as the ACTION model.
The PRODUCT model has the ProductHas<CustomAction>PlanFragment relationship. The ActionIDrelationship attribute has a record from the ACTION repository.
These are the possible actions you can select:
● Provide
● Cease
● Update
● Cancel
● Custom Actions
Modeling Action-based Data
The following is an example of the action-based modeling. Perform the given steps to model action-based data:
Prerequisites
See Action-based Modeling for details related to Action-based Modeling.
Procedure
1. Create the HomeMove record in the ACTION repository.
2. Create the P1 record in the PRODUCT repository.
3. Create the ProductHasCustomPlanFragment relationship for the P1 record.In this relationship, the ActionID relationship attribute value HomeMove is selected from theACTION repository.
The existing PLANFRAGMENT record is assumed from the PLANFRAGMENTrepository for the ProductHasCustomPlanFragment relationship. You can create a newPLANFRAGMENT record and then associate it.
46
TIBCO® Fulfillment Catalog User's Guide

Conditional AffinityFulfillment Catalog 2.0.0 introduced Conditional Affinity modeling, which combines InLink andCrossLink affinities in a single affinity type and provides additional flexibility. Affinity groupingenables different plan items to be grouped together based on the evaluation of the XPATH expressiondefined at the product catalog.
The following attributes are available at the record level in the AFFINITY GROUP of product or at theProductHasProvidePlanFragment, ProductHasUpdatePlanFragment,ProductHasCeasePlanFragment, ProductHasCancelPlanFragment, andProductHasCustomPlanFragment relationships. The additional configuration fields and rules inconditional affinity are :
AffinityType Determines the type of affinity implemented.
● InLink
● CrossLink
● Sequenced Affinity
● ConditionalAffinity
AffinityCondition Valid for Conditional type only. A String fieldcontaining an XPATH expression that evaluatesto true or false based on data is in the order:
● If the expression is true, the product planitem is affinity-grouped
● If the expression is false, then the productplan item is not affinity-grouped
● If the field is blank, assume that the value istrue
● If the XPATH expression evaluates toanything other than the true or false, AOPDfails, and returns an exception
The XPATH expression evaluates against thefollowing data fields on the order:
● Order Header UDF Name and Value
● Order Line ProductID
● Order Line Action and ActionMode
● Order Line UDF Name and Value
The XPATH expression can also be definedagainst the following plan data fields:
● planItem productID
● planItem UDF name value
● planItem Action
47
TIBCO® Fulfillment Catalog User's Guide

AffinityCorrelation Valid for Conditional type only. The XPATH isevaluated on the Plan data and the order data. AString field containing an xpath expressionbased on a data is in the following order:
● All plan items that evaluate to the sameAffinityCorrelation are grouped together
● The field is functionally similar to the LinkIDmethod of correlating plan items in theInLink affinity. However, it allowscorrelation based on complex conditionswithout a restriction on the UDF names
● If the field is blank, a default LinkID value isshared by all other blank configurations
● If the XPATH expression evaluates to anempty string, the XPATH expression is blank,or assume a default LinkID
The XPATH expression evaluates against thefollowing order data fields:
● Order Header UDF Name and Value
● Order Line ProductID
● Order Line Action and ActionMode
● Order Line UDF Name and Value
The XPATH expression can also be definedagainst the following plan data fields:
● planItem productID
● planItem UDF name value
● planItem Action
AffinityParentGroup Valid for Conditional type only. A boolean fieldcontaining the value true or false:
● If set to true, the plan items with productssharing the same immediate parent productare grouped together
● If set to false, the parent product is notconsidered for grouping
AffinityActionGroup Valid for Conditional type only. A boolean fieldcontaining the value true or false:
● If set to true, then only plan items withproducts that share the same action aregrouped together
● If set to false, then action is not consideredfor grouping
48
TIBCO® Fulfillment Catalog User's Guide

AffinityActionValue AffinityActionValue is considered for groupingwhen AffinityActionGroup is set to true. This isvalid for Conditional type only. String fieldcontaining an XPATH expression that evaluatesto a String based on data is in the followingorder: The XPATH expression must evaluate toone of the following:
● PROVIDE
● UPDATE
● CEASE
● Empty String
If the XPATH expression evaluates to anythingother than these actions, then AOPD fails andreturns an exception.
● If the field is blank, or the return value fromthe XPATH expression is an empty string, theremaining action rules must be applied.
The XPATH expression is able to evaluateagainst the following data fields on the order:
● Order Header UDF Name and Value
● Order Line Action and ActionMode
● Order Line UDF Name and Value
The XPATH expression can also be definedagainst the following plan data fields:
● planItem productID
● planItem UDF name value
● planItem Action
AffinityProvide Provide plan fragment name for affinitygrouped plan item. Only plan items with theProvide action and the same value in this fieldare grouped together
AffinityUpdate Update plan fragment name for affinity groupedplan item. Only plan items with the Updateaction and the same value in this field aregrouped together
AffinityCease Cease plan fragment name for affinity groupedplan item. Only plan items with the Cease actionand the same value in this field are groupedtogether
49
TIBCO® Fulfillment Catalog User's Guide

AffinityCancel Cancel plan fragment name for affinity groupedplan item. Only plan items with the Cancelaction and the same value in this field aregrouped together
See TIBCO Fulfillment Catalog Product Catalog Guide for more details.
1) If XPath is defined against plan data, the format should be <Actual XPath> containing string$var/PlanItem. For example, if you want to define the XPath for UDF name-value pair MSISDN=123,the XPath can be $var/PlanItem[productID='GSMLine']/udfs[name='MSISDN']/value/text().
XPath evaluates data from the planItem. See Sample Plan Item XML for more details.
2) If XPath is defined against the order data, the format should be <Actual XPath> containingstring $var/Order. Refer to Sample Order XML for more details.
3) Default order data is considered for evaluation if XPATH does not contain $var/PlanItem.
See Sample XPATHs for XPATH definitions.
ProductDependsOn and ProductRequiredFor RelationshipsThe ProductDependsOn (PDO) and ProductRequiredFor (PRF) relationships helps you to createproduct offers without defining sequencing for the products. You can create ProductDependsOnrelationship to lower level products instead of using ProductComprisedOf links.
ProductDependsOn Relationship ProductRequiredFor Relationship
The ProductDependsOn (PDO) is a productdependency relationship to sequence theassociated target and source plan items. ThePDO relationship allows flexible productdecomposition. This establishes a relationshipbetween two products and is evaluated duringthe decomposition process.
The ProductRequiredFor (PRF) relationship is aprerequisite relationship for a product to add atarget plan item.
The PDO and PRF relationships have the following two relationship attributes:
● Source Action
● Target Action
The PRF relationship also has the thirdrelationship attribute named ocvValidationReq.This is a boolean flag for validation. Based on avalidation flag, the Fulfillment engine can decideif a product should be added, or only consideredfor validation purpose.
The PDO relationship also has the thirdrelationship attribute named'sequenceDirection'. The valid values of thisattribute are either 'AFTER' or 'BEFORE'. Thisattribute will be paired with the provided valuesof SourceAction and TargetAction. For eachSourceAction and TargetAction, there will be avalue defined for the sequenceDirectionattribute.
50
TIBCO® Fulfillment Catalog User's Guide
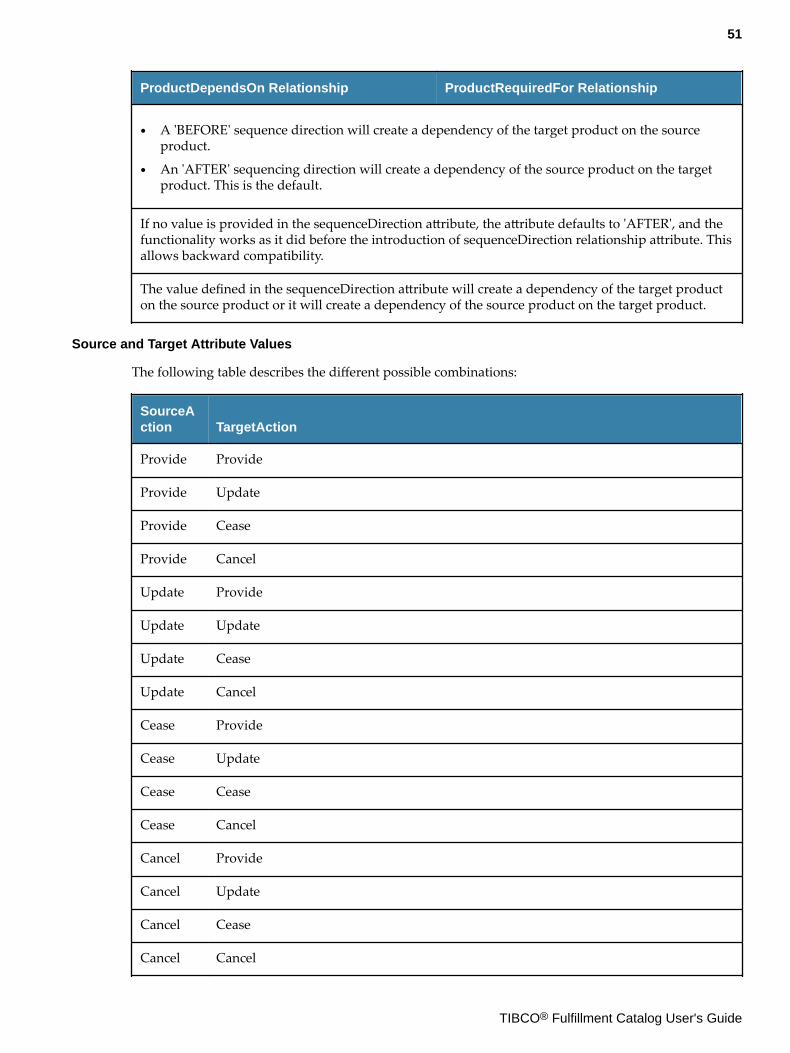
ProductDependsOn Relationship ProductRequiredFor Relationship
● A 'BEFORE' sequence direction will create a dependency of the target product on the sourceproduct.
● An 'AFTER' sequencing direction will create a dependency of the source product on the targetproduct. This is the default.
If no value is provided in the sequenceDirection attribute, the attribute defaults to 'AFTER', and thefunctionality works as it did before the introduction of sequenceDirection relationship attribute. Thisallows backward compatibility.
The value defined in the sequenceDirection attribute will create a dependency of the target producton the source product or it will create a dependency of the source product on the target product.
Source and Target Attribute Values
The following table describes the different possible combinations:
SourceAction TargetAction
Provide Provide
Provide Update
Provide Cease
Provide Cancel
Update Provide
Update Update
Update Cease
Update Cancel
Cease Provide
Cease Update
Cease Cease
Cease Cancel
Cancel Provide
Cancel Update
Cancel Cease
Cancel Cancel
51
TIBCO® Fulfillment Catalog User's Guide

You can also define source action and target action to match the following combination using commaseparated values. For example
SourceAction: Provide, Provide, Update, Cease, Cancel, Cease
TargetAction: Update, Cancel, Provide, Update, Provide, Update
You can also define sequenceDirection to match the following combination using comma separatedvalues. For example
SourceAction: Provide, Provide, Update, Cease, Cancel, Cease
TargetAction: Update, Cancel, Provide, Update, Provide, Update
SequnceDirection: After, Before, After, Before, Before, After
Dependency between planitems occurs when both the following occur:
● The sequenceDirection attribute has valid values, i.e. either 'AFTER' or 'BEFORE.'
● The number of sequenceDirection attributes match with the number of Source Actions and thenumber of Target Actions.
There is only one target action for any given source action.
The following table explains the PDO and PRF relationships and their impact on orders and plans.
Product Configuration Order Plan
Product A has a PRF relationshipwith Product B having sourceaction and target action PROVIDEand PROVIDE
OL1=ProductA Two plan item (A and B) do notdepend on each other
Product A has PRF and PDOrelationship with B and PRF andPDO has source action and targetaction PROVIDE and PROVIDE
OL1=ProductA(Action=Provide)OL2=ProductB(Action=Provide)
planItemA depends on planItemB
Product A has PRF and PDOrelationship with B and PRF andPDO has source action and targetaction PROVIDE and PROVIDE
OL1=ProductA planItemA depends on planItemB
Product A has PDO relationshipwith B having source action andtarget action PROVIDE andPROVIDE
OL1=ProductA(Action=Provide)OL2=ProductB(Action=Provide)
planItemA depends on planItemB
The following table explains PDO with Sequence direction and their impact on orders and plans.
Product Configuration Order Plan
Product A has PDO relationshipwith B having SA & TA asPROVIDE & PROVIDE.SequenceDirection is AFTER.
OL1=ProductA(Action=Provide)OL2=ProductB(Action=Provide)
Two planitem having planItemAdepends on planItemB
52
TIBCO® Fulfillment Catalog User's Guide

Product Configuration Order Plan
Product A has PDO relationshipwith B having SA & TA asPROVIDE & PROVIDE.SequenceDirection is BEFORE.
OL1=ProductA(Action=Provide)OL2=ProductB(Action=Provide)
Two planitem having planItemBdepends on planItemA
Product A has PDO relationshipwith B having SA & TA asPROVIDE & PROVIDE.SequenceDirection is AFTER.Product B has PDO relationshipwith C having SA & TA asPROVIDE & PROVIDE andSequenceDirection is BEFORE.
OL1=ProductA(Action=Provide)OL2=ProductB(Action=Provide)OL3=ProductC(Action=Provide)
Three planitems havingplanItemA depends on planItemBand planItemC depends onplanItemB
Product A has PDO relationshipwith B having SA & TA asPROVIDE & PROVIDE.SequenceDirection is BEFORE.Product B has PDO relationshipwith C having SA & TA asPROVIDE & PROVIDE andSequenceDirection is AFTER.
OL1=ProductA(Action=Provide)OL2=ProductB(Action=Provide)OL3=ProductC(Action=Provide)
Three planitems having planItemBdepends on planItemA andplanItemB depends on planItemC
Product Specification Field DecompositionEach product has a modeled set of characteristics within a product catalogue. When a product isdecomposed to a plan item, the default and the instance characteristics are copied over into the UserDefined Fields (UDFs) of every plan item. This allows the information to be reused later when the planitem is executed.
For example, consider a product "Line Access 5 MB" has characteristics modeled such as Speed=5,QOS=4, IPAccess=false. These are all modeled as instance variables. When an order is submitted forLine Access or is part of a bundle, the plan item uses the same instance characteristics copied as UDFsinto the plan item. When the plan item is executed, the UDFs can be passed to the service call.
When an order is made the characteristics are visible as UDFs for each order line. When you submit theorder, the UDFs are converted into UDFs for the new plan items and if the order line is a bundle thenthose items can have UDFs as well which are copied to the execution plan. All theses UDFs can be usedlater through the service call.
Custom Action based Product Decomposition and Characteristic Inclusion
The custom action provides flexible way to define products and product fulfillment by allowingproduct decomposition and characteristic list inclusion. The ProductComprisedOf (henceforth, referredto as PCO) relationship enables you to model complex product hierarchies. This allows a productmodeler to model specific product decomposition according to the specified action.
Irrespective of an action, all the PCO or Characteristic relationships are valid.
The following table describes the custom action for the PCO and Characteristic relationships:
53
TIBCO® Fulfillment Catalog User's Guide

ProductComprisedOf (PCO) Characteristic (C)
IfPCO.ActionID=n
ull
The child product is alwaysa part of the decompositionduring decomposition
IfC.ActionID=nul
l
The characteristic is alwaysincluded as planItem UDFs
IfPCO.ActionID=n
ot null
The child product is onlyadded if the following orderaction is specified duringdecomposition:
order Action = the ActionID
IfC.ActionID=not
null
The characteristic isincluded if the followingorder action is specifiedduring decomposition:
order Action = ActionID
Scenario for the Custom Action Based Product Decomposition
The following table describes how a custom action impacts the product decomposition:
This scenario is applicable for characteristic list inclusion based on custom action.
Data Model Configuration Order Plan
Action repository has recordwith ID as HomeMove andrecordtype as PROVIDE. ProductB has PCO relationship with P1,P2, P3 with autoprovision=true
P1.PCO.ActionID=nullP2.PCO.ActionID=PROVIDE
P3.PCO.ActionID=HomeMove
OL=B(PROVIDE) There are three planItems:
● B
● P1
● P2
B depends on P1 & P2
OL=B(UPDATE) There are two planItems:
● B
● P1
B depends on P1
OL=B(HomeMove) There are two planItems:
● B
● P3
B depends on P3
Group Record ModelingThe Fulfillment Catalog's Group Record feature provides better ways to define, model and designproducts. This is a design time feature. The following Group related relationship attributes are movedto the record level:
● GroupNumber
● GroupOptional
● GroupMinQty
● GroupMaxQty
54
TIBCO® Fulfillment Catalog User's Guide

The moved attributes are put under the new attribute group called GROUPINFO of the PRODUCTrepository.
When you publish the data model from Fulfillment Catalog to the Fulfillment system, the groupinformation within this record is re-de normalized back to the child relationships. For the modelingpurpose, the group record is neither a saleable nor an actionable record. It is a container to expressgroup rules. Therefore, when expressing the product model to an external system, this container groupis removed from the model and expressed using the same product schema.
Record Status AttributeThe Record Status attribute is maintained against every record of Fulfillment Catalog that holds thestatus of the record.
Even though MDM maintains the CONFIRMED or UNCONFIRMED state for every record, theattribute Record Status will be available, and depending upon the ‘Record Status’ value it will beupdated or assigned automatically. This means that every CONFIRMED record should have arecordstatus=”Active” and every UNCONFIRMED records should have a recordstatus =”Testing”.
You can add additional states depending on the workflow. The value of ‘Record Status’ attribute has tobe assigned and it is only available in the View mode, which means an end user cannot modify thevalue of the ‘Record Status’.
The record status values will be set based on the following parameters:
● Testing: Assign the value Testing when creating a record or editing a record.
● Active: Assign or update the value Active when confirming a record as a part of the workflow.
● Inactive: Assign or update the value Testing when deleting a record as a part of the workflow.
Workflow ChangesFulfillment Catalog has customized the two existing MDM workflowswfin26productaddapprovalv3.xml and wfin26producteditapprovalv3.xml in the$MQ_COMMON_DIR/<enterprisename>/workflow directory.
The wfin26productaddapprovalv3.xml workflow file is called when adding a new record or whenapproving an unconfirmed record. The wfin26producteditapprovalv3.xml workflow file is calledwhen we edit an existing record or while deleting a record.
Customization on wfin26productaddapprovalv3.xml Workflow
Two new activities has been added in the workflow before the workflow calls theUpdateRecordStateAsApproved activity which will confirms the state of the record in MDM. They areSetRulebaseFilePath and EvaluateRuleBase.
Below is the SetRulebaseFilePath activity - which basically set the absolute rule base file path.
SetRulebaseFilePath Activity for wfin26productaddapprovalv3.xml Workflow
Below is the EvaluateRuleBase activity - which basically calls or executes the rule base file path.
55
TIBCO® Fulfillment Catalog User's Guide

EvaluateRulebase Activity for wfin26productaddapprovalv3.xml Workflow
Customization on wfin26producteditapprovalv3.xml Workflow
Two new activities has been added in the workflow before the workflow calls theUpdateRecordStateAsApproved activity which will confirms the state of the record in MDM. They areSetRulebaseFilePath and EvaluateRuleBase.
Below is the SetRulebaseFilePath activity - which basically set the absolute rule base file path.
SetRulebaseFilePath Activity for wfin26producteditapprovalv3.xml Workflow
Below is the EvaluateRuleBase activity - which basically calls or executes the rule base file path.
EvaluateRulebase Activity for wfin26producteditapprovalv3.xml Workflow
56
TIBCO® Fulfillment Catalog User's Guide

Uneditable Record StatusThe value of record status is uneditable and the value will be assigned, automatically, depending on thestate of record.
This non-editability is achieved by having VIEW mode constraint in the catalog validation file for therepositories which has record status as attribute.
Uneditable Record Status
Assign ACTIVE to Confirmed RecordAs a part of the workflow that confirms a record, update the record status to ACTIVE.
When a record is approved while creating or adding, wfin26productaddapprovalv3.xml will beinvoked which has evaluate rule base activity to run the catalog validation file where the followingconstraint is executed to assign or update the record status to ACTIVE.
Assign ACTIVE to Confirmed Record
57
TIBCO® Fulfillment Catalog User's Guide

Assign INACTIVE to a Deleted RecordAs a part of the workflow that deletes a record, update the record status to INACTIVE.
When a record is deleted then wfin26producteditapprovalv3.xml will be invoked which hasevaluate rule base activity to run the catalog validation file where below constraint is executed to assignor update the record status to INACTIVE.
Assign INACTIVE to a Deleted Record
Assign TESTING to a Creating Record or Unconfirmed RecordAt the time of creating a record or editing a record, assigning the record status field to TESTING.
When a record is created which means in unconfirmed state then using the new record configurationfile we assign record status to TESTING where below constraint is executed. Till the record is confirmedit will be in TESTING. Once the record is approved then wfin26productaddapprovalv3.xml will beinvoked which assign from TESTING to ACTIVE.
Assign TESTING to a Creating Record or Unconfirmed Record
58
TIBCO® Fulfillment Catalog User's Guide
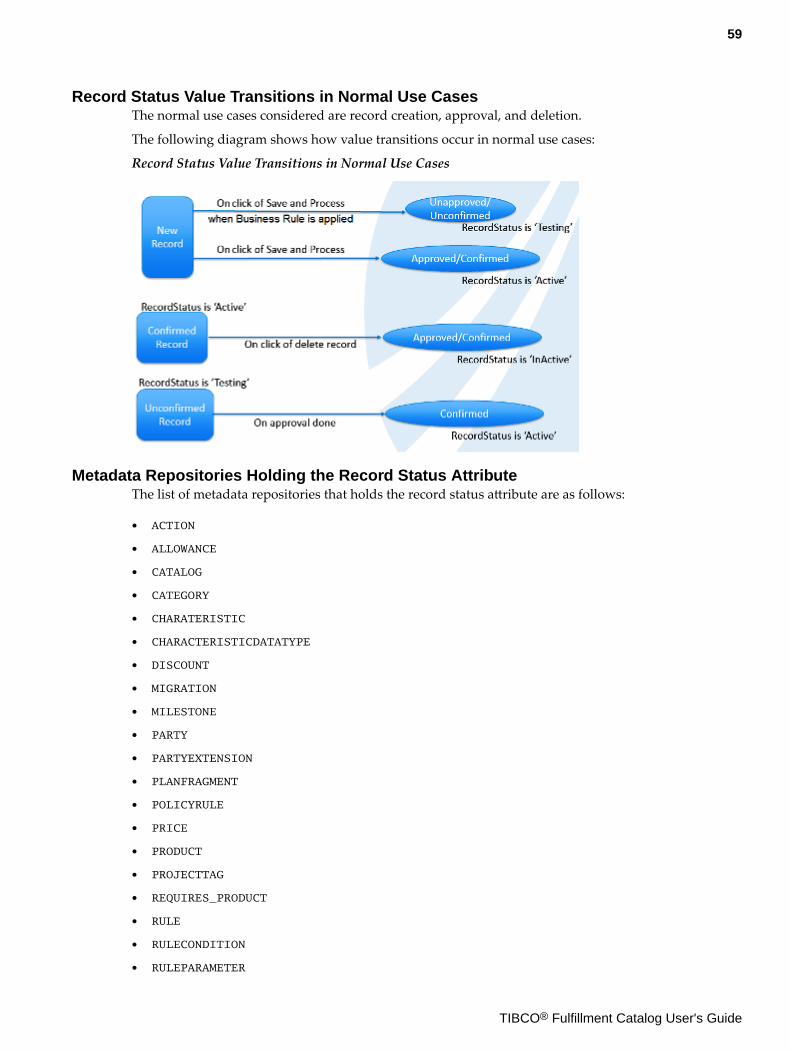
Record Status Value Transitions in Normal Use CasesThe normal use cases considered are record creation, approval, and deletion.
The following diagram shows how value transitions occur in normal use cases:
Record Status Value Transitions in Normal Use Cases
Metadata Repositories Holding the Record Status AttributeThe list of metadata repositories that holds the record status attribute are as follows:
● ACTION
● ALLOWANCE
● CATALOG
● CATEGORY
● CHARATERISTIC
● CHARACTERISTICDATATYPE
● DISCOUNT
● MIGRATION
● MILESTONE
● PARTY
● PARTYEXTENSION
● PLANFRAGMENT
● POLICYRULE
● PRICE
● PRODUCT
● PROJECTTAG
● REQUIRES_PRODUCT
● RULE
● RULECONDITION
● RULEPARAMETER
59
TIBCO® Fulfillment Catalog User's Guide

● SEGMENT
Building BlocksThe Building Block feature is a catalog structure that defines the Product repository and itsrelationships. There are no limits on the hierarchy levels of the Building Block. The hierarchy isidentified, in the Fulfillment Catalog, using the ProductComprisedOf relationship.
You can use the Building Block feature to define different characteristics for the parent and childproduct. You can also define the relationships between single products or group of products.
Use Case for Building BlocksConsider a case of a building block where the ProductComprisedOf relationship with three records aredefined. Since this is a building block, you will need to create multiple such structures with only achange in root the node.
In absence of the Template feature, duplication effort will be required to create a new record and linkthose three children nodes with the ProductComprisedOf relationship.
Building Blocks Example using Templates
You can use the Template feature to create a pattern with one root template record and three non-template records. The root record then connects three children with a ProductComprisedOfrelationship. This pattern can further be instantiated to create multiple hierarchies as shown in thefollowing image:
Template Instance for Building Blocks - Group 1
In this instance the root template record T1 is instantiated and named as group1.
60
TIBCO® Fulfillment Catalog User's Guide

Template Instance for Building Blocks - Group 2
In this instance the root template record T1 is instantiated and named as group2.
Template-based Product ModelA Template is a record in the Product repository. A product is a template product only if the value ofthe attribute IsTemplate is TRUE.
The template attribute was introduced because there was a need to have a system where a pattern wascreated and then that pattern was re-used to create real products into the system. A template productreduces the effort in creating multiple similar bundles.
The template feature also integrates with the Building Blocks feature.
Difference between Template and Non-template RecordThe differences between template and non-template record are as follows:
Template Record Non-template Record
Can be instantiated. Cannot be instantiated. If a non-template recordis selected for instance creation, an alert will popup.
Cannot be published during Publish Model asthese are not real products which can beordered.
Can be exported using Full or Partial Exportfeature. This flexibility is provided to enablecopy of template records as well from oneenvironment to another.
Validation Rules for Template RecordThere are some constraints for introducing a template. They are as follows:
Rule Example
A template cannot be added under anothertemplate. ADSL_TEMPLATE is a template.Therefore, another template STS_2 cannot beadded as a child. The bundle becomes invalid.
61
TIBCO® Fulfillment Catalog User's Guide

Rule Example
A template cannot be added under a non-template record. ADSL_SPLITTER is a non-template. Therefore, a template STS_2 cannot beadded as a child. The bundle becomes invalid.
Template Filter during Publish CatalogThe Template functionality impacts Publish Catalog feature because the Publish Catalog does notpublish any records, in XML, that are template records.
This has been achieved by a rule that is executed for each and every record during the Publish Catalogexecution.<constraint> <name>IsTemplateRecord</name> <description>Checks record is template </description> <condition> <and> <eq> <var>CATALOG_NAME</var> <const type="string">PRODUCT</const> </eq> <defined> <var>IsTemplate</var> </defined> </and> </condition> <action> <check> <explanation>Record is template.</explanation> <!--reject record when condition is evaluated to false--> <neq> <var>IsTemplate</var> <const type="boolean">true</const> </neq> </check> </action></constraint>
The rule is executed only for the PRODUCT repository record as only these records can be defined as atemplate.
Use Cases for Template InstancesThe following are some key points before you refer the Use Cases:
● The instance creation screen as similar to that of Add Record screen except that the screen is pre-populated with data of the selected template.
● In all the use cases, when an instance of template is being created, the PRODUCTID andPRODUCTIDEXT are pre-populated with COPY-<template’s PRODUCTID> and COPY-<template’sPRODUCTIDEXT> respectively.
● Only a new copy of only template record is created. If template record has any relationship (implicitor explicit), only those relationships are copied to the instance. Child records are never copied. Thismeans, the instance will have new relationships with the old child records.
● While creating an instance, you can add new relationship or relationships in addition to existingrelationship or relationships, which were defined for the template, and will be added by default to
62
TIBCO® Fulfillment Catalog User's Guide

the instance, remove any such default relationship(s) or modify the attributes of such defaultrelationship.
When a template record is instantiated, the new root record will have the value of IsTemplate recordattribute as FALSE by default.
Simple Template with No Relationships
There is a template record ADSL_TEMPLATE which has no relationship. When this template is selectedfor instance creation, a screen is displayed, which is pre-filled with data of ADSL_TEMPLATE.
You can change any attribute. The following image indicates that the PRODUCTID of the instance ischanged to ADSL_ALL_INCLUDE:
Simple Template with No Relationships
Template with Relationships
The following image is an example of Template with Relationship:
Template with Relationships
A template ADSL_TEMPLATE has two Characteristics and one ProductComprisedOf relationship.When this template is instantiated without any changes in relationship (addition, modification, ordeletion), the instance model will look like the following image:
Template with Relationship when Template is Instantiated
The following image shows the representation of the result of the template being instantiated twice:
63
TIBCO® Fulfillment Catalog User's Guide

Template with Relationship when Template is Instantiated Twice
Update/Resolve Relationship TagThis feature helps in automating the tagging service for relationships. This feature is also termed asresolving relationship tags because of the fact that it does tagging of the relationship based on parentand child record tags. It works only when one or more records are selected using the check boxes.
When clicked on Update Tag(s), it update/resolve the tags of all relationships which either starts fromor ends at the selected record. While updating the tags, the previous tag would be appended with thecommon tag(s) between the parent and child record, ensuring that the tags do not duplicate. And thiscycle continues for all selected record.
This feature is added on the MDM search result page.
Update/Resolve Relationship Tag Button
The button is always enabled. But if clicked without selecting any record, it pops up an alert message.
Update/Resolve Relationship Tag - Alert Popup
When click on Update/Resolve Relationship Tag after selecting one or more records:
Update/Resolve Relationship Tag - In Progress
When the update/resolve process is successful:
Update/Resolve Relationship Tag - Success
A normal flow is described below:
64
TIBCO® Fulfillment Catalog User's Guide

Update/Resolve Relationship Tag - Flow
The feature behavior can be described with following diagrams:
65
TIBCO® Fulfillment Catalog User's Guide

Before Update/Resolve Relationship Tag
After Update/Resolve Relationship Tag
66
TIBCO® Fulfillment Catalog User's Guide

Administrator Options
You must have administrator privileges to perform the tasks listed in this topic.
The bulk model publisher does not require administrator privileges.
● Import from TIBCO Provisioning
● Export of Fulfillment Catalog Data
● Import of Fulfillment Catalog Data
Creating Users for Offer and Price DesignerA user can only access Offer and Price Designer if the user is assigned the role of Offer Designer in theFulfillment Catalog enterprise. Only the user having the administrator role in the Fulfillment Catalogenterprise can create users who can access the Offer and Price Designer system.
The user having an administrator role only approves the offer using the Fulfillment Catalog enterprise.The user with the administrator role cannot access the Offer and Price Designer system. The user withthe Offer Designer role can access the Offer and Price Designer system to create offers.
Prerequisites
To perform the following steps it is mandatory that the user has administrator role in the FulfillmentCatalog enterprise:
Procedure
1. Access the Fulfillment Catalog system and login using administrator credentials.
2. Click Administration > User Accounts.The User Accounts page opens.
3. Click Create.The Add User page opens.
4. Provide values for the following fields:Fields Description
User Name Enter an appropriate user name. This will be used for logging in to Offer andPrice Designer.
First Name Enter the first name of the user.
Middle Name Enter the middle name of the user.
Last Name Enter the last name of the user.
Password Enter a temporary password for the user.
Re-enter Password Re-enter the temporary password for the user.
5. In the Roles panel, highlight the Offer Designer option from the Available Roles list and click the
button.The action performed will add Offer Designer role in the Selected Roles list.
6. Click the Save button.The new user is created and the user can access and use the Offer and Price Designer system.
67
TIBCO® Fulfillment Catalog User's Guide

User Role MatrixThe following table shows a comparison of the access rights, in the Fulfillment Catalog UI, betweenuser having an Administrator role and user having Offer Designer role.
Menu/Role Administrator Offer Designer
Inbox X X
Administration X
Administration > My Company Profile X
Administration > User Accounts X
Administration > Roles X
Administration > Backend System Profiles X
Administration > Resource Security X
System Operations X
System Operations > Import Metadata X
System Operations > Export Metadata(Wizard) X
System Operations > Export Metadata (File) X
System Operations > Data Transfer X
Master Data X X
Master Data > Data Sources X X
Master Data > Repositories X X
Master Data > Mass Update X X
Master Data > Subset Rules X X
Master Data > Synchronization Profiles X X
Master Data > Synchronization Formats X X
Browse and Search X X
Fulfillment Catalog Operation X X
Fulfillment Catalog Operation > Import fromTIBCO Provisioning X
68
TIBCO® Fulfillment Catalog User's Guide

Menu/Role Administrator Offer Designer
Fulfillment Catalog Operation > PublishCatalog X
Fulfillment Catalog Operation > Export FCData X
Fulfillment Catalog Operation > Import FCData X
Fulfillment Catalog Operation > HierarchyManagement X X
Business Processes X
Event Log X X
“X” denotes the availability of the menu for the role. In case an “X” is marked for themenu, it is not necessary that all menu items are available for the particular role. Forexample, the Administrator role has access to all menu items of the Fulfillment CatalogOperation menu but the Offer Designer role has access only to the HierarchyManagement menu item of the Fulfillment Catalog Operation menu.
The user with the Administrator role cannot access the Offer and Price Designer system at all. Theaccess is only granted to the user with the Offer Designer role. The user with the Administrator role canonly create users who can access Offer and Price Designer system, and approve or activate the offerscreated by them.
Import from TIBCO ProvisioningImport from TIBCO Provisioning is a process of importing Customer Facing Services (CFS) record typefrom TIBCO Fulfillment Provisioning (FP) into TIBCO® Fulfillment Catalog (FC) on demand. It is arequest-reply sequence.
TIBCO® Fulfillment Catalog is used to design various bundles of product or service offering andvarious offers. TIBCO Fulfillment Provisioning has its own catalog, called FP Catalog that allows you toconfigure the list of available CFS and all of them are diverted into Resource Facing Services (RFS).Fulfillment Provisioning supports different catalogues as part of the implementation of the Product andService Order Management components maintaining Telecom provider products (product catalogue)and services (service catalogue).
For each order management component a Catalog defines the following information:
● managing order item instances such as services, products or resources
● authorized actions for these order items instances, such as create, remove, and modify
The synchronization is primarily a one-way process, where catalog data from Fulfillment Provisioningis extracted and imported into the TIBCO Fulfillment Catalog under the pre-defined rule set. TIBCOFulfillment Provisioning responds to any incoming CFS Import Request messages by generating a .csvfile of all the top-level records in its default catalog. At the Fulfillment Provisioning level, the cataloghas the CFS and RFS data, but only the top level CFS record data is synchronized. The child records arenot synchronized.
69
TIBCO® Fulfillment Catalog User's Guide

Configurations Before Starting the Fulfillment Provisioning Catalog SynchronizationYou must set the following properties before starting the Fulfillment Provisioning CatalogSynchronization process.
These properties are added to the $MQ_HOME/config/ConfigValues.xml file after Fulfillment Catalogis configured as the TIBCO MDM plugin. For details, see the Configuring Fulfillment Catalog topic in theTIBCO Fulfillment Catalog Installation and Configuration Guide.
Property Name Description Value
FulfillmentProvisioning messaging initialcontext
FulfillmentProvisioning messaging initialcontext
com.tibco.catalog.fulfillmentProvisionin
g.messaging.initialcontext
FulfillmentProvisioning messagingendpoint
FulfillmentProvisioning messaging endpoint
com.tibco.catalog.fulfillmentProvisionin
g.messaging.endpoint
FulfillmentProvisioning Catalog messaginguser name
FulfillmentProvisioning messaging username
com.tibco.catalog.fulfillmentProvisionin
g.messaging.username
FulfillmentProvisioning Catalog messagingpassword
FulfillmentProvisioning messaging password
com.tibco.catalog.fulfillmentProvisionin
g.messaging.password
To configure the context factory of Fulfillment Provisioning messaging service, use thecom.tibco.catalog.fulfillmentProvisioning.messaging.initialcontext property. The value ofthis property is described in the following table:
Message ServiceProvider Context factory name
TIBCO EMS com.tibco.tibjms.naming.TibjmsInitialContextFactory
Integration Between Fulfillment Catalog and Fulfillment Provisioning
The following configuration is required on TIBCO Enterprise Message Service:
1. Add Factories:
a. Topic Connection Factory - System/JSR264/ApplicationType/OrderManagement/Application/1-0;1-0-0;TIBCO-FOS-FP/Comp/TopicConnectionFactory
b. Queue Connection Factory - System/JSR264/ApplicationType/OrderManagement/Application/1-0;1-0-0;TIBCO-FOS-FP/Comp/QueueConnectionFactory
2. Create Queue:
a. System/JSR264/ApplicationType/OrderManagement/Application/1-0;1-0-0;TIBCO-FOS-
FP/Comp/MessageQueue
3. Create Topic:
a. System/JSR264/ApplicationType/OrderManagement/Application/1-0;1-0-0;TIBCO-FOS-
FP/Comp/XVTEventTopic
70
TIBCO® Fulfillment Catalog User's Guide

Restart Enterprise Message Service if factories are added in the factories.conf configuration file.
Synchronizing Fulfillment Provisioning CatalogThe Fulfillment Provisioning Catalog Synchronization process is initiated through a menu itemFulfillmentCatalog Operation > Import from TIBCO Provisioning. This menu item is added to themenu only after the Fulfillment Catalog is configured as a plugin for TIBCO MDM. For securityreasons, the menu item is visible only to the user with the Administrator privileges. For any change inthe access rule, refer to the Customizing Roles, Menus and Access Rights in the TIBCO MDMCustomization Guide document.
The nominal scenario is as follows (Service Order Data from Fulfillment Provisioning is imported intothe Fulfillment Catalog PRODUCT repository. Additionally, the basic data is created into otherrepositories such as, ACTION, PLANFRAGMENT, MILESTONE, and CHARACTERISTIC, in orderthat service order data conforms to the Fulfillment Catalog rule):
Procedure
1. Got to FulfillmentCatalog Operation > Import from TIBCO Provisioning.
Catalog Synchronization
The application launches the Fulfillment Provisioning Catalog Synchronization process. In thisprocess, Fulfillment Catalog makes a request for CFS data to Fulfillment Provisioning through ajava message sent over a designated queue and wait for the response. The waiting time is set to 2seconds. If reply is not received in time, Fulfillment Catalog terminates the synchronization processwith a message TIBCO Provisioning did not respond. The delay can occur in the following twoscenarios:
● Fulfillment Provisioning is not running. Check with your administrator if FulfillmentProvisioning is deployed or not.
● The Fulfillment Provisioning message queue listener is busy. Try again after some time.
After Fulfillment Catalog receives the reply, it launches the LoadImportAction process of TIBCOMDM to push that data in various repositories. The affected repositories are:
1. ACTION
2. PRODUCT
3. PLANFRAGMENT
4. MILESTONE
5. CHARACTERISTIC
2. Click Check Progress to open the log event where the progress or a status of import process isdisplayed. This event logging is similar to the MDM event logging.
71
TIBCO® Fulfillment Catalog User's Guide

Catalog Synchronization Status
You may see an error or an unexpected screen, if you do not have Fulfillment Provisioninginstalled and configured on your machine.
Cases When Fulfillment Provisioning Synchronization FailsThe synchronization process can fail in the following cases:
1. If the required properties are not available in the ConfigValues.xml file or not set correctly. In thiscase, the process is terminated with the error message on the UI. For details on the configurableproperties, see the Configuration before Starting the Fulfillment Provisioning CatalogSynchronization topic.
2. If Fulfillment Provisioning application is not running or busy.
Data to SynchronizeYou can synchronize data by:
● ACTION Repository Data
● PRODUCT Repository Data
ACTION Repository Data
The details related to ACTION Repository Data are as follows:
TIBCO Fulfillment CatalogAttribute
TIBCO FulfillmentProvisioning Value Comments
PRODUCTID The Verb portion create, modify, cancel
RECORD_TYPE Update hard-coded
SHORTDESC FP managed Action hard-coded
PRODUCT Repository Data
The details related to PRODUCT repository data are as follows:
TIBCO Fulfillment CatalogAttribute
TIBCO FulfillmentProvisioning Value Comments
PRODUCTID FP ID
PRODUCTIDEXT Fulfillment Provisioning CatalogVersion
RECORD_TYPE "CFS" Hard-coded
72
TIBCO® Fulfillment Catalog User's Guide

TIBCO Fulfillment CatalogAttribute
TIBCO FulfillmentProvisioning Value Comments
Name same as PRODUCTID
Owner "FP" Hard-coded
SHORTDESC
LONGDESC
SingleUse
MustComplete
ConcurrentOrder
Message LogsAll the messages are logged as per TIBCO MDM standards.
Export of Fulfillment Catalog DataExport of Fulfillment Catalog data deals with:
● Export of Blank Template
● Export of Fulfillment Catalog Data using Graphical User Interface
● Customization Workflow for Export
Export of Blank TemplateFulfillment Catalog provides you the facility to export a blank template so that you can use thetemplate to model your enterprise data.
Accessing User Interface to Export a Blank Template
To export a blank template using Fulfillment Catalog user interface, perform the following steps:
Procedure
1. Click FulfillmentCatalog Operation > Export FC Data.
73
TIBCO® Fulfillment Catalog User's Guide

Accessing Export FC Data
2. The Blank Template option will be selected by default. Click the Export button.The blank template will be downloaded to your system.
Types of Export of Fulfillment Catalog DataThe following types of export can be performed using the Fulfillment Catalog user interface:
● Full Export of Fulfillment Catalog Data
● Partial Export of Fulfillment Catalog Data
● Enterprise Delta Export of Fulfillment Catalog Data
Full Export of Fulfillment Catalog Data
Full Export is a process of exporting all repository instances and relationship instances data into a csvformat file. The Full Export feature is primarily used when there is a need to copy data from oneenterprise to another.
The repositories involved in this process would be all the repositories that are present in the enterprisewhere from the process is invoked.
Full Export helps to replicate data in one environment in another environment. For example, if data ispopulated in a Development environment, and you are required to have the same data in a Test /Staging environment, you can use this feature to export the data from the Development environmentand import it to your target environment.
Accessing User Interface for Full Export of Fulfillment Catalog Data
To execute Full Export using Fulfillment Catalog user interface, perform the following steps:
Procedure
1. Click FulfillmentCatalog Operation > Export FC Data.
74
TIBCO® Fulfillment Catalog User's Guide

Accessing Export FC Data
2. Select Full/Partial Enterprise Data Export.
3. Click Export button at the bottom of the screen.This internally initiates an export process on the enterprise. If the export process starts successfully,a success page is displayed with the message “Successfully initiated exporting FC data. Monitorevent progress by clicking Check Progress".
4. Click Check Progress link to monitor the event progress.
Enterprise Data Export Status
The success page (as above) is only an indication that the export process has been initiatedsuccessfully. The actual result of the process should be checked from the event log. If, forany reason, the process initiation fails, appropriate error message is displayed on thescreen
The successful execution of the process creates a zip fie, containing one or more csv files inside, atthe location represented by FileName attribute in the event log. The output file can also bedownloaded from the event log.
75
TIBCO® Fulfillment Catalog User's Guide

Export Fulfillment Catalog Data Download
Partial Export of Fulfillment Catalog Data
Partial Export is a process of exporting selective data from all the repository and relationships. Theselection of data is based ProjectTagName attribute value.
Partial Export is primarily used when there is a need to copy one or more project data from oneenterprise to another. The repositories involved in this process would be all the repositories that arepresent in the enterprise where from the process is invoked.
Accessing User Interface for Partial Export of Fulfillment Catalog Data
To execute Partial Export using Fulfillment Catalog user interface, perform the following steps:
Procedure
1. Click FulfillmentCatalog Operation > Export FC Data.
Accessing Export FC Data
2. Select Full/Partial Enterprise Data Export.
76
TIBCO® Fulfillment Catalog User's Guide

Export FC Data Options
3. Click the icon for the Choose the Project Tag Names for exporting Catalog data field.The Multi-value Attribute Details dialog opens.
4. Select the Project Tag Name, click the + sign and click the Done button.
Multi-value Attribute Details Dialog Box
5. When you click the Export label, the workflow is invoked. If the workflow executes successfully, itgenerates the csv files of the data (repository and relationship instance(s)) which matches the one ormore selected tag names. If there are multiple tags selected, it is an OR between the tags whilefinding the match. The output export file is available for download using a link in the event log.The link to the output export file is illustrated as follows:
Link to Output Export File
The download link for the partial export will be available only if the partial export issuccessful. Click the Download link corresponding to the Output JAR File field.
77
TIBCO® Fulfillment Catalog User's Guide

Partial Export of Fulfillment Catalog Data - Control Flow
The control flow is described in the following diagram:
Partial Export of Fulfillment Catalog Data - Control Flow
Partial Export of Fulfillment Catalog Data - Use Case 1
The following is the first use case for partial export of Fulfillment Catalog:
78
TIBCO® Fulfillment Catalog User's Guide

Partial Export of Fulfillment Catalog Data - Use Case 2
The following is the second use case for partial export of Fulfillment Catalog:
79
TIBCO® Fulfillment Catalog User's Guide
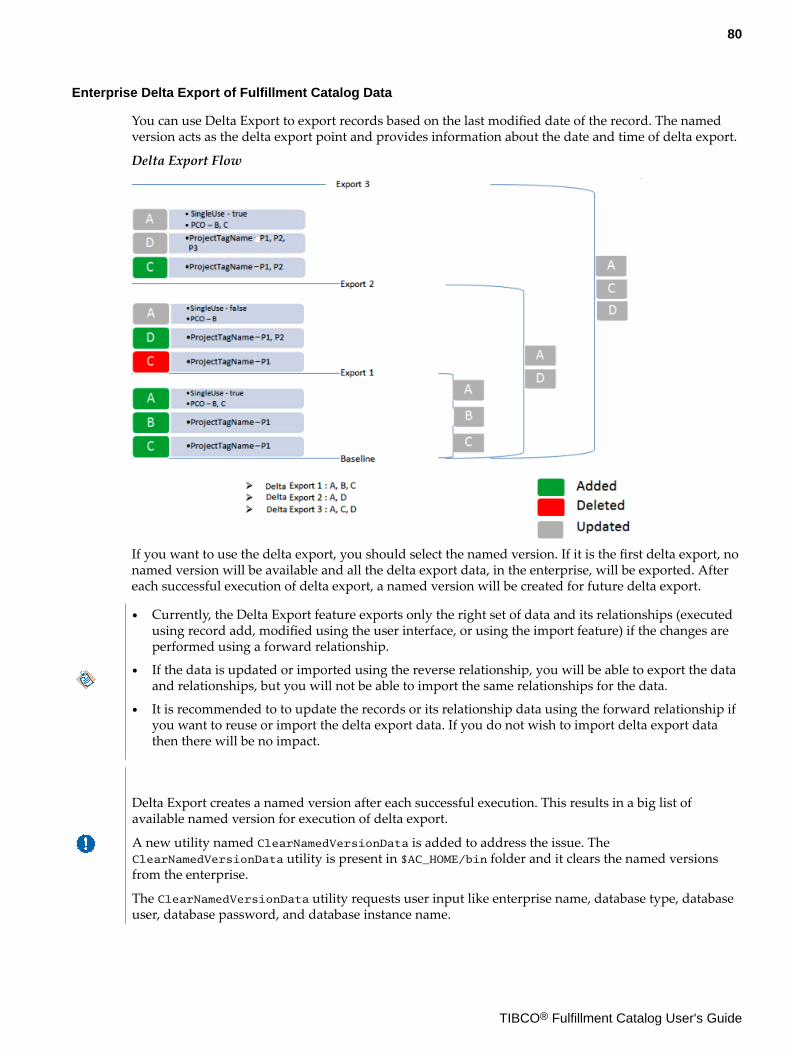
Enterprise Delta Export of Fulfillment Catalog Data
You can use Delta Export to export records based on the last modified date of the record. The namedversion acts as the delta export point and provides information about the date and time of delta export.
Delta Export Flow
If you want to use the delta export, you should select the named version. If it is the first delta export, nonamed version will be available and all the delta export data, in the enterprise, will be exported. Aftereach successful execution of delta export, a named version will be created for future delta export.
● Currently, the Delta Export feature exports only the right set of data and its relationships (executedusing record add, modified using the user interface, or using the import feature) if the changes areperformed using a forward relationship.
● If the data is updated or imported using the reverse relationship, you will be able to export the dataand relationships, but you will not be able to import the same relationships for the data.
● It is recommended to to update the records or its relationship data using the forward relationship ifyou want to reuse or import the delta export data. If you do not wish to import delta export datathen there will be no impact.
Delta Export creates a named version after each successful execution. This results in a big list ofavailable named version for execution of delta export.
A new utility named ClearNamedVersionData is added to address the issue. TheClearNamedVersionData utility is present in $AC_HOME/bin folder and it clears the named versionsfrom the enterprise.
The ClearNamedVersionData utility requests user input like enterprise name, database type, databaseuser, database password, and database instance name.
80
TIBCO® Fulfillment Catalog User's Guide
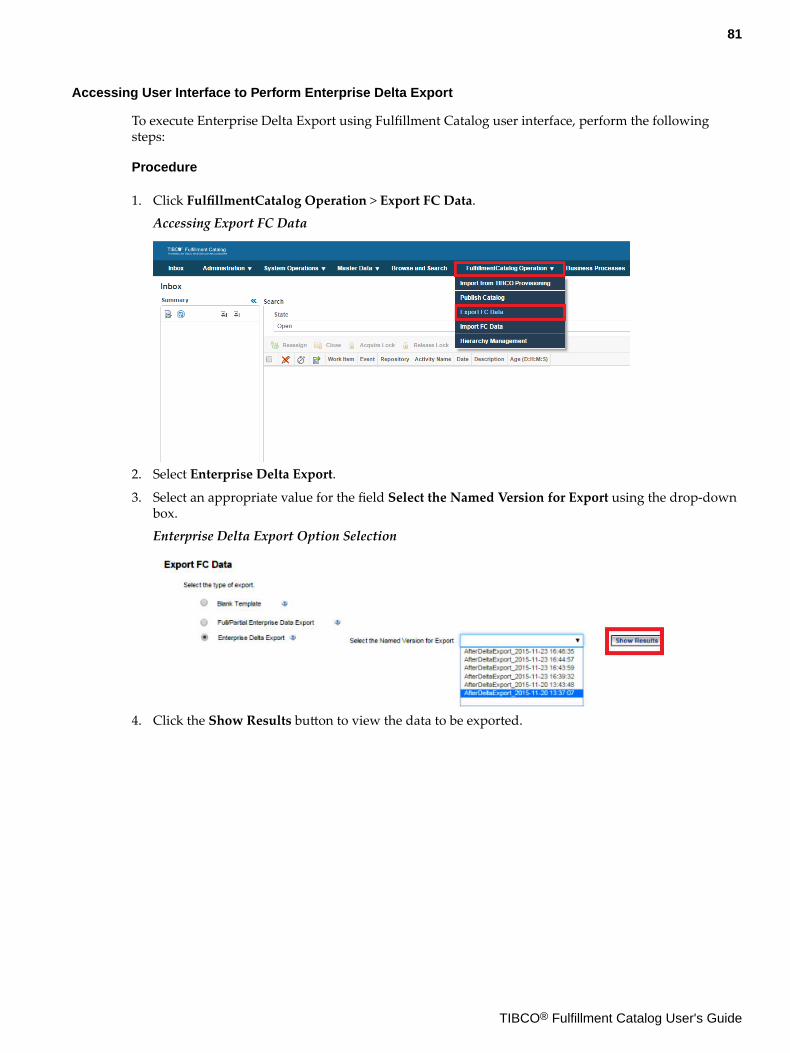
Accessing User Interface to Perform Enterprise Delta Export
To execute Enterprise Delta Export using Fulfillment Catalog user interface, perform the followingsteps:
Procedure
1. Click FulfillmentCatalog Operation > Export FC Data.
Accessing Export FC Data
2. Select Enterprise Delta Export.
3. Select an appropriate value for the field Select the Named Version for Export using the drop-downbox.
Enterprise Delta Export Option Selection
4. Click the Show Results button to view the data to be exported.
81
TIBCO® Fulfillment Catalog User's Guide
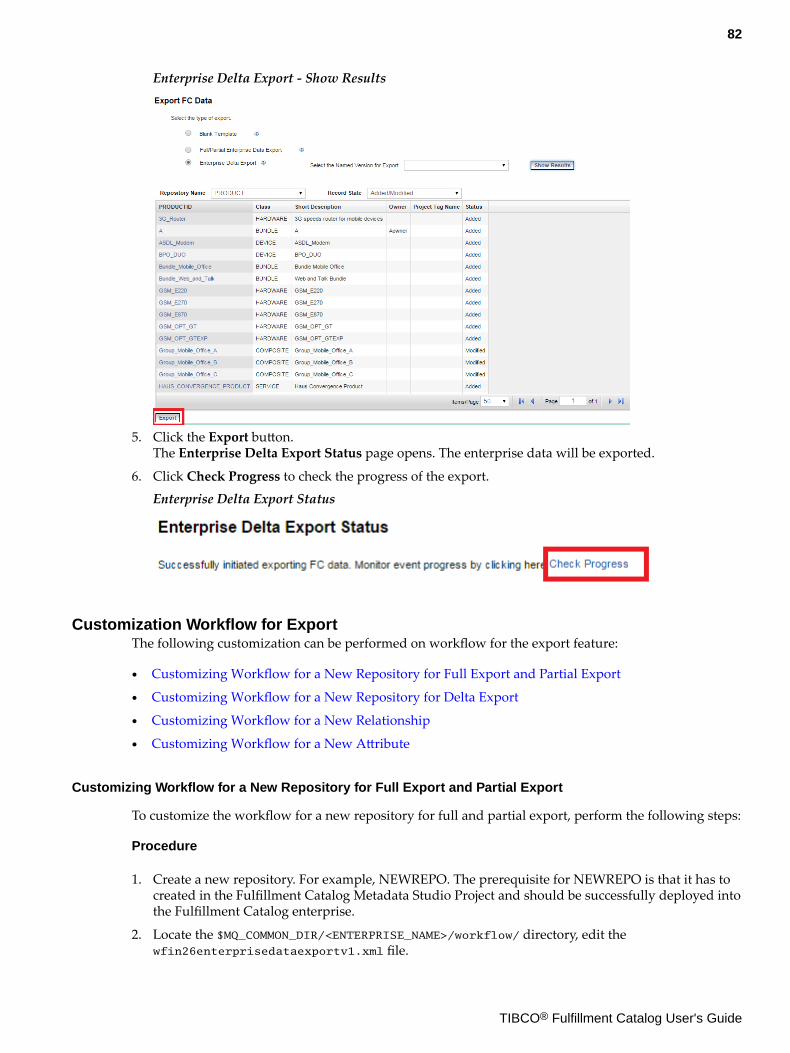
Enterprise Delta Export - Show Results
5. Click the Export button.The Enterprise Delta Export Status page opens. The enterprise data will be exported.
6. Click Check Progress to check the progress of the export.
Enterprise Delta Export Status
Customization Workflow for ExportThe following customization can be performed on workflow for the export feature:
● Customizing Workflow for a New Repository for Full Export and Partial Export
● Customizing Workflow for a New Repository for Delta Export
● Customizing Workflow for a New Relationship
● Customizing Workflow for a New Attribute
Customizing Workflow for a New Repository for Full Export and Partial Export
To customize the workflow for a new repository for full and partial export, perform the following steps:
Procedure
1. Create a new repository. For example, NEWREPO. The prerequisite for NEWREPO is that it has tocreated in the Fulfillment Catalog Metadata Studio Project and should be successfully deployed intothe Fulfillment Catalog enterprise.
2. Locate the $MQ_COMMON_DIR/<ENTERPRISE_NAME>/workflow/ directory, edit thewfin26enterprisedataexportv1.xml file.
82
TIBCO® Fulfillment Catalog User's Guide

3. Succeeding the SpawnSubWorkFlow_PROJECTTAG, add another activity for the new repository asshown in the following example:<Activity Name="SpawnSubWorkFlow_NEWREPO"><Action>InitiateSubFlow</Action><Description>Spawn the subworkflow for NEWREPO repository</Description><Execution>SYNCHR</Execution><Parameter direction="in" type="string" eval="constant" name="eventState">SPAWNWORKFLOW</Parameter><Parameter direction="in" type="string" eval="constant" name="ProcessID">standard/workflow/wfin26enterprisedataexportsubflowv1</Parameter><Parameter direction="in" type="document" eval="variable" name="InDocument">inDoc</Parameter><Parameter name="RepositoryName" direction="in" eval="constant" type="string">NEWREPO</Parameter><Parameter direction="in" eval="variable" type="string" name="ProjectTagNames">ProjectTags</Parameter><Parameter direction="in" eval="variable" type="string" name="FolderPath">TempFilePath</Parameter><Parameter name="OutDocument" direction="out" eval="variable" type="document">inDoc</Parameter></Activity>
4. Comment out the Script tag by adding "<!--" at the beginning of the script and adding "-->" at theend of the script. Example for the script to be commented out is as follows:<Transition FromActivity="SpawnSubWorkFlow_PROJECTTAG" ToActivity="PostProcessExport"/>
5. Add activity transitions as shown in the following example:<Transition FromActivity="SpawnSubWorkFlow_PROJECTTAG" ToActivity="SpawnSubWorkFlow_NEWREPO"/><Transition FromActivity="SpawnSubWorkFlow_NEWREPO" ToActivity=" PostProcessExport "/>
Customizing Workflow for a New Repository for Delta Export
To customize the workflow for a new repository for delta export, perform the following steps:
Procedure
1. Create a new repository. For example, NEWREPO. The prerequisite for NEWREPO is that it has tocreated in the Fulfillment Catalog Metadata Studio Project and should be successfully deployed intothe Fulfillment Catalog enterprise.
2. Locate the $MQ_COMMON_DIR/<ENTERPRISE_NAME>/workflow/ directory, edit thewfin26enterprisedataexport_increamentalv1.xml file.
3. Succeeding the SpawnSubWorkFlow_PROJECTTAG, add another activity for the new repository asshown in the following example:<Activity Name="SpawnSubWorkFlow_NEWREPO"> <Action>InitiateSubFlow</Action> <Description>Spawn the subworkflow for NEWREPO repository</Description> <Execution>SYNCHR</Execution> <Parameter direction="in" type="string" eval="constant" name="eventState">SPAWNWORKFLOW</Parameter> <Parameter direction="in" type="string" eval="constant" name="ProcessID">standard/workflow/wfin26enterprisedataexportsubflow_increamentalv1</Parameter> <Parameter direction="in" type="document" eval="variable" name="InDocument">inDoc</Parameter> <Parameter name="RepositoryName" direction="in" eval="constant" type="string">NEWREPO</Parameter> <Parameter name="SelectedNV" direction="in" eval="variable" type="string">SelectedNamedVersionName</Parameter> <Parameter name="SelNVTimeStamp" direction="in" eval="variable" type="string">fromTimeStamp</Parameter> <Parameter direction="in" eval="variable" type="string"
83
TIBCO® Fulfillment Catalog User's Guide

name="NamedVersionName">NamedVersionNameToCreate</Parameter> <Parameter name="NVTimeStamp" direction="in" eval="variable" type="string">toTimeStamp</Parameter> <Parameter direction="in" eval="variable" type="string" name="FolderPath">TempFilePath</Parameter> <Parameter name="OutDocument" direction="out" eval="variable" type="document">inDoc</Parameter> </Activity>
4. Comment out the Script tag by adding "<!--" at the beginning of the script and adding "-->" at theend of the script. Example for the script to be commented out is as follows:<Transition FromActivity="SpawnSubWorkFlow_PROJECTTAG" ToActivity="PostProcessExport"/>
5. Add activity transitions as shown in the following example:<Transition FromActivity="SpawnSubWorkFlow_PROJECTTAG" ToActivity="SpawnSubWorkFlow_NEWREPO"/><Transition FromActivity="SpawnSubWorkFlow_NEWREPO" ToActivity=" PostProcessExport "/>
Customizing Workflow for a New Relationship
For a new relationship, no additional configuration is required.
New relationship must be created in the Fulfillment Catalog Metadata Studio Project and should bedeployed into the Fulfillment Catalog enterprise successfully.
The new relationship would be exported to a CSV file with the nameRelationshipAttribute_<REL_NAME>.csv.
Customizing Workflow for a New Attribute
For a new attribute (Repository or relationship), no additional configuration is required.
Newly added attribute must be created in Fulfillment Catalog Metadata Studio Project and successfullydeployed into the Fulfillment Catalog instance.
The new attribute would be exported to CSV file of the corresponding repository or relationship.
Import of Fulfillment CatalogImporting data into Fulfillment Catalog deals with:
● Types of Import of Fulfillment Catalog Data, and● Customization Workflow for Import
Types of Import of Fulfillment Catalog DataThe following import types, of Fulfillment Catalog data, can be performed using the FulfillmentCatalog user interface:
● Full Import of Fulfillment Catalog Data● Partial Import of Fulfillment Catalog Data
Full Import of Fulfillment Catalog Data
Full Import allows you to import data into the enterprise. You can import a ZIP file (*.zip) containingCSV files of data. To ensure that a valid ZIP file is selected for import, content files are checked for validrepository and relationship names. If unacceptable files are found, the process terminates with an error.Data will be added or updated in repositories and relationships based on the data availability in theimported ZIP file and data existing in the enterprise.
84
TIBCO® Fulfillment Catalog User's Guide

● Full Import works well with the out-of-the-box metadata provided by the TIBCO FulfillmentCatalog product. Any customization of the metadata, like adding attributes to the repository or tothe relationship levels, will have an impact on the feature, resulting in incorrect data. It may alsolead to the importing of incorrect data, or it might provide undesired results. If you are facing sucha problem, contact TIBCO support for additional help.
● The CSV files, which will be imported, containing the Fulfillment Catalog data must conform to thestructure required by the metadata. You can download a sample of the CSV file, for a repository or arelationship, from the respective data source.
Accessing the User Interface to Fully Import Fulfillment Catalog Data
To execute Full Import of Fulfillment Catalog data using the Fulfillment Catalog user interface, performthe following steps:
Procedure
1. Click FulfillmentCatalog Operation > Import FC Data.
Accessing Import FC Data
2. Select Full Import.
3. Click Choose File button and select the required file.
Import FC Data Options
85
TIBCO® Fulfillment Catalog User's Guide

Only a ZIP file can be selected for import.
4. When upload is clicked, business logic is invoked to import data. User is directed to a status page ifthe process has been initiated successfully. The status page contains the link to the event log wherestatus of the process can be monitored.
Full Import FC Data Status
Backward Compatibility
The Import FC Data feature is backward compatible with Fulfillment Catalog 3.0.1 because FulfillmentCatalog 3.0.1 data CSVs can still be imported without any messaging.
However, the same feature is not compatible with Fulfillment Catalog 3.0.0 data CSVs because of twonew attributes, OfferID and IsTemplate, introduced to the PRODUCT repository. Importing theFulfillment Catalog 3.0.0 compatible PRODUCT_DATA.csv (or any other csv name which is used forimporting record in PRODUCT repository) would not be supported. You have to download the blanktemplate from Fulfillment Catalog 3.0.2, fill the data, and then perform the import operation.
Partial Import of Fulfillment Catalog Data
This allows to import data into the enterprise where from the same has been initiated. It accepts a ZIPfile (*.ZIP) only where the content should be CSV files containing the actual data. To ensure that a validZIP file is selected for import, the content files are checked for valid names for repository andrelationships. If there is any unaccepted file found, the process terminates with the error. The datawould be added/updated/deleted into repositories and relationships based on the exported tag(s), datain the imported ZIP file and already data availability in the enterprise.
● The feature works well with the out-of-the-box metadata provided by the TIBCO FulfillmentCatalog product. Any customization of the metadata, like adding attributes to the repository or tothe relationship levels, will have an impact on the feature, resulting in incorrect data. It may alsolead to the importing of incorrect data, or it might provide undesired results. If you are facing sucha problem, contact TIBCO support for additional help.
● The CSV files, which will be imported, containing the Fulfillment Catalog data must conform to thestructure required by the metadata. You can download a sample of the CSV file, for a repository or arelationship, from the respective data source.
Accessing the User Interface to Partially Import Fulfillment Catalog Data
To execute the Partial Import of Fulfillment Catalog data using the Fulfillment Catalog user interface,perform the following steps:
Procedure
1. Click FulfillmentCatalog Operation > Import FC Data. The Import FC Data page opens.
86
TIBCO® Fulfillment Catalog User's Guide

Accessing Import FC Data
2. Select the type of import as Partial Import.
3. Click Choose file button to select the appropriate ZIP file.
4. Click Upload button to complete the import process.
Import FC Data Page - Partial Upload Selected
Only a ZIP file can be selected for import.
When upload is clicked, business logic is invoked to import data. User is directed to a status page ifthe process has been initiated successfully. The status page contains the link to the event log wherestatus of the process can be monitored.
Use Cases for Partial Import of Fulfillment Catalog Data
The topic covers use cases that are relevant to the Partial Import feature of Fulfillment Catalog.
Each use case is applicable for the Repository records as well as the Relationship records.
The list of use cases are as follows:
1. Partial Import of Fulfillment Catalog Data - Use Case 1
2. Partial Import of Fulfillment Catalog Data - Use Case 2
3. Partial Import of Fulfillment Catalog Data - Use Case 3
87
TIBCO® Fulfillment Catalog User's Guide

4. Partial Import of Fulfillment Catalog Data - Use Case 4
5. Partial Import of Fulfillment Catalog Data - Use Case 5
6. Partial Import of Fulfillment Catalog Data - Use Case 6
7. Partial Import of Fulfillment Catalog Data - Use Case 7
8. Partial Import of Fulfillment Catalog Data - Use Case 8
9. Partial Import of Fulfillment Catalog Data - Use Case 9
10. Partial Import of Fulfillment Catalog Data - Use Case 10
Partial Import of Fulfillment Catalog Data - Use Case 1
The following is the first use case for the Partial Import feature of Fulfillment Catalog:
Step 1
The import zip file has repository records (for example, PRODUCT repository records) namedProductA with the project tag [P1,P2]. The TagNames.csv file, which exists within the import zip file,has [P1,P2]. Import the zip file to a Clean or New Enterprise.
Because [P1,P2] exists in the TagNames.csv file, only the records that are tagged with [P1,P2] areadded or modified to the Test enterprise.
Because ProductA does not exist in the enterprise, but exists in the PRODUCT_DATA.csv file with theproject tag [P1,P2], it is added to the Test enterprise with the project tag [P1,P2].
Partial Import of Fulfillment Catalog Data - Use Case 1 Step 1
Step 2
The import zip file has repository records (for example, PRODUCT repository records) namedProductA and ProductB with project tags as [P1,P2] and [P1] respectively. The TagNames.csv file,which exists within the import zip file, has [ P1 ]. Import the zip file to an enterprise on which Step 1is performed.
Because [P1] is present in the TagNames.csv file, only the records that are tagged with [P1] are addedor modified to the Test enterprise.
Because ProductB does not exist in the enterprise, but exists in the PRODUCT_DATA.csv file, ProductB,with the project tag [P1], is loaded to the Test enterprise.
Because ProductA exists in the enterprise with the project tag [P1], and exists in thePRODUCT_DATA.csv file with the project tag [P1], it is loaded to the enterprise with no modificationsto the project tag.
88
TIBCO® Fulfillment Catalog User's Guide

Partial Import of Fulfillment Catalog Data - Use Case 1 Step 2
Partial Import of Fulfillment Catalog Data - Use Case 2
The following is the second use case for the Partial Import feature of Fulfillment Catalog:
Step 1
The Import zip file has repository records (for example, PRODUCT repository records) namedProductA and ProductB with the project tags [P1] and [P1] respectively. The TagNames.csv file, whichexists within the import zip file, has [P1]. Import the zip file to an existing enterprise that has data init.
Because [P1] exists in TagNames.csv file, only the records with the project tag [P1] are added ormodified to the Test enterprise.
Because ProductA exists in the PRODUCT_DATA.csv file with the project tag [P1], and ProductA alsoexists in the enterprise with the project tag [P1], it is loaded to the enterprise without any change tothe project tag.
Because ProductB exists in the PRODUCT_DATA.csv file with the project tag [P1], and ProductB alsoexists in the enterprise with the project tag [P1], it is loaded to the enterprise without any change tothe project tag.
Partial Import of Fulfillment Catalog Data - Use Case 2 Step 1
Partial Import of Fulfillment Catalog Data - Use Case 3
The following is the third use case for the Partial Import feature of Fulfillment Catalog:
The Import zip file has repository records (for example, PRODUCT repository records) namedProductA and ProductB without the project tags. The TagNames.csv file, which exists within theimport zip file, has [P1]. Import the zip file to an existing enterprise that has data in it.
Because [P1] exists in the TagNames.csv file, only the records that are tagged with [P1] are added ormodified to the Test enterprise.
89
TIBCO® Fulfillment Catalog User's Guide

Because ProductA exists in the PRODUCT_DATA.csv file without the project tag, and ProductA alsoexists in the enterprise with the project tag [P1,P2], it is loaded to the enterprise with the project tag[P2]. The [P1] tag is removed for ProductA because it is not present in the PRODUCT_DATA.csv file.
Because ProductB exists in the PRODUCT_DATA.csv file without the project tag, and ProductB alsoexists in the enterprise with the project tag [P1], it is updated to the enterprise without the projecttag. Because PorductB has no project tag it is removed from the enterprise.
Partial Import of Fulfillment Catalog Data - Use Case 3 Step 1
Partial Import of Fulfillment Catalog Data - Use Case 4
The following is the fourth use case for the Partial Import feature of Fulfillment Catalog:
Step 1
The Import zip file has repository records (for example, PRODUCT repository records) namedProductA and ProductB with project tags [P1 ]and [P1] respectively. The TagNames.csv file, whichexists within the import zip file, has [P1]. Import the zip file to an existing enterprise that has datapresent in it.
Because [P1] exists in the TagNames.csv file, only the records with the project tag [P1] are added ormodified to the Test enterprise.
Because ProductA exists in the PRODUCT_DATA.csv file with the project tag [P1], and ProductA alsoexists in the enterprise with the project tag [P2], it is loaded into the enterprise with the project tag[P1,P2].
Because ProductB exists in the PRODUCT_DATA.csv file with the project tag [P1], and ProductB doesnot exist in the enterprise, it is added to the Test enterprise with the project tag [P1].
Partial Import of Fulfillment Catalog Data - Use Case 4 Step 1
90
TIBCO® Fulfillment Catalog User's Guide

Step 2
The Import zip file has repository records (for example, PRODUCT repository records) namedProductB with the project tag [P1]. The TagNames.csv file, which exists within the import zip file, has[P1]. Import the zip file to an existing enterprise on which Step 1 is performed.
Because ProductA does not exist in the PRODUCT_DATA.csv file, and ProductA exists in the enterprisewith the project tag [P1,P2], it is updated with the project tag [P2] and the project tag [P1] is beremoved. If the ProductA existed in the enterprise, its project tag would have been modified orremoved. The ProductB is loaded to the Test enterprise with the project tag [P1].
Partial Import of Fulfillment Catalog Data - Use Case 4 Step 2
Step 3
The Import zip file has repository records (for example, PRODUCT repository records) namedProductB and Product C with project tags [P1], [P1,P3]. The TagNames.csv file, which exists within theimport zip file, has [P1]. Import the zip file to an existing enterprise on which Step 2 is performed.
Because ProductB exists in the PRODUCT_DATA.csv file with the project tag [P1], and ProductB alsoexists in the enterprise, it is loaded to the Test enterprise with the project tag [P1].
Because ProductC exists in the PRODUCT_DATA.csv file with the project tag [P1], and ProductC doesnot exist in the enterprise, it is loaded to the Test enterprise with the project tag [P1].
Partial Import of Fulfillment Catalog Data - Use Case 4 Step 3
Partial Import of Fulfillment Catalog Data - Use Case 5
The following is the fifth use case for the Partial Import feature of Fulfillment Catalog:
Step 1
The Import zip file has repository records (for example, PRODUCT repository records) namedProductA and ProductB with the project tags [P1] and [P1]. The TagNames.csv file, which exists withinthe import zip file, has [P1]. Import the zip file to a Clean or New enterprise.
Because [P1] exists in the TagNames.csv file, only the records that are tagged with [P1] are added ormodified to the Test enterprise.
Because the import is performed on a Clean or New enterprise, ProductA and ProductB are loaded tothe Test enterprise with the project tag [P1] and [P1] respectively.
91
TIBCO® Fulfillment Catalog User's Guide

Partial Import of Fulfillment Catalog Data - Use Case 5 Step 1
Step 2
The Import zip file has repository records (example PRODUCT repository records) named ProductA,ProductB, and ProductC with the project tags [P1], [P1], and [P2] respectively. The TagNames.csv file,which exists within the import zip file, has [P2]. Import the zip file to an enterprise on which Step 1 isperformed.
Because [P2] exists in the TagNames.csv file, only the records that have the project tag [P2] are addedor modified to the Test enterprise. ProductC with the project tag [P2] is loaded to the Test enterprise.
Partial Import of Fulfillment Catalog Data - Use Case 5 Step 2
Partial Import of Fulfillment Catalog Data - Use Case 6
The following is the sixth use case for the Partial Import feature of Fulfillment Catalog:
Step 1
The Import zip file has repository records (for example, PRODUCT repository records) namedProductA, ProductB, and ProductC with the project tags [P1], [P1], and [P2] respectively. TheTagNames.csv file, which exists within the import zip file, has [P1,P2]. Import the zip file to a Clean orNew enterprise.
Because [P1,P2] exists in the TagNames.csv file, only the records that have the project tag [P1] or [P2]are added or modified to the Test enterprise.
Because the import is performed on a Clean or New enterprise, ProductA, ProductB, and ProductCare loaded to the Test enterprise with the project tags [P1], [P1], and [P2] respectively.
Partial Import of Fulfillment Catalog Data - Use Case 6 Step 1
Step 2
The Import zip file has repository records (for example, PRODUCT repository records) namedProductA, ProductB, and ProductC with the project taga [P1,P2], [P1], and [P2] respectively. TheTagNames.csv file, which exists within the import zip file, has [P1]. Import the zip file into anenterprise on which Step 1 is performed.
92
TIBCO® Fulfillment Catalog User's Guide
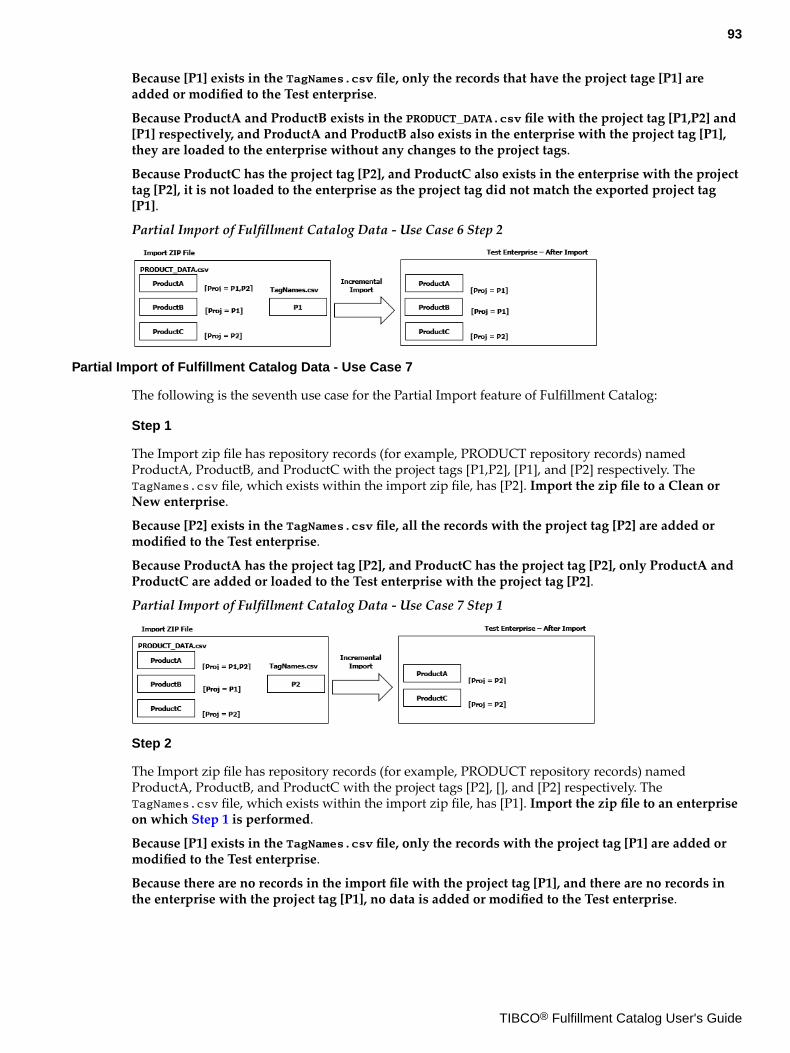
Because [P1] exists in the TagNames.csv file, only the records that have the project tage [P1] areadded or modified to the Test enterprise.
Because ProductA and ProductB exists in the PRODUCT_DATA.csv file with the project tag [P1,P2] and[P1] respectively, and ProductA and ProductB also exists in the enterprise with the project tag [P1],they are loaded to the enterprise without any changes to the project tags.
Because ProductC has the project tag [P2], and ProductC also exists in the enterprise with the projecttag [P2], it is not loaded to the enterprise as the project tag did not match the exported project tag[P1].
Partial Import of Fulfillment Catalog Data - Use Case 6 Step 2
Partial Import of Fulfillment Catalog Data - Use Case 7
The following is the seventh use case for the Partial Import feature of Fulfillment Catalog:
Step 1
The Import zip file has repository records (for example, PRODUCT repository records) namedProductA, ProductB, and ProductC with the project tags [P1,P2], [P1], and [P2] respectively. TheTagNames.csv file, which exists within the import zip file, has [P2]. Import the zip file to a Clean orNew enterprise.
Because [P2] exists in the TagNames.csv file, all the records with the project tag [P2] are added ormodified to the Test enterprise.
Because ProductA has the project tag [P2], and ProductC has the project tag [P2], only ProductA andProductC are added or loaded to the Test enterprise with the project tag [P2].
Partial Import of Fulfillment Catalog Data - Use Case 7 Step 1
Step 2
The Import zip file has repository records (for example, PRODUCT repository records) namedProductA, ProductB, and ProductC with the project tags [P2], [], and [P2] respectively. TheTagNames.csv file, which exists within the import zip file, has [P1]. Import the zip file to an enterpriseon which Step 1 is performed.
Because [P1] exists in the TagNames.csv file, only the records with the project tag [P1] are added ormodified to the Test enterprise.
Because there are no records in the import file with the project tag [P1], and there are no records inthe enterprise with the project tag [P1], no data is added or modified to the Test enterprise.
93
TIBCO® Fulfillment Catalog User's Guide

Partial Import of Fulfillment Catalog Data - Use Case 7 Step 2
Partial Import of Fulfillment Catalog Data - Use Case 8
The following is the eighth use case for the Partial Import feature of Fulfillment Catalog:
Step 1
The Import zip file has repository records (for example, PRODUCT repository records) namedProductA, ProductB, and ProductC with the project tags [P1], [P2], and [P3] respectively. TheTagNames.csv file, which exists within the import zip file, has [P1,P2,P3]. Import the zip file to a Cleanor New enterprise.
Because [P1,P2,P3] exists in the TagNames.csv file, only the records that have the project tags [P1],[P2] or [P3] are added or modified to the Test enterprise.
Partial Import of Fulfillment Catalog Data - Use Case 8 Step 1
Step 2
The Import zip file has repository records (for example, PRODUCT repository records) namedProductA, ProductB, and ProductC with the project tags [P1,P2], [P2,P3], and [P3,P1] respectively. TheTagNames.csv file, which exists within the import zip file, has [P1,P2,P3]. Import the zip file to anenterprise on which Step 1 is performed.
Because [P1], [P2], and [P3] exists in the TagNames.csv file, only the records with the project tags[P1], [P2] or [P3] are added or modified to the Test enterprise.
Because ProductA in the PRODUCT_DATA.csv file has the project tag [P1,P2], and the TagNames.csvfile has the project tag [P1,P2,P3], it is loaded to the enterprise with the project tag [P1,P2].
Because ProductB in the PRODUCT_DATA.csv file has the project tag [P2,P3], and the TagNames.csvfile has the project tag [P1,P2,P3], it is loaded to the enterprise with the project tag [P2,P3].
Because ProductC in the PRODUCT_DATA.csv file has the project tag [P3,P1], and the TagNames.csvfile has the project tag [P1,P2,P3], it is loaded to the enterprise with the project tag [P3,P1].
Partial Import of Fulfillment Catalog Data - Use Case 8 Step 2
94
TIBCO® Fulfillment Catalog User's Guide

Partial Import of Fulfillment Catalog Data - Use Case 9
The following is the ninth use case for the Partial Import feature of Fulfillment Catalog:
Step 1
The Import zip file has repository records (for example, PRODUCT repository records) namedProductA, ProductB, and ProductC with the project tags [P1,P2], [P2,P3], and [P3,P1] respectively. TheTagNames.csv file, which exists within the import zip file, has [P1,P2,P3]. Import the zip file to a Cleanor New enterprise.
Because [P1,P2,P3] exists in the TagNames.csv file, only the records with the project tags [P1], [P2] or[P3] are added or modified to the Test enterprise.
Partial Import of Fulfillment Catalog Data - Use Case 9 Step 1
Step 2
The Import zip file has repository records (for example, PRODUCT repository records) namedProductA, ProductB, and ProductC with the project tags [P4], [P5], and [P6] respectively. TheTagNames.csv file, which exists within the import zip file, has [P1,P2,P3]. Import the zip file to anenterprise on which Step 1 has been performed.
[P4], [P5], and [P6] does not exist in the TagNames.csv file and such project tags are not added to theTest enterprise.
Because ProductA exists in the PRODUCT_DATA.csv file without the project tag [P1,P2], and ProductAexists in the enterprise with the project tag [P1,P2], the import process removes the project tag[P1,P2] from ProductA. Because there is no project tag for ProductA, it is deleted.
Because ProductB exists in the PRODUCT_DATA.csv file without the project tag [P2,P3], and ProductBexists in the enterprise with the project tag [P2,P3], the import process removes the project tag[P2,P3] from ProductB. Because there is no project tag for ProductB, it is deleted.
Because ProductC exists in the PRODUCT_DATA.csv file without the project tag [P3,P1], and ProductCexists in the enterprise with the project tag [P3,P1], the import process removes the project tag[P3,P1] from ProductC. Because there is no project tag for ProductC, it is deleted.
Partial Import of Fulfillment Catalog Data - Use Case 9 Step 2
95
TIBCO® Fulfillment Catalog User's Guide

Partial Import of Fulfillment Catalog Data - Use Case 10
The following is the tenth use case for the Partial Import feature of Fulfillment Catalog:
Step 1
The import zip file has repository records (for example, PRODUCT repository records) namedProductA, ProductB, and ProductC with the project tags [P1,P2], [P2,P3], and [P3,P1] respectively. TheTagNames.csv file, which exists within the import zip file, has [P1,P2,P3]. Import the zip file to a Cleanor New Enterprise.
Because [P1], [P2], and [P3] exist in the TagNames.csv file, only the records having the project tag[P1], [P2] or [P3] are added or modified to the Test enterprise.
Partial Import of Fulfillment Catalog Data - Use Case 10 Step 1
Step 2
The import zip file has repository records (for example, PRODUCT repository records) namedProductA, ProductB, and ProductC with the project tags [P4], [P5], and [P6] respectively. TheTagNames.csv file, which exists within the import zip file, has [P1,P6]. Import the zip file to anenterprise on which Step 1 is performed.
Because [P1,P6] exists in the TagNames.csv file, only the records that have the project tag [P1] or [P6]are added or modified to the Test enterprise.
Because [P4,P5] does not exist in the TagNames.csv file, the records that have the project tag [P4] or[P5] are not added to the Test enterprise.
Because ProductA exists in the PRODUCT_DATA.csv file without the project tag [P1,P2], and ProductAexists in the TagNames.csv file with the project tag [P1,P6], ProductA is added to the Test enterprisewithout the project tag [P1].
Because ProductB exists in the PRODUCT_DATA.csv file with the project tag [P5], and theTagNames.csv file has [P1,P6], ProductB is not imported into the Test enterprise.
Because ProductC exists in the PRODUCT_DATA.csv file without the project tag [P3,P1], and theTagNames.csv file has [P1,P6], ProductC is added to the Test enterprise with the project tag [P6] andwithout the project tag [P1].
Partial Import of Fulfillment Catalog Data - Use Case 10 Step 2
Customization Workflow for ImportThe following customization can be performed on the workflow for the import feature:
● Customizing Workflow for a New Repository
96
TIBCO® Fulfillment Catalog User's Guide

● Customizing Workflow for a Newly Added Relationship
● Customizing Workflow for a Newly Added Attribute to Existing Repository
● Customizing Workflow for Newly Added Relationship Attribute to Existing Relationship
Customizing Workflow for a New Repository
To customize the workflow for a new repository, perform the following steps:
● NEWREPO (newly created repository).
● The corresponding data source and input map should be created in the Fulfillment CatalogMetadata Studio Project and successfully deployed into the Fulfillment Catalog enterprise.
● Follow the naming convention of Repository name, its data source name, and the input map nameas seen in the CatalogDataMap.csv file present in the $AC_HOME/samples/ directory. Ensure thatthere are corresponding CSV file as per the created datasource to import.
Procedure
1. Open the $AC_HOME/samples/ CatalogDataMap.csv file.
2. After theline RULEPARAMETER,RULEPARAMETER_DATA_IMAP,RULEPARAMETER_DATA_DS,RULEPARAMETER_DATA.csv add the new line for every new repositoryNEWREPO,<NEWREPO>_DATA_IMAP,<NEWREPO>_DATA_DS,NEWREPO_DATA.csv.
● New lines in CatalogDataMap.csv should be added as per the heading.
● Adhere to the <NEWREPO>_DATA_IMAP format for the input map when creating it inMDM Studio.
● Adhere to the <NEWREPO>_DATA_DS format for the data source when creating it inMDM Studio.
● Adhere to the <NEWREPO>_DATA.csv file name format for the CSV file to be imported.
3. For just a partial import perform the following steps:a) Locate the $MQ_COMMON_DIR/<ENTERPRISE_NAME>/workflow/ directory and edit the
wfin26partialimportfcdatav1.xml file.b) Succeeding the activity SpawnSubWorkFlow_PROJECTTAG, add another activity for the new
repository as shown in the following example:<Activity Name="SpawnSubWorkFlow_NEWREPO"><Action>InitiateSubFlow</Action><Description>Spawn the subworkflow for NEWREPO repository</Description><Execution>SYNCHR</Execution><Parameter direction="in" type="string" eval="constant" name="eventState">SPAWNWORKFLOW</Parameter><Parameter direction="in" type="string" eval="constant" name="ProcessID">standard/workflow/wfin26partialimportfcdatasubflowv1</Parameter><Parameter direction="in" type="document" eval="variable" name="InDocument">inDoc</Parameter><Parameter name="RepositoryName" direction="in" eval="constant" type="string">NEWREPO</Parameter><Parameter direction="in" eval="variable" type="string" name="ProjectTagNames">ProjectTagName</Parameter><Parameter direction="in" eval="variable" type="string" name="FolderPath">TempFilePath</Parameter><Parameter name="OutDocument" direction="out" eval="variable" type="document">inDoc</Parameter></Activity>
97
TIBCO® Fulfillment Catalog User's Guide

c) Comment out the existing activity transition for SpawnSubWorkFlow_PROJECTTAG by adding"<!--" at the beginning of the transition and adding "-->" at the end of the transition. Example forthe transition to be commented out is as follows:<Transition FromActivity="SpawnSubWorkFlow_PROJECTTAG" ToActivity="PrepareForImport"/>
d) Add the activity transitions as shown in the following example:<Transition FromActivity="SpawnSubWorkFlow_PROJECTTAG" ToActivity="SpawnSubWorkFlow_NEWREPO "/><Transition FromActivity="SpawnSubWorkFlow_NEWREPO" ToActivity="PrepareForImport "/>
Customizing Workflow for a Newly Added Relationship
To customize the workflow for a newly added relationship, perform the following steps:
● NEWRELATONSHIP (newly created relationship)
● Its corresponding data source and input maps should be created in the Fulfillment CatalogMetadata Studio Project and deployed successfully into the Fulfillment Catalog enterprise.
● Follow the naming convention of Repository name, its data source name, and input maps names asper RelationshipDataMap.csv file present in $AC_HOME/samples/ directory. Ensurecorresponding CSV file as per the created data source for import.
Procedure
1. Open the $AC_HOME/samples/ directory and edit the RelationshipDataMap.csv file as shown inthe following example:
2. After the line REQUIRES_PRODUCT, GROUPREQUIRESPRODUCTS_PARENT_IMAP,REL_GROUPREQUIRESPRODUCT_DS, RelationshipAttribute_GroupRequiresProducts.csv addthe new line for every forward relationship of the new repo NEWREPO,<RELATIONSHIPNAME>PARENT_IMAP, REL<RELATIONSHIPNAME>DS,
RelationshipAttribute<RELATIONSHIPNAME>.csv.
● The first line of RelationshipDataMap.csv indicates that the reponame should bewritten first followed by ForwardRelationshipNameInputMap name, datasourcename, and CSV file name, in the same order it should be imported.
● Adhere to the <RELATIONSHIPNAME>_PARENT_IMAP format for the input map whencreating it in MDM Studio.
● Adhere to the REL_<RELATIONSHIPNAME>_DS format for the data source when creatingit in MDM Studio.
● Adhere to the RelationshipAttribute_<RELATIONSHIPNAME>.csv file to beimported.
Customizing Workflow for a Newly Added Attribute to Existing Repository
There is no change required for importing newly added attribute to existing repository.
New attribute should be created for the repository in the Fulfillment Catalog Metadata Studio Projectand the data source, and the input map of the repository should be modified and deployed into theFulfillment Catalog enterprise successfully. The data source and input map names that need to bemodified should be present in the $AC_HOME/samples/CatalogDataMap.csv.
98
TIBCO® Fulfillment Catalog User's Guide

Customizing Workflow for Newly Added Relationship Attribute to Existing Relationship
There is no change required for importing newly added attribute to existing relationship.
New relationship attribute should be created for the relationship and its corresponding data source.Input maps in the Fulfillment Catalog Metadata Studio should be modified and deployed to theFulfillment Catalog enterprise successfully. The data source and input map names that should bemodified should be present in the $AC_HOME/samples/RelatonshipDataMap.csv.
Enforcement of RecordStatus
99
TIBCO® Fulfillment Catalog User's Guide

Frequently Asked Questions
The following are a list of Frequently Asked Questions (FAQs)
1. Question 1
2. Question 2
3. Question 3
Question 1I am facing the error "JAV-8001: Unexpected error. Class: 'ActiveCatalogUtility' andmethod name: 'initiateWorkflow'. Additional information: Unknown" on a newly createdenterprise. What do I do?If you are facing the error "JAV-8001: Unexpected error. Class: 'ActiveCatalogUtility' andmethod name: 'initiateWorkflow'. Additional information: Unknown" on a newly createdenterprise, then the following sections will provide you information about the initial checks that are tobe performed, and a workaround that will act as a solution.
Verify if the problem occurs only on a newly created enterprise
First, you need to verify if the problem is actually happening on a newly created enterprise. To verifythe same, perform the following steps:
Procedure
1. Click Master Data > Datasources. Ensure that the data source row count is zero for all data sources.
2. Check the message displayed in the $MQ_LOG/sqlldr.log . If the message is "fix PATH" then oneof the following conditions are true:a) The environment variable PATH is correctly set, that is, $MQ_HOME/bin will appear before
$ORACLE_HOME/bin.b) The LD_LIBRARY_PATH is correctly set to $ORACLE_HOME/lib:$LD_LIBRARY_PATH.c) If step (a) is not true then the JVM arguments has the same PATH in the JBOSS startup script.
Workaround
The workaround provided is the solution to the mentioned scenario:
Fix the $PATH environment variable correctly and restart the application.
100
TIBCO® Fulfillment Catalog User's Guide
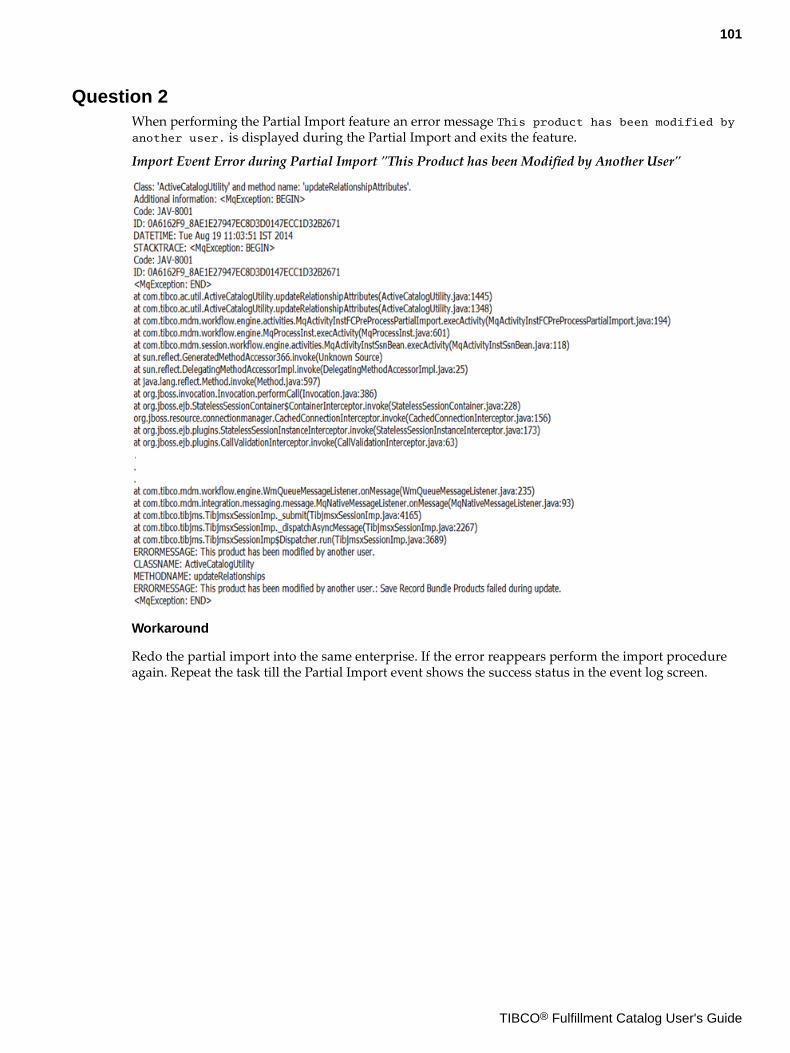
Question 2When performing the Partial Import feature an error message This product has been modified byanother user. is displayed during the Partial Import and exits the feature.
Import Event Error during Partial Import "This Product has been Modified by Another User"
Workaround
Redo the partial import into the same enterprise. If the error reappears perform the import procedureagain. Repeat the task till the Partial Import event shows the success status in the event log screen.
101
TIBCO® Fulfillment Catalog User's Guide
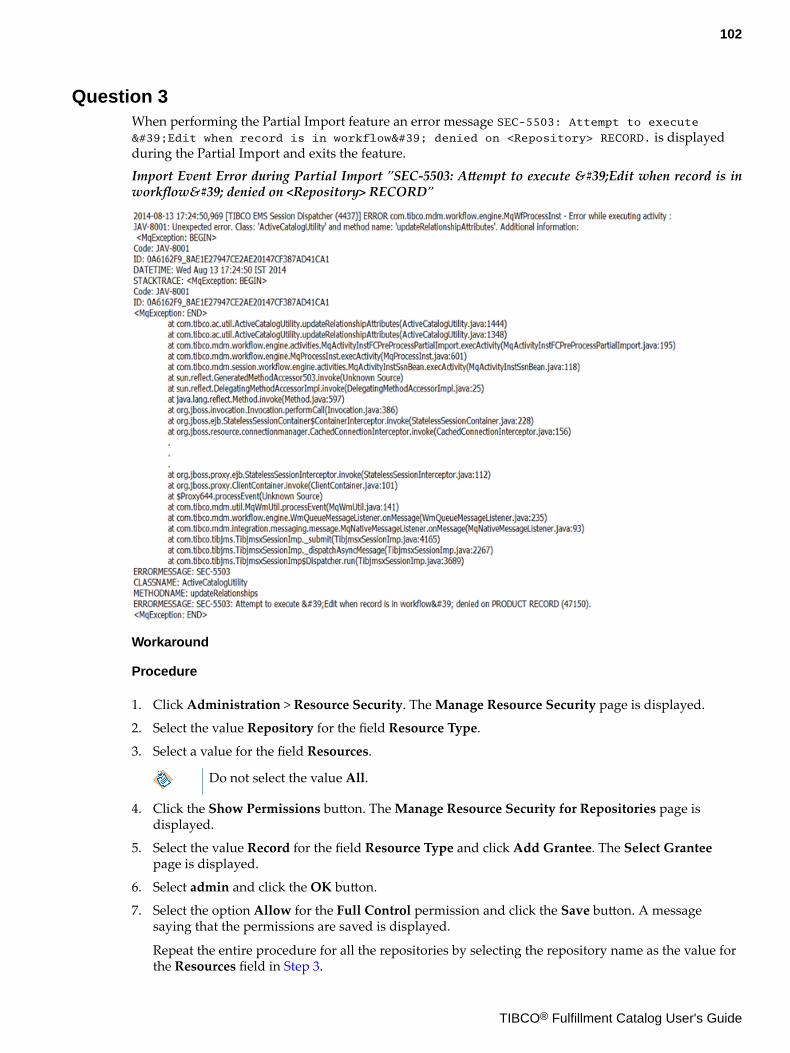
Question 3When performing the Partial Import feature an error message SEC-5503: Attempt to execute'Edit when record is in workflow' denied on <Repository> RECORD. is displayedduring the Partial Import and exits the feature.
Import Event Error during Partial Import "SEC-5503: Attempt to execute 'Edit when record is inworkflow' denied on <Repository> RECORD"
Workaround
Procedure
1. Click Administration > Resource Security. The Manage Resource Security page is displayed.
2. Select the value Repository for the field Resource Type.
3. Select a value for the field Resources.
Do not select the value All.
4. Click the Show Permissions button. The Manage Resource Security for Repositories page isdisplayed.
5. Select the value Record for the field Resource Type and click Add Grantee. The Select Granteepage is displayed.
6. Select admin and click the OK button.
7. Select the option Allow for the Full Control permission and click the Save button. A messagesaying that the permissions are saved is displayed.
Repeat the entire procedure for all the repositories by selecting the repository name as the value forthe Resources field in Step 3.
102
TIBCO® Fulfillment Catalog User's Guide

Samples
The following list contains samples that are available for your reference:
● Conditional Affinity Sample
● Sample Order XML
● Sample Plan Item XML
● Sample XPATHs
Conditional Affinity SampleThe conditional affinity sample is as follows:
A product model has two parents:
● Parent_A
● Parent _B
Consider a product model where conditional affinity is defined at all the child products:
● Child_A1
● Child_B1
● Child_B2
Conditional Affinity
The XPATH defined in the product model is evaluated against the submitted order schema.
The following table describes the attribute-based conditional affinity scenarios:
Attribute Sample XPATH Expressions Order Payload
AffinityCondition exists($var/Order/
OrderHeaderUDF[name=UDFNAME
and value="UDFVALUE"])
<ord1:udf><ord1:name>UDFNAME</ord1:name><ord1:value>UDFVALUE</ord1:value></ord1:udf>
103
TIBCO® Fulfillment Catalog User's Guide
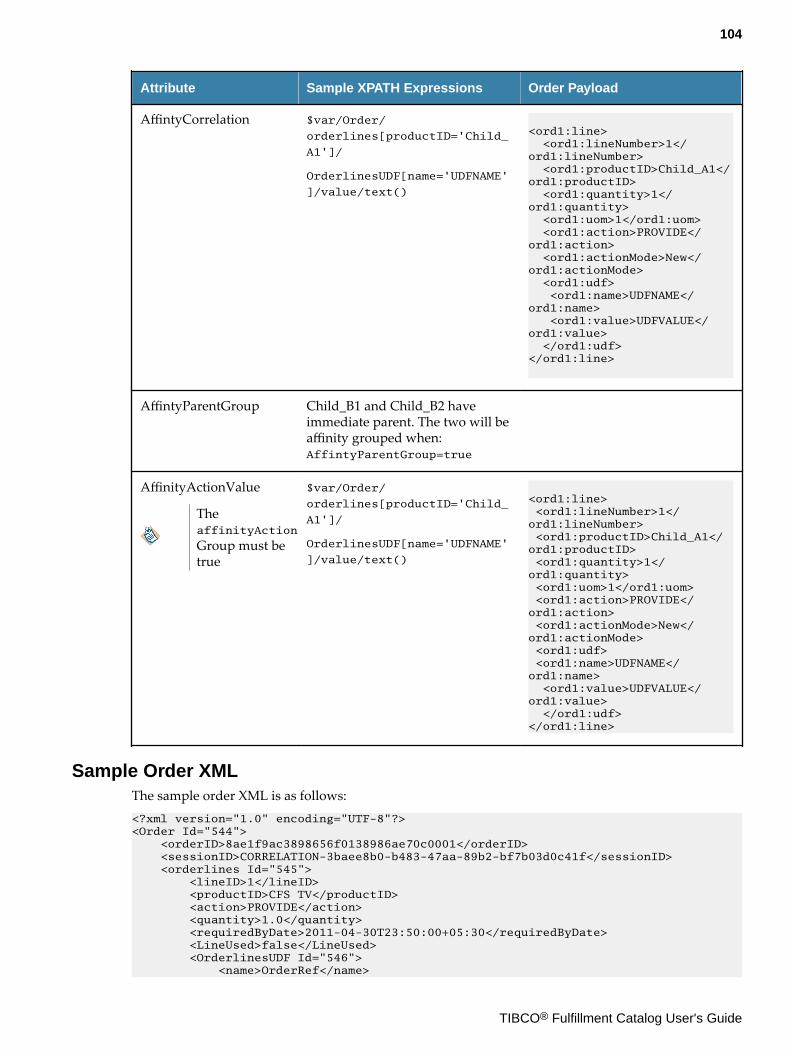
Attribute Sample XPATH Expressions Order Payload
AffintyCorrelation $var/Order/
orderlines[productID='Child_
A1']/
OrderlinesUDF[name='UDFNAME'
]/value/text()
<ord1:line> <ord1:lineNumber>1</ord1:lineNumber> <ord1:productID>Child_A1</ord1:productID> <ord1:quantity>1</ord1:quantity> <ord1:uom>1</ord1:uom> <ord1:action>PROVIDE</ord1:action> <ord1:actionMode>New</ord1:actionMode> <ord1:udf> <ord1:name>UDFNAME</ord1:name> <ord1:value>UDFVALUE</ord1:value> </ord1:udf></ord1:line>
AffintyParentGroup Child_B1 and Child_B2 haveimmediate parent. The two will beaffinity grouped when:AffintyParentGroup=true
AffinityActionValue
TheaffinityAction
Group must betrue
$var/Order/
orderlines[productID='Child_
A1']/
OrderlinesUDF[name='UDFNAME'
]/value/text()
<ord1:line> <ord1:lineNumber>1</ord1:lineNumber> <ord1:productID>Child_A1</ord1:productID> <ord1:quantity>1</ord1:quantity> <ord1:uom>1</ord1:uom> <ord1:action>PROVIDE</ord1:action> <ord1:actionMode>New</ord1:actionMode> <ord1:udf> <ord1:name>UDFNAME</ord1:name> <ord1:value>UDFVALUE</ord1:value> </ord1:udf></ord1:line>
Sample Order XMLThe sample order XML is as follows:<?xml version="1.0" encoding="UTF-8"?><Order Id="544"> <orderID>8ae1f9ac3898656f0138986ae70c0001</orderID> <sessionID>CORRELATION-3baee8b0-b483-47aa-89b2-bf7b03d0c41f</sessionID> <orderlines Id="545"> <lineID>1</lineID> <productID>CFS TV</productID> <action>PROVIDE</action> <quantity>1.0</quantity> <requiredByDate>2011-04-30T23:50:00+05:30</requiredByDate> <LineUsed>false</LineUsed> <OrderlinesUDF Id="546"> <name>OrderRef</name>
104
TIBCO® Fulfillment Catalog User's Guide

<value>OrderRefID</value> <flavor>input</flavor> </OrderlinesUDF> </orderlines> <orderlines Id="547"> <lineID>2</lineID> <productID>CFS Live Box</productID> <action>PROVIDE</action> <quantity>1.0</quantity> <requiredByDate>2011-04-30T23:50:00+05:30</requiredByDate> <LineUsed>false</LineUsed> <OrderlinesUDF Id="548"> <name>OrderRef</name> <value>OrderRefID</value> <flavor>input</flavor> </OrderlinesUDF> </orderlines> <orderlines Id="549"> <lineID>3</lineID> <productID>CFS VOIP</productID> <action>PROVIDE</action> <quantity>1.0</quantity> <requiredByDate>2011-04-30T23:50:00+05:30</requiredByDate> <LineUsed>false</LineUsed> <OrderlinesUDF Id="550"> <name>OrderRef</name> <value>OrderRefID</value> <flavor>input</flavor> </OrderlinesUDF> </orderlines> <status>NewOrder</status> <currentTime>2012-07-18T10:19:03+05:30</currentTime> <TineDelay>0</TineDelay> <customerref>Apple</customerref> <OrderHeaderUDF Id="551"> <name>Company</name> <value>Orange</value> <flavor>input</flavor> </OrderHeaderUDF> <Originator>Orchestrator</Originator> <OrderRef>OrderRefID</OrderRef> <businessTransactionID>a7eb1e1de1fa45c993f65589dba70648</businessTransactionID></Order>
Sample Plan Item XMLThe sample plan item is as follows:
<?xml version="1.0" encoding="UTF-8"?><PlanItem Id="2169"> <planID>PF1</planID> <parentID>CORRELATION-1b1260e6-9cdd-4903-a184-d473aa11b622</parentID> <lineID>2</lineID> <dependentOn>PF10.7747556</dependentOn> <planDesc> PROVIDE</planDesc> <planItemID>PF10.8786092</planItemID> <EOL>N</EOL> <TimeDelay>0</TimeDelay> <status>addDependency</status> <singleUse>false</singleUse> <sequence>0</sequence> <sequenceName>leaf</sequenceName> <action>PROVIDE</action> <productID>GSMDataService</productID> <itemMark4Del>false</itemMark4Del> <mustComplete>true</mustComplete> <affinityType>ConditionalAffinity</affinityType> <affintyPlanID>PF1</affintyPlanID> <affintyPlanDesc> AFFINITY PROVIDE</affintyPlanDesc> <udfs Id="2170"> <name>TASKID</name>
105
TIBCO® Fulfillment Catalog User's Guide

<value>PF10.8786092</value> <flavor>config</flavor> </udfs> <udfs Id="2172"> <name>PRODUCTID</name> <value>GSMDataService</value> <flavor>config</flavor> </udfs> <udfs Id="2173"> <name>RECORD_TYPE</name> <value>SERVICE</value> <flavor>config</flavor> </udfs> <udfs Id="2174"> <name>MSISDN</name> <value>123</value> <flavor>input</flavor> </udfs> <Ancestors>PF10.7747556</Ancestors> <cancelUsed>false</cancelUsed> <M_EP_UDFS Id="2171"> <name>M_EP_UDFS</name> <value>PF10.8786092</value> </M_EP_UDFS> <pI_Used>false</pI_Used> <isLeaf>false</isLeaf> <counter>0</counter> <LinkID>1</LinkID> <affinityCorrelation>$var/PlanItem[productID='GSMLine']/udfs[name='MSISDN']/value/text()</affinityCorrelation> <affinityParentGroup>false</affinityParentGroup> <affinityActionGroup>false</affinityActionGroup> <isDynamic>false</isDynamic></PlanItem>
Sample XPATHsThe sample is as follows:
● <ns0:affinityCondition>exists($var/Order/
OrderHeaderUDF[name="SubscriberProduct"and value="Product BB Network Access"])</
ns0:affinityCondition>
● <ns0:affinityCorrelation>exists($var/Order/
OrderHeaderUDF[name="SubscriberProduct"and value="Product BB Network Access"])</
ns0:affinityCorrelation>
● <ns0:affinityActionValue>$var/Order/orderlines[productID='CFS STB']/action/
text()</ns0:affinityActionValue>
● <affinityCorrelation>$var/PlanItem[productID='GSMLine']/udfs[name='MSISDN']/
value/text()</affinityCorrelation>
106
TIBCO® Fulfillment Catalog User's Guide