the sop for the it set up for studies participating in an exemplar
TRANSCRIPT

Global data for diabetes and obesity research
InterConnect
Global initiative on gene environment interactions in diabetes / obesity in specific populations
Grant agreement no: 602068
Study IT set up
Standard Operating Procedure
V2.6 12 July 2016

Page 2
1 SETTING UP AN OPAL AND AN R SERVER.................................................................. 3
1.1 HARDWARE REQUIREMENTS .................................................................................... 3 1.2 INSTALLING OPAL SERVER ...................................................................................... 4
1.2.1 Software Requirements ..................................................................................... 4 1.2.2 Installation of Opal ........................................................................................... 5 1.2.3 Configuration, Administration and Execution of Opal .............................................. 5
1.3 INSTALLING R SERVER ............................................................................................ 6 1.3.1 Software Requirements ..................................................................................... 6 1.3.2 Installation of R Server ...................................................................................... 6
1.4 SECURITY CONFIGURATION ..................................................................................... 6
2 INFRASTRUCTURE TESTING ...................................................................................... 8
2.1 GETTING THE TEST DATASET ................................................................................... 8 2.2 SETUP THE DATA FOR TESTING ................................................................................. 8
2.2.1 Configuring the Databases ................................................................................. 8 2.2.2 Uploading data for testing .................................................................................. 9 2.2.3 Create a Project and Import Data ....................................................................... 9
2.3 TEST THE R SERVER WITH TEST DATA ..................................................................... 10
3 INSTALL DATASHIELD FOR FEDERATED ANALYSIS ..................................................10
3.1 INSTALL DATASHIELD PACKAGES ........................................................................... 10 3.2 CREATE AN INTERCONNECT USER ........................................................................... 10 3.3 SET DATASHIELD PERMISSIONS ............................................................................. 11 3.4 SET PROJECT PERMISSIONS ................................................................................... 11 3.5 TEST THE FUNCTIONALITY ..................................................................................... 12
4 TRANSFER STUDY-SPECIFIC DATA INTO OPAL ........................................................13
4.1 OVERVIEW .......................................................................................................... 13 4.2 PREPARE DATA FILE .............................................................................................. 13
4.2.1 Study specific variables ................................................................................... 13 4.2.2 Data File Type ................................................................................................ 13 4.2.3 Manage Data Inconsistencies and Create Clean Datasets ..................................... 14 4.2.4 Create data file .............................................................................................. 14
4.3 PREPARE DATA DICTIONARY FILE ............................................................................ 14 4.3.1 Overview of the data dictionary file .................................................................. 14 4.3.2 Structure of the data dictionary file .................................................................. 15
4.4 CREATE NEW PROJECT .......................................................................................... 16 4.5 CREATING A TABLE AND UPLOADING DATA IN OPAL .................................................. 16
4.5.1 Creating an empty table using a Data Dictionary in Opal ...................................... 16 4.5.2 Uploading data to your new table in Opal .......................................................... 18
5 HARMONISATION AND FEDERATED ANALYSIS ........................................................21
5.1 HARMONISATION ................................................................................................. 21 5.1.1 Set up Harmonisation User .............................................................................. 21 5.1.2 Give Harmonisation User Permissions ................................................................ 21
5.2 FEDERATED ANALYSIS .......................................................................................... 23 5.2.1 Add a DataSHIELD User .................................................................................. 23 5.2.2 Give DataSHIELD users permission to analyse data .............................................. 24

Page 3
1 SETTING UP AN OPAL AND AN R SERVER This section explains in details how to install and configure both Opal, R and a database application.
Opal will be used as the core data warehouse in your installation. Opal provides all the necessary tools to import, transform and describe data. Note that Opal is not a database: Opal needs to connect to a database application to store its data.
R provides a software environment for statistical computing and graphics. R will be used as a server: Opal will connect to this server to control remote accesses, push data to be analysed and retrieve results.
The instructions given assume that Opal, R and the database servers will be deployed on Ubuntu 14.04 LTS. These applications can also be installed on other Debian-like Linux distributions (Debian 7 for instance). Packages for Fedora-like Linux distributions (Fedora, CentOS 6 or 7) are also available: alternative installation instructions for these systems are provided as reference to the relevant installation guides.
Most of the following instructions and related information are taken from Opal Server Administrator Guide. Please refer to this online documentation for updated information.
1.1 HARDWARE REQUIREMENTS Although it is possible to install Opal, R and the database applications on different machines, this documentation assumes that these different software will be installed on the same host. As a consequence the hardware requirements must satisfy the combination of these three applications.
Component Requirement
CPU Recent server-grade or high-end consumer-grade processor
Memory (RAM) 8GB required, >= 16GB recommended
Disk space 5GB of free disk space required* * The required disk space varies in function of the number of participants (and variables) in the datasets. Please use the following "rule of thumb" to evaluate your needs: 1 GB for the software + 4 GB/10000 participants.
Note that R is a single-threaded application and having CPUs with multi-cores will not make R computations faster: the performance of a single CPU core should be as good as possible.
Note also that R works in memory, then make sure the server has enough RAM for satisfying R needs without affecting too much the other applications. The recommended RAM size then should be adjusted depending on the size of the datasets and the type of statistical analysis that will be conducted (and the number of researchers running analysis simultaneously).
TECHNICAL SUPPORT
Please contact [email protected] if you have any queriesrelating to this SOP, need further guidance, or would like to provide any feedback.

Page 4
1.2 INSTALLING OPAL SERVER This section is about installing both Opal and an associated database application.
1.2.1 Software Requirements The following softwares must be installed on your server before you install Opal.
Note: At least one database management system must be installed. It can be either MongoDB, MySQL or both. Unless you have specific needs or constraints, MongoDB is recommended.
Software Suggested Version
Use Installation/Configuration
Java Runtime Environment
JRE 8.x Java runtime environment - needed to run Opal
JRE 8 Ubuntu Installation Guide
MySQL >= 5.5.x Database management system - stores data imported into Opal
MySQL Database Configuration
MongoDB >= 2.6.x Database management system - stores data imported into Opal
MongoDB Database Configuration
a) Installation of Java
Using apt, you can install Java 8 via the following sequence of commands:
Alternatively download Oracle Java RPM package.
b) Installation of the Database
One database server is required for Opal server to be able to operate. It is your choice to install MySQL or MongoDB. Due to the data schema used by Opal for storing data in the database, MongoDB is known to be better for large datasets.
MongoDB installation [recommended]
MongoDB is the recommended database engine.
See detailed MongoDB Ubuntu Installation Guide that can be summarized as follow:
Alternatively see MongoDB RedHat/CentOS Installation Guide.
Installation of MySQL
sudo add-apt-repository ppa:webupd8team/java sudo apt-get update sudo apt-get install oracle-java8-installer
sudo apt-key adv --keyserver hkp://keyserver.ubuntu.com:80 --recv 7F0CEB10 echo 'deb http://repo.mongodb.org/apt/ubuntu trusty/mongodb-org/3.0 multiverse' \ | sudo tee /etc/apt/sources.list.d/mongodb.list sudo apt-get update sudo apt-get install -y mongodb-org

Page 5
MySQL database server can be installed using the following apt command:
Alternatively see MySQL RPM Repository instructions.
Finalise the installation by following the recommended MySQL server configuration.
1.2.2 Installation of Opal Latest Opal server installation recommendations are available online in the Opal Installation Guide.
Once installed the Opal server is up and running (though not fully configured).
Prerequisite: The package apt-transport-https is required for OBiBa’s repository communicate through HTTPS. If you don’t have it installed on your system, install it via:
Then run the following commands to register the OBiBa Debian packages repository where Opal and other tools lies and install Opal server:
Alternatively see OBiBa RPM repository instructions.
1.2.3 Configuration, Administration and Execution of Opal a) Options for the Java Virtual Machine
Default configuration of Opal is usually not suitable for a production server. More specifically, the Opal application is allocated a maximum of 2G of RAM by default which could be not enough for operating on large datasets.
To increase the allocated memory edit the file /etc/default/opal and modify the value of JAVA_ARGS accordingly: -Xmx argument is to be changed for a higher value (at least 4G).
Then restart Opal server for making the new settings effective:
b) Opal service log files
For troubleshooting, the log files to be inspected are located in /var/log/opal directory.
Opal offers many configuration possibilities (see Opal documentation for more details):
• Some are file-based (located in the folder /etc/opal)
sudo apt-get install mysql-server
sudo apt-get install apt-transport-https
wget -q -O - https://pkg.obiba.org/obiba.org.key | sudo apt-key add - echo 'deb https://pkg.obiba.org stable/' \ | sudo tee /etc/apt/sources.list.d/obiba.list sudo apt-get update sudo apt-get install opal
sudo service opal restart

Page 6
• Others are accessible from the web application interface(located at https://<host>:8443)
1.3 INSTALLING R SERVER The R server consists of several pieces of software:
• R, is the R language interpreter,
• Rserve, is an R package that allows to start an R session from a distant connection,
• R Server Admin, is a Java-based application that allows to start and stop Rserve from a distant connection.
Latest R server installation recommendations are available online in the R Server Installation Guide.
1.3.1 Software Requirements
Software Suggested Version
Use Installation/Configuration
Java Runtime Environment
JRE 8.x Java runtime environment - needed to run R Server Admin
JRE 8 Ubuntu Installation Guide
R >= 3.1.x Statistical analysis engine http://cran.r-project.org
1.3.2 Installation of R Server A Debian package is provided to conveniently install all the softwares required to build an R server that is ready to be used by Opal.
The default R provided by the Linux distribution is not the latest one: the R Debian repository is to be added first.
Then the R server installation is performed using the following commands:
Once done, the R server should be up and running. Default settings are usually enough for Opal to connect to this server.
Alternatively see CRAN RPM repository and OBiBa RPM repository instructions.
1.4 SECURITY CONFIGURATION Several servers are running on your system, but only a limited number of services should be exposed. The communication to these services must be encrypted and can be restricted to a limited set of clients.
sudo apt-key adv --keyserver keyserver.ubuntu.com --recv-keys E084DAB9 echo 'deb https://cran.rstudio.com/bin/linux/ubuntu trusty/' \ | sudo tee /etc/apt/sources.list.d/cran.list
sudo apt-get update
sudo apt-get install opal-rserver sudo service rserver restart

Page 7
The following firewall rules must be applied:
1. Allow HTTPS connections to Opal through the port 8443 (this port number can be configured; a reverse proxy can also be setup),
2. Allow SFTP connections to Opal through the port 8022 (this firewall rule is optional, as file upload can also be performed through HTTPS),
3. Allow a limited set of external IP addresses to connect to the host: 131.111.251.165 and 131.111.251.227 (for the analysis server and InterConnect admin).
The other services (R and database servers) must not be exposed. Opal server will access them locally.
Advanced security setting that can be considered is to restrict the supported encryption protocols and algorithms used by Opal server when communicating through HTTPS. This can be achieved at Opal and/or Java levels. See Opal server documentation for more details.

Page 8
2 INFRASTRUCTURE TESTING In this section are instructions for cohorts to set up a test dataset on their server that we can test against.
The tests you will perform on Opal are quite simple:
1. You will upload a test dataset in Opal. This will ensure that Opal is correctly configured, that it is properly connected to its database, and that it can be administered through its web interface.
2. You will make some calculations on this dataset from a distant computer. These calculations will be made using R, and success of this testing will guarantee that R Server Admin is properly installed.
2.1 GETTING THE TEST DATASET The test dataset (generated data) to be downloaded is LifeLines.sav.
2.2 SETUP THE DATA FOR TESTING Opal’s administrative web interface can be accessed with any modern web browser by pointing it to:
https://<host>:8443
where <host> is the IP address or the host name where Opal is located on the network.
2.2.1 Configuring the Databases Before proceeding, Opal storage databases have to be configured. If you already done this, go to step 2.2.2.
Otherwise, for being fully operational, Opal requires to register two databases (that can be located in the same database server): one for the participant identifiers and one for their data.
First, prepare the databases in the database server:
• One with name opal_ids,
• One with name opal_data.
Create a user with administrator privileges on these databases. See MongoDB Database Creation or MySQL Database Creation instructions for more details.
Then databases registration is done as follows:
1. Login as an administrator in Opal web interface,
2. A "Post-Install Configuration" page is displayed allowing to set up the Opal databases,
3. In the "Identifiers Database" section, click on "Register" and select the database type of your choice (“SQL” or “MongoDB”).
4. Input information for the database: provide the name of the database along with connection information (URL, username and password) and save the settings.

Page 9
5. Do the same for the “Data Databases” (the database URL must be different from the one for the identifiers).
2.2.2 Uploading data for testing Some test data will be imported from a file. This file needs to be accessible from the Opal server. For that purpose, Opal has a "file system" where the data files can be uploaded.
From the "Dashboard" page, click on "Manage Files":
1. Navigate to the directory where the data file will be uploaded.
2. Click on the "Upload" button; this will open a "File Upload" window which allows you to select a file to upload from your computer.
3. Click on "Choose File" and select the LifeLines.sav file you have saved at section 2.1. Once done, click on the "Upload" button.
2.2.3 Create a Project and Import Data In Opal, a project is the workspace for managing data. It is required to create a project before importing data into Opal.
1. Go to the "Projects" page.
2. Add a Project by clicking on the "Add Project" button. Then, in the "Add Project" popup window,
a. Enter test in the name field,
b. Select the database you created in step 2.2.1 as the project’s data store,
c. Save the project.
Then import data into this project.
1. Go to the test project page, tables section,
2. Click on the "Import" button to open the "Import Data" window.
3. For the "Data Format" drop-down, select "SPSS" option and click on the "Next" button.
4. Under "Data File", click "Browse" to select (tick) the LifeLines.sav file, then click on "Select".
5. Click on the "Next" button so that you skip the "Configure data import" step.
6. Tick the checkbox to the left of the LifeLines table and click on the "Next" button.
7. You can review the data for the table LifeLines to be imported, then click on the "Next" button.
8. Keep the default setting for data file archiving and click on the "Finish" button.
Since LifeLines.sav is an SPSS file, it includes both the data dictionary (i.e. variable coding and labels) and the participant data.

Page 10
You can follow the import task progress by going to the tasks section of the project page. Once importation is completed successfully, the LifeLines table should appear in the tables section of the project page.
2.3 TEST THE R SERVER WITH TEST DATA You will use the data you imported in the previous section in order to test whether the R Server is correctly installed and works correctly with Opal.
From the shell prompt of the server, start the R console:
The following R script should be executed without errors (make sure to change in this script the administrator’s password with the one of your server):
The expected output result from the data frame summary command is:
GESLACHT GEWICHT LENGTE HEALTH17A1 HEALTH17B1 HEALTH17D1 1:2551 Min. : 31.00 Min. :144.2 1: 425 1: 0 1:4666
2:2473 1st Qu.: 66.94 1st Qu.:172.2 2:4599 2:5024 2: 0 Median : 76.08 Median :178.5 3: 0 3: 150 Mean : 76.20 Mean :178.6 4: 0 4: 208 3rd Qu.: 85.42 3rd Qu.:184.9 5: 0 Max. :130.68 Max. :210.5
DBPa SMK11 SMK31 SMK4A1 SMK4A21 Min. : 39.00 1: 997 1: 811 Min. : 0.000 1: 708 1st Qu.: 71.00 2:4027 2:4213 1st Qu.: 0.000 2: 58 Median : 80.00 Median : 2.000 3:4258 Mean : 79.78 Mean : 3.915 3rd Qu.: 88.00 3rd Qu.: 7.000 Max. :126.00 Max. :24.000
R
# Load Opal R library require('opal') # Then, create an opal object with the login information # Change the login credentials and url with the appropriate values! o <- opal.login(username = 'administrator', password = 'password', url = 'https://localhost:8443') # To verify if the connexion with Opal works, # get the list of all projects opal.datasources(o) # Assign the content of the LifeLines table (from the test project) # into a data frame in a R session of the R server opal.assign(o,'D','test.LifeLines', missings = TRUE) # Get the summary of this data frame from the remote R session opal.execute(o,'summary(D)') # Terminate the remote R session opal.logout(o)

Page 10
3 INSTALL DATASHIELD FOR FEDERATED ANALYSIS DataSHIELD is the platform that allows federated analysis to be carried out on your data. This section explains how to set up DataSHIELD on your server.
3.1 INSTALL DATASHIELD PACKAGES Each server in the network must be configured the same way so that same computation is done in each Opal for one client request. This is done by using the DataSHIELD-R packages repository.
To install these packages, follow these steps:
1. Go to the "Administration" page, and click on "DataSHIELD" section.
2. Click on "Add Package".
3. Leave the default option: “Install all DataSHIELD packages” and click "Install"
4. Restart the Opal service:
5. The DataSHIELD packages should appear in the list and the Methods section should also be populated with entries.
3.2 CREATE AN INTERCONNECT USER Now we need to create a user account for an InterConnect user to be able to run a test analysis against your server:
1. Go to the "Administration" page, and click on "Users and Groups" section.
2. Click on "Add User".
3. Select "Add user with certificate".
4. Give the user the name InterConnect
5. Paste the following certificate into the box and click "Save" (copy the entire contents of the box below)
-----BEGIN CERTIFICATE----- MIIChjCCAe+gAwIBAgIJAKuCGJpv/eZJMA0GCSqGSIb3DQEBCwUAMFwxCzAJBgNV BAYTAkdCMRMwEQYDVQQIDApTb21lLVN0YXRlMSEwHwYDVQQKDBhJbnRlcm5ldCBX aWRnaXRzIFB0eSBMdGQxFTATBgNVBAMMDEludGVyQ29ubmVjdDAeFw0xNTA3MDYw OTMxMzJaFw0xNjA3MDUwOTMxMzJaMFwxCzAJBgNVBAYTAkdCMRMwEQYDVQQIDApT b21lLVN0YXRlMSEwHwYDVQQKDBhJbnRlcm5ldCBXaWRnaXRzIFB0eSBMdGQxFTAT BgNVBAMMDEludGVyQ29ubmVjdDCBnzANBgkqhkiG9w0BAQEFAAOBjQAwgYkCgYEA s0sZZ7P3fbN6Za3ZvtE2FCpxfjHJ1CD2HubE66sxsXidy7L6UvnXi2hDi4EtbkMJ D1m4o3xwJxl1Vfu6RxPwHcjH4nqrYqMWl/Y+285X9/Oquh80ZgnP44qqtIdkzzY2 pmPXaagG4UQUS9pWcpmJzP3ECyJ16X6vNdg5n98iS+MCAwEAAaNQME4wHQYDVR0O BBYEFLqDyLtdHxfZ/ZFqiXWeVoQZW5kPMB8GA1UdIwQYMBaAFLqDyLtdHxfZ/ZFq iXWeVoQZW5kPMAwGA1UdEwQFMAMBAf8wDQYJKoZIhvcNAQELBQADgYEAqDBTA4PL BXh8St4IENKkqp+U57lTMoFhbiyxifI/gF0jTjhjm8X3O3/TSKeLEKbAO5YyX7dc CVJqmZftbDZAjwNeyWCvU4mK2xoUcolQIGZrXfsegzHAyYH+ZRq0Ddru2e0vOBfJ u3FvoBt84oRaqLhlfZv7ZjivE0E9ZC8Vnms= -----END CERTIFICATE-----
sudo service opal restart

Page 11
3.3 SET DATASHIELD PERMISSIONS The InterConnect user must be given permission to access the server using DataSHIELD.
1. Go to the “Administration” page, and click on “DataSHIELD” section.
2. Scroll down the page and Click on “Add Permission”.
3. Select “Add user permission”.
4. Type InterConnect in the name field.
5. Leave the default selection of “Use” and click on “Save”.
3.4 SET PROJECT PERMISSIONS Now it is necessary to set up the permissions for the user on the LifeLines table in the test project.
1. Go to the test project page, tables section and click on the LifeLines table you created previously,
2. This should take you to the overview of the table,
3. On the “Permissions” tab, click “Add Permission” and select “Add user permission…”,

Page 12
4. In the name field, type InterConnect,
5. Leave the default permission of “View dictionary and summaries” (depending on the agreement with the study, the permission “View dictionary and values” should be chosen instead), and save.
3.5 TEST THE FUNCTIONALITY Contact InterConnect technical support ([email protected]) who will check that they can run a summary analysis on the test dataset.

Page 13
4 TRANSFER STUDY-SPECIFIC DATA INTO OPAL
4.1 OVERVIEW This section will explain how to prepare data and a data dictionary that will be uploaded to Opal.
The following steps will be explained:
1. Preparing a data file for the variables that are required to generate the harmonized variables
2. Preparing a data dictionary to describe the data and allow an empty table to be generated in Opal
3. Creating a project in Opal
4. Creating an empty table in the project by uploading the data dictionary
5. Populating the empty table by uploading and importing the data file
Note that for data that is available in the SPSS format, the dictionary and data can be contained in a single file. This reduces the amount of work that needs to be done and is recommended for SPSS users.
4.2 PREPARE DATA FILE
4.2.1 Study specific variables For your study, a list of study-specific variables will be supplied to you based on the mapping protocol developed by the harmonisation working group. These are the variables that need to be uploaded to Opal and will need to be in your data file. The mapping protocol will then convert these study-specific variables into the harmonised variables.
4.2.2 Data File Type While there are more than two different types of data file types, we will only cover the two most common formats for data import:
• CSV is a “delimiter separated values” text file format. First row are the variable names, subsequent rows are the participant values. The first column is expected to be the anonymous participant identifier. InterConnect technical support will provide an EXAMPLE data file for your study to show what the structure looks like. It is important that you check the information in the file is correct or the variables will not be generated correctly.
• SPSS source file must be a valid non-compressed binary file with a .sav extension. In Opal an SPSS file represents a table and its variables are used as the table's data dictionary. An Opal compatible SPSS file must have its first variable represent the anonymous identifiers. If this is not the case, before a file import, the identifier variable must be moved to the first position of the SPSS variable sheet. If you are an SPSS user, then this method is much quicker than preparing separate data and data dictionary files.
Do not complete this section until it has been agreed which variables will be required for the research question that the consortium is addressing.

Page 14
For more information about the available file based formats, see Opal Datasource Types documentation.
4.2.3 Manage Data Inconsistencies and Create Clean Datasets Before creating the data file it is sensible to run diagnostic checks on the data. Otherwise, if problems are not discovered until later, then more work will have to be redone.
a) Run Descriptive Statistics
Data distribution and variables’ associations should be tested to ensure data quality. Data should be checked for odd distributions (e.g. 92% missing values for income), impossible ranges (e.g. sleeping more than 24 hours per day), and contradictory values (e.g. age of onset of diabetes is higher than the actual age of participant). The data should also conform to the questionnaire flow taking into consideration all skip patterns.
b) Manage Problematic Values and Document Decisions
Management of the problematic values is context specific. It is recommended that a local group reviews each case and recommends solution strategies. All data cleaning decisions should be transparent and well documented to be provided to the harmonization working group.
c) Manage Problematic Characters
It is recommended that you perform the following checks to avoid problems later in the process:
• Missing values cannot be indicated through the use of a full stop (.) as this is interpreted as a decimal value of 0.0. It is preferable to use a missing indicator such as -9999.
• Check variable names for leading or trailing spaces, and remove these. The TRIM function in Excel can be useful for this.
4.2.4 Create data file You will need to develop a new data file with the required variables (as detailed by the InterConnect harmonization team) and data. The first row of the table should be used for the variable names. Watch out for trailing spaces in variable names as this can cause problems later on. The naming of the data file should indicate the study and data release it belongs to so that it is possible to identify where the data was sourced from.
4.3 PREPARE DATA DICTIONARY FILE
4.3.1 Overview of the data dictionary file The data dictionary details information for each variable to enhance comprehension and highlight existing heterogeneity across different studies. The data dictionary can be used in Opal to generate an empty table that is populated with the data file. Without the data dictionary, when the data are uploaded they cannot be interpreted and are stored as plain text.
Keep note of the name that you choose for your data file for use the next section.
Note that if you prefer to work in SPSS, then it is possible to use a native SPSS file directly rather than recreating the information in Excel.
Page 15
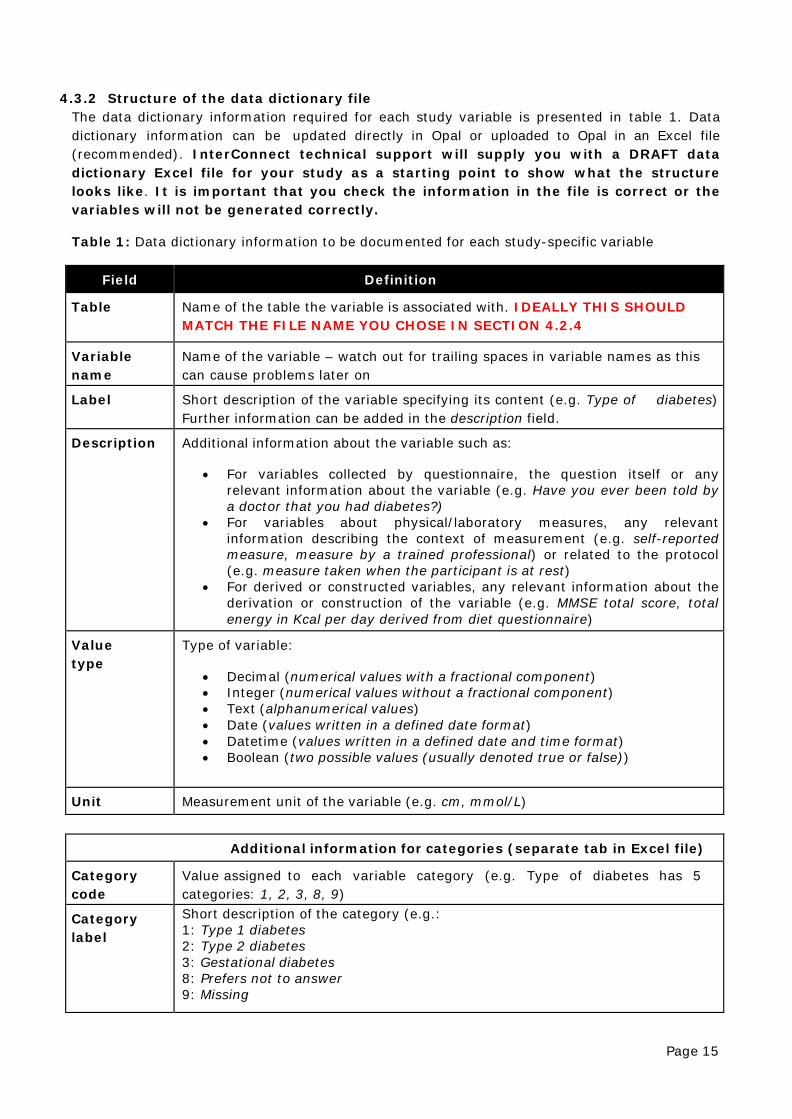
4.3.2 Structure of the data dictionary file The data dictionary information required for each study variable is presented in table 1. Data dictionary information can be updated directly in Opal or uploaded to Opal in an Excel file (recommended). InterConnect technical support will supply you with a DRAFT data dictionary Excel file for your study as a starting point to show what the structure looks like. It is important that you check the information in the file is correct or the variables will not be generated correctly.
Table 1: Data dictionary information to be documented for each study-specific variable
Field Definition
Table Name of the table the variable is associated with. IDEALLY THIS SHOULD MATCH THE FILE NAME YOU CHOSE IN SECTION 4.2.4
Variable name
Name of the variable – watch out for trailing spaces in variable names as this can cause problems later on
Label Short description of the variable specifying its content (e.g. Type of diabetes) Further information can be added in the description field.
Description Additional information about the variable such as:
• For variables collected by questionnaire, the question itself or any relevant information about the variable (e.g. Have you ever been told by a doctor that you had diabetes?)
• For variables about physical/laboratory measures, any relevant information describing the context of measurement (e.g. self-reported measure, measure by a trained professional) or related to the protocol (e.g. measure taken when the participant is at rest)
• For derived or constructed variables, any relevant information about the derivation or construction of the variable (e.g. MMSE total score, total energy in Kcal per day derived from diet questionnaire)
Value type
Type of variable:
• Decimal (numerical values with a fractional component) • Integer (numerical values without a fractional component) • Text (alphanumerical values) • Date (values written in a defined date format) • Datetime (values written in a defined date and time format) • Boolean (two possible values (usually denoted true or false))
Unit Measurement unit of the variable (e.g. cm, mmol/L)
Additional information for categories (separate tab in Excel file)
Category code
Value assigned to each variable category (e.g. Type of diabetes has 5 categories: 1, 2, 3, 8, 9)
Category label
Short description of the category (e.g.: 1: Type 1 diabetes 2: Type 2 diabetes 3: Gestational diabetes 8: Prefers not to answer 9: Missing

Page 16
Missing Code assigned to each category identifying it as a missing value (e.g.: 1: Type 1 diabetes (Not missing = 0) 2: Type 2 diabetes (Not missing = 0) 3: Gestational diabetes (Not missing = 0) 8: Prefers not to answer (Missing = 1) 9: Missing (Missing = 1))
4.4 CREATE NEW PROJECT In Opal, a project is the workspace for managing tables of data. Opal can support several projects and each project can have many tables. It is required to create a project before importing data into Opal.
1. Go to the "Projects" page.
2. Add a Project by clicking on the "Add Project" button. Then, in the "Add Project" popup window,
a. Enter a suitable name in the name field (InterConnect technical support can advise),
b. Select the database you created in step 2.2.1 as the project’s data store,
c. Save the project.
4.5 CREATING A TABLE AND UPLOADING DATA IN OPAL
4.5.1 Creating an empty table using a Data Dictionary in Opal An empty table can be created from the data dictionary Excel file. This section can be skipped if you are using an SPSS file. Below are the steps:
1. Go to the project page that you created in section 4.4
2. Click the Add Table button and choose “Add/update tables from dictionary…”

Page 17
3. Click on “Browse” and select “Upload”
4. Upload your data dictionary (either Excel format),
5. Select the uploaded file by checking the box. Click “Select” and then “Next >”,
6. Check the box next to your table name (there should be only new variables),
7. Click “Finish”. You should see an empty table in your project.

Page 18
4.5.2 Uploading data to your new table in Opal After creating the empty table, it needs to be populated with your data. Depending on whether you are using a CSV (Excel) file or SPSS file, the steps are slightly different.
For a CSV file (can be created with Excel):
1. Go to the project page that you created in section 4.4 – you should see an empty table,
2. Click on the "Import" button to open the "Import Data" window,
3. Click “Next” and then “Browse”,
4. Select “Upload” to upload your data file (CSV format),

Page 19
5. Select the uploaded file, click “Select” and then “Next”,
6. VERY IMPORTANT1 – check that the name in the “Destination Table” field matches the name of your table from section 4.5.1. If in doubt, delete the contents of the field and then start to type your table name – an autocomplete option should appear.
7. Click “Next”. If the data look reasonable, then click “Next” again,
8. Check the box next to your table name. Confirm that there are no new, modified or conflicting variables and click “Next”. If this is not the case, go back and check your table name in step #6,
1 If this step is not done correctly, the data will not be inserted into your empty table. Instead a new table will be created that just contains text values.

Page 20
9. Click “Finish”. Your table should now be populated with the data. This may take a while, but if you refresh the page the number of entities should start to increase.
For a SPSS file, the process is almost identical to the CSV file and does not require the data dictionary step, so is summarized below:
1. Go to the project page that you created in section 4.4,
2. Click on the "Import" button to open the "Import Data" window,
3. For the "Data Format" drop-down, select "SPSS" option and click on the "Next" button.
4. Select “Upload” to upload your data file,
5. Select the uploaded file, click “Select” and then “Next”,
6. Click on the "Next" button so that you skip the "Import Data" step (no need to enter a table name).
7. Tick the checkbox to the left of your table and click on the "Next" button.
8. Click on the "Next" button.
9. Click on the "Finish" button.

Page 21
5 HARMONISATION AND FEDERATED ANALYSIS This section describes the steps that are necessary to implement harmonisation algorithms on the raw data to produce a harmonised dataset. This is the dataset that will be used for the federated analysis.
5.1 HARMONISATION Harmonisation requires the consortium agree on algorithms that, when applied to each dataset, will result in a common set of variables across all studies in the consortium. These algorithms are then coded in JavaScript on the server. Since writing the code in JavaScript is specialist knowledge, this can initially be done by the InterConnect team. To do this they will need a username that has sufficient permissions to set up the algorithms without being able to see the individual level data (higher privileges can be granted by the study).
5.1.1 Set up Harmonisation User The credentials for the Harmonisation user are added as follow:
1. Go to the “Administration” page, and click on “Users and Groups” section,
2. Click “Add User”, and select “Add user with password”,
3. Give the user the name: Harmonisation,
4. Choose a password,
5. Inform the InterConnect technical support ([email protected]) of the password (password can be changed by the user afterwards).
5.1.2 Give Harmonisation User Permissions The Harmonisation user must be able to see the data dictionary and summaries of the study- specific table:
1. Go to the project page, tables section and click on the table you created previously,
2. This should take you to the overview of the table,

Page 22
3. On the “Permissions” tab, click “Add Permission” and select “Add user permission…”,
4. In the name field, type Harmonisation,
5. Leave the default permission of “View dictionary and summaries” (depending on the agreement with the study, the permission “View dictionary and values” should be chosen instead), and save.
Then the Harmonisation user should be granted the permission to create a view in this project:
1. Go to the project page, tables section,

Page 23
2. On the “Permissions” tab, click “Add Permission” and select “Add user permission”,
3. In the name field, type Harmonisation,
4. Leave the default permission of “Add table”, and save.
The view that will be added by the Harmonisation user will transform the variables of the study-specific table into the harmonised variables (without compromising the individual level data).
5.2 FEDERATED ANALYSIS
Once the harmonised dataset is ready, users will need to be given permission to run analyses on your data.
5.2.1 Add a DataSHIELD User This section only needs to be completed if a new user is required:
1. Go to the “Administration” page, and click on “Users and Groups” section,
Do not complete this section until it has been agreed which users will be permitted to run analyses on your data.

Page 24
2. Click “Add User”, and select “Add user with certificate”,
3. Give the user the name supplied by the InterConnect technical support,
4. Paste the certificate for that user (supplied by the InterConnect technical support) and save.
DataSHIELD users will need to be given permission to connect via DataSHIELD:
1. Go to the “Administration” page, and click on “DataSHIELD” section,
2. Click “Add Permission”, and select “Add user permission”,
3. Type the name chosen above in the name box,
4. Leave the default selection of “Use” and save.
5.2.2 Give DataSHIELD users permission to analyse data Now it is necessary to set up the permissions for the DataSHIELD user on the project (similar to section 5.1.2):
1. Go to the project page, tables section, 2. Go the the harmonised table page, 3. On the “Permissions” tab, click “Add Permission” and select “Add user permission”, 4. Enter the name of the user, 5. Leave the default permission of “View dictionary and summaries”, and save.