the organic farming guidebook
TRANSCRIPT

A guide for organic farmers, transitioning farmers
and farmers who want to reduce chemical usage
TheORGANIC FARMING
GUIDEBOOK

4
4
4
5
5
5
7
8
9
10
11
11
12
13
14
15
17
20
20
21
21
22
23
24
25
25
26
28
29
30
32
33
34
35
CONTENT PAGE
Hint: This guide is based on the experiences and results of tests made in Central Europe. Due to the different soil conditions and climate conditions in other regions of the world, this guide can not frame universal rules, but shall give you tips and suggestions how to do organic farming successfully. All data is not binding and without responsibility.
REQUIREMENTS FOR TRANSITIONING
REQUIREMENTS FOR FARM OPERATION
HOW LONG DOES IT TAKE TO TRANSITION TO ORGANIC FARMING?
SOIL
INCREASING SOIL FERTILITY
LIME
SOIL ANALYSIS
ANALYSIS OF INDICATOR WEEDS
CROP ROTATION
EXAMPLE OF AN ORGANIC CROP ROTATION
SOIL PREPARATION
PRIMARY TILLAGE
SECONDARY TILLAGE
SEEDBED PREPARATION
COVER CROPS
DIFFERENT FORMS OF SEEDING COVER CROPS
MOWING/CRIMPING OF COVER CROPS
MECHANICAL WEED CONTROL
TINE WEEDER
BLIND WEEDING
TINE WEEDING IN POST EMERGENCE CROPS
SUMMER CEREALS
WINTER CEREALS
GOOSEGRASS IN CEREALS
CULTIVATING IN THE ROW
CULTIVATING CEREALS
CORN
SOYBEANS
FIELD BEANS
SUGAR BEETS
COMPARISON OF „WIDE ROW“ TO TYPICAL SOWING
MECHANICAL WEED CONTROL
RESULT SPRING WHEAT
RESULT SOYBEANS
3

01.01.202015.06.2017 15.06.2018 15.06.2019
Depending on the farm operation, there can be challenges transitioning from a conventional operation to organic. Due to these challenges, it is important for a farm operation to first analyse whether or not it is even possible for their operation to be sustained if they transition to organic.
It is important to get as much information as possible before starting the transition phase. Specifically, it is important to look at equipment adjustments, changes in barn management to reach organic standards, changing crop rotations and searching for marketing opportunities. These adjustments should be analysed thoroughly and thoughtfully to ensure a transition is right for you and your operation.
Requirements for farm operation
• The farm must be economically healthy. • The farm should have free working capital. • The barn for livestock corresponds to organic standards, or it is economical to adjust. • The number of animal’s every acre is not higher than the organic standards. • The crop rotation is diverse and legumes are already components of the crop rotation. • The soil is adequately provided with nutrients and no ‘problem’ weeds are in the fields.
How long does it take to transition to organic farming?
When you sign a contract with an organic certifier, the transition phase will start for the fields and the animals on the farm. As you go through the transition phase, the farm must be operated in an organic way. (According to EU Regulation (EEC) 834/2007 and executive regulation 889/2008)• Crops which are harvested in the first 12 months after signing with the organic certifier, must be sold as conventional
product.• Crops which are harvested later than 12 months after signing with the organic certifier, can be sold as transitioning
product.• Crops which are seeded later than 24 months after signing with the organic certifier can be sold as organic product.
Also, when all livestock on the operation correspond to organic standards, the livestock products can be also sold as organic products.
Contract before the cereal harvest, at least at the
June 15
Products, which are harvested after the June 15, 2018 is a transtioning
product
Harvest 2020 is an organic product
sowing in Autumn of organic seeds
Crops that have been seeded 24 months after signing the contract, are organic products
REQUIREMENTS FOR TRANSITIONING
4

In organic agriculture, soil fertility is the central factor of success.
Increasing soil fertility:
On conventional operations, crops get the required nutrients through genetic engineering and fertilizer. On an organic operation however, nutrients are provided through high soil fertility. For this reason, farming practices have to be changed in order to increase soil fertility on an organic operation.
The following points will help to increase soil fertility:
• Regular incorporation of large quantities of dead biomass or harvest residues
• Green manure (crops which grow several years)
• Increased fertilization with organic manure, especially with good composted manure
• Rotation between shallow and deep-rooted plants as well as alternating between main and cover crops
• Cultivation of suitable crop varieties
• Multi-annual field forage with a mix of legumes and grasses
• Inter-crops
• Constant soil covering with cover crops
• Gentle soil cultivation
• Reduced cultivation intensity
• Use of light weight harvest and transport machines
• Avoiding driving or working on soil during wet field conditions
• Use of alkaline material
• Fertilizing the soil with doses of lime
SOIL
5

ph-Wert strong acid acidic slightly acidic neutral slightly alkaline
barley
sugar beet
red clover
wheat
corn
pumpkin
field beans
peas
canola
oats
potatoes
ray
grassland
lucerne
Lime (Source: Landwirt Bio Plus*)
The general rule is that all fields should be spread with lime every 3 to 4 years to stable pH-values.
• Lime consists mainly of calcium; calcium ensures, especially in heavy and clay soil, a stabile soil structure. Lime forms bonds between clay and humus particles, the ton-humus-complex.
• Rain washes carbonic acid into the soil and calcium out, especially in sandy soil this causes huge issues (until 300 kg/ha/year - 268lbs/acre/year).
• The crops need calcium, but what is more essential is that the calcium maintains the pH-value.
• pH-value under 5: release of aluminium (harmful for plant roots and microorganisms)
• pH-value 6-7: phosphate and boron are most available
• pH-value over 7: Availability of most trace elements except molybdenum is reduced.
Every type of soil structure has its optimal pH-value. In order to achieve this, you need to plant legumes. It is important that between crop rotations, lime should be spread out before seeding peas, beans, soybeans, clover or alfalfa. Also in the case of protein crops (grain and oilseeds), it is important to take care of the sulphur supply.
Recommendation: spread 2 – 3 tons of lime every 2-3 years. The finer the carbonic lime, the better the effect it has on the soil.
3,5 4 4,5 5 5,5 6 6,5 7 7,5 8 8,5
cultivated plants have different optimal pH-values (regarding to Klapp)
* Source: „Von Analyse bis Zeigerpflanze“ (Manuel Böhm, Landwirt Bio plus edition 3) and „Kalk für den Acker - Sauer ist nicht lustig“ (Stefan SImon, Landwirt Bio plus edition 4)Landwirt Agrarmedien GmbH, www.landwirt.com
6
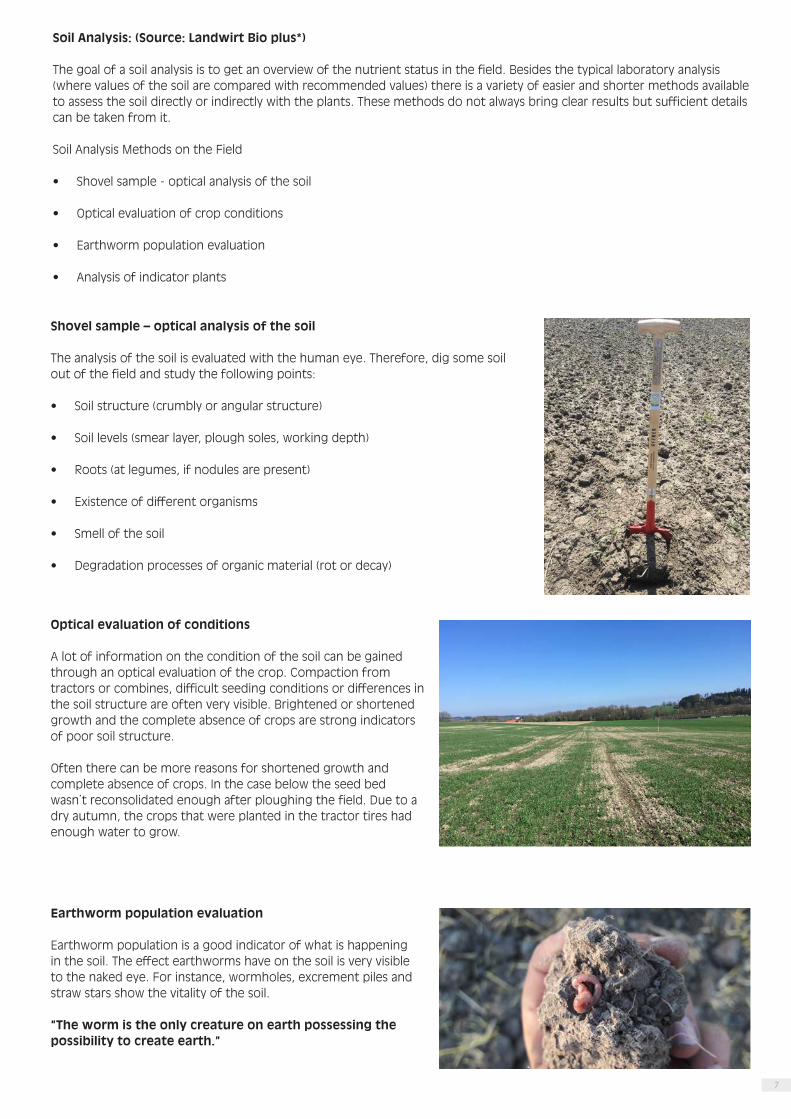
Soil Analysis: (Source: Landwirt Bio plus*)
The goal of a soil analysis is to get an overview of the nutrient status in the field. Besides the typical laboratory analysis (where values of the soil are compared with recommended values) there is a variety of easier and shorter methods available to assess the soil directly or indirectly with the plants. These methods do not always bring clear results but sufficient details can be taken from it.
Soil Analysis Methods on the Field
• Shovel sample - optical analysis of the soil
• Optical evaluation of crop conditions
• Earthworm population evaluation
• Analysis of indicator plants
Shovel sample – optical analysis of the soil
The analysis of the soil is evaluated with the human eye. Therefore, dig some soil out of the field and study the following points:
• Soil structure (crumbly or angular structure)
• Soil levels (smear layer, plough soles, working depth)
• Roots (at legumes, if nodules are present)
• Existence of different organisms
• Smell of the soil
• Degradation processes of organic material (rot or decay)
Optical evaluation of conditions
A lot of information on the condition of the soil can be gained through an optical evaluation of the crop. Compaction from tractors or combines, difficult seeding conditions or differences in the soil structure are often very visible. Brightened or shortened growth and the complete absence of crops are strong indicators of poor soil structure.
Often there can be more reasons for shortened growth and complete absence of crops. In the case below the seed bed wasn´t reconsolidated enough after ploughing the field. Due to a dry autumn, the crops that were planted in the tractor tires had enough water to grow.
Earthworm population evaluation
Earthworm population is a good indicator of what is happening in the soil. The effect earthworms have on the soil is very visible to the naked eye. For instance, wormholes, excrement piles and straw stars show the vitality of the soil.
“The worm is the only creature on earth possessing the possibility to create earth.”
7

1. Soil preparation in wet conditions.
2. Nitrogen surplus at the surface
3. Nitrogen surplus at deeper soil levels
4. Silting with creation of backwater
5. Compaction on the headland, structure problems at the surface
6. Soil acidification
7. Lack of lime
8. Gap filler (thin stocks or time gaps)
9. Gap filler (thin stocks, punctual gaps or damage on swards)
10. Dry, lighter, warm soil
11. Wet, heavy, cold soil
12. Deep soil compaction
* Source: „Von Analyse bis Zeigerpflanze“ (Manuel Böhm, Landwirt Bio plus edition 3) and „Kalk für den Acker - Sauer ist nicht lustig“ (Stefan SImon, Landwirt Bio plus edition 4)Landwirt Agrarmedien GmbH, www.landwirt.com
Analysis of indicator weeds (Source: Landwirt Bio Plus*)
PH-value, soil structure (elimination of capillary action, compression, smearing of the soil) and moisture of the soil can be seen by the growth of different weeds. If the crops in the field show an irregular growth pattern or there is extremely wet harvest and poor soil preparation conditions resulting in silting, acidification, nutrient or oxygen deficiency this will be visible for years in plant growth. Moreover, a lack of nutrients will make weeds discoloured to the human eye. The following graph examines results for having certain weeds.
PLANT INDICATOR FOR
ALSO SEEDLING GROWN UP PLANT
FIELD-MAYWEED 7 5 and 6
CREEPING THISTLE
3 and 4 because of wet soil preparation
11
AMARANTH 2 mostly 6, also 10
DOCK 7 3, 4, 12
COMFREY 4 11, 12
BUTTERCUP 7 6
WILD RADISH 7 6
GOOSEGRASS 2
CORNFLOWER 6 mostly 7, often 10
DANDELION 7 6, also 11
COUCH GRASS 8 2 and 4, also 5
HORSETAIL 4 11, also 12
CHICKWEED 2 also 9
APERA 1 also 11
8

It is important to understand the correlation of crop rotations. Single crops should be selected because of their cultivation and soil advantages instead of an economical advantage.
The crop rotation should be designed that the available nitrogen will be used by the selected crop. The crop rotation links should be designed like this:
Nitrogen collection – Strong consumption of Nitrogen – Low Consumption of Nitrogen
Slight overproduction of nitrogen is important to increase the humus content in the soil. (to increase the humus content by 1 %, 1200 kg/ha nitrogen is necessary)
Principles of good crop rotation: (Year 1)
• percentage of legumes should be between 20 – 25 %• percentage of grain should be a maximum 50 – 60 %• percentage of root crops should be a maximum 5 – 25 %• Alternate between
• plants with deep roots and shallow roots• nitrogen collecting – consuming• winter crops – summer crops• root crops – grain crops• cover crops and intercrops
Goals of a balanced crop rotation:
• Preservation of soil fertility• Maximizing nitrogen collection• Weed control
• for example.: clover-grass: regulation of thistle• prevention against disease and defence against pests• mobilization of nutrients• plants covering the soil throughout the year (cover crops)
Example of an organic-crop rotation:
MARKET-ORIENTED CROP ROTATION FORAGE CROP ROTATION
YEAR 1- CLOVER-GRASSYEAR 2- WHEAT
• COVER CROP WITH LEGUMES (VETCHES – FLAT PEA)
YEAR 3- CORNYEAR 4- BROAD BEANS/ SOYBEANS
• COVER CROP PERHAPS MUSTARD AS NITROGEN SAVER
YEAR 5- WHEAT AND RYE• COVER CROP WITH OUT LEGUMES
YEAR 6- OATS• WITH CLOVER AS INTER-CROP
YEAR 1- CLOVER-GRASSYEAR 2- CLOVER-GRASSYEAR 3- WHEAT AND RYE
• COVER CROP (OATS)YEAR 4- PEAS
• COVER CROP: HAIRY VETCH, CANOLA AND SUN FLOWERS
YEAR 5- WHEAT AND RYE• COVER CROP: HAIRY VETCH, PHACELIA, CANOLA
AND SUN FLOWERSYEAR 6- SPRING BARLEY
• WITH CLOVER AS INTER-CROP
CROP ROTATION
9
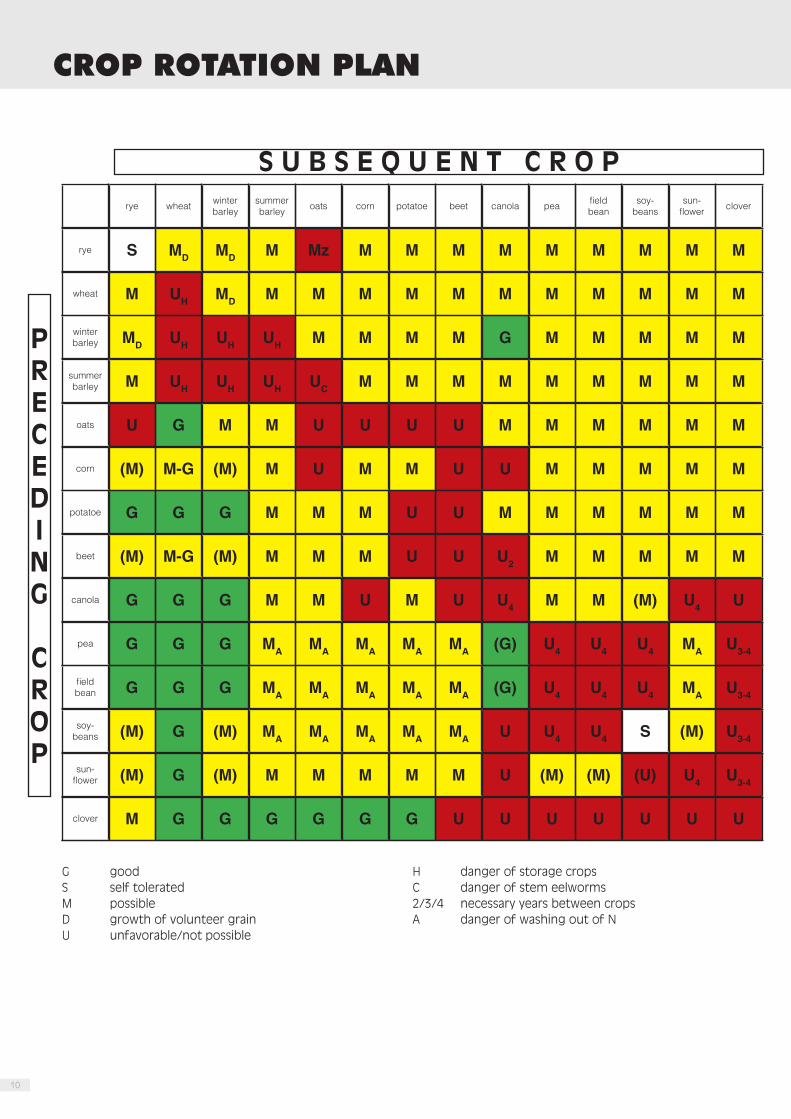
rye wheat winter barley
summer barley oats corn potatoe beet canola pea field
beansoy-
beanssun-
flower clover
rye S MD MD M Mz M M M M M M M M M
wheat M UH MD M M M M M M M M M M M
winter barley MD UH UH UH M M M M G M M M M M
summer barley M UH UH UH UC M M M M M M M M M
oats U G M M U U U U M M M M M M
corn (M) M-G (M) M U M M U U M M M M M
potatoe G G G M M M U U M M M M M M
beet (M) M-G (M) M M M U U U2 M M M M M
canola G G G M M U M U U4 M M (M) U4 U
pea G G G MA MA MA MA MA (G) U4 U4 U4 MA U3-4
field bean G G G MA MA MA MA MA (G) U4 U4 U4 MA U3-4
soy- beans (M) G (M) MA MA MA MA MA U U4 U4 S (M) U3-4
sun-flower (M) G (M) M M M M M U (M) (M) (U) U4 U3-4
clover M G G G G G G U U U U U U U
CROP ROTATION PLAN
S U B S E Q U E N T C R O P
PR ECE D I N G
CROP
G goodS self toleratedM possibleD growth of volunteer grainU unfavorable/not possible
H danger of storage crops C danger of stem eelworms2/3/4 necessary years between cropsA danger of washing out of N
10

“Work done after the harvest affects the next harvest”
The following points make stubble cultivation crucial:
• prevention of water evaporation
• it efficiently combats weed growth
• supports residue breakdown
• prevents volunteer plant germination
1.Primary tillage:
The first pass with a stubble cultivator is important. The cultivator should be set to work shallow and level (approx. 4 - 5 cm / 1.5”-2”), to stimulate the germination of grain. Also, the soil should be worked and cut through completely to efficiently combat future weed growth.
SOIL PREPARATION
Picture left: Duckfoot sweep mounted on a spring tine.Picture right: Tine with diamond share, with this combination it is possible to work the soil completely.
In order to kill deep root weeds, it is very important to eliminate soil compaction as much as possible.
Especially when controlling deep rooted weeds, compaction has a very detrimental effect on the overall success of weed control. Weeds that are pressed into the soil will start to grow again. For this reason, it is important to work with a light roller in combination with following weeder tines on the cultivator. The tines will than remove any soil that remains on the root of the weed. This will also help the weed to dry out sooner.
11

2. Secondary tillage:
On the second pass with a stubble cultivator, the working depth should be increased to 10 cm / 4”. This pass is crucial in creating optimal conditions for residue decomposition as well as it helps to destroy any germinated grain. It is important that only the dry soil horizon is cultivated. This is important because working wet soil will cause ‘smearing’ and will close off pores in the soil that help with the transport of water. The entire working width should not be broken up with a flat sweep but instead a small share should be used to break up the soil.
In order to improve soil structure, it is important to seed a cover crop on this pass. This will provide a cover on the soil as well as build up a nutrient bank that the next years main crop can take from. The picture below is an example of how this can be done. It is a combination of a cultivator with a pneumatic air seeder.
Third Pass of Cultivation before seedbed preperation:
The last pass of soil preparation before seedbed preparation should be the deepest. In order to achieve this, a cultivator or plough should be used in order to destroy weeds and volnteer grains.
Advantages of using a plough:
• The soil is worked over intensely, which increases the mobilization of nitrogen and expands the habitat for certain microorganisms.
• Weeds are buried and/or destroyed.• Working depth and quality of the job is apparent immediately.
Disadvantages of using a plough:
• High operating costs and low production (time, fuel, etc.)• Since residues and nutrients are buried deep, decomposition happens in the wrong environment. Earthworms miss out
on this food source at the surface and it caused the surface of the soil to silt up.• Mobilization of nitrogen is affected negatively as it is easily washed out. Intense soil movement always means humus
decomposition!
In the picture a roll-over plough is shown in operation. IMPORTANT: When using a plough, work at a depth of 12 cm / 5-6”.12

Seedbed Preparation
A perfectly level and flat seedbed can be characterised by a surface soil structure that is medium to coarse. The seed should be seeded in a firm but crumbled soil layer that is above a well packed layer. This well packed layer of soil will act like a sponge during the season and is very important for moisture retention. It is important to limit the number of passes for seedbed preparation as resulting compaction can prolong crop emergence (especially wet conditions).
If the conditions in spring allow early seedbed preparation, you can prepare a flate seedbed. By preparing the seedbed 2- 4 weeks before planting, weeds can germinate and grow. This effect can be entranced by operating the tine weeder or seed harrow several times before preparing the seedbed. The emerged seeds then will be killed during the real seebed-preparation operation. This will reduce the weed pressure, especially in early growth stage of the main crop, dramatically.
Seedbed preparation in the spring after fall tillage was done. Use a spring tooth harrow.
IMPORTANT: PTO driven implements such as power harrows or rotavators should be avoided as much as possible as they can smear the ground in wet conditions.
These tools tend to work the soil to intensely and will crumble the soil too much which will result in run-off.
13

Cover crops are an important tool in bringing the suns energy into the soil. Between main crops it is important to build up the nutrient bank in the soil as well as to fix nitrogen. This will happen mostly between the months of July to September.
Principle goals of cover crops:
• Soil covering (protection against the soil drying out)
• Bonding soil structure
• Increasing soil fertility
• Nutrient fixing
• Decomposition residues
Cover crops can detriment the main crop rotation and can induce infection bridges. Therefore, the following points should be followed when seeding cover crops: In crop rotations producing peas, cover crops containing of lupins, peas, vetches and field beans, should be avoided. They should be avoided since peas are particularly sensitive to fruit-related diseases. The same applies to lupines and field beans as main crop in a weakened form. Mustard and oil radish should be avoided due the danger of cabbage hernia in canola crop rotations.Phacelia and mustard are prohibited in potato crop rotations because they transmit the soil-borne rattle virus (iron stain).
COVER CROPS
14

Different forms of seeding cover crops
• Intercrop Seeding
When you want to grow low growing grasses, white clover, yellow clover, mustard, clover grass, red clover or alfalfa as following main crop, you can interseed them in the growing crop. Recommendation: Intercrop seeding should be completed on the second pass with the tine weeder, when the crop tillering is finished.
Advantages:
• Fixing of additional nitrogen, regulation of weeds and prevention of erosion.• After harvesting the main crop, the cover crop gets light and starts to grow which means no soil cultivation is
necessary, even possible.
Disadvantages:
• The main crop can depress the intercrop and reduce growth.• The cover crop can overgrow the main crop and/or withdraw water and nutrients.
15

• Seeding after stubble cultivation:
Following cereal harvest, the soil should be cultivated in dry conditions and as early and level as possible. This helps to stimulate germination of volunteer grains and weed seeds. Repeated cultivations at different depths and intervals will lead to the reduction of weed seed potential in the field. However, this allows early seeding of cover crops. Depending on the conditions of the season and weed pressure, you have to decide either to fight wees or to cover the ground with a cover crop. If there is not a lot of weed pressure you can seed a cover crop as soon as possible instead of having to first eliminate the weed pressure. A strong cover crop will depress the lost crop; but germinated lost crop can also be seen as a part of cover crop seed mix.
The picture on the left shows a shallow stubble cultivation pass (working depth approx. 5 cm / 2”), the picture on the right shows the second stubble cultivation (working depth approx. 10 cm / 4”) in combination with planting a cover crop.
It is important that when seeding expensive or small grain cover crops that a pneumatic air seeder or seed drill is used. This will ensure precise seed placement and even emergence and growth of the crop. If cover crops are seeded with a classic disc spreader it can lead to uneven distribution due to winds etc. (see picture below)
16

Mowing/Crimping of cover crops
It is important that only pre-decomposted material is incorporated into the soil as the soil cannot break down a ‘green’ plant well.The following points should be observed:
• Timing is important when mowing or crimping high stands. If the stand is flowering it is important to protect insects (bees) by mowing stands in the morning, evening or in cool weather conditions.
• Pre-rotting reduces the risk of anaerobic degradation
• Mow or crimp the stand approx. 2 weeks before incorporation
• Don´t allow the growth to become liquified, otherwise the nitrogen release is slow and reduced yields will occur
• Don´t plough the fresh green mass deep into heavy soil
• Don´t incorporate a fresh green mass too late on light soils before winter as the growth of the main crop the following year can be obstructed
17

In certain cases, there are crops that are easy to crimp, such as mustard, buckwheat or field beans. A roller combined with high speed is often sufficient to cause the vegetation to die. In the case of cover crops that are too difficult to crimp, such as clover or grass, the vegetation must be mulched or mowed.
The picture shows how cover crops (mustard, buckwheat and field bean) are crushed at 20 km/h with a roller crimper.
Incorporation of cover crops that died over winter:
Certain crops such as mustard, and certain clovers can be incorporated very well if they have dried up or froze. They break up very well on their own through the use of soil tillage implements such as a cultivator or rotary harrow. Certain clovers can also be „chopped“ with the Cambridge roller when they are frozen.
18

Incorporation cover crops that do not die off during the winter:
It is important to kill off the cover crop if it did not die over the winter as it can lead to too much re-growth in the main crop.
Grasses are particularly persistent and great care must be taken here. It is important to cut across the entire surface, whether with a plough, winged cultivator or light cultivator with duckfoot sweeps.
If the roots are not turned into the ground, they must be separated from the soil as much as possible in order to prevent them from growing again. Therefore, it is important to use a weeder tines behind the roller.
Usually a combination of several processing steps with a few days interval is necessary to let the plants die off.
Seedbed combination with duckfoot sweeps (working depth 5 cm / 2“), cuts through the entire surface and destroys the cover crop. ATTENTION: soil should not be sensitive in respect of silting
Seeds eaten by birds:
Corn, sunflowers and grain legumes are the preferred food source for birds, from seed to seedling. As there are no artificial preventatives available so far, the farmer has to help himself with banging devices, reflective CDs or scarecrows. However, the effect of these preventive methods usually subsides after a few days, as birds are very intelligent.
In the pictures you can see how corn became the victim of a bird attack. The bird picks the entire corn plant out of the soil (corn was seeded 5 cm / 2” deep) and eats only the foilage, as he leaves the stalk on the soil.
Remedy for a few days can be obtained by using a scarecrow with reflective CD´s etc.
19

MECHANICAL WEED CONTROL
In general, don‘t be afraid of weeds!
In the fi rst few years of transition, weed pressure will be lower because of prior use of pesticides. This prior usage has led to a signifi cant reduction in weed seeds.
The aim of tine weeding and chopping is to support the crop and eliminate the weeds. The aim is to reduce weed pressure to a minimum and give the crop a head start. A 100% weed kill cannot and should not be achieved. Up to a certain threshold, weeds can be benefi cial because of the higher density and diversity of wild herbs promoting the stability of the soil.
Suggestions for effective mechanical weed control:
• fl at seedbed preparation with fi ne soil structure
• sunny and windy day
• Leaves of the main crop are fl exible, weeds dry out quickly and die
Tine Weeder
For the tine weeder to have a positive effect on weed control, the operating instructions should be followed closely. Seventy percent of weeds can be destroyed if you understand and use the tine weeder properly. The angle of the tines should be adjusted so that the tines have light pressure on the soil. The aggressiveness of the tine weeder is mainly related to the working speed and the structure of the soil and not the angle of the tines. Often it makes more sense to operate at slower speeds but to work the soil in two passes. (Work the opposite direction on the second pass). It is recommended to keep a journal of soil, weather and crop conditions to build up knowledge of what settings work in different conditions. The setting of the tine weeder will differ based on the conditions presented.
Basic settings of the tine weeder:
• Working depth should be approx. 2,5 cm / 1“ so that the seedbed is not disturbed
• The tine section should be horizontal to the ground. The A-fork will be on an angle putting light pressure on the back of the tine section
• Tines shall be adjusted “Point to the front”
• Basic depth adjustment with support wheels, fi ne adjustment with the top link
low pressure on the sections
hydraulictine adjustment
fi xedsections
tine postion “tip is forward of the bend“
slotted holefor upper link
20

Blind-weeding
Blind weeding is carried out between seeding and crop emergence. A deeper seed placement ensures that the seedbed is not disturbed. Blind weeding is especially recommended for crops such as fi eld beans, soybeans or corn (these crops are generally seeded deeper). In addition to weed control, blind weeding will break up the soil crust and allow for better emergence of the crop. When blind weeding, it is very important that the tine weeder is set properly so that it does not interfere with the seedbed.
Tine weeding in post emergence crops
In general, tine weeding cereals, grains, corn and potatoes is dependent on the size of the crop. Post emergence, it is important to tine weed when the weeds are in the germination stage (white hairs). During sensitive stages of crop growth however (e.g. 2 leaf stage on grain) it is important that tine weeding is avoided.
Important information for weed control:
It is very important to begin weed control before seeding. Multiple passes with a harrow or tine weeder before seeding will reduce weed seed potential.
weeder weeder, later also cultivator 1) Attention with rye
be
fore
se
ed
ing
be
fore
em
erg
ing
lea
f p
oin
t st
ag
e
1. t
o 2
. le
af
3. t
o 4
. le
af Tillering Stem elongation
crop growth
weed growth
1)
21

Summer cereals
Summer cereals such as oats, spring barley and summer wheat are usually in the crop rotation after winter cereals, corn or potatoes. If fertilisation is too intensive, there is a risk of a storage crop. In principle, summer cereals should be sown as early as possible. But cereals are sensitive against soil compaction and silting.
Mechanical weed control:
1. Blind-weeding is possible with a slightly deeper seed placement, 2 - 5 days after planting
2. After emergence of the crop, the field can be tine weeded after the two-leave stage of the main crop, with middle to aggressive tine position. Besides weed control, this step also stimulates tillering
3. The last pass with the tine weeder is carried out before the canopy forms. On this pass, it is possible to work aggressively with more pressure on the tines. This will regulate weed pressure for the remainder of the season
In the picture above, spring wheat is tine weeded for the second time (aggressive tine weeding in mid growth stage before canopying).
22

Winter cereals
Sequence according to previous crop claims: winter barley - winter wheat - triticale - spelt – rye.
Winter cereals must be sown in time: winter barley, triticale and rye should before the end of vegetation start to tillering. Winter wheat and spelt should overwinter in the 3-leaf stage. Attention: A too high proportion of winter cereals in the crop rotation promotes cereal diseases, autumn germinating weeds such as goosegrass, black weed and root weeds (dock, thistle) due to the long vegetation period.
Mechanical weed control:
1. Blind-weeding is possible with a slightly deeper seed placement, 2 - 5 days after sowing.
2. After emergence of the crop, the field can be tine weeded after the two-leave stage of the main crop, with middle to aggressive tine position. In this stage, it is often not possible anymore to tine weed the field, because of the wet weather. For this reason, the field should be tine weeded as soon as possible in spring. (Attention: no night frost should occur after tine weeding). Besides weed control, the tillering is stimulated, the topsoil loosened and aeroted.
3. The second pass of the tine weeder should be done approx. 2 weeks after the first one in order to kill again germinated weeds.
It is difficult to damage a winter crop with the tine weeder.
Left picture: winter barley was tine weeded aggressively in the spring. (it looks like the entire crop was destroyed) Right picture: you can see the same winter barley at the end of May.
23

Goosegrass in cereals
This weed has a major impact on the crop and yield, especially in wheat and canola; it can reduce the yield between 30-60%. The damaging effect is mainly due to the competition of nitrogen and light, as well the weed grows over the crop.
Goose grass can be combated effectively with a tine weeder (without the tines touching the ground). The growth of the weed is hindered and it can be combed out before the ear is established.
24

Cultivating in the row
Besides the conventional row spacing of 50 cm / 20” used in sugar beet or soybean production and 75 cm / 30” in corn production, individual rows with a spacing of 25 cm / 10” common in cereals, canola, field beans and peas are common. Cultivating on this narrow row spacing must be taken into consideration when planting. It is very important that the rows are parallel in order to cultivate as close to the plants as possible. With a row spacing of 25 cm / 10“, the seed rate is the same as 12,5 cm / 5” spacing.
The positvitve advantages of cultivating is that it is more effective in maintaining weed control longer, eliminates weeds that are in further stages of growth and deep rootng weeds.
Cultivating Cereals
The first pass of the cultivator should be at the 4-leaf stage. For this reason, it is advisable to tine weed the cereals before cultivating in order to kill weeds in the plant row. The second and third cultivating pass (if it is necessary) can be done until the ear is established, or the crop canopies.
The picture on the left shows weeds that are very visible. By cultivating with the hoe (pictured right) it was possible to remove the weeds between the rows and also partly in the row (with the finger-weeders).
25

Corn
As a row crop, corn in cereal-stressed crop rotations can benifet the soil by loosening the stress on the soil and fight deep rooting weeds. Corn is known as a nutrient absorber and has a late canopy stage. For this reason, corn should be kept weed-free until the 6-leaf stage. To ensure rapid growth of a young plant, the soil temperature should be at least 8°C, when seeding.
Mechanical weed control:
1. Blind weeding (approx. 3 - 5 days after planting). Plant when weather permits to blind weed successfully.
2. If it is necessary, gently tine weed in 2 - 3-leaf stage at 2 - 3 km/h ATTENTION: the plants can be bent easily at this stage
26

3. Cultivating should be done approximately one week after tine weeding. It is very important to cultivate as close to the row as possible. A camera guidance system on the cultivator assists the tractor operator and compensates errors of the driver.
4. The last cultivating pass should be done shortly before the rows canopy. Move the teeth closer together so that they do not interfere with the root system. It is also recommended to push soil into the plant row on this pass. After this pass is complete it should be no longer necessary/ or possible to do any more mechanical weed control.
27

Soybeans
Soybeans grow best in a seedbed that is not too fine, in medium-heavy soil conditions and in a warm and wet climate. Soybeans are generally very self-tolerated but due to the fungal disease, sclerotia, there should be an interval of 4 - 5 years between rotations. This should also be observed with other susceptible plants such as canola, sunflowers and legumes (clover, peas, beans).
To be able to cultivate, the soybeans should be planted on rows of 25 - 50 cm / 10 to 20”. To ensure rapid growth development, the soil temperature should be between 8 and 10°C, when seeding.
ATTENTION: In order to ensure good emergence, the soybeans should be injected shortly before sowing.
Mechanical weed control:
1. Blind weeding (approx. 3 - 4 days after planting). Planting should be dependent on when you can blind weed (weather).
2. Cultivate as soon as the 2nd seed leaf is visible. Covering the soybeans with soil is no problem.
3. Gentle tine weeding 1 - 2 days after cultivating, to remove the soil from the soybean.
4. 3-4 leaf stage: Cultivate
5. One week after cultivating you can tine weed once again.
6. Shortly before blooming: last cultivating pass, weeds are also cultivated in the row by a finger weeder. (illustrated in the picture)
28

Field beans
Field beans store nitrogen and root through the soil very well. A heavy, limy soil is suitable for cultivation. A seeding break of at least three years must be observed. The seedbed should not be too fine. The ideal sowing time is the beginning of March, generally as early as possible. The seed should be placed 6 - 10 cm / 2,5” – 4” deep. Field beans can be sown in drill seed or in a wide row. (drill 12 or 50 cm / 5” or 20” with a planter)
Mechanical weed control in drill seed:
1. blind weeding (approx. 10 days after sowing), aggressive tine weeding is possible as the seed is placed deep.2. tine weeding (approx. 10 days after the blind weeding, growth of the plant approx. 5 cm / 2”), field beans can be
covered with soil.
3. tine weeding (approx. 10 days after the last one), after this pass it is not necessary to go in with any mechanical weed control.
Weed-free field bean field only by using a tine weeder
Mechanical weed control at a row spacing of 25 cm / 10” or more:
1. blind weeding (approx. 10 days after sowing) aggressive harrowing is possible, as the seed is planted deep
2. first cultivating pass at a height of 5 - 10 cm / 2 - 4”
3. second and last cultivating pass depend on the weed pressure or before the crop canopies. It is important to operate with high speeds to put as much soil in the row as possible
29

Sugar Beets
Sugar beet is known as a nutrient absorber, but it has a good previous crop value, especially if the leaves are worked into the soil. Good soil preparation with a freezing, well rooted cover crop is important. The weed pressure should be kept as low as possible in the young growth stage (2- to 6-leaf stage). The amount of manual labour involved in weed control is the decisive factor for the cost-effectiveness of organic sugar beet. For this reason, all measures to reduce manual weed control by hand is important. A row spacing of 50 cm / 20” has become the standard. The planting date should be about 10 days after conventional cultivation to ensure a fast growth of the plant. (Field temperature min. 5 degrees Celsius)
Mechanical weed control:
ATTENTION: Sugar beets are very sensitive against soil covering onto the plant. In addition, mechanical weed control is often not enough and it must be weeded by hand.
1. First pass hoeing is necessary from the cotyledon stage, the sugar beet is particularly non-competition at this stage, particularly flat chopping and a use of crop deflectors discs to protect the sugar beets should be used
Tip:
At this stage the camera control unit cannot see the small sugar beet so we recommend to seed a rapidly growing inter crop. The camera can‘t follow the sugar beet at the first chopping time, but the inter crop is visible to the camera, (the green lines show where the sugar beets are drilled). This allows usage of a camera guidance unit early in the growth stage and the cultivator will eliminate the intercrop used for sight on the camera.
30

2. You are able to make a pass with the Chopstar when the 1st pair of leaves are visible to the camera. The cultivator leaves only a small, untreated band.
3. From the 4-leaf stage onwards, it is possible to tine weed between cultivating passes.
4. Depending on the weed pressure, cultivating passes can be done until the row is closed. During the last cultivating pass, it is recommended to drive quick and to throw soil into the plant row.
31

Project results: Comparison of „standard row“ to „wide row“ in organic spring wheat and soybeans
In spring of 2017, organic spring wheat and soybeans were sown in plots (4000 m² each). Each crop was seeded once in standard row (row spacing 13 cm / 5”) and on „Wide row“ (row spacing 37,5 cm / 15”).
Location
The test area is located in 4751 Dorf an der Pram (Austria), at an altitude of 460m above sea level. The average annual temperature is 11 degrees Celsius and the average annual rainfall is 900 litres/m² (distributed over 80 days of rain). The soil type is silty loam.
Seeding
At spring wheat, the sowing rate was reduced by 28 % compared to standard row. (345 grains/m² instead of 480 grains/m²)In the case of soybean, 70 grains/m² were sown on both plots.
The picture on the left shows a classic seed drill (row spacing 13 cm / 5”), the picture on the right shows a row crop drill (row spacing 37,5 cm / 15”)
Basis for calculation:
• Machine costs without driver (OEKL-values 2017)• Costs for soil preparation, seedbed preparation, sowing and harvesting were not included, because they were identical
in both systems
32

Mechanical weed control:
(Regarding the weather conditions, the optimal times for weed control of the respective crops wasn´t possible)
• Spring wheat standard row::
• Tine weeding: beginn of tillering
• Tine weeding: middle of tillering
• Spring wheat „wide row“:
• Hoeing: beginn of tillering
• Hoeing: middle till end of tillering
• Tine weeding: end of tillering
• Soybean standard row:
• Blind-weeding: 4 days after seeding
• Tine weeding: 2nd seed leaf was visible
• Tine weeding: the plant was 10 cm / 4“ high
• Soybean „wide row“:
• Blind-weeding: 4 days after seeding
• Hoeing: 2nd seed leaf was visible
• Tine weeding: the plant was 10 cm / 4“ high
• Hoeing: shortly before blooming
33

Result spring wheat:
Spring wheat Standard row Wide row (spacing 37,5 cm / 15“)
Yield (per plot) 700 kg 740 kg
Protein 13,90 % 14,48 %
In addition to the 5,7 % increase in yield, a 0,58 % increase at the protein content was observed. The increased protein content leaded to a higher profit.
Calculation Standard row Wide row (37,5 cm / 15“)
Seed costs / plot € 70,24 € 50,57
Costs for weed control / plot € 37,00 € 74,50
Revenue / plot * € 290,77 € 327,38
Profit / plot: € 183,53 € 202,31
Profit / ha € 458,82 € 505,77 10,23 % surplus profit
* Revenue: for standard row (protein > 13 % protein 415,38 €, according to Agrar Markt Austria for 2016/17 without tax)
* Revenue: for Wide Row (protein > 14 % protein: 442,40 €, according to Agrar Markt Austria for 2016/17 without tax)
Despite the increased cost for weed control, a 10,2 % surplus of profit was possible, because of the less seed costs and the higher price for the higher protein content of the spring wheat in the “wide row”.
In the left picture you can see the plot seeded on standard rows, in the right picture you can see the plot seeded on „wide rows“.
34

Result soybeans:
Soybeans Standard row Wide row (spacing 37,5 cm / 15“)
Yield (per plot) 1.230 kg (24 % moisture) 1.580 kg (17 % moisture)
Yield at 13 % moisture 1.075 kg 1.505 kg
Yield / ha 2.687,5 kg 3.762,5 kg 40,00 % higher yield
By breaking the soil crust with the hoe, the gas exchange and the activity of the nodule bacteria was increased. This is the reason, why the soybeans achieve a 40 % higher yield in the wide row than in standard row.
Calculation Standard row Wide row (spacing 37,5 cm / 15“)
Seed costs / plot € 323,35 € 323,35
Costs for weed control / plot € 55,50 € 93,00
Revenue / plot * € 754,57 € 1.056,40
Profit / plot € 375,72 € 640,05
Profit / ha: € 939,31 € 1.600,14 70,35 % surplus profit
* Revenue: Price for organic soybeans for food industry 2016/17 according to Agrar Markt Austria 701,93 €/t without tax
Despite the increased cost for weed control, a significant increase in profit of 70.4 % was achieved
In the left picture you can see the plot seeded on standard rows, in the right picture you can see the plot seeded on „wide rows“.
35