the head & neck isolator instructional manual · the head & neck isolator instructional...
TRANSCRIPT

1
The Head & Neck Isolator
Instructional Manual
Evidence-Based Methodology
to Strength Train the Head & Neck
By
Mark Asanovich
Manufactured By:

2
About the Author
Mark Asanovich is a fourteen-year National Football
League (NFL) veteran Strength & Conditioning Coach. After serving as the Assistant Strength & Conditioning Coach for the Minnesota Vikings in 1995, Asanovich was the strength & Conditioning Coach for six seasons under Head Coach Tony Dungy with the Tampa Bay Buccaneers from 1996 – 2001. During the 2002 season, Asanovich served as the Assistant Strength & Conditioning Coach for the Baltimore Ravens. From 2003 – 2010 he served as the Head Strength & Conditioning Coach of the Jacksonville Jaguars. He completed his career in professional football in the United Football League with the Hartford Colonials in 2011.
His list of NFL Hall of Famers trained includes: Derrick Brooks, Chris Carter, Chris Doleman, Randall McDaniel, Warren Moon,
Jonathon Ogden, John Randle, Warren Sapp & Gary Zimmerman.
His list of NFL Pro Bowlers trained includes: Donnie Abraham, Mike Alstott, Ronde Barber, Jeff
Blake, Peter Boulware, Derrick Brooks, Mark Brunnell, Tony Brackens, Chris Carter, Jeff
Christy, Jack Del Rio, Trent Dilfer, Chris Doleman, Hugh Douglas, Warrick Dunn, David
Garrard, Sam Gash, Jason Gildon, Martin Gramatica, Robert Griffith, Chris Hanson, Al
Harris, Todd Heap, John Henderson, Chris Hinton, Maurice Jones-Drew, Brad
Johnson,Keyshawn Johnson, Pepper Johnson, Steve Jordan, Jim Lachey, Jermaine
Lewis, Ray Lewis,John Lynch, Rashean Mathis, Tony Mayberry, Chris McAlister, Michael
McCrary, Randall McDaniel, Warren Moon, Dave Moore, Lorenzo Neal, Hardy
Nickerson, Jonathan Ogden,Shelton Quarles, John Randle, Ed Reed, Faud Reveiz, Simeon
Rice, Warren Sapp, Bart Scott, Jimmy Smith, Robert Smith, Todd Steussie, Korey
Stringer, Marcus Stroud, Matt Stover,Fred Taylor, Henry Thomas, Bob Whitfield & Gary
Zimmerman.
Prior to joining the Minnesota Vikings, Asanovich served as the strength & conditioning coach
at Anoka High School (Minneapolis, Minnesota) from 1987-95. During his tenure there, the
school captured state football championships in 1990 and 1994. Anoka also won state titles in
soccer (1989), wrestling (1991), and basketball (1992) during his eight years at the school.
Asanovich came to Anoka after spending 1986 in a similar capacity at The Citadel.
In 1984, Asanovich was hired as a graduate assistant strength coach at The Ohio State
University. The Buckeyes won the Big Ten Football Championship that season and played in
the Rose Bowl. Asanovich was promoted to Assistant Strength & Conditioning Coach at OSU
the following year as the team went 9 – 3 and defeated Brigham Young in the Citrus Bowl.

3
Asanovich was one of the first fifteen Certified Strength & Conditioning Specialists and former Minnesota State Director for the National Strength & Conditioning Association. He is also a Certified Health Fitness Instructor, former Professional Education Committee Member, and former Healthy People 2000 State Director for the American College of Sports Medicine. He has also served as an executive board member/consultant for the National Dance-Exercise Instructors Training Association. In addition, he served as a member on the Minnesota's Governor's Council on Health & Physical Fitness and on the Executive Board for the Minnesota Association of Physical Education, Health, Exercise, Recreation & Dance.
Recognized in Who's Who Among American Teachers, Asanovich was a contributing author in Death in the Locker Room II (Elite Sports Medicine Publishers, 1993), and High Intensity Strength Training (Perigue Books: Putnam Publishing, 1993). He has also published articles in The High Intensity Training Newsletter, The Conditioning Quarterly, Coach & Athletic Director and the Minnesota High School League Bulletin. Asanovich earned his bachelor’s degree in education from St. Cloud State University and his master’s in exercise science from The Ohio State University.
As a clinician, Asanovich has spoken nationally and abroad. As an international speaker, he spoke at the Strong-S Strength Seminar in Tokyo, Japan. He has also spoken at such national events as: the 2017 American Football Coaches Association National Convention, 2016 Resistance Exercise Conference, the 2011/12 Legends Football Strength Clinic, the 1998 American Football Quarterly University, the 1998 and 2005 Nike Coach Of The Year Football Clinic, the 1994 Minnesota HPERD State Convention, 1994 ACSM Northland Fall Tutorial, 1994 & 1995 Minneapolis In Motion, 1993 New Jersey HPERD State Convention, 1987-95 Midwest Strength & Conditioning Seminars, 1992 University of Toledo Strength Clinic, 1991 MSHSCA All-Star Clinic, 1989 Coach of the Year Clinic, 1989 McGregor-Nautilus Clinic, 1985 NSCA National Convention etc. He has also served as a clinician/faculty member for the American College of Sports Medicine, Hamline University, and St. Thomas University (St. Paul, Minnesota).
Recently, Asanovich has been actively engaged as a researcher, speaker and co-author in evidence-based strategies for proactively mitigating the severity and frequency of Cervical Spine Injury and traumatic brain injury through head & neck strengthening. The culmination of the work resulted in publishing of “A Neck Strengthening Protocol in Adolescent Males and Females for Athletic Injury Prevention” in the Journal of Trainology in April of 2016.
Asanovich is a native of Duluth, Minnesota. His wife Allisen and he currently live in Victoria, Minnesota where they are raising Haley, Gracie and Wyatt.

4
TABLE OF CONTENTS
Introduction .............................................................. 6
THE PRIORITY ……………………………..…….…………… 10
THE PROTOCOL ..………………................................... 11
Neck Extension ........................................................ 12
Head Tilt ................................................................ 13
Neck Flexion ............................................................. 14
Head Nod ............................................................... 15
Neck Lateral Flexion ................................................. 16
Complementary Exercises ………………………………… 17
Bilateral Shrug ........................................................... 18
Iso-Lateral Shrug ....................................................... 19
Lat Row ...................................................................... 20
Scapular Retraction ................................................... 21
Scapular Retraction with 90-Degree Row ................. 22
THE PROGRAM ………………………………………………….. 23
THE PRINCIPLES ………………...................................... 24
Frequently Asked Questions ...................................... 30
References .................................................................. 37

5
THE HEAD & NECK ISOLATOR
The only evidence-based head and neck strength machine ever designed
Back Pad
Face Pad
Seat Pad
Seat Height
Adjustment
Range
Limiter
Movement Arm
Selector
Torso
Stabilizing
Handles
Neck
Extension
Handles
Neck
Flexion/Nod
Handles

6
INTRODUCTION
The Centers of Disease Control estimates that there are 1.6 - 3.8 million
sports and recreation-related concussions occurring in the United States each
year. Yet in actuality, no one really knows what the exact numbers are ... since
many concussions go unrecognized, undetected and unreported? Suffice it to say -
- it's an epidemic. Yet, whether a concussion is sports-related, recreational-
related and/or trauma-related the severity of the injury and resulting cognitive
impairment would in fact be reduced if the head, neck and surrounding cervical
structures were STRONGER. In other words, if the morphological structure is
thicker and/or stiffer (i.e. stronger), the research is conclusive ... that is,
concussive and sub-concussive forces will be better dissipated more effectively if
the individual's cervical spine’s structural integrity is more highly developed …
this is simple physics.
There is no area of the body that induces such beneficial physiological
responses to an individual's health and well-being as does training the musculature
of the cervical spine:
(1) Increased passive stiffness of the head & neck
(2) Increased resistance to deformation forces
(3) Lowering of concussive and subconcussive forces
(4) Enhanced athleticism with quicker head mobility
(5) Increased maximum oxygen uptake by strengthening the musculature that
elevates the rib cage
(6) Increased blood flow to and from the brain to become more effective at
cooling
(7) Reduction of headaches due to weakened head muscles
(8) Have a baseline strength measurement that can be used in conjunction with
symptomology and cognitive measurements to determine when an individual
can safely resume normal daily activity after head and/or neck trauma.
When you apply the laws of physics to kinetic energy dissipation and reduced
deformation of the neck ... and the resulting preventative and "protective effect"
on the cervical spine; as a coach, athletic trainer, strength professional and/or
health care practitioner ... who is entrusted with primary responsibility of

7
PRUDENTLY PREPARING THE INDIVIDUAL for the potential dangers and orthopedic
rigors of the task at hand, it would be foolish, neglectful and reckless (not to
mention culpable) NOT to include a comprehensive head & neck strengthening
program in the training prescriptions for athletes and non-athletes alike.
Case in point, given the high incidence of ACL tears in sports (particularly in
females), countless ACL prevention programs have been researched, developed
and implemented with a high degree of urgency to curtail the incidence of these
injuries. Wouldn't it then be logical to assume that if prevention protocols that
strengthen muscles around a joint that reduces rupture of a repairable ligament;
are at least equal, if not the same sense of urgency for the prevention of cervical
spine injury and traumatic brain pathologies ... to a joint/organ that may not
be repairable???
The preponderance of current concussion research emphasis is investigating
causation, care and consequences of concussion. Sadly, there has been minimal
consideration in the literature with respect to strategies that proactively mitigate
cervical spine and traumatic brain pathologies. What has been done with respect
to the prevention aspect of cervical spine injury and traumatic brain injury has
focused on better recognition, better education, better legislation, better
execution, better regulation and better innovation. Recent public awareness
campaigns targeting coaches, parents, athletes, teachers, administrators and
medical personnel in regard to the identification, diagnosis, management and
treatment of concussion pathology has been very commendable and effective. Both
state and national governmental legislative efforts are beginning to mandate better
management and return to play procedures nationwide. Sport governing bodies are
developing and enforcing stricter contact rules, reinforcing safer contact
techniques and requiring more comprehensive medical supervision of
competitions. Finally, technological advances in helmet design while decreasing
cranial injuries significantly, has increased cervical spine injuries and traumatic
brain injury exponentially.
Now as important and well-intended as these preventative steps may be, they
are only as effective as coaches, players, officials and manufacturers abide by and
enforce the rules. What is most disconcerting; however, is when all the regulation,
execution, information, legislation and innovation does not do the job … then what?
8
In other words, despite attempts to prevent concussions, the fact is that the
numbers of concussions continue to upsurge each year. Given that fact, do we
simply throw our arms in the air crying "foul", "that's unfair", "that's unfortunate"?
Should the consequences of cervical spine injury and traumatic brain injury from
failed regulation, information, legislation, execution and innovation be considered
"collateral damage"?
Certainly not, given the potentially catastrophic and long term effects of
cervical spine injury and traumatic brain injury, EVERY contingency must be
painstakingly explored, considered and engaged - EVERY SINGLE ONE! Therefore,
the prudent thing, no ... the RIGHT thing to do is to PRERARE individuals ... just in
case the other preventative measures fail.
Strengthening of the head, neck muscles surrounding cervical structures ...
is the ONLY organic contingency within our control to prepare individuals to
withstand potentially injurious forces. The only one! Meaning, it is the only
preventative means that provides a 100% guarantee with respect to its ability to
positively affect an individual's chances in minimizing and/or mitigating the
severity of a cervical spine and traumatic brain injury. Yet one never or rarely
hears anything about training the musculature around the cervical spine in the
contemporary discussion and coverage in the popular press with respect to
cervical spine and traumatic brain trauma prevention. WHY???
There are a number of reasons why training of the head & neck has been
neglected and avoided. One is FEAR. Fear stems from not knowing how to train the
musculature surrounding the cervical spine. A second reason is PRIDE. If a
practitioner does not know how to train the head & neck, often times the prideful,
mental default response is either "it is bad to train the head & neck" and/or "it
doesn't need to be trained" ... because I don't know how to do it. Regardless of the
reason - given the preponderance and growing body of evidence in support of head
& neck strengthening and the catastrophic consequences of NOT training the head
& neck ... THERE IS SIMPLY NO GOOD REASON FOR NOT TRAINING THE MUSCLES
SURROUNDING THE CERVICAL SPINE. PERIOD!

9
Certainly, these injuries can never be fully prevented; however, it is
imperative that health care practitioners take a PROACTIVE approach rather than
a REACTIVE approach in their strategies for mitigating TBI pathologies. Current
attempts at "prevention" primarily involve management of the injury after the
damage already has been done. On the other hand, prevention, by definition, is the
pursuit of researching, developing and implementing those protocols and
procedures that can be initiated before the damage is done.
The cervical spine and concussion prevention protocols that you are about to
learn DO JUST THAT. Based on the research by Ralph Cornwell, Ph.D; PROJECT
NECK conclusively and unequivocally demonstrated that through proper
strengthening of the head, neck and surrounding cervical structures, males and
females are better able to dissipate potentially dangerous concussive forces more
effectively. In doing so, it may not alleviate cervical injury and/or concussive
pathologies, but will certainly reduce the severity of the injury. When it comes to
spinal injury and brain trauma pathology, this may literally be the difference of life
and death.

10
THE PRIORITY: PRIORITY ONE
The most important goal of the strength & conditioning professional is to
PRUDENTLY PREPARE the individual for the rigors of the task. As such, given the
catastrophic consequences of a spinal cord and traumatic brain injury, the
strengthening of the neck and surrounding muscular structures of the cervical
spine MUST be considered PRIORITY ONE in the prescription and design of
exercise routines.
As PRIORITY ONE, neck strengthening SHOULD NOT be looked upon as a
"supplemental exercise" or "extra" that must be "fit" or "squeezed in" to the
workout. Instead, it must be regarded as the FIRST PRIORITY ... and in fact, the
BASIS & FOUNDATION that all other exercises are to be programmed around.
This paradigm shift in thinking on the part of the strength & conditioning
professional, cannot and MUST NOT be taken lightly ... as the health and well-being
of the individuals who have entrusted their health to our care... hangs in the
balance. Training the head & neck and surrounding muscular structures of the
cervical spine, whether athlete or non-athlete, is PRIORITY ONE!
In the proper design of exercise prescription, exercise sequencing in the
workout should follow from the large muscular structures to the smaller muscular
structures. Because neck strengthening is PRIORITY ONE, the neck and
surrounding muscular structures of the cervical spine MUST be sequenced FIRST
in the workout (rather than last). This accords the head, neck and surrounding
structures its due importance and allows the lifter to train this vital area when
relatively "fresh" rather than training it at the end of the workout when the lifter is
in a "fatigued" state. Why? The neck and surrounding muscular structures of the
cervical spine, not the chest, the hips, the knees, the "core" ... is PRIORITY ONE!

11
THE PROTOCOL:
EVIDENCE-BASED
HEAD & NECK
STRENGTH TRAINING
PROTOCOL
Neck Extension
Head Tilt
Neck Flexion
Head Nod
Neck Lateral Flexion
“Injuries are part of football, but no coach wants to see one of his players suffer a severe head or neck injury. We all try to teach the proper techniques to minimize the risks of those
types of injuries. But there is MORE that we can do and it
involves physically preparing your players.” Mark Asanovich was my strength coach for six years in Tampa and he is the best strength and conditioning coach I’ve been around. He has a program to strengthen the head and neck area that will help reduce the chances of these severe neck injuries
and concussion. I know your teams will benefit from
putting some of these fundamental exercises into your
preparation.”
Tony Dungy NFL Hall Of Fame Coach

12
NECK EXTENSION
Muscles Targeted: Upper Trapezius Semispinalis Cervicis Longissimus Cervicis Splenius Cervicis Ligamentum
Nuchae
Machine Setting: Work arm: “N” position Range Limiter: “N” position
Seat Height Setting: The lifter must be aligned so as the Face Pad is centered on the back of the head and travels comfortably through the full range of motion while seated in a fully upright posture.
Starting Position: Set the appropriate set height and weight. Adjust the Back Pad to stabilize the upper torso and prevent any shifting or "swaying" of the upper torso in the direction of movement. The lifter sits in the middle of the seat in a fully upright posture with the head fully flexed, the chin against the chest and the Face Pad centered on the back of the head. Place the feet flat on the floor and do not attempt to push from the legs to assist in the movement of the Face Pad. If the lifter’s legs are too short to touch the ground, allow the legs to hang free. Grip the handles so as to fixate the arms at a 90-degree angle. This arm alignment facilitates maximum firing of the higher fibers of the trapezius attaching to the neck and occipital lobe when the head is in the fully extended position. The lifter must maintain an upright posture throughout the movement with the back firmly supported and in contact with the Back Pad for the entirety of the exercise.
Exercise Mechanics: The lifter initiates the movement with the head fully flexed with the chin against the chest. The lifter initiates the movement by smoothly pressing the back of the head against the Face Pad by rotating the head backwards while simultaneously lifting the chin upwards. This is a rotational movement. The emphasis must be on "pulling" the head up and back in a rotary fashion. The lifting phase is complete when the lifter has reached full extension and the eyes are looking directly overhead. After a momentary pause in the fully contracted position, the lifter lowers the eccentric load under control back to the starting position. Upon returning to the “chin on chest” starting position, the movement is repeated with a smooth and deliberate transition out of the bottom position. Avoid jerking and/or accelerating out of the bottom position, particularly when the lifter begins to fatigue.
Instructional Points: It is common in the performance of this exercise for the upper torso to rock and/or “teeter” in the direction of the lift, particularly when the lifter begins to fatigue. To prevent any unwanted compensatory movements and or muscles, other than the neck extensors, the shoulders and feet must remain fixed. The back must remain firmly supported against the Back Pad. The buttocks must remain centered on the seat for the entirety of the exercise.

13
HEAD TILT
Muscles Targeted: Splenius Capitis
Semispinalis Capitis Longissimus Capitis
Inferior & Superior Obliquus Capitis Rectus Capitis Posterior Major & Minor
Machine Setting: Work arm: “H” position Range Limiter: “HT” position
Seat Height Setting: The lifter must be aligned so as the Face Pad is centered on the back of the head and travels
comfortably through the full range of motion while seated in a fully upright posture.
Starting Position: Adjust the weight appropriately. The head musculature is smaller than the neck muscles. Most lifters will decrease the weight from that used in the Neck Extension exercise by a significant amount. Since the head musculature has a shorter range of motion than the neck muscles, set the Movement Arm Selector to “H” and lower the Range Limiter to the “H” position. The lifter sits in the middle of the seat in a fully upright posture with the head in the neutral position (head straight and eyes looking directly forward). The Face Pad is comfortably centered on the back of the head. With the head in the neutral position, the lifter will begin the exercise under load. Place the feet flat on the floor and do not attempt to push from the legs to assist in the movement of the Face Pad. Grip the Torso Stabilizing Handles so as to fixate the trapezius. The grip on the Torso Stabilizing Handles facilitates better isolation of the head extensors. By effectively placing the trapezius under a stretch, it is unable to engage in the movement, thereby forcing the head extensors to perform all the work. The lifter must maintain an upright posture throughout the movement with the back firmly supported and in contact with the Back Pad for the entirety of the exercise.
Exercise Mechanics: The lifter initiates the movement by smoothly pressing the back of the head against the Face
Pad by rotating the head backwards while simultaneously “tilting” the chin upwards. This is a
rotational movement. The emphasis must be on "pulling" the head up and back in a rotary fashion. The lifting phase is complete when the lifter has reached 25 degrees of extension. At this position, the Range Limiter will stop movement. To facilitate maximal fiber recruitment, the lifter should briefly push isometrically into the Face Pad. After a momentary isometric or “second push” in the fully contracted position, the lifter lowers the eccentric load under control back to the “jaw parallel to the floor”/head neutral starting position. Upon returning to the starting position, the movement is repeated with a smooth and deliberate transition out of the neutral position. Avoid jerking and/or accelerating out of the neutral position, particularly when the lifter begins to fatigue.
Instructional Points: The Neck Extension exercise must be sequenced immediately before the Head Tilt . Normally the larger cervical muscles of the neck will take over for the smaller capitus muscles. To facilitate a better isolation of the smaller capitus muscles, it is necessary to “pre-exhaust” the cervical muscles. To take advantage of the “pre-exhaustion” of the cervical muscles, the time
taken between Neck Extension and the Head Tilt should be minimal.

14
NECK FLEXION
Muscles Targeted: Sternocleidomastoid
Anterior Scalene Middle Scalene
Machine Setting: Work arm: “N” position Range Limiter: “N” position
Seat Height Setting: The lifter must be aligned so as the Face Pad is centered on the front of the head with the forehead positioned across the top-center of the face pad and travels comfortably through the full range of motion while seated in a fully upright posture.
Starting Position: Set the appropriate set height and weight. Push the work arm forward to allow easy access into the machine and for positioning the lifter’s face into the Face Pad. While sitting fully upright, the lifter centers the forehead and the cheek bones carefully into the Face Pad. Next, gradually transition the load from the hands to a static isometric holding of the head in the fully flexed neck position with the lifter's chin touching the chest and eyes looking down at the floor. An abrupt transition of the loaded work arm could result in a violent overstretching and injury to the neck muscles. Place the feet flat on the floor and do not attempt to push from the legs to assist in the movement of the Face Pad. If the lifter’s legs are too short to touch the ground, allow the legs to hang free. Grip the handles so as to stabilize the upper torso and prevent any shifting or "swaying" of the upper torso in the direction of movement. The lifter must maintain an upright posture throughout the movement for the entirety of the exercise.
Exercise Mechanics: The lifter initiates the movement under load. Pressing the forehead against the Face Pad while simultaneously extending the head eccentrically to the neutral position. After a momentary pause in the neutral position, the lifter smoothly and deliberately initiates the movement by tucking the chin downwards in a rotary fashion. This is a rotational movement. The emphasis must be on rotating and "pulling" the head down and tucking the chin; rather than “protracting” the head forward. The lifting phase is complete when the lifter has reached full flexion of the neck. After a momentary pause in the fully contracted position, the movement is repeated with a smooth and deliberate transition out of the fully flexed position. Avoid lowering the weight too fast out of the fully flexed position, particularly when fatigued. To exit the exercise, grasp the work arm with your hand while in the fully flexed position. Remove your head from the face pad and lower the work arm to its resting position. This will avoid over-hyperextending the neck under load while in a fatigued state.
Instructional Points: It is common in the performance of this exercise for the upper torso to rock and/or “teeter” in the direction of the lift, particularly when the lifter begins to fatigue. To prevent any unwanted compensatory movements and or muscles, other than the neck flexors, the shoulders and feet must remain fixed and the buttocks must remain centered on the seat for the entirety of the exercise.

15
HEAD NOD
Muscles Targeted: Longus Capitis
Anterior and Lateral Rectus Capitis Suprahyoid and Hyoid muscles
Machine Setting: Work arm: “H” position Range Limiter: “HN” position
Seat Height Setting: The lifter must be aligned so as the Face Pad is centered on the front of the head with the forehead positioned across the top-center of the face pad and travels comfortably through the full range of motion while seated in a fully upright posture.
Starting Position: Set the appropriate set height and weight. While sitting fully upright, the lifter centers the forehead and the cheek bones carefully into the Face Pad. Place the feet flat on the floor and do not attempt to push from the legs to assist in the movement of the Face Pad. If the lifter’s legs are too short to touch the ground, allow the legs to hang free. Grip the handles so as to stabilize the upper torso and prevent any shifting or "swaying" of the upper torso in the direction of movement. The lifter must maintain an upright posture throughout the movement for the entirety of the exercise.
Exercise Mechanics: The lifter initiates the movement under load. Pressing the forehead against the Face Pad
“nodding” the head slightly downwards while simultaneously tucking the chin in a rotary
fashion. This is a rotational movement. The emphasis must be on rotating and "pulling" the head down and tucking the chin; rather than “protracting” the head forward. The lifting phase is complete when the lifter has reached has reached 10 degrees of head flexion. At this position, the Range Limiter will stop movement. To facilitate maximal fiber recruitment, the lifter should briefly push isometrically into the Face Pad. After a momentary isometric or “second push” in the fully contracted position, the lifter lowers the eccentric load under control back to the head neutral starting position. Upon returning to the starting position, the movement is repeated with a smooth and deliberate transition out of the neutral position. Avoid jerking and/or accelerating out of the neutral position, particularly when the lifter begins to fatigue. The movement is very similar to performing a "nodding" of acknowledgement as if greeting someone familiar.
Instructional Points: The Neck Flexion exercise must be sequenced immediately before the Head Nod . Normally the larger cervical muscles of the neck will take over for the smaller capitus muscles. To facilitate a better isolation of the smaller capitus muscles, it is necessary to “pre-exhaust” the cervical muscles. To take advantage of the “pre-exhaustion” of the cervical muscles, the time
taken between Neck Flexion and the Head Nod should be minimal.
16
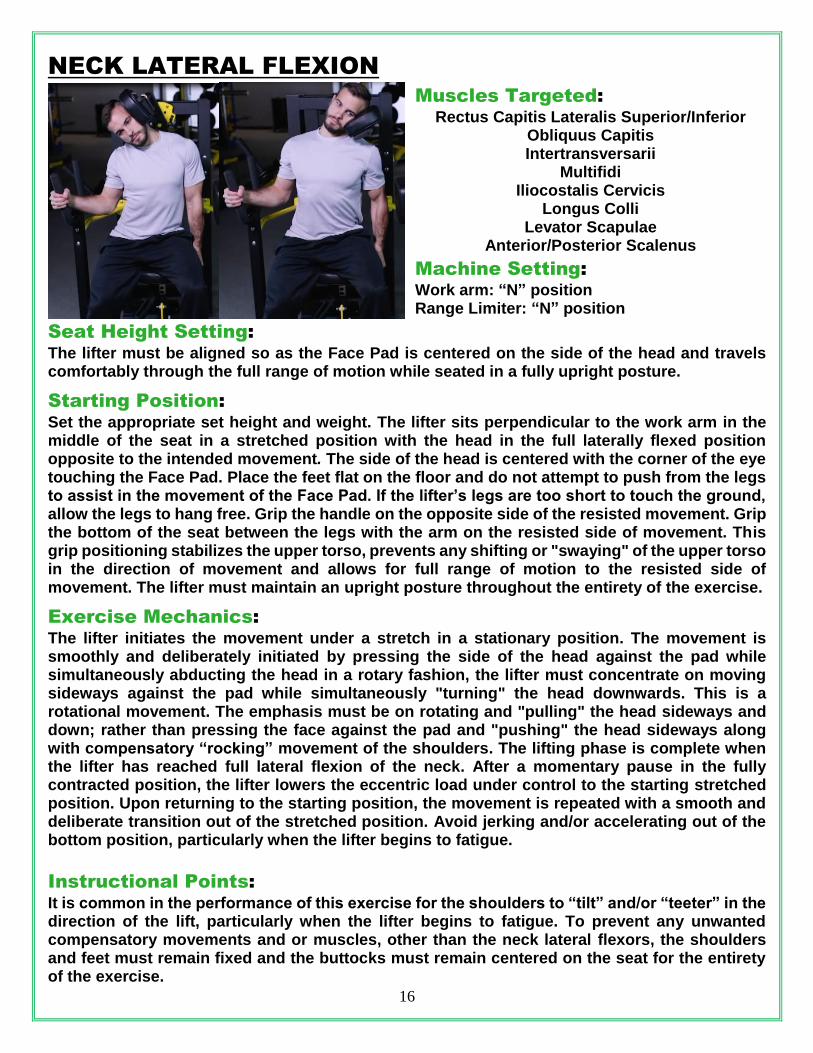
NECK LATERAL FLEXION
Muscles Targeted: Rectus Capitis Lateralis Superior/Inferior
Obliquus Capitis Intertransversarii
Multifidi Iliocostalis Cervicis
Longus Colli Levator Scapulae
Anterior/Posterior Scalenus
Machine Setting: Work arm: “N” position Range Limiter: “N” position
Seat Height Setting: The lifter must be aligned so as the Face Pad is centered on the side of the head and travels comfortably through the full range of motion while seated in a fully upright posture.
Starting Position: Set the appropriate set height and weight. The lifter sits perpendicular to the work arm in the middle of the seat in a stretched position with the head in the full laterally flexed position opposite to the intended movement. The side of the head is centered with the corner of the eye touching the Face Pad. Place the feet flat on the floor and do not attempt to push from the legs to assist in the movement of the Face Pad. If the lifter’s legs are too short to touch the ground, allow the legs to hang free. Grip the handle on the opposite side of the resisted movement. Grip the bottom of the seat between the legs with the arm on the resisted side of movement. This grip positioning stabilizes the upper torso, prevents any shifting or "swaying" of the upper torso in the direction of movement and allows for full range of motion to the resisted side of movement. The lifter must maintain an upright posture throughout the entirety of the exercise.
Exercise Mechanics: The lifter initiates the movement under a stretch in a stationary position. The movement is smoothly and deliberately initiated by pressing the side of the head against the pad while simultaneously abducting the head in a rotary fashion, the lifter must concentrate on moving sideways against the pad while simultaneously "turning" the head downwards. This is a rotational movement. The emphasis must be on rotating and "pulling" the head sideways and down; rather than pressing the face against the pad and "pushing" the head sideways along with compensatory “rocking” movement of the shoulders. The lifting phase is complete when the lifter has reached full lateral flexion of the neck. After a momentary pause in the fully contracted position, the lifter lowers the eccentric load under control to the starting stretched position. Upon returning to the starting position, the movement is repeated with a smooth and deliberate transition out of the stretched position. Avoid jerking and/or accelerating out of the bottom position, particularly when the lifter begins to fatigue.
Instructional Points: It is common in the performance of this exercise for the shoulders to “tilt” and/or “teeter” in the direction of the lift, particularly when the lifter begins to fatigue. To prevent any unwanted compensatory movements and or muscles, other than the neck lateral flexors, the shoulders and feet must remain fixed and the buttocks must remain centered on the seat for the entirety of the exercise.

17
THE PROTOCOL:
Complementary
Exercises: Kinetic energy from an external blow or impact to the head, neck ot torso dissipates down the thoracic spine. Developing the trapezius and latissimus dorsi muscles aids in the dissipation of this energy. The trapezius muscle is a diamond shaped muscle that originates at the midpoint of the back of your skull. It lays on top of the neck extensor muscles. The latissimus dorsi attaches midway down the thoracic spine. There are few exercises that target the upper trapezius muscle fibers and central latissimus dorsi muscle. The shrugging exercises and rowing sequence isolate and target these vital regions.
Bilateral Shrug
Iso-Lateral Shrug
Lat Row
Scapular Retraction
Scapular Retraction with 90-Degree Row

18
BILATERAL SEATED/STANDING SHRUG
Muscle Targeted: Trapezius
Seat Height Setting: If performing the exercise on a seated shrugging machine, the lifter's seat must be aligned so as the work arm handles are slightly out of the lifters reach, this ensures that when the lifter begins the exercise in a fully upright position there is resistance in the starting & stretched position. No seat alignment is necessary when performing the exercise on barbells/dumbbells.
Starting Position: The lifter grips the shrugging handles (for machines) or a barbell/dumbbell(s) with a closed, overhand grip. If performing the exercise in a standing position, assume a shoulder width stance, raise the load into the starting position with a "flat" (upright) back using the muscles of the hips to lift the weight into a fully upright position (as if performing a classic style dead lift). If performing the exercise in a seated position, raise the load into the starting position with a "flat" (upright) back into a fully upright position with the back firmly supported by the seat back. Maintain an erect posture with back and legs straight and "fixed" throughout the entirety of the exercise with no shifting or "rocking" of the upper torso in the direction of movement.
Exercise Mechanics: The lifter initiates the movement by elevating the shoulders upward to a point as high as the ears where there is a "pinching" and "squeezing" of the trapezius against the neck. Emphasis must be on raising the shoulders as high as possible; rather than "rounding" or "rolling" the shoulders in a circular motion. After a momentary pause in the fully contracted position, the lifter lowers the eccentric load under control to the fully stretched position. The movement is repeated with a smooth and deliberate transition out of the stretched position. Avoid “heaving” and/or accelerating out of the starting position, particularly when the lifter begins to fatigue.
Instructional Points: This is a very small range of movement and requires the lifter's undivided focus and attention to detail of rep mechanics in the initiating of movement and transitioning into the eccentric lowering while maintaining tension and maximizing full range of muscular loaded motion.
In every single repetition the shoulders must reach the exact same height. A spotter should stand in back of the lifter and ensure the lifter raises the weight to the same height by having the lifter touch the shoulders to the spotter’s hand.
After the lifter acquires increased strength levels in the trapezius, it is not uncommon for the grip strength to fatigue prior to maximal loading of the traps. In such circumstances where difficulty in maintaining a grip is an issue, "lifting straps" (or hooks) can be placed around the lifters wrists to maintain a firm grip and ensure maximal stimulation to the trapezius.
19
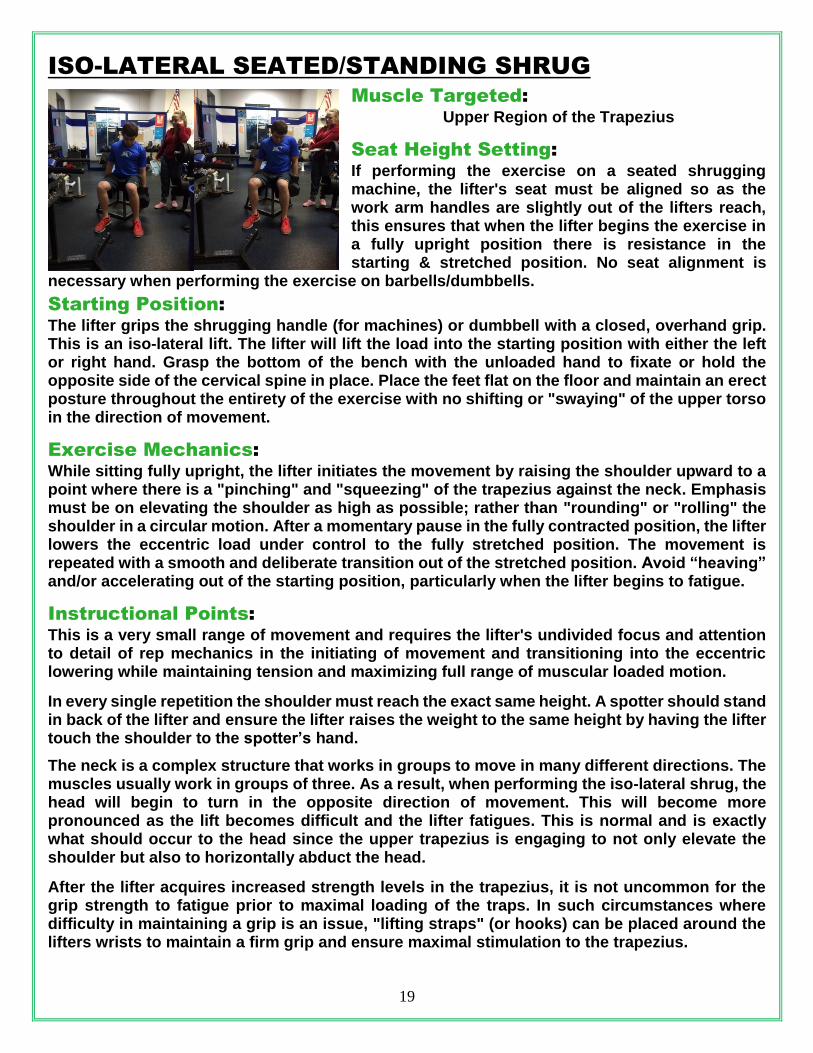
ISO-LATERAL SEATED/STANDING SHRUG
Muscle Targeted: Upper Region of the Trapezius
Seat Height Setting: If performing the exercise on a seated shrugging machine, the lifter's seat must be aligned so as the work arm handles are slightly out of the lifters reach, this ensures that when the lifter begins the exercise in a fully upright position there is resistance in the starting & stretched position. No seat alignment is
necessary when performing the exercise on barbells/dumbbells.
Starting Position: The lifter grips the shrugging handle (for machines) or dumbbell with a closed, overhand grip. This is an iso-lateral lift. The lifter will lift the load into the starting position with either the left or right hand. Grasp the bottom of the bench with the unloaded hand to fixate or hold the opposite side of the cervical spine in place. Place the feet flat on the floor and maintain an erect posture throughout the entirety of the exercise with no shifting or "swaying" of the upper torso in the direction of movement.
Exercise Mechanics: While sitting fully upright, the lifter initiates the movement by raising the shoulder upward to a point where there is a "pinching" and "squeezing" of the trapezius against the neck. Emphasis must be on elevating the shoulder as high as possible; rather than "rounding" or "rolling" the shoulder in a circular motion. After a momentary pause in the fully contracted position, the lifter lowers the eccentric load under control to the fully stretched position. The movement is repeated with a smooth and deliberate transition out of the stretched position. Avoid “heaving” and/or accelerating out of the starting position, particularly when the lifter begins to fatigue.
Instructional Points: This is a very small range of movement and requires the lifter's undivided focus and attention to detail of rep mechanics in the initiating of movement and transitioning into the eccentric lowering while maintaining tension and maximizing full range of muscular loaded motion.
In every single repetition the shoulder must reach the exact same height. A spotter should stand in back of the lifter and ensure the lifter raises the weight to the same height by having the lifter touch the shoulder to the spotter’s hand.
The neck is a complex structure that works in groups to move in many different directions. The muscles usually work in groups of three. As a result, when performing the iso-lateral shrug, the head will begin to turn in the opposite direction of movement. This will become more pronounced as the lift becomes difficult and the lifter fatigues. This is normal and is exactly what should occur to the head since the upper trapezius is engaging to not only elevate the shoulder but also to horizontally abduct the head.
After the lifter acquires increased strength levels in the trapezius, it is not uncommon for the grip strength to fatigue prior to maximal loading of the traps. In such circumstances where difficulty in maintaining a grip is an issue, "lifting straps" (or hooks) can be placed around the lifters wrists to maintain a firm grip and ensure maximal stimulation to the trapezius.

20
LAT ROW Muscle Targeted:
Latissimus Dorsi
Seat Height/Chest Pad
Setting: Adjust the seat height so as the chest is supported and avoids placing undue pressure on the front of the neck. If there is a chest pad setting, adjust the pad so the work arm handle is slightly out of the lifters reach to ensure resistance in the starting (stretched) position. The lifter must remain in an erect posture with the chest maintaining contact with the pad throughout the entirety of the exercise. Avoid leaning back, particularly when the lifter begins to fatigue.
Starting Position: Depending upon the type of rowing apparatus, feet placement can be placed forward to stabilize the upper torso or the feet can be positioned under and behind the lifter to negate the assistance of the hips/legs during the exercise. The lifter grips the handles with a closed, overhand grip with the arms fully extended and under load. The lifter’s posture is erect with the chest upright and fully supported (when a chest pad is provided).
Exercise Mechanics: While maintaining an upright posture, the lifter initiates the movement by bending and rotating the arms backwards keeping the elbows relatively close to the body. Emphasis must be on pulling the weight to the abdominal wall or chest pad. After a momentary pause in the fully contracted position, the lifter lowers and extends the eccentric load under control to the starting "arms completely straightened" position. The movement is repeated with a smooth and deliberate transition out of the stretched position. Avoid jerking and/or accelerating out of the starting position, particularly when the lifter begins to fatigue.
Instructional Points: It is common in the performance of this exercise for the upper torso to lean and “rock” back, particularly when the lifter begins to fatigue. To prevent any unwanted compensatory movements and/or muscle involvement, other than the latissimus dorsi and biceps, the upper torso and feet must remain fixed. The chest must remain in contact against the chest pad (when a chest pad is provided). The buttocks must remain on the seat for the entirety of the exercise. Movement must only occur around the shoulder, elbow and wrist.

21
SCAPULAR RETRACTION
Muscle Targeted: Rhomboids
Seat Height/Chest Pad Setting: Adjust the seat height so as the chest is supported and avoids placing undue pressure on the front of the neck. If there is a chest pad setting, adjust the pad so the work arm handle is slightly out of the lifters reach to ensure resistance in the starting (stretched) position. The lifter must remain in an erect posture, avoid leaning back, the chest must maintain contact with the pad throughout the entirety of the exercise.
Starting Position: Depending upon the type of rowing apparatus, feet placement can be placed forward to stabilize the upper torso or the feet can be positioned under and behind the lifter to negate the assistance of the hips/legs during the exercise. The lifter grips the handles with a closed, overhand grip with the arms fully extended and under load. The lifter’s posture is erect with the chest upright and fully supported (when a chest pad is provided).
Exercise Mechanics: While maintaining an upright posture with the arms fully extended and elbows "softly" locked out under load, the lifter initiates the movement by "pinching" or "squeezing" the scapula (shoulder blades) together. Emphasis must be on keeping the elbows straight while simultaneously "squeezing" or "pulling" the shoulder blades together. Every effort should be made so as not to engage the latisimus dorsi and biceps by bending at the elbow. After a momentary pause in the fully contracted position, the lifter lowers the eccentric load under control to the starting position allowing the shoulder blades to relax and stretch. The movement is repeated with a smooth and deliberate transition out of the stretched position. Avoid jerking and/or accelerating out of the starting position, particularly when the lifter begins to fatigue.
Instructional Points: This is a very small range of movement and requires the lifter's undivided focus and attention to detail of rep mechanics in the initiating of movement and transitioning into the eccentric lowering while maintaining tension and maximizing full range of motion muscular loading.
It is common in the performance of this exercise for the upper torso to lean and “rock” back, particularly when the lifter begins to fatigue. To prevent any unwanted compensatory movements and/or muscle involvement, other than the latissimus dorsi and biceps, the upper torso and feet must remain fixed. The chest must remain in contact against the chest pad (when a chest pad is provided). The buttocks must remain on the seat for the entirety of the exercise. Movement must only occur around the shoulder. A burning or fatigued feel directly between the shoulder blades is not uncommon.
After the lifter acquires increased strength levels in the scapula retractors, it is not uncommon for the grip strength to fatigue and release prior to maximal loading of the Rhomboids. In such circumstances where difficulty in maintaining a grip is an issue, "lifting straps" (or hooks) can be placed around the lifters wrists to maintain a firm grip and ensure maximal stimulation to the scapular retractors.
22
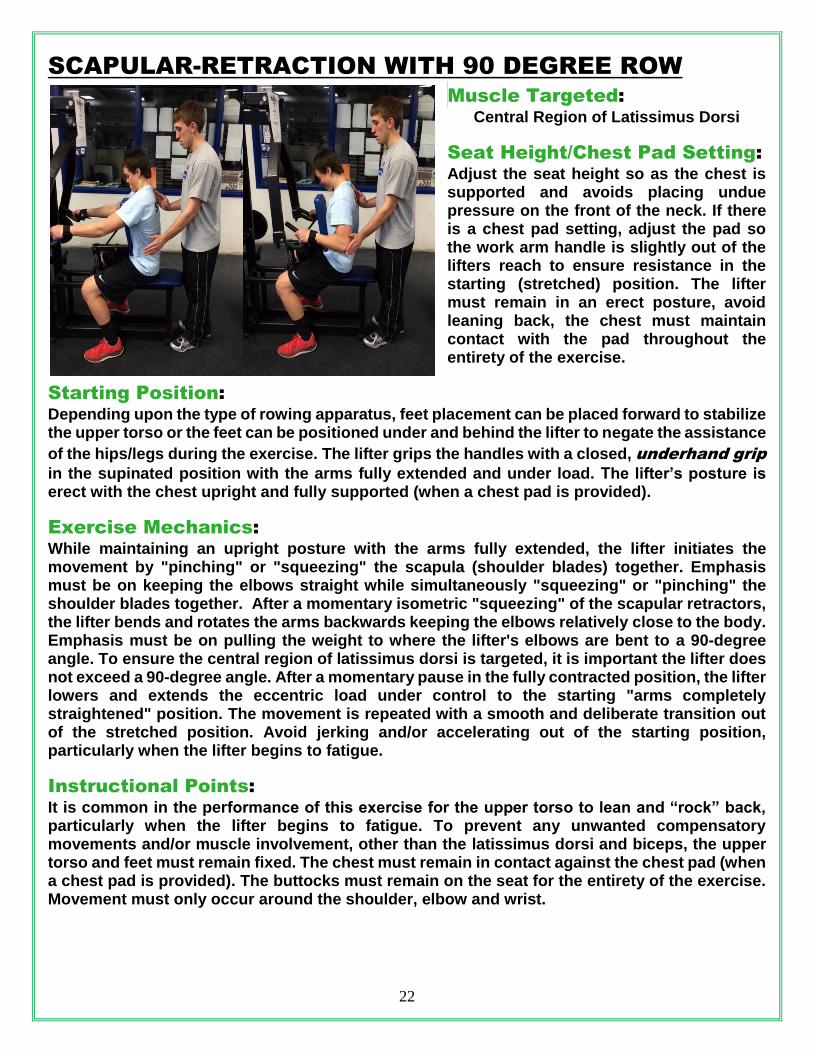
SCAPULAR-RETRACTION WITH 90 DEGREE ROW
Muscle Targeted: Central Region of Latissimus Dorsi
Seat Height/Chest Pad Setting: Adjust the seat height so as the chest is supported and avoids placing undue pressure on the front of the neck. If there is a chest pad setting, adjust the pad so the work arm handle is slightly out of the lifters reach to ensure resistance in the starting (stretched) position. The lifter must remain in an erect posture, avoid leaning back, the chest must maintain contact with the pad throughout the entirety of the exercise.
Starting Position: Depending upon the type of rowing apparatus, feet placement can be placed forward to stabilize the upper torso or the feet can be positioned under and behind the lifter to negate the assistance
of the hips/legs during the exercise. The lifter grips the handles with a closed, underhand grip
in the supinated position with the arms fully extended and under load. The lifter’s posture is erect with the chest upright and fully supported (when a chest pad is provided).
Exercise Mechanics: While maintaining an upright posture with the arms fully extended, the lifter initiates the movement by "pinching" or "squeezing" the scapula (shoulder blades) together. Emphasis must be on keeping the elbows straight while simultaneously "squeezing" or "pinching" the shoulder blades together. After a momentary isometric "squeezing" of the scapular retractors, the lifter bends and rotates the arms backwards keeping the elbows relatively close to the body. Emphasis must be on pulling the weight to where the lifter's elbows are bent to a 90-degree angle. To ensure the central region of latissimus dorsi is targeted, it is important the lifter does not exceed a 90-degree angle. After a momentary pause in the fully contracted position, the lifter lowers and extends the eccentric load under control to the starting "arms completely straightened" position. The movement is repeated with a smooth and deliberate transition out of the stretched position. Avoid jerking and/or accelerating out of the starting position, particularly when the lifter begins to fatigue.
Instructional Points: It is common in the performance of this exercise for the upper torso to lean and “rock” back, particularly when the lifter begins to fatigue. To prevent any unwanted compensatory movements and/or muscle involvement, other than the latissimus dorsi and biceps, the upper torso and feet must remain fixed. The chest must remain in contact against the chest pad (when a chest pad is provided). The buttocks must remain on the seat for the entirety of the exercise. Movement must only occur around the shoulder, elbow and wrist.

23
THE PROGRAM: The benefits of training the head and neck musculature can still be attained if you decide to split this protocol up:
An example of how to program the protocol into a three-day workout plan:
Day #1
Neck Extension
Head Tilt
Bilateral Shrug
An example of how to program the protocol into a four-day workout plan:
SETS & REPS:
Although it is up to the individual Strength Professional, the protocol administered
in Project Neck I, II and III was one maximal set of ten to twelve repetitions.
Meaning, through a process of trial and error as described on page 28, the lifter
ascertained a weight that could be lifted in proper form for at least ten repetitions.
When the lifter could complete twelve repetitions in proper form, the weight was
increased appropriately.
This double-progressive protocol of increasing repetitions and weight, also
provides an efficient means to stimulate the head & neck musculature in a minimal
amount of time. This allows for maximal stimulation to the head & neck
musculature in 5-10 minutes and facilitates ample time to address the other
segments of the training program.
Day #3
Neck Flexion
Head Nod
Iso-Lateral Shrug
Day #2
Neck Lateral Flexion
Neck Lateral Flexion
Scap Retraction
Day #1
Neck Extension
Head Tilt
Bilateral Shrug
Day #3
Iso-Lateral Shrug
Scap-Retract/90 Deg Row
Day #4
Neck Flexion
Head Nod
Bilateral Shrug
Day #2
Neck Lateral Flexion Right
Neck Lateral Flexion Left
Scap Retraction

24
THE PRINCIPLES:
EVIDENCE-BASED
STRENGTH
TRAINING
STRENGTH TRAINING:
PRUDENT, PRODUCTIVE,
PRACTICAL & PURPOSEFUL

25
THE PRINCIPLES:
The goal of any strength training program should be to develop optimal
muscular strength potentials in a manner that is PRUDENT, PRODUCTIVE,
PRACTICAL & PURPOSEFUL. That is to say, maximal levels of muscular strength -
- developed in the safest, most successful, sensible and specific manner is THE
RIGHT WAY.
WHAT IS A PRUDENT STRENGTH TRAINING PROGRAM?
The answer lies in two questions: “Are the training protocols orthopedically-
safe?” and “Are the training protocols physiologically-sound?” Obviously, it is the
intent of any strength-training program to ENHANCE the physical potentials of the
individual rather than ENDANGER the individual. Use common sense. If an exercise
or training technique looks dangerous -- it probably is!
An orthopedically safe program has at its foundation the execution of properly
performed repetitions. The emphasis should always be on HOW the repetition is
lifted rather than HOW MUCH is lifted. Every effort should be made to minimize the
biomechanical sheering forces (bouncing, recoiling etc.) on muscles, joints and
connective tissue, and to maximize muscular tension. Each repetition should be
lifted under control in a deliberate fashion. Flex the muscle momentarily in the
midrange of the exercise when the muscle is in its “fully contracted position”. Then
lower the resistance slowly to the beginning position. Obviously, this is the most
difficult way to train; however, it is also the most productive and prudent way to
train.
A physiologically sound program is one that includes in its design the
fundamental principles of training right, eating right, resting right and living right.
As simple as it is to understand -- it is anything but simple to do! To compromise
anyone of these requirements would likewise compromise results. There are no
“secret”, “short-cut” and/or “simple” means to achieve maximum strength gains.
Rather, there is no substitute for progressively highly intense exercise, a nutritious
meal plan, ample rest/recovery, and a common sense approach to a consistent
strength training routine.
WHAT IS A PRODUCTIVE STRENGTH TRAINING PROGRAM?
The physiological basis of strength training is the overload principle. This
principle asserts that to stimulate a strength/growth response, a muscle must be
progressively overloaded beyond its current capabilities. Therefore, any
progressive strength training protocol that has a systematic plan of overload (i.e.
increasing resistance/repetitions) will produce results! Otherwise stated, despite
what strength-training program is used, it is the INTENSE and INTELLIGENT

26
application of the lifter’s EFFORT and EXECUTION that is most responsible for their
results -- not the program. The bottom line is, and always will be, an issue of
executing QUALITY REPS and exerting HARD WORK -- not how much ... or the
QUANTITY of sets/reps performed.
MAXIMAL EFFORT is required to develop maximal results. HARD WORK
should not be confused with MORE WORK. Truth be told, it does not take a maximal
amount of work and/or time to develop maximal results. It does require maximal
effort and maximal GRIT. In other words, strength development is USE IT OR LOOSE
IT -- AND DON’T ABUSE IT! Train hard, chart your progression, allow appropriate
time to rest/recover between workouts and incorporate variety into your
programing/prescriptions to prevent overtraining and monotony.
WHAT IS A PRACTICAL STRENGTH TRAINING PROGRAM?
The scientific evidence is conclusive, all progressive strength training
protocols are PRODUCTIVE - and NONE more significant than the other when given
equal levels of effort. However, not all are equally PRACTICAL. Strength can be
developed either by exposing the muscle to a lengthy “high volume” of exercise or
by brief “high intensity” exercise. Both training protocols have their advantages
and disadvantages. However, given the time constraints on most individual's
schedules, it is much more practical to decrease the volume of training in favor of
increasing the intensity of training to get similar and/or BETTER results in less
time. In other words, one's training goal should be to spend the minimal amount of
time to derive the maximal amount of benefits.
WHAT IS A PURPOSEFUL STRENGTH TRAINING PROGRAM?
Strength training is a means to an end -- not an end in itself. In other words,
it is the purpose of exercise to facilitate defined, positive physiological responses.
It is not the goal of a strength training program to develop Olympic Weightlifters
and/or Power lifters. Rather, the goal of strength training is to develop maximal
levels of muscular strength to maximize functional capabilities.
The development of muscular strength is the general progression of
increasing the muscle’s ability to produce force. In other words, strength training
is a non-specific adaptation of DEVELOPING MUSCULAR FORCE in the weight room
whereas skill acquisition is a specific adaptation resulting from the teaching of the
proper APPLICATION OF MUSCULAR FORCE developed through guided practice -
outside the weight room. As a result, strength is developed physically in the weight
room, which by a separate process is developed mechanically outside the weight
room in specific functional tasks. Simply stated, you build muscle in the weight
room and movement outside the weight room.

27
REPETITION SPEED:
The speed of movement of a repetition is directly proportional to the safety and
productivity of the exercise. Regardless of the training modality, repetitions should
be performed in a controlled and deliberate manner. After a momentary pause in
the fully contracted position, the lifter should lower the eccentric load twice as
slowly than in the lifting phase. When transitioning back into the concentric lifting,
the lifter must avoid the temptation to "accelerate" out of the starting position.
Rather, the lifter must intentionally focus on moving the weight in a purposely
deliberate manner so as to minimize momentum and maximize muscular loading.
When in doubt one should always move slower rather than faster.
EXERCISE INTENSITY:
Exercise Intensity refers to "HOW HARD" the exercise is performed. Results are
directly proportional to the volitional effort exerted during the exercise. Intensity
is directly correlated to "HOW LONG" and "HOW OFTEN" exercise is done. If
intensity is HIGH, workouts must be brief in duration and less frequent in
occurrence. Volitional effort must reflect the individual’s level of fitness. Initially
effort should be minimal to moderate and increased as fitness and strength levels
improve.
EXERCISE FREQUENCY:
Exercise frequency refers to "HOW OFTEN" exercise is to be done. If an individual
train too infrequently results diminish (i.e. atrophy) with disuse. Likewise, if an
individual train too frequently there will be minimal and even a loss in results. This
is called "over training". Strength is not gained during exercise but in the recovery
from exercise. One to three times per week is all that is necessary if exercise
intensity is appropriate.
SEAT HEIGHT SETTINGS:
Appropriate seat height settings are very important for exercises performed on
machines. Aligning the seat properly ensures that the lifter’s "strength curve" best
accommodates the lifter's leverages and physical build with the biomechanics of
the machine. Consistent seat settings ensure consistent progression. If seat
settings are inconsistent and/or arbitrarily set each workout, the interaction of
machine and anatomical leverages may result in an exercise being
biomechanically easier or more difficult simply due to the seat height setting. This
would result in the inability to quantitatively document progression over time.
Results would be attributed to the positioning of the seat height, rather than
reflecting an in/decrease in strength outcomes.
Once proper alignment has been ascertained, these numbers should be recorded
on the workout card next to the exercise. In subsequent workouts, the first thing

28
that the lifter should do is adjust the seat to the appropriate, predetermined seat
setting.
DETERMINING STARTING WEIGHTS:
Novices are advised to initially begin with lighter resistances to first become
proficient at the exercise techniques and protocol schemes. Once the appropriate
technique has been mastered and protocol scheme is learned:
1. Make a weight "guesstimation” appropriate to the specified lifting protocol.
2. Perform the exercise with the predicted weight load to a near maximum effort.
3. Based on the outcome, adjust the weight appropriately (if necessary).
Take time and be patient in ascertaining the appropriate starting weights. Most
weights will be found over the course of no more than three workouts.
Once starting weights have been determined, progress according to the design of
the prescribed protocol by increasing the total number of reps performed ... using
strict form. Once the highest number of the rep range can be attained, increase the
weight conservatively (1-2 LBS. using fractional or magnetic weights), particularly
as the weight gets progressively challenging. The muscles best adapt in smaller
increments. Avoid the common mistake of increasing the resistance too much …
too soon. Be patient, persistent and realize that small & steady progress eventually
produces higher results.
A WORD OF WARNING:
If an individual has never or has not trained the head & neck musculature for a long
period, most lifters will experience a high degree of delayed onset muscle soreness
(DOMS). Waking up the following morning with a stiff and sore neck. This is normal
and may last for two to three days after the initial workout. Beginners must be
forewarned to expect moderate to severe soreness and not be overly alarmed.
Although annoying … it is very common response.
FOR EXAMPLE: On the first workout, the weight was guesstimated to be "X" LBS., and the result in total reps was well over the protocol's rep range. Since the total reps lifted exceeded the designated
repetition range … the estimated weight was too light. The weight should be then be
increased appropriately for the next workout.
If on the next workout the weight was increased 20 LBS., and the result in total reps fell short
of the protocol's rep range, the estimated weight was too heavy. The weight should
then be decreased appropriately.
Finally, on the third workout, if the result in total reps now falls within the protocols rep range,
you have now found through a process of trial and error the correct starting
weight.

29
Generally, on the first initial neck strengthening workouts, if the individual is
experiencing significant head & neck DOMS, the lifter should be encouraged to
complete the next workout as outlined in its entirety. However, if after a long period
of neck strengthening the lifter experiences a high level of DOMS, this may indicate
over training. In this case, the lifter should be advised to NOT do any neck
strengthening or any exercises that exasperate the condition until the soreness
subsides.
A WORD OF ADVICE:
In the design and management of strength training prescriptions, always use PAIN
& SWELLING as your guide. Muscular discomfort resulting from intense effort is
NORMAL. Feelings associated with the abnormal stretching and straining of
muscular/joint tissue is NOT NORMAL. In other words, if any exercise causes acute
pain, terminate the set and make the appropriate modifications (i.e. change the
exercise, change the grip, change the resistance, change the range of motion,
change the angle of exercise, change the modality, etc.) so as NOT to elicit pain.
Likewise, if the individual experiences joint swelling on account of the exercise
after the workout, the appropriate changes to the exercise prescription must be
made to facilitate maximize results and minimize orthopedic pathology.
ALWAYS LET PAIN & SWELLING TO BE YOUR GUIDE.
A WORD TO THE WISE:
Since the general populace does not know how to intuitively strength train
properly, to facilitate the best outcomes, it is a requisite that the strength
professional coach, teach & instruct the correct lifting/spotting mechanics. This
will serve to maximize optimum gains and minimize the potential for injury.
Before instructing lifters in the proper techniques of the Head & Neck Strength
Training Protocol, the strength professional must invest the appropriate time
necessary in becoming proficient at demonstrating and coaching the correct
concepts and techniques before introducing it into the strength program. I would
recommend training with a respected colleague for two to three weeks to acquire
the necessary lifting and spotting skills. Experiencing the protocol first hand will
familiarize the coach with the "feel" of the correct lifting and spotting mechanics.
Strength coaching is a coaching reality. Meaning, a strength professional will
always get more out of what is INSPECTED rather than what is EXPECTED. To get
better outcomes YOU must intentionally COACH, TEACH, INSTRUCT. Period!

30
FREQUENTLY ASKED QUESTIONS...
Q: What is head & neck strength training?
A: Head & neck training is precisely as the name implies. That is, placing the head and neck musculature under a progressive overload to facilitate higher functional outcomes. The skeletal musculature comprising the head and neck is exactly the same as any other muscle tissue in the body. Training the muscles of the head and neck with progressive resistance exercise will induce the same physiological response as in training any other muscle of the body.
Q: Why should I train the muscles of my head and neck?
A: Given the potentially catastrophic and lifelong consequences of cervical spine and traumatic brain injury, and given the fact that training these muscles will aid in minimizing the risk of an individual getting a concussion and given that if a concussion is sustained will reduce the severity of the concussion.... actually, the better question is "Why wouldn't you train the muscles of the head and neck?"
Q: I am a female. Will my neck get bigger from this type of training?
A: No. In fact, in the PROJECT NECK studies all female subjects were measured for upper and lower neck circumferences. There was only ONE who increased lower neck circumference ... and it was a whopping 1/32 of an inch! The point being, that proper head & neck strengthening WILL NOT result in the development of masculine physical features in females. However, their necks will get significantly stronger. In fact, females have more to gain from training the head and neck since they are twice as likely to sustain and suffer more severe symptoms. Furthermore, once a female concusses they are three times more likely to re-concuss.
Q: I am an athlete. Will this training inhibit my ability to “scan the
field of play” when I am playing my sport? I don’t want my neck to
get too big or stiff and prevent me from being able to do this.
A: No, having a bigger and stronger neck will not inhibit your ability to scan the field of play. In fact, increasing the strength of the neck will increase your ability to move your head faster which will improve athletic performance. Further, by working your neck properly through the fullest range of movement, your neck will likely increase flexibility and thereby allow greater mobility and improve the athlete's field of vision.
Q: I am not an athlete. Why should I train my head and neck?
A: People who are not athletes should train their head and neck musculature for the same reasons athletes train their necks, that is, to prevent cervical spine and traumatic brain injury. Many professions and everyday tasks place great amounts of force and stress on the head and neck. Training these muscles can aid in reducing these forces and the subsequent stress placed on this region of the body. Likewise, auto accidents can cause severe whiplash from even relatively low impact accidents. Consequently, anyone who operates a motor vehicle should train the head & neck muscles. Strengthening the head & neck muscles will aid in minimizing the whiplash effect and the symptoms that are incurred. So clearly, strengthening the head & neck muscles are just as (if not more) beneficial for non-athletes as it is for athletes.

31
Q: I am an athlete but I do not compete in a contact sport. Why should
I train my head and neck?
A: Concussions are prevalent in ALL sports, including “non-contact” sports. Concussion etiology results most often from "contact"; however, can also occur from non-contact as well (i.e. violent or sudden shaking, wiping and/or jarring the head and neck). Case in point, cheerleading has currently one of the highest rates of frequency of concussion in high school sports. Although the risk of obtaining a head or neck injury in non-contact sports is much lower than that of contact sports, these injuries still do occur. Strengthening the head & neck muscles are just as important for non-contact sport athletes as it is for contact sports athletes.
Q: I am a strength coach. I have my athletes perform a very intense
strength program that simply does not allow time for training the
muscles of the head and neck. How do I fit this training into my
program?
A: The MOST IMPORTANT goal of the strength & conditioning professional is to PRUDENTLY PREPARE the individual for the rigors of competition. As such, given the potentially catastrophic and permanent consequences of a cervical spine and traumatic brain injury, the strengthening of the neck and surrounding muscular structures of the cervical spine MUST be considered PRIORITY ONE in the prescription and design of exercise routines. Training the head and neck musculature should NOT be “fit in” to your program. Rather, it should be the FOUNDATION of your program. In fact, it should be the first exercise any athlete performs in the program. NOT to include a comprehensive head and neck strengthening program in the training prescriptions for athletes and non-athletes alike would be foolish, neglectful, reckless ... and culpable.
Q: My daughter is an eight-year-old Junior Olympic volleyball player.
At what age should I begin training the musculature of the head
and neck?
A: As soon as the child is introduced to competitive athletics. Now having said that, the fact of the matter is that children are competing at younger and younger ages. Are you saying that a prepubescent should be involved with progressive resistance exercise? Allow me to answer that question with another question: Should a seven or eight-year-old child be prudently PREPARED for the potentially injurious forces from competition? Absolutely! Youth injuries continue to climb each year as a result of allowing young and physically unprepared children to compete at levels not appropriate to their level of development. Certainly, they need to be properly trained as well. However, because of their physical and emotional immaturity, the prescription of exercise must be very basic, very brief and very SUPERVISED.
Q: I don't have The Head & Neck Isolator in my facility. Can I still
utilize the Head & Neck Strength Training Protocol?
A: YES, you can! Each of the demonstrated exercises of the Head and Neck Strength Training protocol can be trained using Manual Resistance Exercise. Manual Resistance Exercise is a partner resisted strength training modality that employs a spotter providing concentric and eccentric resistance as the lifter performs the exercise. These are demonstrated and explained in the Head & Training Specialist Manual. However, because

32
you cannot quantify progress using this style of training, eventually purchasing The Head
& Neck Isolator machine is advised.
Q: I have trained the neck my whole career. How is the Head & Neck
Strength Training Protocol so different than what I have already done?
A: That is exactly my point ... you have trained the neck, but have in most cases neglected training the head (capital) muscles. After spending the last fifteen years training professional football players, my programming always emphasized the neck. Ask any of my former players and they will tell you that the first exercises they started EVERY workout was neck exercises. My only regret, knowing what I now know from the PROJECT NECK research and the new research on concussions, is that I wish I would've DONE EVEN MORE to protect my
players HEAD MUSCLES … And realize, this is coming from a coach who emphasized
training of the neck!!!
Q: How LONG should I train the head and neck?
Again, the muscle tissue of the head & neck is the same muscle tissue as that compromising any other muscle tissue on the body. Consequently, you train it the SAME as any other muscle tissue of the body. Since the length or duration of the training is directly correlated to the INTENSITY of the effort, if the individual is training at a high level of intensity, the workout will be brief ... with the neck portion of the workout being 5-10 minutes. Generally, you can work HARD (and this is where one gets the strongest) or you can work LONG. But you can't train HARD for LONG. The preponderance of evidence therefore recommends that
for the most efficient results, training should be Basic, Brutal & BRIEF!
Q: How OFTEN should I train the head and neck?
A: The muscle tissue of the head & neck is the same muscle tissue as that compromising any other muscle tissue of the body. Consequently, you train it the SAME as any other muscle tissue of the body. The research on muscle recovery is inconclusive as to what is best for everyone. Rather, recovery from exercise best matches the "bell-shaped curve". In other words, MOST individuals will require at least 48 hours to recover and to respond physiologically to the exercise stimulus. The practical application being that whether one is training the head & neck muscles or the pectoral muscles, the musculature best adapts to overloads given on non-consecutive days (NOT EVERYDAY!!!) In fact, my recommendation would NOT be to approach your strength training with the mindset of determining HOW MUCH exercise is necessary for eliciting maximal results, but rather approaching it in a manner where the mentality is to ascertain HOW LITTLE exercise is necessary for eliciting maximal results. After all, one does not get strong from lifting weights ... but in the RECOVERY from lifting weights. It's for this reason that I would recommend training the head & neck 1 - 3 times per week on non-consecutive days.
Q: Can I train the head and neck on the field/court/pool deck?
A: YES! Utilizing Manual Resistance Exercise, the coach/athlete can and MUST effectively train the head & neck on the field/court/pool deck. Since muscle is a "use it or lose it" reality, and since in-season circumstances leave little time for strength training, Manual Resistance Exercise at the practice venue is a viable and efficient means to facilitate increased (or at least a maintenance) of strength during the competition season.
33
Q: Should head & neck training be done before or after practice?
A: Most definitely AFTER PRACTICE! It makes little sense to pre-fatigue the muscles of the head & neck prior practice. The "protective effect" that a fresh level of strength will provide the neck muscles to dissipate potentially dangerous forces that the individual may encounter during practice are much higher than can be provided by a weaker, pre-fatigued muscle.
Q: I grew up training my neck with isometric holds/pauses. Is this an
effective way to effectively train the head & neck?
A: NO! Strength training is angular specific. Meaning that strength adaptations are specific to the angles trained. The disadvantage of isometric exercise is that the muscle only gets strong at the angle(s) trained. Therefore, if you only train the muscle isometrically at one angle, the neck will only increase strength at that one and only one angle. This will effectively lower the "protective effect" of strength training, leaving the neck vulnerable at all angles not trained. The training application is that full range strength can only be attained utilizing full range exercise.
Q: Does the adage “No pain, no gain” apply?
A: Yes, and no! The single most important factor in determining the level of physiological adaptation is the level of effort exerted by the lifter. The higher intensity … the higher the muscular discomfort. Therefore, in training hard, one must expect to experience a high level of discomfort. However, there is a distinction between training discomfort and orthopedic pain. In the event that pain is elicited by exercise, it should be terminated. So, during intense exercise, discomfort is normal. Pain is abnormal.
Q: I've never trained using single set overload protocols, can
you get results with one set?
A: According to the evidence, single set training is at least as effective in eliciting the same strength outcomes as in multi-set training. Although equally effective, single set training is a more efficient way of training since it requires less time to complete in comparison to multi-set training. The one drawback to single set training is the high degree of muscular discomfort in performing the set. Remember, this is not a "warm-up set" ... rather it is a "training set" that must facilitate an overload. Certainly, simple to
understand … NOT simple to do!
Q: What is the most appropriate way to breathe during resistance
exercise?
A: The most important thing to keep in mind in regard to breathing during resistance exercise is that you do exactly that, breathe ... don't hold your breath. Technically, you should breathe out during the concentric lifting and breathe in during the eccentric lowering of the resistance. My advice ... just breathe, inhale and exhale at least once every repetition. Lifters that hold their breath risk losing consciousness, this is referred to as the Valsalva maneuver. High inter-thoracic pressures in the lungs can compress arteries that carry oxygen to the brain. This restriction of adequate blood flow to the brain will result in a loss of consciousness.

34
For many, it is natural to hold their breath on maximal exertions of effort. This can be alleviated with concerted reminders by the supervising practitioner and/or spotter to the individual to consistently ventilate air during the attempt.

35
DISCLAIMER
The author and publisher of this Evidence-Based Head & Neck Protocol
Instructional Training Manual and the accompanying materials have used their
best efforts in preparing this manual. The author and publisher make no
representation or warranties with respect to the accuracy, applicability, fitness, or
completeness of the contents of this manual. The information contained in this
manual is strictly for educational purposes. Therefore, if you wish to apply ideas
contained in this manual, you are taking full responsibility for your actions.
The author and publisher disclaim any warranties (express or implied),
merchantability, or fitness for any particular purpose. The author and publisher
shall in no event be held liable to any party for any direct, indirect, punitive, special,
incidental or other consequential damages arising directly or indirectly from any
use of this material, which is provided “as is” and without warranties.
Quick results and ability of the Evidence-Based Head & Neck Protocol Instructional
Training Manual does not provide medical advice. As always, seek the advice of
your physician or other qualified health professional should be sought before
changing or adopting any exercise regimen. Never disregard medical advice based
on such information in the sample.
No part of this may be copied, or changed in any format, sold, or used in any way
other than what is outlined within this manual under any circumstances without
expressed permission from Mark Asanovich.
Certain risks are inherent when a person exercises. These include muscular
discomfort, physical injury, abnormal blood pressure response, dizziness, fainting,
abnormal heart rhythm, chest pain and a very remote possibility of heart attack.
As such, you are advised to attain a physician’s medical clearance prior to initiation
of the Evidence-Based Head & Neck Strengthening Protocol.
It is understood that participation in the Head & Neck Strengthening Protocol DOES
NOT guarantee that an individual will NEVER CONCUSS. Rather, participation will
result in increased levels of strength to the head & neck tissue that will facilitate
physiological and morphological adaptations that will minimize the chances and
severity from cervical spine and concussive events.

36
FOR MORE INFORMATION
... on clarifying any information contained in this instructional
manual.
... on arranging a Head & Neck Training in-service,
... on arranging consulting services
... on arranging public speaking engagements
Contact me at:
Mark Asanovich
37
References
Adler,R., & Herring, S. (2011). Changing the Culture of Concussion: Education Meets Legislation. The American Academy of Physical Medicine and Rehabilitation. Vol. 3, 468-470. Brzycki, M. (1985). Strengthening the Neck: Reducing Risk of Cervical Injury. Athletic Journal. 40-41, 48. Cantu, R. C. (1996). Head Injuries in Sport. British Journal of Sports Medicine, 30, 289-296. Conley, Stone, Nimmons & Dudley. (1997). Specificity of Resistance Training Responses in Neck Muscle Size and Strength. European Journal of Applied Physiology and Occupational Physiology, 75 (5), 443-8. Cornwell, R. (2013). Creating a Standardized Program to Resistance Train the Muscles of the Head and Neck. ProQuest Publishing 155. Fisher, J. Asanovich, M. Cornwell, R. Steele, J. (2016) A Neck Strengthening Protocol in Adolescent Males and Females for Athletic Injury Prevention Journal of Trainology; 5:13-17. Harmon, Kimberly G., Drezner, Jonathan A., Gammons, Matthew, Guskiewicz, Kevin M., Halstead, Mark, Herring, Stanley A., Kutcher, Jeffrey, S., Pana, Andrea, Putukian, Margot, and Roberts, William O. (2013) American Medical Society for Sports Medicine Position Statement: Concussion in Sports. British Journal of Sports Medicine. 47:15-26. doi: 10.1136/bsports-2012-09 1941. Hill, B. (1975). Exercises Reduce Neck Injuries, The Physician and Sports Medicine. Vol. 3 (1), 113-115. Peterson, J. (1975). Project Total Conditioning. Athletic Journal. Vol. 56 (8). Shahim, Pushtun, Tegner, Yelverton, Wilson David H., Randall, Jeffery, Skillback, Tobias, Pazooki, David, Kaliberg, Birgitta, Biennow, Kaj, and Zetterberg, Henrik. (2014) Blood Biomarkers for Brain Injury in Concussed Professional Ice Hockey Players. JAMA Neurology. 7(6):684-692. doi: 10.1001/jamaneurol.2014.367 Riley, D. (1999). Total Conditioning: A Case Study. Coach and Athletic Director. Viano, David C., Casson, Ira R., Pellman, Elliot J. (2007) Concussion in

38
Professional Football; Biomechanics of the Struck Player. Neurosurgery 61(2) 313-328.

39
Product Features
Includes an Evidence-Based Head & Neck
Strengthening Protocol that is simple to
understand, easy to administer and proven to
stimulate maximum results.
Independent Settings for Precise Isolation of
the Capital Muscles of the Head.
Multi-Layered, Memory Foam, Mersa-
Resistant Upholstered Face Pad that
comfortably molds/conforms to the face and
head.
Advanced Cam Profile Design to Smoothly
Balance the Concentric Loading with the
Appropriate and Accommodating Extra
Loading of the Eccentric Head & Neck
Strength Curve.
Torso Stabilizing Bar and Adjusting Back
Pad to Minimize Upper Torso Sway and
Maximize Isolation of the Head & Neck
Musculature.
Multi-Level Seat Adjustment that easily
accommodates all torso lengths to facilitate
maximum, full range strength outcomes.
Ergonomically Designed Handles for wrist
friendly use.
Easy access for entry and exiting of
machine.
Small foot print that easily fits in the most
well equipped gyms/weight rooms.
Durable construction to accommodate high
industrial usage.
THE HEAD & NECK ISOLATOR
The only evidence-based head and neck strength machine ever designed
Product Overview
Although there have been neck machines
developed in the past to isolate and train the
larger strap muscles of the neck, there has been
no known apparatus designed to train and
isolate the capital muscles of the head. The
capital muscles of the head work in concert
with the neck muscles to protect the cervical
spine and slow the acceleration of the head
during impacts and falls. The Head and Neck
Isolator specifically and safely targets and
strengthens both the cervical muscles of the
neck and the capital muscles of the head.
Designed by a 14 Year NFL Veteran Strength
and Conditioning Coach, Mark Asanovich, in
conjunction with results from Project Neck I.
CoachAPro Training.com
(612) 462-3566