the day was ours exclusive rules - revolutiongames.us
TRANSCRIPT
Designer Matt Ward
Developer Daniel Rouleau and Roger Miller
Art Rick Barber, Charles Kibler, Mark Mahaffey
Rules and Charts Layout Richard Handewith
Exclusive Rules
The Day Was Ours: The First Battle of Bull Run 2 Revolution Games, 2021
Table of Contents 1.0 Introduction 2 2.0 Unit Counters, Markers and Chits 2 3.0 Unit Stacking 4 5.0 Command Decision Phase 4 6.0 Artillery Phase 4 7.0 Chit Draw Phase 4 9.0 Fire Combat 5 10.0 Movement 7 11.0 Close Combat 7 12.0 Cohesion Tests 8 16.0 Scenarios 8
1.0 Introduction The Day Was Ours is a game simulating the fighting on July 21st, 1861, known as the Battle of First Bull Run. The game features the Blind Swords chit-pull system, which emphasizes the three “FOW’s” of military conflict: fog-of-war, friction-of-war, and fortunes-of-war. With each chit pull, players will be challenged to make tough decisions based on their assessment of the situation at that moment. Unlike traditional chit-pull systems, the Blind Swords system ensures that no combat units can be counted on, or conversely, counted out. It allows the players the immersive experience of tactical combat without the heavy rules overhead normally found in such games, while also delivering a comprehensive experience of limited intelligence and unexpected events. This yields an environment of tense action and constant surprises – an environment that will challenge each player.
Game Components 1 – 22 x 34 inch map 1 – Counter-sheet of 176 5/8” counters 5 – Player Aid Charts 1 – Series Rulebook 1 – Exclusive Rulebook 1 – Game Box or Ziplock Bag 2 – Dice (Boxed version only)
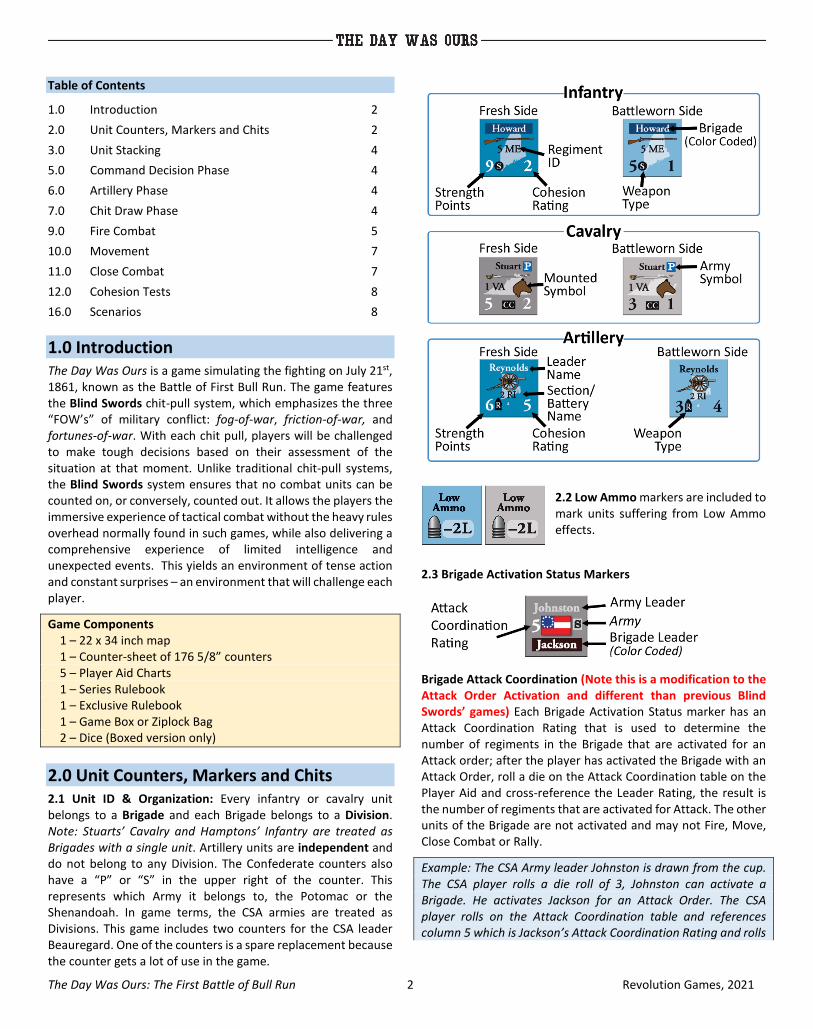
2.0 Unit Counters, Markers and Chits 2.1 Unit ID & Organization: Every infantry or cavalry unit belongs to a Brigade and each Brigade belongs to a Division. Note: Stuarts’ Cavalry and Hamptons’ Infantry are treated as Brigades with a single unit. Artillery units are independent and do not belong to any Division. The Confederate counters also have a “P” or “S” in the upper right of the counter. This represents which Army it belongs to, the Potomac or the Shenandoah. In game terms, the CSA armies are treated as Divisions. This game includes two counters for the CSA leader Beauregard. One of the counters is a spare replacement because the counter gets a lot of use in the game.
2.2 Low Ammo markers are included to mark units suffering from Low Ammo effects.
2.3 Brigade Activation Status Markers
Brigade Attack Coordination (Note this is a modification to the Attack Order Activation and different than previous Blind Swords’ games) Each Brigade Activation Status marker has an Attack Coordination Rating that is used to determine the number of regiments in the Brigade that are activated for an Attack order; after the player has activated the Brigade with an Attack Order, roll a die on the Attack Coordination table on the Player Aid and cross-reference the Leader Rating, the result is the number of regiments that are activated for Attack. The other units of the Brigade are not activated and may not Fire, Move, Close Combat or Rally.
Example: The CSA Army leader Johnston is drawn from the cup. The CSA player rolls a die roll of 3, Johnston can activate a Brigade. He activates Jackson for an Attack Order. The CSA player rolls on the Attack Coordination table and references column 5 which is Jackson’s Attack Coordination Rating and rolls
The Day Was Ours: The First Battle of Bull Run 3 Revolution Games, 2021
a 1 on the die. Jackson then activates two units for the Attack Order, and the rest of the Brigade does nothing.
2.9 Game Scale: Each map hex is approximately 150 yards across. Infantry and cavalry units represent regiments or battalions, and artillery units represent individual batteries or sections. One Strength Point equals about 50 men or a single gun. Each Game Turn represents roughly 30 minutes.
2.10 Map Terrain Features: Various types of terrain are depicted on the game map. A hex is only considered to contain a certain terrain feature if the terrain’s graphic occupies or traverses at least half of the hex.
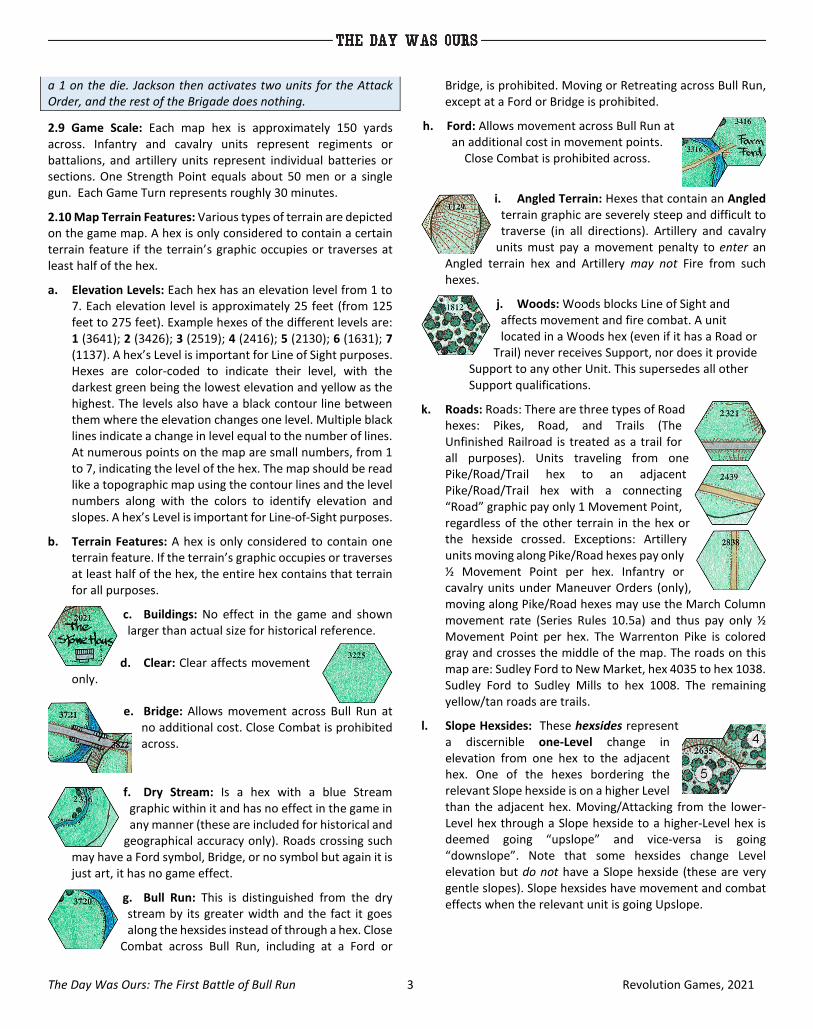
a. Elevation Levels: Each hex has an elevation level from 1 to 7. Each elevation level is approximately 25 feet (from 125 feet to 275 feet). Example hexes of the different levels are: 1 (3641); 2 (3426); 3 (2519); 4 (2416); 5 (2130); 6 (1631); 7 (1137). A hex’s Level is important for Line of Sight purposes. Hexes are color-coded to indicate their level, with the darkest green being the lowest elevation and yellow as the highest. The levels also have a black contour line between them where the elevation changes one level. Multiple black lines indicate a change in level equal to the number of lines. At numerous points on the map are small numbers, from 1 to 7, indicating the level of the hex. The map should be read like a topographic map using the contour lines and the level numbers along with the colors to identify elevation and slopes. A hex’s Level is important for Line-of-Sight purposes.
b. Terrain Features: A hex is only considered to contain one terrain feature. If the terrain’s graphic occupies or traverses at least half of the hex, the entire hex contains that terrain for all purposes.
c. Buildings: No effect in the game and shown larger than actual size for historical reference.
d. Clear: Clear affects movement only.
e. Bridge: Allows movement across Bull Run at no additional cost. Close Combat is prohibited across.
f. Dry Stream: Is a hex with a blue Stream graphic within it and has no effect in the game in any manner (these are included for historical and
geographical accuracy only). Roads crossing such may have a Ford symbol, Bridge, or no symbol but again it is just art, it has no game effect.
g. Bull Run: This is distinguished from the dry stream by its greater width and the fact it goes along the hexsides instead of through a hex. Close
Combat across Bull Run, including at a Ford or
Bridge, is prohibited. Moving or Retreating across Bull Run, except at a Ford or Bridge is prohibited.
h. Ford: Allows movement across Bull Run at an additional cost in movement points.
Close Combat is prohibited across.
i. Angled Terrain: Hexes that contain an Angled terrain graphic are severely steep and difficult to traverse (in all directions). Artillery and cavalry
units must pay a movement penalty to enter an Angled terrain hex and Artillery may not Fire from such hexes.
j. Woods: Woods blocks Line of Sight and affects movement and fire combat. A unit located in a Woods hex (even if it has a Road or
Trail) never receives Support, nor does it provide Support to any other Unit. This supersedes all other Support qualifications.
k. Roads: Roads: There are three types of Road hexes: Pikes, Road, and Trails (The Unfinished Railroad is treated as a trail for all purposes). Units traveling from one Pike/Road/Trail hex to an adjacent Pike/Road/Trail hex with a connecting “Road” graphic pay only 1 Movement Point, regardless of the other terrain in the hex or the hexside crossed. Exceptions: Artillery units moving along Pike/Road hexes pay only ½ Movement Point per hex. Infantry or cavalry units under Maneuver Orders (only), moving along Pike/Road hexes may use the March Column movement rate (Series Rules 10.5a) and thus pay only ½ Movement Point per hex. The Warrenton Pike is colored gray and crosses the middle of the map. The roads on this map are: Sudley Ford to New Market, hex 4035 to hex 1038. Sudley Ford to Sudley Mills to hex 1008. The remaining yellow/tan roads are trails.
l. Slope Hexsides: These hexsides represent a discernible one-Level change in elevation from one hex to the adjacent hex. One of the hexes bordering the relevant Slope hexside is on a higher Level than the adjacent hex. Moving/Attacking from the lower-Level hex through a Slope hexside to a higher-Level hex is deemed going “upslope” and vice-versa is going “downslope”. Note that some hexsides change Level elevation but do not have a Slope hexside (these are very gentle slopes). Slope hexsides have movement and combat effects when the relevant unit is going Upslope.
The Day Was Ours: The First Battle of Bull Run 4 Revolution Games, 2021
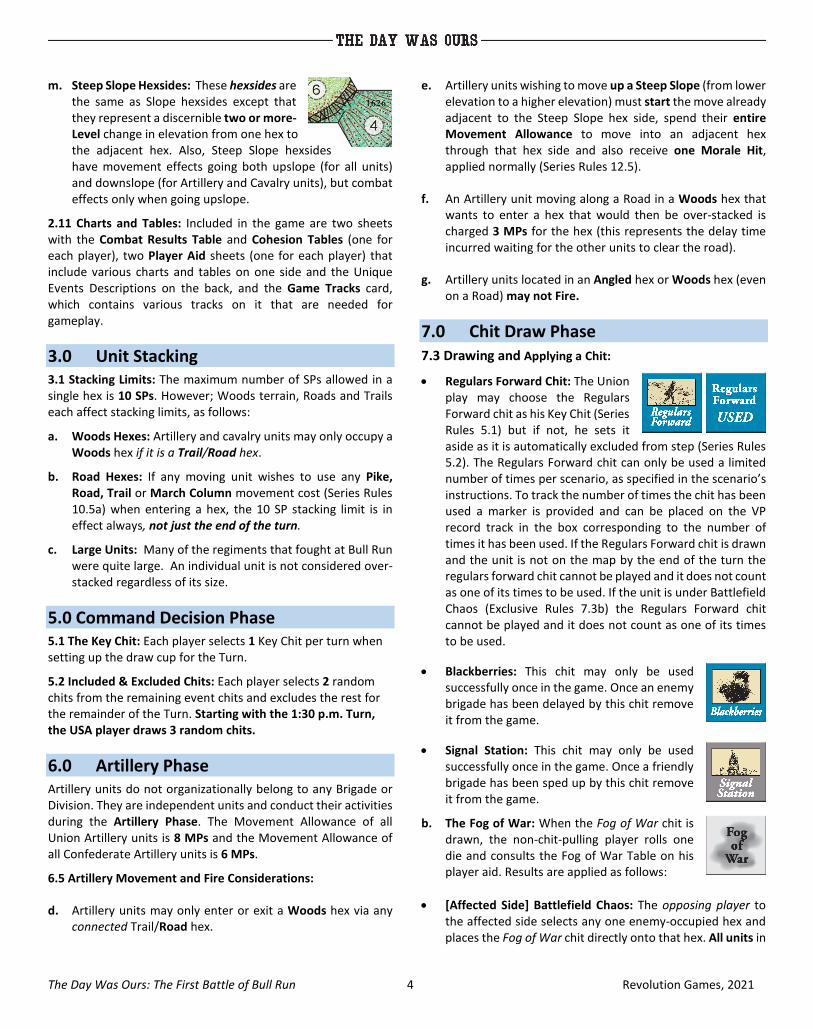
m. Steep Slope Hexsides: These hexsides are the same as Slope hexsides except that they represent a discernible two or more-Level change in elevation from one hex to the adjacent hex. Also, Steep Slope hexsides have movement effects going both upslope (for all units) and downslope (for Artillery and Cavalry units), but combat effects only when going upslope.
2.11 Charts and Tables: Included in the game are two sheets with the Combat Results Table and Cohesion Tables (one for each player), two Player Aid sheets (one for each player) that include various charts and tables on one side and the Unique Events Descriptions on the back, and the Game Tracks card, which contains various tracks on it that are needed for gameplay.
3.0 Unit Stacking 3.1 Stacking Limits: The maximum number of SPs allowed in a single hex is 10 SPs. However; Woods terrain, Roads and Trails each affect stacking limits, as follows:
a. Woods Hexes: Artillery and cavalry units may only occupy a Woods hex if it is a Trail/Road hex.
b. Road Hexes: If any moving unit wishes to use any Pike, Road, Trail or March Column movement cost (Series Rules 10.5a) when entering a hex, the 10 SP stacking limit is in effect always, not just the end of the turn.
c. Large Units: Many of the regiments that fought at Bull Run were quite large. An individual unit is not considered over-stacked regardless of its size.
5.0 Command Decision Phase 5.1 The Key Chit: Each player selects 1 Key Chit per turn when setting up the draw cup for the Turn.
5.2 Included & Excluded Chits: Each player selects 2 random chits from the remaining event chits and excludes the rest for the remainder of the Turn. Starting with the 1:30 p.m. Turn, the USA player draws 3 random chits.
6.0 Artillery Phase Artillery units do not organizationally belong to any Brigade or Division. They are independent units and conduct their activities during the Artillery Phase. The Movement Allowance of all Union Artillery units is 8 MPs and the Movement Allowance of all Confederate Artillery units is 6 MPs.
6.5 Artillery Movement and Fire Considerations:
d. Artillery units may only enter or exit a Woods hex via any connected Trail/Road hex.
e. Artillery units wishing to move up a Steep Slope (from lower elevation to a higher elevation) must start the move already adjacent to the Steep Slope hex side, spend their entire Movement Allowance to move into an adjacent hex through that hex side and also receive one Morale Hit, applied normally (Series Rules 12.5).
f. An Artillery unit moving along a Road in a Woods hex that wants to enter a hex that would then be over-stacked is charged 3 MPs for the hex (this represents the delay time incurred waiting for the other units to clear the road).
g. Artillery units located in an Angled hex or Woods hex (even on a Road) may not Fire.
7.0 Chit Draw Phase 7.3 Drawing and Applying a Chit:
• Regulars Forward Chit: The Union play may choose the Regulars Forward chit as his Key Chit (Series Rules 5.1) but if not, he sets it aside as it is automatically excluded from step (Series Rules 5.2). The Regulars Forward chit can only be used a limited number of times per scenario, as specified in the scenario’s instructions. To track the number of times the chit has been used a marker is provided and can be placed on the VP record track in the box corresponding to the number of times it has been used. If the Regulars Forward chit is drawn and the unit is not on the map by the end of the turn the regulars forward chit cannot be played and it does not count as one of its times to be used. If the unit is under Battlefield Chaos (Exclusive Rules 7.3b) the Regulars Forward chit cannot be played and it does not count as one of its times to be used.
• Blackberries: This chit may only be used successfully once in the game. Once an enemy brigade has been delayed by this chit remove it from the game.
• Signal Station: This chit may only be used successfully once in the game. Once a friendly brigade has been sped up by this chit remove it from the game.
b. The Fog of War: When the Fog of War chit is drawn, the non-chit-pulling player rolls one die and consults the Fog of War Table on his player aid. Results are applied as follows:
• [Affected Side] Battlefield Chaos: The opposing player to the affected side selects any one enemy-occupied hex and places the Fog of War chit directly onto that hex. All units in

The Day Was Ours: The First Battle of Bull Run 5 Revolution Games, 2021
that marked hex have the following restrictions applied to them:
o They may not voluntarily move or initiate combat of any kind for the remainder of the Game Turn. Exception: see bullet below.
o No friendly Event Chit can be played by the owning side on this hex (the opponent can).
o They may not receive Unit Support (Series Rules 12.4) nor do they provide Unit Support.
o They may conduct Defensive Fire (Series Rules 11.3a) but with only ½ SPs and Retreat (Series Rules 12.3) normally.
The chit is removed if the unit(s) retreats. Remove the Fog of War chit at the end of the turn.
• Wayward [Affected Side] Move: The player selects any one enemy unit to affect. He may then move this enemy unit one hex in any direction. The unit may not be moved into a hex the unit is prohibited from entering, a hex that would then be over stacked, or off the map edge. This move may trigger Opportunity Fire. Artillery that is not engaged could not be moved into engagement as this is a prohibited move.
• Possible General Casualty: The owning player rolls two dice and reads them as the Combat dice roll resulting in a number from 11 to 66. He then consults the General Casualty Table for his side, located on his player aid.
o If the Division Activation chit for the rolled General is not yet in play, the result is converted to “No Effect”.
o If the Division Activation chit for the rolled General is currently in play, that General has been killed, wounded or otherwise incapacitated. Remove the affected chit from the game and replace it with its corresponding Casualty version (the one with the “red cross" on it). If the affected Division Activation chit is still in the cup, place the Casualty version of the chit next to the cup, and when the relevant chit is drawn, immediately replace it with the Casualty chit (before any Command Rating roll, etc.). The Casualty chit is used for the remainder of the game as the Division Activation chit.
o If the rolled Division Activation chit is already a Casualty chit, the original (normal) chit is returned to play (he has recovered, an able replacement has taken command, etc.). Replace the Casualty version of the chit with the corresponding regular chit. This switch back and forth can take place any number of times in a game. See the Leader Casualty Table for the exact die rolls needed to bring a chit back.
• Firing on Friends: When this event is rolled roll another die. On a 1-3 the CSA player gets the chit, on a 4-6 the USA player gets the chit. This chit is held and may be played anytime an enemy unit attempts to fire or close combat. It cancels the fire or close combat. The canceling of close combat occurs before any defensive fire or defensive support fire.
After all effects are resolved, the Fog of War chit is discarded (unless deployed onto the map) and the next chit is drawn.
The Fog of War chit allows for the occurrence of those rather unusual or unexplained troop movements and attacks that have often happened throughout military history. Instances of misidentified friendly and enemy formations and seemingly suicidal charges are also represented with this chit. In addition, officers of both sides were at great risk and this chit reflects the high casualty rate amongst Civil War generals.
• CIC Chit: There are no CIC chits in this game.
9.0 Fire Combat 9.1 Firing Eligibility:
a. Line of Sight (LOS): LOS cases, organized by elevation changes traversed, are:
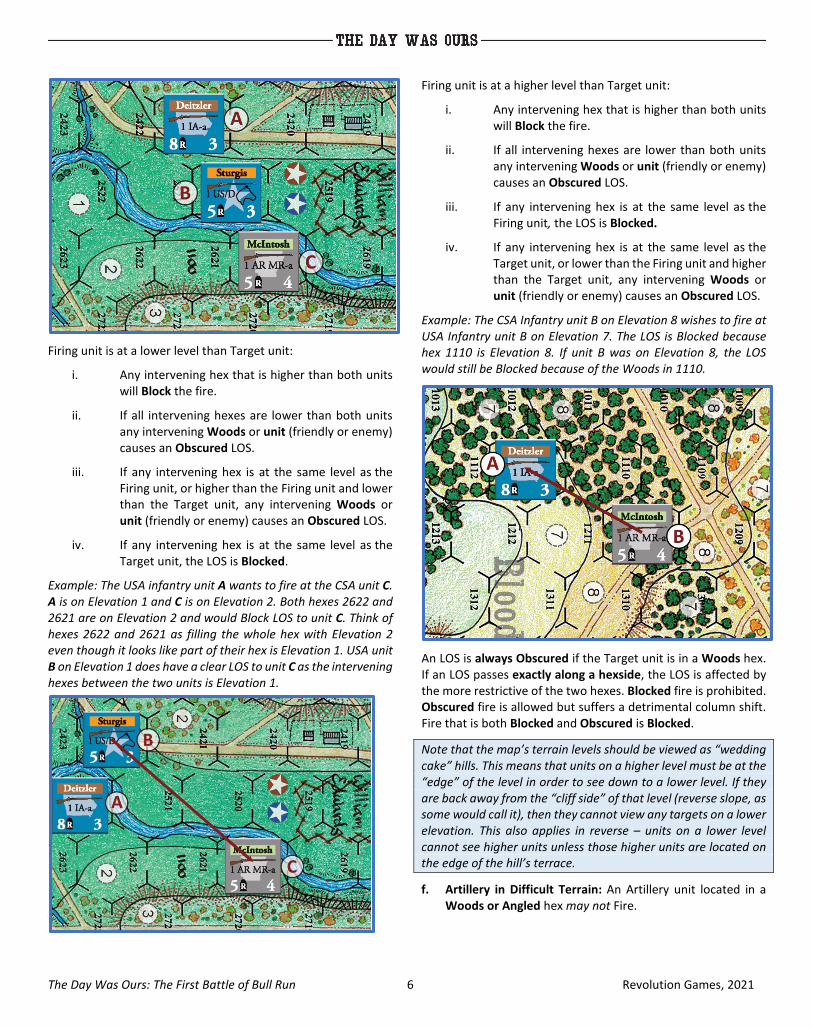
Firing unit and Target unit are on the same level:
i. Any intervening hex that is higher than both units will Block the fire.
ii. If all intervening hexes are lower than both units any intervening Woods, terrain, or unit (friendly or enemy) causes an Obscured LOS.
iii. If any intervening hex is at the same level as both units, the LOS is Blocked if there is any Woods or terrain or any unit (friendly or enemy) in the hex.
Example: The CSA infantry unit C wants to fire at the USA infantry unit A. Both units are on Elevation 2 and the USA dismounted Cavalry B is on Elevation 1 and would Obscure but not Block the fire. Note that infantry or cavalry may not fire over friendly troops; artillery can but not while using canister.
The Day Was Ours: The First Battle of Bull Run 6 Revolution Games, 2021
Firing unit is at a lower level than Target unit:
i. Any intervening hex that is higher than both units will Block the fire.
ii. If all intervening hexes are lower than both units any intervening Woods or unit (friendly or enemy) causes an Obscured LOS.
iii. If any intervening hex is at the same level as the Firing unit, or higher than the Firing unit and lower than the Target unit, any intervening Woods or unit (friendly or enemy) causes an Obscured LOS.
iv. If any intervening hex is at the same level as the Target unit, the LOS is Blocked.
Example: The USA infantry unit A wants to fire at the CSA unit C. A is on Elevation 1 and C is on Elevation 2. Both hexes 2622 and 2621 are on Elevation 2 and would Block LOS to unit C. Think of hexes 2622 and 2621 as filling the whole hex with Elevation 2 even though it looks like part of their hex is Elevation 1. USA unit B on Elevation 1 does have a clear LOS to unit C as the intervening hexes between the two units is Elevation 1.
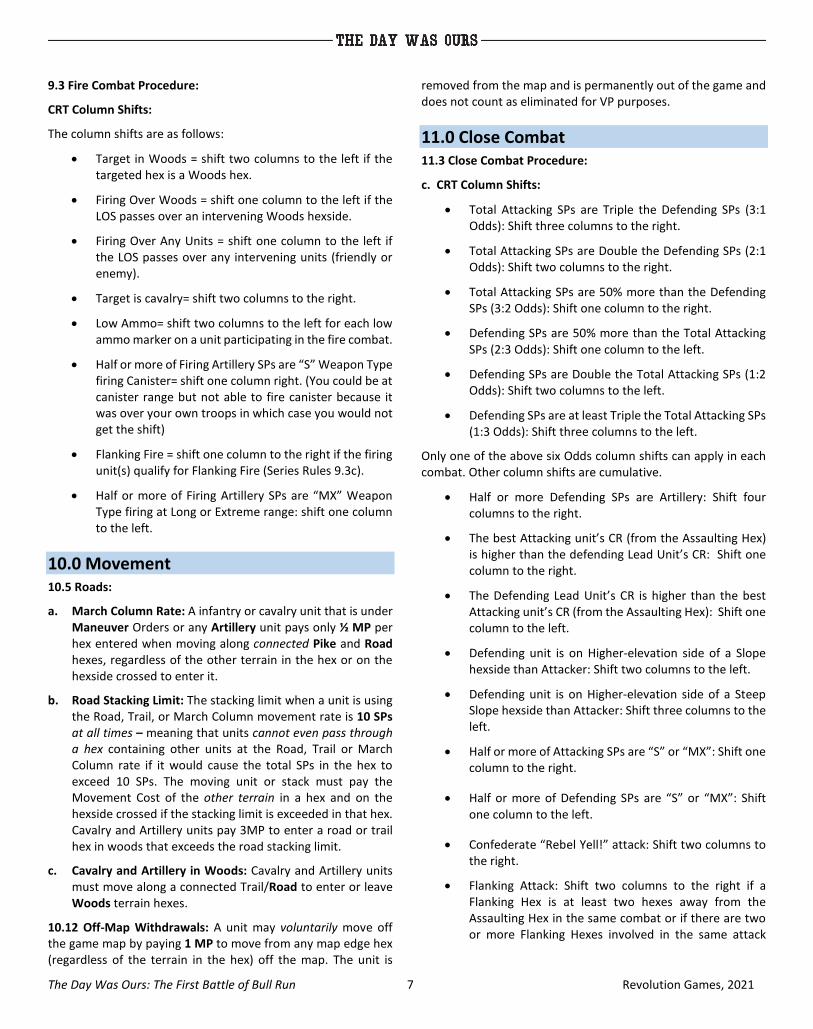
Firing unit is at a higher level than Target unit:
i. Any intervening hex that is higher than both units will Block the fire.
ii. If all intervening hexes are lower than both units any intervening Woods or unit (friendly or enemy) causes an Obscured LOS.
iii. If any intervening hex is at the same level as the Firing unit, the LOS is Blocked.
iv. If any intervening hex is at the same level as the Target unit, or lower than the Firing unit and higher than the Target unit, any intervening Woods or unit (friendly or enemy) causes an Obscured LOS.
Example: The CSA Infantry unit B on Elevation 8 wishes to fire at USA Infantry unit B on Elevation 7. The LOS is Blocked because hex 1110 is Elevation 8. If unit B was on Elevation 8, the LOS would still be Blocked because of the Woods in 1110.
An LOS is always Obscured if the Target unit is in a Woods hex. If an LOS passes exactly along a hexside, the LOS is affected by the more restrictive of the two hexes. Blocked fire is prohibited. Obscured fire is allowed but suffers a detrimental column shift. Fire that is both Blocked and Obscured is Blocked.
Note that the map’s terrain levels should be viewed as “wedding cake” hills. This means that units on a higher level must be at the “edge” of the level in order to see down to a lower level. If they are back away from the “cliff side” of that level (reverse slope, as some would call it), then they cannot view any targets on a lower elevation. This also applies in reverse – units on a lower level cannot see higher units unless those higher units are located on the edge of the hill’s terrace.
f. Artillery in Difficult Terrain: An Artillery unit located in a Woods or Angled hex may not Fire.
The Day Was Ours: The First Battle of Bull Run 7 Revolution Games, 2021
9.3 Fire Combat Procedure:
CRT Column Shifts:
The column shifts are as follows:
• Target in Woods = shift two columns to the left if the targeted hex is a Woods hex.
• Firing Over Woods = shift one column to the left if the LOS passes over an intervening Woods hexside.
• Firing Over Any Units = shift one column to the left if the LOS passes over any intervening units (friendly or enemy).
• Target is cavalry= shift two columns to the right.
• Low Ammo= shift two columns to the left for each low ammo marker on a unit participating in the fire combat.
• Half or more of Firing Artillery SPs are “S” Weapon Type firing Canister= shift one column right. (You could be at canister range but not able to fire canister because it was over your own troops in which case you would not get the shift)
• Flanking Fire = shift one column to the right if the firing unit(s) qualify for Flanking Fire (Series Rules 9.3c).
• Half or more of Firing Artillery SPs are “MX” Weapon Type firing at Long or Extreme range: shift one column to the left.
10.0 Movement 10.5 Roads:
a. March Column Rate: A infantry or cavalry unit that is under Maneuver Orders or any Artillery unit pays only ½ MP per hex entered when moving along connected Pike and Road hexes, regardless of the other terrain in the hex or on the hexside crossed to enter it.
b. Road Stacking Limit: The stacking limit when a unit is using the Road, Trail, or March Column movement rate is 10 SPs at all times – meaning that units cannot even pass through a hex containing other units at the Road, Trail or March Column rate if it would cause the total SPs in the hex to exceed 10 SPs. The moving unit or stack must pay the Movement Cost of the other terrain in a hex and on the hexside crossed if the stacking limit is exceeded in that hex. Cavalry and Artillery units pay 3MP to enter a road or trail hex in woods that exceeds the road stacking limit.
c. Cavalry and Artillery in Woods: Cavalry and Artillery units must move along a connected Trail/Road to enter or leave Woods terrain hexes.
10.12 Off-Map Withdrawals: A unit may voluntarily move off the game map by paying 1 MP to move from any map edge hex (regardless of the terrain in the hex) off the map. The unit is
removed from the map and is permanently out of the game and does not count as eliminated for VP purposes.
11.0 Close Combat 11.3 Close Combat Procedure:
c. CRT Column Shifts:
• Total Attacking SPs are Triple the Defending SPs (3:1 Odds): Shift three columns to the right.
• Total Attacking SPs are Double the Defending SPs (2:1 Odds): Shift two columns to the right.
• Total Attacking SPs are 50% more than the Defending SPs (3:2 Odds): Shift one column to the right.
• Defending SPs are 50% more than the Total Attacking SPs (2:3 Odds): Shift one column to the left.
• Defending SPs are Double the Total Attacking SPs (1:2 Odds): Shift two columns to the left.
• Defending SPs are at least Triple the Total Attacking SPs (1:3 Odds): Shift three columns to the left.
Only one of the above six Odds column shifts can apply in each combat. Other column shifts are cumulative.
• Half or more Defending SPs are Artillery: Shift four columns to the right.
• The best Attacking unit’s CR (from the Assaulting Hex) is higher than the defending Lead Unit’s CR: Shift one column to the right.
• The Defending Lead Unit’s CR is higher than the best Attacking unit’s CR (from the Assaulting Hex): Shift one column to the left.
• Defending unit is on Higher-elevation side of a Slope hexside than Attacker: Shift two columns to the left.
• Defending unit is on Higher-elevation side of a Steep Slope hexside than Attacker: Shift three columns to the left.
• Half or more of Attacking SPs are “S” or “MX”: Shift one column to the right.
• Half or more of Defending SPs are “S” or “MX”: Shift one column to the left.
• Confederate “Rebel Yell!” attack: Shift two columns to the right.
• Flanking Attack: Shift two columns to the right if a Flanking Hex is at least two hexes away from the Assaulting Hex in the same combat or if there are two or more Flanking Hexes involved in the same attack
The Day Was Ours: The First Battle of Bull Run 8 Revolution Games, 2021
(regardless of their position relative to the Assaulting Hex).
• Defender is Cavalry: Shift three columns to the left
• Attacking Unit(s) is Charging Cavalry against Infantry/Artillery: Shift two columns to the right for a cavalry charge.
• Close Combat across Ford or Bridge is Prohibited
12.0 Cohesion Tests 12.3 Retreat Movement: After all other priorities of retreat are met add the following. The Union player must try to retreat towards the North and/or East map edge and the Confederate player towards the South and/or West map edge. If a retreating unit reaches the map edge and has not yet completed its retreat, place it in Broken Box 1 on the Broken Track. However, Artillery and Fragile units are eliminated.
12.4 Unit Support:
a. Unit Support Qualification:
i. Infantry and Cavalry: Stuart’s cavalry is always considered supported and may give support to any Confederate unit. Hampton’s Legion may get support from any Confederate unit and may give it to any Confederate unit.
iv. Any Unit in Woods: A unit located in a Woods hex (even if it has a Road or Trail) never receives Support, nor does it provide Support to any other Unit. This supersedes all other Support qualifications.
16.0 Scenarios There are three scenarios in The Day Was Ours. The first two involve the two significant actions of the First Battle of Bull Run: the initial clash on Matthews Hill and the battle for the Henry House Hill. The third scenario covers the entire battle. The Optional Rules are designed for use only with the full battle scenario. They will cause significant balance shifts in the smaller scenarios.
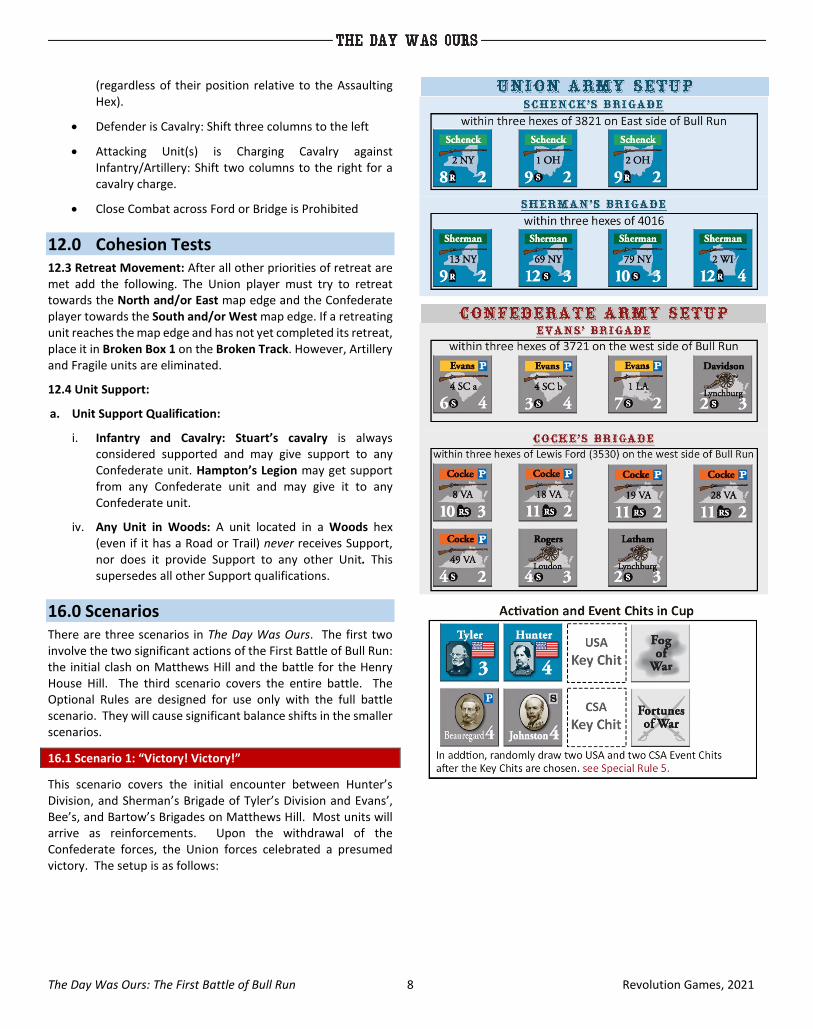
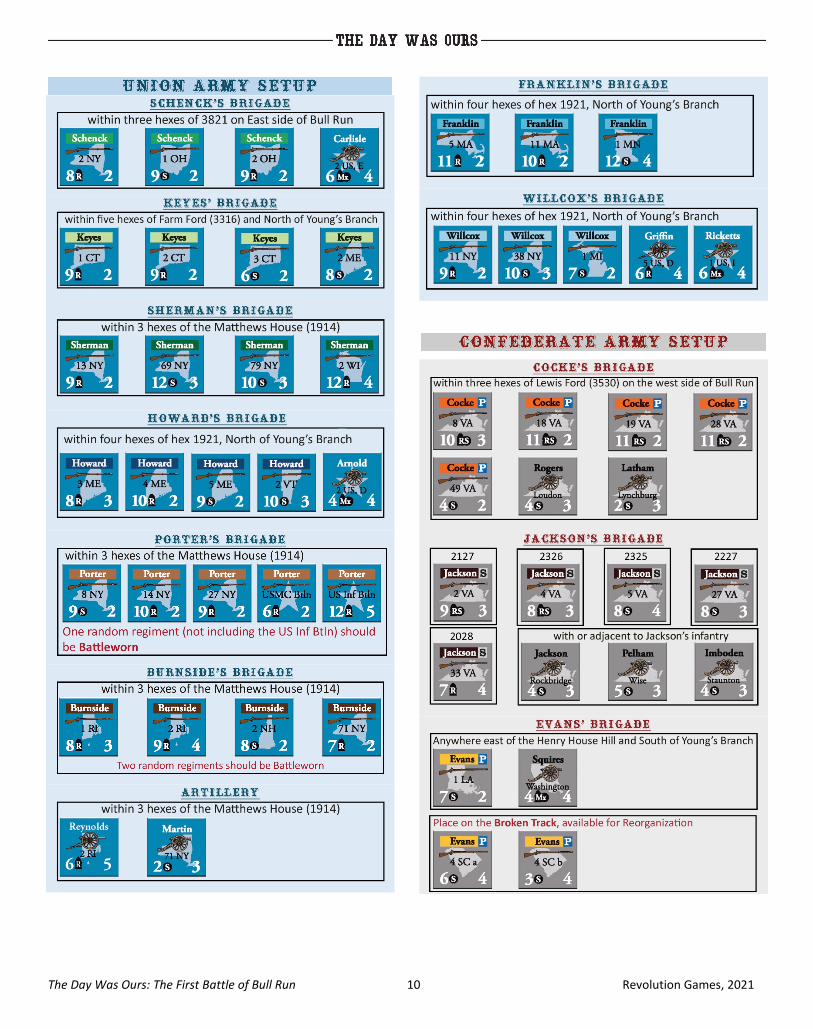
16.1 Scenario 1: “Victory! Victory!”
This scenario covers the initial encounter between Hunter’s Division, and Sherman’s Brigade of Tyler’s Division and Evans’, Bee’s, and Bartow’s Brigades on Matthews Hill. Most units will arrive as reinforcements. Upon the withdrawal of the Confederate forces, the Union forces celebrated a presumed victory. The setup is as follows:
The Day Was Ours: The First Battle of Bull Run 9 Revolution Games, 2021
Special Scenario Rules
1) This scenario is 6 turns long, starting at 9:00 a.m. and ending at the conclusion of the 11:30 a.m. turn. Place the Game Turn marker in the in the 9:00 a.m. space of the Game Turn Track.
2) Use the reinforcements listed in Scenario 16.3 for 10:00 a.m. and earlier.
3) Set aside the Exhaustion, Superior Artillery, and Low Ammo chits, they are not used in this scenario.
4) The Regular’s Forward chit may only be used twice in this scenario.
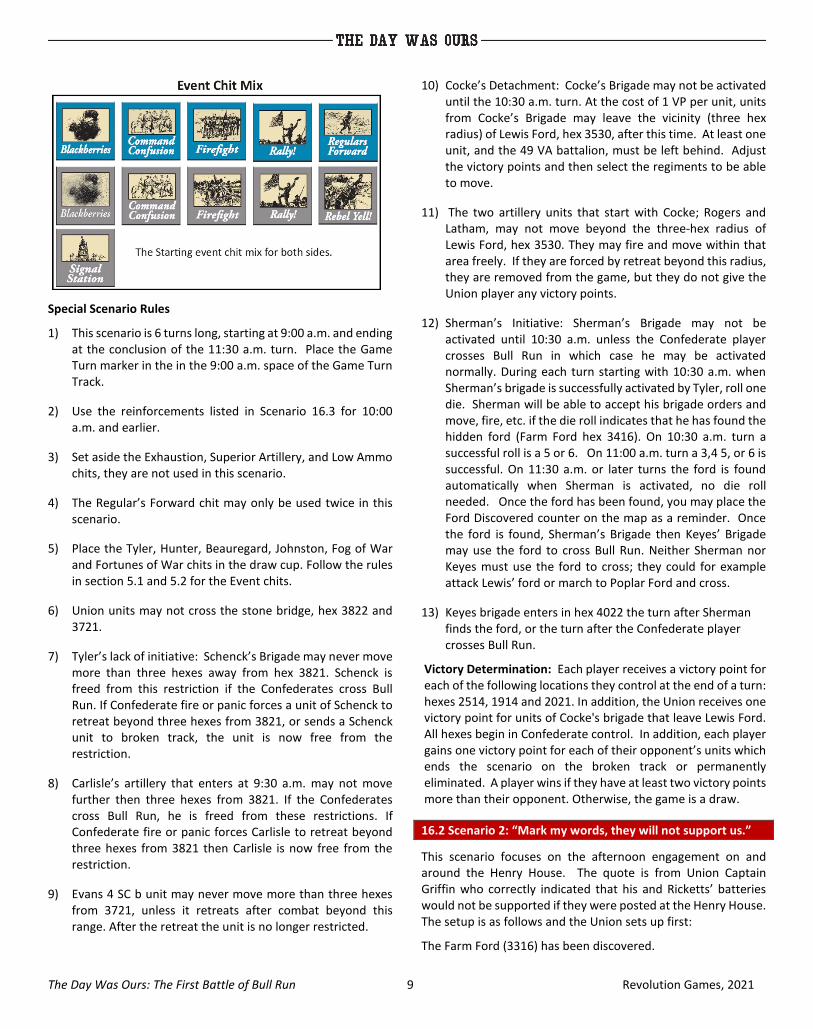
5) Place the Tyler, Hunter, Beauregard, Johnston, Fog of War and Fortunes of War chits in the draw cup. Follow the rules in section 5.1 and 5.2 for the Event chits.
6) Union units may not cross the stone bridge, hex 3822 and 3721.
7) Tyler’s lack of initiative: Schenck’s Brigade may never move more than three hexes away from hex 3821. Schenck is freed from this restriction if the Confederates cross Bull Run. If Confederate fire or panic forces a unit of Schenck to retreat beyond three hexes from 3821, or sends a Schenck unit to broken track, the unit is now free from the restriction.
8) Carlisle’s artillery that enters at 9:30 a.m. may not move further then three hexes from 3821. If the Confederates cross Bull Run, he is freed from these restrictions. If Confederate fire or panic forces Carlisle to retreat beyond three hexes from 3821 then Carlisle is now free from the restriction.
9) Evans 4 SC b unit may never move more than three hexes from 3721, unless it retreats after combat beyond this range. After the retreat the unit is no longer restricted.
10) Cocke’s Detachment: Cocke’s Brigade may not be activated until the 10:30 a.m. turn. At the cost of 1 VP per unit, units from Cocke’s Brigade may leave the vicinity (three hex radius) of Lewis Ford, hex 3530, after this time. At least one unit, and the 49 VA battalion, must be left behind. Adjust the victory points and then select the regiments to be able to move.
11) The two artillery units that start with Cocke; Rogers and Latham, may not move beyond the three-hex radius of Lewis Ford, hex 3530. They may fire and move within that area freely. If they are forced by retreat beyond this radius, they are removed from the game, but they do not give the Union player any victory points.
12) Sherman’s Initiative: Sherman’s Brigade may not be activated until 10:30 a.m. unless the Confederate player crosses Bull Run in which case he may be activated normally. During each turn starting with 10:30 a.m. when Sherman’s brigade is successfully activated by Tyler, roll one die. Sherman will be able to accept his brigade orders and move, fire, etc. if the die roll indicates that he has found the hidden ford (Farm Ford hex 3416). On 10:30 a.m. turn a successful roll is a 5 or 6. On 11:00 a.m. turn a 3,4 5, or 6 is successful. On 11:30 a.m. or later turns the ford is found automatically when Sherman is activated, no die roll needed. Once the ford has been found, you may place the Ford Discovered counter on the map as a reminder. Once the ford is found, Sherman’s Brigade then Keyes’ Brigade may use the ford to cross Bull Run. Neither Sherman nor Keyes must use the ford to cross; they could for example attack Lewis’ ford or march to Poplar Ford and cross.
13) Keyes brigade enters in hex 4022 the turn after Sherman finds the ford, or the turn after the Confederate player crosses Bull Run.
Victory Determination: Each player receives a victory point for each of the following locations they control at the end of a turn: hexes 2514, 1914 and 2021. In addition, the Union receives one victory point for units of Cocke's brigade that leave Lewis Ford. All hexes begin in Confederate control. In addition, each player gains one victory point for each of their opponent’s units which ends the scenario on the broken track or permanently eliminated. A player wins if they have at least two victory points more than their opponent. Otherwise, the game is a draw.
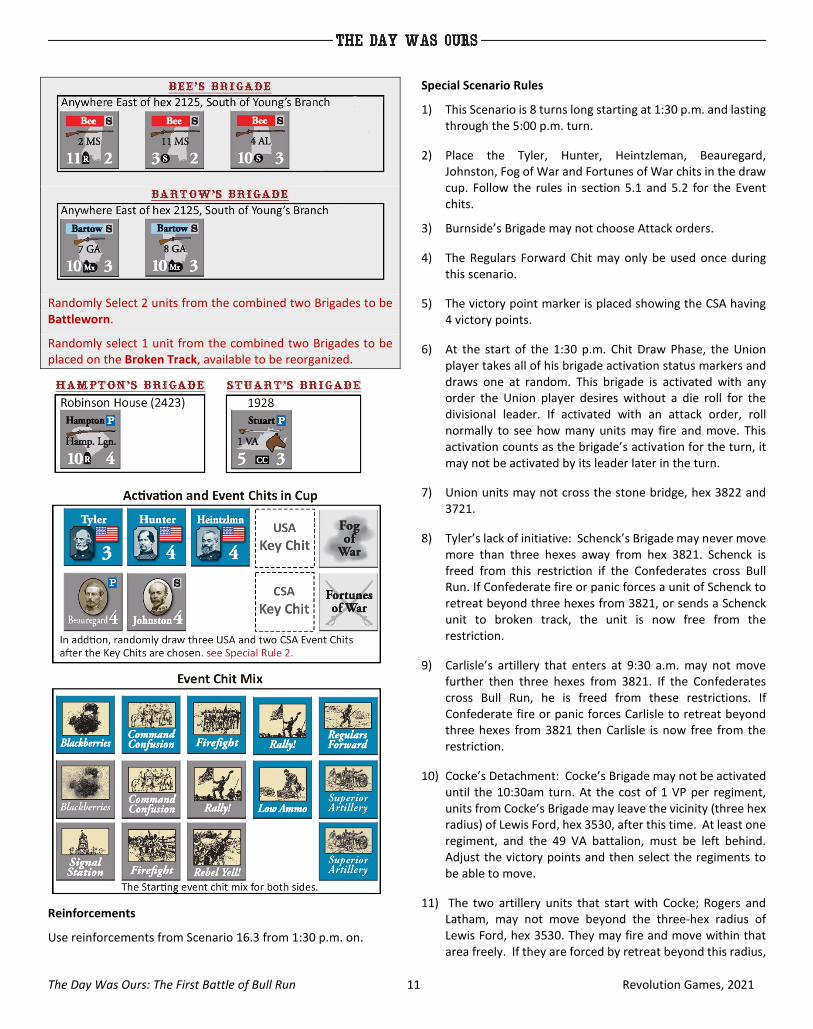
16.2 Scenario 2: “Mark my words, they will not support us.”
This scenario focuses on the afternoon engagement on and around the Henry House. The quote is from Union Captain Griffin who correctly indicated that his and Ricketts’ batteries would not be supported if they were posted at the Henry House. The setup is as follows and the Union sets up first:
The Farm Ford (3316) has been discovered.
The Day Was Ours: The First Battle of Bull Run 10 Revolution Games, 2021
The Day Was Ours: The First Battle of Bull Run 11 Revolution Games, 2021
Randomly Select 2 units from the combined two Brigades to be Battleworn.
Randomly select 1 unit from the combined two Brigades to be placed on the Broken Track, available to be reorganized.
Reinforcements
Use reinforcements from Scenario 16.3 from 1:30 p.m. on.
Special Scenario Rules
1) This Scenario is 8 turns long starting at 1:30 p.m. and lasting through the 5:00 p.m. turn.
2) Place the Tyler, Hunter, Heintzleman, Beauregard, Johnston, Fog of War and Fortunes of War chits in the draw cup. Follow the rules in section 5.1 and 5.2 for the Event chits.
3) Burnside’s Brigade may not choose Attack orders.
4) The Regulars Forward Chit may only be used once during this scenario.
5) The victory point marker is placed showing the CSA having 4 victory points.
6) At the start of the 1:30 p.m. Chit Draw Phase, the Union player takes all of his brigade activation status markers and draws one at random. This brigade is activated with any order the Union player desires without a die roll for the divisional leader. If activated with an attack order, roll normally to see how many units may fire and move. This activation counts as the brigade’s activation for the turn, it may not be activated by its leader later in the turn.
7) Union units may not cross the stone bridge, hex 3822 and 3721.
8) Tyler’s lack of initiative: Schenck’s Brigade may never move more than three hexes away from hex 3821. Schenck is freed from this restriction if the Confederates cross Bull Run. If Confederate fire or panic forces a unit of Schenck to retreat beyond three hexes from 3821, or sends a Schenck unit to broken track, the unit is now free from the restriction.
9) Carlisle’s artillery that enters at 9:30 a.m. may not move further then three hexes from 3821. If the Confederates cross Bull Run, he is freed from these restrictions. If Confederate fire or panic forces Carlisle to retreat beyond three hexes from 3821 then Carlisle is now free from the restriction.
10) Cocke’s Detachment: Cocke’s Brigade may not be activated until the 10:30am turn. At the cost of 1 VP per regiment, units from Cocke’s Brigade may leave the vicinity (three hex radius) of Lewis Ford, hex 3530, after this time. At least one regiment, and the 49 VA battalion, must be left behind. Adjust the victory points and then select the regiments to be able to move.
11) The two artillery units that start with Cocke; Rogers and Latham, may not move beyond the three-hex radius of Lewis Ford, hex 3530. They may fire and move within that area freely. If they are forced by retreat beyond this radius,
The Day Was Ours: The First Battle of Bull Run 12 Revolution Games, 2021
they are removed from the game, but they do not give the Union player any victory points.
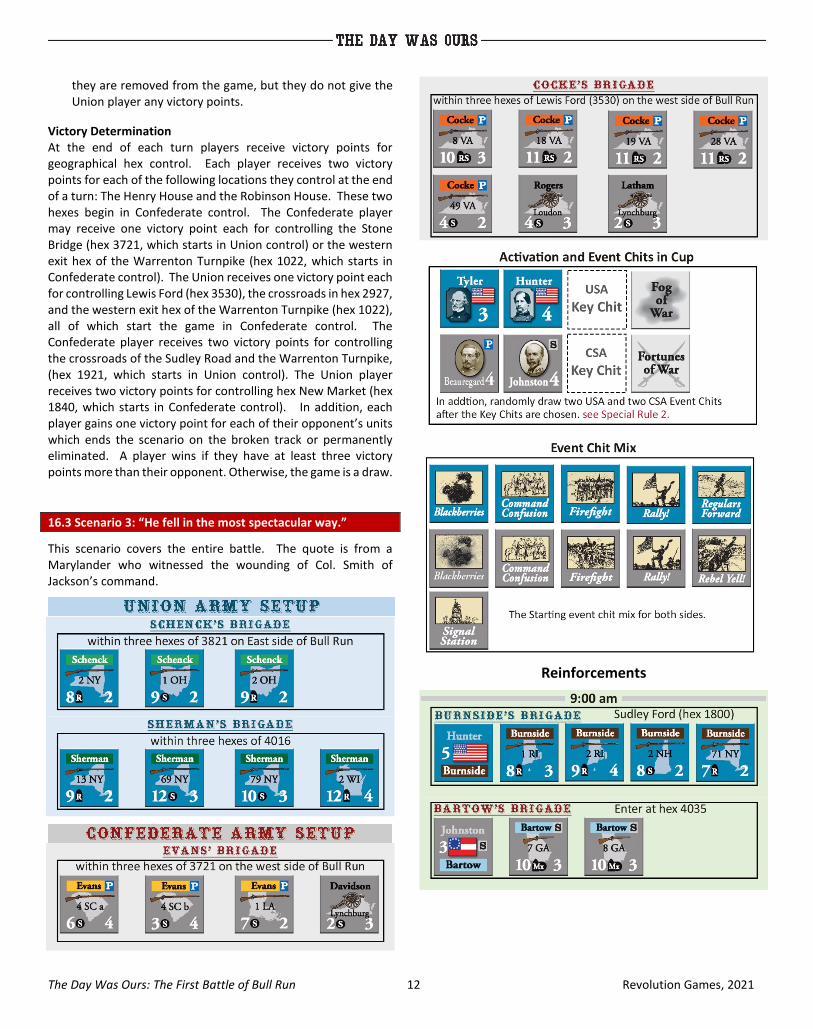
Victory Determination At the end of each turn players receive victory points for geographical hex control. Each player receives two victory points for each of the following locations they control at the end of a turn: The Henry House and the Robinson House. These two hexes begin in Confederate control. The Confederate player may receive one victory point each for controlling the Stone Bridge (hex 3721, which starts in Union control) or the western exit hex of the Warrenton Turnpike (hex 1022, which starts in Confederate control). The Union receives one victory point each for controlling Lewis Ford (hex 3530), the crossroads in hex 2927, and the western exit hex of the Warrenton Turnpike (hex 1022), all of which start the game in Confederate control. The Confederate player receives two victory points for controlling the crossroads of the Sudley Road and the Warrenton Turnpike, (hex 1921, which starts in Union control). The Union player receives two victory points for controlling hex New Market (hex 1840, which starts in Confederate control). In addition, each player gains one victory point for each of their opponent’s units which ends the scenario on the broken track or permanently eliminated. A player wins if they have at least three victory points more than their opponent. Otherwise, the game is a draw.
16.3 Scenario 3: “He fell in the most spectacular way.”
This scenario covers the entire battle. The quote is from a Marylander who witnessed the wounding of Col. Smith of Jackson’s command.
Reinforcements
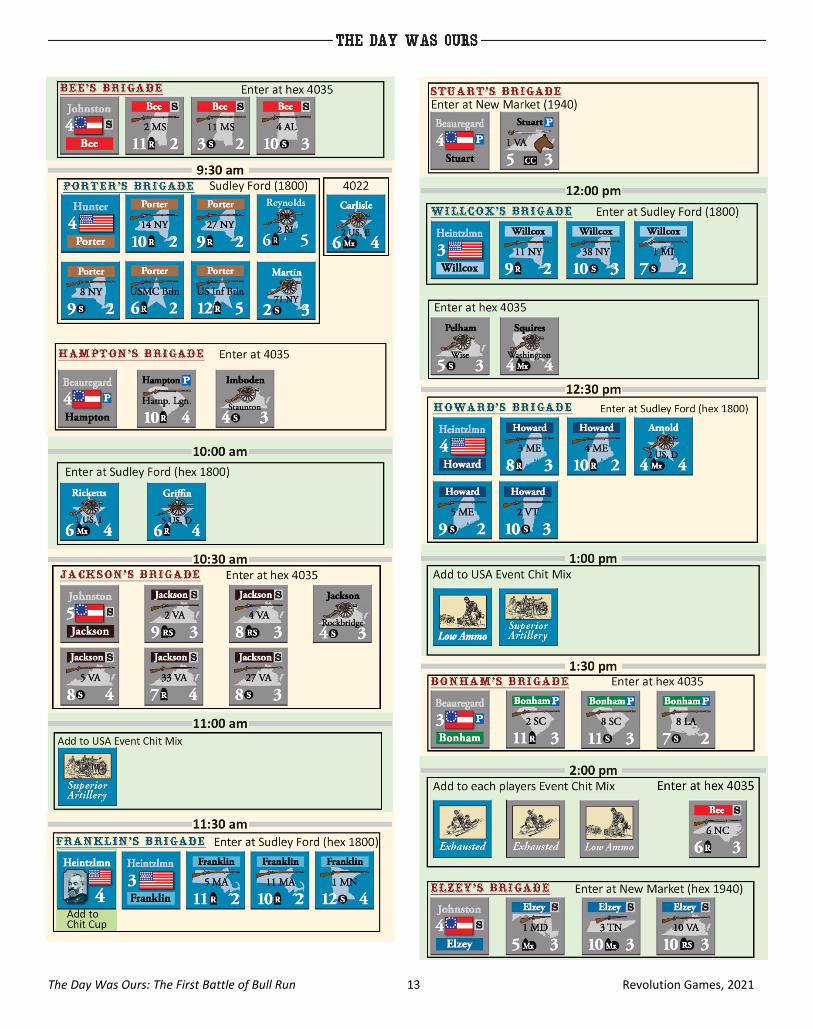
The Day Was Ours: The First Battle of Bull Run 13 Revolution Games, 2021
The Day Was Ours: The First Battle of Bull Run 14 Revolution Games, 2021
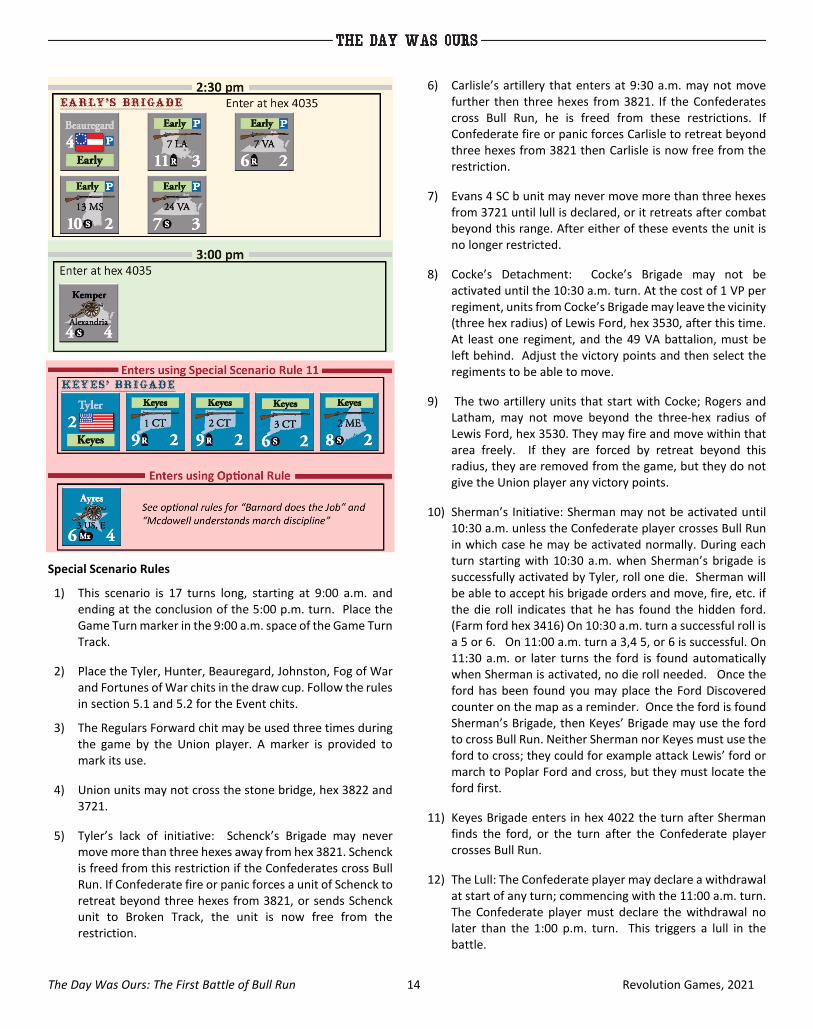
Special Scenario Rules
1) This scenario is 17 turns long, starting at 9:00 a.m. and ending at the conclusion of the 5:00 p.m. turn. Place the Game Turn marker in the 9:00 a.m. space of the Game Turn Track.
2) Place the Tyler, Hunter, Beauregard, Johnston, Fog of War and Fortunes of War chits in the draw cup. Follow the rules in section 5.1 and 5.2 for the Event chits.
3) The Regulars Forward chit may be used three times during the game by the Union player. A marker is provided to mark its use.
4) Union units may not cross the stone bridge, hex 3822 and 3721.
5) Tyler’s lack of initiative: Schenck’s Brigade may never move more than three hexes away from hex 3821. Schenck is freed from this restriction if the Confederates cross Bull Run. If Confederate fire or panic forces a unit of Schenck to retreat beyond three hexes from 3821, or sends Schenck unit to Broken Track, the unit is now free from the restriction.
6) Carlisle’s artillery that enters at 9:30 a.m. may not move further then three hexes from 3821. If the Confederates cross Bull Run, he is freed from these restrictions. If Confederate fire or panic forces Carlisle to retreat beyond three hexes from 3821 then Carlisle is now free from the restriction.
7) Evans 4 SC b unit may never move more than three hexes from 3721 until lull is declared, or it retreats after combat beyond this range. After either of these events the unit is no longer restricted.
8) Cocke’s Detachment: Cocke’s Brigade may not be activated until the 10:30 a.m. turn. At the cost of 1 VP per regiment, units from Cocke’s Brigade may leave the vicinity (three hex radius) of Lewis Ford, hex 3530, after this time. At least one regiment, and the 49 VA battalion, must be left behind. Adjust the victory points and then select the regiments to be able to move.
9) The two artillery units that start with Cocke; Rogers and Latham, may not move beyond the three-hex radius of Lewis Ford, hex 3530. They may fire and move within that area freely. If they are forced by retreat beyond this radius, they are removed from the game, but they do not give the Union player any victory points.
10) Sherman’s Initiative: Sherman may not be activated until 10:30 a.m. unless the Confederate player crosses Bull Run in which case he may be activated normally. During each turn starting with 10:30 a.m. when Sherman’s brigade is successfully activated by Tyler, roll one die. Sherman will be able to accept his brigade orders and move, fire, etc. if the die roll indicates that he has found the hidden ford. (Farm ford hex 3416) On 10:30 a.m. turn a successful roll is a 5 or 6. On 11:00 a.m. turn a 3,4 5, or 6 is successful. On 11:30 a.m. or later turns the ford is found automatically when Sherman is activated, no die roll needed. Once the ford has been found you may place the Ford Discovered counter on the map as a reminder. Once the ford is found Sherman’s Brigade, then Keyes’ Brigade may use the ford to cross Bull Run. Neither Sherman nor Keyes must use the ford to cross; they could for example attack Lewis’ ford or march to Poplar Ford and cross, but they must locate the ford first.
11) Keyes Brigade enters in hex 4022 the turn after Sherman finds the ford, or the turn after the Confederate player crosses Bull Run.
12) The Lull: The Confederate player may declare a withdrawal at start of any turn; commencing with the 11:00 a.m. turn. The Confederate player must declare the withdrawal no later than the 1:00 p.m. turn. This triggers a lull in the battle.
The Day Was Ours: The First Battle of Bull Run 15 Revolution Games, 2021
a) The lull lasts for the turn it is declared and for the two subsequent turns.
b) During the lull do not place the wild chits in the cup and the only event chit placed in the cup for each side is Rally.
c) Confederate units may not cross to the north side of Young’s Branch during the lull. (They may enter the hex containing Young’s Branch but not finish the lull in those hexes) Young’s Branch runs from hex 1023 to Bull Run. Also, the Confederate player may only use Maneuver and Rally orders. However, Confederate units that start their activation north of Young’s Branch can engage Union units while under Maneuver Orders or if artillery moving in the artillery phase during the lull but cannot conduct any type of combat. Confederate units north of Young’s Branch must attempt to move south of Young’s Branch, as quickly as possible during the lull.
d) Union units may cross to the south side of Young’s Branch during the lull. (They may enter the hex containing Young’s Branch but not finish the lull in those hexes) Also, the Union player may only use Defend and Maneuver orders. However, Union units that start their activation south of Young’s Branch can engage Confederate units while under Maneuver Orders or if artillery moving in the artillery phase during the lull but cannot conduct any type of combat. Union units south of Young’s Branch must attempt to move north of Young’s Branch as quickly as possible during the lull.
e) Recovery: After the lull finishes rebuild attempts no longer receives any die roll adjustments from the Rally chit.
Victory Determination Use the geographical objectives from Scenario 1 before the lull and the geographical objectives from Scenario 2 after the lull. No points are scored during the lull. In addition, each player gains one victory point for each of their opponent’s units which ends the scenario on the broken track or permanently eliminated. A player wins if they have at least three victory points more than their opponent. Otherwise, the game is a draw.
Optional Rules As in all Civil War battles the landscape is littered with “What ifs?”. Some of the most common, and their effects on the game, are shown below. In all cases, victory point adjustments are included. In all cases these options are used in Scenario 16.3
Barnard Does the Job. Major Barnard was given the task of finding the upstream fords of Bull Run to permit the flanking columns to cross. Major Barnard was cautious in performing this task in order to avoid alerting the Confederates to the movement. As a result, he did not actually find the Sudley Ford but merely assumed it on the basis of some discussion with locals and the general lay of the land. This option assumes that he went the extra mile (literally) and found the actual ford thus giving McDowell an actual understanding of the distance to be covered.
Effects: Begin the game at 7:00 a.m. adding four turns to Scenario 16.3. Increase the victory points for hexes before the lull to 2 each turn. Adjust the entire Union reinforcement schedule forward by two hours. Ayres battery enters the game at 4022 at 3:00 p.m.. Adjust all Confederate reinforcements forward by one hour with the exception of Elzey. (Elzey’s still arrives at 2:00).
McDowell understands march discipline. McDowell’s orders placed Tyler’s division at the head of the flanking column even though Tyler had the shortest distance to go. The sluggish march of Tyler’s division held up the flanking column considerably and lead to considerable straggling in Hunter’s and Heintzleman’s Divisions as they attempted to make up lost time.
Effects: Begin the game at 7:00 a.m. adding four turns to Scenario 16.3. Move the 9:00 a.m., 9:30 a.m., and 10 a.m. Union reinforcements to 7:00, 7:30, and 8 a.m. respectively. Advance the Union reinforcements from Heintzleman’s Division to the following: Franklin’s Brigade 10:00AM, Willcox’s Brigade 10:30 a.m., Arnold’s Battery 11:00 a.m. Howard’s Brigade 11:30 a.m. Ayres battery enters the game at 4022 at 3:00 p.m. Double all Confederate victory points prior to the lull.
Beauregard’s Courier makes it to Ewell and Holmes. Beauregard, as is his norm, had a plan to attack the Union forces at Centreville, using an echelon attack beginning on his right with Ewell’s brigade. Each subsequent Brigade was to begin their attack once they observed the effects of the advance of the brigade to their right (to the east). Ewell and Holmes never received their orders to begin the attack as the courier got lost. As a result, most of the Confederate Army was ready for an attack that never began.
Effects: Remove Bonham and Early from the Confederate reinforcements. Increase all Confederate victory point awards for geographical locations after the lull by one (e.g. Henry House becomes worth 3 victory points to the Confederate player, while only worth two to the Union player. Reduce Beauregard’s activation number by one to 3 to reflect his attention being placed elsewhere.
The Day Was Ours: The First Battle of Bull Run 16 Revolution Games, 2021
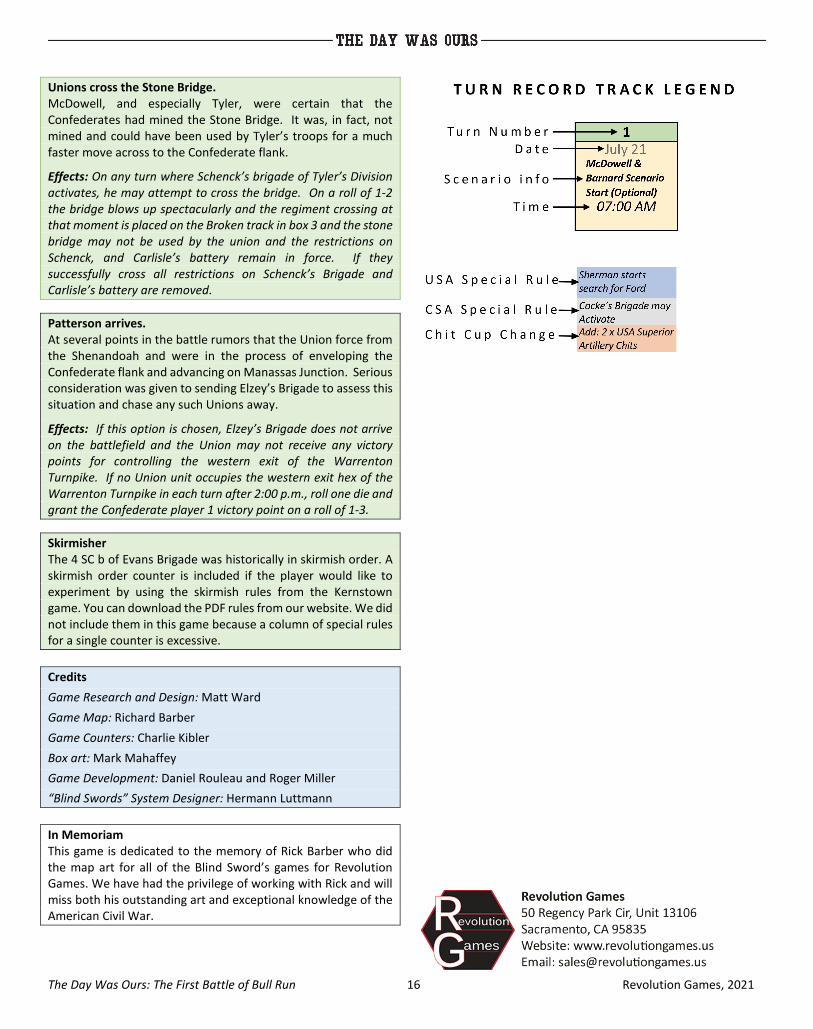
Unions cross the Stone Bridge. McDowell, and especially Tyler, were certain that the Confederates had mined the Stone Bridge. It was, in fact, not mined and could have been used by Tyler’s troops for a much faster move across to the Confederate flank.
Effects: On any turn where Schenck’s brigade of Tyler’s Division activates, he may attempt to cross the bridge. On a roll of 1-2 the bridge blows up spectacularly and the regiment crossing at that moment is placed on the Broken track in box 3 and the stone bridge may not be used by the union and the restrictions on Schenck, and Carlisle’s battery remain in force. If they successfully cross all restrictions on Schenck’s Brigade and Carlisle’s battery are removed.
Patterson arrives. At several points in the battle rumors that the Union force from the Shenandoah and were in the process of enveloping the Confederate flank and advancing on Manassas Junction. Serious consideration was given to sending Elzey’s Brigade to assess this situation and chase any such Unions away.
Effects: If this option is chosen, Elzey’s Brigade does not arrive on the battlefield and the Union may not receive any victory points for controlling the western exit of the Warrenton Turnpike. If no Union unit occupies the western exit hex of the Warrenton Turnpike in each turn after 2:00 p.m., roll one die and grant the Confederate player 1 victory point on a roll of 1-3.
Skirmisher The 4 SC b of Evans Brigade was historically in skirmish order. A skirmish order counter is included if the player would like to experiment by using the skirmish rules from the Kernstown game. You can download the PDF rules from our website. We did not include them in this game because a column of special rules for a single counter is excessive. Credits Game Research and Design: Matt Ward Game Map: Richard Barber Game Counters: Charlie Kibler Box art: Mark Mahaffey Game Development: Daniel Rouleau and Roger Miller “Blind Swords” System Designer: Hermann Luttmann In Memoriam This game is dedicated to the memory of Rick Barber who did the map art for all of the Blind Sword’s games for Revolution Games. We have had the privilege of working with Rick and will miss both his outstanding art and exceptional knowledge of the American Civil War.