the cisco ordering tool tool user guide internet commerce ordering tool user guide -october 2003...
TRANSCRIPT
The Cisco Ordering Tool User Guide
O
rder
ing
To
ol
Ordering Tool User Guide Internet Commerce
Ordering Tool User Guide-October 2003 Revision
2
Table of Contents
TABLE OF CONTENTS..............................................................................................................2
ABOUT THIS GUIDE ..................................................................................................................6
BENEFITS OF USING THE ORDERING TOOL ....................................................................6
USING THE ORDERING TOOL ...............................................................................................6
PREREQUISITES.........................................................................................................................6 Logging into the Ordering Tool .................................................................................................................................................................................6
RECOMMENDED FOR BEST PERFORMANCE...................................................................7 Hardware Requirements ............................................................................................................................................................................................7 Software Requirements...............................................................................................................................................................................................7 Network Requirements ...............................................................................................................................................................................................7
A QUICK OVERVIEW OF THE ORDERING TOOL ............................................................8
CHAPTER ONE –.........................................................................................................................9
ORDERING TOOL HOME PAGE .......................................................................................................9 CHAPTER OBJECTIVE .....................................................................................................................9 CHOICES ON THE ORDERING TOOL NAVIGATION BAR (SEE FIGURE B.1) ......................................9 WHAT WOULD YOU LIKE TO DO? SECTION (SEE FIGURE B.1) ......................................................10
CHAPTER TWO –......................................................................................................................11
SETTING ORDER DEFAULTS .........................................................................................................11 CHAPTER OBJECTIVE ...................................................................................................................11 DEFINITIONS ................................................................................................................................11 FREQUENTLY USED DEFAULT FIELDS..........................................................................................12 HOW TO SET THE ORDER DEFAULTS............................................................................................13
Accessing the Default Settings .................................................................................................................................................................................13 Setting Ordering Tool Preference Defaults.............................................................................................................................................................15 Setting the Default Billing Address..........................................................................................................................................................................15 Setting Default Billing Contact Information ...........................................................................................................................................................16 Setting Default Shipping Address Information........................................................................................................................................................16 Setting or Changing the Default Shipping Contact.................................................................................................................................................17 Setting or Changing the Default Shipping Method .................................................................................................................................................17 Setting or Changing the Default Pricing Information ............................................................................................................................................18 Setting or Changing the Payment & Taxes Information.........................................................................................................................................20 Setting or Changing the Service Options Information............................................................................................................................................21 Setting or Changing the Order Acknowledgements Information ...........................................................................................................................21 Setting or Changing the Order Contacts Information ............................................................................................................................................22
CHAPTER THREE – .................................................................................................................23
CREATING AND USING ORDER TEMPLATES .................................................................................23 CHAPTER OBJECTIVE ...................................................................................................................23 DEFINITION ..................................................................................................................................23 HOW TO USE ORDER TEMPLATES ................................................................................................23
Ordering Tool User Guide Internet Commerce
Ordering Tool User Guide-October 2003 Revision
3
Saving an Order as a Template................................................................................................................................................................................23 MANAGING ORDER TEMPLATES ..................................................................................................27
Preview a Template ..................................................................................................................................................................................................27 Modify a Template....................................................................................................................................................................................................27 Create an Order from a Template ...........................................................................................................................................................................27 Delete a Template.....................................................................................................................................................................................................28
CHAPTER FOUR – ....................................................................................................................29
CREATE AN ORDER ......................................................................................................................29 CHAPTER OBJECTIVE ...................................................................................................................29 HOW TO CREATE AN ORDER ........................................................................................................29
Begin to Create a New Order...................................................................................................................................................................................30
CHAPTER FIVE – ......................................................................................................................33
MAIN ORDER FORM .....................................................................................................................33 CHAPTER OBJECTIVES .................................................................................................................33
Buttons on the Main Order Form ............................................................................................................................................................................34 Buttons on the Main Order Form ............................................................................................................................................................................35 Fields for Entering Line Items .................................................................................................................................................................................37 Additional Fields for Viewing and Modifying Line Items.......................................................................................................................................38
MANAGING LINES ON THE MAIN ORDER FORM ...........................................................................39 Add New Line Items..................................................................................................................................................................................................39 Modifying an Existing Line Item..............................................................................................................................................................................39 Deleting Line Items...................................................................................................................................................................................................40 Saving an Order........................................................................................................................................................................................................40
CHAPTER SIX –.........................................................................................................................41
HEADER DETAILS ........................................................................................................................41 CHAPTER OBJECTIVE ...................................................................................................................41 DEFINITIONS ................................................................................................................................41 ENTERING ORDER DETAILS .........................................................................................................42
Display the All Header Details Page.......................................................................................................................................................................42 Changing the Billing Address ..................................................................................................................................................................................43 Adding or Changing the Billing Contact Person ....................................................................................................................................................44 Adding or Changing the Shipping Address .............................................................................................................................................................45 Adding or Changing the Shipping Contact Person.................................................................................................................................................45 Adding or Changing the Shipping Method Information .........................................................................................................................................46 Adding or Changing End User Information............................................................................................................................................................47 Adding or Changing Payment and Taxes Information ...........................................................................................................................................48 Adding or Changing Order Acknowledgments Information...................................................................................................................................50 Adding or Changing Order Contact Information ...................................................................................................................................................51 Entering Delivery Options .......................................................................................................................................................................................53 Non Standard Shipping Requests.............................................................................................................................................................................54
CHAPTER SEVEN – ..................................................................................................................55
SHIPSETS .....................................................................................................................................55 CHAPTER OBJECTIVES .................................................................................................................55 HOW TO CREATE SHIPSETS FOR YOUR ORDER ............................................................................55
Creating a New ShipSet............................................................................................................................................................................................56 Using an Existing ShipSet to Create a New ShipSet ...............................................................................................................................................59 Viewing and Modifying ShipSets .............................................................................................................................................................................59 Deleting a ShipSet ....................................................................................................................................................................................................60
CHAPTER EIGHT – ..................................................................................................................61
Ordering Tool User Guide Internet Commerce
Ordering Tool User Guide-October 2003 Revision
4
ALL ORDER DETAILS ...................................................................................................................61 CHAPTER OBJECTIVE ...................................................................................................................61 DEFINITIONS ................................................................................................................................61 HOW TO USE THE ALL ORDER DETAILS PAGE .............................................................................61
Accessing the All Order Details Page .....................................................................................................................................................................62 Modifying Order Information ..................................................................................................................................................................................63
CHAPTER NINE – .....................................................................................................................64
ADDRESS BOOK ...........................................................................................................................64 CHAPTER OBJECTIVES .................................................................................................................64 DEFINITIONS ................................................................................................................................64 HOW TO USE THE ADDRESS BOOK...............................................................................................65
Maintaining Addresses .............................................................................................................................................................................................65 Searching for a Shipping Address............................................................................................................................................................................73 Applying an Address to Multiple Locations at Once ..............................................................................................................................................76 Creating a New Contact...........................................................................................................................................................................................77
CHAPTER TEN – .......................................................................................................................80
CONFIGURE..................................................................................................................................80 CHAPTER OBJECTIVE ...................................................................................................................80 DEFINITION ..................................................................................................................................80 HOW TO USE THE CONFIGURATOR TO CONFIGURE PRODUCTS FOR YOUR ORDER..................................80
Configuring a Line Item ...........................................................................................................................................................................................80 The Configurator Screen..........................................................................................................................................................................................82 The Configurator Screen..........................................................................................................................................................................................83
CHAPTER ELEVEN – ...............................................................................................................85
ITEM SEARCH...............................................................................................................................85 CHAPTER OBJECTIVE ...................................................................................................................85 DEFINITIONS ................................................................................................................................85 HOW TO SEARCH FOR PRODUCTS FOR YOUR ORDER ...................................................................85
Searching for a Product ...........................................................................................................................................................................................86 Searching for a Spare...............................................................................................................................................................................................88 Searching My Saved Configs ...................................................................................................................................................................................89 Searching My Saved Configs ...................................................................................................................................................................................90
CHAPTER TWELVE – ..............................................................................................................92
MY SAVED CONFIGS ....................................................................................................................92 CHAPTER OBJECTIVE ...................................................................................................................92 DEFINITION ..................................................................................................................................92 HOW TO USE SAVED AND SHARED CONFIGURATIONS .................................................................92
Using Your Saved and Shared Configurations........................................................................................................................................................92 Example of How to Configure a CISCO776M and Save the Configuration..........................................................................................................94
CHAPTER THIRTEEN – ..........................................................................................................95
SERVICE/LINE DETAILS ...............................................................................................................95 CHAPTER OBJECTIVE ...................................................................................................................95 DEFINITIONS ................................................................................................................................95 HOW TO USE THE LINE ITEM DETAILS SECTION ..........................................................................96
Viewing Line Item Details for a Hardware Line Item.............................................................................................................................................98
Ordering Tool User Guide Internet Commerce
Ordering Tool User Guide-October 2003 Revision
5
Viewing Line Item Details for a Service Line Item .................................................................................................................................................99 Viewing Configuration Details ............................................................................................................................................................................. 101
CHAPTER FOURTEEN – .......................................................................................................103
ORDER ROUTING .......................................................................................................................103 CHAPTER OBJECTIVES ...............................................................................................................103 DEFINITIONS ..............................................................................................................................103 HOW TO USE ORDER ROUTING ..................................................................................................103
Routing an Order................................................................................................................................................................................................... 103 Acquiring a Routed Order..................................................................................................................................................................................... 106 Viewing Routing History for an Order ................................................................................................................................................................. 107
CHAPTER FIFTEEN – ............................................................................................................109
ERROR CHECKING......................................................................................................................109 CHAPTER OBJECTIVE .................................................................................................................109 DEFINITIONS ..............................................................................................................................109 HOW TO USE ERROR CHECKING ................................................................................................109
Checking Your Order for Errors........................................................................................................................................................................... 109 Trade Agreements Act ........................................................................................................................................................................................... 111
CHAPTER SIXTEEN –............................................................................................................113
CREATING SHARED SUPPORT ORDERS .........................................................................................113 CHAPTER OBJECTIVE .................................................................................................................113 CREATING AN ORDER WITH SHARED SUPPORT SERVICE............................................................113
Creating a Shared Support Order......................................................................................................................................................................... 113 Entering Header Detail Information .................................................................................................................................................................... 114 Entering Service Site Information......................................................................................................................................................................... 115 Creating an Order with Service Referrals............................................................................................................................................................ 117
GLOSSARY...............................................................................................................................118
APPENDIX ................................................................................................................................123
PRODUCT BUNDLES ...................................................................................................................123 BUNDLE DISPLAY IN THE MAIN ORDER FORM ...........................................................................123 VIEWING SERVICE OPTIONS FOR BUNDLE PRODUCTS................................................................124 VIEWING BUNDLE LINE ITEM DETAILS ......................................................................................125 VIEWING BUNDLE CONFIGURATION DETAILS............................................................................126 VIEWING BUNDLE INFORMATION IN ORDER DETAILS SECTION .................................................127
Ordering Tool User Guide Internet Commerce
Ordering Tool User Guide-October 2003 Revision
6
About This Guide The Ordering Tool User Guide describes the basic process of creating an order using the Ordering Tool. Topics are presented in a sequential manner so you can reference the information you need when using the tool. Advanced features, timesaving techniques, and ways to customize your orders are also described in detail. These topics include: Setting defaults, using ship sets, getting saved configurations, line item details, and item searching.
Benefits of Using the Ordering Tool < A central home page from which you can create orders, access saved orders, and use
features that save time in creating orders. < The ability to assign different shipping destinations and contact people to items on the
same order. < Time saving features such as default order information, order templates, and saved
configurations.
Using the Ordering Tool < The Home Page provides convenient access to the following ordering functions: < Create an Order Create a new order. < Open/Delete Saved Orders View and manage existing orders. < Get Routed Order View orders routed to you for approval. < Use Order Templates Build an order from a template or to modify a template. < Set Defaults Set defaults or standard settings for all orders you create.
Prerequisites < You must be a registered user of the Ordering Tool to access the tool. < Your company must have a signed ICA (Internet Commerce Agreement) with Cisco. (The
ICA is a contract that sets forth information about doing business with Cisco online through the Ordering Tool)
< You must have logged into the Ordering Tool to access the functionality outlined in this user guide.
Logging into the Ordering Tool < 1 – Type http://www.cisco.com/en/US/partner/ordering/index.shtml in your browser
website address field. Ensure that you log in prior to trying to access the Ordering Tool. The ordering page is displayed.
< 2 – Click the Ordering Tool Link. The Ordering Tool Home page is displayed.
Ordering Tool User Guide Internet Commerce
Ordering Tool User Guide-October 2003 Revision
7
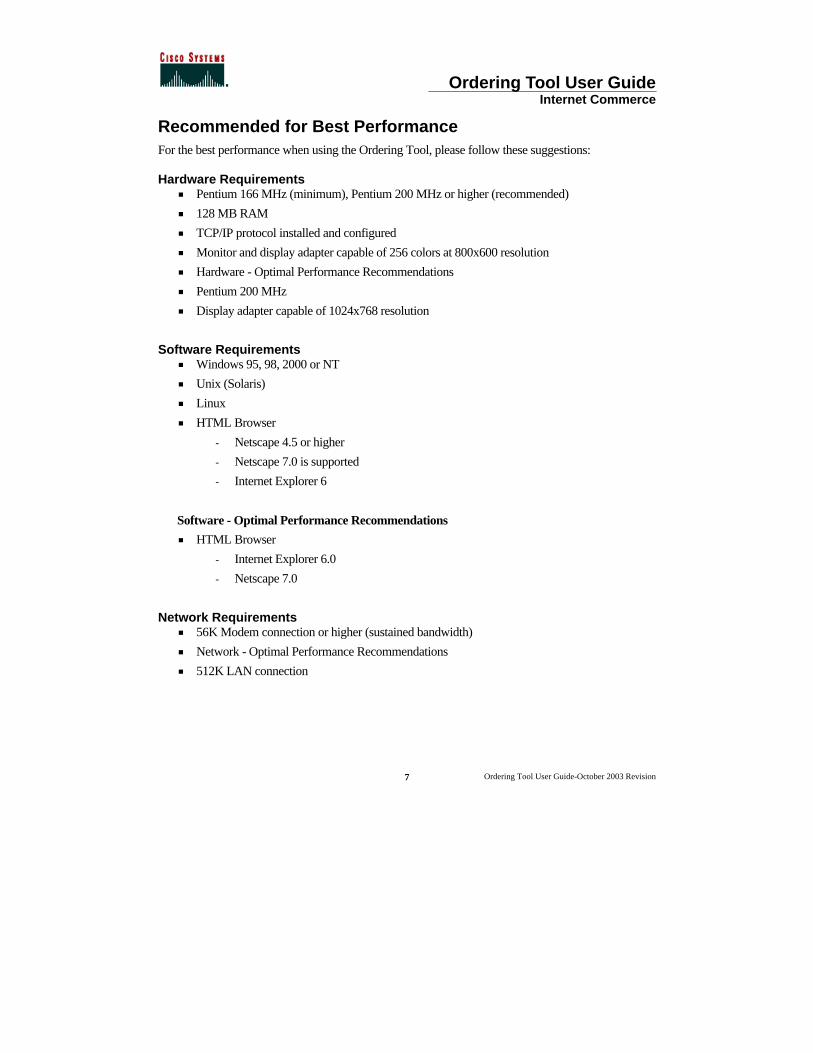
Recommended for Best Performance For the best performance when using the Ordering Tool, please follow these suggestions:
Hardware Requirements < Pentium 166 MHz (minimum), Pentium 200 MHz or higher (recommended) < 128 MB RAM < TCP/IP protocol installed and configured < Monitor and display adapter capable of 256 colors at 800x600 resolution < Hardware - Optimal Performance Recommendations < Pentium 200 MHz < Display adapter capable of 1024x768 resolution
Software Requirements < Windows 95, 98, 2000 or NT < Unix (Solaris) < Linux < HTML Browser
- Netscape 4.5 or higher
- Netscape 7.0 is supported
- Internet Explorer 6
Software - Optimal Performance Recommendations < HTML Browser
- Internet Explorer 6.0
- Netscape 7.0
Network Requirements < 56K Modem connection or higher (sustained bandwidth) < Network - Optimal Performance Recommendations < 512K LAN connection
Ordering Tool User Guide Internet Commerce
Ordering Tool User Guide-October 2003 Revision
8
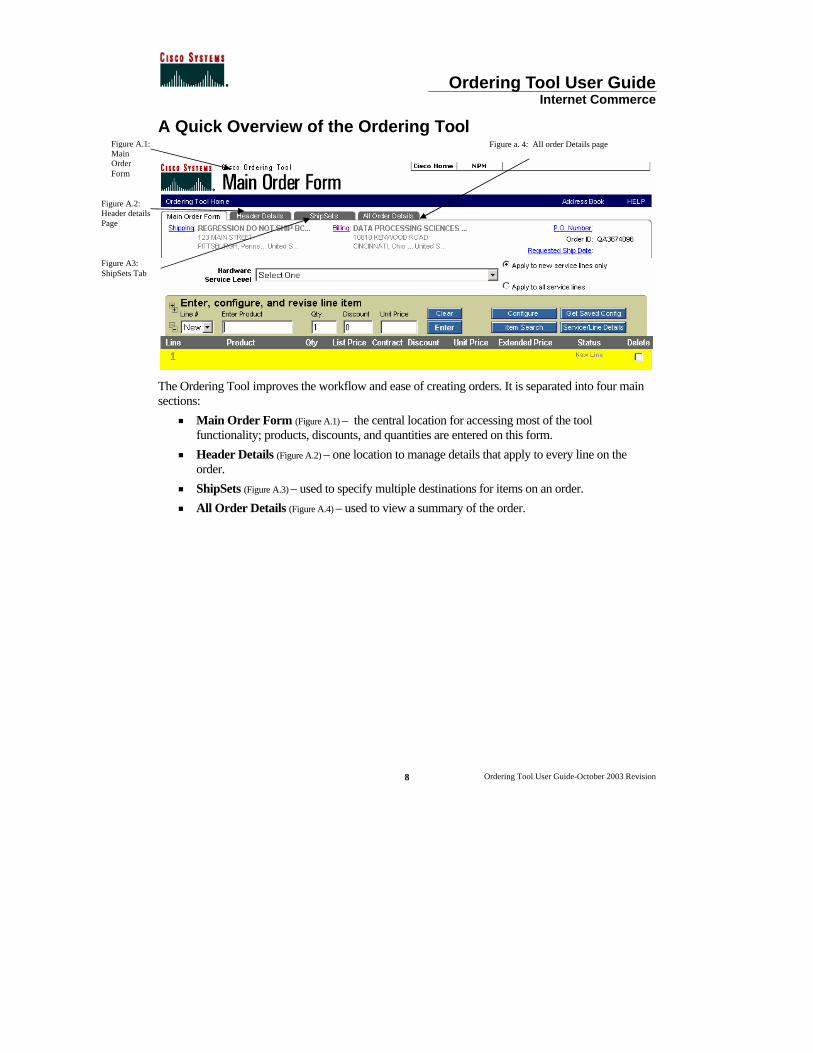
A Quick Overview of the Ordering Tool
The Ordering Tool improves the workflow and ease of creating orders. It is separated into four main sections:
< Main Order Form (Figure A.1) – the central location for accessing most of the tool functionality; products, discounts, and quantities are entered on this form.
< Header Details (Figure A.2) – one location to manage details that apply to every line on the order.
< ShipSets (Figure A.3) – used to specify multiple destinations for items on an order. < All Order Details (Figure A.4) – used to view a summary of the order.
Figure A.1: Main Order Form
Figure A.2: Header details Page
Figure A3: ShipSets Tab
Figure a. 4: All order Details page
Ordering Tool User Guide Internet Commerce
Ordering Tool User Guide-October 2003 Revision
9
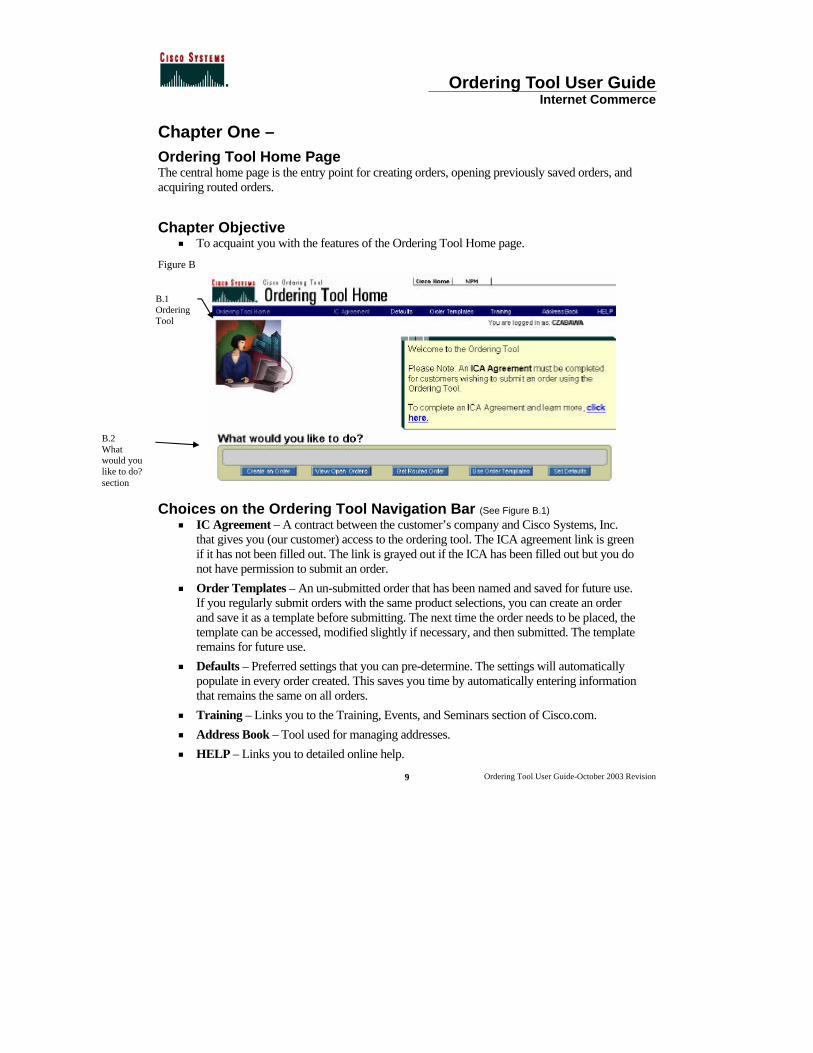
Chapter One – Ordering Tool Home Page The central home page is the entry point for creating orders, opening previously saved orders, and acquiring routed orders.
Chapter Objective < To acquaint you with the features of the Ordering Tool Home page.
Figure B
Choices on the Ordering Tool Navigation Bar (See Figure B.1) < IC Agreement – A contract between the customer’s company and Cisco Systems, Inc.
that gives you (our customer) access to the ordering tool. The ICA agreement link is green if it has not been filled out. The link is grayed out if the ICA has been filled out but you do not have permission to submit an order.
< Order Templates – An un-submitted order that has been named and saved for future use. If you regularly submit orders with the same product selections, you can create an order and save it as a template before submitting. The next time the order needs to be placed, the template can be accessed, modified slightly if necessary, and then submitted. The template remains for future use.
< Defaults – Preferred settings that you can pre-determine. The settings will automatically populate in every order created. This saves you time by automatically entering information that remains the same on all orders.
< Training – Links you to the Training, Events, and Seminars section of Cisco.com. < Address Book – Tool used for managing addresses. < HELP – Links you to detailed online help.
B.1 Ordering Tool
B.2 What would you like to do? section
Ordering Tool User Guide Internet Commerce
Ordering Tool User Guide-October 2003 Revision
10
What would you like to do? Section (See Figure B.1) The Home Page provides convenient access to ordering functions. To get more information about using these functions see the associated chapter.
< Create an Order – To build a new order. (See Chapter Four for details) < View Open Orders – To view and manage existing orders. < Get Routed Order – To view orders routed to you for approval. (See Chapter Fourteen
for details) < Use Order Templates – To build an order from a template or to modify a template. (See
Chapter 3 for details) < Set Defaults – To set defaults or standard settings for all orders you create. (See Chapter
Two for details)
Ordering Tool User Guide Internet Commerce
Ordering Tool User Guide-October 2003 Revision
11
Chapter Two – Setting Order Defaults
Chapter Objective < To acquaint you with setting up order defaults; the standard information that is used on
most of your orders.
Definitions Carton Notes – Enter any notes you want to appear on carton labels, packing slip, and invoices (commercial and remittance) for all future orders.
Change Address – Displays the My Billing Addresses or My Saved Addresses page, where you can change the addresses.
Change Contact – Displays the Select a Contact page within the Address Book, where you can change default contact information. The contact is the person with whom Cisco should communicate regarding billing or shipping questions. Click Change Contact in the Billing Information section for a billing contact, and Change Contact in the Shipping Address & Method section for a shipping contact.
Defaults – Preferred settings that you can predetermine. The settings will automatically populate in every order created.
Early Shipment Accepted? – Click Yes if you will allow Cisco to ship a partial order or all of your order prior to the requested ship date.
Shipping Preference/Shipping Service Level – Indicates the seller and buyer’s responsibilities during transportation of purchased product from the manufacturing location, to Title Transfer, to the customer.
Ship All Items Separately – This selection informs Cisco if you would like all line items shipped as if they are individual orders. No should be selected if you would like Cisco to ship products together whenever possible (this will extend ShipSet lead times). Yes should be selected if you would like Cisco to ship each line item as individual shipments.
Note: Cisco manufactures worldwide, so multiple line orders typically arrive in separate deliveries. Selecting Ship All Items Separately – No – reduces the number of deliveries.
Shipping & Packaging Notes – Enter any default shipping and packaging notes that you want to appear on packing slips and invoices for all future orders. You can change this information if necessary on the Header Details page when you are creating an order.
Service Options – There are now two pull down menus one for Software Service Level and one for Hardware Service Level. These pull down menus will make it easier to order Software Service by providing a separate software service level drop down in the Set Defaults section of the Ordering Tool as well as on the Create an Order Page. If you have set the Hardware and Software Service Level dropdown in the “Set Defaults” section as we mentioned earlier, your selections will auto populate on the “Create an Order” Page.
Ordering Tool User Guide Internet Commerce
Ordering Tool User Guide-October 2003 Revision
12
Frequently Used Default Fields Setting defaults saves you time with every order by pre-populating frequently used fields in the following sections of the order:
< Billing < Shipping Address and Method < Pricing Info < Payment & Taxes < Service Options < Acknowledgements < Order Contacts
When these fields are defined on the Set Defaults page, they automatically populate each new order created. You have the option to edit the fields within an order when necessary. For instance, when you need to make a change to the billing address on one order, do not change the default address; instead change the address within the applicable order. This maintains the defaults that are used for most orders, and allows you to customize each individual order as necessary.
Ordering Tool User Guide Internet Commerce
Ordering Tool User Guide-October 2003 Revision
13
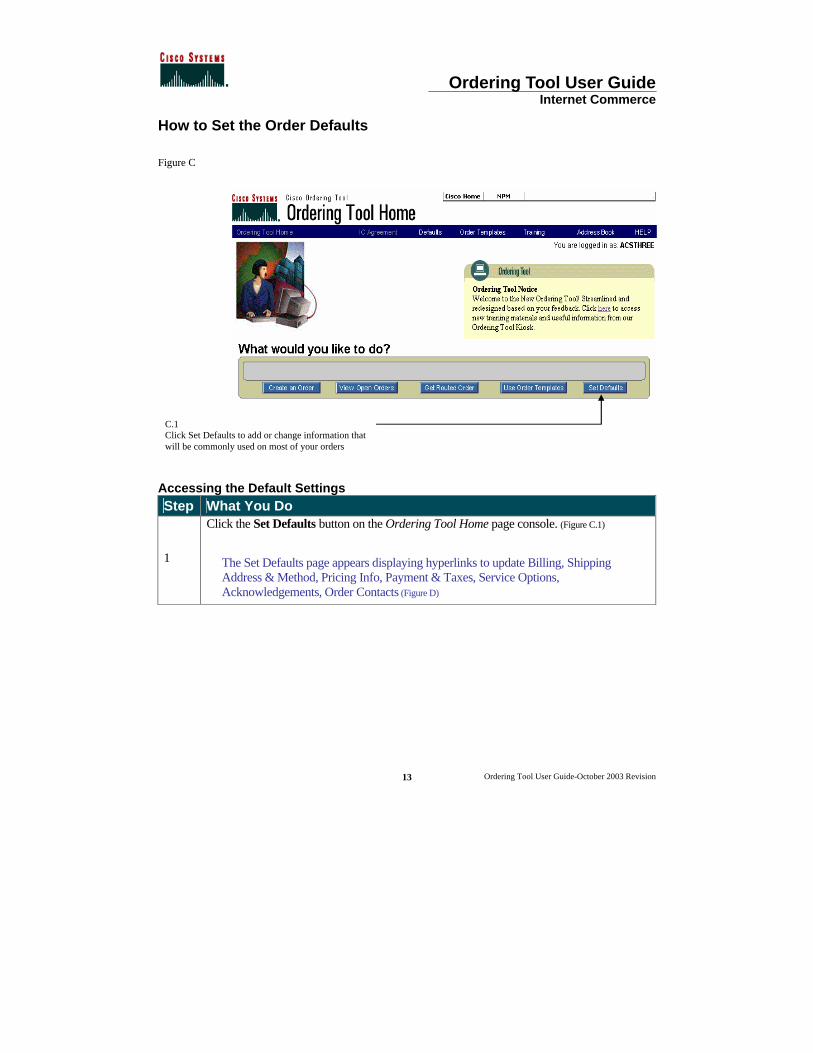
How to Set the Order Defaults
Figure C
Accessing the Default Settings Step What You Do
1
Click the Set Defaults button on the Ordering Tool Home page console. (Figure C.1)
The Set Defaults page appears displaying hyperlinks to update Billing, Shipping Address & Method, Pricing Info, Payment & Taxes, Service Options, Acknowledgements, Order Contacts (Figure D)
C.1 Click Set Defaults to add or change information that will be commonly used on most of your orders
Ordering Tool User Guide Internet Commerce
Ordering Tool User Guide-October 2003 Revision
14
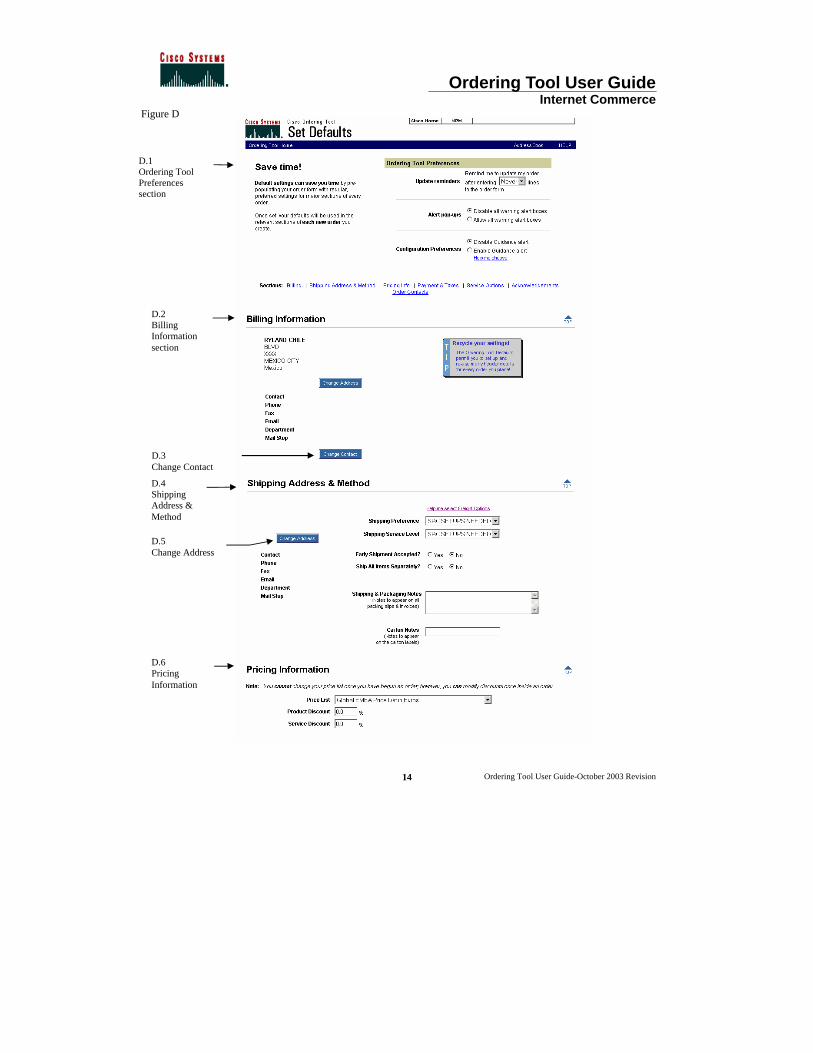
D.2 Billing Information section
Figure D
D.1 Ordering Tool Preferences section
D.3 Change Contact
D.4 Shipping Address & Method
D.5 Change Address
D.6 Pricing Information
Ordering Tool User Guide Internet Commerce
Ordering Tool User Guide-October 2003 Revision
15
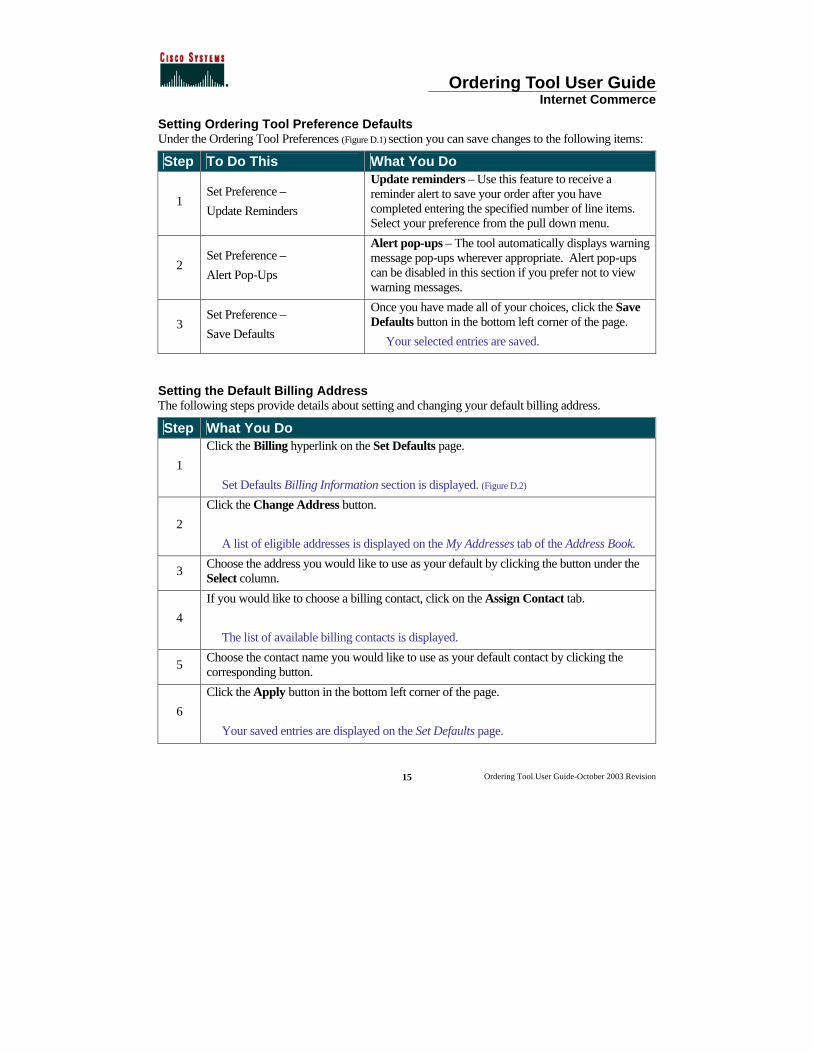
Setting Ordering Tool Preference Defaults Under the Ordering Tool Preferences (Figure D.1) section you can save changes to the following items:
Step To Do This What You Do
1 Set Preference –
Update Reminders
Update reminders – Use this feature to receive a reminder alert to save your order after you have completed entering the specified number of line items. Select your preference from the pull down menu.
2 Set Preference –
Alert Pop-Ups
Alert pop-ups – The tool automatically displays warning message pop-ups wherever appropriate. Alert pop-ups can be disabled in this section if you prefer not to view warning messages.
3 Set Preference –
Save Defaults
Once you have made all of your choices, click the Save Defaults button in the bottom left corner of the page.
Your selected entries are saved.
Setting the Default Billing Address The following steps provide details about setting and changing your default billing address.
Step What You Do
1
Click the Billing hyperlink on the Set Defaults page.
Set Defaults Billing Information section is displayed. (Figure D.2)
2
Click the Change Address button.
A list of eligible addresses is displayed on the My Addresses tab of the Address Book.
3 Choose the address you would like to use as your default by clicking the button under the Select column.
4
If you would like to choose a billing contact, click on the Assign Contact tab.
The list of available billing contacts is displayed.
5 Choose the contact name you would like to use as your default contact by clicking the corresponding button.
6
Click the Apply button in the bottom left corner of the page.
Your saved entries are displayed on the Set Defaults page.
Ordering Tool User Guide Internet Commerce
Ordering Tool User Guide-October 2003 Revision
16
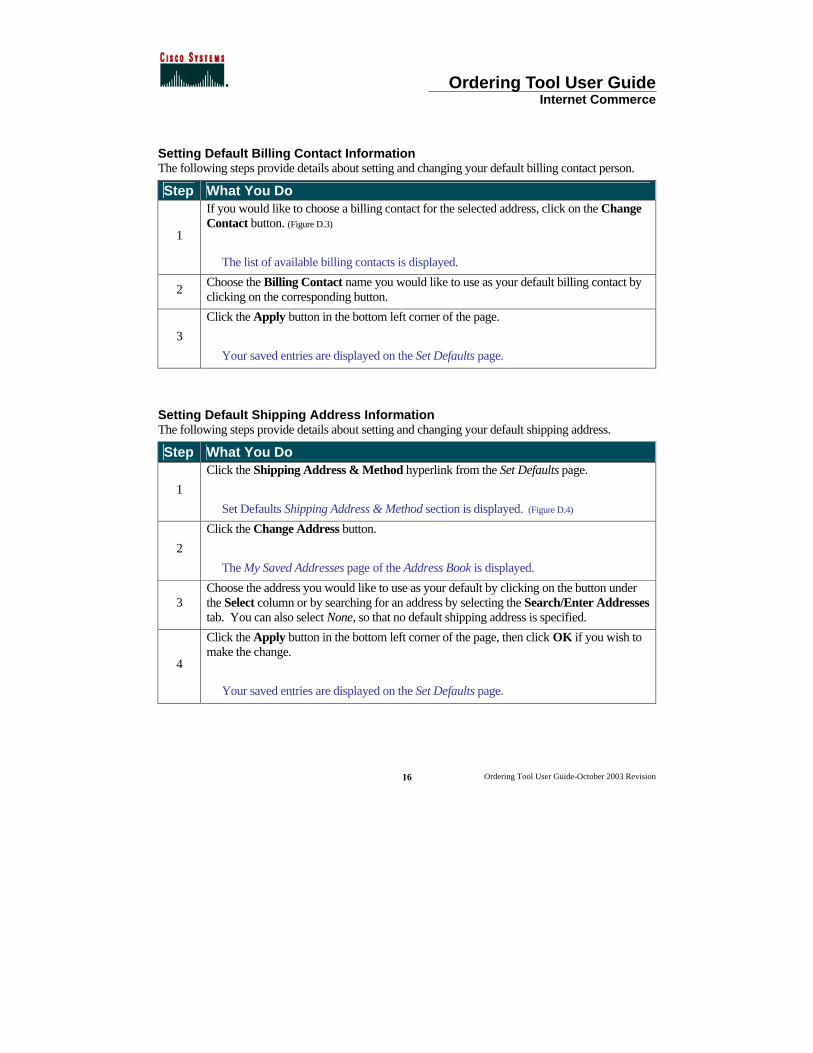
Setting Default Billing Contact Information The following steps provide details about setting and changing your default billing contact person.
Step What You Do
1
If you would like to choose a billing contact for the selected address, click on the Change Contact button. (Figure D.3)
The list of available billing contacts is displayed.
2 Choose the Billing Contact name you would like to use as your default billing contact by clicking on the corresponding button.
3
Click the Apply button in the bottom left corner of the page.
Your saved entries are displayed on the Set Defaults page.
Setting Default Shipping Address Information The following steps provide details about setting and changing your default shipping address.
Step What You Do
1
Click the Shipping Address & Method hyperlink from the Set Defaults page.
Set Defaults Shipping Address & Method section is displayed. (Figure D.4)
2
Click the Change Address button.
The My Saved Addresses page of the Address Book is displayed.
3 Choose the address you would like to use as your default by clicking on the button under the Select column or by searching for an address by selecting the Search/Enter Addresses tab. You can also select None, so that no default shipping address is specified.
4
Click the Apply button in the bottom left corner of the page, then click OK if you wish to make the change.
Your saved entries are displayed on the Set Defaults page.
Ordering Tool User Guide Internet Commerce
Ordering Tool User Guide-October 2003 Revision
17
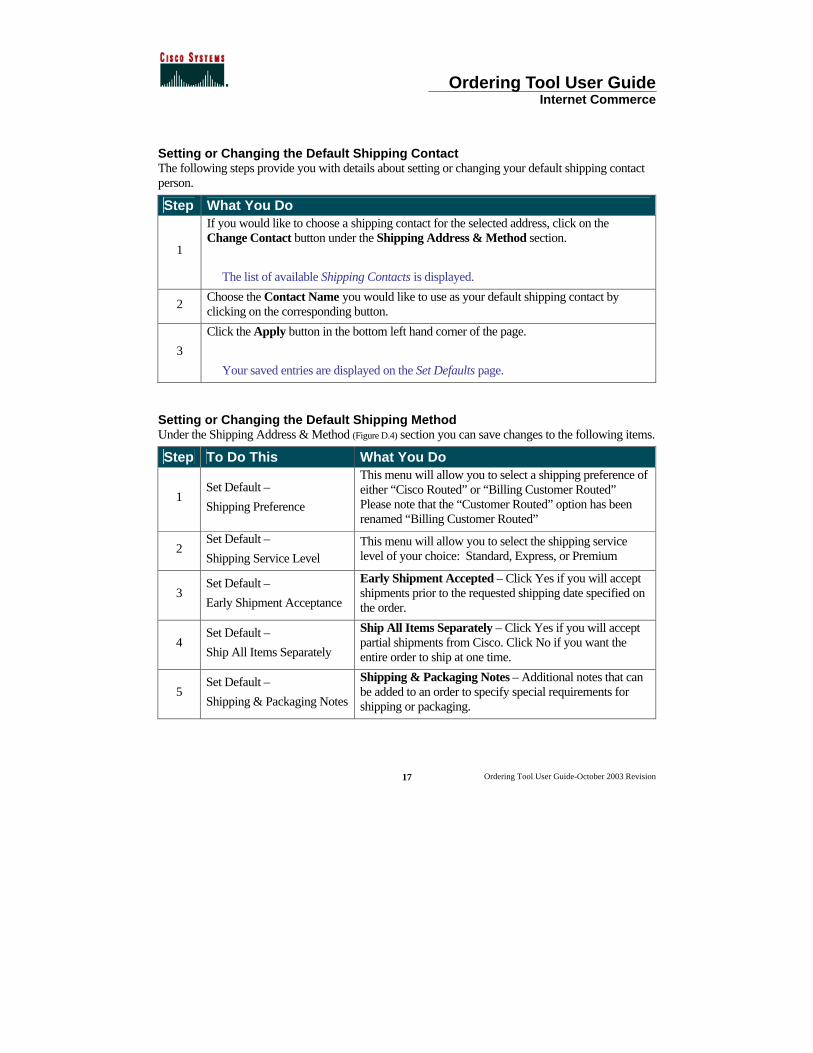
Setting or Changing the Default Shipping Contact The following steps provide you with details about setting or changing your default shipping contact person.
Step What You Do
1
If you would like to choose a shipping contact for the selected address, click on the Change Contact button under the Shipping Address & Method section.
The list of available Shipping Contacts is displayed.
2 Choose the Contact Name you would like to use as your default shipping contact by clicking on the corresponding button.
3
Click the Apply button in the bottom left hand corner of the page.
Your saved entries are displayed on the Set Defaults page.
Setting or Changing the Default Shipping Method Under the Shipping Address & Method (Figure D.4) section you can save changes to the following items.
Step To Do This What You Do
1 Set Default –
Shipping Preference
This menu will allow you to select a shipping preference of either “Cisco Routed” or “Billing Customer Routed” Please note that the “Customer Routed” option has been renamed “Billing Customer Routed”
2 Set Default –
Shipping Service Level This menu will allow you to select the shipping service level of your choice: Standard, Express, or Premium
3 Set Default –
Early Shipment Acceptance
Early Shipment Accepted – Click Yes if you will accept shipments prior to the requested shipping date specified on the order.
4 Set Default –
Ship All Items Separately
Ship All Items Separately – Click Yes if you will accept partial shipments from Cisco. Click No if you want the entire order to ship at one time.
5 Set Default –
Shipping & Packaging Notes
Shipping & Packaging Notes – Additional notes that can be added to an order to specify special requirements for shipping or packaging.
Ordering Tool User Guide Internet Commerce
Ordering Tool User Guide-October 2003 Revision
18
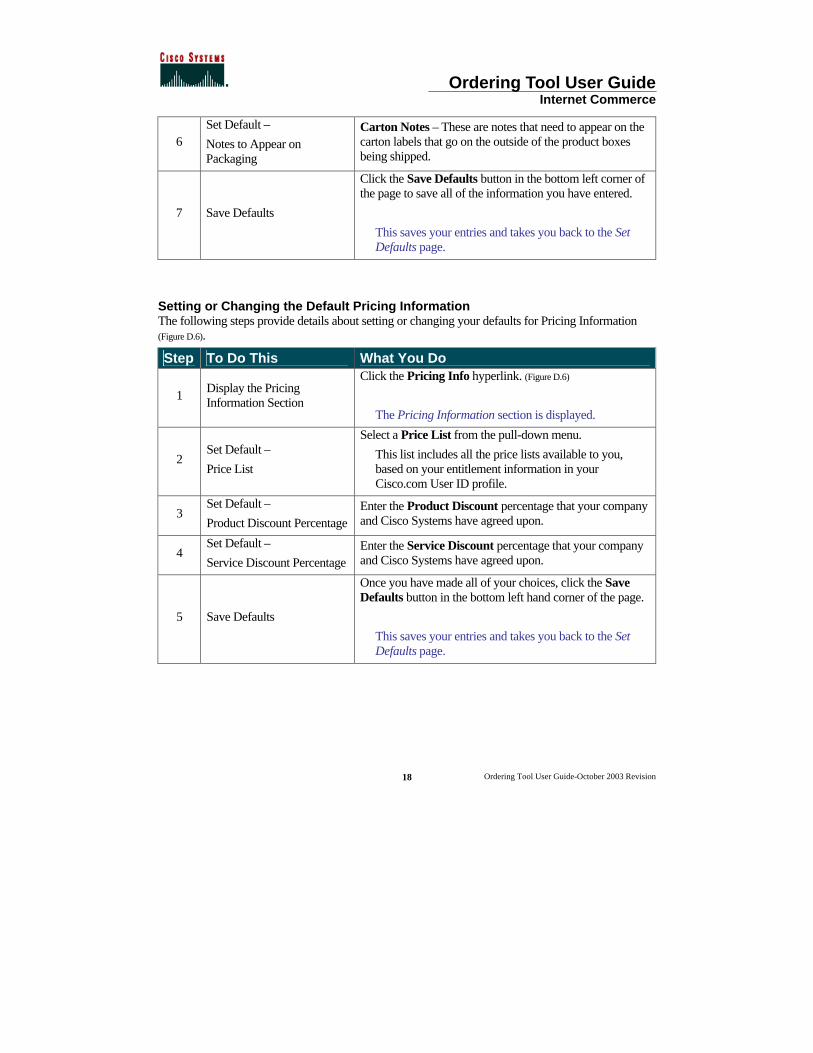
6 Set Default –
Notes to Appear on Packaging
Carton Notes – These are notes that need to appear on the carton labels that go on the outside of the product boxes being shipped.
7 Save Defaults
Click the Save Defaults button in the bottom left corner of the page to save all of the information you have entered.
This saves your entries and takes you back to the Set Defaults page.
Setting or Changing the Default Pricing Information The following steps provide details about setting or changing your defaults for Pricing Information (Figure D.6).
Step To Do This What You Do
1 Display the Pricing Information Section
Click the Pricing Info hyperlink. (Figure D.6)
The Pricing Information section is displayed.
2 Set Default –
Price List
Select a Price List from the pull-down menu.
This list includes all the price lists available to you, based on your entitlement information in your Cisco.com User ID profile.
3 Set Default –
Product Discount Percentage Enter the Product Discount percentage that your company and Cisco Systems have agreed upon.
4 Set Default –
Service Discount Percentage Enter the Service Discount percentage that your company and Cisco Systems have agreed upon.
5 Save Defaults
Once you have made all of your choices, click the Save Defaults button in the bottom left hand corner of the page.
This saves your entries and takes you back to the Set Defaults page.
Ordering Tool User Guide Internet Commerce
Ordering Tool User Guide-October 2003 Revision
19
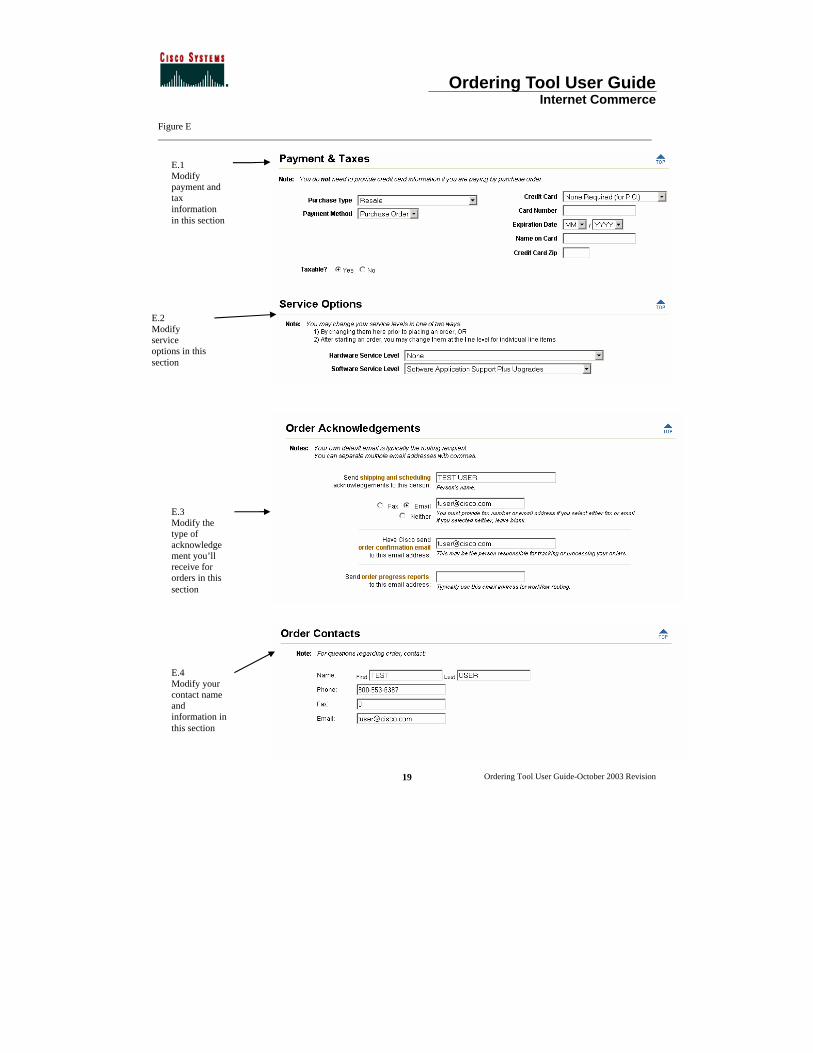
Figure E ____________________________________________________________________________________________________________________
E.1 Modify payment and tax information in this section
E.2 Modify service options in this section
E.3 Modify the type of acknowledgement you’ll receive for orders in this section
E.4 Modify your contact name and information in this section
Ordering Tool User Guide Internet Commerce
Ordering Tool User Guide-October 2003 Revision
20
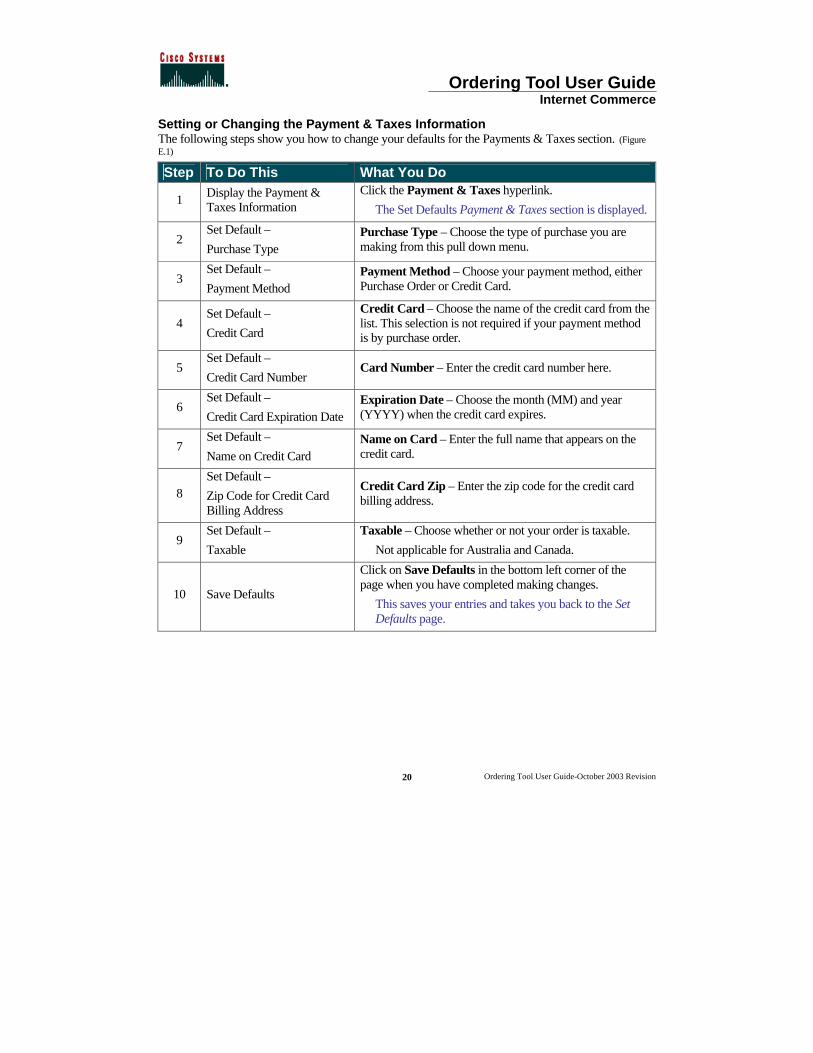
Setting or Changing the Payment & Taxes Information The following steps show you how to change your defaults for the Payments & Taxes section. (Figure E.1)
Step To Do This What You Do
1 Display the Payment & Taxes Information
Click the Payment & Taxes hyperlink.
The Set Defaults Payment & Taxes section is displayed.
2 Set Default –
Purchase Type Purchase Type – Choose the type of purchase you are making from this pull down menu.
3 Set Default –
Payment Method Payment Method – Choose your payment method, either Purchase Order or Credit Card.
4 Set Default –
Credit Card
Credit Card – Choose the name of the credit card from the list. This selection is not required if your payment method is by purchase order.
5 Set Default –
Credit Card Number Card Number – Enter the credit card number here.
6 Set Default –
Credit Card Expiration Date Expiration Date – Choose the month (MM) and year (YYYY) when the credit card expires.
7 Set Default –
Name on Credit Card Name on Card – Enter the full name that appears on the credit card.
8 Set Default –
Zip Code for Credit Card Billing Address
Credit Card Zip – Enter the zip code for the credit card billing address.
9 Set Default –
Taxable
Taxable – Choose whether or not your order is taxable.
Not applicable for Australia and Canada.
10 Save Defaults
Click on Save Defaults in the bottom left corner of the page when you have completed making changes.
This saves your entries and takes you back to the Set Defaults page.
Ordering Tool User Guide Internet Commerce
Ordering Tool User Guide-October 2003 Revision
21
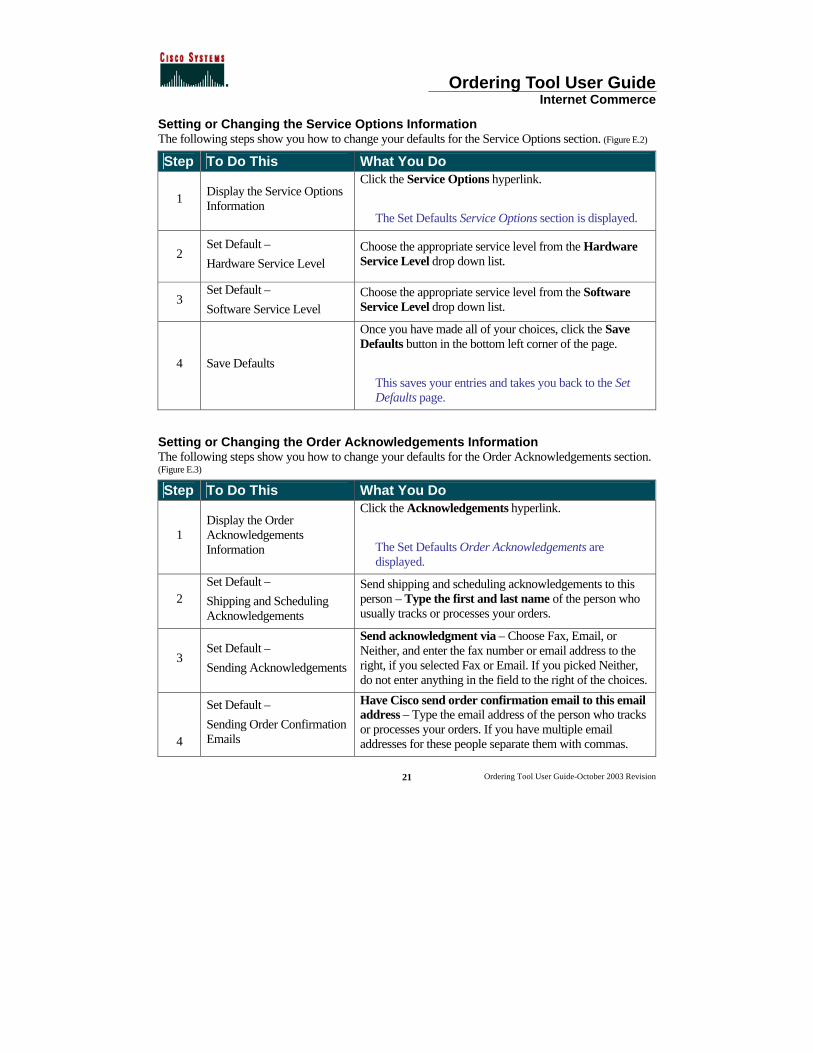
Setting or Changing the Service Options Information The following steps show you how to change your defaults for the Service Options section. (Figure E.2)
Step To Do This What You Do
1 Display the Service Options Information
Click the Service Options hyperlink.
The Set Defaults Service Options section is displayed.
2 Set Default –
Hardware Service Level Choose the appropriate service level from the Hardware Service Level drop down list.
3 Set Default –
Software Service Level Choose the appropriate service level from the Software Service Level drop down list.
4 Save Defaults
Once you have made all of your choices, click the Save Defaults button in the bottom left corner of the page.
This saves your entries and takes you back to the Set Defaults page.
Setting or Changing the Order Acknowledgements Information The following steps show you how to change your defaults for the Order Acknowledgements section. (Figure E.3)
Step To Do This What You Do
1 Display the Order Acknowledgements Information
Click the Acknowledgements hyperlink.
The Set Defaults Order Acknowledgements are displayed.
2 Set Default –
Shipping and Scheduling Acknowledgements
Send shipping and scheduling acknowledgements to this person – Type the first and last name of the person who usually tracks or processes your orders.
3 Set Default –
Sending Acknowledgements
Send acknowledgment via – Choose Fax, Email, or Neither, and enter the fax number or email address to the right, if you selected Fax or Email. If you picked Neither, do not enter anything in the field to the right of the choices.
4
Set Default –
Sending Order Confirmation Emails
Have Cisco send order confirmation email to this email address – Type the email address of the person who tracks or processes your orders. If you have multiple email addresses for these people separate them with commas.
Ordering Tool User Guide Internet Commerce
Ordering Tool User Guide-October 2003 Revision
22
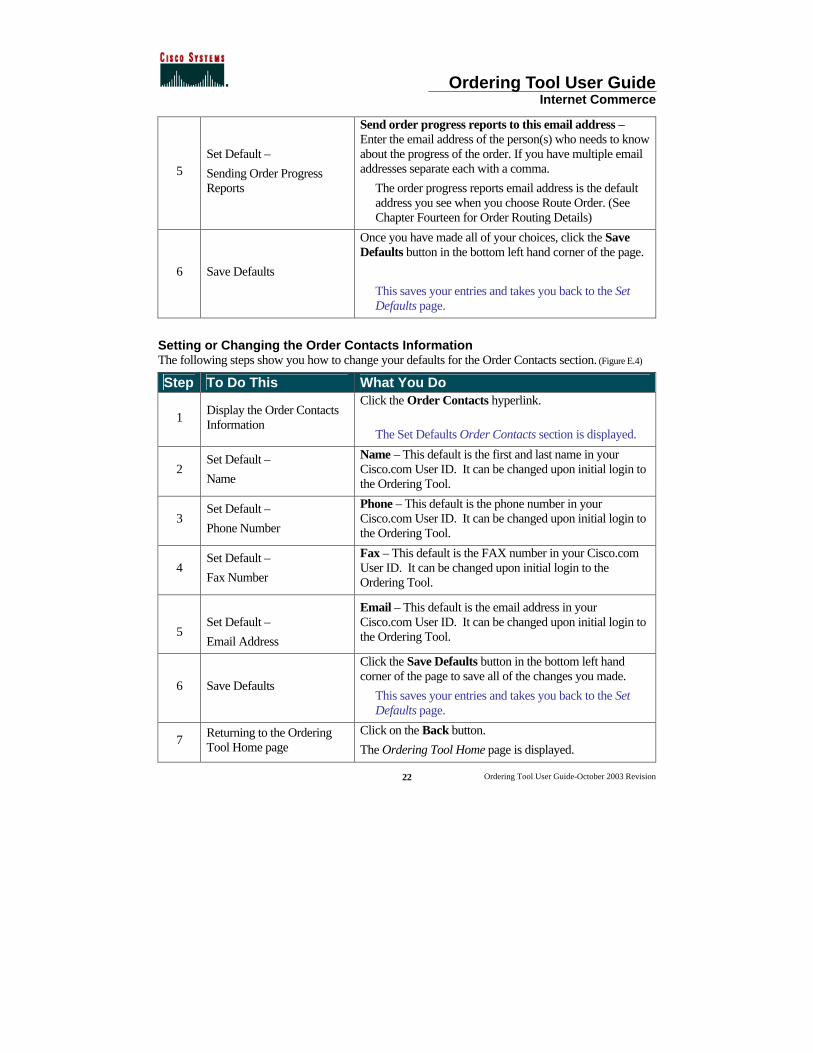
5 Set Default –
Sending Order Progress Reports
Send order progress reports to this email address – Enter the email address of the person(s) who needs to know about the progress of the order. If you have multiple email addresses separate each with a comma.
The order progress reports email address is the default address you see when you choose Route Order. (See Chapter Fourteen for Order Routing Details)
6 Save Defaults
Once you have made all of your choices, click the Save Defaults button in the bottom left hand corner of the page.
This saves your entries and takes you back to the Set Defaults page.
Setting or Changing the Order Contacts Information The following steps show you how to change your defaults for the Order Contacts section. (Figure E.4)
Step To Do This What You Do
1 Display the Order Contacts Information
Click the Order Contacts hyperlink.
The Set Defaults Order Contacts section is displayed.
2 Set Default –
Name
Name – This default is the first and last name in your Cisco.com User ID. It can be changed upon initial login to the Ordering Tool.
3 Set Default –
Phone Number
Phone – This default is the phone number in your Cisco.com User ID. It can be changed upon initial login to the Ordering Tool.
4 Set Default –
Fax Number
Fax – This default is the FAX number in your Cisco.com User ID. It can be changed upon initial login to the Ordering Tool.
5
Set Default –
Email Address
Email – This default is the email address in your Cisco.com User ID. It can be changed upon initial login to the Ordering Tool.
6 Save Defaults
Click the Save Defaults button in the bottom left hand corner of the page to save all of the changes you made.
This saves your entries and takes you back to the Set Defaults page.
7 Returning to the Ordering Tool Home page
Click on the Back button.
The Ordering Tool Home page is displayed.
Ordering Tool User Guide Internet Commerce
Ordering Tool User Guide-October 2003 Revision
23
Chapter Three – Creating and Using Order Templates You can save time by creating order templates for those orders that you frequently submit. You can then access your templates through the Order Templates link on the Home page, or by clicking the Use Order Templates button in the “What would you like to do?” section.
Chapter Objective < Learn how to create and access order templates.
Definition Order Templates – A un submitted order that has been named and saved for future use. An order that is frequently submitted can be made into an order template, thus saving time when placing the same order in the future. The next time the order needs to be placed, the template can be accessed, modified slightly if necessary, and then submitted. The template remains for future use.
How to Use Order Templates
Saving an Order as a Template The following steps show you how to save an order as a template.
Step What You Do
1
On the Ordering Tool Home page fill out the required fields to create an order (See Chapter 4) or choose an order under the Open Orders section.
The Main Order Form of the Ordering Tool is displayed.
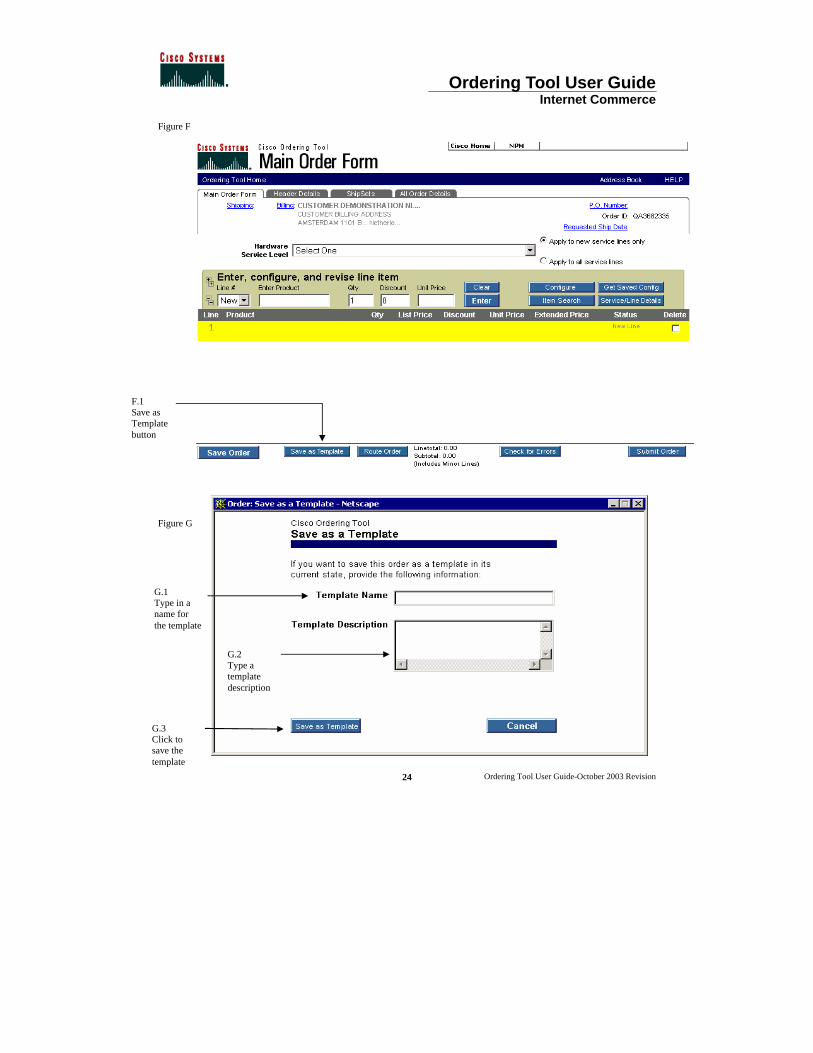
2
After you have completed all the areas of the order that you want to be part of the order template (address information, contacts, adding products) you will click the Save as Template button (Figure F.1) at the bottom of the Main Order Form (Figure F).
The Save as a Template page is displayed. (Figure G)
Note: Steps continue after the figures on the following page.
Ordering Tool User Guide Internet Commerce
Ordering Tool User Guide-October 2003 Revision
24
Figure F
Figure G
F.1 Save as Template button
G.1 Type in a name for the template
G.2 Type a template description
G.3 Click to save the template
Ordering Tool User Guide Internet Commerce
Ordering Tool User Guide-October 2003 Revision
25
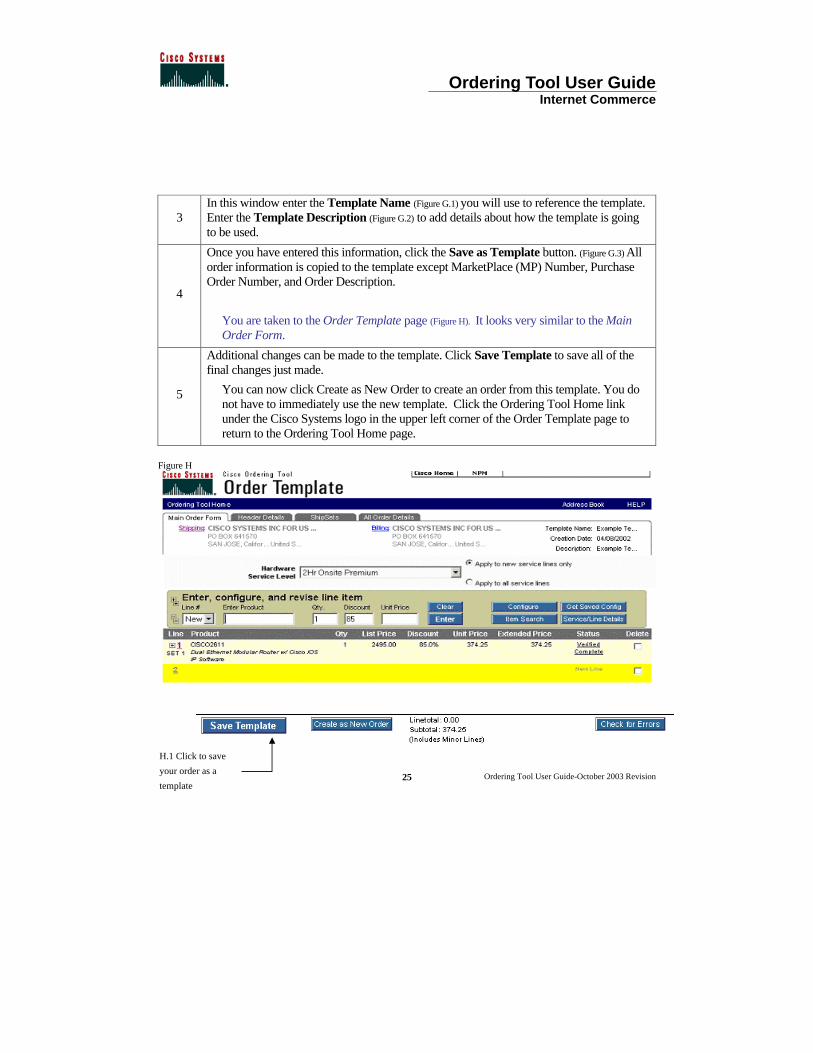
3 In this window enter the Template Name (Figure G.1) you will use to reference the template. Enter the Template Description (Figure G.2) to add details about how the template is going to be used.
4
Once you have entered this information, click the Save as Template button. (Figure G.3) All order information is copied to the template except MarketPlace (MP) Number, Purchase Order Number, and Order Description.
You are taken to the Order Template page (Figure H). It looks very similar to the Main Order Form.
5
Additional changes can be made to the template. Click Save Template to save all of the final changes just made.
You can now click Create as New Order to create an order from this template. You do not have to immediately use the new template. Click the Ordering Tool Home link under the Cisco Systems logo in the upper left corner of the Order Template page to return to the Ordering Tool Home page.
Figure H
H.1 Click to save
your order as a
template
Ordering Tool User Guide Internet Commerce
Ordering Tool User Guide-October 2003 Revision
26
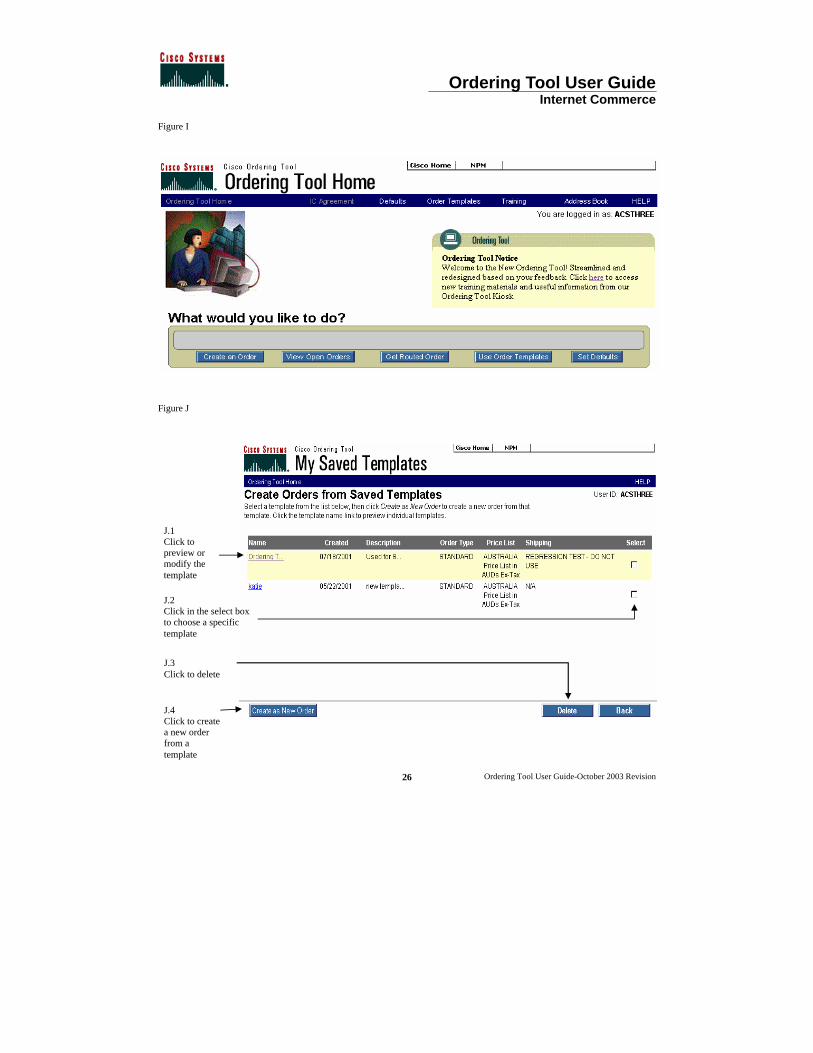
Figure I
Figure J
J.4 Click to create a new order from a template
J.3 Click to delete
J.2 Click in the select box to choose a specific template
J.1 Click to preview or modify the template
Ordering Tool User Guide Internet Commerce
Ordering Tool User Guide-October 2003 Revision
27
Managing Order Templates The following steps show you how to manage your order templates.
Preview a Template Step What You Do
1 On the Ordering Tool Home page click the Use Order Templates button in the What would you like to do? section. (Figure I.1)
My Saved Templates page is displayed. (Figure J)
2
Click on the template name link in the Name column. (Figure J.1)
The Order Template page appears where you can view the template details. At this point you will not actually be creating an order, you will be modifying only the template.
3 Return to the Ordering Tool Home page by clicking the link under the Cisco Systems logo in the upper left hand corner of the templates page.
Modify a Template Step What You Do
1
Click the template name in the Name column. (Figure J.1)
The Order Template page is displayed.
At this point you are not creating an order, but modifying the template only.
2 Make any necessary changes to the template, and then save.
3 Return to the Ordering Tool Home page by clicking the link under the Cisco Systems logo in the upper left hand corner of the templates page.
Create an Order from a Template Step What You Do
1 Choose the template in the Select column for the order you want to create. (Figure J.2)
2 Click the Create as New Order button (Figure J.4).
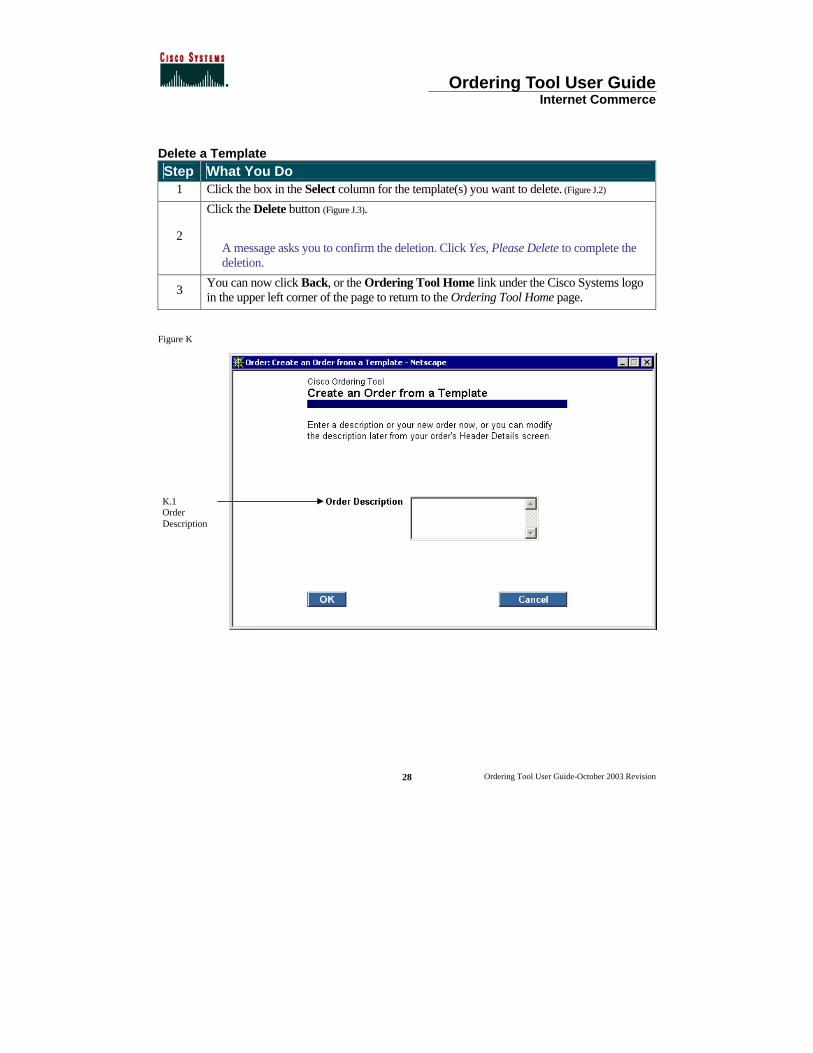
A small screen titled Create an Order from a Template is displayed. (Figure K).
3 Enter the Order Description (Figure K.1) and click OK (Figure K.2).
4 The Main Order Form for the newly created order is displayed on your screen.
5 You can now click the Ordering Tool Home link under the Cisco Systems logo in the upper left hand corner of the page to return to the Ordering Tool Home page.
Ordering Tool User Guide Internet Commerce
Ordering Tool User Guide-October 2003 Revision
28
Delete a Template Step What You Do
1 Click the box in the Select column for the template(s) you want to delete. (Figure J.2)
2
Click the Delete button (Figure J.3).
A message asks you to confirm the deletion. Click Yes, Please Delete to complete the deletion.
3 You can now click Back, or the Ordering Tool Home link under the Cisco Systems logo in the upper left corner of the page to return to the Ordering Tool Home page.
Figure K
K.1 Order Description
Ordering Tool User Guide Internet Commerce
Ordering Tool User Guide-October 2003 Revision
29
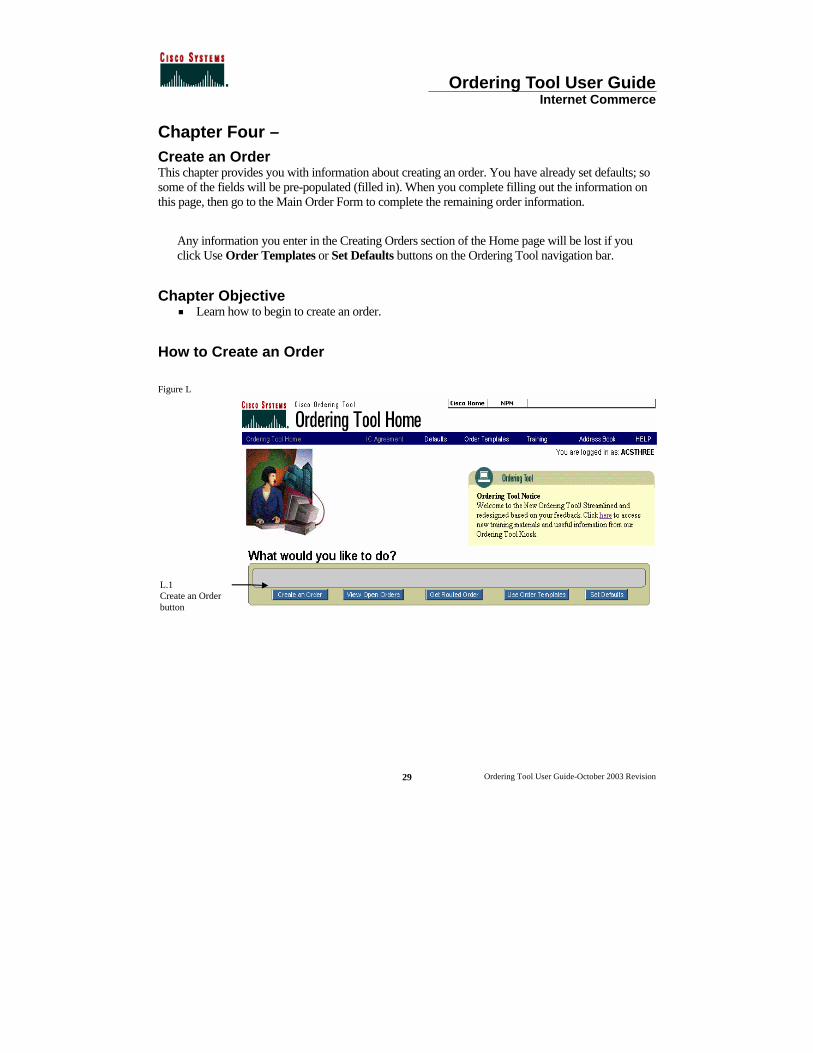
Chapter Four – Create an Order This chapter provides you with information about creating an order. You have already set defaults; so some of the fields will be pre-populated (filled in). When you complete filling out the information on this page, then go to the Main Order Form to complete the remaining order information.
Any information you enter in the Creating Orders section of the Home page will be lost if you click Use Order Templates or Set Defaults buttons on the Ordering Tool navigation bar.
Chapter Objective < Learn how to begin to create an order.
How to Create an Order
Figure L
L.1 Create an Order button
Ordering Tool User Guide Internet Commerce
Ordering Tool User Guide-October 2003 Revision
30
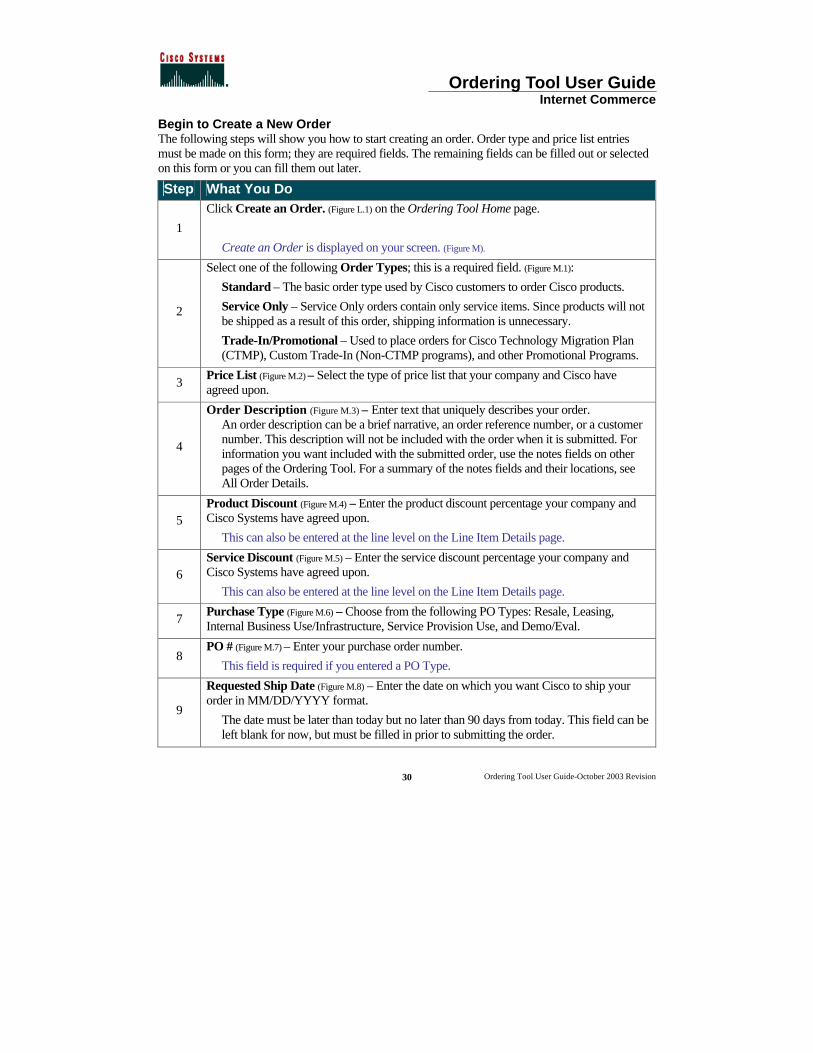
Begin to Create a New Order The following steps will show you how to start creating an order. Order type and price list entries must be made on this form; they are required fields. The remaining fields can be filled out or selected on this form or you can fill them out later.
Step What You Do
1
Click Create an Order. (Figure L.1) on the Ordering Tool Home page.
Create an Order is displayed on your screen. (Figure M).
2
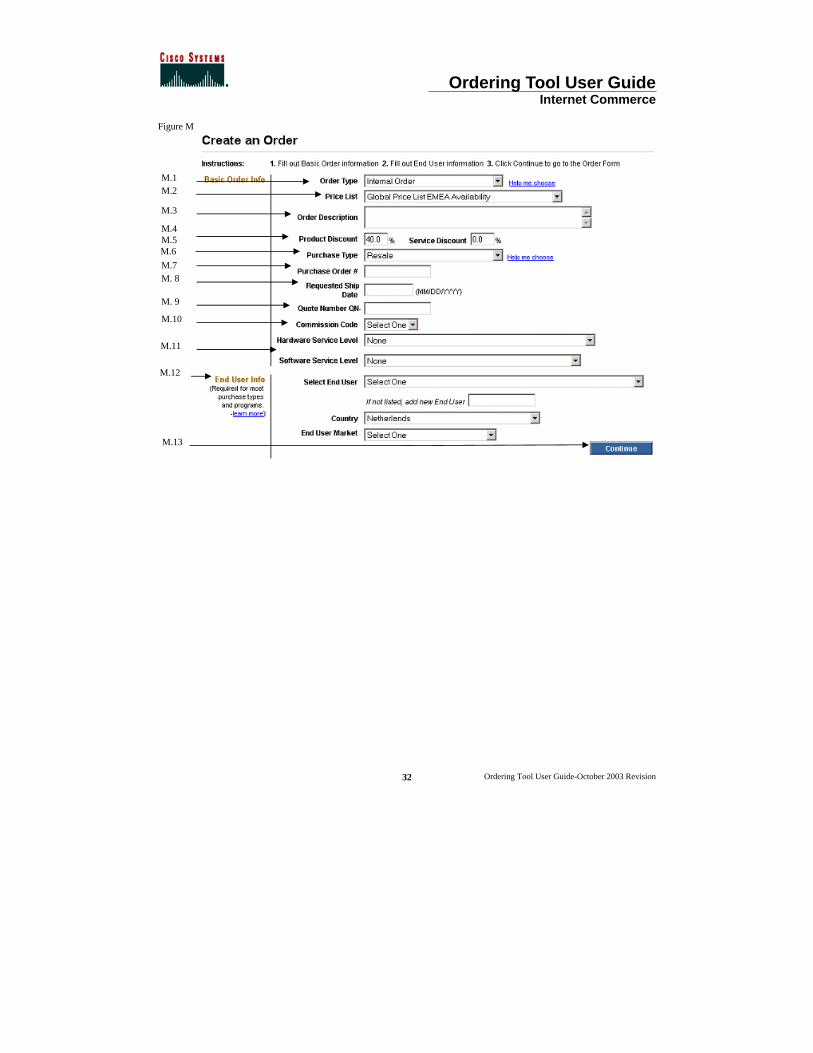
Select one of the following Order Types; this is a required field. (Figure M.1):
Standard – The basic order type used by Cisco customers to order Cisco products.
Service Only – Service Only orders contain only service items. Since products will not be shipped as a result of this order, shipping information is unnecessary.
Trade-In/Promotional – Used to place orders for Cisco Technology Migration Plan (CTMP), Custom Trade-In (Non-CTMP programs), and other Promotional Programs.
3 Price List (Figure M.2) – Select the type of price list that your company and Cisco have agreed upon.
4
Order Description (Figure M.3) – Enter text that uniquely describes your order. An order description can be a brief narrative, an order reference number, or a customer number. This description will not be included with the order when it is submitted. For information you want included with the submitted order, use the notes fields on other pages of the Ordering Tool. For a summary of the notes fields and their locations, see All Order Details.
5 Product Discount (Figure M.4) – Enter the product discount percentage your company and Cisco Systems have agreed upon.
This can also be entered at the line level on the Line Item Details page.
6 Service Discount (Figure M.5) – Enter the service discount percentage your company and Cisco Systems have agreed upon.
This can also be entered at the line level on the Line Item Details page.
7 Purchase Type (Figure M.6) – Choose from the following PO Types: Resale, Leasing, Internal Business Use/Infrastructure, Service Provision Use, and Demo/Eval.
8 PO # (Figure M.7) – Enter your purchase order number.
This field is required if you entered a PO Type.
9
Requested Ship Date (Figure M.8) – Enter the date on which you want Cisco to ship your order in MM/DD/YYYY format.
The date must be later than today but no later than 90 days from today. This field can be left blank for now, but must be filled in prior to submitting the order.
Ordering Tool User Guide Internet Commerce
Ordering Tool User Guide-October 2003 Revision
31
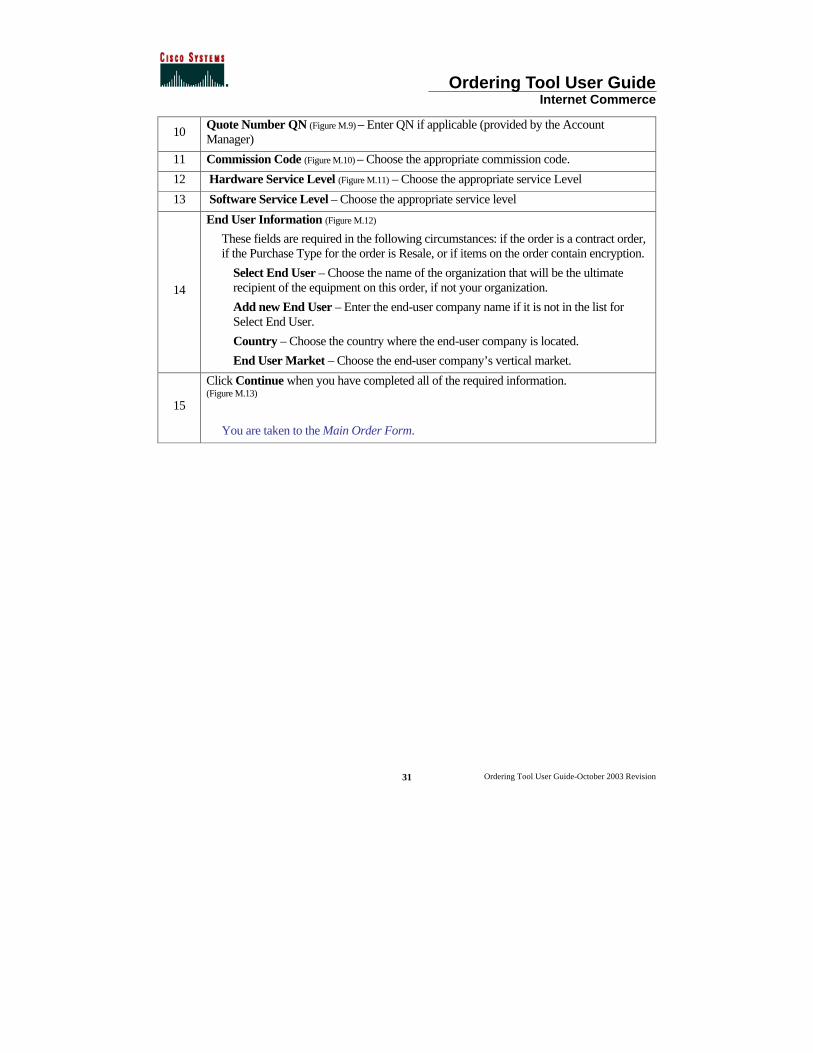
10 Quote Number QN (Figure M.9) – Enter QN if applicable (provided by the Account Manager)
11 Commission Code (Figure M.10) – Choose the appropriate commission code.
12 Hardware Service Level (Figure M.11) – Choose the appropriate service Level
13 Software Service Level – Choose the appropriate service level
14
End User Information (Figure M.12) These fields are required in the following circumstances: if the order is a contract order, if the Purchase Type for the order is Resale, or if items on the order contain encryption.
Select End User – Choose the name of the organization that will be the ultimate recipient of the equipment on this order, if not your organization.
Add new End User – Enter the end-user company name if it is not in the list for Select End User.
Country – Choose the country where the end-user company is located.
End User Market – Choose the end-user company’s vertical market.
15
Click Continue when you have completed all of the required information. (Figure M.13)
You are taken to the Main Order Form.
Ordering Tool User Guide Internet Commerce
Ordering Tool User Guide-October 2003 Revision
32
Figure M
M. 8
M. 9
M.4 M.5
M.3
M.2 M.1
M.12
M.13
M.10
M.11
M.6 M.7

Ordering Tool User Guide Internet Commerce
Ordering Tool User Guide-October 2003 Revision
33
Chapter Five – Main Order Form The Main Order Form is the central location from which most of your order information is supplied. The following list describes what can be done on the form:
< Add configurable products, spares and service. < Link to the Configurator to configure products. < View shipping, billing, PO number and requested ship date. < Submit your order or create order templates. < Access saved configurations, shared configurations and search for items. < Apply/modify the order hardware service level.
Chapter Objectives
< Learn how to enter new products, quantities, and discounts. < Learn how to edit, delete and save order information.
Ordering Tool User Guide Internet Commerce
Ordering Tool User Guide-October 2003 Revision
34
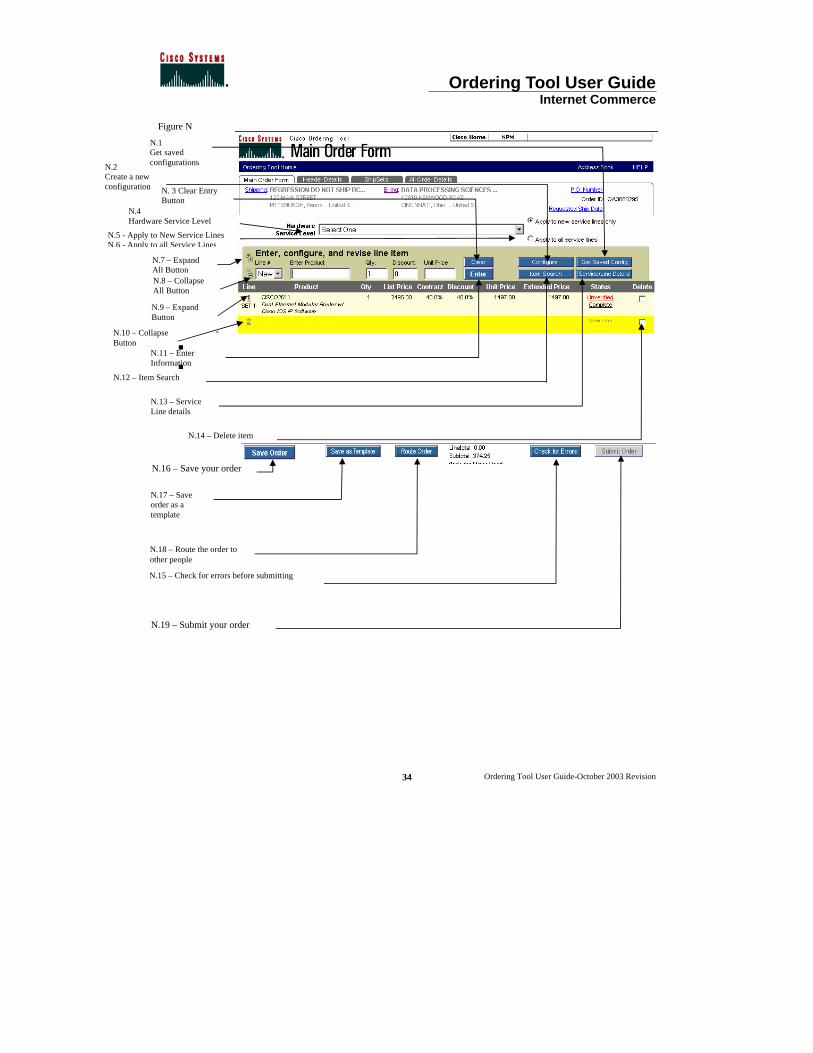
Figure N
- < <
N.14 – Delete item
N.13 – Service Line details
N.16 – Save your order
N.11 – Enter Information
N.17 – Save order as a template
N.18 – Route the order to other people
N.19 – Submit your order
N.9 – Expand Button
N.10 – Collapse Button
N.15 – Check for errors before submitting
N.1 Get saved configurations
N.7 – Expand All Button
N.2 Create a new configuration N. 3 Clear Entry
Button
N.8 – Collapse All Button
N.5 - Apply to New Service Lines N.6 - Apply to all Service Lines
N.4 Hardware Service Level
N.12 – Item Search
Ordering Tool User Guide Internet Commerce
Ordering Tool User Guide-October 2003 Revision
35
Buttons on the Main Order Form Get Saved Config (Figure N.1) – Click this button to search for your saved configurations.
Configure (Figure N.2) – Click this button to select software, cables, memory, and other options associated with a product.
Clear (Figure N.3) – Click this button to remove information from the editing console.
Hardware Service Dropdown (Figure N.4) - This option will allow you to select or modify your Hardware Service Level while you are creating your order. (Please note that if you would like to change your Software Service Level while creating your order, this must be done on a line by line basis)
Apply to New Service Line Only (Figure N.5) - If you would like to add Hardware Service to every NEW Hardware product line that is being entered, select your preferred Hardware Service Level from the Hardware Service Dropdown and then select the radio button titled “Apply to new service line only”.
Apply to all Service Lines (Figure N.6) - If you would like to add Hardware Service to ALL products that are visible on the Main Order Form including any new products that are added, select your preferred Hardware Service Level from the Hardware Service Dropdown and then select the radio button titled “Apply to all service lines”.
Expand All (Figure N.7) – Click this button to expand all major lines that contain minor line options
Collapse All (Figure N.8) – Click on this button to collapse all major lines that contain minor line options
Expand (Figure N.9) – Click on this button to expand only that major line
Collapse (Figure N.10) – Click on this button to collapse only that major line
Enter (Figure N.11) – Located on the editing console, the enter button applies the new or changed line item information to the order.
Item Search (Figure N.12) – This is useful when you are unsure of a product’s name. You can search by product number, product description, or product family.
Service Line Details (Figure 13) – Click on this button to choose service, provide end user, and ship set details at the line item level. You can also edit configuration details for already configured items.
Delete (Figure N.14) - Delete line item.
Check for Errors (Figure N.15) – Click this button to have the tool check your line item details and configurations for correctness and completeness. It displays a message if you need to make a correction.
Save Order (Figure N.16) – Click this button to save all new or revised information on the order form.
Save as Template (Figure N.17) – Click this button to save your order as a template.
Route Order (Figure N.18) – Enables you to route the order to another person for approval. A routed order is created by one user and sent to another user. The second user retrieves the order by typing in the Order ID and a key on the Ordering Tool Home page.
Submit Order (Figure N.19) – Click this button to submit your order to Cisco. The order is automatically checked for errors.
Ordering Tool User Guide Internet Commerce
Ordering Tool User Guide-October 2003 Revision
36
Verify All Configs – Selecting this button is equivalent to selecting each previously configured product line-by-line and running the configuration check. This button verifies any configurations currently loaded in the order that are still valid, and sets their status to verified. Any invalid configurations remains as unverified status.
Ordering Tool User Guide Internet Commerce
Ordering Tool User Guide-October 2003 Revision
37
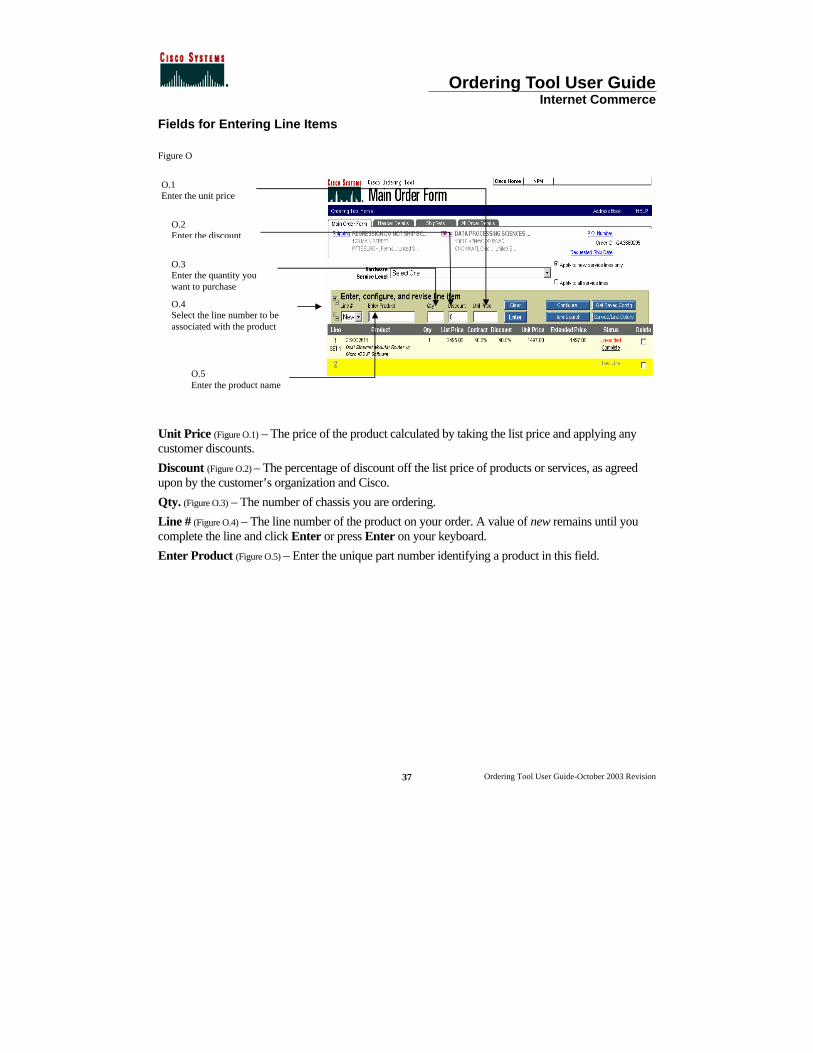
Fields for Entering Line Items Figure O
Unit Price (Figure O.1) – The price of the product calculated by taking the list price and applying any customer discounts.
Discount (Figure O.2) – The percentage of discount off the list price of products or services, as agreed upon by the customer’s organization and Cisco.
Qty. (Figure O.3) – The number of chassis you are ordering.
Line # (Figure O.4) – The line number of the product on your order. A value of new remains until you complete the line and click Enter or press Enter on your keyboard.
Enter Product (Figure O.5) – Enter the unique part number identifying a product in this field.
O.5 Enter the product name
O.4 Select the line number to be associated with the product
O.3 Enter the quantity you want to purchase
O.2 Enter the discount
O.1 Enter the unit price
Ordering Tool User Guide Internet Commerce
Ordering Tool User Guide-October 2003 Revision
38
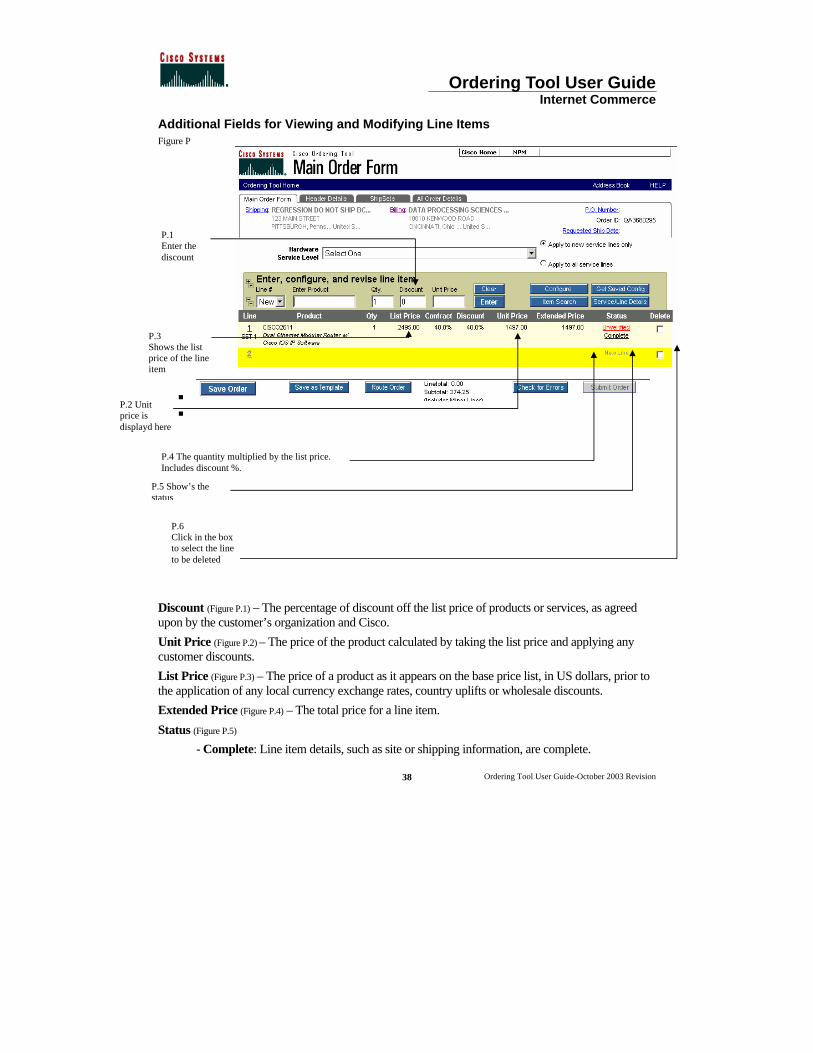
Additional Fields for Viewing and Modifying Line Items Figure P
< <
Discount (Figure P.1) – The percentage of discount off the list price of products or services, as agreed upon by the customer’s organization and Cisco.
Unit Price (Figure P.2) – The price of the product calculated by taking the list price and applying any customer discounts.
List Price (Figure P.3) – The price of a product as it appears on the base price list, in US dollars, prior to the application of any local currency exchange rates, country uplifts or wholesale discounts.
Extended Price (Figure P.4) – The total price for a line item.
Status (Figure P.5) - Complete: Line item details, such as site or shipping information, are complete.
P.1 Enter the discount
P.6 Click in the box to select the line to be deleted
P.5 Show’s the status
P.4 The quantity multiplied by the list price. Includes discount %.
P.3 Shows the list price of the line item
P.2 Unit price is displayd here

Ordering Tool User Guide Internet Commerce
Ordering Tool User Guide-October 2003 Revision
39
- Incomplete: Line items details are missing or incomplete. Clicking this link displays Line Item Details.
- Unverified: The configuration status of a product indicating that its configuration has not been completed and verified as correct.
- Verified: The configuration status of a product indicating that its configuration has been completed and verified as correct.
Delete (Figure P.6) – Click to check the box for deletion of the item upon saving the order.
Managing Lines on the Main Order Form
Add New Line Items The following steps show you how to enter new line items on an order. Some of the information is described in detail in other chapters.
Step What You Do 1 Select New for the Line #.
2
Enter the product number exactly as it appears in the price list.
If you don’t know the product number, click Item Search (See Chapter 11). To order a spare part, type an equal sign (=) at the end of the product number, for example CAB-AC=.
3
Enter the Qty (Quantity) and the Discount percentage your company and Cisco have agreed upon.
The Unit Price is automatically calculated.
4 To add options (minor lines) for a configurable item, either use a saved configuration by selecting Get Saved Config (See Chapter 12) or choose the line and click the Configure button. (See Chapter 10).
5 To define service, end user, and ShipSet details at the line item level, click Service/Line Details (see Chapter 13).
Modifying an Existing Line Item The following steps show you how to modify an existing line item on an order.
Step What You Do
1
Choose the line number in the Line # pull down menu for the item you want to modify.
Line item data is displayed.
2 Modify information as needed.
Ordering Tool User Guide Internet Commerce
Ordering Tool User Guide-October 2003 Revision
40
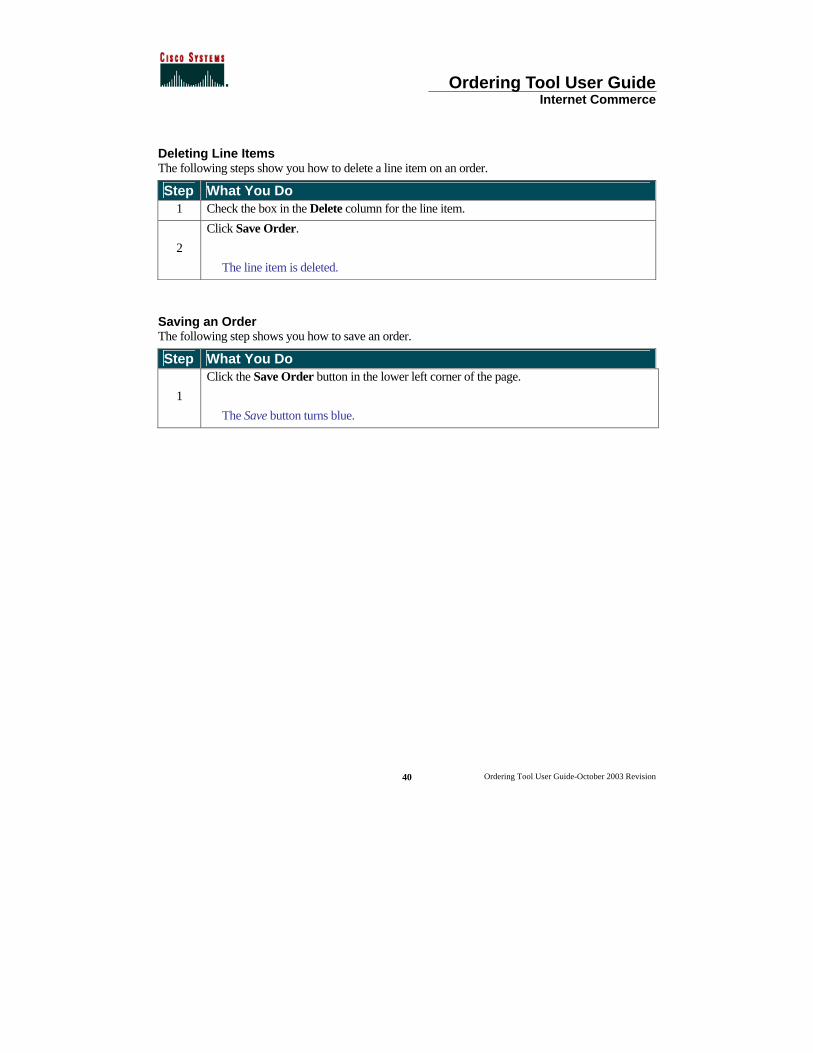
Deleting Line Items The following steps show you how to delete a line item on an order.
Step What You Do 1 Check the box in the Delete column for the line item.
2
Click Save Order.
The line item is deleted.
Saving an Order The following step shows you how to save an order.
Step What You Do
1
Click the Save Order button in the lower left corner of the page.
The Save button turns blue.
Ordering Tool User Guide Internet Commerce
Ordering Tool User Guide-October 2003 Revision
41
Chapter Six – Header Details Header Details provides one location to manage details that apply to every line in your order. It contains many of the same fields as Set Defaults.
Chapter Objective < How to change all the sections within the All Header Details section of the Ordering Tool.
Definitions Carton Notes – Enter any notes you want to appear on carton labels, packing slip, and invoices (commercial and remittance) for all future orders. Change Address – Displays the My Billing Addresses or My Saved Addresses page, where you can change the addresses.
Change Contact – Displays the Select a Contact page within the Address Book, where you can change default contact information. The contact is the person with whom Cisco should communicate regarding billing or shipping questions. Click Change Contact in the Billing Information section for a billing contact, and Change Contact in the Shipping Address & Method section for a shipping contact.
Company Grouping: This will be displayed if there are at least two company groupings available in the profile for that user.
Cisco Prod. Number/Competitor Prod. Description – If you are returning a Cisco product, enter the Cisco Part Number or use the Search Products button to find valid Cisco Part Numbers. If you are returning a Competitive product enter the Competitive product description
Merge in transit – Lets you choose whether or not to merge all items into one shipment. If you choose Merge Order, you override multiple ShipSets.
Early Shipment Accepted? – Click Yes if you will allow Cisco to ship a partial order or all of your order prior to the requested ship date.
Shipping Preferences – Indicates whether Cisco (Cisco Routed) or the customer (Billing Customer Routed) will be responsible for shipping the products.
Shipping Service Level – Indicates the shipping service level.
Ship All Items Separately – This selection informs Cisco if you would like all line items shipped as if they are individual orders. No should be selected if you would like Cisco to ship products together whenever possible (this extends ShipSet lead times). Yes should be selected if you would like Cisco to ship each line item as individual shipments.
Note: Cisco manufactures worldwide, so multiple line orders typically arrive in separate deliveries. Selecting Ship All Items Separately - No- reduces the number of deliveries.
Ordering Tool User Guide Internet Commerce
Ordering Tool User Guide-October 2003 Revision
42
Shipping & Packaging Notes – Enter any default shipping and packaging notes that you want to appear on packing slips and invoices for all future orders. You can change this information if necessary on the Header Details page when you are creating an order.
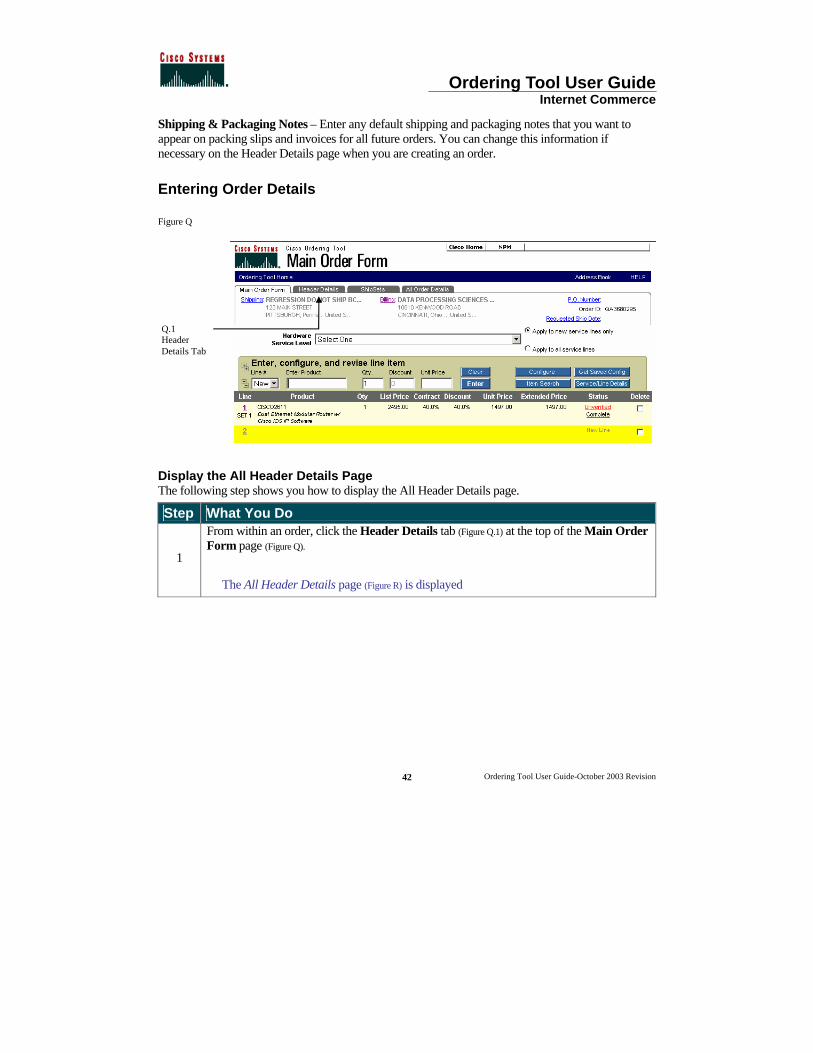
Entering Order Details Figure Q
Display the All Header Details Page The following step shows you how to display the All Header Details page.
Step What You Do
1
From within an order, click the Header Details tab (Figure Q.1) at the top of the Main Order Form page (Figure Q).
The All Header Details page (Figure R) is displayed
Q.1 Header Details Tab
Ordering Tool User Guide Internet Commerce
Ordering Tool User Guide-October 2003 Revision
43
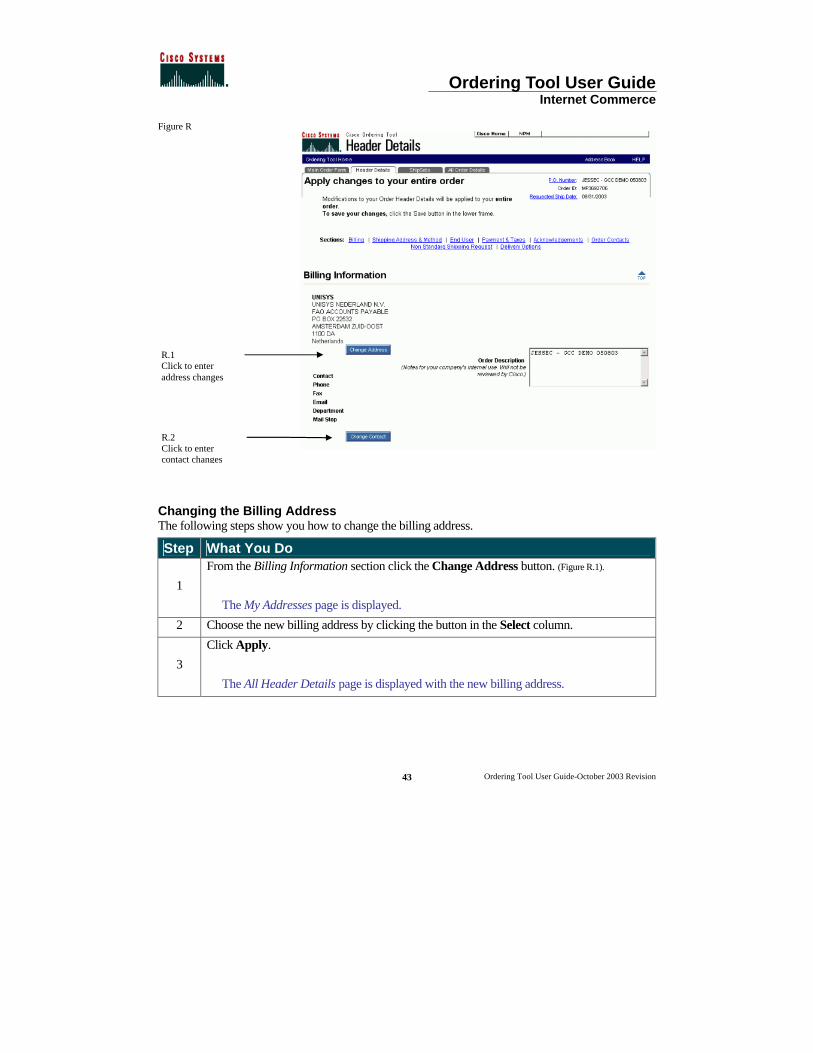
Figure R
Changing the Billing Address The following steps show you how to change the billing address.
Step What You Do
1
From the Billing Information section click the Change Address button. (Figure R.1).
The My Addresses page is displayed.
2 Choose the new billing address by clicking the button in the Select column.
3
Click Apply.
The All Header Details page is displayed with the new billing address.
R.1 Click to enter address changes
R.2 Click to enter contact changes
Ordering Tool User Guide Internet Commerce
Ordering Tool User Guide-October 2003 Revision
44
Adding or Changing the Billing Contact Person The following steps show you how to add or change the Billing Contact Person.
Step What You Do
1
From the Billing Information section click Change Contact. (Figure R.2).
The Select a Contact page is displayed.
2 Choose a new contact by checking the button in the Select column, or click the New Contact button to enter a contact person if they are not listed on the Select a Contact page
3
Click on Apply.
The All Header Details page is displayed.
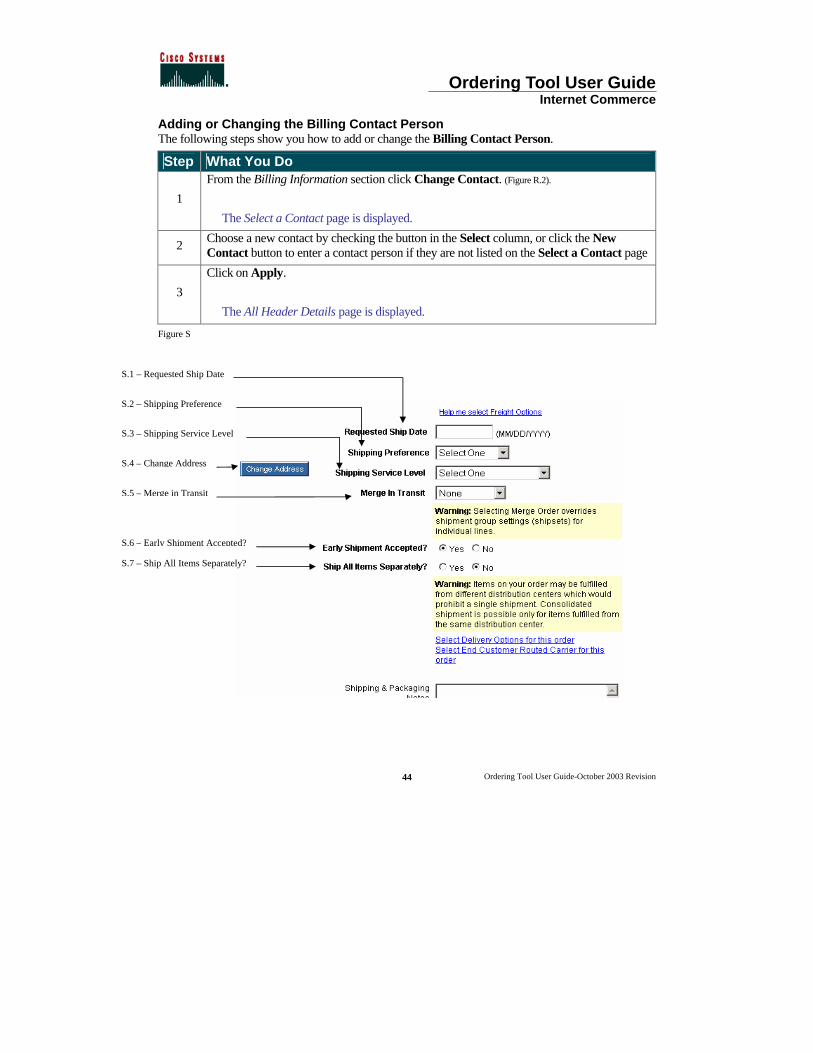
Figure S
S.3 – Shipping Service Level
S.2 – Shipping Preference
S.1 – Requested Ship Date
S.5 – Merge in Transit
S.4 – Change Address
S.6 – Early Shipment Accepted?
S.7 – Ship All Items Separately?
Ordering Tool User Guide Internet Commerce
Ordering Tool User Guide-October 2003 Revision
45
Adding or Changing the Shipping Address The following steps show you how to add or change the Shipping Address.
Step What You Do
1
In the Shipping Address & Method section click on Change Address. (Figure S.4).
The My Saved Addresses page is displayed.
2
Choose a saved address from My Addresses, or search from existing addresses by clicking the Search button.
The Search screen is displayed.
3
Enter search criteria or type a new address, and then click Continue.
The Search Results that met your criteria are displayed.
4 Choose the address by checking the button in the Select column.
5
Click on Apply.
The All Header Details page is displayed.
Adding or Changing the Shipping Contact Person The following steps show you how to add or change the shipping contact person.
Step What You Do
1
From the Shipping Address & Method section click on Change Contact.
The Select a Contact page is displayed.
2 Choose a new contact by clicking the button in the Select column, or click the New Contact button to enter a contact person if they are not listed on the Select a Contact page.
3
Click the Apply button in the bottom left corner.
The All Header Details page is displayed.
Ordering Tool User Guide Internet Commerce
Ordering Tool User Guide-October 2003 Revision
46
Adding or Changing the Shipping Method Information In the Shipping Address & Method section you can save changes to the following items.
Step To Do This What You Do
1 Requested Ship Date
Requested Ship Date (Figure S.1) – Enter the date on which you want Cisco to ship your order in MM/DD/YYYY format.
The date must be later than today but no later than 90 days from today.
2 Shipping Preference Shipping Preference (Figure S.2) – choose freight routing
3 Shipping Service Level
Shipping Service Level (Figure S3) – choose the preferred service level
4 Merge in transit Merge in Transit (Figure S.5) – Choose if you want to merge your order.
5 Early Shipment Acceptance
Early Shipment Accepted (Figure S.6) – Click “Yes” to accept shipments prior to the requested ship date specified.
6 Ship All Items Separately
Ship All Items Separately (Figure S.7) – Click “Yes” if you will accept partial shipments from Cisco. Click “No” if you want the entire order to ship at one time.
9 Shipping and Packaging Notes
Shipping & Packaging Notes – Additional notes that specify special requirements for Shipping or Packaging.
10 Notes to Appear on Packaging
Carton Notes – These are notes that need to appear on the carton labels that go on the outside of the boxes your product will be shipped in.
11 Saving Header Details
Click Save to save all changes made on Header Details.
The Save button turns blue.
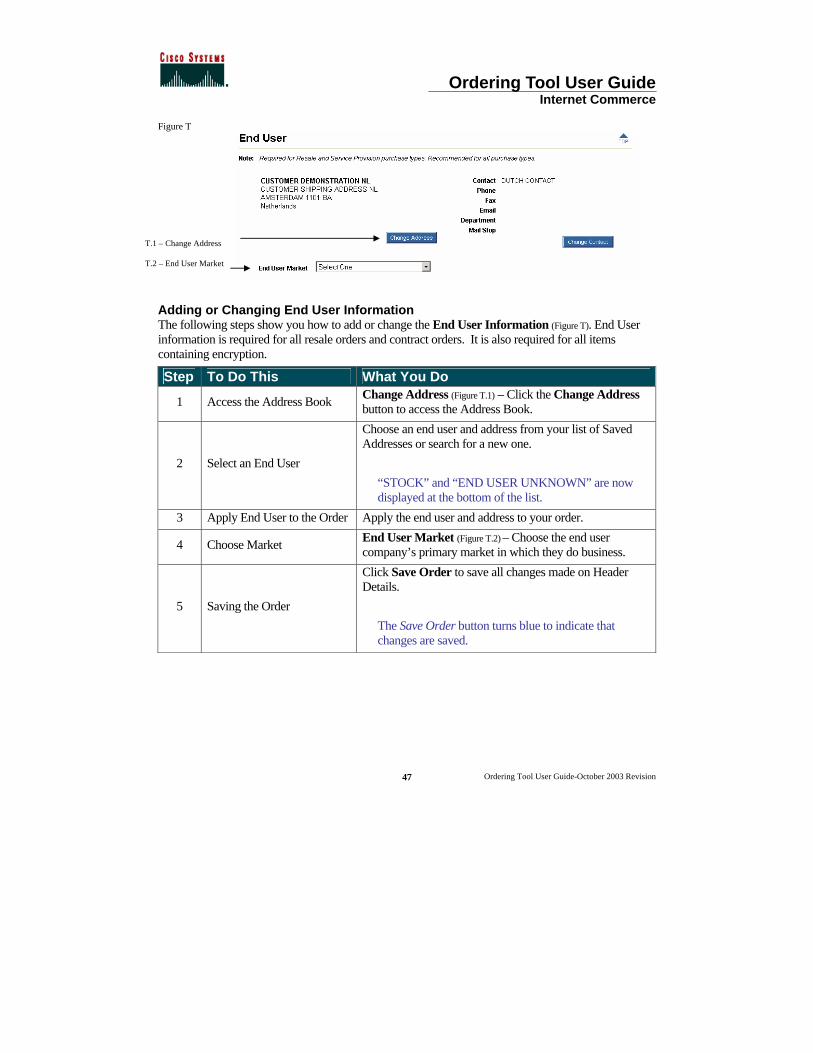
Ordering Tool User Guide Internet Commerce
Ordering Tool User Guide-October 2003 Revision
47
Figure T
Adding or Changing End User Information The following steps show you how to add or change the End User Information (Figure T). End User information is required for all resale orders and contract orders. It is also required for all items containing encryption.
Step To Do This What You Do
1 Access the Address Book Change Address (Figure T.1) – Click the Change Address button to access the Address Book.
2 Select an End User
Choose an end user and address from your list of Saved Addresses or search for a new one.
“STOCK” and “END USER UNKNOWN” are now displayed at the bottom of the list.
3 Apply End User to the Order Apply the end user and address to your order.
4 Choose Market End User Market (Figure T.2) – Choose the end user company’s primary market in which they do business.
5 Saving the Order
Click Save Order to save all changes made on Header Details.
The Save Order button turns blue to indicate that changes are saved.
T.1 – Change Address
T.2 – End User Market

Ordering Tool User Guide Internet Commerce
Ordering Tool User Guide-October 2003 Revision
48
Figure U
Adding or Changing Payment and Taxes Information In the Payment and Taxes section (Figure U) you can modify the following.
Step To Do This What You Do
1 Choosing the Purchase Type Purchase Type (Figure U.2) – Select the type of purchase for the order.
2 Choosing the Payment Method
Payment Method (Figure U.3) – Select “Purchase Order” or “Credit Card”.
3 Choosing Purchase Order Payment Method Options
The following fields are required for a Purchase Order payment method:
PO Number (Figure U.4) – Provide your internal purchase order number.
Terms (Figure U.5) – Select your payment terms. If anything other than 30 net, your order will go on hold for review.
4 Choosing the Credit Card Payment Method Options
The following fields are required for a credit card payment method (Figure U.1):
Credit Card – Select the name of the credit card.
Card Number – Enter the credit card number.
U.1 Credit Card Information
U.2 Purchase Type U.3 Payment Method
U.4 Purchase Order U.5 Terms
U.6 Deal ID
U.8 Taxable
U.9 Order Processing Notes
U.7 Commission Code
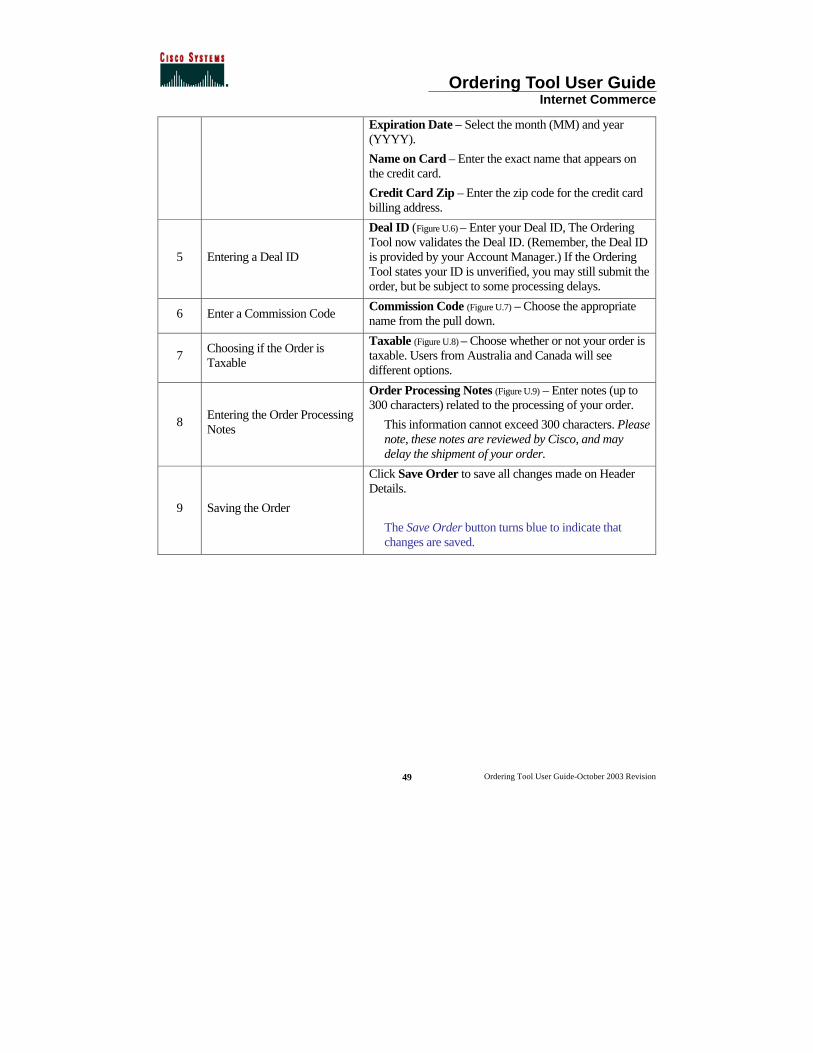
Ordering Tool User Guide Internet Commerce
Ordering Tool User Guide-October 2003 Revision
49
Expiration Date – Select the month (MM) and year (YYYY).
Name on Card – Enter the exact name that appears on the credit card.
Credit Card Zip – Enter the zip code for the credit card billing address.
5 Entering a Deal ID
Deal ID (Figure U.6) – Enter your Deal ID, The Ordering Tool now validates the Deal ID. (Remember, the Deal ID is provided by your Account Manager.) If the Ordering Tool states your ID is unverified, you may still submit the order, but be subject to some processing delays.
6 Enter a Commission Code Commission Code (Figure U.7) – Choose the appropriate name from the pull down.
7 Choosing if the Order is Taxable
Taxable (Figure U.8) – Choose whether or not your order is taxable. Users from Australia and Canada will see different options.
8 Entering the Order Processing Notes
Order Processing Notes (Figure U.9) – Enter notes (up to 300 characters) related to the processing of your order.
This information cannot exceed 300 characters. Please note, these notes are reviewed by Cisco, and may delay the shipment of your order.
9 Saving the Order
Click Save Order to save all changes made on Header Details.
The Save Order button turns blue to indicate that changes are saved.
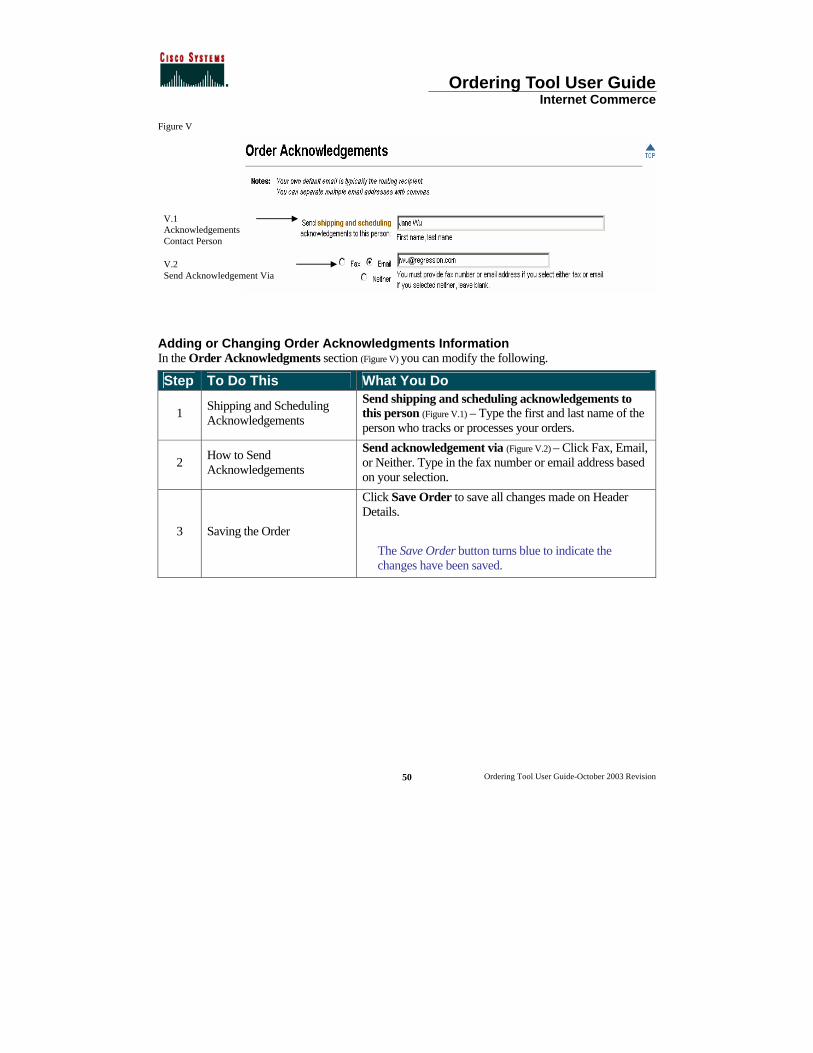
Ordering Tool User Guide Internet Commerce
Ordering Tool User Guide-October 2003 Revision
50
Figure V
Adding or Changing Order Acknowledgments Information In the Order Acknowledgments section (Figure V) you can modify the following.
Step To Do This What You Do
1 Shipping and Scheduling Acknowledgements
Send shipping and scheduling acknowledgements to this person (Figure V.1) – Type the first and last name of the person who tracks or processes your orders.
2 How to Send Acknowledgements
Send acknowledgement via (Figure V.2) – Click Fax, Email, or Neither. Type in the fax number or email address based on your selection.
3 Saving the Order
Click Save Order to save all changes made on Header Details.
The Save Order button turns blue to indicate the changes have been saved.
V.1 Acknowledgements Contact Person
V.2 Send Acknowledgement Via
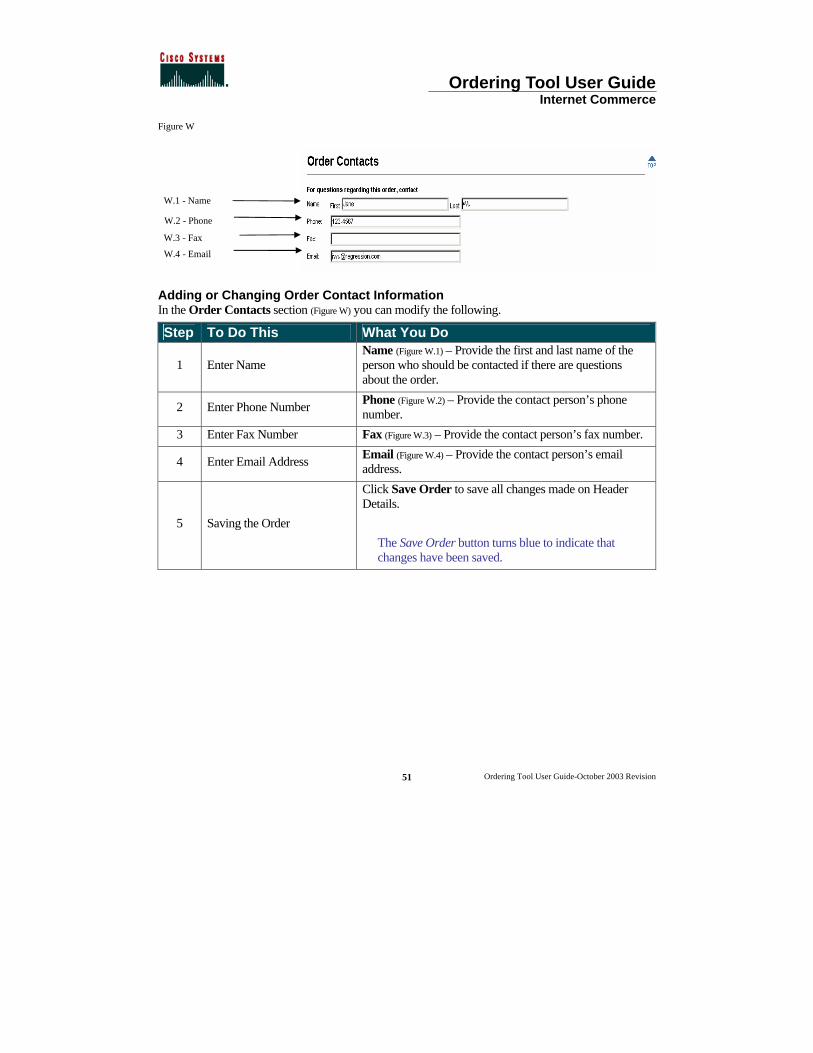
Ordering Tool User Guide Internet Commerce
Ordering Tool User Guide-October 2003 Revision
51
Figure W
Adding or Changing Order Contact Information In the Order Contacts section (Figure W) you can modify the following.
Step To Do This What You Do
1 Enter Name Name (Figure W.1) – Provide the first and last name of the person who should be contacted if there are questions about the order.
2 Enter Phone Number Phone (Figure W.2) – Provide the contact person’s phone number.
3 Enter Fax Number Fax (Figure W.3) – Provide the contact person’s fax number.
4 Enter Email Address Email (Figure W.4) – Provide the contact person’s email address.
5 Saving the Order
Click Save Order to save all changes made on Header Details.
The Save Order button turns blue to indicate that changes have been saved.
W.3 - Fax
W.2 - Phone
W.4 - Email
W.1 - Name
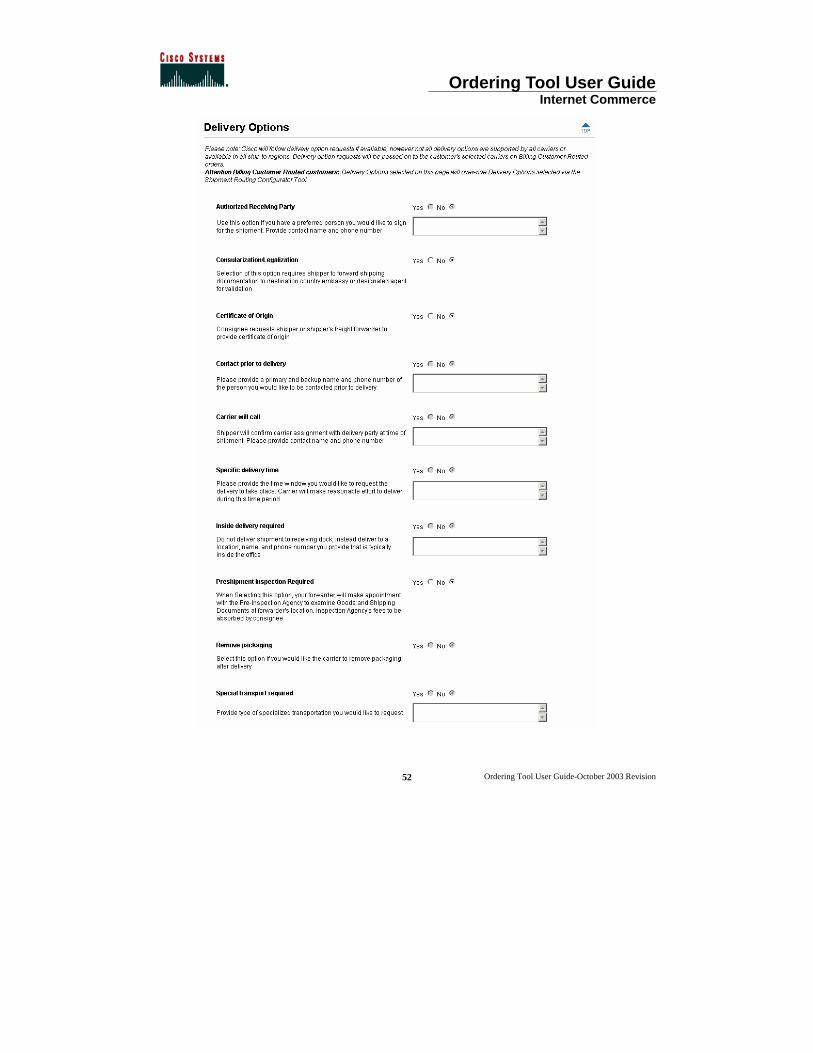
Ordering Tool User Guide Internet Commerce
Ordering Tool User Guide-October 2003 Revision
52
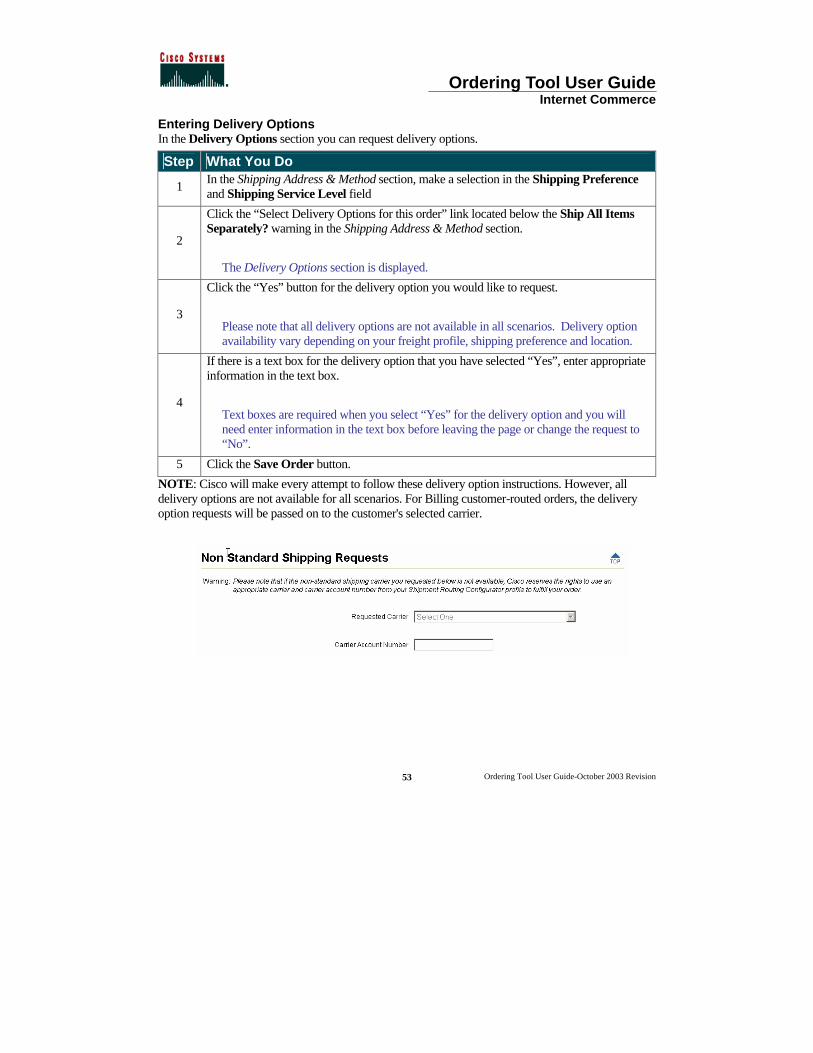
Ordering Tool User Guide Internet Commerce
Ordering Tool User Guide-October 2003 Revision
53
Entering Delivery Options In the Delivery Options section you can request delivery options.
Step What You Do
1 In the Shipping Address & Method section, make a selection in the Shipping Preference and Shipping Service Level field
2
Click the “Select Delivery Options for this order” link located below the Ship All Items Separately? warning in the Shipping Address & Method section.
The Delivery Options section is displayed.
3
Click the “Yes” button for the delivery option you would like to request.
Please note that all delivery options are not available in all scenarios. Delivery option availability vary depending on your freight profile, shipping preference and location.
4
If there is a text box for the delivery option that you have selected “Yes”, enter appropriate information in the text box.
Text boxes are required when you select “Yes” for the delivery option and you will need enter information in the text box before leaving the page or change the request to “No”.
5 Click the Save Order button.
NOTE: Cisco will make every attempt to follow these delivery option instructions. However, all delivery options are not available for all scenarios. For Billing customer-routed orders, the delivery option requests will be passed on to the customer's selected carrier.
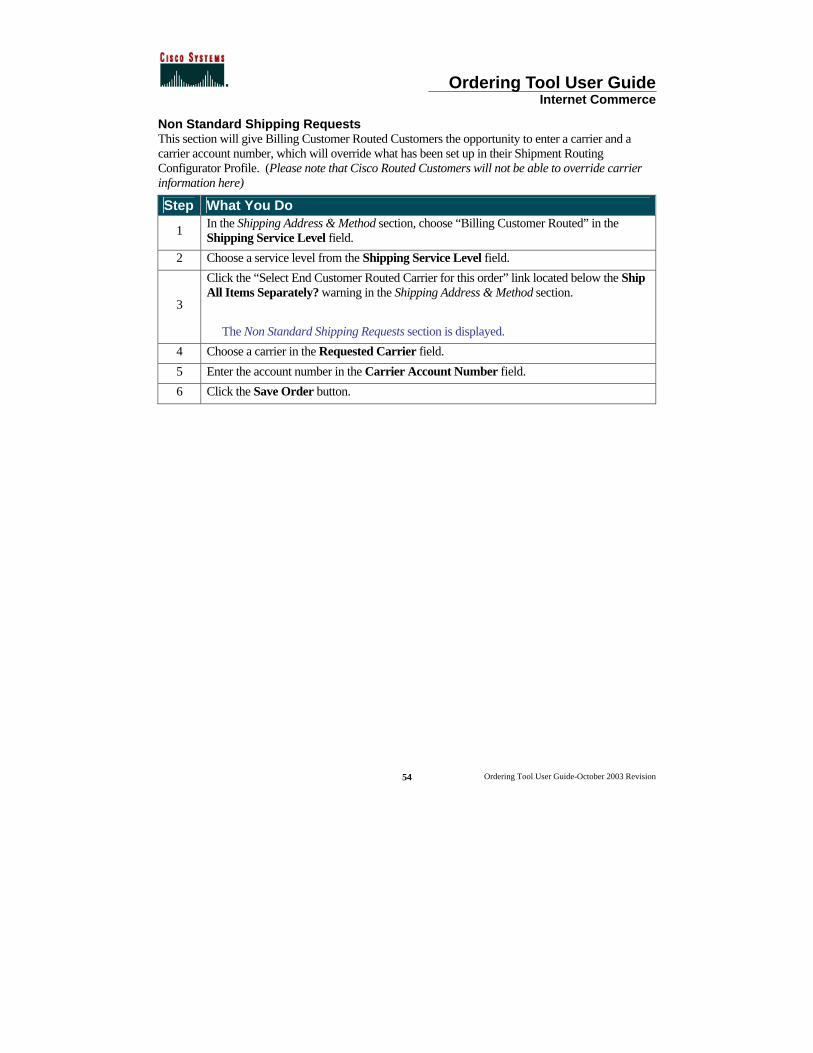
Ordering Tool User Guide Internet Commerce
Ordering Tool User Guide-October 2003 Revision
54
Non Standard Shipping Requests This section will give Billing Customer Routed Customers the opportunity to enter a carrier and a carrier account number, which will override what has been set up in their Shipment Routing Configurator Profile. (Please note that Cisco Routed Customers will not be able to override carrier information here)
Step What You Do
1 In the Shipping Address & Method section, choose “Billing Customer Routed” in the Shipping Service Level field.
2 Choose a service level from the Shipping Service Level field.
3
Click the “Select End Customer Routed Carrier for this order” link located below the Ship All Items Separately? warning in the Shipping Address & Method section.
The Non Standard Shipping Requests section is displayed.
4 Choose a carrier in the Requested Carrier field.
5 Enter the account number in the Carrier Account Number field.
6 Click the Save Order button.
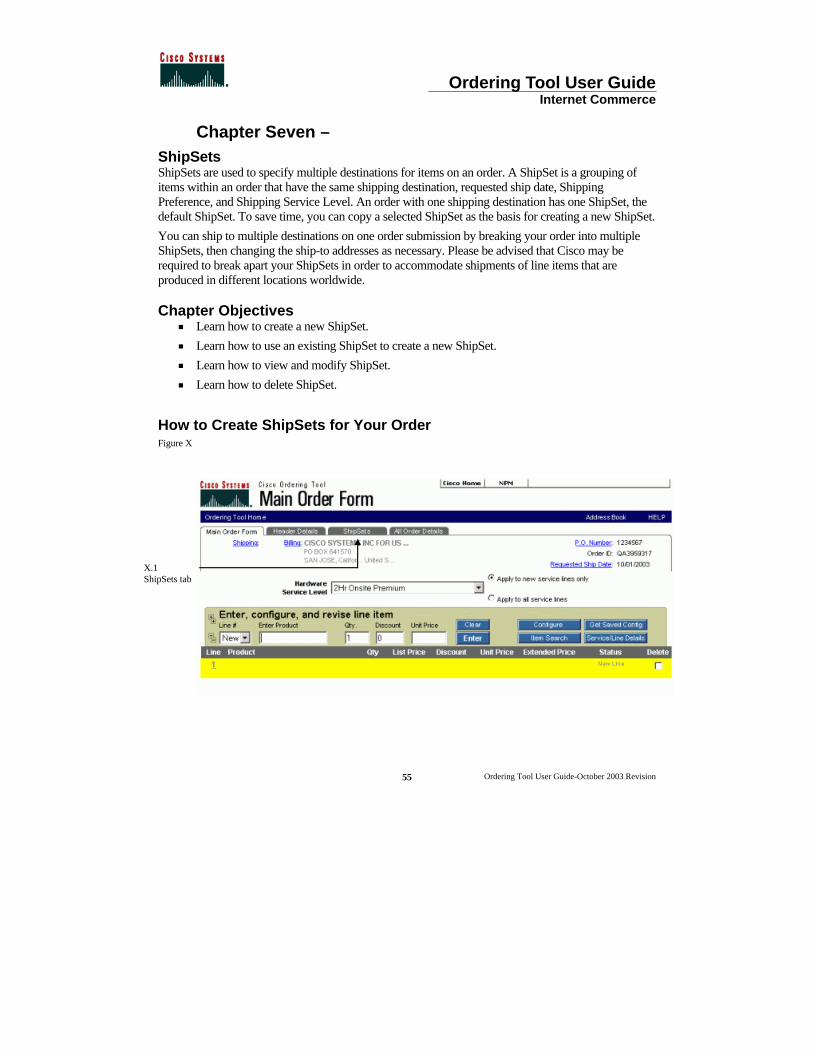
Ordering Tool User Guide Internet Commerce
Ordering Tool User Guide-October 2003 Revision
55
Chapter Seven – ShipSets ShipSets are used to specify multiple destinations for items on an order. A ShipSet is a grouping of items within an order that have the same shipping destination, requested ship date, Shipping Preference, and Shipping Service Level. An order with one shipping destination has one ShipSet, the default ShipSet. To save time, you can copy a selected ShipSet as the basis for creating a new ShipSet.
You can ship to multiple destinations on one order submission by breaking your order into multiple ShipSets, then changing the ship-to addresses as necessary. Please be advised that Cisco may be required to break apart your ShipSets in order to accommodate shipments of line items that are produced in different locations worldwide.
Chapter Objectives < Learn how to create a new ShipSet. < Learn how to use an existing ShipSet to create a new ShipSet. < Learn how to view and modify ShipSet. < Learn how to delete ShipSet.
How to Create ShipSets for Your Order Figure X
X.1 ShipSets tab
Ordering Tool User Guide Internet Commerce
Ordering Tool User Guide-October 2003 Revision
56
Creating a New ShipSet The following steps show you how to create a new ShipSet.
Step What You Do
1
On the Main Order Form (Figure X) click the ShipSets tab (Figure X.1) at the top of the page.
The ShipSets page is displayed (Figure Y).
2
Click on the New ShipSet button (Figure Y.5).
The ShipSets: View/Modify page (Figure Z) appears.
3 In the Lines in Order window choose the lines you want to be part of the new ShipSet. (Figure Z.2)
4 Click the Add button (Figure Z.3) for a line item or the Add All button (Figure Z.5) if you want all line items to be added.
5 Once the lines have been added you must choose the Shipping Address (Figure Z.8) and Shipping Options (Figure Z.7) for the new ShipSet.
6
When you are finished click Save (Figure Z.9).
The ShipSets page is displayed after you save.
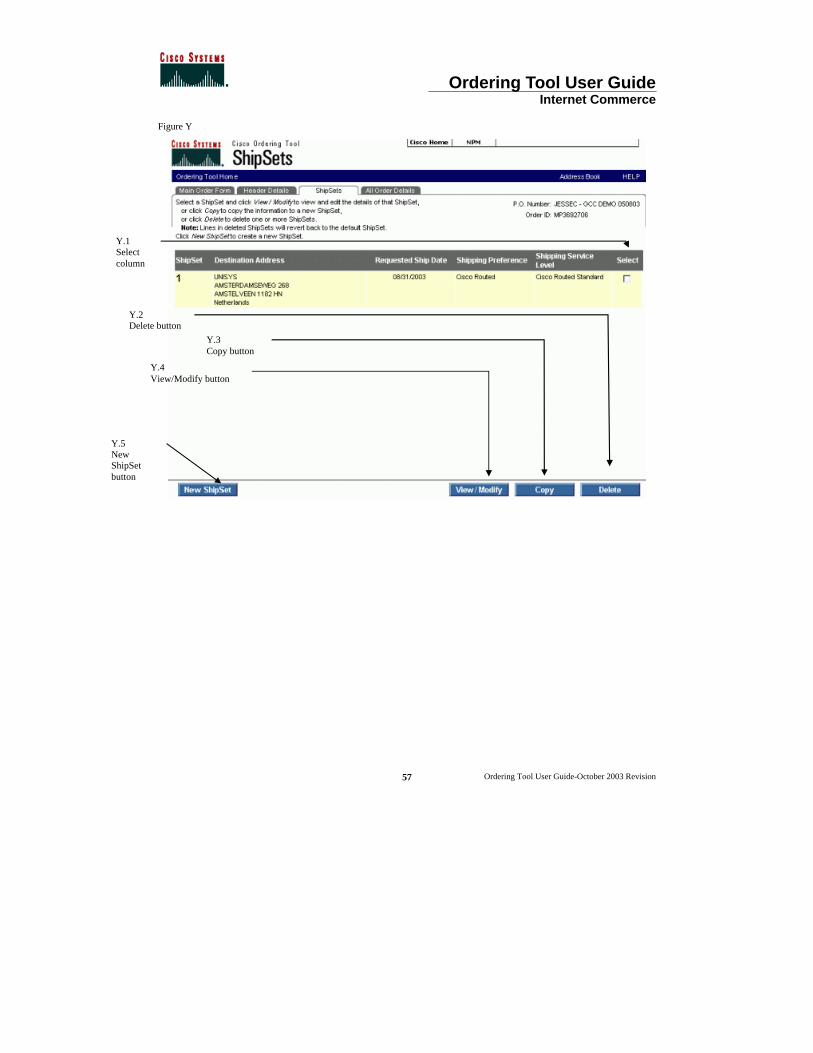
Ordering Tool User Guide Internet Commerce
Ordering Tool User Guide-October 2003 Revision
57
Figure Y
Y.4 View/Modify button
Y.5 New ShipSet button
Y.3 Copy button
Y.2 Delete button
Y.1 Select column
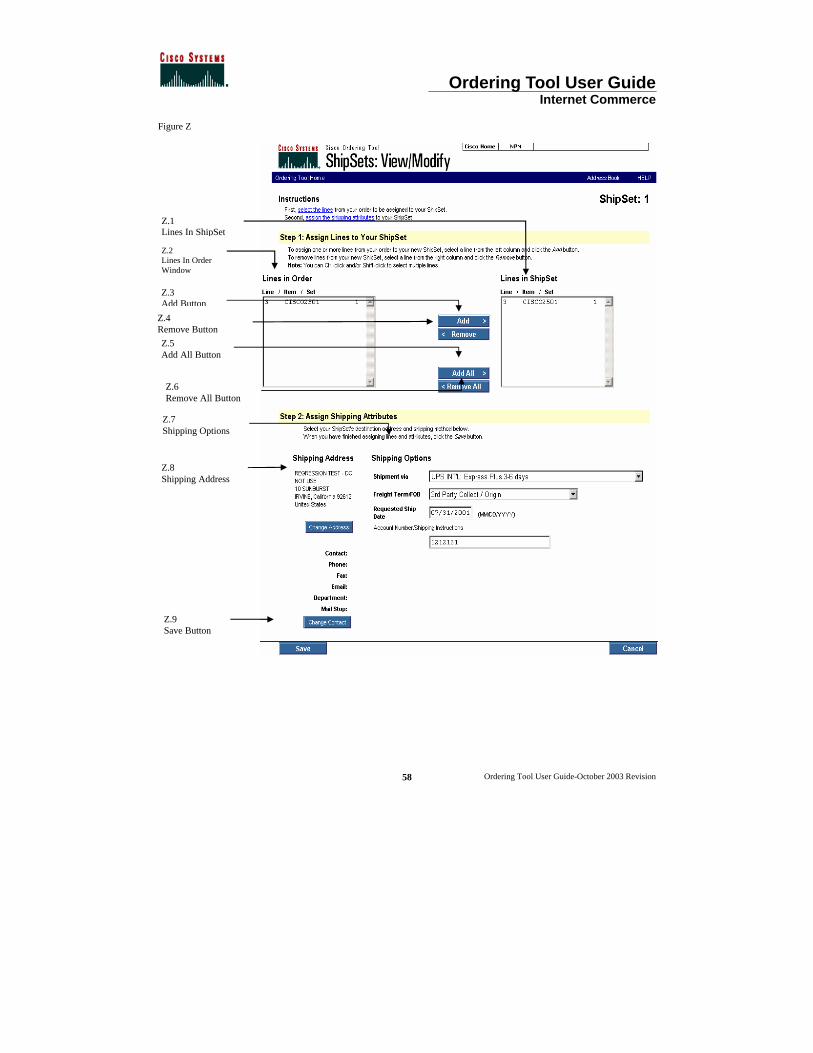
Ordering Tool User Guide Internet Commerce
Ordering Tool User Guide-October 2003 Revision
58
Figure Z
Z.9 Save Button
Z.8 Shipping Address
Z.7 Shipping Options
Z.6 Remove All Button
Z.5 Add All Button
Z.4 Remove Button
Z.2 Lines In Order Window
Z.1 Lines In ShipSet
Z.3 Add Button
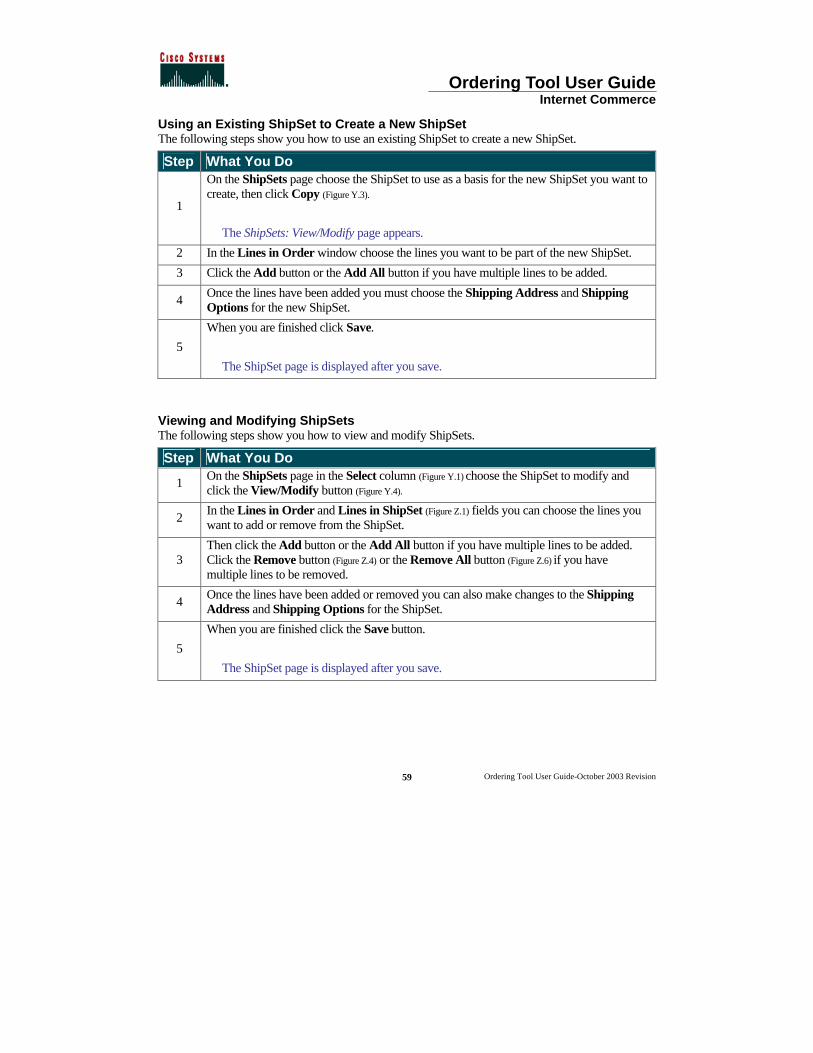
Ordering Tool User Guide Internet Commerce
Ordering Tool User Guide-October 2003 Revision
59
Using an Existing ShipSet to Create a New ShipSet The following steps show you how to use an existing ShipSet to create a new ShipSet.
Step What You Do
1
On the ShipSets page choose the ShipSet to use as a basis for the new ShipSet you want to create, then click Copy (Figure Y.3).
The ShipSets: View/Modify page appears.
2 In the Lines in Order window choose the lines you want to be part of the new ShipSet.
3 Click the Add button or the Add All button if you have multiple lines to be added.
4 Once the lines have been added you must choose the Shipping Address and Shipping Options for the new ShipSet.
5
When you are finished click Save.
The ShipSet page is displayed after you save.
Viewing and Modifying ShipSets The following steps show you how to view and modify ShipSets.
Step What You Do
1 On the ShipSets page in the Select column (Figure Y.1) choose the ShipSet to modify and click the View/Modify button (Figure Y.4).
2 In the Lines in Order and Lines in ShipSet (Figure Z.1) fields you can choose the lines you want to add or remove from the ShipSet.
3 Then click the Add button or the Add All button if you have multiple lines to be added. Click the Remove button (Figure Z.4) or the Remove All button (Figure Z.6) if you have multiple lines to be removed.
4 Once the lines have been added or removed you can also make changes to the Shipping Address and Shipping Options for the ShipSet.
5
When you are finished click the Save button.
The ShipSet page is displayed after you save.
Ordering Tool User Guide Internet Commerce
Ordering Tool User Guide-October 2003 Revision
60
Deleting a ShipSet The following step shows you how to delete ShipSets.
Step What You Do
1
Choose the ShipSet to be deleted by clicking the box in the Select column, then click Delete.
The page is refreshed and redisplays the ShipSets page.
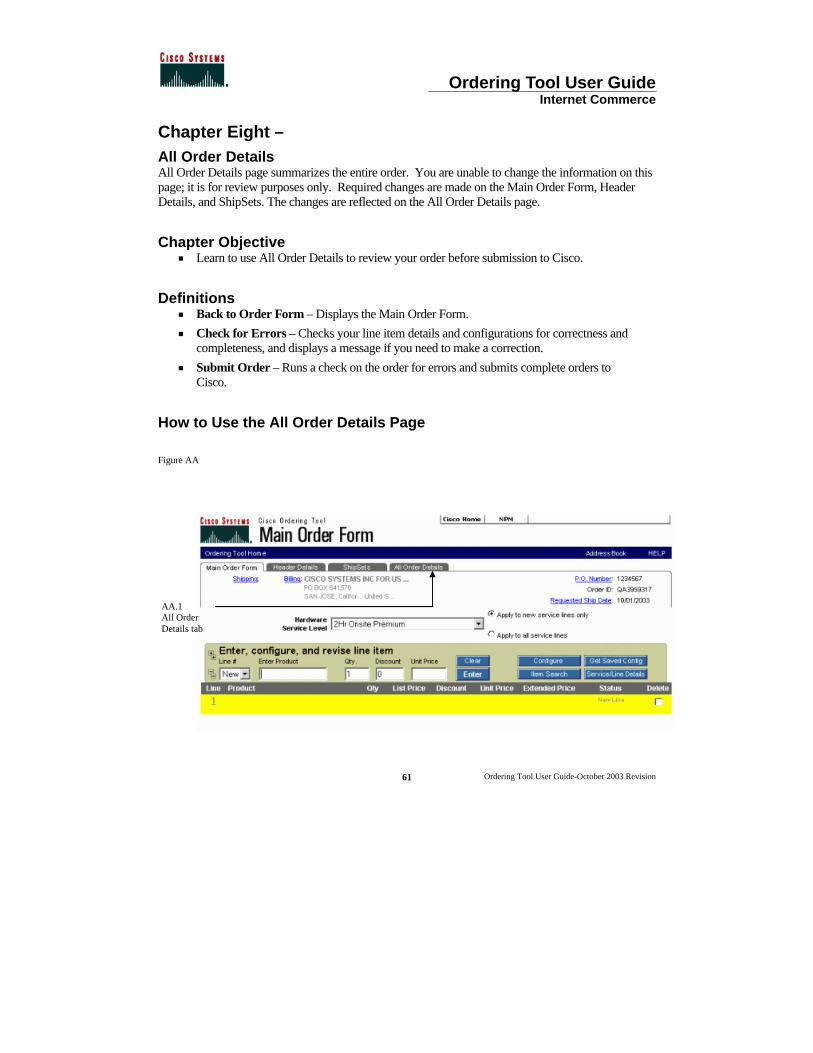
Ordering Tool User Guide Internet Commerce
Ordering Tool User Guide-October 2003 Revision
61
Chapter Eight – All Order Details All Order Details page summarizes the entire order. You are unable to change the information on this page; it is for review purposes only. Required changes are made on the Main Order Form, Header Details, and ShipSets. The changes are reflected on the All Order Details page.
Chapter Objective < Learn to use All Order Details to review your order before submission to Cisco.
Definitions < Back to Order Form – Displays the Main Order Form. < Check for Errors – Checks your line item details and configurations for correctness and
completeness, and displays a message if you need to make a correction. < Submit Order – Runs a check on the order for errors and submits complete orders to
Cisco.
How to Use the All Order Details Page
Figure AA
AA.1 All Order Details tab
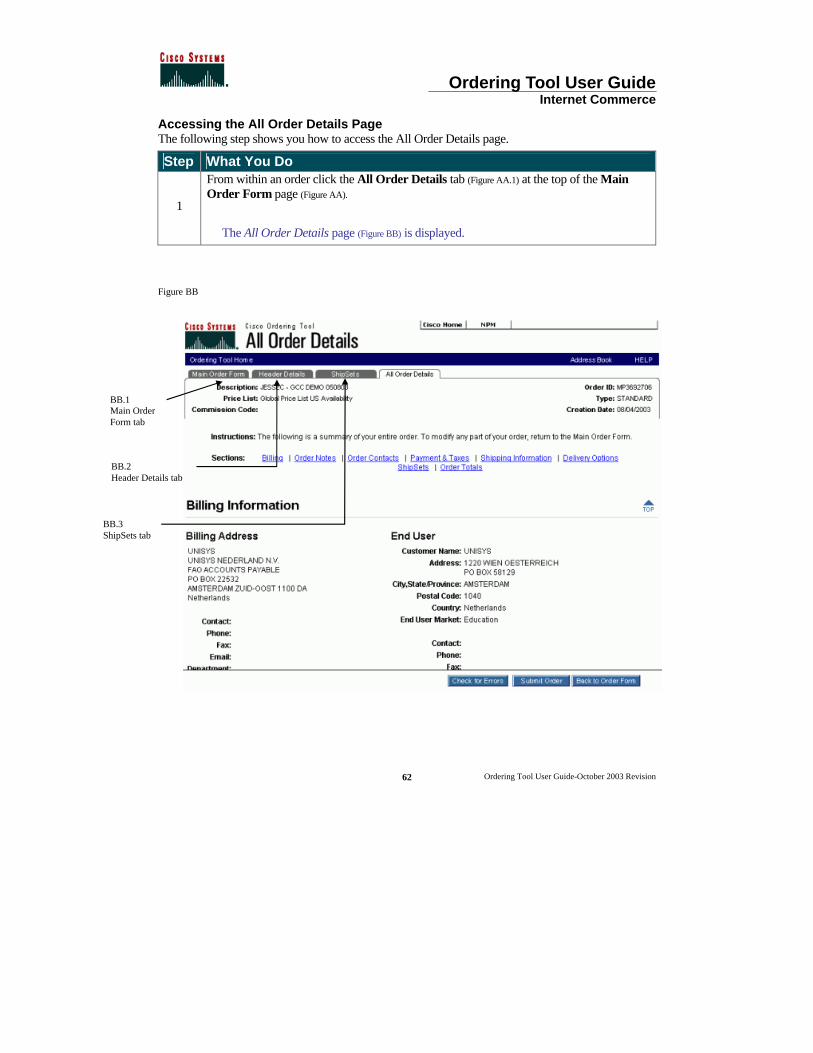
Ordering Tool User Guide Internet Commerce
Ordering Tool User Guide-October 2003 Revision
62
Accessing the All Order Details Page The following step shows you how to access the All Order Details page.
Step What You Do
1
From within an order click the All Order Details tab (Figure AA.1) at the top of the Main Order Form page (Figure AA).
The All Order Details page (Figure BB) is displayed.
Figure BB
BB.3 ShipSets tab
BB.1 Main Order Form tab
BB.2 Header Details tab
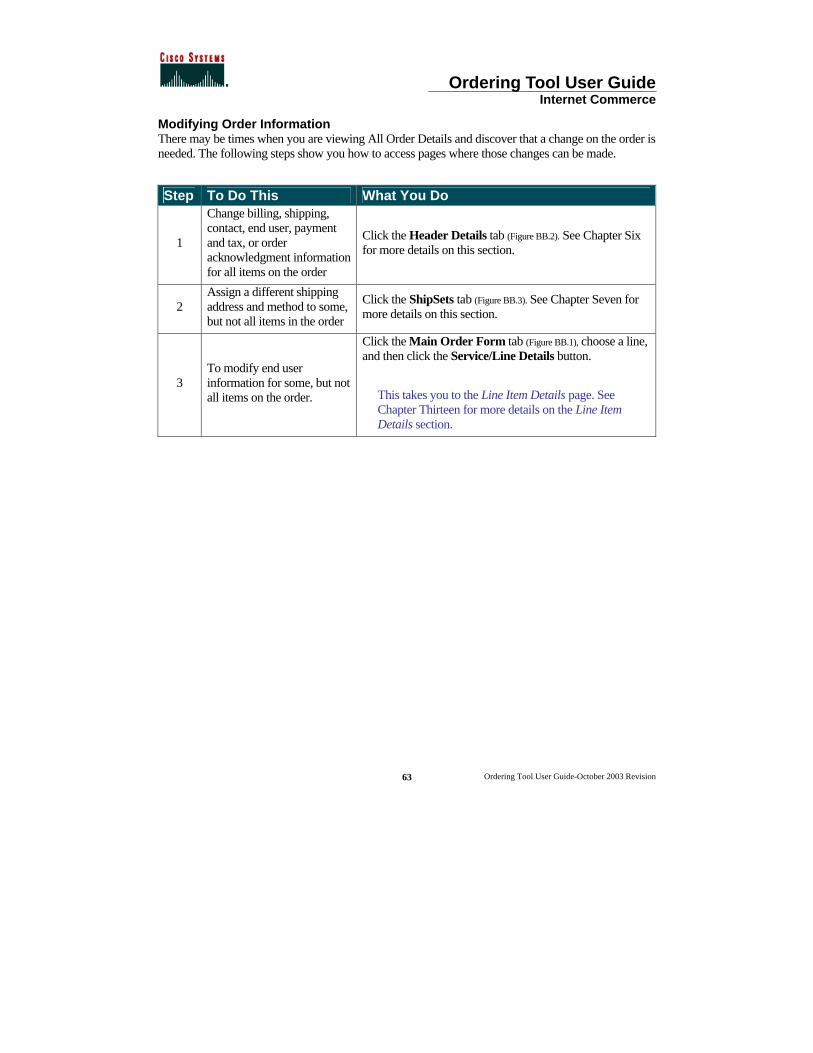
Ordering Tool User Guide Internet Commerce
Ordering Tool User Guide-October 2003 Revision
63
Modifying Order Information There may be times when you are viewing All Order Details and discover that a change on the order is needed. The following steps show you how to access pages where those changes can be made.
Step To Do This What You Do
1
Change billing, shipping, contact, end user, payment and tax, or order acknowledgment information for all items on the order
Click the Header Details tab (Figure BB.2). See Chapter Six for more details on this section.
2 Assign a different shipping address and method to some, but not all items in the order
Click the ShipSets tab (Figure BB.3). See Chapter Seven for more details on this section.
3 To modify end user information for some, but not all items on the order.
Click the Main Order Form tab (Figure BB.1), choose a line, and then click the Service/Line Details button.
This takes you to the Line Item Details page. See Chapter Thirteen for more details on the Line Item Details section.
Ordering Tool User Guide Internet Commerce
Ordering Tool User Guide-October 2003 Revision
64
Chapter Nine – Address Book There are two ways to access the Address Book from within the Ordering Tool. An Address Book button is located on the top navigation bar throughout the Ordering Tool. In addition, you can click any of the Change Address buttons within the Ordering Tool to access the Address book.
My Addresses is a list of up to 50 addresses that you manage. You can add, delete and assign contacts to each address. My Addresses saves you time by allowing you to quickly select from your most frequently used addresses rather than performing a search for each address. Each time you access the Address Book, the My Addresses page is displayed first.
Apply To checkboxes allow you to select an address for multiple target areas at the same time. For example, you can select a shipping address and service site location addresses with one action. You simply choose an address, click to check all the locations you want to use that address and then click Apply. The address is populated into all the appropriate target areas.
Chapter Objectives < Learn how to add a new address that you can use for future orders for your company. < Acquaint you with the Address Search Results page. < Learn how to assign a default contact person for an address. < Learn how to add a contact person for an address.
Definitions
< Add to My Addresses – This adds a frequently used address to My Addresses list. < Existing Customer – Choose the customer for whom you want to add a new address. < New Customer Name – If you want to enter a new customer enter their name in this
field. < Postal/Zip – Enter the postal or zip code. < Search Again – Returns you to the Search Addresses page for another search. < State/Province – Choose the U.S. state or Canadian, Chinese, Indian or Korean province
if appropriate.
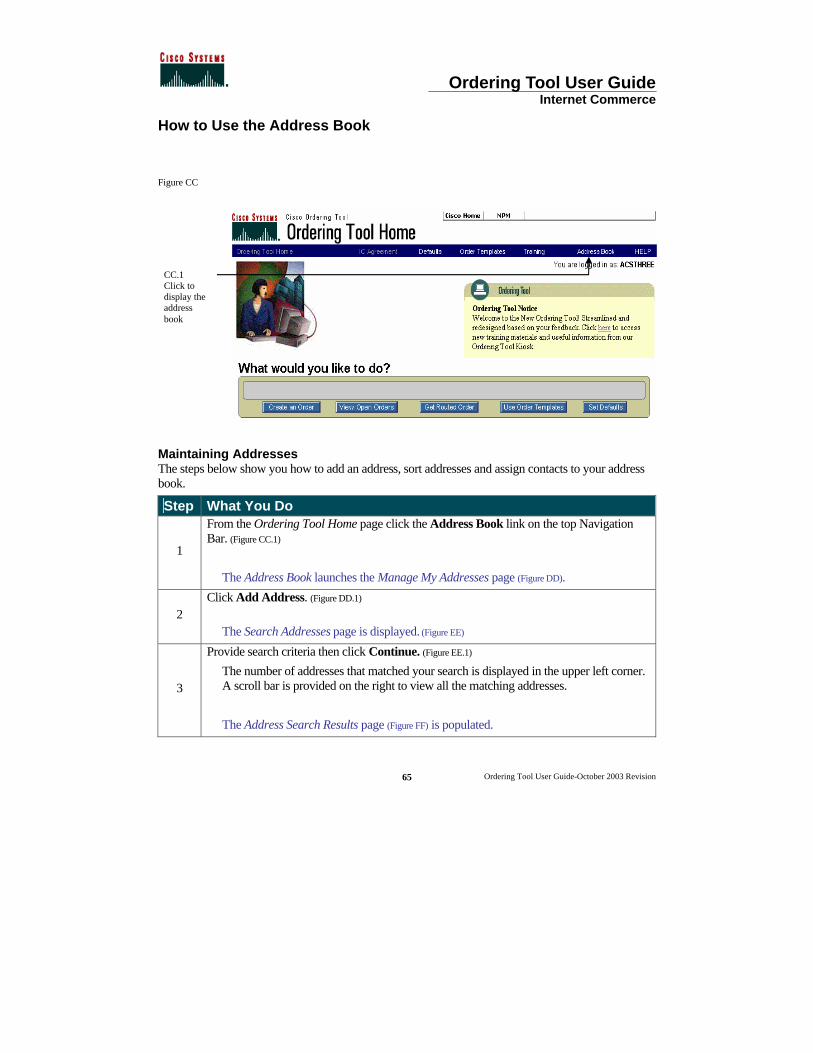
Ordering Tool User Guide Internet Commerce
Ordering Tool User Guide-October 2003 Revision
65
How to Use the Address Book
Figure CC
Maintaining Addresses The steps below show you how to add an address, sort addresses and assign contacts to your address book.
Step What You Do
1
From the Ordering Tool Home page click the Address Book link on the top Navigation Bar. (Figure CC.1)
The Address Book launches the Manage My Addresses page (Figure DD).
2 Click Add Address. (Figure DD.1)
The Search Addresses page is displayed. (Figure EE)
3
Provide search criteria then click Continue. (Figure EE.1)
The number of addresses that matched your search is displayed in the upper left corner. A scroll bar is provided on the right to view all the matching addresses.
The Address Search Results page (Figure FF) is populated.
CC.1 Click to display the address book
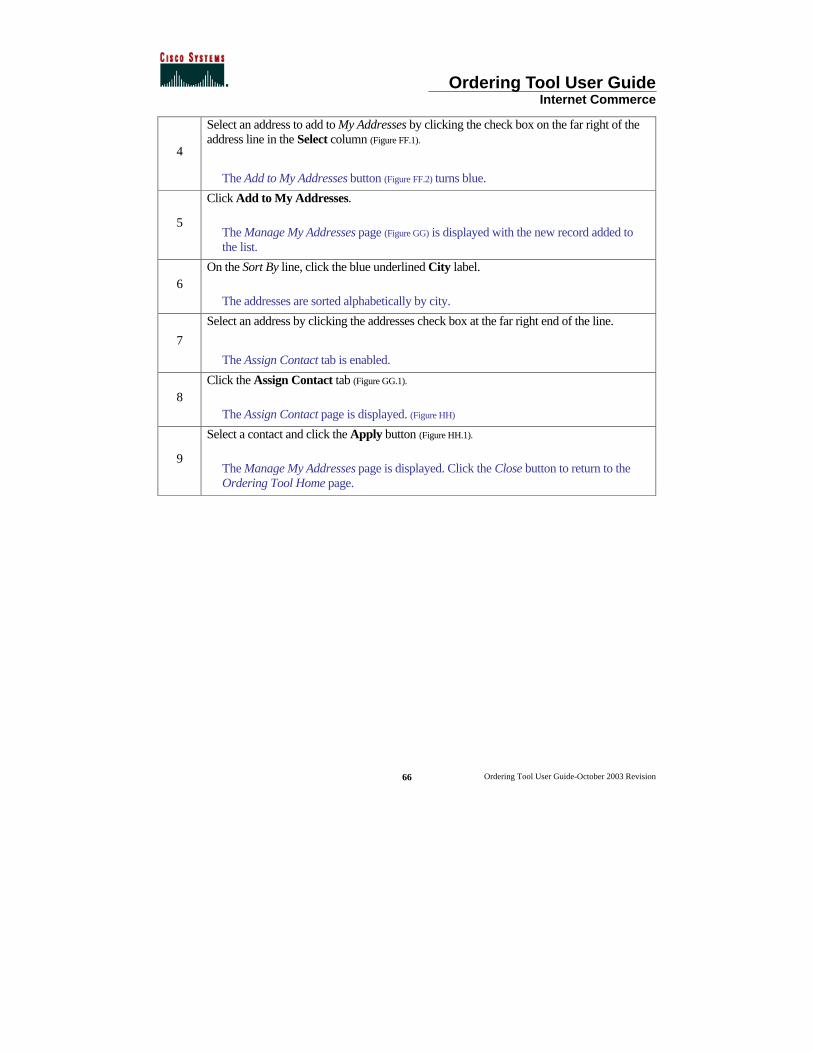
Ordering Tool User Guide Internet Commerce
Ordering Tool User Guide-October 2003 Revision
66
4
Select an address to add to My Addresses by clicking the check box on the far right of the address line in the Select column (Figure FF.1).
The Add to My Addresses button (Figure FF.2) turns blue.
5
Click Add to My Addresses.
The Manage My Addresses page (Figure GG) is displayed with the new record added to the list.
6 On the Sort By line, click the blue underlined City label.
The addresses are sorted alphabetically by city.
7
Select an address by clicking the addresses check box at the far right end of the line.
The Assign Contact tab is enabled.
8 Click the Assign Contact tab (Figure GG.1).
The Assign Contact page is displayed. (Figure HH)
9
Select a contact and click the Apply button (Figure HH.1).
The Manage My Addresses page is displayed. Click the Close button to return to the Ordering Tool Home page.
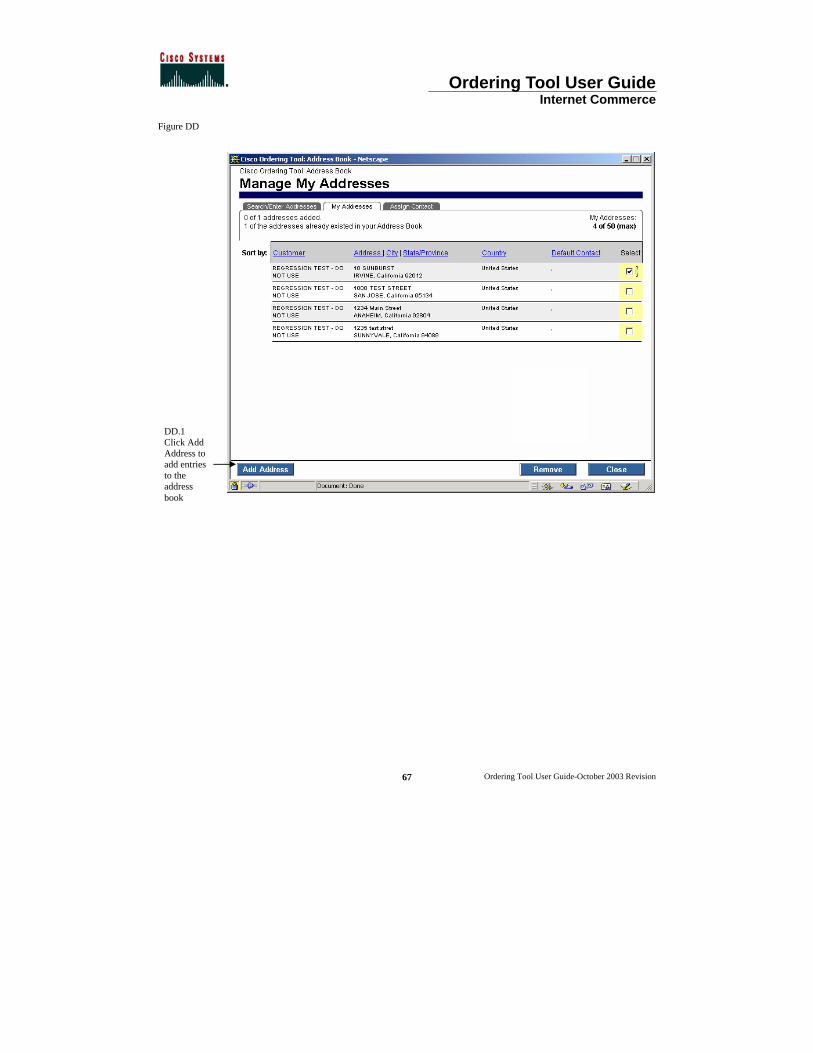
Ordering Tool User Guide Internet Commerce
Ordering Tool User Guide-October 2003 Revision
67
Figure DD
DD.1 Click Add Address to add entries to the address book
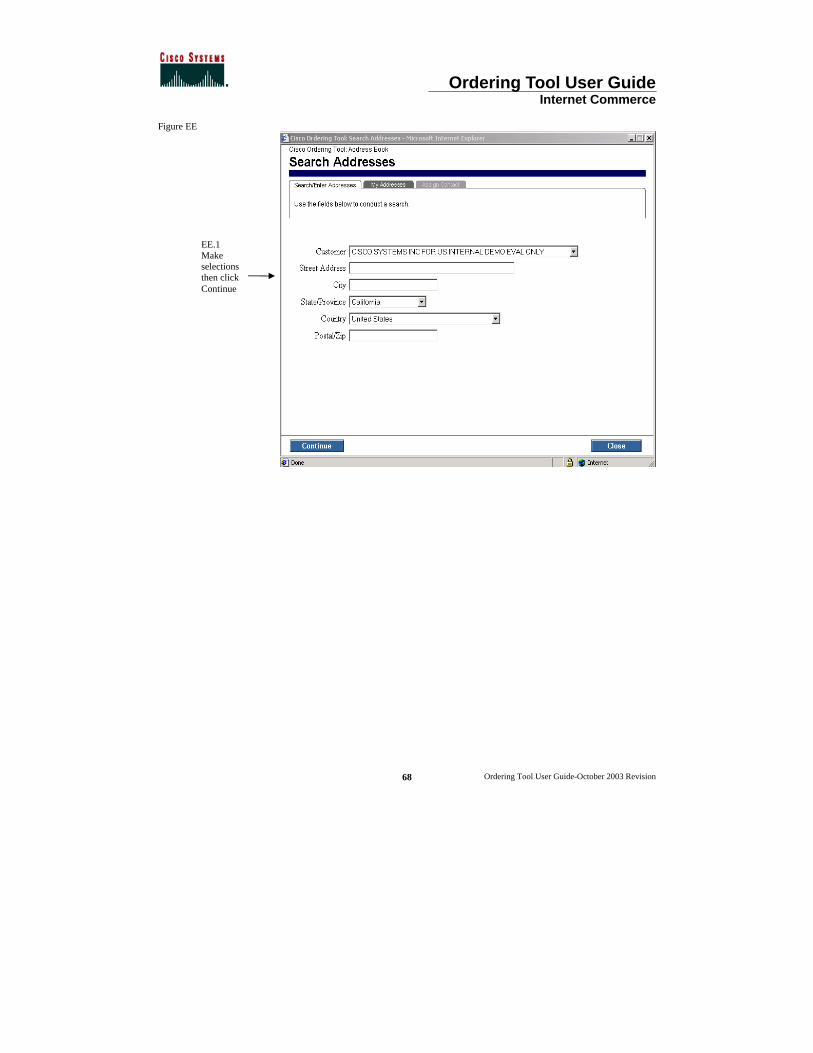
Ordering Tool User Guide Internet Commerce
Ordering Tool User Guide-October 2003 Revision
68
Figure EE
EE.1 Make selections then click Continue
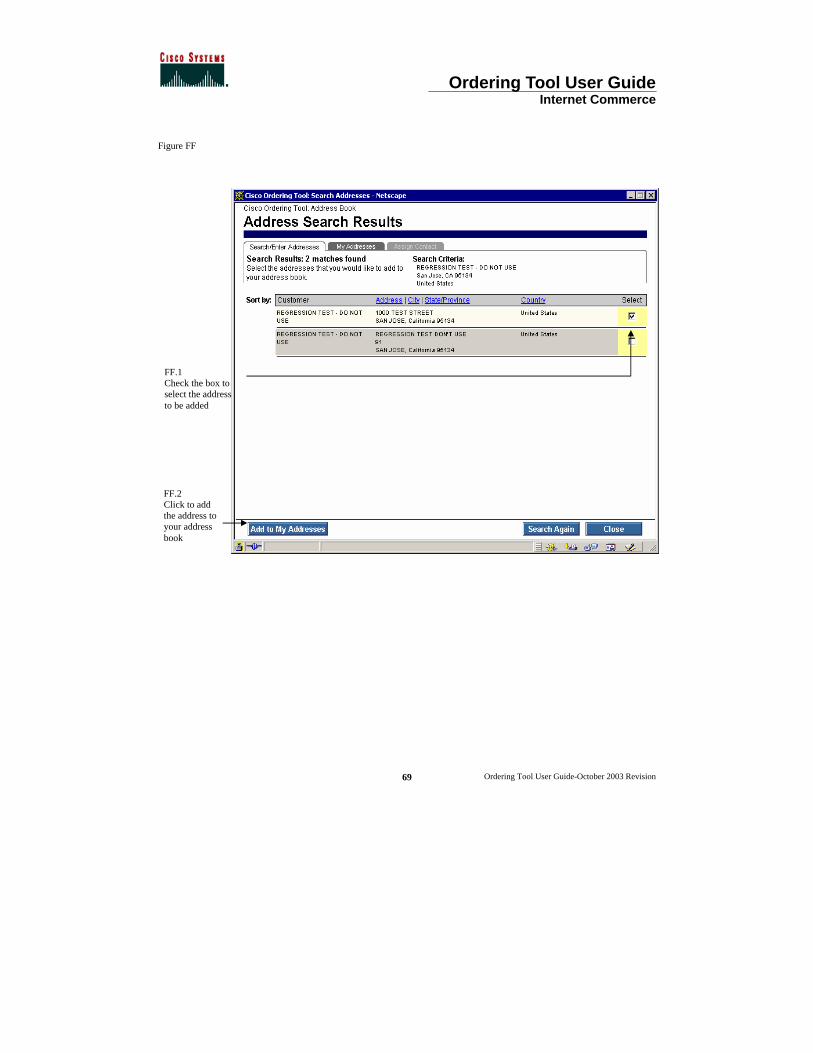
Ordering Tool User Guide Internet Commerce
Ordering Tool User Guide-October 2003 Revision
69
Figure FF
FF.1 Check the box to select the address to be added
FF.2 Click to add the address to your address book
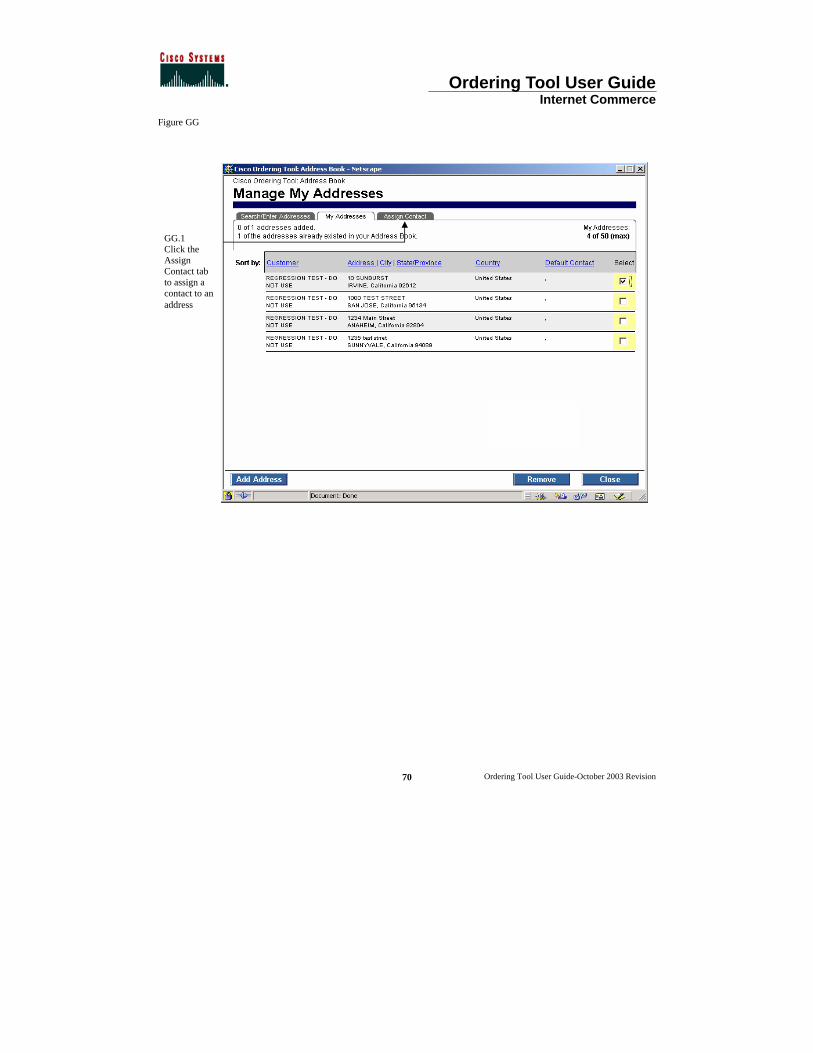
Ordering Tool User Guide Internet Commerce
Ordering Tool User Guide-October 2003 Revision
70
Figure GG
GG.1 Click the Assign Contact tab to assign a contact to an address
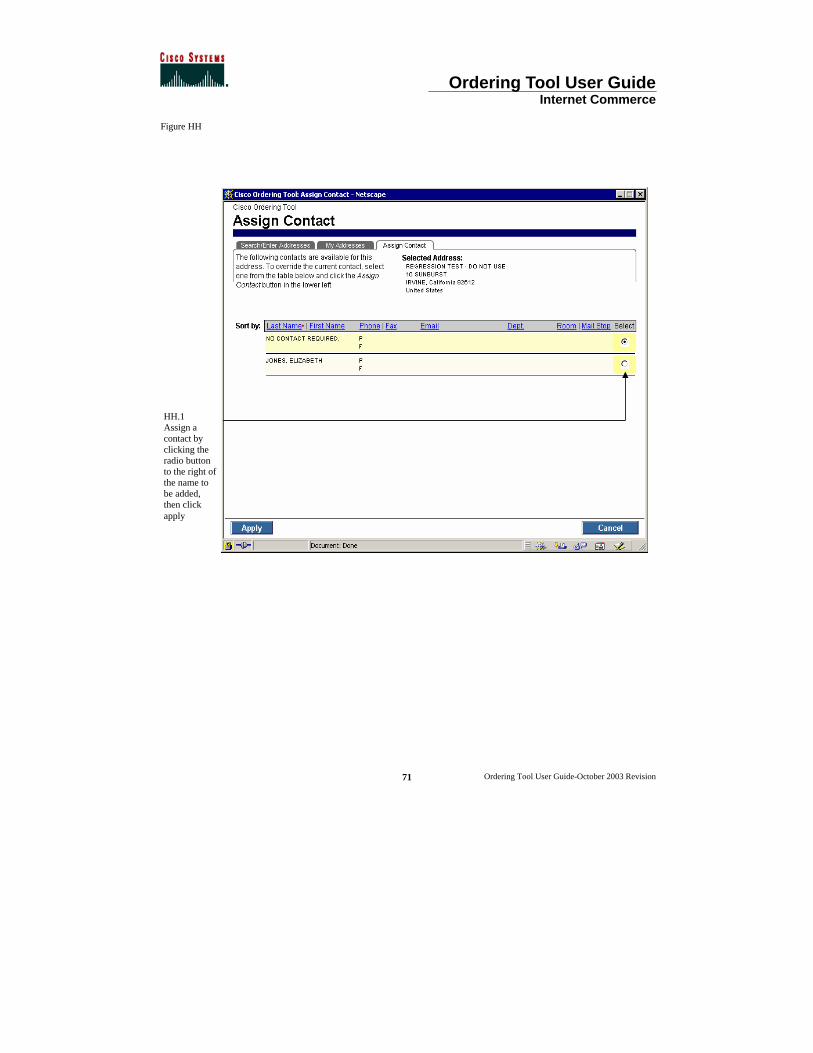
Ordering Tool User Guide Internet Commerce
Ordering Tool User Guide-October 2003 Revision
71
Figure HH
HH.1 Assign a contact by clicking the radio button to the right of the name to be added, then click apply

Ordering Tool User Guide Internet Commerce
Ordering Tool User Guide-October 2003 Revision
72
Figure II
II.1
Change
Contact
II.2
Change
Address
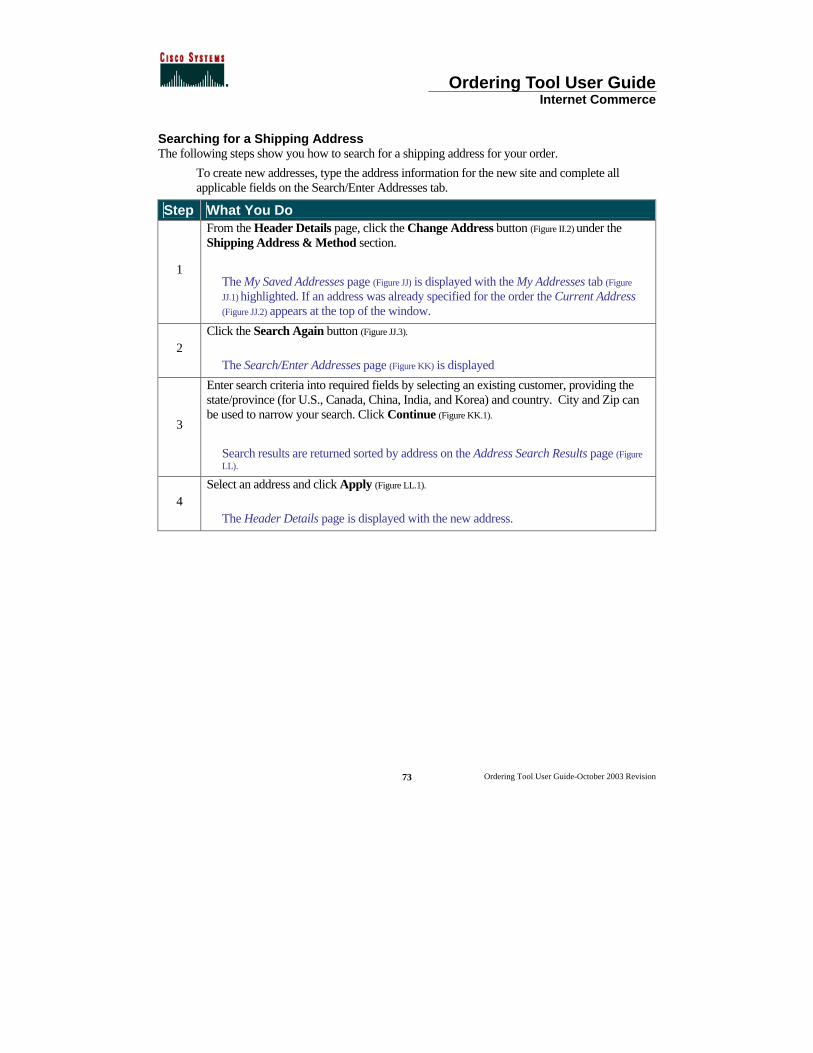
Ordering Tool User Guide Internet Commerce
Ordering Tool User Guide-October 2003 Revision
73
Searching for a Shipping Address The following steps show you how to search for a shipping address for your order.
To create new addresses, type the address information for the new site and complete all applicable fields on the Search/Enter Addresses tab.
Step What You Do
1
From the Header Details page, click the Change Address button (Figure II.2) under the Shipping Address & Method section.
The My Saved Addresses page (Figure JJ) is displayed with the My Addresses tab (Figure
JJ.1) highlighted. If an address was already specified for the order the Current Address (Figure JJ.2) appears at the top of the window.
2 Click the Search Again button (Figure JJ.3).
The Search/Enter Addresses page (Figure KK) is displayed
3
Enter search criteria into required fields by selecting an existing customer, providing the state/province (for U.S., Canada, China, India, and Korea) and country. City and Zip can be used to narrow your search. Click Continue (Figure KK.1).
Search results are returned sorted by address on the Address Search Results page (Figure LL).
4 Select an address and click Apply (Figure LL.1).
The Header Details page is displayed with the new address.
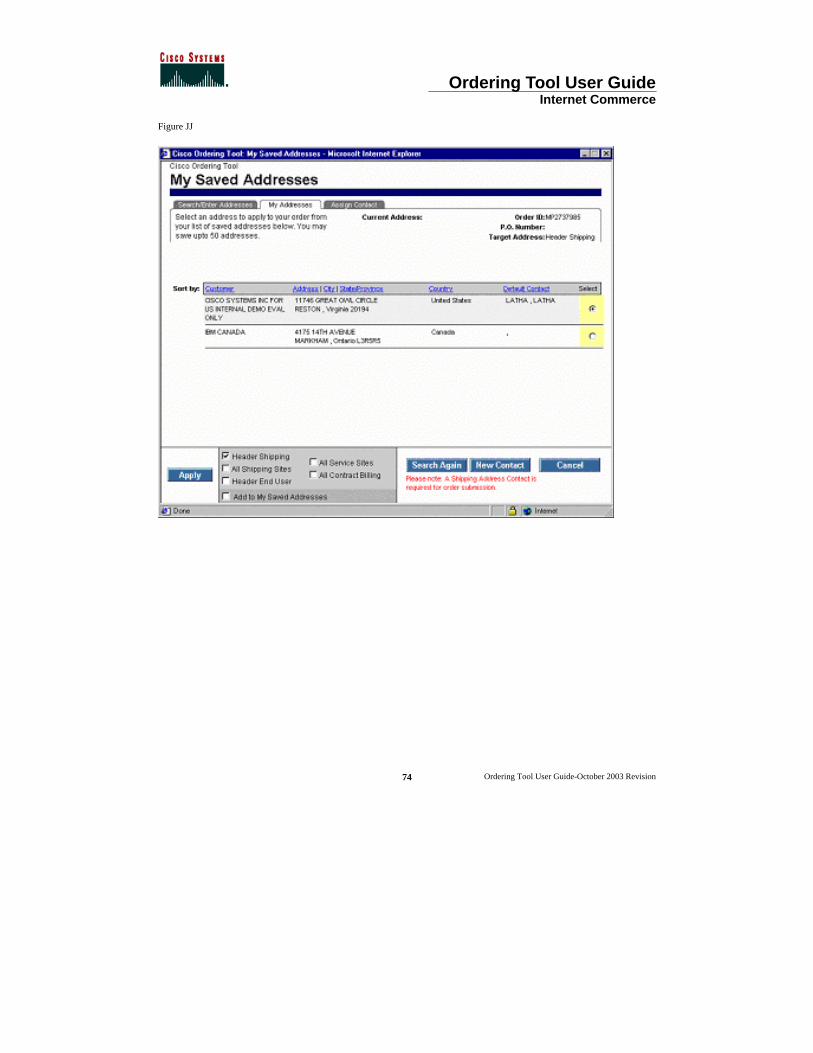
Ordering Tool User Guide Internet Commerce
Ordering Tool User Guide-October 2003 Revision
74
Figure JJ
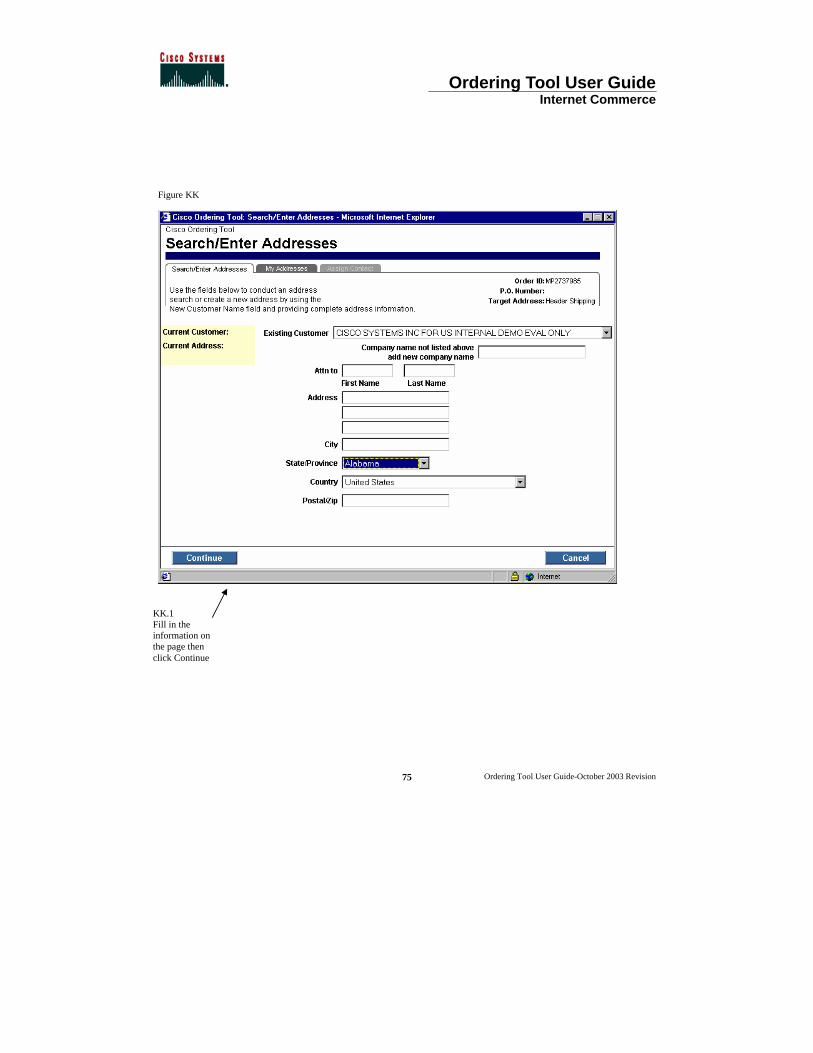
Ordering Tool User Guide Internet Commerce
Ordering Tool User Guide-October 2003 Revision
75
Figure KK
KK.1 Fill in the information on the page then click Continue
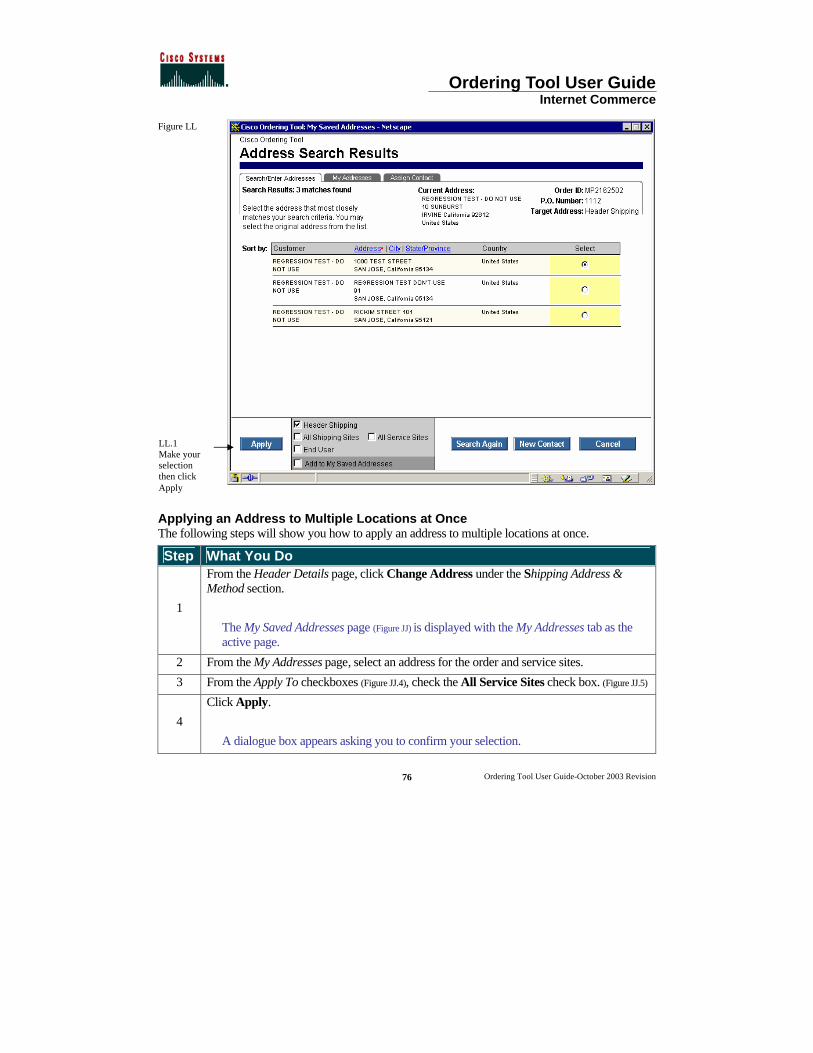
Ordering Tool User Guide Internet Commerce
Ordering Tool User Guide-October 2003 Revision
76
Figure LL
Applying an Address to Multiple Locations at Once The following steps will show you how to apply an address to multiple locations at once.
Step What You Do
1
From the Header Details page, click Change Address under the Shipping Address & Method section.
The My Saved Addresses page (Figure JJ) is displayed with the My Addresses tab as the active page.
2 From the My Addresses page, select an address for the order and service sites.
3 From the Apply To checkboxes (Figure JJ.4), check the All Service Sites check box. (Figure JJ.5)
4
Click Apply.
A dialogue box appears asking you to confirm your selection.
LL.1 Make your selection then click Apply
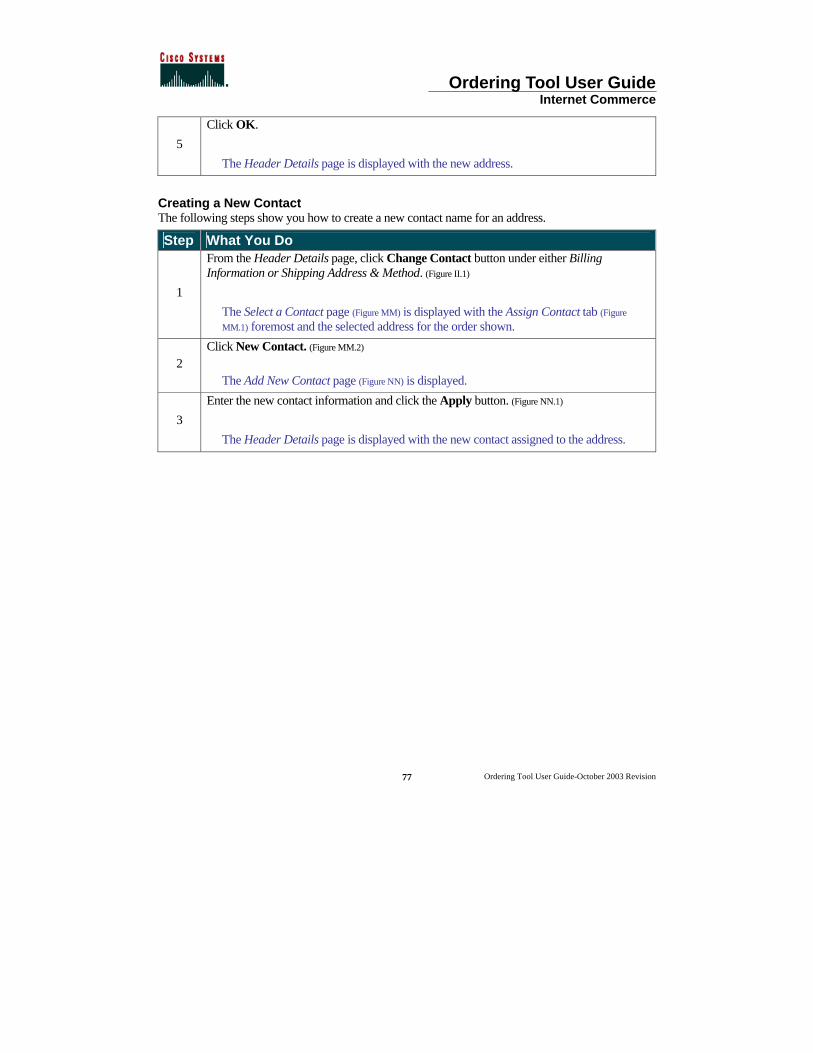
Ordering Tool User Guide Internet Commerce
Ordering Tool User Guide-October 2003 Revision
77
5
Click OK.
The Header Details page is displayed with the new address.
Creating a New Contact The following steps show you how to create a new contact name for an address.
Step What You Do
1
From the Header Details page, click Change Contact button under either Billing Information or Shipping Address & Method. (Figure II.1)
The Select a Contact page (Figure MM) is displayed with the Assign Contact tab (Figure
MM.1) foremost and the selected address for the order shown.
2 Click New Contact. (Figure MM.2)
The Add New Contact page (Figure NN) is displayed.
3
Enter the new contact information and click the Apply button. (Figure NN.1)
The Header Details page is displayed with the new contact assigned to the address.
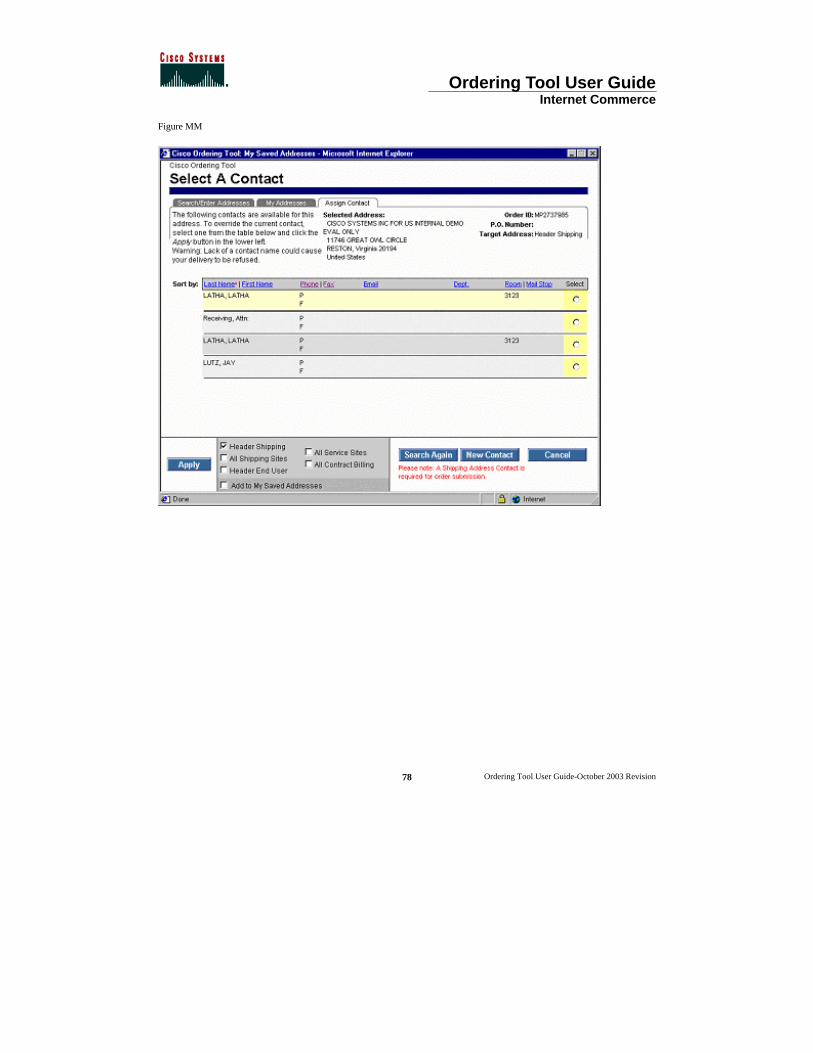
Ordering Tool User Guide Internet Commerce
Ordering Tool User Guide-October 2003 Revision
78
Figure MM
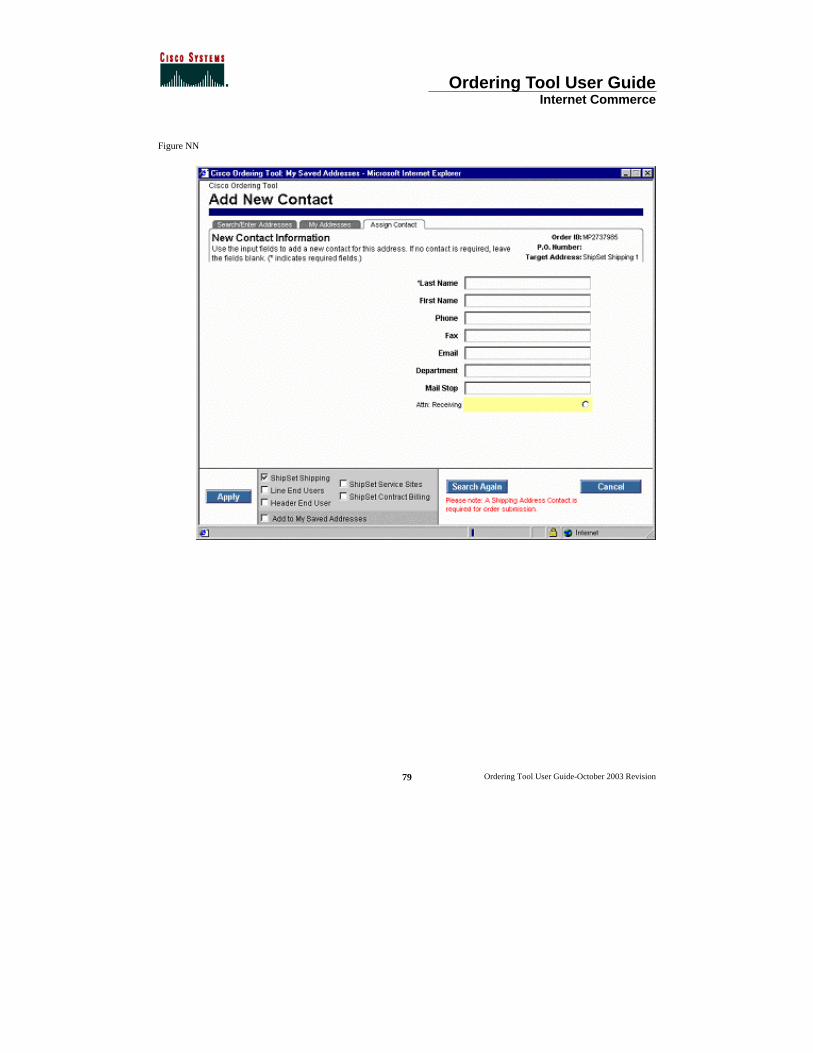
Ordering Tool User Guide Internet Commerce
Ordering Tool User Guide-October 2003 Revision
79
Figure NN

Ordering Tool User Guide Internet Commerce
Ordering Tool User Guide-October 2003 Revision
80
Chapter Ten – Configure Some products must be configured with cables and other pieces during the ordering process. This chapter introduces you to the configuration process.
Chapter Objective < Learn how to access the Configurator.
Definition < Configuration – The process of choosing different options (cables, memory, cards) that
will be included with the product you are purchasing.
How to Use the Configurator to Configure Products for Your Order
Configuring a Line Item The following steps show you how to configure a line item.
Step What You Do
1 On the Main Order Form locate a line item that currently says Unverified in the Status column (Figure OO.1).
2
You must first select what is to be configured. To make your selection, either click the Unverified hyperlink (Figure OO.4), or choose the line in the Line # pull down menu (Figure
OO.3). Click the Configure button. (Figure OO.2)
You are taken to the Configurator to configure the product. (Figure PP)
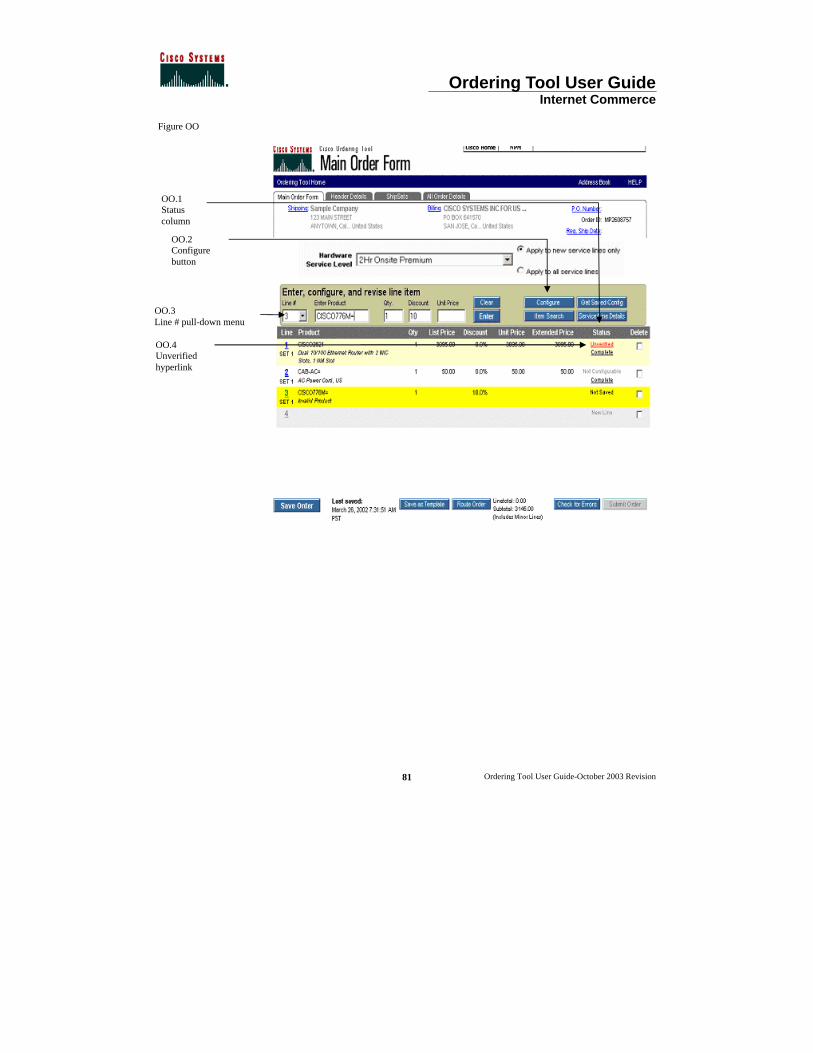
Ordering Tool User Guide Internet Commerce
Ordering Tool User Guide-October 2003 Revision
81
Figure OO
OO.2 Configure button
OO.1 Status column
OO.4 Unverified hyperlink
OO.3 Line # pull-down menu
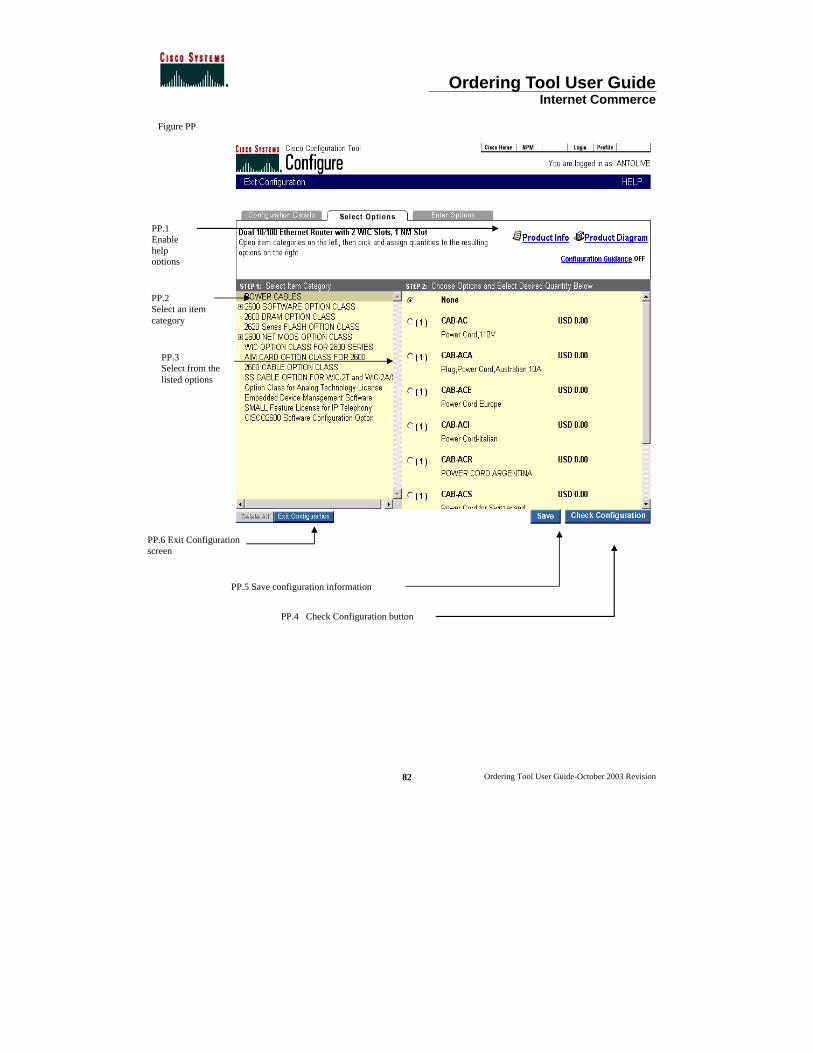
Ordering Tool User Guide Internet Commerce
Ordering Tool User Guide-October 2003 Revision
82
Figure PP
PP.2 Select an item category
PP.3 Select from the listed options
PP.1 Enable help options
PP.4 Check Configuration button
PP.5 Save configuration information
PP.6 Exit Configuration screen
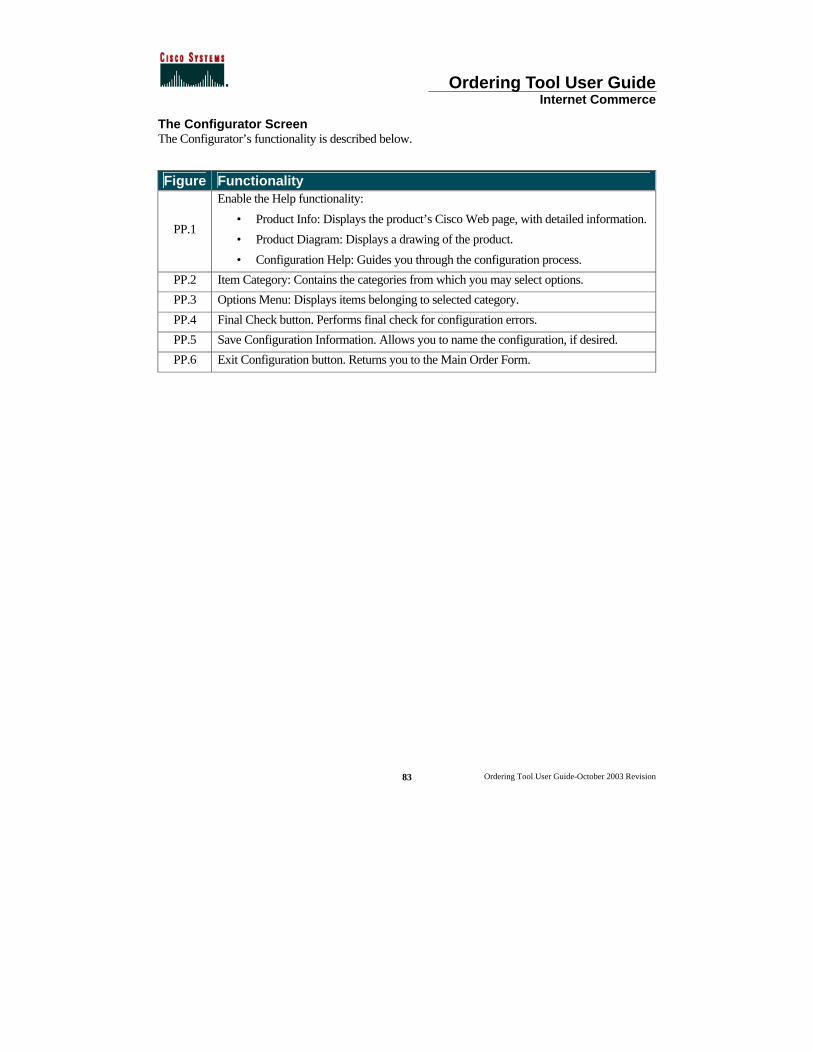
Ordering Tool User Guide Internet Commerce
Ordering Tool User Guide-October 2003 Revision
83
The Configurator Screen The Configurator’s functionality is described below.
Figure Functionality
PP.1
Enable the Help functionality:
• Product Info: Displays the product’s Cisco Web page, with detailed information.
• Product Diagram: Displays a drawing of the product.
• Configuration Help: Guides you through the configuration process.
PP.2 Item Category: Contains the categories from which you may select options.
PP.3 Options Menu: Displays items belonging to selected category.
PP.4 Final Check button. Performs final check for configuration errors.
PP.5 Save Configuration Information. Allows you to name the configuration, if desired.
PP.6 Exit Configuration button. Returns you to the Main Order Form.
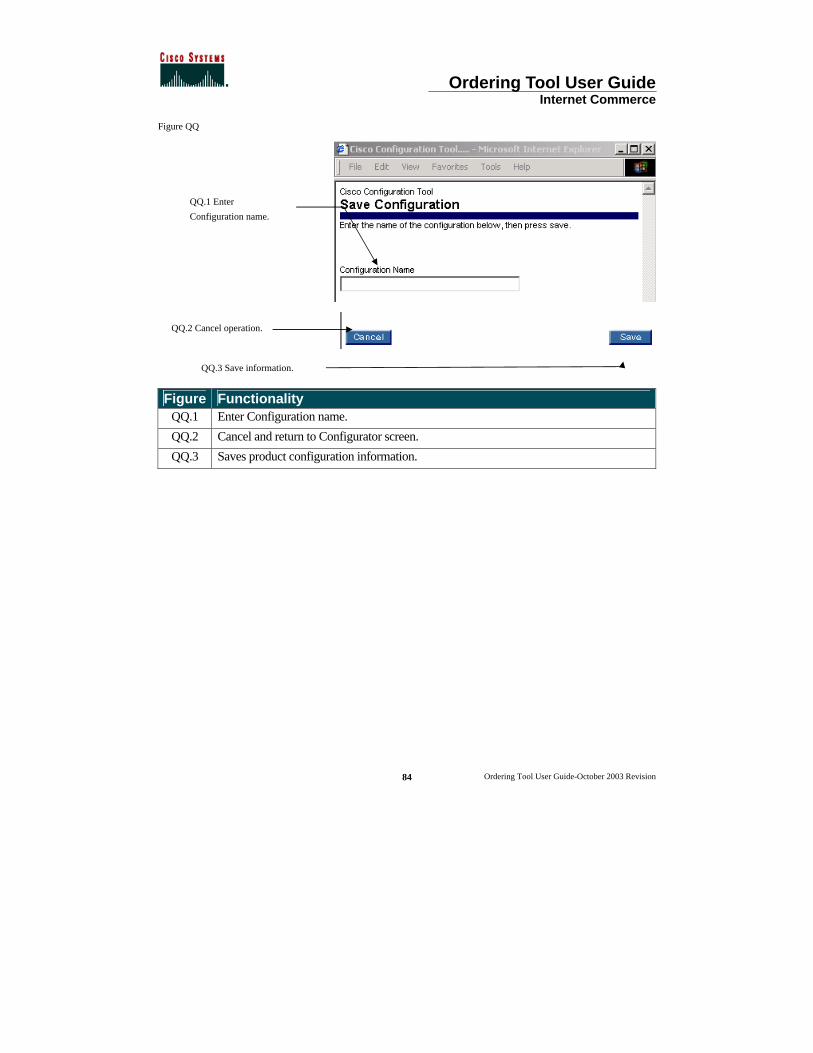
Ordering Tool User Guide Internet Commerce
Ordering Tool User Guide-October 2003 Revision
84
Figure QQ
Figure Functionality QQ.1 Enter Configuration name.
QQ.2 Cancel and return to Configurator screen.
QQ.3 Saves product configuration information.
QQ.1 Enter
Configuration name.
QQ.2 Cancel operation.
QQ.3 Save information.
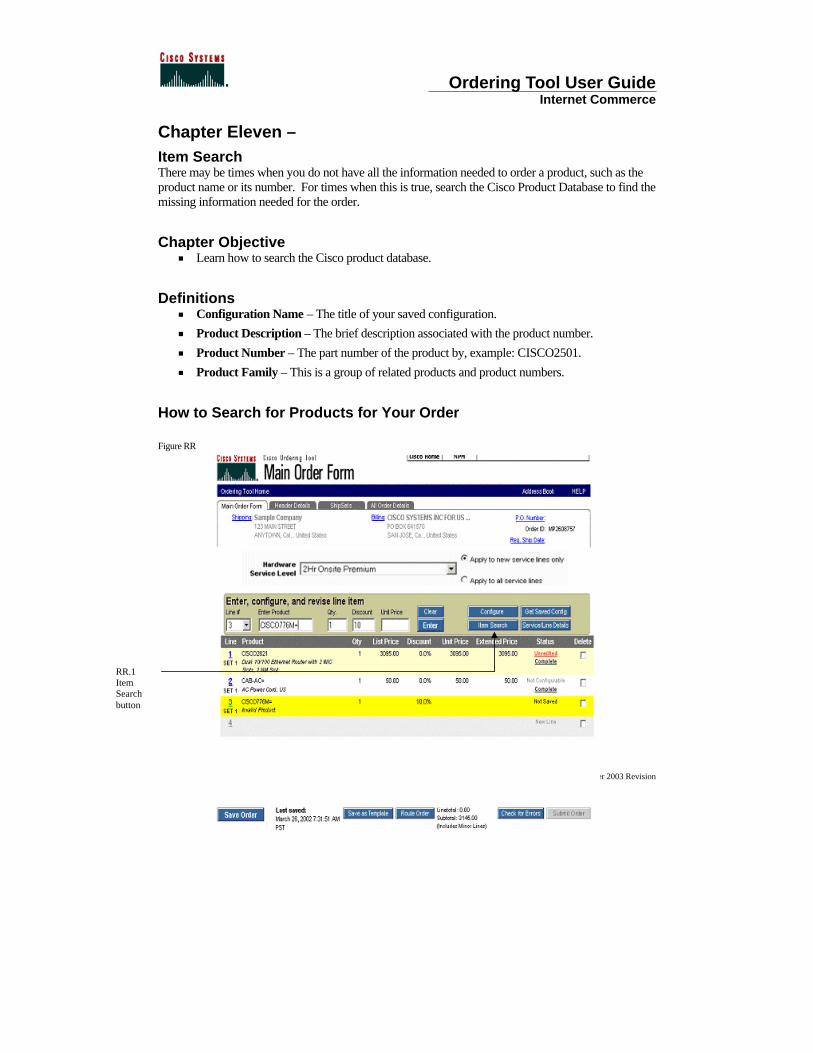
Ordering Tool User Guide Internet Commerce
Ordering Tool User Guide-October 2003 Revision
85
Chapter Eleven – Item Search There may be times when you do not have all the information needed to order a product, such as the product name or its number. For times when this is true, search the Cisco Product Database to find the missing information needed for the order.
Chapter Objective < Learn how to search the Cisco product database.
Definitions < Configuration Name – The title of your saved configuration. < Product Description – The brief description associated with the product number. < Product Number – The part number of the product by, example: CISCO2501. < Product Family – This is a group of related products and product numbers.
How to Search for Products for Your Order Figure RR
RR.1 Item Search button
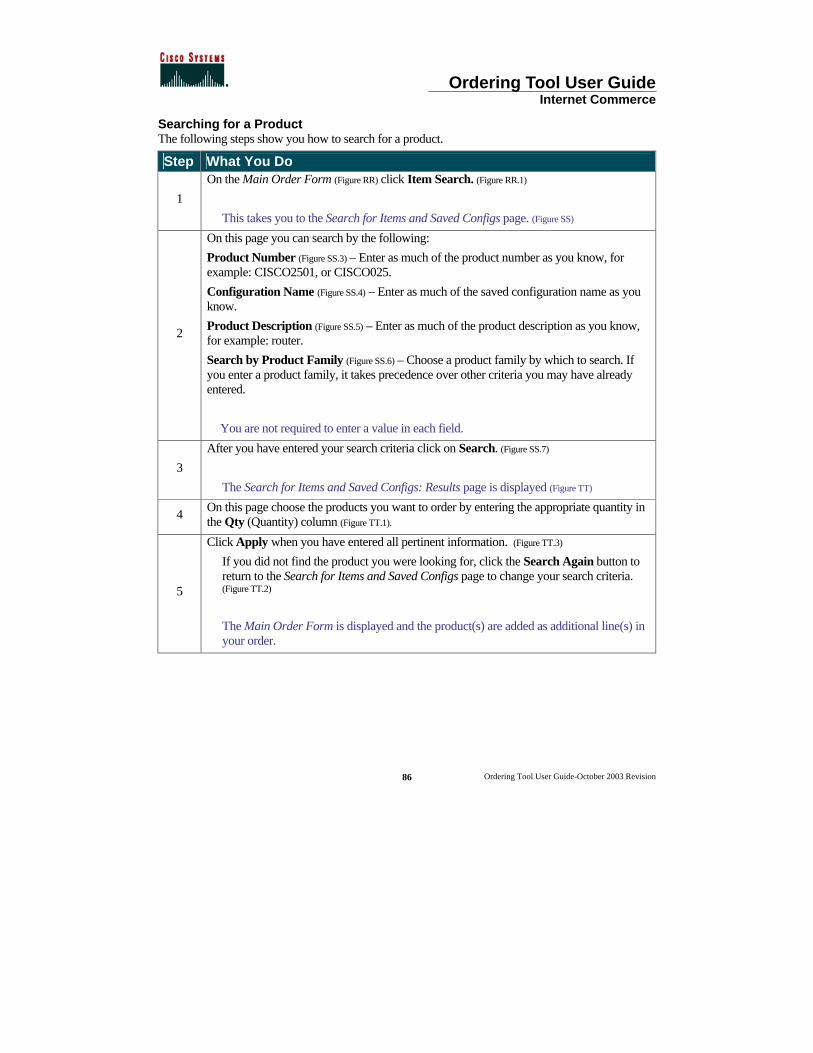
Ordering Tool User Guide Internet Commerce
Ordering Tool User Guide-October 2003 Revision
86
Searching for a Product The following steps show you how to search for a product.
Step What You Do
1
On the Main Order Form (Figure RR) click Item Search. (Figure RR.1)
This takes you to the Search for Items and Saved Configs page. (Figure SS)
2
On this page you can search by the following:
Product Number (Figure SS.3) – Enter as much of the product number as you know, for example: CISCO2501, or CISCO025.
Configuration Name (Figure SS.4) – Enter as much of the saved configuration name as you know.
Product Description (Figure SS.5) – Enter as much of the product description as you know, for example: router.
Search by Product Family (Figure SS.6) – Choose a product family by which to search. If you enter a product family, it takes precedence over other criteria you may have already entered.
You are not required to enter a value in each field.
3
After you have entered your search criteria click on Search. (Figure SS.7)
The Search for Items and Saved Configs: Results page is displayed (Figure TT)
4 On this page choose the products you want to order by entering the appropriate quantity in the Qty (Quantity) column (Figure TT.1).
5
Click Apply when you have entered all pertinent information. (Figure TT.3)
If you did not find the product you were looking for, click the Search Again button to return to the Search for Items and Saved Configs page to change your search criteria. (Figure TT.2)
The Main Order Form is displayed and the product(s) are added as additional line(s) in your order.

Ordering Tool User Guide Internet Commerce
Ordering Tool User Guide-October 2003 Revision
87
Figure SS
Figure TT
TT.1 Qty. column
TT.2 Search Again button
TT.3 Apply button
SS.7 Search
SS.6 Search by Product Family
SS.5 - Product Description
SS.4 Configuration Name
SS.3 Product Number
SS.2 Spares Search Tab
SS.1 - My Saved Configs Tab
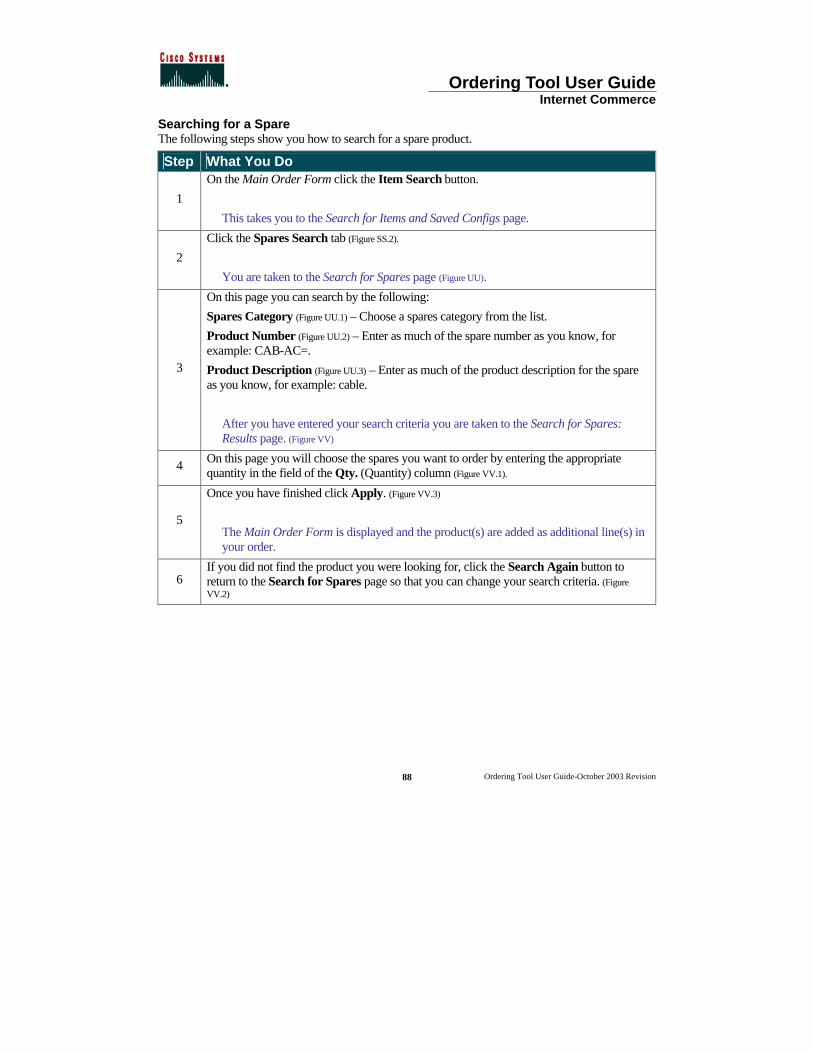
Ordering Tool User Guide Internet Commerce
Ordering Tool User Guide-October 2003 Revision
88
Searching for a Spare The following steps show you how to search for a spare product.
Step What You Do
1
On the Main Order Form click the Item Search button.
This takes you to the Search for Items and Saved Configs page.
2
Click the Spares Search tab (Figure SS.2).
You are taken to the Search for Spares page (Figure UU).
3
On this page you can search by the following:
Spares Category (Figure UU.1) – Choose a spares category from the list.
Product Number (Figure UU.2) – Enter as much of the spare number as you know, for example: CAB-AC=.
Product Description (Figure UU.3) – Enter as much of the product description for the spare as you know, for example: cable.
After you have entered your search criteria you are taken to the Search for Spares: Results page. (Figure VV)
4 On this page you will choose the spares you want to order by entering the appropriate quantity in the field of the Qty. (Quantity) column (Figure VV.1).
5
Once you have finished click Apply. (Figure VV.3)
The Main Order Form is displayed and the product(s) are added as additional line(s) in your order.
6 If you did not find the product you were looking for, click the Search Again button to return to the Search for Spares page so that you can change your search criteria. (Figure VV.2)
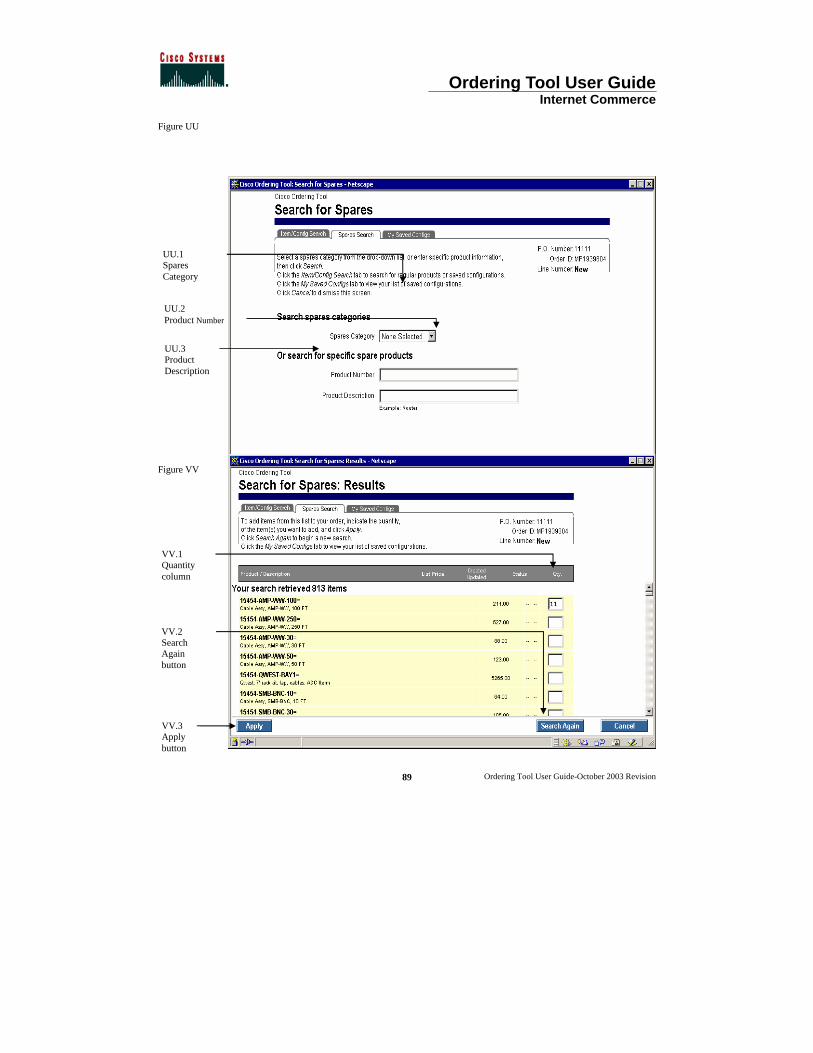
Ordering Tool User Guide Internet Commerce
Ordering Tool User Guide-October 2003 Revision
89
Figure UU
Figure VV
UU.1 Spares Category
UU.2 Product Number
UU.3 Product Description
VV.3 Apply button
VV.2 Search Again button
VV.1 Quantity column
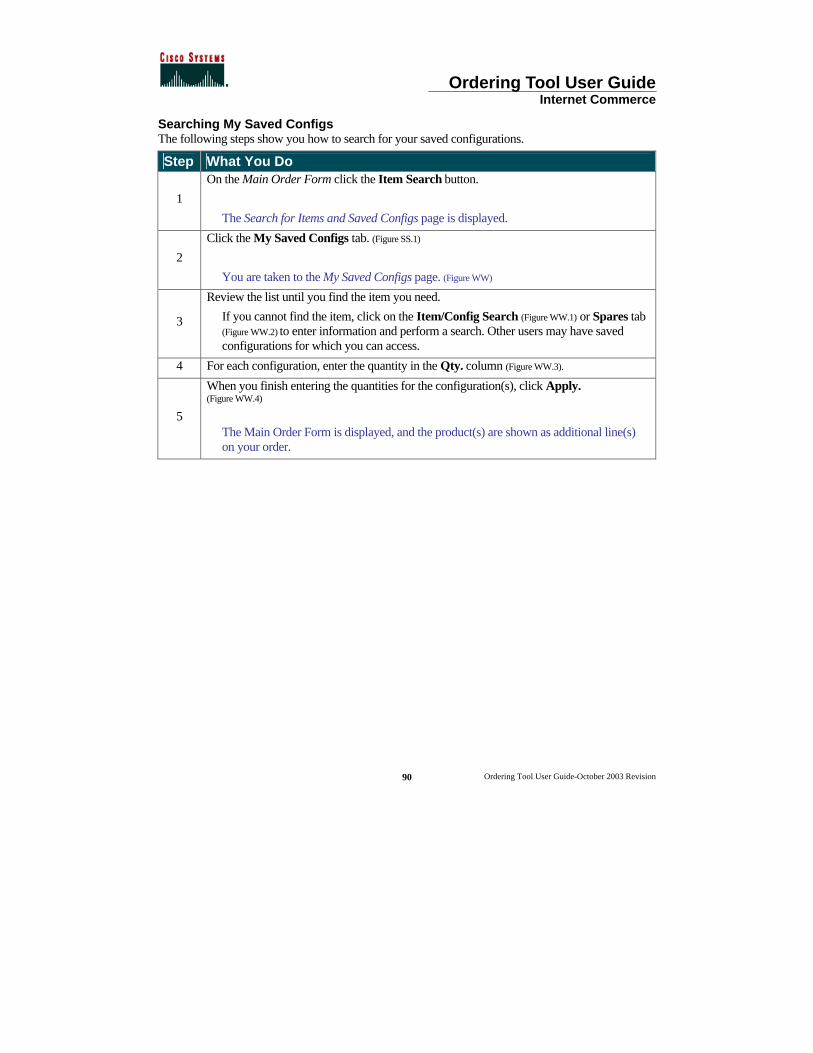
Ordering Tool User Guide Internet Commerce
Ordering Tool User Guide-October 2003 Revision
90
Searching My Saved Configs The following steps show you how to search for your saved configurations.
Step What You Do
1
On the Main Order Form click the Item Search button.
The Search for Items and Saved Configs page is displayed.
2
Click the My Saved Configs tab. (Figure SS.1)
You are taken to the My Saved Configs page. (Figure WW)
3
Review the list until you find the item you need.
If you cannot find the item, click on the Item/Config Search (Figure WW.1) or Spares tab
(Figure WW.2) to enter information and perform a search. Other users may have saved configurations for which you can access.
4 For each configuration, enter the quantity in the Qty. column (Figure WW.3).
5
When you finish entering the quantities for the configuration(s), click Apply. (Figure WW.4)
The Main Order Form is displayed, and the product(s) are shown as additional line(s) on your order.
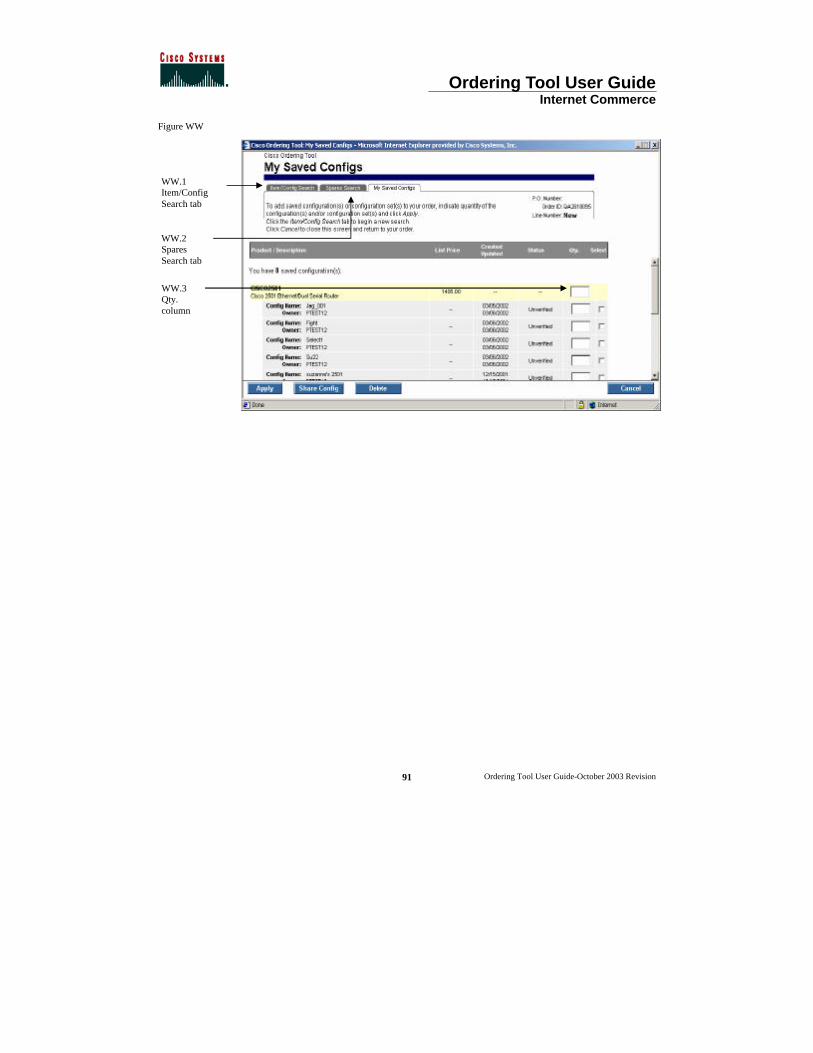
Ordering Tool User Guide Internet Commerce
Ordering Tool User Guide-October 2003 Revision
91
Figure WW
WW.2 Spares Search tab
WW.3 Qty. column
WW.1 Item/Config Search tab
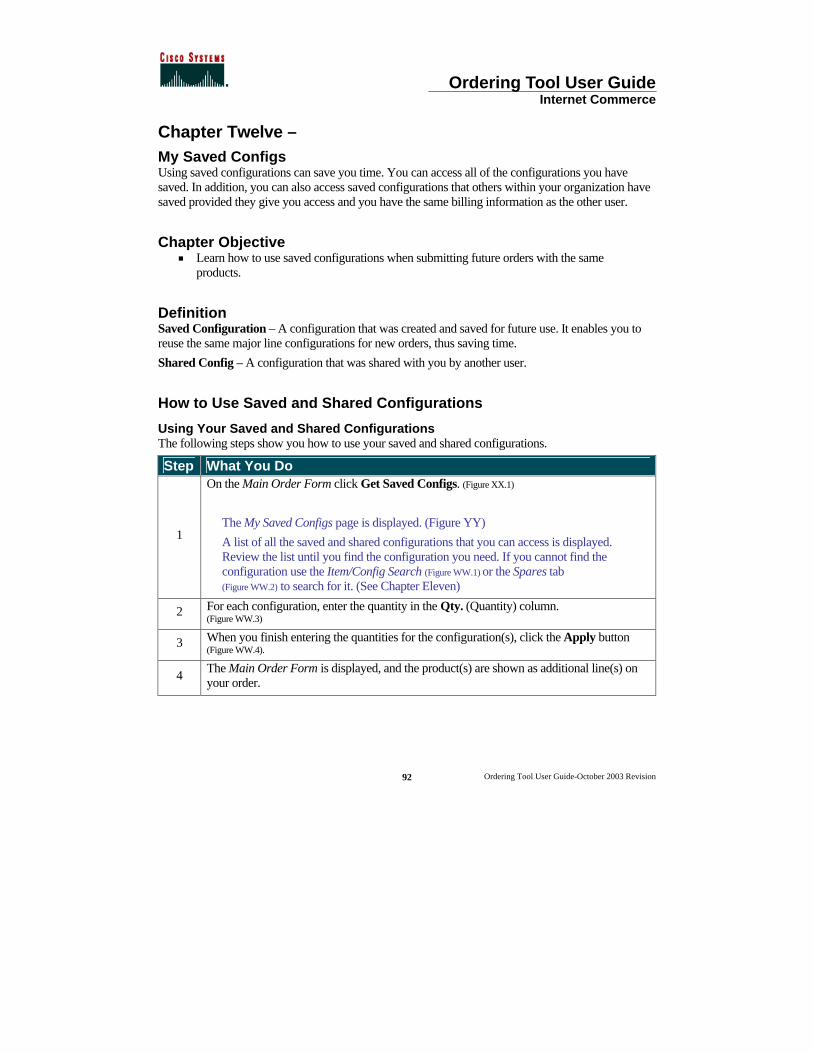
Ordering Tool User Guide Internet Commerce
Ordering Tool User Guide-October 2003 Revision
92
Chapter Twelve – My Saved Configs Using saved configurations can save you time. You can access all of the configurations you have saved. In addition, you can also access saved configurations that others within your organization have saved provided they give you access and you have the same billing information as the other user.
Chapter Objective < Learn how to use saved configurations when submitting future orders with the same
products.
Definition Saved Configuration – A configuration that was created and saved for future use. It enables you to reuse the same major line configurations for new orders, thus saving time.
Shared Config – A configuration that was shared with you by another user.
How to Use Saved and Shared Configurations
Using Your Saved and Shared Configurations The following steps show you how to use your saved and shared configurations.
Step What You Do
1
On the Main Order Form click Get Saved Configs. (Figure XX.1)
The My Saved Configs page is displayed. (Figure YY)
A list of all the saved and shared configurations that you can access is displayed. Review the list until you find the configuration you need. If you cannot find the configuration use the Item/Config Search (Figure WW.1) or the Spares tab (Figure WW.2) to search for it. (See Chapter Eleven)
2 For each configuration, enter the quantity in the Qty. (Quantity) column. (Figure WW.3)
3 When you finish entering the quantities for the configuration(s), click the Apply button (Figure WW.4).
4 The Main Order Form is displayed, and the product(s) are shown as additional line(s) on your order.
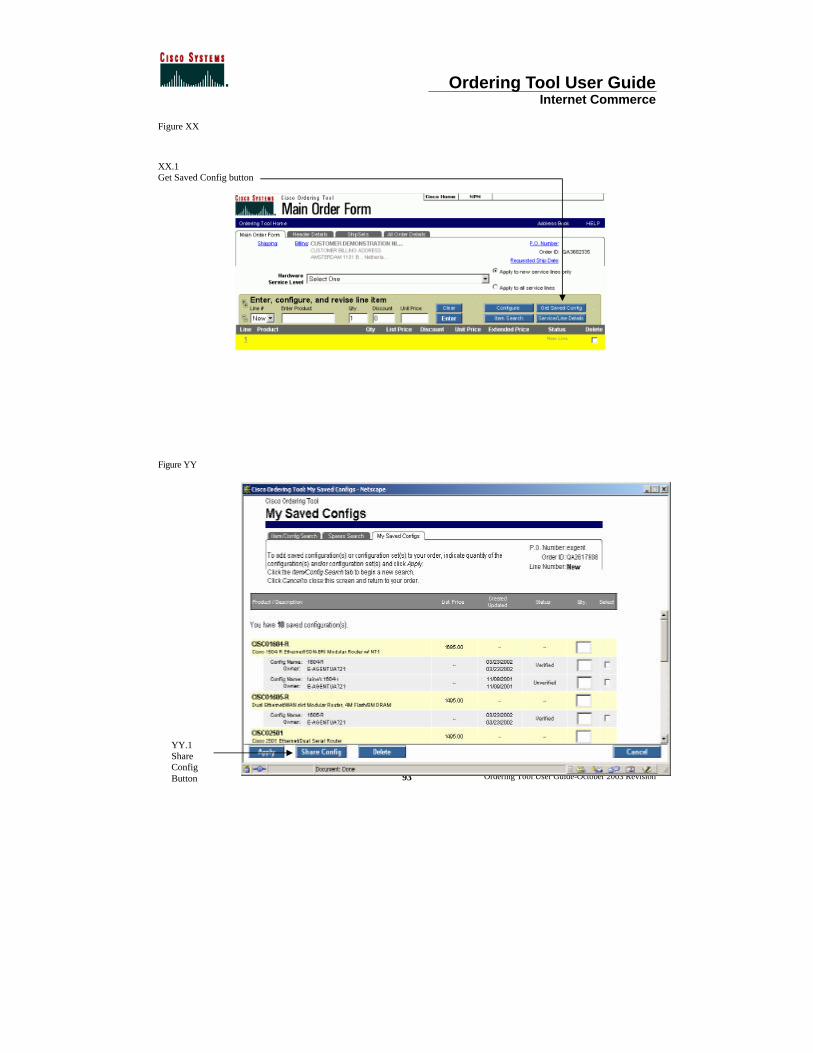
Ordering Tool User Guide Internet Commerce
Ordering Tool User Guide-October 2003 Revision
93
Figure XX XX.1 Get Saved Config button
Figure YY
YY.1 Share Config Button
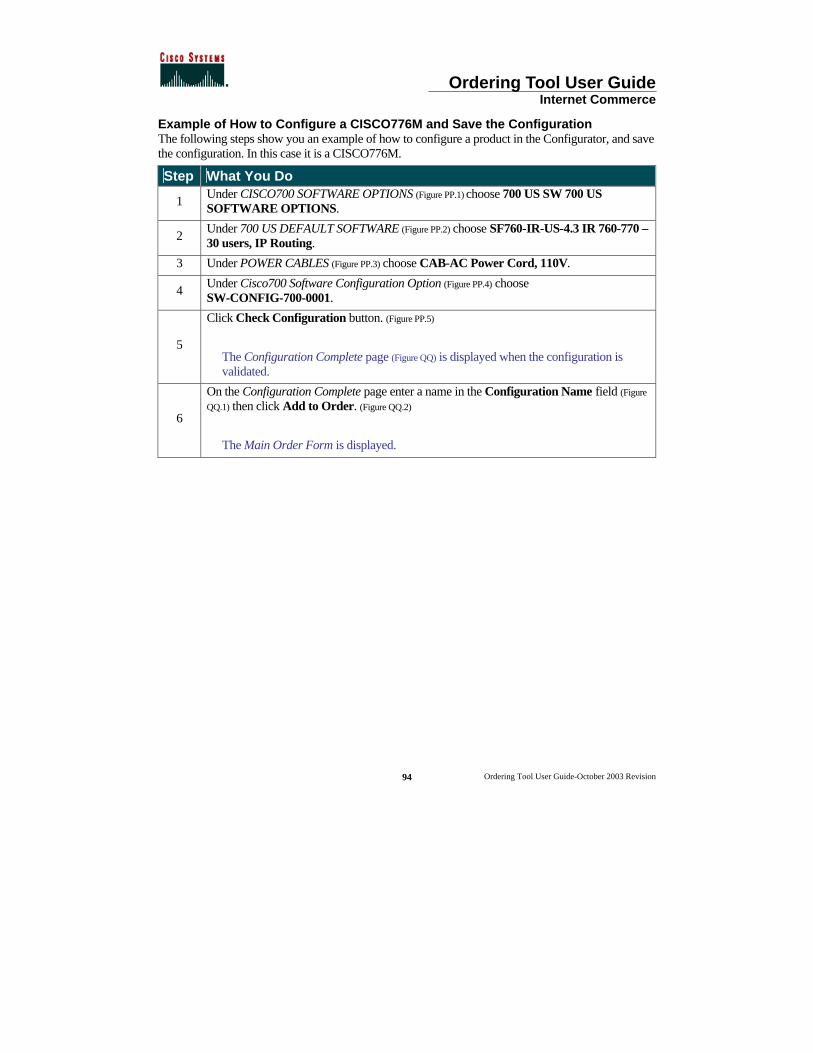
Ordering Tool User Guide Internet Commerce
Ordering Tool User Guide-October 2003 Revision
94
Example of How to Configure a CISCO776M and Save the Configuration The following steps show you an example of how to configure a product in the Configurator, and save the configuration. In this case it is a CISCO776M.
Step What You Do
1 Under CISCO700 SOFTWARE OPTIONS (Figure PP.1) choose 700 US SW 700 US SOFTWARE OPTIONS.
2 Under 700 US DEFAULT SOFTWARE (Figure PP.2) choose SF760-IR-US-4.3 IR 760-770 – 30 users, IP Routing.
3 Under POWER CABLES (Figure PP.3) choose CAB-AC Power Cord, 110V.
4 Under Cisco700 Software Configuration Option (Figure PP.4) choose SW-CONFIG-700-0001.
5
Click Check Configuration button. (Figure PP.5)
The Configuration Complete page (Figure QQ) is displayed when the configuration is validated.
6
On the Configuration Complete page enter a name in the Configuration Name field (Figure
QQ.1) then click Add to Order. (Figure QQ.2)
The Main Order Form is displayed.
Ordering Tool User Guide Internet Commerce
Ordering Tool User Guide-October 2003 Revision
95
Chapter Thirteen – Service/Line Details The Service/Line Details page allows you to set details that are specific to a particular line item. These include service options, end user information, service site information, ShipSets, and notes. Use this section in the following cases:
§ Service must be added to a product.
§ ShipSet information for a particular line item needs to be reviewed.
When you are setting line item specific details, the changes only affect the specific line item.
Chapter Objective < Learn how to set line item specific details for hardware and service line items.
Definitions < Major Line Item – This is usually the main product that you are ordering, for instance - a
chassis. < Minor Line Item – This is usually an option associated with the main product that you
are ordering, for instance - cable, memory, or an interface card.
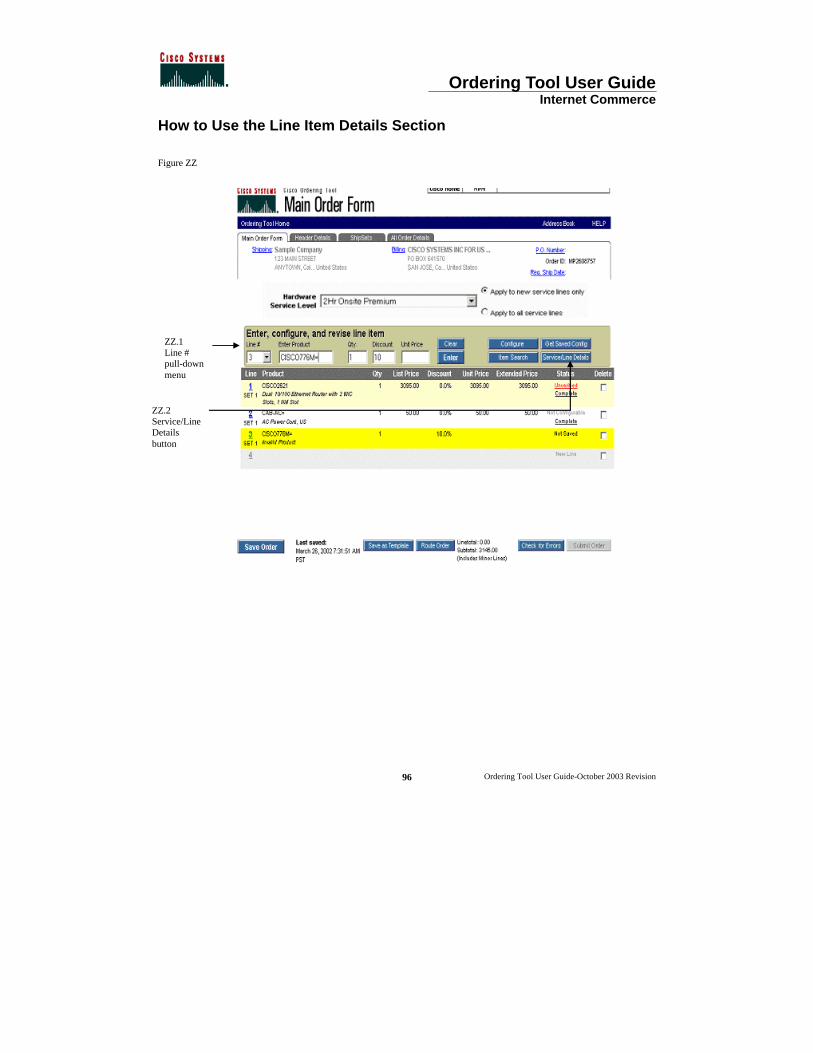
Ordering Tool User Guide Internet Commerce
Ordering Tool User Guide-October 2003 Revision
96
How to Use the Line Item Details Section
Figure ZZ
ZZ.2 Service/Line Details button
ZZ.1 Line # pull-down menu
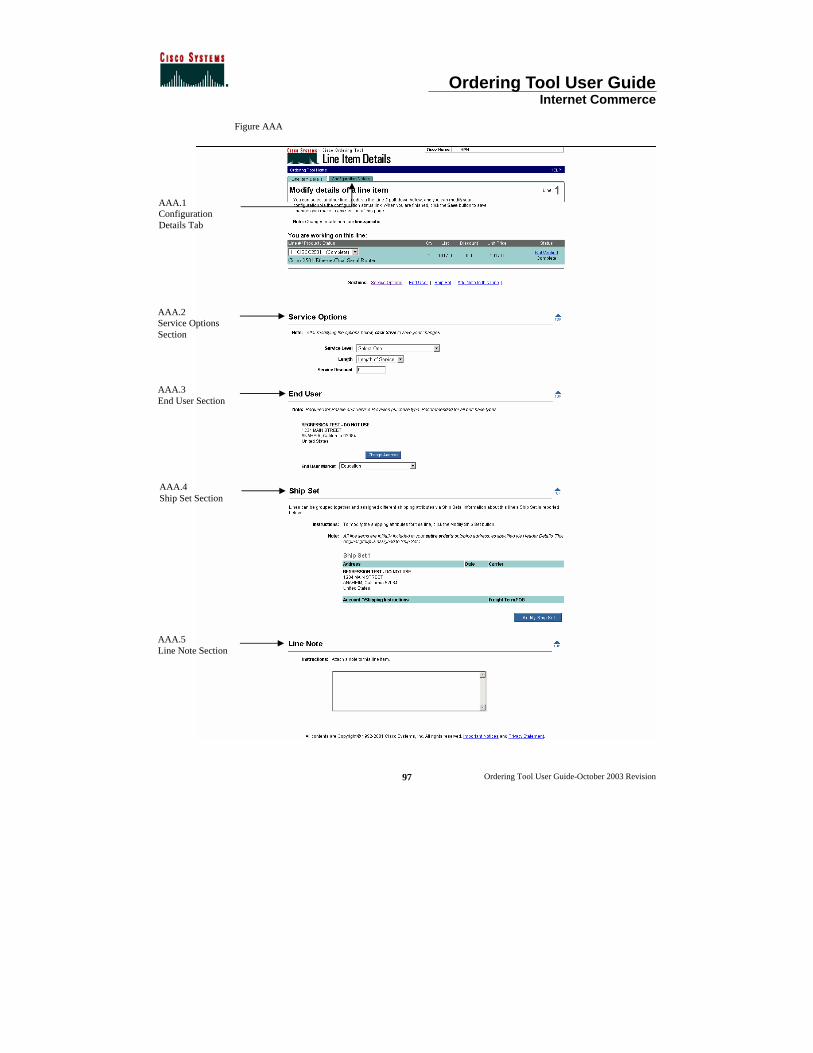
Ordering Tool User Guide Internet Commerce
Ordering Tool User Guide-October 2003 Revision
97
Figure AAA
AAA.1 Configuration Details Tab
AAA.2 Service Options Section
AAA.3 End User Section
AAA.4 Ship Set Section
AAA.5 Line Note Section

Ordering Tool User Guide Internet Commerce
Ordering Tool User Guide-October 2003 Revision
98
Viewing Line Item Details for a Hardware Line Item The following steps show you how to view details on hardware line items on the Line Item Details page.
If the line you choose is not configurable you will not see the Service Options section on the Line Item Details page.
Step What You Do
1
Choose a configurable line item in the Line # pull down menu (Figure YY.1). Click Service/Line Details (Figure XX.2) on the Main Order Form.
The Line Item Details page is displayed. (Figure AAA)
2 On the Line Item Details page you can make changes to any of the following sections:
2a
Service Options (Figure AAA.2) Service Level – Choose the service level that applies to the product.
Length – Choose one, two, or three years for the length of the service agreement.
Service Discount – Enter the service discount for the line item.
2b
End User (Figure AAA.3) Change Address – Allows you to add an end user to the line item or modify the current end user information.
End User Market – Choose the end user’s vertical market.
2c
Ship Set (Figure AAA.4) The ShipSets information for the line item appears here. To change it, click the Modify ShipSet button to take you too the ShipSets page to make modifications. (See Chapter Seven)
2d Line Note (Figure AAA.5)
You can enter a note specific to the line item. The notes box accepts up to 2,000 characters.
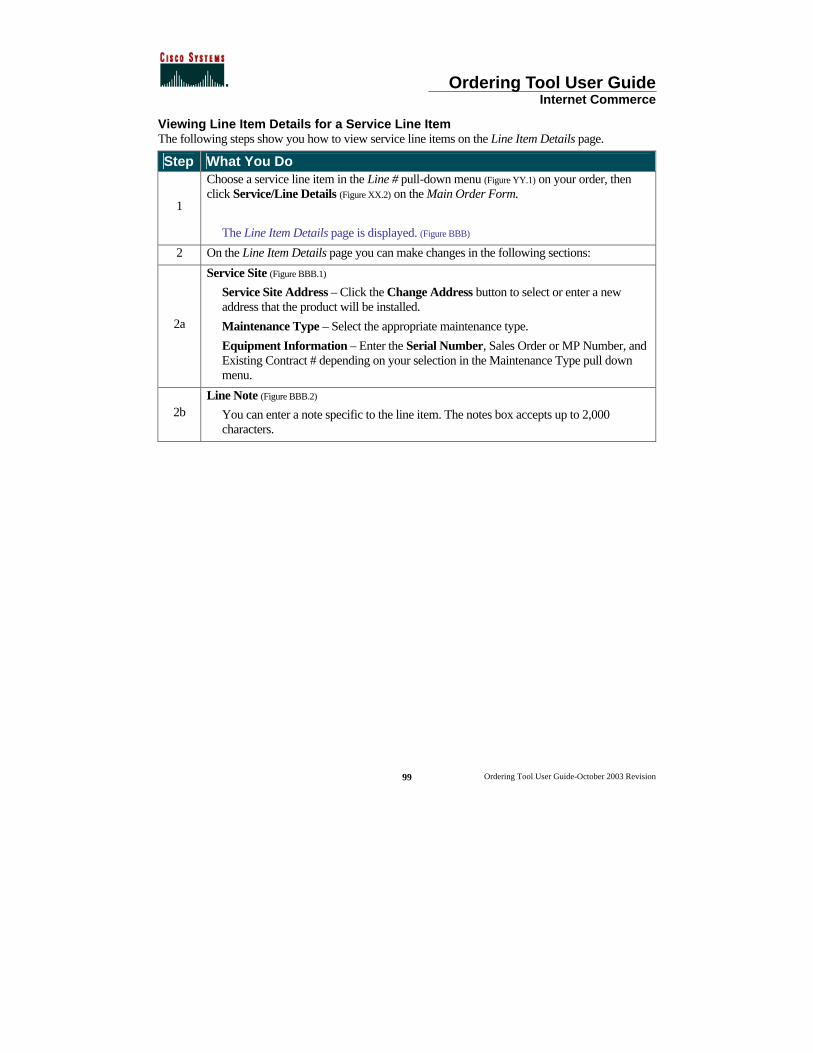
Ordering Tool User Guide Internet Commerce
Ordering Tool User Guide-October 2003 Revision
99
Viewing Line Item Details for a Service Line Item The following steps show you how to view service line items on the Line Item Details page.
Step What You Do
1
Choose a service line item in the Line # pull-down menu (Figure YY.1) on your order, then click Service/Line Details (Figure XX.2) on the Main Order Form.
The Line Item Details page is displayed. (Figure BBB)
2 On the Line Item Details page you can make changes in the following sections:
2a
Service Site (Figure BBB.1) Service Site Address – Click the Change Address button to select or enter a new address that the product will be installed.
Maintenance Type – Select the appropriate maintenance type.
Equipment Information – Enter the Serial Number, Sales Order or MP Number, and Existing Contract # depending on your selection in the Maintenance Type pull down menu.
2b Line Note (Figure BBB.2)
You can enter a note specific to the line item. The notes box accepts up to 2,000 characters.

Ordering Tool User Guide Internet Commerce
Ordering Tool User Guide-October 2003 Revision
100
Figure BBB
BBB.1 Service Site section
BBB.2 Line Note section
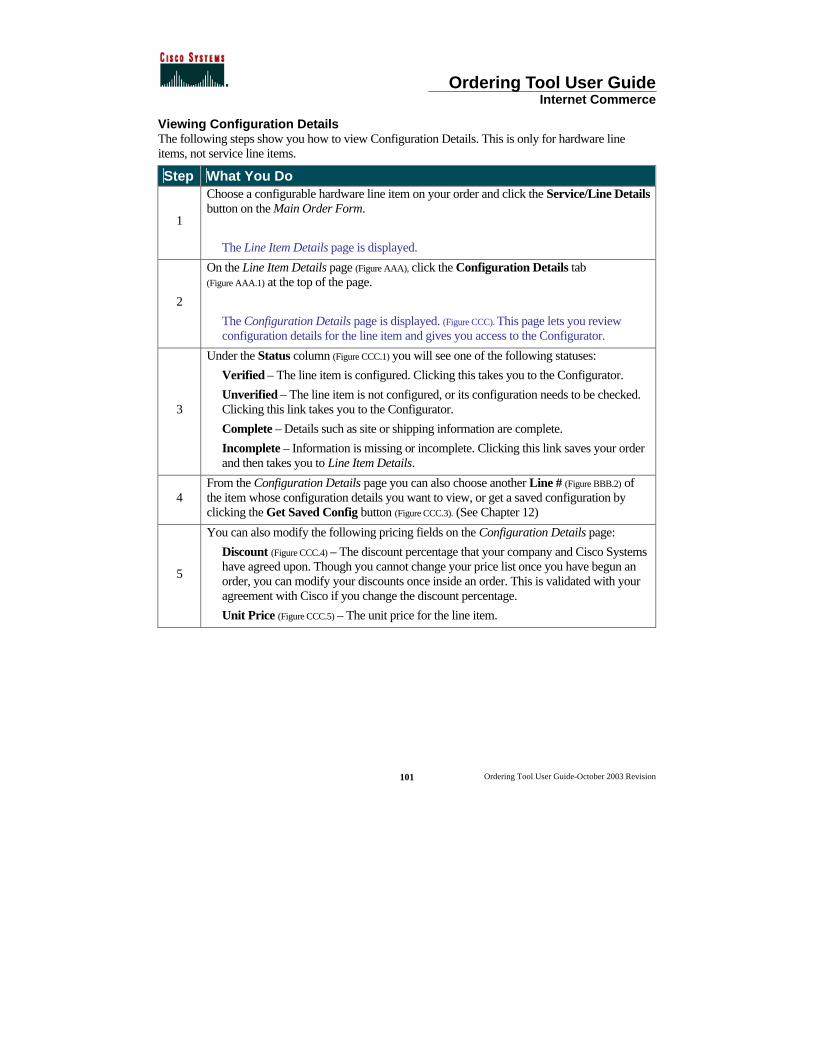
Ordering Tool User Guide Internet Commerce
Ordering Tool User Guide-October 2003 Revision
101
Viewing Configuration Details The following steps show you how to view Configuration Details. This is only for hardware line items, not service line items.
Step What You Do
1
Choose a configurable hardware line item on your order and click the Service/Line Details button on the Main Order Form.
The Line Item Details page is displayed.
2
On the Line Item Details page (Figure AAA), click the Configuration Details tab (Figure AAA.1) at the top of the page.
The Configuration Details page is displayed. (Figure CCC). This page lets you review configuration details for the line item and gives you access to the Configurator.
3
Under the Status column (Figure CCC.1) you will see one of the following statuses:
Verified – The line item is configured. Clicking this takes you to the Configurator.
Unverified – The line item is not configured, or its configuration needs to be checked. Clicking this link takes you to the Configurator.
Complete – Details such as site or shipping information are complete.
Incomplete – Information is missing or incomplete. Clicking this link saves your order and then takes you to Line Item Details.
4 From the Configuration Details page you can also choose another Line # (Figure BBB.2) of the item whose configuration details you want to view, or get a saved configuration by clicking the Get Saved Config button (Figure CCC.3). (See Chapter 12)
5
You can also modify the following pricing fields on the Configuration Details page:
Discount (Figure CCC.4) – The discount percentage that your company and Cisco Systems have agreed upon. Though you cannot change your price list once you have begun an order, you can modify your discounts once inside an order. This is validated with your agreement with Cisco if you change the discount percentage.
Unit Price (Figure CCC.5) – The unit price for the line item.
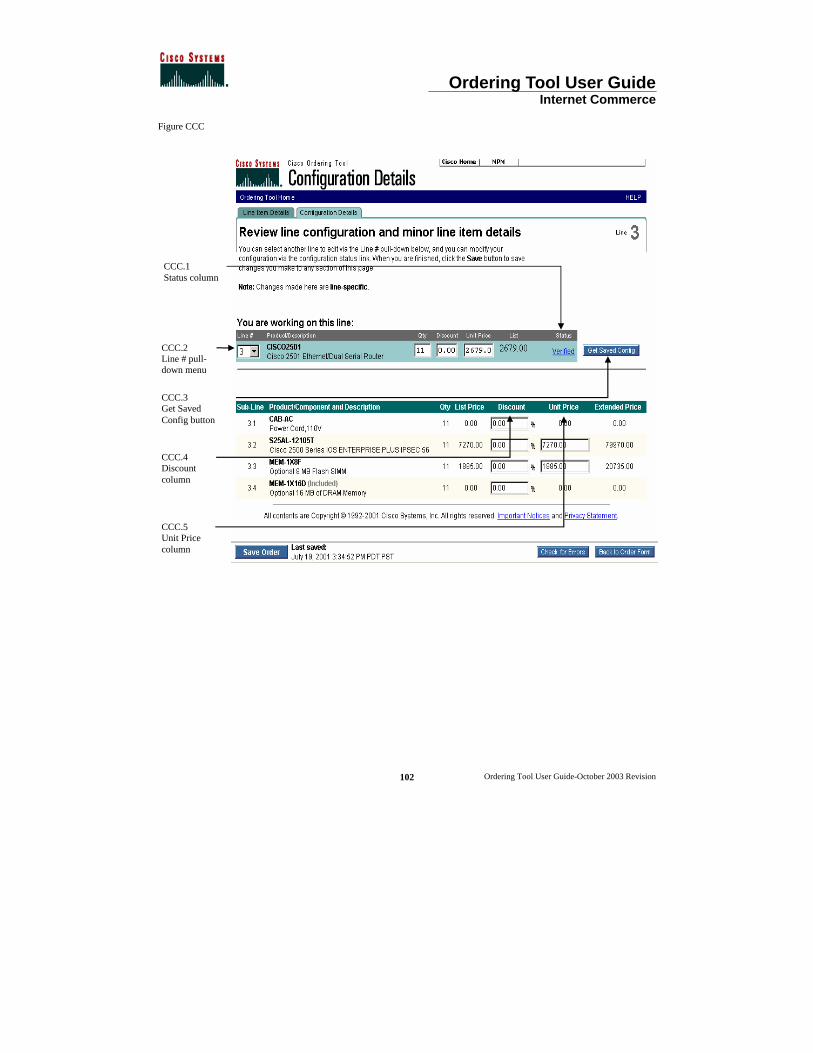
Ordering Tool User Guide Internet Commerce
Ordering Tool User Guide-October 2003 Revision
102
Figure CCC
CCC.5 Unit Price column
CCC.4 Discount column
CCC.3 Get Saved Config button
CCC.1 Status column
CCC.2 Line # pull-down menu
Ordering Tool User Guide Internet Commerce
Ordering Tool User Guide-October 2003 Revision
103
Chapter Fourteen – Order Routing A routed order is an order that is created by one person and sent to someone else to complete, approve or submit. If an order has been routed to you, you will receive an email message from the person who routed the order. The email provides the Order ID and the Key needed to access the order in the Ordering Tool.
Chapter Objectives < How to route an order. < How to acquire a routed order. < How to use the routing history.
Definitions < Acquire Order – Displays the Main Order Form for the order identified by the Order ID
and Key fields. < Key – A combination of letters and numbers used to access a routed order. < Order ID – The MarketPlace (MP) number assigned to each order.
How to Use Order Routing Routing an Order The following steps show you how to route an order.
Step What You Do
1
On the Main Order Form for an open order, click the Route Order button (Figure DDD.1).
The Order Routing page (Figure EEE) appears.
2 Enter the email address/es (Figure EEE.2) of the user(s) who should receive the routed order.
3 Enter any notes to be routed with the order in the Routing notes section. (Figure EEE.3)
4
Click the Route Order button (Figure EEE.4).
An email message containing the order number, routing key, notes, and order details is sent to the specified email addresses.
The Ordering Tool Home page is displayed.
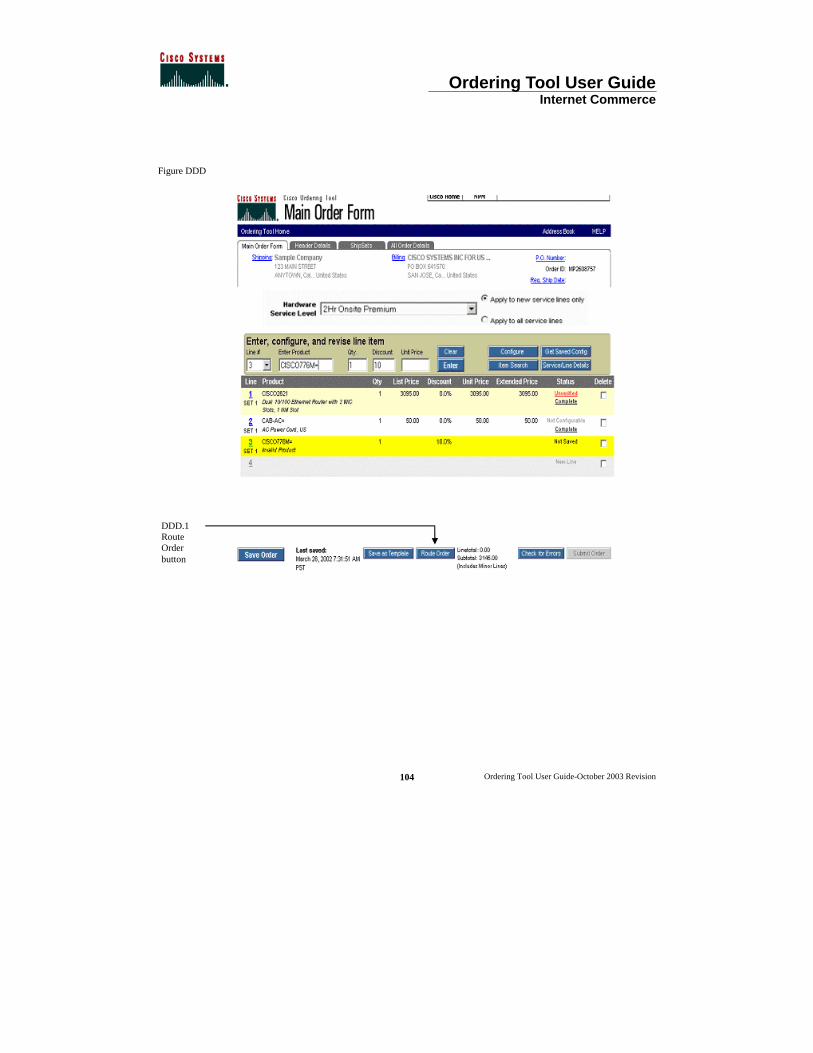
Ordering Tool User Guide Internet Commerce
Ordering Tool User Guide-October 2003 Revision
104
Figure DDD
DDD.1 Route Order button
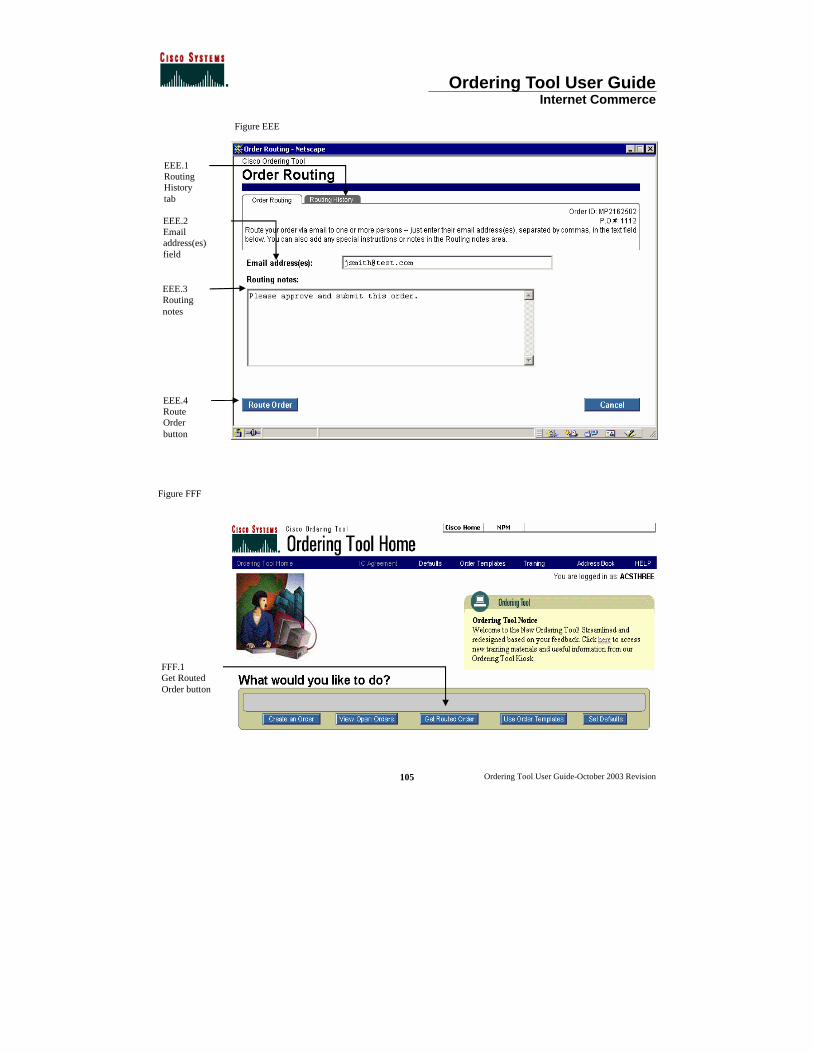
Ordering Tool User Guide Internet Commerce
Ordering Tool User Guide-October 2003 Revision
105
Figure EEE
Figure FFF
FFF.1 Get Routed Order button
EEE.4 Route Order button
EEE.3 Routing notes
EEE.2 Email address(es) field
EEE.1 Routing History tab
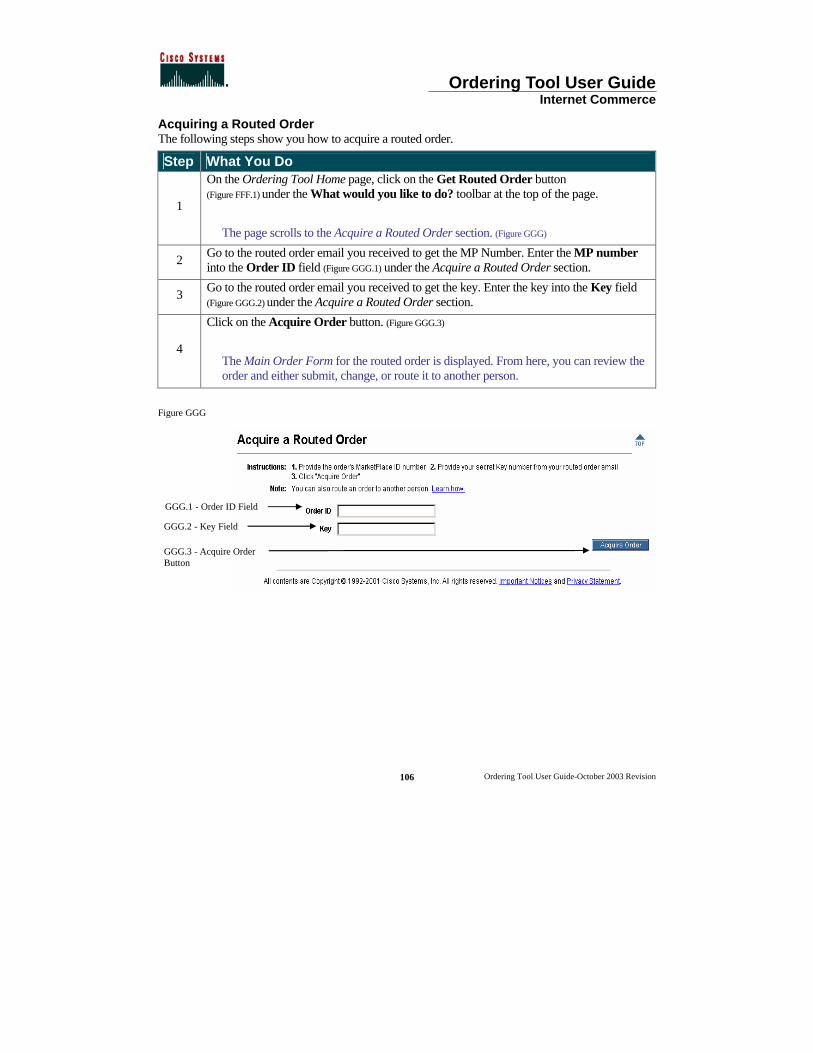
Ordering Tool User Guide Internet Commerce
Ordering Tool User Guide-October 2003 Revision
106
Acquiring a Routed Order The following steps show you how to acquire a routed order.
Step What You Do
1
On the Ordering Tool Home page, click on the Get Routed Order button (Figure FFF.1) under the What would you like to do? toolbar at the top of the page.
The page scrolls to the Acquire a Routed Order section. (Figure GGG)
2 Go to the routed order email you received to get the MP Number. Enter the MP number into the Order ID field (Figure GGG.1) under the Acquire a Routed Order section.
3 Go to the routed order email you received to get the key. Enter the key into the Key field (Figure GGG.2) under the Acquire a Routed Order section.
4
Click on the Acquire Order button. (Figure GGG.3)
The Main Order Form for the routed order is displayed. From here, you can review the order and either submit, change, or route it to another person.
Figure GGG
GGG.3 - Acquire Order Button
GGG.2 - Key Field
GGG.1 - Order ID Field
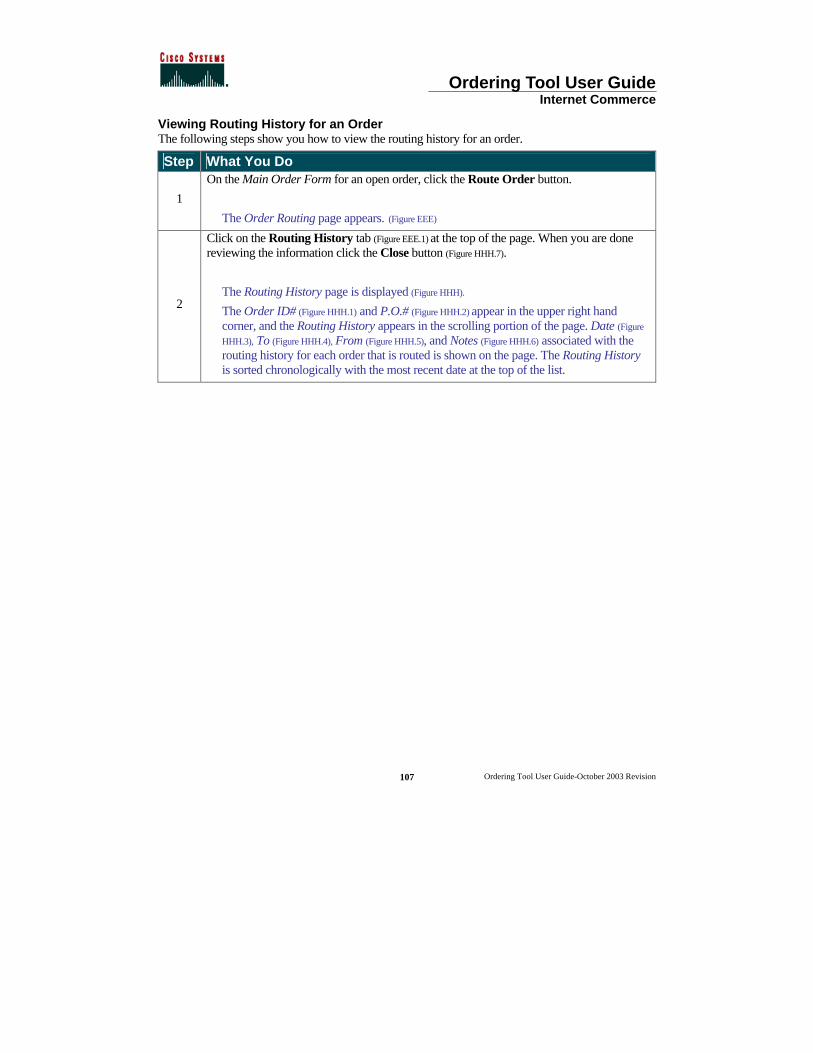
Ordering Tool User Guide Internet Commerce
Ordering Tool User Guide-October 2003 Revision
107
Viewing Routing History for an Order The following steps show you how to view the routing history for an order.
Step What You Do
1
On the Main Order Form for an open order, click the Route Order button.
The Order Routing page appears. (Figure EEE)
2
Click on the Routing History tab (Figure EEE.1) at the top of the page. When you are done reviewing the information click the Close button (Figure HHH.7).
The Routing History page is displayed (Figure HHH).
The Order ID# (Figure HHH.1) and P.O.# (Figure HHH.2) appear in the upper right hand corner, and the Routing History appears in the scrolling portion of the page. Date (Figure
HHH.3), To (Figure HHH.4), From (Figure HHH.5), and Notes (Figure HHH.6) associated with the routing history for each order that is routed is shown on the page. The Routing History is sorted chronologically with the most recent date at the top of the list.
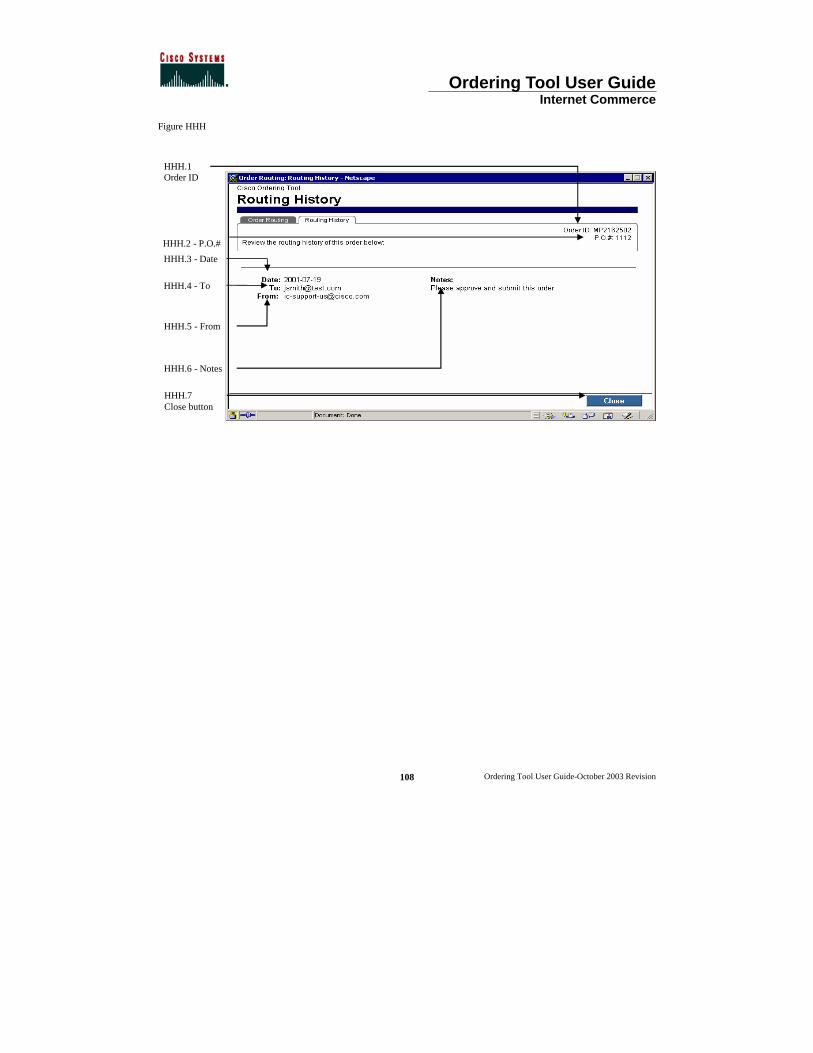
Ordering Tool User Guide Internet Commerce
Ordering Tool User Guide-October 2003 Revision
108
Figure HHH
HHH.2 - P.O.#
HHH.7 Close button
HHH.6 - Notes
HHH.5 - From
HHH.4 - To
HHH.3 - Date
HHH.1 Order ID
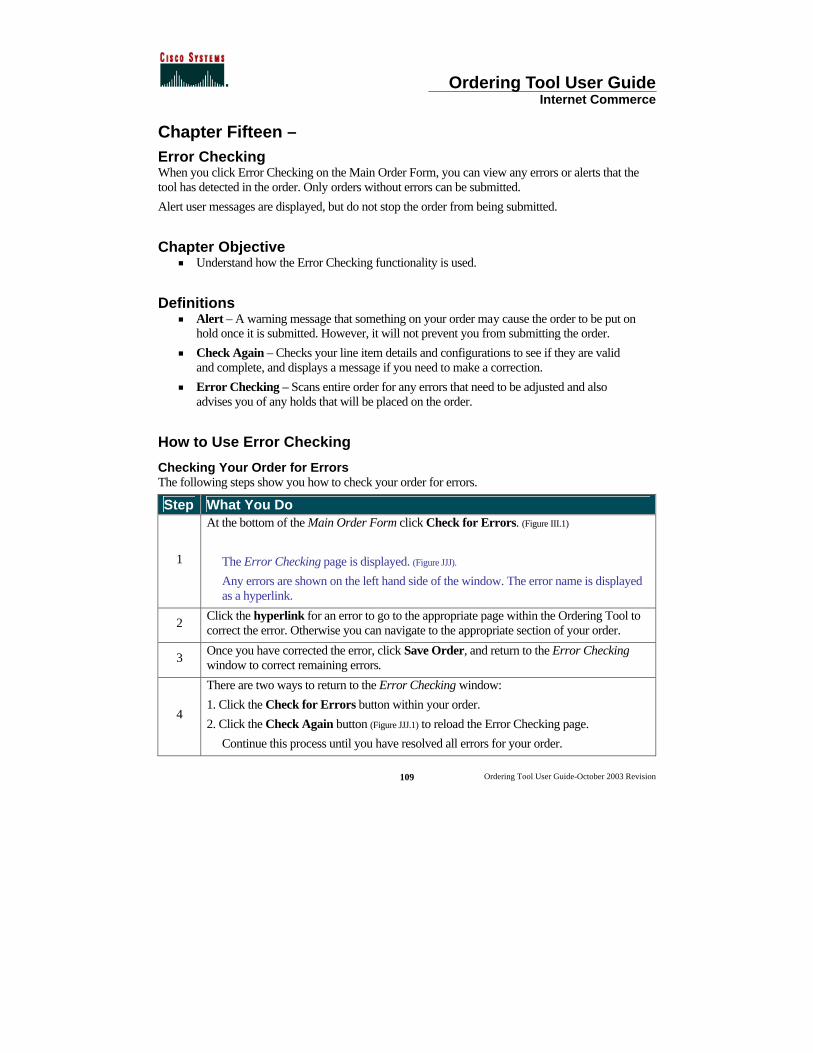
Ordering Tool User Guide Internet Commerce
Ordering Tool User Guide-October 2003 Revision
109
Chapter Fifteen – Error Checking When you click Error Checking on the Main Order Form, you can view any errors or alerts that the tool has detected in the order. Only orders without errors can be submitted.
Alert user messages are displayed, but do not stop the order from being submitted.
Chapter Objective < Understand how the Error Checking functionality is used.
Definitions < Alert – A warning message that something on your order may cause the order to be put on
hold once it is submitted. However, it will not prevent you from submitting the order. < Check Again – Checks your line item details and configurations to see if they are valid
and complete, and displays a message if you need to make a correction. < Error Checking – Scans entire order for any errors that need to be adjusted and also
advises you of any holds that will be placed on the order.
How to Use Error Checking
Checking Your Order for Errors The following steps show you how to check your order for errors.
Step What You Do
1
At the bottom of the Main Order Form click Check for Errors. (Figure III.1)
The Error Checking page is displayed. (Figure JJJ).
Any errors are shown on the left hand side of the window. The error name is displayed as a hyperlink.
2 Click the hyperlink for an error to go to the appropriate page within the Ordering Tool to correct the error. Otherwise you can navigate to the appropriate section of your order.
3 Once you have corrected the error, click Save Order, and return to the Error Checking window to correct remaining errors.
4
There are two ways to return to the Error Checking window:
1. Click the Check for Errors button within your order.
2. Click the Check Again button (Figure JJJ.1) to reload the Error Checking page.
Continue this process until you have resolved all errors for your order.
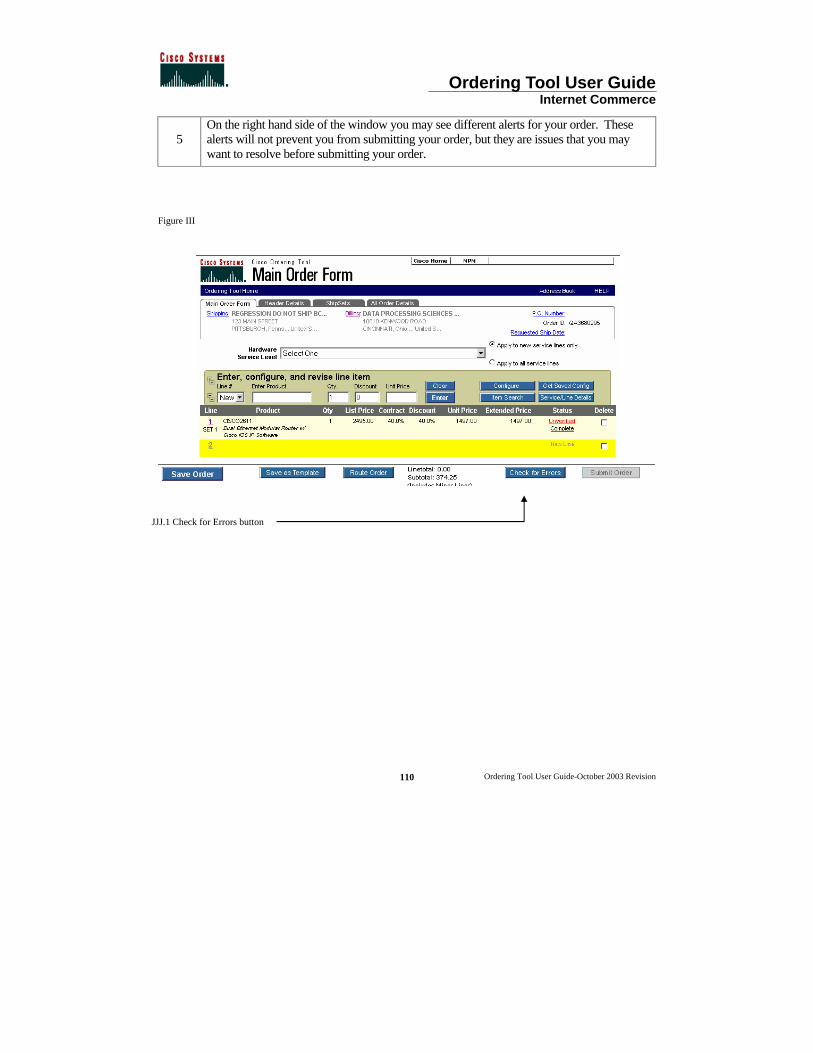
Ordering Tool User Guide Internet Commerce
Ordering Tool User Guide-October 2003 Revision
110
5 On the right hand side of the window you may see different alerts for your order. These alerts will not prevent you from submitting your order, but they are issues that you may want to resolve before submitting your order.
Figure III
JJJ.1 Check for Errors button
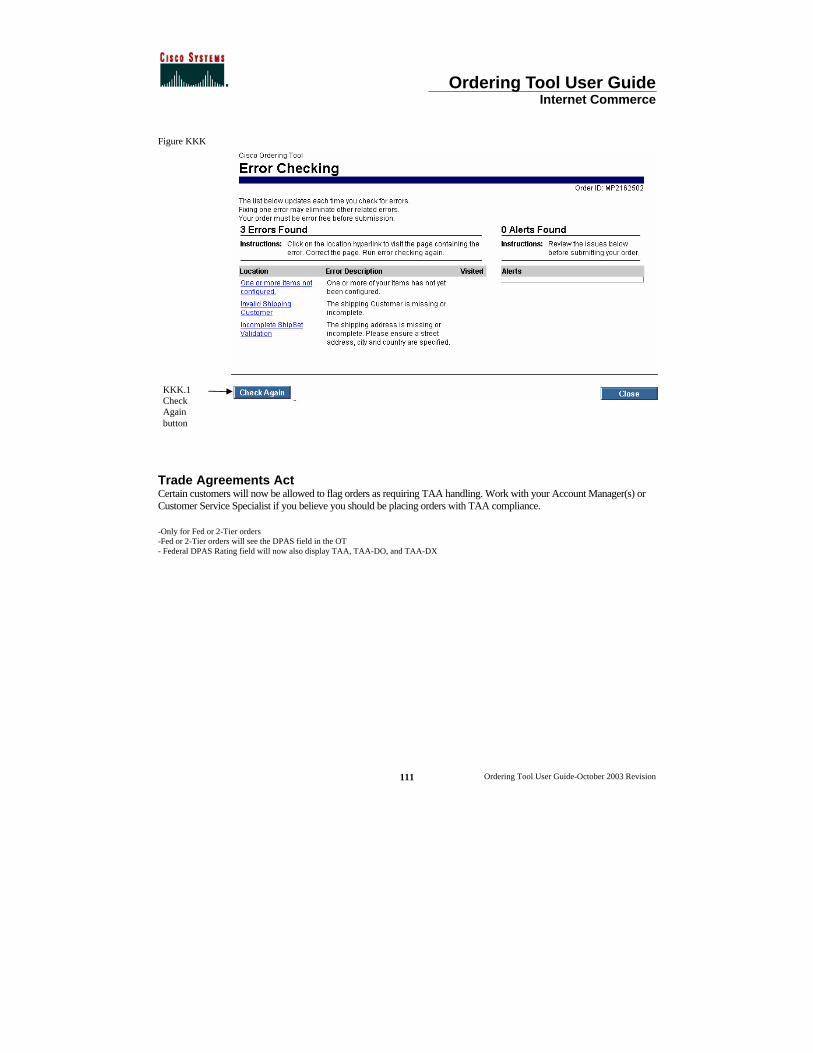
Ordering Tool User Guide Internet Commerce
Ordering Tool User Guide-October 2003 Revision
111
Figure KKK
Trade Agreements Act Certain customers will now be allowed to flag orders as requiring TAA handling. Work with your Account Manager(s) or Customer Service Specialist if you believe you should be placing orders with TAA compliance. -Only for Fed or 2-Tier orders -Fed or 2-Tier orders will see the DPAS field in the OT - Federal DPAS Rating field will now also display TAA, TAA-DO, and TAA-DX
KKK.1 Check Again button
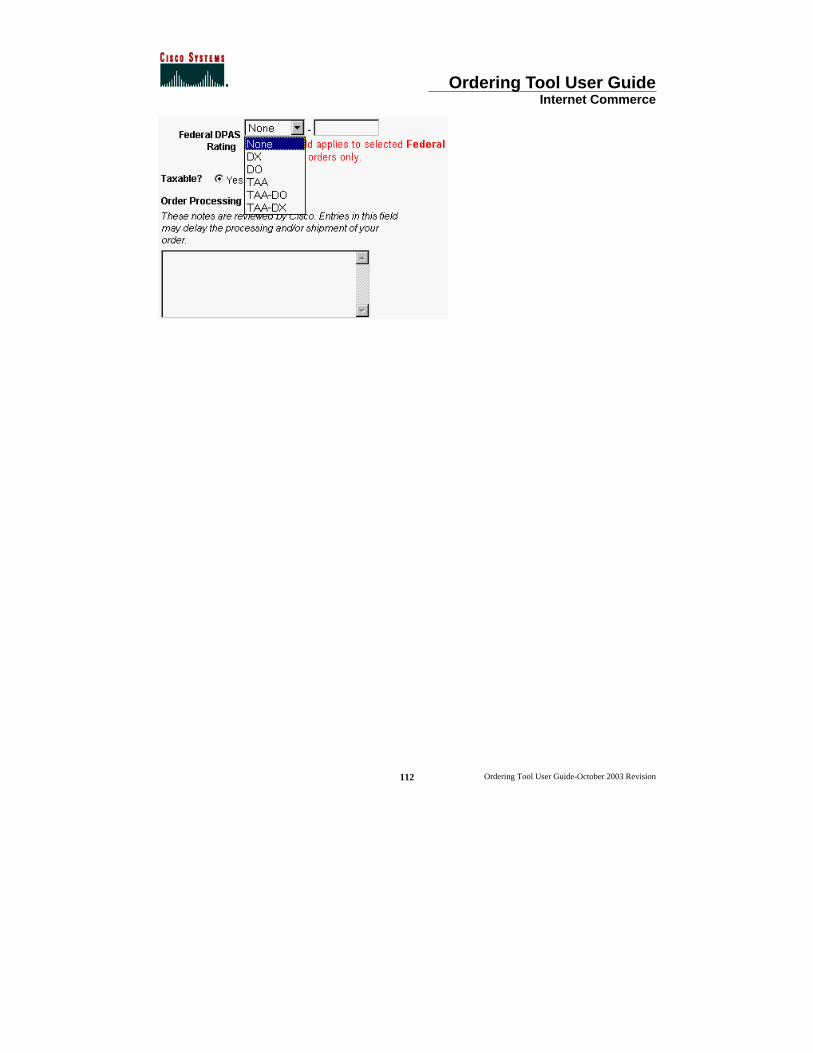
Ordering Tool User Guide Internet Commerce
Ordering Tool User Guide-October 2003 Revision
112
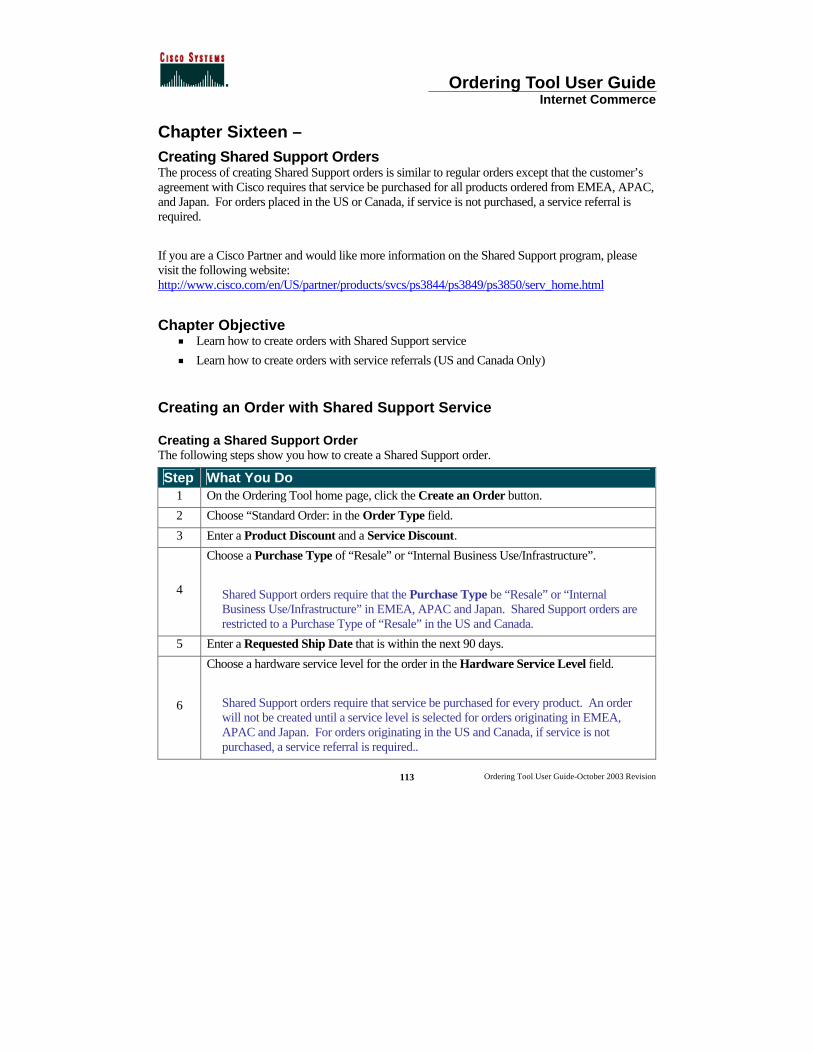
Ordering Tool User Guide Internet Commerce
Ordering Tool User Guide-October 2003 Revision
113
Chapter Sixteen – Creating Shared Support Orders The process of creating Shared Support orders is similar to regular orders except that the customer’s agreement with Cisco requires that service be purchased for all products ordered from EMEA, APAC, and Japan. For orders placed in the US or Canada, if service is not purchased, a service referral is required.
If you are a Cisco Partner and would like more information on the Shared Support program, please visit the following website: http://www.cisco.com/en/US/partner/products/svcs/ps3844/ps3849/ps3850/serv_home.html
Chapter Objective < Learn how to create orders with Shared Support service < Learn how to create orders with service referrals (US and Canada Only)
Creating an Order with Shared Support Service Creating a Shared Support Order The following steps show you how to create a Shared Support order.
Step What You Do 1 On the Ordering Tool home page, click the Create an Order button.
2 Choose “Standard Order: in the Order Type field.
3 Enter a Product Discount and a Service Discount.
4
Choose a Purchase Type of “Resale” or “Internal Business Use/Infrastructure”.
Shared Support orders require that the Purchase Type be “Resale” or “Internal Business Use/Infrastructure” in EMEA, APAC and Japan. Shared Support orders are restricted to a Purchase Type of “Resale” in the US and Canada.
5 Enter a Requested Ship Date that is within the next 90 days.
6
Choose a hardware service level for the order in the Hardware Service Level field.
Shared Support orders require that service be purchased for every product. An order will not be created until a service level is selected for orders originating in EMEA, APAC and Japan. For orders originating in the US and Canada, if service is not purchased, a service referral is required..
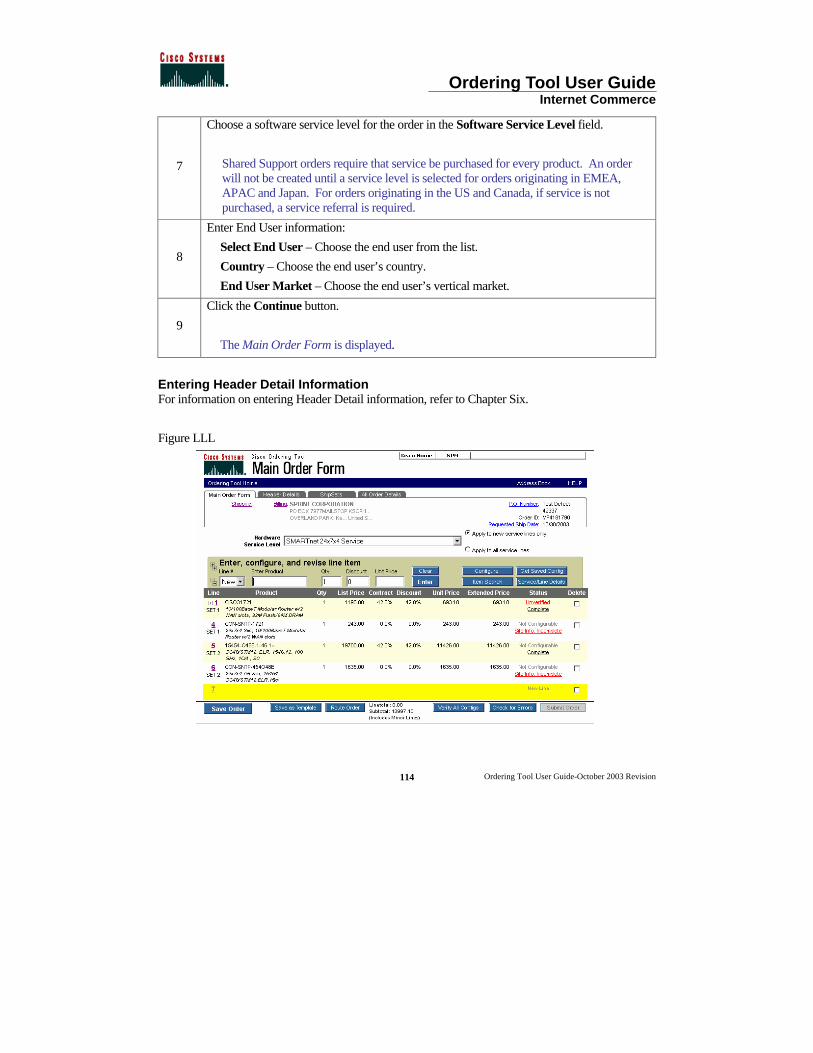
Ordering Tool User Guide Internet Commerce
Ordering Tool User Guide-October 2003 Revision
114
7
Choose a software service level for the order in the Software Service Level field.
Shared Support orders require that service be purchased for every product. An order will not be created until a service level is selected for orders originating in EMEA, APAC and Japan. For orders originating in the US and Canada, if service is not purchased, a service referral is required.
8
Enter End User information:
Select End User – Choose the end user from the list.
Country – Choose the end user’s country.
End User Market – Choose the end user’s vertical market.
9
Click the Continue button.
The Main Order Form is displayed.
Entering Header Detail Information For information on entering Header Detail information, refer to Chapter Six.
Figure LLL
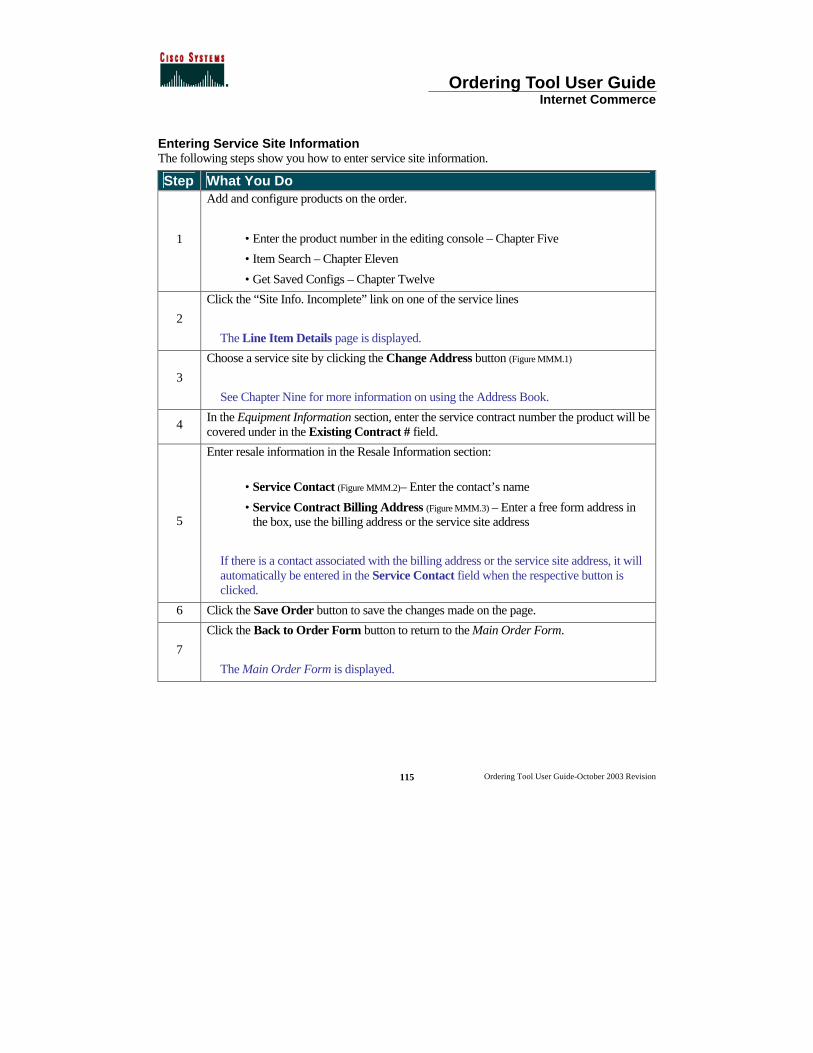
Ordering Tool User Guide Internet Commerce
Ordering Tool User Guide-October 2003 Revision
115
Entering Service Site Information The following steps show you how to enter service site information.
Step What You Do
1
Add and configure products on the order.
• Enter the product number in the editing console – Chapter Five
• Item Search – Chapter Eleven
• Get Saved Configs – Chapter Twelve
2
Click the “Site Info. Incomplete” link on one of the service lines
The Line Item Details page is displayed.
3
Choose a service site by clicking the Change Address button (Figure MMM.1)
See Chapter Nine for more information on using the Address Book.
4 In the Equipment Information section, enter the service contract number the product will be covered under in the Existing Contract # field.
5
Enter resale information in the Resale Information section:
• Service Contact (Figure MMM.2)– Enter the contact’s name
• Service Contract Billing Address (Figure MMM.3) – Enter a free form address in the box, use the billing address or the service site address
If there is a contact associated with the billing address or the service site address, it will automatically be entered in the Service Contact field when the respective button is clicked.
6 Click the Save Order button to save the changes made on the page.
7
Click the Back to Order Form button to return to the Main Order Form.
The Main Order Form is displayed.
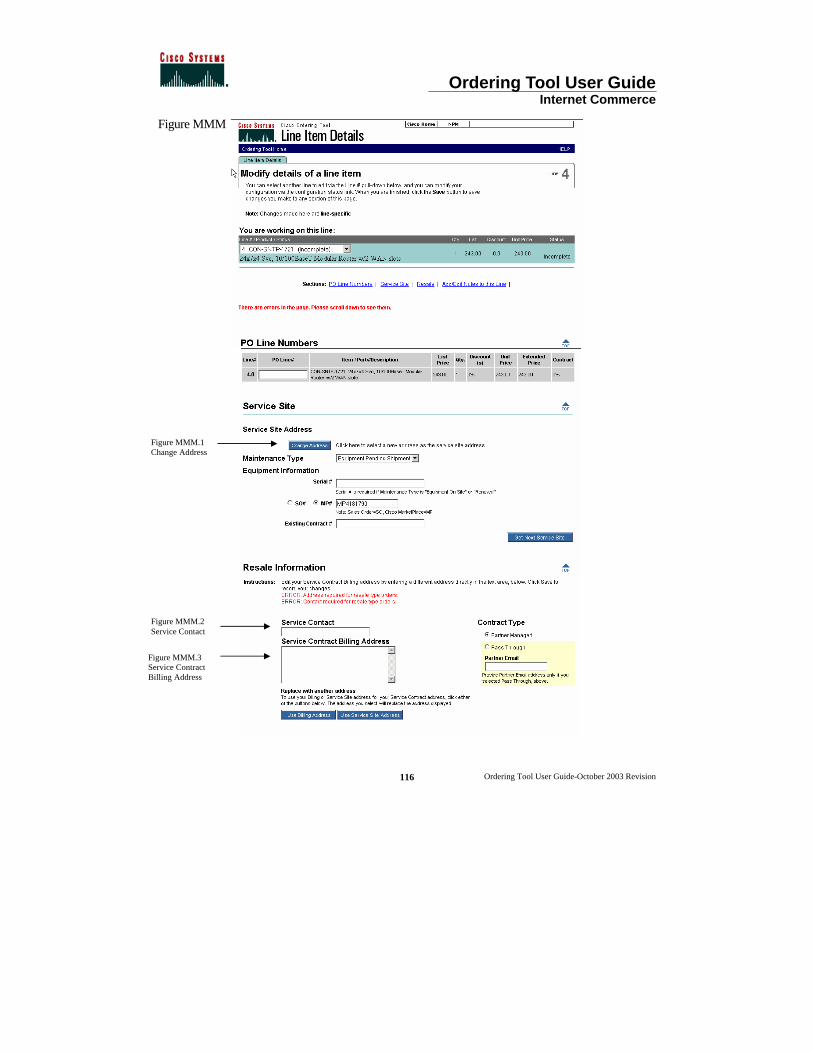
Ordering Tool User Guide Internet Commerce
Ordering Tool User Guide-October 2003 Revision
116
Figure MMM
Figure MMM.1 Change Address
Figure MMM.2 Service Contact
Figure MMM.3 Service Contract Billing Address
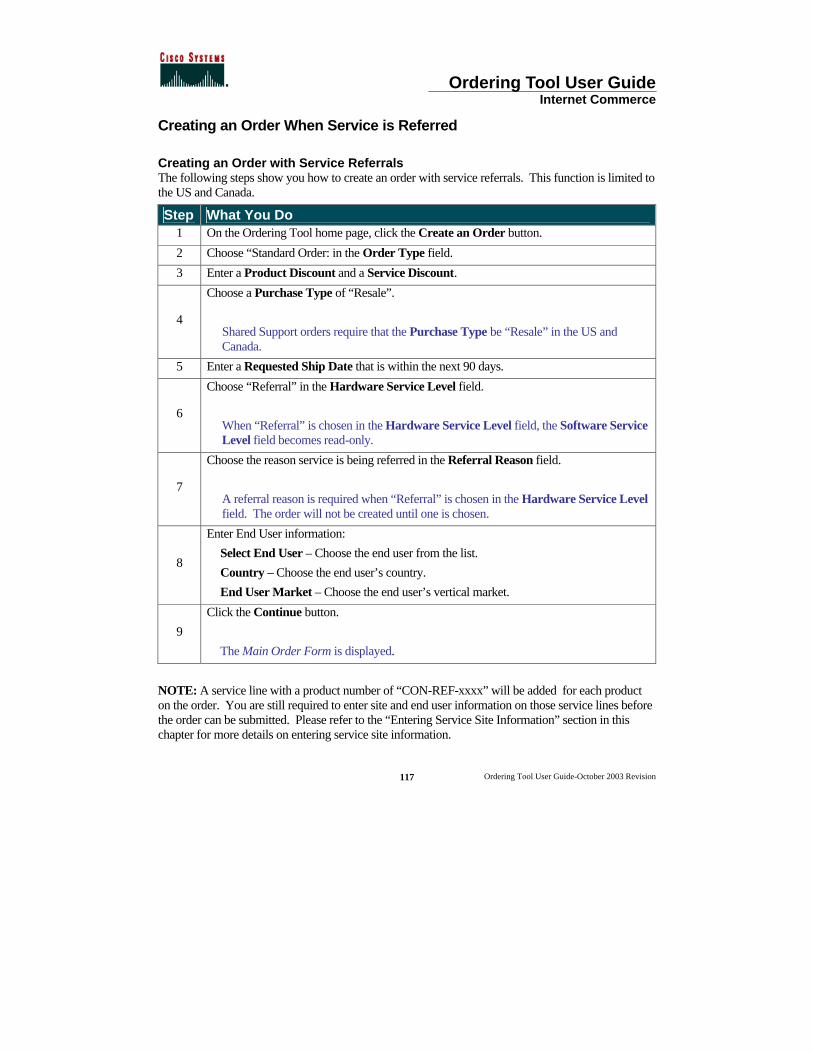
Ordering Tool User Guide Internet Commerce
Ordering Tool User Guide-October 2003 Revision
117
Creating an Order When Service is Referred Creating an Order with Service Referrals The following steps show you how to create an order with service referrals. This function is limited to the US and Canada.
Step What You Do 1 On the Ordering Tool home page, click the Create an Order button.
2 Choose “Standard Order: in the Order Type field.
3 Enter a Product Discount and a Service Discount.
4
Choose a Purchase Type of “Resale”.
Shared Support orders require that the Purchase Type be “Resale” in the US and Canada.
5 Enter a Requested Ship Date that is within the next 90 days.
6
Choose “Referral” in the Hardware Service Level field.
When “Referral” is chosen in the Hardware Service Level field, the Software Service Level field becomes read-only.
7
Choose the reason service is being referred in the Referral Reason field.
A referral reason is required when “Referral” is chosen in the Hardware Service Level field. The order will not be created until one is chosen.
8
Enter End User information:
Select End User – Choose the end user from the list.
Country – Choose the end user’s country.
End User Market – Choose the end user’s vertical market.
9
Click the Continue button.
The Main Order Form is displayed.
NOTE: A service line with a product number of “CON-REF-xxxx” will be added for each product on the order. You are still required to enter site and end user information on those service lines before the order can be submitted. Please refer to the “Entering Service Site Information” section in this chapter for more details on entering service site information.
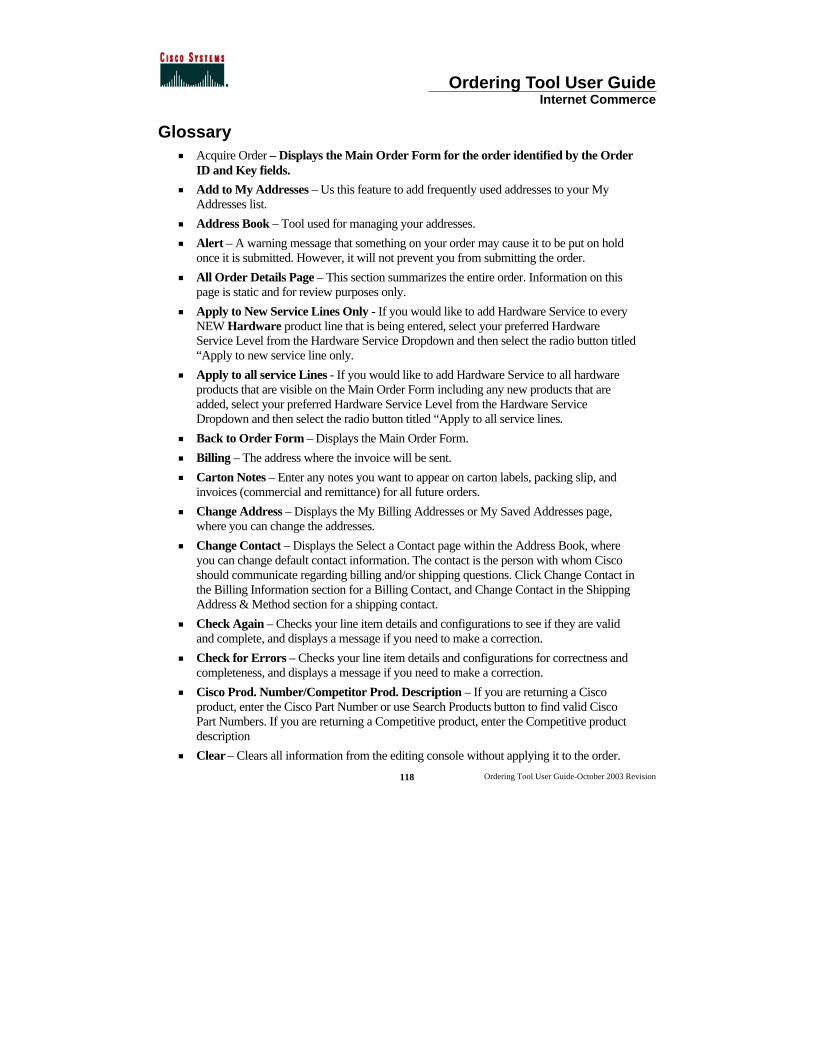
Ordering Tool User Guide Internet Commerce
Ordering Tool User Guide-October 2003 Revision
118
Glossary < Acquire Order – Displays the Main Order Form for the order identified by the Order
ID and Key fields. < Add to My Addresses – Us this feature to add frequently used addresses to your My
Addresses list. < Address Book – Tool used for managing your addresses. < Alert – A warning message that something on your order may cause it to be put on hold
once it is submitted. However, it will not prevent you from submitting the order. < All Order Details Page – This section summarizes the entire order. Information on this
page is static and for review purposes only. < Apply to New Service Lines Only - If you would like to add Hardware Service to every
NEW Hardware product line that is being entered, select your preferred Hardware Service Level from the Hardware Service Dropdown and then select the radio button titled “Apply to new service line only.
< Apply to all service Lines - If you would like to add Hardware Service to all hardware products that are visible on the Main Order Form including any new products that are added, select your preferred Hardware Service Level from the Hardware Service Dropdown and then select the radio button titled “Apply to all service lines.
< Back to Order Form – Displays the Main Order Form. < Billing – The address where the invoice will be sent. < Carton Notes – Enter any notes you want to appear on carton labels, packing slip, and
invoices (commercial and remittance) for all future orders. < Change Address – Displays the My Billing Addresses or My Saved Addresses page,
where you can change the addresses. < Change Contact – Displays the Select a Contact page within the Address Book, where
you can change default contact information. The contact is the person with whom Cisco should communicate regarding billing and/or shipping questions. Click Change Contact in the Billing Information section for a Billing Contact, and Change Contact in the Shipping Address & Method section for a shipping contact.
< Check Again – Checks your line item details and configurations to see if they are valid and complete, and displays a message if you need to make a correction.
< Check for Errors – Checks your line item details and configurations for correctness and completeness, and displays a message if you need to make a correction.
< Cisco Prod. Number/Competitor Prod. Description – If you are returning a Cisco product, enter the Cisco Part Number or use Search Products button to find valid Cisco Part Numbers. If you are returning a Competitive product, enter the Competitive product description
< Clear – Clears all information from the editing console without applying it to the order.
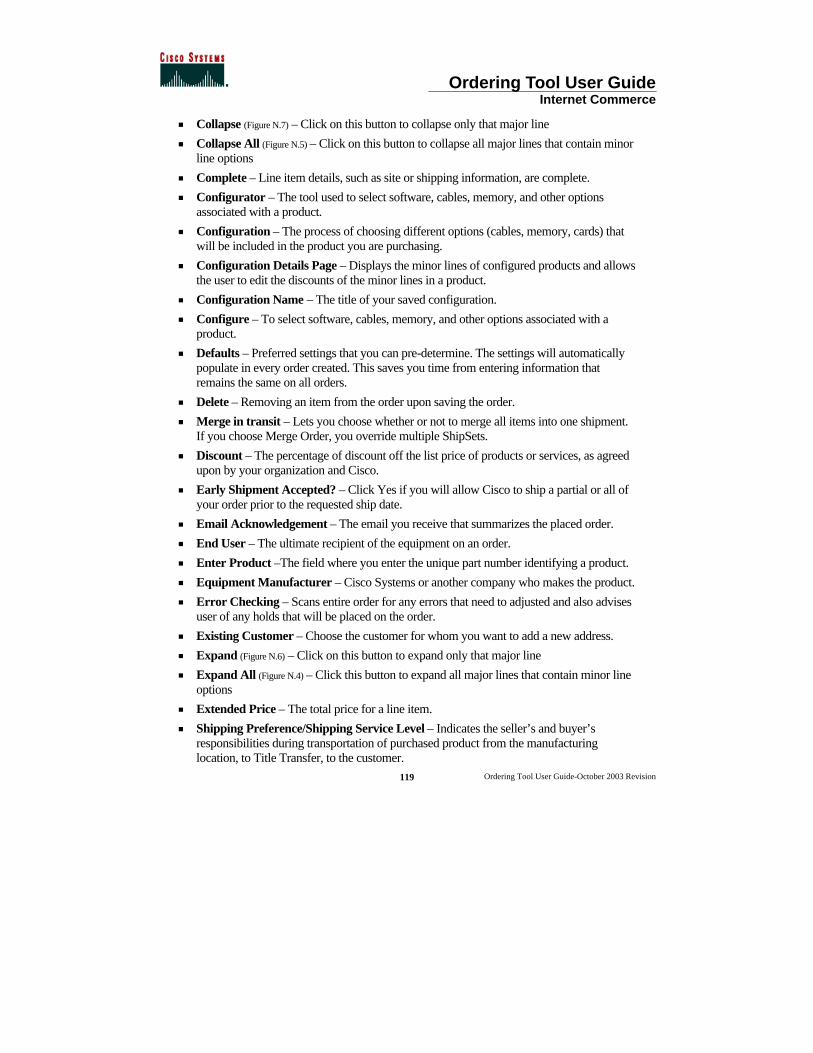
Ordering Tool User Guide Internet Commerce
Ordering Tool User Guide-October 2003 Revision
119
< Collapse (Figure N.7) – Click on this button to collapse only that major line < Collapse All (Figure N.5) – Click on this button to collapse all major lines that contain minor
line options < Complete – Line item details, such as site or shipping information, are complete. < Configurator – The tool used to select software, cables, memory, and other options
associated with a product. < Configuration – The process of choosing different options (cables, memory, cards) that
will be included in the product you are purchasing. < Configuration Details Page – Displays the minor lines of configured products and allows
the user to edit the discounts of the minor lines in a product. < Configuration Name – The title of your saved configuration. < Configure – To select software, cables, memory, and other options associated with a
product. < Defaults – Preferred settings that you can pre-determine. The settings will automatically
populate in every order created. This saves you time from entering information that remains the same on all orders.
< Delete – Removing an item from the order upon saving the order. < Merge in transit – Lets you choose whether or not to merge all items into one shipment.
If you choose Merge Order, you override multiple ShipSets. < Discount – The percentage of discount off the list price of products or services, as agreed
upon by your organization and Cisco. < Early Shipment Accepted? – Click Yes if you will allow Cisco to ship a partial or all of
your order prior to the requested ship date. < Email Acknowledgement – The email you receive that summarizes the placed order. < End User – The ultimate recipient of the equipment on an order. < Enter Product –The field where you enter the unique part number identifying a product. < Equipment Manufacturer – Cisco Systems or another company who makes the product. < Error Checking – Scans entire order for any errors that need to adjusted and also advises
user of any holds that will be placed on the order. < Existing Customer – Choose the customer for whom you want to add a new address. < Expand (Figure N.6) – Click on this button to expand only that major line < Expand All (Figure N.4) – Click this button to expand all major lines that contain minor line
options < Extended Price – The total price for a line item. < Shipping Preference/Shipping Service Level – Indicates the seller’s and buyer’s
responsibilities during transportation of purchased product from the manufacturing location, to Title Transfer, to the customer.
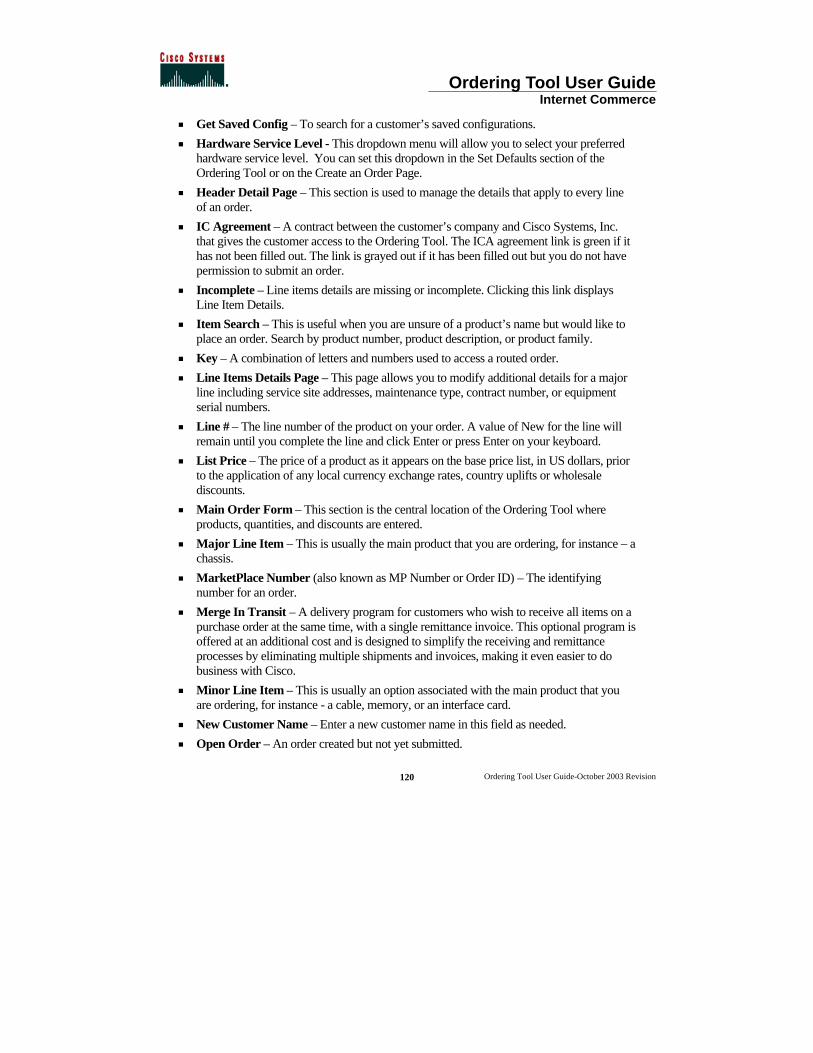
Ordering Tool User Guide Internet Commerce
Ordering Tool User Guide-October 2003 Revision
120
< Get Saved Config – To search for a customer’s saved configurations. < Hardware Service Level - This dropdown menu will allow you to select your preferred
hardware service level. You can set this dropdown in the Set Defaults section of the Ordering Tool or on the Create an Order Page.
< Header Detail Page – This section is used to manage the details that apply to every line of an order.
< IC Agreement – A contract between the customer’s company and Cisco Systems, Inc. that gives the customer access to the Ordering Tool. The ICA agreement link is green if it has not been filled out. The link is grayed out if it has been filled out but you do not have permission to submit an order.
< Incomplete – Line items details are missing or incomplete. Clicking this link displays Line Item Details.
< Item Search – This is useful when you are unsure of a product’s name but would like to place an order. Search by product number, product description, or product family.
< Key – A combination of letters and numbers used to access a routed order. < Line Items Details Page – This page allows you to modify additional details for a major
line including service site addresses, maintenance type, contract number, or equipment serial numbers.
< Line # – The line number of the product on your order. A value of New for the line will remain until you complete the line and click Enter or press Enter on your keyboard.
< List Price – The price of a product as it appears on the base price list, in US dollars, prior to the application of any local currency exchange rates, country uplifts or wholesale discounts.
< Main Order Form – This section is the central location of the Ordering Tool where products, quantities, and discounts are entered.
< Major Line Item – This is usually the main product that you are ordering, for instance – a chassis.
< MarketPlace Number (also known as MP Number or Order ID) – The identifying number for an order.
< Merge In Transit – A delivery program for customers who wish to receive all items on a purchase order at the same time, with a single remittance invoice. This optional program is offered at an additional cost and is designed to simplify the receiving and remittance processes by eliminating multiple shipments and invoices, making it even easier to do business with Cisco.
< Minor Line Item – This is usually an option associated with the main product that you are ordering, for instance - a cable, memory, or an interface card.
< New Customer Name – Enter a new customer name in this field as needed. < Open Order – An order created but not yet submitted.
Ordering Tool User Guide Internet Commerce
Ordering Tool User Guide-October 2003 Revision
121
< Order ID – The MarketPlace (MP) number assigned to each order. < Order Templates – An unsubmitted order that has been named and saved for future use.
If a customer regularly submits an order with the same product selections, the customer can create the order and save it as a template before submitting it. The next time the order needs to be placed, the template can be accessed, modified slightly if necessary, and then submitted. The template remains for future use.
< Order Type – The type of order to be placed: internal, evaluation, standard, service-only, multinational, or trade in.
< Ordering Tool Home Page – This page is where you begin to create a new order, view an open order, access a routed order, or access the Set Defaults page.
< PO (Purchase Order) Number – The purchase order reference number used to identify the order within your organization.
< Postal/Zip – Enter the postal or zip code. < Price List – The list from which you may order products. < Product Description – The brief description associated with the product number. < Product Family – This is a group of related products and product numbers. < Product Number – The part number that is used to order the product. For example:
CISCO2501. < Purchase Type – Indicates the purpose of the order. < Quantity (Qty.) – The number of chassis you are ordering. < Routed Order – An order created by one user and sent to another user, to be retrieved by
that user with the Order ID and a key. < Save as Template – Saves your order as a template that can then be used for future
orders. < Save Order – Saves all new or revised information on the order form. < Search Again – Returns you to the Search Addresses page for another search. < Service Only Order – An order that contains only service/maintenance items. < Service Options – You can choose the service level, service length, and service discount. < Service Site – The location where the product resides. < Service/Line Details – Enables you to choose service, provide end user, and ShipSet
details at the line item level. Also enables you to edit configuration details for already configured items.
< Set Defaults – This section is used to set pre-determined fields that automatically populate each time the ordering tool is used.
< Shared Config – A configuration that was shared with you by another user.
Ordering Tool User Guide Internet Commerce
Ordering Tool User Guide-October 2003 Revision
122
< Ship All Items Separately – Select Yes if you would like to receive each line item as an individual shipment. Select No when you want all products shipped together whenever possible (this will extend ShipSet lead times).
As Cisco manufactures worldwide, multiple line orders will typically still arrive in separate deliveries, though selecting Ship All Items Separately No will reduce the number of deliveries.
< Ship Early – This selection informs Cisco if it is permissible to ship product prior to the Requested Ship Date. No should be selected if you want Cisco to ship as close as possible to the Requested Ship Date.
< Shipping – The address where the order will be shipped. < Shipping & Packaging Notes – Enter any default shipping and packaging notes that you
want to appear on packing slips and invoices for all future orders. You can change this information if necessary on the Header Details page when you are creating an order.
< ShipSets – A grouping of items within an order that have the same shipping information. < Software Service Level – This dropdown menu will allow you to select your preferred
Software Service Level. You can set this dropdown in the Set Defaults section of the Ordering Tool or on the Create an Order Page.
< Standard Order – A traditional order placed for Cisco products or a combination of Cisco products and services.
< State/Province – Choose the U.S. state or Canadian province if appropriate. < Submit Order – Runs a check on the order for errors and submits complete orders to
Cisco. < Trade-In Order – The order type used to place Cisco Technology Migration Plan
(CTMP), Custom Trade-In (Non-CTMP programs), or other Promotional Programs orders.
< Unit Price – The price of the product calculated by taking the list price and applying any customer discounts.
< Unverified – The configuration status of a product indicating that its configuration has not been completed and verified as correct.
< Verified – The configuration status of a product indicating that its configuration has been completed and verified as correct.
< Verify All Configs – Selecting this button is equivalent to selecting each previously configured product line by line and running the configuration check. This button will verify any configurations currently loaded in the order that are still valid and set their status to verified; any invalid configurations will remain in the Unverified status.
Additional materials to learn more about the Ordering Tool can be found at:
http://www.cisco.com/go/ordering-tool
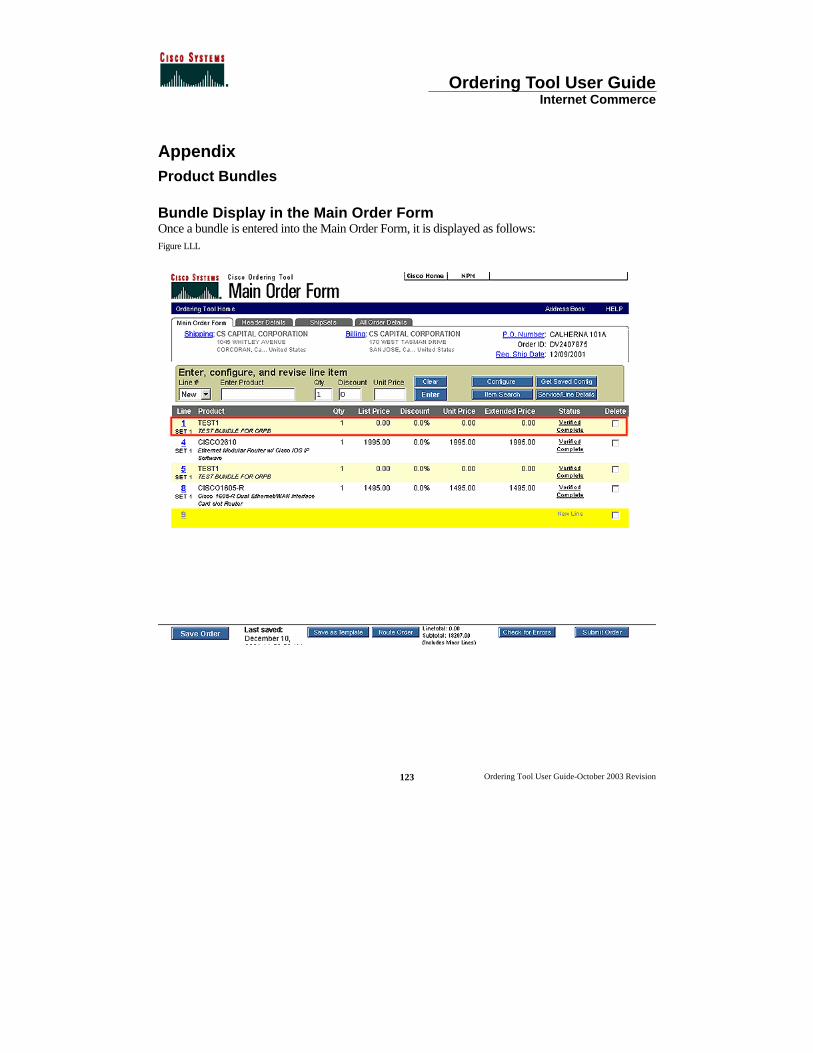
Ordering Tool User Guide Internet Commerce
Ordering Tool User Guide-October 2003 Revision
123
Appendix Product Bundles
Bundle Display in the Main Order Form Once a bundle is entered into the Main Order Form, it is displayed as follows: Figure LLL
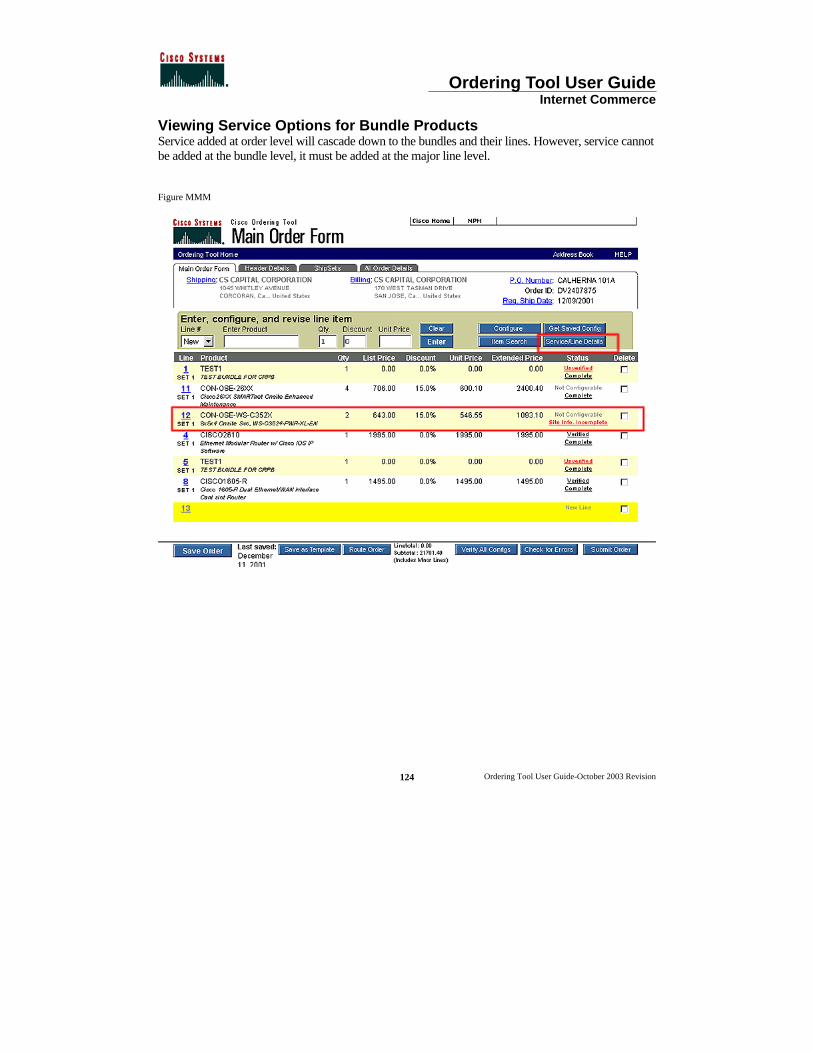
Ordering Tool User Guide Internet Commerce
Ordering Tool User Guide-October 2003 Revision
124
Viewing Service Options for Bundle Products Service added at order level will cascade down to the bundles and their lines. However, service cannot be added at the bundle level, it must be added at the major line level.
Figure MMM
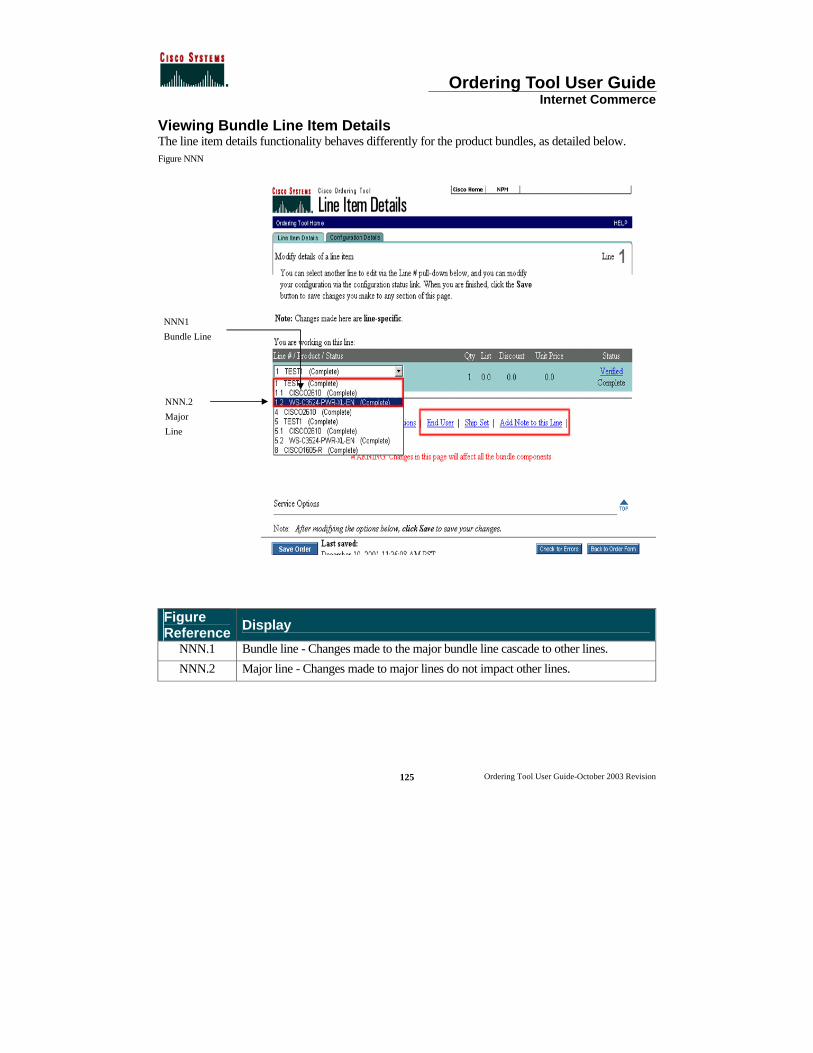
Ordering Tool User Guide Internet Commerce
Ordering Tool User Guide-October 2003 Revision
125
Viewing Bundle Line Item Details The line item details functionality behaves differently for the product bundles, as detailed below. Figure NNN
Figure Reference Display
NNN.1 Bundle line - Changes made to the major bundle line cascade to other lines.
NNN.2 Major line - Changes made to major lines do not impact other lines.
NNN1
Bundle Line
NNN.2
Major
Line
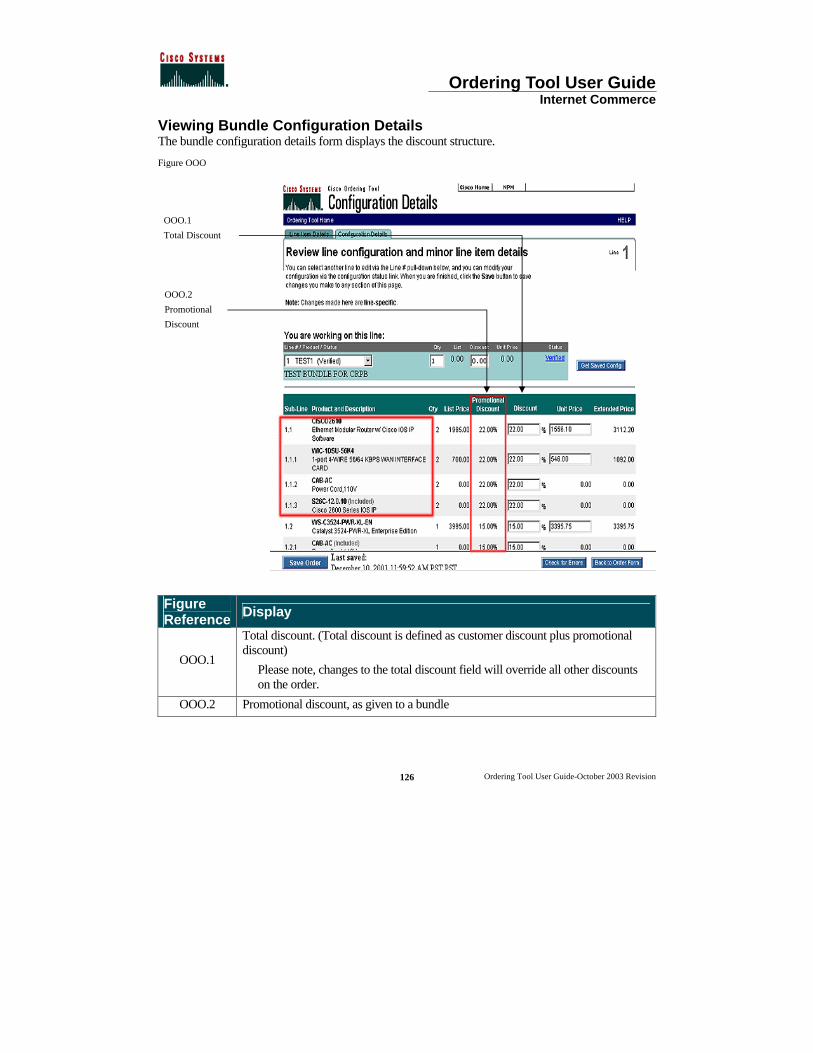
Ordering Tool User Guide Internet Commerce
Ordering Tool User Guide-October 2003 Revision
126
Viewing Bundle Configuration Details The bundle configuration details form displays the discount structure.
Figure OOO
Figure Reference Display
OOO.1
Total discount. (Total discount is defined as customer discount plus promotional discount)
Please note, changes to the total discount field will override all other discounts on the order.
OOO.2 Promotional discount, as given to a bundle
OOO.2
Promotional
Discount
OOO.1
Total Discount
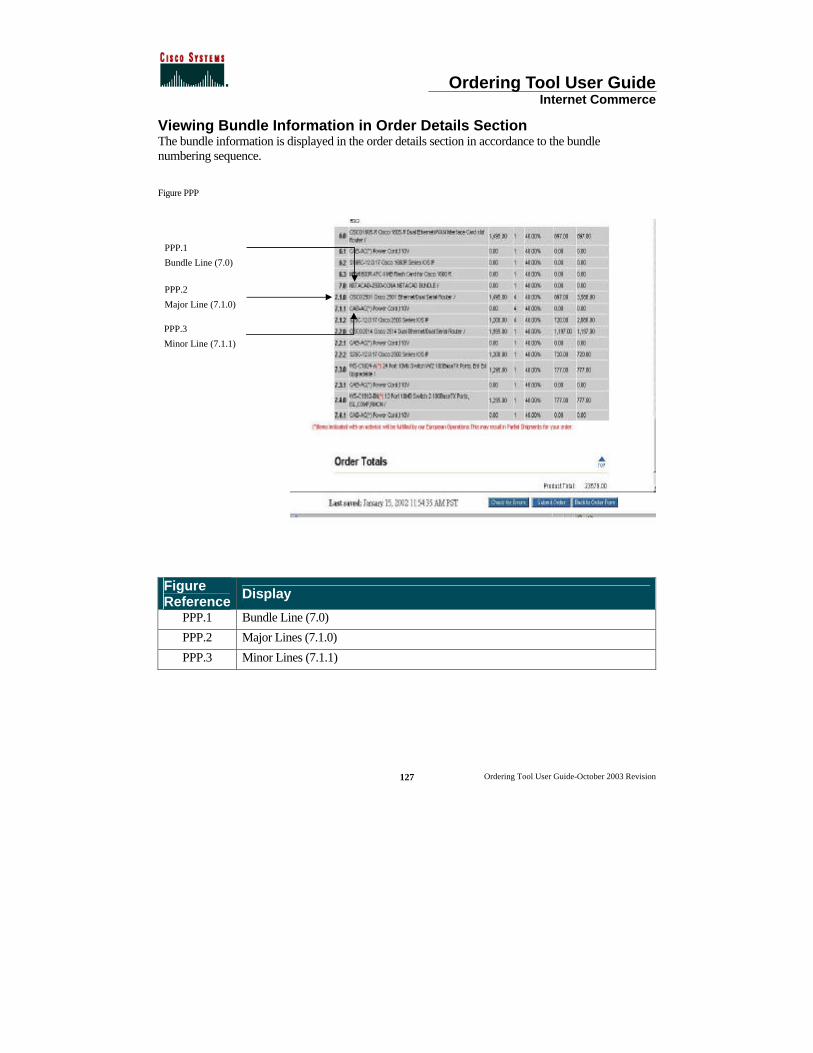
Ordering Tool User Guide Internet Commerce
Ordering Tool User Guide-October 2003 Revision
127
Viewing Bundle Information in Order Details Section The bundle information is displayed in the order details section in accordance to the bundle numbering sequence.
Figure PPP
Figure Reference Display
PPP.1 Bundle Line (7.0)
PPP.2 Major Lines (7.1.0)
PPP.3 Minor Lines (7.1.1)
PPP.1
Bundle Line (7.0)
PPP.2
Major Line (7.1.0)
PPP.3
Minor Line (7.1.1)


Cisco Systems, Inc.
170 West Tasman Drive
San Jose, CA 95134-1706
USA
Tel: 408 526-4000
800 553-NETS (6387)
Fax: 408 526-4100
www.cisco.com
Copyright © 2002, Cisco Systems, Inc. All rights reserved. Cisco, Cisco Systems, and the Cisco Systems logo are registered trademarks of Cisco Systems, Inc. or its affiliates in the U.S. and certain other countries. All other trademarks mentioned in this document are the property of their respective owners. The use of the word partner does not imply a partnership relationship between Cisco and any other company. (ooo5R) Copyright © 2002, Cisco Systems, Inc. All right reserved. This work is protected by copyright law and international treaties. Except as expressly authorized by Cisco Systems in writing, reproduction of any portion or element of this copyrighted work, including without limitation any portion of any text or image, is strictly prohibited and is a violation of Federal law.