thank you - diamond archery · cables and strings, bearings, paint, hydrographic film and/or other...
TRANSCRIPT
THANK YOUCongratulations on your recent purchase! We at Diamond know that you have a choice when it comes to your archery equipment, and we want to thank you for choosing us as your hunting partner. Your feedback is important to us, as it is our desire to provide you with the absolute finest products and customer service in the industry. Please take the time to go online and register your new Diamond bow. It is equally important to read through this owner’s manual as there are valuable tips to help keep your Diamond trouble free for many seasons.
We encourage you to contact and utilize your local dealer as they can assist you with purchases, services and accessories. To locate the dealer nearest you, visit diamondarchery.com and click on the “Dealer Locator” button. Frequently asked questions and additional contact information can also be found at diamondarchery.com.
BEFORE USING YOUR NEW DIAMOND BOW, READ AND UNDERSTAND THE FOLLOWING MATERIAL OUTLINED IN THIS MANUAL. FAILURE TO FOLLOW ANY OF THESE WARNINGS AND INSTRUCTIONS CAN DAMAGE THE BOW AND MAY CAUSE SERIOUS INJURY TO YOURSELF AND/OR OTHERS.
DISCLAIMER OF LIABILITY: By accepting a Diamond product, the buyer agrees to hold harmless Diamond and all associated parties from liability for any damage to persons or property, which may result, for any reason, from the use of this product.
QUALITYEvery Diamond bow has undergone a
comprehensive quality control process and
is built from the highest quality components
available. Most have been individually shot,
tested and measured to ensure compliance
with our strict performance standards.
Adjusting draw length Setting draw weight
Timing the cams Adjusting the string stop
Setting center shot
TUNING AND PROPER FITIt is very important that your bow is adjusted to fit you properly. Assistance in achieving proper fit should be provided by your Authorized Diamond Dealer.
Complete manual for your bow model and additional information
for the following can be found on our website at
diamondarchery.com/manuals
1
97422_Sonar_OwnerManual2017.indd 1 10/28/16 9:25 AM
LIFETIME WARRANTY
All Diamond bows come with a non-transferable lifetime warranty to the registered original owner. This warranty protects against any failures of the product due to defects in material or workmanship and does not include any damage due to abuse, misuse or modification to the bow’s design. The following exclusions apply.
EXCLUSIONSCables and strings, bearings, paint, hydrographic film and/or other transferred finishes, accessories to include: sights, arrow rests, string silencers, quivers, or any other components included as part of an accessory package.
Damage caused by abuse, mishandling, dry-firing, alteration or modification to original product. Other excluded damages are those resulting from either loose mod screws or shooting arrows less than five grains per pound of draw weight. Damage caused by altered or damaged arrows and/or string dampening material, including original and aftermarket parts, is also excluded.
For the warranty to be enforceable the original purchaser must complete and submit the online registration form within 30 days of purchase.
WARRANTY SERVICEOur goal with all warranty returns is to have the bow shipped out the door and on its way back to your dealer within 3 business days of receiving it at our facilities in Eugene, Oregon. You are our greatest asset, and we will give you the highest quality and most efficient service possible.
All products requiring warranty service may be returned to an Authorized Dealer for inspection and diagnosis of any problem. Your Diamond dealer can determine whether factory service is required, or if the service needed can be performed at the dealer’s facility. In the event that a bow must be returned for factory service, a Return Authorization (RA) number must first be obtained. Bows returned to the factory without an RA number will not be accepted.
The bow owner is responsible for the return prepaid freight to Diamond. No COD shipments will be accepted. Diamond will perform the warranty service required and return the product prepaid.
• All methods of shipping by UPS or FED-EX only. Sender should insure all shipments.
• If your bow cannot be repaired, we reserve the right to replace your bow with a newer model of equal or greater value.
• Diamond reserves the right to substitute any parts required for warranty coverage at its sole discretion and for any reason.
CONTACT USIf you have any questions or concerns regarding our products, please don’t hesitate to call us at (888) 689-1289 or email us at [email protected].
SIGN UP FOR THE LIFETIME WARRANTY ATREGISTERYOURBOW.COM
2
97422_Sonar_OwnerManual2017.indd 2 10/28/16 9:25 AM

BOW MAINTENANCE.
Your Diamond bow was made with the highest quality components to last for a lifetime of use in the field with proper maintenance. It is important that you NEVER draw and release a bow without an arrow on the string. NEVER leave your Diamond bow in an area of extreme temperatures. This could cause your string and cables to stretch which effects timing.
Before shooting your bow, ALWAYS inspect the string and cables and check the limbs for any visible damage. If damage is found, take the bow to your local Diamond dealer for inspection or repair.
Your Diamond bow comes equipped with sealed bearings in both cams. There is no need to lubricate cams.
STRINGS & CABLESYour Diamond bowstring is manufactured to provide long string life and absolute
consistency, shot after shot. This results in greater accuracy and less time spent re-tuning your equipment.
It is recommended that you cycle the bow 10-20 times to settle the string as a result of relaxation during packaging and shipping.
Wax the string often. We recommend BCYML 6 synthetic string wax or an equivalent product. To wax the string, apply wax liberally to entire length of string. Rub briskly with fingers until the string appears slick. Remove all excess wax with a clean cloth. We recommend that you wax every other time you shoot your bow to lengthen the life of your string and cable sets.
We encourage you to contact and utilize your local dealer as they can assist you with setting up your bow, tuning, purchases, services and accessories. To locate the dealer nearest you, visit diamondarchery.com and click on the “Dealer Locator” button. Frequently asked questions and additional contact information can also be found at diamondarchery.com.
Date of Purchase: Purchase Price:
Bow Model & Year:
Serial Number: Brace Height:
Draw Length: Draw Weight:
IBO Speed Rating: String Length: Cable Length:
Dealer Purchased From:
Dealer’s Address:
City: State: Zip:
Phone No:
E-mail Address:
OWNER’S RECORD
3
97422_Sonar_OwnerManual2017.indd 3 10/28/16 9:25 AM

GENERAL INFORMATION
Your new Diamond bow is a highly tuned, precise shooting machine. It requires special care and handling to achieve and maintain peak performance. The string, cables and limbs are under extreme tension, which creates an incredible source of energy that must not be taken for granted. Please respect this power and use it properly.
ADULT SUPERVISION OF ALL CHILDREN UNDER THE AGE OF 18 IS REQUIRED Diamond has designed your bow to be a safe and fun product. However, as with any shooting style product, safety rules must be observed. It is HIGHLY recommended that these rules be read before using any bow. Bows and arrows are NOT toys. For maximum safety and enjoyment, always exercise caution and common sense when shooting any bow.
ALWAYS use an appropriate backstop for maximum safety. An appropriate backstop must be constructed of a durable material and must extend beyond the perimeter of the target. The recommended backstop size is determined by the accuracy and ability of the shooter. With a low level of shooter accuracy, the backstop perimeter requirement must be increased appropriately.
NEVER aim or draw any bow in the direction of a person. Aim and draw ONLY in the direction of an appropriate target. ALWAYS have a full view of the path to and beyond the target when shooting.
ALWAYS check all arrow components prior to shooting, including nock, insert and tip. Loose components can cause unbalanced arrow flight and partial dry firing of the bow. If an arrow has been damaged, or if you believe it has been damaged, do not shoot it again, as it could break on release, and sharp arrow pieces could strike and injure you or someone nearby.
NEVER retrieve arrows or allow anyone else to do so until all arrows have been shot.
NEVER draw the bow without properly adjusted limb bolts (see “Adjusting Draw Weight” section online for more information). Make sure the string and cables are
4
97422_Sonar_OwnerManual2017.indd 4 10/28/16 9:25 AM

properly attached to the correct post and in the correct tracks in order to avoid possible injury.
DO NOT attach anything to the cables or string that could create excessive wear or slice the string material. This will void the warranty.
DO NOT cross cables in any configuration other than the configuration set by the factory. This will have an adverse effect on the performance and shootability of your bow. Further, it may cause extreme wear to the string, cable, and cable-slide/roller guard.
Any alteration from the factory specifications or the adjustments outlined herein will void the factory warranty. ALL maintenance must be performed at an Authorized Diamond Dealer.
5
97422_Sonar_OwnerManual2017.indd 5 10/28/16 9:25 AM
CHANGING DRAW LENGTHIt is very important that your Diamond bow is adjusted to fit you properly. Assistance in achieving a proper fit should be provided by your Authorized Diamond Dealer.
The draw length for Diamond bows can be adjusted without draw length specific modules. The Rotating Mod System makes this feature possible. By simply rotating the module clockwise or counterclockwise, your draw length can be adjusted, typically in 1/2 inch increments. (See Figure 1)
1. Diamond recommends that you take your bow to your Authorized Diamond Dealer for adjustment to your bow’s draw length.
2. For draw length adjustments to the Edge Sonar, use a 7/64 inch hex wrench to remove the module screws that attach the modules to the cams.
3. Notice the numbered indexing mark on the module and the indexing mark on the cam. All bows are factory preset to a 28 inch draw length; with the indexing marks aligned for this draw length setting. The numbered mark corresponds to a draw length setting as specified in Table 1.
4. To lengthen the draw length, rotate the module so that the indexing mark on the cam is aligned with a lower numbered indexing mark on the module.
5. To shorten the draw length, rotate the module so that the indexing mark on the cam is aligned with a higher numbered indexing mark on the module. (See Table 1)
6. Replace both module screws on each cam and retighten. We recommend applying blue Loctite 242 to the threads before replacing them at your desired setting. This will prevent the screws from loosening during normal use of the bow.
The Diamond Edge Sonar has the ability to be adjusted from 30 inches of draw length down to 18 inches of draw length.
6
97422_Sonar_OwnerManual2017.indd 6 10/28/16 9:25 AM
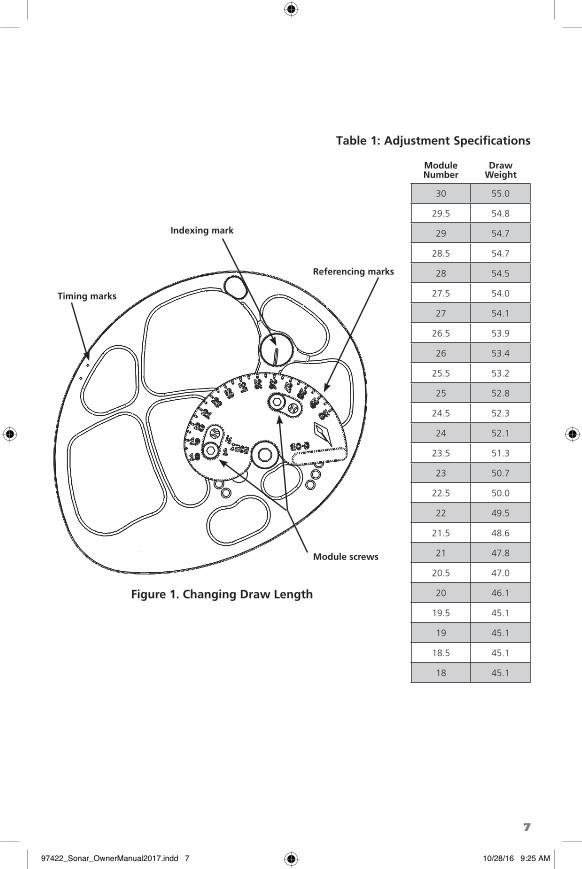
Table 1: Adjustment Specifications
Indexing mark
Timing marks
Referencing marks
Module screws
30 55.0
29.5 54.8
29 54.7
28.5 54.7
28 54.5
27.5 54.0
27 54.1
26.5 53.9
26 53.4
25.5 53.2
25 52.8
24.5 52.3
24 52.1
23.5 51.3
23 50.7
22.5 50.0
22 49.5
21.5 48.6
21 47.8
20.5 47.0
20 46.1
19.5 45.1
19 45.1
18.5 45.1
18 45.1
ModuleNumber
DrawWeight
Figure 1. Changing Draw Length
7
97422_Sonar_OwnerManual2017.indd 7 10/28/16 9:25 AM

TUNING AND PROPER FITThe Edge Sonar is preset to factory specifications of 18 inches draw length. You may need to adjust your bow to match your draw length. Any other alterations to the factory setup will likely inhibit performance.
CAM TIMINGThere are small indentations or “timing marks” on the module-side of the cam near its perimeter. When viewing the bow directly from the module side of the cam, the cable should be approximately centered in between the timing marks as shown in Figure 1. Both the top and bottom cams should be timed properly so that the cams complete their rotation simultaneously. It is recommended that your Authorized Diamond dealer should aid you in performing all timing adjustments.
SETTING THE DRAW WEIGHT:Draw weight on the Diamond Edge Sonar is adjustable from 55 pounds downward to 5 pounds. Table 1 reflects the available max draw weight settings. Please reference this table when setting up your bow. Draw weight can be adjusted by using a 3/16 inch hex wrench to either tighten or loosen the limb bolt. The draw weight should be adjusted equally on top and bottom limb bolt. The limb bolt has been marked with increments to help you set up your bow. Each mark is reflective of approximately 8.6% of the bows original peak weight.
Every bow configuration as seen in Table 1 has a slightly different result so therefore please consult your maximum draw weight. Limb bolt adjustment marks are a useful tool in keeping the limb bolts equal on both the top and bottom of your bow when you are adjusting draw weight. As a safety precaution, the limb bolts should never be backed out beyond the limb bolt reference hole on the riser while the bow is being shot. Please reference Figure 2.
Limb bolt reference hole
Limb boltadjustment marks
Limb bolt
3/16” hex wrenchfor adjustment
Figure 2. Draw Weight Adjustment
8
97422_Sonar_OwnerManual2017.indd 8 10/28/16 9:25 AM

LINE RETAINER & NEW TRIGGER GUARD
Line Retainer
Trigger Guard
Always pay attention to your line and keep it as tight as possible between your reel and AMS Safety Slide®.
Line RetainerUse the line retainer on every shot! Simply slip the line in the line retainer and crank in any excess line.
New Trigger GuardSimply push the narrow end into a hole on your bow riser. If no hole is available, use a zip-tie to secure the end of the trigger guard to your bow riser. This new feature protects your reel and prevents any excess or loose line from getting behind your trigger.
THE INFINITY/BOWFISHING SETTINGAdditionally the Diamond Edge Sonar comes with a special setting called the Infinity setting. It is a setting for which the bow has zero let-off. In other words, the bow will maintain most of its peak holding weight for the entirety of the draw cycle. This setting is popular when more than one person may use the bow but have different draw lengths associated with them as its setting is for a maximum of 31 inches with no minimum. With the infinity setting, the bow will allow the users to draw the bow back to their comfortable draw lengths and not require the bow to be readjusted via module re-positioning. This setting is also popular when bowfishing. The module is simply adjusted to align its infinity sign with the module indexing mark on both the top and bottom cams (See Figure 1).
9
97422_Sonar_OwnerManual2017.indd 9 10/28/16 9:25 AM
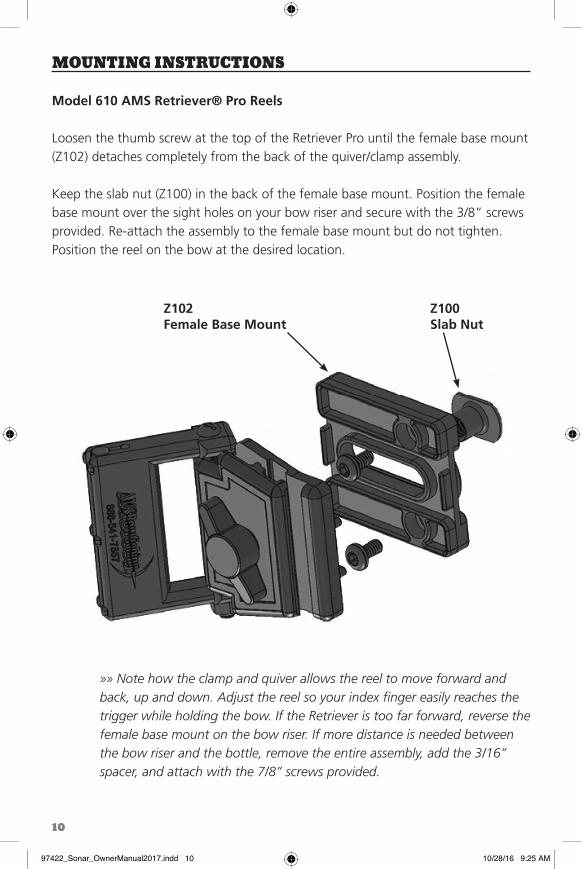
»» Note how the clamp and quiver allows the reel to move forward and back, up and down. Adjust the reel so your index finger easily reaches the trigger while holding the bow. If the Retriever is too far forward, reverse the female base mount on the bow riser. If more distance is needed between the bow riser and the bottle, remove the entire assembly, add the 3/16” spacer, and attach with the 7/8” screws provided.
MOUNTING INSTRUCTIONS
Model 610 AMS Retriever® Pro Reels
Loosen the thumb screw at the top of the Retriever Pro until the female base mount (Z102) detaches completely from the back of the quiver/clamp assembly.
Keep the slab nut (Z100) in the back of the female base mount. Position the female base mount over the sight holes on your bow riser and secure with the 3/8” screws provided. Re-attach the assembly to the female base mount but do not tighten. Position the reel on the bow at the desired location.
Z100Slab Nut
Z102Female Base Mount
10
97422_Sonar_OwnerManual2017.indd 10 10/28/16 9:25 AM
ARROW SAFETY
Warning! Don’t shoot an arrow without an AMS Safety Slide® System!
»» Each AMS Safety Slide® is marked with its logo and patent number. US Patent 6,517,453. Beware of counterfeit products.
Arrow snapback can occur when bowfishing line is tied directly to the tail of an arrow. As the arrow is drawn back and shot, a trailing loop of line forms and has the potential to knot itself to the string, cable or the arrow rest. This could cause the arrow to suddenly stop mid-flight and comeback toward the archer. AMS Safety Slides® are the solution to this hazard.
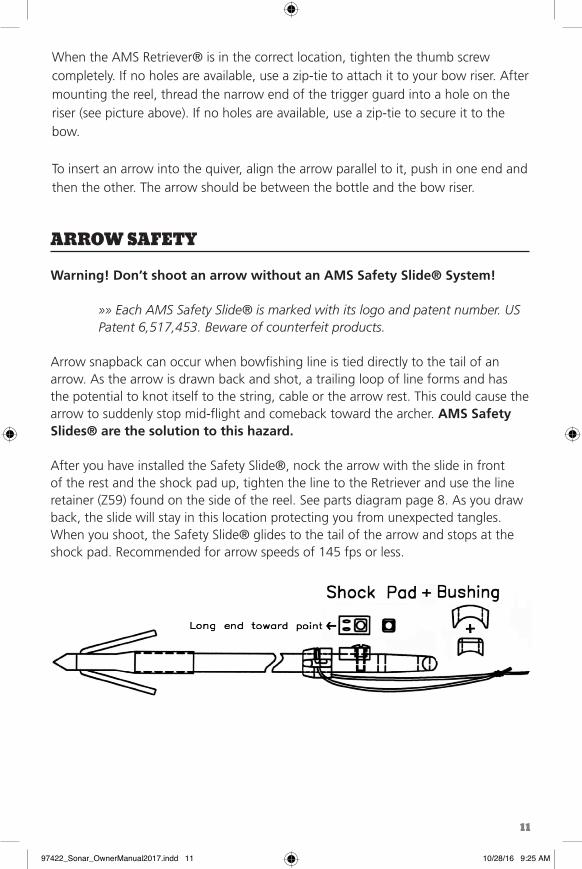
After you have installed the Safety Slide®, nock the arrow with the slide in front of the rest and the shock pad up, tighten the line to the Retriever and use the line retainer (Z59) found on the side of the reel. See parts diagram page 8. As you draw back, the slide will stay in this location protecting you from unexpected tangles. When you shoot, the Safety Slide® glides to the tail of the arrow and stops at the shock pad. Recommended for arrow speeds of 145 fps or less.
When the AMS Retriever® is in the correct location, tighten the thumb screw completely. If no holes are available, use a zip-tie to attach it to your bow riser. After mounting the reel, thread the narrow end of the trigger guard into a hole on the riser (see picture above). If no holes are available, use a zip-tie to secure it to the bow.
To insert an arrow into the quiver, align the arrow parallel to it, push in one end and then the other. The arrow should be between the bottle and the bow riser.
11
97422_Sonar_OwnerManual2017.indd 11 10/28/16 9:25 AM

Installing AMS Safety Slides®1. Remove the Safety Slide® found on the reel.2. The shock pad must be installed so it faces up and is in-line with the bowstring
when nocked. It must not bump the arrow rest or bow upon release.3. Push the Safety Slide® over the nock if possible. If not, remove nock and push
the Safety Slide® onto the shaft with the rounded part facing the point.4. If an existing 1/8” hole is in-line with the bowstring and nock, use it. If no hole
is present, use a drill press and drill a 1/8” hole at least 1” from the end of shaft and 1” from other holes.
5. Push the square bushing into the shock pad following curvature of both parts.6. Place shock pad assembly on the shaft with the oval holes toward the point.7. Screw should self-thread into hole. Do not thread screw more than once as it
will weaken the hole. For added strength, add a small amount of glue to the screw threads. Do not over-tighten.
Tying Line to the Slide1. Thread the bowfishing line from the reel through the Safety Slide® on the
arrow following the groove in the slide. Pull about 5” of line through the slide and position the arrow vertically in front of you.
2. Holding both lines, make a loop in the line and hold it above the point.3. Now send the entire arrow, starting at the point, through the loop. A knot will
form behind the arrow and hang 2 – 3” past it.
»» Visit our website at diamondarchery.com to watch a step-by-step video on how to properly tie the line to the patented AMS Safety Slide®.
12
97422_Sonar_OwnerManual2017.indd 12 10/28/16 9:25 AM

Line Care & MaintenanceAMS Retrievers® work best when the line is wet. Toss your arrow by hand into the water to wet the line and remove any tangles. If it is twisted, reel the line in slowly, removing any twists as you go or hold the line a few feet from the arrow and let the arrow untwist freely. Inspect line regularly for wear and replace or cut back as needed.The AMS Retriever® should operate smoothly. If there is any binding or mis-feeding, see adjustment instructions on the last page.
Bowfishing Check List• Check for any loose parts on sights, quiver, rest, etc. and tighten.• Inspect the bowstring and cable. If either is frayed or has broken strands,
replace it before using. If the protective servings are loose or have come undone, either have the string re-served or replace it.
• Check the bow limbs for cracks or splits. If any limb appears damaged, DO NOT USE your bow. Take your bow to a qualified pro shop and have it looked at by a trained professional or call AMS Bowfishing directly for service options.
• Check your cam and idler wheel for dents or gouges that can damage the bow string. Do not use the bow until they are repaired or replaced.
• Check your arrows. Look for cracks or loose fibers in the shaft which can cause slivers and misguided arrows. Look at the AMS Safety Slide® and shock pad. Make sure the AMS Safety Slide® is moving freely on the shaft and that the shock pad is tight beneath the screw.
• Check line for frays and knots. Replace line that is badly frayed. Twisted line causes knots. Twists can be worked out by removing the arrow and pulling all the line from the bottle over an open area and slowly retrieving the line back into the reel.
• Make sure the trigger guard is securely attached to the bow riser.• Use polarized sunglasses for day shooting. They reduce glare dramatically on
the water and make fish easier to see. Use safety glasses at night.• Sun protection, gloves and cell phone.
Shooting1. Nock your arrow and place it in your arrow rest with the shock pad up.2. Always keep the AMS Safety Slide® in front of the arrow rest.3. Tighten the line between your AMS Retriever® and arrow and push it into the
line retainer (Z59) found on the front, outside edge of your reel.4. There are no buttons to push. Just draw, aim and shoot.5. To retrieve the arrow, pull the trigger lightly with the index finger of your bow
hand and crank the handle with the other.6. To retrieve fish, the most exciting way is by taking the line in hand over hand.
The AMS Retriever® is designed with zero drag. It does not have an adjustable fighting drag, but you can control line release using your trigger. With a little practice you can fight your fish by pumping your bow and taking up slack line on the down stroke.
13
97422_Sonar_OwnerManual2017.indd 13 10/28/16 9:25 AM

ITEM DESCRIPTION
Z1 6-32 x 3/16” screw
Z2 6-32 x 3/4” screw
Z3 6-32 X 1” screw
Z4 6-32 x 1 1/4” screw
Z5 10-32 x 5/16” truss screw
Z8 6-32 nyloc nut
Z12 brass drive gear
Z16 R/L back mount plate alum.
Z16-600 R/L back mount plate plastic
Z17 pinion bearing
Z18 R/L side plate alum.
Z18-600 R/L side plate plastic
Z27 bottle cap
Z28 bottle
Z29 gear cover
Z30 line guide
Z31 stripper
Z32 alignment spacer
Z33 TW tie off button
Z35 rubber drive roller
Z36 handle assembly
Z37 R/L trigger assembly
Z45 trigger guard
Z59-600 line retainer
Z100 slab nut
Z101 thumb screw
Z102 female base mount
Z103 male mount clamp
Z104 quiver
Z105 10-24 x 2 3/4” screw
Z106 10-24 nyloc nut
Z109 o-ring
Z7-300 trigger bushing
Z71-300 line retainer bushing
Retriever Parts List and Diagrams
14
97422_Sonar_OwnerManual2017.indd 14 10/28/16 9:25 AM
AMS Retriever® Adjustments & Trouble Shooting Guide
»» Tools needed: flat screw driver, 5/16” box wrench & marine grease »» See diagrams on previous pages to define parts
If the handle on your AMS Retriever® won’t turn freely or line is coming out in front of the bottle, the stripper (Z31), line guide (Z30) or both need to be adjusted. We recommend adjusting the line guide first:
1. Loosen (1/2 turn), but do not remove, the line guide screw (Z3).2. Push the line guide down completely so the handle won’t turn.3. Then push it back up slightly until the handle turns freely.4. Holding the line guide in this location, tighten the screw.
»» If the handle still won’t turn or line is coming out in front of the bottle, the stripper (Z31) needs to be adjusted also.
1. The stripper is the cone-shaped part between the bottle cap and the body of the Retriever. Loosen the trigger screw (Z4) above it and the stripper screw (Z3) below one turn. Just enough to move the part by hand.
2. Slide the stripper/bottle cap assembly downward toward the base of the reel until it meets the rubber drive roller inside and the handle won’t turn at all.
3. Now push the stripper/bottle cap assembly up just enough so the handle starts to turn freely. You want the stripper as close to the rubber drive roller as possible without touching it. This is the proper location for the stripper. If it is too high, line will come out in front of the bottle. If it is too low, it will rub against the rubber drive roller and make the handle difficult to turn.
4. Holding the stripper/bottle cap assembly in place, tighten the lower stripper screw first. It has a built-in lock nut on the back side. Then tighten the trigger screw using a wrench to hold the nut in place on the back side.
5. More than one attempt at this adjustment may be required.
Trouble ShootingPulling the trigger back and trying to brake the fish while the fish is running can cause your line to burn grooves in the rubber drive roller. These grooves can cause operational problems and premature wear to internal parts.
15
97422_Sonar_OwnerManual2017.indd 15 10/28/16 9:25 AM

90554 HWY 99 NORTH, EUGENE, OREGON 97402DiamondArchery.com
Every effort has been made to ensure the accuracy of information and typographical content within our owner’s manual. Diamond reserves the right to modify and/or discontinue products without notice and at its discretion. © 2017 Diamond Archery by BowTech. All rights reserved.
AMS Retriever Assembly
»» Tools needed: Flat screw driver, 5/16” box wrench & marine grease
1. Push lock nuts (Z8) into the back side of the mount plate (Z16).2. Place pinion bearing (Z17) into mount plate, aligning small notch.3. Grease both ends of the rubber drive roller (Z35) and place the small end into
the pinion bearing. Excessive grease is not necessary.4. Place line guide (Z30) on the mount plate with the legs over the rubber drive
roller.5. To assemble gear cover: place gear cover (Z29) over brass drive gear (Z12), add
handle (Z36) and secure pieces together with the truss screw (Z5).6. Locate the small snap above the center hole on the side plate. Place gear cover
assembly over it and slide it downward toward the bottom of the reel until it snaps onto the side plate.
7. Add side plate assembly to mount plate assembly. The two holes in the gear cover snap over the posts on the side plate. Secure with 1” screws (Z3) at the bottom.
8. Add the line guide screw (Z3). If your line retainer (Z59) is a separate piece, add it to the back side of this screw with the slot facing forward. Secure with a lock nut but do not tighten completely as it will be adjusted later.
9. Add the trigger assembly (Z37) by slightly squeezing the mount and side plates together and pushing it onto the built-in trigger bushings.
10. Assemble stripper (Z31) and bottle cap (Z27) by squeezing the cap slightly.11. Push stripper/bottle cap assembly between the plates.12. Align the holes in the trigger with the stripper and plates and add the 1 ¼”
trigger screw through the trigger. Do not tighten yet as it will be adjusted later.13. Add the 1” stripper screw (Z3) but do not tighten.14. IMPORTANT! Adjust the stripper and line guide before use. Follow the
adjustment instructions on the last page.
16
97422_Sonar_OwnerManual2017.indd 16 10/28/16 9:25 AM