testing & data services apperson/datalink scanner (540)231
TRANSCRIPT

Testing & Data Services Apperson/DataLink Scanner (540)231-‐5413 [email protected] http://www.tds.vt.edu/pages/datalink.html
1
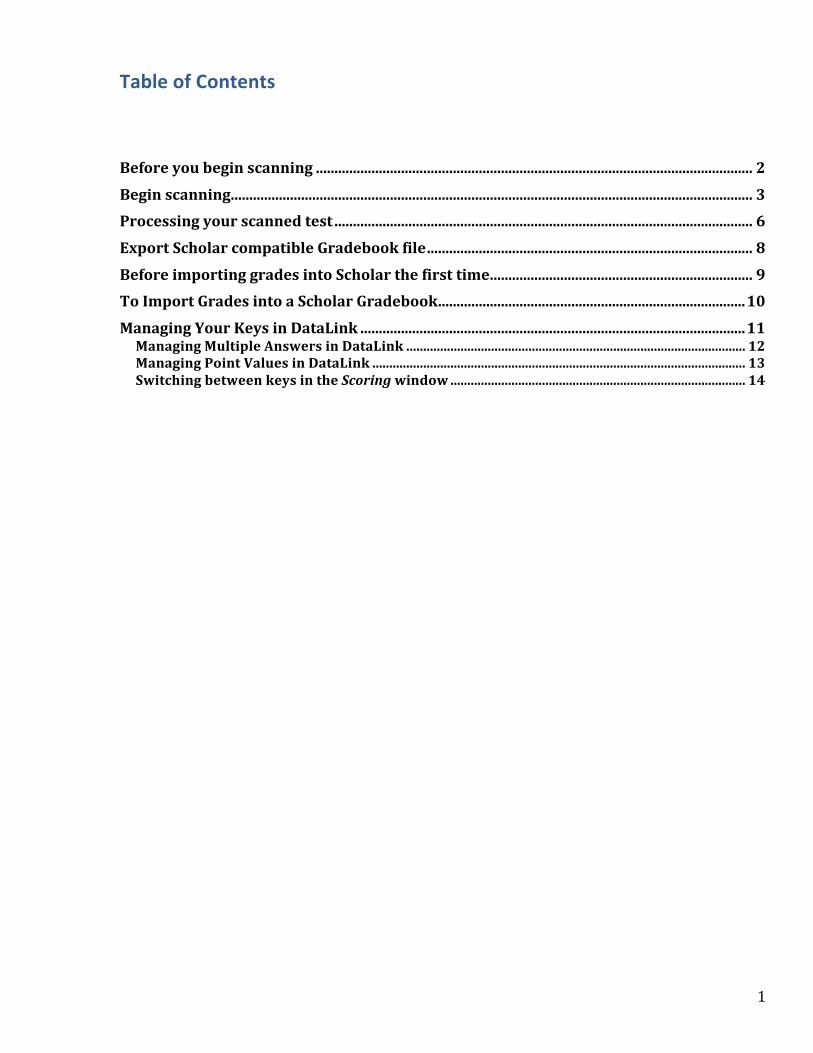
Table of Contents Before you begin scanning ...................................................................................................................... 2
Begin scanning ............................................................................................................................................. 3 Processing your scanned test ................................................................................................................. 6
Export Scholar compatible Gradebook file ........................................................................................ 8
Before importing grades into Scholar the first time ....................................................................... 9 To Import Grades into a Scholar Gradebook ................................................................................... 10
Managing Your Keys in DataLink ........................................................................................................ 11 Managing Multiple Answers in DataLink .................................................................................................... 12 Managing Point Values in DataLink .............................................................................................................. 13 Switching between keys in the Scoring window ....................................................................................... 14
2
Before you begin scanning
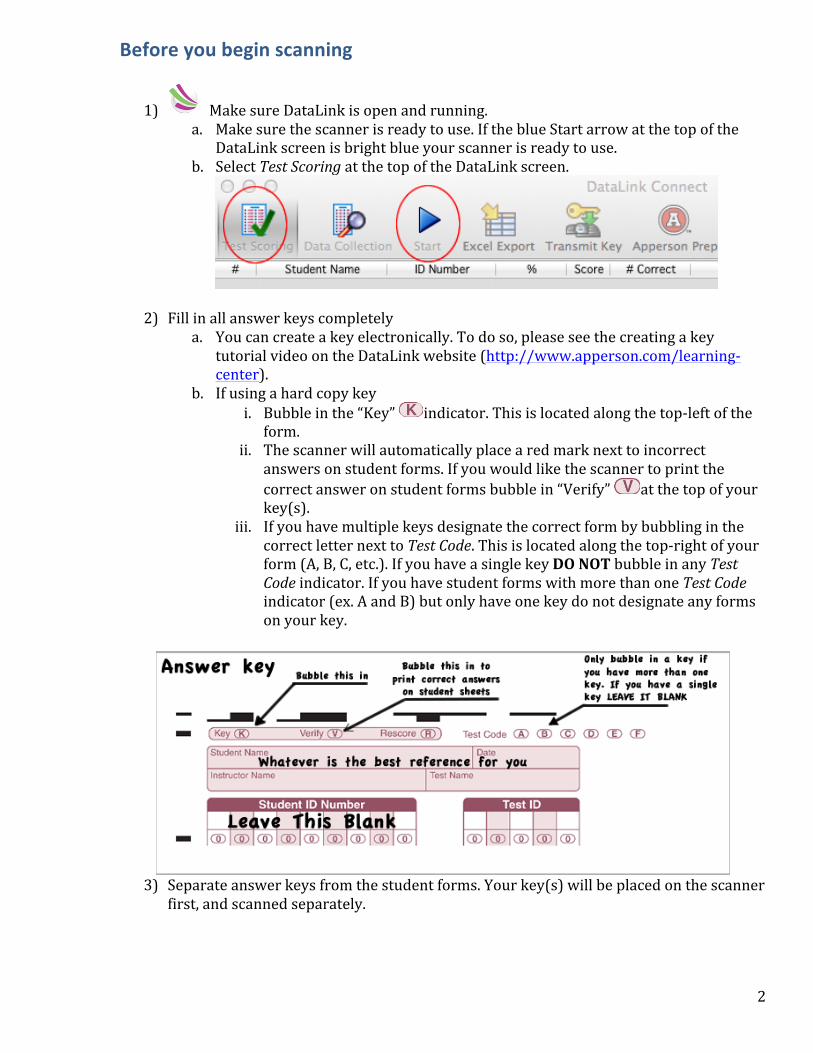
1) Make sure DataLink is open and running. a. Make sure the scanner is ready to use. If the blue Start arrow at the top of the
DataLink screen is bright blue your scanner is ready to use. b. Select Test Scoring at the top of the DataLink screen.
2) Fill in all answer keys completely a. You can create a key electronically. To do so, please see the creating a key
tutorial video on the DataLink website (http://www.apperson.com/learning-‐center).
b. If using a hard copy key i. Bubble in the “Key” indicator. This is located along the top-‐left of the form.
ii. The scanner will automatically place a red mark next to incorrect answers on student forms. If you would like the scanner to print the correct answer on student forms bubble in “Verify” at the top of your key(s).
iii. If you have multiple keys designate the correct form by bubbling in the correct letter next to Test Code. This is located along the top-‐right of your form (A, B, C, etc.). If you have a single key DO NOT bubble in any Test Code indicator. If you have student forms with more than one Test Code indicator (ex. A and B) but only have one key do not designate any forms on your key.
3) Separate answer keys from the student forms. Your key(s) will be placed on the scanner first, and scanned separately.

3
Begin scanning
1) Place answer key(s) face up on scanner. If you have multiple keys they can be in any order. Please note the DataLink scanner feeds from the bottom, meaning any sheets scanned will be in reverse order after scanning.
2) Make sure the metal output tray, on the opposite end from the feed tray is completely extended prior to scanning.
3) On your monitor click the blue Start button at the top of the DataLink screen or press the green button on the face of the scanner.
4) DataLink will start scanning your keys. The information will immediately start loading onto the DataLink screen.
a. Make sure the Score field and # Correct field match and are the same as the number of questions on your exam. The only exception will be if any questions have been omitted from the key. In that case the two numbers will still match but be less the amount of questions that were omitted. The example below is a test with 3 keys and 99 questions.
5) Remove keys from the scanner if you would prefer to keep them separate. Place the
student answer forms face up on the scanner.
6) On your monitor click the start button at the top of the DataLink screen or press the green button on the face of the scanner.
4
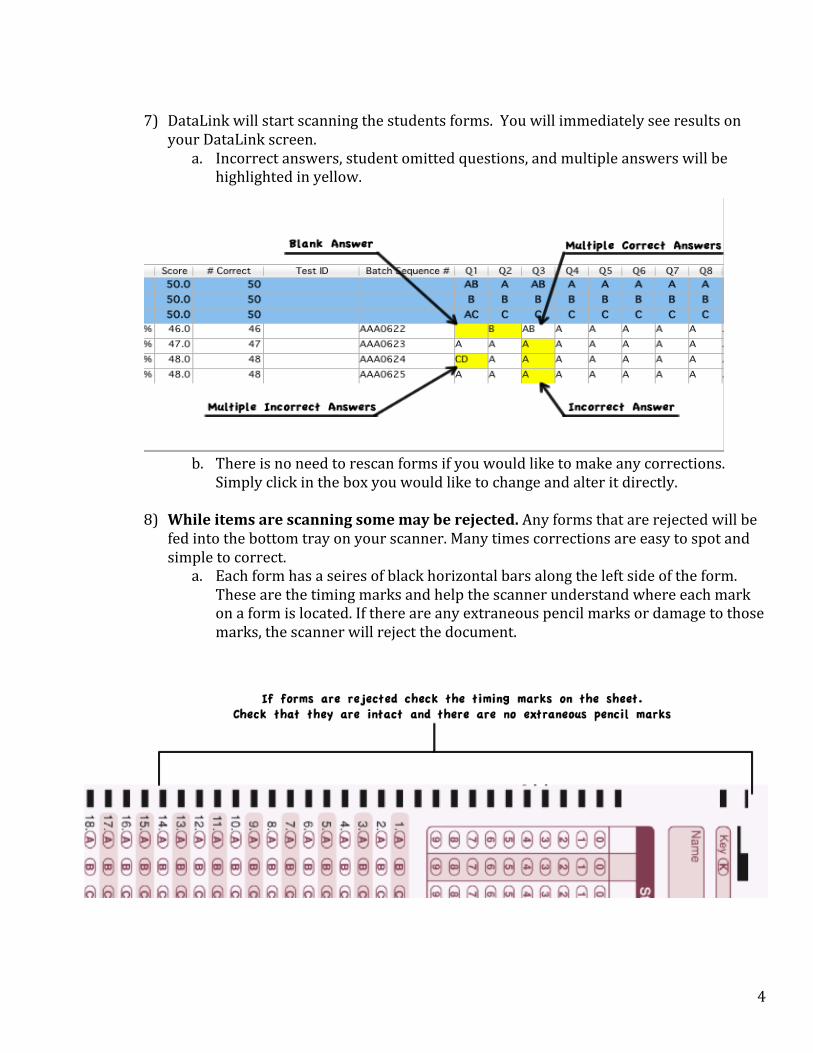
7) DataLink will start scanning the students forms. You will immediately see results on your DataLink screen.
a. Incorrect answers, student omitted questions, and multiple answers will be highlighted in yellow.
b. There is no need to rescan forms if you would like to make any corrections. Simply click in the box you would like to change and alter it directly.
8) While items are scanning some may be rejected. Any forms that are rejected will be fed into the bottom tray on your scanner. Many times corrections are easy to spot and simple to correct.
a. Each form has a seires of black horizontal bars along the left side of the form. These are the timing marks and help the scanner understand where each mark on a form is located. If there are any extraneous pencil marks or damage to those marks, the scanner will reject the document.

5
9) Once your exams are all scanned save your results to a network or USB drive. a. Go to FILE àSave this will open a new window.
b. In the window that opens select your USB drive ( you may have to scroll down on the left). Name the file whatever will be the most significant refernece for you (ex: ENGE-‐1105-‐AM-‐quiz1-‐2012.apxt). The standard file name for DataLink testing files is .apxt , do not change this file extension.
c. You are now ready to take your files to your laptop/desktop for editing/import into your Scholar GradeBook.
Make sure all of your data/files are saved to a USB or network drive. Once you have scanned all of the exams that you wish to scan and confirmed the information is saved elsewhere please restart the scanning computer. TDS scanning computers will not permanently save
any information.

6
Processing your scanned test
1) Once at your computer, insert your USB drive and open DataLink.
2) Once DataLink is open go to FileàOpen Saved Session.
3) Navigate to your USB and select the file you have saved
4) Review your test results and make any initial changes. A great place to start is under
the “Reports” tab at the top of the screen. Reports will open in a seperate window. This gives several options to see how your students performed individually and as a group on each question.
a. To make changes to your exam or student responses return to the main window. To make changes to your key simply click in the field that has the answer you would like to change. Delete the old answer and enter your new response. Your results are immediately updated. If you intend to have multiple answers per question or weight questions at different values please see “Managing your keys” .
b. Point values for individual questions can be altered as well. Go to SessionàScoring
i. Under scoring find the question you would like to assign a higher point value. In the correct column change “1” to the point value you would like. If you would like to take additional points off for getting a question inccorrect, place a negative number in the incorrect column.
ii. Select apply at the bottom of the screen. These changes are immediately applied to your results.
c. If you prefer to manage your grades outside of DataLink Connect there are several options to export results to an excel spreadsheet(s). Please note that these excel reports cannot be imported into Scholar or back into DataLink
Option 1: In the options bar across the top of the DataLink window there is a tab for Excel Export. Select Full Report on your first scan to get an idea of all the options.
Option 2: In DataLink while your results are open go to EditàCopy to clipboard. Open excel and select the upper left cell. Right click and paste your results.

7
Mac users-‐ click on Excel export to see your report options.
Windows users click on the small black arrow to the right of Excel Export to see your report options.
5) Once you are satisfied with your results select, FileàSAVE at the top of the screen.

8
Export Scholar compatible Gradebook file
1) Once you have saved your changes, select Gradebook Export at the top of the screen. 2) If this is your first time using the export tool you may need to select VT from the list.
Enter in the assignment name and select OK.
3) The default file name is VT.txt. It is a good idea to rename the file if you are processing
several results/tests at one time to eliminate the risk of overwriting a previously saved file. You are now ready to import the results into your Scholar Gradebook.

9
Before importing grades into Scholar the first time Skip this step if you already have the TSS import tool on your course’s Scholar page. The first time you import grades into a Scholar site you will need to add the TSS Import Tool to your site.
1) Navigate to your course and select Site Info on the left.
2) Select Edit Tools at the top of the site info window.
3) Select Test Scoring Services (TSS) Import tool from the list and continue at the bottom of the page.
4) Confirm your changes on the next page and you are ready to import grades into your Scholar Gradebook.

10
To Import Grades into a Scholar Gradebook 1) Navigate to your Scholar course site 2) Select the Test Scoring Services (TSS) Import tab on the left of your screen.
3) Select “Browse” on your PC or Choose File on your MAC, locate the VT export file you had saved earlier and select OPEN. Enter the total number of points you would like the assignment to be worth. Select Upload File.
4) The next page will allow you rename the test file if needed.
5) Any student ID numbers that are not in the student database will appear in RED. The
most common reasons for this is student error when entering their ID number on the test form and during earlier portions of a semester due to Drop/Adds.
6) Scroll to the bottom of the screen and select submit.
For further help managing your grades in Scholar please contact 4Help or the Faculty Development Institutes website (fdi.vt.edu) for Scholar resources.
11
Managing Your Keys in DataLink This tutorial is intended for use AFTER you have scanned your student exams and key(s). This tutorial is not a complete reference for all DataLink Connect scoring options. It is intended to introduce some of the most commonly used options available. For a more complete reference visit the Apperson/DataLink site at http://www.apperson.com/learning-‐center for video tutorials, or http://datalinkupdate.com/helpfiles/datalink/4.2/for text based tutorials. There are several options for altering your key(s) and managing multiple answers in DataLink.
a. Simple Corrections-‐ If you are simply correcting your key you can click in the space where the current answer is, delete that answer, and enter the new response. Grades are instantly updated within DataLink. Be sure to save your session after you make changes.
b. Multiple Responses (ALL) -‐ If you have multiple answers this can be managed on the DataLink main page or on your paper key before scanning. By default DataLink treats multiple answers entered in on a paper key or the main DataLink screen as “ALL”. This means that if you bubble in A and D on your answer key(s) before scanning a student will have to have both answers, A and D, on their form to be receive credit for that question. Be sure to save your test if you make alterations on the main DataLink screen.
c. Multiple Responses (Either/Or & Both)-‐If you would like to offer multiple correct answers on a “Both” or “Either/Or” basis please see Managing Multiple Answers in DataLink for information on how to access and manage these options.
d. Different Point Values-‐DataLink offers the option to weight certain questions at higher or lower point values. Please see Managing Point Values in DataLink for information on how to access and manage this option.

12
Managing Multiple Answers in DataLink This tutorial is not a complete reference for all DataLink Connect scoring options. It is intended to introduce some of the most commonly used options available. For a more complete reference visit the Apperson/DataLink site at http://www.apperson.com/learning-‐center for video tutorials, or http://datalinkupdate.com/helpfiles/datalink/4.2/for text based tutorials.
1. With your already scanned exam open select SessionàScoring from the menu along the top of the DataLink window.
2. If you are using a single key please continue with the next step. If you are using multiple
keys please see Switching Between Keys in the Scoring Window. 3. Navigate to the question response you would like to change and click in the box. Simply
type the response(s) you would like for that question. 4. There are three options for scoring multiple answers in DataLink connect. Select the
option that best suites your key. Please note that these options cannot be accessed unless there are multiple responses in the answer column for that question.
a. All -‐ Student responses must match ALL answers designated in the answer column of the key in order to receive credit. This is the default setting for multiple answers on the main DataLink screen and on multiple answers bubbled in on a paper key before scanning.
b. Either/Or -‐ Student responses must match one, and only one, of the designated answers in the answer column on the key to receive credit.
c. Both -‐ Student responses can match any combination of answers, or a single answer, in the answer column on the key to receive credit.
5. After you have made any changes to your key select Apply at the bottom of the screen. Once you are finished updating all of your key(s) select OK to close the window and return to the main DataLink screen. The main DataLink screen will be updated with your results.
6. SAVE your test file before exiting.

13
Managing Point Values in DataLink DataLink offers the option to weight questions differently. This option is managed AFTER exams and key(s) have been scanned and can be changed at any time. This tutorial is not a complete reference for all DataLink Connect scoring options. It is intended to introduce some of the most commonly used options available. For a more complete reference visit the Apperson/DataLink site at http://www.apperson.com/learning-‐center for video tutorials, or http://datalinkupdate.com/helpfiles/datalink/4.2/for text based tutorials.
1. With your already scanned exam open select SessionàScoring from the menu along the top of the DataLink window.
2. If you are using a single key please continue with the next step. If you are using multiple
keys please see Switching Between Keys in the Scoring Window. 3. Navigate to the question point value you would like to change and click in the box.
Simply type the point value you would like for that question. If you would also like to have multiple answers for a question please see Managing Multiple Answers in DataLink.
4. After you have made any changes to your key select Apply at the bottom of the screen. Once you are finished updating all of your key(s) select OK to close the window and return to the main DataLink screen. The main DataLink screen will be updated with your results.
5. SAVE your test file before exiting.

14
Switching between keys in the Scoring window There is a minor software glitch with DataLink when switching between keys. The screen does not always visually update to the correct key. TDS is working with Apperson on correcting this issue(Fall 2012). There is a very simple, temporary, work-‐around for this glitch. 1. Select the form you would like to edit in the drop down menu. 2. Select the Standard Scoring tab at the top of the screen. Do not make any changes 3. Select the Custom Scoring tab at the top of the screen. This will take you to the original
screen you were on but with the key you selected being displayed. 4. After you have made any changes to your key select Apply at the bottom of the screen. If
you would like to make changes to other keys follow this procedure each time you switch to another key. Once you are finished updating all of your keys select OK to close the window and return to the main DataLink screen.