technical skills section
TRANSCRIPT
Technical Skills SectionChapters 7–9

Section OverviewThe next three chapters of The Mandt System® address the uses of physical interaction, including situations of potential physical aggression. The Mandt System® emphasizes that all people are to be treated with dignity and respect, especially if physical interaction may be warranted.
Chapter Seven, Assisting and Supporting, will build a solid foundation for the other two chapters by providing the concepts and skills foundational to all the technical skills. The instructor is not required to teach students all the skills in each chapter. Instead, the student can be certified in specific skills in the assisting/supporting chapter. However, instructors must certify the student in the stances, step slide, push/pull drill, walking with and accompanying and escorting, prior to instruction of any of the other physical skills. These skills contain the information needed to maintain proper stance and balance, body mechanics and movement, and body positioning relative to the other person and are the foundations for successful performance of any of the other skills.
The Mandt System® recommends the instructor spend more time on this chapter than on the other two chapters. By laying a good foundation for physical interaction in Chapter Seven, the skills in Chapters Eight and Nine will be easier to teach and for students to learn. If a trainer wishes to do so, they may teach specific skills from Chapters Seven and Eight, but do not have to teach all of them.
The three basic concepts are:
• Stance and Balance
• Body Mechanics and Body Movement
• Body Positioning Relative to Other People
This chapter will introduce these concepts and focus on assisting and supporting people who may be confused, disoriented, and/or having difficulty maintaining their balance. Remind students as these concepts are taught and practiced, there is NO potential for physical aggression. The individual may also have difficulty with following directions, responding to requests, changes in medication, seizure activity, or other personal issues.
Chapter Eight, Separating, introduces concepts to assess and then respond to potential aggression in ways that invite people to de-escalate. The concepts taught in this chapter focus on preventing the need for restraint! Assessing the needs of people, ensuring those needs are met, and treating people with dignity and respect are central to this process.
The first application of the concepts is called the turn-step and is the most important skill set in this chapter! If people are able to use this particular set of concepts and skills, many situations that resulted in restraint in the past may be eliminated. Other situations addressed involve people being grabbed by their arms, wrists or fingers; having their hair pulled; being bitten; having clothing grabbed; and separating two people who may be fighting each other.
Chapter Nine, the final chapter in the Technical Skills Section, is Restraining. The chapter begins with information concerning the medical risks of restraint and ensures caregivers are aware of the risk factors that may be present in caregivers and individuals served, as well as having an awareness of indicators of distress if and when restraint is imposed. The Mandt System® teaches only standing restraints. At no time are individuals served restrained on the floor or in a seated position.
At the end of this section are two sets of skills for restraining people of short stature, as well as information addressing the special needs of people who may use wheelchairs for ambulation, and people who are engaging in self-injurious behavior.
In those settings that require information on the use of seclusion be taught, The Mandt System® has available a document specific to the prevention and, if needed, use of seclusion.

165
Chapter Seven | Technical Skills
Student Workbook © 1975 – 2017 The Mandt System, Inc.
CHAPTER SEVENAssisting and Supporting
Se
ctio
n 1

166
Chapter Seven | Technical Skills
Student Workbook © 1975 – 2017 The Mandt System, Inc.
OverviewAs we prepare for the technical, or physical training, section of The Mandt System®, it is important to ensure that participants in the training have an awareness of the issues surrounding interpersonal violence, or betrayal trauma (Freyd, 1991). The Adverse Childhood Experiences (ACE) study published in 2000 and frequently updated (Anda, 2012) is covered in more depth in Chapter Four, Trauma Informed Services. The instructor should emphasize that when people who are trusted betray that trust, the effects of abuse and neglect are even more harmful for the individual than traumatic events that are the result of natural disasters or accidents.
Please read the following objectives carefully. They will give you a good picture of what will be learned during this section.
Learning Objectives Upon completion of this chapter, participants will have:
1. Determined the purpose and procedures for the appropriate use of physical interaction.
2. Distinguished between situations requiring non-physical assistance and physical assistance.
3. Listed the three major points of stance and balance.
4. Gained competence in physical skills for balance, body positioning, and redirecting.
5. Demonstrated the importance of stance, posture, balance, form, lower abdomen and hips, center of gravity, rhythm, and timing in performing physical skills.
6. Demonstrated the use of each of the physical skills presented in this chapter.
7. Defined practices prohibited by The Mandt System® when using physical interaction.
8. Defined the types of physical assistance.

167
Chapter Seven | Technical Skills
Student Workbook © 1975 – 2017 The Mandt System, Inc.
Review Of Trauma
Trauma effects on crisis cycle placement
The upside down pyramid is a model of our neurological system. It was developed by Bruce Perry, a psychiatrist and neuropsychologist. The neurological system is designed to be “wired together” for the most part after birth. Basic functions necessary to sustain life, such as cardiovascular and temperature regulation in the brainstem, are designed to be functional at birth. As sensory input comes in through external senses, the process of behavioral output is what wires the neurosensory systems.
Traumatic events not only cause a difference in the wiring of the brain, they create a different emotional state than that which is found in children without trauma histories. As an example, a child who is neglected during the first year of life will have significant impact in their perceptions of their own safety and security, especially under stressful conditions.
Understanding the neurological impact of trauma
People who have a history of trauma are seldom, if ever, at peace. Their baseline is higher, depending on a
number of different factors. When caregivers use the term “rapid escalator” or describe behavior as being “out of the blue” or “zero to 60,” what they are probably describing is the response of people whose baseline is elevated.
As a result, they have a lower tolerance for stress and escalate more quickly. In Chapter Four, Trauma Informed Services, this topic is presented in more depth and reviews the neurological process behind rapid escalation. The crisis cycle is presented in neurological terms and explains the neurological reasons the recommendations of The Mandt System® are so effective.
Se
ctio
n 2
• Abstract thought
• Concrete thought
• A�liation
• “Attachment”
• Sexual Behavior
• Emotional Reactivity
• Motor Regulation
• “Arousal”
• Appetite / Satiety
• Sleep
• Blood Pressure
• Heart Rate
• Body Temperature
Ages 12 - 18
Ages 8 - 12
Ages 4 - 8
Ages 1 - 4
First Year
3rd Trimester
2nd Trimester
NeoCortex
Limbic
Diencephalon
Brain - stem
Used
with
perm
ission
© D
r. Bru
ce Perry, 19
99

168
Chapter Seven | Technical Skills
Student Workbook © 1975 – 2017 The Mandt System, Inc.
S.2
Resilience
Resilience is the ability to thrive, mature and increase competence in the face of adverse circumstances.
Resilience comes from the hope deep inside every person with a trauma history. With resilience, people who have been wounded are able to thrive, mature, and increase competence in the face of adverse circumstances
(Gordon, 1995). To do so, people must draw on their biological, psychological, and environmental resources. Using resilience requires the person to use all the resources available to them. In thinking about interacting physically with individuals receiving services, it is important to understand that the person in the role of caregiver is part of their psychological and environmental resources that empower resilience in the person.
The people served in organizations using The Mandt System® are part of the resources available to people. Any and every person within the organization can be a hero to someone. The connections we offer to people who have been deeply wounded starts with the relationships between caregivers. If caregivers trust each other, the people served can trust their caregivers.
Crisis Phase
Baseline Phase
Post-Crisis Drain Phase
Escalation Phase
De - Escalation Phase
Stimulus or Trigger Phase
Stabilization Phase
TRAUMA HISTORY
Notes:

169
Chapter Seven | Technical Skills
Student Workbook © 1975 – 2017 The Mandt System, Inc.
Secondary trauma
Secondary trauma can happen to people, whether they are providing or receiving services, when they see something happening to others that is, from their perspective, traumatic. Examples include seeing someone known and cared for injured.
Secondary trauma can also be experienced by individuals receiving services who witness restraint and seclusion happening to others.
Pat Risser shares that while lying on the bed in a psychiatric hospital, in mechanical restraints, he heard the cries of the person in the next room, “Oh no! Please let me go. Please don’t do this to me. You’re hurting me, please stop. Please let me out of here!” These cries went on through the night. Pat lay there in fear from those who could care so little. Who could be so emotionally scabbed over and so distant from their humanity that they were not
moved by these pleas? What cold and callous beasts must these people be? How could anyone care so little?
Emotional safety and physical interactionIn preparing to teach the physical skills, be aware of the trauma histories of caregivers. In Chapter Four, data was presented showing the effects of trauma on students who become caregivers, resulting in what was called “the wounded workforce.” If students indicate that they are uncomfortable being in the position of being supported or being restrained, talk with them. In preparing to practice the physical skills, inform the students working with the person who expressed discomfort that when they are asked to “change roles,” this person will remain in the caregiver role because they have asked to really focus on their physical skills. DO NOT say that they have a trauma history. If they want to share it, they can.
In response to secondary trauma, some caregivers can become calloused or “hard hearted.” Others may use what is called “dark humor” to make fun of the pain that is present. Either response must be seen as a defensive response, used to keep the person safe. In order for caregivers to support others, they must themselves feel supported. Earlier in this course it was emphasized that “You can only give what you have.” It is the responsibility of the supervisor to give caregivers the support they need so they can, in turn, support others.
S.2
Notes:

170
Chapter Seven | Technical Skills
Student Workbook © 1975 – 2017 The Mandt System, Inc.
Healthy relationships
When the houses discussed in Chapter One are built and have a strong foundation based on dignity, respect, trust, and other characteristics of healthy relationships, people can say that In this place and with these people, I feel safe™. When they can say these words, they can use their internal resources and the external supports to make the best of their own situation. It may also be easier to trust caregivers and easier to allow, or at least tolerate, physical interaction.
In learning the physical chapters, the foundational principles of Maslow’s hierarchy of needs, R.A.D.A.R., and the crisis cycle need to be carried forward. Always remember that the goal of The Mandt System® is to build healthy relationships
between people. The physical interactions must reflect this commitment. It is important to continually remind people of the core values. What people believe leads to how they behave. In using physical interactions, it is important to always be centered on the core values and beliefs identified in Chapter One.
S.2
Te taha tinana
Physical health Te taha whirua
Spiritual health
Te taha whánau
Family healthTe taha hinengaro
Psychological health
Notes:

171
Chapter Seven | Technical Skills
Student Workbook © 1975 – 2017 The Mandt System, Inc.
Technical IntroductionThe first critical concept of physical assisting is stance and balance. Correct stance and balance are essential to help maintain posture which is necessary to safely provide assistance to the other person.
The second critical concept is body mechanics and movement. Any type of movement involves the principles of body mechanics, and includes stance, posture, balance, body-shifting, and using the lower abdomen and hips to help manage a person’s center of gravity.
The third critical concept is body positioning in relationship to the other person. For example, when someone places their body between the person and a dangerous area, it limits or denies the person’s access to that danger. When accompanying a person, it is important to position your body in a way (e.g., on the person’s left or right side) to provide safety from harm.
S.2
Notes:
Keep your elbows in!

172
Chapter Seven | Technical Skills
Student Workbook © 1975 – 2017 The Mandt System, Inc.
S.2
Physical interaction — a definition
”Physical interaction” means the use of a physical presence or skill to either assist or limit a person’s behavior. Physical interaction includes accompanying, assisting, escorting, supporting, avoiding, redirecting, releasing, separating, and restraining. While physical interaction is often used to assist people, some restrictive interaction may be used to limit a person’s freedom of movement, restrict access to personal property, or cause a person to do something which they do not want to do.
The Mandt System® believes that some physical interaction skills may be used to assist or limit a person’s behavior.
The following are taught in Chapter Seven:
• Accompanying — using non-physical and/or physical interaction to assist someone to transition from one place to another primarily through the use of body positioning.
• Assisting — having the person hold on to you and/or you physically holding on to the person to steady and support them while standing or walking to keep them from falling or slipping. The person doing the assisting follows the lead of the person being assisted. The person must be released when they no longer need the physical assist.
• Escorting — accompanying another to give protection or as a courtesy. In The Mandt System®, escorting relates to the use of physical contact by
the caregiver holding above the elbow and the opposite belt/hip area of the person being assisted.
• Supporting — providing physical assistance to help a person maintain their stance and balance, body mechanics, and body positioning.
Chapter Eight will teach people these skills:
• Avoiding — eluding, evading or escaping physical contact through the use of body positioning, shifting, stepping, or sliding without making physical contact with the person.
• Redirecting or deflecting — while avoiding, using the hand and/or arm to make physical contact without holding on to the person.
• Releasing — removing someone or something from a physical hold. This may involve holding on briefly to the hand and forearm, just above the wrist, of the person.
Chapter Nine teaches:
• Restraining — limiting, but not immobilizing, a person who has engaged in behavior that is harmful to themselves and/or others.
This lists the gradual and graded system of alternatives in the physical interactions taught in The Mandt System®. The Relational Section taught that when people are at the top of the crisis cycle, the response of the caregiver should be the “least amount of interaction necessary for safety.”
Notes:

173
Chapter Seven | Technical Skills
Student Workbook © 1975 – 2017 The Mandt System, Inc.
Introduction To Physical InteractionPhysical interaction skills should be used only after non-physical interaction has proven to be insufficient to ensure the safety of everyone involved.
The interactions with people need to be done in ways that use the minimum amount of physical interaction to maintain the safety of all people.
Exception according to The Mandt System®:
If the behavior is involuntary (tripping, falling, loss of consciousness), physical interaction must be used concurrent with non-physical skills.
Purpose
The Mandt System® does not teach to contract for safety, i.e., “If you promise to stop fighting, I will release you.” After the people who were at risk are safe, the interaction should be discontinued in a planned, purposeful approach that will be demonstrated during training.
The concepts of physical interaction can be applied in a number of different ways and should be individualized to the preferences of the people who may be experiencing them.
For instance, some people may feel safer in a side body hug support, while others may prefer a one-arm support or simply an escort position that offers stability. It is a good idea to check with the individual being physically supported before releasing them.
Implementation of physical interactionPhysical Skills — Instruction
All caregivers who are required as part of their job description (either written or implied) to use any type of physical interaction skills must be:
• Taught and certified by a currently certified Mandt instructor in the use of such skills according to the facility’s policy and procedures and prior to actual implementation.
• Provided a student manual during instruction that includes written information, possible causes, application, cautions, glossary of terms, self-study questions, and illustrations of physical skills learned.
• Given adequate practice time for the acquisition of the knowledge and physical interaction skills.
• Tested to provide quality assurance that the instruction was given, the knowledge was received, and the physical interaction skills were acquired.
• Recertified annually in accordance with federal/state laws and regulations.
Debriefing — processing
• Each facility and agency should make provisions for processing, evaluation, and analysis of the situation (i.e., what worked and what could have been done differently?) by caregivers involved, the supervisor, and other team members, as appropriate. The person experiencing a crisis or being placed in restrictive physical interaction or skills should also be a part of the evaluation and analysis. Additionally, it is generally helpful to debrief with other people who have witnessed the event.
Documentation of physical interaction skills
• The person’s parent, guardian, or advocate must be notified immediately of any injuries sustained during restrictive physical interaction skills requiring first aid and/or medical care.
• Injuries should be reported to the appropriate review or human rights committee, law enforcement, or other authority, as appropriate.
S.2
Notes:

174
Chapter Seven | Technical Skills
Student Workbook © 1975 – 2017 The Mandt System, Inc.
Documentation should include:
• The date and time of occurrence.
• The name of person(s) involved.
• The name or caregiver(s) or other(s) involved.
• The names of witnesses to the incident.
• The description of what happened.
• The non-physical interaction used to attempt de-escalation and response.
• Any physical interaction used, reason for use, duration of the interaction, and response.
• A list of any injury to the person receiving services, photo of injuries, and/or body chart.
• The name of medical personnel attending.
• A list any follow up that may be required.
• The name of the person writing the report.
• The name(s) of any individuals notified of the occurrence and/or injuries if applicable.
S.2
Notes:

175
Chapter Seven | Technical Skills
Student Workbook © 1975 – 2017 The Mandt System, Inc.
S.2
Prohibited Practices• Pain compliance, trigger
points, pressure points
Pain compliance, trigger points and pressure points are often taught in correctional programs or police departments. These settings have different “use of force” laws and regulations than schools, hospitals, supported living programs, mental health centers, and other human service programs.
• Hyperextension of any part of the body
Hyperextension means moving a body part beyond its’ normal range of motion. For people who have physical limitations, hyperextension could be achieved (accidentally) much more easily than someone without physical limitations.
• Potential risk of hyper-extension of any part of the body beyond normal limits
Positions where limbs are almost hyperextended can result in hyperextension if the person struggles.
• Pressure or weight on chest, lungs, sternum, diaphragm, back, or upper abdomen
• Any technique that obstructs or restricts circulation of blood and/or airway
Examples are pressure on the throat by putting a forearm on the throat, pressure on the carotid artery from certain kinds of holds can result in unconsciousness in a very brief period of time.
• Straddling or sitting on any part of the body
Straddling the body can result in accidentally falling on the person. Sitting on any part of the body can result in injury or death.
• Pressure on the chest, lungs, sternum, diaphragm, back, or upper abdomen can result in immediate asphyxiation
The Mandt System® prohibits these actions.
• Any type of choking, hand chokes, and arm chokes
No organization teaches how to choke someone in human services. But caregivers who have had any exposure to mixed martial arts or similar techniques may resort to choking.
• Any technique that involves pushing into the person’s mouth, nose, eyes, or any part of the face, or covering the face or body
Pushing anything into the mouth, pinching the nose shut, or pushing on the nose or eyes or any part of the face is prohibited. Some organizations teach techniques that wrap the person in a sheet or blanket to control behavior. The Mandt System® prohibits such actions for the purposes of behavior control. The use of a weighted vest or blanket, which the person can take off by themselves at any time, is not prohibited.
• Any technique that involves substantial risk of injury
If a practice is not on this list, and you believe it could result in harm or injury, don’t do it!
• Any technique that forces the person to the floor, chair, wall, or other place
The Mandt System® prohibits the use of restraints that force people to the floor or force them against a wall for the purpose of controlling their behavior. This is often called a “take-down.” The Mandt System® does not teach a chair restraint.
• Any manual restraint that maintains a person on the floor in any position (prone, supine, side-lying)
The Mandt System® taught floor restraint until 2008 but now prohibits all floor restraints because, in the opinion of The Mandt System®, the benefits of using such restraints are far outweighed by the risks.

176
Chapter Seven | Technical Skills
Student Workbook © 1975 – 2017 The Mandt System, Inc.
S.2
• Any technique that puts or keeps the person off balance, i.e., shoving, tripping, pushing on the backs of the knees
When people are off balance, they do not feel safe and they will escalate. We strive to always keep people balanced.
• Any technique that involves punching, hitting, biting, hair pulling, poking, pinching, or shoving
While no one teaches punching, hitting, biting, hair pulling, poking or pinching, individuals who have been in human services for 10 years or more have unfortunately seen caregivers do these things. Including them in the prohibited practices list clearly indicates that these actions are unacceptable and are prohibited in The Mandt System®.
• Any lifting or carrying of a person who is actively combative unless an extreme hazard or emergency exists
If there is a fire drill, there is no reason to move a person. If there is or could be a fire, then moving someone must be done for their safety. Only an extreme hazard or emergency would meet the criteria to authorize the use of lifting and/or carrying someone who is actively combative.
Notes:

177
Chapter Seven | Technical Skills
Student Workbook © 1975 – 2017 The Mandt System, Inc.
Introduction To Assisting
What is assisting?
Assisting is giving non-physical and/or physical help, guidance, support, and protection from harm to a person who may be disoriented, confused, injured, or who, for any reason, is having trouble with directions, information, a specific task, keeping their balance, and who may not be able to sit, stand, walk or support themselves without help.
Two types of assisting
Non-physical assist
Verbal or gestural prompts. Providing individuals with directions. Prompting them to use a chair or wall to steady themselves.
What is non-physical assistance?
Non-physical assistance does not require any direct physical contact with the person. It could involve providing directions or information. It could involve using a stance and body positioning to direct someone without touching the person.
Examples include verbal or gestural prompts, providing individuals with directions, or prompting them to use a chair or wall to steady themselves.
Protection from harm
There is often a need to assist people who are injured, confused, visually impaired, experiencing medication side effects, or have difficulty maintaining their balance. They may be under the influence of alcohol/drugs. Sometimes people simply need some help, and usually they appreciate any help given to them. However, these same people may be offended or become angry if help is given without first asking their permission. Touching without permission could startle the person, causing them to fall or escalate, and could result in retraumatization by breaking the relationship with the caregiver. When assisting a person, always ask if they need assistance, then do not touch or assist them unless permission is given. This includes situations in which a
person uses a wheelchair or a walker for mobility. Touching the wheelchair is like touching them.
The following definitions will be used throughout The Mandt System® programs:
Physical assist
What is physical assistance?
Physical assistance is providing the person with directions or information while simultaneously using stance and body positioning to maintain safety. Unless the person is in immediate danger of an involuntary act such as falling, ask for permission to touch the person.
There may be times when someone may ask the caregiver for assistance by providing their hands, arms, shoulders, or other body part to steady or support the person while sitting, standing, or walking. This assistance and support provides the person with something to hold onto (an anchor point) and gives additional balance and support to prevent the person from falling or slipping.
S.2

178
Chapter Seven | Technical Skills
Student Workbook © 1975 – 2017 The Mandt System, Inc.
S.2
There are three ways of physically assisting a person:
1. The person assisting is being physically touched or held onto by a person who needs assistance to steady or support themselves while sitting, standing, or walking to keep their balance and to prevent them from falling or slipping. The person doing the assisting follows the lead of the person needing the assistance. The person may let go at any time they no longer need physical assistance.
2. The person assisting is physically touching or holding onto the person who needs assistance to steady or support themselves while sitting, standing, or walking to keep their balance and to prevent them from falling or slipping. The person providing the assistance and support follows the lead of the person needing the assistance and support. The person must be released when they no longer need the physical assistance or support and/or request that the assistance be discontinued.
3. The person assisting and the person needing assistance are touching and holding onto each other. The person being assisted may let go at any time.
Assisting principles
In any type of assisting and/or supporting, it is important to remember these principles:
• Take your time.
• Be an active listener.
• Keep your R.A.D.A.R. on.
• Walk beside, and slightly behind, the person.
• Be able to document.
Take your time and don’t rush the person. Remember you are assisting and/or supporting the person. They are the one in charge of the situation.
Be an active listener. If the person talks, be open minded and nonjudgmental. Observe the person’s nonverbal cues (e.g., facial expression, eye contact, body language, personal space) as well as the person’s verbal cues (e.g., tone, pitch, breath, speed, volume, and use of words). Walk beside the
person and have a casual conversation, making
sure to pay attention and not ignore the person.
Keep your R.A.D.A.R. on!
Use body positioning. Walk
beside the person and slightly behind,
maintaining an awareness of distance and the value of using proper stances, balance, personal space, and body positioning when assisting people. Protection from harm may require body positioning in such a way as to limit or deny access or redirect the person.
Be able to document. If required, be sure to document what type of assistance and/or support was given. Documentation should
be as specific as possible and should be written in accordance with the organization’s policies and procedures.
Notes:

179
Chapter Seven | Technical Skills
Student Workbook © 1975 – 2017 The Mandt System, Inc.
S.2
Crisis Cycle & StancesStance is mainly concerned with the position of the lower part of the body. Only with a strong and stable base can skills be executed in a manner that is fast, accurate, powerful, and smooth. The upper body must be firmly settled on this strong base and the back kept straight—however, concentrating too much on remaining in a firm and stable position can cause loss of mobility. From this base or stance, all parts of the body must work together as a unit (i.e., feet, legs, trunk, arms, and hands). The stance you choose will vary according to the circumstances. However, it must be natural and allow people to move freely in all directions and to assume any position. Stances change according to the direction of movement and the kind of skill used. Each stance is designed for a particular purpose.
Proper stance and balance permit movements that are safe and smooth. As such, these should not be thought of as separate fundamentals, for they must work together. They are the foundation for all efficient movements and must be learned so that they feel comfortable and become automatic.
This chapter covers some basic types of stances that may be slightly adjusted and changed depending on the body type of the person performing the stance or what is happening in the environment.
In the teaching of stance and balance, the following key points are important:
• Movement must come from the hips. Caregivers must not start with their feet and leave their body behind. Keep the hips level, body balanced and perpendicular to the ground.
• Moving into the stance from a normal body position, such as walking or standing, may sometimes require the ability to move quickly. Frequent practice can result in minimum effort to perform this skill. Remember that everyone has a different body type, so don’t try to compare yourself to someone else. Just be yourself.
• Use the proper stance that works best to keep everyone safe. Using small steps helps to maintain balance and posture.
Notes:

180
Chapter Seven | Technical Skills
Student Workbook © 1975 – 2017 The Mandt System, Inc.
S.2
Crisis Cycle and the Stances
Crisis Phase
Baseline Phase Relaxed Stance
Post-Crisis Drain Phase Relaxed Stance
Escalation Phase 1 & 2
De-escalation Phase
Stimulus or Trigger Phase Natural Stance
Natural Stance with One Foot Forward
Natural Stance with One Foot Forward
Front or Side Stance
Stabilization Phase Natural Stance

181
Chapter Seven | Technical Skills
Student Workbook © 1975 – 2017 The Mandt System, Inc.
Relaxed stance
Application: This stance is most appropriate when R.A.D.A.R. indicates people are at baseline or in the post-crisis drain phase of the crisis cycle. A relaxed stance is any position in which you look, feel, and act relaxed and casual to the person with whom you are interacting as well as to the other people around you. As the person observes the caregiver, they should feel less threatened as they read the caregiver’s body language. It is important that verbal skills such as the words, tone, pitch, and volume match the body language.
Mechanics: The relaxed stance can be accomplished by leaning against something such as a cabinet or doorway or crossing your legs.
Caution: While the relaxed stance may be disarming, it is not a stance which prepares you for any physical activity.
Natural stance
Application: This stance is most appropriate when R.A.D.A.R. indicates people are at trigger or stimulus phase of the crisis cycle. A natural stance is a more protective but visually nonthreatening position. The caregiver should still look relaxed and casual to the person with whom they are interacting. You do not want to look mechanical or stiff but rather relaxed and natural. You have the option of facing forward (face to face) by having both feet pointing straight ahead or turned out slightly. This allows you the option of moving in eight different directions depending on what the other person does or needs.
Mechanics: Shoulders are facing forward. The front facing natural stance can be accomplished by standing with the feet shoulder or hip width apart; feet pointed straight ahead or turned out slightly;
knees relaxed. Your body should be over your hips and your hips over the center of your stance. Your hands should look nonthreatening and in a natural position with your elbows in close to your body upon entering and exiting the skill..
Caution: Do not relax too much. Be ready to move and change direction quickly by body shifting. This consists of turning, stepping, sliding, or combinations of these.
Discontinuing: If you feel or observe that this particular stance is incorrect or puts you in the wrong position, change positions. You may do this while talking (may be used as a diversion) to the person or you may say nothing at all.
S.2
Notes:

182
Chapter Seven | Technical Skills
Student Workbook © 1975 – 2017 The Mandt System, Inc.
Natural stance foot forward
Application: This stance is most appropriate when R.A.D.A.R. indicates people are at escalation or de-escalation phase of the crisis cycle. The natural stance with one foot forward is used in entering and avoiding skills. If the stance is used in this context, it is more of an “on-guard stance” like in the sport of fencing. This “on-guard” or “ready” position is different than the more relaxed type of natural stance.
Mechanics: Shoulders face the person. Take a small step forward with the right foot slightly turned in. Back foot is turned out slightly relative to the front foot. Knees are relaxed, with the body over the hips, and hips over the center of the stance. Your hands should be available and non–threatening, not behind the back or in pockets. Keep your elbows in close to your body upon entering and exiting the skill.
A natural stance with the right foot forward is midway between the front stance and natural stance. The placement of the feet is almost the same as in the front stance, but the distance between the feet is shorter, about hip or shoulder width apart. You can also be in the same position by stepping backwards with the left foot, turning the right foot in slightly, which may provide the person with a nonverbal message that you are not a threat to them. By using the natural stance with your right foot forward and having your feet closer together, you are able to use small quick sliding movements or short quick steps in any direction while maintaining your balance and body positioning. Remember the real
power, strength, and speed is generated by the lower body (hips and legs). This stance may be used as it relates to the position or stance of the individual you are interacting with. To use the left foot forward, reverse directions.
Caution: Don’t relax too much. Be ready to move and change direction quickly by body shifting. This consists of turning, stepping, sliding, or combinations of these.
Discontinuing: If you feel or observe that this particular stance is incorrect or puts you in the wrong position, change positions. You may do this while talking (may be used as a distraction) to the person or you may say nothing at all.
S.2
Notes:

183
Chapter Seven | Technical Skills
Student Workbook © 1975 – 2017 The Mandt System, Inc.
S.2
Front stance
Application: This stance is most appropriate when R.A.D.A.R. indicates people are at the crisis phase of the crisis cycle. A front stance is very effective if you are being pushed or pulled from the front or back. Your legs act as brakes if someone is pushing you backwards or trying to pull you forward. As a result, you will be strong front to back. Your legs also act as movers if you are trying to move someone toward or away from an area. Many people will try to use their upper bodies (i.e., arm and chest muscles), but the real power and strength are in the lower body (hips and legs). You may also have to use your legs to slow the person down or even stop them if they are in danger. By keeping your balance and body positioning, you may be able to redirect the person to where you want them to go. By making small sliding movements or steps and using their strength, you may be able to relax somewhat and let them push or pull you where you want them to go. You only use this stance if the person is pushing or pulling you with a lot of force. If they are only holding onto you and not pushing or pulling with much force, just walk with them and relax. Don’t tense up; instead relax and go with them. If you have to move someone away from danger, your back leg and foot, in combination with your hips and body mass, will act to move the person away from the area. Remember force against force makes both people tense up and escalate.
Mechanics: Facing forward, take one large step forward or backward with your right foot, moving it to the outside so both feet are wider than shoulder width or hip width apart. Your front (right) foot should be turned in slightly (adjust for body size/body type). Your front (right) leg should be bent at the knee, keeping the leg relaxed. Your back (left) leg should be relaxed; knee bent and not locked. Your left foot should be turned out slightly relative to the front foot. Your body mass should be over your hips. Your hips should be over the center of the stance. Your weight should be evenly distributed on both feet. Your hands should look nonthreatening and in a natural position for you. Keep your elbows in close to your body upon entering and exiting the skill. If your preference is to have your left foot forward instead of your right foot, simply reverse the directions.
Discontinuing: If you feel or observe that this particular stance is incorrect or puts you in the wrong position, change positions. You may do this while talking (may be used as a distraction) to the person or you may say nothing at all.
Notes:

184
Chapter Seven | Technical Skills
Student Workbook © 1975 – 2017 The Mandt System, Inc.
Side stance
Application: This stance is most appropriate when R.A.D.A.R. indicates people are at the crisis phase of the crisis cycle. A side stance is very effective if you are being pushed or pulled from side to side. Your legs act as brakes if someone is pushing you or pulling you sideways. Your legs also act as movers if you are trying to move someone toward or away from an area. This stance is not used very often by itself but more often in combination with a modified front stance, which results when you step backward or forward from a side stance with either foot.
Mechanics: Facing forward, take one large step sideways with either foot, so that the distance between both feet is wider than hips or shoulders. Both feet should be pointed straight ahead or turned out slightly. Both knees should be bent, keeping your hips forward and weight evenly distributed. The body mass should be over the hips, the back should remain straight, and the body mass should be over the center of the stance. Keep your elbows in close to your body upon entering and exiting the skill.
Caution: If you bend over at the waist, your center of gravity may cause you to lose your balance. Remember your feet are not anchored to the ground. Move your feet as needed using your legs for any lifting, lowering, or repositioning movement. The strength of this stance is side to side. It is weak front to back.
Discontinuing: If you feel or observe that this particular stance is incorrect or puts you in the wrong position, change positions
S.2
Stances and The Crisis Cycle
Crisis Cycle Phase Stance
Baseline Phase Relaxed Stance
Stimulation Phase Natural Stance
Escalation Phase 1 & 2 Natural Stance with One Foot Forward
Crisis Phase Front or Side Stance
De-escalation Phase Natural Stance with One Foot Forward
Stabilization Phase Natural Stance
Post Crisis Phase Relaxed Stance
Notes:
185
Chapter Seven | Technical Skills
Student Workbook © 1975 – 2017 The Mandt System, Inc.
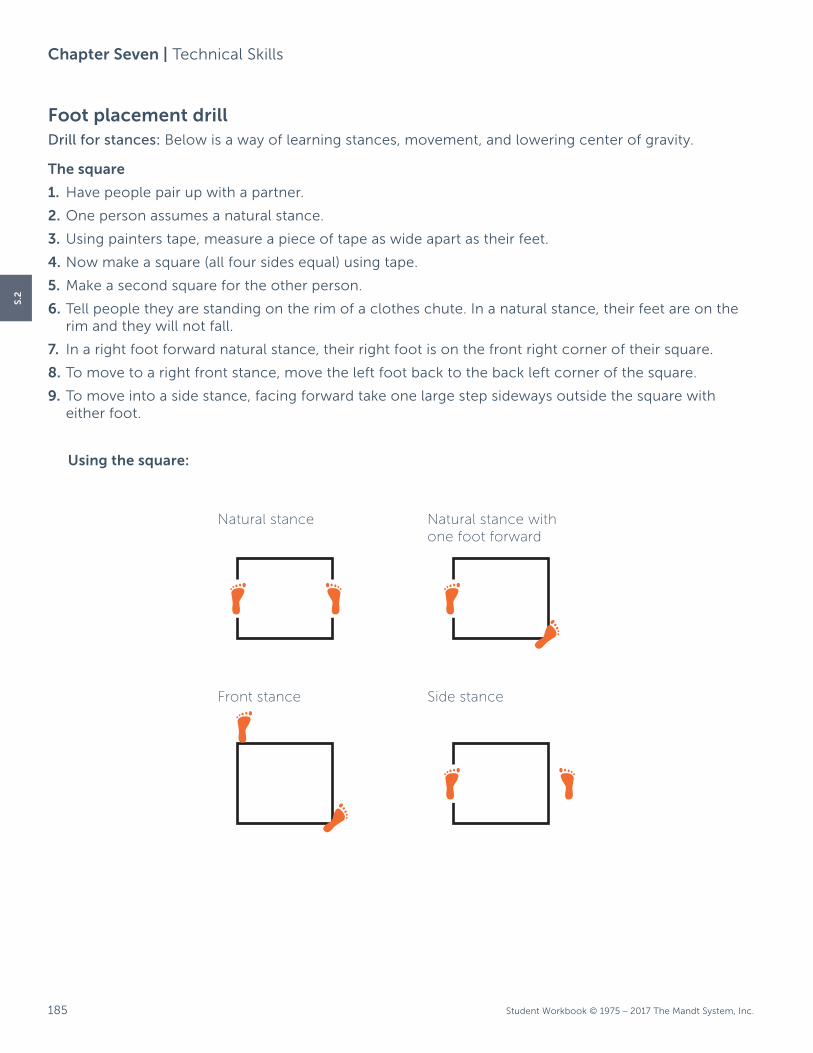
Foot placement drillDrill for stances: Below is a way of learning stances, movement, and lowering center of gravity.
The square
1. Have people pair up with a partner.
2. One person assumes a natural stance.
3. Using painters tape, measure a piece of tape as wide apart as their feet.
4. Now make a square (all four sides equal) using tape.
5. Make a second square for the other person.
6. Tell people they are standing on the rim of a clothes chute. In a natural stance, their feet are on the rim and they will not fall.
7. In a right foot forward natural stance, their right foot is on the front right corner of their square.
8. To move to a right front stance, move the left foot back to the back left corner of the square.
9. To move into a side stance, facing forward take one large step sideways outside the square with either foot.
S.2
Using the square:
Natural stance
Front stance Side stance
Natural stance with one foot forward

186
Chapter Seven | Technical Skills
Student Workbook © 1975 – 2017 The Mandt System, Inc.
Body mechanics & movementEvery day, 24 hours a day, with any type of movements you make, there are basic principles of body mechanics involved. In this section you will learn stances, body positioning, and skills for moving away from someone and avoiding contact, moving closer to someone, and turning and redirecting a person. During this teaching in body mechanics and movement, all of the elements listed below are extremely important. To perform these skills, you must increase your skill level in all of the following areas.
Stance and posture
Proper stance and posture are of the utmost importance, and as such, they should not be thought of as separate fundamentals, for they must work together. They are the foundation for all movements and must be learned so that they become automatic.
Balance
Balance is also a major part of any skill. It is important to maintain good balance while performing any physical skill, especially
some of the advanced skills and combinations of skills. Movement from one skill to the next always creates the chance of losing your balance. Keeping your balance depends on correct stance, posture, and body shifting.
Form
Most sports depend on correct form for the effectiveness of their skills. In golf, good form or skill is necessary to attain a low scoring average. A gymnast spends years perfecting movements which, to us, look easy. Such practice results in body movement, form, or skill that is physiologically correct. If the body lacks balance and stability, all skills will be ineffective. All parts of the body must work together to provide the stability necessary to perform all skills. The ability to repeat movements effectively depends largely upon the adoption of the correct form. In performing the physical skills, you should move like a puppet. That means if your left foot moves, the left hand will also move. Upper body strength is enhanced when your elbows are in close to your body. With one exception, the bite release, when using physical skills in The Mandt System® you will always keep your elbows in close to your body.
Body shifting
When a person is moving toward you, you must be able to move away from, or closer to, the person by using body-shifting skills. This consists of turning, twisting, bending, stepping, sliding, walking, or any combination of these.
Lower abdomen and hips
Coaches of modern sports constantly stress the role of the hips in furnishing maximum power to any movement (i.e., “Get your hips into it”). If the power concentrated in the hips is brought into play in executing any physical skills, the pelvic and hip bones will be firmly supported by the thighs and the trunk by the spine. This interlocking support will produce strong skills. The center of the body (i.e., the lower abdominal area and the hips) plays a large part in our various movements.
Center of gravity
If the feet are placed far apart while lowering the hips (center of gravity), the stance will be stronger. However, it is easier to move if the hips (center of gravity) are somewhat higher and the feet closer together. Sometimes the body weight is evenly distributed between both feet, and sometimes there is more weight on one foot than on the other. The center of gravity is always shifting. Therefore, the position of the body and consequently the center of gravity depends upon the circumstances.
Rhythm
An important element in the performance of any physical skills or sport is rhythm. The proper execution of a series of movements in any sport is impossible without rhythm. It is essential to learn correct rhythm in the technical and advanced skills.
S.2

187
Chapter Seven | Technical Skills
Student Workbook © 1975 – 2017 The Mandt System, Inc.
Walking
• Walking forward: This is used when you want to cover a medium or long distance, moving closer to the person.
• Walking backward: This is used when you want to cover a medium or long distance, moving away from the person.
Stepping
• One step forward or backward: This is used when you want to cover a small distance, moving closer to or away from the person.
• Two steps forward or backward: This is used when you want to cover a small or medium distance, moving closer to or away from the person.
Sliding
• Step-slide forward and backward: The movement is most appropriate when R.A.D.A.R. indicates that you should use body positioning to keep a person safe or to help move a person away from danger toward safety. To move forward you will step forward a short distance making the stance slightly larger. You will then slide your back foot forward bringing the stance back to its original size where the heels of your feet are wider than your shoulders or hips. Knees are bent and relaxed. Shoulders are over the hips facing forward. Hips are over the stance with belly button facing forward and hands are up in a nonthreatening position with elbows in close to your body. When moving backwards, the back foot moves first.
• Step-slide side to side: This movement is most appropriate when R.A.D.A.R. indicates that you should use body positioning to keep a person safe or to help move a person away from danger and toward safety. Starting in a side stance, you will step toward either side a short distance making the stance slightly larger. You will then slide your other foot in the same direction, bringing the stance back to its original size where the heels of your feet are wider than your shoulders or hips. Knees have remained bent and relaxed. Shoulders remained over the hips facing forward. Hips have remained over the stance with belly button facing forward and hands up in a nonthreatening position with elbows in close to your body.
• One sliding movement forward or backward: This is used when you want to cover a small distance, moving closer to or away from the person.
• Two sliding movements forward or backward: This is used when you want to cover a small or medium distance, moving closer to or away from the person.
Combinations of Step and Slide
• One or two step-slide movements forward or backward: This is used in making larger position shifts than are feasible with stepping.
• One or two sliding and stepping movement forward or backward: This is used in making larger position shifts than are feasible with sliding.
Caregivers being pushed
• This movement is most appropriate when R.A.D.A.R. indicates you can move safely in your environment while relaxing and walking with a person or possibly redirecting a person’s movements. You should state, “Excuse my touch” as you get an anchor point above the elbow joint to help the person maintain good balance to feel safe, all the while keeping your elbows in close to your body. As you are being pushed, you will use a stance and movements appropriate to maintain the safety and balance of everyone involved.
Caregivers being pulled
• This movement is most appropriate when R.A.D.A.R. indicates you can move safely in your environment while relaxing and walking with a person or possibly redirecting a person’s movement. You should say, “Excuse my touch” as you get an anchor point above the person’s wrist joint using the hand of the arm being held to help the person maintain good balance to feel safe all the while keeping your elbows in close to your body. Your free hand should be up in a nonthreatening position to redirect or deflect if necessary. As you are being pulled, you will use a stance and movements appropriate to maintain the safety and balance of everyone involved.
S.2

188
Chapter Seven | Technical Skills
Student Workbook © 1975 – 2017 The Mandt System, Inc.
S.2
Redirecting
Redirecting is used to take advantage of the person’s own momentum to turn and redirect them in another direction. Some key ideas related to redirecting are:
• Redirect: To redirect is to change the course or direction of momentum. Redirecting skills are used to take advantage of the person’s own momentum to redirect them. When redirecting, you are using the person’s size, strength, and weight to induce them to move in a direction toward safety and away from danger. That’s why small people can be effective against larger people when they are moving or becoming physically aggressive.
• Turn: To turn is to cause to move or to follow a certain course (i.e., the direction of least resistance). Turning someone involves using their momentum to change the direction in which they are moving so they go towards safety and away from danger.
• Distance: When you face a person, the ideal distance is having enough space in which to
maneuver easily. Proper distance is different for everyone, and that varies according to each situation and the size of each person (such as height, weight, arm reach, and length of legs). When setting up proper distance, assume and maintain a face to face relationship regardless of your movements. Take advantage of surroundings, furniture, or open space. If you cannot be out of arm’s reach, stay close, preferably behind or to the side of the person.
Hands, movement, and balance
Keep hands open and relaxed using slow, small and smooth movements. Keep everyone balanced.
It is important to always be concerned about what your physical movements are communicating to other people, that is, how others are interpreting your physical movements. In assisting, you are working with people who need you to be relaxed. If you are relaxed, this will give you a better chance to think through your options. It will also convey to the other person that you are not going to overreact or hurt them. If you are relaxed, this may cause the other person to relax and feel safe, which gives you a better ability to assist them.
You should always keep yourself and the other person on balance. If you get the other person off balance, they, as well as you, have a chance of falling down. This means that either or both parties could get hurt.
You must always be concerned with how the skill looks, feels, and sounds to the person, as
well as to anyone who may be watching.
The importance of using muscle groups
The concept of muscle groups (muscles helping other muscles) comes into play whenever you try to do anything physical. Our bodies use muscles to lift, move, and do many other things. Without muscle groups, we would be severely limited in the amount of work we could do and the strength with which we could do it. When assisting, people may need to “borrow balance” from you. Upper body strength is enhanced when your elbows are in close to your body. With one exception, the bite release, when using physical skills in The Mandt System® you will always keep your elbows in. Muscle groups, combined with lowering your center of gravity and maintaining a wide and stable stance, will offer the person the best combination of stance and balance, body mechanics and movement, and body positioning to maintain safety.

189
Chapter Seven | Technical Skills
Student Workbook © 1975 – 2017 The Mandt System, Inc.
Body positioningIn relationship to the other person
Repositioning
Application: Body positioning describes where your body is in relationship to the other person. It is important to know if you should place your body next to or near the person’s left side or right side, or if you should change sides. You may desire to move to the person’s other side in order to provide or prevent an entrance or exit for the person or yourself.
Mechanics: Stand on the right side of the person in a natural stance with the right foot forward. Explain to the person what you are going to do. Your intent is not to frighten the person but to move from one side of the person to the other side.
While talking to the person, move behind the person, reposition yourself to the person’s left side, and stand in a natural stance with the left foot forward. This should be done in a casual and relaxed manner. You are now positioned on the person’s left side maintaining your hands in a nonthreatening position and not touching the person.
Providing alternative exits
There may be times, for the safety of the person being served, that you have to redirect them from where they want to go to another, safer area. For example, if someone is barefoot and a glass breaks in the kitchen, they may want to help clean up the glass. Verbal redirection may be all that is needed in many cases, but in some cases physical redirection may be needed.
Application: By placing yourself in such a way that the person is between you and the door, hallway, or other specific object, you are using body positioning to provide that person an avenue to reach their, or your own, intended destination. In essence you are opening up an avenue of approach and encouraging the person to move in that direction. The goal of this approach is to provide an alternative point of egress and to prevent access to an area that is unsafe for this individual. Remember a person’s tendency is to move toward the area of least resistance. This skill is used for safety!
Sometimes the simple act of casually moving in or out of the way of a person and looking nonthreatening may encourage the person to de-escalate. If using an arm to gesture, use only one arm to indicate the direction you would like the person to go and keep your other arm near your body, hands open in a nonthreatening position.
Caution: Continue to use nonverbal and verbal communication, always observing the person’s nonverbal, verbal, and body language.
Discontinuing: Use your R.A.D.A.R. to determine when safety has been established or if another skill taught later in this section may be needed.
S.2
190
Chapter Seven | Technical Skills
Student Workbook © 1975 – 2017 The Mandt System, Inc.
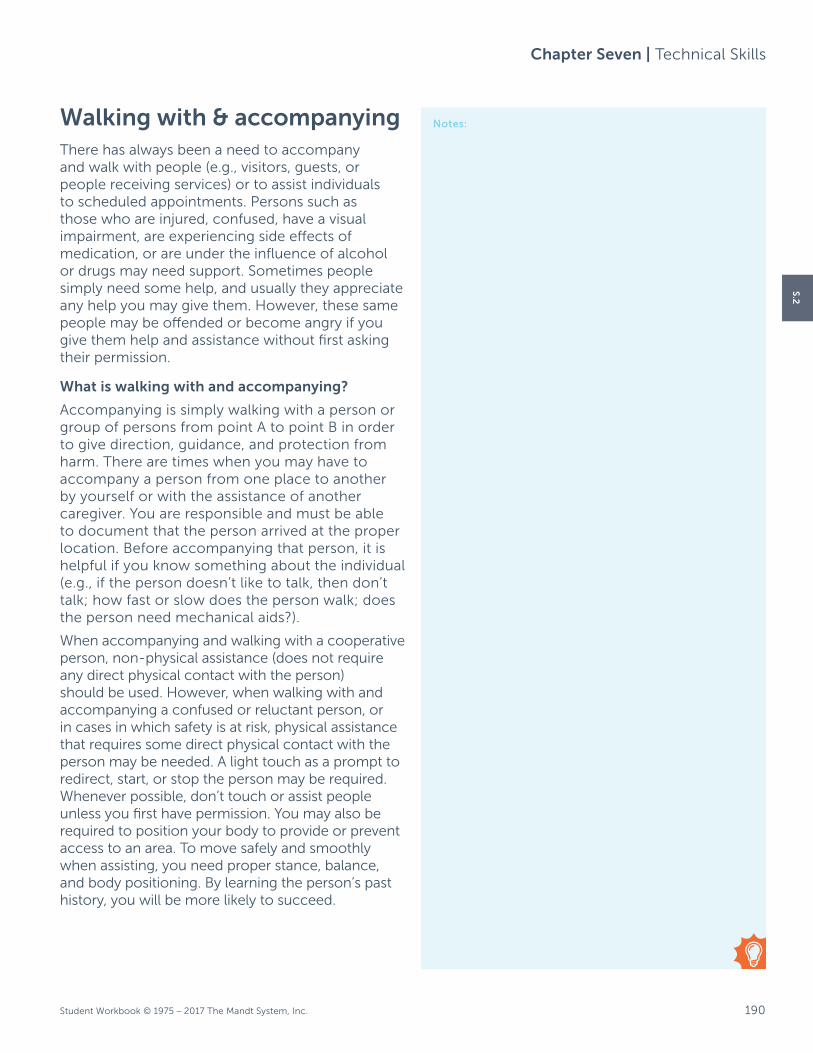
Walking with & accompanyingThere has always been a need to accompany and walk with people (e.g., visitors, guests, or people receiving services) or to assist individuals to scheduled appointments. Persons such as those who are injured, confused, have a visual impairment, are experiencing side effects of medication, or are under the influence of alcohol or drugs may need support. Sometimes people simply need some help, and usually they appreciate any help you may give them. However, these same people may be offended or become angry if you give them help and assistance without first asking their permission.
What is walking with and accompanying?
Accompanying is simply walking with a person or group of persons from point A to point B in order to give direction, guidance, and protection from harm. There are times when you may have to accompany a person from one place to another by yourself or with the assistance of another caregiver. You are responsible and must be able to document that the person arrived at the proper location. Before accompanying that person, it is helpful if you know something about the individual (e.g., if the person doesn’t like to talk, then don’t talk; how fast or slow does the person walk; does the person need mechanical aids?).
When accompanying and walking with a cooperative person, non-physical assistance (does not require any direct physical contact with the person) should be used. However, when walking with and accompanying a confused or reluctant person, or in cases in which safety is at risk, physical assistance that requires some direct physical contact with the person may be needed. A light touch as a prompt to redirect, start, or stop the person may be required. Whenever possible, don’t touch or assist people unless you first have permission. You may also be required to position your body to provide or prevent access to an area. To move safely and smoothly when assisting, you need proper stance, balance, and body positioning. By learning the person’s past history, you will be more likely to succeed.
S.2
Notes:

191
Chapter Seven | Technical Skills
Student Workbook © 1975 – 2017 The Mandt System, Inc.
Some principles when accompanying and walking with someone
Body positioning. Walk beside and slightly behind the person, taking into consideration what the proper distance is. You must be aware of your body positioning in relationship to the other person. It is important to understand the value of using proper stances, balance, personal space, and body positioning when accompanying and assisting people. For protection from harm, you may be required to position your body in such a way as to limit and deny access or redirect the person.
Take your time and don’t rush the person. Remember you are walking with and accompanying the person to give assistance, direction, guidance, and protection from harm.
If the person talks, be an active listener, open-minded and nonjudgmental. Walk beside the person and have a casual conversation, making sure you pay attention and do not ignore the person. Observe their nonverbal cues (such as appearance, facial expression, eye contact, body language, personal space), as well as verbal cues (e.g., tone, pitch, resonance, speed, breath, volume, and use of words).
Be able to document where and when the person departed and/or arrived. When accompanying someone, it is your responsibility to make sure that person departed from the designated location and arrived at the designated location. You must be able to document those facts.
Using a light and occasional touch as a prompt. Since you are only walking with the person, it is important that only one person lightly and occasionally touch as a prompt, if needed. Explain to the person what you are going to do. Ask permission to touch and/or excuse yourself for touching. Sometimes when walking with a person you may have to lightly and occasionally touch the person’s upper arm or shoulder as a prompt in order to restart, stop, or redirect the person. The light and occasional touch is just that, a light and occasional touch, not a grab or a push. As soon as the person resumes walking, stops, or is redirected, discontinue the light touch. If you touch longer than the person thinks you should (and that is very subjective), the natural tendency
is for the person to verbally or physically escalate. All the person is saying is “You have held on or touched too long, so take your hands off.” If the person does not want to be touched, then do not touch them. Remember, most people appreciate any assistance you may give them. However, these same people may become offended and angry if you touch and/or give them direction without first asking their permission and/or excusing yourself.
S.2

192
Chapter Seven | Technical Skills
Student Workbook © 1975 – 2017 The Mandt System, Inc.
Escorting someone away from danger
Generally speaking, escorting is accompanying another person to give protection or as a courtesy. It is particularly useful in guiding someone away from an area of danger by inducing them to go toward safety.
• This technique provides the maximum amount of safety, using the minimum amount of force.
• You are inducing or guiding someone to go toward safety and preventing access to danger.
• This is not a restraint (in most states and systems). It is an escort.
If the person becomes physically insistent that they want to go toward danger, you may need to escort them away from danger. In an escort position, you will:
• Place the palm of left hand above the left elbow.
• Thumb on the inside of the arm, fingers on the outside of the arm.
• Right hand on the right hip belt area.
Keeping your torso close and to one side of the person, place your hand (the hand on the same side as your torso) on the individual’s arm above the elbow. Using a combination of front stance and side stance, shifting as appropriate, you will escort the person away from danger and toward safety. This escort position will provide the maximum amount of safety with the minimum amount of force.
If you escort a person who is moving, even if it is only to move them away from danger and toward safety, some federal and state laws appear to consider this to be a restraint. You will need a good understanding of your state’s laws and regulations in your service sector to determine when an escort becomes a restraint.
Note: In the states of Maine and Vermont, and in Saskatchewan, Canada, this would be considered to be a restraint, yet it may be an appropriate skill to use due to immediate risk of harm to self or others. The US Department of Justice may also consider this to be a restraint. Some federal legislation in the U.S. use this definition of escort or physical escort.
The term “physical escort” means “the temporary touching or holding of the hand, wrist, arm, shoulder, waist, hip, or back for the purpose of inducing a student who is acting out to move to a safe location” (US Department of Education 2012).
Connecting the dots
You need to help others in the organization “connect the dots” when applying the three major concepts and the principles of assisting.
1. Our physical skills are based on the three concepts and should be applied in a manner that treats the person with dignity and respect while maintaining their safety.
2. Avoid all prohibited practices.
3. “Connecting the dots” empowers people to maintain safety when responding to physical threats.
Chapter Seven skills
Note: This is the end of the foundational skills in Chapter Seven that the student must be certified in prior to Chapter Eight. The foundational skills include the stances, step slide, push pull drill, walking with and accompanying, and escorting. The order of the following skills may vary based on the preference of the instructor.
S.2
Notes:

193
Chapter Seven | Technical Skills
Student Workbook © 1975 – 2017 The Mandt System, Inc.
Physical assistingFrom a sitting position on the floor to a chair
Application: This is most appropriate when R.A.D.A.R. indicates the person is at baseline or possibly slightly elevated in the crisis cycle. All other attempts by the person to get up independently or using things in the environment have been unsuccessful. When you have to assist a person who is sitting on the floor and cannot get up without assistance, it is important to understand that assisting a person from the floor is different from lifting a person from the floor. This is not a lifting skill. The caregiver is only assisting the person from sitting on the floor to sitting in a chair by allowing them to pull on caregivers while they push themselves up using their own feet and legs. Ask if they need some assistance. If the person requests help, then devise a plan. Determine if the person needs medical assistance and respond appropriately. If the person wants to stand up, explain that you will assist in stages (i.e., first to sitting in a chair, then to standing). The caregiver doing the assisting may need to get the help of other people. If the person cannot bear weight on their legs, or does not have the muscle tone to hold on to the arms of the caregiver, do not use this skill set. The Mandt System® recommends instead the use of a mechanical device to lift a person.
Mechanics:
1. One caregiver takes the lead and asks the person if they would like assistance to get off the floor. The caregiver asks if they can stand up if supported. Explain to the person on the floor what you are going to do and introduce everyone involved. Have a caregiver with a chair standing behind the individual on the floor.
2. One caregiver approaches on each side of the person on the floor. Caregivers should be opposite each other (belt buckles facing each other) and lined up belly button with the ear of the person on the floor.
3. If the person is not already sitting up, ask them to sit up, with each caregiver providing support by placing one hand on their shoulder blade. When the person is in a sitting position ask the person to bring their knees toward their chest if possible.
4. Ask the person to hold on to each of the caregivers’ arms just above the elbow. The caregivers assisting the person use a wide side stance, belt buckles facing each other. The caregivers place their free hand on the inside of the person’s arm between their elbow and shoulder, with their thumb next to their fingers.
5. Each caregiver gets into a half-squat, keeping their back straight, weight equally balanced. At least one caregiver places a foot in front of the heel of the person to prevent sliding when beginning to stand. If neither caregiver can do this, ask someone else to put one foot in front of the feet of the person to prevent their feet from sliding.
6. Caregivers roll their hips in to ensure their backs are straight. Caregivers look up slightly to straighten their lower back. Tell the person on the floor to stand when they are ready. (When caregivers count,
S.2

194
Chapter Seven | Technical Skills
Student Workbook © 1975 – 2017 The Mandt System, Inc.
S.2
Notes:
they tend to lift instead of allowing the person to rise using their own strength.) Both caregivers use their legs to stand. A third person carefully and quickly slides a chair underneath the person so they can sit. If possible, touch the front of the chair to the backs of the legs of the person attempting to get up. Ensure the person can sit by themselves before letting go.
7. If the person wishes to stand, request that the individual move to the edge of the chair. The caregiver assumes a wide side stance and assists the individual to their feet. Now all are now in a standing position.
Caution: Remember, close is safe. Don’t be a hero. Get help if help is available. If the person goes limp and you are supporting their total body weight, bend your knees or take a big step back while keeping your back straight and gently lower the person to a sitting position in a chair or on the floor.
Discontinuing: Eventually you will need to discontinue the assist. Make sure that the person being released, as well as the caregivers present, feels safe. Never just release a person without first communicating to the person and the caregivers what you are going to do. This should be done in a gradual, slow, step-by-step method, by slowly moving away.

195
Chapter Seven | Technical Skills
Student Workbook © 1975 – 2017 The Mandt System, Inc.
One-person support using a side body hug
Application: This is appropriate when R.A.D.A.R. indicates that a person needs assistance due to illness, injury, or dizziness. The one-person support using a side body hug simply means you are standing beside and slightly behind the person you are supporting, while you are hugging their upper body.
Possible causes: The person has some problems with their physical movement and balance and is about to fall.
Mechanics:
1. The caregiver moves toward the person from the left side, hands are up in a nonthreatening position, elbows in close to the body, using a natural stance with the left foot forward.
2. Use a stance appropriate to maintain your balance. An option is using a step and slide movement, moving toward the person. Ask permission, “May I touch your shoulder?” Or say, “Excuse me for touching…” when unable to ask. Place your hands on the top of the person’s left arm, near where the arm and shoulder meet, with both hands at the same time. Keep your body close to the person by placing your abdomen and chest on the person’s side using a wide stance. Make contact with the inside of your left thigh to the outside of the left thigh of the person being supported. Extend your left hand and arm in front of the person and step forward with the left foot at the same time. Foot placement is perpendicular with your heel in front of their big toe. Your entire body is in contact with the person (close is safe). Your left hand reaches for the person’s right hip area, not the waist.
3. Extend your right hand and arm behind the person being supported and reach for the person’s right hip area. Tuck your head behind the left shoulder. Make sure both your hands are on the hips of the person, and that your arms are below the diaphragm area. If the person is shorter than you are, you will need to make an adjustment in your stance to ensure your arms are below the diaphragm area. Relax yourself. (If you are coming in from the right side, reverse these directions.)
The key points of contact
• Your left armpit secures their left arm above the elbow.
• Your belt buckle is on their left hip.
• The inside of your left thigh is against the outside of their left thigh.
Adaption: If your arms are unable to encircle the person, an alternative is to secure the individual’s clothing by pulling the shirt down with both hands and then pull the clothing in toward the individual.
S.2

196
Chapter Seven | Technical Skills
Student Workbook © 1975 – 2017 The Mandt System, Inc.
Caution: Your front leg should make contact above the knee of the person. If you feel your leg contacting the knee of the individual, make an adjustment. If the shoulder of the person who is doing the one-arm support is at or below the elbow of the person being supported, the integrity of the position may be compromised and a one-arm support may be more appropriate. Remember, close is safe. Don’t be a hero. Get some help if help is available. If the person goes limp and you are supporting their total body weight, bend your knees while keeping your back straight and gently lower the person to a sitting position in a chair or on the floor.
Discontinuing the one-person support using a side body hug: Eventually you will need to discontinue and release the person from the support. Make sure that the person being released, as well as the caregivers present, feel safe. Never just release a person without first communicating to the person and the caregivers what you are going to do. This should be done in a gradual, slow, step-by-step method by releasing and moving away in reverse order. To release, ask the person if you can release them. Move your right hand to a place on the upper left shoulder of the individual. Then move your left hand to a place on the upper left shoulder of the individual. Step back with hands up in a nonthreatening position. Make sure you have a chair, bed, or something that the person can be supported with.
S.2
Notes:

197
Chapter Seven | Technical Skills
Student Workbook © 1975 – 2017 The Mandt System, Inc.
Two-person support using a side body hug
Application: This is appropriate when R.A.D.A.R. indicates that a person needs assistance due to illness, injury, or dizziness. There may be times when you cannot support a person by yourself because of the size of the other person or because the person may be moving around. In such instances, two people may be able to support the person by having each caregiver simultaneously perform a one-person side body hug with one caregiver on each side of the person being supported. This is the same as the one-person support using a side body hug except two people are doing it at the same time, one on each side. The second person must make sure that they come in below the arm of the first person to ensure their arm is not placed on the diaphragm of the individual being supported. If a second person is not available, using a chair and assisting the person to sit is a good option.
Possible causes: The individual being supported is too large for one caregiver to manage alone. The second caregiver can aid in stabilization for safety purposes. The first caregiver may be small, but may have excellent rapport with the individual and may need to stay to assist the second caregiver with the individual.
Mechanics:
1. While the first caregiver has the person in a side body hug with the person’s left arm secured, the second caregiver approaches from slightly behind and on the right side to manage the person’s free right arm. As you move closer, your hands and arms should be close together to protect your face and chest in case the person swings their arm. Use caution, as the person’s free arm could be quite dangerous.
2. Approach with your hands visible in a nonthreatening manner saying, “Excuse my touch” or “Can I put my hand on your arm?” Gently touch the supported person’s right shoulder. Your right foot steps forward into a front stance with the right foot forward. At the same time, reach across the front of the supported person’s body, reaching for their left hip area. The arm of the first person is your guide to the hip. Go below their arm to get to the hip of the person being supported. Foot placement is perpendicular with your heel in front of their big toe.
S.2
Notes:

198
Chapter Seven | Technical Skills
Student Workbook © 1975 – 2017 The Mandt System, Inc.
3. Extend your left arm behind the person being held and reach for the person’s left hip. You should keep your body (chest and abdomen) close to the person’s back or side.
The four points of contact are:
• Your left armpit secures their left arm above the elbow.
• Your left belt buckle area is on their left hip.
• The inside of your left thigh is against their left thigh.
• Your hands are on the right belt hip area.
Discontinuing: When the person has regained the ability to maintain their balance, slowly release. If a chair is nearby, help them to sit down. Keep your R.A.D.A.R. on!
Caution: If the shoulder of the person who is doing the one-arm support is at or below the elbow of the person being supported, the integrity of the position may be compromised and a one-arm support may be more appropriate.
S.2
Notes:
199
Chapter Seven | Technical Skills
Student Workbook © 1975 – 2017 The Mandt System, Inc.
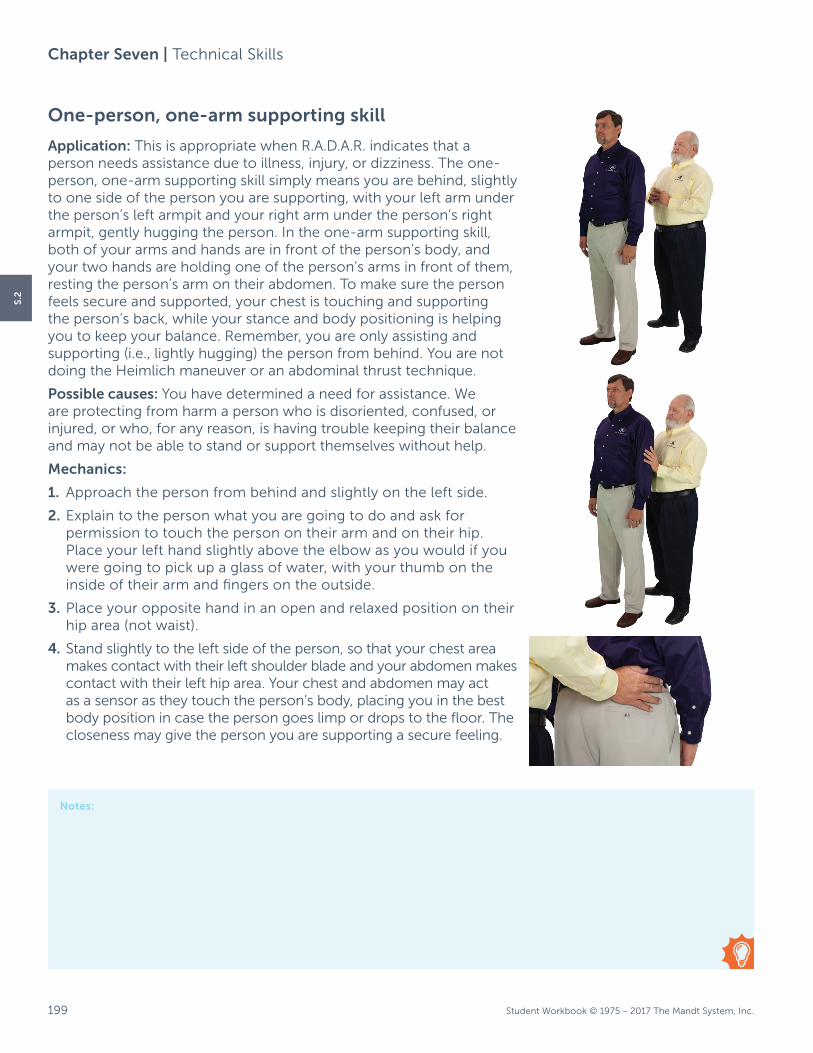
One-person, one-arm supporting skill
Application: This is appropriate when R.A.D.A.R. indicates that a person needs assistance due to illness, injury, or dizziness. The one-person, one-arm supporting skill simply means you are behind, slightly to one side of the person you are supporting, with your left arm under the person’s left armpit and your right arm under the person’s right armpit, gently hugging the person. In the one-arm supporting skill, both of your arms and hands are in front of the person’s body, and your two hands are holding one of the person’s arms in front of them, resting the person’s arm on their abdomen. To make sure the person feels secure and supported, your chest is touching and supporting the person’s back, while your stance and body positioning is helping you to keep your balance. Remember, you are only assisting and supporting (i.e., lightly hugging) the person from behind. You are not doing the Heimlich maneuver or an abdominal thrust technique.
Possible causes: You have determined a need for assistance. We are protecting from harm a person who is disoriented, confused, or injured, or who, for any reason, is having trouble keeping their balance and may not be able to stand or support themselves without help.
Mechanics:
1. Approach the person from behind and slightly on the left side.
2. Explain to the person what you are going to do and ask for permission to touch the person on their arm and on their hip. Place your left hand slightly above the elbow as you would if you were going to pick up a glass of water, with your thumb on the inside of their arm and fingers on the outside.
3. Place your opposite hand in an open and relaxed position on their hip area (not waist).
4. Stand slightly to the left side of the person, so that your chest area makes contact with their left shoulder blade and your abdomen makes contact with their left hip area. Your chest and abdomen may act as a sensor as they touch the person’s body, placing you in the best body position in case the person goes limp or drops to the floor. The closeness may give the person you are supporting a secure feeling.
S.2
Notes:

200
Chapter Seven | Technical Skills
Student Workbook © 1975 – 2017 The Mandt System, Inc.
5. With your left hand above the person’s left elbow, and your right hand placed on the right hip area, step forward with your left foot (you are now in a front stance with your left foot forward) and guide their arm slightly forward and to the right, moving the arm across the person’s midsection or abdomen. Your left foot is parallel (on the side, not in front) of the person’s left foot.
6. Move your right hand from resting on the person’s right hip area to reach under the person’s right arm, making contact with their left forearm (now in front of their body) grasping their left forearm area with your right hand. Fingers underneath their arm, thumb on top. Guide the arm of the person down to their waist or belt area to eliminate the risk of positional asphyxiation.
7. Release their left arm with your left hand, go through the opening between their left elbow and armpit with the palm of your hand facing away from the person’s body, and grasp the person’s left forearm with your left hand. You now have both of your hands on their left arm (which is across the front of their body) and your arms are underneath the person’s armpits. This allows better protection should the person slip or drop straight down. Maintain the individual’s arm at the waist or belt area. Make sure you hold the person’s forearm above their wrist joint, and your hands are rotated forward so that your grasp is more secure. Thumbs should be forward and on top of the individual’s arm.
The three points of contact are:
• Your chest supporting their back
• Your belt buckle in their hip pocket
• Your hands on the person’s forearm
Adaption—Taking up the slack: If the caregiver is working with an individual much smaller than themselves, they may need to adjust their own arm length by removing the hand closest to the individual’s elbow, then placing that hand on the caregiver’s own forearm. This will bring the caregiver closer to the individual as well as take up the extra length of the caregiver’s arms, allowing for additional protection to the individual. Guide the person’s arm down to the waist or belt area so they can breathe.
Caution: Remember, close is safe. Remember to relax and breathe. Maintain a good stance with knees flexed. Make sure that everyone involved is informed as to what will happen next. Do not squeeze the person’s arm with your fingers and thumb; instead, the hand should touch very softly. If the person performing the hold cannot reach the forearm of the person being held, a side body hug may be more appropriate.
Discontinuing the one-arm standing support: Eventually you will need to discontinue and release the person from the one-arm support. Make sure that the person being released, as well as the caregivers present, feel safe. Never just release a person without first communicating to the person and the caregivers what you are going to do. This should be done in a gradual, slow, step-by-step method, by releasing and moving away in reverse order.
S.2

201
Chapter Seven | Technical Skills
Student Workbook © 1975 – 2017 The Mandt System, Inc.
One-person, two-arm supporting skill
Application: This is appropriate when R.A.D.A.R. indicates that a person needs assistance due to illness, injury, or dizziness. The one-person, two-arm supporting skill simply means you are behind the person you are supporting, holding both of the person’s arms in front of them, with both of your hands. Your right arm is under the person’s right elbow and armpit, while your right hand is holding their left forearm in front of them. Your left arm is under the person’s left elbow and armpit, while your left hand is holding their right forearm in front of them. In the two-arm supporting skill, both of your arms and hands are in front of the person’s body, and your two hands are holding both of the person’s arms in front of them, resting the person’s arm on their abdomen. The two-arm supporting skill is used when there is a need to have both arms held at the same time. To make the person feel secure and supported, your chest is touching and supporting the person’s back, while your stance and body positioning is helping you to keep your balance. Remember, you are only assisting and supporting (i.e., lightly hugging) the person from behind; you are not doing the Heimlich maneuver or an abdominal thrust technique.
Possible causes: The person is in need of assistance. We are protecting from harm a person who is disoriented, confused, or injured, or who, for any reason, is having trouble keeping their balance and may not be able to stand or support themselves without help. The individual being supported needs additional support or balance.
Mechanics:
1. Begin with the person in a one-person, one-arm standing support, with their right arm across their body and their left arm free.
2. You are now grasping their right forearm with your right hand and the right wrist with your left hand. You now have the person in a two-arm physical support. Lower both arms to the person’s waist or belt area so they can breathe.
Caution: Close is safe. Remember to relax and breathe. Maintain a good stance with knees flexed, lowering the center of gravity and keeping the back straight. Make sure that everyone involved is informed as to what will happen next. Do not squeeze the person’s arm with your fingers and thumb, i.e., the hand should touch very softly.
Discontinuing the one-person, two-arm standing support: Eventually you will need to discontinue and release the person from the one-arm standing support. Release the second hand, moving your left hand back to their forearm. Release completely moving your left hand, palm down, back to their left arm, with the heel of your left hand above their left elbow, thumb on the outside, fingers on the inside Make sure that the person being released, as well as the caregivers present, feels safe. Never just release a person without first communicating to the person and the caregivers what you are going to do. This should be done in a gradual, slow, step-by-step method, by releasing and moving away in reverse order.
S.2

202
Chapter Seven | Technical Skills
Student Workbook © 1975 – 2017 The Mandt System, Inc.
S.2
Notes:

203
Chapter Seven | Technical Skills
Student Workbook © 1975 – 2017 The Mandt System, Inc.
Ergonomic assessment
The following section reviews each of the skills taught by The Mandt System® and how The Mandt System® maximizes safety and minimizes risk in each of the skills. As stated previously, no physical skill can be considered safe because there is a risk of injury anytime a physical interaction takes place.
We are indebted to Chris Van Ee, Ph.D., whose biomechanical assessments of all the physical skills taught by The Mandt System® were used in completing this assessment. David H. Mandt, Sr., was the primary architect of all of the physical skills taught by The Mandt System® with additional input from the faculty of The Mandt System, Inc.
The skills in this chapter are designed to first, provide a foundation for all efficient movement in The Mandt System®, and second, to provide principles to empower people to maintain their own safety and the safety of others. The principles underlying all of the physical skills taught in The Mandt System® are:
Stance and balance — In order to maintain the safety of individuals served and caregivers, we have to be able to maintain balance. At times, people may need to “borrow balance” from others. This means that the people providing that additional balance must not only maintain their own balance, they must have balance to spare. The stances taught in The Mandt System® are designed to provide balance in all of the phases of the crisis cycle. When moving in the stances, caregivers are
taught to keep their balance by always maintaining contact with the ground with one foot. This “sliding” or “shuffling” movement mimics that seen in sports drills, such as fencing and basketball.
Body mechanics and movement — Maintaining proper body mechanics is key in maintaining safety. During stance and balance instruction, caregivers are taught to always keep their upper torso centered over their hips, which not only maintains balance, but also maintains proper back alignment. As stress increases, they are taught to lower their center of gravity. This action provides additional stability and ensures a greater degree of safety for all concerned.
Body positioning — One of the repeated statements in The Mandt System® is “close is safe, and far away is safer.” How close or far away caregivers are from those who may need their assistance will vary with the situation as well as the body size and type of the persons involved. Generally speaking, though, it is safer to be closer when providing assistance and support.
S.2
Notes:

204
Chapter Seven | Technical Skills
Student Workbook © 1975 – 2017 The Mandt System, Inc.
S.2
Stance Individuals served Caregiver
Relaxed Stance
Stance is nonthreatening and relaxed so the R.A.D.A.R. of individuals served perceives safety.
As all people are at baseline phase of the crisis cycle, the stance can be relaxed (such as leaning or weight on one hip).
Natural Stance
Using their R.A.D.A.R., the individual receiving services may perceive a stimulus or trigger in the environment. This stance is nonthreatening so the caregiver’s behavior does not add to the stimulus or threat perception. The caregiver hands are open and visible to minimize the perception of threat.
The caregiver is now in a balanced position, with weight equally distributed over the hips and the feet, hip- or shoulder-width apart, to maintain balance. The caregiver’s knees are relaxed to permit slow and small movements to other stances if and when needed. The back of the caregiver is straight.
Natural Stance with one foot forward
Using their R.A.D.A.R., the individual receiving services may perceive a stimulus or trigger in the environment. This stance is nonthreatening so the caregiver’s behavior does not add to the stimulus or threat perception. Caregiver’s hands are open and visible to minimize the perception of threat. They may have also stepped backward to maximize the perception of safety of the individual served by giving them slightly more space.
In this stance, caregivers maintain an upright posture, and as they alter the position of their feet, their belt buckle is facing the person with whom they are interacting. This will keep their back and shoulders aligned should the individual served need support or assistance. The trunk of the caregiver is over their hips with the back straight. If moving, the caregiver maintains safety by never crossing their feet and maintaining hip- or shoulder-width distance apart at all times.
Front Stance
In this stance, physical contact between the caregiver and the individual served is likely. Safety of the individual served is maximized by the stance as the caregiver has enough balance for two people. Stance is still relaxed and movement is slow.
Caregivers have widened their stance to lower their center of gravity and increased their ability to maintain balance or by being pushed, or pulled from the back or front, or if a specific skill is needed such as redirecting or deflecting, support, or restraint. The back of the caregiver is always straight. If moving, the caregiver uses short and slow movements with one foot always in contact with the ground in a shuffling motion.
Side Stance
There may or may not be physical contact between the caregiver and the individual. If there is contact, caregivers have lowered their center of gravity and can offer additional support to the person, if needed.
Caregivers have widened their stance to lower their center of gravity and increase their ability to maintain balance if stressed by being pushed, pulled from the side, or if a specific skill is needed such as redirecting or deflecting, support, or restraint. The back of the caregiver is always straight. If moving, the caregiver has one foot always in contact with the ground in a shuffling motion. If needed, they can move quickly in this stance.

205
Chapter Seven | Technical Skills
Student Workbook © 1975 – 2017 The Mandt System, Inc.
Providing an alternative exit
Safety of individual served: The safety of individuals served is maintained by the caregiver ensuring that alternative accessibility away from high risk areas (such as traffic, broken glass, behavioral concerns) is provided. Physical contact is limited to a light and occasional prompt consistent with the principles of touch as communication.
Caregiver safety: Caregivers maintain their safety by shifting from one stance to another as needed. They maintain their balance as noted in the section on stances. Caregiver backs are always straight.
Escort
Safety of individuals served: In this application of stance and balance, body mechanics and body positioning, the safety of individuals receiving services is maintained by the close positioning of caregivers. The hand on the hip of the individual served provides stability, as does the caregiver’s hand on the arm
of the individual served. The individual served is able to move toward safety if they so desire. The caregiver is redirecting, not resisting, the individual. The small movements of the caregiver provide balance and safety to the individual.
Caregiver safety: The key to caregiver safety is to follow the instructions for stance and balance, body mechanics, and body positioning. If on the left side, the caregiver is in a front stance with the left foot forward. If on the right side, the caregiver is in a front stance with the right foot forward. The placement of the caregiver’s arm on the upper arm of the individual receiving services, above the elbow, with the caregiver’s thumb on the inside, provides safety in case the individual receiving services were to reflexively startle and move their elbow back. By using small stepping and sliding movements, the caregiver assures a maximum amount of their own safety.
Three-person assist
Safety of individual served: In this skill, the caregiver ensures the safety of individuals served
by assessing them prior to using the skill. If there is any concern for safety, the caregiver will request assessment per policy and procedure (such as contacting the call nurse or 911).
The positions of the caregiver in stance, body mechanics, and body positioning all combine to ensure safety for the individual. The shoulder joint of the individual is stabilized by the position of the caregiver’s hands on the shoulder blades and arms of the individual, and the hands of the individual on the caregiver’s arms. By bending their knees with the soles of their feet on the ground, when they start to stand, the caregivers’ thigh muscles can engage and they can assist in standing. As caregivers stand, they move together to maintain the balance of the individual served, and one person talks to the individual to let them know when it is safe to sit down.
Caregiver safety: This skill applies the principles of stance and balance, body mechanics and movement, and body positioning to ensure the safety of all. Caregiver safety is maintained by the wide stance they establish as they prepare
S.2
206
Chapter Seven | Technical Skills
Student Workbook © 1975 – 2017 The Mandt System, Inc.
to assist the individual to stand. This is not a lifting procedure. As caregivers prepare to stand, they ensure their back is straight by rotating their hips in toward the person. When preparing to stand, they tilt their chins up slightly, which aids in straightening the lower part of the spine, where injuries often take place. When standing, they make sure their backs are straight and their weight is centered over the stance (not leaning one way or the other).
Application: If the person cannot bear weight on their legs or does not have the muscle tone to hold on to the arms of the caregiver, do not use this skill set. The Mandt System® recommends the use of a mechanical device to lift the person.
Side body hug support
Safety of individual served: In this application of stance and balance, body mechanics, and body positioning, the safety of individuals served is maintained by the close positioning of caregivers. The individual served is able to move if they so desire and is in charge of when the support is ended because this skill is only for the purpose of support. The limbs of the person are held close to their body, using the body positioning of the caregiver and not using any force to maintain the position of the limbs. There is no compression of the chest, back, sternum, abdomen, or diaphragm. The hands of the caregiver must be on the hip of
the individual served to ensure maximum safety.
Caregiver safety: The key to caregiver safety is to follow the instructions for stance and balance, body mechanics, and body positioning. If on the left side, the caregiver is in a front stance with the left foot forward, and if on the right side, a front stance with the right foot forward. This ensures that when the caregivers position themselves according to the instructions in the manual, they will have their backs straight. If they have to lower themselves to the ground in the event the individual loses consciousness, they will widen their stance and, while keeping their back straight, lower themselves to the ground while assisting the individual to the floor.
One-arm support
Safety of individual served: In this application of stance and balance, body mechanics, and body positioning, the safety of individuals served is maintained by the close positioning of caregivers. The individual served is able to move if they so desire and is in charge of when the support is ended, because this skill is only for the purpose of support. One arm of the individual is held in front of them, with the forearm at or below the waist/belt area so the person is able to breathe. There is no compression on the chest, diaphragm, sternum, or back.
Caregiver safety: The key to caregiver safety is to follow the instructions for stance and balance, body mechanics, and body positioning. If on the left side, the caregiver is in a front stance with the left foot
forward, and if on the right side, a front stance with the right foot forward. This ensures that when the caregivers have positioned themselves according to the instructions in the manual they will have their backs straight. They place their heads on the same shoulder of the arm they are using to maintain the support. This ensures the lower back of the caregiver is as straight as possible.
One-person, two-arm supporting skill
Safety of individual served: Safety is established as noted above, with the additional use of the second arm of the individual in a crossed-arm position, the arms are prevented from moving up the torso of the individual. The caregivers are instructed to re-adjust the arms to the waist or belt area to prevent positional asphyxiation.
Caregiver safety: Identical to the one-arm support position in almost all respects. The use of the crossed-arm position helps caregivers maintain their stance and balance, body mechanics, and body positioning.
Note: This position may need to be adjusted based on the height of the caregiver compared to that of the individual served. If caregivers have to lower themselves to the ground if individual loses consciousness, they will widen their stance and, while keeping their back straight, lower themselves to the ground while assisting the individual to the floor.
S.2

207
Chapter Seven | Technical Skills
Student Workbook © 1975 – 2017 The Mandt System, Inc.
ConclusionBefore proceeding to the next chapter, review the learning objectives found at the beginning of this chapter. Do you feel that you have accomplished each of the objectives listed there? If not, mark the objective(s) that you feel uncertain about and review the section of the lesson that corresponds to that objective. When finished, review the terms listed in the glossary. Since the sections and chapters build upon one another, it is essential that you feel you have mastered the concepts and physical skills presented in this chapter before proceeding to the next.
Congratulations! This completes Chapter Seven, Assisting and Supporting Skills. The Mandt System® trusts that this will serve caregivers in a way that will enhance the quality of interactions if and when it is necessary to provide assistance and support to others.
Glossary Of TermsAssisting: Assisting is giving physical help, guidance, support, and protecting from harm a person who may be disoriented, confused, injured, or who for any reason is having trouble keeping their balance and may not be able to sit, stand, walk, or support themselves without help.
Accompanying: Accompanying is simply walking with a person or group of persons from point A to point B in order to give direction, guidance, and protection from harm.
Body positioning: Body positioning involves using the position of your body relative to another person in order to assist or limit their movement.
Front stance: A front stance is very effective if you are being pushed or pulled from the front or rear. Your legs act as brakes if someone is pushing you backward or trying to pull you forward. Your legs also act as movers if you are trying to move someone toward or away from an area. This stance is strong from front to back, but weak from side to side.
Natural stance: A natural stance is a stance in which you are in a more protective but visually nonthreatening position. You should still look relaxed and casual to the person with whom you are interacting. You do not want to look mechanical or stiff but rather, relaxed and natural.
Natural stance with one foot forward: A natural stance with one foot forward is used in skills for entering and avoiding. Shoulders face the person at a 45-degree angle. A natural stance with one foot forward is midway between the front stance and the natural stance. The placing of the feet is almost the same as in the front stance, but the distance between the feet in a natural stance with one foot forward is shorter.
Non-physical assistance: Non-physical assistance does not require any direct physical contact with the person. You may be providing directions or information, or you may be using stance and body positioning to help someone, but you are not touching the person, e.g., steadying a chair.
Physical assistance: Physical assistance requires some direct physical contact with the person.
Relaxed stance: A relaxed stance is any stance in which you look, feel, and act relaxed and casual to the person with whom you are interacting as well as to the other people around you.
Side stance: A side stance is very effective if you are being pushed or pulled from the side. Your legs act as brakes if someone is pushing you or pulling you sideways. Your legs also act as movers if you are trying to move someone toward or away from an area. This stance is strong side-to-side and is weak front to back.
S.2

208
Chapter Seven | Technical Skills
Student Workbook © 1975 – 2017 The Mandt System, Inc.
S.2
Physical Demonstration SkillsThese physical demonstration skills are provided to give you an opportunity to gauge your understanding of this chapter. Some or all of these physical demonstration skills may be used on the final exam. In all assisting skills, it is important to ask permission to touch the person.
Note: Students are encouraged to give a verbal explanation of the physical skills. A visual test is conducted during skill sets practice.
1. Relaxed stance
DEMONSTRATION
a. Looks, feels, and acts relaxed and casual.
2. Natural stance
DEMONSTRATION
a. Shoulders are facing forward.
b. Feet about hip- or shoulder-width apart.
c. Feet straight ahead or turned out slightly.
d. Knees relaxed.
e. Shoulders over the hips.
f. Hips over the center of the stance.
g. Hands available in a nonthreatening position with elbows in close to body.
3. Natural stance (one foot forward)
DEMONSTRATION
a. Shoulders face the person.
b. Take a step forward or backward with either foot.
c. The heels of feet should be hip- or shoulder-width apart.
d. Front foot turns in slightly.
e. Back foot turns out slightly at an angle to the front foot.
f. Knees relaxed.
g. Body over the hips.
h. Hips over the stance.
i. Hands in a nonthreatening position with elbows in close to body.
4. Front stance (with one foot forward)
DEMONSTRATION
a. Take one large step forward or backward with either foot.
b. The heels of feet should be wider than hip- or shoulder-width apart.
c. Front foot turns in slightly.
d. Back foot turns out slightly at an angle to the front foot.
e. Knees relaxed and bent.
f. Body over the hips.
g. Hips over the stance.
h. Hands in a nonthreatening position with elbows in close to body.
5. Side stance
DEMONSTRATION
a. Stand facing forward.
b. Take one large step to the side with either foot.
c. The heels of feet should be wider than hip- or shoulder-width apart.
d. Feet straight ahead or turned out slightly.
e. Knees relaxed and bent.
f. Hands up in a nonthreatening position with elbows in close to body.
6. Step-slide forward/backward
DEMONSTRATION
a. Assume a front stance position.
b. Step forward a small distance, appropriate for body size.
c. Slide the back foot the same distance, maintaining a wide stance at all times.
d. Repeat the motions to step forward.
e. Reverse directions (move back foot first) when step-sliding backward.

209
Chapter Seven | Technical Skills
Student Workbook © 1975 – 2017 The Mandt System, Inc.
7. Caregiver being pushed and pulled
DEMONSTRATION
a. Get an anchor point as appropriate to help the person maintain balance.
b. Keep own elbows in.
c. Step back into a front stance with one foot forward.
d. Relax, going with the person, if appropriate.
e. Use legs as brakes and slow the person down with a step slide, or relax and walk.
f. If pushed backward, the back foot moves first.
8. Walking with & accompanying
DEMONSTRATION
a. Walk with the person.
b. Hands up in a nonthreatening manner.
c. Elbows in close to body.
d. Stance appropriate for caregiver’s body size.
e. Ask permission, “May I touch you? or say, “Excuse me for touching,” when unable to ask.
f. May use light and occasional touch as a prompt.
g. Reposition to provide and prevent an entrance or exit.
9. Escort
DEMONSTRATION
a. Use a natural stance with the left foot forward.
b. Place the palm of the left hand above the person’s left elbow.
c. Place left thumb on the inside and the four fingers on the outside of the person’s arm.
d. Place right on the person’s left hip bone area. As needed, adjust the placement of hand as the person moves to provide safety for the person. If person moves forward, hand may need to move to the hip bone area.
e. Elbows are in close to own body.
Using the momentum of the person, if they try to move towards danger, step and slide with them, escorting them away from danger and toward safety.
Note: This application of stance and balance, body mechanics and body movement, and body positioning is also used to separate two people when safety is at risk, taught in Chapter Eight.
Please note the order in which the following skills are taught may vary based on the preference of the instructor.
S.2
Notes:

210
Chapter Seven | Technical Skills
Student Workbook © 1975 – 2017 The Mandt System, Inc.
S.2
10. Three-person physical assisting from floor to chair
DEMONSTRATION
a. Explain to the person what you are going to do.
b. One caregiver is responsible to slide the chair underneath the person to sit down on.
c. One caregiver approaches from the left side of the person sitting on the floor.
d. One caregiver approaches from the right side of the person sitting on the floor.
e. Ask permission, “May I touch you?” or say, “Excuse me for touching,” when unable to ask.
f. The caregiver on the left side makes contact with the person on the floor and gets into a half-squat.
g. The caregiver on the right side makes contact with the person on the floor and gets into a half-squat.
h. Ask the person if they can stand up with some assistance.
i. Ask the person on the floor to bring their knees up, to hold onto the caregiver’s arm just above the elbow, and get ready to help stand.
j. The two caregivers on the sides should place their feet in front of the person being lifted, if possible, so the person’s feet cannot slide forward.
k. Get hips down and bow in back to assist up.
l. Place one hand under the arm (at or above the person’s elbow) with fingers behind the arm, thumbs next to the hand to prevent grabbing the bicep area.
m. Place other hand on the person’s shoulder blade for support.
n. The person with the chair slides the chair forward and touches the back of the knees of the person being assisted to a standing position.
11. One-person side body hug support (approaching from left)
DEMONSTRATION
a. Approach from slightly behind on the left side.
b. Hands up in a nonthreatening manner.
c. Elbows in close to body.
d. Use a natural stance with the left foot forward.
e. Ask permission, “May I touch you?” or say, “Excuse me for touching,” when unable to ask.
f. Hands make contact between elbow and shoulder.
g. Reach for the person’s right hip area with the left hand (simultaneous with step “h”).
h. Step with the left foot into a front stance.
i. Left armpit secures the person’s left arm between the elbow and shoulder.
j. Belt buckle touches the left hip.
k. Make contact with left thigh next to the person’s left thigh area.
l. Left hand rests on the right side hip bone.
m. Right hand now moves across the back, resting on the right hip bone making sure hands are on hips and your arms are below the person’s diaphragm area.
n. Head tucks behind the person’s left shoulder.
o. Relax yourself.
p. Move the right hand back to the area between the elbow and shoulder.
q. Move the left hand back to the area between the elbow and shoulder.
r. Step back with the left foot, retreating slightly back on the left side.

211
Chapter Seven | Technical Skills
Student Workbook © 1975 – 2017 The Mandt System, Inc.
12. Two-person side body support
DEMONSTRATION
a. Approach from slightly behind on the left side.
b. Hands up in a nonthreatening manner.
c. Elbows in close to body.
d. Use a natural stance with the left foot forward.
e. Ask permission, “May I touch you?” or say, “Excuse me for touching,” when unable to ask.
f. Hands make contact between elbow and shoulder.
g. Reach for the person’s right hip area with the left hand (simultaneous with step “h”).
h. Step with the left foot into a front stance.
i. Left armpit secures the person’s left arm between the elbow and shoulder.
j. Belt buckle touches the left hip.
k. Make contact with your left thigh next to the person’s left thigh area.
l. Left hand rests on the right side hip bone.
m. Right hand now moves across the back, resting on the right hip bone.
n. Head tucks behind the person’s left shoulder.
o. Second caregiver approaches from slightly behind on the right side.
p. Hands up in a nonthreatening manner.
q. Elbows in close to body.
r. Use a natural stance with the left foot forward.
s. Ask permission, “May I touch you?” or say, “Excuse me for touching.”
t. Hands make contact between elbow and shoulder.
u. Reach for the person’s left hip area with the right hand (simultaneous with step “V”).
v. Step with the right foot into a front stance.
w. Right armpit secures the person’s right arm between the elbow and shoulder.
x. Belt buckle touches the right hip.
y. Make contact with right thigh next to the person’s right thigh area.
z. Using the arm of the first caregiver, your right hand rests on the left side hip bone.
aa. Left hand now moves across the back, under the arms of the first caregiver, resting on the left hip bone.
ab. Head tucks behind the person’s right shoulder.
ac. Relax yourself.
ad. Move the left hand back to the area between the elbow and shoulder.
ae. Move the right hand back to the area between the elbow and shoulder.
af. Step back with the right foot, retreating slightly back on the right side.
ag. Hands up in a non-threating position.
ah. Move the right hand back to the area between the elbow and shoulder.
ai. Move the left hand back to the area between the elbow and shoulder.
aj. Step back with the left foot, retreating slightly back on the left side.
ak. Hands up in a nonthreatening position, elbows in close to body.
S.2
Notes:

212
Chapter Seven | Technical Skills
Student Workbook © 1975 – 2017 The Mandt System, Inc.
13. One-arm support (approaching from left)
DEMONSTRATION
a. Approach from slightly behind on the left side.
b. Hands up in a nonthreatening manner.
c. Elbows in close to body.
d. Use a natural stance with the left foot forward.
e. Ask permission, “May I touch you?” or say, “Excuse me for touching,” when unable to ask.
f. Place the palm of left hand above the left elbow.
g. Thumb on the inside of the arm, fingers on the outside of the arm.
h. Right hand on the right hip belt area.
i. Step into a front stance with the left foot forward
j. Guide the left arm forward and across the person’s body.
k. Your belt buckle makes contact with the left hip pocket.
l. Your chest contacts the person’s back.
m. Right hand moves around the person and grasps above left wrist.
n. Fingers below the wrist, thumbs on top.
o. Rotate the left hand around the left elbow.
p. Your palm follows the person’s left arm to a place on the left forearm.
q. Move the arms low around the belt buckle area.
r. Relax yourself.
s. Release, moving the left hand, palm down, up the left forearm.
t. Place the left palm above the left elbow.
u. Thumb on the inside, fingers on the outside.
v. Right hand releases the left wrist area, moves back to the belt hip area.
w. Step back, retreating slightly on the left side.
x. Hands up in a nonthreatening manner.
14. Two-arm standing support (approaching from right) Visual test conducted during skill sets practice
DEMONSTRATION
Note: This skill starts after step Q of the one- person one-arm support, in which you are supporting the person on their left side
a. Ask the person to give you their right arm.
b. Using your left hand, taken from the forearm of the person you are supporting and grasp their right arm above their wrist.
c. Fingers and thumbs together on top.
d. Move the arms low around the belt buckle area.
e. Relax yourself.
f. Release the second hand, moving your left hand back to their forearm. Release completely, moving your left hand, palm down, back to their left arm, with the heel of your left hand above their left elbow, thumb on the outside, fingers on the inside.
g. Your right hand releases the left wrist area, moves back to the belt.
h. Step back, retreating slightly on the right side.
i. Hands up in a nonthreatening manner.
S.2
Notes:

213
Chapter Seven | Technical Skills
Student Workbook © 1975 – 2017 The Mandt System, Inc.
Notes:

214
Chapter Seven | Technical Skills
Student Workbook © 1975 – 2017 The Mandt System, Inc.
Notes:

Self–Study Guide | Chapter 7
Student Workbook © 1975 – 2017 The Mandt System, Inc.Page A (CH 7 SSG)
SS
G
Self–Study Questions
These self–study questions are provided to give you an opportunity to gauge your understanding of these chapters. These questions will be used on the final exam.
Complete the following statements using a word from the word bank.
1. The three critical concepts of physical assisting
include, and ,
body and ,
body in relation to the other person. (Ch 7, Pg 171)
2. In performing the physical skills, you should
move like a puppet. That means if your right
foot moves, the hand will also
move. (Ch 7, Pg 186)
3. “Physical interaction” means the use of a physical presence or skill to either
or a person’s
behavior. (Ch 7, pg 172)
4. When a person has four strong walls in their life, they will be better able to be resilient, which is
the ability to make the of their own situation. (Ch 7, Pg 170)
Circle the letter beside the correct response(s) to the following questions:
5. It is important to gain permission before you touch another person to provide assistance because: (Ch 7, Pg 177)
a. You could startle the person and cause them to fall if you don’t ask.
b. Their behavior could escalate if they are touched without permission.
c. Touching without permission could result in re-traumatization.
6. Proper stance and balance: (Ch 7, Pg 179)
a. Permit you to move safely and smoothly.
b. Are the foundation for all efficient movement.
c. Must be learned so that they become automatic.
d. Are unimportant when performing physical skills.
7. In the natural stance with a foot forward: (Ch 7, Pg 182)
a. Your feet are wider than the widest part of your body.
b. Your feet are close together.
c. You are in more of a “ready” position allowing you to make small sliding or stepping movements to change directions quickly (“body shifting”).
8. Generally speaking, people with histories of trauma: (Ch 7, Pg’s 167–168)
a. Have a higher baseline than people without trauma histories.
b. Have no change in behavior compared to people without trauma histories.
c. Have a lower tolerance for stress and escalate more quickly.
d. Need caregivers to trust each other before they can trust caregivers.
Word Bank
positioning
left
posture
assist
stance
limit
balance
mechanics
right
best
redirecting
movement

Self–Study Guide | Chapter 7
Student Workbook © 1975 – 2017 The Mandt System, Inc. Page B (CH 7 SSG)
Notes:
SS
G