tdw79 t statue
TRANSCRIPT
8/8/2019 Tdw79 t Statue
http://slidepdf.com/reader/full/tdw79-t-statue 1/6
FACTFILE
FOR
Maya and RenderMan for Maya
DIFFICULTYAdvanced
TIME TAKENThree hours
ON THE CD• Full-size screenshots
• Source images
• Start and final
scene files
• Final composite
ALSO REQUIRED• Photoshop
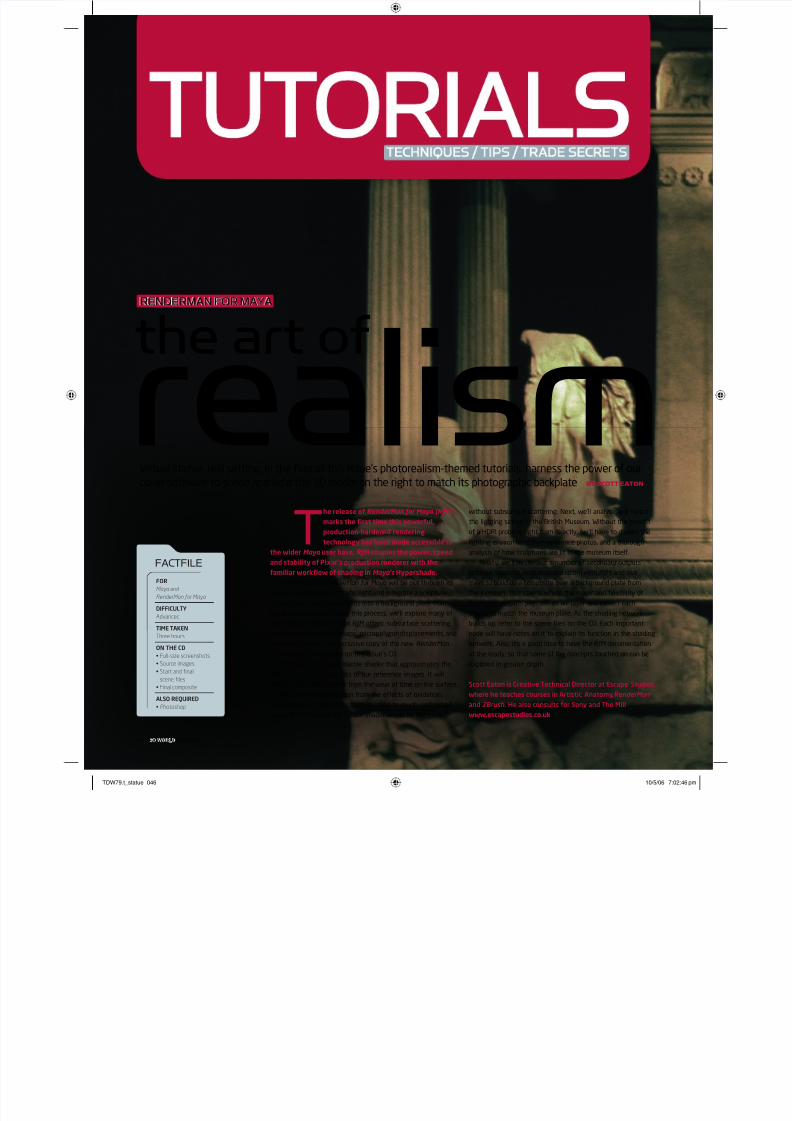
Virtual statue, real setting: in the first of this issue’s photorealism-themed tutorials, harness the power of ourcover software to shade and light the 3D model on the right to match its photographic backplate BY SCOTT EATON
realismthe art of
RENDERMAN FOR MAYARENDERMAN FOR MAYA
The release of RenderMan for Maya (RfM)
marks the first time this powerful,
production-hardened rendering
technology has been made accessible to
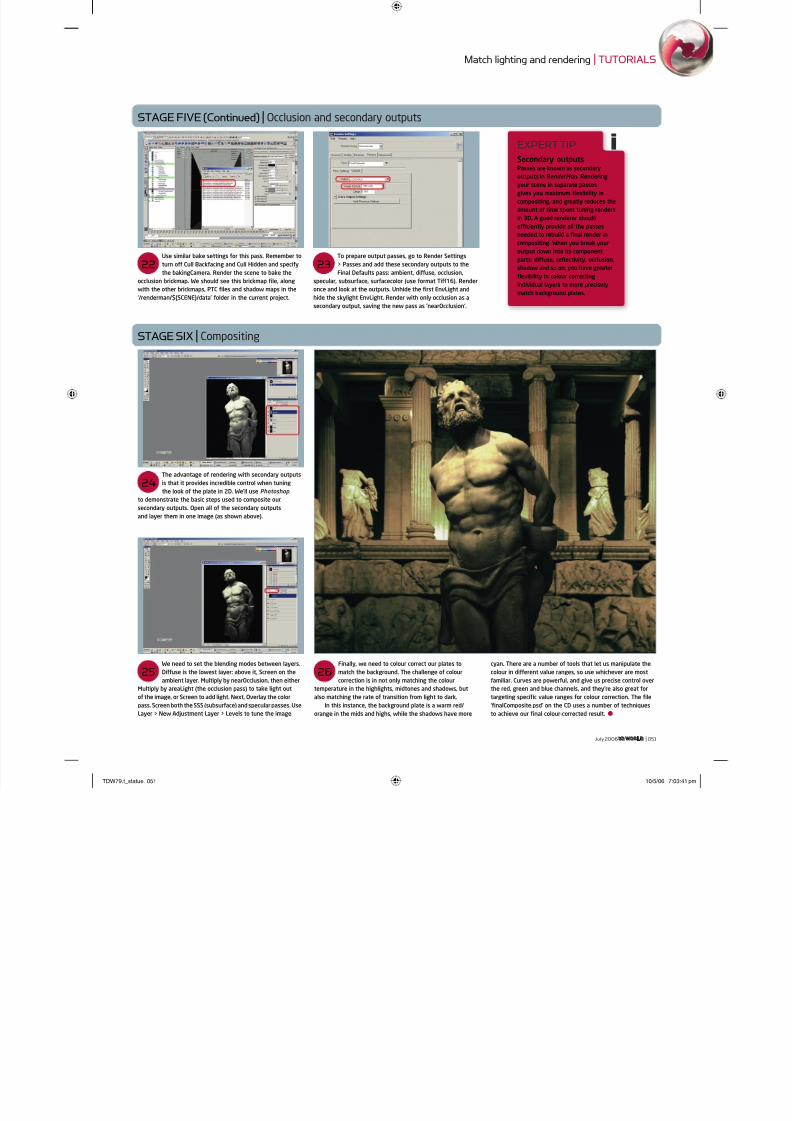
the wider Maya user base. RfM couples the power, speed
and stability of Pixar’s production renderer with the
familiar workflow of shading in Maya’s Hypershade.
In this tutorial, RenderMan for Maya will be put through its
paces in an attempt to shade, light and integrate a sculptureof the Greek Titan Prometheus into a background plate from
the British Museum. During this process, we’ll explore many of
the advanced features that RfM offers: subsurface scattering,
ambient occlusion, brickmaps, micropolygon displacements, and
secondary outputs. An exclusive copy of the new RenderMan
for Maya Eval is included on this issue’s CD.
First, we’ll develop a marble shader that approximates the
main surface characteristics of our reference images. It will
need to show small divots from the wear of time on the surface
of the marble, discolouration from the effects of oxidation,
and changes in specularity from polished to rough, unfinished
areas. And, of course, no marble shader would be complete
without subsurface scattering. Next, we’ll analyse and match
the lighting set-up in the British Museum. Without the benefit
of a HDRI probe to light from directly, we’ll have to dissect the
lighting environment from reference photos, and a thorough
analysis of how sculptures are lit in the museum itself.
Finally, we’ll render out a number of secondary outputs
(diffuse, specular, occlusion and so on) with RfM , and use
them to build up a composite over a background plate from
the museum. This step is where the magic and flexibility ofsecondary outputs pays off, as we layer and correct each
output to match the museum plate. As the shading network
builds up, refer to the scene files on the CD. Each important
node will have notes on it to explain its function in the shading
network. Also, it’s a good idea to have the RfM documentation
at the ready, so that some of the concepts touched on can be
explored in greater depth.
Scott Eaton is Creative Technical Director at Escape Studios,
where he teaches courses in Artistic Anatomy, RenderMan
and ZBrush. He also consults for Sony and The Mill
www.escapestudios.co.uk
046 | 3D WORLD3D WORLD July 2006
TDW79.t_statue 046TDW79.t_statue 046 10/5/06 7:02:46 pm10/5/06 7:02:46 pm

8/8/2019 Tdw79 t Statue
http://slidepdf.com/reader/full/tdw79-t-statue 2/6
▲
ON THE CD● RenderMan for Maya Eval
and project filesSEE PAGE 114
Match lighting and rendering | TUTORIALS
July 2006 3D WORLD3D WORLD | 047
TDW79.t_statue 047TDW79.t_statue 047 10/5/06 7:03:03 pm10/5/06 7:03:03 pm
8/8/2019 Tdw79 t Statue
http://slidepdf.com/reader/full/tdw79-t-statue 3/6
8/8/2019 Tdw79 t Statue
http://slidepdf.com/reader/full/tdw79-t-statue 4/6
▲
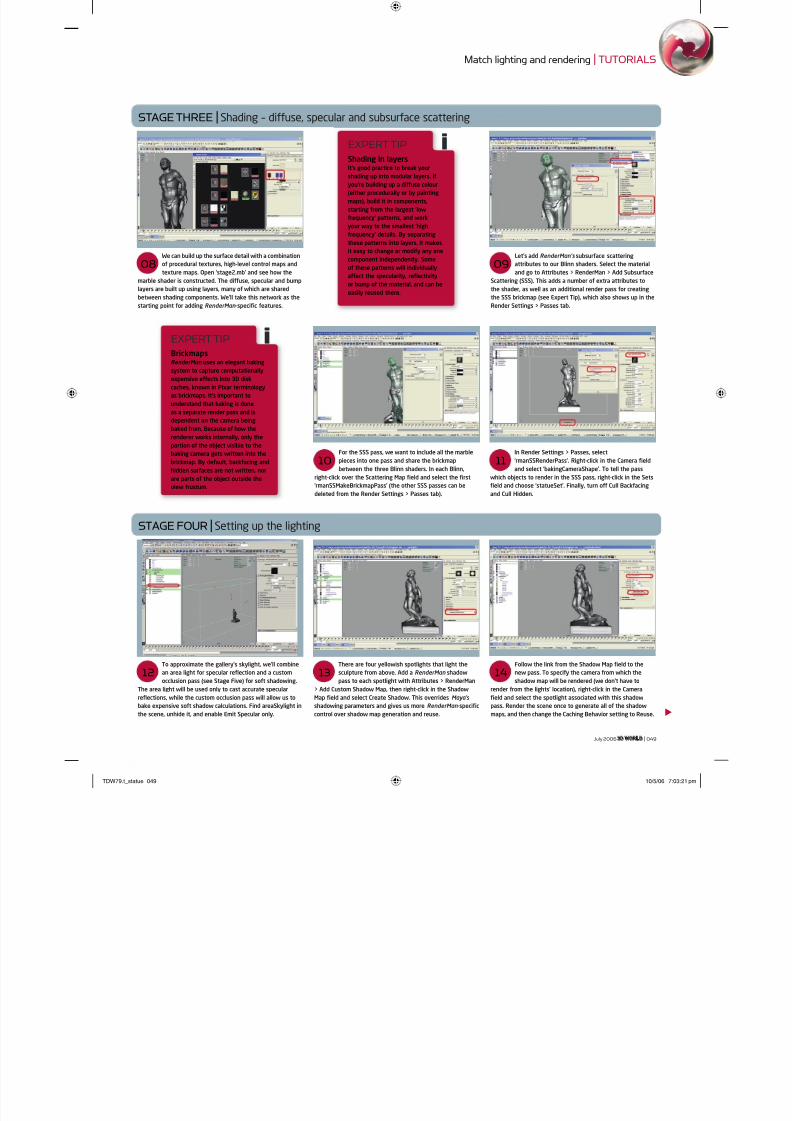
There are four yellowish spotlights that light the
sculpture from above. Add a RenderMan shadow
pass to each spotlight with Attributes > RenderMan
> Add Custom Shadow Map, then right-click in the Shadow
Map field and select Create Shadow. This overrides Maya’s
shadowing parameters and gives us more RenderMan-specific
control over shadow map generation and reuse.
13
Follow the link from the Shadow Map field to the
new pass. To specify the camera from which the
shadow map will be rendered (we don’t have to
render from the lights’ location), right-click in the Camera
field and select the spotlight associated with this shadow
pass. Render the scene once to generate all of the shadow
maps, and then change the Caching Behavior setting to Reuse.
14
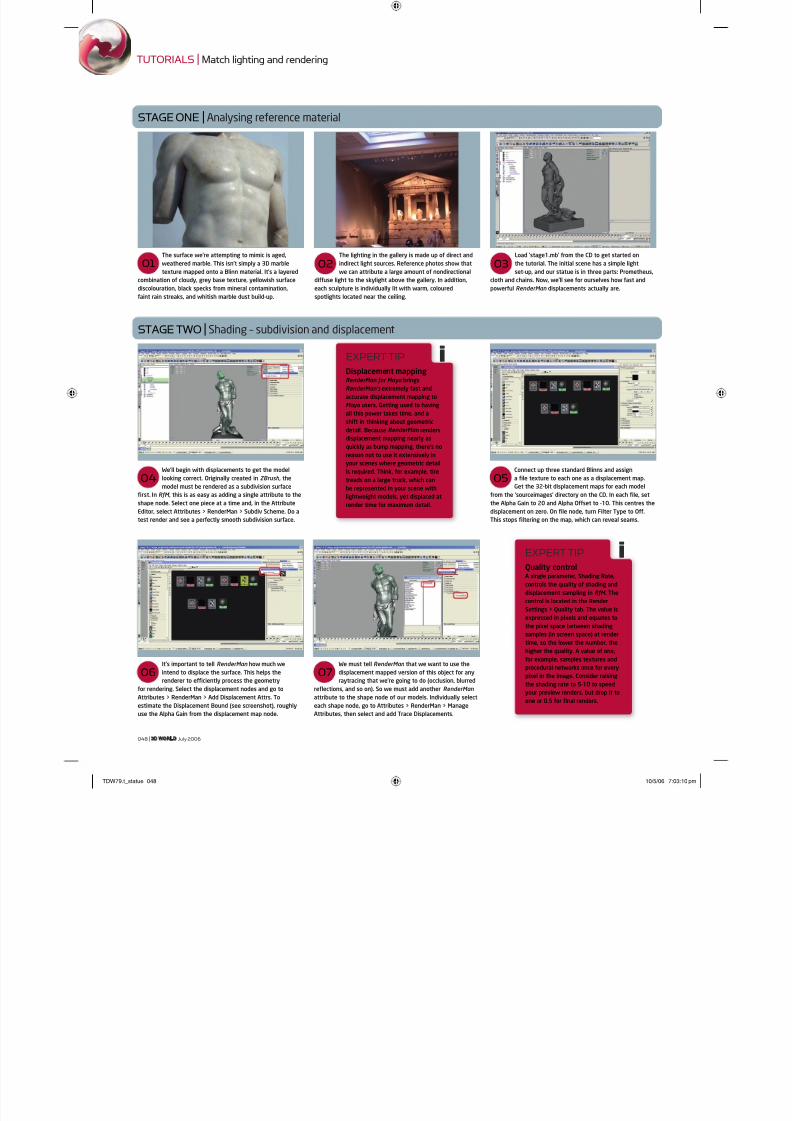
We can build up the surface detail with a combination
of procedural textures, high-level control maps and
texture maps. Open ‘stage2.mb’ and see how the
marble shader is constructed. The diffuse, specular and bump
layers are built up using layers, many of which are shared
between shading components. We’ll take this network as the
starting point for adding RenderMan-specific features.
08
STAGE THREE | Shading – diffuse, specular and subsurface scattering
Let’s add RenderMan’s subsurface scattering
attributes to our Blinn shaders. Select the material
and go to Attributes > RenderMan > Add Subsurface
Scattering (SSS). This adds a number of extra attributes to
the shader, as well as an additional render pass for creating
the SSS brickmap (see Expert Tip), which also shows up in the
Render Settings > Passes tab.
09
For the SSS pass, we want to include all the marble
pieces into one pass and share the brickmap
between the three Blinn shaders. In each Blinn,
right-click over the Scattering Map field and select the first
‘rmanSSMakeBrickmapPass’ (the other SSS passes can be
deleted from the Render Settings > Passes tab).
10
In Render Settings > Passes, select
‘rmanSSRenderPass’. Right-click in the Camera field
and select ‘bakingCameraShape’. To tell the pass
which objects to render in the SSS pass, right-click in the Sets
field and choose ‘statueSet’. Finally, turn off Cull Backfacing
and Cull Hidden.
11
To approximate the gallery’s skylight, we’ll combine
an area light for specular reflection and a custom
occlusion pass (see Stage Five) for soft shadowing.
The area light will be used only to cast accurate specular
reflections, while the custom occlusion pass will allow us to
bake expensive soft shadow calculations. Find areaSkylight in
the scene, unhide it, and enable Emit Specular only.
12
EXPERT TIPShading in layersIt’s good practice to break your
shading up into modular layers. If
you’re building up a diffuse colour
(either procedurally or by painting
maps), build it in components,
starting from the largest ‘low
frequency’ patterns, and work
your way to the smallest ‘high
frequency’ details. By separatingthese patterns into layers, it makes
it easy to change or modify any one
component independently. Some
of these patterns will individually
affect the specularity, reflectivity
or bump of the material, and can be
easily reused there.
i
EXPERT TIP
BrickmapsRenderMan uses an elegant baking
system to capture computationally
expensive effects into 3D disk
caches, known in Pixar terminology
as brickmaps. It’s important to
understand that baking is done
as a separate render pass and is
dependent on the camera being
baked from. Because of how the
renderer works internally, only the
portion of the object visible to the
baking camera gets written into the
brickmap. By default, backfacing and
hidden surfaces are not written, norare parts of the object outside the
view frustum.
i
STAGE FOUR | Setting up the lighting
July 2006 3D WORLD3D WORLD | 049
Match lighting and rendering | TUTORIALS
TDW79.t_statue 049TDW79.t_statue 049 10/5/06 7:03:21 pm10/5/06 7:03:21 pm
8/8/2019 Tdw79 t Statue
http://slidepdf.com/reader/full/tdw79-t-statue 5/6
To give us control over the shadow filtering and
samples once we have a shadow map baked, we
need to add additional custom attributes to our
light shape node. Select the light and go to Attributes >
RenderMan > Extra RenderMan Attributes. This provides
access to the shadow filtering and sampling attributes to
blur the edges of our maps as required.
15
Now we’ll fake an area light using occlusion for soft
shadows. Hide the first Environment Light, and
‘unhide’ the occlusionBlocker mesh in the geometry
group. This missing face at the top will act as the skylight,
letting the occlusion pass see white. Next, create a new
Environment Light from the Render Settings > Features tab.
20
We’ll make this Environment Light act like an area
light by setting the Max Dist attribute to a value
larger than the maximum dimension of our blocking
geometry. Here, a value of 10000 is used. The other settings
are the same as the last Environment Light.
21
STAGE FOUR (Continued) | Setting up the lighting
There is reflected light in the room as a result of
the overhead skylights. We’ll include an ambient
light in our scene, which we’ll later attenuate with
our ambient occlusion pass. Set the Intensity low and tune
Ambient Shade to 0.2 to give a little direction to the light to
simulate reflection from the ground. The amount of ambience
can be tuned later in compositing.
16
To save recalculating this expensive raytracingeffect every frame, we’re going to bake the
calculation into a brickmap. Create a new ‘rmanMake
GlobalDiffuse3dPass’ in the Bake field of the Environment
Light. This will create a new pass in the Render Settings >
Passes tab where we can tune the Caching Behavior and
Phase for the pass. We’ll use Compute and Once Per Job.
18The other tab created with the new ‘rmanMakeGlobalDiffuse3dPass’ is the ‘rmanRenderGlobal
Diffuse3dPass’, found just underneath the former
in Render Settings. Similar to the SSS set-up, this tab is
where we set up a camera for final baking. Specify the same
bakingCameraShape and disable Cull Backfacing and Cull
Hidden. Render to bake, then set Caching Behavior to Reuse.
19To enable global illumination effects, such asambient occlusion and colour bleeding, create a
RenderMan Environment Light from the Render
Settings > Features tab. Enable Ray Tracing and create an
Environment Light – this is where we access our settings
for occlusion. Tune the settings as shown in the screenshot
above, hide the other lights and then render.
17
STAGE FIVE | Occlusion and secondary outputs
EXPERT TIPMap reuseRenderMan has a long history of
reusing pre-computed maps to save
on render time for large productions.
Each time you create a new pass that
needs to compute a map, you get a
Phase option to create a disk cache
in two ways: Once Per Job and Every
Frame. For stationary geometry,
as in this tutorial, Once Per Job isthe option to select. For animation
sequences where motion will change
the map, use Every Frame and you’ll
get a cached map for each frame of
the animation. After you’ve created
the cache, switch the Caching
Behavior from Compute to Reuse.
i
EXPERT TIPTuning GI effectsThe Environment Light has a number
of parameters for tuning the type,
quality and speed of the globalillumination effects. Shadowing can
be set to either Occlusion or Color
Bleeding. Of the two, Occlusion is
considerably faster, as it shadows an
object based solely on the presence
of blocking geometry around the
point being shaded. Color Bleeding
shadows based on the average
colour of blocking geometry and is
much slower. Sampling gives the
best results, and increasing samples
gives higher quality and reduces
noise if you don’t bake.
i
TUTORIALS | Match lighting and rendering
050 | 3D WORLD3D WORLD July 2006
TDW79.t_statue 050TDW79.t_statue 050 10/5/06 7:03:31 pm10/5/06 7:03:31 pm
8/8/2019 Tdw79 t Statue
http://slidepdf.com/reader/full/tdw79-t-statue 6/6
The advantage of rendering with secondary outputsis that it provides incredible control when tuning
the look of the plate in 2D. We’ll use Photoshop
to demonstrate the basic steps used to composite our
secondary outputs. Open all of the secondary outputs
and layer them in one image (as shown above).
24
Finally, we need to colour correct our plates to
match the background. The challenge of colour
correction is in not only matching the colour
temperature in the highlights, midtones and shadows, but
also matching the rate of transition from light to dark.
In this instance, the background plate is a warm red/
orange in the mids and highs, while the shadows have more
cyan. There are a number of tools that let us manipulate the
colour in different value ranges, so use whichever are most
familiar. Curves are powerful, and give us precise control over
the red, green and blue channels, and they’re also great for
targeting specific value ranges for colour correction. The file
‘finalComposite.psd’ on the CD uses a number of techniques
to achieve our final colour-corrected result.●
STAGE FIVE (Continued) | Occlusion and secondary outputs
To prepare output passes, go to Render Settings
> Passes and add these secondary outputs to the
Final Defaults pass: ambient, diffuse, occlusion,
specular, subsurface, surfacecolor (use format Tiff16). Render
once and look at the outputs. Unhide the first EnvLight and
hide the skylight EnvLight. Render with only occlusion as a
secondary output, saving the new pass as ‘nearOcclusion’.
23
Use similar bake settings for this pass. Remember to
turn off Cull Backfacing and Cull Hidden and specify
the bakingCamera. Render the scene to bake the
occlusion brickmap. We should see this brickmap file, along
with the other brickmaps, PTC files and shadow maps in the
‘/renderman/${SCENE}/data’ folder in the current project.
22
We need to set the blending modes between layers.
Diffuse is the lowest layer: above it, Screen on the
ambient layer. Multiply by nearOcclusion, then either
Multiply by areaLight (the occlusion pass) to take light out
of the image, or Screen to add light. Next, Overlay the color
pass. Screen both the SSS (subsurface) and specular passes. Use
Layer > New Adjustment Layer > Levels to tune the image.
25 26
EXPERT TIPSecondary outputsPasses are known as secondary
outputs in RenderMan. Rendering
your scene in separate passes
gives you maximum flexibility in
compositing, and greatly reduces the
amount of time spent tuning renders
in 3D. A good renderer should
efficiently provide all the passes
needed to rebuild a final render incompositing. When you break your
output down into its component
parts: diffuse, reflectivity, occlusion,
shadow and so on, you have greater
flexibility in colour correcting
individual layers to more precisely
match background plates.
i
STAGE SIX | Compositing
July 2006 3D WORLD3D WORLD | 051
Match lighting and rendering | TUTORIALS
TDW79 t statue 051 10/5/06 7:03:41 pm