tapit ex manual
TRANSCRIPT

IMPORTANT When upgrading your TAPIT software make sure that all call accounting data has been exported before you begin the installation process.
Registration Settings:
SERIAL NUMBER:
COMPUTER ID:
REGISTRATION NUMBER:
Once you have your TAPIT software functioning properly copy your phone system settings onto this page and save it for future reference
PORT:
SPEED:
PARITY:
DATA BITS:
STOP BITS:
PBX TYPE:
DATE SELECTION (PBX OR COMPUTER):

Tapit Introduction •••• i
Contents Introduction.............................................................................1
Introduction - Overview ....................................................................1 System Requirements ........................................................................1
Installation ...............................................................................2 Getting Started ..................................................................................2 Before installing your software .........................................................2 Installing Tapit Single User...............................................................4 Setting up TAPIT Single User...........................................................5 Installing Tapit Multi-User................................................................8
TAPIT Server Installation...................................................8 Setting up TAPIT Server.....................................................9 TAPIT Client Installation....................................................10 Setting up TAPIT Client .....................................................10 NOTE FOR NOVELL NETWARE 3.11 USERS ..............11
Upgrading TAPIT EX using different serial number ........................11 Moving TAPIT EX to another computer...........................................12 Reinstalling TAPIT EX.....................................................................12 Upgrading TAPIT EX to TAPIT EX.................................................12 Upgrading TAPIT 2000 to TAPIT EX..............................................12 Upgrading TAPIT for Windows to TAPIT EX.................................15 Upgrading TAPIT for DOS to TAPIT EX ........................................18 Registration .......................................................................................20
Main Menu ..............................................................................21 Main Menu - Overview .....................................................................21
Users/Departments .................................................................22 Overview...........................................................................................22 Users..................................................................................................22 Departments ......................................................................................24 Hierarchy Tree ..................................................................................27
Clients ......................................................................................29 Managing Clients ..............................................................................29

ii •••• Introduction Tapit
Reports .................................................................................... 31 Generating Reports ...........................................................................31
Statistics .................................................................................. 45 Statistics Concepts ............................................................................45
To generate statistical graph ...............................................45
System Maintenance............................................................. 47 System Maintenance - Overview ......................................................47
System Parameters ................................................................ 48 System Parameters Screen ................................................................48 Communications ...............................................................................49 Call Costing ......................................................................................51 Activity .............................................................................................53 Trunks ...............................................................................................54 Destination ........................................................................................55 DATA ...............................................................................................57
Call Editor................................................................................ 58 Working with Call Editor..................................................................58
TAPIT Pricing............................................................................ 60 Pricing Call Records .........................................................................60
Reindex Database ................................................................. 65 Reindexing ........................................................................................65
Recosting ................................................................................ 66 Recosting Call Records .....................................................................66
Dialing Patterns....................................................................... 69 Working with Dialing Patterns..........................................................69
Report Scheduler.................................................................... 71 Using Report Scheduler ....................................................................71
Data Maintenance................................................................. 73 Data Maintenance Concepts..............................................................73 Export................................................................................................74 Import................................................................................................75 Call Records Maintenance ................................................................76 Export to Billing Software ................................................................77 Import Tapit DOS Data.....................................................................77

Tapit Introduction •••• iii
Import V&H Data..............................................................................78
Report Designer ......................................................................79 Creating Custom Reports ..................................................................79
Fraud Alert ...............................................................................83 Fraud Alert Features..........................................................................83 Parameters .........................................................................................83 Delete Log File..................................................................................85 Test Alarms .......................................................................................85 Trunks ...............................................................................................86 Extensions .........................................................................................87 Dialed Numbers ................................................................................88
Database Repair Utility...........................................................90 Using Repair Utility ..........................................................................90
SMDR Monitor ..........................................................................92 Understanding SMDR Monitor .........................................................92 SMDR Monitor Menu Options: ........................................................93
Action..................................................................................93 Settings................................................................................93 PBX.....................................................................................94
Software License Agreement.................................................96 Contents.............................................................................................96
Technical Support ...................................................................99 Technical Support from Trisys, Inc...................................................99
Troubleshooting ..................................................................99 TAPIT End of the Month Procedures .................................101 To Prevent Data Loss..........................................................102
SMDR ALARM...........................................................................103 REQUIREMENTS............................................................................103
Hardware:............................................................................103 Supported Operating Systems:............................................103 Software Requirements: ......................................................103
INSTALLATION..............................................................................104 Before installing SMDR Alarm ..........................................104 Installing SMDR Alarm......................................................104
USER INSTRUCTIONS...................................................................105 Setting up the SMDR Alarm...............................................105 Setting up Phone Number tracking .....................................109 Example of the Phone Number tracking .............................110 Understanding the TPSALARM.LOG file..........................111

iv •••• Introduction Tapit
WEB REPORTS........................................................................... 112 REQUIREMENTS............................................................................112
Hardware: ...........................................................................112 Windows NT, Windows 2000 and Windwos XP Professional software requirements:........................................................112
INSTALLATION..............................................................................113 Before installing Tapit Web Reports ..................................113 Installing Tapit Web Reports ..............................................113 Changing IIS permissions...................................................117
UPGRADING TAPIT WEB REPORTS...........................................123 USER INSTRUCTIONS...................................................................124
Logging in to the Tapit Web Reports .................................124 CREATING/PRINTING REPORTS..................................126 DRILL DOWN REPORTS.................................................131 GRAPH REPORTS ............................................................131 TRUNK ANALYSIS REPORTS .......................................132
PERMISSIONS.................................................................................139 Setting up Permissions for the first time.............................140 Using User List Screen .......................................................144 Using User Profile Screen...................................................145 Forgot Password?................................................................151 Glossary of terms................................................................151
TROUBLESHOOTING WEB REPORTS........................................152
Index ....................................................................................... 153

Tapit Introduction •••• 1
Introduction
Introduction - Overview • TAPIT is a call management and accounting software package designed to report on
the phone activity of a business. • It is a tool to help identify and control expenses, provide statistical information, and
assist in overall management of the business. • TAPIT collects all available information about incoming and outgoing calls from
your telephone equipment and stores it for later processing. • TAPIT is a real-time system, which means that all phone activity data is current to
the minute. • TAPIT has an on-line help facility. Any time you need more information about a
specific screen, just press F1 key and related help screen will be displayed.
System Requirements System Requirements
• Pentium™ II Based PC • 128 MB RAM • Microsoft™ Windows 98/NT/2000/XP Professional • 250 MB free disk space • One RS232 port connection to the PBX® SMDR port • Printer driver must be installed on your system • Power Management feature of your system must be disabled
Assumptions This manual assumes that you are familiar with using a mouse, as well as with the common Microsoft Windows elements i.e. Scroll Bars, Selecting Menu Items etc. For detailed description on these elements please refer to Microsoft Windows User Guide.

2 •••• Installation Tapit
Installation
Getting Started Before Installation
If your PBX system sends data to the RS232 port, test the SMDR link by following instructions from page 2 (“Before installing your software”).
Plain TAPIT Installation
Install and setup TAPIT following the instructions on page 4 (“Installing Tapit Single-User”) or page 8 (“Installing Tapit Multi-User”).
TAPIT Remote Manager Installation
Install and setup TAPIT (see ”Plain TAPIT Installation above”). Install TAPIT Remote Manager (refer to the TAPIT Remote Manager manual located on the CD in Docs folder).
If your system is collecting data from CDR systems like Altigen, 3COM, AVAYA IP Office, Cisco CCM etc.:
Open and print readme and an appropriate startup file located on the Trisys Software CD in Tapit CDR Loader folder. Follow installation instructions for your telephone system. Note: the installation includes TAPIT Multi-User setup, TAPIT Remote Manager setup (if you purchased this option) and TAPIT CDR Loader setup.
If you want to use Web based reports with your TAPIT software:
Install and setup TAPIT Multi-User (page 8 - “Installing Tapit Multi-User”). If you purchased this option, install and setup TAPIT Remote Manager (refer to the TAPIT Remote Manager manual on the CD in Docs folder). Install TAPIT Web Reports following the instructions on page 110.
Before installing your software In an effort to separate possible hardware and software issues we need to confirm the presence of clear SMDR data (this will tell us if the connection between PBX and computer is intact). To do that we’ll use a communications software called HyperTerminal , which comes bundled with Microsoft Windows. Please follow the steps below: 1. Click on Start

Tapit Installation •••• 3
2. Click on Programs 3. Click on Accessories 4. Click on HyperTerminal 5. Double-click Hypertrm.exe 6. Enter name for session, i.e. SMDR Test. Click OK 7. Using the arrow on the right of Connect using: select Direct to Com X (where
X= the number of the comport connected to the PBX). Click OK 8. Configure COM Port settings as per PBX specifications. Click OK 9. Proceed with Step 10, unless you get a message Unable to open Com X. If you
see this message, you will need to change the X value (use a different Com Port). Here is what you need to do: • Click File on the Menu Bar • Click New Connection • Go back to Step 6
10. You should see “Connected” in the left lower corner with elapsed time counter. 11. At this stage, if you have everything configured properly, every time you hang up
after a completed call, you should see legible call data displayed on the screen. 12. If clear data is displayed write down communication parameters and exit
HyperTerminal. Now you can proceed with the installation of Trisys, Inc. software.
13. However, if NO data or “garbled” is displayed you may have a problem with either your cable (between PBX and the Com Port) or PBX’s SMDR port. At this stage you should contact you Phone Dealer for help.
4 •••• Installation Tapit
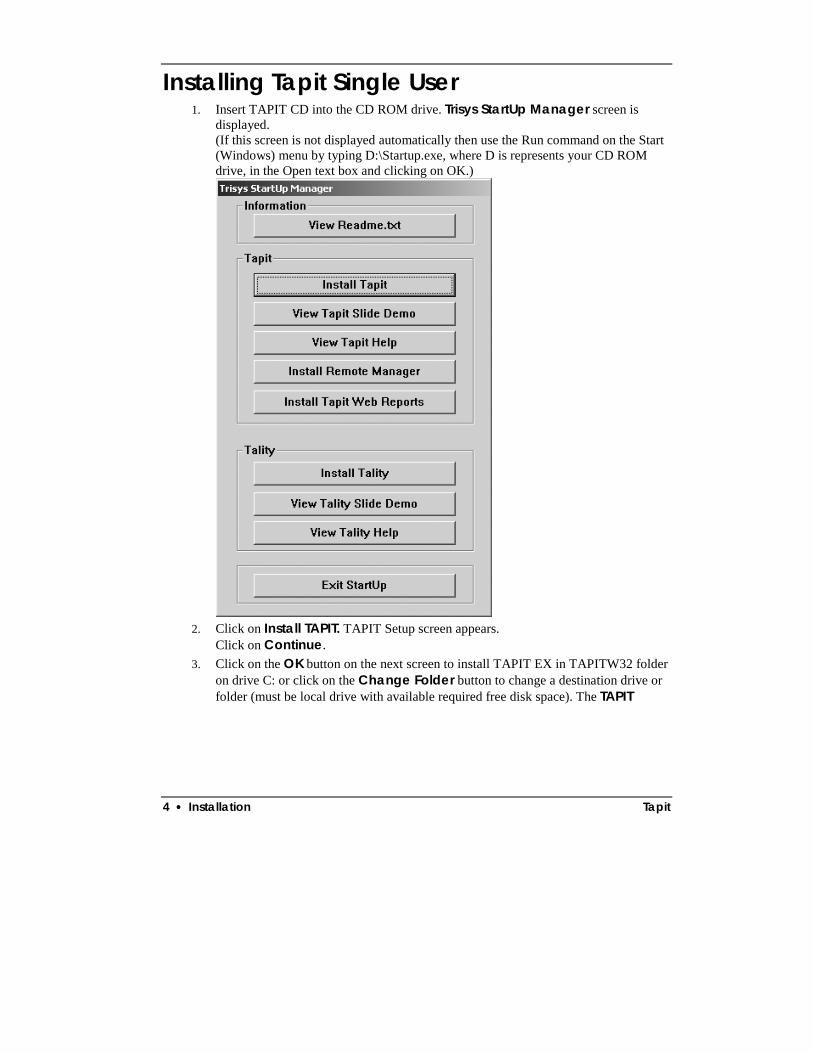
Installing Tapit Single User 1. Insert TAPIT CD into the CD ROM drive. Trisys StartUp Manager screen is
displayed. (If this screen is not displayed automatically then use the Run command on the Start (Windows) menu by typing D:\Startup.exe, where D is represents your CD ROM drive, in the Open text box and clicking on OK.)
2. Click on Install TAPIT. TAPIT Setup screen appears.
Click on Continue. 3. Click on the OK button on the next screen to install TAPIT EX in TAPITW32 folder
on drive C: or click on the Change Folder button to change a destination drive or folder (must be local drive with available required free disk space). The TAPIT

Tapit Installation •••• 5
Setup screen appears.
4. Click on the Install button/icon to continue (or click on the Change Folder button
to change a destination drive or folder). Program installs TAPIT files and updates your system.
5. Program displays a message asking if your TAPIT software has a serial number. If you have a serial number click on YES, otherwise click on NO and TAPIT will be installed as a trial version.
6. TAPIT displays the Enter Serial Number screen. Enter your TAPIT software serial number. Click on OK.
7. TAPIT processes the serial number. Product information message is displayed. Click on OK.
8. Setup program displays a registration message as a reminder to register TAPIT software. It is very important to register your TAPIT promptly. TAPIT will stop functioning if you do not register it 30 days from the date of installation. You can find registration instructions on page 19 of this manual, “Getting Started” booklet included with your package or TAPIT CD in register.txt file.
9. When installation is completed the installation program displays a message “TAPIT Setup was completed successfully”. Click on OK. It is recommended to restart the computer. Next step is to proceed with Tapit Setup.
10. Go to START/Programs/TAPIT and run TAPIT Setup - see Setting up TAPIT Single User instructions following this section.
Setting up TAPIT Single User 1. When the program installation is completed you can proceed with the configuration
of TAPIT so it will communicate with the phone system properly. Open Setup program by clicking on Start/Programs/Tapit/Tapit Setup. A message with product information is displayed. This message contains the TAPIT Serial Number. Verify the number is correct and click on Yes.

6 •••• Installation Tapit
2. The TAPIT Setup screen appears. This screen displays your software serial number and product description.
3. Click on the START SETUP button. 4. The setup program will display a message indicating your database location and will
ask you if you want to keep the current location settings. We recommend the default directory is accepted (that is where program files were installed). However, a different drive and/or directory may be specified if i.e. there is not enough free disk space on the drive where application files were installed. Click on Yes to accept the default location.

Tapit Installation •••• 7
5. System Parameters screen is displayed.
Note: All settings for this screen can be changed in the TAPIT application on Maintenance/System Parameters screen.
6. Click on the Your Telephone Number field and enter your main telephone number (do not use an 800 number).
7. Load Calls from Text File: check this check box only if you want the call records to be loaded from a text file instead of a Com Port. When Load Calls from Text File: is checked the adjacent text box with the path to a call records file is enabled. Accept the default value or enter a new path.
8. Process Text File Every______seconds This option becomes available when the Load Calls from Text File box is checked. The value entered in this box determines how often TAPIT loads data from the text file.
9. Load Calls into Database Every __ minutes The value entered in this box determines how often TAPIT processes data (converts raw information into TAPIT database format). Twenty minutes is the default value for this field.
10. Click on the down arrow icon in the PBX Type/SMDR Format field to select a telephone system type the computer is receiving data from. Data will not be processed accurately if incorrect selection is made.

8 •••• Installation Tapit
11. eXtended Processing (not available for ALL PBX formats) Check this box only when you are certain TAPIT supports extended processing format or when suggested by Trisys Technical Support.
12. Click on the PBX or Computer options in the Use Computer or Telephone System Date? field to specify whether date information for the call records is going to be processed based on the computer or PBX date. You must check the Computer date option if your phone system is not generating the following date information: day, month and year. Otherwise we recommend you use the PBX date.
Note: The Port, Speed, Parity, Data Bits and Stop Bits options are enabled only when the Load Calls From Text File: box is unchecked.
13. Click on the down arrow in the Port field to select a port the SMDR cable is connected to.
14. Click on the down arrow icon in the Speed field to select the phone system transmission speed/baud rate.
15. Click on the down arrow icon in the Parity field to select the phone system parity setting.
16. Click on 7 or 8 in the Data Bits fields to select the phone system data bits setting. 17. Click on 1 or 2 in the Stop Bits fields to select the phone system stop bits setting. 18. Click on OK.
Setup program will ask if you have a V&H Data Diskette. This is an optional pricing table that can be purchased with TAPIT.
19. If you have purchased V&H pricing tables, click on Yes. TAPIT starts loading V&H pricing tables. This process will take several minutes. You can also load V&H pricing files later directly from the TAPIT application. Otherwise, click on No.
20. If setup is completed successfully, click on EXIT. Otherwise print out a log file (go to SHOW LOG and click on the Print button) and call Trisys Technical Support at 973 360 2300.
21. If everything is complete reboot your computer. 22. Verify the TAPIT Monitor is running and start your TAPIT application by clicking
on Start/Programs/Tapit/Tapit. To confirm that TAPIT is collecting data, run a detail activity report for the day.
Installing Tapit Multi-User TAPIT Server Installation
1. One of the computers on the network must be configured as an administrative station. This is where data from the phone equipment will be collected. The administrative station (TAPIT Server) is the only computer that has to go through the TAPIT registration process.

Tapit Installation •••• 9
2. Follow the instructions from the Installing Tapit Single User section above (page 4) pt. 1 through 7.
3. TAPIT processes the serial number. The product information message is displayed followed by the message:
Click on Yes.
4. The setup program displays a registration message as a reminder to register the TAPIT software.
5. When installation is completed the installation program displays a message “TAPIT Setup was completed successfully”. Click on OK. It is recommended to restart the computer.
Setting up TAPIT Server When the program installation is completed you can proceed with the configuration of TAPIT so it will communicate with the phone system properly. 1. Open the Setup program by clicking on Start/Programs/Tapit/Tapit Setup.
A message with product information is displayed. This message contains the TAPIT Serial Number. Verify the number and click on Yes. TAPIT Setup screen appears. This screen displays your software serial number and product description.
2. Click on the START SETUP button. 3. Product information message is displayed followed by the message: “Will this computer be
connected to the Telephone System?”. Click on YES .
4. The Setup program displays a message indicating the initial database location and asks you if you want to keep the current location settings. Click on No to reject the current location.
5. The message "..Store Tapit in the default folder for Tapit/w Multi-user Access?" appears. Click on Yes.
6. Follow instructions on page 5 - Setting up TAPIT Single User - pt.5 - pt.22
Note: Maintenance option can be accessed only on the TAPIT Server Computer. Also when making any changes on the Maintenance Screen (i.e. Reindex, Data Maintenance or Recosting) make sure that TAPIT applications on all Client computers are closed.
7. Open your Windows Explorer and go to TapitW32 folder. Find the DATA folder. Make sure this folder is shared with read/write access on the network.
Note: Wherever you decide to store your data the basic rule for the TAPIT Server setup is: Tapit Database must be stored in the subfolder of the shared folder.
10 •••• Installation Tapit
TAPIT Client Installation Client installation must be performed on every workstation that is used to access TAPIT data. Insert Trisys Software CD in the CD ROM drive. Trisys StartUp Manager screen is displayed. 1. Follow the instructions from Installing Tapit Single User section above (page 4) pt. 1
through 7.
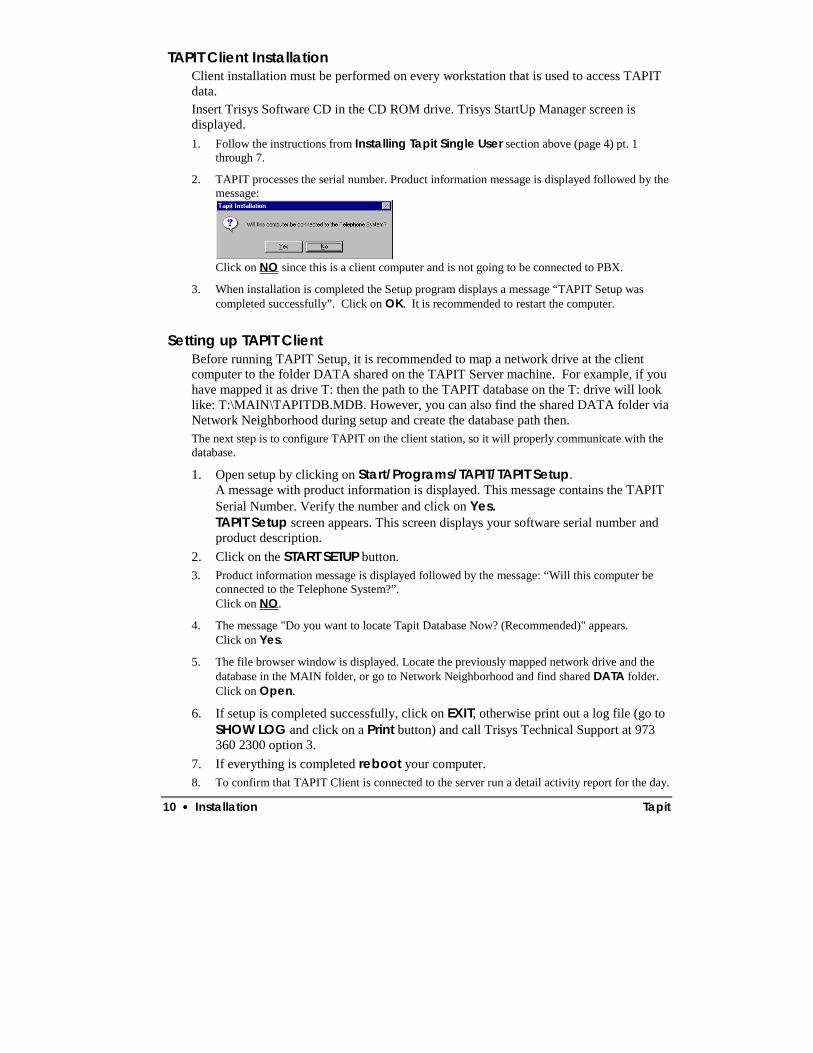
2. TAPIT processes the serial number. Product information message is displayed followed by the message:
Click on NO since this is a client computer and is not going to be connected to PBX.
3. When installation is completed the Setup program displays a message “TAPIT Setup was completed successfully”. Click on OK. It is recommended to restart the computer.
Setting up TAPIT Client Before running TAPIT Setup, it is recommended to map a network drive at the client computer to the folder DATA shared on the TAPIT Server machine. For example, if you have mapped it as drive T: then the path to the TAPIT database on the T: drive will look like: T:\MAIN\TAPITDB.MDB. However, you can also find the shared DATA folder via Network Neighborhood during setup and create the database path then. The next step is to configure TAPIT on the client station, so it will properly communicate with the database.
1. Open setup by clicking on Start/Programs/TAPIT/TAPIT Setup. A message with product information is displayed. This message contains the TAPIT Serial Number. Verify the number and click on Yes. TAPIT Setup screen appears. This screen displays your software serial number and product description.
2. Click on the START SETUP button. 3. Product information message is displayed followed by the message: “Will this computer be
connected to the Telephone System?”. Click on NO.
4. The message "Do you want to locate Tapit Database Now? (Recommended)" appears. Click on Yes.
5. The file browser window is displayed. Locate the previously mapped network drive and the database in the MAIN folder, or go to Network Neighborhood and find shared DATA folder. Click on Open.
6. If setup is completed successfully, click on EXIT, otherwise print out a log file (go to SHOW LOG and click on a Print button) and call Trisys Technical Support at 973 360 2300 option 3.
7. If everything is completed reboot your computer. 8. To confirm that TAPIT Client is connected to the server run a detail activity report for the day.
Tapit Installation •••• 11
Note: Maintenance option can be accessed only on the TAPIT Server Computer. Also when making any changes on the Maintenance Screen (i.e. Reindex, Data Maintenance or Recosting) make sure TAPIT applications on all Client computers are closed. To avoid any inappropriate changes to system configuration, delete the shortcut to the TAPIT Monitor from Tapit program group on Client computer.
NOTE FOR NOVELL NETWARE 3.11 USERS Access Locking and Novell NetWare 3.11
When using data from a server back end, Access uses the locking facilities provided by that back end. There is a bug in NetWare 3.11 TTS (Transaction Tracking System) that can result in a server's abending when running certain Access queries or otherwise requesting a large number of locks. Each page of records Access locks uses one or more locks from the NetWare TTS. The defaults in NetWare allow a single workstation to have 500 locks at any given time. This results in a limit of 1M of data that Access can deal with in a single transaction. Since Access tries to lock every record involved in either an update or a delete query before actually carrying out the update or delete, it is quite possible to bump into this limit on a moderately large database. The problem is that NetWare 3.11 reacts rather poorly to having its lock limit exceeded. It appears to count a lock violation every time it looks at the connection in question, which is still trying to lock more records. Eventually (in about 3-5 minutes) some internal table overflows, and the entire server goes down, with a frightening message that instructs you to cycle the power. There are two things you can do if this happens to you. The first is to increase the number of locks available, and the second is to apply the NetWare patch that prevents the abend of the server. (Very large queries can still fail, but at least the server doesn't fail along with them.) To increase the number of locks available, enter the following commands at the file server console or in your AUTOEXEC.NCF file: set maximum record locks per connection = 10000 set maximum record locks = 200000 The first parameter is the most locks any single connection can have, and the second is the most the entire server can keep track of. These values (10,000 and 200,000) are the maximums that NetWare 3. 11 can accommodate. By setting the maximum record locks per connection to 10,000, Access can handle a transaction up to 20MB. To fix the server abend problem, you need to download the latest NetWare 3.11 patch file. It can be found on CompuServe in the NOVFILES download area, as of this writing, the current version is 311PTD.ZIP. You will need to load two of the NLMs from this file, either directly from the server console or in your AUTOEXEC.NCF file: load patchman.nlm load ttsfix.nlm This problem is specific to NetWare version 3.11 and has been fixed in later versions of NetWare.
Upgrading TAPIT EX using different serial

12 •••• Installation Tapit
number This section of the manual pertains to a registered version of TAPIT EX that is upgraded to a different type of TAPIT call accounting software (i.e. upgrading TAPIT EX Single-User to TAPIT EX Multi-User). In such cases, please call Technical Support at 973 360 2300 for instructions.
Moving TAPIT EX to another computer Follow the instructions in this section if your TAPIT EX software is registered and you need to move it to another computer.
1. At the new computer install and configure TAPIT EX by following the upgrade instructions from the Upgrading TAPIT EX To TAPIT EX section bellow.
2. Note: Make sure that you have access to the old computer. Call Technical Support to deactivate previous registration and obtain a new registration number.
Reinstalling TAPIT EX Follow the instructions in this section if you need to reinstall your TAPIT EX software on the same computer with the same serial number.
Open your Windows Explorer. Go to TAPITW32 folder. Select Setup folder and delete it. Now you can proceed with installing TAPIT - refer to the Installing TAPIT Single User (page 4). Your system already has information about previously used serial number. While reinstalling TAPIT, program will ask you to either accept or reject existing serial number. Accept the number provided by the system.
Upgrading TAPIT EX to TAPIT EX Follow instructions from the Upgrading TAPIT 2000 to TAPIT EX section below.
Upgrading TAPIT 2000 to TAPIT EX 1. Click on the Maintenance icon on the TAPIT Main Menu of a current version of
your software. 2. Click on Data Maintenance. Data Maintenance screen opens on the Export
tab by default. Click All in the Export field for all data to be exported. The default folder is your current TAPIT folder. You may choose another folder if you want. DO NOT Check “Delete Existing Data from Database”. Click Continue. You will receive “Data Export Completed” message.

Tapit Installation •••• 13
Note: If you are using account codes with matter codes you need to follow the steps below before you export your call records. Otherwise proceed with step 3. 1. Go to the Systems Parameters screen and select the Call Costing tab. 2. Write down the Matter Code Length setting for later use. 3. Change the Matter Code Length setting to 0. 4. Click on OK. 5. Click on Reindex Database. 6. Select second option. 7. Click on Continue. 8. Filter screen appears. Enter the date range criteria for the call records you intend to export. 9. Click on Continue. 10. Tapit reindexes the data. The confirmation message appears when done. Click on OK. 3. Click on Call Records Maintenance tab. Click on Export & Keep Call
Records. Then specify the filename for the call records: Calls.txt. Click on Continue. At the filter screen, you must enter the date range for the records you wish to keep and click on Continue. You will receive “Call Records Export Completed” message. Exit from Data Maintenance screen.
4. Close TAPIT 2000 and TAPIT SMDR Monitor. 5. Go to Windows Explorer and locate the TAPITW32 folder. Rename the folder as
TAPITOLD (if prompted with a warning by the operating system click on OK). Find TAPIT.INI and SERIAL.TXT files. TAPIT. INI file resides in the same folder where TAPIT database is located. If you are not sure of its whereabouts open TAPIT program and press CTRL + F1 keys at the Main Menu screen. Copy both files to another folder as backup.
6. Proceed with the new installation of TAPIT EX. 7. Insert TAPIT CD into the CD ROM drive. The Trisys StartUp Manager screen is
displayed. 8. Click on Install TAPIT . TAPIT Setup screen appears. 9. Click on Continue button. TAPIT is searching for the installed components. 10. Click on OK button to install TAPIT in TAPITW32 folder on drive C. TAPIT Setup
screen appears. 11. Click on Install button to continue (Note: Change Folder button allows a different
TAPIT destination path than default). 12. Program installs TAPIT files and updates your system. 13. Program displays a following message: “Setup has found Serial Number (your
current serial number). Is it your current valid Serial Number?” Click on NO. 14. TAPIT displays Enter Serial Number screen. Enter your TAPIT software serial
number. Click on OK. 15. TAPIT processes the serial number. Product information message is displayed. Click
on OK.

14 •••• Installation Tapit
16. Setup program displays a registration message as a reminder to register TAPIT software.
17. It is very important to register your TAPIT promptly. TAPIT will stop functioning if you do not register it 30 days from the date of installation. You can find registration instructions on page 19 of this manual, “Getting Started” booklet included with your package or TAPIT CD in register.txt file. Setup program displays a message “TAPIT Setup was completed successfully”. Click on OK (If prompted by system, restart the computer).
18. Copy TAPIT.INI file from TAPITOLD folder into new TAPITW32 folder (where your TAPIT database files reside). Let it overwrite the existing file.
19. Go to START/Programs/TAPIT and run TAPIT Setup. Note: While running TAPIT Setup, System Parameters screen reflects settings from your previous version of TAPIT. Do not change anything unless required. (For setup instructions see Setting up TAPIT on page 5 of this manual.)
20. After completing Setup go to START/Programs/TAPIT/TAPIT. TAPIT provides the following message: “TAPIT will be connected to the database…”. Click OK.
21. From the Main Menu, click on Maintenance, click on Data Maintenance, click on Import tab. Check all the boxes EXCEPT V&H Data. Do Not Check ALL. Go to Directory and change folder to C:\TAPITOLD. Click Continue. After import is finished, you will receive “Data Import Completed” message.
22. Click on Call Records Maintenance. Click on Import Call Records. Go to Directory and change the folder to C:\TapitOld. Go to File Name and enter the file name: Calls.txt. Click on Continue. At the filter screen, you must enter the date range for the records you wish to keep and click on Continue. After the import is finished, you will receive “Call Record Import Completed” message. Exit Call Records Maintenance screen.
Note: If you are using account codes with matter codes you need to follow the steps below after you import your call records. Otherwise proceed with step 12. 1. Go to the Systems Parameters screen and select the Call Costing tab. 2. Change the Matter Code Length setting to the previously recorded setting. 3. Click on OK.
23. Click on Reindex Database. Select second option. Click on Continue. Filter
screen appears. Enter the date range criteria for the call records you intend to export. Click on Continue. Tapit reindexes the data. The confirmation message appears when done. Click on OK.
24. To confirm successful import of data, run a Detail Activity by Date report from the Report Menu.
25. If everything is running after you completed the above, you may go back to Windows Explorer and delete the TAPITOLD folder. Note: The old TAPIT 2000

Tapit Installation •••• 15
program group is not automatically removed from the MS Windows START/ Programs menu. You have to delete it manually (see MS Windows help).
Upgrading TAPIT for Windows to TAPIT EX Upgrading TAPIT on the SAME computer:
1. Click on the Maintenance icon on the TAPIT Main Menu of a current version of your software.
2. Click on Data Maintenance and in the Export field, click All for all data to be exported. The default folder is your current TAPIT folder. You may choose another folder if you want. DO NOT Check “Delete Existing Data from Database”. Click on Continue. You will receive “Data Export Completed” message.
Note: If you are using account codes with matter codes you need to follow the steps below before you export your call records. Otherwise proceed with step 3. 1. Go to the Systems Parameters screen and select the Call Costing tab. 2. Write down the Matter Code Length setting for later use. 3. Change the Matter Code Length setting to 0. 4. Click on OK. 5. Click on Reindex Database. 6. Select second option. 7. Click on Continue. 8. Filter screen appears. Enter the date range criteria for the call records you intend to export. 9. Click on Continue. 10. Tapit reindexes the data. The confirmation message appears when done. Click on OK.
3. Click on the Call Records Maintenance tab. Click on Export & Keep Call Records. Then specify the filename for the call records, Calls.txt. Click on Continue. At the filter screen enter the date range criteria for the records you wish to keep (leave it blank for all) and click on Continue. You will receive “Call Records Export Completed” message. Exit the Data Maintenance screen.
4. Click on the System Parameters icon. System Parameters screens opens up on the default Communications tab. You need to write down this screen’s settings to save them for entry during new installation.
5. Exit the System Parameters screen. 6. Close TAPIT for Windows and TAPIT SMDR Monitor. 7. Go to Windows Explorer and locate the TAPITW folder. Rename the folder as
TAPITOLD. 8. Proceed with TAPIT EX installation.(see Installing TAPIT Single User on page.4)

16 •••• Installation Tapit
9. Go to START/Programs/TAPIT and run TAPIT Setup. NOTE: While running TAPIT Setup, System Parameters screen appears. Enter settings copied previously from your old version of TAPIT. Do not change anything unless required. (For setup instructions see Setting up TAPIT on page 5 of this manual.)
10. After completing Setup, go to START/Programs/TAPIT/TAPIT. TAPIT provides the following message: “TAPIT will be connected to the database…”. Click OK.
11. From Main Menu, click on Maintenance, click on Data Maintenance, click on the Import tab, and then check all the boxes EXCEPT V&H Data. Do Not Check ALL. Go to Directory and change folder to C:\TAPITOLD. Click Continue. After import is finished, you will receive “Data Import Completed” message.
12. Click on Call Records Maintenance. Click on Import Call Records. Go to Directory and change the folder to C:\TapitOld. Go to File Name and enter the file name: Calls.txt. Click on Continue. At the filter screen, you must enter the date range for the records you wish to keep and click on Continue. After the import is finished, you will receive “Call Record Import Completed” message. Exit Call Records Maintenance screen.
Note: If you are using account codes with matter codes you need to follow the steps below after you import your call records. Otherwise proceed with step 12. 1. Go to the Systems Parameters screen and select the Call Costing tab. 2. Change the Matter Code Length setting to the previously recorded setting. 3. Click on OK.
12. Click on Reindex Database. Select second option. Click on Continue. Filter
screen appears. Enter the date range criteria for the call records you intend to export. Click on Continue. Tapit reindexes the data. The confirmation message appears when done. Click on OK.
To confirm successful import of data, run a Detail Activity by Date report from the Report Menu. If you have completed the above and everything is running, you may go back to Windows Explorer and delete the TAPITOLD folder. It is recommended to delete the old TAPIT for Windows program group from the START, Programs menu (see MS Windows help).
Upgrading TAPIT on the DIFFERENT computer: 1. Click on the Maintenance icon on the TAPIT Main Menu. 2. Click on Data Maintenance and in the Export field click All for all data to be
exported. The default folder is your current TAPIT folder. You may choose another folder if you wish. DO NOT Check “Delete Existing Data from Database”. Click on Continue. You will receive “Data Export Completed” message.

Tapit Installation •••• 17
Note: If you are using account codes with matter codes you need to follow the steps below before you export your call records. Otherwise proceed with step 3. 1. Go to the Systems Parameters screen and select the Call Costing tab. 2. Write down the Matter Code Length setting for later use. 3. Change the Matter Code Length setting to 0. 4. Click on OK. 5. Click on Reindex Database. 6. Select second option. 7. Click on Continue. 8. Filter screen appears. Enter the date range criteria for the call records you intend to export. 9. Click on Continue. 10. Tapit reindexes the data. The confirmation message appears when done. Click on OK.
3. Click on Call Records Maintenance tab. Click on Export & Keep Call Records. Then specify the filename for the call records, Calls.txt. Click Continue. At the filter screen enter the date range criteria for the records you wish to keep (leave it blank for all) and click on Continue. You will receive “Call Records Export Completed” message. Exit Data Maintenance screen.
4. Click on the System Parameters icon. System Parameters screens opens up on the default Communications tab. You need to write down this screen’s settings to save them for entry during new installation.
5. Exit the System Parameters screen. 6. Close TAPIT for Windows and TAPIT SMDR Monitor. 7. Copy all the exported data files to an external storage. 8. Proceed with TAPIT EX installation on a new computer. See Installing TAPIT
Single User on page 4. 9. Copy all the exported data files from the external storage into new TAPITW32
folder. 10. Run TAPIT Setup Program – START/Programs/TAPIT/TAPIT Setup.
NOTE: While running TAPIT Setup, System Parameters screen appears. Enter settings copied previously from your old version of TAPIT. Do not change anything unless required. (For setup instructions see Setting up TAPIT on page 5 of this manual).
11. After completing Setup program, go to START/Programs/TAPIT/TAPIT. TAPIT provides the following message: “TAPIT will be connected to the database…”. Click OK.
12. From the Main Menu, click on Maintenance, click on Data Maintenance, click on Import tab, and then check all the boxes EXCEPT V&H Data. Do Not Check ALL. Go to Directory and set folder to C:\TAPITW32. Click Continue. After import is finished, you will receive “Data Import Completed” message.

18 •••• Installation Tapit
13. Click on Call Records Maintenance. Click on Import Call Records. Go to Directory and change the folder to C:\TapitOld. Go to File Name and enter the file name: Calls.txt. Click on Continue. At the filter screen, you must enter the date range for the records you wish to keep and click on Continue. After the import is finished, you will receive “Call Record Import Completed” message. Exit Call Records Maintenance screen.
Note: If you are using account codes with matter codes you need to follow the steps below after you import your call records. Otherwise proceed with step 12. 1. Go to the Systems Parameters screen and select the Call Costing tab. 2. Change the Matter Code Length setting to the previously recorded setting. 3. Click on OK.
12. Click on Reindex Database. Select second option. Click on Continue. Filter screen appears. Enter the date range criteria for the call records you intend to export. Click on Continue. Tapit reindexes the data. The confirmation message appears when done. Click on OK.
To confirm successful import of data, run a Detail Activity by Date report from the Report Menu.
Upgrading TAPIT for DOS to TAPIT EX Note: you need to have TAPIT for DOS version 2.9.8 in order to upgrade it to TAPIT EX.
1. Go to C:\Tapit> prompt and type TPDBEXP then press ENTER 2. Start TAPIT for DOS 3. Select 6 (System Maintenance) 4. Select A (Export for Billing) 5. Enter criteria for call records that you would like to be imported into TAPIT for
Windows 6. Enter 0 (Zero) in Select Billing Interface field and press F3 7. Exit TAPIT using F10 to the C:\TAPIT> prompt. You need to copy exported files to
an external storage media. Floppy disk is used here as an example of such media. Insert a floppy disk into your floppy drive. Proceed with coping exported files to a floppy disk. Type the following: copy tapit.txt a:\ - and press Enter copy client.txt a:\ - and press Enter copy dept.txt a:\ - and press Enter copy user.txt a:\ - and press Enter copy rates.txt a:\ - and press Enter
8. Install TAPIT EX – complete the instructions on page 4 of this manual. 9. Run TAPIT Setup – see the instructions on page 5.

Tapit Installation •••• 19
10. Copy exported files from the floppy disk to TAPITW32 directory. 11. Start TAPIT EX – Start/Programs/TAPIT/TAPIT 12. Click on Maintenance icon located on the Main Menu screen. 13. Click on Data Maintenance icon. 14. Click on Import DOS data (Assumes .txt files are in TAPITW32 host folder) 15. Click on OK when a message confirming the Import process is completed appears on
the screen 16. Click on Exit to leave Data Maintenance screen 17. Run a Detail Activity by Date report to confirm import of call records. 18. Close any running program, and exit out of Windows and reboot the computer.

20 •••• Installation Tapit
Registration It is very important to register your software promptly; otherwise, it will stop functioning within 30 days from the date of installation.
For registration instructions refer to the Registration.txt file on the CD or the company website - www.trisys.com (option Registration).
Tapit Main Menu •••• 21
Main Menu
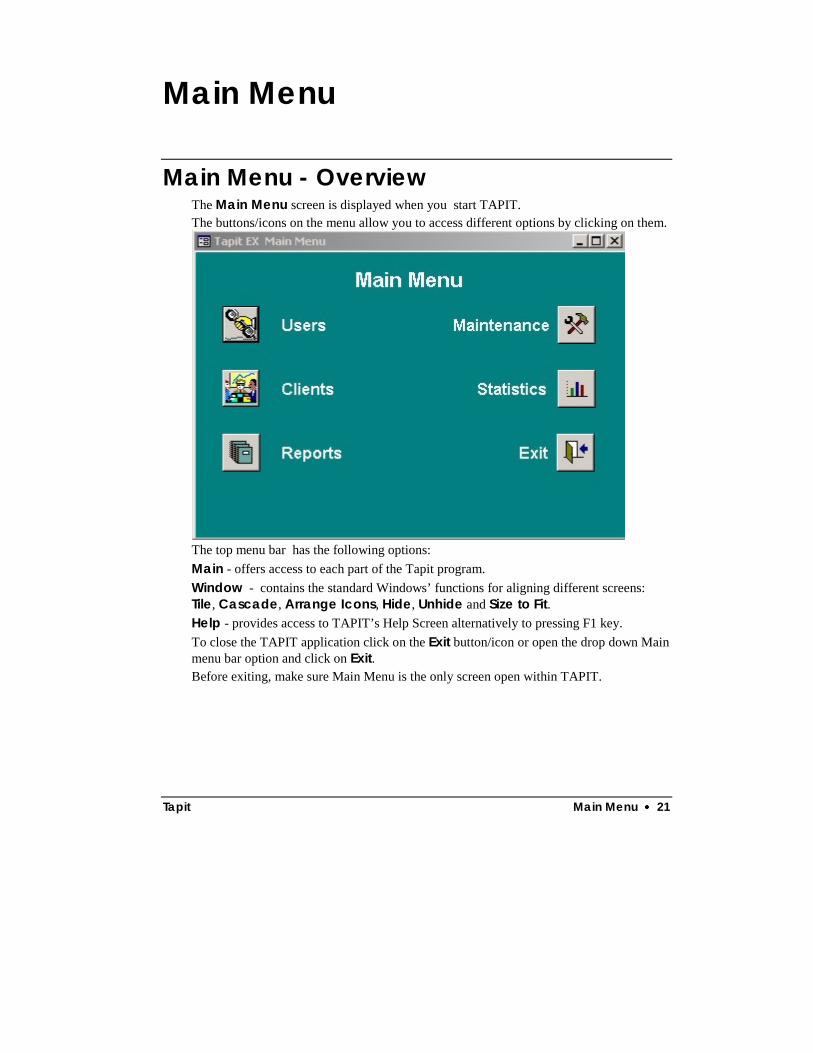
Main Menu - Overview The Main Menu screen is displayed when you start TAPIT. The buttons/icons on the menu allow you to access different options by clicking on them.
The top menu bar has the following options: Main - offers access to each part of the Tapit program. Window - contains the standard Windows’ functions for aligning different screens: Tile, Cascade, Arrange Icons, Hide, Unhide and Size to Fit. Help - provides access to TAPIT’s Help Screen alternatively to pressing F1 key. To close the TAPIT application click on the Exit button/icon or open the drop down Main menu bar option and click on Exit. Before exiting, make sure Main Menu is the only screen open within TAPIT.

22 •••• Users/Departments Tapit
Users/Departments
Overview The Users/Departments screen is used to define employees’ names, extensions in addition to defining and assigning department information. It is divided into two sections. The left section of the screen has 3 tabs: Hierarchy, Departments and Users. The right-hand side contains detailed information and is dependent on the selection made in the list(left) section. When clicked, Departments and Users tabs, display the corresponding departments and users screens. A list of departments, or users appears on the left-hand side. You can navigate it by clicking on list's items. You can also sort by clicking on the header labels of the list. When a particular record is highlighted the right section of the User/Department screen displays its detail information. This screen allows you to change, add, or delete department's or user's data. Hierarchy tab shows Hierarchy of Departments tree on the left-hand side. The right side initially displays instructions but when any of the tree nodes is selected, the screen changes to an edit mode.
Users Users screen is used to maintain employees' records. It has two sections. The left section is a list of users. You can navigate it by clicking on list's items. You can also sort by clicking on the header labels of the list. When a particular record is highlighted the right section displays user's detail information. This screen allows you to change, add, or delete user's data.
Tapit Users/Departments •••• 23
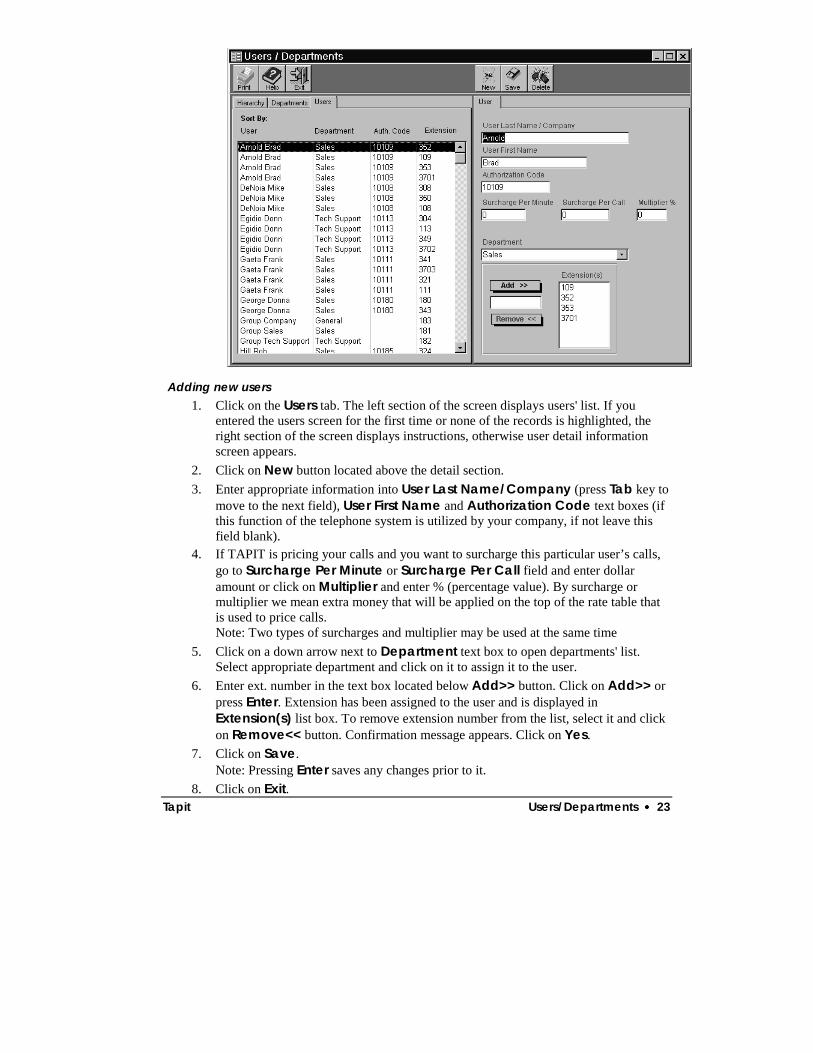
Adding new users 1. Click on the Users tab. The left section of the screen displays users' list. If you
entered the users screen for the first time or none of the records is highlighted, the right section of the screen displays instructions, otherwise user detail information screen appears.
2. Click on New button located above the detail section. 3. Enter appropriate information into User Last Name/Company (press Tab key to
move to the next field), User First Name and Authorization Code text boxes (if this function of the telephone system is utilized by your company, if not leave this field blank).
4. If TAPIT is pricing your calls and you want to surcharge this particular user’s calls, go to Surcharge Per Minute or Surcharge Per Call field and enter dollar amount or click on Multiplier and enter % (percentage value). By surcharge or multiplier we mean extra money that will be applied on the top of the rate table that is used to price calls. Note: Two types of surcharges and multiplier may be used at the same time
5. Click on a down arrow next to Department text box to open departments' list. Select appropriate department and click on it to assign it to the user.
6. Enter ext. number in the text box located below Add>> button. Click on Add>> or press Enter. Extension has been assigned to the user and is displayed in Extension(s) list box. To remove extension number from the list, select it and click on Remove<< button. Confirmation message appears. Click on Yes.
7. Click on Save. Note: Pressing Enter saves any changes prior to it.
8. Click on Exit.

24 •••• Users/Departments Tapit
Editing or deleting users 1. If not active, click on the Users tab. The left section of the screen displays users' list.
If you entered the users screen for the first time or none of the users is highlighted, the right section of the screen displays instructions, otherwise user detail information screen appears.
2. From the users list select a user to be edited and click on it (you can sort users list by clicking on list's header labels). Go to the detail section. Navigate with Tab and type in new values in any of User Last Name/Company, User First Name, Authorization Code, Surcharge Per Minute, Surcharge Per Call and Multiplier fields.
3. To change or assign department, click on a down arrow next to Department text box and open departments' list. Select appropriate department and click on it.
4. Enter ext. number in the text box located below Add>> button. Click on Add>> or press Enter. Extension has been assigned to the user and is displayed in Extension(s) list box. To remove extension number from the list, select it and click on Remove<< button. Confirmation message appears. Click on Yes.
5. To delete user's record, go to users' list and click on a user to be deleted. 6. Click on Delete button. The confirmation message appears. Click on Yes. The
general instructions screen takes place of the detail screen and user is no longer found in the list section.
7. Click on Save. Note: Pressing Enter saves any changes prior to it.
8. Click on Exit.
It is a good practice to run Reindex Database (Main Menu/Maintenance/Reindex Database) after adding, changing or deleting user records.
Printing users list 1. Click on Print button. List of reports appears. You can print any listed report from
this screen. 2. Select List of Users from the list of reports. 3. Click on Open Report. 4. Click on Options. Select Print and click on it. 5. When report has finished printing, close preview screen by clicking on Options and
then Exit.
Departments Departments screen is used to maintain departments' data. It has two sections. Left section is a list of departments. You can navigate it by clicking on list's items. You can also sort it by clicking on the header labels of the list. When a particular record is

Tapit Users/Departments •••• 25
highlighted the right section displays department's detail information. This screen allows you to change, add, or delete department's data.
Adding new departments 1. Click on the Departments tab. The left section of the screen displays departments'
list. If you entered the departments' screen for the first time or none of the departments is highlighted, the right section of the screen displays instructions, otherwise department detail information screen appears.
2. Click on New button located above the detail section of the screen. 3. Type in department's name. If this is a sub-department check Parent check box.
Click on a down arrow next to Parent department text box and open departments' list. Select appropriate department and click on it.
4. Click on Save. Note: Pressing Enter saves any changes prior to it.
5. Click on Exit. Editing or deleting departments
1. If not active, click on Departments tab. The left section of the screen displays the departments' list. If you entered departments' screen for the first time or none of the departments is highlighted, the right section of the screen displays instructions, otherwise department information screen appears.
2. Click on a department to be edited (you can sort departments list by clicking on list's header labels).
3. Go to the detail section and type in changes to the department's name. 4. You can assign, change or remove a parent department.
To assign a parent department, check Parent check box and click on a down

26 •••• Users/Departments Tapit
arrow next to Parent department text box. Departments' list opens. Select appropriate department and click on it. To change existing parent department, click on a down arrow next to Parent department text box. Departments' list opens. Select appropriate department and click on it. To remove parent department, click on the Parent check box to uncheck it. Click on Save. Note: Unlike proceeding cases, removing parent department is not reflected in the left-hand side departments' list right away. You have to click on the Save button to update the left section of the screen.
5. To delete a department, go to the list section and click on a department to be deleted. Click on Delete button. The confirmation message appears. Click on Yes. General instructions screen takes place of the detail screen and user is no longer found in a list section.
6. Click on Save. Note: Pressing Enter saves any changes prior to it.
7. Click on Exit.
It is a good practice to run Reindex Database (Main Menu/Maintenance/Reindex Database) after adding, changing or deleting user records.
Printing departments list 1. Click on Print button. List of reports appears. You can print any listed report from
this screen. 2. Select List of Departments from the list of reports. 3. Click on Open Report. 4. Click on Options. Select Print and click on it. 5. When report has finished printing, close preview screen by clicking on Options and
then Exit.

Tapit Users/Departments •••• 27
Hierarchy Tree Hierarchy Tree screen displays structure of departments and users.
1. If not active, click on Hierarchy Tree tab. The left section of the screen displays
Hierarchy of Departments Tree. If you entered this screen for the first time or none of the nodes is selected, the right section of the screen displays instructions otherwise detail information screen (corresponding to your selection) appears.
2. Select any node by clicking on it. If the node is a department then department screen appears on your right-hand side. Correspondingly, if the node is a user then user screen appears in the detail section. You add, edit or delete departments or users from here.
3. Click on Save after you're done with any changes. If you are adding, editing or deleting any of the departments or users records from this screen, you must update the Hierarchy Tree when finished. In order to do this, click anywhere on a white space of the screen or press F5, otherwise changes will not be reflected.
Printing Hierarchy Tree 1. Click on Print button. List of reports appears. You can print any listed report from
this screen. 2. Select Department Hierarchy from the list of reports. 3. Click on Open Report. 4. Click on Options. Select Print and click on it. 5. When report has finished printing, close preview screen by clicking on Options and
then Exit.

28 •••• Users/Departments Tapit
It is a good practice to run Reindex Database (Main Menu/Maintenance/Reindex Database) after adding, changing or deleting user records.

Tapit Clients •••• 29
Clients
Managing Clients The Client screen is used to enter, view and edit client’s information. It contains two sections. The left section of the screen displays a list of clients. You can navigate it by clicking on list's items. When a particular client's record is highlighted the right section of the Clients screen displays its detail information. The detail section allows you to add, edit or delete client's data.
Adding new client 1. Click on New button located above the detail section. 2. Enter data into Client Last Name/Company, Client First Name, Account
Code and address fields. Press Tab key to move to the next field. 3. Click on Save.
Note: Pressing Enter saves any changes prior to it. 4. Click on Exit.

30 •••• Clients Tapit
Editing or deleting clients 1. From the clients' list select a client's record to be edited and click on it (you can sort
clients list by clicking on header labels of the list). 2. Go to the detail section of the screen. Navigate with Tab and type in new values in any of
Client Last Name/Company, Client First Name, Account Code, and address fields.
3. Enter new phone number in the text box located below Add>> button. Click on Add>> or press Enter. Phone number has been assigned to a client and is displayed in Phone Number(s) list box. To remove phone number from the list, select it and click on Remove<< button. Confirmation message appears. Click on Yes. You may use partial phone numbers (i.e.) 011 placed in the area code would assigned all international calls to this client or you can define area code and exchange.
4. Click on the field to be edited and type new values. To add a new telephone number, click on the New Phone button and type new telephone number. To delete a telephone number, place a cursor on the telephone number to be erased and click on the Delete Phone button.
5. In order to delete client's record, go to clients' list and click on a client to be deleted. 6. Click on Delete button. The confirmation message appears. Click on Yes. General
instructions screen takes place of the detail screen and user is no longer found in the list section.
7. Click on Save. Note: Pressing Enter saves any changes prior to it.
8. Click on Exit.
It is a good practice to run Reindex Database (Main Menu/Maintenance/Reindex Database) after adding, changing or deleting user records.
Printing Clients List 1. Click on Print button. List of reports appears. You can print any listed report from this
screen. 2. Select appropriate report from the list of reports. 3. Click on Open Report. 4. Click on Options. Select Print and click on it. 5. When report has finished printing, close preview screen by clicking on Options and then
Exit.

Tapit Reports •••• 31
Reports
Generating Reports The Report Selection screen lists available report groups and individual reports names. We recommend you try all of the reports at least once to see the difference among the reports, and then choose the reports you will be running in the future. Note: Other Reports button located at the bottom of the Report Selection screen. Click on it to invoke the Special Reports screen. These additional reports cannot be modified. They can be scheduled using Report Scheduler.
Go back to the Reports Selection screen. Click on the report group buttons to see available reports. For example: All button displays all reports, User button brings up only user related reports and clicking on Custom button displays reports built with a Report Designer ( see Report Designer chapter later in this manual).
Running a report – HOW TO USE FILTER SCREEN Select a report (by clicking on its name) and click on Continue.
Click here to view the additional set of custom reports. Custom CallerID Deluxe report is one of them.

32 •••• Reports Tapit
The filter screen is displayed.
The same screen is used in other parts of TAPIT, please read the following section carefully.
Available options are:
1. Date
You must enter a start and end date for the data to be reported on the report or click on the button next to the word Date and make a selection from the pull down list. When the date selection or entry is made a “+” sign appears next to the Date field. To clear the selection, click on the same button again. A “+” sign disappears.
2. Time Enter start time and end time (leave these fields blank to generate a report without any time restrictions) in military time format “hh:mm”.
3. Call Duration This field is used to specify the duration of call records to be included in the report. For example:

Tapit Reports •••• 33
Enter 00:01:00 in the first field and 00:10:00 in the second field to display calls longer than 1 min. and shorter than 10 min. Enter 00:05:00 in the first field and leave the second field blank to display all calls longer than 5 min. To clear both fields, click on the button next to the word Call Duration.
4. Ring Duration - indicates the length of the ring time before the call is picked up. The report will display all records with a ring time equal to or more than the entered value.
5. On Hold Duration - indicates the length of the time the call stayed on hold. The report will display all records with a hold time equal to or more than the entered value.
6. Call Direction Click on the button next to the word Call Direction and select one or the combination of Incoming, Outgoing and Internal options. When finished the button displays a “+” sign.
7. Call Type Click on the button next to Call Type and select Transfer – TAPIT will report now only on transferred calls.
8. Call Status Click on the button next to Call Status – select one or the combination of the following options: Normal, Continued, Abandoned. Normal – calls that are neither transferred or terminated. Continued – transferred calls. Abandoned – terminated calls.
9. Department To include all departments in the report leave both fields empty. To specify a range of departments, click on the square button to the right of the Department label. The Select List of Department screen appears.
Left-side list contains all available departments.
Right-side list contains selected departments.
34 •••• Reports Tapit
Check one of the option buttons, Include or Exclude, located on the top of the selection screen. Include – the report is run only for the selected departments. Exclude – the selected departments are excluded from the report. To add a department Click on the item in the left-side list to highlight it. Transfer the selection to the right-side list by clicking on the right arrow. To remove a department Click on the item in the right-side list to highlight it. Transfer the selection to the left-side list by clicking on the left arrow. If you want to start over click on the Clear button. When finished click on OK to accept the selection and go back to the filter screen. To cancel the selection and go back to the filter screen click on the Cancel button. At the filter screen note a “+” sign next to the Department label and a dotted line between the department fields. This indicates the range of departments that has been selected.
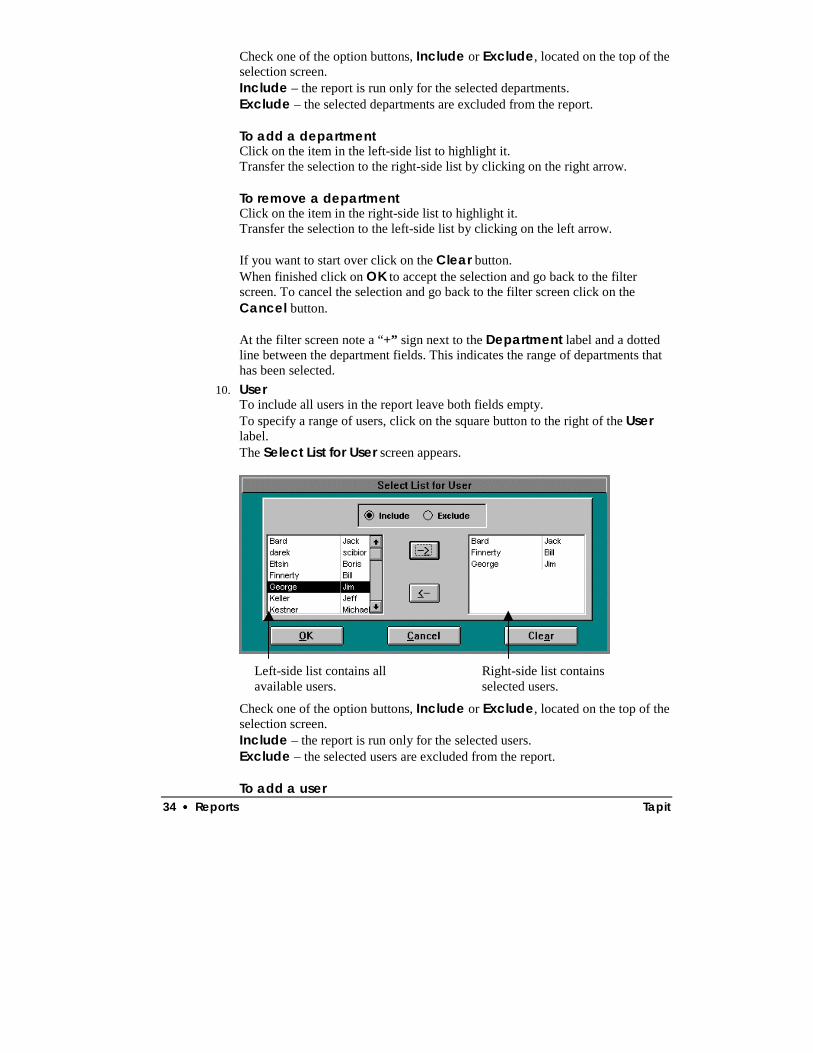
10. User To include all users in the report leave both fields empty. To specify a range of users, click on the square button to the right of the User label. The Select List for User screen appears.
Check one of the option buttons, Include or Exclude, located on the top of the selection screen. Include – the report is run only for the selected users. Exclude – the selected users are excluded from the report. To add a user
Left-side list contains all available users.
Right-side list contains selected users.
Tapit Reports •••• 35
Click on the item in the left-side list to highlight it. Transfer the selection to the right-side list by clicking on the right arrow. To remove a user Click on the item in the right-side list to highlight it. Transfer the selection to the left-side list by clicking on the left arrow. If you want to start over click on the Clear button. When finished click on OK to accept the selection and go back to the filter screen. To cancel the selection and go back to the filter screen click on the Cancel button. At the filter screen note a “+” sign next to the User label and a dotted line between the user fields. This indicates the range of users that has been selected.
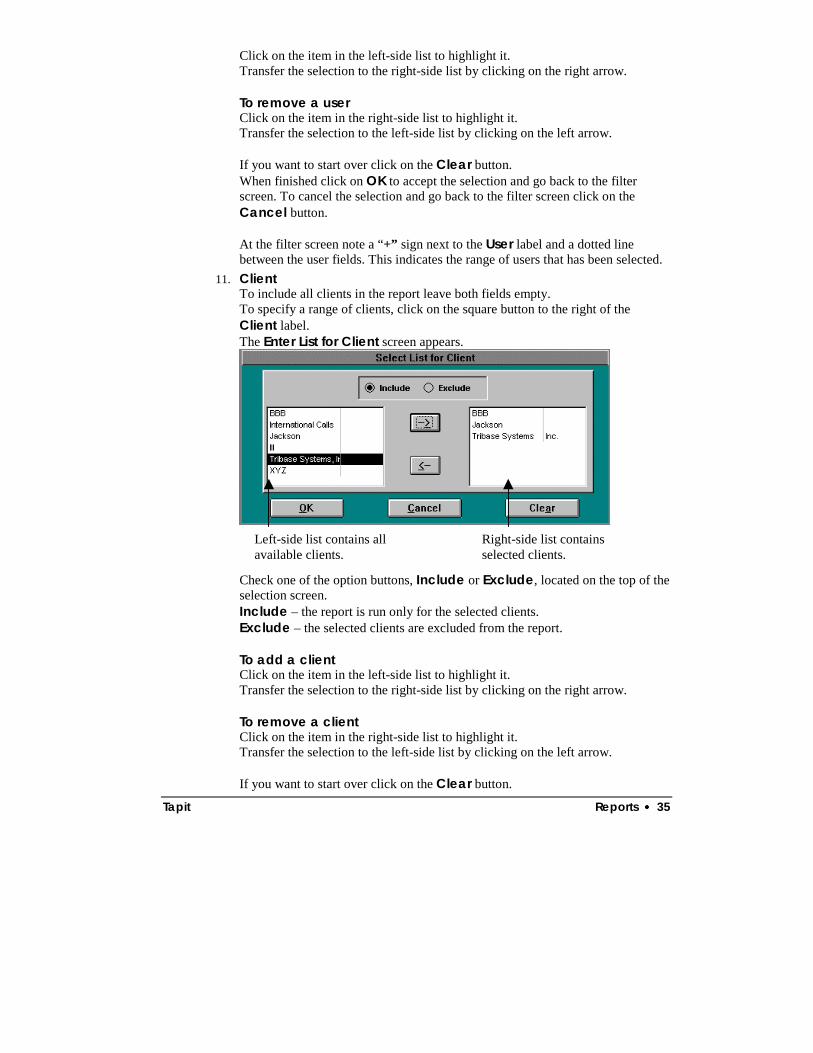
11. Client To include all clients in the report leave both fields empty. To specify a range of clients, click on the square button to the right of the Client label. The Enter List for Client screen appears.
Check one of the option buttons, Include or Exclude, located on the top of the selection screen. Include – the report is run only for the selected clients. Exclude – the selected clients are excluded from the report. To add a client Click on the item in the left-side list to highlight it. Transfer the selection to the right-side list by clicking on the right arrow. To remove a client Click on the item in the right-side list to highlight it. Transfer the selection to the left-side list by clicking on the left arrow. If you want to start over click on the Clear button.
Left-side list contains all available clients.
Right-side list contains selected clients.

36 •••• Reports Tapit
When finished click on OK to accept the selection and go back to the filter screen. To cancel the selection and go back to the filter screen click on the Cancel button. At the filter screen note a “+” sign next to the Client label and a dotted line between the client fields. This indicates the range of clients that has been selected.
12. Extension – source extension. To include all extensions in the report leave both fields empty. Otherwise, enter a range of extensions or click on the square button to the right of the Extension label. The Enter List for Extension screen appears.
Check one of the option buttons, Include or Exclude, located on the top of the selection screen. Include – the report is run only for the selected extensions. Exclude – the selected extensions are excluded from the report. To add an extension Enter the extension in a text box on the left side of the screen. Transfer the entry to the right-side list by clicking on the right arrow. To remove an extension Click on the item in the right-side list to highlight it. Remove it from the list by clicking on the left arrow. If you want to start over click on the Clear button. When finished click on OK to accept the selection and go back to the filter screen. To cancel the selection and go back to the filter screen click on the Cancel button. At the filter screen note a “+” sign next to the Extension label and a dotted line
Enter the extension you want to add to the right-side list.
Right-side list contains selected extensions.

Tapit Reports •••• 37
between the extension fields. This indicates the range of extensions that has been selected.
13. 2nd Extension - destination extension. To include all destination extensions in the report leave both fields empty. Otherwise, enter a range of extensions or click on the square button to the right of the 2nd Extension label. The Enter List for 2nd Extension screen appears. This screen works exactly the way Enter List for Extension screen does. Refer to pt.12 for instructions.
14. Trunk To include all trunks in the report leave both fields empty. Otherwise, enter a range of trunks or click on the square button to the right of the Trunk label. The Enter List for Trunk screen appears.
Check one of the option buttons, Include or Exclude, located on the top of the selection screen. Include – the report is run only for the selected trunks. Exclude – the selected trunks are excluded from the report. To add an trunk Enter the trunk in a text box on the left side of the screen. Transfer the entry to the right-side list by clicking on the right arrow. To remove an trunk Click on the item in the right-side list to highlight it. Remove it from the list by clicking on the left arrow. If you want to start over click on the Clear button. When finished click on OK to accept the selection and go back to the filter screen. To cancel the selection and go back to the filter screen click on the
Enter the trunk you want to add to the right-side list.
Right-side list contains selected trunks.
38 •••• Reports Tapit
Cancel button. At the filter screen note a “+” sign next to the Trunk label and a dotted line between the trunk fields. This indicates the range of trunks that has been selected.
15. 2nd Trunk - destination trunk. To include all destination trunks in the report leave both fields empty. Otherwise, enter a range of trunks or click on the square button to the right of the 2nd Trunk label. The Enter List for 2nd Trunk screen appears. This screen works exactly the way Enter List for Trunk screen does. Refer to pt.14 for instructions.
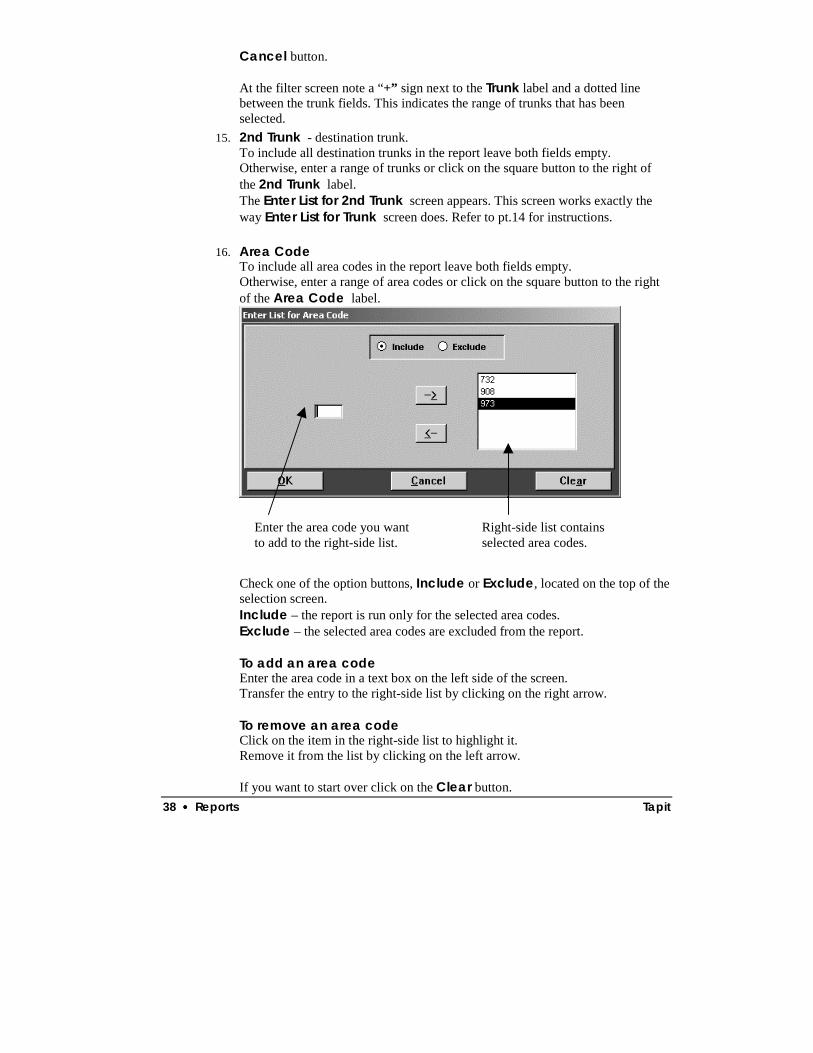
16. Area Code To include all area codes in the report leave both fields empty. Otherwise, enter a range of area codes or click on the square button to the right of the Area Code label.
Check one of the option buttons, Include or Exclude, located on the top of the selection screen. Include – the report is run only for the selected area codes. Exclude – the selected area codes are excluded from the report. To add an area code Enter the area code in a text box on the left side of the screen. Transfer the entry to the right-side list by clicking on the right arrow. To remove an area code Click on the item in the right-side list to highlight it. Remove it from the list by clicking on the left arrow. If you want to start over click on the Clear button.
Enter the area code you want to add to the right-side list.
Right-side list contains selected area codes.

Tapit Reports •••• 39
When finished click on OK to accept the selection and go back to the filter screen. To cancel the selection and go back to the filter screen click on the Cancel button. At the filter screen note a “+” sign next to the Area code label and a dotted line between the area code fields. This indicates the range of area codes that has been selected.
17. State To include all states on the report leave both fields empty. To include or exclude states, click on the button next to the word State. The Enter List for State screen appears.
Check one of the option buttons, Include or Exclude, located on the top of the selection screen. Include – the report is run only for the selected states. Exclude – the selected states are excluded from the report. To add a state Click on the item in the left-side list to highlight it. Transfer the selection to the right-side list by clicking on the right arrow. To remove a state Click on the item in the right-side list to highlight it. Transfer the selection to the left-side list by clicking on the left arrow. If you want to start over click on the Clear button. When finished click on OK to accept the selection and go back to the filter screen. To cancel the selection and go back to the filter screen click on the Cancel button.
Left-side list contains all available states.
Right-side list contains selected states.

40 •••• Reports Tapit
At the filter screen note a “+” sign next to the State label and a dotted line between the state fields. This indicates the range of states that has been selected.
18. Phone Number To include all phone numbers in the report leave both fields empty. Otherwise, enter a range of phone numbers or click on the square button to the right of the Phone label (note: this field can accept partial numbers i.e. enter 800 in the area code to run report only for 800 numbers). The Enter List for Phone Number screen appears.
Check one of the option buttons, Include or Exclude, located on the top of the selection screen. Include – the report is run only for the selected phone numbers. Exclude – the selected phone numbers are excluded from the report. To add a phone number Enter the phone number in a text box on the left side of the screen. Transfer the entry to the right-side list by clicking on the right arrow. To generate global search for a particular exchange or a number, use a space bar to move forward through the phone number field. I.e. if you are looking for the phone numbers with an exchange of 512, type the following in the phone number field: <space><space><space><space>512. When finished click on the right arrow button on the screen and the number will be automatically transferred to the right-side list. This number should read ????512 in order to be processed correctly (“?” in place of each space). To remove a phone number Click on the item in the right-side list to highlight it. Remove it from the list by clicking on the left arrow.
Enter the phone number you want to add to the right-side list.
Right-side list contains selected phone numbers.

Tapit Reports •••• 41
If you want to start over click on the Clear button. When finished click on OK to accept the selection and go back to the filter screen. To cancel the selection and go back to the filter screen click on the Cancel button. At the filter screen note a “+” sign next to the Phone label and a dotted line between the phone number fields. This indicates the range of phone numbers that has been selected.
19. DNIS Number To include all DNIS numbers in the report leave both fields empty. Otherwise, enter a range of DNIS numbers or click on the square button to the right of the DNIS Number label.
Check one of the option buttons, Include or Exclude, located on the top of the selection screen. Include – the report is run only for the selected DNIS numbers. Exclude – the selected DNIS numbers are excluded from the report. To add a DNIS number Enter the DNIS number in a text box on the left side of the screen. Transfer the entry to the right-side list by clicking on the right arrow. To remove a DNIS number Click on the item in the right-side list to highlight it. Remove it from the list by clicking on the left arrow. If you want to start over click on the Clear button. When finished click on OK to accept the selection and go back to the filter screen. To cancel the selection and go back to the filter screen click on the Cancel button. At the filter screen note a “+” sign next to the DNIS number label and a dotted
Enter DNIS number you want to add to the right-side list.
Right-side list contains selected DNIS numbers.

42 •••• Reports Tapit
line between the DNIS number fields. This indicates the range of DNIS numbers that has been selected.
20. Account Code, Matter Code, Author. Code To include all account/matter/author codes on the report leave both fields empty for all options. To select a range click on the square button to the right of Account Code, Matter Code or Author.Code label. Since all three screens work in the same way we will use the “Enter List for Account Code” screen as an example. The Enter List for Account Code screen appears.
Check one of the option buttons, Include or Exclude, located on the top of the selection screen. Include – the report is run only for the selected account codes. Exclude – the selected account codes are excluded from the report. To add an account code Enter the account code in a text box on the left side of the screen. Transfer the entry to the right-side list by clicking on the right arrow. To remove an account code Click on the item in the right-side list to highlight it. Remove it from the list by clicking on the left arrow. If you want to start over click on the Clear button. When finished click on OK to accept the selection and go back to the filter screen. To cancel the selection and go back to the filter screen click on the Cancel button.
Enter the account code you want to add to the right-side list.
Right-side list contains selected account codes.

Tapit Reports •••• 43
At the filter screen note a “+” sign next to the Account code label and a dotted line between the account code fields. This indicates the range of account codes that has been selected.
21. Cost Enter dollar amount values for call records to be included on the report For example: Enter .50 in the first field and 5.00 in the second field to display calls with cost over $.50 and less then $5.00. Enter 1.00 in the first field and leave the second field blank to display all calls with cost over $1.00. To clear both fields click on the button next to the word Cost.
22. IP Addr. Out Enter the source IP address. A wild character “*” at the end of a partial IP address runs a report for all IP addresses containing the entered string.
23. IP Addr In Type in the destination IP address. A wild character “*” at the end of a partial IP address runs a report for all IP addresses containing the entered string.
24. Show Only Local Calls - check the box to display only local calls in the report.
25. Do not Show Local Calls - check the box to exclude all local calls from the report
PLEASE NOTE: LOCAL AREA CODE AND EXCHANGES HAVE TO BE DEFINED IN THE DESTINATION TABLE. REFER TO THIS SECTION LATER IN THIS MANUAL.
There are four command buttons on the right side of the filter screen.
Continue – click on it to run the report. Clear - click on this button to erase all filter criteria. Cancel - click on it to exit filter screen Click on Predefined button to save your selection for the future use (such filters come handy when setting Report Scheduler). Enter the name of the filter in a Save Filter screen and click on OK The Predefined Filters screen replaces the buttons on the right side of the screen.
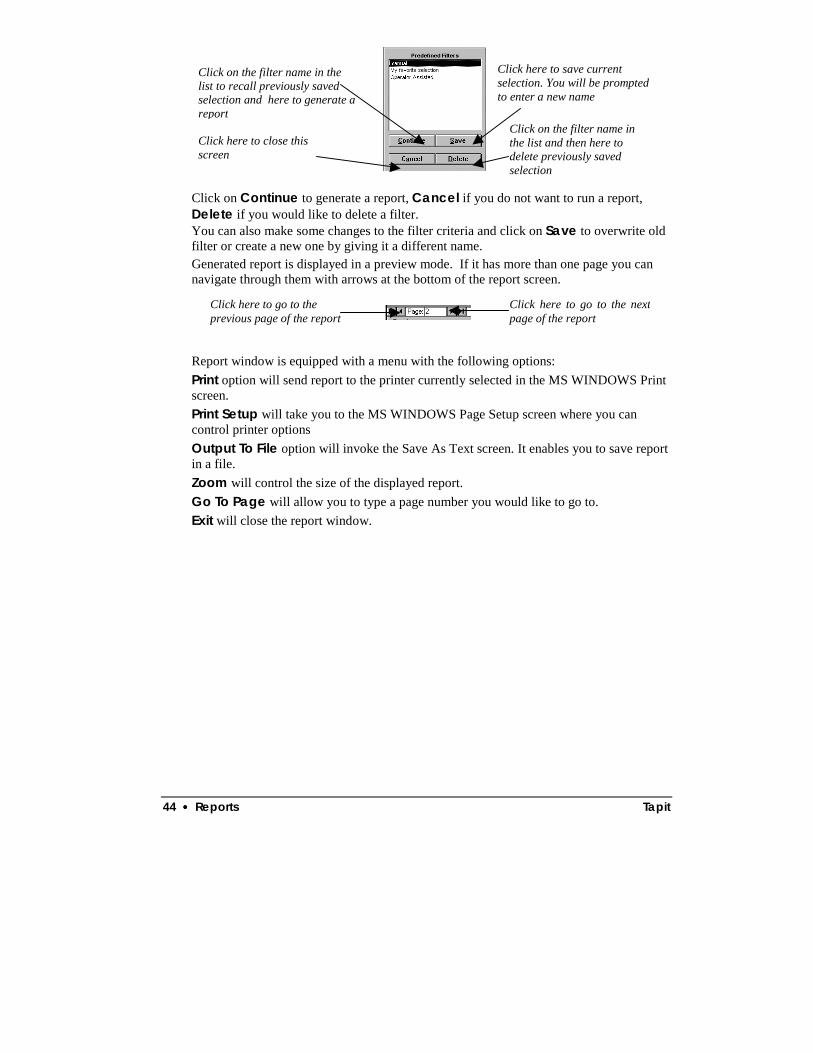
44 •••• Reports Tapit
Click on Continue to generate a report, Cancel if you do not want to run a report, Delete if you would like to delete a filter. You can also make some changes to the filter criteria and click on Save to overwrite old filter or create a new one by giving it a different name. Generated report is displayed in a preview mode. If it has more than one page you can navigate through them with arrows at the bottom of the report screen. Report window is equipped with a menu with the following options: Print option will send report to the printer currently selected in the MS WINDOWS Print screen. Print Setup will take you to the MS WINDOWS Page Setup screen where you can control printer options Output To File option will invoke the Save As Text screen. It enables you to save report in a file. Zoom will control the size of the displayed report. Go To Page will allow you to type a page number you would like to go to. Exit will close the report window.
Click here to save current selection. You will be prompted to enter a new name
Click here to close this screen
Click on the filter name in the list and then here to delete previously saved selection
Click on the filter name in the list to recall previously saved selection and here to generate a report
Click here to go to the previous page of the report
Click here to go to the next page of the report

Tapit Statistics •••• 45
Statistics
Statistics Concepts Statistics function provides a graphical representation for your call records data. To access statistics click on the Statistics icon on the Main Menu
To generate statistical graph For top 10 values
1. Click on Top 10 Values in the report group 2. Select a report category by clicking on its name in the Report Categories section.
3. Select a report type by clicking on its name in the Report Type section.
4. Select a chart type by clicking on its picture located in the Chart Types section.
5. Click on Continue. 6. Enter criteria on the filter screen.
See page 30 on how to use filter screen.
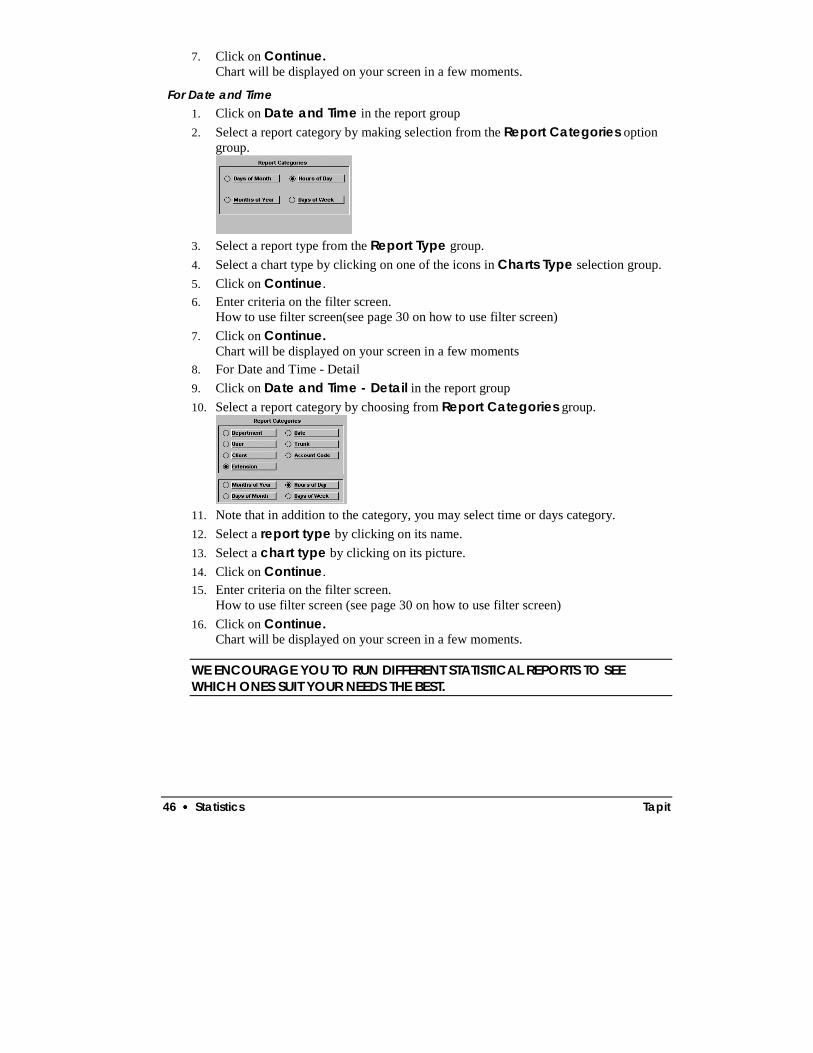
46 •••• Statistics Tapit
7. Click on Continue. Chart will be displayed on your screen in a few moments.
For Date and Time 1. Click on Date and Time in the report group 2. Select a report category by making selection from the Report Categories option
group.
3. Select a report type from the Report Type group. 4. Select a chart type by clicking on one of the icons in Charts Type selection group. 5. Click on Continue. 6. Enter criteria on the filter screen.
How to use filter screen(see page 30 on how to use filter screen) 7. Click on Continue.
Chart will be displayed on your screen in a few moments 8. For Date and Time - Detail 9. Click on Date and Time - Detail in the report group 10. Select a report category by choosing from Report Categories group.
11. Note that in addition to the category, you may select time or days category. 12. Select a report type by clicking on its name. 13. Select a chart type by clicking on its picture. 14. Click on Continue. 15. Enter criteria on the filter screen.
How to use filter screen (see page 30 on how to use filter screen) 16. Click on Continue.
Chart will be displayed on your screen in a few moments.
WE ENCOURAGE YOU TO RUN DIFFERENT STATISTICAL REPORTS TO SEE WHICH ONES SUIT YOUR NEEDS THE BEST.

Tapit System Maintenance •••• 47
System Maintenance
System Maintenance - Overview The System Maintenance allows you to access different options by clicking on icons/buttons.
Click on the Exit button to go back to the Main Menu screen.

48 •••• System Parameters Tapit
System Parameters
System Parameters Screen The System Parameters screen allows you to configure various settings of the TAPIT system. Click on the Maintenance icon on the Main Menu and then click on the System Parameters icon. The System Parameters screen is displayed. It consists of six different screens: Communications, Call Costing, Activity, Trunks, Destination, and Data.
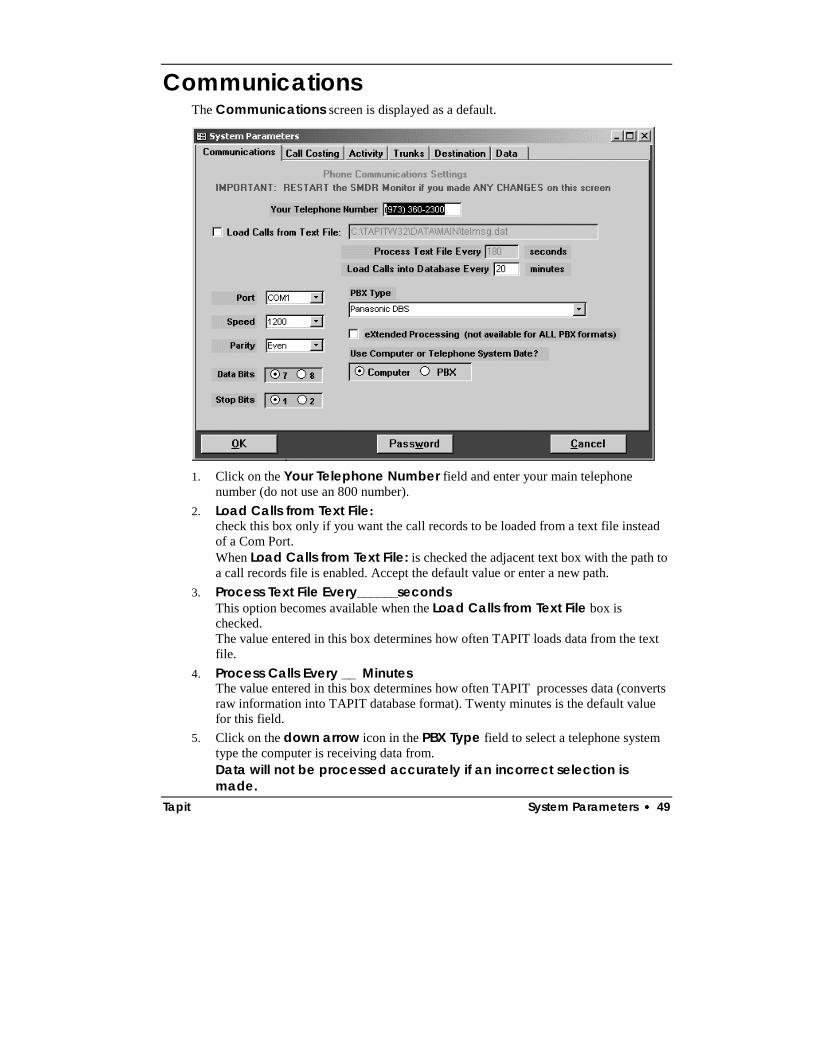
Tapit System Parameters •••• 49
Communications The Communications screen is displayed as a default.
1. Click on the Your Telephone Number field and enter your main telephone
number (do not use an 800 number). 2. Load Calls from Text File:
check this box only if you want the call records to be loaded from a text file instead of a Com Port. When Load Calls from Text File: is checked the adjacent text box with the path to a call records file is enabled. Accept the default value or enter a new path.
3. Process Text File Every______seconds This option becomes available when the Load Calls from Text File box is checked. The value entered in this box determines how often TAPIT loads data from the text file.
4. Process Calls Every __ Minutes The value entered in this box determines how often TAPIT processes data (converts raw information into TAPIT database format). Twenty minutes is the default value for this field.
5. Click on the down arrow icon in the PBX Type field to select a telephone system type the computer is receiving data from. Data will not be processed accurately if an incorrect selection is made.

50 •••• System Parameters Tapit
6. eXtended Processing (not available for ALL PBX formats) Check this box only if you are certain TAPIT supports extended processing format or when suggested by Trisys Technical Support.
7. Click on the PBX or Computer options in the Use Computer or Telephone System Date? field to specify whether date information for the call records is going to be processed based on the computer or PBX date. You must specify Computer date if your phone system is not generating the following date information: day, month and year. Otherwise we recommend using the PBX date.
Note: The Port, Speed, Parity, Data Bits and Stop Bits options are enabled only when the Load Calls From Text File: check box is unchecked.
8. Click on the down arrow icon in the Port field to select a port on the computer the SMDR cable is connected to.
9. Click on the down arrow icon in the Speed field to select a transmission speed the phone system is set at.
10. Click on the down arrow icon in the Parity field to select a parity setting of the phone system.
11. Click on 7 or 8 in the Data Bits fields to select a data bits setting of the phone system.
MS Windows MUST be shut down and restarted when making any changes in the Communications Parameters Screen
8. Click on OK to save changes or Cancel to exit the screen without saving any changes.
9. From the Communications screen the Password function may be accessed. Click on Password button
Enter the system password here
Re-enter the system password here to confirm the correct spelling
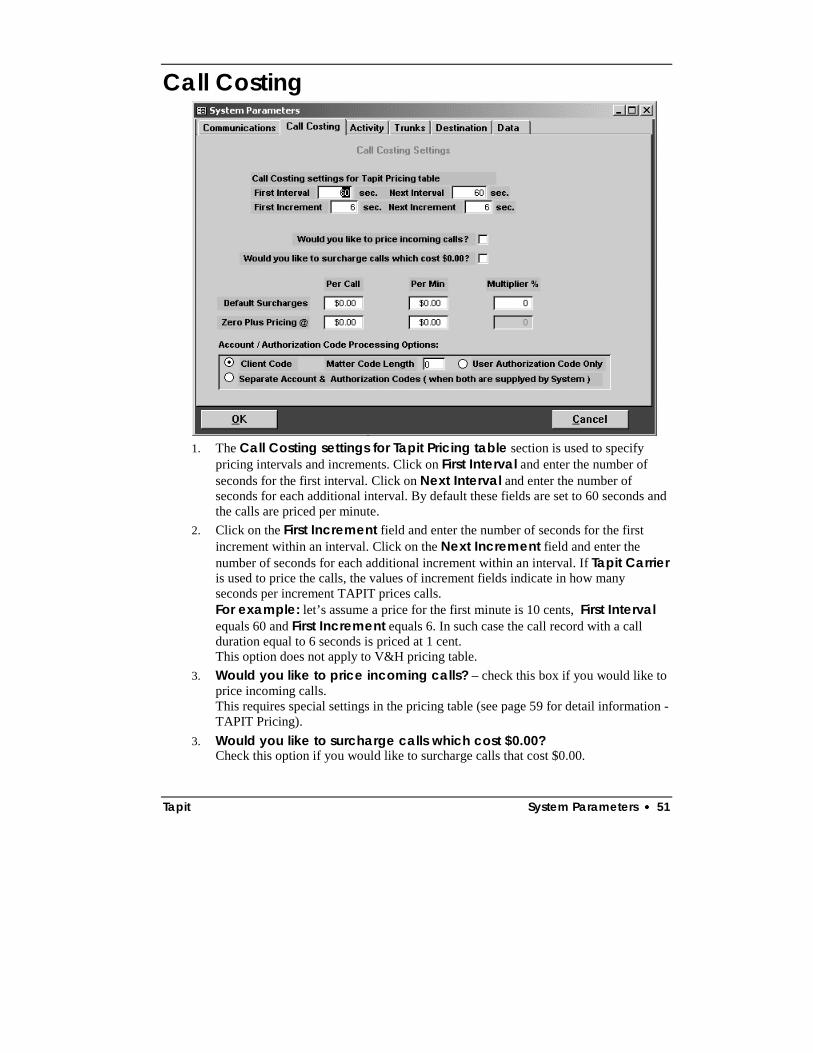
Tapit System Parameters •••• 51
Call Costing
1. The Call Costing settings for Tapit Pricing table section is used to specify
pricing intervals and increments. Click on First Interval and enter the number of seconds for the first interval. Click on Next Interval and enter the number of seconds for each additional interval. By default these fields are set to 60 seconds and the calls are priced per minute.
2. Click on the First Increment field and enter the number of seconds for the first increment within an interval. Click on the Next Increment field and enter the number of seconds for each additional increment within an interval. If Tapit Carrier is used to price the calls, the values of increment fields indicate in how many seconds per increment TAPIT prices calls. For example: let’s assume a price for the first minute is 10 cents, First Interval equals 60 and First Increment equals 6. In such case the call record with a call duration equal to 6 seconds is priced at 1 cent. This option does not apply to V&H pricing table.
3. Would you like to price incoming calls? – check this box if you would like to price incoming calls. This requires special settings in the pricing table (see page 59 for detail information - TAPIT Pricing).
3. Would you like to surcharge calls which cost $0.00? Check this option if you would like to surcharge calls that cost $0.00.

52 •••• System Parameters Tapit
4. Default surcharges - numbers you enter in these fields appear automatically in surcharge and multiplier fields when adding a new user (see User setup). Click on Per Call field and enter dollar amount to apply per call surcharge. Click on Per Minute field and enter dollar amount to apply per minute surcharge. Click on Multiplier and a percentage value to apply as a surcharge.
5. Zero Plus Pricing @ – this field holds prices and surcharges for operator assisted calls.
6. Account/Authorization Code Processing Options: - selection in this option group determines whether account codes generated by the phone system will be associated with user name or client name. Click on Client Code to associate this number with client name (if your system supplies only account code). Click on User Authorization Code to associate this number with user name (if your system supplies only authorization code). If Client Code is selected a Matter Code field becomes available (a sub-account code). Click on the Matter Code Length field to enter the number of digits of used by the matter codes (this number must be shorter than a length of the account code). Click on the Separate Account & Authorization Codes to associate Account Code with the client and Authorization Code with the user (if your system supplies both Account and Authorization Codes).
7. Click on OK to save changes or Cancel to exit the screen without saving any changes.
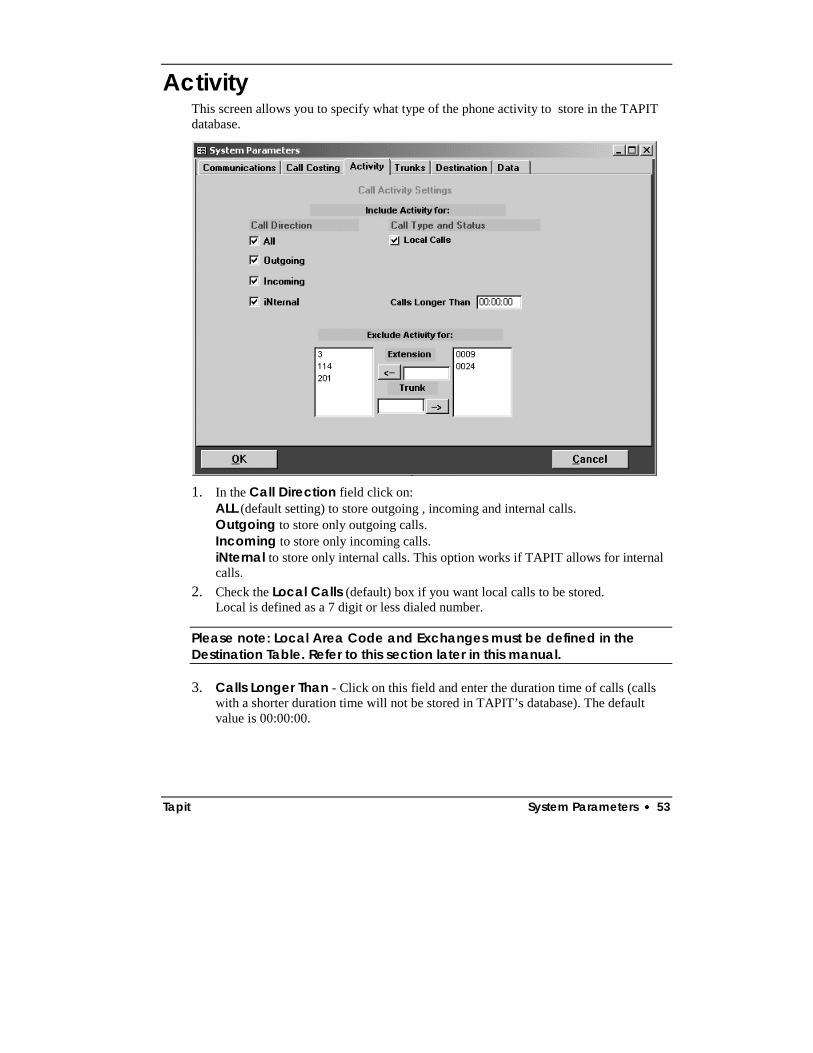
Tapit System Parameters •••• 53
Activity This screen allows you to specify what type of the phone activity to store in the TAPIT database.
1. In the Call Direction field click on:
ALL (default setting) to store outgoing , incoming and internal calls. Outgoing to store only outgoing calls. Incoming to store only incoming calls. iNternal to store only internal calls. This option works if TAPIT allows for internal calls.
2. Check the Local Calls (default) box if you want local calls to be stored. Local is defined as a 7 digit or less dialed number.
Please note: Local Area Code and Exchanges must be defined in the Destination Table. Refer to this section later in this manual.
3. Calls Longer Than - Click on this field and enter the duration time of calls (calls with a shorter duration time will not be stored in TAPIT’s database). The default value is 00:00:00.
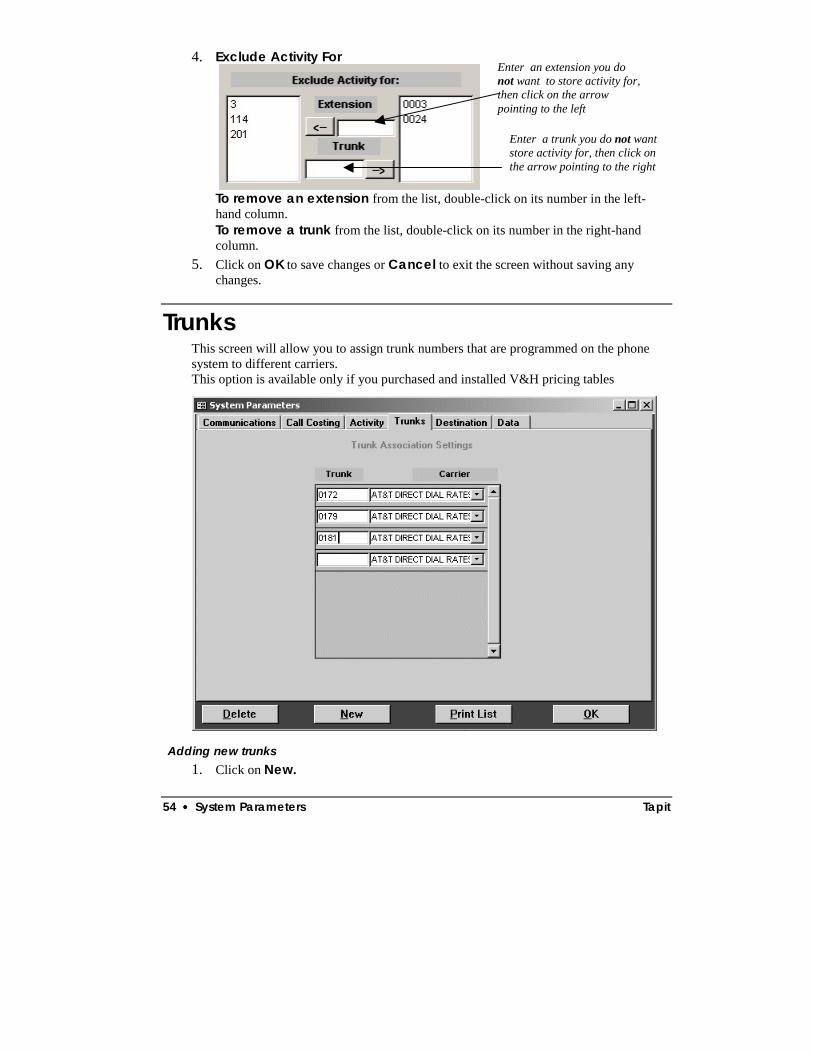
54 •••• System Parameters Tapit
4. Exclude Activity For
To remove an extension from the list, double-click on its number in the left-hand column. To remove a trunk from the list, double-click on its number in the right-hand column.
5. Click on OK to save changes or Cancel to exit the screen without saving any changes.
Trunks This screen will allow you to assign trunk numbers that are programmed on the phone system to different carriers. This option is available only if you purchased and installed V&H pricing tables
Adding new trunks 1. Click on New.
Enter an extension you do not want to store activity for, then click on the arrow pointing to the left
Enter a trunk you do not want store activity for, then click on the arrow pointing to the right
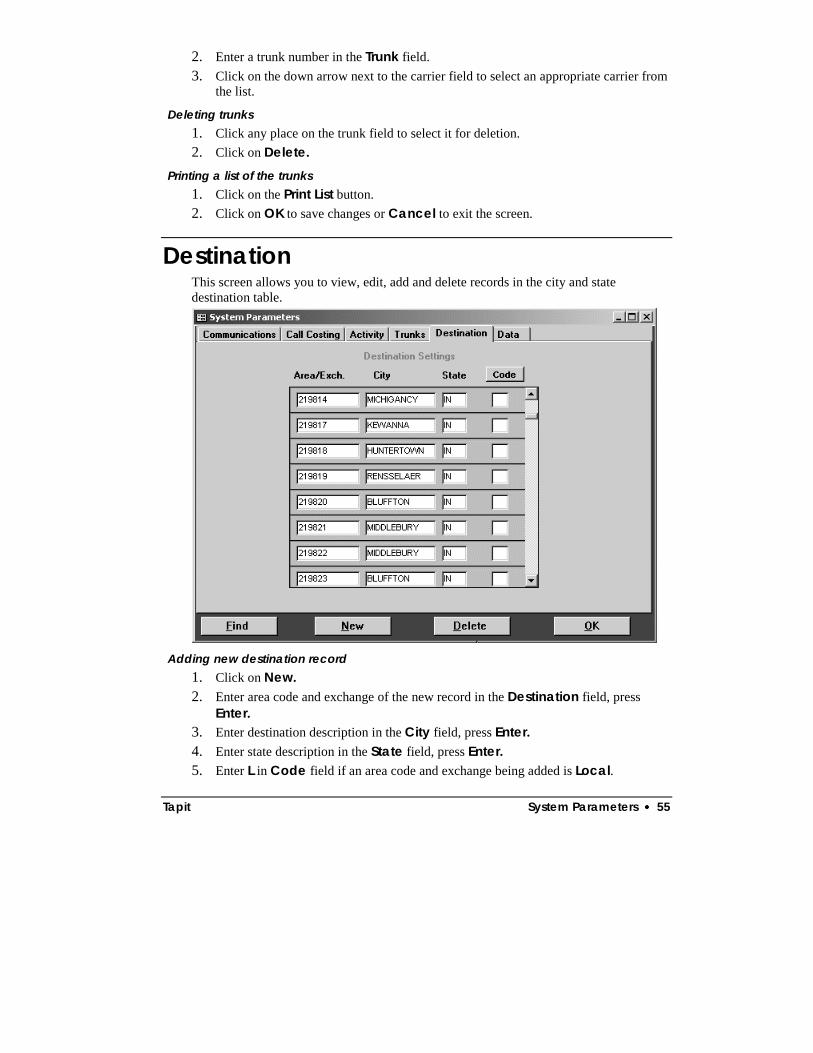
Tapit System Parameters •••• 55
2. Enter a trunk number in the Trunk field. 3. Click on the down arrow next to the carrier field to select an appropriate carrier from
the list.
Deleting trunks 1. Click any place on the trunk field to select it for deletion. 2. Click on Delete.
Printing a list of the trunks 1. Click on the Print List button. 2. Click on OK to save changes or Cancel to exit the screen.
Destination This screen allows you to view, edit, add and delete records in the city and state destination table.
Adding new destination record
1. Click on New. 2. Enter area code and exchange of the new record in the Destination field, press
Enter. 3. Enter destination description in the City field, press Enter. 4. Enter state description in the State field, press Enter. 5. Enter L in Code field if an area code and exchange being added is Local.

56 •••• System Parameters Tapit
It is a good practice to run Reindex Database (Main Menu/Maintenance/Reindex Database) after adding, changing or deleting destination information.
Deleting destination records 1. Place the cursor on the field you want to delete or click on Find button and enter
area code and exchange to be deleted and click on OK. The record you want to delete should be highlighted.
2. Click on Delete button.
It is a good practice to run Reindex Database (Main Menu/Maintenance/Reindex Database) after adding, changing or deleting destination information.
Editing destination records 1. Place the cursor on the field you want to edit and click on the Find button.
Enter the value of the field to be edited and click on OK. For example: place the cursor on any Area/Exch. field and click on Find. Enter the value of the desired area code and/or exchange. Click on OK. The record you want to edit is highlighted.
2. Edit field value.
It is a good practice to run Reindex Database (Main Menu/Maintenance/Reindex Database) after adding, changing or deleting the destination information.
To clear all “L“ codes in the Code field: If you purchased a V&H pricing table, all local exchanges in your area code are marked with an L code. If you do not want to process these calls as local, then click on the Code button. This removes all L settings from the destination table.
Click on OK to save changes and exit the screen.
To remove ALL L codes click here

Tapit System Parameters •••• 57
DATA
Create Backup on exit When this box is checked TAPIT will create a backup copy of the main database every time you exit the software. When exiting TAPIT make sure within the TAPIT application only Main Menu window is open. We recommend you leave this box checked to secure the integrity of the database.
Note: depending on the size of the database this process may take some time.

58 •••• Call Editor Tapit
Call Editor
Working with Call Editor This facility allows you to change existing phone activity records and add new call records that were made outside of your environment. 1. Click on the Maintenance icon on the Main Menu and then click on the Call
Editor icon. 2. A filter screen appears (see page 30 how to use filter screen), enter filter criteria
information and click on Continue. Call Editor screen appears.

Tapit Call Editor •••• 59
Adding new call records
1. Click on the New button - a new blank record appears. 2. Start entering the call record information.
The Dir And Status field can have the following values: O - outgoing calls Depending on the output of your phone system the incoming call entries can be a variation of I, X, C, A where I stands for incoming, X - transferred, C – continued, A-abandoned (i.e. IX, IXC, IA) N - internal calls.
3. Click on Exit (changes are saved automatically).
Editing call records 1. Click on the field where the information is to be edited and using the Delete or the
Backspace keys erase the existing information. Enter the new data. 2. Click on Exit (changes are saved automatically).
Deleting call records 1. Click any place on the record to be deleted and click on the Delete button. 2. Click on Exit (changes are saved automatically).

60 •••• TAPIT Pricing Tapit
TAPIT Pricing
Pricing Call Records The Tapit Pricing Table screen is used to enter pricing information to apply cost to the call records. Click on the Maintenance icon on the Main Menu screen and click on the Tapit Pricing icon. The Tapit Pricing Table screen allows you to enter prices for the first and the next minute/interval for the three different time periods. SCREEN 1

Tapit TAPIT Pricing •••• 61
SCREEN 2
If the same prices apply 24 hours a day, use only the first section of the pricing table leaving the From column at 00:00.
Note: When pricing local calls an exchange must be prefixed by the local area code. I.e. 411 calls must be entered with the local area code – i.e. “973411”.
TINxxxx – entry in the pricing table allows for pricing incoming calls for trunk xxxx. The entry is composed of the prefix TIN and the trunk number (xxxx). In other words the entry TIN00123 would price incoming calls for trunk 00123. Note: this setting does not affect incoming calls that are already priced via Caller ID or DNIS. Incoming trunk pricing has lower priority than Caller ID and DNIS.
In our example:
SCREEN 1:
• 973411 All 411 calls for 973 area code are priced at a flat rate of 33 cents per call.
• DNIS1111 - DNISxxxx Incoming calls with the DNIS number equal to “1111” are priced at one dollar per each minute/interval.

62 •••• TAPIT Pricing Tapit
• NNN555 All 555 information calls are priced at a flat rate of 50 cents per call.
• QQQ The domestic long distance calls are priced 11 cents per first minute/interval and 8 cents per each additional minute/interval.
• IN973360 - INaaaxxx Incoming calls with “973” area code and “360” exchange are priced 8 cents per each minute/interval.
• IN973 - INaaa The remaining incoming calls with “973” area code are priced at 10 cents per each minute/interval.
• INCID Call records with Caller ID are priced at 5 cents for each minute/interval.
• IN All other incoming calls are priced at 4 cents per each minute/interval.
• 01141 – 011xxxxxx International calls with the 41 country code are priced 70 cents per first minute/interval and 65 cents per each additional minute/interval.
• 011 All other international calls are priced at 85 cents per each minute/interval
SCREEN 2:
• IPI234.123.12.* - IPIxxx.xxx.xxx.* All calls incoming to IP Addresses containing “234.123.12.” are priced 80 cents per the first minute/interval and 40 cents per each additional minute/interval.
• IPO123.234.12.34 - IPOxxx.xxx.xxx.xxx All calls outgoing to “123.234.12.34” IP Address are priced 50 per each minute/interval.
• IPO234.123.12.* - IPOxxx.xxx.xxx.* All calls outgoing to IP Addresses containing “234.123.12.” are priced 80 cents per the first minute/interval and 40 cents per each additional minute/interval.
• L All local calls are priced 10 cents per first minute/interval and 5 cents per each additional minute/interval.
• TLC001- TLCxxxx Local calls originating from trunk “001” are priced the rate of 10 cents per each minute/interval.
• TLD001 – TLDxxxx Long distance calls originating from trunk “001” are priced the rate of 10 cents per each minute/interval.
• 201593 -aaaxxx Calls made to the area code “201” and the exchange “593” are priced at 25 cents for the first minute/interval and 20 cents for each additional minute/interval between 8:00 AM and 11:00 AM. Between 11:00 AM and 23:00 calls are priced at 20 cents for the first minute/interval and 15 cents for each additional minute/interval.

Tapit TAPIT Pricing •••• 63
After 23:00 until 8:00 AM the rate is 11 cents for the first minute/interval and 8 cents for each additional minute/interval.
• 201 - aaa all other calls made to the area code “201” are priced at 30 cents for the first minute/interval and 25 cents for each additional minute/interval between 8:00 AM and 11:00 AM. Between 11:00 AM and 23:00 calls are priced at 25 cents for the first minute/interval and 23 cents for each additional minute/interval. After 23:00 until 8:00 AM the rate is 15 cents for the first minute/interval and 10 cents for each additional minute/interval.
• 800 - all 800 calls would be free of charge. • NNN - all other calls would be priced at 55 cents per each minute/interval.
To activate incoming pricing: - set the Would you like to price incoming calls? option on the Call Costing screen (see page 50 for detailed instructions).
Adding new pricing record 1. Click on the New button - cursor is inserted in a blank record line. 2. Enter the phone number code in the Number Dialed field (follow the guidelines
from “The Number Dialed entries” section below). 3. Enter a start time for the first time period in the first Start Time field. If your time
period is 24 hours long, leave this field at 00:00 value. 4. Enter the rate for the first minute/interval in the First field under the Rate Per
Minute/Interval section. If the Next field is left empty then this rate is applied flatly to all the calls for the specified phone number code. This means regardless of call duration or the System Parameters/Communications price increment setting all call records for the specified phone number code are going to be priced at the rate of the first minute/interval.
5. If you want to price additional minutes/intervals enter the desired rate in the Next field under the Rate Per Minute/Interval section. Each additional minute/interval will be priced according to this setting.
6. If the time and rate settings are different for the remaining time periods fill in appropriate values, otherwise, leave them blank and TAPIT will assume that call records are priced at the same rate all day.
7. Click on the New button to create another record or Exit to leave the screen. Changes are saved automatically.
Deleting pricing records 1. Click anywhere on the record to be deleted and click on Delete button. 2. Click on Exit to leave the screen. Changes are saved automatically.
Finding specific record in the Number Dialed field 1. Click anywhere on the Number Dialed field. 2. Click on the Find button.

64 •••• TAPIT Pricing Tapit
3. Enter the value to look for in the Look for text box. You can also select from the list of previous searches by clicking on a down arrow.
4. Click on OK.

Tapit Reindex Database •••• 65
Reindex Database
Reindexing This facility will allow you to reassign pointers in TAPIT’s Databases.
It is strongly recommended that you run this program after making any changes in User, Client, Department, Pricing or Destination Databases.
1. Click on the Maintenance icon on the Main Menu and then click on the Reindex Database icon. After clicking Reindex Database icon filter screen appears(see page 30 on how to use filter screen). Enter filter criteria information and click on continue.
2. While your Database is being Reindexed it is very important that you do not reboot or shut down your computer. The reindex process can sometimes take 20 to 30 minutes depending on your computer resources as well as the size of your database. If you interrupt this process your entire database will be corrupted.
3. When the reindexing is finished status screen appears with the appropriate message. 4. Click on OK, TAPIT’s database has been reindexed.
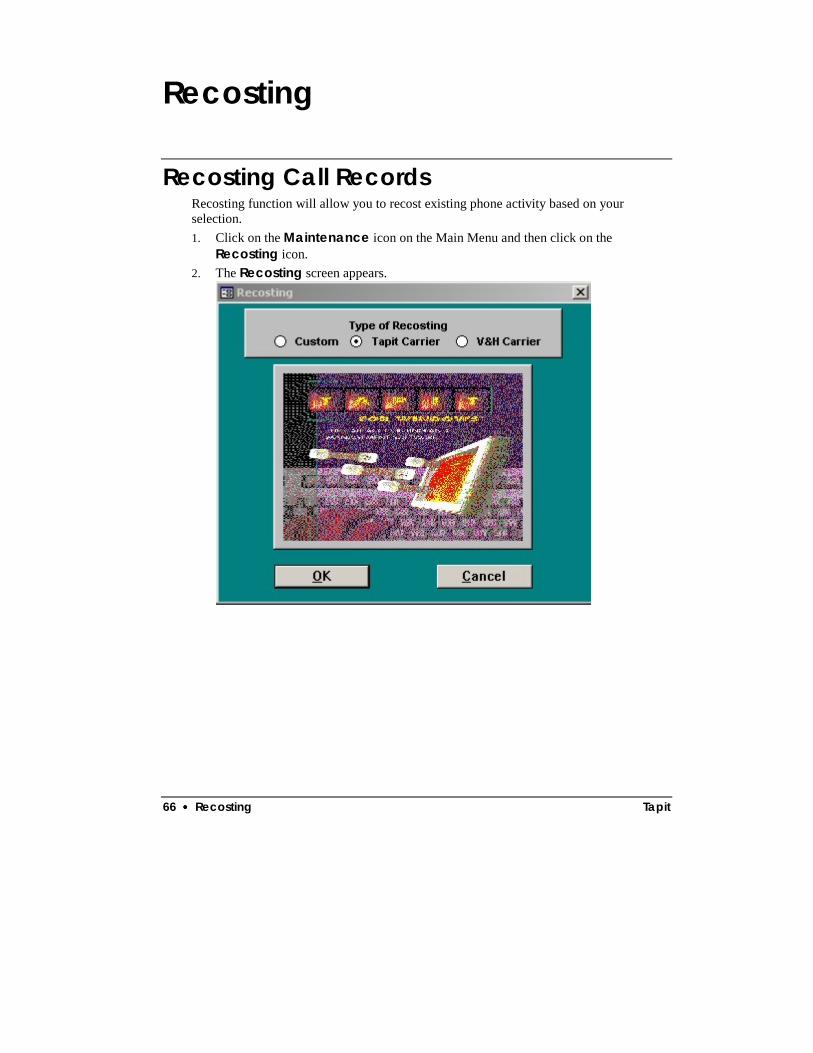
66 •••• Recosting Tapit
Recosting
Recosting Call Records Recosting function will allow you to recost existing phone activity based on your selection. 1. Click on the Maintenance icon on the Main Menu and then click on the
Recosting icon. 2. The Recosting screen appears.

Tapit Recosting •••• 67
Using Custom option 1. Click on Custom selector in Type of Recosting.
2. Click on either Decrement or Increment. 3. Click on Per Call or Per Minute. 4. Click on Percentage and enter percentage value in the Value field or click on
Dollar value and enter dollar amount in the Value field. 5. Click on OK. 6. Filter screen appears(see page 30 on how to use filter screen).Enter filter criteria and
click on Continue. TAPIT will start recosting calls.

68 •••• Recosting Tapit
Using Tapit Carrier option 1. Click on Tapit Carrier option in Type of Recosting. 2. Click on OK.
The Type of Recost screen appears.
3. Check one of the option buttons according to the instructions on the screen. 4. Click on Continue. 5. Filter screen appears (see page 30 on how to use filter screen).Enter filter criteria and
click on Continue. TAPIT will start recosting calls.
Using V&H Carrier option 1. This option is available only if you have purchased TAPIT’s V&H Pricing table. 2. Click on the V&H Carrier option in Type of Recosting. 3. A list of available carriers appears on the screen. Click on the carrier you want to use
for recosting and click on OK. Filter screen appears (see page 30 on how to use filter screen).Enter filter criteria and click on Continue. TAPIT will start recosting calls.
While your Data Base is being recosted it is very important that you do not reboot or shut down your computer. The recosting process can sometimes take 20 to 30 minutes depending on your computer resources as well as the size of your data base. If you interrupt this process your entire database will be corrupted.!!!

Tapit Dialing Patterns •••• 69
Dialing Patterns
Working with Dialing Patterns Dialing Patterns function will allow you to separate the actual telephone number from complex dialing digit sequences. Click on the Maintenance icon on the Main Menu and then click on the Dialing Patterns icon.
To define a dialing pattern you may use the following characters: T - represents one digit of the telephone number (0-9) 0-9, #, * - indicates a one to one correspondence between the appropriate character and the dialing string N - represents any one character of the dialing string that is not a part of the dialed number X - ignores all characters from this point on, can be used only once and after the longest dialing pattern C - indicates an authorization or account code that directly proceeds or follows the telephone number dialed on the SMDR string. When defining dialing patterns, please remember that it is important what digits are generated by your telephone system. Sometimes they do not match what you have dialed, i.e. dialing 1-202-593-8200 may generate 494-1-202-593-8200. Correct pattern would be NNNTTTTTTTTTTT. The following examples may already contain patterns that you can use. If not, they should at least help you to create correct patterns for your environment:
DIALED COMBINATION PATTERN
1-201-593-8200 TTTTTTTTTTT
Cost Indicator Enter/Edit Patterns in this field

70 •••• Dialing Patterns Tapit
593-8200 TTTTTTT
9-593-8200-123 9TTTTTTTNNN
1-593-8200 1TTTTTTT
10288-1-201-593-8200 10NNNTTTTTTTTTTT
1800-593-82004333#1123 TTTTTTTTTTTX
4994-1201-593-8200 4994TTTTTTTTTTT
1234-1201-593-8200 CCCCTTTTTTTTTTT
1202-593-82001234 TTTTTTTTTTCCCC
*In last two examples 1234 is an account code. This pattern can be used only if account or authorization code is generated with EVERY telephone number.
Adding new dialing pattern 1. Click on New button. 2. Type in a new dialing pattern. 3. Click on Cost Indicator to associated cost with applicable pattern. 4. Click on New button if you want to create a new dialing pattern or
on OK button to save changes and exit. Clicking on Cancel button will exit the screen without saving the changes.
Deleting dialing patterns 1. Click on existing dialing pattern on the list. 2. Click on Delete button. 3. Click on OK button to save changes and exit.
Editing dialing patterns 1. Click on existing dialing pattern on the list. 2. Add new characters or overwrite existing ones in the Dialing Pattern field. 3. Click on OK button to save changes and exit.
It is strongly recommended that you exit out of the TAPIT program as well as the SMDR Monitor and reboot the computer for the dialing pattern changes to take effect. The changes will effect only the calls processed after PC has been rebooted.
*
*

Tapit Report Scheduler •••• 71
Report Scheduler
Using Report Scheduler Report Scheduler screen will allow you to generate selected reports automatically.
TAPIT software must be running in order for Report Scheduler to generate a report.
Click on the Maintenance icon on the Main Menu and then click on the Report Scheduler icon.
Adding a new report 1. Click on the New button.
The Report Selection screen is displayed. 2. Select the report name you want to add. 3. Click on Continue.
The filter screen is displayed. It is the same screen used to filter data in Reports module of TAPIT. To apply filter criteria to reports generated by Report Scheduler you must save a filter as Predefined or use an existing Predefined filter (see page 30 on using a filter screen). Click on Continue. Report Selection screen will close. The name of the selected report and filter (if
72 •••• Report Scheduler Tapit
used) will appear on the Report Scheduler screen in Scheduled Report and Applied Filter fields.
4. Enter the time for the report to be generated in Time text box. 5. Select one of the options from the Output to listbox.
Print - the report will be sent to a printer File - the report will be saved as a file. Click on the Settings button located next to the Output to list. Accept the default file name and path or enter a new one. Select an appropriate file format from the File format list box. Click on OK to save changes or Cancel to leave the screen without saving. Email - the report will be sent to the provided email address. Click on the Settings button located next to the Output to list. Choose a name for the To and CC fields. Go to File format and choose from Rich Text, HTML and Text formats. Enter the title of your email message in a Subject field and a short description in the Description field. Click on OK to save changes or Cancel to leave the screen without saving.
6. Confirm both Scheduled Report and Applied Filter fields have the correct values entered.
7. Click on Frequency button and select a frequency (how often) the report will be generated with. Daily - a report is generated every day at the specified time. Weekly - a report is generated once a week at the specified time and day of the week. Monthly - a report is generated once a month at the specified time and day of the month.
8. Click on Exit to leave the screen and save changes.
Editing report records 1. To edit Time and File Name fields click on them and enter new values. 2. If you want to change the report name or the filter name click on the Report button
and make your selection. 3. Click on Frequency button to change the setting for how frequently the report is
going to be generated. 4. Check Print check box (if required) or leave it unchecked if you want to print to a
file. 5. Click on Exit to leave the screen and save the changes.
Deleting report records 1. Click on Time or File Name field on the report record you want to delete. 2. Click on the Delete button to delete a report record. 3. Click on Exit to leave the screen and save the changes.

Tapit Data Maintenance •••• 73
Data Maintenance
Data Maintenance Concepts Data Maintenance screen will allow you to maintain TAPIT’s data export and import functions. Click on the Maintenance icon on the Main Menu and then click on the Data Maintenance icon.
1. An Export/Import/Billing Data screen will be displayed. It consists of six
different sections: Export, Import, Call Records Maintenance, Export to Billing Software, Import Tapit DOS Data, Import V&H Data
2. Export screen is displayed first as a default

74 •••• Data Maintenance Tapit
Export 1. Export facility will allow you to export selected data for different categories to a
file. Exported data can be used as a back-up or it can be imported by TAPIT installed at another location.
2. Select data category to be exported in the Export Categories box (select All if you
wish to export all categories). 3. Click on Directory field and enter a destination path (do not enter anything if you
wish to accept default destination). 4. Check the Delete Existing Data from Database box if you wish to remove data
while exporting. Please be careful and make sure that you do not export already empty files , because they will overwrite already exported data (for example exporting twice in a row with Delete option on).
5. Click on Continue button. 6. TAPIT will create a number of files (depending on categories selected) in the
destination directory with TXT extensions.

Tapit Data Maintenance •••• 75
Import Import feature allows you to import TAPIT’s data after it was exported as describe in Export section
Select a category to be imported in the Import Categories box (select All if you wish to import all categories) 1. Click on Directory field and enter a source path (do not enter anything if data
resides in C:\TAPITW32 directory) 2. Click on Continue button 3. TAPIT will start importing data. If appropriate files are not found in the specified
directory TAPIT will notify you with a message. Those files will not be imported. The files were not found most likely because they were not exported from TAPIT or were exported to a different directory. When finished TAPIT will display “Data Import Completed” message.

76 •••• Data Maintenance Tapit
Call Records Maintenance Call Records Maintenance facility allows to export, purge, archive and import call records.
1. Select Type of Calls Maintenance
Available options are: 2. Purge Call Records - selected call records (a filter screen will be displayed in the
next step) will be deleted permanently from TAPIT database. 3. Export and Remove Call Records - selected call records will be copied to the
specified directory and deleted from TAPIT database. A file name for exported records must be entered in the File Name box (i.e. 0896.txt for exported records for August 1996). We recommend a .txt extension for this file.
Please keep track of all file names that are used when exporting since you will need to know them when importing records.
4. Export and Keep Call Records - selected call records will be copied to the specified directory. They will not be deleted from TAPIT database. A file name for exported records must be entered in the File Name box (i.e. 0896.txt for exported records for August 1996). This option can be used if you would like to have a copy of the call records on a different location where TAPIT is installed. Note that when this option is used importing data from the newly created export file will create duplicate call records.
Please keep track of all file names that are used when exporting since you will need to know them when importing records.
5. Import Call Records - choose this option to import call records that have been exported using either Export or Remove Call Records or Export and Keep Call Records utility. Type in the directory name in the Directory box where file
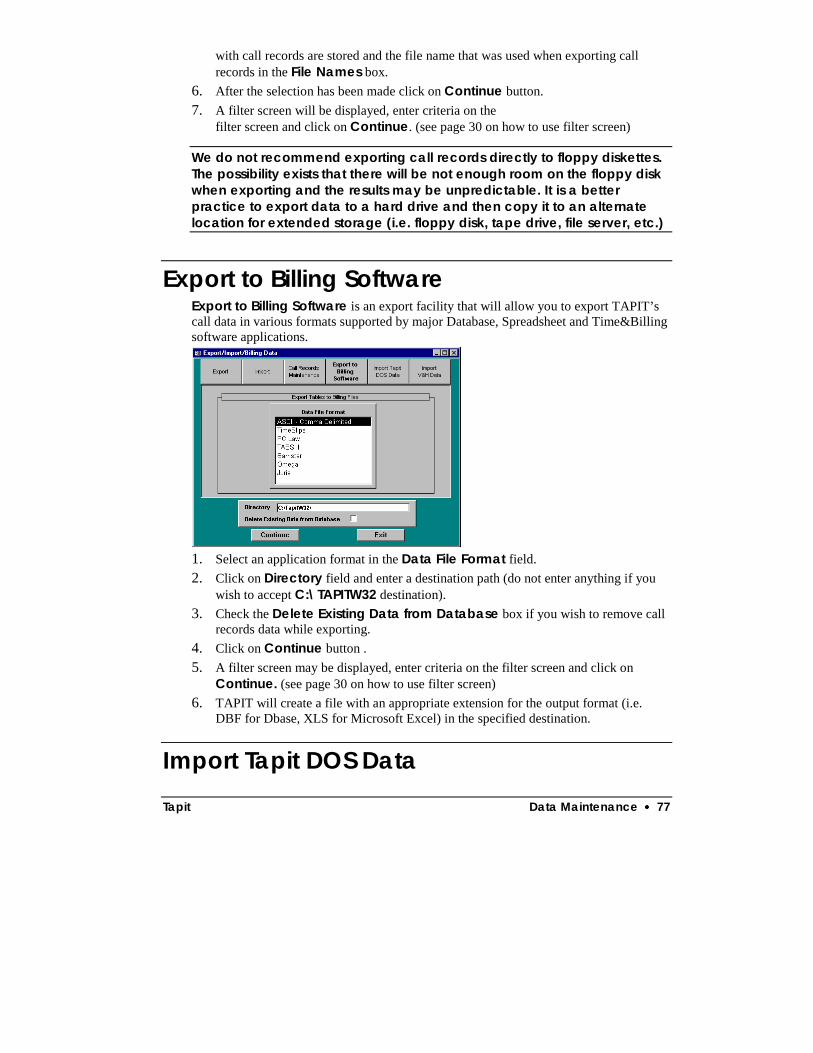
Tapit Data Maintenance •••• 77
with call records are stored and the file name that was used when exporting call records in the File Names box.
6. After the selection has been made click on Continue button. 7. A filter screen will be displayed, enter criteria on the
filter screen and click on Continue. (see page 30 on how to use filter screen)
We do not recommend exporting call records directly to floppy diskettes. The possibility exists that there will be not enough room on the floppy disk when exporting and the results may be unpredictable. It is a better practice to export data to a hard drive and then copy it to an alternate location for extended storage (i.e. floppy disk, tape drive, file server, etc.)
Export to Billing Software Export to Billing Software is an export facility that will allow you to export TAPIT’s call data in various formats supported by major Database, Spreadsheet and Time&Billing software applications.
1. Select an application format in the Data File Format field. 2. Click on Directory field and enter a destination path (do not enter anything if you
wish to accept C:\TAPITW32 destination). 3. Check the Delete Existing Data from Database box if you wish to remove call
records data while exporting. 4. Click on Continue button . 5. A filter screen may be displayed, enter criteria on the filter screen and click on
Continue. (see page 30 on how to use filter screen) 6. TAPIT will create a file with an appropriate extension for the output format (i.e.
DBF for Dbase, XLS for Microsoft Excel) in the specified destination.
Import Tapit DOS Data

78 •••• Data Maintenance Tapit
Use Import Tapit DOS Data function when upgrading to current TAPIT version. Please follow instructions from Upgrading TAPIT for DOS to TAPIT EX on page 18.
Import V&H Data Use Import V&H Data function to import V&H pricing file 1. Click on Import V&H Data. 2. Make sure that the area code and exchange of a telephone number entered in
System Parameters screen matches area code and exchange imprinted on the V&H diskette.
3. Click on Continue. Enter the name of a drive containing V&H disk if it is different from default option and click on OK.
4. Loading will take some time to complete. When finished program will display a following message: “ V&H Data Load Completed” Click on OK.

Tapit Report Designer •••• 79
Report Designer
Creating Custom Reports Report Designer screen allows you to create your own custom detail or summary reports. Click on the System Maintenance icon on the Main Menu and then click on the Report Designer icon.
Creating a new detail report 1. Click on the New button. 2. Primary Sort Sequence
Select the field name for the primary sort sequence by clicking on the appropriate option button. Click on the Ascending or Descending button to indicate the sort order. Check the Page Break box if you want the information for different values of the selected field to always start on a new pages. e.i. If Date is selected as a primary sort sequence field and the Page Break is checked the data for each date will start on a new page.

80 •••• Report Designer Tapit
3. Secondary Sort Sequence Select the field name for the secondary sort sequence by clicking on one of the option buttons. Click on the Ascending or Descending button to indicate the sort order. Check Subtotal box if you want to see totals for the secondary sort field.
4. Available Fields box lists all fields available for the reports. Click on the field name to be included on the report and click on the right arrow to move the field to the Chosen Fields list box (you may also double click the field name to add it to the list). The number of fields you can select is limited by the page size. Page may print landscape in order to fit wide reports. Note: The order of the columns on the report is the same as the order of the selected fields. To remove a field from the report, click on the field name in the Chosen Fields box and click on the left arrow or double click the field name.
5. Click on the Save button. 6. Enter the report name and click on OK. The example screen above: The detail report is grouped first by Date and then by Extension. Each date will start on the new page. Totals for each extension are going to be displayed. The report sort order is ascending. 7. Click on the Test Run button to generate a report. 8. The report filter screen appears. Enter the report criteria.
If you want to run this report always based on the same criteria: Click on the Predefined Filter button. ”Do you want to save the current filter selection as a predefined filter?” message appears. Click on Yes. Save Filter screen appears. Fill in the filter name and click on OK. Click on Continue. The message “Do you want to associate the selected predefined filter with this report for future use?”. Click on Yes. You can also choose from the list of existing predefined filters and associate your report with one of them. To change the predefined filter to another predefined filter open the Report Filter screen (either via MainMenu/Reports or Test Run ) and select another existing filter name or create a new one. Run the report. When the “Do you want to associate the selected predefined filter with this report for future use” message. Click on Yes.
If you do not want to run this report always based on the same criteria: Click on Continue.
9. Verify the report and close the report screen. 10. Click on Exit to leave the screen.
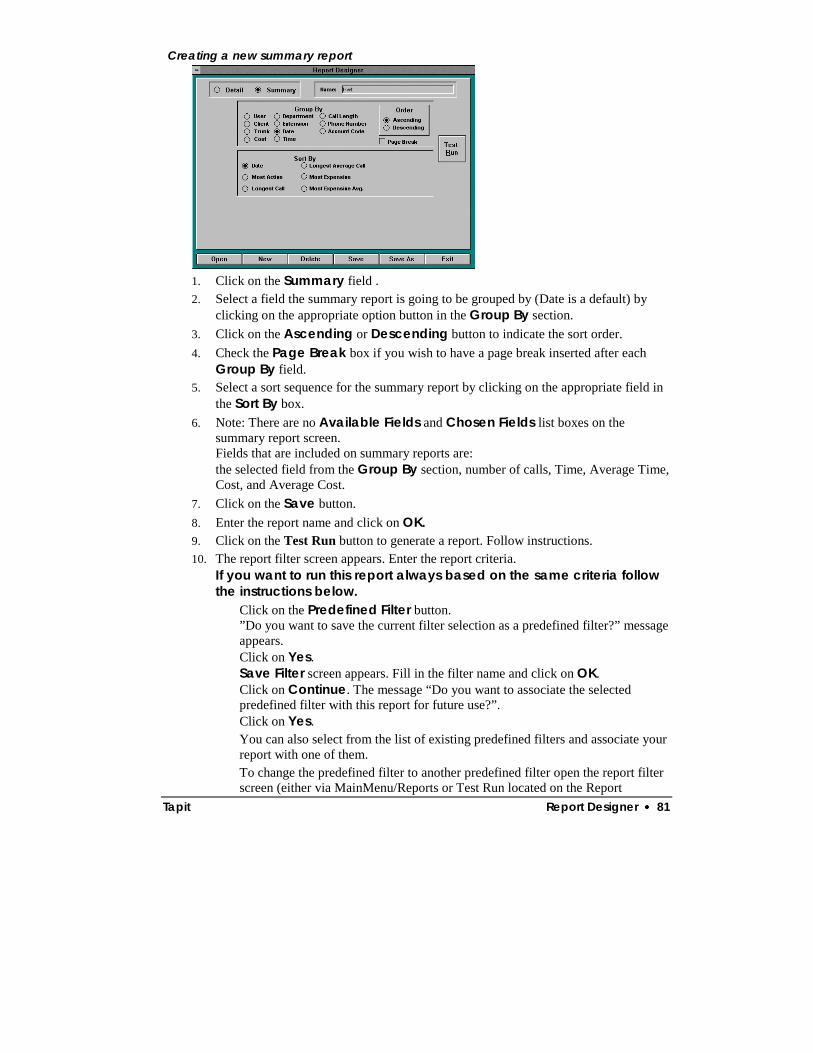
Tapit Report Designer •••• 81
Creating a new summary report
1. Click on the Summary field . 2. Select a field the summary report is going to be grouped by (Date is a default) by
clicking on the appropriate option button in the Group By section. 3. Click on the Ascending or Descending button to indicate the sort order. 4. Check the Page Break box if you wish to have a page break inserted after each
Group By field. 5. Select a sort sequence for the summary report by clicking on the appropriate field in
the Sort By box. 6. Note: There are no Available Fields and Chosen Fields list boxes on the
summary report screen. Fields that are included on summary reports are: the selected field from the Group By section, number of calls, Time, Average Time, Cost, and Average Cost.
7. Click on the Save button. 8. Enter the report name and click on OK. 9. Click on the Test Run button to generate a report. Follow instructions. 10. The report filter screen appears. Enter the report criteria.
If you want to run this report always based on the same criteria follow the instructions below.
Click on the Predefined Filter button. ”Do you want to save the current filter selection as a predefined filter?” message appears. Click on Yes. Save Filter screen appears. Fill in the filter name and click on OK. Click on Continue. The message “Do you want to associate the selected predefined filter with this report for future use?”. Click on Yes. You can also select from the list of existing predefined filters and associate your report with one of them. To change the predefined filter to another predefined filter open the report filter screen (either via MainMenu/Reports or Test Run located on the Report

82 •••• Report Designer Tapit
Designer screen) and select another existing filter name or create a new one. Run the report. When the “Do you want to associate the selected predefined filter with this report for future use” message appears click on Yes.
If you do not want to run this report always based on the same criteria click on Continue.
11. Verify the report and close the report screen. 12. Click on Exit to leave the screen.
Creating reports from templates 1. Click on Open. 2. The Report Selection screen comes up. 3. Select the report you want to base your new report on and click on Continue. 4. The Report Selection screen disappears and the Report Designer screen reflects
the criteria of the open report. 5. You can edit the reports criteria in any way you need (refer to sections on creating
detail and summary reports above) and save the report using Save As option. If you want to associate this report with the predefined filter, follow instructions from pt. 8 to pt. 12 from the section Creating a new summary report above.
Editing custom reports 1. Click on Open. 2. The Report Selection screen comes up. 3. Select the report that needs editing and click on Continue. 4. The Report Selection screen disappears and the Report Designer screen reflects
the criteria of the open report. 5. You can edit reports criteria in any way you need (refer to the section on creating
detail and summary reports above) and save the report using Save (if you want to overwrite the same report name) or Save As option (if you want to save it as a new report).
6. To run the custom reports from the Main Menu click on the Reports icon. On the Report Selection screen click on the Custom tab. Select the name of the report and click on Continue. For help with running reports refer to the Reports chapter (page 30).
Note: Standard TAPIT Reports cannot be modified and saved with the same name. You can open and modify a Standard TAPIT Report; however, you must use Save As option to save it under different name.
.

Tapit Fraud Alert •••• 83
Fraud Alert
Fraud Alert Features Fraud Alert will notify you of unusual activity on the phone system according to the parameters specified.
TAPIT MUST BE RUNNING (EVEN MINIMIZED) IN ORDER FOR FRAUD ALERT TO WORK.
Click on the Maintenance icon on the Main Menu and then click on the Fraud Alert icon.
Fraud Alert will slow down your processing speed
Parameters This facility allows you to define the parameters that will control Fraud Alert. To access Parameters click on the Parameters icon.

84 •••• Fraud Alert Tapit
Fraud Alert will not function if the parameters are NOT defined or are not properly defined! The following is a description of fields that are available on this screen: Working Hours - In order to distinguish between your work and off-work hours, you need to provide this information using these fields. Please be as accurate as possible. Work hours are the time period in which you normally conduct business (i.e. 8:00 AM - 5:00 PM would be 08:00 to 17:00). Note that the times are in military format. Anytime that is not specified as work is by default off-hours. Saturday would be 00:00 to 00:00, this means that there are NO work hours for that day and all the time will be off-hours. Alarms There are several alarms available to you. To specify which alarms will be utilized, click on the check box in the corresponding fields. Printer - If selected, every time that an alarm condition is triggered, a message based on the condition will be sent to your printer. Video - If selected, every time that an alarm condition is triggered, a warning message will flash in the center of your computer screen. Audio - If selected, every time that an alarm condition is triggered, a siren will be activated on your computer. The sound quality is hardware dependent, so it may vary from computer to computer. Dial - If selected and your computer is equipped with a Hayes compatible modem, every time that an alarm condition is triggered, a call will be initiated to a specified telephone number. COM port - If you are planning to use a modem, you need to specify which COM port (serial port) you are going to use. REMEMBER that TAPIT is ALSO using a port. For example, if TAPIT is using COM1, you may use your modem on COM2 or COM4, etc. LPT port - If using a printer, this field identifies LPT#. Modem init string - If you are planning to dial out to a pager, you are going to need a Hayes compatible modem. There are many varieties. Some of them may need to be initialized with special "AT" commands. Fraud Alert will use "AT" sequence if nothing is entered in this field. Please refer to your modem documentation. Modem dial string - This field needs to be entered by the user. It should contain a telephone number for a pager or service, as well as characters to be transmitted in the event of an alarm condition. For example: "AT2125551234,,,,,25276" (this string interprets as dial # 212-555-1234; wait 10 seconds; dial "ALARM"). Log Alarm to File - If selected, every time that an alarm condition is triggered, a message based on the condition will be written to "TPWFRAUD.TXT" file in the TAPIT directory. This file may be stored somewhere else as configured by the user. This is a standard ASCII text file that you may print, view and edit. To exit this screen click on the Exit button, changes will be saved automatically. Print Log File - click on this icon to send output of the Log File ("TPWFRAUD.TXT") to the printer

Tapit Fraud Alert •••• 85
Every time that an alarm condition is triggered, a message based on the condition will be written to "TPWFRAUD.TXT" file. To Print "TPWFRAUD.TXT" file click on the Print List button Example: 01/24/96 9:02 EXTENSION 116 EXCEEDED 1 IN CALLS BY 0 (OFF) IN HOUR 14:00 This record means that at 9:02 AM on January 24, 1996 extension 116 had exceeded it’s check value of one (1) incoming call by 0 calls during off hours (OFF) in hour period 14:00 (2:00 PM). This alarm was to check for any calls from extension 116 during off-hours.
Delete Log File Every time that an alarm condition is triggered, a message based on the condition will be written to "TPWFRAUD.TXT" file. This file is never overwritten, so there is a possibility that it may grow quite large (depending on your telephone activity). It is advisable to delete this file periodically. Click on the Delete Log File button to delete "TPWFRAUD.TXT"
Test Alarms As we have mentioned earlier, there are several "alarms" available to you. They are defined on the Fraud Alert Parameters screen. To get a good feel for what they are, you may want to try them out first before using them. Also, if you plan to use a modem to dial out to a pager in the event of Toll Fraud, you can test that process with this facility. Click on the Test Alarms button to test alarms
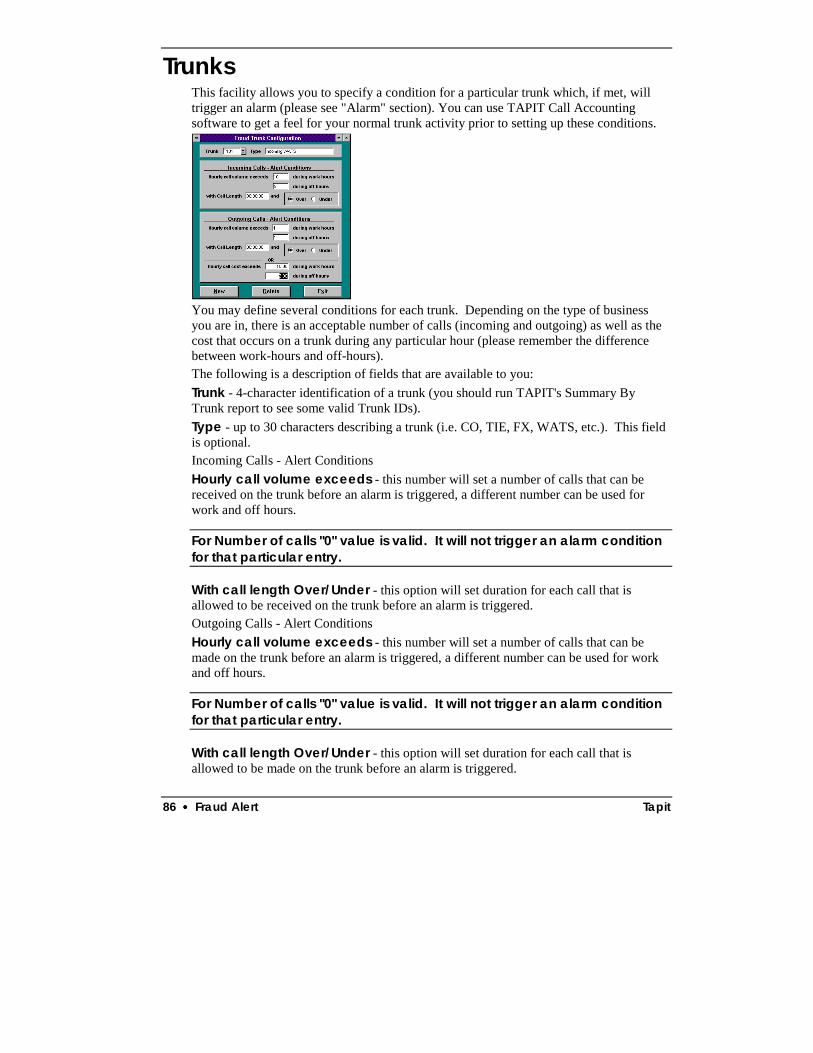
86 •••• Fraud Alert Tapit
Trunks This facility allows you to specify a condition for a particular trunk which, if met, will trigger an alarm (please see "Alarm" section). You can use TAPIT Call Accounting software to get a feel for your normal trunk activity prior to setting up these conditions.
You may define several conditions for each trunk. Depending on the type of business you are in, there is an acceptable number of calls (incoming and outgoing) as well as the cost that occurs on a trunk during any particular hour (please remember the difference between work-hours and off-hours). The following is a description of fields that are available to you: Trunk - 4-character identification of a trunk (you should run TAPIT's Summary By Trunk report to see some valid Trunk IDs). Type - up to 30 characters describing a trunk (i.e. CO, TIE, FX, WATS, etc.). This field is optional. Incoming Calls - Alert Conditions Hourly call volume exceeds - this number will set a number of calls that can be received on the trunk before an alarm is triggered, a different number can be used for work and off hours.
For Number of calls "0" value is valid. It will not trigger an alarm condition for that particular entry.
With call length Over/Under - this option will set duration for each call that is allowed to be received on the trunk before an alarm is triggered. Outgoing Calls - Alert Conditions Hourly call volume exceeds - this number will set a number of calls that can be made on the trunk before an alarm is triggered, a different number can be used for work and off hours.
For Number of calls "0" value is valid. It will not trigger an alarm condition for that particular entry.
With call length Over/Under - this option will set duration for each call that is allowed to be made on the trunk before an alarm is triggered.

Tapit Fraud Alert •••• 87
Hourly call cost exceeds - alarm will be triggered if specified amount of cost is exceeded during the work and off hours regardless of number of calls made
Adding new trunk record Click on New button and type in the desired information for a Trunk
Editing and retrieving existing trunk records Click on the arrow pointing down and select a Trunk from the drop down list. Type new or overwrite existing settings.
Deleting trunk records Retrieve an existing Trunk record and click on Delete button Click on Exit to leave Fraud Trunk Configuration screen
Extensions This screen allows you to specify a condition for a particular extension which, if met, will trigger an alarm (please see "Alarm" section). You can use TAPIT Call Accounting software to get a feel for your normal extension activity prior to setting up these conditions.
Following is the description of fields that are available to you: From Extension - 4-digit identification of this extension (it may be helpful to run TAPIT's Summary by Extension report to see some valid Extensions). To Extension - when creating or deleting a range of Extensions, this field will contain the "To" Extension. Parameters may be entered for a range of extensions i.e. from 110 to 120 or just for one extension i.e. from 125 to 125 Incoming Calls - Alert Conditions Hourly call volume exceeds - this number will set a number of calls that can be received by a single extension or each extension in the range before an alarm is triggered, a different number can be used for work and off hours
For Number of calls "0" value is valid. It will not trigger an alarm condition for that particular entry.

88 •••• Fraud Alert Tapit
With call length Over/Under - this option will set duration for each call that is allowed to be received by a single extension or each extension in the range before an alarm is triggered. Outgoing Calls - Alert Conditions Hourly call volume exceeds - this number will set a number of calls that can be made by a single extension or each extension in the range before an alarm is triggered, a different number can be used for work and off hours.
For Number of calls "0" value is valid. It will not trigger an alarm condition for that particular entry.
With call length Over/Under - this option will set duration for each call that is allowed to be made by a single extension or each extension in the range before an alarm is triggered. Hourly call cost exceeds - alarm will be triggered if specified amount of cost is exceeded during the work and off hours regardless of number of calls made.
Adding new extension record Click on New button and type in the desired information for an extension or an extension range.
Editing and retrieving existing extension records Click on the arrow pointing down and select an extension or extension range from the drop down list. Type new or overwrite existing settings.
Deleting extension records Retrieve an existing extension or extension range record and click on Delete button. Click on Exit to leave Fraud Alert Extension Configuration screen.
Dialed Numbers This facility allows you to specify which outgoing calls will trigger an alarm (please see "Alarm" section).
Depending on your type of business, you may be concerned with excessive international or long distance calls, or you may be interested in monitoring calls to a particular Area Code, Country, or even a local exchange. Here you may set conditions for a particular telephone number. For example, if you specify "411”, this entry will be processed EVERY time when someone dials Information. You can also specify an area code separately, such as “800” or “900” calls.
Tapit Fraud Alert •••• 89
You may define several conditions for each number dialed. You should know the acceptable number of outgoing calls as well as the cost that occurs during any particular hour (please remember the difference between work-hours and off-hours). Following is the description of fields that are available to you: Area Code - 3-digit field in which you may enter specific area codes that you may be concerned with. You can also enter “NNN” and the system will populate your specified phone number with all available area codes (to cover 555-1212 calls for all area codes for example). Note that area code must be present if phone number is populated. Number Dialed - 12-digit field in which you may enter telephone numbers that you may be concerned with. Hourly call volume exceeds - this number will set an amount of calls that can be made to a particular number or area code before an alarm is triggered, a different number can be used for work and off hours. For Number of calls "0" value is valid. It will not trigger an alarm condition for that particular entry. With call length Over/Under - this option will set duration for each call that is allowed to be made to a particular number or area code before an alarm is triggered. Hourly call cost exceeds - alarm will be triggered if specified amount of cost is exceeded during the work and off hours regardless of number of calls made.
Adding new Number Dialed record Click on New button and type in the desired information for a telephone number.
Editing and retrieving existing Number Dialed records Click on the arrow pointing down and select a Number Dialed record from the drop down list. Type new or overwrite existing settings.
Deleting Number Dialed records Retrieve a Number Dialed record and click on Delete button. Click on Exit to leave Fraud Alert Extension Configuration screen.
Note that making a change on any of the configuration screens will cause the system to reset all the counters for Fraud Alert.

90 •••• Database Repair Utility Tapit
Database Repair Utility
Using Repair Utility Occasionally database may get damaged or corrupted. The most common reason for this type of situation is either a power outage or user action of shutting computer down when application is still open. TAPIT ships with a utility that will try to repair databases that were not closed properly. If you start getting error messages related to databases or if advised by our technical support staff: 1. Exit from TAPIT application. 2. Run Scandisk. 3. Go to Start\TAPIT\Tapit Repair. Carefully read the message on your screen. If you are ready to run a repair utility click on OK. TAPIT Repair Utility screen appears.
It displays your system’s information.

Tapit Database Repair Utility •••• 91
Click on Repair Database button. TAPIT will attempt to repair your database file. It will notify you with a message if the process has been successful. Restore Files button allows you to replace damaged files with backup files. When advised by Tech Support you can restore application files or database files using the above utility. To prevent data loss be very careful and follow all TAPIT messages guiding you through the process.
Restoring damaged file: 1. Check or uncheck the Restore from Default Backup Folders check box
depending on what folder contains the backup file. 2. Select file you would like to restore from Select file to restore: list by clicking on
it. The correct path for both damaged and backup files will appear in text boxes below. If Repair Utility cannot locate the file it will notify you with a message and you will have to enter the correct path manually.
3. Click on Restore button. Try to recreate the problem when repairing is completed.

92 •••• SMDR Monitor Tapit
SMDR Monitor
Understanding SMDR Monitor SMDR Monitor is a communication program that collects SMDR information generated by the PBX. It can also display the SMDR information on the screen of your computer in real time in the raw format. SMDR Monitor command line is added to the Microsoft Windows WIN.INI file Load statement, so every time Microsoft Windows is started SMDR Monitor is loaded minimized and is ready to collect the call records data. SMDR Monitor must be running in order for TAPIT to collect the call activity information. By default SMDR Monitor loads the call data from COM Port. However, the program can be set up to process the data from the file. To load the call data from the file special settings need to be placed under the [TAPIT] entry in the mz.ini file (the mz.ini file can be found in the Windows folder on your computer. See the following example below. Statements starting with a semicolon are comments and do not need to be entered to the mz.ini file. ;FileProc=1 - process the call data from the file, not from COM Port. FileProc=1 ;FileTimer=n - load the call data from the file every "n" seconds in 60 sec increments, for example: 180 = 3 minutes. ;The actual value depends on your requirements. The minimum value is 120 and the maximum value is 3600. FileTimer=180 ;FilePath= - the path to the file containing the call records data. ;You can use wild-card characters in a file name. For example: if your file name is changed daily to reflect the date of the data collection (smdr111201.log) you can substitute the "111201" string with the "?" wild-card character - "smdr??????.log". The file cannot have ".tmp" extension and a wild-card character "*" cannot be used in the file's extension as well. FilePath=E:\tapitw32\Data\Main\telmsg.dat ;FileKill=1 - delete the temporary file after processing is done. ;FileKill=0 - keep the temporary file until the next load (recommended). FileKill=0 To view the SMDR data in real time, double-click on SMDR Monitor minimized icon. The SMDR Monitor screen is displayed.
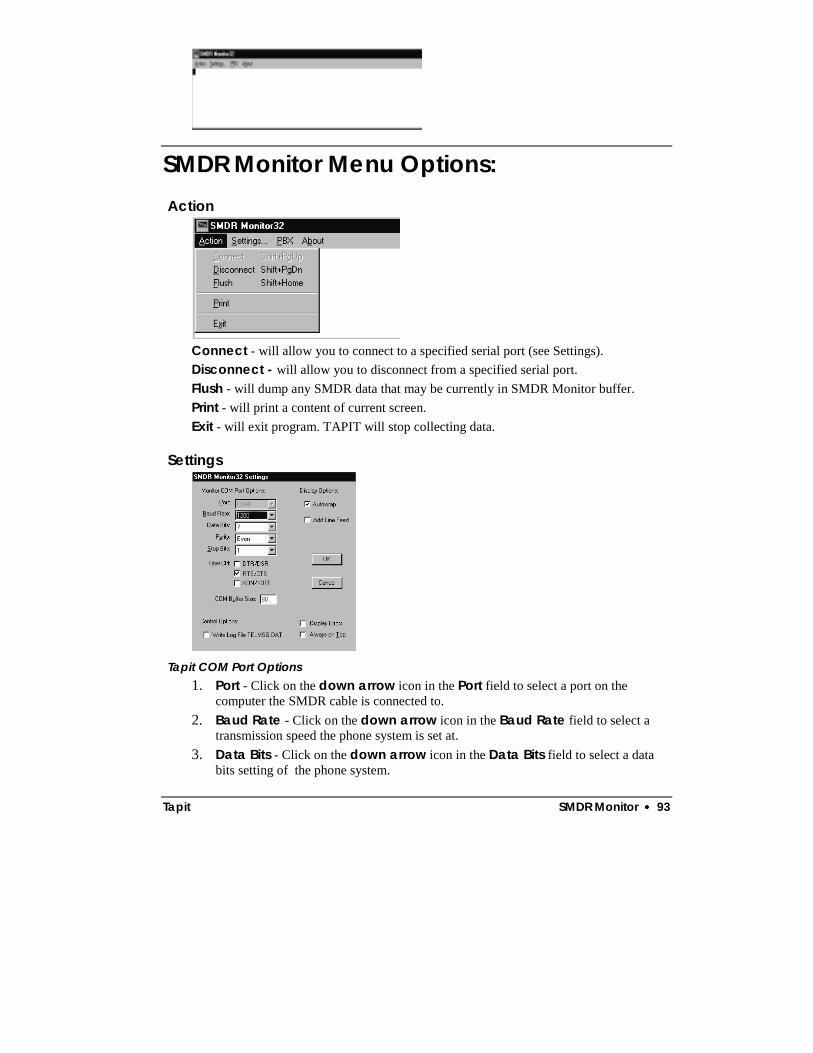
Tapit SMDR Monitor •••• 93
SMDR Monitor Menu Options: Action
Connect - will allow you to connect to a specified serial port (see Settings). Disconnect - will allow you to disconnect from a specified serial port. Flush - will dump any SMDR data that may be currently in SMDR Monitor buffer. Print - will print a content of current screen. Exit - will exit program. TAPIT will stop collecting data.
Settings
Tapit COM Port Options
1. Port - Click on the down arrow icon in the Port field to select a port on the computer the SMDR cable is connected to.
2. Baud Rate - Click on the down arrow icon in the Baud Rate field to select a transmission speed the phone system is set at.
3. Data Bits - Click on the down arrow icon in the Data Bits field to select a data bits setting of the phone system.

94 •••• SMDR Monitor Tapit
4. Parity - Click on the down arrow icon in the Parity field to select a parity setting of the phone system.
5. Stop Bits - Click on the down arrow icon in the Stop Bits field to select a stop bits setting of the phone system.
6. Flow Ctrl. - Check an appropriate box to select a flow control parameter that may be required by the PBX (refer to PBX’s documentation).
7. Com Buffer Size - a number of characters SMDR Monitor will hold in the memory buffer before saving data to the hard disk of the computer (recommended setting is 80).
Control Options 1. Write Log File TELMSG.DAT - check this box if you wish TAPIT to save a raw
SMDR information in the separate file (TELMSG.DAT in directory where TAPIT’s database is stored).
2. Display Errors - Check this box if you wish TAPIT to display communication errors in the SMDR Monitor window.
3. Always on top - check this if you wish SMDR Monitor icon or window to be always on the foreground of the desktop.
Display Options 1. Autowrap - some PBX SMDR string is longer than can fit on the screen, check this
option to force the string to wrap to the next string when the right edge of the SMDR Monitor window is reached.
2. Add Line Feed - Check this box if you wish to have a blank line inserted between SMDR call records (it may improve readability of SMDR records displayed on the SMDR Monitor).
PBX

Tapit SMDR Monitor •••• 95
PBX Format - Click on it if you would like to select a PBX Format.
1. Go to Select current PBX format list box and click on a down arrow to select
appropriate PBX format from the list. 2. Go to eXtended Processing check box. For some PBX formats TAPIT supports
extensions up to 7 digits and trunks up to 8 characters. Check this box if you are certain that TAPIT Monitor supports extended processing for your PBX format. In case Monitor does not support this feature for your PBX format and eXtended Processing box is checked TAPIT will not process calls at all.
Load Telmsg.dat - Click on it if you would like to load data from Telmsg.dat file.
Loading Telmsg.dat may result in duplicate records in your TAPIT database.
You have to disconnect (Action/Disconnect) form the COM port before attempting loading.

96 •••• Software License Agreement Tapit
Software License Agreement
Contents Software License Agreement TO PERSONS WHO PURCHASE OR USE THIS SOFTWARE: Carefully read all the terms and conditions of this agreement before opening this package. Opening of this package indicates your acceptance of the terms and conditions of this License Agreement. Parties. The Licenser is TRISYS, INC. 215 Ridgedale Avenue, Florham Park, NJ 07932, and you are the Licensee. 1. Grant of License. The Licensor grants to the Licensee a non-transferable, non-exclusive, non-assignable license to use the copyright materials and programs as set forth herein for the purposes stated herein, and none other. The licensed program materials are identified as "TAPIT". 2. Identification of Materials Subject to the License. The copyright materials and programs are identified as the "program materials", and include the program diskette and the documentation manual. 3. Modification of the Program(s). Licensee may not alter, amend, change or otherwise modify the program, and any such change voids the license effective as of the date of the licensee's first receipt of the program materials. 4. No Copying Allowed. All program materials have been provided to the Licensee upon the strict condition that they may not be copied. The program materials have been provided to the Licensee upon the strict condition that they may not be distributed or modified in any way without the prior written approval of the Licensor. Any copies other than as set forth herein are illegal, and will cause the License to be breached automatically. 5. Ownership of the Program. Licensee acknowledges that the program materials identified herein are and remain the sole and exclusive property of the Licensor. The program materials may not be resold, given or otherwise transmitted by the Licensee to any other third party or parties, or reused by the Licensee in any other application without the express written consent of the Licensor. LICENSEE MAY NOT COPY, MODIFY, TRANSFER OR TRANSLATE THE PROGRAMS OR RELATED DOCUMENTATION EXCEPT AS EXPRESSLY PROVIDED FOR IN THIS AGREEMENT. 6. Copyright. The program materials are copyrighted. All other copies of the programs and their related documentation in the possession of the Licensee are in violation of this license, and

Tapit Software License Agreement •••• 97
Licensee agrees to destroy them, and/or allow the Licensor to destroy them if the Licensee is unable or unwilling to do so. 7. Warranty. Licensor warrants that TAPIT will substantially conform to its current published specifications when installed and will be free of defects that substantially affect system performance. Licensor will correct substantial software errors at no charge, provided the Licensee returns complete TAPIT with a dated proof of purchase to Licensor within 3 years of delivery. These are the sole remedies for any breach of warranty. Licensee agrees that Licensor’s liability arising out of contract, negligence, strict liability in tort or warranty shall not exceed the then existing dealer's cost of TAPIT at the time of the claim or the purchase, whichever is less. Except as specifically provided above, Licensor makes no warranty or representation, either express or implied, with respect to the software or documentation, including their quality, performance, merchantability, or fitness for a particular purpose. THE ABOVE IS A LIMITED WARRANTY AND IT IS THE ONLY WARRANTY MADE BY LICENSOR. LICENSOR MAKES AND LICENSEE RECEIVES NO WARRANTY EXPRESS OR IMPLIED AND THERE ARE EXPRESSLY EXCLUDED ALL WARRANTIES OF MERCHANTABILITY AND FITNESS FOR A PARTICULAR PURPOSE. LICENSOR SHALL HAVE NO LIABILITY WITH RESPECT TO ITS OBLIGATIONS UNDER THIS AGREEMENT FOR CONSEQUENTIAL, EXEMPLARY, OR INCIDENTAL DAMAGES EVEN IF IT HAS BEEN ADVISED OF THE POSSIBILITY OF SUCH DAMAGES. THE STATED EXPRESS WARRANTY IS IN LIEU OF ALL LIABILITIES OR OBLIGATIONS OF LICENSOR FOR DAMAGES ARISING OUT OF OR IN CONNECTION WITH THE DELIVERY, USE, OR PERFORMANCE OF TAPIT. 8. Governing Law. This Agreement shall be governed by the laws of the State of New Jersey, and of the United States, where applicable, and shall inure to the benefit the Licensor, its successors, administrators, heirs and assigns. 9. Remedy - Limitation of Damages. The Licensee's obligations under this License are of a special and unique character which gives them a particular value, and the Licensor cannot be reasonably or adequately compensated in damages in an action at law in the event of the Licensee's breach of this License. Therefore, the Licensee expressly agrees that the Licensor shall be entitled to injunctive and other equitable relief in the event of such breach or threatened breach in addition to any other rights or remedies which the Licensor may possess. Licensor’s entire obligation, and Licensee's exclusive remedy shall be the replacement by the Licensor of the diskette and/or backup diskette supplied, if defective in materials or workmanship. IN NO EVENT SHALL THE LICENSER BE LIABLE FOR DIRECT, INDIRECT, INCIDENTAL, CONSEQUENTIAL OR SPECIAL DAMAGES ARISING OUT OF THIS LICENSE OR THE USE OR NON-USE OF THE PROGRAM MATERIALS OR THE EXISTENCE, FURNISHING, FUNCTIONING OR THE USE BY THE LICENSEE OF THE PROGRAM MATERIALS, AS LICENSED HEREIN. The Licensee agrees that the Licensor’s liability arising out of strict liability, negligence,

98 •••• Software License Agreement Tapit
tort or warranty shall not exceed any amounts paid by the Licensee for the program materials. 10. Indemnification. Licensor, at its own expense, will defend the Licensee in any action brought against same to the extent that said action is based on a claim of infringement against a patent, copyright or any other property right pertaining to the program materials. Licensor reserves the right to control the defense of any such claim, lawsuit or other proceeding. In no event shall the Licensee settle any claim, lawsuit or proceeding without the prior written consent of the Licensor. 11. Supersedes All Prior Agreements. This license supersedes all prior understandings and agreements by and between the Licensor and Licensee related to the subject matter hereof, and is intended to be the exclusive and complete statement of the parties of the terms of this license. BY USING THIS SOFTWARE YOU SPECIFICALLY AND EXPRESSLY CONSENT TO THIS LICENSE AGREEMENT
Tapit Technical Support •••• 99
Technical Support
Technical Support from Trisys, Inc. Free Technical Support is available, by calling 973.360.2300 to all registered users of TAPIT for 30 days from the date of the first call. Extended Technical Support plan is available, please contact your dealer or Trisys, Inc. for details. Trisys, Inc. 215 Ridgedale Avenue Florham Park, NJ 07932 Visit also Trisys Web site http:\\www.trisys.com when looking for help in troubleshooting your software. When calling Technical Support please have the following information ready in order to expedite your call. • Serial number of the TAPIT software. • Version number. • Com Port Settings. • Cable specifics for PBX Connection (start to finish cable type/any adapters?). • PBX type (name and model). • Computer specs - your processor type and speed. • The amount of free disk space. • The amount of RAM.
Troubleshooting Unable to get the report to display on screen
TAPIT program gets all of its printing capabilities from the printer setup within windows. In order for the report to come up to the screen there must be a print driver installed and a default printer selected.
The monitor is not getting any SMDR Data 1. Configure HyperTerminal session using TAPIT settings. SMDR Monitor has to be
turned off at that time. 2. Check the pin outs - DB-25 connector (3=receiving, 7=ground), DB-9 connector
(2=receiving, 5=ground). 3. The cable may not be functioning. 4. The COM ports may be damaged.
100 •••• Technical Support Tapit
5. The PBX is not actually outputting the SMDR.
Error 3040 - "Disk I/O error" or "Disk I/O error during read". TAPIT is having difficulty putting data to the hard drive or getting data from it. This error is common to Windows and is most often caused by a misreporting of file size by the operating system. This can be corrected by running a Scandisk. 1. Run Scandisk with a surface scan when using Windows 3.1/3.11 or as a Thorough
Scan in Win95. 2. Following Scandisk activate the TAPIT Repair Database utility which has two
phases. The first phase completes with a message "Repair Database Completed Successfully" and an "OK" box. Clicking on the "OK" box begins the second phase, which compacts the database by removing any blank space found or created by the repair, thereby making the database more efficient.
3. Once completed restart TAPIT and repeat the operation that yielded the error message.
Error 3000 - "Reserved error - There is no message for this error". This error occurs when there has been damage to the application files preventing TAPIT from operating properly, but not in an expected or predictable manner to which a dedicated message could be referenced. This error is common following an upgrade or reinstallation of the software when the proper sequence wasn't followed. 1. Close all applications and restart the computer. 2. Following restart run Scandisk including surface scan (Thorough Scandisk in
Win95/98). 3. Run Repair Database utility located in the TAPIT program group.
"NPA Summary" NPA stands for Numbering Plan Administration and this is an example of an Area Code being recognized by TAPIT but the Exchange is unknown. The Exchange was most likely created after this version of TAPIT was released. Contact your vendor about a City/State Update.
Error 3075 - TAPIT It mentions an illegal function but the program still loads. This error shows that some other program or your operating system has loaded newer common files than TAPIT was expecting. Please visit our web site www.trisys.com. Go to Tech Support and select Product Update Downloads. Click on TAPIT and download the Tapitapp.bak file for your installation ( it is available as a single file or zipped in multidisk format). It will need to be installed on each machine running TAPIT in multi-user environments. If you have any further questions please contact Trisys Tech Support at 973 360 2300.
Error 3197 - "Data has changed - Operation Stopped" This message appears following a failed upgrade, an upgrade by incorrect methods, or in limited cases - data corruption. The corrective action is completely dependent on the cause. Please contact our technical support at 973.360.2300.

Tapit Technical Support •••• 101
Error Message “CONNECTION FAILED” when Monitor opens The following message will appear when SMDR Monitor is opened, if there is a conflict with that comport (any other program or hardware device using that comport); or you have selected a comport that is not in your computer
Monitor shows gibberish for call records Do you see gibberish (symbols, not clear readable records) across the screen when you receive a call record? You need to double-check your parameters. Gibberish across the screen means that the Parity, Stop Bits, Data Bits, or Baud Rate are not matched with what the PBX is sending out. Again go to Action and select disconnect and then go to Settings and select the proper parameters. DO NOT CHANGE THE COMPORT SETTING!!! If you are still getting gibberish across the screen contact your PBX manufacturer for proper settings, or have the COM port checked for proper operation.
Error 2202 There is no default printer. TAPIT cannot create reports or print to file without the use of your computers print drivers. 1. Go to Control Panel. 2. Select Printers. 3. Select a default printer or install one.
Note that you do not need a printer to be physically attached to the computer in order to install printer’s driver. You can select a generic ink jet or laser jet to supply the necessary driver.
TAPIT End of the Month Procedures In order to maintain adequate speed and data integrity, we recommend that the following procedures be attended to at the beginning of each month. 1. Enter Maintenance Menu from TAPIT Main Menu. 2. Select Data Maintenance. 3. Select Call Records Maintenance. 4. Select Export and Remove Calls. 5. Enter the correct archive drive (normally d: which is your zip drive) and directory
(root directory is ok). Example: d:\. 6. Enter file name (april.txt). 7. Click on Continue. 8. Enter the correct dates in the filter screen (04/01/1998 – 04/30/1998). 9. Click on Continue. 10. After the process is complete, exit TAPIT program (only SMDR Monitor should be
running). 11. Run scandisk utility on drive c:. 12. Run Database Repair.

102 •••• Technical Support Tapit
13. Run defrag utility on drive c:. 14. Restart the computer.
To Prevent Data Loss 1. Consider installing an uninterrupted power supply (UPS) for the computer running
TAPIT. 2. Close TAPIT during non-business hours. 3. Backup all user/client data following initial input and periodically after
changes/updates are done. 4. Close program and restart MS Windows on a periodic basis to refresh system
resources and update operating system to current file statistics. Suggested every 1-2 weeks of operation.
5. “Export and Keep” call records on a regular basis to provide backup in the event of system failure.
6. “Export and Remove” call records that are not needed in the current, active database. These records can be imported back into the active database if reporting or research needs to be done.
7. Copy Exported calls files to floppy to allow for system rebuild in the event of a hard drive failure.
8. Run Repair Database after each “Export and Remove” session to compress database and return available space to the hard drive.
9. Run Thorough Scandisk on monthly, or more frequent, basis to advise on system storage integrity.
10. Run Defrag to improve system speed and efficiency.

Tapit SMDR ALARM •••• 103
SMDR ALARM
REQUIREMENTS For newest information and updates go to http://www.trisys.com/.
You must have administrative rights for the local computer in Windows NT/2000 environments in order to install the SMDR Alarm.
Tapit Multi-User or Tapit Remote Manager must be installed and set up. SMDR Alarm can work only with Multi-User and Remote Manager versions of TAPIT. When installing SMDR Alarm on a machine other then your TAPIT Server make sure that you can point from it to the TAPIT database folder located on the TAPIT Server.
Hardware: • CPU: Pentium II 166MHz or faster • RAM: 64 MB (more recommended) • Hard-disk Space: Minimum 20 MB • Printer (to Print alarm messages - optional) • COM Port and Modem (to dial on the Phone and send signal to the Beeper -
optional) • Sound Card and Speakers (to play Sound alarm message - optional)
Supported Operating Systems: • Microsoft™ Windows 98/NT/2000/XP • Windows NT4.0 Server Service Pack 5 or higher
Windows 2000 Server Service Pack 1 or higher recommended
Software Requirements: • E-Mail client application MS Outlook 98/2000 (for E-mail Alarm signal option) • Media Player capable to play WAV files.

104 •••• SMDR ALARM Tapit
INSTALLATION Before installing SMDR Alarm
• You must have administrative access rights to the computer where the SMDR Alarm application will be installed.
• TAPIT Multi-User version must be installed and set up. • When installing SMDR Alarm on a computer other then your TAPIT server make
sure that you can point from that machine to the TAPIT database folder located on the TAPIT Server. You must have read and write access rights to the TAPIT database folder.
Installation program may require rebooting of your PC.
Installing SMDR Alarm 1. Open SMDR Alarm folder located on the TAPIT CD.
2. Double click on Setup.exe file. SMDR Alarm - Trisys, Inc. Setup screen appears. This screen is a reminder to close all running applications before installation begins. Click on the OK button to continue.
3. Click on the computer icon/button to install in a default folder or click on Change Directory to install the application in a different folder. Click on Continue.
4. The next screen consists of the Program Group text box and the Existing Group list box. Accept default value or select of the program groups listed below. Click on Continue.
5. The program begins installation. When installation is completed SMDR Alarm - Trisys, Inc Setup was completed successfully. Click on OK.
6. To start SMDR Alarm select Start/Programs/SMDR Alarm.

Tapit SMDR ALARM •••• 105
USER INSTRUCTIONS Setting up the SMDR Alarm
1. Click the Start menu and choose Programs. Select the program group SMDR Alarm and then SMDR Alarm. Application screen appears.
SMDR Alarm screen is not updated automatically to display the current day of the week settings. Instead the screen shows the settings for the last viewed/edited day of the week.
2. Check the Report No SMDR Signal box located in the lower left corner of the SMDR
Alarm screen.
3. Click on the down arrow of the Day of Week list box and select the day of the week you want to setup the alarm first.
4. Enter the Start Time (military time format - hh:mm) and the NO SMDR Timer (minutes) values.
"Waiting..." indicates the SMDR Alarm application is running.
In this example each comma represents 1-second delay.
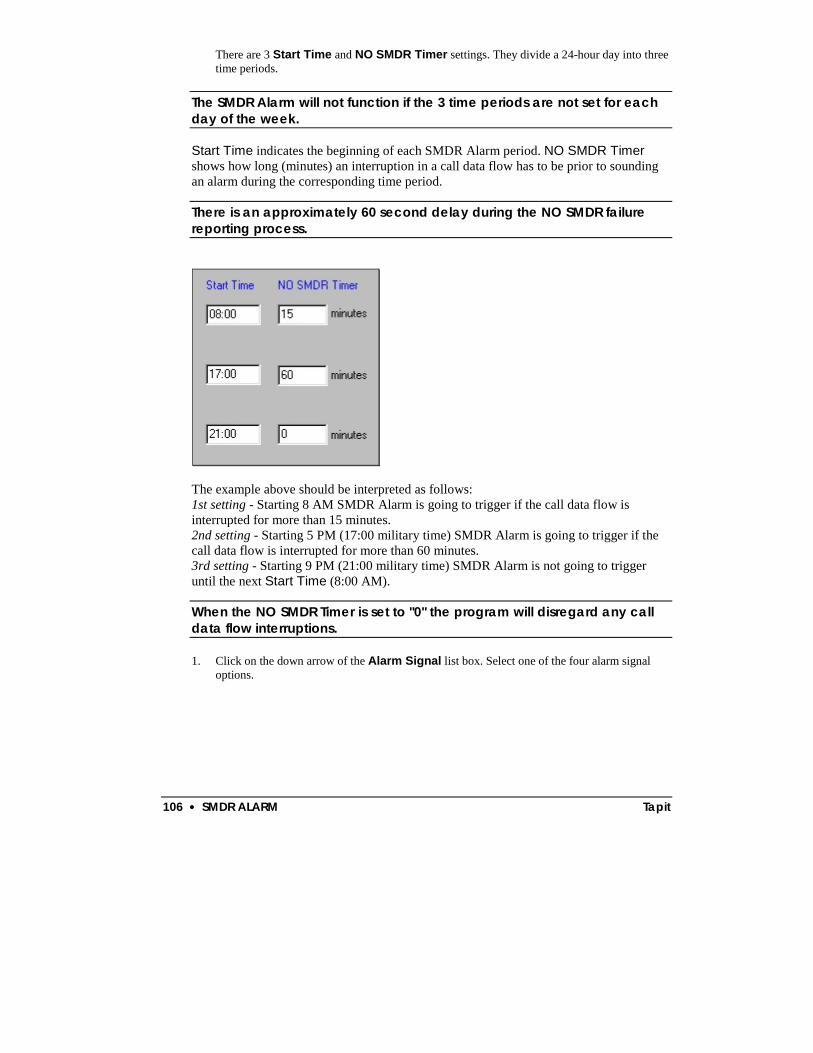
106 •••• SMDR ALARM Tapit
There are 3 Start Time and NO SMDR Timer settings. They divide a 24-hour day into three time periods.
The SMDR Alarm will not function if the 3 time periods are not set for each day of the week.
Start Time indicates the beginning of each SMDR Alarm period. NO SMDR Timer shows how long (minutes) an interruption in a call data flow has to be prior to sounding an alarm during the corresponding time period.
There is an approximately 60 second delay during the NO SMDR failure reporting process.
The example above should be interpreted as follows: 1st setting - Starting 8 AM SMDR Alarm is going to trigger if the call data flow is interrupted for more than 15 minutes. 2nd setting - Starting 5 PM (17:00 military time) SMDR Alarm is going to trigger if the call data flow is interrupted for more than 60 minutes. 3rd setting - Starting 9 PM (21:00 military time) SMDR Alarm is not going to trigger until the next Start Time (8:00 AM).
When the NO SMDR Timer is set to "0" the program will disregard any call data flow interruptions.
1. Click on the down arrow of the Alarm Signal list box. Select one of the four alarm signal options.

Tapit SMDR ALARM •••• 107
Each option indicates how a user is notified about the SMDR failure. Phone option -system pages a user (modem connection required). Email option - notification message is sent to a user's mailbox (email client required). Print option - notification is printed (printer connection required). Visual option - SMDR Alarm flashes the notification message on the screen and plays an alarm voice recording (sound card required).
Note: By default all options are accompanied with the screen notification and voice-recorded message.
The alarm on-screen message has the Cancel Alarm button. Click on it to close the message screen. You can assign 2 types of alarm signals to one time period.
6. If you selected Phone or E-mail Alarm Signal option, enter the phone number or email address that corresponds to your choice in the Send Alarm Signal using: text box.
7. Repeat pt 4 through 6 for all time periods.
Note: The SMDR Alarm will not function if the 3 time periods are not set for each day of the week.
Each comma represents 1-second delay.
108 •••• SMDR ALARM Tapit
8. Click on the Apply button.
9. Click on the Test Now button. It allows you to test alarm signals.
Note: You can only test alarm signals assigned to a current day and time period.
Example: You have clicked on the Test Now button at 9 AM on Friday. Let us assume that Friday's SMDR Alarm is set to the email and printer options for the time period starting at 8:AM. We have to remember that screen and voice alarm by default accompanies all other types of alarm. In this case, clicking Test Now prompts the system to send an email notification, print the message, display the screen alarm message and play the voice-recorded message.
10. If you want to apply the same settings to all the days of the week, click on the Apply to all Days button. Otherwise, click on the down arrow of the Day of the Week list box, select the desired day and repeat pt.4 through 8. Continue this process for the remaining days of the week (you can set different options for each day but all days of the week must be set).
11. If you want to clear all settings for a given day, select the day from the Day of Week list box and click on the Clear Day Alarms button. Click on YES for the confirmation message. All values for the day are discarded. Enter the new settings and click on Apply.
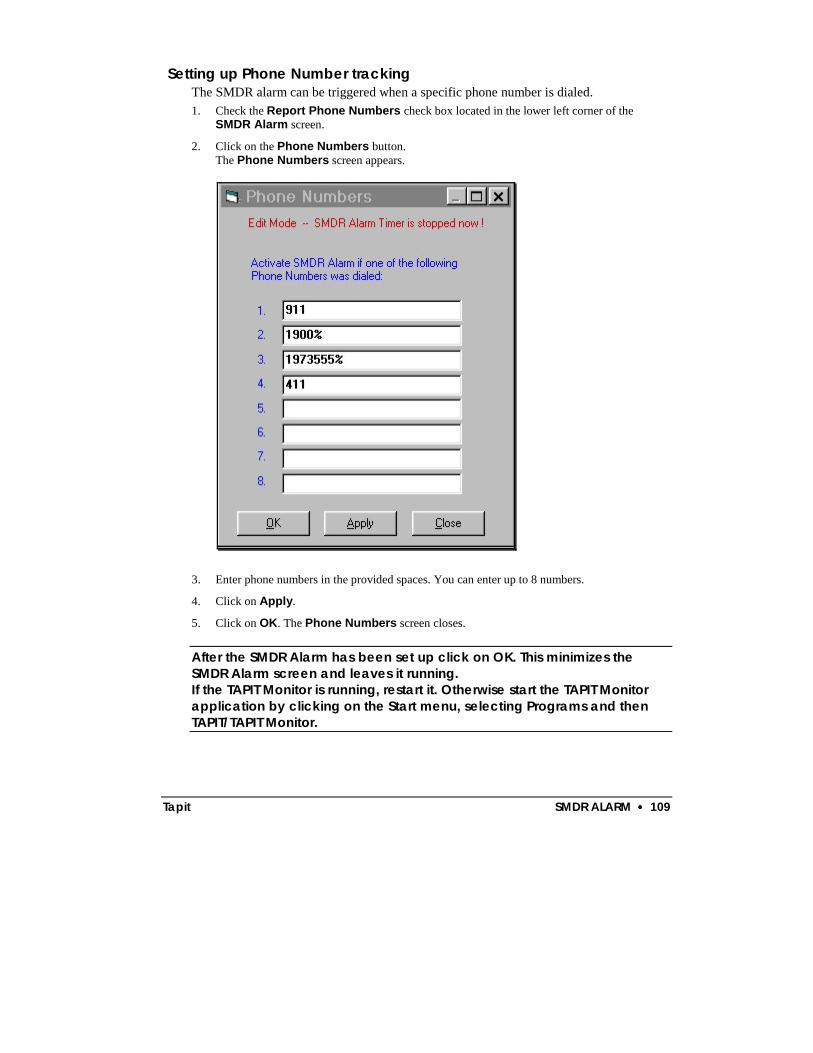
Tapit SMDR ALARM •••• 109
Setting up Phone Number tracking The SMDR alarm can be triggered when a specific phone number is dialed. 1. Check the Report Phone Numbers check box located in the lower left corner of the
SMDR Alarm screen.
2. Click on the Phone Numbers button. The Phone Numbers screen appears.
3. Enter phone numbers in the provided spaces. You can enter up to 8 numbers.
4. Click on Apply.
5. Click on OK. The Phone Numbers screen closes.
After the SMDR Alarm has been set up click on OK. This minimizes the SMDR Alarm screen and leaves it running. If the TAPIT Monitor is running, restart it. Otherwise start the TAPIT Monitor application by clicking on the Start menu, selecting Programs and then TAPIT/TAPIT Monitor.

110 •••• SMDR ALARM Tapit
Example of the Phone Number tracking
Phone Number tracking works in conjunction with SMDR Alarm settings. The two examples above can be explained as follows: According to the Phone Numbers screen above, the following numbers are being tracked: 411, 911 or any numbers starting with 1900 or 1973555 ("%" is a wild character used to indicate that any digits can follow the preceding number).
Time period one Time period two Time period three

Tapit SMDR ALARM •••• 111
In our SMDR Alarm screen example, the following alarm signals are triggered if any of the above numbers are dialed: time period one - between 8 AM and 5 PM a user is emailed, presented with a screen message and a voice-recording. time period two - between 5 PM and 9 PM a notification message is printed, a user is paged, a screen message is displayed and a voice recording is played. time period three - between 9 PM and 8:AM a screen message is displayed and a voice recording is played.
The NO SMDR Timer setting is disregarded by the Phone Number tracking. When it is set to "0" the SMDR Alarm is not activated but the alarm for the phone numbers is still triggered.
Understanding the TPSALARM.LOG file The TPSALARM.LOG file contains time and date log of the SMDR alarm and the tracked phone numbers. The above file is located in the same folder the TAPIT database is stored.
When the TPSALARM.LOG file becomes too large to maintain it is saved into TPSALOLD.LOG and the new empty TPSALARM.LOG file is created.
The tracked phone number has been detected. The call originated from ext. 139. The alarm has been triggered.
The SMDR flow has been interrupted for more than 15 min. The alarm has been triggered.

112 •••• WEB REPORTS Tapit
WEB REPORTS
REQUIREMENTS You must have administrative rights for the local computer in Windows NT/2000 environments in order to Install the Tapit Web Reports.
Tapit EX Multi-User must be installed and set up. Tapit Web Reports can work only with Multi-User versions of TAPIT. When installing Tapit Web Reports on a machine other then your TAPIT Server make sure you can point from it to the TAPIT database located on the TAPIT Server.
Hardware: CPU: Pentium II 200MHz or faster RAM: 64 MB (more recommended) Hard-disk Space: Minimum 20 MB
Windows NT, Windows 2000 and Windwos XP Professional software requirements:
OS: Windows NT4.0 Server Service Pack 5 or higher with IIS 4.0 or higher Windows 2000 Server Service Pack 1 or higher recommended Browser: Internet Explorer 5.5 Service Pack 2 or higher Data Access Drivers: MDAC 2.5 or higher
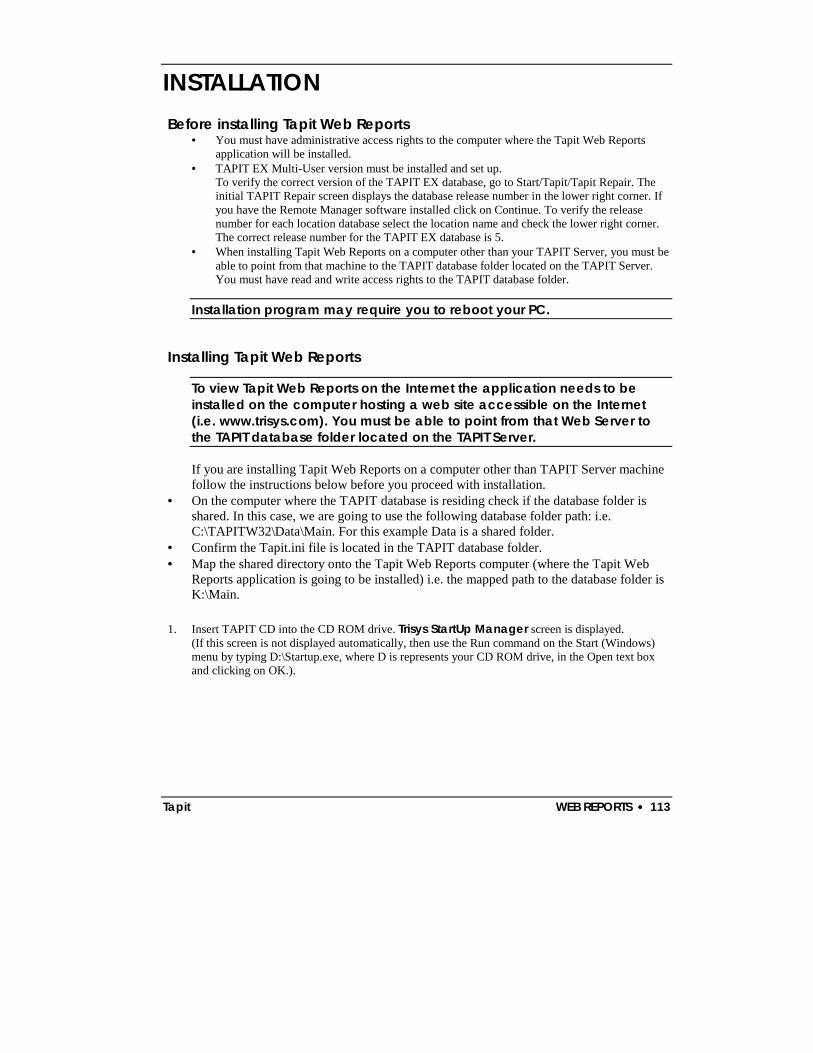
Tapit WEB REPORTS •••• 113
INSTALLATION Before installing Tapit Web Reports
• You must have administrative access rights to the computer where the Tapit Web Reports application will be installed.
• TAPIT EX Multi-User version must be installed and set up. To verify the correct version of the TAPIT EX database, go to Start/Tapit/Tapit Repair. The initial TAPIT Repair screen displays the database release number in the lower right corner. If you have the Remote Manager software installed click on Continue. To verify the release number for each location database select the location name and check the lower right corner. The correct release number for the TAPIT EX database is 5.
• When installing Tapit Web Reports on a computer other than your TAPIT Server, you must be able to point from that machine to the TAPIT database folder located on the TAPIT Server. You must have read and write access rights to the TAPIT database folder.
Installation program may require you to reboot your PC.
Installing Tapit Web Reports
To view Tapit Web Reports on the Internet the application needs to be installed on the computer hosting a web site accessible on the Internet (i.e. www.trisys.com). You must be able to point from that Web Server to the TAPIT database folder located on the TAPIT Server.
If you are installing Tapit Web Reports on a computer other than TAPIT Server machine follow the instructions below before you proceed with installation.
• On the computer where the TAPIT database is residing check if the database folder is shared. In this case, we are going to use the following database folder path: i.e. C:\TAPITW32\Data\Main. For this example Data is a shared folder.
• Confirm the Tapit.ini file is located in the TAPIT database folder. • Map the shared directory onto the Tapit Web Reports computer (where the Tapit Web
Reports application is going to be installed) i.e. the mapped path to the database folder is K:\Main.
1. Insert TAPIT CD into the CD ROM drive. Trisys StartUp Manager screen is displayed.
(If this screen is not displayed automatically, then use the Run command on the Start (Windows) menu by typing D:\Startup.exe, where D is represents your CD ROM drive, in the Open text box and clicking on OK.).
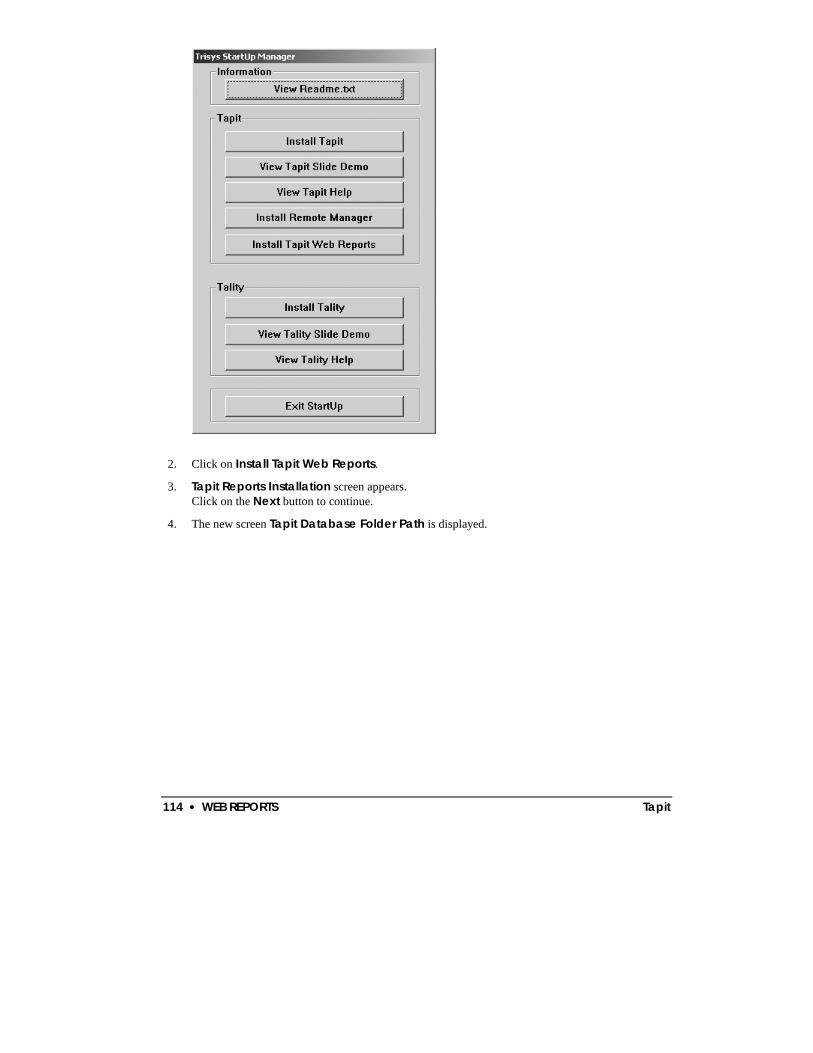
114 •••• WEB REPORTS Tapit
2. Click on Install Tapit Web Reports.
3. Tapit Reports Installation screen appears. Click on the Next button to continue.
4. The new screen Tapit Database Folder Path is displayed.

Tapit WEB REPORTS •••• 115
Enter the path to the folder where the Tapit database is located or click on a Browse button to locate the database folder. Only the path to the database folder (without ending backslash) is required i.e. C:\TapitW32\Data\Main. Do NOT enter the Tapit database file name. Click on Next. Note: If TAPIT is not properly installed or you have entered an incorrect path to the database or the TAPIT database release number is not “5” then the message “Cannot access the Tapit database at : your database path” appears. You cannot continue with Tapit Web Reports installation.
5. User Account screen appears. User Name field - enter a user account to be used by IIS to run the Tapit Web Reports application. This account needs Full Control permissions for all Tapit Web Report application folders (TapitWeb folder where Tapit Web Reports are installed and its subfolders - especially TapitWeb\TapitReps\Data folder) and TAPIT database folder (where TAPIT database resides). When entering Domain User Name use the following format: DOMAIN\User Enter this users’ password in the Password field and confirm the password by reentering it in the Confirm Password field.
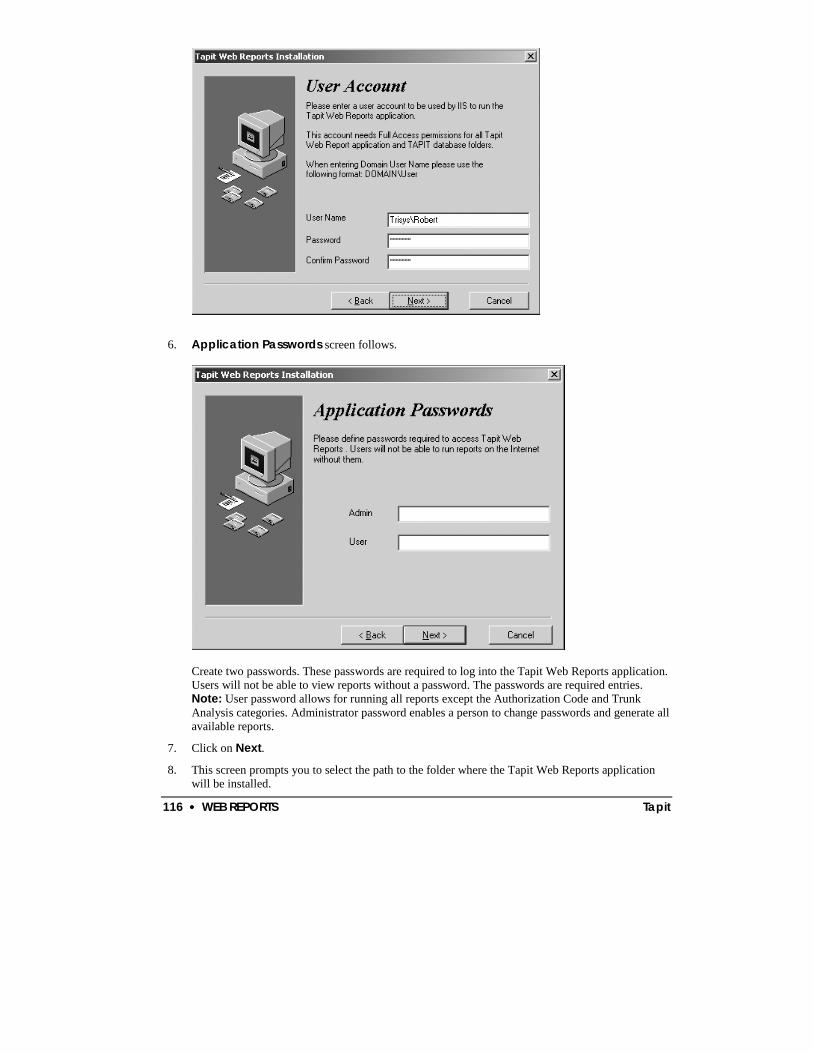
116 •••• WEB REPORTS Tapit
6. Application Passwords screen follows.
Create two passwords. These passwords are required to log into the Tapit Web Reports application. Users will not be able to view reports without a password. The passwords are required entries. Note: User password allows for running all reports except the Authorization Code and Trunk Analysis categories. Administrator password enables a person to change passwords and generate all available reports.
7. Click on Next.
8. This screen prompts you to select the path to the folder where the Tapit Web Reports application will be installed.

Tapit WEB REPORTS •••• 117
Accept the default value or click on the Browse button to locate a different folder. Click on Next.
9. The Ready to Install! screen appears. Click on Next. Setup program starts installing files.
10. Installation Completed screen is displayed. Check the View ReadMe.txt check box if you would like to print/read user instructions document. Click on Finish.
Changing IIS permissions During installation entries from the User Account screen are used to set up IIS to use an appropriate user account when running the Tapit Web Reports application. However, you can change user account settings using provided Tapit Web Config utility or manually.
Changing IIS permissions with Tapit Web Config utility
1. Click on Start menu and select Start/Programs/Tapit Web Reports/ Tapit Web Config.

118 •••• WEB REPORTS Tapit
Tapit Web Reports Configuration screen opens in your Internet browser.
2. User field contains the currently used (by IIS) User Name. You can type a new
user name if required. Note: this user account is used by IIS to run the Tapit Web Reports and it needs Full Control permissions for all Tapit Web Report application folders (TapitWeb folder where Tapit Web Reports are installed and its subfolders - especially TapitWeb\TapitReps\Data folder) and TAPIT database folder (where TAPIT database resides). When entering Domain User Name use the following format: DOMAIN\User
3. Enter this users’ password in a Password field and confirm the password by reentering it in the Confirm Password field.
4. Click on Change. If the IIS settings are changed successfully you will receive a confirmation message.

Tapit WEB REPORTS •••• 119
Changing IIS permissions manually.
1. Click on Start menu and select Programs/Administrative Tools/Internet Services Manager (when working with Windows NT click on the Internet Services Manager icon on your desktop). The Internet Information Services screen (or if using Windows NT the Microsoft Management Console screen) appears.
2. Click on the Default Web Site folder and select TapitReps folder below. Right-click on the folder and select the Properties option from the drop-down menu.

120 •••• WEB REPORTS Tapit
3. The TapitReps Properties screen is displayed.
4. Click on the Directory Security tab.
5. Click on the Edit button located in the Anonymous access and authentication control group.
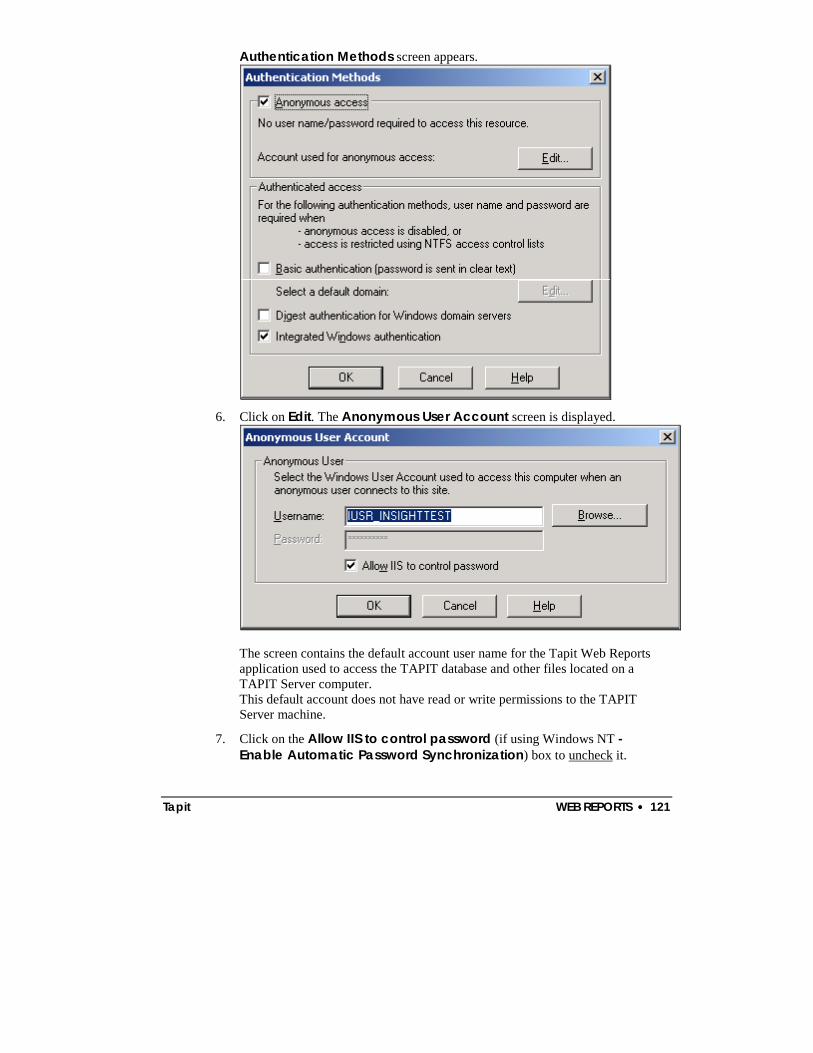
Tapit WEB REPORTS •••• 121
Authentication Methods screen appears.
6. Click on Edit. The Anonymous User Account screen is displayed.
The screen contains the default account user name for the Tapit Web Reports application used to access the TAPIT database and other files located on a TAPIT Server computer. This default account does not have read or write permissions to the TAPIT Server machine.
7. Click on the Allow IIS to control password (if using Windows NT - Enable Automatic Password Synchronization) box to uncheck it.

122 •••• WEB REPORTS Tapit
8. Enter the account name into the Username text box or click on the Browse button and select the appropriate name from the list. This account needs Full Control permissions for all Tapit Web Report application folders (TapitWeb folder where Tapit Web Reports are installed and its subfolders - especially TapitWeb\TapitReps\Data folder) and TAPIT database folder (where TAPIT database resides).
9. Enter the new password. Press enter. Type in the password again in the confirmation screen. Click on OK.
10. Your screen should look similar to the screen below with the exception of the Username value, which will be different in your case.
11. Click on OK.
• To start the Tapit Web Reports application on the same computer:
Go to Start/Programs/Tapit Web Reports/Tapit Reports. • To view Tapit Web Reports via Network from a different computer:
Note: The computer where the Tapit Web Reports application has been installed must be turned on and its Web Server must be running. Open the Internet Explorer and type in the following link: http://web server name/TapitReps (i.e. http://myserver/TapitReps).
• To access Tapit Web Reports via Internet from any computer. Open the Internet Explorer and type in the following link: www.your domain name/TapitReps (i.e. www.trisys.com/TapitReps).

Tapit WEB REPORTS •••• 123
UPGRADING TAPIT WEB REPORTS Note: TAPIT Web Reports version 4.1.1.5 and higher works ONLY with the Multi-User versions of TAPIT EX. TAPIT EX must be installed and set up before upgrading TAPIT Web Reports.
When upgrading TAPIT Web Reports passwords are not carried from the old version to the new version. You have to re-enter passwords while installing the software.
Upgrading TAPIT Web Reports ver. 4.1.5.0 and higher (versions distributed with TAPIT EX 4.1.5 and higher)
The location/department level permission module has been added to the Tapit Web Reports ver. 4.1.5.0 The permission information is stored in TapitWeb/Bin/ Security.mdb database. When performing uninstall this database is deleted. If you are using permission module (you have created users and permissions for Tapit Web Reports) do not uninstall Tapit Web Reports. Simply run the installation of the upgrade version. The upgrade installation will update your files without deleting Security.mdb. However, if you need to uninstall the program and want to preserve your security data, make a backup of the Security.mdb first. Store the backup file in a folder outside the TapitWeb folder. Once the upgrade installation is finished you can overwrite the new Security.mdb file with the backed up file. For upgrade installation follow directions from Installing Web Reports section of this document.
Upgrading TAPIT Web Reports ver. 4.1.1.5 and higher (versions distributed with TAPIT EX 4.1.0 and higher)
1. Go to Start/TapitWeb/Uninstall Web Reports and run the uninstall program. 2. Follow directions from Installing Web Reports section of this document.
Upgrading TAPIT Web Reports ver. 1.1.1.4 (version distributed with TAPIT 2000 3.1.9) Note: When upgrading to version 4.1.1.5 and higher you must upgrade your TAPIT 2000 to TAPIT EX first. 3. Go to Start/TapitWeb/Uninstall Web Reports and run the uninstall program. 4. Follow directions from Installing Web Reports section of this document.
Upgrading TAPIT Web Reports version 1.1.1.3 (TAPIT Web Reports version 1.1.1.3 has been distributed with the TAPIT 2000 3.1.8 version)
Note: When upgrading to version 4.1.1.5 and higher you must upgrade your TAPIT 2000 to TAPIT EX first. This version has a problem with the uninstall program. Do not use the uninstall utility. It can impair your TAPIT software. Remove TapitWebReports folder as well as TapitWeb entries in Start/Programs menu manually.

124 •••• WEB REPORTS Tapit
Proceed with the installation of the new product – see Installing Web Reports section of this document.
USER INSTRUCTIONS Logging in to the Tapit Web Reports
There are two ways to use Tapit Web Reports. A = if required, you can set up location/department level permissions and only users with assigned permissions will be able to view reports. B = you can use Tapit Web Reports “as is” – using the two passowrds created during installation.
1. Open Tapit Web Reports. Login screen appears.
2. A If you are not using location/department permissions or no permissions have yet been created, login screen has only one entry field - Password. (If permissions have already been set up, skip this point and go to point 3.) Enter your password. If the administrative password has been entered, the main menu is displayed. This screen contains the following options: View Reports, Passwords, and Set up Permissions. To view reports, click on the View Reports option. Reports menu screen appears. For more information on how to generate reports see the Creating /Printing Reports section below. If you decide to set up permissions click on the Set up Permissions option. Refer to the Permissions section for further instructions.
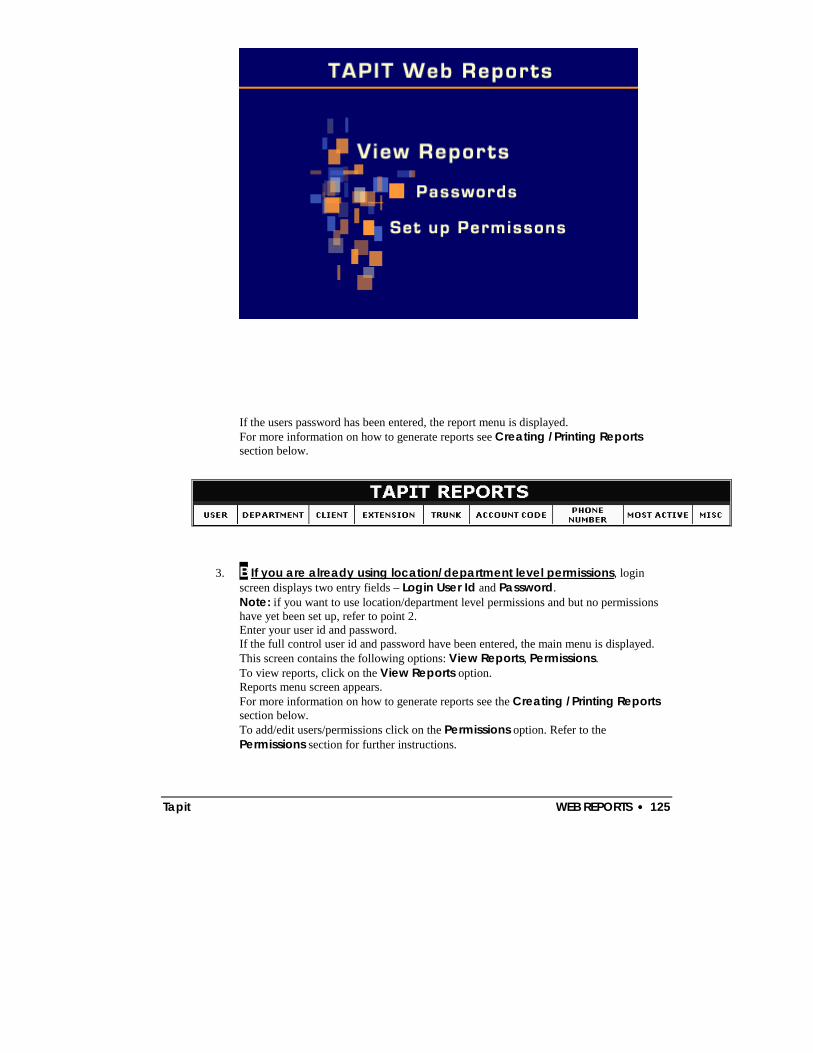
Tapit WEB REPORTS •••• 125
If the users password has been entered, the report menu is displayed. For more information on how to generate reports see Creating /Printing Reports section below.
3. B If you are already using location/department level permissions, login screen displays two entry fields – Login User Id and Password. Note: if you want to use location/department level permissions and but no permissions have yet been set up, refer to point 2. Enter your user id and password. If the full control user id and password have been entered, the main menu is displayed. This screen contains the following options: View Reports, Permissions. To view reports, click on the View Reports option. Reports menu screen appears. For more information on how to generate reports see the Creating /Printing Reports section below. To add/edit users/permissions click on the Permissions option. Refer to the Permissions section for further instructions.

126 •••• WEB REPORTS Tapit
If the users password has been entered, the report menu is displayed. For more information on how to generate reports see Creating /Printing Reports section below.
Depending on users permissions, the report menu may not have all the options shown above.
CREATING/PRINTING REPORTS 1. Open the report menu (see Logging in to the Tapit Web Reports for instructions on how
to open report menu).
2. Each option on the menu is a report category. Each category contains several reports. For example click on Phone Number. Your screen displays the list of reports in a Phone Number category.

Tapit WEB REPORTS •••• 127
3. Click on the name of a required report.

128 •••• WEB REPORTS Tapit
4. The filter screen appears. Enter the appropriate criteria.
Location If the Remote Manager is not installed this list contains only one item – Main. Otherwise Location list box enables you to switch locations and run reports for any of your remote sites. Date enter the time frame in the following format: “mm/dd/yyyy-mm/dd/yyyy” or select data range from the list box below Time Window enter the time window in the following format: “hh:mm-hh:mm”. The report will run only for calls taking place in that time bracket. Extension enter the extension bracket or if you want to run a report for a specific extension, enter the same value in both text boxes. Trunk enter the trunk bracket or if you want to run a report for a specific trunk, enter the same value

Tapit WEB REPORTS •••• 129
in both text boxes. Account Code enter the account code bracket or if you want to run a report for a specific account code, enter the same value in both text boxes. Matter Code enter the matter code bracket or if you want to run a report for a specific matter code, enter the same value in both text boxes. Author. Code enter the authorization code bracket or if you want to run a report for a specific authorization code, enter the same value in both text boxes. Area Code enter the area code bracket or if you want to run a report for a specific area code, enter the same value in both text boxes. Source IP Addr enter the source IP address. Use “*” wild character at the end of the entry if you want to search for all source IP addresses containing the entered string. Dest. IP Addr enter the destination IP address. Use “*” wild character at the end of the entry if you want to search for all destination IP addresses containing the entered string. Duration click on the down arrow to open the operator list. Select the appropriate operator and enter the call duration value in the following format: “hh:mm:ss”. Ring Duration click on the down arrow to open the operator list. Select the appropriate operator and enter the ring duration value in the following format: “hh:mm:ss”. Ring Duration indicates the length of the ring time before the call was picked up. Hold Duration click on a down arrow to open the operator list. Select the appropriate operator and enter the call duration value in the following format: “hh:mm:ss”. Hold Duration indicates how long the call stayed on hold. Cost click on the down arrow to open the operator list. Select the appropriate operator and enter the call cost value (i.e. enter 1.0 for $1 and .5 for 50 cents) Telephone # enter the telephone number. You can enter partial numbers. i.e. only area code or area code and exchange (973 or 973 360). DNIS # enter the DNIS number. Direction select the direction of phone activity. To select consecutive list entries, click the first item, press and hold down SHIFT, and then click the last item. To select list entries that are not consecutive, press and hold down CTRL, and then click each item. Call Status select the desired call status option. To select consecutive list entries, click the first item, press and hold down SHIFT, and then click the last item. To select list entries that are not consecutive, press and hold down CTRL, and then click each item. Department, User, Client, States If your Tapit database does not contain any Department, Client or User records the list boxes will be empty. To select consecutive list entries, click the first item, press and hold down SHIFT, and then

130 •••• WEB REPORTS Tapit
click the last item. To select list entries that are not consecutive, press and hold down CTRL, and then click each item. Only Local Calls/Exclude Local Calls check one of the boxes if you want to run a report only for local calls or all calls except local respectively.
5. To start over clean the filter screen by clicking on Clear. When you have entered all filter criteria, click on the Create Report button. Report screen appears. Depending on the size of your database, the scope of the report and the speed of your Internet connection it may take a few minutes. If the report has more than one page, links to the next pages (up to 10) appear on the top and the bottom of the screen. Ten page numbers are displayed at the same time. You can move to each page by clicking on its number. To advance to the next 10 pages, click the single arrow pointing to the right. To go back to the previous 10 pages, click on the single arrow pointing to the left. Click the right double arrow to go to the last page of the report. If you want to go to the first page of the report, click the left double arrow
6. Print To File opens the Print To File screen. Use it if you need to save a copy of a report for printing or emailing.
Select appropriate file type: HTML or EXCEL (to view EXCEL files MS EXCEL must be installed) and click on Continue. The Print to File screen expands to display View File button and specs for the newly generated file.

Tapit WEB REPORTS •••• 131
Click on the View File button to open the report. Some files may take few minutes to load – depending on their size. The report file opens in a new window. You can save this file to your disk, print or email it using Internet Explorer menu options. Note: once you leave the Print To File screen or generate a new file, the previously created file is erased.
DRILL DOWN REPORTS Summary reports contain links to the detail reports for the each record. For example clicking on a specific user name in the Summary by User report invokes a detail report for this user. Clicking on the name of state in the Summary by State – Map report displays the detail report for this state. Most Active reports are summary reports. They display top 30 (for your filter selection) most active extensions/account codes/phone numbers. If you purchased TAPIT with Remote Manager you can run Most Active reports for all or selected locations.
GRAPH REPORTS There are several graph reports available. They display the top 100 records for your filter selection and can be sorted by call volume or by cost.

132 •••• WEB REPORTS Tapit
TRUNK ANALYSIS REPORTS
1. To run one of the trunk analysis reports click on the Trunk Analysis group. The list of available reports appears.
2. Click on the required report. The filter screen appears. Note: It is important to set your trunks and your trunk groups before running reports. Refer to the sections below on “how to maintain trunks and trunk groups”.
3. When your trunks and trunk groups are set up, correctly enter the required criteria on the filter screen and click on Create Report.
The report screen appears.
To see field descriptions point to each columns header. Note: The Trunk Group reports produce no data unless trunk groups are set up.
Tapit WEB REPORTS •••• 133
Hourly All Trunks Busy By Trunk Group accounts only for the time when all trunks are unavailable for use.

134 •••• WEB REPORTS Tapit
Setting Up Trunk Groups:
1. From the main menu click on the Trunk Analysis report group to display the list of
available reports. 2. Select one of the Trunk Analysis reports. 3. The report filter screen appears.
4. Click on the Setup Trunk Groups button located on the bottom of the screen.
The Trunk Group Setup Screen appears.

Tapit WEB REPORTS •••• 135
5. To add a new group: Click on the New button. Enter group's name/id in the New Group text box. Note: When opened for the first time this screen displays the New Group text field by default. Select trunk/trunks from the Available Trunks list. Click on the Add button to add selected trunks to the Assigned Trunks list. If you need to remove any trunks from Assigned Trunks list, select trunk/trunks from the Assigned Trunks list and click on the Remove button. Click on the Save button to save the new group. The New Group field changes into Available Trunks list.
6. To edit a trunk group: Select a trunk group from the Available Groups list.
Select trunk/trunks from the Assigned Trunks list and click on the Remove button to remove them from a trunk group. Select trunk/trunks from the Assigned Trunks list and click on the Add button to add them to a trunk group. Click on the Save button to save the changes.
7. To delete an unwanted trunk group: Select a trunk group from the Available Groups list and click on the Delete button. Click OK on the confirmation message. A trunk group has been deleted.
8. Click on Filter to go back to the filter screen.
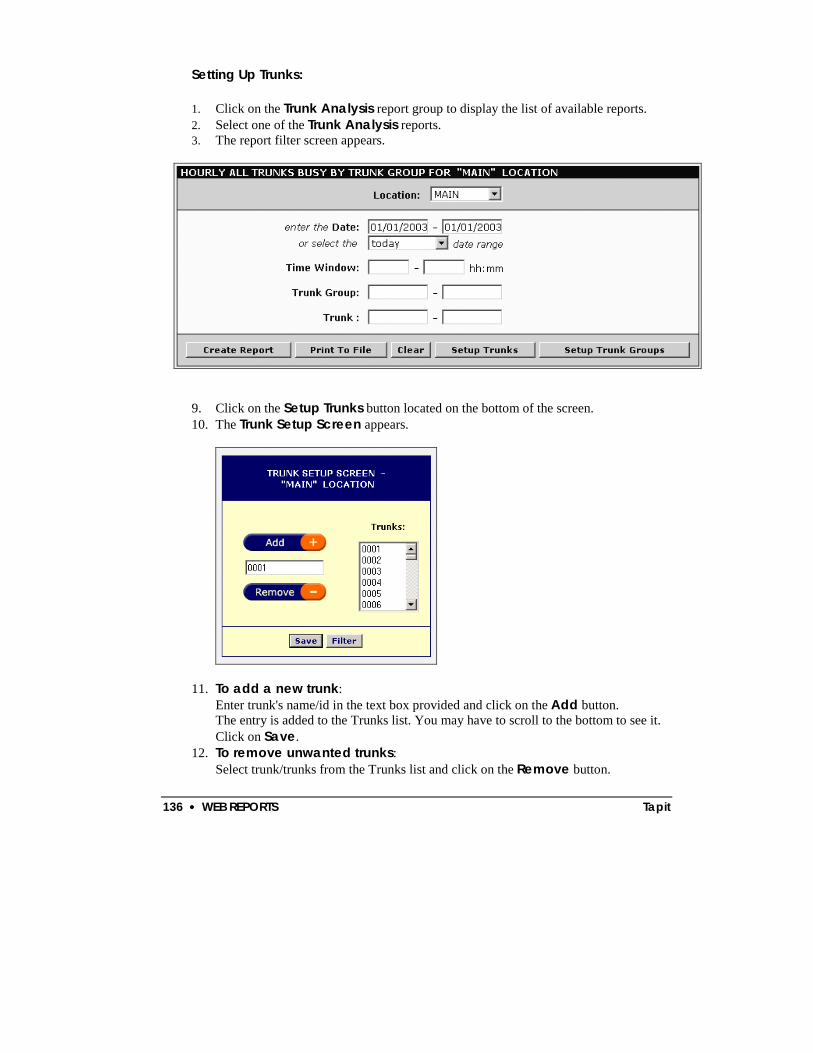
136 •••• WEB REPORTS Tapit
Setting Up Trunks: 1. Click on the Trunk Analysis report group to display the list of available reports. 2. Select one of the Trunk Analysis reports. 3. The report filter screen appears.
9. Click on the Setup Trunks button located on the bottom of the screen. 10. The Trunk Setup Screen appears.
11. To add a new trunk: Enter trunk's name/id in the text box provided and click on the Add button. The entry is added to the Trunks list. You may have to scroll to the bottom to see it. Click on Save.
12. To remove unwanted trunks: Select trunk/trunks from the Trunks list and click on the Remove button.

Tapit WEB REPORTS •••• 137
Click on the Save button to save the changes. Click on Filter to go back to the filter screen.
PASSWORDS Password screen is available to a user with the administrator password ONLY if the location/department level permissions have not been set up. Tapit Web reports has two levels of passwords: - administrator is able to set/change passwords, view Authorization Code and Trunk Analysis reports - user is able to view all reports but authorization code group and does not have access to password setup screen. Initially passwords are set during the installation, however they can be changed later using the password screen. 1. Open Tapit Web Reports application with your administrator password. 2. The Main Menu screen appears.
3. Click on Passwords. 4. The Password screen is displayed.
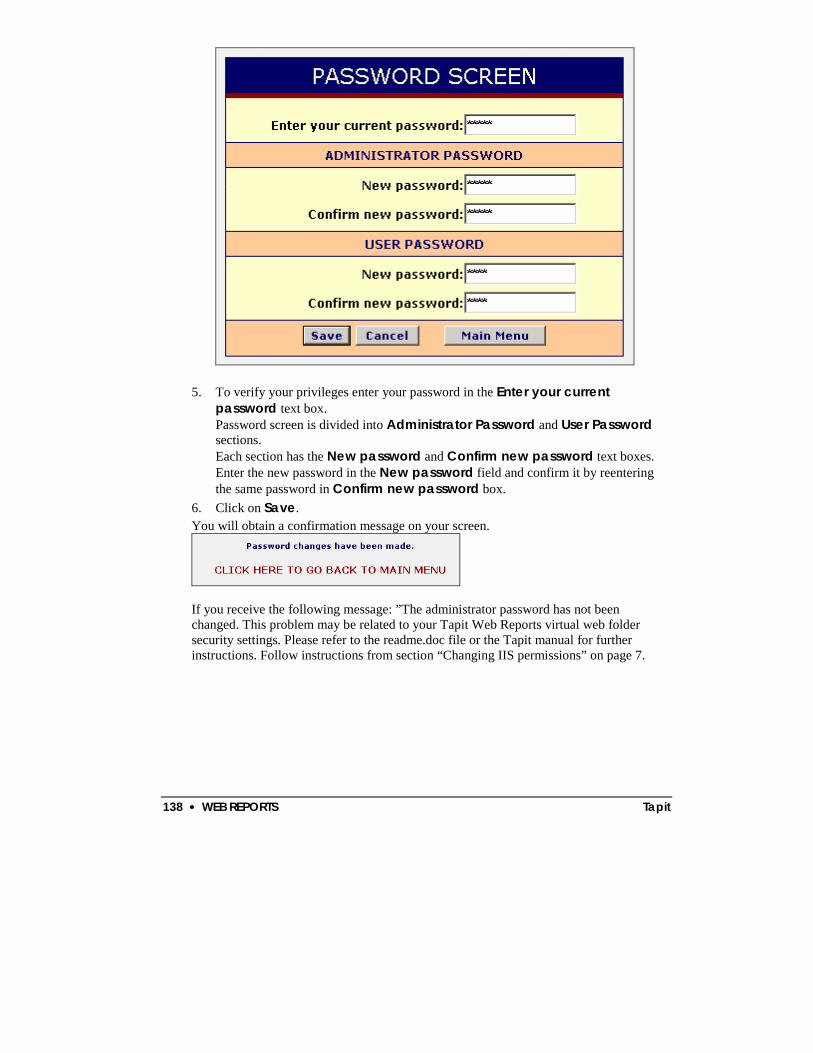
138 •••• WEB REPORTS Tapit
5. To verify your privileges enter your password in the Enter your current password text box. Password screen is divided into Administrator Password and User Password sections. Each section has the New password and Confirm new password text boxes. Enter the new password in the New password field and confirm it by reentering the same password in Confirm new password box.
6. Click on Save. You will obtain a confirmation message on your screen.
If you receive the following message: ”The administrator password has not been changed. This problem may be related to your Tapit Web Reports virtual web folder security settings. Please refer to the readme.doc file or the Tapit manual for further instructions. Follow instructions from section “Changing IIS permissions” on page 7.

Tapit WEB REPORTS •••• 139
PERMISSIONS IMPORTANT NOTE:
Once permissions are created, the Tapit Web Reports login process changes. Only users with permissions are able to access Tapit Web Reports.
If a Full Control password or user id is lost, an administrator can use the generic password (old Administrator Password) to open Tapit Web Reports with full control. The generic password needs to be entered in both Login User Id and Password fields on the login screen.
The generic administrator password should be available only to Tapit Web Reports administrator/s. If users other than administrator/s know it, the Administrator Password should be changed using the Passwords option from the Main Menu before permissions are set up. The Passwords option is not available once permissions are set up.
BEFORE SETTING UP PERMISSIONS: Tapit EX must be installed and set up. Remote Manager, if you have purchased this option, must be installed and set up. Each remote site and the main location must have at least one department assigned to it.
1. Open Tapit Web Reports. Login screen appears.
2. If no permissions have yet been created, login screen has only one entry field - Password. Enter your administrative password. If permissions have already been set up, login screen displays two entry fields – Login User Id and Password. Enter your Full Control user id and password. You must be a Tapit Web Reports administrator to access Permissions.
3. The main menu screen appears. If no permissions have yet been created, this screen displays the following options: View Reports, Passwords, and Set up Permissions. If permissions have already been set up, this screen displays the following options: View Reports, Permissions.
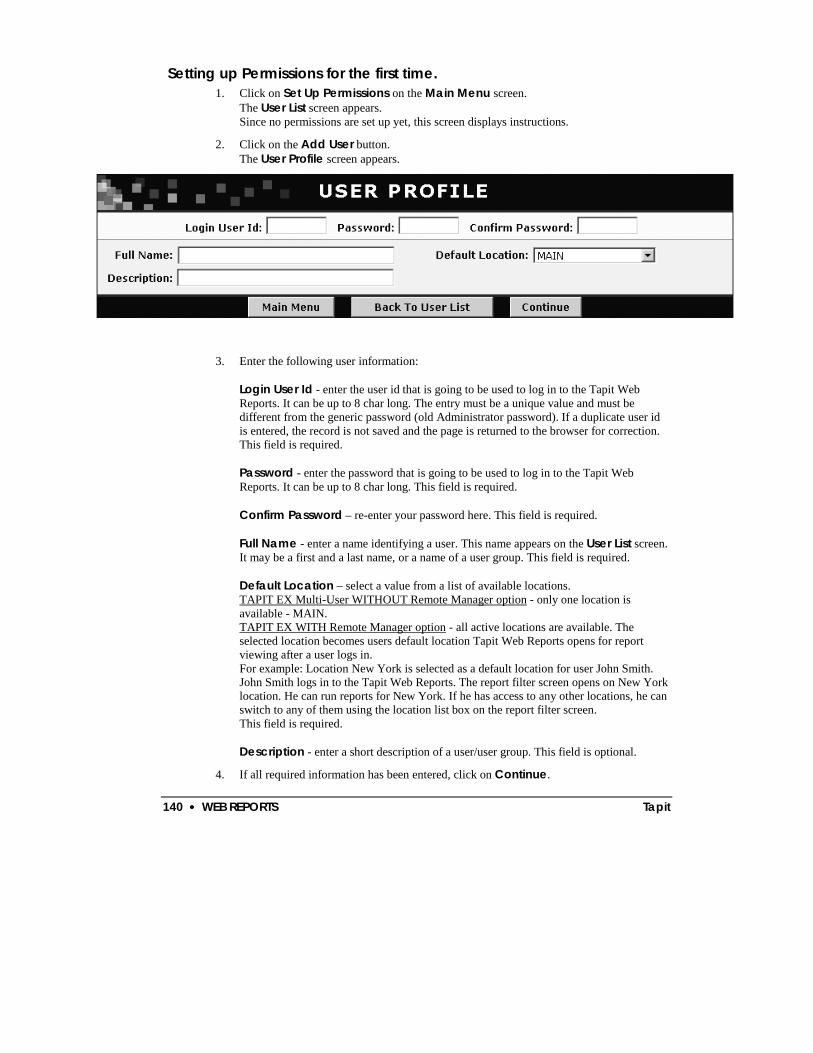
140 •••• WEB REPORTS Tapit
Setting up Permissions for the first time. 1. Click on Set Up Permissions on the Main Menu screen.
The User List screen appears. Since no permissions are set up yet, this screen displays instructions.
2. Click on the Add User button. The User Profile screen appears.
3. Enter the following user information: Login User Id - enter the user id that is going to be used to log in to the Tapit Web Reports. It can be up to 8 char long. The entry must be a unique value and must be different from the generic password (old Administrator password). If a duplicate user id is entered, the record is not saved and the page is returned to the browser for correction. This field is required. Password - enter the password that is going to be used to log in to the Tapit Web Reports. It can be up to 8 char long. This field is required. Confirm Password – re-enter your password here. This field is required. Full Name - enter a name identifying a user. This name appears on the User List screen. It may be a first and a last name, or a name of a user group. This field is required. Default Location – select a value from a list of available locations. TAPIT EX Multi-User WITHOUT Remote Manager option - only one location is available - MAIN. TAPIT EX WITH Remote Manager option - all active locations are available. The selected location becomes users default location Tapit Web Reports opens for report viewing after a user logs in. For example: Location New York is selected as a default location for user John Smith. John Smith logs in to the Tapit Web Reports. The report filter screen opens on New York location. He can run reports for New York. If he has access to any other locations, he can switch to any of them using the location list box on the report filter screen. This field is required. Description - enter a short description of a user/user group. This field is optional.
4. If all required information has been entered, click on Continue.

Tapit WEB REPORTS •••• 141
5. The Location/Department Security Setup part of the User Profile screen is displayed.
To set the same permissions for each location, use one of the preset permission options ( ) located below user information part of the screen. To set custom permissions for each location use the location/department tree located in the left pane of the screen (see Using Location/Department Tree section below).
6. When you are finished setting up a user, click on Save. User Profile screen is brought back by the browser with the appropriate status message.
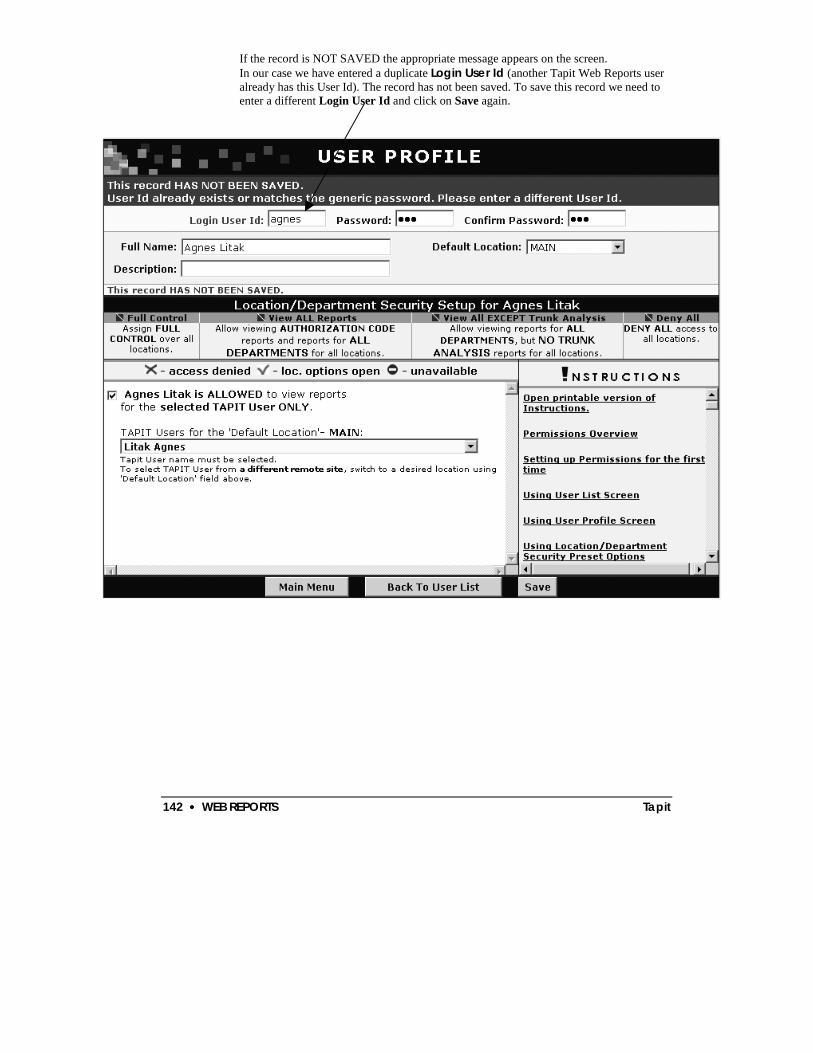
142 •••• WEB REPORTS Tapit
If the record is NOT SAVED the appropriate message appears on the screen. In our case we have entered a duplicate Login User Id (another Tapit Web Reports user already has this User Id). The record has not been saved. To save this record we need to enter a different Login User Id and click on Save again.

Tapit WEB REPORTS •••• 143
If the record is SAVED the Record has been SAVED message is displayed.
7. To set up another user click the Go back to User List button and repeat steps 2 to 6. To quit, simply close the browser window. To go to the main menu, click on the Main Menu button.

144 •••• WEB REPORTS Tapit
Using User List Screen User List screen is a list of the current Tapit Web Report users. It allows you to add/edit/remove users. The list can be sorted by clicking on the Full Name, Default Location or Description headers correspondingly.
To enter the User List screen click on the Permissions option on the Main Menu. User List screen appears.
To add a new user click on the Add User button. The User Profile screen is displayed.
To edit a user double click on users Full Name. The User Profile screen is displayed. You can also select this user by checking the Select box for the required record. The record is highlighted. Click on the Edit User button to bring up the User Profile screen

Tapit WEB REPORTS •••• 145
To remove a user, select a user by checking the Select box for the required record. The record is highlighted. Click on the Remove User button. Click OK to the confirmation message. The user is removed from the list.
Using User Profile Screen User Profile screen allows you to enter users information and set up users permissions.
To open the User Profile screen, depending on what you want to do, use the Edit User or Add User options from the User List screen. If you are adding a new user, only users information part of the screen is displayed at first. To add a new user, follow instructions from the section above - Setting up Permissions for the first time.
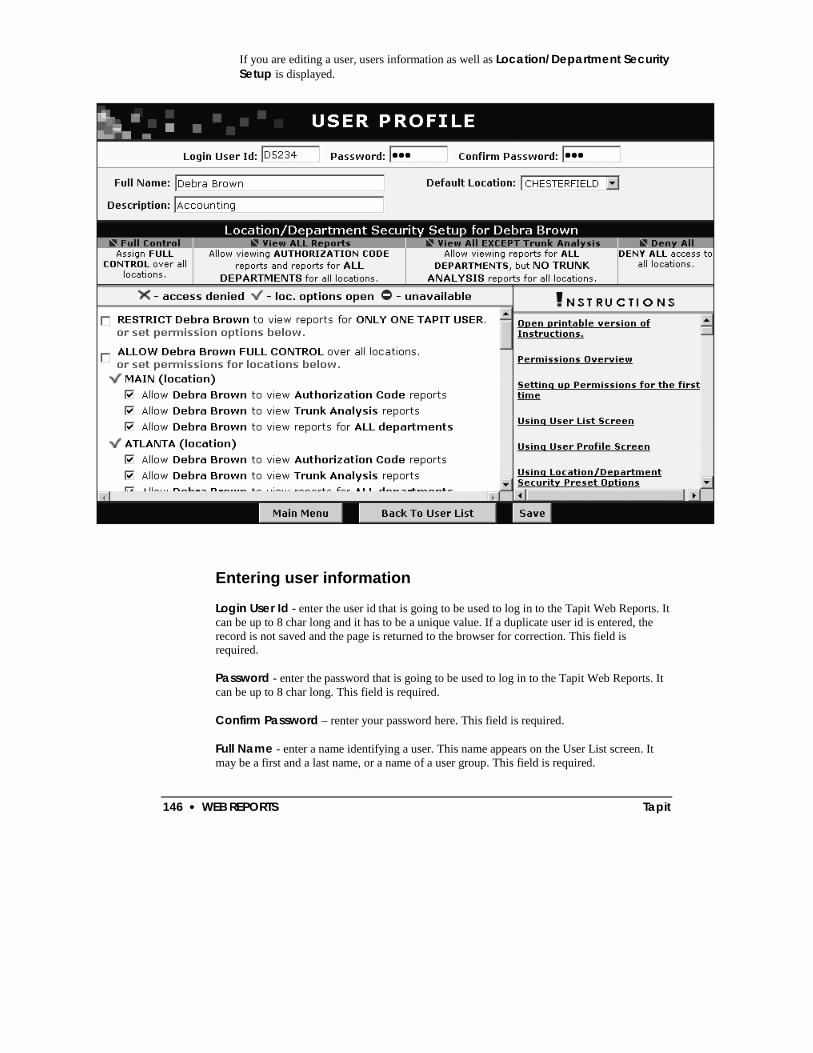
146 •••• WEB REPORTS Tapit
If you are editing a user, users information as well as Location/Department Security Setup is displayed.
Entering user information Login User Id - enter the user id that is going to be used to log in to the Tapit Web Reports. It can be up to 8 char long and it has to be a unique value. If a duplicate user id is entered, the record is not saved and the page is returned to the browser for correction. This field is required. Password - enter the password that is going to be used to log in to the Tapit Web Reports. It can be up to 8 char long. This field is required. Confirm Password – renter your password here. This field is required. Full Name - enter a name identifying a user. This name appears on the User List screen. It may be a first and a last name, or a name of a user group. This field is required.

Tapit WEB REPORTS •••• 147
Default Location – select a value from a list of available locations. TAPIT EX Multi-User WITHOUT Remote Manager option - only one location is available - MAIN. TAPIT EX WITH Remote Manager option - all active locations are available. The selected location becomes users default location Tapit Web Reports opens for report viewing after a user logs in. For example: Location New York is selected as a default location for user John Smith. John Smith logs in to the Tapit Web Reports. The report filter screen opens on New York location. He can run reports for New York. If he has access to any other locations, he can switch to any of them using the location list box on the report filter screen. A user must be allowed access to his default location - a location must be open ( ) and appropriate permission options within a location must be checked. If no permission boxes are checked, a location is interpreted as denied. This field is required. Description - enter a short description of a user/user group. This field is optional.
UUssiinngg LLooccaattiioonn//DDeeppaarrttmmeenntt SSeeccuurriittyy SSeettuupp Using preset options
There are four preset options located below the user information part of the screen (they are not displayed right away when entering a new user). You can set the same permissions for each location by clicking the icon for the appropriate option. Each option has a description displayed below it.

148 •••• WEB REPORTS Tapit
Using the location/department tree:
By default the location/department tree displays permission options for all available departments. When adding a new user, the top Restrict.. and Full Control boxes are unchecked and access is denied to all locations.
To restrict user to view reports for ONLY ONE TAPIT USER, check the Restrict … to view reports for ONLY ONE TAPIT USER box on the top of the location/department tree.

Tapit WEB REPORTS •••• 149
The box description changes to ...is ALLOWED to view reports for the selected TAPIT User ONLY. Select the TAPIT User name from the list below. This list contains user names for TAPIT installed at the Default Location. In our case the default location is MAIN. If we select another Default Location
the user list populates with TAPIT Users for that location.
The TAPIT User must be selected. In our case (for the Main location above) Debra Brown can view reports ONLY for Brad Arnold. Note: Tapit Web Reports user restricted to view reports for only one TAPIT User does not have access to Trunk Analysis, Most Active and Consolidated Locations (Remote Manager only) reports. To assign full control rights to a user, check the Allow … Full Control box located below the Restrict … to view reports for ONLY ONE TAPIT USER option. To allow access to a location open a location by clicking on a icon to the left of its name. Location options are displayed and a changes to a .

150 •••• WEB REPORTS Tapit
Set up permissions for a location by checking appropriate location options. If a location is open ( ) but has NO permission options checked, it is interpreted as a denied location. The permission options for each location include: Allow ... to view Authorization Code reports, Allow ... to view Trunk Analysis reports, Allow ... to view reports for All Departments and a list of locations departments.
Check the Allow to ... view Authorization Code reports box if you want a user to be able to view this kind of reports for a location. The same applies to the Allow ... to view Trunk Analysis reports option. Note: to prevent fraud, Authorization Code reports should not be accessible to everyone. Trunk Analysis group reports on call traffic. Such reports are NOT of interest to everyone and since they take time and resources to generate, you may decide to deny access to average users.
Note: if a location name has a to the left of it, then this location has no departments. A location must have at least one department, otherwise no permissions can be assigned to it and it is not accessible for users. To let a user view reports for all departments within a location click on the Allow ... to view reports for All Departments box. Otherwise, check the appropriate department boxes within a location.
To deny access to a location close it by clicking on icon to the left of it. The icon changes to . Note: when you deny access to a location all previously set permissions for this location are cleared.
Tapit WEB REPORTS •••• 151
Forgot Password? 1. If a user forgets the user id/password then an administrator (user with full control) has to
create a new user id/password for this user.
2. If a full control password or user id is forgotten or lost, an administrator can use the generic password (old Administrator Password) to open Tapit Web Reports with full control. The generic password needs to be entered in both Login User Id and Password fields on the Login screen.
Glossary of terms Login User Id is the user id that is going to be used to log in to the Tapit Web Reports. It can be up to 8 char long and it has to be a unique value. If a duplicate user id is entered, the record is not saved and the page is returned to the browser for correction. This field is required. Password is the password that is going to be used to log in to the Tapit Web Reports. It can be up to 8 char long. This field is required. Confirm Password - renter your password here. This field is required. Full Name is a name identifying a user. This name appears on the User List screen. It may be a first and a last name, or a name of a user group. This field is required. Default Location is a list of available locations. TAPIT EX Multi-User WITHOUT Remote Manager option - only one location is available - MAIN. TAPIT EX WITH Remote Manager option - all active locations are available. The selected location becomes users default location Tapit Web Reports opens for report viewing after a user logs in. For example: Location New York is selected as a default location for user John Smith. John Smith logs in to the Tapit Web Reports. The report filter screen opens on New York location. He can run reports for New York. If he has access to any other locations, he can switch to any of them using the location list box on the report filter screen. A user must be allowed access to his default location - a location must be open ( ) and appropriate permission options within a location must be checked. If no permission boxes are checked, a location is interpreted as denied. This field is required. Description is a short description of a user/user group. This field is optional. Restrict … to view reports for ONLY ONE TAPIT USER option check this box to restrict user to view reports for ONLY ONE TAPIT USER. Note: Tapit Web Reports user restricted to view reports for only one TAPIT User does not have access to Trunk Analysis, Most Active and Consolidated Locations (Remote Manager only) reports. Full Control option gives a user full control over all locations. A full control user is the Tapit Web Reports administrator. Full control user can maintain passwords/permissions for all users and view all available reports for all available sites. Check the preset Full Control option or the Full Control box on the top of the location/department tree to assign full control to a user. If a full control password or user id is lost, an administrator can use the generic password (which is the administrator password used before permissions were set up) to open Tapit Web

152 •••• WEB REPORTS Tapit
Reports with full control. The generic password needs to be entered in both Login User Id and Password fields on the Login screen.
Allow to ... view Authorization Code reports - check this box if you want a user to be able to view Authorization Code reports for a location. To prevent fraud, Authorization Code reports should not be accessible to everyone.
Allow ... to view Trunk Analysis reports - check this box if you want a user to be able to view Trunk Analysis reports for a location. These are call traffic reports. Such reports are NOT of interest to everyone and since they take time and resources to generate, you may decide to deny access to average users.
Deny All - click on this preset option if you don't want to delete user information and at the same time you want to prevent this user from entering Tapit Web Reports.
= access denied. Click on to open permission options for a location.
= location permission options are opened. Access is allowed to this location provided
appropriate option boxes are checked. Clicking on denies access to a location as well as clears and hides its permission options.
= unavailable location. Location is unavailable because it does not have any departments
assigned to it. A location must have at least one department to allow access. You can save user information. After departments for a location are set up in TAPIT EX, you can go back to this record in Tapit Web Reports to set up permissions.
TROUBLESHOOTING WEB REPORTS For troubleshooting information see the TapitWebReports.pdf on Trisys Software CD in Tapit Web Reports folder or find it on the Web at http://www.trisys.com/documents/WebRepsDoc/TapitWebReports.pdf
Error Message: “Script Time Out” error occurs when a report is generating longer than the maximum allowed processing time. Sometimes the specified time frame contains too much data and the report takes too long to run. You can remedy this by going back to the filter screen and trying to run the same report again for a shorter time period.

Tapit Index •••• 153
Index
B Before installing your software 2
C Call Editor 58 Clients 29
Add a new client 29 Edit or delete a client 30 Print Clients List 30
Custom Reports 80
D Data Maintenance 74
Call Records Maintenance 77 Export 75 Export to Billing Software 78 Import 76 Import Tapit DOS Data 79 Import V&H Data 79
Database Repair Utility 91 Departments 24
Add a new department 25 Edit or delete a department 25 Print departments list 26
Dialing patterns 69 Add a dialing pattern 70 Delete a dialing pattern 70 Edit a dialing pattern 70
DOS Data 79
F Filter - reports 32 Fraud Alert 84
Delete Log File 86 Dialed numbers 89 Extensions 88 Parameters 84
Test Alarms 86 Trunks 87
G Getting Started 2
H Hierarchy Tree 27
I Installing Tapit Multi-User 8 Installing Tapit Single User 4 Introduction 1
M Main Menu 21 Monitor 93
Action 94 PBX 95 Settings 94
Moving TAPIT EX to another computer 12
O Overview 22
P Pricing
Add new pricing record 63 Delete pricing record 63 Find a specific record 63
Pricing Call Records 60
R Recosting 66
Using Custom option 67 Using Tapit Carrier option 68 Using V&H Carrier option 68
Reindexing 65 Reinstalling TAPIT EX 12 Report Designer 80

154 •••• Index Tapit
Custom Reports Creating reports from templates 83 Detail report 80 Editing custom reports 83 Summary report 82
Report Scheduler 72 Add a new report 72 Delete a report record 73 Edit a report record 73
Reports 31 Filter options 32 Web Reports 113
S Setting up TAPIT Single User 5 SMDR Alarm 104
Installation 105 Requirements 104 User Instructions 106
SMDR Monitor 93 Software License Agreement 97 Statistics 45
Graphs 45 For Date and Time 46 For Date and Time - Detail 46 For top 10 values 45
System Maintenance 47 System Parameters 7, 48
Activity 53 Call Costing 51 Communications 49 Destination 55 Trunks 54
System Requirements 1
T Technical Support 100 Troubleshooting 100
U Upgrading TAPIT 2000 to TAPIT EX 12 Upgrading TAPIT EX – different serial
number 11 Upgrading TAPIT EX to TAPIT EX 12
Upgrading TAPIT for DOS to TAPIT EX 18
Upgrading TAPIT for Windows 15 Users 22
Add a new user 23 Edit or delete a user 24 Print Hierarchy Tree 27 Printing users list 24
V V&H Data - Import 79
W Web Reports
User Instructions Creating/Printing Reports 125, 127 Drill Down Reports 132 Graph Reports 132 Trunk Analysis Reports 133
Web Reports 113 Installation 114 Permissions 140 Requirements 113 Troubleshooting 153 Upgrading TAPIT Web Reports 124 User Instructions 125