table saw -...
TRANSCRIPT

Table Saw 600WInstruction Manual3 Year Replacement Warranty
OZTS600WAWARNING! Read all safety warnings and all instructions. Failure to follow the
warnings and instructions may result in electric shock, fire and/or serious injury.Save all warnings and instructions for future reference.
To view the full range visit: www.ozito.com.au0212
!!

14
Motor Size: 600W (S2-30min=600W)Input: 230 - 240V ~ 50HzBlade Diameter: 200mm (8”)Blade Bore: 16mmNo. Load Speed: 2950/minDepth of Cut: 40mm Table size: 500 x 335mmWeight: 12.95kg
1. Fence guide2. 45º cutting guide3. Blade guard4. Tape measure5. Table6. Riving knife7. TCT blade8. Table insert9. Leg
10. Blade cover11. On/off switch12. Fence lock knob13. Blade shaft wrench14. Blade wrench15. Push stick
21
2
SPECIFICATIONS - MODEL NO. OZTS600WA
3
4
5
67
8
109
11
12
4
15
13
KNOW YOUR PRODUCT

3
TABLE OF CONTENTS
SPECIFICATIONS…………………………………………
KNOW YOUR PRODUCT………………………………..
INTRODUCTION………………………………………...
GENERAL SAFETY WARNINGS………………………..
ADDITIONAL SAFETY RULES FOR TABLE SAW…….
ASSEMBLY………………………………………………..
OPERATION ……………………………………………..
MAINTENANCE …………….…………………………..
SPARE PARTS ……………………………………………
CONTENTS ……………………………………………...
WARRANTY………………………………………………
Page 2
Page 2
Page 4
Page 5
Page 7
Page 8
Page 8
Page 9
Page 10
Page 11
Page 12

4
Congratulations on purchasing an Ozito Table Saw. Weaim to provide quality tools at an affordable price. Wehope you will enjoy using this appliance for many years.
Your Ozito Table Saw OZTS600WA has been designed to cut timber and timber products. It is intended for DIYuse only.
Warning! When using mains-powered tools, basic safety precautions,including the following, should always be followed to reduce risk of fire,electric shock, personal injury and material damage.
Read the whole manual carefully and make sure you know how to switch the tooloff, in an emergency, before operating the tool.
Save these instructions and other documents supplied with this machine for future reference.
The electric motor has been designed for 230V and 240V only. Always check thatthe power supply corresponds to the voltage on the rating plate.
This tool is earthed in accordance with AS/NZS3100:2002+A1:2003+A2:2004+A3:2005.
Using an Extension Lead
Always use an approved extension lead suitable for the power input of this tool.Before use, inspect the extension lead for signs of damage, wear and ageing.Replace the extension lead if damaged or defective.
When using an extension lead on a reel, always unwind the lead completely. Use ofan extension lead not suitable for the power input of the tool or which is damagedor defective may result in a risk of fire and electric shock.
It is recommended that the extension lead is a maximum of 25m in length. Do Notuse multiple extension leads.
INTRODUCTION
!!
ELECTRICAL SAFETY!!

!!
5
GENERAL SAFETY WARNINGS
Warning! Read all instructions. Failure to follow all instructions listed belowmay result in electric shock, fire and/or serious injury. The term “Power Tool”in all of the warnings listed below refers to your mains operated (corded)power tool or battery operated (cordless) power tool.
SAVE THESE INSTRUCTIONS
1) WORK AREA
a) Keep work area clean and well lit. Cluttered and dark areas invite accidents.
b) Do not operate power tools in explosive atmospheres, such as in thepresence of flammable liquids, gases, or dust. Power tools create sparks whichmay ignite the dust or fumes.
c) Keep children and bystanders away while operating a power tool. Distractionscan cause you to lose control.
2) ELECTRICAL SAFETY
a) Power tool plugs must match the outlet. Never modify the plug in any way.Do not use any adapter plugs with earthed (grounded) power tools.Unmodified plugs and matching outlets will reduce risk of electric shock.
b) Avoid body contact with earthed or grounded surfaces such as pipes,radiators, ranges and refrigerators. There is an increased risk of electric shock ifyour body is earthed or grounded.
c) Do not expose power tools to rain or wet conditions. Water entering a powertool will increase the risk of electric shock.
d) Do not abuse the cord. Never use the cord for carrying, pulling or unpluggingthe power tool. Keep cord away from heat, oil, sharp edges or moving parts.Damaged or entangled cords increase the risk of electric shock.
e) When operating a power tool outdoors, use an extension cord suitable foroutdoor use. Use of a cord suitable for outdoor use reduces the risk of electric shock.
3) PERSONAL SAFETY
a) Stay alert, watch what you are doing and use common sense when operating apower tool. Do not use a power tool while you are tired or under the influenceof drugs, alcohol or medication. A moment of inattention while operating powertools may result in serious personal injury.
b) Use safety equipment. Always wear eye protection. Safety equipment such asdust mask, non-skid safety shoes, hard hat, or hearing protection used forappropriate conditions will reduce personal injuries.
c) Avoid accidental starting. Ensure the switch is in the off position beforeplugging in. Carrying power tools with your finger on the switch or plugging inpower tools that have the switch on invites accidents.
d) Remove any adjusting key or wrench before turning the power tool on. Awrench or a key left attached to a rotating part of the power tool may result inpersonal injury.
!!
6
GENERAL SAFETY WARNINGS (cont.)
e) Do not overreach. Keep proper footing and balance at all times. Thisenables better control of the power tool in unexpected situations.
f) Dress properly. Do not wear loose clothing or jewellery. Keep your hair,clothing and gloves away from moving parts. Loose clothes, jewellery orlong hair can be caught in moving parts.
g) If devices are provided for the connection of dust extraction and collectionfacilities, ensure these are connected and properly used. Use of thesedevices can reduce dust related hazards.
4) POWER TOOL USE AND CARE
a) Do not force the power tool. Use the correct power tool for yourapplication. The correct power tool will do the job better and safer at the ratefor which it was designed.
b) Do not use the power tool if the switch does not turn it on and off. Anypower tool that can not be controlled with the switch is dangerous and must berepaired.
c) Disconnect the plug from the power source before making anyadjustments, changing accessories, or storing power tools. Such preventivesafety measures reduce the risk of starting the power tool accidentally.
d) Store idle power tools, unplugged & out of the reach of children and donot allow persons unfamiliar with the power tool or these instructions tooperate the power tool. Power tools are dangerous in the hands of untrainedusers.
e) Maintain power tools. Check for misalignment or binding of moving parts,breakage of parts and any other condition that may affect the power toolsoperation. If damaged, have the power tool repaired before use. Manyaccidents are caused by poorly maintained power tools.
f) Keep cutting tools sharp and clean. Properly maintained cutting tools withsharp cutting edges are less likely to bind and are easier to control.
g) Use the power tool, accessories and tool bits etc., in accordance withthese instructions and in the manner intended for the particular type ofpower tool, taking into account the working conditions and the work tobe performed. Use of the power tool for operations different from intendedcould result in a hazardous situation.
5) SERVICE
a) Have your power tool serviced by a qualified repair person using onlyidentical replacement parts. This will ensure that the safety of the power tool is maintained.
!!
7
ADDITIONAL SAFETY INSTRUCTIONS FOR TABLE SAWS
a) This tool is designed to cut timber, timber products and some plastics. Do not use the tool to cut any other materials.
b) Do not cut firewood with this tool. The irregular shape of firewood makes itunsafe to cut with this tool.
c) Prior to operating, connect a dust extractor to the tool. This will ensure a dust-free environment for safer operation.
d) Always use recommended size blade. Do not use smaller or larger blades.
e) Do not use dull or damaged blades. Unsharpened or improperly set bladesproduce narrow *kerf causing excessive friction, blade binding and kickback.
f) Never use damaged or incorrect blade washers or blade bolts. The blade boltand washers are specifically designed for the tool for optimum performance andsafety of operation.
g) Ensure the blade is properly fitted and rotates in the correct direction.Incorrectly fitted blades can cause damage to the material and tool and injury tothe operator.
h) Do not use damaged blades. This can result in serious injury to the operator anddamage to the tool.
i) Do not use abrasive or dado blades. This can result in serious injury to theoperator and damage to the tool.
j) When the blade binds in material being cut, switch off the tool and wait forblade to come to a complete stop. Investigate and take corrective action toeliminate cause of binding.
k) Blade depth and bevel adjusting locking levers must be tight and securebefore making a cut. If blade adjustment shifts while cutting, it may cause bindingand kickback.
l) Do not use the tool without guards in place and operating correctly. Failure toadhere to this may cause damage to the material and tool and injury to the operator.
m) Ensure all clamps, levers and locking knobs are securely tightened prior tooperation. This will result in projects being produced accurately and safely.
n) Support large panels to minimise risk of blade pinching and kickback. Largepanels tend to sag under their own weight. The use of roller stands and/orextension tables is recommended.
o) Allow motor to reach full speed prior to inserting blade into timber. This willresult in safe operation and clean cuts.
p) Never place any part of your body in the blade area while the power isconnected. Injury will be prevented by the accidental starting of the tool.
q) Never attempt to stop the blade by wedging an object against the blade. Thiscan result in serious injury to the operator and damage to the tool.
r) Extremely small pieces of timber should not be cut with this tool in eithermode. This can result in serious injury to the operator caused by flying debris.
s) Recommendation for the use of a residual current device with a rated residualcurrent device of 30mA or less.
*kerf - groove cut in timber
!!
!!
t) When ripping, always use the rip fence. This improves the accuracy of cutand reduces the chance of the blade binding.
u) Always use the push stick, especially when cutting narrow pieces oftimber. Do not place hands in the near vicinity of the blade while operating the tool.
v) Ensure that the riving knife is properly positioned prior to operating. Thiswill prevent the timber from binding up and stalling the blade.
w) Do not over reach to retrieve material from behind the blade. This canresult in serious injury to the operator.
x) Take care when using the table saw to cut a slot in timber. Ensure thatblade guard is properly in place while operating the machine.
1. Remove tool from packaging.
2. Assemble blade guard (3) to riving knife (6) with bolt and nut supplied.
3. Assemble fence guide (1) with fence lock knobs (12) to the table (5).
4. The tool can be fixed to a hard surface by inserting bolts through the legs (9).
Warning! Disconnect the plug from the power source before assembling,making any adjustments or changing accessories. Such preventive safetymeasures reduce the risk of starting the tool accidentally.
Blade replacement
1. Remove the blade cover (10) by removing two screws securing it.
2. Place the blade wrench (14) over the nut securing the blade. Place the bladeshaft wrench (13) onto the blade shaft.
3. Hold the blade shaft wrench (13) while turning the blade wrench (14) anti-clockwise to loosen the blade nut.
4. Remove the blade nut, outer flange and blade from the blade shaft.
5. Clean out any dirt and sawdust.
6. Fit new blade ensuring that the blade teeth follow the same direction as thearrow on the blade guard (3) and repeat the above procedure in reverse.
ADDITIONAL SAFETY INSTRUCTIONS FOR TABLE SAWS(cont.)
8
ASSEMBLY
TOOL OPERATION
!!
9
TOOL OPERATION
Adjusting the riving knife1. Remove the blade guard (3).
2. Remove the table insert (8) by removing the 6 screws securing it.
3. Loosen 2 screws securing the riving knife (6).
4. Adjust the riving knife (6) as required ensuring that it is no less than 3mm from thefitted blade and in line with the blade
NOTE: Adjust the riving knife each time the blade is changed.
Cutting
5. Use fence guide (1) for ripping.
6. Use 45º cutting guide (2) for 45º cuts.
7. Use the push stick (15) when cutting narrow pieces of timber.
8. Push green button on the on/off switch (11) to turn the saw on.
9. Push the timber slowly and carefully through the rotating blade.
10. Push red button on the on/off switch (11) to turn the power off and wait for theblade (7) to come to a complete stop.
11. Remove the timber.
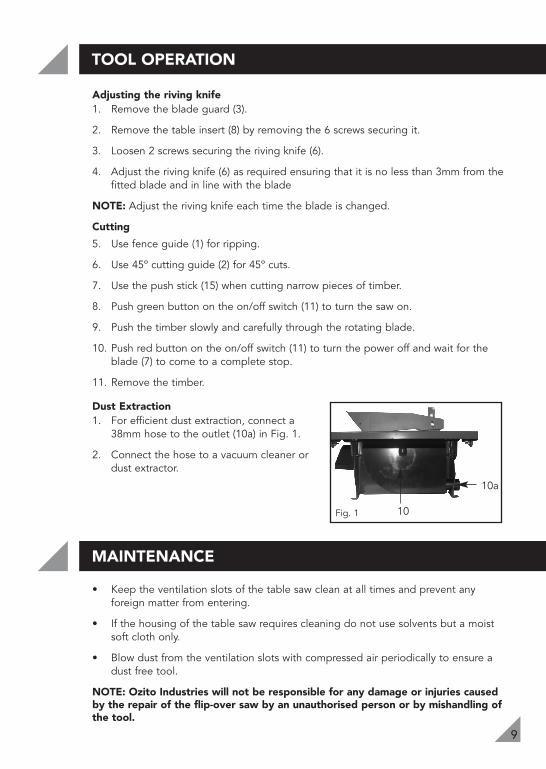
Dust Extraction1. For efficient dust extraction, connect a
38mm hose to the outlet (10a) in Fig. 1.
2. Connect the hose to a vacuum cleaner ordust extractor.
• Keep the ventilation slots of the table saw clean at all times and prevent anyforeign matter from entering.
• If the housing of the table saw requires cleaning do not use solvents but a moistsoft cloth only.
• Blow dust from the ventilation slots with compressed air periodically to ensure adust free tool.
NOTE: Ozito Industries will not be responsible for any damage or injuries causedby the repair of the flip-over saw by an unauthorised person or by mishandling ofthe tool.
Fig. 1 10
10a
MAINTENANCE

SPARE PARTS
10
V Volts Hz Hertz
~ Alternating current W Watts
/min Revolutions or reciprocation per minute
Double insulated Regulator compliance mark
no No load speed
DESCRIPTION OF SYMBOLS
Limited spare parts are available subject to availability. Please contact your localBunnings Special Orders Desk to order the required spare parts.
Most common spare parts listed below
Spare part Part no.
Outer Flange SPOZTS600-05
Inner Flange SPOZTS600-07
Blade Guard SPOZTS600-28
Blade (200x16 20T) SPOZTS600-06
Switch SPOZTS600-77

11
Power tools that are no longer usable should not bedisposed of with household waste but in an environmentallyfriendly way. Please recycle where facilities exist. Check withyour local council authority for recycling advice.
Recycling packaging reduces the need for landfill and rawmaterials. Reuse of recycled material decreases pollution inthe environment. Please recycle packaging where facilitiesexist. Check with your local council authority for recyclingadvice.
1 x Table Saw OZTS600WA 1 x Blade (fitted)1 x 45º Cutting Guide1 x Push Stick
1 x Fence Guide1 x Blade Wrench1 x Blade Shaft Wrench1 x Instruction Manual
AUSTRALIA (Head Office)
1 - 23 Letcon Drive, Bangholme, Victoria, Australia 3175Telephone: 1800 069 486Facsimile: +61 3 9238 5588Website: www.ozito.com.auEmail: [email protected]
CARING FOR THE ENVIRONMENT
CONTENTS
OZITO INDUSTRIES PTY LTD

3 YEAR REPLACEMENT WARRANTY
Your product is guaranteed for a period of 36 months from the original date of purchase and is intended for DIY (Do It Yourself) use only. If a product is defective it will be replaced in accordance with the terms of this warranty. Warranty excludes consumable parts, for example: blade, cutting guide, push stick, fence guide, blade wrench, blade shaft wrench.
WARNING
The following actions will result in the warranty being void.
Professional, Industrial or high frequency use.If the tool has been operated on a supply voltage other than that specified on the tool.If the tool shows signs of damage or defects caused by or resulting from abuse, accidents or alterations.Failure to perform maintenance as set out within the instruction manual.If the tool is disassembled or tampered with in any way.
OZITOAustralia/New Zealand (Head Office)1-23 Letcon Drive, Bangholme, Victoria, Australia 3175
•••
••
OW5
WARRANTYYOUR WARRANTY FORM SHOULD BE RETAINED BY YOU AT ALL TIMES. IN ORDER
TO MAKE A CLAIM UNDER THIS WARRANTY YOU MUST RETURN THE PRODUCT TO YOUR NEAREST BUNNINGS WAREHOUSE WITH YOUR BUNNINGS REGISTER RECEIPT.
PRIOR TO RETURNING YOUR PRODUCT FOR WARRANTY PLEASE TELEPHONE OUR CUSTOMER SERVICE HELPLINE:
TO ENSURE A SPEEDY RESPONSE PLEASE HAVE THE MODEL NUMBER AND DATE OF PURCHASE AVAILABLE. A CUSTOMER SERVICE REPRESENTATIVE WILL TAKE YOUR CALL AND ANSWER ANY QUESTIONS YOU MAY HAVE RELATING TO THE WARRANTY POLICY
OR PROCEDURE.
The benefits provided under this warranty are in addition to other rights and remedies which are available to you at law.Our goods come with guarantees that cannot be excluded at law. You are entitled to a replacement or refund for a major failure and for compensation for any other reasonably foreseeable loss or damage. You are also entitled to have the goods repaired or replaced if the goods fail to be of acceptable quality and the failure does not amount to a major failure. Generally you will be responsible for all costs associated with a claim under this warranty, however, where you have suffered any additional direct loss as a result of a defective product you may be able to claim such expenses by contacting our customer service helpline above.
`Australia 1800 069 486New Zealand 0508 069 486