cordless line trimmercdn2.blocksassets.com/assets/ozito/ozito-product-manuals/tmgiul2... · your...
TRANSCRIPT

Cordless Line Trimmer18 VoltOperation Manual2 Year Replacement WarrantyOZCLT18VACAUTION: Read this operation manual before using this tool.
To view the full range visit: www.ozito.com.au0309

Power Input: 18VBatteries: 1 x 18V, 1.3Ah Ni-CdCharge time: 1 hour No load speed: 10,000 /minNoise level: 96dB(A)Cutting diameter: 250mmCutting line thickness: 1.3mmCutting line feed: Bump feedWeight: 2.5kg (incl. battery)
Features: 1 Hour Fast ChargeSecondary HandleBump FeedLightweight
1. Secondary handle2. Rubber grip handle3. 18V Battery pack4. Battery release button 5. On/off switch6. Lock-off button7. Upper handle assembly8. Locking bolt9. Lock button
10. Telescopic shaft11. Shaft adjustment knob12. Lower housing13. Cutting guard14. Spool & line15. Bump knob16. Line cutting blade17. Fast Charger18. Set button
SPECIFICATIONS - MODEL NO. OZCLT18VA
2
6
1
15
15
4
52
7
8
9
11
10
12
13
14
18
17
3

3
TABLE OF CONTENTS
SPECIFICATIONS …………………………………………
TABLE OF CONTENTS…………………………………..
INTRODUCTION………………………………………...
SAFETY INSTRUCTIONS………………………………..
OPERATION ……………………………………………..
MAINTENANCE …………….…………………………..
SPARE PARTS/ACCESSORIES………………………….
CONTENTS ……………………………………………...
WARRANTY………………………………………………
Page 2
Page 3
Page 4
Page 4
Page 11
Page 14
Page 14
Page 15
Page 16

INTRODUCTION
4
Warning! A battery operated tool with individual batteries or a separatebattery pack must be recharged only with the specific charging unit for thebattery. A charging unit that may be suitable for one type of battery maycreate a risk of fire when used with another battery type.
• Avoid accidental starting. Carrying a tool with your finger on the switch orinserting the battery pack into a tool with the switch on invites accidents.
• Disconnect the battery pack from the tool before making any adjustments,changing accessories or storing the tool.
• When the battery pack is not in use keep it away from other metal objects.
Read the whole manual carefully and make sure you know how to switch the toolOFF, in an emergency, before operating the tool.
Save these instructions and other documents supplied with this machine for future reference.
Congratulations on purchasing the Ozito Cordless LineTrimmer. We aim to provide quality tools at an affordableprice. We hope you will enjoy using this line trimmer for many years.
Your Ozito Cordless Line Trimmer OZCLT18VA has beendesigned for trimming lawn edges and grass around shrubsand trees. This product is intended for DIY use only.
SAFETY INSTRUCTIONS

!!
5
GENERAL SAFETY RULES
Warning! Read all instructions, Failure to follow all instructions listed belowmay result in electric shock, fire and/or serious injury. The term “Power Tool”in all of the warnings listed below refers to your mains operated (corded)power tool or battery operated (cordless) power tool.
SAVE THESE INSTRUCTIONS
This appliance is not intended for use by young children or infirm persons unlessthey have been adequately supervised by a responsible person to ensure thatthey can use the appliance safely.
Young children should be supervised to ensure that they do not play with the appliance.
1) WORK AREA
a) Keep work area clean and well lit. Cluttered and dark areas invite accidents.
b) Do not operate power tools in explosive atmospheres, such as in thepresence of flammable liquids, gases, or dust. Power tools create sparks whichmay ignite the dust or fumes.
c) Keep children and bystanders away while operating a power tool. Distractionscan cause you to lose control.
2) ELECTRICAL SAFETY
a) Power tool plugs must match the outlet. Never modify the plug in any way.Do not use any adapter plugs with earthed (grounded) power tools.Unmodified plugs and matching outlets will reduce risk of electric shock.
b) Avoid body contact with earthed or grounded surfaces such as pipes,radiators, ranges and refrigerators. There is an increased risk of electric shock ifyour body is earthed or grounded.
c) Do not expose power tools to rain or wet conditions. Water entering a powertool will increase the risk of electric shock.
d) Do not abuse the cord. Never use the cord for carrying, pulling orunplugging the power tool. Keep cord away from heat, oil, sharp edges ormoving parts. Damaged or entangled cords increase the risk of electric shock.
e) When operating a power tool outdoors, use an extension cord suitable foroutdoor use. Use of a cord suitable for outdoor use reduces the risk of electric shock.
f) Recommendation that the appliance should be supplied with a residualcurrent device (RCD) with a tripping current of not more than 30mA.
3) PERSONAL SAFETY
a) Stay alert, watch what you are doing and use common sense when operating apower tool. Do not use a power tool while you are tired or under the influenceof drugs, alcohol or medication. A moment of inattention while operating powertools may result in serious personal injury.
b) Use safety equipment. Always wear eye protection. Safety equipment such asdust mask, non-skid safety shoes, hard hat, or hearing protection used forappropriate conditions will reduce personal injuries.
6
c) Avoid accidental starting. Ensure the switch is in the off position beforeplugging in. Carrying power tools with your finger on the switch or plugging inpower tools that have the switch on invites accidents.
d) Remove any adjusting key or wrench before turning the power tool on. Awrench or a key left attached to a rotating part of the power tool may result inpersonal injury.
e) Do not overreach. Keep proper footing and balance at all times. Thisenables better control of the power tool in unexpected situations.
f) Dress properly. Do not wear loose clothing or jewellery. Keep your hair,clothing and gloves away from moving parts. Loose clothes, jewellery orlong hair can be caught in moving parts.
g) If devices are provided for the connection of dust extraction andcollection facilities, ensure these are connected and properly used. Use ofthese devices can reduce dust related hazards.
4) POWER TOOL USE AND CARE
a) Do not force the power tool. Use the correct power tool for yourapplication. The correct power tool will do the job better and safer at the ratefor which it was designed.
b) Do not use the power tool if the switch does not turn it on and off. Anypower tool that can not be controlled with the switch is dangerous and mustbe repaired.
c) Disconnect the plug from the power source before making anyadjustments, changing accessories, or storing power tools. Such preventivesafety measures reduce the risk of starting the power tool accidentally.
d) Store idle power tools, unplugged & out of the reach of children and donot allow persons unfamiliar with the power tool or these instructions tooperate the power tool. Power tools are dangerous in the hands of untrainedusers.
e) Maintain power tools. Check for misalignment or binding of moving parts,breakage of parts and any other condition that may affect the powertools operation. If damaged, have the power tool repaired before use.Many accidents are caused by poorly maintained power tools.
f) Keep cutting tools sharp and clean. Properly maintained cutting tools withsharp cutting edges are less likely to bind and are easier to control.
g) Use the power tool, accessories and tool bits etc., in accordance withthese instructions and in the manner intended for the particular type ofpower tool, taking into account the working conditions and the work tobe performed. Use of the power tool for operations different from intendedcould result in a hazardous situation.
5) SERVICE
a) Have your power tool serviced by a qualified repair person using onlyidentical replacement parts. This will ensure that the safety of the power tool is maintained.
GENERAL SAFETY RULES (cont.)
7
BATTERY CHARGING SAFETY INSTRUCTIONS
THIS MANUAL CONTAINS IMPORTANT SAFETY AND OPERATINGINSTRUCTIONS FOR YOUR CHARGER & BATTERY.
• Before using the charging adaptor, thoroughly read all instructions within this manual.
Danger! If the battery pack housing is cracked or damaged, do not attempt tocharge the battery. There is a danger of electric shock or electrocution.
Warning! Do not allow any liquid to get inside the charger. Electric shock may result.To facilitate cooling of the battery pack after use, avoid placing the charger or batterypack in a warm environment such as in a metal shed, or an uninsulated trailer.
• This charger is not intended for any uses other than charging rechargeablebatteries. Any other use may result in risk of fire, electric shock or electrocution.
• Do not place any objects on top of the unit whilst it's being charged, doing so mayresult in excessive internal heat. Place the tool away from other heat sources whenrecharging the battery.
• To reduce risk of damage to the electric plug and cord, pull by the plug rather thanthe cord when disconnecting the charge from the power supply.
• Make sure cord is located so that it will not be stepped on, tripped over, orotherwise subjected to damage or stress.
• An extension cord should not be used unless absolutely necessary. Use of animproper extension cord could result in the risk of fire, electric shock or electrocution.
• Do not operate charger if it has received a sharp blow, been dropped or otherwisedamaged in any way.
• Do not disassemble charger, if service or repair is required. Incorrect reassemblingmay result in a risk of electric shock, electrocution or fire. New chargers can beobtained through Ozito.
• To reduce risk of electric shock, unplug charging adaptor from the socket outletbefore attempting any cleaning.
• Never attempt to connect 2 separate chargers together.
• DO NOT store or use the tool in locations where the temperature may reach orexceed 40ºC (such as outside sheds or metal buildings in summer).
• The charger is designed to operate on standard household electrical power (240volts). Do not attempt to use it on any other voltage.
• The longest life and best performance can be obtained if the tool is charged whenthe air temperature is between 18 - 24ºC. Do not charge the tool in an airtemperature below 10º C or above 40º C. This is important and will prevent damage.
• Do not incinerate batteries even if it is seriously damaged or completely worn out.Batteries can explode in a fire.
• Never attempt to open batteries for any reason. If the plastic housing breaks orcracks, immediately discontinue use and do not recharge.

8
• Inspect the items you want to cut before starting to work. Remove any foreign objects.If you hit an obstacle while cutting, turn off the machine and remove the obstacle.
• Work only in good visibility.
• Always make sure of your footing while working. Be careful when stepping backwards.
• Never leave the tool unattended at your work area. Store the tool in a safe placeduring interruptions.
• If you interrupt your work to move to a different position it is imperative toswitch off the tool while you are moving there.
• Never use the tool in the rain or in moist or wet conditions.
• Protect the tool from the damp and rain.
• Before you switch on the tool, make sure that there are no stones or otherobjects touching the nylon line.
• Always wear suitable clothing to protect your head, hands and feet from injury.Wear a helmet, goggles or visor, high boots or strong shoes, long trousers madeof tough material, and work gloves.
• Be sure to hold the tool away from your body when it is switched on!
• Switch off the motor and remove the battery pack when you are not using thetool, when you leave the tool and or battery pack unattended, when you arechecking the spool & line, if the power cable is damaged, and when you aremoving the tool to another location.
• Keep the tool away from other persons, particularly children and pets.
• Be aware of stones and other objects in the work area which may becomeairborne when hit by the nylon line.
• Keep at least 5 m away from other persons and animals when you are workingwith the tool.
• To prevent injury to yourself and damage to the tool, never cut against hard objects.
• Use the edge of the guard to keep the tool away from walls, changes of surfaceand fragile objects.
Caution! The cutting guard is vital for your safety and for the safety of others, andit is also essential for the grass trimmer to work correctly. Failure to observe thisinstruction will not only create a potential hazard, but also void any warranty claims.
• Never try to stop the spool and line with your hands. Wait until the spool andline comes to a complete stop by itself.
• Always use nylon line
• Beware of injuring yourself on the spool and line
• Never attempt to cut grass.
• Within the working radius of the grass trimmer the user is responsible for any damage caused to third persons by use of the trimmer.
• When you are not using the grass trimmer, keep it in a dry place out of the reachof children.
• Use the grass trimmer only as described in these instructions.
• Check the screws regularly to see that they are properly tightened.
ADDITIONAL SAFETY INSTRUCTIONS FOR LINE TRIMMERS

9
ADDITIONAL SAFETY INSTRUCTIONS FOR LINE TRIMMERS (cont.)
• Keep cables and other objects out of the work area you want to cut.
• If you have to lift the grass trimmer to move it, switch off the motor and wait forspool & line to stop.
• Before you connect the grass trimmer to the power supply, make sure that none of itsmoving parts are damaged and that the spool & line is correctly inserted and fastened.
• Use only original replacement parts for repair and maintenance purposes.
• Always keep your hands and feet away from the cutting mechanism, particularlywhen you switch on the trimmer.
• After pulling out new line, always return the trimmer to normal working positionbefore you switch it on again.
• Remove the battery pack before checking,cleaning or doing any work on themachine and when it is not being used.
Caution! The nylon line will run on for a few seconds after the tool is switched off!
The batteries have been shipped in a low charge condition to prevent possibleproblems, therefore you should charge them prior use.
• Insert the battery into the fast charger (17)
• Press the yellow set button (18) on the charger. Once the yellow set button (18) ispressed the fast charger starts to change. The red on light goes on when thebattery is charging. The green off light goes on when the battery is fully charged.
• To stop charging, switch off at the mains and remove the battery, from the fastcharger. Please note it takes approximately 60 minutes to fully charge the battery.
Once the battery has fully charged in the charger it can't be recharged until thebattery has been removed.
Follow the above charging steps to charge your battery.
Important Charging Notes
• The charger and battery pack may become warm to touch while charging. This is anormal condition, and does not indicate a problem.
• Use the charger at normal room temperatures whenever possible.
• To prevent overheating, do not cover the charger and do not charge the batterypack in direct sunlight or near heat sources.
• To increase the batteries life it is recommended to discharge it completely before recharging.
• If the battery pack does not charge properly:-
1. Check current at power source by plugging in a lamp or other appliance.
2. Check to see if power source is connected to a light switch which turns poweroff when you turn out the light.
3. Move the charger and battery pack to a location where the surrounding airtemperature is approximately 18 - 24°C.
CHARGING YOUR BATTERIES
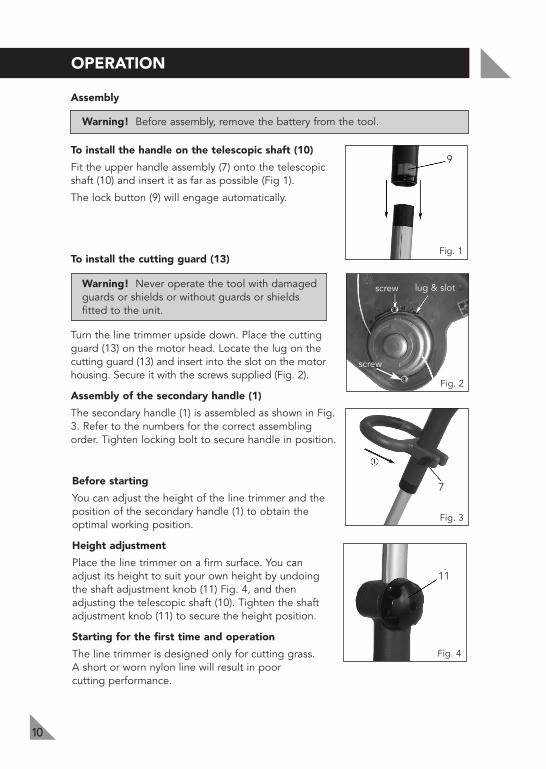
Before starting
You can adjust the height of the line trimmer and theposition of the secondary handle (1) to obtain theoptimal working position.
Height adjustment
Place the line trimmer on a firm surface. You can adjust its height to suit your own height by undoingthe shaft adjustment knob (11) Fig. 4, and thenadjusting the telescopic shaft (10). Tighten the shaftadjustment knob (11) to secure the height position.
Starting for the first time and operation
The line trimmer is designed only for cutting grass. A short or worn nylon line will result in poor cutting performance.
OPERATION
10
Assembly
Warning! Before assembly, remove the battery from the tool.
To install the handle on the telescopic shaft (10)
Fit the upper handle assembly (7) onto the telescopicshaft (10) and insert it as far as possible (Fig 1).
The lock button (9) will engage automatically.
To install the cutting guard (13)
Warning! Never operate the tool with damaged guards or shields or without guards or shields fitted to the unit.
Turn the line trimmer upside down. Place the cuttingguard (13) on the motor head. Locate the lug on thecutting guard (13) and insert into the slot on the motorhousing. Secure it with the screws supplied (Fig. 2).
Assembly of the secondary handle (1)
The secondary handle (1) is assembled as shown in Fig.3. Refer to the numbers for the correct assemblingorder. Tighten locking bolt to secure handle in position.
Fig. 1
Fig. 2
9
lug & slotscrew
screw
Fig. 3
Fig. 4
7
11
OPERATION (cont.)
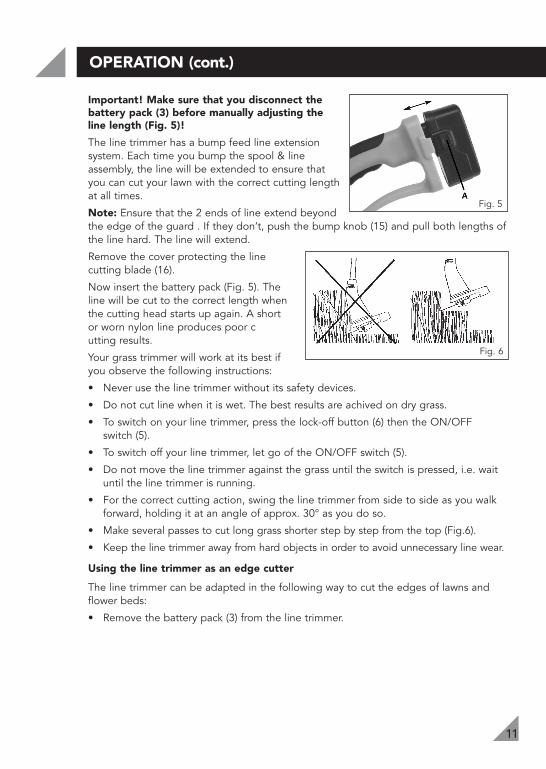
Important! Make sure that you disconnect thebattery pack (3) before manually adjusting theline length (Fig. 5)!
The line trimmer has a bump feed line extensionsystem. Each time you bump the spool & lineassembly, the line will be extended to ensure thatyou can cut your lawn with the correct cutting lengthat all times.
Note: Ensure that the 2 ends of line extend beyondthe edge of the guard . If they don’t, push the bump knob (15) and pull both lengths ofthe line hard. The line will extend.
Remove the cover protecting the linecutting blade (16).
Now insert the battery pack (Fig. 5). Theline will be cut to the correct length whenthe cutting head starts up again. A short or worn nylon line produces poor cutting results.
Your grass trimmer will work at its best ifyou observe the following instructions:
• Never use the line trimmer without its safety devices.
• Do not cut line when it is wet. The best results are achived on dry grass.
• To switch on your line trimmer, press the lock-off button (6) then the ON/OFF switch (5).
• To switch off your line trimmer, let go of the ON/OFF switch (5).
• Do not move the line trimmer against the grass until the switch is pressed, i.e. waituntil the line trimmer is running.
• For the correct cutting action, swing the line trimmer from side to side as you walkforward, holding it at an angle of approx. 30° as you do so.
• Make several passes to cut long grass shorter step by step from the top (Fig.6).
• Keep the line trimmer away from hard objects in order to avoid unnecessary line wear.
Using the line trimmer as an edge cutter
The line trimmer can be adapted in the following way to cut the edges of lawns andflower beds:
• Remove the battery pack (3) from the line trimmer.
Fig. 5
Fig. 6
11

• Push the lock button (9) Fig.7, in the direction indicated by the arrow and pullthe upper handle (7) off the telescopic shaft (10). Turn the upper handle (6)through 180° and slide it back into the telescopic shaft (10). The lock button (9)will engage automatically.
• The line trimmer has now been converted into an edge trimmer suitable forvertical cutting (Figure 8).
• Reinsert the rechargeable battery.
Replacing the spool & line (14)
Important! Make sure thatyou unplug the batterypack (3) before replacingthe spool & line (14) (Fig. 9)!
• Press the sides of thespool cover as shown and remove it with thespool (Figure 9+10).Ensure that you do notlose the spring.
• Remove the empty spool.
• Thread the ends of the line on the new spoolthrough the eyelets in the spoolcover (Fig. 11).
• Fit the spring, spool and spool cover back into the spool mounting (Fig.10).
• Ensure that the blade cover is removed from the cutting guard (12).
• The line will be cut to the correct length when thecutting head starts up again.
OPERATION (cont.)
12
Fig. 7 Fig. 8
Fig. 9 Fig. 10
9
Fig. 11

OPERATION (cont.)
13
Manually re-winding spool with nylon line
• Remove the empty spool and do not lose the spring.
• Remove the retaining strap from the spool (Fig.12).
• Cut a length of nylon line 8m long (max.) and fold in half.
• Insert the 2 ends of the nylon line into 2 holes of thespool (Fig.13).
• Replace the retaining strap on the spool (Fig.14)ensuring each half of the nylon line is located in each of the slots on the retaining strap.
• Thread the nylon line through the holes in the spooland pull the 2 halves completely through the holes.
• Hold the spool and line on a flat surface or in the palm of your hand with the bump knob pointingtowards the sky or ceiling.
• Hold the retaining strap between 2 fingers and rotatethe bump knob clockwise until all but 100mm of lineprotrudes from both slots (Fig.15).
• Thread the line through the eyelets of the spool cover (Fig.11).
• Fit spring, spool and spool cover onto the motor headof the line trimmer and allow tabs on the spool coverto lock into position (Fig.10).
Caution! Catapulted pieces of nylon line may causeinjury!
Fig.12
Fig.13
Fig.14
Fig.15
rotate

14
MAINTENANCE
Your trimmer has been designed to operate over a long period of time with aminimum of maintenance.Continuous satisfactory operation depends upon proper tool care and regular cleaning.Your charger does not require any maintenance apart from regular cleaning.
Warning! Before performing any maintenance on the tool, remove the batteryfrom the tool. Unplug the charger before cleaning it.
• After use disconnect the battery and check the tool for any damage.• Regularly clean the ventilation slots in your tool and charger using a soft brush
or dry cloth.• Regularly clean the motor housing using a damp cloth.• Do not use any abrasive or solvent-based cleaner.• Regularly clean the cutting line and spool using a soft brush or dry cloth.• Regularly use a blunt scraper to remove grass and dirt from the underneath of the guard.Note: Ozito Industries will not be responsible for any damage or injuries causedby the repair of the tool by an unauthorised person or by mishandling of the tool.
If your tool seems not to operate properly, follow the instructions below. If this doesnot solve the problem, please return it to your place of purchase with your receipt.
Warning! Before proceeding, remove the battery from the tool
TROUBLE SHOOTING
SYMPTOMS SOLUTIONS
Tools Runs Slow
Spool Jammed
Check the spool housing can rotate freely. Carefully clean if necessary. Also check the cutting line does not protrude more than 10 – 12cm from the spool housing. If it does, cut it off so that it just reaches the line trimming blade.
Keep the tabs depressed and remove the spool cover from the housing. Carefully clean the spool housing. Push the cover onto the housing until it snaps securely into place.
SPARE PARTS/ACCESSORIES
Limited spare parts/accessories are available subject to availability. Please contact yourlocal Bunning's Special Orders Desk to order the required spare parts or accessories. Most common spare parts/accessories listed below
Spare Part/Accessories Part No.Spool and Line Assembly ACCCLT-006Spring SPOZCLT18VA-03Protective Cover SPOZCLT18VA-09Battery Pack SPOZCLT18VA-23Fast Charger SPOZCLT18VA-44

AUSTRALIA (Head Office)1 - 23 Letcon Drive, Bangholme, Victoria, Australia 3175Telephone: 1800 069 486Facsimile: +61 3 9238 5588Website: www.ozito.com.auEmail: [email protected]
1 x Cordless Line Trimmer1 x Spool & Line (fitted)1 x 18V Battery
1 x Charger Adaptor1 x Cutting Guard and screws1 x Operation Manual
Power tools that are no longer usable should not bedisposed of with household waste but in an environmentallyfriendly way. Please recycle where facilities exist. Check withyour local council authority for recycling advice.
Recycling packaging reduces the need for landfill and rawmaterials. Reuse of recycled material decreases pollution in theenvironment. Please recycle packaging where facilities exist.Check with your local council authority for recycling advice.
V Volts Hz Hertz
~ Alternating current W Watts
/min Revolutions or reciprocation per minute
Double insulated Regulator compliance mark
no No load speed
Warning Wear eye protection
Wear hearing protection
Wear a dust mask
Do not operate in the rain
Read operator’s manual
Beware of debris beingejected from the planer thicknesser
Keep bystanders away
DESCRIPTION OF SYMBOLS
CARING FOR THE ENVIRONMENT
CONTENTS
OZITO INDUSTRIES PTY LTD
15

WARRANTYTHIS WARRANTY FORM AND CONFIRMED BUNNINGS REGISTER RECEIPT SHOULD BERETAINED BY THE CUSTOMER AT ALL TIMES
The warranty is only made available by returning the product to your nearestBunnings Warehouse with a confirmed Bunnings register receipt
PURCHASED FROM:__________________________________________________
DATE PURCHASED: __________________________________________________
2 YEAR REPLACEMENT WARRANTYYour Ozito tool is guaranteed for a period of 24 months from the original date ofpurchase and is intended for DIY (Do it yourself) use only.
WARNING
The following actions will result in the warranty being void.
• Professional, trade or high frequency use.
• If the tool has been operated on a supply voltage other than that specified on the tool.
• If the tool shows signs of damage or defects caused by or resulting from abuse,accidents or alterations.
• If the tool is disassembled or tampered with in any way.
Note: Warranty excludes consumable parts such as batteries, nylon line, drivesockets, fuses, blades & accessories.
YOUR WARRANTY FORM SHOULD BE RETAINEDBY YOU AT ALL TIMES.
SHOULD YOU HAVE ANY QUESTIONS PRIOR TORETURNING YOUR PRODUCT FOR WARRANTY OR
REPAIR PLEASE TELEPHONE OUR CUSTOMERSERVICE HELPLINE:
Australia 1800 069 486New Zealand 0508 069 486
TO ENSURE A SPEEDY RESPONSE PLEASE HAVE THE MODEL NUMBERAND DATE OF PURCHASE AVAILABLE. AN OZITO CUSTOMER SERVICE
REPRESENTATIVE WILL TAKE YOUR CALL AND ANSWER ANY QUESTIONSYOU MAY HAVE RELATING TO THE WARRANTY POLICY OR PROCEDURE.