table of contents - hunter irrigation sprinkler systems ... of contents introduction 3 configuring...
TRANSCRIPT


Table of Contents Introduction ....................................................................................................................................... 3Configuring from the Controller Touchscreen .................................................................................. 3
Touchscreen Navigation ..................................................................................................................................... 3Connecting to a WiFi Network ............................................................................................................................ 4Wireless Connection Status Messages ............................................................................................................. 6Viewing Controller Status ................................................................................................................................... 6Viewing Network Information and Testing Internet Connectivity ..................................................................... 8Viewing Time and Date ....................................................................................................................................... 9Operating Zones From the Controller ................................................................................................................ 9
Configuring from the Hydrawise App or Website ........................................................................... 12Getting Started Wizard .................................................................................................................................... 12Linking your Controller to your Account .......................................................................................................... 15Zones & Schedules .......................................................................................................................................... 15Controller Weather Stations ............................................................................................................................ 23Sensors ............................................................................................................................................................. 24Watering Triggers ............................................................................................................................................. 27Creating Alerts .................................................................................................................................................. 28Controller Configuration .................................................................................................................................. 30My Account ....................................................................................................................................................... 32
Monitoring ....................................................................................................................................... 35Controller Dashboard ...................................................................................................................................... 35Changing your Current Controller ................................................................................................................... 38Reports ............................................................................................................................................................. 38
Using Hydrawise as an Irrigation Contractor .................................................................................. 41Registering as a Contractor ............................................................................................................................. 41The Hydrawise Contractor Portal .................................................................................................................... 43Managing Customers and Controllers ............................................................................................................ 46Configuring Customer Controllers ................................................................................................................... 52Adding a Controller .......................................................................................................................................... 56Managing Customer Plans .............................................................................................................................. 57Managing Users ............................................................................................................................................... 60Managing Customer Files ................................................................................................................................ 63Creating Customer Wide Settings ................................................................................................................... 65Monitoring Customer Controllers from the Contractor Dashboard .............................................................. 67Limiting Changes a Customer Can Make ....................................................................................................... 68Viewing Changes to Customer Controllers ..................................................................................................... 69
Getting Help ................................................................................................................................... 70Certifications ................................................................................................................................... 70
Canadian FCC Statement ................................................................................................................................ 70US FCC Statement ........................................................................................................................................... 70
Page 3 RC-024 Version 2.01
Introduction This guide covers configuration of your Hydrawise™ Ready controller using the Hydrawise App for Apple or Android or configuration using your web browser.
Because each Hydrawise™ Ready controller model is slightly different, please consult the Quick Start Guide supplied with your model for information on hardware installation and connection to your irrigation system.
Configuring from the Controller Touchscreen
Touchscreen Navigation The controller features a full color touchscreen making navigation easy.
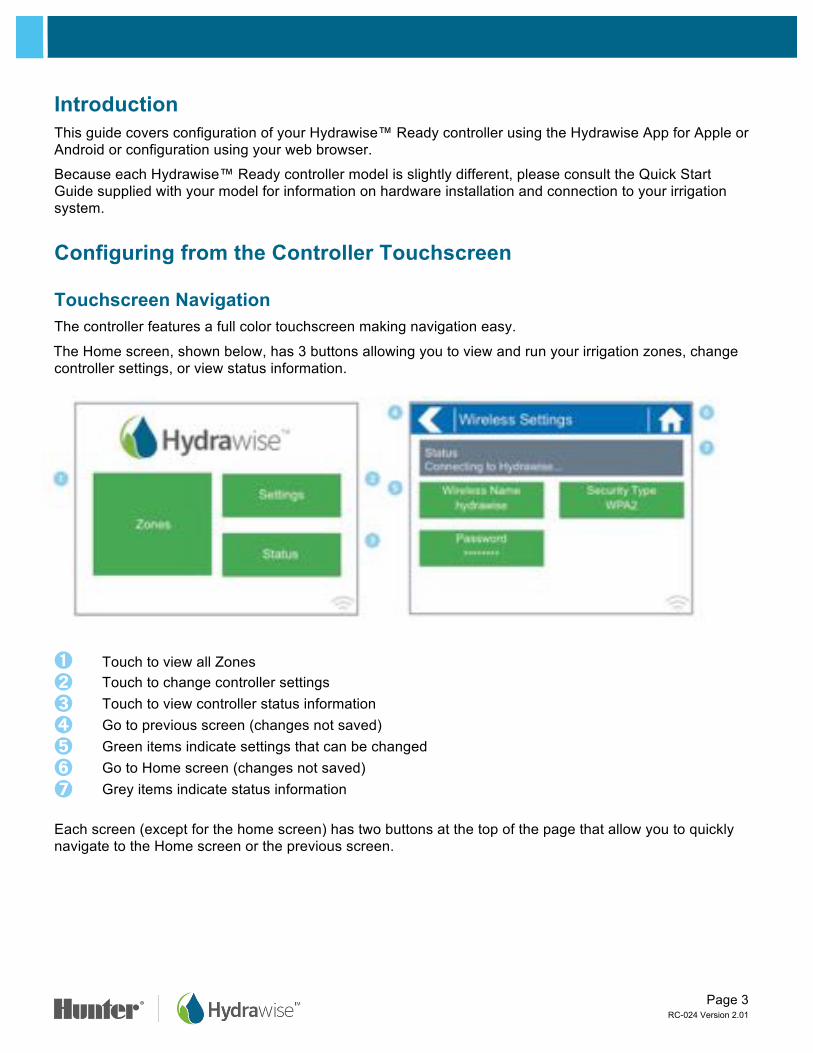
The Home screen, shown below, has 3 buttons allowing you to view and run your irrigation zones, change controller settings, or view status information.
� Touch to view all Zones� Touch to change controller settings � Touch to view controller status information � Go to previous screen (changes not saved) � Green items indicate settings that can be changed � Go to Home screen (changes not saved) � Grey items indicate status information Each screen (except for the home screen) has two buttons at the top of the page that allow you to quickly navigate to the Home screen or the previous screen.

Page 4 RC-024 Version 2.01
All items on each screen are color coded to indicate which screen elements are buttons and which screen elements indicate status information.
GREEN screen items indicate settings that can be changed. If you touch on the GREEN color item, then you'll be able to change that setting.
GREY colored items indicate status information. Touching on these has no effect.
Connecting to a WiFi Network When your controller is first powered on, it will run a short wizard to connect your controller to your wireless router.
If you’re not using the initial startup wizard then go to the Viewing Wireless Settings section, to change your wireless settings.
Using the Wizard 1. Select your wireless network from the list shown on the controller display and press the Confirm
button on screen. If your network is not listed then check that the unit is within wireless range. 2. Enter your wireless password and press the OK button on keyboard. Make sure you press the OK
button after you’ve entered your password. Pressing the Home or Back buttons will not save your changes.
When connecting to your wireless network, the WiFi Icon at the bottom right of the controller screen will flash. Connecting takes about 30 seconds and when successfully connected the WiFi Icon will stop flashing and stay on.
If you have issues connecting to wireless then the Viewing Wireless Settings section has more troubleshooting information.
Viewing Wireless Settings
From the Home screen navigate to the Wireless Settings by pressing Settings > Wireless Settings.
To successfully connect the Hydrawise unit to your wireless router you will need to correctly select your wireless router, wireless security mode, and enter your wireless password.
The current status of the controller’s connection to your wireless router is shown at the top of the screen. The controller will automatically attempt to connect to the configured access point if a connection is lost (for example, after power failure).
If you’re entering information into the controller and use the Home or Back buttons, then your changes on that screen will not be changed. Always use the OK or Confirm buttons to confirm your changes.

Page 5 RC-024 Version 2.01
Touch on any of the green buttons to change the wireless type, security type, or password.
Configuring Wireless Name Touching on the currently configured Wireless Name will automatically start a scan of all local wireless routers and allow you to choose a new one.
After about 5 seconds, a list of found wireless networks will be listed. To select a wireless name, touch on the wireless name and then touch Confirm. Do not press the Home or Back buttons after selecting your wireless router name – these options will not save your router name.
Each time you touch a wireless name the signal strength will be shown at the bottom of the screen.
If your wireless router is not shown then check the following:
• Your Hydrawise controller is within range of your wireless router. • Your access point is configured to accept connections from 802.11b/g wireless clients. If your wireless router is hidden you may manually enter it by selecting Manually Enter Wireless and typing in the name.
Configuring the Security Type The security type configured on the controller must match the security type configured in your wireless router. The Hydrawise unit can attempt to automatically detect this if you choose Auto Detect as the security type.
Hydrawise supports the following security types:
• Open • WPA Personal • WPA2 Personal • WPA Auto
After choosing the security type press the Confirm button.

Page 6 RC-024 Version 2.01
Setting your Password For any security mode (except for Open) your wireless router password must be entered. Wireless passwords are a minimum of 8 characters and are case sensitive.
After typing in your password press the OK button. Do not press the Home or Back buttons – these options will not save your password.
Wireless Connection Status Messages The controller will show different status messages while connecting to your wireless router.
Looking for Wireless Controller is currently scanning for local wireless networks.
Connecting to Controller is currently trying to connect to your wireless router.
Waiting for IP Controller has connected to your wireless router and is waiting for your wireless router to give it an IP address. Your wireless router must be configured as a DHCP server.
Connected Controller has successfully connected to your wireless router.
Local Connection Only Controller is acting as a local wireless router.
Troubleshooting Wireless Connection Issues After entering your wireless settings, the controller will connect to your access point. The connection process takes about 30 seconds.
Upon successful connection the wireless status will show Connected.
If your controller fails to connect to your wireless router check the following:
• Your password is entered correctly. It is case sensitive and must be at least 8 characters long. • Check that the wireless security types match between the controller and your wireless router. Hydrawise
recommends use of WPA2 security between the controller and your wireless router. • We have additional troubleshooting steps at https://support.hydrawise.com/
Viewing Controller Status From the Home screen navigate to the Controller Status by pressing Status > Controller Status.
Enter Wireless Password
q w e r t y u i o p
z x c v b n m
.,
a s d f g h j k l
OK?123
hydrawiserocks

Page 7 RC-024 Version 2.01
The controller status screen shows your controller’s connection to Hydrawise servers for synchronizing schedule and weather information.
Server Status A successful connection to the Hydrawise servers is indicated by Sync’d as the Server Status.
Different types of status messages are shown below:
Sync’d Controller has a connection to Hydrawise servers. No Internet Controller has connected to wireless but is unable to connect to Hydrawise servers.
Check that your internet is OK by connecting another device to the same wireless router. If this is OK then go to Status > Network and select Test Network to perform a diagnostics test.
Wireless Down Controller has not connected successfully to your wireless. Go to Settings > Wireless Settings to check the wireless status.
Checking The controller is checking connection to Hydrawise.
Error XXX The controller received an error while connecting to the Hydrawise server.
The success percentage shows the percentage of time the controller successfully connects to Hydrawise servers to synchronise weather and schedule-related information.
A low success percentage will indicate a poor wireless connection between the controller and your access point.
To improve your wireless signal strength you could try the following:
• Move the controller closer to your wireless router. • Remove any obstacles in a direct line of sight between the controller and your wireless router such as
metal items (metal interferes with WiFi signals). • Move your wireless router closer to the controller. • Install a higher gain antenna on your wireless router. • Use Ethernet in a location closer to the controller and install a new wireless router. • Consider a WiFi repeater between your wireless router and the Hydrawise controller to boost the signal
strength. • Consider moving the controller away from potential sources of interference, including • Microwave ovens
Controller Status
Server StatusSync’d 5 seconds ago
Serial NumberC012556
Version1.89
ModelHWC-006
Success100%
Uptime1day 3 hr
Status of connection to Hydrawise Servers
Your serial number. Used to link your controller to your accountConnection to Hydrawise success rate
Page 8 RC-024 Version 2.01
• Cordless telephones operating in the 2.4GHz range – you could also change the channel your phone uses
• Nearby base stations using adjacent channels
Note that the Hydrawise unit is designed to work in poor wireless environments. However, if you wish to manually run or stop a zone and the wireless signal is down then these actions will fail.
Offline Mode If the controller loses internet for more than 24 hours you’ll receive a notification email.
The controller will go into an offline mode. In offline mode your controller won’t be able to access local weather conditions such as rainfall or evaporation and will revert to a pre-defined program.
• For Smart (ET) Watering zones, the controller will adjust each zone’s watering length based on your offline watering budget and will water at each zone’s configured peak watering frequency.
• For Time Based watering zones, the controller will adjust each zone’s watering length based on your offline watering budget and will water at each zone’s configured watering frequency.
• Note that Cycle & Soak is not supported in Offline Mode and each zone will water for its full watering length without pausing.
• The controller will water only at your configured Program Start Times.
Saving Your Controller Configuration The controller doesn’t have a battery backup – your configuration settings are stored in non-volatile RAM which is preferable as batteries need to be periodically replaced.
Configuration settings are automatically saved.
Serial Number The serial number is used to link your actual controller with your Hydrawise account. This number is also printed on the controller.
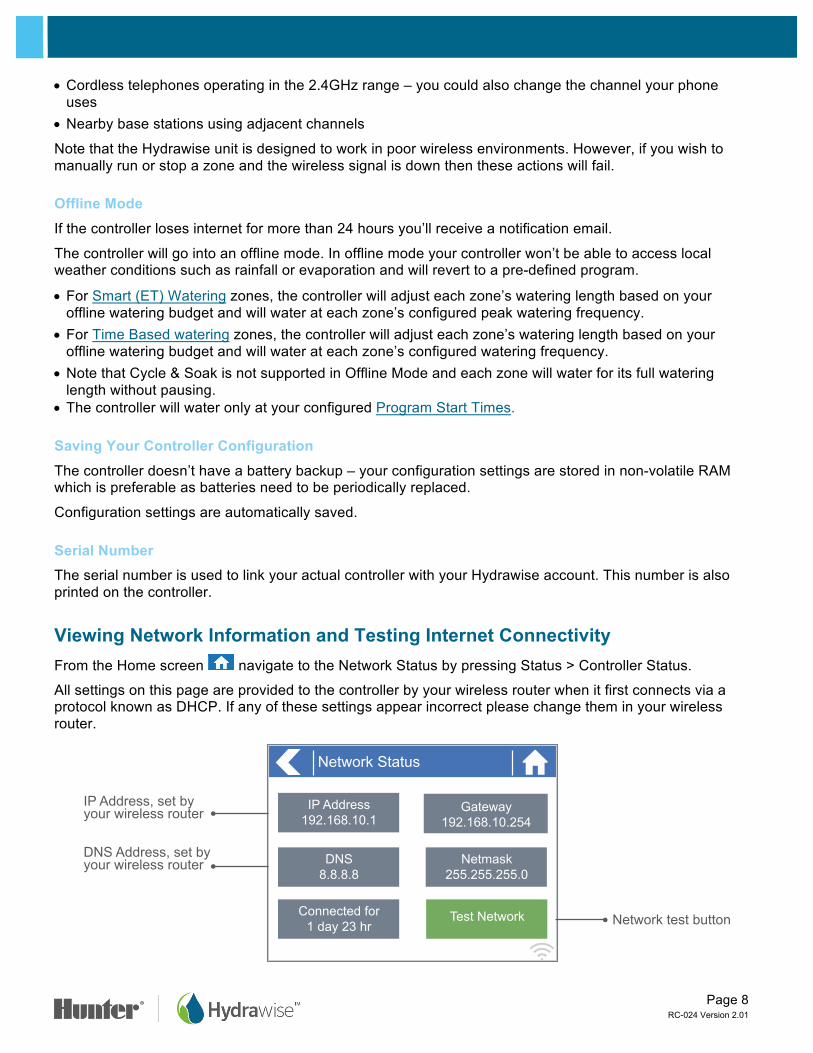
Viewing Network Information and Testing Internet Connectivity From the Home screen navigate to the Network Status by pressing Status > Controller Status.
All settings on this page are provided to the controller by your wireless router when it first connects via a protocol known as DHCP. If any of these settings appear incorrect please change them in your wireless router.
Network Status
IP Address192.168.10.1
DNS8.8.8.8
Connected for1 day 23 hr
Test Network
Netmask255.255.255.0
Gateway192.168.10.254
IP Address, set by your wireless router
DNS Address, set by your wireless router
Network test button

Page 9 RC-024 Version 2.01
Once the controller has successfully connected to your wireless router the Test Network button can be used to test network connectivity for troubleshooting purposes. The network test will verify connectivity to 4 destinations:
Checking WiFi Performs a ping test to the Gateway address listed in the Network Status screen. If this test fails, check that you don’t have MAC address filtering enabled on your router.
Checking DNS Performs a ping test to the DNS address listed in the Network Status screen. If this test fails, check that the DNS address is correct – if it is wrong then correct the DNS address under DHCP Settings on your wireless router. It is possible that this test may fail if the DNS server doesn’t not accept ping requests which does not indicate an issue.
Checking Internet Performs a ping test to the Google server at IP address 8.8.8.8. This is a well known server which accepts ping requests on the internet. If this test fails then it indicates an issue with the internet configuration of your wireless router.
Checking Hydrawise Performs a ping test to the Hydrawise servers. If this test fails, then it may indicate an issue with the internet configuration of your wireless router.
Viewing Time and Date Time and date settings are synchronised with the settings that you configure in the Hydrawise app. The timezone is set based on the location you entered during the app wizard.
If your controller is running as a stand-alone controller (ie. WiFi is disabled) then the date, time and timezone will be shown on a GREEN background can be changed.
Operating Zones From the Controller
Zone Summary
From the Home screen navigate to the Zone Summary screen by pressing Zones.
The Zone summary screen shows the status of 6 zones at a time. To view the next or previous group of zones use the Next and Previous buttons. The current range of zones that you are viewing is indicated at the top of the screen.

Page 10 RC-024 Version 2.01
Each zone is color coded to indicate the current status of the zone as follows:
Green Zone is scheduled to run at some time in the future.
Grey This zone is not scheduled to run in the future.
Blue (dark) Zone is current active.
Blue (light Zone is waiting for another zone to finish watering and then will start immediately.
Gold This zone is a master zone.
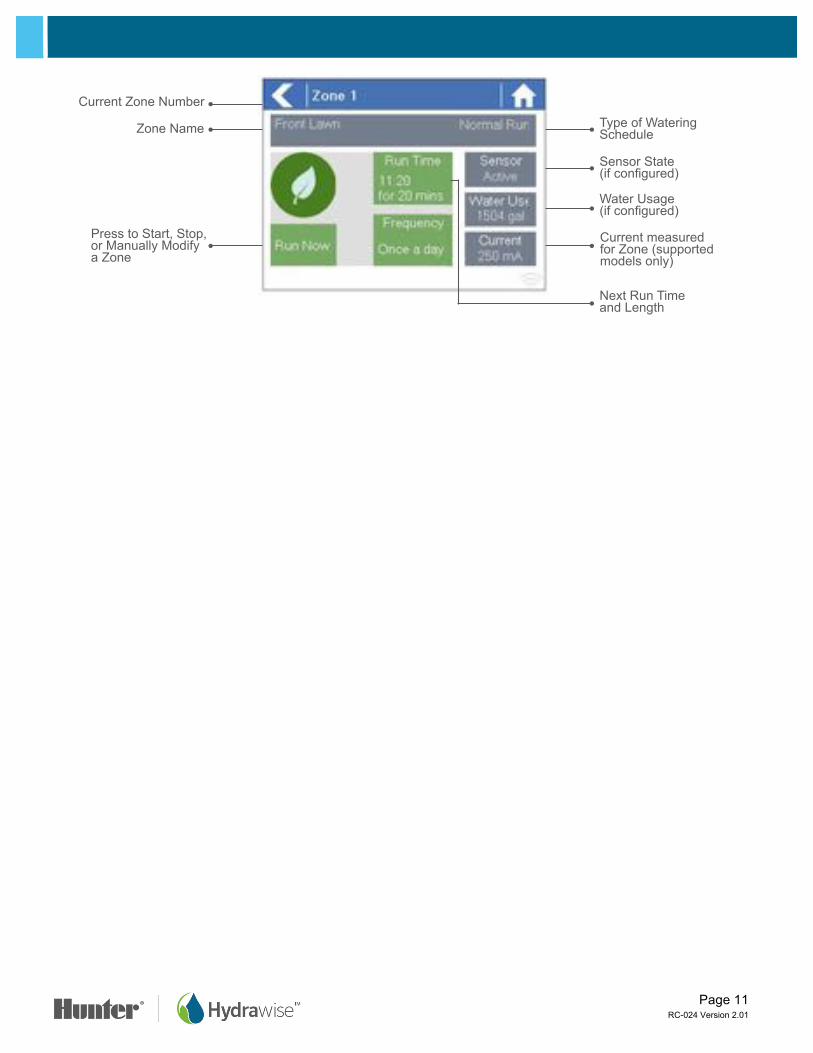
Viewing zone information From the Zone Summary screen touch the zone you wish to view.
TheZoneStatusscreenallowsyoutoviewthefollowinginformation:Zone Name This is the name of the Zone you’ve configured in the Hydrawise app. Sensor The current sensor state if configured in the Hydrawise app.
Water Usage Water usage for this zone run. This is shown only if you have a flow meter installed and the zone is currently running.
Current Indicates the current that all solenoids are using (including a master solenoid if configured). Generally speaking, this value ranges from 200mA to 600mA depending on the number of solenoids attached to a single zone output. The controller has a built-in failsafe to automatically stop your zone if more than approximately 800mA is detected as this may indicate a faulty solenoid or wiring. TheZoneStatusscreenalsoallowsyoutomanuallystartazoneusingtheRunNowbutton.Whenstarted,thezonewillrunforthezone’sdefaultconfiguredrunlength.ThiscanbeoverriddenbyclickingonRunTimepriortomanuallystartingthezone.
When a zone is running the Run Now button will change to Stop, allowing you to stop a running zone.
Vegetables Zone 6
Page 11 RC-024 Version 2.01
Current Zone NumberType of Watering Schedule
Sensor State (if configured)
Water Usage (if configured)
Current measured for Zone (supported models only)
Next Run Time and Length
Zone Name
Press to Start, Stop, or Manually Modify a Zone

Page 12 RC-024 Version 2.01
Configuring from the Hydrawise App or Website
Getting Started Wizard To be able to configure your controller from the Hydrawise App or website you will need to connect your controller to the internet and link the serial number of the controller to your account.
The controller does not need to be connected to the internet when you’re making your configuration changes – if it isn’t connected at the time the changes are made the new configuration will be loaded once the controller connects to the internet.
The Getting Started wizard is shown when you first create a new account or when you select Settings -> Setup Wizard in the app.
1. If you have not already done so, create an account at the Hydrawise web site. Go to http://hydrawise.com/try-now and register for an account.
2. Log into your account. If this is the first time that you have logged in you will be guided through a setup wizard to help you with initial configuration of your controller.
Setting the Controller Model The wizard will ask you to choose the model of your controller. You can search by SKU or simply select the model from the list.
If you’re setting up a trial account, choose the closest model to the one you want – you can always change it later.
Setting the Controller Name and Serial Number The wizard will ask you to give your controller a name and also to enter the serial number. If you’re setting up a test account and you don’t yet have a controller you can leave the serial number blank.

Page 13 RC-024 Version 2.01
Controller Location Set the address where your controller is located. Your controller will use this address for weather forecasts.
When you click Update Address you will see local weather stations to which you can subscribe.
You can subscribe to one or more weather stations by clicking on them and choosing Subscribe. The weather stations that you’ve subscribed to will display in blue.
You can subscribe to one of the two closest airport stations for free – these will be updated daily. If you have an Enthusiast plan you can subscribe to up to 5 personal, airport or other official stations. The advantage of subscribing to multiple weather stations is that the results will be evaluated to remove any particularly high or low readings which might be inaccurate.

Page 14 RC-024 Version 2.01
Configuring the Master Valve If your irrigation system has a master valve then configure it here. For more details on what a master valve is see Configuring a Master Valve.
Adding Zones Now you can add the zones for the various parts of your garden. For more detail on how to add zones, see Adding a Zone.
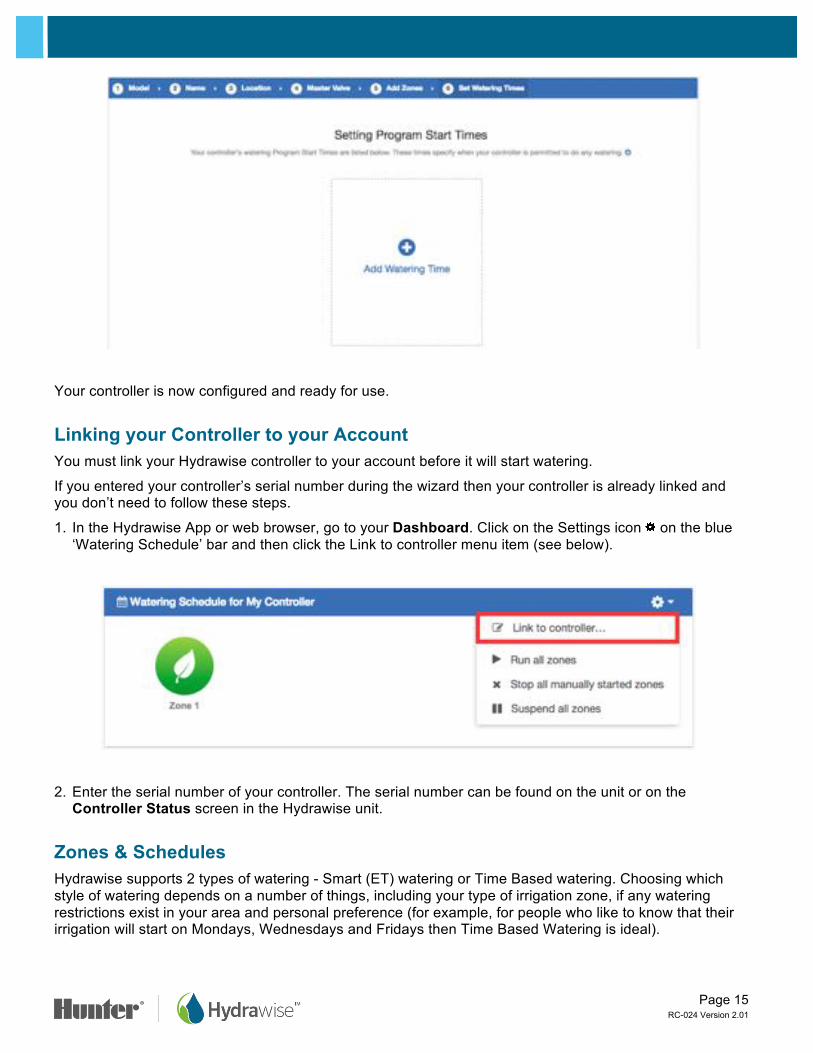
Setting Program Start Times The last step in configuring your controller is to set up your Program Start Times. These will tell your controller when it’s allowed to water. You can set specific days of the week or use odd/even watering days. You can also set the time of day and then link the program start times to particular zones and schedules.
Page 15 RC-024 Version 2.01
Your controller is now configured and ready for use.
Linking your Controller to your Account You must link your Hydrawise controller to your account before it will start watering.
If you entered your controller’s serial number during the wizard then your controller is already linked and you don’t need to follow these steps.
1. In the Hydrawise App or web browser, go to your Dashboard. Click on the Settings icon on the blue ‘Watering Schedule’ bar and then click the Link to controller menu item (see below).
2. Enter the serial number of your controller. The serial number can be found on the unit or on the Controller Status screen in the Hydrawise unit.
Zones & Schedules Hydrawise supports 2 types of watering - Smart (ET) watering or Time Based watering. Choosing which style of watering depends on a number of things, including your type of irrigation zone, if any watering restrictions exist in your area and personal preference (for example, for people who like to know that their irrigation will start on Mondays, Wednesdays and Fridays then Time Based Watering is ideal).

Page 16 RC-024 Version 2.01
Time Based Watering For Time Based watering you decide the watering frequency and irrigation run time, either by entering the information directly or choosing a preconfigured watering schedule. The controller will use the Watering Triggers you’ve set to automatically adjust its watering schedule.
Time based watering will water on specific days (unless delayed by rainfall or forecast rainfall) and will vary the watering length based on your watering triggers.
Smart (ET) Watering Smart (ET) watering is an automated watering schedule that uses information about environmental conditions to ensure your plants get the optimal amount of water. Evaporation will draw moisture from your garden, while rainfall and irrigation will add moisture. Understanding these conditions allows Hydrawise to decide when the time is right to water your garden. ET stands for evapotranspiration and is explained further in the diagram below.
For each zone, we’ll ask you to specify the watering length and peak watering frequency:
• The watering length is how long watering needs to run to fully water your zone. • The peak watering frequency is how often you would normally water this zone during your peak irrigation
period.
The controller will vary your watering frequency based on actual evaporation and rainfall in your area on a day to day basis.
In contrast to Time Based Watering, Smart Watering will always water a zone for the same length of time and it will vary the frequency of watering based on temperature and rainfall.
Readily available water
Precipitation
AbsorptionEvaporation
Transpiration
Evapotranspiration
Determined by -TemperatureHumidityWindSoilPlant type
Root depthAvailable water

Page 17 RC-024 Version 2.01
Adding a Zone To add an irrigation zone, navigate to the Zones & Schedules page in your Hydrawise account and click on Add a New Zone. The Zone wizard will be displayed.
Fill in the Zone Details:
Zone Name Use a meaningful name for each irrigation zone. Zone names are displayed on the Hydrawise controller and are used in your Hydrawise account to show run times and allow manual modification of watering schedules.
Zone Number The zone number for each irrigation zone should match the number you have used when wiring the controller.
Zone Icon Choose an icon which will be used to display the zone on the dashboard. If you have uploaded an image for this zone you can choose it to be displayed on the dashboard instead.
Watering Type Select a watering mode for this zone. A zone can use Smart (ET) watering or Time Based watering, which are described below.
Depending on the type of watering you chose, fill in the details for Smart (ET) watering or Time Based watering.
Smart (ET) Watering Watering Type Choose whether to set the information manually or choose from a list of preconfigured
watering schedules.
Enter Time and Frequency: allows you to manually set the watering length and frequency.
Use a preconfigured Watering Schedule: add a preconfigured watering schedule or use one you’ve previously created. If your controllers are managed by a contractor, you
Page 18 RC-024 Version 2.01
may see preconfigured watering schedules that your contractor has created, which you can also use.
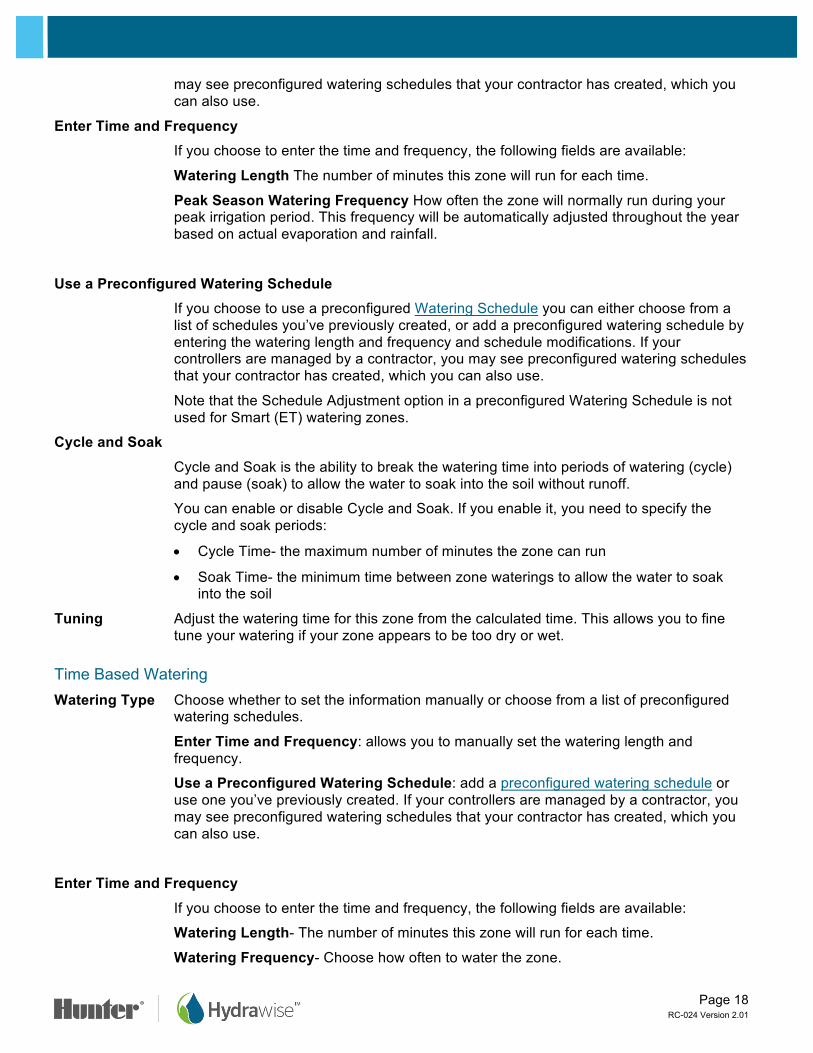
Enter Time and Frequency If you choose to enter the time and frequency, the following fields are available:
Watering Length The number of minutes this zone will run for each time.
Peak Season Watering Frequency How often the zone will normally run during your peak irrigation period. This frequency will be automatically adjusted throughout the year based on actual evaporation and rainfall.
Use a Preconfigured Watering Schedule
If you choose to use a preconfigured Watering Schedule you can either choose from a list of schedules you’ve previously created, or add a preconfigured watering schedule by entering the watering length and frequency and schedule modifications. If your controllers are managed by a contractor, you may see preconfigured watering schedules that your contractor has created, which you can also use.
Note that the Schedule Adjustment option in a preconfigured Watering Schedule is not used for Smart (ET) watering zones.
Cycle and Soak
Cycle and Soak is the ability to break the watering time into periods of watering (cycle) and pause (soak) to allow the water to soak into the soil without runoff.
You can enable or disable Cycle and Soak. If you enable it, you need to specify the cycle and soak periods:
• Cycle Time- the maximum number of minutes the zone can run
• Soak Time- the minimum time between zone waterings to allow the water to soak into the soil
Tuning Adjust the watering time for this zone from the calculated time. This allows you to fine tune your watering if your zone appears to be too dry or wet.
Time Based Watering Watering Type Choose whether to set the information manually or choose from a list of preconfigured
watering schedules.
Enter Time and Frequency: allows you to manually set the watering length and frequency.
Use a Preconfigured Watering Schedule: add a preconfigured watering schedule or use one you’ve previously created. If your controllers are managed by a contractor, you may see preconfigured watering schedules that your contractor has created, which you can also use.
Enter Time and Frequency
If you choose to enter the time and frequency, the following fields are available:
Watering Length- The number of minutes this zone will run for each time.
Watering Frequency- Choose how often to water the zone.

Page 19 RC-024 Version 2.01
Schedule Adjustment- Choose how to adjust the watering time based on your weather triggers.
Use a Preconfigured Watering Schedule
If you choose to use a preconfigured Watering Schedule you can either choose from a list of schedules you’ve previously created, or add a preconfigured watering schedule by entering the watering length and frequency and schedule modifications as per the fields above. If your controllers are managed by a contractor, you may see preconfigured watering schedules that your contractor has created, which you can also use.
Cycle and Soak
Cycle and Soak is the ability to break the watering time for a zone into periods of watering (cycle) and pause (soak) to allow the water to soak into the soil without runoff.
You can enable or disable Cycle and Soak. If you enable it, you need to specify the cycle and soak periods:
• Cycle Time: the maximum number of minutes the zone can run for
• Soak Time: the minimum time between zone waterings to allow the water to soak into the soil
Tuning Adjust the watering time for this zone from the calculated time. This allows you to fine tune your watering if your zone appears to be too dry or wet.
Adding Zone Images You can upload multiple pictures of each of your irrigation zones to the Hydrawise system. To upload an image click on the Image Add button next to the Zone Edit button.

Page 20 RC-024 Version 2.01
You can upload multiple images per zone. The total number of images that can be uploaded is based on the images size and is different for each account’s Plan Subscription.
After an image is uploaded you can select an image to be displayed on the Dashboard by editing the zone and selecting the image in the Zone Icon list.
Configuring a Master Valve A master valve is an automatic valve that is installed at the point where the irrigation system connects to the water supply. (Sometimes this circuit is called a “pump start circuit.” Both types of circuits work similarly and can be used for a pump and/or a master valve.) The controller turns the master valve on and off.
Zone valves are the individual valves that operate a group of sprinklers or drip emitters. Typically one zone valve is turned on at a time, and controls the irrigation in a specific area of your garden. Whenever one of the irrigation zone valves is told to open by the controller, the controller also signals the master valve to open - the master valve acts like a back up valve, or a fail-safe valve. The purpose of the master valve is to shut off the water to the irrigation system when none of the zone valves are operating.
The image below shows a master valve operating connected to Zone 12 on a Hunter HC controller.
� Water main � Master valve (optional) � Solenoid Valves � Water to zones � Common wires � 24V AC plug pack
Different Hydrawise-Ready controller models have different options when selecting a master valve. With a Hunter HC controller, any one of your ordinary zones can be configured to act as a master valve, with all other Hydrawise-Ready controller models there is a dedicated master valve.
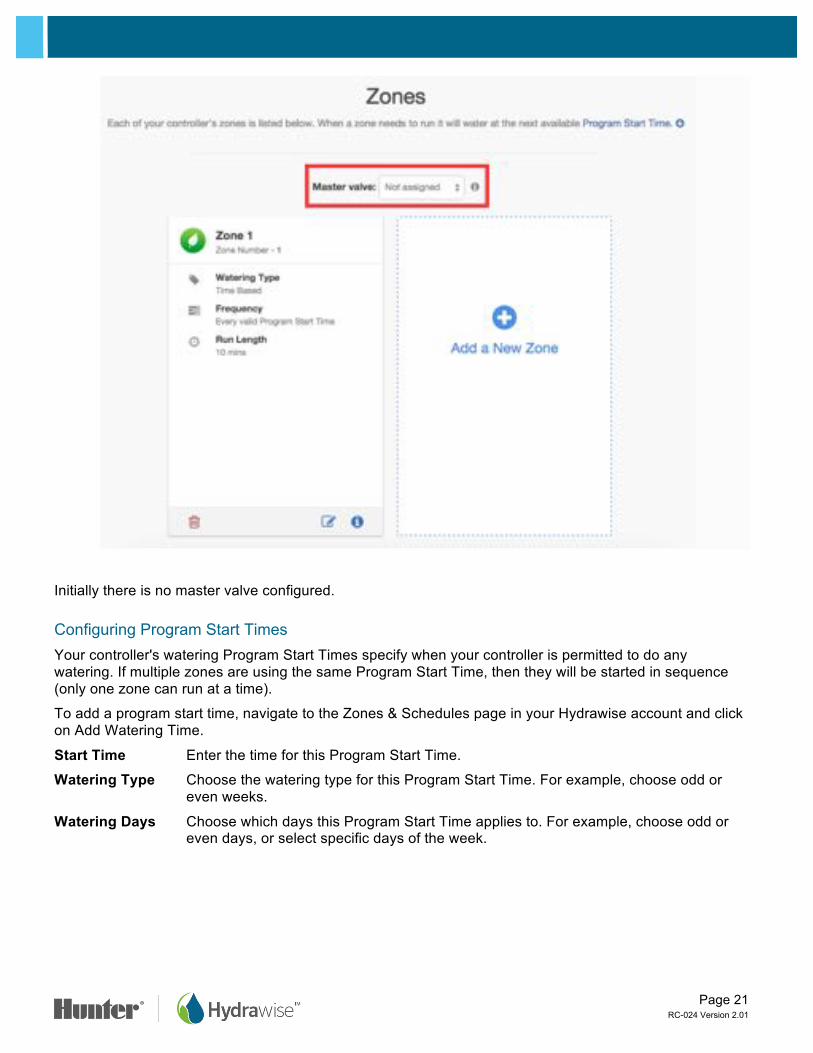
The master zone is configured on the Zones & Schedules page underneath your list of irrigation zones as highlighted in the image below.
➊
➋ ➌
➍
➎
➏
Page 21 RC-024 Version 2.01
Initially there is no master valve configured.
Configuring Program Start Times Your controller's watering Program Start Times specify when your controller is permitted to do any watering. If multiple zones are using the same Program Start Time, then they will be started in sequence (only one zone can run at a time).
To add a program start time, navigate to the Zones & Schedules page in your Hydrawise account and click on Add Watering Time.
Start Time Enter the time for this Program Start Time.
Watering Type Choose the watering type for this Program Start Time. For example, choose odd or even weeks.
Watering Days Choose which days this Program Start Time applies to. For example, choose odd or even days, or select specific days of the week.

Page 22 RC-024 Version 2.01
Then select the zones to which this Program Start Time applies. Either apply it to all zones or select from a list of zones or Preconfigured Watering Schedules.
Configuring Preconfigured Schedules Preconfigured Watering Schedules allow you to group together zones with identical watering properties.

Page 23 RC-024 Version 2.01
Each Preconfigured Watering Schedule determines how long a group of zones will run and how the schedule should be modified based on your local weather. Zones will water only at your defined Program Start Times.
To add a preconfigured watering schedule, navigate to the Zones & Schedules page in your Hydrawise account and click on Add Watering Schedule.
Schedule Name Give the schedule a name. Run Time Choose how long each irrigation zone associated with this Preconfigured
Watering Schedule will run.
Run Frequency Choose how often each irrigation zone associated with this Preconfigured Watering Schedule will run.
Schedule Modification
Select how the watering schedule for this Preconfigured Watering Schedule is modified based on temperature and rainfall. Note: if you apply this watering schedule to a Smart (ET) Watering zone, the schedule modification is not used.
Viewing Preconfigured Watering Schedules You can see all your preconfigured watering schedules on the Zones & Schedules page.
If your controllers are managed by a contractor, you may also see preconfigured watering schedules that your contractor has created. These will have a group symbol next to them as highlighted below. You can use these preconfigured watering schedules but you can’t edit or delete them – only the contractor can do that.
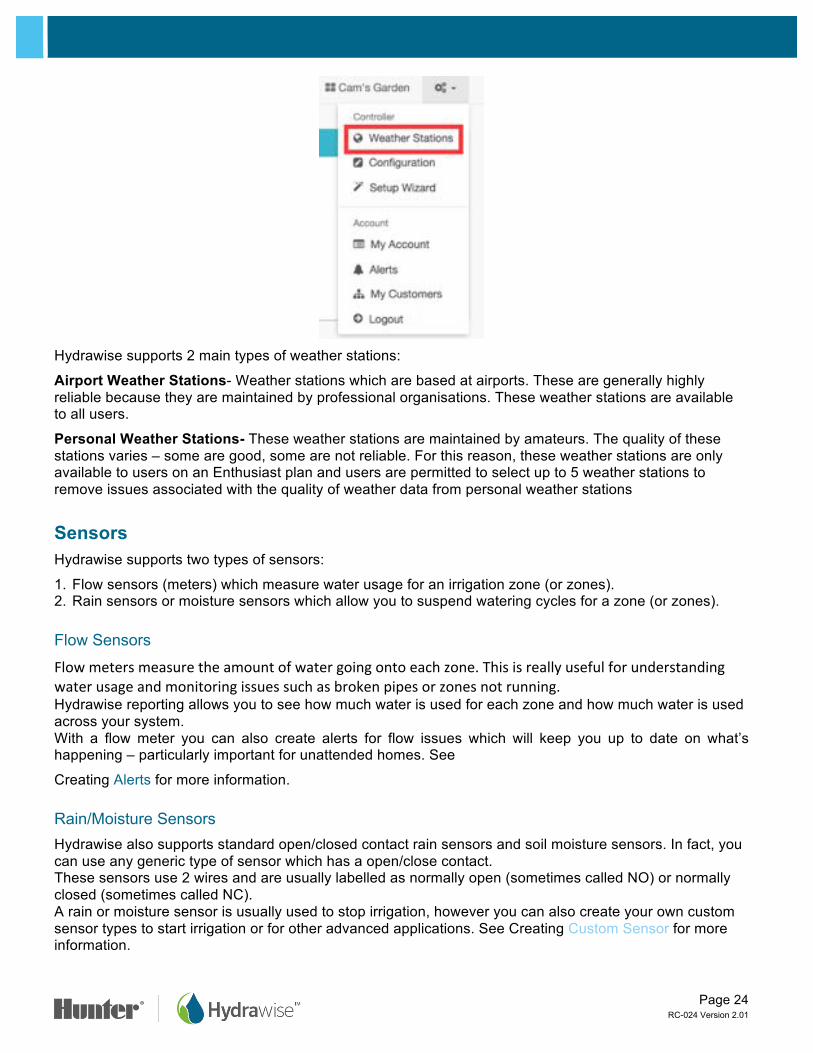
Controller Weather Stations To change the location of your controller or the weather stations you’re subscribed to, select Weather Stations from the menu in the top right hand corner.
Page 24 RC-024 Version 2.01
Hydrawise supports 2 main types of weather stations:
Airport Weather Stations- Weather stations which are based at airports. These are generally highly reliable because they are maintained by professional organisations. These weather stations are available to all users.
Personal Weather Stations- These weather stations are maintained by amateurs. The quality of these stations varies – some are good, some are not reliable. For this reason, these weather stations are only available to users on an Enthusiast plan and users are permitted to select up to 5 weather stations to remove issues associated with the quality of weather data from personal weather stations
Sensors Hydrawise supports two types of sensors:
1. Flow sensors (meters) which measure water usage for an irrigation zone (or zones). 2. Rain sensors or moisture sensors which allow you to suspend watering cycles for a zone (or zones).
Flow Sensors Flowmetersmeasuretheamountofwatergoingontoeachzone.Thisisreallyusefulforunderstandingwaterusageandmonitoringissuessuchasbrokenpipesorzonesnotrunning.Hydrawise reporting allows you to see how much water is used for each zone and how much water is used across your system. With a flow meter you can also create alerts for flow issues which will keep you up to date on what’s happening – particularly important for unattended homes. See
Creating Alerts for more information.
Rain/Moisture Sensors Hydrawise also supports standard open/closed contact rain sensors and soil moisture sensors. In fact, you can use any generic type of sensor which has a open/close contact. These sensors use 2 wires and are usually labelled as normally open (sometimes called NO) or normally closed (sometimes called NC). A rain or moisture sensor is usually used to stop irrigation, however you can also create your own custom sensor types to start irrigation or for other advanced applications. See Creating Custom Sensor for more information.

Page 25 RC-024 Version 2.01
Sensor Configuration
There are 2 steps to get your sensor working for each of your zones: 1. Create a new sensor in your Hydrawise account under Sensors.
Sensor Name Give the sensor a name. Type of Sensor Choose the type of sensor or Creating Custom Sensor.
Standard sensor types are:
Flow meter with ¾ inch coupling A Hydrawise ¾ inch flow meter
Flow meter with 1 inch coupling A Hydrawise 1 inch flow meter
Rain Sensor (Normally Closed)
A standard rain sensor – use this if you have wired the rain sensor’s normally closed wire to the controller
Rain Sensor (Normally Open)
A standard rain sensor – use this if you have wired the rain sensor’s normally open wire to the controller
Soil Moisture Sensor (Normally Closed A standard soil moisture sensor – use this if you have wired the soil moisture sensor’s normally closed wire to the controller
Soil Moisture Sensor (Normally Open) A standard soil moisture sensor – use this if you have wired the soil moisture sensor’s normally open wire to the controller
Controller Choose the controller to which the sensor is wired.
Controller Input Choose the input on the controller to which the sensor is wired.
2. Once you’ve created your sensor, choose the zones which will use the sensor. You must only choose zones that are on the same controller that the sensor is connected to.

Page 26 RC-024 Version 2.01
Creating Custom Sensors You can also create custom sensors in your Hydrawise account under Sensors.
Some examples of custom sensor types are:
• A flow meter of a different size to the standard Hydrawise flow meters. • A sensor to conform to watering restrictions which specify that zones must not water for a minimum
period of time after rain is detected. • A sensor to start irrigation if motion is detected
To add a custom sensor type, go to Sensors and click on Add Custom Sensor Type.
Sensor Name Give the sensor a name.
Type of Sensor Choose the type of sensor.
Flow Meter Litres per pulse- The number of litres of water expected to pass through the flow sensor per flow meter pulse (you can get this information from your flow meter’s specifications)
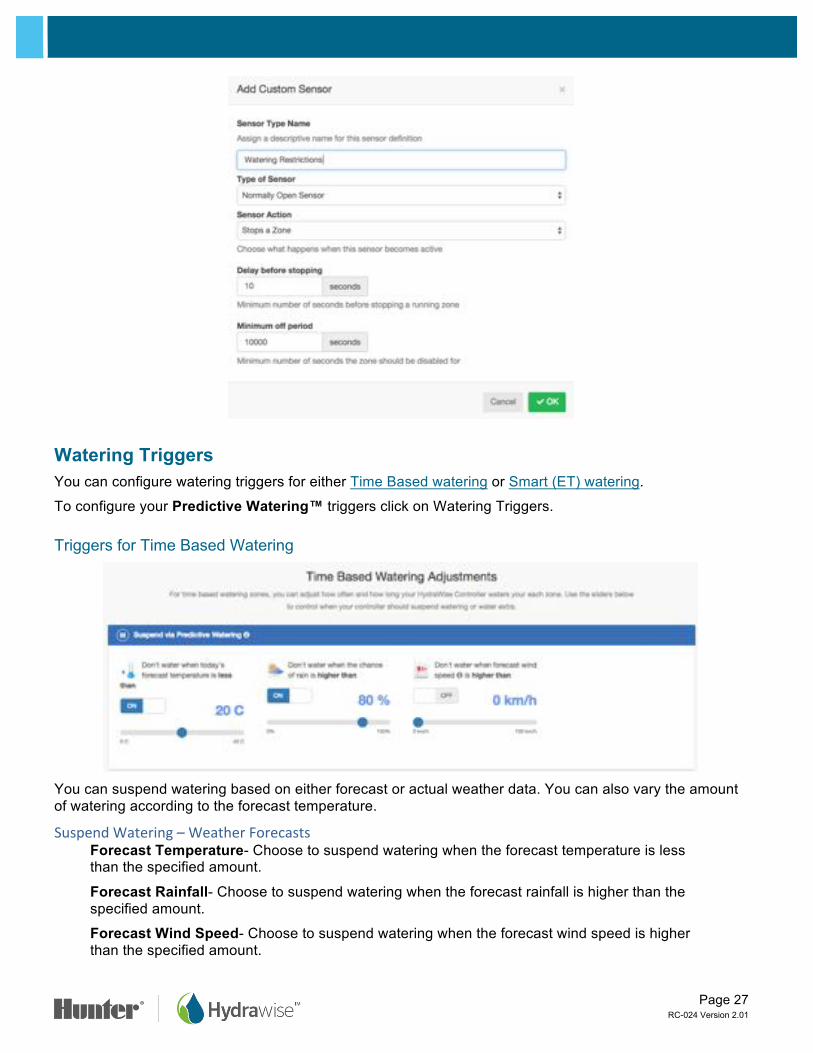
Normally Open Sensor/Normally Closed Sensor Sensor Action- Whether the sensor should cause a zone to start or stop.
Start a Zone If the zone should start, choose the minimum number of seconds before the sensor can cause the same zone to start again.
Stop a Zone If the zone should stop, choose the number of seconds delay before stopping the zone, and how long the zone should be disabled.
For example, some watering restrictions require that if rain is detected, sprinklers should not run for at least two days.
Page 27 RC-024 Version 2.01
Watering Triggers You can configure watering triggers for either Time Based watering or Smart (ET) watering.
To configure your Predictive Watering™ triggers click on Watering Triggers.
Triggers for Time Based Watering
You can suspend watering based on either forecast or actual weather data. You can also vary the amount of watering according to the forecast temperature.
SuspendWatering–WeatherForecastsForecast Temperature- Choose to suspend watering when the forecast temperature is less than the specified amount.
Forecast Rainfall- Choose to suspend watering when the forecast rainfall is higher than the specified amount.
Forecast Wind Speed- Choose to suspend watering when the forecast wind speed is higher than the specified amount.

Page 28 RC-024 Version 2.01
SuspendWatering–WeatherStationMeasurementsActual Rainfall 24 hr- Choose to suspend watering when the rainfall over the past 24 hours is higher than the specified amount.
Actual Rainfall 7 days- Choose to suspend watering when the rainfall over the past 7 days is higher than the specified amount. The threshold of 7 days can be changed to between 1 and 30 days by clicking on the number.
VariableWateringWater Less- Choose to water a certain percentage less when the forecast temperature is less than the specified amount.
Note: to change the watering percentage, click on the number next to the % sign.
Water More- Choose to water a certain percentage more when the forecast temperature is higher than the specified amount and the forecast humidity is below the specified amount.
Note: to change the watering percentage, click on the number next to the % sign.
Triggers for Smart (ET) Watering Using forecast evapotranspiration helps to predict the right watering schedule for your zones, giving you a more accurate picture of when the zones will next run.
You can choose whether or not to use the forecast temperature to predict smart (ET) watering, and whether or not to use forecast rainfall to delay smart (ET) watering.
Schedules will be estimated up to 30 days from today based on forecast and historical temperatures and rainfall. The predicted schedules will be progressively updated each day based on actual weather conditions and new forecasts.
Your watering schedule is updated based on actual weather conditions shortly before your first Program Start Time each day.
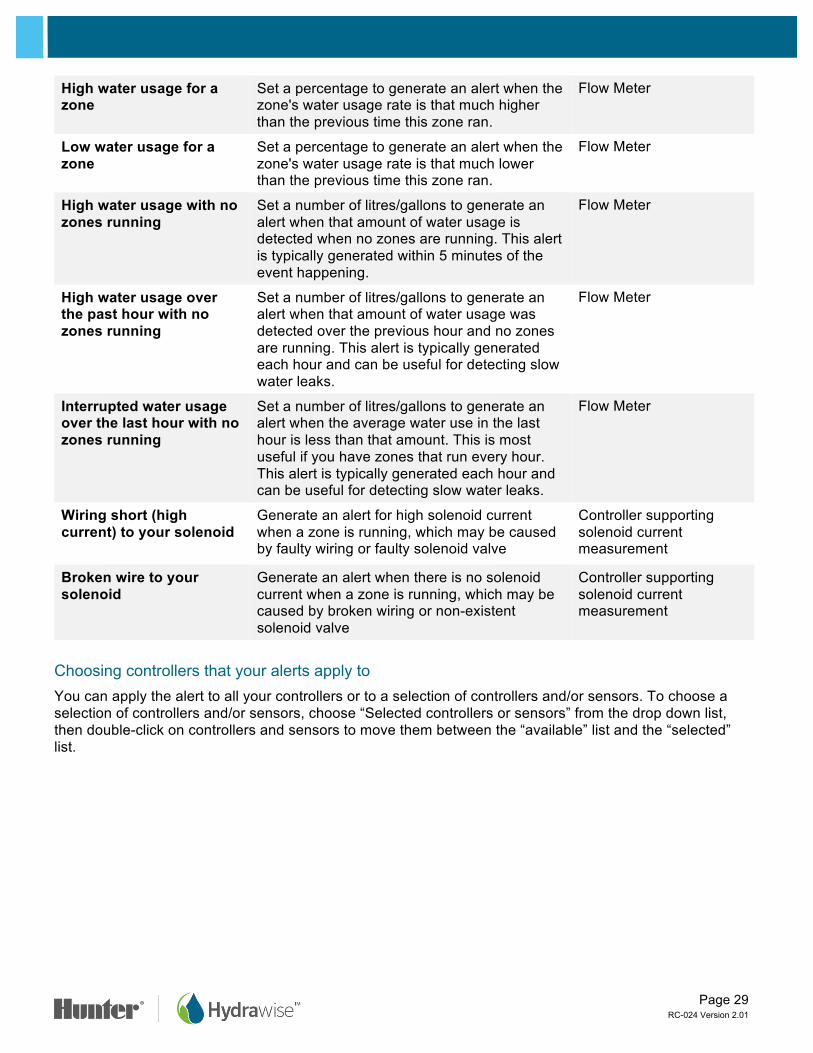
Creating Alerts You can create alerts to keep you up to date on what’s happening with your controllers. Alerts can be created to track water flow or detect faulty solenoid wiring.
Note: If your controllers are managed by a contractor, the contractor may create alerts for your controllers. You’ll see these alerts listed along with any that you’ve created but you won’t be able to edit them – only the contractor can do that. Look out for the symbol to see alerts created by your contractor.Alert Types
ALERT TYPE DESCRIPTION REQUIREMENT
Page 29 RC-024 Version 2.01
High water usage for a zone
Set a percentage to generate an alert when the zone's water usage rate is that much higher than the previous time this zone ran.
Flow Meter
Low water usage for a zone
Set a percentage to generate an alert when the zone's water usage rate is that much lower than the previous time this zone ran.
Flow Meter
High water usage with no zones running
Set a number of litres/gallons to generate an alert when that amount of water usage is detected when no zones are running. This alert is typically generated within 5 minutes of the event happening.
Flow Meter
High water usage over the past hour with no zones running
Set a number of litres/gallons to generate an alert when that amount of water usage was detected over the previous hour and no zones are running. This alert is typically generated each hour and can be useful for detecting slow water leaks.
Flow Meter
Interrupted water usage over the last hour with no zones running
Set a number of litres/gallons to generate an alert when the average water use in the last hour is less than that amount. This is most useful if you have zones that run every hour. This alert is typically generated each hour and can be useful for detecting slow water leaks.
Flow Meter
Wiring short (high current) to your solenoid
Generate an alert for high solenoid current when a zone is running, which may be caused by faulty wiring or faulty solenoid valve
Controller supporting solenoid current measurement
Broken wire to your solenoid
Generate an alert when there is no solenoid current when a zone is running, which may be caused by broken wiring or non-existent solenoid valve
Controller supporting solenoid current measurement
Choosing controllers that your alerts apply to You can apply the alert to all your controllers or to a selection of controllers and/or sensors. To choose a selection of controllers and/or sensors, choose “Selected controllers or sensors” from the drop down list, then double-click on controllers and sensors to move them between the “available” list and the “selected” list.

Page 30 RC-024 Version 2.01
If an alert is added to a controller, it will be applied to all sensors for that controller. If an alert is added to a sensor, it will be applied only to the selected sensor.
Alert Actions Add Event to Event Log Add the alert to your event log which you can view under Reports.
This option is always selected. Send App Notification Send a notification to any Apple or Android device with the Hydrawise app.
Note: if you see (app not validated) in the drop down list, that means you have not logged into any valid device using your Hydrawise app. You need to log into your Hydrawise app at least once on the device before the notification can be sent to that device.
To test alerts for your Apple or Android device, press the Send Test button.
Please note that Apple and Google do not guarantee delivery of all app notifications to your device, for example in situations where your phone is uncontactable for an extended period of time, or where multiple app notifications are sent in a short period of time.
Send SMS Notification Send an SMS to the specified mobile number (this feature requires an Enthusiast plan).
To test alerts for your cell phone press the Send Test button.
Controller Configuration To change the configuration of your controller, select Configuration from the menu in the top right hand corner.

Page 31 RC-024 Version 2.01
Controller Settings Here you can see your controller settings and remove a serial number.
Some configuration options include –
Controller Name The name of your controller Serial Number The controller’s serial number. Click ‘Remove Serial’ to remove the serial number
and replace it with another physical controller
Notification Email The email address notifications are sent to when the controller is offline, or Hydrawise needs to contact you (for example when your subscription plan is about to end)
Notify The amount of time that your controller is offline for before we notify you
Units The units used for reports, alerts and elsewhere in the app
Inter Zone Delay The number of seconds to insert between each zone watering when calculating scheduled
Master Valve Delay The minimum number of seconds that the master valve should be active before any zone starts
Hide password If set to yes, this will hide your wireless password on the controller. If your controller is in a publically accessible area we recommend you hide your password.

Page 32 RC-024 Version 2.01
Expansion Modules Here you can see your expansion modules and when they last made contact. You can also add or remove expansion modules.
Up to 2 expansion modules can be added to a single Hunter HC controller.
When you add an expansion module you will need to give it a name and specify the ID number that you selected when setting up the module.
Offline Water Adjustments Offline water adjustments allow the controller to automatically adjust the amount of watering on a month-by-month basis if the controller is in an Offline mode (ie. it is not connected to the internet).
My Account From your account screen you can:
1. Update your account details 2. Manage your controllers 3. Manage users 4. Manage files
Account Details Here you can change your password, change your plan and change your account visibility settings.

Page 33 RC-024 Version 2.01
By default, nobody else can see your account. However, if you want help from a Hydrawise contractor then you can choose to make your account visible to the contractor so that they can help you with configuration or troubleshooting.
You can also register as a contractor.
Controllers Here you can see a summary of your controllers. You can also manage or delete a controller.
Users Here you can see which users have access to manage your controller. Users can have access to change configuration or to just view configuration.
Note that this list is separate from any contractors which you have given access to under
Account Details.
You can also add or delete a user. Multiple users are supported for customers on an Enthusiast plan.

Page 34 RC-024 Version 2.01
User Name The name of the new user
Email Address The email address that the new user will use to log into their account
Type of User Ifyou want the user to have full control over the controllers, select “Can modify configuration and run zones”
If you don’t want the user to be able to change configuration, select “Can view configuration, manually run zones”
Click Create- the user will get an activation email and when they visit their Dashboard for the first time they will need to select a password.
Files Here you can upload files which are useful in managing your garden. For example, you might like to add a picture which shows the layout of your garden and zones. Uploading of files is supported for Enthusiast plan customers.

Page 35 RC-024 Version 2.01
Monitoring There are a number of ways to keep an eye on your controller, including the dashboard, reports, and configuration.
Controller Dashboard From the controller dashboard you can:
1. Find zone information and start, stop, and suspend zones 2. See temperature and rainfall observations 3. See the weather forecast 4. See and add sensors 5. See your controller’s status 6. View a different controller
Zone Information All your configured zones are listed here. To find more information about a zone, click on the zone.
This will show when the zone is next scheduled to run and for how long, and when it last ran.

Page 36 RC-024 Version 2.01
To run a zone, click the Play button. You will be prompted to run the zone for its normal watering time or to choose a custom time.
To suspend a zone, click the Pause button. You will be prompted to choose when the suspension should end. Once a zone is suspended it will display in a lighter color on the dashboard and you can click the Pause button again to remove the suspension.
To display zone information, click the information button. This will display information including the next watering time, watering frequency and program start times.
The icon on the dashboard can be changed to display a picture of your irrigation zone.

Page 37 RC-024 Version 2.01
Temperature and Rainfall All temperature and rainfall values are calculated as the median of your weather stations.
For example, if you are subscribed to 3 weather stations, the temperature or rainfall will be the middle value. If you are subscribed to 4 weather stations it will be halfway between the two middle values.
3 weather stations:
• If your weather stations record maximum temperatures of 45, 48 and 56 degrees, the median will be 48 degrees.
4 weather stations:
• If your weather stations record maximum temperatures of 70, 75, 77 and 80 degrees, the median will be 76 degrees.
If your temperature or rainfall readings are consistently showing a low value, go to Reports and check each weather station rainfall or temperature and adjust them accordingly.
Temperature For customers on an Enthusiast plan this will show the current and maximum temperatures for today. This is based on the median value of all the weather stations you have selected.
Rainfall This panel will show you the amount of rain which fell yesterday and in the past week. This is based on the median value of all the weather stations you have selected.
If you have an Enthusiast plan, instead of yesterday’s rainfall you will see rainfall for the past 24 hours.

Page 38 RC-024 Version 2.01
Forecast This area will show forecast temperature and weather conditions, including the percentage chance of rainfall, expected humidity, and expected average wind speed.
Sensors This area will show any sensors you have configured and will also allow you to add a sensor.
Controller Status This area will display the status of your controller. If the controller is online you will see a green circle with a tick, and you can hover over this to see the last time the controller was synchronised. If the controller has been offline for 30 minutes or more then you will see a red triangle with an exclamation mark. If your controller remains offline for 24 hours we will send you an email.
Changing your Current ControllerFrom the menu, choose the Controller link.
This will give you a list of all the controllers in your account. Click on the controller name to change to configuring that controller.
Choose the controller you want to view.
Reports You can access reports for your controllers by selecting Reports from the main menu. Use the settings at the top of the screen to: • Change the date range for the report • Clear all report data • Download a report to Excel • Refresh a report REPORT NAME DESCRIPTION Watering Schedule Shows the scheduled watering time for each zone. You can
hover over each schedule to see more details about the planned watering.

Page 39 RC-024 Version 2.01
REPORT NAME DESCRIPTION Watering History (Actual) Shows actual completed watering time for each zone. You
can hover over each watering time to see more details about the watering.
Weather Forecast Show the historical weather forecast plus the next 3 days, forecast. You controller will use this forecast to adjust your watering schedule.
Weather Station Temperatures Shows daily maximum temperatures for each weather station to which the controller is subscribed. You can click on the weather station names at the bottom of the report to show their information in the report or exclude it. Hover over any temperature bar to see further information including the relevant time period and rainfall for that period.
Weather Station Rainfall Shows daily rainfall for each weather station to which the controller is subscribed. You can click on the weather station names at the bottom of the report to show their information in the report or exclude it. Hover over any rainfall bar to see further information.
Weather Station Wind Gust Shows wind gusts for each weather station to which the controller is subscribed. You can click on the weather station names at the bottom of the report to show their information in the report or exclude it. Hover over any wind gust bar to see further information.
Evapotranspiration (ET) Shows daily evapotranspiration for each weather station to which the controller is subscribed. You can click on the weather station names at the bottom of the report to show their information in the report or exclude it.
Water Saving Shows the estimated water saving for your controller over the last 7 days. During cold weather you would expect to see this percentage increase due to reduced watering. During hot weather you would expect to see this percentage decrease (and go negative) as the controller increases watering.
Flow Meter Measurements If you have a flow meter installed, this report shows reported flow for each of your controller’s zones.
Total Water Usage Shows daily water usage as recorded by each flow meter. Also shows minimum and maximum water usage for any flow meter across the period as well as the average and total water usage. You can click on the flow meter names at the bottom of the report to show their information in the report or exclude it. Hover over any flow meter bar to see how many zones were active at the time.

Page 40 RC-024 Version 2.01
REPORT NAME DESCRIPTION Flow Rates (per minute) If you have a flow meter installed, this report shows
instantaneous flow rates each time the controller records flow. Hover over any dot to see the flow rate and number of zones active at the time.
Sensor Levels If you have a rain sensor, moisture sensor or any other ‘level’ based sensor configured this report will show the historical status of your sensor (open or closed).
Smart Water Balance Shows the irrigation balance for each zone on a given day. Also shows the minimum and maximum irrigation balance over the report period. You can click on the zone names at the bottom of the report to show their information in the report or exclude it. Hover over the graph to see information on evapotranspiration, rainfall and irrigation amounts.
Monthly Evapotranspiration and Rainfall
Shows the historical ET and rainfall in your area. This data is based on a 12 year average.
Monthly Temperature and Rainfall Shows the historical temperature and rainfall in your area. This data is based on a 12 year average.

Page 41 RC-024 Version 2.01
Using Hydrawise as an Irrigation Contractor If you’re a landscape or irrigation contractor, a Hydrawise Contractor account with a Hydrawise-Ready controller can save you and your customers time and money. It offers automatic schedule adjustments based on internet weather stations with a simple-to-use interface.
You can:
• avoid onsite visits by fixing your customer’s irrigation from your smartphone or tablet • store irrigation or landscape designs in your account for easy reference later • stop customers from making changes to their controller without your permission • manage thousands of different customers from the Hydrawise app and easily change controller settings
for any of your customers with just 2 clicks • see all irrigation issues from one interface – manage your customers’ irrigation
Hydrawise Contractor accounts are free for up to 5 controllers. You can create ‘test’ controllers online to see how it works – there’s no commitment to purchase.
Registering as a Contractor To register as a contractor you’ll first need to sign up for an account. You can do this without purchasing a controller.
From the Hydrawise website (https://hydrawise.com), click on Sign Up at the top of the page. When registering select the option that says you’re a contractor and fill in your business details. You will be automatically subscribed to our free Contractor Starter plan which allows you to manage up to 5 of your customer’s controllers free of charge.
If you already have a Hydrawise account you can register as a contractor by going to My Customers and choosing the appropriate contractor plan for your account.

Page 42 RC-024 Version 2.01
If you choose a plan with an associated price you’ll be taken to Paypal to pay for the plan. Then you can enter your business details.
Your Business Name The name of your business
Contact Details Your phone number or email address
Business Location Where your business is located
Website Your business website address
Business Description A brief description of the services you offer
If you would like your details to be available to Hydrawise customers, tick the “I want my details listed online so customers can find me” box. Now that you’re set up as a contractor, you can either add a customer to your account or ask your customers to select you as their contractor – see How to Add a Customer to Your Account. Your Contractor Settings show how your details will look to Hydrawise customers.
1. Click on Settings -> My Account To change them, click on Change. Either confirm your existing plan or choose a new one, then update your details.
Page 43 RC-024 Version 2.01
The Hydrawise Contractor Portal Hydrawise accounts with a Contractor plan have a dedicated portal for creating and managing your customers and controllers.
To get to your portal go to Settings -> My Customers. If you haven’t already registered for a contractor plan then you can do that here, otherwise the portal will show you details on all your current customers.
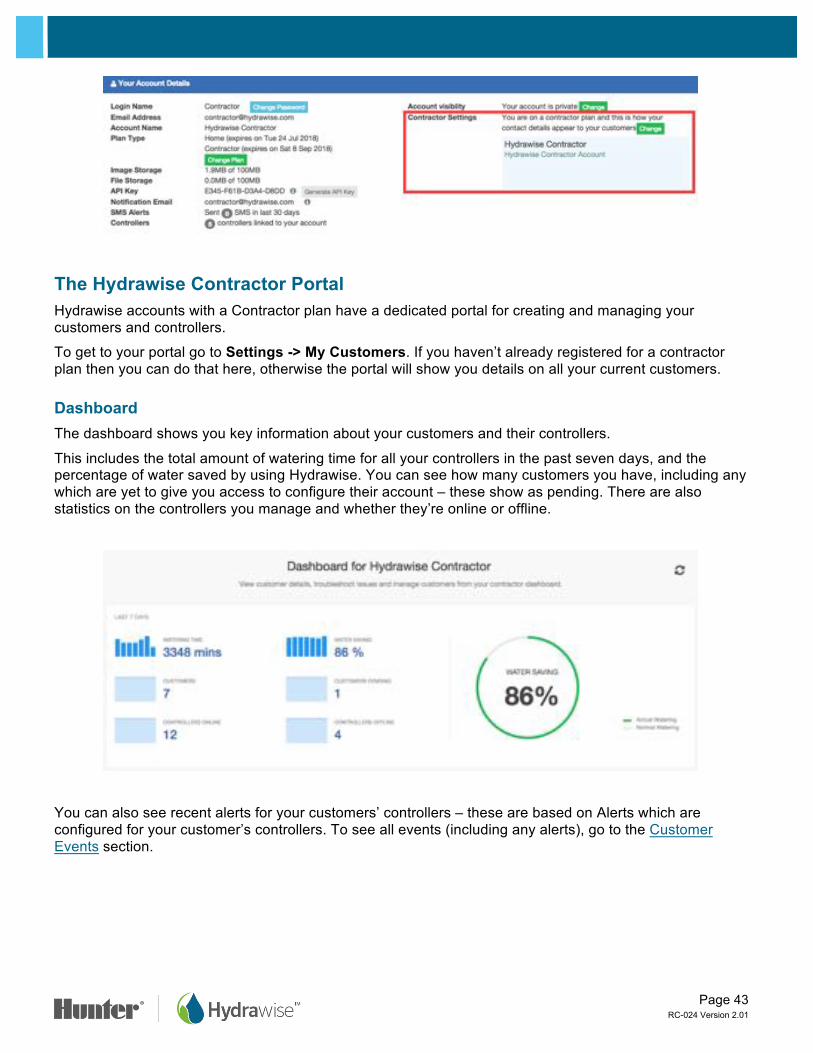
Dashboard The dashboard shows you key information about your customers and their controllers.
This includes the total amount of watering time for all your controllers in the past seven days, and the percentage of water saved by using Hydrawise. You can see how many customers you have, including any which are yet to give you access to configure their account – these show as pending. There are also statistics on the controllers you manage and whether they’re online or offline.
You can also see recent alerts for your customers’ controllers – these are based on Alerts which are configured for your customer’s controllers. To see all events (including any alerts), go to the Customer Events section.

Page 44 RC-024 Version 2.01
Customers and Controllers This section allows you to configure all your customers and their controllers. You can also see your own controllers.
When you first enter the screen you’ll see a list of your customers. From here you can also add a customer. Customers will be color-coded by the type of plan they have:
• Green for a Home plan • Orange for an Enthusiast plan • Blue for a Contractor plan
There’s also a map which shows all the controllers you manage unless you’re using a small screen. Controllers on the map are color-coded by their status:
• Green: online • Red: offline • Yellow: this controller is not yet linked to a physical device. To do so, you can configure the controller
and attach a serial number.
Click on a controller on the map to see status information and also configure the controller.
You can use the search box to find your customers by name, email address, controller status or serial number. Simply clear the search box if you want to see all your customers.
To manage a customer, either click on their name or use the menu next to their name to show their details. You can also use the menu to remove this customer from your account. Once you’re looking at a customer you’ll be able to configure their plans, controllers and users.

Page 45 RC-024 Version 2.01
Customer Events This section shows all events for your customers’ controllers, with the most recent events at the top. Events can be errors, warnings or information and you can use the buttons at the top of the section to filter the type of events you want to see.
If you don’t need to see the events anymore you can either click Acknowledge next to a specific event or click Acknowledge All Events.
You can change the number of events shown on the page. You can also search for events by a range of information including:
• Customer name • Controller name • Date • Event information keywords, e.g. “flow” or “usage” • Event severity
Customer Wide Settings This section allows you to create settings which you can apply to one or more of your customers. This way you can save time by creating commonly used settings once rather than for every customer.
Global alerts If you have an alert that you want to use for multiple customers, you can create it once here and simply apply it to whichever customers or controllers you need it for.
You can also apply an alert to “All Customers”, which means it will be automatically added to any new customers in the future.
Watering schedules Do you have lots of zones which all need to run to the same watering schedule? You can add a preconfigured watering schedule which you apply to any customers or controllers.
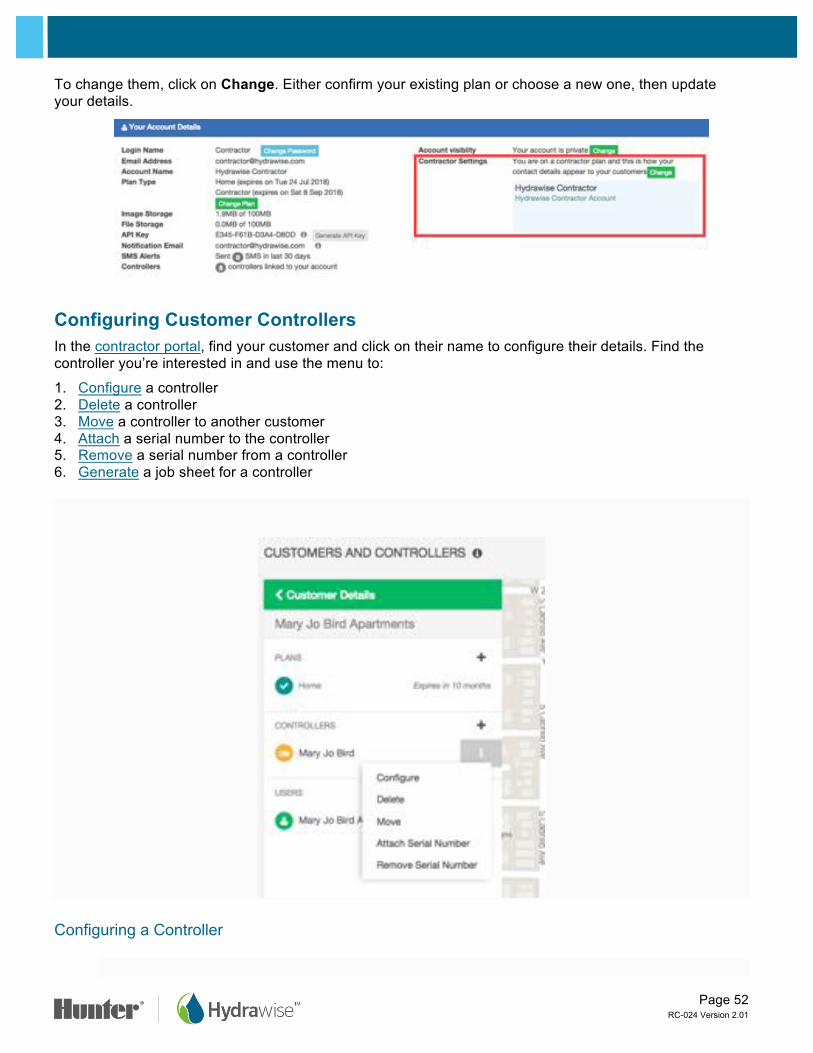
My Business From here you can see what plan you’re on and change it.
You can also see how your business details appear to your customers when they are logged into the app and update them.
Page 46 RC-024 Version 2.01
Managing Customers and Controllers
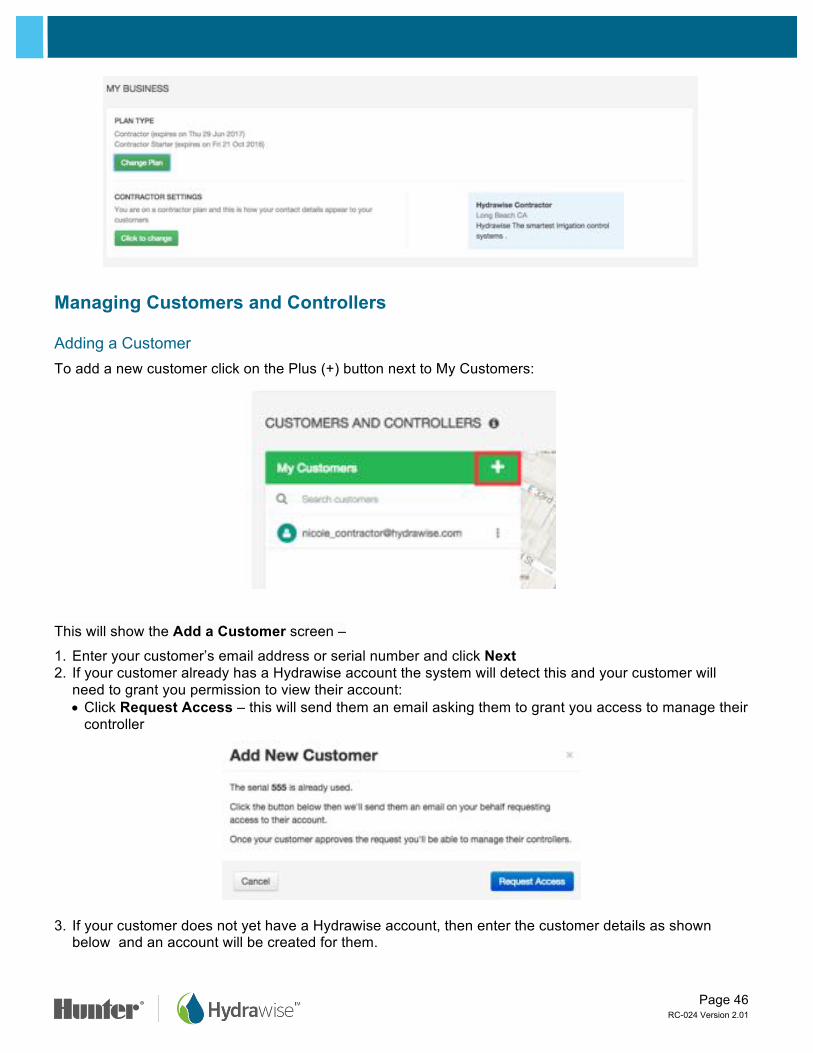
Adding a Customer To add a new customer click on the Plus (+) button next to My Customers:
This will show the Add a Customer screen –
1. Enter your customer’s email address or serial number and click Next 2. If your customer already has a Hydrawise account the system will detect this and your customer will
need to grant you permission to view their account: • Click Request Access – this will send them an email asking them to grant you access to manage their
controller
3. If your customer does not yet have a Hydrawise account, then enter the customer details as shown below and an account will be created for them.

Page 47 RC-024 Version 2.01
Customer’s Email The email address that the customer will use to log into their account Customer Name The customer’s name
Type of User If you want your customer to have full control over their system, select “Can modify configuration and run zones
If you don’t want your customer to be able to change their configuration, select “Can view configuration, manually run zones
Send Notifications To Choose where to send emails about a controller being offline or plans requiring renewal. This can be either your email address or your customer’s email address
Send activation email to me If you don’t want the customer to receive an account activation email then tick this box and the activation email will be sent to your email address instead.
Once you click Create you’ll be taken through a wizard to set up your customer’s controller and it will be linked to your account. If you chose, you’ll receive the activation email, otherwise, it will be sent to the customer.
Once their account is activated and they can log in and view their Dashboard, they will need to set a password. Your new customer will now be visible in your list of customers in the Contractor portal.

Page 48 RC-024 Version 2.01
Viewing Customers & Controllers In the contractor portal go to the Customers and Controllers section.
Click on any customer name to drill down to information specific to that customer.
Plans The plans section shows you which subscription plan your customer has and when they’ll expire. You can also add plans.

Page 49 RC-024 Version 2.01
Controllers The controllers section shows you this customer’s controllers. You can add a controller from here. You can also configure controllers.
Users The users section shows you all the users associated with your customer. You add a user from here. You can also click on the user name or choose View Details from the menu which will allow you to manage the user.

Page 50 RC-024 Version 2.01
Files You can add files to a customer. For example, you may wish to upload a diagram showing the layout of their garden. You can also rename and delete a file.
Any files that you add to your own account will also show up in the My Account screen.
Updating your Business Details As a landscape contractor, you can make your business details available to existing Hydrawise customers. Customers can then choose you to manage their controllers.
If you’re not already registered as a contractor, you can do so via your My Account screen.
1. Click on Settings -> My Account Next to Contractor Settings, click on Change. This will show the Register for a Contractor Plan screen
Note: if you’re already registered as a contractor, you can update your details in two ways: via your My Account screen – simply click Change next to your Contractor Settings, choose your existing plan and update your details via the Contractor Portal.

Page 51 RC-024 Version 2.01
If you choose a plan with an associated price, you’ll be taken to Paypal to pay for the plan. Then you can enter your business details.
Your Business Name The name of your business Contact Detail Your phone number or email address
Business Location Where your business is located
Website Your business website address
Business Description A brief description of the services you offer
If you would like your details to be available to Hydrawise customers, tick the “I want my details listed online so customers can find me” box. Now that you’re set up as a contractor, you can either add a customer to your account or ask your customers to select you as their contractor – see How to Add a Customer to Your Account. Your Contractor Settings show how your details will look to Hydrawise customers.
1. Click on Settings -> My Account
Page 52 RC-024 Version 2.01
To change them, click on Change. Either confirm your existing plan or choose a new one, then update your details.
Configuring Customer Controllers In the contractor portal, find your customer and click on their name to configure their details. Find the controller you’re interested in and use the menu to:
1. Configure a controller 2. Delete a controller 3. Move a controller to another customer 4. Attach a serial number to the controller 5. Remove a serial number from a controller 6. Generate a job sheet for a controller
Configuring a Controller

Page 53 RC-024 Version 2.01
Deleting a Controller If the controller is no longer being used, you can delete it.
Moving a Controller You can move a controller from your own account to a customer account. However you can’t move the controller between customers.
Select the account to which you’re moving the controller and click Move.
Page 54 RC-024 Version 2.01
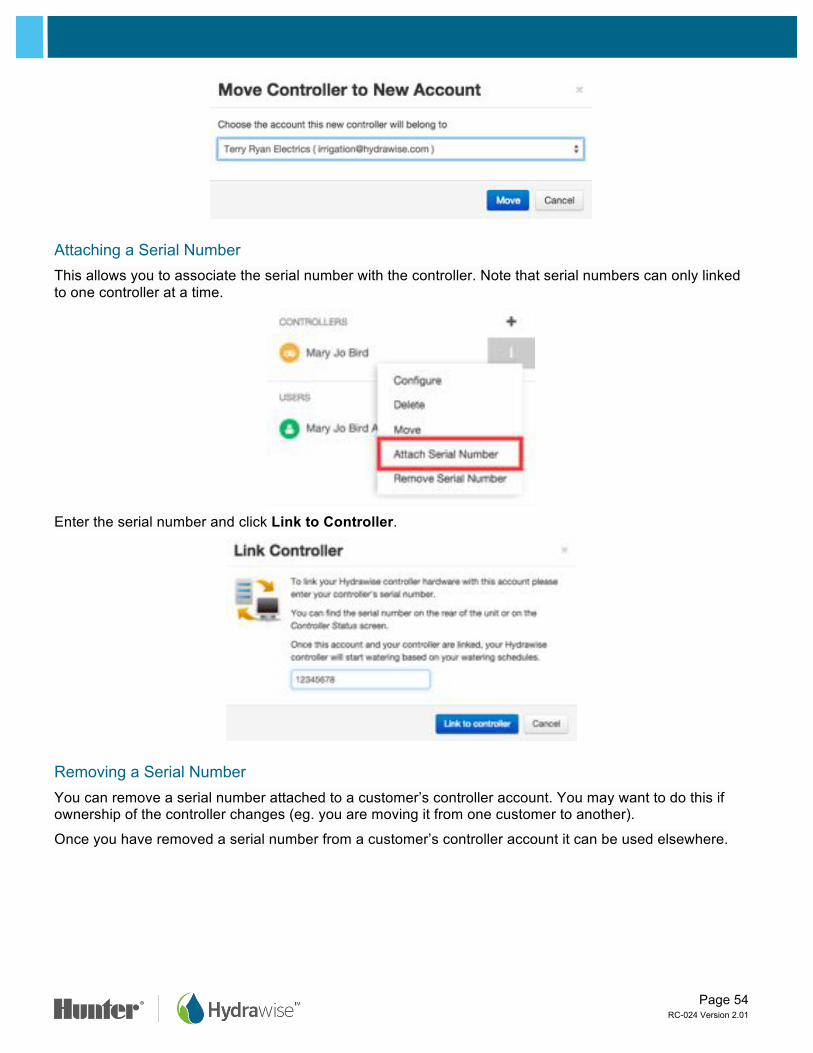
Attaching a Serial Number This allows you to associate the serial number with the controller. Note that serial numbers can only linked to one controller at a time.
Enter the serial number and click Link to Controller.
Removing a Serial Number You can remove a serial number attached to a customer’s controller account. You may want to do this if ownership of the controller changes (eg. you are moving it from one customer to another).
Once you have removed a serial number from a customer’s controller account it can be used elsewhere.

Page 55 RC-024 Version 2.01
Generating Job Sheets A job sheet is a handy summary of information about a controller which you or your staff can use when you go out on site to make changes or fix a problem.
You can generate a job sheet from three different places:
1. In the contractor portal, find your customer and click on their name to configure the details. Find the relevant controller, click on the plus sign and select Generate Job Sheet.
2. In the contractor portal, click on the controller on the map and use the menu to select Generate Job Sheet.
3. Select Generate Job Sheet from the menu in the top right hand corner to generate a job sheet for the currently selected controller.
You can choose to include or exclude certain parts of the job sheet, as outlined below. Assuming you include all available information, the job sheet will show:
• Job Number and job-specific instructions • Customer Name and Address

Page 56 RC-024 Version 2.01
• Controller Name and alerts summary • An area for you or your staff to record details on when the job was done and how long it took • Zone Information • Alert details • Files (email only)
Printing a Job Sheet If you choose to print a job sheet, a PDF file will be created which you can then print.
Job Number Enter an optional job number
Include Zone Details Choose to include or exclude information about each zone
Include Zone Pictures Choose to include or exclude pictures for each zone
Include Alerts Choose to include or exclude details about alerts for the controller
Add an Instruction Add an optional instruction to the person completing the job
Emailing a Job Sheet If you choose to email a job sheet, an email will be sent from you to your selected recipients and you’ll also receive a copy. You can choose from a list of users on the customer’s account and/or your own staff.
Job Number Enter an optional job number Browse emails Choose one or more users associated with the customer’s account or one or
more of your staff members.
Add Add specific email addresses.
Include Zone Details Choose to include or exclude information about each zone
Include Zone Pictures Choose to include or exclude pictures for each zone
Include Alerts Choose to include or exclude details about alerts for the controller
Add Files Choose to include files associated with the customer – these will be attachments to the email
Add an Instruction Add an optional instruction to the person completing the job
Adding a Controller In the contractor portal, find your customer and click on their name to configure their details. You’ll see their controllers and can click on the plus sign to add a controller, which will display the Add New Controller screen.

Page 57 RC-024 Version 2.01
Enter the name of the controller and the serial number if you know it, then click Create.
This will add the controller to the customer and you will see it in the list. You can click on it to see status information and from here you can configure the controller. Note that your new controller will not appear on the map until you have gone through the configuration wizard for the controller and entered an address for it.
Managing Customer Plans In the contractor portal, find your customer and click on their name to configure their details. You’ll see what plans the customer has and when they’re going to expire.

Page 58 RC-024 Version 2.01
You can also:
1. Add a Plan using a Code you’ve received from a retailer 2. Assign a Plan you’ve previously purchased 3. Purchase a Plan
Adding a Plan using a Plan Card If you’ve purchased a Hydrawise plan card with a code on the back from a retailer you can use this to assign the plan to your customer.
The plan code will look like 4 characters followed by a dash and another 4 characters (for example 45F2-644E).
Click on the menu and select Add Plan using Code.
Page 59 RC-024 Version 2.01
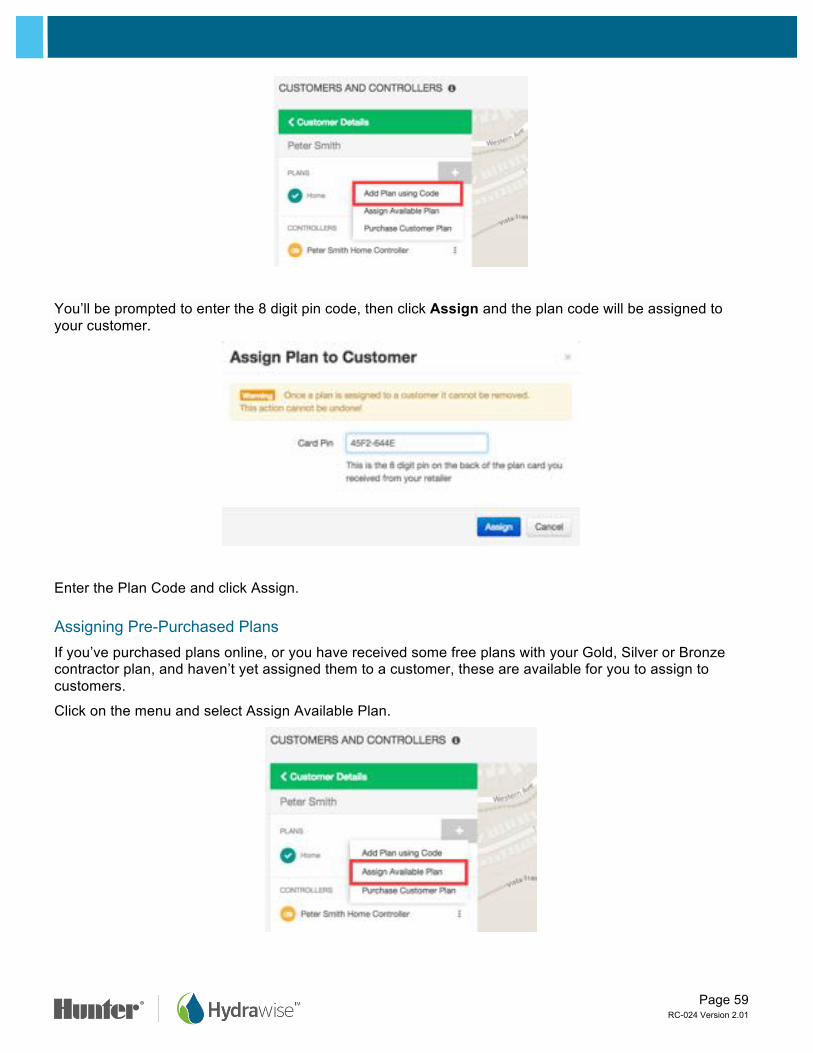
You’ll be prompted to enter the 8 digit pin code, then click Assign and the plan code will be assigned to your customer.
Enter the Plan Code and click Assign.
Assigning Pre-Purchased Plans If you’ve purchased plans online, or you have received some free plans with your Gold, Silver or Bronze contractor plan, and haven’t yet assigned them to a customer, these are available for you to assign to customers.
Click on the menu and select Assign Available Plan.

Page 60 RC-024 Version 2.01
You’ll see a list of available plans – choose the one you want and click on Add Plan to assign it to the customer.
Purchasing Customer Plans Online If you don’t have any plans available you can purchase one from here.
Click on the menu and select Purchase Customer Plan.
Choose the plan you want to purchase and select whether or not you’d like it to be automatically renewed, then continue to Paypal to pay for the plan.
Managing Users You may want to have several people in your organisation manage your customers’ controllers. Or your customers may have more than one person in their household or business who wants to manage their controller. You can do this by adding extra users for a customer.
In the contractor portal, find your customer and click on their name to configure their details.
Find the user you’re interested in and either click on their name or use the menu to view their details. From here you can add new users, delete users, alter user settings or resend activation emails to users.
Adding a User

Page 61 RC-024 Version 2.01
This will show the New User screen.
User Name The name of the new user
Email Address The email address that the new user will use to log into their account
Type of User If you want your customer to have full control over their system, select “Can modify configuration and run zones”
If you don’t want your customer to be able to change their configuration, select “Can view configuration, manually run zones”
Click Create – the user will get an activation email and when they visit their Dashboard for the first time they will need to select a password.
Editing a User This allows you to set the user’s permissions.
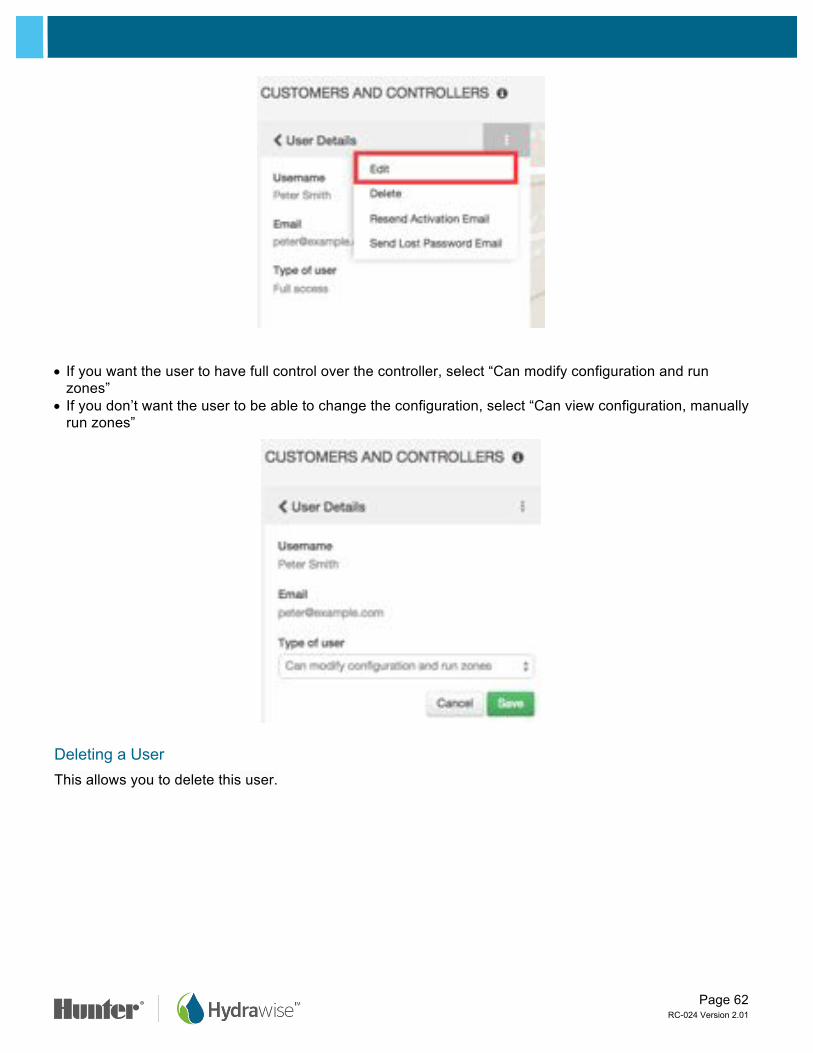
Page 62 RC-024 Version 2.01
• If you want the user to have full control over the controller, select “Can modify configuration and run zones”
• If you don’t want the user to be able to change the configuration, select “Can view configuration, manually run zones”
Deleting a User This allows you to delete this user.

Page 63 RC-024 Version 2.01
Resend Activation Emails This allows you to re-send the account activation email to this user, in case, they can’t find it.
Sending a Lost Password Email This allows you to send an email to the user to allow them to reset their password.
Managing Customer Files In the contractor portal, find your customer and click on their name to configure their details. You can see the list of files toward the bottom.

Page 64 RC-024 Version 2.01
You can use the customer file functionality to store information about your customer, for example you may wish to store irrigation drawings so that you can refer to them at a later date.
Adding a File To add a file, click on the plus button in the File section and select the file you want to upload.
Renaming a File To rename a file, click on the menu next to the file name and choose Rename.

Page 65 RC-024 Version 2.01
Deleting a File To delete a file, click on the menu next to the file name and choose Delete.
Creating Customer Wide Settings Customer wide settings allow you to create different configurations which can apply across multiple customers.
Global Alerts There are some things that you may always want to be alerted to for all your customers.
For example, let’s say you want to be alerted to high water flow on any controller for any of your customers. You can set up one alert in the Contractor Dashboard and automatically apply it to all your customers, even the ones you don’t have yet.
From the Customer Wide Settings section of your Contractor Dashboard, select Global Alerts and click Add New Alert.

Page 66 RC-024 Version 2.01
For more information on the different types of alerts, see Alert Types.
On the next screen, select “Applies to all customers” to apply this alert to all your customers and their controllers. If you add new customers, or if existing customers add controllers in the future, this alert will automatically be applied to them.
Alternatively, click on the customers and controllers in the “available” box to apply the alert only to those customers or controllers.

Page 67 RC-024 Version 2.01
On the next screen, select the action you want to take when the alert occurs. You can choose to create an event, receive an in-app notification or receive an SMS. For more information on alert actions, see Alert Actions. For these customer-wide alerts, actions can only be sent to you, not to your customers.
Your customers will also see these alerts on their own account but they won’t be able to edit or delete them – only you can do that.
Pre-configured Watering Schedules You might have watering schedules that you use repeatedly across customers and controllers.
For example, whenever you install turf, you might want to water it for 30 minutes twice a week. You can set up a preconfigured watering schedule that you then apply to all the relevant zones.
From the Customer Wide Settings section of your Contractor Dashboard, select Preconfigured Watering Schedules and click Add Watering Schedule.
The next time you add or edit a zone you’ll see this preconfigured watering schedule and you can apply it straight away.
Your customers will see these preconfigured watering schedules and can apply them to their controllers, but they won’t be able to edit or delete them – only you can do that.
Monitoring Customer Controllers from the Contractor Dashboard Information about the status of your customers’ controllers will show up on your My Customers screen.
Click on Settings –> My Customers
In the Customer Events section, you can see different types of events. Use the Info, Warning and Error buttons to show or hide different types of events.
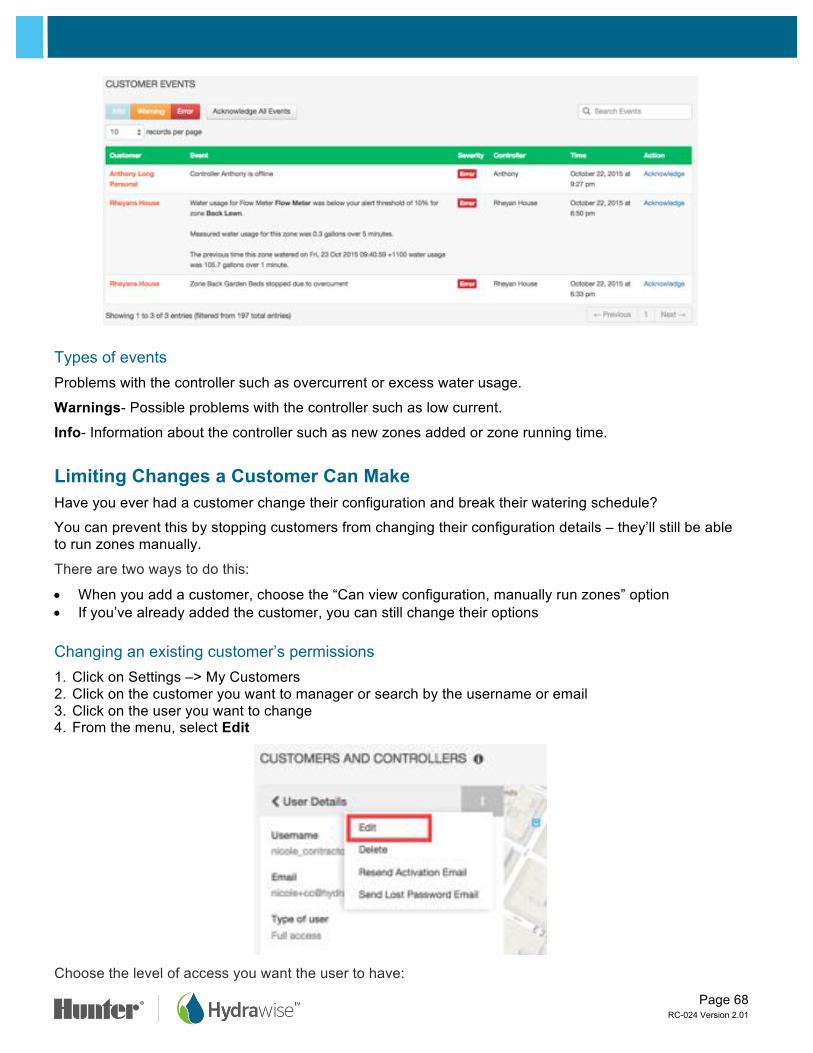
Page 68 RC-024 Version 2.01
Types of events Errors Problems with the controller such as overcurrent or excess water usage.
Warnings- Possible problems with the controller such as low current.
Info- Information about the controller such as new zones added or zone running time.
Limiting Changes a Customer Can Make Have you ever had a customer change their configuration and break their watering schedule?
You can prevent this by stopping customers from changing their configuration details – they’ll still be able to run zones manually.
There are two ways to do this:
• When you add a customer, choose the “Can view configuration, manually run zones” option • If you’ve already added the customer, you can still change their options
Changing an existing customer’s permissions 1. Click on Settings –> My Customers 2. Click on the customer you want to manager or search by the username or email 3. Click on the user you want to change 4. From the menu, select Edit
Choose the level of access you want the user to have:
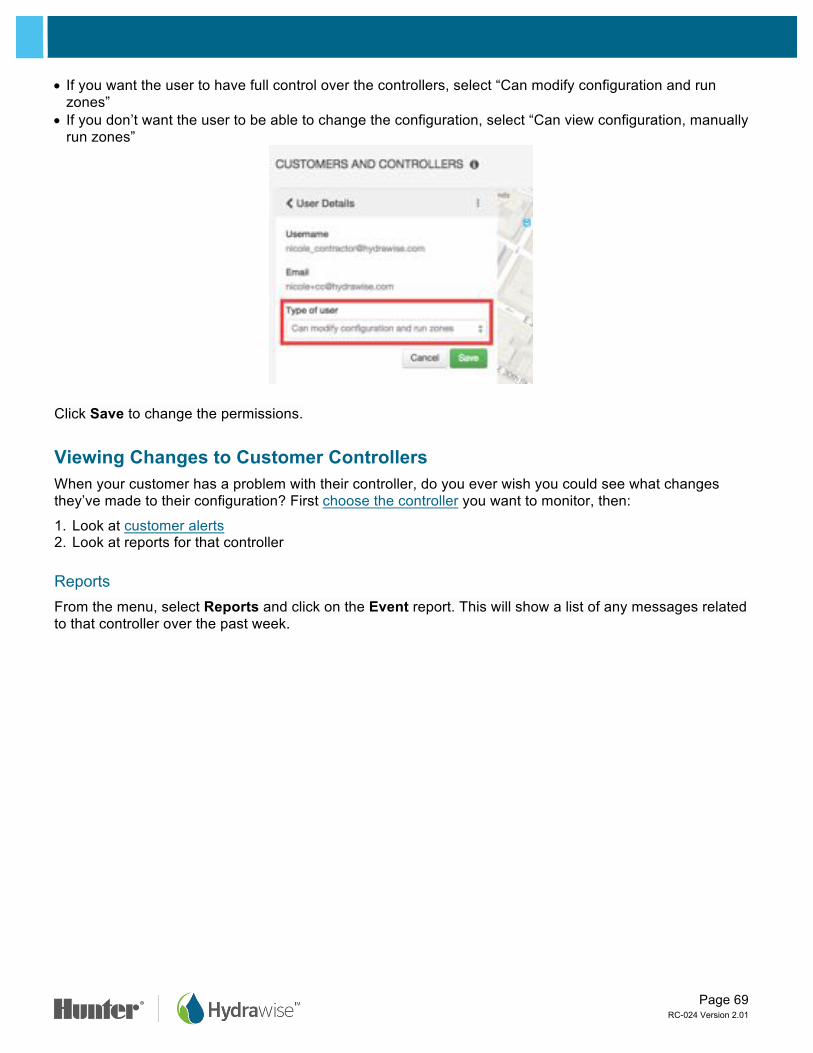
Page 69 RC-024 Version 2.01
• If you want the user to have full control over the controllers, select “Can modify configuration and run zones”
• If you don’t want the user to be able to change the configuration, select “Can view configuration, manually run zones”
Click Save to change the permissions.
Viewing Changes to Customer Controllers When your customer has a problem with their controller, do you ever wish you could see what changes they’ve made to their configuration? First choose the controller you want to monitor, then:
1. Look at customer alerts 2. Look at reports for that controller
Reports From the menu, select Reports and click on the Event report. This will show a list of any messages related to that controller over the past week.

Page 70 RC-024 Version 2.01
Getting Help Self-help guides are available at https://support.hydrawise.com.
Email support is available at [email protected]
Certifications
Canadian FCC Statement This device complies with Industry Canada license-exempt RSS standard(s). Operation is subject to the following two conditions: (1) this device may not cause interference, and (2) this device must accept any interference, including interference that may cause undesired operation of the device.
Le présent appareil est conforme aux CNR d'Industrie Canada applicables aux appareils radio exempts de licence. L'exploitation est autorisée aux deux conditions suivantes: (1) l'appareil ne doit pas produire de brouillage, et (2) l'utilisateur de l'appareil doit accepter tout brouillage radioélectrique subi, même si le brouillage est susceptible d'en compromettre le fonctionnement.
US FCC Statement This equipment has been tested and found to comply with the limits for a Class B digital device, pursuant to part 15 of the FCC Rules. These limits are designed to provide reasonable protection against harmful interference in a residential installation. This equipment generates, uses and can radiate radio frequency energy, and if not installed and used in accordance with the instructions, may cause harmful interference to radio communications. However, there is no guarantee that interference will not occur in a particular installation. If this equipment does cause harmful interference to radio or television reception, which can be determined by turning the equipment off and on, the user is encouraged to try to correct the interference by one or more of the following measures:
• Reorient or relocate the receiving antenna. • Increase the separation between the equipment and receiver. • Connect the equipment into an outlet on a circuit different from that to which the receiver is
connected. • Consult the dealer or an experienced radio/TV �technician for help.
To satisfy FCC RF Exposure requirements for mobile and base station transmission devices, a separation distance of 20 cm or more should be maintained between the antenna of this device and persons during operation. To ensure compliance, operation at closer than this distance is not recommended.
The antenna(s) used for this transmitter must not be co-located or operating in conjunction with any other antenna or transmitter.