surevector crispr library cloning kit - agilent · surevector crispr library cloning kit 3 in this...
TRANSCRIPT

SureVector CRISPR Library Cloning Kit
Part Number G7556A
ProtocolVersion B0, January 2017
For Research Use Only. Not for use in diagnostic procedures.
Agilent Technologies

Notices© Agilent Technologies, Inc. 2016–2017
No part of this manual may be reproduced in any form or by any means (including elec-tronic storage and retrieval or translation into a foreign language) without prior agree-ment and written consent from Agilent Technologies, Inc. as governed by United States and international copyright laws.
Manual Part NumberG7556-90000
EditionVersion B0, January 2017
Agilent Technologies, Inc. 5301 Stevens Creek Blvd Santa Clara, CA 95051 USA
WarrantyThe material contained in this document is provided “as is,” and is subject to being changed, with-out notice, in future editions. Fur-ther, to the maximum extent permitted by applicable law, Agi-lent disclaims all warranties, either express or implied, with regard to this manual and any information contained herein, including but not limited to the implied warranties of merchant-ability and fitness for a particular purpose. Agilent shall not be lia-ble for errors or for incidental or consequential damages in con-nection with the furnishing, use, or performance of this document or of any information contained herein. Should Agilent and the user have a separate written agreement with warranty terms covering the material in this doc-ument that conflict with these terms, the warranty terms in the separate agreement shall control.
Technology Licenses The hardware and/or software described in this document are furnished under a license and may be used or copied only in accor-dance with the terms of such license.
Restricted Rights LegendU.S. Government Restricted Rights. Soft-ware and technical data rights granted to the federal government include only those rights customarily provided to end user cus-tomers. Agilent provides this customary commercial license in Software and techni-cal data pursuant to FAR 12.211 (Technical Data) and 12.212 (Computer Software) and, for the Department of Defense, DFARS 252.227-7015 (Technical Data - Commercial Items) and DFARS 227.7202-3 (Rights in Commercial Computer Software or Com-puter Software Documentation).
Safety Notices
CAUTION
A CAUTION notice denotes a haz-ard. It calls attention to an operat-ing procedure, practice, or the like that, if not correctly performed or adhered to, could result in damage to the product or loss of important data. Do not proceed beyond a CAUTION notice until the indicated conditions are fully understood and met.
WARNING
A WARNING notice denotes a hazard. It calls attention to an operating procedure, practice, or the like that, if not correctly per-formed or adhered to, could result in personal injury or death. Do not proceed beyond a WARNING notice until the indicated condi-tions are fully understood and met.
Technical SupportFor technical product support, contact Agilent at (800) 227-9770 or [email protected]
SureVector CRISPR Library Cloning Kit 2

SureVector CRISPR Library Cloning Kit 3
In this Guide...This document describes how to use the Agilent SureVector CRISPR Library Cloning kit for preparation of a lentiviral plasmid library for in vivo expression of guide RNA (gRNA) sequences.
1 Before You Begin
This chapter provides important information on getting started with SureVector CRISPR Library cloning for Agilent’s SureGuide Custom CRISPR Libraries (Amplified).
2 Protocol
This chapter provides guidelines and instructions on how to perform the SureVector CRISPR Library cloning protocol.
3 Troubleshooting
This chapter contains suggestions for troubleshooting your SureVector CRISPR Library cloning.
4 Reference Information
This chapter provides instructions for preparation of the bacterial growth media and guidelines for in vivo functionality testing of the control plasmid.

Contents
1 Before You Begin 5
Notices to Purchaser 6
Limited License 6Limited Label License For Lentiviral Vector Containing Products 6
Overview of SureVector CRISPR Cloning 8
Materials Provided and Materials Required 9
Materials provided 9Materials required but not provided 10
2 Protocol 12
Preprotocol Considerations 13
About the pSGLenti plasmid 13Library size and representation 15Control reaction 16
Overview of the Protocol 17
Protocol 18
Step 1. Perform SureVector cloning 18Step 2. Purify the assembled plasmid DNA 20Step 3. Prepare the amplification bottles and liquid growth media 21Step 4. Perform the electro-transformations 24Step 5. Inoculate the amplification bottles and spread the control plates 29Step 6. Analyze transformants on the plates 31Step 7. Harvest and amplify the plasmid library 33
3 Troubleshooting 38
Troubleshooting suggestions 39
4 Reference Information 41
Preparation of media 42In vivo testing of the control plasmid 43Recovery of the gRNA sequences 47
SureVector CRISPR Library Cloning Kit 4

SureVector CRISPR Library CloningProtocol
1Before You Begin
Notices to Purchaser 6
Overview of SureVector CRISPR Cloning 8
Materials Provided and Materials Required 9
This chapter provides important information on getting started with SureVector CRISPR Library cloning for Agilent’s SureGuide Custom CRISPR Libraries (Amplified).
5Agilent Technologies

Before You Begin 1 Notices to Purchaser
Notices to Purchaser
Limited License
SureVector CRISPR
This product is provided under an agreement between Bio- Rad Laboratories and Agilent Technologies, Inc., and the manufacture, use, sale or import of this product is subject to US. Pat. No. 6,627,424 and EP Pat. No. 1 283 875 B1, owned by Bio- Rad Laboratories, Inc. Purchase of this product conveys to the buyer the non- transferable right to use the purchased amount of the product and components of the product in PCR (but not real- time PCR) in the Research Field including all Applied Research Fields (including but not limited to forensics, animal testing, and food testing).
Use of this product is covered by one or more of the following US patents and corresponding patent claims outside the US: 6,258,569, 6,171,785, 6,127,155, 6,030,787, 5,994,056, 5,876,930, 5,804,375, 5,789,224, 5,773,258 (claims 1 and 6 only), 5,723,591, 5,677,152 (claims 1 to 23 only), 5,618,711, 5,538,848, and claims outside the US corresponding to expired US Patent No. 5,079,352. The purchase of this product includes a limited, non- transferable immunity from suit under the foregoing patent claims for using only this amount of product for the purchaser's own internal research. No right under any other patent claim and no right to perform commercial services of any kind, including without limitation reporting the results of purchaser's activities for a fee or other commercial consideration, is conveyed expressly, by implication, or by estoppel. This product is for research use only. Diagnostic uses under Roche patents require a separate license from Roche. Further information on purchasing licenses may be obtained by contacting the Director of Licensing, Applied Biosystems, 850 Lincoln Centre Drive, Foster City, California 94404, USA.
Limited Label License For Lentiviral Vector Containing Products
This product is covered by the claims of the following US patent 7,419,829. Purchase of this product conveys to the purchaser only the non- transferable right under this patent to use the product for research use only by the purchaser. No rights are granted to the purchaser
Library Cloning Kit 6

Before You Begin 1 Limited Label License For Lentiviral Vector Containing Products
SureVector CRISPR
hereunder to sell, modify for resale or otherwise transfer this product, either alone or as a component of another product, to any third party. Agilent reserves all other rights, and this product may not be used in any manner other than as provided herein. For information on obtaining a license to use this product for purposes other than research, please contact Agilent Technologies, Business Development, 11011 North Torrey Pines Road, La Jolla, California 92037. Phone (858) 535- 5400.
Library Cloning Kit 7

Before You Begin 1 Overview of SureVector CRISPR Cloning
Overview of SureVector CRISPR Cloning
SureVector CRISPR
The Agilent SureVector CRISPR Library Cloning Kit provides reagents for preparation of a lentiviral plasmid library for in vivo expression of guide RNA (gRNA) sequences. The plasmid libraries generated by the kit are optimized to work with S. pyogenes Cas9, with expression driven by a human U6 promoter*, but adaptation of the protocol for different Cas9 variations may be possible.
Agilent’s SureVector cloning technology uses a unique enzyme blend to enable the assembly of multiple linear fragments of DNA to create a complete plasmid vector in a single- tube reaction. In the SureVector CRISPR Library Cloning Kit, this technology has been adapted to create a method for insertion of a custom CRISPR library into the lentiviral plasmid pSGLenti. The typical starting material for the protocol is an amplified SureGuide Custom CRISPR Guide Library (Agilent p/n G7555A), although other amplified CRISPR guide libraries that have the correct overlapping sequences may also be used. The library is composed of linear DNA fragments that encode custom gRNA sequences. Using the reagents in the SureVector CRISPR Library Cloning Kit, you clone the DNA fragments from the custom CRISPR library into the pSGLenti plasmid by recombination cloning, which is mediated by homologous overlapping sequences between the DNA fragment and the linearized plasmid (illustrated in Figure 1). You then purify the recombinant plasmid DNA, transform the plasmid DNA into E.coli, amplify the cultures, and recover the plasmid library from the E. coli cultures (see Figure 3 on page 17 for a workflow overview). The plasmid library is then ready for lentiviral packaging and in vivo screening in a genome- editing assay.
Figure 1 Recombination events between the library insert and the linear pSGLenti plasmid
* The human U6 promoter has been broadly reported to direct transcription in a variety of mammalian cells.
Library Cloning Kit 8

Before You Begin 1 Materials Provided and Materials Required
Materials Provided and Materials Required
Materials provided
SureVector CRISPR
Table 1 lists the materials provided with the SureVector CRISPR Library Cloning Kit, Agilent Part Number G7556A, and the storage temperature for each material. Sufficient reagents are provided for the cloning of four individual SureGuide Custom CRISPR Guide Libraries.
Table 1 Materials provided in the SureVector CRISPR Library Cloning Kit
Materials provided Quantity Storage condition
Cloning Mix 30 L –20°C
10× Cloning Buffer 200 L –20°C
SureSolution 500 L –20°C
dNTP Mix 30 L –20°C
Control Cloning Fragment (Human) 5 L –20°C
Control Cloning Fragment (Mouse) 5 L –20°C
pSGLenti (linear) 34 L –20°C
SureVector ElectroTen-Blue Competent Cells 100 L/tube; 44 tubes –80°C
SureVector Library Grade Low Gelling Agarose 24 g Room temperature
Library Cloning Kit 9

Before You Begin 1 Materials required but not provided
Materials required but not provided
SureVector CRISPR
Table 2 contains the list of reagents and equipment that are required for the protocol but are not provided with the SureVector CRISPR Cloning Kit.
Table 2 Materials required but not provided
Materials
Agilent SureGuide Custom CRISPR Guide Library (Amplified), Agilent p/n G7555A
Agencourt AMPure XP, magnetic (SPRI) beads, Beckman Coulter p/n A63882
Magnetic bead attractor for SPRI purifications, e.g., Agencourt SPRIStand, Beckman Coulter p/n A29182
Programmable thermal cycler, e.g., Agilent SureCycler 8800 Thermal Cycler, base unit and 96-well module, Agilent p/n G8800A and G8810A
P10, P20, P200, and P1000 micropipettors
0.2-mL thin-wall PCR tubes, or other tubes suitable for your thermal cycler
Centrifuge capable of accommodating 0.2-mL tubes
Nuclease-free 1.5-mL microcentrifuge tubes
Electroporator suitable for electroporation of bacterial cells, e.g., Bio-Rad Gene Pulser Xcell Microbial System, Bio-Rad p/n 1652662
1-mm electroporation cuvettes, e.g., VWR Signature Disposable Electroporation Cuvettes, VWR p/n 89047-206
Two round ice buckets, 2.5-L capacity, for icing amplification bottles; additional 2 ice buckets or 1 rectangular ice pan, 4-L capacity, for chilling cuvettes during transformation
14-mL BD Falcon polypropylene round-bottom tubes (BD Biosciences Catalog #352059)
50-mL BD Falcon polypropylene tubes (BD Biosciences Catalog #352070)
Vortex mixer
Tube rack for 14-mL tubes
Incubator set to 30°C
Incubator set to 37°C
Shaking incubator set to 37°C
Library Cloning Kit 10

Before You Begin 1 Materials required but not provided
SureVector CRISPR
1-L wide-mouth autoclavable bottles (×2), e.g., Corning Pyrex bottle 1395-1L
Magnetic stir bar, 2-inch (×2)
Magnetic stir plate
TE buffer, pH 7.0
(10 mM Tris-HCl containing 1 mM EDTA)
Ethanol, molecular biology grade, 200 proof
Nuclease-free water
High speed centrifuge, with accompanying fixed-angle rotor (e.g., Beckman JA-10) and swinging-bucket rotor (e.g., Beckman JS-4.0), and bottles for large volume spins
Laboratory tissues, such as Kimwipes wipers
2-L culture flask (×2)
Infrared thermometer gun, e.g., Westward infrared thermometer model #2ZB46
Aluminum foil
Graduated pipettes, sterile, and pipette bulb or electronic pipette controller
Ampicillin
SOC medium (see “Preparation of media” on page 42)
LB liquid media or LB broth pellets
LB-agar plates with ampicillin (see “Preparation of media” on page 42)
Giga-scale plasmid isolation kit or method for purification of transfection-quality plasmids
Table 2 Materials required but not provided
Materials
Library Cloning Kit 11

SureVector CRISPR Library CloningProtocol
2Protocol
Preprotocol Considerations 13
About the pSGLenti plasmid 13
Library size and representation 15
Control reaction 16
Protocol 18
Step 1. Perform SureVector cloning 18
Step 2. Purify the assembled plasmid DNA 20
Step 3. Prepare the amplification bottles and liquid growth media 21
Step 4. Perform the electro-transformations 24
Step 5. Inoculate the amplification bottles and spread the control plates 29
Step 6. Analyze transformants on the plates 31
Step 7. Harvest and amplify the plasmid library 33
This chapter provides guidelines and instructions on how to perform the SureVector CRISPR Library cloning protocol.
12Agilent Technologies

Protocol 2 Preprotocol Considerations
Preprotocol Considerations
About the pSGLenti plasmid
SureVector CRISPR
The SureVector CRISPR Library Cloning Kit includes the pSGLenti plasmid. This lentiviral plasmid vector allows for:
• Constitutive expression of gRNAs under regulation of the human U6 promoter
• In vivo monitoring using a green fluorescent protein (GFP)
• Puromycin- mediated selection of cells harboring a lentiviral insert
• Production of lentiviral supernatants
The plasmid is provided in linear form and is ready for use in the cloning reaction. Note that the plasmid does not include an open reading frame for expression of Cas9. You must introduce the Cas9 enzyme into your assay in trans in order to enable cleavage of the CRISPR targets.
See Figure 2 for a map of the pSGLenti plasmid as it is structured once a SureGuide gRNA sequence from the SureGuide Custom CRISPR Guide Library has been inserted. Table 3 includes a list of the features in the plasmid. A limited section of the plasmid sequence is provided in Chapter 4 (see “Recovery of the gRNA sequences” on page 47). Contact Technical Support to obtain the complete plasmid sequence.
Table 3 pSGLenti plasmid features
Plasmid feature Description
AmpR ORF for ampicillin selection in E. coli
CMV-IE promoter CMV immediate early promoter
LTR Long terminal repeats
packaging signal Sequence needed for packaging the plasmid into lentiviral particles
RRE HIV Rev response element
CCPt Central polypurine tract
Human U6 promoter Human U6 promoter to drive expression of the inserted gRNA
Library Cloning Kit 13

Protocol 2 About the pSGLenti plasmid
SureVector CRISPR
sgRNA scaffold Sequences needed for formation of gRNA structure
EF1- promoter EF1- promoter to drive expression of hrGFP II and puromycin
hrGFP II ORF for green fluorescent protein
T2A T2A sequence for bicistronic protein expression
Puromycin ORF for puromycin selection in mammalian cells
WPRE Woodchuck Hepatitis Virus post-transcriptional regulatory element
pUC origin Origin of amplification sequence for replication in E. coli
Table 3 pSGLenti plasmid features
Plasmid feature Description
Figure 2 Vector map of pSGLenti with insert from the SureGuide Custom CRISPR Guide Library
Library Cloning Kit 14
Protocol 2 Library size and representation
Library size and representation
SureVector CRISPR
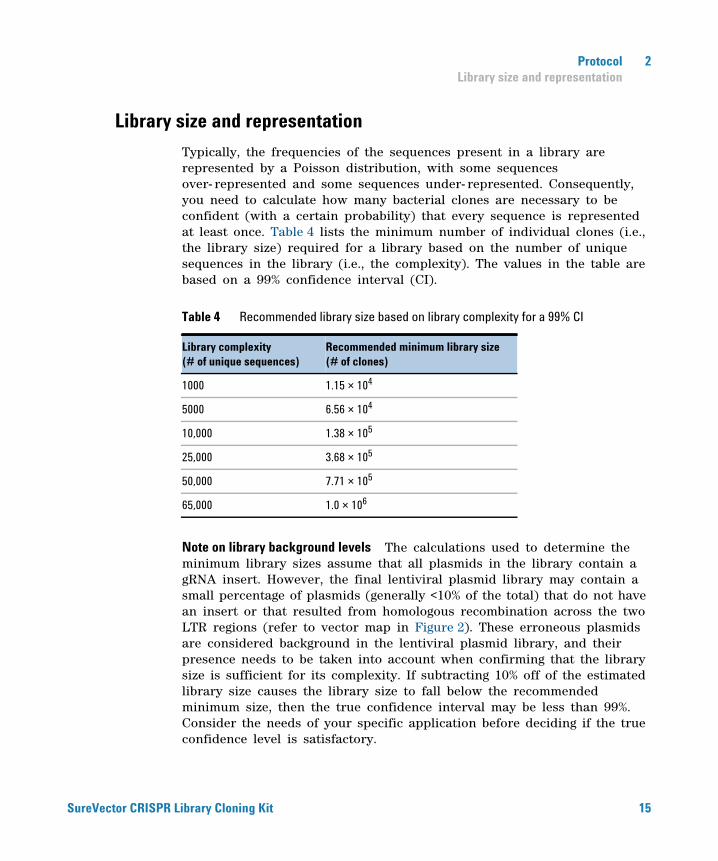
Typically, the frequencies of the sequences present in a library are represented by a Poisson distribution, with some sequences over- represented and some sequences under- represented. Consequently, you need to calculate how many bacterial clones are necessary to be confident (with a certain probability) that every sequence is represented at least once. Table 4 lists the minimum number of individual clones (i.e., the library size) required for a library based on the number of unique sequences in the library (i.e., the complexity). The values in the table are based on a 99% confidence interval (CI).
Note on library background levels The calculations used to determine the minimum library sizes assume that all plasmids in the library contain a gRNA insert. However, the final lentiviral plasmid library may contain a small percentage of plasmids (generally <10% of the total) that do not have an insert or that resulted from homologous recombination across the two LTR regions (refer to vector map in Figure 2). These erroneous plasmids are considered background in the lentiviral plasmid library, and their presence needs to be taken into account when confirming that the library size is sufficient for its complexity. If subtracting 10% off of the estimated library size causes the library size to fall below the recommended minimum size, then the true confidence interval may be less than 99%. Consider the needs of your specific application before deciding if the true confidence level is satisfactory.
Table 4 Recommended library size based on library complexity for a 99% CI
Library complexity(# of unique sequences)
Recommended minimum library size(# of clones)
1000 1.15 × 10⁴
5000 6.56 × 10⁴
10,000 1.38 × 10⁵
25,000 3.68 × 10⁵
50,000 7.71 × 10⁵
65,000 1.0 × 10⁶
Library Cloning Kit 15
Protocol 2 Control reaction
Control reaction
SureVector CRISPR
The SureVector CRISPR Cloning Kit includes a Control Cloning Fragment (Human) and Control Cloning Fragment (Mouse). These fragments are linear, double- stranded DNA fragments appropriate for expression of a control gRNA in human and murine cells, respectively. You can use either fragment as a control in the cloning reaction in place of the SureGuide Custom CRISPR Guide Library. The control plasmid constructed from this insert during the cloning reaction is then used throughout the remainder of the cloning protocol, serving as a control for the SPRI purification process and the electro- transformations.
If you are using a human or murine cell line*, you have the option of using the control plasmid as a functional in vivo control in the genome- editing assay. When inserted into the pSGLenti plasmid, the Control Cloning Fragment encodes for a specific gRNA sequence that directs Cas9 cleavage at a known genomic target. In the presence of the gRNA expressed from the control plasmid, Cas9 mediates a double- stranded DNA break within a specific Bst XI restriction site in the Malat1 gene. Double- stranded DNA breaks in vivo are lethal and need to be repaired via a process known as non- homologous end joining (NHEJ). Because this process is error prone, at some frequency, errors are incorporated at the break site during repair, thus destroying the Bst XI recognition sequence. You can screen for destruction of the Bst XI recognition sequence by PCR- amplifying the region of the Malat1 gene that contains the Bst XI restriction site, digesting the PCR- amplified DNA with Bst XI, and analyzing the digested DNA by electrophoresis. The presence of any full- length (i.e., undigested) PCR product indicates that an error during repair of a Cas9- mediated double- stranded break resulted in a disruption of the Bst XI site. This disruption is due to constitutive expression of the specific gRNA from the control plasmid in the presence of Cas9.
See “In vivo testing of the control plasmid” on page 43 for guidelines on testing the functionality of the control plasmid in the genome- editing assay.
* Agilent has successfully used the control plasmid with the human control cloning fragment in the human cell lines HEK293, K562, and HeLa. The control plasmid containing the mouse control cloning fragment has been successfully used in the murine cell lines Hepa 1-6, NIH 3T3, and C3H/10T1/2.
Library Cloning Kit 16

Protocol 2 Overview of the Protocol
Overview of the Protocol
SureVector CRISPR
Figure 3 outlines the workflow for SureVector CRISPR library cloning using a 5- day protocol. If desired, you can perform all steps from day 1 and day 2 in a single day. If you do so, prepare the agarose amplification bottles and liquid amplification media as the first step on day 1.
Figure 3 Workflow for the SureVector cloning protocol
Library Cloning Kit 17

Protocol 2 Protocol
Protocol
SureVector CRISPR
If you are planning to perform the electro-transformations on the same day as the
Step 1. Perform SureVector cloning
NOTESureVector cloning, then prepare the amplification bottles and liquid media (as described in “Step 3. Prepare the amplification bottles and liquid growth media” on page 21) prior to performing the SureVector cloning.
Set up a total of five cloning reactions. One of the reactions is for the Control Cloning Fragment. The other four reactions are identical reactions containing the SureGuide Custom CRISPR Guide Library. These four identical reactions are eventually pooled into the same tube.
1 Set the thermal cycler to run the program below.
2 Thaw the reagents needed for the cloning reactions.
• Thaw the SureGuide Custom CRISPR Guide Library. Once thawed, store the tube on ice until use.
• From the SureVector CRISPR Cloning Kit, thaw the 10× Cloning Buffer, SureSolution, pSGLenti (linear), dNTP Mix, Cloning Mix, and either the Control Cloning Fragment (Human) or the Control Cloning Fragment (Mouse). Store the thawed SureSolution at room temperature until use. Store the remaining thawed reagents on ice until use.
Table 5 Thermal cycler program for library assembly
Step Temperature Time
Step 1 95°C 1 minute
Step 2 (8 cycles) 95°C 20 seconds
60°C 1 minute 30 seconds
65°C 1 minute
Step 3 4°C Hold
Library Cloning Kit 18

Protocol 2 Step 1. Perform SureVector cloning
SureVector CRISPR
3 Using the instructions below, dilute the SureSolution reagent 5- fold to generate a 20% working solution.
a Transfer 100 L of SureSolution to a nuclease- free 1.5- mL microcentrifuge tube.
b Add 400 L of nuclease- free water directly to the tube to dilute the SureSolution by a factor of five. Mix well on a vortex mixer. Store at room temperature until use.
4 Prepare the Cloning Master Mix by mixing the components in Table 6. Use the volumes that are appropriate for five reactions (with overage).
5 Add 18.75 L of Cloning Master Mix to each of five 0.2- mL thin- wall PCR tubes.
6 To one of the five tubes, add 1.25 L of the Control Cloning Fragment (either mouse or human). To each of the remaining four tubes, add 1.25 L of the SureGuide Custom CRISPR Guide Library.
7 Close the tubes, briefly mix on a vortex mixer, and then briefly spin in a centrifuge to drive the contents off the walls and lid.
8 Transfer the tubes into the thermal cycler, and start the program. If prompted for the reaction volume, enter 20 L.
9 At the end of the program, remove the tubes from the thermal cycler and briefly spin them in a centrifuge to drive the contents off the walls and lid.
10 Pool together the four CRISPR library cloning reactions into a fresh 1.5- mL microcentrifuge tube.
11 Transfer the control reaction to a fresh 1.5- mL microcentrifuge tube.
Table 6 Preparation of Cloning Master Mix
Component Volume for single reaction Volume for 5 reactions (with 10% overage)
10× Cloning Buffer 2.0 L 11.0 L
dNTP Mix 0.8 L 4.4 L
pSGLenti (linear) 1.5 L 8.25 L
Cloning Mix 0.8 L 4.4 L
20% SureSolution 2.0 L 11.0 L
Nuclease-free water 11.65 L 64.075 L
Library Cloning Kit 19

Protocol 2 Step 2. Purify the assembled plasmid DNA
SureVector CRISPR
Continue to the next section, “Step 2. Purify the assembled plasmid DNA”.
Alternatively, at this point you can store the reactions overnight at –20°C.
Step 2. Purify the assembled plasmid DNA
1 Prepare 5 mL of a fresh solution of 70% ethanol by combining 3.5 mL of ethanol with 1.5 mL of water in a 14- mL or 50- mL BD Falcon polypropylene tube.
2 To the 1.5- mL tube containing the pooled CRISPR library cloning reactions, add 64 L of Agencourt AMPure XP magnetic SPRI beads.
Make sure the stock of beads is completely resuspended before use.
3 To the 1.5- mL tube containing the control reaction, add 16 L of Agencourt AMPure XP magnetic SPRI beads.
4 Briefly mix both tubes on a vortex mixer, and then incubate them at room temperature for 10 minutes.
5 Put the tubes on the magnetic bead attractor to collect the beads into a pellet. Make sure that the solutions are clear and all beads are settled into a tight pellet before proceeding (typically 1–2 minutes).
Keep the tubes on the magnetic bead attractor until instructed to remove them in step 12.
6 Using a micropipettor, carefully remove and discard the supernatant from each tube without disturbing the pellet.
7 Add 500 L of 70% ethanol to each tube without disturbing the pellet.
8 Incubate the tubes at room temperature for one minute.
9 Using a micropipettor, carefully remove and discard the supernatant from each tube without disturbing the pellet.
10 Repeat step 7 through step 9 for a second ethanol wash.
11 Leave the caps of the tubes open to allow the pellets to air dry (approximately 5 minutes). Continue to air dry the pellets until any remaining droplets of ethanol are gone but the pellets are not yet completely dry.
12 Remove the tubes from the magnetic bead attractor.
13 Elute the purified DNA from the beads.
Library Cloning Kit 20

Protocol 2 Step 3. Prepare the amplification bottles and liquid growth media
SureVector CRISPR
• Resuspend the pellet for the pooled CRISPR library reactions in 80 L of nuclease- free water.
• Resuspend the pellet for the control reaction in 20 L of nuclease- free water.
14 Briefly mix the tubes on a vortex mixer, and then briefly spin them in a centrifuge to drive the contents off the walls and lid. Then, incubate them at room temperature for 10 minutes.
15 Put the tubes back on the magnetic bead attractor to collect the beads into a tight pellet. Make sure that the solutions are clear and all beads are settled into the pellet before proceeding.
16 While keeping the tubes on the magnetic bead attractor, carefully transfer each supernatant to a fresh 1.5- mL tube. Put the tubes on ice.
• For the tube of pooled CRISPR library reactions, this supernatant contains the SPRI- purified plasmid library.
• For the tube with the control reaction, this supernatant contains the SPRI- purified control plasmid.
Store the tubes at –20°C until the following day, or for up to one month. When ready, continue to the next section, “Step 3. Prepare the amplification bottles and liquid growth media”.
Alternatively, if you are performing the electro- transformations today, then you should have already prepared the amplification bottles and liquid growth media. In this case, keep the tubes on ice, and proceed directly to “Step 4. Perform the electro- transformations” on page 24.
Step 3. Prepare the amplification bottles and liquid growth media
On the morning of the day that you will be setting up the electro- transformations, prepare the amplification bottles of soft agarose medium and the flasks of liquid medium needed for amplification of the transformed E. coli cells. Once the media are prepared, proceed directly to “Step 4. Perform the electro- transformations” on page 24.
The amplification bottles and liquid growth media are used at different steps in the protocol
NOTEbut it is convenient to prepare the two types of media at the same time.Library Cloning Kit 21

Protocol 2 Step 3. Prepare the amplification bottles and liquid growth media
SureVector CRISPR
Amplification bottles
1 Add a magnetic stir bar to each of two 1- L wide- mouth autoclavable bottles.
2 Add 1 L of LB medium to each bottle. Place each bottle on a magnetic stir plate and stir the solutions at medium speed.
3 As the solutions continue to stir, slowly add 3.0 g of SureVector Library Grade Low Gelling Agarose to each bottle. Do not add the entire 3.0 g of agarose all at once.
Figure 4 shows the recommended technique for adding agarose to the bottles. Weigh out 3 g of agarose onto a weighing dish. Then, insert a corner of the weighing dish into the bottle neck and tap the dish to slowly dispense the agarose into the bottle.
Figure 4 Technique for slowly adding agarose to an amplification bottle
4 Allow the bottles to stir until all the agarose is hydrated (typically 2–3 minutes).
Library Cloning Kit 22

Protocol 2 Step 3. Prepare the amplification bottles and liquid growth media
SureVector CRISPR
The agarose will not dissolve but stirring helps to minimize agarose clumping.
5 Cap the bottles loosely then autoclave for 30 minutes on the liquid cycle (slow vent).
6 After autoclaving, while the bottles are still hot, put the bottles back on the magnetic stir plates and stir the solutions at medium speed. Continue to stir until the bottles cool to approximately 37–40°C (approximately 2–3 hours).
Monitor the temperature of the bottles from the outside of the glass using an infrared thermometer gun. Do not insert a thermometer or other device into the bottles.
Uniform distribution of the agarose is critical to the growth of the transformed E. coli in the
NOTEamplification bottles. Carefully inspect the bottles prior to inoculation to make sure the solutions are uniform and homogeneous. Do not use bottles that contain agarose clumps. See “Troubleshooting suggestions” on page 39 for tips on avoiding agarose clumps.7 Store the bottles at 37°C (without shaking or stirring) until ready for use in “Step 5. Inoculate the amplification bottles and spread the control plates” on page 29.
Figure 5 shows two prepared amplification bottles.
Library Cloning Kit 23

Protocol 2 Step 4. Perform the electro-transformations
SureVector CRISPR
Figure 5 Two prepared amplification bottles, 1-liter each
Flasks of liquid growth media
1 Add 1 L of LB medium to each of two 2- L culture flasks.
2 Cover the openings of the flasks with aluminum foil then autoclave them for 30 minutes on the liquid cycle (slow vent).
3 After autoclaving, store the flasks at room temperature until needed in “Step 7. Harvest and amplify the plasmid library” on page 33.
Step 4. Perform the electro-transformations
1 Confirm that the amplification bottles are equilibrated to 37°C, do not contain globules of agarose, and are ready to use.
2 Pre- warm the SOC medium (20 mL) and eight LB- agar plates with ampicillin to 37°C.
3 Fill an ice pan or two ice buckets with ice.
The working area on the ice needs to be large enough to accommodate 20 electroporation cuvettes.
Library Cloning Kit 24

Protocol 2 Step 4. Perform the electro-transformations
SureVector CRISPR
4 If the SPRI- purified plasmid DNA and SPRI- purified control plasmid were stored at –20°C, then thaw them and put the tubes on ice to chill. If they were not stored at –20°C, then continue to store the tubes on ice.
5 Unwrap 20 new electroporation cuvettes. Label one of the cuvettes “Control- 1” and label another cuvette “Control- 2.” These cuvettes are to be used for the control plasmid transformations.
The remaining 18 cuvettes are for the plasmid DNA transformations. Leave these cuvettes blank or label them “1” through “18” if desired.
6 Put all 20 cuvettes on the ice to chill. Loosen and orient the caps if needed.
7 Put 20 14- mL BD Falcon polypropylene round- bottom tubes in a tube rack. Label one of the tubes “Control- 1” and label another tube “Control- 2.” These tubes are to be used for the control plasmid transformations.
The remaining 18 tubes are for the plasmid DNA transformations. Leave these tubes blank or label them “1” through “18” if desired.
8 Thaw 10 tubes of SureVector ElectroTen- Blue Competent Cells on ice. Once thawed, mix each tube by gently flicking it with your finger. Immediately return the tubes to ice. If necessary, briefly spin the tubes in a centrifuge to drive the contents off the walls and lid before immediately returning the tubes to ice.
9 Label the top of one of the tubes of competent cells as “Control.” To this tube, add 5.5 L of the SPRI- purified control plasmid. Mix the competent cells by gently flicking the tube with your finger. Immediately return the tube to ice. If necessary, briefly spin the tubes in a centrifuge to drive the contents off the walls and lid before immediately returning the tubes to ice.
10 To the remaining nine tubes of competent cells, add 5.5 L of the SPRI- purified plasmid DNA. Mix each tube by gently flicking it with your finger. Immediately return the tubes to ice. If necessary, briefly spin the tubes in a centrifuge to drive the contents off the walls and lid before immediately returning the tubes to ice.
Library Cloning Kit 25

Protocol 2 Step 4. Perform the electro-transformations
SureVector CRISPR
11 Distribute the contents of each tube of cell solution between two cuvettes.
a Transfer 42 L of cell solution to a chilled cuvette. Close the cap of the cuvette and put the cuvette back on ice.
b Transfer another 42 L from the same tube of cell solution to a second chilled cuvette. Close the cap of that cuvette put the cuvette back on ice.
c Repeat step a and step b for each tube of cell solution. For the tube labeled “Control,” transfer the cell solution into the two cuvettes labeled “Control- 1” and “Control- 2.”
When pipetting the cell solutions into cuvettes, do not allow bubbles to form in the
NOTEcuvettes. To avoid creating bubbles, do not press the micropipettor expulsion button past the first stop point when pipetting the cells into the cuvette. If necessary, lightly tap the cuvette to remove any bubbles and to help the cell solution settle to the bottom of the cuvette.12 Set the electroporator to the following electroporation conditions.
Applied volts Resistance Capacitance
2200 V 200 25 F
Library Cloning Kit 26

Protocol 2 Step 4. Perform the electro-transformations
SureVector CRISPR
13 Electroporate each cuvette of cell solution. Electroporate the cuvette labeled “Control- 1” first, and electroporate the cuvette labeled “Control- 2” last.
a Remove the cuvette from the ice and blot off moisture from the outside of the cuvette using a laboratory tissue. Do not rub the cuvette.
b Visually confirm that the solution is evenly settled at the bottom of the cuvette. Lightly tap the cuvette, if necessary, to ensure the solution is at the bottom and that no bubbles are present.
c Slide the cuvette into the electroporation chamber until the cuvette connects with the electrical contacts.
d Pulse the cell solution once, then quickly remove the cuvette and add 960 L of pre- warmed SOC medium to resuspend the cells.
e Transfer the transformed cell solution to a 14- mL BD Falcon polypropylene round- bottom tube.
f Repeat step a through step e for each cuvette. Keep the 14- mL tubes containing cell solution and SOC at room temperature until all cuvettes have been electroporated.
Discard any transformation samples that arc during electroporation. Of the 20 cuvettes,
NOTEarcing is expected to occur for 1–4 of the cuvettes. To generate a library of 1 × 10⁶ independent clones, you generally need at least 12 transformations that do not arc.14 Transfer the 14- mL tubes containing the transformations into a 37°C shaker. Incubate the transformations on the shaker for one hour. Do not allow cells to incubate for longer than one hour.
15 Near the end of the 1- hour outgrowth, prepare ice baths in each of two 2.5- L round ice buckets. These ice baths will be used in “Step 5. Inoculate the amplification bottles and spread the control plates” on page 29.
A properly prepared ice bath is a slushy mixture of ice and water. See Figure 6 for an example.
Library Cloning Kit 27

Protocol 2 Step 4. Perform the electro-transformations
SureVector CRISPR
Figure 6 Ice bath prepared in a 2.5-L ice bucket
Continue to the next section, “Step 5. Inoculate the amplification bottles and spread the control plates”.
Library Cloning Kit 28

Protocol 2 Step 5. Inoculate the amplification bottles and spread the control plates
Step 5. Inoculate the amplification bottles and spread the control plates
SureVector CRISPR
1 At the end of the 1- hour outgrowth, remove the 14- mL tubes from the 37°C shaker and store them in a tube rack at room temperature.
2 Spread samples of each of the control transformations (Control- 1 and Control- 2) onto LB- agar plates with ampicillin.
a Briefly mix the tubes for the control transformations on a vortex mixer.
b Add 495 L of SOC medium to each of four fresh 1.5- mL tubes.
c Transfer 5 L from the Control- 1 tube into two of the 1.5- mL tubes containing SOC medium. Transfer 5 L from the Control- 2 tube into the other two 1.5- mL tubes containing SOC medium. Mix well.
d Spread a 100-L sample from each of the four tubes onto pre- warmed LB- agar plates with ampicillin. Label the four plates appropriately (Control- 1 or Control- 2).
e Put all four control plates at 37°C to incubate overnight. At the end of the overnight incubation, proceed to “Step 6. Analyze transformants on the plates” on page 31.
3 Inoculate the amplification bottles and spread samples onto plates.
a Transfer one of the amplification bottles from 37°C to a stir plate at room temperature and stir the solution at medium speed.
The speed needs to be slow enough to not produce bubbles or a large vortex.
b Add 2 mL of freshly prepared ampicillin solution (50 mg/mL in water, sterile) to the amplification bottle. Continue to stir the solution for 30 seconds to 1 minute to allow mixing.
The integrity of the ampicillin is critical to the growth of the library clones in the agarose
NOTEsolution. Prepare the ampicillin solution fresh each time you perform the cloning procedure.c Add half of the viable plasmid DNA transformations to the amplification bottle by sterilely transferring the contents of the 14- mL tubes directly into the bottle using a graduated pipette or micropipettor.
Library Cloning Kit 29

Protocol 2 Step 5. Inoculate the amplification bottles and spread the control plates
SureVector CRISPR
A viable transformation is one that did not arc during electroporation. If you have an odd number of viable plasmid DNA transformations, add the extra transformation to either of the two amplification bottles.
d Loosely close the cap of the amplification bottle and continue to stir the solution for three minutes.
e Using a 1- mL graduated pipette, transfer 0.5 mL of the solution to a fresh 1.5- mL tube. Collect the sample from the middle of the bottle and do so without compromising sterility. From this 1.5- mL tube, transfer 100 L of the solution to each of two pre- warmed LB- agar plates with ampicillin. Spread the 100-L of solution across the plates and then transfer the plates to a 37°C incubator.
f Tighten the cap on the amplification bottle until it first begins to feel tight. Do not over- tighten.
g Put the amplification bottle into one of the two ice baths that was prepared earlier. Make sure that the bottle is immersed to the level of the agarose solution in the bottle (see Figure 7).
Chilling the amplification bottles is required in order for the agarose solution to form a semi- solid gel.
Figure 7 Ice bath with an amplification bottle
h Repeat step a through step g for the second amplification bottle and the remaining 14- mL tubes of plasmid DNA transformations.
4 Add additional ice to the ice bath(s) so that the amplification bottles are fully packed in ice up to the neck (see Figure 8). Make sure that water from melting ice cannot wick up under the cap of the bottle.
Library Cloning Kit 30

Protocol 2 Step 6. Analyze transformants on the plates
SureVector CRISPR
Figure 8 Ice bath with amplification bottle and ice packed to the bottle neck
5 Continue to ice the amplification bottles for 1–1.5 hours.
6 Without jostling the solutions, gently transfer the amplification bottles to a 30°C incubator (no shaking). Incubate the amplification bottles for 40–45 hours (2 overnight periods), making sure to avoid physically disturbing the solutions in any way. At the end of the incubation, proceed to “Step 7. Harvest and amplify the plasmid library” on page 33.
Step 6. Analyze transformants on the plates
Control plates
1 On the control plates (two plates for Control- 1 and two plates for Control- 2), count the number of colony forming units (cfu) on each plate then calculate the average of the four numbers to obtain the average #cfu per control transformation.
2 Multiply the average #cfu/plate by 1000. This value is the average #cfu/transformation.
A value 1×10⁵ is expected for the average #cfu/transformation. This value does not impact the lentiviral plasmid library, but it can be useful for troubleshooting in the event that the library size is not large enough to be confident (with a 99% CI) that every gRNA insert is represented at least once.
Library Cloning Kit 31

Protocol 2 Step 6. Analyze transformants on the plates
SureVector CRISPR
If you will be using the control plasmid as an in vivo control in the genome-editing assay
NOTE(see “In vivo testing of the control plasmid” on page 43), then select a colony from one of the control plates and use it to inoculate a culture of LB medium with ampicillin. You can then isolate the control plasmid from the culture.Amplification bottle sample plates
1 On the plates containing 100-L samples of the amplification bottle solutions, count the number of cfu on each plate and use these numbers to calculate the size of the entire library.
The volume spread on each plate (i.e., 100 L) represents 1/10,000th of the total volume of the amplification bottle. Therefore, an example calculation for a library for which the two plates from amplification bottle #1 have an average of 107 cfu and the two plates from amplification bottle #2 have an average of 85 cfu is:107 cfu × 10,000 = 1.07 × 10⁶ cfu/amplification bottle #1
85 cfu × 10,000 = 8.5 × 10⁵ cfu/amplification bottle #2
(1.07 × 10⁶ cfu)+ (8.5 × 10⁵ cfu) = 1.92 × 10⁶ clones per library
2 Refer to Table 4 on page 15 (and the associated note on library background levels) to determine if the library size is sufficient for the complexity of your library. If the library size is sufficient, proceed to “Step 7. Harvest and amplify the plasmid library”. If the library size is not sufficient, see “Troubleshooting suggestions” on page 39. In the event that the library size is adequate but the #cfu/transformation on the control plates is < 1×10⁵, Agilent recommends proceeding to “Step 7. Harvest and amplify the plasmid library”.
Library Cloning Kit 32

Protocol 2 Step 7. Harvest and amplify the plasmid library
Step 7. Harvest and amplify the plasmid library
SureVector CRISPR
1 Following the 40 to 45- hour incubation of the amplification bottles, inspect the bottles for colony growth. The table below offers guidelines on what features to look for as you inspect the bottles.
2 Transfer the flasks of liquid LB medium to a 37°C shaker to pre- warm the medium. Allow the medium to incubate in the 37°C shaker until needed (step 6 on page 35).
These flasks were prepared earlier in “Step 3. Prepare the amplification bottles and liquid growth media” on page 21. The medium is needed for amplification of the lentiviral plasmid library.
3 Pour the viscous agarose solution from each amplification bottle into a large centrifuge bottle.
Amplification bottles in which transformant growth was even and relatively unbiased have very small, barely visible colonies that are evenly distributed throughout the solution. In some cases, individual colonies may not be visible, but the media has a uniformly cloudy appearance. The very top of the solution that is exposed to air may have larger colonies than the rest of the solution, which is normal.
The amplification bottle on the right is mildly cloudy throughout, but not totally opaque, with no clearly visible colonies. A modest layer of growth, in which individual colonies can be seen, is discernible at the very top of the solution. Respiration bubbles are also present at the top.
Amplification bottles in which transformant growth may have been biased due to lack of uniformity in the agarose solution may have a layered or gradient appearance across the depth of the solution or have a thick layer at the top of the solution. The representation of clones in such bottles is skewed.
In the amplification bottle on the right, the bottle was chilled in an ice bath of insufficient volume, which led to a layer of excess growth in the middle of the solution. Do not continue the protocol with a bottle of this appearance. Consult the “Troubleshooting suggestions” on page 39.
Library Cloning Kit 33
Protocol 2 Step 7. Harvest and amplify the plasmid library
SureVector CRISPR
Use centrifuge bottles that accommodate a high- speed centrifuge with a fixed- angle rotor, such as the Beckman JA- 10.
While pouring, immobilize the stir bar in the amplification bottle by holding a second stir bar against the bottom of the amplification bottle.
Do not overfill the centrifuge bottles and risk leakage. If needed, split the contents of each amplification bottle into multiple centrifuge bottles. Make sure to fill an even number of bottles to balance the centrifuge.
4 Spin the centrifuge bottles at 8,000 × g for 30 minutes at 22°C. Do not chill the centrifuge or rotor.
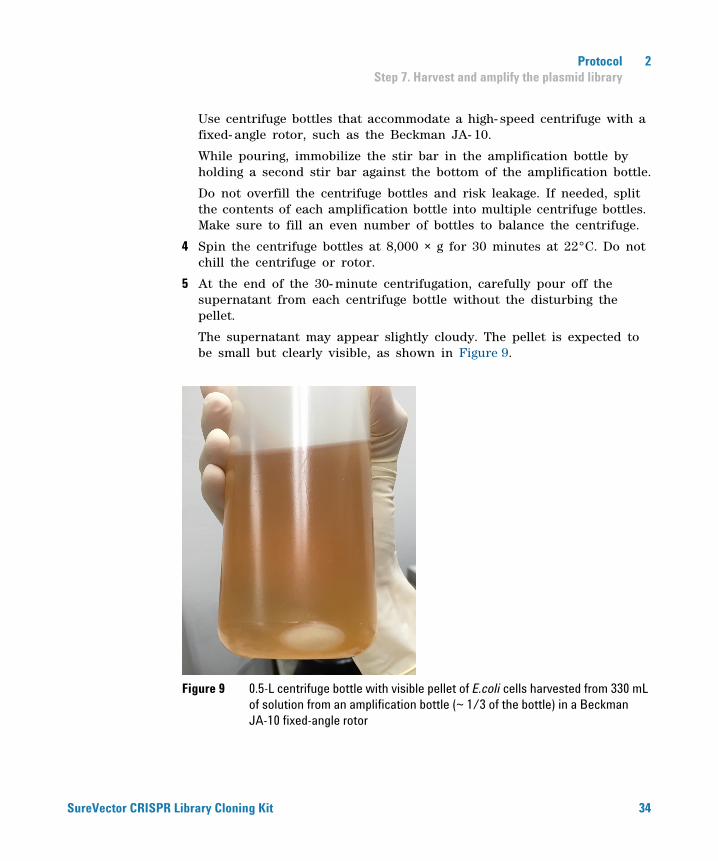
5 At the end of the 30- minute centrifugation, carefully pour off the supernatant from each centrifuge bottle without the disturbing the pellet.
The supernatant may appear slightly cloudy. The pellet is expected to be small but clearly visible, as shown in Figure 9.
Figure 9 0.5-L centrifuge bottle with visible pellet of E.coli cells harvested from 330 mL of solution from an amplification bottle (~ 1/3 of the bottle) in a Beckman JA-10 fixed-angle rotor
Library Cloning Kit 34

Protocol 2 Step 7. Harvest and amplify the plasmid library
SureVector CRISPR
6 Remove the pre- warmed flasks of LB medium from the 37°C shaker. Add 2 mL of 50 mg/mL ampicillin to each flask. Mix briefly by manually swirling the flasks.
7 Using a graduated pipette, remove 15 mL of LB medium from one of the two pre- warmed flasks and distribute that 15 mL of LB medium between the two centrifugation bottles (7.5 mL per bottle).
If you used more than two centrifugation bottles in order to avoid overfilling the bottles,
NOTEevenly distribute the 15 mL of LB medium between all bottles.8 Resuspend each pellet in the LB medium by pipetting the medium up and down and intermittently mixing on a vortex mixer.
9 Pool the resuspended cells into a single centrifuge bottle.
10 Using a fresh graduated pipette, remove 15 mL of LB medium from the other pre- warmed flask and dispense it into the now empty centrifuge bottle (or evenly distribute it among all of the empty centrifuge bottles if there is more than one). As you do so, use the LB medium to rinse the inside walls of the bottle in order to collect as many of the cells as possible. Transfer this additional 15- mL of medium into the centrifuge bottle containing the pooled cells.
11 Measure the total volume of the pooled cells using a graduated pipette.
12 Divide the solution of pooled cells evenly between the two pre- warmed flasks of LB- ampicillin medium so that the flasks are inoculated with the same volume of solution.
13 Incubate the flasks in a 37°C shaker (200–250 rpm) for 4 hours. Do not allow the flasks to incubate for longer than 4 hours.
14 Transfer the contents of each flask to a large centrifuge bottle. Spin the bottles in a centrifuge at 4,000 × g for 30 minutes to collect the cells. Pour off the supernatant from each bottle.
Use centrifuge bottles that accommodate a centrifuge with a swinging- bucket rotor, such as the Beckman JS- 4.0.
Figure 10 shows an example of a cell pellet after the supernatant has been poured off.
Library Cloning Kit 35

Protocol 2 Step 7. Harvest and amplify the plasmid library
SureVector CRISPR
Figure 10 1-L centrifuge bottle with visible pellet of E.coli cells harvested from 1 L of liq-uid culture (~ half of the library) in a Beckman JS-4.0 swinging-bucket rotor
At this point, freeze the centrifuge bottles containing the cell pellets at –20°C, or proceed directly to isolation of the plasmid library. Isolate the plasmid DNA from the cell pellets using a large- scale (gigaprep) plasmid isolation kit or method. Follow the instructions provided by the kit manufacturer.
Library Cloning Kit 36

Protocol 2 Step 7. Harvest and amplify the plasmid library
SureVector CRISPR
Library Cloning Kit 37
SureVector CRISPR Library CloningProtocol
3Troubleshooting
Troubleshooting suggestions 39
This chapter contains suggestions for troubleshooting your SureVector CRISPR Library cloning.
38Agilent Technologies

Troubleshooting 3 Troubleshooting suggestions
Troubleshooting suggestions
SureVector CRISPR
ooting suggestions based on potential observations
Table 7 TroubleshObservation Possible Cause Suggestion
The amplification bottles appear to have clumps of agarose in the solution.
The solution was not adequately stirred either before or after autoclaving,
Prior to autoclaving, allow the solution to mix until the agarose is hydrated. After autoclaving, stir the solution until the temperature cools to 37–42°C.
During autoclaving of the amplification bottles, the agarose solution bubbles over out of the 1-L bottles.
Variations in autoclave performance.
Prepare four 1-L amplification bottles, each containing only 0.5-L of solution. After autoclaving, sterilely transfer the contents of one bottle into another to create a 1-L bottle containing 1-L of solution. Repeat for the other pair of bottles.
During electroporation, many of the samples arc and have to be discarded
The cell solutions are not evenly distributed at the bottom of the cuvettes
After pipetting the cell solution into a cuvette, make sure that the solution is at the bottom of the cuvette and that the surface of the solution is level. Lightly tap the cuvette to help the contents settle.
The cell solution contains bubbles. When transferring the cell solution into a cuvette, do not press the micropipettor expulsion button past the first stop point.
The purified plasmid library was eluted in buffer instead of water.
When eluting the plasmid library from the SPRI beads, always use water.
The cuvette was mishandled. Just before placing the cuvette into the electroporation chamber, blot off (do not rub) any moisture with a laboratory tissue.
Following the 40 to 45-hour incubation of the amplification bottles, the bottles have a layer of higher bacterial growth in the middle of the bottle
The ice bath in which the bottles were chilled was not filled with ice all the way to the neck of the bottles, causing uneven cooling in the agarose solution.
Repeat the protocol and make sure that the amplification bottles are properly chilled during the inoculation procedure. See Figure 7 on page 30 and Figure 8 on page 31.
Library Cloning Kit 39

Troubleshooting 3 Troubleshooting suggestions
Following the 40 to 45-hour incubation of the amplification bottles, the bottles have a thick layer of growth at the top of the solution and/or the solution is totally opaque.
Or, the cell pellets produced from centrifugation of the agarose solution from the amplification bottles are much smaller than expected.
Inadequate ampicillin in the agarose solutions.
Make sure to use a freshly prepared solution of ampicillin each time you perform the cloning procedure.
Make sure that the agarose solutions are not warmer than 37°C at the time the ampicillin is added.
Instead of ampicillin, use a 50 mg/mL solution of carbenicillin in the agarose solutions.
The library size is not sufficiently large enough to be confident that all gRNA inserts are represented at least once
An insufficient number of clones were generated.
Proceed with harvesting and amplifying the library (“Step 7. Harvest and amplify the plasmid library” on page 33), and freeze the cell pellets at the end of the procedure. Then, repeat the cloning protocol from the beginning and combine the new library with the first one.
Table 7 Troubleshooting suggestions based on potential observations
Observation Possible Cause Suggestion
SureVector CRISPR
Library Cloning Kit 40
SureVector CRISPR Library CloningProtocol
4Reference Information
Preparation of media 42
LB-agar plates with ampicillin (per liter) 42
SOB medium (per liter) 42
SOC medium (per liter) 42
In vivo testing of the control plasmid 43
Recovery of the gRNA sequences 47
This chapter provides instructions for preparation of the bacterial growth media and guidelines for in vivo functionality testing of the control plasmid.
41Agilent Technologies

Reference Information 4 Preparation of media
Preparation of media
SureVector CRISPR
Use the recipes below to prepare the E. coli growth media needed for the protocol.
LB-agar plates with ampicillin (per liter)
In a clean flask combine:
• 10 g of NaCl• 10 g of tryptone• 5 g of yeast extract• 20 g of agar
Add deionized H20 to a final volume of 1 liter. Add an autoclavable stir bar and mix on a magnetic stir plate. Adjust pH to 7.0 with 5 N NaOH then autoclave.
When cooled to 50°C, add ampicillin to a final concentration of 100 g/mL.
Pour into 100 × 15 mm petri dishes (~25 mL/plate).
SOB medium (per liter)
In a clean flask combine:
• 20 g of tryptone• 5 g of yeast extract• 0.5 g of NaCl
Add deionized H20 to a final volume of 1 liter. Add an autoclavable stir bar and mix on a magnetic stir plate. Aliquot the medium into 10 small autoclavable bottles (100 mL/bottle) then autoclave the bottles on the liquids cycle.
SOC medium (per liter)
Prepare SOB medium (above). Add the following to a bottle containing a 100- mL of sterile SOB:
• 2 mL filter- sterilized 20% (w/v) glucose• 1 mL of 1 M MgSO4 • 1 mL of 1 M MgCl2
Library Cloning Kit 42

Reference Information 4 In vivo testing of the control plasmid
In vivo testing of the control plasmid
SureVector CRISPR
If you are using a human or murine cell line for the genome- editing, then you can use the appropriate control plasmid as a functional, in vivo control by processing the control plasmid side by side with your custom lentiviral plasmid library. The steps below outline the general procedure for testing the functionality of the human or mouse control. The exact procedure will depend on your specific application and reagents.
1 Prepare lentiviral vectors carrying the control plasmid.
For a reference, see: Barde, I., Salmon, P. and Trono, D. 2010. Production and Titration of Lentiviral Vectors. Current Protocols in Neuroscience. 53:4.21:4.21.1–4.21.23
2 Transduce human or murine cells with the respective control lentivirus.
3 Select for transduced cells with puromycin.
4 Confirm expression of hrGFP II by visualizing the transduced cells under a fluorescent microscope with an appropriate filter (excitation 500 nM, emission 506 nm).
5 Plate puromycin- selected cells for preferred Cas9 delivery method. Prepare replicate platings to test the cells in both the presence and absence of Cas9. Label one plate “with Cas9” and the other plate “without Cas9.”
6 To the “with Cas9” cells, introduce a Cas9 expression vector by either transfection or viral transduction. Incubate both the “with Cas9” cells and the “without Cas9” cells for a minimum of 48 hours.
7 Isolate genomic DNA from both the cell cultures using method of your choice. Purified DNA needs to be suitable for PCR amplification.
8 Dilute the genomic DNA samples to 125 ng/L using TE buffer.
9 Set up the PCR reactions in 0.2- mL PCR tubes by combining the components listed in Table 8. Set up one reaction for the “with Cas9” DNA and one reaction for the “without Cas9” DNA. The reactions use Agilent Herculase II Fusion DNA Polymerase (p/n 600675). The PCR primer sequences for human and mouse DNA are provided in Table 9.
Library Cloning Kit 43

Reference Information 4 In vivo testing of the control plasmid
SureVector CRISPR
10 Run the PCR reactions using the thermal cycling program in Table 10.
Table 8 Preparation of PCR reactions
Component Volume per reaction
genomic DNA (125 ng/L) 2 L
5× Herculase II Reaction Buffer 10 L
100 mM dNTP mix 0.5 L
Forward primer (10 M) 1.25 L
Reverse primer (10 M) 1.25L
Herculase II Fusion DNA Polymerase 0.5L
Nuclease-free water 34.5L
Table 9 PCR primer sequences for amplifying Malat1 Bst XI restriction site in human and murine cells
Primer Human Sequence (5’ to 3’) Murine Sequence (5’ to 3’)
Forward primer AGTGATCAGTGCCTTGATGC CCTGTT AAGACCACTCCCAAATA
Reverse primer TAGCAGCGGGATCAGAACAG TGATGGAGCGAGCAGTTTAG
Table 10 PCR program for amplifying the Malat1 Bst XI region
Step Temperature Time
Step 1 95°C 2 minutes
Step 2 (5 cycles) 95°C 20 seconds
60–56°C (–1°C/cycle) 20 seconds
72°C 30 seconds
Step 3 (30 cycles) 95°C 20 seconds
55°C 20 seconds
72°C 30 seconds
Library Cloning Kit 44

Reference Information 4 In vivo testing of the control plasmid
SureVector CRISPR
11 At the end of the thermal cycling program, purify the PCR products using SPRI beads or another purification method of your choice. Elute the purified PCR products in 25 L of TE buffer. The expected PCR product is 970 bp for human DNA and 1.31 kb for mouse DNA.
12 Quantitate the concentrations of the purified PCR products. Dilute the products to 50 ng/L with TE buffer.
13 Digest 5 L (250 ng) of each PCR product with the restriction enzyme Bst XI at 37°C for one hour. Use the manufacturer’s recommended instructions for setting up the digest reactions. Include an uncut control reaction (without the Bst XI enzyme) for both the “with Cas9” and “without Cas9” PCR products.
14 At the end of the 1- hour digest, transfer the reactions to 80°C and incubate for 20 minutes to heat- kill the Bst XI enzyme. At the end of the 20- minute incubation, cool the reactions at room temperature for 15 minutes, then transfer the reactions to ice.
15 Resolve the DNA fragments in the digestion reactions using an electrophoresis technique (e.g., the Agilent DNA 1000 Kit for the Agilent 2100 Bioanalyzer).
The range of expected fragment sizes is approximately 400 bp to 1.3 kb.
If using a standard agarose gel, run half of the volume of each reaction on the gel.
16 Analyze the electrophoresis results.
The uncut PCR product is 970 bp in human DNA and 1.31 kb in mouse DNA. Cutting at the Bst XI site results in the fragment sizes displayed in Table 11. Any detectable level of uncut PCR product (as indicated by the presence of a 970- bp or 1.31- kb uncut product) in the “with Cas9” reaction is considered a positive result for in vivo functionality of the genome- editing assay. The “without Cas9” PCR product should be completely cut with no detectable level of uncut product. An example of the expected results on an agarose gel is shown in Figure 11.
Step 4 72°C 3 minutes
Step 5 4°C Hold
Table 10 PCR program for amplifying the Malat1 Bst XI region
Step Temperature Time
Library Cloning Kit 45

Reference Information 4 In vivo testing of the control plasmid
SureVector CRISPR
Figure 11 Agarose gels for samples from human HEK293 cells (left) and murine C3H/10T1/2 cells (right) visualized with ethidium bromide. In the “–Cas9” lanes are PCR products from cells without the Cas9 expression vector. In these cells, the Bst XI restriction site is in-tact because in the absence of Cas9, the gRNA could not direct cleavage of the Malat1 gene. In the “+Cas9” lanes are PCR products from cells with the Cas9 expression vector. In a fraction of these cells, the Bst XI restriction site was knocked out due to cleavage of the Malat1 gene (as evidenced by the presence of the uncut band in each gel). In the “uncut” lanes are the uncut control samples from the Bst XI digest.
Table 11 Expected fragment sizes from the Bst XI digest
Cell Type Bst XI Fragment Sizes Uncut Fragment Size
Human 555 bp and 415 bp 970 bp
Murine 833 bp and 475 bp 1.31 kb
Library Cloning Kit 46

Reference Information 4 Recovery of the gRNA sequences
Recovery of the gRNA sequences
SureVector CRISPR
As part of the genome- editing assay, once a phenotype of interest is identified, you will need to determine the identity of the gRNA sequence responsible for that phenotype. Provided below is 351 nucleotides of sequence from pSGLenti which includes the U6 promoter, the unknown 20- nucleotide CRISPR gRNA sequence (in red), and the gRNA scaffold. You can use this sequence to design primers for recovery and analysis of gRNA sequences. The underlined sequences in bold type have been used to generate PCR products suitable for analysis by NGS. Additional sequence information for pSGLenti can be obtained by contacting Agilent Technical Support at (800) 227- 9770 or [email protected].
GAGGGCCTATTTCCCATGATTCCTTCATATTTGCATATACGATACAAGGCTGTTAGAGAGATAATTAGAATTAATTTGACTGTAAACACAAAGATATTAGTACAAAATACGTGACGTAGAAAGTAATAATTTCTTGGGTAGTTTGCAGTTTTAAAATTATGTTTTAAAATGGACTATCATATGCTTACCGTAACTTGAAAGTATTTCGATTTCTTGGCTTTATATATCTTGTGGAAAGGACGAAACACCGNNNNNNNNNNNNNNNNNNNNGTTTTAGAGCTAGAAATAGCAAGTTAAAATAAGGCTAGTCCGTTATCAACTTGAAAAAGTGGCACCGAGTCGGTGCTTTTTT
Library Cloning Kit 47

www.agilent.com
In this book
This document describes how to use the Agilent SureVector CRISPR Library Cloning kit for preparation of a lentiviral plasmid library for in vivo expression of guide RNA (gRNA) sequences.
Agilent Technologies, Inc. 2016–2017
Version B0, January 2017
*G7556-90000*G7556-90000
Agilent Technologies